Embed Size (px)
Citation preview


Salesforce Zoom App Admin Guide
Table of Contents New Zoom App Installation 2
Obtain and Install the Zoom App in Salesforce 2
Configure Zoom App 3
User Setup for Access to Zoom App 6
Add users to Zoom Permission Set 7
Salesforce User and Zoom User Mapping 7
Upgrading Zoom App 8
Checking for the Latest Version 8
Upgrade Processhttps://appexchange.salesforce.com/appxListingDetail?listingId=a0N30000000qEuqEAE 8
Enable and Configure Zoom features 9
1.Zoom Configuration page 10
A) Zoom Settings 10
B) User Settings 11
B) User Password Settings 11
D) User Google Calendar API Setting 11
D) Create Events for Non Salesforce Zoom Meetings for matching Contacts / Leads 12
2. Enable Remote site settings 12
Customize Salesforce objects to include Zoom features 13
Event Page Layout Customization 13
Step 1. Edit your Event Page Layout 13
Step 2. Move the Button, Fields and Visualforce page to the Event Detail Section in Event Page Layout.13
Lead Page Layout Customization 14
Step 1. Edit your Lead Page Layout 14
Step 2. Move the button “Start Zoom Meeting” to the detail section 14
Contact Page Layout Customization 15
Step 1. Edit your Contact Page Layout 15
Step 2. Move the button “Start Zoom Meeting” to the detail section 15
Other objects Page Layout Customization 15
Enable feed tracking 15
Check Email Deliverability 17
Admin Features 17
Reports 17
Syncing Non-Salesforce Zoom Meeting into Salesforce 17
1

Frequently Asked Questions 18
New Zoom App Installation The following summarizes the basic steps to integrate Zoom into your Salesforce deployment.
● Obtain and install Zoom app from the Salesforce AppExchange ● Configure Zoom app to connect to your Zoom account and enable desired features ● Setup user access to Zoom app ● Enable and setup desired Zoom features ● Customize Salesforce objects to include Zoom features
Obtain and Install the Zoom App in Salesforce
1. Find the Zoom App in the Salesforce AppExchange and select “Get It Now”. If prompted, log in to your Salesforce admin account (production).
2. Select if you want to install in Production or in the Sandbox. 3. Review the installation details and confirm you have read and agree to the terms and conditions. 4. Select “Confirm and Install”. 5. When shown the install options, select the option you would like to have installed and select “Install” to
begin the installation. For security reasons, select “Install for Admins Only”.
2

6. Give access to Zoom API & Google API (If you need to integrate with Google Calendars. You can change this setting later. ) Then click “Continue”. Then the app will be installed.
Configure Zoom App 1. Login to your Zoom account as an admin and navigate to the https://marketplace.zoom.us.
Sign in--> Develop --> Build App
3

* 1) populate you App Name, such as ‘SFDC integration’
* 2) Intend to publish : No * 3) App Type : Account-level app * 4) Authentication type: JWT API Credentials -->click Continue * 1) populate your company name * 2) populate contact name * 3) populate contact email address
4

--> click Continue * get API key and secret
2. Save or remember the “API Key” and “API Secret” as it will be used in a later step. 3. Go back to your Salesforce admin portal and bring up the App Launcher.
5

4. Click on Zoom Config and fill in:
● API key and API secret that you obtained earlier from your Zoom admin account 5. Under User settings, there are user personal settings for you only. PLease Follow Upgrading Zoom App -- 1.Zoom Configration Page to set all your org and customer settings. And Customize Salesforce Objects to inlcude zoom feature.
User Setup for Access to Zoom App By default, all users are enabled with permission to use the “Zoom connected app”. If that is not the desired behavior, you can change the default permission and selectively enable specific users as described in the following instructions:
1. In classic. navigate to Administration Setup -> Manage Apps -> Connected Apps and select “Edit” for the
Zoom App 2. In lightning. navigate to Setup> Platform Tools > Connected Apps > Manage Connected Apps > Zoom > Edit
policies. 3. Under OAuth policies, set Permitted Users to “Admin approved users are pre-authorized”.
6

3. Navigate to Administration- > Users -> Permission Sets and find “Zoom Admin” & “Zoom User”. 4. Clone the permission sets and give names for new permission sets. 5. Add “Zoom” connected app to both of them. 6. Assign users to Zoom admin and Zoom user permission sets as per the requirement. (Zoom Admin has the following privileges : + setting for api key and secret(org level setting) + user settings for admin himself(user level setting) + customized objects read/write + visual force pages in zoom package Zoom User has the following privileges : + setting for user its own with zoom meeting (like google calendar notification setting, use pmi or not, send email to attendees before launch ) + customized objects R/W ) + visual force pages in zoom package
Add users to Zoom Permission Set
a.) Add One user to the permission set: Go to Manage Users -> Users, click on the username, Edit Permission Set Assignments, add Zoom Permission Sets to the user b.) Add Multiple users to the permission set: Administrator can also go the Permission Set and Manage Assignments do add multiple users to this permission set. Path for lightning : Setup> Administration > Users > Permission Sets
Salesforce User and Zoom User Mapping
Important mapping for the Salesforce Zoom App to work is the email of the Salesforce user must match exactly with the email (username) of the Zoom User. Otherwise, the complete functionality will not work. It is better to maintain different email for every user in Salesforce because a Salesforce User Account is mapped with a Zoom User Account and completed app logic is built on user email.
7

The Email addresses of Salesforce Users are
Emails must be exactly matched with Zoom Users emails / Username
Upgrading Zoom App
Checking for the Latest Version
1. In Salesforce under Setup > Installed Packages > you will see the Zoom App with version number mentioned.
2. To know the latest version of Zoom app, go to App Exchange Link - Zoom. Under “Additional Information”, you will find the current package version, released date and other details.
Upgrade Processhttps://appexchange.salesforce.com/appxListingDetail?listingId=a0N30000000qEuqEAE
If you want to install the latest version of Zoom App, install from AppExchange which is an upgrade. Previously if you have given access to only System Admin or Selected Profiles but you want to give access for all users now, it’s better to upgrade the same package by selecting all users while installing.
8

9

Enable and Configure Zoom features
1. Zoom Configuration page
A) Zoom Settings
Zoom Setting is a global setting over your org. Only User with ‘Zoom Admin’ permission set could view and edit this section. ● Zoom API Key and Secret is the account level credential of your company . You can get this from
zoom developer page: https://developer.zoom.us/me/# ● Mail Default From Address - If you want to set an outbound email for all your meeting
invitation emails, you should first add an Org-Wide-Email to your org,grant access to all profiles and validate it in your email; Then Select one Org-Wide-Email as the ‘Mail Default From address’ (before version 2.3 you should go to Custom Setting -- zoom config-- ‘Mail Default From Address’ to config this.)
10

● Populate Details into Event Description - Enable automatically populating meeting details into the Description field of Event. If you are using ‘Salesforce for Outlook’ to sync the salesforce event to your outlook calendar, you’d better check this option on.
● Disable Invitation Email - Prevents invitation emails to be sent when a Zoom meeting is created.
● Enable Password for Non-PMI Meeting - When enabled, all non-PMI meetings created will require a password to join. The password is determined by the user’s settings in the “User Password Settings” configuration.
B) User Settings
User Setting is a user level setting , just works for the current user. 1) PMI Enabled
By checking the “PMI Enabled”, the user will always use PMI (Personal Meeting Number) to schedule or start Instant Meetings. (not recommended)
2) Send Email to Attendees at Launch By checking the “Send Email to Attendee”, the user will be able to send Email to the attendee after starting the meeting from Lead and Contact. 3) Send ICS in Invitation Email Add a ICS(Internet Calendar Scheduling) as the attachment to meeting invitation email.
C) User Password Settings
● PMI Meeting Password - displays the PMI meeting password configured on zoom.us. If “password required” is enabled for PMI scheduled meetings in the user’s zoom.us meeting settings, the displayed password must be used to join the meeting. This password will also be used for instant meetings if the user’s instant meeting setting in zoom.us is set to use PMI.
● Non-PMI Meeting Password - users can select which option to use for determining the password for non-PMI meetings if the “Enable Password for Non-PMI Meeting” option is enabled. Options include:
○ Using the user’s PMI password ○ Configuring a 1-10 digit numeric-only password ○ Letting the system generate a 6-digit number-only password for each non-PMI meeting
This setting will be used for all scheduled non-PMI meetings. It will also be used for instant meetings if the user’s instant meeting setting in zoom.us is not set to use PMI.
Note: A new email template (v3) has been created which contains the meeting password. If you previously customized the email template you will need to customize the new email template accordingly (the previous template is no longer used). If no customization was previously done, no action is required.
D) User Google Calendar API Setting
To sync your zoom meeting to your google calendar, you can follow the steps below to set your google settings on zoom config page. 1.Go to https://console.developers.google.com/projectselector/apis/library?pli=1 and verify you are
logged into to the correct Google account.(Your google account should be the email address of your
salesforce user)
11

2. Click the “Create” button and create a new project by entering a Project Name and clicking the
“CREATE” button.
3. Search for Google Calendar API and click “ENABLE” button.
4. Click “Credentials” from left side panel and then click “Credentials in APIs & Services”.
5. Click on the "OAuth consent screen" tab and fill in “Application name”.
6. Add “force.com” in the “Authorized domains” section and click “Save”.
7. Click the “Create credentials” dropdown and select "Oauth client ID".
8. Go to Salesforce “Zoom Config” page - copy and save the URL until the end of “ZoomDetail” - i.e.
“https:// …. /apex/ZoomDetail” (will be used in the next step).
9. Select “Web application” and add the URL from the previous step as an “Authorized redirect URI”.
10. Click “Create” button. Copy and save the client ID and client secret displayed in the pop up and then
click “OK”.
11. Click the “Create credentials” dropdown and select "API Key". Copy and save the API key displayed in
the pop up and then click “CLOSE”.
12. Go to Salesforce and configure the previously saved Client ID, Client Secret and API Key in the "Google
Calendar API Settings" in "Zoom Config" page.
E) Create Events for Non Salesforce Zoom Meetings for matching Contacts / Leads
Automate the creation of event for the Zoom meetings created outside Salesforce for matching Contacts / Leads. This feature will pull the zoom meetings that are created outside of salesforce into salesforce. You can select the following option to activate this feature.
2. Enable Remote site settings
Go to Setup > Security Controls > Remote Site Settings Edit the Zoom & Google API and enable them.
12

Customize Salesforce objects to include Zoom features
Event Page Layout Customization
Don’t add other pages to the page layouts which are not in the documentation. It leads to app malfunction. Ex: StartZoomMeeting or MakeZoomMeeting pages. Don’t add these pages.
Step 1. Edit your Event Page Layout
Step 2. Move the Button, Fields and Visualforce page to the Event Detail Section in Event Page Layout.
Move the button “Start Zoom Meeting” to the layout. Move the “Start Zoom Meeting” action to the layout for classic and lightning.
Create new section “Zoom Meeting Information” and add following fields.
1. Use my Zoom PMI 2. Join Before Host 3. Schedule a zoom meeting 4. Send Email to External Attendees
13

If you want to use time zone feature for the event, add below fields too to the layout. 1. Customer Timezone 2. Customer Start Time 3. Customer Meeting Duration
Create another section “Zoom Meeting Details” and add “ZoomEventDetails” Visualforce page to this section and Height (in pixels) as “400” and save it. You can increase as per your requirement.
Lead Page Layout Customization
Step 1. Edit your Lead Page Layout
Step 2. Move the button “Start Zoom Meeting” to the detail section Move the button “Start Zoom Meeting” to the layout. Move the “Start Zoom Meeting” action to the layout for classic and lightning.
14
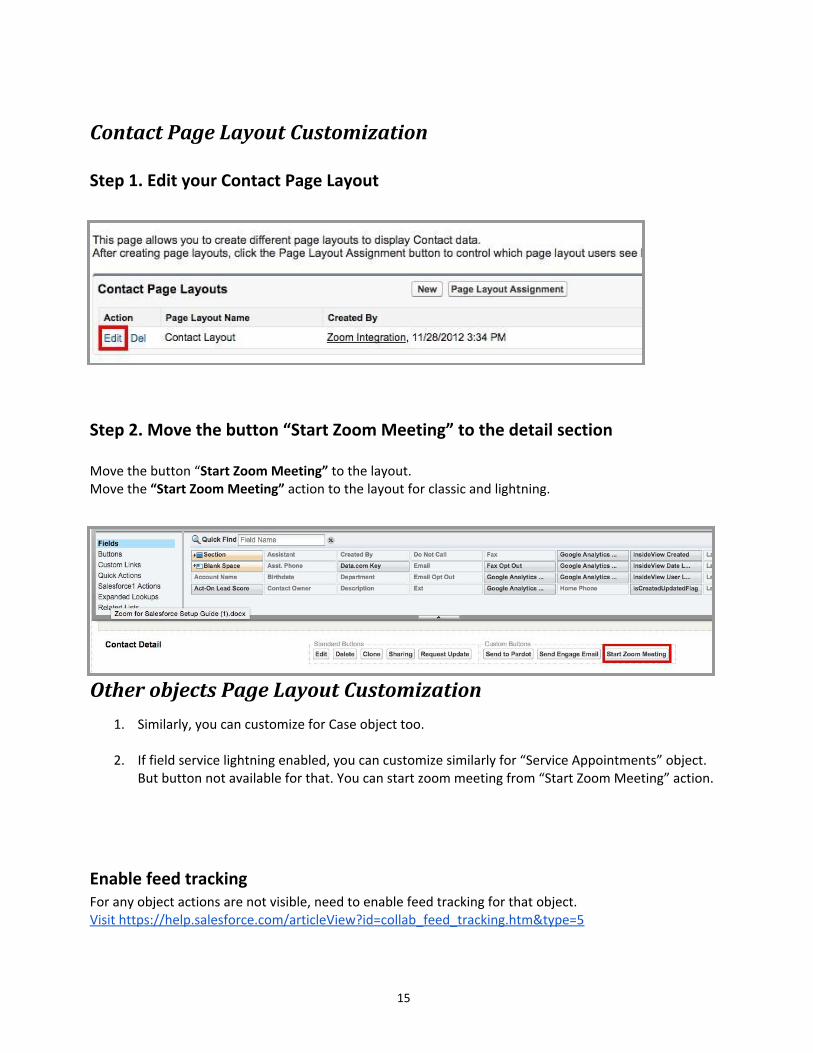
Contact Page Layout Customization
Step 1. Edit your Contact Page Layout
Step 2. Move the button “Start Zoom Meeting” to the detail section Move the button “Start Zoom Meeting” to the layout. Move the “Start Zoom Meeting” action to the layout for classic and lightning.
Other objects Page Layout Customization 1. Similarly, you can customize for Case object too.
2. If field service lightning enabled, you can customize similarly for “Service Appointments” object.
But button not available for that. You can start zoom meeting from “Start Zoom Meeting” action.
Enable feed tracking For any object actions are not visible, need to enable feed tracking for that object. Visit https://help.salesforce.com/articleView?id=collab_feed_tracking.htm&type=5
15

16

Check Email Deliverability ● Setup > Email Administration > Deliverability
● Verify Access level is set to "All email".
Admin Features
Reports
Open the “Zoom Report” folder under Report tab. This folder contains 3 different types of reports.
1. Zoom Events: This report contains all the events which has Zoom Meeting with event information like subject, Start Date, Account, Contact and Opportunity.
2. All Zoom Meetings by Status: This report shows all the events having Zoom Meeting Scheduled with all the Zoom
information like Subject (Zoom topic), Zoom Meeting Start Time, End Time, Duration (mins), Participant Count, Participants which are grouped by Zoom Meeting Status.
3. All Zoom Meetings by User by Status: This report shows all the events having Zoom Meeting Scheduled with all the Zoom
information like Subject (Zoom topic), Zoom Meeting Start Time, End Time, Duration (mins), Participant Count, Participants which are grouped by User and then by Zoom Meeting Status.
Note: - You will find reports with “New” appended to name. Those are new reports after the data model changed. Earlier all data present on Event only. Now you will find data will be saved to new custom object.
Syncing Non-Salesforce Zoom Meeting into Salesforce
To sync zoom meetings which are created outside of salesforce, can be synced and saved as events by attaching to respective contact or lead. But to link events, host of zoom meeting should be owner of the respective contact or lead. The zoom meeting host should match with owner of any contact or lead. Then events will be created automatically. If this is not matched, such meetings will be shown on External Zoom meetings page, of respective users. To start syncing, on the zoom configuration page,
17

Tick the “Active” check box, and enter the start time and interval required. So, as per the interval given, jobs will be scheduled automatically in background to fetch the external zoom meetings.
------------------------------------------------------------------------------------------------------------------------------------------------------------
Frequently Asked Questions
1. Meeting Id is showing as null Solution: Make sure “Remote Site” Settings are correct. Only Admins have access to change.
2. No mail is being received from Salesforce Solution: Check “Email Deliverability” settings. Change to “All mail”.
3. What is the requirement/conditions to sync a external zoom meeting to Salesforce? Solution: The zoom meeting host should match with owner of any contact or lead. Then events will be created automatically. If this is not matched, such meetings will be shown on External Zoom meetings page, of respective users.
4. Where can we see the zoom meeting data related to the Event. Solution: On the page layout, you need to add “ZoomEventDetails” visualforce page.
5. I get an Error of Zoom_Meeting_Creation_Status , it’s said ‘Your email is not a valid Zoom User, Please check with your Administrator’
Solution: the email of your salesforce user is not a zoom account user, please ask your zoom account admin to invite you as a zoom user.
6. I get an Error of Zoom_Meeting_Creation_Status , it’s said ‘Schedule Meeting for [email protected] Failed, you are not an assigned scheduler. Please check schedule for settings on zoom.us’
Solution: To change the owner of zoom meeting on salesforce, you should get the new owner’s approval for ‘schedule for’ setting on zoom web. please ask the target user sign in to zoom web and add your email address to My Meeting Setting → Schedule Privilege
18

19