Embed Size (px)
Citation preview

Guide to Migrating Data
Sage 50 to Sage 200
Copyright statement© Sage (UK) Limited, 2011. All rights reserved.
If this documentation includes advice or information relating to any matter other thanusing Sage software, such advice or information is provided for information purposesonly. While Sage takes responsible steps to ensure the accuracy and completeness ofsuch information, it can only be general in nature. You should therefore takeappropriate steps to ensure it is correct and relevant to your circumstances. Youshould also consider taking professional advice when appropriate, for example toensure that the results obtained from using the software comply with statutoryrequirements.
No part of this documentation may be copied, photocopied, reproduced, translated,microfilmed, or otherwise duplicated on any medium without prior written consent ofSage (UK) Limited, publisher of this work.
Use of the software described in this documentation is subject to Sage (UK) Limited'sLicence Agreement enclosed with, or displayed by, that software.
Sage, the Sage logo, and other Sage logos and brands are either registeredtrademarks or trademarks of Sage (UK) Limited, or its holding company, The SageGroup PLC. All other marks are trademarks or registered trademarks of theirrespective owners.
Sage (UK) Limited
North Park
Newcastle upon Tyne
NE13 9AA
Issue date: 28/04/2011
Pbn No: 14255

Introduction 1
The migration process 3
How your Sage 50 data migrates 5
How Company and Nominal Ledger data migrates 6
Creating cost centres and departments in Sage 200 13
How Bank data migrates 26
How Customer and Supplier data migrates 30
Pricing and discounting 36
How Products data migrates 49
How Sales Order Processing and Invoicing data migrates 59
How Purchase Order Processing data migrates 72
How Bill of Materials data migrates 77
Using the Migration tool 79
Sage 50 pre-migration tasks 81
Prepare the Sage 200 database 88
Entering your migration settings 90
Connections 91
Choose the data to convert 93
Financials settings 1 94
Financials settings 2 96
Stock, SOP and POP 97
Stock Options 100
Warehouse options 102
Stock traceability options 103
Migrate your data 104
Contents

Progress 105
Post migration tasks 107
Run Balance Ledgers in Sage 200 108
Compare Sage 50 data with Sage 200 data 113
Enter your Sage 200 settings 114
Appendix A: Summaries 117
Summary: Company and Nominal Ledger 118
Summary: Bank 123
Summary: Customers 125
Summary: Suppliers 128
Summary: Prices and Discounts 130
Summary: Products 132
Summary: Sales Order Processing 134
Summary: Purchase Order Processing 137
Summary: Bill of Materials 139
Appendix B: Checklists 141
Sage 50 pre migration checklist 142
Sage 200 pre migration checklist 145
Migration options checklist 146
Post migration checklist 149
Appendix C - Comparison with previous Migration tool 151
Comparison: Sage 200 Data Migration tool and Sage 50 to Sage 200 DataMigration tool 152
Index 157
Guide to Migrating Data Sage 50 to Sage 200

IntroductionThis guide is designed to provide Sage 200 Business Partners and customers with allthe information required to migrate data from Sage 50 to Sage 200, using the Sage 50to Sage 200 Data Migration tool. Use this tool to migrate data from Sage 50 Accountsv2011 to Sage 200 v2011.
Note: To migrate data from Sage 50 Manufacturing, Sage 200 BOM, Sage Line 100 orSage MMS to Sage 200, you must use the Sage 200 Data Migration Tool. This can befound on the support area of the Sage website.
Your 'Financials' (Company, Nominal Ledger, Customer, Supplier, and Bank) dataalways migrates. In addition, you can choose to migrate:
n Commercials data (Sales Order Processing, Invoicing, Purchase OrderProcessing and Products).
n Bill of Materials data.
PrerequisitesBefore you can migrate your data to Sage 200, you must have installed:
n Sage 50 Accounts v2011.
n Sage 200 v2011.
Before you beginn We recommend that you carry out a test migration. You can then use this testdatabase to:
l Make sure all the migrated data appears as expected.
l Identify any issues with your migrated data.
1
1

Guide to Migrating Data Sage 50 to Sage 200
l Allow new users of Sage 200 to become familiar with the product beforeprocessing live data.
n You must make sure all your data is backed up to a secure location.
How to use this guideThis guide covers two key areas; how your Sage 50 data migrates to Sage 200, andhow to use the Migration tool.
We strongly recommend that you read How your Sage 50 data migrates on page 5before starting to migrate your data. This section explains:
n How your Sage 50 data migrates to Sage 200.
n When Sage 50 data is not migrated to Sage 200.
n The options you can choose in the Migration tool, and how this affects yourmigrated data.
2

Introduction
The migration processThis diagram shows the recommended migration process.
3

4

How your Sage 50 data migratesSage 50 and Sage 200 differ in a number of ways; you are not making a like for likecopy of your data when you migrate from Sage 50. Before you migrate your data youmust make sure you understand how the automatic data migration works, what datais not migrated and how the options you choose in the Migration tool affect yourmigrated data.
In addition, there are various settings within Sage 200 which determine how yourdata is stored and processed. Some of these settings are set for you as a result of themigration, some you must set in the Sage 200 database before the data is migrated.
This section explains:
n How your data is migrated from Sage 50 to Sage 200.
n How the options that you choose, both within the Sage 200 product and withinthe Migration tool, affect the migrated data.
General considerationsSome fields in Sage 200 allow fewer characters than those in Sage 50. In these cases,the data is migrated up to the field length allowed in Sage 200.
Some fields in Sage 200 do not allow certain characters which may be allowed inSage 50. In these cases, the data is migrated without characters that are restricted inSage 200.
5
2
Guide to Migrating Data Sage 50 to Sage 200
How Company and Nominal Ledger data migrates
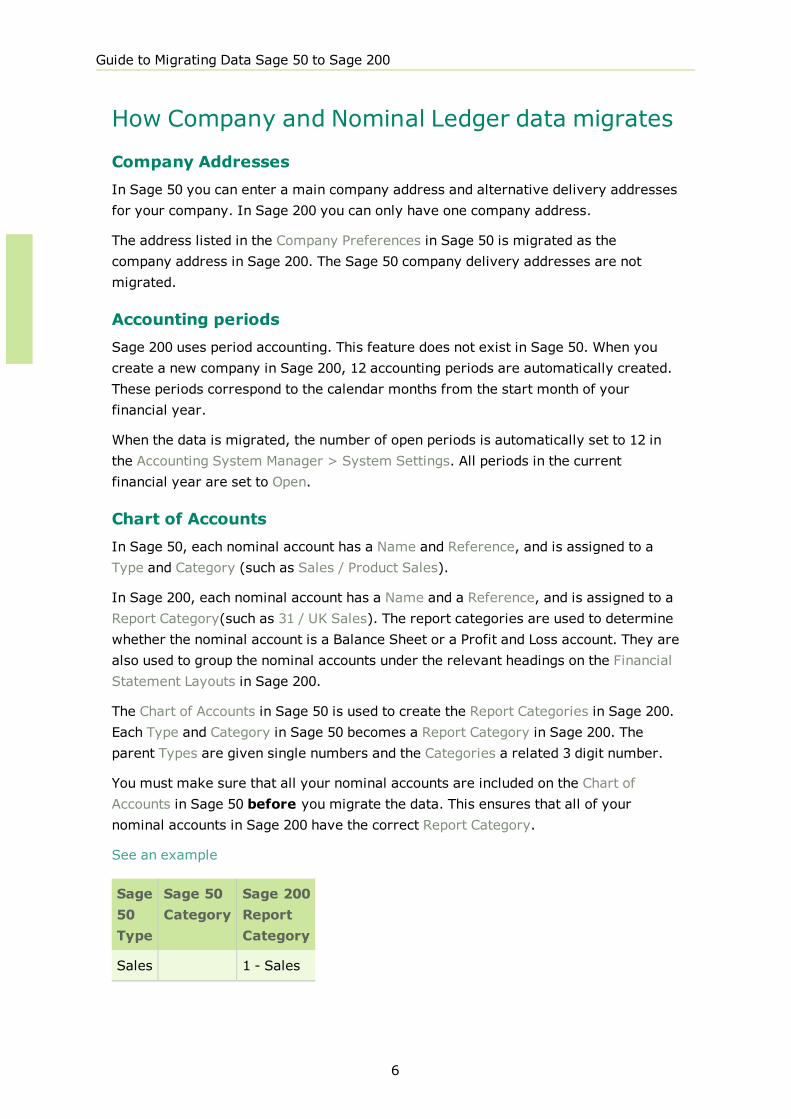
Company AddressesIn Sage 50 you can enter a main company address and alternative delivery addressesfor your company. In Sage 200 you can only have one company address.
The address listed in the Company Preferences in Sage 50 is migrated as thecompany address in Sage 200. The Sage 50 company delivery addresses are notmigrated.
Accounting periodsSage 200 uses period accounting. This feature does not exist in Sage 50. When youcreate a new company in Sage 200, 12 accounting periods are automatically created.These periods correspond to the calendar months from the start month of yourfinancial year.
When the data is migrated, the number of open periods is automatically set to 12 inthe Accounting System Manager > System Settings. All periods in the currentfinancial year are set to Open.
Chart of AccountsIn Sage 50, each nominal account has a Name and Reference, and is assigned to aType and Category (such as Sales / Product Sales).
In Sage 200, each nominal account has a Name and a Reference, and is assigned to aReport Category(such as 31 / UK Sales). The report categories are used to determinewhether the nominal account is a Balance Sheet or a Profit and Loss account. They arealso used to group the nominal accounts under the relevant headings on the FinancialStatement Layouts in Sage 200.
The Chart of Accounts in Sage 50 is used to create the Report Categories in Sage 200.Each Type and Category in Sage 50 becomes a Report Category in Sage 200. Theparent Types are given single numbers and the Categories a related 3 digit number.
You must make sure that all your nominal accounts are included on the Chart ofAccounts in Sage 50 before you migrate the data. This ensures that all of yournominal accounts in Sage 200 have the correct Report Category.
See an example
Sage50Type
Sage 50Category
Sage 200ReportCategory
Sales 1 - Sales
6

How your Sage 50 data migrates
Sage50Type
Sage 50Category
Sage 200ReportCategory
ProductSales
101 -ProductSales
ExportSales
102 -ExportSales
Nominal AccountsWhen the data is migrated, a nominal account is created in Sage 200 for everynominal account in Sage 50. The Sage 50 N/C and Name is used as the A/C Ref andName in Sage 200. All Sage 50 nominal accounts are migrated to Sage 200 as Postingaccounts.
You can choose to create cost centres or departments for your nominal accounts inSage 200. See Creating cost centres and departments in Sage 200 on page 13.
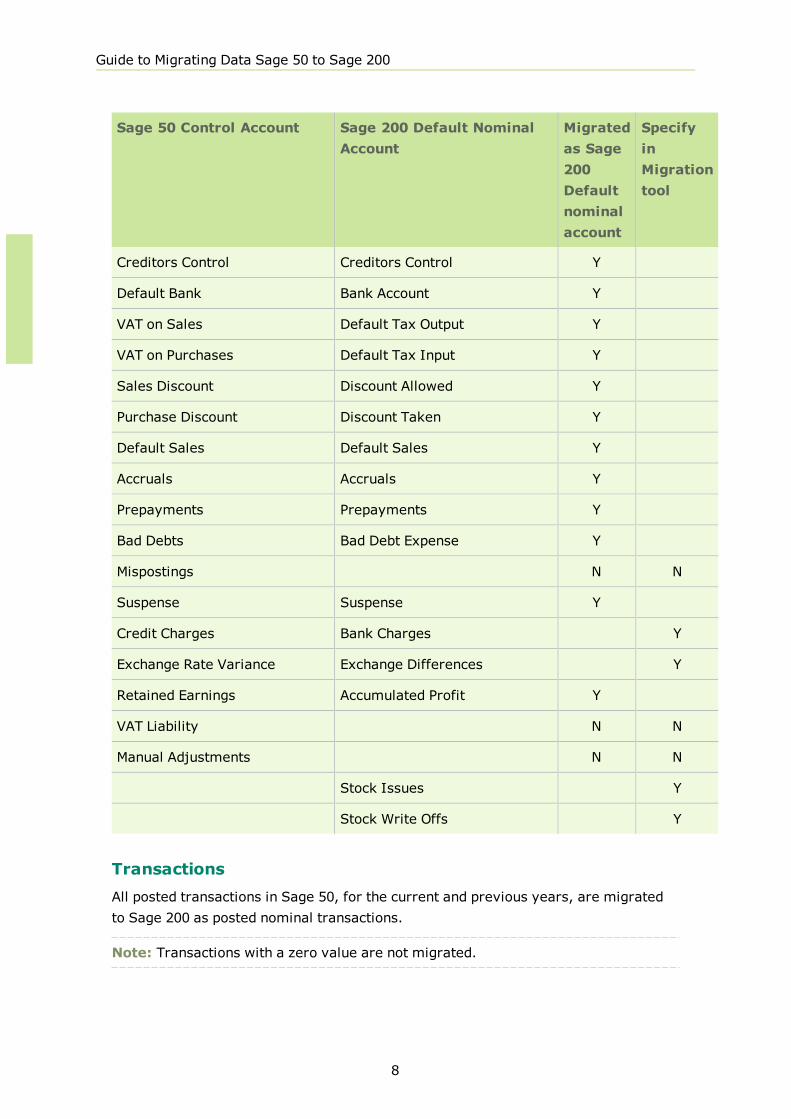
Default Nominal Accounts
Sage 200 maintains a list of default nominal accounts. When the data is migrated, thedefault nominal accounts in Sage 200 are taken from any nominal accounts in Sage50 that are specified as Control Accounts.
Sage 200 maintains some default nominal accounts that are not specified as ControlAccounts in Sage 50. You must specify which Sage 50 nominal accounts you want touse in the Migration tool.
See how Sage 200 default nominal accounts are created
Sage 50 Control Account Sage 200 Default NominalAccount
Migratedas Sage200Defaultnominalaccount
SpecifyinMigrationtool
Debtors Control Debtors Control Y
7
Guide to Migrating Data Sage 50 to Sage 200
Sage 50 Control Account Sage 200 Default NominalAccount
Migratedas Sage200Defaultnominalaccount
SpecifyinMigrationtool
Creditors Control Creditors Control Y
Default Bank Bank Account Y
VAT on Sales Default Tax Output Y
VAT on Purchases Default Tax Input Y
Sales Discount Discount Allowed Y
Purchase Discount Discount Taken Y
Default Sales Default Sales Y
Accruals Accruals Y
Prepayments Prepayments Y
Bad Debts Bad Debt Expense Y
Mispostings N N
Suspense Suspense Y
Credit Charges Bank Charges Y
Exchange Rate Variance Exchange Differences Y
Retained Earnings Accumulated Profit Y
VAT Liability N N
Manual Adjustments N N
Stock Issues Y
Stock Write Offs Y
TransactionsAll posted transactions in Sage 50, for the current and previous years, are migratedto Sage 200 as posted nominal transactions.
Note: Transactions with a zero value are not migrated.
8

How your Sage 50 data migrates
Future transactions
Sage 50 allows you to enter transactions in a future financial year. These futuretransactions are then included in the overall balance of the associated nominalaccounts.
In Sage 200, transactions entered for a future financial year are held in a deferredpostings file. These transactions are not included in the balance of associatednominal accounts.
If you migrate your Sage 50 data with future transactions, you will have differencesin your total nominal account balances once the migration is complete. The futuretransactions will be held in the deferred postings file until you run the year endprocess and open the relevant periods.
Transaction enquiries
The Transaction Enquiry screen in Sage 200 displays all transactions posted to aspecified nominal account. This includes a detailed breakdown of related postings toother nominal accounts.
If you have entered a nominal journal in Sage 50 with a single reference and for thesame date, you cannot view the detailed breakdown of related postings for thistransaction on the transaction enquiry in Sage 200.
Posting transactions to the nominal ledger
In Sage 50, all transactions are automatically posted to the nominal ledger whenthey are entered in other modules. In Sage 200, you can choose whether to post yourtransactions to the nominal ledger as soon as they are entered in other Sage 200modules. To do this you must select Update Nominal Ledger immediately oncetransactions are entered in the System settings in the Accounting System Managermodule.
VAT
Tax Codes
Your Sage 50 tax rates are migrated to Sage 200 when either;
n they have a description in Sage 50, or
n they are flagged as in use in Sage 50.
Two additional tax codes are created by default in Sage 200; Reverse Charge Salesand Reverse Charge Purchases. If you already have tax codes set up in Sage 50 for
9

Guide to Migrating Data Sage 50 to Sage 200
reverse charges, these Sage 50 tax codes are migrated to Sage 200 and are selectedto be included on the VAT return.
VAT transactions
Sage 50 stores details of VAT transactions differently to Sage 200.
Unreconciled VAT transactions are migrated to Sage 200 to allow you to produce younext VAT return when it is due.
We recommend that you print a draft VAT return before you migrate the data. Thiswill help you check the data has migrated correctly.
However, details of historic reconciled VAT transactions are not migrated to Sage200.
In Sage 200, you can only view the total VAT liability for VAT returns previouslyreconciled in Sage 50. You cannot view information about the individual totals thatmake up these VAT returns.
You must use Sage 50 if you want to see the details of the transactions entered onreconciled VAT returns.
How changes to VAT rates are applied in Sage 50 and Sage 200
When you change a VAT rate in Sage 50, your un-posted purchase orders, salesorders, invoices and credit notes retain their original VAT rate.
A list of these orders and invoices is displayed when you select Warnings in theMigrate Data section of the Migration tool.
You can either:
n Update the VAT rate on each relevant order line in Sage 50.
n Continue with the migration.
If you continue with the migration, the VAT on these orders and returns is re-calculated when you run Balance Ledgers in Sage 200, or when you view orprocess the order in Sage 200.
See Run Balance Ledgers in Sage 200 on page 108.
e-VAT Submissions
If you use e-VAT Submissions in Sage 50, your VAT Submission details are notmigrated to Sage 200. You must re-enter these before you submit your VAT returnonline from Sage 200.
10
How your Sage 50 data migrates
CurrenciesOnly currencies with an exchange rate set in Sage 50 are migrated to Sage 200. Theexchange rate set in Sage 50 is migrated to Sage 200.
The euro exchange rate is added to the base currency record in Sage 200.
If you do not use the Euro currency in Sage 50, it is created for you in Sage 200during the migration process. However, no exchange rate is set.
Prepayments and accrualsSage 50 processes prepayments and accruals at the end of each month. Sage 200processes all the prepayments and accruals transactions at one time, and posts theminto future months.
If you choose to migrate prepayments and accruals:
n Prepayment and accrual transactions that are already posted in Sage 50 aremigrated as current transactions.
n Prepayment and accrual transactions in the current financial year, that have notbeen processed in Sage 50, are migrated as pending transactions.
n Prepayment and accrual transactions in future financial years, are migrated asdeferred transactions.
IntrastatYour confirmed Intrastat despatches and arrivals are not migrated. We recommendthat you generate an Intrastat return before you migrate the data.
In Sage 50, Intrastat entries are generated when sales and purchase orders aredespatched and received. You must continue to record your Intratstat entries in thesame way after the data is migrated to Sage 200. To so this you must select thefollowing settings in Sage 200, before you migrate the data:
n SOP Settings > Intrastat > Generate Intrastat for sales orders.
n SOP Settings > Intrastat > Include entries based on Despatch/receipt date.
n POP Settings > Printing > Generate Intrastat for purchase orders.
n POP Settings > Printing > Include entries based on Receipt/return date.
All relevant Live sales orders and purchase orders migrated to Sage 200, are thenentered on the Intrastat Return when they are processed.
Audit trailThe audit trail is not migrated to Sage 200.
11

Guide to Migrating Data Sage 50 to Sage 200
If you have cleared the audit trail in Sage 50, you may see an adjustment to thesuspense account when you run Balance Ledgers in Sage 200. See Run BalanceLedgers in Sage 200 on page 108.
The following information is not migrated:n Accountant Details
n Countries
n Fixed Assets
n Intrastat transactions
n Reconciled VAT transactions
12

How your Sage 50 data migrates
Creating cost centres and departments in Sage200In Sage 50 you can link your transactions to a Department. This is specified on eachtransaction but is not linked to your nominal accounts. The Sage 50 departments havereference numbers (0 - 999) as well as names.
Sage 200 uses Cost Centres and Departments. In Sage 200 you have separatenominal accounts for your cost centres and departments. Each nominal account canhave a cost centre and /or department assigned. Each cost centre and department isassigned a code. This code then forms part of the Nominal Account reference.
For example, in Sage 200 you may have a cost centre called London with the codeLON, and a department called Administration with the code ADM If both the costcentre and department are assigned to the nominal account 4000, the accountreference would be 4000 LON ADM. You would then have two nominal accounts 4000and 4000 LON ADM.
In Sage 200, you can also choose whether you want to use cost centres / departmentswith your profit and loss nominal accounts only, or with your balance sheet nominalaccounts as well.
You must decide how your want to create your nominal accounts in Sage 200. You canuse your Sage 50 departments as cost centres or as departments in Sage 200. Theoptions you choose affect how your data is migrated to Sage 200.
This section covers the following:
n Creating nominal accounts with cost centres or departments in Sage 200.
n The Trial Balance
n Nominal Account Budgets
Creating Nominal accounts with cost centres or departments inSage 200The following table shows how you can use nominal accounts in Sage 200 and theoption(s) to choose in the migration tool. This is followed by a detailed explanation ofhow your data migrates in relation to the option(s) chosen.
13

Guide to Migrating Data Sage 50 to Sage 200
Nominal accounts in Sage 200 Options to select in the MigrationTool
1. Do not use cost centres ordepartments with nominalaccounts.
See Do not use cost centres ordepartments with your nominal accountson page 14.
n Create departments from Sage 50departments but do not link tonominal accounts.
2. Use cost centres with balancesheet and profit and loss nominalaccounts.
See Use cost centres or departmentswith balance sheet and profit and lossnominal accounts on page 15
n Create nominal accounts and costcentres from Sage 50 Departments
3. Use cost centres with profit andloss nominal accounts only.
See Use cost centres or departmentswith profit and loss nominal accountsonly on page 20
n Create nominal accounts and costcentres from Sage 50 Departments
n Link Sage 200 cost centres anddepartments to Profit and LossNominal account only
4. Use departments with balancesheet and profit and loss nominalaccounts.
See Use cost centres or departmentswith balance sheet and profit and lossnominal accounts on page 15
n Create nominal accounts anddepartments from Sage 50Departments
5. Use departments with profit andloss nominal accounts only.
See Use cost centres or departmentswith profit and loss nominal accountsonly on page 20
n Create nominal accounts anddepartments from Sage 50Departments
n Link Sage 200 cost centres anddepartments to Profit and LossNominal account only
Do not use cost centres or departments with your nominal accounts
Select the following option in the migration tool:
n Create departments from Sage 50 departments but do not link to nominalaccounts
14

How your Sage 50 data migrates
How your data migrates
n A Sage 200 department is created for every Sage 50 department with a Name.
n Your nominal accounts are not linked to cost centres or departments.
n Your transactions are migrated without their department specifications.
Use cost centres or departments with balance sheet and profit and lossnominal accounts
Select one of the following options in the migration tool:
n Create nominal accounts and cost centres from Sage 50 Departments
This creates a Sage 200 nominal account and relevant cost centre for each Sage50 department that has transactions posted to it. The related transactions aremigrated to the nominal account and cost centre.
n Create nominal accounts and departments from Sage 50 Departments
This creates a Sage 200 nominal account and relevant department for eachSage 50 department that has transactions posted to it. The related transactionsare migrated to the nominal account and department.
How your data migrates
1. A nominal account with either a cost centre or a department is created in Sage200 for each department that has transactions posted to it in Sage 50.See an example
You have used departments 1 and 2, with Nominal Account 4000 (P and L) andNominal account 1001 (BS) in Sage 50.
The following nominal accounts are created in Sage 200:
l 4000
l 4000 1
l 4000 2
l 1001
l 1001 1
l 1001 2
15

Guide to Migrating Data Sage 50 to Sage 200
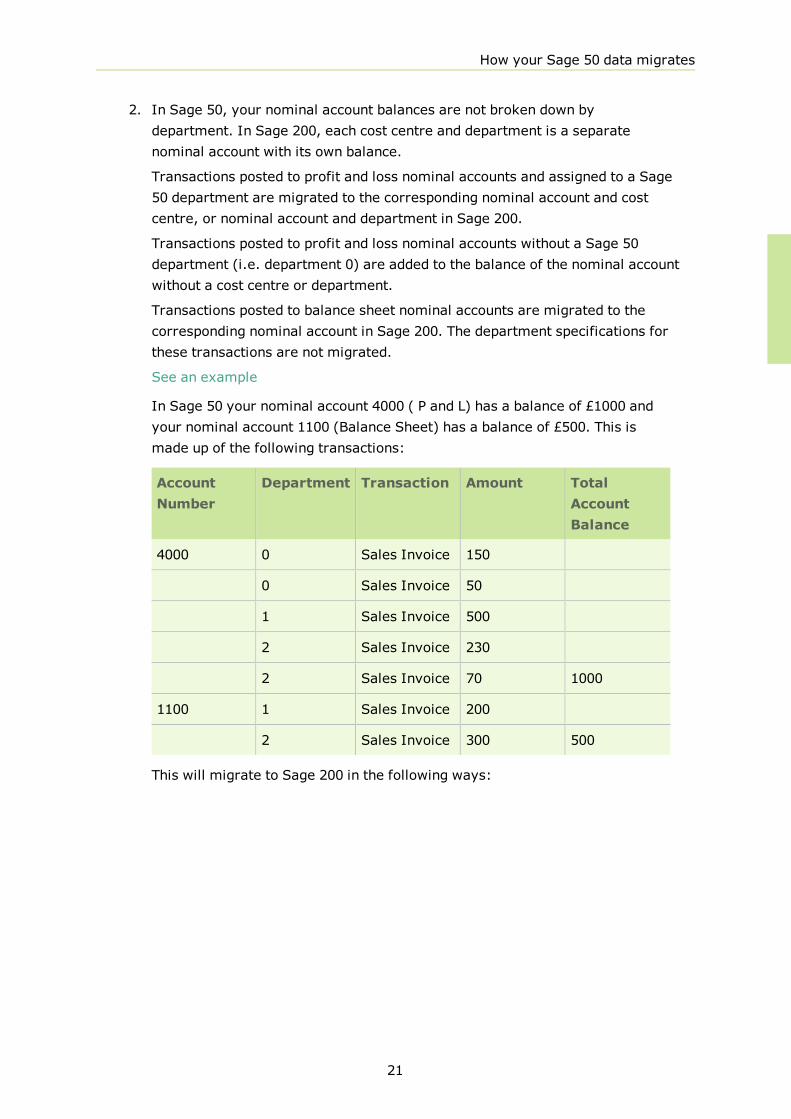
2. In Sage 50, your nominal account balances are not broken down bydepartment. In Sage 200, each cost centre and department is a separatenominal account with its own balance. During the migration process,transactions assigned to each Sage 50 department are migrated to the relevantnominal account and cost centre, or nominal account and department in Sage200.
Any transactions without a Sage 50 department (i.e. department 0) are addedto the balance of the nominal account without a cost centre or department.
See an example
In Sage 50 your Nominal Account 4000 (Profit and Loss) has a balance of £1000and your nominal account 1100 (Balance Sheet) has a balance of £500. This ismade up of the following transactions:
AccountNumber
Department Transaction Amount TotalAccountBalance
4000 0 Sales Invoice 150
0 Sales Invoice 50
1 Sales Invoice 500
2 Sales Invoice 230
2 Sales Invoice 70 1000
1100 1 Sales Invoice 200
2 Sales Invoice 300 500
This will migrate to Sage 200 in the following ways:
16
How your Sage 50 data migrates
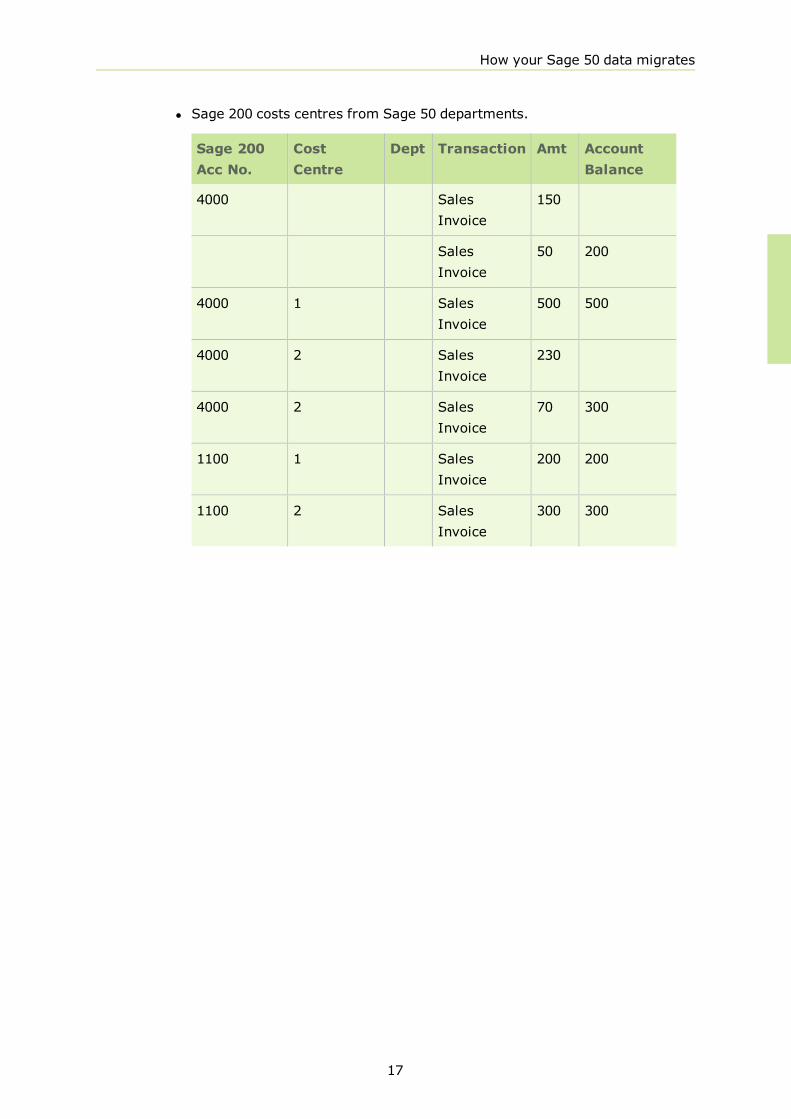
l Sage 200 costs centres from Sage 50 departments.
Sage 200Acc No.
CostCentre
Dept Transaction Amt AccountBalance
4000 SalesInvoice
150
SalesInvoice
50 200
4000 1 SalesInvoice
500 500
4000 2 SalesInvoice
230
4000 2 SalesInvoice
70 300
1100 1 SalesInvoice
200 200
1100 2 SalesInvoice
300 300
17

Guide to Migrating Data Sage 50 to Sage 200
l Sage 200 departments from Sage 50 departments.
Sage 200Acc No.
CostCentre
Dept Transaction Amt AccountBalance
4000 SalesInvoice
150
SalesInvoice
50 200
4000 1 SalesInvoice
500 500
4000 2 Sales Invoice
230
4000 2 SalesInvoice
70 300
1100 1 SalesInvoice
200 200
1100 2 SalesInvoice
300 300
3. The default nominal account on each of your customer, supplier and stock itemrecords in Sage 200 has a related cost centre and/or department.
In Sage 50 you can specify a default department for your customer, supplierand product records. This default department is added to the default nominalaccount on your Sage 200 customer, supplier and stock items records as a CostCentre or Department, depending on which option you select in the Migrationtool.
For example, if your Sage 50 customer record has the default nominal accounts4000 and default department 1, the default nominal account for the customer inSage 200 will be 4000 1.
4. If you have 'cleared' any transactions from your Sage 50 database (using theClear Audit Trail option), the value of these transactions will be included in theNominal Account balance with no associated cost centre or department, even ifthey were originally associated with a department.
18

How your Sage 50 data migrates
5. Default balance sheet control accounts are created in Sage 200 for each Sage50 department that has relevant transactions posted to it. These controlaccounts are
a. Debtors Control Account
b. Creditors Control Account
c. Sales Tax Control Account
d. Purchase Tax Control Account
In Sage 200 you can create separate balance sheet accounts for your costcentres or departments. You can choose to post transactions to separate defaultbalance sheet nominal accounts. They are posted according to the cost centreor department held as the default nominal account on the customer or supplierrecord.
When the data is migrated, all transactions associated with a department inSage 50 are posted to the balance sheet nominal accounts with the relevantcost centre or department in Sage 200.
For example, if you have sales transactions that have been posted todepartments 0, 1 and 2 in Sage 50, they are migrated to three Debtors ControlAccounts (1100, 1100 1, and 1100 2) and three Sales Tax Control accounts(2200, 2200 1, and 2200 3) in Sage 200.
If you want to continue to post your transactions to the separate default balancesheet nominal accounts in Sage 200, you must select the Split postings betweencost centres for balance sheet accounts setting in System Settings in theAccounting System Manager module in Sage 200. This setting is not selected bydefault. To make sure that your transactions continue to post in this way, youmust select this setting after the data has migrated.
After the data has migrated, only customer records in Sage 50 that have adefault department specified, will continue to have transactions posted to theseparate balance sheet nominal accounts.
See an example
In Sage 50 you have Customer A who has a default department of 1 specifiedon their customer record. Customer B has default department 0.
a. In Sage 50, you have enter a sales invoice for both customers for £100and assigned them to department 1.
b. The data is migrated to Sage 200. Both these transactions are posted toDebtors Control Account 1100 1.
c. You enter another invoice for both customers in Sage 200.
d. For Customer A the invoice is posted to Debtors Control Account 1100 1.
19

Guide to Migrating Data Sage 50 to Sage 200
e. For customer B the invoice is posted to Debtors Control Account 1100.This is because the Default Nominal Code for Customer B does not have acost centre or department assigned.
Use cost centres or departments with profit and loss nominal accountsonly
Select one of the following options in the migration tool:
n Create nominal accounts and cost centres from Sage 50 Departments
This creates a Sage 200 nominal account and relevant cost centre for eachprofit and loss nominal account in Sage 50 which has transactions linked to adepartment posted to it. The related transactions are migrated to the nominalaccount and cost centre.
n Create nominal accounts and departments from Sage 50 Departments
This creates a Sage 200 nominal account and relevant department for eachprofit and loss nominal account in Sage 50 which has transactions linked todepartment posted to it. The related transactions are migrated to the nominalaccount and department.
Plus the following option:
n Link Sage 200 cost centres and departments to Profit and Loss Nominal accountonly
How your data migrates
1. A Sage 200 nominal account with a linked cost centre or department is createdwhen the following conditions are met in Sage 50:
a. The nominal account is a profit and loss nominal account.
b. Transactions linked to departments are posted to the nominal account.
See an example
You have used departments 1 and 2, with Nominal Account 4000 (P and L) andNominal account 1001 (Balance Sheet) in Sage 50.
The following nominal accounts are created in Sage 200:
l 4000
l 4000 1
l 4000 2
l 1001
20
How your Sage 50 data migrates
2. In Sage 50, your nominal account balances are not broken down bydepartment. In Sage 200, each cost centre and department is a separatenominal account with its own balance.
Transactions posted to profit and loss nominal accounts and assigned to a Sage50 department are migrated to the corresponding nominal account and costcentre, or nominal account and department in Sage 200.
Transactions posted to profit and loss nominal accounts without a Sage 50department (i.e. department 0) are added to the balance of the nominal accountwithout a cost centre or department.
Transactions posted to balance sheet nominal accounts are migrated to thecorresponding nominal account in Sage 200. The department specifications forthese transactions are not migrated.
See an example
In Sage 50 your nominal account 4000 ( P and L) has a balance of £1000 andyour nominal account 1100 (Balance Sheet) has a balance of £500. This ismade up of the following transactions:
AccountNumber
Department Transaction Amount TotalAccountBalance
4000 0 Sales Invoice 150
0 Sales Invoice 50
1 Sales Invoice 500
2 Sales Invoice 230
2 Sales Invoice 70 1000
1100 1 Sales Invoice 200
2 Sales Invoice 300 500
This will migrate to Sage 200 in the following ways:
21

Guide to Migrating Data Sage 50 to Sage 200
l Sage 200 costs centres from Sage 50 departments.
Sage 200Acc No.
CostCentre
Dept Transaction Amt AccountBalance
4000 SalesInvoice
150
SalesInvoice
50 200
4000 1 SalesInvoice
500 500
4000 2 SalesInvoice
230
4000 2 SalesInvoice
70 300
1100 SalesInvoice
200
SalesInvoice
300 500
22

How your Sage 50 data migrates
l Sage 200 departments from Sage 50 departments.
Sage 200Acc No.
CostCentre
Dept Transaction Amt AccountBalance
4000 SalesInvoice
150
SalesInvoice
50 200
4000 1 SalesInvoice
500 500
4000 2 Sales Invoice
230
4000 2 SalesInvoice
70 300
1100 SalesInvoice
200
SalesInvoice
300 500
3. The default nominal account on each of your customer, supplier and stock itemrecords in Sage 200 has a related cost centre and/or department.
In Sage 50 you can specify a default department for your customer, supplierand product records. This default department is added to the default nominalaccount on your Sage 200 customer, supplier and stock items records as a CostCentre or Department, depending on which option you select in the Migrationtool.
For example, if your Sage 50 customer record has the default nominal account4000 and default department 1, the default nominal account for the customer inSage 200 will be 4000 1.
4. If you have 'cleared' any transactions from your Sage 50 database (using theClear Audit Trail option), the value of these transactions will be included in theNominal Account balance with no associated cost centre or department, even ifthey were originally associated with a department.
The trial balance in Sage 50 and Sage 200If you choose to create cost centres or departments in Sage 200, the trial balance inSage 200 may not match the trial balance in Sage 50. This is because there will beadditional account balances in Sage 200. In addition the debit and credit totals may bedifferent to the account balances in Sage 50.
23

Guide to Migrating Data Sage 50 to Sage 200
See an example
In Sage 50 you have entered the following transactions:
Accountnumber
Department Debit Value Credit Value Accountbalance
001 0 £123.00
001 1 £23.00 100.00
002 0 £100.00 100.00
In Sage 50 these appear on the trial balance as follows:
AccountNumber
Debit Credit
001 100
002 100
Total 100 100
In Sage 200, they are appear on the trial balance as follows:
AccountNumber
Debit Credit
001 123.00
001 1 23.00
002 100.00
Total 123.00 123.00
Nominal account budgetsIf you have used:
n Advanced / Nominal code budgets in Sage 50:
The nominal account budget values are posted to the corresponding nominalaccount with no cost centre or department.
24

How your Sage 50 data migrates
n Advanced / In depth budgets in Sage 50:
l If you have selected to create Sage 200 nominal accounts, withassociated cost centres or departments, from your Sage 50 departments:
The nominal account budget values are migrated to the correspondingnominal account and cost centre, or nominal account and department,depending on your migration options.
See an example
In Sage 50, nominal account 4000 has a monthly budget of 200 fordepartment 1 and 300 for department 2.
In Sage 200, nominal account 4000 1 will have a monthly budget of 200.Nominal account 4000 2 will have a monthly budget of 300.
l If you have selected to create nominal accounts with associated costcentres or departments for profit and loss account only, the nominalaccount budgets are migrated in the following way:
o Profit and loss nominal accounts
The nominal account budget values are migrated to thecorresponding nominal account and cost centre, or nominal accountand department.
o Balance sheet nominal accounts
The Sage 50 nominal account budget values for each departmentare amalgamated and migrated to the corresponding balance sheetnominal account with no cost centre or department.
l If you have selected not to create Sage 200 nominal accounts withassociated cost centres and departments, from your Sage 50departments:
The Sage 50 nominal account budget values for each department areamalgamated and migrated to the corresponding nominal account with nocost centre or department.
See an example
In Sage 50, nominal account 4000 has a monthly budget of 200 fordepartment 1 and 300 for department 2.
In Sage 200, nominal account 4000 will have a monthly budget of 500.
n Advanced / Overview budgets in Sage 50:
No budget values are migrated to Sage 200.
n Standard budgets in Sage 50:
The budget values are migrated to the corresponding Sage 200 nominal accountwith no cost centre or department.
25

Guide to Migrating Data Sage 50 to Sage 200
How Bank data migrates
Bank AccountsYour Sage 50 bank record details are migrated to create Sage 200 Cash BookAccounts.
The bank account that is set as the default bank account in Sage 50 is also set as thedefault bank account in Sage 200. The default bank account in Sage 200, must be inthe same currency as your Sage 200 base currency.
If your Sage 50 default bank account is in a different currency, you must change thedefault bank account, in Sage 50, before the data is migrated.
Bank sort codes
In Sage 200, the bank sort code can only contain six digits.
When the data is migrated, this is checked by the migration tool. All non-numericcharacters are removed, and the remaining six digit number is migrated to Sage 200.You cannot migrate the data if the bank sort code in Sage 50 does not contain sixdigits.
Information not migrated
n E-banking
You can use the Sage e-Banking facility in Sage 50 and Sage 200.
As Sage 200 stores the information differently to Sage 50, your e-bankingdetails are not migrated. You must re-enter your e-banking details in Sage 200after the data has migrated.
n Minimum Limit.
Sage 200 does not store a minimum limit on your bank accounts, so this is notmigrated.
Bank transactionsYou can choose whether to migrate your bank transactions in the Migration tool.
n If you choose to migrate your transactions, all bank transactions are migratedfrom Sage 50, including details of your bank reconciliation.
26

How your Sage 50 data migrates
n If you do not want to migrate bank transactions to the Cash Book in Sage 200,the migration process creates a single opening balance transaction for each ofyour bank accounts in Sage 200. This is calculated from the total of the cashbook transactions for each bank account in Sage 50.
When the data is migrated, this opening balance transaction is marked asreconciled in Sage 200. Therefore, if you do not want to migrate your banktransactions, youmust make sure all your bank accounts are fully reconciledbefore you migrate the data.
Transaction Types
Sage 50 uses a two letter code to identify each type of transaction. The followingtable shows the transaction types created in Sage 200 for each Sage 50 transactiontype.
Sage 50 Sage 200
VP Payment
VR Receipt
CP Payment
CR Receipt
BP Payment
BR Receipt
PA Payment
PP Payment
PR Receipt
SA Receipt
SR Receipt
SP Payment
JC Payment
JD Receipt
Opening Balances
In Sage 50, opening balances for bank accounts are posted to the nominal ledger.
In Sage 200, opening balances for bank accounts are not posted to the nominalledger.
27

Guide to Migrating Data Sage 50 to Sage 200
The bank account opening balance transactions are migrated to Sage 200. However,only one side of these transactions is displayed in the transaction enquiry screens.
Bank ReconciliationIf you choose to migrate your cash book transactions, details of your bankreconciliation in Sage 50 are migrated to Sage 200. When you reconcile your bankstatement using Sage 200, the last reconciled balance from Sage 50 is displayed, andthe relevant transactions are marked as reconciled.
If you have saved a draft bank reconciliation in Sage 50, this is not migrated to Sage200. We recommend that you complete any draft bank reconciliations before youmigrate the data.
In Sage 200, you can also view your Statement Balances on each bank account. Noinformation is migrated here. Your statement balances will update once you havereconciled using Sage 200.
Bank accounts set to not reconcile in Sage 50.
In Sage 50 you can choose not to reconcile a bank account. When you choose the Nobank reconciliation option for a bank account in Sage 50, all transactions entered forthat bank account are marked as reconciled. You can decide to reconcile this accountat a later date. The reconciled flag is then automatically removed from all thetransactions posted to that bank account.
This option is not available in Sage 200. When Sage 50 bank accounts that have theNo bank reconciliation option selected are migrated, all transactions posted to thosebank accounts are marked as reconciled in Sage 200.
Bank accounts with an opening balance and no reconciledtransactions
If you have a bank account with an opening balance in your Sage 50 data, but thatbank account does not have any reconciled transactions, a statement balance is notmigrated to Sage 200.
To resolve this, you must reconcile a least one transaction in the bank account beforeyou migrate your data.
Nominal AccountsIn the Migration tool you specify which Sage 50 nominal accounts you want to use foryour Bank Charges and Exchange Rate Differences.
The nominal accounts you choose here are migrated as the default nominal accountsin the Nominal Ledger, and are specified on each bank account in the Cash Book.
28

How your Sage 50 data migrates
Recurring Bank TransactionsYour recurring bank transactions are migrated to Sage 200 as Standing Orders andDirect Debits in the Cash Book.
In Sage 50, you can choose to Suspend a recurring bank transaction. This is notpossible in Sage 200. Suspended recurring bank transactions in Sage 50 are notmigrated to Sage 200.
When the data is migrated, you can amend the entry details for the migrated standingorders and direct debits. However, you cannot view the details of previously postedpayments and receipts.
ChequesIn Sage 50, you can print cheques using the Cheque list option.
In Sage 200, supplier cheques are generated from the Purchase Ledger.
Therefore, the Cheque list in Sage 50 is not migrated. We recommend that you printyour cheques from Sage 50 before you migrate the data.
29

Guide to Migrating Data Sage 50 to Sage 200
How Customer and Supplier data migrates
Customer and supplier recordsYour Sage 50 customer and supplier record details are migrated to Sage 200 ascustomer and supplier accounts.
Addresses and contacts
Customers
The Registered address for each customer record in Sage 50 is migrated as the maincompany address for the customer account in Sage 200.
All the contact details for each Sage 50 customer are migrated to the customeraccount (Contacts tab) in Sage 200. The contact for the registered address is markedas the default contact and the preferred contact for the Account role. The contact setin the address Preferences in Sage 50 for Statements is set as the preferred contactfor the Send Statement to role on the customer account in Sage 200.
All the address details for each customer in Sage 50 are migrated as CustomerDelivery Addresses in the Sales Order Processing module. The address set as thedefault delivery address in Sage 50 is also set as the default delivery address inSage 200.
In Sage 50 you can enter customer addresses with the same description but indifferent cases. For example, registered address and Registered Address.
In Sage 200, customer address descriptions are not case sensitive and cannot beduplicated.
If you have any duplicated customer address descriptions in Sage 50, you must re-name them before you migrate the data. This is checked by the migration tool whenyou validate your settings and relevant messages are displayed.
Suppliers
In Sage 50, you can store additional delivery addresses for your suppliers, as wellas additional contact details.
In Sage 200, you can only store one address for each supplier, although you canstore additional contact details.
When the data is migrated, the Registered address for each supplier in Sage 50 ismigrated as the main company address for the supplier account in Sage 200.
The contact details for each Sage 50 supplier are migrated to the supplier account(Contacts tab) in Sage 200. The contact for the Registered address is marked as the
30

How your Sage 50 data migrates
default contact and the preferred contact for the Account role. The contact set in theaddress Preferences in Sage 50 for Remittances is set as the preferred contact forthe Send Remittance to role on the supplier account in Sage 200.
The address details for the Contact address and Delivery address types are notmigrated.
Segmented addresses
In Sage 200, you can choose to use segmented addresses for customer and supplieraccounts. This allows you to enter the City and County on separate lines in theaddress. To do this, you must select Use segmented addresses in the SystemSettings in the Accounting System Manager.
When the data is migrated, this setting is not selected. If you want to use segmentedaddresses in Sage 200, you must select this option after the migration is complete.
Account status
In Sage 50, you can maintain several Account Statuses. Sage 200 only has a singleOn Hold status. When you migrate your data, all customers and suppliers with astatus of Y against the On Hold option in Sage 50, are placed On Hold in Sage 200.The individual Sage 50 statuses are not migrated.
Sales prices and discounts
Sage 50 Price Lists and Special Customer Prices are migrated to the Sage 200 PriceBook. For more information, see Pricing and discounting on page 36.
The customer Discount %, set on the Defaults tab of the customer record in Sage 50,is migrated as the Line Discount on the Sage 200 Customer Account (Documents tab).
Custom Fields
The customer and supplier Custom Fields in Sage 50 are migrated as Analysis Codesin Sage 200.
Each custom field label becomes an analysis code in Sage 200. Each custom field,specified in the customer and supplier accounts, becomes an analysis code value. Ifyou have not specified a custom field on any of your customer or supplier accounts, ablank value is created in Sage 200.
The analysis codes are then assigned to the customer and supplier accounts. Anycustomer or supplier records that have a custom field in Sage 50, have analysiscodes and values in Sage 200.
31

Guide to Migrating Data Sage 50 to Sage 200
See an example:
Sage 50 Sage 200
Customer Custom FieldLabel
Customer CustomField
AnalysisCode
Value
Area Manager Bob Johnson Area manager BobJohnson
Area North Area North
Supplier bank details
The supplier bank details in Sage 50 are migrated to Sage 200.
In Sage 200, the bank sort code can only contain six digits.
When the data is migrated, this is checked by the migration tool. All non-numericcharacters are removed, and the remaining six digit number is migrated to Sage 200.You cannot migrate the data if the bank sort code in Sage 50 does not contain sixdigits.
Memos and attachments
n Customer supplier Memos on the Memo tab in Sage 50 migrate to the Memotab on the Customer and Supplier account in Sage 200.
n Attachments migrate to the Attachment tab on the customer and supplieraccount in Sage 200.
n Memos on the Credit Control tab in Sage 50 migrate to Credit tab in Sage 200.
Note: Only the first 1000 characters of Credit Control memos will migrate toSage 200.
Information not migrated to Sage 200
The following information is held on your Sage 50 customer and supplier records, butis not migrated to Sage 200:
n Communication details
n Diary events
n Customer Bank Details
Customer and supplier transactionsYou can choose whether to migrate your customer and supplier transactions in theMigration tool.
32

How your Sage 50 data migrates
n If you choose to migrate your transactions, all sales and purchase transactionsare migrated from Sage 50.
n If you do not want to migrate your transactions, the migration process createsan opening balance, per tax code, for each of your customer and supplieraccounts in Sage 200.
These opening balances are not allocated in Sage 200. If required, you canallocate the opening balance credits to the opening balance debits after the datahas migrated.
Note: If you have processed any transactions in Sage 50 Accounts using Sage Pay,the Sage Pay details associated with your transactions are not migrated to Sage 200.Sage 200 can only report on Sage Payment details entered via Sage 200.
Transactions with the same date and reference
In Sage 50, when you enter several batch invoices or credit notes for a customer orsupplier with the same date and reference, they are saved on the Audit Trail as asingle 'header' transaction. You can see details of the individual lines in the customerand supplier Activity.
The 'header' transaction is migrated to Sage 200 with a single URN number. The linedetails are not displayed in the Sage 200 Transaction Enquiry screen.
See an example
n In Sage 50 you have two batch invoices for a customer:
Customer Date Reference Value No
Jones 30/04/11 April 50 473
30/04/11 April 100 474
On the Sage 50 Audit trail , this transaction appears as no 473 for £150.
n The transaction is migrated to Sage 200 in the following way:
Customer Date Reference Value URN No
Jones 30/04/11 April 150 473
Transaction Types
Sage 50 uses a two letter code to identify each type of transaction. The followingtable shows the transaction types created in Sage 200 for each Sage 50 transactiontype.
33

Guide to Migrating Data Sage 50 to Sage 200
Sage 50 Sage 200
PI Invoice
PA Payment
PC Credit Note
PP Payment
PD Credit
PR Receipt
SI Invoice
SA Receipt
SC Credit Note
SR Receipt
SD Credit
SP Payment
In Sage 200, these transaction types are used on the Transaction Enquiry. This showsa detailed breakdown of each transaction, including information about howtransactions are allocated. The allocation information is not shown on the TransactionEnquiry screen in Sage 200 for the following transactions:
n Sales credits allocated to customer refunds in Sage 50.
n Write offs
Recurring Sales and Purchase InvoicesIn Sage 50 you can create recurring sales and purchase invoices and orders. Sage200 does not have recurring invoices and sales orders, so this information is notmigrated.
AllocationsAll allocations in Sage 50 are recreated in Sage 200 using the Sage 50 auditinformation.
Finance ChargesIn Sage 50, you set up you set up your finance charge percentage in the ConfigurationEditor. This finance charge percentage is then applied to all the transactions youselect using the Credit Charges wizard.
34

How your Sage 50 data migrates
In Sage 200, you can set up to 20 different interest rates for your finance charges inthe Sales Ledger settings. You then choose which finance charge rate you want to usefor each customer. When you apply the finance charges, the percentage chargespecified for each customer is applied to the relevant transactions.
As the finance charges are handled differently in each program, no finance chargesare migrated from Sage 50. Each customer account in Sage 200 will default to NoCharge. After the data is migrated, you must set up your finance charges and applythe rates to each customer account.
Aged Debtor and Aged Creditor reportsWhen the aged debtor or aged creditor reports are run in Sage 50, the customer andsupplier account balances are rounded down to two decimal places.
When the aged debtor and aged creditor reports are run in Sage 200, the customerand supplier account balances are rounded up to two decimal places.
This means that the aged debtor and aged creditor reports in Sage 50 may havedifferent balances to the corresponding reports in Sage 200.
35

Guide to Migrating Data Sage 50 to Sage 200
Pricing and discountingSage 50 and Sage 200 use different methods for calculating the selling price of stockitems.
In Sage 50 you can set up various selling prices and discounts for your customers.They are listed on the Defaults tab of the customer record, and on the PricingStructure of the product record.
In Sage 200, price bands and discount groups are set in the Price Book module.Invoice discounts and Line discounts are set on the customer account (Documentstab).
Sage 50 pricing methods
n Standard sales price
This is the Sales Price for a product entered on the product record. This is thedefault price for the product.
n Price Lists
Each price list contains a price for a specified list of products. This price can befixed, a percentage increase or decrease from the standard sales price, a valueincrease or decrease from the standard sales price, or a percentage increaseor decrease form the cost price of the product.
Customers are then associated with the price list.
n Special customer prices
A price is specified for a product and an individual customer account. This pricecan also be fixed, a percentage increase or decrease from the standard salesprice, a value increase or decrease from the standard sales price, or apercentage increase or decrease from the cost price of the product.
n Invoice Value
These are set up in the Customer Defaults in Sage 50. An invoice value andrelated discount is specified. You specify whether a customer receives theinvoice value discounts as an Additional Discount on the customer record.
n Quantity break discounts
Quantity break discounts are set on the Discounts tab of the each productrecord. You specify whether a customer receives the quantity discounts as anAdditional discount on the customer record.
n Discount %
This is set on the customer record and is applied to every invoice for thatcustomer. This is in addition to any other discounts that may be applied.
36

How your Sage 50 data migrates
Sage 200 pricing methods
n Price bands
Each price band contains a price for all stock items. There is a default standardprice band. A customer can be linked to one price band. If no price band isspecified, then the customer account is linked to the standard price band.
n Order value discount bands
This is a list of monetary values with an associated percentage discount. Whena sales order amount is more than the amount specified on the band, thecustomer receives the specified discount.
A customer can be linked to one order value discount band.
n Product group discounts
These are discounts that are applied to all stock items in a specified productgroup. You can have more than one set of discounts for each product group.
The discounts are either a flat rate percentage, or a percentage based on thequantity ordered.
The discounts are associated with a customer discount group. This is a group ofcustomers who all have the same discounts. A customer can only belong to onecustomer discount group.
n Stock item discounts
These are discounts that are applied to individual stock items. You can havemore than one discount set up for each stock item.
The discounts can be:
l A flat rate percentage.
l A percentage based on the quantity ordered.
l A flat rate amount.
l An amount based on the quantity ordered.
The discounts are associated with a customer discount group. This is a group ofcustomers who all have the same discounts. A customer can only belong to onecustomer discount group.
n Invoice and Line Discounts
These are set on the Documents tab of the customer account in Sage 200.
The Invoice Discount is a percentage value applied to the total goods value of asales order. This is in addition to other available discounts.
The Line Discount is a percentage value applied to each line of a sales order.Where there is more than one discount available for a line the largest discountis usually applied.
37

Guide to Migrating Data Sage 50 to Sage 200
You can choose how you want to migrate your Sage 50 selling prices into Sage 200.You can:
n Migrate your Sage 50 price lists to Sage 200 Price Bands.
n Migrate your Sage 50 price lists as Stock item discounts.
Migrating price lists as price bands
Price lists
When the data is migrated, the price bands are created in Sage 200 in the followingway:
n A standard price band is created in Sage 200. This price band uses the standardsales price, listed on the product records in Sage 50, for all the stock items inSage 200.
n Additional Sage 200 price bands are created from each Sage 50 price list.
n Any stock items, that are not listed in the Sage 50 price list, are set to Usestandard in the new Sage 200 price band.
38

How your Sage 50 data migrates
n All of the stock items listed in the Sage 50 price list, are given a price in theSage 200 price band. The Sage 200 price bands only use fixed prices.
See how the price band prices are calculated
Pricecalculationmethod inSage 50
How the new price is calculated in Sage 200
Fixed price The price is copied from the Sage 50 price list.
Standardsales price
The Sales Price from the Sage 50 product record is used.
Note: The Use Standard option is not selected in the Sage 200price band.
Decreasesales priceby %
The Sage 50 Sales price is reduced by the specified %. Thisvalue is used as the price for the stock item in the Sage 200price band.
Decreasesales priceby value
The Sage 50 Sales price is reduced by the specified value. Thisnew value is used as the price for the stock item in the Sage200 price band.
Increasesales priceby %
The Sage 50 sales price is increase by the specified %. Thisnew value is used as the price for the stock item in the Sage200 price band.
Markup % oncost price.
Markupvalue on costprice
The Sales Price from the Sage 50 product record is used. TheUse Standard option is automatically selected in the Sage 200price band.
Note: Sage 200 has no method for calculating sales pricesfrom cost prices. Therefore, it is not possible to use themarkup price from the Sage 50 price list for the Sage 200 priceband.
n Any customers linked to a Sage 50 price list, are linked to the correspondingprice band in Sage 200.
Customers who are not linked to any Sage 50 price lists, are linked to theStandard price band in Sage 200.
Note: Foreign currency price lists are also migrated from Sage 50. To make sure thecorrect exchange rate is used to calculate foreign currency prices, you mustRecalculate Prices in Sage 50 before you migrate the data.
39

Guide to Migrating Data Sage 50 to Sage 200
Special customer prices
The special customer prices are migrated to Sage 200, though they may not alwaysbe applied to a sales order. In Sage 50, where there is a special customer price, thisis always applied to a sales order in preference to price list prices. Sage 200 alwaysapplies the cheapest available price.
Each product in Sage 50 may have a special price per customer. Therefore, thespecial customer prices are migrated to Sage 200 as Stock item discounts.
The stock item discounts are created in the following way:
n A customer discount group is created in Sage 200 for each customer associatedwith a special price.
40

How your Sage 50 data migrates
n A stock item discount is created for each stock item with a special customerprice.
See how the stock item discount prices are calculated
Pricecalculationmethod inSage 50
How the new price is calculated in Sage 200
Fixed price The Sage 200 stock item discount Type is set to Special Price.
The special price is the Sage 50 special customer price.
Standardsales price
The Sage 200 stock item discount Type is set to Special Price.
The special price is the Sales Price from the Sage 50 productrecord.
Decreasesales priceby %
The Sage 200 stock item discount Type is set to Percentage andFlat rate discount is selected.
The percentage decrease from the Sage 50 price list is used asthe percentage discount for Sage 200 stock item discount.
Decreasesales priceby value
The Sage 200 stock item discount Type is set to Amount.
The Sage 50 sales price is reduced by the value specified in theSage 50 price list. This value is used as the amount for thestock item discount in Sage 200.
Increasesales priceby %
The Sage 200 stock item discount Type is set to Percentage andQuantity break discounts is selected.
The quantity break Quantity ... is set to 1. The Value is set tothe percentage increase specified in Sage 50. The Modifier isset to Surcharge, for the Sage 200 stock item discount.
Markup %on costprice.
Markupvalue oncost price
The Sage 200 stock item discount Type is set to Special Price.
The special price is the Sales Price from the Sage 50 productrecord.
Note: Sage 200 has no method for calculating sales pricesfrom cost prices. Therefore it is not possible to use the markupprice from the Sage 50 special price for the Sage 200 stockitem discount.
n The stock item discount is then associated with the relevant customer discountgroup.
Note: Special customer prices for Non-stock and Service products are not migrated.
41

Guide to Migrating Data Sage 50 to Sage 200
Invoice value discounts
In Sage 50, discounts are always entered for each line of a sales order or invoice.
In Sage 200, discounts can be entered for the whole order and for each line. When anorder is saved, Sage 200 will apply whole order discounts in addition to any linediscounts.
Invoice value discounts are migrated to Sage 200 as Order Value Discounts. Ordervalue discounts are applied to the whole order in Sage 200 (entered on the Deliveryand Invoicing tab).
The Sage 200 order value discounts are created in the following way:
n A Standard Order Value Discount band is created from the invoice valuediscounts set in Sage 50.
n This Standard Order Value Discount band is not linked to any customers.
This is because when the data is migrated, the invoice value discounts in Sage50 are migrated as line discounts in Sage 200. To make sure the discounts arenot applied twice to sales orders in Sage 200, invoice value discounts are notlinked to any customers.
To continue to use invoice value discounts in Sage 200, you must link therelevant customers to the Standard Order Value Discount band, after the datahas migrated. However, if you have outstanding orders that have migratedfrom Sage 50, the order value discount will be applied in addition to existingline discounts.
See an example
l You have a 5% invoice value discount applied to a sales order in Sage 50.
l When the data is migrated, the 5% discount is applied to the sales orderline in Sage 200.
l If you also link the customer for this order to an order value discountband, a extra 5% order value discount is applied to the whole ordervalue, making the total discount 10%.
Customer Discount %
The Discount %, set on the Sage 50 customer record, is migrated as the Line discountset on the Documents tab of the Sage 200 customer account.
Quantity break discounts
These are not migrated to Sage 200.
In Sage 200 quantity break discounts are set up in the Price Book module as StockItem Discounts, and are then linked to customers using Customer Discount Groups.
42

How your Sage 50 data migrates
Sage 50 special prices are also be migrated to Sage 200 as Stock Item Discounts, andlinked to customers using Customer Discount Groups.
In Sage 200, a customer can only be linked to one Customer Discount Group. It is notpossible to migrate both pricing methods.
Migrating price lists as stock item discounts
Price lists
When the data is migrated, the stock item discounts are created in Sage 200 in thefollowing way:
n A standard price band is created in Sage 200. This price band uses the standardsales price, listed on the product records in Sage 50, for all the stock items inSage 200.
n A customer discount group is created in Sage 200 for each Sage 50 price list.
43

Guide to Migrating Data Sage 50 to Sage 200
n A stock item discount is created for each stock item in a price list.
See how the stock item discount prices are calculated
Pricecalculationmethod inSage 50
How the new price is calculated in Sage 200
Fixed price The Sage 200 stock item discount Type is set to Special Price.
The special price is the price from the Sage 50 price list.
Standardsales price
The Sage 200 stock item discount Type is set to Special Price.
The special price is the Sales Price from the Sage 50 productrecord.
Decreasesales priceby %
The Sage 200 stock item discount Type is set to Percentage andFlat rate discount is selected.
The percentage decrease from the Sage 50 price list is used asthe percentage discount for the Sage 200 stock item discount.
Decreasesales priceby value
The Sage 200 stock item discount Type is set to Amount andFlat rate discount is selected.
The value of the decrease from the Sage 50 price list is used asthe discount amount for the Sage 200 stock item discount.
Increasesales priceby %
The Sage 200 stock item discount Type is set to Percentage andQuantity break discounts is selected.
The quantity break Quantity ... is set to 1. The Value is set tothe percentage increase specified in the Sage 50 price list. TheModifier is set to Surcharge for the Sage 200 stock itemdiscount.
Markup %on costprice.
Markupvalue oncost price
The Sage 200 stock item discount Type is set to Special Price.The special price is the Sales Price from the Sage 50 productrecord.
Note: Sage 200 has no method for calculating sales pricesfrom cost prices. Therefore, it is not possible to use the markupprice from the Sage 50 special price as the Sage 200 stock itemdiscount.
n The stock item discount is associated with the relevant customer discountgroup.
44

How your Sage 50 data migrates
Note: Foreign currency price lists are also migrated from Sage 50. To make sure thecorrect exchange rate is used to calculate foreign currency prices, you mustRecalculate Prices in Sage 50 before you migrate the data.
Special customer prices
The special customer prices are also migrated to Sage 200 as stock item discounts.
n A customer discount group is created in Sage 200 for each customer associatedwith a special price.
45

Guide to Migrating Data Sage 50 to Sage 200
n A stock item discount is created for each stock item with a special customerprice.
See how the stock item discount prices are calculated
Pricecalculationmethod inSage 50
How the new price is calculated in Sage 200
Fixed price The Sage 200 stock item discount Type is set to Special Price.
The special price is the Sage 50 special customer price.
Standardsales price
The Sage 200 stock item discount Type is set to Special Price.
The special price is the Sales Price from the Sage 50 productrecord.
Decreasesales priceby %
The Sage 200 stock item discount Type is set to Percentageand Flat rate discount is selected.
The percentage decrease from the Sage 50 price list is used asthe percentage discount for Sage 200 stock item discount.
Decreasesales priceby value
The Sage 200 stock item discount Type is set to Amount.
The Sage 50 sales price is reduced by the value specified in theSage 50 price list. This value is used as the amount for thestock item discount in Sage 200.
Increasesales priceby %
The Sage 200 stock item discount Type is set to Percentageand Quantity break discounts is selected.
The quantity break Quantity ... is set to 1. The Value is set tothe percentage increase specified in Sage 50. The Modifier isset to Surcharge for the Sage 200 stock item discount.
Markup %on costprice.
Markupvalue oncost price
The Sage 200 stock item discount Type is set to SpecialPrice.The special price is the Sales Price from the Sage 50product record.
Note: Sage 200 has no method for calculating sales pricesfrom cost prices. It is not possible to use the markup pricefrom the Sage 50 special price as the Sage 200 stock itemdiscount.
n The stock item discount is associated with the relevant customer discountgroup.
In Sage 50, a customer can be associated with a price list and a special customerprice. In Sage 200 customers can only belong to one Customer discount group. In this
46

How your Sage 50 data migrates
case, the special customer price is used to calculate the stock item discount in Sage200.
Note: Special customer prices for Non-stock and Service products are not migrated.
Invoice value discounts
In Sage 50, discounts are always entered for each line of a sales order or invoice.
In Sage 200, discounts can be entered for the whole order and for each line. When anorder is saved, Sage 200 will apply whole order discounts in addition to any linediscounts.
Invoice value discounts are migrated to Sage 200 as Order Value Discounts. Ordervalue discounts are applied to the whole order in Sage 200 (entered on the Deliveryand Invoicing tab).
The Sage 200 order value discounts are created in the following way:
n A Standard Order Value Discount band is created from the invoice valuediscounts set in Sage 50.
n This Standard Order Value Discount band is not linked to any customers.
This is because when the data is migrated, the invoice value discounts in Sage50 are migrated as line discounts in Sage 200. To make sure the discounts arenot applied twice to sales orders in Sage 200, invoice value discounts are notlinked to any customers.
To continue to use invoice value discounts in Sage 200, you must link therelevant customers to the Standard Order Value Discount band, after the datahas migrated. However, if you have outstanding orders that have migratedfrom Sage 50, the order value discount will be applied in addition to existingline discounts.
See an example
l You have a 5% invoice value discount applied to a sales order in Sage 50.
l When the data is migrated, the 5% discount is applied to the sales orderline in Sage 200.
l If you also link the customer for this order to an order value discountband, a extra 5% order value discount is applied to the whole ordervalue, making the total discount 10%.
Customer Discount %
The Discount %, set on the Sage 50 customer record, is migrated as the Line discountset on the Documents tab of the Sage 200 customer account.
Quantity break discounts
These are not migrated to Sage 200.
47

Guide to Migrating Data Sage 50 to Sage 200
In Sage 200, quantity break discounts are set up in the Price Book module as StockItem Discounts. They are linked to customers using Customer Discount Groups.
The price bands and special prices are also migrated to Sage 200 as Stock ItemDiscounts. They are linked to customers using Customer Discount Groups.
In Sage 200, a customer can only be linked to one Customer Discount Group. Youcannot migrate both pricing methods.
Supplier price listsThe Supplier Price Lists are not migrated from Sage 50.
If required, you can enter the stock item prices per supplier on the supplier tab of thestock item record after the data has migrated.
See Supplier details on page 54.
48

How your Sage 50 data migrates
How Products data migrates
Product CategoriesSage 50 uses Product Categories to group products. The product type (Stock, Service,Non-Stock) in Sage 50 is specified on the product record. It is not related to theproduct category. In Sage 50 you can have products in a single product category, fordifferent types of items.
In Sage 200, all stock items are assigned to a Product Group. You can only have onetype of stock item per product group.
When the data is migrated, a Sage 200 product group is created for every Sage 50product category that is linked to a product, and for every product type. This meansyou could have a large number of product groups in Sage 200. If necessary, you canchange your product categories in Sage 50 before you migrate the data.
In Sage 50, you can assign products to a category that has a number but no categoryname. When you migrate the data, all product categories containing productsmusthave a category name. This is checked by the migration tool when you validate yoursettings. A list of categories without names is displayed. Before you can migrate thedata, you must either enter a name for the category, or move the products to acategory with a name.
How Sage 200 product groups are created
n All Sage 50 product categories linked to products become Product Groups inSage 200.
Sage 50 product categories with no linked products are not migrated.
n The Sage 50 product category No. becomes the Sage 200 product group Code.For example, category 1 becomes product group 001.
n Any Sage 50 product categories, that contain products for more than one typeof product, are migrated as separate product groups.
For Sage 50 product categories containing Service products, the Sage 200product group code is followed by _SERV. For example 001_SERV.
For Sage 50 product categories containing Non-Stock products, the Sage 200product group code is followed by _MISC. For example, 001_MISC.
n The Sage 50 product category name becomes the product group Description inSage 200. Product categories containing Service or Non-Stock products havethe category name, followed by _Serv or _Misc.
n Two additional product groups are created in Sage 200 for your Sage 50 specialproduct items. These are NONS and SERV.
49

Guide to Migrating Data Sage 50 to Sage 200
Example of how Sage 50 Product Categories migrate
Sage 50 Sage 200
ProductCategory No
ProductCategory Name
ProductType
ProductGroup Code
Product GroupDescription
1 Paper Products Stock 001 Paper Products
1 Paper Products Service 001_SERV Paper Products_SERV
1 Paper Products Non-Stock
001_MISC Paper Products_MISC
Stock traceabilityIn Sage 200, you can choose to make all products, in a specified Sage 200 ProductGroup, traceable. This allows you assign a unique serial number or batch number toindividual stock items when they are bought or sold. This allows you track the stockmovements of individual items.
How to make your Sage 50 products traceable
You choose to make your products traceable in the Migration tool. To make yourSage 50 products traceable, you must specify which Sage 50 Product Categories youwant to make traceable. These become traceable Product Groups in Sage 200. All theproducts within each Product Group also become traceable.
Note: You cannot make existing product groups traceable after the data hasmigrated.
Before migrating the data, you must make sure that all individual products in Sage50 that you want to make traceable, are in the correct Sage 50 Product Categories.These product categories must:
n Only contain Stock Item type products.
n Only contain products that you want to become traceable in Sage 200.
n Only contain products with a stock level that is zero or above.
Traceable items in Sage 200 cannot have negative stock levels.
50

How your Sage 50 data migrates
n If you want to use serial numbers for your traceable items:
l The stock levels for each product must be a whole number.
l Outstanding sales order lines , invoice lines and purchase order lines, foreach product, must not contain fractional quantities.
l Allocated stock must not contain fractional quantities.
These are checked by the Migration tool and the relevant messages displayed.
In the Migration tool, choose whether you want the product category to use batchnumbers or serial numbers.
Assigning batch and serial numbers
You must assign the actual batch or serial numbers to the individual stock itemsafter the migration process is complete.
All un-despatched traceable stock items are given batch/serial numbers ofUnassigned. Use the Assign Batch/Serial Nos option in Sage 200, to enter the actualserial and batch numbers for these traceable items.
All despatched traceable stock items are assigned a unique serial or batch number ofConversion plus a number; Conversion1, Conversion2 etc. If required, use theAmend Batch/Serial Nos option in Sage 200 to change these to the actual batch andserial numbers for these items. If you do not want to change the Conversion serialnumbers, they can be archived after the data has migrated.
Note: These Conversion serial numbers do not appear in the Stock History.
Product locationsIn Sage 200 you can store your stock in multiple locations. Sage 200 allows you storestock in two levels:
n Warehouse: This is the location as a whole, such as a warehouse, or a largearea, in or by, a building.
n Bin: This is an area in the warehouse where the stock item is stored.
Note: The locations levels are referred to here as a Warehouse and a Bin. This isused by default in Sage 200. You can configure Sage 200 to use a name of your choicefor each location level.
In the Migration tool, you can choose to create Sage 200 Warehouses or Bins fromyour Sage 50 product locations.
About creating Sage 200 stock locations
You have three options when migrating the data. You can:
51

Guide to Migrating Data Sage 50 to Sage 200
n Choose not to migrate your Sage 50 stock locations. All stock items will bestored in a Home warehouse and a single Unspecified bin in Sage 200.
n Create a Warehouse in Sage 200 for each of your Sage 50 locations. Anyproducts without a location specified in Sage 50, are migrated to a HOMEwarehouse in Sage 200.
See an example
Sage 50 Sage 200
Location Warehouse Bin
Workshop Workshop Unspecified
Showroom Showroom Unspecified
n Use a single Warehouse, and create a Bin for each of your Sage 50 locations.Any products without a location are migrated to an Unspecified bin in Sage 200.
See an example
Sage 50 Sage 200
Location Warehouse Bin
Workshop Warehouse Workshop
Showroom Warehouse Showroom
Note: You can specify the name of the single warehouse in the Migration tool.The default name is Warehouse.
Note: Sage 200 is not case sensitive. If you have two locations in Sage 50, one asHOME and the other as home, these will be created as a single HOME warehouse inSage 200. If you have locations that are the same but spelt differently in Sage 50, awarehouse will be created in Sage 200 for each one. For example, a Sage 50 locationspelt HOM and HOME, will be created as two warehouses in Sage 200, HOM andHOME. Use the View Sage 50 locations option in the Migration tool to see a list of allyour Sage 50 locations. This allows you to check for duplicates and spelling errors.You should change the Sage 50 locations as required, before you migrate the data.
Stock TransactionsIn the Migration tool, you can choose whether to migrate your stock transactions. Ifyou do not migrate your stock transactions, no stock history information is migratedto Sage 200.
52

How your Sage 50 data migrates
Archive stock transactions
In Sage 200, your stock transactions are stored in two files Current and Archived.You can choose when to move stock transactions from your current to your archivedfile. Once your transactions have been archived, you can delete them if required. Ifyou choose to archive your transactions, you can continue to view and print themfrom the archive file.
In the Migration tool, you can choose to archive your stock transactions. You mustspecify an archive date. All stock transactions dated prior to this, are migrated to theArchive file. All stock transactions dated after this date, are migrated to the Currentfile.
Damaged Stock
Damaged stock transactions are not migrated to Sage 200.
Product recordsYour Sage 50 product record details are migrated to Sage 200 stock item records inthe following ways:
Product types
This is set in the Product Group for the stock item in Sage 200.
n Sage 50 Stock item products become Stock type stock items in Sage 200.
n Sage 50 Non-stock products become Service/Labour type stock items in Sage200.
n Sage 50 Service products in become Service/Labour type stock items in Sage200.
Costing methods
Sage 50 uses the FIFO (First In, First Out) method to calculate the value and costprice of your products.
In Sage 200, you can choose which costing method you use from the following: FIFO,Average, Standard, Actual (traceable items only). The costing method is determinedon the product group and is applied to all stock items in that group.
When the data is migrated, the costing method in Sage 200 for all Stock type productgroups is FIFO by default.
The Average Buying Price, specified in the stock item record in Sage 200 is takenfrom your Sage 50 database.
53

Guide to Migrating Data Sage 50 to Sage 200
Custom Fields
In Sage 50, you specify a value for your Product Custom Fields on your productrecords. The Sage 200 stock item records do not have an equivalent field. Therefore,the Sage 50 Product Custom Fields are not migrated.
However, you can apply Analysis Codes to your stock transactions in Sage 200. Ifyou want to use the same Sage 50 product custom fields as Stock Analysis Codes inSage 200, you must set these up after the data has migrated.
Special product codes
In Sage 50, you can use special product codes (M, S1, S2, S3) to add miscellaneousitems and message lines to your invoices, orders and credit notes, without having toset product records for them.
In Sage 200 you can add Free Text lines and Comment lines to your orders andreturns, or you can create Miscellaneous (Non-Stock) and Service type stock items.
When the data is migrated, the S1, S2, S3 special product codes are migrated asMiscellaneous type stock items in Sage 200. The M special product code is migratedas a Service type stock item. These stock items do not have any activity associatedwith them in Sage 200. Therefore, you can delete them from Sage 200 if they are nolonger required.
Any sales and purchase order lines for these products are migrated as Comment orFree Text lines in Sage 200. For more information, see How Sales Order Processingand Invoicing data migrates on page 59.
Supplier details
In Sage 50, you can specify a single supplier for a product on the product record.
In Sage 200, you can specify any number of suppliers for a stock item. For eachsupplier you can specify supply details and pricing details. This information ismigrated in the following ways:
n The Usual Order Quantity is taken from the Re -order quantity on the Sage 50product record.
n The Supplier List Price is set to 0.00. The supplier price lists are not migratedfrom Sage 50. If required, you can enter the supplier prices here after the datahas migrated.
n The Price Source is set to Last Buying Price by default. The Last Order Price isthen used when entering a purchase for this item from this supplier.
54

How your Sage 50 data migrates
n The Last Order Price is the last price paid for the item from any supplier inSage 50.
n The Currently on Order quantity is taken from the outstanding purchase orders.
Sage 200 also records an order history for each supplier. As there is no equivalent inSage 50, no supplier history information is migrated. The supplier history will beupdated as you start processing in Sage 200.
If a supplier record has been deleted in Sage 50, this supplier's details will not bemigrated to the stock items in Sage 200.
Discounts
In Sage 50, you set quantity break discounts on the Discounts tab of the each productrecord. You specify whether a customer uses the quantity discounts on the customerrecord. These quantity discount breaks are not migrated.
This is because in Sage 200 quantity break discounts are set up in the Price Bookmodule as Stock Item Discounts and are then linked to customers using CustomerDiscount Groups.
When the data is migrated, special customer prices and Sage 50 price lists can alsobe migrated to Sage 200 as Stock Item Discounts and linked to customers usingCustomer Discount Groups. In Sage 200, a customer can only be linked to oneCustomer Discount Group. Therefore it is not possible to migrate all pricing methods.
For more information, see Pricing and discounting on page 36.
Unit of Sale
In Sage 50 you specify the Unit of Sale on each product record.
In Sage 200, you can specify the Units of Measure for your stock items. You can useunits of measure to set how stock items are stored as well as how they are boughtand sold. The Units of Measure are set on each product group and stock item record.
When the data migrates, the Stock Unit for all stock items in Sage 200 is set to Each.If you want to specify different units of measure for your stock items, you must setthis up after the data has migrated.
Stock Take
You can choose to migrate your stock take information in the Migration tool. Sage 50only records the date the stock take was made.
If you choose to migrate stock take information, a stock take history is created inSage 200. This shows you the date the last stock take was done.
55

Guide to Migrating Data Sage 50 to Sage 200
Stock Nominal AccountsIn the Migration tool, you must choose the Sage 50 nominal accounts that you want touse as the default for your stock transactions. When the data is migrated thesenominal accounts are set on each product group and each stock item record in Sage200.
In Sage 50, you specify nominal accounts (Sales Nominal Code and Purchase NominalCode ) that you want to use for the sales and purchases of your stock items on thestock record (Default tab).
In Sage 200, you specify four nominal accounts on your stock item records. Thesenominal accounts are specified in the product group. They are then applied to eachstock item in that group by default. If required, you can change these nominalaccounts for individual stock items.
When the data is migrated, Sage 200 needs four nominal accounts to use for eachproduct group. It also needs nominal accounts to use for each stock item record. Todo this, the Migration tool uses both the nominal accounts specified in the Migrationtool and the nominal accounts specified on the stock record in Sage 50.
How stock nominal accounts migrate:
Sage 200 Stock nominal account Sage 200productgroup
Sage 200stock itemrecord
Stock
An asset nominal account used to record stock inand out.
Specified inthe Migrationtool.
Specified inthe Migrationtool.
Revenue
An income nominal account used to record thevalue of stock when it is sold.
Specified inthe Migrationtool.
From Sage 50productrecord.
Accrued receipts
A liability nominal account used to record thevalue of stock that has been received but notinvoiced.
Specified inthe Migrationtool.
Specified inthe Migrationtool.
Issues
A cost of sales nominal account used to record thevalue of stock issued.
Specified inthe Migrationtool.
From Sage 50productrecord.
56

How your Sage 50 data migrates
Stock write offs
In addition to the Stock, Revenue, Issues and Accrued Receipts nominal accounts,you must also specify a default nominal account for stock Write Offs in the Migrationtool.
This is an expense nominal account used to record stock write-offs. In Sage 200 youcan have several write-off categories. These allow you monitor why stock is writtenoff in more detail. Sage 200 has a default write off category Written-off. When thedata is migrated, the nominal account for this category is taken from the nominalaccount specified for Write offs in Sage 50.
Note:The nominal accounts you specify for Stock, Issues and Write Offs, are also specifiedas default nominal accounts in the Nominal Ledger in Sage 200.
These nominal accounts must exist in Sage 50. If required, you can change thesedefault nominal accounts after the data is migrated.
Internal AreasIn Sage 200, you can record the movement of goods internally in your business. Thisfacility does not exist in Sage 50.
When the data is migrated, a default Internal area is created in Sage 200. Thenominal account you specified for Issues in the Migration tool is assigned to thisinternal area.
If required, you can change this after the data has migrated.
Stock Allocations
Quotations
In Sage 50 you can allocate stock to a quotation. This is not possible in Sage 200.Therefore these allocations are not migrated. The amount of free stock is adjustedaccordingly.
Stock History
When the data is migrated to Sage 200, the stock history does not show stock thathas been allocated to an order. The stock issue is added to the stock history when theorder is despatched.
Stock item balancesIn Sage 200, you can use the Stock Item Balances to view the total quantity in stock,the amount allocated and the quantity on order for a particular item. This also shows
57

Guide to Migrating Data Sage 50 to Sage 200
the quantities sold this period and last period.
As there are no periods in Sage 50, the sales per period figures on your stock itembalances migrate in the following way:
n The Sold last period figure is the year-to-date sales from Sage 50 before thedata was migrated.
n The Bought last period figures are not carried through to Sage 200 and so areset to 0.
n The Sold this period and Bought this period figures are set to 0. The period startdate is set to the date of the migration. Sales and purchases from the migrationdate onwards are accumulated into This period.
58

How your Sage 50 data migrates
How Sales Order Processing and Invoicing datamigratesIn Sage 50, you can create invoices and credit notes for customers using theInvoicing module, without creating a sales order or return first. This means that theredoes not have to be a link between an invoice and a sales order.
In Sage 200, invoices and credit notes are created from sales orders and returns.
When the data is migrated, all invoices, credit notes and sales orders in Sage 50become sales orders and returns in Sage 200.
Sales OrdersIn Sage 200, you can choose when stock levels are updated. This can either be whena sales order is despatched or when the invoice is posted. You cannot change thissetting once you have live sales orders in Sage 200.
If you want to migrate your part-despatched sales orders from Sage 50, you mustchoose to update stock levels when the sales order is despatched in Sage 200 beforemigrating your data.
All unprocessed and allocated sales orders in Sage 50 are always migrated to Sage200. These have a Live status in Sage 200.
Note: As Sage 50 and Sage 200 process the VAT on sales orders and invoicesdifferently, there may be occasions when the total order values for your Live salesorders are different after the data has migrated. See Run Balance Ledgers in Sage200 on page 108.
In the Migration tool, you can choose whether to migrate your completed and/or part-despatched sales orders. You can choose from the following options:
n Migrate completed sales orders and posted invoices.
Once selected, all sales orders with a Despatched status of Complete in Sage 50are migrated to Sage 200.
n Migrate part-despatched sales orders.
Once selected, all sales orders with a Despatched status of Part in Sage 50 aremigrated to Sage 200.
59

Guide to Migrating Data Sage 50 to Sage 200
Table showing how your sales orders migrate to Sage 200
Status ofsalesorders inSage 50
Option selected in the Migration tool
Migrate completedsales orders andinvoices optiononly selected
Migrate part-despatched salesorders and invoicesoption only selected
Both optionsselected
Unprocessedsales orders
Yes Yes Yes
Fully andpartallocatedsales orders
Yes Yes Yes
Fullydespatchedsalesorders.
Yes
Note: All relatedinvoices must beposted, prior tomigrating.
No Yes
Note: All relatedinvoices must beposted, prior tomigrating.
Partdespatchedsales orders
No Yes
Note: Any relatedinvoices for the partdespatched amountmust be posted.
Yes
Note: Any relatedinvoices for the partdespatched amountmust be posted.
Invoices and Credit NotesIn Sage 50, when the goods on a sales order are recorded as despatched, an invoiceis created for the order in the Sage 50 Invoicing module. In Sage 50, you can changethis invoice, using the Invoicing module. This is not possible in Sage 200. to avoiddiscrepancies between the two sets of data, all invoices created from sales orders,both part and fully despatched,must be posted before the data is migrated.
In the Migration tool, you can choose whether to migrate your posted invoices andcredit notes and /or unposted product invoices and credit notes. You can choose fromthe following options:
60

How your Sage 50 data migrates
n Migrate completed sales orders and posted invoices.
Once selected, all posted invoices and credit notes in Sage 50 are migrated toSage 200.
n Migrate part-despatched sales orders and invoices.
Once selected, all un-posted invoices and all un-posted credit notes in Sage 50are migrated to Sage 200, as Live sales orders.
Note: As Sage 50 and Sage 200 process the VAT on sales orders and invoicesdifferently, there may be occasions when the total order values for your Livesales orders are different after the data has migrated. See Run Balance Ledgersin Sage 200 on page 108.
Note: All invoices that are linked to sales orders must be posted before you migrateyour data.
Table showing how your invoices and credit notes migrate to Sage 200
Status ofinvoices andcredit notesin Sage 50
Option selected in the Migration tool
'Migrate completedsales orders andinvoices option'only selected
'Migrate partprocessed salesorders and invoices'option only selected
Both optionsselected
Postedinvoices linkedto salesorders.
Yes No Yes
Un-postedinvoices linkedto salesorders.
No
Note: All invoicescreated from salesorders must beposted.
No
Note: All invoicescreated from salesorders must be posted.
No
Note: Allinvoices createdfrom sales ordersmust be posted.
Un-postedinvoices.
No Yes Yes
Postedinvoices.
Yes No Yes
61

Guide to Migrating Data Sage 50 to Sage 200
Status ofinvoices andcredit notesin Sage 50
Option selected in the Migration tool
'Migrate completedsales orders andinvoices option'only selected
'Migrate partprocessed salesorders and invoices'option only selected
Both optionsselected
Posted creditnotes.
Yes No Yes
Un-postedcredit notes.
No Yes Yes
Additional Sales Order Processing and Invoicing information
Sales orders and invoices with payments
Sales orders and invoices with payments are migrated as follows:
Sales order with paymentsmarked as:
Migrated as:
Post as Payment on Account Must be fully completed and posted beforemigrating.
Payment already received Migrated with the payment details on thesales order.
Invoices with paymentsmarked as:
Migrated as:
Post as Payment on Account Must be fully completed and posted beforemigrating.
Payment already received Migrated with the payment details on the salesorder.
Allocate Payment to Invoice Migrated with the payment details on the salesorder.
Sales orders with 'invoiced only' lines
In Sage 50, you can add lines to an invoice that has already been created from a
62
How your Sage 50 data migrates
sales order, but not yet posted. These additional 'invoiced only' lines do not appearon the linked sales order, the stock levels are not updated, and no despatch history iscreated.
In Sage 200, you can only create an invoice from a sales order line. Therefore, youcannot migrate sales orders where the invoice has additional 'invoiced only' lines.These sales orders and the related invoice must be deleted before you migrate thedata.
A list of these sales orders and their related invoices is displayed, when you validateyour settings in the migration tool. You cannot proceed with the migration until thesesales orders and invoices are deleted.
How changes to VAT rates are applied in Sage 50 and Sage 200
When you change a VAT rate in Sage 50, your un-posted purchase orders, salesorders, invoices and credit notes retain their original VAT rate.
A list of these orders and invoices is displayed when you select Warnings in theMigrate Data section of the Migration tool.
You can either:
n Update the VAT rate on each relevant order line in Sage 50.
n Continue with the migration.
If you continue with the migration, the VAT on these orders and returns is re-calculated when you run Balance Ledgers in Sage 200, or when you view orprocess the order in Sage 200.
See Run Balance Ledgers in Sage 200 on page 108.
Sales orders linked to deleted stock items or deleted customerrecords in Sage 50.
In Sage 50, you can delete stock items and customer records.
Sales orders cannot be migrated to Sage 200 if the related customer records andstock items do not exist.
To resolve this you must either:
n Delete all sales orders linked to deleted stock items and/or customer records.
n Re-create the deleted stock items and customer records in Sage 50.
A list of these sales orders is displayed when you validate your settings in themigration tool.
See Sage 50 pre-migration tasks on page 81.
63

Guide to Migrating Data Sage 50 to Sage 200
VAT only order lines.
In Sage 50, you can enter VAT only order lines on your sales orders, invoices andcredit notes.
In Sage 200 you create a VAT only invoice or an VAT only credit note using a free textline. These VAT only invoices and credit notes are posted at the point of entry.
Therefore it is not possible to migrate any sales orders, invoices or credit notes withVAT only order lines from Sage 50. You must either delete the VAT only order lines orcomplete these invoices, orders and credit notes, before you migrate the data.
See Sage 50 pre-migration tasks on page 81.
Document numbers
When the data is migrated, all sales orders, invoices and credit notes in Sage 50become sales orders and returns in Sage 200.
In Sage 50 sales orders, invoices, and credit notes have separate numberingsystems and can be up to seven digits. Quotations and pro formas are numbered insequence with sales orders.
In Sage 200, you have separate numbering systems for sales orders, returns,quotations and pro formas.
n For sales order and returns you can choose to enter sales order and returnnumbers manually, or you can generate them automatically. Manually enterednumbers can be alphanumeric. Automatically generated numbers are 10 digits.You specify the starting number and preceding zeros are added to create a 10digit number.
n For quotations and pro formas, numbers are always generated automaticallywith 10 digits. You can specify the starting number and preceding zeros areadded to create a 10 digit number.
To avoid the duplication of document numbers, all invoices and credit notes createddirectly in the Invoicing module in Sage 50, have INV and CRED after the ordernumber in Sage 200.
In the migration tool, you can choose how your sales order, return, quotation and proforma numbers are migrated to Sage 200. You can either:
n Migrate your current numbering system from Sage 50.
Clear the option Precede SOP Order numbers with zeros in the migration tool.
Your sales order and return numbers in Sage 200 will be as follows:
64

How your Sage 50 data migrates
Sage 50 Sage 200
Sales order 1 Sales order 1
Invoice 1 Sales order 1 - INV
Credit Note 1 Return 1 - CRED
Quotation 2 Quotation 2
Pro forma 3 Pro forma 3
Note: In Sage 200, document numbers in this format are not displayed innumerical order on lists and workspaces. For example, sales orders 1, 2 , 21and 110 would be displayed 1, 110, 2, 21.
65

Guide to Migrating Data Sage 50 to Sage 200
n Choose to add preceding zeros to your document numbers.
Select Precede SOP order numbers with zeros in the migration tool. This isselected by default.
Your sales order, return, quotation and pro forma numbers in Sage 200 will be10 digits and preceded by zeros where applicable.
For example:
Sage 50 Sage 200
Sales order 1 Sales order 0000000001
Invoice 1 Sales order 0000000001 - INV
Credit Note 1 Return 0000000001 -CRED
Quotation 2 Quote 0000000002
Pro forma 3 Pro forma 0000000003
Note: Once selected, your documents will be displayed in numerical order onlist and workspaces in Sage 200.
To continue using this numbering method for new orders in Sage 200, werecommend that you select Automatically generate order and return numbersin the SOP settings, after the data has migrated. Once selected, the order andreturn numbers will always contain 10 digits.
You must specify the following starting numbers which must be higher thattheir Sage 50 equivalent:
n Sales order
n Return
n Quotation
n Pro forma
If you have manually changed the sales order reference number on invoices createdfrom sales orders, the invoice and the sales order will not be linked after the data ismigrated.
Comments
In Sage 50, you can add comments to individual product lines on your sales ordersand invoices.
In Sage 200, you add separate Comment lines.
66

How your Sage 50 data migrates
When the data is migrated, you Sage 50 comments become separate comment linesin Sage 200.
Message lines
In Sage 50, you can use a special product code M to add message only lines to yoursales orders.
When the data is migrated, any sales order lines that use the M special product codebecome Comment lines in Sage 200.
Service and Non-stock item lines
In Sage 200, you can choose whether Service/Labour order lines are required toundergo goods despatched processing before the invoice can be printed.
When the data is migrated, Service/Labour order lines are automatically set toConfirmation with Goods despatched. This means you have to use the goodsdespatched process in Sage 200 to complete and invoice Service/Labour order lines.If required, you can change this setting after the data has migrated.
Special Product Lines
In Sage 50, you can use special product codes (S1, S2, S3) to add miscellaneousitems to your sales orders and invoices without having to set product records forthem.
In Sage 200 you can add Free Text lines to your sales orders and returns. You canalso choose whether you want to use the goods despatched processing for your freetext items.
When the data is migrated, any sales order or invoice lines that use the S1, S2, andS3 special product codes in Sage 50 become Free Text lines in Sage 200. These freetext lines are set to Confirmation with Goods despatched. This means you have touse the goods despatched process in Sage 200 to complete these order lines. Ifrequired, you can change this after the data has migrated.
Sales orders with blank descriptions on order lines
In Sage 50, you can enter a sales order line without a description. This is not possiblein Sage 200.
When the data is migrated, you must add a description to the order line when youview or process the order in Sage 200.
Carriage charges
In Sage 50 you can add a carriage charge to invoices and sales orders. These are
67

Guide to Migrating Data Sage 50 to Sage 200
entered per order. The carriage charges are added to the value of the order everytime a despatch is made.
Sage 200 uses Additional Charge lines. You add separate additional charge lines foreach charge made. You can also set up a list of typical Additional Charges that youcan choose from when entering orders.
When the data is migrated, the carriage charges on invoices and orders becomeadditional charge lines in Sage 200. If an order has been part- despatched in Sage50, the carriage charges are migrated as Complete additional charge lines. If theorder requires further carriage charges after the data has migrated, you mustmanually add further additional charge lines to the order in Sage 200.
An Additional Charge code is also set up for carriage. This additional charge is giventhe code CAR_1.
The VAT applied to carriage charges is also calculated differently in Sage 200, whenan order, invoice or return has a settlement discount. This can create differences inyour total order values when the data is migrated. See Run Balance Ledgers in Sage200 on page 108.
Sales Order Profit
In Sage 50, you can view the profit for a sales order using the Profit Check option.The profit for the order is calculated using the cost price entered on the stock record.
In Sage 200, the method used to calculate the profit depends on the costing methodused for the stock item.
For the migrated data, it is not possible to calculate accurate profit figures for eachorder in Sage 200. The average buying price, as recorded in Sage 50, is used tocalculate the order profit in Sage 200.
Once you start processing orders in Sage 200, accurate profit figures can becalculated.
Cancelled, held , lost and expired orders, quotations and pro formas
In Sage 50 you can take your sales order, pro formas and quotation off order. Youthen mark them as Cancelled or On Hold. Quotation can also be marked as Lost orExpired. These can all be place back On Order in Sage 50.
These are migrated to Sage 200 in the following ways:
68

How your Sage 50 data migrates
Type Sage 50 Status Sage 200 status
Sales order Cancelled Not migrated.
Quotation Cancelled
Pro forma Cancelled
Sales order Held On Hold
Quotation Held On Hold
Pro forma Held On Hold
Quotation Lost Live
Quotation Expired Live
Global nominal account
In Sage 50, you can specify a global nominal account on your sales orders, invoicesand credit notes. This nominal account is applied to all items listed on a sales orderor invoice. When the related invoice or credit note is updated, a single transaction isposted to the nominal account specified. This overrides the nominal account specifiedon the customer or product record.
When the data is migrated, the global nominal account in Sage 50, is used as thenominal account for each line of the order or return in Sage 200.
Information not migrated to Sage 200
The following information can be added to orders and invoices in Sage 50, but is notmigrated as there is no equivalent in Sage 200:
n Courier
n Consign No
n Notes
n Global Nominal account
Quotations and pro formasAll quotations and pro formas in Sage 50 are migrated to Sage 200.
Converting quotations and pro formas to sales orders in Sage 200
Sage 50 and Sage 200 process the VAT on sales orders and invoices differently.When quotations and pro formas, entered in Sage 50, are converted to sales ordersin Sage 200, the VAT is re-calculated according to the Sage 200 VAT rules. This mayresult in differences between the value of the quotation or pro forma and the
69

Guide to Migrating Data Sage 50 to Sage 200
converted sales order.
See Run Balance Ledgers in Sage 200 on page 108.
VAT only order lines
In Sage 50, you can enter VAT only order lines on your pro forma invoices and proforma sales orders.
In Sage 200 you create a VAT only invoice or an VAT only credit note using a free textline. These VAT only invoices and credit notes are posted at the point of entry.
Therefore it is not possible to migrate any pro formas with VAT only order lines fromSage 50. You must either convert these pro formas to an invoice and complete them,or delete them, before you migrate the data.
Stock allocated to quotations / pro formas
In Sage 50 you can allocate stock to a quotation or pro forma. This is not possible inSage 200.
When the data is migrated, the stock is un-allocated from the quotations and proformas. The amount of free stock is adjusted accordingly.
Archiving sales orders, invoices and credit notesIn Sage 200, your completed orders and returns are stored in two files Current andArchived. You can choose when you move your completed orders and returns fromyour current to your archived file. Once your completed orders and returns have beenarchived you can delete them if required. You can continue to view and print yourarchived orders and returns from the archive file.
In the Migration tool, you can specify an archive date. All competed orders andreturns dated prior to this are migrated to the Archive file. All completed orders andreturns dated after this date, as well as all live orders, are migrated to the Currentfile.
Despatches and ReceiptsIn Sage 50, you can choose whether to generate despatch notes (GDNs). This is set inthe Invoice and Order Defaults.
Despatch notes (GDNs) are not generated in Sage 50
If you have chosen not to generate despatch notes in Sage 50, youmust post allsales orders and invoices in Sage 50, prior to migrating the data.
70

How your Sage 50 data migrates
Despatch notes (GDns) are generated in sage 50
When the data is migrated, a new despatch record is created in Sage 200. Thisdespatch record is given a despatch number that matches the Sage 50 invoicenumber.
If you have chosen to add preceding zeros to your document numbers in themigration tool, your migrated despatch notes will have 10 digit numbers preceded byzeros where applicable.
Sage 50 does not record the return of goods on it's credit notes.
In Sage 200, you record the receipt of returned goods and create credit notes fromyour returns. When the data is migrated, a Delivery record is created for each postedcredit note in Sage 50.
71
Guide to Migrating Data Sage 50 to Sage 200
How Purchase Order Processing data migrates
Purchase ordersIn the Migration tool, you can choose whether or not to migrate purchase orders fromSage 50. If you choose to migrate your purchase orders, all orders are migrated, bothcompleted and part processed.
Note: As Sage 50 and Sage 200 process the VAT on purchase orders differently, theremay be occasions when the total order values for your Live purchase orders aredifferent after the data has migrated. See Run Balance Ledgers in Sage 200 on page108.
How changes to VAT rates are applied in Sage 50 and Sage 200
When you change a VAT rate in Sage 50, your un-posted purchase orders, salesorders, invoices and credit notes retain their original VAT rate.
A list of these orders and invoices is displayed when you select Warnings in theMigrate Data section of the Migration tool.
You can either:
n Update the VAT rate on each relevant order line in Sage 50.
n Continue with the migration.
If you continue with the migration, the VAT on these orders and returns is re-calculated when you run Balance Ledgers in Sage 200, or when you view orprocess the order in Sage 200.
See Run Balance Ledgers in Sage 200 on page 108.
Purchase orders linked to deleted stock items or deleted supplierrecords in Sage 50.
In Sage 50, you can delete stock items and supplier records once the audit trail hasbeen cleared.
Purchase orders cannot be migrated to Sage 200 if the related supplier records andstock items do not exist.
To resolve this you must either:
n Delete all purchase orders linked to deleted stock items and/or supplierrecords.
n Re-create the deleted stock items and/or supplier records in Sage 50.
72

How your Sage 50 data migrates
A list of these purchase orders is displayed when you validate your settings in themigration tool.
See Sage 50 pre-migration tasks on page 81.
Document numbers
In Sage 50 purchase order numbers can be up to seven digits.
In Sage 200, you can either enter purchase order and return numbers manually, oryou can generate them automatically. Manually entered numbers can bealphanumeric. Automatically generated numbers are 10 digits. You specify thestarting number and preceding zeros are added to create a 10 digit number.
In the migration tool, you can choose how your purchase order numbers aremigrated to Sage 200. You can either:
n Migrate your current numbering system from Sage 50.
Clear the option Precede POP Order numbers with zeros in the migration tool.This is selected by default.
Your purchase order and return numbers in Sage 200 will be as follows:
Sage 50 Sage 200
Purchase order 1 Purchase order 1
2 2
Note: In Sage 200, purchase order numbers in this format are not displayed innumerical order on lists and workspaces. For example, purchase orders 1, 2 ,21 and 110 would be displayed 1, 110, 2, 21.
73

Guide to Migrating Data Sage 50 to Sage 200
n Choose to add preceding zeros to your migrated purchase orders.
Select Precede POP order numbers with zeros in the migration tool. This isselected by default.
Your purchase order in Sage 200 will be 10 digits and preceded by zeros whereapplicable. For example:
Sage 50 Sage 200
Purchase order 1 Purchase order 0000000001
2 0000000002
Note: Once selected, your purchase orders and returns will be displayed innumerical order on lists and workspaces in Sage 200.
To continue using this numbering method for new orders in Sage 200, werecommend that you select Automatically generate order and return numbersin the POP settings, after the data has migrated. Once selected, the order andreturn numbers will always contain 10 digits. You must specify a startingnumber that is after the highest purchase order number used in Sage 50.
Comments
In Sage 50, you can add comments to individual lines on your purchase orders. Theseare migrated as separate comment lines in Sage 200.
Service and Non-stock item lines
In Sage 200, you can choose whether Service/Labour order lines are required toundergo goods received processing.
When the data is migrated, Service/Labour order lines are automatically set toConfirmation with Goods received. This means you have to use the goods receivedprocess in Sage 200 to complete Service/Labour order lines. If required, you canchange this setting after the data has migrated.
Special Product Lines
In Sage 50, you can use special product codes (S1, S2, S3) to add miscellaneousitems to your purchase orders without having to set product records for them.
In Sage 200 you add Free Text lines to your purchase orders and returns. You canalso choose whether you want to use the goods received processing for your free textitems.
74

How your Sage 50 data migrates
When the data is migrated, any purchase order lines that use the S1, S2, and S3special product codes become Free Text lines in Sage 200. These free text lines areset to Confirmation with Goods received. You must use the goods received process inSage 200 to complete these order lines.
Message lines
In Sage 50 you can use a special product code M to add message-only lines to yourpurchase orders.
In Sage 200, you can add Comment lines to your purchase orders.
When the data is migrated, any purchase order lines that use the M special productcode become Comment lines in Sage 200.
VAT only order lines
In Sage 50, you can enter VAT only order lines on your purchase orders.This is notpossible in Sage 200.
Therefore you cannot migrate any purchase orders with VAT only order lines fromSage 50. You must either complete these purchase orders, or delete the VAT onlyorder lines, before you migrate the data.
Carriage charges
In Sage 50, you can add a carriage charge to purchase orders. These are entered perorder.
Sage 200 uses Additional Charge lines. You can set up a list of typical additionalcharges that you can choose from when entering orders.
When the data is migrated, the carriage charges on purchase orders becomeadditional charge lines in Sage 200.
An Additional Charge code is also set up for carriage. This additional charge is giventhe code CAR_1.
Cancelled orders.
In Sage 50, you can choose to place a cancelled purchase order back on order again.This is not possible in Sage 200.
Cancelled purchase orders are not migrated to Sage 200.
Delivery Addresses
In Sage 50, you can store several delivery addresses for your company. You can then
75

Guide to Migrating Data Sage 50 to Sage 200
add these delivery addresses to your purchase orders. These delivery addresses arenot migrated.
In Sage 200, delivery address are added per order or as a warehouse address.
If the purchase order has a delivery address in Sage 50, this is migrated as thedelivery address for the purchase order in Sage 200.
Information not migrated to Sage 200
The following footer information can be added to purchase orders in Sage 50, but isnot migrated as there is no equivalent in Sage 200:
n Courier
n Consign No
n Notes
Archiving purchase ordersIn Sage 200, your completed purchase orders and returns are stored in two filesCurrent and Archived. You can choose when you move your completed orders andreturns from your current to your archived file. Once your completed orders andreturns have been archived you can delete them if required. You can continue to viewand print your archived orders and returns from the archive file.
In the Migration tool, you must specify an archive date. All completed orders andreturns dated prior to this are migrated to the Archive file. All completed orders andreturns dated after this date, as well as all live orders are migrated to the Currentfile.
Goods received notesSage 50 records when goods are received and automatically assigns a GoodsReceived Note (GRN) number.
These are not migrated to Sage 200. When the data is migrated, the POP setting formatching invoices and credit notes is set to Order and returns only.
If you want to record GRNs and match these to your invoices and credit notes, youcan change this setting after the data has migrated.
76

How your Sage 50 data migrates
How Bill of Materials data migratesYou can use the migration tool to migrate your BOM data. Once selected, anyassembled products in Sage 50 are migrated to the Bill of Materials module in Sage200.
Bill of Materials in Sage 50
In Sage 50, the Bill of Materials for a product is set up the BOM tab of the productrecord. All the components and sub-assemblies that make up the built item are listedhere. The quantity for each component is entered here.
Bill of Materials in Sage 200
In Sage 200, all stock items are defined as one of the following: Built item,Component, Phantom item, Built/Bought.
In the Sage 200 Bill of Materials module, you create a Bill of Materials record foreach built item. Here you specify the components and sub assemblies.
Bill of Materials recordA Bill of Materials record is created in Sage 200, for each product recorded in Sage50, with components listed on the BOM tab of the product record.
All components and subassemblies for the assembled product are listed on theComponents tab of the BOM record in Sage 200.
Sequence numbers are assigned to the Sage 200 BOM record in the order thecomponents are listed on the BOM in Sage 50.
Non stock and service items
In Sage 50, you can:
n Include Service and Non-stock items on a BOM.
n Create BOM for a Service or Non-stock item.
In Sage 200:
n A BOM can only contain Stock type items.
n You can only create a BOM for Stock type items.
When the data is migrated:
n Any Service or Non stock items on a BOM in Sage 50 become comments on theBOM in Sage 200.
n A BOM record is created in Sage 200 for the Service or Non-stock item. Theseare for reference purposes only. You cannot process these BOMs in Sage 200.
77

Guide to Migrating Data Sage 50 to Sage 200
Sage 200 ManufacturingIf you are using Sage 200 Manufacturing, the Bill of Materials data from Sage 50migrates to the Bill of Materials module in Sage 200 Manufacturing.
If you are using Sage 200 Manufacturing, or intend to use it in the future, some of theinformation that you may enter and use in the Bill of Materials module now, cannot beused in the Estimating, Planning and Works Orders modules at this point. This isbecause Sage 200 Manufacturing is being extensively redeveloped and this process isnot yet complete. This affects how you add operations to the BOM record.
For guidelines on adding operations to the BOM record, see the Sage 200 Deploymentand Installation Guide.
Note: If you want to migrate Sage 50 Manufacturing data to Sage 200 Manufacturing,youmust use the Sage 200 Data Migration tool. This can be found on the support areaof the Sage website.
78

Using the Migration toolThis chapter explains how to use the Migration tool to migrate your Sage 50 data toSage 200. It explains all the tasks you need to complete before using the Migrationtool, and how to use the Migration tool.
The migration process involves the following:
n Complete the pre-migration tasks.
n Create a Sage 200 database.
n Enter your settings in the migration tool.
n Migrate your data.
n Complete the post-migration tasks.
To migrate your data to Sage 200 you must:1. Prepare your Sage 50 database.
You must complete a number of pre-migration tasks before you migrate thedata. Some of these tasks involve making changes to your existing Sage 50data. You must complete these tasks to prevent errors occurring when youmigrate the data.
See Sage 50 pre-migration tasks on page 81.
2. Make sure Sage 200 v2011 is installed.
79
3

Guide to Migrating Data Sage 50 to Sage 200
3. Create and prepare a Sage 200 database.
a. In the Sage 200 System Administration tool, create a new company.
b. Make sure the Attachments folder for this company is a empty folder andis not connected to any other Sage 200 companies.
This is verified when the Migration tool connects to the Sage 200database.
c. Assign a User with full access to the database.
d. Make sure the financial year for the Sage 200 company matches thefinancial year in the Sage 50 database.
This is verified when the Migration tool connects to the Sage 200database.
e. Enter the required settings in your Sage 200 database, prior to migration.
Note: Some of these cannot be changed once the migration is complete.
See Prepare the Sage 200 database on page 88.
4. Install the Migration tool.
5. Enter your migration settings in the Migration tool.
See Entering your migration settings on page 90
6. Migrate your data.
7. Run Balance Ledgers in Sage 200.
See Run Balance Ledgers in Sage 200 on page 108
8. Compare your Sage 50 data with your Sage 200 data.
See Compare Sage 50 data with Sage 200 data on page 113.
9. Enter your Sage 200 settings.
See Enter your Sage 200 settings on page 114.
80

Using the Migration tool
Sage 50 pre-migration tasksSage 200 processes data differently to Sage 50. Therefore, you must carry out somepre-migration tasks before you migrate your data.
You must take a back-up of the your Sage 50 database before completing these tasks.You should keep this back-up for auditing purposes as you may have to delete someSage 50 data prior to migration.
These tasks fall into three categories:
n Maintenance tasks
These tasks will help to make sure that errors do not occur in Sage 200 afterthe data has migrated. These tasks are not checked by the Migration tool andwill not prevent your data being migrated.
n Pre-migration tasks
The Migration tool checks your Sage 50 data when you choose to validate yourmigration settings. If any of these checks fail, a list showing the affected data isdisplayed. You must is correct these before you can migrate your data.
n Optional tasks.
The migration tool checks for data where the VAT amount on unposted purchaseorder, sales order and invoice lines is different to the VAT rate specified in Sage50.
Select Warnings to see a list of the affected orders and invoices. You cancontinue with the migration without correcting these, however the VAT will beadjusted when the data is migrated to Sage 200.
For a printable checklist of these tasks, see the Sage 50 pre migration checklist onpage 142.
Maintenance tasksYou must complete the following before migrating your Sage 50 data:
1. Correct any Previous Year Adj, if found in the 'Capital and Reserves' section ofthe balance sheet.
81

Guide to Migrating Data Sage 50 to Sage 200
2. Make sure all of your nominal accounts are included on your chart of accounts.
This is because the Category in Sage 50 is used as the Report category forNominal accounts in Sage 200.
To check your chart of accounts in Sage 50
a. From the Sage 50 Accounts menu bar, select Settings > Configuration>Chart of Accounts.
b. Make sure all your nominal accounts are included on the chart ofaccounts.
See Chart of Accounts on page 6.
3. Make sure your default bank account in Sage 50 is in the same currency as thebase currency for Sage 200.
4. If you are not migrating your bank transactions, make sure all your bankaccounts are fully reconciled.
When the data is migrated, an opening balance transaction is created for eachof your bank accounts in Sage 200. This opening balance is automaticallymarked as reconciled in Sage 200.
To reconcile a bank account
a. Select Reconcile Account from the Bank Tasks list.
See Bank transactions on page 26.
5. Print cheques using the Cheque List option.
Cheques are not migrated to Sage 200.
To print cheques
a. Select Cheque List from the Bank Links pane.
6. If you are using Transaction email, make sure all Transaction emailtransactions have been converted in your Sage 50 data. Transaction emailtransactions are not migrated to Sage 200.
Note: Transaction e-mail is not available in Sage 200.
8. Delete any expired or lost quotations that you do not require.
All expired or lost quotations are migrated to Sage 200 with a Live status. Toprevent unwanted quotations being processed in Sage 200, we recommend thatyou delete these before migrating the data.
See Quotations and pro formas on page 69.
11. If you use foreign currency price lists, you must Recalculate Prices before youmigrate the data. This makes sure the correct exchange rate is used to
82

Using the Migration tool
calculate the price in Sage 200.
To recalculate prices in Sage 50
a. Select Price List from the Customer link pane.
b. Select the price list and click Edit.
c. Click Recalculate Prices and choose to recalculate for all products in theprice list.
d. Click Save.
12. If you want to use VAT inclusive pricing in Sage 200, all sales orders andinvoices must be completed and posted before you migrate the data.
13. To help you to check your data after it has migrated, print the following Sage 50reports:
a. Trial Balance.
b. Draft VAT return.
c. Aged Debtors.
d. Aged Creditors.
e. Sales Order Status.
f. Product Listing (from the products window).
g. Purchase Order Status.
14. Back up your Sage 50 data.
15. Run the Check data process.
To run the check data process:
a. From the Sage 50 Accounts menu bar, choose File > Maintenance.
b. Click Check Data.
c. If there are problems with your data, they are displayed on the FileMaintenance Problems Reports window.
16. Re-index and compress the Sage 50 database.
To re-index and compress data files in Sage 50:
a. From the Sage 50 Accounts menu bar choose File > Maintenance.
b. Click Reindex.
c. Click Select All to re-index all files and click OK.
d. When the re-index is complete, click Compress now.
17. Back up your Sage 50 database again.
83

Guide to Migrating Data Sage 50 to Sage 200
Pre-migration tasksYou must complete the following before you migrate your data. When you validateyour migration settings, the migration tool checks your data. If you have instances ofany of the following in your Sage 50 data, an error message is displayed with detailsof the affected data.
1. Make sure your default bank account is in your base currency.
This is checked by the migration tool.
2. Make sure the bank Sort Code in your Sage 50 bank records and your supplieraccounts, only contains six numbers.
This is checked by the migration tool. A list of affected bank records andsupplier accounts is displayed.
3. Make sure your company VAT registration number is no longer than 12characters.
4. All product categories that contain products in Sage 50 must have a categoryName as well as a number.
A list of products in categories without names is displayed.
To create or amend product categories
a. Select Settings > Configuration > Products.
b. Edit the required categories.
See Product Categories on page 49.
84

Using the Migration tool
5. If you want to use stock traceability in Sage 200, identify the products that youwant to make traceable. Make sure these products are:
l Stock type items.
l In the correct product categories in Sage 50.
If necessary create special categories in Sage 50 for your traceableproducts.
The product categories must:
o Only contain products that you want to make traceable in Sage 200.
o Not contain service or non stock items.
Only stock item type products can be traceable in Sage 200.
o Only contain products with a stock level that is zero or above.
Traceable items in Sage 200 cannot have negative stock levels.
l For each traceable product that will use serial numbers, make sure:
o The stock level is a whole number.
o There are no outstanding sales order lines, invoice lines orpurchase order lines for fractional quantities.
o There are no stock allocations for fractional quantities.
If your products do not conform to the rules above, a list of these products andproduct categories is displayed.
To change a product's category
a. Select Products > Record > Details.
b. Choose a new category from the Category drop-down list.
See Stock traceability on page 50.
6. If you have chosen not to generate despatch notes in Sage 50 (Settings >Invoice and Order Defaults > Options > Goods Despatched Notes > Do notgenerate), you must post all orders and invoices.
7. Post all invoices linked to sales orders.
A list of these invoices is displayed.
See How Sales Order Processing and Invoicing data migrates on page 59.
8. Post all sales orders and invoices paid from a foreign currency bank account.
A list of these sales orders and invoices is displayed.
9. Post all sales orders and invoices with payments that are marked Post asPayment on Account.
A list of these sales orders and invoices is displayed.
85

Guide to Migrating Data Sage 50 to Sage 200
10. For sales orders, invoices and credit notes that have VAT only order lines, youmust either:
n Post the relevant orders, invoices and credit notes.
n Delete the VAT only order lines and recreate them as tax only batchinvoices.
A list of these is displayed.
11. For all pro forma invoices and pro forma sales orders that have VAT only orderlines, you must either:
n Convert the proforma to an invoice or sales order and complete it.
n Delete the VAT Only order lines.
12. For all purchase orders that have VAT only order lines, you must either:
a. Post the relevant purchase orders.
b. Delete the relevant VAT only order lines and recreate them as tax onlybatch invoices.
13. Delete any sales orders and linked invoices where the invoice has lines that arenot on the sales order.
A list of these sales orders is displayed.
See Sales orders with 'invoiced only' lines on page 62.
14. For purchase orders and sales orders that have order lines for a deleted stockitem, you must either:
n Delete all purchase orders and sales orders for that stock item.
n Recreate the stock item.
A list of these orders is displayed.
15. For sales orders that have order lines for a deleted customer account, you musteither:
n Delete all sales orders for that stock item.
n Recreate the customer account.
A list of these orders and invoices is displayed.
16. For purchase orders that have order lines for a deleted supplier account, youmust either:
n Delete all purchase orders for that stock item.
n Recreate the supplier account.
A list of these orders and invoices is displayed.
17. Re-name any duplicated customer address descriptions on your customerrecords.
See Addresses and contacts on page 30.
86

Using the Migration tool
18. Back up your data again.
Optional tasksWhen you select Warnings, a list of purchase orders, sales orders, invoices,quotations and pro formas is displayed where the VAT amount on the order lines isdifferent to the VAT rate specified in Sage 50.
These differences occur because; there are rounding differences between Sage 200and Sage 50, the VAT rate has been changed in Sage 50, or because you havemanually adjusted the VAT amount on order lines.
For the displayed orders, invoices and credit notes, you can:
n Post the order, invoice or credit note in Sage 50.
n Update the VAT for each line on the order or invoice.
To update the VAT on sales orders and purchase orders
a. Open the relevant order, invoice or credit note.
b. Select in the Description to view the order product item information.
c. Re-select the Tax Code.
d. Click OK.
e. Save the order.
n Continue with the migration.
If you choose to do this, the VAT will be re-calculated when you:
n Run Balance Ledgers in Sage 200 and choose to fix the errors.
n Process the order or invoice in Sage 200.
n Convert the quotation or proforma to sales order in Sage 200.
n Amend the order, invoice, quotation or pro forma in Sage 200.
Note: The VAT is re-calculated for the whole order value and not for individualorder lines.
87
Guide to Migrating Data Sage 50 to Sage 200
Prepare the Sage 200 databaseTo migrate the Sage 50 data, you must link it to a Sage 200 database. You mustcreate the Sage 200 database before migrating the data.
This database must not contain any transactions. However, you must enter somesettings in Sage 200 before you migrate the data. These are listed below.
In addition, some settings are set by the Migration tool. These are also listed below.
All other settings must be entered after the data has migrated.
Enter settings in Sage 200You must set the following in the Sage 200 database before you migrate the data.
1. Financial Year
When you create the Sage 200 database, set the financial year to match thefinancial year in the Sage 50 data.
Do not set the Accounting Periods in Sage 200. These must be set after thedata has migrated.
2. SOP settings > Order Processing > Update stock quantities
l If you want to migrate part-despatched sales orders, youmust selectUpdate stock quantities when Order despatch is confirmed.
This is validated at the final stage of the migration process. You cannotproceed with the migration if you have chosen to migrate part-despatched sales orders in the Migration tool and not selected this optionin the Sage 200 database.
Note: This is the default setting in Sage 200.
l If you want to update stock levels when invoices are posted in Sage 200,and you do not want to migrate part-despatched sales orders, selectUpdate stock quantities when Invoice is posted.
This is validated at the final stage of the migration. You cannot proceed ifyou have chosen this setting in Sage 200 and chosen to migrate part-despatched sales orders on the Migration tool.
Note: You cannot change this setting once Live sales orders exist in Sage 200.
For more information, see How Sales Order Processing and Invoicing datamigrates on page 59.
88

Using the Migration tool
3. SOP settings > Order Processing > Order pricing.
If you want to use VAT inclusive pricing in Sage 200, select Order prices includetax. If you select this option, all sales orders, invoices and credit notesmust becompleted in Sage 50, before you migrate the data. This is because Sage 50uses VAT exclusive pricing. If you choose to use VAT inclusive pricing in Sage200, you cannot process any incomplete migrated sales orders and invoices,once the data has migrated.
Note: You cannot change this setting after you have migrated the data.
4. SOP settings > Intrastat > Generate Intrastat entries for sales orders.
SOP settings > Intrastat > Despatch/receipt date.
If you want to generate Intrastat entries for your sales orders in Sage 200, youmust select these settings before you migrate the data.
In Sage 50, Intrastat entries are processed when sales orders are despatched.You must continue to process your Intrastat entries in the same way in Sage200.
5. POP settings > Printing> Generate Intrastat entries for sales orders.
POP settings > Printing > Receipt/return date.
If you want to generate Intrastat entries for your purchase orders in Sage 200,you must select these settings before you migrate the data.
In Sage 50, Intrastat entries are processed when purchase orders are received.You must continue to process your Intrastat entries in the same way in Sage200.
89

Guide to Migrating Data Sage 50 to Sage 200
Entering your migration settingsYou must select the relevant migration settings in the Data Migration tool, beforeyou migrate your data.
You can save your settings at any time. Once saved, you can open thesettings file to re-use the settings each time you migrate your data.
Some data is always migrated when you use the Migration tool. Any data that the toolis unable to migrate is reported in the Errors section on the Progress window.
The migration tool must be installed on the same PC as the Sage 200 client.
To use the Data Migration tool1. Select each item, in turn, from the Navigation bar, or click Next.
2. Choose how you want to migrate the data by selecting the relevant settings.
3. Validate the settings. Any errors are displayed in the pop-up message box.
4. If required, correct any errors in the migration settings and in the Sage 50, orthe Sage 200, databases.
5. Migrate the data.
6. Check the Progress of the migration.
7. Review and correct any errors and run the migration again if required.
90
Using the Migration tool
ConnectionsEnter the location and logon details of the Sage 50 database you are migrating fromand the Sage 200 database that you have created.
To enter the Sage 50 connection details1. Select Connections from the Navigation bar.
2. Enter the User name and Password for the Sage 50 data.
The logon details you enter here should have full access to all areas of the Sage50 database.
3. Enter the location of the Sage 50 database, or click Browse to select it.
4. Click Connect.
This checks the following:
l That the Sage 50 database exists.
l That the Sage 50 Accounts database is the correct version.
l That the Sage 50 User Name and Password are valid for that database.
If the connection is not successful, an error message is displayed. You mustcorrect the errors in the Sage 50 database before continuing.
5. When the connection is successful, enter the Sage 200 Connection Details.
To enter the Sage 200 connection details1. Enter the User name and Password for the Sage 200 database you have
created.
2. Click Connect.
This checks that the Sage 200 User name and Password are valid.
3. Select the Sage 200 database from the Company selection drop-down list.
91

Guide to Migrating Data Sage 50 to Sage 200
4. Click Validate.
This checks the following:
l That the Sage 200 database is in the correct version.
l That the financial year in the Sage 50 database matches the financial yearin the Sage 200 database.
l That the Sage 200 database does not contain any transactions.
l That the attachments folder for the Sage 200 database is empty.
l That your company VAT number is no longer than 12 characters.
l That you customer addresses descriptions are not duplicated.
See Sage 50 pre-migration tasks on page 81.
If the validation is not successful, error messages are displayed. You mustcorrect the errors in the Sage 50 database before continuing.
See how to correct any validations errors:
l Make sure that you have installed Sage 200 v2011.
l Make sure that the Sage 200 database has been updated v2011, using theSage 200 System Administration tool.
l Connect to a different Sage 200 database, or create a Sage 200database:
o With the correct financial year.
o That does not contain any transactions.
l Delete the contents of the Attachments folder specified, or change theAttachments folder specified for the Sage 200 database, in the Sage 200System Administration tool.
l Check you company VAT number.
l Amend your customer address descriptions.
92

Using the Migration tool
Choose the data to convertYour 'Financials' data (Nominal Ledger, Customers, Suppliers and Bank) is alwaysmigrated.
You can choose to migrate:
n Commercials (Products, SOP, Invoicing and POP).
n Bill of Materials.
Note: You can only migrate BOM with your Commercials data.
To choose the data to convert1. Select Data to Convert from the navigation bar.
2. Select the data you want to migrate from the relevant Optional MigrationElements check box.
You must select Commercials if you want to migrate BOM data.
93

Guide to Migrating Data Sage 50 to Sage 200
Financials settings 1Enter your Financials settings:
Transactions
1. Choose how to migrate your Financials transactions:
Migrate Sales LedgerTransactions
Select this to migrate your customer transactions.
Clear this option if you do not want to migrate yoursales ledger transactions. An opening balancetransaction per tax code is created in Sage 200, foreach of your customer records.
See Customer and supplier records on page 30.
Migrate PurchaseLedger Transactions
Select this to migrate your supplier transactions.
Clear this option if you do not want to migrate yourpurchase ledger transactions. An opening balancetransaction per tax code is created in Sage 200, foreach of your supplier records.
See Customer and supplier records on page 30.
Migrate Cash BookTransactions
Select this to migrate your bank transactions.
Clear this option if you do not want to migrate yourcash book transactions. An opening balancetransaction is created in Sage 200, for each of yourbank account records. This opening balance is markedas reconciled in Sage 200.
See How Bank data migrates on page 26.
Note: If you have processed any transactions in Sage 50 Accounts using SagePayment Solutions, the Sage Payment Solutions details associated with yourtransactions are not migrated to Sage 200. Sage 200 can only report on SagePayment details entered via Sage 200.
94

Using the Migration tool
Cost centre and department options
2. Choose your Department Options.
Create departmentsfrom Sage 50departments but donot link to nominal
Select this if you do not want to create Sage 200 costcentres and departments from your Sage 50departments.
A Sage 200 department is created from each Sage 50department with a name. The Sage 200 departmentsare not linked to any Sage 200 nominal accounts andno values are associated with them.
Department specifications for transactions are notmigrated.
See Creating cost centres and departments in Sage200 on page 13.
Create nominalaccounts and costcentres from Sage 50departments
Select this to create a separate Sage 200 nominalaccount and cost centre for each Sage 50 department.
See Creating cost centres and departments in Sage200 on page 13.
Create nominalaccounts anddepartments fromSage 50 departments
Select this to create a separate Sage 200 nominalaccount and department for each Sage 50department.
See Creating cost centres and departments in Sage200 on page 13.
Link Sage 200 costcentres to Profit andLoss NominalAccounts only
Select this if you want to create cost centres ordepartments for you profit and loss nominal accountsonly.
Once selected, all transactions posted to a departmentand to a profit and loss nominal account in Sage 50are migrated to the corresponding nominal accountand cost centre or nominal account and department inSage 200.
Transactions posted to a department and a balancesheet nominal account in Sage 50 are migrated to thecorresponding nominal account in Sage 200 but arenot linked to a department or cost centre.
See Creating cost centres and departments in Sage200 on page 13.
95

Guide to Migrating Data Sage 50 to Sage 200
Financials settings 2Enter your Financials settings:
Nominal Accounts
1. Choose your default Cash Book nominal accounts:
Bank ChargesNominal Account
Use the drop-down list to enter or select the Sage 50nominal account you want to use for your bankcharges in Sage 200.
See Nominal Accounts on page 7.
Exchange DifferencesNominal Account
Use the drop-down list to enter or select the Sage 50nominal account you want to use for your foreigncurrency exchange differences in Sage 200.
See Nominal Accounts on page 7.
VAT return
2. Enter your VAT return details:
Date Last VAT ReturnProduced
Enter the date the last VAT Return was 'Reconciled' inSage 50.
See VAT on page 9.
Date of Next VATReturn
Enter the date that your next VAT Return is due. Thiscannot be before, or the same date as, the last VATReturn produced.
See VAT on page 9.
Prepayments and Accruals
3. Enter your prepayment and accrual options:
Migrate Sage 50Prepayments
Select this to migrate your Sage 50 prepayments.
See Prepayments and accruals on page 11.
Migrate Sage 50Accruals
Select this to migrate your Sage 50 Accruals.
See Prepayments and accruals on page 11.
All current year prepayments and accruals are placed in the current waitingpostings file in Sage 200. Any prepayments or accruals for future financialyears are placed in the deferred postings file. These are not included in yournominal account balances.
96

Using the Migration tool
Stock, SOP and POPStock transactions
1. Choose how to migrate your stock transactions:
Migrate stocktransactions
Select this to migrate your stock transactions. If youdo not choose to keep your stock transactions, nostock history information is migrated to Sage 200.
See Stock Transactions on page 52.
Archive stocktransactions
Select this if you want to archive your stocktransactions in Sage 200.
See Stock Transactions on page 52.
Archive stocktransactions before
Enter the date that you want to use to archive yourstock transactions.
All stock transactions, dated prior to this, aremigrated to the Archive file. All stock transactionsdated after this date are migrated to the Current file.
See Stock Transactions on page 52.
SOP transactions
2. Choose how to migrate your sales orders, invoices, and credit notes:
Note: Quotations, pro formas and sales orders that have not been despatched(part or fully), are always migrated.
Migratecompletedsales ordersand postedinvoices
Select this to migrate completed sales orders and postedinvoices to Sage 200.
See How Sales Order Processing and Invoicing data migrateson page 59.
Migrate partdespatchedsales orders
Select this to migrate part-despatched sales orders andunposted invoices to Sage 200.
Note: You must have selected Update Stock Levels WhenDespatch is Confirmed in your Sage 200 database. This isvalidated at the end of the migration process.
See How Sales Order Processing and Invoicing data migrateson page 59.
97

Guide to Migrating Data Sage 50 to Sage 200
Precede SOPOrdernumbers withzeros
Select this if you want to add zeros to the beginning of yoursales order numbers in Sage 200.
Once selected all your migrated sales orders will have 10digits.
Archive SOPtransactions
Select this if you want to archive your sales orders, invoicesand credit notes in Sage 200.
How Sales Order Processing and Invoicing data migrates onpage 59
Archive salesorders andinvoicesbefore
Enter the date that you want to use to archive your salesorders and returns in Sage 200.
All completed sales orders and returns dated prior to this aremigrated to the Archive file. All completed sales orders andreturns dated after this date, and all live sales orders andreturns are migrated to the Current file.
See How Sales Order Processing and Invoicing data migrateson page 59.
98

Using the Migration tool
Purchase Orders
3. Choose how to migrate your purchase orders:
Migrate purchaseorders
Select this to migrate all your purchase orders,complete and part-processed.
If this is not selected, no purchase orders aremigrated to Sage 200.
For more information, see Purchase orders on page72.
Precede SOP Ordernumbers with zeros
Select this if you want to add zeros to the beginning ofyour purchase order numbers in Sage 200.
Once selected all your migrated purchase orders willhave 10 digits.
Archive POPtransactions
Select this if you want to archive your purchaseorders in Sage 200.
See Archiving purchase orders on page 76.
Archive purchaseorders before
Enter the date that you want to use to archive yourpurchase orders in Sage 200.
All completed orders dated prior to this are migratedto the Archive file. All completed orders dated afterthis date, and all live orders are migrated to theCurrent file.
See Archiving purchase orders on page 76.
99

Guide to Migrating Data Sage 50 to Sage 200
Stock OptionsStocktake
1. Choose whether to migrate your stock take details:
Migrate StocktakeDetails.
Select this if you want to migrate your last stocktakeinto Sage 50 to Sage 200.
You must have a stocktake history in Sage 50 if youselect this.
We recommend that you do a new stocktake in Sage200, after the migration has completed successfully.
Nominal Accounts
2. Select your default Stock Nominal Accounts from the drop-down lists.
If required, you can change these default nominal accounts after the data ismigrated.
For more information, see How Products data migrates on page 49.
Stock Enter or select the nominal account that you want touse for stock in Sage 200.
This is an asset nominal account used to record stockin and out in Sage 200.
Revenue Enter or select the nominal account that you want touse for stock revenue in Sage 200.
This is an income nominal account used to record thevalue of stock in Sage 200, when it is sold.
Accrued receipts Enter or select the nominal account that you want touse for accrued stock receipts in Sage 200.
This is a cost of sales nominal account used to recordthe value of stock issued in Sage 200.
Issues Enter or select the nominal account that you want touse for stock issues in Sage 200.
This is a cost of sales nominal account used to recordthe value of stock issued in Sage 200.
100

Using the Migration tool
Write Offs Enter or select the nominal account that you want touse for stock write offs in Sage 200.
This is an expense nominal account used to record torecord stock write-offs. This is used as the nominalaccount for the default Written Off write off categoryin Sage 200.
101

Guide to Migrating Data Sage 50 to Sage 200
Warehouse optionsUse this to choose how to set up your stock locations in Sage 200.
Stock Warehouse Options
1. Choose your stock warehouse options:
Use Multiple locations Select this to use multiple stock locations in Sage 200.
Your Sage 50 product locations will becomeWarehouses or Bins in Sage 200.
See Product locations on page 51.
Use single stocklocation
Select this if you do not want to keep your Sage 50stock locations. All products will be stored in a singleHOME warehouse and a single Unspecified bin.
See Product locations on page 51.
Stock Warehouse Configuration
2. If you have chosen to use multiple locations, enter your warehouseconfiguration options:
Use Sage 50 ItemLocations as Sage 200Warehouses
Select this to create a warehouse for each Sage 50stock location.
See Product locations on page 51.
Use Sage 50 ItemLocations as Sage 200Bins
Select this to create a bin for each Sage 50 stocklocation.
These bins will be stored in a single warehouse.
Enter the Warehouse Name and WarehouseDescription for the single warehouse.
See Product locations on page 51.
3. Click View Sage 50 locations to see a list of your Sage 50 stock locations.
102

Using the Migration tool
Stock traceability optionsStock categories
This displays a list of all the product categories used in your Sage 50 database, byname. Any product categories in Sage 50 that have a number only (with a blankname), are not displayed. Choose the product categories that contain the productsthat you want to make traceable in Sage 200. All of the products in the selectedcategory will become traceable in Sage 200.
Note: You cannot make a product traceable after the data has migrated.
All product categories that are selected to become traceable must:
n Have a name and a number.
n Only contain stock type products.
n Only contain products that you want to become traceable in Sage 200.
n Contain products with a stock level that is zero or above.
n For products that will use serial numbers:
l The products must have a stock level that is a whole number.
l Outstanding sales order lines must not contain fractional quantities.
For more information, see Stock traceability on page 50.
Batch Groups
1. Use the arrows to move any product categories, that you want to maketraceable and that will use batch numbers in Sage 200, to the Batch Groups box.
Any product categories left in the Stock Category list will not become traceablein Sage 200.
Serial Groups
2. Use the arrows to move any product categories, that you want to maketraceable and that will use serial numbers in Sage 200, to the Serial Groupsbox.
Any product categories left in the Stock Categories list will not becometraceable in Sage 200.
103

Guide to Migrating Data Sage 50 to Sage 200
Migrate your dataOnce you have entered all of the relevant settings in the Migration tool, you canmigrate your data. You can see the progress of the migration in the Progress section.
Before you begin
All users must be logged out of the Sage 50 database.
You must have completed the pre-migration tasks in Sage 50.
You must have taken a back up of the Sage 50 database.
You must have created and set up a Sage 200 database.
You must have taken a back up of the Sage 200 database.
You must entered the relevant migration settings in the Data Migration tool.
To migrate your data1. Select Migrate Data from the navigation bar.
2. Check the settings that you have selected on the right side of the window.
To print your settings, click on the toolbar.
3. Select Sage 50 Warnings.
This checks the Sage 50 database. If there are items that you may need tochange in Sage 50, these are displayed in a message box.
See Optional tasks on page 87.
4. Select Validate Settings.
This checks the database connections and all of the options you have selected.
If there are any errors in the validation, they are displayed in a message box.You must correct these before you can migrate your data. See Pre-migrationtasks on page 84.
If your settings are correct a green tick is displayed.
5. Once your settings are correct, select I confirm the settings are correct.
6. Select Migrate Data.
This checks that are no transactions in the Sage 200 database.
If there are any errors, they are displayed in a message box. You must correctthese errors before continuing.
If there are no errors, the migration begins and the Progress window appears.
104

Using the Migration tool
ProgressThis displays the Progress of the data migration. Some data is always migrated. Usethe progress information to check for any issues and errors.
Detailed information about the progress of the migration is shown in a tree view. Thisdisplays the data in four levels:
Information about the migrated data for each selected area of the tree view, isdisplayed under the list of headings to the right of the tree view.
[Selectedheading]
The first heading displays the section selected in the tree view tothe left. It shows when the migration started and finished for theselected section.
To see the information for the whole migration, select the toplevel heading. In the example above, click onSage50v17toSage2002011.
Row Counts This is the numbers of rows on the database that have beenmigrated so far.
Errors These indicate any problems with the migration. You mustinvestigate these errors to make sure the data has migratedcorrectly.
Warnings These indicate the changes made to the Sage 50 data so that itmatches the way data is stored in the Sage 200 database.
Messages These show the progress of each phase of the migration.
When the migration has completed a message is displayed.
To print a summary of the migrated data, click View Migration Summary.
105

Guide to Migrating Data Sage 50 to Sage 200
A detailed log of the migration is also created. This is stored in the SageUK\Migration\Reporting folder within your Local Application Data. The location of yourLocal Application Data depends on your PC's operating system and your user name.For example:
n For Windows Vista the location is:
C:\Users\(your user name)\AppData\Local\.
n For Windows XP, the location is:
C:\Documents and Settings\(your user name)\Local Settings\Application Data\.
n For Windows 7 the location is:
C:\Users\(your user name)\AppData\Local\
106

Post migration tasksYou must complete the following post migration tasks in Sage 200 to make the surethe data has migrated correctly, and to make sure you are ready to start processingdata in Sage 200.
We recommend you check as much of your migrated data as possible.
Once the data has migrated, you must:
n Run Balance Ledgers in Sage 200.
n Compare your key Sage 50 data with your Sage 200 data.
n Enter your remaining Sage 200 settings.
Take a backup of the data immediately after the migration process has finished, andbefore making any changes.
107
4

Guide to Migrating Data Sage 50 to Sage 200
Run Balance Ledgers in Sage 200Once the data has migrated to Sage 200, you must check the validity of your migrateddata in Sage 200.
To do this you must run the Balance Ledgers utility for the Financials andCommercials modules in Sage 200.
For the Financials modules, this utility checks that the total of all transactions agreewith the balances for all nominal, bank customer and supplier accounts. For theCommercial modules, this utility validates stock quantities and the order/return linevalues for sales and purchases. ( For detailed information about Balance Ledgers, seethe Sage 200 help.)
About running Balance LedgersWhen you run the balance ledgers utility, there are some errors that you must alwayscorrect. These are detailed below. You must also investigate any additional errorsthat occur.
Clear Audit Trail
If you have run the Clear Audit Trail option in Sage 50, you may see an adjustmentmade to the suspense account when your run Balance Ledgers in Sage 200.
This is because the clear audit trail option in Sage 50 removes bank reconciled andVAT reconciled transactions up to a specified date and creates an opening balancetransaction as at that date. This corresponding opening balance transaction may notbe in the same financial year as the cleared transactions.
When Balance Ledgers is run in Sage 200, the closing balances are checked for eachfinancial year. In this case, a discrepancy is found and the closing balance figureadjusted. This adjustment is counteracted by the opening balance transaction createdby the Clear Audit Trail option in Sage 50. Therefore the overall nominal accountbalances are not affected and no further action is required.
Balance Ledgers errors that you must always correct
When live sales orders, invoices and purchase orders are migrated from Sage 50 toSage 200, differences can occur in the values the orders and invoices. This is due todifferences in the way VAT is calculated in Sage 50 and Sage 200.
The Balance Ledgers utility checks that the values entered for Live orders comply withthe Sage 200 VAT rules. Where this is not the case, the orders are recalculated.
This recalculation also occurs when quotations and pro formas entered in Sage 50 areconverted to sales orders in Sage 200.
When the VAT is re-calculated, the VAT amount for the total order value is adjusted.The VAT amount on individual order lines is not changed.
108

Post migration tasks
These differences are due to:
n Differences in how VAT is applied to sales orders, invoices and purchase ordersbetween Sage 50 and Sage 200.
n VAT entered manually on order and invoice lines in Sage 50.
n The way that changes to VAT rates are applied in Sage 50 and Sage 200.
n Orders and invoices entered using Calc Net in Sage 50.
n Differences in how VAT is calculated for sales orders and invoices with carriagecharges and settlement discounts between Sage 50 and Sage 200.
Differences in how VAT is applied to orders and invoices in Sage 50and Sage 200.
In Sage 50, VAT is calculated for each line of the order or invoice.
In Sage 200, VAT is calculated on the total order value.
When Balance Ledgers is run, the VAT value of Live orders is re-calculated in Sage200, for the whole order value. Due to rounding differences, this means that someorder values in Sage 200 will be different to Sage 50.
See an example
n In Sage 50, you enter an order line for £832.38. The VAT on this line iscalculated as £145.67 ( 832.28 x 17.5% VAT = 145.67).
n You enter a second order line for the same amount.
n The order value is calculated by adding the order lines. The net value of theorder is 832.38 + 832.38 = 1664.76. The VAT value is 145.67 +145.67=291.34.
n The total order value is £1956.10 (1664.76 + 291.34).
n The data is migrated to Sage 200.
n The VAT is recalculated for the total value of the order. This is 291.33.(1664.76 x 17.5% VAT = 291.33).
n The total order value is now £1956.09. (1664.76 + 291.33).
How VAT entered manually on order and invoice lines in Sage 50 isre-calculated in Sage 200.
In Sage 50, you can manually enter the amount of VAT due on individual purchaseorder, sales order, invoice and credit note lines.
When Balance Ledgers is run, the VAT value of Live sales orders and purchase ordersis re-calculated, to make sure that they comply with the Sage 200 VAT rules.
109

Guide to Migrating Data Sage 50 to Sage 200
Any purchase orders, sales orders and invoices that have not been posted and havemanually entered VAT values, are re-calculated in Sage 200 using their associatedVAT rate.
See an example
n In Sage 50, you enter an order for £100 using the standard VAT rate.
n You manually enter the VAT as £17.00.
n The total value of the order is £117.00.
n The data is migrated to Sage 200.
n The VAT amount is re-calculated using the standard VAT rate of 17.5%.
n The VAT value of the order is now £17.50, making the total value of the orderis £117.50.
How changes to VAT rates are applied in Sage 50 and Sage 200
When you change a VAT rate in Sage 50, your un-posted purchase orders, salesorders, invoices and credit notes retain their original VAT rate.
A list of these orders and invoices is displayed when you select Warnings in theMigrate Data section of the Migration tool.
You can either:
n Update the VAT rate on each relevant order line in Sage 50.
n Continue with the migration.
If you continue with the migration, the VAT on these orders and returns is re-calculated when you run Balance Ledgers in Sage 200, or when you view orprocess the order in Sage 200.
See Run Balance Ledgers in Sage 200 on page 108.
How order lines entered using Calc Net in Sage 50 are calculated inSage 200
Sage 50 has the facility to calculate the net value of a sales order, invoice orpurchase order line, from an entered gross value using the Calc Net option. This is toovercome rounding anomalies when calculating VAT.
Sage 200 does not have this facility.
If you have entered an order line using Calc Net in Sage 50, this may createdifferences when the data is migrated to Sage 200. This is because Sage 200 alwaysadds the VAT to the net value of the order.
110

Post migration tasks
When Balance Ledgers is run, the VAT value of Live orders is re-calculated from theNet value and rounded accordingly. This means that some order values in Sage 200will be different to Sage 50.
See an example
n In Sage 50, you enter a gross value of £12.99 on an order and use the Calc Netfacility.
n The order is saved with a net value of £11.06 and a VAT value of £1.93.
n The data is migrated to Sage 200.
n The VAT value of the order is re-calculated from the net value. This is £1.94.(11.06 + x 17.5% = 1.9355. The VAT value of the order is rounded up to£1.94.)
n The gross value of the order is now £13.00.
How VAT is calculated for sales orders and invoices with carriagecharges and settlement discount in Sage 50 and Sage 200
In Sage 50, the full VAT amount is always added to the carriage charge, even whenthe sales order or invoice has a settlement discount.
In Sage 200, the VAT on the carriage charge is reduced when the sales order has asettlement discount.
When Balance Ledgers is run, the VAT is recalculated in Sage 200, taking thesettlement discount into account. This applies to all un-despatched sales orders andun-posted invoices with a settlement discount.
See an example
n In Sage 50, you enter a sales order with a settlement discount of 10%.
n The total sales order value is £100. The VAT is calculated as £15.75. (100 -10% settlement discount = £90. £90 x 217.5% VAT = £15.75.)
n You add a carriage charge to the order for £10. The VAT is calculated as £1.75.(10 x 17.5 VAT = £1.75.)
n The order total is £127.50. (100 +15.75 + 10 +1.75 = £127.50.)
n You migrate the data to Sage 200.
n The VAT is calculated on the whole order. This takes the settlement discountinto account. (100 +10 - 10% settlement discount = £99. £99 x 17.5% VAT =£17.33.)
n The order total in Sage 200 is £127.33. (110 +17.33 = 127.33.)
111

Guide to Migrating Data Sage 50 to Sage 200
To run balance ledgersOpen: Accounting System Manager > System Utilities > Balance Ledgers >Financials / Commercials
1. Select the Ledger or Module to validate.
2. For the Financials modules, select All Accounts.
3. Select Validate and Report Anomalies.
4. Click OK.
5. Investigate any errors that are reported.
6. If you are happy for the errors to be corrected, run Balance Ledgers again, andselect Validate, Report and Correct Anomalies.
112

Post migration tasks
Compare Sage 50 data with Sage 200 dataWe recommend you compare the following:
Sage 50 Sage 200 More information
Trial Balance
(Company > Links> FinancialReports)
Trial Balance.
(Nominal Ledger >Reports > FinancialStatements)
Use this to check your nominal accountbalances.
The trial balance in Sage 200 will notexactly match the trial balance in Sage50, if you have chosen to create costcentres or departments for your nominalaccounts. This is because you will haveadditional nominal accounts in Sage 200.
See Creating cost centres anddepartments in Sage 200 on page 13.
VAT Return
(Company >Manage VAT > VATReturn)
VAT Return
(Nominal Ledger >Period End Routines> VAT Analysis)
Use this to check your VAT transactions.
You can view the VAT return just to checkthat the figures match. You do not needto reconcile / produce the return.
Bank Accounts List
(Bank > Links >Bank List)
Cash Book List
(Cash Book > ListView)
Use this to check your bank accountbalances.
Aged Debtorsreport.
(Customers > Links> Aged Balance)
Aged Debtorsreport.
(Sales Ledger >Reports > CreditControl)
Use this to check your customer accountbalances.
Make sure the reports run up to the samedate in both Sage 50 and Sage 200.
Aged Creditorsreport.
(Suppliers > Links> Aged Balance)
Aged Creditorsreport.
(Purchase ledger >Reports > CreditControl)
Use this to check your supplier accountbalances.
Make sure the reports are run up to thesame date in both Sage 50 and Sage 200.
Product List
(Products > Links >Product List)
Stock Levelsreport.
(Stock Control >Reports > Status >Stock Levels)
Use this to check your stock itembalances.
113

Guide to Migrating Data Sage 50 to Sage 200
Enter your Sage 200 settings1. Check and enter the settings for the Sage 200 modules that you are using.
Open: Configuration Settings.
For more information, see the Sage 200 Help.
2. If you have migrated your Sage 50 departments as Sage 200 cost centres orSage 200 departments for all your nominal accounts, select Split postingsbetween cost centres for balance sheet accounts in the System Settings in theAccounting System Manager module.
This makes sure that your transactions continue to be posted to separatebalance sheet accounts in Sage 200.
Open: Accounting System Manager > Settings > System Settings |Operational Settings.
See How Company and Nominal Ledger data migrates on page 6.
3. If you chosen to add preceding zeros to your sales document numbers in themigration tool and want to continue with this numbering system:
a. Select Automatically generate order and returns numbers.
b. Enter the next sales order number, return number, quotation number, proforma number, and despatch note number.
Open: Sales Order Processing > SOP Utilities > System Set Up > SOPSettings | Document Numbering.
4. If you chosen to add preceding zeros to your purchase document numbers inthe migration tool and want to continue with this numbering system:
a. Select Automatically generate order and returns numbers.
b. Enter the next purchase order number and return number.
Open: Purchase Order Processing > POP Utilities > System Set Up > POPSettings | Document Numbering.
5. Check the nominal codes for the product groups and stock items. Amend them ifnecessary.
Open: Stock Control > Stock Maintenance > Product Groups.
Open: Stock Control > Amend Stock Item Details | Analysis.
6. Check the prices in your Price Bands and Discount Groups.
7. Enter your e-Banking details, if required.
Open: Cash Book > Cash Book Accounts > Amend Account Details | e-Banking.
114

Post migration tasks
8. Enter your VAT submission details, if required.
Open: Nominal Ledger > Ledger Set Up > Ledger Settings > VATSubmissions.
9. Set up quantity break discounts, if required.
Open: Price Book > Discounts > Discount for Stock Item.
10. Assign batch and/or serial numbers to your traceable products, if required.
Open: Stock Control > Batch/Serial Nos > Assign Batch/Serial Nos.
11. Set up stock analysis codes, if required.
Open: Stock Control > Stock Maintenance > Maintain Analysis Codes.
12. Enter supplier stock prices, if required.
Open: Stock Control > Stock Records > Amend Stock Item Details >Suppliers
13. Back up your data again.
115

116

Appendix A: SummariesThis appendix contains summaries of how the Sage 50 data migrates to Sage 200.These summaries are designed to be brief and do not contain full explanations of howthe data migrates. They should be used in conjunction with the rest of the migrationguide.
n Summary: Company and Nominal Ledger on page 118
n Summary: Bank on page 123
n Summary: Customers on page 125
n Summary: Suppliers on page 128
n Summary: Products on page 132
n Summary: Prices and Discounts on page 130
n Summary: Sales Order Processing on page 134
n Summary: Purchase Order Processing on page 137
n Summary: Bill of Materials on page 139
117
5

Guide to Migrating Data Sage 50 to Sage 200
Summary: Company and Nominal LedgerSage 50Company andNominal Ledgermigrates to:
Sage 200 Nominal Ledgerand Accounting SystemManager
More Information
Financial year
(Settings >Financial Year)
Financial Year The Sage 50 and Sage 200databases must have thesame financial year.
Accounting periods
(ASM > System Settings)
(ASM > Accounting Periods)
Sage 50 does not useaccounting periods. 12calendar monthly accountingperiods are automaticallycreated in the Sage 200database. The number of openperiods is set to 12. Allperiods in the currentfinancial year are set to Open.
Company details
(CompanyPreferences >Address)
Company details
(ASM > Company details)
The address listed on theCompany Preferences in Sage50, is migrated as thecompany address in Sage200.
Delivery addresses are notmigrated as there is noequivalent in Sage 200.
Chart of accounts
(Configuration >Chart of accounts)
Report categories
(NL > Utilities > Ledger Set up> Report Categories)
Each Type and Category inSage 50 becomes a ReportCategory in Sage 200. Theparent Types are given singlenumbers and the Categories arelated three digit number inSage 200.
See Chart of Accounts on page6.
Nominal accounts Nominal accounts A nominal account is createdis Sage 200 for every nominalaccount in Sage 50.
118

Appendix A: Summaries
Sage 50Company andNominal Ledgermigrates to:
Sage 200 Nominal Ledgerand Accounting SystemManager
More Information
Departments
(Links >Department)
Cost centres or Departments
(Utilities > Ledger Set Up >Cost Centre Names)
(Utilities > Ledger Set Up >Department Names)
In the Migration tool, you canchoose to create Sage 200cost centres or Sage 200departments from your Sage50 departments.
See Creating cost centres anddepartments in Sage 200 onpage 13.
Nominal accountbudgets
(Company >Budgets)
(CompanyPreferences >Budgeting)
Nominal account budgets
(Nominal Account > BudgetThis Year)
Budget values are migrateddifferently, depending on thebudgeting method used inSage 50.
See Creating cost centres anddepartments in Sage 200 onpage 13.
Control accounts
(Settings > ControlAccounts)
Default nominal accounts
(NL > Utilities > Ledger Set up> Default Nominal Accounts)
When the data is migrated,the default nominal accountsin Sage 200 are taken fromany nominal accounts in Sage50 that are specified asControl Accounts.
See Nominal Accounts onpage 7.
119

Guide to Migrating Data Sage 50 to Sage 200
Sage 50Company andNominal Ledgermigrates to:
Sage 200 Nominal Ledgerand Accounting SystemManager
More Information
Transactions Transactions All posted transactions inSage 50, for the current andprevious years, are migratedto Sage 200 as postednominal transactions.
Transactions dated in a futurefinancial year are migrated tothe deferred posting files inSage 200. These transactionsare not included in thebalance of associated nominalaccounts.
See Transactions on page 8.
Tax codes
(Configuration >Tax Codes)
Tax Rates
(ASM > Settings > Tax Rates)
Your Sage 50 tax rates aremigrated to Sage 200 whenthey have a description inSage 50, or are flagged as Inuse in Sage 50.
VAT transactions VAT transactions Un-reconciled VATtransactions are migrated toSage 200.
Reconciled VAT transactionsare not migrated.
In the Migration tool, youmust specify the date of yourlast VAT return. Your VATreturn information is migratedto Sage 200.
120

Appendix A: Summaries
Sage 50Company andNominal Ledgermigrates to:
Sage 200 Nominal Ledgerand Accounting SystemManager
More Information
VAT submissiondetails
(Companypreferences > VAT)
Your e-VAT submission detailsare not migrated to Sage 200.You must re-enter thesebefore you submit your VATreturn online from Sage 200.
(NL > Utilities > Ledger SetUp > Settings > VATSubmissions)
Prepayments andaccruals
(Nominal Ledger >Prepay)
(Nominal Ledger >Accrual)
Prepayments and accruals
(NL> Enter Transactions >Prepayments)
(NL> Enter Transactions >Accruals)
If you choose to migrateprepayments and accruals:
n Prepayment and accrualtransactions that arealready posted in Sage50 are migrated ascurrent transactions.
n Prepayment and accrualtransactions in thecurrent financial year,that have not beenprocessed in Sage 50,are migrated as pendingtransactions.
n Prepayment and accrualtransactions in futurefinancial years aremigrated as deferredtransactions.
Audit trail No Sage 200 equivalent. Nodetails are migrated.
121

Guide to Migrating Data Sage 50 to Sage 200
Sage 50Company andNominal Ledgermigrates to:
Sage 200 Nominal Ledgerand Accounting SystemManager
More Information
Currencies
(Settings >Currencies)
Currencies and ExchangeRates
( ASM > Settings > Currenciesand Exchange Rates)
Only currencies with anexchange rate set in Sage 50are migrated to Sage 200. Theexchange rate set in Sage 50is migrated to Sage 200.
The euro exchange rate isadded to the base currencyrecord in Sage 200.
If you do not use the Eurocurrency in Sage 50, this iscreated for you in Sage 200automatically. No exchangerate is set.
Countries
(Settings >Countries)
Sage 200 maintains it's ownlist of country codes. Theseare not migrated from Sage50.
(ASM > Settings > CountryCodes)
Fixed Assets
(Configuration >Fixed Assets)
No Sage 200 equivalent. Nodetails migrated.
Accountant details
(CompanyPreferences >Accountant)
No Sage 200 equivalent. Nodetails migrated.
Intrastattransactions
Not migrated.
122

Appendix A: Summaries
Summary: BankSage 50 Bankmigrates to:
Sage 200 CashBook
More information
Bank record Cash Book account The bank sort code number in Sage 50must contain six numbers.
See How Bank data migrates on page 26.
Default bankaccount
(Configuration >Chart of Accounts)
Default Bankaccount
(CB > Utilities > CBSettings)
The default bank account in Sage 50 mustbe in base currency.
Reconciledbalances
(Bank Record >Bank Details)
Reconciled balances are not migrated.
Transactions Transactions /opening balance
If you choose to migrate your cash booktransactions, details of whichtransactions are reconciled is alsomigrated.
If you do not want to migrate cash booktransactions, an opening balance iscreated for each bank account. Thisopening balance transaction is marked asreconciled in Sage 200.
Draft bankreconciliation
You can save a draft bank reconciliationin Sage 200, but Sage 50 draftreconciliation details are not migrated.
e-Banking details
(Bank record >Bank Details)
e-Banking details are not migrated.
To use e-Banking in Sage 200, you mustre-enter your details.
(CB > Accounts > E-banking)
123
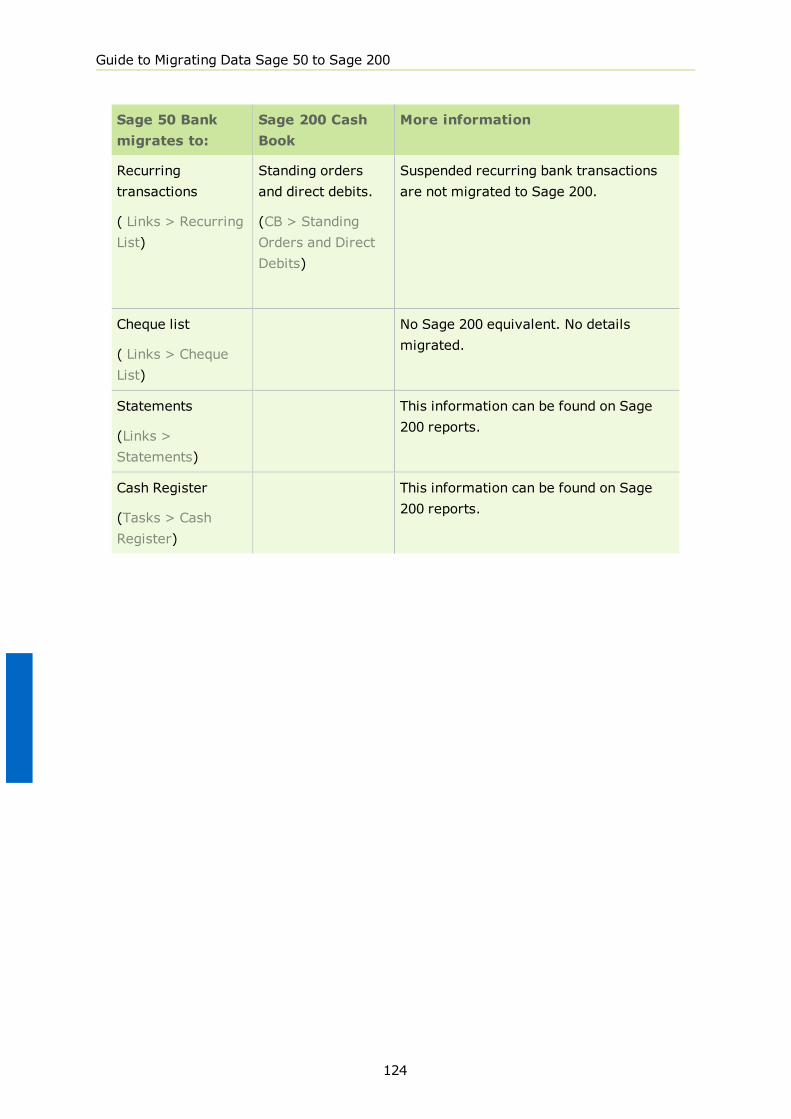
Guide to Migrating Data Sage 50 to Sage 200
Sage 50 Bankmigrates to:
Sage 200 CashBook
More information
Recurringtransactions
( Links > RecurringList)
Standing ordersand direct debits.
(CB > StandingOrders and DirectDebits)
Suspended recurring bank transactionsare not migrated to Sage 200.
Cheque list
( Links > ChequeList)
No Sage 200 equivalent. No detailsmigrated.
Statements
(Links >Statements)
This information can be found on Sage200 reports.
Cash Register
(Tasks > CashRegister)
This information can be found on Sage200 reports.
124

Appendix A: Summaries
Summary: CustomersSage 50Customersmigrates to:
Sage 200 SalesLedger
More Information
Ageing periods
(Customer Defaults> Ageing)
Ageing periods
(Sales LedgerSettings > Ageing)
Invoice valuediscounts
(Customer Defaults> Discounts)
Sage 200 PriceBook module
See Pricing and discounting on page 36.
Customer record Sales account See Customer and supplier records onpage 30.
Addresses andContacts
(Customer record>Details)
Contacts
(Sales Account >Contacts)
SOP Deliveryaddresses
(SOP > SOPMaintenance >Customer DeliveryAddresses)
Customer bankdetails
(Customer Record> Bank)
No Sage 200 equivalent. No detailsmigrated.
Communications
(Customer record>Communications)
No Sage 200 equivalent. No detailsmigrated.
125

Guide to Migrating Data Sage 50 to Sage 200
Sage 50Customersmigrates to:
Sage 200 SalesLedger
More Information
Customer recordcustom fields
(Configuration >Custom Fields )
Sales ledgeranalysis codes
(ASM > Settings >Maintain AnalysisCodes)
(Sales Account >Trading)
Each custom field label becomes ananalysis code in Sage 200. Each customfield specified in the customer andsupplier accounts becomes an analysiscode value.
The analysis codes are assigned to thecustomer and supplier accounts.
See Customer and supplier records onpage 30.
Transactions Transactions /opening balance
If you do not choose to migrate salesledger transactions, an opening balanceis created for each customer account InSage 200.
Dispute reasons
(Configuration >Dispute Reasons)
No Sage 200 equivalent. No detailsmigrated.
Disputedtransactions
Transactionsmarked with querycode D.
Recurringtransactions
No Sage 200 equivalent. No detailsmigrated.
Credit charges
(Configuration >Terms > CustomerFinance Rates)
Not migrated.
Finance charges are set per customeraccount in Sage 200.
This defaults to No charge when the datais migrated.
(SL Settings > Processing)
(Sales account > Credit terms)
Diary events No Sage 200 equivalent. No detailsmigrated.
126

Appendix A: Summaries
Sage 50Customersmigrates to:
Sage 200 SalesLedger
More Information
Credit bureaus
(Internet resources> Credit info)
Credit information
ASM > CreditInformation
Customer Account> Credit
Couriers
(InternetResources >Couriers)
No Sage 200 equivalent. No detailsmigrated.
127

Guide to Migrating Data Sage 50 to Sage 200
Summary: SuppliersSage 50Suppliersmigrates to:
Sage 200Purchase Ledger
More Information
Ageing periods
(Supplier Defaults> Ageing)
Ageing periods
(Purchase LedgerSettings > Ageing)
Supplier records Supplier accounts See Customer and supplier records onpage 30.
Supplier bankdetails
Supplier > Bank
Supplier bankdetails
Supplier > Bank
Bank Sort Code must only contain sixnumbers or six numbers and hyphens.
Supplier addressesand contacts
(Supplier record >Details)
Supplier contacts
(Supplier Account> Contacts)
Additional supplier addresses are notmigrated.
Communications
(Supplier record >Communications)
No Sage 200 equivalent. No detailsmigrated.
Supplier recordcustom fields
(Configuration >Custom Fields)
Purchase ledgeranalysis codes
(ASM > Settings >Maintain AnalysisCodes)
(Purchase Account> Trading)
Transactions Transactions /opening balance
If you choose not to migrate PurchaseLedger transactions, an opening balancetransactions is created for each supplieraccount in Sage 200.
Dispute reasons No Sage 200 equivalent. No detailsmigrated.
128

Appendix A: Summaries
Sage 50Suppliersmigrates to:
Sage 200Purchase Ledger
More Information
Disputedtransactions
Transactionsmarked with querycode D.
Recurringtransactions
No Sage 200 equivalent. No detailsmigrated.
Diary events No Sage 200 equivalent. No detailsmigrated.
Credit bureaus
(Internet resources> Credit info)
Credit information
(ASM > CreditInformation)
(Supplier Account> Credit)
Couriers
(InternetResources >Courier)
No Sage 200 equivalent. No detailsmigrated.
129

Guide to Migrating Data Sage 50 to Sage 200
Summary: Prices and DiscountsIn the Migration tool, you choose whether to create Price bands or Stock ItemDiscounts in Sage 200. The following table shows how your Sage 50 selling prices anddiscounts migrate for each option.
Sage 50 selling pricesand discounts migrateto:
Sage 200 Price Book
Price bands Discount groups
Product record sales price
(Product record > Price)
Standard price band
(PB > Price bands >Standard)
See Migrating price listsas price bands on page 38.
Standard price band
(PB > Price bands >Standard)
See Migrating price lists asstock item discounts onpage 43.
Customer Price lists (allcurrencies)
Price bands
(PB > Price bands >Standard)
See Price lists on page 38.
Customer discount groupsand stock item discounts
(PB > Discounts >Discounts for stock item)
(PB > Discount Groups >Customer Discount Groups)
See Price lists on page 43.
Mark up cost prices
(Price list > Calculationmethod)
Standard sales price
Sage 200 has noequivalent. Mark up costprices are not migrated.
(PB > Price bands >Standard)
See Price lists on page 38.
Standard sales price
Sage 200 has noequivalent. Mark up costprices are not migrated.
(PB > Price bands >Standard)
See Price lists on page 43.
130

Appendix A: Summaries
Sage 50 selling pricesand discounts migrateto:
Sage 200 Price Book
Price bands Discount groups
Special customer prices
(Product record > Details> Pricing structure >Special Customer Price)
Customer discount groupsand stock item discounts
(PB > Discounts >Discounts for stock item)
(PB > Discount Groups >Customer DiscountGroups)
See Special customerprices on page 40.
Customer discount groupsand stock item discounts
(PB > Discounts >Discounts for stock item)
(PB > Discount Groups >Customer Discount Groups)
See Special customerprices on page 45.
Supplier price list
(Product record > Details> Pricing structure>Supplier Price List)
Not migrated
See Supplier details onpage 54.
Not migrated
See Supplier details onpage 54.
Invoice Value Discount
(Customer record >Defaults > AdditionalDiscount)
Standard Order ValueDiscount Band
(PB > Discounts > OrderValue Discounts)
See Pricing anddiscounting on page 36.
Standard Order ValueDiscount Band
PB > Discounts > OrderValue Discounts)
SeeInvoice value discountson page 42.
Discount %
(Customer record >Defaults > Discount %)
Invoice discount
(SL > Sales Account >Documents > InvoiceDiscount)
See Customer Discount %on page 47.
Invoice discount
(SL > Sales Account >Documents > InvoiceDiscount)
See Customer Discount %on page 47.
Quantity break discounts
(Product record >Discount)
Not migrated
See Quantity breakdiscounts on page 42.
Not migrated
See Quantity breakdiscounts on page 47.
131

Guide to Migrating Data Sage 50 to Sage 200
Summary: ProductsSage 50 Productsmigrates to:
Sage 200 StockControl
More Information
Product categories
(Configuration >Products)
Product groups
(Stock Maintenance> Product Groups)
Sage 200 product groups can only containproducts of one type. Only products onthe same type can be in each 50 productcategory.
See Product Categories on page 49.
You can choose to make all stock items ina specified Sage 50 category traceable inSage 200. Only the stock items that youwant to make traceable can be in thespecified Sage 50 categories.
See Stock traceability on page 50.
Locations
(Product record >Details)
Locations
(Stock Records >Stock Locations)
(Stock Records >Stock Item >Locations)
You can choose to create a warehouse foreach Sage 50 location, or create a singlewarehouse with a bin for each Sage 50location.
See Product locations on page 51.
Product customfields
(Configuration >Product CustomFields)
In Sage 200, analysis codes are linked tostock transactions and not productrecords. The Sage 50 product customfields are not migrated.
See Product records on page 53.
Product records Stock item records See Product records on page 53.
BOM
(Product Record >BOM)
Sage 200 BOMrecord
(BOM > Bill ofMaterials Record)
A Sage 200 BOM record is created forevery Sage 50 product with components.
See How Bill of Materials data migrateson page 77.
Quantity breakdiscounts
(Product Record >Discounts)
These are not migrated as customers canonly be linked to one discount group inSage 200.
See Pricing and discounting on page 36.
132

Appendix A: Summaries
Sage 50 Productsmigrates to:
Sage 200 StockControl
More Information
Stock transactions Stock transactions You can choose not to migratetransactions in the Migration tool.
See Stock Transactions on page 52.
Damaged stocktransactions
No Sage 200 equivalent. No detailsmigrated.
Allocations Allocations The Sage 200 stock history only showsstock as allocated when order isdespatched.
Stock is not allocated to quotations.
See Stock Allocations on page 57.
133

Guide to Migrating Data Sage 50 to Sage 200
Summary: Sales Order ProcessingSage 50 SalesOrder Processingmigrates to:
Sage 200 SalesOrder Processing
More information
Sales Orders,Invoices and CreditNotes
Sales Orders andReturns
All unprocessed sales orders aremigrated.
You can choose to migrate completedsales orders and/or part-despatchedsales orders.
See Sales Orders on page 59 andInvoices and Credit Notes on page 60.
Sage 50 and Sage 200 process the VATon sales orders and invoices differently.There may be occasions when the totalorder values for your Live sales ordersare different after the data has migrated.See Run Balance Ledgers in Sage 200 onpage 108.
Invoices linked tosales orders
Completed salesorders
Invoices linked to sales orders must beposted prior to migration.
Invoices with lines that are not on thelinked sales order, cannot be migrated.Both the invoice and the linked salesorder must be deleted prior to migration.
See Sales orders with 'invoiced only'lines on page 62
134

Appendix A: Summaries
Sage 50 SalesOrder Processingmigrates to:
Sage 200 SalesOrder Processing
More information
Quotations and proformas
Quotations and proformas
Sage 50 and Sage 200 process the VATon sales orders and invoices differently.When quotations and pro formas, enteredin Sage 50, are converted to sales ordersin Sage 200, the VAT is re-calculatedaccording to the Sage 200 VAT rules. Thismay result in differences between thevalue of the quotation or pro forma andthe converted sales order.
See Run Balance Ledgers in Sage 200 onpage 108.
You cannot allocate stock to quotations inSage 200. Stock is unallocated, and freestock levels adjusted, when the data ismigrated. See Quotations and pro formason page 69.
Product order lines Standard item lines
Comment lines Comment lines
Lines using Serviceand Non-stockitems
Standard item lines These are automatically set toConfirmation with Goods Despatched.
Lines using S1, S2,S3 product codes
Free text lines These are automatically set toConfirmation with Goods Despatched.
Message lines - Mproduct code
Comment lines
VAT only orderlines
These cannot be migrated.
You must either complete the relevantsales order, invoice or credit note ordelete the VAT only order line.
See Sage 50 pre-migration tasks on page81.
135

Guide to Migrating Data Sage 50 to Sage 200
Sage 50 SalesOrder Processingmigrates to:
Sage 200 SalesOrder Processing
More information
Carriage charges
(Sales Order >Footer Details)
Additional chargelines
Additional charge code CAR_1 alsocreated in Sage 200.
(SOP > SOP Maintenance > AdditionalCharges)
Payment Details
(Sales Order >Footer Details)
Payment withOrder
( Sales Order >Payment with orderDetails)
Sales orders and invoices marked as PostPayment on account must be fullycompleted and posted before migratingthe data.
Sales orders and invoices marked asPayment already received are migratedwith the payments details on the salesorder.
Invoices marked Allocate Payments toInvoice are migrated with the paymentdetails on the sales order.
Consign No
Courier
(Sales Order >Footer Details)
No Sage 200 equivalent. No detailsmigrated.
Cancelledorders/quotes/proformas
These are not migrated to Sage 200.
On Holdorders/quotes/proformas
On Holdorders/quotes/proformas
If these are no longer required, deletethem prior to migration.
Lost and expiredquotes
Live quotes If these are no longer required, deletethem prior to migration.
136

Appendix A: Summaries
Summary: Purchase Order ProcessingSage 50Purchase OrderProcessingmigrates to:
Sage 200Purchase OrderProcessing
More information
Purchase Orders Purchase Orders You can choose whether to migratepurchase orders in the Migration tool.
See Purchase orders on page 72.
Sage 50 and Sage 200 process salesorders and invoices differently. Theremay be occasions when the total ordervalues for your Live sales orders aredifferent after the data has migrated.See Run Balance Ledgers in Sage 200 onpage 108.
Product order lines Standard item lines
Comment lines Comment lines
Message lines - Mproduct code
Comment lines
Lines using Serviceand Non-stockitems
Standard item lines These are automatically set toConfirmation with Goods Received.
Lines using S1, S2,S3 product codes
Free text lines These are automatically set toConfirmation with Goods Received.
VAT only orderlines
These cannot be migrated to Sage 200.
You must either delete the VAT onlyorder lines or complete the purchaseorders before you migrate the data.
See Sage 50 pre-migration tasks on page81.
Carriage charges
(Purchase Order >Footer Details)
Additional chargelines
Additional charge code CAR_1 alsocreated in Sage 200.
(POP > POP Maintenance > AdditionalCharges)
See Purchase orders on page 72.
137

Guide to Migrating Data Sage 50 to Sage 200
Sage 50Purchase OrderProcessingmigrates to:
Sage 200Purchase OrderProcessing
More information
Deliveries
(Purchase Order >Deliveries)
Goods received notes are not migrated
Consign No
Courier
(Purchase Order >Footer Details)
No Sage 200 equivalent. No detailsmigrated.
Cancelled purchaseorders.
These are not migrated to Sage 200.
138

Appendix A: Summaries
Summary: Bill of MaterialsSage 50 BOMdetails migratesto:
Sage 200 BOM More information
BOM details
(Product Record >BOM)
Bill of Materialsrecord
(Bill of Materials >Records)
A BOM record is created for every Sage50 product that has components listed onthe BOM tab of the product record.
See How Bill of Materials data migrateson page 77.
Non-stock itemslisted as BOMcomponents
Comments on BOMrecord
A Sage 200 BOM can only contain stockitems.
Service items listedas BOMComponents
Comments on BOMrecord
A Sage 200 BOM can only contain stockitems.
139

140

Appendix B: ChecklistsThis section contains printable checklists for you to specify your migrationinformation.
The checklists are:
n Sage 50 pre migration checklist on page 142
n Sage 200 pre migration checklist on page 145
n Migration options checklist on page 146
n Post migration checklist on page 149
141
6

Guide to Migrating Data Sage 50 to Sage 200
Sage 50 pre migration checklistYou must complete the following before migrating your Sage 50 data. For moreinformation, see Sage 50 pre-migration tasks on page 81.
Maintenance tasksCorrect any Previous Year Adj if found in the 'Capital and Reserves' section ofthe balance sheet.
All nominal accounts are included on your chart of accounts.
Your default bank account in Sage 50 is in the same currency as the basecurrency for Sage 200.
If you are not migrating your bank transactions, all your bank accounts arefully reconciled in Sage 50.
Print any outstanding cheques.
All Transaction email transactions have been converted in your Sage 50 data.
Transaction email transactions are not migrated to Sage 200.
Note: Transaction e-mail is not available in Sage 200.
Delete any expired or lost quotations that you do not require.
If you want to use VAT inclusive pricing in Sage 200, complete all sales ordersand invoices.
Recalculate Prices for all foreign currency price lists.
To help check your migrated data, print the following Sage 50 reports:
Trial Balance.
Draft VAT return.
Aged Debtors.
Aged Creditors.
Sales Order Status.
Product Listing (from the products window).
Purchase Order Status.
Back up your Sage 50 data.
Run the Check data process.
Re-index and compress the Sage 50 database.
Back up your Sage 50 database again.
Pre-migration tasksThese are checked by the Migration tool. Details of the affected data is displayedwhen you validate your migration settings.
142

Appendix B: Checklists
The default bank account is in base currency.
The bank sort code in all bank records and supplier accounts only contain sixnumbers.
Your company VAT registration number is no longer than 12 characters.
All product categories that contain products have a category Name as well as anumber.
All products that will become traceable in Sage 200 are in the correct productcategories in Sage 50. The product categories must:
Have a number and name.
Only contain stock items.
Only contain products that you want to become traceable in Sage 200.
Only contain products with a stock level that is zero or above.
Each product item that will use serial numbers:
Has a stock level that is a whole number.
Does not have outstanding sales order lines , invoice lines or purchaseorder lines that contain fractional quantities.
Does not have stock allocated in a fractional quantity.
If you have chosen not to generate despatch notes in Sage 50, post all salesorders and invoices.
Post all invoices linked to sales orders.
Post all live invoices and sales orders that have been paid by a foreign bank.
Post all sales orders and invoices with payments that have been marked Post asPayment On Account.
Post or delete all sales orders, invoices and credit notes that have VAT onlyorder lines.
Post or delete all purchase orders that have VAT only order lines.
Delete all sales orders and linked invoices where the invoice contains lines thatare not on a sales order.
For all purchase orders and sales orders linked to a deleted stock item, either:
Delete all relevant purchase orders and sales orders.
Recreate the stock item.
For all sales orders linked to a deleted customer record, either:
Delete all relevant sales orders.
Recreate the customer record.
143
Guide to Migrating Data Sage 50 to Sage 200
For all purchase orders linked to a deleted supplier account, either:
Delete all relevant purchase orders.
Recreate the supplier record.
Re-name any duplicated customer address descriptions in your customerrecords.
Back up your Sage 50 database again.
Optional tasksChoose how to deal with data in listed in the Warnings section. Choose to:
Process and post the orders and invoices in Sage 50.
Update the VAT on the affected order lines in Sage 50.
Convert quotation and pro formas to sales orders in Sage 50.
Delete the quotations and pro formas.
Continue with the Migration to Sage 200. The VAT will be updated when theitems are processed in Sage 200 and when Balance Ledgers is run.
144

Appendix B: Checklists
Sage 200 pre migration checklistYou must set following in the Sage 200 database before you migrate the data.
Set the Financial Year to match the financial year in the Sage 50 data.
Do not set the accounting periods in Sage 200. You must set these after thedata has migrated.
Select the Sales Order Processing settings > Order Processing >Update stockquantities setting:
If you want to migrate part-despatched sales orders, youmust selectUpdate stock quantities when Order despatch is confirmed.
If you want to update stock levels when invoices are posted in Sage 200,and you do not want to migrate part-despatched sales orders, selectUpdate stock quantities when Invoice is posted.
See How Sales Order Processing and Invoicing data migrates on page 59.
Select the Sales Order Processing settings > Order Processing > Order pricing.
If you want to use VAT inclusive pricing in Sage 200, select Order pricesinclude tax.
Note: You cannot change this setting after you have migrated the data.
Note:
See Sage 50 pre-migration tasks on page 81.
If you want to generate Intrastat entries in Sage 200, select the settings:
SOP Settings > Intrastat > Generate Intrastat for sales orders.
SOP Settings > Intrastat > Include entries based on Despatch/receipt date.
POP Settings > Printing > Generate Intrastat for purchase orders.
POP Settings > Printing > Include entries based on Receipt/return date.
If applicable, also enter you default terms of delivery for both sales andpurchase Orders.
145

Guide to Migrating Data Sage 50 to Sage 200
Migration options checklistUse this checklist to note the options you require in the Migration tool.
Data to migrateCommercials
Bill of Materials
Financials 1
Transactions
Sales Ledger Transactions
Purchase Ledger Transactions
Cash Book Transactions
Cost Centres/Departments
Create departments from Sage 50 departments but do not link to nominalaccounts
Create nominal accounts and cost centres from Sage 50 departments
Create Nominal accounts and departments from Sage 50 departments
Link Sage 200 cost centres or departments to Profit and Loss nominal accountsonly.
Financials 2
Nominal accounts
Bank Charges nominalaccount
...................................
Exchange differencenominal account
...................................
VAT Return
Date last VAT returnproduced:
...................................
Date next VAT returndue:
...................................
Prepayments and accruals
Migrate Sage 50 prepayments
Migrate Sage 50 Accruals
146
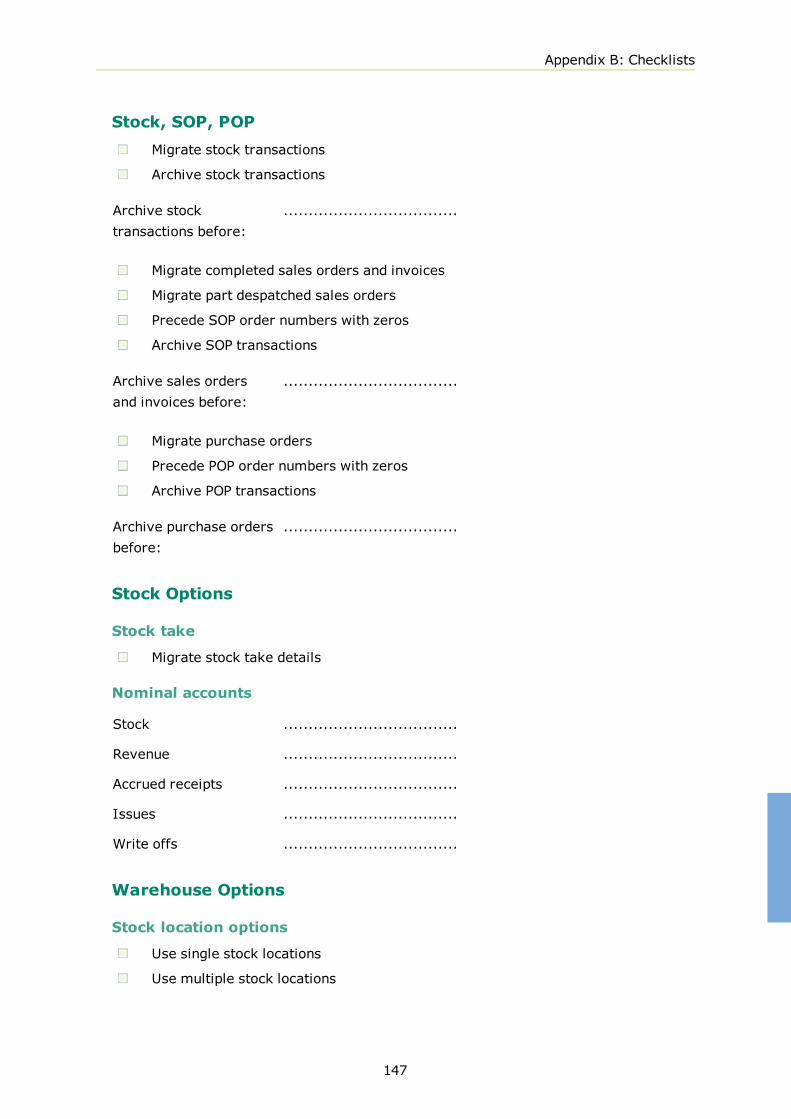
Appendix B: Checklists
Stock, SOP, POPMigrate stock transactions
Archive stock transactions
Archive stocktransactions before:
...................................
Migrate completed sales orders and invoices
Migrate part despatched sales orders
Precede SOP order numbers with zeros
Archive SOP transactions
Archive sales ordersand invoices before:
...................................
Migrate purchase orders
Precede POP order numbers with zeros
Archive POP transactions
Archive purchase ordersbefore:
...................................
Stock Options
Stock take
Migrate stock take details
Nominal accounts
Stock ...................................
Revenue ...................................
Accrued receipts ...................................
Issues ...................................
Write offs ...................................
Warehouse Options
Stock location options
Use single stock locations
Use multiple stock locations
147
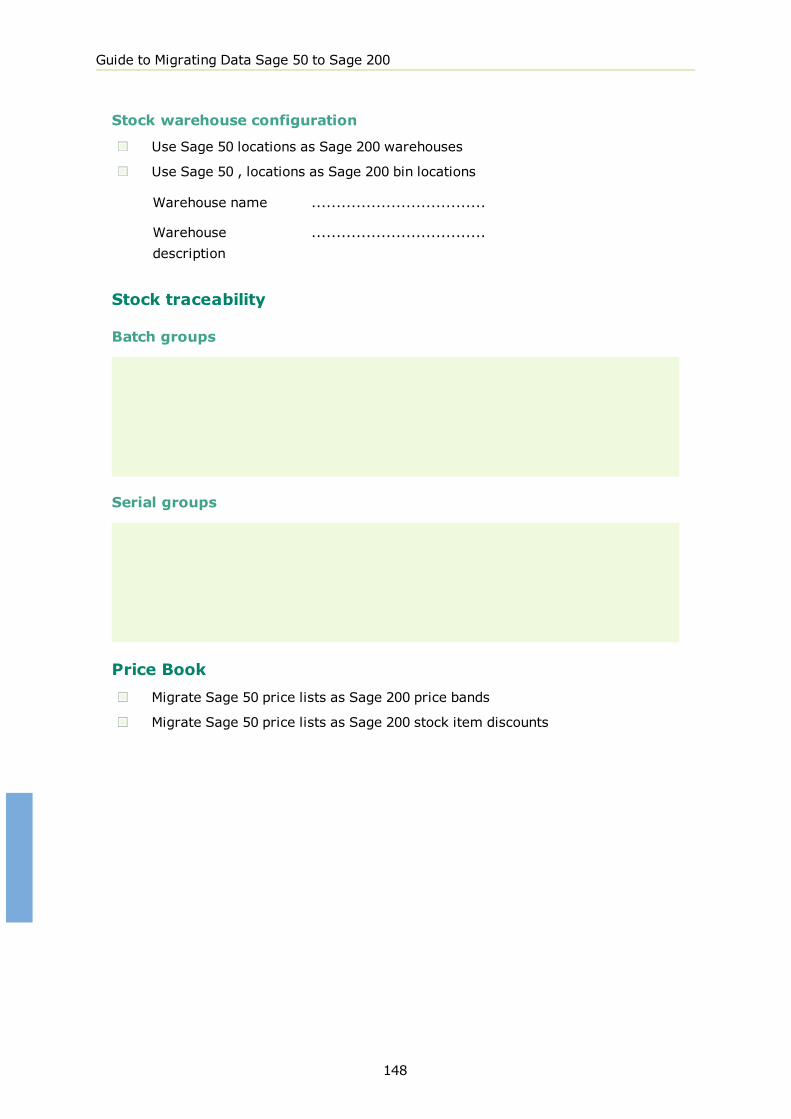
Guide to Migrating Data Sage 50 to Sage 200
Stock warehouse configuration
Use Sage 50 locations as Sage 200 warehouses
Use Sage 50 , locations as Sage 200 bin locations
Warehouse name ...................................
Warehousedescription
...................................
Stock traceability
Batch groups
Serial groups
Price BookMigrate Sage 50 price lists as Sage 200 price bands
Migrate Sage 50 price lists as Sage 200 stock item discounts
148
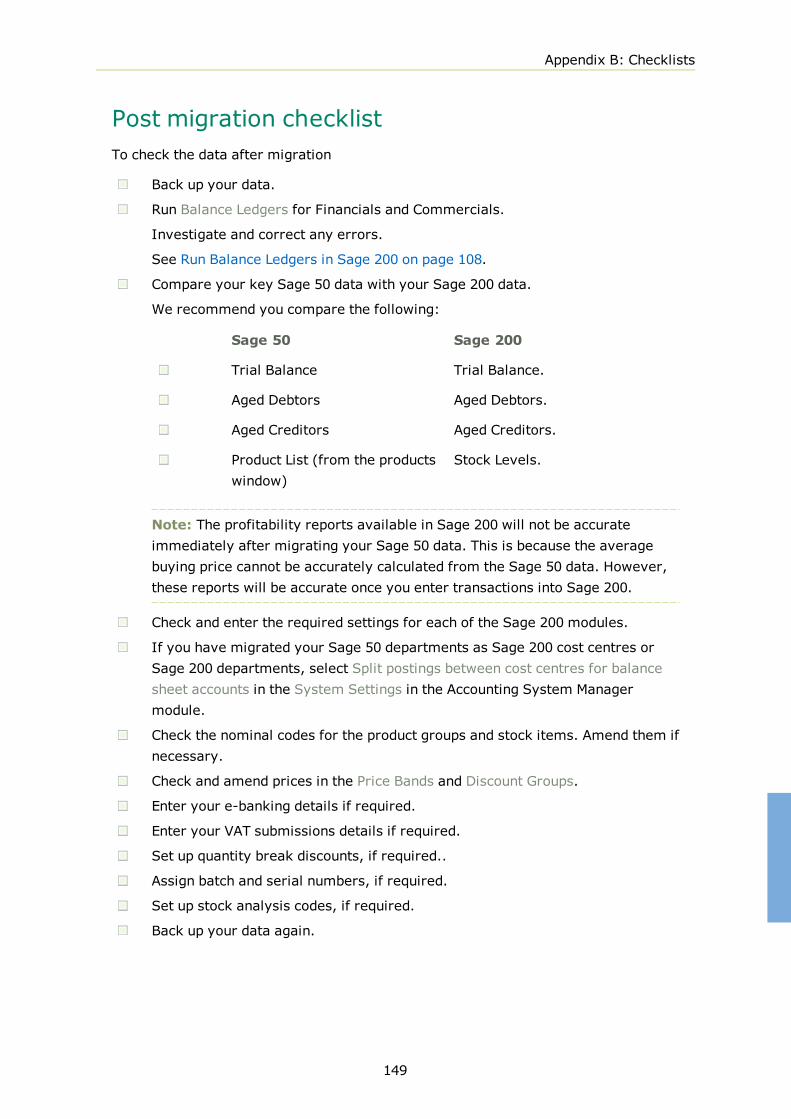
Appendix B: Checklists
Post migration checklistTo check the data after migration
Back up your data.
Run Balance Ledgers for Financials and Commercials.
Investigate and correct any errors.
See Run Balance Ledgers in Sage 200 on page 108.
Compare your key Sage 50 data with your Sage 200 data.
We recommend you compare the following:
Sage 50 Sage 200
Trial Balance Trial Balance.
Aged Debtors Aged Debtors.
Aged Creditors Aged Creditors.
Product List (from the productswindow)
Stock Levels.
Note: The profitability reports available in Sage 200 will not be accurateimmediately after migrating your Sage 50 data. This is because the averagebuying price cannot be accurately calculated from the Sage 50 data. However,these reports will be accurate once you enter transactions into Sage 200.
Check and enter the required settings for each of the Sage 200 modules.
If you have migrated your Sage 50 departments as Sage 200 cost centres orSage 200 departments, select Split postings between cost centres for balancesheet accounts in the System Settings in the Accounting System Managermodule.
Check the nominal codes for the product groups and stock items. Amend them ifnecessary.
Check and amend prices in the Price Bands and Discount Groups.
Enter your e-banking details if required.
Enter your VAT submissions details if required.
Set up quantity break discounts, if required..
Assign batch and serial numbers, if required.
Set up stock analysis codes, if required.
Back up your data again.
149

150

Appendix C - Comparison with previous MigrationtoolPrior to Sage 200 v2011, the Sage 200 Data Migration tool was used to migrate datafrom Sage 50 to Sage 200.
The new Sage 50 to Sage 200 Data Migration tool has been designed to improve theway in which data is migrated from Sage 50 to Sage 200. There are a number ofsignificant differences in how the data is migrated using the Sage 50 to Sage 200 DataMigration tool.
This section provides a comparison between the two tools. It is designed to helpbusiness partners use the new Sage 50 to Sage 200 Data Migration tool to migratecustomer data from Sage 50 v2010 and v2011 to Sage 200 v2010 and v2011.
Note: Use the Sage 200 Data Migration tool to migrate data to Sage 200 from thefollowing: Sage 50 Manufacturing, Sage 200 BOM, Sage Line 100 and Sage MMS. Formore information about the Sage 200 Data Migration tool, see the Data MigrationGuide. These can be found on the support area of the Sage website.
151
7

Guide to Migrating Data Sage 50 to Sage 200
Comparison: Sage 200 Data Migration tool andSage 50 to Sage 200 Data Migration tool
Sage 200 Data MigrationTool (legacy)
Sage 50 to Sage 200 DataMigration Tool (new)
Migrationprocess
A Sage 200 database is createdby the Migration tool.
Settings are entered in the tooland used to create the Sage 200database.
A Sage 200 database must becreated before using theMigration tool. The tool links tothis database.
Some settings must be enteredin the Sage 200 database beforeusing the Migration tool.
Company / Nominal Ledger
Accountingperiods
All periods prior to the currentfinancial year must be closed.
Financial year and periods arespecified in the Migration tool.
The financial year is set whenSage 200 database is created.This must match the financialyear set in Sage 50.
Accounting periods must be setafter the data has migrated.
Clear Audittrail
Required to clear the audit trailup to the end of the previousfinancial year.
Not required to clear the audittrail.
Prepayments Not migrated Migrated
Accruals Not migrated Migrated
VATtransactions
Not migrated
VAT return must be reconciled.
Un- reconciled transactionsmigrated.
Not required to reconcile VATreturn.
152

Appendix C - Comparison with previous Migration tool
Sage 200 Data MigrationTool (legacy)
Sage 50 to Sage 200 DataMigration Tool (new)
Departments Department specifications fortransactions are not migrated.
All transactions are migrated toa single corresponding nominalaccount in Sage 200.
Department specifications fortransaction are migrated.
Choose to create nominalaccounts in Sage 200 with linkedcost centres or with linkeddepartments, in the Migrationtool.
If you have chosen to createSage 200 cost centres or Sage200 departments, alltransactions posted to adepartment in Sage 50 areposted to the correspondingnominal account and cost centreor nominal account anddepartment in Sage 200.
Future yeartransactions
Migrated as current yeartransactions.
Migrated to the deferred postingfile for the correct period.
Currencies Have to specify which currencyis the Euro.
Have to make sure each Sage 50currency has a valid ISO code.
Only currencies with anexchange rate are migrated.
If Sage 50 does not have a Eurocurrency one is created by theMigration tool.
Bank
Recurringtransactions
Not migrated Migrated as standing orders anddirect debits.
Customers and suppliers
Terms ofbusiness
Set in the Migration tool Set to Sage 200 default ofDocument Date. This can bechanged after migration.
Memos Not migrated Migrated
Sales Order Processing and Invoicing
Sales Orders Must be fully open or fullycompleted.
Can choose to migrate part-despatched sales orders.
153

Guide to Migrating Data Sage 50 to Sage 200
Sage 200 Data MigrationTool (legacy)
Sage 50 to Sage 200 DataMigration Tool (new)
Invoices Must be completed. Only invoices linked to salesorders must be completed.
Invoices linkedto sales orders
Must be deleted prior tomigration.
Migrated and linked to relevantsales orders.
These must be posted beforemigrating the data.
Update stockwhen ordersdespatched orinvoicesposted.
Choose in the Migration tool Set in Sage 200 before the datais migrated.
If you want to migrate part-despatched sales orders youmust select Update stock whenorders despatched.
If you want to update stocklevels when invoices are posted,you cannot migrate part-despatched sales orders.
Tax inclusive/exclusiveprices
Choose which to use in theMigration tool.
Set in Sage 200 before the datais migrated.
If you choose to use VATinclusive pricing, all sales ordersand invoices must be posted inSage 50 prior to migrating.
Products
Multiplelocations
If you want to use multiplelocations, a single warehouse iscreated with Sage 50 locationsas bins.
If you want to use multiplelocations, you can choose to:
n Create a single warehousewith Sage 50 locations asbins.
n Create a warehouse foreach Sage 50 location.
Price Lists
154

Appendix C - Comparison with previous Migration tool
Sage 200 Data MigrationTool (legacy)
Sage 50 to Sage 200 DataMigration Tool (new)
Price lists Price lists are migrated ascustomer discount groups linkedto stock item discounts.
You can choose to:
n Migrate as price lists asprice bands.
If selected a price band iscreated for each Sage 50price list and linked to therelevant customers.
n Migrate price lists as stockitem discounts.
If selected a customerdiscount group is createdfor each Sage 50 price listand linked to a stock itemdiscount.
Foreigncurrency pricelists
Migrated as base currency Migrated in the relevantcurrency.
To make sure the correctexchange rate is used tocalculate foreign currencyprices, you must RecalculatePrices in Sage 50 before youmigrate the data.
155

156

Index
AAccount Status 31
Accountant Details 12
Accruals 11, 96
Additional Charges 67, 75
Aged Creditors Report 83, 142
Aged Debtors Report 83, 142
Analysis Codes
sales and purchase ledger 31
stock 54
Archive
Credit Notes 70, 98
Invoices 70, 98
purchase orders 76, 99
sales orders 70, 98
Audit Trail 11
BBalance Ledgers 87, 149
Bank 26
cheque list 29
default bank account 26
e-banking 26
reconciliation 28
recurring bank transactions 29
statement balances 28
transactions 26
Bank Charges Nominal Account 96
Batch numbers 50, 103
Bill of Materials 77
BOM record 77
non stock items 77
service items 77
Bin 51
CCalc Net 110
Cancelled Orders
purchase orders 75
quotation and pro formas 82, 142
sales orders 68
Carriage Charges 67, 75
settlement discount 111
Cash Book 26
Cash Book Transactions 94
Category 6
Chart of Accounts 6, 82, 142
Check Data 83, 142
Checklist
after migration 107
Sage 200 database 88
Sage 50 database 81
Cheque List 29
Commercials Data 97
Compress data 83
Connecting
Sage 200 database 91
Sage 50 database 91

Guide to Migrating Data Sage 50 to Sage 200
Consignment numbers 69, 76
Contact Addresses 30
Cost Centres 13
Costing Methods 53-54
Countries 12
Courier 69, 76
Credit Notes 59-60
archive 70
document numbers 64
migrate 60, 97
Customers 30
account status 31
bank details 32
communication details 32
contact addresses 30
custom fields 31
deleted records 63, 86
diary events 32
finance charges 34
segmented addresses 31
transactions 32
DDefault Bank Account 26, 82, 142
Default Nominal Accounts 7
Departments 13
Discount Groups 40, 45, 149
Discounts
invoice value 42, 47
percentage 42, 47
quantity break 42, 47, 55
Document Numbers 64
Draft Bank Reconcilation 28
Ee-Banking 26
Errors 105
Exchange Differences Nominal Account 28,96
FFIFO 54
Finance Charges 34
Financial Year 88
Financials Settings 94, 96
accruals 96
cost centres and departments 95
nominal accounts 96
prepayments 96
transactions 94
VAT return 96
Fixed Assets 12
Foreign Currency 11
price lists 82, 142
Future Transactions 9
GGlobal Nominal Account 69
Goods Received Notes 76

Index
IInternal Areas 57
Intrastat 11
Invoices
archive 70
carriage charges 67
comments 66
consignment number 69
courier 69
document numbers 64
global nominal account 69
message lines 67
migrate 60, 97
notes 69
payment with order 62
posted 61
S1,S2,S3 67
un-posted 61
VAT differerences 109
MMessages 105
Migrate Data 104
Migration Progress
errors 105
rmessages 105
row counts 105
warnings 105
Migration Settings
connections 91
data to convert 93
financials 94, 96
stock options 100
stock traceability 103
stock, SOP, POP 97
warehouse options 102
Migration Tool
running 90
NNominal Accounts 7
bank 82, 142
bank charges 28, 96
budgets 24
advanced in depth 25
advanced nominal code 24
advanced overview 25
standard 25
default 7
departments 13
exchange differences 28, 96
stock 56
stock accrued receipts 56
stock issues 56
stock revenue 56
stock write offs 57
Nominal Ledger 6, 13
accounting periods 6

Guide to Migrating Data Sage 50 to Sage 200
accruals 11
audit trail 11
category 6
chart of accounts 6, 82, 142
company address 6
cost centres 13
countries 12
currencies 11
departments 13
fixed assets 12
intrastat 11
nominal accounts 7
prepayments 11
report category 6, 82, 142
settings 94
transactions 8
VAT 9
Notes 69, 76
PPayment With Order 62
Preparing
Sage 200 database 88
Sage 50 database 81
Prepayments 11, 96
Price Bands 149
Price Book 36
price bands 38
stock item discounts 43
Price Lists 38, 43
foreign currency 82, 142
special cusomer prices 40, 45
supplier 48
Pro Formas 69
stock allocation 70
Product Categories 49-50
Product Groups 49-50
Product List 83, 142
Products 49
batch and serial numbers 50
bill of materials 77
categories 49
costing methods 53-54
custom fields 54
damaged stock 53
discounts 55
internal areas 57
locations 51
nominal accounts 56
product groups 49
records 53
S1,S2,S3,M 54
settings 97
stock item balances 57
stock take 55
supplier details 54
traceability 85
traceable items 50
transactions 52, 97

Index
unit of sale 55
write offs 57
Purchase Ledger 30
account status 31
accounts 30
analysis codes 31
contact addresses 30
recurring invoices 34
settings 94
transactions 32
Purchase Order Processing 72
settings 97
Purchase Order Status Report 83,142
Purchase Orders 72
archive 76
Calc net 110
cancelled 75
carriage charges 75
comments 74
consignment numbers 76
courier 76
document numbers 73
goods received notes 76
message lines 75
migrate 99
notes 76
S1,S2,S3 74
QQuotations 69
cancelled 82, 142
lost 82, 142
on hold 82, 142
stock allocation 57, 70
RRe-index data 83
Recalculate Prices 82, 142
Recurring Bank Transactions 29
suspended 29
Recurring Invoices 34
Report Categoory 6
Reports
aged creditors 83, 142
aged debtors 83, 142
product list 83, 142
purchase order status 83, 142
sales order status 83, 142
trial balance 83, 142
Returns 59
document numbers 64
Row counts 105
SSales Ledger 30
account status 31
accounts 30

Guide to Migrating Data Sage 50 to Sage 200
analysis codes 31
contact addresses 30
finance charges 34
recurring invoices 34
settings 94
transactions 94
Sales Order Processing 59
settings 97
Sales Order Profit 68
Sales Order Status Report 83, 142
Sales Orders 59
archive 70
Calc net 110
cancelled orders 68
carriage charges 67
comments 66
completed 59, 61, 97
consignment number 69
courier 69
despatches and receipts 70
document numbers 64
free text lines 67
global nominal account 69
message lines 67
migrate 59, 97
notes 69
part-depatched 59, 61
part processed transactions 88, 97
payment with order 62, 85
profit 68
S1,S2,S3 67
settlement discount 111
VAT differences 109
Serial numbers 50, 103
Settlement discount
carriage charges 111
Special Customer Prices 40, 45
Special Product Codes 54, 67, 74
Stock 49
allocations 57
analysis codes 54
batch and serial numbers 50, 103
costing methods 53-54
damaged stock 53
deleted records 63, 72, 86
discounts 55
internal areas 57
item balances 149
locations 51, 102
migrate stocktake details 100
nominal accounts 56
product groups 49
records 53
S1,S2,S3 54
settings 97
stock history 51-52, 57, 97, 133
stock item balances 57
stocktake 55
supplier details 54
traceability 50, 85

Index
traceability settings 103
transactions 52, 97
unit of sale 55
write offs 57
Stock Allocations 57
Stock Item Balances 57
Stock Locations 51
bins 52
warehouses 52
Stock Nominal Accounts 56
Stock Take 55
Stock Traceability Settings 85, 103
Stock Transactions 52
Stocktake Details 100
Supplier Price Lists 48
Suppliers 30
account status 31
accounts 30
bank details 32
communication details 32
contact addresses 30
custom fields 31
deleted accounts 72, 86
diary events 32
segmented addresses 31
transactions 32
TTax Codes 9
Transaction email 82, 142
Transactions
accruals 11, 96
bank 26, 94
completed sales orders 97
customer 32
future 8-9
nominal 8
part processed sales orders 88, 97
prepayments 11, 96
purchase ledger 94
purchase orders 99
sales ledger 94
stock 52, 97
supplier 32
Trial Balance 83, 142
VValidate
migration settings 104
Warnings 104
VAT 9
sales orders 109
submissions 10
transactions 10
VAT rate changes 10, 63, 72, 87,110
VAT Inclusive Pricing 83, 142
VAT Return
date last produced 96
date next due 96
Guide to Migrating Data Sage 50 to Sage 200
tax codes 9
WWarehouse
bin 51
settings 102
Warnings 104-105
Write Offs Nominal Account 57

165