Embed Size (px)
Citation preview

Rules, tapes and squares worksheet
1Copyright © Commonwealth of Learning
Rules, tapes and squaresThis worksheet is about the tools
you use to measure and mark pieces of timber.
Things you need before you start
Materials
You will need some pieces of timber to work with. ❏
Tools or equipment
A ruler, a measuring tape, a try or combination square. ❏A pencil, pen or a marking knife. ❏
What you will learnWhen you have fi nished this worksheet, you should be able to:
❏ Identify and use marking tools
❏ Identify and use measuring tools

Rules, tapes and squares worksheet
2Copyright © Commonwealth of Learning
IntroductionYou need to be able to measure and mark timber accurately so that the fi nished pieces are the correct shape and size and fi t properly.
Good cutting and joining of timber is no use if the measuring and marking are in the wrong place !
Careful marking and cutting can also make good use of the timber and save waste.
There is an old saying of carpenters ;“measure twice — and cut once”. It is good advice.
This worksheet tells you how to use simple tools for measuring and marking.
First, let’s look at measuring tools.
What is a measuring tool?A measuring tool is used to fi nd out
• how long, how short or how wide something is, or
• what angle two pieces of timber meet at.
LengthSimple tools to measure length are rulers and tape measures. They are usually divided in metres, centimetres(cm) and millimetres(mm)
Some places still use the old system of feet and inches.
For long measurements, the easiest tools to use are:
A measuring tape
This is a small tool that can stretch out and spring back to its fi rstposition.
It is easy to carry about and it is fl exible, so it can bend around things.
It can be locked into position, which is helpful when taking measurements.
Useful lengths for construction work are 3 metre(m) tapes and 5m tapes.

Rules, tapes and squares worksheet
3Copyright © Commonwealth of Learning
Most measuring tapes have a tip on the end that can move.
This allows you to make accurate inside and outside measurements.
A rulerThis is a long and thin piece of timber or metal. It is solid (doesnʼt bend) so it is good to use when measuring in straight lines. In some places it is known as a ʻruleʼ.
For construction work a useful length is 500mm to 1000mm (1 metre)
The markings go right to the end of these rules — not like a school The markings go right to the end of these rules — not like a school or drawing ruler where there is an extra bit on the end.or drawing ruler where there is an extra bit on the end.
Inside
Outside

Rules, tapes and squares worksheet
4Copyright © Commonwealth of Learning
To measure a distance longer than the ruler, you need to:
• measure and mark on the timber at the length of the rule
• slide the end of the rule along to your mark, and mark again
• keep doing this until you get to the distance you need
• add up the number of ruler lengths to get your measurement.• add up the number of ruler lengths to get your measurement.
For shorter distances, the easiest tools to use are 200m rulers or the rules that are on the sides of squares.
AnglesAnother type of measurement you have to make is to measure the angle at which timber is joined together. These angles are measured in degees(°).
Simple tools for checking and marking angles are called “squares”.
The most common angle used in construction work with timber is the 90 degree(°). This angle is also known as the ʻright-angleʼ or ʻsquareʼ.
You may also fi nd the 45° angle used for some joints.
Rules, tapes and squares worksheet
5Copyright © Commonwealth of Learning
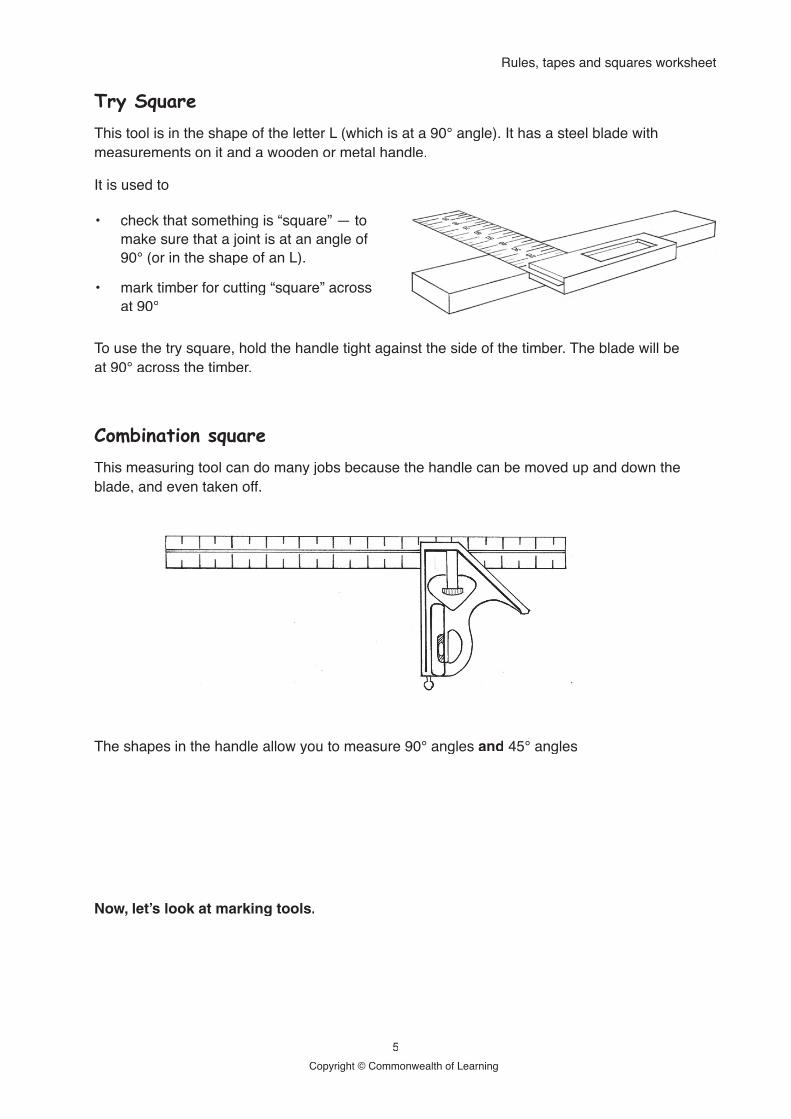
Try SquareThis tool is in the shape of the letter L (which is at a 90° angle). It has a steel blade with measurements on it and a wooden or metal handle.
It is used to
• check that something is “square” — to make sure that a joint is at an angle of 90° (or in the shape of an L).
• mark timber for cutting “square” across at 90°
To use the try square, hold the handle tight against the side of the timber. The blade will be at 90° across the timber.
Combination squareThis measuring tool can do many jobs because the handle can be moved up and down the blade, and even taken off.
The shapes in the handle allow you to measure 90° angles and 45° angles
Now, let’s look at marking tools.
Rules, tapes and squares worksheet
6Copyright © Commonwealth of Learning
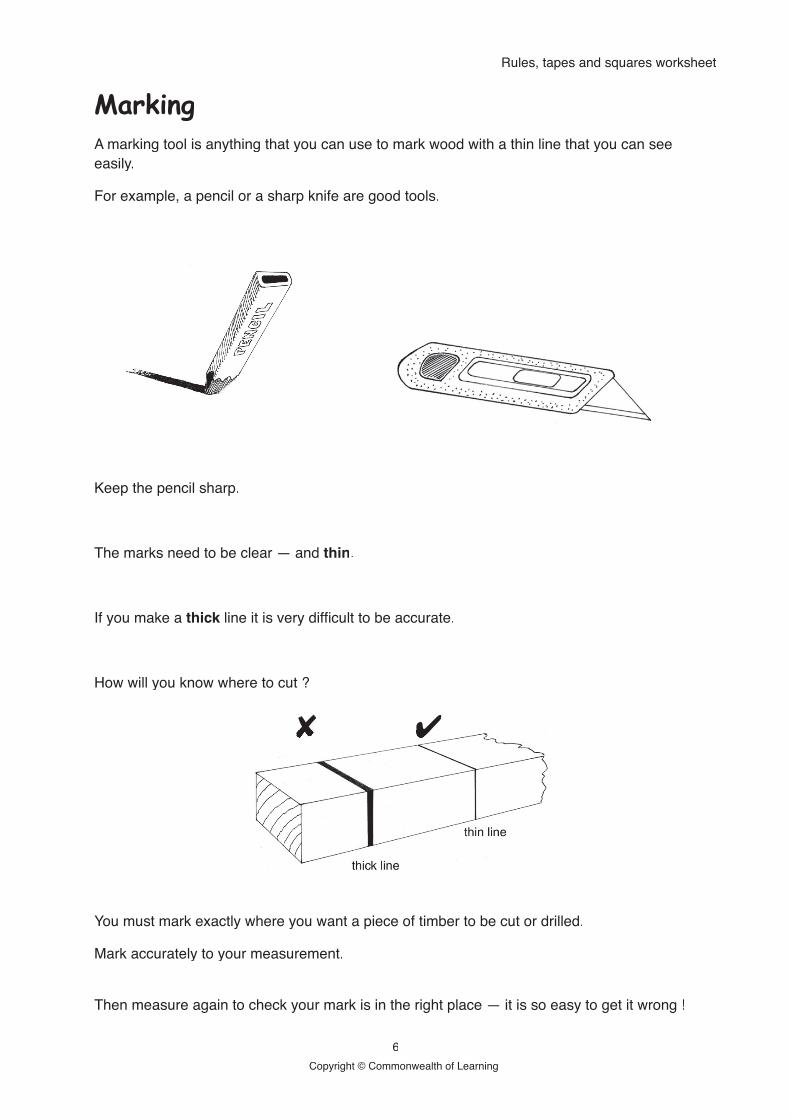
MarkingA marking tool is anything that you can use to mark wood with a thin line that you can see easily.
For example, a pencil or a sharp knife are good tools.
Keep the pencil sharp.
The marks need to be clear — and thin.
If you make a thick line it is very diffi cult to be accurate.thick line it is very diffi cult to be accurate.thick
How will you know where to cut ?
You must mark exactly where you want a piece of timber to be cut or drilled.
Mark accurately to your measurement.
Then measure again to check your mark is in the right place — it is so easy to get it wrong !
✘✘ ✔ ✔

Rules, tapes and squares worksheet
7Copyright © Commonwealth of Learning
When you mark for cutting:
• Draw your mark just on the ʻwasteʼ side of your measurement
• When you cut along the line, it will leave the size you want
• Make lines or scratches on the scrap or waste side of your marks – That way you will be sure which is the piece you want to use.
When you mark a piece of timber for sawing to length, it is good to mark across the top using a square, and then to mark down both sides of the timber with the square as well. This will help you with sawing the timber accurately later.
Mark line on waste sideMark line on waste side
Mark across with the square
Mark down sides Mark down sides
Rules, tapes and squares worksheet
8Copyright © Commonwealth of Learning
Activity
• Measure the length and width of the room you are in. What measure will you use ?
• Measure and mark a piece of timber for sawing square to a length of 800mm.
• Mark a piece of timber to be sawn at a 45 angle and 750mm on its longest edge.
• Measure the width of a doorway (or window frame).
— Then measure and mark a piece of timber to fi t exactly inside the top of the frame.
Rules, tapes and squares worksheet
9Copyright © Commonwealth of Learning
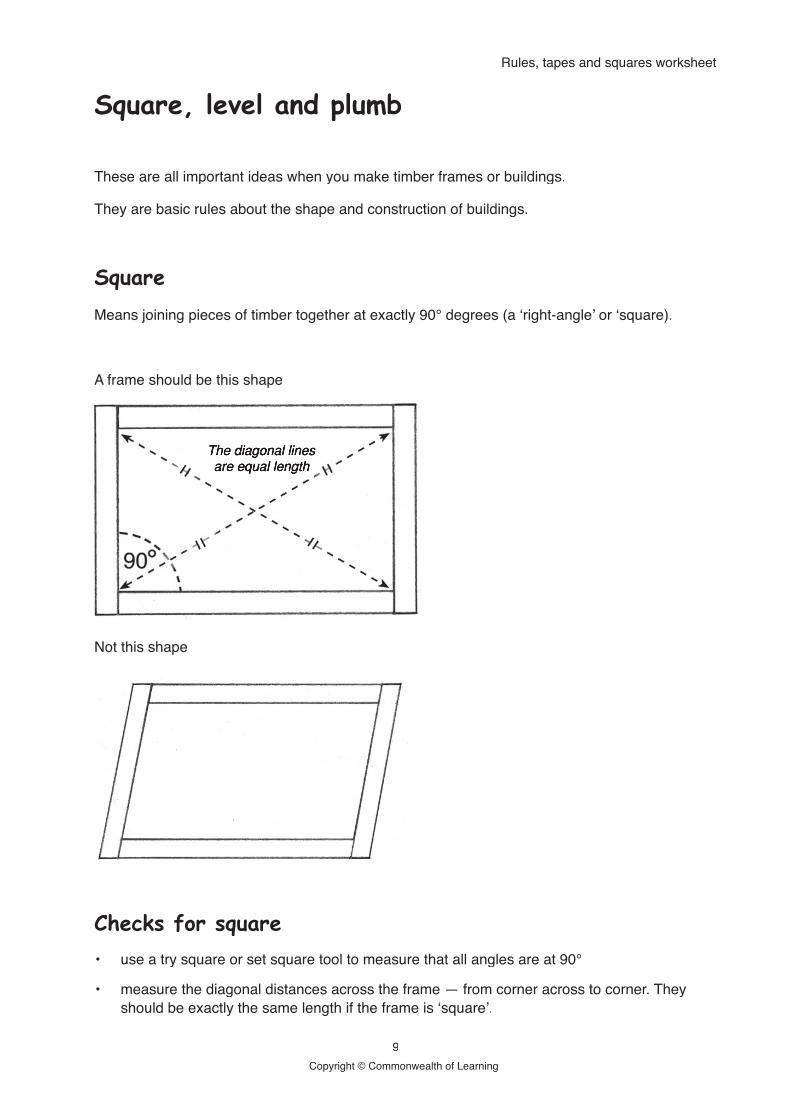
Square, level and plumb
These are all important ideas when you make timber frames or buildings.
They are basic rules about the shape and construction of buildings.
SquareMeans joining pieces of timber together at exactly 90° degrees (a ʻright-angleʼ or ʻsquare).
A frame should be this shape
Not this shape
Checks for square • use a try square or set square tool to measure that all angles are at 90°
• measure the diagonal distances across the frame — from corner across to corner. They should be exactly the same length if the frame is ʻsquareʼ.
The diagonal lines are equal length

Rules, tapes and squares worksheet
10Copyright © Commonwealth of Learning
LevelThis means that a surface is at the same height at both ends and at both sides.
When a surface is level, a ball will stay still on the surface — not roll in any direction.
Check for levelA “spirit level” uses an air bubble inside a glass tube to show when a surface is level.
To use a spirit level, put it on the top surface of the timber. When the air bubble is in the middle of the tube, the surface is level.
This Not this

Rules, tapes and squares worksheet
11Copyright © Commonwealth of Learning
Plumb“Plumb” means that a piece of timber is exactly upright in all directions
It does not lean at all.
Try thisTie a weight to a piece of string and hang it from a point — it will hang ʻplumbʼ, or exactly vertical in all directions, once it stops swinging.
You have made a simple “plumb-bob” or “plumb-line” that you can use to check the plumb of an upright timber.
Hang the plumb-bob from the top corner of the timber and see how the line of the timber matches the string.
If the timber does not match the line, move the timber until the timber follows the plumb-line exactly.
Square, level and plumbIf you think about these — they all fi t together
An upright timber that is “plumb” — will be at 90° degrees (or “square”) — to a timber that is exactly ʻlevelʼ.
Safety tipsNever use a tape or ruler to hit timber or nails. If you do, you might damage the ruler and it will no longer be accurate.
This Not this
Plumb Plumb
Level
Square