Embed Size (px)
Citation preview
RESOURCE AND PATIENT MANAGEMENT SYSTEM
Office of Information Technology Division of Information Technology
Albuquerque, New Mexico
RPMS/Ensemble Cache Classes Database File
(BMW)
BMW CACHE.DAT Installation Guide
Version 2016.2 September 2016
RPMS/Ensemble Cache Classes Database File (BMW) Version 2016.2
BMW CACHE.DAT Installation Guide Table of Contents September 2016
ii
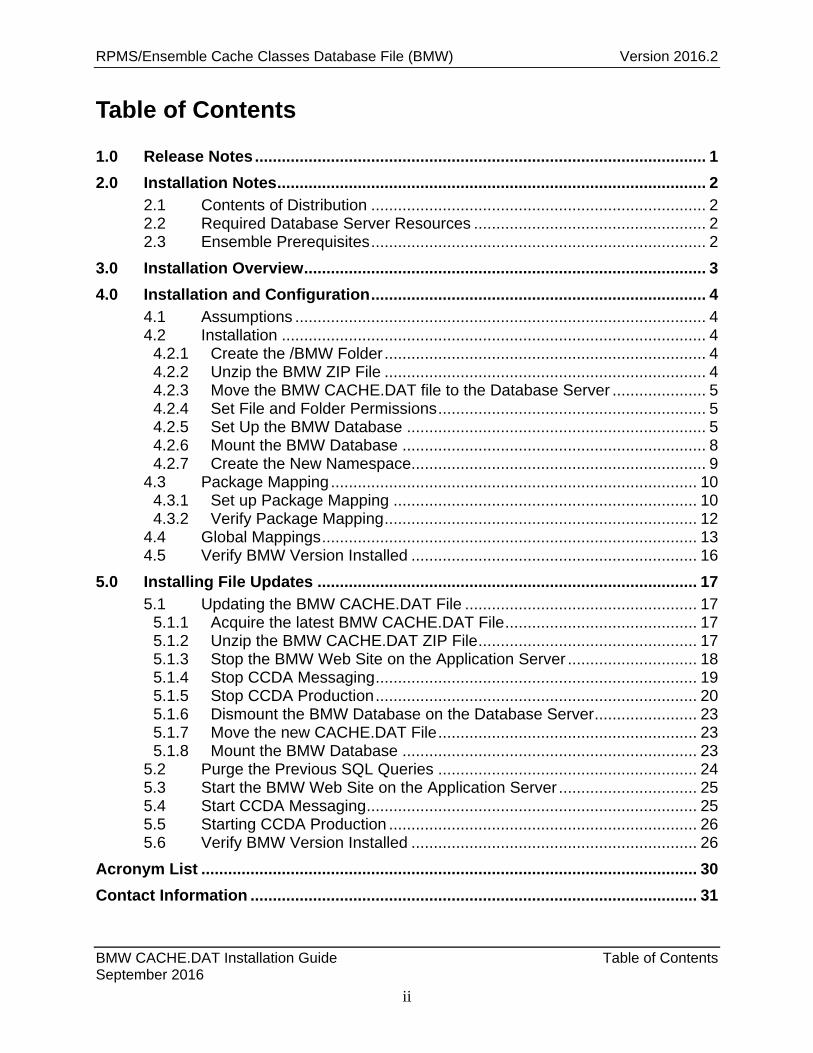
Table of Contents
1.0 Release Notes ..................................................................................................... 1
2.0 Installation Notes ................................................................................................ 2 2.1 Contents of Distribution ........................................................................... 2 2.2 Required Database Server Resources .................................................... 2 2.3 Ensemble Prerequisites ........................................................................... 2
3.0 Installation Overview .......................................................................................... 3
4.0 Installation and Configuration ........................................................................... 4 4.1 Assumptions ............................................................................................ 4 4.2 Installation ............................................................................................... 4
4.2.1 Create the /BMW Folder ........................................................................ 4 4.2.2 Unzip the BMW ZIP File ........................................................................ 4 4.2.3 Move the BMW CACHE.DAT file to the Database Server ..................... 5 4.2.4 Set File and Folder Permissions ............................................................ 5 4.2.5 Set Up the BMW Database ................................................................... 5 4.2.6 Mount the BMW Database .................................................................... 8 4.2.7 Create the New Namespace.................................................................. 9
4.3 Package Mapping .................................................................................. 10 4.3.1 Set up Package Mapping .................................................................... 10 4.3.2 Verify Package Mapping ...................................................................... 12
4.4 Global Mappings .................................................................................... 13 4.5 Verify BMW Version Installed ................................................................ 16
5.0 Installing File Updates ..................................................................................... 17 5.1 Updating the BMW CACHE.DAT File .................................................... 17
5.1.1 Acquire the latest BMW CACHE.DAT File ........................................... 17 5.1.2 Unzip the BMW CACHE.DAT ZIP File ................................................. 17 5.1.3 Stop the BMW Web Site on the Application Server ............................. 18 5.1.4 Stop CCDA Messaging ........................................................................ 19 5.1.5 Stop CCDA Production ........................................................................ 20 5.1.6 Dismount the BMW Database on the Database Server ....................... 23 5.1.7 Move the new CACHE.DAT File .......................................................... 23 5.1.8 Mount the BMW Database .................................................................. 23
5.2 Purge the Previous SQL Queries .......................................................... 24 5.3 Start the BMW Web Site on the Application Server ............................... 25 5.4 Start CCDA Messaging .......................................................................... 25 5.5 Starting CCDA Production ..................................................................... 26 5.6 Verify BMW Version Installed ................................................................ 26
Acronym List ............................................................................................................... 30
Contact Information .................................................................................................... 31
RPMS/Ensemble Cache Classes Database File (BMW) Version 2016.2
BMW CACHE.DAT Installation Guide Preface September 2016
iii
Preface
This manual describes the installation of the BMW CACHE.DAT file used by the BPRM Practice Management Application Suite, as well as other Meaningful Use 2-compliant Indian Health Service (IHS) applications. The versioning information indicates the calendar year and release number in which the BMW CACHE.DAT file was generated.
RPMS/Ensemble Cache Classes Database File (BMW) Version 2016.2
BMW CACHE.DAT Installation Guide Release Notes September 2016
1
1.0 Release Notes This release of the stand-alone BMW CACHE.DAT file is to support changes related to a BPRM patch release. Previously, this file was integrated into the BMW Practice Management Application Suite, but since this CACHE.DAT file is now used by other applications, it is provided to sites as a stand-along package from this point forward.
RPMS/Ensemble Cache Classes Database File (BMW) Version 2016.2
BMW CACHE.DAT Installation Guide Installation Notes September 2016
2
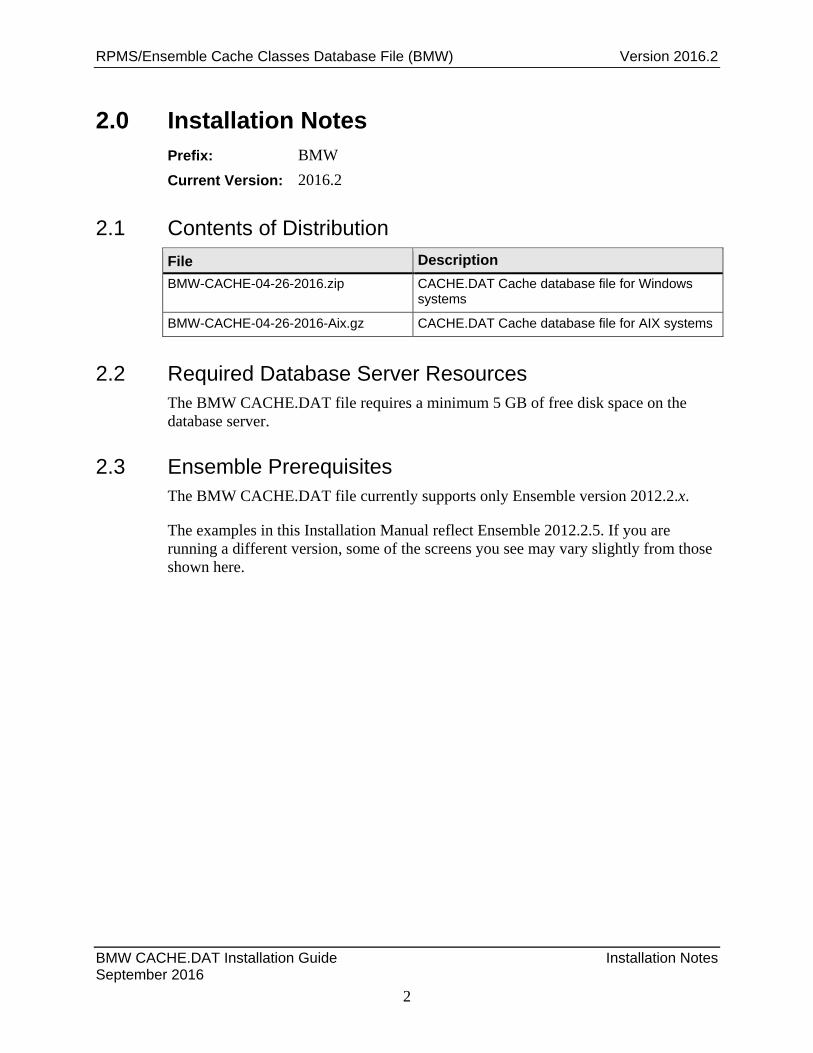
2.0 Installation Notes Prefix: BMW Current Version: 2016.2
2.1 Contents of Distribution File Description BMW-CACHE-04-26-2016.zip CACHE.DAT Cache database file for Windows
systems
BMW-CACHE-04-26-2016-Aix.gz CACHE.DAT Cache database file for AIX systems
2.2 Required Database Server Resources The BMW CACHE.DAT file requires a minimum 5 GB of free disk space on the database server.
2.3 Ensemble Prerequisites The BMW CACHE.DAT file currently supports only Ensemble version 2012.2.x.
The examples in this Installation Manual reflect Ensemble 2012.2.5. If you are running a different version, some of the screens you see may vary slightly from those shown here.

RPMS/Ensemble Cache Classes Database File (BMW) Version 2016.2
BMW CACHE.DAT Installation Guide Installation Overview September 2016
3
3.0 Installation Overview The BMW CACHE.DAT file is a required component of several IHS RPMS applications. It must be present in order for these applications to run.
As a strategy to minimize changes to the Resource and Patient Management (RPMS) database, the BMW CACHE.DAT file is mounted as a separate database and attached to an Ensemble/Cache server. This database contains already generated Cache classes against FileMan files.
The classes in the BMW database are generated in a specific package called BMW. The BMW package can be mapped onto the RPMS database, thus enabling the RPMS database to consume the mapped classes. The Cache-generated Classes will reside in the BMW database, yet remain available to the RPMS database, thus achieving the goal of minimizing steps for the BMW database setup when it is scaled onto several sites.
Follow the instructions shown in Section 4.0 if you are installing the BMW CACHE.DAT file for the first time at your site. Refer to Section 5.0 if an earlier version of the BMW CACHE.DAT file is installed at your site.

RPMS/Ensemble Cache Classes Database File (BMW) Version 2016.2
BMW CACHE.DAT Installation Guide Installation and Configuration September 2016
4
4.0 Installation and Configuration
4.1 Assumptions This section assumes the following:
• Ensemble/Cache server (running one of the supported versions) has already been set up.
• An RPMS database is already set up on the Ensemble/Cache server.
• The user performing the installation and configuration has the appropriate rights to mount databases.
In this manual, “EBCI” is the name of the RPMS database used. The name may be different on your system. The steps shown in the following sections will guide you through setting up the BMW database for the IHS RPMS environment.
4.2 Installation
4.2.1 Create the /BMW Folder Create a /BMW folder under the default database folder on the database server. This is the folder where the BMW CACHE.DAT file will reside.
For Windows systems, follow these steps (substituting the appropriate drive letter and folder names):
1. Using Windows Explorer, navigate to D:\EnsembleData\ on your database server.
2. Click Organize, and then select New Folder.
3. Type BMW, and press Enter to create the D:\EnsembleData\BMW folder.
For AIX systems, issue the following command at the command prompt. (Note that this example is using usr3 as the default database directory. Your default directory will likely be different.):
$mkdir /usr3/cachedata/bmw/
4.2.2 Unzip the BMW ZIP File Using the appropriate utility for the file format provided, unzip the CACHE.DAT file, which will be mounted onto the Ensemble/Cache server in the steps shown in Section 4.2.6.

RPMS/Ensemble Cache Classes Database File (BMW) Version 2016.2
BMW CACHE.DAT Installation Guide Installation and Configuration September 2016
5
Unzip this file on a workstation or other local machine, not on your database server itself. After is it unzipped, it will be moved to the database server as described in Section 4.2.3
4.2.3 Move the BMW CACHE.DAT file to the Database Server After unzipping the compressed file, move the CACHE.DAT file contained within it to the /BMW folder created in Section 4.2.1:
• If installing on a Windows database server, this file move can be done directly through the network or via Remote Desktop Connection, depending on site requirements.
• On an AIX database server, it will probably be necessary to use File Transfer Protocol (FTP) or another similar file transfer program to move the file.
4.2.4 Set File and Folder Permissions The BMW CACHE.DAT file needs specific access permissions (also known as access rights on AIX systems) to access the CACHE.DAT file and the folder in which it is stored. On Windows servers, the necessary permissions are typically set up by default.
On AIX servers, the necessary rights are not established by default. To set the access rights on an AIX server:
1. Type this command at the AIX command prompt to navigate to the folder where CACHE.DAT is stored. (Note that this example is using usr3 as the default database directory. Your default directory will likely be different.):
$cd /usr3/cachedata/
2. Type this command to set the permissions for the /bmw directory:
$chmod 770 /usr3/cachedata/bmw
3. Type this command to set the permissions for the CACHE.DAT file:
$chmod 775 /usr3/cachedata/bmw/CACHE.DAT
4.2.5 Set Up the BMW Database Mount the unzipped BMW database using the Ensemble System Management Portal, a component of Ensemble/Cache:
1. Right-click the Ensemble icon ( ) in the Windows Notification Area. The menu in Figure 4-1 displays.

RPMS/Ensemble Cache Classes Database File (BMW) Version 2016.2
BMW CACHE.DAT Installation Guide Installation and Configuration September 2016
6
Figure 4-1: Opening the Ensemble System Management Portal
2. Select System Management Portal.
Figure 4-2: Ensemble/Cache Login dialog
3. Type your Ensemble/Cache user name and password in the window displayed (Figure 4-2). Click Login.
4. From the Ensemble/Cache System Management Portal Home window click System Administration > Configuration > System Configuration > Local Databases as shown in Figure 4-3:

RPMS/Ensemble Cache Classes Database File (BMW) Version 2016.2
BMW CACHE.DAT Installation Guide Installation and Configuration September 2016
7
Figure 4-3: System Management Portal – Local Databases selected
5. The Local Databases window displays as shown in Figure 4-4:
Figure 4-4: Local Databases window
6. Select Create New Database in the upper left of the Local Databases window. The Database Wizard (Figure 4-5) window is displayed.
7. In the Enter the name of your database field, type BMW.
8. Click Browse and browse to the folder where the BMW database is located as described in Section 4.2.2. (The correct folder is labeled \BMW and contains the CACHE.DAT file).
RPMS/Ensemble Cache Classes Database File (BMW) Version 2016.2
BMW CACHE.DAT Installation Guide Installation and Configuration September 2016
8
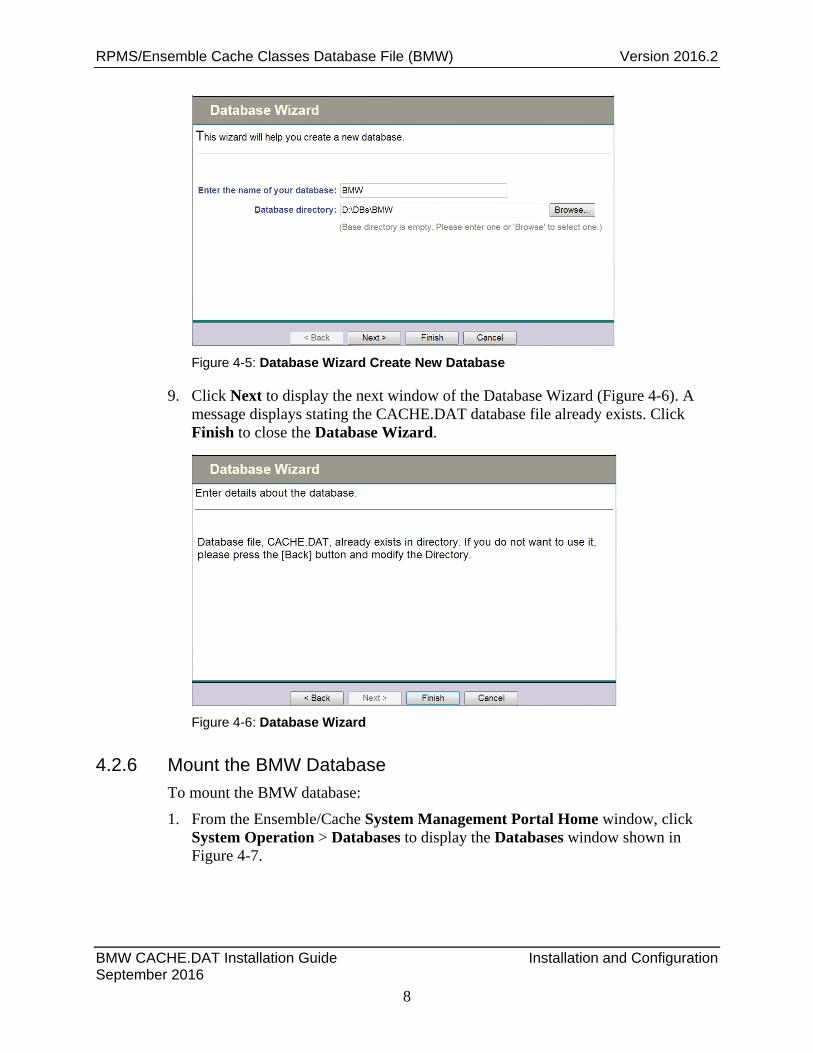
Figure 4-5: Database Wizard Create New Database
9. Click Next to display the next window of the Database Wizard (Figure 4-6). A message displays stating the CACHE.DAT database file already exists. Click Finish to close the Database Wizard.
Figure 4-6: Database Wizard
4.2.6 Mount the BMW Database To mount the BMW database:
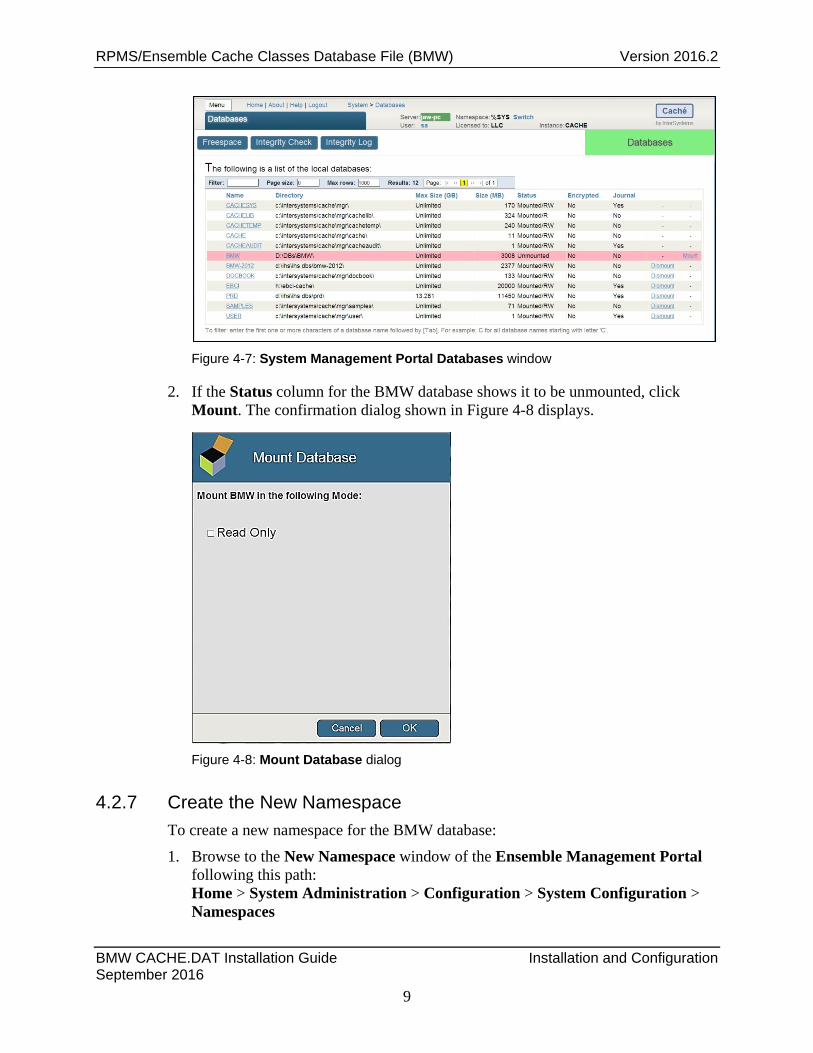
1. From the Ensemble/Cache System Management Portal Home window, click System Operation > Databases to display the Databases window shown in Figure 4-7.
RPMS/Ensemble Cache Classes Database File (BMW) Version 2016.2
BMW CACHE.DAT Installation Guide Installation and Configuration September 2016
9
Figure 4-7: System Management Portal Databases window
2. If the Status column for the BMW database shows it to be unmounted, click Mount. The confirmation dialog shown in Figure 4-8 displays.
Figure 4-8: Mount Database dialog
4.2.7 Create the New Namespace To create a new namespace for the BMW database:
1. Browse to the New Namespace window of the Ensemble Management Portal following this path: Home > System Administration > Configuration > System Configuration > Namespaces

RPMS/Ensemble Cache Classes Database File (BMW) Version 2016.2
BMW CACHE.DAT Installation Guide Installation and Configuration September 2016
10
2. Click Create New Namespace at the top of the screen displayed. This causes the New Namespace window shown in Figure 4-9 to be displayed.
Figure 4-9: Add a New Namespace
3. Create a new namespace, specifying BMW as the name of the namespace, and selecting BMW from the list of existing databases.
4. Click Save.
4.3 Package Mapping
4.3.1 Set up Package Mapping To set up the package mapping:
1. Browse to the Namespaces window of the Ensemble Management Portal following this path: Home > System Administration > Configuration > System Configuration > Namespaces A Namespaces window similar to Figure 4-10 displays.

RPMS/Ensemble Cache Classes Database File (BMW) Version 2016.2
BMW CACHE.DAT Installation Guide Installation and Configuration September 2016
11
Figure 4-10: Namespaces window with Package Mappings
2. Click Package Mappings in the row corresponding to your RPMS production database. This example shows the ECBI database. Your database will have a different name. The Package Mappings window (Figure 4-11) displays.
Figure 4-11: Package Mappings window
3. Click New Package Mapping to display the Package Mapping (Figure 4-12) dialog.
Figure 4-12: Package Mapping dialog
RPMS/Ensemble Cache Classes Database File (BMW) Version 2016.2
BMW CACHE.DAT Installation Guide Installation and Configuration September 2016
12
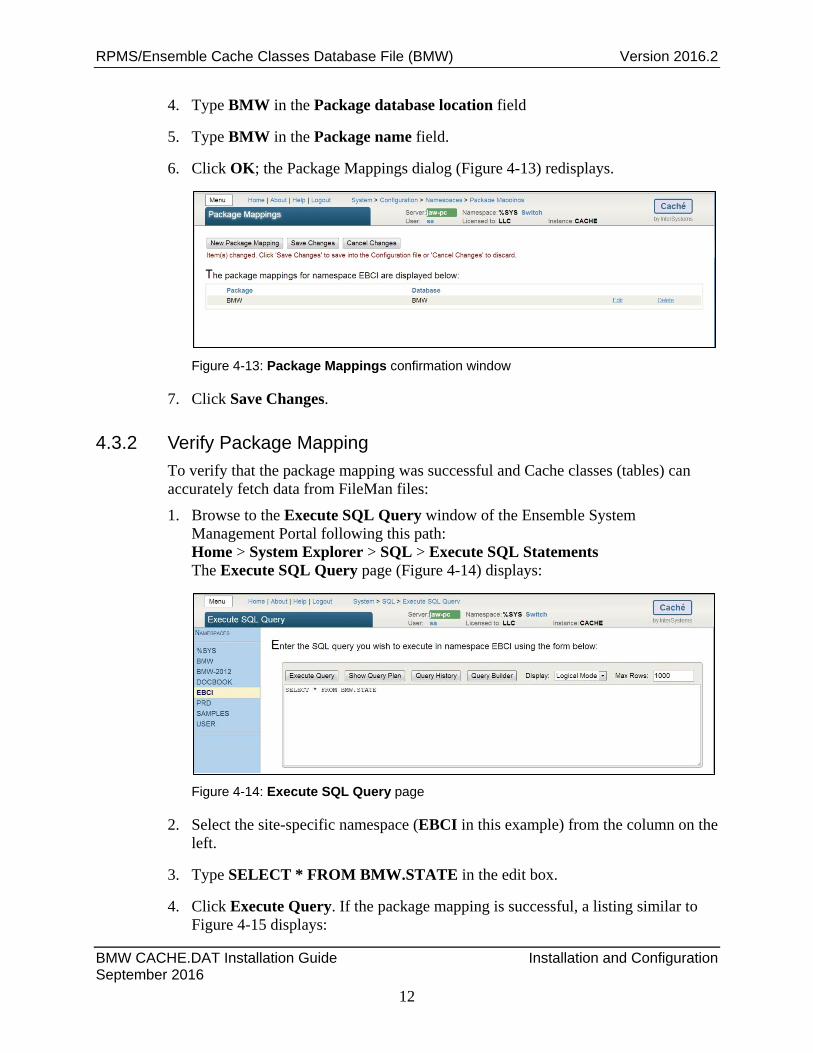
4. Type BMW in the Package database location field
5. Type BMW in the Package name field.
6. Click OK; the Package Mappings dialog (Figure 4-13) redisplays.
Figure 4-13: Package Mappings confirmation window
7. Click Save Changes.
4.3.2 Verify Package Mapping To verify that the package mapping was successful and Cache classes (tables) can accurately fetch data from FileMan files:
1. Browse to the Execute SQL Query window of the Ensemble System Management Portal following this path: Home > System Explorer > SQL > Execute SQL Statements The Execute SQL Query page (Figure 4-14) displays:
Figure 4-14: Execute SQL Query page
2. Select the site-specific namespace (EBCI in this example) from the column on the left.
3. Type SELECT * FROM BMW.STATE in the edit box.
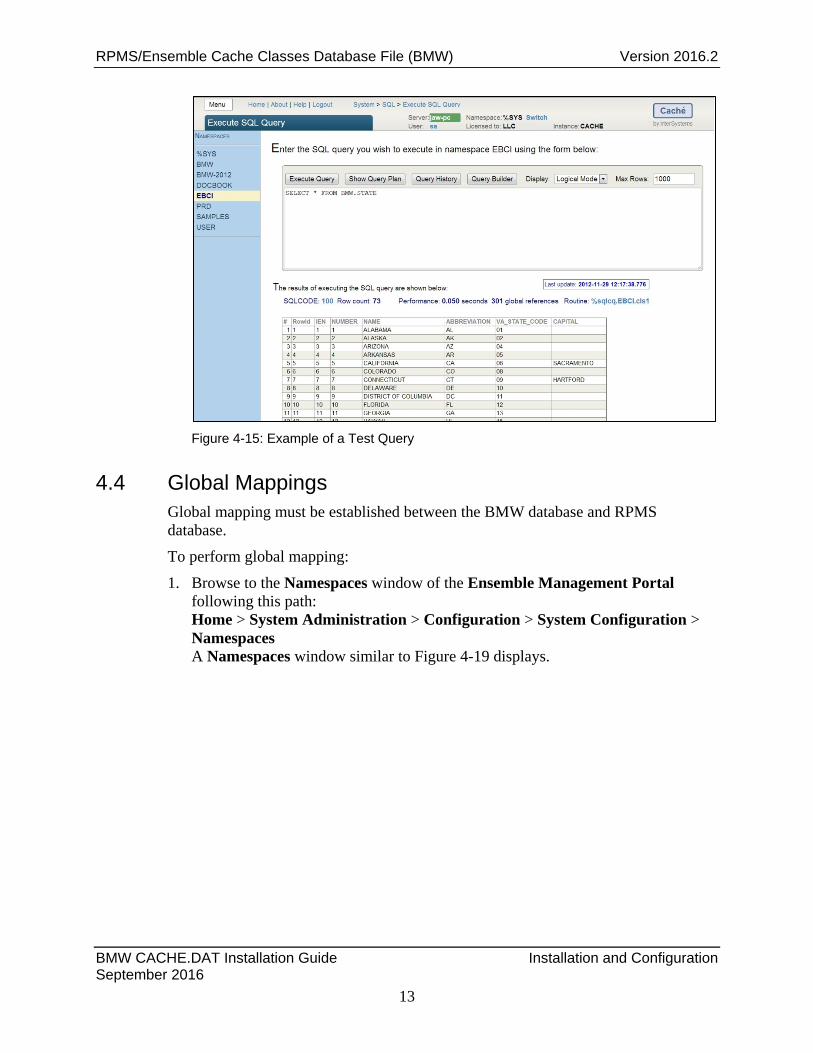
4. Click Execute Query. If the package mapping is successful, a listing similar to Figure 4-15 displays:
RPMS/Ensemble Cache Classes Database File (BMW) Version 2016.2
BMW CACHE.DAT Installation Guide Installation and Configuration September 2016
13
Figure 4-15: Example of a Test Query
4.4 Global Mappings Global mapping must be established between the BMW database and RPMS database.
To perform global mapping:
1. Browse to the Namespaces window of the Ensemble Management Portal following this path: Home > System Administration > Configuration > System Configuration > Namespaces A Namespaces window similar to Figure 4-19 displays.

RPMS/Ensemble Cache Classes Database File (BMW) Version 2016.2
BMW CACHE.DAT Installation Guide Installation and Configuration September 2016
14
Figure 4-16: Namespaces window with Global Mappings
2. Click Global Mappings in the row corresponding to the RPMS production database. This example shows the ECBI database, an RPMS production database. Your database will have a different name, and potentially a different name for each site. The Global Mappings window (Figure 4-20) displays.
Figure 4-17: Global Mappings window
RPMS/Ensemble Cache Classes Database File (BMW) Version 2016.2
BMW CACHE.DAT Installation Guide Installation and Configuration September 2016
15
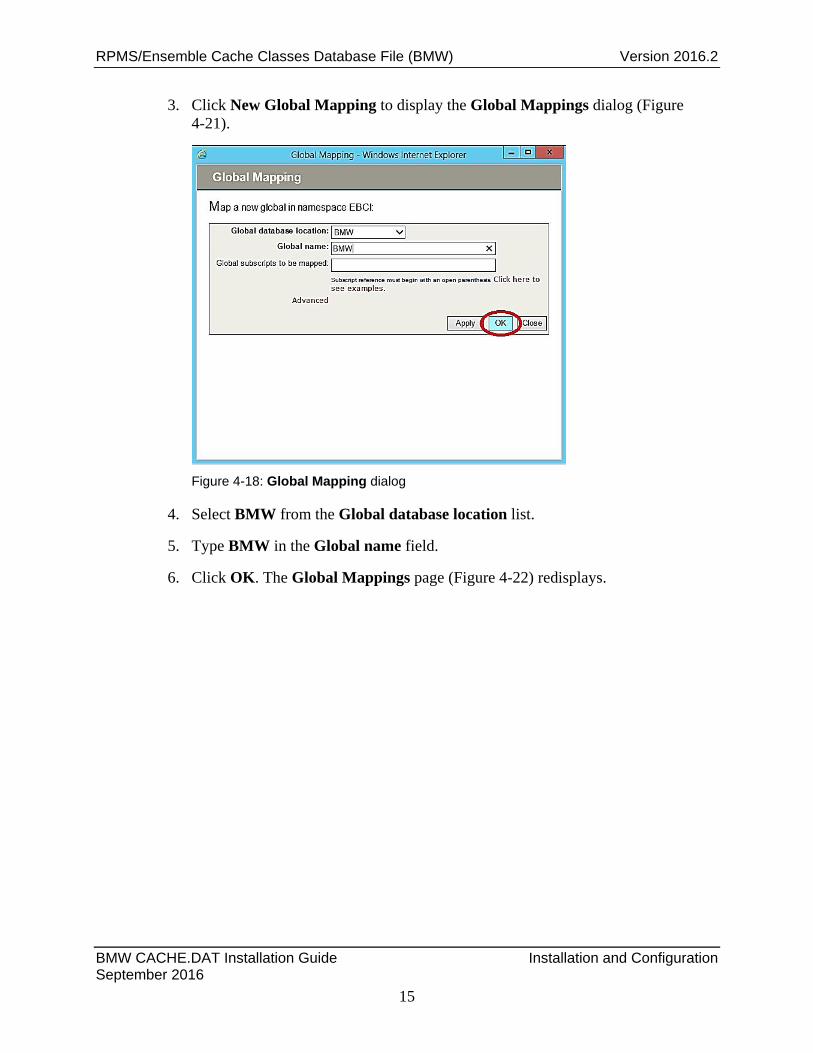
3. Click New Global Mapping to display the Global Mappings dialog (Figure 4-21).
Figure 4-18: Global Mapping dialog
4. Select BMW from the Global database location list.
5. Type BMW in the Global name field.
6. Click OK. The Global Mappings page (Figure 4-22) redisplays.

RPMS/Ensemble Cache Classes Database File (BMW) Version 2016.2
BMW CACHE.DAT Installation Guide Installation and Configuration September 2016
16
Figure 4-19: Global Mappings confirmation window
7. Click Save Changes to complete the global mapping operation.
4.5 Verify BMW Version Installed Once installation is complete, you confirm the version number of BMW that is currently installed.
1. Log into an RPMS session and go to the programmer prompt
2. Type in the following command: ZW ^BMW
3. This will display the BMW generation date and version number (Figure 4-20) that is currently installed
Figure 4-20: Example of BMW Version from RPMS Programmer Prompt
RPMS/Ensemble Cache Classes Database File (BMW) Version 2016.2
BMW CACHE.DAT Installation Guide Installing File Updates September 2016
17
5.0 Installing File Updates BMW CACHE.DAT file updates are released on a periodic basis to address reported issues and to add enhancements. Follow the steps in Sections 5.1 through 5.5 to install a BMW CACHE.DAT update.
5.1 Updating the BMW CACHE.DAT File Follow the steps in Sections 5.1.1 through 5.1.8 to import a new BMW CACHE.DAT file.
5.1.1 Acquire the latest BMW CACHE.DAT File Acquire the latest BMW CACHE.DAT file from the IHS RPMS website or FTP site.
5.1.2 Unzip the BMW CACHE.DAT ZIP File Using the appropriate software, unzip the compressed file containing the BMW CACHE.DAT file. Unzip this file on a workstation or other local machine, not on the database server. After is it unzipped, it is moved to the database server as described in Step 2 in Section 5.1.6. After it has been moved, the BMW CACHE.DAT file is mounted onto the Ensemble/Cache server following the steps shown in Section 5.1.8.

RPMS/Ensemble Cache Classes Database File (BMW) Version 2016.2
BMW CACHE.DAT Installation Guide Installing File Updates September 2016
18
5.1.3 Stop the BMW Web Site on the Application Server If running the BPRM Practice Management Application Suite, it is necessary to stop the BPRM (Moonwalk) web site on the application server before installing a BMW CACHE.DAT file patch or update. Follow these steps:
Figure 5-1: Opening Internet Information Services (IIS) Manager
1. Select Internet Information Services (IIS) Manager from the Windows Server Administrative Tools menu. The Internet Information Services (IIS) Manager window (Figure 5-2) displays.

RPMS/Ensemble Cache Classes Database File (BMW) Version 2016.2
BMW CACHE.DAT Installation Guide Installing File Updates September 2016
19
Figure 5-2: Internet Information Services (IIS) - Stopping the BMW (Moonwalk) web site
2. Select the application server in the left pane (Win2k8srv32 in the example).
3. Expand the Sites folder, and select the Moonwalk site.
4. Click Stop in the Manage Web Site section in the Actions pane.
5.1.4 Stop CCDA Messaging If CCDA is running, it must be stopped before updating the BMW CACHE.DAT file. CCDA Messaging can be stopped using the Manage CCDA transmissions option, available in the CCDA Menu (Figure 5-3). The CCDA Menu can be accessed from the regular “OPTION NAME” prompt in RPMS.
Select CCDA Menu Option: MANG Manage CCDA transmissions C Messaging status: No configuration problems found CCDA processing task is running Stop CCDA? No// Y (Yes) Attempting to stop CCDA....CCDA stopped
Figure 5-3: Stopping CCDA Messaging
1. At the “Select CCDA Menu Option” prompt, type MANG (Manage CCDA transmissions) and press Enter.
2. If CCDA Messaging is running, type YES at the “Stop CCDA?”) prompt.

RPMS/Ensemble Cache Classes Database File (BMW) Version 2016.2
BMW CACHE.DAT Installation Guide Installing File Updates September 2016
20
5.1.5 Stop CCDA Production To stop CCDA production, if it is currently running:
1. Sign on to Ensemble’s Management Portal as an administrator. At the top center, the main page displays the server name, the current user, the current namespace, license and instance information, and a Switch link
Figure 5-4: Ensemble Management Portal
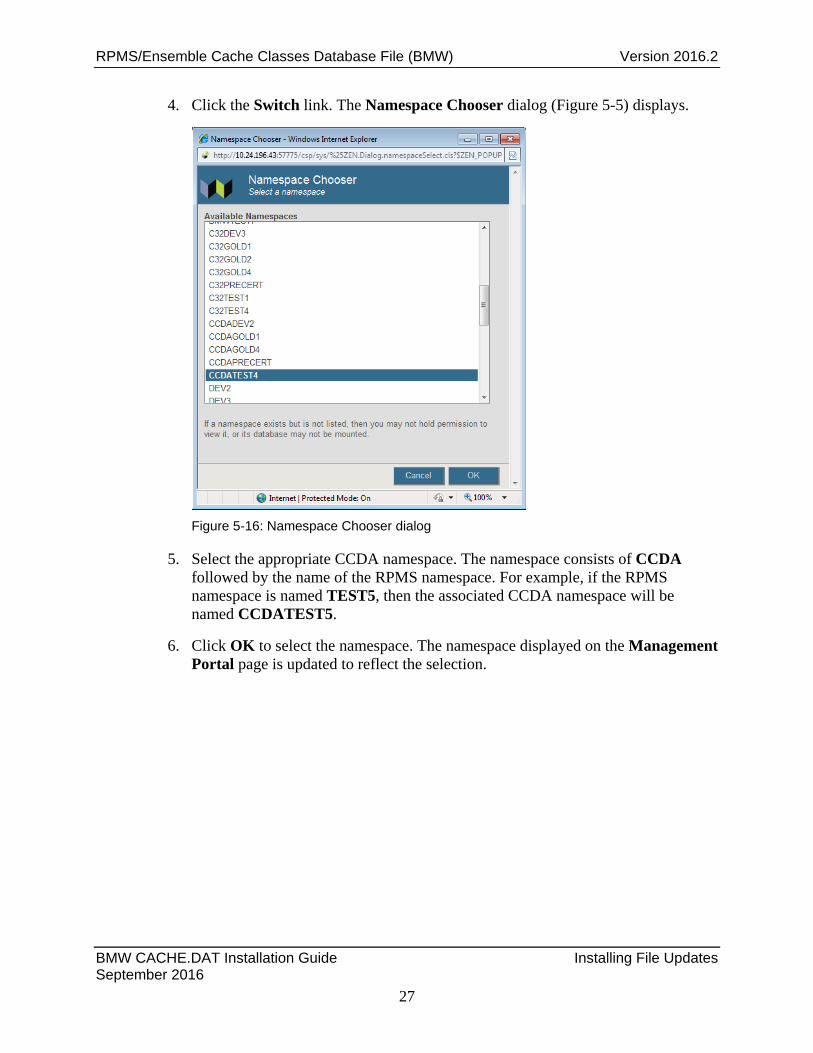
2. Click the Switch link. The Namespace Chooser dialog (Figure 5-5) displays.
Figure 5-5: Namespace Chooser dialog

RPMS/Ensemble Cache Classes Database File (BMW) Version 2016.2
BMW CACHE.DAT Installation Guide Installing File Updates September 2016
21
3. Select the appropriate CCDA namespace. The namespace consists of CCDA followed by the name of the RPMS namespace. In the example, the RPMS namespace is named TEST4, so the associated CCDA namespace is named CCDATEST4.
4. Click OK to select the namespace. The namespace displayed on the Management Portal page (Figure 5-6) is updated to reflect the selection.
Figure 5-6: Production option in the Ensemble Management Portal
5. Select Ensemble in the left column.
6. Select Configure.
7. Select Production.
8. When the View, Edit, Start, or Stop a Production option appears, click Go to display the Production Configuration page (Figure 5-7).

RPMS/Ensemble Cache Classes Database File (BMW) Version 2016.2
BMW CACHE.DAT Installation Guide Installing File Updates September 2016
22
Figure 5-7: Production Configuration
9. Above the Services column on the left of the display, the words Ensemble Running will be displayed. If the words Ensemble Stopped are displayed, then the production is already stopped. Otherwise, click Stop. The Stop Production dialog (Figure 5-8) displays.
Figure 5-8: Stop Production dialog
It might take the production a few seconds to stop. When it stops, the message Production ‘BCCD.Prod.Production’ stopped displays, followed by the message Done. There might be additional messages on this screen if it takes Ensemble more than a few seconds to stop all associated processes.

RPMS/Ensemble Cache Classes Database File (BMW) Version 2016.2
BMW CACHE.DAT Installation Guide Installing File Updates September 2016
23
10. Click OK to return to the Production Configuration screen.
5.1.6 Dismount the BMW Database on the Database Server 1. From the Ensemble/Cache System Management Portal Home window, click
System Operation > Databases to display the Databases window (Figure 5-9).
Figure 5-9: Dismounting the BMW database
2. Click Dismount in the BMW row to dismount the database.
5.1.7 Move the new CACHE.DAT File After unzipping the compressed file as described in Section 5.1.2, move the CACHE.DAT file contained within it to the /BMW folder where earlier versions of the file have been stored. If installing on a Windows database server, this file move can be done directly through the network or via Remote Desktop Connection, depending on site requirements. On an AIX database server, it may be necessary to use FTP or a similar file transfer program to move the file.
5.1.8 Mount the BMW Database To mount the BMW database:
1. From the Ensemble/Cache System Management Portal Home window, click System Operation > Databases. A Databases window similar to Figure 5-10 displays.

RPMS/Ensemble Cache Classes Database File (BMW) Version 2016.2
BMW CACHE.DAT Installation Guide Installing File Updates September 2016
24
Figure 5-10: System Management Portal Databases window
2. If the Status column for the BMW database reads unmounted, click Mount. The confirmation dialog (Figure 5-11) displays.
Figure 5-11: Mount Database dialog
5.2 Purge the Previous SQL Queries To clear any previous SQL queries for your RPMS database:
1. From the Ensemble/Cache System Management Portal Home window, click System Explorer > SQL > Browse SQL Schemas. The Schemas page (Figure 5-12) displays.

RPMS/Ensemble Cache Classes Database File (BMW) Version 2016.2
BMW CACHE.DAT Installation Guide Installing File Updates September 2016
25
Figure 5-12: Purge Queries - Ensemble 2012 systems
2. On the left side of the window select the RPMS database. In the example shown in, EBCI is selected. Your database will likely have a different name.
3. Click Purge Queries.
5.3 Start the BMW Web Site on the Application Server If running the BMW Practice Management Application Suite, restart the BMW web site. Follow the steps outlined in Section 5.1.3, but select the Start option in Step 2.
5.4 Start CCDA Messaging If CCDA was previously running, restart it by following the steps outlined in Step 2 of Section 5.1.3 and typing YES at the “Start CCDA?” prompt as shown in Figure 5-13:
Select CCDA Menu Option: MANG Manage CCDA transmissions CCDA status: No configuration problems found CCDA processing task is not running Start CCDA? No// YES (Yes) Attempting to start CCDA (JUL 16, 2013@16:09:54)..CCDA started
Figure 5-13: Starting CCDA Messaging

RPMS/Ensemble Cache Classes Database File (BMW) Version 2016.2
BMW CACHE.DAT Installation Guide Installing File Updates September 2016
26
5.5 Starting CCDA Production When CCDA Messaging is started via the Manage CCDA Transmissions option, the CCDA production will start automatically within two minutes. If it is necessary to start the production without starting CCDA Messaging:
1. Sign on to the Ensemble Management Portal as an administrator.
Figure 5-14: Ensemble Management Portal
5.6 Verify BMW Version Installed Once installation is complete, you confirm the version number of BMW that is currently installed.
1. Log into an RPMS session and go to the programmer prompt
2. Type in the following command: ZW ^BMW
3. This will display the BMW generation date and version number (Figure 5-15) that is currently installed
Figure 5-15: Example of BMW Version from RPMS Programmer Prompt
RPMS/Ensemble Cache Classes Database File (BMW) Version 2016.2
BMW CACHE.DAT Installation Guide Installing File Updates September 2016
27
4. Click the Switch link. The Namespace Chooser dialog (Figure 5-5) displays.
Figure 5-16: Namespace Chooser dialog
5. Select the appropriate CCDA namespace. The namespace consists of CCDA followed by the name of the RPMS namespace. For example, if the RPMS namespace is named TEST5, then the associated CCDA namespace will be named CCDATEST5.
6. Click OK to select the namespace. The namespace displayed on the Management Portal page is updated to reflect the selection.

RPMS/Ensemble Cache Classes Database File (BMW) Version 2016.2
BMW CACHE.DAT Installation Guide Installing File Updates September 2016
28
Figure 5-17: Production option in Ensemble’s Management Portal
7. Select Ensemble in the left column.
8. Select Configure.
9. Select Production.
10. When the View, Edit, Start, or Stop a Production option appears, click Go to display the Production Configuration page (Figure 5-17).
Figure 5-18: Production Configuration
RPMS/Ensemble Cache Classes Database File (BMW) Version 2016.2
BMW CACHE.DAT Installation Guide Installing File Updates September 2016
29
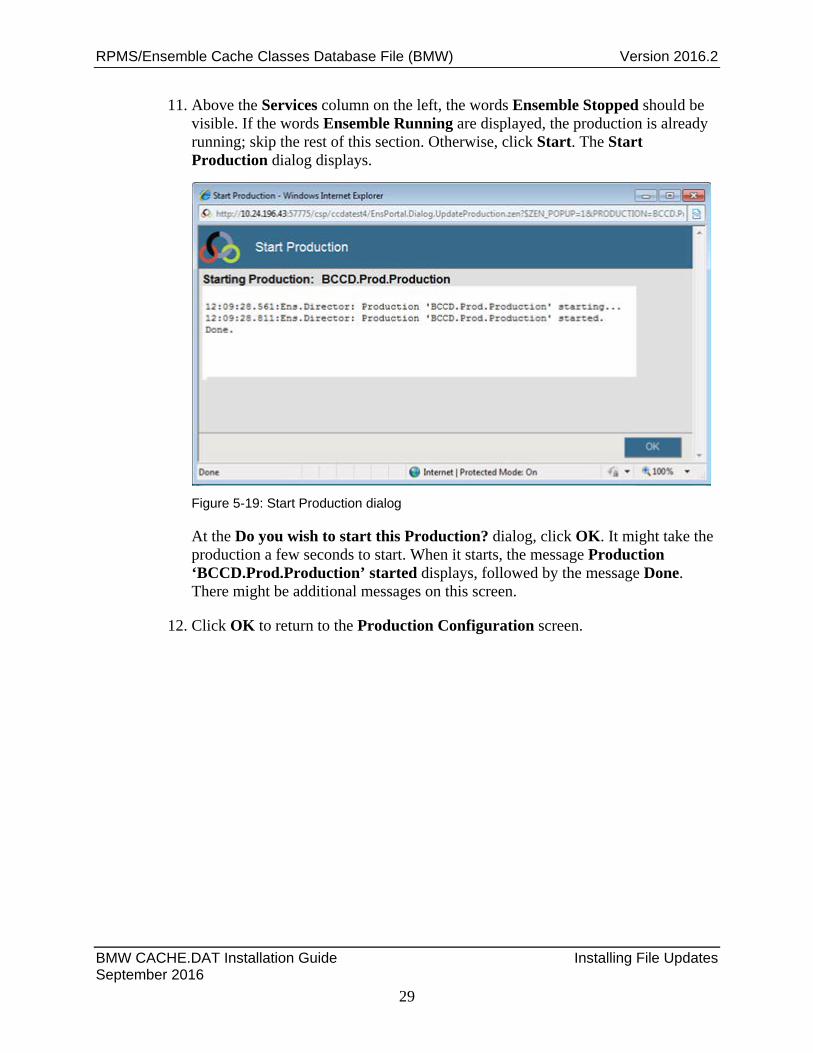
11. Above the Services column on the left, the words Ensemble Stopped should be visible. If the words Ensemble Running are displayed, the production is already running; skip the rest of this section. Otherwise, click Start. The Start Production dialog displays.
Figure 5-19: Start Production dialog
At the Do you wish to start this Production? dialog, click OK. It might take the production a few seconds to start. When it starts, the message Production ‘BCCD.Prod.Production’ started displays, followed by the message Done. There might be additional messages on this screen.
12. Click OK to return to the Production Configuration screen.

RPMS/Ensemble Cache Classes Database File (BMW) Version 2016.2
BMW CACHE.DAT Installation Guide Acronym List September 2016
30
Acronym List
Acronym Term Definition FTP File Transfer Protocol
IHS Indian Health Service
OIT Office of Information Technology (IHS)
RPMS Resource and Patient Management System
SQA Software Quality Assurance (OIT)
RPMS/Ensemble Cache Classes Database File (BMW) Version 2016.2
BMW CACHE.DAT Installation Guide Contact Information September 2016
31
Contact Information
If you have any questions or comments regarding this distribution, please contact the OIT Help Desk (IHS).
Phone: (888) 830-7280 (toll free)
Web: http://www.ihs.gov/helpdesk/
Email: [email protected]