Embed Size (px)
Citation preview
ROBOTIC VACUUM CLEANER
INSTRUCTION
Please read this instruction carefully before using
MANUAL
Please comply with the safety precautions below:
These safety precautions are for the purpose of avoiding personal injury and property damage. Please read the following terms carefully. The meanings of the Symbols are listed below:
Violation may cause Caution personal injury. Attention Violation may cause
machinery damage.
Caution No person should disassemble, modify or service the product except the maintenance technicians designated by our company. Failure to comply may result in fire, electric shock or personal injury.
Only use the charger designed for the Robot. Do not use any other charger, or it may cause product damage, electric shock or fire, due to the high voltage.
Do not touch high-voltage power cord Do not kink the power cord or apply of the electric appliance with wet hands, weight on it, as this may cause
or it may cause electric shock. power cord damage, fire or electric shock.
Do not place your clothes or any part of your body (head, finger etc.) into the brush or wheel of robot, or it may cause personal injury.
Keep away from cigarettes, lighters, matches and other heat objects or combustible materials such as gasoline cleaners.
Do not insert the charger in the socket of charging dock while the cleaner is operating.
Do not step on the power cord while the cleaner is working, or it may cause electric shock.
Attention Ensure power is turned off while Insert the charger power cord correctly
transporting or storing the cleaner for or it may cause electric shock, short long periods, or it may damage the battery. circuit, smoke or fire.
Check the charger and unit are connected correctly, or it may cause charging failure or fire.
Please use the cleaner cautiously in the presence of children to avoid fear or injuries.
Remove all easily damaged objects (including luminous objects, fabrics, glass bottles etc.) before using, or it may cause damage to these objects, or affect the use of the cleaner.
Do not stand or sit on the cleaner, or it may cause damage to the cleaner, or personal injury.
Ensure the cleaner does not take in water or other liquids so as to avoid product damage.
Do not use the cleaner outdoors, or it may cause the product to be damaged.
Do not use the cleaner in commercial places, or it may be damaged due to excessive use.
Do not use the cleaner on small tables, chairs or other small spaces, or the cleaner may be damaged.
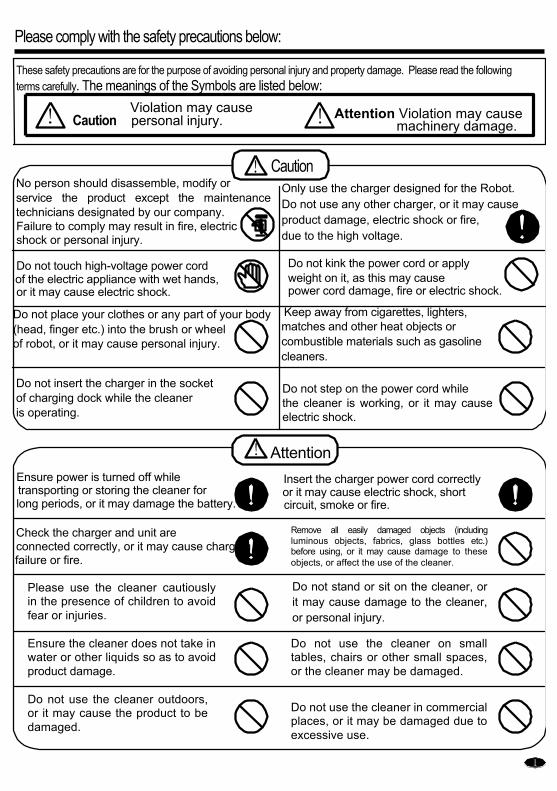
Product Components
Main body Space isolator Charging dock Remote control Charge adapter
Side brush Cleaning brush Instructions Mop
Detailed Parts Top of main body
Dust box Button
Infrared signal receiver Front bumper Auto-charging electrode
Auto-charging Auto-cleaning
Speed adjustment
Indication of buttons
model DC113-10 only
model DC113-10 only
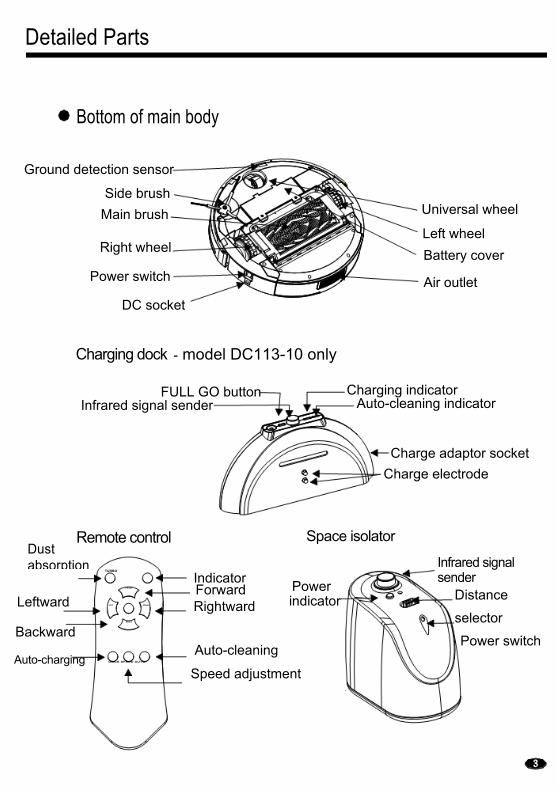
Detailed Parts
Bottom of main body
Ground detection sensor
Side brush Main brush
Right wheel
Power switch
DC socket
Charging dock
FULL GO button Infrared signal sender
Remote control TURBO
Universal wheel
Left wheel Battery cover
Air outlet
Charging indicator Auto-cleaning indicator
Charge adaptor socket Charge electrode
Space isolator
FRONT
LIFT RIGHT
BAC K
DOCK SPEED AUTO
Indicator Forward Rightward
Auto-cleaning
Power indicator Distance
selector
Power switch
Speed adjustment
Dust absorption
Leftward
Backward
Auto-charging
Infrared signal sender
- model DC113-10 only
Applicable Environments
1) Wood floor.2) Tile floor and cement floor.3) Short-pile carpet (less than 10mm thick)
Attention Please remove the side brush before using the robot on short-pile carpet in order to avoid damage.
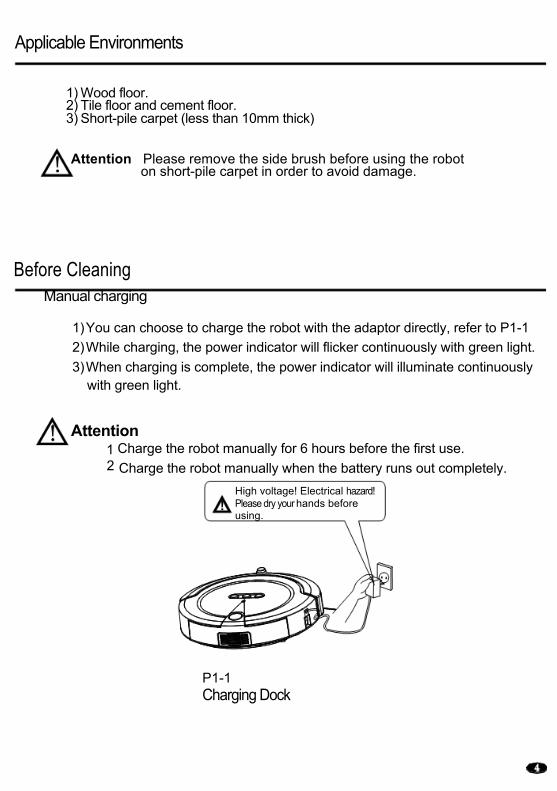
Before Cleaning Manual charging
1) You can choose to charge the robot with the adaptor directly, refer to P1-12) While charging, the power indicator will flicker continuously with green light.3) When charging is complete, the power indicator will illuminate continuously
with green light.
Attention 1 Charge the robot manually for 6 hours before the first use. 2 Charge the robot manually when the battery runs out completely.
High voltage! Electrical hazard! Please dry your hands before using.
P1-1 Charging Dock
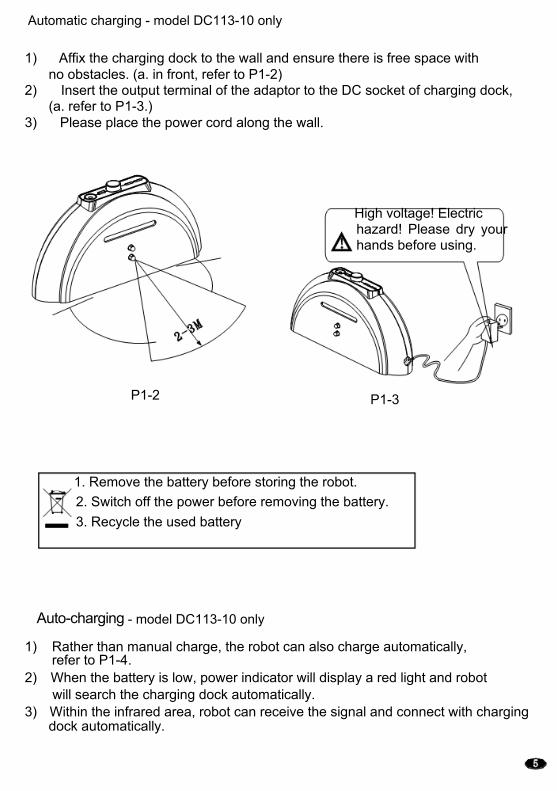
1) Affix the charging dock to the wall and ensure there is free space withno obstacles. (a. in front, refer to P1-2)
2) Insert the output terminal of the adaptor to the DC socket of charging dock,(a. refer to P1-3.)
3) Please place the power cord along the wall.
High voltage! Electric hazard! Please dry your hands before using.
P1-2 P1-3
1. Remove the battery before storing the robot.2. Switch off the power before removing the battery.3. Recycle the used battery
Auto-charging
1) Rather than manual charge, the robot can also charge automatically,refer to P1-4.
2) When the battery is low, power indicator will display a red light and robotwill search the charging dock automatically.
3) Within the infrared area, robot can receive the signal and connect with chargingdock automatically.
Automatic charging - model DC113-10 only
- model DC113-10 only
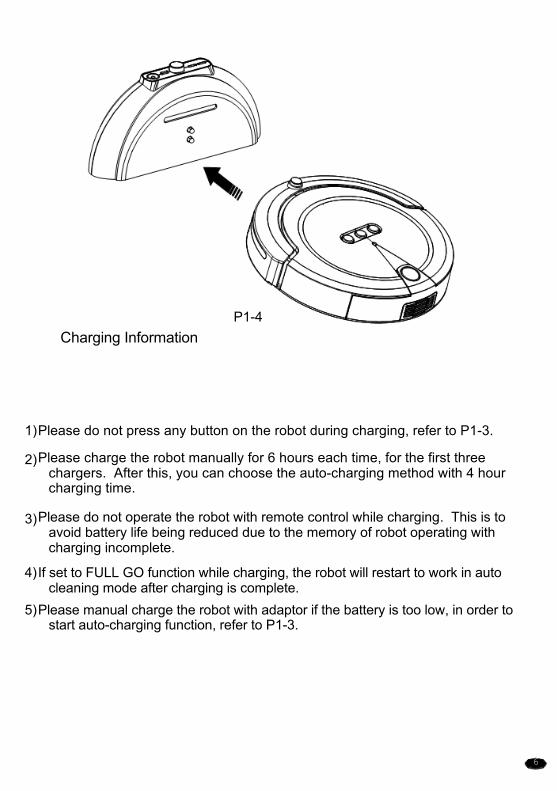
P1-4 Charging Information
1) Please do not press any button on the robot during charging, refer to P1-3.
2) Please charge the robot manually for 6 hours each time, for the first threechargers. After this, you can choose the auto-charging method with 4 hour charging time.
3) Please do not operate the robot with remote control while charging. This is toavoid battery life being reduced due to the memory of robot operating with charging incomplete.
4) If set to FULL GO function while charging, the robot will restart to work in autocleaning mode after charging is complete.
5) Please manual charge the robot with adaptor if the battery is too low, in order tostart auto-charging function, refer to P1-3.
6
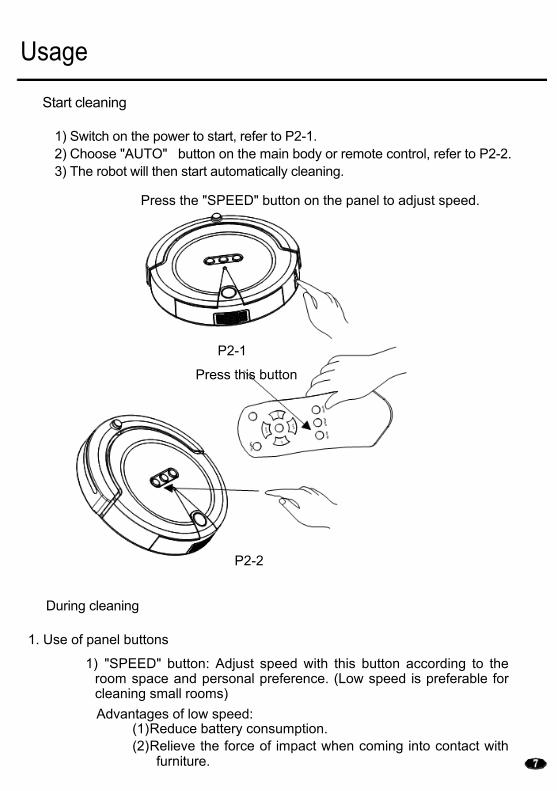
Usage
Start cleaning
1) Switch on the power to start, refer to P2-1.2) Choose "AUTO" button on the main body or remote control, refer to P2-2.3) The robot will then start automatically cleaning.
Press the "SPEED" button on the panel to adjust speed.
P2-1
Press this button
P2-2
During cleaning
1. Use of panel buttons
1) "SPEED" button: Adjust speed with this button according to theroom space and personal preference. (Low speed is preferable for cleaning small rooms) Advantages of low speed:
(1) Reduce battery consumption. (2) Relieve the force of impact when coming into contact with
furniture.
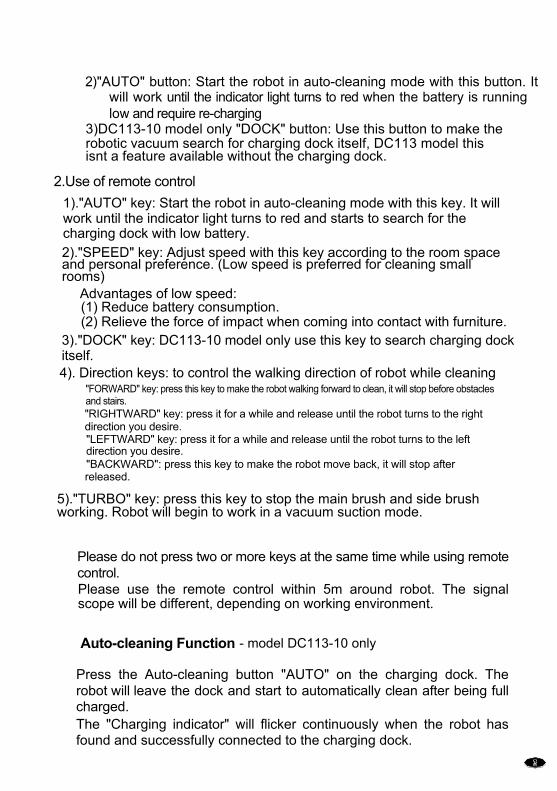
2) "AUTO" button: Start the robot in auto-cleaning mode with this button. Itwill work until the indicator light turns to red when the battery is running low and require re-charging
3)DC113-10 model only "DOCK" button: Use this button to make the robotic vacuum search for charging dock itself, DC113 model this isnt a feature available without the charging dock.
2.Use of remote control 1)."AUTO" key: Start the robot in auto-cleaning mode with this key. It will work until the indicator light turns to red and starts to search for the charging dock with low battery. 2)."SPEED" key: Adjust speed with this key according to the room space and personal preference. (Low speed is preferred for cleaning small rooms)
Advantages of low speed: (1) Reduce battery consumption. (2) Relieve the force of impact when coming into contact with furniture.
3)."DOCK" key: DC113-10 model only use this key to search charging dock itself. 4). Direction keys: to control the walking direction of robot while cleaning
"FORWARD" key: press this key to make the robot walking forward to clean, it will stop before obstacles and stairs. "RIGHTWARD" key: press it for a while and release until the robot turns to the right direction you desire. "LEFTWARD" key: press it for a while and release until the robot turns to the left direction you desire. "BACKWARD": press this key to make the robot move back, it will stop after released.
5)."TURBO" key: press this key to stop the main brush and side brush working. Robot will begin to work in a vacuum suction mode.
Please do not press two or more keys at the same time while using remote control. Please use the remote control within 5m around robot. The signal scope will be different, depending on working environment.
Auto-cleaning Function
Press the Auto-cleaning button "AUTO" on the charging dock. The robot will leave the dock and start to automatically clean after being full charged. The "Charging indicator" will flicker continuously when the robot has found and successfully connected to the charging dock.
- model DC113-10 only
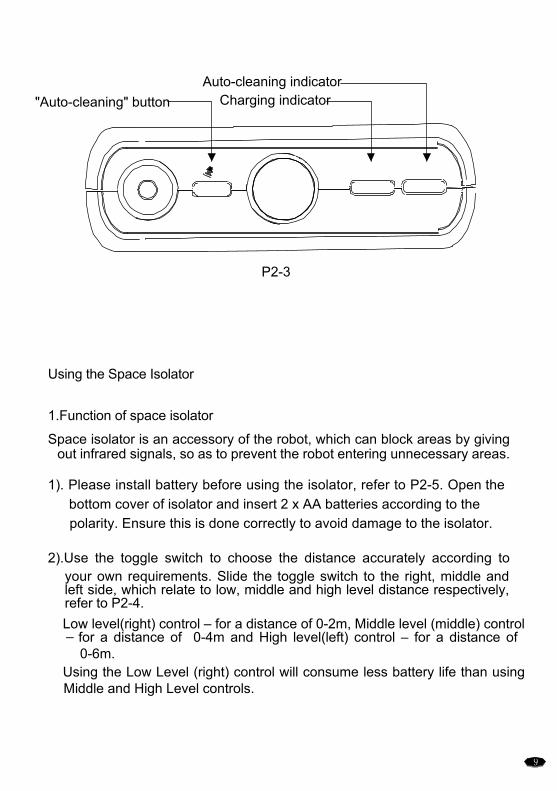
Auto-cleaning indicator "Auto-cleaning" button Charging indicator
P2-3
Using the Space Isolator
1.Function of space isolator
Space isolator is an accessory of the robot, which can block areas by giving out infrared signals, so as to prevent the robot entering unnecessary areas.
1). Please install battery before using the isolator, refer to P2-5. Open thebottom cover of isolator and insert 2 x AA batteries according to the polarity. Ensure this is done correctly to avoid damage to the isolator.
2).Use the toggle switch to choose the distance accurately according to
your own requirements. Slide the toggle switch to the right, middle and left side, which relate to low, middle and high level distance respectively, refer to P2-4. Low level(right) control – for a distance of 0-2m, Middle level (middle) control – for a distance of 0-4m and High level(left) control – for a distance of
0-6m. Using the Low Level (right) control will consume less battery life than using Middle and High Level controls.
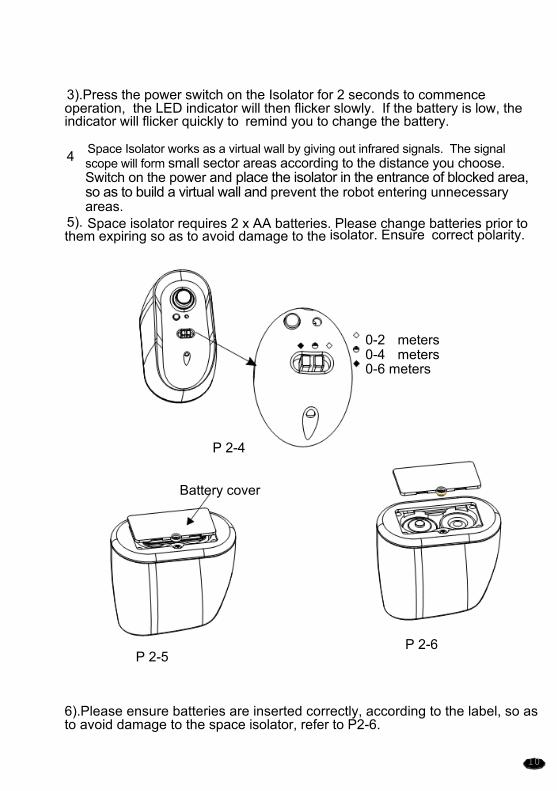
3).Press the power switch on the Isolator for 2 seconds to commence operation, the LED indicator will then flicker slowly. If the battery is low, the indicator will flicker quickly to remind you to change the battery.
4 Space Isolator works as a virtual wall by giving out infrared signals. The signalscope will form small sector areas according to the distance you choose. Switch on the power and place the isolator in the entrance of blocked area, so as to build a virtual wall and prevent the robot entering unnecessary areas.
5). Space isolator requires 2 x AA batteries. Please change batteries prior to them expiring so as to avoid damage to the isolator. Ensure correct polarity.
0-2 meters 0-4 meters 0-6 meters
P 2-4
Battery cover
P 2-6 P 2-5
6).Please ensure batteries are inserted correctly, according to the label, so as to avoid damage to the space isolator, refer to P2-6.
10

1. Remove the batteries before storing the robot.2. Switch off the power before removing the batteries.3. Recycle the used batteries.
2. Attention1). Place the isolator at a distance of 20cm beside the door, refer to P2-7. 2). You can also position the isolator in an appropriate location to stop the robot passing through. 3). Remove obstacles from the blocked area in front of the isolator, to assist in improving efficiency.
P 2-7
11
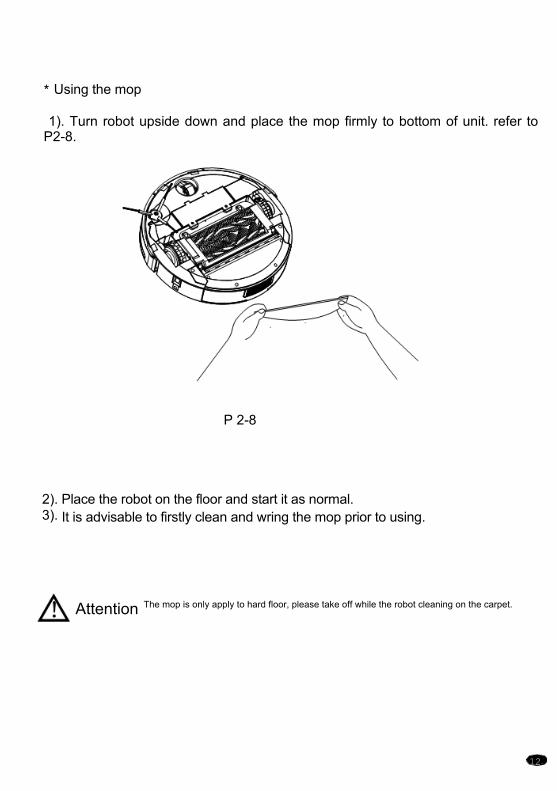
Attention The mop is only apply to hard floor, please take off while the robot cleaning on the carpet.
* Using the mop
1). Turn robot upside down and place the mop firmly to bottom of unit. refer to P2-8.
P 2-8
2). Place the robot on the floor and start it as normal. 3). It is advisable to firstly clean and wring the mop prior to using.
12
Cleaning & Maintenance
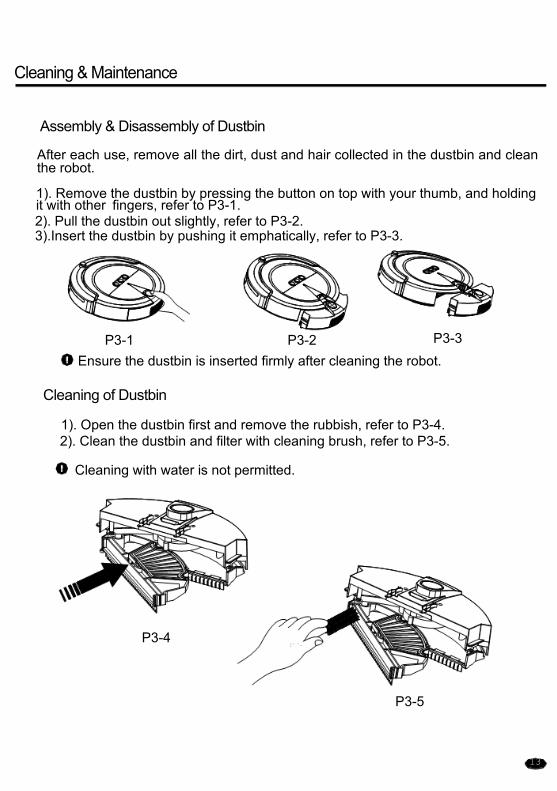
Assembly & Disassembly of Dustbin
After each use, remove all the dirt, dust and hair collected in the dustbin and clean the robot.
1). Remove the dustbin by pressing the button on top with your thumb, and holding it with other fingers, refer to P3-1. 2). Pull the dustbin out slightly, refer to P3-2. 3).Insert the dustbin by pushing it emphatically, refer to P3-3.
P3-1 P3-2 P3-3 Ensure the dustbin is inserted firmly after cleaning the robot.
Cleaning of Dustbin
1). Open the dustbin first and remove the rubbish, refer to P3-4. 2). Clean the dustbin and filter with cleaning brush, refer to P3-5.
Cleaning with water is not permitted.
P3-4
P3-5
13
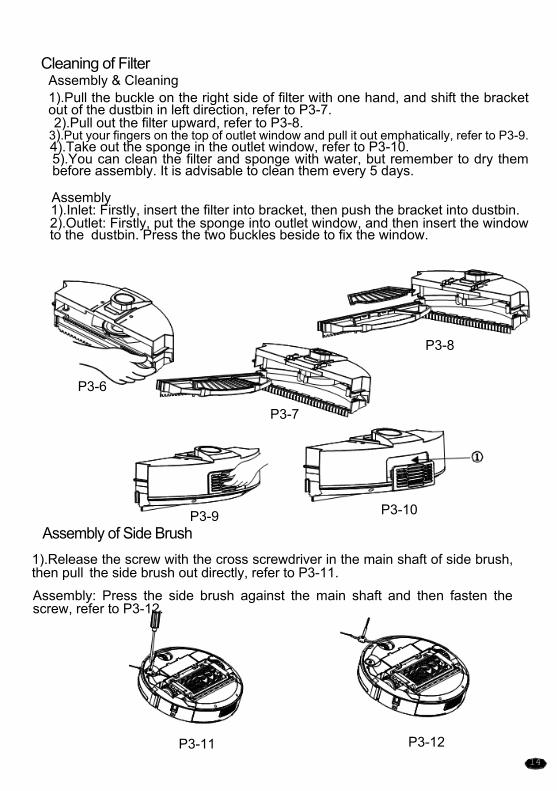
Cleaning of Filter Assembly & Cleaning 1).Pull the buckle on the right side of filter with one hand, and shift the bracket out of the dustbin in left direction, refer to P3-7. 2).Pull out the filter upward, refer to P3-8.
3).Put your fingers on the top of outlet window and pull it out emphatically, refer to P3-9. 4).Take out the sponge in the outlet window, refer to P3-10. 5).You can clean the filter and sponge with water, but remember to dry them before assembly. It is advisable to clean them every 5 days.
Assembly 1).Inlet: Firstly, insert the filter into bracket, then push the bracket into dustbin. 2).Outlet: Firstly, put the sponge into outlet window, and then insert the window to the dustbin. Press the two buckles beside to fix the window.
P3-8
P3-6
P3-7
P3-9 Assembly of Side Brush
P3-10
1).Release the screw with the cross screwdriver in the main shaft of side brush, then pull the side brush out directly, refer to P3-11.
Assembly: Press the side brush against the main shaft and then fasten the screw, refer to P3-12.
P3-11 P3-12 14
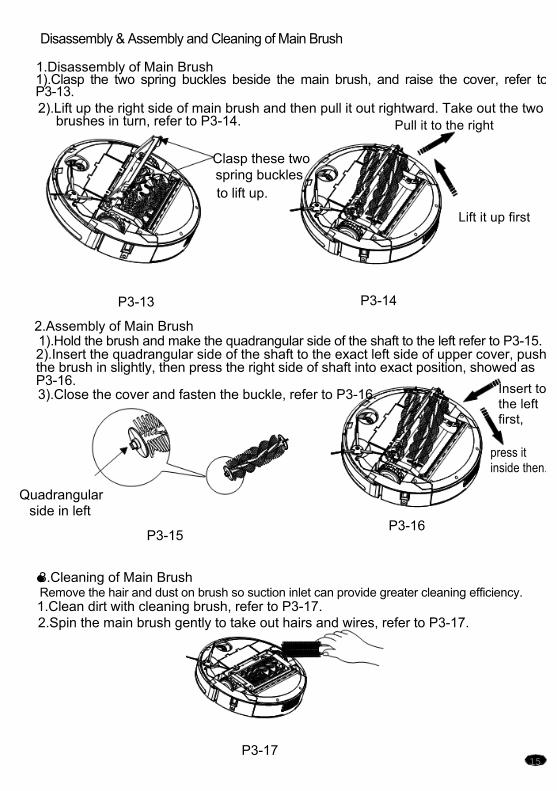
Disassembly & Assembly and Cleaning of Main Brush
1.Disassembly of Main Brush 1).Clasp the two spring buckles beside the main brush, and raise the cover, refer to P3-13. 2).Lift up the right side of main brush and then pull it out rightward. Take out the two
brushes in turn, refer to P3-14.
Clasp these two spring buckles to lift up.
P3-13 P3-14
2.Assembly of Main Brush 1).Hold the brush and make the quadrangular side of the shaft to the left refer to P3-15. 2).Insert the quadrangular side of the shaft to the exact left side of upper cover, push the brush in slightly, then press the right side of shaft into exact position, showed as P3-16. 3).Close the cover and fasten the buckle, refer to P3-16.
Quadrangular side in left
P3-15
3.Cleaning of Main Brush
P3-16
Remove the hair and dust on brush so suction inlet can provide greater cleaning efficiency. 1.Clean dirt with cleaning brush, refer to P3-17. 2.Spin the main brush gently to take out hairs and wires, refer to P3-17.
P3-17 15
Pull it to the right
Lift it up first
Insert to the left first,
press it inside then.
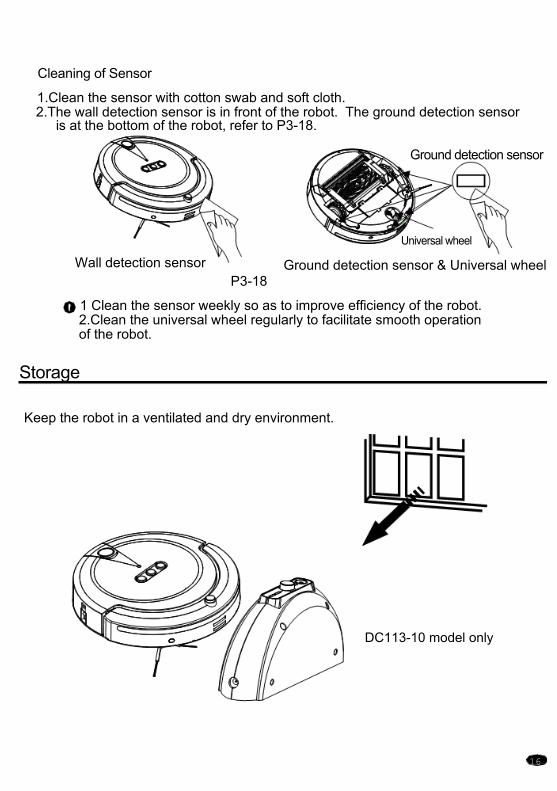
Cleaning of Sensor
1.Clean the sensor with cotton swab and soft cloth. 2.The wall detection sensor is in front of the robot. The ground detection sensor
is at the bottom of the robot, refer to P3-18.
Ground detection sensor
Universal wheel
Wall detection sensor Ground detection sensor & Universal wheel P3-18
1 Clean the sensor weekly so as to improve efficiency of the robot. 2.Clean the universal wheel regularly to facilitate smooth operation of the robot.
Storage
Keep the robot in a ventilated and dry environment.
16
DC113-10 model only
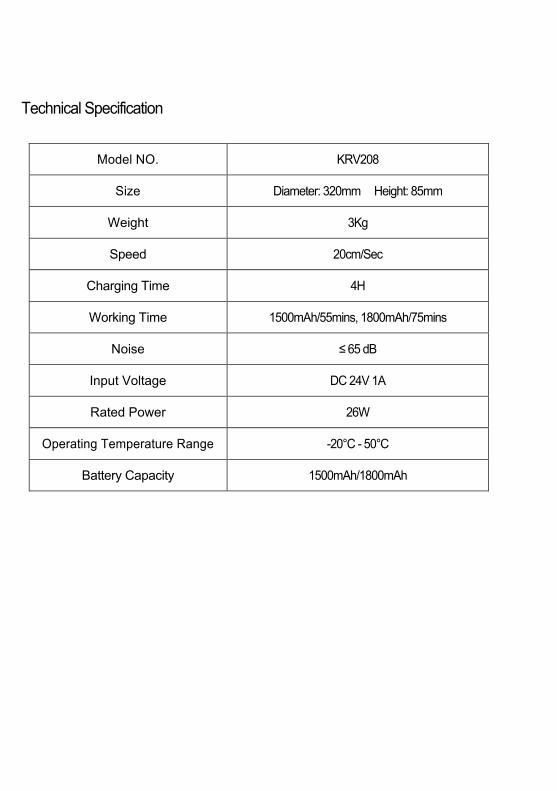
Technical Specification
Model NO. KRV208
Size Diameter: 320mm Height: 85mm
Weight 3Kg
Speed 20cm/Sec
Charging Time 4H
Working Time 1500mAh/55mins, 1800mAh/75mins
Noise ≤ 65 dB
Input Voltage DC 24V 1A
Rated Power 26W
Operating Temperature Range -20°C - 50°C
Battery Capacity 1500mAh/1800mAh