Embed Size (px)
Citation preview

RIGGING AND EQUIPMENT GUIDE
CONTENTS
· Diagram of Rigging from Port side
· Diagram of Rigging from Starboard Side
· 1. Specification
· 2. Sail Configuration
· 3. Stepping the Mast
· 4. Mast Ring Fairleads
· 5. Setting the Mainsail
· 6. Reefing
· 7. Buoyancy
· 8. Oars & Rowlocks
· 9. Anchor
· 10. Bailer
· 11. Rudder
· 12. Centreboard
· 13. Stirrups
· 14. Outboard
· 15. Maintenance
· 16. Towing Afloat
· 17. Towing Ashore
· 18. How to get the best out of your Scow
Port Rigging

Starboard Rigging
Rigging and Equipment Guide
1 Specification
The Lymington River Scow is a balanced lug sailing dinghy with the following specification.

Hull:Length 3.4 m Beam 1.4 m Draft (centreboard raised) 0.3 m
Sail Area: Main7.0 sq m Jib1.0 sq m Spinnaker6.5 sq m
Weight: 100 kgs
(Back to Contents.)
2 Sail Configurations
Traditionally a Scow has had only a mainsail and this is a requirement when racing single-handed. The Lymington River Scow Class Rules, however, allow a jib to be used when racing with a crew and, if the combined weight of the helm and crew exceeds 22 stone (140 kgs), a spinnaker is also allowed.
(Back to Contents.)
3 Stepping the Mast
a) Insert the burgee in the hole in the top of the mast.
b) Pass the mast through the deck ring into the step on the hog, making sure that the main halyard block is on the aft side.

c) Loosely secure the shroud lanyards and then tighten the forestay. The shrouds should only be taut as this allows for the articulation of the gaff.
d) When the forestay and shrouds have been adjusted and secured the mast should be slightly aft of the middle of the deck ring.
e) If the mast is going to be removed frequently shackles can be put between the shroud lanyards and the chain plate, so that the shrouds can be unshackled instead of untying the lanyards.
f) When removing the mast undo the shroud and forestay lanyards and slacken the halyards, then loosely tape them all to the mast, which can then be removed from the deck ring and laid on top of the deck with all the halyards still led through their cleats. This makes re-rigging much quicker.
g) Inspect halyard and shroud fixings at the mast top regularly; if worn or distorted refer to the builder.
(Back to Contents.)
4 Mast Ring Fairleads
a) Aft hole port side – downhaul
b) Aft hole starboard side – spinnaker halyard
c) Forward hole port side – jib halyard
d) Forward hole starboard side – main halyard
e) Hole in deck in front of ring – spinnaker pole downhaul
(Back to Contents)
5 Setting the Mainsail
a) Prior to hoisting, slacken the downhaul and the kicking strap.
b) Feed the halyard loop through the ring nearest the hook and then over the hook.
c) After hoisting the mainsail and tensioning the downhaul, there should be a 3” (75 mm) gap between the gaff and the main halyard mast block. This allows for articulation and avoids block damage.
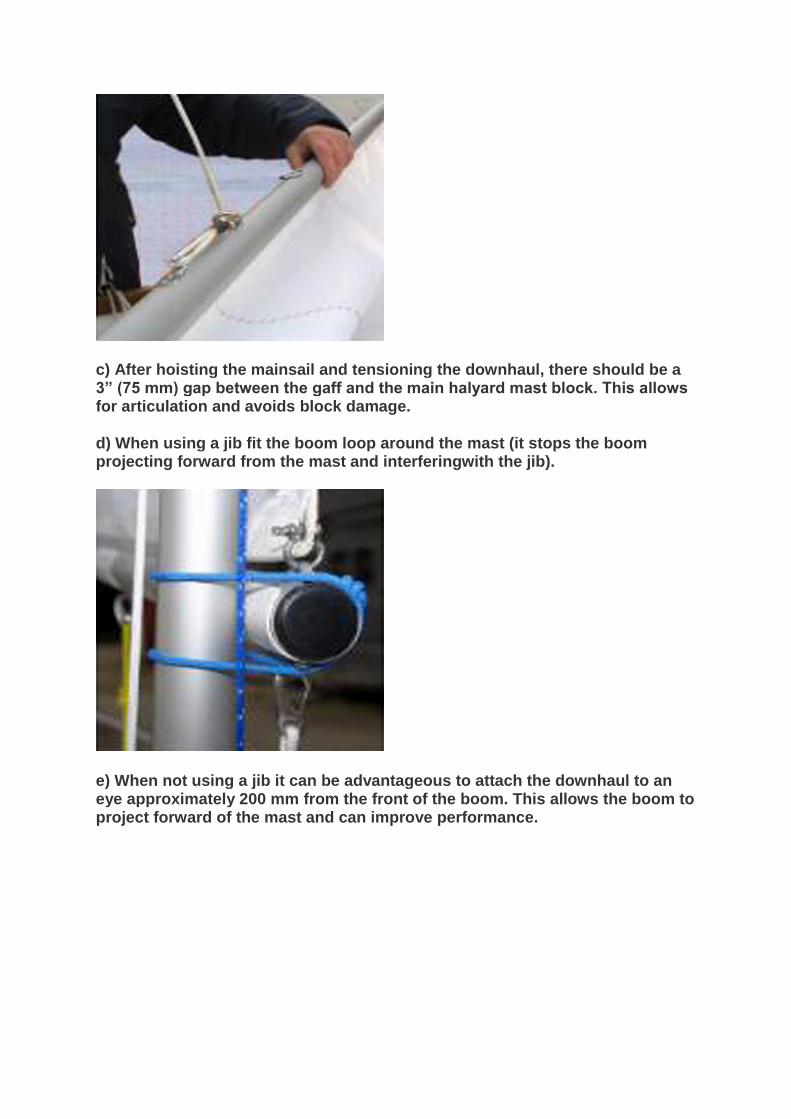
d) When using a jib fit the boom loop around the mast (it stops the boom projecting forward from the mast and interferingwith the jib).
e) When not using a jib it can be advantageous to attach the downhaul to an eye approximately 200 mm from the front of the boom. This allows the boom to project forward of the mast and can improve performance.

f) Tension the kicker.
In light winds the kicker controls mainsail twist and in strong winds it prevents the boom from rising
The most common problem with the set of the sail is a diagonal crease from the bottom of the gaff to the clew. This indicates that more downhaul is required. However, over about force 3 a crease cannot be prevented unless reefed.
Sail tension, using the lanyards on the gaff and the boom, should be adjusted prior to hoisting. Increased tension will flatten the sail and make it easier to handle the boat in stronger winds.
When lowering the rig remember to release the boom loop and downhaul, and when releasing the main halyard from its cleat keep a firm hold on it as the combined weight of the gaff and boom can be bad for morale if dropped on the head of your crew!
(Back to Contents)
6 Reefing
For strong wind a reef can be put in the mainsail in the following manner:

a) Attach a reefing loop to the reefing cringle in the luff of the sail and pass it over the end of the boom.
b) Pass the leech reefing line through the clew cringle and back through the leech cringle, tension it and tie off round the boom. This will hold the reef down and flatten the sale.
c) Pass the main halyard loop through both attachment rings on the gaff, then onto the hook. The sail is now ready for hoisting.

d) After hoisting, the surplus sail can be kept tidy by tying up the three reefing lines round the boom.
(Back to Contents)
7 Buoyancy
Class rules require that buoyancy is checked annually and that the test is recorded on the boat’s certificate. The Class Association arranges for buoyancy tests, normally in the springtime. The test is only a check on buoyancy at the time of the test. It is the owner’s responsibility to maintain the integrity of the buoyancy.
When ashore the buoyancy tank hatch covers should be removed to prevent a build-up of pressure in the tanks, especially during hot weather, and to prevent mould and possible damage to the wooden pads inside the tanks. An alternative method is to drill a 1.5mm hole in one hatch cover and identify the cover with a coloured dot. This cover will be removed for the buoyancy test. Check that they are refitted correctly to prevent the ingress of water.
(Back to Contents)
8 Oars and Rowlocks

Rowlocks are stored in pockets under the thwart and the oars are
released by unclipping the hooks on the shroud plates.
(Back to Contents.)
9 Anchor
The anchor is stowed in a plastic pocket on the forward bulkhead. It is important to put the shank of the anchor in the pocket first as this allows for quick removal. The anchor warp is coiled around the plastic pocket, over the flukes and under the wooden toggle at the base of the pocket, then made fast to the deck ring to which the kicker is shackled.
It should be noted that the standard folding grapnel anchor is only suitable for kedging and beaching purposes. If any serious anchoring is envisaged a Bruce anchor or equivalent should be considered. When using an anchor of this type pass the warp around the cleat on the foredeck and secure to the main thwart using a round-turn and two half-hitches.
(Back to Contents.)
10 Bailers
A five litre manual bailer is standard equipment. In case of loss these can be made by cutting down a plastic petrol can.
The Class Rules allow one self-bailer to be fitted. These are normally of the Anderson type and the following should be born in mind:
a) Avoid kicking it down as this damages the sides and causes leaks.

b) Avoid ropes going down the shoot - if one does carefully open the non-return flap with a finger, or preferably a stick, and pull back the rope. Just pulling on the rope unseats the flap and damages the bailer.
c) Make sure the bailer is up when beaching or launching.
d) If the bailer is leaking new seals or a replacement can be obtained from the builder.
(Back to Contents.)
11 Rudder
The rudder is usually put on ashore by placing the tiller under the wire mainsheet horse and dropping it onto its pintles. The shock cord, which is secured to a ring on the transom just above the aft seat, should be stretched over the tiller and hooked back onto the ring. Additionally, a rudder clip may be fitted. These devices prevent the rudder coming off in the event of a capsize or lifting in heavy seas.
When launching, the blade can be held up by looping the downhaul shock cord over the end of the blade.
Once in the water it can be removed and hooked onto the tiller to pull the blade down.
When coming ashore or going into shallow water it can be a good idea to unhook the downhaul to allow the blade to lift as soon as it touches.
(Back to Contents.)
12 Centreboard

The centreboard, like the rudder blade, is of fibreglass sandwich construction and should need little or no maintenance. If the tip is damaged it should be built up with polyester filler and the damaged area painted.
The centreboard is held in position by a rubber friction device, which can be adjusted when afloat. Lower the board slightly and with a long screwdriver gently tighten the two screws on the front of the board just below the handle until friction is sufficient to hold it in position.
(Back to Contents.)
13 Stirrups
Stirrups may be fitted to assist re-boarding once the boat has been righted after a capsize. The stirrups should be adjusted to be of a suitable length for the user.
(Back to Contents.)
14 Outboard
Scows have outboard pads fitted and perform well with a 1.5 to 2.5 hp engine. This can be stored across the aft tank on a foam pad when not in use. The builder can advise on fixing pads.
(Back to Contents.)
15 Maintenance
a) It is recommended that the teak woodwork is treated with teak oil three or four times a season. However, if it is neglected it can be restored by sanding and oiling.

b) On older Scows the white paintwork inside the hull is a One Can Polyurethane and the floor is coated with International Deck Paint. This can be painted or patched up as required. On later build Scows a gell coat is used which should only need a good scrubbing.
c) The fibreglass and spars should be washed and polished and any major damage or scratches referred to the builder.
d) Ropes, cordage and rigging should be washed and checked for wear and damage and, where necessary, replaced. It is good practice to replace the shroud and forestay lanyards each year.
e) The launching trolley’s rubber pads should be checked for wear and security of fitment. Check the tyre pressures, and it can be a good idea to remove the wheels and grease the inside of the hubs and axles as this can save a lot of effort when pulling the boat on the trolley.
f) If you have a road trailer this should be regularly inspected. The main points to check are the:
i) tyre pressures should be inflated to about 45 psi.
ii) tightness of the wheel nuts
iii) bearings’ lubrication
iv) ball and wire secondary hitch
v) number plate lights
vi) suspension units
If a fault is found or suspected refer to a qualified mechanic.
(Back to Contents.)
16 Towing Afloat
a) If your boat needs to be towed at sea the recommended procedure is to pass the towrope around the cleat to keep the tow central on the foredeck and then secure it to the main thwart with a round-turn and two half-hitches.
b) The centreboard should be raised and the mainsail lowered.
(Back to Contents.)
17 Towing Ashore
a) Loading

Secure scow to launch trolley with its painter. Push down on the transom, keeping if clear of the ground, to raise the bow. Push the road trailer under the launch trolley until the launch trolley axle engages with the hooks on the road trailer.
Release downward pressure on the transom, then use foot to press down on the tow bar and the launch trolley will slide forward. Secure trolley to trailer with drop-nose pins.
b) Unloading
Release road trailer drop-nose pins and lift launch trolley free from lugs. Push the boat and launch trolley to the rear of the road trailer and, keeping downward pressure on the tow bar, carefully unhitch it from the car. When unhitched, gently let the trailer tow bar come up until the launch trolley slides backwards and the wheels are in contact with the ground. Apply downward pressure to the Scow transom to raise the bow of the boat, then ease the road trailer backwards to disengage.

c) The boat should be tied down to the road trailer by the painter. A ratchet strap or rope should be passed over the boat between the shroud plate and the foredeck secured to the forward trailer “D” rings and tensioned. Do not over tension the ratchet straps. When using rope, pad the gunwales and make a Trucker’s Hitch in the standing part to provide additional purchase.
d) Never tow the boat ashore with the mast up, and check that the road trailer
wheel bearings are well greased before undertaking long journeys.
(Back to Contents.)
18 How to get the best out of your Scow
Scows are easy to sail badly, but less easy to sail really well. Here are a few tips on how to get the best out of your Scow.
Before sailing, check that the mast is in its correct position (slightly aft of centre of the mast ring) and see that the rigging is set up taut to reduce stress on the mast.
Light airs sailing
Ease the sail tension a little on the boom and gaff lanyards. Ease the kicker and downhaul to increase the twist in the mainsail. Upwind, keep the weight in the middle and allow the boat to heel slightly to leeward. Centreboard and rudder should be fully down and the sail a little free.
When reaching, the kicker should be adjusted to fly the tell-tails evenly, the centreboard halfway, weight in the middle.
When running, ease the kicker to encourage twist, the centreboard should be up, heel the boat slightly to windward.
Heavy weather sailing
Tighten the sail tension on the boom and gaff lanyards, sweat up the halyards and tighten the downhaul.

Upwind. Keep weight as far as possible outboard. If the wind increases, the centreboard can be raised from fully down by about one third to aid tacking. In heavy seas, ease the mainsheet a little to keep the boat moving.
Running. The centreboard should be two-thirds down. Sit aft and well to windward to keep the bows from digging in. Adjust the mainsheet to stop rolling by sheeting in if the boat heels to windward and by easing the mainsheet if the boat heels to leeward.
At all times try to avoid sudden rudder and crew movements.
If you get ‘caught in irons’ half raise the centreboard and push both the tiller and the boom away from you. When the boat has reversed onto a close reach repeatedly pull the helm towards you whilst heeling the boat to windward and sheeting in the mainsail.
Capsize. If the boat inverts, pass the painter round a shroud, toss it over the inverted hull and from the other side of the boat use it to help to stand on the gunwale. Grasp the fully extended centreboard and lean back, this should right the boat from 180 degrees through to 90 degrees. Next transfer weight onto the centreboard to complete the righting. Avoid touching the self bailer as it has sharp edges.
If there is a crew aboard, he should be ready to float horizontally in the boat as it returns to 90 degrees to that when the Scow is righted, he is inboard ready to help the helm aboard.
Many scow sailors never capsize, but it can be a good idea to go to a safe place with others and practice, so that you know how to cope just in case.