Embed Size (px)
Citation preview

REVTRONIC
ULTIMATE PRO KEY
There are 5 options available on the Ultimate Pro Key :
Option Type of Fitting Models Action
1 Click to view Fit inside the EZS Mercedes S Class W221, C Class W204, E Class W212
None
2 Click to view Fit inside the EZS Mercedes ML W164, R Class W251, GL W164
Bridge points marked W164
3 Click to view Fit outside the wiring loom leading to the EZS
Mercedes S Class W221, C Class W204, E Class W212
None
4 Click to view Fit outside the wiring loom leading to the EZS
Mercedes ML W164, R Class W251, GL W164
Bridge points marked W164
5 Click to view Fit inside the dash on Renault
Renault Megane 3, Laguna 3 and Scenic 3
Bridge points marked Reno
Option 1 – Fit inside EZS
Mercedes S Class W221 Version 1

If you encounter problems with the installation, then please remove the 5v cable and connect 12v as shown below :
Mercedes S Class Version 2

Mercedes C Class W204 and E Class W212 (Black EZS)
Desolder the 3 points, then gently unclip the points as shown below.
Remove the PCB and locate the brown component. Remove this component and reassemble
the board.
Mind the switch shown above.
Be careful when putting back the PCB.
Also Watch solder points C + D when soldering.

Mercedes E Class, W212 – (Grey Back EZS)
Gently unclip to access the other side of the board. Locate brown component and remove.

Option 2 – Fit Inside EZS
Mercedes ML W164, R Class W251, GL W164
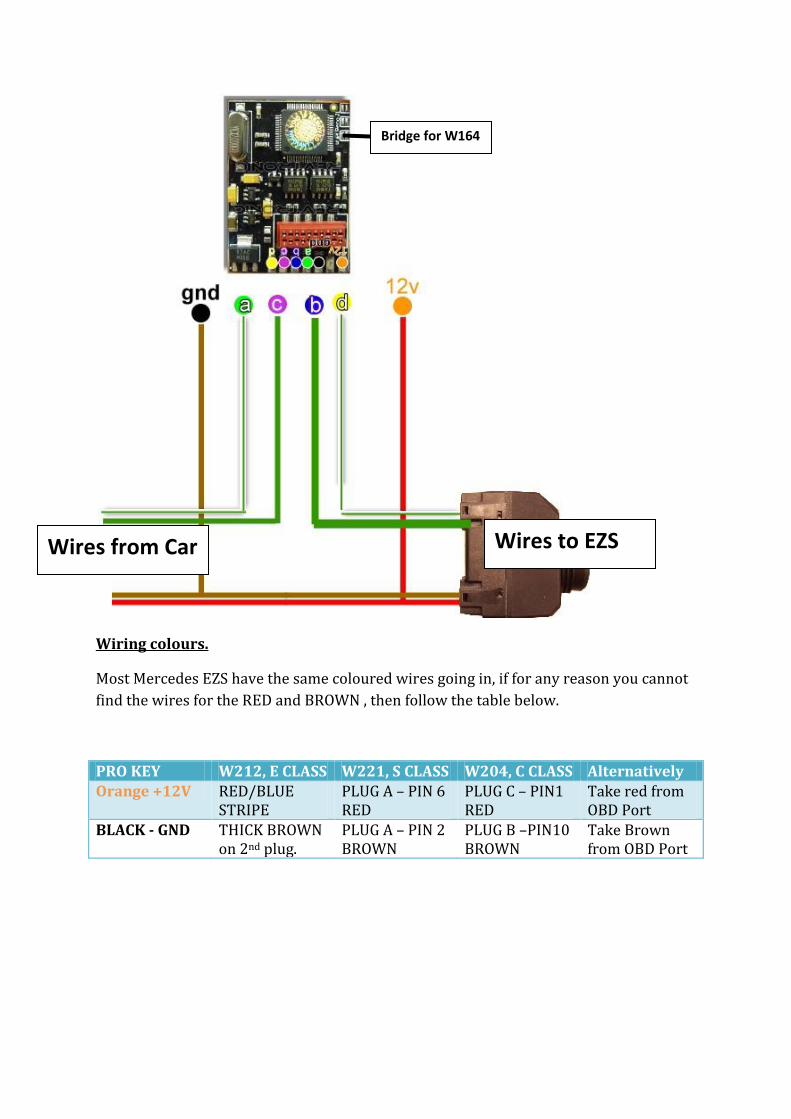
Bridge for W164
Other side of the board

Mercedes W164 -Version 2
Option 3 – Fit outside the wiring loom leading to the EZS
Mercedes S Class W221, C Class W204, E Class W212
Below is typically how an ezs is wired from the car to the EZS. We need to cut the CAN
High/Low wires leading into the EZS.
LOCATE AND CUT
WIRES MARKED X
Bridge for W164

To make a good job, ensure that the ULTIMATE PRO KEY is fitted as far back as
possible.
To use the ULTIMATE PRO KEY all you need to do is to locate the
GREEN+GREEN/WHITE cable which leads in to the EZS plug. These are normally paired
together.
Cut the GREEN wire first , then cut the GREEN/WHITE wire (Make sure no wires touch
!).
Connect as in diagram below, once you have connected the GREEN+GREEN/WHITE
wires to the PRO KEY, connect the BROWN , RED wires last.
The LED on the ULTIMATE PRO KEY should light up.
Look at the diagram below, and wire in according to the model that you have.
Wires from Car Wires to EZS

Wiring colours.
Most Mercedes EZS have the same coloured wires going in, if for any reason you cannot
find the wires for the RED and BROWN , then follow the table below.
PRO KEY W212, E CLASS W221, S CLASS W204, C CLASS Alternatively Orange +12V RED/BLUE
STRIPE PLUG A – PIN 6 RED
PLUG C – PIN1 RED
Take red from OBD Port
BLACK - GND THICK BROWN on 2nd plug.
PLUG A – PIN 2 BROWN
PLUG B –PIN10 BROWN
Take Brown from OBD Port
Option 4 – Fit outside the wiring loom leading to the EZS
Mercedes ML W164, R Class W251, GL W164
Below is typically how an ezs is wired from the car to the EZS. We need to cut the CAN
High/Low wires leading into the EZS.
To make a good job, ensure that the ULTIMATE PRO KEY is fitted as far back as
possible.
To use the ULTIMATE PRO KEY all you need to do is to locate the
GREEN+GREEN/WHITE cable which leads in to the EZS plug. These are normally paired
together.
Cut the GREEN wire first , then cut the GREEN/WHITE wire (Make sure no wires touch
!).
Connect as in diagram below, once you have connected the GREEN+GREEN/WHITE
wires to the PRO KEY, connect the BROWN , RED wires last.
The LED on the ULTIMATE PRO KEY should light up.
Look at the diagram below, and wire in according to the model that you have.
LOCATE AND CUT
WIRES MARKED X
Wiring colours.
Most Mercedes EZS have the same coloured wires going in, if for any reason you cannot
find the wires for the RED and BROWN , then follow the table below.
PRO KEY W212, E CLASS W221, S CLASS W204, C CLASS Alternatively Orange +12V RED/BLUE
STRIPE PLUG A – PIN 6 RED
PLUG C – PIN1 RED
Take red from OBD Port
BLACK - GND THICK BROWN on 2nd plug.
PLUG A – PIN 2 BROWN
PLUG B –PIN10 BROWN
Take Brown from OBD Port
Bridge for W164
Wires from Car Wires to EZS

Option 5 – Fit Inside Dash
Renault Megane 3, Laguna 3 and Scenic 3
Megane3
1. Remove dashboard from car and open back cover carefully to get full access to dashboard
PCB.
2. Change mileage in 24C16 eeprom.
3. Remove and discard electronic component showed in the photo below. This component will
be not soldered back to the PCB anymore.
Remove this component
Bridge Point RENO
5v
gnd
a
b
c
d

Laguna 3
1. Remove dashboard from car and open back cover carefully to get full access to dashboard
PCB.
2. Change mileage in 24C16 eeprom.
3. Remove and discard electronic component showed in the photo below. This component will
be not soldered back to the PCB anymore.
Remove this component
Bridge Point RENO
5v
gnd
a
b
c
d

Scenic 3
1. Remove dashboard from car and open back cover carefully to get full access to dashboard PCB.
2. Change mileage in 24C16 eeprom.
4. Remove and discard electronic component showed in the photo below. This component will
be not soldered back to the PCB anymore.

Typical Installation:
Bridge Point RENO
a
b d
c
5v
gnd
REVTRONIC
www.enigmatool.co.uk