Embed Size (px)
Citation preview

© 2017 eFolder, Inc. All rights reserved. Last Update: May 2017 Page 1
Replibit Recovery Toolkit
eFolder Replibit
Replibit Recovery Toolkit

© 2017 eFolder, Inc. All rights reserved. Last Update: May 2017 Page 2
Replibit Recovery Toolkit
Customer Support
At eFolder, we want to help you quickly resolve your technical issues and value your input to build products that incorporate your suggestions!
If you need assistance with set-up or any other technical questions or issues, please contact our Technical Support team at [email protected] or call:
720-642-6389, and select 2 for technical support, then 1 for Replibit, which includes eFolder Replibit, or
678-888-0700, and select 2 for technical support, then 1 for Replibit, which includes eFolder Replibit.
For known problem resolutions, open a browser and navigate to:
Knowledgebase:
https://secure.efoldering.com/support/index.php?/efolder/Knowledgebase/List/Index/69/bdr-for-replibit

© 2017 eFolder, Inc. All rights reserved. Last Update: May 2017 Page 3
Replibit Recovery Toolkit
Table of Contents
Table of Contents ..................................................................................................... 3
Overview of Features ................................................................................................ 5
Getting Started ......................................................................................................... 5
The Taskbar ..................................................................................................................... 6
Disk Manager................................................................................................................... 8
Disk and File Management ......................................................................................... 8
Using Disk Manager to mount local disk volumes..................................................... 8
File Manager .................................................................................................................. 10
Accessing Windows Network Shares........................................................................ 10
Drives and Paths: How Linux differs from Windows ................................................... 11
Available Utilities..................................................................................................... 12
Clamtk ............................................................................................................................ 12
Fred ................................................................................................................................ 13
GParted .......................................................................................................................... 14
Hardware Info ................................................................................................................ 15
Remote Support ............................................................................................................ 15
Secure Erase (Scrub) ..................................................................................................... 16
iSCSI Manager ............................................................................................................... 16
iSCSI Manager ............................................................................................................... 17
Shell (Linux Terminal) .................................................................................................... 17
TestDisk.......................................................................................................................... 17
Recovery Wizard PREPARATION ............................................................................ 18
Using the Recovery Wizard ..................................................................................... 19
Using the Disk Copy Wizard ................................................................................... 23
Dissimilar Hardware Driver Injection ...................................................................... 24
Benchmark tests ...................................................................................................... 28
Disk Performance .......................................................................................................... 28
CPU Performance .......................................................................................................... 29
Burn-in Testing .............................................................................................................. 29

© 2017 eFolder, Inc. All rights reserved. Last Update: May 2017 Page 4
Replibit Recovery Toolkit
Advanced Recovery Options .................................................................................. 30
Manually Recreate the UEFI Boot Partition ................................................................. 30
Manual Driver Injection for Windows Server 2008 R2 or newer ................................. 31
Manual Partition Recovery ............................................................................................ 32
Repair a Damaged Boot Record (Server 2008 R2 or Newer) ..................................... 34
Troubleshooting ...................................................................................................... 35
No Network Available ................................................................................................... 35
No Desktop Environment ............................................................................................. 35
NTFS Disk Will Not Mount with Disk Manager ........................................................... 36
Windows Server 2003 does not boot after recovery .................................................. 36

© 2017 eFolder, Inc. All rights reserved. Last Update: May 2017 Page 5
Replibit Recovery Toolkit
Overview of Features
The Replibit Recovery Toolkit is a Linux Live CD containing a wealth of tools and utilities for performing system recovery, diagnostics, troubleshooting, and general digital forensics.
Note: The Replibit Recovery Toolkit supports both legacy MBR and modern UEFI system architecture.
This utility contains:
Replibit Bare Metal Restore Wizard: Recover protected systems from a Replibit Appliance or Vault, directly back onto your replacement hardware. Protected systems may be recovered onto either physical or virtual machine hardware.
Replibit Driver Injector: Inject critical device drivers into an offline Windows operating system to allow it to boot properly after it has been recovered to dissimilar hardware.
Also included are tools for:
• disk partition recovery and editing • filesystem repair • antivirus scanning • offline Windows registry editing • disk cloning and imaging.
Getting Started
The Replibit Recovery Toolkit is built on Linux, and contains a comprehensive set of utilities that should please even the most experienced Linux users. For those less familiar with Linux, the disc has been designed to look and feel as much like Windows as possible, and experienced Windows users should have little difficulty navigating the GUI environment. Some of the most common applications have shortcuts located on the desktop, and the application menu behaves similarly to the Windows Start menu.
On the desktop, you will find the following items:
• Disk Manager – Manages the mounting and dismounting of system disks
• File Manager – Browse local and network files similar to Windows Explorer
• GParted – Graphical Partition Management utility
• Recovery Wizard – Recover systems from a Replibit Appliance or Vault
• Remote Support – Link to eFolder Replibit ScreenConnect Portal

© 2017 eFolder, Inc. All rights reserved. Last Update: May 2017 Page 6
Replibit Recovery Toolkit
The Taskbar
The system taskbar is located at the bottom of the desktop. This operates similarly to the Windows taskbar.
The system Taskbar contains:
Desktop Selector The Desktop Selector buttons allow you to toggle between two virtual desktops. After opening your Application windows, you can click on the selector buttons as shown, and easily alternate between them by clicking on each selector button.
Launcher Menu The Launcher Menu is similar to a Windows Start menu. To open, click on the button in the bottom left corner as shown. Use the Launcher menu to navigate a list of installed applications as you do similarly in Windows.
Quick Launch bar The Quick Launch bar contains icons for both Chrome (Chromium) and Firefox web browsers for your convenience.
© 2017 eFolder, Inc. All rights reserved. Last Update: May 2017 Page 7
Replibit Recovery Toolkit
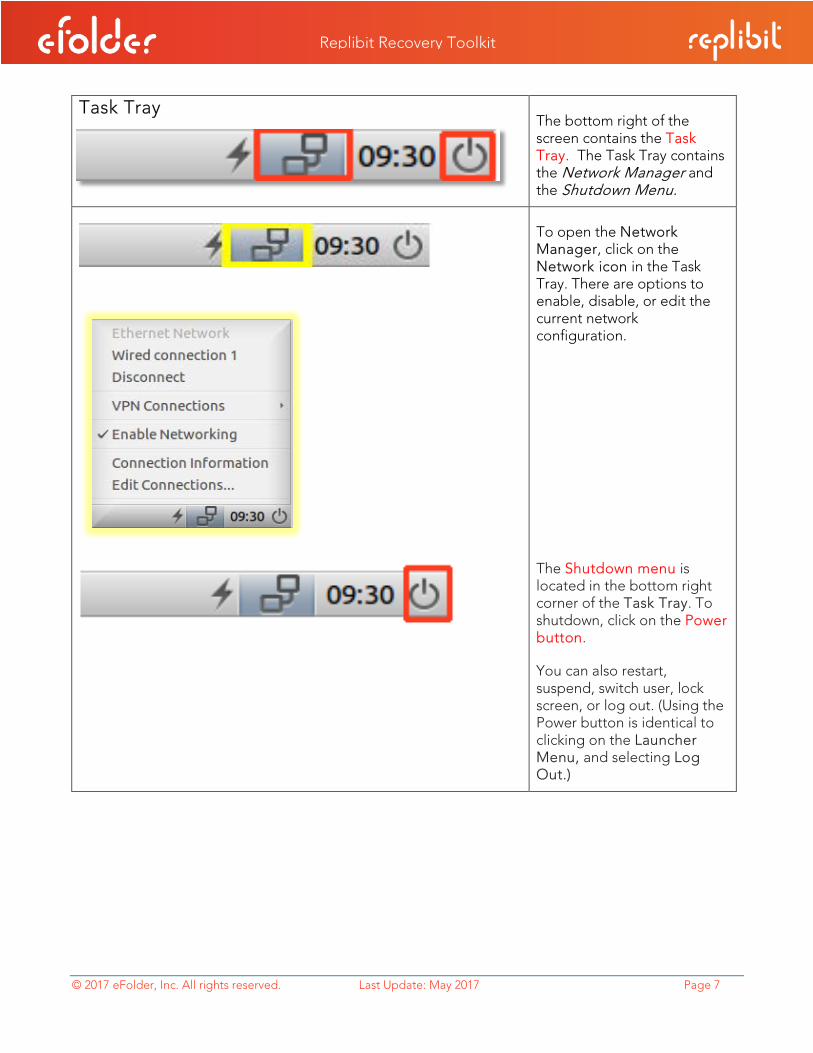
Task Tray The bottom right of the screen contains the Task Tray. The Task Tray contains the Network Manager and the Shutdown Menu.
To open the Network Manager, click on the Network icon in the Task Tray. There are options to enable, disable, or edit the current network configuration.
The Shutdown menu is located in the bottom right corner of the Task Tray. To shutdown, click on the Power button.
You can also restart, suspend, switch user, lock screen, or log out. (Using the Power button is identical to clicking on the Launcher Menu, and selecting Log Out.)

© 2017 eFolder, Inc. All rights reserved. Last Update: May 2017 Page 8
Replibit Recovery Toolkit
Disk Manager
Disk Manager is located on the Desktop, as well as within the Recovery Tools folder on the Launcher menu. Use Disk Manager to display the list of all attached disk devices in the system, and mount or dismount disk volumes for file access.
Disk and File Management
When the Replibit Recovery Toolkit initially boots, only the Linux operating system on the CD itself is mounted.
In order to browse and recover files from disks installed within the physical system, you will first have to open Disk Manager and mount the local disk volumes.
Using Disk Manager to mount local disk volumes
Within Disk Manager, there are several different panels:
• The left pane displays Discovered Devices and logical volumes. • The right pane displays Volumes, showing partitions on the selected device.

© 2017 eFolder, Inc. All rights reserved. Last Update: May 2017 Page 9
Replibit Recovery Toolkit
• The Actions pane offers choices to mount/dismount, delete partition, or perform other options on the selected partition.
Notes:
• Items you have selected in the Devices and Volumes panes will be highlighted in gray. • The area above the Volumes pane displays detailed information about the selected device. • The area below the Volumes pane shows details about the selected partition or volume.
If you receive an error when trying to mount a volume (for example, indicating that an NTFS partition cannot be mounted because it is not in a clean state), repair it as follows:
1. Open LXTerminal from the System Tools folder on the Launcher menu.
2. Run sudo su to elevate to the root user.
3. Identify the device name, like /dev/sda1 (See the bottom pane of DiskManager above)
4. Run ntfsfix <device> from the shell window. (i.e. ntfsfix /dev/sda1)
5. Once the partition has been repaired, mount it with Disk Manager by selecting the Volume, and then clicking on Mount from the Actions menu pane.

© 2017 eFolder, Inc. All rights reserved. Last Update: May 2017 Page 10
Replibit Recovery Toolkit
File Manager
The File Manager operates similarly to Windows Explorer. The left pane contains devices and familiar places, and the right pane contains the filesystem content. Double-click items to open or right-click for a menu of options.
Access Windows Network Shares
To open a window, select Go from the top menu and click Network.
When opening Network locations, a login dialog will be displayed in order to enter your credentials. Once you open a network share, it will be mounted and appear as a new folder on the desktop. Mounted network locations will also appear for selection in the File >Open dialog of any application.
Note for Advanced Users: The Menu icon in the top right of the Disk Manager window offers the option to create or restore a selected disk partition to or from an image file. If you would like to save this image file to a network location, first open the File Manager and browse to the desired network location in order to mount that network share.

© 2017 eFolder, Inc. All rights reserved. Last Update: May 2017 Page 11
Replibit Recovery Toolkit
Drives and Paths: How Linux differs from Windows
• IMPORTANT NOTE: Unlike Windows, Linux does not use drive letters
(such as C:\) to reference physical disks. Instead, everything within Linux is referenced from a hierarchical top-down pathing tree. The top of the tree is referred to as the root, and is represented with the forward-slash ‘/’ symbol. All physical devices and mounted disks are represented with a path proceeding from root.
For example, user home folders are generally located in ‘/home’. So, the Replibit user’s home folders would be located in ‘/home/replibit’.
Note: Linux uses a FORWARD slash ‘/’ within path names, whereas Windows uses a BACKSLASH ‘\’.
• Physical devices on the system all have special reference files located within the ‘/dev’ folder.
• Hard disk devices are generally referenced using a name containing three-letters, like hda or sdb.
• Names beginning with the letter ‘h’ are IDE based devices (uncommon on modern systems), while those beginning with the letter ‘s’ are SCSI, SATA, or USB type devices. In this naming scheme, the second letter is always ‘d’ for ‘Disk’, and the last letter is an alphabetical progression from a-z designating the order for multiple disks.
For example, the first IDE hard drive found on the system would be ‘/dev/hda’, the third SATA disk would be ‘/dev/sdc’ and so on.
• Partitions and volumes created on a physical disk are represented by adding a number to the device name.
For example, the first partition on the disk ‘/dev/sda’ would be referenced as ‘/dev/sda1’.
Note: Some RAID controllers (for example in HP servers) have different naming conventions. A complete list of discovered disk devices can be found by running Disk Manager.
• The special device files found within ‘/dev’ are not directly accessible for file access.
For example, you cannot browse to ‘/dev/sda1/Windows’. You must first mount the desired partition somewhere within the root filesystem, in order to access its contents.
• Using Disk Manager, you would first select the disk from the left pane, then select the partition from the Volumes pane, and then click on the Mount button in the Actions menu.
• The partition will be mounted at the path ‘/media/replibit/<Name>’ where <Name> is the label or logical unit ID of the selected partition. The full path, including the <Name> used will be displayed in Disk Manager below the Volume window, as a clickable link.
Mounted volumes will also appear as an icon on the desktop labeled <Name>.
© 2017 eFolder, Inc. All rights reserved. Last Update: May 2017 Page 12
Replibit Recovery Toolkit
Available Utilities
Clamtk
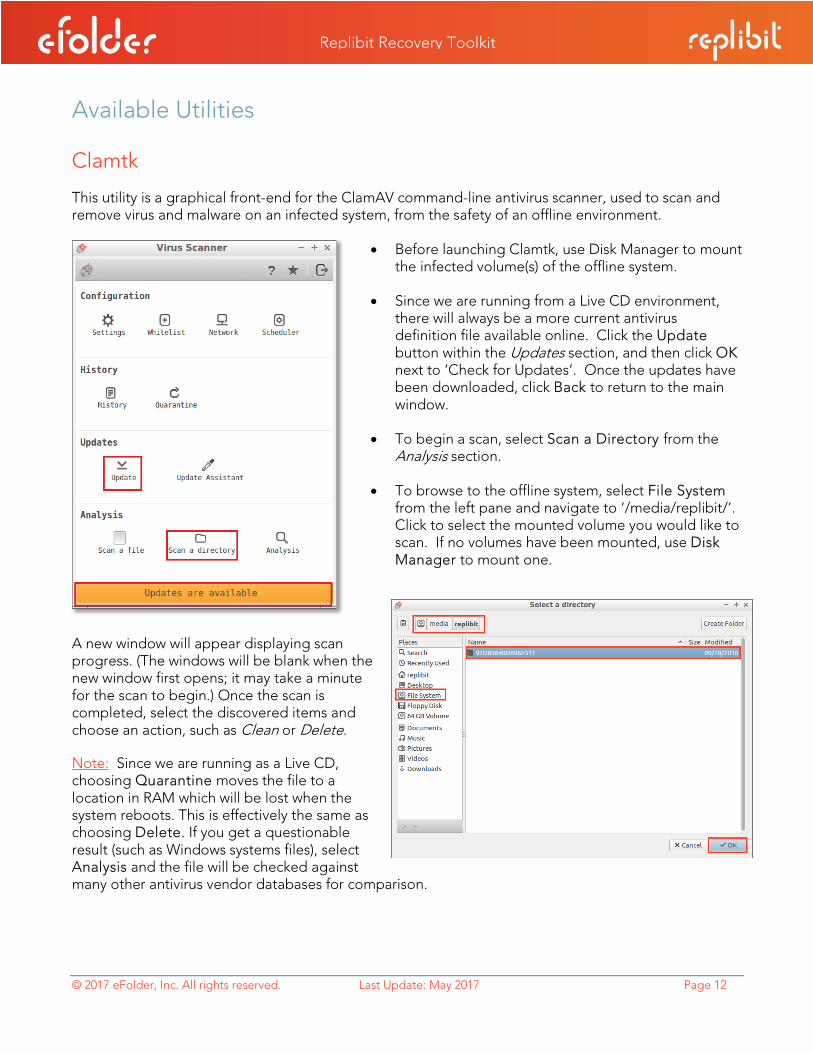
This utility is a graphical front-end for the ClamAV command-line antivirus scanner, used to scan and remove virus and malware on an infected system, from the safety of an offline environment.
• Before launching Clamtk, use Disk Manager to mount the infected volume(s) of the offline system.
• Since we are running from a Live CD environment, there will always be a more current antivirus definition file available online. Click the Update button within the Updates section, and then click OK next to ‘Check for Updates’. Once the updates have been downloaded, click Back to return to the main window.
• To begin a scan, select Scan a Directory from the Analysis section.
• To browse to the offline system, select File System from the left pane and navigate to ‘/media/replibit/’. Click to select the mounted volume you would like to scan. If no volumes have been mounted, use Disk Manager to mount one.
A new window will appear displaying scan progress. (The windows will be blank when the new window first opens; it may take a minute for the scan to begin.) Once the scan is completed, select the discovered items and choose an action, such as Clean or Delete.
Note: Since we are running as a Live CD, choosing Quarantine moves the file to a location in RAM which will be lost when the system reboots. This is effectively the same as choosing Delete. If you get a questionable result (such as Windows systems files), select Analysis and the file will be checked against many other antivirus vendor databases for comparison.
© 2017 eFolder, Inc. All rights reserved. Last Update: May 2017 Page 13
Replibit Recovery Toolkit
Fred
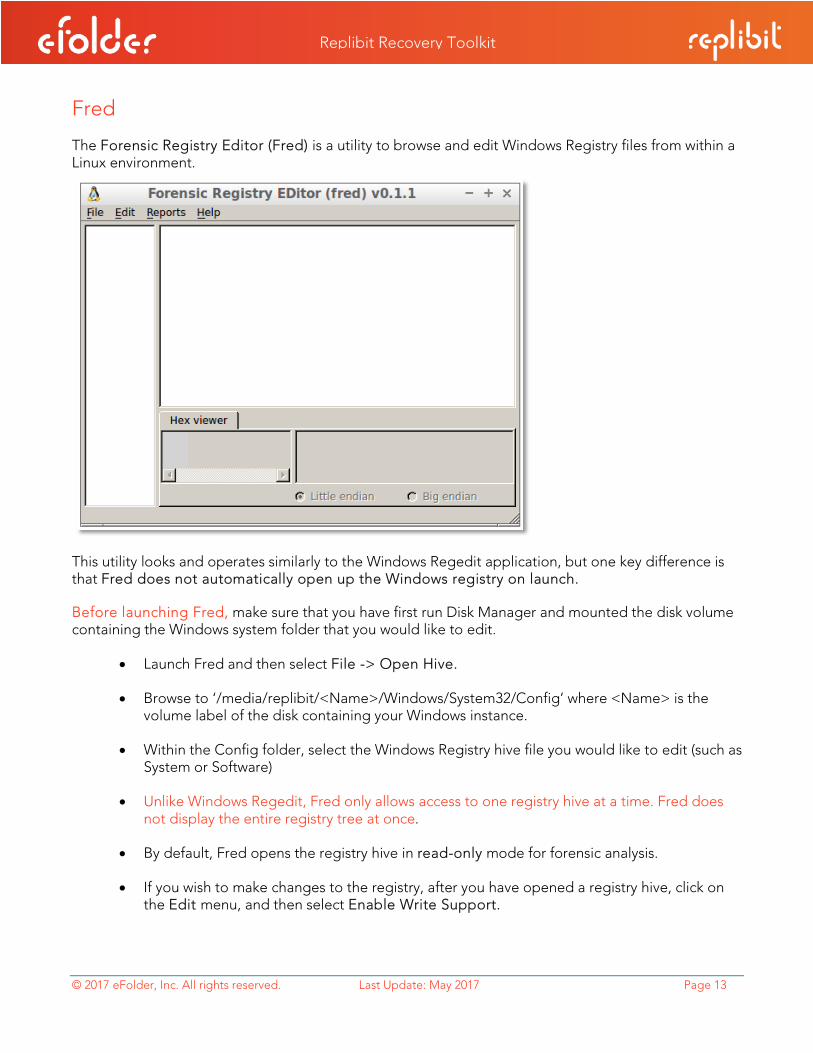
The Forensic Registry Editor (Fred) is a utility to browse and edit Windows Registry files from within a Linux environment.
This utility looks and operates similarly to the Windows Regedit application, but one key difference is that Fred does not automatically open up the Windows registry on launch.
Before launching Fred, make sure that you have first run Disk Manager and mounted the disk volume containing the Windows system folder that you would like to edit.
• Launch Fred and then select File -> Open Hive.
• Browse to ‘/media/replibit/<Name>/Windows/System32/Config’ where <Name> is the volume label of the disk containing your Windows instance.
• Within the Config folder, select the Windows Registry hive file you would like to edit (such as System or Software)
• Unlike Windows Regedit, Fred only allows access to one registry hive at a time. Fred does not display the entire registry tree at once.
• By default, Fred opens the registry hive in read-only mode for forensic analysis.
• If you wish to make changes to the registry, after you have opened a registry hive, click on the Edit menu, and then select Enable Write Support.

© 2017 eFolder, Inc. All rights reserved. Last Update: May 2017 Page 14
Replibit Recovery Toolkit
GParted
This application is a powerful partition management utility and includes:
• The ability to check, create, delete, resize, move, format, or copy partitions. • Robust support for multiple operating systems, computing platforms, and filesystems. • Support for all filesystems commonly available under Windows, Mac, and Linux.
1. Select the desired physical disk using the drop-down selector at the top right.
2. Right-click on individual partitions within the main window for a list of operations that may be performed.
3. After selecting a Move or Resize operation, click and drag the body or edges of the partition, or enter exact numbers in the operation dialog window to specify how you want the operation to be performed.
4. GParted does not perform most actions immediately, but rather queues them up into a batch. The list of pending actions is displayed in the lower half of the window. You may right-click pending operations and select delete to remove them from the list.
5. Once you have selected all of the operations that you require, click the check-mark button in the top toolbar to perform all pending actions.

© 2017 eFolder, Inc. All rights reserved. Last Update: May 2017 Page 15
Replibit Recovery Toolkit
Hardware Info
The Hardware Info utility provides a convenient graphical display of discovered hardware within the system. This is useful for determining which drivers you may need to install when recovering a protected system to a different hardware or virtual device than it was originally running on.
For example, to determine which Hard Drive controller is installed in the system, select PCI Devices from the left pane, and scroll through the main window looking for IDE, SATA, SCSI, or Serial Attached SCSI devices. Select the device and the window will populate with detailed identification data.
Remote Support
Clicking the Remote Support icon on the desktop will launch Firefox and take you to the eFolder Replibit remote support site.
Enter the code provided by your Replibit support engineer and then click on the large arrow button to the right in order to share your screen.
This will provide remote access to the running Recovery Tools environment and enable direct support assistance from the eFolder Replibit engineering team.
TCP Ports 8040-8041 need to be open for outbound connections on your firewall in order to use our Remote Support tool.

© 2017 eFolder, Inc. All rights reserved. Last Update: May 2017 Page 16
Replibit Recovery Toolkit
Secure Erase (Scrub) Perform a secure disk wipe and thoroughly erase all data from a disk device, using the scrub utility. Important! This will overwrite the entire drive with random data!
• From the System Tools folder on the Launcher Menu, select LXTerminal to open a shell window.
• At the command line type sudo su and press enter to elevate your status to the root user. • To wipe a disk, type scrub <Device Path> where <Device Path> is the disk to erase
For example: scrub /dev/sda • This operation make take a long time to complete if the disk is very large. • All data on the disk will become unrecoverable!
iSCSI Manager
A simple utility for managing connections to remote iSCSI disk volumes, iSCSI Manager operates similarly to Microsoft’s iSCSI Initiator tool on Windows and may be used to connect to disk volumes that have been exported from a SAN or NAS device, or from a Replibit Appliance or Vault via the Start iSCSI action from the Protected System Details page.
• After you have exported the iSCSI volumes, run iSCSI Manager from the Recovery Tools folder of the Launcher Menu.
• Enter the IP address of the SAN, NAS, Appliance or Vault in the Portal Address field and click on Discover. The Discovered Targets will populate with available Disk Volumes.

© 2017 eFolder, Inc. All rights reserved. Last Update: May 2017 Page 17
Replibit Recovery Toolkit
iSCSI Manager (continued)
• To identify which Windows volume is associated with each discovered target, consult the iSCSI tab on the Web GUI of the Replibit Appliance and compare the IQN names. (To determine the IQN names exported by a SAN or NAS device, consult the documentation for that unit.)
• Click to select a Target Volume, and then click on Connect to mount the device as a new disk. Once mounted, the Device Name will be displayed in the Device column. (i.e. /dev/sdb)
• To disconnect a device, select the target and click on Disconnect. Connected devices are persistent until the system is rebooted, or the target is disconnected using iSCSI Manager.
Shell (Linux Terminal)
Advanced users may find the Linux Shell Terminal to be useful, as there are a plethora of Linux command-line utilities included on the Recovery Tools disk. To open a Linux Shell, select LXTerminal from the System Tools folder on the Launcher menu.
From the shell, a wide range of command-line utilities are available to assist with troubleshooting, repairing, searching, and so on. Some useful command-line utilities include: clonezilla, ethtool, fdisk, foremost, fsck, iotop, locate, photorec, safecopy, scalpel and various zfs filesystem commands.
• To attain root user access, run the command sudo su.
Note: Documentation of Linux command-line features is beyond the scope of this manual.
TestDisk
This advanced partition recovery utility is capable of identifying and recovering deleted or corrupt partitions and data. TestDisk is a Shell console application, recommended to be used only by expert and experienced users who are thoroughly familiar with data recovery and Linux.
WARNING: Improper use of TestDisk can destroy your data. Documentation of TestDisk is beyond the scope of this document. USE AT YOUR OWN RISK!!

© 2017 eFolder, Inc. All rights reserved. Last Update: May 2017 Page 18
Replibit Recovery Toolkit
Recovery Wizard PREPARATION The following section will provide step-by-step instructions on preparing for and using the Replibit Recovery Wizard to restore your system directly from an Appliance or Vault onto physical or virtual hardware.
Note: If you require multiple partitions on a single physical disk to complete system recovery, you cannot use the automated recovery wizard. Please contact Support for assistance in performing a manual partition recovery.
• To begin, boot the system that you wish to recover onto from a Recovery Toolkit CD or USB image.
• Before beginning the recovery process, run Disk Manager from the desktop shortcut, or from the Recovery Tools folder on the Launcher Menu.
• Examine the properties of the physical disks installed in the system. Make a note of their size and device names.
When performing the recovery, you will need to know the Linux device names that you wish to restore your original Windows drive volumes onto. As mentioned previously, Linux does not use drive letters to identify disk devices in the way that Windows does
In this example, you will restore the C:\ drive onto /dev/sda
When there are multiple disks present, you can usually determine which Linux Volume matches with the Windows drive by comparing volume size.

© 2017 eFolder, Inc. All rights reserved. Last Update: May 2017 Page 19
Replibit Recovery Toolkit
Note: The size displayed by the Linux utilities is in raw bytes, not true GB/TB. For example, where Windows shows 60GB, the Linux tools displays 64GB (64 billion bytes.)
• When recovering your system, the Destination disk must be at least as large as the original Source Windows volume.
o Each Windows volume with a drive letter will be restored onto its own dedicated disk during the recovery. If the original Windows system had its hard drives partitioned into multiple volumes, (for example, C: and D: are both located on a single physical disk,) each of those partitions will be restored onto its own disk during the recovery. Make sure you have sufficient physical or virtual disks in the system for each Windows volume that you intend to restore.
o Note: If you require multiple partitions on a single physical disk to complete system recovery, you cannot use the automated recovery wizard. Contact support for assistance or refer to the section in this guide, Manual Partition Recovery.
• Once you have identified your installed hard drives and verified their size and quantity is sufficient to allow completion of your system recovery, launch the Recovery Wizard from the desktop shortcut, or from the Recovery Tools folder on the Launcher menu.
• The Wizard will walk you through connecting to an Appliance or Vault, selecting the Protected System that you wish to recover and choosing a recovery point, and assigning volumes to be recovered to local disks.
Using the Recovery Wizard 1. After launching the Recovery Wizard, on the first page, enter:
a) IP address of the Appliance or Vault from which you are recovering your Protected System b) User name (admin on an Appliance, or the customer account on a Vault) c) Password

© 2017 eFolder, Inc. All rights reserved. Last Update: May 2017 Page 20
Replibit Recovery Toolkit
Click Next to proceed to the next page.
2. From the drop-down list of systems, select the protected system that you would like to recover.
You can choose from a list of the most recent snapshots, or from a specific date.
After making your selections, click on Next to proceed to the next page.
3. Choose the snapshot you would like to recover from the drop-down list. If this system is protected by an encryption password, enter the password in the Encryption Password box. (If no password is
needed, Encryption Password will not be displayed.) Click Next to proceed to the next page.
Note: The Recovery Wizard always exports iSCSI volumes in Live Mode.

© 2017 eFolder, Inc. All rights reserved. Last Update: May 2017 Page 21
Replibit Recovery Toolkit
If you are recovering a system that has been running as a virtual machine in Live Mode, select the same running recovery point, so that you restore all data changed while virtualized in recovery mode.
4. Wait for
a) the wizard to connect to the Appliance or Vault b) iSCSI to export the Protected System’s disk(s) from the selected snapshot c) iSCSI to mount them on the local system.
Once the iSCSI operations have completed, click on Next to proceed to the next page.

© 2017 eFolder, Inc. All rights reserved. Last Update: May 2017 Page 22
Replibit Recovery Toolkit
5. Click to select the checkbox next to one or more Windows disk volumes that you would like to restore from backup. Refer to the list of local disks you made earlier (or use the displayed disk sizes to align your selections) and then select which local disk to restore each Windows volume onto using the drop-down list selection.
Click Next to proceed to the next page.
6. The disk recovery process will begin. A description of the recovery operation being performed is shown in the main window.
The details of the current operation are displayed at the bottom of the window, including elapsed time, estimated time remaining, percentage complete, and transfer rate.
Once all recovery operations have completed, click Finish to close and exit the wizard.
7. Reboot your system and verify that the recovery was completed successfully.

© 2017 eFolder, Inc. All rights reserved. Last Update: May 2017 Page 23
Replibit Recovery Toolkit
Using the Disk Copy Wizard
You can use the Disk Copy Wizard to (a) clone one or more existing hard disks onto new drives, (b) migrate to new hardware, or (c) replace failing disks within a system.
Before running the Disk Copy Wizard: Launch Disk Manager to help identify the Linux device paths of the drives within the system. This will help you in selecting source and destination devices.
1. Launch the Disk Copy Wizard from the Recovery Tools folder on the Launcher menu. 2. Select a source and destination disk device and click Add to queue up the copy job.
3. Once you have added all of the source and destination disk pairs to the queue, click Next to proceed to the next page.
4. The disk copy process will now begin. Detailed job information will be displayed within the main window. Progress details of the current job are displayed at the bottom of the window.
Once all copy jobs are completed, click Finish to exit the wizard.

© 2017 eFolder, Inc. All rights reserved. Last Update: May 2017 Page 24
Replibit Recovery Toolkit
Dissimilar Hardware Driver Injection If recovering to a Bare Metal system, it is likely that the new hardware is substantially different from the original machine and the recovered system will need to have drivers installed for the new devices. Perform the following steps to inject drivers into the offline system prior to booting it for the first time.
• Mount the volume containing the C: drive of the protected system using Disk Manager.
• From the Recovery Tools menu, launch the Driver Injector.
• If you have not mounted a disk volume that contains a valid Windows installation folder, you will receive a warning that the Driver Injector could not locate the offline Windows installation, “No offline systems found!”

© 2017 eFolder, Inc. All rights reserved. Last Update: May 2017 Page 25
Replibit Recovery Toolkit
• From the dropdown menu, select the Offline Windows Operating System, then click browse and select the location containing the Windows drivers you would like to install. To use the basic set of Windows drivers that has been included on the Recovery ISO, select the /root/Windows-Drivers folder. You may leave all other settings at their default values.
• Click Next to continue.
• Wait for the Driver Injector to read through the provided driver files, and make matches against the hardware installed within the running system.
• Click Next to continue.
© 2017 eFolder, Inc. All rights reserved. Last Update: May 2017 Page 26
Replibit Recovery Toolkit
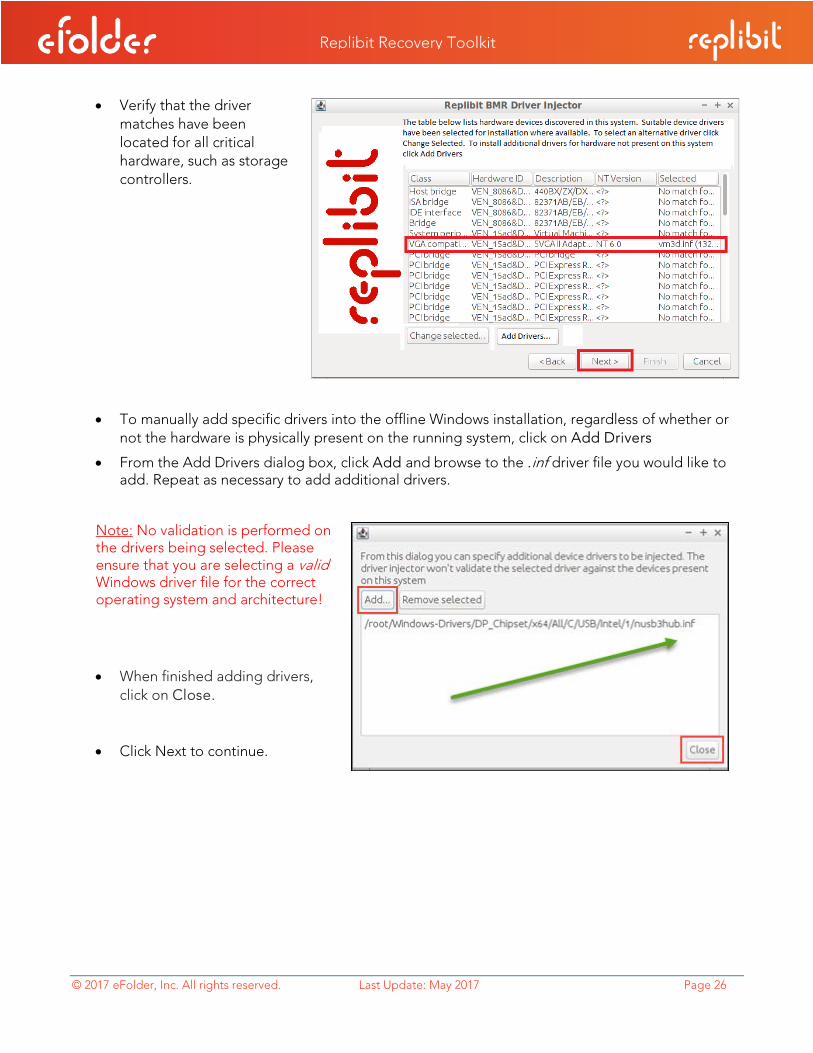
• Verify that the driver matches have been located for all critical hardware, such as storage controllers.
• To manually add specific drivers into the offline Windows installation, regardless of whether or not the hardware is physically present on the running system, click on Add Drivers
• From the Add Drivers dialog box, click Add and browse to the .inf driver file you would like to add. Repeat as necessary to add additional drivers.
Note: No validation is performed on the drivers being selected. Please ensure that you are selecting a valid Windows driver file for the correct operating system and architecture!
• When finished adding drivers, click on Close.
• Click Next to continue.

© 2017 eFolder, Inc. All rights reserved. Last Update: May 2017 Page 27
Replibit Recovery Toolkit
• The previously discovered and (optionally) manually selected drivers will now be installed. Click Finish once the installation process has completed.

© 2017 eFolder, Inc. All rights reserved. Last Update: May 2017 Page 28
Replibit Recovery Toolkit
Benchmark tests
Disk Performance
Basic disk benchmarking may be performed using Disk Manager.
1. Launch Disk Manager from the desktop or from the Recovery Tools folder on the Launcher menu. Select the drive you wish to test from the Devices panel.
2. Click the Menu button in the top right corner and select Benchmark Disk.
3. Select the Start Benchmark button at the bottom of the window.
4. Enter your desired values for number of samples, and sample size, or take the defaults.
5. Click on Start Benchmarking to begin the testing process. Read and write performance are graphed in blue and red respectively. Access (seek) time is graphed in green.

© 2017 eFolder, Inc. All rights reserved. Last Update: May 2017 Page 29
Replibit Recovery Toolkit
CPU Performance
Several different types of CPU benchmark tests are available within the Hardware Info utility.
• Launch Hardware Info from the Recovery Tools folder of the Launcher menu. • In the left pane, collapse the Computer, Devices, and Network sections. • Within the Benchmarks section, click on a performance test to run that test immediately.
The results panel displays a graph comparing this computer to a set of known benchmarks.
Burn-in Testing
The process of performing a burn-in test involves applying stress for a period of time on a new computer system, in order to try to ensure that there are no faulty components within the system. Forcing the computer to operate under high CPU, memory, and disk IO load operations for an extended period of time can act as a quality control test of the system before delivering it to the customer. Typically, a burn-in test will be run over a period of 6-12 hours.
To perform burn-in testing:
• Run LXTerminal from the System Tools folder on the Launcher menu.
• From the shell, run sudo stress and specify how many threads of each type of load you wish to run.
For example: sudo stress --cpu 4 --io 2 --vm 2--hdd 4 --timeout 6h Note: stress performs hard drive IO testing by writing to the current directory. Ensure the current directory is writable and located on the physical disk you wish to test. To test a specific hard drive volume, first mount it with Disk Manager, and then change directory to /media/replibit/<Name>, where <Name> is the volume label or ID, before running stress.

© 2017 eFolder, Inc. All rights reserved. Last Update: May 2017 Page 30
Replibit Recovery Toolkit
Advanced Recovery Options
Manually Recreate the UEFI Boot Partition
UEFI systems that were backed up prior to UEFI supported agents, or systems with corrupted UEFI partitions will not be able to boot after using the Recovery Wizard. The following manual procedure may be used to repair the UEFI boot partitions of these systems:
1. Boot from a Windows Operating System disk or ISO. Be sure the system is configured to boot using UEFI mode, not Legacy BIOS mode
2. Click OK or Next on the language selection page, and then select the Repair option on the next screen.
3. Select Troubleshoot and choose Command Prompt to open a recovery shell.
4. Prepare the Destination disk for UEFI
a. From a CMD prompt run DISKPART b. Enter Select Disk x (where x is the drive number of the target recovery C: disk)
Note: Use List Disk to display a list of attached disk drives c. Select Partition x (where x is the system partition)
Use list partition to see the list of partitions and identify system d. Delete Partition e. Create Partition efi f. Select Partition x (where x is the System partition) g. Format Quick FS=fat32 h. Assign i. List volume (Note the drive letter assignments) j. Exit
5. Copy the Windows EFI boot files a. Locate the drive letter containing the Windows folder by changing drives and Dir
(i.e. enter D:<enter> to change to the D: drive and then Dir to list disk contents) Note: You may need to inject a storage controller driver if it is not native on the Windows Operating System disk. See Manual Driver Injection in the next section.
b. Mkdir <drv:>\EFI (where <Drv:> is the drive letter assigned to the System partition) c. Xcopy <winDrv:>\Windows\Boot\EFI <sysDrv:>\EFI (Where winDrv is the drive
containing the Windows folder, and sysDrv is the drive assigned to the System partition) 6. Recreate the Windows BCD boot records and EFI System files
a. From the CMD prompt and run the following commands b. Bootrec /FixBoot c. Bootrec /RebuildBCD (Enter ‘Y’ when prompted) d. Bcdboot x:\windows (Replace ‘x’ with the Destination drive letter containing the
Windows folder) 7. Remove the Windows Operating System disk and reboot the system in UEFI mode

© 2017 eFolder, Inc. All rights reserved. Last Update: May 2017 Page 31
Replibit Recovery Toolkit
Manual Driver Injection for Windows Server 2008 R2 or newer
When restoring your system to different hardware, it is likely that the original operating system may not have all of the drivers necessary to boot normally after performing the recovery. The following procedure will walk you through manually installing critical device drivers to enable the system to boot on the new hardware.
Note: Use this procedure only if the Replibit Driver Injector utility fails to install your drivers.
1. Start by locating the necessary critical drivers for the new hardware (such as storage and network controllers).
2. Copy the installation files to a USB stick.
3. Make a folder named Drivers, and copy each set of driver files into its own folder inside the Drivers folder. Note: Copy only the files for the correct architecture for your operating system. (Copy x86 or x64 files, not both.)
4. Boot the system from a Windows operating system installation disk.
5. Click OK or Next on the language selection page, and then select the Repair option on the next screen.
6. Select Troubleshoot and choose Command Prompt to open a recovery shell.
7. Connect your USB disk to the system.
8. Using DOS commands, switch drives and perform a DIR command, starting from C: and moving upwards until you have identified which drive letter contains your USB stick Drivers folder, and which drive contains the Windows folder. (For example, type C: and press enter, then type DIR and hit enter to list the drive contents.) DOS will inform you if the given drive letter does not exist.
9. If you cannot find the Windows folder on any drive, it means that the Windows Installer media does not have a driver for your storage controller. Switch drives for the USB stick and change directory into the folder containing the storage controller drivers. Run DIR to list the files and identify the driver.inf file name. To load the driver into the running system, type drvload.exe <driver.inf> where driver.inf is the file you just identified. Repeat the drive switching process above and locate the drive letter that contains the Windows folder.
10. To install the drivers into your recovered system, run the following command: DISM /Image:<ImagePath> /Add-Driver /Driver:<DriverPath> /Recurse a. Replace <ImagePath> with the drive leter containing the Windows folder b. Replace <DriverPath> with the path to the Drivers folder Example: DISM /Image:E:\ /Add-Driver /Driver:C:\Drivers /Recurse
11. If successful, DISM will display a message advising that the drivers have been installed. Remove the Windows operating system disc and power cycle the system. Verify that the system boots normally.

© 2017 eFolder, Inc. All rights reserved. Last Update: May 2017 Page 32
Replibit Recovery Toolkit
Manual Partition Recovery
In some cases, it may be necessary to perform a manual, partition-by-partition recovery operation to restore a system to working order. For example, if the original source disk contains multiple Windows volumes, and you must restore the original topology when recovering the system, you can use a manual copy process to recover the data, one partition at a time. (Replibit’s Recovery Wizard recovers each protected Windows volume to its own dedicated disk.)
The following is an example of how to use Manual Partition Recovery to restore a system where the original Disk 0 drive contains multiple Windows volumes:
1. Start by exporting the protected system via iSCSI Start. From the Replibit Web GUI, select the protected system details page. Locate the desired snapshot and select iSCSI Start. If you are recovering a system that has been running in Live Mode as a virtual machine on the Appliance, then select Live Mode when starting iSCSI. Otherwise, choose Test Mode.
2. Boot your new system from the Replibit Recovery Toolkit.
3. When the desktop loads, launch iSCSI Manager from the Recovery Tools folder of the Launcher menu.
4. Enter the IP address of your Appliance and click Discover.
5. Select the disk target(s) containing the Windows volume(s) you wish to recover and click on Connect to attach them to the recovery tools environment.

© 2017 eFolder, Inc. All rights reserved. Last Update: May 2017 Page 33
Replibit Recovery Toolkit
6. Launch Disk Manager and examine your attached disk devices. Identify the device path for the local disk you intend to restore the C: volume onto, as well as the device path of the original C: volume you mounted via iSCSI Manager.
7. a.) Launch LXTerminal from the System Tools folder of the Launcher menu.
b.) Within the shell terminal, elevate to the root user by running sudo su.
c.) Clone the partition table and disk identity onto the new system by running the following command: dd if=<source disk device> of=<destination disk device> bs=1024 count=1024. For example, if your original protected system is /dev/sdb and your new local disk is /dev/sda then you would run dd if=/dev/sdb /of=/dev/sda bs=1024 count=1024
11. Launch GParted from the shortcut on the desktop.
Note:
If a message appears during launch stating that not all available space is in use, click Fix. For each partition from the original C: drive:
• Select the source disk device from the drop-down choices in the top right corner • Right-click on the partition and select copy • Select the destination disk from the drop-down selector

© 2017 eFolder, Inc. All rights reserved. Last Update: May 2017 Page 34
Replibit Recovery Toolkit
• Right-click the appropriate partition • Click Paste • Click OK when the warning on overwriting an existing partition appears.
For additional volumes, repeat the steps above to copy each partition onto the destination disk. Select unallocated space on the destination disk and a new partition will be created. Once all partitions have been selected, click the Check button from the top tool bar to perform the selected actions.
12. When all operations have completed, reboot to verify that the system will boot normally.
Repair a Damaged Boot Record (Server 2008 R2 or Newer)
In the event that your recovered system does not boot (or a Blue-Screen error message appears on startup), it may be necessary to recreate the Windows boot records on the hard drive.
• Boot the system from a Windows operating system disc.
• Click Next on the language selection page, and then choose the Repair option.
• Select Troubleshooting and then select Command Prompt.
• From the command shell, switch disks and locate the recovery partition (if it exists.) This will likely be on C:. The recovery partition will most likely appear to be empty, but verify that you can change directory into the hidden folder named BOOT. Within BOOT, rename the existing BCD file.
For example: move BCD BCD.old
• Run the following commands to replace the boot records
bootrec /fixmbr (Only for systems using legacy MBR BIOS, not UEFI systems) bootrec /fixboot bootrec /RebuildBcd
• Select Yes when prompted for Windows instances to install
• Reboot and verify that the system boots normally
© 2017 eFolder, Inc. All rights reserved. Last Update: May 2017 Page 35
Replibit Recovery Toolkit
Troubleshooting Below are some possible issues you might encounter while using the Recovery Toolkit, and our recommend work-arounds or fixes.
• For support from our excellent team of engineers, visit http://www.efolder.net/support.
• Click on Start Support Session to create a new ticket. This is the fastest way to receive a call back from the eFolder Replibit engineering team.
• You may also browse our Knowledgebase for answers to commonly encountered issues.
No Network Available
On rare occasions, when booting the Recovery Toolkit, the network layer does not start.
This happens because Linux has not discovered any network adapters.
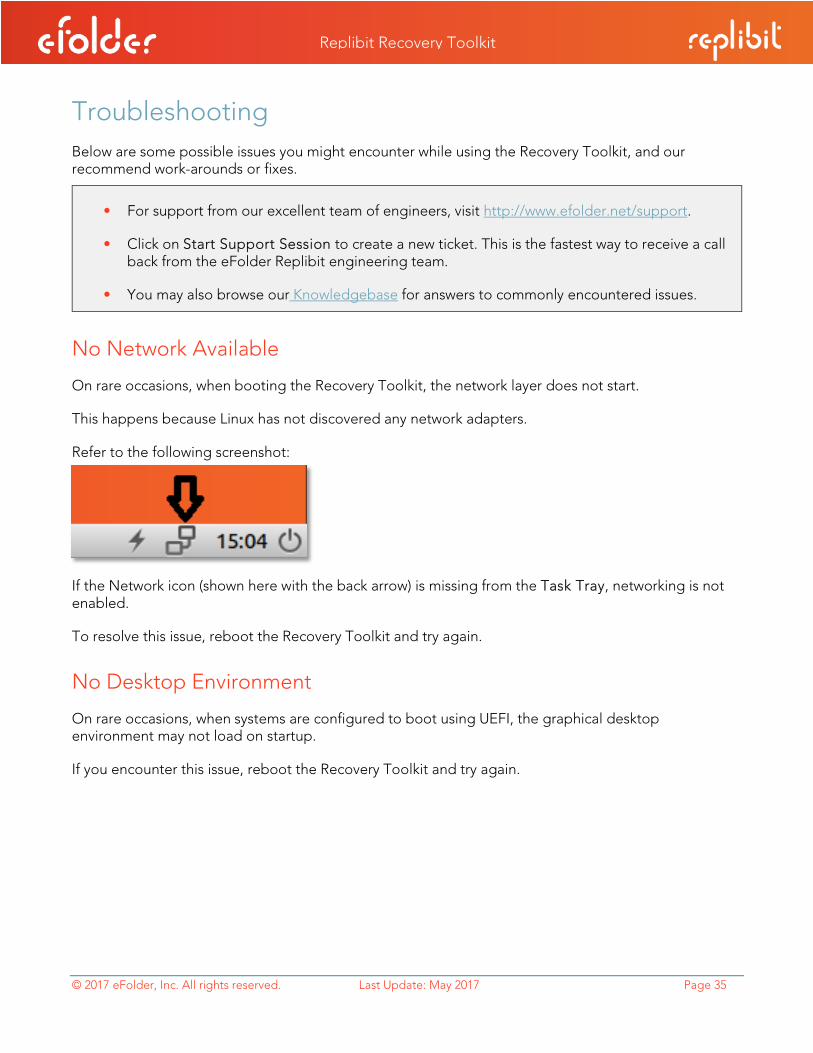
Refer to the following screenshot:
If the Network icon (shown here with the back arrow) is missing from the Task Tray, networking is not enabled.
To resolve this issue, reboot the Recovery Toolkit and try again.
No Desktop Environment
On rare occasions, when systems are configured to boot using UEFI, the graphical desktop environment may not load on startup.
If you encounter this issue, reboot the Recovery Toolkit and try again.

© 2017 eFolder, Inc. All rights reserved. Last Update: May 2017 Page 36
Replibit Recovery Toolkit
NTFS Disk Will Not Mount with Disk Manager
You may receive an error within Disk Manager stating that an NTFS volume cannot be mounted because it was not shut down in a clean state. To resolve this issue, a disk check must be performed on the volume.
• Open LXTerminal from the System Tools folder on the Launcher menu.
• Run sudo su to elevate to the root user.
• Identify the device name, like /dev/sda1 (See the bottom pane of DiskManager above)
• Run ntfsfix <device> from the shell window. (i.e. ntfsfix /dev/sda1)
• Once the partition has been repaired, mount it with Disk Manager by selecting the Volume, and then clicking on Mount from the Actions menu pane.
Once the repair has completed, close LXTerminal and try mounting the volume with Disk Manager again.
If this fails, launch LXTerminal and elevate to root by running sudo su. Run ntfsfix <device> to repair the filesystem. (i.e. ntfsfix /dev/sda1)
Windows Server 2003 does not boot after recovery
You may receive an error message such as Error Loading Operating System, after recovering a system running Windows Server 2003.
To resolve this issue, boot the system from the Recovery Toolkit again and perform the following steps to repair the NTFS filesystem:
• Open GParted and identify which disk partition has the Boot flag set.
(This is likely to be /dev/sda1, for example.)

© 2017 eFolder, Inc. All rights reserved. Last Update: May 2017 Page 37
Replibit Recovery Toolkit
• Open LXTerminal from the System Tools folder on the Launcher menu.
• Run sudo su to elevate your permissions to root.
• Run ntfsfix <device path> to perform a file system check and fix any errors discovered.
(For example, ntfsfix /dev/sda1)
Copyright © 2017 eFolder Inc.
All rights reserved. All trademarks are the property of their respective owners.
eFolder Inc. is the sole author of this document. eFolder and the eFolder logo are trademarks of eFolder Inc. eFOLDER MAKES NO WARRANTIES, EXPRESSED OR IMPLIED, IN THIS DOCUMENT