Embed Size (px)
Citation preview

IMPORTANT!Failure to read, understand and follow theinstructions and warnings in this instructionmanual could result in serious injury ordeath to the child.
Can.Eng.. 4358-3434E
Dorel Juvenile Group
Read all instructions BEFORE USING this child restraint and booster seat.
KEEP INSTRUCTIONS FOR FUTURE USE.
Alpha Omega® Elite/LuxeDeluxe 3-In-1, All Terrain
Owner’s Manual
Infant Restraint2.3-16 kg (5-35 lb)48-81 cm (19-32 in.)
Child Restraint10-18 kg (22-40 lb)74-102 cm (29-40 in.)
Booster Seat18-36 kg (40-80 lb)102-132 cm (40-52 in.)
55
Replacement Parts ListNOTE: If requested color is not available, similar color will besubstituted.Part Cost Quantity Total CostBuckle/Crotch Strap $6.99 X______= $ ______________Harness Strap . . . . .$2.99 X______= $ ______________Full Wrap . . . . . . .$42.00 X______= $ ______________5-point PadChest Clip . . . . . . . .$1.50 X______= $ ______________Locking Clip . . . . . . .$2.50 X______= $ ______________Tether Kit . . . . . . . .$9.99 X______= $ ______________UAS Kit . . . . . . . . .$24.99 X______= $ ______________Instructions . . . . . . .$0.00 X______= $ ______________
Merchandise Total $______________
Shipping and handling: $______________
Sales Tax $ ____________Residents of Quebec, add 5% GST and 7.5% QST.Residents of New Brunswick, Newfoundland and Nova Scotia, add 13% HST.All other provinces, add 5% GST.
Grand Total $ ______________No shipping and handling on instructions for quantities under 6. Add $.50 for each instruction over 6, then add applicable shipping and handling.
Fill Out For Credit Card �� Visa �� Mastercard
Card Exp. Date:______________________________
Cardholder’s Name:__________________________
Card Number: ______________________________
Signature____________________________________
Up to $25.00 . . . . . . . . . .$5.95$25.01 to $50.00 . . . . . . .$6.95$50.01 to $75.00 . . . . . . .$8.95$75.01 to $100.00 . . . . . .$9.95
$100.01 to $150.00 . . . . .$10.95$150.01 to $200.00 . . . . .$11.95$200.01 and up . . . . . . . .$13.95Outside USA and Canada $10.00
CU
T O
N D
OT
TE
D L
INE
12.15.08
4358-3434E Canada Elite Eng 12/17/08 3:36 PM Page 1

II
Registration Cards
I
Thank you for choosing this car seat, referred tothroughout this manual as a child restraint and boosterseat. Dorel Juvenile Group, (DJG) is committed tocreating convenient, comfortable, and dependableproducts for children.
No one can predict if use of a child restraint willprevent injury or death in a particular crash. However,combined with careful driving, proper use of a childrestraint can lower a child’s risk of injury or death inmost crashes.
Your child’s safety is worth the time it will take to read,understand and follow the instructions and warnings.
After reading if you still have questions or concerns withthe child restraint and booster seat please contact ourConsumer Relations Department.
On the back of the shell there is an expiry date for useof this child restraint. Do not use this seat after theexpiry date.
Before You Begin...
Dorel Juvenile Group, ConsumerRelations
Dorel Juvenile Group, Inc.
Mailing address: P.O. Box 2609Columbus, IN 47202-2609
Website: www.djgusa.com
Fax: 1-800-207-8182
Telephone: 1-800-544-11087 A.M. to 6 P.M. EST M-TH7 A.M. to 4:30 P.M. EST FRI
Although child restraints and booster seats are tested,evaluated and certified by the manufacturer and testedby Transport Canada, it is possible that a safety-relatedproblem may be found. So that we may be able to adviseyou, you can now register your child restraint online atwww.djgusa.com/registration/carseat/can or pleasefill out and return the registration card provided or sendyour name, address, child restraint model number andmanufacturing date to:
Dorel Distribution Canada873 HodgeSt-Laurent, QC H4N 2B1Attn: Consumer Relations
Please do not send in your registration card if you haveregistered your child restraint online.
For information on safety-related problems, you can alsocall Transport Canada’s Road Safety Dept. at:1-800-333-0371.
4358-3434E Canada Elite Eng 12/17/08 3:36 PM Page 3

III
Child Restraint and Booster SeatParts
A. Headrest/HarnessAdjusting Levers
B. Pillow C. Adjustable
HeadrestD. Infant Headrest
InsertE. Harness GuidesF. Harness Covers G. BackrestH. Chest Clip I. Harness StrapsJ. Buckle Plate
K. Buckle/Crotch StrapL. Side Pad
(on select models) M. Harness Adjustment
Lever (under flap)N. Recline Handle O. Harness
Adjustment StrapP. Removable BaseQ. Rear-Facing Belt
Path
Front
IV
Level
To Ground
A. Shoulder BeltPositioning Guide
B. Tether Strap,Adjuster &Hook
C. HeadrestAdjustment Bar
D. Locking Clip (behind splitterplate)
E. Splitter Plate F. Instruction
Compartment
G. Recline Stand
H. UAS Belt & Adjuster (may be between pad and shell)
I. Cup Holder
J. Folding Armrests
K. Plastic Shell
L. Forward-FacingBelt Path
M. Level To GroundLine
Back A
B
F
D
H
C
E
G
J
KM
N
O
P
AB
C
D
E
F
H
I
J
K
GQ
L
H
IL
M
4358-3434E Canada Elite Eng 12/17/08 3:36 PM Page 5
Table of Contents
Warnings ..............................................................................2-6Aircraft use ..............................................................................6Transport Canada regulations..............................................6Tether strap information ......................................................7Universal Anchorage System (UAS) information ............7Vehicle seat belt ......................................................................8Storing your child restraint and booster seat ................8General Use ............................................................................8Child restraint and booster seat description ......9Locking clip installation ................................................10-11Preparing child restraint to fit your child ................12-14Adjusting harness/headrest height....................................15Securing your child in the child restraint ................16-17Removing your child from child restraint ......................18Reclining the child restraint and booster seat ..............19Adjusting armrests ..............................................................19Adjusting the tether strap ..................................................20Removing base ......................................................................21Installing base ........................................................................22Removing harness system ............................................23-24Installing harness system ..............................................25-27Adjusting the buckle ......................................................28-29Removing infant insert ........................................................30Removing harness covers ..................................................30Removing side pads (on select models)..........................30Rear-facing installation
with vehicle seat belt ..........................................31-33with UAS belt ..........................................................34-37
Forward-facing installationwith vehicle seat belt ............................................38-40with UAS belt ..........................................................41-44
Belt-positioning booster seat installation ................45-47Removing seat pad for cleaning ..................................48-50Installing seat pad..................................................................50Warranty ................................................................................51Replacement part order form ..........................................54Replacement part list ..........................................................55
1 2
WARNINGS:!
Failure to read, understand and follow allinstructions in this manual can result inserious injury or death to the child in asudden stop or a collision.
According to accident statistics, childrenare safer when properly restrained in therear seating positions than in the frontseating positions.
This child restraint and booster seat canonly be used on forward facing vehicle seats.
Do not use this child restraint and boosterseat on side or rear facing vehicle seats.
The vehicle headrest must not interferewith the booster seat’s head support.Thebooster seat should rest firmly on thevehicle’s seat back.
Never take your child out of the childrestraint and booster seat or attend to thechild’s needs while the vehicle is moving.
This child restraint must always face therear of the vehicle and be in the fully reclinedposition when the child weighs between 2.3-16 kg (5-35 lb.) and is less than one year old.
Never place a child in front of an activefrontal air bag in the rear-facing position.Death or serious injury can occur.
Never place a child less than one-year oldforward facing.
4358-3434E Canada Elite Eng 12/17/08 3:36 PM Page 7

3 4
WARNINGS:!
DJG does not recommend the use ofaccessories or add-ons that have not beencertified with this child restraint and boosterseat at original purchase date.
Although the restraint system has gonethrough testing and evaluations from themanufacturer and was certified to TransportCanada’s standards, the possibility of a safetyrelated problem could occur.To be notified ofa safety related problem, you must registeryour child restraint online atwww.djgusa.com/registration/carseat/can orfill out and return the registration card whichis attached to the child restraint.
Do not use the booster seat with vehiclelap belt only.
The child restraint’s harness systemshould always be snug.A loose harness couldallow the child to come out of the restraintor be ejected during a sudden stop or acollision causing serious injury or death.
Do not wash the child restraint andbooster seat pad while still on the plasticshell. Spot clean only if it cannot beremoved.
Do not recline the infant restraint beyondthe level-to-ground line.
For vehicles with no rear seats verify thevehicle owner’s manual for location andinstallation of a child restraint and boosterseat.
WARNINGS:!
Do not remove the warning labels.
Never allow anyone to play with thisrestraint system. It is not a toy.
To avoid the child being seriously burned,always check for hot seat and buckles beforeusing this restraint system.
Never leave a child unattended in thechild restraint or booster seat.
Do not use this child restraint if themidpoint of your child’s ears is above the topof the child restraint’s headrest.
Always check vehicle owner’s manual forproper use of vehicle seat belts with yourchild restraint and booster seat.
Always check vehicle owner’s manual forchild restraint and booster seat use with sideair bags.
Incorrect use of the harness system in thechild restraint is the most common mistakepeople make.Verify frequently that theharness height is correct for your child’s size.
Always check your vehicle owner’s manualfor child restraint use with your vehicle’suniversal anchorage system (UAS).
Do not lubricate the buckles, harnesssystem or fasteners for any reason.
4358-3434E Canada Elite Eng 12/17/08 3:36 PM Page 9
5 6
WARNINGS:!
Secure the top tether strap provided withthis child restraint as specified in yourvehicle owner’s manual and this instructionmanual.
This child restraint and booster seat hasbeen certified for use in passenger vehiclesonly. Do not use in a boat, on a motorcycleor in a cargo van or bus where there are noseat belts or tether anchors. Do not modifyfor use as a crib or a swing. Do not leave onstove top or any other hot surface.
In very few vehicles, the child restraint andbooster seat cannot be properly installedbecause of the type of seat belt system, airbag system and/or lack of location to anchorthe tether strap.Always read and follow thevehicle owner’s manual instructions for childrestraint and booster seat use.
Do not use a child restraint and boosterseat if you do not know the history of therestraint.
When using as a booster seat never placethe shoulder belt behind the back or underthe arm of the child.
Do not use a child restraint and boosterseat with missing or damaged parts.
Do not use a child restraint and boosterseat that has been in a crash or a collision.The child restraint and booster seat must bereplaced.
Transport Canada Road Safety Directorate regulateschildren’s restraint systems and booster seats under theMotor Vehicle Restraint Systems and Booster CushionSafety Regulations (RSSR).The regulations require themanufacturer and/or importer to certify the childrestraint to the applicable safety standards and placespecified warnings and information on the labelsfastened to each child restraint and in this instructionmanual.
Aircraft Use
This child restraint is certified for aircraft use, only whenused as a child restraint.You may not use as a boosterseat, as aircraft seats do not have a shoulder belt. Useonly on forward-facing seats and in a position where theseat belt can be tightened securely.The installation is thesame as in your vehicle. Use only with F.A.A. certifiedequipment. Contact the airline before taking therestraint on an aircraft in order to comply with theirregulations.
Transport Canada Regulations
WARNINGS:!
When unoccupied, the child restraint andbooster seat must be firmly secured to thevehicle by means of a UAS or a vehicle seatbelt and if the system is equipped with atether strap by means of tether strap. In acrash or sudden stop, an unsecured childrestraint and booster seat could injure thedriver or other occupants in the vehicle.
4358-3434E Canada Elite Eng 12/17/08 3:36 PM Page 11

7
Tether Strap Information
Your vehicle owner’s manual will provide you with thetether strap anchorage information and location. Forolder vehicles with no tether anchorage informationplease contact your dealer or the vehicle manufacturerfor location of anchor brackets and installation.
Universal Anchorage System (UAS)InformationAs of September 1, 2002, Universal Anchorage Systemswere required to be installed on child restraint systems.Vehicles built after this date are required to have anchorbrackets/bars built into the vehicle seat.The UAS allowsfor easier installation of child restraint systems as thevehicle seat belt does not have to be used.
In the United States the term “LATCH” is used insteadof UAS. UAS and LATCH mean the same thing.
Your vehicle owner’s manual provides information onthe UAS brackets installed in the vehicle.The manualalso provides additional information to help youcorrectly install a restraint system that has UAS.
If your vehicle is not equipped with UAS, installing thechild restraint with the seat belt is just as secure.
Note: UAS brackets cannot be installed in oldervehicles.
8
Storing Your Child Restraint andBooster Seat
To protect your child restraint and booster seat, storein the house, not in the garage or attic. The hot andcold temperatures can harm the plastic shell and/or theharness system if stored for a long period of time.
Vehicle Seat BeltA child restraint and booster seat must be securelyattached in a vehicle.
Most passenger vehicles, vans and trucks have seat beltsthat firmly lock around the child restraint system.
Some vehicle seat belts require a locking clip to attachthe child restraint securely.
Your vehicle owner’s manual best describes the use of achild restraint and booster seat with the vehicle’s seatbelt.
Check the vehicle owner’s manual for the correct use ofyour seat belt with a child restraint and booster seat.
WARNINGIn very few vehicles, the child restraint cannotbe properly installed because of the type ofseat belt system, air bag system and/or lack oflocation to anchor the tether strap. Alwaysread and follow the vehicle owner’s manualinstructions for child restraint use.
!
General Use
To help protect your vehicle seat’s upholstery fromdamage, use a seat mat or a towel underneath andbehind child restraint.
4358-3434E Canada Elite Eng 12/17/08 3:36 PM Page 13

9 10
Child Restraint and Belt-PositiioningBooster Seat Description
Rear-facing position;Less than one year old andbetween 2.3-16 kg (5-35 lbs)and 48-81 cm (19-32 inches)tall. Infant and infant restraintare placed in the back seat andface the rear of the vehicle.NOTE: Infants one year oldor less must be rear-facing.
Belt-positioning boosterseat;18-36 kg. (40-80 lbs.) and 102-132 cm. (40-52 inches) tall.Child and booster seat areplaced in the back seat and facethe front of the vehicle.
Your child’s height, weight and age determine how yourchild restraint should be placed in the vehicle and whichrestraint should be used.
WARNING!
Verify your child’s weight and height (do notguess) before choosing the child restraint orbooster seat position.
Forward-facing position;Over one year old andbetween 10-18 kg. (22-40 lbs.)and 74-102 cm. (29 -40 inches)tall. Child and child restraint areplaced in the back seat and facethe front of the vehicle.NOTE: Children must be 1year old or older for forward-facing position.
The locking clip is used to prevent the vehicle belt fromloosening in the event of a sudden stop or crash.Before you put your child restraint in the vehicle, bucklethe lap/shoulder belt. Pull on the lap belt portion. If itloosens or slips, you must either use a locking clip tohold the seat belt tight or move child restraint toanother seating location.Note: A locking clip will not fix all types of seat belt
problems.•You do not need a locking clip when using this
seat as a belt-positioning booster.• Check vehicle owner’s manual if locking clip is
needed.• You will find the locking clip inserted on the
back of the child restraint.• A locking clip can only be used on a lap/shoulder
belt combination.
1 Thread the vehiclelap/shoulder belt throughthe correct belt path.Buckle the vehicle seatbelt. Pull up on shoulderpart of belt until all slack isremoved and lap belt istight.
Locking Clip Installation
continued on next page.
4358-3434E Canada Elite Eng 12/17/08 3:36 PM Page 15

11 12
2
3
5
Grasp the vehiclelap/shoulder belts togethertightly as close to thevehicle latch plate aspossible.While holding thebelts tightly, unbuckle.Note: If the vehicle latchplate, belt and buckle endup behind the childrestraint, grasp the belts asclose to the latch plate aspossible.
Buckle the vehicle seatbelt with locking clip intothe buckle.The childrestraint and the vehiclebelts should now be tight.If not, remove and repeatall steps. If you still havequestions after installingthe locking clip pleasecontact our ConsumerRelations department.
Thread both portions ofthe vehicle belts togetheronto the locking clip.
4 Position locking clip about2.5 cm (1 in.) from vehiclebelt’s buckle plate.
continued on next page.
Preparing Child Restraintto Fit Your Child
3 Push on chest clip releasebutton and pull apart.
You MUST make these adjustments with your childbefore you install the child restraint in the vehicle.
1 Pull UAS belt packaging(plastic bag) out from theshell.
Press down on the redbuckle release button torelease the buckle plates.Place harness straps oversides of child restraint.
4
2 Loosen harness by pushingin on the harnessadjustment lever underthe flap. Pull out onharness just above buckleplates.
4358-3434E Canada Elite Eng 12/17/08 3:36 PM Page 17

13
Harness Guide
8
14
6 Place the child’s bottomand back flat against thechild restraint.This willincrease comfort andallow the harness strapsto properly tighten.
Note: Harness should besnug.
Check HarnessPosition:Rear-Facing Position:Harness slot must be evenwith or just below theshoulders. Adjust if needed(see “Adjusting HarnessSystem” section).
If the lowest harness slot isabove the child’s shoulders,do not use this childrestraint. Verify that childrestraint is fully reclined.Infants have a tendency towant to slouch. If harnessheight is still incorrect, callConsumer Relations formore detailed help.
Harness Guide
7
WARNING!
Do not mistake comfort for safety. Harnesssystem must be snugly adjusted.Incorrect use of the harness system is themost common mistake people make. It isvery important to read, understand andfollow all instructions and warnings.
Check HarnessPosition:Forward-FacingPosition: Harness slotmust be even with orjust above the shoulders.Adjust if needed (see“Adjusting HarnessSystem” section).
Note:The highest headrestposition is for belt-positioning booster useonly. If the harness is belowthe child’s shoulders withthe headrest in the secondhighest position, convertthe child restraint to a belt-positioning booster. Referto weight and heightinformation (see “ChildRestraint & Booster SeatDescription” section) todetermine if the child hasreached the belt-positioningbooster requirements.
Determine which of thethree buckle slots that isboth comfortable and snugto use. (See “Adjusting theBuckle” section)
Note: Thread buckle andbuckle strap through slotclosest to child
5
You MUST use the 1st or 2nd buckle strapslots when rear-facing. Any slot can be usedfor forward-facing.
12
3
4358-3434E Canada Elite Eng 12/17/08 3:36 PM Page 19

15 16
WARNING:!
Failure to make surebar is locked intoposition can result inserious injury ordeath to the child.
Rotate the red headrest/harness adjusting leversinward. Pull levers up ordown to adjust headrestto proper height. Makesure headrest locks intoplace securely.
NOTE:The highestposition is for belt-positioning use only.
continued on next page.
2
Adjusting Harness/Headrest Height
Securing Your Child in the ChildRestraint
1
2
Place the child’s bottomand back flat against thechild restraint. This willincrease comfort andallow the harness systemto be properly tighten.Pull harness over child’sshoulders.
Push each buckle plateinto buckle until you heara “click”. Pull up onharness straps and downon the crotch strap tomake sure buckle islocked.
3 Snap the chest cliptogether.
1 Loosen harness by pushingin on the harnessadjustment lever underthe flap. Pull out onharness just above buckleplates.
4358-3434E Canada Elite Eng 12/17/08 3:36 PM Page 21

17 18
WARNING!
Failure to fasten and tighten the harnesssystem correctly may allow the child to beejected from the child restraint system in acrash or sudden stop causing serious injuryor death.Do not mistake comfort for safety. Harnesssystem must be snugly adjusted.
5 Note: To position thechest clip, move it up ordown so that it is evenwith your child’s armpits,away from the child’s neck.
4 Pull on harness adjustmentstrap to tighten harnesssystem snugly.Note: A snug harness isnot loose and lies flatagainst the child withoutsagging. It does not presson the child's flesh or pushthe child's body into anunnatural position.
Removing Your Child From theChild Restraint
Push down on harnessadjustment lever. Pull up onharness straps just abovethe buckle plates to loosenharness.
2 Press the release buttonon the chest clip and pullapart.
Press down on the redbuckle release button torelease the buckle plates.Remove child.
1
3
4358-3434E Canada Elite Eng 12/17/08 3:36 PM Page 23
19 20
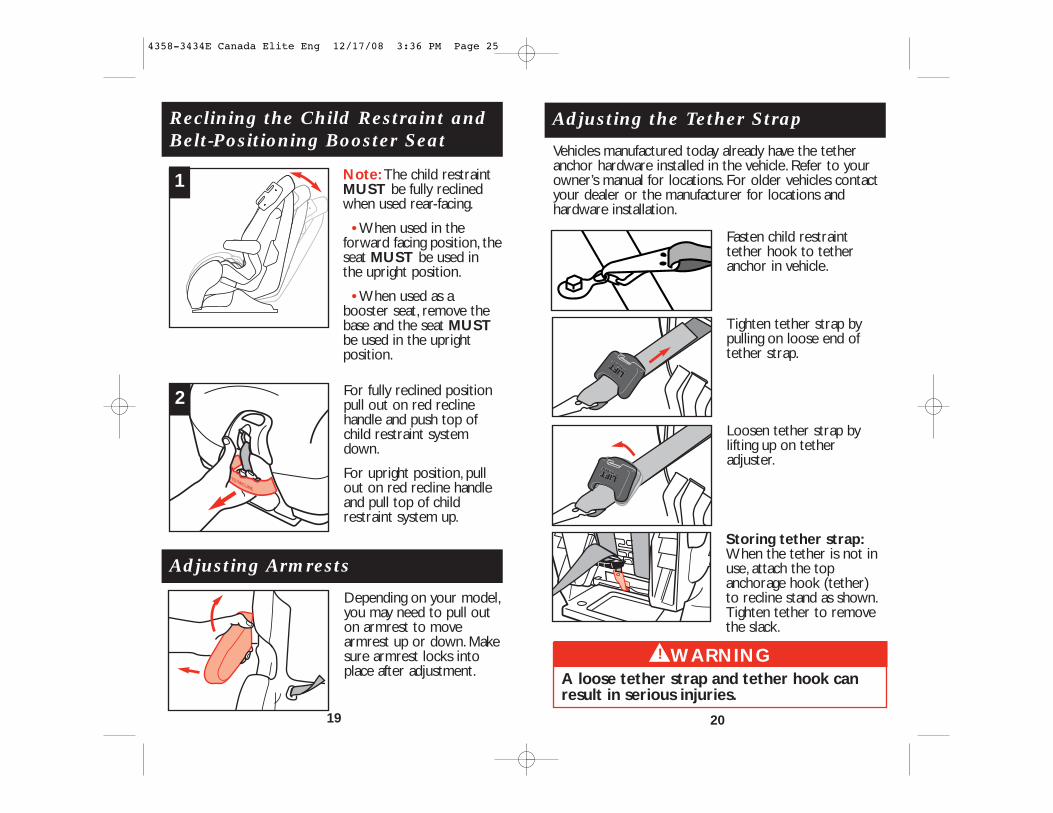
Note: The child restraintMUST be fully reclinedwhen used rear-facing.
• When used in theforward facing position, theseat MUST be used inthe upright position.
• When used as abooster seat, remove thebase and the seat MUSTbe used in the uprightposition.
PULL TO RECLINE
Reclining the Child Restraint andBelt-Positioning Booster Seat
For fully reclined positionpull out on red reclinehandle and push top ofchild restraint systemdown.
For upright position, pullout on red recline handleand pull top of childrestraint system up.
1
2
Depending on your model,you may need to pull outon armrest to movearmrest up or down. Makesure armrest locks intoplace after adjustment.
Adjusting Armrests
Vehicles manufactured today already have the tetheranchor hardware installed in the vehicle. Refer to yourowner’s manual for locations. For older vehicles contactyour dealer or the manufacturer for locations andhardware installation.
Adjusting the Tether Strap
WARNING!
A loose tether strap and tether hook canresult in serious injuries.
Fasten child restrainttether hook to tetheranchor in vehicle.
Tighten tether strap bypulling on loose end oftether strap.
Loosen tether strap bylifting up on tetheradjuster.
Storing tether strap:When the tether is not inuse, attach the topanchorage hook (tether)to recline stand as shown.Tighten tether to removethe slack.
4358-3434E Canada Elite Eng 12/17/08 3:36 PM Page 25

21 22
To remove base the childrestraint must be in thefully reclined position.Underneath the restraint,move tab (A) sideways.Tabis located on the right sideof base.
Note: For narrow vehicles remove base. For rear-facing child restraint make sure recline stand is foldedunder seat. Base must be removed for use as abelt positioning booster seat.
Removing Base
2
3 Lift restraint off base bypulling on red reclinehandle.
Replace bar on base forsafe keeping and futureuse.
From the opposite sidepush metal bar throughuntil the bar is completelyout.
A
1
Installing Base
Underneath the base onright side, move tabsideways. Begin withrounded end of metal bar,push through hole startingfrom right side of shell,until metal bar locks intoplace.
Pull up on child restraintto make sure bar iscorrectly inserted andchild restraint is locked tothe base.
1 Remove Metal Bar:
Make sure to pull reclinestand down and fold underseat.
2 Working underneath thechild restraint, line up shellwith seat base starting atfront of child restraint. Fitbase into place.
3
4
Base attached to shell.
4358-3434E Canada Elite Eng 12/17/08 3:36 PM Page 27

23 24
Removing Harness System
Starting in the back of thechild restraint, unhookharness strap loops fromsplitter plate.
Press harness adjustmentlever.
Pull on splitter plate topull in all slack fromharness adjustment strap.Store the splitter plate inthe opening located in theback of the child restraintshell.
2
4
From the front, pullharness straps out of theupper harness guides.
Remove chest clip fromharness straps.
Remove harness strapsfrom buckle plates.
Holding one harness strap,pull harness completelyout of lower harnessguides.
Note: Remove the base (see “RemovingBase” section).
• Harness must be removed whenusing the seat as a belt positioningbooster seat.
3
Loosen harness by pushingin on the harnessadjustment lever. Pull outon harness straps justabove buckle plates.
6
From the front, pull bucklefree from shell and pad.
Remove Crotch Strapand Buckle:
From the bottom of seatof child restraint locatethe buckle’s metal plate.Insert buckle’s metal plateup through slot in theshell and pad.
Lock buckle plates intobuckle. Store harnessstraps, chest clip andbuckle for future use.
7
8
1
5
4358-3434E Canada Elite Eng 12/17/08 3:36 PM Page 29

2625
Install Harness Straps:Push one harness endthrough lower harnessguide on the left side ofchild restraint.
Thread harness strapunder seat of childrestraint. Be sure harnessadjustment strap isbetween shell and harness.Push end of harness upthrough lower harness sloton the right side ofrestraint.Note: DO NOT twistharness strap.
3
3Installing Harness System
Thread left harness strapthrough left buckle plateand right harness strapthrough right buckleplate. Make sure to pushthrough from the back ofbuckle plate.
Thread harness endsthrough chest clip.
Push left harness strapthrough left upperharness guide and rightharness strap throughright upper harness guide.
Note: DO NOT twistharness strap.
4
1 Install Buckle/CrotchStrap:Choose one of the threeslots that is closest tochild. From the front ofchild restraint, pushbuckle’s metal platethrough pad and shell.Make sure that buckle isfacing out.
WARNING!
Failure to place buckle’s metal platecompletely through pad and shell can resultin serious injury or death to the child.
Pull up on buckle/crotchstrap to make surebuckle’s metal plate iscompletely insertedthrough the pad and shell.
From underneath childrestraint, pull buckle’smetal plate through thepad and shell.
2
continued on next page.
4358-3434E Canada Elite Eng 12/17/08 3:36 PM Page 31

2827
Adjusting the Buckle
6
5
WARNING!
Failure to place harness straps over theheadrest adjustment bar can result inserious injury or death to your child.
From the back, pullharness straps through.Make sure the harnessstraps go OVER the metalbar, BETWEEN metalbar and plastic handle ofthe harness/headrestadjuster.Note: DO NOT twistharness strap.
Fit harness strap loopsonto splitter plate on theback of child restraint.Note: DO NOT twistharness strap.
WARNING!
Failure to install the harness systemproperly can result in serious injury ordeath to the child.
1
From the front, pull bucklefree from shell and pad.
Fully recline the childrestraint. Reach under theseat between base andshell.
3
4 Choose one of the threeslots that is closest tochild. From the front ofchild restraint, pushbuckle’s metal retainerthrough pad and shell.Make sure that buckle isfacing out.
You MUST use the 1st or 2nd buckle strapslots when rear-facing. Any slot can be usedfor forward-facing.
123
2 Locate buckle’s metalretainer under the shell.
Rotate metal retainer, theninsert retainer up throughthe shell and pad.
4358-3434E Canada Elite Eng 12/17/08 3:36 PM Page 33

3029
The infant insert is designedto support the infant’s headand neck. Make sure thatthe insert does not coverthe infant’s face in any way.Remove the insert whenthe infant’s head has
reached the top, inside part of the infant insert.To removethe infant insert you will have to; unthread the harnesssystem, (see “Removing Harness System” section), removeupper harness guides, (see “Removing Seat Pad forCleaning” section), remove insert and rethread harnesssystem. (see “Installing Harness System” section)
The harness covers help toprovide comfort to theinfant’s neck. For harnesscovers to fit correctly youmay have to push the endsof the covers through the
upper harness slots.To remove the harness covers youwill have to; unthread the harness system, (see “RemovingHarness System” section), remove harness covers andrethread harness system. (see “Installing Harness System”section)
Removing Infant Insert
Removing Harness Covers
Side Pads (on selectmodels): Side pads helpkeep child snugly in thechild restraint. To remove,unbuckle harness andremove side pillows.
Removing Side Pads (on select models)WARNING!
Failure to place buckle’s metal platecompletely through pad and shell can resultin serious injury or death to the child.
6 Pull up on buckle/crotchstrap to make surebuckle’s metal plate iscompletely insertedthrough the pad and shell.The buckle must notpull out.
Reach under seat betweenbase and shell. Pull buckle’smetal retainer completelythrough pad and shell.
5
4358-3434E Canada Elite Eng 12/17/08 3:36 PM Page 35

32
Thread the vehicle lap orlap/shoulder belt throughthe rear-facing belt path.
5
Rear-Facing C
hild Restraint Installation w
ith Vehicle Seat Belt:2.3-16 kg (5-35 lb.),48-81 cm (19-32 in.)
Place child restraint rearfacing in the back seat inthe fully reclined position.Make sure the level lineson the shoulder beltpositioning guides arelevel to ground.
4
When UAS is not inuse, fasten UAS hooksbehind the childrestraint as shown.
1
3 If you are using this childrestraint without thebase, the recline standmust be folded underseat (see “Reclining theChild Restraint andBooster Seat” section).
Note: If vehicle seat hasa downward slope,causing the child’s headto fall forward, you mayuse a tightly rolled towelor a foam noodle underthe restraint’s base wherethe vehicle’s bench backmeets the vehicle’s benchseat.
continued on next page.
Rear-Facing Child RestraintInstallation with Vehicle Seat Belt:
Lap/Shoulder Belt Lap Belt
WARNING!
Note:Attach tether strap and hook to reclinestand on the back of the child restraint.
• Check vehicle owner’s manual for seat belt usewith a child restraint.
• Do not use universal anchorage system (UAS)when using the vehicle seat belt.
Fasten the UAS belt hooks togetherbehind the shell when not in use. A looseUAS system could cause injury or death.Never place a child in front of an activefrontal air bag in the rear-facing position.Death or serious injury can occur.
For vehicles with an air bag, but without aback seat, refer to your vehicle owner’smanual.
Attach the topanchorage hook (tether)to recline stand asshown. Tighten tetherto remove the slack.
2
31
4358-3434E Canada Elite Eng 12/17/08 3:36 PM Page 37

33
UAS Belt
Rear-Facing Child RestraintInstallation with UAS Belt
Note:Attach tetherstrap and hook torecline stand on theback of the childrestraint.
• Check vehicle owner’smanual for seat belt usewith a child restraint.
• Do not use the vehicleseat belt when using theuniversal anchoragesystem (UAS).
WARNING!
Never place a child in front of an activefrontal air bag in the rear-facing position.Death or serious injury can occur.
Rear-Facing C
hild Restraint Installation w
ith UA
S Belt:2.3-16 kg (5-35 lb.),48-81 cm (19-32 in.)
continued on next page.
Thread vehicle seat beltunder pad in front ofcrotch strap to theopposite side. Bucklevehicle belt.Note: DO NOTPLACE VEHICLE BELTover the child’s legs.
WARNING!
Use of this child restraint in any vehiclewhere the lap or lap/shoulder belt cannotbe tightened securely can result in seriousinjury or death to the child
6
7 Push down firmly on theseat of the child restraintand pull up on shoulderbelt to tighten.
Note: It maybe easier totighten the belt through thebelt path opening as shown.
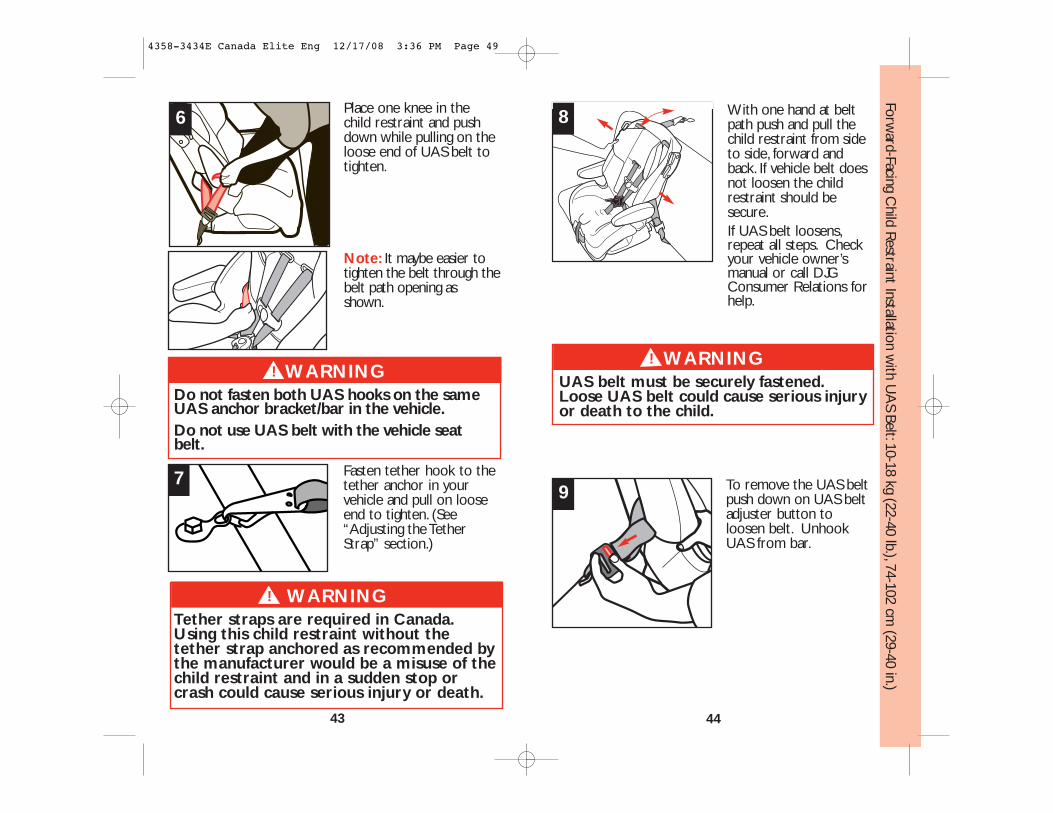
With one hand at belt path,push and pull the childrestraint from side to side,forward and back. If thevehicle belt does notloosen, the child restraintshould be secure.If vehicle belt loosens,repeat all steps. Check seatbelt use in your vehicleowner’s manual and review
the “Locking Clip Installation” section or call DJGConsumer Relations for help.
8
Attach the topanchorage hook (tether)to recline stand asshown. Tighten tether toremove the slack.
2
1 If you are using this childrestraint without thebase, the recline standmust be folded underseat (see “Reclining theChild Restraint andBooster Seat” section).
34
4358-3434E Canada Elite Eng 12/17/08 3:36 PM Page 39

3635
Fasten one UAS hookon each anchor bracket/bar located on each sideof the child restraint. Seeyour vehicle owner’smanual for locations.
7
WARNING!
UAS belt must be securely fastened. Aloose UAS belt could cause serious injuryor death to the child.Do not fasten both UAS hooks on the sameUAS anchor bracket/bar in the vehicle.Do not use UAS belt with the vehicle seatbelt.
Push down firmly on thechild restraint seat andpull up on loose end ofbelt to tighten.
8
Note: If vehicle seat hasa downward slope,causing the child’s headto fall forward, you mayuse a tightly rolled towelor a foam noodle underthe restraint’s basewhere the vehicle’sbench back meets thevehicle’s bench seat.
Rear-Facing C
hild Restraint Installation w
ith UA
S Belt:2.3-16 kg (5-35 lb.),48-81 cm (19-32 in.)
continued on next page.
Place child restraint rearfacing in the back seat inthe fully reclinedposition. Make sure thelevel lines on the shoulderbelt positioning guides arelevel to ground.
6
Completed threading ofUAS rear-facing is shown.DO NOT twist belt.
5
To thread the UAS beltput belt end with hookand adjuster through therear-facing belt path slot.
3
4 Reach under pad and pullthe UAS hook across theshell and out the rear-facing belt path slot onopposite side. Make sureUAS belt goes in front ofbuckle/crotch strap asshown.
4358-3434E Canada Elite Eng 12/17/08 3:36 PM Page 41

37
Lap/Shoulder Belt Lap Belt
WARNING!
Fasten the UAS belt hooks togetherbehind the shell when not in use. A looseUAS system could cause injury or death.For vehicles with an air bag, but withouta back seat, refer to your vehicle owner’smanual.
Forward-Facing C
hild Restraint Installation w
ith Vehicle Seat Belts:10-18 kg (22-40 lb.),74-102 cm (29-40 in.)
Note: Do not use universal anchorage system (UAS)when using the vehicle seat belt.
• Check vehicle owner’s manual for seat belt usewith a child restraint.
• You may need to remove the base for narrowvehicle seats or airline use (see “RemovingBase” section).
• Do not use the level to ground line on theshoulder belt positioning guide in the forwardfacing position.
When UAS is not inuse, fasten UAShooks behind thechild restraint asshown.
1
continued on next page.
To remove the UAS beltpush down on UAS beltadjuster button toloosen belt. UnhookUAS from bar.
10
38
With one hand at beltpath, push and pull thechild restraint from sideto side, forward and back.If the UAS belt does notloosen, the child restraintshould be secure.If belt loosens, repeat allsteps. Check your vehicleowner’s manual or callDJG Consumer Relationsfor help.
9
Note: It maybe easier totighten the belt through thebelt path opening asshown.
Forward-Facing Child RestraintInstallation with Vehicle Seat Belts:
4358-3434E Canada Elite Eng 12/17/08 3:36 PM Page 43

39 40
With one hand at beltpath push and pull thechild restraint from sideto side, forward andback. If vehicle belt doesnot loosen the childrestraint should besecure.If vehicle belt loosens,repeat all steps. Checkseat belt use in yourvehicle owner’s manualand review the “LockingClip Installation” sectionor call DJG ConsumerRelations for help.
WARNING!
Use of this child restraint in any vehiclewhere the lap or lap/shoulder belt cannotbe tightened securely could cause seriousinjury or death to the child.
Fasten tether hook tothe tether anchor inyour vehicle and pull onloose end to tighten.(See “Adjusting theTether Strap” section.)
6
WARNING!
Tether straps are required in Canada.Using this child restraint without thetether strap anchored as recommendedby the manufacturer would be a misuseof the child restraint and in a sudden stopor crash could cause serious injury ordeath.
Forward-Facing C
hild Restraint Installation w
ith Vehicle Seat Belts:10-18 kg (22-40 lb.),74-102 cm (29-40 in.)
5 Place one knee in thechild restraint and pushdown while pulling onvehicle belt to tighten.
Place child restraint flushagainst the back of thevehicle seat forward-facing in the back seat.Thread vehicle beltthrough the forward facingbelt path. Buckle.
4
When used in theforward facing position,the child restraintMUST be used in theupright position.
2
3 If you are using this childrestraint without the base,reach under the seat androtate the recline standdown. Push up firmly untilit locks in place.
Note: It maybe easier totighten the belt through thebelt path opening asshown.
7
4358-3434E Canada Elite Eng 12/17/08 3:36 PM Page 45

41 42
Place child restraint flushagainst the back of thevehicle seat forward-facing in the back seat.Fasten one UAS hookon each anchorbracket/bar located on
each side of the child restraint. See your vehicleowner’s manual for locations.
5
continued on next page.
Forward-Facing C
hild Restraint Installation w
ith UA
S Belt:10-18 kg (22-40 lb.),74-102 cm (29-40 in.)
Note: If you were using theUAS belt for a rear-facinginstallation it must beremoved from the rear-facing belt path before youbegin.
• Do not use the vehicleseat belt when using theuniversal anchorage system(UAS).
• Check vehicle owner’smanual for seat belt usewith a child restraint.
• Do not use the level to ground line on the shoulderbelt positioning guide in the forward-facing position.
• You may need to remove the base for narrow vehicleseats or airline use (see “Removing Base” section).
Forward-Facing Child RestraintInstallation with UAS Belt
UAS Belt
WARNING!
For vehicles with an air bag, but without aback seat, refer to your vehicle ownersmanual.
Insert UAS belt throughthe forward facing beltpath, pulling the hook withthe adjuster across theback of shell and out theother side.
1
2 Completed threading ofUAS forward-facing isshown. DO NOTtwist belt.
When used in theforward facingposition, the childrestraint MUST beused in the uprightposition.
3
4 If you are using this childrestraint without thebase, reach under theseat and rotate therecline stand down.Push up firmly until itlocks in place.
4358-3434E Canada Elite Eng 12/17/08 3:36 PM Page 47
4443
To remove the UAS beltpush down on UAS beltadjuster button toloosen belt. UnhookUAS from bar.
9
With one hand at beltpath push and pull thechild restraint from sideto side, forward andback. If vehicle belt doesnot loosen the childrestraint should besecure.If UAS belt loosens,repeat all steps. Checkyour vehicle owner’smanual or call DJGConsumer Relations forhelp.
8
WARNING!
UAS belt must be securely fastened.Loose UAS belt could cause serious injuryor death to the child.
Forward-Facing C
hild Restraint Installation w
ith UA
S Belt:10-18 kg (22-40 lb.),74-102 cm (29-40 in.)
WARNING!
Tether straps are required in Canada.Using this child restraint without thetether strap anchored as recommended bythe manufacturer would be a misuse of thechild restraint and in a sudden stop orcrash could cause serious injury or death.
6 Place one knee in thechild restraint and pushdown while pulling on theloose end of UAS belt totighten.
Fasten tether hook to thetether anchor in yourvehicle and pull on looseend to tighten. (See“Adjusting the TetherStrap” section.)
7
WARNING!
Do not fasten both UAS hooks on the sameUAS anchor bracket/bar in the vehicle.Do not use UAS belt with the vehicle seatbelt.
Note: It maybe easier totighten the belt through thebelt path opening asshown.
4358-3434E Canada Elite Eng 12/17/08 3:36 PM Page 49

4645
Place booster seat in theback seat of vehiclemaking sure the back ofthe booster seat isresting firmly on theback of the vehicle’sbench. Booster seatfaces the front of thevehicle. Place the child’sbottom and back flatagainst the booster seat.
This will allow the vehicle belt to be properlytightened.
Place the shoulder beltacross the child’s chestand lap belt on thechild’s thighs as shown.Buckle.Note: The shoulder beltshould be over thechild’s shoulder (notacross the face or neck)and across the child’schest.The lap belt should
remain on the child’s upper thighs (not on thestomach).Always verify that the child has not movedout of position and loosened the shoulder belt.
5
4
WARNING!
Do not use this booster seat if themidpoint of your child’s ears is above thetop of the booster seat’s headrest.
Belt-Positioning Booster Seat Installation:18-36 kg (40-80 lb.),102-132 cm (40-52 in.)
Belt-Positioning Booster SeatInstallationNote: For belt-positioning booster seat use,you MUSTremove harness system (see “Removing Harness System”section).• You MUST remove base (see “Removing Base”
section).• Do Not use tether strap (See “Storing Tether
Strap” in the “Adjusting the Tether Strap” section).• Do not use the level to ground line on the
shoulder belt positioning guide in the forward-facing position.
• Check vehicle owner’s manual for seat belt use witha booster seat.
continued on next page.
Use the booster seat inthe upright position only.Reach under the seat androtate the recline standdown. Push up firmly untilit locks in place.
2
Lap/Shoulder Belt
When UAS is not inuse, fasten UAS hooksbehind the childrestraint as shown.
1
Attach the topanchorage hook (tether)to the recline stand asshown. Tighten tetherto remove the slack.
3
4358-3434E Canada Elite Eng 12/17/08 3:36 PM Page 51
4847
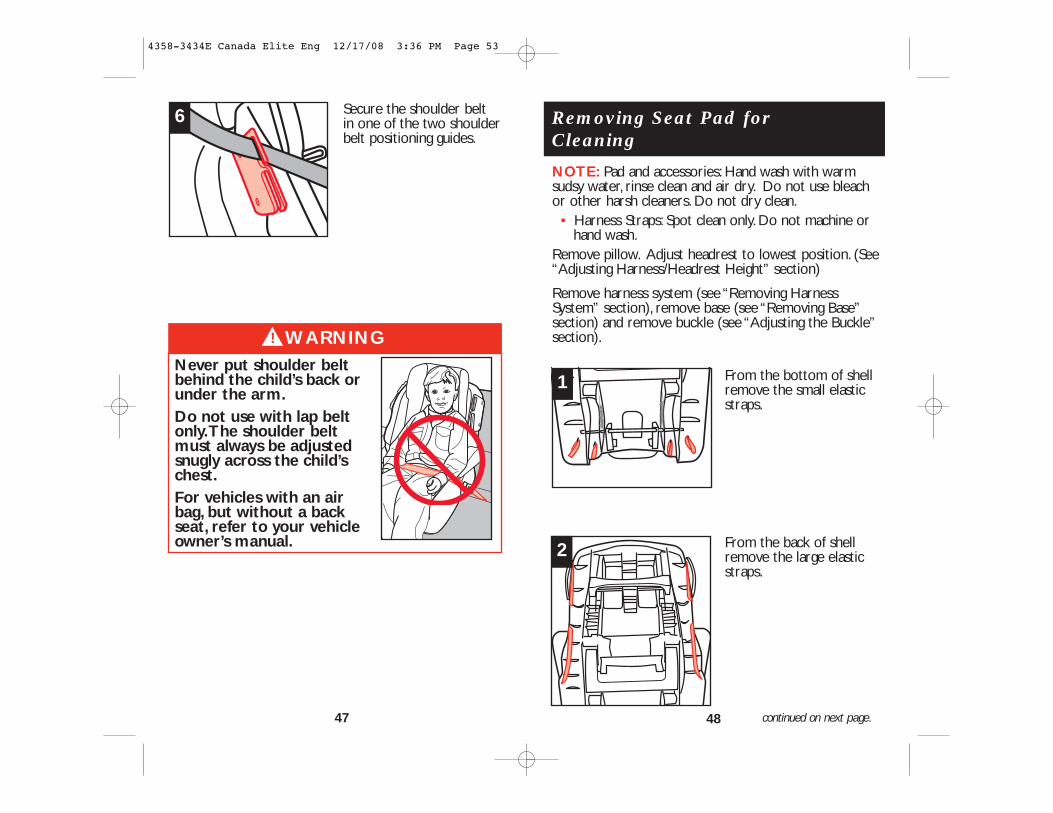
Removing Seat Pad forCleaning
NOTE: Pad and accessories: Hand wash with warmsudsy water, rinse clean and air dry. Do not use bleachor other harsh cleaners. Do not dry clean.
• Harness Straps: Spot clean only. Do not machine orhand wash.
Remove pillow. Adjust headrest to lowest position. (See“Adjusting Harness/Headrest Height” section)
Remove harness system (see “Removing HarnessSystem” section), remove base (see “Removing Base”section) and remove buckle (see “Adjusting the Buckle”section).
From the bottom of shellremove the small elasticstraps.
From the back of shellremove the large elasticstraps.
1
2
continued on next page.
Secure the shoulder beltin one of the two shoulderbelt positioning guides.
6
WARNINGNever put shoulder beltbehind the child’s back orunder the arm.Do not use with lap beltonly.The shoulder beltmust always be adjustedsnugly across the child’schest.For vehicles with an airbag, but without a backseat, refer to your vehicleowner’s manual.
!
4358-3434E Canada Elite Eng 12/17/08 3:36 PM Page 53
5049
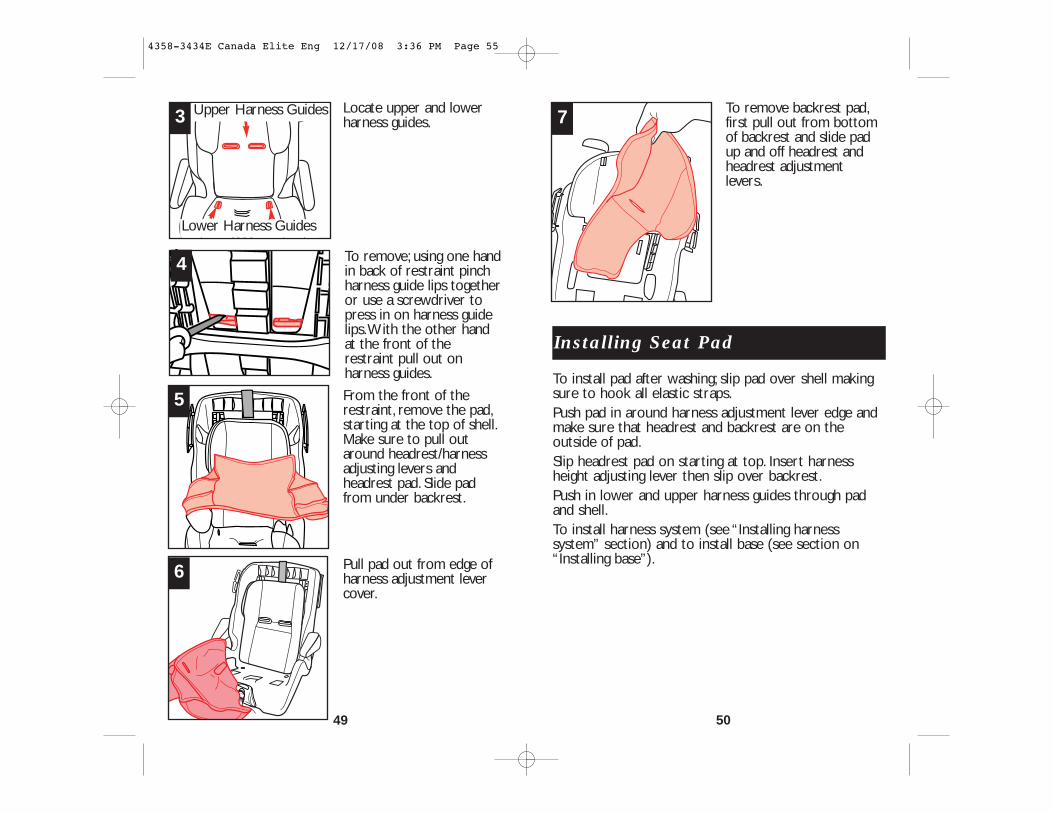
To remove backrest pad,first pull out from bottomof backrest and slide padup and off headrest andheadrest adjustmentlevers.
Installing Seat Pad
To install pad after washing; slip pad over shell makingsure to hook all elastic straps.Push pad in around harness adjustment lever edge andmake sure that headrest and backrest are on theoutside of pad.Slip headrest pad on starting at top. Insert harnessheight adjusting lever then slip over backrest.Push in lower and upper harness guides through padand shell.To install harness system (see “Installing harnesssystem” section) and to install base (see section on“Installing base”).
7
From the front of therestraint, remove the pad,starting at the top of shell.Make sure to pull outaround headrest/harnessadjusting levers andheadrest pad. Slide padfrom under backrest.
Pull pad out from edge ofharness adjustment levercover.
Locate upper and lowerharness guides.
Lower Harness Guides
4
5
6
3
To remove; using one handin back of restraint pinchharness guide lips togetheror use a screwdriver topress in on harness guidelips.With the other handat the front of therestraint pull out onharness guides.
Upper Harness Guides
4358-3434E Canada Elite Eng 12/17/08 3:36 PM Page 55

51 52
Warranty Dorel Juvenile Group, Inc. (DJG) warrants this product to theoriginal retail purchaser as follows:This product is warranted against defective materials orworkmanship for seven years from the date of originalpurchase. An original receipt is required to validateyour warranty. DJG will, at its option, provide replacementparts or replace this product. DJG reserves the right tosubstitute if the part or model has been discontinued.
To make a claim under this warranty you may contact us atwww.djgusa.com, fax us at 1-800-207-8182 24 hours a day,write to DJG, Consumer Relations Department, P O Box2609, Columbus, IN 47202-2609, or call 1-800-544-1108 from7:00 a.m. to 6:00 p.m. EST Monday through Thursday and from7:00 a.m. to 4:30 p.m. on Friday. Proof of purchase isrequired and shipping charges are the responsibility ofthe consumer.
Warranty Limitations:
This warranty does not include damages which arise frommisuse or abuse of this product.
Limitation of Damages:
The warranty and remedies as set forth are exclusive and inlieu of all others, oral or written, express or implied. In noevent will DJG or the dealer selling this product be liable toyou for any damages, including incidental or consequentialdamages, arising out of the use or inability to use this product.
PLEASE REGISTER ON LINE ATWWW.DJGUSA.COM/REGISTRATION/CARSEAT/CAN ORCOMPLETE AND MAIL THE PRE-PAID OWNERREGISTRATION CARD WITHIN (30) DAYS OF PURCHASETO EXPEDITE WARRANTY CLAIMS AND TO VERIFYTHE ORIGINAL DATE OF PURCHASE.
4358-3434E Canada Elite Eng 12/17/08 3:36 PM Page 57
54
Replacement Part Order Form
We MUST have this information to process yourorder:Model Number (5 digits & 3 or 4 letters): __________Manufacture Date (y/m/d): ________________________
For replacement parts, complete this form below.We musthave your model number and manufacture date codes on theform to ensure proper replacement parts.They can be foundon the stickers on the side of the child restraint and boosterseat shell. Payment in U.S. dollars must accompany your order.Choose parts needed from the list supplied.
Mail form and payment to;
Dorel Juvenile Group. Inc.2525 State StreetColumbus, IN 47201-7494
Fax to: 1-800-207-8182Website: www.djgusa.com
Please make money order payable to Dorel Juvenile Group,Inc. See next page for Visa or MasterCard payment.We do notaccept personal checks or Discover Card. For orders outsideof Canada and the U.S. we accept Visa or MasterCard only.
Ship to (please print)________________________________
Name____________________________________________
Address __________________________________________
City______________________________________________
State/Province _____________________________________
Zip/Postal code_______________ Country _____________
Telephone (area code)_______________________________
E-mail address______________________________________
53
4358-3434E Canada Elite Eng 12/17/08 3:36 PM Page 59