Embed Size (px)
Citation preview

Remote control for CPG-based robots
Gabriel Cuendet
Semester project at the Biorob laboratoryEcole polytechnique fédérale de Lausanne
Professor: Auke Jan IjspeertAssistant: Alessandro Crespi
Spring semester 2010

Abstract
This 3rd year semester project’s aims at the realization of an autonomous remotecontrol for the CPG-based Biorob’s robots. This report presents the work that wasdone from the beginning of the project to the final realization of the device. Thefirst step was the realization of a first prototype (the development version) on whichthe software could be developed. Then a second version was designed in order tofit into a case. Some considerations were also made about the ergonomics of thedevice.

Contents
1 Introduction 41.1 Current way to remote control the robots at Biorob . . . . . . . . . . 41.2 Task description . . . . . . . . . . . . . . . . . . . . . . . . . . . . . . 5
2 Hardware design 62.1 The radio interface . . . . . . . . . . . . . . . . . . . . . . . . . . . . 62.2 The user interface . . . . . . . . . . . . . . . . . . . . . . . . . . . . . 7
2.2.1 Definition of the needed components . . . . . . . . . . . . . . 72.2.2 Functioning of the user interface . . . . . . . . . . . . . . . . . 8
2.3 The battery management and voltage supply . . . . . . . . . . . . . . 92.3.1 Battery management and charge . . . . . . . . . . . . . . . . 102.3.2 Voltage supply to the device . . . . . . . . . . . . . . . . . . . 10
2.4 Key points about the PCB . . . . . . . . . . . . . . . . . . . . . . . . 11
3 Software 123.1 Basics . . . . . . . . . . . . . . . . . . . . . . . . . . . . . . . . . . . 12
3.1.1 Getters and setters . . . . . . . . . . . . . . . . . . . . . . . . 123.1.2 Interfacing the buttons . . . . . . . . . . . . . . . . . . . . . . 13
3.2 The state machine based model . . . . . . . . . . . . . . . . . . . . . 143.2.1 Definition of the different states . . . . . . . . . . . . . . . . . 143.2.2 Operations of the state machine . . . . . . . . . . . . . . . . . 153.2.3 Infinite loop in the main . . . . . . . . . . . . . . . . . . . . . 16
3.3 The menu like user interface’s implementation . . . . . . . . . . . . . 173.4 Controlling the robot in speed and direction . . . . . . . . . . . . . . 18
3.4.1 Reading the position of the joystick . . . . . . . . . . . . . . . 183.4.2 Updating the locomotion parameters on the robot . . . . . . . 19
4 Housing and mechanical integration 214.1 Choice of the case . . . . . . . . . . . . . . . . . . . . . . . . . . . . . 214.2 Ergonomics of the user interface . . . . . . . . . . . . . . . . . . . . . 22
2

4.2.1 End panel . . . . . . . . . . . . . . . . . . . . . . . . . . . . . 234.3 Components and integration . . . . . . . . . . . . . . . . . . . . . . . 24
4.3.1 Buttons . . . . . . . . . . . . . . . . . . . . . . . . . . . . . . 244.3.2 LCD . . . . . . . . . . . . . . . . . . . . . . . . . . . . . . . . 24
4.4 Mechanical result . . . . . . . . . . . . . . . . . . . . . . . . . . . . . 25
5 Conclusion 265.1 Recommendations for improvements and further developments . . . . 26
A Schematics 28
B Part list 31
C Mechanical drawings 32
3

Chapter 1
Introduction
1.1 Current way to remote control the robots at
Biorob
The communication between the remote controller and the robot is based upon aradio protocol using the ISM frequencies band. The radio interface on the robot’sside will not be detailed in this project. On the controller’s side, the radio interfaceis currently connected to a computer via USB. The user is then controlling the robotwith a wireless gamepad. A software on the computer interfaces the signals fromthe gamepad to the radio interface which sends those signals to the robot. Thus thecomputer is used only as an interface between the gamepad and the radio interfacebut still remains essential because the protocol used by the gamepad is proprietary.The consequence is that it is very difficult to interface the gamepad directly withthe radio interface, without needing the computer.
The need for a computer is not a problem when controlling the robots insidethe laboratory. On the opposite, when outside the laboratory, for example in anexhibition for a demo or in the nature to make a movie, the computer becomesannoying.
Therefore the goal of this project is to make an autonomous device that permitsto wirelessly remote control any of the Biorob’s CPG-based robots that use the ISMfrequencies band. The next page shows the task description including the initialproject’s description.
4

Remote control for CPG-based robots
Semester project, task description
Gabriel Cuendet, March 19, 2010
The goal of this project is to develop a wireless remote control that communicateswith a robot, which is controlled by a CPG . The electronics for the RF part aren’tpart of that project, since they are already designed. The remote control is able toconfigure a small number of locomotion parameters on the robot. It allows a userto interactively remote control the robot without needing a PC.
Task-list :
1. Review of the existing remote control using a PC and a radio interface. Thisradio interface is then included in the current project.
2. Definition of the components needed to achieve interaction between the userand the robot.
3. The PIC18F2580 development kit is available for test purpose.
4. Design of the hardware (PCB).
5. Design of the software on the micro-controller.
6. Design of the housing and mechanical integration of the hardware.
Deliverables:
1. A final report.
2. An entry on the BIRG site, which summarizes the work on the project.
3. A live demo of the remote control during final presentation.
5

Chapter 2
Hardware design
For a better understanding, the device can be divided into three distinct parts:
• The radio interface
• The user interface
• The battery management and voltage supply
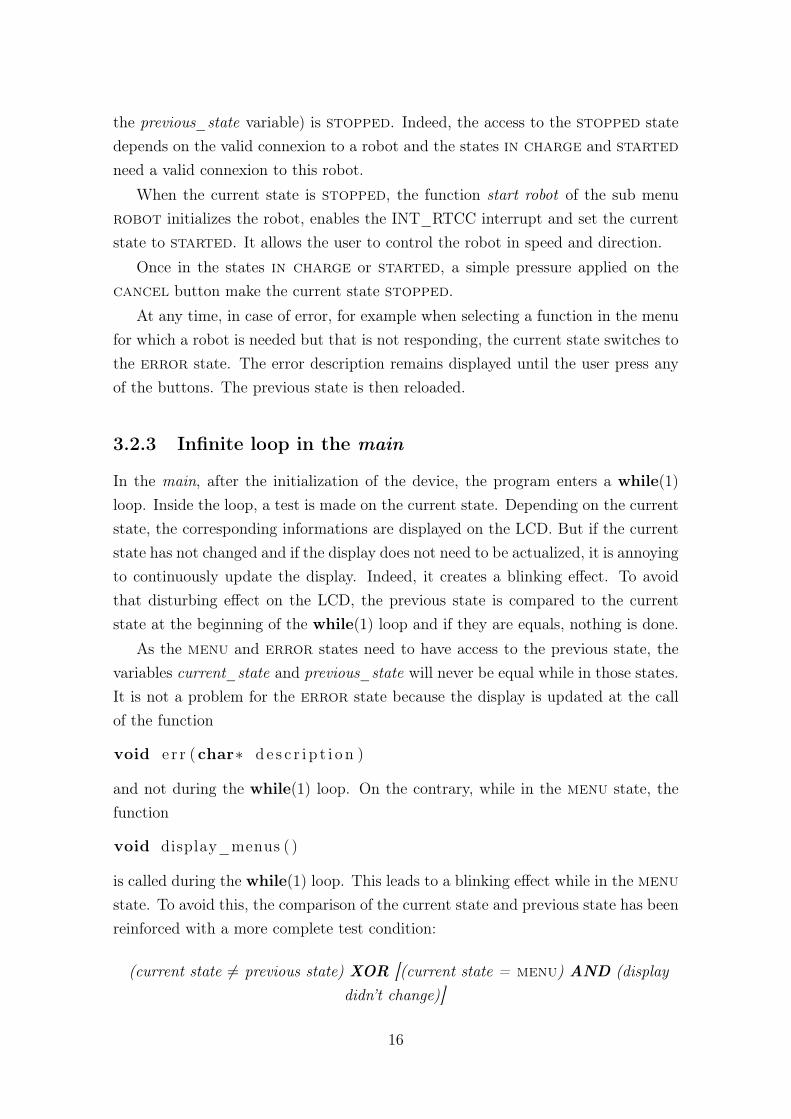
Even if the three parts are interconnected, they are analyzed separately in thisreport. Indeed, they were designed that way. The complete schematic of the threeparts can be found at the end of this report (cf. Appendix A). Although the designof the radio interface is not strictly speaking part of this project, a small section willbe dedicated to its functioning.
During the project, a total of two versions of printed circuit board of the hardwarehave been realized:
• the first prototype, called the development version, on which the software partof the project has been developed and
• the second prototype, called the final version, which had to fit into a case andwas made more user-friendly.
2.1 The radio interface
The radio interface is composed of a microcontroller (the Microchip PIC16LF876A),a 868 MHz radio transceiver (the Nordic nRF905), an impedance matching circuitand an antenna.
The microcontroller communicates with the user interface (which previously wasthe computer) using an asynchronous serial transmission. The communication pro-tocol which is implemented on that microcontroller was designed by Alessandro
6

Crespi and the relevant aspects of it will be seen in the « software » section of thisreport.
Without going too much into details, this radio interface can thus be consideredas a black box with two wires for the asynchonous serial communication input andoutput on one side and an antenna for the 868 MHz radio communication input andoutput on the other side.
2.2 The user interface
As it is said in the task description (cf. 1.2), the device must be able to configurea small number of locomotion parameters on the robot and to permit interactionbetween the user and the robot.
2.2.1 Definition of the needed components
First, in order to allow the user to control the locomotion parameters of the robot,which are mainly the speed and the direction, a two-axis joystick is needed. It hasto be a potentiometer joystick and not a switch joystick in order to provide a betterresolution in the movements.
Furthermore, four push buttons are used in a menu navigation system to controlevery other parameters: an enter button, a cancel button, a plus (+) buttonand a minus (-) button. To allow further development of the device, a fifth buttonis added.
Finally, in order to achieve interaction, a visual feedback is provided to the userthrough LEDs and a LCD screen. As the LCD is mainly used in the menu navigationsystem, a simple 2x16 characters, alphanumeric LCD is sufficient. In this case, a I2Cinterfaced LCD (the Batron’s BTHQ21605V-FSRE-I2C-COG) has been chosenin order to minimize the number of pins used for the display on the microcontroller.It also minimizes the number of tracks on the printed circuit. Moreover, the LCDvoltage supply is only 3.3V 1.
The LEDs can be used instead of the LCD to display binary values or to indicatean error. In the device, two green LEDs are used to display binary values (forexample if the robot is moving in a walking or swimming mode) and a red oneto indicate an error. In the development version, a LED indicated if the devicewas turned on or off. As the device is supplied by a battery, this LED has beenremoved in the final version; it was only discharging the battery faster by pulling a
1see the datasheet of the BTHQ21605V-FSRE-I2C-COG pp.7-8 , for more details
7

constant current out of it without providing any consistent information to the user.
2.2.2 Functioning of the user interface
The link between the above elements and the radio interface is done by a microcon-troller, a Microchip PIC18F2580. The choice of this microcontroller was dictatedby the habits of the staff of Biorob and the fact that this particular microcontrollerand development tools for it were available at Biorob.
Figure 2.1 shows the user interface components, linked to the microcontroller.For a complete schematic, see the Schematics section in the appendix (cf. AppendixA).
Figure 2.1: User interface components
Two of the eight analog-to-digital 10-bits converter of the microcontroller areused to convert the voltages on the two joystick potentiometers (each correspondingto an axis) to an 8-bits number. In spite of the 10-bits conversion capability of theconverter, 8-bits are sufficient to encode the position of the joystick with a goodresolution. Consequently, the 8-bits mode is used instead of the 10-bits one.
The enter and cancel buttons are connected to input 0 and input 1 of port B,which correspond to the external interrupts 0 and 1 (INT0 and INT1 Pin interrupts).
8

The additional button is connected to input 2 of port B (INT2 Pin interrupt). Itis not represented in figure 2.1 as this button is not used. Those three buttonshave independent interrupts, in opposition to the plus (+) and minus (-) buttonswhich are connected to input 4 and input 5 of port B. Those inputs are triggeringthe same interrupt, which is the PortB interrupt-on-change (INTRB). In spite ofthat fact, the buttons are easily differentiated by a simple test on these inputs atthe beginning of the interrupt routine.
As the LCD uses a I2C communication protocol, only two wires are needed tointerface it with the microcontroller. Pins 3 and 4 of port C are respectively the I2Cclock and data input/output.
The LEDs are connected between outputs 0, 1 and 2 of port C and the groundthrough 150Ω resistors. The forward current is then approximately 2:
If =Usupply − Uf
R=
3.3V − 1.9V
150Ω= 9.3mA (2.1)
The maximum current sourced by any I/O pins is 25mA while the maximumcurrent sourced by the port is 200mA. The microcontroller is then capable of sourc-ing a sufficient current for those three LEDs. A lower value for the resistor couldhave been chosen in order to increase the current and the intensity of light, but thenthe battery would not have lasted as long.
Finally, the microcontroller is connected to the radio interface via a serial link.Pins 6 and 7 of port C are connected to the TX (transmit) and RX (receive) tracks.Of course, on the side of the radio interface’s microcontroller (the PIC16LF876A)the tracks are cross-connected, which means that the TX track is connected to theRX pin and vice versa.
2.3 The battery management and voltage supply
As the device is powered by a rechargeable Li-Ion battery, this one needs to beprotected and charged. Moreover, a monitoring function is very useful to know thecharge level of the battery. The voltage from the battery is included between 4.2Vand about 3V depending on its charge. Due to this variation, a DC/DC converteris needed to provide the device a constant voltage.
The above functions are realized using the same integrated circuits as in thesalamander 3. Indeed, the schematics have been adapted from the schematicsSAL3BODYPWR drawn by Alessandro Crespi.
2The forward voltage Uf is given in the datasheet of the LED in function of the forward current
9
2.3.1 Battery management and charge
The DS2764 integrated circuit from Dallas Semiconductor is a high-precision Lithiumion battery monitor including a data-acquisition, information-storage, and safety-protection device. The circuit permits to disconnect the battery in case of overcharge(overvoltage), overdischarge (undervoltage), and excessive charge and discharge cur-rents (overcurrent, short circuit) to avoid irreparable damages. This circuit also al-lows to monitor the temperature, voltage and current through a I2C communicationprotocol. Moreover, it has a 40 bytes EEPROM memory that will not be used inthis project but could be used in further developments.
The battery charging is managed by the LT1571-5 integrated circuit from LinearTechnology. The charge voltage can be include between 8.2V and 26V. At Biorob,the chargers are providing a 24V constant voltage. The circuit also provide a flagoutput which indicate the end of the charge. This one is not used in the final versionof the remote control because a software implementation of that functionality hasbeen preferred. The advantage of the software implementation versus the LED ismainly at the mechanical integration level. Indeed, a charge-LED would have meantone more hole near the power jack connector, which would have been problematicbecause of the lack of space on this side of the case (cf. chapter 4).
2.3.2 Voltage supply to the device
The option to supply the whole device with a single 3.3V voltage has been taken.It would have been perfectly possible to supply two parts of the circuit with twodifferent voltages, but obviously, it requires less components to generate only oneconstant supply voltage. As the radio interface circuit (nRF905) needs a supply of3.3V, this voltage is inevitably necessary.
Most of the LCD displays need a 5V supply, but the chosen one only needs a3.3V supply. This is one of the reasons why it was chosen, beside the I2C interface.
The only problematic circuit is the user interface’s microcontroller, the PIC18F2580.According to the datasheet3, this version of the microcontroller only accepts a supplyvoltage between 4.2V and 5.5V. However, the low-voltage part PIC18LF2580 func-tions over an extended VDD range of 2.0V to 5.5V but with reduced clock speed. Inboth versions (development and final version) of the remote control, a PIC18F2580is used. Indeed, some tests had already been made at Biorob and the only problemwith a supply voltage of 3.3V on that microcontroller was a failure with the CANbus at a temperature exceeding 35C. As the CAN bus is not used in this project,
3see the datasheet of the PIC18F2580, pp.422-423
10

this is not a limitation.Taking into account all those considerations, a single DC/DC converter is needed
in the device. The LTC3240-3.3 from Linear Technologies has been used. This is astep-up/step-down charge pump DC/DC converter that produces a fixed regulatedoutput voltage of 3.3V over a wide input voltage range (1.8V to 5.5V) including thevoltage range covered by the battery at the different charge levels.
2.4 Key points about the PCB
The most sensitive routing part is the impedance matching circuit. The tracks mustbe as short as possible all the way between the ant1/ant2 outputs of the nRF905integrated circuit and the antenna. Moreover, the tracks must be balanced.
For most integrated circuits, good routing advices can be found in the corre-sponding datasheets. For example, the routing advices about the charger4 (LT1571-5) have been followed.
4see the datasheet of the LT1571-5 p.14
11

Chapter 3
Software
During the project, only the software on the microcontroller PIC18F2580 has beendeveloped. Indeed, the software on the radio interface’s microcontroller was alreadydeveloped and thus will not be part of this report. The software has been developedon the development version of the hardware.
This chapter aims to present the global functioning of the software and not todescribe every single functions in details. The reader should read the code, which iscommented, in order to get those details.
3.1 Basics
3.1.1 Getters and setters
The way to control the robots consists only in writing into or reading specifiedregisters of the robot. As a consequence, the most needed software functions are thesetter functions and the getter functions.
The remote control always remains the master and the robot the slave. Therobot cannot initiate the transmission. Thus, the getter functions first have toask the robot to send the value of a register. There is no function receiving dataautomatically from the robot. That enables both the getters and the setters to sharethe same structure. For both functions, a one dimension array req is defined. Itsstructure is shown in figure 3.1.
The first two elements of that array are then sent to the radio interface via theserial link. The radio interface microcontroller answers with a confirmation byte.This byte has either the value ’6’ in case of success, which value corresponds tothe ACK (Acknowledgment) character in the ASCII table or the value ’13’ (NAK(Negative Acknowledgement) character) in case of failure.
12

req[0] op op op op op op addr addrreq[1] addr addr addr addr addr addr addr addrreq[2-n] data data data data data data data data
Figure 3.1: Structure of the array req with ’op’ refering to operation and ’addr’ toaddress.
Depending on the function (either a getter or a setter), the data are then sentfrom the radio interface via serial link and written in the req[2] and following orread from the req[2] and following and sent to the radio interface via RS-232.The number of lines of req depends on the length of the register that is beingaccessed. That length varies from one byte to 29 bytes making the number of linesof req between 3 and 32. Several getters and setters of various length are thenimplemented, but each one is based upon the same basic function:
int1 reg_op ( int8 op , int16 addr , int8∗ data , int l en ) ;
All the access to the robot will be provided by the specific-length getters and setters.
3.1.2 Interfacing the buttons
Every time a button is pressed, the corresponding interrupt is trigered. The figure3.2 shows those interrupts names.
Button Pin Interruptenter Port B0 INT0cancel Port B1 INT1(supp Port B2 INT2)plus Port B4 INT_RBminus Port B5 INT_RB
Figure 3.2: The buttons and their corresponding interrupts
As the buttons plus and minus trigger the same interrupt, inputs 4 and 5 ofport B are read at the beginning of the routine of interrupt INT_RB in order todecide which buttons trigger interrupt up.
This detail taking apart, all the interrupts then works the same way:
1. A do-while loop increments a variable from 0 to 50 each millisecond as long asthe button state does not change (no bouncing).
2. If the variable is greater than 45, which means the button has been pressedfor 45 millisecond without bouncing, the function
13

void press_button (char button ) ;
is called. Otherwise, the function is not called. As the button is bouncing, itis very likely that the interrupt is going to be set up again at the next bounce.
The function press_button implements the state machine as described in section3.3.
3.2 The state machine based model
3.2.1 Definition of the different states
In order to facilitate the navigation into the different functions, six states have beendefined:
1. RC Autonomous: When no robot is controlled, this state allows the user toaccess the menu by pressing the enter button in order to select one robot orto access the remote control’s functions like the display of the battery voltage.
In this state, the charge of the remote control is displayed on a seven segmentsbar graph. The values of the segments are the following: 3.1V / 3.25V / 3.4V/ 3.55V / 3.7V / 3.85V / 4V. If the voltage is under 3V, a text message isdisplayed : ’empty!’.
2. Menu: In this state, the menu is displayed. The working of the menu isdescribed in section 3.3.
3. Stopped: When a communication with a robot has been set up, this stateallows the user to access the menu but not to control the robot in speed anddirection (the INT_RTCC interrupt is disabled).
The LCD displays the text "Ready" on first line and "enter for menu" onsecond line. Entering the menu enables the user to start the robot and thusto control it in speed and direction.
4. In charge: When the robot is charging, the corresponding state is "In charge".On the older version of the salamander the charge can be interrupted bypressing the cancel button. The menu can still be accessed, but the robotcannot be started and thus cannot be controlled in speed and direction.
5. Started: In this state, the INT_RTCC interrupt is enabled. The joystick con-trols the speed and direction of the robot (see section 3.4 for more details). The
14

menu cannot be displayed and the robot is stopped by pressing the cancel
button. The plus button is enabling the turbo mode while the minus buttonis disabling that turbo. A single pressure on the enter button switches thelocomotion between walking and swimming.
6. Error: "error !" is displayed on the first line of the LCD and a small de-scription of the error on the second line. Furthermore, the red error LED isturned on.
The figure 3.3 shows the state machine.
Figure 3.3: State machine
3.2.2 Operations of the state machine
Two global variables (current_state and previous_state) are defined. They are ofthe type state.
typedef enumSTARTED, IN_CHARGE, STOPPED, MENU,RC_AUTONOMOUS, ERROR=9 s t a t e ;
The use of two variables enables to remember a previous state. This is useful withthe menu and error modes where a return to the previous state is needed.
Basically, the transition between the states are made via the menu state. Thestates in charge and started can be accessed only if the previous state (stored in
15
the previous_state variable) is stopped. Indeed, the access to the stopped statedepends on the valid connexion to a robot and the states in charge and started
need a valid connexion to this robot.When the current state is stopped, the function start robot of the sub menu
robot initializes the robot, enables the INT_RTCC interrupt and set the currentstate to started. It allows the user to control the robot in speed and direction.
Once in the states in charge or started, a simple pressure applied on thecancel button make the current state stopped.
At any time, in case of error, for example when selecting a function in the menufor which a robot is needed but that is not responding, the current state switches tothe error state. The error description remains displayed until the user press anyof the buttons. The previous state is then reloaded.
3.2.3 Infinite loop in the main
In the main, after the initialization of the device, the program enters a while(1)loop. Inside the loop, a test is made on the current state. Depending on the currentstate, the corresponding informations are displayed on the LCD. But if the currentstate has not changed and if the display does not need to be actualized, it is annoyingto continuously update the display. Indeed, it creates a blinking effect. To avoidthat disturbing effect on the LCD, the previous state is compared to the currentstate at the beginning of the while(1) loop and if they are equals, nothing is done.
As the menu and error states need to have access to the previous state, thevariables current_state and previous_state will never be equal while in those states.It is not a problem for the error state because the display is updated at the callof the function
void e r r (char∗ d e s c r i p t i o n )
and not during the while(1) loop. On the contrary, while in the menu state, thefunction
void display_menus ( )
is called during the while(1) loop. This leads to a blinking effect while in the menu
state. To avoid this, the comparison of the current state and previous state has beenreinforced with a more complete test condition:
(current state 6= previous state) XOR [(current state = menu) AND (displaydidn’t change)]
16

3.3 The menu like user interface’s implementation
The menus, displayed on the LCD and whose give access to the different functionsof the remote control, are two levels menus. For a memory saving purpose, thelabels of each top menu and each function are stored in a single dimensional arrayof characters strings:
char menu_labels [ 1 3 ] [ 1 6 ] ="INFOS RC" ,"Batt. voltage" , . . . , "Stop charging" ;
Indeed, none of the menu have the same length and it would have been a waste toallocate memory according to the longest menu (the one having the most functions)in a two-dimensional array. As a consequence, two variables are then needed to storethe current first level and second level during the navigation. Those variables are:
typedef enum INFOS_RC_MAIN=0,SELECT_ROBOT_MAIN,ROBOT_MAIN main_menu ;
main_menu current_main_menu = 0 ;
and
typedef enumNO_SUB=0, BATT_VOLTAGE_SUB=1, VERSION_RADIO_SUB,FAVORITES_SUB=1, ENTER_CHANNEL_SUB, SCAN_CHANNELS_SUB,START_SUB=1, STOP_SUB, START_CHARGING_SUB,
STOP_CHARGING_SUB sub_menu ;
sub_menu current_sub_menu = NO_SUB;
The corresponding functions are stored in an array of pointers on functions takingno arguments and returning nothing.
typedef void (∗ tab_fct ) ( void ) ;
tab_fct menu_fct [10]= show_batt_voltage , . . . ,menu_stop_charging ;
In order to be able to display the label (or to select the function) correspondingto the current main menu index and/or sub menu index, the number of menu andthe length of each menu have to be store. This is done in the variable:
int8 menu_lengths [4 ]=3 , 2 , 3 , 4 ;
17

Where the first element is the number of main menu and the following elements arethe length of each sub menu.
Finally, the function void display_menus() is called each time a button has beenpressed. This is indicated by the value of the variable:
int1 display_changed = 0 ;
This variable is set to one each time the function void press_button(char button) iscalled and set to zero before each new display.
3.4 Controlling the robot in speed and direction
Each of the two axis of the joystick corresponds to a parameter, either the speedor the direction. When the user is controlling the robot, the timer-based interruptINT_RTCC is enabled. At each interrupt, an update function updates the contentof defined registers in the robot.
3.4.1 Reading the position of the joystick
The period of the interrupts has been chosen in order to have a good compromisebetween a slow, non responsive system (if T 0.2s) and a too demanding periodfor the system (T 50µs 1). Indeed, during the interrupt, 2 · 10 µs are necessaryto switch the input channel plus the time of conversion which also has to be takeninto account.
Afterwards, it appeared that a very similar value had been chosen in the previoussoftware2 which was used with the gamepad and the computer (see Current way toremote control the robots at Biorob, section 1.1). The chosen period is given byequation (3.1) for a prescaler equal to 4.
Tinterrupt =2bits
fcounter
prescaler
=216 · 4
2500000≈ 104 ms (3.1)
At each interrupt, the voltages on the x axis (corresponding to the speed) andthe y axis (corresponding to the direction) are converted to the 8-bits numbers aand b.
The update function (here the update function of the salamander3) is then called
1see the datasheet of the PIC18F2580, p.258 for the detailed calcul of the minimum requiredacquisition time, which is if the order of 10 - 15µs maximum
2cf. file "joyctrl.cpp", part of the software developped by Alessandro Crespi.3corresponding functions exist for the amphibot II, the amphibot III and for the amphibot with
Mathieu Porez software
18

with two arguments:
int1 update_salamander ( f loat spd , f loat d i r )
As the update functions take two floating point numbers between (-1) and 1 inargument, those are calculated from the converted values a and b of the ADC:
spd =a− 28−1
228−1
2
=a− 127.5
127.5(3.2)
dir =b− 28−1
228−1
2
=b− 127.5
127.5(3.3)
Moreover, the speed and direction values are displayed on the LCD.
3.4.2 Updating the locomotion parameters on the robot
The update functions update the values of the registers of the corresponding robotin function of:
• the position of the joystick (given by the arguments spd and dir),
• the current locomotion mode stored in the global variable
locomotion_mode current_locomotion_mode ;
which is of the type:
typedef enumWALKING, SWIMMING locomotion_mode ;
(can be either walking or swimming for the salamander and only swimmingfor the amphibot) and
• the turbo option (turbo on or off) which value is stored in the global variable
int1 turbo = 0 ;
In order to control the different types of CPG-based robots at Biorob, which aremainly the salamanders and the amphibots, several update functions have been im-plemented. Indeed, each different type of CPG-based robot has its own registersaddresses and its own locomotion parameters set. Moreover, the locomotion param-eters set is different from a version to another even for the same type of robot. Ineach update function the parameters set is updated in function of the version of thecurrent robot (which is stored in the current_robot global variable).
19

The values of the different registers and the locomotion parameters set have beencopied from the code of the previous software which was used with the gamepad andthe computer4.
4cf. file "robots.h" and "robots.cpp", part of the software developed by Alessandro Crespi.
20

Chapter 4
Housing and mechanical integration
From the very beginning of the project, the goal was to come to a device integratedinto a case. An effort has been made in order to find an ergonomic case and to keepthe aesthetic side on mind. This chapter focus on the choices that have been madeand not on all the mechanical aspects of the work.
4.1 Choice of the case
The key point in the choice of the case has been the size. Indeed, as the device wasintended to be hold in the hand, the size of the housing had to be reasonable. Onthe other hand, some elements were of such dimensions that they would not havefitted into a small case. For example, the height of the joystick or the width of theLCD were limiting factors.
During the search for the right case, two main options appeared:
1. A bigger case in which the joystick could fit entirely but less ergonomic becauseof its size and shape. In particular the height of the case would not havepermitted to hold it in one hand comfortably.
2. A specific case designed for hand-held comfort, with a reduced height but inwhich the joystick would not have fit entirely.
Figure 4.1 shows an example of a case of each category. The second option hasbeen preferred, giving priority to the ergonomic. Moreover, the aesthetic point isnot forgotten. Indeed, a case specifically designed for hand-held comfort is muchmore aesthetic than a big rectangular box in spite of the joystick sticking out of thecase.
From a mechanical point of view, the chosen option is a bit more complex becauseof the shape of the joystick hole which is not just a circular hole. This leads to an
21

Figure 4.1: Two types of case: a) option 1; b) option 2
important comment: the device is certainly less protected from the dust or eventhe water splashing when choosing the second option. Even if the device does nothave to be waterproof, an improvement of that aspect could be made in furtherdevelopment.
The case is in molded ABS plastic with a black soft plastic grip on the sides.
4.2 Ergonomics of the user interface
Figure 4.2 shows the front panel (top) of the remote control.
Figure 4.2: Front panel view (without antenna)
22

The orientation of the case was dictated by the fact that the antenna is anexternal one. As it is sticking out of the box from the end panel, the end panel hadto be pointing forwards and not sideways which would have been the case with anhorizontal orientation. The horizontal orientation would have permit to hold thecase with both hands: controlling the joystick with one and pushing the buttonswith the other one. The use of the device would then have been very similar to theuse of the gamepad.
Conversely, the vertical orientation enables the user to hold the device with onlyone hand. A small experiment among the staff of Biorob shows that the right-handerfirst take the device with the left hand in order to have access to the joystick withthe right hand. The four buttons, slightly on the right side are then also accessiblewith the right hand. While not controlling the robot in speed and direction, thedevice can also be held with the right hand. In this case, the buttons are accessiblewith the same hand. The use is then similar to the use of a television remote control.
The layout of the buttons is strongly inspired from the gamepad that is currentlyused at Biorob. Indeed, the gamepad is especially designed to be ergonomic.
4.2.1 End panel
Figure 4.3 shows the end panel of the remote control.
Figure 4.3: End panel view (without antenna)
From the left to the right, there is a small reset push button, the antenna con-nector, the main power switch and the jack connector for the charger.
The reset button1 is intentionally not too easily accessible as its size is reducedand its position is on the side of the top panel.
1Note that this button resets only the user interface microcontroller (PIC18F2580) and notboth microcontrollers.
23

4.3 Components and integration
4.3.1 Buttons
The buttons that have been used are the Multimec 3FTL6. They are composed ofa through hole mounting body covered by a cap. The important point is that thiscap can be chosen in various height : 16mm, 19mm or 22.5mm. In the presentcase, 19mm height buttons perfectly fit for the application, sticking out from thecase of about 3mm.
4.3.2 LCD
The total height between the top surface of the PCB and the inner top side of thecase is 8.9mm with a 1.6mm thick PCB. Thus, the LCD could not be fixed on thePCB and at the same time be near the surface of the inner top side of the case whichis what is wanted.
The selected solution is to fix the LCD on another PCB which is itself fixed onthe top of the case. The link between the main PCB and the LCD is then made viaa flat cable.
Figure 4.4 shows the side view of the inside of the case. The second PCB is ingreen and is screwed in the dark grey boss.
Figure 4.4: Elevation view of the inside of the case. The main PCB is in light grey,The LCD is in red and the second PCB in green.
This solution enables the battery to be fixed between the two PCBs by providingjust the sufficient height. In this version, the battery is fixed with double side scotch-tape. An alternative idea is to integrate the fixating system on one of the PCB. Thissystem could be as simple as four pins surrounding the battery, one on each side,making a cage. By assembling the two parts, the battery is then hold in position.
Figure 4.5 shows the shape of that second PCB and the position of the LEDsand buttons.
24

Figure 4.5: Second PCB on the inside of the top panel
4.4 Mechanical result
Figure 4.6 shows the disassembled device.
Figure 4.6: Final version of the remote control
25

Chapter 5
Conclusion
The designed device satisfies the main objective of the project, which was to havean autonomous device. Moreover, the designed remote control seems to be practicaland user-friendly, but this has to be verified during the effective use of it. Theexternal size of the device is not much bigger than the size of the previously usedgamepad.
Keeping in mind that the final version of the device as presented in this reportis only the second prototype, improvements can still be made.
5.1 Recommendations for improvements and fur-
ther developments
From a mechanical point of view, the drawings could be improved. Indeed, as this isonly the second version, a big margin has been taken on every hole. By reducing thismargin, the device could be better protected against dust and even water splashing.Nevertheless, the case cannot be made waterproof as the joystick is sticking out.
An interesting development could be the integration of the antenna inside thecase. This would considerably reduce the external size of the device. Moreover, itcould enable the user to hold the device horizontally, providing new potential uses.
Most of the improvements that could be done are in the software part. Forexample, the voltage indicator during the rc_autonomous state, could better fitthe discharge curve of the battery, which is non-linear. A function could also providean access to the charge level of the battery, during its charge. Indeed, the function
f loat battery_current ( ) ;
can be used in order to measure the current flowing into the battery (while in charge)or out of the battery. This provides access to the level of charge, as the battery is
26

charging under a constant voltage during the second part of the charging cycle1.The management of the different robots could also be improved, making easier
to add a robot with its own parameters set without having to write several functions(the init function, the update function and possibly other specific functions).
A further software development could be to enable the user to choose betweendifferent parameters sets for each robot. The locomotion could then be adapted todifferent conditions, like for example the type of the ground.
1In the first part of the charging cycle, the current flowing into the battery is constant (I =600mA). In the second part, the voltage remains constant while the current is decreasing nonlinearly.
27

1
1
2
2
3
3
4
4
D D
C C
B B
A A
Title
Number RevisionSize
A4
Date: 09.06.2010 Sheet ofFile: \\..\schema_remoteControl01.SchDoc Drawn By:
RA2/AN2/VREF- 1
RA3/AN3/VREF+ 2
RA4/T0CKI 3
RA5/AN4/SS/HLVDIN 4VSS5
OSC1/CLKI/RA7 6OSC2/CLKO/RA6 7
RC0/T1OSO/T13CKI 8
RC1/T1OSI 9
RC2/CCP1 10
RC3/SCK/SCL 11
RC4/SDI/SDA 12
RC5/SDO 13
RC6/TX/CK 14
RC7/RX/DT 15
VSS16
VDD17
RB0/INT0/AN10 18
RB1/INT1/AN8 19
RB2/INT2/CANTX 20
RB3/CANRX 21
RB4/KBI0/AN9 22
RB5/KBI1/PGM 23
RB6/KBI2/PGC 24
RB7/KBI3/PGD 25
MCLR/VPP/RE326 RA0/AN0 27
RA1/AN1 28
Thermal Pad29
U1
PIC18F2580-I/ML
C1100nF, 20V
GND
47KR1
+3.3V
+3.3V
23
1
SW1
ResetGND
22pF
C2
22pFC3
GND
TXD->RADIO
RXD<-RADIO
GND
progpgm_PIC
progpgm_PIC
progpdt_PICprogpcl_PIC
D2LED
150RR3
D3LED
150RR4
GND
progpdt_PICprogpcl_PIC
GND
SW2
Enter
47KR7
+3.3V
GND
button01
button01
SW3
Clear
47KR8
+3.3V
GND
button02
button02
button03button04
SW4
button03
47KR9
+3.3V
GND
button03SW5
button04
47KR10
+3.3V
GND
button04 Remote_control : User's interface
Gabriel Cuendet
123456
J2
MM6
Prog
ram
mat
ion_
PIC
12
Y1XTALGND 10MHz
GND
VC
C1
Xaxis2
GN
D3
VC
C4
Yaxis5
GN
D6
JoystickJoystick
+3.3V
123456
J3
LCD
SDA
SCL
+3.3V
GND
100nFC4
1uFC5
+3.3V
GND GND
VLCD
VLCD
SCLSDA
SDA
SCL
3.3KR5
3.3KR6
J1
progvdd_PIC
progvdd_PIC
buttonSupp
SW7
buttonSupp
47KR30
+3.3V
GND
buttonSupp
D11LED
150RR31
Final version
reset_radio
PIC101
PIC102COC1 PIC201 PIC202
COC2
PIC301 PIC302
COC3
PIC401
PIC402COC4
PIC501
PIC502COC5
PID201PID202
COD2PID301PID302
COD3PID1101PID1102
COD11
PIJ101 PIJ102
COJ1PIJ201
PIJ202
PIJ203
PIJ204
PIJ205
PIJ206
COJ2
PIJ301
PIJ302
PIJ303
PIJ304
PIJ305
PIJ306
COJ3
PIJoystick01
PIJoystick02
PIJoystick03
PIJoystick04
PIJoystick05
PIJoystick06
COJoystick
PIR101
PIR102COR1
PIR301
PIR302COR3
PIR401
PIR402COR4 PIR501
PIR502COR5
PIR601
PIR602COR6
PIR701
PIR702COR7
PIR801
PIR802COR8
PIR901
PIR902COR9
PIR1001
PIR1002COR10
PIR3001
PIR3002COR30
PIR3101
PIR3102COR31
PISW101
PISW102
PISW103COSW1
PISW201 PISW202
COSW2
PISW301 PISW302
COSW3
PISW401 PISW402
COSW4
PISW501 PISW502
COSW5
PISW701 PISW702
COSW7
PIU101
PIU102
PIU103
PIU104PIU105
PIU106
PIU107
PIU108
PIU109
PIU1010
PIU1011
PIU1012
PIU1013
PIU1014
PIU1015
PIU1016
PIU1017
PIU1018
PIU1019
PIU1020
PIU1021
PIU1022
PIU1023
PIU1024
PIU1025
PIU1026 PIU1027
PIU1028
PIU1029
COU1
PIY101PIY102
COY1
PIC402
PIJ101
PIJ303
PIJoystick01 PIJoystick04
PIR102
PIR502PIR602
PIR702 PIR802 PIR902 PIR1002
PIR3002
PIR701PISW201
PIU1018NLbutton01
PIR801PISW301
PIU1019NLbutton02
PIR901PISW401
PIU1022 NLbutton03
PIR1001PISW501
PIU1023
NLbutton04
PIR3001PISW701
PIU1020
NLbuttonSupp
PIC101PIC202
PIC302
PIC401 PIC501
PIJ204
PIJ302
PIJ305
PIJoystick03 PIJoystick06
PIR301PIR401PIR3101
PISW102
PISW202 PISW302 PISW402 PISW502
PISW702
PIU105
PIU1016
PIU1029
PIY103
PIC201
PIU107PIY101
PIC301
PIU106
PIY102
PID201PIU108
PID202PIR302
PID301PIU109
PID302PIR402
PID1101PIU1010
PID1102PIR3102
PIJ201
PIC102PIJ102
PIJ205
PIU1017
POprogvdd0PIC
PIJoystick02PIU1027
PIJoystick05PIU1028
PISW103
PIU101
PIU102
PIU103
PIU104
PIU1013
PIU1014
POTXD0>RADIOPIU1015
PORXD<0RADIO
PIU1021 POreset0radio
PIJ202
PIU1024
NLprogpcl0PIC
PIJ203
PIU1025
NLprogpdt0PIC
PIJ206
PIR101PISW101
PIU1026
NLprogpgm0PIC
PIJ306
PIR501
PIU1011
NLSCLPOSCL
PIJ304
PIR601
PIU1012
NLSDAPOSDA
PIC502
PIJ301
NLVLCD
POPROGVDD0PIC
PORESET0RADIO
PORXD<0RADIOPOSCL
POSDAPOTXD0>RADIO
28

1
1
2
2
3
3
4
4
D D
C C
B B
A A
Title
Number RevisionSize
A4
Date: 09.06.2010 Sheet ofFile: \\..\schema_alim01.SchDoc Drawn By:
Remote_Control : Battery
Gabriel Cuendet
VOUT 3
C+ 4
C- 5
VIN2
GND1
SHDN6
U3
ltc3240
C131uF
C141u
C154u7
+3.3V
C16100n
C17220u 4V
Vbatt
GND_Batt
SW 2
BOOST 3
SENSE 7
CAP 13
SELECT 6
GND 16
VCC115
PROG12
VC11
FLAG5
BAT10
BAT24
VCC214
GND1
GND8 GND 9
U2
LT1571-5GND
100nFC10
GND
22uF 6.3V
C12
330nF
C91KR11
GND
Battery charger
1uFC8
300RR12
8.2KR13
22uFC6
GND
D4D Schottky
Vcharge (8.2-26V)1
23
J4
PWRJACK
D5MCL4148
220nFC11
10uHL1
D6
D SchottkyGND
100nFC7
DC/DC Converter Vbatt -> 3.3V
33KR15
SS24
SS24
35V
1234
J5
Battery
CC 1
PLS2
DC 3
SNS4
SNS5
SNS6
PS7
IS28 IS19
SDA10
VSS 11
VSS 12
VSS 13
SCL14 VDD 15
Vin16
U4
DS2764
1KR16
150R17
4.7KR18
25m
R19
150R20
1KR21
1KR22
100nFC20
100nFC18
100nFC19
Vbatt
Vbatt
GND_BattGND
SDA
SCL
Q1IRF7410
Q2IRF7410
Vbatt
VCC
VCC
VCC
VCC
Battery monitor & protection
100nFC21
1nFC22
1nFC23
S6
SW-ON/OFF
Final version
GND
GND_Batt
PIC601
PIC602COC6
PIC701
PIC702COC7
PIC801 PIC802
COC8
PIC901 PIC902COC9
PIC1001
PIC1002COC10
PIC1101
PIC1102COC11
PIC1201
PIC1202
COC12
PIC1301
PIC1302COC13
PIC1401 PIC1402
COC14
PIC1501
PIC1502COC15
PIC1601
PIC1602COC16
PIC1701
PIC1702COC17
PIC1801
PIC1802COC18
PIC1901
PIC1902COC19
PIC2001PIC2002
COC20
PIC2101
PIC2102COC21
PIC2201
PIC2202COC22
PIC2301
PIC2302COC23
PID401PID402
COD4
PID501PID502
COD5
PID601PID602
COD6
PIJ401
PIJ402
PIJ403
COJ4
PIJ501
PIJ502
PIJ503
PIJ504
COJ5
PIL101
PIL102
COL1
PIQ101PIQ102PIQ103PIQ104
PIQ105PIQ106PIQ107PIQ108COQ1
PIQ201PIQ202PIQ203PIQ204
PIQ205PIQ206PIQ207PIQ208COQ2
PIR1101 PIR1102
COR11PIR1201
PIR1202COR12
PIR1301
PIR1302COR13
PIR1501
PIR1502COR15
PIR1601 PIR1602
COR16
PIR1701 PIR1702COR17
PIR1801
PIR1802COR18
PIR1901PIR1902
COR19
PIR2001PIR2002
COR20
PIR2101PIR2102
COR21
PIR2201PIR2202
COR22
PIS601 PIS602
COS6
PIU201
PIU202
PIU203
PIU204
PIU205
PIU206
PIU207
PIU208
PIU209
PIU2010
PIU2011
PIU2012
PIU2013
PIU2014
PIU2015
PIU2016
COU2
PIU301
PIU302 PIU303
PIU304PIU305PIU306
COU3
PIU401
PIU402
PIU403
PIU404
PIU405
PIU406
PIU407
PIU408
PIU409
PIU4010
PIU4011
PIU4012
PIU4013
PIU4014
PIU4015
PIU4016
COU4
PIC1501 PIC1601 PIC1701PIU303
PIC602
PIC702
PIC1002PIC1202
PIC1502 PIC1602 PIC1702
PIC1902 PIC2101
PID601
PIJ402
PIJ403
PIR1101PIR1201 PIR1301
PIR1501
PIR1801
PIR1902
PIU201
PIU206
PIU208
PIU209
PIU2016
PIU301
PIU404
PIU405
PIU406
PIC1802
PIJ503
PIJ504
PIR1901
PIU4011
PIU4012
PIU4013
PIC601PID402
PIU2014
PIU2015PIC801PIR1202 PIC802PIR1302
PIU2012
PIC901PIR1102 PIC902PIU2011
PIC1001 PIR1502PIU2013
PIC1101PID602 PIL101PIU202
PIC1102PID502
PIU203
PIC1302 PIU306 PIC1401PIU305 PIC1402
PIU304
PIC2001PIU409PIC2002
PIU408
PIC2102
PIR2002PIU4015
PIC2201PIC2302
PID501PIL102
PIU207
PIJ501
PIJ502
PIS601
PIQ104PIR2101
PIQ105PIQ106PIQ107PIQ108
PIQ205PIQ206PIQ207PIQ208PIQ204
PIR2201
PIR1602PIU4016
PIR1702PIU402
PIR1802PIU407
PIR2102PIU401
PIR2202PIU403
PIU205
PIU4010
POSDA
PIU4014
POSCL
PIC1801
PIC2301
PIQ201PIQ202PIQ203
PIR1601
PIR2001PIS602
PIC1201
PIC1301
PIC1901
PIC2202PIQ101PIQ102PIQ103
PIR1701
PIU204
PIU2010
PIU302
PIC701 PID401PIJ401
POSCL
POSDA
29
1
1
2
2
3
3
4
4
D D
C C
B B
A A
Title
Number RevisionSize
A4
Date: 09.06.2010 Sheet ofFile: \\..\schema_radio01.SchDoc Drawn By:
C305p6
C315p6
ant2
ant1
C32
(not
fit) L2
12nH
L4
10nH
L3
12nH
C33
22p
C35
33p
C36 4p7
C34
3n3
vddpa
Sortie antenne(50 Ohm)
5
1
2 3 4
P1 COAX-M
123456
J7
MM6Prog
ram
mat
ion_
RA
DIO
VDD14
VDD217
VDD325
DVDD_1V231
MISO10
MOSI11
SCK12
CS13
TRX_CE1
PWR_UP2
TX_EN32
CD6
AM7
DR8
uPCLK3
VSS1 5
VSS2 9
VSS3 16
VSS4 18
VSS5 22
VSS6 24
VSS7 26
VSS8 27
VSS9 28
VSS10 29
VSS11 30
XC1 14
XC2 15
VDD_PA 19
ANT1 20
ANT2 21
IREF 23
U6
NRF905
RA0/AN0 27
RA1/AN1 28
RA2/AN2/VREF-/CVREF 1
RA3/AN3/VREF+ 2
RA4/T0CKI/C1OUT 3
RA5/AN4/SS/C2OUT 4
RB0/INT 18
RB1 19
RB2 20
RB3/PGM 21
RB4 22
RB5 23
RB6/PGC 24
RB7/PGD 25
RC0/T1OSO/T1CKI8
RC1/T1OSI/CCP29
RC2/CCP110
RC3/SCK/SCL11
RC4/SDI/SDA12
RC5/SDO13
RC6/TX/CK14
RC7/RX/DT15
VSS5
VSS16
MCLR/VPP26
OSC1/CLKI6
OSC2/CLKO7
VDD 17
U5
PIC16LF876A-I/ML
R28
22K (1%)
C24
22pF
C25
22pF
csel
csel
txentxce
txce
txenpwuppwup
dramcd
dramcd
picled
sckmisomosi
misomosisck
R23
47K
+3.3V
C27
10n
vddpa
ant1ant2
R291M
C29
22p
C28
22pR27
10K
+3.3V
RXD<-RADIOTXD->RADIO
+3.3V
C26100n
picled_tx
D9
Orange
R25
150Rpicled
Q3 BSS138
D10
Vert
R26
150R
+3.3V
cd
D8
Rouge
R24
150Rpicled_tx
Remote_control : Radio interface
20MHz
progpcl_RADIOprogpdt_RADIO
progpgm_RADIO
progpcl_RADIOprogpdt_RADIO
progpgm_RADIO
Gabriel Cuendet
12
Y2XTALGND10MHz
12
Y3XTALGND
progvdd_PIC
progvdd_PIC
Final version
reset_radio
150RR33
PIC2401PIC2402
COC24
PIC2501PIC2502
COC25
PIC2601
PIC2602COC26
PIC2701PIC2702
COC27
PIC2801 PIC2802
COC28
PIC2901 PIC2902
COC29
PIC3001
PIC3002COC30
PIC3101
PIC3102COC31
PIC3201
PIC3202
COC32
PIC3301 PIC3302
COC33
PIC3401 PIC3402
COC34
PIC3501 PIC3502
COC35
PIC3601
PIC3602COC36
PID801 PID802
COD8
PID901 PID902
COD9
PID1001 PID1002
COD10
PIJ701
PIJ702
PIJ703
PIJ704
PIJ705
PIJ706
COJ7
PIL201
PIL202COL2
PIL301PIL302COL3
PIL401 PIL402
COL4PIP101
PIP102 PIP103 PIP104 PIP105
COP1
PIQ301 PIQ302
PIQ303
COQ3
PIR2301 PIR2302COR23
PIR2401PIR2402COR24
PIR2501PIR2502COR25
PIR2601PIR2602COR26
PIR2701PIR2702COR27
PIR2801 PIR2802
COR28
PIR2901
PIR2902COR29
PIR3301 PIR3302COR33
PIU501
PIU502PIU503
PIU504
PIU505
PIU506
PIU507
PIU508
PIU509
PIU5010
PIU5011
PIU5012
PIU5013
PIU5014
PIU5015
PIU5016 PIU5017
PIU5018
PIU5019
PIU5020
PIU5021
PIU5022
PIU5023
PIU5024
PIU5025
PIU5026
PIU5027
PIU5028
COU5
PIU601PIU602
PIU603
PIU604 PIU605
PIU606
PIU607
PIU608
PIU609
PIU6010
PIU6011
PIU6012
PIU6013
PIU6014
PIU6015
PIU6016
PIU6017
PIU6018
PIU6019
PIU6020
PIU6021
PIU6022
PIU6023
PIU6024
PIU6025
PIU6026
PIU6027
PIU6028
PIU6029
PIU6030
PIU6031
PIU6032
COU6
PIY201PIY202
COY2
PIY301PIY302
COY3
PID1001
PIR2301
PIR2702
PIU604
PIU6017
PIU6025
PIU5019
PIU607NLam
PIC3102
PIC3202
PIL201
PIL302
PIU6020NLant1
PIC3001
PIC3201
PIC3301
PIL202
PIU6021NLant2
PIQ303
PIU5020
PIU606NLcd
PIU508
PIU6013NLcsel
PIU5018
PIU608NLdr
PIC2402
PIC2502
PIC2602
PIC2702
PIC2802
PIC2902
PIC3002
PIC3101PIC3402
PIC3502
PIC3602
PIJ704
PIP102 PIP103 PIP104 PIP105
PIQ302
PIR2401
PIR2501
PIR2802
PIU505
PIU5016
PIU605
PIU609
PIU6016
PIU6018
PIU6022
PIU6024
PIU6026
PIU6027
PIU6028
PIU6029
PIU6030
PIY203
PIY303
PIU5012
PIU6010NLmiso
PIU5013
PIU6011NLmosi
PIC2401
PIU506
PIY201
PIC2501
PIU507PIY202
PIC2601
PIJ705
PIU5017 POprogvdd0PIC
PIC2701 PIU6031
PIC2801
PIR2902PIU6014
PIY301
PIC2901
PIR2901PIU6015
PIY302
PIC3302 PIL401
PIC3601
PIL402 PIP101
PID802PIR2402
PID902PIR2502
PID1002PIR2602
PIJ701
PIQ301PIR2601
PIR2801PIU6023
PIR3301POreset0radio
PIU501
PIU502
PIU5014
PORXD<0RADIO
PIU5015
POTXD0>RADIOPIU5021
PIU5022
PIU5027
PIU5028
PIU603
PID901
PIU504
NLpicled
PID801
PIU5023
NLpicled0tx
PIJ702
PIU5024NLprogpcl0RADIO
PIJ703
PIU5025NLprogpdt0RADIO
PIJ706
PIR2302
PIR3302
PIU5026
NLprogpgm0RADIOPIR2701PIU503 PIU602
NLpwup
PIU5011
PIU6012NLsck
PIU5010
PIU601NLtxce
PIU509
PIU6032NLtxen
PIC3401
PIC3501
PIL301
PIU6019NLvddpa
POPROGVDD0PIC
PORESET0RADIO
PORXD<0RADIOPOTXD0>RADIO
30

Qté Nom Valeur Fabriquant N° Farnell Footprint============================================================================= ==============
1 C1 100nF, 20V 0603_G7 C2,C3,C24,C25,C28,C29,C33 22pF 0603_G9 C4,C7,C10,C16,C18,C19,C20,C21,C26 100nF 0603_G4 C5,C8,C13,C14 1uF 0603_G1 C6 22uF, 35V CAP_SMD_D1 C9 330nF 0603_G1 C11 22nF 0603_G1 C12 22uF, 6.3V CAP_SMD_A1 C15 4,7uF 0603_G1 C17 220uF, 4V CAP_SMD_B2 C22,C23 1nF 0603_G1 C27 10nF 0603_G2 C30,C31 5,6pF 0603_G0 C32 not fit 0603_G1 C34 3,3nF 0603_G1 C35 33pF 0603_G1 C36 4,7pF 0603_G
------------------------------------------------------ ------------------------------------------ ------------------- ------------- ----------------------2 D2,D3 LED verte, 3mm Kingbright *1142502 LED_5MM1 D11 LED rouge, 3mm Kingbright *1142517 LED_5MM2 D4,D6 Diode schottky DSO-C2/X2.31 D5 MCL4148 Micromelf MICROMELF_D_21 D8 Led smd rouge 0603_D1 D9 Led smd orange 0603_D1 D10 Led smd vert 0603_D
------------------------------------------------------ ------------------------------------------ ------------------- ------------- ----------------------1 J1 Jumper JUMP4 J2,J3,J7 MM6 Micromatch MM6
*LCD, pour le 2e PCB MM6 Micromatch MM61 J4 RASM712 Switchkraft *1608734 RASM7121 J5 MM4 Micromatch MM4
----------------------------------------------------- ------------------------------------------ ------------------- ------------- ----------------------1 Joystick STD-2603AR Multicomp 1148306
----------------------------------------------------- ------------------------------------------ ------------------- ------------- ----------------------1 L1 10uH WE-PD2-S2 L2,L3 12nH 0603_G1 L4 10nH 0603_G
----------------------------------------------------- ------------------------------------------ ------------------- ------------- ----------------------1 LCD BTHQ21605V-COG-FSRE-I2C Batron 1220409 LCD1 P1 Connecteur RF, SMA coudé Multicomp *1169632 CONN_SMA2 Q1,Q2 IRF7410 SOIC127P600-8AM1 Q3 BSS138 SOT95P240-3M
----------------------------------------------------- ------------------------------------------ ------------------- ------------- ----------------------7 R1,R7,R8,R9,R10,R23,R30 47K 0603_G8 R3,R4,R17,R20,R24,R25,R26,R31 150R 0603_G3 R5,R6,R27 10K 0603_G4 R11,R16,R21,R22 1K 0603_G1 R12 300R 0603_G1 R13 8.2K 0603_G1 R15 33K 0603_G1 R18 4,7K 0603_G1 R19 25m RESC5025M1 R28 22K (1%) 0603_G1 R29 1M 0603_G1 R33 150R RESC1608L
----------------------------------------------------- ------------------------------------------ ------------------- ------------- ----------------------1 SW-ON/OFF Jumper JUMP1 SW-ON/OFF, facade Slider switch Knitter-Switch *8075391 SW1 SPDT Subminiature switch, M6RE Multicomp *15502675 SW2,SW3,SW4,SW5,SW7 Bouton, corps 3FTL6 Multimec *11328855 Bouton, cap. 1S09-19.0 Multimec *1132918
----------------------------------------------------- ------------------------------------------ ------------------- ------------- ----------------------1 U1 PIC18F2580-I/ML Microchip QFN-ML28_M1 U2 LT1571-5,Battery charger1 U3 ITC3240, DC/DC converter, 3.3V DFN6-DC1 U4 DS2764,Battery monitor TSSOP161 U5 PIC16LF876A-I/ML Microchip QFN-ML28_M1 U6 NRF905,single chip radio trans. QFN32_M
----------------------------------------------------- ------------------------------------------ ------------------- ------------- ----------------------2 Y1,Y2 Crystal Oscillator, 10MHz XTALGND1 Y3 Crystal Oscillator, 20MHz XTALGND
----------------------------------------------------- ------------------------------------------ ------------------- ------------- ----------------------1 Boitier Hammond 1553D Noir Hammond *1511160
Bleu translucide *1511161Jaune *1511163
31
SIZE
WEIGHT:
2.01553D
ABS
Remote Control, BiorobG.C. 01.06.10
DWG. NO. du boitier !
FRONT PANELCOMMENTS:
SHEET 1 OF 2
Q.A.
MFG APPR.
ENG APPR.
CHECKED
DRAWN
DATENAME
ATTENTION : Vue depuis l'intérieur
AREV.
FINISH
MATERIAL
DO NOT SCALE DRAWING
DIMENSIONS ARE IN MMTOLERANCES:FRACTIONALANGULAR: MACH BEND TWO PLACE DECIMAL THREE PLACE DECIMAL
SCALE:1:1
84.6
8
155
35
77.9518
119.
67
59.95 (cf. datasheet)
95
32

DÉTAIL A
2424
28
4
28
36
4
36
DWG. NO.SIZE
WEIGHT:
AREV.
MATERIAL
FINISH
DO NOT SCALE DRAWING
ATTENTION : Vue depuis l'extérieur
1553D
ABS
Remote Control, BiorobG.C.
NAME
du boitier
FRONT PANELCOMMENTS:
SHEET 2 OF 2
Q.A.
MFG APPR.
ENG APPR.
CHECKED
DRAWN
DATE
01.06.2010DIMENSIONS ARE IN MMTOLERANCES:FRACTIONALANGULAR: MACH BEND TWO PLACE DECIMAL THREE PLACE DECIMAL
SCALE:1:1
A
21.39
88.4
2
61.84
3.50
49.7
3
15.8
0
16.79
61
76.3
788.8
2
3x
44.90
32.9533.08
7
101.
14
76.8
7
62.02 7
74x
140.
40
33

2.50
12.5
7
43.72
17.60
4.50 7
13.20
2.50
50.32
26.12
7
11.76
28.328.
3612
.37
2.50
20.57
7.50
INTERPRET GEOMETRICTOLERANCING PER:
5 4 3 2
ENDPANEL
2.0DO NOT SCALE DRAWING
1553DSHEET 1 OF 1
01.06.10GC
UNLESS OTHERWISE SPECIFIED:
SCALE: 2:1 WEIGHT:
REVDWG. NO.
ASIZE
TITLE:Remote control, BiorobNAME DATE
COMMENTS:
Q.A.
MFG APPR.
MATERIAL
CHECKED
ENG APPR.
FINISH
DRAWN
ABS
DIMENSIONS ARE IN MMTOLERANCES:FRACTIONALANGULAR: MACH BEND TWO PLACE DECIMAL THREE PLACE DECIMAL
1
34


![Designing Telepresence Robots for K-12 Education...students to engage in regular classroom activities. Telepresence robots have already been found to improve remote collaboration [19],](https://img.dokumen.tips/doc/110x75/5f313c9da2cd3a786b78644a/designing-telepresence-robots-for-k-12-education-students-to-engage-in-regular.jpg)