Embed Size (px)
Citation preview
Remedy ITSM
Service Request Management
Quick Start Guide
For use by customers of IT services
with Remedy ITSM at Missouri S&T
Version 1.5
December 11, 2013

Remedy ITSM - Service Request Management - Quick Start Guide (for customers)
Page 2 of 13
Table of Contents
1.0 Getting Started With Remedy’s Service Request Management………….……4
2.0 Submitting a Service Request………………………………………………………………….7
3.0 Updating a Service Request…………………………………………………………………..10
4.0 Answering Surveys………………………………………………………………………………..12
Revision History
Version Date Modified Author Modification 1.0 11/15/12 Melissa Deatz First Draft
1.2 12/27/12 Melissa Deatz Attachment file size limitation updated to 60 MB
1.3 1/4/13 Melissa Deatz
Renamed document title and added Version, Date, Revision History and Audience
1.4 1/9/13 Lauren Oswald Updated style and format to more clearly identify intended audience (support staff vs customers) and specific area within Remedy (ie. Service Request Management)
1.5 12/11/13 Karen Kunkle Updated content for Remedy version 8.1

Remedy ITSM - Service Request Management - Quick Start Guide (for customers)
Page 3 of 13
1.0 Getting Started with Remedy’s Service Request Management
1.1 Logging In
1. Open your browser (Internet Explorer, Mozilla Firefox, Safari) and navigate to
request.umsystem.edu.
2. Ensure pop-ups are allowed for this site.
3. At the Remedy login page, enter your User ID (SSO) and password.
4. Click Log In.
When you log in for the first time, the “Request Service” window appears.

Remedy ITSM - Service Request Management - Quick Start Guide (for customers)
Page 4 of 13
1.2 Setting Request Entry Console Preferences
To customize the Request Entry Console:
1. Click Settings and select Preferences.
The Service Request Management User Preferences window appears.

Remedy ITSM - Service Request Management - Quick Start Guide (for customers)
Page 5 of 13
2. Under the “General Settings” panel, select your option for “Submit Confirmation”. Select Yes to have a confirmation dialog box each time you submit. Select No to submit without asking for confirmation.
3. For “Initial Console View”, select Popular Categories or Service Categories.

Remedy ITSM - Service Request Management - Quick Start Guide (for customers)
Page 6 of 13
4. Under the” My Requests” panel, select the option you want to view when you open SRM under “Show”. All is the default option.
5. Select the number of days, weeks or, months you want to include in “Recently Closed Requests”.
6. Click Save when finished.
A message appears stating your preferences have been modified. Click OK
Note: You must log out and log back in for the changes to take effect.
1.3 Navigating Service Request Management

Remedy ITSM - Service Request Management - Quick Start Guide (for customers)
Page 7 of 13
Home button Takes you to the SRM home page or the IT home page
Help button Provides documentation about the Request Entry Console and link to Surveys
Settings button Takes you to Preferences
Logout button Logs user out of the Remedy system
2.0 Submitting a Service Request
To submit a request:
1. From the “Available Requests” window, select the Request IT Support and click Request Now
button.

Remedy ITSM - Service Request Management - Quick Start Guide (for customers)
Page 8 of 13
2. At the “Provide Information” window, enter the following data:
a. Brief Description (Required)
b. Detailed Description
c. Computer Name - The name in which your computer is registered. There should be a
sticker on your computer with the computer name.
d. Physical Location – Where is the computer physically located? Include the building and
room number.
e. Alternate Contact Information – Do you have another phone number where you can be
reached?
f. If submitting on behalf of another user, provide his or her User ID (SSO).
3. If you have an attachment to add, click to open the “Attachments” window.

Remedy ITSM - Service Request Management - Quick Start Guide (for customers)
Page 9 of 13
4. Click Browse and select the document you want to attach.
5. Click OK. The document attaches and the “Provide Information” window returns.
Note: You can only delete an attachment if it has not been submitted. Also the file size is limited to 60
MB and to file types that are allowed by the Outlook Exchange Server.
6. Click Submit.
Note: If you are not ready to submit the service request, you can click on the Save As Draft button and
then return at a later time to update and submit the request.

Remedy ITSM - Service Request Management - Quick Start Guide (for customers)
Page 10 of 13
Upon submission, you will see a message stating that your request has been submitted, click OK and you
will be returned to the main menu. The “My Requests” window will appear on the right, displaying your
new request.
3.0 Updating a Service Request
To update a service request:
1. In the “Show” field, select Open and draft requests.
2. Select the service request you want to update. Click on it to open the “Details” option.

Remedy ITSM - Service Request Management - Quick Start Guide (for customers)
Page 11 of 13
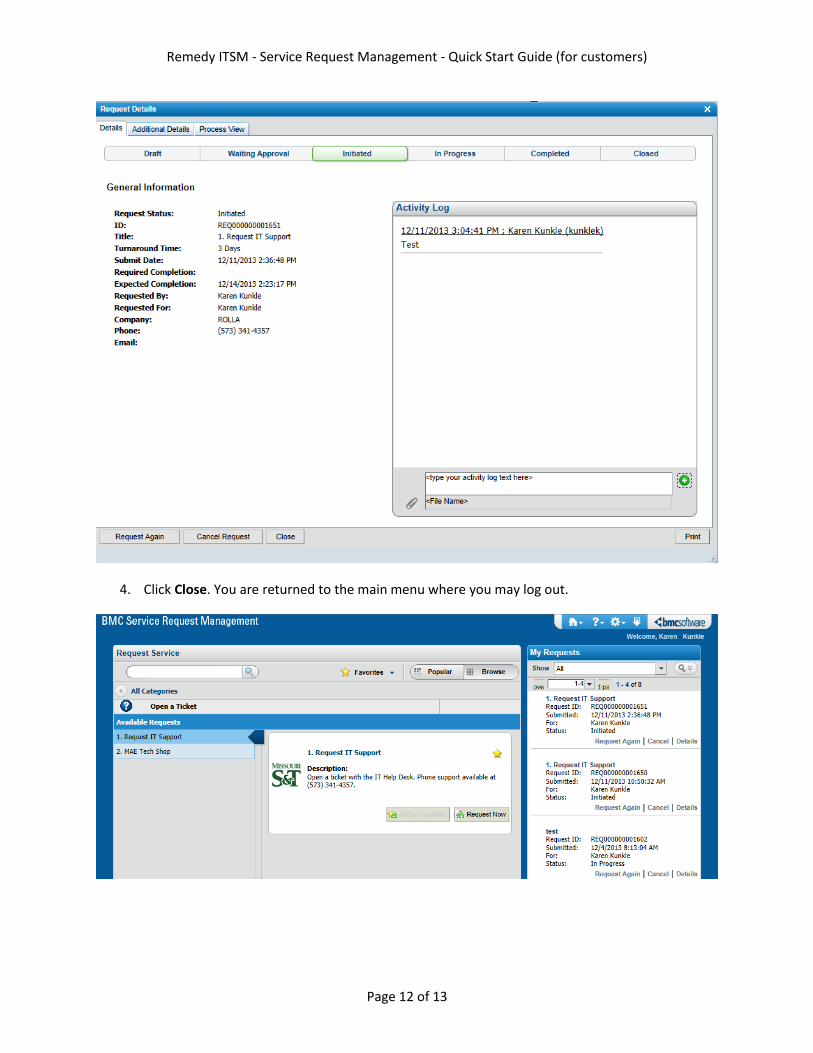
3. Enter updates in the Activity Log field and click the to add update.
Remedy ITSM - Service Request Management - Quick Start Guide (for customers)
Page 12 of 13
4. Click Close. You are returned to the main menu where you may log out.
Remedy ITSM - Service Request Management - Quick Start Guide (for customers)
Page 13 of 13
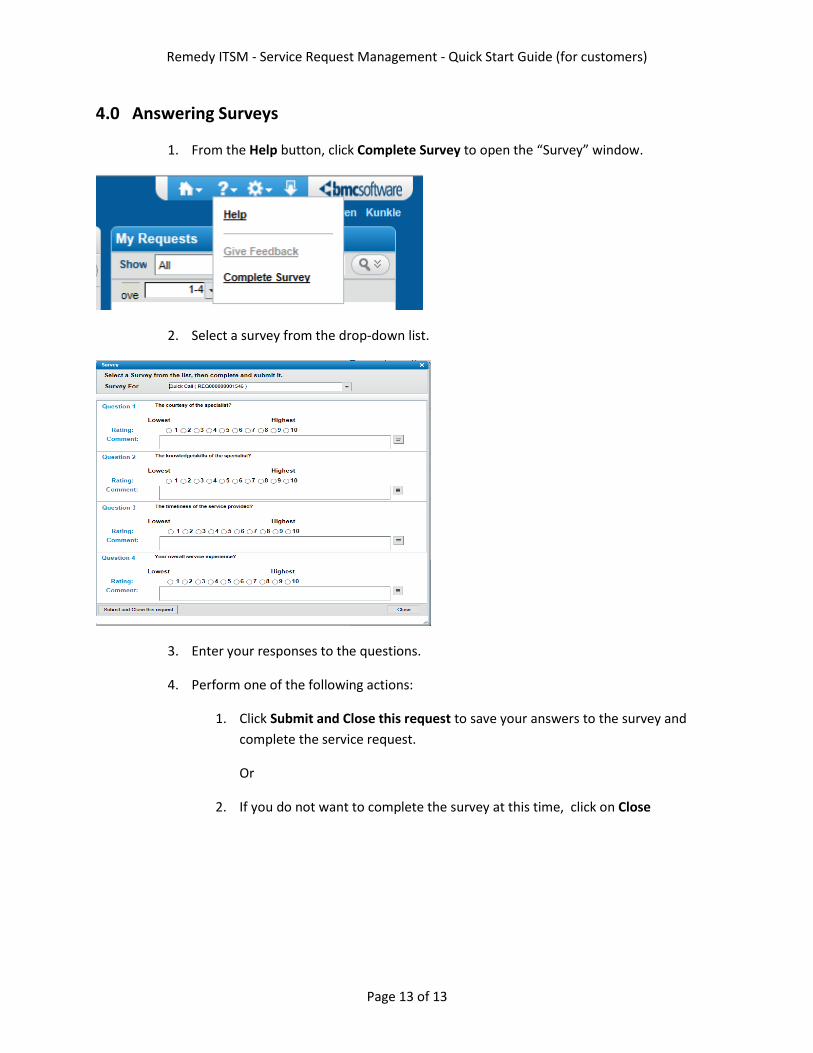
4.0 Answering Surveys
1. From the Help button, click Complete Survey to open the “Survey” window.
2. Select a survey from the drop-down list.
3. Enter your responses to the questions.
4. Perform one of the following actions:
1. Click Submit and Close this request to save your answers to the survey and
complete the service request.
Or
2. If you do not want to complete the survey at this time, click on Close