Embed Size (px)
Citation preview

Exit Record Mode5
OFFRECORD SWITCH TOY/APPL.
Enter Record Mode3
OFFRECORD SWITCH TOY/APPL.
Choose your Switch Color1Quickstart Guide: BIGmack® and LITTLEmack™ communicators
www.ablenetinc.com
Firmly, rotate the colored switch top counter-clockwise to remove. Attach a new color by rotating the cap clockwise until it stops.
A Snap Switch Cap is included with your BIG or LITTLEmack. Place a picture or symbol on the switch top, and secure by snapping your Switch Cap over it.
Insert Batteries and Turn On2
Connect one 9-volt battery at the bottom of the device. Rotate the Volume ON/OFF knob to turn the device on.
LITTLEmack includes a detachable Mounting Base that must be removed to access the battery door. Press the tab and slide to remove the base.
On
On
Record a Message4
Press and Hold the switch top, begin speaking when you hear a beep. Release when finished.
RECORD Light will flash while recording.
Press and Release the RECORD button to exit Record Mode. Your BIG or LITTLEmack is ready for use.
NOTE: This device has 2 minutes of total recording time. The light will turn yellow and flash when only ten seconds of time remain.
Press and Hold the RECORD button until the RECORD Light activates, then Release.
Press and Hold, then Release
Press and Release

OFFRECORD SWITCH TOY/APPL.
OFFRECORD SWITCH TOY/APPL.
Advanced Features
Mounting Options
Product Map and Warranty
Playing a message with an External Switch
Attach the switch of your choice with a 1/8-inch (3.5mm) plug into the switch input jack and continue to use the device as before. (Jacks indicated with )
Controlling Toys or Appliances
Plug any switch-adapted toy or appliance into the TOY/APPL jack. When the BIG or LITTLEmack is activated, the attached toy or appliance will activate for the length of the recorded message. (Jacks indicated with ) NOTE: To control an electrical appliance, a PowerLink® 3 is required. For information about adapting toys and appliances, visit www.ablenetinc.com
PN
90
0-8
01
52
-01
Rev
. C
(0
1/0
9)
Warranty/Repair/Return Information
AbleNet offers a limited two-year warranty on the BIGmack and LITTLEmack communicator products. For full warranty details, visit www.ablenetinc.com
For more information on AbleNet products and services:
AbleNet, Inc., Minneapolis/St. Paul, MN 800-322-0956 (US & Canada) Internet: www.ablenetinc.com © 2007 AbleNet, Inc., All Rights Reserved
Top View Bottom View
Battery Door
Back View
SwitchTop
Speaker
Toy Appliance Jack
Record Button
Volume On/OffExternal Switch Jack
Top View Bottom View
Battery Door
Back View
SwitchTop
Speaker
External Switch Jack
Record Button
Volume On/Off
Toy Appliance Jack
Record Light
Record Light
Fig. A Fig. B
Mounting BIGmack
BIGmack can be mounted using the Large Triangular Mounting Plate* and a variety of mounting systems. Screw the mounting plate into place using the three holes shown at left.
Working with the Mounting Base and LITTLEmack
Release the base by pressing the quick release tab on the mounting base and sliding towards the back of the device.
Attach the base by aligning the four posts on the Base with the corresponding holes on LITTLEmack. Slide the base forward until it clicks.
For a temporary mount, use a #8 pan head screw and the two vertical slots on the Mounting Base. (Figure A)
For permanent mounting, screw the mounting base into place with the three holes shown at left. (Figure B)
*Additional mounting options available at www.ablenetinc.com
Note: Specify large or small triangular mounting plate size when ordering mounting system.
Microphone
Microphone

Quittez le mode d’enregistrement5
OFFRECORD SWITCH TOY/APPL.
Entrez dans le mode d’enregistrement3
OFFRECORD SWITCH TOY/APPL.
Choisissez votre couleur de contacteur1Guide de démarrage rapide : Appareils de communication BIGmack® et LITTLEmack™
www.ablenetinc.com
Tournez fermement le haut du contacteur de couleur dans le sens anti-horaire pour le retirer. Remplacez par un autre d’une couleur différente en tournant dans le sens horaire jusqu’à ce qu’il bute.
Un capuchon de contacteur à fixation par enclenchement est fourni avec votre BIGmack ou votre LITTLEmack. Placez une image ou un symbole sur le haut du contacteur et fixez en position en enclenchant le capuchon dessus.
Insérez la pile et allumez2
Installez une pile de 9 V sous l’appareil. Tournez le bouton du volume pour allumer l’appareil.
Le LITTLEmack est livré avec un socle détachable qui doit être retiré pour permettre d’accéder au volet du comparti-ment de la pile. Appuyez sur l’onglet et glissez pour retirer le socle.
Marche
Marche
Enregistrez un message4
Appuyez sans relâcher sur le haut du contacteur et commencez à parler dès que vous entendez un bip. Relâchez le contacteur une fois l’enregistrement terminé.
Le voyant RECORD clignote en cours d’enregistrement.
Appuyez brièvement sur le bouton RECORD pour quit-ter le mode d’enregistrement. Votre BIGmack ou LITTLEmack est prêt à l’emploi.
REMARQUE : Cet appareil propose un temps total d’enregistrement de 2 minutes. Le voyant vire au jaune et clignote quand il ne reste plus que 10 secondes de temps d’enregistrement.
Appuyez sur le bouton RECORD jusqu’à ce que le voyant RECORD s’allume, puis relâchez le bouton.
Appuyez, puis relâchez
Appuyez et relâchez
OFFRECORD SWITCH TOY/APPL.
OFFRECORD SWITCH TOY/APPL.
Fonctions avancées
Options de montage
Illustrations du produit et garantie
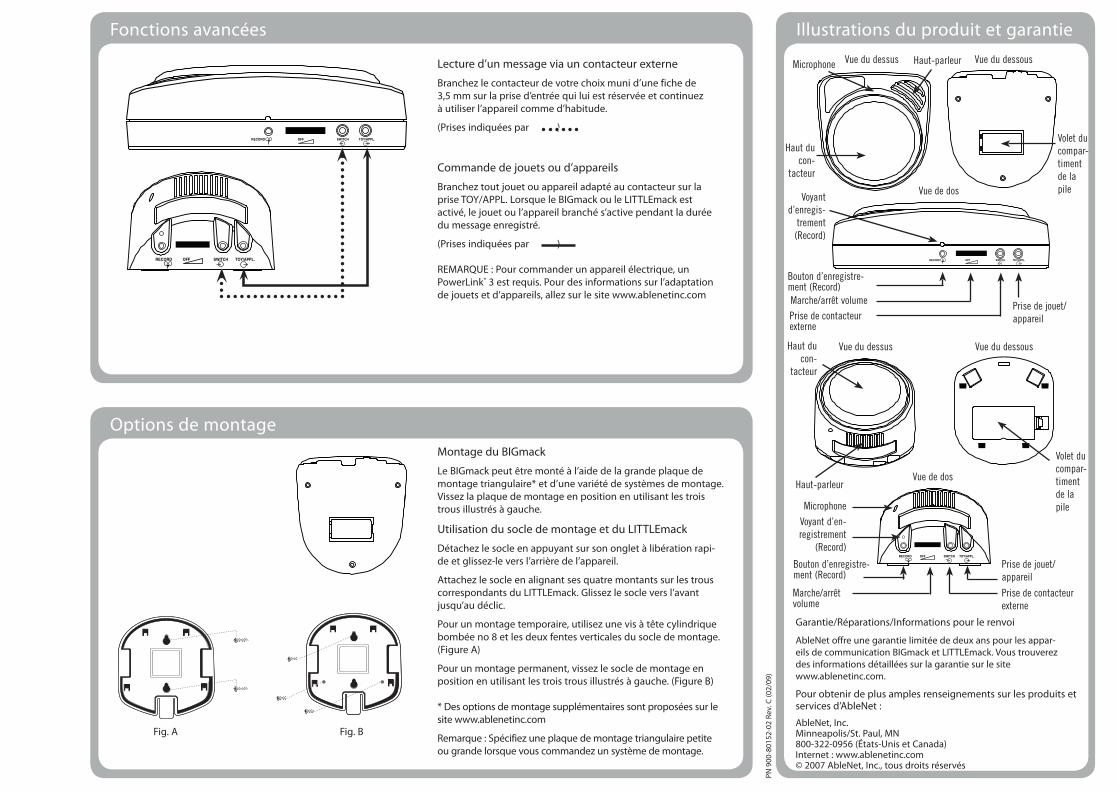
Lecture d’un message via un contacteur externe
Branchez le contacteur de votre choix muni d’une fiche de 3,5 mm sur la prise d’entrée qui lui est réservée et continuez à utiliser l’appareil comme d’habitude.
(Prises indiquées par )
Commande de jouets ou d’appareils
Branchez tout jouet ou appareil adapté au contacteur sur la prise TOY/APPL. Lorsque le BIGmack ou le LITTLEmack est activé, le jouet ou l’appareil branché s’active pendant la durée du message enregistré.
(Prises indiquées par ) REMARQUE : Pour commander un appareil électrique, un PowerLink® 3 est requis. Pour des informations sur l’adaptation de jouets et d’appareils, allez sur le site www.ablenetinc.com
PN 9
00-8
0152
-02
Rev.
C (0
2/09
)
Garantie/Réparations/Informations pour le renvoi
AbleNet offre une garantie limitée de deux ans pour les appar-eils de communication BIGmack et LITTLEmack. Vous trouverez des informations détaillées sur la garantie sur le site www.ablenetinc.com.
Pour obtenir de plus amples renseignements sur les produits et services d’AbleNet :
AbleNet, Inc.Minneapolis/St. Paul, MN800-322-0956 (États-Unis et Canada)Internet : www.ablenetinc.com© 2007 AbleNet, Inc., tous droits réservés
Vue du dessus Vue du dessous
Volet du compar-timent de la pileVue de dos
Haut du con-
tacteur
Haut-parleur
Prise de jouet/appareil
Bouton d’enregistre-ment (Record)Marche/arrêt volumePrise de contacteur externe
Vue du dessus Vue du dessous
Volet du compar-timent de la pile
Vue de dos
Haut du con-
tacteur
Haut-parleur
Prise de contacteur externe
Bouton d’enregistre-ment (Record)
Marche/arrêt volume
Prise de jouet/appareil
Voyant d’en-registrement
(Record)
Voyant d’enregis-
trement (Record)
Fig. A Fig. B
Montage du BIGmack
Le BIGmack peut être monté à l’aide de la grande plaque de montage triangulaire* et d’une variété de systèmes de montage. Vissez la plaque de montage en position en utilisant les trois trous illustrés à gauche.
Utilisation du socle de montage et du LITTLEmack
Détachez le socle en appuyant sur son onglet à libération rapi-de et glissez-le vers l’arrière de l’appareil.
Attachez le socle en alignant ses quatre montants sur les trous correspondants du LITTLEmack. Glissez le socle vers l’avant jusqu’au déclic.
Pour un montage temporaire, utilisez une vis à tête cylindrique bombée no 8 et les deux fentes verticales du socle de montage. (Figure A)
Pour un montage permanent, vissez le socle de montage en position en utilisant les trois trous illustrés à gauche. (Figure B)
* Des options de montage supplémentaires sont proposées sur le site www.ablenetinc.com
Remarque : Spécifiez une plaque de montage triangulaire petite ou grande lorsque vous commandez un système de montage.
Microphone
Microphone

Salga de la modalidad de grabación5Ingrese la modalidad de grabación3
OFFRECORD SWITCH TOY/APPL.
Seleccione el color de su conmutador1Guía de inicio rápido: Comunicadores BIGmack® y LITTLEmack™
www.ablenetinc.com
Gire firmemente en sentido antihorario la parte superior coloreada del conmutador para extraerla. Acople un nuevo color girando la tapa en sentido horario hasta que se detenga.
Con su comunicador BIG o LITTLEmack viene incluida una tapa a presión para el conmutador. Coloque una fotografía o cualquier otro símbolo sobre la parte superior del conmuta-dor y sujételo instalando a presión la tapa del conmutador.
Inserte las pilas y encienda el comunicador2
Conecte una pila de 9 voltios en la parte inferior del dispositivo. Gire el mando del volumen “ON/OFF” para encender el dispositivo.
El comunicador LITTLEmack incluye una base de montaje desmontable que debe extraerse para acceder a la com-puerta del compartimento de pilas. Presione la perilla y deslice la base de montaje para extraerla.
Encender
Encender
Grabe un mensaje4
Mantenga presionada la parte superior del conmutador y comience a hablar cuando oiga un pitido. Suéltela cuando haya terminado.
La luz de grabación “RECORD” se iluminará de forma inter-mitente mientras esté grabando.
Presione y suelte el botón de grabación para salir de la modalidad de grabación. Su comunicador BIG o LITTLEmack ya está listo para ser usado.
NOTA: Este dispositivo dispone de 2 minutos de tiempo total de grabación. La luz cambiará al color amarillo y se ilumina-rá de forma intermitente cuando queden sólo 10 segundos de grabación.
Mantenga presionado el botón de grabación “RECORD” hasta que se encienda la luz de grabación, y a conti-nuación suéltelo.
Mantener presionado, y
a continuación soltar
OFFRECORD SWITCH TOY/APPL.
Presionar y soltar

OFFRECORD SWITCH TOY/APPL.
OFFRECORD SWITCH TOY/APPL.
Características avanzadas
Opciones de montaje
Plano del producto y garantía
Reproducción de un mensaje con un conmutador externo
Acople el conmutador que desee con un conector de 3,5 mm (1/8”) al conector de entrada del conmutador y continúe usán-dolo tal y como lo hacía antes. (Los conectores se indican con la línea de puntos )
Control de juguetes y electrodomésticos
Conecte cualquier juguete o electrodoméstico adaptado a un conmutador, al conector TOY/APPL. Cuando el comunicador BIG o LITTLEmack esté activado, el juguete o electrodoméstico acoplado a él se activará durante el tiempo que dure el mensa-je grabado. (Los conectores se indican con la línea continua )
NOTA: Para controlar un electrodoméstico se necesita una uni-dad PowerLink® 3. Para obtener información sobre cómo adap-tar juguetes y electrodomésticos, visite www.ablenetinc.com
PN 9
00-8
0152
-04
Rev.
C (0
2/09
)
Garantía/Reparación/Información de devoluciónAbleNet ofrece una garantía limitada de dos años en los productos de comunicadores BIGmack y LITTLEmack. Para obtener información detallada sobre la garantía, visite www.ablenetinc.com
Para obtener más información sobre los productos y servicios de AbleNet, póngase en contacto con:AbleNet, Inc., Minneapolis/St. Paul, MN 800-322-0956 (Estados Unidos y Canadá) Internet: www.ablenetinc.com © 2007 AbleNet, Inc., Todos los derechos reservados
Vista superior Vista inferior
Compuerta del compar-timento de pilas
Vista trasera
Parte superior del con-mutador
Altavoz
Conector para juguetes y electro-domésticos
Botón de grabación
Mando de volumen Encendido/ApagadoConector para conmutador externo
Vista superior Vista inferior
Compuerta del compartimento de pilas
Vista trasera
Parte superior del con-mutador
Altavoz
Conector para conmutador externo
Botón de grabación
Mando de volumen Encendido/Apagado
Conector para juguetes y electrodo-mésticos
Luz de grabación
Luz de grabación
Figura A Figura B
Montaje del BIGmackEl BIGmack se puede montar utilizando la placa de montaje trian-gular grande*, así como una variedad de sistemas de montaje. Atornille la placa de montaje en el lugar deseado utilizando los tres orificios mostrados a la izquierda.
Cómo trabajar con la base de montaje y el comunicador LITTLEmackSuelte la base presionando su perilla de liberación rápida y desli-zándola hacia la parte trasera del dispositivo.
Acople la base alineando sus cuatro salientes con los orificios correspondientes del comunicador LITTLEmack. Deslice la base hacia delante hasta que quede enganchada.
Para un montaje temporal, utilice un tornillo de cabeza plana del número 8 y las dos ranuras verticales de la base de montaje. (Figura A)
Para un montaje permanente, atornille la base de montaje en el lugar deseado, utilizando los tres orificios mostrados a la izquierda. (Figura B)
*Para obtener opciones de montaje adicionales visite www.ablenetinc.com
Nota: Cuando realice el pedido del sistema de montaje, especifique si desea una placa de montaje triangular grande o pequeña.
Micrófono
Micrófono

Den Aufnahme-Modus beenden5
OFFRECORD SWITCH TOY/APPL.
In den Aufnahme-Modus umschalten3
OFFRECORD SWITCH TOY/APPL.
Auswahl der Tasterfarbe1Kurzanleitung: BIGmack® und LITTLEmack™ Kommunikationshilfen
www.ablenetinc.com
Das Oberteil des farbigen Tasters fest nach links drehen und abnehmen. Zum Anbringen der neuen Farbe den Deckel bis zum Anschlag nach rechts drehen.
Im Lieferumfang des BIGmack oder LITTLEmack ist ein Schnappdeckel enthalten. Ein Bild oder ein Symbol auf die Oberseite des Tasters legen und durch Aufdrücken des Schnappdeckels auf dem Taster befestigen.
Batterien einlegen und einschalten2
An der Unterseite des Gerätes eine 9-Volt-Batterie einle-gen. Zum Einschalten des Gerätes den Lautstärkenregler drehen.
Zum Wechseln der Batterie muss die Bodenplatte des LITTLEmack abgenommen werden. Dazu die Sperrlasche drücken und die Bodenplatte abziehen.
Ein
Ein
Eine Nachricht aufzeichnen4
Die Tasteroberfläche gedrückt halten und beim Ertönen des Tonsignals zu sprechen beginnen. Am Ende der Aufzeichnung den Taster loslassen.
Während der Aufnahme blinkt die AUFNAHME-Lampe.
Den AUFNAHME-Knopf drücken und loslassen, um den Aufnahme-Modus zu beenden. Damit ist der BIGmack bzw. der LITTLEmack einsatzbereit.
HINWEIS: Dieses Gerät verfügt über insgesamt 2 Minuten Aufnahmezeit. Wenn nur noch zehn Sekunden verbleiben, blinkt die Lampe gelb.
Den AUFNAHME-Knopf gedrückt halten, bis die AUFNAHME-Lampe leuchtet. Dann loslassen.
Gedrückt halten und dann loslassen
Drücken und loslassen
OFFRECORD SWITCH TOY/APPL.
OFFRECORD SWITCH TOY/APPL.
Erweiterte Funktionen
Montageoptionen
Produktabbildung und Garantie
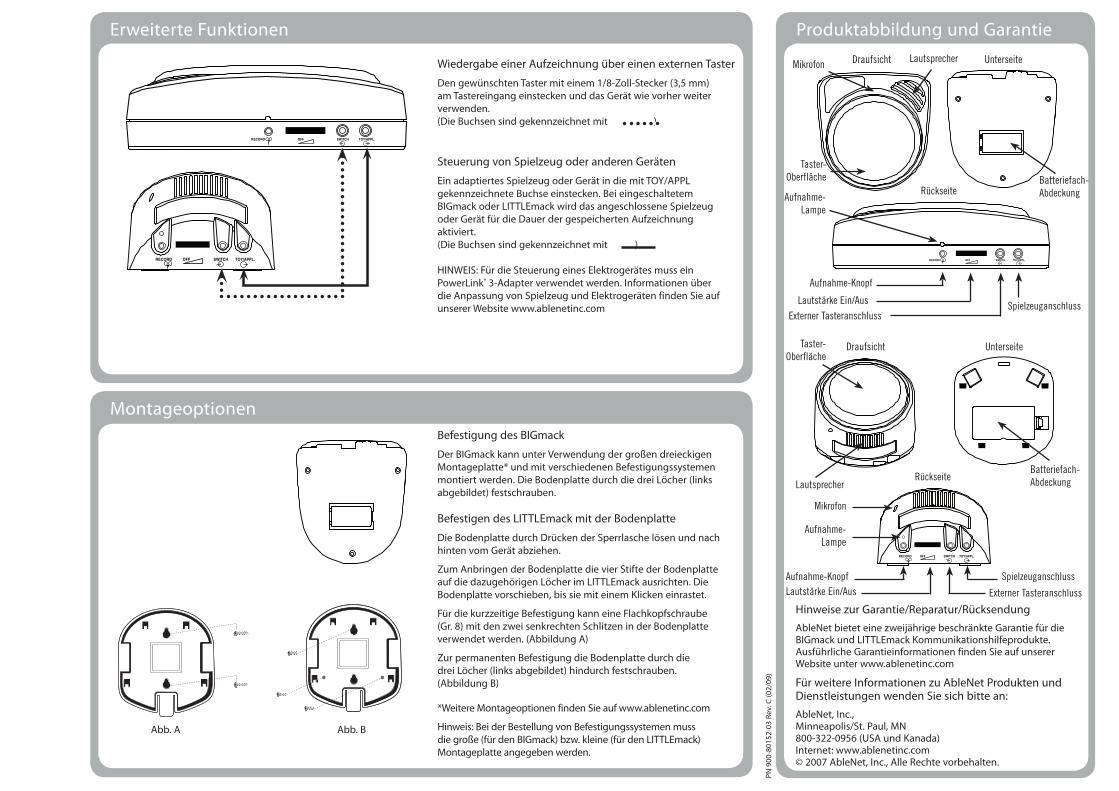
Wiedergabe einer Aufzeichnung über einen externen Taster
Den gewünschten Taster mit einem 1/8-Zoll-Stecker (3,5 mm) am Tastereingang einstecken und das Gerät wie vorher weiter verwenden. (Die Buchsen sind gekennzeichnet mit )
Steuerung von Spielzeug oder anderen Geräten
Ein adaptiertes Spielzeug oder Gerät in die mit TOY/APPL gekennzeichnete Buchse einstecken. Bei eingeschaltetem BIGmack oder LITTLEmack wird das angeschlossene Spielzeug oder Gerät für die Dauer der gespeicherten Aufzeichnung aktiviert. (Die Buchsen sind gekennzeichnet mit ) HINWEIS: Für die Steuerung eines Elektrogerätes muss ein PowerLink® 3-Adapter verwendet werden. Informationen über die Anpassung von Spielzeug und Elektrogeräten finden Sie auf unserer Website www.ablenetinc.com
PN 9
00-8
0152
-03
Rev.
C (0
2/09
)
Hinweise zur Garantie/Reparatur/RücksendungAbleNet bietet eine zweijährige beschränkte Garantie für die BIGmack und LITTLEmack Kommunikationshilfeprodukte. Ausführliche Garantieinformationen finden Sie auf unserer Website unter www.ablenetinc.com
Für weitere Informationen zu AbleNet Produkten und Dienstleistungen wenden Sie sich bitte an:AbleNet, Inc., Minneapolis/St. Paul, MN 800-322-0956 (USA und Kanada) Internet: www.ablenetinc.com © 2007 AbleNet, Inc., Alle Rechte vorbehalten.
Draufsicht Unterseite
Batteriefach-AbdeckungRückseite
Taster-Oberfläche
Lautsprecher
Spielzeuganschluss
Aufnahme-Knopf
Lautstärke Ein/AusExterner Tasteranschluss
Draufsicht Unterseite
Batteriefach-AbdeckungRückseite
Taster-Oberfläche
Lautsprecher
Externer Tasteranschluss
Aufnahme-KnopfLautstärke Ein/Aus
Spielzeuganschluss
Aufnahme-Lampe
Aufnahme-Lampe
Abb. A Abb. B
Befestigung des BIGmack
Der BIGmack kann unter Verwendung der großen dreieckigen Montageplatte* und mit verschiedenen Befestigungssystemen montiert werden. Die Bodenplatte durch die drei Löcher (links abgebildet) festschrauben.
Befestigen des LITTLEmack mit der Bodenplatte
Die Bodenplatte durch Drücken der Sperrlasche lösen und nach hinten vom Gerät abziehen.
Zum Anbringen der Bodenplatte die vier Stifte der Bodenplatte auf die dazugehörigen Löcher im LITTLEmack ausrichten. Die Bodenplatte vorschieben, bis sie mit einem Klicken einrastet.
Für die kurzzeitige Befestigung kann eine Flachkopfschraube (Gr. 8) mit den zwei senkrechten Schlitzen in der Bodenplatte verwendet werden. (Abbildung A)
Zur permanenten Befestigung die Bodenplatte durch die drei Löcher (links abgebildet) hindurch festschrauben. (Abbildung B)
*Weitere Montageoptionen finden Sie auf www.ablenetinc.com
Hinweis: Bei der Bestellung von Befestigungssystemen muss die große (für den BIGmack) bzw. kleine (für den LITTLEmack) Montageplatte angegeben werden.
Mikrofon
Mikrofon