Embed Size (px)
Citation preview

2.5 | December 2015 | 3725-69598-001/C
GETTING STARTED GUIDE
Polycom® RealPresence® Media Suite

ii
Copyright© 2015, Polycom, Inc. All rights reserved. No part of this document may be reproduced, translated into another language or format, or transmitted in any form or by any means, electronic or mechanical, for any purpose, without the express written permission of Polycom, Inc.
6001 America Center DriveSan Jose, CA 95002 USA
Trademarks Polycom®, the Polycom logo and the names and marks associated with Polycom products are trademarks and/or service marks of Polycom, Inc. and are registered and/or common law marks in the United States and various other countries.
All other trademarks are property of their respective owners. No portion hereof may be reproduced or transmitted in any form or by any means, for any purpose other than the recipient's personal use, without the express written permission of Polycom.
Java is a registered trademark of Oracle America, Inc., and/or its affiliates.
Disclaimer While Polycom uses reasonable efforts to include accurate and up-to-date information in this document, Polycom makes no warranties or representations as to its accuracy. Polycom assumes no liability or responsibility for any typographical or other errors or omissions in the content of this document.
Limitation of Liability Polycom and/or its respective suppliers make no representations about the suitability of the information contained in this document for any purpose. Information is provided "as is" without warranty of any kind and is subject to change without notice. The entire risk arising out of its use remains with the recipient. In no event shall Polycom and/or its respective suppliers be liable for any direct, consequential, incidental, special, punitive or other damages whatsoever (including without limitation, damages for loss of business profits, business interruption, or loss of business information), even if Polycom has been advised of the possibility of such damages.
End User License Agreement By installing, copying, or otherwise using this product, you acknowledge that you have read, understand and agree to be bound by the terms and conditions of the End User License Agreement for this product. The EULA for this product is available on the Polycom Support page for the product.
Patent Information The accompanying product may be protected by one or more U.S. and foreign patents and/or pending patent applications held by Polycom, Inc.
Open Source Software Used in this Product This product may contain open source software. You may receive the open source software from Polycom up to three (3) years after the distribution date of the applicable product or software at a charge not greater than the cost to Polycom of shipping or distributing the software to you. To receive software information, as well as the open source software code used in this product, contact Polycom by email at [email protected].
Customer Feedback We are striving to improve our documentation quality and we appreciate your feedback. Email your opinions and comments to [email protected].
Polycom Support Visit the Polycom Support Center for End User License Agreements, software downloads, product documents, product licenses, troubleshooting tips, service requests, and more.
Polycom, Inc. iii
Contents
Regulatory Notices . . . . . . . . . . . . . . . . . . . . . . . . . . . . . . . . . . . . . . . . . . . . . . . . . . 1Russia Regulatory Information . . . . . . . . . . . . . . . . . . . . . . . . . . . 1
About This Guide . . . . . . . . . . . . . . . . . . . . . . . . . . . . . . . . . . . . . . . . . . . . . . . . . . . 1
Set up RealPresence Media Suite . . . . . . . . . . . . . . . . . . . . . . . . . . . . . . . . . . . . . . 2RealPresence Media Suite Introduction . . . . . . . . . . . . . . . . . . . . . . . . . . . . . . . . . . . . . . . . . . 2
Web Browser Requirements . . . . . . . . . . . . . . . . . . . . . . . . . . . . . . . . . . . . . . . . . . . . . . . . . . . 3
Google Chrome Browser Limitations . . . . . . . . . . . . . . . . . . . . . . . . . . . . . . . . . . . . . . . . . 3
Install RealPresence Media Suite (Appliance Edition) . . . . . . . . . . . . . . . . . . . . . . . . . . . . . . . 4
Before You Begin . . . . . . . . . . . . . . . . . . . . . . . . . . . . . . . . . . . . . . . . . . . . . . . . . . . . . . . . 4
Unpack the RealPresence Media Suite Package . . . . . . . . . . . . . . . . . . . . . . . . . . . . . . . . 4
Install the RealPresence Media Suite . . . . . . . . . . . . . . . . . . . . . . . . . . . . . . . . . . . . . . . . . 4
Hardware Specifications . . . . . . . . . . . . . . . . . . . . . . . . . . . . . . . . . . . . . . . . . . . . . . . . . . . 5
Install RealPresence Media Suite (Virtual Edition) . . . . . . . . . . . . . . . . . . . . . . . . . . . . . . . . . . 5
Hardware Requirements . . . . . . . . . . . . . . . . . . . . . . . . . . . . . . . . . . . . . . . . . . . . . . . . . . . 5
Software Requirements . . . . . . . . . . . . . . . . . . . . . . . . . . . . . . . . . . . . . . . . . . . . . . . . . . . . 6
Resource and License Management . . . . . . . . . . . . . . . . . . . . . . . . . . . . . . . . . . . . . . 6
Set up RealPresence Media Suite in a Virtual Environment . . . . . . . . . . . . . . . . . . . . . 7
Configure NFS (Required) . . . . . . . . . . . . . . . . . . . . . . . . . . . . . . . . . . . . . . . . . . . . . . 7
Initial System Configuration . . . . . . . . . . . . . . . . . . . . . . . . . . . . . . . . . . . . . . . . . . . . . . . . . . . . 8
Obtain the Product Activation Key from Polycom . . . . . . . . . . . . . . . . . . . . . . . . . . . . . . . . 8
Set the Role of RealPresence Media Suite . . . . . . . . . . . . . . . . . . . . . . . . . . . . . . . . . . . . . . . . 9
Configure Device . . . . . . . . . . . . . . . . . . . . . . . . . . . . . . . . . . . . . . . . . . . . . . . . . . . . . . . . . . . 11
Configure IP Settings through the Console . . . . . . . . . . . . . . . . . . . . . . . . . . . . . . . . . . . . . . . 16
Set up the Gatekeeper . . . . . . . . . . . . . . . . . . . . . . . . . . . . . . . . . . . . . . . . . . . . . . . . . . . . . . 18
Record and View Meetings . . . . . . . . . . . . . . . . . . . . . . . . . . . . . . . . . . . . . . . . . . 19User Interfaces . . . . . . . . . . . . . . . . . . . . . . . . . . . . . . . . . . . . . . . . . . . . . . . . . . . . . . . . . . . . 19
Start a Recording . . . . . . . . . . . . . . . . . . . . . . . . . . . . . . . . . . . . . . . . . . . . . . . . . . . . . . . . . . . 19
Dial in from an Endpoint . . . . . . . . . . . . . . . . . . . . . . . . . . . . . . . . . . . . . . . . . . . . . . . . . . 20
Record from RMX by Recording Link . . . . . . . . . . . . . . . . . . . . . . . . . . . . . . . . . . . . . . . . 21
Contents
Polycom, Inc. iv
Change Conference Layout for MCU hosted calls . . . . . . . . . . . . . . . . . . . . . . . . . . . 21
Point-to-Point Recording . . . . . . . . . . . . . . . . . . . . . . . . . . . . . . . . . . . . . . . . . . . . . . . . . . 22
Play Back Media Archives . . . . . . . . . . . . . . . . . . . . . . . . . . . . . . . . . . . . . . . . . . . . . . . . . . . . 23
View Live Streams . . . . . . . . . . . . . . . . . . . . . . . . . . . . . . . . . . . . . . . . . . . . . . . . . . . . . . . . . . 24
Polycom, Inc. 1
Regulatory Notices
USA and Canadian Regulatory Notices
This Class [A] digital apparatus complies with Canadian ICES-003.
Cet appareil numérique de la classe [A] est conforme à la norme NMB-003 du Canada.
This device complies with part 15 of the FCC Rules. Operation is subject to the following two conditions: This device may not cause harmful interference, and this device must accept any interference received, including interference that may cause undesired operation.
Note: This equipment has been tested and found to comply with the limits for a Class A digital device, pursuant to part 15 of the FCC Rules. These limits are designed to provide reasonable protection against harmful interference when the equipment is operated in a commercial environment. This equipment generates, uses, and can radiate radio frequency energy and, if not installed and used in accordance with the instruction manual, may cause harmful interference to radio communications. Operation of this equipment in a residential area is likely to cause harmful interference in which case the user will be required to correct the interference at his own expense
In accordance with part 15 of the FCC rules, the user is cautioned that any changes or modifications not expressly approved by Polycom Inc. could void the user’s authority to operate the equipment.
EU Regulatory Notices
This RealPresence Media Suite system has been marked with the CE mark. This mark indicates compliance with EEC Directives 2006/95/EC and 2004/108/EC. A full copy of the Declaration of Conformity can be obtained from Polycom Ltd, 270 Bath Road, Slough, Berkshire, SL1 4DX, UK.
この装置は、情報処理装置等電波障害自主規制協議会(VCCI)の基準
に基づくクラス A 情報技術装置です。 この装置を家庭環境で使用すると電波
妨害を引き起こすことがあります。 この場合には使用者が適切な対策を講ず
るよう要求されることがあります。
Russia Regulatory Information
声明
此为 A 级产品,在生活环境中,该产品可能会造成无线电干扰。在这种情况下,可能需要用户对其干扰采取切实可行的措施。
Система Номер регистрации Дата истечения срока
Media Suite Д-СПД-6758 June 02, 2017

Regulatory Notices
Polycom, Inc. 2
A 급 기기 ( 업무용 방송통신기자재 )
이 기기는 업무용 (A 급 ) 전자파적합기기로서 판매자 또는 사용자는 이 점을 주의하시기 바라며 ,
가정외의 지역에서 사용하는 것을 목적으로 합니다 .
WARNING
This is a Class A product. In a domestic environment this product may cause radio interference in which case the user may be required to take adequate measures.
Safety Considerations and Storage
● RealPresence Media Suite has a 7 year period of life.
● RealPresence Media Suite has a 7 year period of storage. Electrical safety advisory
We recommend that you install an AC surge arrestor in the AC outlet to which this device is connected. This action will help to avoid damage to the equipment caused by local lighting strikes and other electrical surges.
Special Safety Instructions
Follow existing safety instructions and observe all safeguards as directed.
Environment
Operating temperature 5° to 40°C (40° to 100°F).
Non-operating temperature -40° to 5° (-40° to 40°F), 40°C to 60°C (100° to 140° F).
Operating Relative humidity 8% to 90% non-condensing.
Non-operating Relative humidity 5% to 8%, 90% to 95% non-condensing

Polycom, Inc. 3
About This Guide
This guide explains how to install and set up the Polycom RealPresence Media Suite, including how to record your first video call and how to play the media file in a compatible web browser. The topics in this guide include:
● Set up RealPresence Media Suite
Gives a general introduction of this product and describes the steps required to perform the initial installation and setup.
● Record and View Meetings
Details how to record your first video call, view live streaming, and how to play back the archive media file in a compatible web browser.
Polycom, Inc. 4
Set up RealPresence Media Suite
The following sections provide a general introduction of the RealPresence Media Suite and describe the steps required to perform the initial installation and setup.
● RealPresence Media Suite Introduction
● Install RealPresence Media Suite (Appliance Edition)
● Install RealPresence Media Suite (Virtual Edition)
RealPresence Media Suite IntroductionThe Polycom® RealPresence® Media Suite is a Video Content Management solution, which introduces a new and easy-to-use User Portal. From the new User Portal, customers can easily start recording, create live events, and share media files.
The Polycom® RealPresence Media Suite is also a streaming and recording system that participates in standards-based video and telepresence calls. As a native part of the Polycom RealPresence Platform, the RealPresence Media Suite records, archives, and streams telepresence and video conferences for playback on a variety of client devices including tablets, smart phones, desktop computers, and standards-based video endpoints.
The RealPresence Media Suite is typically deployed as part of a larger Polycom RealPresence Platform solution, but it can be used as a standalone solution or with third-party systems.
● By leveraging RealPresence Media Suite with existing telepresence systems, video conferencing endpoints and video infrastructure, or familiar unified communications (UC) tools, your organization can easily convert real-time conferences and events into reusable multimedia assets. Following are some features of RealPresence Media Suite:Integrates with Polycom endpoints and conference platforms for automated recording and playback.
● Supports H.323 and Session Initiation Protocol (SIP) standards for interoperability with third-party conferencing systems.
● Outputs a video stream (live or video on demand) at a resolution up to 1080p HD (people + content combined).
● Provides access to live and video call archive streams on devices with compatible browsers including PC, MAC, iOS, and Android devices.
● Accesses to video call archives via any standard-based endpoint.
● Provides REST API support for third-party integrations.
The Polycom® RealPresence Media Suite is available in an Appliance Edition (AE, packaged with a system server), a Virtual Edition (VE, packaged as software only), and Amazon Web Service (AWS).
Most of the functionality described in this document applies to AE and VE editions, and so the product references are general - that is, the RealPresence Media Suite. However, when information applies to a

Set up RealPresence Media Suite
Polycom, Inc. 5
specific edition, the reference will be specific - that is, RealPresence Media Suite, Virtual Edition, or RealPresence Media Suite, Appliance Edition. For information about deploying RealPresence Media Suite in AWS, refer to RealPresence Media Suite on AWS Deployment Guide.
The RealPresence Media Suite, Virtual Edition, is packaged as an Open Virtualization Archive (OVA) file. The OVA file contains the RealPresence Media Suite application and information about its virtual machine environment. It can be installed as a virtual instance on a host machine running VMware vSphere.

Set up RealPresence Media Suite
Polycom, Inc. 6
Web Browser RequirementsThe following table shows the web browser requirements for the RealPresence Media Suite.
User Portal Web Browser Requirement
Install RealPresence Media Suite (Appliance Edition)
Before You BeginBefore you begin installing this product, make sure you follow these rules to ensure general safety:
Operating System Browser Name Version
PC (Windows 7, Windows 8/8.1, and Windows 10)
Internet Explorer 10, 11
Note: Make suer the User TLS 1.2 is check from Internet Options > Advanced > Security.
Edge 25
Firefox 41, 42
Chrome 46, 47
Note: To use Polycom RealPresence Media Suite Player with Chrome 46 and above, go to chrome://flags or chrome://plugins to enable Native Client.
MAC OS-X
(10.10.5, 10.11)
Safari 9.0.1
Firefox 41, 42
Chrome 46, 47
Note: To use Polycom RealPresence Media Suite Player with Chrome 46 and above, go to chrome://flags or chrome://plugins to enable Native Client.
iOS Safari 9.0.1
Andriod phone and tablet Android browser 4.3, 4.4/4.4.2, 5.0, 5.1

Set up RealPresence Media Suite
Polycom, Inc. 7
● Keep the area around the RealPresence Media Suite unit clean, free of clutter, and well ventilated.
● Choose a suitable location for the equipment rack that will hold the unit and ensure that it is near a grounded power outlet.
● Use a regulating Uninterruptible Power Supply (UPS) to protect the RealPresence Media Suite unit from power surges and voltage spikes, and to keep it operating in case of a power failure.
Unpack the RealPresence Media Suite PackageWhen you unpack the RealPresence Media Suite package, ensure that the following items are included, and that they are in proper condition:
● One RealPresence Media Suite appliance (weighs about 50 lbs)
● Rail-mount kit for standard 19-inch equipment rack
● One power cable for your regional power
● Two RJ-45 network cables
● One RealPresence Media Suite faceplate
● Documentation DVD, which contains the links to the latest RealPresence Media Suite documentation on the Polycom Support web site
● License information
Take all items out of the package and check to ensure they are in proper condition.
Install the RealPresence Media SuiteAfter you unpack and examine the components, you can start to install the product.
To install RealPresence Media Suite:
1 Place the RealPresence Media Suite unit on a stable flat surface.
2 Peel off the protective film from the top and bottom of the appliance.
3 If appropriate, install the rack-mount rail kit following the instructions provided.
4 Place the appliance in a properly ventilated equipment rack (shelf or rails) or similar environment.
5 Insert the power cable connector into the rear of the chassis and connect it to an appropriately rated socket outlet.
6 Connect a network cable to LAN 1 on the back of the unit.
7 Power on the system.
8 Attach the server faceplate.
Note: In case of damaged items
If you find damage, file a claim with the delivery carrier. Polycom is not responsible for damage sustained during shipment of this product.

Set up RealPresence Media Suite
Polycom, Inc. 8
Install RealPresence Media Suite (Virtual Edition)
Hardware RequirementsThe following table shows the hardware requirements for the RealPresence Media Suite virtual edition.
Software RequirementsRealPresence Media Suite, Virtual Edition, is supported on VMware vSphere 5.1/5.5/6.0. Before you install and configure the RealPresence Media Suite system, you need the following:
● VMware vSphere 5.1, 5.5, or 6.0 client installed where you can access the ESXi host
Ensure that sufficient CPU and memory resources are reserved for VMware as required in the table below, otherwise the System may not function properly or in the worst case may fail to respond.
RealPresence Media Suite Virtual Edition Hardware Specification
Simultaneous Recording Ports
Live Stream
Virtual Core CPU
Minimum RAM
Minimum Accessible Storage
Software Requirements
2 1 4 2.67GHz (Intel® Xeon® CPU x5650@ 2.67GHz or better) CPU
2.90GHz (Intel® Xeon® CPU E5-2690 @ 2.90GHz or better) CPU
16GB 80GB VMWare vSphere 5.1/5.5/6.0
Note: For 2/1 model deployment on VMware, requires 8 virtual cores for OVA installation. You can change the CPU virtual core to 4 after the software installation is done.
6 3 8 16GB VMWare vSphere 5.1/5.5/6.0
12 6 12 16GB VMWare vSphere 5.1/5.5/6.0
18 9 24 32GB VMWare vSphere 5.1/5.5/6.0
Polycom recommends increasing the virtual CPU cores to 24 to better experience the new functionalities of the User Portal.
40 0 16 32GB VMWare vSphere 5.1/5.5/6.0

Set up RealPresence Media Suite
Polycom, Inc. 9
● Login credentials and IP addresses of one or more VMware vShpere hosts on which you will deploy your RealPresence Media Suite OVA
● A web browser where you access the Viewer Portal. See the Set up RealPresence Media Suite in a Virtual Environment for the supported versions
For VMware vSphere ESXi and client v5.1, v5.5, or v6.0 installation guide, refer to the VMware website.
Resource and License Management
For the first installation of RealPresence Media Suite Virtual Edition, the 90-day trial license provides 6/3 capacity and Platinum functionality. To permanently enable the RealPresence Media Suite system, a RealPresence Media Suite license is required. For RealPresence Media Suite 2.5 release, the 2/1 model is supported for Virtual Edition only, which is different from the Appliance Edition.
Set up RealPresence Media Suite in a Virtual Environment
The following steps assume you are familiar with deploying applications into a VMware environment.
For more information about deploying applications into a VMware environment, see the VMware website.
To set up the RealPresence Media Suite in a virtual environment:
1 Obtain the RealPresence Media Suite OVA package.
2 Deploy the OVA file into the VMware vShpere hosts that you have set up.
3 From the vSphere client, edit the instance and configure to the customer options.
4 Click the Summary tab and note the IP address of RealPresence Media Suite system assigned by DHCP.
5 On the VMware console, click Edit and adjust the CPU, memory, and the minimum disk space.
License of Capability
License
6 Calls Record
3 Calls (of the 6 total calls) stream live
Note: The VMware vSphere host must meet the RealPresence Media Suite hardware requirements
If the VMware vSphere host is very busy or it does not meet the RealPresence Media Suite hardware requirements, the deployment may fail. See the Software Requirements for details.
Note: A RealPresence Media Suite must have a local disk or NFS for media storage
A RealPresence Media Suite, Virtual Edition must have an additional local hard disk in VMware, access to a NFS share, or both.

Set up RealPresence Media Suite
Polycom, Inc. 10
Add a Hard Disk in VMware vShpere (Optional)
RealPresence Media Suite virtual edition supports local storage as its media storage. The procedure below demonstrates how to add a hard disk in VMware vShpere.
Make sure the OVA file has been deployed successfully.
To add a hard disk:
1 Right click the virtual machine which you want to add hard disk to, and select Edit Settings.
2 Click Add on the top of the pop-up window.
3 Select Hard Disk as the hardware type, and click Next.
4 Select Create a new virtual disk to create a new disk, and click Next.
5 Set the Disk Size which should more than 500 GB, Disk Provisioning, and Location for the new disk, and click Next.
6 Configure the Advance Options if needed, and click Next.
Caution: Shut down the system before adding a hard disk in VMware vShpere
Shut down the RealPresence Media Suite system before adding a hard disk.

Set up RealPresence Media Suite
Polycom, Inc. 11
7 Check the hard disk options, and click Finish to add the hardware.
8 Right click the virtual machine, and select Power > Power On to power on the system.
Configure NFS (Optional)
The RealPresence Media Suite virtual edition supports NFS share as its media storage. The procedure below demonstrates how an NFS share is configured on a typical Linux distribution.
Make sure that NFS is co-located on the same switch/location as the RealPresence Media Suite system to ensure stable I/O operations.
To export a shared storage location through NFS on a typical Linux system:
1 Make sure the NFS service has been installed and is running.
Examples:
[root@centos-nfs ~]# service nfs status
rpc.svcgssd is stopped
rpc.mountd (pid 20129) is running...
nfsd (pid 20194 20193 20192 20191 20190 20189 20188 20187) is running...
rpc.rquotad (pid 20125) is running...
2 Edit NFS configuration file /etc/exports to set the file system paths for export.
Examples:
[root@centos-nfs ~]# cat /etc/exports
/home/nfs *(rw,no_root_squash)
/home/nfs_zip_1 192.168.9.78(rw,no_root_squash)
3 Restart the NFS service.
Examples:
[root@centos-nfs ~]# service nfs restart
Shutting down NFS daemon: [ OK ]
Shutting down NFS mountd: [ OK ]
Shutting down NFS quotas: [ OK ]
Shutting down NFS services: [ OK ]
Starting NFS services: [ OK ]
Starting NFS quotas: [ OK ]
Starting NFS mountd: [ OK ]
Stopping RPC idmapd: [ OK ]
Starting RPC idmapd: [ OK ]
Starting NFS daemon: [ OK ]
Set up RealPresence Media Suite
Polycom, Inc. 12
Initial System ConfigurationTo configure the system for use, you need a compatible web browser to access and use the Administration user interface (hereafter referred to as the Admin Portal). The initial configuration consists of four steps:
● Obtain the Product Activation Key from Polycom
● (For Scalability Mode Only) Set the Role of RealPresence Media Suite
● Configure the RealPresence Media Suite
● Set up the Gatekeeper
Obtain the Product Activation Key from PolycomA new installation of RealPresence Media Suite, Virtual Edition, comes with a 90-day trial license.
For the Appliance Edition, you must activate the license using the product serial number (you can find this by choosing Admin > Product Activation) of the RealPresence Media Suite.
To obtain the product activation key:
1 (Appliance Edition) Obtain the serial number from rear panel of the RealPresence Media Suite system. Write it down for later use.
2 (Virtual Edition) Go to Admin > Product Activation to obtain the serial number. Write it down for later use.
3 Enter the following web site address in the address bar of the web browser: support.polycom.com. and go to Support Home.
4 Go to Licensing & Product Registration > Activation/Upgrade.
5 Click All other Polycom Products in the pop-up window.
6 Enter your e-mail address and password to log in to or register for a new account.
7 Follow the page prompts to generate the key code required for system activation.
8 Enter the Serial Number you recorded and click Next.
9 Note the activation key (key code) on the page and click Upgrade.
10 Go back to RealPresence Media Suite Admin Portal and activate the system under Admin > Product Activation.
Configure IP Settings through the ConsoleBy default, when a new RealPresence Media Suite is started, it obtains an IP address from the DHCP server automatically. Follow the steps here to check the IP address assigned by the DHCP server. If you configure IP settings from the RealPresence Media Suite system console, you must confirm the changes on Admin Portal to make the settings take effective.
To view the system IP address in the RealPresence Media Suite console:
1 (Appliance Edition) Connect a VGA monitor to VGA interface of the RealPresence Media Suite system, and connect the USB keyboard to the USB interface of the RealPresence Media Suite system.

Set up RealPresence Media Suite
Polycom, Inc. 13
2 (Virtual Edition) Open the console of your RealPresence Media Suite.
3 The default console with IP address displays.
Assign the system a static IP from the RealPresence Media Suite’s console. If needed, modify the IP address in the Admin user interface. See Configure Device for more information.
4 Type Alt+F2 keys to go to the login screen.
5 Enter the user name and password (both are polycom by default).
6 Change the default password when log into the system first time.
7 Set a static IP or the DHCP for LAN interface using the Network Settings command. After you are finished with the DHCP configuration, go to console and get the IP address information assigned by the DHCP server. Refer to Network Settings for more information.
8 After you set the IP, click Yes to reboot and accept the changes.
Set the Role of RealPresence Media SuiteIn Scalability Mode, there must be exactly one device that has the role Media Suite Center and additional ones have the role of Media Nodes. The default role of a new RealPresence Media Suite or a RealPresence Media Suite upgraded from previous version is Media Suite Center. A single stand-alone RealPresence Media Suite should remain as Media Suite Center. You can change the server role from Media Suite Center to Media Node through console port as follows:
To set the server role to Media Node through the console:
1 (Appliance Edition) Connect a VGA monitor to the VGA interface of the RealPresence Media Suite system, and connect the USB keyboard to the USB interface of the RealPresence Media Suite system.
2 (Virtual Edition) Accessed through vSphere client console or SSH.
3 Open the console of your RealPresence Media Suite.
4 The default console displays.
Note: Media Node cannot access to web UI
Once the Media Suite role is changed to a Media Node, the web UI is not accessible on that server, and the Media Node is controlled by the Media Suite Center. If you want access to the Web UI again, change the server role to Media Suite Center.

Set up RealPresence Media Suite
Polycom, Inc. 14
5 Select Set Server Role by pressing the Enter key.
6 Select Media Node, and press OK to set the RealPresence Media Suite to Media Node.
7 Set the Media Suite Center IP address for Media Node, and click OK.
8 Click Yes to save the changes on the pop-up page.
9 Click Yes to reboot all services on the pop-up confirmation page. All the services reboot, and then log off.
10 Check the device setting of Media Node on the Admin Portal.
1 In the address line, enter the Admin Portal IP address in this format: http://<system IP address>/admin, or http://<FQDN>/admin.
2 Enter the user name and password to log in to the system.

Set up RealPresence Media Suite
Polycom, Inc. 15
3 Go to Device > Device Manager.
4 Select one Media Node.
5 Click Edit to set the Media Node. For device configuration, refer to the Configure Device.
Configure DeviceIn Scalability mode, one to ten devices could be added in to cluster as Media Nodes. This section describes how to add, edit or delete those devices from the RealPresence Media Suite admin portal.
To add or edit a device:
1 Access the RealPresence Media Suite Admin Portal by its IP address or FQDN from a compatible browser.
2 Go to Device > Device Manager.
3 Select a specific device, then click Add or Edit.
4 Configure the Common settings:
5 Configure the Network Setting as shown next:
Common Settings
Parameter Description
Device Name Specify a unique name for the device name.
Register IP Address Display the IP address of the device configured in Network Settings.
Device Box Type Specify the device box type as follows:
• HARDWARE: for Appliance Edition
• VMWARE_VM: for Virtual Edition
Only available when adding a new device.
Network Settings
Parameter Description
Enable Networking Separation Select this check box to route the management, streaming traffic, and video call traffic through LAN 1 and LAN 2 interfaces separately.
This offers higher security for the signaling data.
Network Settings
Set up RealPresence Media Suite
Polycom, Inc. 16
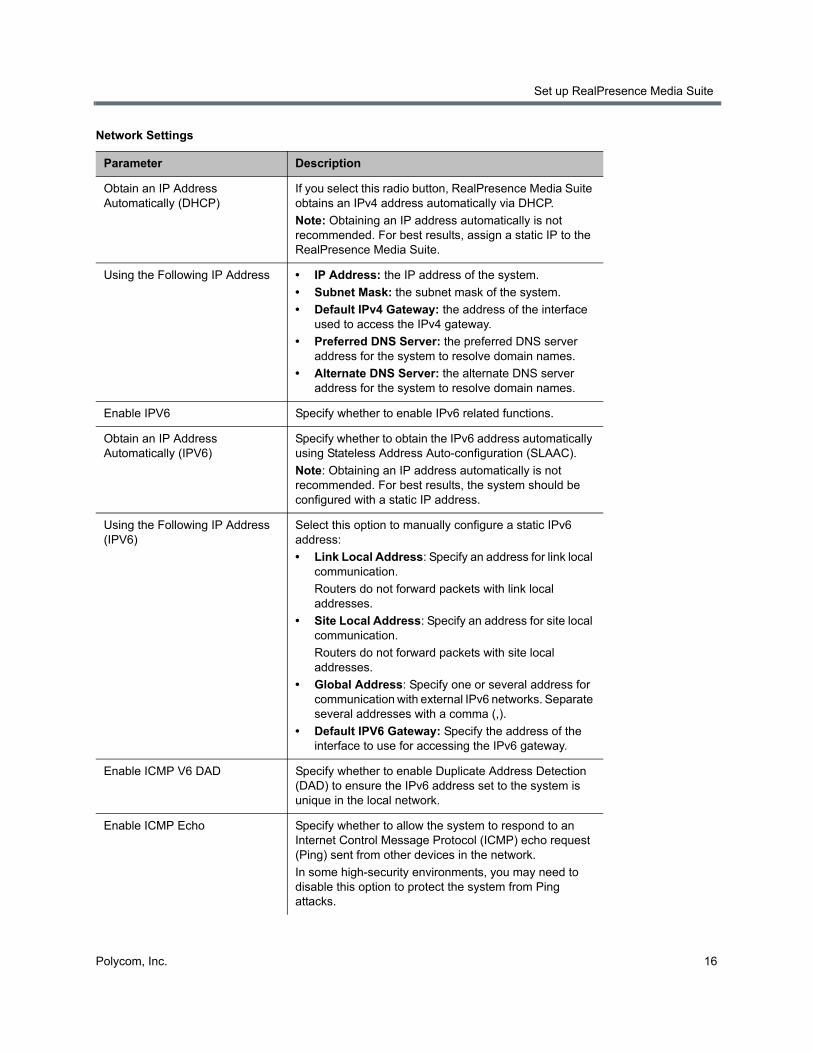
Obtain an IP Address Automatically (DHCP)
If you select this radio button, RealPresence Media Suite obtains an IPv4 address automatically via DHCP.
Note: Obtaining an IP address automatically is not recommended. For best results, assign a static IP to the RealPresence Media Suite.
Using the Following IP Address • IP Address: the IP address of the system.
• Subnet Mask: the subnet mask of the system.
• Default IPv4 Gateway: the address of the interface used to access the IPv4 gateway.
• Preferred DNS Server: the preferred DNS server address for the system to resolve domain names.
• Alternate DNS Server: the alternate DNS server address for the system to resolve domain names.
Enable IPV6 Specify whether to enable IPv6 related functions.
Obtain an IP Address Automatically (IPV6)
Specify whether to obtain the IPv6 address automatically using Stateless Address Auto-configuration (SLAAC).
Note: Obtaining an IP address automatically is not recommended. For best results, the system should be configured with a static IP address.
Using the Following IP Address (IPV6)
Select this option to manually configure a static IPv6 address:
• Link Local Address: Specify an address for link local communication.
Routers do not forward packets with link local addresses.
• Site Local Address: Specify an address for site local communication.
Routers do not forward packets with site local addresses.
• Global Address: Specify one or several address for communication with external IPv6 networks. Separate several addresses with a comma (,).
• Default IPV6 Gateway: Specify the address of the interface to use for accessing the IPv6 gateway.
Enable ICMP V6 DAD Specify whether to enable Duplicate Address Detection (DAD) to ensure the IPv6 address set to the system is unique in the local network.
Enable ICMP Echo Specify whether to allow the system to respond to an Internet Control Message Protocol (ICMP) echo request (Ping) sent from other devices in the network.
In some high-security environments, you may need to disable this option to protect the system from Ping attacks.
Network Settings
Parameter Description

Set up RealPresence Media Suite
Polycom, Inc. 17
6 Click Add to add static routes. Enter the following information for each route:
MTU Specify the Maximum Transmission Unit (MTU) size.
LAN Speed Specify the speed or duplex modes for the LAN port. Select Auto to let the system set the speed automatically.
Note: When setting the LAN port speed, contact your network administrator to ensure that the switch link rate matches the system port speed.
NAT Public (WAN) Address Set the external IP address in a Network Address Translation (NAT) environment.
NAT environments use private internal IP addresses for devices within the network, while using one external IP address to allow devices outside the LAN to access the RealPresence Media Suite Web Portal, view live streaming, or play back VoD.
General System Network Settings
Host Name Specify the host name of the system.
Domain Specify the domain name of the system.
FQDN Specify the FQDN for RealPresence Media Suite.
The FQDN must be correct and reachable. After configuring the FQDN, DNS must be configured for streaming service works well.
In Scalability Mode, if https is enabled, FQDN should be configured for Media Suite center and each Media Node.
Preferred DNS Server The preferred DNS server address for the system to resolve domain names.
Alternate DNS Server The alternate DNS server address for the system to resolve domain names.
Set Route Parameters
Parameter Descriptions
Destination Specify the IP address of the destination network.
Gateway Specify the IP address of the gateway to access the destination network.
Subnet Mask Specify the subnet mask for the destination network.
Ethernet Specify the Ethernet interface for the destination network.
Network Settings
Parameter Description

Set up RealPresence Media Suite
Polycom, Inc. 18
7 Configure the Media Storage settings. By default, RealPresence Media Suite, Virtual Edition, stores the files on a network file system if enabled to do so, or on a local hard disk. For the Appliance Edition, archives are saved on its local hard disk and the network file system could be configured.
Media Storage Settings for Virtual Edition
Parameter Description
Media Storage Policy If you select a policy other than Local Storage Only, you need to configure the settings below for the network file system.
Local Storage Only
Local Disk Select one local disk from drop-down list for media storage. For how to add a local disk, refer to Add a Hard Disk in VMware vShpere (Optional)
Format new disk Select the check box to format the new disk.
Note: The format time depends on the size of the disk. A larger size would take a longer time.
Synchronize archives when storage setting changed
When this option is selected, the archives on the storage will sync up with the archive record in the system database, and can be viewed from either portal.
Network Storage Only
• If Network Storage Only is selected and the network storage is disabled or has an error, the RealPresence Media Suite cannot dial in and dial out.
• RealPresence Media Suite supports NFS Versions 2 and 3.
NFS Server Address Enter an address of the NFS server.
NFS Storage Folder Specify the folder path to the NFS storage.
Note: Make sure the NFS server is set up. The NFS storage share folder must be different for all RealPresence Media Suite VE systems
Test Test whether the NFS server is reachable.
Synchronize archives when storage setting changed
When this option is selected, the archives on the storage will be synced with the archive record in the system database, and can be viewed from either portal. The sync action takes effect after the system restarts.
Note: This is a one-time operation. You need to check it again when you make storage change and need to sync up archives from the new storage.
Send warning e-mail to the admin when the remaining NFS free space reaches: (GB)
(For network storage) Set an NFS storage space threshold in the range of 10-50GB. After the system reaches the threshold, the RealPresence Media Suite will send notifications to specified receivers.
Send warning email to the admin when remaining LOCAL free space reaches (GB)
(For local storage) Set a local storage space threshold in the range of 10-50GB (the default value is 10GB). After the system reaches the threshold, the RealPresence Media Suite will send notifications to specified receivers.

Set up RealPresence Media Suite
Polycom, Inc. 19
Media Storage Settings for Appliance Edition
Parameter Description
Media Storage Policy If you select a policy other than Local Storage Only, you need to configure settings below for network file system.
NFS Server Address Enter an address of the NFS server.
NFS Storage Folder Specify the folder path to the NFS storage.
Note: Make sure the NFS server is set up. The NFS storage share folder must be different for all RealPresence Media Suite VE systems
Test Test whether the NFS server is reachable.
Synchronize archives when storage setting changed
When this option is selected, the archives on the storage will be synced up with the archive record in the system database, and can be viewed from either portal.
Send warning e-mail to the admin when the remaining NFS free space reaches: (GB)
(For network storage) Set an NFS storage space threshold in the range of 10-50GB. After the system reaches the threshold, the RealPresence Media Suite will send notifications to specified receivers.
Send warning email to the admin when remaining LOCAL free space reaches (GB)
(For local storage) Set a local storage space threshold in the range of 10-50GB (the default value is 10GB). After the system reaches the threshold, the RealPresence Media Suite will send notifications to specified receivers.

Set up RealPresence Media Suite
Polycom, Inc. 20
8 Configure the Service Setting:
9 Click Save to apply your changes.
If more than one Media Node server is pointing to the Media Suite Center, you can make the same changes to other Media Node servers.
10 Click OK to reboot the server.
11 Check the status of devices. After the system reboots, the devices show a red status until the system is ready. Select the Refresh button to update the screen.
Service Settings
Parameter Description
Service Policy Select Enable All Services to enable recording, transcoding, and streaming services, or select Enable Streaming Service only to enable streaming service only.
• Enable All Services: the device supports all services, and provides recording, transcoding, and streaming functionality.
• Enable Streaming Services Only: the device supports streaming service, and load balances the streaming service only.
Note: The Services Policy can be changed only once.
Resource Policy Specify the resource policy on the device. The option is only available when the Enable All Services is selected.
• Recording and Streaming: the device supports both recording and live streaming. The capacity of device depends on the hardware configuration (CPU, RAM or DSP), for example, for DSP device, the maximum capacity is 36/18, and the device with 24 Core and 32G RAM supports up to 18/9.
Note: In 40/0 mode, if Recording and Streaming is selected, only 18 recordings can be supported by system.
• Recording Only: the device functions as 40/0 maximum capacity to provide recording service without live streaming service. The recording service distribution is based on the idle capability of each device in Scalability Mode.

Set up RealPresence Media Suite
Polycom, Inc. 21
12 Create a Certificate Signing Request (CSR) and install a certificate.
In Scalability Mode, if https is enabled, you should add all possible FQDNs and IP addresses of Media Suite Center and each Media Node in SAN filed. Additionally, If a new device is added, a new certificate need to be generated to include the new device.
For procedure of creating a CSR, refer to RealPresence Media Suite Administrator Guide.
To download RealPresence Media Suite software and VE version (Virtual Edition):
1 Go to Admin > Product Activation to obtain the serial number. Write it down for later use.
2 Enter the following URL in the address bar of the Web browser: support.polycom.com. and go to Support Home.
3 Go to DOCUMENTS & DOWNLOADS > UC Infrastructure.
4 Click Video Content & Management Solutions at the left side bar.
5 Click Polycom RealPresence Media Suite, Virtual Edition.
6 Enter your e-mail address and password to log in to or register for a new account.
7 Click the End User License Agreement (EULA) and agree to it.
8 Click Submit.
9 Go to RealPresence Media Suite Admin Portal and activate the system under Admin > Product Activation.
To view the system activation status:
» Go to Admin > Product Activation. The system information is displayed as shown next:
Parameter Description
License Type Permanent license.
Software Version Current version of the software running on the system.
Serial Number Product serial number.
Activation Status Whether the system is activated. After the system is successfully activated, Active displays.
Max Recording Ports Maximum number of recording ports supported by the system.
Max Live Streaming Ports Maximum number of live streaming ports supported by the system.
Max Streaming Sessions Maximum number of video-on-demand and live streaming sessions supported by the system.
Base: 500.
Note: After purchasing and activating the license, the streaming sessions capacity will be increased from 500 to 1,000.
Media Encryption Whether the AES encryption function of the system is activated.
This is a charged function that can be used it only after purchasing and activating the license.

Set up RealPresence Media Suite
Polycom, Inc. 22
Set up the Gatekeeper and SIP Proxy RegistrarFor H.323, if a gatekeeper is configured on your network, you can register RealPresence Media Suite to the
gatekeeper to simplify calling. A gatekeeper manages functions such as bandwidth control and admission
control. A gatekeeper also handles address translation, which allows you to make calls using static aliases
instead of IP addresses that may change each day.
If you make SIP calls, you can register RealPresence Media Suite to a SIP server to simplify calling.
To register the system to a gatekeeper to make H.323 calls:
1 In the Web browser, enter the system’s IP address in this format: http://<system IP address>/admin, or http://<FQDN>/admin.
2 Go to Configuration > Signaling Settings > H.323.
3 Select Register To Gatekeeper.
4 Configure the following settings. After you finish the configuration, click OK.
Streaming without recording (no archive) Whether the streaming without recording function of the system is activated.
This function is activated by default; the system performs live streaming without recording and no archives are generated.
1080p60 Whether the 1080p60 is activated.
Timecode Watermark Whether the basic timecode watermark capability for transcoded mp4 on-demand files is activated. On-demand archives can be output with basic timecode watermarking.
Scalability Enable Whether Scalability Mode is activated.
This is a charged function that can be used only after purchasing the license and activating it.
Parameter Description
Gatekeeper Type Choose between Polycom and Cisco VCS.
Primary Gatekeeper Indicates whether the system is registered to the primary gatekeeper.
Gatekeeper Address Specify the IP address for the gatekeeper.
Note: Never enter the IP address of RealPresence Media Suite.
Gatekeeper Port Specify the port number for the gatekeeper; the default value is 1719.
Register User Information for Gatekeeper
Specify whether to register the system to a Polycom Gatekeeper server for H.235.0 authentication.
When H.235.0 authentication is enabled, the gatekeeper ensures that only trusted endpoints are allowed to access the gatekeeper.
Gatekeeper User Specify the user name for registration with the Polycom Gatekeeper server.
Parameter Description

Set up RealPresence Media Suite
Polycom, Inc. 23
To configure the SIP settings:
1 Go to Configuration > Signaling Settings > SIP.
2 Configure the SIP settings, as shown next:
SIP Configuration Settings
Gatekeeper Password Specify the password for registration with the Polycom Gatekeeper server.
Alternate Gatekeeper Indicates whether the system is registered to the alternate gatekeeper.
Note: The alternate gatekeeper is used only when the primary gatekeeper is not available.
System Prefix / E.164 Specify the E.164 number for the system.
System H.323 Alias Specify the H.323 alias for the system.
Remote Display Name Specify the name to be displayed to the far end.
Note: If you set the remote display name with double-bytes characters like Chinese, you will not see the characters on the far end endpoints in a H.323 call between endpoints and the RealPresence Media Suite system.
Setting Description
Transport Type Specify the transport layer protocol used for communicating with the SIP server. It needs to be consistent with the protocol supported by the SIP server.
Enable Certificate Validation Specify whether to validate the server’s certificate before accepting it.
This option is available only after you select TLS as the Transport Type.
Note: RealPresence Media Suite always sends its own certificate to the server, regardless of this selection.
Register to SIP Server Specify whether to register the system to the SIP server.
SIP Server Type Choose a SIP server type from the drop-down list. Currently only a generic type is available.
SIP Server Status Specify:
• Server Address
• Server Port
• Server Domain Name
Note: Never enter RealPresence Media Suite IP for the Server Address.
Register User’s Information Specify:
• User Name
• Auth User Name
• User Auth Password
Parameter Description

Set up RealPresence Media Suite
Polycom, Inc. 24
.
Outbound Proxy Server For communication with the SIP server when the system is configured on the internal network, an outbound proxy server is required to implement traversal of the firewall or NAT. In this case, you need to set the IP address and port number for the outbound proxy server.
• Server Address: Enter an address of the SIP server.
• Server Port: Enter the port of the SIP server.
Note: Find information on DMA
• If you need to configure both the H.323 Gatekeeper parameters and SIP parameters at the same time, click OK after you finish the configuration of both parameters.
• If the RealPresence Media Suite is registered to DMA as the SIP server, you can find RealPresence Media Suite information on the DMA portal under Network > Endpoints.
Setting Description
Polycom, Inc. 25
Record and View Meetings
The following topics demonstrate how to record your first video call, view the live streaming, play VoD and live streaming, and how to play back media archives in a compatible web browser.
● User Interfaces
● Start a Recording
● Play Back Media Archives
● View Live Streams
User InterfacesThe RealPresence Media Suite provides four interfaces that are used for specific purposes:
● Web-based Admin Portal: Accessed by a compatible Web browser, the Admin Portal is used to configure the system, set up recording parameters, monitor system use and health, dial out to endpoints to record meetings, disconnect calls in progress, create different transcoded versions of archived calls, download media files, and give admin users a quick way to access and play archives and live streams.
● Web-based Viewer Portal: Accessed by compatible device/Web browser (PC/MAC, iOS and Android), the Viewer Portal user interface is used to record meetings, find, navigate, search, play archives and live streams.
● TV user interface (also called the “TVUI”): Accessed via standards-based video conferencing endpoints, this interface can be used to record meetings.
● Console: Accessed by VGA interface for Appliance Edition, the vSphere client console for Virtual Edition or SSH, this console is used to remotely and securely view/change IP settings and reboot the system.
For more information, see the RealPresence Media Suite Administrator Guide.
Start a RecordingYou can start recording in RealPresence Media Suite using one of the following methods:
● Call from the RealPresence Media Suite to an interoperable endpoint from the User Portal.
● Call from the RealPresence Media Suite to an interoperable endpoint from the Admin Portal.
● Call the RealPresence Media Suite from an interoperable endpoint.
● Start a recording from the Polycom RMX system by recording link.

Record and View Meetings
Polycom, Inc. 26
To start a recording from the User Portal:
1 Access the RealPresence Media Suite user portal by its IP address or FQDN from a compatible browser.
2 Click Sign In on the top-right corner to enter your User ID and Password.
3 Click Start Recording on the top-right corner.
4 (Optional) Click Advanced Options in the Conference tab on the pop-up page.
5 Configure the recording parameters shown in the next table:
Recording Parameters
Parameters Description
Title Specify the recording title.
Meeting Room (or End-point)
Enter the endpoint IP address, SIP URI, E.164 ID, or VMR number.
Advanced Options (optional)
Signaling Type Select the H.323 or SIP network type for the system to recording. The selection depends on the network environment.
If the User Call Preference in System Settings is set to SIP only or H.323 only by administrator, the signaling type cannot be changed.
VRR Click a VRR from the drop-down list. You can use the built-in default VRR or one you have created.
Using Default Configura-tion
Specify whether use the default configuration of selected VRR. If clear the checkbox, the Enable Live Streaming, Live Streaming Layout, and Start Recording Imme-diately are shown for setting.
Enable Live Streaming Specify whether to enable recording at the same time.
The default selection shows the setting from selected VRR template, and you can change the setting for the specific recording temporary.
Live Streaming Layout Specify the live streaming layout.
The default selection shows the setting from selected VRR template, and you can change the setting for the specific recording temporary.
Start Recording Immedi-ately
Specify whether to start the recording immediately if the recording is enabled.
The default selection shows the setting from selected VRR template, and you can change the setting for the specific recording temporary.
Category Specify a category for the recording archive.
Publish to Channels Select whether to publish the recording to channels. If you select the check box, the channel list is available for your selection.
Tag Specify a tag for the recording archive. Tag can help to search archive after the recording is completed.
Description Specify description for the recording archive.

Record and View Meetings
Polycom, Inc. 27
6 Click OK. The RealPresence Media Suite calls the VMR or endpoint. When the VMR or endpoint is called, after call is connected, an Interactive Voice Response (IVR) announcement is initiated.
Dial in from an EndpointYou can start recording by dialing the RealPresence Media Suite or by dialing into a VRR directly.
To start recording by dialing the RealPresence Media Suite:
» Enter the E.164 prefix or H.323 ID or SIP URL of the RealPresence Media Suite on the user interface of an interoperable endpoint, for example, from remote control of HDX or Group Series.
If your system or endpoint is not registered to the gatekeeper or to a SIP server, call the system IP address instead.
You can also dial in to a VRR directly to start recording:
For H.323 calls:
● [RealPresence Media Suite IP]##[VRR number]
For example, if the RealPresence Media Suite IP is 11.12.13.14, and the VRR number is 4096, dial 11.12.13.14##4096.
● [RealPresence Media Suite E.164 prefix][VRR number]
For example, if the RealPresence Media Suite E.164 prefix number is 8888, and the VRR number is 4096, dial 88884096.
For SIP calls:
● [VRR number]@[RealPresence Media Suite IP]
For example, if the RealPresence Media Suite IP is 11.12.13.14, and the VRR number is 4096, dial [email protected].
● [SIP peer prefix][VRR number]
If the system has been registered to a SIP server, the SIP server should configure RealPresence Media Suite as a SIP peer. For example, if the SIP peer prefix of the Polycom RealPresence Media Suite system is 8888 and the VRR number is 4096, the dial string should be 88884096.
Record from RMX by Recording LinkIf you configure the Recording Link function on the Polycom RMX series conference platform and integrate the platform with the RealPresence Media Suite, the RealPresence Media Suite can be called automatically for recording when a multi-point conference is hosted through an MCU.
For more information about configuring the Recording Link function on the RMX, refer to the User Guide provided with the RMX system.
Note: Only one recording per VMR
The RealPresence Media Suite tracks ongoing recordings. You cannot have two recordings from the same RealPresence Media Suite connecting to the identical VMR.

Record and View Meetings
Polycom, Inc. 28
Change Conference Layout for MCU hosted calls
Once the Recording Link function is enabled on the RealPresence Collaboration Server system, if you dial into a conference which is hosted through MCU, the conference layout type can be changed once the call is connected. You can also set conference layout type in a recording template.
For SIP call, require Polycom RealPresence Collaboration Server 1800/2000/4000/Virtual Edition v8.4 or higher. For H.323 call, require Polycom RealPresence Collaboration Server 1800/2000/4000/Virtual Edition v8.6.2 or higher.
To set the conference layout type in a recording template:
1 Log into the Admin Portal.
2 Go to Template > Recording Templates.
3 Select a recording template and then click Edit.
4 Choose from the Conference Layout drop-down list:
Auto: Automatic layout according to the conference setting at RMX side to recording server
1x1: Single view to recording server.
1x2: Dual view to recording server.
To change conference layout type for an ongoing call:
1 Go to Signaling Connection and click
2 Choose from the following layouts:
Auto: Automatic layout according to conference setting at RMX side to recording server
1x1: Single view to recording server.
1x2: Dual view to recording server.
When an endpoint or MCU tries to connect by directly dialing the IP address or E.164 prefix of the RealPresence Media Suite system, the default VRR parameters are used to record. Add the VRR number to the dial-in number to start recording directly.
If the RealPresence Media Suite system is configured in connection with a Polycom RMX series system through the recording link, you can specify which VRR to be used by adding the VRR number in the Recording Link field on the Polycom RMX system. For more information, refer to the Polycom RMX system Administrator Guide.
For the prefix+VRR format, add SIP Peer to the Polycom DMA server. For details, refer to the Polycom DMA server’s Administrator’s Guide.
You can start recording by dialing one of the following:
● For incoming calls to RealPresence Media Suite, the dial-in number is [VRR number]@[RealPresence Media Suite IP address].
● If you call from the RealPresence Media Suite to an interoperable endpoint such as the Polycom Group Series system, the dial-out number is [RealPresence Media Suite E.164 suffix]@[GroupSeries IP Address] or [RealPresence Media Suite H.323 ID]@[Group Series IP Address].
● If you call from the RealPresence Media Suite to a MCU such as Polycom Collaboration Server or RMX, the dial-out number is [Conference ID]@[RMX Signaling IP Address].
Record and View Meetings
Polycom, Inc. 29
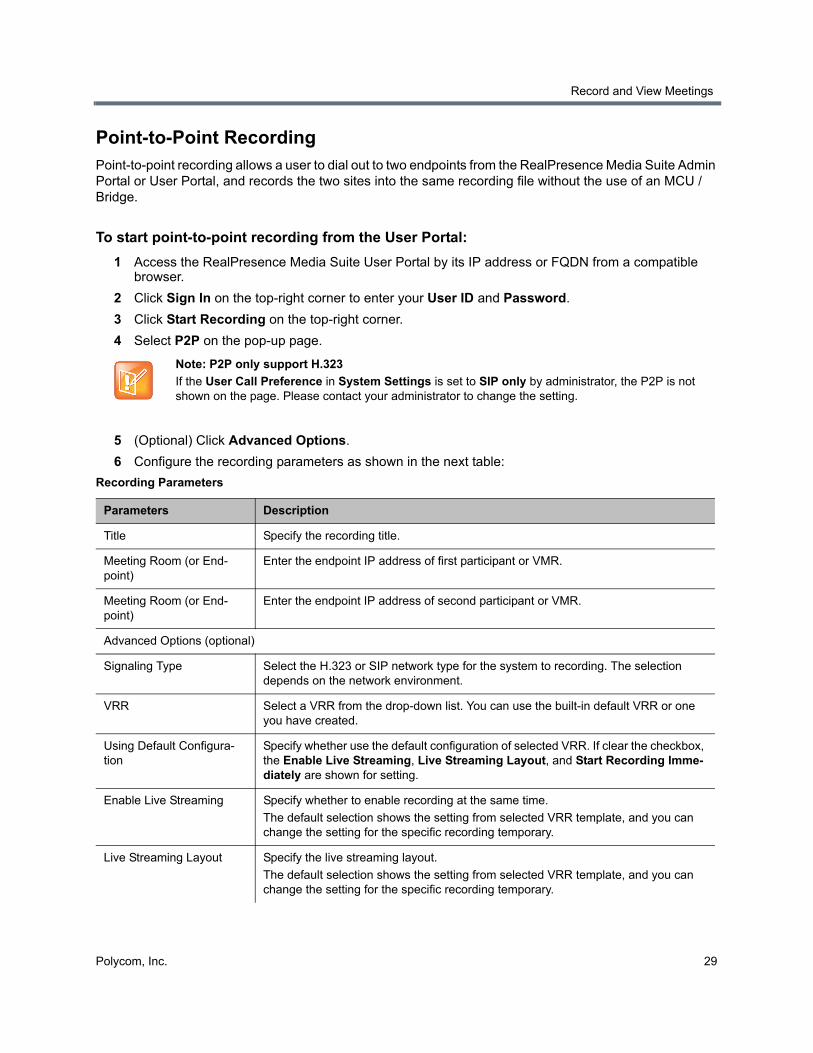
Point-to-Point RecordingPoint-to-point recording allows a user to dial out to two endpoints from the RealPresence Media Suite Admin Portal or User Portal, and records the two sites into the same recording file without the use of an MCU / Bridge.
To start point-to-point recording from the User Portal:
1 Access the RealPresence Media Suite User Portal by its IP address or FQDN from a compatible browser.
2 Click Sign In on the top-right corner to enter your User ID and Password.
3 Click Start Recording on the top-right corner.
4 Select P2P on the pop-up page.
5 (Optional) Click Advanced Options.
6 Configure the recording parameters as shown in the next table:
Note: P2P only support H.323
If the User Call Preference in System Settings is set to SIP only by administrator, the P2P is not shown on the page. Please contact your administrator to change the setting.
Recording Parameters
Parameters Description
Title Specify the recording title.
Meeting Room (or End-point)
Enter the endpoint IP address of first participant or VMR.
Meeting Room (or End-point)
Enter the endpoint IP address of second participant or VMR.
Advanced Options (optional)
Signaling Type Select the H.323 or SIP network type for the system to recording. The selection depends on the network environment.
VRR Select a VRR from the drop-down list. You can use the built-in default VRR or one you have created.
Using Default Configura-tion
Specify whether use the default configuration of selected VRR. If clear the checkbox, the Enable Live Streaming, Live Streaming Layout, and Start Recording Imme-diately are shown for setting.
Enable Live Streaming Specify whether to enable recording at the same time.
The default selection shows the setting from selected VRR template, and you can change the setting for the specific recording temporary.
Live Streaming Layout Specify the live streaming layout.
The default selection shows the setting from selected VRR template, and you can change the setting for the specific recording temporary.

Record and View Meetings
Polycom, Inc. 30
7 Click OK. The RealPresence Media Suite calls the two endpoints.
Play Back Media ArchivesYou can play back recorded media archives stored in the RealPresence Media Suite using one of the following methods:
● Play back from RealPresence Media Suite User Portal.
● Download recorded files and play back using compatible media players.
For more information, see the RealPresence Media Suite User Guide.
To play back archives through the User Portal:
1 Access RealPresence Media Suite user portal by its IP address or FQDN from a compatible browser.
2 Click Sign In on the top-right corner to enter your User ID and Password.
3 Go to My Media Center > Media.
Start Recording Immedi-ately
Specify whether to start the recording immediately if the recording is enabled.
The default selection shows the setting from selected VRR template, and you can change the setting for the specific recording temporary.
Category Specify the category for the recording archive.
Publish to Channels Select whether to publish the recording to channels. If you select the check box, the channel list is available for your selection.
Tag Specify a tag for the recording.
Description Specify a description for the recording archive.
Note: Turn off the pop-up blocker on browser
To view archives and live streams, you must turn off the pop-up blocker on your device. For example:
• For iPad: From Settings > Safari, make sure the Block Pop-ups is OFF.
• For Android devices: From Browser > Settings > Advanced, make sure the Block Pop-ups is OFF.
• For Internet Explorer (version 9.0 or above): From Tools > Internet Options > Privacy, make sure the Turn on Pop-up Blocker is NOT selected.
Recording Parameters
Parameters Description

Record and View Meetings
Polycom, Inc. 31
4 Find out the video or content waiting for playback in Archives, and then click the video or content to play back.
5 Install RealPresence Media Suite Player Plugin. When the first time you play back the video through RealPresence Media Suite Player, system requires to install player plugin for video playback.
6 Refresh the browser and allow pop-ups on browser.
7 Play back the desired media again.
View Live StreamsYou can view live streams from the RealPresence Media Suite User Portal:
To view your live streaming from the User Portal:
1 Open a supported Web browser on your device.
2 Enter the system’s portal address, for example, https://System IP.
3 Click Live Streaming from the menu on the top.
4 Click the Play button of the live streaming that you want to play.
Note: Media bitrate must less than 20Mbps.
If the bitrate of the media is more than 20Mbps, the media cannot be played backs smoothly.


![User’s Guide for the Polycom RealPresence Group …support.polycom.com/.../products/video/rpg_ug400_001.pdf[Type the document title] Polycom Document Title 1 4.0.0 | November 2012](https://img.dokumen.tips/doc/110x75/5aec452f7f8b9ab24d8fc716/users-guide-for-the-polycom-realpresence-group-type-the-document-title-polycom.jpg)