Embed Size (px)
Citation preview

Congratulations on your choice of a Real Good Toys product. Your kit has been precision made with meticu-lous care by our craftspeople using carefully selected materials. This Dollhouse will last for years, even genera-tions, if heirloom care and attention is given during assembly. Take your time and read the instructions com-pletely. If you have questions, ask the experts at your local Dollhouse store or at [email protected]
Instructions for Real Good Toys’
the Victoria’s Farmhouse Special Edition Kit #JM-1065©06/14
Measure and identify the parts: The kit is packed in groupings that protect the parts, and that is how the Parts List is organized. As you measure and identify the parts, label them with sticky notes using the names from the parts list, and check them off the parts list so you know you have everything. Taking the time now to identify and organize the parts also makes them familiar so you will understand what the in-structions intend as you read ahead.• Plan ahead so you know where you are going• Read ahead so you know how to get there• Paint ahead so the parts will be ready when you need them
Prepare your space: This dollhouse will spread out over a large area while it is being built. You will need a large flat tabletop for the house, several boxes to keep parts organized until they are needed, and several trays lined with waxed paper for holding small parts like windows and railings. A snap-lid box will keep your tools and supplies handy between building sessions.
Preview the Overview (page 2) to plan and organize your build; this helps make it fun and fulfilling.
Real Good Toys s 10 Quarry St s Barre, VT 05641 s 802 479-2217 s www.realgoodtoys.com
Not suitable for children under 13 years of ageCalifornia 93120 compliant for formaldehyde phase 2
Supplies: Paint: Interior semi-gloss latex paint... Everything gets at least one coat before assembly - get the paint now. Paintbrushes 1” or 2” foam brushes for each color, 3” foam roller for interior paintingSandpaper: 320 grit, 3-5 sheetsGlue: Aleene’s Tacky Glue for the dollhouse, Solvent-Based panel cement for shingles Masking tape: ¾” or 1” Wiring: it’s easiest to install some parts during assembly… order wiring supplies now. Screwdriver: #1 Phillips Wallpaper paste: Roman’s “Border” Paste
Before you begin - You have already opened the box and see all the parts organized in boxes and bundles. For the moment, keep them that way. There are important things to do before you open your glue bottle.
Assembly Notes /Getting Started (A) page 2Instructions for Special Edition Kit #JM-1065 Victoria’s Farmhouse
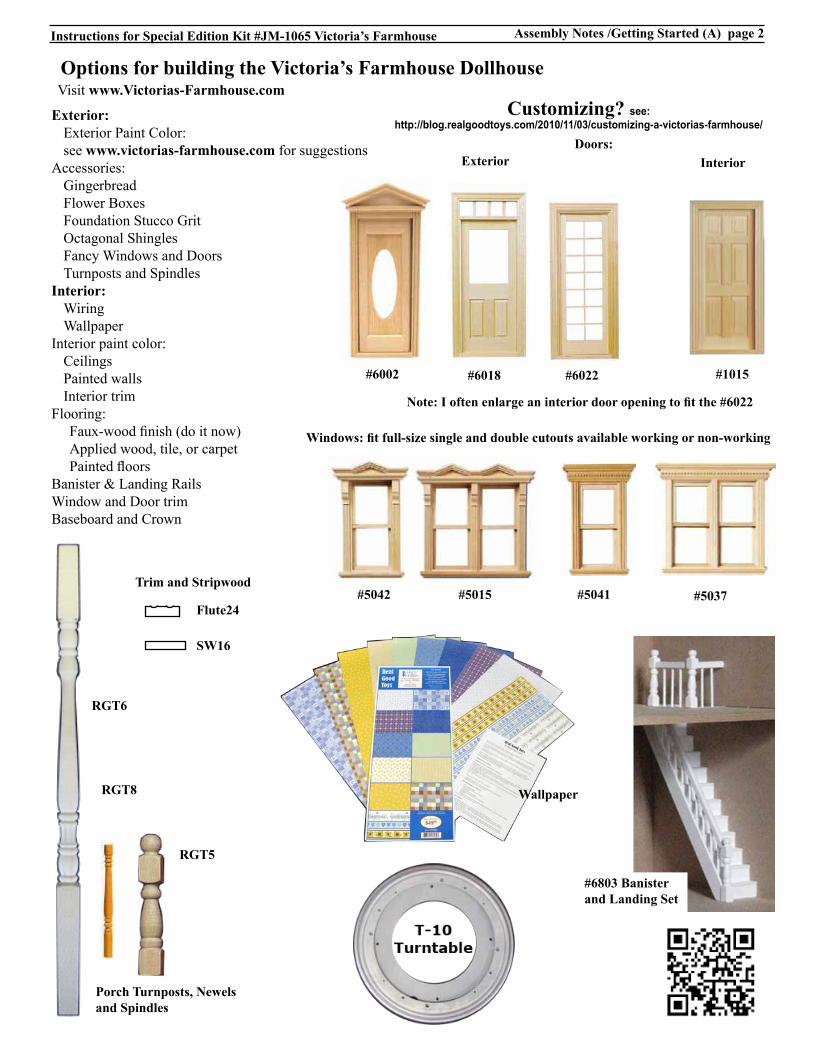
Exterior: Exterior Paint Color: see www.victorias-farmhouse.com for suggestions
Accessories: Gingerbread Flower Boxes Foundation Stucco GritOctagonal Shingles Fancy Windows and DoorsTurnposts and Spindles
Interior: Wiring Wallpaper
Interior paint color: Ceilings Painted walls Interior trim
Flooring:Faux-wood finish (do it now)Applied wood, tile, or carpet Painted floors
Banister & Landing RailsWindow and Door trimBaseboard and Crown
Options for building the Victoria’s Farmhouse DollhouseVisit www.Victorias-Farmhouse.com
Doors:
#6022#6002 #6018 #1015
Windows: fit full-size single and double cutouts available working or non-working
#5042 #5015 #5037#5041
#6803 Banister and Landing Set
Porch Turnposts, Newels and Spindles
Wallpaper
Trim and Stripwood
Flute24
SW16
RGT6
RGT8
RGT5
Customizing? see: http://blog.realgoodtoys.com/2010/11/03/customizing-a-victorias-farmhouse/
Exterior Interior
Note: I often enlarge an interior door opening to fit the #6022
Assembly Notes /Getting Started (A) page 3Instructions for Special Edition Kit #JM-1065 Victoria’s Farmhouse
Assembly Tips:A large, clutter-free, well-lighted work area is helpful dur-ing assembly, but a flat work surface is essential.
Read the instructions carefully; look at each of the illus-trations. !With the parts in your hands!, think the assembly through before you proceed.
Test fit each time you are ready to glue a piece in place...then you’ll know you have it right.If more tape or a helper is needed, it’s good to know that before the parts have glue on them.
Don’t be stingy with glue or tape; use generous amounts. Always wipe off excess glue immediately. Keep one damp rag and one dry rag handy all the time.Have weights available for holding things tight as glue joints dry (stacks of books, gallons of pure Vermont Maple Syrup - anything heavy)
Glue the body of your dollhouse together with white, water clean-up glue that dries clear. Do not use instant-bond (super glue), fast-tack, rubber cement, silicone, or hot melt glues. They are all used in some wood applications, but they all have some characteristic that makes them un-desirable for the body of your dollhouse. Carpenter Glue works well, but glue-smear dries yellow or tan; many of the things you glue onto the house are pre-painted – extra glue will show. I use Aleene’s Tacky Glue® for all house body assembly.Make sure everything is straight and flat as glue dries... That’s the shape that will be permanent.
Q: Can I wallpaper before I assemble the doll house?
A: Yes you can (it’s your house!) Many experienced builders are advocates of papering before construction - I am not.
My biggest objection to papering first is that you are always too skimpy with glue so none will squeeze out and get on the paper. I try to use the amount of glue that fills the joint, so some will squeeze out in every joint and be wiped up. But wiping glue off of wallpaper leaves a streak, so the temptation is to go skimpy, and the joints aren’t as strong.
Second, I can always tell a house that was pre-papered because the corners show a void instead of being continuous (see the slideshows about how to crowd the papers together in the cor-ner... you can’t do that with pre-papered walls).
Third, I have had to replace paper too often that has gotten damaged by glue or tape during construction... that wastes time and paper ($) and can make it so you are left deciding whether to replace a damaged paper or letting it slide because you don’t have any more of that pattern and you’ll have to order it and that takes too much time (running out but then needing another piece is a distressing moment).
Finally, I don’t find pre-papering to be faster. By the time I have done all of the extra planning that getting the papers in the right place requires, I have used up any potential advan-tage. I have great big blacksmith’s hands, and papering in a finished house is easy for me. All that having been said, I do pre-cut the papers used in the at-tic before attaching the Roofs and I paper in front of the Blind Dividers (21/2”) before I glue them in place.
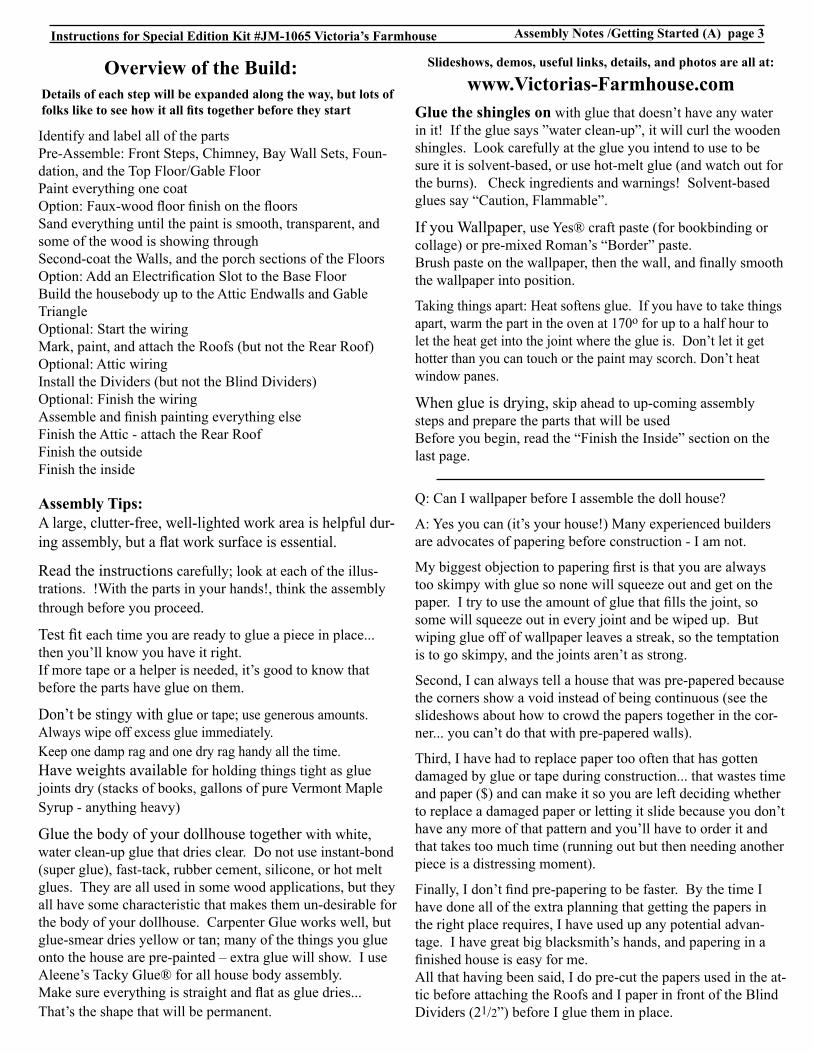
Overview of the Build:
Identify and label all of the partsPre-Assemble: Front Steps, Chimney, Bay Wall Sets, Foun-dation, and the Top Floor/Gable Floor Paint everything one coatOption: Faux-wood floor finish on the floorsSand everything until the paint is smooth, transparent, and some of the wood is showing throughSecond-coat the Walls, and the porch sections of the FloorsOption: Add an Electrification Slot to the Base FloorBuild the housebody up to the Attic Endwalls and Gable TriangleOptional: Start the wiringMark, paint, and attach the Roofs (but not the Rear Roof)Optional: Attic wiringInstall the Dividers (but not the Blind Dividers)Optional: Finish the wiringAssemble and finish painting everything elseFinish the Attic - attach the Rear RoofFinish the outsideFinish the inside
Details of each step will be expanded along the way, but lots of folks like to see how it all fits together before they start
Slideshows, demos, useful links, details, and photos are all at:
www.Victorias-Farmhouse.comGlue the shingles on with glue that doesn’t have any water in it! If the glue says ”water clean-up”, it will curl the wooden shingles. Look carefully at the glue you intend to use to be sure it is solvent-based, or use hot-melt glue (and watch out for the burns). Check ingredients and warnings! Solvent-based glues say “Caution, Flammable”.
If you Wallpaper, use Yes® craft paste (for bookbinding or collage) or pre-mixed Roman’s “Border” paste. Brush paste on the wallpaper, then the wall, and finally smooth the wallpaper into position.
Taking things apart: Heat softens glue. If you have to take things apart, warm the part in the oven at 170o for up to a half hour to let the heat get into the joint where the glue is. Don’t let it get hotter than you can touch or the paint may scorch. Don’t heat window panes.
When glue is drying, skip ahead to up-coming assembly steps and prepare the parts that will be usedBefore you begin, read the “Finish the Inside” section on the last page.

Parts List page 4Instructions for Special Edition Kit #JM-1065 Victoria’s Farmhouse
Identify the parts: Open one bundle at-a-time. Measure each part and find it on the parts list. Label the parts and group them by the ‘instruction section #’ at the end of each part’s name(#). These groups are how the parts will be used. Loose Parts:(2) E8130 Front/Back Foundation1: (1/2) 33 x 13/4(4) E8131 Middle Foundation1: (1/2) 183/4 x 13/4(2) E9801 Bottom Stair Block10: (6Step) 21/4(2) E9802 Top Stair Block10: (6Step) 21/4(1) E8104 Gable Left Roof2: (1/4) 141/8 x 141/8, Bev.(1) E8103 Gable Right Roof2: (1/4) 141/8 x 141/8, Bev. (2) E8128 Attic Endwall2: (3/8) 105/8 Tall x 151/8 Base, Groove(1) E8127 Gable Triangle2: (3/8) 105/8 Tall x 151/8 Base, Groove(1) E8129 Attic Partition10: (3/8) 101/4 x 91/4 Base(2) E8110 Gable Right SideB: (Clapboard) 9 x 53/4(1) E8118 Top Floor1: (3/8) 28 x 141/2, Stair hole (4) E8125 Divider10: (3/8) 9 x 21/2(2) E8133 Eave2: (1/4) 12 x 2 (1) E8101 Front Roof2: (1/4) 301/2 x 141/8, Cutout(1) E8102 Rear Roof2: (1/4) 301/2 x 2, Bev.(3) E8105 False Eave6: (1/4) 11/2 x 153/4, Bev. (1) E8132 Gable Foundation3: (1/4) 14 x 13/4(1) E8106 Access Bay Roof4: (1/4) 8 x 13/4. Bev(1) E8119 Middle (“Mid”) Floor1: (3/8) 331/4 x 20, Stair hole(1) E8120 Base Floor1: (1/4) 331/4 x 20 Panels Bundle: (1) E8122 Gable Top Floor1: (3/8) 141/2 x 53/4(1) E8111 Access Bay FrontB: (Clapboard) 171/8 x 67/8, Cutouts (1) E8114 Lower Right FrontB: (Clapboard) 9 x 131/8, Door&Window Cutout(1) E8115 Upper Right FrontB: (Clapboard) 9 x 131/8, Window Cutout(1) E8123 Access Bay Middle Floor1: (3/8) 1 x 61/4 (1) E8141 Access Bay Spacer1: (3/8) 11/2 x 61/4 (1) E8107 Left SideB: (Clapboard) 1819/32 x 105/8, Grooved(2) E8142 Access Bay SidesB: (Clapboard) 171/8 x 25/32 (1) E8109 Gable Left SideB: (Clapboard) 1819/32 x 3, Grooved(2) E8126B Divider10: (3/8 mdf) 9 x 141/8, Door(6) E8138 Bay VerticalA: (3/8) 97/32 x 3/4, Bev. (1) E8112 Lower Right SideB: (Clapboard) 9 x 141/2 (1) E8113 Upper Right SideB: (Clapboard) 9 x 141/2, Cutout(1) E8108 Gable FrontB: (Clapboard) 1819/32 x 141/2, Grooved, Cutouts
Gable Left Roof
Gable Triangle
Attic Endwall
Attic Partition
Access Bay Middle Floor
Acc
ess B
ay F
ront
:
Gable Top Floor
Lower Right Front
Upper Right Front
Access Bay Spacer
Left Side
Gab
le L
eft S
ide
Divider
Lower Right Side
Upper Right Side (clapboard)
Gable Front
Middle Floor
Access Bay Roof
Top FloorG
able
Rig
ht S
ide
Acc
ess B
ay S
ide
Gable Foundation
Access Bay Base Floor
Divider (Blinds)
Bevel
141/4
Left
Edge
Electrification slot
Electrification slot The Electrification Slots in the Middle and Top Floors make it easier to run tape style wiring from floor to floor. If you intend to wire this dollhouse, carve the bottom of this slot as part of step #10
so you will be able to slip tape into it from the bottom (see step 10)
Top Stair Block
Bottom Stair Block
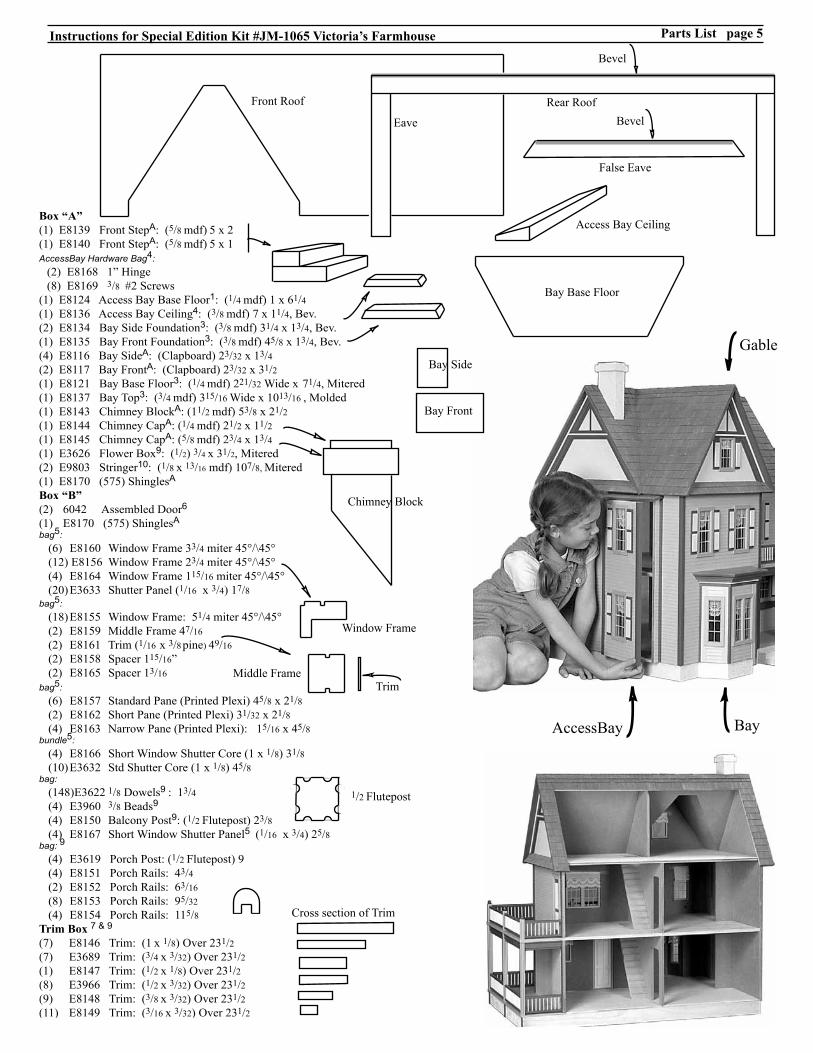
Box “A”(1) E8139 Front StepA: (5/8 mdf) 5 x 2 (1) E8140 Front StepA: (5/8 mdf) 5 x 1 AccessBay Hardware Bag4: (2) E8168 1” Hinge (8) E8169 3/8 #2 Screws(1) E8124 Access Bay Base Floor1: (1/4 mdf) 1 x 61/4 (1) E8136 Access Bay Ceiling4: (3/8 mdf) 7 x 11/4, Bev. (2) E8134 Bay Side Foundation3: (3/8 mdf) 31/4 x 13/4, Bev.(1) E8135 Bay Front Foundation3: (3/8 mdf) 45/8 x 13/4, Bev.(4) E8116 Bay SideA: (Clapboard) 23/32 x 13/4 (2) E8117 Bay FrontA: (Clapboard) 23/32 x 31/2 (1) E8121 Bay Base Floor3: (1/4 mdf) 221/32 Wide x 71/4, Mitered(1) E8137 Bay Top3: (3/4 mdf) 315/16 Wide x 1013/16 , Molded(1) E8143 Chimney BlockA: (11/2 mdf) 53/8 x 21/2(1) E8144 Chimney CapA: (1/4 mdf) 21/2 x 11/2(1) E8145 Chimney CapA: (5/8 mdf) 23/4 x 13/4(1) E3626 Flower Box9: (1/2) 3/4 x 31/2, Mitered (2) E9803 Stringer10: (1/8 x 13/16 mdf) 107/8, Mitered(1) E8170 (575) ShinglesA
Box “B” (2) 6042 Assembled Door6
(1) E8170 (575) ShinglesAbag5: (6) E8160 Window Frame 33/4 miter 45°/\45° (12) E8156 Window Frame 23/4 miter 45°/\45° (4) E8164 Window Frame 115/16 miter 45°/\45° (20) E3633 Shutter Panel (1/16 x 3/4) 17/8bag5: (18) E8155 Window Frame: 51/4 miter 45°/\45° (2) E8159 Middle Frame 47/16 (2) E8161 Trim (1/16 x 3/8 pine) 49/16 (2) E8158 Spacer 115/16” (2) E8165 Spacer 13/16bag5: (6) E8157 Standard Pane (Printed Plexi) 45/8 x 21/8 (2) E8162 Short Pane (Printed Plexi) 31/32 x 21/8 (4) E8163 Narrow Pane (Printed Plexi): 15/16 x 45/8bundle5: (4) E8166 Short Window Shutter Core (1 x 1/8) 31/8 (10) E3632 Std Shutter Core (1 x 1/8) 45/8bag: (148)E3622 1/8 Dowels9 : 13/4 (4) E3960 3/8 Beads9
(4) E8150 Balcony Post9: (1/2 Flutepost) 23/8 (4) E8167 Short Window Shutter Panel5 (1/16 x 3/4) 25/8bag: 9
(4) E3619 Porch Post: (1/2 Flutepost) 9 (4) E8151 Porch Rails: 43/4 (2) E8152 Porch Rails: 63/16 (8) E8153 Porch Rails: 95/32 (4) E8154 Porch Rails: 115/8 Trim Box 7 & 9
(7) E8146 Trim: (1 x 1/8) Over 231/2(7) E3689 Trim: (3/4 x 3/32) Over 231/2(1) E8147 Trim: (1/2 x 1/8) Over 231/2(8) E3966 Trim: (1/2 x 3/32) Over 231/2(9) E8148 Trim: (3/8 x 3/32) Over 231/2(11) E8149 Trim: (3/16 x 3/32) Over 231/2
Parts List page 5Instructions for Special Edition Kit #JM-1065 Victoria’s Farmhouse
Eave
Front Roof Rear Roof
Bevel
Bevel
False Eave
Access Bay Ceiling
Bay Base Floor
Window Frame
Trim
1/2 Flutepost
Middle Frame
Cross section of Trim
AccessBay Bay
Gable
Chimney Block
Bay Front
Bay Side
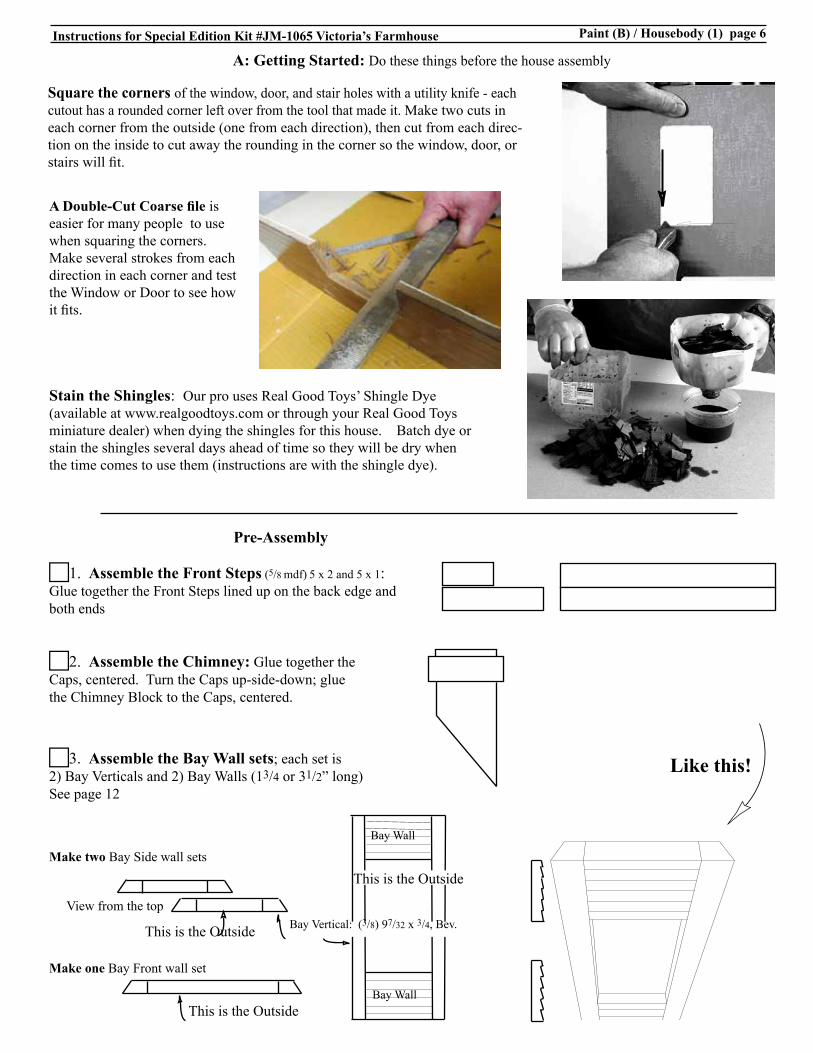
A: Getting Started: Do these things before the house assembly
Stain the Shingles: Our pro uses Real Good Toys’ Shingle Dye (available at www.realgoodtoys.com or through your Real Good Toys miniature dealer) when dying the shingles for this house. Batch dye or stain the shingles several days ahead of time so they will be dry when the time comes to use them (instructions are with the shingle dye).
Square the corners of the window, door, and stair holes with a utility knife - each cutout has a rounded corner left over from the tool that made it. Make two cuts in each corner from the outside (one from each direction), then cut from each direc-tion on the inside to cut away the rounding in the corner so the window, door, or stairs will fit.
Paint (B) / Housebody (1) page 6Instructions for Special Edition Kit #JM-1065 Victoria’s Farmhouse
A Double-Cut Coarse file is easier for many people to use when squaring the corners. Make several strokes from each direction in each corner and test the Window or Door to see how it fits.
c1. Assemble the Front Steps (5/8 mdf) 5 x 2 and 5 x 1: Glue together the Front Steps lined up on the back edge and both ends
c2. Assemble the Chimney: Glue together the Caps, centered. Turn the Caps up-side-down; glue the Chimney Block to the Caps, centered.
c3. Assemble the Bay Wall sets; each set is 2) Bay Verticals and 2) Bay Walls (13/4 or 31/2” long)See page 12
Make two Bay Side wall sets
Make one Bay Front wall set
This is the Outside
This is the Outside
This is the Outside
Bay Wall
Bay Vertical: (3/8) 97/32 x 3/4, Bev.
Bay Wall
View from the top
Pre-Assembly
Clapboard Pro�le
Like this!
Clapboard Pro�le

Paint (B) / Housebody (1) page 7Instructions for Special Edition Kit #JM-1065 Victoria’s Farmhouse
Illustration #1Front/Back Overlapthe Sides
Illustration #2Install the Middle Foundations
±11”
±11”
±11”
33”
183/4 c4 A. Glue and tape together the Foundation pe-rimeter. The Front and Back overlap the Sides (Illustration #1). B. Install the Middle Foundations spaced evenly (about ±11”) from each other (Illustration #2).
Gable Top Floor
Top Floor
This edge...is traced here
141/2
141/4
Left edge
Front-left edge
Porch Floor is outside the tracing
c5. A. Identify the top and front edges of the Top Floor ((3/8) 28 x 141/2,) - the Gable Top Floor ((3/8) 141/2 x 53/4) shows the spacing from the left edge to the stair hole (141/2”), and the stair hole is closer to the front edge. Glue and tape the Gable Top Floor to the front edge of the Top Floor, lined up on the left B. Identify the left edge of the Mid Floor - the stair hole is spaced 141/4” from the left edge, and 163/4” from the right edge (looking from the front). Set the Mid Floor on the Base Floor, lined up on the edges. Very lightly trace the left and right edges of the stair hole onto the Base Floor. Remove the Middle Floor. C. Set the Top Floor/Gable Floor on the Mid Floor lined up at the back edge and lined up side-to-side at the stair holes (the left edge of the Top Floor will over-hang 1/4” on the left edge). Trace the Top Floor/Gable Floor perimeter onto the Mid Floor. This tracing is the outside edge of the right walls - outside the tracing is the Porch Floor. Trace the Top Floor/Gable Floor onto the bottom surface of the Mid Floor. This tracing is the Porch Ceiling (make sure the tracings line up with each other) D. Set the Top Floor/Gable Floor on the Base Floor lined up at the back edge and lined up side-to-side with the stair hole tracing (the left edge of the Top Floor will overhang 1/4”). Trace the Top Floor/Gable Floor perimeter onto the Base Floor.
In step 5, you are marking the Porch floor and ceiling for painting using the Top Floor as a template. But, the left edge of the Top Floor doesn’t line up with the left edge of the Middle Floor or Base Floor (the Top Floor overlaps the walls, while the lower floors fit into grooves), so the stair hole will be used as a side-to-side reference instead of the left edge.
Can I do it differently? Yes you can - it’s your house! The information on these pages is offered as “best practices” advice, and it is what we do when we build this house. But if you are customizing or have something else in mind, test-ahead to make sure your planning includes everything!
The Base Floor overhangs ±1/4” at the Front and Right edges (view from the Front)
Make the Foundation line up on the left edge
Make the Foundation line up in Back
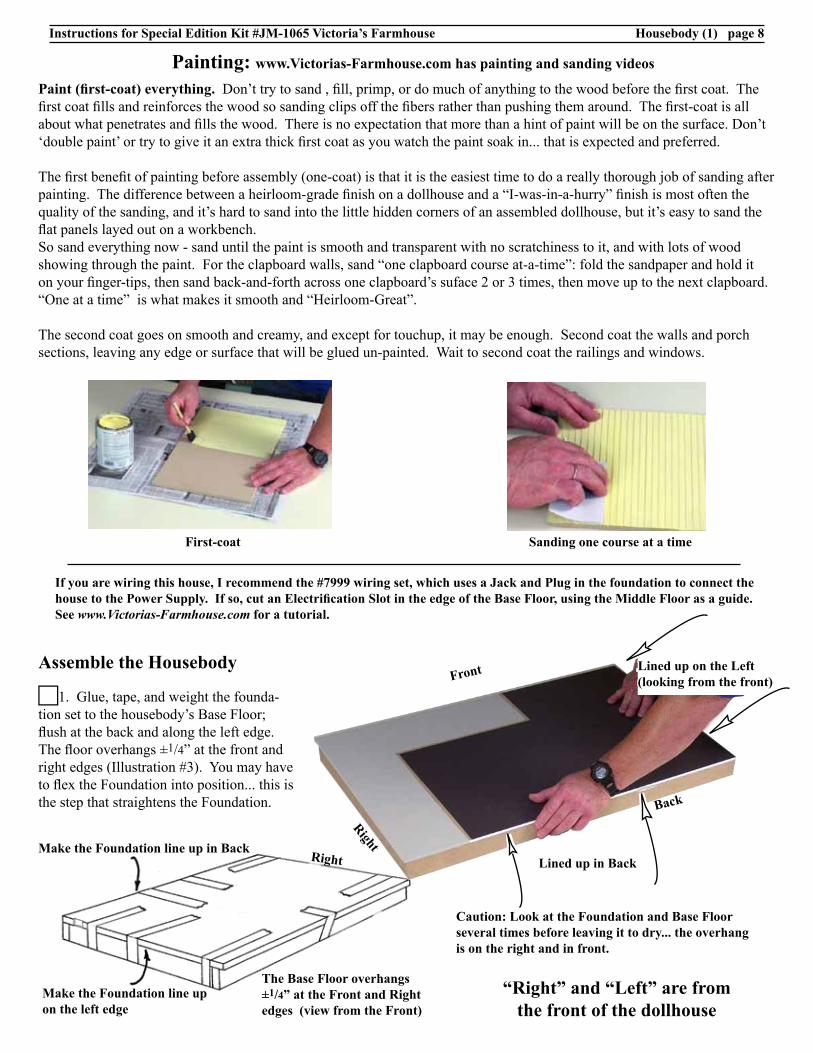
Housebody (1) page 8Instructions for Special Edition Kit #JM-1065 Victoria’s Farmhouse
If you are wiring this house, I recommend the #7999 wiring set, which uses a Jack and Plug in the foundation to connect the house to the Power Supply. If so, cut an Electrification Slot in the edge of the Base Floor, using the Middle Floor as a guide. See www.Victorias-Farmhouse.com for a tutorial.
Caution: Look at the Foundation and Base Floor several times before leaving it to dry... the overhang is on the right and in front.
Lined up in Back
Lined up on the Left(looking from the front)
c1. Glue, tape, and weight the founda-tion set to the housebody’s Base Floor; flush at the back and along the left edge. The floor overhangs ±1/4” at the front and right edges (Illustration #3). You may have to flex the Foundation into position... this is the step that straightens the Foundation.
Painting: www.Victorias-Farmhouse.com has painting and sanding videos
Assemble the Housebody
“Right” and “Left” are from the front of the dollhouse
Paint (first-coat) everything. Don’t try to sand , fill, primp, or do much of anything to the wood before the first coat. The first coat fills and reinforces the wood so sanding clips off the fibers rather than pushing them around. The first-coat is all about what penetrates and fills the wood. There is no expectation that more than a hint of paint will be on the surface. Don’t ‘double paint’ or try to give it an extra thick first coat as you watch the paint soak in... that is expected and preferred.
The first benefit of painting before assembly (one-coat) is that it is the easiest time to do a really thorough job of sanding after painting. The difference between a heirloom-grade finish on a dollhouse and a “I-was-in-a-hurry” finish is most often the quality of the sanding, and it’s hard to sand into the little hidden corners of an assembled dollhouse, but it’s easy to sand the flat panels layed out on a workbench. So sand everything now - sand until the paint is smooth and transparent with no scratchiness to it, and with lots of wood showing through the paint. For the clapboard walls, sand “one clapboard course at-a-time”: fold the sandpaper and hold it on your finger-tips, then sand back-and-forth across one clapboard’s suface 2 or 3 times, then move up to the next clapboard. “One at a time” is what makes it smooth and “Heirloom-Great”.
The second coat goes on smooth and creamy, and except for touchup, it may be enough. Second coat the walls and porch sections, leaving any edge or surface that will be glued un-painted. Wait to second coat the railings and windows.
First-coat Sanding one course at a time
Front
Right
Right
Back

Illustration #6Glue and tape the Gable Front & Gable Left Side to the Base Floor
Illustration #8Glue and Tape the 1st Floor Walls in Place
Lined up and taped at the back edge
2. Glue and tape the Gable Front to the Gable Left Side panel (the Front overlaps the Side), with the grooves perfectly lined up (use a divider to make sure the grooves line up) see Illustration #5. Let the glue dry.
Housebody (1) page 9Instructions for Special Edition Kit #JM-1065 Victoria’s Farmhouse
The Grooves are Lined up
Illustration #5Gable Front Overlaps the Gable Left Side
3. Glue and tape or nail the Gable Front and Gable Left Side assembly to the Base Floor, straight and tight (Illustration #6). The Base Floor sets into the Base Floor’s groove in the walls Use lots of tape to make the walls hold tight to the Floor in the grooves.
4. Glue and tape the first floor walls in place (the Gable Right Side, Right Front, and Right Side walls) following the perimeter tracing (Illustration #8).
Right Front
Right Side
Gable Left Side
Step 4Detail of overlaps
(temporary)Divider fits here
Gable Right Side
Gable Front
Stair hole or tracing lines up with this edge of the Gable Side
Base Floor

Housebody (1) page 10Instructions for Special Edition Kit #JM-1065 Victoria’s Farmhouse
c 5. Test the Middle Floor in the grooves in the Gable Front and Gable Left Side. Sand the top and bottom at the edges if necessary for a good fit. Glue and tape the Middle Floor to the Walls, fully into the grooves of the Gable Front/Left Side, with the walls lined up with the ceiling tracing and flush at the back edge (Illustration #9).
c 6. Glue and tape the Second Floor walls in place follow-ing the tracing. Make sure the right side walls line up at the back edge, and look lined up with each other when viewed from the front.
c 7. Glue and tape the Top Floor/Gable Floor to the walls, lined up with all of the walls on the outside (Illus. 11). If you are going to wire your dollhouse, trace and carve the bottom of the Electrification slot to make it exposed inside the Left Side Wall (don’t make it deeper at the top, just at the bottom) before gluing on the floor
Review: • Look at the housebody from every angle. Everything should be tight and lined up.• Make sure the housebody is on a flat surface as the glue dries.• Prop dividers between the floors to keep them straight.• Add weight and plenty of tape to keep everything tight and straight as the glue dries.
Lined up
AccessBay Spacer(3/8 mdf) 11/2 x 61/4
Left Side
AccessBay Mid Floor(3/8 mdf) 1 x 61/4
AccessBay Base Floor(1/4 mdf) 1 x 61/4
Lined up
Top Floor
Illus. 11
Top Floor
Attic Endwall will go here
Left Side Wall
Carve for tapewire access to Electrification slot
Gable Front:fits in the groove
Lines up in back
Use a Divider here to straighten and line up the Right Side
Illustration #9Glue and Tape the Middle Floor to the Walls - Tight in the Groove.
Use a Divider here to support and line up the corner
Lines up in back
Illus. 10
Note: clean paint out of the grooves!
c 8. Glue and tape the Access Bay Spacer to the Gable Left Side and to the Top Floor (Illus #11).Note: The AccessBay Spacer is smooth - it is hidden by other parts. c 9. Glue and tape the AccessBay Mid Floor and AccessBay Base Floor the the Middle Floor and Base Floor (Illus. 11, see also step 1, page 10) c 10. Glue and tape the Housebody’s Left Side to the Floors and Spacer, tight in the grooves and lined up at the back edge.

Attic and Roofs (2) page 11Instructions for Special Edition Kit #JM-1065 Victoria’s Farmhouse
Even Spacing
One Shingle Length
Front Roof
Bevel
Eave
Front Roof Overlapsthe Rear Roof
Eave
One Shingle length
Illustration #2Shingle Guidelines
1”
1”
1”
1”
1”
1”
1”
1”
1”
1”
Illustration #3
Rear Roof
Illustration #4
Attic Endwall
Gable Triangle
c7. Glue the Gable Roofs to each other, the Ga-ble Triangle, and the house’s Front Roof. Add extra glue to the “V” space between the Gable Roofs and the Front Roof. Tape inside and out for a good fit.
Review: The shell of the house is all together and the panels are straight and tight. Make sure the house is flat on a flat surface as the glue dries.
c5. Glue and tape the Eaves in place on the re-maining exposed top edge of the Attic Endwalls, flush at the outside edge of the Rear Roof. Look under the Eaves to check that the spacing is even (Illus. #4).c6. Tape together the Gable Roofs at the peak. Test the Gable Roofs on the house (Make sure the house Front Roof is touching the Third floor all along the front edge). Look at the fit from the inside and adjust if necessary. Mark the position of the Gable Roofs on the house’s Front Roof
c3. Without glue, Test the Roof panels on the house. Make sure the Front Roof touches the Third Floor’s edge all across the Front (par-ticularly on both sides of the gable ... trim the cutout’s inside corners for a good fit: Illus-tration #3).c4. *Glue and tape the Front and Rear Roofs together. The Rear Roof is beveled where the two roofs meet. Use many pieces of tape across the top, and tape around each end. Before the glue dries, glue the roofs to the Attic Endwalls, centered side-to-side, and with the roof overhanging evenly from top to bot-tom. Use all the tape you need to hold the roof tight as the glue dries.
c1. Glue and tape the Gable Triangle and Attic End-wall Triangles to the Top Floor. Tape a Divider or Attic Partition to the Triangles to hold them straight as the glue dries (Ill. #1).c2. On the outside of the Roof Panels draw guidelines for locating Shingles. The first guide-line should be drawn one Shingle length from the bottom edge. Draw the rest of the guidelines spaced 1” apart (Illustration #2 and the Guideline Measure at right). Now is an easy time to pre-cut attic wallpaper
II. Build the Attic and Roof ... Plan ahead:
Pre-paint (or mark, and paint as you go) any parts that will be a different color from the ones they touch. It is easiest to do some of the wiring and interior finish-ing in the attic before attaching the Rear Roof
Attic Partition for temporary support
Illustration #1Glue and Tape the Gable Triangle and Attic Endwall Triangles to the Top Floor
Guideline Measure
Gable Triangle
There are interior finishing decisions that should be made now. For suggestions, see the “Customizing a Victoria’s Farmhouse” Blog on the Real Good Toys website. You can find a link here: www.Victirias-Farmhouse.com
*Note: I do not attach the Rear Roof perma-nently until interior finishing is done

c2. Glue and tape together the Bay foun-dation (Illustration #1).c3. Glue and tape the Bay Base Floor to the front edge of the house’s Base Floor, inside the bay cutout in the Gable Front (Il-lustration #2). Make sure the floor surface across the joint is tight and smooth.c4. Glue and tape the Bay Foundation set to the Bay Base Floor and to the Gable Foundation. The foundation extends past the Bay Base evenly on all edges (this is a ledge to hold the bottom of the Bay Walls).
Front Bay (3) page 12Instructions for Special Edition Kit #JM-1065 Victoria’s Farmhouse
c5. Tape the Bay wall sets together at the corners (Illustration #4). Test them on the house wrapped around the Bay Floor, and ad-just if necessary. Glue the Bay walls together, to the Bay Base Floor, and to the foundation (Illustration #5).c6. Glue and tape the Bay Top to the house-body and Bay, spaced evenly all around (pg 1 photo).
Clapboard
BayVertical
Illustration #5Glue the Bay Walls Together, to the Bay Base Floor, and to the Foundation
Illustration #3Glue together the Bay Wall Sets
Bay Foundation
Illustration #2Glue and Tape the Bay Base Floor to the Front Edge of the House’s Base Floor
Illustration #1Glue and Tape Together the Bay Foundation
BayVertical
Clapboard
Illustration #4
Bay Side wall set
Caution!Don’t
overlook the Gable Foundation
Cla
pboa
rd Clapboard surface is on the outside
Do Step 2 to Step 4 without stopping
Bay Foundation
Bay Base Floor
Gable Foundation
House Foundation
Gable Foundation
Exterior Painting:Finish all of the Exterior painting now!
III. Assemble the Front Bay:
c1. Lay the house assembly on its Back. Glue the Gable Foundation to the front of the house’s foundation, lined up on the left. Let the glue dry.
Bay Front wall set

AccessBay (4) page 13Instructions for Special Edition Kit #JM-1065 Victoria’s Farmhouse
IV. Assemble the Access Bay: The Access Bay allows the decorator access to the gable’s front rooms.c1. (this may already be done) Glue and tape the Access Bay Floors to the housebody’s floors, tight and straight. Dividers between the Access Bay floors help to keep the floors lined up (Illustration #1).c 2. Prepare for Attaching the Hinges:Preview: In this section, you will temporarily install the hinges for the Access Bay Front and Access Bay Left Side. You are doing this now so you can work flat on the table where you can hammer and drive screws more eas-ily than inside an assembled house. Make sure your #1 Phillips head screwdriver is in new condition. Check that the hinge can open a bit more than 3/4 of the way around (this helps the Accessbay Front from being “springy” when it closes).c3. Check the clapboard profile on the Access Bay Front and Access Bay Side to identify the base end of each of those panels. Mark the base end so that even when the clapboard surface is on the work table, you can tell that the base end is at the bottom (Illustration #2).c4. Lay the Access Bay Front face down with the clap-board surface on the work table.c5. Tape two hinges on the Front Panel pin down and hooked on the edge, one spaced 1” from the top, and the other spaced 1” from the bottom (Illustration #3).
Glue and tape the Access Bay Floors to the Housebody’s Floors.
Illustration #1
Divider
Dividers help to keep the Floors Lined Up
Illustration #2 Base End
Illustration #3Tape Hinges Pin Downand Hooked on the edge 1” from the top edge
1” from the bottom edge
Hinges Pin Downand hooked on the edge
Clapboard faces down
AccessBay Floor
Punch a starter hole in the center of each hole in the hinge: Drive a nail part way through the wall and pull it back out (don’t go all the way through).
Builders Tip: Stick the screws in a soft bar of soap to make them turn in easier. Start a screw in each hole (the tape will help the screw stand up). Drive the screw 1/2 way in with a hammer (hit it hard!), and the rest of the way with a #1 Phillips screwdriver. Repeat for the other screws. Turn the tape to cover the hinge and screws. Add another piece of tape... this will hold the AccessBay Front a bit away from the Side in the next step.

AccessBay (4) page 14Instructions for Special Edition Kit #JM-1065 Victoria’s Farmhouse
c 6. Set an Access Bay Side on the edge of your work-bench with the clapboard up. Let the Access Bay Front Hang off the front of the workbench. Fold the Hinges across the clapboard surface of the Access Bay Side. Line up the top edges of the Access Bay Front and Access Bay Side (check the clapboard profile again) see Illustration #4.Builder’s tip: let the Accessbay Front hang a little bit away from the Accessbay Side so they won’t be quite touching in the assembled house.c 7. Tape the Hinges to the Side. Punch a starter hole and drive the screws as you did for the Front, then take the screws back out of the Front (it’s easier building the house without the Access Bay Front attached).c 8. Glue and tape the Access Bay Sides to the house-body’s walls and Access Bay Floors (Illustration #5).c 9. Glue and tape the Access Bay Ceiling to the house and tops of the Access Bay Sides, lined up on the outside.c 10. Glue and tape the Access Bay Roof to the Access-Bay Ceiling, centered side-to-side (Illus. 6).c 11. Hinge the Access Bay Front in place using the holes prepared in step #5.(Illustration #6).
Access Bay Front
Access Bay Left Side
Illustration #6
Illustration #5
Glue and Tape the Access Bay Sides to the Housebody’s Walls & Access Bay Floors
Hinge the AccessBay Front in Place
Lined Up
Workbench
Illustration #4
HingeScrew
AccessBay Side
AccessBay Front
AccessBay Front
AccessBay Side
Left Side
AccessBay Ceiling
AccessBay Roof
Masking Tape gives clearance here

V. Window Assembly:The parts used in this section should be painted ahead of time. If they have not been painted, do so now.
1. Standard Windows: Test assem-ble (no glue) the window set. Practice holding the frame pieces face-down on the work surface and putting on the rubber band. When you can do it every time without pieces flying, then you are ready for glue (Illustration #1). 2. Glue and rubber band together the window frame with the Window Plexi in place. Make sure the assembly is square as the glue dries (Illustration #2). 3. Short and the Narrow Windows: assemble these windows as you did the Standard Window. 4. Standard Double Window: Lay out and assemble the Double Win-dow face down on the work surface (Illustration #4). 5. Turn the Double Window face up and push the Middle Frame down to the work surface. Adjust the spacing of the Middle Frame with the 115/16” Spacers (Il-lustration #5). 6. Glue the Trim to the Frames cen-tered on the Middle Frame. 7. Narrow Double Window: As-semble the Narrow Double Window as you did the Standard Double Window using the 13/16” Spacers to locate the Middle Frame. 8. Touch-up the sanding and paint, but stay away from the Window Pane! 9. Check the fit of the windows in the openings. Make sure the windows can sit level with the house. Trim the corners of the openings square if neces-sary for a good fit.
Windows (5) page 15Instructions for Special Edition Kit #JM-1065 Victoria’s Farmhouse
Illustration #1
Illustration #2
Window Plexi InsideSide Frame
Face Down Top Frame
Side Frame
Face Down: Inside Showing
Bottom Frame
Illustration #4
Plexi
These hands are holding the frame parts down against the table (not squeezing them together)
115/16 Spacers
Illustration #3
Middle Frame
Trim
www.Victorias-Farmhouse.com has more window assembly photos

Windows (5) page 16Instructions for Special Edition Kit #JM-1065 Victoria’s Farmhouse
c 10. Paint the Shutter parts. Without glue, adjust the spacing of the Shutter Panels on the Shutter Cores. Remove the Shutter Panel, put a scant line of glue on each edge of the back surface, then replace the Shutter Panel. Too much glue will make the panel curl.
VI. Install the windows and doorThe parts used in this section should be painted ahead of time. If they have not been painted, do so now.
c 1. Touch-up the sanding and paint. Check the fit of the door in the opening. Make sure the door can sit level with the house. Trim the corners of the opening square if necessary for a good fit.c 2. Glue the door in place only after the housebody is painted.c 3. Install the Windows and Doors.c 4. Glue the Shutters in place against the Windows, centered up and down (Illustration #1).
CenteredIllustration #1
Shutter is CenteredUp-and-Down
ShutterCore
Shutter Panel
Shutter Core
Shutter Panel

Trim (7) page 17Instructions for Special Edition Kit #JM-1065 Victoria’s Farmhouse
Gable and Attic Endwall Trim: Cut the Trim material with a fine toothed saw (such as an x-acto™ razor saw or a hack saw). Line up the trim material with the pattern and mark the cuts with a pencil ... there is enough material to get all the parts, but a wrong cut can leave you with two short pieces when you need one long piece. Plan ahead (!), then make your cut. Always cut the longest pieces first, and nest parts that are mitered. The Attic Partition has all the angles that are needed for the trim. Hold the trim against the side of the Attic Parti-tion to help stabilize the saw when you start a cut, but do not damage the Attic Partition. Measurements given in this set of illustrations are taken from a model that we built, but may be different from what works on your house. Always test a part in place on the house before the final cut-to-length to make sure your work fits on your house.
c 1. Cut 1” Trim 121/16”, mitered as shown in Illustration #1 & #6. Without glue, test the Trim along with a False Eave. When the Trim length is right, the False Eave just reaches from roof to roof. Paint and install the Trim and False Eaves.c 2. Trim for the Attic Endwalls: Cut 1” Trim 57/32” mitered like the perimeter of Illustration #2. For the Gable (Illus. #3 & #4), install the window, and trim around it with 1/8” x 1/2” Trim (one piece of the 1/2” Trim supplied is thicker than all the rest ... just as thick as the lip on the window frame). Paint and install the Horizontal Trim.
Illustration #1
Trim
False Eave
Illustration #2
Illustration #3
Illustration #4
1” Trim:121/16”
53/8
57/32
57/32
41/2
11/16

Trim (7) page 18Instructions for Special Edition Kit #JM-1065 Victoria’s Farmhouse
c 3. Shingle the False Eave (Illustration #5) one full shingle course and one course of shingles cut 3/4” long. See the shingling instruction on page 17.
c 4. Cut, Paint, and install 3/4” Trim on the Eaves and 3/32” x 1/2” Trim (the same thickness as the 3/4” Trim) for the horizontals Illus. #6. The bottom edge of the Eave Trim touches the shingles on the False Eave (Illus. #7).c 5. Cut, paint, and install the 3/16” Trim as shown.c 6. Finish any touch-up painting that is needed.
Illustration #6
Illustration #7
3/4” Trim: 121/8”
57/16”1/2” Trim
3/16” Trim: 121/4”
3/16” Trim: 65/8”
3/16”
3/4”
1”

3/16”
3/4”
3/8”
Trim (7) page 19Instructions for Special Edition Kit #JM-1065 Victoria’s Farmhouse
c 7. Cut, paint, and install the Front Bay Facia (Illustration #8).c 8. Cut, paint, and install the Wall Trim as shown in Illustration #9.
Illustration #8
Use this Bevel Guide when Cutting the Ends of the Bay Facia
Illustration #9
3/8”
3/16”
3/8”3/8”
3/8”
1/2”1/2”
1/2”
1/2”
1/2”
3/16”
1/2”
3/8”
A Trim Cutting photo gallery is at www.victorias-farmhouse.com
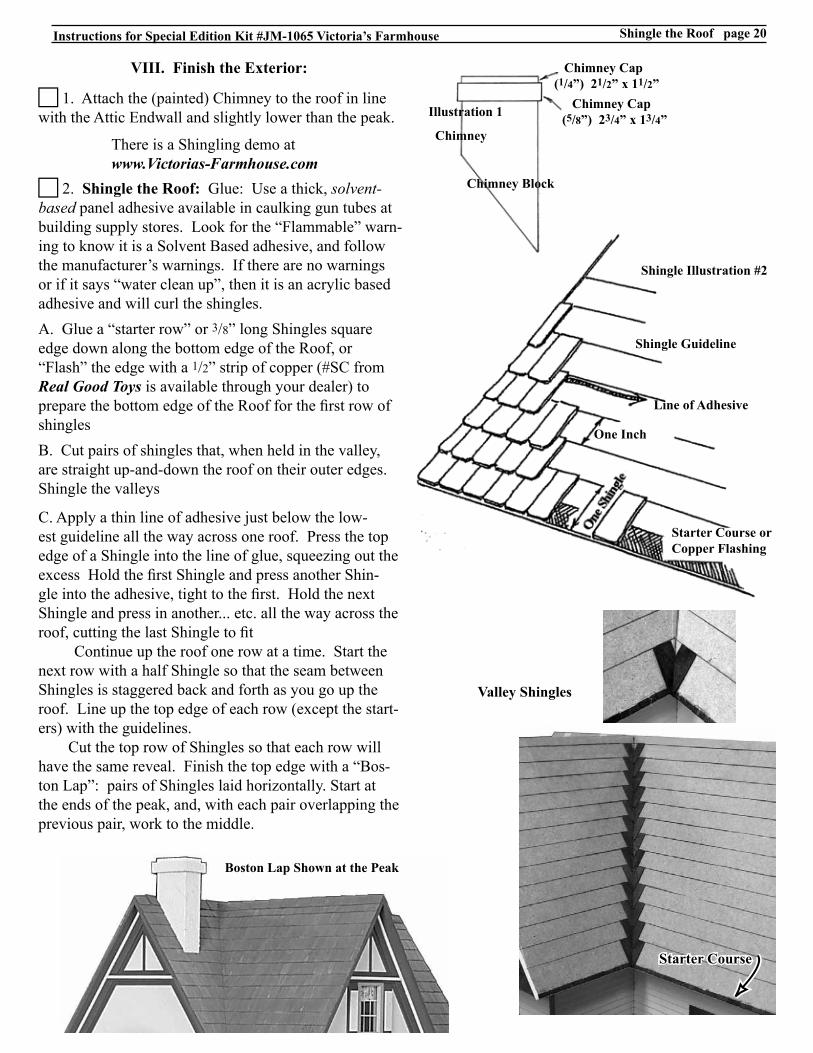
Shingle the Roof page 20Instructions for Special Edition Kit #JM-1065 Victoria’s Farmhouse
VIII. Finish the Exterior:
c 1. Attach the (painted) Chimney to the roof in line with the Attic Endwall and slightly lower than the peak.
Boston Lap Shown at the Peak
There is a Shingling demo at www.Victorias-Farmhouse.com
Valley Shingles
Shingle Illustration #2
One Inch
Line of Adhesive
Shingle Guideline
Starter Course or Copper Flashing
c 2. Shingle the Roof: Glue: Use a thick, solvent-based panel adhesive available in caulking gun tubes at building supply stores. Look for the “Flammable” warn-ing to know it is a Solvent Based adhesive, and follow the manufacturer’s warnings. If there are no warnings or if it says “water clean up”, then it is an acrylic based adhesive and will curl the shingles.A. Glue a “starter row” or 3/8” long Shingles square edge down along the bottom edge of the Roof, or “Flash” the edge with a 1/2” strip of copper (#SC from Real Good Toys is available through your dealer) to prepare the bottom edge of the Roof for the first row of shinglesB. Cut pairs of shingles that, when held in the valley, are straight up-and-down the roof on their outer edges. Shingle the valleys
C. Apply a thin line of adhesive just below the low-est guideline all the way across one roof. Press the top edge of a Shingle into the line of glue, squeezing out the excess Hold the first Shingle and press another Shin-gle into the adhesive, tight to the first. Hold the next Shingle and press in another... etc. all the way across the roof, cutting the last Shingle to fit Continue up the roof one row at a time. Start the next row with a half Shingle so that the seam between Shingles is staggered back and forth as you go up the roof. Line up the top edge of each row (except the start-ers) with the guidelines. Cut the top row of Shingles so that each row will have the same reveal. Finish the top edge with a “Bos-ton Lap”: pairs of Shingles laid horizontally. Start at the ends of the peak, and, with each pair overlapping the previous pair, work to the middle.
Starter Course
Chimney Cap(1/4”) 21/2” x 11/2”
Chimney Cap(5/8”) 23/4” x 13/4”Illustration 1
Chimney
Chimney Block
A Railing Assembly demo is available at www.victorias-farmhouse.com
Railings and Porch (9) page 21Instructions for Special Edition Kit #JM-1065 Victoria’s Farmhouse
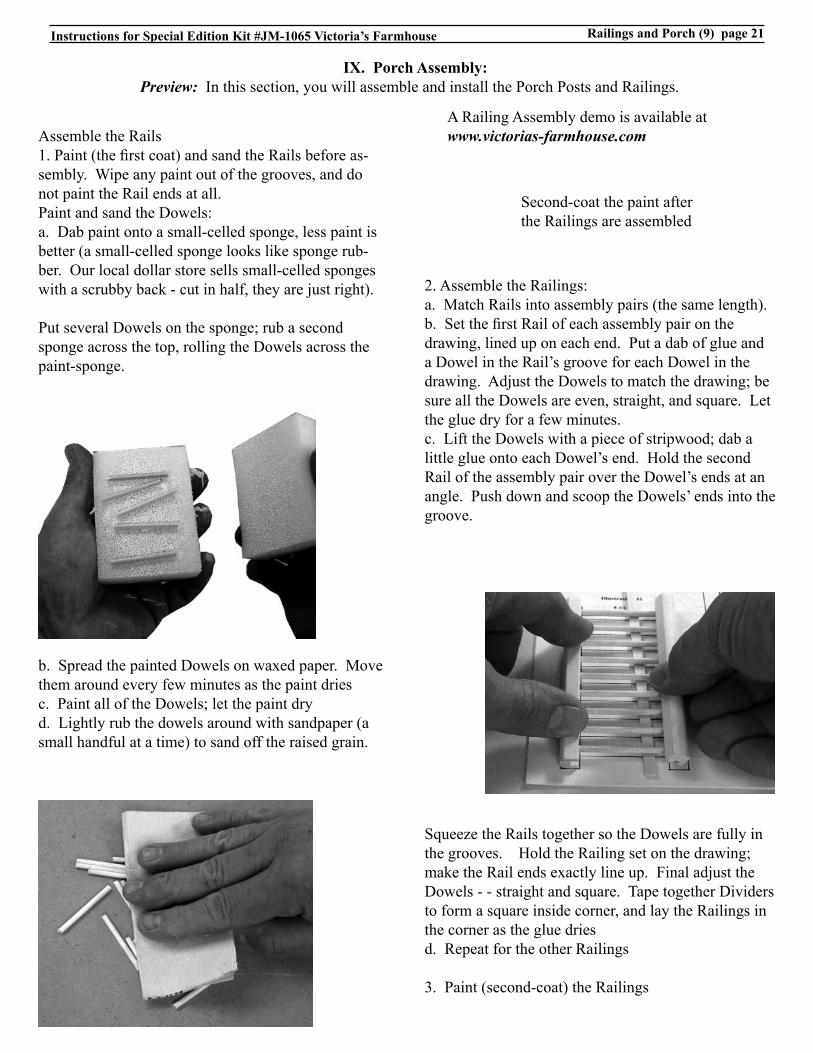
Assemble the Rails 1. Paint (the first coat) and sand the Rails before as-sembly. Wipe any paint out of the grooves, and do not paint the Rail ends at all. Paint and sand the Dowels:a. Dab paint onto a small-celled sponge, less paint is better (a small-celled sponge looks like sponge rub-ber. Our local dollar store sells small-celled sponges with a scrubby back - cut in half, they are just right).
Put several Dowels on the sponge; rub a second sponge across the top, rolling the Dowels across the paint-sponge.
b. Spread the painted Dowels on waxed paper. Move them around every few minutes as the paint driesc. Paint all of the Dowels; let the paint dryd. Lightly rub the dowels around with sandpaper (a small handful at a time) to sand off the raised grain.
Second-coat the paint after the Railings are assembled
2. Assemble the Railings:a. Match Rails into assembly pairs (the same length). b. Set the first Rail of each assembly pair on the drawing, lined up on each end. Put a dab of glue and a Dowel in the Rail’s groove for each Dowel in the drawing. Adjust the Dowels to match the drawing; be sure all the Dowels are even, straight, and square. Let the glue dry for a few minutes.c. Lift the Dowels with a piece of stripwood; dab a little glue onto each Dowel’s end. Hold the second Rail of the assembly pair over the Dowel’s ends at an angle. Push down and scoop the Dowels’ ends into the groove.
Squeeze the Rails together so the Dowels are fully in the grooves. Hold the Railing set on the drawing; make the Rail ends exactly line up. Final adjust the Dowels - - straight and square. Tape together Dividers to form a square inside corner, and lay the Railings in the corner as the glue driesd. Repeat for the other Railings
3. Paint (second-coat) the Railings
IX. Porch Assembly:Preview: In this section, you will assemble and install the Porch Posts and Railings.

Railings and Porch (9) page 22Instructions for Special Edition Kit #JM-1065 Victoria’s Farmhouse
Illustration #3
Illustration #2
Illustration #1
2 sets 43/4
1 set 63/16
4 sets 95/32
Note: Variations in printers and “Print Scaling” in your printer dialogue box can effect the size of these graphics. If your rails don’t match up exactly, center them on the diagram.

Railings and Porch (9) page 23Instructions for Special Edition Kit #JM-1065 Victoria’s Farmhouse
5. Cut Porch Facia sets the same length as the railing sets. Each Facia set uses the following:
• (1) 1” wide• (1) 3/4” wide• (1) 3/16” wide
Cut the pieces square on the ends and even in length for each set Illustration #6. We suggest pre-painting the sets in contrasting colors.
4. Assemble the Flutepost and Beads (Illustration #5).
Wait to install the Railings until the Windows and Doors are in place, and the Shingling is done.
Illustration #6
3/16” Wide
3/4” Wide
3/16” x 3/32”: 43/4”
Center Half Mark
Illustration #4
Shown is Half of a 115/8” Rail
Illustration #5
Bead
Balcony Post
Post & Bead
3/4” x 3/32”: 43/4”
1”x 1/8”: 43/4”1/2” x 3/32”
1/2” x 3/32”
1” Wide
Detail view from the rear of the
house
Note: Variations in printers and “Print Scaling” in your printer dialogue box can effect the size of these graphics. If your rails don’t match up exactly, center them on the diagram.
FoundationBase Floor
Lower Right Side
Middle Floor
Upper Right Side
9” Porch Post
43/4” Rail Set
Railings and Porch (9) page 24Instructions for Special Edition Kit #JM-1065 Victoria’s Farmhouse
Illustration #9
Base Floor
Housebody Foundation
Front Step 5” x 1”
Front Step 5” x 2”
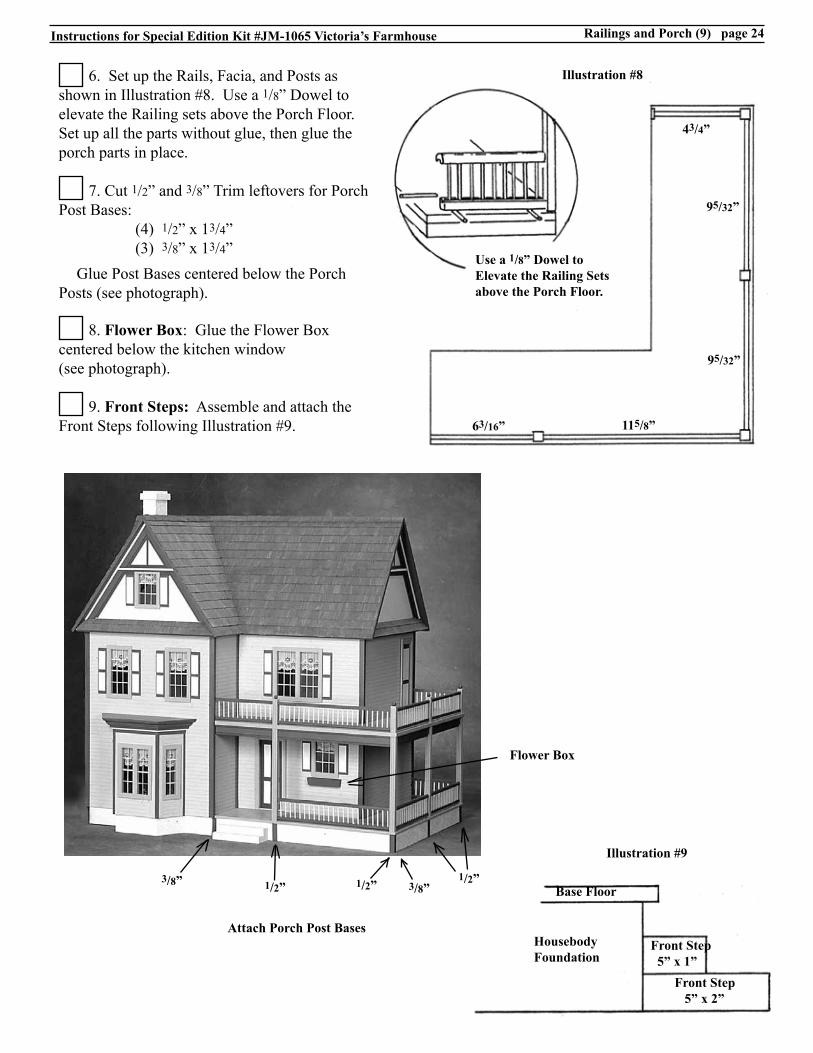
6. Set up the Rails, Facia, and Posts as shown in Illustration #8. Use a 1/8” Dowel to elevate the Railing sets above the Porch Floor. Set up all the parts without glue, then glue the porch parts in place.
7. Cut 1/2” and 3/8” Trim leftovers for Porch Post Bases:
(4) 1/2” x 13/4” (3) 3/8” x 13/4”
Glue Post Bases centered below the Porch Posts (see photograph).
8. Flower Box: Glue the Flower Box centered below the kitchen window(see photograph).
9. Front Steps: Assemble and attach the Front Steps following Illustration #9.
Use a 1/8” Dowel to Elevate the Railing Sets above the Porch Floor.
3/8” 1/2” 3/8” 1/2” 1/2”
Attach Porch Post Bases
Illustration #8
63/16” 115/8”
95/32”
95/32”
43/4”
Flower Box
Divider9” x 141/8” Divider
9” x 21/2”
1st Floor Layout
Divider9” x 141/8”
Divider9” x 21/2”
2nd Floor Layout
“Blind”
“Blind”
You have finished the Dollhouse Assembly part of your project...
ENJOY THE REST
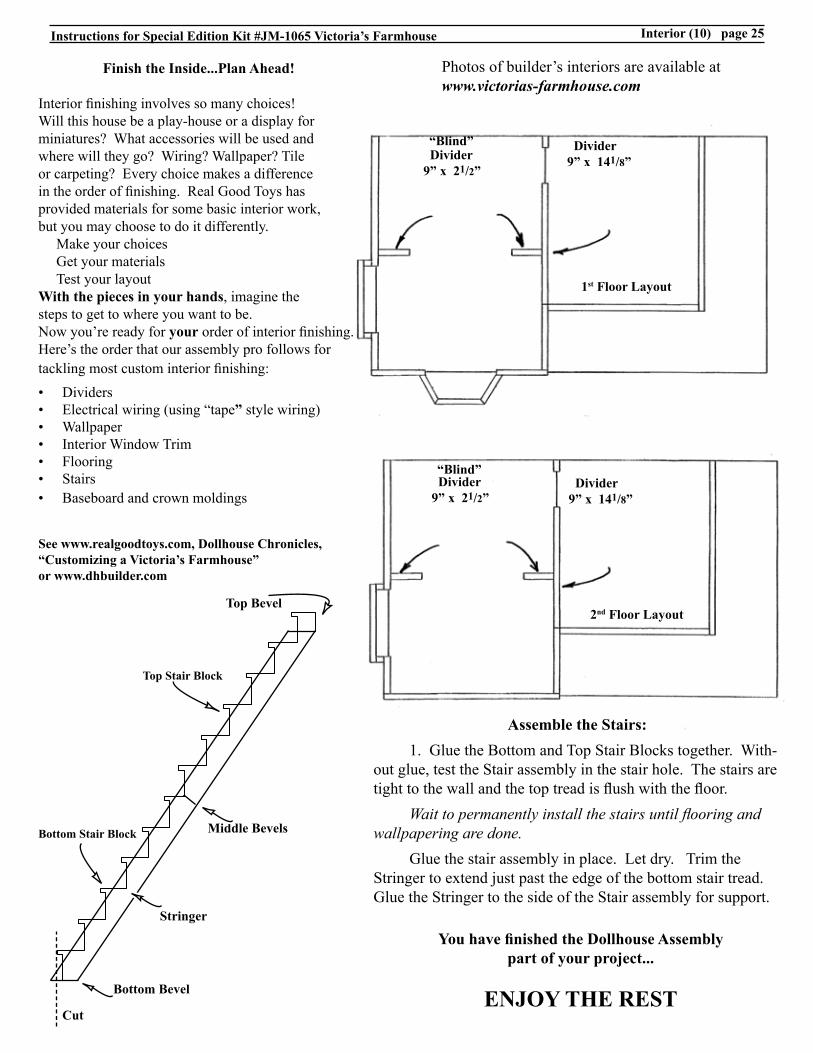
Assemble the Stairs: 1. Glue the Bottom and Top Stair Blocks together. With-out glue, test the Stair assembly in the stair hole. The stairs are tight to the wall and the top tread is flush with the floor. Waittopermanentlyinstallthestairsuntilflooringandwallpapering are done. Glue the stair assembly in place. Let dry. Trim the Stringer to extend just past the edge of the bottom stair tread. Glue the Stringer to the side of the Stair assembly for support.
Interior (10) page 25Instructions for Special Edition Kit #JM-1065 Victoria’s Farmhouse
Top Stair Block
Bottom Stair Block
Top Bevel
Stringer
Cut
Bottom Bevel
Middle Bevels
Finish the Inside...Plan Ahead!
Interior finishing involves so many choices! Will this house be a play-house or a display for miniatures? What accessories will be used and where will they go? Wiring? Wallpaper? Tile or carpeting? Every choice makes a difference in the order of finishing. Real Good Toys has provided materials for some basic interior work, but you may choose to do it differently.
Make your choicesGet your materialsTest your layout
With the pieces in your hands, imagine the steps to get to where you want to be. Now you’re ready for your order of interior finishing.Here’s the order that our assembly pro follows for tackling most custom interior finishing:• Dividers• Electrical wiring (using “tape” style wiring)• Wallpaper• Interior Window Trim• Flooring• Stairs• Baseboard and crown moldings
See www.realgoodtoys.com, Dollhouse Chronicles, “Customizing a Victoria’s Farmhouse” or www.dhbuilder.com
Photos of builder’s interiors are available at www.victorias-farmhouse.com

Here are some Builder’s Photos... just for fun!