Embed Size (px)
Citation preview

INSTALLATION INSTRUCTIONS
READ BEFOREINSTALLATION
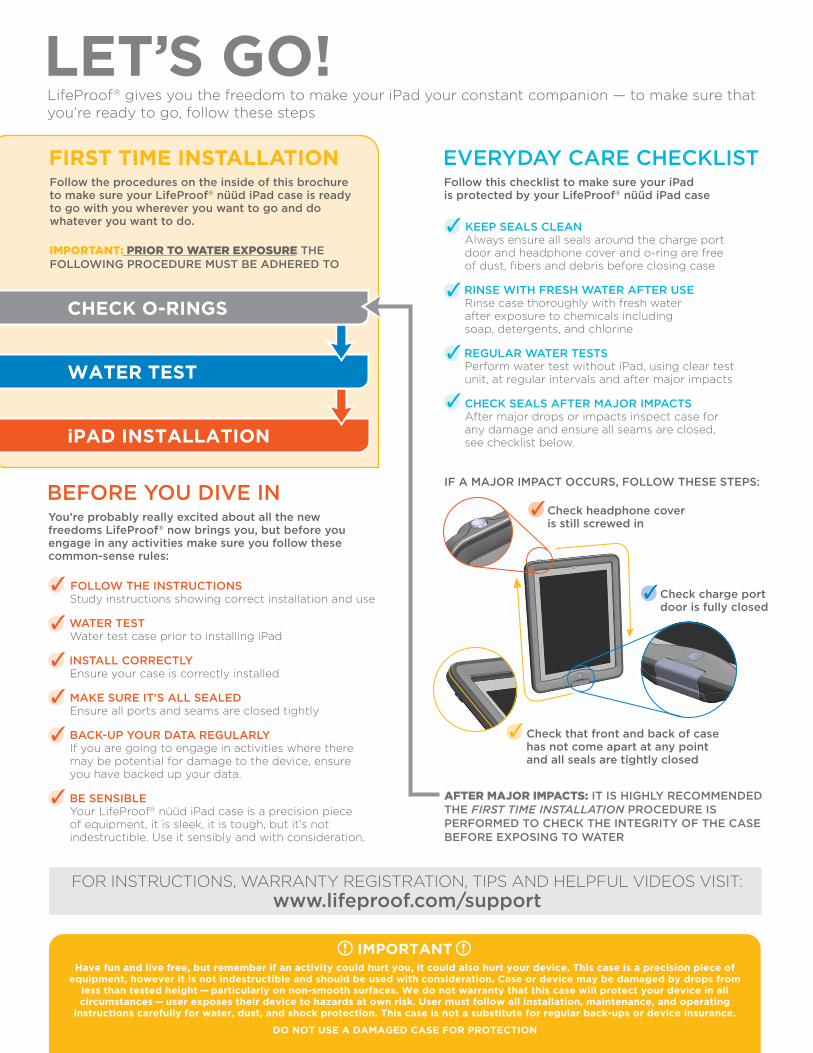
IF A MAJOR IMPACT OCCURS, FOLLOW THESE STEPS:
AFTER MAJOR IMPACTS: IT IS HIGHLY RECOMMENDEDTHE FIRST TIME INSTALLATION PROCEDURE IS PERFORMED TO CHECK THE INTEGRITY OF THE CASEBEFORE EXPOSING TO WATER
Check headphone cover is still screwed in
Check that front and back of casehas not come apart at any pointand all seals are tightly closed
Check charge portdoor is fully closed
KEEP SEALS CLEAN Always ensure all seals around the charge port door and headphone cover and o-ring are free of dust, fibers and debris before closing case
RINSE WITH FRESH WATER AFTER USERinse case thoroughly with fresh water after exposure to chemicals including soap, detergents, and chlorine
REGULAR WATER TESTSPerform water test without iPad, using clear test unit, at regular intervals and after major impacts
CHECK SEALS AFTER MAJOR IMPACTSAfter major drops or impacts inspect case for any damage and ensure all seams are closed, see checklist below.
FIRST TIME INSTALLATIONFollow the procedures on the inside of this brochureto make sure your LifeProof® nüüd iPad case is readyto go with you wherever you want to go and dowhatever you want to do.
BEFORE YOU DIVE INYou’re probably really excited about all the newfreedoms LifeProof® now brings you, but before youengage in any activities make sure you follow thesecommon-sense rules:
EVERYDAY CARE CHECKLISTFollow this checklist to make sure your iPadis protected by your LifeProof® nüüd iPad case
FOR INSTRUCTIONS, WARRANTY REGISTRATION, TIPS AND HELPFUL VIDEOS VISIT:www.lifeproof.com/support
iPAD INSTALLATION
WATER TEST
CHECK O-RINGS
LifeProof® gives you the freedom to make your iPad your constant companion — to make sure that you’re ready to go, follow these steps
LET’S GO!
IMPORTANTHave fun and live free, but remember if an activity could hurt you, it could also hurt your device. This case is a precision piece of
equipment, however it is not indestructible and should be used with consideration. Case or device may be damaged by drops from less than tested height — particularly on non-smooth surfaces. We do not warranty that this case will protect your device in all circumstances — user exposes their device to hazards at own risk. User must follow all installation, maintenance, and operating
instructions carefully for water, dust, and shock protection. This case is not a substitute for regular back-ups or device insurance.
DO NOT USE A DAMAGED CASE FOR PROTECTION
FOLLOW THE INSTRUCTIONSStudy instructions showing correct installation and use
WATER TESTWater test case prior to installing iPad
INSTALL CORRECTLYEnsure your case is correctly installed
MAKE SURE IT’S ALL SEALEDEnsure all ports and seams are closed tightly
BACK-UP YOUR DATA REGULARLYIf you are going to engage in activities where there may be potential for damage to the device, ensure you have backed up your data.
BE SENSIBLEYour LifeProof® nüüd iPad case is a precision piece of equipment, it is sleek, it is tough, but it’s not indestructible. Use it sensibly and with consideration.
IMPORTANT: PRIOR TO WATER EXPOSURE THEFOLLOWING PROCEDURE MUST BE ADHERED TO

CHECK O-RINGS
FREEDOM STARTS HEREFollow these steps to make sure you are ready to experience new freedoms with your iPad
FRONT SECTION
Make sure o-ring (shown in yellow) is firmly seated in the groove and the black marks on the o-ring are positioned as indicated
Check that the o-rings are installed correctly (see diagrams below).
Make sure they are free of dust, dirt, hair and other debris.
If the o-rings are not clean, remove them and rinse in warm water, then give them a quick shake to remove excess
water before immediately reinstalling
BACK SECTION
Make sure o-ring (shown in yellow) is firmly seated in the groove and the three ‘T’ shapes on the o-ring are positioned as indicated
1
2
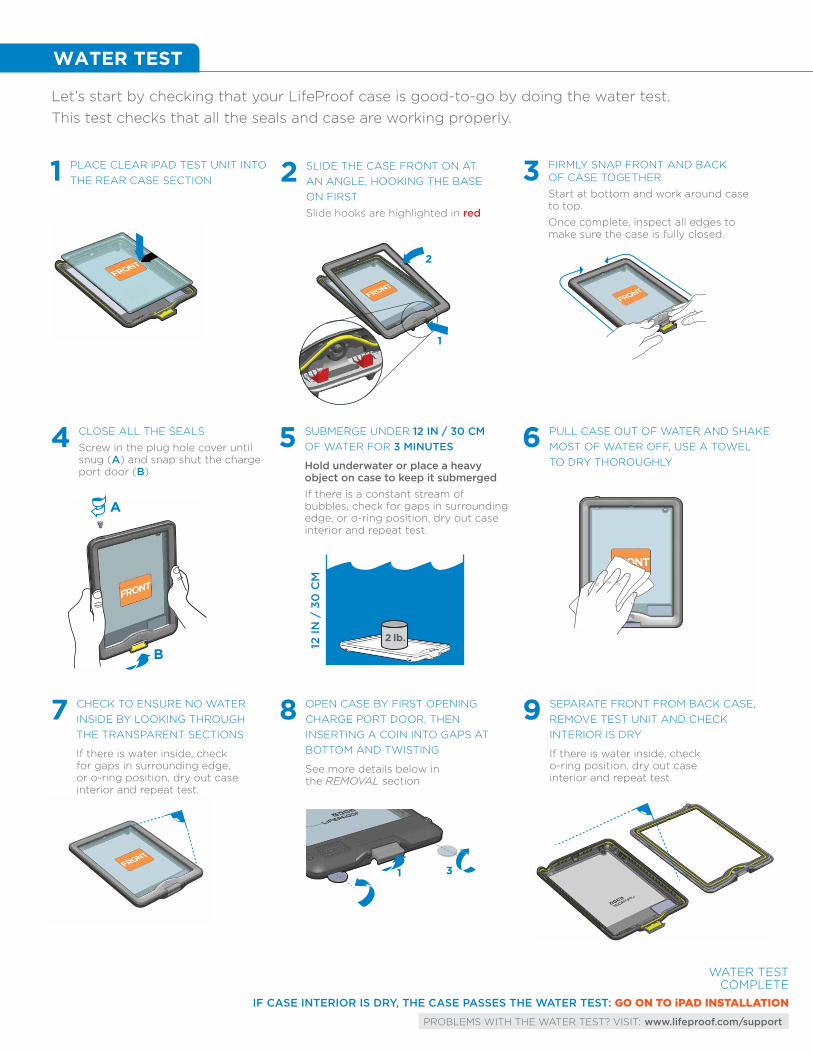
PLACE CLEAR iPAD TEST UNIT INTO
THE REAR CASE SECTION1 SLIDE THE CASE FRONT ON AT
AN ANGLE, HOOKING THE BASE
ON FIRST
Slide hooks are highlighted in red
2
WATER TEST
FIRMLY SNAP FRONT AND BACK OF CASE TOGETHER
Start at bottom and work around case to top.
Once complete, inspect all edges to make sure the case is fully closed.
3
A
B
CLOSE ALL THE SEALS
Screw in the plug hole cover until snug (A) and snap shut the charge port door (B)
4 SUBMERGE UNDER 12 IN / 30 CM
OF WATER FOR 3 MINUTES
Hold underwater or place a heavy object on case to keep it submerged
If there is a constant stream of bubbles, check for gaps in surrounding edge, or o-ring position, dry out case interior and repeat test.
5 PULL CASE OUT OF WATER AND SHAKE
MOST OF WATER OFF, USE A TOWEL
TO DRY THOROUGHLY
6
12 I
N /
30
CM 30 MIN
2 lb.
CHECK TO ENSURE NO WATER
INSIDE BY LOOKING THROUGH
THE TRANSPARENT SECTIONS
If there is water inside, check for gaps in surrounding edge, or o-ring position, dry out caseinterior and repeat test.
7 OPEN CASE BY FIRST OPENING
CHARGE PORT DOOR, THEN
INSERTING A COIN INTO GAPS AT
BOTTOM AND TWISTING
See more details below inthe REMOVAL section
8 SEPARATE FRONT FROM BACK CASE,
REMOVE TEST UNIT AND CHECK
INTERIOR IS DRY
If there is water inside, check o-ring position, dry out caseinterior and repeat test.
9
1 3
Let’s start by checking that your LifeProof case is good-to-go by doing the water test.
This test checks that all the seals and case are working properly.
PROBLEMS WITH THE WATER TEST? VISIT: www.lifeproof.com/support
IF CASE INTERIOR IS DRY, THE CASE PASSES THE WATER TEST: GO ON TO iPAD INSTALLATION
WATER TESTCOMPLETE
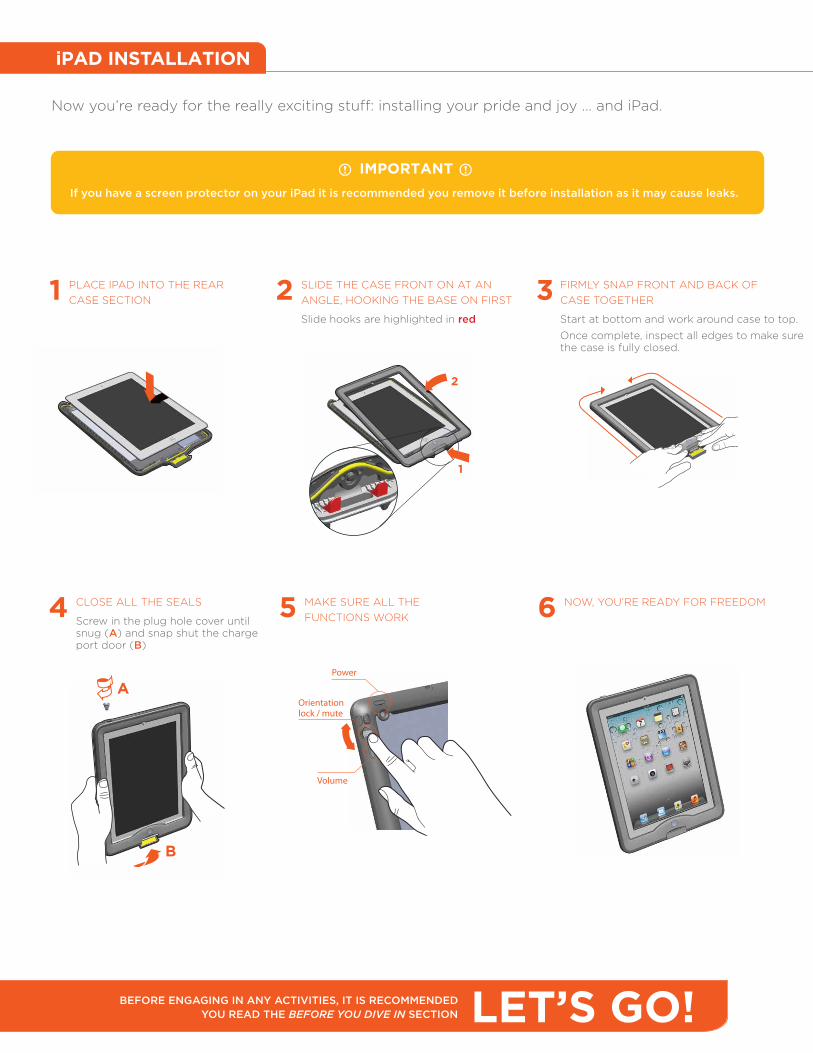
iPAD INSTALLATION
Now you’re ready for the really exciting stuff: installing your pride and joy ... and iPad.
1
2
PLACE IPAD INTO THE REAR
CASE SECTION1 SLIDE THE CASE FRONT ON AT AN
ANGLE, HOOKING THE BASE ON FIRST
Slide hooks are highlighted in red
2
Power
Volume
Orientationlock / mute
FIRMLY SNAP FRONT AND BACK OF
CASE TOGETHER
Start at bottom and work around case to top.
Once complete, inspect all edges to make surethe case is fully closed.
3
A
B
CLOSE ALL THE SEALS
Screw in the plug hole cover until snug (A) and snap shut the charge port door (B)
4 MAKE SURE ALL THE
FUNCTIONS WORK5 NOW, YOU’RE READY FOR FREEDOM6
IMPORTANT
If you have a screen protector on your iPad it is recommended you remove it before installation as it may cause leaks.
LET’S GO!BEFORE ENGAGING IN ANY ACTIVITIES, IT IS RECOMMENDEDYOU READ THE BEFORE YOU DIVE IN SECTION
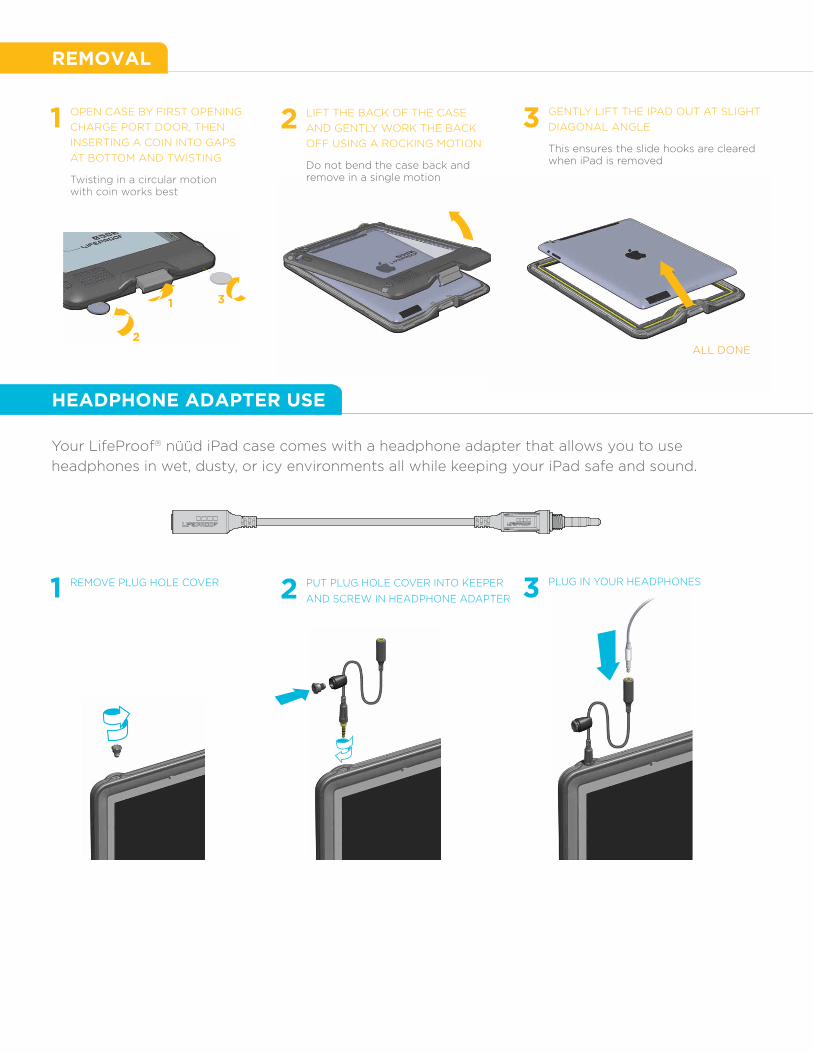
ALL DONE
1
2
3
OPEN CASE BY FIRST OPENING
CHARGE PORT DOOR, THEN
INSERTING A COIN INTO GAPS
AT BOTTOM AND TWISTING
Twisting in a circular motionwith coin works best
1 LIFT THE BACK OF THE CASE
AND GENTLY WORK THE BACK
OFF USING A ROCKING MOTION
Do not bend the case back andremove in a single motion
2
REMOVAL
GENTLY LIFT THE IPAD OUT AT SLIGHT
DIAGONAL ANGLE
This ensures the slide hooks are cleared when iPad is removed
3
REMOVE PLUG HOLE COVER1 PUT PLUG HOLE COVER INTO KEEPER
AND SCREW IN HEADPHONE ADAPTER2 PLUG IN YOUR HEADPHONES3
HEADPHONE ADAPTER USE
Your LifeProof® nüüd iPad case comes with a headphone adapter that allows you to use
headphones in wet, dusty, or icy environments all while keeping your iPad safe and sound.

CONNECT WITH LIFEPROOF®
lifeproof.com/support
Join LifeProof® 360+5 to get the most from your LifeProof® case:
www.lifeproof.com
Follow us and share your LifeProof®
stories using #LifeProof here:
HOW WILL YOU USE YOUR LIFEPROOF?
ON THE JOB
constructionsites
on theroad
all weatherconditions
IN ACTION
on thewater
adventure andthe outdoors
whennavigating
AT HOME
cookingand mess
in and aroundthe pool
with thekids
AT SCHOOL
fun andsports
go-anywheretextbook
science anddiscovery
WATER PROOF
Fully submerge underwaterdown to 6.6 ft
DIRT PROOF
Totally sealed from minute dust particles
SNOW PROOF
Complete protectionkeeps ice and snow out
SHOCK PROOF
Designed to military drop survivability specifications


![organ systems [Read-Only] - Fayetteville State Universityfaculty.uncfsu.edu/ssalek/Biol130/organ systems [Read-Only].pdf · to perform vital body functions • 12 major organ systems](https://img.dokumen.tips/doc/110x75/5aa760aa7f8b9a50528c5066/organ-systems-read-only-fayetteville-state-systems-read-onlypdfto-perform.jpg)


![The Sociology Major - powerpoint.pptx [Read-Only]](https://img.dokumen.tips/doc/110x75/6178cb0570eef525382b6b26/the-sociology-major-read-only.jpg)