Embed Size (px)
Citation preview
Raisecom Technology Co., Ltd
RC3000 PCM Multi-Service
Multiplexer
User Manual
Raisecom Technology Co., Ltd (9/2005)

Raisecom Technology Co., Ltd
1
1. Cautions
Please read the following notices carefully before
installing and using this device, Raisecom does not
respond to any loss caused by violating safety
notices.
RC3000 is integrated device that has precise elements,
please avoid violent shakes and impacts, and do not
disassemble or maintain the device yourself. If it is
required, please do it under the guide of our technical
staff following in the steps of anti static. Please
contact us if there is any need.
There must be grounding protection for the sake of
safety; do not disassemble the device yourself, we
regard it as you waiver your rights of repair guarantee.

Raisecom Technology Co., Ltd
2
Contents 1. Cautions ............................................................................................................. 1 2. Overview............................................................................................................. 7
2.1. Introduction .............................................................................................. 7 2.2. Main features: .......................................................................................... 7
3. Application examples:......................................................................................... 9 3.1. Traditional PCM application ..................................................................... 9 3.2. Automatic ADM application ...................................................................... 9 3.3. Multi devices ADM application................................................................ 10 3.4. Point-to-multipoint star topology application............................................11 3.5. Hybrid access of star topology and chain topology .................................11
4. Device type and user-board explanation .......................................................... 12 4.1. Device type explanation: ........................................................................ 12 4.2. User-board type explanation: ................................................................. 13
5. Parameters ....................................................................................................... 15 5.1. Line-board parameters: .......................................................................... 15
5.1.1. E1 interface parameters: ............................................................... 15 5.1.2. Optical fiber parameters: ............................................................... 15 5.1.3. Ethernet interface parameters:...................................................... 16
5.2. User-board parameters: ......................................................................... 16 5.2.1. Interface standard of FXS user-board (RC3000-SUB-DS): ........... 16 5.2.2. Interface standard of FXO voice relay user-board
(RC3000-SUB-DO): .......................................................................................... 17 5.2.3. Interface standard of E&M 2 audio relay user-board
(RC3000-SUB-DM2): ........................................................................................ 17 5.2.4. Interface standard of E&M 4 audio relay user-board
(RC3000-SUB-DM4): ........................................................................................ 18 5.2.5. Standard of V35 data user-board (RC3000-SUB-DV35): .............. 18 5.2.6. Interface standard of V24 data user-board (RC3000-SUB-DV24): 18 5.2.7. Interface standard of Ethernet data user-board
(RC3000-SUB-DETH):...................................................................................... 19 5.2.8. Interface standard of RS232 serial data user-board
(RC3000-SUB-D232): ....................................................................................... 19 5.2.9. Interface standard of RS422 serial data user-board
(RC3000-SUB-D422): ....................................................................................... 19 5.2.10. Interface standard of magneto telephone user-board
(RC3000-SUB-DMT):........................................................................................ 19 5.2.11. Interface standard of FXS user-board with polarity reversal function
(RC3000-SUB-DSR): ..................................................................................... 20 5.3. Power supply.......................................................................................... 20 5.4. Environment requirement....................................................................... 21
6. Structure and indicator lights............................................................................. 22 6.1. Fundamental structure: .......................................................................... 22

Raisecom Technology Co., Ltd
3
6.2. Front panel explanation:......................................................................... 24 6.2.1. Globle indicator lights: ................................................................... 24 6.2.2. Indicator lights of line-board: ......................................................... 24 6.2.3. Optical interface alarm indicator lights:.......................................... 24 6.2.4. E1 line alarm indicator lights: ........................................................ 25 6.2.5. Definition of mute, DIP-switches and interfaces: ........................... 25
6.3. Rear panel explanation .......................................................................... 26 6.3.1. User-board slots: ........................................................................... 26 6.3.2. Line-board interface: ..................................................................... 27 6.3.3. Power supply interface: ................................................................. 27
7. Function & Application ...................................................................................... 28 7.1. Function and application explanation of RC3000: .................................. 28
7.1.1. Factory default configuration ......................................................... 28 7.1.2. Start self-check.............................................................................. 28 7.1.3. System automatic configuration in factory default status .............. 28 7.1.4. Clock switch explanation............................................................... 29 7.1.5. Auto cross connect explanation .................................................... 29 7.1.6. Explanation of system configuration and cross connect configuration
30 7.1.7. Alarm explanation: ........................................................................ 30 7.1.8. Network management channel explanation .................................. 31 7.1.9. Interface definitions ....................................................................... 32
7.2. RC3000-SUB-DS user voice card explanation....................................... 34 7.3. RC3000-SUB-DO voice relay card explanation...................................... 35 7.4. RC3000-SUB-DSO user-board explanation........................................... 36 7.5. RC3000-SUB-DM2 audio relay card explanation ................................... 36 7.6. RC3000-SUB-DM4 audio relay card explanation ................................... 37 7.7. RC3000-SUB-DV35 user-board explanation.......................................... 38
7.7.1. Rules for channel allocation .......................................................... 38 7.7.2. V35 interface definition.................................................................. 39 7.7.3. V35 data card configuration explanation: ...................................... 40
7.8. RC3000-SUB-DETH user-board explanation......................................... 41 7.8.1. Rules of channel distribution: ........................................................ 41 7.8.2. Ethernet interface definition........................................................... 41 7.8.3. Ethernet data card configuration explanation ................................ 41
7.9. RC3000-SUB-D232 user-board explanation: ......................................... 41 7.10. RC3000-SUB-D422 user-board explanation ...................................... 42 7.11. RC3000-SUB-DMT user-board explantion ......................................... 43 7.12. RC3000-SUB-DSR user-board explanation ....................................... 44 7.13. RC3000-SUB-OPT-FE explanation .................................................... 45 7.14. RC3000-SUB-OPT-2E1 explanation................................................... 45
8. Installation & verifying....................................................................................... 47 8.1. Check when you first open the box ........................................................ 47 8.2. Preparation before installation................................................................ 47

Raisecom Technology Co., Ltd
4
8.3. Installation.............................................................................................. 47 8.3.1. Device fixing:................................................................................. 47 8.3.2. Cabble connection ........................................................................ 47 8.3.3. Powered on: .................................................................................. 48
9. Q & A ................................................................................................................ 49 9.1. SYS is ON.............................................................................................. 49 9.2. Alarms of E1 interface............................................................................ 49 9.3. Cross connection cannot communicate normally ................................... 49 9.4. There is no alarm but voice channel is discontinuous or communication is
abnormal 50 9.5. There is LOF or RAL alarms sometimes of E1 inteface ......................... 50 9.6. Not all devices in a network can be network managed .......................... 50 9.7. Device cannot be configured through CONSOLE .................................. 51 9.8. Memory information loss ........................................................................ 51 9.9. Display of device is abnormal ................................................................ 51 9.10. Forget the password........................................................................... 51
10. Appendix A: How to use Hyper Terminal to configure RC3000......................... 52 10.1. Enter................................................................................................... 52 10.2. Input the password ............................................................................. 53 10.3. Main menu:......................................................................................... 54 10.4. Device set query:................................................................................ 54
10.4.1. Device ID and Baud rate ............................................................. 54 10.4.2. Line-Board information (RAM):.................................................... 55 10.4.3. Line-Board information (EEPROM): ............................................ 55 10.4.4. E1 using and mode information:.................................................. 56 10.4.5. Clock, CRC and Net information: ................................................ 56 10.4.6. E1 Alarm Mask information: ........................................................ 57 10.4.7. User-Board information (RAM).................................................... 57 10.4.8. User-Board information (EEPROM) ............................................ 59
10.5. Cross Set Query menu: ...................................................................... 59 10.5.1. Four E1 Cross Query (RAM) ....................................................... 59 10.5.2. Four User Cross Query (RAM).................................................... 60 10.5.3. Four E1 Cross Query (EEPROM) ............................................... 60 10.5.4. Four User Cross Query (EEPROM) ............................................ 61
10.6. State Info Query.................................................................................. 61 10.6.1. Receive State Query ................................................................... 62 10.6.2. Transmit State Query .................................................................. 62
10.7. Alarm Query menu ............................................................................. 62 10.7.1. Device Alarm............................................................................... 62 10.7.2. System Alarm.............................................................................. 63
10.8. Set menu ............................................................................................ 63 10.9. System Set menu ............................................................................... 63
10.9.1. ID set........................................................................................... 64 10.9.2. Baud Rate Set............................................................................. 64

Raisecom Technology Co., Ltd
5
10.9.3. Line-Board set............................................................................. 64 10.9.4. E1 set .......................................................................................... 65 10.9.5. E1 Clock Set ............................................................................... 65 10.9.6. Net Topology Set ......................................................................... 65 10.9.7. Alarm Sound Set ......................................................................... 68 10.9.8. User Board Set............................................................................ 68 10.9.9. DCD and RTS of V35V24 Board with Alarm Set ......................... 69
10.10. Line Board Set menu.......................................................................... 69 10.10.1. Alarm Mask Set......................................................................... 70 10.10.2. Loopback Set ............................................................................ 70 10.10.3. ALS Set ..................................................................................... 70 10.10.4. Ether Net Port Set ..................................................................... 70 10.10.5. Ether Net Port Work Set............................................................ 71 10.10.6. Transmit Band Width Set........................................................... 71 10.10.7. Receive Band Width Set ........................................................... 71 10.10.8. Reset Ether Net......................................................................... 71
10.11. E1 Set................................................................................................. 72 10.11.1. Use Set...................................................................................... 72 10.11.2. Mode Set ................................................................................... 72 10.11.3. Mask Set ................................................................................... 72 10.11.4. CRC Set .................................................................................... 73
10.12. User Board Set (with signal) menu ..................................................... 73 10.12.1. Input Signal ............................................................................... 73 10.12.2. Output Signal ............................................................................ 73 10.12.3. Signal Bit ................................................................................... 74
10.13. V35 User Board Set menu.................................................................. 74 10.13.1. Sub-Board Slot Number ............................................................ 74 10.13.2. Receive Data Phase.................................................................. 75 10.13.3. Transmit Data Phase................................................................. 75 10.13.4. Channel Select.......................................................................... 75 10.13.5. Loopback Set ............................................................................ 76 10.13.6. Error Code Test ......................................................................... 76 10.13.7. Auto to Adjust Phase for Transmit ............................................. 76 10.13.8. To Adjust Receive Phase........................................................... 76
10.14. Ethernet user-board set menu............................................................ 77 10.14.1. Sub-Board Slot Number ............................................................ 77 10.14.2. Channel Select.......................................................................... 77 10.14.3. Buffer Size Set .......................................................................... 77 10.14.4. Default Port Mode ..................................................................... 78 10.14.5. Reset Ether Net Port ................................................................. 78
10.15. RS232 and RS422 user-board set menu............................................ 78 10.15.1. Channel Band Width Set ........................................................... 78
10.16. Cross Set menu.................................................................................. 78 10.16.1. Cross Set .................................................................................. 79

Raisecom Technology Co., Ltd
6
10.16.2. Create Group Cross .................................................................. 79 10.16.3. Delete Group Cross .................................................................. 80
10.17. Operate menu..................................................................................... 81 10.17.1. System Reset............................................................................ 81 10.17.2. Mute .......................................................................................... 81 10.17.3. Clear All Set .............................................................................. 81 10.17.4. Clear Cross Set......................................................................... 82 10.17.5. Save Set Info............................................................................. 82 10.17.6. Make Default Set....................................................................... 82 10.17.7. Clear Reset and Board-Change Flag ..................................... 82 10.17.8. Test Watchdog........................................................................... 82 10.17.9. Test EEPROM ........................................................................... 82
10.18. Version ............................................................................................... 83 10.18.1. Display Version information....................................................... 83
10.19. Console Set menu .............................................................................. 83 10.19.1. Language Select ....................................................................... 83 10.19.2. Password Set ............................................................................ 83
10.20. Quit..................................................................................................... 84 10.21. Hot key explanation ............................................................................ 84

Raisecom Technology Co., Ltd
7
2. Overview
2.1. Introduction
RC3000 is a PCM multi-service multiplexer that uses both traditional and modern
technologies, and can provide a high reliable access at a low cost along with multi
functions, easy application and maintenance.
2.2. Main features:
Multiple up-link access methods(single E1, multi E1, optical interface and etc).
Available to various user-boards, and supports many kinds of voice and data access,
including: Ethernet data, V35 data, V24 data and series data.
E1 interface supports both G703 and G704 standards, and is available for PCM30
or PCM31 frame format.
Supports multi E1 interfaces and non-blocking timeslots cross-connect of 4 E1
based on 64K, it is very convenience for point-to-multipoint access application and
can save both devices and money for our costumers.
Use large integrated circuit module and programmable logic circuit, and there are
multi kinds of check methods in control program to make sure of stable work.
Supports hot swap, the user configuration will not be changed and is easy to
maintain.
Auto recognization and configuration of user-board, for simple application the device
can start to work without any configuration.
Master/slave clock mode supports clock holding, locking and free running to easy
your work and reduce wrong operations.
Easy configuration of E1 mode and line signal enables flexible access with other E1
interfaces of different factories.
Supports hyper terminal configuration, and is very convenience for maintenance
and fault detection.
Supports field upgrade in local and remote network management upgrade
Save data in EEPROM and check the data by many methods to avoid data loss or
destroyment.

Raisecom Technology Co., Ltd
8
Strong network management function: both assistant network management channel
and network management cascade are available to manage whole network of
RC3000 devices.

Raisecom Technology Co., Ltd
9
3. Application examples:
3.1. Traditional PCM application
The default factory status of RC3000 is without any configuration. All user-boards
support automatic recognition and voice channel allocation. In figure 1, the same
extension slots in the two devices use the same timeslots. In simple application, with
proper user-board the devices can start to work without any configuration. In this case
RC3000 does not use its function of cross connect and add/drop voice channel, this is
same as traditional single E1 PCM30 device that for point-to-point connection.
RC3000-2E1, RC3000-2E1 (ADM), RC3000-4E1, RC3000-OPT all can be used in this
way.
3.2. Automatic ADM application
RC3000-2E1 (ADM) has the ADM function, and figure 2 is a typical application:
Figure 1

Raisecom Technology Co., Ltd
10
RC3000-2E1 (ADM) will connect the same channels (unused) of 1E1 and 2E1
automatically. That is to say, when there is no user-board all the channels in 1E1 will be
cross connected with those of 2E1; in this case the device has ADM function. The
relationship of the two devices is in figure 3:
The user-boards in local and those in remote are corresponding to each other, and the
local device can allot service to the three remote ones. Meanwhile work status of middle
device will not affect the last device.
3.3. Multi devices ADM application
When you need complicated ADM or multi services you can configure the device
yourself, and the number of connected RC3000 is alterable.
Local
Remot Device 1
Device 2
Device 3
SLOT1 SLOT2 SLOT3
Sub-card 1 Sub-card 2 Sub-card 3
Sub-card 1
Sub-card 2
Sub-card 3
Figure 3
Figure 4
Local
Remote
Transmission network
Transmission network
N *RC3000
Raisecom Technology Co., Ltd
11
In this application, voice channels in local device can be alloted to remote RC3000s, and
voice channels of remote RC3000s can be cross connected too. So multi services
access can be realized.
3.4. Point-to-multipoint star topology application
Point-to-multipoint acess through RC3000-4E1 in figure 5:
This application can reduce the number of devices for multi user service configuration.
3.5. Hybrid access of star topology and chain topology
Hybrid access of star topology and chain topology in figure 6
Figure 5
Local Remote
Transmission network
Figure 6
Local
Remote
Transmission network
Transmission
Transmission network

Raisecom Technology Co., Ltd
12
4. Device type and user-board explanation
4.1. Device type explanation:
Explanation of device type: RC3000-XXX-XX-XX AC
There are 4 types of line-boards of RC3000:
RC3000-OPT-2E1 RC3000 line-board of optical interface
RC3000-OPT-FE RC3000 line-board of optical interface
RC3000-4E1 RC3000 line-board of 4 E1 interfaces
RC3000-2E1 RC3000 line-board of 2 E1 interfaces
RC3000-2E1 (ADM) RC3000 line-board of 2 E1 interfaces
RC3000-OPT-FE line-board has an optical interface and a 100M Ethernet interface;
RC3000-OPT-2E1 line-board has an optical interface and 2 E1 ports; RC3000-4E1
line-board has 4 balanced E1 interface; RC3000-2E1 and RC3000-2E1 (ADM) have two
CC3 (coaxial cable 3) E1 interfaces, and RC3000-2E1 (ADM) function.
For RC3000-OPT the optical module type decides the device type as following table:
Device type Optical module type
RC3000-OPT-S1 Single-mode Dual-fiber 1310, DSC, 0~25Km
RC3000-OPT-S2 Single-mode Dual-fiber1310, DSC, 10~60Km
RC3000-OPT-S3 Single-mode Dual-fiber 1550, DSC, 15~120Km
RC3000-OPT-SS13 Single-mode Single -fiber Dual-wavelength T1310/R1550, SC,
0~25Km
RC3000-OPT-SS15 Single-mode Single -fiber Dual-wavelength T1550/R1310, SC,
0~25Km
RC3000-OPT-SS23 Single-mode Single -fiber Dual-wavelength T1310/R1550, SC,
10~50Km
RC3000-OPT-SS25 Single-mode Single-fiber Dual-wavelength T1550/R1310, SC,
10~50Km
Device name: multi-service multiplexer Line-board
Optical interface type of optical line-board Power supply type: AC or DC
Assistant interface type of optical line-board

Raisecom Technology Co., Ltd
13
RC3000-OPT-S1FC Single-mode Dual-fiber 1310,DFC, 0~25Km
RC3000-OPT-M Single-mode Dual-fiber 1310,DSC, 0~2Km
RC3000-OPT-AS1 Single-mode Dual-fiber 1310,DSC, with ALS function, 0~25Km
RC3000-OPT-AS2 Single-mode Dual-fiber 1310,DSC, with ALS function, 10~50Km
Note: device types in the shadow are customized products.
For power supply type (after the device type), voltage range of AC is 85 to 265V and DC
is -36 to -72 V
ALS: Automatic Leaser Shutdown/Reduction.
4.2. User-board type explanation:
Explanation of RC3000 user-board type:
RC3000-SUB- D XXX
User-boards of RC3000:
User-board type User-board name Channel description
RC3000-SUB-DS FXS user voice user-board 8 channels, unconfigurable
RC3000-SUB-DO FXO voice relay user-board 8 channels, unconfigurable
RC3000-SUB-DSO FXS and FXO hybrid voice
user-board
8 channels, unconfigurable
RC3000-SUB-DM2 E&M 2 audio relay user-board 8 channels, unconfigurable
RC3000-SUB-DM4 E&M 4 audio relay user-board 4 channels, unconfigurable
RC3000-SUB-DV35 V35 data user-board 1 interface, and the time
slots of channel is
configurable
RC3000-SUB-DV24 V24 data user-board 1 interface, and the time
slots of channel is
configurable
RC3000-SUB-DETH 10BaseT Ethernet data
user-board
1 interface, and the time
slots of channel is
configurable
RC3000-SUB-D232 RS232 serial data user-board 8 channels, unconfigurable
Device name: multi-service multiplexer Identifier of user-board
Identifier of user-board type Name of user-board

Raisecom Technology Co., Ltd
14
RC3000-SUB-D422 RS422 serial data user-board 8 channels, unconfigurable
RC3000-SUB-DMT Magneto telephone user-board 8 channels, unconfigurable
RC3000-SUB-DSR FXS user-board with polarity
reversal function
8 channels, unconfigurable

Raisecom Technology Co., Ltd
15
5. Parameters
5.1. Line-board parameters:
5.1.1. E1 interface parameters:
Standard baud rate: 2048Kbps±50ppm
Interface coding: HDB3
Interface impedance: 75Ω(unbalanced),120Ω(balanced)
Electric feathers: ITU-T G.703 compliant
Frame format: ITU-T G.704 compliant
Jitter: ITU-T G.823 compliant
E1 cable type: SYV 75-2-2 thin coaxial cable is recommended for
unbalanced signal (transmission distance is longer than 200m); 0.6mm (22AWG)
twisted-pair is recommended for balanced signal. PCM30 and PCM31 are both
available.
5.1.2. Optical fiber parameters:
Standard rate: 150Mbps
Interface coding: Special coding
Optical connector: SC type
Optical connector: SC type(FC is also available for some dual-strand) Type Interface Wavelength
Nm Tx powerdBmW
Rx sensitivitydBmW
Typical range Km
AttenuationdB/Km
RC3000-OPT-S1 DSC 1310 -15 ~ -8
-31 0 ~ 25 0.5
RC3000-OPT-S2 DSC 1310 -5 ~ 0 -35 10 ~ 60
0.5
RC3000-OPT-S3 DSC 1550/DFB -5 ~ 0 -35 15 ~ 120
0.25
RC3000-OPT-SS13 SC/PC T1310/R1550 -15 ~ -8
-31 0 ~ 25 0.5
RC3000-OPT-SS15 SC/PC T1550/R1310 -15 ~ -8
-31 0 ~ 25 0.5

Raisecom Technology Co., Ltd
16
RC3000-OPT-SS23 SC/PC T1310/R1550 -5 ~ 0 -35 10 ~ 50
0.5
RC3000-OPT-SS25 SC/PC T1550/R1310 -5 ~ 0 -35 10 ~ 50
0.5
RC3000-OPT-S1FC DFC 1310 -15 ~ -8
-31 0 ~ 25 0.5
RC3000-OPT-M DSC 1310 -15 ~ -8
-31 0 ~ 25 0.5
RC3000-OPT-AS1 DSC 1310 -15 ~ -8
-31 0 ~ 25 0.5
RC3000-OPT-AS2 DSC 1310 -5 ~ 0 -35 10 ~ 50
0.5
Note: device types in the shadow are customized products. A of ASx means the optical
interface has ALS function.
5.1.3. Ethernet interface parameters:
RJ-45 interface of UTP, the longest tansmission distance of 5-category cable is 100m.
Comply with IEEE 802.3, 10/100M auto negotiation, full/half duplex auto negotiation.
Support IEEE 802.1d Spanning Tree relay, IEEE 802.1q VLAN packet relay
Maximum Ethernet frame size is 1916 byte
Support flow control of IEEE 802.3x in full duplex
Support flow contrla of backpressure in half duplex
MDI and MDIX auto sensing
5.2. User-board parameters:
5.2.1. Interface standard of FXS user-board (RC3000-SUB-DS):
Feed voltage: DC –48 V or DC 24 V
Loop current: 18-24 mA standard value 20 mA
Feed ring voltage: AC 65±10 V 25 Hz
Ring stop time: 200 ms
2W input impedance: 200+680Ω
Gain from 2W to 4W: 0±0.5 db
Frequency characteristic from 2W to 4W: 0±0.2 db
Gain from 4W to 2W: -3.5±0.5 db
Frequency characteristic from 4W to 2W: 0±0.2 db

Raisecom Technology Co., Ltd
17
Return loss: 30-40 db
Balance: 60-70 db
Common-Mode Rejection Ratio: 60-70 db
Power Supply Rejection Ratio: Vcc: 30 db Vbat: 30 db
Idle channel noise: 75 db
5.2.2. Interface standard of FXO voice relay user-board
(RC3000-SUB-DO):
Ring detect voltage: ≥35 V
Ring detect frequency: 17-63 Hz
Ring not detect frequency: ≤15 V
2W loop impedance: pickup status 200+680Ω
hangup status 2M Ω
Gain from 2W to 4W: hangup status -0.60 db
Frequency characteristic from 2W to 4W: hangup status 0±0.2 db
Gain from 2W to 4W: pickup status 0±0.5 db
Frequency characteristic from 2W to 4W: pickup status 0±0.2 db
Gain from 4W to 2W: pickup status -3.5±0.5 db
Frequency characteristic from 4W to 2W: pickup status 0±0.2 db
Return loss: 30-40 db
Balance: 60-70 db
Common-Mode Rejection Ratio: 60-70 db
Power Supply Rejection Ratio: 30 db
Idle channel noise: 75 db
5.2.3. Interface standard of E&M 2 audio relay user-board
(RC3000-SUB-DM2):
AD gain: 0 db
DA gain: -3.5 db
AD frequency characteristic (300-3400Hz): 0±0.2 db
DA frequency characteristic (300-3400Hz): 0±0.2 db
Output loop impedance: 600Ω
Input loop impedance: 600Ω
Blance: 60-70 db

Raisecom Technology Co., Ltd
18
Return loss: 20 db
Maximum voltage of common-mode: 300 V
Common-Mode Rejection Ratio: >55 db
Power supply Rejection Ratio: 30 db
Idle channel noise: 60 db
Note: AD gain and DA gain are adjustable according to user’s requirement
5.2.4. Interface standard of E&M 4 audio relay user-board
(RC3000-SUB-DM4):
AD gain: +14 db
DA gain: +4 db
AD frequency characteristic (300-3400Hz): 0±0.2 db
DA frequency characteristic (300-3400Hz): 0±0.2 db
Output loop impedance: 600Ω
Input loop impedance: 600Ω
Blance: 60 db
Maximum voltage of common-mode: 300 V
Common-Mode Rejection Ratio: >60 db
Power supply Rejection Ratio: 30 db
Idle channel noise: >60 db
Note: AD gain and DA gain are adjustable according to user’s requirement
5.2.5. Standard of V35 data user-board (RC3000-SUB-DV35):
Physical characteristic: Comply with V.35 interface standard
Interface type: HDB26 female connector
Working mode: DCE
Interface rate: N×64Kbps(N=1-31)
5.2.6. Interface standard of V24 data user-board (RC3000-SUB-DV24):
Physical characteristic: Comply with V.24 interface standard
Interface type: HDB26 female connector
Working mode: DCE

Raisecom Technology Co., Ltd
19
Interface rate: N×64Kbps(N=1-31)
5.2.7. Interface standard of Ethernet data user-board
(RC3000-SUB-DETH):
RJ-45 interface of UTP, the longest tansmission distance of 5-category cable is 100m.
Comply with IEEE 802.3 standard, 10/100M auto negotiation, full/half duplex auto
negotiation.
Support IEEE 802.1d Spanning Tree relay, IEEE 802.1q VLAN packet relay
Maximum Ethernet frame size is 1916 byte
Support flow control of IEEE 802.3x in full duplex
Support flow contrla of backpressure in half duplex MDI and MDIX auto sensing
5.2.8. Interface standard of RS232 serial data user-board
(RC3000-SUB-D232):
Physical characteristic: RS232 interface standard compliant
Interface type: RJ45 connector
Interface rate: maximum rate 19.2KBps
5.2.9. Interface standard of RS422 serial data user-board
(RC3000-SUB-D422):
Physical characteristic: RS422 interface standard compliant
Interface type: RJ45 connector
Interface rate: Maximum rate 19.2KBps
5.2.10. Interface standard of magneto telephone user-board
(RC3000-SUB-DMT):
Feed ring voltage: AC 65±10 V 25 Hz
Ring detect voltage: ≥35 V
Ring detect frequency: 17-63 Hz

Raisecom Technology Co., Ltd
20
Ring not detect voltage: ≤15 V
2W input impedance: normal and not ring status: 600Ω
2W input impedance: ring or abnormal status: 1000K Ω
Gain from 2W to 4W: 0±0.5 db
Frequency characteristic from 2W to 4w: 0±0.2 db
Gain from 4W to 2W: -3.5±0.5 db
Frequency characteristics from 4W to 2w: 0±0.2 db
Return loss: 30-40 db
Balance: 60-70 db
Common-Mode Rejection Ratio: 60-70 db
Power supply Rejection Ratio: 30 db
Idle channel noise: 75 db
5.2.11. Interface standard of FXS user-board with polarity reversal
function (RC3000-SUB-DSR):
Feed voltage: DC –48 V or DC 24 V
Loop current: 18-24 mA standard value 20 mA
Feed ring voltage: AC 65±10 V 25 Hz
Ring stop time: 200 ms
2W input impedance: 200+680Ω
Gain from 2W to 4W: 0±0.5 db
Frequency characteristic from 2W to 4W: 0±0.2 db
Gain from 4W to 2W: -3.5±0.5 db
Frequency characteristic from 4W to 2W: 0±0.2 db
Return loss: 30-40 db
Balance: 60-70 db
Common-Mode Rejection Ratio: 60-70 db
Power Supply Rejection Ratio: Vcc: 30 db Vbat: 30 db
Idle channel noise: 75 db
5.3. Power supply
Input voltage: DC -48V, tolerance range -36V~ -72V AC 220V, tolerance range 85~265V Module power: general≤20W, maximum≤40W

Raisecom Technology Co., Ltd
21
5.4. Environment requirement
Temperature:0 ~ 50 Relative humidity:≤90%(25 noncondensing )

Raisecom Technology Co., Ltd
22
6. Structure and indicator lights
6.1. Fundamental structure:
Fundamental structure of RC3000 is as follows:
RC3000 can multiplex or demultiplex local voice channels or data to any time slots (time
slot 0 is not included) of RC7850’s 4 E1 through cross-matrix, the following is exact
explanations:
Line-board interface module: interface of up-link data channel, E1 or optical interface.
User-board interface module: user interface for data or voice access.
RC7850 module: cross connect the user information to up-link interface or up-link data
to user interface through cross-matrix.
Memory module: save all kinds of user configuration including work status and cross
information.
Network management channel: a management channel for PC.
System information & alarm information display module: provide our users present
system status and alarm information; meanwhile the buzzer will buzz so that user can
System information &
alarm
NM channel
Memory module
MPU control module
RC7850 module
Cross-matrix and
information processing module
Line-board interface module
User-board interface module
Figure 15

Raisecom Technology Co., Ltd
23
find problems in time.
MPU control modue: this module is the system controller; once powered on it will check
the data saved in the memory, if the data is valid MPU will configure device according to
saved data, otherwise it will generate default data according to hardware status and set
the default data to RC7850 for cross connect, and than system will work normally. In
normal work status MPU will collect information of line-board module, user-board module,
RC7850 module and alarm continuously and control all the modules. MPU also answers
user queries, receives configuration operations, saves new configuration in memory
memory module and displays system information and alarms. Architecture of RC3000 is as figure16:
Management
Power supply
User interface card
Up-link card
中心复
接单元
板
Power supply
Center multiplexer
Up-link card
User interface card
User interface card
User interface card
User interface card
User interface card
Alarm and system indicator lights
CONSOLE
Fan
Figure 16

Raisecom Technology Co., Ltd
24
6.2. Front panel explanation:
Front view:
6.2.1. Globle indicator lights:
SYS(green): Indicates system work status. Flicking: system works normal. ON: 1 CUP
works abnormal; 2 system configuration error or the following problems:
1.User-board communicates abnormally
2.Temperature sensor works abnormally
3.Fan does not work
4.Time slots configuration error
OFF: CPU works abnormally
PWR(green): OFF system is not powered on
TX(green): ON serial interface is transmitting data
RX(green): ON serial interface is receiving data
6.2.2. Indicator lights of line-board:
4E1(green): ON line-board is 4E1 interface card
2E1(green): ON line-board is 2E1 interface card
OPT(green): ON line-board is optical interface card
Note: only one of the three lights can be ON, otherwise there is system error.
6.2.3. Optical interface alarm indicator lights:
Optical interface alarm indicator lights form a matrix, L and R indicate local and remote,
OP(LOS,LOF , E-3, E-6)indicate alarms:
L OP LOS(red): Loss of signal at local
L OP LOF(red): Loss of frame at local
L E1 E-3(red): Alarm when bit error ratio is more than 10-3/s at local
L E1 E-6(red): Alarm when bit error ratio is more than 10-6/s at local
R OP LOS(red): Loss of signal at remote
R OP LOF(red): Loss of frame at remote
Figure 17

Raisecom Technology Co., Ltd
25
R E1 E-3(red): Alarm when bit error ratio is more than 10-3/s at remote
R E1 E-6(red): Alarm when bit error ratio is more than 10-6/s at remote
6.2.4. E1 line alarm indicator lights:
These indicator lights form a matrix, 1, 2, 3, 4 indicate 4 E1 line, USED, LOS, LOF, AIS,
CRC, RAL indicate the using status of the 4 E1 and alarms:
USED(green): ON this E1 line is used; OFF this E1 line is unused
LOS(red): ON loss of E1 signal
LOF(red): ON loss of E1 frame
AIS(red): ON there is E1 AIS alarm
CRC(red): ON there is E1 CRC error
RAL(red): ON there is alarm in remote E1 line
Note: if E1 interface is not used, there no corresponding alarms.
6.2.5. Definition of mute, DIP-switches and interfaces:
MUTE: A lockless button to mute alarm sound. There will be alarm sound if there are alarms. This button only mutes the present sound. And if there are new alarms there will be new alarm sound. CONSOLE:
A RJ45 connector to connect PC and RC3000 device for Hyper Terminal configuration
(through the cable offered by Raisecom, and please plug the cable in RJ45 connector
first and then the DB9 serial interface connector on PC, this will protect the serial
interface), set the first bit of DIP-switches ON, startup Hyper Terminal and then you can
configure the device. LINK:
There are two RJ45 connectors for network management: UP and DOWN.
UP (RJ45 connector): network management interface for PC, through this interface a PC
can manage all the RC3000 devices in this network (the second bit of DIP-switches
should be ON).
DOWN(RJ45 connector): This is a cascade interface for RC3000 or other devices need
to be managed. DIP-switches:
First bit: CONSOLE configuration. Set this bit ON, connect RC3000 with PC through
serial interface cable offered by Raisecom, and then you can configure the device by

Raisecom Technology Co., Ltd
26
Hyper Terminal. This operation will not affect the whole network management but only
shielded that device for a while.
Second bit: PC network management access. When this RC3000 is network
management access device or network management is connected to its LINK UP
interface, set this bit ON, and MCU will receive the network management information
from LINK UP interface.
Third bit: assistant network management channel shielded bit. When the device
connected with the E1 interface is not a RC3000 device, the assistant network
management channel may not work. And to make sure of normal network management,
set this bit ON, shield assistant channel and than manage the device, in this case LINK
DOWN interface is still available for cascade.
The last bit is reserved.
Note: in a physical network of RC3000s only one network management PC is available,
or you cannot manage the devices normally.
6.3. Rear panel explanation
Rear view:
6.3.1. User-board slots:
There are 3 extension slots for user-board, from left to right: SLOT1, SLOT2 and SLOT3.
When channel number of a user-board is not configurable, this number will be equal or
less than 8. In this case, channels for each slot are:
SLOT1: 1-8 channels
SLOT2: 9-16 channels
SLOT3: 17-24 channels
When channel number of a user-board is configurable, RC3000 will distribute channels
for each slot:
SLOT1: 1-8 channels of main channel
SLOT2: 9-16 channels main channel
SLOT3: 17-30 channels (PCM30) or 17-31 channels(PCM31)main
channel
Note: time slot configuration is available in the following chapters.
PWR LINE Figure 18

Raisecom Technology Co., Ltd
27
All user-boards support hot-swap and this operation will not affect device work status.
6.3.2. Line-board interface:
There is one line-board slot for each RC3000 and the device cannot work without
line-board. You must confirm the type of line-board when ordering because it is fixed and
not hot-swap:
1. Optical line-board + 100M Ethernet interface: RC3000-OPT-FE
2. Optical line-board + 2E1 interfaces: RC3000-OPT-2E1
3. Line-board with unbalanced 2 E1 interfaces: RC3000-2E1
4. Line-board with balanced 2 E1 interfaces: RC3000-2E1-BL
5. Line-board with 4 E1 interfaces: RC3000-4E1
6.3.3. Power supply interface:
There are two kinds of power supply interface for AC and DC, voltage range is: AC
85V ~ 265V, DC –36V ~ -72V.
Note: please make sure of grounding protection when using AC power supply for safty.

Raisecom Technology Co., Ltd
28
7. Function & Application
7.1. Function and application explanation of RC3000:
7.1.1. Factory default configuration
There is only hardware version of a new RC3000 and without any cross configuration.
7.1.2. Start self-check
RC3000 will check all configurations when powered on, including: system configuration
information, cross connect configuration information, line-board information and
user-board information. Meanwhile all LEDs will flick and buzzer will buzz, otherwise
there is error of some parts of device.
7.1.3. System automatic configuration in factory default status
RC3000 will configure itself according to hardware:
Configuration information not related to line-board:
a. Device ID: not configured
b. Baud rate: not configured
c. Alarm shield: not shield any alarm.
d. CRC check: disable.
e. E1 mode: PCM30.
f. Alarm sound: enable
g. Assistant network management channel: 0 time slot.
h. Clock switch mode: auto.
Configuration information related to line-board:
a. Number of E1 interface:
RC3000-OPT: first and second E1 interfaces are used.
RC3000-2E1: first and second E1 interfaces are used.
RC3000-2E1 (ADM): first and second E1 interfaces are used.
RC3000-4E1: first E1 is used.
b. Network management topolosy direction:
RC3000-OPT: dual-E1 direction.

Raisecom Technology Co., Ltd
29
RC3000-2E1: single E1 direction.
RC3000-2E1 (ADM): dual-E1 direction.
RC3000-4E1: single E1 direction.
7.1.4. Clock switch explanation
In factory default status, clock mode of RC3000 is slave clock (trace first E1); the device
can switch clock by itself in clock auto-switch mode according to practice so that all
devices can work under a uniform clock. You can also set the work clock manually. Once
powered on RC3000 will first synchronize with configured clock. If this clock is invalid, in
auto clock mode RC3000 will switch the clock according to work status and in manual
clock mode, it will keep history configuration.
Suggestion: please be attention to clock mode when organize your network with lots of
RC3000s and make sure of uniform clock.
7.1.5. Auto cross connect explanation
In factory default status, RC3000 can cross connect user-board channels with first user
E1. For simple application RC3000 can work normally without any configuration. Details
are as follows: User-board in first slot:
If the channel number of the user-board is not configurable, system will cross connect
user-board’s channels with those of first user E1 channels 1-8 one by one according to
user-board channel number (note: this number should be equal or less than 8); if the
user-board channel number is configurable, system will give it 8 channels and cross
connect the 8 channels with first user E1 channels 1-8.
User-board in second slot:
If the channel number of the user-board is not configurable, system will cross connect
user-board’s channels with those of first user E1 channels 9-16 one by one according to
user-board channel number (note: this number should be equal or less than 8); if the
user-board channel number is configurable, system will give it 8 channels and cross
connect the 8 channels with first user E1 channels 9-16.
User-board in third slot:
If the channel number of the user-board is not configurable, system will cross connect
user-board’s channels with those of first user E1 channels 17-24 one by one according to
user-board channel number (note: this number should be equal or less than 8); if the
user-board channel number is configurable, system will give it 14 channels and cross
connect the 14 channels with first user E1 channels 17-30. RC3000 does not cross connect idle channels except RC3000-2E1 (ADM). RC3000-2E1 (ADM) cross connect the same idle channels of 1 E1 and 2 E1 to realize the transfer of

Raisecom Technology Co., Ltd
30
1E1 and 2E1. RC will first use valid cross connect configuration information saved in memory, and erase invalid configuarion information automaticly. Rules for cross connection are as follows:
a. All configurations will be refreshed if the line-board is changed and all saved
cross connect information is invalid.
b. When user-board is pulled out, the corresponding cross connect information
will be erased.
c. If the same type user-board is put into the same slot, system will restore
cross connect information saved in memory.
d. If new type user-board is put in, system will first distribute the idle channels of
first E1.
7.1.6. Explanation of system configuration and cross connect
configuration
RC3000 has rich configuration information for any E1 interface and signal interface to
realize all kinds of cross connect. Please refer to appendix A. how to use Hyper Terminal
to configure RC3000.
7.1.7. Alarm explanation:
There are two kinds of alarms: 1 device alarms; 2 system alarms. Device alarms indicate
E1 line and optical interface alarms, and optical interface alarms includes:
a. LOS alarm at local
b. LOF alarm at local
c. Alarm when bit error ratio is more than 10-3/s at local
d. Alarm when bit error ratio is more than 10-6/s at local
e. LOS alarm at remote
f. LOF alarm at remote
g. Alarm when bit error ratio is more than 10-3/s at remote
h. Alarm when bit error ratio is more than 10-6/s at remote
E1 interface alarms:
a. LOS alarm
b. LOF alarm
c. AIS alarm
d. CRC error alarm

Raisecom Technology Co., Ltd
31
e. Remote alarm indicator
f. Signal loss of multiframe alignment alarm
g. CRC loss of multiframe alignment alarm
There is no f and g alarm on device panel and you can get these alarm information
through network management or Hyper Terminal.
There are system alarms when RC3000 cannot work normally, including:
a. Status of data storage (there are four kinds of data saved in memory):
config. Information module, E1 modules, user E1 modules and device
version.
b. Communication status of user-board
c. Communication status of line-board
d. Work status of temperature converter
e. Work status of fan
f. Channel configuration information for each user-board
7.1.8. Network management channel explanation
Network management channel explanation:
RC3000 has both assistant network management channel and network management
cascade function. Through assistant network management channel local PC can
manage remote devices, local and remote network management channel connection
can be realized through LINK UP and LINK DOWN interfaces on RC3000, so one
network management PC can manage all RC3000s in different networks. The following
is exact explanations:
a. Assistant network management channel:
Through assistant network management channel all RC3000s in one network can be
managed as in figure 19:
Figure 19
A
1E1 1E1
2E1
2E1
1E1
3E1 1E1
4E1
B E
D
C
F
1E1
2E1
3E1
4E1 1E1 1E1
2E1

Raisecom Technology Co., Ltd
32
In this topology the lines between each RC3000 are assistant network management channels, and for normal network management there must be network management topology configuration as follows: RC3000 A: double E1 channel direction RC3000 B: single E1 channel direction RC3000 C: single E1 channel direction RC3000 D: four E1 channel direction RC3000 E: single E1 channel direction RC3000 F: single E1 channel direction Rules for network management topology: the number of network management channels decides the number of E1 direction, and configuration of E1 direction must start from 1 E1. b. Network management cascade: Local and remote network management channel connection can be realized through LINK UP and LINK DOWN interfaces on RC3000 as in figure 20:
There are three RC3000 networks: RC3000 A and RC3000 B connected through E1
cable, RC3000 C and RC3000 D connected through E1 cable, RC3000 E and RC3000 F
connected through E1 cable; connect RC3000A and RC3000C through cascade cable,
RC3000B and RC3000E through cascade cable, and set the second bits of A, C, E’s
DIP-switches ON, then local and remote network management channel connection can
be realized through LINK UP and LINK DOWN interfaces
7.1.9. Interface definitions
a. CONSOLE definition of Hyper Terminal:
CONSOLE interface for Hyper Terminal is RC45 interface and standard RC232 voltage:
Signaling and Pinouts:
1E1
Figure 20
A
F
D
B E 1E1 1E1
1E1
1E1
LINKDOWN
1E1 1E1
LINKUP
LINKDOWN
C
LINKUP

Raisecom Technology Co., Ltd
33
Pin number Signal Explanation
3 RXD Rx of RC3000 7 TXD Tx of RC3000 4,8 GND Ground of RC3000
b.LINK UP definition:
Network management interface LINK UP is RC45 interface and standard RC232 voltage:
Signaling and Pinouts: Pin number Signal Explanation
3 RXD Rx of RC3000 7 TXD Tx of RC3000 4,8 GND Ground of RC3000
c. LINK DOWN definition:
Network management interface LINK DOWN is RC45 interface and standard RC232
voltage:
Signaling and Pinouts: Pin number Signal Explanation
3 TXD Rx of RC3000 7 RXD Tx of RC3000 4,8 GND Ground of RC3000
d. Definition of balanced RC3000-4E1 E1 interface:
Balanced E1 interface is RJ45 interface, and the Signaling and Pinouts are: Pin number Signal Explanation
1 OUT+ Positive Tx of balanced E1 interface 2 OUT- Negative Tx of balanced E1 interface 5 IN+ Positive Rx of balanced E1 interface 6 IN- Negative Rx of balanced E1 interface
Figure 21
1 2 3 4 5 6 7 8

Raisecom Technology Co., Ltd
34
7.2. RC3000-SUB-DS user voice card explanation
FXS is a user voice card with feed voltage and feed ring and can be connected to
exterior line interface of FBX. There are 8 channels of a FXS and the channel number is
decided by hardware, unchangeable. Two RJ45 interfaces make up of the 8 channels
(each RJ45 interface has four channnels). Definition of RJ45 interface is as follows:
Channel 1 2 3 4 Pins RJ45-1 1A,2B RJ45-1 3A,4B RJ45-1 5A,6B RJ45-1 7A,8BChannel 5 6 7 8 Pins RJ45-2 1A,2B RJ45-2 3A,4B RJ45-2 5A,6B RJ45-2 7A,8B Fundamental structure of RC3000-SUB-DS:
1 2 3 4 5 6 7 8 1 2 3 4 5 6 7 8
Figure 22
RJ45-1 RJ45-2
Voice channel control module Multiplexing
module Voice
channel
interface
Bus
inteface
Multiplexing bus
Control bus
Multiplexing bus module
Control bus module
Voice input &
output
Signal input
& output
Control of
channel
output
2W & 4W balance module
Voice D/A converter
Detect of ring and pickup/hangup
Interface protection
Figure 23

Raisecom Technology Co., Ltd
35
7.3. RC3000-SUB-DO voice relay card explanation
FXO is a voice relay card for the relay of FBX voice channel and is connected to output
interface of FBX voice channel. There are 8 channels of a FXO and the channel number
is decided by hardware, unchangeable. Two RJ45 interfaces make up of the 8 channels
(each RJ45 interface has four channnels). Definition of RJ45 interface is as follows:
Channel 1 2 3 4 Pines RJ45-1 1A,2B RJ45-1 3A,4B RJ45-1 5A,6B RJ45-1 7A,8BChannel 5 6 7 8 Pins RJ45-2 1A,2B RJ45-2 3A,4B RJ45-2 5A,6B RJ45-2 7A,8B Fundamental structure of RC3000-SUB-DO:
1 2 3 4 5 6 7 8 1 2 3 4 5 6 7 8
Figure 24
RJ45-1 RJ45-2
Voice channel control module Multiplexing
module Voice
channel
interface
Bus
interface
Multiplex
ing bus
Control
bus
Multiplexing bus module
Control bus module
Voice input &
out put
Signal input
& out put
Control of
channel
output
2W & 4W balance module
Voice D/A converter
Detect of loop and ring
Interface protection
Figure 25

Raisecom Technology Co., Ltd
36
7.4. RC3000-SUB-DSO user-board explanation
RC3000-SUB-DSO is a customized hybrid card of FXS and FXO, there can be N FXS
interfaces and M FSO interfaces (M, N can be 0, and M+N=8). There totally 8 channels
decided by hardware, unchangeable. Two RJ45 interfaces make up of the 8 channels
(each RJ45 interface has four channnels). Definition of RJ45 interface is as follows:
Channel 1 2 3 4 Pins RJ45-1 1A,2B RJ45-1 3A,4B RJ45-1 5A,6B RJ45-1 7A,8BChannel 5 6 7 8 Pins RJ45-2 1A,2B RJ45-2 3A,4B RJ45-2 5A,6B RJ45-2 7A,8B
7.5. RC3000-SUB-DM2 audio relay card explanation
RC3000-SUB-DM2 is a 2W audio relay card with E&M signal, used for transmission of
signal and voice between offices. There totally 8 channels decided by hardware,
unchangeable. Two RJ45 interfaces make up of the 8 channels (each RJ45 interface has
four channnels). Definition of RJ45 interface is as follows:
Channel 1 2 3 4 Pins RJ45-1
1A, 2B, 3E, 4M RJ45-1 5A, 6B, 7E, 8M
RJ45-2 1A, 2B, 3E, 4M
RJ45-2 5A, 6B, 7E, 8M
Channel 5 6 7 8
Pins RJ45-3 1A, 2B, 3E, 4M
RJ45-3 5A, 6B, 7E, 8M
RJ45-4 1A, 2B, 3E, 4M
RJ45-4 5A, 6B, 7E, 8M
Note: A and B is 2-wire channel voice, E is E signal Rx and M is M signal Tx.
1 2 3 4 5 6 7 8 1 2 3 4 5 6 7 8
Figure 26
RJ45-1 RJ45-2
1 2 3 4 5 6 7 8 1 2 3 4 5 6 7 8
RJ45-1 RJ45-2
1 2 3 4 5 6 7 8 1 2 3 4 5 6 7 8
Figure 27
RJ45-3 RJ45-4
Raisecom Technology Co., Ltd
37
Fundamental structure of RC3000-SUB-DM2:
7.6. RC3000-SUB-DM4 audio relay card explanation
RC3000-SUB-DM2 is a 4W audio relay card with E&M signal, used for signal and voice
transmission between offices. There totally 8 channels decided by hardware,
unchangeable. Two RJ45 interfaces make up of the 8 channels (each RJ45 interface has
four channnels). Definition of RJ45 interface is as follows:
Channel 1 2 3 4
Pins
RJ45-1 1TA, 2TB 3RA, 4RB 6E, 7M
RJ45-2 1TA, 2TB 3RA, 4RB 6E, 7M
RJ45-3 1TA, 2TB 3RA, 4RB 6E, 7M
RJ45-4 1TA, 2TB 3RA, 4RB 6E, 7M
Note: 1TA and 2TB is 2-wire voice Tx, 3RA and 4RB is 2-wire voice Rx, 6E is E signal Rx
and 7M is M signal Tx.
Voice channel control module Multiplexing module
Voice channel
interface
Bus
interface
Multiplexing
bus
Control bus
Multiplexing bus process module
Control bus process module
Voice input &
output
Signal input &
output
Control of
channel output
2W & 4W balance module
Voice D/A converter
E & M signal process module
Figure 28
1 2 3 4 5 6 7 8 1 2 3 4 5 6 7 8
RJ45-1 RJ45-2
1 2 3 4 5 6 7 8 1 2 3 4 5 6 7 8
Figure 29
RJ45-3 RJ45-4

Raisecom Technology Co., Ltd
38
Fundamental structure of:
7.7. RC3000-SUB-DV35 user-board explanation
7.7.1. Rules for channel allocation
RC3000-SUB-DV35 is a data user-board with V35 interface and the channel number is configurable, the rules are as follow:
a. Rules for automatic channel distribution: RC3000 has automatic channel
distribution function. If V35 data is put into the first slot and 1-8 channels of
the first user E1 are idle, system will distribute 1-8 channels of the first user
E1 to it; If V35 data is put into the second slot and 9-16 channels of the
second user E1 are idle, system will distribute 9-16 channels of the first user
E1 to it; If V35 data is put into the third slot and 17-30 channels of the first
user E1 are idle, system will distribute 17-30 channels of the first user E1 to it
(or 17-31 in PCM31 frame mode)
b. Rules for manual channel distribution:
There will be position limitation for manual channel distribution. Here we will
first give the definition of cross connect groups. RC3000 can have 4 E1 at
most and we use 1, 2, 3, and 4 to stand them (each E1 is one cross group,
and now we have cross group 1, 2, 3, and 4), it also has four STBUSes (2M
Voice channel control module Multiplexing module
Voice channel
interface
Bus
interface
Multiplexing
bus
Control bus
Multiplexing bus process module
Control bus process module
Voice input &
output
Signal input &
output
Control of
channel output
Voice D/A converter
E & M signal process module
Figure 30

Raisecom Technology Co., Ltd
39
of each) to access 4 user groups (user E1), and we refer these 4 user E1 as
cross groups 5, 6, 7 and 8.
The first user E1 is a main cross group and channels of this cross group will
be distributed to user cards by default. Other user E1s are single cross group
for different slots: 1 MCU version is REV1.2 and versions below this: user
card in first slot will occupy cross group 6 (user E1 2) and user card in
second slot will occupy cross group 8 (user E1 4), user card in the third slot
cannot have single cross group. 2 MCU versions are advanced than REV1.2: cross group 6, 7 and 8 (user E1 2, 3 and 4) are single cross group
for user card in slot 1, 2 and 3.
Limitation for main cross group (user E1 1): when use main cross group to
transfer data the number of channels will not same for different slots. Channel
number range for first slot is 0-31, 0 indicates that shutdown the transmission
of this user card, and the startup channel is channel 1. If other slots have
already occupied the channels of main cross group there will alarms.
Channel number range for second slot is 0-23, 0 indicates that shutdown the
transmission of this user card, and the startup channel is channel 9. If other
slots have already occupied the channels of main cross group there will
alarms. Channel number range for the third slot is 0-15, 0 indicates that
shutdown the transmission of this user card, and the startup channel is
channel 17.
Limitation for single cross group: Channel number range is 0-31; the startup
channel is channel 1 and there will not be channel occupation collision
alarms.
Point-to-point communication can be realized by automatic channel distribution, and
we recommend you list the cross connect table first to avoic mistakes.
7.7.2. V35 interface definition
V35 interface uses V35/HDB26 female connector and can be connected to standard
DTE cable as in following figure:
Figure 31
Raisecom Technology Co., Ltd
40
Indicatore lights are all green:
TD: V35 data Tx indicator light
RD: V35 data Rx indicator light
LP_STA: loop indicator light. ON there is local loop
PAT_OK: In normal work status is OFF.
Do the RCR check: ON normal
OFF abnormal Interface definition:
Name Input/output Pin number Chassis Ground — CGND - 1 Signal Ground — GND - 7 Receive Data (A) — RD(A) O 3 Receive Data (B) — RD(B) O 21 Receive Timing (A) — RCK(A) O 17 Receive Timing (B) — RCK(B) O 25 Send Data (A) — TD(A) I 2 Send Data (B) — TD(B) I 11 Send Timing (A) — TCK(A) O 15 Send Timing (B) — TCK(B) O 23 Terminal Timing (A) — SCTE(A) I 24 Terminal Timing (B) — SCTE(B) I 16 Request to Send — RTS I 4 Clear to Send — CTS O 5 Data Set Ready — DSR O 6 Data Carrier Detect — DCD O 8 Data Terminal Ready — DTR I 20
Note:I—input; O—output
7.7.3. V35 data card configuration explanation:
V35 user-board has many functions: plenty test methods, loop, phase adjustment and
etc. Both Hyper Terminal and network management can configure the following
commands:
a. Configuration of user card time slot; b. Phase of Rx data; c. Phase of Tx data; d.
Choose the data channel; e. Loop configuration f. Error bit test; g. Auto adjustment of Tx data phase; h. Auto
adjustment of Rx data phase;
Please refer to Appendix A How to use Hyper Terminal to configure RC3000

Raisecom Technology Co., Ltd
41
7.8. RC3000-SUB-DETH user-board explanation
7.8.1. Rules of channel distribution:
RC3000-SUB-DETH is an Ethernet data user card with a 10BaseT interface, and
please refer to configuration rules of RC3000-SUB-DV35 user card.
7.8.2. Ethernet interface definition
Ethernet interface uses RJ45 connector and can realize MDI & MDIX cable as following
figure:
Indicatore lights are all green:
LNK: indicates the Ethernet user card LINK status, ON means link
PWR: power supply indicator light, ON means powered on.
ACT: ON transmitting data
FDX: ON full dulplex
Ethernet interface standard compliant.
7.8.3. Ethernet data card configuration explanation
Ethernet user card has many functions and both Hyper Terminal and network
management can configure the following commands: a. Configuration of user card time slot; b. Choose the data channel; c.
Buffer configuration d. Default interface mode e. Interface reset
Please refer to Appendix A How to use Hyper Terminal to configure RC3000
7.9. RC3000-SUB-D232 user-board explanation:
RC3000-SUB-D232 serail data user-board has standard RS232 interface. There are 8
channels whitch is decided by hardware, unchangeable. Four RC45 connectors make up
of the 8 channels and each RJ45 connector has two channels. And the definition of each
Figure 32

Raisecom Technology Co., Ltd
42
interface is as follows: Channel 1 2 3 4
Pins RJ45-1 2RD,3TD,1,4GND
RJ45-1 6RD,7TD,5,8GND
RJ45-2 2RD,3TD,1,4GND
RJ45-2 6RD,7TD,5,8GND
Channel 5 6 7 8
Pins RJ45-3 2RD,3TD,1,4GND
RJ45-3 6RD,7TD,5,8GND
RJ45-4 2RD,3TD,1,4GND
RJ45-4 6RD,7TD,5,8GND
Note: 2RD is the input of RS232 Rx data, 3TD is the output of Tx data and 4GND is the
ground. Here we want to explain the grounding rules: there are two grouding conductors,
one is signal grounding and the other one is chassis grounding. Please connect the
RJ45 connector of RS232 first and then DB interface of other device when connect
RS232 with other device (both powered on), this can make sure of grouding protection to
avoid destroyment of RS232 serial interface.
7.10. RC3000-SUB-D422 user-board explanation
RC3000-SUB-D422 user card has standard serial data interface. There are 8 channels
whitch is decided by hardware, unchangeable. Four RC45 connectors make up of the 8
channels and each RJ45 connector has two channels. And the definition of each
interface is as follows:
Channel 1 2 3 4
Pins RJ45-1 1RA,2RB,3TA,4TB
RJ45-1 5RA,6RB,7TA,8TB
RJ45-2 1RA,2RB,3TA,4TB
RJ45-2 5RA,6RB,7TA,8TB
Channel 5 6 7 8
Pins RJ45-3 1RA,2RB,3TA,4TB
RJ45-3 5RA,6RB,7TA,8TB
RJ45-4 1RA,2RB,3TA,4TB
RJ45-4 5RA,6RB,7TA,8TB
Note: 1RA is the positive input of RS422 Rx data, 2RB is the negative input of RS422 Rx
data, 3TA is the the positive output of RS422 Tx data and 4TB is the negative output of
RS422 Tx data. RC3000-SUB-D422 user card has static protection and the serial
interface will not be destroyed. In application, please connect the cable first and then
plug the user card into RC3000 slot.
1 2 3 4 5 6 7 8 1 2 3 4 5 6 7 8
RJ45-1 RJ45-2
1 2 3 4 5 6 7 8 1 2 3 4 5 6 7 8
Figure 34
RJ45-3 RJ45-4

Raisecom Technology Co., Ltd
43
7.11. RC3000-SUB-DMT user-board explantion
RC3000-SUB-DMT is a magneto telephone interface card and can transimit magneto
telephone calls (hot-wire magneto telephone). There are 8 channels whitch is decided by
hardware, unchangeable. Two RC45 connectors make up of the 8 channels and each
RJ45 connector has four channels. And the definition of each interface is as follows:
Channel 1 2 3 4 Pins RJ45-1 1A,2B RJ45-1 3A,4B RJ45-1 5A,6B RJ45-1 7A,8BChannel 5 6 7 8 Pins RJ45-2 1A,2B RJ45-2 3A,4B RJ45-2 5A,6B RJ45-2 7A,8B Fundamental structure of RC3000-SUB-DMT:
1 2 3 4 5 6 7 8 1 2 3 4 5 6 7 8
Figure 35
RJ45-1 RJ45-2
Voice channel control module Multiplexing module
Voice
channel
interface
Bus
interfaces
Multiplexi
ng bus
Control
bus
Multiplexing bus process module
Control bus process module
Voice input &
output
Signal input &
output
Control of
channel output
2W & 4W balance module
Voice D/A converter
Ring output & detect
Interface protection
Figure 36
Raisecom Technology Co., Ltd
44
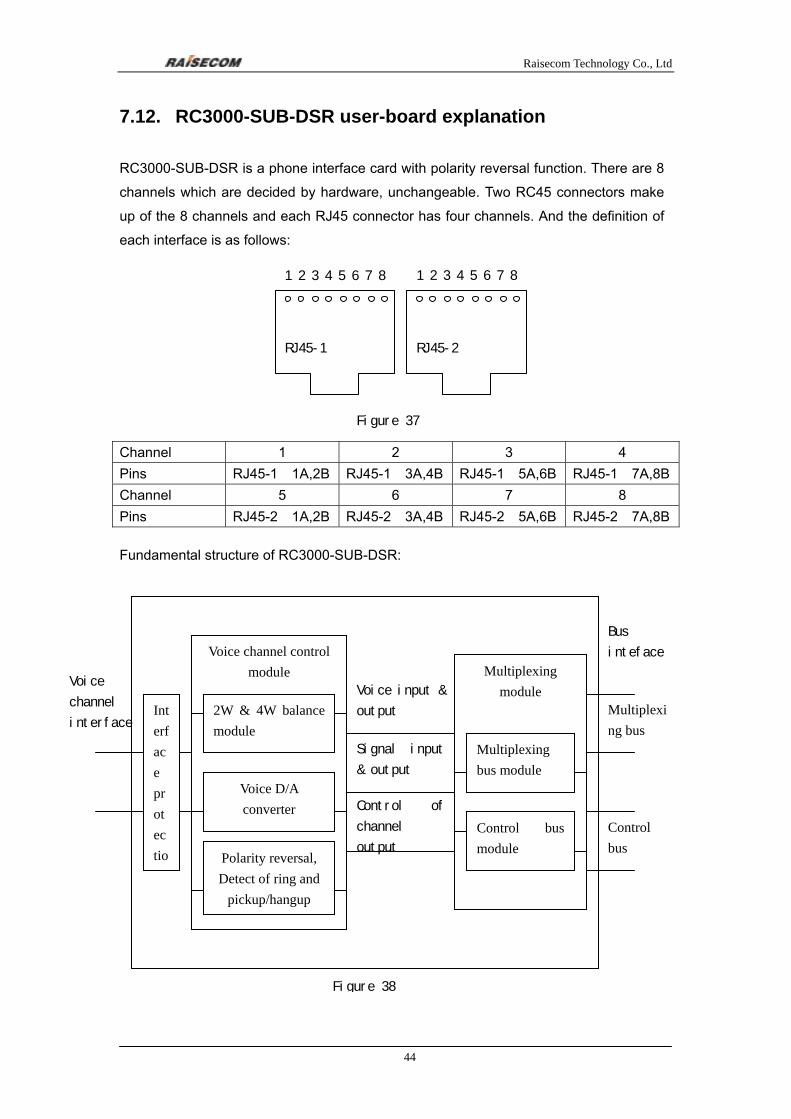
7.12. RC3000-SUB-DSR user-board explanation
RC3000-SUB-DSR is a phone interface card with polarity reversal function. There are 8
channels which are decided by hardware, unchangeable. Two RC45 connectors make
up of the 8 channels and each RJ45 connector has four channels. And the definition of
each interface is as follows:
Channel 1 2 3 4 Pins RJ45-1 1A,2B RJ45-1 3A,4B RJ45-1 5A,6B RJ45-1 7A,8BChannel 5 6 7 8 Pins RJ45-2 1A,2B RJ45-2 3A,4B RJ45-2 5A,6B RJ45-2 7A,8B Fundamental structure of RC3000-SUB-DSR:
1 2 3 4 5 6 7 8 1 2 3 4 5 6 7 8
Figure 37
RJ45-1 RJ45-2
Voice channel control module Multiplexing
module Voice
channel
interface
Bus
inteface
Multiplexing bus
Control bus
Multiplexing bus module
Control bus module
Voice input &
output
Signal input
& output
Control of
channel
output
2W & 4W balance module
Voice D/A converter
Polarity reversal, Detect of ring and
pickup/hangup
Interface protectio
Figure 38

Raisecom Technology Co., Ltd
45
7.13. RC3000-SUB-OPT-FE explanation
Optical line-board can communicate with main board and its initial value can be set
through DIP switches. There are 2 banks of 8-bit DIP switches and definitions ard as
follows: Switch Definition Value Explanation
FFFF S1 FFFN S2 FFNF S3 FFNN SS13 FNFF SS15 FNFN SS23 FNNF SS25 FNNN S1FC NFFF M
1-4 Optical module
type
Other Other status will be regarded as S1 (0000) F Without ALS function
5 ALS N With ALS function F Enable auto negotiation function
6 Auto
negotiation N Disable auto negotiation function
F Ethernet port rate is 100M (auto negotiation
disable) 7 100M/10M
N Ethernet port rate is 10M (auto negotiation
disable)
F Ethernet port works in full duplex mode (auto
negotiation disable)
SW1
8 Full/half duplex
N Ethernet port works in half duplex mode (auto
negotiation disable) F Relative E1 line works normally
1-4 1-4E1 Loop back N Relative E1 line is doing the loop back test
F Local loop back 5
Loop back type N Remote loop back
SW2
6-8 Reserved Reserved
Note: F stands for OFF and N stands for ON status. Network management has higher
privilege than DIP switches except optical module type and ALS function configuration.
All configuration information is available through Hyper Terminal. First bit to fifth bit of
SW1 are set in factory according to optical module type and other bits are all OFF.
7.14. RC3000-SUB-OPT-2E1 explanation
Optical line-board can communicate with main board and its initial value can be set

Raisecom Technology Co., Ltd
46
through DIP switches. There are 3 banks of 8-bit DIP switches and definitions ard as
follows:
Switch Definition Value Explanation FFFF S1 FFFN S2 FFNF S3 FFNN SS13 FNFF SS15 FNFN SS23 FNNF SS25 FNNN S1FC NFFF M
1-4 Optical module
type
Other Other status will be regarded as S1 (0000)F Without ALS function
5 ALS N With ALS function
SW1
Reserved Reserved F Relative E1 line works normally
1-4 1-4E1 Loop back N Relative E1 line is doing the loop back test
F Local loop back 5
Loop back type N Remote loop back
SW2
6-8 Reserved Reserved FFFN Impedance of 3rd E1 is 120Ω
1-4 3rd E1
impedance NNNF Impedance of 3rd E1 is 75Ω FFFN Impedance of 4th E1 is 120Ω
SW3 5-8
4th E1 impedance NNNF Impedance of 4th E1 is 75Ω
Note: F stands for OFF and N stands for ON status. Network management has higher
privilege than DIP switches except optical module type and ALS function configuration.
All configuration information is available through Hyper Terminal. First bit to fifth bit of
SW1 are set in factory according to optical module type and other bits are all OFF.

Raisecom Technology Co., Ltd
47
8. Installation & verifying
8.1. Check when you first open the box
Check whether the type of device, spare parts and number are same with that of packing list. Make sure the device appearance is in excellent condition. There must be drying process if the device has been damp.
8.2. Preparation before installation
a. Read this manual carefully
b. Verify all the cables are good for normal use. (Please refer to relative chapter for the
connection method of cables).
c. Make sure that the voltage of power supply is within the range and grounding
protection.
d. Make ready of bit error rate test and optical power meter for necessary line tests.
e. For the devices to be installed, please consider their positions and the length of cables.
We recommend you have a whole topology first.
8.3. Installation
8.3.1. Device fixing:
RC3000 can be installed in the chassis or on cabinet. Please make sure that the
installation is firm and convenience for operation.
8.3.2. Cabble connection
a. Connect the power supply and ground:
There are both AC power supply and DC power supply of RC3000, no matter which
kind of power supply make sure of good grounding protection. And the chassis
grounding of RC3000 must be connected to that of other device and the earth.
Otherwise the device may not work normally.
b. E1 signal interface:
The E1interfaces of RC3000-2E1 are CC3 interfaces, and the E1interfaces of
RC3000-4E1 are balanced RJ45 interfaces. Please use the affixing cables we

Raisecom Technology Co., Ltd
48
offered, and when you need to transfer balanced interfaces to unbalanced ones
RC909-4E1 of Raisecom is available.
c. Optical interface:
SC connector is for optical interface. And if you are not sure of Rx & Tx direction,
please connect the connector before device powered on.
d. Connect network management interface:
When this device is connected with network management PC, connect cable to
LINK UP interface; and when you need network management cascade, connect
cable to LINK DOWN interface. Please connect to network management interface
before device powered on if you are not sure of common grounding.
8.3.3. Powered on:
a. Verify all the connections are normal (power supply and interfaces), and than
powered on.
b. Verify the self-check of the device is normal (PWR is ON and SYS is flicking).
Buzzer will buzz if there are alarms and MUTE botton can shutdown present
alarm sound.
c. You do not need to configure the device for point-to-point topology. Use
CONSOLE interface to configure the device when necessiry.
d. RC3000 will work normally if all connections are right.

Raisecom Technology Co., Ltd
49
9. Q & A
9.1. SYS is ON
When there are alarms SYS will be ON. You can check the alarm information through
network management or Hyper Terminal to confirm why the buzzer buzzes:
a. Communication failure with user card.
b. Communication failure with line-board when line-board is RC3000-OPT.
c. Collision of channel occupation.
d. Fan problems.
e. Temperature collection problems
If these are not the reasons why buzzer buzzes, please contact us for technical support.
9.2. Alarms of E1 interface
If there are LOF, LOS or AIS alarms, please check the followings:
a. Cable of E1 or optical interface has been correctly connected.
b. Device connected to RC3000 works normally.
c. If E1 is not used, please shut it down.
d. Verify the impedance of both ends match each other, or change the
impedance.
e. Verify grounding protection.
If these are not the reasons, please contact us for technical support.
9.3. Cross connection cannot communicate normally
If channels cannot communicate normally, judge from the followings:
a. RC3000s of both ends work normally, otherwise reset the devices.
b. Correct use of user cards in both ends.
c. Verify the cables connected to user cards are good.
d. Verify the synchronization of both end devices.
e. Verify correct cross connection.
f. Verify correct parameter configuration, such as signal mode, data phase and
etc.
If these are not the reasons, please contact us for technical support.

Raisecom Technology Co., Ltd
50
9.4. There is no alarm but voice channel is discontinuous or
communication is abnormal
Generally asynchronism of multiframe causes this phenomenon, check whether there is
loss of multiframe of RC3000 E1 interface or CRC loss of multiframe. If there is loss of
multiframe, the followings can resolve this problem:
a. Enable or Mask CRC4 to synchronize the two ends.
b. Make sure of synchronous clock, and we recommend one clock in one
network.
c. Use cards work normally.
If these are not the reasons, please contact us for technical support.
9.5. There is LOF or RAL alarms sometimes of E1 inteface
Generally it is caused by clock asynchronism. In practice application, all RC3000s in one
network will synchronous with one clock (that is to say one master clock and multi slave
clocks), when all devices synchronous with a nonexistent clock or trace clock each other,
this phenomenon will happen. Please check the clock configuration.
If these are not the reasons, please contact us for technical support.
9.6. Not all devices in a network can be network managed
If not all devices in a network can be managed, please check the followings:
a. Check the cables connected to all devices first.
b. Check the network topology.
c. Check the DIP-switches of device that cannot be managed, remember to
set first bit (CONSOLE control bit) OFF.
d. Check the network management configuration, make sure that time slot for
network management of all devices is the same (occupy time slot 0 or 1)
and number of network management channels is same with that of E1
direction.
e. When manage two RC3000-OPT devices, the network management
topology should be single E1 direction, otherwise you may not manage the
remote device
f. Check the configuration of device ID and Baud rate, in a RC3000 network
all devices must have different ID and same baud rate, and when assistant
network management channel is used, the Baud rate must be 2400Bps.

Raisecom Technology Co., Ltd
51
If these are not the reasons why you cannot manage the device, please contact us for
technical support.
9.7. Device cannot be configured through CONSOLE
If the device cannot be configured through CONSOLE, please check the followings:
a. Check that proper cable is used to connect to CONSOLE.
b. Check the configuration of Hyper Terminal (refer to appendix A: How to user
Hyper Terminal)
c. Check the DIP-switches and set the Console control bit ON (the second bit).
d. In Hyper Terminal press M to display the menu if ENTER is not effective.
e. When you press the ENTER, light of serial interface Tx will lighten and this
indicates that RC3000 receives data normally. Otherwise check other
configuration.
f. Check serial interface
If these are not the reasons why you cannot configure the device, please contact us for
technical support.
9.8. Memory information loss
If the information saved in memory lost after RC3000 running for some time, check
whether EEPROM can save data normally, if not, bring the device back to Raisecom for
maintenance.
9.9. Display of device is abnormal
When RC3000 cannot display alarms correctly, check the followings:
a. Device voltage ripple is too high and voltage of MCU is not stable, so there is
errorof program data. In this status please try to power on the device again.
b. Equipments inside the device is destroyed, in this status you should bring the
device back to Raisecom for repair.
9.10. Forget the password
When forget your password, you must bring the device back to Raisecom for password
updating.

Raisecom Technology Co., Ltd
52
10. Appendix A: How to use Hyper Terminal to
configure RC3000
10.1. Enter
Use the affixed CONSOLE cable to connect CONSOLE interface (RJ45) of RC3000 with PC serial interface (DB9), before connecting make sure that both RC3000 and PC have grounding protection; and you should connect the cable to CONSOLE interface of RC3000 first and then the PC serial interface. Set the first bit of DIP-switches ON, start Hyper Terminal program and configure COM interface as figure 37:
Figure 39

Raisecom Technology Co., Ltd
53
In the Properties menu, use VT100 to emulate as in figure 38:
Figure 40
Now press ENTER to start configure RC3000 through Hyper Terminal.
10.2. Input the password
Before starting to configure the device you need to input the password (default password is raisecom), the prompt is:
Please input password and click Enter Password:
When enter the password there will be a * for every input character. If you want to change the password: use BackSpace key for wrong enters; password is case sensitive, and control character is invalid. After setting the new password enter the new one again to comfirm. And then you can configure the device. If the password is wrong there will be the prompt:
Input password error or input illegal charactor. Please input password again
Password:

Raisecom Technology Co., Ltd
54
10.3. Main menu:
If the password is right, you can start to operate: Welcome to use Raisecom Communication Device 1.Device Set Query 2.Cross Set Query 3.State Info Query 4.Alarm Query 5.Set 6.Operate 7.Version 8.Console Set 9.Quit
Command: 1-9, Display Menu:M Command: In this interface users can enter number keys 1-9 to get into the next menu or exist. There will be echo of valid entering and system will not deal with invalid commands.
10.4. Device set query:
In main menu press number key 1, and then there will be device set query menu: 1.Device ID and Baud rate 2.Line-Board info(RAM) 3.Line-Board info(EEPROM) 4.E1 using and mode info 5.Clock,CRC and Net info 6.E1 Alarm Mask info 7.User-Board info(RAM) 8.User-Board info(EEPROM) Device Query Command:1-8, Menu Display:M, Return:Q Command:
10.4.1. Device ID and Baud rate
In device set query menu press number key 1, and there will be device ID and baud rate information:
Device ID:1 Baud Rate:2(2400bps) Device Query Command:1-8, Menu Display:M, Return:Q Command:

Raisecom Technology Co., Ltd
55
10.4.2. Line-Board information (RAM):
In device set query menu press number key 2, and then there will be device Line-Board information:
Real information: Line-Board Type:2E1 Board (Line-Board card name) Device Query Command:1-8, Menu Display:M, Return:Q Command:
There will be Line-Board name for each Line-Board card. If a Line-Board card cannot be configured there will not be configuration information and status information. At present only optical Line-Board card has configuration information as follows: Real information: Line-Board Type:Optical Board Software Version:REV A.0 Hardware Version:REV A.0 Optical Modul Type:S1 Alarm Mask: 1=Mask Optical LOS| Frame LOF | E-3 ERROR | E-6 ERROR Local: 0 0 0 0 Remote: 0 0 0 0 Loopback State:No Loopback Ether Net Set: Ether Net E-Port:Open Link State:Link Down Ether Net State:Auto Adapt 10M Half Duplex Enable AUTO_MDI/MDIX Send Limited Bandwidth:4095 x 32Kbps Receive Limited Bandwidth:4095 x 32Kbps
Device Query Command:1-8, Menu Display:M, Return:Q Command:
2E1 Line-Board: Line-Board Type:2E1 Board
4E1 Line-Board:
Line-Board Type:4E1 Board
10.4.3. Line-Board information (EEPROM):
In device set query menu press number key 3, and then there will be device Line-Board information:
EEPROM Set: Line-Board Type:2E1 Board Device Query Command:1-8, Menu Display:M, Return:Q Command:
Please refer to Line-Board information (RAM) for Line-Board information explanation:

Raisecom Technology Co., Ltd
56
10.4.4. E1 using and mode information:
Indevice set query menu press number key 4, and there will be E1 using and mode information:
E1: First Second Third Fourth Real information: Use: 1=Using 1 1 0 0 Mode: 1=PCM31 0 0 0 0 Mask: 1=Mask 0 0 0 0 EEPROM Set: Use:1=Using 1 1 0 0 Mode:1=PCM31 0 0 0 0 Mask:1=Mask 0 0 0 0 Device Query Command: 1-8, Menu Display: M, Return: Q Command:
There are two parts information, one is the information saved in RAM and the other part is the information saved in EEPROM.
10.4.5. Clock, CRC and Net information:
Indevice set query menu press number key 5, and there will be E1 using and mode information:
Real information: Clock Mode: Recovered Clock(1 E1) Auto Net Topology: Single E1 Direction Net Using Time Slot: 0 Time Slot CRC Transmit: Enable Alarm Sound Output: Disable EEPROM information: Clock Mode: Recovered Clock(1 E1) Auto Net Topology: Single E1 Direction Net Using Time Slot: 0 Time Slot CRC Transmit: Enable Alarm Sound Output: Disable Device Query Command:1-8, Menu Display:M, Return:Q Command:
Note: clock modes: main clock Recovered clock (1 E1) Recovered clock (2 E1) Recovered clock (3 E1) Recovered clock (4 E1)
There are two ways to adapt clock: Auto Manual

Raisecom Technology Co., Ltd
57
Net topology: Single E1 Direction Double E1 Dircetion Three E1 Dircetion Four E1 Dircetion
Net Using Time Slot: 0 Time Slot 1 Time Slot
CRC transmit: eanble disable
10.4.6. E1 Alarm Mask information:
Indevice set query menu press number key 6, and there will be E1 Alarm Mask information:
Alarm LOS AIS LOF RAL LOMF LOMFC CRC Real information: 1st E1 1=Mask 0 0 0 0 0 0 0 2nd E1 1=Mask 0 0 0 0 0 0 0 3rd E1 1=Mask 0 0 0 0 0 0 0 4th E1 1=Mask 0 0 0 0 0 0 0 EEPROM Set: 1st E1 1=Mask 0 0 0 0 0 0 0 2nd E1 1=Mask 0 0 0 0 0 0 0 3rd E1 1=Mask 0 0 0 0 0 0 0 4th E1 1=Mask 0 0 0 0 0 0 0 Device Query Command:1-8, Menu Display:M, Return:Q Command:
There are two parts information, one is the information saved in RAM and the other part is the information saved in EEPROM.
10.4.7. User-Board information (RAM)
Indevice set query menu press number key 7, there will be the prompt: Input User Board No.(1-3, Esc=Cancel):
Then chose the user-board number you want to query and there will be the user-board interformtion:
User-Board X:
Type: user-card name Channel Number: X Set Mode: Hardware/Software
Device Query Command:1-8, Menu Display:M, Return:Q Command: User-board type 6 V35 data user card information:
Type: 6 V35 User Board Channel Number: 7 Set Mode:Software Signal:None Receive Phase:Positive Transmit
Phase:Positive

Raisecom Technology Co., Ltd
58
Channel:Main Channel Local Loopback:Loopback Remote Loopback:No Loopback Error Code Test:Disable 7235 Auto Adjust Phase:Enable Adjust Receive Phase:Enable(Clock Down) DTR State:1(Unready) RTS State:1(Unready) DCD State:0(Ready) CTS State:0(Ready)
Note: parameters of phase adjustment: positive and negative; Channel: main channel & Single channel
Loopback Set: No Loopback & Loopback Error Code Test: Disable & Enable Auto to Adjust Phase for Transmit: Enalbe & Disable To Adjust Receive Phase: Enable & Disable Status of DTR, RTS, DCD, CTS: Ready & Unready Error Test Effect: Normal & Abnormal; if you disble error code test,
there will not be this item.
User-board type 7 V24 data user card: Not available now
User-board type 8 Ethernet data user card: Type: 8 Ether Net Board Channel Number: 8 Set Mode:Software Signal:None Channel:Main Channel Band Width Buffer:>256Kbps Defeat Link Default Set:Half Duplex Link State:Link Down FXD State:Half Duplex
Note: Band Width Buffer is used to adjust buffer to reduce latency. User-board type 9 RS232 serial interface user card:
Type: 9 RS232 Board Channel Number: 8 Set Mode:Hardware Signal:None Band Width:64Kbps Device Query Command:1-8, Menu Display:M, Return:Q Command:
Note: the bandwidth configuration is not effective now User-board type 10 RS422 serial interface user card:
User-Board 3: Type:10 RS422 Board Channel Number: 8 Set
Mode:Hardware Signal:Exist Band Width:64Kbps Device Query Command:1-8, Menu Display:M, Return:Q Command:
Note: the bandwidth configuration is not effective now User-board type 11 magneto telephone card:
Type:11 Magneto Board Channel Number: 8 Set Mode:Hardware

Raisecom Technology Co., Ltd
59
Signal:Exist Signal In:Original Signal Out:Original Signal Bit(D7:D0):A A A A A A A A Device Query Command:1-8, Menu Display:M, Return:Q Command:
10.4.8. User-Board information (EEPROM)
Device Set Query menu press number key 8 you can get the same information saved in EEPROM as User-Board information (RAM)
10.5. Cross Set Query menu:
In main menu press number key 2, there will be Cross Set Query menu: 1.Four E1 Cross Query(RAM) 2.Four User Cross Query(RAM) 3.Four E1 Cross Query(EEPROM) 4.Four User Cross Query(EEPROM) CROSS Query Command:1-4, Menu Display:M, Return:Q Command:
Note: here you need to enter two commands (group number is required)
10.5.1. Four E1 Cross Query (RAM)
In Cross Set Query menu, press number key 1 and there will be the following information: Input Group No.(1-4, Esc=Cancel):1 Enter group number 1, cross connection of the first E1 will be displayed: First E1 Cross Set
Channel 1 2 3 4 5 6 7 8 cross 0 0 0 | 5 2 | 5 3 | 5 4 | 5 5 | 5 6 | 5 7 | 5 8
8 0 0 | 0 0 | 0 0 | 0 0 | 0 0 | 0 0 | 0 0 | 0 0 16 5 17 | 5 18 | 5 19 | 5 20 | 0 0 | 0 0 | 0 0 | 0 0 24 0 0 | 0 0 | 0 0 | 0 0 | 0 0 | 0 0 | 0 0
CROSS Query Command:1-4, Menu Display:M, Return:Q Command:
Note: in this table the address indicates the output data direction and the contents indicate the input data direction. Data in each cell consists of two parts, the first part indicates cross group: 1: cross group 1 2: cross group 2 3: cross group 3 4: cross group 4 5: user E1 1 6: user E1 2 7: user E1 3 8: user E1 4 And the second part indicates the channel of cross group (the first part): 1-31, 0 0 indicates there is no cross connection. Address indication: result of row number plus column number is the channel number. For example: (5 17),the address is 16+1=17 that is to say the data in this cell is the cross connection of the 17th channel of first E1 (cross group 1)

Raisecom Technology Co., Ltd
60
10.5.2. Four User Cross Query (RAM)
In Cross Set Query menu, press number key 2 and there will be the following information:
Input Group No. (1-4, Esc=Cancel): Enter group number 1, cross connection of the first E1 will be displayed:
First User Group Cross Set Channel 1 2 3 4 5 6 7 8
cross 0 0 0 | 1 2 | 1 3 | 1 4 | 1 5 | 1 6 | 1 7 | 1 8 8 0 0 | 0 0 | 0 0 | 0 0 | 0 0 | 0 0 | 0 0 | 0 0 16 1 17 | 1 18 | 1 19 | 1 20 | 1 21 | 1 22 | 1 23 | 1 24 24 0 0 | 0 0 | 0 0 | 0 0 | 0 0 | 0 0 | 0 0
CROSS Query Command:1-4, Menu Display:M, Return:Q Command:
Note: in this table the address indicates the output data direction and the contents indicate the input data direction. Data in each cell consists of two parts, the first part indicates cross group: 1: cross group 1 2: cross group 2 3: cross group 3 4: cross group 4 RC3000 does not support the cross connect from user E1 to user E1, so the input data direction of cross group 5-8 is meaningless. And the second part indicates the channel of cross group (the first part): 1-31, 0 0 indicates there is no cross connection. Address indication: result of row number plus column number is the channel number. For example: (1 18),the address is 16+2=18 that is to say the data in this cell is the cross connection of the 18th channel of first user E1 (cross group 5)
10.5.3. Four E1 Cross Query (EEPROM)
In Cross Set Query menu, press number key 3 and there will be the following information:
Input Group No. (1-4, Esc=Cancel): Enter group number 1, cross connection of the first E1 information saved in EEPROM will be displayed:
First E1 Cross Set (EEPROM) Channel 1 2 3 4 5 6 7 8 cross 0 0 0 | 5 2 | 5 3 | 5 4 | 5 5 | 5 6 | 5 7 | 5 8
8 0 0 | 0 0 | 0 0 | 0 0 | 0 0 | 0 0 | 0 0 | 0 0 16 5 17 | 5 18 | 5 19 | 5 20 | 0 0 | 0 0 | 0 0 | 0 0 24 0 0 | 0 0 | 0 0 | 0 0 | 0 0 | 0 0 | 0 0
CROSS Query Command:1-4, Menu Display:M, Return:Q Command: Note: in this table the address indicates the output data direction and the contents indicate the input data direction. Data in each cell consists of two parts, the first part indicates cross group: 1: cross group 1 2: cross group 2 3: cross group 3 4: cross group 4 5: user E1 1 6: user E1 2 7: user E1 3 8: user E1 4 And the second part indicates the channel of cross group (the first part): 1-31, 0 0

Raisecom Technology Co., Ltd
61
indicates there is no cross connection. Address indication: result of row number plus column number is the channel number. For example: (5 17),the address is 16+1=17 that is to say the data in this cell is the cross connection of the 17th channel of first E1 (cross group 1) RC3000 has automatic user-board recognization and automatic channel configuration functions, and the information saved in EEPROM may be different from that of RAM (real information), so you can use this command to get the information saved in EEPROM.
10.5.4. Four User Cross Query (EEPROM)
In Cross Set Query menu, press number key 4 and there will be the following information:
Input Group No.(1-4, Ese=Cancel): Enter group number 1, cross connection of the first user E1 information (cross group 5) saved in EEPROM will be displayed:
First User Group Cross Set (EEPROM) Channel 1 2 3 4 5 6 7 8
cross 0 0 0 | 1 2 | 1 3 | 1 4 | 1 5 | 1 6 | 1 7 | 1 8 8 0 0 | 0 0 | 0 0 | 0 0 | 0 0 | 0 0 | 0 0 | 0 0 16 1 17 | 1 18 | 1 19 | 1 20 | 1 21 | 1 22 | 1 23 | 1 24 24 0 0 | 0 0 | 0 0 | 0 0 | 0 0 | 0 0 | 0 0
CROSS Query Command:1-4, Menu Display:M, Return:Q Command:
Note: in this table the address indicates the output data direction and the contents indicate the input data direction. Data in each cell consists of two parts, the first part indicates cross group: 1: cross group 1 2: cross group 2 3: cross group 3 4: cross group 4 RC3000 does not support the cross connect from user E1 to user E1, so the input data direction of cross group 5-8 is meaningless. And the second part indicates the channel of cross group (the first part): 1-31, 0 0 indicates there is no cross connection. Address indication: result of row number plus column number is the channel number. RC3000 has automatic user-board recognization and automatic channel configuration functions, and the information saved in EEPROM may be different from that of RAM (real information), so you can use this command to get the information saved in EEPROM.
10.6. State Info Query
In main menu press number key 3 there will be state information query menu: 1.Receive State Query 2.Transmit State Query State Query Command:1-2, Menu Display:M, Return:Q Command:

Raisecom Technology Co., Ltd
62
10.6.1. Receive State Query
In state information query menu press number key 1 there will be the following information:
Input Group No.(1-4, Esc=Cancel): Enter group number 1, there will receive signal status information:
First Group Receive State Channel 1 2 3 4 5 6 7 8
state 0 1 | 2 | 3 | 4 | 5 | 6 | 7 | 8 8 9 | 10 | 11 | 12 | 13 | 14 | 15 | 16 16 17 | 18 | 19 | 20 | 21 | 22 | 23 | 24 24 25 | 26 | 27 | 28 | 29 | 30 | 31
State Query Command:1-2, Menu Display:M, Return:Q Command:
Note: the data in each cell is hex and refer to receive signal information of user board, through this command you can get the device work status.
10.6.2. Transmit State Query
In state information query menu press number key 2 there will be the following information:输 Input Group No.(1-4, Esc=Cancel):1 Enter group number 1, there will transmit signal status information:
First Group Transmit State Channel 1 2 3 4 5 6 7 8 state 0 1 | 2 | 3 | 4 | 5 | 6 | 7 | 8
8 9 | 10 | 11 | 12 | 13 | 14 | 15 | 16 16 17 | 18 | 19 | 20 | 21 | 22 | 23 | 24 24 25 | 26 | 27 | 28 | 29 | 30 | 31
State Query Command:1-2, Menu Display:M, Return:Q Command: Note: the data in each cell is hex and refer to transmit signal information of user
board, through this command you can get the device work status.
10.7. Alarm Query menu
In main menu press number key 4, there will be alarm query menu: 1.Device Alarm 2.System Alarm Alarm Query Command:1-2, Menu Display:M, Return:Q Command:
10.7.1. Device Alarm
In alarm query menu press number key 1 there will be present device alarm information: Device Alarm:
1E1 Alarm: LOMF, CRC
Raisecom Technology Co., Ltd
63
2E1 Alarm:No Alarm Alarm Query Command:1-2, Menu Display:M, Return:Q Command:
Note: E1 interface alarms include: LOS, AIS, LOF, RAL, LOMF, CRC and CRC LOMF Optical interface alarms include: Optical LOS, Frame LOF , E-3 ERROR and E-6 ERROR Alarms include: E1 interface alarms and line-board alarms. There are E1 interface alarms only when that E1 interface is used, so are line-board alarms.
10.7.2. System Alarm
In alarm query menu press number key 1 there will be system alarm information: System Alarm: EEPROM Block: Main:Correct(T T T) E1 Block:Correct(T T T) 2M Block:Correct(T T T) Version:Correct(T T T) User Board Com: 1:Success 3:Success Line Board Com: Fail Temp Sensor: Normal 30 Fans: Normal Alarm Query Command:1-2, Menu Display:M, Return:Q Command::
10.8. Set menu
In main menu press number key 5 and there will be set menu: 1.System Set 2.Cross Set Set Command:1-2, Menu Display:M, Return:Q Command:
10.9. System Set menu
In set menu press number key 1 there will be system set menu: 1.ID Set
2.Baud Rate Set 3.Line Board Set 4.E1 Set 5.Clock Set 6.Net Topology Set 7.Alarm Sound Set 8.User Board Set 9.DCD and RTS of V35V24 Board with Alarm Set System Set Command:1-9, Menu Display:M, Return:Q Command:

Raisecom Technology Co., Ltd
64
10.9.1. ID set
In system set menu press number key 1 to configure device ID: DeviceID=2 Input Device ID(0-255):
The first row is device present ID and the second row is for user configuring a new ID. If you do not input number but press ENTER key, the old ID will be effective. And if you input a number and then press ENTER key, this number will be the device ID. The range of device ID is 0-255 and 0 indicates to clear the ID, the invalid number will be ignored. BackSpace key is available to change the input.
10.9.2. Baud Rate Set
In system set menu press number key 1 to configure Baud Rate: Baud Rate=2(2400bps) Baud Rate(1:300,2:2400,3:4800,4:9600):
The first row is device present Baud Rate and the second row is for user configuring a new Baud rate. If you do not input number but press ENTER key, the old Rate will still be effective. And if you input a number and then press ENTER key, this configuration will be effective. The range of Baud Rate is 0-4 and 0 indicates to clear the Baud Rate, the invalid number will be ignored. BackSpace key is available to change the input.
10.9.3. Line-Board set
In system set menu press number key 1 to configure Line-Board, and at present there are three ways to configure Line-Board:
a. Without CPU the prompt will be: The line board is 2E1 Board, it can't be set. System Set Command:1-9, Menu Display:M, Return:Q Command: b. With optical line-board, the menu will be:
1.Alarm Mask Set 2.Loopback Set 3.ALS Set 4.Ether Net Port Set 5.Ether Net Port Work Set 6.Transmit Band Width Set 7.Receive Band Width Set 8.Reset Ether Net Optical Board Set Command:1-8, Menu Display:M, Return:Q Command:
Note: the explanation of each command is available in 10.9 Line Board Set menu

Raisecom Technology Co., Ltd
65
10.9.4. E1 set
In system set menu press number key 4 to configure E1 interface and the menu will be: 1.Use Set
2.Mode Set 3.Mask Set 4.CRC Set E1 Set Command:1-4, Menu Display:M, Return:Q Command:
The explanation of each command is available in 8.10 E1 set
10.9.5. E1 Clock Set
In system set menu press number key 5 to configure E1 clock: Using Clock:Main Clock
In this status use → key to change the configuration; ENTER and E keys all indicate confirm the operation and press ESC key to cancel. Clock modes: Main clock
Recovered clock (1 E1) Recovered clock (2 E1) Recovered clock (3 E1) Recovered clock (4 E1)
Press ↓to configure the way to adapt clock: To Adapt Clock:Auto There are two ways to adapt clock: Auto & Manual In Auto Adapt Clock mode RC3000 will set a steady clock mode according to E1 using status and board information. When there are alarms, system will judge whether to change the clock mode, if necessary RC3000 will find a valid clock to synchronous. In any status, press ENTER to confirm configuration (or press ENTER until the configuration finished), press E key to finish configuration, and ESC to cancel configuration.
10.9.6. Net Topology Set
In system set menu press number key 6 to configure network management channel: Using Time Slot:0 Time Slot
In this statu use → key to change the configured value; use ↓↑to change items (using time slot & net topology); Press ENTER to confirm configuration, press E key to finish configuration, and ESC to cancel configuration. Using time slots are: 0 time slot & 1 time slot Network management topologies are: Single E1 Direction, Double E1 Dircetion, Three E1 Dircetion and Four E1 Dircetion. RC3000 has an assistant network management channel, with DIP –switches on front

Raisecom Technology Co., Ltd
66
panel, all RC3000 devices can be managed. To realize whole network management the following rules must be obeyed: If time slot 0 is network management channel, the maximum rate of serial data is 2400bps, otherwise there will be error codes. If time slot 1 is network management channel, the serial data rate can be up to 9600bps and time slot 1 cannot be cross connected, otherwise RC3000 will work abnormally. Time slot is recommended. Network management topology rule is the number of network management channels decides the number of E1 direction as follows: Three RC3000 devices make up this network and a PC can manage them all when connected to LINK UP interface of the first RC3000. Device 1: Set the second bit of DIP-switches ON, and others OFF; use one E1, time slot 0 and single E1 direction. Device 2: Set all DIP-switches OFF; use two E1s, time slot 0 and double E1 direction. Device 3: Set all DIP-switches OFF; use one E1, time slot 0 and single E1 direction. If connect two RC3000 devices through two E1, the number of used E1 will not be same
as that of network management topology E1 directions. See in following figure: In this topology device 1 and 2 are connected through 2 E1 (4 E1 if it is optical interface), but the network management topology must be configured as follows: Device 1: Set the second bit of DIP-switches ON, and others OFF; use two E1, time slot 0 and single E1 direction. Device 2: Set the second bit of DIP-switches ON, and others OFF; use two E1, time slot 0 and single E1 direction. If either of these two devices’ network management topology is configured as double E1 direction, the remote device cannot be managed. When use three RC3000 devices to make up a ring, the number of used E1 will not be same as that of network management topology E1 directions. See in following figure:
Figure 41
RC3000-2E1 RC3000-2E1(ADM)
1E1 2E1
Device 1 Device 2 Device 3
RC3000-2E1
Figure 42
RC3000-2E1
1E1
2E1
Device 1 Device 2
RC3000-2E1
2E1
1E1

Raisecom Technology Co., Ltd
67
In this topology, the configuration of each device is as follows; Device 1: Set the second bit of DIP-switches ON, and others OFF; use two E1, time slot 0 and single E1 direction. Device 2: Set all DIP-switches OFF; use two E1s, time slot 0 and double E1 direction. Device 3: Set all DIP-switches OFF; use two E1s, time slot 0 and single E1 direction. If your configuration of any of the three devices is not same as above, there will be device that cannot be managed. (Attention: 0nly device 2 is configured as double E1 direction). Figure 44 Here is a more complex topology:
In this topology connect RS232 serial interface of PC with LINK UP interface of device 1, device 1 and device 2, device 2 and device 3, device 3 and device 4, device 4 and device 5 are connected through E1 cable, and connect LINK DOWN interface of device 2 with LINK UP interface of device 4 to realize remote network management connection. The configuration of each device is as follows: Device 1: Set the second bit of DIP-switches ON, and others OFF; use one E1, time slot 0 and single E1 direction. Device 2: Set all DIP-switches OFF; use two E1s, time slot 0 and double E1 direction. Device 3: Set all DIP-switches OFF; use one E1, time slot 0 and single E1 direction. Device 4: Set the second bit of DIP-switches ON, and others OFF; use one E1, time slot
Figure 43
RC3000-2E1
RC3000-2E1 1E1
2E1
Device 1
Device 2
Device 3
RC3000-2E1
1E1
1E1
2E1
2E1

Raisecom Technology Co., Ltd
68
0 and single E1 direction. Device 5: Set all DIP-switches OFF; use one E1, time slot 0 and single E1 direction. To avoid error the above configuration is recommended.
10.9.7. Alarm Sound Set
In system menu press number key 7 to configure the alarm sound: Alarm Sound Output: Disable
In this status, press ENTER to confirm configuration (or press ENTER until the configuration finished), press E key to finish configuration, and ESC to cancel configuration. By default the alarm sound output is ENABLE, when disable the sound there will not be alarm sound.
10.9.8. User Board Set
In system menu press number key 8 to configure the user-board: Input User Board No.(1-3, Esc=Cancel):
If the relative user-board does not exist, there will be the following information: The First board is not exist. System Set Command:1-9, Menu Display:M, Return:Q Command:
If the user-board exists, then you can configure. When user-board types are: 1 (FXS user voice card), 2 (FXO voice relay card), 3 (FXS & FXO hybrid card), 4 (EM2 audio relay card), 5 (EM4 audio relay card), and 11 (magneto telephone care) the set menu will be:
1.Input Signal 2.Output Signal 3.Signal Bit
User-Board1(FXS Board) Set Command:1-3, Menu Display:M, Return:Q Command: Note: the command explanation is available in 8.11 User Board Set (with signal) menu. When the user-board types are: 6 (V35 user-board), 7 (V24 user-board) the menu will be:
1.Sub-Board Slot Number 2.Receive Datat Phase 3.Transmit Data Phase 4.Channel Select 5.Loopback Set 6.Error Code Test 7.Auto to Adjust Phase for Transmit 8.To Adjust Receive Phase

Raisecom Technology Co., Ltd
69
User-Board2(V35 User Board) Set Command:1-8, Menu Display:M, Return:Q Command:
Note: the command explanation is available in 8.12 V35 User Board Set menu. When the user-board type is 8 (Ethernet data user-board), the menu will be:
1.Sub-Board Slot Number 2.Channel Select 3.Buffer Size Set 4.Default Port Mode 5.Reaet Ether Net Port User-Board3(Ether Net Board) Set Command:1-5, Menu Display:M, Return:Q Command:
Note: the command explanation is available in 8.13 Ethernet user-board set menu.
When the user-board type is 9( RS232 data user-board) , 10( RS422 data user-board),the menu will be:
1.Channel Band Width Set User-Board3(RS232 Board) Set Command:1-1, Menu Display:M, Return:Q Command:
Note: the command explanation is available in 8.14 RS232 and RS422 user-board set menu.
10.9.9. DCD and RTS of V35V24 Board with Alarm Set
In System Set menu press number key 9 to configure the alarm correlation of DCD & RTS:
With Alarm Set:Disable In this status use → key to change the configured value; Press ENTER to confirm configuration, press E key to finish configuration, and ESC to cancel configuration. When disable alarm correlation function, if the output status of DCD & CTS is normal the V35 board will transmit data and remote DTE device does not need to reset all the time; when enable alarm correlation function, if there are alarms of LOS, LOF and AIS, status of DCD will be unready and if there is RAL alarm status of CTS will be unready.
10.10. Line Board Set menu
This section we will explain how to configure RC3000-OPT line-board and you must first enter the Line Board Set menu.

Raisecom Technology Co., Ltd
70
10.10.1. Alarm Mask Set
In optical line-board set menu press number key 1 to configure optical alarm mask: Optical Alarm Mask Set: Local Optical Loss:(Enable)
In this statu use → key to disable or enable alarm mask; use ↓↑to change items (alarms); Press ENTER to confirm configuration, press E key to finish configuration, and ESC to cancel configuration. The alarms are: Local Optical Loss;Local LOF; Local E-3 ERR; Local E-6 ERR; Remote Optical Loss; Remote LOF; Remote E-3 ERR; Remote E-6 ERR
10.10.2. Loopback Set
In optical line-board set menu press number key 2 to configure loopback of optical line: Optical Loopback Set: Loopback Direction:Remote
In this statu use → key to change configured value; use ↓↑to change configuration items; Press ENTER to confirm configuration, press E key to finish configuration, and ESC to cancel configuration. The configuration items are: Loopback Direction; 1E1 Loopback; 2E1 Loopback; 3E1 Loopback; 4E1 Loopback
10.10.3. ALS Set
In optical line-board set menu press number key 3 to configure ALS function (the precondition is optical module has this function):
ALS function: Enable In this statu use → key to change configured value (enable or disable); Press ENTER to confirm configuration, press E key to finish configuration, and ESC to cancel configuration. If the optical module does not have this function there will be prompt:
Optical Model hasn't ALS function, Can't be set. Optical Board Set Command:1-8, Menu Display:M, Return:Q Command:
10.10.4. Ether Net Port Set
In optical line-board set menu press number key 4 to configure Ethernet interface: Ether Net Port:Open
In this statu use → key to change configured value (open or close); Press ENTER to confirm configuration, press E key to finish configuration, and ESC to cancel configuration.

Raisecom Technology Co., Ltd
71
10.10.5. Ether Net Port Work Set
In optical line-board set menu press number key 5 to configure Ethernet interface work status:
Ether Net Work State Set: Auto Mode:Enable
In this statu use → key to change configured value (enable or disable); use ↓↑to change configuration items; Press ENTER to confirm configuration, press E key to finish configuration, and ESC to cancel configuration. The configuration items are: Auto Mode: Enable/Disable
Port Mode: Full Duplex/Half Duplex Port Speed: 100M/10M AUTO_MDI/MDIX: Enable/Disable
10.10.6. Transmit Band Width Set
In optical line-board set menu press number key 6 to configure Ethernet interface Tx Band Width:
Transmit Band Width: 4095 x 32Kbps Set (0-4095):
The first row is present configuration value and the second row is for your configuration. If you do not set bandwidth value in the second row and just press ENTER, the old configuration will be reserved. If you set the bandwidth value (the entering can only be number and within the range of 0-4095) and press ENTER, the new configuration will be effective. BackSpace key is available to modify the input value.
10.10.7. Receive Band Width Set
In optical line-board set menu press number key 7 configure Ethernet interface Rx Bandwidth:
Receive Band Width:4095 x 32Kbps Set(0-4095):
The first row is present configuration value and the second row is for your configuration. If you do not set bandwidth value in the second row and just press ENTER, the old configuration will be reserved. If you set the bandwidth value (the entering can only be number and within the range of 0-4095) and press ENTER, the new configuration will be effective. BackSpace key is available to modify the input value.
10.10.8. Reset Ether Net
In optical line-board set menu press number key 8 to reset the Ethernet interface: To run this command will reset ether net port.

Raisecom Technology Co., Ltd
72
Run this command (Y/N): Press Y key to confirm the operation and press N key to return, others keys are invalid.
10.11. E1 Set
This section will explain the command in E1 Set menu.
10.11.1. Use Set
In E1 Set menu press number key 1 to configure the E1 use status: First E1: Using
In this statu use → key to change configured value; use ↓↑to change configuration items; Press ENTER to confirm configuration, press E key to finish configuration, and ESC to cancel configuration. Configuration items are: First E1; Second E1; Third E1 and Fourth E1.
10.11.2. Mode Set
In E1 Set menu press number key 2 to configure the E1 frame structure: First E1 Mode: PCM30
In this statu use → key to change E1 frame format: PCM30 or PCM31; use ↓↑to change configuration items; Press ENTER to confirm configuration, press E key to finish configuration, and ESC to cancel configuration. Configuration items are: First E1 Mode, Second E1 Mode, Third E1 Mode and Fourth E1 Mode
10.11.3. Mask Set
In E1 Set menu press number key 3 to configure alarm mask: First E1:(Enable)
In this statu use → key to change E1 alarm mask (enable or mask); use ↓↑to change configuration items; Press ENTER to confirm configuration, press E key to finish configuration, and ESC to cancel configuration. Configuration items are: First E1; First E1 LOS; First E1 AIS; First E1 LOF
First E1 RAL; First E1 LOMF; First E1 CRC LOMF First E1 CRC Alarm Second E1; Second E1 LOS; Second E1 AIS; Second E1 LOF Second E1 RAL; Second E1 LOMF; Second E1 CRC LOMF Second E1 CRC Alarm Third E1; Third E1 LOS; Third E1 AIS; Third E1 LOF Third E1 RAL; Third E1 LOMF; Third E1 CRC LOMF Third E1 CRC Alarm

Raisecom Technology Co., Ltd
73
Fourth E1; Fourth E1 LOS; Fourth E1 AIS; Fourth E1 LOF Fourth E1 RAL; Fourth E1 LOMF; Fourth E1 CRC LOMF Fourth E1 CRC Alarm
Note: if the line-board is 2E1 line-board only 2 E1 can be configured.
10.11.4. CRC Set
In E1 Set menu press number key 4 to configure CRC check function: CRC Set: Enable
In this statu use → key to change the configured value: Enable or disable; Press ENTER to confirm configuration, press E key to finish configuration, and ESC to cancel configuration.
10.12. User Board Set (with signal) menu
This section will explain the command of User Board Set (with signal configurarion) menu, including: FXS user voice card RC3000-SUB-DS, FXO voice relay card RC3000-SUB-DO, FXS & FXO hybrid user board RC3000-SUB-DSO, E&M2 audio relay card RC3000-SUB-DM2, E&M4 audio reley card RC3000-SUB-DM4 and magneto telephone card RC3000-SUB-DMT.
10.12.1. Input Signal
In user board set menu press number key 1 to configure Rx signal: User Board Signal In:Original
In this statu use → key to change the configured value: Original or Anti; Press ENTER to confirm configuration, press E key to finish configuration, and ESC to cancel configuration. Note: the Original indicates the default signal mode of RC3000, Anti indicates the reverse mode of RC3000 default signal mode. Default signal mode of RC3000 is: high-voltage ring and pickup.
10.12.2. Output Signal
In user board set menu press number key 2 to configure Tx signal mode: User Board Signal Out:Original
In this statu use → key to change the configured value: Original or Anti; Press ENTER to confirm configuration, press E key to finish configuration, and ESC to cancel configuration.

Raisecom Technology Co., Ltd
74
10.12.3. Signal Bit
In user board set menu press number key 3 to configure the signal bit: First Channel Signal Bit:A
In this status use → key to change signal bit; use ↓↑to change configuration items; Press ENTER to confirm configuration, press E key to finish configuration, and ESC to cancel configuration. Configuration items are: First Channel Signal Bit; Second Channel Signal Bit; Third Channel Signal Bit…Last Channel Signal Bit;
10.13. V35 User Board Set menu
This section explains hwo to configure V35 user board.
10.13.1. Sub-Board Slot Number
In V35 user board set menu press number key 1 to configure the occupied channel number:
User Board Slot Number=8(Can Set) Input Slot Number (0-31):
The first row displays present configuration value and the second row is for your new configuration. If you do not set occupied channel number in the second row and just press ENTER, the old configuration will be reserved. If you set the occupied channel number (the entering can only be number and within the range of 0-31) and press ENTER, the new configuration will be effective. BackSpace key is available to modify. RC3000-SUB-DV35 is a data card with V35 interface and the channel number is configurable, the rules are as follow:
a. V35 user-board can transmit data in two ways: use main cross group &
use single cross group. The first user E1 is a main cross group and channels
of this cross group will be distributed to user boards. Other user E1s are
single cross group for different slots: 1 MCU version is REV1.2 and versions below this: user card in first slot will occupy cross group 6 (user E1
2) and user card in second slot will occupy cross group 8 (user E1 4), user
card in the third slot cannot have single cross group. 2 MCU versions are advanced than REV1.2: cross group 6, 7 and 8 (user E1 2, 3 and 4) are
single cross group for user card in slot 1, 2 and 3.
b. The number of occupied channels for V35 user board is limited. Limitation
for single cross group: Channel number range is 0-31, 0 indicates nonuse;
the startup channel is channel 1 and there will not be channel occupation
Raisecom Technology Co., Ltd
75
collision alarms. And limitation for main cross group (user E1 1) is: when V35
user-board uses main cross group to transfer data the number of channels
will not same for different slots. Channel number range for first slot is 0-31, 0
indicates that shutdown the transmission, and the startup channel is channel
1. If other slots have already occupied the channels of main cross group
there will alarms. Channel number range for second slot is 0-23, 0 indicates
that shutdown the transmission, and the startup channel is channel 9. If other
slots have already occupied the channels of main cross group there will
alarms. Channel number range for the third slot is 0-15, 0 indicates that
shutdown the transmission of this user card, and the startup channel is
channel 17.
10.13.2. Receive Data Phase
In V35 user board set menu press number key 2 to configure Rx data phase: Receive Data Phase: Positive
In this status use → key to change the configured value: Positive or Negative; Press ENTER to confirm configuration, press E key to finish configuration, and ESC to cancel configuration. Note: the Positive indicates the default output data phase of V35, Negative indicates the reverse value of default data phase.
10.13.3. Transmit Data Phase
In V35 user board set menu press number key 3 to confugre Tx data phase: Transmit Data Phase: Positive
In this status use → key to change the configured value: Positive or Negative; Press ENTER to confirm configuration, press E key to finish configuration, and ESC to cancel configuration.
10.13.4. Channel Select
In V35 user board set menu press number key 4 to select data channel: Data Channel Select: Main Channel
In this status use → key to change the configured value: Main channel or Single channel; Press ENTER to confirm configuration, press E key to finish configuration, and ESC to cancel configuration.

Raisecom Technology Co., Ltd
76
10.13.5. Loopback Set
In V35 user board set menu press number key 5 to configure loopback status of V35 user board:
Local Loopback Set:No Loopback In this status use → key to change loopback status; use ↓↑to change configuration items; Press ENTER to confirm configuration, press E key to finish configuration, and ESC to cancel configuration. Configuration items are: Local Loopback & Remote Loopback. Note: Local loopback indicates the data loopback from V35 to V35 and Remote Loopback indicates the data loopback from V35 to E1.
10.13.6. Error Code Test
In V35 user board set menu press number key 6 to configure Error code test Error Code Test: Disable
In this status use → key to change the configured value: Disable or Enable; Press ENTER to confirm configuration, press E key to finish configuration, and ESC to cancel configuration. Note: when you start error code test, V35 user board will transmit error code periodically, and its Rx will test the Rx data. If the Rx error code is same with that of Tx, error code test indicator light (PAT_OK) will ON, otherwise the light will flicking or OFF.
10.13.7. Auto to Adjust Phase for Transmit
In V35 user board set menu press number key 7 to configure the Tx data Phase Auto Adjust function:
Auto to Adjust Phase for Transmit:Enable In this status use → key to change the configured value: Disable or Enable; Press ENTER to confirm configuration, press E key to finish configuration, and ESC to cancel configuration. Note: V35 user-board can adjust the phase of Tx data automatically.
10.13.8. To Adjust Receive Phase
In V35 user board set menu press number key 8 to configure the Rx data phase adjust function:
To Adjust Receive Phase:Disable In this status use → key to change the configured value: Disable or Enable; Press ENTER to confirm configuration, press E key to finish configuration, and ESC to cancel configuration. Note: V35 user-board can adjust Rx data with a 0-degree shift, 90-degree shift and

Raisecom Technology Co., Ltd
77
180-degree shift. Disable this function and set the Rx data phase positive: the Rx data phase will be 0 degree; disable this function and set the Rx data phase negative: the Rx data phase will be 180 degree; enable this function and set the Rx data phase positive: the Rx data phase will be 90 degree.
10.14. Ethernet user-board set menu
This section will explain how to configure Ethernet data user-board.
10.14.1. Sub-Board Slot Number
In Ethernet user-board set menu press number key 1 to configure the number of occupied channels:
User Board Slot Number=8(Can Set) Input Slot Number(0-31):
The first row displays present configuration value and the second row is for your new configuration. If you do not set occupied channel number in the second row and just press ENTER, the old configuration will be reserved. If you set the occupied channel number (the entering must within the range of 0-31) and press ENTER, the new configuration will be effective. BackSpace key is available to modify. The rule of configuring channels is the same as that of V35, please refer to the relative section of V35 user-board set.
10.14.2. Channel Select
In Ethernet user board set menu press number key 2 to select data channel: Data Channel Select: Main Channel
In this status use → key to change the configured value: Main channel or Single channel; Press ENTER to confirm configuration, press E key to finish configuration, and ESC to cancel configuration.
10.14.3. Buffer Size Set
In Ethernet user board set menu press number key 3 to set the buffer size: Buffer Size Set:>256Kbps
In this status use → key to change the configured value: >=2Mbps, >1Mbps, >512Kbps, >256Kbps; Press ENTER to confirm configuration, press E key to finish configuration, and ESC to cancel configuration.

Raisecom Technology Co., Ltd
78
10.14.4. Default Port Mode
In Ethernet user board set menu press number key 4 to set the default port mode: Default Port Model:Half Duplex
In this status use → key to change the configured value: Full duplex of Half duplex; Press ENTER to confirm configuration, press E key to finish configuration, and ESC to cancel configuration. Note: default port mode refers to the mode when Ethernet electric interface is LINK DOWN, and when Ethernet electric interface is LINK UP it is in auto negotiation mode.
10.14.5. Reset Ether Net Port
In Ethernet user board set menu press number key 5 to reset the Ethernet electric interface and there will be the confirm prompt:
To run this command will reset ether net port. Run this command (Y/N):
In this status press Y to reset the board and press N to cancel the operation. Other enterings are invalid.
10.15. RS232 and RS422 user-board set menu
This section will explain the commands of RS232 & RS422 user-board menu:
10.15.1. Channel Band Width Set
In user board set menu press number key 1to configure channel band width:: Channel Band Width:64Kbps
In this status use → key to change the configured value: 64Kbps, 128Kbps, 256Kbps and 512Kbps; Press ENTER to confirm configuration, press E key to finish configuration, and ESC to cancel configuration. Note: bandwidth set of RS232 & RS422 has not been fully realized now, and this function is reserved.
10.16. Cross Set menu
In set menu press number key 2 there will be Cross Set menu: 1.Cross Set
2.Create Group Cross 3.Delete Group Cross Cross Set Command:1-3, Menu Display:M, Return:Q Command:

Raisecom Technology Co., Ltd
79
10.16.1. Cross Set
In cross set menu press number key 1 to configure the cross connect: Input Group Number (1-8):
First input the cross group number: First Channel:
There are two parts of configured data for each channel: a group number and a channel number (there must be space between the two numbers) such as: 1 1, 0 0 indicates deleting the cross connection of this channel. Press ENTER for the configuration of the next channel (for unfinished entering you cannot start to configure the next channel and the invalid data will be discarded).
Second Channel: Press ENTER to confirm configuration (or skip that channel’s configuration and the old value will be reserved), press E key to finish configuration, and ESC to cancel configuration.
10.16.2. Create Group Cross
In cross set menu press number key 2 to create group cross: Group No. for Time Slot Out:
The entering must be a number from 1 to 8, press ENTER to confirm and start the configuration of next item. The system will check the entered number, if invalid it will be discard; if valid there will be next item configuration.
Time Slot Start No. for Time Slot Out: The entering must be a number from 1 to 31, press ENTER to confirm and start the configuration of next item. The system will check the entered number; if invalid it will be discard; if valid there will be next item configuration.
Group No. for Time Slot In: The entering must be a number from 1 to 8, press ENTER to confirm and start the configuration of next item. The system will check the entered number; if invalid it will be discard; if valid there will be next item configuration.
Time Slot Start No. for Time Slot In: The entering must be a number from 1 to 31, press ENTER to confirm and start the configuration of next item. The system will check the entered number; if invalid it will be discard; if valid there will be next item configuration.
Time Slot Number for Create Cross: The entering must be a number from 1 to 31, press ENTER to confirm and start the configuration of next item. The system will check the entered number; if invalid it will be discard; if valid there will be next item configuration.
Create Mode:Uni-direction In this statu use → to change the configured value: Uni-direction & Bi-direction, press ENTER to confirm and start the configuration of next item.
Deal Mode for Old Relation Data:Retain

Raisecom Technology Co., Ltd
80
In this statu use → to change the configured value: Retain & Clear, press ENTER to confirm. In the configuration process press ESC to exist and the above configurations will be invalid. (There are seven steps of this configurarion: Group No. for Time Slot Out, Time Slot Start No. for Time Slot Out, Group No. for Time Slot In, Time Slot Start No. for Time Slot In, Time Slot Number for Create Cross, Create Mode:Bi-direction, Deal Mode for Old Relation Data) Users can use these commands when set a continuous cross connect, for example the next cross connect is required: Bi-direction cross connect the 1-5 channel of cross group 1 with 9-13 channels of cross group 5 (first user E1) and clear the old configurations, you can use these commands as:
Group No. for Time Slot Out:1 Time Slot Start No. for Time Slot Out:1 Group No. for Time Slot In:5 Time Slot Start No. for Time Slot In:9 Time Slot Number for Create Cross:5 Create Mode:Bi-direction Deal Mode for Old Relation Data:Clear
Then the required cross connect will be set.
10.16.3. Delete Group Cross
In cross set menu press number key 3 to delete group cross: Group No. for Delete Cross:
The entering must be a number from 1 to 8, press ENTER to confirm and start the configuration of next item. The system will check the entered number, if invalid it will be discard; if valid there will be next item configuration.
Time Slot Start No. for Delete Cross: The entering must be a number from 1 to 31, press ENTER to confirm and start the configuration of next item. The system will check the entered number; if invalid it will be discard; if valid there will be next item configuration.
Time Slot Number for Delete Cross: The entering must be a number from 1 to 31, press ENTER to confirm and start the configuration of next item. The system will check the entered number; if invalid it will be discard; if valid there will be next item configuration.
Delete Relation:Retain In this statu use → to change the configured value: Retain & Clear, press ENTER to confirm, and the relative cross connect will be deleted. (There are four steps of this configurarion:, Group No. for Delete Cross, Time Slot Start No. for Delete Cross, Time Slot Number for Delete Cross, and Delete Releation: delete this group or delete both this group and the retain group.) Users can use these commands when delete a continuous cross connect, for example the next cross connect is required:

Raisecom Technology Co., Ltd
81
Delete cross connect of cross group 1 1-5 channels and its correlation configuration: Group No. for Delete Cross:1 Time Slot Start No. for Delete Cross:1 Time Slot Number for Delete Cross:5 Delete Releation:Clear
Then cross connect of cross group 1 1-5 channels and its correlation configuration will be deleted.
10.17. Operate menu
In main menu press number key 6 there will be Operate menu: 1.System Reset 2.Mute 3.Clear All Set 4.Clear Cross Set 5.Save Set Info 6.Make Default Set 7.Clear Reset and Board-Change Flag 8.Test Watchdog 9.Test EEPROM Operate Command:1-9, Menu Display:M, Return:Q Command:
10.17.1. System Reset
In operate menu press number key 1 to reset the system: Run this command,the device will restart and need reinput password for enter console operating. Run this command(Y/N): Press Y to reset (system will be repowered on) and N to cancel.
10.17.2. Mute
In operate menu press number key 2 to mute alarm sound once and there will not be any prompt.
10.17.3. Clear All Set
In operate menu press number key 3 to clear all configurations: Run this command,the device will format all data.System will be initialized. Run this command (Y/N):
Press Y to start initialization and N to cancel.

Raisecom Technology Co., Ltd
82
Note: system initialization will set all configurations in 0 status, and parts restore to factory default value. All cross set will be cleared.
10.17.4. Clear Cross Set
In operate menu press number key 4 to clear cross set: Run this command,the device will format all cross data. All data will be nil. Run this command(Y/N):
Press Y to start initializing all cross connect and N to cancel.
10.17.5. Save Set Info
In operate menu press number key 5 to save all information in RAM to EEPROM.
10.17.6. Make Default Set
In operate menu press number key 6 to restore factory default value: Run this command,the device will be first state from manufactory. All saving data will be losed. The device will restart. Run this command(Y/N):
All information in EEPROM will be invalid if you press Y key, and press N key will exist. By default, except hardware version there is no information in EEPROM. So restore to factory default value is same as delete all saved information.
10.17.7. Clear Reset and Board-Change Flag
In operate menu press number key 7 to clear flag information of resetting device and changing the board. And there is no prompt.
10.17.8. Test Watchdog
In operate menu press number key 8 the check whether watchdog can reset CPU. Normally watchdog program will restart CPU, and in abnormal status the system cannot exist from closed-loop.
10.17.9. Test EEPROM
In operate menu press number key 9 to test whether EEPROM can save data normally: Normally there will be:
Can save data to EEPROM. Abnormally there will be:

Raisecom Technology Co., Ltd
83
Can not save data to EEPROM.
10.18. Version
In main menu press number key 7 to get version information: 1.Display Version information Version Information Command: 1-1, Menu Display: M, Return: Q Command:
10.18.1. Display Version information
In version menu press number key 1 to show device version information: Hardware Version:REV A.00 Software Version:REV A.0 Version Information Command:1-1, Menu Display:M, Return:Q Command:
10.19. Console Set menu
In main menu press number key 8 there will be console set menu: 1.Language Select
2.Password Set Console Set Command:1-2, Menu Display:M, Return:Q Command:
10.19.1. Language Select
In console set menu press number key 1 to select language: Language Select: English
In this status use → key to change the language (English and Chinese), press ENTER to confirm.
10.19.2. Password Set
In console set menu press number key 2 to change the password: Input Old Password:
Enter your password and press ENTER to confirm (there will be * prompt for each entered character). If the password is wrong, there will be:
Input password error or input illegal charactor. If right, there will be:
Input New Password::

Raisecom Technology Co., Ltd
84
Enter your password and press ENTER for next entering: Input New Password Again:
Enter your password and press ENTER to confirm (there will be * prompt for each entered character). If it is same with the last entered password, the password configuration will be successful; otherwise there will be the prompt:
Twice new password is not same, password setting failed. Anytime press ESC to cancel and the control characters are invalid.
10.20. Quit
In main menu press number key 9 to exit console operation.
10.21. Hot key explanation
For console operation there are four hot keys: Ctrl + L(l) change language Ctrl + R(r) force the device to reset, and there is no prompt Ctrl + U(m) mute present alarm sound Ctrl + Q(q) exit from console operation

Raisecom Technology Co., Ltd
85
@2005 Raisecom Technology Co., Ltd. All trademarks are the property of their respective owners.
Technical information may be subject to change without prior notification.