Embed Size (px)
Citation preview

PH
OTO
© T
K
PosingGuide
Rangefinder’s

2
R A N G E F I N D E R ’ S P O S I N G G U I D E
Contents
Posing to Unpose: Families 3
Posing to Unpose: High School Seniors 5
In Vogue: Lindsay Adler on Fashion Posing 7
Posing and Prepping Newborns 9
Body Language Basics 10
Celebrating the Feminine Form 14

3
PHO
TO ©
ELE
NA
S B
LAIR
PH
OTO
GR
APH
Y
R A N G E F I N D E R ’ S P O S I N G G U I D E
W hen I am working with a family, my main goals are to capture love, connection and a little piece of humanity. There is so much going on within any family dynamic and there is
so much interaction to be captured. Without a sense of connec-tion, you are simply capturing the pose and the outfits. Perceiv-able connection gives family photos a human feel and it makes everything within the photos look more genuine.
I do not want my clients to have images that show stiff and uncomfortable (albeit well-dressed) versions of themselves. I want them to end up with images that convey a feeling that brings them back to a fleeting moment in time.
Once you give yourself the creative freedom to go beyond
traditional, stiffly posed family portraits, you can create artistic and emotive images.
When you are photographing families, you are working with real people, not models. You need to be able to guide them and direct them so that they look their best and they feel comfortable in front of you. I like to say that I guide my clients, but really, I pose them. Then I direct them to interact, and that is where the moments come from.
1DANCE IN A LINE Start by asking the family to stand in a line and hold hands. Then tell them to dance and direct them to look at each other
while dancing. Some will really move and some will simply interact. Either way, it yields a connected photo.
ELENA S BLAIR
Posing to Unpose: Families
1

4
2BREATHE EACH OTHER INI ask the family to embrace each other. Standing or sitting, I make sure that they are close and facing their bodies
toward each other. Then I ask them to look at each other, and I say, “Okay, breathe each other in.”
As cheesy as that sounds, many parents can relate to this exercise. I make sure to continue to direct the parents not to look at me. It’s fine if the child is looking at the camera or facing the embrace of his or her parents. This yields an intimate and con-nected photograph.
3TICKLE ONE OTHERAsk the family to sit down as close together as they can. Place smaller children on their parents’ laps. Then ask the
parents to gently tickle the kids and to look at the kids as they do so. Make sure that a child’s head isn’t covering their faces.
4FREE MOVEMENTNearly every session with young children has a moment when the kids have had enough. At this point, I direct the
family into an open space with good light and I give the children
permission to move their wiggly bodies. But I always give the kids boundaries. I will say, “You can run and play between this bush and this rock.” I ask the parents to get close together and embrace, and I direct the kids to move—chase each other, play Ring Around the Rosie, or hold hands and run toward me. I usually shoot this fairly wide in order to include some of the environment at the location of the session.
5SHOULDER LOVEI like to ask Dad to put one of the kiddos up on his shoulders, and I direct Mom to walk up and hug him.
If there is more than one small child, I will ask Mom to hold the little one. Any older kids can either hold hands with Mom or stand right in front of their parents. Then, I direct Mom and Dad to kiss, and sometimes, I ask the kiddo on Dad’s shoulders to lean down and kiss Mom.
Elena S Blair is an award-winning family and newborn photog-rapher based in Seattle. She is also an educator who co-owns both Blair & Thurston Retreats and Lady Boss Workshops.
R A N G E F I N D E R ’ S P O S I N G G U I D E
3
4 5
2
PHO
TOS
© E
LEN
A S
BLA
IR P
HO
TOG
RA
PHY

5
R A N G E F I N D E R ’ S P O S I N G G U I D E
BY PAIGE RAMSEY
Posing to Unpose: High School Seniors
For fun and natural portraits, there is a balance to strike between giving too much direction and not enough. Telling high school seniors to stand there and “do their thing” while you click the shutter makes
them doubt every move they make. Break down a pose into every microscopic detail and you’ll destroy their confidence.
Here’s our secret to natural-looking images: I do pose my cli-ents. I pose them in a way that is flattering for their body, and once posed, I give them things to do within that pose, and that is how I create natural looks. A pose on its own is lifeless until you give meaning to it through action.
Here are three poses I use, and they are how I get a variety of natural, unposed looks that help my seniors feel confident. Within those poses, I focus on the following: posture, expression, hands and movement.
1WALKINGYou should start with movement. Blast some music and begin with a walk. You can tell them, “Walk like you’re Tyra Banks,” or,
“Walk big, swinging your arms,” or, “Walk as if you’re on a tightrope.” You can have them try this a couple of times. Have them walk forward and backward.
As they walk, remind them to stand tall and push their shoul-ders back and down. They can keep their arms swinging at their sides if they aren’t holding anything. Or, have them walk holding things like balloons or a dog’s leash. This helps them feel more confident because they’re not thinking about what to do with their hands.
Tell them to start with their eyes down and then as they walk toward you to lift their eyes to the camera. Try this with a smiling or neutral expression, and let them try it several times so that they can get a feel for it. Ask for loving or joyful eyes (instead of a “Smile at the camera!” directive).
2 STANDINGIn standing poses, take into account your surroundings. Can you lean up against a wall? Look for symmetry. Can
you stand in the center between two columns? Consider their feet. Have them place one foot behind the other, placing their weight on the foot in front. Have them square up to the camera and then turn 45 degrees from the camera. They can cross their arms, put
hands in pockets, put hands on hips, touch their collar bone or play with their hair. You can also have them hold something again.
Hands are important to consider, as a lot of people tend to carry tension in their hands. If you notice someone with tense hands, ask them to make a tight fist and then relax their hand. Tell them, “Pretend like you’re caressing a baby’s forehead,” which sounds super strange but helps them look more natural. And if they’re touching their hair or face, ask them to make “soft touches,” so they aren’t smashing their hands in their pictures.
Give them a variety of expression prompts. Tell them to give you five different expressions. They can be any expressions they want. Give them a minute to think about it, then go straight into each one. Make sure to encourage them and respond with enthu-siasm, as that will help them commit to the idea.
Twirling or spinning is another great standing pose. If a client wears a long flowing dress, have them hold one side and sway back and forth. They can also hold both sides and spin in circles, either looking at you or up or away from the camera. Whatever they do, ask for loving eyes or a confident gaze.
PH
OTO
© T
HE
RA
MS
EY
S
1
6
PH
OTO
S TH
IS P
AG
E ©
PA
IGE
RA
MSE
Y
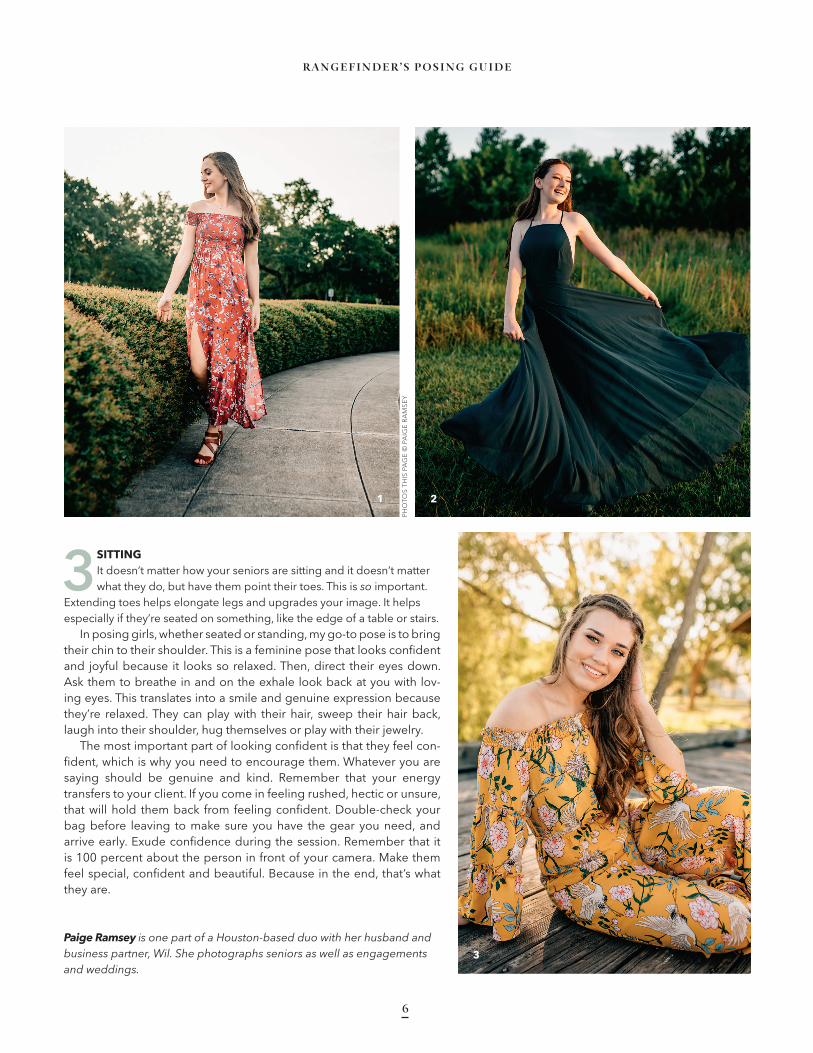
3SITTINGIt doesn’t matter how your seniors are sitting and it doesn’t matter what they do, but have them point their toes. This is so important.
Extending toes helps elongate legs and upgrades your image. It helps especially if they’re seated on something, like the edge of a table or stairs.
In posing girls, whether seated or standing, my go-to pose is to bring their chin to their shoulder. This is a feminine pose that looks confident and joyful because it looks so relaxed. Then, direct their eyes down. Ask them to breathe in and on the exhale look back at you with lov-ing eyes. This translates into a smile and genuine expression because they’re relaxed. They can play with their hair, sweep their hair back, laugh into their shoulder, hug themselves or play with their jewelry.
The most important part of looking confident is that they feel con-fident, which is why you need to encourage them. Whatever you are saying should be genuine and kind. Remember that your energy transfers to your client. If you come in feeling rushed, hectic or unsure, that will hold them back from feeling confident. Double-check your bag before leaving to make sure you have the gear you need, and arrive early. Exude confidence during the session. Remember that it is 100 percent about the person in front of your camera. Make them feel special, confident and beautiful. Because in the end, that’s what they are.
Paige Ramsey is one part of a Houston-based duo with her husband and business partner, Wil. She photographs seniors as well as engagements and weddings.
R A N G E F I N D E R ’ S P O S I N G G U I D E
3
21

7
R A N G E F I N D E R ’ S P O S I N G G U I D E
BY LINDSAY ADLER
In Vogue: Lindsay Adler on Fashion Posing
W hile I now work as a fashion photogra-pher in New York City, I actually began my photo career as a portrait photog-rapher in a small town in upstate New
York. I felt deeply inspired by fashion imagery and eventually dreamed of making the move to the “Big City,” so I began to practice my fashion techniques on brides, maternity subjects and high school seniors.
I saw my work take a turn for the better as bit by bit I infused more elegance and impact in my imagery. Now when I shoot portraits, I treat them the same as the fashion editorials I shoot for major magazines, carefully planning out all elements of the shoot from concept and color palette to lighting, wardrobe, makeup and posing.
Today’s high school senior is constantly bombarded with visuals from the fashion world, whether by celebrities they follow on Instagram or in the pages of Vanity Fair. They don’t want their poses to be overly rehearsed, static or traditional; they want more of the excitement and glamour that they’re seeing in contemporary media and from figures they admire.
To bridge the worlds of fashion and senior portraiture, here are some considerations to put into practice when you’re posing high schoolers with fashion flair.
ADD MOVEMENTThere is nothing wrong with a subtler pose, but movement will result in a more engaging image. Many fashion shoots infuse an element of movement to make a scene look more dynamic—the flow of the hair, wispiness of the
dress or the subject caught mid-step. These will help transform a portrait from a simple still to an energetic moment in time. I try to add movement as often as I can to full-length shots in particular to avoid stagnancy.
But adding movement can get complicated. I’ve often found that when a subject moves with spontaneity, many of the more flattering elements of posing start to fall apart. I tend to carefully direct movement instead of just having my subject twirl or dance around—for me that almost never works out. (Tips in the sidebar to the right
tell how to incorporate movement into a pose while still maintaining control.)
DON’T FORCE WHAT ISN’T WORKINGThere are lots of places to get inspired by fashion posing. Ads, magazines and images on Pinterest provide a plethora of resources to flood your mind with posing ideas. I recommend beginning your shoots with a few tried-and-true poses that you are comfortable with, and then once you’ve gotten some “safe shots,” bring a few more creative poses to create more unexpected imagery.
One word of warning: If you are inspired by a pose but it’s not working, don’t force it.
Everyone has a different body type and shape, and not every pose will be able to translate to your subject. Bring several pieces of inspiration to help your subject channel the spirit of the pose and mood, but don’t expect them to look exactly like the model does in that pose (remember that female models in most magazines are size
0 to 2 and a minimum height of 5’8”). Keep in mind that teenage subjects can be a little awkward or unfamiliar with their bodies and struggle to follow
PHO
TO ©
LIN
DSA
Y A
DLE
R
ABOVE: In this more dramatic and theatrical pose, I had my subject lift her left leg and “fall” slowly through the step, making it easy for me to snap a frame. We tried several versions with the knee lifted to various heights and the arm in different positions.

8
your posing direction, so complicated posing is usually not the right approach.
However, you shouldn’t necessarily abandon a pose instantly. You may just need a bit of time (and better understanding of posing) to get the shot to look right. Experiment with how posing meshes with a particular camera angle, perspective and lens choice—they all work in conjunction to create a flattering pose. Just like no one pose works for everyone, no single camera angle is right for every body type.
Remember to stay positive. If you struggle and make them feel like they are letting you down, everyone loses. Work with the pose a bit, then try something a tad different until you achieve something that flatters that individual.
POSE WITH A CLEAR CONCEPTThere is no clear and definitive definition that encompasses what fashion posing looks like. It’s more about conveying a mood or fundamental cool with a pose that can be soft and subtle, dramatic and aggressive, and everything in between.
What you’ll notice in most fashion editorials is that every element of the shoot works together to support an underlying theme or concept. Is the shoot
meant to be dreamy and ethereal, or glamorous and theatrical? The lighting, styling and posing should all fit the theme and mood.
Many photographers have a vision of what they believe fashion posing is—hands on hips, arm draped over the head. Don’t use a cliché as your go-to. Think of it this way: If you are shooting a soft, dreamy shoot, why would you put the subject’s hands on their hips? That creates right angles and a more aggressive stance, when you’re actually going for the opposite.
One way to think about fashion posing is not about specific poses that you see all the time, but instead how a pose can reinforce the central idea about the shot you are trying to make. It’s not just a headshot pose meant to create flattering angles of the face. Think about what more can you do with the body to be emotive or reflective of the concept.
Lindsay Adler is an educator and fashion photographer based in New York City. She’s penned numerous books on lighting, posing and shooting full-figured subjects, among others. Learn more at her educational site, learnwithlindsay.com.
MOVEMENT TECHNIQUES
1. THE FALL-THROUGH STEP When I want a more dramatic pose (like a knee lifted up), I use the fall-through step. I invite the subject to lift their leg and slowly fall through the step. This way I have several opportunities throughout the pose to capture a moment since it is slowed down and exaggerated. For each step I can make subtle changes. Be sure to have the subject avoid leading with their stomach; tell them to elongate through the top of the head and lead with the chest for more flattering results.
2. THE BOUNCE STEP If I want the subject to look as though they are mid-step, I invite them to bounce back and forth from one foot to the other. I do not have them walk across the frame or toward the camera because I find it much harder to capture the ideal movement
or focus that way. The bounce step allows me to capture movement in the clothing, feet and hair, and I’m still able to achieve variety from bounce to bounce. I’ll say, “Great, now bounce again but this time, lean your chest slightly forward,” or, “Looking beautiful, but this time, I want you to relax your back hand a bit more and give me a laugh.” It is much easier to “reset” and try something different.
3. THE WIND-UP When you have your subject twirl around freely, the results can be disastrous—they can get dizzy, step out of ideal light, or make it nearly impossible to capture a frame where both their body and expression look good. Trust me, I’ve tried it. Instead, I have my subjects “wind up.” I start by posing roughly where I want the hands, face and body to be and then ask them to keep their feet in the same position, twist their body around and snap back into place. I get movement, some spontaneity, but a lot more control.
R A N G E F I N D E R ’ S P O S I N G G U I D E
PHO
TO ©
LIN
DSA
Y A
DLE
R
ABOVE: The slight lift of the back foot (suggesting movement) was achieved by having the subject bounce back and forth from one leg to the other.

9
BY ANA BRANDT
Posing + Prepping Newborns
W hile newborns tend to look cute no matter what pose or props they’re in, California-based photographer Ana Brandt has a way of making the tiny bodies look particularly precious. You
may have seen Brandt at WPPI 2016 hosting two hands-on work-shops and also presenting “The Art & Business of Pregnancy and Newborn Photography.” Brandt also owns the Belly Baby Love studio in Tustin, California, and offers educational workshops across the U.S. Here, she offers her tips on how she poses min-iature humans in a way that’s safe, comfortable and downright adorable.
1WHEN SHOOTING FROM THE SIDE, BE EVEN IN HEIGHT WITH THE BABY. I tend to pose my newborns on a Paloma Shell beanbag and
shoot straight to the baby. I like to sit on a yoga ball so I am even in height with the beanbag.
2WHEN SHOOTING FROM ABOVE, STAY ABOVE. Too many photographers squat down and end up shooting “up the nose.” If you are shooting into newborns’
nostrils, it won’t look amazing. Instead, stand right over the baby. I shoot my above shots with a Canon USM 24-70mm II lens that allows me to stand flat on the floor and shoot over a newborn. If I were using a fixed lens, then I would have to climb on something, which can be a safety hazard. (Note: When I do need to stand on a ladder, I have an assistant helping me.)
3 DON’T UNDERESTIMATE THE FEET SHOTS. Even if a baby is crying, you can give them a pacifier to calm them down and capture feet images. It is most parents’ go-to
image when creating announcements.
4 START WITH A WRAPPED BABY. Whether the baby is on the floor with a head support or in a basket, I know if the baby is wrapped, it’s a
guaranteed shot. Even if a baby is awake, they are usually more settled if wrapped, which also helps me achieve great sibling photos.
5 WHEN SHOOTING FROM AN ANGLE, KEEP THE HEAD HIGHER THAN THE BODY. I tend to curve my babies in a banana shape, curving
R A N G E F I N D E R ’ S P O S I N G G U I D E
the head up on one side. I will tilt my camera down toward the head to achieve this angle.
extra tip: I always keep a heater close by for warmth as well as a baby shusher, which are essential for newborn shoots.
Ana Brandt has been photographing newborns and pregnancy in her California studio for over 17 years.
PHO
TOS
© A
NA
BR
AN
DT
3
5

10
R A N G E F I N D E R ’ S P O S I N G G U I D E
B efore humans evolved into speaking beings, we communicated with each other through gestures, sounds and expressions. This mode of communication is commonly known as body
language, and our brains learned how to recognize emotions linked to different behaviors so we could survive and live together. As it turns out, body language is trusted 14 times more than spoken words. When you feel an emotion, your body instinctively moves in response. It’s essentially a physi-cal reaction that happens without a filter. And this is where it gets really interesting for us photographers.
MICRO EXPRESSIONSWhen our bodies react through movement, they can be big movements with your body or smaller movements with your facial muscles; the slightest tension in the face can make your
subject look angry, sad or disgusted and can impact the overall feeling of your portrait.
Don’t Say Cheese!Real happiness doesn’t happen in the lips or mouth, but around the eyes. When humans feel real happiness, it’s the muscles around the eyes that pull up the cheeks, not the mouth that pushes them out. We can identify a fake smile by the absence of action in the eyes.
Why do we want to avoid fake smiles? Because what a fake or tense smile says about the person in the image is that they are not being honest, that they are uncomfortable or even submissive.
An emotion can’t be faked and a person has to really feel it for the image to look genuine, so if you want a real smile, you need to help the person to actually feel that emotion on the inside. I
BY DANIELLE LIBINE
Body Language Basics
ABOVE, LEFT TO RIGHT: The slightest change in a facial expression can completely change the emotion in your image. Can you see how just changing the eye tension makes the subject look bored, connected or angry?

11
ask my clients to think of something that makes them happy—a person, an object, a food, a memory—and observe their faces as I run through the options. As soon as I see that little tension around the eyes, I know we have it. At that moment, I ask them to share that thought with me and we’ll use that word during the shoot to get a real smile every time.
Engaging the EyesWhen we are actively engaged with another person or activity, we squint slightly by tensing our lower eyelids. We change the shape of our eyes in this way so we can focus better (just like the aperture in our cameras), and on a non-verbal communication level, this indicates to the other person that we are actively engaged with them. On the other hand, when we are bored or scared, our bottom eyelid drops and this makes us look less confident and lower power.
When working with someone to create that confident look, I like to help them connect to a moment in their lives where they felt really proud of what they did; I see that lower eyelid come up automatically as soon as they have connected with that thought.
I try to avoid telling people to squint to get this result because—just like with happiness—they might try to fake it and end up appearing angry instead. When we squint, we do bring the lower eyelid up but also push our upper eyelid down, and this is what our faces do when we are angry.
Angular PosingBecause our torso holds all our vital organs, making it one of the
LEFT: The way we angle our bodies and faces toward or away from another person is one of the most important indicators of how powerful and confident we feel, and also indicates how we feel about the person we’re interacting with.
most vulnerable parts of the body, we’ll only leave it open and unprotected when we feel safe and comfortable. When we’re uncomfortable or don’t like someone, we start to pivot away as our bodies get instinctively ready to fight or flight. The way you use this in your poses can drastically impact the feeling of power in the image.FrontingTo make a person appear confident, powerful and trustworthy in your pictures, you will want to shoot them straight on. However, this presents a particular challenge in photography because we often ask our clients to stand sideways to create a more visually pleasing image.
At this point, it’s important to know the objective of the image, and to choose what’s more important: the feeling of power or making a more pleasing image. If you’ve been hired to create an image for a client, it’s important to understand their personality and the objective for the image so you can adjust the amount of fronting to match the level of power they want to portray.
PivotingA slight pivot can still convey a certain amount of power, especially if the posture is good and the expression is confident, but the more you pivot the body away from the camera, the more defensive or low power the person is going to appear (versus high power, which looks more open and confident).
Not all pivoting is defensive, however. A woman who is flirting with someone will turn her body sideways and look at them over her shoulder. This is a pose that we see a lot in glamour and boudoir photography for this reason. But because nothing is clean-cut with body language, she can also communicate disdain at something or someone she doesn’t like with this same movement; the difference will be in her expression.
It’s also very important to pay attention to pivoting while photographing groups of people. When people stand in groups, they will naturally pivot toward the people they like and away from those they might not. If you want to avoid the individuals in your group looking disconnected from each other, you will want to pivot them slightly toward each other to create a nice sense of connection in the image.
The same goes with couples during engagement and wedding sessions; if you want to create a sense of love and connection between them, always keep their bodies pivoted toward one another, even slightly. If you want to have some distance between them, or their bodies facing away from each other for aesthetic reasons, make sure there is a lot of connection going on elsewhere in their bodies—especially their eyes—otherwise the body language will communicate distance or even distrust between them.
BODY LANGUAGE IS SPOKEN IN
OUR POSES, AND WE CAN USE THIS
KNOWLEDGE TO POWERFULLY
CONVEY EMOTIONS THROUGH
OUR PICTURES.
PHO
TO ©
DA
NIE
LLE
LIB
INE
R A N G E F I N D E R ’ S P O S I N G G U I D E

12
This is also true for the face. As photographers, we like to pivot the face slightly as it creates and shows a nice jawline (which is also rooted in non-verbal communication, as this area of the body indicates our hormone levels). As soon as we pivot the head sideways there is another cue that enters the equation, and the way we tilt it will also create a different meaning.
NEGATIVE BODY LANGUAGELike with any other language, body language conveys information and emotion. While there is no “wrong” body language, some cues can be linked to negative emotions or levels of discomfort, and you’re going to see them in your clients’ bodies (and therefore your photos) as you interact with them.
Pacifying and Blocking GesturesRubbing or pressure movements are called pacifying gestures and are meant to calm down the brain when we are feeling discomfort by releasing a hormone called oxytocin.
You will observe this when a woman is playing with her necklace, rubbing her arms or legs, or a man is playing with his clothes or squeezing his fingers together. Another place to look for pacifying gestures is the mouth; lip pressing and licking, and tongue movements pressing inside the cheeks or lips show high levels of stress.
Take any of these as a sign from your clients that they are uncomfortable, and this might show up in your pictures.
We implement blocking gestures by putting something between ourselves and an uncomfortable situation. Crossed or closed arms are the most obvious ones, but the person might also be holding something like a bag or a laptop in front of them,
PICTURED: To cross or not to cross arms in pictures? It depends on what message you want to convey.
or even crossing their legs tightly when standing or sitting.
Crossed ArmsTorso-shielding gestures occur most often when a person is feeling defensive or uncomfortable, and also to indicate that they are not open to discussion. Whether it’s arms folded across one’s body, buttoning up a jacket, holding something in front of their torso or straddling a chair, these gestures are initiated to put something between ourselves and a situation or a person.
People often argue that they don’t feel defensive when they cross their arms, and this is explained by the fact that this soothing gesture releases oxytocin and makes us feel calmer. And that is exactly the point. Any pacifying gesture highlights a discomfort of some sort, and will come across as low power.
But what about crossing your arms in business portraits? Isn’t that a powerful sign of a successful businessperson?
Just because we are used to seeing this image everywhere doesn’t mean it’s conveying the right message. We have become accustomed to these images and have stopped questioning their validity.
Of course, people can also cross their arms when they are cold, to relieve pain, or to indicate that they are not open to discussion, but no matter the reason, this is not an open and confident expression.
Let’s take it out of the context of photography. Think about the last time you were having an open and positive discussion with your friends. When you were happily out on a date. When you were trying to convince someone about a subject you’re passionate about. Did you cross your arms? Think of the people giving powerful presentations on stage. Do they cross their arms? When we’re looking to create a confident and open image of someone, we want to stay away from shielding body language cues.
So when do we want to use crossed arms in photos? There is no right or wrong body language; it’s just a language that conveys an emotion, and it’s a great cue to use if the emotion you want to convey is one that happens when humans do cross their arms, like in the following:
1 DEFIANCEYou’ll see this behavior as a characteristic in children who
don’t want to do something, or in two people disagreeing on a subject. Pair this one with a higher chin and squinting eyes to achieve the perfect defiant look.
2NO DISCUSSIONPeople will also cross their arms to indicate that they are not
open to discussion anymore. An interesting study found that when our arms are crossed, we are actually less open to hearing what other people are saying. If your client wants to show that they are not open to discussion and it goes with their personal brand, or their profession, then this is the perfect pose to adopt.
R A N G E F I N D E R ’ S P O S I N G G U I D EPH
OTO
© D
AN
IELL
E LI
BIN
E

13
R A N G E F I N D E R ’ S P O S I N G G U I D E
3BIGGER BICEPSAlthough not linked to an emotion, crossed arms
are also favored by portrait photographers when shooting male subjects because it’s an easy way to make their upper arms look bigger. Simply get your client to make fists, place them under their biceps and tada! Bigger biceps.
Note that if the objective is first to make your client look strong and virile, and we don’t care too much about openness, the crossed-arms pose will trump the closed body language message.
MIRRORINGUnderstanding and using body language doesn’t end at creating stronger photos—it will also help you when directing and interacting with your clients. Many people feel uncomfortable at photo shoots, mostly because they don’t know what to do, and this will translate in your photography if you aren’t careful.
A client of mine shared this story: “At my last photo shoot, the photographer asked me to smile. So I smiled. ‘No! Not like that!’ he said. ‘You know…relax and smile!’ All I could think is, ‘Damn…I’m not relaxed, how do I relax?’ which made me stress even more, and the more he was telling me to relax, the less I was! It was horrible! I look like I’m growling in all the photos. I hate them!”
Telling your clients to “act natural” doesn’t work because what would be natural for them in this moment would probably be to run away.
So if telling them what to do doesn’t help, what can you do? Show them. People can easily mirror what you want them to do. Ask them to mirror you, and show them exactly the pose you want them to take. Not only will this help them relax, it also allows you to get them to tap into the ideal body language for your session. When working with children, you can turn this into an imitation game, and they will play along with you in seconds.
Mirroring has roots in body language theory, too. It’s a key human bonding behavior that creates an immediate connection between you and your subject, and allows them to relax, shift their attention away from the lens and focus on you instead, all while feeling safe and comfortable.
TOP: Mirroring helps your clients understand what to do. ABOVE: This in turn allows your subject to relax and give you genuine expressions.
Danielle (Dee) Libine is a Swiss-Canadian portrait photographer and a certified body language trainer with Science of People. Running photo studios in Switzerland and Hong Kong allowed her to test her approach with a wide variety of clients, and she went on to write and publish A Photographer’s Guide to Body Language to share this knowledge with portrait photographers worldwide.
PHO
TOS
© D
AN
IELL
E LI
BIN
E

14
I believe boudoir can give every woman in the world a chance to celebrate her unique femininity, shamelessly. It all starts with a great pose. Your job as her photographer is to make her look as good as, or better than, she does in real life.
The poses you create are meant to flatter her body and show off her features. Posing is the quickest way to improve your photos and cli-ent satisfaction. I’m not telling you that white balance isn’t important, or that the right tools aren’t important, however, if you just fix one thing in your posing and everything else stays equal, your clients will be that much happier. The client, after all, wants to look hot.
FOCUS ON PROPORTION I don’t believe in body types. So what do I look for when I pose a woman? Proportion is key. Every single woman I work with is completely different, so I look for proportion within that woman and what looks best on her. I treat every client individually based on how her body works. Then, I decide how I can use the best poses to keep her body in proportion.
IMPLEMENT THE EIGHT POINTS OF POSING I developed the eight points of posing—neck, shoulders, elbows, wrists, waist, hips, knees, ankles—from the armature dolls I used in my art classes growing up. These are the major joints in the body that move, and we can manipulate the body to create our desired pose. During my shoots, I pose the eight points. If each of them looks good, I take the photo. I look at the back of my camera to make sure everything looks good, and if it doesn’t, I make adjustments. This takes muscle memory. The more you do it, the better you will get. Scan for the eight points every time you pose, even if you are only capturing a certain part of the body in the photo.
POSE THE CHIN AND SHOULDERS PROPERLY When I first tell a woman to look at the camera, many push their chin up to avoid a double chin. When you tell her to push her chin out and down, it gets rid of her double chin, strengthens her jaw line and makes her eyes appear larger. While she is lying down, have her raise her chin so you can avoid distortions and forehead wrinkles. (Open up her shoulders to avoid broad shoulders if she has them.)
CREATE FLATTERING ARMS Arms are the hardest to pose on a woman because they add bulk to the body. Keeping them away from the sides helps slim and show
BY JENNIFER ROZENBAUM
Celebrating the Feminine Form
PHO
TO ©
JEN
NIF
ER R
OZE
NB
AU
M
off a subject’s curves. In-body posing is when the arms are within the lines of the body, which accentuates her shape. Out-of-body posing is when the arms are outside the lines of the body, which allows us to see the shape without blocking it. You can combine the two to ensure you can see the curves and not add bulk.
ADJUST THE HANDS, WRISTS AND WAIST Hands can often look out of proportion on some women, so try to avoid the front of the hand as often as you can. Positioning a subject’s hands on her waist helps slim her so her body looks more in proportion. Another trick to use when you adjust her waist and hips is to have her push her hips away from the camera. This makes her hips look smaller, defines the stomach, and lengthens the torso.
PAY ATTENTION TO THE LEGS AND FEET I make sure when I pose a woman and she’s lying down that the leg farthest from the camera should be lower than the one closest. It creates a nice line and slims out the thigh. Legs can create interest in the same way arms can, so it’s necessary to pay attention to how they are posed, as well as her ankles. As you pose her lying down, make sure her toes are pointed so it adds a few inches to her height.
Jennifer Rozenbaum runs a successful boudoir photography studio, Jenerations, in New York, and loves helping women feel beautiful.
R A N G E F I N D E R ’ S P O S I N G G U I D E