Embed Size (px)
Citation preview

RAMQTT Configuration Guide
1
Industrial Automation / Industrial Networking Tech Note 14 RAMQTT Configuration Guide
Abstract:
The RAMQTT Client allows the Red Lion RAM® device to publish data to IoT clouds using the MQTT protocol.
Products: Sixnet® Series RAM 6000 RTU
Sixnet® Series RAM 9000 RTU
Sixnet® Series IndustrialPro® 6000
Use Case: Short Description This user guide describes different messages the RAMQTT Client can publish, how to setup the RAMQTT Client, and basic setup on a supported IoT cloud provider.
RAMQTT Supported IoT Clouds: AT&T M2X Autodesk Fusion Connect Amazon AWS IoT Telenor Cloud Connect
Required Firmware: Version 4.24 or higher

2 RAMQTT Configuration Guide
RAMQTT Configuration Guide TNIA / TNIN14 REV A
1.1 Overview The RAMQTT Client allows the Red Lion RAM device to publish data to IoT clouds using the MQTT protocol. This user guide describes different messages the RAMQTT Client can publish, how to setup the RAMQTT Client, and basic setup on a supported IoT cloud provider. 1.2 Message Publishing
Device Information Publishing 1.2.1 Information about the Device can be published to the cloud by selecting either "Basic" (less detailed) or "Full" (more detailed) for the Device Info Message option. If "None" is selected, no Device Information message is sent.
Definitions: IP - Initial Publish, CP - Change Publish, c- Change in Device Info, start - Start of RAMQTT, x - Unpublished value, cip - Change in one or more IP addresses. The complete Device Information message is sent when the RAMQTT client starts. Afterwards, only changes in the data points are updated. The frequency of updates depends on the value set for Device Info Publish Interval. In the example above, the Device Info Publish Interval is set to 4 hours. The only exception is that if any IP address changes, the message is published immediately and will reset the publish timer.
IODB Publishing 1.2.2 When RAMQTT starts, it publishes an initial IODB message containing the current values of all IODB Tags specified in the Points section. Once the initial IODB message is sent, RAMQTT only publishes the changed values of IODB Tags. This helps reduce data usage while still recording activity. To further enhance data usage efficiency, RAMQTT only publishes changes after a set amount of time from the last published message. The amount of time depends on the value set for the Minimum Publish Interval (MPI). The MPI helps to reduce the number of messages sent when publishing IODB Tag values that change frequently. Once the changed IODB Tag values are sent, the next message containing changes won't be published until after the MPI.
Connecting the Red Lion device to the IoT cloud is only supported on RAM 6000 and RAM 9000 devices with a firmware version of 4.24 or higher.

RAMQTT Configuration Guide TNIA / TNIN14 REV A
RAMQTT Configuration Guide 3
Single IODB Value
Definitions: IP - Initial Publish, CP - Change Publish, MPI - Minimum Publish Interval, C - Change in IODB value, start - Start of RAMQTT, x - Unpublished value. Multiple IODP Values
Definitions: IP - Initial Publish, CP - Change Publish, MPI - Minimum Publish Interval, C - Change in IODB value, start - Start of RAMQTT. The illustration above demonstrates when multiple IODB values change. All changes in IODB values will be published not at the instance the change happened, but at the MPI. 1.3 Message Definitions RAMQTT has two types of messages that can be published to the cloud:
• Device Information Message - Contains information about the device such as the RSSI or IMEI values. This message comes in two forms, "Basic" (less detailed) and "Full" (more detailed).
• IODB Message - Contains IODB Tag values from system tags and or user created tags.
All published and received messages are formatted into JSON (JavaScript Object Notation). This is a standardized way of formatting information that is understandable by multiple cloud services and applications. The actual organization and structure of the message may vary from cloud to cloud.

4 RAMQTT Configuration Guide
RAMQTT Configuration Guide TNIA / TNIN14 REV A
Publish Messages 1.3.1 Device Information Message Device information is sent as a separate message. This message covers general information about the device. The device information message is sent after initial connection and on a specified interval known as the Device Information Publish Interval. The table below contains all the information that is stored within a Device Information message.
Field Description Type Units Basic/Fill unitName User defined name of the unit string basic serialNumber Device serial number string basic model Device model number string basic version Device firmware version number string basic cellIp Cellular IP address string basic upTime Device uptime in seconds number Sec basic versionLong Device firmware version number with build numbers string Full
pwr Device power. If device has more than one power supply, this will read power1. number V full
unitTemp Device temperature number C full
hostName Host name string full
intInfo
Interface Information. All active ip addresses on the device in following format: <InterfaceName>=<Ip address>;<InterfaceName>=<Ip address>; Example: eth0=192.168.10.10;usb0=192.168.111.1;
string full
cellFirmVer Cellular module firmware version string full
cellFirmNum Cellular module firmware number string full
imei IMEI (International Mobile Equipment Identity) string full
mdn MDN (Mobile Directory Number) string full
simID Sim Card Identification Number. It is also known as the ICCID (Integrated Circuit Card Identifier). string full
ismi ISMI (International Mobile Subscriber Identity) string full
cellServType Cellular Service Type string full
plmn PLMN (Public Land Mobile Network) string full
cellChan Cellular Channel number full
wsSig
Wireless Signal • NO_SERVICE 0x09 • NO_SIGNAL 0x00 • POOR_SERVICE 0x01 • FAIR_SERVICE 0x03 • GOOD_SERVICE 0x07
number full

RAMQTT Configuration Guide TNIA / TNIN14 REV A
RAMQTT Configuration Guide 5
Field Description Type Units Basic/Fill
• EXEL_SERVICE 0x0F • DECODE_OOM 0x10 • DECODE_UP 0x11 • DECODE_DOWN 0x12 • DECODE_INOUT 0x13 • DECODE_TOGGLE 0x14 • DECODE_OUTIN 0x15
rssi Current RSSI (Received Signal Strength Indicator) number dBm full
ecio Current ECIO - Also known as Ec/Io, which is the ratio of the received energy per chip and the interference level. number dB full
rsrp Current RSRP (Reference Signal Receive Power) number dBm full
rsrq Current RSRQ (Reference Signal Received Quality) number dBm full
cellUpTime Cellular module up time number Sec full
cellModTemp Cellular module temperature number C full
apn Current APN (Access Point Name) string full
dataDay Today's data usage in kb on wwan0 (cell) number KiB full
dataMonth This month’s data usage in kb on wwan0 (cell) number KiB full
gpsAltitude GPS Altitude number dm full
gpsTime GPS Time number Sec full
gpsNumOfSat GPS Number of satellites number full
gpsFtFromCp GPS Feet From Center Point number ft full
gpsSpeed GPS Speed number knots full
gpsCourse GPS Course/Heading number full GPS Location The GPS Latitude and Longitude values are included in the message. Please note, that visual display of these values will differ between the IoT Cloud providers and may not be in the same area with the rest of device information details. Please refer to IoT Cloud provider documentation for details on where to look for GPS location of the device. IODB Messages The fields of an IODB message contain the name of the IODB register, known as the Tag Name, and the value of the IODB register. If the IODB register does not have a system or user defined Tag Name, the tag name will be in following format: <IODB Type>_<IODB Address> where IODB Address is in zero based address. For example: AO_3232.
Subscribe Messages 1.3.2
1.3.3
Message format and topics are specific to each IoT cloud environment.

6 RAMQTT Configuration Guide
RAMQTT Configuration Guide TNIA / TNIN14 REV A
The RAMQTT client subscribes to certain Cloud specific topics to receive following message types: • IODB Write - update IODB registers • Firmware Update* - update the device firmware • Package Install* - install a package to the device • Configuration Update* - update configurations on the device • Configuration Fetch* - fetch current configurations from the device and send them to the cloud • Reboot* - reboot the device
*Availability of these message types may differ between IoT Cloud providers. 1.4 Device Quick Setup Guide
Setting up IODB Tags for particular registers. 1.4.1 Step 1. Navigate to: Automation>Tags From device web interface, navigate to: Automation>Tags Step 2. Click Add button to add new tag definition.
Step 3. Fill out Tag definition fields:
• Name - Enter Tag name without spaces • Type - Select Register type • Address - Enter Register address • Units - Optional, enter units associated with the tag • Description - Optional, enter description for the tag
Step 4. Add more Tags To add more tags, Click Add button at the bottom of the page.
Repeat Step 3.

RAMQTT Configuration Guide TNIA / TNIN14 REV A
RAMQTT Configuration Guide 7
Repeat Step 4 as many times as needed to add desired amount of tags. After completing adding tags, user defined tags might look something like this:
Step 5. Click Apply When finished adding all user tags, click Apply to save all changes.
Enabling and configuring the RAMQTT Client. 1.4.2 RAMQTT Client is located under Service>RAMQTT Client. Step 1. Enable RAMQTT Client By default, RAMQTT Client is disabled and must be enabled in order to use it.
To Enable RAMQTT Client, select Yes from "Enable RAMQTT Client"
Please note that if IODB tag name is changed after it was selected on RAMQTT page, RAMQTT Client will need to be restarted to get tag name changes into effect.
Enabling RAMQTT does not automatically start the client. The Blue Apply button must be clicked.

8 RAMQTT Configuration Guide
RAMQTT Configuration Guide TNIA / TNIN14 REV A
Step 2. Select IoT Cloud Select which cloud provider for RAMQTT Client to connect to.
Step 3. Enter general settings. General settings are the minimum settings required to configure the RAMQTT Client to connect the device to the IoT cloud provider. Each cloud provider may have different set of general settings.
• Enter IoT MQTT broker IP adders or URL address • Enter appropriate port • Select if using encryption • Select if authentication will be used
• If Use Authentication is set to Yes, enter User Name and Password for the MQTT server. • Other fields may be specific to various IoT Cloud providers. See: • IoT Cloud Specific Information
Step 3.1. Testing connection
Once the Broker and Port are entered, it is possible to test the connection. To do this, press green Test Server Availability button at the bottom of the page. A message box appears indicating if a RAMQTT can connect to broker with given configurations.

RAMQTT Configuration Guide TNIA / TNIN14 REV A
RAMQTT Configuration Guide 9
Step 4. Enter message settings Message settings are configured to manage the frequency of messages sent to the cloud.
• Specify Minimum Publish Interval • Select what type of Device Info Message (information) to be sent.
• If Device message is selected to "Basic" or "Full", enter Device Info Publish Interval.
Step 5. Enter advanced settings
Please note, Device Information, when Basic or Full is selected, will publish in its entirety on RAMQTT startup. Then on every next device publish interval, only changed values are published, if any. IP address changes are published as soon as they happen.
Changing Advanced Settings is not recommended unless deep knowledge of MQTT is understood.

10 RAMQTT Configuration Guide
RAMQTT Configuration Guide TNIA / TNIN14 REV A
Step 6. Select data points To add a single data point: 1. Click on the Add Point blue button.
2. A single row appears to enter point data. Enter tag name in Tag Name box.
3. If adding an IODB point that does not have a tag, simply select Type and enter the address.
To add all User Tags: 1. To add all user tags, simply click on Add User Tags button. All user tags defined on Tags page will be added.

RAMQTT Configuration Guide TNIA / TNIN14 REV A
RAMQTT Configuration Guide 11
To add multiple points: 1. Click on the blue Add Multiple Points button. A Select Tags dialog will appear.
2. If desired, enter filter test in Filter box to limit number of available tags.
3. Select desired tags from the left by clicking on them. 4. Once all desired tags have been selected, Click blue Select Button. Selected tags will appear on RAMQTT
page.

12 RAMQTT Configuration Guide
RAMQTT Configuration Guide TNIA / TNIN14 REV A
To remove a point: To remove an IODB point from the list, simply click on the red Remove button of the desired point to be removed.
Step 7. Start RAMQTT Client Once all settings have been set, RAMQTT client is ready to be started. Click on the Apply button to save and to start/restart the client.
Step 8. Stopping RAMQTT Client Stopping RAMQTT Client can be done in two simple steps. 1. Select No from Enable RAMQTT Client.
2. Click Apply button to stop the client.
Stopping RAMQTT client does not change any configuration. All configurations will be saved.
RAMQTT Configuration Guide TNIA / TNIN14 REV A
RAMQTT Configuration Guide 13
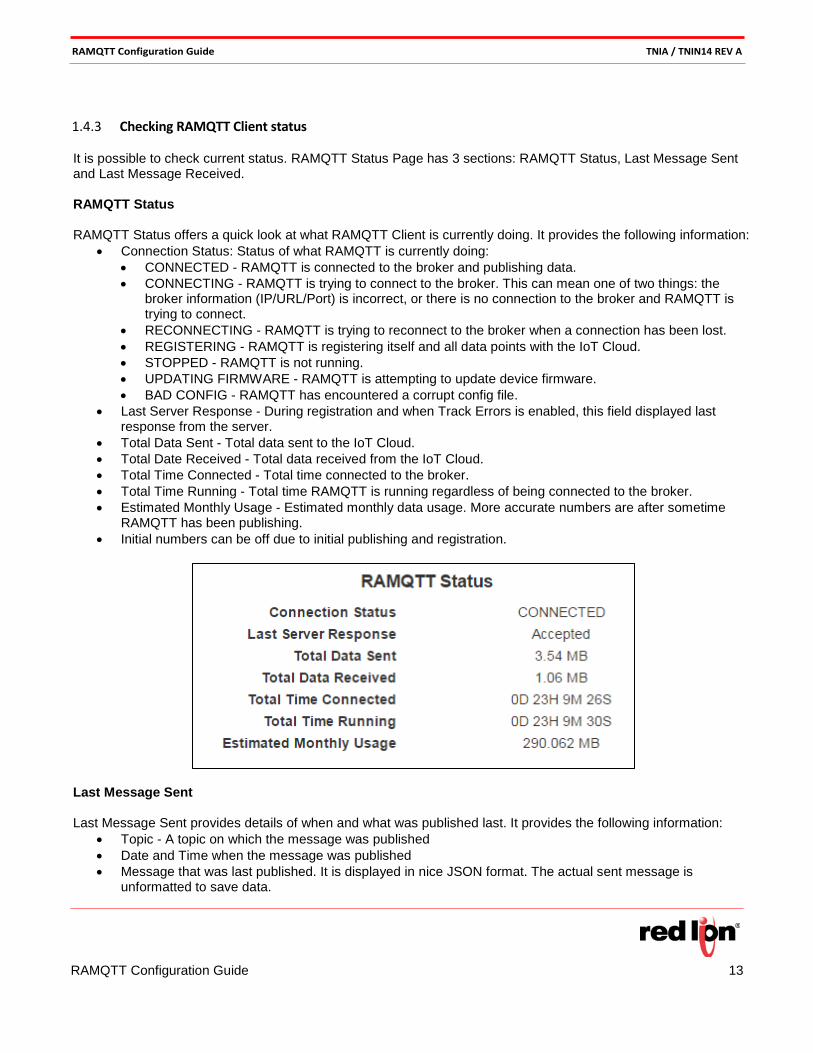
Checking RAMQTT Client status 1.4.3
It is possible to check current status. RAMQTT Status Page has 3 sections: RAMQTT Status, Last Message Sent and Last Message Received. RAMQTT Status RAMQTT Status offers a quick look at what RAMQTT Client is currently doing. It provides the following information:
• Connection Status: Status of what RAMQTT is currently doing: • CONNECTED - RAMQTT is connected to the broker and publishing data. • CONNECTING - RAMQTT is trying to connect to the broker. This can mean one of two things: the
broker information (IP/URL/Port) is incorrect, or there is no connection to the broker and RAMQTT is trying to connect.
• RECONNECTING - RAMQTT is trying to reconnect to the broker when a connection has been lost. • REGISTERING - RAMQTT is registering itself and all data points with the IoT Cloud. • STOPPED - RAMQTT is not running. • UPDATING FIRMWARE - RAMQTT is attempting to update device firmware. • BAD CONFIG - RAMQTT has encountered a corrupt config file.
• Last Server Response - During registration and when Track Errors is enabled, this field displayed last response from the server.
• Total Data Sent - Total data sent to the IoT Cloud. • Total Date Received - Total data received from the IoT Cloud. • Total Time Connected - Total time connected to the broker. • Total Time Running - Total time RAMQTT is running regardless of being connected to the broker. • Estimated Monthly Usage - Estimated monthly data usage. More accurate numbers are after sometime
RAMQTT has been publishing. • Initial numbers can be off due to initial publishing and registration.
Last Message Sent Last Message Sent provides details of when and what was published last. It provides the following information:
• Topic - A topic on which the message was published • Date and Time when the message was published • Message that was last published. It is displayed in nice JSON format. The actual sent message is
unformatted to save data.

14 RAMQTT Configuration Guide
RAMQTT Configuration Guide TNIA / TNIN14 REV A
Last Message Received
Last Message Received provides details of when and what was received last. It provides the following:
• Topic - A topic on which the message was received • Date and Time when the message was received • Message that was last received. It is displayed in a non-minified JSON format. The actual sent
message is minified save data by removing white-space characters such as newlines and tabs. Viewing RAMQTT Client status To view RAMQTT Client status, click Show Status button. RAMQTT Client status page is shown.
Returning back to configurations To return back to configurations, click Show Config button. RAMQTT Client configuration is shown.
IoT Cloud Specific Information 2.1 IoT Cloud Specific Information Following are supported IoT Clouds:
IoT Cloud Version Added IoT Cloud Information Website Autodesk Fusion Connect 4.24 http://autodeskfusionconnect.com/ AT&T M2X 4.25 https://m2x.att.com/ Amazon AWS IoT 4.25 https://aws.amazon.com/iot/ Telenor Cloud Connect 4.25 http://www.telenorconnexion.com/services/cloud-connect
IoT Cloud Specific User Guides
• RAMQTT – Autodesk Fusion Connect
• RAMQTT – AT&T M2X
• RAMQTT – AMAZON AWS
• RAMQTT - Telenor Cloud Connect

RAMQTT Configuration Guide TNIA / TNIN14 REV A
RAMQTT Configuration Guide 15
RAMQTT – Autodesk Fusion Connect 2.2 IoT Cloud Specific Information This walk-through uses a sample scenario to demonstrate the process of setting up the Red Lion device connection to the Fusion Connect cloud.
The Scenario 2.2.1 This scenario uses a single Red Lion device that is monitoring its cellular connection by observing it's RSSI value. The RSSI value is sent from the Red Lion device to the Fusion Connect cloud through the RAMQTT service. Once the Fusion Connect cloud receives the message, the Fusion Connect's virtual representation of the data is updated to show the Red Lion device's current RSSI value.
2.3 Device Setup
1) Select Autodesk Fusion Connect from IoT Cloud 2) Enter Root Topic provided by Fusion Connect into Root Topic field 3) Enter Fusion Connect broker address into Broker field 4) Enter Port number into Port field 5) Select if Encryption is to be used from Encryption (TLS/SSL) drop down field 6) Select if Authentication to be used from Use Authentication drop down field. When Use Authentication is set to
"Yes", User Name and Password field will become visible.
It is recommended to complete the Red Lion device side setup before completing the Fusion Connect cloud setup. Make sure that the User Name is the same as the Root Topic during the RAMQTT device side setup.

16 RAMQTT Configuration Guide
RAMQTT Configuration Guide TNIA / TNIN14 REV A
a) Enter User the user name. Typically for Fusion Connect, it will be the same as the root topic b) Enter the password
2.4 Cloud Setup Guide This walk-through provides the following steps to complete the Fusion Connect cloud provider setup.
1. Create a Resource Type to define the attributes for your monitored "thing". 2. Create a resource to connect a device to. 3. Create a device profile to represent the attributes being collected from your Red Lion device. 4. Create the message content within the device profile. 5. Add the actual devices corresponding to your physical red lion devices. 6. Create routines based on the resources you created, based on and triggered by your Red Lion
incoming message content. 7. Track and Observe messages sent from the Red Lion device.
Getting Started Before completing the steps below, make sure to check the following:
• After logging into the Fusion Connect cloud instance, make sure that the design mode box is checked. This will enable the ability to edit and create what is needed for this setup.
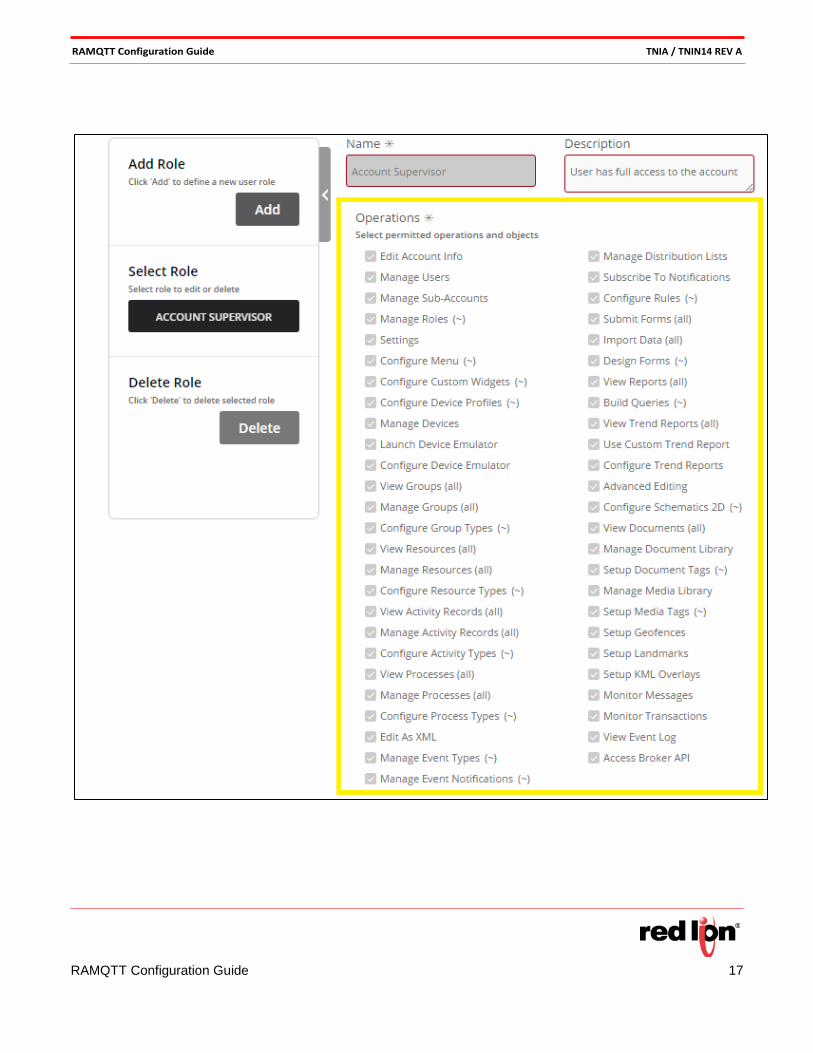
• Once the Design Mode box is checked, the screen displays the Account Center page. A single account can have different Users. Make sure that the User Role being used contains the ability to create, edit, or delete Devices, Resources, etc. To check this:
• Navigate to the Admin Users page. • Find the User entry being used and look at the Roles column. • Now navigate to the Admin User Roles page. • Select the Role that matches the one found on the previous page. • Make sure that all the boxes are checked.
For additional support with Fusion Connect see the SeeControl_IoT_User_Guide.pdf
RAMQTT Configuration Guide TNIA / TNIN14 REV A
RAMQTT Configuration Guide 17

18 RAMQTT Configuration Guide
RAMQTT Configuration Guide TNIA / TNIN14 REV A
Step 1: Creating the "Red Lion Device" Resource Type A Resource Type is like a blueprint. It contains all the attributes and information of a particular "thing" needed to create a virtual instance of that Resource Type. To create a Resource Type:
• Navigate to Model Resource Types. • Fill in the Resource Type Name box, to give a name to the Resource Type. • The Resource Type Code will automatically be filled out based on what was typed into the Resource Type
Name box. This code is used for the Cloud to identify the Resource Type. The generated code is only a suggestion and can be edited to be something else.
• The Resource Label Expression / Resource Key Expression boxes are only needed for advanced functionality and can be skipped for this walk-through.
• Under Attributes, leave the Globally Unique Key box unchecked. • The Container for Resources box is used for situation where there can be "sub blueprints". For this
walk-through, it is not needed and can be left blank.
RAMQTT Configuration Guide TNIA / TNIN14 REV A
RAMQTT Configuration Guide 19
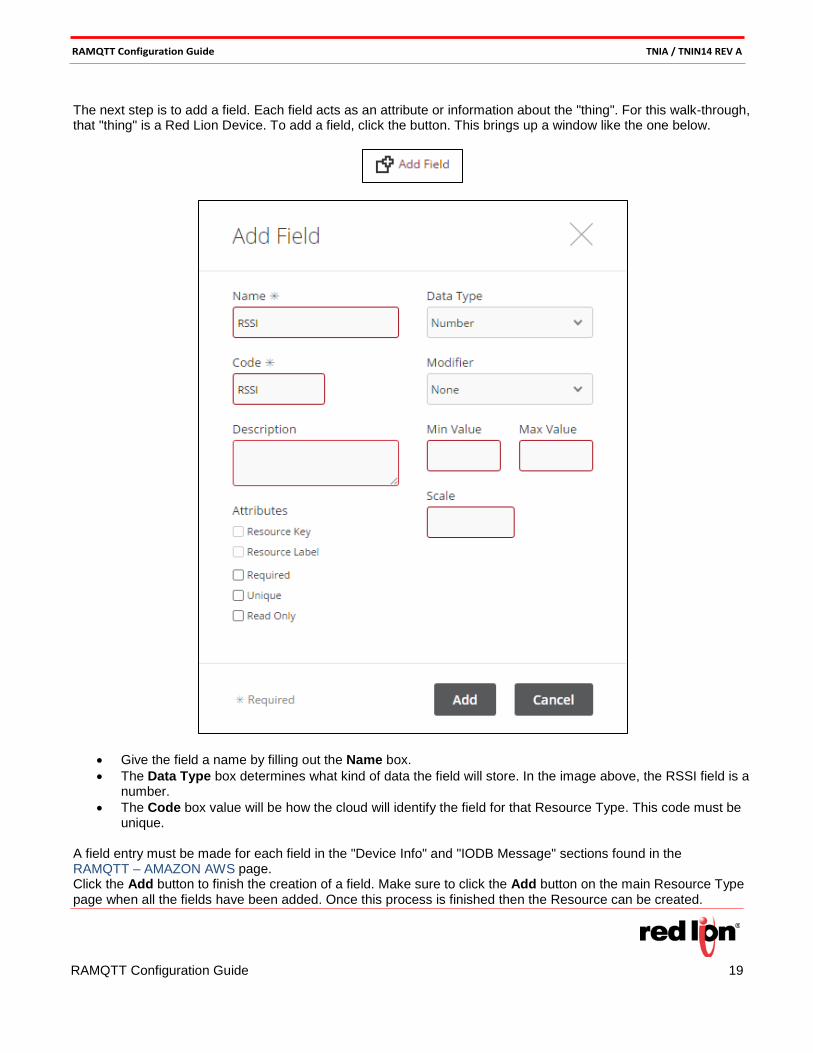
The next step is to add a field. Each field acts as an attribute or information about the "thing". For this walk-through, that "thing" is a Red Lion Device. To add a field, click the button. This brings up a window like the one below.
• Give the field a name by filling out the Name box. • The Data Type box determines what kind of data the field will store. In the image above, the RSSI field is a
number. • The Code box value will be how the cloud will identify the field for that Resource Type. This code must be
unique. A field entry must be made for each field in the "Device Info" and "IODB Message" sections found in the RAMQTT – AMAZON AWS page. Click the Add button to finish the creation of a field. Make sure to click the Add button on the main Resource Type page when all the fields have been added. Once this process is finished then the Resource can be created.

20 RAMQTT Configuration Guide
RAMQTT Configuration Guide TNIA / TNIN14 REV A
Step 2: Create Resource Associated with Red Lion Device Now that the Resource Type is created, a Resource is made by:
• Navigate to the Edit Resources page. • Select the Resource Type name from the Resource Type drop down list. If the resource type was named
"Red Lion Device", then select that name. • Click the Add button to create the Resource. This will pop up a window with a list of the attributes specified
in the Resource Type. • Fill out any identifying information such as a Serial Number, and any fields with an asterisk next to them. • All other fields can be left blank as they will be populated later by the Device Info and IODB Message
messages and Routines. Each Resource created refers to a single Red Lion Device. Step 3: Create the Red Lion Device Profile Once the Resources are added, a Device Profile must be created to allow the cloud to know what device it is talking to, and what protocol it is using. To create a Device Profile: Navigate to Connect Device Profiles. Under New Profile, click Add. This pops up a window like the one shown below. Fill out the Name for the Device Profile. For the Device Type, make sure to select MQTT::JSON. This represents how the message will be interpreted by the cloud. For Installed On, select Resource, and then select the Red Lion Device Resource Type, or the name chosen for the Resource Type created earlier. The Code again is used by the cloud to identify this Device Profile. Like the Resource Type, the Device Profile is like a blueprint, but for the Device connection itself. If you see the null[null] grey button it means an error has occurred.

RAMQTT Configuration Guide TNIA / TNIN14 REV A
RAMQTT Configuration Guide 21
If you try to add the Message Profile when it has the null[null] grey button then you will get an image similar to the one below. Try re-logging into Fusion Connect and try the process again.
Before clicking Add to fully create the Device Profile, proceed to Step 4 to create the two Messages needed for the Device Profile. Step 4: Create the "Device Info" and "IODB Message" Messages Before clicking Add, click the Add Message button. A window like the one below pops up.
Two Messages must be created; The "Device Info" message and the "IODB Message". For both, under the Direction section, select Inbound. For the name, type “IODB Message” and “Device Info”. For the Codes, put iodb_message, and device info. Click the Add button to create the message. Then, as in the create Resource process, click the button. Make sure that each field in the message matches the descriptions in the RAMQTT – AMAZON AWS .
A Device Profile must have at least one message with at least one field before it can be created.

22 RAMQTT Configuration Guide
RAMQTT Configuration Guide TNIA / TNIN14 REV A
Step 5: Create the Red Lion Device Now that the Device Profile is created, it is time to create the Device(s).
1. Navigate to the Connect Devices page. 2. Like the creation of Resources, click the Add button. This brings up a window like the one below. 3. For the Device Type, select MQTT :: Abstract JSON from the list. 4. For the Profile, select the name of the Device Profile set up in the previous steps. 5. For the Data Gateway, select MQTT Abstract JSON. 6. Put the serial number of the physical device that this virtual device corresponds to for the Device
Code. 7. For the Red Lion Device, or the name used for the Resource Type, select the created resource that
corresponds to the physical devices. For example, if you have a Physical Device with a serial number, then you will have a Device with a device code with that serial number and have a Resource that has a serial number field containing that serial number.
8. For this walk-through, leave Network Connection blank and Status unchecked. 9. Once this process is complete click Add.
A Device must be created for each physical device. Repeat the instructions for this step for each physical device.
The Code value for each field must match the Tag name set up in the Red Lion Device Side Setup walk-through. If the desired register to send is the RSSI register, then the Code value must be RSSI, as that is the RSSI Tag name.
If the Tag name and the Code for the field do not match then the values from that register will be ignored!

RAMQTT Configuration Guide TNIA / TNIN14 REV A
RAMQTT Configuration Guide 23
Step 6: Create the Routines Messages at this point in the process will be received by the cloud, but will not be processed, and the resource fields will not be updated. A Routine must be created to respond to the messages received, get the message's values, and update the resource fields. These Routines are highly customizable and can be created at the Configure Routines page. Step 7: Track and Observe To observe the messages being received, navigate to the Monitor Device Messages page. There will be dials to display various statistics about the messages sent and received. Click the Inbound tab and a list of message records will be displayed. 2.5 Message Definitions
Publish Messages 2.5.1 Default message values Following fields are included in all the messages that are included by default for all Fusion Connect messages.
• Code - Unique message ‘code’ value that is used by the device adapter to identify the correct message definition used to process this message.
• Time - Time when message is sent • Location - GPS location if GPS information is available on the device. Location is part of Device Information
Message only. Device Information Message This is a device information message that could be sent on startup and on a specified interval. Message code is: device_info. Device message is sent as a basic list or full list of variables.
24 RAMQTT Configuration Guide
RAMQTT Configuration Guide TNIA / TNIN14 REV A
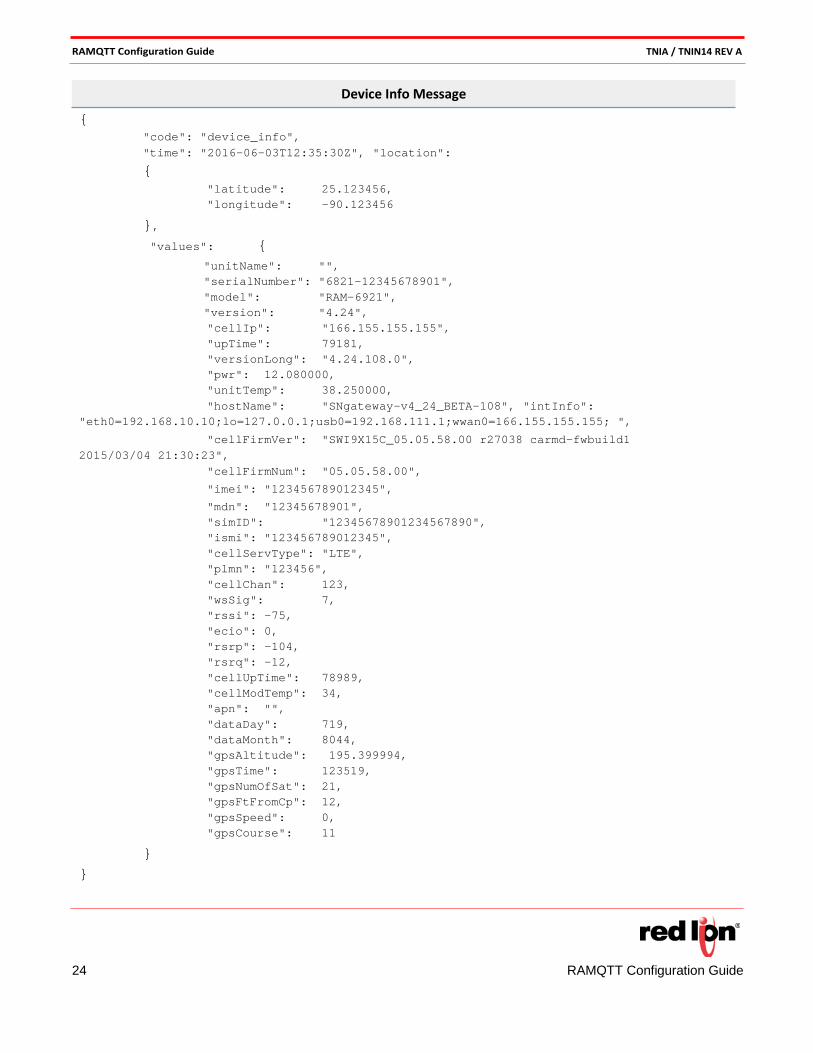
{
"code": "device_info", "time": "2016-06-03T12:35:30Z", "location":
{ "latitude": 25.123456, "longitude": -90.123456
}, "values": {
"unitName": "", "serialNumber": "6821-12345678901", "model": "RAM-6921", "version": "4.24", "cellIp": "166.155.155.155", "upTime": 79181, "versionLong": "4.24.108.0", "pwr": 12.080000, "unitTemp": 38.250000, "hostName": "SNgateway-v4_24_BETA-108", "intInfo":
"eth0=192.168.10.10;lo=127.0.0.1;usb0=192.168.111.1;wwan0=166.155.155.155; ",
"cellFirmVer": "SWI9X15C_05.05.58.00 r27038 carmd-fwbuild1 2015/03/04 21:30:23",
"cellFirmNum": "05.05.58.00",
"imei": "123456789012345",
"mdn": "12345678901", "simID": "12345678901234567890", "ismi": "123456789012345", "cellServType": "LTE", "plmn": "123456", "cellChan": 123, "wsSig": 7, "rssi": -75, "ecio": 0, "rsrp": -104, "rsrq": -12, "cellUpTime": 78989, "cellModTemp": 34, "apn": "", "dataDay": 719, "dataMonth": 8044, "gpsAltitude": 195.399994, "gpsTime": 123519, "gpsNumOfSat": 21, "gpsFtFromCp": 12, "gpsSpeed": 0, "gpsCourse": 11
} }
Device Info Message

RAMQTT Configuration Guide TNIA / TNIN14 REV A
RAMQTT Configuration Guide 25
IODB Message IODB Message publishes user selected iodb registers. The Message code is: iodb_message. The message is in the following format:
{ "code": "iodb_message", "time": "2016-06-01T03:21:13Z",
"values": { "<Tag Name>": <value>,
"<Tag Name>": <value>
} } This is an example of IODB Message: { "code": "iodb_message", "time": "2016-06-01T03:21:11Z", "values": { "AI1": 23, "AI_2676": 21, "DI1": 0, "DI2": 0, "DO1": 0, "DO2": 0, "TMP1": 49, "PWR1": 11980, "VBAT": 0 } }
Subscribe Messages 2.5.2 All messages to be received by RAMQTT Client are to be sent to <root topic>/<device serial number>/directive topic. IODB Write The IODB write message must have following two fields:
• message code must be: iodb_write, • values: a list of values to be updated. Must have at least one value field. Format of every value field is:
<Tag>_<Value>
IODB Message format
{ "code": "iodb_message", "time": "2016-06-01T03:21:11Z", "values": {
"AI1": 23, "AI_2676": 21, "DI1": 0, "DI2": 0,
"DO1": 0, "DO2": 0, "TMP1": 49, "PWR1": 11980, "VBAT": 0
} }
26 RAMQTT Configuration Guide
RAMQTT Configuration Guide TNIA / TNIN14 REV A
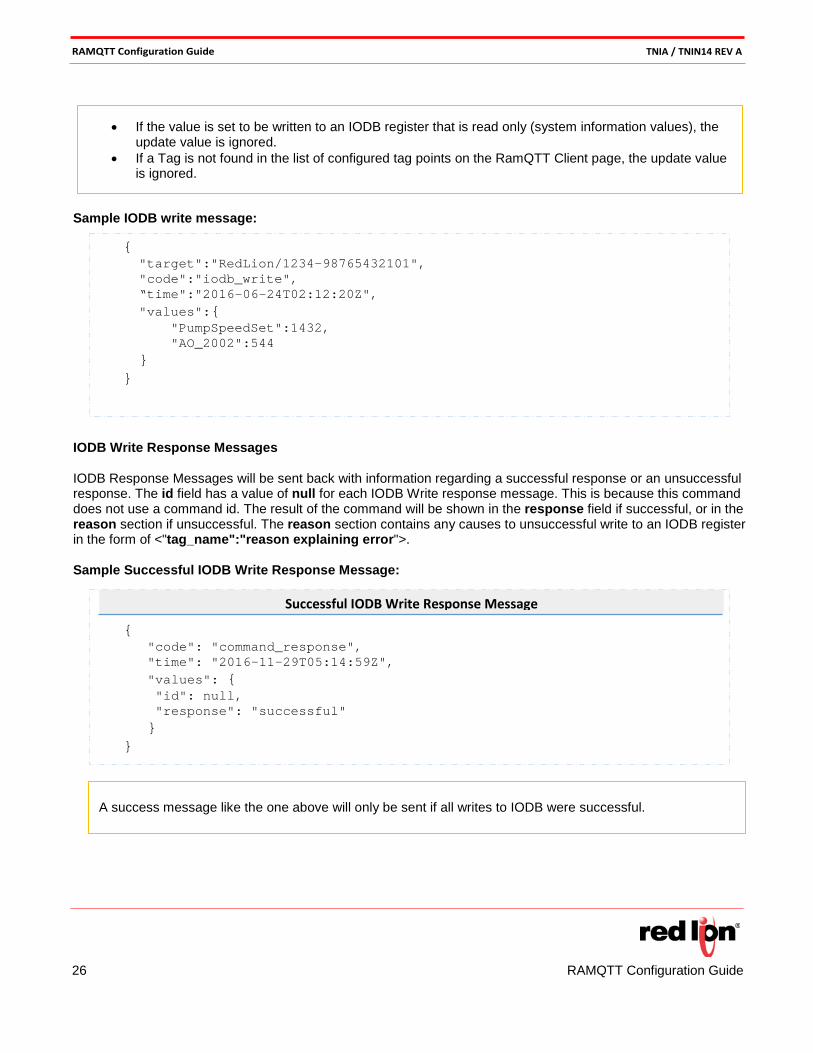
Sample IODB write message: IODB Write Response Messages IODB Response Messages will be sent back with information regarding a successful response or an unsuccessful response. The id field has a value of null for each IODB Write response message. This is because this command does not use a command id. The result of the command will be shown in the response field if successful, or in the reason section if unsuccessful. The reason section contains any causes to unsuccessful write to an IODB register in the form of <"tag_name":"reason explaining error">. Sample Successful IODB Write Response Message:
{ "target":"RedLion/1234-98765432101", "code":"iodb_write", “time":"2016-06-24T02:12:20Z", "values":{ "PumpSpeedSet":1432, "AO_2002":544 } }
{ "code": "command_response", "time": "2016-11-29T05:14:59Z", "values": { "id": null, "response": "successful" } }
Successful IODB Write Response Message
A success message like the one above will only be sent if all writes to IODB were successful.
• If the value is set to be written to an IODB register that is read only (system information values), the update value is ignored.
• If a Tag is not found in the list of configured tag points on the RamQTT Client page, the update value is ignored.

RAMQTT Configuration Guide TNIA / TNIN14 REV A
RAMQTT Configuration Guide 27
Sample Unsuccessful IODB Write Response Message: Commands RAMQTT Client can process the commands listed below:
Message Code Version Added Description firmware_update 4.25 Update firmware of the device package_install 4.25 Installs/update a custom package to the device config_update 4.25 Update configuration with XML file reboot 4.25 Reboots the device
Command message format is shown below:
{ "code": "command_response", "time": "2016-11-29T05:29:21Z", "values": { "id": null, "reason": { "AO_3001": "The value is non numeric.", "AO_4000": "AO_4000 does not exist"
} }
}
Unsuccessful IODB Write Response Message
Only failed writes to IODB will be included in the response message under the reason section.
{
"target": "<root topic>/<device serial number>", "code": "<firmware_update | config_update | package_install | reboot>", "time": "2016-06-24T02:12:20Z", "values": {
"id": "<custom_command_id>", "<document_key | full_url>": "<key | url_path_to_download_a_file>"
} }
Command Message Format

28 RAMQTT Configuration Guide
RAMQTT Configuration Guide TNIA / TNIN14 REV A
document_key is supplied by Fusion Connect under Manage Library Documents full_url is a custom url path for file to be downloaded
id is a custom id for the message. This id is used to identify the response message receiving from the
device. For example, if the id field is "Test1234", then a response message from the device has the id field set to "Test1234".
Once a command is processed, a response is sent to <root topic>/<device serial number> topic stating if a command was successfully processed or rejected. If a command response is a rejected, a reason why it was rejected is also in the message. The reboot command will send a reason of "Device is rebooting".
{
"code": "command_response", "time": "2016-11-10T19:58:16Z", "values": {
"id": "<custom_command_id>", "response": "<successful | reject reason>"
} }
Command Response Format

RAMQTT Configuration Guide TNIA / TNIN14 REV A
RAMQTT Configuration Guide 29
RAMQTT – AT&T M2X 3.1 Overview When using AT&T M2X, RAMQTT Client can auto register the device to the M2X cloud. There are a few methods that can be used to establish initial connection.
1. Device is not registered with M2X. If the device is not registered with M2X, a Master API Key is needed to enable auto registration. The device does the following in this case:
a. Device registers itself with M2X using the provided Master API Key b. RAMQTT Configuration is updated to include the obtained Device API Key and Device ID c. The Master API Key is removed from the device for security d. RAMQTT registers all IO points (streams) e. Start publishing IO data
2. Device is registered; No Device API Key or Device ID is available. If the device has been registered,
but for some reason the Device API Key and/or Device ID has been lost or removed, a Master API Key is required. In this Case the device performs the following:
a. Check the M2X to see if the device has been previously registered. RAMQTT Client sends a check device message with its serial number and if this serial number is found among registered devices on the cloud, it will get that Device API Key and Device ID.
b. Remove Master API Key from the device for security c. Verify that selected IO points are all setup as streams on the cloud. For any missing or not
matching streams, new streams are registered. d. Start publishing IO data
3. Device is registered; streams are not setup. If the device has previously registered itself with M2X or a
user has created a device on M2X and Device API Key and Device ID is known, the RAMQTT performs the following.
a. Verify that selected IO points are all setup as streams on the cloud. For any missing or not matching streams, new streams are registered.
b. Start publishing IO data.
4. Device is registered, streams are setup. a. Verify that selected IO points are all setup as streams on the cloud. For any missing or not
matching streams, new streams are registered. b. Start publishing IO data
30 RAMQTT Configuration Guide
RAMQTT Configuration Guide TNIA / TNIN14 REV A
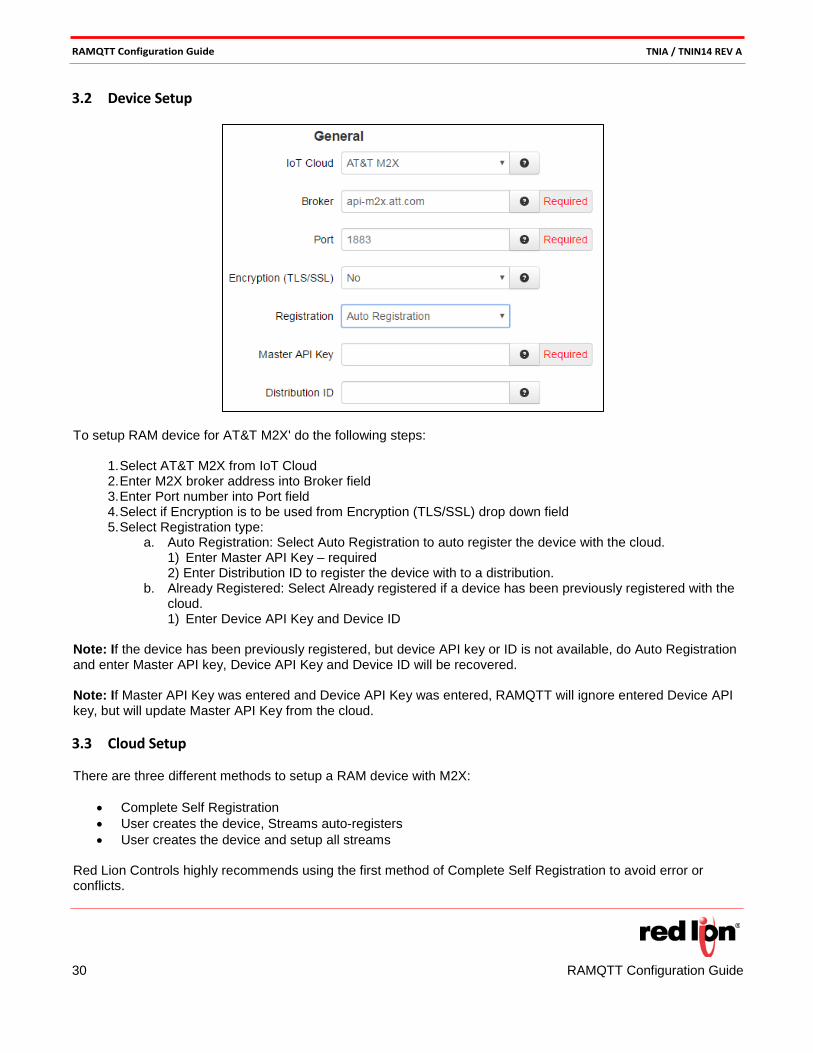
3.2 Device Setup
To setup RAM device for AT&T M2X' do the following steps:
1. Select AT&T M2X from IoT Cloud 2. Enter M2X broker address into Broker field 3. Enter Port number into Port field 4. Select if Encryption is to be used from Encryption (TLS/SSL) drop down field 5. Select Registration type:
a. Auto Registration: Select Auto Registration to auto register the device with the cloud. 1) Enter Master API Key – required 2) Enter Distribution ID to register the device with to a distribution.
b. Already Registered: Select Already registered if a device has been previously registered with the cloud. 1) Enter Device API Key and Device ID
Note: If the device has been previously registered, but device API key or ID is not available, do Auto Registration and enter Master API key, Device API Key and Device ID will be recovered. Note: If Master API Key was entered and Device API Key was entered, RAMQTT will ignore entered Device API key, but will update Master API Key from the cloud. 3.3 Cloud Setup There are three different methods to setup a RAM device with M2X:
• Complete Self Registration • User creates the device, Streams auto-registers • User creates the device and setup all streams
Red Lion Controls highly recommends using the first method of Complete Self Registration to avoid error or conflicts.

RAMQTT Configuration Guide TNIA / TNIN14 REV A
RAMQTT Configuration Guide 31
Complete Auto Registration 3.3.1 AT&T M2X provides two options to automatically register the physical device on the cloud. Register Device Based on RAMQTT Settings The only piece of information needed for this method is the Master API Key.
1. From your M2X page, go to Account Settings page
2. On the Account Setting page, there is a list of all Master and Primary Key. Select a Master Key that you would like to use with RAMQTT Client.
3. If you decide to create a new Master API Key for use with RAMQTT Client, Click button.
Note: A secondary Master Key is recommended. This is beneficial since you can set various limitations like expiry date, filter on allowed IP addresses and various permissions.
4. Fill out the information as desired.
Performing auto registration requires the use of the Master API Key. If RAMQTT is given a Master API Key, then it will use it over the other Device API Key and Device ID to obtain its identity from the cloud and complete auto registration. This is a safety mechanism for using auto registration in which the same Device API Key and Device ID are assigned to multiple devices which could cause a conflict. If using auto registration, the Device API Key and Device ID should not be included in the configuration.

32 RAMQTT Configuration Guide
RAMQTT Configuration Guide TNIA / TNIN14 REV A
5. Please make sure that following permissions are selected: GET, POST, PUT, and DELETE.
6. Click Save. Enter the Master API Key in RAMQTT Client page and click Apply. After a short time, the newly created device(s) appear on the main page under devices. Register Device as Part of a Distribution In order to register the device as part of a distribution, the account must be upgraded to the pro account to have access to the Distributions feature. If using a device a basis for setting up the Distribution, that device must already be created on the cloud.
1. Go to the Devices tab on the main screen.
2. Find the device to be distributed. Make sure the device is ENABLED.
3. Click the device entry and check to see if the device is still enabled. If not, toggle it to ENABLED.
4. Review the device overview. Make sure the device is exactly as desired. Click the Distribute button at the top right.
5. Fill out the fields and review the Device Attributes to make sure they are as desired. 6. RAMQTT supports the Private Distribution option only. Make sure the Private Distribution option is
selected.

RAMQTT Configuration Guide TNIA / TNIN14 REV A
RAMQTT Configuration Guide 33
7. After filling out the information, click the Add Distribution button.
8. Once created, the newly created Distribution can be viewed under the Distribution tab.
9. Copy the DISTRIBUTION ID from the newly created Distribution. It will be labeled with name provided in Step 6.
10. Obtain the Master API Key from the steps provided in Register Device Based on RAMQTT Settings. 11. Select Auto Registration from the Registration drop down menu. Enter the Master API Key and Distribution
ID into the RAMQTT Client page and click Apply.
12. After a short time, the newly created device(s) will appear on the main page under devices.

34 RAMQTT Configuration Guide
RAMQTT Configuration Guide TNIA / TNIN14 REV A
User creates a device, Streams auto registered 3.3.2 In this method, a user creates the device(s) but does not setup streams for IO points.
1. From device page of your account, Click on Create New and select Device.
2. Fill out all the fields as desired. It is not required, but is highly recommended to enter the device serial number into Serial Number field. This becomes useful in case Device API key or id gets corrupted. Using the Master API key, the device will auto reconnect to the device instance in the cloud with its serial number.
3. Click Create button. 4. Newly created device should open. Copy Device API Key and Device ID.
Now enter the Device API Key and Device in RAMQTT Client page and click apply. After a short time, the created the stream(s) appear on the device page (may need page refresh).
User creates the device and setup all streams 3.3.3
1. From device page of your account, Click on Create New and select Device.
2. Fill out all the fields as desired. It is not required, but is highly recommended to enter the device serial number into Serial Number field. This becomes useful in case the Device API key or id gets corrupted. Using Master API key, the device will auto reconnect to the device instance in the cloud with its serial number.
3. Click Create button. 4. Newly created device should open. Copy the Device API Key and Device ID and post Device API Key
and ID into appropriate fields in the RAMQTT Client page. 5. For each Data Point create a stream:
a. Click Add Stream button
b. Fill out all the information needed. Please make sure that Stream ID field has the same name as the name of the tag for the IO point in the RAMQTT Client page. If there is no tag defined for the stream id must be in the format <type>_<register>, the register is zero based value.
c. Click Save button.

RAMQTT Configuration Guide TNIA / TNIN14 REV A
RAMQTT Configuration Guide 35
3.4 Message Definitions
Publish Messages 3.4.1 RAMQTT publishes both IODB values and Device Information messages with similar formats. Both messages are published as Single Values to Multiple Streams. For more details of message formats please refer to M2X API documentations https://m2x.att.com/developer/documentation/v2/ .
IODB messages 3.4.2 All IODB messages are published with "id" equal to "iodb_message". All messages include the timestamp (time on the device) when the message was sent. Device Information Messages The Device Information message is almost identical to the IODB message with following differences:
• id: device_message • Includes GPS location of the device
{
"id": "iodb_message", "method": "POST", "resource":v2/devices/9abcd2900c32fed1234a62201fb37896/update", "body": {
"timestamp": "2016-10-14T14:22:54Z", "values": {
"AI1": 14945, "AI2": 8971, "Time_Min": 22, "Time_Second": 53, "Uptime_Minutes": 34, "Uptime_Seconds": 59, "GPS_Time_MM": 22, "GPS_Time_SS": 48, "AO_3000": 101
} }
}
Sample IODB Message

36 RAMQTT Configuration Guide
RAMQTT Configuration Guide TNIA / TNIN14 REV A
{ "id": "device_message", "method": "POST", "resource": "/v2/devices/9abcd2900c32fed1234a62201fb37896/update", "body": {
"timestamp": "2016-10-14T14:43:44Z", "Location": {
"latitude": 12.345678, "longitude": -98.765432, "elevation": 209.600006
}, "values": {
"unitName": "", "serialNumber": "1234654796325847", "model": "RAM-9931", "version": "4.25", "cellIp": "12.12.12.12", "upTime": 68150, "versionLong": "4.25.75.0", "pwr": 11.96, "unitTemp": 43.43, "hostName": "SNgateway-v4_25_BETA-75", "intInfo":
"lo=127.0.0.1;eth0=192.168.1.2;eth1=192.168.1.1;usb0=192.168.111.1;wwan0=1 2.12.12.12;",
"cellFirmVer": "SWI9X15C_05.05.58.00 r27038 carmd-fwbuild1 2015/03/04 21:30:23",
"cellFirmNum": "05.05.58.00", "imei": "123456789123456", "mdn": "123456789321", "simID": "89011234567898765432", "ismi": "8901123456789876543", "cellServType": "LTE", "plmn": "123456", "cellChan": 675, "wsSig": 7, "rssi": -73, "ecio": 0, "rsrp": -104, "rsrq": -13, "cellUpTime": 68002, "cellModTemp": 42, "apn": "i2gold", "dataDay": 0, "dataMonth": 37362, "gpsAltitude": 209.600006, "gpsTime": 144343, "gpsNumOfSat": 20, "gpsFtFromCp": 3005, "gpsSpeed": 0, "gpsCourse": 182}
} }
}
Sample Full Device Information Message

RAMQTT Configuration Guide TNIA / TNIN14 REV A
RAMQTT Configuration Guide 37
Subscribe Messages – Commands 3.4.3 To receive commands, RAMQTT is subscribed to commands topic. For RAMQTT to receive a command, a command message needs to be published to M2X cloud. For detail on M2X commands, please refer to M2X API documentations https://m2x.att.com/developer/documentation/v2/commands and https://m2x.att.com/developer/documentation/v2/mqtt. Each command listed below and has an example of the command that is sent to the cloud. M2X will then generate a device specific message that is sent to the devices. For all received commands, a response message is sent A process command response message is sent if the command successfully completes. If for some reason the command was not able to fully complete, a reject command response message is sent. Each reject command response message contains the reason in the body. RAMQTT Client can process the commands listed below: Command Name Version Added Description iodb_write 4.25 Update an IODB value on the device firmware_update 4.25 Update firmware of the device package_install 4.25 Installs/update a custom package to the device config_update 4.25 Update configuration with XML file config_fetch 4.25 Upload device configurations to the cloud (specified location) reboot 4.25 Reboots the device
IODB Write The IODB Write command must have "iodb_write" in the name field. All values in the data are string types and are in lowercase. This will match against IODB Tags, case insensitive. Data contains the list for all of the IODB values to be updated. After an IODB Write command is received, RAMQTT verifies that it can update the IODB value. If for some reason it cannot update one or more of the values, it responds with reject command response. If RAMQTT was able to update all IODB values, it sends a process command response.
{
"method": "POST", "resource": "/v2/commands", "body": {
"name": "iodb_write", "data": {
"ao_3000": "121", "ao_3001": "101"
}, "targets": {
"devices": [ "9abcd2900c32fed1234a62201fb37896"
] }
} }
Sample IODB Write Command

38 RAMQTT Configuration Guide
RAMQTT Configuration Guide TNIA / TNIN14 REV A
Firmware Update The Firmware Update command must have "firmware_update" in the name field. The data must contain "path" field with a path to the Firmware update zip package. After a Firmware Update command is received, and the package is validated to be a valid firmware update package, RAMQTT stops and the firmware update will take place. If the downloaded package is invalid, a reject command response is sent. Package Install The Package Install command must have "package_install" in the name field. The data must contain "path" field with a path to the package to be installed. After a Package Install command is received, and the package is validated to be a valid zip package, an attempt to install the package will take place. If a package was not able to successfully install, a reject command response message is sent.
{ "method": "POST", "resource": "/v2/commands", "body": {
"name": "firmware_update", "data": {
"path": "ftp://ftp.mysite.com/firmware/4.25_DEV_sn_reflash.zip" }, "targets": {
"devices": [ "9abcd2900c32fed1234a62201fb37896"
] }
} }
Sample Firmware Update Command
{ "method": "POST", "resource": "/v2/commands", "body": {
"name": "package_install", "data": {
"path": "ftp://ftp.mysite.com/packages/customPackage.zip" }, "targets": {
"devices": [ "9abcd2900c32fed1234a62201fb37896"
] }
} }
Sample Package Install Command

RAMQTT Configuration Guide TNIA / TNIN14 REV A
RAMQTT Configuration Guide 39
Configuration Update The Configuration Update command must have "config_update" in the name field. The data must contain "path" field with a path to the configuration file to be installed. After a Configuration Update command is received, an attempt to update configurations with given configuration xml file will take place. If a configuration update was not able to successfully complete, a reject command response message is sent. Configuration Fetch (Not Available in 4.25 release) The Configuration Fetch command must have "config_fetch" in the name field. The data must contain "path" field with a path where to send the configurations from the device. After a Configuration Fetch command is received, an attempt is made to send device configuration to the specified path. If a RAMQTT was not able to successfully send device configurations, a reject command response message is sent.
{ "method": "POST", "resource": "/v2/commands", "body": {
"name": "config_update", "data": {
"path": "ftp://ftp.mysite.com/configs/myconfigs.xml" }, "targets": {
"devices": [ "9abcd2900c32fed1234a62201fb37896"
] }
} }
Sample Configuration Update Command
{ "method": "POST", "resource": "/v2/commands", "body": {
"name": "config_fetch", "data": {
"path": "ftp://ftp.mysite.com/configs/configs.xml" }, "targets": {
"devices": [ "9abcd2900c32fed1234a62201fb37896"
] }
} }
Sample Configuration Fetch Command
40 RAMQTT Configuration Guide
RAMQTT Configuration Guide TNIA / TNIN14 REV A
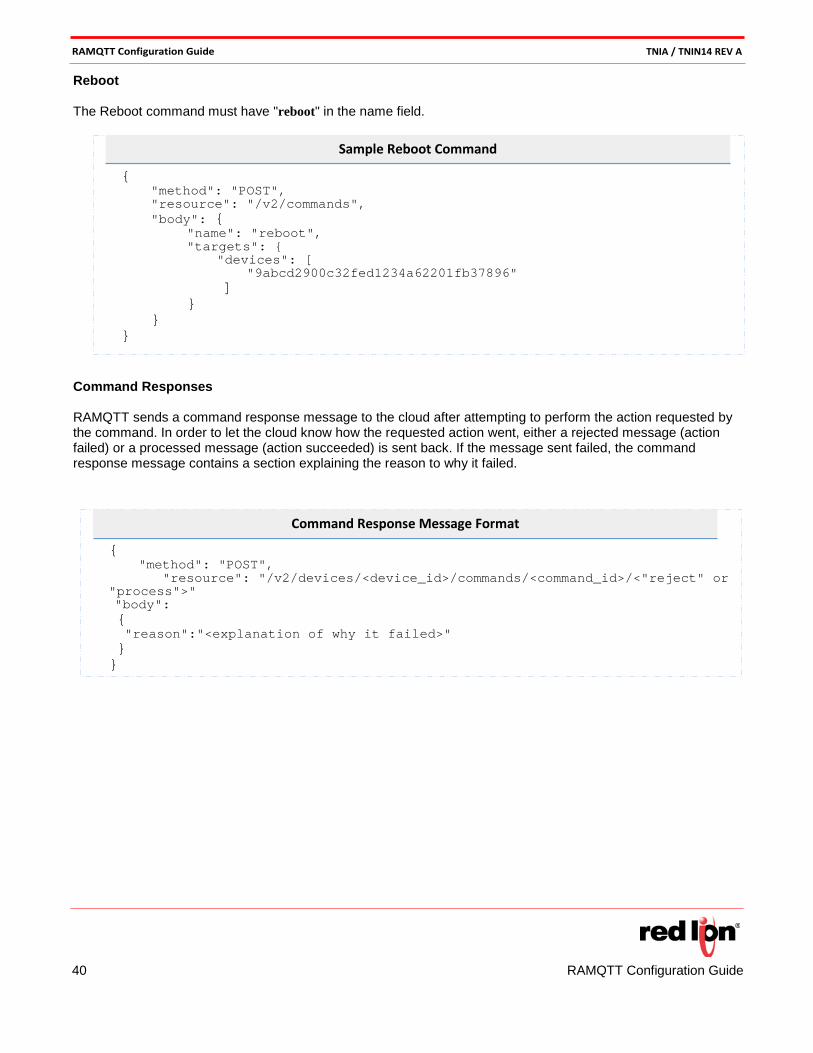
Reboot The Reboot command must have "reboot" in the name field. Command Responses RAMQTT sends a command response message to the cloud after attempting to perform the action requested by the command. In order to let the cloud know how the requested action went, either a rejected message (action failed) or a processed message (action succeeded) is sent back. If the message sent failed, the command response message contains a section explaining the reason to why it failed.
{ "method": "POST", "resource": "/v2/commands", "body": {
"name": "reboot", "targets": {
"devices": [ "9abcd2900c32fed1234a62201fb37896"
] }
} }
Sample Reboot Command
{ "method": "POST",
"resource": "/v2/devices/<device_id>/commands/<command_id>/<"reject" or "process">" "body": { "reason":"<explanation of why it failed>" } }
Command Response Message Format

RAMQTT Configuration Guide TNIA / TNIN14 REV A
RAMQTT Configuration Guide 41
RAMQTT – AMAZON AWS 4.1 Overview
Device Name 4.1.1 RAMQTT uses device serial number as a Device Name.
Last Will and Testament 4.1.2 The Last Will and Testament (LWT ) acts as a way to let other subscribers of a topic receive a message when a device has disconnected ungracefully. Depending on which topic you publish the message to it could end up being ignored. According to Amazon's AWS documentation, if the LWT is published to a “system reserved topic” (Topics starting with a "$", such as $aws/things/...) the message is ignored. However, there is a way around this using an example provided in their documentation which can be found at http://docs.aws.amazon.com/iot/latest/developerguide/thing-shadow-data-flow.html. 4.2 Cloud Setup Prior to setting up a device, Device Certificates must be created either on AWS or user created certificates registered with AWS. Please refer to AWS IoT documentation for more detail how to set up the cloud side.
• AWS IoT Quick Start Guide • Certificates
4.3 Device Setup To setup RAM device for Amazon AWS perform the following steps:
Fill out General Section:
1. Select Amazon from IoT Cloud 2. Enter AWS broker address provided by AWS into Broker field. 3. Enter Port number into Port field.

42 RAMQTT Configuration Guide
RAMQTT Configuration Guide TNIA / TNIN14 REV A
Attach Certificates Attach all 3 certificates.
• If certificates have been previously added with device Certificate manager, just select appropriate certificate from the drop down box.
• Certificates can be also added by clicking on the file icon and selecting the appropriate certificate file. 4.4 Message Definitions
Publish Messages 4.5.1 RAMQTT publishes IODB and Device information messages to Shadow Device topic: $aws/things/<Device Serial Number>/shadow/update. IODB Messages All IODB points are published inside an "iodb" JSON struct which is inside predefined AWS "reported" struct. Device Information All Device Information is published inside a "deviceInfo" and "location" JSON structs which is inside predefined AWS "reported" struct.
{ "state": {
"reported": { "iodb": {
"AO_3000": 0, "AO_3001": 0, "Firmware_Version": 425
} }
} }
Sample IODB Message
RAMQTT Configuration Guide TNIA / TNIN14 REV A
RAMQTT Configuration Guide 43
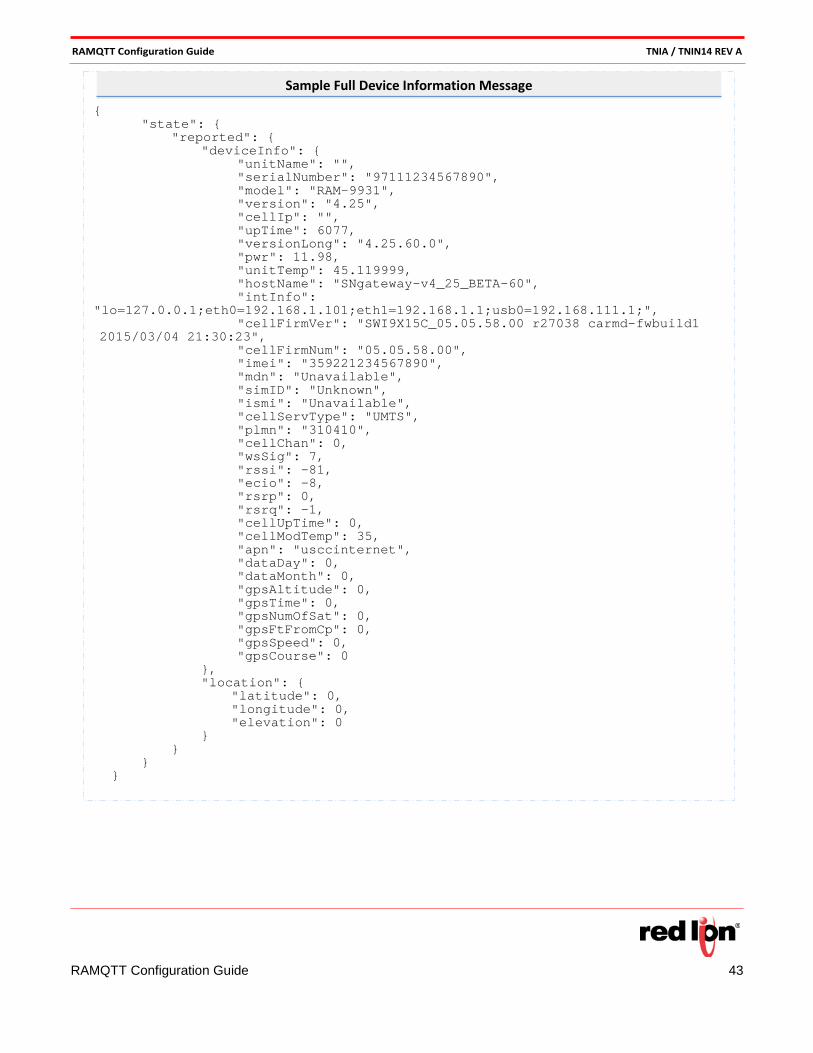
{ "state": {
"reported": { "deviceInfo": {
"unitName": "", "serialNumber": "97111234567890", "model": "RAM-9931", "version": "4.25", "cellIp": "", "upTime": 6077, "versionLong": "4.25.60.0", "pwr": 11.98, "unitTemp": 45.119999, "hostName": "SNgateway-v4_25_BETA-60", "intInfo":
"lo=127.0.0.1;eth0=192.168.1.101;eth1=192.168.1.1;usb0=192.168.111.1;", "cellFirmVer": "SWI9X15C_05.05.58.00 r27038 carmd-fwbuild1
2015/03/04 21:30:23", "cellFirmNum": "05.05.58.00", "imei": "359221234567890", "mdn": "Unavailable", "simID": "Unknown", "ismi": "Unavailable", "cellServType": "UMTS", "plmn": "310410", "cellChan": 0, "wsSig": 7, "rssi": -81, "ecio": -8, "rsrp": 0, "rsrq": -1, "cellUpTime": 0, "cellModTemp": 35, "apn": "usccinternet", "dataDay": 0, "dataMonth": 0, "gpsAltitude": 0, "gpsTime": 0, "gpsNumOfSat": 0, "gpsFtFromCp": 0, "gpsSpeed": 0, "gpsCourse": 0
}, "location": {
"latitude": 0, "longitude": 0, "elevation": 0
} }
} }
Sample Full Device Information Message

44 RAMQTT Configuration Guide
RAMQTT Configuration Guide TNIA / TNIN14 REV A
Subscribe Messages 4.5.2 IODB Write For updating IODB values on the device from cloud, RAMQTT is subscribed to $aws/things/<Device Serial Number>/shadow/update/delta topic. Below is the sample desired messaged that is published by others (service, cloud, etc.) on which AWS generated a delta message for the device. Commands For receiving commands, RAMQTT is subscribed aws/things/<Device Serial Number>/commands/requests topic. Below is the command type table and definitions. The Type field column tells what must be in the "type" field as identifier for that command.
Command Version Added Description
firmware_update 4.25 Update firmware of the device
package_install 4.25 Installs/update a custom package to the device
config_update 4.25 Update configuration with XML file
reboot 4.25 Reboots the device
Sending a command requires a special message containing the type of command and a path to download file if needed. RAMQTT supports firmware update, package update/install, config update, and reboot commands. To send a command to RAMQTT, the following message format is used except for the reboot.
{ "state": {
"desired": { "iodb": {
"AO_3000": 1234, "AO_3001": 122,
} }
} }
Sample IODB Desired Message
If a desired message is sent to update an IODB value that is read only, not defined in IODB points list, or is of a string value, RAMQTT sends a message to delete that desired request for that IODB register.

RAMQTT Configuration Guide TNIA / TNIN14 REV A
RAMQTT Configuration Guide 45
Example of the reboot command: Once a command is processed, a response is sent to the aws/things/<Device Serial Number >/commands /responses topic stating if a command was successfully processed or rejected. If a command response is a rejected, a reason why it was rejected is also in the message. The reboot command sends a reason of "Device is rebooting".
{ "command": "<firmware_update | config_update | package_update >", "id": "<custom_command_id>", "path": "<url_path_to_download_a_file>" }
}
Command Message Format
{ "command": "reboot>, "id": "<custom_command_id>"}
}
Reboot Command
{ "id": "<custom_command_id>", "response": "<successful | reject reason>"}
}
Sample Command Response message

46 RAMQTT Configuration Guide
RAMQTT Configuration Guide TNIA / TNIN14 REV A
RAMQTT - Telenor Cloud Connect 5.1 Overview Since Telenor Cloud Connect leverages Amazon AWS IoT platform, RAMQTT uses the same underlying methodology to send messages with differences mentioned on this page. Please refer to RAMQTT – AMAZON AWS for details on RAMQTT user guide with AWS. 5.2 Cloud Setup Prior to the RAMQTT device side setup, a device instance must first be created on the cloud side.
1. From Telenor Cloud Connect Connexion page, click on button.
2. Enter desired information and click Save 3. Click on newly created thing type
4. Click on the (Add Things) button
5. Enter number of things to create and domain, and press Create 6. Click on thing type again. 7. Scroll down to Thing Credentials 8. Click on the download credentials arrow to download credential information for all things created in
steps 4 and 5.
9. Save the download file to a known location. This zip archive contains device certificate and key files. The device name is the folder name inside the downloaded zip archive.

RAMQTT Configuration Guide TNIA / TNIN14 REV A
RAMQTT Configuration Guide 47
5.3 Device Setup Device setup for Telenor Cloud Connect is the same setup as for Amazon AWS IoT device setup except that Telenor Cloud Connect has an additional Device Name field. The Device Name field is required and must match with the certificates.
5.4 Message Definitions
Publish Messages 5.4.1 All messages are published to $aws/things/<Device Name>/shadow/update topic. Initial TCXN Message On connection, RAMQTT publishes an initial message to Telenor Cloud Connect. This message does not contain any IODB points. It contains all RAMQTT supported data for TCXN block and GPS location.
{ "state": {
"reported": { "latlng": "45.6789,-71.2345", "tcxn": {
"connection_status": 2, "ip_addr": "123.123.123.123", "fw_ver": "4.25.84.13", "cellular": {
"network_type": "LTE", "rssi": 90, "imsi": "312345678901234", "imei": "398765432109876"
} }
} }
}
Sample Initial TXCN message

48 RAMQTT Configuration Guide
RAMQTT Configuration Guide TNIA / TNIN14 REV A
Last TCXN Message When RAMQTT publishes a last TCXN message before it disconnects to update the connection status variable on the cloud.
Device Information Message Device information message is similar to AWS with the exception that deviceInfo sub thing has its type defined as "Device Information" and also includes the TCXN block.
{ "state": {
"reported": { "latlng": "42.9049,-73.798", "tcxn": {
"connection_status": 0} }
} }
}
Sample Last TXCN message
{ "state": {
"reported": { "deviceInfo": {
"unitName": "Ram9000_103", "serialNumber": "971100001234567", "model": "RAM-9931", "version": "4.25", "cellIp": "123.123.123.123", "upTime": 15821, "type": "Device Information"
}, "latlng": "42.9049,-73.798", "tcxn": {
"connection_status": 2, "ip_addr": "123.123.123.123", "fw_ver": "4.25.84.13", "cellular": {
"network_type": "LTE", "rssi": 90, "imsi": "312345678901234", "imei": "398765432109876"
} }
} }
}
Sample initial TXCN message

RAMQTT Configuration Guide TNIA / TNIN14 REV A
RAMQTT Configuration Guide 49
IODB Message IODB message is similar to Amazon AWS with the exception that iodb sub thing has its type defined as "IODB Registers".
Subscribe messages 5.4.2 IODB Write IODB Write messages for Telenor Cloud Connect are sent to the same topic as Amazon AWS. RAMQTT subscribes to $aws/things/<Device Name>/shadow/update/delta topic for IODB Write messages. To send an IODB Write message from Telenor Cloud Connect to the RAM device, follow these steps:
1. Add or edit a widget on the dashboard 2. Select the type of the widget to be one of the following: Value, Gauge, Table of Time Series
3. Select the resource. This is the IODB register sent from the device.
4. Select "Yes" from Setable Widget
{ "state": {
"reported": { "iodb": {
"Time_Min": 17, "Time_Second": 8, "Uptime_Seconds": 47, "type": "IODB Registers"}
} }
} }
Sample Initial TXCN message

50 RAMQTT Configuration Guide
RAMQTT Configuration Guide TNIA / TNIN14 REV A
5. Click the Done button. 6. Save your view 7. From the top right corner of the widget, click button below and click Set
8. Enter the desired value and click Set At this point, Telenor Cloud Connect will set a desired value for the selected resource and the Amazon AWS back-end will send a delta message to the device. To clear the desired value, from the top right corner of the widget, click the button below and click Reject.
Commands The following Commands for Telenor Cloud Connect are not available in the 4.25 release due to restrictions in the Telenor Cloud Connect implementation:
• Firmware Update • Config Update • Package Install • Reboot
If the desired value is not rejected (cleared), a delta message will continue to be sent every time the device publishes a message.
When RAMQTT starts, it publishes numbers as numbers and strings as strings. Values from Telenor Cloud Connect are sent as strings. For all received values, RAMQTT preserves the received value type and publishes changes with the same type. Example: If a value, AO_3000, is received by RAMQTT as a string, a changed value will be sent as a string..