Embed Size (px)
Citation preview
© 2011 - Qwizdom Inc.
Qwizdom Training guide Q6 / Q7

General InformatIon 1HID Host 1Connect Overview 1
remote ConfIGuratIon 2
InstallInG state standards 2
CreatInG Classes 3Creating a Participant List – In Connect 3Importing a Participant List from CSV/Excel File 3Importing a Live Editor Activity from Connect Online 4
CurrICulum and aCtIvItIes 4Creating a Live Editor Activity 5Working in Live Editor 5Creating Content 7
PresentInG a lIve edItor aCtIvIty 8
remote PresentInG features 9Presenting Features Specific to the Q7 Presenter Tablet 9Q6 Student Remote Features 9
aCtIonPoInt ProGram 10
answer Key maKer 11Creating a Single Answer Key 11Multiple Answer Key 12
QuestIon toolbar ProGram 13
results and rePorts 14Results Editing Options 14Results Merger 14
two ProGrams outsIde of ConneCt 15Survey Bar with Q7 Presenter Tablet (Spontaneous Activity) 15Survey Bar with Q7 Presenter Tablet (Preplanned Activity) 15Simple Survey Bar with Q7 Presenter Tablet (Spontaneous Activity) 16
Simple Survey Bar with Q7 Presenter Tablet (Preplanned Activity) 17
notes 18
Contents

1
general informaTion
Connect overviewtop toolbar of the Connect software includes:
1. file menu - set preferences, change password, and download state standards
2. Qwizdom online menu - allows login to Connect Online to access premade activities and the media library • To acquire login information, register at http://register.qwizdom.com
3. Programs menu - displays the 4 programs within the software suite
4. remotes menu -providesaccesstoremoteconfigurationprocess(seep.2)5. Help menu - provides access to User Guide and software updates
• The HID Host is located in the back compartment of the Q7RFTablet.
• Plug the HID Host into an open USB port on the computer beforeopeningtheConnectsoftware.
• Thecomputerwillautomaticallydetectandconfigurethenewhardwaredevice.
1
1 2 3 4 5
HId Host
2
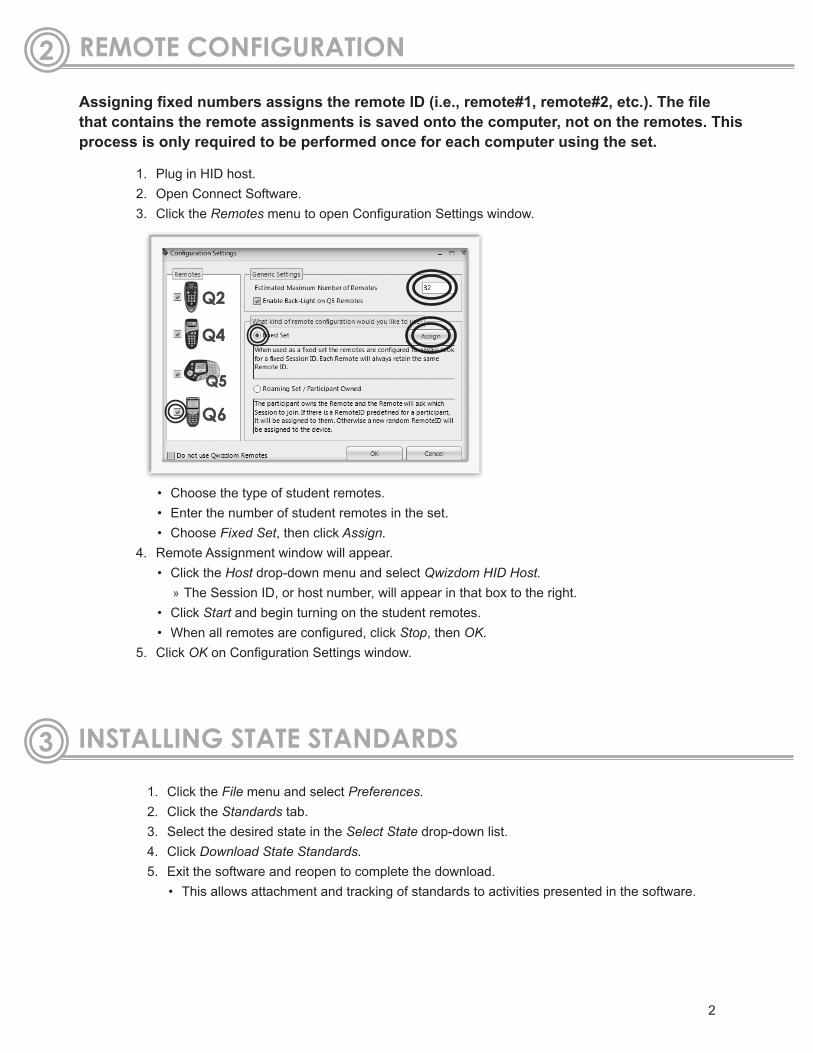
Assigning fixed numbers assigns the remote ID (i.e., remote#1, remote#2, etc.). The file that contains the remote assignments is saved onto the computer, not on the remotes. This process is only required to be performed once for each computer using the set.
1. PluginHIDhost.2. OpenConnectSoftware.3. Click the RemotesmenutoopenConfigurationSettingswindow.
• Choosethetypeofstudentremotes.• Enterthenumberofstudentremotesintheset.• Choose Fixed Set, then click Assign.
4. RemoteAssignmentwindowwillappear.• Click the Host drop-down menu and select Qwizdom HID Host.
» TheSessionID,orhostnumber,willappearinthatboxtotheright.• Click Startandbeginturningonthestudentremotes.• Whenallremotesareconfigured,clickStop, then OK.
5. Click OK onConfigurationSettingswindow.
1. Click the File menu and select Preferences.2. Click the Standardstab.3. Select the desired state in the Select Statedrop-downlist.4. Click Download State Standards.5. Exitthesoftwareandreopentocompletethedownload.
• Thisallowsattachmentandtrackingofstandardstoactivitiespresentedinthesoftware.
remoTe ConfiguraTion2
insTalling sTaTe sTandards3

32
Creating a Participant list – In Connect1. Click the Participantstab.2. Click the Participant Wizardicon(topleft),andParticipantWizardwindow
willappear.3. Choose Create New Participant List, enter a class name, then click Next.4. When the Template Selection appears, click Education, then Next.5. When the Participant Field Selection window appears, click on Participant ID2
in the Selected Fields box to highlight and then click the left blue arrow to move thisitemtoAvailableFieldsbox.• ThreeitemsarerequiredintheSelectedFieldsbox(FirstName,LastName,andParticipantID).1
6. Click Next tobeginenteringstudentinformation.7. EnterFirstName,LastName,ParticipantIDnumber. 2
• The Participant ID number, which can be used for student login, can be up to 10digitsforQ6remotes.
• The Participant ID number needs to be numeric, cannot include symbols or alphanumericsequences.
• TheRemotenumberwillautogenerate,butcanbeoverridden.8. Click Finish and the list will appear under My Classes.
Importing a Participant List from CSV/Excel File1. Open, Edit, and/or resave the class list in Excel®. 3
• AminimumofthreefieldsarerequiredintheExcelfile.Forexample,FirstName,LastName,andParticipantIDnumber.2
• The Participant ID number, which can be used for student login, can be up to 10digitsforQ6remotes.
• TheParticipantIDnumberneedstobenumeric.Itcannotincludesymbolsoralphanumericsequences.
2. Click the Participantstab.3. Click the Participant WizardiconandParticipantWizardwindowwillappear.4. Choose Import option and click Next.5. BrowsefortheCSV(Commadelimited)fileandclickOpen.6. BeginmappingthecolumnsintheCSVImportwindow.
• Click the word None under Maps to,tomatcheachcolumnintheExcelsheet.• Check or uncheck First record is header, 4 depending on the list and click OK.
Tip 1: Others fields can be included from the Available Fields box or from the Custom Field box.
Tip 2: Participant IDis the student’s uniqueidentification number.We recommend using aschool/district ID number, if one is available.
Tip 3: Excel file must be saved/resaved as a CSV (Comma delimited) file.
Tip 4: For example, if the imported information on theleft shows column headers such as Last Name, First Name, Remote ID, etc.,those are headers, so you would check the First Record is Header box. If the information on the left shows the actual name, Remote ID, etc., uncheck First Record is Header because those are not headers.
CreaTing Classes4
4
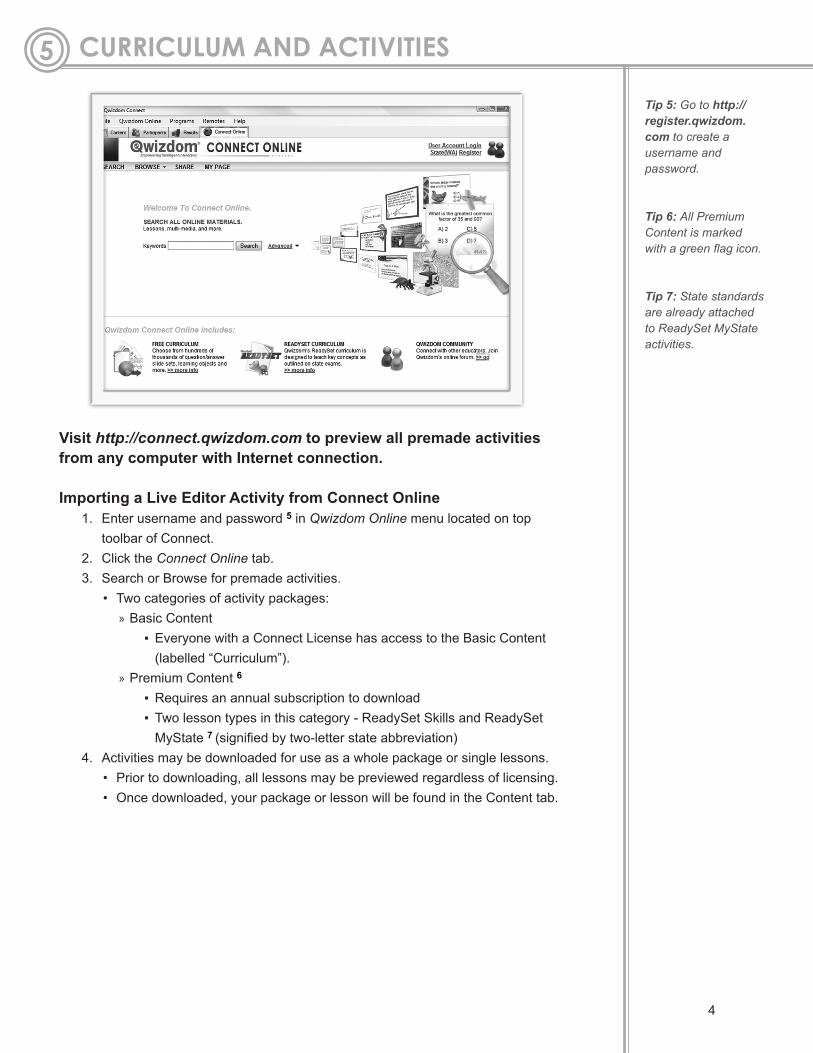
visit http://connect.qwizdom.com to preview all premade activities from any computer with Internet connection.
Importing a live editor activity from Connect online1. Enter username and password 5 in Qwizdom Online menu located on top
toolbarofConnect.2. Click the Connect Onlinetab.3. SearchorBrowseforpremadeactivities.
• Two categories of activity packages: » Basic Content
▪ EveryonewithaConnectLicensehasaccesstotheBasicContent(labelled“Curriculum”).
» Premium Content 6
▪ Requires an annual subscription to download ▪ Two lesson types in this category - ReadySet Skills and ReadySet MyState 7 (signifiedbytwo-letterstateabbreviation)
4. Activitiesmaybedownloadedforuseasawholepackageorsinglelessons.• Priortodownloading,alllessonsmaybepreviewedregardlessoflicensing.• Oncedownloaded,yourpackageorlessonwillbefoundintheContenttab.
Tip 5: Go to http://register.qwizdom.com to create a username and password.
Tip 6: All Premium Content is marked with a green flag icon.
Tip 7: State standards are already attached to ReadySet MyState activities.
CurriCulum and aCTiviTies5

54
Creating a live editor activity
1. Click the Contenttab.2. Click Add Live Editor Fileinthetoolbar.3. Enter a name for your new activity and click OK.4. The new activity title is added to the content tree and a single blank slide
appears.5. Click the Edit activity icon in the toolbar to access the editing section and
begincreatingtheslideset.
working in live editorInthiseditingsection,therearethreetoolbarsatthetop. 1) The top bar (Main Editing Toolbar) provides access to basic program items.
6
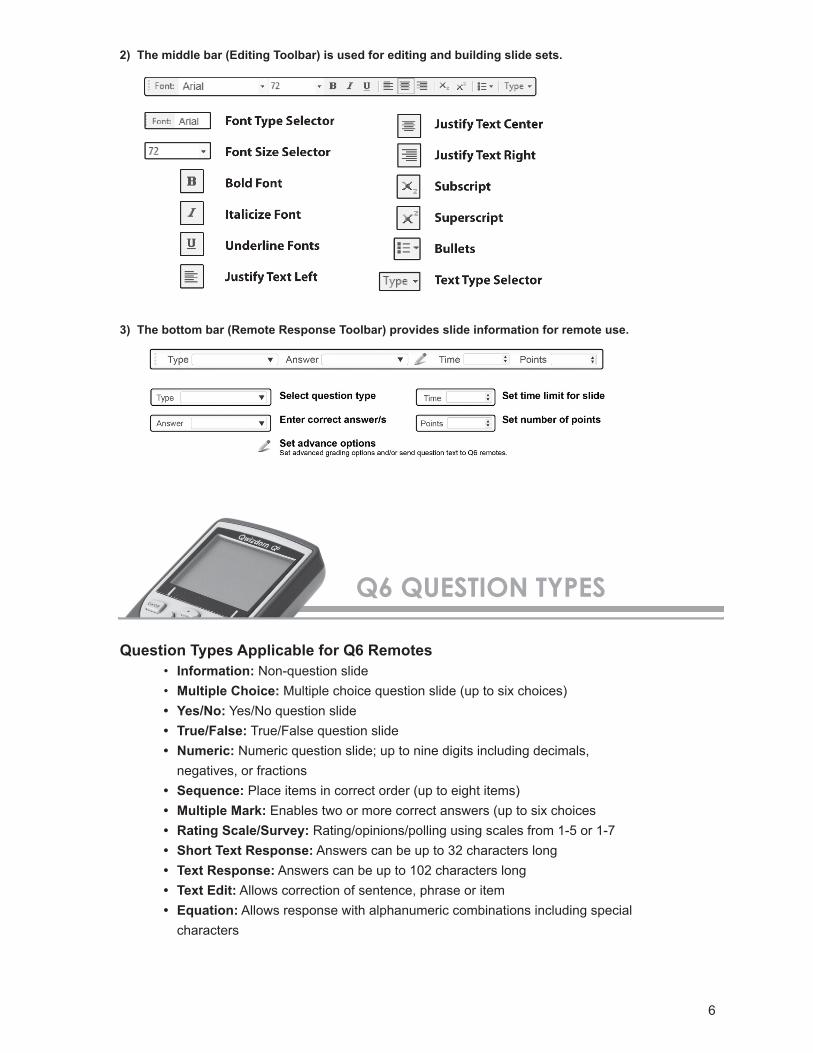
2) The middle bar (Editing Toolbar) is used for editing and building slide sets.
3) The bottom bar (Remote Response Toolbar) provides slide information for remote use.
Question types applicable for Q6 remotes
• Information:Non-questionslide• multiple Choice:Multiplechoicequestionslide(uptosixchoices)• yes/no:Yes/Noquestionslide• true/false: True/False question slide• numeric:Numericquestionslide;uptoninedigitsincludingdecimals,
negatives, or fractions• sequence:Placeitemsincorrectorder(uptoeightitems)• multiple mark: Enablestwoormorecorrectanswers(uptosixchoices• rating scale/survey: Rating/opinions/polling using scales from 1-5 or 1-7• Short Text Response:Answerscanbeupto32characterslong• Text Response:Answerscanbeupto102characterslong• Text Edit: Allows correction of sentence, phrase or item• equation: Allows response with alphanumeric combinations including special
characters
Q6 QuesTion TYPes

76
Creating Content1. Click on the Type drop-down menu in the Remote Response Toolbar to select the
appropriateslidetype.8
2. Beginbuildingtheactivitybyutilizingthe4tabsontheleft.• Click the Styles tab to add a background, narrowing the choices by selecting a specificCategoryfromthedrop-downmenu.
» Right-click on the selected style for options of background and text formatting applications.
• Next,clicktheTemplates Tab or if not using a template click the Text Tool in the Editing Toolbartoopenatextbox.
» Applythedesiredtemplatebydragginganddroppingontotheslide. ▪ Gray area designated for text, blue for personal media or access to EquationTool,allowinginsertionofsymbolsontoslide.
• ApplymediafromQwizdom’slibrarythroughtheMediatab.9 » TypeinaKeywordtosearch,thendraganddropselecteditemintotheslide.
3. Whenfinished,makesuretheinformationintheRemoteResponseToolbarmatchesyourslidetypeandanswerwhileadjustingTimerandPointsoptions.
4. For use with Q6 remotes , access further editing options through the pencil icon in the Remote Response Tool Bar• Click the pencil icon to access Question Properties window• Choose from options of sending the question text and answer text to remotes • Allows further editing and options for Text Response, Text Edit, and Equation
questions 5. If creating an answer slide to attach to the question, right-click on the question
slide and go to Add Slide to select either Add Information Slide(blankanswerslide),orAdd Copy of This Slide(copiesquestionslide).• Nolimittothenumberofanswerslidesattachedtoquestion• In editing screen, answer slide thumbnails are indented to differentiate from questions.
• Can skip any answer slide when presenting• Notnecessarytocreateanswerslides
6. To make a new slide, click the arrow next to Insert Slide/Question icon in the MainEditingToolbartoselecttheappropriateslidetypefromthedrop-downmenu.
7. Followpreviousstepsuntilthepresentationiscomplete.8. Whenfinished,clicktheFile menu, then click Exit to return to main Connect
screen.9. Toattachstandardstothepresentation,clickontheappropriateslides.10
10.Click the Edit Standards icon to access the downloaded Standardswindow.11.Use the Current Standarddrop-downmenutoselectthesubjectarea.12.Openthe[+]plussignbytheappropriategradelevel.13.Openthe[+]plussignbytheappropriatecategorytodisplaystandardsstrands.14.Clickontheappropriatestrand.15.Click Addtodropitintothebottomcue.16.Click Donetoattachthisstrandtothechosenslide(s).
Tip 8: Question Types for the Q6 Remotes include Information, Multiple Choice, Yes/No, True/False, Numeric, Sequence, Multiple Mark, Rating Scale/Survey, Short Text Response, Text Response, and Text Edit. See p.6 for details.
Tip 9: Go to the Qwizdom Online menu and login to view and download media items.
Tip 10: Hold down Ctrl on your keyboard for selecting multiple slides.

8
Presenting a live editor activity1. Click the Contenttab.2. ClicktheactivityintheContentTree.3. Click Present which will open up the Presentation Setupwindow.
• Under the Presentation Settings Tab » Click the Participant Listdrop-downmenutoselectparticipantoptions.11
» Click the Save Resultsdrop-downmenutoselectsavingoptions.12
» Click the Present Asdrop-downmenutoselectpresentationoptions. ▪ Normal Presentation would be selected for direct instruction using the instructordevice.
▪ Present on Auto Pilot wouldbeanautomatedslideshowpresentation. ▪ Self-Paced Mode allowing students to answer at their own pace from the hardcopypresentation(seeAnswerKeyMaker,p.11,fordetails).
▪ Gamesmodescanbechosenforanypresentation.13 » Settingsallowstheselectionoffeedback,answerchanges,andquestiontimers.14
• Click the Login SettingsTab. » Require Login by IDoptionwillrequirethestudententryofParticipantID(seep.3)numberstoactivatetheremotesuponinitiationofthepresentation.
» Click Advanced Settingsoptiontofurthercustomizethepresentation.• Click the Chart Settings Tab.
» Allowstheselectionofgraphlayoutanddisplayoptionsfortheprojectedresults.• Click OKandthefirstslidewillappear.
4. The Buzz-In box will appear which displays the percentage of students who have responded.• Right-click the Buzz-Inboxtoaccessvariousoptions.15
5. Toptoolbarprovidesreferenceforslideorder(QisquestionslideandAisattachedanswerslide).
6. To navigate through the slides, use the Scroll button on the left side of the instructordevice.• Tomovetothenextslide,pushtherightarrow.• Tomovetotheanswerslide,pushtheuparrow.• Tomovetothepreviousslide,pushtheleftarrow.
PresenTing a live ediTor aCTiviTY6
Tip 11: If using the same computer during the day, choose Qwizdom Connect to access a previously created class lists.
Tip 12: If using the same computer during the day, choose Auto Save to Results Manager to save scores in the Results tab.
Tip 13: Games add animations to presentations, including baseball, car racing, rocket racing, and more.
Tip 14: For classroom activities, it is common that Right/Wrong Feedback feature is checked so students can see if they answered the question correctly. For paper tests (Answer Key), it is common to allow students to change answers, while turning off Right/Wrong feedback.
Tip 15: A commonly used feature is the Answer Grid. It displays student response by corresponding remote ID numbers. To activate, click View, then Answer Grid.

98
1. new Item - inserts a new slide which can be annotated • Whenfinishedannotating,ifposingaquestionforremoteuse,clickonthe
selected answer choice from the quick pose question types• Once correct answer is selected, press Enter (hardkey)• Then press Send to activate the student remotes and take a screen shot• After participants respond, scroll right to navigate to the next slide
2. Pick - randomly displays participants names on screen to call upon3. view Help requests - displays the names of those who have sent help requests 4. new Question - inserts a new verbal question within the presentation
• Press ,questiontypeswillappearontheLCDscreen• Use the scroll button to highlight the question type needed• Push the Enter button to select highlighted question• Then press Send to activate the student remotes and take a screen shot• After participants respond, scroll right to navigate to the next slide
5. repose - a presenter can repose a previously answered or skipped question 6. Private Graph-showsprivategraphondevice’sLCDscreen7. Public Graph - allows the viewing of a public graph8. drawing tools-annotateonanyslidewithinyourpresentation.9. Quick Pose Questions - instantly select an answer and pose a spontaneous
question
7
3 54
Presenting Features Specific to the Q7 Presenter Tablet
Q6 student remote features
1 2
remoTe PresenTing feaTures
6 7
8
9
1
25
3
4
6
1. on/off and Help-Turnremoteonandoff. To request help,• Push the On/Off button to reveal the menu of choices on theLCDscreen.
• UsingthedownarrowandscrolltoHelp.• Pushtheselect()buttonwhenhelpishighlighted.
2. directional arrows - will allow navigation through Answer Key(paper-based)activities
3. send answer - will allow participants to submit a response• Select the answer by either using the letter choices or thearrows.Thenpushsend.
• This button will change functions depending on what modetheremoteisin.ThefunctionwillbedisplayeddirectlyabovethisbuttonontheLCDscreen.
4. symbol - will allow participants to access various symbols to enter into remote
5. select - press to select menu choices6. shift - will allow participants to access various text cases
including subscript and superscript

10
1. Open PowerPoint®.2. Open or create a PowerPoint activity and click the Qwizdom Actionpoint tab to
accesstheActionpointToolbar.• Make or insert a slide into the presentation through the PowerPoint Home tab, or throughtheQwizdomActionpointtabbyclickingthe Insert Slide 16 drop-down arrowforalistofquestiontypestoaccessapremadetemplateforinsertion.
3. Tagquestionslidesforremoteuse.• Highlight the selected slide in Slidesmenuonleft.• Use the drop-down menu under Question TypeintheQwizdomActionpointtoolbartoselecttheappropriatequestiontype.
• Usethedrop-downmenutoselectthecorrectanswer. » For additional editing features applicable to using the Q6 remotes, click Advanced Options 17 next to the answer menu to access
• Selectapointvalueinthistoolbar.• Selectatimerinthistoolbar.18
• Click Standards and Categories to select appropriate state standards to attach toslides.
4. Click Start PresentationiconintheQwizdomActionpointtoolbar.• This will bring you to the Presentation Setupmenu(seep.8fordetails).• Make selections and click OK to begin presentation.19
Tip 16: Icons may vary depending on the version of PowerPoint.
Tip 17: Advanced Options will allow you to set partial grading, send text to the Q6 remote, and enter complex answers including text edit and numeric range. Q6 remotes can be sent a maximum of 153 characters, including punctuation and spacing. This number varies depending on question type.
Tip 18: Timer can be overridden in the Presentation Setup Window.
Tip 19: If presenting in game mode, to show game animations; press the Show icon on the Q7.
aCTionPoinT Program8

1110
Creating a single answer Key1. Click Add Answer KeyintheContenttab.2. Awindowwillappear;nameyourAnswerKeyactivity.3. This activity will be placed in the content tree, double-click the activity to open Qwizdom
Answer Key Makerwindow.4. Click on the word None in the Type column to display a menu for question choices, then
selectthedesiredquestiontype.5. Click on the word None in the Answer column to display Question Properties window
andselectthecorrectanswerchoice.• Q6remotesuserscanaddtextforremotedisplay.20
• Sending question and answer text to Q6 remotes will allow paperless Answer Key presentation, if no images are required
6. Click the Copy, Insert Question, or Delete icons to add or delete questions.
7. Selectthequestionstopresentbycheckingtheboxesrightnexttothequestions;orselecting Odd, Even, or Allatthetoptoolbar.
8. Attach standards by clicking on the Standard and Categoriesicon.9. Click PresenttoaccessthePresentationSetupmenu(seep.8).
• Present As option defaults to Self-Paced Mode for this presentation10. After completing the Presentation Setup, click OK.11.TheActivityProgresswindowwillappearwhichallowsmonitoringoftheactivity.
• Participants in Error State are the names of students who are not loggedincorrectly.21
• Active Participantsarethestudentswhohaveenteredthesessionsuccessfully.• Inactive Participants are the students on the class list who have not turned on the remote,oftenabsentstudents.
12.Seep.9forspecificstudentremotenavigationfeatures. 22
Tip 20: In the Question Properties window, check the Send Question Text to Remotes box and type in text. Q6 remotes can be sent a maximum of 153 characters, including punctuation and spacing. This number varies depending on question type.
Tip 21: Make sure to resolve any students that are in an error state to ensure their score is accurately recorded.
Tip 22: Instruct students to push the right directional arrow key after answering the last question, select Yes, and press the Send button to complete the Answer Key activity.
9 answer KeY maKer

12
multiple answer Key1. Create a new Answer Key activity as described above or use previously created ones
withintheContentTree.• When presenting Multiple Answer Keys, the student will need to enter the appropriateTestNumber,foundrightaboveQuestionNumberintheQwizdomAnswerKeyMaker,intotheremote.23
2. Create a new folder by clicking Create a new folder in the activity tree within the Contenttab.
3. Once the folder appears on the content tree, drag and drop the Answer Key activities topresentsimultaneouslyintothatfolder.
4. Once all the Answer Key activities are in this folder, click on that folder to highlight the foldername.
5. Click on the small arrow next to Present selected items in the top toolbar and using the drop-down menu, select Present Multiple Activities In Self-Paced Mode.
6. ThePresentationSetupwindowappears(seep.8).• Present As option defaults to Multiple Self Pace ModeforthistypeofPresentation.
7. After completing the Presentation Setup, click OK.8. Thestudents’remoteswillpromptforActivityIDuponturningon.
• ThisActivityIDisTestNumberauto-generateduponcreationofactivity,foundinthatactivity’sQwizdomAnswerKeyMakerwindow.24
9. TheActivityProgresswindowwillappearwhichallowsmonitoringoftheactivity.• Participants in Error Statearethestudentswhoarenotloggedincorrectly.25
• Active Participantsarethestudentswhohaveenteredthesessionsuccessfully.• Inactive Participants are the students in the class list who have not turned on the remote,oftenabsentstudents.
10.Seep.9forspecificstudentremotenavigationfeatures.
Tip 23: It is helpful to include this number in the activity’s title upon saving.
Tip 24: It is helpful to write the test number on the printed tests. Students can then easily type it in to their remote. Tip 25: Make sure to resolve all students that are in an error state. Students scores may not be recorded if errors are not resolved.

1312
1. Click Programs menu and select Question Toolbar.2. Toolbarappears.3. Presentation Setupboxappearstomakeselections(seep.8),thenclickOK.4. Accessacomputer-basedactivity(i.e.,Webpage,curriculumCD).5. Usingthestylus,selectQuickPoseiconsatthebottomofQ7tablet,ifappropriate.
• Numericanswersclickoncorrectnumber • Multiple choice click on the correct letter • SelectappropriateYes/Nochoice • Select rating question
6. QuestiontypewillbedisplayedonQ7LCDscreenandanswerchoicewillbehighlighted.• Scrolltochangehighlightedanswerifnecessary.
7. Press EnterbuttononQ7tablettolockinanswerchoice.8. Press SendbuttononQ7tablet.
• Sendsthequestiontostudentremotes.• TheProgramtakesandsavethescreenshotforreportsandsubsequentuse.
9. After students respond, push Enter buttontocleartheLCDscreen.26
10.If an additional question type is needed, press Insert Slide icon• ThiswilldisplayadditionalquestiontypesonQ7LCDscreentoscrollthough,highlight,selectandsendtostudentremotes.
11.Repeatprocessthroughoutactivity.12.To end, click Settings in toolbar and choose Exit.13.YoucannameandsaveactivityintheContentTreeforeditingandfutureuse.
10Tip 26: May need to manually move to next screen on web page etc.
QuesTion Toolbar Program (Questions on the Fly)

14
If Auto Save to Results Manager was chosen in the Presentation Setup window, click on the Resultstab.
1. Openthe[+]plussignnexttotheclasslistusedinthepresentation.• Themostrecentresultswillbeinthelastpositionunderthisclasslist.
2. ClickontheactivitytoviewtheScoreReport.3. More reporting options are available by clicking the Report Wizard toolbar
iconatthetopleft.• Reportsonleftcolumnareclasswidereports.• Reportsonrightcolumnareindividualstudentreports.
» Usethedrop-downmenuonrighttoselectparticularstudent.• Standard’sbasedreportswillbeactiveiftheactivityhadstandardsattached.
• Choose the report to view, then click Generate. » AnyreportcanbeexportedtoanExcelfileorprintedout.
results editing options Quick/MarkRegrade-allowsalterationofresultsfile.
• Click on the activity to alter in the Resultstab.• Click Quick/Mark Regradeinthetoptoolbar.• Clickontheemptygrid,checkorXinthegridtochangeresponse.• Clickonanyquestioncolumntochangealltheanswersinthatcolumn.• Clickonanystudentnametochangealltheresponsesforthatstudent.• Click OK whenfinishedtosaveresults.
results merger Mergetwofilesofsameactivityandsameclasslist.27
1. ExportthefilestomergefromtheConnectsoftwarebyclickingontheactivityin the Results tab, then click the File menu and choose Export and repeat for eachfile.
2. Right-click Qwizdom Toolsinthebottomrighttooltraytoaccessthemenu.3. Hover over Utilities, then choose Results Merger.4. When the Results Merger window appears, click Browse next to File 1 which
willallowyoutosearchforthefileyouexported.5. Selecttheappropriatefile.6. Dothisforthesecondfile.7. Click the Browse option next to the Output Fileandnamethenewfiletobe
created.8. Selectaplacetosaveandnamethenewfile.9. Click Merge.10.In the Connect software, click the File menu again and hover over Import and
select Results File.11.SelectthemergedfileanditwillnowbestoredintheResultstab.
resulTs and rePorTs11
Tip 27: This is often used to merge an absent student‘s score with class results. It can also be used to merge results of an activity that was taken in two different sessions.

1514
Survey Bar with Q7 Presenter Tablet (Spontaneous Activity)1. Select Survey Bar.2. PresentationSetupwindowappearstomakeselections(seep.8fordetails),thenclickOK.3. Click the blue arrow nexttotheQinthetoolbartodisplaymenu.
• Select Capture settingstocaptureallorpartsofthecomputerscreenaseachquestionisposed.• Thesescreencaptureswillbedisplayedasthumbnailsinseveralreportoptions.
4. Accessacomputer-basedactivity(i.e.,Webpage,curriculumCD).5. Usingthestylus,selectQuickPoseiconsatthebottomofQ7tablet,ifappropriate.
• Numericanswersclickoncorrectnumber • Multiple choice click on the correct letter • SelectappropriateYes/Nochoice • Select rating question
6. QuestiontypewillbedisplayedonQ7LCDscreenandanswerchoicewillbehighlighted.• Scrolltochangehighlightedanswerifnecessary.
7. Press EnterbuttononQ7tablettolockinanswerchoice.8. Press SendbuttononQ7tablet.
• Sendsthequestiontostudentremotes.9. Studentsrespond.10.Repeatprocessthroughoutactivity.11.If an additional question type is needed, press Insert Slide icon
• ThiswilldisplayadditionalquestiontypesonQ7LCDscreentoscrollthough,highlight,selectandsendtostudentremotes.
12.To end, click the blue arrow next to the Q on the toolbar and select Exit.
Survey Bar with Q7 Presenter Tablet (Preplanned Activity)This application will allow preprogramming question and answers, instead of spontaneously posing themintheprocessdiscussedabove.
1. Select Survey Bar.2. PresentationSetupwindowappearstomakeselections(seep.8fordetails),thenclickOK.3. Click the blue arrownexttotheQinthetoolbartodisplaymenu.
• Select Capture settingstocaptureallorpartsofthecomputerscreenaseachquestionisposed.• Thesescreencaptureswillbedisplayedasthumbnailrecordsseveralreportoptions.
4. Click the blue arrownexttotheQinthetoolbartodisplaymenu.5. Click Create Answer Key. 6. Qwizdom Answer Key Makerwindowwillappear(seeAnswerKeyMaker,p.11fordetails).7. Close the Qwizdom Answer Key Makerwindowtosavethefile.8. Click the blue arrownexttotheQinthetoolbartodisplaymenu.9. Click Load Answer Key.10.Search for and select the desired Answer Key.11.Studentsanswerfirstquestion.12.OntheQ7PresenterTablet,presstherightarrowonthescrollbuttontomovetothenextquestion.13.Repeatthisprocessuntilallofthequestionshavebeenanswered.14.To end, click the blue arrow next to the Q on the toolbar and select Exit.
12 Two Programs ouTside of ConneCT
16
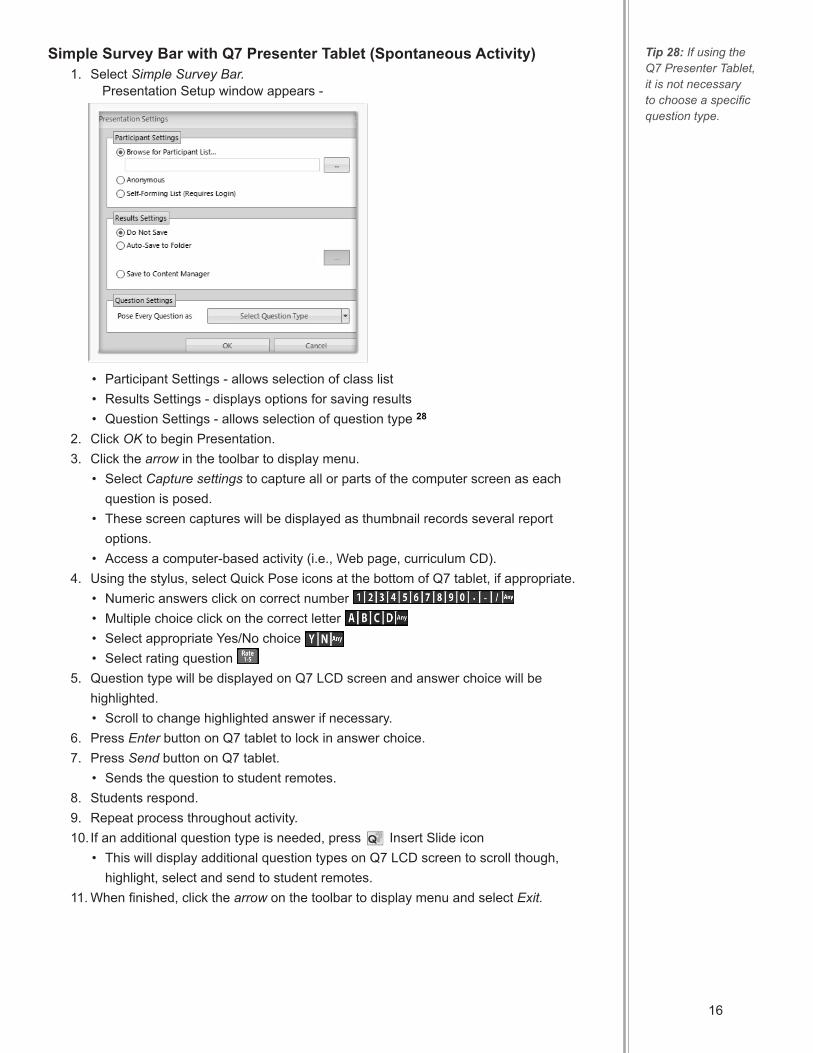
Simple Survey Bar with Q7 Presenter Tablet (Spontaneous Activity)1. Select Simple Survey Bar.
Presentation Setup window appears -
• Participant Settings - allows selection of class list• Results Settings - displays options for saving results• Question Settings - allows selection of question type 28
2. Click OKtobeginPresentation.3. Click the arrow inthetoolbartodisplaymenu.
• Select Capture settings to capture all or parts of the computer screen as each questionisposed.
• These screen captures will be displayed as thumbnail records several report options.
• Accessacomputer-basedactivity(i.e.,Webpage,curriculumCD).4. Usingthestylus,selectQuickPoseiconsatthebottomofQ7tablet,ifappropriate.
• Numericanswersclickoncorrectnumber • Multiple choice click on the correct letter • SelectappropriateYes/Nochoice • Select rating question
5. QuestiontypewillbedisplayedonQ7LCDscreenandanswerchoicewillbehighlighted.• Scrolltochangehighlightedanswerifnecessary.
6. Press EnterbuttononQ7tablettolockinanswerchoice.7. Press SendbuttononQ7tablet.
• Sendsthequestiontostudentremotes.8. Studentsrespond.9. Repeatprocessthroughoutactivity.10.If an additional question type is needed, press Insert Slide icon
• ThiswilldisplayadditionalquestiontypesonQ7LCDscreentoscrollthough,highlight,selectandsendtostudentremotes.
11.Whenfinished,clickthearrow on the toolbar to display menu and select Exit.
Tip 28: If using the Q7 Presenter Tablet, it is not necessary to choose a specific question type.

1716
Simple Survey Bar with Q7 Presenter Tablet (Preplanned Activity)1. Select Simple Survey Bar.
Presentation Setup window appears -
• Participant Settings - allows selection of class list• Results Settings - displays options for saving results• Question Settings - allows for selection of question type 28
2. Click OKtobeginPresentation.3. Click the arrowinthetoolbartodisplaymenu.
• Select Capture settingstocaptureallorpartsofthecomputerscreenaseachquestionisposed.• Thesescreencaptureswillbedisplayedasthumbnailsinseveralreportoptions.
4. Accesscomputerbasedactivity(i.e.,Webpage,curriculumCD).5. Click the arrowonthetoolbartodisplaymenu.6. Click Create Answer Key. 7. Qwizdom Answer Key Makerwindowwillappear(seeAnswerKeyMaker,p.11fordetails).8. Close the Qwizdom Answer Key Makerwindowtosavethefile.9. Click the arrowonthetoolbartodisplaymenu.10.Click Load Answer Key.11.SearchforandselectthedesiredAnswerKey.12.Studentsanswerfirstquestion.13.OntheQ7PresenterTablet,presstherightarrowonthescrollbuttontomovetothenextquestion.14.Repeatthisprocessuntilallofthequestionshavebeenanswered.15.To end, click arrow on the toolbar and select Exit.

18
noTes