Embed Size (px)
Citation preview

Quarterly Web Interfaced Commodity Reporting System (QWICR)
Users’ Guide
http://www.qwicr.com

We Need To Hear From You!!
Online Course Evaluation
Your feedback on the training that you have taken is very important to us. The comments and suggestions received through the online evaluation help the Training and Food For Peace and the
course instructors to monitor the quality of the training and ensure that we are offering “best” instructions for Cooperating Sponsors staff.
You can send your comments to [email protected], [email protected]
USAID Contact Dina Esposito Food for Peace Director
Thank you.

Initial evaluation quiz……….

Table of Contents Abbreviations .............................................................................................................................................. v Definitions and Calculations .................................................................................................................... vi Background .................................................................................................................................................. 1 Commodity Reporting Process ................................................................................................................. 2
Commodity Status Report (CSR) ....................................................................................................... 2 Recipient Status Report (RSR) ........................................................................................................... 2 Loss Summary Report (LSR) .............................................................................................................. 2 Damage or Misuse of Commodities Report (DMCR) ................................................................... 2 Claims Report ....................................................................................................................................... 3 Commodity Complaint ........................................................................................................................ 3 Monetization Performance Report (MPR) ....................................................................................... 3
QWICR Overview ...................................................................................................................................... 4 QWICR Features.................................................................................................................................. 2
Inputting Data ............................................................................................................................................. 2 Commodity Status Report (CSR) ....................................................................................................... 3 Divider TabRecipient Status Report (RSR) ...................................................................................... 2 Divider TabLoss Summary Report (LSR) ........................................................................................ 2 Claims Report ....................................................................................................................................... 2 Commodity Complaint ........................................................................................................................ 3
Verifying and Submitting Reports ............................................................................................................ 4 Verifying Reports ................................................................................................................................. 5 Submitting Reports .............................................................................................................................. 2 Final Reports and Archives ................................................................................................................ 3 Viewing Submitted Reports ................................................................................................................ 3 Amending Submitted Reports ............................................................................................................ 3

Abbreviations AER Annual Estimate of Requirements BL Bill of lading CBO Country backstop officer CCC Commodity Credit Corporation CCC/SI Commodity Credit Corporation/shipping instruction CS Cooperating sponsor CSR Commodity Status Report DMCR Damage or Misuse of Commodities Report EST Eastern Standard Time FAS Free along side FDP Final distribution point FFP Office of Food for Peace (USAID) FY Fiscal year ID Identification KG Kilogram LSR Loss Summary Report MPR Monetization Performance Report MT Metric ton MYAP Multi-year assistance program QWICR Quarterly Web Interfaced Commodity Reporting System Regulation 11 22 CFR 211 RSR Recipient Status Report SYAP Single-year assistance program URL Uniform resource locator USAID/W USAID/Washington VAT Value-added tax YTD Year-to-date

Definitions and Calculations Actual cost recovery index: This is a calculation used in the Monetization Performance Report (MPR). To calculate this value take the actual sales price of the commodity [including duty and value-added tax (VAT)] and divide by the actual cost of the commodity (including freight).
Actual fair market value index: This is a calculation used in the MPR. To calculate these values take the actual sales price of the commodity (including duty and VAT) and divide by the average market value. Annual Estimate of Requirements (AER): The Annual Estimate of Requirements reflects a food aid program’s proposed commodity needs for both direct distribution and monetization over the course of an implementation year. Browser: A browser is the application used to access the Internet. Examples of different browsers include Internet Explorer, Mozilla Firefox, Netscape, and Opera. Beneficiary: A beneficiary is one who benefits from a FFP funded program, such as someone who receives training ore technical assistance or other services funded under a Title II program. If no food rations are provided, however, the beneficiary is not classified as a recipient. CCC: Commodity Credit Corporation: Operating unit of USDA that manages export credits, surplus stocks and acquisition of commodities for P.L. 480 purposes. CS – Cooperating Sponsor: An entity, within or without the United States, governmental or not, such as the foreign government, the American Red Cross, the intergovernmental organization, or the private voluntary organization or cooperative, which enters into an agreement with the U.S. Government for the use of the Title II agricultural commodities or funds. Call forward: A call forward is a request initiated by a cooperating sponsor (CS) for the delivery of food commodities to a particular country program for use over a specified period of time. Claim: A claim is a request for compensation or restitution for lost, damaged, unfit, missing, spilled, or short-landed commodities. It can also be referred as a legal demand by a claimant for compensation, payment, or reimbursement for a loss under a contract, due to negligence.
Development program resources: Development program resources fund multi-year activities that target chronically food insecure populations. These activities include long-term safety nets and interventions to enhance human capacities, livelihood capabilities, and community capacity and resiliency. Development program resources may also fund early warning and mitigation activities. Emergency program resources: Emergency program resources are Title II resources used to fund emergency and disaster mitigation activities. USAID’s Office of Food for Peace (FFP) generally funds single-year activities with emergency program resources. FFP may use emergency program resources in a development program for expanded safety net and asset protection activities. These resources would be used if the activities target populations suffering from transitory food insecurity during a shock or during a transition from an emergency situation. FFP may also use emergency resources to fund mitigation and early warning activities.
Estimated cost recovery index: This is a calculation used in the MPR. The formula is: estimated cost recovery index = (expected sales price of commodity/ estimated cost of commodity) + freight costs. Estimated fair market value index: This is a calculation used in the MPR. To calculate this value, divide the expected sales price of the commodity by its average market value. Free along side (FAS) plus calculation: This is a method for calculating a commodity loss. It is calculated by adding the “commercial export price of the commodity at the value of the time and place of export, plus ocean freight charges and other costs incurred by the U.S. Government in [delivering the commodity] to the cooperating sponsor.”1 Home page: This is the QWICR Web page that appears after you logon to the system. Clicking “Home” from other pages in QWICR will bring you back to this page. The Web site address of the QWICR home page is http://www.qwicr.com/home.asp. Inland Transport: The movement of commodities from an overseas port to a secondary delivery point in a landlocked country. Inland transport rates are set by FFP and are updated periodically. Inland losses: These are losses that pertain to landlocked countries only. They may include warehouse handling losses at the port of entry and losses that occur during transportation through the intermediate country to a designated point in the recipient country. Internal Transport: The movement of commodities from an overseas port to an internal delivery point within the same country. Internal losses at the final destination point (FDP) and post FDP losses: These are losses that occur after commodities are delivered to the final distribution point. Internal losses up to FDP: These are losses that occur between the time that the CS’s consignee receives the commodity in-country and the time the commodities are received at the final destination point, which may be a distribution site, school, or other institution. Loss: A loss is an incident in which commodities are discovered to be missing or damaged. An incident is defined as a loss discovered at a particular time and location (such as during a warehouse inventory) or a loss occurring as part of a contract with a third party (such as a transport contract). An incident of loss could include more than one type of commodity. Market price calculation: This is a method of calculating the value of a commodity loss. It is based on “the domestic market price [of the commodity] at the time and place the misuse, loss, or damage occurred….”2 Monetization: The sale of agricultural commodities to obtain foreign currency for use in U.S assistance programs. CS’s monetize USG-donated commodities to generate cash resources to cover
1 Food, Conservation, and Energy Act (2008). Public Law 110-234. 110th Cong., 2007, Title 22, Chapter 2, Part 211.9. 2 Public Law 110-234, Title 22, Chapter 2, Part 211.9.

expenses associated with implementing of P.L 480 Title II funded programs. Monetization sales can be conducted by direct negotiation with wholesalers, mid-level merchants, or government parastatals. Sales can also be carried out through auction mechanisms. Planned commodity quantity and planned number of recipients: These are data entry fields in the RSR. If the CS is implementing a program on a fiscal year (FY) cycle, the CS should take these figures from the most recent version of the Annual Estimate of Requirements (AER). If the program is not on a FY cycle, the CS should calculate the sum of: (1) the numbers of recipients and tonnage planned between October 1st and the end date of the initial program and (2) the recipients and tonnage planned between the start date of the following approved program (if there is one) and September 30th of the same FY. If the data for the new program is not yet known, the CS should include only the data for the initial program and add new data in subsequent quarterly reports once it is known. Post-shipping loss incident: This is an incident in which commodities valued at above U.S. $500 become lost, damaged, spoiled, stolen, or misused after the commodities are discharged at the port. Examples of post-shipping losses include losses associated with a contract with a third party, such as a transporter or warehouse company. POD – Program Operating Division within the Office of Food for Peace. QWICR – Quarterly Web-Interfaced Commodity Reports: An internet based system used as a mode of transmission of commodity reports on distribution, losses and claims tracking on a quarterly basis. Quarterly actual number of recipients reached: This is a data entry field in the RSR. It refers to the total number of individuals who received food aid during the quarter. If the program served a certain number of people every month, but the recipients changed from month to month, CSs should only add the new recipients to the total. However, if the recipients are the same each month, the monthly totals should not be added together when calculating the quarterly total. Recipient: An individual who receives a FFP funded food ration. A recipient is always a beneficiary under a Title II program. However beneficiaries are not always recipients since beneficiaries do not necessarily receive food rations. Reconstitution/re-bagging: This is a category in the data entry field Loss Reasons. This category refers to losses a CS witnesses while salvaging commodities from broken bags or containers. Regulation 11: More formally known as 22 CFR 211, this is the primary regulation that governs the implementation or Title II food aid programs. Report header: All reports in QWICR, except commodity complaints, have an associated report header that contains basic information about the report, including the fiscal year, quarter, report date, name of organization, country, and the names of the individuals preparing, verifying, and submitting the report. With the exception of commodity complaints, you must create a report header for each type of report for which you are entering data. You will not be able to enter data for the report until you create the header.

Short landed: The quantity of shortfall a commodity received by a CS is less than the amount that was loaded onto the vessel per the bill of lading.
Spillage/partially filled bags or tins: This is a category in the data entry field Loss Reasons. This category refers to losses that have occurred because bags or tins have less weight than they should have. Start Page: This is the page that appears when you type in the QWICR Web site address, http://www.qwicr.com/. It is the main login page that allows you to access the QWICR system. Static bar: This is a term used to refer to the three bars that appear on the top of each page in QWICR. The top bar contains the date, user information, and links to logout, change your password, and return to the home page. The second bar contains links to each of the main report pages – Commodity Status Report, Recipient Status Report, Loss Summary Report, and Monetization Performance Report. The third bar contains links to archived reports and the system’s administrative functions. TA – Transfer Authorization: The document signed by the cooperating sponsor and FFP which describes commodities and the program in which they will be used. The TA incorporates Regulation 11 and authorizes CCC to ship commodities. In some cases the TA is referred to as “Cooperative Agreement” Uniform Resource Locator (URL): This is a term used to indicate an Internet address. The QWICR URL is http://www.qwicr.com. User Group: This is an administrative category in QWICR that distinguishes users based on the type of access and permissions needed. The user group to which a user is assigned will determine the functions the user will be able to access and the fields into which the user will be able to enter data. Year-to-date actual recipients: This is a data entry field in the RSR. This number is the total number of individuals who received food aid during the current implementation year, as of the date the CS prepared the report. Only new recipients should be added to the totals from previous quarters. Double-counting of recipients should be avoided.

Background
USAID’s Office of Food for Peace (FFP) manages U.S. international food assistance provided under Title II of the Food for Peace Act. FFP provides more than 2.4 million mega tons of commodities annually,3 benefitting more than 56 million people in 49 countries. 4 Commodities are at the center of Food for Peace’s programs. As a result, commodity management, including accurate commodity reporting, is crucial to the effective implementation and monitoring of Food for Peace activities. Title 22 Part 211 of the Code of Federal Regulations (Regulation 11) governs the implementation of Title II activities. Regulation 11 requires quarterly commodity reporting by FFP cooperating sponsors. To facilitate this process, FFP created the Quarterly Web Interfaced Commodity Reporting System (QWICR). QWICR is a field-initiated software system designed to simplify the commodity reporting and tracking processes. FFP developed QWICR in response to an identified need to provide consistency in the commodity reporting process and enhance loss tracking. This user-friendly system furthers data collection and analysis, providing users with a centralized repository of commodity transactions. Since QWICR is Web based, users can access the system from anywhere and multiple users within an organization can view commodity reports. This guide takes users step-by-step through the process of entering data and submitting their commodity reports in QWICR. It provides an overview of the required reports, describes the features of the system, and includes detailed instructions for entering data.
3 USAID. “P.L. 480 Title II FY 2009 Approved Quantities.” USAID Office of Food for Peace. http://prancer.usaid.gov/lastfy/oybl17app.html. 4 USAID. (2008). U.S. International Food Assistance Report 2008. Washington, DC: USAID.

Commodity Reporting Process FFP requires cooperating sponsors to submit Commodity Status Reports and Recipient Status Reports on a quarterly basis. If losses occur, CSs must also complete the Loss Summary Report. If the value of any individual loss exceeds $500, they must submit the Damage or Misuse of Commodities Report and the Claims Report. CSs submit these reports on a quarterly basis by entering them into QWICR. CSs enter and verify data prior to submitting the reports to FFP mission or regional office staff. FFP staff then review and approve or reject the submitted reports. Commodity Status Report (CSR) A Commodity Status Report is a record of the commodity transactions that occur within a reporting quarter. The report includes opening and closing balances in warehouses and in transit; commodities received, borrowed, or loaned; commodities distributed or monetized; and commodities lost, damaged, or misused. It shows the total quantities of commodities and records discrepancies. Recipient Status Report (RSR) The Recipient Status Report captures the quantities of commodities that an organization distributes and the number of recipients it reaches. The report also records the annual amounts of commodities that a CS plans to distribute and the annual number of recipients the CS intends to reach. Cooperating sponsors enter commodity and recipient information based on the funding source, sector, and activity type. Loss Summary Report (LSR) The Loss Summary Report is used to record incidences of missing or damaged commodities. CSs submit the LSR on a quarterly basis for all losses occurring during the quarter. The report captures the type of commodity affected, where the loss occurred, the reason for the loss, and the quantity and dollar value of the commodity loss. CSs should include all incidences of loss during a quarter in the same LSR. CSs should determine the value of the misused, lost, or damaged commodities in either one of two ways (1) on the domestic market price at the time and place the loss, misuse, or damage occurred. Or (2) adding the following to determine the FAS plus loss value:
a) free on board or free along side “commercial export price of the commodity at the time and place of export”5
b) ocean freight charges c) “other costs incurred by the U.S. Government in making delivery to the cooperating
sponsor"6 Damage or Misuse of Commodities Report (DMCR) This is a required report for any loss that occurs as a result of a post-shipping incident if the lost, damaged, or misused commodities are valued at $500 or more. The report records information
5 Public Law 110-234, Title 22, Chapter 2, Part 211.9. 6 Public Law 110-234, Title 22, Chapter 2, Part 211.9.

regarding the loss incident, including the type of commodities affected the type of loss, and the reason for the loss. The report also captures information regarding liability for the loss and claims filed by the CS. In addition to completing the DMCR, cooperating sponsors must also submit a Claims Report. Claims Report The Claims Report is required for every post-shipping loss over $500. The report documents the value of the claim, communication between the CS and FFP officers regarding the claim, amounts paid on the claim, and administrative costs incurred by the CS to pursue the claim. Commodity Complaint The Commodity Complaint is an optional report within QWICR. CSs should only use this report when a DMCR is not required. This form allows CSs to report all non-loss issues with commodities, such as packaging problems or discolored commodities. The Commodity Complaint is accessible on the main CSR, RSR, and LSR pages. Monetization Performance Report (MPR) The Monetization Performance Report is a required report for all CSs that monetize commodities. It captures information from calls forward and commodity sales. The MPR reconciles estimated costs, commodity amounts, and sales prices against quantities received, costs incurred, and actual sales prices. It allows CSs to analyze the results of commodity monetization against planned performance.

QWICR Overview QWICR is a web-based system that FFP cooperating sponsors use to submit commodity reports required under Regulation 11. This online system simplifies the reporting process by providing standardized formats for required reports. It allows CSs to submit reports to their respective missions in an accurate and timely manner, ensuring compliance with Regulation 11 monitoring, oversight, and accountability requirements. By archiving submitted reports, QWICR enables CSs to easily view prior submissions and analyze trends. QWICR improves claims tracking, as CSs are better able to update reports and provide current, detailed information about the processing and payment of claims. The system also permits CSs to document non-loss issues with commodities through the use of Commodity Complaint reports. To access QWICR, you must have Internet Explorer 5.0 or higher, or an equivalent browser, installed on your computer. You will also need to have a QWICR account established in your name. Contact your mission or regional Food for Peace officer to set up an account. Logging on to the System In the address bar of the browser, type the QWICR URL, http://www.qwicr.com. The start page of the QWICR application will load as shown in Figure 1.
Figure 1 – QWICR start page
At the middle right of the start page, you will see a box that says “User ID,” as shown in Figure 2. Enter the user name and password provided to you by your Food for Peace officer.
Figure 2 – QWICR user login box
If you select the “Remember Me” checkbox before clicking on the button labeled “Login to QWICR,” the QWICR application will remember your username the next time you return to the QWICR Web site. Click the “Login to QWICR!” button. This will take you to the QWICR home page, as shown in

Figure 4. If you forget your password, clicking on the “Forgot Password?” link will bring you to the password request page, as shown in Figure 3.
Figure 3 – Password request page
Once QWICR redirects you to the password request page, type your email address in the appropriate textbox and click on the button labeled “Send Password”. An email with your password will be sent to the address provided with instructions for changing your password. Once you have changed your password, you can login to the QWICR system. Successfully logging in will be determined by the initial email set during the issuing of your login account bringing you to the QWICR home page, as shown in Figure 4.
Figure 4 – QWICR data entry page
You are now able to view and create reports, access help, and use the administrative functions. Logging off of the System To logout of QWICR, click on the “Logout” link on the top static bar, as shown in Figure 5.

Figure 5 – QWICR logout link
Clicking the link will take you to the logout confirmation page, as shown in Figure 6. If you click “Yes, Log Me Out Please,” you will be logged out of the system and redirected to the QWICR start page. If you click “No, Take Me To The Home Page,” you will be redirected to the QWICR home page.
Figure 6 – Logout confirmation page
QWICR Features Under the USAID and QWICR logos are three static bars that will appear on all pages of the QWICR Web site. The static bars allow users to quickly navigate between pages in QWICR. QWICR also allows users to navigate between pages by using the forward and back buttons on their browsers. Web pages within the individual report sections also contain links to help users navigate between different parts of those reports.
Figure 7 – QWICR static bars
The first static bar shows your user name and user group. It contains links to change your password or to logout of the system. This bar also displays the current date and time. All times in QWICR are based on U.S. Eastern Standard Time (EST) and all dates are captured in the mm/dd/yyyy format. On pages other than the home page this bar will also contain a link to the home page. The next two bars contain different links, each of which represents a specific function within QWICR. These links allow quick access to QWICR report pages and other functions and may be

performed from any page. The functions that are available to you will depend on your user type (FFP staff, CS staff, system administrators, etc.) and individual account permissions. Your access level will be set by the QWICR administrator during your initial account setup. If you click on a link to which you do not have access, you will receive the following message: “Sorry, access is denied to this section. Please contact your system administrator if you have any queries regarding this.” Click on the back button or static bar links to navigate away from this page. The Data Input row displays links to the reports for which cooperating sponsors will enter data. Clicking on any of these links will take you to the main page for the report, where you can create new reports or search existing reports.
Figure 8 – Data input static bar
The second row, Reports & Other, contains links to submitted reports and administrative features. The Final Reports & Archives link allows users to view reports submitted to FFP. The Help Guide link contains links to Regulation 11 and to the QWICR users’ guides.
Figure 9 – Reports and other static bar
In addition to the static bars that appear on all QWICR Web pages, report pages include quick links that allow users to navigate between different parts of reports. This view from the “Inventories and Receipts” page of the CSR shows an example of these quick links.
Figure 10 – QWICR quick links
Another feature of QWICR is the ability to search and sort reports. On the main page for each report, there is a “Filter By” box at the top of the page. This allows users to search reports by fiscal year, quarter, country, and cooperating sponsor. By entering the relevant parameters, users can search for specific reports and narrow the list of reports that appear in the report table.
Figure 11 – Filters for searching reports

Each of the main report pages contains a table that lists the reports completed by your organization. The underlined headers in the table allow you to sort the listing. Clicking on one of the underlined headers will sort the results in the table by that category. If the column header is not underlined, report results cannot be sorted by that category.
Figure 12 – Sample table header indicating sortable results
Report tables also include a “Delete” column. This feature allows you to delete reports that your organization has not yet submitted. To delete a report, check the “Delete” box on the right hand side corresponding to the report you would like to delete, then click “Delete selected” at the bottom of the page, as shown in Figure 13.
Figure 13 – Delete report link
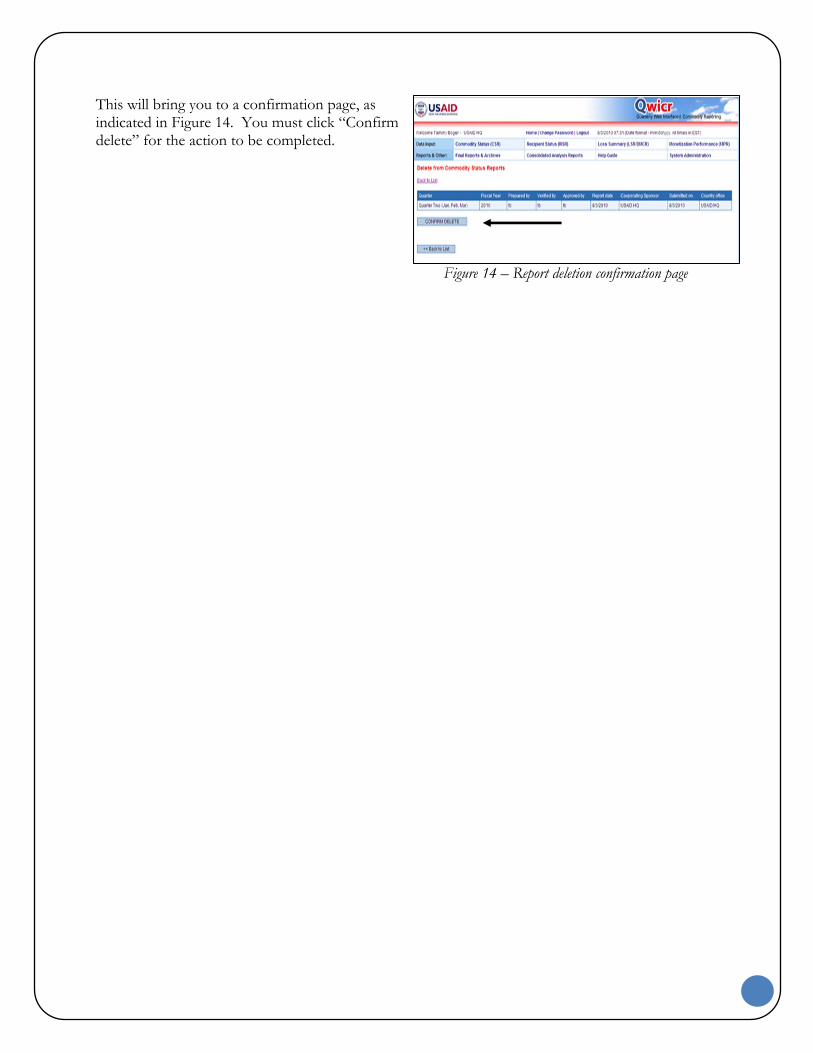
This will bring you to a confirmation page, as indicated in Figure 14. You must click “Confirm delete” for the action to be completed.
Figure 14 – Report deletion confirmation page

Section Divider tab

Inputting Data QWICR allows cooperating sponsors to enter data for six reports: Commodity Status Reports, Recipient Status Reports, Loss Summary Reports, Damage and Misuse of Commodities Reports, and Monetization Performance Reports. It also enables CSs to submit Commodity Complaint reports. This section outlines the information CSs need to enter for each report. Commodity Status Report (CSR) A CSR is a comprehensive accounting of the commodity transactions that occurred during the reporting period. To create a CSR, click the “Commodity Status (CSR)” link from any page. This link will take you to the main “Commodity Status Report” page, as shown in Figure 15.
Figure 15 – Main commodity status report page
The first step in creating a report in QWICR is to create a report header. The report header contains basic information about the report and is the same for the CSR, RSR, LSR, and MPR. If you did not create a CSR header from another report page, you will need to do so before entering CSR data. To create a header for a CSR, click the “Add CSR” link. This will bring you to the header data entry page, as shown in Figure 16. If you already have a header for the CSR, you can begin entering data as indicated in the next section.
Figure 16 – CSR header data entry page
The report date will automatically populate. Users will need to input data for all other fields: Country: Select the country on which you are reporting from the drop-down menu. Cooperating sponsor: Select your organization’s name from the drop-down menu.

Report for quarter: Use the drop-down menu to select the quarter on which you are reporting. Fiscal year: Use the drop-down menu to select the fiscal year for which you are reporting. Prepared by: Enter your name. Verified by: Enter the name of the person who will be verifying the report. Approved by: Enter the name of the person who will be approving and submitting the report. Add corresponding RSR header: If you have not already created a corresponding RSR header,
QWICR will create one for you if you check this box. The RSR is a required report. Add corresponding LSR header: If your organization has commodity losses to report and you
would like QWICR to create a corresponding LSR header, check this box. If your organization has losses to report for the quarter, this report is required.
Add corresponding MPR header: If your organization has monetization activities to report and you would like QWICR to create a corresponding MPR header, check this box. If your organization monetized commodities during the quarter, this report is required.
To save the information you entered and to generate the CSR header, click “Add” at the bottom of the page. QWICR will return you to the main CSR page. The report you created will appear in the report table, as indicated in Figure 17. If you checked the RSR, LSR, and MPR header boxes, you will see a corresponding report header in the report table on each of those pages. If you need to edit any of the header information you entered, you can do so by clicking on the “Edit” link in the table entry for the report.
Figure 17 – Report table on main CSR page Entering CSR Data Once the report header exists, you can enter data into the CSR. You must add data to the inventories and receipts section of the report. You should also add data into the following sections, as appropriate:
1. Transfers in/out 2. Distributions 3. Monetization 4. Remarks on unaccounted quantities
To enter data into any of these sections, click on the hyperlink in the table that corresponds to the report. These links will bring you to the data entry pages for the appropriate sections. Adding Inventories and Receipts Data Inventories and receipts is a required section of the CSR. You will not be able to add data into other sections of the CSR until you have entered inventory and receipts information for all commodities.

If your organization previously entered inventories and receipt data for this CSR, clicking the “Inventories & Receipts” link from the main CSR page will take you to the “Inventories and Receipts” page, as shown in Figure 18.
Figure 18 – Main inventories and receipts page
From here, you will need to click “Add” to access the “Add to Inventories and Receipts” data entry page. If your organization has not previously entered inventories and receipts data, clicking on the “Inventories & receipts” link from the CSR page will take you directly to the “Add to Inventories and Receipts” data entry page, as shown in Figure 19.
Figure 19 – Inventories and receipts data entry page
The CSR Header identification (ID) field will automatically indicate the quarter for which you are reporting. Users will enter data into the following fields: Commodity group: Use the drop-down menu to select from one of four commodity groups:
cereals, pulses, vegetable oil, or other. Commodity: Use the drop-down menu to select the commodity for which you are reporting. CCC contract number: This is an optional field that allows you to enter the Commodity Credit
Corporation (CCC) number indicated in your bill of lading (BL).

Vessel BL number: This optional field allows you to enter the BL number for this commodity shipment.
A. Physical inventory at the beginning of the quarter: o Warehouses (primary, secondary, and distribution centers): Enter the quantity of the
commodity being held at the beginning of the quarter in all warehouses used by your organization. Note: After the first time your organization enters data, the system will automatically carry over the closing balance from the previous quarter as the opening balance for the subsequent quarter, i.e., the quarter one closing balance will be the quarter two opening balance.
o In transit between CS warehouses: Enter the quantity of the commodity being transported between warehouses at the beginning of the quarter.
B. Receipts (arrivals) o Quantity received according to the bill of lading (BL): Enter the quantity of the commodity
indicated in the bill of lading. o Excess in relation to the bill of lading (BL): If your organization received more of the
commodity than indicated in the bill of lading, enter the amount here. L. Physical inventory at the end of the quarter
1. Warehouses (primary, secondary, and distribution centers): Enter the quantity of the commodity being held at the end of the quarter in all warehouses used by your organization. 2. In transit between CS warehouses: Enter the quantity of the commodity being transported between warehouses at the end of the quarter.
Click “Back to list” to return to the “Inventories and Receipts” page without saving the data. Click “Add” to save the information you entered and return to the “Inventories and Receipts” page. This page will now include a table with the commodity information you just entered, as shown in Figure 20.
Figure 20 – Main inventories and receipts page
To add information for additional commodities, click “Add” and repeat the process.
Adding Information Regarding Commodity Transfers In and Out When you click on the “Transfers in/out” link, the main “Transfers In and Transfers Out” page will appear as indicated in Figure 21. If your organization previously entered information regarding commodity transfers, the main “Transfers In and Transfers Out” page will include a table listing your organization’s prior entries.
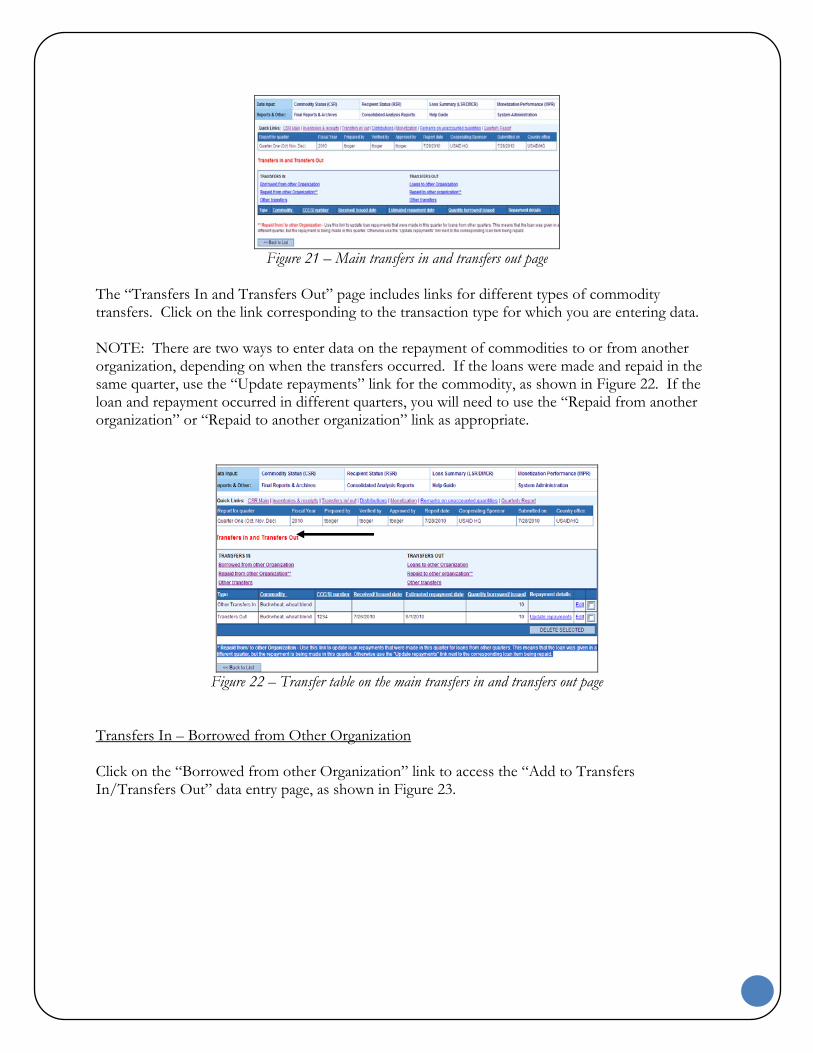
Figure 21 – Main transfers in and transfers out page
The “Transfers In and Transfers Out” page includes links for different types of commodity transfers. Click on the link corresponding to the transaction type for which you are entering data. NOTE: There are two ways to enter data on the repayment of commodities to or from another organization, depending on when the transfers occurred. If the loans were made and repaid in the same quarter, use the “Update repayments” link for the commodity, as shown in Figure 22. If the loan and repayment occurred in different quarters, you will need to use the “Repaid from another organization” or “Repaid to another organization” link as appropriate.
Figure 22 – Transfer table on the main transfers in and transfers out page
Transfers In – Borrowed from Other Organization Click on the “Borrowed from other Organization” link to access the “Add to Transfers In/Transfers Out” data entry page, as shown in Figure 23.

Figure 23 –Transfers in – borrowed from another organization data entry page
The CSR Header ID field will automatically indicate the quarter for which you are reporting. Users will enter data into the following fields: Country: Select the country on which you are reporting from the drop-down menu. Organization: Select your organization’s name from the drop-down menu. Commodity loaned: Select the type of commodity your organization borrowed from the drop-
down menu. You will only be able to select commodities that your organization previously entered into a CSR.
Quantity loaned (KGs): Enter the quantity, in kilograms (KGs), of the commodity that your organization borrowed.
CCC/SI number: Enter the Commodity Credit Corporation/shipping instruction (CCC/SI) number for the commodity on which you are reporting. This is the number provided to your organization by FFP after the call forward.
Date loaned: Enter the date that the title of the commodity transferred from the loaning organization to your organization.
Estimated repayment date: Enter the date your organization anticipates repaying the organization that loaned the commodity.
CS authorizing officer: Enter the name of the person in your organization who authorized borrowing the commodity.
USAID approving officer: Enter the name of the USAID/Washington (USAID/W) country backstop officer (CBO) that approved the loan.
USAID date approved: Enter the date the USAID/W CBO approved the loan. USAID country office: Use the drop-down list to select the name of the USAID mission or
regional office to whom your organization reports.
Click “Back to list” to return to the “Transfers In and Transfers Out” page without saving the data. Click “Add” to save the information you entered and return to the “Transfers In and Transfers Out” page. The table will show the commodity entry you just created, as indicated in Figure 24.

Figure 24 – Transfer table on the main transfers in and transfers out page
Transfers In – Repaid from Other Organization This link should be used to record repayments made to your organization in a different quarter from the one in which your organization loaned the commodity. Do not use this link to enter data regarding repayments made in the same quarter as the loan. To enter data regarding loan repayments made in the same quarter, follow the instructions in the update repayments section of this manual. If your organization previously entered data about commodity repayments, clicking the “Repaid from other Organization” link will take you to the “Transfers In and Transfers Out --> Loan Repayments” page, as shown in Figure 25.
Figure 25 –Transfers in and out – main loan repayments
page
From here, you will need to click “Add” to access the “Add to Loan Repayments” data entry page.

If your organization has not previously entered loan repayment information, clicking on the “Repaid from other Organization” link from the CSR page will take you directly to the “Add to Loan Repayments” data entry page, as shown in Figure 26.
Figure 26 –Transfers in – repaid from another
organization data entry page
The CSR Header ID field will automatically indicate the quarter for which you are reporting. Users will enter data into the following fields:
Organization: Enter your organization’s name. Commodity repaid: Use the drop-down menu to select the type of commodity the borrower
repaid to your organization. You will only be able to select commodities that your organization previously entered into a CSR.
Quantity repaid (KGs): Enter the amount, in kilograms, of the commodity your organization received from the borrower.
CCC/SI number: Enter the Commodity Credit Corporation/shipping instruction number for the commodity on which you are reporting. This is the number provided to your organization by FFP after the call forward.
Date: Enter the date when the borrower repaid the commodity in full. Use the date when the borrower transferred title of the commodity back to your organization.
Click “Back to list” to return to the “Transfers In and Transfers Out --> Loan Repayments” page without saving the data. Click “Add” to save the information you entered and return to the “Transfers In and Transfers Out --> Loan Repayments” page. The table will show the commodity entry you just created, as indicated in Figure 27 below.
Figure 27 – Transfers in and out – main loan
repayments page
To add transfer information for additional commodities, click “Add” and repeat the process. Transfers In – Other Transfers

Click on the “Other transfers” link to access the main data entry page, as shown in Figure 28.
Figure 28 – Transfers in – other transfers data entry
page
The CSR Header ID field will automatically indicate the quarter for which you are reporting. Users will enter data into the following fields: Commodity transferred in (other): Select the commodity your organization received from the
drop-down menu. You will only be able to select commodities that your organization previously entered into a CSR.
Quantity transferred in (other) KGs: Enter the amount, in kilograms, of the commodity your organization received.
Details of transfer: Enter the reason for the transaction and any other relevant information about the transfer.
Click “Back to list” to return to the “Transfers In and Transfers Out” page without saving the data. Click “Add” to save the information you entered and return to the main “Transfers In and Transfers Out” page. The table will show the commodity entry you just created, as indicated in Figure 22. Transfers Out – Loans to Other Organization Click on the “Loans to other organization” link to access the “Add to Transfers In/Transfers Out” data entry page, as shown in Figure 29.
Figure 29 – Transfers out – loans to other organizations
data entry page

The CSR Header ID field will automatically indicate the quarter for which you are reporting. Users will enter data into the following fields: Country: Select the appropriate country from the drop-down menu. Organization: Select your organization’s name from the drop-down menu. Commodity loaned: Select the type of commodity your organization loaned from the drop-
down menu. You will only be able to select commodities that your organization previously entered into a CSR.
Quantity loaned (KGs): Enter the amount, in kilograms, of the commodity that your organization loaned.
CCC/SI number: Enter the Commodity Credit Corporation/shipping instruction number for the commodity on which you are reporting. This is the number provided to your organization by FFP after the call forward.
Date loaned: Enter the date the title of the commodity transferred from your organization to the borrowing organization.
Estimated repayment date: Enter the date your organization anticipates being repaid by the organization that borrowed the commodity.
CS authorizing officer: Enter the name of the person in your organization who authorized loaning the commodity.
USAID approving officer: Enter the name of the USAID/W CBO who approved the loan. USAID date approved: Enter the date the USAID/W CBO approved the loan. USAID country office: Use the drop-down list to select the name of the USAID mission or
regional office to whom your organization reports. Click “Back to list” to return to the “Transfers In and Transfers Out” page without saving the data. Click “Add” to save the information you entered and return to the “Transfers In and Transfers Out” page. The table will show the commodity entry you just created, as indicated in Figure 22. Transfers Out – Repaid to Other Organization This link should be used to record repayments made in a different quarter from the one in which your organization borrowed the commodity. Do not use this link to enter data regarding loan repayments made in the same quarter in which your organization borrowed the commodity. To enter data regarding loan repayments made in the same quarter, follow the instructions in the update repayments section of this manual.

If your organization previously entered data about commodity repayments, clicking the “Repaid to other organization” link will take you to the “Transfers In and Transfers Out --> Loan Repayments” page, as shown in Figure 30.
Figure 30 – Transfers in and out – main loan
repayments page
From here, you will need to click “Add” to access the “Add to Loan Repayments” data entry page. If your organization has not previously entered loan repayment information, clicking on the “Repaid to other organization” link from the CSR page will take you directly to the “Add to Loan Repayments” data entry page, as shown in Figure 31.
Figure 31 – Loan repayment data entry page
The CSR Header ID field will automatically indicate the quarter for which you are reporting. Users will enter data into the following fields: Organization: Enter your organization’s name. Commodity repaid: Use the drop-down menu to select the type of commodity your
organization repaid to the lending organization. You will only be able to select commodities that your organization previously entered into a CSR.
Quantity repaid (KGs): Enter the amount, in kilograms, of the commodity your organization repaid to the lending organization.
CCC/SI number: Enter the Commodity Credit Corporation/shipping instruction number for the commodity on which you are reporting. This is the number provided to your organization by FFP after the call forward.
Date: Enter the date when your organization transferred title of the commodity to the lending organization.

Click “Back to list” to return to the “Transfers In and Transfers Out --> Loan Repayments” page without saving the data. Click “Add” to save the information you entered and return to the “Transfers In and Transfers Out --> Loan Repayments” page. The table will show the commodity entry you just created, as indicated in Figure 32.
Figure 32 – Transfers in and out – loan repayments page
To add information for additional commodities, click “Add” and repeat the process. Transfers Out – Other Transfers Click on the “Other transfers” link in the “Transfers Out” column to access the main data entry page, as shown in Figure 33.
Figure 33 – Transfers out – other transfers data entry
page The CSR Header ID field will automatically indicate the quarter for which you are reporting. Users will enter data into the following fields: Commodity transferred out (other): Select the commodity your organization transferred from
the drop-down menu. You will only be able to select commodities that your organization previously entered into a CSR.
Quantity transferred out (other) KGs: Enter the quantity, in kilograms, of the commodity your organization transferred.
Details of transfer: Enter the reason for the transaction and any other relevant information about the transfer.
Click “Back to list” to return to the “Transfers In and Transfers Out” page without saving the data. Click “Add” to save the information you entered and return to the main “Transfers In and Transfers Out” page. The table will show the commodity entry you just created, as indicated in Figure 22. Update Repayments
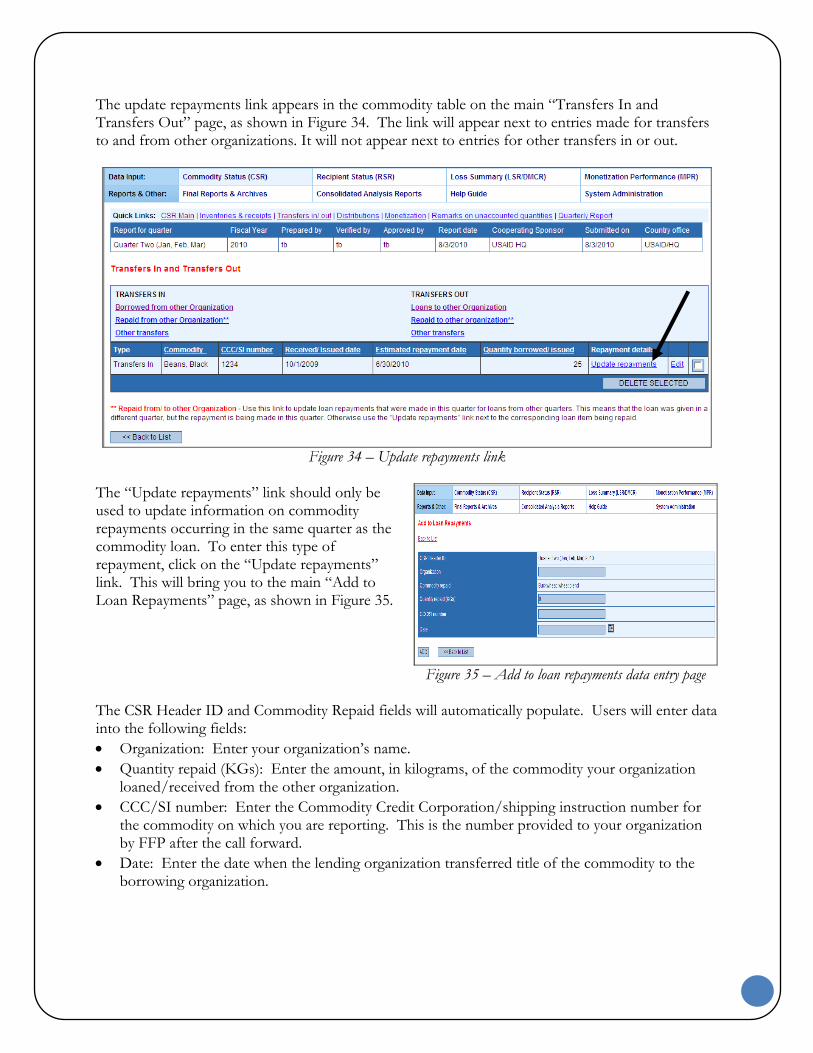
The update repayments link appears in the commodity table on the main “Transfers In and Transfers Out” page, as shown in Figure 34. The link will appear next to entries made for transfers to and from other organizations. It will not appear next to entries for other transfers in or out.
Figure 34 – Update repayments link
The “Update repayments” link should only be used to update information on commodity repayments occurring in the same quarter as the commodity loan. To enter this type of repayment, click on the “Update repayments” link. This will bring you to the main “Add to Loan Repayments” page, as shown in Figure 35.
Figure 35 – Add to loan repayments data entry page
The CSR Header ID and Commodity Repaid fields will automatically populate. Users will enter data into the following fields: Organization: Enter your organization’s name. Quantity repaid (KGs): Enter the amount, in kilograms, of the commodity your organization
loaned/received from the other organization. CCC/SI number: Enter the Commodity Credit Corporation/shipping instruction number for
the commodity on which you are reporting. This is the number provided to your organization by FFP after the call forward.
Date: Enter the date when the lending organization transferred title of the commodity to the borrowing organization.

Click “Back to list” to return to the “Transfers In and Transfers Out” page without saving the data. Click “Add” to save the information you entered and return to the main “Transfers In and Transfers Out” page. Adding Distribution Information If your organization previously entered distribution information for this report, clicking on the “Distributions” link will take you to the “Distributions” page, as shown in Figure 36.
Figure 36 – Main distributions page
From here, you will need to click “Add” to access the “Add to Distributions” data entry page. If your organization has not previously entered distribution data, clicking on the “Distributions” link from the CSR page will take you directly to the “Add to Distributions” data entry page, as shown in Figure 37.
Figure 37 – Distributions data entry page
Commodity: Select the commodity on which you are reporting from the drop-down menu.
You will only be able to select commodities that your organization previously entered into a CSR.
Quantity in KGs: Enter the amount, in kilograms, of the commodity your organization distributed.

Click “Back to list” to return to the “Distributions” page without saving the data. Click “Add” to save the information you entered and return to the “Distributions” page. This page will now include a table with the commodity information you just entered, as shown in Figure 38.
Figure 38 – Main distributions page
To add information for additional commodities, click “Add” and repeat the process. Adding Information Regarding Monetized Commodities Organizations that monetize commodities must enter data into both the CSR and the MPR. To enter monetization data into the CSR, click the “Monetization” link. If your organization previously entered monetization data for this report, clicking this link will take you to the “Monetization” page, as shown in Figure 39.
Figure 39 – Main monetization page
From here, you will need to click “Add” to access the “Add to Monetization” data entry page. If your organization has not previously entered monetization data, clicking on “Monetization” link from the CSR page will take you directly to the “Add to Monetization” data entry page, as shown in Figure 40.
Figure 40 – Monetization data entry page
Commodity: Select the commodity on which you are reporting from the drop-down menu.
You will only be able to select commodities that your organization previously entered into a CSR.
Quantity in KGs: Enter the amount, in kilograms, of the commodity your organization monetized.

Click “Back to list” to return to the “Monetization” page without saving the data. Click “Add” to save the information you entered and return to the “Monetization” page. This page will now include a table with the commodity information you just entered, as shown in Figure 41.
Figure 41 – Main monetization page
To add information for additional commodities, click “Add” and repeat the process. Adding Remarks about Unaccounted for Quantities of Commodities If your organization previously entered remarks regarding this report, clicking the “Remarks on unaccounted quantities” link will take you to the “Remarks/Comments” page, as shown in Figure 42.
Figure 42 – Main CSR remarks/comments page
From here, you will need to click “Add” to access the “Add to Remarks/Comments” data entry page. If your organization has not previously entered remarks, clicking on the “Remarks on unaccounted quantities” link from the CSR page will take you directly to the “Add to Remarks/Comments” data entry page, as shown in Figure 43.
Figure 43 – Remarks/comments data entry page The CSR Header ID and Remarks By fields will automatically populate. Users will need to enter a title for their remarks and then enter their comments in the Remarks or explanations field. Users should explain why there are commodities for which their organization cannot account, and identify the type and quantity of the commodity involved.
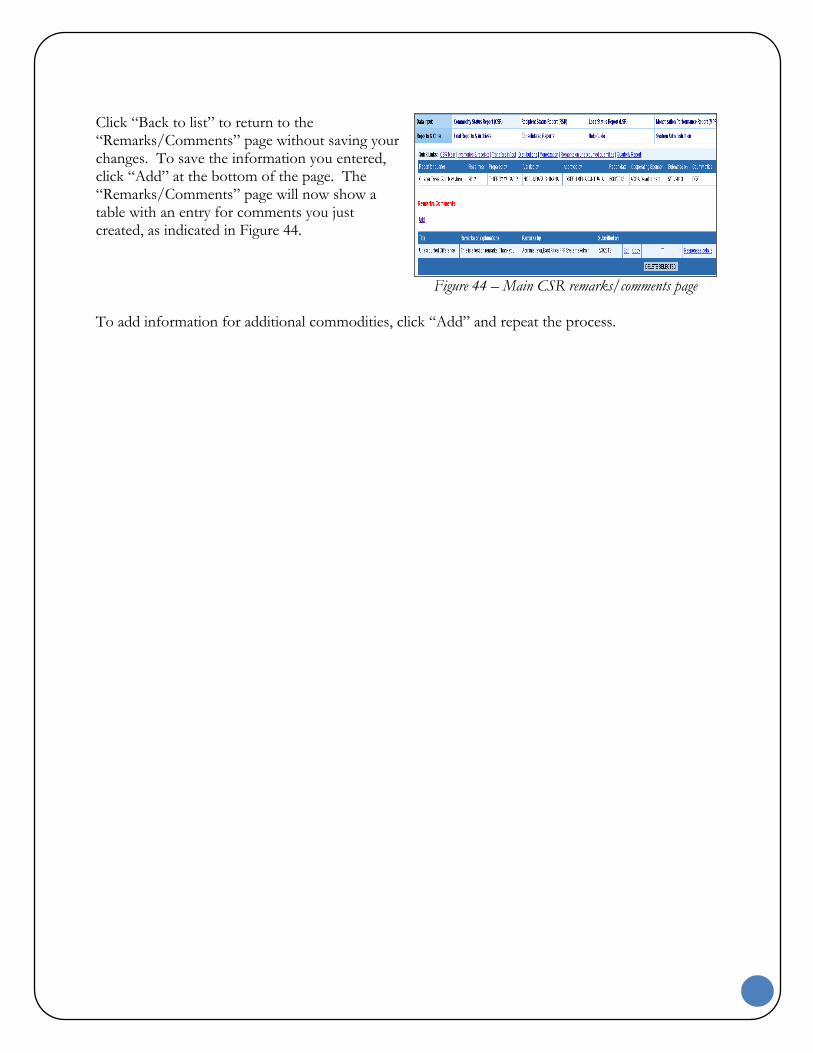
Click “Back to list” to return to the “Remarks/Comments” page without saving your changes. To save the information you entered, click “Add” at the bottom of the page. The “Remarks/Comments” page will now show a table with an entry for comments you just created, as indicated in Figure 44.
Figure 44 – Main CSR remarks/comments page
To add information for additional commodities, click “Add” and repeat the process.

Section Divider Tab

Recipient Status Report (RSR) An RSR records planned and actual of amounts of commodities distributed and recipients reached through a cooperating sponsor’s activities in a given reporting period. To create an RSR, click the “Recipient Status (RSR)” link from any page. This link will take you to the main “Recipient Status Reports – RSR” page, as shown in Figure 45.
Figure 45 – Main RSR page
If you did not create an RSR header by clicking a check box on the CSR report page, you will need to do so before entering RSR data. To create a header for an RSR, click “Add RSR” under the “Filter By” box. This will bring you to the header data entry page, as shown in Figure 46. If you already have a header for the RSR, you can begin entering data as indicated in the next section.
Figure 46 –RSR header data entry page
The report date will automatically populate. Users will need to input data for all other fields: Country: Select the country for which you are reporting from the drop-down menu. Cooperating sponsor: Select your organization’s name from the drop-down menu. Report for quarter: Use the drop-down menu to select the quarter on which you are reporting. Fiscal year: Use the drop-down menu to select the fiscal year for which you are reporting. Prepared by: Enter your name. Verified by: Enter the name of the person who will be verifying the report. Approved by: Enter the name of the person who will be approving and submitting the report.

To save the information you entered and to generate the RSR header, click “Add” at the bottom of the page. QWICR will return you to the main RSR page. The report you created will appear in the report table. If you need to edit any of the header information you entered, you can do so by clicking on the “Edit” link in the table entry for your report. Entering RSR Data Once the report header exists, you can enter data into the RSR. From the main RSR page click on the “Report data details” link. If your organization previously entered recipient information for this report, clicking on the “Report data details” link will take you to the “RSR data listing” page, as shown in Figure 47.
Figure 47 –RSR data listing page
From here, you will need to click “Add” to access the “Add RSR distribution details” data entry page. If your organization has not previously entered recipient data, clicking on the “Report data details” link from the RSR page will take you directly to the “Add RSR distribution details” data entry page, as shown in Figure 48.
Figure 48 –RSR data entry page

The RSR Header ID field will automatically populate. Users will need to input data for all other fields: Source of funding: Use the drop-down menu to indicate whether the activities on which you
are reporting were funded with emergency funds, development funds, or both. Refer to the definitions section for additional clarification.
Sector: From the drop-down menu, select the sector that corresponds to the program your organization is implementing.
Type of activity: Select the type of activity your organization is implementing from the drop-down menu.
Annual planned: o Commodity quantities in kilograms (KGs): In kilograms, enter the quantity of
commodities your organization planned to distribute, as indicated in the AER. o Number of recipients: Enter the number of recipients your organization planned to
reach, as reported in the AER. o Is this planned number of recipient above (3ii) based on individuals or households?:
Based on what your organization indicated in the AER, select the appropriate response from the drop-down menu.
o What is the average number of persons per household?: Enter the average number of people per household, as indicated in your organization’s AER.
Quarterly actuals: o Commodity quantities in kilograms (KGs): Enter the quantity of commodities, in
kilograms, distributed for the quarter, sector, and activity on which you are reporting. o Number of recipients reached: Enter the number of recipients reached. Use the
definitions at the bottom of the screen to calculate the amount. o Is this actual number of recipients above (4ii) based on individuals or households?:
From the drop-down menu, select the response that corresponds to how your organization calculated the number of recipients reached.
o What is the average number of persons per household? Enter the average number of people per household, as indicated in your organization’s AER.
Year-to-date (YTD) o Cumulative recipients from previous quarter: Enter the number of recipients who
received a ration in the previous quarter and o New recipients who did not receive in the previous quarter: This field should only
register new registered recipient but not come back recipients. o Cumulative recipient YTD: This is an automated field that adds up recipients. o YTD commodity quantities: This is also automated field that adds up total
commodities distributed within the year. Click “Back to list” to return to the “RSR data listing” page without saving the data. Click “Add” to save the information you entered and return to the “RSR data listing” page. This page will now include a table with the activity information you just entered, as shown in Figure 49.
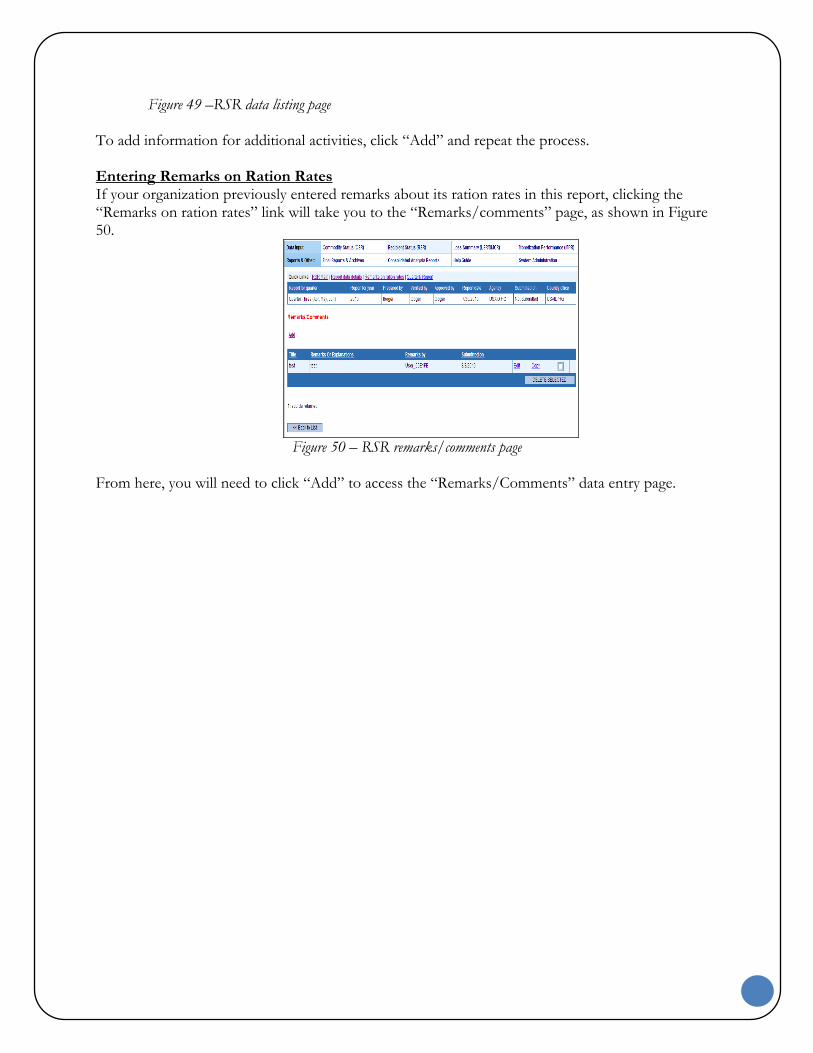
Figure 49 –RSR data listing page
To add information for additional activities, click “Add” and repeat the process. Entering Remarks on Ration Rates If your organization previously entered remarks about its ration rates in this report, clicking the “Remarks on ration rates” link will take you to the “Remarks/comments” page, as shown in Figure 50.
Figure 50 – RSR remarks/comments page
From here, you will need to click “Add” to access the “Remarks/Comments” data entry page.

If your organization has not previously entered remarks, clicking on the “Remarks on ration rates” link from the RSR page will take you directly to the “Remarks/Comments” data entry page, as shown in Figure 51.
Figure 51 –RSR remarks/comments data entry page
The RSR Header ID and Remarks By fields will automatically populate. Users will need to enter a title for their remarks and then enter their comments about the ration rates in the Remarks or Explanations field. Users should explain the rations and how they were determined. To save the information you entered, click “Add” at the bottom of the page. The “Remarks/Comments” page will now show a table with an entry for comments you just created, as shown in Figure 52.
Figure 52 – Main RSR remarks/comments page
To add additional remarks, click “Add” and repeat the process.

Section Divider Tab

Loss Summary Report (LSR) The Loss Summary Report is used to record losses when commodities are discovered to be unfit, missing, spilled, or damaged. For any post-shipping incident of losses greater than U.S. $500, users must also complete a Damage or Misuse of Commodities Report. To create a Loss Summary Report, click on the “Loss Summary (LSR/DMCR)” link from any page. This will take you to the main “Loss Summary Reports – LSR” page, as shown in Figure 53.
Figure 53 – Main LSR page
If you did not create an LSR header from another report page, you will need to do so before entering LSR data. To create a header for an LSR, click “Add LSR” under the “Filter By” box. This will bring you to the header data entry page, as shown in Figure 54. If you already have a header for the LSR, you can begin entering data as indicated in the next section.
Figure 54 – LSR header data entry pageThe report date will automatically populate. Users will need to input data for all other fields: Country: Select the country on which you are reporting from the drop-down menu. Cooperating sponsor: Select your organization’s name from the drop-down menu. Report for quarter: Use the drop-down menu to select the quarter on which you are reporting. Fiscal year: Use the drop-down menu to select the fiscal year for which you are reporting. Prepared by: Enter your name. Verified by: Enter the name of the person who will be verifying the report. Approved by: Enter the name of the person who will be approving and submitting the report.
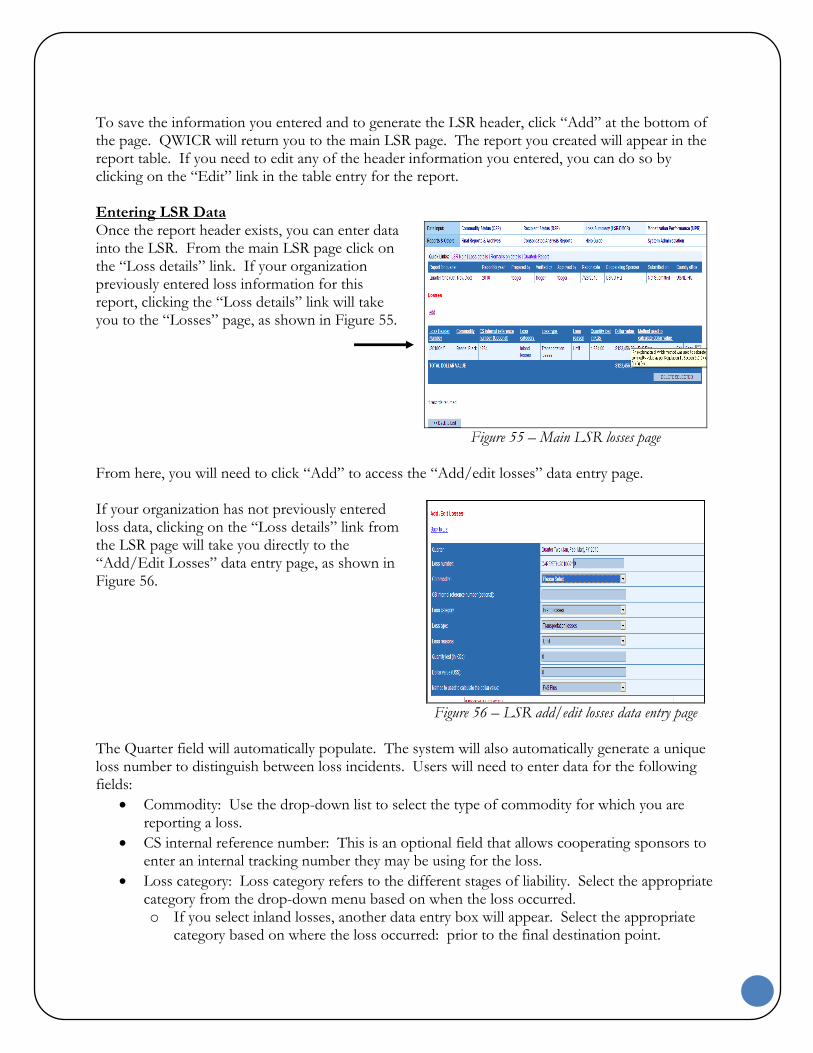
To save the information you entered and to generate the LSR header, click “Add” at the bottom of the page. QWICR will return you to the main LSR page. The report you created will appear in the report table. If you need to edit any of the header information you entered, you can do so by clicking on the “Edit” link in the table entry for the report. Entering LSR Data Once the report header exists, you can enter data into the LSR. From the main LSR page click on the “Loss details” link. If your organization previously entered loss information for this report, clicking the “Loss details” link will take you to the “Losses” page, as shown in Figure 55.
Figure 55 – Main LSR losses page
From here, you will need to click “Add” to access the “Add/edit losses” data entry page. If your organization has not previously entered loss data, clicking on the “Loss details” link from the LSR page will take you directly to the “Add/Edit Losses” data entry page, as shown in Figure 56.
Figure 56 – LSR add/edit losses data entry page
The Quarter field will automatically populate. The system will also automatically generate a unique loss number to distinguish between loss incidents. Users will need to enter data for the following fields:
Commodity: Use the drop-down list to select the type of commodity for which you are reporting a loss.
CS internal reference number: This is an optional field that allows cooperating sponsors to enter an internal tracking number they may be using for the loss.
Loss category: Loss category refers to the different stages of liability. Select the appropriate category from the drop-down menu based on when the loss occurred. o If you select inland losses, another data entry box will appear. Select the appropriate
category based on where the loss occurred: prior to the final destination point.
Loss type: Select the appropriate loss type from the drop-down list depending on whether it is a warehouse, transportation, or distribution loss.
Loss reason: This refers to what makes this a loss situation. Select the appropriate category from the drop-down list based on whether the commodity was damaged, unfit, stolen, missing, spilled, or short landed.
Quantity (in KGs): Enter the total number of KGs of the commodity that was damaged, unfit, stolen, missing, spilled, or short landed.
Dollar value (U.S.$): Enter the dollar value of the commodity affected. Refer to the LSR overview section for information on calculating the dollar value of the loss.
Method to be used to calculate the dollar value: Use the drop-down menu to indicate whether your organization used the FAS plus or market price calculation to determine the dollar value of the loss. See the definitions section for an explanation of these methods.
To save the data you entered, click the “Add” button. To return to the main/previous page without saving, click on “Back to List.” This will return you to the main LSR page. Repeat this process to add loss information for additional incidents of loss.

Section Divider tab

Damage or Misuse of Commodities Report (DMCR) If your organization is reporting inland or internal losses greater than $500, a link to the DMCR will appear automatically in the report table, as shown in Figure 57.
Figure 57 – LSR table showing DMCR link
To enter data into the DMCR, click on the “Update” link under the DMCR number. The DMCR data entry page will appear, as shown in Figure 58.
Figure 58 –DMCR data entry page
The fields for Quarter and Loss Number will automatically populate. Users will need to enter data for the following fields
Transfer authorization number: Enter the number from the transfer authorization agreement.
Date of the loss, damage, or misuse: Enter the date when the loss occurred. Place of the loss, damage, or misuse: Enter the location where the loss occurred. The number and size of containers/bags: Enter the quantity and size of the bags or
containers that were damaged, unfit, missing, stolen, spilled, or short landed. Current location or disposition of commodities: Enter information about the current
location of the commodities or their current disposition. Explain circumstances of the loss: This is a required field. Explain how the loss occurred. Who, if anyone (person or organization), had possession of the commodities at the time of
loss, damage, or misuse: Enter the name of the individual or organization that had possession of the commodity at the time of the loss.
Who, if anyone (person or organization), might be responsible for the loss, damage, or misuse: Enter the name of the individual or organization responsible for the loss.
Claim value: Enter the amount you entered into the Dollar Value field in the LSR.

Action taken to effect recovery, disposal, or restitution: Indicate what action your organization has taken to recover the lost, missing, or stolen commodities; dispose of damaged commodities; replace unfit or short-landed commodities; and seek restitution from the responsible party.
Details of claims established against responsible parties: Enter information regarding communication your organization has had with the responsible party regarding restitution for the loss.
CS claim action requested: Use the drop-down menu to indicate whether your organization is responsible for the loss, is making a claim against a third party, or is requesting a claim waiver.
To save the data you entered and return to the LSR page, click the “Update” button. To return to the main LSR page without saving the data, click “Back to list.” Claims Report If your organization is reporting inland or internal losses greater than $500, a link to the Claims report will appear automatically in the report table, as shown in Figure 59.
Figure 59 – LSR table showing the claims report link
To enter claims data, click on the “Update” link under “Claim.” The “Add to Losses” data entry page will appear, as shown in Figure 60.
Figure 60 – Claims report data entry page
The following fields will automatically populate from the LSR: Loss header number Quarter Loss number Claim tracking section:
o Date & time o Name
Users will enter data into the following fields: Claim tracking section:

o Comments: Enter the details of communications between your organization and the FFP officer regarding the status of the claim. If you are entering comments, you will need to click “Add” to create the claim entry. This will automatically generate a claim number.
Payment information o Agreed payment value (U.S.$): Enter the amount the responsible party agreed to pay for
the lost, damaged, unfit, stolen, missing, spilled, or short-landed commodities. o CS retain value (U.S.$): Enter the administrative costs incurred by your organization while
pursuing this claim up to a maximum of $150. o Amount paid to date (U.S.$): Enter the amount paid to your organization by the
responsible party as of the report date. o Payment ref no: Enter the reference number for any payments received.
The following fields will allow FFP Officers ONLY to enter data after the report has been submitted: USAID FFP review information
o Payment verified amount o Payment ref details o Payment verified by the U.S. Government o Claim closed
To save the data you entered and return to the LSR page, click the “Update” button. To return to the main LSR page without saving the data, click “Back to list.”

Commodity Complaint The Commodity Complaint report allows CSs to report all non-loss issues with commodities, such as packaging problems and discolored commodities. The “Add Commodity Complaint” link is accessible from the CSR, RSR, and LSR pages. To submit a Commodity Complaint report, click on the “Add Commodity Complaint” link from any of these pages, as shown in Figure 61.
Figure 61 – Report page showing commodity complaint
link The “Add Commodity Quality Complaint” data entry page will appear, as shown in Figure 62.
Figure 62 – Commodity complaint data entry page
Users will need to enter data for the following fields:
Country: Select the country on which you are reporting from the drop-down menu. Organization: Select your organization’s name from the drop-down menu. Report for quarter: Select the quarter on which you are reporting from the drop-down
menu. Fiscal year: Select the fiscal year for which you are reporting from the drop-down menu. Reported by: Enter your name. Commodity: Use the drop-down menu to select the commodity for which your organization
is filing the complaint.

Estimated quantity questioned: In kilograms, enter the amount of the commodity for which your organization is filing the complaint.
Complaint description: Describe the problem with the commodity. Action taken: Describe what actions your organization took as a result of the problem(s)
with the commodity. Report date: Enter the date you are completing the report. FFP officer: Enter the name of the FFP officer your organization contacted regarding the
problem with the commodity. To save the data you entered, click the “Add” button. This will return you to the main CSR page. To return to the main CSR page without saving, click “Back to list.”

Section Divider Tab

Monetization Performance Report (MPR) An MPR documents information from calls forward and commodity sales. To create an MPR, click the “Monetization Performance Report (MPR)” link from any page. This link will take you to the main “Monetization Performance Reports – MPR” page, as shown in Figure 63.
Figure 63 – Main MPR page
If you did not create an MPR header from another report page, you will need to do so before entering MPR data. To create a header for an MPR, click the “Add MPR” link. This will bring you to the header data entry page, as shown in Figure 64 below. If you already have a header for the MPR, you can begin entering data as indicated in the next section.
Figure 64 –MPR header data entry page
The report date and current fiscal year will automatically populate. Users will need to input data for all other fields:
Country: Select the country for which you are reporting from the drop-down menu. Cooperating sponsor: Select your organization’s name from the drop-down menu. Report for quarter: Use the drop-down menu to select the quarter on which you are
reporting. Fiscal year: Use the drop-down menu to select the fiscal year for which you are reporting. Prepared by: Enter your name. Verified by: Enter the name of the person who will be verifying the report. Approved by: Enter the name of the person approving the report for your organization.
To save the information you entered and to generate the MPR header, click “Add” at the bottom of the page. QWICR will return you to the main MPR page. The report you created will appear in the

report table. If you checked the CSR, LSR, or RSR header boxes, you will see corresponding report headers in the report table on each of those pages. If you need to edit any of the header information you entered, you can do so by clicking on the “Edit” link in the table entry for the report. Entering MPR Data Once the report header exists, you can enter data into the MPR. From the main MPR page click the “Details for this MPR” link. If your organization previously entered MPR data for this report, clicking this link will take you to the “MPR Data List” page, as shown in Figure 65.
Figure 65 – MPR data list page
From here, you will need to click “Add” to access the MPR data entry page. If your organization has not previously entered MPR data, clicking on the “Details for this MPR” link from the MPR page will take you directly to the “Add/Edit MPR Data” page, as shown in Figure 66.
Figure 66 – Add/edit MPR data entry page
The MPR Header ID field will automatically populate. Users will need to input data for all other fields Commodity: Select the commodity your organization monetized from the drop-down list. CCC contract number: Enter the Commodity Credit Corporation number indicated in your
organization’s bill of lading. Call forward ID: Enter the commodity request number from the Food Aid Request Entry
System. Call forward date: Enter the date of the call forward in which your organization requested this
commodity. Click “Back to list” to return to the “MPR Data List” page without saving the data. Click “Add” to save the information you entered and return to the “MPR Data List” page. This page will now include a table with the commodity information you just entered, as shown in Figure 67.

Figure 67 – MPR data list page
You have several options from the “MPR Data List” page: 1. You can add additional commodities by clicking “Add” and repeating the process outlined
above. 2. You can add remarks regarding the MPR by clicking on the “Remarks on details” quick link
under the static bar. 3. You can add information about the call forward by clicking on the “Call forward concurrence
data” link in the report table. There will be a corresponding link in the table for each commodity you added above. Click the link corresponding to the appropriate commodity to add the call forward data for that commodity.
4. You can add monetization information by clicking on the “Performance assessment data” link in the report table. There will be a corresponding link in the table for each commodity you added above. Click the link corresponding to the appropriate commodity to add the monetization data for that commodity.
The call forward concurrence data and performance assessment data must be added for each monetized commodity before submitting the report. Adding Remarks about the MPR If your organization previously entered remarks for this report, clicking the “Remarks on details” link will take you to the “Remarks/Comments” page, as shown in Figure 68.
Figure 68 –MPR remarks/comments page

From here, you will need to click “Add” to access the “Add to Remarks/Comments” data entry page. If your organization has not previously entered remarks about the MPR, clicking on the “Remarks on details” link from the MPR page will take you directly to the “Add to Remarks/Comments” data entry page, as shown in Figure 69.
Figure 69 –MPR remarks/comments data entry page
The MPR Header ID and Remarks By fields will automatically populate. Users will need to enter a title for their remarks and then enter their comments in the Remarks or Explanations field. To save the information you entered, click “Add” at the bottom of the screen. The “Remarks/Comments” screen will now show a table with an entry for comments you just created, as shown in Figure 70.
Figure 70 – Main MPR remarks/comments page
To add additional remarks, click “Add” and repeat the process. Inputting Call Forward Concurrence Data Clicking on the “Call forward concurrence data” link will bring you to the following page:
Figure 71 – Data entry page for update monetization call
forward concurrence data

The Commodity field will automatically populate. Users will need to input data for all other fields:
Planned/AER quantity in MTs: In MTs, enter the amount of the commodity your organization planned to monetize, as stated in the AER.
Estimated cost per MT (in U.S.$): Enter the total of the purchase cost and freight costs for the commodity. Enter the amount in U.S.$ per MT of the commodity.
Estimated ocean (U.S. flag) and inland freight costs per MT (in U.S.$): Enter the estimated cost of ocean shipping and inland freight to deliver the commodity. Enter the amount in U.S.$ per MT of the commodity.
Sales price (U.S. $) (estimated or actual) - duty and VAT free: In U.S. dollars, enter the actual or estimated price your organization will receive in country for the sale of the commodity. You will enter either the estimated sales price or the actual sales price, depending on the terms of your organization’s sales contract.
Duty and VAT (U.S. $): In U.S. dollars, enter the actual or estimated VAT cost for the commodity. You will enter the estimated or actual cost depending on the terms of your organization’s sales contract.
Average market value (U.S. $): Enter the market price of the commodity used by your organization in its proposal.
Remarks/comments on estimated cost recovery index and estimated fair market index: Calculate the estimated cost recovery index and the estimated fair market value index, as described in the definitions section. Review the results of the two calculations and enter any comments or explanations into this section.
Click “Back to list” to return to the “MPR Data List” page without saving the data. Click “Update” to save the information you entered and return to the “MPR Data List” page. This page will now include a table with the commodity information you just entered, as shown in Figure 72.
Figure 72 – MPR data list page with table indicating
call forward concurrence data
To add information for additional commodities, click “Add” and repeat the process.
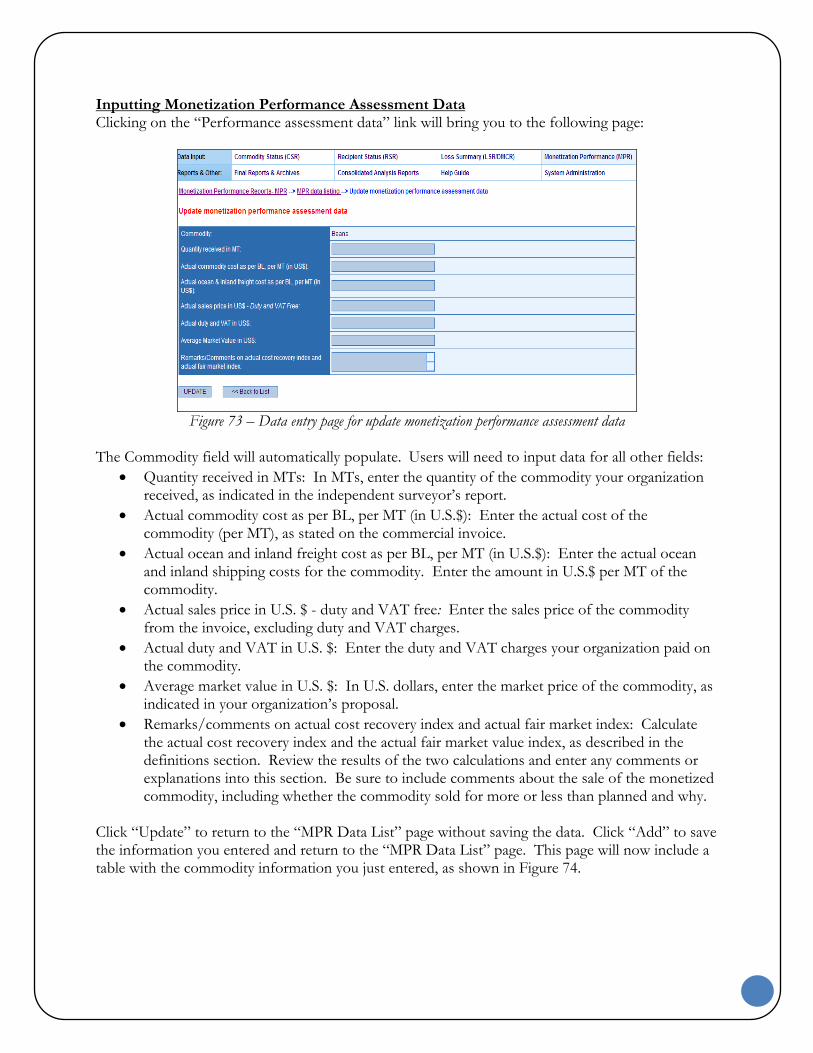
Inputting Monetization Performance Assessment Data Clicking on the “Performance assessment data” link will bring you to the following page:
Figure 73 – Data entry page for update monetization performance assessment data
The Commodity field will automatically populate. Users will need to input data for all other fields:
Quantity received in MTs: In MTs, enter the quantity of the commodity your organization received, as indicated in the independent surveyor’s report.
Actual commodity cost as per BL, per MT (in U.S.$): Enter the actual cost of the commodity (per MT), as stated on the commercial invoice.
Actual ocean and inland freight cost as per BL, per MT (in U.S.$): Enter the actual ocean and inland shipping costs for the commodity. Enter the amount in U.S.$ per MT of the commodity.
Actual sales price in U.S. $ - duty and VAT free: Enter the sales price of the commodity from the invoice, excluding duty and VAT charges.
Actual duty and VAT in U.S. $: Enter the duty and VAT charges your organization paid on the commodity.
Average market value in U.S. $: In U.S. dollars, enter the market price of the commodity, as indicated in your organization’s proposal.
Remarks/comments on actual cost recovery index and actual fair market index: Calculate the actual cost recovery index and the actual fair market value index, as described in the definitions section. Review the results of the two calculations and enter any comments or explanations into this section. Be sure to include comments about the sale of the monetized commodity, including whether the commodity sold for more or less than planned and why.
Click “Update” to return to the “MPR Data List” page without saving the data. Click “Add” to save the information you entered and return to the “MPR Data List” page. This page will now include a table with the commodity information you just entered, as shown in Figure 74.

Figure 74 – MPR data list page with table
To add information for additional commodities, click “Add” and repeat the process.

Section Divider Tab

Verifying and Submitting Reports The CSR, RSR, LSR, DMCR, and MPR entries need to be verified before your organization submits them to mission or regional FFP staff. Cooperating sponsors should verify all entries on each report prior to submission. Depending on the CS, the verification and submission processes may be performed by the same person; however, data entry should be done separately. The actual verification process takes place outside the QWICR system as CSs review and cross-check the information entered into QWICR. Once CSs finish this process, they can complete the verification and submission process within the system. The verification link in QWICR will only be active to users with verifying rights. After the data entry person sending the report for verification by clicking send to Verifier. Verifying Reports Go to the main report page for the report you want to verify. Identify the report in the table and click on the corresponding “Verify this report” link, as shown in Figure 75.
Figure 75 – Report table indicating the report verification link
QWICR will take you to the report verification page. Click “Verify Report” to confirm the action.
Figure 76 – Verify report confirmation page
Once you have clicked this link, QWICR will return you to the main page for the type of report you verified. The entry for the report you just verified will now include an “Unverify this report” link, as shown in Figure 77. The
“Unverify this report” link can be used to reverse the verification and make additional changes to the report if needed. Once the report is submitted, your organization will not be able to

make changes, so it is important that all data be accurate and complete prior to submission.
Figure 77 – Report table displaying the link to unverify a
reportClicking on the “Unverify this report” link will bring you to another confirmation page:
Figure 78 – Unverify a report confirmation page
Click “Unverify this report” to confirm the action. This will take you back to the main report page and the report table will now show a “Verify this report” link in the entry for the report.
Submitting Reports Once cooperating sponsors have verified the information contained in the reports, they will submit their reports to their mission or regional FFP officer. The FFP officer will then be able to view the completed report. To submit a report, go to the main report page for the report you want to submit. Identify the report from the table and click on the “Submit this report” link, as shown in Figure 79.
Figure 79 – Report table indicating report submission link

Once you submit the report, it is locked and no additional changes can be made. If you need to make changes to a submitted report, you will need to amend the report.

Final Reports and Archives Viewing Submitted Reports Users can view their previously submitted CSRs, RSRs, LSRs, DMCRs, Claims reports, and MPRs. To view these reports, click on the “Final Reports & Archives” link on the static bar. The following screen will appear:
Figure 80 – Final reports and archives page
To view reports, locate the name of the report you want to view and click on the corresponding fiscal year. This will bring you to a page that lists all of the reports submitted by your organization in that fiscal year, as shown in Figure 81.
Figure 81 – Sample table showing submitted reports
You can filter your search by fiscal year, quarter, and country. Select the appropriate entries from the drop-down boxes at the top of the screen and click “Search Now.”
Figure 82 – Filters for searching reports
Once you have clicked on the “Final Reports & Archives” link, you will only see reports for the fiscal year you selected, even if you click on the static bar links for other report pages. To see all reports again, you will need to change the fiscal year to “Show all years” in the “Filter By” box. This will need to be done even if you click on the “Return to normal reports” link. Amending Submitted Reports Once reports are submitted, they cannot be changed. To revise or update a submitted report, you will need to amend it. Click on the “Final
Reports & Archives” link to access submitted reports. This will take you to the “Final Report and Archives” page, as shown in Figure 83.

Figure 83 –Final reports and archives page
Locate the name of the report you want to amend and click on the appropriate fiscal year. This will bring you to a page that lists all of the reports submitted by your organization in that fiscal year, as shown in Figure 84.
Figure 84 –Report table displaying amend report link
Locate the report you want to amend and click “Amend.” This will bring you to a page that shows the header for that report, as shown in Figure 85.
Figure 85 – Amend report header screen
The header information for the report will automatically populate, but you can make changes. This will affect any reports associated with the header. Once you are done reviewing and updating the header information, click make a copy.
A copy of the same report will be added to the data entry level for you to make necessary amendment. The process of Verifying and Submitting remain the same. Please note that the system will not allow you to create two reports in the system. One has to be submitted before a second one is created.
ATTACHMENTS
1. USAID 22 C.F.R. 211 (USAID Regulation 11)
http://transition.usaid.gov/our_work/humanitarian_assistance/ffp/reg11p.htm
2. Guidance On Monetization Monetization Field Manual
3. Transfer of funds to Commodity Credit Corporation U.S Department of Agriculture