Embed Size (px)
Citation preview

Project Document Management System
GUIDED TOUR
UGD-DM-002 5Q 02 June 2014
Document: Revision:
Last Updated:

Document No: UGD-DM-002 Rev: 5Q QDMS Guided Tour Page 2 of 62
Information in this document is subject to change without notice. Companies, names and data used in examples are fictitious.
1995 - 2011 by QA Software. All rights reserved. No part of this document may be reproduced or transmitted in any form or by any means, electronic or mechanical, for any purpose, without the express permission of QA Software. Microsoft Windows, Microsoft Excel and Microsoft FoxPro are registered trademarks of Microsoft Corporation. Although QDMS has undergone extensive testing, QA Software makes no warranty or representation, either express or implied, with respect to this software or documentation, its quality, performance, merchantability, or fitness for purpose. As a result this software and documentation are licensed “as is”, and you, the licensee are assuming the entire risk as to its quality and performance. In no event will QA Software be liable for direct, indirect, special, incidental or consequential damages arising out of the use or inability to use the software or documentation. Please send your comments to: QA Software Pty Ltd L3 332
St Kilda Road Melbourne 3006 Australia
For technical support Australia Phone: 03 9291 0800 Fax: 03 9699 6293 International Phone: +61 3 9291 0800 Fax: +61 3 9699 6293 Email: [email protected] Internet: http://www.qa-software.com

Table of Contents
Document No: UGD-DM-002 Rev: 5Q QDMS Guided Tour Page 3 of 62
Chapter 1 - Introduction .............................................................. 5 1.01 Introducing QDMS .......................................................................................... 6 1.02 Highlights ........................................................................................................ 6 1.03 How to get started with QDMS ........................................................................ 7
Chapter 2 – QDMS Simple Guided Tour .................................... 9
2.01 About the QDMS Guided Tours .................................................................... 10 2.02 Login ............................................................................................................ 10 2.03 The Master Document Register .................................................................... 11 2.04 Adding a New Document .............................................................................. 13 2.05 Creating a Recipient ..................................................................................... 15 2.06 Generating a Transmittal .............................................................................. 19 2.07 View the Transmittal History ......................................................................... 24 2.08 Receiving Revised Documents ..................................................................... 25 2.09 The Document History File ........................................................................... 26 2.10 Transmittals Pending .................................................................................... 26 2.11 Transmitting Revised Documents ................................................................. 27
Chapter 3 – QDMS Advanced Guided Tour ............................. 31
3.01 Introduction ................................................................................................... 32 3.02 Managing Configuration Tables .................................................................... 32 3.03 Using Filters.................................................................................................. 33 3.04 Customising the Master Document Register ................................................. 35 3.05 Printing the Master Document Register ........................................................ 36 3.06 Master Document Register Views ................................................................. 36 3.07 Receiving Documents ................................................................................... 38 3.08 Using Re-Transmit ........................................................................................ 39 3.09 Using Auto Tag ............................................................................................. 41 3.12 Viewing the Transmittal History..................................................................... 45 3.13 Tracking Responses and Acknowledgements............................................... 46 3.14 Tracking the Document Review Process ...................................................... 47 3.15 Other things to try ......................................................................................... 52
Chapter 4 - Appendices ............................................................ 53
Appendix A – Quick Start Instructions for Installing QDMS ................................... 54 Appendix B - File Formats supported by QVIEW ................................................. 57 Appendix C - Work Flow for Initial Transmittal Generation .................................... 58 Appendix D - Work Flow for Transmittal of Revised Documents ........................... 59 Appendix E - Examples of some Customisations for QDMS ................................. 60


Document No: UGD-DM-002 Rev: 5Q QDMS Guided Tour Page 5 of 62
Chapter 1 - Introduction
1.01 Introducing QDMS
1.02 Highlights
1.03 How to get started with QDMS

Chapter 1 – Introduction
Document No: UGD-DM-002 Rev: 5Q QDMS Guided Tour Page 6 of 62
1.01 Introducing QDMS In any Drawing Office, on any Construction Site, or in fact anywhere else where there are large quantities of documents, there will be a Register of Documents. With time, documents are revised, new documents are created, and documents become superseded. The document register is continually updated to reflect these changes. When documents are issued from one party to another, they are generally issued under a transmittal. This is a cover sheet that lists the issued documents, their status, the reason for issue etc. A transmittal is the means by which document issues are controlled. QDMS is a Document Management and Transmittal System developed by QA Software to electronically maintain a document register, to generate transmittals for the issue of new documents, and to manage the distribution of revised documents. Though this may sound simple, in today’s fast track environment, control of documents is fundamental to the smooth operation of any Project and is often managed badly. Handwriting of transmittals is time consuming and a manually maintained distribution matrix, (or more common still, a distribution matrix held only in someone’s memory) is prone to error and potential disaster. QDMS is a powerful and flexible PC based system. It has been designed to be as simple to use as possible while offering the maximum power for the advanced user. QDMS has been developed to assist companies in meeting the requirements of ISO 9000 standards for document control, but offers far more than the means of simply meeting this standard.
1.02 Highlights QDMS is special because it has been developed on the job. People actually doing document control have written it. QDMS displays information in a spread sheet format that enables the user to see multiple records at a glance. Flexibility has been considered of primary importance. Data can be browsed, or reports generated in a wide variety of ways. A powerful filter generation facility is incorporated for editing or reporting on selected information only. QDMS generates an audit trail for all revisions to documents and document Issues. Data entry with QDMS is rapid with single line or batch entry for new documents. Documents are selected for generating transmittals by simply tagging the documents in the Document Register. The distribution of revised documents is almost completely automated. Full automation has not been implemented in order to provide the user with the final control button. Importing and Exporting from and to other systems is a built-in feature of QDMS. The system can generate electronic transmittals that can be imported by other users. All, or only selected records within any QDMS data file can be exported from within the system to most popular software packages such as Excel, Lotus, etc. QDMS is designed so that you can access the information you want quickly and the system operates with standardized Tool buttons for maximum user-friendly operation. In an environment with electronic versions of drawing files, QDMS has an optional viewer which can read most of the common CAD file formats. The viewer also has red lining facilities which can be controlled per user.

Chapter 1 – Introduction
Document No: UGD-DM-002 Rev: 5Q QDMS Guided Tour Page 7 of 62
1.03 How to get started with QDMS QDMS requires installation of some software. This can be obtained from www.qa-software.com or by contacting QA Software on: Phone: +61 (3) 9291 0800 Fax: +61 (3) 9699 6293 Email: [email protected] Use the Quick Start Instructions contained in Appendix A at the end of this document to Install the Software.


Document No: UGD-DM-002 Rev: 5Q QDMS Guided Tour Page 9 of 62
Chapter 2 – QDMS Simple Guided Tour
2.01 About the QDMS Guided Tours
2.02 Login
2.03 The Master Document Register
2.04 Adding a New Document
2.05 Creating a Recipient
2.06 Generating a Transmittal
2.07 View the Transmittal History
2.08 Receiving Revised Documents
2.09 The Document History File
2.10 Transmittals Pending
2.11 Transmitting Revised Documents
2.12 View Transmittals Detailed again
2.13 Exiting QDMS

Chapter 2 – QDMS Simple Guided Tour
Document No: UGD-DM-002 Rev: 5Q QDMS Guided Tour Page 10 of 62
2.01 About the QDMS Guided Tours What follows is a simple guided tour, which takes you through the most basic features of QDMS. Please follow the steps below sequentially if using the program for the first time. Type data exactly as indicated in these instructions as it may be referenced later in the Chapter. For maximum benefit from this exercise, note changes that take place on the screen with each step.
2.02 Login If QDMS has already been installed on your computer but you are not at the Login screen, you need to start the program by clicking on the Start button, selecting Programs, locating the work group QA Software, and selecting QDMS Drawing Management. You will then be presented with the Login Screen. Alternatively, if you have a short cut icon on your desktop for QDMS, double click on this to start the program. 1. Select the User ID as QA and press Tab (your login details appear on the right) 2. Enter the Password as QA and press Tab (a list of projects you have access to appear) 3. Select the Demonstration Project by double clicking on it, or select it and click on the
OK button.
Note that the log in screen is normally populated automatically until QDMS is registered with both the User ID and Password as QA.
1
2
3

Chapter 2 – QDMS Simple Guided Tour
Document No: UGD-DM-002 Rev: 5Q QDMS Guided Tour Page 11 of 62
The program main menu will then be displayed.
The above screen is called the QDMS Dashboard. At the top of the screen is the Main Menu. Displayed as a list under Favorites are some commonly used QDMS menu items. These menu items are fully customisable for each user. During the guided tour you should use the main menu options rather than the short cuts on the Favorites list to gain familiarisation with the menu system.
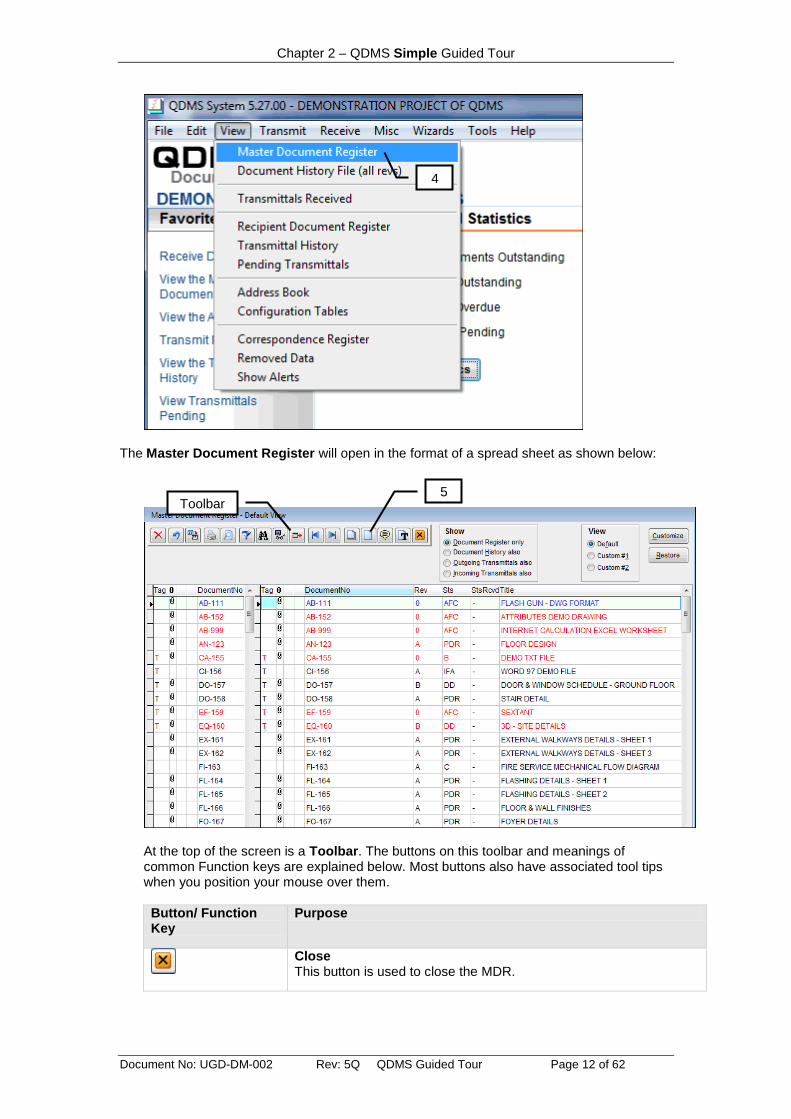
2.03 The Master Document Register The Master Document Register (MDR) is a key file in QDMS. This is where the system stores the latest revisions of all documents. All documents in QDMS (both new and revised) are processed into QDMS through the Master Document Register. Note that the MDR only stores information regarding the latest revision of each document. When Documents are revised, superseded documents are automatically moved to a separate file called the Document History file. 4. Select View from the main menu and then select Master Document Register from the
sub menu as follows:
Main Menu
Favorites
Chapter 2 – QDMS Simple Guided Tour
Document No: UGD-DM-002 Rev: 5Q QDMS Guided Tour Page 12 of 62
The Master Document Register will open in the format of a spread sheet as shown below:
At the top of the screen is a Toolbar. The buttons on this toolbar and meanings of common Function keys are explained below. Most buttons also have associated tool tips when you position your mouse over them.
Button/ Function Key
Purpose
Close This button is used to close the MDR.
Toolbar
4
4
5

Chapter 2 – QDMS Simple Guided Tour
Document No: UGD-DM-002 Rev: 5Q QDMS Guided Tour Page 13 of 62
Auto-Tag Documents Used to Automatically “Tag” documents for selection.
Comments Used to assign comments to a document.
or F4
New Document Used to add a new document to the MDR.
or F5
New Duplicate Used to add a new document to the MDR, duplicating the information from the current document.
or Ctrl+End Move to the bottom of the register.
or Ctrl+Home Move to the top of the register.
Export View Files Used to copy the view files of tagged documents to a selected location.
Look for Used to locate a specific document containing specific text in any column.
or F7
Find Find a Document via it’s number or other attributes.
or F6
Filter Used to locate documents that match specified criteria.
Preview Preview a report.
Print Print a report.
Renumber Renumber a document.
Undo Used to undo the last edit. This option is not available if a user movers to another document first.
Delete Used to delete the current row.
F8 Enters current date in a Date field.
End Move to End of Text.
Home Move to Beginning of Text.
2.04 Adding a New Document There are a number of ways of registering new documents into QDMS. One of the simplest is to add documents directly in to the Master Document Register. Note that QDMS stores both incoming and outgoing documents in the Master Document Register. The FromCompId (From Company ID) field indicates whether a document is internal or from an external party.

Chapter 2 – QDMS Simple Guided Tour
Document No: UGD-DM-002 Rev: 5Q QDMS Guided Tour Page 14 of 62
To add a new document: 5. Press F4 or click the New Document button to open the Document key information window. 6. In the field Document No type DUMMY-A and press Tab. 7. Click the down arrow next to the Rev field and select A from the drop-down list. 8. Click the down arrow next to the Sts field and select DD – Design Development from the
drop-down list. 9. Enter the Title for the document as Dummy Document A. The fields in the key
information window should now be as shown below:
10. Click OK to add this document and return to the Master Document Register. 11. Type the FromCompId value as JKN or select this from the drop down list in the
Company field. Press Tab. 12. Enter the Transmittal Received number as TR005 and press Tab. 13. Enter the Received date by pressing F8 when in the Received field and press Tab. Note
you could also right click on the Received field and select Today to enter this date. To add another document: 14. With your mouse still on the row for document DUMMY-A, press the F5 key or click the
New Duplicate button. This is used to create a document with similar attributes to the document just entered. The Document key information box will open again.
15. Change the A to a B in both the Document Number and Title fields to create a document
DUMMY–B with the title Dummy Document B and then click OK.
(Tip: Press the End key to go direct to the end of the Title and then Backspace.)
6
7
8 9
10

Chapter 2 – QDMS Simple Guided Tour
Document No: UGD-DM-002 Rev: 5Q QDMS Guided Tour Page 15 of 62
Notice that the other fields such as FromCompId and Transmittal Received have been “duplicated” from Document DUMMY-A.
16. Add a third document DUMMY-C as per steps 14 and 15 above.
Note that there are numerous additional attributes that can be captured about documents in QDMS. These include Disciplines, Types, Zones and the like. You will see some of these additional attributes later in the Guided Tour. You can even add your own fields to the Master Document Register if required.
17. Click on the Close button on the far right of the Toolbar to return to the Dashboard.
2.05 Creating a Recipient Recipients in QDMS are people to whom drawings are issued. Controlled Documents should be issued by transmittal to both External and Internal recipients. Recipients are stored in an Address Book. 18. From the main menu, select View and from the sub menu select Address Book.
The Address Book will then appear as shown below.
You are now going to enter a new contact Joe Fredericks from BigPond Construction. To do this you must first add BigPond Construction as a company.
19. Click on the Edit Company Details button to the right of the word CompanyID, at the top
centre of the above screen.
The Company Details Screen will then appear.
19

Chapter 2 – QDMS Simple Guided Tour
Document No: UGD-DM-002 Rev: 5Q QDMS Guided Tour Page 16 of 62
20. Click the New CompanyID button on the toolbar.
The Add New Company window shown below will appear.
21. Enter the Company ID as BIGPOND and press Tab (This is a unique identifier for the
Company). 22. Enter the Title as BigPond Construction. 23. Click the OK button. You will be returned to the Company Details Screen. 24. Select Company Types button located at the top right of the Company Details Screen.
The Company Type Details screen will then be displayed. 25. Click the New Company Type button on the toolbar and the following screen will be
displayed.
26. Enter the Type as “BLD”.
26
27
24
21
22
23
20
20

Chapter 2 – QDMS Simple Guided Tour
Document No: UGD-DM-002 Rev: 5Q QDMS Guided Tour Page 17 of 62
27. Enter the Title of the Type as “Builder” and click the Add button. Now click the Close
button to return to the Company Details screen. 28. Select Builder against BigPond from the drop down under Type as in the screen below.
The Respond Days field can be used to define a default number of days by which responses to incoming transmittals must be made.
29. Close this screen to return to the Address Book screen. BIGPOND will be selected as the
current Company ID by default. (If not, just select BIGPOND from the Company ID drop down list).
30. Click on the New Contact button on the Address Book Toolbar. The New Contact
window shown below will appear.
31. Enter the contact details as shown above and select the OK button. 32. On the right hand side of the screen, enter the Position as CEO.
30
31
29
28
Chapter 2 – QDMS Simple Guided Tour
Document No: UGD-DM-002 Rev: 5Q QDMS Guided Tour Page 18 of 62
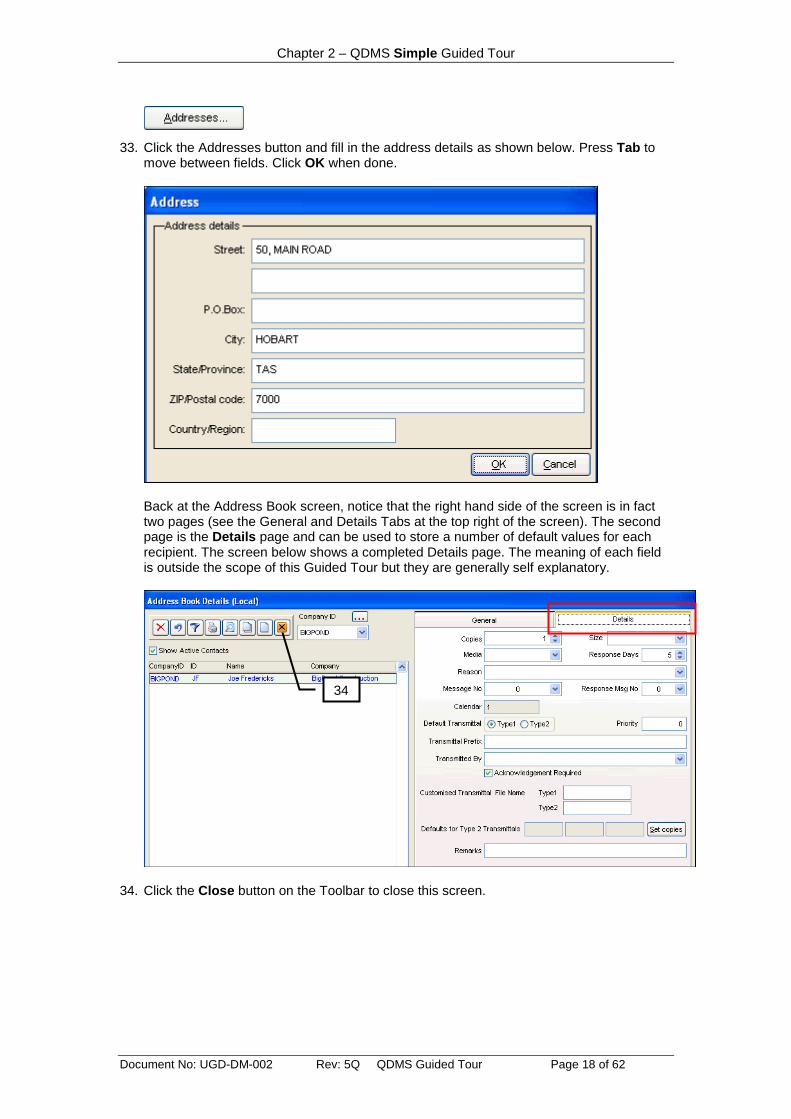
33. Click the Addresses button and fill in the address details as shown below. Press Tab to move between fields. Click OK when done.
Back at the Address Book screen, notice that the right hand side of the screen is in fact two pages (see the General and Details Tabs at the top right of the screen). The second page is the Details page and can be used to store a number of default values for each recipient. The screen below shows a completed Details page. The meaning of each field is outside the scope of this Guided Tour but they are generally self explanatory.
34. Click the Close button on the Toolbar to close this screen.
34

Chapter 2 – QDMS Simple Guided Tour
Document No: UGD-DM-002 Rev: 5Q QDMS Guided Tour Page 19 of 62
2.06 Generating a Transmittal A transmittal is a means of creating and recording the issue of controlled documents to recipients. Transmittals can be generated in a number of ways. The simplest transmittal generation method is to send one or more documents to a single recipient. Note that regardless of the transmittal method used, all transmittals in QDMS are processed in the same way. 35. From the main menu select Transmit and from the sub menu select Single Recipient.
The Transmittal generation screen then appears as shown below:
The Transmittal screen has three main sections which are selected via links above each section. The first section relates to who the transmittal is to be sent to (the Recipient(s)). The second section is titled Messages and can be used to define messages relating to the transmittal such as Reason for Issue, Response requirements and the like. The third section is used to define the Documents for inclusion on the transmittal. There are a number of ways of selecting documents for transmittal which will be discussed in more detail later in this Guided Tour.
36. Click on the To link at the top left of the screen.
36
44
39
Chapter 2 – QDMS Simple Guided Tour
Document No: UGD-DM-002 Rev: 5Q QDMS Guided Tour Page 20 of 62
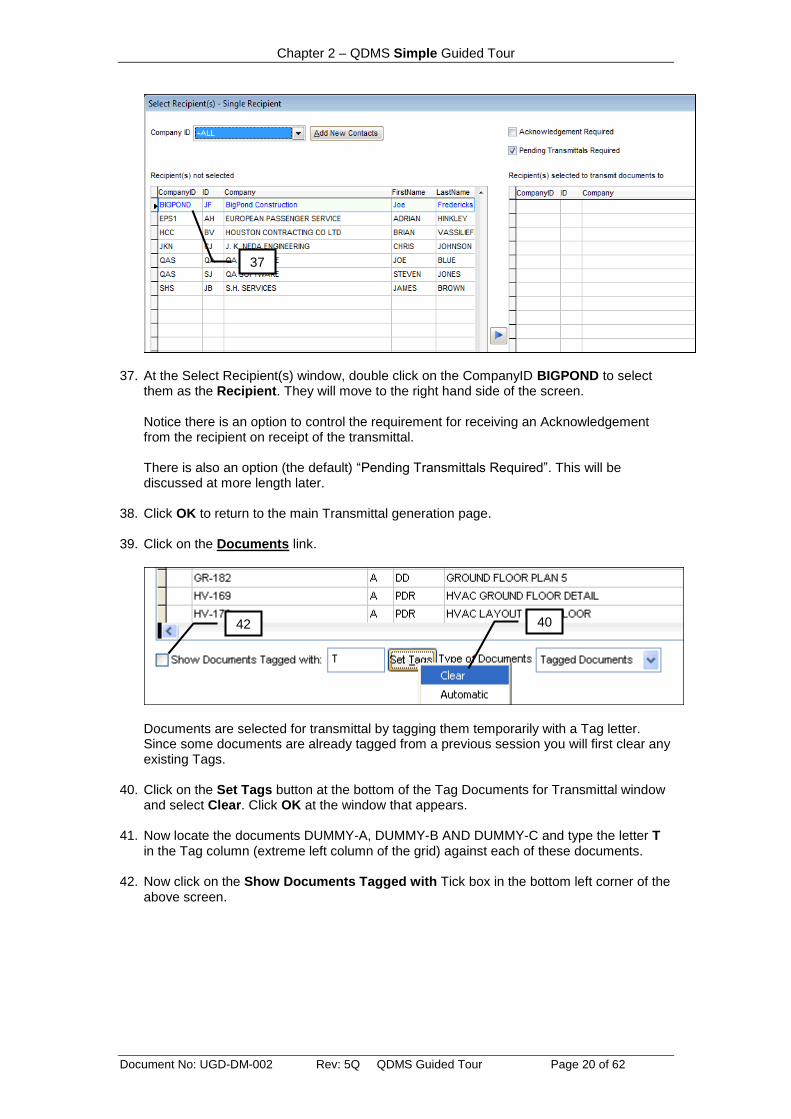
37. At the Select Recipient(s) window, double click on the CompanyID BIGPOND to select
them as the Recipient. They will move to the right hand side of the screen.
Notice there is an option to control the requirement for receiving an Acknowledgement from the recipient on receipt of the transmittal. There is also an option (the default) “Pending Transmittals Required”. This will be discussed at more length later.
38. Click OK to return to the main Transmittal generation page. 39. Click on the Documents link.
Documents are selected for transmittal by tagging them temporarily with a Tag letter. Since some documents are already tagged from a previous session you will first clear any existing Tags.
40. Click on the Set Tags button at the bottom of the Tag Documents for Transmittal window
and select Clear. Click OK at the window that appears. 41. Now locate the documents DUMMY-A, DUMMY-B AND DUMMY-C and type the letter T
in the Tag column (extreme left column of the grid) against each of these documents. 42. Now click on the Show Documents Tagged with Tick box in the bottom left corner of the
above screen.
37
40 42

Chapter 2 – QDMS Simple Guided Tour
Document No: UGD-DM-002 Rev: 5Q QDMS Guided Tour Page 21 of 62
Only documents tagged with the letter T will be displayed.
43. Click OK to return to the main Transmittal generation page. 44. Click on the Messages link.
45. Select the Reason for Issue as ISSUED FOR INFORMATION.
45
Chapter 2 – QDMS Simple Guided Tour
Document No: UGD-DM-002 Rev: 5Q QDMS Guided Tour Page 22 of 62
The fields on the Select Messages window have the following functions
Field Description
Transmitted by This is the Method of delivery of the transmittal.
Copies, Size, Media
These fields specify the number of copies, the size of documents and the media being sent. Note that these attributes can be defined per document using a Type 2 transmittal.
Reason This is the reason why the documents are being issued.
Message This is a message printed on the transmittal.
Response required
If the recipient is required to respond to the transmittal (eg approve the documents) you can select a response message and enter a response required by date. QDMS will then track outstanding and overdue responses.
Note that values in the various drop down lists for Reasons, messages etc are user definable via the View menu and sub menu Configuration Tables. More on this later in the Advanced Guided Tour.
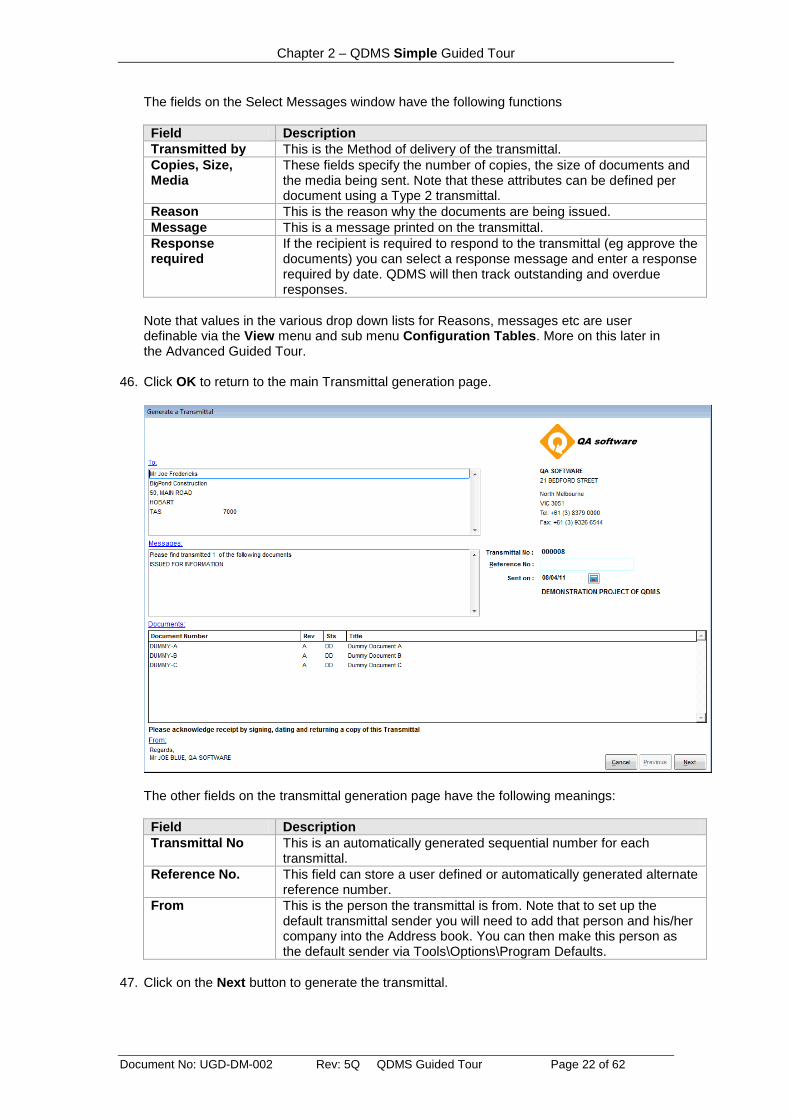
46. Click OK to return to the main Transmittal generation page.
The other fields on the transmittal generation page have the following meanings:
Field Description
Transmittal No This is an automatically generated sequential number for each transmittal.
Reference No. This field can store a user defined or automatically generated alternate reference number.
From This is the person the transmittal is from. Note that to set up the default transmittal sender you will need to add that person and his/her company into the Address book. You can then make this person as the default sender via Tools\Options\Program Defaults.
47. Click on the Next button to generate the transmittal.
Chapter 2 – QDMS Simple Guided Tour
Document No: UGD-DM-002 Rev: 5Q QDMS Guided Tour Page 23 of 62
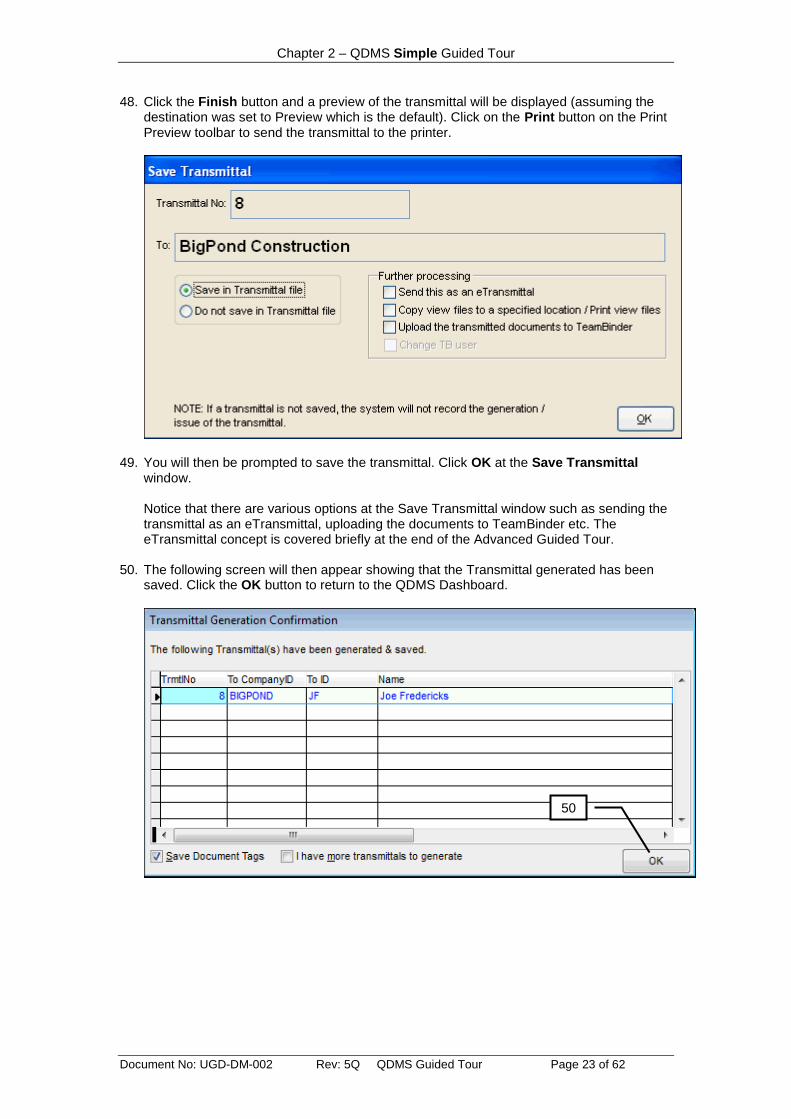
48. Click the Finish button and a preview of the transmittal will be displayed (assuming the destination was set to Preview which is the default). Click on the Print button on the Print Preview toolbar to send the transmittal to the printer.
49. You will then be prompted to save the transmittal. Click OK at the Save Transmittal
window.
Notice that there are various options at the Save Transmittal window such as sending the transmittal as an eTransmittal, uploading the documents to TeamBinder etc. The eTransmittal concept is covered briefly at the end of the Advanced Guided Tour.
50. The following screen will then appear showing that the Transmittal generated has been
saved. Click the OK button to return to the QDMS Dashboard.
50

Chapter 2 – QDMS Simple Guided Tour
Document No: UGD-DM-002 Rev: 5Q QDMS Guided Tour Page 24 of 62
2.07 View the Transmittal History Transmittal information in QDMS is stored in the Transmittal History file. It is instructive to now view the transmittal you have just generated to see how it is stored in QDMS. 51. From the View menu, select Transmittal History.
Notice that the upper half of the screen displays by default a register of all transmittals. 52. Click on the row for Transmittal Number 8.
In the lower half of the screen you will see the documents transmitted on transmittal number 8.
There are three views for the above screen. The most useful view at any time is dependent on your reason for being in this screen.
53. Try changing the view to By Recipient (using the radio buttons at the top centre of the
screen).
You will now see the Address book in the upper grid and in the lower grid the documents that have been transmitted to each Recipient.
54. Change the view to By Document No and in the top grid the Master Document Register
is displayed. 55. Locate document DUMMY-A to see who it has been issued to. After doing this change
the view back to By Transmittal. Note it is possible to regenerate a transmittal in it’s printed format from the above screen by simply clicking on a hyperlinked transmittal number or right clicking on a transmittal row and selecting Preview from the two options that appear. Note also that the Hot List button at the above screen enables the view to be immediately filtered for transmitted documents to which responses are outstanding or overdue.
52
53
54
56

Chapter 2 – QDMS Simple Guided Tour
Document No: UGD-DM-002 Rev: 5Q QDMS Guided Tour Page 25 of 62
56. Close this screen and return to the Dashboard using the Close button on the toolbar.
2.08 Receiving Revised Documents You will now register revised versions of Documents DUMMY-A and B into QDMS to see how the system manages revisions to documents. While the document register can be updated directly with the new revision, the most popular method for recording the receipt of documents is the Receive Documents screen which you will now use. 57. From the main menu, select Receive and then sub menu Documents. 58. Enter the Incoming Transmittal No number as TR007. 59. Select the From value as JKN from the drop down list.
Note that steps 53 and 54 above define the general information that will be recorded against each of the documents you are about to enter.
60. Press F4 to add a new document. At the Key Information window, type DUMMY-A and
press Tab. You will get a message that the document exists in the MDR – click OK to continue and the Rev field will be populated with the current revision value for this document which is A. Change the revision to B.
61. Click OK and see how the document is added to the grid with the existing title from the
Master Document Register. 62. Press F5 to add a duplicate document (this will save typing DUMMY-B) and change the A
to a B at the document key information window for Document DUMMY-B. Press Tab, click OK and change the Rev to B and click OK.
63. Click on the Close button. Click Yes when prompted to save your work and click No
when prompted to enter another transmittal received.
58
59
60
62 63

Chapter 2 – QDMS Simple Guided Tour
Document No: UGD-DM-002 Rev: 5Q QDMS Guided Tour Page 26 of 62
2.09 The Document History File QDMS maintains automatically a complete history of every revision of every document in a Document History file. Now that you have processed revisions to documents DUMMY-A and DUMMY-B it is time to have a look at this file. 64. From the View menu, select Document History File (all revs).
65. Locate Documents DUMMY-A and DUMMY-B and notice that there are two entries each
for these documents. Notice also that information in the document history file cannot be changed which means the document history can be audited from here.
66. Click on the Close button on the tool bar.
2.10 Transmittals Pending When new revisions of documents already stored in QDMS are received, the following files in QDMS are updated:
The Master Document Register gets updated with the latest revision.
The Document History File is updated with all revisions.
The Pending Transmittals file is updated if the document being received has previously been transmitted. Transmittals Pending displays only recipients who do not have the latest revision of documents they have previously received.
67. From the View menu, select Pending Transmittals.

Chapter 2 – QDMS Simple Guided Tour
Document No: UGD-DM-002 Rev: 5Q QDMS Guided Tour Page 27 of 62
Notice that the recipient BIGPOND is one of the recipients displayed. This is because they currently have superseded copies of documents. Notice documents that are pending to be issued to BIGPOND are only DUMMY-A and DUMMY-B. This is because the document DUMMY-C which was transmitted to them previously, has not been updated with a later revision. It is a good idea to print transmittals pending for checking after receipt of a batch of revised documents. Simply click the Print or Print Preview button on the Toolbar.
68. Click on the Close button on the tool bar to close this screen.
2.11 Transmitting Revised Documents The Pending Transmittals file is continuously updated as documents are transmitted and revised and can be cleared in only one of two ways: (a) Send the recipient the latest version of documents by transmittal. (b) Take the recipient off the distribution for the documents.
One of the unique features of QDMS is that the distribution of documents is built automatically simply via the process of transmitting documents. This means there is no need to set up a matrix for distribution prior to issuing documents which is a great time saver. However, there are times when you no longer want to keep sending the latest revision of documents to recipients. In this case you can edit the distribution via the Recipient document register (available under the View menu). This is option (b) above and is not covered by the Guided Tour. You will now clear Pending Transmittals by sending BIGPOND the documents pending for them. QDMS provides a special transmittal option for revised documents in which the system will select the required documents for each recipient to bring them up to the latest revision. 69. From the Transmit menu, select Revised Documents.
BIGPOND is selected as the recipient automatically since it is the first recipient (alphabetically) with superseded documents.
70. Click on the Documents link and notice that the documents from Pending transmittals
have been selected automatically for you. (ie Dummy-A and B both at revision B)
71. Click OK to return to the transmittal generation page.
68

Chapter 2 – QDMS Simple Guided Tour
Document No: UGD-DM-002 Rev: 5Q QDMS Guided Tour Page 28 of 62
72. Click Next and then Finish to see a preview of the transmittal. 73. Click the Print button on the Print Preview toolbar and click OK to save the transmittal
when prompted. .
74. A confirmation window then appears. Click OK to return to the QDMS Dashboard.
75. Finally, from the View menu, select Pending Transmittals and notice that BIGPOND is no longer listed. Click Close from the Toolbar.
Note that Pending Transmittals gets updated regardless of the transmittal method used. If rather than using the Revised Documents Transmittal option you had simply tagged these two documents and transmitted them to BigPond using a simple transmittal, the effect on Pending Transmittals would have been the same. All transmittals in QDMS are processed by the system in the same way and the different transmittal types are provided purely for convenience.
2.12 View Transmittal History again With some more transmittal information, have another look at your transmittal history. 76. From the View menu, select Transmittals History. 77. Change the view to Document No at the top of the screen and locate Dummy Document A.

Chapter 2 – QDMS Simple Guided Tour
Document No: UGD-DM-002 Rev: 5Q QDMS Guided Tour Page 29 of 62
78. Click on the row containing Document DUMMY-A.
Notice that DUMMY-A has been issued twice to BIGPOND, once at revision A and once at revision B.
79. You might also trying clicking Print Preview with each of the different views displayed to
get an idea of some of the reports available in QDMS. 80. Click the Close button.
2.13 Exiting QDMS To quit QDMS: 81. From the File menu, select Exit and click Yes when prompted. You are now ready for the Advanced Guided Tour in Chapter 3. This will take you through an extended range of QDMS features and is essential reading if you want to get a feel for the power of QDMS.
77
79
80

Document No: UGD-DM-002 Rev: 5Q QDMS Guided Tour Page 31 of 62
Chapter 3 – QDMS Advanced Guided Tour
3.01 Introduction
3.02 Managing Configuration Tables
3.03 Using Filters
3.04 Customising the Master Document Register
3.05 Printing the Master Document Register
3.06 Master Document Register Views
3.07 Receiving Documents
3.08 Using Re-Transmit
3.09 Using Auto Tag
3.10 Transmit to Multiple Recipients
3.11 Using a Free Form Transmittal
3.12 Viewing the Transmittal History
3.13 Tracking Responses and Acknowledgements
3.14 Tracking the Document Review Process
3.15 Other things to try

Chapter 3 – QDMS Advanced Guided Tour
Document No: UGD-DM-002 Rev: 5Q QDMS Guided Tour Page 32 of 62
3.01 Introduction The Advanced Guided Tour of QDMS introduces a number of further concepts and features of QDMS not covered in the Simple Guided Tour. If you are not already in QDMS, run the program and log into the Demonstration Project. If you are already have QDMS running, make sure you are back at the Dashboard. In the section below, all actions start from the Dashboard.
3.02 Managing Configuration Tables In the Simple Guided Tour you were introduced to the major files in QDMS such as the Master Document Register, the Document History File and the Transmittals History. In many of the screens in QDMS there are drop down lists from which you can select values. The Master Document Register and Transmittal generation screens in particular have many of these drop down lists. The values in the drop down lists are maintained in what are called Configuration Tables in QDMS. Generally, wherever you see a drop down list in QDMS you can assume there is a Configuration Table associated with it where you can maintain your own values for that list. In this first activity in the Advance Guided Tour you will add a new Discipline value to the table that stores the library of Disciplines and also, add a new Message to the table that stores standard messages for use on Transmittals. 1. From the View menu, select the sub menu Configuration Tables.
The Group drop down lists has three options and controls the files listed in the Files drop down list. The three groups are:
Document Attributes
Transmittal Attributes
Address Book Attributes The File drop down list shown above lists all the Configuration Tables in the selected Group available in QDMS. Use the scroll bar to see additional files. Once a file is selected the main grid displays the values stored in this file and actions on the data are performed using the toolbar as normal.
2. From the File drop down list, select Disciplines as shown above. 3. Click on the New button and when prompted, enter the Discipline code as 8-FO and the
Title for the Discipline as FITOUT. 4. Click OK.
Notice that you could print a list of discipline values by clicking the Print or Print Preview button on the tool bar.
2
3
Chapter 3 – QDMS Advanced Guided Tour
Document No: UGD-DM-002 Rev: 5Q QDMS Guided Tour Page 33 of 62
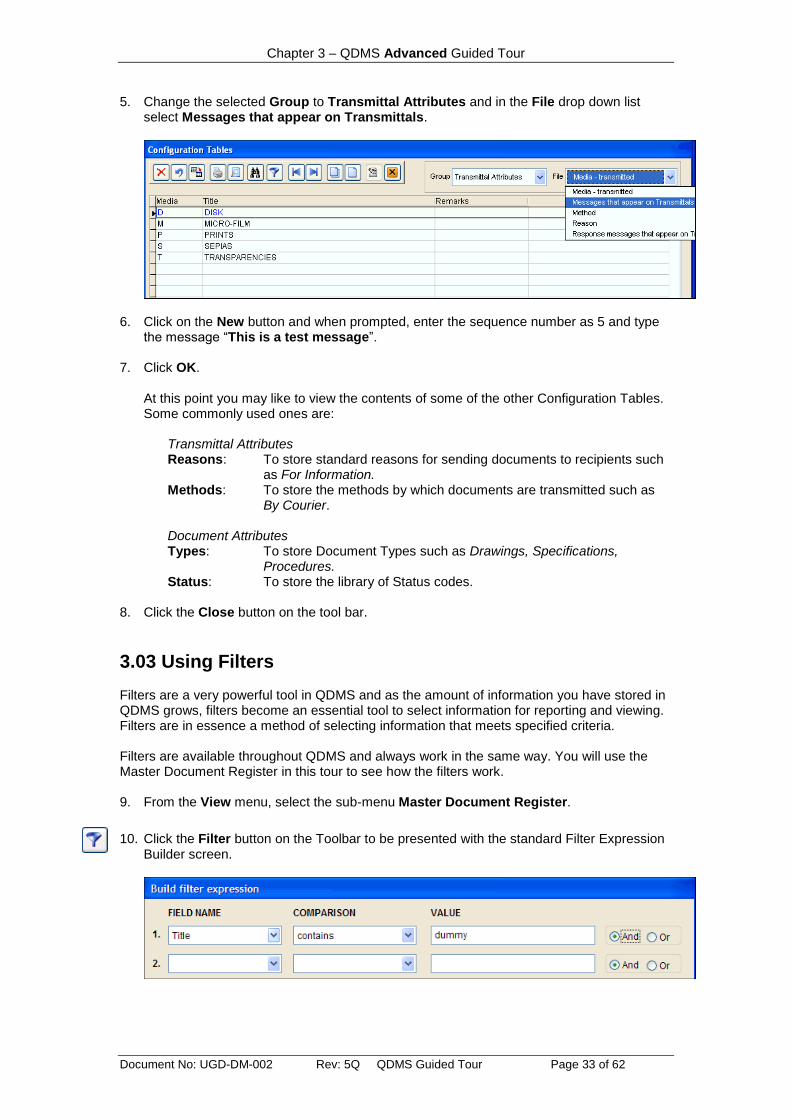
5. Change the selected Group to Transmittal Attributes and in the File drop down list select Messages that appear on Transmittals.
6. Click on the New button and when prompted, enter the sequence number as 5 and type
the message “This is a test message”. 7. Click OK.
At this point you may like to view the contents of some of the other Configuration Tables. Some commonly used ones are:
Transmittal Attributes Reasons: To store standard reasons for sending documents to recipients such
as For Information. Methods: To store the methods by which documents are transmitted such as
By Courier. Document Attributes Types: To store Document Types such as Drawings, Specifications,
Procedures. Status: To store the library of Status codes.
8. Click the Close button on the tool bar.
3.03 Using Filters Filters are a very powerful tool in QDMS and as the amount of information you have stored in QDMS grows, filters become an essential tool to select information for reporting and viewing. Filters are in essence a method of selecting information that meets specified criteria. Filters are available throughout QDMS and always work in the same way. You will use the Master Document Register in this tour to see how the filters work. 9. From the View menu, select the sub-menu Master Document Register.
10. Click the Filter button on the Toolbar to be presented with the standard Filter Expression
Builder screen.

Chapter 3 – QDMS Advanced Guided Tour
Document No: UGD-DM-002 Rev: 5Q QDMS Guided Tour Page 34 of 62
The above screen shows the filter expression Title contains dummy. Looking at the component parts of this expression, Title is a field name in the Master Document Register. All fields in the master document register are available for use in the filter expression since this filter was activated from within the Master Document Register. When the filter is activated in other files in QDMS, the fields available for use relate to the file currently in use.
By selecting the Field Name value as Title, you are indicating that you want to filter for documents that have a certain value in the Title field in the document register. The Value field above is dummy. This means that the value you are filtering for in the title field is dummy. The Comparison field above is set as contains which means that the title field must contain the word dummy. Note that a common mistake in QDMS is to use the incorrect comparison condition. For example, the filter Title equal to dummy has a very different meaning to title contains dummy. In the former case, only documents that have the word dummy as the document title will be selected. Ie these documents will have no other text in the title other than the word dummy. In the latter case, the title only has to contain the word dummy and can contain other words and still meet the filter condition.
Notice at the filter generation screen above that the filter can contain up to five lines of conditions. Multiple lines are joined together by either an And or Or condition. Notice also that commonly used filters can be saved for simple recall later using the Save and Load buttons.
11. At the expression builder screen, click the Clear button to clear any current filter and then
select Title from the drop down list under Field Name and press Tab. Select contains from the drop down list under Comparison (you can scroll down to locate the contains comparison or just type c to locate it) and press Tab. Then type dummy in the Value box.
12. Click OK to activate the filter.
The documents you can see in the Master Document register should now be restricted to those shown below.
13. Try using the Tab key to move across to the Discipline column on the Master Document
Register. A drop down list for Discipline values will appear and if you click on the list you will see that your Discipline FO – FITOUT is in the list.
13

Chapter 3 – QDMS Advanced Guided Tour
Document No: UGD-DM-002 Rev: 5Q QDMS Guided Tour Page 35 of 62
3.04 Customising the Master Document Register There are a large number of fields available for use in the Master Document Register. It is unlikely you will need to use all the possible fields when setting up projects in QDMS. As a result, you will find that when maintaining your data you are constantly tabbing across columns you don’t use which is inefficient. This can be overcome by customising the layout of the Master Document Register to suit your individual needs. 14. With the document register open, click on the Customize button at the top right corner of
the screen.
The Customise window above enables: rearrangement of columns; making selected fields invisible; changing other attributes of columns such as font size; and controlling the way the document register is sorted. To demonstrate some of the possibilities:
15. Locate the field Received (currently Column No. 9) and change the Column No. value to 2. 16. Locate the field DocumentNo and change the “Backcolor” to Yellow. (A drop down list
will appear when you click in the field). You may need to scroll to the right to find the Backcolor column.
17. Click OK and notice the change to the document register layout.
If this customisation is saved it is only for the current user. Other users may save their own custom views i.e. the custom views are not global, but are user specific. Note also that columns can be re-arranged by simply dragging the column headers to the left or right.
15
17
Chapter 3 – QDMS Advanced Guided Tour
Document No: UGD-DM-002 Rev: 5Q QDMS Guided Tour Page 36 of 62
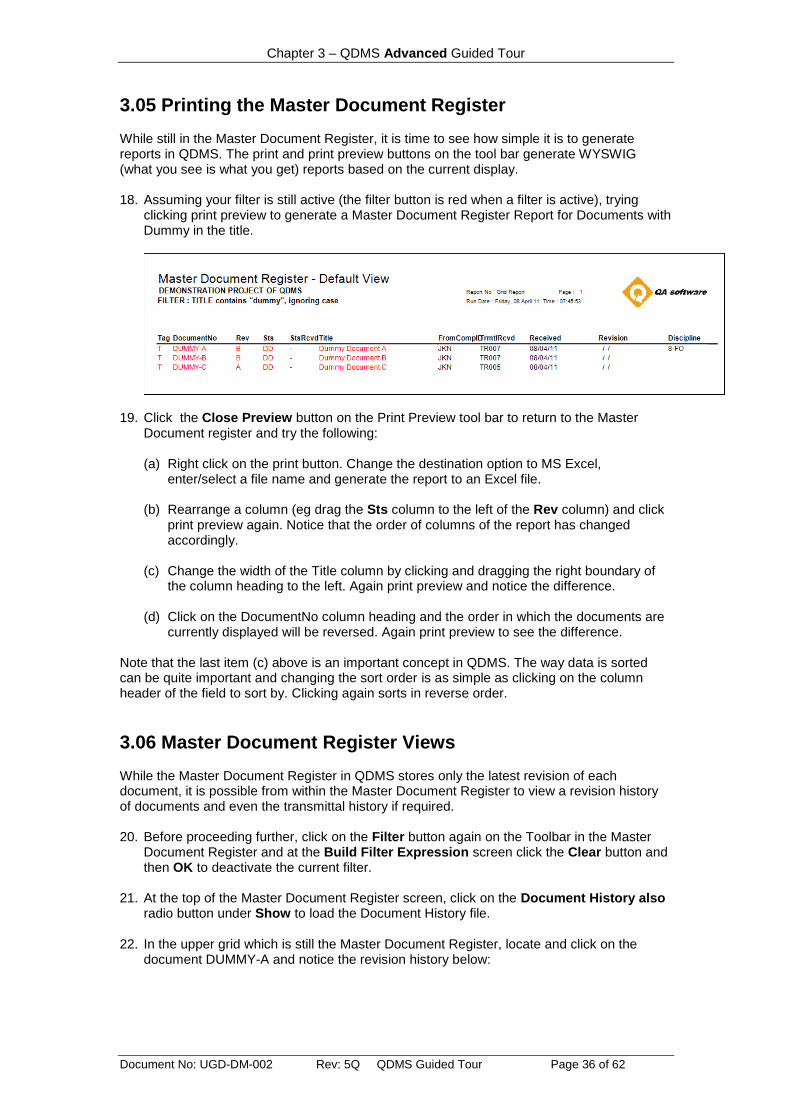
3.05 Printing the Master Document Register While still in the Master Document Register, it is time to see how simple it is to generate reports in QDMS. The print and print preview buttons on the tool bar generate WYSWIG (what you see is what you get) reports based on the current display. 18. Assuming your filter is still active (the filter button is red when a filter is active), trying
clicking print preview to generate a Master Document Register Report for Documents with Dummy in the title.
19. Click the Close Preview button on the Print Preview tool bar to return to the Master
Document register and try the following:
(a) Right click on the print button. Change the destination option to MS Excel, enter/select a file name and generate the report to an Excel file.
(b) Rearrange a column (eg drag the Sts column to the left of the Rev column) and click
print preview again. Notice that the order of columns of the report has changed accordingly.
(c) Change the width of the Title column by clicking and dragging the right boundary of
the column heading to the left. Again print preview and notice the difference. (d) Click on the DocumentNo column heading and the order in which the documents are
currently displayed will be reversed. Again print preview to see the difference. Note that the last item (c) above is an important concept in QDMS. The way data is sorted can be quite important and changing the sort order is as simple as clicking on the column header of the field to sort by. Clicking again sorts in reverse order.
3.06 Master Document Register Views While the Master Document Register in QDMS stores only the latest revision of each document, it is possible from within the Master Document Register to view a revision history of documents and even the transmittal history if required. 20. Before proceeding further, click on the Filter button again on the Toolbar in the Master
Document Register and at the Build Filter Expression screen click the Clear button and then OK to deactivate the current filter.
21. At the top of the Master Document Register screen, click on the Document History also
radio button under Show to load the Document History file. 22. In the upper grid which is still the Master Document Register, locate and click on the
document DUMMY-A and notice the revision history below:

Chapter 3 – QDMS Advanced Guided Tour
Document No: UGD-DM-002 Rev: 5Q QDMS Guided Tour Page 37 of 62
Notice that DUMMY-A has two entries in the Document History file. Note that a change in Status and/or a change in Rev triggers an automatic update of the document history.
23. Now click on the Outgoing Transmittals also radio button at the top of the Master
Document Register screen to load the transmittal history file.
Notice that document DUMMY-A has been transmitted twice to BIGPOND, once at Rev A and once at Rev B. Scroll to the right in the lower grid to see the transmittal details and click the hyperlinked transmittal number to view a copy of the transmittal sent.

Chapter 3 – QDMS Advanced Guided Tour
Document No: UGD-DM-002 Rev: 5Q QDMS Guided Tour Page 38 of 62
3.07 Receiving Documents In the next few sections of the Guided Tour you will explore some of the alternative transmittal methods supported by QDMS. First though, you will receive some more documents using the Receive Documents screen. 24. If you have not already done so, close the Master Document Register using the Close
button on the Toolbar. 25. From the Receive menu, select Documents. 26. At the receive documents screen, enter the Incoming Transmittal No received as TR008. 27. Select the From value as JKN and enter the Respond By date as a date one week from
the current date. 28. Press F4 to add a new document. 29. Enter the Document Number as DUMMY-A, and press Tab. A message will appear that
the document exists in the MDR and click OK. 30. Press Tab, and change the Revision value from B to C and click OK.
31. At the top right of the screen, click the Columns button. Now in the columns window,
scroll down to find the column Size and against this column, tick the box in the Visible column.
26
27
31
31
27

Chapter 3 – QDMS Advanced Guided Tour
Document No: UGD-DM-002 Rev: 5Q QDMS Guided Tour Page 39 of 62
32. Now click the Save button and the Size column will appear in the Grid. You may have to scroll to the right to find it
Note: If you want to select a document file (view file) to relate to the document you have just registered, right click in the Filename field to the right of the Title of the Document and choose Select File from the options. You will be taken to an open file dialog box, defaulting to \Qasoft\QDMS\CAD folder. Select file QDMS1.Pdf and click OK.
33. Now press F5 to add a further document and enter the details for DUMMY-B. Change the Rev to C and click OK.
34. Repeat step 33 for DUMMY-C which is an existing document (change the Rev to B) 35. Enter document DUMMY-D which is a new document (make the Rev A and the Title as
Dummy Document D.
36. Click on the Close button and click Yes when prompted to save the information you have entered into the Master Document Register and No when prompted to enter another transmittal received.
3.08 Using Re-Transmit The most commonly used method of transmitting documents in QDMS is the Single recipient option to transmit a series of documents to a recipient. The documents on the Single Recipient transmittal option are selected by tagging them from the Master Document Register. The Re-Transmit Transmittal Received option is very similar to the Single Recipient option, only the documents are selected automatically based on the selection of an incoming transmittal number. In section 3.07 above, you processed a group of incoming documents against a transmittal received number of TR008. Using re-transmit you will now transmit these same documents to a recipient. QDMS will select the drawings for you. 37. From the Transmit menu, select Re-Transmit Transmittal Received. 38. The first window that appears is for the selection of the incoming transmittal number.
Either Type TR008 in the Transmittal No. field or click on it on the lower grid to select it.
39. Click OK to proceed to the transmittal generation screen, and click on the Documents
link to see the list of drawings ready for selection.
38

Chapter 3 – QDMS Advanced Guided Tour
Document No: UGD-DM-002 Rev: 5Q QDMS Guided Tour Page 40 of 62
Notice that the four drawings you input at 3.07 above have been selected automatically. 40. Click OK to return to the transmittal generation screen. 41. Click back on the To link and select HOUSTON CONTRACTING (HCC) from the
Company ID drop down list and then select Brian Vassilieff as the recipient by double clicking his record.
42. Click OK to return again to the transmittal generation screen.
43. Click on the Messages link.
By using the drop down list for Messages you will notice that the message you added to the Configuration files in section 3.02 above is now available for selection.
44. Select the Reason as ISSUED FOR APPROVAL.
Notice that a Response Required by message and date are populated automatically (taken from the default values set for this recipient via the Address Book).
45. Click OK to return to the transmittal generation screen.
43
46
44

Chapter 3 – QDMS Advanced Guided Tour
Document No: UGD-DM-002 Rev: 5Q QDMS Guided Tour Page 41 of 62
46. Click Next and then Finish to generate the Transmittal and click the Print button on the Print Preview toolbar after reviewing the preview.
47. Save the transmittal when prompted and click OK to return to the QDMS Dashboard.
Note that in Section 3.14 you will see how to manage the response to this transmittal which is being Issued for Approval.
3.09 Using Auto Tag In the Guided Tours so far you have seen two ways of selecting documents for transmittal: Tagging and Re-Transmit. A third method of selecting documents is Auto Tag. This is a powerful feature of QDMS and can be used to automatically select documents for transmittal based on one of seven options:
That meet a filter condition: For example to select all documents that have the word steel in the title. Based on Documents Revised since last controlled Issue. Used to select all documents that have been revised since the last “Controlled Issue” of the document register. Based on Document Status updated since last controlled Issue. Used to select all documents that have had their Status updated since the last “Controlled Issue” of the document register. Based on a previous transmittal: For example, if last week you sent 35 documents to a person and this week want to send the same 35 documents to someone else. Not transmitted to anyone: Used to select all documents that have never been transmitted to any recipients. Based on CAD Attributes: Used to select documents based on searching for an expression stored in the attribute block of the linked CAD Files. Based on the distribution: For example, you want to send all the documents you have sent in the past to Recipient A to a new Recipient B.
There are even more things that you can do with Auto Tag such as work out which documents in the Master Document Register a company has NOT received but that is for later. You will now use Auto tag to automatically tag the documents in the Master Document Register that have the word steel in their title, to select them for transmittal. 48. From the Transmit menu, select Multiple Recipients. 49. At the transmittal generation screen, click on the Documents link. 50. At the bottom left of the Tag Documents for transmittal window, click on the Set tags
button and select Automatic.

Chapter 3 – QDMS Advanced Guided Tour
Document No: UGD-DM-002 Rev: 5Q QDMS Guided Tour Page 42 of 62
Note that Auto Tag can be used with all transmittal methods and the use of Multiple Recipients as the transmittal here is just in readiness for later.
The Automatically Tag Documents screen will now appear. Notice the options available as per the introduction to this section.
Note: It is always a good idea to click on the Clear all Tags first tick box at the bottom left of the Automatic Tags window (selected by default) to ensure that any existing tags in the Master document are removed during the Auto Tag process. Remember always in QDMS that tags are only a temporary means of selecting documents for transmittal.
51. Now click on the radio button That meet a Filter condition. The Build filter expression
window will appear.
52. Set up the filter condition Title contains Steel as shown above. 53. Click OK to activate the filter and then back at the Automatically tag window, click OK to
perform the Auto tag process. 54. Back at the Documents window, click on the Show Documents Tagged with tick box at
the bottom left of the screen and you will see the selection of drawings that have been tagged automatically as shown below:
Note that the Set Tags button can be used to clear tags as well as automatically applying tags.
50

Chapter 3 – QDMS Advanced Guided Tour
Document No: UGD-DM-002 Rev: 5Q QDMS Guided Tour Page 43 of 62
55. Click OK to return to the transmittal generation screen.
3.10 Transmit to Multiple Recipients You are now going to select Multiple Recipients to transmit the documents selected above to. 56. Click on the To link.
The Select Recipient(s) window shows the contents of your Address Book. Recipients are selected by either double clicking on them in the left hand grid or selecting them via a single click and use the arrow buttons to move them to the right hand grid.
57. Select the Recipients BigPond Construction and HOUSTON CONTRACTING by
double clicking on them in turn so that they appear listed in the right hand grid as shown above.
Note that if you use the scroll bar to scroll to the right of the right hand side grid, you will see columns for sequence, Copies, Reason etc. The sequence column is used to control the order in which the distribution will print on the transmittals. The reason is used to be able to define a different reason for issue against each selected recipient if required.
58. Click on the tick box adjacent to Print Distribution on Transmittal at the bottom centre
of the screen. 59. Click OK to return to the transmittal generation screen. 60. Click Next and then Finish to preview the first transmittal being generated.
Note that a transmittal to Multiple Recipients creates a uniquely numbered transmittal for each tagged recipient. QDMS also supports generating a single transmittal to a circulation list but this is not covered in this guided tour.
The first transmittal generated after clicking Finish is for the first of the selected recipients. Send this transmittal to the printer (from the preview screen by clicking the print button).
58

Chapter 3 – QDMS Advanced Guided Tour
Document No: UGD-DM-002 Rev: 5Q QDMS Guided Tour Page 44 of 62
Note at the Save Transmittal screen that there is a Save All button which if selected, will proceed to generate and save the remaining transmittals for tagged recipients.
61. To see the next transmittal being generated, click OK rather than Save All.
Notice at the preview that this is to HOUSTON where as the first transmittal was addressed to BIGPOND.
62. Print and save the second transmittal as normal.
3.11 Using a Free Form Transmittal There are times on a project when it is important to maintain a record that items other than controlled documents have been transmitted to recipients. This could include samples, a CD or diskette, or a report just to name a few. The above scenarios are catered for in QDMS via a Free Form Transmittal which can be used to transmit documents/items not contained in the Master Document Register. 63. From the Transmit menu, select Free Form Transmittal. 64. At the transmittal generation screen, click on the Documents link.
65. Click the Add button. 66. Type SKETCH in the Document Number field and press Tab.
Since this document is not in the Master Document Register you will be prompted to complete the New document window details. Note however that this document will NOT be added to the Master Document Register but the details WILL be saved in the Transmittals History.
67. Complete the details for Rev, Sts, and Title for the Sketch as shown above and click OK.
67
65
66

Chapter 3 – QDMS Advanced Guided Tour
Document No: UGD-DM-002 Rev: 5Q QDMS Guided Tour Page 45 of 62
68. Click OK to return to the transmittal generation screen. 69. Click the To link and select BIGPOND as the recipient and click OK to again return to the
transmittal generation screen.
70. Click Next and then Finish and Print and then Save the transmittal as normal.
3.12 Viewing the Transmittal History After completing the tasks above, you will now have a more interesting transmittal history and it is worth taking another look at this information now. 71. From the View menu, select the sub menu Transmittal History. 72. Click on the By Recipient radio button at the top centre of the screen to change the view.
Locate the Recipient BIGPOND in the top half of the screen and click on this row.
Notice that there are now a large number of documents transmitted to BIGPOND. The transmittals history is an auditable record of all documents transmitted to a recipient. To see only the latest versions of documents transmitted to BIGPOND, click on the check box at the top of the screen for Latest Transmitted only.
73. Try clicking the Print Preview button to see the example report for the transmittals
screen. 74. Click the Close button.
72

Chapter 3 – QDMS Advanced Guided Tour
Document No: UGD-DM-002 Rev: 5Q QDMS Guided Tour Page 46 of 62
3.13 Tracking Responses and Acknowledgements Your next task in this Advanced Guided Tour is to generate a few basic reports. Managing the responses to document issues such as approvals required, is often a time consuming task. Getting acknowledgements back from Recipients to prove that they received the documents is equally hard. QDMS has a number of reports to assist with this process. 75. From the File menu, select Print Standard Reports. 76. Click on Outgoing Transmittals - Details in the upper window of the Standard Reports
screen.
77. Double click on Report Number 4R – Responses to Transmitted Documents.
78. Click OK to generate a report list all documents that have been transmitted which both require a response and for which the response is outstanding.
Other options at the above window are further filter for only responses overdue or due in the next few days.
76
77

Chapter 3 – QDMS Advanced Guided Tour
Document No: UGD-DM-002 Rev: 5Q QDMS Guided Tour Page 47 of 62
79. Close the preview after reviewing the report on the screen and click the Cancel button at the above window.
80. Change the selection to Outgoing Transmittals – Summary in the upper window of the
Standard Reports screen. 81. Double click on Report Number 5C – By Trmtl No – Acknowledgements Outstanding
to print a list of Acknowledgements Outstanding. Again close the preview after reviewing the report on the screen.
Note that you could generate the above reports to Excel and email them to the recipients if required (see Other things to try in Section 3.15).
To update QDMS when Acknowledgements or Responses are received, a simple method is to go to the Transmittals screen (from the View menu) and with the View set on Transmittals, complete the Ackndate and Rspnrcvd fields accordingly.
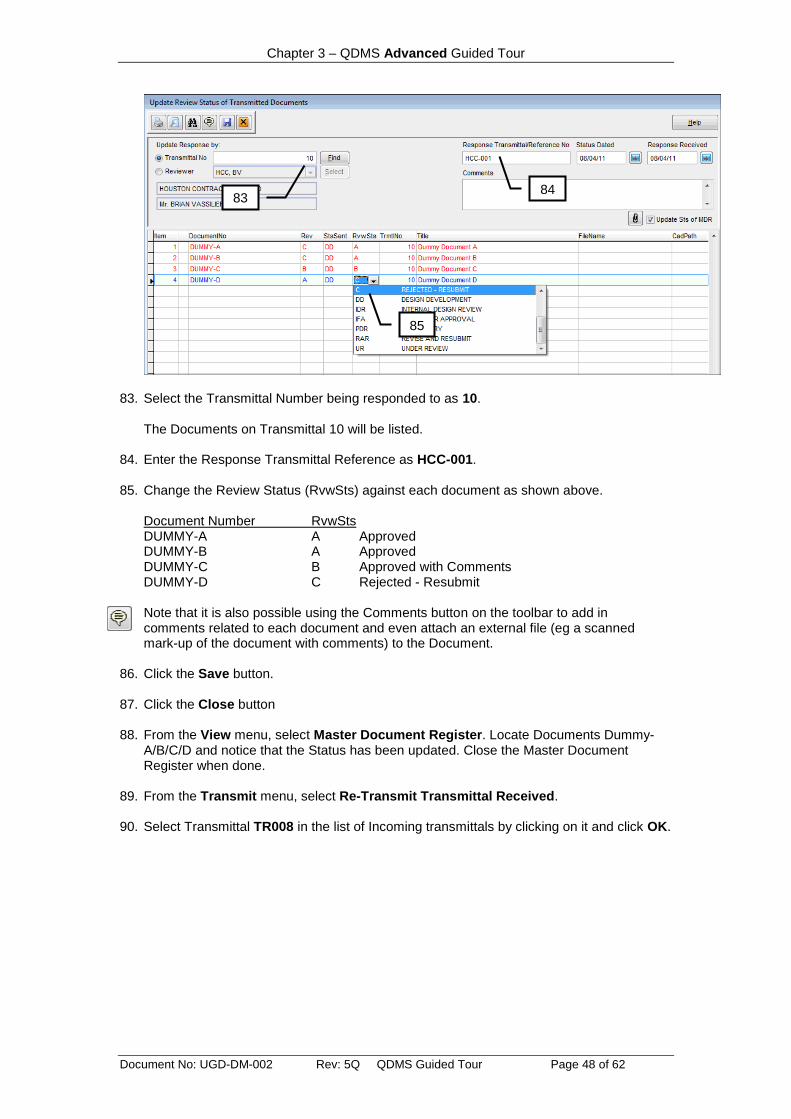
3.14 Tracking the Document Review Process For tracking the review/approval and return of submitted documents, there are a number of sequential steps to follow that enable generation of a powerful Document Review Status tracking report. The steps below are designed when following the business process described by the following flow chart: In Section 3.07 of this Advanced Guided Tour you received 4 documents from JKN on Incoming Transmittal Number TR008. In Section 3.08 you transmitted these documents for Approval to company HCC requested their response 5 days from the current date. HCC have now transmitted the documents back to you on their Transmittal HCC-001 with their Approval Status and in this last section of this Guided tour you will update the approval status, transmit the documents back to JKN and run the Document Review Status tracking Report. Since the incoming transmittal from HCC is a response to your outgoing transmittal number 10, rather than use Receive Documents to process this you will use Update Review Status of Transmitted Documents. 82. From the Receive menu, select Update Review Status of Transmitted Documents.
3. Update Review Status of Transmitted Documents: Documents returned to Document Control after Review is complete.
2. Transmit: Document Control transmit for review to Reviewers.
1. Receive Documents: Originator submits documents for Review.
ORIGINATOR
DOCUMENT CONTROL
REVIEWER(S)
4. Transmit: Transmit response to Originator.
Chapter 3 – QDMS Advanced Guided Tour
Document No: UGD-DM-002 Rev: 5Q QDMS Guided Tour Page 48 of 62
83. Select the Transmittal Number being responded to as 10.
The Documents on Transmittal 10 will be listed.
84. Enter the Response Transmittal Reference as HCC-001. 85. Change the Review Status (RvwSts) against each document as shown above.
Document Number RvwSts DUMMY-A A Approved DUMMY-B A Approved DUMMY-C B Approved with Comments DUMMY-D C Rejected - Resubmit Note that it is also possible using the Comments button on the toolbar to add in comments related to each document and even attach an external file (eg a scanned mark-up of the document with comments) to the Document.
86. Click the Save button. 87. Click the Close button
88. From the View menu, select Master Document Register. Locate Documents Dummy-
A/B/C/D and notice that the Status has been updated. Close the Master Document Register when done.
89. From the Transmit menu, select Re-Transmit Transmittal Received. 90. Select Transmittal TR008 in the list of Incoming transmittals by clicking on it and click OK.
84
85
83

Chapter 3 – QDMS Advanced Guided Tour
Document No: UGD-DM-002 Rev: 5Q QDMS Guided Tour Page 49 of 62
91. Click on the Documents link and notice that the 4 documents received from JKN on
transmittal TR008 are listed but with the latest status as updated at step 85 above. 92. Click OK to return to the transmittal generation screen. 93. Click on the To link and select the Recipient as Chris Johnson of JKN (the company
who submitted the documents to you and to whom you are now returning them). 94. Click OK to return to the transmittal generation screen. 95. Click Next and Finish and then print and save the transmittal as per previous transmittals
generated within this Guided Tour. 96. Back at the QDMS Dashboard, from the File menu, select Print - Standard Reports. 97. At the Standard Reports window, select Document History File – All Revisions from
the upper window.
97
98

Chapter 3 – QDMS Advanced Guided Tour
Document No: UGD-DM-002 Rev: 5Q QDMS Guided Tour Page 50 of 62
98. Double click Report 2E – Document Review Status Report.
99. Select JKN as who the Documents were received from and click Next.
100. Select the Reviewer of the Documents as HCC by double clicking on them in the left
hand grid so that they move to the right hand grid. 101. Click Next and at the last screen of the wizard click Finish to generate the report.
99

Chapter 3 – QDMS Advanced Guided Tour
Document No: UGD-DM-002 Rev: 5Q QDMS Guided Tour Page 51 of 62
Notice that the information relating to the Document Review process is grouped into 4 areas: Receipt Information recorded when receiving the submitted Documents. Review – Issue Information captured when transmitting the documents for Approval. Review – Return Information captured when processing the response to the transmitted Documents. Response to Originator Information captured when transmitting the documents back to the Originator.

Chapter 3 – QDMS Advanced Guided Tour
Document No: UGD-DM-002 Rev: 5Q QDMS Guided Tour Page 52 of 62
3.15 Other things to try You have now completed the Simple and Advanced QDMS guided tours. There are still many features of QDMS for you to explore. Some to try are as follows: Export data to other applications: From the Wizards menu, select Export Data Files to export file types Excel, Lotus … Import and Export of Transmittals: QDMS supports import and export of transmittals from and to other QDMS users. This can save a large amount of data entry on larger projects. Go to the Wizards menu and Export/Import Transmittal. Emailing of Transmittals: If you send electronic versions of documents to recipients, QDMS can generate an electronic transmittal and what is more, it can also zip and auto attach the documents you are sending without leaving the program. Go to the Transmit menu and select e-Transmittal to generate the Email – Copies of Transmittals page. Note that you will have had to define the path and file names for your electronic document versions in the Master Document register first. Print Reports to Excel: Have you ever wanted to generate a report and then email it to someone? Try File\Print Standard Reports and on the Right hand side against Destination Options, choose File and then Excel. This will publish any QDMS report to an Excel sheet.

Document No: UGD-DM-002 Rev: 5Q QDMS Guided Tour Page 53 of 62
Chapter 4 - Appendices
Appendix A Quick Start Instructions for Installing QDMS
Appendix B File Formats supported by QVIEW
Appendix C Work Flow for Initial Transmittal Generation
Appendix D Work Flow for Transmittal of Revised Documents
Appendix E Examples of some Customisations for QDMS

Chapter 4 – Appendices
Document No: UGD-DM-002 Rev: 5Q QDMS Guided Tour Page 54 of 62
Appendix A – Quick Start Instructions for Installing QDMS This set of instructions is provided to enable those familiar with installing software to get up and running with QDMS fast. These Quick Start instructions contain the key steps to installing and setting up QDMS.
A.1 System Requirements The system requirements for running QDMS are:
Hardware/Software Minimum Requirements
Recommended Requirements
Computer/Processor Pentium 250
Pentium 800
Memory (RAM) 512 MB
1 GB
Available Hard Disk Space 30 MB 80 MB
Display 800 x 600 16 Bit
1024 x 768 16 Bit
Operating System Windows 98, Windows Me, Windows 2000, Windows NT, Windows XP, Windows Vista, Windows 7
Windows XP, Windows 7
A.2 Software Installation
Installing the QDMS Application
1. Insert the QA Software CD and if it auto loads, simply click the Install QDMS option at
the QA Software menu and follow the installation instructions. QDMS will be installed in C:\Qasoft\Qdms\ by default.
2. A short cut icon on your desktop will have been created to access C:\Qasoft\Qdms\Qdms.exe
If the CD does not auto load: 3. Using Windows Explorer locate the D:\Qdms\Setup folder and double click on QDMS.msi 4. Follow the install instructions as above. If you downloaded QDMS from the Internet: 5. Using Windows Explorer double click on the QDMS.msi file you downloaded. 6. Follow the install instructions as above.
A.3 Configure your work station 1. If your monitor is not already set to a display of 800 x 600 pixels, you should change it to
this setting before proceeding. To do this, right click on any blank space on your desktop, select Properties and then the Settings tab. Adjust the screen resolution to 800 x 600 pixels.
2. Create a shortcut icon on your desktop (if one was not automatically created during
installation) to access the QDMS.EXE (Located by default in the folder C:\Qasoft\Qdms\)

Chapter 4 – Appendices
Document No: UGD-DM-002 Rev: 5Q QDMS Guided Tour Page 55 of 62
A.4 Running the QDMS System 1. Double click the QDMS icon on your desktop. (Or use Start | Programs | QA Software |
QDMS). 2. At the login screen, the User ID = QA and the password is also QA. 3. Select the Demonstration project by double clicking on the Project Name and you will be
located at the Dashboard. This is the starting point for all QDMS actions.
A.5 Creating a Project Before creating your first live project you should have worked through the QDMS Guided tour using the Demonstration project. When you are ready to create your new project: 1. From the File menu select New Project and click Next at the Welcome screen. 2. Enter the Project Number and Title and click Next. 3. At the Data Transfer screen, choose the Do not populate option so that you will create a
completely empty first project. 4. Complete the remaining screens as required and click Finish when done. On completion of this you will be positioned in your new project automatically.
A.6 Where to next Before you start processing documents and generating transmittals, the following areas of QDMS should be configured:
A.6.1 Populate the Address book QDMS supports the use of either a Project or Global Address Book for each project. For instructions on setting up your project address book, refer to the QDMS User Guide. The Address Book is located under the View menu and sub-menu Address Book. Note that the Address book is structured in two parts: Companies and Contacts. You must first setup companies before you can create contacts within each company.
A.6.2 Setup Users Security in QDMS is controlled via User ID’s and passwords. You will need to create a User ID for each staff member requiring access to the system. Note that users must first exist in the Address book as contacts belong to the licensee company. 1. From the Tools menu select Security – Users and Projects. 2. Click on the Create a New User button and select from the available list of contacts who
belonging to your company that are not yet users. 3. Complete the details about the new user.
Tip: Set the User ID as the initials of the new user. The User should be allocated User Level 1 access at this stage.
4. Select the Projects that the new user may access by clicking on the Assign Projects button and select from the list of projects in the left pane by double clicking on them.
5. Return to the Dashboard and from the File menu, select Re-enter password to log in as the new user.

Chapter 4 – Appendices
Document No: UGD-DM-002 Rev: 5Q QDMS Guided Tour Page 56 of 62
A.6.3 Populate the Configuration Tables There are a number of miscellaneous libraries in QDMS that support drop down lists in various screens. You should populate these tables with values to suit your business. The Configuration Tables are located under the option Configuration Tables from the View menu. Refer to the User Guide for more details. Tip: See also the Quick Start Check List at the end of Chapter 1 of the QDMS User Guide.
A.7 Installation of QVIEW QVIEW is QDMS’s optional integrated CAD viewer which is purchased as an add-on module. To evaluate QVIEW you will first need to install it as follows: 1. Insert the QA Software CD and if it auto loads, close down the auto loaded screen. 2. Using Windows Explorer locate the D:\QView\Disk1 folder on the CD and double click on
Qview.msi 3. Follow the on screen setup instructions. 4. Run QDMS and from the Tools menu, select Options and then Program Defaults. Click
Edit and select the viewer as QVIEW. Then click Save.
A.8 Support If you are having any problems with getting our software installed or getting started, please don't hesitate to contact our Technical Support Division by Phone: +61 (3) 9291 0800, Fax: +61 (3) 9699 6293, Email: [email protected]

Chapter 4 – Appendices
Document No: UGD-DM-002 Rev: 5Q QDMS Guided Tour Page 57 of 62
Appendix B - File Formats supported by QVIEW QVIEW is the optional integrated viewer for the QDMS Drawing Management System. The File Formats supported by QVIEW as listed below:
File Ext.
Description File Ext.
Description
DRW Anvil 1000 SAT ACIS SAT File
BGP Rx AutoImage VEC Data Design Systems
CCP Calcomp DRW Personal Drg
CG4 CALS Raster XWD X – Windows
CGM CGM File XBM X - Windows Bitmap
CIT Integraph Raster RAS SUN Bitmap
DWF AutoDesk DWF IFF Amiga IFF
DWG AutoCAD SLD AutoCAD Slide
CRF Calcomp Raster XLS MS Excel 97
DGN Microstation DOC Word 97 Doc
DXB AutoCAD RTF Rich Text Format
IG4 Image Systems G4 WPD WP 6.0/Win
FLX FelixAD TXT Text Files
GBR Gerber BIN Binary Files
TG4 Integraph Tiled G4 HTM HTML
PRT CadKey Print DCX Intel Fax format
MI MP ME 10/30 GIF Compuserve GIF
PLT HP-GL/2 JPG JPEG Picture
PSL RxAI Edit Hybrid PCX PC Paintbrush PCX
REF GTX Raster CAD WMF Windows Meta File
RES CAD Overlay BMP Windows Bitmap
RLC Run Length Coded TGA Targa
RND AutoCAD Rendering TIF TIFF Bitmap
TG4 Tiled G4 RGB Integraph RGB
VC4 Rx Vectoring PNG Portable Network Graphics
VC5 Rx Spotlight RLE Integraph RLE
WS Rx Spotlight PDF Adobe Acrobat
XWS Rx WorkSpace
Chapter 4 – Appendices
Document No: UGD-DM-002 Rev: 5Q QDMS Guided Tour Page 58 of 62
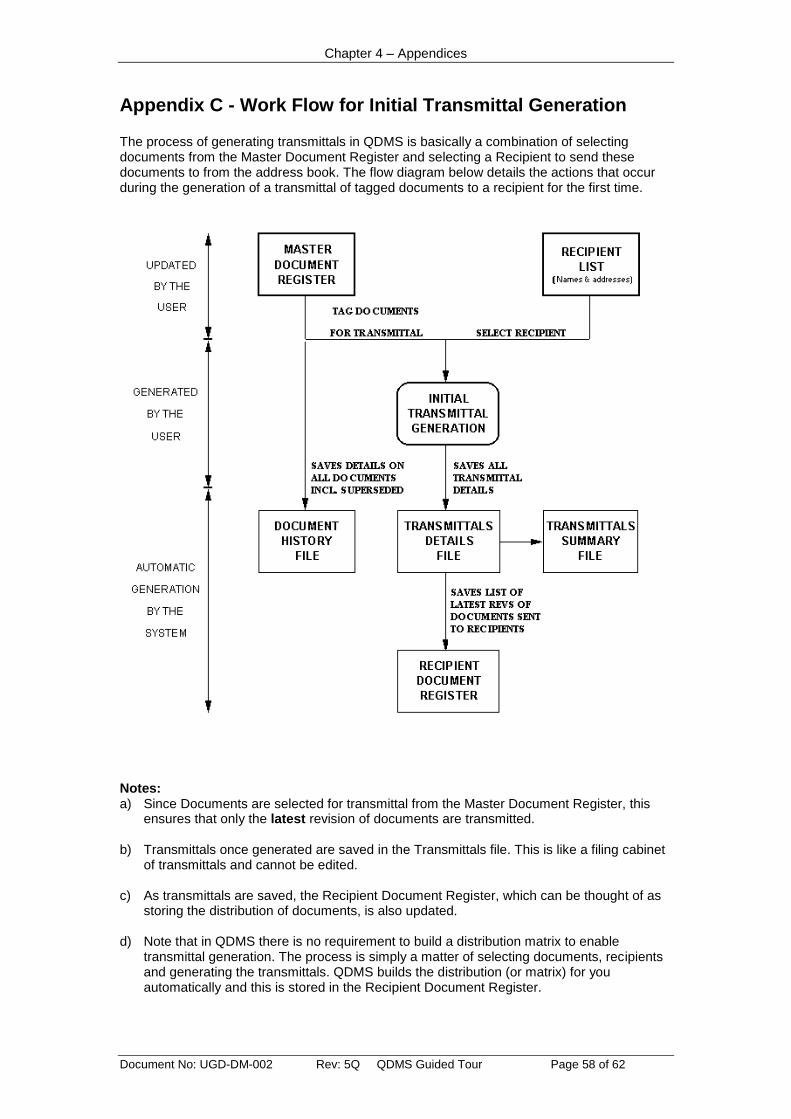
Appendix C - Work Flow for Initial Transmittal Generation The process of generating transmittals in QDMS is basically a combination of selecting documents from the Master Document Register and selecting a Recipient to send these documents to from the address book. The flow diagram below details the actions that occur during the generation of a transmittal of tagged documents to a recipient for the first time.
Notes: a) Since Documents are selected for transmittal from the Master Document Register, this
ensures that only the latest revision of documents are transmitted. b) Transmittals once generated are saved in the Transmittals file. This is like a filing cabinet
of transmittals and cannot be edited. c) As transmittals are saved, the Recipient Document Register, which can be thought of as
storing the distribution of documents, is also updated. d) Note that in QDMS there is no requirement to build a distribution matrix to enable
transmittal generation. The process is simply a matter of selecting documents, recipients and generating the transmittals. QDMS builds the distribution (or matrix) for you automatically and this is stored in the Recipient Document Register.

Chapter 4 – Appendices
Document No: UGD-DM-002 Rev: 5Q QDMS Guided Tour Page 59 of 62
Appendix D - Work Flow for Transmittal of Revised Documents The flow diagram below details the actions that occur during generation of transmittals for the issue of revised documents to a recipient who has previously received these documents.
Note: The automatic selection of drawings in the above process is as follows: The revision status of documents in the Recipient Document Register is first compared by the system with those in the Master Document Register. Only those documents in the Recipient Document Register that do not have the current revision number in the Master Document Register are selected for transmittal. In order to prevent the system from generating numerous transmittals as soon as the revision status of a document is changed, the above will only take place automatically, when requested by the user. It is therefore recommended that such a request be carried out on a regular basis as a part of the QA Document Control Procedure (at least weekly) or more frequently after major updates to the Master Document Register.
Chapter 4 – Appendices
Document No: UGD-DM-002 Rev: 5Q QDMS Guided Tour Page 60 of 62
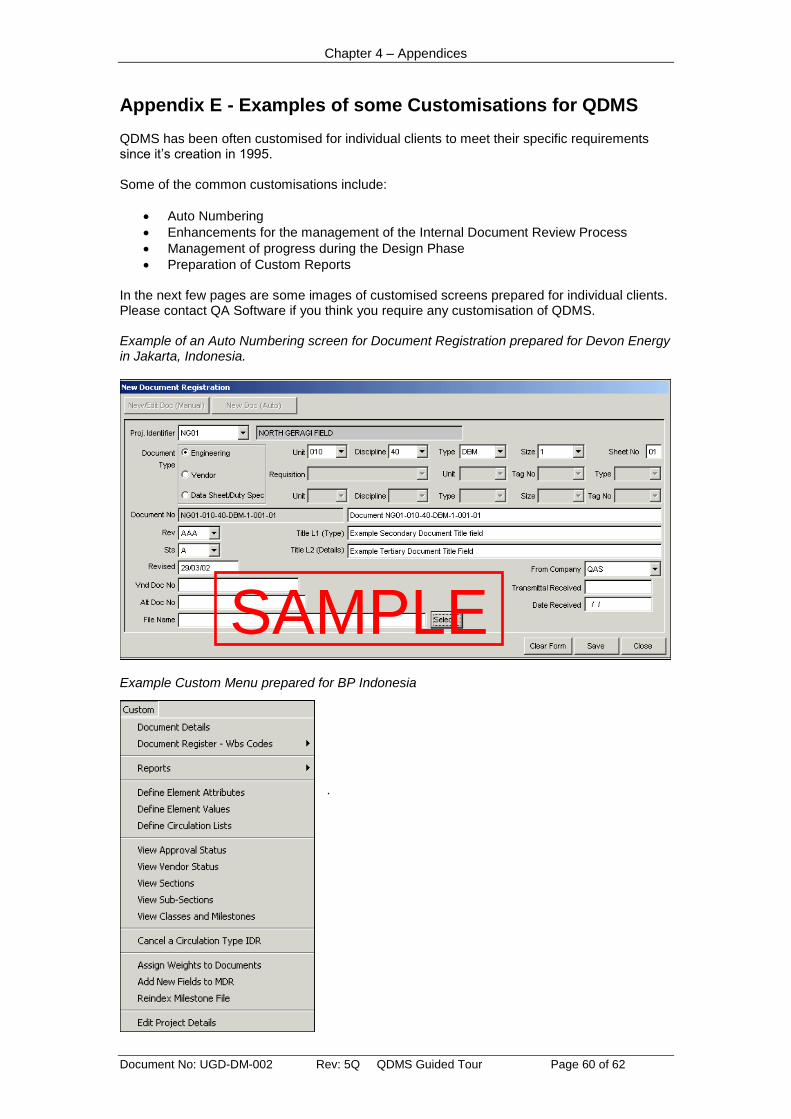
Appendix E - Examples of some Customisations for QDMS QDMS has been often customised for individual clients to meet their specific requirements since it’s creation in 1995. Some of the common customisations include:
Auto Numbering
Enhancements for the management of the Internal Document Review Process
Management of progress during the Design Phase
Preparation of Custom Reports In the next few pages are some images of customised screens prepared for individual clients. Please contact QA Software if you think you require any customisation of QDMS. Example of an Auto Numbering screen for Document Registration prepared for Devon Energy in Jakarta, Indonesia.
Example Custom Menu prepared for BP Indonesia
.
SAMPLE

Chapter 4 – Appendices
Document No: UGD-DM-002 Rev: 5Q QDMS Guided Tour Page 61 of 62
A Custom Document Details screen prepared for BP Indonesia that includes auto document number plus management of the entire document review and approval process from a single screen.
Example Internal Document Review Sheet developed for BP Indonesia. Notice that this allows for Multiple Circulation Lists on the same Transmittal when using a Flood Issue.
SAMPLE
SAMPLE

Chapter 4 – Appendices
Document No: UGD-DM-002 Rev: 5Q QDMS Guided Tour Page 62 of 62
Custom Scheduling screen developed for Clough Engineering, Western Australia. Allows for the definition of Document Classes and Milestones with auto scheduling and forecasting built in.
Example custom report also developed for Clough Engineering, Western Australia
SAMPLE
SAMPLE