Embed Size (px)
Citation preview
350 East Plumeria DriveSan Jose, CA 95134USA
January 2011202-10769-01v1.0
Push2TV HD Adapter (PTV2000) for Intel Wireless DisplayUser Manual

2 |
Push2TV HD TV Adapter for Intel® Wireless Display User Manual
©2011 NETGEAR, Inc. All rights reserved.No part of this publication may be reproduced, transmitted, transcribed, stored in a retrieval system, or translated into any language in any form or by any means without the written permission of NETGEAR, Inc.
Technical SupportThank you for choosing NETGEAR. To register your product, get the latest product updates, or get support online, visit us at http://support.netgear.com.
Phone (US & Canada only): 1-888-NETGEARPhone (Other Countries): See Support information card.
TrademarksNETGEAR, the NETGEAR logo, ReadyNAS, ProSafe, Smart Wizard, Auto Uplink, X-RAID2, and NeoTV are trademarks or registered trademarks of NETGEAR, Inc. Microsoft, Windows, Windows NT, and Vista are registered trademarks of Microsoft Corporation. Other brand and product names are registered trademarks or trademarks of their respective holders.
Statement of ConditionsTo improve internal design, operational function, and/or reliability, NETGEAR reserves the right to make changes to the products described in this document without notice. NETGEAR does not assume any liability that may occur due to the use, or application of, the product(s) or circuit layout(s) described herein.
Revision History
Publication Part Number Version Publish Date Comments
202-10769-01 v1.0 January 2011 First publication
Contents
Chapter 1 Getting StartedAdapter Hardware . . . . . . . . . . . . . . . . . . . . . . . . . . . . . . . . . . . . . . . . . . . . 5
Front and Rear View. . . . . . . . . . . . . . . . . . . . . . . . . . . . . . . . . . . . . . . . . 5Adapter Cable Connections . . . . . . . . . . . . . . . . . . . . . . . . . . . . . . . . . . . 6Adapter Label . . . . . . . . . . . . . . . . . . . . . . . . . . . . . . . . . . . . . . . . . . . . . . 6
Opening Intel Wireless Display on the Laptop . . . . . . . . . . . . . . . . . . . . . . .7Scanning and Detecting Adapters . . . . . . . . . . . . . . . . . . . . . . . . . . . . . . . .7Connecting to the Adapter . . . . . . . . . . . . . . . . . . . . . . . . . . . . . . . . . . . . . . 8Playing Media . . . . . . . . . . . . . . . . . . . . . . . . . . . . . . . . . . . . . . . . . . . . . . . . 9
Playing DVDs with Intel Wireless Display. . . . . . . . . . . . . . . . . . . . . . . . .9Closing the Laptop Lid . . . . . . . . . . . . . . . . . . . . . . . . . . . . . . . . . . . . . . . 9
Exiting Intel Wireless Display . . . . . . . . . . . . . . . . . . . . . . . . . . . . . . . . . . . . 9Resetting Intel Wireless Display . . . . . . . . . . . . . . . . . . . . . . . . . . . . . . . . . . 9
Chapter 2 Wireless Display SettingsChanging the Display Language . . . . . . . . . . . . . . . . . . . . . . . . . . . . . . . .10Updating the Firmware . . . . . . . . . . . . . . . . . . . . . . . . . . . . . . . . . . . . . . . . 11Wireless Display Properties . . . . . . . . . . . . . . . . . . . . . . . . . . . . . . . . . . . . 11
Behavior Properties . . . . . . . . . . . . . . . . . . . . . . . . . . . . . . . . . . . . . . . . 11Adapter Properties . . . . . . . . . . . . . . . . . . . . . . . . . . . . . . . . . . . . . . . . . 12
Resizing the TV Picture . . . . . . . . . . . . . . . . . . . . . . . . . . . . . . . . . . . . . . . 12Adjusting the Sound . . . . . . . . . . . . . . . . . . . . . . . . . . . . . . . . . . . . . . . . . . 13
Testing the Audio . . . . . . . . . . . . . . . . . . . . . . . . . . . . . . . . . . . . . . . . . . 13Global Volume Control . . . . . . . . . . . . . . . . . . . . . . . . . . . . . . . . . . . . . . 13Windows Audio Mixer . . . . . . . . . . . . . . . . . . . . . . . . . . . . . . . . . . . . . . . 13Changing the Sound using the Windows Control Panel. . . . . . . . . . . . .13
Setting Up Autoconnect . . . . . . . . . . . . . . . . . . . . . . . . . . . . . . . . . . . . . . . 13HDTV 1080p Resolution. . . . . . . . . . . . . . . . . . . . . . . . . . . . . . . . . . . . . . . 14
Chapter 3 TroubleshootingTV Display . . . . . . . . . . . . . . . . . . . . . . . . . . . . . . . . . . . . . . . . . . . . . . . . . 16
The Color on the Laptop Looks Different thanon the TV . . . . . . . . . . . .16TV Display Shows a Different Image than the Laptop . . . . . . . . . . . . . .16Adjusting the Size of the TV Display . . . . . . . . . . . . . . . . . . . . . . . . . . .16The TV Screen Is Blank after It Is Connected . . . . . . . . . . . . . . . . . . . .16TV Image Is Rough, Frozen, or Delayed . . . . . . . . . . . . . . . . . . . . . . . .17Your Video Mode Has Changed. . . . . . . . . . . . . . . . . . . . . . . . . . . . . . .18
Returning the Adapter to Its Original Firmware and Factory Settings . . . .18Initial Setup. . . . . . . . . . . . . . . . . . . . . . . . . . . . . . . . . . . . . . . . . . . . . . . . . 19
Contents | 3
Push2TV HD TV Adapter for Intel® Wireless Display User Manual
Adapter Power Does Not Turn On . . . . . . . . . . . . . . . . . . . . . . . . . . . . . 19Changing the TV Input . . . . . . . . . . . . . . . . . . . . . . . . . . . . . . . . . . . . . . 19Adapter Encountered a Problem on Startup. . . . . . . . . . . . . . . . . . . . . . 19There Are No Adapters Detected . . . . . . . . . . . . . . . . . . . . . . . . . . . . . . 20Security Code . . . . . . . . . . . . . . . . . . . . . . . . . . . . . . . . . . . . . . . . . . . . . 20Unsupported Audio Mode. . . . . . . . . . . . . . . . . . . . . . . . . . . . . . . . . . . . 20Intel Wireless Display Requires a Different Security Profile . . . . . . . . . . 20Your Wireless Switch Is Turned Off . . . . . . . . . . . . . . . . . . . . . . . . . . . . 21Intel My WiFi Technology Is Disabled . . . . . . . . . . . . . . . . . . . . . . . . . . 21Unsupported Laptop Hardware . . . . . . . . . . . . . . . . . . . . . . . . . . . . . . . 21Firewall Issues . . . . . . . . . . . . . . . . . . . . . . . . . . . . . . . . . . . . . . . . . . . . 21Windows Power Saving . . . . . . . . . . . . . . . . . . . . . . . . . . . . . . . . . . . . . 22Could Not Obtain a Network Address. . . . . . . . . . . . . . . . . . . . . . . . . . . 22Checking the Wi-Fi Access Point Frequency . . . . . . . . . . . . . . . . . . . . . 22
Common Solutions to Many Issues . . . . . . . . . . . . . . . . . . . . . . . . . . . . . . 23Known Issues . . . . . . . . . . . . . . . . . . . . . . . . . . . . . . . . . . . . . . . . . . . . . . . 23
Appendix A Factory Settings and Technical SpecificationsRestoring Factory Settings . . . . . . . . . . . . . . . . . . . . . . . . . . . . . . . . . . . . . 24Technical Specifications. . . . . . . . . . . . . . . . . . . . . . . . . . . . . . . . . . . . . . . 25
Appendix B Related Documents
Appendix C Notification of Compliance
4 | Contents

1
1. Getting StartedWith Intel Wireless Display and the Push2TV HD Wireless Adapter, you can connect your laptop wirelessly to your TV and enjoy and share your personal media collections, latest YouTube videos, downloaded or streamed movies, music, or a variety of other Internet content from the comfort of your home.
Intel Wireless Display requires the following:
• Push2TV adapter. The adapter receives Wi-Fi signals from the laptop, translates the signals into an image, and sends the image to the TV.
• A laptop computer with Intel Wireless Display installed. This manages the connection to the TV through the adapter.
This chapter provides instructions for using Intel Wireless Display after installation. For help with installation, see the Push2TV HD Adapter (PTV2000) for Intel Wireless Display Installation Guide.
Adapter Hardware
Front and Rear ViewThe following figure shows the front and rear view of the Push2TV HD Wireless Adapter.
HDMI
LED
Power On/Off Composite
Figure 1. Push2TV HD Wireless Adapter
Chapter 1. Getting Started | 5

Push2TV HD TV Adapter for Intel® Wireless Display User Manual
Adapter Cable ConnectionsThe power cord connects to the rear panel of the adapter. Plug the other end of the power cord into an electrical outlet. The HDMI cable connects to the rear panel as shown:
HDMI
Power
Figure 2. Push2TV HD Wireless Adapter cable connections
Connect either the HDMI cable or the audio/video cable, not both. An HDMI cable will produce higher quality images than an audio/video cable. An HDMI cable is provided in the package with the Push2TV adapter. (Audio/video cables can be found at electronics stores.) If you use an audio/video cable, match the connectors to the correct colors on the adapter (yellow, white, and red). Connect each cord and cable into its correct input on the TV. (See your TV owner’s manual if necessary.) Once the adapter is plugged in, make sure the cords and cables are pushed all the way into their correct input positions.
Using the composite video cable (the yellow input on the audio/video cable) might cause the TV image to be off-center. Consult the TV owner’s manual for image adjustment.
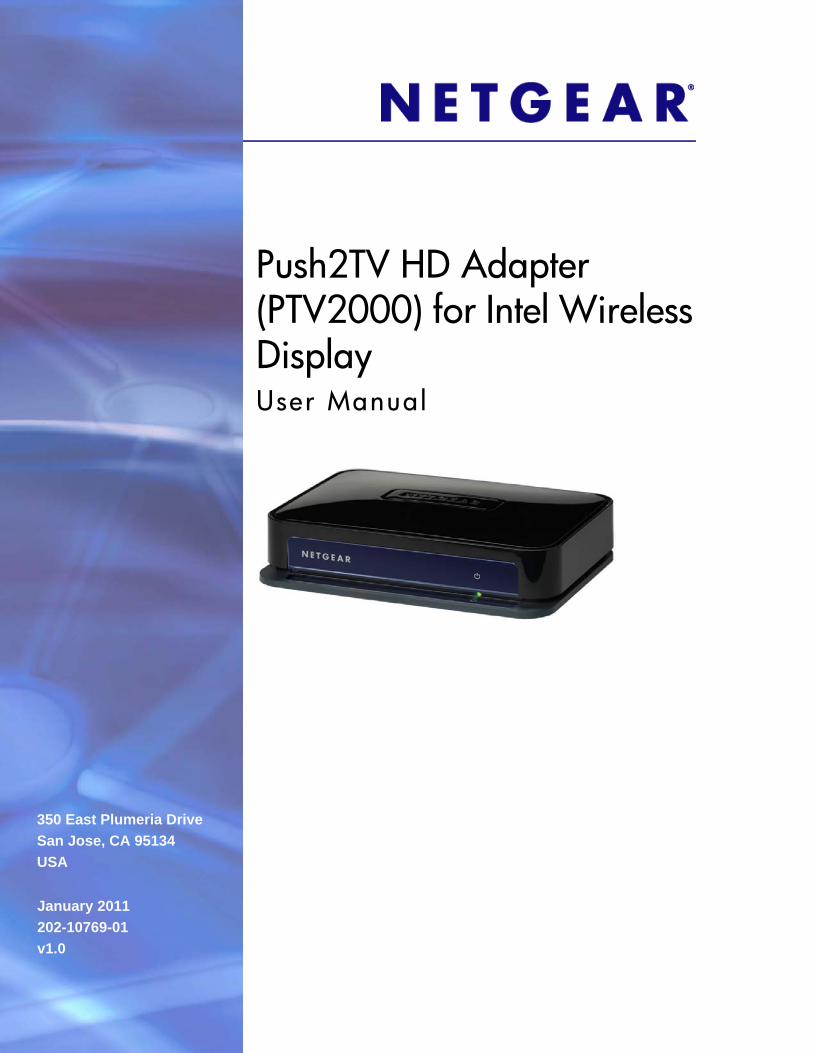
Adapter LabelThe product label is located on the bottom of the Push2TV HD Wireless Adapter.
Restore Factory Settings button
MAC address
Serial number
Figure 3. Adapter label
6 | Chapter 1. Getting Started

Push2TV HD TV Adapter for Intel® Wireless Display User Manual
Opening Intel Wireless Display on the Laptop
To open Intel Wireless Display, click the Windows Start icon on the laptop’s taskbar. Type Intel Wireless Display into the search field. In the search results click Intel Wireless Display. If an auto-connect adapter is set up, the application tries to connect to it (see Setting Up Autoconnect on page 13).
Some laptops have a button or key that starts Intel Wireless Display. This key is located in different places depending on the laptop. It is usually on or around the keyboard. The key has a small version of this symbol.
During the initial set up you might see a firewall alert message, and the license agreement displays.
• Firewall alert. In the initial set up, a firewall might block Intel Wireless Display, and a firewall alert message might be displayed. If this happens, make sure to allow access for both private and public networks. For firewall help, see Firewall Issues on page 21 or see your firewall’s user manual.
• License agreement. After reading and agreeing to the license agreement, click the I agree to the terms of this license button and proceed to the next screen. If you do not agree to the terms of the license, click the I do not agree button. You will not be able to continue and the application will close.
At this point, the TV status reads Ready for connection.
Scanning and Detecting Adapters
When you open the Intel Wireless Display application, it scans for a Push2TV HD Wireless Adapter. The status shows Scanning for adapters.
Note: If you set up auto connect, the application automatically tries to connect to your adapter when it is detected. See Setting Up Autoconnect on page 13.
If the application does not automatically begin scanning, click the Scan for available adapters button.
Chapter 1. Getting Started | 7

Push2TV HD TV Adapter for Intel® Wireless Display User Manual
After the scan is complete, any adapters in range are displayed in the Detected adapters field. If your adapter is not detected, click the Scan for available adapters button. If your adapter still does not appear, see the There Are No Adapters Detected on page 20.
The Detected adapters headings are Type, Name, ID, Model, and Signal.
• Type. If this is a first-time connection, the circle on the TV icon is gray. If the connection has been used previously, the icon circle is orange.
• Name. This refers to the adapter and is initially set by the adapter manufacturer. If this is the initial setup, you can rename the adapter in a following step.
• ID. If the default name has not been changed, use the ID to distinguish multiple entries and find your adapter.
• Model. This is the adapter manufacturer and product model name.• Signal. The number of bars represents signal strength. The scale ranges from one bar
(weakest signal) to five bars (strongest signal). The bars turn from green to yellow if the signal strength falls below three bars.
Connecting to the Adapter
1. On the laptop, in the Detected adapter screen, click the adapter and then click the Connect button. If more than one adapter is detected, use the ID to find the correct adapter. • The laptop and TV screens both show Connecting...
Note: If the laptop status shows Connecting... and the TV screen shows Ready for Connection, click the Cancel connect button and try connecting again. If this does not work, the connection might be blocked by a firewall. See Firewall Issues on page 21.
• After the laptop connects to the adapter, the TV displays the message Connected. Please wait. If this message is displayed more than 1 minute, the connection attempt failed. Click the Disconnect button and try connecting again.
• After a successful connection, the laptop and TV screen display the same images, and your adapter is displayed in the Connected adapter field. You are now ready to enjoy and share your favorite pictures, videos, and music.
2. If you want to move Intel Wireless Display out of the display area, use the minimize button instead of the close button. • To disconnect from the adapter, click the Disconnect button. • See Setting Up Autoconnect on page 13 for information about automatically
connecting to an adapter after the first connection has been made.
8 | Chapter 1. Getting Started

Push2TV HD TV Adapter for Intel® Wireless Display User Manual
Playing Media
Playing DVDs with Intel Wireless DisplayPersonal content you have burned into a disc will play. Many DVDs and Blu-ray discs include copy protection mechanisms that prevent playback over unprotected outputs. the Push2TV HD Wireless Adapter can play protected content on a protected content-supported laptop with Intel Wireless Display application software version 2.1 or higher.
Closing the Laptop LidClosing the lid of the laptop may put the system to sleep or turn it off, and as a result, end the Intel Wireless Display session.
To close the lid and continue using the application:
1. Click the Windows Start icon and type Closing the lid in the search field.2. Click the Change what closing the lid does link.3. Next to the When I close the lid heading and under both the On battery and Plugged in
headings, select Do nothing.4. Click the Save changes button.
Exiting Intel Wireless Display
To exit Intel Wireless Display, click the Disconnect button, wait until the adapter disconnects, and click the Close Window button (red x) in the upper right corner of application window. If you click the Close Window button while still connected, you are asked if you want to close the connection. Click Yes to exit or No to cancel exiting. To not view this screen again, select the Don’t ask me next time check box.
If you would like to turn off Intel My WiFi Technology after closing the application, click the Intel My WiFi Technology icon in the Windows taskbar and select Disable Intel My WiFi Technology.
Resetting Intel Wireless Display
Resetting reverts the application back to its out-of-the-box state. To reset, click Help and select About. Click Reset Settings. To proceed with the reset, click the Yes button on the Reset Intel Wireless Display settings screen.
After you start Intel Wireless Display, all detected adapters are displayed as not previously connected. However, it is not necessary to enter a security code since the security settings are stored in the adapter.
Chapter 1. Getting Started | 9

2
2. Wireless Display SettingsAfter you install the Push2TV HD Wireless Adapter, you can adjust the settings.
Changing the Display Language
To change the adapter display language, use the Restore Factory Settings button located on the bottom of the adapter.
Figure 1. Cycling through display languages
CAUTION:
Pressing the Restore Factory Settings button for more than 5 seconds erases the adapter setup. See Restoring Factory Settings in Appendix A.
To change the adapter’s language display:
1. While the adapter is turned on and the Push2TV HD menu is displayed on your TV, tap the Restore Factory Settings button.
The language display on the TV changes.
• To step through the language selections, tap the Restore Factory Settings button for less than 0.5 seconds.
• To go back to the previous language selection, press the Restore Factory Settings button for more than 0.5 second and less than 5 seconds.
2. When the correct language is displayed, release the Restore Factory Settings button.
Chapter 2. Wireless Display Settings | 10

Push2TV HD TV Adapter for Intel® Wireless Display User Manual
Updating the Firmware
If the firmware needs updating, there is an Update available button on the Adapter properties screen. The Properties button is available only if you are currently connected to an adapter.
1. Click the Update available button to begin the update process.
Once the update begins, the TV screen displays Updating adapter. Please wait. After the procedure is complete, the adapter automatically disconnects from the laptop.
2. Scan again from the laptop to connect to the adapter.
Wireless Display Properties
The Properties button is only available if you are currently connected to an adapter. The Intel Wireless Display properties screen has two tabs, Behavior and Adapter.
Behavior PropertiesSelect the Behavior tab to display this screen:
• Automatically hide the Intel Wireless Display application after connecting. This allows the application to minimize right after connecting.
• Don’t ask me again options. You can select the following check boxes to stop the warning and prompts from displaying.- Don’t warn me that the
connection will end if I close the application while connected.
- Don’t prompt me to upgrade the firmware.
- Don’t prompt me to download software updates.• Change how the mouse pointer appears on the TV.
- Show the pointer on the TV.- Allow the pointer to change appearance based on the context. If this check box is
selected, the cursor appearance changes based on the Windows cursor.
Chapter 2. Wireless Display Settings | 11

Push2TV HD TV Adapter for Intel® Wireless Display User Manual
Adapter PropertiesSelect the Adapter tab to display this screen:
• Adapter name. This is either the default name or the name you choose in the initial set up process. It is okay to change the name at any time. Just type a new name. If the default name is deleted and the Name field is left empty, the application restores the name to the previous value.
The valid character set for adapter names includes upper-case and lower-case letters A through Z, numbers, and punctuation marks, also defined as ASCII characters 32 through 126.
• Network address. This is the IP (Internet Protocol) address.
• Adapter ID. A preset and unchangeable number set by the adapter.• Adapter manufacturer. NETGEAR.• Adapter model. This is the model of the adapter currently connected.• Adapter hardware version. The version of the current hardware.• Adapter firmware version. The version of the application. If a Web update is required,
click the Update Available button.• Automatically connect. Allows this adapter to be set as the auto-connect adapter. See
Setting Up Autoconnect on page 13 for more details.• Register. Register your adapter to obtain support and get the latest software updates.• Audio/Visual Tuning. See Resizing the TV Picture on page 12 and Testing the Audio on
page 13.
Resizing the TV Picture
If the laptop display is cropped or not filling the entire TV screen, the image needs to be adjusted. To adjust the TV image click the Properties button. On the Adapter properties screen click the Resize TV picture button. On the next screen, click the plus icon to increase the size, or the minus icon to decrease the size. When the image is correct, click OK to return to the previous screen. If the image still does not fit the entire TV screen, try adjusting the TV settings.
12 | Chapter 2. Wireless Display Settings

Push2TV HD TV Adapter for Intel® Wireless Display User Manual
Adjusting the Sound
Once a connection begins, the laptop’s sound is muted. When the connection ends, the laptop’s sound is enabled.
Testing the AudioWhen the laptop is connected, clicking the Test audio button on the Adapter properties screen takes you to an audio test screen. If you do not hear audio after clicking the Play sample button, increase the volume on the TV speakers by using the TV remote.
Global Volume ControlUsually, the laptop’s sound is muted after the laptop is connected to Intel Wireless Display. Sometimes, however, other applications might automatically turn on the laptop’s sound. This results in your hearing the same sound from the laptop before hearing it from the TV. To turn the volume off, click the little speaker icon located on the far right of the taskbar. This brings up the Global Volume Control pop-up window. Click the speaker icon just below the slider to mute the laptop’s sound. If the laptop’s sound keeps coming back on, try turning the volume all the way down using the slider in the pop up window instead of muting. Moving the volume slider automatically unmutes the laptop’s speakers.
Windows Audio MixerAttempting to change audio settings in the Windows Audio Mixer while using the application, might result in a connection disruption. (Find the Windows Audio Mixer by clicking the Mixer link in the Global Volume Control window.) Usually the connection is automatically reestablished. The TV image might flicker during this time. If the connection does not automatically reestablish, manually reconnect.
Changing the Sound using the Windows Control PanelTo bring up the audio device window click the Start icon, type audio device in the search field, and press the Enter key. On the Playback tab, make sure the green circle with a check mark is on local speakers.
Setting Up Autoconnect
You can use this feature to select a Push2TV HD Wireless Adapter that you want the Intel Wireless Display to try to connect to automatically. This is somewhat similar to selecting a default printer. Only one adapter at a time can be set as the auto-connect adapter. In addition, the auto-connect feature can be enabled only after you have successfully connected the first time and completed the security configuration. Auto-connect is an attempt to connect, and it could fail in the same ways that a manual connection could fail.
Chapter 2. Wireless Display Settings | 13

Push2TV HD TV Adapter for Intel® Wireless Display User Manual
There are two instances where the auto-connect is attempted.
1. The auto-connect adapter is discovered when the Intel Wireless Display application is launched.
2. If the auto-connect adapter is in the list of adapters when the Intel Wireless Display application is relaunched. In this case, if a connection is made, it is typically faster than in case 1, because the application is already running and a new scan is not performed.
There are two ways to select the auto-connect adapter.
1. On the Adapter properties screen, select the Automatically connect to this adapter check box. Note that if you have more than one adapter, any other adapter that was previously selected for auto-connect will no longer have its auto-connect property set.
2. In the Detected adapters list on the Intel Wireless Display home screen, right-click an adapter that has previously been connected. This shows an Auto-connect property in a pop-up menu. A check indicates if this adapter is currently set as the auto-connect adapter or not. Selecting that menu item changes the autoconnect state of the adapter.
HDTV 1080p Resolution
To experience Intel Wireless Display in full HD 1080p resolution on your TV, you need to have an 1080P HDTV and one of the following:
• An HRV laptop with an 1920 x1080 panel in clone mode.• An HRV Huron River platform laptop in extend or remote only mode.
To set up extend mode for an HRV Huran River platform laptop:
1. Before you connect to PTV2000, the laptop screen resolution is 1280 x 800 or 1366 x 768, depending on the laptop.
14 | Chapter 2. Wireless Display Settings

Push2TV HD TV Adapter for Intel® Wireless Display User Manual
2. After you connect to PTV2000, your laptop displays two screen in clone mode (duplicated displays). This is the default display mode and the resolution is 1280 x720 for both screens.
3. For the Multiple Displays setting, select Extend these displays (extend mode), as shown in the following figure:
Now screen_1 (laptop) is back to its default resolution of 1280 x 800 (or 1366 x768), and screen_2 (TV) remains at 1280 x 720 resolution.
4. Set the screen_2 (TV) resolution to 1920 x 1080. Now the TV displays full 1080P resolution.
Chapter 2. Wireless Display Settings | 15
3
3. TroubleshootingIf you need help with support, contact your computer or adapter manufacturer to get support for your specific product.
• For information about your Intel Wireless Display software, visit www.intel.com/go/wirelessdisplayupdate.
• For additional help, visit http://kbserver.netgear.com/products/PTV2000.asp.
TV Display
The Color on the Laptop Looks Different thanon the TVSometimes colors on the TV screen and the laptop might be a slightly different. To match the colors, change the TV settings until the screens are the same. (See your TV manual for color adjustment help.)
TV Display Shows a Different Image than the LaptopIf both the application and the TV screen show that you are connected, but they are not showing the same image, the laptop’s firewall might be stopping the connection. For firewall help, see Firewall Issues on page 21.
Adjusting the Size of the TV DisplayIf the TV display shows areas of black around the edges or appears too big, click Adjust your display settings. For screen adjustment help, see Resizing the TV Picture on page 12.
The TV Screen Is Blank after It Is ConnectedWhile using a laptop and a TV, sometimes the laptop’s display settings might be inadvertently changed. This might result in the TV showing a blank screen after it is connected. The TV screen might also be blank if the adapter is too warm after being used for a long time. (The adapter is not designed to be connected for more than 4 hours.) If this is the case, do not use the adapter until it has cooled down.
Chapter 3. Troubleshooting | 16

Push2TV HD TV Adapter for Intel® Wireless Display User Manual
Two DisplaysSimultaneously press the Windows key and the letter P on the keyboard. Select Duplicate in the pop-up window to make both laptop and TV screens the same.
Three DisplaysThe laptop is capable of displaying only two screens at the same time including its own. The TV screen needs to be one of the two selected screens.
To select which screens to use:
1. Simultaneously press the Windows key and the letter P on the keyboard. Select Duplicate in the pop-up window. If your laptop screen is not duplicated on your TV, proceed to the next step.
2. Click the Windows Start icon.3. In the search field, type Adjust screen resolution and press Enter.4. Next to the heading Display, select the option other than Multiple Monitors.5. Next to the heading Multiple displays, select either one of the duplicate combinations.6. To try the new settings, click Apply.7. If the laptop screen is showing on the combination of displays that you want, click the Keep
changes button in the pop-up window, and then click OK. Otherwise, click Revert and go back to Step 4 and select the other combination in Step 5.
TV Image Is Rough, Frozen, or DelayedTo fix a rough, frozen, or delayed image try each of the following steps individually.
• Check the laptop’s CPU status. Right-click on the taskbar and select Start Task Manager. In the Task Manager window click the Processes tab. Under the CPU heading, check WiDiApp.exe. If the WiDiApp.exe CPU number is 80 or above, save documents, and close unused applications.
• Check the network link speed. Right-click he taskbar and select Start Task Manager. In the Task Manager window click the Networking tab. The link speed should be higher than 36 Mbps. If it is not, try moving the adapter to a different position that is farther away from other electronic equipment, or closer to the laptop. If this does not help, try disconnecting the adapter and connecting again.
• Change the channel on the wireless router. See the router’s manual for channel changing instructions. (If you are not using a router, see the next solution.)
• If you are not connected to a router, change the wireless channel. Open Intel My WiFi Utility by clicking the Intel My WiFi Technology icon in the taskbar and selecting Open Intel My WiFi Utility. Use the help document in the Intel My WiFi Utility and search for Access Points. In the results, click Advanced Settings and follow the instructions.
Chapter 3. Troubleshooting | 17

Push2TV HD TV Adapter for Intel® Wireless Display User Manual
Your Video Mode Has ChangedThe video display resolution might change while you are using Intel Wireless Display. This can happen regardless of whether you change the display resolution manually or it is changed by another application. On the Your Video Mode has Changed screen, click the Restore settings and resume connection button to allow the application to automatically reset the display to the correct settings. Selecting Keep settings and close connection results in the display session ending. Intel Wireless Display supports at least one or more of the following resolutions: 1280 x720, 1280 x768, 1280 x 800, 1366 x 768, 1440 x 900, 1600 x 900, and 1920 x 1080. For information about viewing in HDTV 1080p resolution, see HDTV 1080p Resolution on page 14.
Returning the Adapter to Its Original Firmware and Factory Settings
This procedure erases the security code for your adapter. After you do this, you will have to set the adapter up again to work with your TV and your laptop as described in the installation guide. This procedure also removes any firmware updates that you have installed.
To return the adapter to its original firmware level and its default settings:
1. Turn off the adapter by pushing the On/Off button on the rear panel.2. Press and hold the Restore Factory Settings button.3. While you continue to hold the Restore Factory Settings button, press the On/Off button to
turn the adapter back on.4. Wait until the LED on the front flashes, then release the Restore Factory Settings button.
The adapter returns to its original firmware level and its default settings.
18 | Chapter 3. Troubleshooting

Push2TV HD TV Adapter for Intel® Wireless Display User Manual
Initial Setup
Adapter Power Does Not Turn OnThe On/Off button is located on the rear of the adapter.
On/Off
Figure 1. On/Off button
If the adapter is not turning on, make sure the power cord is pushed all the way into both the wall outlet and the adapter. If power is not getting to the adapter, there might be a faulty power cord.
Changing the TV InputDifferent TV brands have various methods of changing the TV input. Five of the most common processes are covered here. If these options do not cover your TV, consult your TV owner’s manual for additional help.
• Some TV remote controls have buttons labeled HDMI, HDMI 1, HDMI 2, A\V, and so on. Press the appropriate button to choose the TV input.
• Other TV remote controls include a button labeled Input, Source, TV, or TV/Video. Press this button to cycle the TV through the input options.
• Pressing the Input button on some remote controls results in a list of inputs on the TV screen. Simply select the input that you want.
• You select the input on some TVs by pressing the Input button on the front or side panel of the TV screen. Simply press the button until the input that you want is selected.
• Sometimes the inputs are located beneath the regular channels on the TV. Try selecting the lowest TV channel and then go down one channel.
Adapter Encountered a Problem on StartupThe adapter is experiencing technical difficulties. First turn the adapter off and back on again. If this does not resolve the issue, see Adapter Label on page 6.
Chapter 3. Troubleshooting | 19
Push2TV HD TV Adapter for Intel® Wireless Display User Manual
There Are No Adapters DetectedIt might be necessary to scan multiple times. If rescanning does not solve the issue, make sure the adapter is on and the TV is displaying the To get started screen.
Also, try moving the laptop or the adapter to different places in the room. The adapter and TV should be in the same room to work correctly. If this does not work, see Common Solutions to Many Issues on page 23.
Security CodeThe phrase, That security code is not correct in the Security Code section means the wrong security code has been entered. Make sure to type the code exactly as shown on the TV screen. The security code number will change after an incorrect entry.
If the connection fails right after a correct security code is entered, it is necessary to connect again and retype the security code.
Unsupported Audio ModeThe laptop has to have specific audio settings for Intel Wireless Display to work correctly. NETGEAR recommends that you do not adjust these settings to a unsupported audio mode. The Unsupported audio mode screen appears if the audio display settings need adjusting.
To restore the audio settings to the correct values:
1. In the Unsupported audio mode window click the Adjust audio settings button.2. In the Sound window, double-click Speakers.3. On the Advanced tab select either 16 bit, 44100 Hz (CD Quality) or 48000 Hz (DVD
Quality) and click OK. (Unpredictable results can occur if different audio modes are used.)
Intel Wireless Display Requires a Different Security Profile
The Security Profile Is IncorrectThe wireless security settings have been reconfigured using the Intel My WiFi Utility.
To allow the application to automatically choose the correct profile:
1. Right-click the Intel My WiFi Technology icon on right end of the taskbar.2. Select Disable Intel My WiFi Technology.3. Click the Scan for available adapters button on the Intel Wireless Display screen. While
scanning, the application enables Intel My WiFi Technology and selects the correct security profile.
20 | Chapter 3. Troubleshooting
Push2TV HD TV Adapter for Intel® Wireless Display User Manual
Manually Setting the Correct Security ProfileIf the previous steps do not automatically select the correct security profile, click the Intel My WiFi Utility icon in the taskbar and select Open Intel My WiFi Utility. Use the help document in Intel My WiFi Utility and search for Security. In the results, click Security Settings and follow the instructions.
Your Wireless Switch Is Turned OffNormally, Wi-Fi allows the laptop to connect to the router for wireless Internet access. A new feature included with Intel Wireless Display uses Wi-Fi to wirelessly connect the laptop to the TV through the adapter.
For this new Wi-Fi connection to work correctly, three switches must be turned on. The first switch is the hardware switch. It is usually located around the edge of the laptop or above the keyboard. It might be identified by a pole with two half circles on each side. Check the laptop manual for the exact location. Turn the switch on and scan again.
When needed, the other two switches are automatically turned on by the application. If it is still impossible to connect because the application is not automatically turning the other switches on, see Common Solutions to Many Issues on page 23.
Intel My WiFi Technology Is DisabledIntel My WiFi Technology allows the laptop to become a Wi-Fi access point for other laptops. If the laptop screen shows that Intel My WiFi Technology is disabled, click the Scan for available adapters button to automatically enable Intel My WiFi Technology. If the Wi-Fi is already on, Intel Wireless Display automatically enables Intel My WiFi Technology. If the Wi-Fi is off, the application asks if you would like to turn on Intel My WiFi Technology. Select Yes and scan again. If this does not work, see Common Solutions to Many Issues on page 23.
Unsupported Laptop HardwareFor Intel Wireless Display to run, Intel My WiFi Technology must be installed, and the laptop must have an Intel Core i7, i5, or i3 processor with Intel Graphics Media Accelerator HD.
Firewall IssuesIn some cases the laptop’s firewall blocks the Wi-Fi connection between the laptop and the adapter. If this happens, you have to change the laptop's firewall settings. The following instructions apply to a Microsoft Windows Firewall. To allow Intel Wireless Display through a different firewall, see that firewall’s product manual. There might be inconsistent results allowing the application through a firewall that is not a Microsoft Windows firewall.
1. Click on the Windows Start icon in the search field, type Allow a program through a Windows Firewall.
2. In the search results, click Allow a program through Windows Firewall.
Chapter 3. Troubleshooting | 21
Push2TV HD TV Adapter for Intel® Wireless Display User Manual
3. In the firewall control panel, make sure that the Name, Private, and Public check boxes are selected for both WiDiApp and Wireless PAN DHCP Server.
4. When done, click OK and connect again.
Windows Power SavingMicrosoft Windows software might be set to dim the display or put the computer to sleep after a period of time. To stop the laptop screen from dimming while using Intel Wireless Display, change the laptop’s power settings:
1. Click the Windows Start icon.2. Type Power Options in the search field and click the Power Options result.3. Under the Select a Power Plan heading, make sure the Balanced radio button is selected.4. Click Change Plan Settings next to the current plan.5. Enter a longer time setting for the Dim the display, Turn of the display, and Put the
computer to sleep options under either On Battery and Plugged in headings.
Could Not Obtain a Network AddressTry closing Intel Wireless Display and restarting the laptop. The laptop’s firewall could be blocking the adapter’s request for a network address. For information about how to allow the address request through a firewall, see Firewall Issues on page 21. If this does not resolve the issue, see Common Solutions to Many Issues on page 23.
Checking the Wi-Fi Access Point FrequencyIntel Wireless Display works at 2.4 GHz on both the PAN connection to the TV and LAN connection to the wireless router. If your router supports both 2.4 GHz and 5 GHz, when you are using the Intel Wireless Display, make sure that the connection to the router is set to 2.4 GHz.
If you changed your router connection from 5GHz to 2.4GHz, you might have to disable and enable Intel My WiFi Technology using the following steps:
1. Right-click the Intel My WiFi Technology icon on right end of the taskbar.2. Select Disable Intel My WiFi Technology.3. Click the Scan for available adapters button on Intel Wireless Display. While scanning, the
application automatically enables Intel My WiFi Technology.
22 | Chapter 3. Troubleshooting

Push2TV HD TV Adapter for Intel® Wireless Display User Manual
Common Solutions to Many Issues
This section describes procedures to try if the other troubleshooting sections have not helped. Try each solution one at a time starting with Step 1. For additional help, visit http://kbserver.netgear.com/products/PTV2000.asp.
1. Close Intel Wireless Display, reopen the application, scan for available adapters, and connect.
2. Shut down the laptop, restart, open the application, scan for available adapters, and connect.
3. Reset the adapter, scan for available adapters, and connect. For help resetting the adapter, see Restoring Factory Settings in Appendix A..
4. Check the laptop’s firewall settings. A firewall mightbe blocking the application. For firewall help, see Firewall Issues on page 21.
5. Try updating the firmware. See Updating the Firmware on page 11.6. If the adapter will not turn on, or it is impossible to update the firmware, you can return the
adapter to its original firmware level and factory settings. This erases any firmware updates that you have installed and removes the security settings and the adapter name (if it was changed from the default name). See Returning the Adapter to Its Original Firmware and Factory Settings on page 18.
Known Issues
This section lists known Intel Wireless Display issues and workarounds.
• After you stop using the Intel Wireless Display application, you might have to manually enable the laptop’s sound. For audio help see Adjusting the Sound on page 13.
• The application will usually not work if it is located in the Windows startup group.• Wait until Microsoft Windows has fully booted before opening Intel Wireless Display.• If the media application in use can be set to mute or unmute only for both the laptop and
TV at the same time, NETGEAR recommends that you use a different media application.• Pressing Control + Alt + Delete on the laptop might freeze the TV image.• For analog TVs, the adapter does not support NTSC (National Television System
Committee) format 4.43 variations on the composite interface. See the TV owner’s manual for NTSC variation information.
• Changing the wireless LAN or connection settings when Intel Wireless Display is connected might cause momentary disruption of or end the connection.
Chapter 3. Troubleshooting | 23
A
A. Factory Settings and Technical SpecificationsRestoring Factory Settings
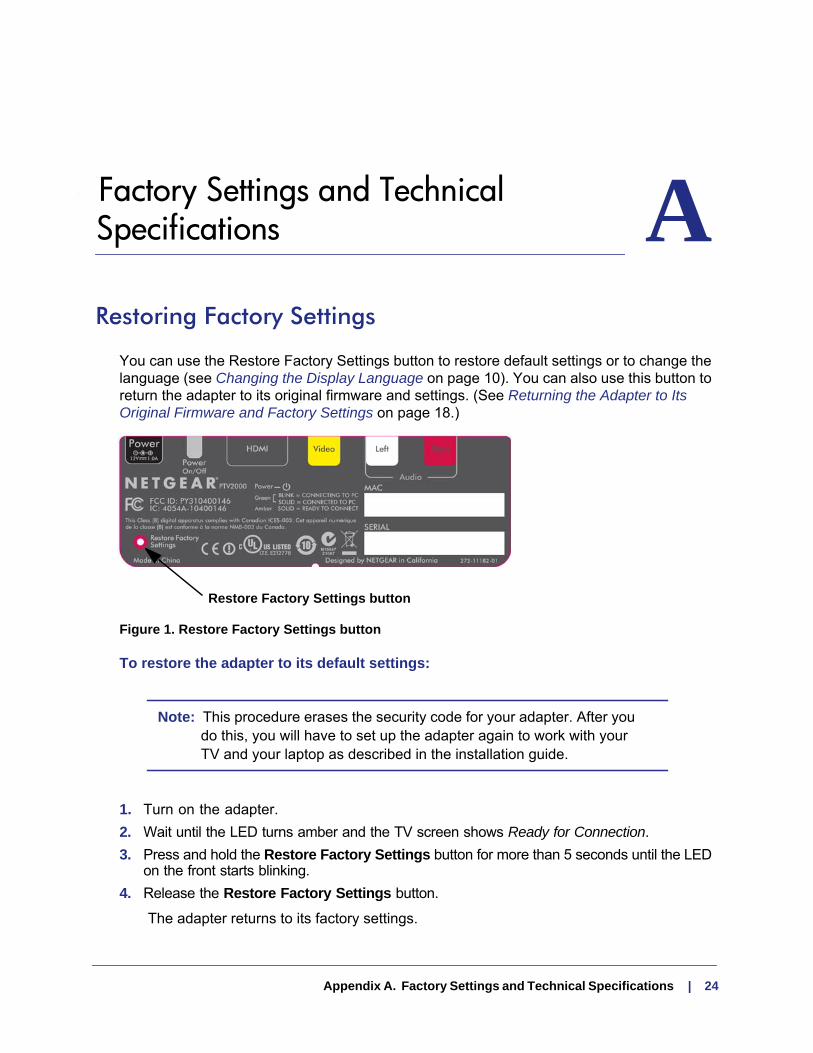
You can use the Restore Factory Settings button to restore default settings or to change the language (see Changing the Display Language on page 10). You can also use this button to return the adapter to its original firmware and settings. (See Returning the Adapter to Its Original Firmware and Factory Settings on page 18.)
Restore Factory Settings button
Figure 1. Restore Factory Settings button
To restore the adapter to its default settings:
Note: This procedure erases the security code for your adapter. After you do this, you will have to set up the adapter again to work with your TV and your laptop as described in the installation guide.
1. Turn on the adapter. 2. Wait until the LED turns amber and the TV screen shows Ready for Connection.3. Press and hold the Restore Factory Settings button for more than 5 seconds until the LED
on the front starts blinking.4. Release the Restore Factory Settings button.
The adapter returns to its factory settings.
Appendix A. Factory Settings and Technical Specifications | 24
Push2TV HD TV Adapter for Intel® Wireless Display User Manual
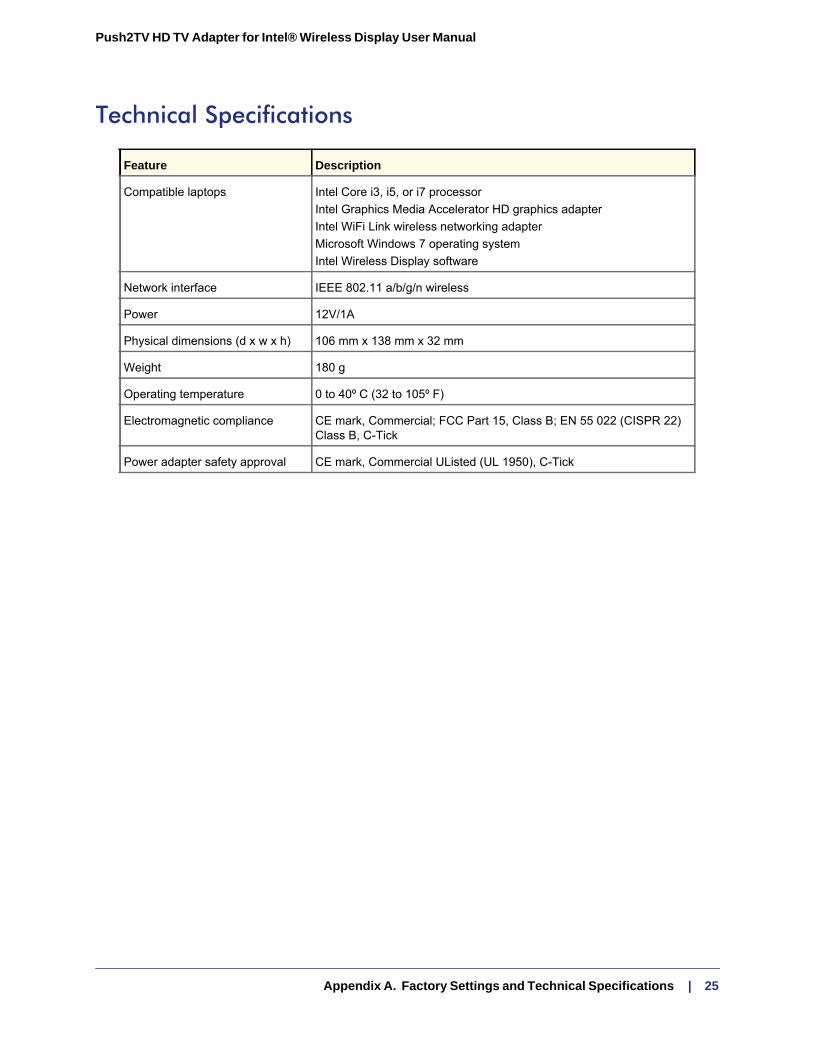
Technical Specifications
Feature Description
Compatible laptops Intel Core i3, i5, or i7 processorIntel Graphics Media Accelerator HD graphics adapterIntel WiFi Link wireless networking adapterMicrosoft Windows 7 operating systemIntel Wireless Display software
Network interface IEEE 802.11 a/b/g/n wireless
Power 12V/1A
Physical dimensions (d x w x h) 106 mm x 138 mm x 32 mm
Weight 180 g
Operating temperature 0 to 40º C (32 to 105º F)
Electromagnetic compliance CE mark, Commercial; FCC Part 15, Class B; EN 55 022 (CISPR 22) Class B, C-Tick
Power adapter safety approval CE mark, Commercial UListed (UL 1950), C-Tick
Appendix A. Factory Settings and Technical Specifications | 25

B
B. Related DocumentsThis appendix provides links to reference documents you can use to gain a more complete understanding of the technologies used in your NETGEAR product.
Document Link
Document Link
Using Microsoft Vista and Windows XP to Manage Wireless Network Connections
http://documentation.netgear.com/reference/enu/winzerocfg/vistaxpconfig.pdf
Networking Basics http://documentation.netgear.com/reference/enu/tcpip/index.htm
Wireless Networking Basics http://documentation.netgear.com/reference/enu/wireless/index.htm
Preparing Your Network http://documentation.netgear.com/reference/enu/wsdhcp/index.htm
Glossary http://documentation.netgear.com/reference/enu/glossary/index.htm
Appendix B. Related Documents | 26

C
C. Notification of ComplianceNETGEAR AdaptersRegulatory Compliance InformationThis section includes user requirements for operating this product in accordance with National laws for usage of radio spectrum and operation of radio devices. Failure of the end-user to comply with the applicable requirements may result in unlawful operation and adverse action against the end-user by the applicable National regulatory authority.
Note: This product’s firmware limits operation to only the channels allowed in a particular Region or Country. Therefore, all options described in this user's guide may not be available in your version of the product.
FCC Requirements for Operation in the United States
FCC Information to User
This product does not contain any user serviceable components and is to be used with approved antennas only. Any product changes or modifications will invalidate all applicable regulatory certifications and approvals
FCC RF Radiation Exposure and SAR Statements
SAR Statement
The Push2TV HD Adapter (PTV2000) for Intel Wireless Display has been tested for body-worn Specific Absorption Rate (SAR) compliance. The FCC has established detailed SAR requirements and has established that these requirements have been met while the Push2TV HD Adapter (PTV2000) for Intel Wireless Display was installed in a host notebook computer.
RF Exposure Information
The radio module has been evaluated under FCC Bulletin OET 65C (01-01) and found to be compliant to the requirements as set forth in CFR 47 Sections, 2.1093, and 15.247 (b) (4) addressing RF Exposure from radio frequency devices. This model meets the applicable government requirements for exposure to radio frequency waves. The highestSAR level measured for this device was <insert value; get from engineer> W/kg.
FCC Declaration of Conformity
We, NETGEAR, Inc., 350 East Plumeria Drive, San Jose, CA 95134, declare under our sole responsibility that the Push2TV HD Adapter (PTV2000) for Intel Wireless Display complies with Part 15 Subpart B of FCC CFR47 Rules. Operation is subject to the following two conditions:
• This device may not cause harmful interference, and• This device must accept any interference received, including interference that may cause undesired operation.
FCC Radio Frequency Interference Warnings & InstructionsThis equipment has been tested and found to comply with the limits for a Class B digital device, pursuant to Part 15 of the FCC Rules. These limits are designed to provide reasonable protection against harmful interference in a residential installation. This equipment uses and can radiate radio frequency energy and, if not installed and used in accordance with the instructions, may cause harmful interference to radio communications. However, there is no
Appendix C. Notification of Compliance | 27
Push2TV HD TV Adapter for Intel® Wireless Display User Manual
guarantee that interference will not occur in a particular installation. If this equipment does cause harmful interference to radio or television reception, which can be determined by turning the equipment off and on, the user is encouraged to try to correct the interference by one or more of the following methods:
• Reorient or relocate the receiving antenna.• Increase the separation between the equipment and the receiver.• Connect the equipment into an electrical outlet on a circuit different from that which the radio receiver is
connected.• Consult the dealer or an experienced radio/TV technician for help.
Canadian Department of Communications Radio Interference RegulationsThis digital apparatus, Push2TV HD Adapter (PTV2000) for Intel Wireless Display, does not exceed the Class B limits for radio-noise emissions from digital apparatus as set out in the Radio Interference Regulations of the Canadian Department of Communications.
Europe – EU Declaration of Conformity
Marking by the above symbol indicates compliance with the Essential Requirements of the R&TTE Directive of the European Union (1999/5/EC). This equipment meets the following conformance standards:• EN300 328 (2.4Ghz), EN301 489-17, EN301 893 (5Ghz), EN60950-1• This device is a 2.4 GHz wideband transmission system (transceiver), intended for use in all EU member states and
EFTA countries, except in France and Italy where restrictive use applies.• In Italy the end-user should apply for a license at the national spectrum authorities in order to obtain authorization to
use the device for setting up outdoor radio links and/or for supplying public access to telecommunications and/or network services.
• This device may not be used for setting up outdoor radio links in France and in some areas the RF output power may be limited to 10 mW EIRP in the frequency range of 2454 – 2483.5 MHz. For detailed information the end-user should contact the national spectrum authority in France.
For complete DoC please visit the NETGEAR EU Declarations of Conformity website at: http://kb.netgear.com/app/answers/detail/a_id/11621/
Language Statement
Cesky [Czech] NETGEAR Inc. tímto prohlašuje, že tento Radiolan je ve shode se základními požadavky a dalšími príslušnými ustanoveními smernice 1999/5/ES.
Dansk [Danish] Undertegnede NETGEAR Inc. erklærer herved, at følgende udstyr Radiolan overholder de væsentlige krav og øvrige relevante krav i direktiv 1999/5/EF.
Deutsch [German] Hiermit erklärt NETGEAR Inc., dass sich das Gerät Radiolan in Übereinstimmung mit den grundlegenden Anforderungen und den übrigen einschlägigen Bestimmungen der Richtlinie 1999/5/EG befindet.
Eesti [Estonian] Käesolevaga kinnitab NETGEAR Inc. seadme Radiolan vastavust direktiivi 1999/5/EÜ põhinõuetele ja nimetatud direktiivist tulenevatele teistele asjakohastele sätetele.
28 | Appendix C. Notification of Compliance

Push2TV HD TV Adapter for Intel® Wireless Display User Manual
English Hereby, NETGEAR Inc., declares that this Radiolan is in compliance with the essential requirements and other relevant provisions of Directive 1999/5/EC.
Español [Spanish]
Por medio de la presente NETGEAR Inc. declara que el Radiolan cumple con los requisitos esenciales y cualesquiera otras disposiciones aplicables o exigibles de la Directiva 1999/5/CE.
Ελληνική [Greek] ΜΕ ΤΗΝ ΠΑΡΟΥΣΑ NETGEAR Inc. ΔΗΛΩΝΕΙ ΟΤΙ Radiolan ΣΥΜΜΟΡΦΩΝΕΤΑΙ ΠΡΟΣ ΤΙΣ ΟΥΣΙΩΔΕΙΣ ΑΠΑΙΤΗΣΕΙΣ ΚΑΙ ΤΙΣ ΛΟΙΠΕΣ ΣΧΕΤΙΚΕΣ ΔΙΑΤΑΞΕΙΣ ΤΗΣ ΟΔΗΓΙΑΣ 1999/5/ΕΚ.
Français [French] Par la présente NETGEAR Inc. déclare que l'appareil Radiolan est conforme aux exigences essentielles et aux autres dispositions pertinentes de la directive 1999/5/CE.
Italiano [Italian] Con la presente NETGEAR Inc. dichiara che questo Radiolan è conforme ai requisiti essenziali ed alle altre disposizioni pertinenti stabilite dalla direttiva 1999/5/CE.
Latviski [Latvian] Ar šo NETGEAR Inc. deklarē, ka Radiolan atbilst Direktīvas 1999/5/EK būtiskajām prasībām un citiem ar to saistītajiem noteikumiem.
Lietuvių [Lithuanian] Šiuo NETGEAR Inc. deklaruoja, kad šis Radiolan atitinka esminius reikalavimus ir kitas 1999/5/EB Direktyvos nuostatas.
Nederlands [Dutch]
Hierbij verklaart NETGEAR Inc. dat het toestel Radiolan in overeenstemming is met de essentiële eisen en de andere relevante bepalingen van richtlijn 1999/5/EG.
Malti [Maltese] Hawnhekk, NETGEAR Inc., jiddikjara li dan Radiolan jikkonforma mal-htigijiet essenzjali u ma provvedimenti ohrajn relevanti li hemm fid-Dirrettiva 1999/5/EC.
Magyar [Hungarian
Alulírott, NETGEAR Inc. nyilatkozom, hogy a Radiolan megfelel a vonatkozó alapvetõ követelményeknek és az 1999/5/EC irányelv egyéb elõírásainak.
Polski [Polish] Niniejszym NETGEAR Inc. oświadcza, że Radiolan jest zgodny z zasadniczymi wymogami oraz pozostałymi stosownymi postanowieniami Dyrektywy 1999/5/EC.
Português [Portuguese]
NETGEAR Inc. declara que este Radiolan está conforme com os requisitos essenciais e outras disposições da Directiva 1999/5/CE.
Slovensko [Slovenian]
NETGEAR Inc. izjavlja, da je ta Radiolan v skladu z bistvenimi zahtevami in ostalimi relevantnimi določili direktive 1999/5/ES.
Slovensky [Slovak] NETGEAR Inc. týmto vyhlasuje, že Radiolan spĺňa základné požiadavky a všetky príslušné ustanovenia Smernice 1999/5/ES.
Suomi [Finnish] NETGEAR Inc. vakuuttaa täten että Radiolan tyyppinen laite on direktiivin 1999/5/EY oleellisten vaatimusten ja sitä koskevien direktiivin muiden ehtojen mukainen.
Language Statement
Appendix C. Notification of Compliance | 29
Push2TV HD TV Adapter for Intel® Wireless Display User Manual
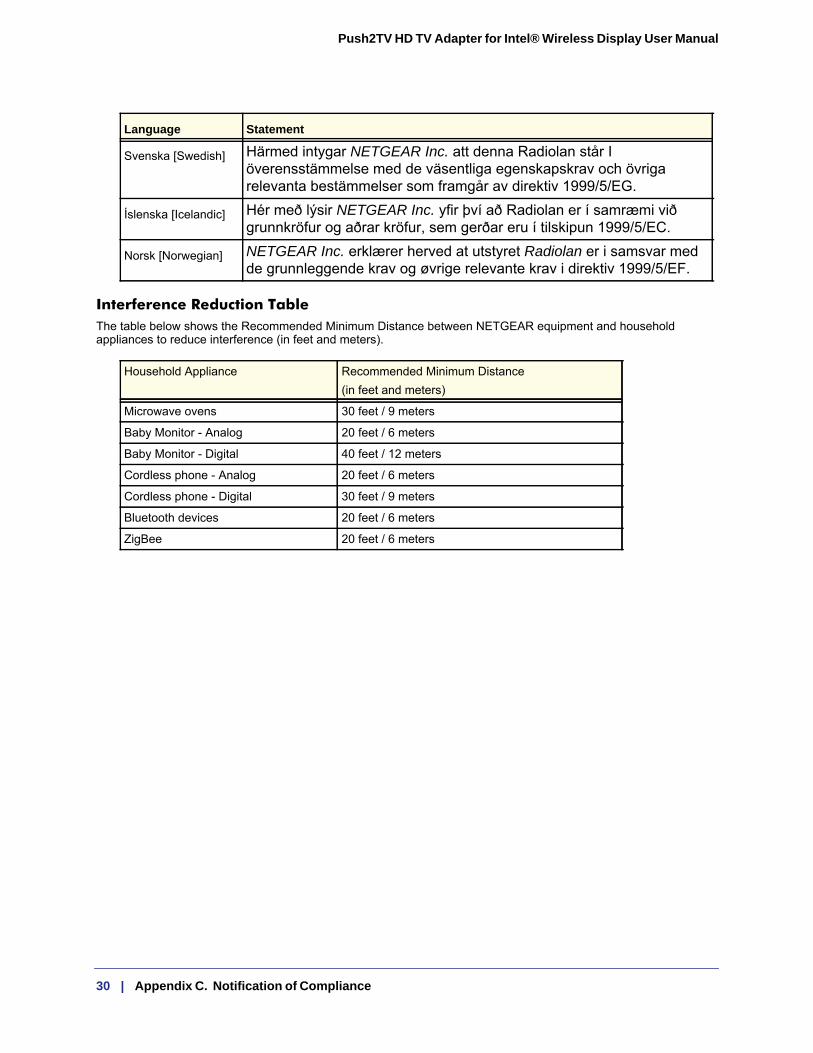
Interference Reduction TableThe table below shows the Recommended Minimum Distance between NETGEAR equipment and household appliances to reduce interference (in feet and meters).
Household Appliance Recommended Minimum Distance(in feet and meters)
Microwave ovens 30 feet / 9 meters
Baby Monitor - Analog 20 feet / 6 meters
Baby Monitor - Digital 40 feet / 12 meters
Cordless phone - Analog 20 feet / 6 meters
Cordless phone - Digital 30 feet / 9 meters
Bluetooth devices 20 feet / 6 meters
ZigBee 20 feet / 6 meters
Svenska [Swedish] Härmed intygar NETGEAR Inc. att denna Radiolan står I överensstämmelse med de väsentliga egenskapskrav och övriga relevanta bestämmelser som framgår av direktiv 1999/5/EG.
Íslenska [Icelandic] Hér með lýsir NETGEAR Inc. yfir því að Radiolan er í samræmi við grunnkröfur og aðrar kröfur, sem gerðar eru í tilskipun 1999/5/EC.
Norsk [Norwegian] NETGEAR Inc. erklærer herved at utstyret Radiolan er i samsvar med de grunnleggende krav og øvrige relevante krav i direktiv 1999/5/EF.
Language Statement
30 | Appendix C. Notification of Compliance