Embed Size (px)
Citation preview
Publisher v.3
Description Publisher - Xcode project of universal iOS app for selling PDF publications. Programming language - Swift 3.
Complitable with iOS9 - iOS 10.3: iPhone 4s, 5, 5c, 5s, 6, 6 Plus, SE, 6s, 6s Plus, 7, 7Plus iPad 2, 3, Mini, Mini 2, Mini 3, Mini 4, Air, Pro iPod Touch 5g, 6g
Questions? email me: [email protected] !2
Publisher v.3
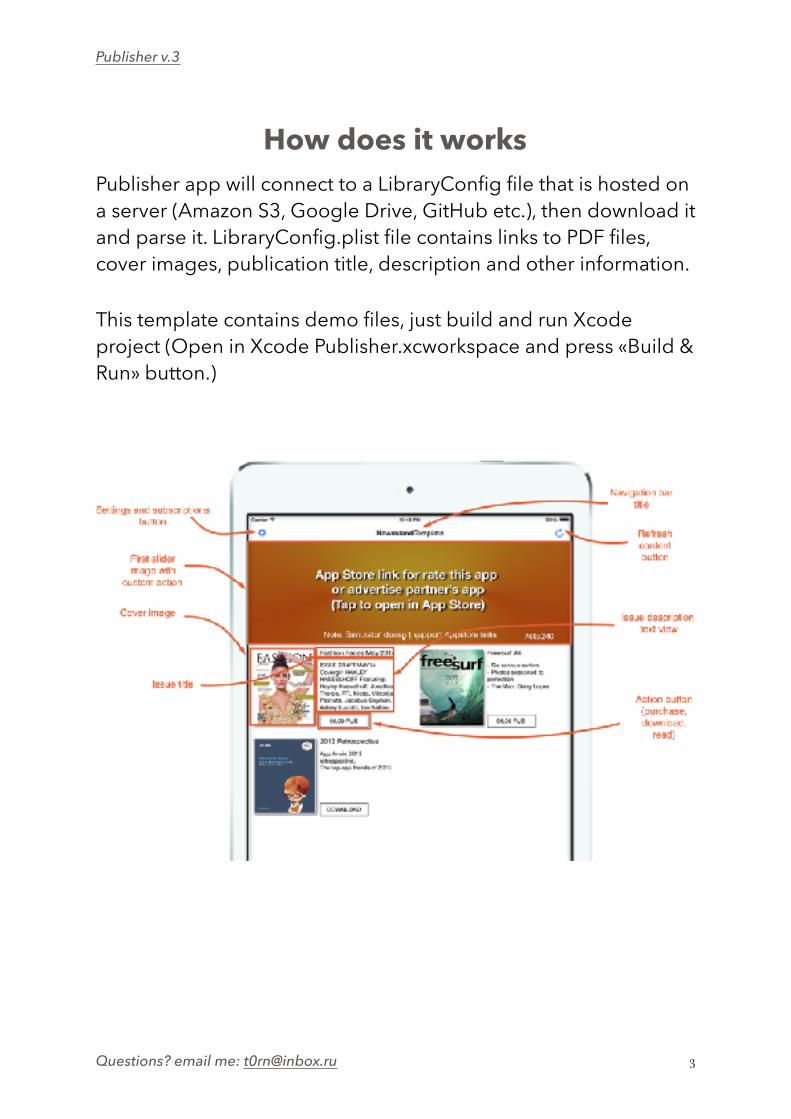
How does it works Publisher app will connect to a LibraryConfig file that is hosted on a server (Amazon S3, Google Drive, GitHub etc.), then download it and parse it. LibraryConfig.plist file contains links to PDF files, cover images, publication title, description and other information. This template contains demo files, just build and run Xcode project (Open in Xcode Publisher.xcworkspace and press «Build & Run» button.)
Questions? email me: [email protected] !3
Publisher v.3
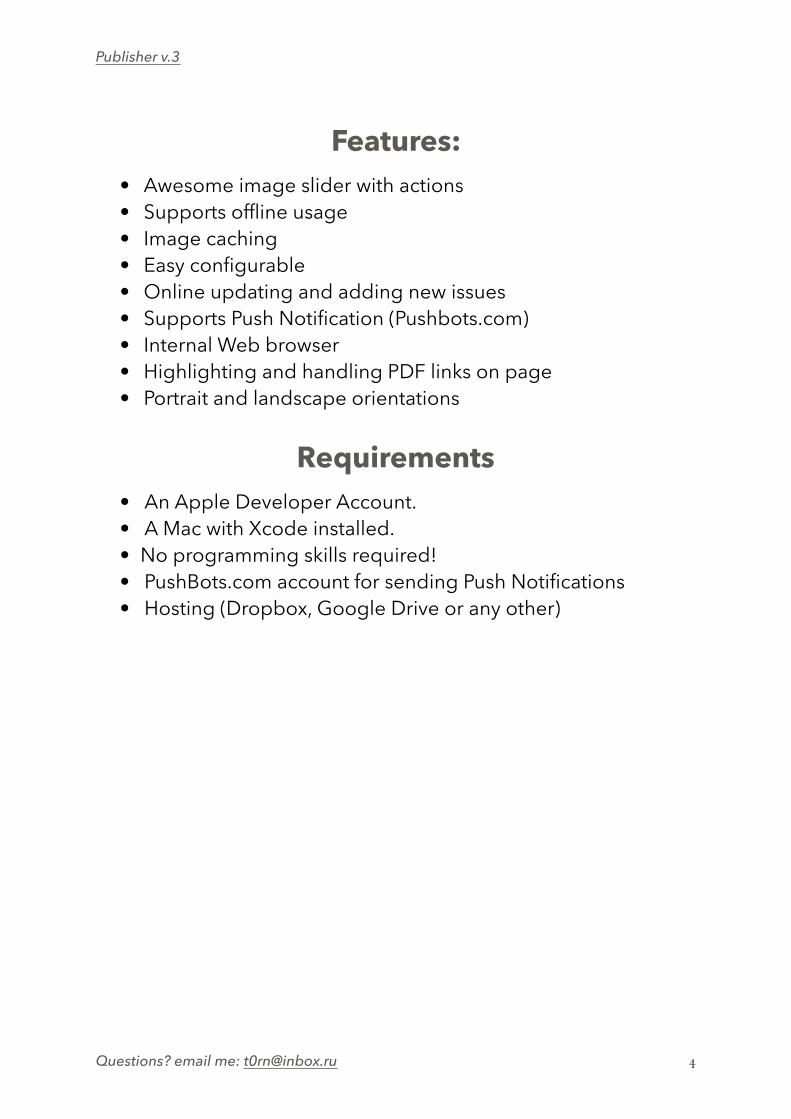
Features: • Awesome image slider with actions • Supports offline usage • Image caching • Easy configurable • Online updating and adding new issues • Supports Push Notification (Pushbots.com) • Internal Web browser • Highlighting and handling PDF links on page • Portrait and landscape orientations
Requirements • An Apple Developer Account. • A Mac with Xcode installed. • No programming skills required! • PushBots.com account for sending Push Notifications • Hosting (Dropbox, Google Drive or any other)
Questions? email me: [email protected] !4
Publisher v.3
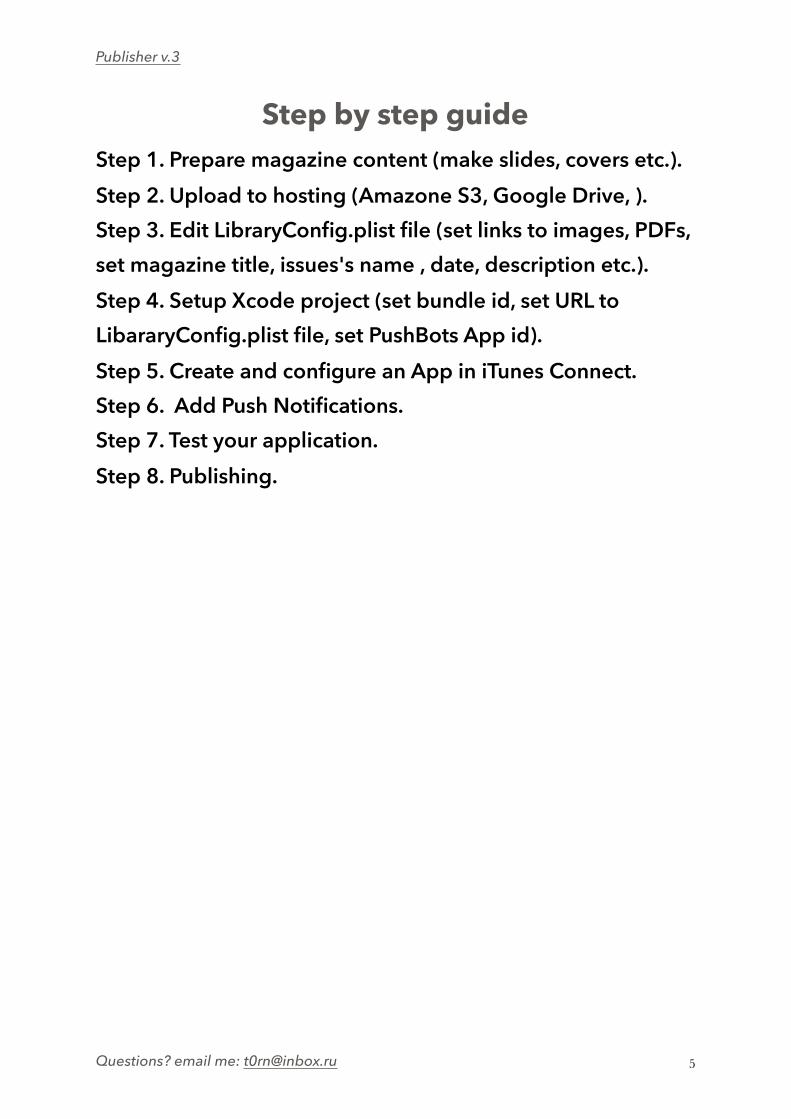
Step by step guide Step 1. Prepare magazine content (make slides, covers etc.). Step 2. Upload to hosting (Amazone S3, Google Drive, ). Step 3. Edit LibraryConfig.plist file (set links to images, PDFs, set magazine title, issues's name , date, description etc.). Step 4. Setup Xcode project (set bundle id, set URL to LibararyConfig.plist file, set PushBots App id). Step 5. Create and configure an App in iTunes Connect. Step 6. Add Push Notifications. Step 7. Test your application. Step 8. Publishing.
Questions? email me: [email protected] !5
Publisher v.3
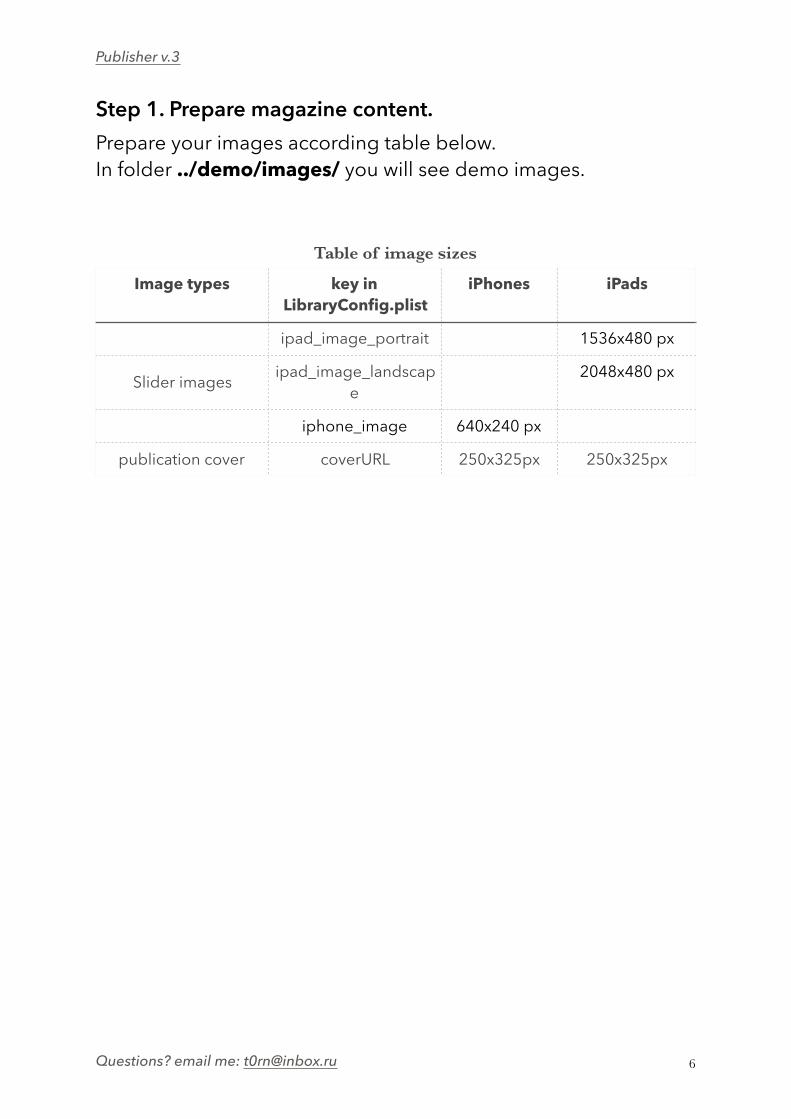
Step 1. Prepare magazine content. Prepare your images according table below. In folder ../demo/images/ you will see demo images.
Table of image sizes
Image types key in LibraryConfig.plist
iPhones iPads
Slider images
ipad_image_portrait 1536x480 px
ipad_image_landscape
2048x480 px
iphone_image 640x240 px
publication cover coverURL 250x325px 250x325px
Questions? email me: [email protected] !6
Publisher v.3
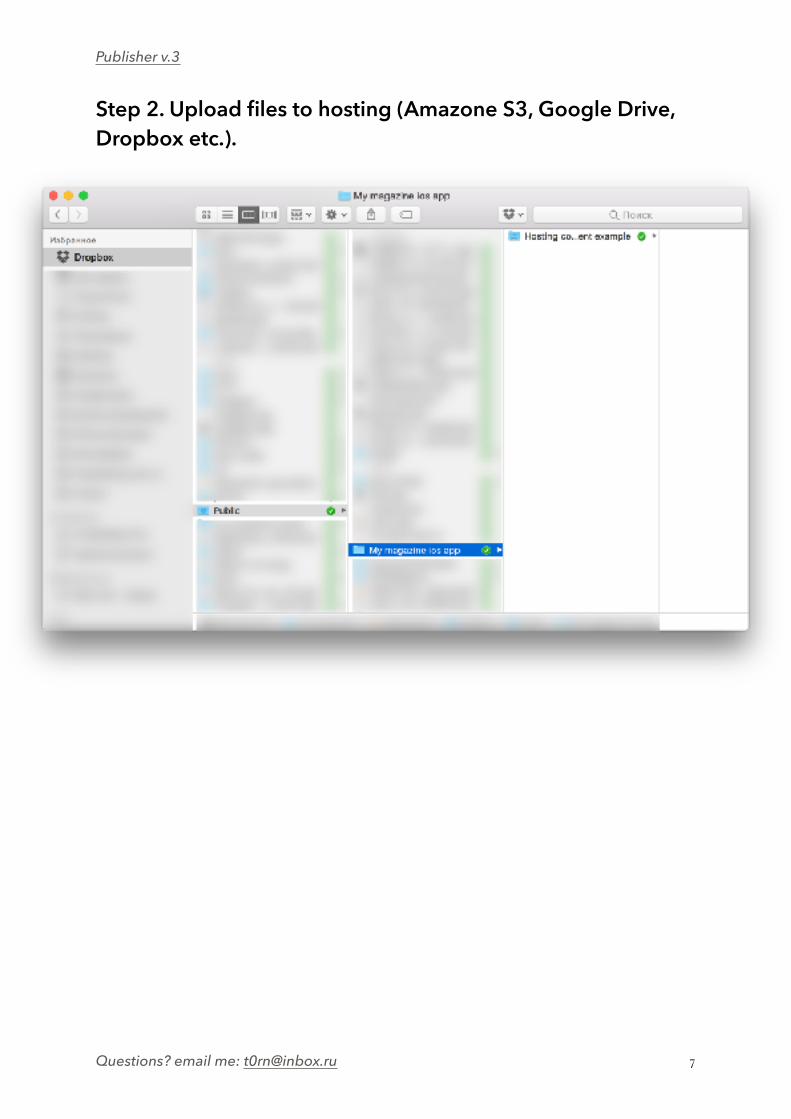
Step 2. Upload files to hosting (Amazone S3, Google Drive, Dropbox etc.).
Questions? email me: [email protected] !7
Publisher v.3
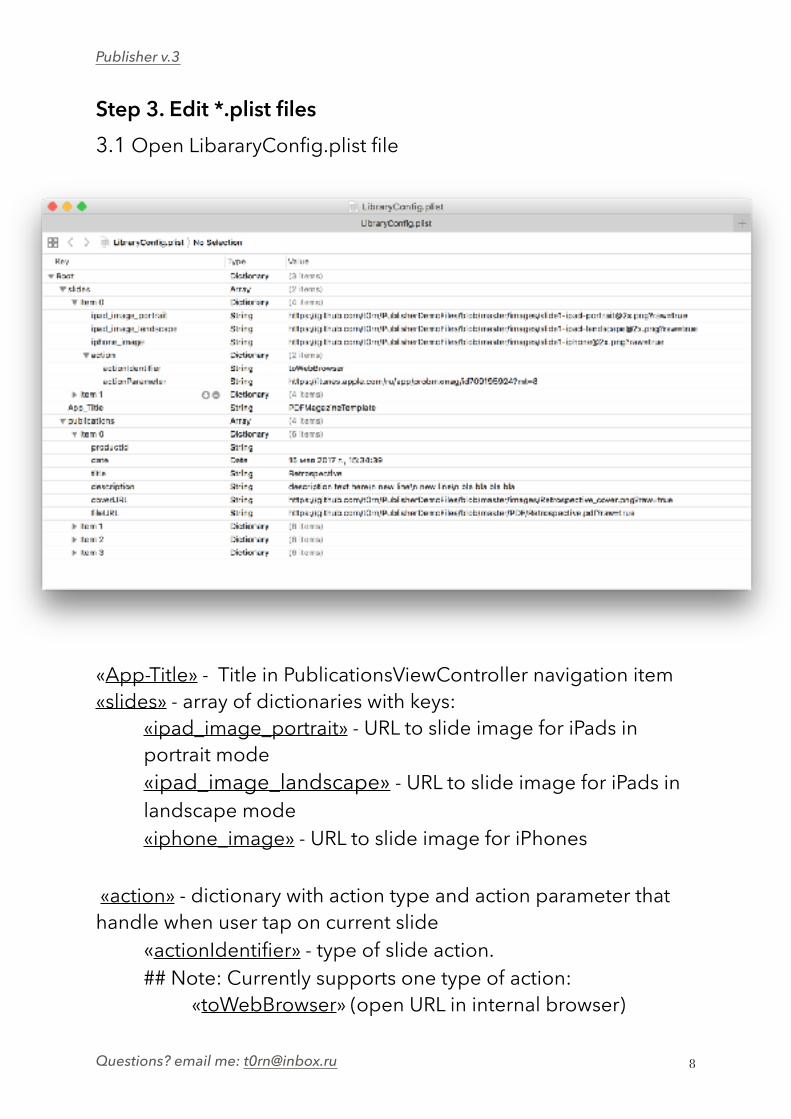
Step 3. Edit *.plist files 3.1 Open LibararyConfig.plist file
«App-Title» - Title in PublicationsViewController navigation item «slides» - array of dictionaries with keys: «ipad_image_portrait» - URL to slide image for iPads in portrait mode «ipad_image_landscape» - URL to slide image for iPads in landscape mode «iphone_image» - URL to slide image for iPhones
«action» - dictionary with action type and action parameter that handle when user tap on current slide «actionIdentifier» - type of slide action. ## Note: Currently supports one type of action: «toWebBrowser» (open URL in internal browser)
Questions? email me: [email protected] !8
Publisher v.3
«actionParameter» - URL for internal browser
«publications» - array of dictionaries that describes each publication «productId» - Product ID for "non-consumable" purchase «date» - Publication date «title» - title publication ## Note: publications will be ordered by date ## «description» - description of current issue (use “\n” for new line) «coverURL" - URL to cover image «fileURL» - URL to PDF file
Replace URLs from step 2, then save a LibraryConfig.plist file, upload to a hosting and copy direct URL to this file. You will need this URL for next step.
Questions? email me: [email protected] !9
Publisher v.3
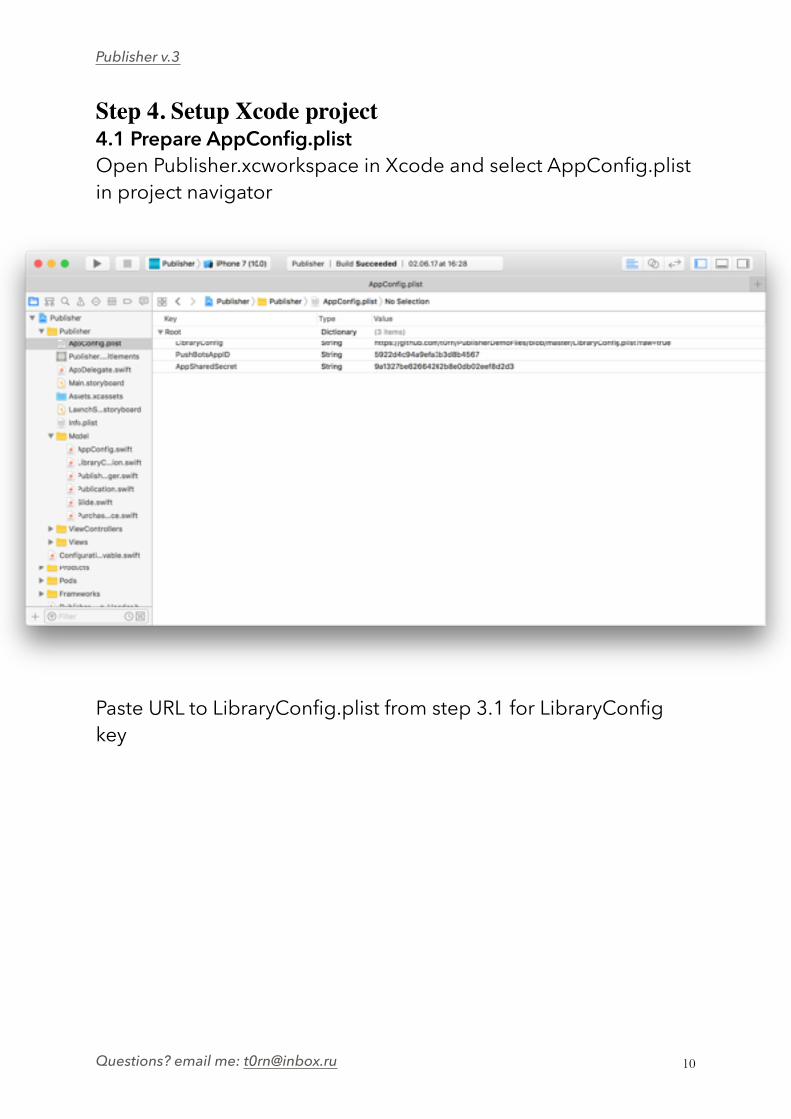
Step 4. Setup Xcode project4.1 Prepare AppConfig.plist Open Publisher.xcworkspace in Xcode and select AppConfig.plist in project navigator
Paste URL to LibraryConfig.plist from step 3.1 for LibraryConfig key
Questions? email me: [email protected] !10
Publisher v.3
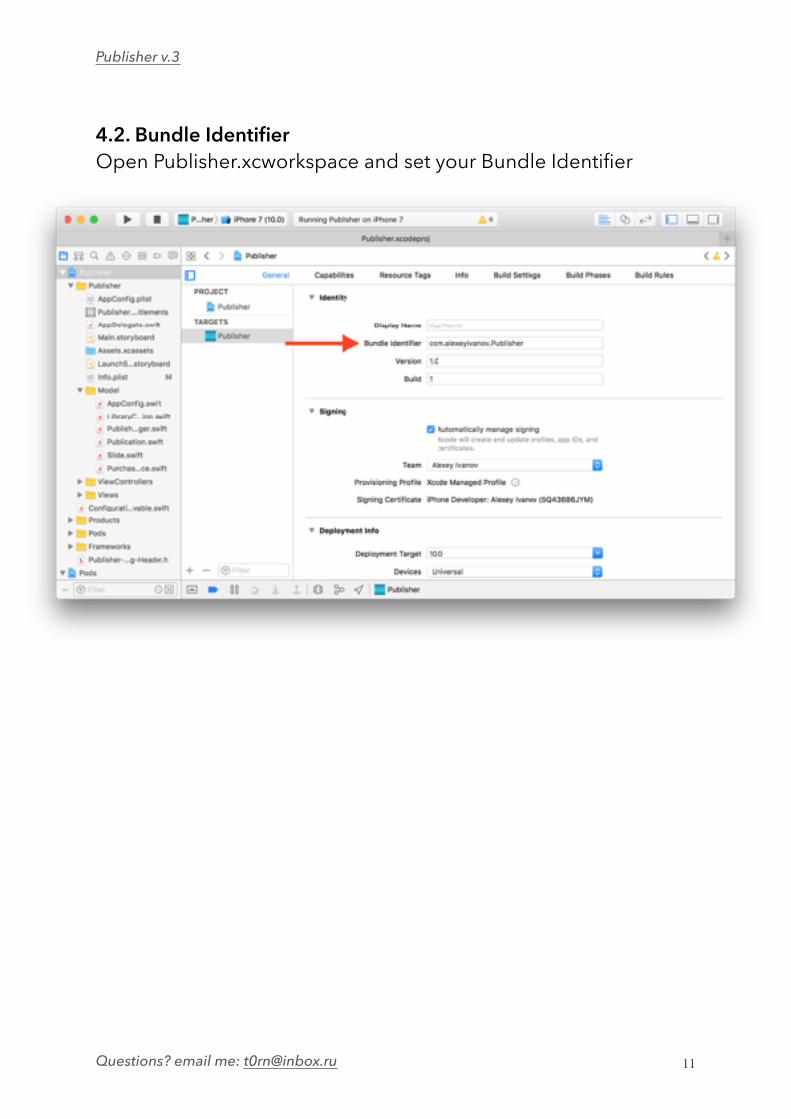
4.2. Bundle Identifier Open Publisher.xcworkspace and set your Bundle Identifier
Questions? email me: [email protected] !11
Publisher v.3
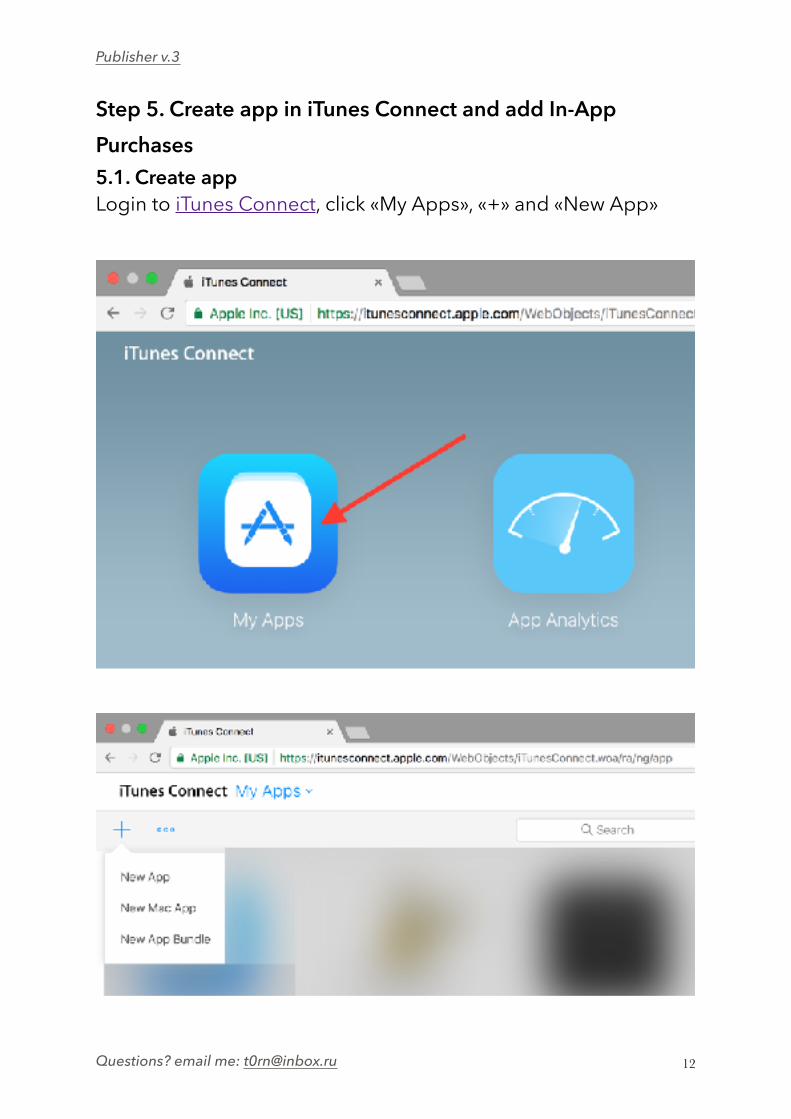
Step 5. Create app in iTunes Connect and add In-App Purchases 5.1. Create app Login to iTunes Connect, click «My Apps», «+» and «New App»
Questions? email me: [email protected] !12
Publisher v.3
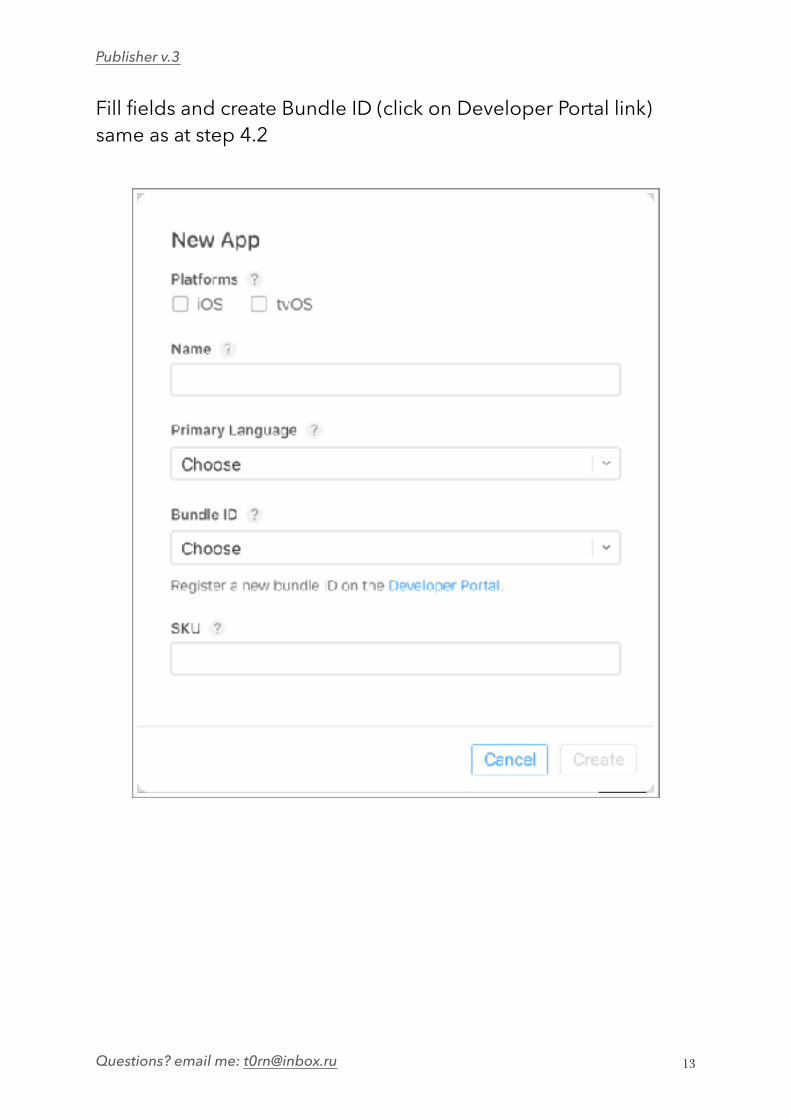
Fill fields and create Bundle ID (click on Developer Portal link) same as at step 4.2
Questions? email me: [email protected] !13
Publisher v.3
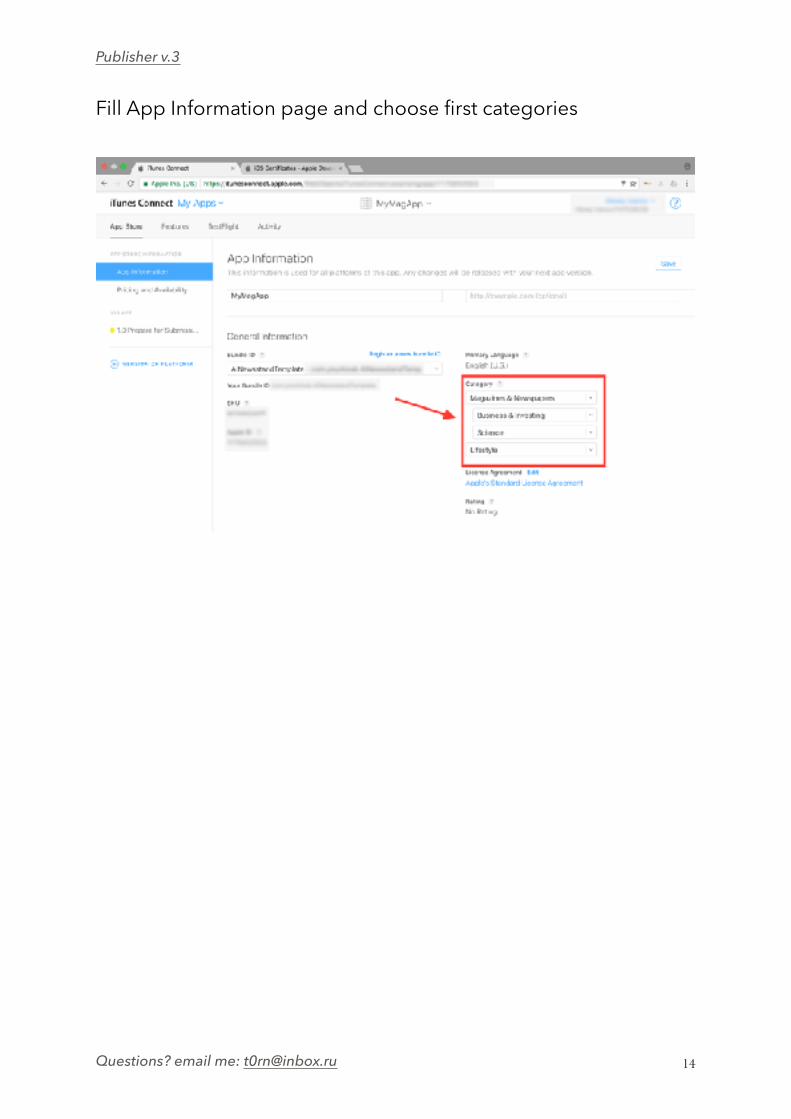
Fill App Information page and choose first categories
Questions? email me: [email protected] !14
Publisher v.3
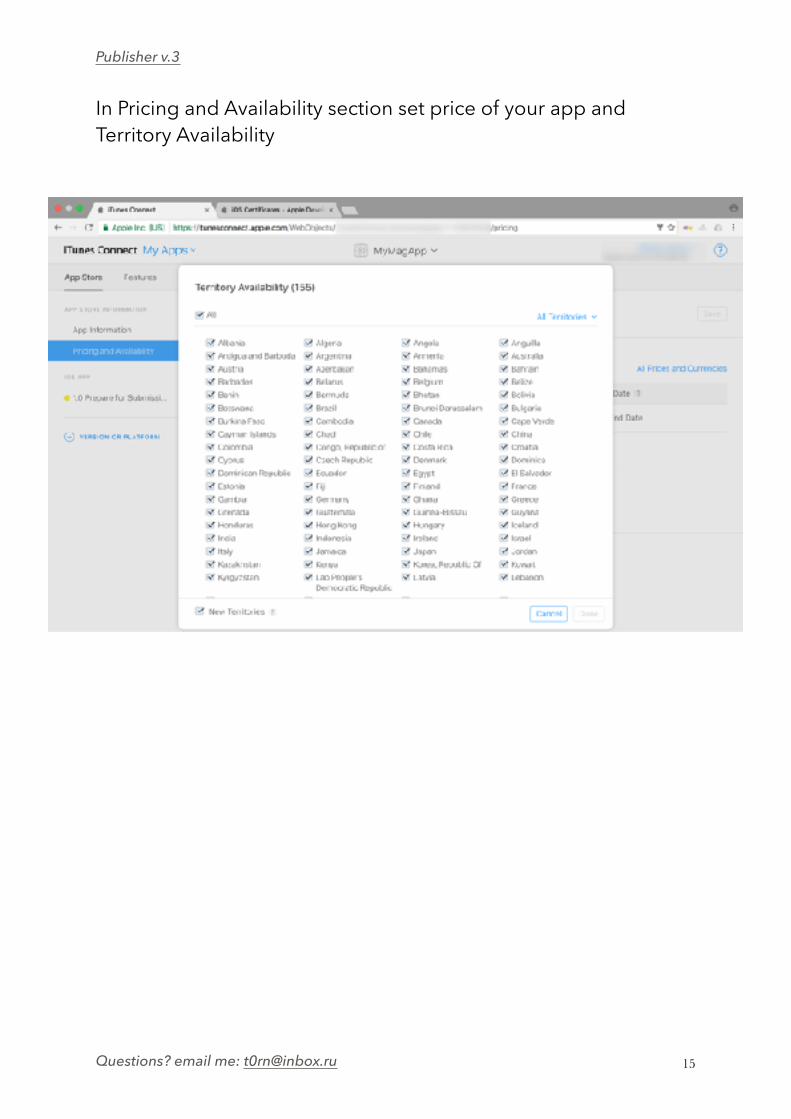
In Pricing and Availability section set price of your app and Territory Availability
Questions? email me: [email protected] !15

Publisher v.3
Copy and paste Shared Secret code into AppConfig.plist for AppSharedSecret key
Questions? email me: [email protected] !16
Publisher v.3
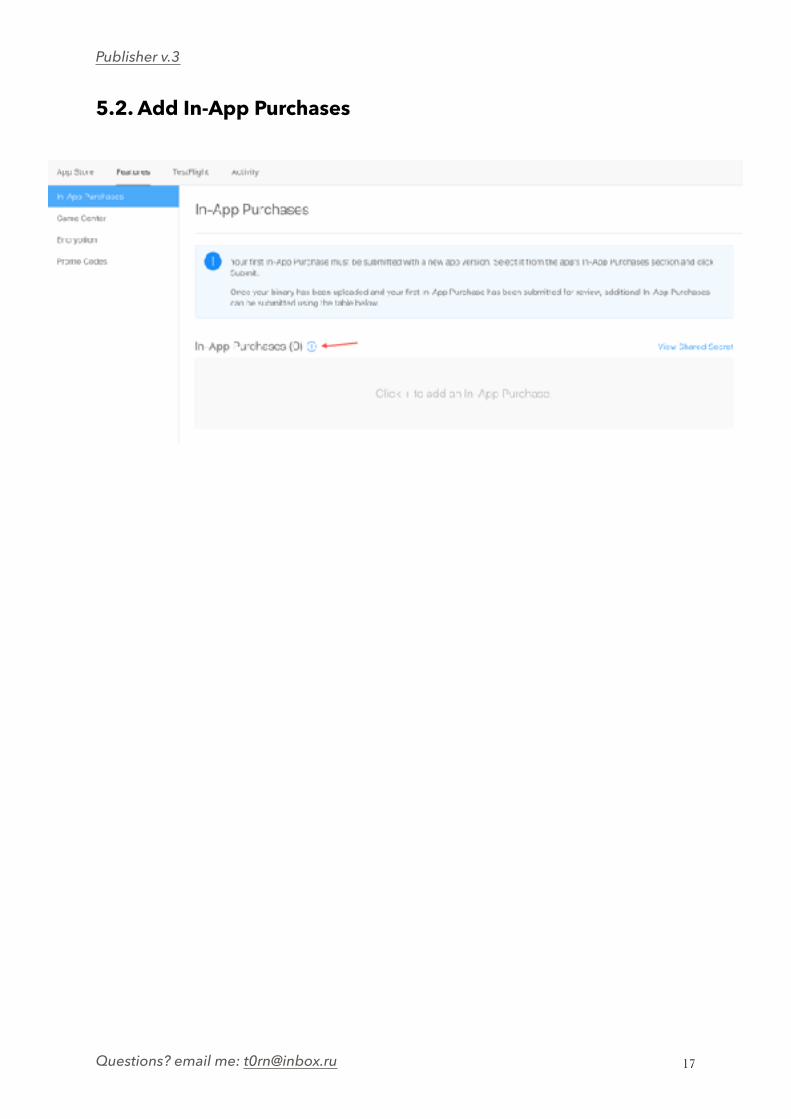
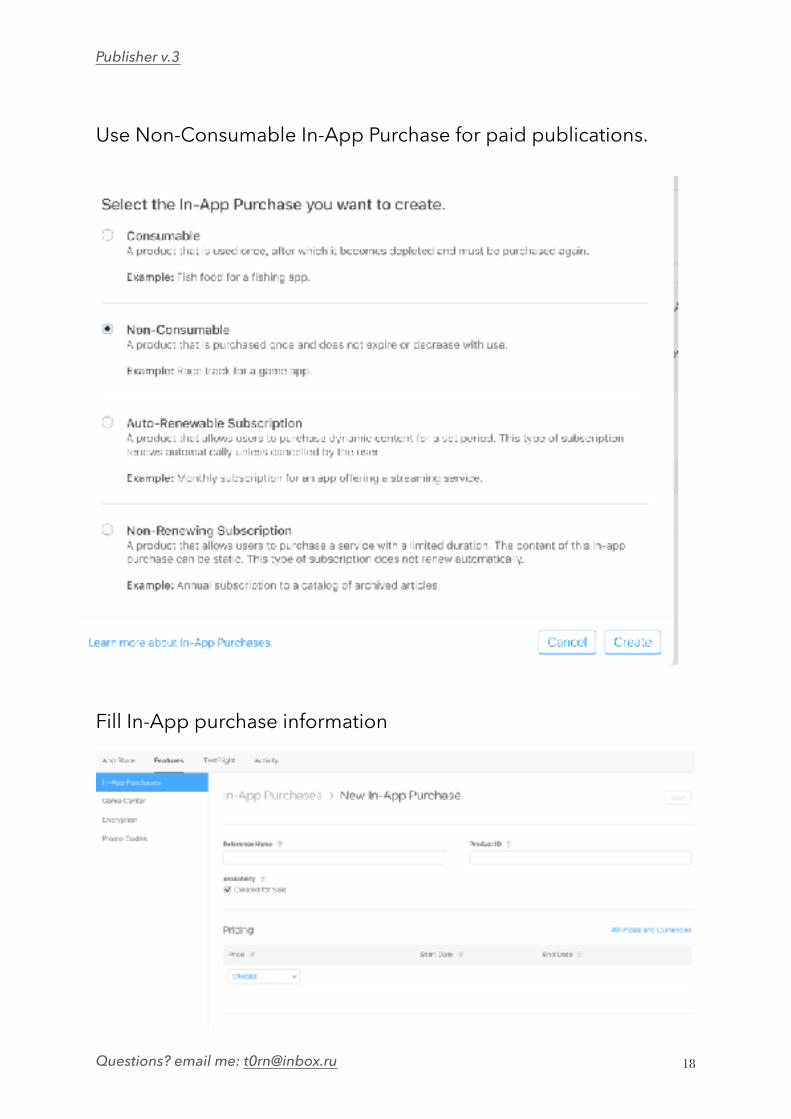
Use Non-Consumable In-App Purchase for paid publications.
Fill In-App purchase information
Questions? email me: [email protected] !18

Publisher v.3
Copy and paste «Product ID» into LibraryConfig.plist productId key’s value. Don’t turn on Apple content hosting.
In-App purchases testing notes:Double check Bundle ID in iTunes Connect and in Xcode project
Use real device for testing. In-App Purchases in iTunes Connect should have «Ready to
Submit» status. Data about purchasing stored in Apple «Keychain», so user will be
able to download publication even after reinstallation of application.
Please read Testing In-App Purchase Products for better understanding.
Questions? email me: [email protected] !19
Publisher v.3
Step 6. Add Push Notifications 6.1. Generate App Id for PushBots.com SDK Register on https://pushbots.com and create new app on dashboard. Copy «Application ID» for this app and paste into AppConfig.plist PushBotsAppID key’s value
6.2. Configure App for push notifications Go through steps 1-3 from https://pushbots.com/developer/docs/ios-configuration
Please test push notifications on real devices.
Questions? email me: [email protected] !20