Embed Size (px)
Citation preview

PUB-NP-025
Attachment D
Requests for Information NP 2016/2017 GRA
Newfoundland Power – 2016/2017 General Rate Application
Test Procedures

Maintenance Standard Number: MST001
Effective Date: 2009-07-17
Superseding Date: 1992-08-31
Page 1 of 2
TEST PROCEDURE BATTERY CAPACITY TEST
Created by: G. Mayo Reviewed by: G. Samms
Revised by: B. Ropson Approved by: G. Samms
Battery capacity is usually given in ampere-hours for an eight hour discharge. This will be the maximum amps it can
discharge for eight hours at a temperature of 77oF, to a minimum voltage of 1.75 volts per cell. See MSR001-3 for
the affects of battery temperature on battery capacity.
Materials Required for a Capacity Test
a) Portable load box;
b) Spare battery bank;
c) Jumper cables to remove batteries from service;
d) A digital voltmeter;
e) An electrolyte thermometer;
f) An hydrometer;
g) Battery Discharge Test forms;
h) An instruction manual for the charger.
Procedure for a Battery Capacity Test
1. An equalizing charge must be given at least 3 days and not more than 7 days before a test.1 Ensure that the
charger is set at the correct float and equalize voltage at this time.
2. Make sure all battery connections are clean, tight and free of corrosion.
3. While the battery is on float, read and record the specific gravity, the voltage of each cell, the temperature of
the pilot cell and the battery terminal float voltage. Voltage readings should be taken with a digital voltmeter
capable of reading accurately to two decimal places.
4. If it is necessary to maintain DC, substitute the spare battery bank for the unit to be tested. Isolate the unit to be
tested.
5. The correct value of discharge current for a three-hour discharge test can usually be found in MP2; the
manufacturer’s specifications; or in case neither source lists the required information we can use a rule of
thumb (i.e. 3-hour discharge rate = 2 x 8-hour discharge rate).
6. Set up the Broman Model 123 portable load box as per the manufacturer’s instructions to apply a load
equivalent to the temperature corrected 3-hour discharge rate.
Temperature correction formula to obtain the correct discharge current:
It = Id – Id x [(0.06 x (Ts – Te)) / 100]
Where: It = temperature corrected discharge current
Id = discharge current at rated temperature
Ts = standard temperature, usually 77oF
Te = temperature of the electrolyte2
Readings should be recorded as per the Battery Discharge Test Form (MSF017) at 15-minute intervals.
PUB-NP-025, Attachment D Page 1 of 57

2009-07-17
Page 2 of 2
TEST PROCEDURE BATTERY CAPACITY TEST
7. Measure the voltage drop across the intercell connecters. This should be about 7mV.
8. When the voltage of any cell falls below 1.75 volts, the test must be interrupted while the cell is removed from
the circuit. The time duration of this interruption must be subtracted from Ta when doing the capacity
calculation.
9. The test shall be terminated when the average voltage of the remaining cells falls below 1.75 volts per cell or
when the 3 hours are up.
10. Battery capacity is calculated as follows:
% Capacity at 25oC (77
oF) = (Ta x 100) / Ts
Where: Ta = actual time duration of test (hours)
Ts = rated time duration of test (hours)
The available ampere-hours will vary with age and history (charging cycles) of the battery. In normal service
the battery, when new, will have as little as 85% of its full rating. After one to two years of service, it will reach
a maximum condition of 100% and thereafter will decline. Since the main purpose of a station battery is to
provide a highly reliable power supply, the battery will be discarded when it declines to 80% capacity.
11. Set the current limit on the charger.
12. Recharge the battery using an equalizing charge.1
1 - Not applicable to Gelled Electrolyte Batteries.
2 - The temperature inside a maintenance free battery can be found by putting a thermometer on the post.
PUB-NP-025, Attachment D Page 2 of 57

Maintenance Standard Number: MST002
Effective Date: 2009-07-17
Superseding Date: N/A
Page 1 of 1
TEST PROCEDURE BATTERY CYCLING
Created by: B. Ropson Reviewed by: G. Samms
Revised by: B. Ropson Approved by: G. Samms
To cycle a battery:
1. Discharge with a 10-Ohm, 15-Watt resistor to a terminal voltage of 10V;
2. Recharge it with a voltage regulated DC supply set to 13.8V. A 3A current-limited supply is appropriate.
PUB-NP-025, Attachment D Page 3 of 57

Maintenance Standard Number: MST003
Effective Date: 2009-07-17
Superseding Date: N/A
Page 1 of 3
TEST PROCEDURE BATTERY IMPEDANCE TEST
Created by: B. Ropson Reviewed by: G. Samms
Revised by: J. Barry Approved by: G. Samms
The following instructions are specific to the Biddle Bite 2P Battery Impedance Tester.
Note: For messages requiring a yes/no response, a ‘yes’ is indicated by pressing the ▲ button and a ‘no’ is indicated
by pressing the ▼ button.
1. Set up the Receiver first.
2. Turn on the unit, then a series of messages will flash across the screen.
3. The display stops at WAND “Y or N”. Since we are not currently using bar codes, press the ▼ button to
indicate that we are not using a bar code scanner. If we start using bar codes, press the ▲ button and scan the
necessary data for the site, cell and ambient temperature.
4. The display stops at ENTER BASELINE “Y or N”. If you want to enter a baseline value, press the ▲ button
and enter the value by scrolling to enter 0 to 9 plus the decimal point using the ▲ and/or the ▼ buttons. Use the
<Enter> key to move to the next character. It will ask for a warning level in percent change from the baseline,
then a fail level.
5. The display then stops at SPLIT STRAP “Y or N”. If your test current path is split among a number of straps,
press “Y”. Enter the number of parallel paths and save (scroll through the # with the <Enter> key then press
<Enter> again to confirm). If your test current path involves only one strap press ▼. Typically we do not use
parallel straps, so normally the answer would be no.
6. The display will ask if you wish to SAVE SETTINGS “Y or N”. If no, then it will return to ENTER
BASELINE “Y or N”. If you are satisfied with the entries, press the ▲ key.
7. The display tells you to connect the “CT”, then measure the RIPPLE CURRENT flowing in the battery circuit.
To store the ripple current measurement, pull the trigger. Refer to Figure 1.
Figure 1
8. The display reads CONNECT & POWER TRANSMITTER. Connect the transmitter to 120 Vac power and turn
on switch S1.
PUB-NP-025, Attachment D Page 4 of 57

2009-07-17
Page 2 of 3
TEST PROCEDURE BATTERY IMPEDANCE TEST
9. Connect all leads, red to the (+) bus and black to the (-) bus. For consistent results make the current source
lead connections to the cable, lug or terminal plate that connects to the battery terminals. See Figure 2.
10. Press the “Current On/Off” switch. After a short delay, the Current Ready lamp lights and the LCD displays the
magnitude of current applied across the battery system.
Figure 2
11. The receiver display will show the total test and ripple currents flowing in the battery circuit. Pull the trigger to
save the total test current measurement.
12. The display’s first line will show 001 and the actual current level in the battery string. If the test current is
outside the test limits, the display shows Lo/Hi. The second line shows TEST NUMBER 001, 002, etc.
13. Position the Receiver at the + post of the #1 cell, and the small probe at the - post of the #1 cell. See Figure 3.
Figure 3
14. The display will show the (+) cell voltage and the impedance measurement. Pull the trigger to store the data.
15. For a moment the display will show the status of the cell compared to the baseline value, if entered.
PUB-NP-025, Attachment D Page 5 of 57

2009-07-17
Page 3 of 3
TEST PROCEDURE BATTERY IMPEDANCE TEST
16. The second line of the display shows STRAP. Move the Receiver to the (+) post of the next cell. The second
display line will show the strap impedance. Pull the trigger. The beeper will sound and readings will be stored.
Refer to Figure 4.
17. The display advances to cell number (n+1). Repeat steps 13 through 16 until all cells are measured. After every
fourth cell, the amount of memory remaining in the receiver is displayed.
Figure 4
18. After all the cells are measured, “short” the probe ends and pull the trigger. This creates a false strap
measurement, which completes the last line of data. If this is not done, the impedance, DC volts, and
strap resistance for the last cell will be lost.
19. Arrow Key Up to review data, or Arrow Key Down to end the test sequence. When the display shows an action
message, stop and follow the instructions.
20. At this point you may either close the test or print the active test to review the stored data. If the test is closed,
no further testing/retesting can be performed on that test.
21. Disconnect “CT” and probe, and turn off the transmitter. Disconnect the current source injection leads.
22. To print the data on the BITE 2P transmitter printer, connect the data transfer cable to the “J3 RS232” port on
the Receiver and connect to the “J3-Printer” port on the transmitter. The Receiver will prompt you for actions.
All tests may be printed or only selected tests can be printed.
23. At this point the data must be downloaded to the ProActiv database. If a company laptop is available with the
ProActiv software it can be downloaded directly. Otherwise you must perform all tests and return to an area
where a computer is available that contains the ProActiv software.
24. Instructions for using ProActiv can be found on Webster. The path is:
Departments –>Engineering –> Substation –> Substation Maintenance Standards –> Reference –> MSR001 – Batteries
and Battery Chargers -> MSR001-02 – ProActiv Software Instructions
PUB-NP-025, Attachment D Page 6 of 57

The following instructions are specific to the Megger BITE3 Battery Impedance Tester. NOTE: To select something use the arrow keys to highlight it and press the RETURN (blue) key The required equipment for the battery impedance test is the Megger BITE3, a set of dual-lead test guns, and a Fluke clamp-type CT, as illustrated in Figure 1.
Figure 1 - MEGGER BITE3
PUB-NP-025, Attachment D Page 7 of 57

1.0 Setup 1-1. If the battery bank of interest already has its string information on this apparatus, then
skip ahead to the section on testing. 1-2. Before going on-site to perform testing, it will be necessary to import site and string
information to the BITE3 for the battery bank to be tested. Connect the BITE3 to a computer via the serial port with the cable provided and power up the unit.
1-3. Start the ProActiv software. Choose INSTRUMENT UTILITIES – STRING
INFORMATION EXPORT from the top menu, refer to Figure 2.
Figure 2 - ProActiv
1-4. Choose the proper string to upload to the BITE3, making sure the “Include Last Test”
checkbox is clear, and click “Export”, refer to Figure 3.
Figure 3 - Export Data
PUB-NP-025, Attachment D Page 8 of 57

2.0 Testing 2-1. Connect the test guns and CT to the BITE3 and power up the unit. 2-2. If the battery bank to be tested is of parallel cells type, with no posts available to test for
each cell (eg. a bank of car batteries), it will be necessary to change the CT setup to ESCAPE CURRENT as opposed to IMPEDANCE. To do this, press MENU, choose CONFIGURE and INSTRUMENT, and change the field for CT TYPE. Then press MENU and choose SAVE AND CONTINUE.
2-3. Place the CT around a strap or cable in the battery circuit. Usually, it is best to use a point
near the middle of the circuit. 2-4. Press MENU and choose NEW TEST. Select the proper site and string for the test by
highlighting the appropriate field and using the up and down arrows. Press MENU and SELECT AND CONTINUE. You will be prompted for a temperature reading. Input the temperature and push RETURN.
2-5. The BITE3 will then attempt a float current measurement. If an Out of Range error
occurs, press MENU and select MEASURE IMPEDANCE. Refer to section 4-1 for Out of Range information.
2-6. Connect the red-backed test gun to the positive pole of cell 1 and the black gun to the
negative pole. 2-7. When the LED indicators on the back of the test guns blink yellow, a connection has been
made. Click the trigger to take a reading. When the machine beeps and the LED indicators turn green the reading is finished. This should take 15-20 seconds. If a reading comes back with NOISE DETECTED, press MENU and DISCARD MEASUREMENT. You will be asked to confirm the measurement removal.
2-8. CONFIRM STRAP message may appear during measurements. If a strap is being
measured click the trigger and continue measurements. This message may also appear when measuring cells that have low voltage readings. To identify a cell toggle NO by pressing the right arrow key, then click the trigger.
2-9. Continue taking the readings in sequence. The BITE3 automatically classifies each
reading as a cell or strap reading. Shorted-lead readings as for the BITE2 are no longer required.
2-10. To retake a test scroll to the test in question and press the right arrow key. This places
the test in edit mode. Next, take the measurement by clicking the trigger. Then, push the left arrow key to save the changes.
PUB-NP-025, Attachment D Page 9 of 57

NOTE: For error information refer to section 4-1. 2-11. At the end of the test, press MENU and select SAVE AND CLOSE. 2-12. To print the test results connect the printer to the serial port on the BITE3 using the cable
and adaptor provided. Press MENU, select ANALYZE and push RETURN. Choose the proper test and press MENU, and choose SELECT AND CONTINUE to view the test results. To print a hard copy, press MENU again and select PRINT. Be sure to print two copies of the test result; one to leave in the substation and one to bring back to the shop.
2-13. At this point the data must be downloaded to the ProActiv database. If a company laptop is available with the ProActiv software it can be downloaded directly. Otherwise you must perform all tests and return to an area where a computer is available that contains the ProActiv software.
3.0 Exporting Test Results to ProActiv 3-1. Connect the BITE3 to the computer by the serial port using the cable provided. 3-2. Open ProActiv and power up the BITE3. 3-3. From the ProActiv main menu, choose IMPORT DATA – IMPORT FROM
INSTRUMENT – BITE3. Data transfer should begin. 3-4. Select the checkbox for each result set to be saved. If Configuration Integrity is marked
with a red ‘X’, click on the appropriate Result Set link (for example, click on “Set 1 (60 cells)” which is highlighted in blue). This will show you the error which caused the failed Configuration Integrity test.
a. If you are trying to download for example, 61 cells into a string which has been
configured to take only 60, you can click on CREATE to create the extra required cells that are required for your download.
b. However, if you are trying to download for example, 59 cells into a string which
has been configured to take 60 or more, you can simply select the save checkbox to override this error (Note that in this case, the Create link is not clickable).
3-5. Click NEXT to move to step 5 and verify that all data was saved successfully. Then click
FINISH. 3-6. Close and reopen ProActiv to confirm test results. Properly imported tests can be
removed from the BITE3.
PUB-NP-025, Attachment D Page 10 of 57

4.0 Troubleshooting Guide 4-1. Common Errors:
a. Out of Range: Indicates the measured value is not within the required range of the BITE3. This error commonly occurs while taking ripple and float current readings. These current values are too low for BITE3 to read.
b. Invalid Mode: Error occurs when BITE3 is searching for one item, but measuring another. When BITE3 is searching for a strap and a cell is measured (or vise versa) this error occurs. To correct this problem, remove the probes and allow BITE3 to reset. This should take approximately 5 seconds. If the problem is not corrected changing the instrument setting as outlined in section 2-2 may be required.
c. Noise Detection: When fluctuation occurs while BITE3 is in measuring mode
noise is detected. Review the reading and compare with a previous reading if possible. If the reading is acceptable, continue measuring the remaining cell and strap impedances. If the reading is unacceptable discard the measurement and take the measurement again.
4-2. Analysis Report:
a. %V: Represents % variation. It is calculated using the Base Line Value impedance which is entered when the string is set up in BITE3. The Base Line Value impedance is the impedance value of the battery when it is new. If this value is not available a default value of 0 should be entered.
b. %D: Represents % deviation.
It is calculated by comparing each cell’s impedance value with the average impedance value.
c. %C: Represents % change.
It is calculated by comparing the previous test impedance readings with the current test impedance readings.
PUB-NP-025, Attachment D Page 11 of 57

Maintenance Standard Number: MST004
Effective Date: 2009-07-17
Superseding Date: 1982-07-19
Page 1 of 1
TEST PROCEDURE CURRENT TRANSFORMER POLARITY CHECK
Created by: M. Rideout Reviewed by: G. Samms
Revised by: B. Ropson Approved by: G. Samms
Kick Test
One method of checking the polarity of a current transformer is by means of a kick test as follows:
1. Select the current scale on the analog multimeter and connect it as shown above;
2. With the connections as shown in the above diagram, the multimeter will momentarily deflect up scale when the
battery is connected. Upon removal of the battery connection the multimeter will deflect down scale.
Note: A 6 volt lantern battery is suitable for this purpose.
H1
H2
Polarity Mark
Analog
Multimeter
+
-
X1
X2
Current Transformer Under Test
+
-
PUB-NP-025, Attachment D Page 12 of 57
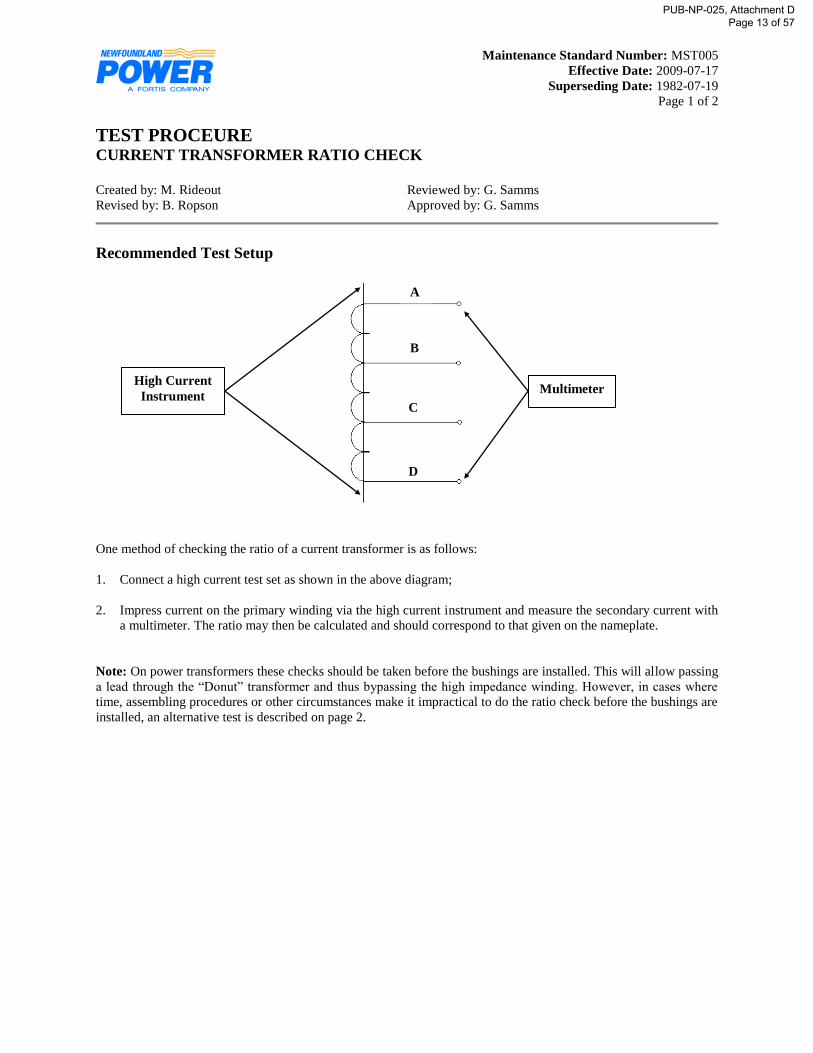
Maintenance Standard Number: MST005
Effective Date: 2009-07-17
Superseding Date: 1982-07-19
Page 1 of 2
TEST PROCEURE CURRENT TRANSFORMER RATIO CHECK
Created by: M. Rideout Reviewed by: G. Samms
Revised by: B. Ropson Approved by: G. Samms
Recommended Test Setup
One method of checking the ratio of a current transformer is as follows:
1. Connect a high current test set as shown in the above diagram;
2. Impress current on the primary winding via the high current instrument and measure the secondary current with
a multimeter. The ratio may then be calculated and should correspond to that given on the nameplate.
Note: On power transformers these checks should be taken before the bushings are installed. This will allow passing
a lead through the “Donut” transformer and thus bypassing the high impedance winding. However, in cases where
time, assembling procedures or other circumstances make it impractical to do the ratio check before the bushings are
installed, an alternative test is described on page 2.
C
A
B
D
Multimeter High Current
Instrument
PUB-NP-025, Attachment D Page 13 of 57

2009-07-17
Page 2 of 2
TEST PROCEURE CURRENT TRANSFORMER RATIO CHECK
Alternative Test Setup
A method of checking the ratio of a current transformer in a power transformer when the tank is sealed and a high
current test set cannot be used is a follows:
1. Connect a variac across the two outside taps at the terminal block, as shown in the above diagram;
2. Apply 100 volts, as measured with a digital voltmeter rather than the variac’s analog meter, across A and E;
3. Measure the voltage with a digital voltmeter across A and B, A and C, A and D, and A and E. The measured
voltage should correspond with the calculated voltage.
Formula for determining correct voltages:
Voltage Across Taps = Turns Between Taps / Total Turns in CT x Applied Voltage
Calculations for sample shown above:
A and B = 20/140 x 100 = 14.3 volts
A and C = 50/140 x 100 = 35.7 volts
A and D = 90/140 x 100 = 64.3 volts
A and E = 140/140 x 100 = 100 volts
20 turns
30 turns
40 turns
50 turns
A
B
C
D
E
Variac
PUB-NP-025, Attachment D Page 14 of 57

Maintenance Standard Number: MST006
Effective Date: 2009-07-17
Superseding Date: 1983-01-05
Page 1 of 2
TEST PROCEDURE DUCTOR TEST
Created by: M. Rideout Reviewed by: G. Samms
Revised by: B. Ropson Approved by: G. Samms
A ductor test is the measurement of contact resistance and is carried out on circuit breakers and reclosers as per our
Standard Procedures.
The manufacturer’s instruction manual covers the application and operation of the instrument. Personnel who will
operate the instrument and interpret its readings should become familiar with the manual.
The following is a brief description of the instrument and the procedures for performing a ductor test.
Instrumentation
I. Digital meter reads the resistance directly;
II. Reference indicating meter. The green area indicates the correct measuring current.
Operating Instructions
All test lead connections must be tight. Each lead from the instrument should be connected directly to the bushing
terminals of the equipment being tested (e.g. the alligator clip on the current test lead should not be connected to the
alligator clip on the potential test lead, but directly to the bushing terminal).
1. Connect the heavy current leads and the potential leads to the contacts being checked (connect at bushing tops)
and the instrument;
2. Connect the instrument to a 120 volt AC, 60 Hz supply;
3. Turn on the instrument and advance the current control to set the desired current (usually 20 amps);
4. Read the resistance on the digital meter. LEDs indicate whether the reading is in micro-ohms (ohms x 10-6
) or
milli-ohms (ohms x 10-3
);
5. A set of four readings should be taken for the four setups that follow:
I. Correct current lead and correct potential lead;
II. Correct current lead and reversed potential lead;
III. Reversed current lead and reversed potential lead;
IV. Reversed current lead and correct potential lead.
The average of these readings gives the correct resistance.
The changed polarity signs on the indicating meter indicate reversed lead connections.
PUB-NP-025, Attachment D Page 15 of 57

2009-07-17
Page 2 of 2
TEST PROCEDURE DUCTOR TEST
Sample test readings (readings corresponding to previously stated lead connections):
Lead Connections Connection
Polarity Indicator
Resistance
(milli-ohms)
I + 2.11
II - 2.12
II + 2.13
IV - 2.14
Total: 8.50
Average: 2.125
Notes
1. The instrument is not designed to supply 50 amps and 100 amps on a continuous basis, so a cooling period is
necessary after each use at 50 amps and 100 amps.
2. Internal over-temperature cutoff is provided to shut off the instrument when the set temperature is recorded. The
instrument can be turned on again after it cools down.
PUB-NP-025, Attachment D Page 16 of 57

Maintenance Standard Number: MST007
Effective Date: 2009-07-17
Superseding Date: 1982-11-17
Page 1 of 3
TEST PROCEDURE GAS DETECTOR RELAY CHECK
Created by: G. Mayo Reviewed by: J. Power
Revised by: J. Coady Approved by: G. Samms
The following steps are considered as standard procedure for the testing of a Model 11 or Model 12 gas detector
relay. This procedure is typically performed and intended to be used in conjunction with reference documents
“MRS008 - Gas Detector Relay” and the “ABB Product Bulletin”, both of which are located in the reference section
on Webster. In addition to these documents, Test Procedure “MST017 - Transformer Protection Equipment Check”
and form “MSF020 – Transformer Protection Devices should be completed once the unit is installed on the
transformer.
The figure below shows the setup for checking the operation of a Model 11 or Model 12 gas detector relay.
Procedure
Caution: Pressures must be kept below 3.5 psi for all tests. Application of pressure greater than 3.5 psi and
less than 4.9 psi will require recalibration of the relay. Pressures greater than 4.9 psi, will damage the relay.
1. Before beginning, read the manufacturer’s maintenance and operations bulletins.
2. The relay will be mounted on the transformer or mounted on the bench.
2.1. If mounted on the transformer, disable all trips and alarms and close the valve that connects the relay to
the transformer.
2.2. If mounted on the bench, the procedure can be completed with the Gas Detector Relay filled with oil or, if
required, calibration of the trip switch can be completed without oil. If proceeding without oil, drain the
relay of oil and place a ¾” pipe plug (without the sponge/wood insert) in the fitting for the oil connection
at the back of the relay.
Note: when the relay is free of oil, the gas accumulator test cannot be accurately completed.
3. Loosen the relay test check valve and connect the air supply system as shown in the above Figure. Use an
accurate 0-5 psi pressure gauge in the test circuit to guard against applying excessive pressure. (i.e. greater than
3.5 psi). Always remember to release any pressure in the relay between tests by venting via the bleeder valve as
stated in step 13.
PUB-NP-025, Attachment D Page 17 of 57

2009-07-17
Page 2 of 3
TEST PROCEDURE GAS DETECTOR RELAY CHECK
To check the gas accumulator operation:
Note: This Procedure can only be accurately completed when the gas detector relay is filled with oil. If
testing the unit without oil, the opening and closing of the alarm contact switch can be verified by simply
turning the relay upside down, thereby simulating the presence of air inside the accumulator chamber
which causes the float switch to close.
4. Monitor the alarm contacts for operation by hooking a continuity tester across the black and white leads. Slowly
force air into the relay while monitoring the alarm contacts for operation and the indicator window for the
presence of gas accumulation. The relay contacts should open when the needle on the dial is approximately at
the center of the scale on the meter’s face.
To check the operation of the pressure chamber trip circuit:
Note: This switch operates when the pressure across the bellows reaches 2.5 ± 0.5 psi. This pressure swing
within this range, called the sensitivity, is set on the Model 12 by a non-adjustable bypass orifice. In the Model
11 it is controlled by the sensitivity adjustment.
5. Place the leads of a continuity tester across the red and green leads to determine switch operation.
6. Open the air compressor tank bleed off screw and completely drain the compressor air tank. Re-tighten or close
this screw when the air tank is completely empty. Note: Make sure the compressor motor is in the off
position before plugging it in. This will assure that there is no damage to the pressure gauge while
attempting to fill the tank to required pressures.
7. Fully open the air pressure regulator located on the air compressor outlet to avoid restrictions in flow during
testing.
8. Completely close the ¼” ball valve on the air delivery system and fill the compressor air tank to the desired air
pressure (2.5 psi or as required). This can be accomplished by quickly switching on and off the compressor
motor until the desired air pressure is contained in the tank and shown on the 0-5 psi pressure gauge.
Note: Take care not to apply more than 5 psi to the pressure gauge or it can be damaged.
9. Firmly connect the air valve connector (pressure fitting) to the relay test valve using the spring actuated lock to
hold it in place.
10. Quickly open the ¼’ ball valve thereby applying the desired air pressure to the relay bellows. Note that
increasing or decreasing the time to reach trip pressure will tend to increase the pressure at which the
contacts will close (see Approximate Characteristic Curve for relays located in the ABB Product
Bulletin).
11. Verify that the relay contacts close at 2.5 psig ± 0.5 psig (17.25 kPa ± 3.45 kPa).
12. If the unit fails to operate within the ranges given above, it must be repaired and recalibrated before being
placed back into service. See MSR008 for repair instructions.
13. Between trip tests on the relay, release any pressure in the relay by venting via the bleeder valve. Allow
between two (2) to three (3) minutes for the relay to adjust to its initial conditions. When relay is mounted on
the transformer, open the valve to the transformer, then open the bleeder valve until oil is seen running out of
the bleeder valve.
14. Remove the air valve connector (pressure fitting) from the relay test check valve and replace the original cap.
PUB-NP-025, Attachment D Page 18 of 57

2009-07-17
Page 3 of 3
TEST PROCEDURE GAS DETECTOR RELAY CHECK
15. Install a packet of Humidsorb inside the bellows chamber on the relay. Place a date on the unit to indicate when
the packet was installed.
16. Check the integrity of the micro-switch contacts by meggering them at 250V for 5 minutes.
17. To check the wiring insulation during field installations, disconnect the wires from the terminal blocks (if not
already done) and megger the alarm circuit (between black and white), the trip circuit (between red and green)
and to ground (between black, white, red and green to ground). Meggering should be completed using 250V for
5minutes.
Note: If a low reading is found, carefully disconnect the cable at the relay (assuring not to twist off the terminal
pins which extend from the relay) and check the reading again. If the reading is still low, the problem is most
likely due to faulty wiring. If the reading is good, the problem is most likely with the relay, which is probably
an indication of moisture contamination within the relay. See test Procedure “MST017 - Transformer Protection
Equipment Check” for details.
18. If the unit needs to be returned to service: (1) open the valve to the transformer; (2) open the bleeder valve until
oil runs out; (3) check that the alarm and trip contacts are in the open position with an ohmmeter; and (4)
reconnect the alarms and trips using a crimping sleeve complete with compound and heat shrink.
PUB-NP-025, Attachment D Page 19 of 57
Maintenance Standard Number: MST008
Effective Date: 2009-07-17
Superseding Date: 1997-02-01
Page 1 of 1
TEST PROCEDURE MEGGERING
Created by: B. Ropson Reviewed by: G. Samms
Revised by: B. Ropson Approved by: G. Samms
General Meggering Procedures
The following procedure is intended as a general meggering procedure applicable to various types of equipment. For
information specific to certain types of equipment refer to MSR012.
Note: Attempt to take all megger readings at a temperature above the dew point. An indication would be the absence
of moisture on the surface of equipment being meggered.
Note: Record the temperature of the insulation each time a reading is taken.
1. Review any previous megger records.
2. Review the test instrument operating instructions.
3. Determine which circuit components will be included in the test.
4. Ensure that the unit to be tested is isolated from all potential sources.
5. Discharge the capacitance of the test specimen before and after a test.
6. Check and record the temperature of the insulation to be tested.
7. Check that the insulation temperature is above the dew point.
8. Do a preliminary 30-second test at 500 volts. See MSR012 for more information.
9. If the reading is equal to 1 mega-ohm per kV of voltage rating plus 1 proceed with the next step. If not, the
problem will be found and corrected before proceeding.
10. Refer to MSR012 for recommended maximum meggering voltages to be used.
11. Carry out recommended tests from Table 2 in MSR012.
12. Refer to MSR012 for test results interpretation.
13. Record test data on the appropriate maintenance form.
PUB-NP-025, Attachment D Page 20 of 57

Maintenance Standard Number: MST009
Effective Date: 2009-07-17
Superseding Date: 1982-05-28
Page 1 of 1
TEST PROCEDURE MOTION ANALYZER TEST
Created by: M. Rideout Reviewed by: G. Samms
Revised by: B. Ropson Approved by: G. Samms
Analyzer tests are conducted on circuit breakers that are designed to allow external mechanical coupling to the
operating rod. The Doble Circuit Breaker Motion Analyzer is used for these tests.
The manufacturer’s instruction manual covers all aspects of application, operation and maintenance of the analyzer.
Personnel who will operate the analyzer and interpret it’s recordings should become familiar with the contents of the
manual.
The analyzer is used to observe and record the characteristics of circuit breakers during TRIP, CLOSE, TRIP-FREE
and RECLOSE operations. In addition, Contact Insertion (wipe) and Closure Over-travel can be measured with the
instrument set up to produce one-to-one size recordings. For this purpose, the TRAVEL switch should be in the 0.5
inches/division position and the CYCLE SPEED set to FAST.
Analyzer Setup
1. With the instrument mounted on a solid, flat surface, turn the POWER switch to STANDBY, allowing a 20-
minute warm-up period before operation;
2. Mount the transducer and connecting rod with the breaker in the closed position;
3. Apply external grounds to one side of the breaker and connect the cable assemblies to the instrument and circuit
breaker;
4. Set the instrument panel controls to the appropriate settings and operate the breaker from the instrument panel;
5. The paper recording which is produced should be protected from strong, direct sunlight and allowed to develop
slowly;
Refer to the Type TR-1A Circuit Breaker Motion Analyzer instruction manual for diagrams and more detailed
instructions.
When the recording is analyzed and the information written on the Circuit Breaker Report Form (MSF005), the
recording can be discarded, provided there are no abnormal conditions. If there are abnormal conditions, the
recording should be kept for comparison purposes until the abnormal conditions are corrected.
PUB-NP-025, Attachment D Page 21 of 57

Maintenance Standard Number: MST010
Effective Date: 2009-07-17
Superseding Date: 1982-09-27
Page 1 of 1
TEST PROCEDURE TEMPERATURE GAUGE CHECK
Created by: M. Rideout Reviewed by: G. Samms
Revised by: B. Ropson Approved by: G. Samms
The manufacturer’s instruction literature covers all aspects of application, construction, operation and maintenance
on the different types of temperature gauges. Personnel should refer to the instruction manuals for more descriptive
information, diagrams and illustrations. See MSR022 for normal temperature gauge settings
If any testing of a temperature gauge is done with the gauge still mounted on the transformer, make sure that the
control wiring is disconnected. Otherwise, alarm and trip circuits may be activated.
The temperature reading shown by the maximum indicating pointer should be recorded before maintenance is
carried out.
Field Test for Accuracy of Dial Reading and Switch Settings
1. Remove the bulb of the temperature indicator from its well on the transformer (it may be necessary to have the
transformer de-energized to safely remove thermometer bulbs from their wells).
2. Use the Thermo-Cal test unit to verify the accuracy of the gauges.
Field Test for Control Micro-Switch Operation
The opening and closing of the control micro-switches may be checked by the following procedure:
1. Place an ohmmeter across the appropriate leads or pins.
2. Raise and lower the temperature, paying attention to the ohmmeter reading.
3. Megger micro-switches at 250V.
Changing Switch Settings
Switch settings are changed by different methods depending on the manufacturer. Two of the most common
methods of adjusting switches are:
1. Removing the bezel and changing tab positions;
2. Removing sealing screws at the back of the gauge to gain access to adjusting screws.
The manufacturer’s instruction manual gives instructions on the particular model used.
Maximum Indicating Pointer Reset
Ensure that the method of resetting the maximum indicating pointer is operational. Silicone grease or Never-Seeze
may be used as a lubricant. The two most common methods of resetting are by means of a reset plunger or a reset
magnet.
PUB-NP-025, Attachment D Page 22 of 57

Maintenance Standard Number: MST011
Effective Date: 2009-07-17
Superseding Date: 1982-10-27
Page 1 of 2
TEST PROCEDURE TRANSFORMER RATIO CHECK
Created by: M. Rideout Reviewed by: G. Samms
Revised by: B. Ropson Approved by: G. Samms
Ratio measurements are usually made on all transformers at the factory and the information is supplied to us on the
test data sheet.
Ratiometer checks are useful for comparison purposes, checking for correct tapchanger operation, and for checking
the windings for any electrical problems.
The operating instructions are supplied with the ratiometer and personnel should become familiar with the operation
of the instrument.
Caution: Personnel should stay away from transformer bushings when making ratio checks since voltages will be
present at the voltage terminals.
Setup Procedure
1. Connect the ratiometer to the transformer with the cables as required.
2. Set up the instrument and conduct the appropriate tests as per the manufacturers equipment instruction manual.
According to Transformer Standards, the difference between calculated values and measured values should be less
than one-half of one percent. The relative difference between taps should be consistent on all taps.
The following table provides the positions for the selector switches when conducting ratio tests using the Criterion
Power Transformer Ratiometer, Model TR-1. If, in some case, the polarity is not correct with the selector switch on
H1-H2, for example, turn the ratiometer off and change the selector switch to H2-H1.
Winding Connections Selector Switch Settings Three Phase
H1 – H2, X0 – X2
H2 – H3, X0 – X3
H3 – H1, X0 – X1
H1 – H0, X1 – X0
H2 – H0, X2 – X0
H3 – H0, X3 – X0
H1 – H2, X1 – X2
H2 – H3, X2 – X3
H3 – H1, X3 – X1
H1 – H0, X1 – X0
H2 – H0, X2 – X0
H3 – H0, X3 – X0
H3
H2
H1
X1
X2
X3
X0
H1
H2
H3
H0
X1
X2
X3
X0
H3
H2
H1 X3
X2
X1
H1
X1 X3
H3
H0
X0
X2 H2
PUB-NP-025, Attachment D Page 23 of 57

2009-07-17
Page 2 of 2
TEST PROCEDURE TRANSFORMER RATIO CHECK
Single Phase
H1 – H2, X1 – X2
Because of the design of the Criterion Power Transformer Ratiometer, Model TR-1, the ratio indicated will be the
reciprocal of that supplied by some manufacturers.
X1
X2
H1
H2
PUB-NP-025, Attachment D Page 24 of 57

Maintenance Standard Number: MST012
Effective Date: 2009-07-17
Superseding Date: 1996-04-18
Page 1 of 1
TEST PROCEDURE VOLTAGE REGULATOR CURRENT TEST
Created by: G. Mayo Reviewed by: G. Samms
Revised by: B. Ropson Approved by: G. Samms
Follow these steps to perform a current test:
1. De-energize and isolate the unit.
2. Connect the tank to a suitable ground grid.
3. Connect a jumper rated for nominal current between the “S”
and “L” bushings.
4. Install a clip-on ammeter on the jumper.
5. Hook up a variable AC voltage source across “S” and “SL”.
6. Hook up an external supply to the controls. Note polarity
(i.e. hot to hot and neutral to neutral).
7. Set the regulator on the tap that carries maximum current.
Usually “3” to “5” Raise.
8. Set the variable voltage source between “S” and “SL” for
approximately rated current on the clip-on ammeter. For
manufacturer’s other than McGraw Edison and Cooper
Power, it may be necessary to select “5” Raise to obtain
maximum current.
9. Record the current at each step as the unit is run from “16” Lower to “16” Raise. A loss of current at any step
other than neutral indicates a fault in a contactor or winding.
10. Leave unit in neutral and remove the external supply.
11. Remove the “S” to “SL” supply.
12. Remove the “S” to “L” jumper.
Note: A dry out can be done by leaving nominal current on the unit for 24 hours and then filtering the oil. Repeat
until the unit is dry.
PUB-NP-025, Attachment D Page 25 of 57

Maintenance Standard Number: MST013
Effective Date: 2009-07-17
Superseding Date: 1996-04-18
Page 1 of 1
TEST PROCEDURE VOLTAGE REGULATOR POTENTIAL TRANSFORMER RATIO TEST
Created by: G. Mayo Reviewed by: G. Samms
Revised by: B. Ropson Approved by: G. Samms
Follow these steps to perform a ratio test:
1. De-energize and isolate the unit.
2. Connect the tank to a suitable ground grid.
3. Connect a voltmeter to “S” and “SL”.
4. Connect a voltmeter across the test terminals in the control panel.
The two voltmeters should be checked together to ensure an
accurate reading.
5. Hook up a 120-volt supply between terminals “S” and “SL”, as
shown on the diagram.
6. Record the readings on the two voltmeters.
7. Calculate the ratio (i.e. Es-sl / Etest = ratio).
8. Compare the calculated ratio to the nameplate ratio and ensure
the nameplate PT ratio is marked correctly. Record the primary
voltage the PT is connected for on form MSF012.
9. Disconnect the 120-volt supply.
10. Disconnect both voltmeters.
PUB-NP-025, Attachment D Page 26 of 57

Maintenance Standard Number: MST014
Effective Date: 2009-07-17
Superseding Date: 1996-04-18
Page 1 of 1
TEST PROCEDURE VOLTAGE REGULATOR RATIO TEST
Created by: G. Mayo Reviewed by: G. Samms
Revised by: B. Ropson Approved by: G. Samms
Follow these steps to perform a ratio test:
1. De-energize and isolate the unit.
2. Connect the tank to a suitable ground grid.
3. Connect a voltmeter to “L” and “SL”.
4. Place a 120-volt supply between the “S” and “SL” bushings.
5. Hook up a 120-volt AC supply to the external terminals on the
control panel. Note polarity (i.e. hot to hot and neutral to neutral).
6. Record the voltmeter readings at each step as the regulator is run
from “16” Lower to “16” Raise. The measured voltage should
change approximately 0.75 volts per step. Substantial changes from
this norm indicate the possibility of a winding problem.
7. Place the unit in neutral.
8. Disconnect the external supply.
9. Return the variac to zero and disconnect it.
10. Remove the voltmeter.
PUB-NP-025, Attachment D Page 27 of 57

Maintenance Standard Number: MST015
Effective Date: 2009-07-17
Superseding Date: 2004-05-13
Page 1 of 6
TEST PROCEDURE VOLTAGE REGULATOR SINGLE PHASE TTR TEST
Created by: B. Chubbs Reviewed by: G. Samms
Revised by: B. Chubbs Approved by: G. Samms
The following is a brief description of the procedures for using the Megger TTR100 transformer test ratio device.
The manufacturer’s instruction manual covers the application and operation of the instrument. Personnel who will operate the instrument and
interpret its readings should become familiar with the manual.
Single-Phase Ratio Test using Megger TTR100
Connections:
H1 – Source
H2 – Source/Load
X1 – Load
X2 – Source/Load
1. Selecting 1-XFMER CONFIG from the Main Menu, the Transformer Configuration screen appears. From
here one can select the type of transformers to test.
2. For a voltage regulator select 1-SINGLE PHASE XFMERS. This will give a list of single-phase
transformers.
3. Select 1-HX: NO TAPS to display a group of test setup configurations.
4. Scroll using ◄ and ►, select REGULATOR TEST SETUP and press .
5. Select 3-FULL TEST SETUP. A screen will be displayed to enter information about the device.
6. Select 2-ENTER ID: enter ID# and press
7. Select 3-H VOLTAGE: enter the nominal primary voltage and press .
8. Select 1-CONTINUE
9. Select 2-X VOLTAGE: enter the nominal secondary voltage and press . For a voltage regulator this will
be the same as the primary voltage.
10. Select 3-NO OF TAPS: enter the total number of taps for the device and press . For a typical voltage
regulator there are 16 Raise taps, 16 Lower taps and the Neutral tap. This gives a total of 33 taps for the
device.
11. Select 1-CONTINUE
12. Select 2-NOM X TAP NO: enter nominal x tap and press . Shown on the screen is instruction to use the
* key for N (Neutral).
13. Select 3-HIGH X TAP NO: enter the high x tap (i.e. 16R) and press
14. Select 4-HIGH X VOLT: enter value and press . This is the output voltage with nominal input and the
16R tap selected increasing the input by 10%. For example, a 7200V regulator with an input of 7200 volts
and the 16R tap selected with have an output of 7200 + 10% = 7920 volts.
15. Select 1-CONTINUE
16. Select 2-TEST X TAP NO: enter tap to be tested (i.e. 1L,N,1R, etc.) and press . Ensure the regulator tap
position is the same as the tap entered into the device.
17. Select 3-START TEST wait for test to finish
18. Press ► once to select TEST RESULTS 2. Select 3-STORE to save results.
19. Select 0-NO to avoid entering header info. This information can be entered into the COMlink program
later.
20. Select 5-NEW TEST (Change Tap Position on Regulator)
21. Repeat Steps 17 to 20 for each tap.
PUB-NP-025, Attachment D Page 28 of 57

2009-07-17
Page 2 of 6
REFERENCE VOLTAGE REGULATORS
PT Test using Megger TTR100
Connections:
H1 – Source
H2 – Source/Load
X1 – Supply Voltage from PT (inside Control Panel)
X2 – Ground
*Turn of external power to control panel
1. Selecting 1-XFMER CONFIG from the Main Menu, the Transformer Configuration screen appears. From
here one can select the type of transformers to test.
2. For a voltage regulator select 1-SINGLE PHASE XFMERS. This will give a list of single-phase
transformers.
3. Select 1-HX: NO TAPS to display a group of test setup configurations.
4. Scroll using ◄ and ►, select H-X TEST SETUP and press
5. Select 3-START FULL TEST. A screen will be displayed to enter information about the device.
6. Select kVA and voltage range applicable to the regulator being tested.
7. Enter 1-ENTER ID: enter ID# and press
8. Select 2-H VOLTAGE: enter nominal voltage (i.e. 7200) and press
9. Select 3-X VOLTAGE: enter voltage (i.e. 120) and press
10. Select 4-START TEST, wait for test to finish
11. Press ►to select TEST RESULTS 2, Select 3-STORE to save results
PUB-NP-025, Attachment D Page 29 of 57

2009-07-17
Page 3 of 6
REFERENCE VOLTAGE REGULATORS
CT Test using Megger TTR100
Connections:
X1 – Source
X2 – Load
H1 – CT Secondary Inside Panel (disconnect wire from panel and connect to H1)
H2 – Other Side of CT Secondary
*Turn of external power to control panel
1. Selecting 1-XFMER CONFIG from the Main Menu, the Transformer Configuration screen appears. From
here one can select the type of transformers to test.
2. For a voltage regulator select 1-SINGLE PHASE XFMERS. This will give a list of single-phase
transformers.
3. Select 1-HX: NO TAPS to display a group of test setup configurations.
4. Scroll using ◄ and ►, select CT TEST SETUP and press
5. Select 3-FULL TEST SETUP. A screen will be displayed to enter information about the device.
6. Select 2-PRIMARY I, A: enter primary amp ratio and press
7. Select 3-SECONDARY I, A: enter secondary amp ratio and press
8. Select 4-START TEST, wait for test to finish
9. Press ►to select TEST RESULTS 2, Select 3-STORE from menu to save results
PUB-NP-025, Attachment D Page 30 of 57

2009-07-17
Page 4 of 6
REFERENCE VOLTAGE REGULATORS
Saving and Printing TTR Data
1. Using parallel port cables provided, connect TTR device
to PC
2. Double Click COMLink icon on desktop to open
software.
3. From Select Device pulldown menu, select Single Phase
TTR
4. Enter the regulator company number and test date as the
Test data file name (i.e. 220999-2004-12-30.txt).
5. Click Transfer Readings to PC (program is now waiting
to receive data)
6. On the TTR select 6-SAVED READINGS from Main
Menu
7. Select 4-XFER READINGS TO PC
8. Enter range of readings to be transferred (Use 0 to transfer
all readings)
9. When transfer is complete, computer screen will display
the list of readings
PUB-NP-025, Attachment D Page 31 of 57

2009-07-17
Page 5 of 6
REFERENCE VOLTAGE REGULATORS
10. Click Select All Tests to highlight all the data
11. Enter all relevant information for the regulator in fields
above
12. Click Safe to File,
PUB-NP-025, Attachment D Page 32 of 57

2009-07-17
Page 6 of 6
REFERENCE VOLTAGE REGULATORS
13. Ensure path is correct
\\Np-ken-user1\Maintenance\Substation
Maintenance\Regulator TTR Reports
14. Enter the regulator company number as the Test data file
name (i.e. 220999-2004-12-30.txt).
15. Click Save
16. Click Print Selection to print the selected data. Ensure
‘portrait’ layout is selected.
PUB-NP-025, Attachment D Page 33 of 57

Maintenance Standard Number: MST016
Effective Date: 2009-07-17
Superseding Date: 2005-02-28
Page 1 of 3
TEST PROCEDURE VOLTAGE REGULATOR TRANSFORMER OHMMETER TEST
Created by: B. Chubbs Reviewed by: G. Samms
Revised by: B. Chubbs Approved by: G. Samms
The following is a brief description of the procedures for using the Megger Transformer Ohmmeter Test
Device.
The manufacturer’s instruction manual covers the application and operation of the instrument. Personnel
who will operate the instrument and interpret its readings should become familiar with the manual.
Note: This procedure is designed for using Potential Input “B”. However, Potential Input “A” may also be
used by changing the input leads from the “B” connectors to the “A” connectors and interchanging all
references to Input “B” to Input “A” in this test procedure.
TRANSFORMER OHMMETER
TEST DESCRIPTION
The Transformer Ohmmeter Test for voltage regulators is designed to test the windings and contact
resistance of the regulator as well as the “make-before-break” contact operation.
The Ohmmeter measures resistance by sending a known current through the windings and measuring the
resulting voltage. These values can then be used to calculate the dc resistance of the windings and contacts.
An internal shutdown circuit is used to monitor the “make-before-break” operation. The circuit is triggered
by a voltage kickback of a few microseconds should the regulator contacts open while the unit is changing
taps.
PUB-NP-025, Attachment D Page 34 of 57

2009-07-17
Page 2 of 3
TEST PROCEDURE VOLTAGE REGULATOR TRANSFORMER OHMMETER TEST
CONNECTION DIAGRAM
TEST PROCEDURE
1. Connect current output to voltage regulator winding.
2. Connect “B” potential input to voltage regulator winding. Do not clip potential leads on to the current
leads, since this will add contact resistance to the measurement. Potential leads should always be placed
inside (between) current leads.
3. Connect line cord to unit and plug into 120V socket.
4. Turn power switch “ON”. Wait for “READY” LED to illuminate.
5. Push and hold current control switch up to INITIATE, this will start current flow. Release when current
indicator comes ON.
6. Set the following conditions:
a. Display Selector: up position.
b. Range Selector “B”: position which displays two decimal places.
c. Current Selector: 5A nominal.
d. Voltage Regulator Tap: 1L (this will be the initial tap for the test)
7. Display “A” indicates current output %. As output current approaches steady value, display “B” comes on
and indicates resistance of specimen.
8. Record the value from display “B” in the appropriate location of the “Transformer Ohmmeter Test” chart
on the maintenance report form.
PUB-NP-025, Attachment D Page 35 of 57

2009-07-17
Page 3 of 3
TEST PROCEDURE VOLTAGE REGULATOR TRANSFORMER OHMMETER TEST
9. Raise the tap on the voltage regulator to the next position. While doing so, ensure that the test current light
remains on. If not, the regulator has failed the “make-before-break” component of the test for this tap
change. Should this occur, skip steps 10-13 and move to step 14.
10. Repeat steps 8 and 9 until the regulator has been tested from taps 1L to 16R.
11. When measurement is complete, push the current control switch down to DISCHARGE, this will terminate
current flow. Discharge is complete when current indicator is off (black).
12. Turn power switch OFF and unplug line cord from 120V socket.
13. Leads may now be safely disconnected from the regulator.
Complete these steps only if “make-before-break” test has failed.
14. If the “make-before-break” test has failed, this indicates an internal problem with the regulator. This is
likely the result of pitted or misaligned contacts.
15. To continue testing, the transformer ohmmeter will have to be reinitiated. See Step 5.
16. Resistance measurements no longer have to be recorded as the unit will need to be retested when the unit is
repaired.
17. Run the regulator through all taps from 16L to 16R and record any further “make-before-break” failures.
Remember: The unit will have to be reinitialized whenever a “make-before-break” failure occurs. See Step
5.
18. When all taps have been checked, push the control switch down to DISCHARGE to terminate current flow.
19. Turn power switch OFF and unplug line cord from 120V socket.
20. Leads may now be safely disconnected from the regulator.
21. Repair the voltage regulator and perform the Transformer Ohmmeter Test again to check for correct
operation.
PUB-NP-025, Attachment D Page 36 of 57

Maintenance Standard Number: MST017
Effective Date: 2009-07-17
Superseding Date: None
Page 1 of 2
TEST PROCEDURE TRANSFORMER PROTECTION EQUIPMENT CHECK
Created by: J. Barry Reviewed by: G. Goodwin
Revised by: Approved by: G. Samms
The manufacturer’s instruction literature covers all aspects of application, construction, operation and maintenance
on the different types of transformer protection equipment. Personnel should refer to the instruction manuals for
more descriptive information, diagrams and illustrations.
More detailed procedures for Meggering, checking Gas Detector Relays and checking Temperature changes can be
found in MST008, MST007 and MST010 respectively.
Detailed up-to-date schematics should be present when all field tests are being conducted.
Tests designated under “Transformer Protection Devices” are valid for Gas Detector Relays, Winding Temperature
Gauges, Oil Temperature Gauges, and Pressure Relief Devices. Note that the contacts of these devices may be in
parallel with one another.
Visual Inspection
1. Visually inspect all junction boxes and LB’s for signs of water. Any presence of water should be noted.
2. Visually inspect all devices for signs of corrosion. Any corrosion should be noted.
3. When inspection is complete, replace any covers and seal with silicon RTV108. If a new gasket is
available the old one should be replaced. However if a new gasket is not available the silicon should
suffice.
Field Test for Transformer Protection Equipment
Voltage Tests
Note: Ensure Multimeter is set to measure DC Volts before performing the following voltage tests.
1. Measure voltage across coil of transformer gas trip auxiliary relay, if it exists (typically 63X).
2. Measure voltage across trip coil of transformer low voltage breaker, if it exists (typically 52T). Bulb must
be removed from breaker closed indication light before measuring voltage across the trip coil.
3. If voltage is detected, there is leakage in the circuit. This is an indication of a problem and should be noted.
Megger Tests
1. Before removing any wires, ensure they are labeled and document their termination points.
2. From the control building to the device, Megger lead #1 to ground, lead #2 to ground and across the open
contacts of the device. Please note that only the contacts that will cause a trip need to be tested.
3. If a problem is found within the control building, perform the same Meggering procedure from the control
cabinet to the device to isolate the problem.
PUB-NP-025, Attachment D Page 37 of 57

2009-07-17
Page 2 of 2
TEST PROCEDURE TEMPERATURE GAUGE CHECK
4. If no problems are found in step 2, perform the same Meggering procedure from the control building to the
control cabinet to isolate the problem.
5. Cross reference wire documentation to ensure all wires have been returned to their original termination
points.
Moisture Prevention
1. Place packet of 4x4 Humidsorb inside control cabinet.
2. Install ‘Water-Guard’ as per manufacturers’ instructions into conduits that enter the control cabinet.
3. Install ‘Water-Guard’ as per manufacturers’ instructions in any other conduits where water ingression is an
issue.
PUB-NP-025, Attachment D Page 38 of 57

NOTE: Contact SCC operator to let them know checks are occurring. The voltage transducer typically monitors voltage levels on medium and distribution busses. The transducer provides a DC milliamp output to the RTU that is proportional to the transducer’s AC voltage input. The voltage transducer’s full scale input is 150 VAC that gives 1 mA DC output. When the transducer output is connected to the RTU analog input, 1 mA will give 5 VDC across the RTU terminals. Field staff will be measuring AC voltage and DC voltage quantities. As well staff are required to read panel meters and/or protection relay meter values and contact a SCADA Technologist to record the SCADA voltage readings for the transducer being checked. Possible causes of bus voltage reading incorrect: • Blown PT or fuse • Faulty voltage transducer • Faulty RTU analog board • Faulty wiring • Wrong SCADA scaling factor
If there is AC voltage into the transducer and readings are incorrect then a transducer change out may be required. Prior to changing transducer, take the measurements and do the calculations to verify the transducer. If the transducer checks out then the problem is with the RTU or SCADA. Required Equipment and Material The following is required: AC Digital Multimeter that can display 3 places after decimal AC/DC Schematic for transducer connection Voltage Transducer Check Form Calculator Protection Plan if transducer is being replaced Procedure Measure and record the following quantities on the Voltage Transducer Check Form (MSF027):
1. AC Reading Phase AC Voltage (Terminals 3 & 4), Vin
2. DC Reading
Output DC Voltage (Terminals 1 & 2) (Typical values 0 to 5 VDC), VDCmeas Complete and record the following calculations to verify the voltage transducer is working properly:
Calculate expected VDC out of transducer.
VDCcalc = (Vin/150)*5
PUB-NP-025, Attachment D Page 39 of 57

Calculate Percent Error. % Error = (VDCmeas – VDCcalc) / VDCcalc * 100
The acceptable error is 1% or less. If value exceeds 1%, check with the SCADA Technician to ensure there are no scaling issues. If scaling is ok, the transducer should be changed out. Enter a work request to have the transducer replaced. On the work request make note of the model and type of transducer required. Note: The SCADA tencnologists may require PT configuration and voltage information to determine the scale factors.This information should be available form the AC/DC drawing.
3. SCADA Reading Soon after taking measurements call the SCC or SCADA Technologist. Have them Poll the RTU for the station and to give you the voltage reading for the point being checked. Record the SCADA readings.
4. Panel Meters and/or Relay Value Readings
Where available record panel meter voltage reading and relay reading if relay is connected to voltage source being checked.
Completed forms must be scanned and forwarded to the planner.
1. Planner is required to review the form and if the transducer passed, forward a work request to the Operational Support Team for further investigation.
PUB-NP-025, Attachment D Page 40 of 57

NOTE: Contact SCC operator to let them know checks are occurring. The power transducers typically monitor power levels on transmission lines and transformers. The transducer provides two DC milliamp outputs, one for watts and one for vars, to the RTU that are proportional to the transducer’s AC power input. When the transducer is connected to the RTU analog inputs, 1 mA will give 5 VDC across the RTU terminals. Field staff will be measuring AC voltage and current quantities and DC voltage quantities. As well, staff are required to read panel meters and/or protection relay meter values and contact a SCADA Technologist to record the SCADA power readings for the transducer being checked. Possible causes of power transducer reading incorrectly: • Blown PT or CT fuse • Faulty power transducer • Faulty RTU analog board • Faulty wiring • Wrong SCADA scaling factor
If there is AC voltage and current into the transducer and readings are incorrect then a transducer change out may be required. Prior to changing transducer, take the measurements and do the calculations to verify the transducer. If the transducer checks out then the problem is with the RTU or SCADA. Required Equipment and Material The following is required: AC Digital Multimeter that can display 3 places after the decimal AC Clamp On Ammeter for 0 to 5 amp range to show 3 places after decimal (AEMC Model MN02 or equivalent) AC/DC Schematic for power transducer being checked Power Transducer Check Form Calculator Protection Plan if transducer is being replaced Procedure With reference to the generic power transducer wiring diagram below measure and record the following quantities on the Power Transducer Check Form (MSF028). The wiring diagram is usually located on the side of the transducer as well.
1. AC Readings a. AC Voltage
Phase A AC Voltage (Terminals 3 & 4) (Typical values 110 to 125 VAC) Phase C AC Voltage (Terminals 5 & 6) Calculate and record average voltage, Vavg
b. AC Current
Note the current input order on the transducer (Ph A, Ph C, Ph B) Phase A AC Current (Terminal 7 wire) (Typical values 0 to 5 Amps AC) Phase C AC Current (Terminal 8 wire) Phase B AC Current (Terminal 9 wire)
Calculate and record average current, Iavg
PUB-NP-025, Attachment D Page 41 of 57

2. DC Readings
Output WATT DC Voltage (Terminals 1 & 2) (Typical values 0 to 5 VDC), VDCw Output VAR DC Voltage (Terminals 6A & 12A), VDCv Calculate and record expected VDC out of transducer:
VDCt = SQRT((VDCw)2+(VDCv)2)
3. SCADA Readings Soon after taking measurements call the SCC or SCADA Technologist. Have them Poll the RTU for the station and to give you the MW and MVAR readings for the point being checked. Record the SCADA readings. Completing this check immediately following completion of step 2 helps to avoid inaccuracies due to changes in load.
4. Calculations
Complete the following calculations (record on form MSF028, Step 4) to verify the voltage transducer is working properly:
Calculate expected VA input
VAcalc = (VDCt * 1500) / 5
Calculate Measured Input VA VAmeas = 3*Vavg*Iavg
Calculate Percent Error
% Error = (VAmeas – VAcalc) / VAcalc * 100 The acceptable error is 5% or less. If value exceeds 5%, check with the SCADA Technician to ensure there are no scaling issues. If scaling is ok, the transducer should be changed out. Protection Plan is required for transducer change out. Note: The SCADA Technologists may require PT configuration /voltage and CT ratios to determine correct scaling factors. This can be obtained from the AC/DC drawing.
5. Panel Meters and/or Relay Value Readings
Where available, record panel meter MVA reading and Meter Multiplier and relay readings if transmission line or transformer is equipped with a protection relay that displays 3 Phase MW and MVAR.
Completed forms must be scanned and forwarded to the planner.
1. Planner is required to review the form and if the transducer passed, forward a work request to the Operational Support Team for further investigation.
PUB-NP-025, Attachment D Page 42 of 57

Figure 1 Typical 2.5 Element Transducer Connection
PUB-NP-025, Attachment D Page 43 of 57

Equipment Impinging TEV on Switchgear
CASE 1: In one substation tested the battery charger impinged Amber TEV readings on cubicle switchgear and other surrounding metalwork, including a desk, breaker panel box, and the door to the building. The charger itself had a Red TEV reading. Switchgear close to the charger had Amber TEV readings. Switchgear farthest from the charger had Green TEV reading. Figure 1 illustrates the TEV readings within the building. This indicates that the charger is impinging TEV readings on the switchgear. However, it is important to test this equipment more frequently; as there is a possibility the switchgear may truly have Amber TEV discharge. It is important to spot check surrounding metalwork if Amber or Red TEV is discovered on switchgear as it will help determine the root cause of the discharge.
Figure 1 - Case 1
PUB-NP-025, Attachment D Page 44 of 57

CASE 2: In another switchgear building tested for partial discharge, a range of Amber and Red TEV readings were detected. The outside of the building gave Red TEV readings, including the door. Red and Amber TEV were also detected in the air between the building and transformer. All cubicle switchgear gave Amber and/or Red TEV readings. Some of the TEV readings flashed between Amber and Red. The switchgear readings may be as a result of the background TEV generated from the transformer or other outside equipment. On a subsequent visit, approximately 3 weeks later, all TEV readings were Green. This is an anomaly that is still under investigation.
Figure 2 - Case 2
PUB-NP-025, Attachment D Page 45 of 57

Red Ultrasonic LED: CASE 3: While partial discharge testing at a substation ultrasonic discharge was detected coming from a switchgear cubicle. This cubicle contains a dry type station service transformer. Dry type transformers can generate harmless ultrasonic discharge. When ultrasonic discharge is detected it is important to identify the equipment contained in the cubicle. This will help determine the severity of the results. CASE 4: Red ultrasonic discharge was detected while testing several cubicles for electromagnetic (TEV) discharge. While testing for TEV the front of UltraTEV is placed flat against a panel. There are cases where vibrations create 40 kHz ultrasonic signals. Placing a hand on the panel close to UltraTEV will remove the ultrasonic discharge and ultrasonic LED will turn Green.
PUB-NP-025, Attachment D Page 46 of 57

The following instructions are specific to the UltraTEV Partial Discharge Tester. UltraTEV is designed to detect partial discharge sources in high voltage plants and substations. The required equipment for the partial discharge test is the UltraTEV, illustrated in Figure 1, and the Function Checker, illustrated in Figure 2.
Front
Back
Figure 1 – ULTRATEV 1. TEV Indicator LED 2. Ultrasonic Indicator LED 3. Power LED 4. On/Off button 5. Ultrasonic Indicator LED
Figure 2 - FUNCTION CHECKER
PUB-NP-025, Attachment D Page 47 of 57

1.0 Operating Notes 1-1. Use UltraTEV on grounded metalwork only. 1-2. UltraTEV is calibrated to compensate for an operator holding it in a normal grip.
Holding the instrument by fingertips or allowing it to free stand may affect results. 1-3. Before using UltraTEV, it should be tested using the function checker. Connect the
function checker to the charger socket. To test the LEDs move the function checker around the front of the UltraTEV as illustrated in Figure 3. Once the check is complete, remove the function checker. Do not attempt testing with function checker attached.
Figure 1 - ULTRATEV FUNCTION CHECK
1-4. UltraTEV will automatically shut down after 5 minutes of operation. 1-5. When there is approximately 2 hours of battery life remaining the Power LED will
change from Green to Amber. When the batteries are too low to operate the Power LED will turn Red and shut down after 10 seconds.
1-6. Turn off UltraTEV before charging its batteries. To charge the batteries, connect the
charger using the proper socket. The batteries will charge in 14 hours. For more information refer to UltraTEV Operating Manual.
PUB-NP-025, Attachment D Page 48 of 57

2.0 Preliminary Tests 2-1. Once inside the switchgear building, turn UltraTEV ON and hold at least 1 meter away
from any conducting surface.
a. If the ultrasonic LED is Red there may be “Rodent Control” in the building. Turn off “Rodent Control” using a switch, if applicable. Otherwise, unscrew the mechanism from its socket. If there is no “Rodent Control” in the building, record this result and continue testing.
b. If the TEV LED is either Red or Amber there is significant electromagnetic
background noise. UltraTEV may not be useful in this circumstance. Record this result and continue testing.
3.0 Testing 3-1. To test for ultrasonic discharge turn the device ON and slowly scan around any air paths
to the inside of the switchgear cubicle.
a. If the switchgear is vented, measurements can be taken immediately outside the vent.
b. For non-vented equipment take measurements in small air gaps between the
cubicle and covers. c. If the cubicles are gasketed, the ultrasonic technique may not be useful.
Figure 2 – ULTRASONIC DISCHARGE TESTING
PUB-NP-025, Attachment D Page 49 of 57

3-2. To measure electromagnetic discharge (TEV) hold the front of the UltraTEV flat against the center of the panel. Hold UltraTEV in place for 5 seconds or until the TEV LED gives a continuous steady indication.
Correct – Flat against panel Incorrect - Not flat against panel
Figure 3 - ELECTROMAGNETIC DISCHARGE TESTING 3-3. Electromagnetic discharge from other metalwork equipment may impinge on the
switchgear to be tested or vice versa. Spot check metalwork not connected to the switchgear to aid in investigation of discharge source.
3-4. Record all results on appropriate form. 4.0 Interpreting Results 4-1. Red ultrasonic LED or TEV LED indicates more detailed investigation may be required.
Inform Engineering of any Red results to ensure proper action is taken. 4-2. Amber TEV LED results in more frequent investigation. Partial Discharge testing will
occur every 6 months instead of annually in these areas. 4-3. Green ultrasonic LED or TEV LED indicates no discharge was found. Continue partial
discharge testing at regular intervals. See Figure 6 for further verification of UltraTEV results.
PUB-NP-025, Attachment D Page 50 of 57

Figure 4 - ULTRATEV FLOW CHART
5.0 Troubleshooting Guide 5-1. Red ultrasonic LED when UltraTEV is flat against panel: This is caused by 40 kHz
signals imposed on the metalwork or vibrations. To alleviate this problem and remove the Red ultrasonic reading, simply place a hand on the panel next to UltraTEV. This Red ultrasonic reading can be ignored. However, if TEV is detected (either Red or Amber) it must be recorded.
PUB-NP-025, Attachment D Page 51 of 57

Newfoundland Power
Electromechanical Relay Maintenance Procedure
Connecting to the SMRT1 Test set
Use the following procedure to connect the SMRT1 to the computer.
□ Insert the supplied Protection Key into a free USB port on the laptop. □ Connect the SMRT1 to the computer using the supplied Network cable. □ Power on the SMRT1. After approximately 1 min the Binary Output light will flash several times
indication that the SMRT1 is initialized. □ Open the STVI software and click the OK button when the “Instrument Configuration” window opens.
□ In the upper left corner of the screen click on the Link Button . The STVI software will now try to identify the test set and the following window will appear.
□ After a brief delay the software should detect the test set and the following screen will appear. Click
on the test set listed in the window.
□ The Computer should now be connected to the SMRT1 set. If properly connected the link button will
change as to and the following screen will appear:
PUB-NP-025, Attachment D Page 52 of 57

PUB-NP-025, Attachment D Page 53 of 57
Pow@'rDB A.dvanc@'d {Rela~ T~t Set) ~ r-o l
0.00 60.000

IAC 51B/IAC 53B MANUAL TESTING PROCEDURES
Initial setup and cleaning Upon arrival at substation locate the relay to be tested and ensure the settings match the ones on the relay report. If not contact Frank Antle/Craig Stacey to discuss what action to take. Ensure tailboard conference is held prior to commencing work. Remove relay from service. Prior to testing electrically, a mechanical inspection and cleaning of the contacts is required.
□ Using a Dremel tool with soft polisher or burnishing tool clean the main moving shaft and the main stationary contact assembly.
□ Clean contacts on inst and time coils. □ Clean debris on induction disk using tape. Masking tape or packing tape works best. Use a can
of compressed air to clean relay as well. □ Check connections on terminals to ensure they are tight.
Test indicating flags to ensure they latch in position. Adjust as necessary.
PUB-NP-025, Attachment D Page 54 of 57

Pick-up Test of IAC 51B/1AC 53B
□ Ensure the current and voltage is turned off on the SMRT1. □ Connect terminals 4 and 5 from the relay case to Current output terminals of SMRT1. (Use
the heavy gauge leads which are in the test lead set). □ Connect terminals 1 and 2 from the relay to the SMRT1 “Binary Input”. □ Ensure that the SMRT1 is turned on and connected to the computer as outlined above. □ From the top file menu select “Open as Template” and select the file “IAC Pickup
Test.pbdxml”. Select “No” to the prompt to save the “Untitled” Document. □ Enter the relay pickup setting in the box labeled “Pickup Setting”. □ Click on the play button located below the “Ramp Wizard (EM Pickup) Button. □ Click on the reports button and select “Add Results to Report and View”.The report window
will open and display the results. If necessary you can make adjustments and rerun the test from within the report by pressing the play button.
□ When pickup is ok save the test results by clicking file>save as. Use naming conventions such as “CLV-T2 Ph A Pickup”
□ Close the report window by clicking the check mark on the top of the report. □ To run a pickup test on another relay repeat from step 5.
If the relay is not picking up at the correct setting the tension on the Control spring Adjusting Ring needs to be adjusted. ENSURE CURRENT OUTPUT IS TURNED OFF PRIOR TO ADJUSTING THE CONTROL SPRING ADJUSTING RING. Turn the ring to the RIGHT to increase the setting. Turn the ring to the LEFT to decrease the setting. Turn the current output on again and continue testing and adjusting until Pick Up setting is ok. 5% ERROR IS THE MAXIMUM ALLOWABLE TOLERANCE.
PUB-NP-025, Attachment D Page 55 of 57

INSTANTANEOUS Pick-up Test of IAC 51B/1AC 53B (Manual Mode)
□ Ensure the current and voltage is turned off on the SMRT1. □ Connect terminals 4 and 6 from the relay case to Current output terminals of SMRT1. (Use the
heavy gauge leads which are in the test lead set). □ Connect terminals 1 and 3 from the relay to the SMRT1 “Binary Input”. □ The value of the instantaneous pick up is read from the top of the adjusting screw on top of the
instantaneous coil. This value is difficult to read and not a reliable indication of the Instantaneous setting.
□ Ensure that the SMRT1 is turned on and connected to the computer as outlined above. □ From the top file menu select “Open as Template” and select the file “IAC Inst Test.pbdxml”.
Select “No” to the prompt to save the “Untitled” Document. □ Set the start current to a value just below the instantaneous pickup setting. (ie If the
Instantaneous Pick-Up is set at 20A, set the current start output to 15A). □ Press the play button and wait for the test to complete. □ Click on the reports button and select “Add Results to Report and View”. The report window will
open and display the results. If necessary you can make adjustments and rerun the test from within the report by pressing the play button.
□ When pickup is ok save the test results by clicking file>save as. Use naming conventions such as “CLV-T2 Ph A Inst”
□ Close the report window by clicking the check mark on the top of the report. □ To run a pickup test on another relay repeat from step 5.
PUB-NP-025, Attachment D Page 56 of 57

Timing Test of IAC 51B/1AC 53B
□ Ensure the current and voltage is turned off on the SMRT1. □ Connect terminals 4 and 5 from the relay case to Current output terminals of SMRT1. (Use the
heavy gauge leads which are in the test lead set). □ Connect terminals 1 and 2 from the relay to the SMRT1 “Binary Input”. □ Ensure that the SMRT1 is turned on and connected to the computer as outlined above. □ From the top file menu select “Open as Template” and select the file “IAC TimingTest.pbdxml”.
Select “No” to the prompt to save the “Untitled” Document. □ Click on the settings ICON immediately to the left of the displayed curve. □ Set the pickup and the time dial (TMD) to the observed relay settings and click the check mark at
the bottom of the settings window. □ Timing tests are set automatically to multiples 2, 4, and 6 times the pickup setting. To run these
tests click on the play button below the current multiple. Be sure to wait for the time dial to fully
reset before proceeding to the next test multiple. If you do run the test before the TD is fully reset just wait for the time dial to reset and run the same test again.
□ Click on the reports button and select “Add Results to Report and View”. The report window will
open and display the results. If necessary you can make adjustments and rerun the test from within the report by pressing the play button.
□ When pickup is ok save the test results by clicking file>save as. Use naming conventions such as “CLV-T2 Ph A Timing”
□ To run a pickup test on another relay repeat from step 5.
If time is slower than expected move magnet on the induction disk toward the center of the relay and opposite should the time be faster than expected.
10% error is not acceptable.
PUB-NP-025, Attachment D Page 57 of 57


![CA-NP-036 NP 2013/2014 GRA · 2015. 9. 1. · CA-NP-036 Requests for Information NP 2013/2014 GRA Newfoundland Power – 2013/2014 General Rate Application Page 1 of 1 1 Q. [Decommissioning]](https://img.dokumen.tips/doc/110x75/5fe78aae424728026b4c0cfc/ca-np-036-np-20132014-2015-9-1-ca-np-036-requests-for-information-np-20132014.jpg)