Embed Size (px)
Citation preview

PTLab User Manual
© 2016 All rights reserved.
Order Number 14 060681101 Rev. A Updated 8‐12‐16
Overview
Manual Input
Barcode Input
Managing Slide Levels
Job Queue and Pending Queue
Settings and Preferences
Multiple Printers

1
HistoCore PERMA S – PTLab Manual 2016
Caution!
The user needs to visually check each printed slide for legibility after the printing process.
Caution!
All laboratories must perform their own tests to ensure that the ink is resistant against the various
reagents the slides will subsequently be exposed to.
A wide range of factors beyond Leica’s control can have negative effects on the results. The laboratory
operating the unit shall bear full responsibility for the legibility of the imprint after processing with
reagents.
Manufactured by: Primera Technology, Inc. Two Carlson Parkway North, Suite 375 Plymouth, MN 55447-4446 U.S.A.
Distributed by: Leica Biosystems Nussloch GmbH Heidelberger Straße 17-19 DE-69226 Nussloch Germany

2
HistoCore PERMA S – PTLab Manual 2016
Notices: The information in this document is subject to change without notice. NO WARRANTY OF ANY KIND IS MADE WITH REGARD TO THIS MATERIAL, INCLUDING, BUT NOT LIMITED TO, THE IMPLIED WARRANTIES OF MERCHANTABILITY AND FITNESS FOR A PARTICULAR PURPOSE. No liability is assumed for errors contained herein or for incidental or consequential damages in connection with the furnishing, performance, or use of this material. This document contains proprietary information that is protected by copyright. All rights are reserved. No part of this document may be photocopied, reproduced, or translated into another language without prior written consent.
Trademark Acknowledgments: Windows is a registered trademark of Microsoft Corporation. All other trademarks are the property of their respective owners.
Printing History
Edition 1.3, #041714, Copyright 2012, All rights reserved.
FCC Compliance Statement: This device complies with part 15 of the FCC rules. Operation is subject to the following two conditions: (1) this device may not cause harmful interference, and (2) this device must accept any interference received, including interference that may cause undesired operation.
For Users in the United States:This product is intended to be supplied by a UL listed Direct Plug-In Power Supply marked "Class 2"or a UL listed ITE Power Supply marked "LPS" with output rated 12VDC, 4.5A or higher. This equipment has been tested and found to comply with the limits for a Class A digital device, pursuant to Part 15 of the FCC Rules. In a domestic environment this product may cause radio interference, in which case the user may be required to take adequate measures. This equipment generates, uses, and can radiate radio frequency energy and, if not installed and used inaccordance with the instructions, may cause harmful interference to radio communications. However, there is no guarantee that interference will not occur in a particular installation. If this equip- ment does cause harmful interference to radio or television reception, which can be determined by turning the equipment off and on, the user is encouraged to try to correct the interference by one or more of the following measures: • Re-orient or relocate the receiving antenna. • Increase the separation between the equipment and receiver. • Connect the equipment into an outlet on a circuit different from that to which the receiver is con-
nected. • Consult the dealer or an experienced radio/TV technician for help. Use of shielded cables is
required to comply with the Class A limits of Part 15 of the FCC Rules. You are cautioned that any changes or modifications not expressly approved in this manual could void your authority to operate and/or obtain warranty service for this equipment.
For Users in Canada: This digital apparatus does not exceed the Class A limits for radio noise for digital apparatus set out on the Radio Interference Regulations of the Canadian Department of Communications. Le present appareil numerique n'emet pas de bruits radio electriques depassant les limites applicables aux appareils numeriques de la class A prescrites dans le Reglement sur le brouillage radioelectrique edicte par le ministere des Communications du Canada.
CAUTION! TO PREVENT FIRE OR SHOCK HAZARD, DO NOT EXPOSE THE UNIT TO RAIN OR MOISTURE. TO REDUCE THE RISK OF ELECTRIC SHOCK, DO NOT REMOVE EXTERIOR PANELS. NO USER-SERVICEABLE PARTS INSIDE. REFER SERVICING TO QUALIFIED SERVICE PERSONNEL. OPERATE THE UNIT WITH ONLY THE PROPER ELECTRICAL SPECIFICATIONS AS LABELED ON THE PRINTER AND AC ADAPTER.
CAUTION! USE OF CONTROLS OR ADJUSTMENTS OR PERFORMANCE OF PROCEDURES OTHER THAN THOSE SPECIFIED HEREIN MAY RESULT IN HAZARDOUS RADIATION.
CAUTION! THE USER NEEDS TO VISUALLY CHECK EACH PRINTED SLIDE FOR LEGIBILITY AFTER THE PRINTING PROCESS.
CAUTION! ALL LABORATORIES MUST PERFORM THEIR OWN TESTS TO ENSURE THAT THE INK IS RESISTANT AGAINST THE VARIOUS REAGENTS THE SLIDES WILL SUBSEQUENTLY BE EXPOSED TO A WIDE RANGE OF FACTORS BEYOND LEICA'S CONTROL CAN HAVE NEGATIVE EFFECTS ON THE RESULTS. THE LABORATORY OPERATING THE UNIT SHALL BEAR FULL RESPONSIBILITY FOR THE LEGIBILITY OF THE IMPRINT AFTER PROCESSING WITH REAGENTS.

3
HistoCore PERMA S – PTLab Manual 2016
Czech: Upozornění! Aby se předešlo riziku vzniku požáru nebo úrazu elektrickým proudem, nevystavujte jednotku dešti nebo vlhkosti. Pro snížení rizika úrazu elektrickým proudem neodstraňujte vnější panely. Jednotka neobsahuje žádné díly, na nichž by údržbu mohl provádět uživatel. Údržbu přenechejte kvalifikovaným servisním pracovníkům. Jednotku používejte pouze v elektrické síti s odpovídajícími parametry, které jsou uvedeny na tiskárně a napájecím adaptéru.
Upozornění! Použití ovládacích prvků, provádění úprav nebo úkonů jiných, než jsou zde výslovně uvedeny, může způsobit nebezpečné záření.
Upozornění! Uživatel musí po vytištění vizuálně zkontrolovat ostrost každého potištěného sklíčka.
Upozornění! Všechny laboratoře musejí provádět své vlastní testy, aby zajistily, že použitá tiskařská barva bude odolná vůči různým činidlům, jejichž působení budou sklíčka následně vystavena. Výsledky může negativně ovlivnit široká škála faktorů, na které nemá společnost Leica vliv. Za ostrost tisku po jeho zpracování pomocí činidel plně zodpovídá laboratoř, která tuto jednotku provozuje.
German: Vorsicht! Das Gerät vor Feuchtigkeit und Regen schützen, um Brand- und Stromschlaggefahr zu vermeiden. Um Stromschläge zu vermeiden, darf die Außenverkleidung nicht abgenommen werden. Enthält keine vom Benutzer wartbaren Teile. Die Wartung ist von qualifiziertem Wartungspersonal auszuführen. Das Gerät darf ausschließlich mit den auf dem Drucker und Netzgerät angegebenen elektrischen Daten betrieben werden.
Vorsicht! Wenn Verfahren, Regelungen oder Einstellungen vorgenommen werden, die nicht in diesem Handbuch beschrieben sind, kann gesundheitsschädliche Strahlung abgegeben werden.
Vorsicht! Der Benutzer muss jeden Objektträger nach dem Bedrucken visuell auf seine Lesbarkeit prüfen.
Vorsicht! Jedes Labor muss seine eigenen Tests durchführen, um sicherzustellen, dass die verwendete Tinte allen Reagenzien standhält, denen die Objektträger ausgesetzt werden. Viele verschiedene Faktoren, die außerhalb der Kontrolle von Leica liegen, können die Ergebnisse negativ beeinflussen. Das Labor, welches das Gerät betreibt, trägt die volle Verantwortung für die Lesbarkeit des Aufdrucks nach der Verarbeitung mit Reagenzien.
Spanish: ¡Precaución! Para evitar el riesgo de incendio o descarga eléctrica, no exponga la unidad a la lluvia ni a la humedad. Para reducir el riesgo de descarga eléctrica, no quite los paneles exteriores. No hay piezas reparables por el usuario en el interior. Para cualquier reparación, contacte únicamente con personal de servicio cualificado. Utilice la unidad solamente bajo las especificaciones eléctricas adecuadas, indicadas en la etiqueta de la impresora y en el adaptador de corriente alterna.
¡Precaución! El uso de controles o ajustes o la realización de procedimientos distintos a los aquí especificados puede provocar radiación peligrosa.
¡Precaución! El usuario debe revisar visualmente cada portaobjetos impreso para verificar la legibilidad tras el proceso de impresión.
¡Precaución! Todos los laboratorios deben realizar sus propias pruebas para asegurarse de que la tinta sea resistente a los distintos reactivos a los cuales los portaobjetos serán posteriormente expuestos. Existe una amplia gama de factores fuera del control de Leica que pueden tener efectos negativos en los resultados. El laboratorio que opere la unidad asumirá la plena responsabilidad en cuanto a la legibilidad de la impresión tras el procesamiento con reactivos.
4
HistoCore PERMA S – PTLab Manual 2016
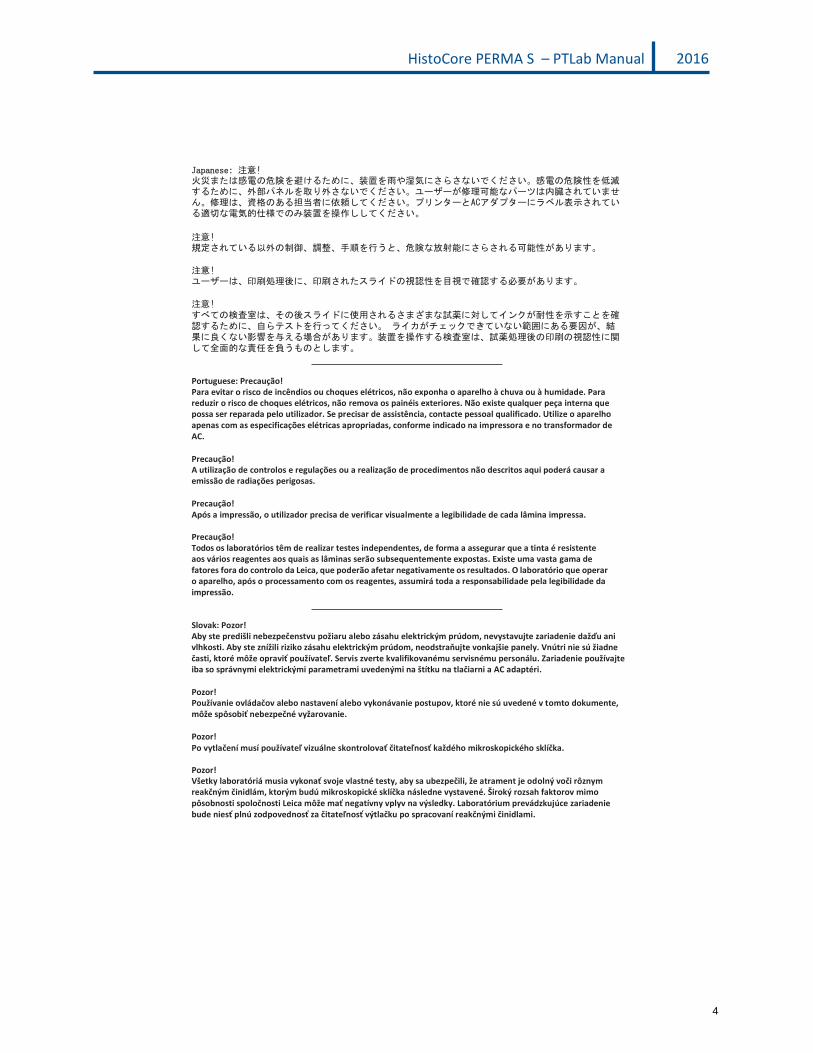
Japanese: 注意! 火災または感電の危険を避けるために、装置を雨や湿気にさらさないでください。感電の危険性を低減 するために、外部パネルを取り外さないでください。ユーザーが修理可能なパーツは内臓されていませ ん。修理は、資格のある担当者に依頼してください。プリンターとACアダプターにラベル表示されてい る適切な電気的仕様でのみ装置を操作ししてください。
注意! 規定されている以外の制御、調整、手順を行うと、危険な放射能にさらされる可能性があります。
注意! ユーザーは、印刷処理後に、印刷されたスライドの視認性を目視で確認する必要があります。
注意! すべての検査室は、その後スライドに使用されるさまざまな試薬に対してインクが耐性を示すことを確 認するために、自らテストを行ってください。 ライカがチェックできていない範囲にある要因が、結 果に良くない影響を与える場合があります。装置を操作する検査室は、試薬処理後の印刷の視認性に関 して全面的な責任を負うものとします。
Portuguese: Precaução! Para evitar o risco de incêndios ou choques elétricos, não exponha o aparelho à chuva ou à humidade. Para reduzir o risco de choques elétricos, não remova os painéis exteriores. Não existe qualquer peça interna que possa ser reparada pelo utilizador. Se precisar de assistência, contacte pessoal qualificado. Utilize o aparelho apenas com as especificações elétricas apropriadas, conforme indicado na impressora e no transformador de AC.
Precaução! A utilização de controlos e regulações ou a realização de procedimentos não descritos aqui poderá causar a emissão de radiações perigosas.
Precaução! Após a impressão, o utilizador precisa de verificar visualmente a legibilidade de cada lâmina impressa.
Precaução! Todos os laboratórios têm de realizar testes independentes, de forma a assegurar que a tinta é resistente aos vários reagentes aos quais as lâminas serão subsequentemente expostas. Existe uma vasta gama de fatores fora do controlo da Leica, que poderão afetar negativamente os resultados. O laboratório que operar o aparelho, após o processamento com os reagentes, assumirá toda a responsabilidade pela legibilidade daimpressão.
Slovak: Pozor! Aby ste predišli nebezpečenstvu požiaru alebo zásahu elektrickým prúdom, nevystavujte zariadenie dažďu ani vlhkosti. Aby ste znížili riziko zásahu elektrickým prúdom, neodstraňujte vonkajšie panely. Vnútri nie sú žiadne časti, ktoré môže opraviť používateľ. Servis zverte kvalifikovanému servisnému personálu. Zariadenie používajte iba so správnymi elektrickými parametrami uvedenými na štítku na tlačiarni a AC adaptéri.
Pozor! Používanie ovládačov alebo nastavení alebo vykonávanie postupov, ktoré nie sú uvedené v tomto dokumente, môže spôsobiť nebezpečné vyžarovanie.
Pozor! Po vytlačení musí používateľ vizuálne skontrolovať čitateľnosť každého mikroskopického sklíčka.
Pozor! Všetky laboratóriá musia vykonať svoje vlastné testy, aby sa ubezpečili, že atrament je odolný voči rôznym reakčným činidlám, ktorým budú mikroskopické sklíčka následne vystavené. Široký rozsah faktorov mimo pôsobnosti spoločnosti Leica môže mať negatívny vplyv na výsledky. Laboratórium prevádzkujúce zariadenie bude niesť plnú zodpovednosť za čitateľnosť výtlačku po spracovaní reakčnými činidlami.

5
HistoCore PERMA S – PTLab Manual 2016
French: Mise en garde ! Pour éviter un incendie ou une décharge électrique, ne pas exposer l'appareil à la pluie ou à l'humidité. Pour réduire le risque de décharge électrique, ne pas retirer les panneaux extérieurs. Aucune pièce interne ne peut être réparée par l'utilisateur Pour tout entretien ou réparation, se reporter à un personnel qualifié. Respecter les spécifications électriques indiquées sur l'imprimante et l'adaptateur secteur pour faire fonctionner l'appareil.
Mise en garde ! L'utilisation de commandes ou de réglages ou de procédures autres que celles spécifiées dans la présente risque provoquer des radiations dangereuses.
Mise en garde ! L'utilisateur doit inspecter visuellement chaque lame pour vérifier la lisibilité après impression.
Mise en garde ! Tous les laboratoires doivent effectuer leurs propres tests pour s'assurer que l'encre est résistante aux divers réactifs auxquelles les lames seront ensuite exposées. De nombreux facteurs hors du contrôle de Leica peuvent avoir des effets négatifs sur les résultats. L'entière responsabilité de la lisibilité de l'empreinte suite au traitement avec des réactifs incombe au laboratoire chargé du fonctionnement de l'appareil.
Chinese: 注意! 为防止发生火灾或触电,请勿让设备遭雨淋或受潮。为减少发生触电的危险,请勿卸下外面板。里面没有 用户自己能维修的部件。请让合格的维修人员进行维修。只能采用符合打号机和交流电源适配器上所标示 的正确电气规格的电源来运行设备。
注意! 未按照本说明书的要求使用控制器或调节装置或进行设备操作,可能会导致受到激光照射的危险。
注意! 打印完成后,用户需目视检查每张打印好的玻片是否清晰易读。
注意! 所有实验室都必须自己通过试验来确保所用墨水能耐受玻片后续将要接触的各种试剂。非徕卡所能控制的 诸多因素会对结果产生负面影响。打印结果经试剂处理后的易读性应由使用本设备的实验室承担全责。
Greek: Προσοχή! Για να αποφευχθεί ο κίνδυνος πυρκαγιάς ή ηλεκτροπληξίας, μην εκθέτετε τη συσκευή στη βροχή ή σε υγρασία. Για να μειωθεί ο κίνδυνος ηλεκτροπληξίας, μην αφαιρείτε τα εξωτερικά πάνελ. Τα εσωτερικά εξαρτήματα δεν είναι επισκευάσιμα από το χρήστη. Για την επισκευή, απευθυνθείτε σε εξειδικευμένο προσωπικό σέρβις. Θέστε σε λειτουργία τη μονάδα μόνο εάν πληρούνται οι απαιτήσεις για τις ηλεκτρικές εγκαταστάσεις που αναφέρονται στον εκτυπωτή και στον μετασχηματιστή εναλλασσόμενου ρεύματος (AC).
Προσοχή! Η χρήση χειριστηρίων ή προσαρμογέων ή η εκτέλεση διαδικασιών, διαφορετικών από αυτές που ορίζονται στο παρόν, ενδέχεται να προκαλέσουν έκθεση σε επικίνδυνη ακτινοβολία.
Προσοχή! Αφού ολοκληρωθεί η διαδικασία εκτύπωσης, ο χρήστης πρέπει να ελέγξει οπτικά κάθε ένα εκτυπωμένο πλακίδιο.
Προσοχή! Όλα τα εργαστήρια πρέπει να εκτελούν τις δικές τους δοκιμές ώστε να διασφαλίσουν ότι το μελάνι είναι ανθεκτικό στα διάφορα αντιδραστήρια στα οποία εκτίθενται ακολούθως τα πλακίδια. Υπάρχουν πολλοί παράγοντες τους οποίους δεν μπορεί να ελέγξει η Leica και οι οποίοι μπορούν να έχουν αρνητική επίδραση στα αποτελέσματα. Την ευθύνη για την αναγνωσιμότητα του αποτυπώματος μετά την επεξεργασία με αντιδραστήρια, φέρει το εργαστήριο στο οποίο λειτουργεί η μονάδα.
6
HistoCore PERMA S – PTLab Manual 2016
Polish: Uwaga! Aby zapobiec pożarowi lub porażeniom prądem, chronić urządzenie przed deszczem i wilgocią. Aby zmniejszyć niebezpieczeństwo porażenia prądem elektrycznym, NIE należy zdejmować zewnętrznych paneli. Wewnątrz urządzenia nie znajdują się żadne części przeznaczone do samodzielnej naprawy przez użytkownika. Naprawę urządzenia należy powierzyć wykwalifikowanym pracownikom serwisu. Urządzenie należy obsługiwać jedynie zgodnie z właściwymi parametrami elektrycznymi podanymi na drukarce i zasilaczu AC.
Uwaga! Użycie elementów sterujących, ustawień lub zastosowanie procedur innych niż określone w niniejszej instrukcji może spowodować narażenie na niebezpieczne promieniowanie.
Uwaga! Po zakończeniu procesu drukowania użytkownik powinien dokonać wzrokowej kontroli każdego pokrytego drukiem szkiełka pod kątem czytelności.
Uwaga! Wszystkie laboratoria muszą przeprowadzić własne testy w celu sprawdzenia, czy atrament jest odporny na różne odczynniki, których działaniu zostaną następnie poddane szkiełka. Na wyniki może negatywnie wpłynąć cały szereg czynników będących poza kontrolą firmy Leica. Laboratorium obsługujące urządzenie ponosi pełną odpowiedzialność za czytelność nadruków po poddaniu szkiełek działaniu odczynników.
Croatian: Oprez! Kako biste spriječili opasnost od požara ili udara, ne izlažite jedinicu kiši ili vlazi. Kako biste smanjili opasnost od električnog udara, ne uklanjajte vanjske ploče. U unutrašnjosti se ne nalaze dijelovi koje korisnik sam može servisirati. Povjerite servis kvalificiranom servisnom osoblju. Jedinicu rabite samo s propisnim električnim specifikacijama, kao što je naznačeno na pisaču i AC adapteru.
Oprez! Uporaba kontrola, prilagođavanja ili primjena postupaka, osim ovdje specificiranih, može rezultirati opasnim zračenjem.
Oprez! Korisnik mora vizualno provjeriti čitljivost svakog ispisanog stakalca nakon postupka ispisivanja.
Oprez! Svi laboratoriji moraju provesti vlastita ispitivanja kako bi se uvjerili da je tinta otporna na razne reagense kojima će stakalca naknadno biti izložena. Na rezultate mogu negativno utjecati raznorazni čimbenici koje tvrtka Leica ne može predvidjeti. Laboratorij u kojem se jedinica rabi u potpunosti odgovara za čitljivost ispisa nakon obrade reagensima.
Hungarian: Vigyázat! A tűz vagy az áramütés veszélyének a megelőzése érdekében az egységet ne tegye ki esőnek vagy nedvességnek. Az áramütés kockázatának elkerülése érdekében, ne távolítsa el a külső védőborítást. Belül nem találhatók felhasználó által javítható alkatrészek. A javítást bízza képzett karbantartó személyzetre. Az egységet csak a nyomtatón és az váltakozó áramú adapter címkéin megtalálható jellemzőknek megfelelő elektromos hálózatról üzemeltesse.
Vigyázat! Amennyiben a jelen leírásban nem található vezérlőket, beállításokat vagy teljesítményt befolyásoló eljárásokat alkalmaz, fennáll a káros sugárzás veszélye.
Vigyázat! A nyomtatási folyamatot követően a felhasználó ellenőrizze minden egyes nyomtatott dia olvashatóságát.
Vigyázat! Az összes laboratórium saját teszteléssel ellenőrizze, hogy a tinta ellenáll azoknak a reagenseknek, amelyeknek a jövőben a diák ki lesznek téve. A Leica hatáskörén kívül álló számos egyéb tényező is negatívan befolyásolhatja az eredményeket. A reagensekkel kezelt lenyomatok olvashatóságáért teljes mértékben az egységet üzemeltető laboratórium vállalja a felelősséget.
7
HistoCore PERMA S – PTLab Manual 2016
Dutch: Let op! Stel het apparaat niet bloot aan regen of vocht, om het risico op brand of elektrocutie te voorkomen. Voorkom het risico op elektrocutie: verwijder geen buitenpanelen. Dit apparaat bevat geen onderdelen die door de gebruiker gerepareerd of onderhouden kunnen worden. Laat reparaties en onderhoud door bevoegd onderhoudspersoneel uitvoeren. Gebruik het apparaat uitsluitend volgens de juiste elektrische specificaties zoals aangegeven op de printer en de netspanningsadapter.
Let op! Gebruik van bedieningselementen of het verrichten van afstellingen of procedures op andere wijze dan hier voorgeschreven kan resulteren in schadelijke straling.
Let op! De gebruiker dient elk bedrukt glaasje na het bedrukken op leesbaarheid te controleren.
Let op! Laboratoria dienen hun eigen tests te verrichten om te controleren of de inkt bestand is tegen de diverse reagentia waaraan de glaasjes blootgesteld zullen worden. Er zijn vele factoren die van negatieve invloed zijn op de uitkomsten, en die buiten de macht van Leica vallen. Het laboratorium waar het apparaat wordt gebruikt is als enige verantwoordelijk voor de leesbaarheid van de afdruk na bewerking met reagentia.
Turkish: Dikkat! Yangın veya elektrik çarpması riskini önlemek için, üniteyi yağmur veya neme maruz bırakmayın. Elektrik çarpması riskini azaltmak için dış panelleri çıkarmayın. İçinde kullanıcı tarafından bakımı yapılamaz parçalar vardır. Yetkili servis personeline başvurun. Üniteyi sadece, Yazıcı ve AC adaptörü üzerinde etikette belirtilen şekilde, uygun elektriksel şartlara göre çalıştırın.
Dikkat! Burada belirtilenleri haricinde kontrollerin, ayarların ya da yordamların kullanılması tehlikeli radyasyona neden olabilir.
Dikkat! Kullanıcı baskı işleminden sonra bastırılan her lamı okunabilirlik açısından görsel kontrol etmelidir.
Dikkat! Tüm laboratuvarlar, mürekkebin lamların maruz kalacağı çeşitli reaktif maddelere dayanıklı olduğundan emin olmak için kendi testlerini yapmalıdır. Leica'nın kontrolü dışındaki çok çeşitli faktörlerin sonuçlar üzerinde olumsuz etkileri olabilir. Üniteyi çalıştıran laboratuvar reaktif maddelerle işlemden sonra baskının okunabilirlik için tüm sorumluluğu üstlenmelidir.
Danish: Forsigtig! Enheden må ikke udsættes for regn eller fugt for at forebygge risikoen for brand eller stød. Fjern ikke de udvendige paneler for at formindske risikoen for elektrisk stød. Ingen bruger-anvendelige dele indeni. Henvis servicering til kvalificeret servicepersonale. Betjen kun enheden med de behørige elektriske specifikationer som mærket på printeren og vekselstrømsadapteren.
Forsigtig! Brug af kontrolfunktioner eller justeringer af eller udførelse af procedurer bortset fra det, som er specificeret heri, kan medføre farlig stråling.
Forsigtig! Brugeren skal efterse hvert trykt objektglas for læselighed efter trykningen.
Forsigtig! Alle laboratorier skal foretage deres egne prøver for at sikre, at blækket er resistent mod de forskellige reagenser, som objektglassene efterfølgende bliver udsat for. En række forhold, som er uden for Leicas kontrol, kan påvirke resultaterne negativt. Laboratoriet, som anvender enheden, har eneansvaret for aftrykkets læselighed efter behandling med reagenser.
8
HistoCore PERMA S – PTLab Manual 2016
Italian: Attenzione! Non esporre l'unità a pioggia o umidità per prevenire il rischio di incendi o scosse elettriche. Non rimuovere i pannelli esterni per ridurre il rischio di scosse elettriche. All'interno non sono presenti parti riparabili dall'utente. Far eseguire le riparazioni esclusivamente a personale qualificato. Far funzionare l'unità in conformità alle specifiche elettriche indicate sulla stampante e l'adattatore c.a.
Attenzione! L'uso dei comandi o l'esecuzione di regolazioni o procedure diversi da quelli specificati può causare radiazioni pericolose.
Attenzione! È necessario che l'utente controlli visivamente ogni vetrino stampato dopo il processo di stampa.
Attenzione! Ogni laboratorio deve eseguire i propri test per assicurarsi che l'inchiostro sia resistente ai vari reagenti a cui i vetrini saranno esposti. Esiste un gran numero di fattori al di fuori del controllo di Leica che possono influire negativamente sui risultati. La responsabilità della leggibilità della stampa dopo l'esposizione ai reagenti è esclusivamente del laboratorio che opera l'unità.
Swedish: Varning! För att förhindra brand- eller stötrisker får enheten inte utsättas för regn eller fukt. För att minska risken för elektriska stötar får ytterpanelerna inte avlägsnas. Det finns inga delar inuti enheten som användaren kan underhålla. Allt underhåll ska utföras av kvalificerad underhållspersonal. Använd rätt elektriska specifikationer enligt etiketten på skrivaren och växelströmsadaptern.
Varning! Användning av andra reglage, justeringar eller procedurer än dem som specificeras i detta dokument kan leda till farlig strålning.
Varning! Efter varje tryckning måste användaren visuellt kontrollera att det tryckta glaset är läsbart.
Varning! Alla laboratorier måste utföra sina egna test för att kontrollera att bläcket är beständigt mot de olika reagenter som glasen senare kommer att utsättas för. Det finns många faktorer som Leica inte har kontroll över som kan påverka resultaten negativt. Det laboratorium som använder enheten är ensamt ansvarigt för tryckets läsbarhet efter behandling med reagenter.
Norwegian: Forsiktig! For å unngå fare for brann eller støt bør du ikke utsette apparatet for regn eller fuktighet. For å redusere faren for elektrisk støt bør du ikke fjerne ytterpanelene. Det er ingen deler inni som kan repareres av bruker. Reparasjoner skal utføres av fagpersoner. Enheten skal kun fungere i samsvar med de elektriske spesifikasjonene som er angitt på skriveren og AC-adapteren.
Forsiktig! Bruk av andre betjeningsanordninger, innstillinger eller instruksjoner enn de som er angitt her kan føre til farlig stråling.
Forsiktig! Brukeren må sjekke visuelt at hvert utskrevne objektglass er leselig etter trykkeprosessen.
Forsiktig! Alle laboratorier bør utføre deres egne tester for å sikre at blekket er bestandig mot de forskjellige reagensene som objektglassene senere vil eksponeres for. En lang rekke faktorer utenfor Leicas kontroll kan ha negativ innvirkning på resultatene. Laboratoriet som bruker enheten, har det fulle ansvar for at avtrykket er leselig etter behandling med reagenser.

9
HistoCore PERMA S – PTLab Manual 2016
Korean: 주의!
화재나 감전 위험을 예방하려면 빗물이나 습기에 기기를 노출하지 마십시오. 감전 위험을 줄이려면 외부 패널 을 제거하지 마십시오. 내부에는 사용자가 수리할 수 있는 부품이 없습니다. 자격이 있는 서비스 담당자에게 서 비스를 요청하십시오. 프린터 및 C어댑터 레이블에 기재된 적절한 전기 규격에 따라 장비를 작동하십시오.
주의!
여기에 명시되지 않은 절차를 제어, 조정 또는 수행할 경우 위험한 방사선이 방출될 수 있습니다.
주의!
인쇄 작업 후에는 사용자가 각각의 인쇄된 슬라이드가 얼마나 뚜렷한지를 눈으로 직접 확인해야 합니다.
주의!
모든 실험실은 슬라이드가 노출될 다양한 시약에 대해 잉크가 저항력이 있는지의 여부를 직접 테스트하여 확 인해야 합니다.
라이카가 통제하지 못하는 다양한 요인으로 인하여 결과에 부정적인 영향이 미칠 수 있습니다. 시약을 사용하 여 처리한 이후 인쇄물의 가독성에 대한 책임은 전적으로 장비를 작동하는 실험실에 있습니다.
Russian: Внимание! В целях предотвращения возгорания или поражения электрическим током запрещается подвергать данное устройство воздействию дождя или влаги. Чтобы снизить опасность поражения электрическим током, не снимайте внешние панели. Внутри отсутствуют детали, требующие пользовательского обслуживания. Обслуживание устройства должно выполняться квалифицированным специалистом. Использование оборудования допускается только в условиях соответствия электрическим характеристикам, указанным на принтере и адаптере переменного тока.
Внимание! Использование средств управления, регулировка или выполнение процедур, помимо указанных в данном документе, может привести к воздействию опасного излучения.
Внимание! По завершении процесса печати пользователю необходимо визуально проверить читаемость каждого отпечатанного стекла.
Внимание! Все лаборатории обязаны самостоятельно выполнять тесты по устойчивости чернил различным реагентам, воздействую которых будут подвергаться стекла.
Негативное воздействие на конечный результат может оказывать широкий спектр факторов, не зависящих от Leica. Лаборатория, выполняющая работу, несет полную ответственность за читаемость отпечатка после взаимодействия с реагентами.

10
HistoCore PERMA S – PTLab Manual 2016
Arabic:

HistoCore PERMA S – PTLab Manual 2016
11
Table of Contents
Section 1 PTLab Overview
Section 2 Manual Input
Section 3 Barcode Input
3.1 Overview (Sample / Demo Scan)
3.2 Scanned Barcode Requirements
3.3 Incomplete Templates
Section 4 Managing Slide Levels
Section 5 Job Queue and Pending Jobs
5.1 Job Queue 5.2 Pending Jobs
Section 6 Settings and Preferences
6.1 Settings
6.2 Printer Information
6.3 Template Management
6.4 Software Info Check for Updates
6.5 Logging
6.6 Set the Slide Type on a Slide Cartridge
6.7 Preload Slide in Auto‐Feed Mode (Slide Printer)
6.8 Advanced Settings
Section 7 Multiple Printers
7.1 Set up Multiple Printers
7.2 Printing to Multiple Printers
HistoCore PERMA S – PTLab Manual 2016
12
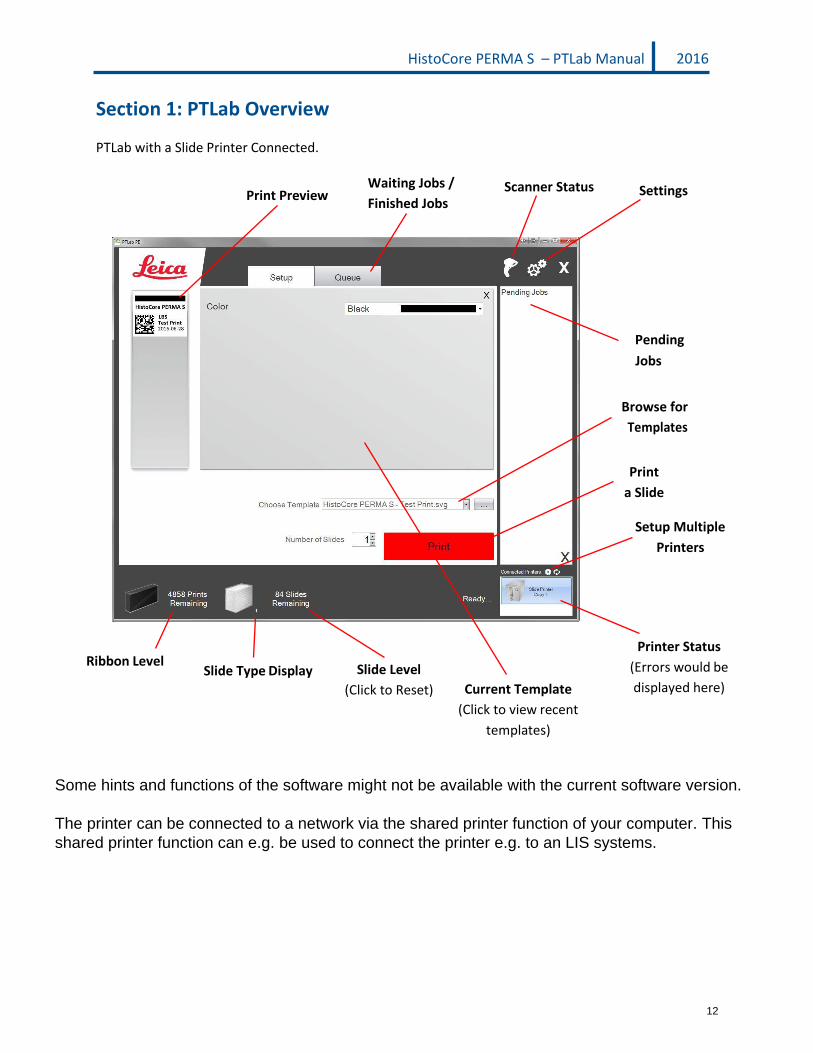
Section 1: PTLab Overview
PTLab with a Slide Printer Connected.
Print Preview Waiting Jobs /
Finished Jobs Scanner Status Settings
Pending
Jobs
Browse for
Templates
a Slide
Setup Multiple
Printers
Ribbon Level Slide Type Display Slide Level
(Click to Reset) Current Template
(Click to view recent
templates)
Printer Status
(Errors would be
displayed here)
Some hints and functions of the software might not be available with the current software version.
The printer can be connected to a network via the shared printer function of your computer. This
shared printer function can e.g. be used to connect the printer e.g. to an LIS systems.

HistoCore PERMA S – PTLab Manual 2016
13
Section 2: Manual Input
This is the least difficult data entry method to implement but still presents the possibility for data errors
to be introduced by the user. Enter the data by typing or by choosing from menus. The type of menu,
the order, the labels and even the slide type are all customizable using the PTTemplate software.
The software comes preloaded with several template options. These options are meant to provide you
with a sampling of the printer’s capability. They are not necessarily suited for practical use. Before
using the printer in a lab you will probably want to edit an existing template or create an entirely new
template using the PTTemplate software (See the PTTemplate software manual).
To quickly choose a preloaded template click the drop down arrow to view recent templates. Choose
one.
Browse
Button
You may also click the browse button to the right of the currently selected template to view the same
list of available templates with a preview.
Once you have selected the template you must enter the information you would like to print.

HistoCore PERMA S – PTLab Manual 2016
14
1. For this example SampleTemplate1.svg was selected. Choose a color swatch to be printed.
2. Type the necessary information in the text fields that require manual input. The preview will update
as you enter the information.

HistoCore PERMA S – PTLab Manual 2016
15
3. This template also includes two other automatic fields/features:
Barcode
A barcode encoded with the patient
ID and the Slide Level will be printed.
Date
The current date will automatically
be printed.
4. Finally, this template requires Slide Type 1. Slide type could be set to any number between 1 and 100
or removed entirely. Slide types can be used as internal designations in a lab for different types of slides
such as charged slides (See section 7.6)
There are many other template fields/features available to preview in the other preloaded slide
templates. Any of the fields found in the other preloaded templates can be added to a custom
template that you can create in the PTTemplate software.

HistoCore PERMA S – PTLab Manual 2016
16
Section 3: Barcode Input 3.1 Overview (Sample / Demo Scan)
If the template supports it you can scan an existing linear or 2D barcode using the optional scanner from
another label. This will allow you to directly transfer some or all the information on the label to the slide
printer template. If all information to complete the template is present, you can either choose to
automatically print the slide or send the job to the Pending Jobs queue.
If the scanned barcode contains the proper fields, the software can automatically choose the template
needed, automatically adding the information to be printed, set a slide type (section 7.6), and even set
the number of copies. Follow the instructions below to see an example of how this can work.
Connect your scanner and install the driver. Open PTLab. To verify that PTLab is
communicating with your scanner, click the scanner icon at the top right part of
your screen.
Scanner Status should report Connected and Running. If it cannot communicate you will see an error
message and a “Reconnect” button will be present. Click “Reconnect”.
On this screen you may also display the character string which is actually encoded into any scanned
barcode. Simply scan the barcode and the data string will appear.
Close this window before attempting a scan/print or scan/pending jobs operation.
2. At any point while the software is open, simply scan a barcode to
print its corresponding template or send the template to the pending
jobs queue for review. The following sample label is preconfigured to
automatically print or send it to pending jobs.
3. If “Move all scanned jobs to pending queue” is unchecked, the associated template will automatically
print the slide.
Tick box "Move all LIS jobs to the pending queue" is not supported with the current software version.

HistoCore PERMA S – PTLab Manual 2016
17
4. If “Move all scanned jobs to pending queue” is checked, the job will appear in the pending jobs
queue.
5. Click on the job to display the template and review the data before printing.
6. Click Print to print the slide.

HistoCore PERMA S – PTLab Manual 2016
18
3.2 Scanned Barcode Requirements
In the sample case described in the previous section, the printed barcode on the specimen label
required that the barcode be encoded with the following data in the order shown. This is not a
requirement for all templates. You can edit or create a template to accept data in the format of an
existing 2D barcode that is currently being printed. This can be accomplished using the PTTemplate
software.
#1#, 16-12345, John Doe, 2, Lun
Template Number Patient Tissue Type
3.3 Incomplete Templates
If the template has more input fields than are provided by the data string scanned in from the barcode,
the job will automatically go into the Pending Jobs queue. This will be the case regardless of whether
you have “Move all scanned jobs to pending queue” checked or unchecked.
Scanned data will
be shown here if
fields are missing.
Extra Field not
found in Barcode
Scan Data
You may now choose to fill in the missing information or print the slide without the extra field
information.
Accession Image Color

HistoCore PERMA S – PTLab Manual 2016
19
Section 4: Managing Slide Levels
The slide level is tracked by the software and displayed on the status bar at the bottom.
Click to Open Set
Slide Level Window
Note: The printer does not have a physical slide level sensor. The software tracks when a slide has been
printed and subtracts one from the total. If the original total was incorrect for some reason, the slide
level reported by the software would also be incorrect.
To set the slide level, click on the slide icon. The following screen will appear.
This window will also appear if the slide cartridge is taken out of the printer with 2 or less slides
remaining. When you replace the slide cartridge you will be prompted with the window above.
An explanation of the function of each button is below.
Reset Slide Level resets the slide level to 100
Set Slide Level sets to a specific number that you can set by typing the number to the left. This
number will be remembered the next time this window appears. This is useful if your slides do
not come in packs of 100. You can easily reset the slide counter to equal whatever number of
slides your standard box includes.

HistoCore PERMA S – PTLab Manual 2016
20
Hide Slide Level will stop this window from appearing after a cartridge change and remove the
slide level icon from the status bar. You can always track the slide level by looking at the actual
slides remaining through the clear blue slide cartridge. You can re‐enable the slide icon in the
settings area.
Ignore dismisses the window and does not change the slide level. Use this if you removed and
inserted the same slide cartridge but did not alter the slide count.

HistoCore PERMA S – PTLab Manual 2016
21
Section 5: Job Queue and Pending Jobs
5.1 Job Queue
The Job Queue displays all current jobs which are printing or waiting to be printed.
The currently printing job will show a status of “printing”. The waiting job will appear below the printing
job.
Printing
Waiting to
Cancel All Jobs
Pause all Jobs
Cancel Job
Successfully Printed
Cancelled
Clear all Jobs
Reprint selected
jobs
Reprint Multiples
(Specific Slides in a Job)
When a job has been successfully printed or cancelled it will be moved to the Completed Jobs window.
The results of the job will be displayed below the status.
You may also cancel a currently printing job, pause jobs while they are printing, clear all jobs from the
list, or reprint jobs using the buttons at the bottom of the window.
Click “Reprint Multiples” to reprint specific slides
in a job. Enter the slide range you would like to
reprint including the starting slide, the total slides
in the set and the number of slides you want to
print. The slides the software will be printing are
shown in the white box.
Note: Use this feature ONLY
if your slide has a number
range component.
Number Range

HistoCore PERMA S – PTLab Manual 2016
22
5.2 Pending Jobs
The Pending Jobs area is only used if data for your templates is received
from a connected barcode scanner. You can set PTLab to automatically
print any slide as soon as the necessary data is received by the template
‐or‐ you can set PTLab to automatically place all jobs from a scanner in
the pending queue.
Note: If there is insufficient data to completely fill all fields in your
template, the job will always go to the pending jobs queue no matter the
setting. Click on the job to open the template and finish filling fields or just click “Print”.
If “Move all scanned jobs to pending queue” is unchecked, the associated template will
automatically print the slide.
Tick box "Move all LIS jobs to the pending queue" is not supported with the current software version.
Click on the job to display the template and review the data before printing. You may enter additional
data in empty fields, leave them blank or change data in any field. Click “Print” when you are ready to
print.

HistoCore PERMA S – PTLab Manual 2016
23
Section 6: Settings and Preferences
The settings window contains the following information:
Various software settings
Printer firmware version and printing statistics
Template management
Logging options
Open the settings area by clicking the tool icon in the upper right corner of the software.
To open or close each settings area click on the ribbon header above each section.
In the following sections you will find descriptions of each of the functions within each settings area.
6.1 Settings
Full Screen Mode. Check or uncheck to toggle between automatic full screen or standard
window mode. You must restart the software for this setting to take effect.
Tick box "Move all LIS jobs to the pending queue" is not supported with the current software version.

HistoCore PERMA S – PTLab Manual 2016
24
Require Login. Check this box to require a login username when the software starts. This is not
necessarily meant as a security feature. If this is checked, a user will be prompted to scan their
2D barcode on their security card or enter a username. This username can be used by a
template to print on the slide, encode on the slide barcode or simply be logged by the software.
The following screen will appear if this option is checked:
Once this setting is enabled you may add new users or manage current users by clicking the
admin icon. Here you can switch the current user, delete a user, or setup a new user. Check the
Administrator box to allow this user to manage users. You may set “Printed on Slide” to users
initials or some other code that will discreetly identify the user on the slide.
Show Slide Level. Uncheck this box to remove the slide level icon from the start bar and stop
tracking the number of slides in a cartridge.
HistoCore PERMA S – PTLab Manual 2016
25
Language. Choose one of the many available languages. The text will immediately be changed
to that language.
Move all scanned jobs to pending queue. If unchecked, the associated template will
automatically print the slide. If checked, the job will appear in the pending jobs queue. See
section 6 for more information.
Color Print Heat / Black Print Heat. Increase the heat settings to improve print quality. The
minimum heat setting that achieves acceptable print quality should be used. Increasing print
heat shortens print head life and increases the likelihood of a ribbon break. Separate heat
settings for color and black ribbons can be stored. If using a color ribbon, the color heat setting
will automatically be used. If using a black ribbon, the black heat setting will automatically be
used.
Current Slide Type. (Visible with Slide Printer Connected) See section 7.6
Enable auto‐feed mode. (Visible with Slide Printer Connected) See section 7.7

HistoCore PERMA S – PTLab Manual 2016
26
6.2 Printer Information
This window displays the current firmware version on the printer, total slides printed and other
information that may be useful to tech support.

HistoCore PERMA S – PTLab Manual 2016
27
6.3 Template Management
Buttons "Clear LIS Default" and "Set LIS Default" are not supported with this software version
All current templates are displayed. Click “Remove Template” to remove a template from the list of
templates available to the user via the “Choose Template” drop down menu or the browse button.
Any template that has been removed can be recovered using the “Recover Removed Templates” button.
You will be brought to the deleted Templates folder to recover your template.
If you have exported a template (for another computer) from the PTTemplate editing software you can
add that template by clicking the” Add Template” button.
Templates exported (for this computer) from the PTTemplate software installed on the same computer
as the PTLab software do not need to be added manually in this way. They will be automatically added
to the list.
You may also Set your Scanner Default in this location. See section 3 for more information.

HistoCore PERMA S – PTLab Manual 2016
28
6.4 Software Info
The Software Info area will tell you the current version of the software.
Buttons and License information referring to PTLab PE are not supported with this software version.
HistoCore PERMA S – PTLab Manual 2016
29
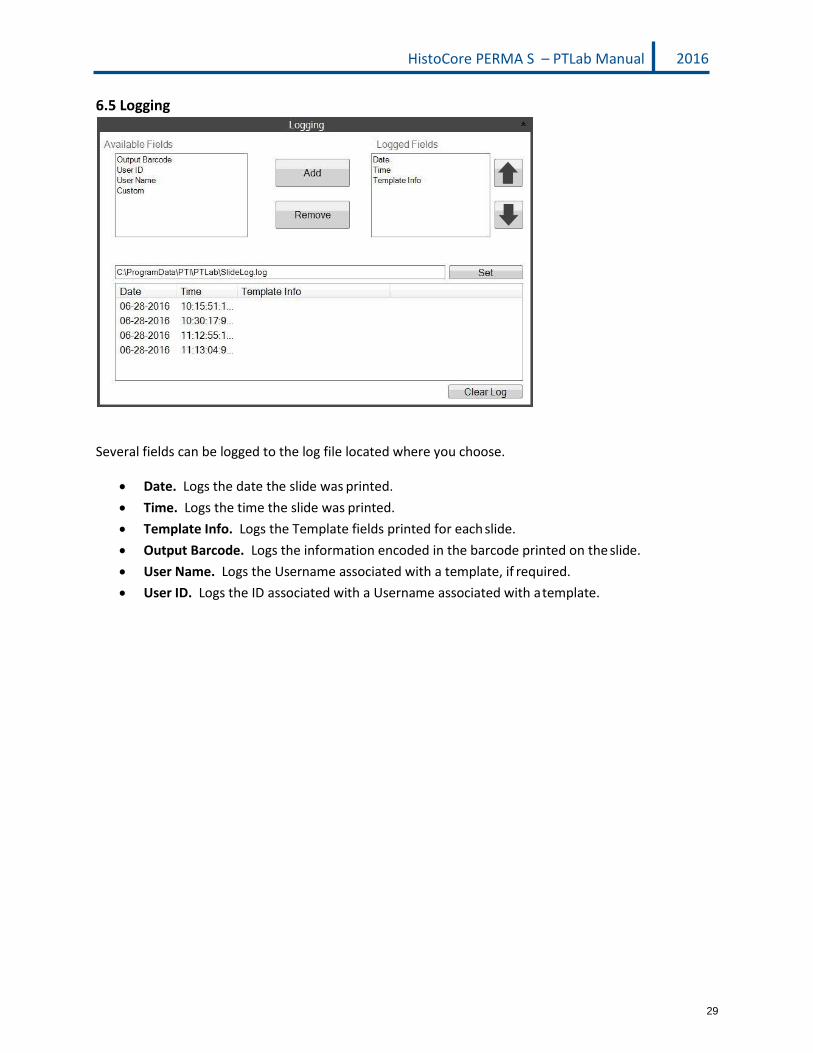
6.5 Logging
Several fields can be logged to the log file located where you choose.
Date. Logs the date the slide was printed.
Time. Logs the time the slide was printed.
Template Info. Logs the Template fields printed for each slide.
Output Barcode. Logs the information encoded in the barcode printed on the slide.
User Name. Logs the Username associated with a template, if required.
User ID. Logs the ID associated with a Username associated with a template.

HistoCore PERMA S – PTLab Manual 2016
30
6.6 Set the Slide Type on a Slide Cartridge
The slide type setting can be used to encode the blue slide cartridge with a unique number. Slide type
can be set to any number between 1 and 100. Slides types can be used as internal designations in a lab
for different types of slides such as charged slides. An encoded slide cartridge can be used in
combination with a template that requires a
specific slide type. In this way you can ensure
certain procedures are done on the appropriate
slides.
Note: To require a specific slide type your template
must have either an image list or text list which has
the “Set default copies and slide type” option
checked in the “Edit Text/Image List” area within
PTTemplate.
When the cartridge is inserted, the slide type will
be displayed below the slide icon on the status bar. PTTemplate
Slide Type
If a slide cartridge encoded with a slide type other than what the template requires is inserted into the
printer the following error will appear. Slide Cartridge
The default designation for any new slide cartridge is “1”.
If you would like to use the slide type setting to track different slide
types, follow this procedure.
1. Purchase additional slide cartridges for each of the slide types you
would like to track. Extra slide cartridges may be purchased from your
printer supplier. You can track many different slide types. Below are a
few examples:
Charged slides
Colored slides
Various manufacturers of slides
Slides with different coatings and treatments for specific procedures
Slide Type 2
Charged Slides

HistoCore PERMA S – PTLab Manual 2016
31
2. Label the slide cartridges. Once you have received the extra slide cartridges, label them by placing a
label or writing on the front or side of the blue cartridge. The label should be permanent so it will
withstand daily handling. The label should specify the slide type number and a description of the slide
type.
3. To encode the slide type number to the IC chip imbedded in the Slide Cartridge, insert the cartridge
into the printer.
4. Open the settings area by clicking the tool icon in the upper right corner of the software.
5. The settings window will appear. Click the settings ribbon to view all settings.
6. Choose the slide type number you would like to encode (1‐100). Click Set. The cartridge will be
encoded.
Important Note!
If you switch between different slide cartridges encoded with different slide type numbers
and you have the auto‐feed mode enabled, the slide of a different type left inside the printer
will be automatically ejected.

HistoCore PERMA S – PTLab Manual 2016
32
6.7 Preload slides in Auto‐feed Mode
The auto‐feed mode automatically feeds a slide from the cartridge into printing position before a print is
sent to the printer. This greatly reduces the time it takes for the first slide in a batch of slides to print.
This feature, if enabled, is especially useful if you only print one slide at a time.
Enable or Disable Auto‐Feed Mode.
1. Open the settings area by clicking the tool icon in the upper right corner of the software.
2. The settings window will appear. Click the settings ribbon to view all settings.
3. Check the Enable auto‐feed mode box.
Important Note!
1. If you switch between different slide types and you have the auto‐feed mode enabled, a
slide of a different type could be left inside the printer after your remove a slide cartridge and
insert another one of a different type.
Press the Slide button on the printer to eject the slide!
2. If the cartridges containing different slide types have been encoded with different slide
type numbers, the slide left inside the printer will be automatically ejected (see section 7.6).
Tick box "Move all LIS jobs to the pending queue" is not supported with the current software version.

HistoCore PERMA S – PTLab Manual 2016
33
6.8 Advanced Settings
Press Shift +A on your keyboard to enable the advanced menu.
In this area you can set your print head resistance value, adjust print offsets, restore factory defaults or
adjust heat offsets. Contact technical support before adjusting any of these settings.

HistoCore PERMA S – PTLab Manual 2016
34
Section 7: Multiple Slide Printers
7.1 Setup Multiple Printers
You can connect multiple Slide Printers to the same computer and control them all through PTLab. This
is useful if you have two different slide types that you regularly print to and you do not want to
continuously change slide cartridges.
To set this up click the gear Icon above the picture of the currently connected slide printer.
The slide printer currently connected will be displayed only with the USB Serial. This is the number that
Windows uses to differentiate between printers. If two different printers have the same USB serial
number windows will recognize them as the same printer. If they both connected at the same time with
the same serial number you may experience a Windows Blue Screen crash.
1. To get started click “Add Printer”.
2. You will be prompted to Unplug all slide printers from the system. Click OK when that has been
completed.
3. Now you will be prompted to Plugin the new slide printer. Plug it in and wait 5 seconds. Now click
“OK”.
4. The new printer will appear by default as Slide Printer (Copy 1). If successful it should have a USB
Serial of 002.

HistoCore PERMA S – PTLab Manual 2016
35
Refresh Button
Note: If the slide printer says “Not Connected” click the refresh button.
5. Connect the original Slide Printer. Click “Refresh”. You will now see both connected.
6. If you choose, you can now rename the slide printers. Select the one you want to rename and click
“Rename Printer”. You will be presented with a window that allows you to do so. Consider naming the
printers after the slide type which will be installed. You may want to further label the cartridge and the
printer itself to match this new name.
7. Close this window. You will see both printers connected. Click the Refresh button if ever you have
need to disconnect one printer and reconnect it while not restarting PTLab.
HistoCore PERMA S – PTLab Manual 2016
36
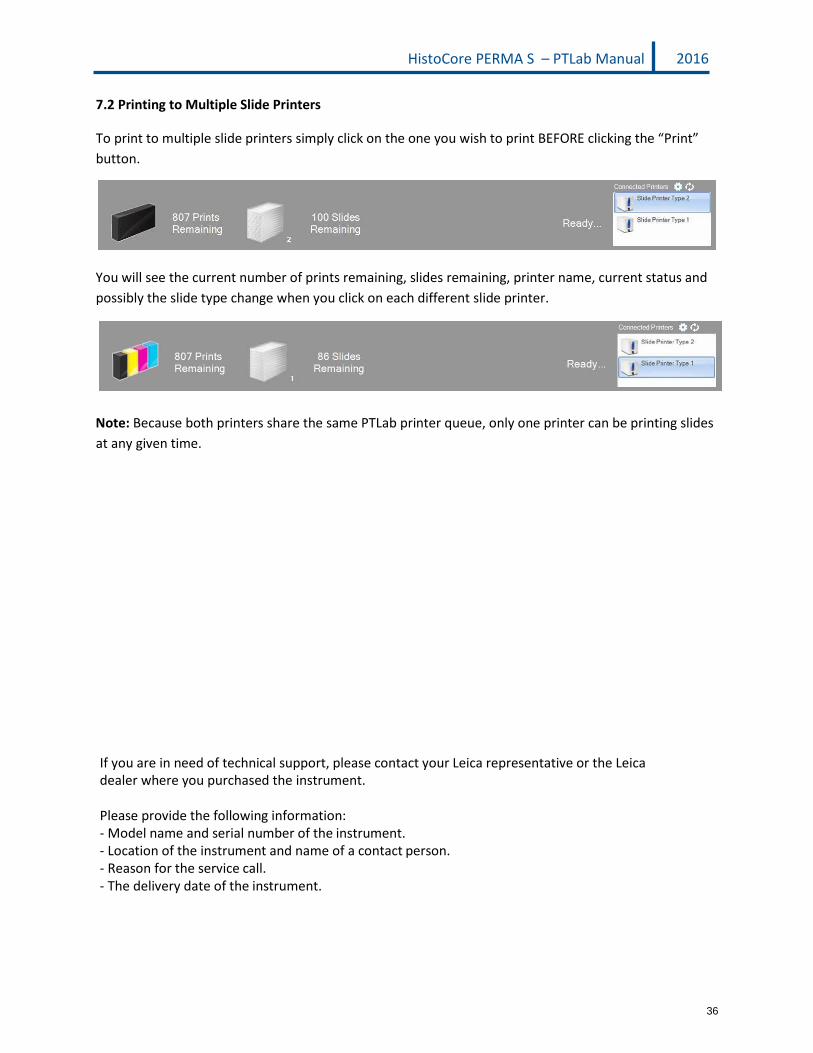
7.2 Printing to Multiple Slide Printers
To print to multiple slide printers simply click on the one you wish to print BEFORE clicking the “Print”
button.
You will see the current number of prints remaining, slides remaining, printer name, current status and
possibly the slide type change when you click on each different slide printer.
Note: Because both printers share the same PTLab printer queue, only one printer can be printing slides
at any given time.
If you are in need of technical support, please contact your Leica representative or the Leica dealer where you purchased the instrument.
Please provide the following information: - Model name and serial number of the instrument.- Location of the instrument and name of a contact person.- Reason for the service call.- The delivery date of the instrument.