Embed Size (px)
Citation preview
Profile Management 2.1
© 2011 Citrix Systems, Inc. All rights reserved. Terms of Use | Trademarks | Privacy Statement

Contents
Profile Management 2.1 5
About Profile Management 6
What's New 7
Existing Features of Profile Management 8
About Profiles 9
General Recommendations for Profiles 11
Accessing Multiple Resources 12
How Profile Management Works 13
Profile Management Use Cases 14
Known Issues in Profile Management 2.1 17
Frequently Asked Questions About Profile Management 19
General Questions 20
Users' Profiles and Settings 22
Installation and Configuration 24
Planning Your Profile Management Deployment 26
Planning Considerations for Profile Management 27
About the User Store 28
Creating the User Store 31
Installing Profile Management 32
System Requirements for Profile Management 33
Files Included in the Download 34
To install Profile management 35
To install Profile management silently 36
Deploying Profile Management with Citrix Receiver 37
Adding the ADM File to Group Policy 38
To store the ADM file 39
To add the ADM file to Group Policy 40
Setting Folder Redirection with Profile Management 41
To upgrade Profile management 42
2
Managing Multiple Versions of Profile Management 43
Considerations When Upgrading .Ini Files 44
To remove Profile management 45
Configuring Profile Management 46
Configuring Profile Management - Basic Setup 47
Testing Profile Management with Local GPO 48
To specify the path to the user store 49
To define which groups profiles are processed 50
To choose a migration policy 51
To resolve conflicting profiles 52
To enable Profile management 53
Configuring Profile Management - Advanced Setup 54
About Profile Management Settings 55
Configuration Precedence 57
Optimizing Profile Management 58
Including and Excluding Items 59
To include items 60
To exclude items 61
Default Included and Excluded Items 62
Combining Inclusion and Exclusion Lists 65
To use extended synchronization 66
Supported Uses of Extended Synchronization 67
Wildcards and Profile Management 69
To store certificates 70
Using Profile Management with Citrix Products 71
Profile Management and XenApp 72
Profile Management and XenDesktop 73
Monitoring and Logging Profile Management 74
About the Profile Management Log File 75
To set up logging 77
Performance Monitoring and Profile Management 78
Troubleshooting Profile Management 79
Basic Troubleshooting 80
Examining the Profile Management Log File 81
Other Troubleshooting Steps 82
To produce a session dump file 83
Contacting Citrix Support 84
3

Deleting Local Profiles 85
Profile Management Reference Section 86
Profile Management ADM File Reference 87
Logon Diagram 98
Logoff Diagram 100
4
5
Profile Management 2.1
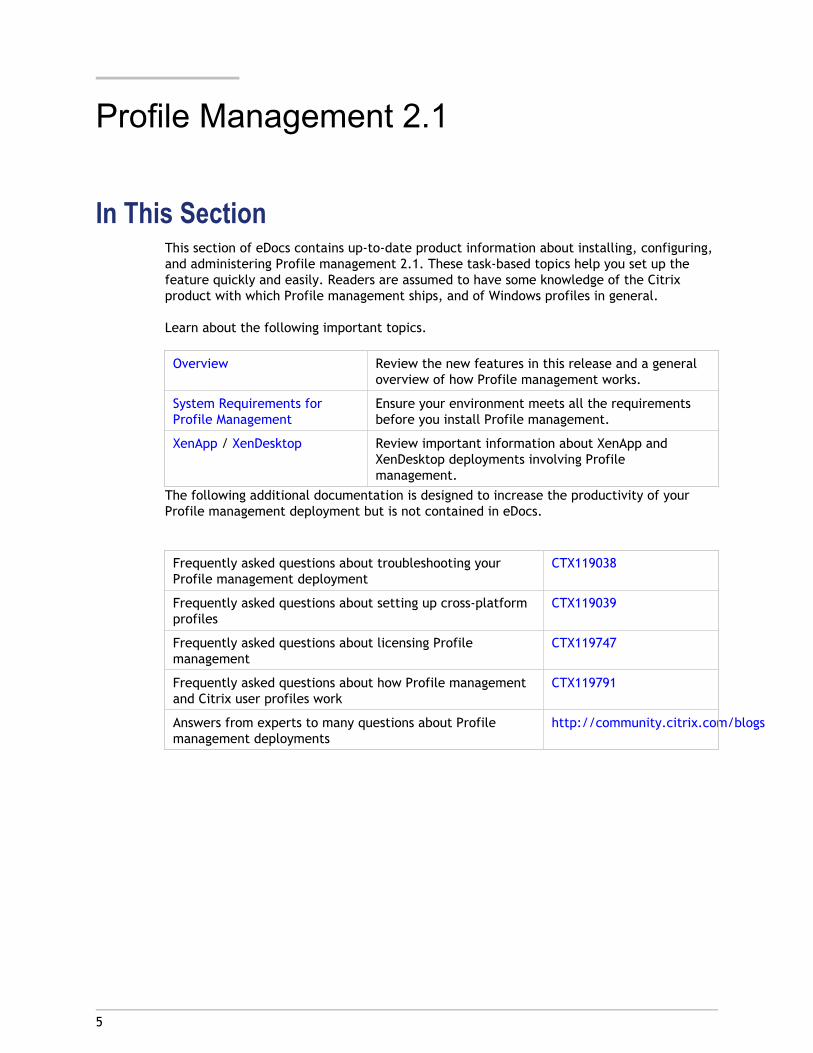
In This SectionThis section of eDocs contains up-to-date product information about installing, configuring,and administering Profile management 2.1. These task-based topics help you set up thefeature quickly and easily. Readers are assumed to have some knowledge of the Citrixproduct with which Profile management ships, and of Windows profiles in general.
Learn about the following important topics.
Overview Review the new features in this release and a generaloverview of how Profile management works.
System Requirements forProfile Management
Ensure your environment meets all the requirementsbefore you install Profile management.
XenApp / XenDesktop Review important information about XenApp andXenDesktop deployments involving Profilemanagement.
The following additional documentation is designed to increase the productivity of yourProfile management deployment but is not contained in eDocs.
Frequently asked questions about troubleshooting yourProfile management deployment
CTX119038
Frequently asked questions about setting up cross-platformprofiles
CTX119039
Frequently asked questions about licensing Profilemanagement
CTX119747
Frequently asked questions about how Profile managementand Citrix user profiles work
CTX119791
Answers from experts to many questions about Profilemanagement deployments
http://community.citrix.com/blogs

6
About Profile Management
Profile management from Citrix provides an easy, reliable, and high-performance way tomanage user personalization settings in virtualized or physical Windows environments. Itrequires minimal infrastructure and administration, and provides users with fast logons andlogoffs. Profile management is primarily intended as a profile solution for XenApp servers,virtual desktops created with XenDesktop, and physical desktops.
You install Profile management on each computer whose profiles you want to manage.
Group Policy allows administrators to control, in detail, how Citrix user profiles behave.Although many settings can be adjusted, in general you only need to configure thosedescribed in this document.
As used in this document, the term computer refers to user devices, virtual desktops, andservers that host published applications. The term Citrix user profile refers to profiles thatusers receive when Profile management is installed and enabled. Citrix user profiles aredifferent from local, roaming, or mandatory Windows profiles.
Usage rights for this feature are described in the end-user license agreement (EULA).
7
New Key Features of Profile Management
This version includes the following new key features:
● Windows 7 support. You can now manage profiles on user devices running Windows 7.
● Integration with Citrix Receiver. Profile management releases and upgrades can bemanaged using Citrix Receiver.
● Improved monitoring and reporting. Additional Perfmon counters allow you tomeasure several new aspects of logon and logoff, providing improved benchmarking andintegration with Citrix EdgeSight.
● Upgrades without .ini files. A command line option allows you to exclude the Profilemanagement .ini files from upgrades.

8
Existing Features of Profile Management
Profile management 2.1 includes the following existing features:
● Profile migration. Allows administrators to migrate profiles to and from physicalcomputers and virtual ones. Depending on the configuration settings, Profilemanagement can copy existing roaming profiles and local Windows profiles to the userstore.
● Wildcard support. Profile management allows wildcard characters to be used in filenames for synchronization, inclusion, and exclusion lists.
● Extended synchronization. Profile management synchronizes files and folders that arelocated outside of users' profile folders.
● Logging. All entries in log files are identified with the user name, domain, and sessionid (where identifiable).
● Multilingual profile support. Profile management uses language-independent profilefolder names in the user store for Windows XP and Windows Server 2003.
● Simplified installation and management. Installation and administration of Profilemanagement have been enhanced.
● Consistent user settings. This feature solves the "last-write-wins" problem that occurswhen the last open session overwrites all of the profile data from previously closedsessions.
● Easy integration. Profile management can be integrated simply into existingdeployments. There is no single point of failure, and no changes to existinginfrastructures, user rights, or logon and logoff scripts are required.
● Unified installer. The same .msi file can be used for servers and desktops. There aretwo versions of the file, for 32-bit and 64-bit systems.
● Active Directory-managed licensing.You can manage user entitlement using an ActiveDirectory user group.
9
About Profiles
A Windows user profile is a collection of folders, files, registry settings, and configurationsettings that define the environment for a user who logs on with a particular user account.These settings may be customizable by the user, depending on the administrativeconfiguration. Examples of settings that can be customized are:
● Desktop settings such as wallpaper and screen saver
● Shortcuts and Start menu setting
● Internet Explorer Favorites and Home Page
● Microsoft Outlook signature
● Printers
Some user settings and data can be redirected by means of folder redirection. However, iffolder redirection is not used these settings are stored within the user profile.
Types of ProfilesWindows includes several types of profiles:
Profile Type StorageLocation
ConfigurationLocation
Application Save Changes?
Local Local device Local device Local deviceonly
Yes
Roaming Network Active Directory Any deviceaccessed
Yes
Mandatory
(MandatoryRoaming)
Network Active Directory Any deviceaccessed
No
Temporary Not Applicable Not Applicable Local deviceonly
No
A temporary profile is only assigned when a specific profile type cannot be assigned. Withthe exception of mandatory profiles, a distinct profile typically exists for each user. Inaddition, mandatory profiles do not allow users to save any customizations.
For Remote Desktop Services users, a specific roaming or mandatory profile can be assignedto avoid issues that may occur if the same profile is assigned to a user within a RemoteDesktop Services session and a local session.
Version 1 and Version 2 ProfilesProfiles in Microsoft Windows XP and Windows Server 2003 are known as Version 1 profiles.Those in Windows Vista, Windows 7, Windows Server 2008, and Windows Server 2008 R2 areknown as Version 2 profiles. The folder structure (or namespace) of Version 1 profiles ismostly interchangeable; the folders on Windows XP and Windows Server 2003 are almostidentical. Likewise, the structure of Version 2 profiles is mostly interchangeable.
However, the namespace is different between Version 1 and Version 2 profiles. This folderstructure was changed in the later operating systems to provide user-specific foldersisolated for user and application data. Version 1 profiles store data in the root folder,Documents and Settings. Version 2 profiles store data in a more intuitively named foldercalled Users. For example, the folder contents of AppData\Local in Windows Vista is thesame as the contents of Documents and Settings\<username>\Local Settings\ApplicationData in Windows XP.
For more information about the differences between Version 1 and Version 2 profiles,seehttp://download.microsoft.com/download/3/b/a/3ba6d659-6e39-4cd7-b3a2-9c96482f5353/Managing%20Roaming%20User%20Data%20Deployment%20Guide.doc
About Profiles
10

11
General Recommendations for Profiles
Where network-based profiles are employed, consider adopting Profile management in yourorganization. You may be able to implement other solutions such as mandatory or roamingprofiles, and maintain them with standard knowledge of Microsoft Windows. However,unless your deployment is very restricted (for example, a call center where usercustomization is very limited so mandatory profiles are appropriate), Profile managementmay be preferred.
Citrix recommends using folder redirection so that user-specific data is saved separatelyfrom the profile.
12
Accessing Multiple Resources
Profiles become more complex as users access multiple resources. With profiles stored on anetwork, Microsoft Windows uses the registry to store user settings. Profiles are copiedfrom the network to the local device at logon, and copied back to the network at logoff. Ona daily basis, users access multiple computers, switch between desktops and laptops, andaccess virtual resources created with Citrix XenDesktop and Citrix XenApp.
This diagram illustrates how a single Citrix user profile follows a user who logs on tomultiple resources.
For example, a user has a local, physical desktop and from it accesses applicationspublished with XenApp. They also access a virtual desktop created with XenDesktop. Theuser's settings will not be uniform across all of these resources unless the settings areappropriately configured.
In addition, when they access a shared resource, the behavior of roaming profiles meansthat the "last write wins". For example, an administrator enables a roaming profile and auser changes the background color of the local desktop. The user then logs on to aXenDesktop virtual desktop, logs off the local desktop, and logs off the virtual desktop.Because both the local and virtual desktops were open at the same time and the last logoffwas from the virtual desktop, the settings from the virtual desktop session were the lastwritten to the profile, and the change to the background color is lost.

13
How Profile Management Works
Profile management addresses user profile deficiencies in virtualized environments wheresimultaneous domain logons by the same user introduce complexities and consistency issuesto the profile. For example, if a user starts sessions to two different virtual resources, theprofile of the session that terminates last overrides the profile of the first session. Thisproblem, known as "last write wins", discards any personalization settings that the usermakes in the first session.
You can tackle the problem by using separate profiles for each application silo. Howeverthis results in increased administration overhead and storage capacity requirements.Another drawback is that users or administrators must replicate settings for all profiles inall silos.
Profile management optimizes profiles in an easy and reliable way. At logoff, registrychanges, as well as files and folders in the profile, are saved to the user store for eachuser. If, as is common, a file already exists, it is overwritten if it has an earlier time stamp.
At logon, users' registry entries and files are copied from the user store. If a locally cachedprofile exists, the two sets are synchronized. This makes all settings for all applications andsilos available during the session and it is no longer necessary to maintain a separate userprofile for each silo.
Profile management processes domain logons not local ones.

14
Profile Management Use Cases
Citrix Profile management can be implemented to manage users' profiles in differentscenarios regardless of how applications are delivered to users or where they are housed.The following are examples of these scenarios:
● Citrix XenApp with published applications
● Citrix XenApp with published desktops
● Citrix XenApp with applications streamed into an isolation environment
● Applications streamed to XenDesktop virtual desktops
● Applications installed on XenDesktop virtual desktops
● Applications streamed to physical desktops
● Applications installed locally on physical desktops
Of these, Citrix sees the following as the most common use cases:
● Multiple sessions. The user accesses multiple XenApp server silos and therefore hasmultiple sessions open. Note however that application isolation and streaming on theserver are alternatives to server silos. This scenario is described in more detail in thistopic.
● "Last write wins" and roaming profile consistency issues. Because the last write tothe roaming profile causes all settings to be saved, roaming profiles may not retain theright data if multiple sessions are open and interim changes are made. In addition,settings may not be written correctly to the profile as a result of network, storageissues, or other problems. This scenario is described in more detail in this topic.
● Large profiles and logon speed. Profile bloat can make user profiles unwieldy resultingin storage and management issues. Typically, during logon Windows copies the user'sentire profile over the network to the local user device. For bloated profiles, this canprolong the user's logon time.
Multiple SessionsEspecially in large environments, it may be necessary for users to open multiple sessions toaccess different applications that are housed on different XenApp servers, whether in thesame farm or multiple farms. Where possible, Citrix administrators should considerapplication isolation or streaming in order to house applications on the same XenApp serverto allow users to access all applications from a single server and thus a single session.However, this may not be possible if a business unit controls specific servers or applicationscannot be streamed.
Once it has been determined that it is indeed necessary for users to access applicationsfrom various XenApp servers, the impact on profiles should be ascertained.
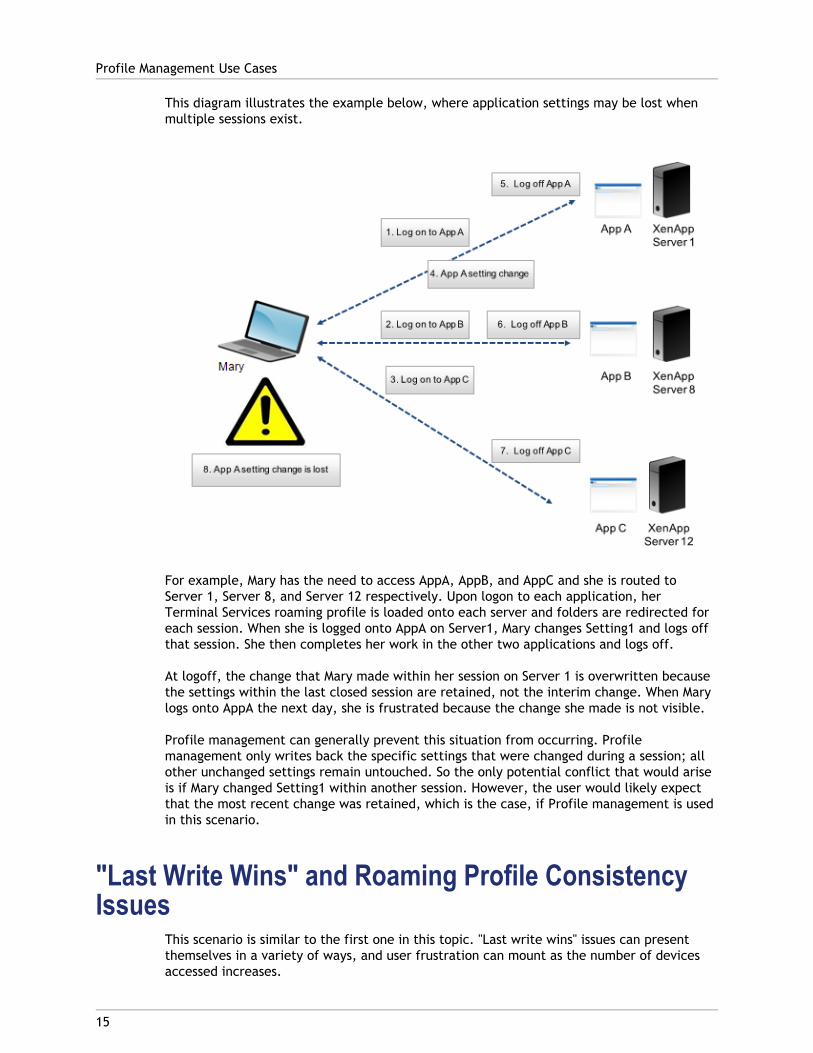
This diagram illustrates the example below, where application settings may be lost whenmultiple sessions exist.
For example, Mary has the need to access AppA, AppB, and AppC and she is routed toServer 1, Server 8, and Server 12 respectively. Upon logon to each application, herTerminal Services roaming profile is loaded onto each server and folders are redirected foreach session. When she is logged onto AppA on Server1, Mary changes Setting1 and logs offthat session. She then completes her work in the other two applications and logs off.
At logoff, the change that Mary made within her session on Server 1 is overwritten becausethe settings within the last closed session are retained, not the interim change. When Marylogs onto AppA the next day, she is frustrated because the change she made is not visible.
Profile management can generally prevent this situation from occurring. Profilemanagement only writes back the specific settings that were changed during a session; allother unchanged settings remain untouched. So the only potential conflict that would ariseis if Mary changed Setting1 within another session. However, the user would likely expectthat the most recent change was retained, which is the case, if Profile management is usedin this scenario.
"Last Write Wins" and Roaming Profile ConsistencyIssues
This scenario is similar to the first one in this topic. "Last write wins" issues can presentthemselves in a variety of ways, and user frustration can mount as the number of devicesaccessed increases.
Profile Management Use Cases
15
Because the roaming profile retains all profile data, with the exception of folders that havebeen redirected, the user profile can grow quite large. Not only does this add to the logontime because the profile must be downloaded, the potential for inconsistency grows duringthe write phase of the logoff, especially where network issues exist.
Profile management enables specific data to be excluded from the user profile, enablingthe user profile to be kept to a minimal size. Because only differences are written to theprofile, the write phase of the logoff involves less data and is faster. Profile managementcan be beneficial for applications that use profiles for temporary data but do not cleanthem up when the applications terminate.
Profile Management Use Cases
16

17
Known Issues in Profile Management 2.1
The following known issues exist in Profile management 2.1.
Installation IssuesIf you change the default location of Profile management cache files, they are not deletedwhen you uninstall the component. [#166/-]
On Windows Vista or Windows Server 2008, the log file directory is not deleted when Profilemanagement is uninstalled. This issue does not occur when the component is removed inunattended mode. [#169/-]
If the path to the log file has been set to a non-default location in Group Policy or the .inifile, the file is not deleted when Profile management is removed. To workaround this issue,delete the log file manually. [#219376]
Other Known IssuesA gpupdate has no effect on the synchronization of new folders located on volumes thathave not been synchronized before. To work around this issue, restart the Citrix ProfileManagement service. [#203859]
In Windows Performance Monitor, the log off counter is displayed as a number not as text.To work around this issue, read the four-digit number as Logoff Counter.[#201474]
Junction points and symbolic links appear not to be synchronized. If a user logs off, an errormessage such as the following may appear in the log file:
2009-01-12;12:01:45.231;ERROR;UPM;user5349;21;7468;FindFirstFileAPIWrapper: FindFirstFile for path <C:\Users\user5349\My Documents\*.*> returned: Access is denied.2009-01-12;12:01:45.278;INFORMATION;UPM;user5349;21;7468;IsFSPathExcluded: Excluding directory <C:\Users\user5349\NetHood> because it is a junction or symbolic link.
This is due to the fact that a junction point is accessed by another process. As junctionpoints are not stored in the user store, this is only a cosmetic issue. Such error messagesand can be ignored. [#204572]
Using extended synchronization in unsupported scenarios may result in data loss. Supportedscenarios, in which this issue does not occur, are documented in Supported Uses ofExtended Synchronization. [#216424]
Specific files and folders can be included and excluded from profiles. Inclusion andexclusion take place only at logoff, but log file entries make it appear they occur at logon.[#218834]
In Group Policy, you can change the location of the cache file used to monitor the MasterFile Table (MFT). The change is processed when policies are refreshed and take effect whenthe Citrix Profile Management service is next restarted. Changing the path when the CitrixProfile Management service is running has no effect, but the presence of log file entriesmay incorrectly give the impression that it does. [#218853]
Logging on immediately after restarting the computer running Profile management or theCitrix Profile Management service may result in two log file entries that include the fields“ctxupm5;0;1708;SessionCount:RealTimeCount - Could not enumerate sessiosn:<ctxupm5>because: The binding handle is invalid” and “ctxupm5;0;1708;ProcessLogon: User sessioncount update failed.” These entries have no effect on profile processing and can beignored. [#217421]
If you set Profile management to synchronize Internet Explorer temporary cache files, someare not processed and the error is noted (as multiple error messages) in the log file. Theseerrors can be ignored, and, because the files are temporary, the effect on the user isnegligible. This issue is observed only with Internet Explorer and only in its cache folder(AppData\Local\Microsoft\Windows\Temporary Internet Files). To workaround this issue,exclude this directory from synchronization. [#218212]
When a user's domain password is about to expire on Windows XP Service Pack 3, they areprompted to change it. When they do, the system loads a local copy of the user profile (orthe default user profile) instead of the Citrix user profile, the session may becomedisconnected, and the Citrix user profile data is not saved. To resolve the issue, applyMicrosoft hotfix KB958058 to the XP SP3 base virtual disk image on the Citrix ProvisioningServer with the disk in private image mode. This issue is limited to Windows XP Service Pack3. For more information, see the Citrix blog article on this topic. [#218418]
Known Issues in Profile Management 2.1
18

19
Frequently Asked Questions About ProfileManagement
This section contains questions and answers about Profile management. It includes generalquestions about installing and configuring the software.
20
General Questions
Are any changes required to profiles stored locally oron the file share?
Users must have write access to their profiles stored on the network. It is best to storethese in users' existing home directory because permissions are already set correctly in thatlocation. However, any UNC path may be defined as long as it uniquely and correctlyresolves for every user.
Because the Citrix Profile Management Service runs before a user logs on, you can use onlysystem environment variables, AD attributes, and any other variable that is set before logonto a system occurs. Two user environment variables are exceptions to this: %USERNAME%and %USERDOMAIN%.
When do profile keys get written back to the userstore?
Changes to users’ profiles are written back to the user store during logoff. TheHKEY_CURRENT_USER registry settings are scanned and only changes are merged back toNTUSER.DAT. Any changes in managed files or folders are copied back to the user store.
Does “last write win?”Last write wins is prevented in the entire registry hive. Only the last write operation to theset of defined files, folders, or registry keys wins. Profile management detects changes inthese files and ensures that only the defined settings are overwritten. Compare this withroaming profiles where the entire profile is overwritten and therefore the last write wins.For more details, see http://community.citrix.com/x/OIENAg.
How does Profile management improve logon andlogoff performance?
Profile management can reduce users' logon time by allowing administrators to exclude andinclude files and folders to prevent extraneous settings from needlessly being copied aspart of the users' profile. For example, some applications create files and folders that aretens or hundreds of megabytes in size in the Application Data profile folder. This data is notrequired. By excluding these items, any user using the application has a smaller profile thatloads faster. Alternatively, you can choose to only include specific files and folders, keepingto a minimum the amount of profile data that is managed.
For more information about profile bloat, see http://community.citrix.com/x/A4AaAg. For more information about improving logon times, see
http://community.citrix.com/x/HYXuAg.
Is profile corruption reduced or managed better?Profile corruption often occurs when an application creates or writes to settingsimproperly. This is referred to as profile inconsistency. Corruption resulting from a networkconnectivity error is less likely; in most cases the operating system manages and recoversproperly. You can reduce the effects of this type of corruption by minimizing the amount ofdata that is copied, and also by limiting the extent of damage to specific data if corruptionoccurs.
For more information about corruption and profile inconsistency, see the article CorruptUser Profiles - Do They Even Exist? on the Sepago blog from http://www.sepago.de/.
General Questions
21

22
Users' Profiles and Settings
Where are profile settings and files stored?Administrators can choose to store users’ profile settings either on a UNC path or a pathrelative to users’ home directory. By default, the folder created in %HOMESHARE% is namedWindows but can be any name that you define when you configure Profile management.
In both cases, the path can include variables such as %USERNAME% and %USERDOMAIN%. Theuser needs write access to this folder. Within this path or folder, there is at least onesubfolder named UPM_Profile that contains the users' profile data.
When using extended synchronization, each drive letter has an additional folder thatfollows the naming convention UPM_Drive_<drive letter> (for example,UPM_Drive_E forE:\).
Because the Citrix Profile Management Service runs before a user logs on, you can use onlysystem environment variables, AD attributes, and any other variable that is set before logonto a system occurs. Two user environment variables are exceptions to this: %USERNAME%and %USERDOMAIN%.
How does folder redirection work with Profilemanagement?
Folder redirection is automatically recognized and Profile management does notsynchronize redirected folders and files. Folder redirection is recommended to ensure thatuser data stored in those folders is segregated.
How are files and folders synchronized?During a session, Profile management monitors files and folders using the New TechnologyFile System (NTFS) change journal. (Changes are recorded internally.) During logoff, asophisticated algorithm recognizes the changes and performs only the minimum ofoperations on the files and folders over the network.
If a file or folder was renamed during a session, it is not copied during logoff. Instead, thefile or folder on the network is simply renamed. If the attributes of a file or folder werechanged, only the changed attributes are set during logoff. If the content of a file waschanged, the file is copied during logoff.

How are changes to files and folders tracked during auser's session?
Profile management monitors the NTFS change journal. In order to resolve relative filenames to absolute paths, the file system must be scanned once, which takes typicallybetween 10 and 20 seconds. To avoid scanning at every subsequent startup, a cache file isused. It is called UserProfileManager_<DriveLetter>.cache and is located in the installationfolder.
There may be environments in which the system cannot write to this folder (or you may notwant software to write to it). For such environments, change the location using GroupPolicy.
Users' Profiles and Settings
23

24
Installation and Configuration
Where should I install Profile management?The MSI package contains the Citrix Profile Management Service and supporting DLLs. Installthe package on any computer that will process users' logons, such as XenDesktop virtualdesktops and XenApp servers.
How does the Service retrieve settings?The Citrix Profile Management Service first checks the settings in the Group Policy Object(GPO) and then the .ini file that corresponds to the local system’s language and version (forexample, UPMPolicyDefaults_V1Profile_en.ini for an English Windows XP or Windows Server2003 system). Finally, if necessary, the Service resorts to using its internal defaults.
The .ini file exists in the same folder as the Service executable file. The .ini file is locatedin the folder where the Service was installed. By default, this is \Program Files\Citrix\UserProfile Manager.
Note: In most cases, you will probably find it unnecessary to use the .ini file forconfiguration.
What are the default settings?The .ini file contains default settings that should work in most environments with minimalmodifications (for example, you will always need to enable the Service). Profilemanagement saves and restores users’ registry settings and files and folders within profiles.Some files, folders, and registry keys that typically do not contain profile data are excludedby default.
If GPO settings are not configured and an .ini file is not present, Profile managementsynchronizes the entire HKCU hive from the registry and everything in the user profile.
Are local policies supported?Yes. However, local policies present a similar challenge to .ini files because you mustcentrally manage their deployment. In addition, be aware that Group Policy takesprecedence over local policies. For information, see Configuration Precedence.
Can I clone the installed Service as part of a baseimage?
Yes. For example, this has been tested successfully using Citrix Provisioning Services.

Installation and Configuration
25

26
Planning Your Profile ManagementDeployment
You should consider how the following apply to your environment before installing andenabling Profile management:
● Computers and users. Define the computers and the users whose profiles you want tomanage with Profile management, and plan any MSI packaging you will need toperform.
● Migration. Decide how to migrate existing Windows local and roaming profiles to Citrixuser profiles.
In XenDesktop deployments, you can install Profile management on virtual desktops (on thedesktop image if you use virtual desktop provisioning) and on user devices. Profilemanagement is particularly suited to pooled desktops since it saves profile data that wouldotherwise be discarded at logoff.
In XenApp deployments, you can install the software on XenApp servers and on userdevices.
Having considered these topics, check the behavior of Profile management in a testenvironment before rolling it out in a production environment. A typical deploymentconsists of:
1. Creating the user store
2. Installing Profile management
3. Adding an administrative template (ADM) file to Group Policy
4. Configuring and enabling Profile management
Important: If you intend to use one of the .ini files (for example,UPMPolicyDefaults_V1Profile_en.ini) for evaluation purposes, rename the file (forexample, to UPMPolicyDefaults_V1Profile_en.old) before you switch to using Group Policyin a production environment. Renaming the file allows you to be certain that onlyproduction settings are applied, and that no settings you specified during your evaluationare used.
If the file is not renamed, Profile management examines it for any settings not configuredin Group Policy (and adopts any non-default settings it finds). So, to eliminate the risk ofunwanted settings being introduced, configure all settings you want to use in yourproduction environment using Group Policy, not the .ini file.
As well as these general points, some details of your environment affect the way you deployProfile management. Consider those details as part of your planning.
27
Planning Considerations for ProfileManagement
Before deploying Profile management, consider the unique qualities of your environment.Answering these questions helps to guide your planning and ensures that your users get thebest experience while you maintain a manageable user profile solution.
Note: Sample answers may not be applicable to every environment.
Question Sample Answer
Is there a need to implement Profilemanagement based on distinct operatingsystems?
Yes, because your XenDesktop deploymentis based on Windows Vista but your XenAppdeployment is based on XenApp 5 forWindows Server 2003.
Which of my Organizational Units storeProfile management functionality?
The OUs that store your virtual desktops(published with XenDesktop) and XenAppservers share the Profile managementGPO, and your Citrix administrator hasrights to configure GPOs within these OUs.
Where are Citrix user profiles stored? Citrix user profiles are stored by default inthe same location as your users' homedirectories. Your administrator can use anarbitrary UNC path instead.
Are there any files and settings that I canexclude from the Citrix profiles?
Yes, you can configure Profile managementto exclude registry keys and file systemobjects in the Citrix user profile. However,because the exclusion applies to users'logoffs, you cannot delete these files andsettings from the profile by activatingexclusion lists. There are other tools, suchas Profile Nurse (available from the SepagoWeb site), that can delete unwanted datafrom your users’ profiles.
Is the .ini file used for local configuration? It depends. Where feasible, configuringProfile management through a GPO ispreferred. However for each setting whichis not configured in the GPO, you canconfigure the corresponding setting in the.ini file for the local machine.
Is folder redirection used? The folders Documents and ApplicationData are redirected to users' homedirectories. You can redirect other folders.Citrix recommends performing pilot testsfirst.

28
About the User Store
The user store is the central location for Citrix user profiles. This defaults to the WINDOWSfolder in the user’s home directory.
The following features make use of the user store:
● Extended synchronization
● Multilingual profile storage (Version 1 profiles only)
Recommendations on creating secure user stores are available in the article called SecurityRecommendations for Roaming User Profiles Shared Folders on the Microsoft TechNet Website. These are minimum recommendations that ensure a high level of security for basicoperation. Additionally, when configuring access to the user store include theAdministrators group, which is required in order to modify or remove a Citrix user profile.
Note: If an application modifies the access control list (ACL) of a file in the user's profile,Profile management does not replicate those changes in the user store. This is consistentwith the behavior of Windows roaming profiles.
Naming ConventionsTo distinguish between Version 1 and Version 2 profile folder types, the following suffix isappended to folders in the user store.
Folder Suffix Notes
_upm_var The localized folder name with the_upm_var suffix is used when profiles areimported into the user store at logoff.When profiles are exported at logon, thesuffix is removed.
Paths anywhere in the local file system (even outside the user profile) are supported.
Absolute paths outside the user profile are stored by replacing the drive letter withUPM_Drive_<Drive letter>. Example: UPM_Drive_D.
Folder StructureThe folder structure of the user store at the root level is shown in this table.
Folder Notes
\ Root of the current profile in the userstore.
\UPM_Profile Contains files folders from the user profile.
\UPM_Drive_C Contains files and folders from elsewherein the file system, in this case from driveC: (UPM_Drive_A to UPM_Drive_Z aresupported).
Network drives are not supported.
Some examples are shown in this table.
Example Folder Name Notes
\UPM_Drive_C\MyProgData The synchronized content ofC:\MyProgData.
\UPM_Profile\Data The synchronized content of the Datafolder in the user profile.
\UPM_Profile\AppData_upm_var The synchronized content of thede-localized Application Data folder in theuser profile.
An overview of how Profile management localizes and de-localizes folders is shown in thistable. Only folder names are localized and de-localized. For example, Start menu entriesand registry settings are not translated into the correct language by Profile management.
V1 English Folder User Store Folder Full Path Relative to the UserProfile
Accessibility Accessibility_upm_var \StartMenu\Programs\Accessories\
Accessories Accessories_upm_var \Start Menu\Programs\
Administrative Tools AdminTools_upm_var \Start Menu\Programs\
Application Data AppData_upm_var \Local Settings\
Cookies Cookies_upm_var \
Desktop Desktop_upm_var \
Entertainment Entertainment_upm_var \StartMenu\Programs\Accessories\
Favorites Favorites_upm_var \
History History_upm_var \Local Settings\
Links Links_upm_var \Favorites\
Local Settings LocalSettings_upm_var \
My Documents MyDocuments_upm_var \
My Music MyMusic_upm_var \My Documents\
My Pictures MyPictures_upm_var \My Documents\
My Videos MyVideos_upm_var \My Documents\
About the User Store
29

NetHood NetHood_upm_var \
PrintHood PrintHood_upm_var \
Programs Programs_upm_var \Start Menu\
Recent Recent_upm_vars \
Start Menu StartMenu_upm_var \
Templates Templates_upm_var \
Temporary InternetFiles
TemporaryInternetFiles_upm_var\Local Settings\
SendTo SendTo_upm_var \
Startup Startup_upm_var \Start Menu\Programs\
System Tools SystemTools_upm_var \StartMenu\Programs\Accessories\
The User Store and AD ForestsUsers in different domains can share the same user store in an Active Directory forest,allowing multiple users with the same logon name to access the same resources in theforest. But you must use variables to disambiguate identical logon names when setting thepath to the user store. To do this, append the domain name variable to the path. You mustalso set permissions on the user store and Profile management's Processed Groups settingusing Active Directory's Universal Groups.
Examples of User Store Paths in AD Forests
\\servername\userstore\%username%.%userdomain%\Vista
\\servername\userstore\%username%.%userdomain%\2008
Use a manually defined system variable such %ProfVer% to set the operating systemversion:
\\servername\userstore\%username%.%userdomain%\%ProfVer%
About the User Store
30

31
Creating the User Store
Any Server Message Block (SMB) or Common Internet File System (CIFS) file share can beused for the user store, but it's good practice to ensure that the share:
● Can be accessed by the accounts used with Citrix user profiles
● Is large enough to store profile data
● Is robust in case of disk or network failure
Recommendations on creating secure user stores are available in the article called SecurityRecommendations for Roaming User Profiles Shared Folders on the Microsoft TechNet Website. These are minimum recommendations that ensure a high level of security for basicoperation. Additionally, when configuring access to the user store include theAdministrators group, which is required in order to modify or remove a Citrix user profile.
Note: If an application modifies the access control list (ACL) of a file in the user's profile,Profile management does not replicate those changes in the user store. This is consistentwith the behavior of Windows roaming profiles.
32
Installing Profile Management
Install Profile management on each computer whose user profiles you want to manage.
Typically, you install the software on computers using a distribution tool, an imagingsolution, or streaming technology. You can also install it directly on any computer using oneof the installers in the download package.
Unattended installations are also supported. Make sure the installer runs with elevatedrights to prevent issues with unattended installations on Windows Server 2008.
Installation alone does not enable Profile management. You must enable it separately(using the procedure To enable User Profile Manager) after performing all other setup tasks.
Citrix recommends that the same version of Profile management is installed on all userdevices and the same version's ADM file is added to each Group Policy Object on all domaincontrollers. This prevents corruption of profile data, which may result when different userstore structures (from different versions) exist.
33
System Requirements for ProfileManagement
Systems running Profile management must have one of the following operating systems:
● Desktops. Microsoft Windows XP Service Pack 3, Windows Vista Service Pack 1, orWindows 7
● Servers. Standard, Enterprise, and Datacenter Editions of: Windows Server 2003 ServicePack 2 and Windows Server 2008
Windows NT domains are not supported.
Every user should have access to the user store, a network folder where profiles are storedcentrally. Alternatively, profiles can be stored in users' home drive if preferred. Read moreabout the user store.
Active Directory Group Policy (GP) is used for configuration. Active Directory forestfunctional and domain functional levels of Windows Server 2003 native mode and above aresupported. Alternatively, local .ini files may be used for configuration settings, but ingeneral the .ini files should be used for testing purposes only. Note that settings in the .inifiles are applied for any setting not set in the Group Policy Object (GPO), that is any GroupPolicy setting that is left in the Not Configured state.
If you are planning to use GP to deploy the installer, you must upgrade to Service Pack 2any domain controllers that will store the Profile management ADM file and that currentlyrun the 64-bit edition of Windows Server 2003 Service Pack 1. You do not have to upgradethe 32-bit edition.
If short file names (also known as 8.3 file names) are mandated in a Citrix product orcomponent you are using with Profile management, do not turn off support for short filenames in your Profile management deployment. Doing so may cause issues when files arecopied to and from the user store.
Make sure the change journal is set up on computers running the Profile ManagementService. In addition, profiles on those computers must be stored on a single disk mountedby drive letter. This avoids the possibility of masking from the Service the profile that isintended to be monitored. This can occur when a disk is mounted into the folder used forprofiles (for example, a disk is mounted into the C:\Users folder, which is a typical locationfor user profiles).
34
Files Included in the Download
The following files are included in this release.
File Name Description
Profilemgt2.1.0_x86.msi Installer for 32-bit systems
Profilemgt2.1.0_x64.msi Installer for 64-bit systems
Ctxprofile2.1.0.adm ADM file used in Group Policy
welcome.html List of documentation resourcesIn addition to DLLs, the following files are created by the installers.
File Name Description
UPMPolicyDefaults_V1Profile_en.ini .Ini file for English Windows XP andWindows 2003
UPMPolicyDefaults_V2Profile_all.ini .Ini file for Windows Vista, Windows 7 andWindows Server 2008
UserProfileManager.exe Windows service carrying out functions oncomputers managed by Profilemanagement
35
To install Profile management
Install the software on all computers whose user profiles you want to manage. Thisprocedure installs Profile management on a single computer.
If you perform the installation on Windows XP or Windows Server 2003 and have disabledsupport for short file names (also known as 8.3 file names), each folder in the installationlocation must conform with the short file naming convention, for exampleC:\Citrix\ProfMgr. This issue does not occur on other supported operating systems.
Important: Before installing this version of Profile management, remove any existingversions.
1. Log on to the computer with administrator privileges.
2. Locate and run the appropriate installer from the download package. The installationwizard appears.
3. Follow the on-screen instructions, accepting the end user license agreement andclicking Install.
4. Once installation is complete, click Finish.
5. Restart the computer.

36
To install Profile management silently
Important: In this version of Profile management, the following keys have been removedfrom the registry exclusion list in the supplied .ini file:
● HKEY_CURRENT_USER\Software\Microsoft\Windows\CurrentVersion\Group Policy
● HKEY_CURRENT_USER\Software\Policies
● HKEY_CURRENT_USER\Software\Microsoft\Windows\CurrentVersion\Policies
If you add one or more of these keys to the registry exlusion list in Group Policy, beaware of the effect the command-line option OVERWRITEINIFILES=yes has when yourun the installer. (This option is primarily intended for deployments using Group Policyrather than an .ini file, or for either deployment type in which configuration settings canbe discarded and the default .ini files re-installed.) The option overwrites all of thechanges you made throughout the .ini file including the keys. Citrix recommends runningthe installer without this option and then manually removing the key settings in the .inifile.
1. At a command line, run the following command:
msiexec /i <path to the MSI file> /quiet [/norestart][INSTALLDIR=<installation directory>] [OVERWRITEINIFILES=yes]
This command performs the installation without displaying a user interface and thenperforms a restart. Optionally, you can suppress the restart using the /norestartoption, but, depending on the operating system, Profile management will not functionuntil the computer has restarted. For example, you do not need to restart user devicesrunning Windows Vista.
installation directory can be user specified.
For information on the OVERWRITEINIFILES=yes option, see Considerations WhenUpgrading .Ini Files.
Note: If UAC is enabled on Windows Vista or Windows Server 2008, run the msiexeccommand with elevated rights, for example from an elevated command prompt.
2. If you are upgrading, a dialog box may advise you that some files are in use. You aregiven the option to close the application or continue without closing. Select the optionto close the application.
37
Deploying Profile Management with CitrixReceiver
You can use Citrix Receiver and Merchandising Server (components of the Citrix DeliveryCenter solution) to distribute Profile management MSI packages. No configuration of Profilemanagement is required to do this. For instructions on deploying components this way, seethe Citrix Receiver documentation.
38
Adding the ADM File to Group Policy
In production environments, you configure Profile management with Group Policy. For eachOU containing the computers you want to manage, you create and link a Group PolicyObject (GPO), and then add the Profile management ADM file to the GPO.
To configure Citrix user profiles, you can use any computer that runs Windows Group PolicyManagement Console. The computer does not have to be a domain controller. Domaincontrollers only store the ADM file.
Note: For small pilot projects and evaluations where no separate test deployment ofActive Directory is available, you can also use the installed .ini files instead of the ADMfile.
39
To store the ADM file
1. On the domain controller, import the Profile management ADM file from the downloadpackage. The file is called Ctxprofile2.1.0.adm and is located in the Group PolicyTemplates folder.
40
To add the ADM file to Group Policy
1. On the computer you want to use to configure Profile management, open ActiveDirectory Users and Computers.
2. Create a new OU for each supported operating system whose profiles you want tomanage: Windows XP, Windows Vista, Windows 7, Windows Server 2003, and WindowsServer 2008. You can skip this step if individual OUs already exist for each operatingsystem.
Tip: In cross-platform scenarios, as an alternative to creating new OUs, you cansimplify administration by implementing a system environment variable that specifiesthe profile version. Use this variable when setting the path to the user store alongwith variables such as %USERNAME% and %USERDOMAIN% to uniquely define users'accounts. For example, \\servername\profilestore\%USERNAME%\%ProfileVer% canresolve to \\servername\profilestore\JoeBloggs\WinXP or\\servername\profilestore\JoeBloggs\Win2k8ts. User environment variables are notsupported.
3. In Group Policy Management, create a GPO and link it to each OU.
Note: If you apply security filtering to the GPO, do so using either the AuthenticatedUsers group or a computer group. Do not use a security group that only containsusers.
4. Edit the GPO in Group Policy Editor:
a. Expand Computer Configuration and right-click Administrative Templates underthe GPO.
b. Click Add/Remove Templates and click Add.
c. In the Policy Templates dialog box, browse to the ADM file that you copied locallyand click Open.
d. In the Add/Remove Templates dialog box, click Close. This creates a Citrix folderand a User Profile Manager subfolder that stores the settings from the ADM file.
41
Setting Folder Redirection with ProfileManagement
Profile management works with folder redirection. Use this technique when your users'profiles contain many folders but don't use it if the folder contents are accessed frequently.
Ensure that the access permissions on folders containing Citrix user profile data are setappropriately. Also, secure the servers on which the data is stored. For instructions onperforming these tasks, see the following articles on the Microsoft TechNet Web site,http://technet.microsoft.com:
● Security Recommendations for Roaming User Profiles Shared Folders
● Configuring Folder Redirection
42
To upgrade Profile management
Important: It's important that you follow the order of the steps in this upgrade process.Upgrade the software on all computers only after adding the new ADM file to GroupPolicy. If you upgrade it beforehand, log files may be stored in two locations (onecontaining log files for the old version and the other for the new version). Thisconsideration particularly affects XenDesktop deployments.
Tip: You can hotfix your Profile management 2.1 deployment by upgrading to Version 3.x.If you do so, install the Version 3.x ADM file and be sure to disable the new featuresintroduced in that release. At a minimum, you must disable the active profile write backfeature (enabled by default) before installing Profile management on all user devices,virtual desktops, and XenApp servers. When all copies of Version 2.1 are upgraded, youcan, if desired, enable any 3.x feature. Coexistence of Version 2.1 and any version earlierthan Profile management 3.2 is not supported. For more information, seehttp://forums.citrix.com/thread.jspa?threadID=276625&tstart=0 and CTX126659.
1. Create a new Group Policy Object (GPO).
2. Add the ADM file to the new GPO.
3. Back up and then import the configuration from your existing GPO to the new GPO.
4. Upgrade the Profile management software on all computers by installing this versionover the earlier version.
5. Apply the new GPO.
43
Managing Multiple Versions of ProfileManagement
This topic describes the support for multiple versions of the software.
Citrix recommends that the same version of Profile management is installed on all userdevices and the same version's ADM file is added to each Group Policy Object on all domaincontrollers. This prevents corruption of profile data, which may result when different userstore structures (from different versions) exist.
If you upgrade, do so using this procedure.
Deployments that contain version 2.1 and any combination of version 2.01 and 2.0, althoughnot recommended, are supported. Deployments that contain any earlier versions, includingCitrix Technical Preview or beta releases, are not supported when used with version 2.1.

44
Considerations When Upgrading .Ini Files
If you edited the .ini file in an earlier version of Profile management and upgrade to thisversion, the software detects that the file was edited and, by default, does not overwriteit. So, if you want to preserve your .ini file settings but also make use of the new settings inthis version, you must do one of the following:
● Manually add the new settings from this version's .ini file to your edited .ini file
● Save a copy of the earlier version's .ini file, use the OVERWRITEINIFILES=yescommand-line option to force an overwrite of the file during the upgrade, and add yoursaved settings to the upgraded .ini file
45
To remove Profile management
This procedure removes Profile management from a single computer.
1. From the list of installed programs in Add or Remove Programs (on Windows XP) orPrograms and Features (on Windows Vista), select Profile management andclickRemove (XP) or Uninstall (Vista).
2. Click Yes.
3. Restart the computer.
You can also remove Profile management in unattended mode.

46
Configuring Profile Management
Once you have added the ADM file to Group Policy, you set up Profile management to matchthe needs of your Citrix deployment using the procedures in this section. For example, youperform basic setup operations such as specifying the location of the user store and thegroups whose profiles you want to manage. If necessary, you can also perform advancedsetup operations such as identifying any files and folder to exclude from processing.
47
Configuring Profile Management - BasicSetup
There are many settings that allow you to customize the way user profiles are processed.This section lists the tasks used to configure commonly used settings.
The tasks for setting up Profile management are as follows. Typically, you don't need tofollow all of these tasks because defaults are provided. Enabling the software is, however,mandatory. The tasks that you are most likely to use are listed first:
1. Enabling Profile management
Important: Perform this task only after checking any other settings were configuredas intended and after testing them.
2. Deciding how to resolve conflicting profile data
3. Choosing an appropriate migration policy that turns existing Windows user profiles intoCitrix user profiles
4. Specifying the path to the user store
5. Defining the groups whose profiles you want Profile management to process
6. Setting up logging (if you want to troubleshoot profile management)
You configure Profile management in Group Policy Object Editor, under the ComputerConfiguration > Administrative Templates > Citrix > Profile Management folder. (InWindows Server 2008, the folder is Computer Configuration > Administrative Templates >Classic Administrative Templates (ADM) > Citrix > Profile Management.) Any settings notconfigured there (that is, settings in the Not Configured state) take the default values fromthe Profile management .ini files if these exist.
For information on any setting, consult the Profile Management ADM File Reference.

48
Testing Profile Management with LocalGPO
Before deploying Profile management in a production environment, you are stronglyencouraged to use a test environment. While you can create this setup on a local machinewith the supplied .ini files, a fully supported and easier means of transferring settings tothe domain GPO is based on a local installation and configuration of the ADM file on adevice. Test logon and logoff behaviors and make adjustments to the local GPO untilsatisfactory results are obtained. You can perform tests safely this way if the device is amember of a production OU because local policies are invoked where OU and domainpolicies do not exist or are not configured. When using local policies, ensure no Profilemanagement GPOs are used anywhere else (for example, in the domain or sites).
In addition, where an administrator does not have access to or control of domain GPOs forthe configuration of the Profile management ADM file, local GPOs can be used as along-term solution. However, this introduces complexities into the environment, such asensuring that the Profile management ADM file is installed and correctly configured on eachdevice and the inability of domain users to maintain settings when accessing multipledevices.
For testing purposes, consider using a Windows Management Instrumentation (WMI) filter totemporarily restrict your configuration to just one machine in an OU.
Important: For these reasons Citrix does not recommend the use of local GPOs as along-term, enterprise solution.
49
To specify the path to the user store
Read about the structure of the user store and how your use of the extendedsynchronization and multilingual profile storage features affect it.
1. Under Profile Management, click the Path to user store policy.
2. Select Enabled and enter the path. If you enter a relative path, it is relative to users'home directories. Enter a complete UNC path to define an explicit path name. You canuse AD variables (for example, #sAMAccountName#) or system environment variables(for example, the combination of %USERNAME% and %USERDOMAIN%). Note that ADvariables are case-sensitive. Unlike #cn# or #sAMAccountName#, the systemenvironment variables allow users to be defined unambiguously in Active Directorynetworks with multiple domains.
For information on managing system environment variables in Windows XP, seehttp://support.microsoft.com/kb/310519.
3. Click OK.
For your changes to take effect, run the gpupdate command from the command promptas documented at http://technet.microsoft.com/en-us/library/bb490983.aspx.

50
To define which groups profiles areprocessed
Use this procedure to select the profiles that are controlled by Profile management. If youdon't define any groups with this setting, all user profiles are processed.
1. Under Profile Management, click the Processed Groups policy.
2. Select Enabled.
3. Click Show.
4. Add the groups containing the users whose profiles you want Profile management toprocess.
5. Click OK.
For your changes to take effect, run the gpupdate command from the command promptas documented at http://technet.microsoft.com/en-us/library/bb490983.aspx.
51
To choose a migration policy
When a user first logs on after Profile management is enabled, no Citrix user profile existsfor that user. You can decide which existing Windows profile (roaming, local, or both) iscopied by Profile management and used in all further processing. If this setting is disabled,no profile is migrated.
1. Under Profile Management, open the Profile handling folder.
2. Click the Migration of existing profiles policy.
3. Select Enabled.
4. Select one of the following options from the drop-down list:
● Roaming and local profiles
● Roaming profiles only
● Local profiles only5. Click OK.
For your changes to take effect, run the gpupdate command from the command promptas documented at http://technet.microsoft.com/en-us/library/bb490983.aspx.
52
To resolve conflicting profiles
Conflicts between local Windows profiles and Citrix user profiles (in the user store) canoccur when you add Profile management to an existing deployment. You need to decidehow the data in the local Windows profile is managed.
1. Under Profile Management, open the Profile handling folder.
2. Click the Local profile conflict handling policy.
3. Select Enabled.
4. Select one of the following options from the drop-down list:
● Use local profile. Profile management processes the local data.
● Delete local profile. Profile management deletes the local data and processes thedata in the user store.
● Rename local profile. Profile management renames the local data (for backuppurposes) and processes the data in the user store.
5. Click OK.
For your changes to take effect, run the gpupdate command from the command promptas documented at http://technet.microsoft.com/en-us/library/bb490983.aspx.
53
To enable Profile management
Enable Profile management only after carrying out all other setup tasks and testing howCitrix user profiles perform in your environment.
1. Under Profile Management, click the Enable Profile management policy.
2. Select Enabled.
3. Click OK. This enables Profile management.
For your changes to take effect, run the gpupdate command from the command promptas documented at http://technet.microsoft.com/en-us/library/bb490983.aspx.

54
Configuring Profile Management -Advanced Setup
Use the settings in this section once you are familiar with the basic operation of Profilemanagement, you have tested it and rolled it out in a production environment, and have aclear business requirement to use these advanced profile configuration settings.
55
About Profile Management Settings
ConflictsProfile management does not check any settings for conflicts. For example, you can set thesame directory to be both included and excluded but this leads to unpredictable results.
Default ConfigurationProfile management comes with a default configuration stored in .ini files. The .ini filesmust be located in the installation folder so that the Citrix Profile Management service canrecognize them. The default configuration is suitable for most environments. It processesthe profiles of all users in all groups.
Use the following table, which lists the installed files, to find the .ini file used by eachoperating system. If you are not sure which file is used, examine the log file and search forthe text Reading from policy defaults file.
Operating System .Ini File Name
Windows XP and Windows Server 2003 UPMPolicyDefaults_V1Profile_en.ini
Windows Vista, Windows Server 2008, andWindows 7
UPMPolicyDefaults_V2Profile_all.ini
On Windows XP and Windows Server 2003, if you are configuring a non-English version ofone of these operating systems, you must create an appropriate language version of the fileusing UPMPolicyDefaults_V1Profile_en.ini. Rename a copy of this file to reflect yourlanguage (for example, UPMPolicyDefaults_V1Profile_es.ini for Spanish) and localize thefolder names. Use these file names:
● For French operating systems, UPMPolicyDefaults_V1Profile_fr.ini
● For German operating systems, UPMPolicyDefaults_V1Profile_de.ini
● For Spanish operating systems, UPMPolicyDefaults_V1Profile_es.ini
● For Japanese operating systems, UPMPolicyDefaults_V1Profile_ja.ini
The operating system language uses the appropriate version of the file, so if that version isnot present Profile management may not work as expected.
The same .ini file is used for all languages on Windows Vista and Windows Server 2008.
Modifying .Ini FilesIf you add entries to an .ini file, ensure the variables and values have the correct format.
Flags (on/off indicators) must be of this form:

<variable>=<value>
A value of 1 enables a setting and any other value or no value disables it. For example, thefollowing entry enables the ServiceActive setting:ServiceActive=1
The following entries disable the setting:ServiceActive=ONServiceActive=OFFServiceActive=TRUEServiceActive=FALSEServiceActive=
List entries must be of this form:
<value>=
Do not append 1 after the equals sign. For example, the following entries specify files to besynchronized:[SyncFileList]Local Settings\Application Data\Microsoft\Office\*.qat=Local Settings\Application Data\Microsoft\Wallpaper1.bmp=
Important: Citrix recommends that you exclude the folder Local Settings (on Windows XPand Windows Server 2003) or AppData\Local and AppData\LocalLow (on Windows Vistaand Windows Server 2008) from synchronization. If you do not, a very large amount ofdata may be transferred over the network and users may experience logon delays. Thesefolders are not synchronized by standard Windows roaming profiles. In the defaultconfiguration, the exclusion lists contain these folders.
Changes to Group Policy settings take effect when a manual or automatic policy refreshoccurs on the target computers. Changes to the .ini file take effect when you issue thecommand gpupdate /force, which is recommended, or you restart the Citrix ProfileManagement service on the target computers.
About Profile Management Settings
56

57
Configuration Precedence
You can configure Profile management using Group Policies and .ini file. Configurationsettings are applied as follows:
1. Settings defined by Group Policies take precedence. The .ini file will only be queried ifa policy setting is set to Not Configured.
Note: If you apply a Group Policy Object selectively to sites and domains within anOrganizational Unit, a further precedence applies. This is documented athttp://technet.microsoft.com/en-us/library/cc785665(WS.10).aspx. In addition, notethat domain and OU Group Policies take precedence over local policies.
2. Where a setting is not defined by a policy, Profile management tries to read the settingfrom the .ini file.
3. If a setting is not configured by a group policy or in the .ini file, the default setting isused.
There may be situations where you want to configure the same setting differently in GroupPolicy and the .ini file, for example when you want to activate default logging with a GroupPolicy setting but activate verbose logging using the .ini file on a computer that you use fortroubleshooting.
You can view the description of any setting and its default value in the Group Policy ObjectEditor or here.

58
Optimizing Profile Management
You can fine tune how profiles are processed using the following settings: Inclusion list,Exclusion list, Directories to synchronize, and Files to synchronize. These define thefiles, folders, and registry keys (in the HKCU hive) that are processed or ignored when userslog on or log off.
By selecting the values for these settings that meet your organization's needs, you canfurther improve the logon and logoff experience of your users.
For example, you might include Microsoft Word because it is a highly customizable andfrequently used application that should present the same experience to roaming usershowever it is accessed. Conversely, you might exclude an enterprise application because itis infrequently used by some groups so its profile data does not need to be downloaded ateach logon and logoff.
59
Including and Excluding Items
By default, all files and folders in local profiles are synchronized with the user store. Youcan specify files and folders that are not synchronized, by adding them to an exclusion list.If you exclude a folder, you can specify subfolders of it that are synchronized by addingthem to an inclusion list.
In addition to files and folders contained in profiles, you can include and exclude:
● Registry entries related to profiles in the HKCU hive. Entries in the HKLM hive are notprocessed by default and cannot be configured to do so.
● Files and folders that are not included in the profile (using the extendedsynchronization feature).
The default configuration specifies included and excluded items in the file system andregistry.
All included and excluded folder names are language specific. However, folder names in theuser store are in a format independent of the operating system language.
You can synchronize files or folders on disks that are treated as local by the operatingsystem. You cannot synchronize files or folders on network mapped drives.
Important: Citrix recommends that you exclude the folder Local Settings (on Windows XPand Windows Server 2003) or AppData\Local and AppData\LocalLow (on Windows Vistaand Windows Server 2008) from synchronization. If you do not, a very large amount ofdata may be transferred over the network and users may experience logon delays. Thesefolders are not synchronized by standard Windows roaming profiles. In the defaultconfiguration, the exclusion lists contain these folders.
60
To include items
1. Under Profile Management > Registry, click the Inclusion list policy.
2. Add any registry keys in the HKCU hive that you want to be processed during logoff.
3. Select Enabled.
4. Under Profile Management > File system > Synchronization, click the Directories tosynchronize policy.
5. Add any folders that you want Profile management to process but that are locatedoutside the user profile or in excluded folders.
6. Select Enabled.
7. Under Profile Management > File system > Synchronization, click the Files tosynchronize policy.
8. Add any files that you want Profile management to process but that are located outsidethe user profile or in excluded folders.
9. Select Enabled.
For your changes to take effect, run the gpupdate command from the command promptas documented at http://technet.microsoft.com/en-us/library/bb490983.aspx.
61
To exclude items
1. Under Profile Management > Registry, click the Exclusion list policy.
2. Add any registry keys in the HKCU hive that you do not want to be processed duringlogoff.
3. Select Enabled.
4. Under Profile Management > File system, click the Exclusion list - directories policy.
5. Add any folders that you do not want Profile management to process.
6. Select Enabled.
7. Under Profile Management > File system, click the Exclusion list - files policy.
8. Add any files that you do not want Profile management to process.
9. Select Enabled.
For your changes to take effect, run the gpupdate command from the command promptas documented at http://technet.microsoft.com/en-us/library/bb490983.aspx.
62
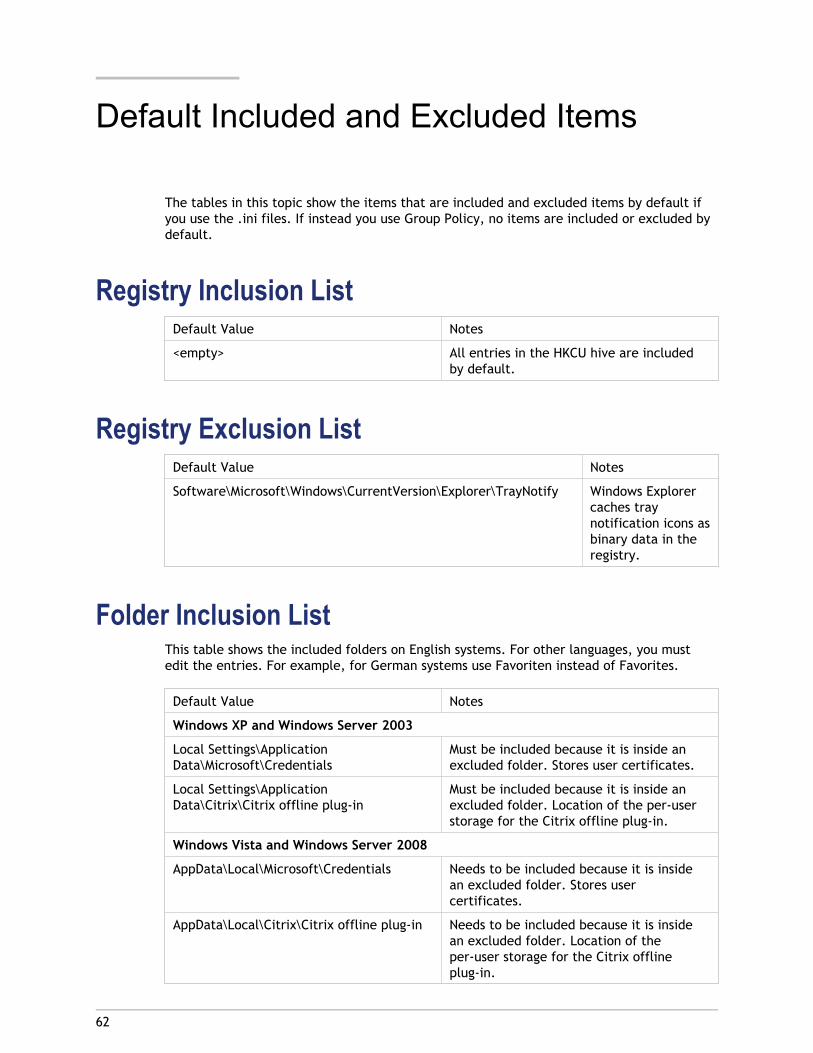
Default Included and Excluded Items
The tables in this topic show the items that are included and excluded items by default ifyou use the .ini files. If instead you use Group Policy, no items are included or excluded bydefault.
Registry Inclusion ListDefault Value Notes
<empty> All entries in the HKCU hive are includedby default.
Registry Exclusion ListDefault Value Notes
Software\Microsoft\Windows\CurrentVersion\Explorer\TrayNotify Windows Explorercaches traynotification icons asbinary data in theregistry.
Folder Inclusion ListThis table shows the included folders on English systems. For other languages, you mustedit the entries. For example, for German systems use Favoriten instead of Favorites.
Default Value Notes
Windows XP and Windows Server 2003
Local Settings\ApplicationData\Microsoft\Credentials
Must be included because it is inside anexcluded folder. Stores user certificates.
Local Settings\ApplicationData\Citrix\Citrix offline plug-in
Must be included because it is inside anexcluded folder. Location of the per-userstorage for the Citrix offline plug-in.
Windows Vista and Windows Server 2008
AppData\Local\Microsoft\Credentials Needs to be included because it is insidean excluded folder. Stores usercertificates.
AppData\Local\Citrix\Citrix offline plug-in Needs to be included because it is insidean excluded folder. Location of theper-user storage for the Citrix offlineplug-in.
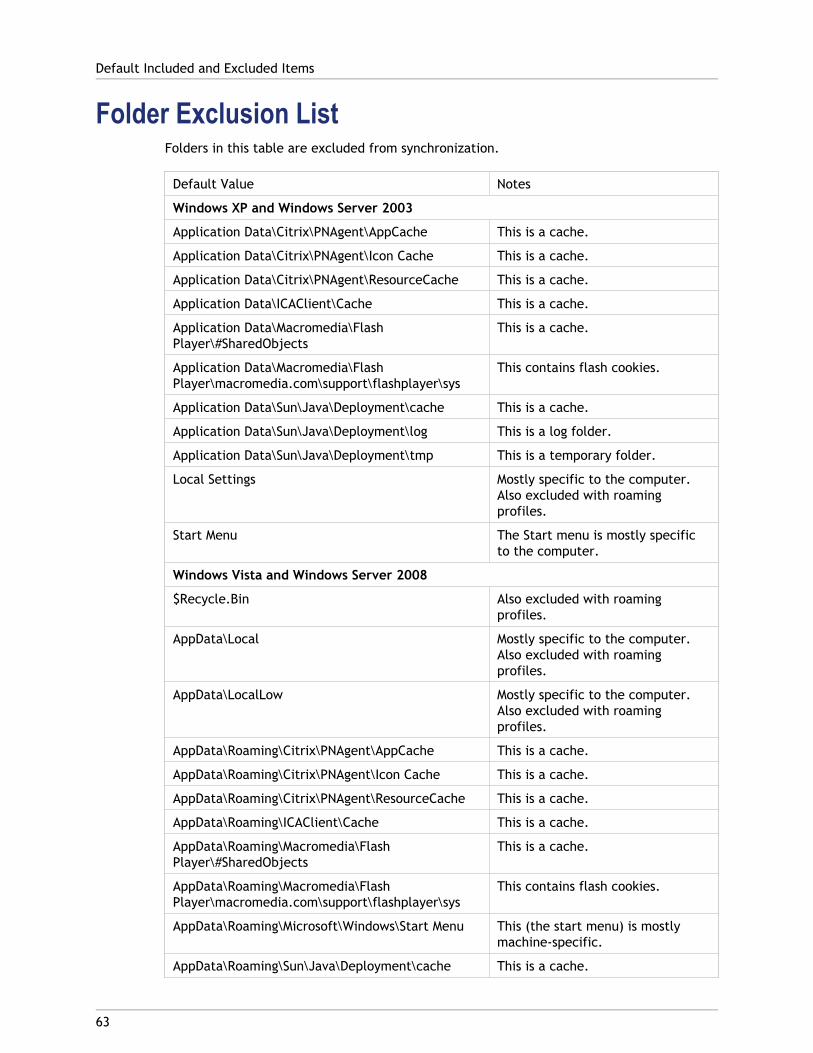
Folder Exclusion ListFolders in this table are excluded from synchronization.
Default Value Notes
Windows XP and Windows Server 2003
Application Data\Citrix\PNAgent\AppCache This is a cache.
Application Data\Citrix\PNAgent\Icon Cache This is a cache.
Application Data\Citrix\PNAgent\ResourceCache This is a cache.
Application Data\ICAClient\Cache This is a cache.
Application Data\Macromedia\FlashPlayer\#SharedObjects
This is a cache.
Application Data\Macromedia\FlashPlayer\macromedia.com\support\flashplayer\sys
This contains flash cookies.
Application Data\Sun\Java\Deployment\cache This is a cache.
Application Data\Sun\Java\Deployment\log This is a log folder.
Application Data\Sun\Java\Deployment\tmp This is a temporary folder.
Local Settings Mostly specific to the computer.Also excluded with roamingprofiles.
Start Menu The Start menu is mostly specificto the computer.
Windows Vista and Windows Server 2008
$Recycle.Bin Also excluded with roamingprofiles.
AppData\Local Mostly specific to the computer.Also excluded with roamingprofiles.
AppData\LocalLow Mostly specific to the computer.Also excluded with roamingprofiles.
AppData\Roaming\Citrix\PNAgent\AppCache This is a cache.
AppData\Roaming\Citrix\PNAgent\Icon Cache This is a cache.
AppData\Roaming\Citrix\PNAgent\ResourceCache This is a cache.
AppData\Roaming\ICAClient\Cache This is a cache.
AppData\Roaming\Macromedia\FlashPlayer\#SharedObjects
This is a cache.
AppData\Roaming\Macromedia\FlashPlayer\macromedia.com\support\flashplayer\sys
This contains flash cookies.
AppData\Roaming\Microsoft\Windows\Start Menu This (the start menu) is mostlymachine-specific.
AppData\Roaming\Sun\Java\Deployment\cache This is a cache.
Default Included and Excluded Items
63
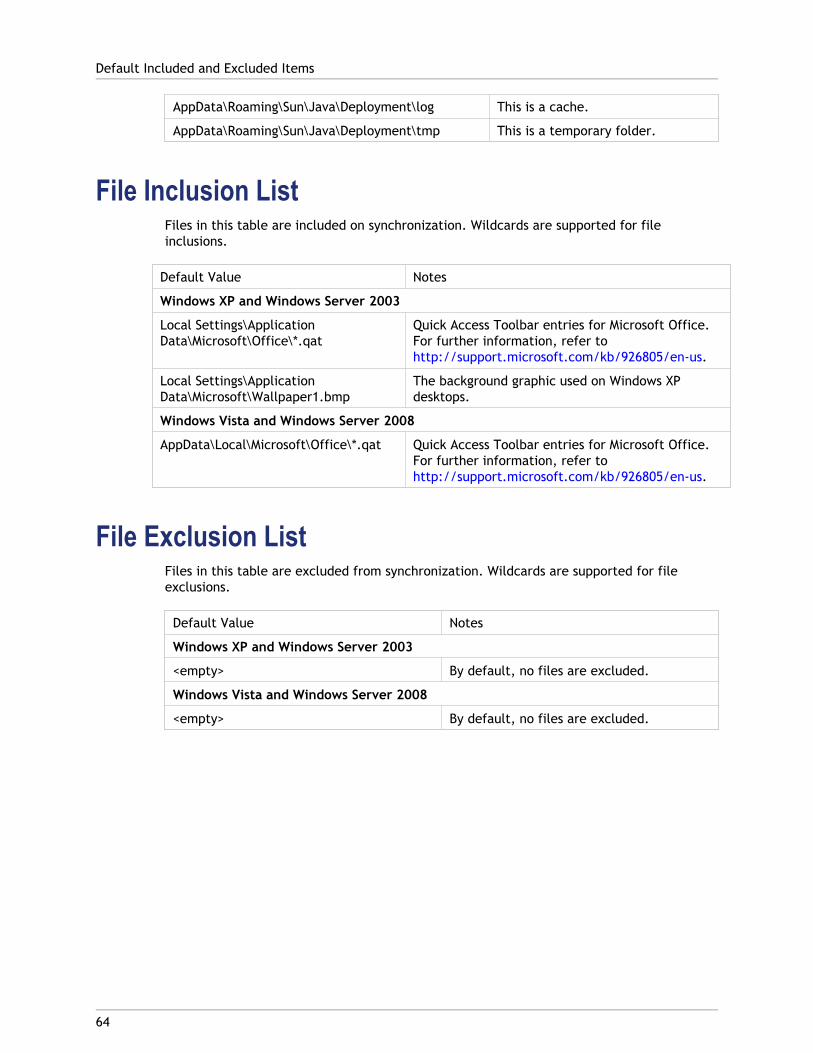
AppData\Roaming\Sun\Java\Deployment\log This is a cache.
AppData\Roaming\Sun\Java\Deployment\tmp This is a temporary folder.
File Inclusion ListFiles in this table are included on synchronization. Wildcards are supported for fileinclusions.
Default Value Notes
Windows XP and Windows Server 2003
Local Settings\ApplicationData\Microsoft\Office\*.qat
Quick Access Toolbar entries for Microsoft Office.For further information, refer tohttp://support.microsoft.com/kb/926805/en-us.
Local Settings\ApplicationData\Microsoft\Wallpaper1.bmp
The background graphic used on Windows XPdesktops.
Windows Vista and Windows Server 2008
AppData\Local\Microsoft\Office\*.qat Quick Access Toolbar entries for Microsoft Office.For further information, refer tohttp://support.microsoft.com/kb/926805/en-us.
File Exclusion ListFiles in this table are excluded from synchronization. Wildcards are supported for fileexclusions.
Default Value Notes
Windows XP and Windows Server 2003
<empty> By default, no files are excluded.
Windows Vista and Windows Server 2008
<empty> By default, no files are excluded.
Default Included and Excluded Items
64
65
Combining Inclusion and Exclusion Lists
Combining an inclusion list and an exclusion list is a powerful way of ensuring no extraneousitems are processed by Profile management. Although this sounds like a good way ofimproving the efficiency of profile synchronization for any deployment, in practice you onlyneed to combine inclusion lists and exclusion lists for "badly behaved" applications (that is,those that store temporary application data in user profiles and, by doing so, create profilebloat). All you have to do to combine both list types is:
● Add to an inclusion list a subfolder of a folder that is on an exclusion list
● Add to an exclusion list a subfolder of a folder that is on an inclusion list
No other configuration is required. The following examples describe each of these cases.
Excluding Temporary DataYour Windows XP users have an application called MyApp that creates and stores manysupporting files in the \Application Data\MyApp folder. A subfolder is called Stuff containstemporary data that does not need to be synchronized.
You add the MyApp folder to the inclusion list and add the Application Data\MyApp\Stufffolder to the exclusion list. At logoff, these files remain on the user device and are nottransferred to the user store. If you configure local profiles not to be cached, thistemporary data is deleted at logoff along with the cached profile.
Including Internet Explorer PasswordsYour Windows Vista users roam between one desktop and another. They want their InternetExplorer passwords to follow them, which means that their Microsoft credentials must beprocessed by Profile management.
You add the Local Settings folder to the exclusion list because by default it is a folderwhere applications store user data that typically should not roam. You add the LocalSettings\Application Data\Microsoft\Credentials folder to the inclusion list so that itscontents are synchronized and available to users whichever desktop they log on to.
66
To use extended synchronization
By default, only files, folders, and registry settings that are part of Windows user profilesare synchronized by Profile management. However, you can include other items. You mayneed to do so because a "bad" application stores data in a non-standard location.
Caution: Only use extended synchronization in a supported scenario. Using this feature inan unsupported one may result in data loss. For more information, see Supported Uses ofExtended Synchronization.
1. For any item that is not part of a Windows user profile, add it to the inclusion list usingan absolute path.
For your changes to take effect, run the gpupdate command from the command promptas documented at http://technet.microsoft.com/en-us/library/bb490983.aspx.

67
Supported Uses of ExtendedSynchronization
Extended synchronization is designed to enable personalization settings that are notproperly stored in the user's profile location to be captured as part of the user profile.So-called "bad applications", for example, store settings in non-standard locations. Thistopic sets out what is supported and what is unsupported.
In brief, the feature is not intended to manage multi-user access to these files or folders(for example, it is not designed to support an application that is not multiuser aware). Noris it intended to become a file and folder synchronization mechanism (for example, onethat allows you to synchronize the entire contents of c:\docs across machines).
It is intended purely to extend personalization settings that exist outside the default userprofile location and thus provide a consistent experience across all resources accessed bythe user.
Supported ScenariosThe supported scenarios are all based on a single-user with exclusive access to aworkstation environment (typically XenDesktop, but a native workstation environment isalso supported where the license permits.)
Scenario 1: Assigned Desktop (XenDesktop) Not Shared with
Any Other UserThis scenario also covers a domain workstation, again not shared with any other user.
Extended Synchronization supports synchronization of one or more external folders (that is,folders outside the user's profile area). For example, assume we have an application App1which stores its personalization in two folders c:\App1 and c:\App1Blobs.
Prior to a user logging on and creating their profile you must configure all the folders to besynchronized. Extended synchronization does not support the addition of further foldersafter logon, once the user's profile has been created. It is essential to pilot the applicationbefore deploying it to a production environment.
Once extended synchronization has been configured as described above, the user may logon and create (or migrate) their profile. Extended synchronization supports the use ofpre-installed applications (for example, using a standard image with all applications alreadyinstalled) and also applications that are installed by the user after the profile has beencreated.

Scenario 2: Pooled Desktop (XenDesktop), Not Shared with
Any Other UserThis is very similar to Scenario 1. In this supported configuration, the application will havebeen installed as part of a shared image, but will not have been run, so that personalizationtakes place on the first use of the application.
Unsupported ScenariosOther scenarios - those typically involving shared access by multiple users to a workstation,or simultaneous access by multiple users to a server - are not supported. Specific examplesof unsupported scenarios include:
● Domain workstations, including domain-joined XenDesktop workstations, shared bymultiple users. Fast User Switching disabled.
● Domain servers, concurrently shared with other users, whether Remote DesktopServices and XenApp environments.
● Domain workstations. Fast User Switching enabled.
These unsupported scenarios all involve a folder or folders being shared by multiple users,which gives rise to privacy and security issues, as well as profile bloat.
More InformationThe scenarios described in this topic may be further constrained by any End User LicenseAgreements (EULAs) that apply to the Citrix products in your deployment.
Supported Uses of Extended Synchronization
68
69
Wildcards and Profile Management
You can use ? (question mark) and * (asterisk) as wildcard characters in file inclusion andexclusion lists. The ? (question mark) matches a single character. The * (asterisk) matcheszero or more characters.
Wildcards work recursively and are not supported in folder names. Ensure you specify thepath when using wildcards.
ExamplesThe wildcard <path name>\h*.txt matches house.txt, h.txt, and house.txt.txt, but does notmatch ah.txt.
The wildcard <path name>\a?c.txt matches abc.txt, but does not match ac.txt.
The wildcard <path name>\a?c*d.txt matches abcd.txt and abccd.txt, but does not matchacd.txt.

70
To store certificates
Follow this procedure to save personal certificates that have been imported into thecertificate store during a session. By default, certificates are automatically synchronized.
1. Add the path Application Data\Microsoft\SystemCertificates\My to the list of folders tobe synchronized. The operating system language determines the Application Data folderin this location. If a policy is used to configure multi-language systems, add eachlanguage's location to the list.
ExampleOn an English system, the path is Application Data\Microsoft\SystemCertificates\My. On aGerman system it is Anwendungsdaten\Microsoft\SystemCertificates\My.
For your changes to take effect, run the gpupdate command from the command promptas documented at http://technet.microsoft.com/en-us/library/bb490983.aspx.

71
Using Profile Management with CitrixProducts
This section contains information for Citrix administrators deploying Profile managementwith XenApp or XenDesktop. Use this information in addition to, not instead of, the othertopics in the Profile management documentation.
See System Requirements for Profile Management for requirements relating to the use ofProfile management with other Citrix products or components.

72
Profile Management and XenApp
This version of Profile management is available to customers who are licensed to useEnterprise and Platinum Editions of XenApp (version 4.5 or later). Users of that product canalso install Profile management on their local desktop, which allows them to share theirlocal profile with their published resources.
Profile management works in XenApp environments that employ Terminal Services. In theseenvironments, you must set up an OU for each supported operating system. For moreinformation, see the article "Using User Profiles in Windows Server 2003" on the MicrosoftTechNet Web site at http://technet.microsoft.com.
In farms that contain different versions of XenApp or that run different operating systems,Citrix recommends using a separate OU for each server that runs each version or operatingsystem.
Important: Citrix does not recommend using extended synchronization on folders that areshared by multiple users (for example, folders containing shared application data). If youapply this feature to such folders, the application data created by one user may beoverwritten by Profile management when another user logs off.
73
Profile Management and XenDesktop
This version of Profile management is available to customers who are licensed to use:
● the Advanced, Enterprise, or Platinum edition of XenDesktop 2.1 or 3.0
● any edition of XenDesktop 4.0 or later
This topic contains advice for administrators using XenApp for Virtual Desktops. Forinformation on XenApp administration in a XenDesktop environment, see the XenDesktopdocumentation.
Profile management works in XenApp environments that employ Terminal Services. In theseenvironments, you must set up an OU for each supported operating system. For moreinformation, see the article "Using User Profiles in Windows Server 2003" on the MicrosoftTechNet Web site at http://technet.microsoft.com.
In farms that contain different versions of XenApp or that run different operating systems,Citrix recommends using a separate OU for each server that runs each version or operatingsystem.
If you upgrade Profile management in a XenDesktop deployment, consider the effect on thelog file locations.
On virtual images (for example, vDisks created with Citrix Provisioning Services), the CitrixProfile Management service starts before Group Policy is applied if Profile management hasnot been configured correctly on the images before they are rolled out. Configure Profilemanagement on the images using the documented procedures before you put the imagesinto a production environment. If you are using vDisks, follow the best practices inCTX119036.
Important: Citrix does not recommend using extended synchronization on folders that areshared by multiple users (for example, folders containing shared application data). If youapply this feature to such folders, the application data created by one user may beoverwritten by Profile management when another user logs off.
74
Monitoring and Logging ProfileManagement
You can log many aspects of your Profile management deployment, but you typically set uplogging only when you troubleshoot problems after enabling Profile management or if youwant to gather performance data in a production environment. You can change theverbosity of logging and select different log settings. You must enable logging so that logfiles are created.
The log file is created on the computer on which Profile management is installed, in thefolder %SystemRoot%\System32\LogFiles\UserProfileManager.
You can use Windows Performance Monitor to track several aspects of logon and logoff.
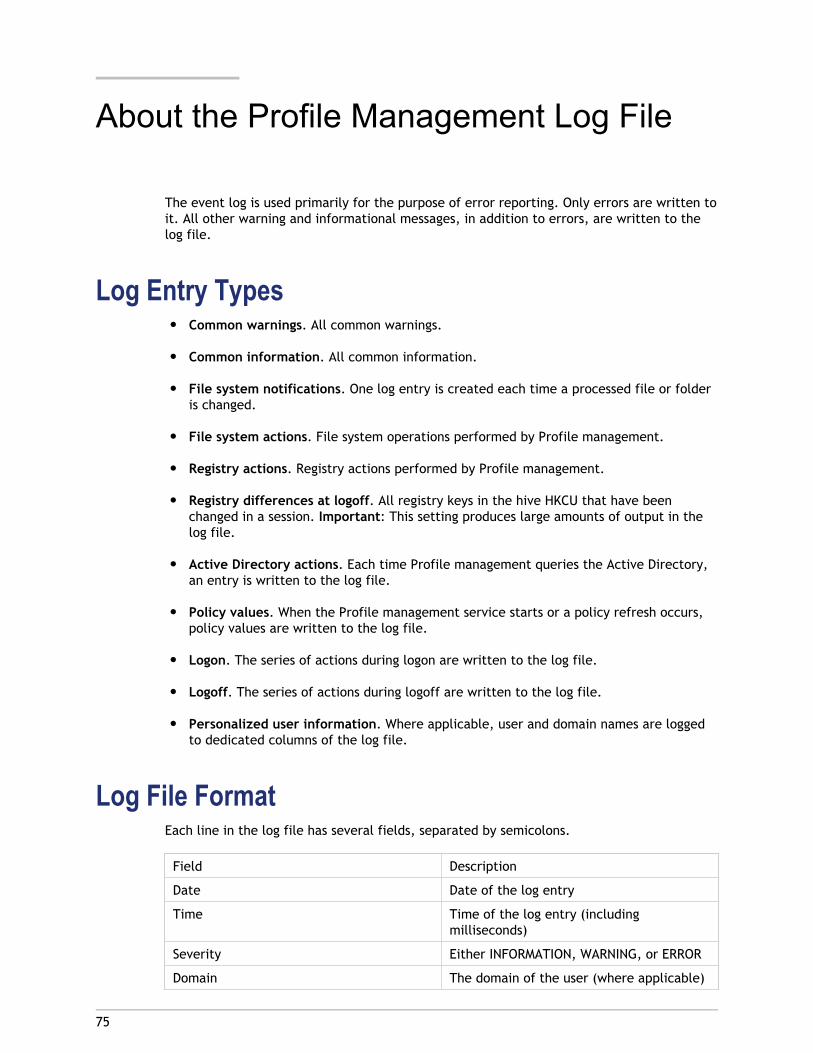
75
About the Profile Management Log File
The event log is used primarily for the purpose of error reporting. Only errors are written toit. All other warning and informational messages, in addition to errors, are written to thelog file.
Log Entry Types● Common warnings. All common warnings.
● Common information. All common information.
● File system notifications. One log entry is created each time a processed file or folderis changed.
● File system actions. File system operations performed by Profile management.
● Registry actions. Registry actions performed by Profile management.
● Registry differences at logoff. All registry keys in the hive HKCU that have beenchanged in a session. Important: This setting produces large amounts of output in thelog file.
● Active Directory actions. Each time Profile management queries the Active Directory,an entry is written to the log file.
● Policy values. When the Profile management service starts or a policy refresh occurs,policy values are written to the log file.
● Logon. The series of actions during logon are written to the log file.
● Logoff. The series of actions during logoff are written to the log file.
● Personalized user information. Where applicable, user and domain names are loggedto dedicated columns of the log file.
Log File FormatEach line in the log file has several fields, separated by semicolons.
Field Description
Date Date of the log entry
Time Time of the log entry (includingmilliseconds)
Severity Either INFORMATION, WARNING, or ERROR
Domain The domain of the user (where applicable)

User name The name of the user (where applicable)
Session ID The session ID (where applicable)
Thread ID The ID of the thread that created this line
Function and description The name of the Profile managementfunction executing at the time, and the logmessage
About the Profile Management Log File
76

77
To set up logging
1. In Group Policy Object Editor, navigate to the Computer Configuration >Administrative Templates > Citrix > Profile Management folder. (In Windows Server2008, the folder is Computer Configuration > Administrative Templates > ClassicAdministrative Templates (ADM) > Citrix > Profile Management.)
2. Open the Log Settings folder.
3. Click the Enable logging policy.
4. Select Enabled.
5. Click OK.
6. Click the Log Settings policy.
7. Select Enabled.
8. Select the type of events that you want Profile management to log.
9. Click OK.
For your changes to take effect, run the gpupdate command from the command promptas documented at http://technet.microsoft.com/en-us/library/bb490983.aspx.
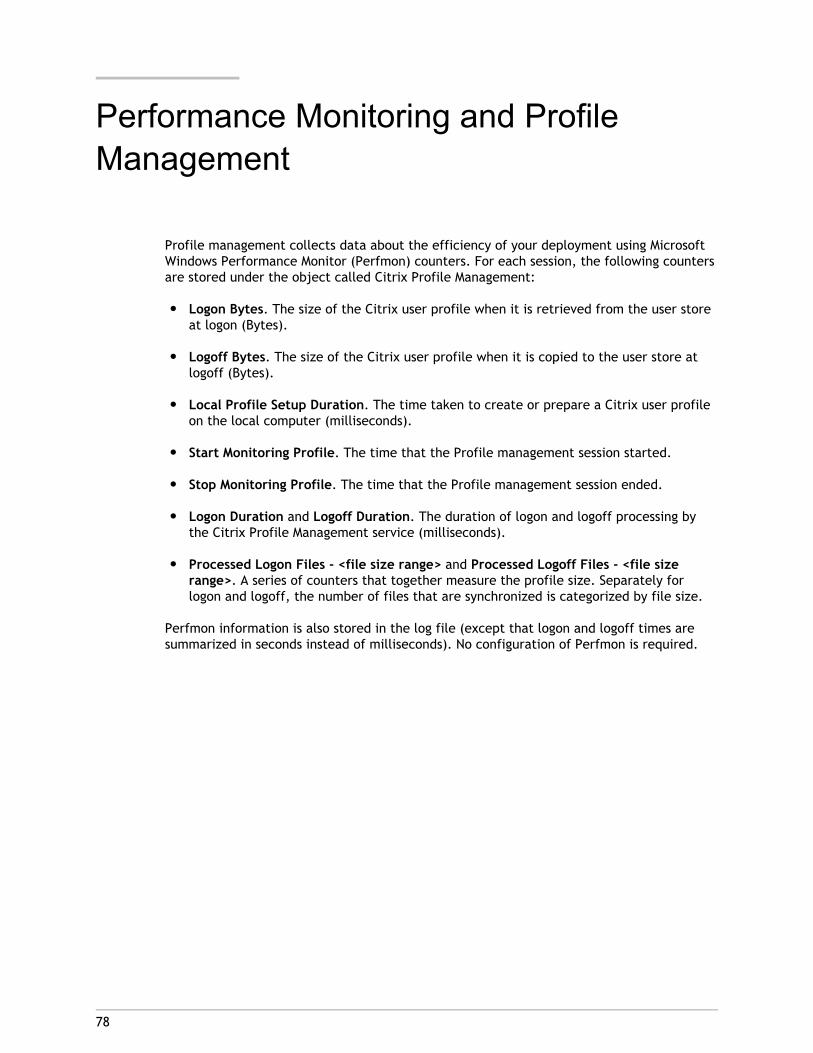
78
Performance Monitoring and ProfileManagement
Profile management collects data about the efficiency of your deployment using MicrosoftWindows Performance Monitor (Perfmon) counters. For each session, the following countersare stored under the object called Citrix Profile Management:
● Logon Bytes. The size of the Citrix user profile when it is retrieved from the user storeat logon (Bytes).
● Logoff Bytes. The size of the Citrix user profile when it is copied to the user store atlogoff (Bytes).
● Local Profile Setup Duration. The time taken to create or prepare a Citrix user profileon the local computer (milliseconds).
● Start Monitoring Profile. The time that the Profile management session started.
● Stop Monitoring Profile. The time that the Profile management session ended.
● Logon Duration and Logoff Duration. The duration of logon and logoff processing bythe Citrix Profile Management service (milliseconds).
● Processed Logon Files - <file size range> and Processed Logoff Files - <file sizerange>. A series of counters that together measure the profile size. Separately forlogon and logoff, the number of files that are synchronized is categorized by file size.
Perfmon information is also stored in the log file (except that logon and logoff times aresummarized in seconds instead of milliseconds). No configuration of Perfmon is required.
79
Troubleshooting Profile Management
The checklists in this section are designed to help you identify and solve issues. Totroubleshoot an issue, work your way through the steps in the checklists. In many cases, thesource of an issue is not Profile management but another component or a misconfigurationof the environment.
80
Basic Troubleshooting
As a first step in troubleshooting any issue that you or your users experience, follow thesesteps:
1. Check the .ini file on the affected user device.
2. Check the settings in Group Policy (GP).
To deactivate any Profile management policy that you enter as lists (for example,exclusion lists and inclusion lists), set the policy to Disabled. Do not set the policy toNot Configured.
3. Check the HKLM\Software\Policies registry entry on the affected device to see if thereare any stale policies due to GP tattooing issues, and delete them.

81
Examining the Profile Management LogFile
After performing the basic troubleshooting steps, check the Profile management log file asfollows. Log file entries are a good starting point when troubleshooting.
1. Make sure that logging is activated.
2. Check the log file for errors. You can locate these by searching for the word ERROR.
3. Check the log file for warnings. You can locate these by searching for the wordWARNING.
4. Run the command gpupdate /force on the computer on which the error occurs, andcheck the log file again. Review which settings are active and from where theconfiguration has been read (either Group Policy or an .ini file).
5. Check the path to the user store is correct.
6. Check all information from Active Directory was read correctly.
7. Check the time stamps. Is there an action that took too long?
If the log file does not help you identify the issue, check these other steps.
82
Other Troubleshooting Steps
Once you have followed the basic troubleshooting steps to try and correct the issue, andeliminated the Profile management log file as a source of useful information, use thischecklist to troubleshoot further.
● Check the Resultant Set of Policies (RSoP) from the computer you are analyzing. Are allGPOs applied the way you expect them to be applied?
● Check that you have the latest version of Profile management installed. Examine theversion information of UserProfileManager.exe by right-clicking the file in WindowsExplorer and clicking Properties > Version.
If you are not using the latest version, upgrade.
● Check the support forum at http://support.citrix.com/forums/forum.jspa?forumID=185.Someone else may already have encountered the problem and solved it.
● Enable user environment debug logging (available on Windows XP and Windows Server2003). Instructions on this are provided at http://support.microsoft.com/kb/221833/.The user environment debug log contains a lot of information about the logon process.
Analyze the output file. Help with analysis is available athttp://technet.microsoft.com/en-us/library/cc786775.aspx.
● Try to reproduce the issue you are observing on a clean computer with the sameoperating system as the affected computer. Ensure the clean computer only has theoperating system and Profile management installed.
Install the software products that are present on the affected computer one by one andsee if the issue is reproduced after each installation.
83
To produce a session dump file
You can save Profile mangement's internal data state to a dump file. This is helpful whenyou can isolate an issue to a specific point in a session but there is no associated entry inthe log file.
1. Create a file called $$upm_log$$.txt in the root of the drive on which the affected userprofile is located (typically C:). Profile management dumps its internal data state tothe file UserProfileManagerInternalData.log in the log file folder and deletes the file$$upm_log$$.txt.
84
Contacting Citrix Support
If you have checked the log file and the other troubleshooting advice in this section, andbelieve the problem you experience is due to Profile management, contact Citrix Support.Always include the following files and information. The more information you can provide,the better:
● All Profile management log files (in%SystemRoot%\System32\Logfiles\UserProfileManager). Be sure you have all log settingsactivated.
A log file from the affected machine should contain at least the following information:
● Start of the service (including the version and build number of Profile management)
● Reading of the configuration by the service
● One full logon process of the affected user
● The activity the user performed when the issue occurred
● One full logoff process for the affected user● The Resultant Set of Policies (RSoP) for the machine and affected user. You can
generate this using the Group Policy Management Console (GPMC).
● Details of the operating system, language, and version installed on the affected system.
● If available, the Userenv debug file.
● If available, the session dump file.
85
Deleting Local Profiles
If you delete a local profile on Windows Vista or Windows 7, ensure you follow Microsoftbest practice to delete the entire profile including the user-specific Registry entries. Do notdelete profiles manually, which can result in errors when users log on. For moreinformation, see http://support.microsoft.com/kb/947215/en-us.

86
Profile Management Reference Section
When configuring Profile management settings or when troubleshooting, you mayoccasionally need to look up information in this section.
87
Profile Management ADM File Reference
This topic describes the settings in the ADM file, the template used to configure Profilemanagement settings. In the Group Policy Object Editor, the settings appear underComputer Configuration > Administrative Templates > Citrix.
Modifying SettingsTo deactivate any Profile management policy that you enter as lists (for example, exclusionlists and inclusion lists), set the policy to Disabled. Do not set the policy to Not Configured.
For your changes to take effect, run the gpupdate command from the command promptas documented at http://technet.microsoft.com/en-us/library/bb490983.aspx.
Sections in the ADM FileAll Profile management policies are contained in the following sections, located in theCitrix folder:
Profile Management
Profile Management\Profile handling
Profile Management\Advanced settings
Profile Management\Log settings
Profile Management\Registry
Profile Management\File system
Profile Management\File system\Synchronization

Profile ManagementEnable Profile management
By default, to facilitate deployment, Profile management does not process logons orlogoffs. Turn on processing by enabling this setting.
If this setting is not configured here, the value from the .ini file is used. If this setting isnot configured here or in the .ini file, Profile management does not process Windowsuser profiles in any way.
This policy requires User Profile Manager 2.0.0 or later.
Path to user store
Sets the path to the directory (the user store) in which the user settings (registry changesand synchronized files) are saved. The path can be an absolute UNC path or a pathrelative to the home directory. In both cases the following types of variables can beused: system environment variables enclosed in percent signs and attributes of theActive Directory user object enclosed in hashes. Attributes are case-sensitive. Userenvironment variables cannot be used, except for %username% and %userdomain%.
Examples:
● The folder Windows\%ProfileVer% stores the user settings in the subfolder calledWindows\W2k3 of the user store (if %ProfileVer% is a system environment variableresolving to W2k3)
● \\server\share\#SAMAccountName# stores the user settings to the UNC path\\server\share\JohnSmith (if #SAMAccountName# resolves to JohnSmith for thecurrent user)
If this setting is disabled, the user settings are saved in the Windows subdirectory of thehome directory.
If this setting is not configured here, the setting from the .ini file is used. If this settingis not configured here or in the .ini file, the Windows directory on the home drive isused.
This policy requires User Profile Manager 1.0.0 or later.
Process logons of local administrators
Specifies whether logons of members of the local Administrators group are processed byProfile management.
If this setting is disabled, logons by local administrators are not processed by Profilemanagement.
If this setting is not configured here, the value from the .ini file is used. If this setting isnot configured here or in the .ini file, administrators will not be processed.
This policy requires User Profile Manager 1.0.0 or later.
Profile Management ADM File Reference
88
Processed groups
Both computer local groups and domain groups (local, global and universal) can be used.Domain groups should be specified in the format: <DOMAIN NAME>\<GROUP NAME>.
If this setting is configured here, Profile management processes only members of theseuser groups. If this setting is disabled, Profile management processes all users.
If this setting is not configured here, the value from the .ini file is used. If this setting isnot configured here or in the .ini file, members of all user groups are processed.
This policy requires User Profile Manager 1.0.0 or later.Back to top
Profile Management ADM File Reference
89
Profile Management\Profile handlingDelete locally cached profiles on logoff
Specifies whether locally cached profiles are deleted after logoff.
If this setting is enabled, a user's local profile cache is deleted after they have loggedoff. This is recommended for terminal servers. If this setting is disabled cached profilesare not deleted.
If this setting is not configured here, the value from the .ini file is used. If this setting isnot configured here or in the .ini file, cached profiles are not deleted.
This policy requires User Profile Manager 2.0.0 or later.
Local profile conflict handling
This setting configures how Profile management behaves if both a profile in the userstore and a local Windows user profile (not a Citrix user profile) exist.
If this setting is disabled or set to the default value of Use local profile, Profilemanagement uses the local profile, but does not change it in any way. If this setting isset to Delete local profile, Profile management deletes the local Windows user profile,and then imports the Citrix user profile from the user store. If this setting is set toRename local profile, Profile management renames the local Windows user profile (inorder to back it up) and then imports the profile from the user store.
If this setting is not configured here, the value from the .ini file is used. If this setting isnot configured here or in the .ini file, existing local profiles are used.
This policy requires User Profile Manager 2.0.0 or later.
Migration of existing profiles
Profile management can migrate existing profiles "on the fly" during logon if the user hasno profile in the user store.
The following event takes place during logon: if an existing Windows profile is found andthe user does not yet have a Citrix user profile in the user store, the Windows profile ismigrated (copied) to the user store on the fly. After this process, the user store profile isused by Profile management in the current and any other session configured with thepath to the same user store.
If this setting is enabled, profile migration can be activated for roaming and localprofiles (the default), roaming profiles only, local profiles only, or profile migration canbe disabled altogether. If profile migration is disabled and no Citrix user profile exists inthe user store, the existing Windows mechanism for creating new profiles is used as in asetup without Profile management.
If this setting is not configured here, the value from the .ini file is used. If this setting isnot configured here or in the .ini file, all types of existing profiles are migrated.
This policy requires User Profile Manager 2.0.0 or later.
Profile Management ADM File Reference
90

Template profile
By default, new user profiles are created from the default user profile on the computerwhere a user first logs on. Profile management can alternatively use a centrally storedtemplate when creating new user profiles. Template profiles are identical to normalprofiles in that they reside in any file share on the network. Use UNC notation forspecifying the folder where the template is located. For example, to specify a template,ntuser.dat, located at \\myservername\myprofiles\template, enter that path. Do notinclude the template file name in thepath,\\myservername\myprofiles\template\ntuser.dat.
Users need read access to a template profile.
If this setting is disabled, templates are not used. If this setting is enabled, Profilemanagement uses the template instead of the local default profile when creating newuser profiles. If a user has no Citrix user profile, but a local Windows user profile exists,by default the local profile is used (and migrated to the user store, if this is notdisabled). This can be changed by enabling the checkbox Template profile overrideslocal profile.
If this setting is not configured here, the value from the .ini file is used. If this setting isnot configured here or in the .ini file, no template is used.
This policy requires User Profile Manager 2.0.0 or later.Back to top
Profile Management ADM File Reference
91

Profile Management\Advanced settingsDirectory of the MFT cache file
Sets the path to the directory in which a cache file of the MFT directory content isstored.
Example: D:\Data\UPMCache
This cache is auto-created if not present by scanning the MFT upon service startup. If thissetting is disabled, the cache is created in the folder where you installed Profilemanagement.
If this setting is not configured here, the default value from the .ini file is used. If thissetting is not configured here or in the .ini file, the file is stored in the installationdirectory.
This policy requires User Profile Manager 1.0.0 or later.
Number of retries when accessing locked files
Sets the number of retries when accessing locked files.
If this setting is disabled the default value of five retries is used.
If this setting is not configured here, the value from the .ini file is used. If this setting isnot configured here or in the .ini file, the default value of five retries is used.
This policy requires User Profile Manager 1.0.0 or later.Back to top
Profile Management ADM File Reference
92
Profile Management\Log settingsEnable logging
Activation of this setting enables debug mode (verbose logging). In debug mode,extensive status information is logged in the log files in%SystemRoot%\System32\Logfiles\UserProfileManager.
Some logon and logoff processing is done in the context of the user using impersonation.Citrix recommends that you grant write permissions on the log folder for the users groupso that Profile management can write to the log files during impersonation.
If this setting is disabled only errors are logged.
If this setting is not configured here, the value from the .ini file is used. If this setting isnot configured here or in the .ini file, only errors are logged.
This policy requires User Profile Manager 1.0.0 or later.
Log settings
Defines detailed log settings, those events or actions that Profile management logs indepth.
If this setting is not configured here, Profile management uses the settings from the .inifile. If this setting is not configured here or in the .ini file, errors and generalinformation are logged.
This policy requires User Profile Manager 1.0.0 or later.
Maximum size of the log file
Sets the maximum size of the log file in bytes. If the log file grows beyond this size anexisting backup of the file (.bak) is deleted, the log file is renamed to .bak, and a newlog file is created.
The log file is created in %SystemRoot%\System32\Logfiles\UserProfileManager.
If this setting is disabled, the default value of 1 MB is used.
If this setting is not configured here, the value from the .ini file is used. If this setting isnot configured here or in the .ini file, the default of 1 MB is used.
This policy requires User Profile Manager 1.0.0 or later.
Profile Management ADM File Reference
93
Path to log file
Sets an alternative path in which the log files are saved.
Some logon and logoff processing is done in the context of the user using impersonation.Citrix recommends that you grant write permissions on the log folder for the users groupso that Profile management can write to the log files during impersonation.
If this setting is not configured here, the value from the .ini file is used. If this setting isnot configured here or in the .ini file, the default location%SystemRoot%\System32\Logfiles\UserProfileManager is used.
This policy requires Profile management 2.1 or later.Back to top
Profile Management\RegistryExclusion list
List of registry keys in the HKCU hive which are ignored during logoff.
Example: Software\Policies
If this setting is disabled, no registry keys are excluded.
If this setting is not configured here, the value from the .ini file is used. If this setting isnot configured here or in the .ini file, no registry keys are excluded.
This policy requires User Profile Manager 1.0.0 or later.
Inclusion list
List of registry keys in the HKCU hive that are processed during logoff.
Example: Software\Adobe.
If this setting is enabled, only keys on this list are processed. If this setting is disabled,the complete HKCU hive is processed.
If this setting is not configured here, the value from the .ini file is used. If this setting isnot configured here or in the .ini file, all of HKCU is processed.
This policy requires User Profile Manager 1.0.0 or later.Back to top
Profile Management ADM File Reference
94
Profile Management\File systemExclusion list - directories
List of folders that are ignored during synchronization. Folder names can be specified asabsolute paths or as paths relative to the user profile (%USERPROFILE%).
Examples:
● Desktop ignores the Desktop folder in the user profile
● C:\MyApp\tmp ignores the folder C:\MyApp\tmp
If this setting is disabled, no folders are excluded.
If this setting is not configured here, the value from the .ini file is used. If this setting isnot configured here or in the .ini file, no folders are excluded.
This policy requires User Profile Manager 2.0.0 or later.
Exclusion list - files
List of files that are ignored during synchronization. File names can be specified asabsolute paths or as paths relative to the user profile (%USERPROFILE%). Wildcards areallowed. Wildcards are applied recursively.
Examples:
● Desktop\Desktop.ini ignores the file Desktop.ini in the Desktop folder.C:\MyApp\myapp.tmp ignores the file myapp.tmp in the directory C:\MyApp.
● C:\MyApp\*.tmp ignores all files with the extension .tmp in the folder C:\MyApp andits subfolders.
If this setting is disabled, no files are excluded.
If this setting is not configured here, the value from the .ini file is used. If this setting isnot configured here or in the .ini file, no files are excluded.
This policy requires User Profile Manager 2.0.0 or later.Back to top
Profile Management ADM File Reference
95
Profile Management\File system\SynchronizationDirectories to synchronize
Profile management synchronizes each user's entire profile between the system it isinstalled on and the user store. It is not necessary to include subfolders of the userprofile by adding them to this list. You can use this setting to synchronize folders thatare not part of the user profile. In addition, you can use it to include subfolders ofexcluded folders.
Paths on this list can be absolute or relative. Relative paths are interpreted as beingrelative to the user profile.
Examples:
● Desktop\exclude\include ensures that the subfolder called include is synchronizedeven if the folder called Desktop\exclude is not
● C:\MyApp\data ensures that the folder called data is synchronized even though thefolder called C:\MyApp is not (because it is not part of the profile)
Disabling this setting has the same effect as enabling it and configuring an empty list.
If this setting is not configured here, the value from the .ini file is used. If this setting isnot configured here or in the .ini file, only non-excluded folders in the user profile aresynchronized.
This policy requires User Profile Manager 1.0.0 or later.
Profile Management ADM File Reference
96
Files to synchronize
Profile management synchronizes each user's entire profile between the system it isinstalled on and the user store. It is not necessary to include files in the user profile byadding them to this list.
This setting can be used to include files outside the user profile in the synchronizationprocess. In addition, it allows for the inclusion of files below excluded folders. Paths onthis list can be absolute or relative. Relative paths are interpreted as being relative tothe user profile. Wildcards can be used but are only allowed for file names. Wildcardscannot be nested and are applied recursively.
Examples:
● AppData\Local\Microsoft\Office\Access.qat specifies a file below a folder that isexcluded in the default configuration
● C:\MyApp\myapp.cnf specifies the file myapp.cnf in the folder C:\MyApp\
● AppData\Local\MyApp\*.cfg specifies all files with the extension .cfg in the profilefolder AppData\Local\MyApp and its subfolders
Disabling this setting has the same effect as enabling it and configuring an empty list.
If this setting is not configured here, the value from the .ini file is used. If this setting isnot configured here or in the .ini file, only non-excluded files in the user profile aresynchronized.
This policy requires User Profile Manager 1.0.0 or later.Back to top
Profile Management ADM File Reference
97

98
Logon Diagram
This diagram helps you work out the details of your user profile migration strategy. It alsoexplains these aspects of performance:
● When you migrate a profile, two network copies can take place, which slows down thelogon process. For example, the operation "Copy default profile to local Pm profile andto user store” first involves a full profile copy from the roaming profile store to thelocal computer and then a second full profile copy from the local computer to the userstore.
● When a cached profile is used, no copying of profile data across the network takesplace.
Read the diagram from the bottom to the top. Check the desired operations in the boxes atthe bottom (for example, "Copy default profile to local Pm profile and to user store") andtrack a path back to identify the required migration settings.

Logon Diagram
99
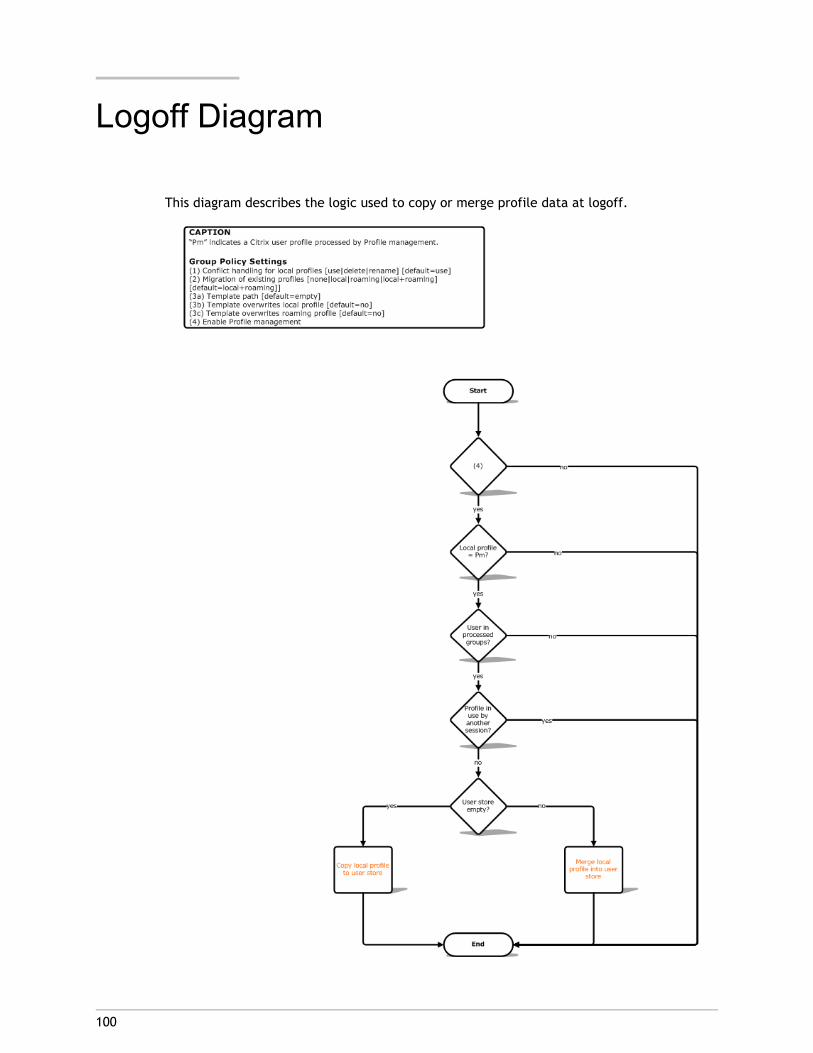
100
Logoff Diagram
This diagram describes the logic used to copy or merge profile data at logoff.


![Profile Management 5 - Citrix Docsprofile is loaded as a temporary profile or a mandatory profile. [#LC7846] Occasionally, file type associations (FTA) fails to roam with Profile Management](https://img.dokumen.tips/doc/110x75/5ecce79be8355a7b3b2fa9e9/profile-management-5-citrix-docs-profile-is-loaded-as-a-temporary-profile-or-a.jpg)