Embed Size (px)
Citation preview

Citrix
eDocs product documentation library
http://edocs.citrix.com
©2010, Citrix Systems, Inc. All rights reserved.
Profile Management 3.x
Contents
1. About Profile Management 3.1.12. About Profile Management 3.12.1. To install and set up Profile Management 3.12.2. To administer Profile Management 3.12.3. Known Issues in Profile Management 3.13. About Profile Management 3.03.1. What's New3.2. Existing Features of Profile Management3.3. What Is a Profile?3.4. General Recommendations for Profiles3.5. Accessing Multiple Resources - Implications for Profiles3.6. How Profile Management Works3.7. Profile Management Use Cases3.8. Known Issues4. Most Read Topics5. Plan5.1. System Requirements for Profile Management5.2. Domain and Forest Support in Profile Management5.3. Deployment Considerations for Profile Management5.4. Operating System Considerations for Profile Management5.5. About the User Store5.6. Creating the User Store5.7. Planning for Migration and Conflicts5.7.1. Migrating Existing Profiles to Citrix User Profiles5.8. Sharing Citrix User Profiles on Multiple File Servers5.9. Using Profile Management with Microsoft DFS5.10. Using Profile Management with non-Microsoft File Servers5.11. Sharing Profiles between Operating Systems of Different Bitness6. Troubleshoot6.1. Basic Troubleshooting6.2. Specific Troubleshooting Information6.3. Examining the Profile Management Log File6.3.1. Advanced Troubleshooting of Log Files6.4. Events Logged by Profile Management6.5. Other Troubleshooting Steps6.5.1. To create a diagnostic trace log6.5.2. To produce a session dump file6.6. Contacting Citrix Technical Support7. Secure7.1. Profile Streaming and Enterprise Antivirus Products8. Install and Set Up8.1. Files Included in the Download8.2. To install Profile management8.2.1. To install Profile management from the command line8.3. Deploying Profile Management with Citrix Receiver8.4. To add the ADM file to Group Policy8.5. Setting Folder Redirection with Profile Management8.6. To remove Profile management9. Upgrade and Migrate9.1. To upgrade Profile management9.2. Considerations When Upgrading .Ini Files10. Manage

10.1. Basic Profile Management Tasks10.1.1. Testing Profile Management with Local GPO10.1.2. To specify the path to the user store10.1.3. To define which groups' profiles are processed10.1.4. To choose a migration policy10.1.5. To resolve conflicting profiles10.1.6. To enable Profile management10.2. Performance Optimization10.2.1. About Profile Management Settings10.2.2. Configuration Precedence10.2.3. Optimizing Profile Management10.2.3.1. Before Optimizing Profile Management10.2.3.2. Monitoring and Logging Profile Management10.2.3.2.1. About the Profile Management Log File10.2.3.2.2. To set up logging10.2.3.2.3. Performance Monitoring and Profile Management10.2.3.2.3.1. To provide access to performance data10.2.3.3. Including and Excluding Items10.2.3.3.1. To include items10.2.3.3.2. To exclude items10.2.3.3.3. Default Included and Excluded Items10.2.3.3.4. Combining Inclusion and Exclusion Lists10.2.3.3.5. To use extended synchronization10.2.3.3.5.1. Supported Uses of Extended Synchronization10.2.3.3.6. Wildcards and Profile Management10.2.4. To store certificates10.2.5. To stream user profiles10.2.6. To configure active profile write back10.3. Administering Profiles Within and Across OUs11. Integrate11.1. Profile Management and XenApp11.2. Profile Management and XenDesktop11.2.1. Example Settings for XenDesktop11.3. Profile Management and Provisioning Services11.3.1. Profile Caching on vDisks11.3.2. Preconfiguring Profile Management with Provisioning Services11.3.3. To retrieve Profile management log files from vDisks11.4. Profile Management and VMWare11.5. Profile Management and Microsoft Outlook12. Reference13. Glossary
Profile Management 3.x
Updated: 2010-07-05
In This Section
These topics contain up-to-date information about installing, configuring, and administering Profile management 3.0, 3.1, and 3.1.1. These task-based topics help you set up the feature quickly and easily. Readers are assumed to have some knowledge of the Citrix product with which Profile management ships, and of Windows profiles in general.
Learn about the following important topics.
About Version 3.0
About Version 3.1
About Version 3.1.1
Get a general overview of how Profile management works, review the new features, and check known and fixed issues.
System Requirements Ensure your environment meets all the requirements before you install Profile management.

XenApp
/
XenDesktop
Review important information about XenApp and XenDesktop deployments involving Profile management.
The following additional documentation is designed to increase your productivity but is not contained in eDocs.
Frequently asked questions about troubleshooting CTX119038
Frequently asked questions about setting up cross-platform profiles CTX119039
Frequently asked questions about licensing CTX119747
Frequently asked questions about how Profile management works CTX119791
Answers from experts to many questions about Profile management deployments
http://community.citrix.com/blogs
1. About Profile Management 3.1.1
Updated: 2010-06-11
The following issues have been fixed in this release: Items on the Quick Launch toolbar and browser favorites are not displayed correctly and do not work. [#234837]
On Windows Server 2003 systems, the presence of Citrix offline plug-in 6.0 and Profile management 3.1 affects CPU usage adversely and prevents streamed applications from starting. [#234347]
Memory leaks occur if you enable the and settings. [#234665]Profile streaming Always cache
If you enable the setting, some files (for example, usrclass.dat) in locally Profile streamingcached profiles are deleted when users log on. [#234918]
McAfee VirusScan Enterprise fails when users log on. The associated error refers to mcshield.exe. [#234081]
Temporary files are not discarded when users log off. The files are used when users log on again if the following conditions apply: the setting is disabled; Delete locally cached profiles on logoff Path
is modified; and is set to (the to user store Local profile conflict handling Use local profiledefault). [#234278]
When a user attempts to log on, a "Windows cannot log you on because your profile cannot be loaded" user environment popup appears and Event ID - 1508 is reported in Windows Event Log. [#235427]
Install and configure Version 3.1.1 as for Version 3.1 but note that the installers for this release are called profilemgt3.1.1_x86.msi for 32-bit systems and profilemgt3.1.1_x64.msi for 64-bit systems. The ADM file in this release is the same as in Version 3.1. It is called Ctxprofile3.1.0.adm.
2. About Profile Management 3.1
Updated: 2010-05-12
Version 3.1 of Profile Management includes the following enhancements in addition to the features released in Version 3.0:
. Profile management can mirror folders, allowing the correct processing Folder mirroringof transactional folders. For example, mirroring the Internet Explorer cookies folder means that index.dat is synchronized only with the latest version of the cookies that it references, not earlier versions that are no longer required. Without mirroring, multiple copies of the referenced files (cookies from multiple sessions, for example) can cause profile bloat.
. Profiles in some deployments can become bloated with stale browser Deleting stale cookiescookies when Web sites are revisited. A setting in the ADM file can be used to delete the stale files.
. Additional Performance Monitor (Perform) counters allow you to Diagnostic enhancementsmeasure the time spent: processing registry changes and file changes at logoff; migrating files from the pending area to the user store; and deleting local profiles. No configuration of Perfmon is required
1.
2.
3.
4.
1.
2.
3.
4.
1.
2.
3.
to use these counters.
2.1. To install and set up Profile Management 3.1
Updated: 2010-05-12
This topic contains procedures for installing Profile management and adding the ADM file to Group Policy. Other aspects of installing and setting up Version 3.1 are similar to .Version 3.0
Version 3.1 has the same system requirements as .Version 3.0
To install Profile management
Install the software on all computers whose user profiles you want to manage. This procedure installs Profile management on a single computer.
If you perform the installation on Windows XP or Windows Server 2003 and have disabled support for short file names (also known as 8.3 file names), each folder in the installation location must conform with the short file naming convention, for example C:\Citrix\ProfMgr. This issue does not occur on other supported operating systems.
Log on to the computer with administrator privileges.
Locate and run the appropriate installer from the download package. There are two installers, profilemgt3.1.0_x86.msi for 32-bit systems and profilemgt3.1.0_x64.msi for 64-bit systems. The installation wizard appears.
Follow the on-screen instructions in the wizard.
Restart the computer.
To upgrade an existing ADM file
If any earlier version of the Profile management ADM file already exists in Group Policy, upgrade it using this procedure. All policy settings in the earlier version are preserved when you upgrade.
In the Group Policy Object Editor, right-click and select Administrative Templates.Add/Remove Templates
Select the existing version of the Profile management ADM file (for example, ctxprofile3.0.0), click The Administrative Templates\Citrix folder is deleted. and then .Remove Close
Right-click and select a second time.Administrative Templates Add/Remove Templates
The Click , browse to the location of the new version of the ADM file, select it, and click .Add Closenew ADM file is imported but the old settings are retained.
To add the ADM file to Group Policy
Use this procedure if no earlier version of the Profile management ADM file is present in Group Policy.
In production environments, configure Profile management with Group Policy. For each OU containing the computers you want to manage, create and link a Group Policy Object (GPO), and then add the Profile management ADM file to the GPO.
To configure Citrix user profiles, you can use any computer that runs Windows Group Policy Management Console. The computer does not have to be a domain controller. Domain controllers only store the ADM file.
Note: For small pilot projects and evaluations where no separate test deployment of Active Directory is available, you can also use the installed .ini files instead of the ADM file.
On the domain controller, import the Profile management ADM file from the download package. The file is called Ctxprofile3.1.0.adm and is located in the Group Policy Templates folder.
On the computer you want to use to configure Profile management, open Active Directory Users .and Computers
3.
4.
5. 1.
2.
3.
4.
1.
2.
3.
1.
2.
Identify the OUs containing the computers that Profile management will be installed on. For information on how to configure Profile management to work in your existing OU structure, see Administering
.Profiles Within and Across OUs
In Group Policy Management, create a GPO and link it to each OU.
Note: If you apply security filtering to the GPO, do so using either the Authenticated Users group or a computer group. Do not use a security group that only contains users.
Edit the GPO in Group Policy Editor:Expand and right-click under the GPO.Computer Configuration Administrative Templates
Click and click Add/Remove Templates Add.
Browse to the ADM file that you copied locally and click Open.
Click . This creates a Citrix folder and a Profile Management subfolder that stores the Closesettings from the ADM file.
2.2. To administer Profile Management 3.1
Updated: 2010-05-12
This topic describes the configuration of the new features in Version 3.1 using the ADM file in this release. Administer all other features using the same ADM file but follow the .Version 3.0 procedures
The two procedures in this topic, mirroring folders and deleting stale cookies, are related. Both can be used to solve the specific issue of profile bloat involving index.dat and browser cookies, but mirroring can also be applied more widely because it can help solve similar issues involving any transactional folder (also known as a referential folder), that is a folder containing interdependent files, where one file references others. Mirroring folders allows Profile management to process a transactional folder and its contents as a single entity, thereby avoiding profile bloat.
For example, consider how index.dat references cookies while a user browses the Internet. If a user has two Internet Explorer sessions, each on a different server, and they visit different sites in each session, cookies from each site are added to the appropriate server. When the user logs off from the first session (or in the middle of a session, if the active profile write back feature is configured), the cookies from the second session should replace those from the first session. However, instead they are merged, and the references to the cookies in index.dat become out of date. Further browsing in new sessions results in repeated merging and a bloated cookie folder.
Mirroring the cookie folder solves the issue by overwriting the cookies with those from the last session each time the user logs off so index.dat stays up to date.
The cookie folder can become bloated not only when multiple sessions are involved but also when Web sites are revisited and stale cookies build up. The second procedure in this topic solves the latter issue by removing the stale cookies from all profiles. Be aware that enabling Process Internet cookie files on logoffincreases logoff times, so only follow that procedure if you are sure profile bloat is the result of stale cookies.
To mirror folders
Under , double-click the > > Profile Management File system Synchronization Folders to mirrorpolicy.
Select Enabled.
For the Add the list of folders, relative to the root folder in the user store, that you want to mirror.cookies example, add the folder Cookies for Version 1 profiles and AppData\Roaming\Microsoft\Windows\Cookies for Version 2 profiles.
For your changes to take effect, run the command from the command prompt as documented at gpupdate
.http://technet.microsoft.com/en-us/library/bb490983.aspx
To delete stale cookies
Under , double-click the > Profile Management Advanced Settings Process Internet cookie files policy.on logoff

2.
3.
Select Enabled.
Click .OK
For your changes to take effect, run the command from the command prompt as documented at gpupdate
.http://technet.microsoft.com/en-us/library/bb490983.aspx
2.3. Known Issues in Profile Management 3.1
Updated: 2010-05-12
The following known issues exist in this version.
Installation Issues
If you change the default location of Profile management cache files, they are not deleted when you uninstall the component. [#226881]
On Windows Vista or Windows Server 2008, the log file directory is not deleted when Profile management is uninstalled. This issue does not occur when the component is removed in unattended mode. [#169/-]
If the path to the log file has been set to a non-default location in Group Policy or the .ini file, the file is not deleted when Profile management is removed. To workaround this issue, delete the log file manually. [#219376]
When installing Profile management with Group Policy, some properties of the Profile management MSI file are incorrectly displayed and the incorrect language version may be installed. The default language is shown as
. In addition, no publisher information is displayed. As a workaround, edit the MSI. German (Germany)For example, open the MSI in Orca, click > , and in remove all language View Summary Info LanguagesIDs that are numerically lower than the language of the MSI you want to install. (German has the lowest ID.) Then proceed with your installation. [#229733]
Other Known Issues
A gpupdate has no effect on the synchronization of new folders located on volumes that have not been synchronized before. To work around this issue, ensure all users are logged off, restart the Citrix Profile Management service, and allow users to log back on. [#203859]
In Windows Performance Monitor, the log off counter is displayed as a number not as text. To work around this issue, read the four-digit number as Logoff Counter. [#201474]
Junction points and symbolic links appear not to be synchronized. If a user logs off, an error message such as the following may appear in the log file:
2009-01-12;12:01:45.231;ERROR;UPM;user5349;21;7468;FindFirstFileAPIWrapper: FindFirstFile for path <C:\Users\user5349\My Documents\*.*> returned: Access is denied.
2009-01-12;12:01:45.278;INFORMATION;UPM;user5349;21;7468;IsFSPathExcluded: Excluding directory <C:\Users\user5349\NetHood> because it is a junction or symbolic link.
This is due to the fact that a junction point is accessed by another process. As junction points are not stored in the user store, this is only a cosmetic issue. Such error messages and can be ignored. [#204572]
Using extended synchronization in unsupported scenarios may result in data loss. Supported scenarios, in which this issue does not occur, are documented in . [#216424]CTX122518
Specific files and folders can be included and excluded from profiles. Inclusion and exclusion take place only at logoff, but log file entries make it appear they occur at logon. [#218834]
In Group Policy, you can change the location of the cache file used to monitor the Master File Table (MFT). The change is processed when policies are refreshed and take effect when the Citrix Profile Management service is next restarted. Changing the path when the Citrix Profile Management service is running has no effect, but the presence of log file entries may incorrectly give the impression that it does. [#218853]
If you set Profile management to synchronize Internet Explorer temporary cache files, some are not processed and the error is noted (as multiple error messages) in the log file. These errors can be ignored, and, because the files are temporary, the effect on the user is negligible. This issue is observed only with Internet Explorer and only in its cache folder (AppData\Local\Microsoft\Windows\Temporary Internet Files). To workaround this issue, exclude this directory from synchronization. [#218212]

When a user's domain password is about to expire on Windows XP Service Pack 3, they are prompted to change it. When they do, the system loads a local copy of the user profile (or the default user profile) instead of the Citrix user profile, the session may become disconnected, and the Citrix user profile data is not saved. To resolve the issue, apply Microsoft hotfix KB958058 to the XP SP3 base virtual disk image on the Citrix Provisioning Server with the disk in private image mode. This issue is limited to Windows XP Service Pack 3. For more information, see the Citrix blog article on this topic at http://community.citrix.com/x/aICcBg. [#218418]
In deployments involving XenDesktop 3.0 with virtual desktops shared between multiple users, some user profile changes are not saved at logoff (for example, changes to NTUSER.DAT or index.dat). This issue does not occur in deployments involving other versions of XenDesktop or with virtual desktops that are not shared. [#220044]
If you delete a local profile on Windows Vista or Windows 7, ensure you follow Microsoft best practice to delete the entire profile including the user-specific registry entries. For more information, see http:
. Do not delete profiles manually, which can result in errors when //support.microsoft.com/kb/947215/en-ususers log on. The errors include failures to connect to Windows services. [#227506]
3. About Profile Management 3.0
Updated: 2010-05-10
Profile management is intended as a profile solution for XenApp servers, virtual desktops created with XenDesktop, and physical desktops. You install Profile management on each computer whose profiles you want to manage.
Active Directory Group Policy Objects allow you to control how Citrix user profiles behave. Although many settings can be adjusted, in general you only need to configure those described in this document.
Usage rights for this feature are described in the end-user license agreement (EULA).
For information on the terminology used in these topics, see .Profile Management Glossary
3.1. What's New in Profile Management 3.0
Updated: 2010-05-10
This version includes the following new key features:
. This feature offers alternative options for speeding up logons and Citrix streamed user profileslogoffs by fetching parts of users' profiles from the user store only when they are needed. One of the options is to use the feature, which fetches all of the files but staggers cache entire profiletheir delivery in the background.
. To improve profile integrity if sessions terminate abnormally, files that Active profile write backare modified on the local computer can be backed up to the user store during a session, before logoff.
. Windows Server 2008 R2 is now supported.Another supported operating system
. Profile management checks for more errors during installation and, if Installation enhancementsthey are encountered, writes messages to the event log. A new command-line switch optionally installs Profile management without the .ini files that were previously used for configuration.
. You can monitor streamed user profile performance using a subset Diagnostic enhancementsof Performance Monitor counters and data from the log files. In this version, to view the counters you no longer need to be a full administrator on the computer used to manage Profile management. In addition, for each user logon, event log messages display the full path to the user store, and the log file indicates whether streamed user profiles are enabled for each user. You can now also create trace logs with Citrix Diagnostic Facility in the event of advanced troubleshooting initiated by Citrix Technical Support.
. The Profile management software and documentation are now localized into LocalizationFrench, German, Spanish, Japanese, and Simplified Chinese.
3.2. Existing Features of Profile Management
Updated: 2010-03-17
Profile management 3.0 includes the following existing features:

. Allows you to migrate profiles to and from physical computers and virtual Profile migrationones. Depending on the configuration settings, Profile management can copy existing roaming profiles and local Windows profiles to the user store. Existing mandatory profiles can be used as the basis for Citrix user profiles when saved as a template.
. Allows the use of wildcard characters in file names for synchronization, inclusion, Wildcard supportand exclusion lists.
. Synchronizes files and folders located outside of users' profile folders.Extended synchronization
. All entries in log files are identified with the user name, domain, and session id Logging(where identifiable).
. Uses language-independent profile folder names in the user store Multilingual profile supportfor Windows XP and Windows Server 2003.
. Enhanced installation and administration features.Simplified installation and management
. Solves the "last-write-wins" problem that occurs when the last open Consistent user settingssession overwrites all of the profile data from previously closed sessions.
. Profile management can be integrated easily into existing deployments. No Easy integrationnew infrastructure or changes to logon and logoff scripts are required.
. The same .msi file can be used for servers and desktops. There are two versions of Unified installerthe file, for 32-bit and 64-bit systems.
Active Directory-managed licensing. You can manage user entitlement using an Active Directory user group.
. You can now manage profiles on user devices running Windows 7.Windows 7 support
. Profile management releases and upgrades can be managed Integration with Citrix Receiverusing Citrix Receiver.
Improved monitoring and reporting. Additional Performance Monitor counters allow you to measure several new aspects of logon and logoff, providing improved benchmarking and integration with Citrix EdgeSight.
. A command line option allows you to exclude the Profile management .Upgrades without .ini filesini files from upgrades.
3.3. What Is a Profile?
Updated: 2010-03-19
A Windows user profile is a collection of folders, files, and configuration settings that define the environment for a user who logs on with a particular user account. These settings may or may not be customizable by the user, depending on the administrative configuration. Examples of settings that can potentially be customized are:
Desktop settings such as wallpaper and screen saver
Shortcuts and Start menu setting
Internet Explorer Favorites and Home Page
Microsoft Outlook signature
Some user settings and data can be redirected by means of folder redirection; however, if folder redirection is not used, these settings are stored within the user profile.
Types of Profiles
Windows includes several types of profiles:
Profile Type Storage Location Configuration Location Application Save Changes?
Local Local device Local device Local device only Yes
Roaming Network Active Directory Any device accessed Yes
1.
2.
3.
Mandatory
(Mandatory Roaming)
Network Active Directory Any device accessed No
Temporary Not Applicable Not Applicable Local device only No
A temporary profile is only assigned when a specific profile type cannot be assigned. With the exception of mandatory profiles, a distinct profile typically exists for each user. In addition, mandatory profiles do not allow users to save any customizations.
For Terminal Server users, a specific roaming or mandatory profile can be assigned to avoid issues that may occur if the same profile is assigned to a user within a terminal server session and a local session.
Version 1 and Version 2 Profiles
Profiles in Microsoft Windows XP and Windows Server 2003 are known as Version 1 profiles. Those in Windows Vista, Windows 7, and Windows Server 2008 are known as Version 2 profiles. The folder structure (or namespace) of Version 1 profiles is mostly interchangeable; the folders on Windows XP and Windows Server 2003 are almost identical. Likewise, the structure of Version 2 profiles is mostly interchangeable.
However, the namespace is different between Version 1 and Version 2 profiles. This folder structure was changed in the later operating systems to provide user-specific folders isolated for user and application data. Version 1 profiles store data in the root folder, Documents and Settings. Version 2 profiles store data in a more intuitively named folder called Users. For example, the folder contents of AppData\Local in Windows Vista is the same as the contents of Documents and Settings\<username>\Local Settings\Application Data in Windows XP.
For more information about the differences between Version 1 and Version 2 profiles, seehttp://download.microsoft.com/download/3/b/a/3ba6d659-6e39-4cd7-b3a2-9c96482f5353/Managing%20Roaming%20User%20Data%20Deployment%20Guide.doc
3.4. General Recommendations for Profiles
Updated: 2010-03-19
Where network-based profiles are employed, Citrix generally recommends that the following solutions be considered in this order:
Mandatory profiles
Roaming profiles
Citrix user profiles
In all cases, folder redirection is encouraged so that user-specific data is saved separately from the profile.
Please remember that these are general recommendations. Citrix recommends this order because administrators can generally implement one of the first two solutions and maintain them with standard knowledge of Microsoft Windows. However, in more complex situations or where these standard solutions cannot address enterprise requirements, Profile management should be considered.
3.5. Accessing Multiple Resources - Implications for Profiles
Updated: 2010-03-19
Profiles become more complex as users access multiple resources. When network-based roaming or mandatory profiles are enabled, Microsoft Windows uses the registry data to describe and preserve the user environment. By default, Windows stores a copy of the profile on the local hard drive, loads a copy of the network-based roaming or mandatory profile when the user logs on, and writes the local copy to the network repository when the user logs off. However, in corporate environments, users may access multiple computers daily. Many users switch from a desktop to a laptop, while others use Citrix XenDesktop
and Citrix XenApp to access virtualized resources. Depending on the enterprise requirements and configuration, there is likely a need for user data to move with the user as they log on to different computers.
For example, if a user has a local desktop that accesses virtualized applications hosted on XenApp and also accesses a virtualized desktop hosted on XenDesktop, then the user settings will not be uniform across all resources unless appropriately configured. In addition, when accessing multiple resources, the behavior of roaming profiles dictates that the "last write wins".
To take the example one step further, let's say that a roaming profile has been enabled and the user changes the background color of the local desktop. The user then logs on to a XenDesktop virtual desktop, logs off the local desktop, and logs off the virtual desktop. Because both the local and virtual desktops were open at the same time and the last logoff was from the virtual desktop, the settings from the virtual desktop session were the last written to the profile and the background color setting is not retained.
3.6. How Profile Management Works
Updated: 2010-03-19
Profile management addresses user profile deficiencies in environments where simultaneous domain logons by the same user introduce complexities and consistency issues to the profile. For example, if a user starts sessions to two different virtual resources based on a roaming profile, the profile of the session that terminates last overrides the profile of the first session. This problem, known as "last write wins", discards any personalization settings that the user makes in the first session.
You can tackle the problem by using separate profiles for each resource silo. However, this results in increased administration overhead and storage capacity requirements. Another drawback is that users will experience different settings depending on the resource silo they access.
Profile management optimizes profiles in an easy and reliable way. At interim stages and at logoff, registry changes, as well as files and folders in the profile, are saved to the user store for each user. If, as is common, a file already exists, it is overwritten if it has an earlier time stamp.
At logon, users' registry entries and files are copied from the user store. If a locally cached profile exists, the two sets are synchronized. This makes all settings for all applications and silos available during the session and it is no longer necessary to maintain a separate user profile for each silo. Citrix streamed user profiles can further enhance logon times.
Note: Profile management processes domain user logons not local accounts.
3.7. Profile Management Use Cases
Updated: 2010-03-19
Citrix Profile management can be implemented to manage users' profiles in different scenarios regardless of how applications are delivered to users or where they are housed. The following are examples of these scenarios:
Citrix XenApp with published applications
Citrix XenApp with published desktop
Citrix XenApp with applications streamed into an isolation environment
Applications streamed to XenDesktop
Applications installed on XenDesktop
Applications streamed to physical desktops

Applications installed locally on physical desktops
Of these, Citrix sees the following as the most common use case scenarios:
. The user accesses multiple XenApp server silos and hence has multiple Multiple sessionssessions open. Note however that application isolation and streaming on the server are alternatives to server silos. This scenario is described in more detail below
. Because the last write to the Last write wins and roaming profile consistency issuesroaming profile causes all settings to be saved, roaming profiles may not retain the right data if multiple sessions are open and interim changes are made. In addition, settings may not be written correctly to the profile as a result of network, storage issues, or other problems. This scenario is described in more detail below.
. Profile bloat can make user profiles unwieldy resulting in storage Large profiles and logon speedand management issues. Typically, during logon Windows copies the user's entire profile over the network to the local user device. For bloated profiles, this can prolong the user's logon time.
Multiple Sessions
Especially in large environments, it may be necessary for users to open multiple sessions to access different applications that are housed on different XenApp servers, whether in the same farm or multiple farms. Where possible, Citrix administrators should consider application isolation or streaming in order to house applications on the same XenApp server to allow users to access all applications from a single server and thus a single session. However, this may not be possible if a business unit controls specific servers or applications cannot be streamed.
Once it has been determined that it is indeed necessary for users to access applications from various XenApp servers, the impact on profiles should be ascertained.
This diagram illustrates the example below, where application settings may be lost when multiple sessions exist.
For example, Mary has the need to access AppA, AppB, and AppC and she is routed to Server 1, Server 8, and Server 12 respectively. Upon logon to each application, her Terminal Services roaming profile is loaded onto each server and folders are redirected for each session. When she is logged onto AppA on Server1, Mary changes Setting1 and logs off that session. She then completes her work in the other two applications and logs off.
Upon logoff, the change that Mary made within her session on Server 1 is overwritten because the settings within the last closed session are retained, not the interim change. When Mary logs onto AppA the next day, she is frustrated because the change she made is not visible.
Profile management can generally prevent this situation from occurring. Profile management only writes back the specific settings that were changed during a session; all other unchanged settings remain untouched.
Thus, the only potential conflict that would arise is if Mary changed Setting1 within another session. However, the user would likely expect that the most recent change was retained, and this is indeed the case if Profile management is used in this scenario.
Last Writer Wins and Roaming Profile Consistency Issues
Similar to the first scenario described above, last write wins issues can present themselves in a variety of ways, and user frustration can mount as the number of devices accessed increases.
Because the roaming profile retains all profile data, with the exception of folders that have been redirected, the user profile can grow quite large. Not only does this cause additional time for the user log on because the profile must be downloaded, the potential for consistency grows during the write phase of the user log off, especially where network issues exist.
Profile management enables specific data to be excluded from the user profile, enabling the user profile to be kept to a minimal size. Because only differences are written to the profile, the write phase of the logoff involves less data and is faster. Profile management can be beneficial for applications that use the profile for temporary data but do not ensure profile clean up upon application termination.
3.8. Known Issues in Profile Management 3.0
Updated: 2010-07-05
The following known issues exist in this version.
Installation Issues
If you change the default location of Profile management cache files, they are not deleted when you uninstall the component. [#226881]
On Windows Vista or Windows Server 2008, the log file directory is not deleted when Profile management is uninstalled. This issue does not occur when the component is removed in unattended mode. [#169/-]
If the path to the log file has been set to a non-default location in Group Policy or the .ini file, the file is not deleted when Profile management is removed. To workaround this issue, delete the log file manually. [#219376]
When installing Profile management with Group Policy, some properties of the Profile management MSI file are incorrectly displayed and the incorrect language version may be installed. The default language is shown as
. In addition, no publisher information is displayed. As a workaround, edit the MSI. German (Germany)For example, open the MSI in Orca, click > , and in remove all language View Summary Info LanguagesIDs that are numerically lower than the language of the MSI you want to install. (German has the lowest ID.) Then proceed with your installation. [#229733]
Other Known Issues
A gpupdate has no effect on the synchronization of new folders located on volumes that have not been synchronized before. To work around this issue, ensure all users are logged off, restart the Citrix Profile Management service, and allow users to log back on. [#203859]
In Windows Performance Monitor, the log off counter is displayed as a number not as text. To work around this issue, read the four-digit number as Logoff Counter. [#201474]
Junction points and symbolic links appear not to be synchronized. If a user logs off, an error message such as the following may appear in the log file:
2009-01-12;12:01:45.231;ERROR;UPM;user5349;21;7468;FindFirstFileAPIWrapper: FindFirstFile for path <C:\Users\user5349\My Documents\*.*> returned: Access is denied.
2009-01-12;12:01:45.278;INFORMATION;UPM;user5349;21;7468;IsFSPathExcluded: Excluding directory <C:\Users\user5349\NetHood> because it is a junction or symbolic link.
This is due to the fact that a junction point is accessed by another process. As junction points are not stored in the user store, this is only a cosmetic issue. Such error messages and can be ignored. [#204572]
Using extended synchronization in unsupported scenarios may result in data loss. This issue does not occur in the . [#216424]supported scenarios
Specific files and folders can be included and excluded from profiles. Inclusion and exclusion take place only at logoff, but log file entries make it appear they occur at logon. [#218834]
In Group Policy, you can change the location of the cache file used to monitor the Master File Table (MFT). The change is processed when policies are refreshed and take effect when the Citrix Profile Management service is next restarted. Changing the path when the Citrix Profile Management service is running has no effect, but the presence of log file entries may incorrectly give the impression that it does. [#218853]
If you set Profile management to synchronize Internet Explorer temporary cache files, some are not processed and the error is noted (as multiple error messages) in the log file. These errors can be ignored, and, because the files are temporary, the effect on the user is negligible. This issue is observed only with Internet Explorer and only in its cache folder (AppData\Local\Microsoft\Windows\Temporary Internet Files). To workaround this issue, exclude this directory from synchronization. [#218212]
When a user's domain password is about to expire on Windows XP Service Pack 3, they are prompted to change it. When they do, the system loads a local copy of the user profile (or the default user profile) instead of the Citrix user profile, the session may become disconnected, and the Citrix user profile data is not saved. To resolve the issue, apply Microsoft hotfix KB958058 to the XP SP3 base virtual disk image on the Citrix Provisioning Server with the disk in private image mode. This issue is limited to Windows XP Service Pack 3. For more information, see the Citrix blog article on this topic at http://community.citrix.com/x/aICcBg. [#218418]
Redirected folders, but not their contents, are created locally the second time a user logs on after enabling Profile management. Although redirected folders are synchronized locally, no redirected files are, so neither logon times nor the user experience is impaired. This issue does not occur until a second logon takes place. A workaround for this issue is available at http://blogs.technet.com/deploymentguys/archive/2008/05/01/dealing-with-duplicate-user-profile-links-in-windows-vista.aspx. [#229737]
In deployments involving XenDesktop 3.0 with virtual desktops shared between multiple users, some user profile changes are not saved at logoff (for example, changes to NTUSER.DAT or index.dat). This issue does not occur in deployments involving other versions of XenDesktop or with virtual desktops that are not shared. [#220044]
If you delete a local profile on Windows Vista or Windows 7, ensure you follow Microsoft best practice to delete the entire profile including the user-specific registry entries. For more information, see http:
. Do not delete profiles manually, which can result in errors when //support.microsoft.com/kb/947215/en-ususers log on. The errors include failures to connect to Windows services. [#227506]
If streamed user profiles are enabled and the Citrix Profile Management service is stopped while files are being fetched from the user store, errors are written to the Windows event log and users are unable to access the files that have not been fetched. (Access is prevented for security reasons.) The workaround for this issue is to restart the service and then allow users to log off and log on again. [#227370]
4. Most Read Topics for Profile Management
Updated: 2010-07-21
These Profile management topics are the most commonly read ones. They contain answers to frequently asked questions and solutions to issues that you may encounter when installing or configuring this component:
Profile management eDocs home page
System Requirements
Antivirus issues
ADM and INI file reference
Upgrading and migrating
Extended synchronization
/ Logon operations Logoff operations
Security
5. Planning Your Profile Management Deployment
Updated: 2010-03-04
Consider how the following apply to your environment before installing and enabling Profile management:
1.
2.
3.
4.
5.
. Define the computers and the users whose profiles you want to manage Computers and userswith Profile management, and plan any MSI packaging you will need to perform.
. Decide how to migrate existing Windows local and roaming profiles to Citrix user profiles.Migration
. Identify a network location to store Citrix user profiles.User store
In XenDesktop deployments, you can install Profile management on virtual desktops (on the desktop image if you use virtual desktop provisioning) and on user devices. Profile management is particularly suited to pooled desktops since it saves profile data that would otherwise be discarded at logoff.
In XenApp deployments, you can install the software on XenApp servers and on user devices.
Having considered these topics, check the behavior of Profile management in a test environment before rolling it out in a production environment. A typical deployment consists of:
Creating the user store
Installing Profile management
Adding an administrative template (ADM) file to Group Policy
Configuring settings based on your deployment's needs
Enabling Profile management
With regard to the order of the last two steps, remember to plan exclusion lists before you enable Profile management; understand the files your users’ applications will create in their profiles and exclude any unwanted files and folders before you enable Profile management. If you exclude unwanted items afterwards, they will only be excluded at logoff not logon and will not fix any already bloated profile folders in the user store. Note that, if that situation arises, you can rectify it using Profile Nurse (available from the
) to prune the user store of the unwanted items.Sepago Web site
Important: If you intend to use one of the .ini files (for example, UPMPolicyDefaults_V1Profile_en.ini) for evaluation purposes, rename the file (for example, to UPMPolicyDefaults_V1Profile_en.old) before you switch to using Group Policy in a production environment. Renaming the file allows you to be certain that only production settings are applied, and that no settings you specified during your evaluation are used.
If the file is not renamed, Profile management examines it for any settings not configured in Group Policy (and adopts any non-default settings it finds). So, to eliminate the risk of unwanted settings being introduced, configure all settings you want to use in your production environment using Group Policy, not the .ini file.
For more information on .ini file deployments, see and Considerations When Upgrading .Ini Files Testing .Profile Management with Local GPO
As well as these general points, some details of your environment affect the way you deploy Profile management. Consider as part of your planning.those details
5.1. System Requirements for Profile Management
Updated: 2010-07-14
Systems running Profile management must be based on one of the following operating systems as a minimum: Desktops. Microsoft Windows XP Service Pack 3, Windows Vista Service Pack 1, or Windows 7
Servers. Standard, Enterprise, and Datacenter Editions of: Windows Server 2003 Service Pack 2 and Windows Server 2008 (including Windows Server 2008 R2)
Every user should have access to the user store, a network folder where profiles are stored centrally. Alternatively, profiles can be stored in users' home drive if preferred. .Read more about the user store
Active Directory (AD) Group Policy Objects (GPOs) are used for configuration. AD forest functional and domain functional levels of Windows Server 2003 native mode and above are supported. For more information, see . Alternatively, local .ini files may be used Domain and Forest Support in Profile Managementfor configuration settings, but in general the .ini files should be used for testing purposes only. Note that settings in the .ini files are applied for any setting not configured in the GPO, that is any Group Policy setting that is left in the Not Configured state.

If you are planning to use AD to deploy the installer, upgrade any domain controllers running the 64-bit edition of Windows Server 2003 Service Pack 1 to Service Pack 2 if you use them to store the Profile management ADM file. You do not have to upgrade the 32-bit edition.
If short file names (also known as 8.3 file names) are mandated in a Citrix product or component you are using with Profile management, do not turn off support for short file names in your Profile management deployment. Doing so may cause issues when files are copied to and from the user store.
Make sure the change journal is set up on computers running the Profile management service.
Before Installing on Windows XP and Windows Server 2003
Important: In addition to meeting the other system requirements in this topic, ensure the update described in Microsoft Security Bulletin MS09-012 is installed on all computers that will run Profile management. The update is included in recent operating systems; but it may have to be applied manually to others. The update is critical for Windows XP and Windows Server 2003 but should also be applied to any other supported operating system. For information about the update, see http://www.
.microsoft.com/technet/security/bulletin/MS09-012.mspx
If you do not apply the update, Profile management installation ends prematurely and no components are installed.
Diagnostic Enhancements Feature
Before you can use Citrix Diagnostic Facility to capture trace logs, the following software must be available on the computers you want to monitor:
On user devices and virtual desktops, install the Citrix offline plug-in
On servers, install Citrix XenApp
Application Streaming
If you publish applications in Citrix XenApp to stream user devices, install the Citrix offline plug-in (formerly called XenApp Plug-in for Streamed Apps) 1.3.1 or later on user devices. Version 1.2 of this plug-in changed the location of per-user disk storage for streamed application settings. With Version 1.3.1 or later, these settings are stored in %LOCALAPPDATA%, and follow the user from device to device without requiring any configuration of Profile management.
5.2. Domain and Forest Support in Profile Management
Updated: 2010-03-17
Domain and forest functional levels of Windows Server 2003 or later are supported by Profile management. This includes a Windows Server 2008 domain controller running in mixed mode at a domain or forest functional level of Windows Server 2003. Older operating systems are unsupported.
The use of system environment variables can help to disambiguate usernames in multiple domains. For information on this, see .Administering Profiles Within and Across OUs
5.3. Deployment Considerations for Profile Management
Updated: 2010-03-19
Before deploying Profile management, consider the unique qualities of your environment. Answering these questions helps to guide your planning and ensures that your users get the best experience while you maintain a manageable user profile solution.
Note: Sample answers may not be applicable to every environment.
Question Sample Answer
Is there a need to implement Profile management based on distinct operating systems?
Yes, because your XenDesktop deployment is based on Windows 7 but your XenApp deployment is based on XenApp 5 for Windows Server 2003.

Which of my Organizational Units store Profile management functionality?
The OUs that store your XenDesktop virtual desktops and XenApp servers share the Profile management GPO, and your Citrix administrator needs rights to configure GPOs within these OUs.
Where are Citrix user profiles stored?
Citrix user profiles are stored by default in the same location as your users' home directories. Your administrator can use an arbitrary UNC path instead.
Can I migrate my existing Windows profiles?
Yes, but you must decide how local and roaming profiles, and any conflicts between local profiles, are handled. See .Planning for Migration and Conflicts
Are there any files and settings that I can exclude from my Citrix user profiles?
Yes, you can configure Profile management to exclude registry keys and file system objects from the Citrix user profile. However, because the exclusion applies to users' logoffs, you cannot delete these files and settings from the profile by activating exclusion lists. There are other tools, such as Profile Nurse (available from the
, that can delete unwanted data from your users’ profiles.Sepago Web site)
Should I use the .ini file for local configuration?
It depends. Where feasible, configuring Profile management through a GPO is preferred. However for each setting which is not configured in the GPO, you can configure the corresponding setting in the .ini file for the local machine.
Are you planning to use Microsoft folder redirection?
If so, redirect the Documents and Application Data folders to users' home directories. You can also redirect other folders. Citrix recommends performing pilot tests before using folder redirection with Profile management. For more information on folder redirection, see .Setting Folder Redirection with Profile Management
5.4. Operating System Considerations for Profile Management
Updated: 2010-03-19
Based on the difference in the profile structure between Windows XP and Windows Vista/Windows 7, Citrix recommends creating a separate profile for Windows XP based systems and an additional separate profile for Windows Vista/Windows 7 based systems. The user profile namespace used in Windows XP is almost identical to the namespace used in Windows 2003, making interoperability between the operating systems transparent. However, there are some changes in the Windows Vista/Windows 7 profile namespace that create a challenge.
Citrix recommends using Microsoft folder redirection with roaming profiles to help ensure profile interoperability, but within an environment where Windows Vista/Windows 7 and Windows XP must co-exist, it is even more important.
5.5. About the User Store
Updated: 2010-05-12
The user store is the central location for Citrix user profiles. This defaults to the WINDOWS folder in the user’s home directory but you typically configure the user store to be a network share.
Recommendations on creating secure user stores are available in the article called Security Recommendations on the Microsoft TechNet Web site. These are for Roaming User Profiles Shared Folders
minimum recommendations that ensure a high level of security for basic operation. Additionally, when configuring access to the user store include the Administrators group, which is required in order to modify or remove a Citrix user profile.

Naming Conventions
To distinguish between Version 1 and Version 2 profile folder types, the following suffix is appended to folders in the user store.
Folder SuffixNotes
_upm_var The localized folder name with the _upm_var suffix is used when profiles are imported into the user store at logoff. When profiles are exported at logon, the suffix is removed.
Paths anywhere in the local file system (even outside the user profile) are supported.
Absolute paths outside the user profile are stored by replacing the drive letter with UPM_Drive_<Drive letter>. UPM_Drive_A to UPM_Drive_Z are supported. Example: UPM_Drive_D.
Folder Structure
The folder structure of the user store at the root level is shown in this table.
Folder Notes
\ The root of the current profile in the user store.
\UPM_Profile This contains files and folders from the user profile.
\UPM_Drive_C If the extended synchronization feature is set up, this contains files and folders from elsewhere in the file system, in this case from drive C.
\Pending If the streamed user profile feature is set up, this contains the streamed files. See Pending Areafor more information.
Some examples are shown in this table.
Example Folder Name Notes
\UPM_Drive_C\MyProgData The synchronized content of C:\MyProgData.
\UPM_Profile\Data The synchronized content of the Data folder in the user profile.
\UPM_Profile\AppData_upm_var The synchronized content of the de-localized Application Data folder in the user profile.
An overview of how Profile management localizes and de-localizes folders is shown in this table. Only folder names are localized and de-localized. For example, Start menu entries and registry settings are not translated into the correct language by Profile management.
V1 English Folder User Store Folder Full Path Relative to the User Profile
Accessibility Accessibility_upm_var \Start Menu\Programs\Accessories\
Accessories Accessories_upm_var \Start Menu\Programs\
Administrative Tools AdminTools_upm_var \Start Menu\Programs\
Application Data AppData_upm_var \Local Settings\

Cookies Cookies_upm_var \
Desktop Desktop_upm_var \
Entertainment Entertainment_upm_var \Start Menu\Programs\Accessories\
Favorites Favorites_upm_var \
History History_upm_var \Local Settings\
Links Links_upm_var \Favorites\
Local Settings LocalSettings_upm_var \
My Documents MyDocuments_upm_var \
My Music MyMusic_upm_var \My Documents\
My Pictures MyPictures_upm_var \My Documents\
My Videos MyVideos_upm_var \My Documents\
NetHood NetHood_upm_var \
PrintHood PrintHood_upm_var \
Programs Programs_upm_var \Start Menu\
Recent Recent_upm_vars \
Start Menu StartMenu_upm_var \
Templates Templates_upm_var \
Temporary Internet Files TemporaryInternetFiles_upm_var \Local Settings\
SendTo SendTo_upm_var \
Startup Startup_upm_var \Start Menu\Programs\
System Tools SystemTools_upm_var \Start Menu\Programs\Accessories\
The User Store and AD Forests
Users in different domains can share the same user store in an Active Directory forest, allowing multiple users with the same logon name to access the same resources in the forest. However, in this case you must

use variables to disambiguate identical logon names when setting the path to the user store. To do this, append the domain name variable to the path. You must also set permissions on the user store and enable Profile management's Processed Groups setting using Active Directory's Universal Groups.
Examples of User Store Paths in AD Forests
\\servername\userstore\%username%.%userdomain%\Vista
\\servername\userstore\%username%.%userdomain%\2008
Use a manually defined system variable such to set the operating system version:%ProfVer%
\\servername\userstore\%username%.%userdomain%\%ProfVer%
Pending Area
The user store includes the . This is a holding area used by the streamed user profiles and pending areaactive profile write back features. All files are synchronized from the pending area to the user store after a user logs off from their last session. New sessions download files from both the user store and the pending area, so the user always experiences an up-to-date profile.
In the event that a server becomes unresponsive, a timeout can be set that releases files in the pending area back to the user store (if configured as part of the streamed user profiles feature).
5.6. Creating the User Store
Updated: 2010-01-18
Any Server Message Block (SMB) or Common Internet File System (CIFS) file share can be used for the user store, but best practice is to ensure that the share:
Can be accessed by the accounts used with Citrix user profiles
Is large enough to store profile data
Is robust in case of disk or network failure
Recommendations on creating secure user stores are available in the article called Security Recommendations on the Microsoft TechNet Web site. These are for Roaming User Profiles Shared Folders
minimum recommendations that ensure a high level of security for basic operation. Additionally, when configuring access to the user store include the Administrators group, which is required in order to modify or remove a Citrix user profile.
Note: If an application modifies the access control list (ACL) of a file in the user's profile, Profile management does not replicate those changes in the user store. This is consistent with the behavior of Windows roaming profiles.
5.7. Planning for Migration and Conflicts
Updated: 2010-03-19
This diagram guides you through the decisions you make when migrating your existing Windows user profiles to Citrix user profiles. The two settings in the Group Policy Editor that allow you to implement your decisions are
and .Migration of existing profiles Local profile conflict handling
First, using decide which existing Windows user profiles you want to migrate. Migration of existing profilesIf you select , migration is disabled. In this situation, if no Citrix user profile exists in the user store, Noneyour deployment's existing mechanism for creating new Windows user profiles is invoked. This is equivalent to a deployment without Profile management.
Then, using decide which existing profile data is used to create each Citrix Local profile conflict handlinguser profile. If a conflict arises between a profile stored locally and a Citrix user profile in the user store, by default the local profile is used. Once Profile management is enabled, Citrix recommend renaming the local profile (selecting ) rather than deleting it until you are sure the data in the Rename local profilelocal profile is no longer required by the user. After selecting , all of the data in the profile Delete local profileis deleted.

5.7.1. Migrating Existing Profiles to Citrix User Profiles
Updated: 2010-03-19
Migration from the following profile types to Citrix user profiles is supported:
Windows roaming profiles
Local profiles based on any of the following operating systems: Windows XP
Windows Vista
Windows 7
Windows Server 2003
Windows Server 2008
Windows Server 2008 R2
Citrix user profiles created with User Profile Manager 2.0
Migration from the following profile types to Profile management 3.0 is unsupported:
Mandatory profiles.
Tip: If you want to use mandatory profiles as the basis for your Citrix user profiles, first rename them and then configure them in Profile management as template profiles. There is no direct way of converting a mandatory profile to a Citrix user profile.
Citrix user profiles created with a User Profile Manager Technical Preview release or beta release
Third-party profiles (including sepagoPROFILEs)
You cannot upgrade from a 32-bit Citrix user profile to a 64-bit one.
5.8. Sharing Citrix User Profiles on Multiple File Servers

Updated: 2010-03-04
The user store can be located across multiple files servers, which has benefits in large deployments where the number of profiles must be shared across the network. Profile management defines the user store with a single setting, , so you define multiple file servers by adding attributes to this setting. Path to user storeYou can use any LDAP attributes that are defined in the user schema in Active Directory. For information on this, see .http://msdn.microsoft.com/en-us/library/ms675090(VS.85).aspx
For example, take the #l# attribute (lower case L, for location). Suppose your users are in schools located in different cities and #l# is configured to represent this. You have locations in London, Paris, and Madrid. You configure the path to the user store as:
\\#l#.userstore.myschools.net\profile\#sAMAccountName#\%ProfileVer%\
For Paris, this is expanded to:
\\Paris.userstore.myschools.net\profile\JohnSmith\v1\
You then divide up your cities across the available servers, for example setting up Paris.userstore.myschools.net in your DNS to point to Server1.
Before using any attribute in this way, check all of its values. They must only contain characters that can be used as part of a server name. For example, values for #l# might contain spaces or be too long.
If you can't use the #l# attribute, examine your AD user schema for other attributes such as #company# or #department# that achieve a similar partitioning.
You can also create custom attributes. Use Active Directory Explorer, which is a sysinternals tool, to find which attributes have been defined for any particular domain. Active Directory Explorer is available at
.http://technet.microsoft.com/en-us/sysinternals/bb963907.aspx
Note: Do not use user environment variables such as %homeshare% to distinguish profiles or servers. Profile management recognizes system environment variables but not user environment variables. You can, however, use the related Active Directory property, #homeDirectory#. So, if you want to store profiles on the same share as the users' HOME directories, set the path to the user store as #homeDirectory#\profiles .
For more information on using variables when specifying the path to the user store, see To specify the path to and .the user store Administering Profiles Within and Across OUs
5.9. Using Profile Management with Microsoft DFS
Updated: 2010-03-04
Deployments involving Profile management can make use of Distributed File System (DFS) from Microsoft. This allows administrators to disperse multiple file shares across a WAN (or across wider geographies) while building in redundancy and keeping the network architecture transparent to users. DFS includes two technologies, DFS Replication and DFS Namespaces. For more information on DFS, see http://www.
.microsoft.com/windowsserver2003/technologies/storage/dfs/default.mspx
DFS Replication
This allows you to set up multiple file servers either for load-balancing (using an active/active cluster configuration) or disaster recovery (active/passive configuration). Profile management supports active/passive configurations, but there are some issues with active/active configurations (for example, file locking) that make them unsuitable for Citrix user profiles and Windows roaming profiles.
DFS Namespaces
This allows you to set up multiple servers to host a virtual tree of folders, where different subfolder trees are assigned to specific servers. This is fully supported by Profile management and can be used to support a global, virtual user store mapped to regional servers.
5.10. Using Profile Management with non-Microsoft File Servers
Updated: 2010-02-19
To take advantage of all its features, administer Profile management with Active Directory. Other
1.
2.
3.
4.
directory services and management protocols, including Novell NetWare, Microsoft Windows NT 4.0, and Samba, cannot be used on the domain controller. Supported AD modes are listed in Domain and Forest Support in Profile Management.
For the user store, any Server Message Block (SMB) or Common Internet File System (CIFS) file share can be used. Alternatively, in the case of the user store only, the above listed non-Microsoft file service protocols can be used.
Note: Citrix user profiles cannot be managed across forests. They can be managed across domains in the same forest. This involves uniquely identifying profiles with the %USERDOMAIN% and %USERNAME% variables in the path to the user store. For an example, see .Administering Profiles Within and Across OUs
5.11. Sharing Profiles between Operating Systems of Different Bitness
Updated: 2010-03-19
Citrix does not recommend sharing profiles on operating systems of different bitness (for example, the 64-bit and 32-bit editions of Windows). One reason is that 32-bit systems may contain profile registry keys that instruct the operating system to start applications in locations specific to 32-bit operating systems. If the keys are used by a Citrix user profile on a 64-bit system, the location might not exist on that system and the application will fail to start.
To avoid issues such as this, manage your 32-bit and 64-bit profiles separately. For example, keep them in separate OUs or use a system environment variable when setting the path to the user store.
6. Troubleshooting Profile Management
Updated: 2009-08-18
The checklists in this section are designed to help you identify and solve issues. To troubleshoot an issue, work your way through the steps in the checklists. In many cases, the source of an issue is not Profile management but another component or a misconfiguration of the environment.
6.1. Basic Troubleshooting
Updated: 2010-03-19
As a first step in troubleshooting any issue that you or your users experience, follow these steps:
Check the configuration .ini file on the affected user device.
Check the settings in Group Policy (GP).
To deactivate any Profile management policy that you enter as lists (for example, exclusion lists and inclusion lists), set the policy to Disabled. Do not set the policy to Not Configured.
Check the HKLM\Software\Policies registry entry on the affected device to see if there are any stale policies due to GP tattooing issues, and delete them.
Check the file UPMSettings.ini, which contains all of the Profile management settings that have been applied for each user. This file is located in the root folder of each Citrix user profile in the user store.
6.2. Specific Troubleshooting Information
Updated: 2010-07-19
Installation on Windows XP or Windows Server 2003 Fails
Profile management installation ends prematurely and no components are installed on the target computers.
This situation may occur if the required Microsoft MSI update is not present on the computers. It is especially likely to occur on new Windows XP and Windows Server 2003 systems where no Windows patches have been applied, and on existing systems running these operating systems where automatic updates are disabled.
To correct this issue, apply the Microsoft update described in Microsoft Security Bulletin MS09-012, and then install Profile management. For information about the update, see http://www.
.microsoft.com/technet/security/bulletin/MS09-012.mspx

1.
2.
1.
2.
3.
4.
Checking That Profiles Are Being Streamed
If you have enabled streamed user profiles and want to verify that this feature is being applied to a user's profile:
Check the following type of entry in the Profile management log file:
2010-03-16;16:16:35.369;INFORMATION;;;;1140;ReadPolicy: Configuration value read from policy: PSEnabled=<1>
The last item should be set to if the feature is enabled.PSEnabled=<1>
Check the following entry for the user in the Profile management log file:
2010-03-16;20:17:30.401;INFORMATION;<domain name>;<user name>;2;2364;ProcessLogon: User logging on with Streamed Profile support enabled.
If streamed user profiles are not being applied, the item reads ProcessLogon: User logging on with Streamed Profile support disabled.
Determining Which Policies Are In Force
Use UPMSettings.ini (located in the root folder of each Citrix user profile in the user store) to determine the Profile management policies that are being applied. Examining this file may be more convenient than using the Resultant Set of Policy (RSoP) especially if you use a mixture of GPOs and .ini file settings to determine policies.
Excluding Corrupt Profile Data
If a user profile is corrupt and you are confident the problem lies with a particular file or folder, exclude it from the synchronization process by adding it to the exclusion list.
Cleaning Connections to Registry Entries
In some scenarios (not just those involving Profile management), connections to registry profile data are preserved after users log off. This may result in slow logoffs or incomplete termination of user sessions. The User Profile Hive Cleanup (UPHClean) tool from Microsoft can help resolve these scenarios. For more information on this tool, see http://www.microsoft.com/downloadS/details.aspx?FamilyID=1b286e6d-
.8912-4e18-b570-42470e2f3582&displaylang=en
Deleting Local Profiles
If you delete a local profile on Windows Vista or Windows 7, ensure you follow Microsoft best practice to delete the entire profile including the user-specific registry entries. Do not delete profiles manually, which can result in errors when users log on. For more information, see .http://support.microsoft.com/kb/947215/en-us
Deleting Locked, Cached Profiles
If you use VMWare software to create virtual desktops, but users' cached profiles are locked and cannot be deleted, see for troubleshooting information.Profile Management and VMWare
Identifying Where Profiles Are Stored
Diagnosing profile issues can involve locating where the files in a user's profiles are stored. This procedure provides a quick way to check this.
In Event Viewer, click in the left pane.Application
Under in the right pane, locate the Citrix Profile Management event of interest and double-click it.Source
The path to the user store associated with the event is displayed as a link on the tab.General
Follow the link to browse the user store if you want to explore the files.
Checking Servers
To determine whether a server is processing a user's logons and logoffs correctly, check the file called PmCompatibility.ini in the user's profile in the user store. The file is located in the profile's root folder. The last entry in the file is the name of the server from which the user last logged off. For example, if the server runs Profile management 3.0, the entry would be:
[LastUpdateServerName]

1.
2.
3.
4.
5.
6.
7.
1.
2.
[LastUpdateServerName]
3.0=<computer name>
Rolling Back to Version 2.1
You can roll back to a Version 2.1 deployment if Version 3.0 has been deployed too early. See Managing for the reasons this might happen.Multiple Versions of Profile Management
Run the following PowerShell command on the file server that hosts the user store. This deletes the file PmCompatibility.ini in each profile in the user store:
Get-ChildItem LocalPathToUserStore -include pmcompatibility.ini -recurse | foreach ($_) {remove-item $_.fullname}
After the command has completed, users can log on to computers running Version 2.1 and receive their profile from the user store.
6.3. Examining the Profile Management Log File
Updated: 2009-08-27
After performing the basic troubleshooting steps, check the Profile management log file as follows. Log file entries are a good starting point when troubleshooting.
Make sure that logging is activated.
Check the log file for errors. You can locate these by searching for the word ERROR.
Check the log file for warnings. You can locate these by searching for the word WARNING.
Run the command on the computer on which the error occurs, and check the log gpupdate /force
file again. Review which settings are active and from where the configuration has been read (either Group Policy or an .ini file).
Check the path to the user store is correct.
Check all information from Active Directory was read correctly.
Check the time stamps. Is there an action that took too long?
If the log file does not help you identify the issue, check these .other steps
6.3.1. Advanced Troubleshooting of Log Files
Updated: 2010-03-19
If no logging at all is taking place, try the troubleshooting approach used in the following example. It is designed to help you work out which configuration settings are being read, establish where they are being read from (when multiple ADM files are present), and check that the log file correctly tracks changes made to profiles. The strategy creates a small test OU to which a test user logs on, allowing you to create profile modifications that you then track in the log file and Resultant Set of Policies (RSoP) report.
The deployment in this example has XenApp servers running on Windows Server 2003 with users connecting to their published resources using the Plug-in for Hosted Apps for Windows. The deployment uses OU-based GPOs. INI file-based configuration is not used.
Caution: Editing the Registry incorrectly can cause serious problems that may require you to reinstall your operating system. Citrix cannot guarantee that problems resulting from the incorrect use of Registry Editor can be solved. Use Registry Editor at your own risk. Be sure to back up the registry before you edit it.
Remove from the production environment one of the XenApp servers that hosts the Citrix user profiles, and add it to a new OU containing just this server.
Remove and reinstall Profile management on the server. When reinstalling, check that short file names (also known as 8.3 file names) are deactivated as follows:
If the following registry entry is set to 1 (DWORD value), set it to 0 and reinstall Profile management: HKLM\System\CurrentControlSet\Control\FileSystem\NtfsDisable8Dot3NameCreation
If the entry is not set to 1, reinstall Profile management to a location where each subfolder name is eight characters or less, for example c:\prof-man

3.
4.
5.
6.
7.
8.
9.
10.
1.
2.
3.
4.
5.
6.
7.
11.
12.
13.
14.
15.
16.
17.
18.
19.
20.
21.
22.
Log on as a domain administrator to the server.
Examine the local policy and remove the ADM file at this level.
Delete any links to GPOs assigned to your new OU.
On the server, delete the key and all subkeys from Registry Editor: HKLM\Software\Policies\Citrix\UserProfileManager\
Remove all Profile management .ini files.
Using , delete all profiles except those you want to > > My Computer Properties Advancedtest. Research any errors that appear.
Give the Authenticated Users group full control of the log file, c:\Windows\System32\LogFiles\UserProfileManager.log. This allows you to check the file when logging in as a user without logging off.
Create a new GPO that contains only the following settings, and link it to your new OU. Ensure the GPO is assigned to the Authenticated Users group. Enable these settings:
.Enable Profile management
.Path to user store
.Enable logging
. Scroll to select all settings in this section of the ADM file.Log settings
. Select .Migration of existing profiles Roaming and local profiles
. Select .Local profile conflict handling Rename local profile
.Delete locally cached profiles on logoff
Disable the setting . This helps when troubleshooting because, Process logons of local administratorsif Profile management accidentally prevents end-user logons, you will still be able to log on as an administrator.
Control how the GPO link is applied to the OU by right-clicking the OU and selecting .Block Inheritance
Create a new domain test user who has never logged on and who is not a member of any group that is a local administrator on the server.
Publish a full desktop to this user and make sure the user is in the Remote Desktop Users group.
If the domain has multiple domain controllers (DCs), force AD replication between all the DCs in the same site as the server.
Log on to the server as domain Administrator, delete the log file, restart the Citrix Profile Management service, and run gpupdate /force.
Check the registry and make sure the only values in HKLM\Software\Policies\Citrix\UserProfileManager\ are the ones for your new GPO.
Log out as Administrator.
Using the Plug-in for Hosted Apps, log on to the published full desktop as the new domain test user.
Make some setting changes to Internet Explorer, and create a blank test file in your My Docs folder.
Create a shortcut to the Profile management log file. Open it and examine the entries. Research any items that may require attention.
Log out and then back in as domain Administrator.
Generate an RSoP report for the test user and the server.
Does the report contain what you expect? Research any items that require attention.
6.4. Events Logged by Profile Management
Updated: 2010-05-25
The following events are logged by Profile management and can be used by Citrix EdgeSight or third-party monitoring and reporting tools. View the events in Windows Event Viewer. Select the node Applicationsin the left pane; the of the events in the right pane is .Source Citrix Profile management
In this table, causes and suggested actions for resolution are included for each event. Long event descriptions are truncated with elipsis (...)
Event ID Description Cause Action
6 The Citrix The Citrix Profile If the start or restart was

Profile management service has started.
management service has started. This may be the result of an automatic start, a manual start, or a restart.
not planned, check the event log for errors and take any corrective action indicated, including Profile management troubleshooting procedures.
7 The Citrix Profile management service has stopped.
The Citrix Profile management service has stopped. This may be the result of a manual stop or as part of shutdown processing.
If the service stop was not planned, check the event log for errors and take any corrective action indicated, including Profile management troubleshooting procedures.
8 The profile for user <user name> has been modified by a later version of Citrix Profile management and can no longer be used by this version...
The Citrix Profile management service on this machine has detected that a later version of Profile management has modified the user's profile in the user store. To prevent possible data loss, earlier versions of Profile management revert to using a temporary profile.
Upgrade this computer (and all other computers sharing the same user store and using earlier versions of Profile management) to use the latest version.
9 The logon hook detection encountered a problem...
The Citrix Profile management service detected a problem while setting up logon notification. The Citrix Profile management service requires either that:
The installation path contains no spaces
8.3 filename support is enabled on the volume where the service is installed
Reinstall Citrix Profile management to a path with no spaces or enable 8.3 filename support on the volume where Profile management is installed.
10 User <user name> path to the user store is...A valid Citrix user profile has been found at the location indicated.
None. This message is for information only.
11 spsMain: CreateNamedPipe failed with...(This event is no longer used.) None.
12 StartMonitoringProfile: The CJ notification event could not be opened...The Citrix Profile management service was unable to monitor the profile or a folder configured for extended synchronization. A problem was detected in the Windows change journal event management, preventing the service from monitoring changes. Citrix
Ensure that change journal processing is configured and operational for all volumes managed by Profile management. Ensure that the computer has adequate system resources. Check the event log for errors and take any corrective action indicated, including

Profile Management will not process this folder. A Windows user profile will be used instead.
Profile management troubleshooting procedures.
13 The CJ notification event could not be set to the signaled state...
The Citrix Profile management service was unable to monitor the profile or a folder configured for extended synchronization. A problem was detected in the Windows change journal event management, preventing the service from monitoring changes. Citrix Profile Management will not process this folder. A Windows user profile will be used instead.
Ensure that change journal processing is configured and operational for all volumes managed by Profile management. Ensure that the computer has adequate system resources. Check the event log for errors and take any corrective action indicated, including Profile management troubleshooting procedures.
14 CJIncreaseSizeIfNecessary: Creating/resizing the change journal failed...The Citrix Profile management service was unable to monitor the profile or a folder configured for extended synchronization. A problem was detected while attempting to create or resize the NTFS change journal on a volume, preventing the service from monitoring changes. Citrix Profile Management will not process this folder. A Windows user profile will be used instead.
Ensure that change journal processing is configured and operational for all volumes managed by Profile management. Ensure that the computer has adequate system resources. Check the event log for errors and take any corrective action indicated, including Profile management troubleshooting procedures.
15 CJInitializeForMonitoring: Unable to query the journal...The Citrix Profile management service was unable to monitor the profile or a folder configured for extended synchronization. A problem was detected while querying the NTFS change journal on a volume, preventing the service from monitoring changes. Citrix Profile Management will not process thisfolder. A Windows user profile will be used instead.
Ensure that change journal processing is configured and operational for all volumes managed by Profile management. Ensure that the computer has adequate system resources. Check the event log for errors and take any corrective action indicated, including Profile management troubleshooting procedures.
16 CJInitializeForMonitoring: Initial MFT scan finished with errors.The Citrix Profile management service was unable to monitor the profile or a folder configured for extended synchronization. A problem was detected while performing an initial scan of the NTFS change journal on a volume, preventing the service from monitoring changes. Citrix Profile Management will not process
Ensure that change journal processing is configured and operational for all volumes managed by Profile management. Ensure that the computer has adequate system resources. Check the event log for errors and take any corrective action indicated, including

this folder. A Windows user profile will be used instead.
Profile management troubleshooting procedures.
17 CJInitializeForMonitoring: Processing FS changes since service start failed.The Citrix Profile management service was unable to monitor the profile or a folder configured for extended synchronization. A problem was detected while performing an update scan of the NTFS change journal on a volume. This error does not prevent the service from monitoring changes. Citrix Profile management will process this directory as normal.
Although this error does not prevent the operation of Profile management, check for errors anyway. Ensure that change journal processing is configured and operational for all volumes managed by Profile management. Ensure that the computer has adequate system resources. Check the event log for errors and take any corrective action indicated, including Profile management troubleshooting procedures.
18 CJProcessAvailableRecords: Internal Error...A failure occurred in the Citrix Profile management service while monitoring the profile or a folder configured for extended synchronization. A problem was detected while performing an update scan of the NTFS change journal on a volume, preventing the service from monitoring recent changes. Citrix Profile management will not complete processing on this folder. Back up critical data manually.
Ensure that change journal processing is configured and operational for all volumes managed by Profile management. Ensure that the computer has adequate system resources. Check the event log for errors and take any corrective action indicated, including Profile management troubleshooting procedures.
19 USNChangeMonitor: Initialization of change journal failed...A failure occurred in the Citrix Profile management service while monitoring the profile or a folder configured for extended synchronization. A problem was detected while preparing the initial scan of the NTFS change journal on a volume, preventing the service from monitoring changes. Citrix Profile management will not complete processing on this directory. Back up critical data manually.
Ensure that change journal processing is configured and operational for all volumes managed by Profile management. Ensure that the computer has adequate system resources. Check the event log for errors and take any corrective action indicated, including Profile management troubleshooting procedures.
20 CADUser::Init: Determining the DNS domain and ADsPath failed...
A problem occurred while querying Active Directory for information about the logged-on user. Citrix Profile management will not process this folder. A Windows user profile will be used instead.
Ensure that the computer has a functioning network path to a domain controller. Ensure that the computer has adequate system resources. Check the event log for errors and take any corrective

1.
action indicated, including Profile management troubleshooting procedures.
21 Determining the DNS domain and ADsPath failed...
This issue can be caused by a limit on memory allocation, as described in the Microsoft TechNet article .263693
The resolution for this issue is described in the Citrix Knowledge Center article
.CTX124953
6.5. Other Troubleshooting Steps
Updated: 2009-09-04
Once you have followed the basic troubleshooting steps to try and correct the issue, and eliminated the Profile management log file as a source of useful information, use this checklist to troubleshoot further.
Check the Resultant Set of Policies (RSoP) from the computer you are analyzing. Are all GPOs applied the way you expect them to be applied?
Check that you have the latest version of Profile management installed. Examine the version information of UserProfileManager.exe by right-clicking the file in Windows Explorer and clicking . > Properties Version
If you are not using the latest version, upgrade.
Check the support forum at . Someone http://support.citrix.com/forums/forum.jspa?forumID=185else may already have encountered the problem and solved it.
Enable user environment debug logging (available on Windows XP and Windows Server 2003). Instructions on this are provided at . The user http://support.microsoft.com/kb/221833/environment debug log contains a lot of information about the logon process.
Analyze the output file. Help with analysis is available at http://technet.microsoft..com/en-us/library/cc786775.aspx
Try to reproduce the issue you are observing on a clean computer with the same operating system as the affected computer. Ensure the clean computer only has the operating system and Profile management installed.
Install the software products that are present on the affected computer one by one and see if the issue is reproduced after each installation.
6.5.1. To create a diagnostic trace log
Updated: 2010-03-24
This topic contains instructions for using the diagnostic enhancements feature, which allows you to create and package trace logs for Citrix Technical Support. These capture events about servers (but not user devices or virtual desktops) relating to many aspects of Profile management's performance particularly the operation of streamed user profiles.
For information on creating trace logs about user devices or virtual desktops, see http://support..citrix.com/article/CTX124455
Only package and send a trace log if you are asked to do so by Technical Support.
Before you can use Citrix Diagnostic Facility to capture trace logs, the following software must be available on the computers you want to monitor:
On user devices and virtual desktops, install the Citrix offline plug-in
On servers, install Citrix XenApp
The Access Management Console and Delivery Services Console contain a powerful tool, Citrix Diagnostic Facility, which gathers and packages trace logs. These can be valuable when Citrix Support diagnose problems in your deployment.

1.
2.
3.
1.
In the Access Management Console or Delivery Services Console, start generating a trace log using the procedure in .CTX104578
When selecting which modules to trace, choose one or all of the following Profile management modules: . This records each time the Profile management service was used.UPM_Service
. This allows you to trace Windows Performance Monitor counters UPM_DLL_Perfmonassociated with and errors generated by Profile management.
. This records each time the Citrix streamed user profiles driver is used.UPM_Driver
Complete the remaining steps in article CTX104578.
6.5.2. To produce a session dump file
Updated: 2009-08-18
You can save Profile mangement's internal data state to a dump file. This is helpful when you can isolate an issue to a specific point in a session but there is no associated entry in the log file.
Create a file called $$upm_log$$.txt in the root of the drive on which the affected user profile is Profile management dumps its internal data state to the located (typically C:).
file UserProfileManagerInternalData.log in the log file folder and deletes the file $$upm_log$$.txt.
6.6. Contacting Citrix Technical Support
Updated: 2010-03-05
If you have checked the log file and the other troubleshooting advice in this section, and believe the problem you experience is due to Profile management, contact Technical Support. Always include the following files and information. The more information you can provide, the better:
All Profile management log files (in %SystemRoot%\System32\Logfiles\UserProfileManager). Be sure you have all log settings activated.
A log file from the affected machine should contain at least the following information:
Start of the service (including the version and build number of Profile management)
Reading of the configuration by the service
One full logon process of the affected user
The activity the user performed when the issue occurred
One full logoff process for the affected user
The Resultant Set of Policies (RSoP) for the machine and affected user. You can generate this using the Group Policy Management Console (GPMC).
Details of the operating system, language, and version installed on the affected system.
PmCompatibility.ini and UPMSettings.ini. These files are located in the root folder of each Citrix user profile in the user store.
If available, the Userenv debug file.
If available, the session dump file.
7. Securing Your Profile Management Deployment
Updated: 2010-03-04
This topic contains recommended best practice for securing Profile management. In general, secure the servers on which the user store is located to prevent unwanted access to Citrix user profile data.
Recommendations on creating secure user stores are available in the article called Security Recommendations on the Microsoft TechNet Web site. These are for Roaming User Profiles Shared Folders
minimum recommendations that ensure a high level of security for basic operation. Additionally, when configuring access to the user store include the Administrators group, which is required in order to modify or remove a Citrix user profile.
Permissions
The minimum access permissions that Citrix recommend for the user store are: Full control of the user store root folder
The following NTFS permissions:
Group or User Name Permission Apply To
Creator Owner Full Control Subfolders and files only
<The group of accounts under Profile management control>
List Folder / Read Data and Create Folders / Append Data
This folder only
Local System Full Control This folder, subfolders and files
Assuming inheritance is not disabled, these permissions allow the accounts to access the user store, create subfolders for users' profiles, and perform the necessary read and write operations.
Beyond this minimum, you can also simplify administration by creating a group of administrators with full control of subfolders and files only. This makes deleting profiles (a common troubleshooting task) easier for members of that group.
Citrix also recommends that you grant write permissions on the log folder for the users group so that Profile management can write to the log files during impersonation.
If you use a template profile, users need read access to it.
ACLs
Note: If an application modifies the access control list (ACL) of a file in the user's profile, Profile management does not replicate those changes in the user store. This is consistent with the behavior of Windows roaming profiles.
7.1. Profile Streaming and Enterprise Antivirus Products
Updated: 2010-06-01
The streamed user profiles feature of Citrix Profile management makes use of advanced NTFS features to simulate the presence of files missing from users' profiles. In that respect, the feature is very similar to a class of products known as Hierarchical Storage Managers (HSMs), which are typically used to archive infrequently used files on to slow mass-storage devices such as magnetic tape or rewritable optical storage. When such files are required, HSM drivers intercept the first file request, suspend the process making the request, fetch the file from the archive storage, and then allow the file request to continue. Given this similarity, the streamed user profiles driver, upmjit.sys, is in fact defined as an HSM driver.
In such an environment, it is very important to configure antivirus products to be aware of HSM drivers, and the streamed user profiles driver is no different. In order to defend against the most sophisticated threats, antivirus products must perform some of their functions at the device driver level and, like HSM drivers, they work by intercepting file requests, suspending the originating process, scanning the file, and resuming.
It is relatively easy to misconfigure an antivirus program to interrupt an HSM such as the streamed user profiles driver, preventing it from fetching files from the user store, and causing the logon to hang.
Fortunately, enterprise antivirus products are usually written with the possibility of sophisticated storage products, such as HSMs, in mind and can be configured to delay their scanning until the HSM has done its work. Note that home antivirus products are generally less sophisticated in this respect, so the use of home and SoHo (small office/home office) antivirus products is not supported with streamed user profiles.
To configure your antivirus product for use with streamed user profiles, look for one of the following product features. Feature names are indicative only:
. This identifies HSMs to the antivirus product, which allows the HSM to Trusted process list

1.
2.
3.
4.
5.
complete the file retrieval process. The antivirus product scans the file when it is first accessed by a non-trusted process.
. This configures the antivirus product to only scan Do not scan on open or status-check operationsa file when data is accessed (for example, when a file is executed or created). Other types of file access (for example, when a file is opened or its status checked) are ignored by the antivirus product. HSMs generally activate in response to file-open and file-status-check operations, so disabling virus scans on these operations eliminates potential conflicts.
Citrix tests streamed user profiles with versions of the leading enterprise antivirus products to ensure that they are compatible with Profile management. These versions include:
McAfee Virus Scan Enterprise 8.7
Symantec Endpoint Protection 11.0
Earlier versions of these products are not tested.
If you are using an enterprise antivirus product from other vendors, ensure that it is HSM-aware, that is, it can be configured to allow HSM operations to complete before performing scans.
Some antivirus products allow administrators to choose to only scan-on-read or scan-on-write. This choice balances performance against security. The streamed user profiles feature is unaffected by the choice.
Troubleshooting
If you encounter issues, such as logons hanging or taking a very long time, there may be a misconfiguration between Profile management and your enterprise antivirus product. Try the following procedures, in this order:
Check that you have the latest version of Profile management. Your issue may already have been found and fixed.
Add the Profile management service (UserProfileManager.exe) to the list of trusted processes for your enterprise antivirus product.
Turn off virus checking on HSM operations such as open, create, restore, or status check. Only perform virus checks on read or write operations.
Turn off other sophisticated virus checking features. For example, antivirus products may perform a quick scan of the first few blocks of a file to determine the actual file type. These checks match the file contents with the declared file type but can interfere with HSM operations.
Turn off the Windows search-indexing service, at least for the folders where profiles are stored on local drives. This service causes unnecessary HSM retrievals, and has been observed to provoke contention between streamed user profiles and enterprise antivirus products.
If none of these steps work, turn off streamed user profiles (by disabling the setting). If Profile streamingthis works, re-enable the feature and disable your enterprise antivirus product. If this also works, gather Profile management diagnostics for the non-working case and contact Citrix Technical Support. They will need to know the exact version of enterprise antivirus product.
To continue using Profile management, do not forget to re-enable the enterprise antivirus and turn off streamed user profiles. Other features of Profile management continue to function in this configuration; only the streaming of profiles is disabled.
8. Installing and Setting Up Profile Management
Updated: 2010-03-15
Install Profile management on each computer whose user profiles you want to manage.
Typically, you install the Profile management software on computers using a distribution tool, an imaging solution, streaming technology, or Citrix Merchandising Server. You can also install it directly on any computer using one of the installers in the download package.
Unattended installations are supported.
If UAC is enabled on Windows Vista, Windows 7, or Windows Server 2008, run the msiexec command
1.
2.
3.
4.
with elevated rights, for example from an elevated command prompt.
Installation alone does not enable Profile management. You must enable it separately (using the procedure ) after performing all other setup tasks.To enable Profile management
Citrix recommends that the same version of Profile management is installed on all user devices and the same version's ADM file is added to each Group Policy Object on all domain controllers. This prevents corruption of profile data, which may result when different user store structures (from different versions) exist.
8.1. Files Included in the Download
Updated: 2010-03-17
The following files are included in this release.
File Name Description
Profilemgt3.0.0_x86.msi
Installer for 32-bit systems
Profilemgt3.0.0_x64.msi
Installer for 64-bit systems
Ctxprofile3.0.0.adm ADM file used in Group Policy
welcome.html List of documentation resources
In addition to DLLs and other files, you may need to be aware of the following, which are created by the installer.
File Name Description
UPMPolicyDefaults_V1Profile_en.ini .Ini file for English Windows XP and Windows 2003
UPMPolicyDefaults_V2Profile_all.ini .Ini file for Windows Vista, Windows 7 and Windows Server 2008
UserProfileManager.exe Windows service carrying out functions on computers managed by Profile management
8.2. To install Profile management
Updated: 2010-03-15
Install the software on all computers whose user profiles you want to manage. This procedure installs Profile management on a single computer.
If you perform the installation on Windows XP or Windows Server 2003 and have disabled support for short file names (also known as 8.3 file names), each folder in the installation location must conform with the short file naming convention, for example C:\Citrix\ProfMgr. This issue does not occur on other supported operating systems.
Log on to the computer with administrator privileges.
Locate and run the appropriate installer from the download package. There are two installers, profilemgt3.0.0_x86.msi for 32-bit systems and profilemgt3.0.0_x64.msi for 64-bit systems. The installation wizard appears.
Follow the on-screen instructions in the wizard.
Restart the computer.
8.2.1. To install Profile management from the command line
Updated: 2010-03-26
Important: In this version of Profile management, the following keys have been removed from the registry exclusion list in the supplied .ini file:
HKEY_CURRENT_USER\Software\Microsoft\Windows\CurrentVersion\Group Policy
HKEY_CURRENT_USER\Software\Policies

1.
2.
1.
2.
3.
HKEY_CURRENT_USER\Software\Microsoft\Windows\CurrentVersion\Policies
If you use these exclusions in Group Policy and set in this procedure, ensure you OVERWRITEINIFILES=yes
add all three of the keys or none of them (but not a subset) to the registry exclusion list. (The option is primarily intended for deployments using Group Policy rather than an .ini file, OVERWRITEINIFILES
or for either deployment type in which configuration settings can be discarded and the default .ini files re-installed.) The option overwrites all of the changes you made throughout the .ini file including the keys. Citrix recommends running the installer without this option and then manually removing the key settings in the .ini file. Alternatively, if you use this option, ensure you add the exclusions as described.
At a command line, run the following command:
msiexec /i <path to the MSI file> /quiet [/norestart] [INSTALLDIR=<installation directory>]
[OVERWRITEINIFILES=yes] [INSTALLPOLICYINIFILES=no]
This command performs the installation without displaying a user interface and then performs a restart.
Optionally, you can suppress the restart using the option, but, depending on the /norestart
operating system, Profile management will not function until the computer has restarted. For example, you do not need to restart user devices running Windows Vista.
INSTALLDIR can be user specified.
For information on the option, see .OVERWRITEINIFILES=yes Considerations When Upgrading .Ini Files
Setting to prevents the installation of Profile management .ini files. If INSTALLPOLICYINIFILES no
you have used the .ini files with a previous version of the software and want to continue to use the settings contained in them with this version, after installation transfer each setting manually to the equivalent Profile management policy in Group Policy Editor.
If UAC is enabled on Windows Vista, Windows 7, or Windows Server 2008, run the msiexec command with elevated rights, for example from an elevated command prompt.
If you are upgrading, a dialog box may advise you that some files are in use. You are given the option to close the application or continue without closing. Select the option to close the application.
8.3. Deploying Profile Management with Citrix Receiver
Updated: 2009-10-16
You can use Citrix Receiver and Merchandising Server (components of the Citrix Delivery Center solution) to distribute Profile management MSI packages. No configuration of Profile management is required to do this. For instructions on deploying components this way, see the .Citrix Receiver documentation
8.4. To add the ADM file to Group Policy
Updated: 2010-03-17
In production environments, configure Profile management with Group Policy. For each OU containing the computers you want to manage, create and link a Group Policy Object (GPO), and then add the Profile management ADM file to the GPO.
To configure Citrix user profiles, you can use any computer that runs Windows Group Policy Management Console. The computer does not have to be a domain controller. Domain controllers only store the ADM file.
Note: For small pilot projects and evaluations where no separate test deployment of Active Directory is available, you can also use the installed .ini files instead of the ADM file.
On the domain controller, import the Profile management ADM file from the download package. The file is called Ctxprofile3.0.0.adm and is located in the Group Policy Templates folder.
On the computer you want to use to configure Profile management, open Active Directory Users .and Computers
Identify the OUs containing the computers that Profile management will be installed on. For information
3.
4.
5. 1.
2.
3.
4.
1.
2.
3.
on how to configure Profile management to work in your existing OU structure, see Administering .Profiles Within and Across OUs
In Group Policy Management, create a GPO and link it to each OU.
Note: If you apply security filtering to the GPO, do so using either the Authenticated Users group or a computer group. Do not use a security group that only contains users.
Edit the GPO in Group Policy Editor:Expand and right-click under the GPO.Computer Configuration Administrative Templates
Click and click Add/Remove Templates Add.
Browse to the ADM file that you copied locally and click Open.
Click . This creates a Citrix folder and a Profile Management subfolder that stores the Closesettings from the ADM file.
8.5. Setting Folder Redirection with Profile Management
Updated: 2010-03-19
Profile management works with folder redirection and is encouraged. Active Directory allows folders, such as Application Data or Documents, to be saved (redirected) to a network location. Thus, the contents of those folders are stored in the designated location and not included within the user profile, which reduces its size. Depending on the version of Active Directory in use, the specific folders that can be redirected vary.
In addition, where mandatory profiles are employed, configuring folder redirection allows users to save some settings, files, and other data while still enabling the benefits of mandatory profiles. As a general guideline, Citrix recommends enabling folder redirection for all user data that is not accessed regularly within a session if network bandwidth permits.
Note: Active Directory based on Windows Server 2008 allows for folder redirection of additional folders not included within Active Directory based on Windows Server 2003.
Not all folders which can be redirected are directly accessible via Active Directory. All folders which can be redirected on a specific operating system can be found in the registry under HKCU\Software\Microsoft\Windows\CurrentVersion\Explorer\User Shell Folders.
Important: To configure folder direction successfully, you need to be aware of the differences in folder structure between Version 1 and Version 2 profiles. For more information, see Version 1 and Version
.2 Profiles
For additional security considerations when using folder redirection, see Securing Your Profile and the article called on the Microsoft TechNet Web site, Management Deployment Configuring Folder Redirection
.http://technet.microsoft.com
8.6. To remove Profile management
Updated: 2010-03-04
This procedure removes Profile management from a single computer.
From the list of installed programs in (on Windows XP) or Add or Remove Programs Programs (on Windows Vista), select and click (XP) or and Features Profile management Remove Uninstall
(Vista).
Click .Yes
Restart the computer.
You can also remove Profile management in unattended mode.
9. Upgrading Profile Management and Migrating Profiles
Updated: 2010-06-24
This section contains procedures for upgrading Profile management software and information about

1.
2.
3.
4.
5.
6.
transitioning your existing Windows user profiles to Citrix user profiles. As a prerequisite, read Planning .for Migration and Conflicts
Citrix recommends that the same version of Profile management is installed on all user devices and the same version's ADM file is added to each Group Policy Object on all domain controllers. This prevents corruption of profile data, which may result when different user store structures (from different versions) exist.
For this reason, Citrix recommends upgrading all computers to the latest version of Profile management before enabling any Version 3.x setting.
Important: Deployments that contain Version 3.0 with Version 2.1 or any earlier version, including Citrix Technical Preview or beta releases, are unsupported. If you require a mixed deployment (for example, as a temporary measure while you’re migrating profiles), isolate each version in a separate OU and maintain separate user stores for the computers running each version. Alternatively, if a single user store serves computers running both versions, ensure no Version 3.0 setting is enabled until all the computers have been upgraded to Version 3.0. After you enable any Version 3.0 setting in a “mixed” user store, users can still log on to a computer that runs Version 2.1, but they receive a temporary Windows user profile (not their network, Citrix user profile) and changes they make to that profile are not saved.
When migrating from Version 2.1 or earlier to Version 3.0 or later, using separate OUs and user stores can be inconvenient. To avoid these constraints, you can use one of the following two strategies. Both rely on Active Directory (AD) groups to separate and users. The terms Version 2 and Version 3 Version 2 Version 3here are shorthand for Profile management 2.1 or earlier and Profile management 3.0 or later. You configure each group in the appropriate version of Profile management using the setting.Processed groups
Strategy 2 is more work than Strategy 1 because, with the former, you keep updating the Version 3 processed user groups and maintain two sets of applications and desktops (but you can automate by exporting application definitions from XenApp). The advantage is that you can take your time over the migration.
Strategy 1 – One-off Migration
This scenario assumes that some downtime is acceptable. All computers are migrated at the same time.
The migration strategy is:
Replace the Version 2 ADM file with the Version 3 file. The latter is compatible with the earlier version, so Version 2 computers continue to operate normally.
Ensure all of the Version 3 settings are not enabled. This is the default setting.
Start upgrading all the computers from Version 2 to Version 3. Fit this in with your normal maintenance and update schedules. With one exception, Version 3 acts as Version 2 until you enable any Version 3 setting.
The exception is as follows. It is rare but more likely to occur if this upgrade step is staggered over a long time. If a user accesses their Citrix user profile from multiple servers, multiple Version 3 sessions are created. For example, they first use a workstation to access a virtual desktop on one server and then a laptop to access a published application on another. Profile management must use the pending area for the second, laptop session. At this point, the entire OU is treated as a Version 3 deployment (albeit one without any configured Version 3 features) and PmCompatibility.ini is updated to reflect this.
Optionally, set your Version 3 processed users group to include only the members of a small pilot group. Wait for the AD Group Policy changes to propagate throughout the network (for example, over a weekend). You don't need to prevent access for any other users while this is happening. Back up the profiles of the pilot group. Then let the pilot group test Profile management.
When you're happy with the pilot group results, ensure that you've backed up the other users' profiles.
Use the next scheduled maintenance period to add the remaining users to the Version 3 processed users group. Allow sufficient time for the AD Group Policy changes to propagate, and let the remaining users log on.
Strategy 2 – Phased Migration
This scenario assumes that can't move all your machines or your users to the new version in one go, so you select subsets of users that you migrate in batches. It suits deployments with several datacenters or geographically distributed users.
The migration strategy is:

1.
2.
3.
4.
5.
6.
7.
8.
1.
2.
3.
4.
5.
Replace the Version 2 ADM file with the Version 3 file. The latter is compatible with the earlier version, so Version 2 computers continue to operate normally.
Ensure all of the Version 3 settings are not enabled. This is the default setting.
Upgrade a few computers (the first batch) to Version 3. Alternatively, install Version 3 on new computers. By default, your Version 3 processed users group contains an empty group, so no user is processed as a Version 3 user. Be aware of the exception described in Strategy 1, which may also apply when you upgrade computers in a phased migration.
Publish new applications (using XenApp) or virtual desktops (using XenApp or XenDesktop) from your Version 3 computers. These applications and desktops are identical to the ones previously published from your Version 2 computers, except for their names, which identify them as for use by Version 3 users.
The selected users in this batch log on to the applications or desktops (for example, using Web Interface). They choose the new applications. (Use Web Interface to enforce this, based on user name or group membership). As a result, their sessions run on the Version 3 computers but they are processed with Version 2 settings.
Ensure that you've backed up all users' profiles.
Move the users out of the Version 2 processed users group and into the Version 3 group. Wait for the AD Group Policy changes to propagate to the Version 3 computers. Next time they log on, the users' sessions are processed with Version 3 settings.
Upgrade the next batch of computers and migrate the next batch of users, as above.
9.1. To upgrade Profile management
Updated: 2010-03-17
Important: It's important that you follow the order of the steps in this upgrade process. Upgrade the software on all computers only after adding the new ADM file to Group Policy. If you upgrade it beforehand, log files may be stored in two locations (one containing log files for the old version and the other for the new version). This consideration particularly affects XenDesktop deployments.
It's also important to perform upgrades during scheduled downtime to allow the AD changes that you make during this procedure to propagate through your deployment. Allow at least 24 hours of downtime for this.
Create a new Group Policy Object (GPO).
.Add the new ADM file to the new GPO
Back up and then import the configuration from your existing GPO to the new GPO.
Upgrade the Profile management software on all computers by over the installing this versionearlier version.
Apply the new GPO.
9.2. Considerations When Upgrading .Ini Files
Updated: 2009-09-09
If you edited the .ini file in an earlier version of Profile management and upgrade to this version, the software detects that the file was edited and, by default, does not overwrite it. So, if you want to preserve your .ini file settings but also make use of the new settings in this version, you must do one of the following:
Manually add the new settings from this version's .ini file to your edited .ini file
Save a copy of the earlier version's .ini file, use the command-line option to OVERWRITEINIFILES=yes
force an overwrite of the file during the upgrade, and add your saved settings to the upgraded .ini file
10. Administering Profile Management
Updated: 2010-03-04
Once you have added the ADM file to Group Policy, set up Profile management to match the needs of your Citrix deployment using the procedures in this section. For example, perform basic setup operations such

1.
2.
3.
4.
5.
6.
7.
as specifying the location of the user store and the groups whose profiles you want to manage. If necessary, you can also perform advanced setup operations such as identifying any files and folder to exclude from processing.
10.1. Basic Profile Management Tasks
Updated: 2010-03-17
There are many settings that allow you to customize the way user profiles are processed. This section lists the tasks used to configure commonly used settings.
Typically, you don't need to follow all of these tasks because defaults are provided. Enabling the software is, however, mandatory. The tasks that you are most likely to use are listed first:
Testing Profile management
Enabling Profile management
Important: Perform this task only after testing any other settings were configured as intended.
Deciding how to resolve conflicting profile data
Choosing an appropriate migration policy that turns existing Windows user profiles into Citrix user profiles
Specifying the path to the user store
Defining the groups whose profiles you want Profile management to process
Setting up logging (if you want to troubleshoot profile management)
You configure Profile management in Group Policy Object Editor, under the > Computer Configuration > > folder. (In Windows Server 2008, the folder is Administrative Templates Citrix Profile Management
> > > Computer Configuration Administrative Templates Classic Administrative Templates (ADM) Citrix> .) Any settings not configured there (that is, settings in the Not Configured state) Profile Managementtake the default values from the Profile management .ini files if you installed these.
For information on any setting, consult .Profile Management ADM File Reference
10.1.1. Testing Profile Management with Local GPO
Updated: 2010-03-17
Before deploying Profile management in a production environment, you are strongly encouraged to use a test environment. While you can create this setup on a local machine with the supplied .ini files, a fully supported and easier means of transferring settings to the domain GPO is based on a local installation and configuration of the ADM file on a device. Test logon and logoff behaviors and make adjustments to the local GPO until satisfactory results are obtained. You can perform tests safely this way if the device is a member of a production OU because local policies are invoked where OU and domain policies do not exist or are not configured. When using local policies, ensure no Profile management GPOs are used anywhere else (for example, in the domain or sites).
In addition, where an administrator does not have access to or control of domain GPOs for the configuration of the Profile management ADM file, local GPOs can be used as a long-term solution. However, this introduces complexities into the environment, such as ensuring that the Profile management ADM file is installed and correctly configured on each device and the inability of domain users to maintain settings when accessing multiple devices.
For testing purposes, consider using a Windows Management Instrumentation (WMI) filter to temporarily restrict your configuration to just one machine in an OU.
Important: For these reasons Citrix does not recommend the use of local GPOs as a long-term, enterprise solution.
Testing the User Experience
Minimizing differences in the end user experience when accessing resources from various devices is the ultimate goal when implementing a profile solution. Before Profile management, the contents of users'

1.
2.
1.
2.
3.
4.
registry and files might vary depending on the physical device, profile configuration, and operating system. For this reason, Profile management should be configured to address the differences between system installations on computers the users will roam between.
You should therefore check user access to resources in ways that mimic your production environment. These may include:
A client device with locally installed applications
A virtual desktop created with Citrix XenDesktop and including streamed or locally installed applications
A Citrix XenApp application, either published on or streamed from a XenApp server
A Terminal Services client
Testing Operating System Variations
Users may access applications from different operating systems, and the variation between them may create conflicting settings within a single user profile. You should understand the differences between Version 1 and Version 2 profiles and how they affect your deployment, since the variations are key to any profile solution. For more information on Version 1 and Version 2 profiles, see .What Is a Profile?
10.1.2. To specify the path to the user store
Updated: 2010-03-05
Before following this procedure, read about and how your use of the the structure of the user storeextended synchronization and multilingual profile storage features affect it.
Under , double-click the policy.Profile Management Path to user store
Select and enter the path. If you enter a relative path, it is relative to users' home directories.EnabledEnter a complete UNC path to define an explicit path name. You can use AD variables (for example, #sAMAccountName#) or system environment variables (for example, the combination of %USERNAME% and %USERDOMAIN%). AD variables are case-sensitive. Unlike #cn# or #sAMAccountName#, the system environment variables allow users to be defined unambiguously in Active Directory networks with multiple domains. User environment variables are not supported.
Example: can resolve to \\servername\profilestore\%USERNAME%\%ProfileVer% or .\\servername\profilestore\JohnSmith\WinXP \\servername\profilestore\JohnSmith\Win2k8ts
For more information on using variables when specifying the path to the user store, see Sharing Citrix and .User Profiles on Multiple File Servers Administering Profiles Within and Across OUs
For information on managing system environment variables in Windows XP, see http://support..microsoft.com/kb/310519
For your changes to take effect, run the command from the command prompt as documented at gpupdate
.http://technet.microsoft.com/en-us/library/bb490983.aspx
10.1.3. To define which groups' profiles are processed
Updated: 2010-03-04
If you don't define any groups with this setting, all Windows user profiles are processed.
Under , double-click the policy.Profile Management Processed groups
Select Enabled.
Click Show.
Add the groups containing the users whose profiles you want Profile management to process.
For your changes to take effect, run the command from the command prompt as documented at gpupdate
.http://technet.microsoft.com/en-us/library/bb490983.aspx
10.1.4. To choose a migration policy
Updated: 2010-03-04

1.
2.
3.
4.
1.
2.
3.
4.
1.
2.
When a user first logs on after Profile management is enabled, no Citrix user profile exists for that user. You can decide which existing Windows profile (roaming, local, or both) is copied by Profile management and used in all further processing. If this setting is disabled, no profile is migrated.
For more information on planning a migration strategy, see .Planning for Migration and Conflicts
Under , open the folder.Profile Management Profile handling
Double-click the policy.Migration of existing profiles
Select Enabled.
Select one of the following options from the drop-down list:Local
Local and Roaming
Roaming
The following event takes place during logon: if an existing Windows profile is found and the user does not yet have a Citrix user profile in the user store, the Windows profile is migrated (copied) to the user store on the fly. After this process, the user store profile is used by Profile management in the current and any other session configured with the path to the same user store.
If this setting is enabled, profile migration can be activated for roaming and local profiles (the default), roaming profiles only, local profiles only, or profile migration can be disabled altogether. If profile migration is disabled and no Citrix user profile exists in the user store, the existing Windows mechanism for creating new profiles is used as in a setup without Profile management.
For your changes to take effect, run the command from the command prompt as documented at gpupdate
.http://technet.microsoft.com/en-us/library/bb490983.aspx
10.1.5. To resolve conflicting profiles
Updated: 2010-03-05
Conflicts between local Windows user profiles and Citrix user profiles (in the user store) can occur when you add Profile management to an existing deployment. In this scenario, you must determine how the data in the local Windows profile is managed. For more information on managing conflicts, see Planning for Migration
.and Conflicts
Under , open the folder.Profile Management Profile handling
Double-click the policy.Local profile conflict handling
Select Enabled.
Select one of the following options from the drop-down list:Use local profile. Profile management processes the local data.
Delete local profile. Profile management deletes the local data and processes the data in the user store.
Rename local profile. Profile management renames the local data (for backup purposes) and processes the data in the user store.
For your changes to take effect, run the command from the command prompt as documented at gpupdate
.http://technet.microsoft.com/en-us/library/bb490983.aspx
10.1.6. To enable Profile management
Updated: 2010-01-20
Enable Profile management only after carrying out all other setup tasks and testing how Citrix user profiles perform in your environment.
Under , double-click the policy.Profile Management Enable Profile management
Select Enabled.

For your changes to take effect, run the command from the command prompt as documented at gpupdate
.http://technet.microsoft.com/en-us/library/bb490983.aspx
10.2. Optimizing Profile Management Performance
Updated: 2010-02-03
Use the settings in this section once you are familiar with the basic operation of Profile management, you have tested it and rolled it out in a production environment, and have a clear business requirement to use these advanced profile configuration settings.
10.2.1. About Profile Management Settings
Updated: 2010-04-21
Conflicts
Profile management does not check any settings for conflicts. For example, you can set the same directory to be both included and excluded but this leads to unpredictable results.
Default Configuration
Profile management comes with a default configuration stored in .ini files. The .ini files must be located in the installation folder so that the Citrix Profile Management service can recognize them. The default configuration is suitable for most environments. It processes the profiles of all users in all groups.
To find the .ini file used by each operating system, see . If you are not sure Files Included in the Downloadwhich file is used, examine the log file and search for the text .Reading from policy defaults file
If you are configuring a non-English version of Windows XP and Windows Server 2003, you must create an appropriate language version of the .ini file using UPMPolicyDefaults_V1Profile_en.ini. Rename a copy of this file to reflect your language (for example, UPMPolicyDefaults_V1Profile_es.ini for Spanish) and localize the folder names. Use these file names:
For French operating systems, UPMPolicyDefaults_V1Profile_fr.ini
For German operating systems, UPMPolicyDefaults_V1Profile_de.ini
For Spanish operating systems, UPMPolicyDefaults_V1Profile_es.ini
For Japanese operating systems, UPMPolicyDefaults_V1Profile_ja.ini
For Simplified Chinese operating systems, UPMPolicyDefaults_V1Profile_zh-CN.ini
The operating system language uses the appropriate version of the file, so if that version is not present Profile management might not work as expected.
The same .ini file is used for all languages on Windows Vista and Windows Server 2008.
Modifying .Ini Files
If you add entries to an .ini file, ensure the variables and values have the correct format.
Flags (on/off indicators) must be of this form:
<variable>=<value>
A value of 1 enables a setting and any other value or no value disables it. For example, the following entry enables the ServiceActive setting:
ServiceActive=1
The following entries disable the setting:
ServiceActive=ON
ServiceActive=OFF
ServiceActive=TRUE
ServiceActive=FALSE
ServiceActive=

1.
2.
3.
List entries must be of this form:
<value>=
Do not append 1 after the equals sign. For example, the following entries specify files to be synchronized:
[SyncFileList]
Local Settings\Application Data\Microsoft\Office\*.qat=
Local Settings\Application Data\Microsoft\Wallpaper1.bmp=
Important: It is highly recommended that you exclude the folder Local Settings (on Windows XP and Windows Server 2003) or AppData\Local and AppData\LocalLow (on Windows Vista and Windows Server 2008) from synchronization. If you don't, a very large amount of data may be transferred over the network and users may experience logon delays. These folders are not synchronized by standard Windows roaming profiles. In the default configuration, the exclusion lists contain these folders.
Changes to Group Policy settings take effect when a manual or automatic policy refresh occurs on the target computers. Changes to the .ini file take effect when you issue the command , which gpupdate /force
is recommended, or you restart the Citrix Profile Management service on the target computers.
10.2.2. Configuration Precedence
Updated: 2010-03-15
You can configure Profile management using Group Policies and .ini files. Configuration settings are applied as follows:
Settings defined by Group Policies take precedence. The .ini file will only be queried if a policy setting is set to .Not Configured
Note: If you apply a Group Policy Object selectively to sites and domains within an Organizational Unit, a further precedence applies. This is documented at http://technet.microsoft.com/en-
. In addition, note that domain and OU Group Policies take us/library/cc785665(WS.10).aspxprecedence over local policies.
Where a setting is not defined by a policy, Profile management tries to read the setting from the .ini file.
If a setting is not configured by a group policy or in the .ini file, the default setting is used.
There may be situations where you want to configure the same setting differently in Group Policy and the .ini file, for example when you want to activate default logging with a Group Policy setting but activate verbose logging using the .ini file on a computer that you use for troubleshooting.
You can view the description of any setting and its default value in the Group Policy Object Editor or .here
10.2.3. Optimizing Profile Management
Updated: 2010-03-05
You can fine tune how profiles are processed using the following settings: , , Inclusion list Exclusion list, and . These define the files, folders, and registry keys (in Directories to synchronize Files to synchronize
the HKCU hive) that are processed or ignored when users log on or log off.
By selecting the values for these settings that meet your organization's needs, you can further improve the logon and logoff experience of your users.
For example, you might Microsoft Word because it is a highly customizable and frequently includeused application that should present the same experience to roaming users however it is accessed. Conversely, you might an enterprise application because it is infrequently used by some groups so excludeits profile data does not need to be downloaded at each logon and logoff.
10.2.3.1. Before Optimizing Profile Management
Updated: 2010-03-19
As a precursor to tuning, consider using the set of built-in Windows Performance Monitoring (Perfmon)
counters. These provide insights into the behavior of your profiles. Available counters include measurements of the profile size and the time taken to create a Citrix user profile on the local computer.
You may need to decide whether to cache profiles locally (on the computers that run Profile management). Factors that affect the decision include the Citrix products in your deployment, the available space on the local computers, and the number of users in the deployment.
In deployments with many XenApp servers, for example, you may decide to delete locally cached profiles in order to save disk space on the servers, which would otherwise (if cached profiles are stored) fill up with many user files.
In XenDesktop deployments where pooled desktops are set to restart at each logoff, there is little point in caching profiles because they are overwritten at each logoff.
If you do not stream user profiles and you want to cache profiles locally, make sure Profile management's setting is disabled. If you stream user profiles, that setting Delete locally cached profiles on logoff
is overriden and any locally cached profiles are deleted; this is not detrimental because the improved logon times resulting from local caching are surpassed when profiles are streamed.
10.2.3.2. Monitoring and Logging Profile Management
Updated: 2010-01-18
You can log many aspects of your Profile management deployment, but logging is typically enabled when you troubleshoot problems or if you want to gather performance data. You can change the verbosity of logging and select different log settings. You must enable logging so that log files are created.
The log file is created on the computer on which Profile management is installed, in the folder %SystemRoot%\System32\LogFiles\UserProfileManager.
You can use Windows Performance Monitor to track several aspects of logon and logoff.
10.2.3.2.1. About the Profile Management Log File
Updated: 2010-03-15
The event log is used primarily for the purpose of error reporting. Only errors are written to it. All other warning and informational messages, in addition to errors, are written to the log file. This is the file %SystemRoot%\system32\LogFiles\UserProfileManager\UserProfileManager.log.
Log Entry Types
. All common warnings.Common warnings
. All common information.Common information
. One log entry is created each time a processed file or folder is changed.File system notifications
. File system operations performed by Profile management.File system actions
. Registry actions performed by Profile management.Registry actions
. All registry keys in the hive HKCU that have been changed in a session. Registry differences at logoff: This setting produces large amounts of output in the log file.Important
. Each time Profile management queries the Active Directory, an entry is Active Directory actionswritten to the log file.
. When the Profile management service starts or a policy refresh occurs, policy values Policy valuesare written to the log file.
. The series of actions during logon are written to the log file.Logon
. The series of actions during logoff are written to the log file.Logoff
. Where applicable, user and domain names are logged to Personalized user informationdedicated columns of the log file.
Log File Format
Each line in the log file has several fields, separated by semicolons.
Field Description
1.
2.
3.
4.
5.
6.
7.
8.
1.
2.
3.
4.
5.
Date Date of the log entry
Time Time of the log entry (including milliseconds)
Severity Either INFORMATION, WARNING, or ERROR
Domain The domain of the user (where applicable)
User name The name of the user (where applicable)
Session ID The session ID (where applicable)
Thread ID The ID of the thread that created this line
Function and description
The name of the Profile management function executing at the time, and the log message
10.2.3.2.2. To set up logging
Updated: 2010-03-17
In Group Policy Object Editor, navigate to the > > Computer Configuration Administrative Templates > folder. (In Windows Server 2008, the folder is > Citrix Profile Management Computer Configuration
> > > Administrative Templates Classic Administrative Templates (ADM) Citrix.)Profile Management
Open the folder.Log settings
Double-click the policy.Enable logging
Select Enabled.
Click OK.
Click the policy.Log settings
Select Enabled.
Select the type of events that you want Profile management to log.
For your changes to take effect, run the command from the command prompt as documented at gpupdate
.http://technet.microsoft.com/en-us/library/bb490983.aspx
To set an alternative location for log files
You can adjust the location where Profile management log files are stored.
Some logon and logoff processing is done in the context of the user using impersonation. Citrix recommends that you grant write permissions on the log folder for the users group so that Profile management can write to the log files during impersonation.
Open the folder.Log settings
Double-click the policy.Path to log file
Select Enabled.
In , enter an alternative path for the log files.Path to log file
Click OK.
For your changes to take effect, run the command from the command prompt as documented at gpupdate
.http://technet.microsoft.com/en-us/library/bb490983.aspx
10.2.3.2.3. Performance Monitoring and Profile Management
Updated: 2010-05-12
Profile management collects data about the efficiency of your deployment using Microsoft Windows Performance Monitor (Perfmon) counters. For each session, counters are stored under the object called Citrix Profile Management. In Profile management 3.0, these include:
. The size of the Citrix user profile when it is retrieved from the user store at logon (Bytes).Logon Bytes
. The size of the Citrix user profile when it is copied to the user store at logoff (Bytes).Logoff Bytes

1.
. The time taken to create or prepare a Citrix user profile on the Local Profile Setup Durationlocal computer (milliseconds).
and . The duration of logon and logoff processing by the Citrix Logon Duration Logoff DurationProfile Management service (milliseconds). helps to measure the reduction in logon Logon Durationtimes when profiles are streamed.
and . A Processed Logon Files - <file size range> Processed Logoff Files - <file size range>series of counters that together measure the profile size. Separately for logon and logoff, the number of files that are synchronized is categorized by file size. helps to measure Processed Logon Filesthe reduction in the number of locally copied files when profiles are streamed.
In Version 3.1, these additional counters can also be used:
. The time spent processing registry changes at logoff.Registry Change Logoff Processing Duration
. The time spent processing file changes at logoff.File Logoff Change Processing Duration
. The time spent migrating files from the pending area to the Userstore Logoff Migrate Durationuser store.
. The time spent deleting local profiles during the initial migration.Delete Local Profile Duration
. The time spent converting existing Windows user profiles to Citrix Initial Profile Migrate Durationuser profiles during the initial migration.
Perfmon information is also stored in the log file (except that logon and logoff times are summarized in seconds instead of milliseconds). No configuration of Perfmon is required.
10.2.3.2.3.1. To provide access to performance data
Updated: 2010-02-05
You can let other administrators use Windows Performance Monitor (Perfmon) to monitor how well your Citrix user profiles are performing. They do not need full administration privileges on any of the domain controllers used to configure Profile management.
Ensure the administrators who will use Perfmon are members of the Performance Monitoring Users group.
10.2.3.3. Including and Excluding Items
Updated: 2010-02-17
By default, all files and folders in local profiles are synchronized with the user store. You can specify files and folders that are not synchronized, by adding them to an . If you exclude a folder, you can exclusion listspecify subfolders of it that are synchronized by adding them to an .inclusion list
Exclusions are processed at logoff not logon.
In addition to files and folders contained in profiles, you can include and exclude:
Registry entries related to profiles in the HKCU hive. Entries in the HKLM hive are not processed by default and cannot be configured to do so.
Files and folders that are not included in the profile (using the extended synchronization feature).
The default configuration specifies included and excluded items in the file system and registry.
All included and excluded folder names are language specific. However, folder names in the user store are in a format independent of the operating system language.
You can synchronize files or folders on disks that are treated as local by the operating system. You cannot synchronize files or folders on network mapped drives.
Important: It is highly recommended that you exclude the folder Local Settings (on Windows XP and Windows Server 2003) or AppData\Local and AppData\LocalLow (on Windows Vista and Windows Server 2008) from synchronization. If you don't, a very large amount of data may be transferred over the network and users may experience logon delays. These folders are not synchronized by standard Windows roaming profiles. In the default configuration, the exclusion lists contain these folders.
1.
2.
3.
4.
5.
6.
7.
8.
9.
1.
2.
3.
4.
5.
6.
7.
8.
9.
10.2.3.3.1. To include items
Updated: 2010-01-20
Under > , double-click the policy.Profile Management Registry Inclusion list
Select Enabled.
Add any registry keys in the HKCU hive that you want to be processed during logoff.
Under > > , double-click the Profile Management File system Synchronization Directories policy.to synchronize
Select Enabled.
Add any folders that you want Profile management to process but that are located outside the user profile or in excluded folders.
Under > > , double-click the Profile Management File system Synchronization Files to synchronizepolicy.
Select Enabled.
Add any files that you want Profile management to process but that are located outside the user profile or in excluded folders.
For your changes to take effect, run the command from the command prompt as documented at gpupdate
.http://technet.microsoft.com/en-us/library/bb490983.aspx
10.2.3.3.2. To exclude items
Updated: 2010-02-10
Under > , click the policy.Profile Management Registry Exclusion list
Select Enabled.
Add any registry keys in the HKCU hive that you do not want to be processed during logoff.
Under > , double-click the policy.Profile Management File system Exclusion list - directories
Select Enabled.
Add any folders that you do not want Profile management to process.
Under > , double-click the policy.Profile Management File system Exclusion list - files
Select Enabled.
Add any files that you do not want Profile management to process.
For your changes to take effect, run the command from the command prompt as documented at gpupdate
.http://technet.microsoft.com/en-us/library/bb490983.aspx
10.2.3.3.3. Default Included and Excluded Items
Updated: 2010-03-05
The tables in this topic show the items that are included and excluded items by default if you use the .ini files. If instead you use Group Policy, no items are included or excluded by default.
Registry Inclusion List
Default Value Notes
<empty> All entries in the HKCU hive are included by default.
Registry Exclusion List
Default Value Notes
Software\Microsoft\Windows\CurrentVersion\Explorer\TrayNotify Windows Explorer caches tray notification icons as binary data in the registry.

Folder Inclusion List
This table shows the included folders on English systems. For other languages, you must edit the entries. For example, for German systems use Favoriten instead of Favorites.
Default Value Notes
Windows XP and Windows Server 2003
Local Settings\Application Data\Microsoft\Credentials
Must be included because it is inside an excluded folder. Stores user certificates.
Local Settings\Application Data\Citrix\Citrix offline plug-in
Must be included because it is inside an excluded folder. Location of the per-user storage for the Citrix offline plug-in.
Windows Vista and Windows Server 2008
AppData\Local\Microsoft\Credentials Needs to be included because it is inside an excluded folder. Stores user certificates.
AppData\Local\Citrix\Citrix offline plug-in
Needs to be included because it is inside an excluded folder. Location of the per-user storage for the Citrix offline plug-in.
Folder Exclusion List
Folders in this table are excluded from synchronization.
Default Value Notes
Windows XP and Windows Server 2003
Application Data\Citrix\PNAgent\AppCache This is a cache.
Application Data\Citrix\PNAgent\Icon Cache This is a cache.
Application Data\Citrix\PNAgent\ResourceCache This is a cache.
Application Data\ICAClient\Cache This is a cache.
Application Data\Macromedia\Flash Player\#SharedObjects This is a cache.
Application Data\Macromedia\Flash Player\macromedia.com\support\flashplayer\sys
This contains flash cookies.
Application Data\Sun\Java\Deployment\cache This is a cache.
Application Data\Sun\Java\Deployment\log This is a log folder.
Application Data\Sun\Java\Deployment\tmp This is a temporary folder.
Local Settings Mostly specific to the computer. Also excluded with roaming profiles.
Start Menu The Start menu is mostly specific to the computer.
Windows Vista and Windows Server 2008
$Recycle.Bin Also excluded with roaming profiles.
AppData\Local Mostly specific to the computer. Also excluded with roaming profiles.
AppData\LocalLow Mostly specific to the computer. Also excluded with roaming profiles.
AppData\Roaming\Citrix\PNAgent\AppCache This is a cache.
AppData\Roaming\Citrix\PNAgent\Icon Cache This is a cache.
AppData\Roaming\Citrix\PNAgent\ResourceCache This is a cache.
AppData\Roaming\ICAClient\Cache This is a cache.
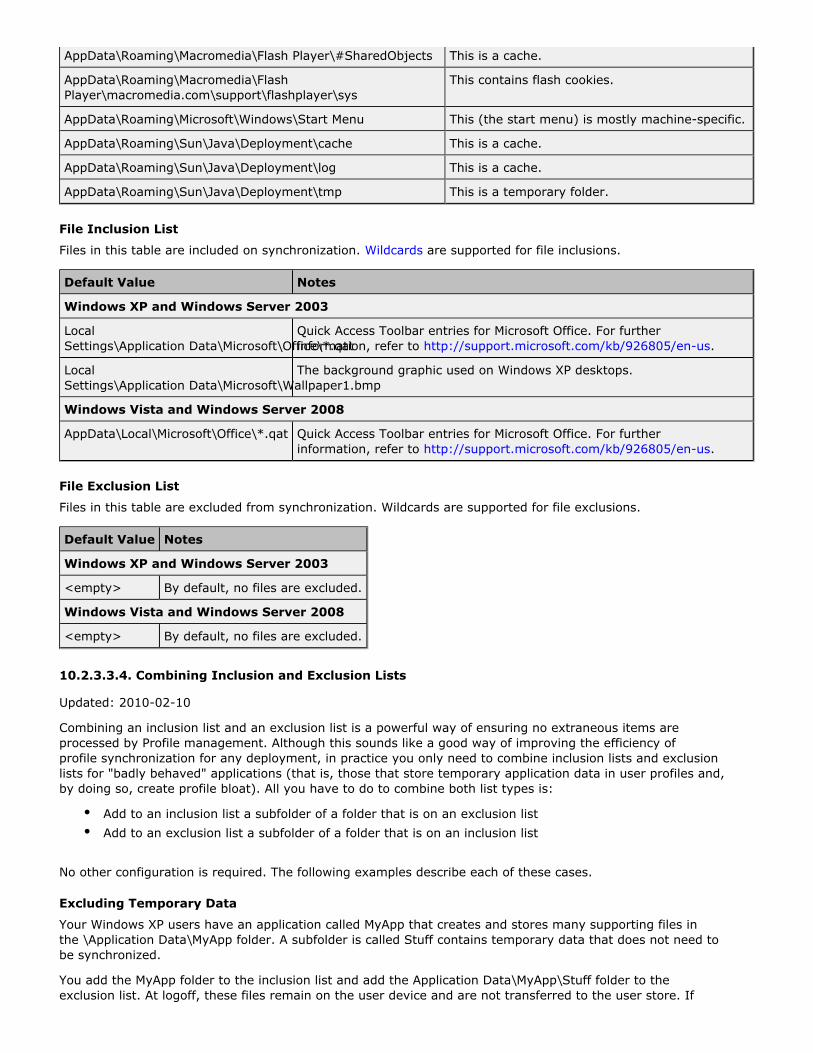
AppData\Roaming\Macromedia\Flash Player\#SharedObjects This is a cache.
AppData\Roaming\Macromedia\Flash Player\macromedia.com\support\flashplayer\sys
This contains flash cookies.
AppData\Roaming\Microsoft\Windows\Start Menu This (the start menu) is mostly machine-specific.
AppData\Roaming\Sun\Java\Deployment\cache This is a cache.
AppData\Roaming\Sun\Java\Deployment\log This is a cache.
AppData\Roaming\Sun\Java\Deployment\tmp This is a temporary folder.
File Inclusion List
Files in this table are included on synchronization. are supported for file inclusions.Wildcards
Default Value Notes
Windows XP and Windows Server 2003
Local Settings\Application Data\Microsoft\Office\*.qat
Quick Access Toolbar entries for Microsoft Office. For further information, refer to .http://support.microsoft.com/kb/926805/en-us
Local Settings\Application Data\Microsoft\Wallpaper1.bmp
The background graphic used on Windows XP desktops.
Windows Vista and Windows Server 2008
AppData\Local\Microsoft\Office\*.qat Quick Access Toolbar entries for Microsoft Office. For further information, refer to .http://support.microsoft.com/kb/926805/en-us
File Exclusion List
Files in this table are excluded from synchronization. Wildcards are supported for file exclusions.
Default Value Notes
Windows XP and Windows Server 2003
<empty> By default, no files are excluded.
Windows Vista and Windows Server 2008
<empty> By default, no files are excluded.
10.2.3.3.4. Combining Inclusion and Exclusion Lists
Updated: 2010-02-10
Combining an inclusion list and an exclusion list is a powerful way of ensuring no extraneous items are processed by Profile management. Although this sounds like a good way of improving the efficiency of profile synchronization for any deployment, in practice you only need to combine inclusion lists and exclusion lists for "badly behaved" applications (that is, those that store temporary application data in user profiles and, by doing so, create profile bloat). All you have to do to combine both list types is:
Add to an inclusion list a subfolder of a folder that is on an exclusion list
Add to an exclusion list a subfolder of a folder that is on an inclusion list
No other configuration is required. The following examples describe each of these cases.
Excluding Temporary Data
Your Windows XP users have an application called MyApp that creates and stores many supporting files in the \Application Data\MyApp folder. A subfolder is called Stuff contains temporary data that does not need to be synchronized.
You add the MyApp folder to the inclusion list and add the Application Data\MyApp\Stuff folder to the exclusion list. At logoff, these files remain on the user device and are not transferred to the user store. If

1.
you configure local profiles not to be cached, this temporary data is deleted at logoff along with the cached profile.
Including Internet Explorer Passwords
Your Windows Vista users roam between one desktop and another. They want their Internet Explorer passwords to follow them, which means that their Microsoft credentials must be processed by Profile management.
You add the Local Settings folder to the exclusion list because by default it is a folder where applications store user data that typically should not roam. You add the Local Settings\Application Data\Microsoft\Credentials folder to the inclusion list so that its contents are synchronized and available to users whichever desktop they log on to.
10.2.3.3.5. To use extended synchronization
Updated: 2010-02-10
By default, only files, folders, and registry settings that are part of Windows user profiles are synchronized by Profile management. However, you can include other items. You may need to do so because a "bad" application stores data in a non-standard location.
Caution: Only use extended synchronization in a supported scenario. Using this feature in an unsupported one may result in data loss. For more information, see .Supported Uses of Extended Synchronization
For any item that is not part of a Windows user profile, add it to the inclusion list using an absolute path.
For your changes to take effect, run the command from the command prompt as documented at gpupdate
.http://technet.microsoft.com/en-us/library/bb490983.aspx
10.2.3.3.5.1. Supported Uses of Extended Synchronization
Updated: 2010-03-05
Extended synchronization is designed to enable personalization settings that are not properly stored in the user's profile location to be captured as part of the user profile. So-called "bad applications", for example, store settings in non-standard locations. This topic sets out what is supported and what is unsupported.
In brief, the feature is not intended to manage multi-user access to these files or folders (for example, it is not designed to support an application that is not multiuser aware). Nor is it intended to become a file and folder synchronization mechanism (for example, one that allows you to synchronize the entire contents of c:\docs across machines).
It is intended purely to extend personalization settings that exist outside the default user profile location and thus provide a consistent experience across all resources accessed by the user.
Supported Scenarios
The supported scenarios are all based on a single-user with exclusive access to a workstation environment (typically XenDesktop, but a native workstation environment is also supported where the license permits.)
Scenario 1: Assigned Desktop (XenDesktop) Not Shared with Any Other User
This scenario also covers a domain workstation, again not shared with any other user.
Extended Synchronization supports synchronization of one or more external folders (that is, folders outside the user's profile area). For example, assume we have an application App1 which stores its personalization in two folders c:\App1 and c:\App1Blobs.
Prior to a user logging on and creating their profile you must configure all the folders to be synchronized. Extended synchronization does not support the addition of further folders after logon, once the user's profile has been created. It is essential to pilot the application before deploying it to a production environment.
Once extended synchronization has been configured as described above, the user may log on and create (or migrate) their profile. Extended synchronization supports the use of pre-installed applications (for example, using a standard image with all applications already installed) and also applications that are installed by the user after the profile has been created.

1.
Scenario 2: Pooled Desktop (XenDesktop), Not Shared with Any Other User
This is very similar to Scenario 1. In this supported configuration, the application will have been installed as part of a shared image, but will not have been run, so that personalization takes place on the first use of the application.
Unsupported Scenarios
Other scenarios - those typically involving shared access by multiple users to a workstation, or simultaneous access by multiple users to a server - are not supported. Specific examples of unsupported scenarios include:
Domain workstations, including domain-joined XenDesktop workstations, shared by multiple users. Fast User Switching disabled.
Domain servers, concurrently shared with other users, whether Remote Desktop Services and XenApp environments.
Domain workstations. Fast User Switching enabled.
These unsupported scenarios all involve a folder or folders being shared by multiple users, which gives rise to privacy and security issues, as well as profile bloat.
More Information
The scenarios described in this topic may be further constrained by any End User License Agreements (EULAs) that apply to the Citrix products in your deployment.
10.2.3.3.6. Wildcards and Profile Management
Updated: 2010-03-05
You can use ? (question mark) and * (asterisk) as wildcard characters in file inclusion and exclusion lists. The ? (question mark) matches a single character. The * (asterisk) matches zero or more characters.
Wildcards work recursively but are not supported in folder names. Ensure you specify a path when using wildcards.
Examples
The wildcard <path name>\h*.txt matches house.txt, h.txt, and house.txt.txt, but does not match ah.txt.
The wildcard <path name>\a?c.txt matches abc.txt, but does not match ac.txt.
The wildcard <path name>\a?c*d.txt matches abcd.txt and abccd.txt, but does not match acd.txt.
10.2.4. To store certificates
Updated: 2010-03-05
Follow this procedure to save personal certificates that have been imported into the certificate store during a session. By default, certificates are automatically synchronized.
Add the path Application Data\Microsoft\SystemCertificates\My to the setting.Directories to synchronizeThe operating system language determines the Application Data folder in this location. If a policy is used to configure multi-language systems, add each language's location to the list.
Example
On an English system, the path is Application Data\Microsoft\SystemCertificates\My. On a German system it is Anwendungsdaten\Microsoft\SystemCertificates\My.
For your changes to take effect, run the command from the command prompt as documented at gpupdate
.http://technet.microsoft.com/en-us/library/bb490983.aspx
10.2.5. To stream user profiles
1.
2.
3.
4.
5.
6.
7.
8.
9.
1.
2.
Updated: 2010-03-05
With the Citrix streamed user profiles feature, files and folders are fetched from the user store to the local computer only when they are accessed by users after they've logged on. Registry entries and any recently modified files (that is, those in the pending area) are exceptions. They are fetched immediately. For more information on the pending area, see .Pending Area
Under , double-click .Profile Management Streamed user profiles
Double-click .Profile streaming
Select and click .Enabled OK
Optionally, to enhance the streaming experience for users, double-click , select Always cache Enabled, and do one of the following:
To save network bandwidth by imposing a lower limit on the size of files or folders that are streamed, set a limit in megabytes. Any files and folders that exceed the limit are fetched as soon as possible after logon.
To turn on the cache entire profile feature, set the limit to zero. After logon, this fetches all files in the user store as a background system task, without any feedback to users.
Click .OK
Optionally, double-click , select , and enter a Timeout for pending area lock files Enabledtimeout period (days) that frees up files so they are written back to the user store from the pending area in the event that the user store remains locked when a server becomes unresponsive.
Click .OK
Optionally, if you want only a subset of user profiles in the OU to be streamed, double-click , select , and enter a list of groups. The profiles of users in Streamed user profile groups Enabled
all other groups will not be streamed.
Click .OK
For your changes to take effect, run the command from the command prompt as documented at gpupdate
.http://technet.microsoft.com/en-us/library/bb490983.aspx
10.2.6. To configure active profile write back
Updated: 2010-02-19
To ensure profile integrity, files and folders (but not registry entries) that are modified on the local computer can be backed up to the user store in the middle of a session, before logoff. This is particularly useful in Citrix XenDesktop deployments, where a user might otherwise leave their session open for a long period without local file changes in their profile being mirrored in the user store.
This feature is not intended to support users opening multiple active sessions. However, if a user starts a second session (started at a second computer, for example) modifications made to a file in the first session will be available in the second if it was started before logging off the first.
Under , double-click .Profile Management Active write back
Select and click .Enabled OK
10.3. Administering Profiles Within and Across OUs
Updated: 2010-03-19
Within OUs
You can control how Profile management administers profiles within an Organizational Unit (OU). In Windows Server 2008 environments, use Windows Management Instrumentation (WMI) filtering to restrict the ADM file to a subset of computers in the OU. WMI filtering is a capability of Group Policy Management Console with Service Pack 1 (GPMC with SP1). For more information on WMI filtering, see http:
and //technet.microsoft.com/en-us/library/cc779036(WS.10).aspx http://technet.microsoft.. For more information on GPMC with SP1, see com/en-us/library/cc758471(WS.10).aspx http://www.
.microsoft.com/DOWNLOADS/details.aspx?FamilyID=0a6d4c24-8cbd-4b35-9272-dd3cbfc81887&displaylang=en
To manage different computers with different OSs using a single GPO in a single OU, you can implement a
system environment variable and incorporate it into the path to the user store as follows.
On each computer, set up a system environment variable called ProfVer. (User environment variables are not supported.) Then, set the path to the user store as:
\\upmserver\upmshare\%username%.%userdomain%\%ProfVer%
For example, set the value for ProfVer to for your Windows XP 32-bit computers and for your XP XPx64
Windows XP 64-bit computers. For Windows Server 2008 32-bit and 64-bit computers, use and 2k8 2k8x64
respectively. Setting these values manually on many computers is time-consuming, but if you are use Provisioning Services, you only have to add the variable to your base image.
An example of how to script this is at:
http://forums.citrix.com/thread.jspa?threadID=241243&tstart=0
Note: This sample script includes lines for Windows Server 2000, which is unsupported by Profile management.
Across OUs
You can control how Profile management administers profiles across OUs. Depending on your OU hierarchy, one OU may inherit policies from another. You can create policy settings in a separate Group Policy Object linked to the affected OU to override the inherited policies.
11. Integrating Profile Management with Citrix Products
Updated: 2010-08-04
This section contains information for Citrix administrators deploying Profile management with other Citrix products or components. Use this information in addition to, not instead of, the other topics in the Profile management documentation. For example, see System Requirements for Profile Managementfor requirements relating to the use of Profile management in such deployments.
This section also contains information on how some third-party products interact with Profile management or profiles in general.
11.1. Profile Management and XenApp
Updated: 2010-03-19
This version of Profile management is available to customers who are licensed to use Enterprise and Platinum Editions of XenApp (version 4.5 or later). You can also install Profile management on local desktops, allowing users to share their local profile with published resources.
Profile management works in XenApp environments that employ Terminal Services. In these environments, you must set up an OU for each supported operating system. For more information, see the article "Using User Profiles in Windows Server 2003" on the Microsoft TechNet Web site at .http://technet.microsoft.com
In farms that contain different versions of XenApp or that run different operating systems, Citrix recommends using a separate OU for each server that runs each version or operating system.
Important: Citrix does not recommend using extended synchronization on folders that are shared by multiple users (for example, folders containing shared application data). If you apply this feature to such folders, the application data created by one user may be overwritten by Profile management when another user logs off.
Streamed Applications
Profile management can be used in environments where applications are streamed to either user devices directly or streamed to XenApp servers and, from there, published to users.
Client-side application virtualization technology in XenApp is based on application streaming which automatically isolates the application. The application streaming feature enables applications to be delivered to XenApp servers and client devices, and run in a protected virtual environment. There are many reasons to isolate the applications that are being streamed to users, such as the ability to control how applications interact on the user device to prevent application conflicts. For example, isolation of user settings is required

1.
if different versions of the same application are present; Microsoft Office 2003 may be installed locally and Office 2007 may be streamed to users' devices. Failure to isolate user settings creates conflicts, and might severely affect the functionality of both applications (local and streamed).
For requirements relating to the use of Profile management with streamed applications, see System .Requirements for Profile Management
11.2. Profile Management and XenDesktop
Updated: 2010-06-25
This version of Profile management is available to customers who are licensed to use: the Advanced, Enterprise, or Platinum edition of XenDesktop 2.1 or 3.0
the VDI, Enterprise, or Platinum edition of XenDesktop 4.0
You can use Profile management with XenApp in a XenDesktop environment. For more information, see . If that environment also uses Provisionsing Services, see Profile Management and XenApp Profile
.Management and Provisioning Services
If you upgrade Profile management in a XenDesktop deployment, consider .the effect on the log file locations
On virtual images (for example, vDisks created with Citrix Provisioning Services), the Citrix Profile Management service starts before Group Policy is applied if Profile management has not been configured correctly on the images before they are rolled out. Configure Profile management on the images using the documented procedures before you put the images into a production environment. If you are using vDisks, follow .best practice
Consider using as a safeguard in your XenDesktop deployment.active profile write back
Important: Citrix does not recommend using extended synchronization on folders that are shared by multiple users (for example, folders containing shared application data). If you apply this feature to such folders, the application data created by one user may be overwritten by Profile management when another user logs off.
11.2.1. Example Settings for XenDesktop
Updated: 2010-04-07
This topic describes example settings used in a XenDesktop deployment, in which virtual desktop images are created with Citrix Provisioning Services and shared by multiple users.
Not all settings are shown in the table in this topic.
Note the following about these settings:
. This setting makes use of an environment variable, ProfVer, which is only set Path to user storeonce (before imaging the Master Target device) for each operating system in the XenDesktop environment. Alternatively, if you have many Provisioning Server private virtual disks (vDisks) or many physical devices, it may be simpler for each OU to have a separate GPO that defines the path to the user store (and that also enables Profile management). For details of this environment variable, see
.Administering Profiles Within and Across OUs
. All domain users' profiles are managed by Profile management.Processed groups
(file system) and (registry). These settings prevent the Exclusion list - directories exclusion listlisted temporary or cached files, and the listed registry entries, from being processed. These files and entries are commonly stored in user profiles.
and . Knowledge of where user's application data Directories to synchronize Files to synchronizeis stored helped define these settings.
and . This deployment includes fairly detailed recording of events in Log settings Path to log filethe Profile management log. The log files are stored on a persistent drive (E:). This preserves them from deletion by the deployment's Provisioning Services disk in Shared mode, which would delete them if they were stored on the C: drive.
and . This deployment existed Local profile conflict handling migration of existing profilesbefore Profile management was added to it. This has two consequences:
Local profiles and Citrix profiles (those managed by Profile management) might co-exist, causing potential conflicts that must be resolved by deciding which profile type takes precedence.

1.
2.
In this case, the deployment favored Citrix profiles over local profiles. The data in the latter is discarded if a conflict arises.
A decision must be made on which existing Windows profile (roaming, local, or both) is copied to the user store and used in all further processing. In this case, both profile types can be present.
Citrix/Profile Management
Policy
Processed groups
Processed groups: MyDomainName\Domain Users
Processed groups: MyDomainName\Domain Users
Policy
Path to user store: \\servername\userstore\%username%.%userdomain%\%ProfVer%
Citrix/Profile Management/File system
Policy
Exclusion list - directories
Exclusion list: $Recycle.Bin
AppData\Local\
AppData\Local\Google\Chrome\User Data\Default\Cache
AppData\Local\Google\Chrome\User Data\Default\Plugin Data
AppData\LocalLow
AppData\Roaming\Citrix\PNAgent\AppCache
AppData\Roaming\Citrix\PNAgent\Icon Cache
AppData\Roaming\Citrix\PNAgent\ResourceCache
AppData\Roaming\ICAClient\Cache
AppData\Roaming\Macromedia\Flash Player\#SharedObjects
AppData\Roaming\Macromedia\Flash Player\macromedia.com\support\flashplayer\sys
AppData\Roaming\Microsoft\Windows\Start Menu
AppData\Roaming\Sun\Java\Deployment\cache
AppData\Roaming\Sun\Java\Deployment\log
AppData\Roaming\Sun\Java\Deployment\tmp
Exclusion list: $Recycle.Bin
AppData\Local\
AppData\Local\Google\Chrome\User Data\Default\Cache
AppData\Local\Google\Chrome\User Data\Default\Plugin Data
AppData\LocalLow
AppData\Roaming\Citrix\PNAgent\AppCache
AppData\Roaming\Citrix\PNAgent\Icon Cache

AppData\Roaming\Citrix\PNAgent\ResourceCache
AppData\Roaming\ICAClient\Cache
AppData\Roaming\Macromedia\Flash Player\#SharedObjects
AppData\Roaming\Macromedia\Flash Player\macromedia.com\support\flashplayer\sys
AppData\Roaming\Microsoft\Windows\Start Menu
AppData\Roaming\Sun\Java\Deployment\cache
AppData\Roaming\Sun\Java\Deployment\log
AppData\Roaming\Sun\Java\Deployment\tmp
Citrix/Profile Management/File system/Synchronization
Policy
Directories to synchronize
List of directories to synchronize:
AppData\Local\Citrix\RadeCache
AppData\Local\Google\Chrome\User Data\Default
AppData\Local\Microsoft\Credentials
AppData\Local\Microsoft\Feeds
AppData\Local\Microsoft\Windows Sidebar
List of directories to synchronize:
AppData\Local\Citrix\RadeCache
AppData\Local\Google\Chrome\User Data\Default
AppData\Local\Microsoft\Credentials
AppData\Local\Microsoft\Feeds
AppData\Local\Microsoft\Windows Sidebar
Policy
Files to synchronize
List of files to synchronize:
AppData\Local\Google\Chrome\User Data\First Run
AppData\Local\Microsoft\Office\*.qat
List of files to synchronize:
AppData\Local\Google\Chrome\User Data\First Run
AppData\Local\Microsoft\Office\*.qat
Citrix/Profile Management/Log Settings
Policy
Enable logging
Log Settings
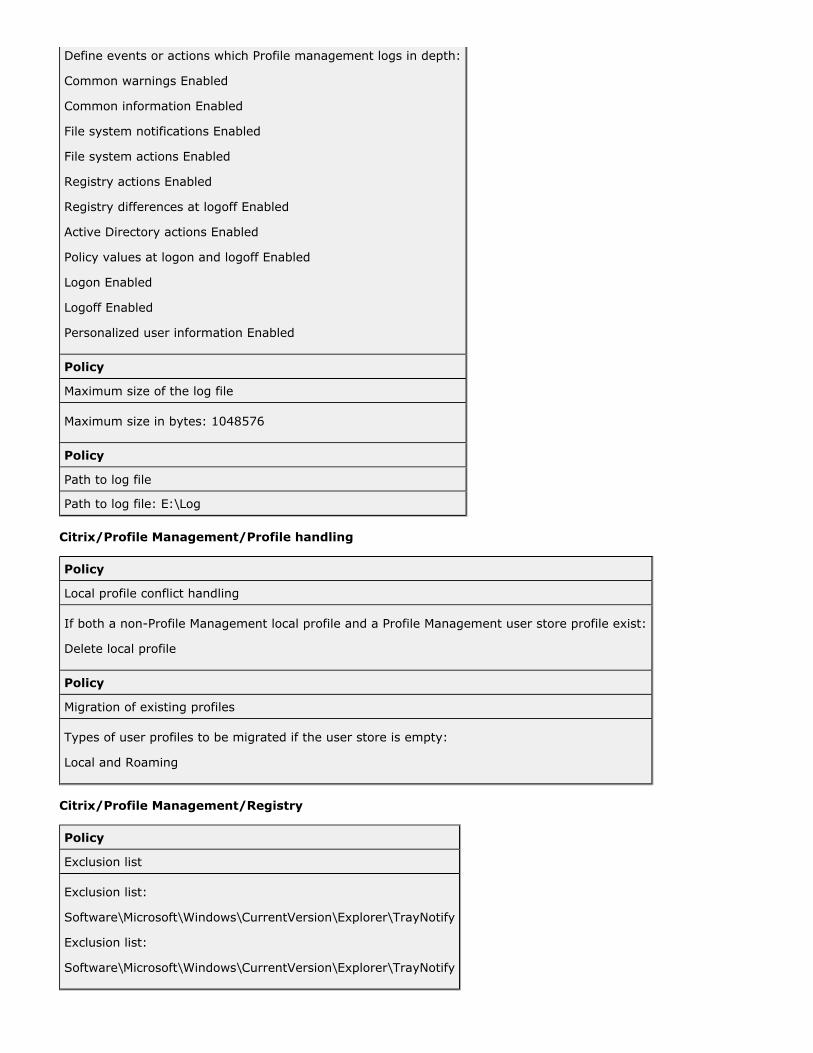
Define events or actions which Profile management logs in depth:
Common warnings Enabled
Common information Enabled
File system notifications Enabled
File system actions Enabled
Registry actions Enabled
Registry differences at logoff Enabled
Active Directory actions Enabled
Policy values at logon and logoff Enabled
Logon Enabled
Logoff Enabled
Personalized user information Enabled
Policy
Maximum size of the log file
Maximum size in bytes: 1048576
Policy
Path to log file
Path to log file: E:\Log
Citrix/Profile Management/Profile handling
Policy
Local profile conflict handling
If both a non-Profile Management local profile and a Profile Management user store profile exist:
Delete local profile
Policy
Migration of existing profiles
Types of user profiles to be migrated if the user store is empty:
Local and Roaming
Citrix/Profile Management/Registry
Policy
Exclusion list
Exclusion list:
Software\Microsoft\Windows\CurrentVersion\Explorer\TrayNotify
Exclusion list:
Software\Microsoft\Windows\CurrentVersion\Explorer\TrayNotify
1.
2.
3.
4.
1.
2.
3. 1.
2.
3.
4.
11.3. Profile Management and Provisioning Services
Updated: 2010-01-27
This section applies to Citrix user profiles on virtual disks (vDisks) created with Citrix Provisioning Services.
You can use Profile management on vDisks running in Standard Image and Private Image modes but not Difference Disk Image mode.
11.3.1. Profile Caching on vDisks
Updated: 2010-03-17
To lay out your vDisk effectively, be aware that the Profile management cache is located separately from the vDisk cache. For information about vDisk cache locations, see your Provisioning Services documentation.
The Profile management cache default location is C:\Program Files\User Profile Manager. If your vDisk has a local physical disk that is not streamed, consider locating the Profile management cache on this disk. This is especially recommended for vDisks running in Standard Image mode because the cache is recreated each time Profile management restarts or the Change Journal's Journal ID is updated (a frequent scenario for vDisks running in this mode). If, on the other hand, the cache is stored on a local physical disk, the cache is not recreated with each restart or update.
It's also good practice for vDisks running in Standard Image mode to ensure, before taking the Master Target Device image, that all non-essential, locally cached profiles are removed from the Device, but do not remove the currently logged-on local administrator's profile. A good way of achieving this is as follows. During this procedure, error messages may be displayed.
To remove non-essential, locally cached profiles from the Master Target Device
This is the procedure on Windows XP.
Right-click .My Computer
Select .Properties
On the tab, click in .Advanced Settings User Profiles
Highlight each profile you want to remove and click .Delete
To maintain Profile management on vDisks
Follow this procedure when maintaining Profile management on a vDisk image that runs in Standard Image mode (for example, when you upgrade the software). If you don't follow this procedure, users' logons may hang while their profiles are loaded.
Stop the vDisk running in Standard Image mode.
Change to Private Image mode.
Perform the maintenance tasks you require. For example, to upgrade Profile management: Upgrade to the new version and let the vDisk start.
Stop the Citrix Profile Management service.
Delete the Profile management cache.
Put the vDisk back into Standard Image mode. Do not restart it.
11.3.2. Preconfiguring Profile Management with Provisioning Services
Updated: 2010-03-05
Using Citrix Provisioning Services, you can build images that have Profile management pre-installed. When doing so, you will likely capture some Group Policy settings in the registry while you set up the image in Private Image mode. The settings will still be present when you switch back to Standard Image mode. Ideally those settings should be sensible defaults for the provisioned virtual machine when it starts running and the user logs on. At a minimum, you should ensure you have sensible defaults for these settings:
. You will need to enable the software once your preparation and testing Enable Profile management
1.
2.
3.
4.
5.
1.
of Profile management and the image as a whole are complete.
. Typically, you don't need to process administrators' logons.Process logons of local administrators
. Specify the groups you want to have Citrix user profiles.Processed groups
. Sets the path to the directory in which a cache file of the Directory of the MFT cache fileMFT directory content is stored.
The defaults are used if the image doesn't immediately get a before the Citrix Profile gpupdate
Management service starts, so it's best to make sure they're sensible defaults for the majority of cases.
11.3.3. To retrieve Profile management log files from vDisks
Updated: 2010-03-05
This section provides guidance on using log files that reside on shared images created with Citrix Provisioning Services (vDisks). Profile management saves the files at logoff, but, if you use vDisks, you should take account of the fact that base vDisk images can be reset, which results in log files being deleted. You therefore need to take some action in order to retrieve the files. The action you take depends on whether the log files are being deleted at logon or logoff.
Use of vDisks is common in XenDesktop deployments, so the guidance in this topic uses that product as an example.
To retrieve a log file that is deleted at logoff
If entire profiles or parts of them are not saved back to the user store on the network, the log file will also not be saved there.
If the Provisioning Services write-cache is stored on the computer running Provisioning Services, this issue should not arise and the log file should be saved back to the user store.
If the write-cache is stored locally, in this procedure you may have to log on from the same device as the user. However, even this may fail if the write-cache is stored locally in RAM.
If the write cache is not on the computer running Provisioning Services, you may have to create a copy of the vDisk, assign it to the new virtual machine, and change the write-cache on the vDisk so it is stored on that computer.
In XenDesktop, create a new desktop group, add one virtual machine to it, and point it to your vDisk.
Grant access to the virtual machine to one test user and the administrator.
Modify the desktop group's idle pool count to for all times of the day (to stop power management 1turning the machine off), and set its logoff behavior to (to prevent the machine restarting Do nothingand resetting the image).
Log on as the test user to the virtual desktop and then log off from it.
Log on as administrator from the XenCenter or VMware console, and retrieve the log file.
Consult the for more information on creating desktop groups and modifying XenDesktop documentationtheir properties.
To retrieve a log file that is deleted at logon
If a profile is current in the user store on the network but does not load correctly when the user logs on, log file entries will be lost.
Map a drive to \\<vmhostname>\C$ and, before the user logs off the session, locate the log file.
The log file will not be complete (some entries will be missing) but if the problem you are troubleshooting is at logon, it may provide enough information for you to isolate the cause of the issue.
11.4. Profile Management and VMWare

1.
2.
3.
4.
5.
6.
7.
8.
Updated: 2010-03-05
This topic applies to Citrix user profiles on virtual machines created with VMware software such as VMware ESX™. It addresses an issue where local profile caches become locked.
If you have set up Profile management to delete cached local profiles when users log off from their virtual machines created with VMware (in your XenDesktop or XenApp deployment, say) but the profiles are not deleted, you can use this workaround to overcome the issue.
This issue has been shown to occur when roaming profiles are used on virtual machines created with VMware ESX 3.5 and the Profile management setting is enabled.Delete locally cached profiles on logoff
The issue occurs because the Shared Folders option in VMware Tools adds a file to the profiles, and the file is locked by a running process thereby preventing profiles being deleted at logoff. The file is C:\Documents and Settings\userid\Application Data\VMware\hgfs.dat.
If you have verbose logging enabled in Profile management, the log file may detect this problem with an entry such as:
2009-06-03;11:44:31.456;ERROR;PCNAME;JohnSmith4;3;3640;DeleteDirectory: Deleting the directory <C:\Documents and Settings\<user name>\Local Settings\Application Data\VMware> failed with: The directory is not empty.
To work around this issue in a XenApp deployment on Windows Server 2008:
Log on as Administrator to the XenApp server.
In XenApp deployments, log off all users from the server.
In Control Panel, go to .Add/Remove Programs
Locate and choose the option.VMware Tools Change
Change to .Shared Folders This feature will not be available
Click > > .Next Modify Finish
Restart the server.
Clean up the half-deleted profiles. Use > > > , My Computer Properties Advanced User Profilesselect the profiles and delete them. Windows informs you of any errors trying to delete the profiles.
11.5. Profile Management and Microsoft Outlook
Updated: 2010-08-05
This topic describes best practice for integrating Microsoft Outlook with roaming profiles.
Read the following article before integration:
http://office.microsoft.com/en-gb/help/HA011402691033.aspx.
It is good practice to ensure that users store Outlook data on a server rather than on a network share or locally.
With roaming profiles, files and folders in the location defined by the environment variable %UserProfile% (on the local computer) roam with users, with the exception of one folder, %UserProfile%\Local Settings. This exception affects Outlook users because, by default, some Outlook data (for example, .ost, .pst, and .pab files) is created in this non-roaming folder.
Important: Files in this location are typically large and hinder the performance of roaming profiles.
The following practices can reduce troubleshooting of roaming profiles with Outlook and encourage good email management by users and administrators:
If possible, use an ADM template for Microsoft Office that prohibits the use of .pst files.
If users need more space, increase storage on your Microsoft Exchange servers rather than a network share.
Define and enforce an email retention policy for the entire company (one that involves a company-wide email storage server) rather than granting exceptions for .pst files to individual users or increasing their personal storage capacity. The policy should also discourage reliance on .pst files by allowing users easily to request email restores to their inbox.
If .pst files cannot be prohibited, do not configure Profile management or roaming profiles on

your Exchange servers.
12. Profile Management ADM File Reference
Updated: 2010-06-30
This topic describes the settings in the ADM file, the template used to configure Profile management settings. In the Group Policy Object Editor, the settings appear under > Computer Configuration
. > Administrative Templates Citrix
Modifying Settings
To deactivate any Profile management policy that you enter as lists (for example, exclusion lists and inclusion lists), set the policy to Disabled. Do not set the policy to Not Configured.
For your changes to take effect, run the command from the command prompt as documented at gpupdate
.http://technet.microsoft.com/en-us/library/bb490983.aspx
Sections in the ADM File
All Profile management policies are contained in the following sections, located in the Citrix folder:
Profile Management
Profile Management\Profile handling
Profile Management\Advanced settings
Profile Management\Log settings
Profile Management\Registry
Profile Management\File system
Profile Management\File system\Synchronization
Profile Management\Streamed user profiles
Profile Management
Enable Profile management
By default, to facilitate deployment, Profile management does not process logons or logoffs. Turn on processing by enabling this setting.
If this setting is not configured here, the value from the .ini file is used. If this setting is not configured here or in the .ini file, Profile management does not process Windows user profiles in any way.
This setting corresponds to the ServiceActive setting in the .ini file.
This policy requires User Profile Manager 2.0.0 or later.
Processed groups
Both computer local groups and domain groups (local, global and universal) can be used. Domain groups should be specified in the format: <DOMAIN NAME>\<GROUP NAME>.
If this setting is configured here, Profile management processes only members of these user groups. If this setting is disabled, Profile management processes all users.
If this setting is not configured here, the value from the .ini file is used. If this setting is not configured here or in the .ini file, members of all user groups are processed.
This setting corresponds to the ProcessedGroups setting in the .ini file.
This policy requires User Profile Manager 1.0.0 or later.
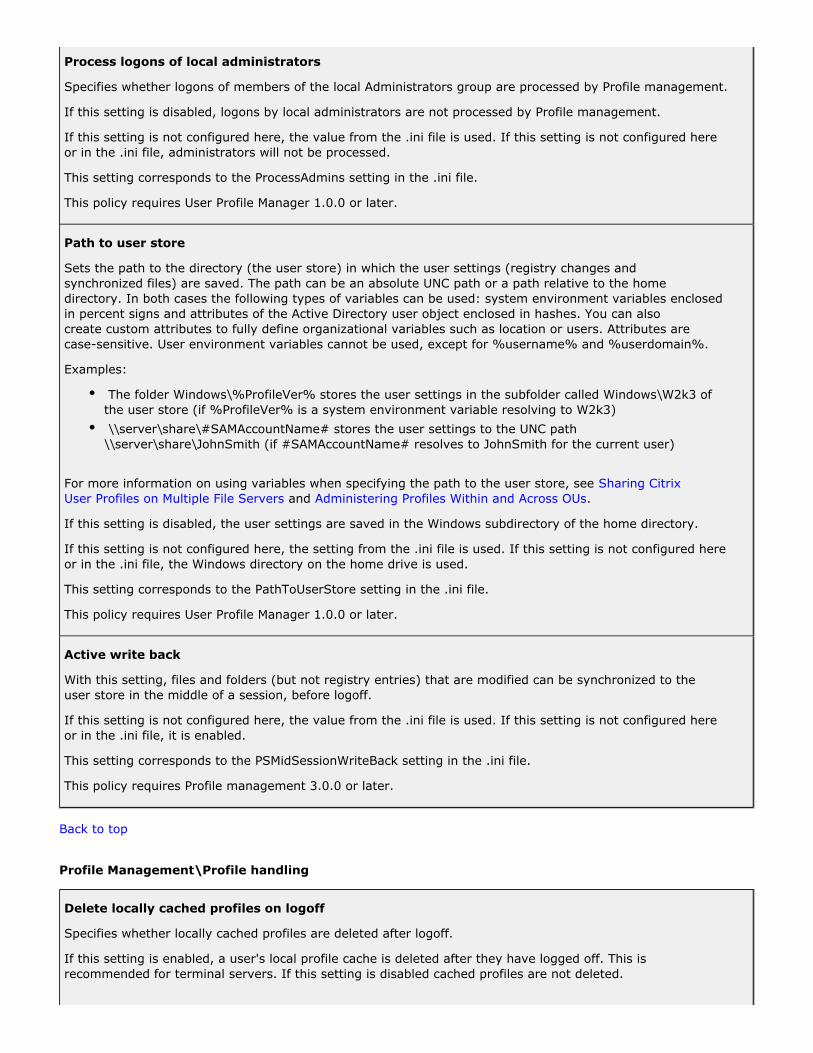
Process logons of local administrators
Specifies whether logons of members of the local Administrators group are processed by Profile management.
If this setting is disabled, logons by local administrators are not processed by Profile management.
If this setting is not configured here, the value from the .ini file is used. If this setting is not configured here or in the .ini file, administrators will not be processed.
This setting corresponds to the ProcessAdmins setting in the .ini file.
This policy requires User Profile Manager 1.0.0 or later.
Path to user store
Sets the path to the directory (the user store) in which the user settings (registry changes and synchronized files) are saved. The path can be an absolute UNC path or a path relative to the home directory. In both cases the following types of variables can be used: system environment variables enclosed in percent signs and attributes of the Active Directory user object enclosed in hashes. You can also create custom attributes to fully define organizational variables such as location or users. Attributes are case-sensitive. User environment variables cannot be used, except for %username% and %userdomain%.
Examples:
The folder Windows\%ProfileVer% stores the user settings in the subfolder called Windows\W2k3 of the user store (if %ProfileVer% is a system environment variable resolving to W2k3)
\\server\share\#SAMAccountName# stores the user settings to the UNC path \\server\share\JohnSmith (if #SAMAccountName# resolves to JohnSmith for the current user)
For more information on using variables when specifying the path to the user store, see Sharing Citrix and .User Profiles on Multiple File Servers Administering Profiles Within and Across OUs
If this setting is disabled, the user settings are saved in the Windows subdirectory of the home directory.
If this setting is not configured here, the setting from the .ini file is used. If this setting is not configured here or in the .ini file, the Windows directory on the home drive is used.
This setting corresponds to the PathToUserStore setting in the .ini file.
This policy requires User Profile Manager 1.0.0 or later.
Active write back
With this setting, files and folders (but not registry entries) that are modified can be synchronized to the user store in the middle of a session, before logoff.
If this setting is not configured here, the value from the .ini file is used. If this setting is not configured here or in the .ini file, it is enabled.
This setting corresponds to the PSMidSessionWriteBack setting in the .ini file.
This policy requires Profile management 3.0.0 or later.
Back to top
Profile Management\Profile handling
Delete locally cached profiles on logoff
Specifies whether locally cached profiles are deleted after logoff.
If this setting is enabled, a user's local profile cache is deleted after they have logged off. This is recommended for terminal servers. If this setting is disabled cached profiles are not deleted.

If this setting is not configured here, the value from the .ini file is used. If this setting is not configured here or in the .ini file, cached profiles are not deleted.
This setting corresponds to the DeleteCachedProfilesOnLogoff setting in the .ini file.
This policy requires User Profile Manager 2.0.0 or later.
Local profile conflict handling
This setting configures how Profile management behaves if both a profile in the user store and a local Windows user profile (not a Citrix user profile) exist.
If this setting is disabled or set to the default value of , Profile management uses the Use local profilelocal profile, but does not change it in any way. If this setting is set to , Delete local profileProfile management deletes the local Windows user profile, and then imports the Citrix user profile from the user store. If this setting is set to , Profile management renames the local Rename local profileWindows user profile (in order to back it up) and then imports the profile from the user store.
If this setting is not configured here, the value from the .ini file is used. If this setting is not configured here or in the .ini file, existing local profiles are used.
This setting corresponds to the LocalProfileConflictHandling setting in the .ini file.
This policy requires User Profile Manager 2.0.0 or later.
Migration of existing profiles
Profile management can migrate existing profiles "on the fly" during logon if the user has no profile in the user store.
The following event takes place during logon: if an existing Windows profile is found and the user does not yet have a Citrix user profile in the user store, the Windows profile is migrated (copied) to the user store on the fly. After this process, the user store profile is used by Profile management in the current and any other session configured with the path to the same user store.
If this setting is enabled, profile migration can be activated for roaming and local profiles (the default), roaming profiles only, local profiles only, or profile migration can be disabled altogether. If profile migration is disabled and no Citrix user profile exists in the user store, the existing Windows mechanism for creating new profiles is used as in a setup without Profile management.
If this setting is not configured here, the value from the .ini file is used. If this setting is not configured here or in the .ini file, existing local and roaming profiles are migrated.
This setting corresponds to the MigrateWindowsProfilesToUserStore setting in the .ini file.
This policy requires User Profile Manager 2.0.0 or later.
Template profile
By default, new user profiles are created from the default user profile on the computer where a user first logs on. Profile management can alternatively use a centrally stored template when creating new user profiles. Template profiles are identical to normal profiles in that they reside in any file share on the network.
Use UNC notation to specify the folder where the template files and folders are located. You should specify the full path to the folder containing the NTUSER.DAT registry file and any other folders and files required for the template profile. If it consists only of NTUSER.DAT, ensure you don't include the file name in the path. For example:
Avoid: \\myservername\myprofiles\template\ntuser.dat
Use: \\myservername\myprofiles\template
Users need read access to a template profile.
If this setting is disabled, templates are not used. If this setting is enabled, Profile management uses the template instead of the local default profile when creating new user profiles. If a user has no Citrix user profile, but a local or roaming Windows user profile exists, by default the local profile is used (and
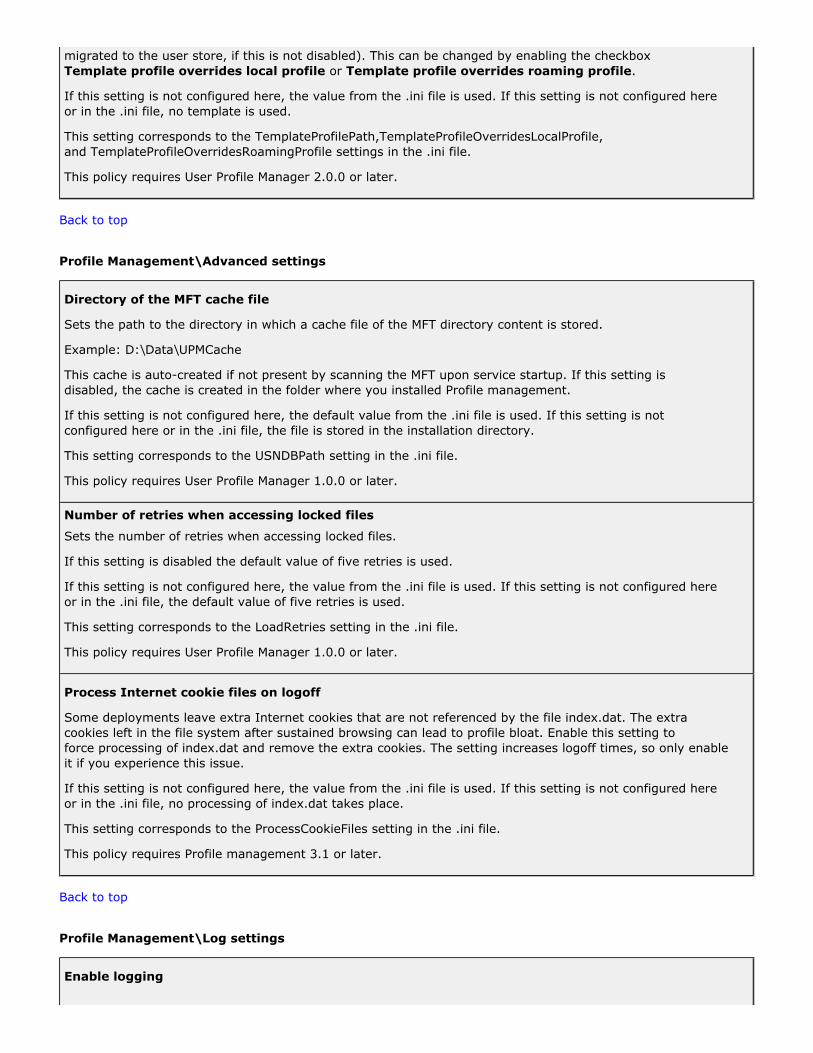
migrated to the user store, if this is not disabled). This can be changed by enabling the checkbox or .Template profile overrides local profile Template profile overrides roaming profile
If this setting is not configured here, the value from the .ini file is used. If this setting is not configured here or in the .ini file, no template is used.
This setting corresponds to the TemplateProfilePath,TemplateProfileOverridesLocalProfile, and TemplateProfileOverridesRoamingProfile settings in the .ini file.
This policy requires User Profile Manager 2.0.0 or later.
Back to top
Profile Management\Advanced settings
Directory of the MFT cache file
Sets the path to the directory in which a cache file of the MFT directory content is stored.
Example: D:\Data\UPMCache
This cache is auto-created if not present by scanning the MFT upon service startup. If this setting is disabled, the cache is created in the folder where you installed Profile management.
If this setting is not configured here, the default value from the .ini file is used. If this setting is not configured here or in the .ini file, the file is stored in the installation directory.
This setting corresponds to the USNDBPath setting in the .ini file.
This policy requires User Profile Manager 1.0.0 or later.
Number of retries when accessing locked files
Sets the number of retries when accessing locked files.
If this setting is disabled the default value of five retries is used.
If this setting is not configured here, the value from the .ini file is used. If this setting is not configured here or in the .ini file, the default value of five retries is used.
This setting corresponds to the LoadRetries setting in the .ini file.
This policy requires User Profile Manager 1.0.0 or later.
Process Internet cookie files on logoff
Some deployments leave extra Internet cookies that are not referenced by the file index.dat. The extra cookies left in the file system after sustained browsing can lead to profile bloat. Enable this setting to force processing of index.dat and remove the extra cookies. The setting increases logoff times, so only enable it if you experience this issue.
If this setting is not configured here, the value from the .ini file is used. If this setting is not configured here or in the .ini file, no processing of index.dat takes place.
This setting corresponds to the ProcessCookieFiles setting in the .ini file.
This policy requires Profile management 3.1 or later.
Back to top
Profile Management\Log settings
Enable logging
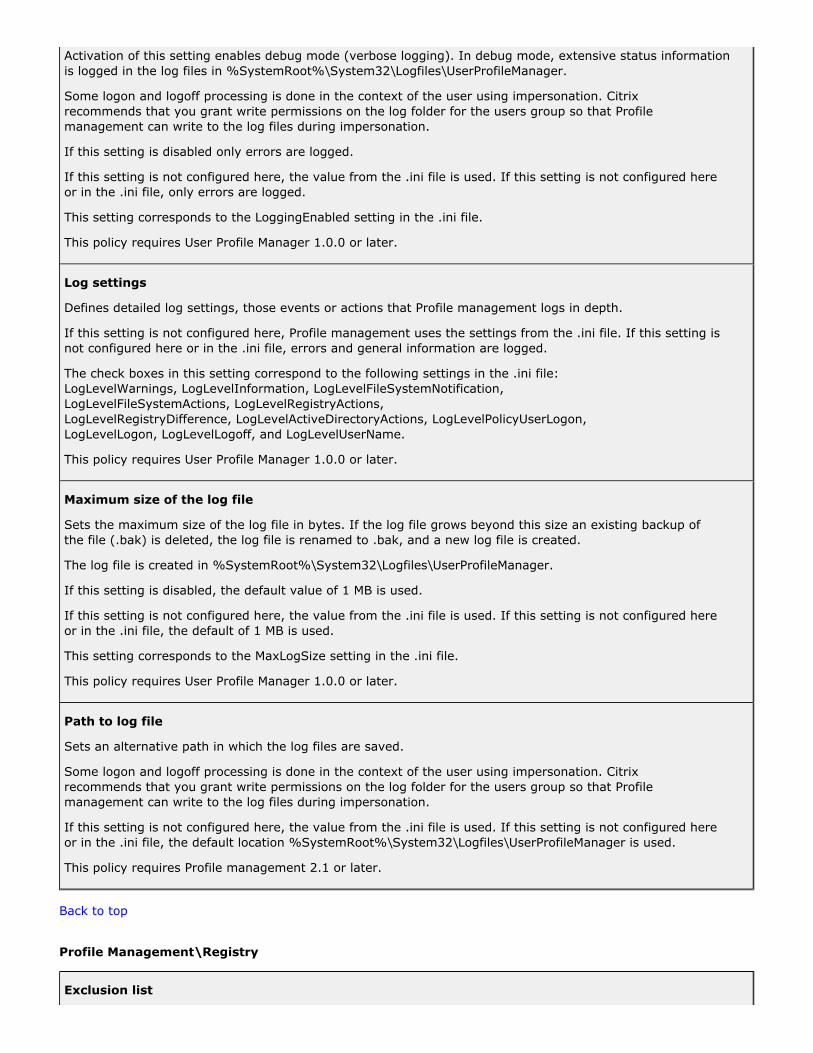
Activation of this setting enables debug mode (verbose logging). In debug mode, extensive status information is logged in the log files in %SystemRoot%\System32\Logfiles\UserProfileManager.
Some logon and logoff processing is done in the context of the user using impersonation. Citrix recommends that you grant write permissions on the log folder for the users group so that Profile management can write to the log files during impersonation.
If this setting is disabled only errors are logged.
If this setting is not configured here, the value from the .ini file is used. If this setting is not configured here or in the .ini file, only errors are logged.
This setting corresponds to the LoggingEnabled setting in the .ini file.
This policy requires User Profile Manager 1.0.0 or later.
Log settings
Defines detailed log settings, those events or actions that Profile management logs in depth.
If this setting is not configured here, Profile management uses the settings from the .ini file. If this setting is not configured here or in the .ini file, errors and general information are logged.
The check boxes in this setting correspond to the following settings in the .ini file: LogLevelWarnings, LogLevelInformation, LogLevelFileSystemNotification, LogLevelFileSystemActions, LogLevelRegistryActions, LogLevelRegistryDifference, LogLevelActiveDirectoryActions, LogLevelPolicyUserLogon, LogLevelLogon, LogLevelLogoff, and LogLevelUserName.
This policy requires User Profile Manager 1.0.0 or later.
Maximum size of the log file
Sets the maximum size of the log file in bytes. If the log file grows beyond this size an existing backup of the file (.bak) is deleted, the log file is renamed to .bak, and a new log file is created.
The log file is created in %SystemRoot%\System32\Logfiles\UserProfileManager.
If this setting is disabled, the default value of 1 MB is used.
If this setting is not configured here, the value from the .ini file is used. If this setting is not configured here or in the .ini file, the default of 1 MB is used.
This setting corresponds to the MaxLogSize setting in the .ini file.
This policy requires User Profile Manager 1.0.0 or later.
Path to log file
Sets an alternative path in which the log files are saved.
Some logon and logoff processing is done in the context of the user using impersonation. Citrix recommends that you grant write permissions on the log folder for the users group so that Profile management can write to the log files during impersonation.
If this setting is not configured here, the value from the .ini file is used. If this setting is not configured here or in the .ini file, the default location %SystemRoot%\System32\Logfiles\UserProfileManager is used.
This policy requires Profile management 2.1 or later.
Back to top
Profile Management\Registry
Exclusion list

List of registry keys in the HKCU hive which are ignored during logoff.
Example: Software\Policies
If this setting is disabled, no registry keys are excluded.
If this setting is not configured here, the value from the .ini file is used. If this setting is not configured here or in the .ini file, no registry keys are excluded.
This setting corresponds to the setting ExclusionListRegistry in the .ini file.
This policy requires User Profile Manager 1.0.0 or later.
Inclusion list
List of registry keys in the HKCU hive that are processed during logoff.
Example: Software\Adobe.
If this setting is enabled, only keys on this list are processed. If this setting is disabled, the complete HKCU hive is processed.
If this setting is not configured here, the value from the .ini file is used. If this setting is not configured here or in the .ini file, all of HKCU is processed.
This setting corresponds to the setting InclusionListRegistry in the .ini file.
This policy requires User Profile Manager 1.0.0 or later.
Back to top
Profile Management\File system
Exclusion list - files
List of files that are ignored during synchronization. File names can be specified as absolute paths or as paths relative to the user profile (%USERPROFILE%). Wildcards are allowed. Wildcards are applied recursively.
Examples:
Desktop\Desktop.ini ignores the file Desktop.ini in the Desktop folder. C:\MyApp\myapp.tmp ignores the file myapp.tmp in the directory C:\MyApp.
C:\MyApp\*.tmp ignores all files with the extension .tmp in the folder C:\MyApp and its subfolders.
If this setting is disabled, no files are excluded.
If this setting is not configured here, the value from the .ini file is used. If this setting is not configured here or in the .ini file, no files are excluded.
This setting corresponds to the SyncExclusionListFiles setting in the .ini file.
This policy requires User Profile Manager 2.0.0 or later.
Exclusion list - directories
List of folders that are ignored during synchronization. Folder names can be specified as absolute paths or as paths relative to the user profile (%USERPROFILE%).
Examples:
Desktop ignores the Desktop folder in the user profile
C:\MyApp\tmp ignores the folder C:\MyApp\tmp
If this setting is disabled, no folders are excluded.
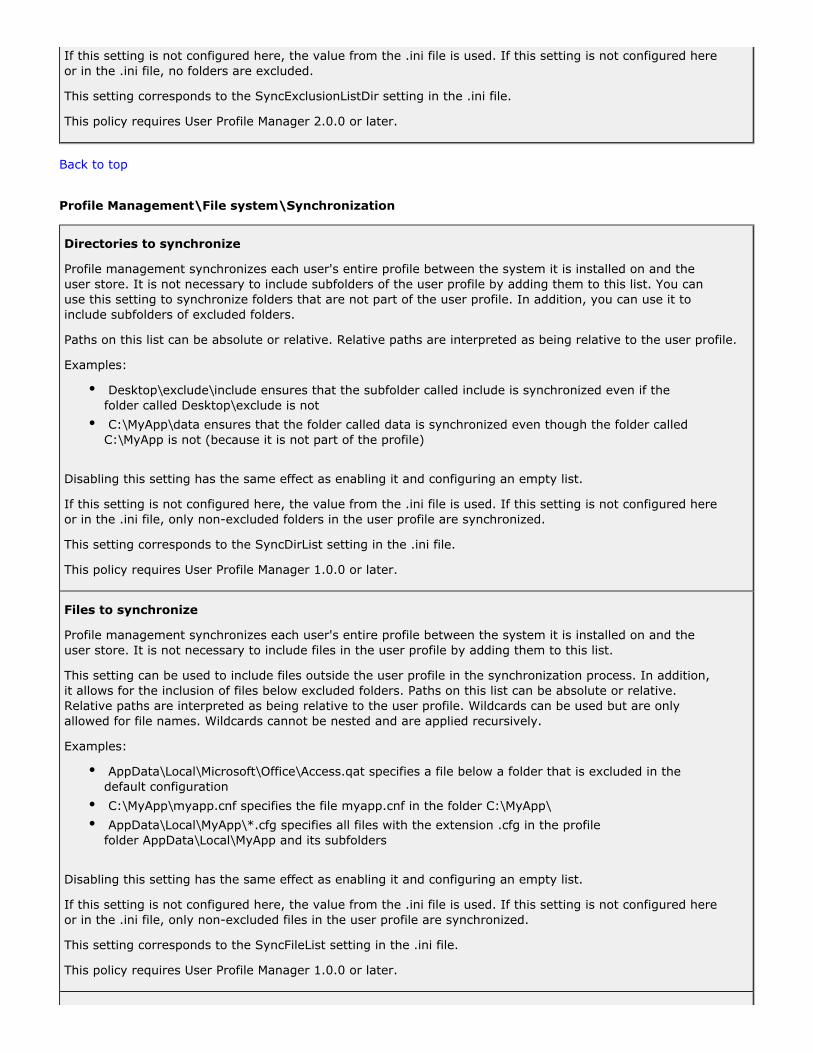
If this setting is not configured here, the value from the .ini file is used. If this setting is not configured here or in the .ini file, no folders are excluded.
This setting corresponds to the SyncExclusionListDir setting in the .ini file.
This policy requires User Profile Manager 2.0.0 or later.
Back to top
Profile Management\File system\Synchronization
Directories to synchronize
Profile management synchronizes each user's entire profile between the system it is installed on and the user store. It is not necessary to include subfolders of the user profile by adding them to this list. You can use this setting to synchronize folders that are not part of the user profile. In addition, you can use it to include subfolders of excluded folders.
Paths on this list can be absolute or relative. Relative paths are interpreted as being relative to the user profile.
Examples:
Desktop\exclude\include ensures that the subfolder called include is synchronized even if the folder called Desktop\exclude is not
C:\MyApp\data ensures that the folder called data is synchronized even though the folder called C:\MyApp is not (because it is not part of the profile)
Disabling this setting has the same effect as enabling it and configuring an empty list.
If this setting is not configured here, the value from the .ini file is used. If this setting is not configured here or in the .ini file, only non-excluded folders in the user profile are synchronized.
This setting corresponds to the SyncDirList setting in the .ini file.
This policy requires User Profile Manager 1.0.0 or later.
Files to synchronize
Profile management synchronizes each user's entire profile between the system it is installed on and the user store. It is not necessary to include files in the user profile by adding them to this list.
This setting can be used to include files outside the user profile in the synchronization process. In addition, it allows for the inclusion of files below excluded folders. Paths on this list can be absolute or relative. Relative paths are interpreted as being relative to the user profile. Wildcards can be used but are only allowed for file names. Wildcards cannot be nested and are applied recursively.
Examples:
AppData\Local\Microsoft\Office\Access.qat specifies a file below a folder that is excluded in the default configuration
C:\MyApp\myapp.cnf specifies the file myapp.cnf in the folder C:\MyApp\
AppData\Local\MyApp\*.cfg specifies all files with the extension .cfg in the profile folder AppData\Local\MyApp and its subfolders
Disabling this setting has the same effect as enabling it and configuring an empty list.
If this setting is not configured here, the value from the .ini file is used. If this setting is not configured here or in the .ini file, only non-excluded files in the user profile are synchronized.
This setting corresponds to the SyncFileList setting in the .ini file.
This policy requires User Profile Manager 1.0.0 or later.

Folders to mirror
Profile management can mirror a folder relative to the profile's root folder. Use this setting for files whose contents index data and where separate instances of the data are likely to exist. For example, you can mirror the Internet Explorer cookies folder so that index.dat is synchronized with the cookies that it indexes. Be aware that, in these situations the "last write wins" so files in mirrored folders that have been modified in more than one session will be overwritten by the last update, resulting in loss of profile changes.
If this setting is not configured here, the value from the .ini file is used. If this setting is not configured here or in the .ini file, no folders are mirrored.
This setting corresponds to the MirrorFoldersList setting in the .ini file.
This policy requires Profile management 3.1 or later.
Back to top
Profile Management\Streamed user profiles
Profile streaming
With profile streaming, users' profiles are fetched from the user store to the local computer only when they are needed. Registry entries are fetched immediately, but files and folders are only fetched when accessed by users.
If this setting is not configured here, the value from the .ini file is used. If this setting is not configured here or in the .ini file, it is disabled.
This setting corresponds to the PSEnabled setting in the .ini file.
This policy requires Profile management 3.0.0 or later.
Always cache
Optionally, to enhance the user experience, use this setting with the setting.Profile streaming
This imposes a lower limit on the size of files that are streamed. Any file this size or larger is cached locally as soon as possible after logon. To use the cache entire profile feature, set this limit to zero (which fetches all of the profile contents as a background task).
If this setting is not configured here, the value from the .ini file is used. If this setting is not configured here or in the .ini file, it is disabled.
This setting corresponds to the PSAlwaysCache setting in the .ini file.
This policy requires Profile management 3.0.0 or later.
Timeout for pending area lock files (days)
You can set a timeout period that frees up users' files so they are written back to the user store from the pending area in the event that the user store remains locked when a server becomes unresponsive (for example, when it goes down). Use this setting to prevent bloat in the pending area and to ensure the user store always contains the most up-to-date files.
If this setting is not configured here, the value from the .ini file is used. If this setting is not configured here or in the .ini file, the default value of one day is used.
This setting corresponds to the PSPendingLockTimeout setting in the .ini file.
This policy requires Profile management 3.0.0 or later.
Streamed user profile groups
Enter one or more Windows user groups.

If this setting is enabled, only the profiles of those groups' members are streamed. If this setting is disabled, all user groups are processed.
If this setting is not configured here, the value from the .ini file is used. If this setting is not configured here or in the .ini file, all users are processed.
This setting corresponds to the PSUserGroupsList setting in the .ini file.
This policy requires Profile management 3.0.0 or later.
Back to top
13. Profile Management Glossary
Updated: 2010-03-17
As used in these Profile Management topics, the term refers to user devices (virtual or physical), computervirtual desktops, and servers that host published applications.
The term refers to profiles that users receive when Profile management is installed and Citrix user profileenabled. Citrix user profiles are different from local, roaming, or mandatory Windows profiles.
The general terms and refer to the act of downloading files from the user store, to synchronize to cacheor uploading to it. The term is more specific and refers to how the streamed user profiles to fetchfeature downloads, any time after logon when the user needs them, a subset of files from the user store.
Migration refers to the incorporation of Windows profile data into a Profile management deployment.
Upgrading refers to the process of installing one version of the software over an earlier version.