Embed Size (px)
Citation preview

Professional Editions Setup Guide FOR TAX YEAR 2017
V 1
1

2
Table of Contents
Click on any title to navigate directly to that section.
Download and Install
Download Installation File from
Practice Manager
Install Your Software
Install from CD
Share Files on a Network
Install State Editions
Installation FAQs
Set up the Software
Practice Information
Preparers
Additional Enterprise Editions Features
Set Master Information Defaults
Set Master Forms Data Defaults
Copy Master Information to Client Returns
Import Last Year’s Client Returns
Import TaxAct Returns
Import from Portable Document
Format (PDF)
Add/Edit Client Returns
Navigating Client Manager
Add Client Returns
Edit Client Returns
E-file Client Return(s)
Other Return Actions
Protect Entered Data
Password-Protect Client Returns
Set Individual Usernames and
Passwords
Back Up Client Returns
Restore Client Returns
Print Returns, Labels, Reports, and Invoices
The Print Center
Print a Client Return
Print Consent Forms
Print Organizers
Print Labels
Print Reports
Print Invoices and Billing Statements
Additional Resources
Professional Reports
Client Xchange

3
Download and Install
Download Installation File from Practice Manager
1. Go to taxactprofessional.com and click the Sign In button in the upper right corner.
2. Sign in with your Username and Password.
3. Click the Orders & Downloads tile.
4. Select the "Downloads" link to the right of the product you wish to download.
5. If the installation does not automatically run, locate and double click the file icon to manually install the software.
(Type CTRL+J in Internet Explorer, Firefox, or Chrome to help you locate your downloaded file.)
TaxAct Professional Editions can be installed by downloading
the software from Practice Manager (your online TaxAct
Account).
Enterprise Editions files can be shared on a network, either
your own local server or online to TaxAct’s secure servers.
Be sure to verify the system requirements before installing the
software.

4
Install Your Software
1. Open the downloaded program file. On the initial screen, click Next to begin the installation.
2. Select the checkbox next to “I Accept the License Agreement”, then click Next.
3. Accept defaults and click Next, or click Browse to change the destination location, then click Next.
4. Make sure the checkbox to receive Automatic Updates to the program remains selected, then click Next.
5. Click Finish in the next window
6. Repeat steps for all programs you wish to install (1040, 1041, 1065, etc.)
Share Files on a Network (Enterprise Editions Only)
The first time you launch the program, you will be prompted to set up your
practice. At this point in the setup process, you need to choose whether to
save shared files on your local network, or on TaxAct’s secure servers.
1. Select the radio button next to the option you prefer.
2. Click Continue.
Online Network Option
If you choose the Enterprise-only Online Network Option, you can edit and access your Practice, Preparer, Client, and Return
information through a secure online account anywhere, anytime. You'll need to sign in to Practice Manager each time you open
the TaxAct software with this option, so please ensure you have a stable Internet connection before proceeding. This is

5
recommended if your practice has multiple preparers or if you want access to returns from multiple locations. See our Online
Networking FAQ for more information.
Local Network Option
If you choose “Locally on my computer,” your files will be saved to a location of your choice on a local drive or server. If you
wish to share this data with multiple computers, this folder should be in a shared network location. See our Local Networking
FAQ for more information.
Have questions about how to set up a local network? Refer to the Microsoft and TaxAct Support resources below:
Windows Support https://support.microsoft.com/en-us/products/windows
TaxAct Support – Prior Year
Network installations https://www.taxact.com/support/22832/
TaxAct Professional Support taxactprofessional.com/support
All users (whether storing data online or locally) are required to sign in with their TaxAct username and password upon
software startup in order to authenticate the account. You will not need to sign in again until either 30 minutes of inactivity on
your PC or after 24 hours (whichever is sooner).
Install State Editions
1. Open a return, then click Return > State > Install State.
2. Select each state you wish to install or Select All
3. Click Auto Install to add the state modules with recommended
settings.
Or, click Manual Install to add states to an alternative location
or to a network.

6
Adding or Removing State from a Return
1. Once a state has been installed, click Return > State > Add/Remove
State
to attach or remove the state from a return.
Installation FAQs
I downloaded the program file but can’t find it on my computer. How do I find it?
Try any of the following:
repeat the download process,
use keyboard shortcut CTRL+J in your web browser, or
find the Downloads menu item or icon on your Web browser.
7
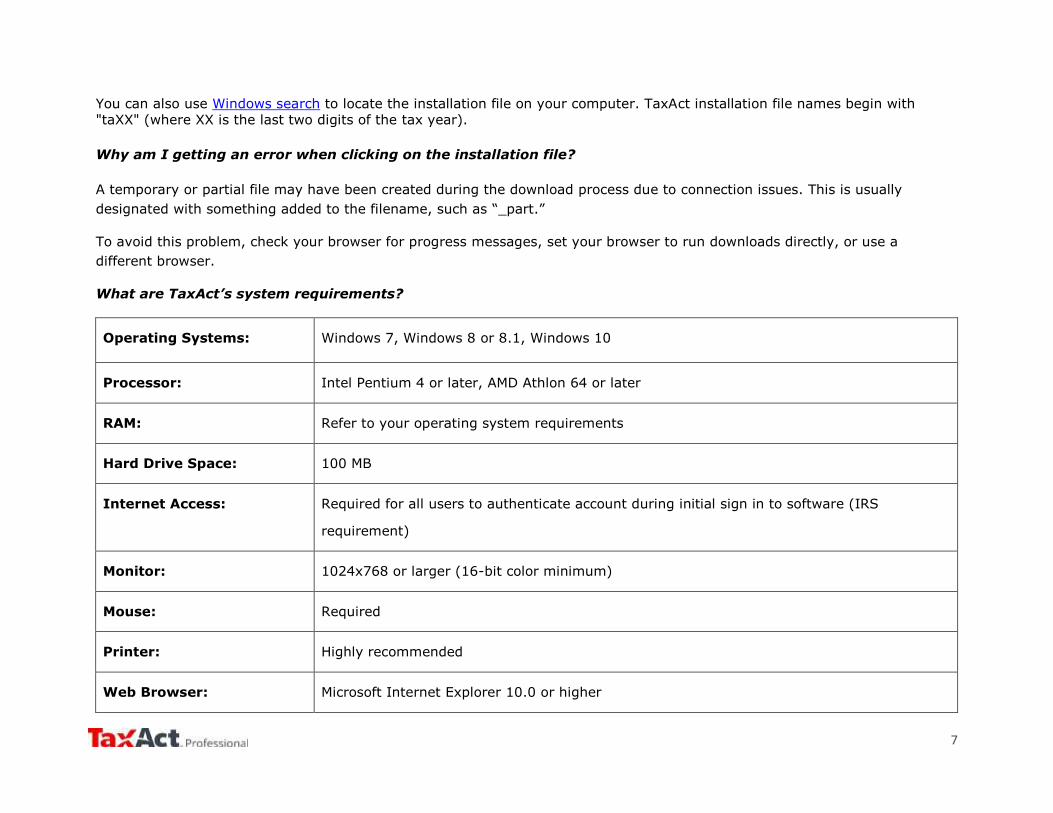
You can also use Windows search to locate the installation file on your computer. TaxAct installation file names begin with
"taXX" (where XX is the last two digits of the tax year).
Why am I getting an error when clicking on the installation file?
A temporary or partial file may have been created during the download process due to connection issues. This is usually
designated with something added to the filename, such as “_part.”
To avoid this problem, check your browser for progress messages, set your browser to run downloads directly, or use a
different browser.
What are TaxAct’s system requirements?
Operating Systems: Windows 7, Windows 8 or 8.1, Windows 10
Processor: Intel Pentium 4 or later, AMD Athlon 64 or later
RAM: Refer to your operating system requirements
Hard Drive Space: 100 MB
Internet Access: Required for all users to authenticate account during initial sign in to software (IRS
requirement)
Monitor: 1024x768 or larger (16-bit color minimum)
Mouse: Required
Printer: Highly recommended
Web Browser: Microsoft Internet Explorer 10.0 or higher

8
Set Up the Software Practice
Enter your practice information as you want it to appear on tax returns, labels, letters, and other correspondence. The
information you enter can also be linked to each preparer (see Preparer Info tab, later). When finished entering your data, click
Continue to Preparer Information.
Preparers
After completing the Practice information, the next step is to enter information
for each Preparer in your practice. You must enter at least one preparer in
order to continue the setup process. To access the full Preparers menu,
click Add New Preparer.
Note: The first preparer you add should be yourself.
The first time you launch the software, the TaxAct
Setup Wizard will walk you through steps.
You will be prompted to enter data for Practice,
Preparers, Client Status, Security, Directories, and
General Preferences.
For best results, complete every tab in the setup
window before clicking the OK button.
To access each section individually after the initial
setup, click Preparer > Master Information
9
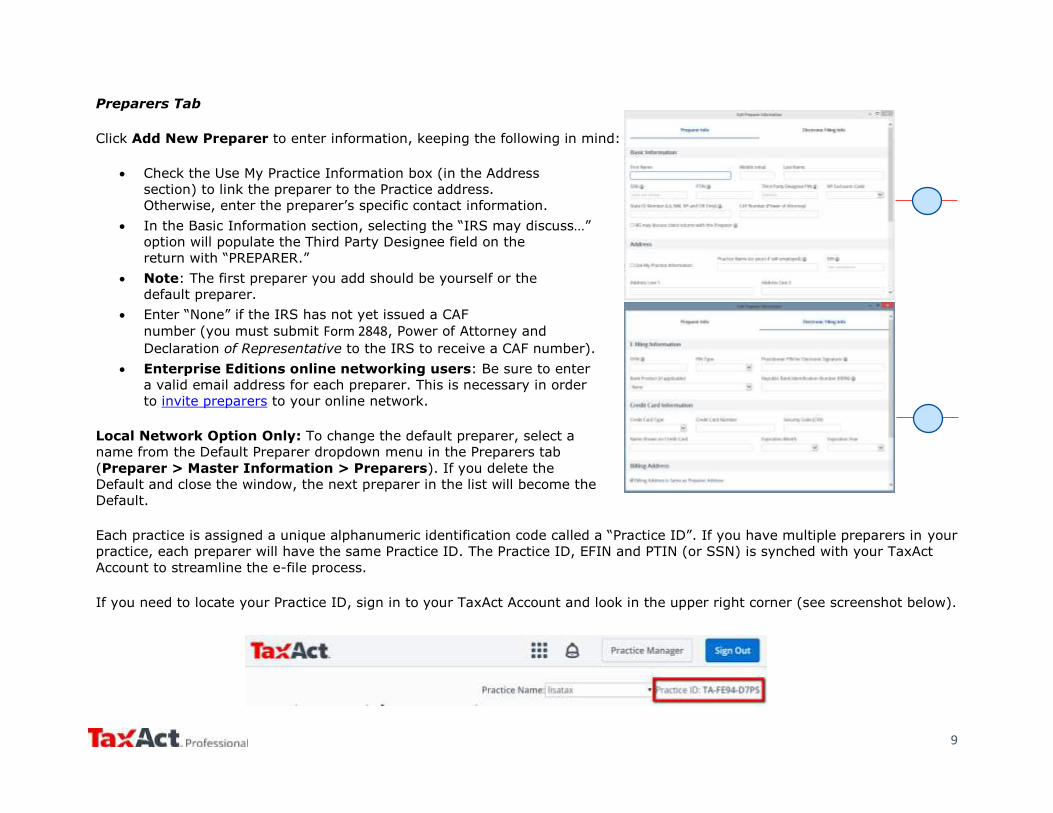
Preparers Tab
Click Add New Preparer to enter information, keeping the following in mind:
Check the Use My Practice Information box (in the Address
section) to link the preparer to the Practice address.
Otherwise, enter the preparer’s specific contact information.
In the Basic Information section, selecting the “IRS may discuss…”
option will populate the Third Party Designee field on the
return with “PREPARER.”
Note: The first preparer you add should be yourself or the
default preparer.
Enter “None” if the IRS has not yet issued a CAF
number (you must submit Form 2848, Power of Attorney and
Declaration of Representative to the IRS to receive a CAF number).
Enterprise Editions online networking users: Be sure to enter
a valid email address for each preparer. This is necessary in order
to invite preparers to your online network.
Local Network Option Only: To change the default preparer, select a
name from the Default Preparer dropdown menu in the Preparers tab
(Preparer > Master Information > Preparers). If you delete the
Default and close the window, the next preparer in the list will become the
Default.
Each practice is assigned a unique alphanumeric identification code called a “Practice ID”. If you have multiple preparers in your
practice, each preparer will have the same Practice ID. The Practice ID, EFIN and PTIN (or SSN) is synched with your TaxAct
Account to streamline the e-file process.
If you need to locate your Practice ID, sign in to your TaxAct Account and look in the upper right corner (see screenshot below).

10
Electronic Filing Info Tab – E-Filing Info
An Electronic Filing Identification Number (EFIN) is required to e-file returns. To obtain an EFIN from the IRS, file Form 8633,
Application to Participate in the IRS E-file Program.
IRS EFIN Requirements for Tax Professionals & Software Companies
The IRS requires tax software companies to collect and verify EFIN Tracking Numbers from its professional customers. Your
Tracking Number appears on the IRS e-Services Summary in your IRS e-Services account.
Please submit a copy of that IRS e-file application summary (including Tracking Number) to TaxAct for verification. Having your
EFIN verified prior to the start of tax season will help avoid disruption to your e-filing services. All EFINs will need to be
verified prior to e-filing.
Generally, professionals who have been verified in a previous year will not need to be re-verified; however, it is possible TaxAct
may request that you re-verify in order to e-file. You can check your EFIN verification status in your TaxAct Account. If your
EFIN is rejected for any reason, we will notify you via email.
To submit your IRS e-file application summary or to check the status of your EFIN Verification:
1. Sign in to your TaxAct Account.
2. Click the Practice Administration Tile.
3. Click EFIN Verification to expand.
4. Enter your EFIN and the Tracking Number found at the bottom of your IRS e-file Application Summary.
Reminder: To obtain a copy of your IRS e-file Application Summary, sign in to your IRS e-Services Account.

11
5. Click Choose File to locate and attach your IRS e-file Application Summary. (PDF is preferred, but .jpg, .bmp and .png
files are also accepted.)
6. Check the box to indicate you are authorized to submit this information. Click Submit.
7. We will notify you via email if your EFIN information is rejected for any reason, and your verification status will be
available in your TaxAct Account within 2 business days.
Electronic Filing Info tab – Credit Card
Credit card information is only required if you choose to pay e-file fees with each submission (Pay Per Return method). If no
credit card information is entered, you will be prompted for credit card and billing information each time you e-file.
If your TaxAct order includes unlimited e-filing or you have prepaid for e-filing, you do not need to enter credit card
information. Simply enter your EFIN, then click OK.
Tip: Double check that you’ve entered your credit card information correctly so that your e-files are not rejected due to
insufficient prepaid funds.
Additional Enterprise Online Network Options
Permissions Tab
If you selected to store files “On TaxAct's secure servers (cloud-based)” during
the installation process, you have the opportunity during setup to assign
permissions to each preparer for any of the following:
Practice Administrator - The first preparer you add to your practice will be the
Practice Administrator by default (this cannot be removed). The Practice
Administrator permission can be given to other preparers in the practice by
checking the box for “User is Practice Administrator” on the permissions tab in
their preparer information. Anyone with the Practice Administrator permission
will be able to:
o Invite other preparers to join the practice
o Modify other preparer's permissions
o Deactivate (or reactivate) preparers
Permissions are divided into 2 categories: Practice and Preparer Information and Client and Return Information
12
Practice and Preparer Information
Edit Practice Information – Allows user to update the Master Information for the practice
Edit Preparer Information – Allow user to update the preparer Information for any preparers within the practice.
Edit Client Status Options – Allows user to edit existing status, add new status, or delete status for Client Return Status
and Client Pay Status
Change General Filing Settings – Allow user to change Filing and Printing options from the General Master Information
tab
Change Miscellaneous Settings – Allow user to change Miscellaneous options from the General Master Information tab
Change Calculation Settings – Allow user to change Calculation options from the General Master Information tab
Edit Master Forms – Allows user to change Master Forms information, including Charge by Form, Billing Invoice,
Instruction Letter, and Schedule K - 1 Letter (in application product versions)
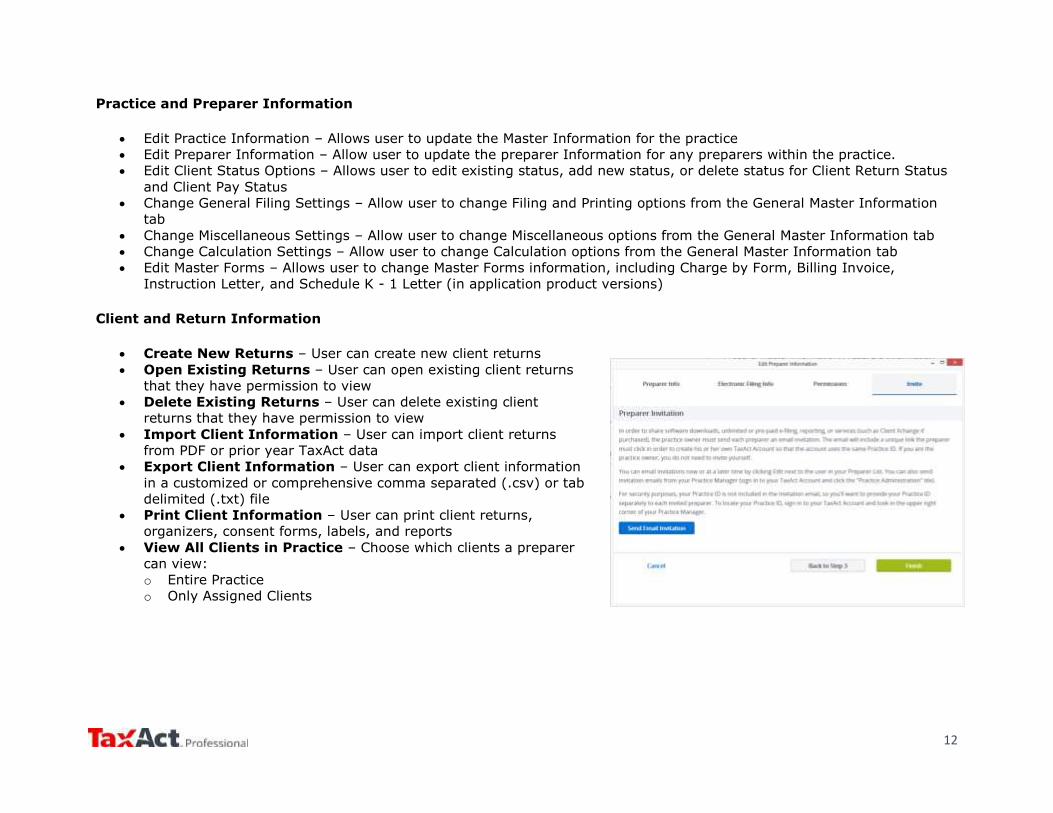
Client and Return Information
Create New Returns – User can create new client returns
Open Existing Returns – User can open existing client returns
that they have permission to view
Delete Existing Returns – User can delete existing client
returns that they have permission to view
Import Client Information – User can import client returns
from PDF or prior year TaxAct data
Export Client Information – User can export client information
in a customized or comprehensive comma separated (.csv) or tab
delimited (.txt) file
Print Client Information – User can print client returns,
organizers, consent forms, labels, and reports
View All Clients in Practice – Choose which clients a preparer
can view:
o Entire Practice
o Only Assigned Clients

13
Invite Tab
To grant network access to other preparers in your practice, the practice owner must “Invite” them to join your practice via
email (instructions below).
The email will include a unique link the preparer must click in order to create his or her own TaxAct Account so that the account
uses your Practice ID. Note: If you are the practice owner, you do not need to invite yourself (you are automatically added to
your practice’s network).
Your invited Preparers will have access to the following areas of Practice Manager (listed by tile name) in their TaxAct Account:
Orders & Downloads
Professional Reports
Practice Administration (EFIN Verification only)
Client Xchange (if purchased by the Practice)
Resources
My Info
My Preferences
Your invited preparers will not have access to the following tiles in Practice Manager:
Preparer Invitation
To invite preparers:
1. Click the Practice Administration tile.
2. Click Preparer Invitation.
3. Complete and click the Send Email Invitation button.
Once all information in the Preparer Information setup is complete,
click OK.

14
Set Master Information Defaults (Professional Editions and Enterprise Editions Local Network option)
The Master Information feature consists of the following tabs:
Practice
Preparers
Client Status
Security
Directories
General
To access Master Information after the initial setup, click Preparer > Master
Information > Preparers.
Security Tab
This tab presents options
for setting password
protection (See Protect
Your Data, later). Click the
View Logs button to list all
recent activity.
Client Status Tab
Click Add New Status to
create a custom message to
appear in the Return
Status and Payment Status
columns of Client Manager.
Directories Tab
The Directories tab displays
where your client
documents are stored, and
allows you to change
directory locations.
General Tab
The General tab presents
options for you to set
preferences for filing,
calculations, and
miscellaneous preferences.

15
Set Master Information Defaults (Enterprise Editions Online Networking option)
The Master Information feature consists of the following tabs:
Practice (after initial setup)
Preparers (after initial setup)
Client Status
Directories
General
To access Master Information after the initial setup, click Preparer >
Master Information > Preparers.
Client Status Tab
Click Add New Status to create a custom message for the Return Status and Payment Status columns of Client Manager.
Directories Tab
The Directories tab displays where certain documents, such as returns, temporary files, and checked-out files are stored.
General Tab
From here, you can set preferences for filing, calculations, and miscellaneous preferences.
16
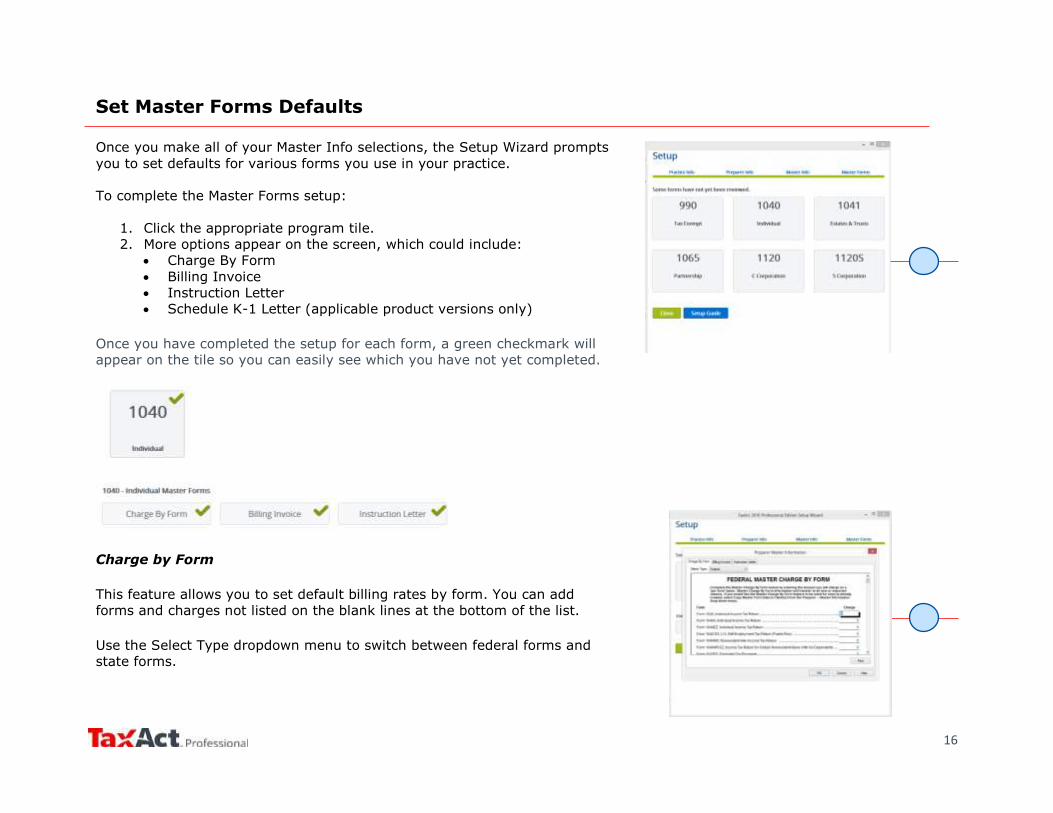
Set Master Forms Defaults Once you make all of your Master Info selections, the Setup Wizard prompts
you to set defaults for various forms you use in your practice.
To complete the Master Forms setup:
1. Click the appropriate program tile.
2. More options appear on the screen, which could include:
Charge By Form
Billing Invoice
Instruction Letter
Schedule K-1 Letter (applicable product versions only)
Once you have completed the setup for each form, a green checkmark will
appear on the tile so you can easily see which you have not yet completed.
Charge by Form
This feature allows you to set default billing rates by form. You can add
forms and charges not listed on the blank lines at the bottom of the list.
Use the Select Type dropdown menu to switch between federal forms and
state forms.

17
Master Billing Invoice Tab
This is where you can:
Assign custom invoices
Select the Charge by Form method or list a flat preparation fee
Charge a separate electronic filing fee
Create custom fees
List separate charges for preparation of Federal and State returns
Apply a local sales tax amount
Add comments as needed
Master Instruction Letter Tab
From here, you can set preferences for the formatting and content of your
filing instruction letters, including:
Letterhead
Date parameters
How to refer to your practice (e.g., “me” or “us”)
Whether to include your name in the signature area
To access Master Form Data, click Preparer > Master Information >
Master Form Data.
Copy Master Information to Client Returns
TaxAct allows you to apply Master Information changes to an individual return or to all returns. You can choose to select by
form type or by clients.
Click Preparer > Master Information > Copy Master Form Data to Clients(s). Click Copy Master Form Data to apply
changes. Changes to Master Information can be applied to select returns or all existing returns.

18
Import Last Year’s Client Returns
Import TaxAct Returns
1. Click File > Import > TaxAct 2016 Client Return(s).
2. Click Select All to import all returns in the directory, then
click Import.
You will receive a message when the import process is complete. The
return(s) will be added to the Client Manager with a status of “Imported.”
The November, 2017 update will include the ability to import
information from last year’s returns into TaxAct Professional
Editions.
You can import:
Prior year returns created with TaxAct
PDFs from other supported tax preparation software.
**PDF Import is not yet available in the early release version
of TaxAct Professional**

19
Import from Portable Document Format (PDF) (Available November 2017)
TaxAct imports key data from PDFs of 1040 returns prepared by many
software programs:
ATX™
CrossLink®
Drake®
Intuit® Tax Online
Intuit Lacerte®
Intuit ProSeries®
TaxAct Preparer's Editions
TaxSlayer Pro™
TaxWise®
To import returns in PDF form:
1. Click File > Import > Prior Year 1040 PDF Data.
2. Locate the file on your hard drive. Select the PDF files you’d like to import.
3. Use the “Select All” button to import all of last year’s returns.
4. Click Import. The client’s Basic Information is shown. Review the information and make any necessary corrections, then
click OK.
You will receive confirmation when the import process is complete. The return(s) will appear in Client Manager with a status of
“Imported.”

20
Add/Edit Client Returns
Navigating Client Manager
The information fields in Client Manager will populate as you add returns.
To open a return, double click the desired client record. To add or edit a client’s information or return, click the client name in
Client Manager. Once the record is selected, you can find additional menu items in two ways:
1. Right click the client record to access the menu, or
2. Use the Quick Link buttons:
Add a Client
Open Currently-Selected Client Return
Edit Currently-Selected Client Information
Delete Currently-Selected Client Return
Search for a Client
Open Client Manager Print Center
View Preferences
You can add, edit, and delete client records in the
Client Manager, which displays all current client
information and the status of each return.
To access Client Manager after the initial setup
process, click Preparer > Client Manager.
From within a return, click the Clients button.
21
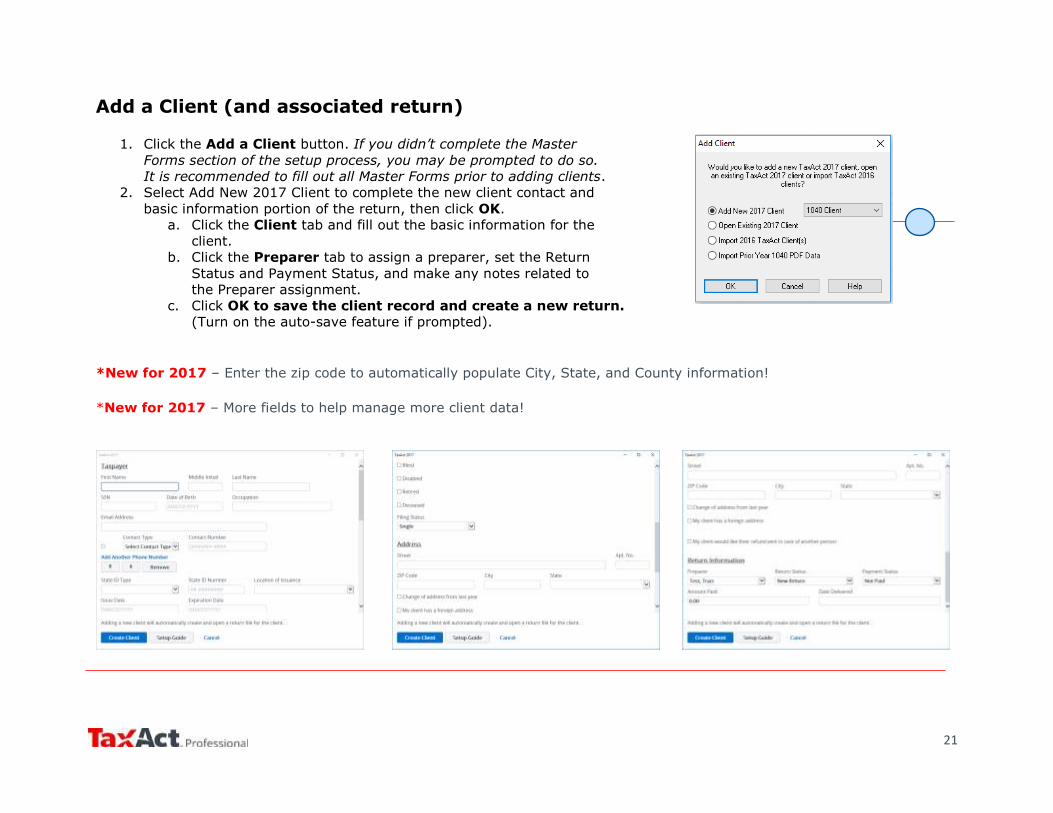
Add a Client (and associated return)
1. Click the Add a Client button. If you didn’t complete the Master
Forms section of the setup process, you may be prompted to do so.
It is recommended to fill out all Master Forms prior to adding clients.
2. Select Add New 2017 Client to complete the new client contact and
basic information portion of the return, then click OK.
a. Click the Client tab and fill out the basic information for the
client.
b. Click the Preparer tab to assign a preparer, set the Return
Status and Payment Status, and make any notes related to
the Preparer assignment.
c. Click OK to save the client record and create a new return.
(Turn on the auto-save feature if prompted).
*New for 2017 – Enter the zip code to automatically populate City, State, and County information!
*New for 2017 – More fields to help manage more client data!
22
Edit Existing Client Return
1. Click the client record in Client Manager.
2. Click the Open Client Return button or menu listing, or double click the client record. The return opens in Forms
Explorer, where you may edit or review forms directly. To switch to the Q&A interview method, click the Q&A button in
the toolbar near the top of the page.
*New for 2017 – Enter the zip code to automatically populate City, State, and County information!
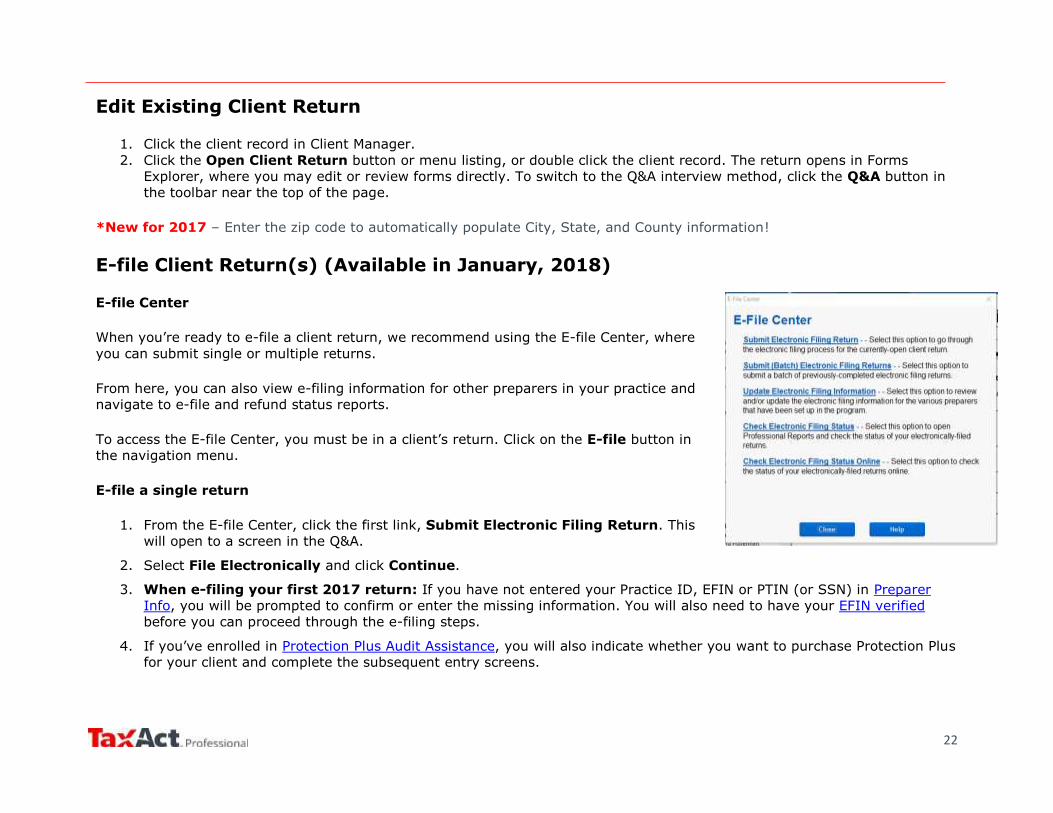
E-file Client Return(s) (Available in January, 2018)
E-file Center
When you’re ready to e-file a client return, we recommend using the E-file Center, where
you can submit single or multiple returns.
From here, you can also view e-filing information for other preparers in your practice and
navigate to e-file and refund status reports.
To access the E-file Center, you must be in a client’s return. Click on the E-file button in
the navigation menu.
E-file a single return
1. From the E-file Center, click the first link, Submit Electronic Filing Return. This
will open to a screen in the Q&A.
2. Select File Electronically and click Continue.
3. When e-filing your first 2017 return: If you have not entered your Practice ID, EFIN or PTIN (or SSN) in Preparer
Info, you will be prompted to confirm or enter the missing information. You will also need to have your EFIN verified
before you can proceed through the e-filing steps.
4. If you’ve enrolled in Protection Plus Audit Assistance, you will also indicate whether you want to purchase Protection Plus
for your client and complete the subsequent entry screens.

23
5. A screen titled E-Filing-Topics will appear, where you can navigate to specific
e-file topics (see list below). You can return to this screen at any time by
clicking “Back” or continuing through all the screens for a topic.
The list of topics is client-specific and depends on the details of that client’s
return such as whether there is a refund or liability. Topics include:
PIN Method – In this required step, choose Self-Select PIN or
Practitioner PIN via Form 8879, then enter related information.
Refund Method – If client is receiving a refund, you must choose bank
products, direct deposit or check, then enter the required information
for the refund method. If client owes money to the IRS or state, you
must choose how they will pay – direct withdrawal, credit card (pay
now or pay later) or paper check.
Print Center (optional) – From here, you can print your client’s
federal and/or state return and filing instructions. You can also print
state forms from here, including Form 8453 and other e-file signature
documents.
Contact Information (optional) – Go here to designate an email
address and/or mobile phone number if you or your client would like to
receive e-file status notification.
Miscellaneous Information (optional) – Enter In Care Of
information here.
6. After completing the E-Filing Topics, complete the screens to “sign” your
client’s return. (Information required for signature depends on whether Self-
Select PIN or Practitioner PIN was chosen.)
7. Then begin TaxAct Alerts, which check the return for potential errors,
omissions and tax-saving opportunities. Make any necessary changes to the
return.
8. If your client’s return has any fees associated with it, the E-filing – Payment Method screen will appear where you must
select whether to pay the client’s fees from your prepaid account (see instructions below) or by a credit card. Please
note: if you purchased a bundle that includes unlimited e-filing, you will not be prompted for payment.
9. Continue through the next screens to submit the e-file.

24
To set up a prepaid account, you must enter the information in Preparer Master Information. (Click Preparer in the
main menu, select Master Information, then Preparers. Click Edit next to the preparer name. In the Edit Preparer
Information window, click the Electronic Filing Info tab and enter the credit card information.)
E-file multiple returns as a batch
Batch e-filing is a convenient tool that allows you to complete client returns while you wait for receipt of payment.
In order to batch e-file client returns, you must prepare returns for submission by completing steps 1 through 8 above for each
return. Any fees associated with returns for batch submission must be paid when completing step 8 above for each return.
1) Complete steps 1-8 above (for e-filing a single return).
2) Continue through the “Submit Return” screen.
3) On the “Create and Submit” screen, choose “Submit Later” in order to place that return into a holding directory.
When you are ready to submit a batch of returns:
1) Click Preparer in the main menu, then select "Submit Client E-files". (You can also navigate here from the E-file Center
by clicking the second link, Submit (Batch) Electronic Filing Returns.)
2) A popup window with all client returns that are ready for submission will appear. Check the returns you would like to
submit.
Note: You can also “delete” a return pending transmission in this window. Deleting simply removes the file from the
holding directory – it does not delete the return or alter the information in the return. If you delete a file from the
holding directory, you must again complete steps 1-8 above for e-filing a single return.
3) After selecting at least one return, the Submit button will be enabled. Click Submit to transmit the selected returns.
4) When submission is complete, a confirmation window will appear. You should also receive an email notification from
TaxAct indicating the returns have been received.

25
Other Return Actions
Delete a Client Return
1. Click the client record in Client Manager.
2. Click the Delete Selected Return button.
3. Click Yes to delete BOTH the tax return file and the client information stored in Client Manager. Click No to cancel.
Search for a Client
Click the Search button and enter text. Click Next.
Print Information in Client Manager
Click the Open Client Manager Print Center button. (See Print Returns, Labels, Reports, and Invoices, later).
View Preparer Preferences
1. Click the View Preferences button.
2. Choose settings for your Client Manager, Electronic Filing Manager, and specify general preferences.
Work on Files Offline (Local storage only)
All users will be required to authenticate themselves upon initial software startup by signing in with their TaxAct Account
username and password with an active Internet connection. After the initial sign in, local storage users may work offline. When
an Internet connection is not detected by the software, you will see a window with a work offline option available. Some
features will not be available while working offline. To access those features, you may need to close your software and re-open
to sign in online.

26
Protect Entered Data
Password-Protect Client Returns (Enterprise Local Storage Only)
In Client Manager, double click to open return.
1. In the main menu, click File > Password > Add.
2. Enter a password in the fields provided, then click OK.
Reminder: Document all of your passwords in a safe location.
If you choose not to add a password to the return, click Cancel to exit.
TaxAct offers several methods for you to keep your client returns safe
and secure, including:
Password protection
Full backup and restore features
Enterprise Editions Online Networking users: Your practice is
issued a TaxAct Account and the practice administrator can set
individual permissions for each preparer. All data you enter is backed
up automatically, so there is no need to run manual backups.
27
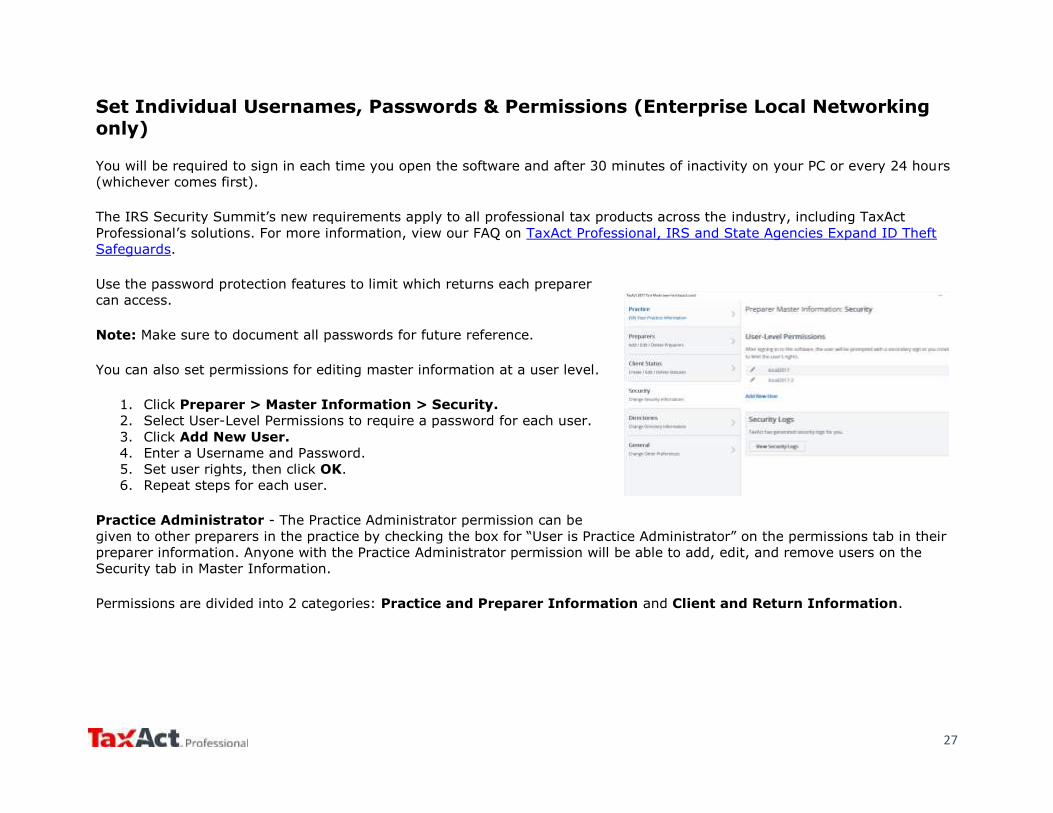
Set Individual Usernames, Passwords & Permissions (Enterprise Local Networking only)
You will be required to sign in each time you open the software and after 30 minutes of inactivity on your PC or every 24 hours
(whichever comes first).
The IRS Security Summit’s new requirements apply to all professional tax products across the industry, including TaxAct
Professional’s solutions. For more information, view our FAQ on TaxAct Professional, IRS and State Agencies Expand ID Theft
Safeguards.
Use the password protection features to limit which returns each preparer
can access.
Note: Make sure to document all passwords for future reference.
You can also set permissions for editing master information at a user level.
1. Click Preparer > Master Information > Security.
2. Select User-Level Permissions to require a password for each user.
3. Click Add New User.
4. Enter a Username and Password.
5. Set user rights, then click OK.
6. Repeat steps for each user.
Practice Administrator - The Practice Administrator permission can be
given to other preparers in the practice by checking the box for “User is Practice Administrator” on the permissions tab in their
preparer information. Anyone with the Practice Administrator permission will be able to add, edit, and remove users on the
Security tab in Master Information.
Permissions are divided into 2 categories: Practice and Preparer Information and Client and Return Information.

28
Practice and Preparer Information
Edit Practice Information – Allows user to update the Master
Information for the practice
Edit Preparer Information – Allow user to update the preparer
Information for any preparers within the practice.
Edit Client Status Options – Allows user to edit existing status,
add new status, or delete status for Client Return Status and
Client Pay Status
Modify Directories – Allows user to change where the files are
stored locally
Change General Filing Settings – Allow user to change Filing
and Printing options from the General Master Information tab
Change Miscellaneous Settings – Allow user to change
Miscellaneous options from the General Master Information tab
Change Calculation Settings – Allow user to change Calculation
options from the General Master Information tab
Edit Master Forms – Allows user to change Master Forms
information, including Charge by Form, Billing Invoice, Instruction
Letter, and Schedule K-1 Letter (in application product versions)
Client and Return Information
Create New Returns – User can create new client returns
Open Existing Returns – User can open existing client returns that they have permission to view
Delete Existing Returns – User can delete existing client returns that they have permission to view
Import Client Information – User can import client returns from PDF or prior year TaxAct data
Export Client Information – User can export client information in a customized or comprehensive comma separated
(.csv) or tab delimited (.txt) file
Print Client Information – User can print client returns, organizers, consent forms, labels, and reports
E-file/Online Backup Returns – User can e-file client returns or back up returns online (Enterprise Local storage users
only)

29
Back Up Client Returns to Your Local Computer
Performing regular backups of client information, returns, and preparer information is important. To utilize TaxAct’s backup and
restore functions, follow these easy steps.
1. Click File > Backup > Client Return(s).
2. Select Local and click Next.
3. Check the box next to the return(s) you want to back up and click Next. (Notes: Click Select All to check all returns.
Choose by return type in the drop down list.)
4. To change the backup file location, select Browse and choose the location using the directory tree.
5. Click Finish. The backup process is complete when a confirmation message appears.
To back up Preparer Info, click File > Backup > Preparer’s Information > Local, specify a backup directory and click
Select Folder. When performing future backups, you will be prompted to overwrite the files that already exist. Be sure to save
the most recent versions.
Enterprise Editions: Back Up Client Returns on TaxAct’s Secure Servers
Using online networking? You don’t need to back up your data – it’s automatically saved to TaxAct’s secure servers!
Networking locally? We recommend backing up your data both on your computer (following the above instructions) and on
TaxAct’s secure servers as an extra level of protection:
1. Click File > Backup > Client Return(s).
2. Choose Online, then click Next.
3. Enter your TaxAct Account username and password.
4. Select the return(s) you want to back up. (Notes: Click Select All to check all returns. Sort by return type in the drop
down list.)
5. To back up preparer information, check the box next to Backup Preparer Master Information.
6. Click Finish to upload the files. The backup process is complete when a confirmation message appears.

30
Restore Client Returns from Backup Files Saved Locally
1. Click File > Restore > Client Return(s).
2. Choose Local, then click Next.
3. Browse to your backup location, then select the files to restore. To restore all returns, click Select All. Click Next.
4. Browse to the restore location. Default is C:\TaxAct\TaxAct 2017 Professional Edition\Client Data. Click Finish.
A confirmation message will appear when files have been restored.
Restore Client Returns from Backup Files Saved on TaxAct Servers (Enterprise Editions Only)
Note: Online data restore for 2017 Professional Enterprise Editions will be available early January 2018. Step-by-step
instructions below will be updated as needed at that time.
1. Click File > Restore > Client Return(s).
2. Select the Online radio button, then click Next.
3. Select the return(s) you want to restore. To restore all returns, click Select All.
4. To restore Master Information at the same time as client returns, check the Restore Preparer Master Information box,
then click Next.
5. Click the Authorize button. This will send an email to the address associated with your account.
6. Leaving the TaxAct Restore Wizard open, click the link in the e-mail. Follow the steps to enter the authorization
information into TaxAct and submit.
7. Return to the TaxAct program and click Next.
8. Browse to the restore location. Default is C:\TaxAct\TaxAct 2017 Professional Edition\Client Data. Click Finish.
You may be prompted to overwrite any files of the same name that exist. Be sure you are restoring from the correct file before
proceeding.
A confirmation message will appear when files have been restored.

31
Print Returns, Labels, Reports, and Invoices
The Print Center
Print a Client Return
Before printing, make sure to set your printer preferences by following these steps:
1. Click File, Print Setup.
2. Select your printer and modify property settings if needed. (Default printer settings will generally allow you to
successfully print documents from TaxAct), then click OK.
When printer preferences are set, continue with printing:
1. Click Preparer, Print Returns. This will open the Print Center window (see image above).
2. Click the Client Returns tab. Select the return(s) to print, or click Select All to print all returns at once.
3. Enter quantities for each desired document.
4. Click Select States or Select Reports to print related materials, then click Print.
The Print Center offers multiple printing options in one convenient place.
Multiple documents can be printed in one job.
The Print Center also consolidates the printing of client returns, organizers,
consent forms, labels, and blank forms.
You can access the Print Center in any of the following ways:
Select any Print command under the Preparer top menu,
From within a return, click the Print button found in the toolbar
under the main menu.
From within a return, click File > Print Client Returns
32
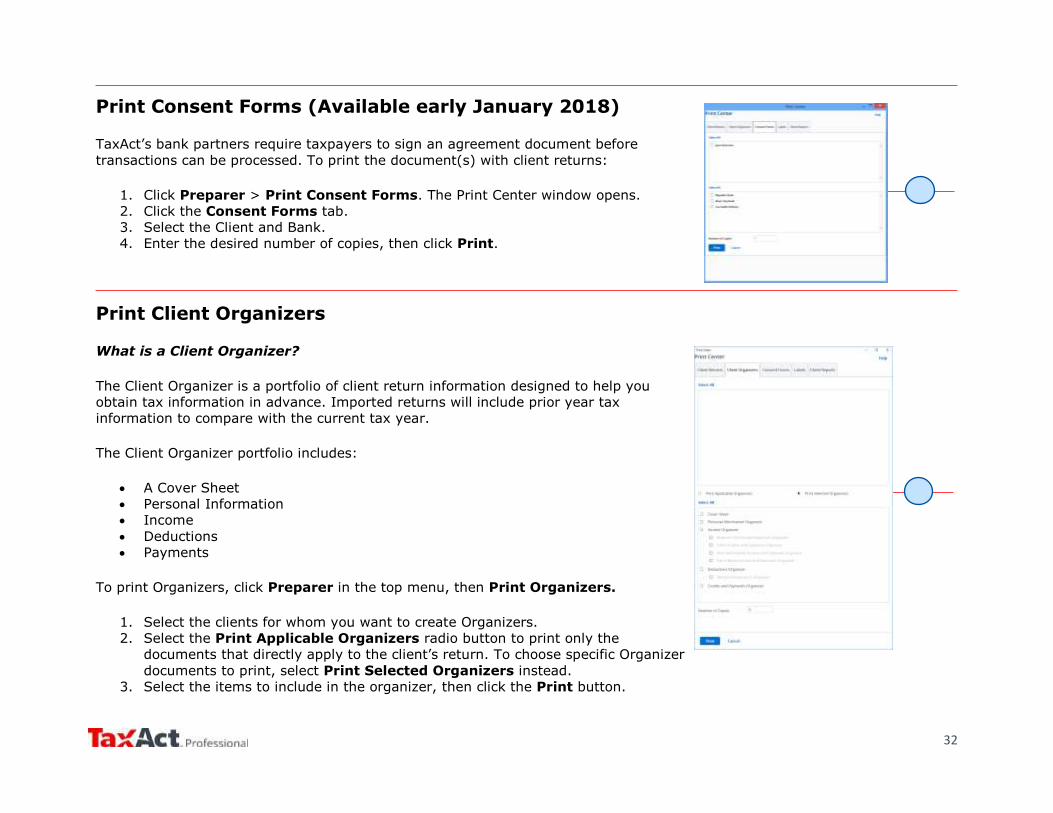
Print Consent Forms (Available early January 2018)
TaxAct’s bank partners require taxpayers to sign an agreement document before
transactions can be processed. To print the document(s) with client returns:
1. Click Preparer > Print Consent Forms. The Print Center window opens.
2. Click the Consent Forms tab.
3. Select the Client and Bank.
4. Enter the desired number of copies, then click Print.
Print Client Organizers
What is a Client Organizer?
The Client Organizer is a portfolio of client return information designed to help you
obtain tax information in advance. Imported returns will include prior year tax
information to compare with the current tax year.
The Client Organizer portfolio includes:
A Cover Sheet
Personal Information
Income
Deductions
Payments
To print Organizers, click Preparer in the top menu, then Print Organizers.
1. Select the clients for whom you want to create Organizers.
2. Select the Print Applicable Organizers radio button to print only the
documents that directly apply to the client’s return. To choose specific Organizer
documents to print, select Print Selected Organizers instead.
3. Select the items to include in the organizer, then click the Print button.

33
From the Print Center, click the Labels tab.
You have three options:
Print Client Labels,
Print Preparer Labels, and
Print Other Labels.
Client Labels
1. Select the client(s).
2. Select Show All Clients or Show Federal Estimated Tax Payment
Clients.
3. Choose options for printing Married Filing Joint clients.
Preparer Labels
To print return address labels:
1. Choose the preparer.
2. Edit the address shown if needed.
Print Other Labels
You can customize address labels for other uses, such as paper-filed returns, tax payments, and personal messages to include
on client correspondence.
Setting Label Properties
To format any of labels, click Label Properties.
1. Set the print job based on your printer type and label size.
2. Click Set Font to access a list of available fonts and modify the text style and size.
3. Once you have set your preferences for the labels to print, click Print.

34
Print Reports
You can print any of the following reports in the Client Reports menu:
Adjusted Gross Income
Average Client Fees
Billing (All, Paid, or Unpaid)
Client Manager
Contact List
Mailing List
Practice Summary
Self-Employment
Update Summary
2018 Federal Estimated Tax Payments
Custom Reporting
Choose this option to select which clients and information fields you’d like to export to a CSV file.
To change the display order, click the appropriate field name within the Fields Included box. Then click on Move Up or Move
Down until the fields are in your preferred order.

35
Print Invoices and Billing Statements
Available reports include:
Print Client Manager
Adjusted Gross Income
Average Client Fees
Billing – Paid
Billing – Unpaid
Billing – All
Contact List
Practice Summary
Mailing List
Update Summary
Self-Employment
2018 Estimated Payments
1. From within Client Manager, select a client.
2. Click the Open Print Center Quick-Link Button.
3. Click the Client Reports tab, and then choose the desired report.
Additional Resources
Professional Reports
TaxAct Professional Reports are accessible from your TaxAct Account (Practice Manager) or from within your Professional
Edition software. TaxAct Professional Reports provides you with summary and detailed information about e-files by status,
EFIN, PTIN and settlement type.
Refer to the Professional Reports Guide to learn how to access the reports and navigate through the system.

36
Client Xchange
Client Xchange is a convenient and secure website portal that enables you and your clients to safely exchange tax information
from any device with internet access. Easily upload and download all the tax information you and your clients need to share in
seconds – from photos of Form W-2s and receipts, to CSV files of stock transactions and PDFs of client organizers and final tax
returns.
If you are a single-preparer office, sign in to your account and click on the Client Xchange tile to purchase. Otherwise, talk to
your practice owner today about purchasing Client Xchange. (In order for all preparers in a practice to have access to Client
Xchange, it must be purchased by your practice owner.)
Refer to this guide to help set up your Client Xchange website, invite clients and manage files.