Embed Size (px)
Citation preview

Producing the Applicable to 7.172 onwards
IMPORTANT NOTE: Capita SIMS has made this document available in Microsoft® Word format to enable you to edit the information supplied herein. Capita SIMS cannot be held responsible for any changes, errors or omissions resulting from the subsequent editing of this supplied document.

Producing the Applicable to 7.172 onwards

C|Contents01| Introduction...............................................................1
Overview.....................................................................................1How has the PLASC Return Changed?...........................................2PLASC Return Process Flow..........................................................3Where to Find More Information...................................................4
02| Preparing for the PLASC Return...................................5Setting Permissions.....................................................................5What Version of SIMS is Required?...............................................6Preparing Data for the PLASC Return...........................................6
Using the Bulk Update Routine.............................................6Specifying the Return Folder Name and Security Message.............9
Configuring the Return Folder.............................................10Specifying the Security Message for Reports.......................11
Importing Revised Filesets for Validation and Reports.................11Before Importing the Revised Files.....................................12Importing the Revised Files................................................13
03| Producing the PLASC Return......................................15Creating a New PLASC Return....................................................15
Order of Working on the PLASC Detail Page.........................16Editing Census Details...............................................................17Checking School Information......................................................17
Calculating Details.............................................................20Editing Class Information...........................................................21
Editing Class Data..............................................................21Recording Reasons for Exceptional Class Size......................23Adding a Class...................................................................27Deleting a Class.................................................................28Undoing Changes...............................................................28
Editing Details of Teachers with a Full-Time or Part-Time Contract29Editing Details of Teachers with a Short-Term Contract...............30Editing Support Staff Details......................................................31Entering the Number of Teachers of Welsh.................................33Entering Recruitment Information..............................................34Entering Retention Information..................................................35Entering General Information.....................................................36Entering Survey Completion Times.............................................38
04| Completing the PLASC Return....................................39Creating and Validating the PLASC Return..................................39
Resolving Validation Errors and Checking Queries...............40Producing Detail Reports...........................................................43
Generating Detail Reports..................................................44

Transferring Report Data to a Spreadsheet.................................45Printing a Report from your Web Browser...................................45Deleting Temporary Web Browser Files......................................45
Deleting the cache in Windows Internet Explorer 10............45Deleting the cache in Windows Internet Explorer 8 and 9.....46
Producing the Summary Report..................................................46Authorising the PLASC Return....................................................47Submitting the PLASC Return.....................................................48Retrieving Authorised Census Return Files..................................49Copying a PLASC Return File......................................................50Deleting an Unauthorised PLASC Return File...............................51
Index............................................................................53

01| Introduction
01|IntroductionOverview......................................................................................1How has the PLASC Return Changed?............................................1PLASC Return Process Flow...........................................................3Where to Find More Information....................................................4
OverviewThis handbook provides instructions for Primary schools in Wales to complete the Pupil Level Annual School Census (PLASC) Return, which takes place on Tuesday 10 January 2017.
NOTE: The contents of the graphics (dates, names, panel numbers, etc.) are examples only of what you might expect to see when using SIMS to produce the PLASC Return.
The PLASC Return collects detailed information about each individual pupil, e.g. name, date of birth, UPN, ethnic code, etc. Summary information is also collected about teachers and support staff, classes as they are taught at the time of the return and information about the school as a whole. The content of the PLASC Return varies depending on your school phase.When the create and validate routine is run, SIMS automatically validates it against a set of Welsh Government rules and then produces a list of any errors and queries, along with their suggested resolutions. Any errors should be corrected and queries checked to ensure that the data is accurate.The completed return should be sent to your school’s Local Authority, where additional checks and validations are performed before it is dispatched to the Welsh Government via the Data Exchange Wales initiative (DEWi) data collection portal.
Producing the PLASC 2017 Return 1

01| Introduction
How has the PLASC Return Changed?Census date is 10/01/2017Age as at Date is 31/08/2016.
Changes to the PLASC return include the following.
SEN NeedsRoutines | Statutory Returns | PLASCSEN Needs Ranking is no longer included in the return. This allows all SEN Needs for a pupil to be included, rather than just those ranked 1 or 2.
SEN Status ValidationValidation number 12909 – Special educational need type missing for pupil with special education needs provision.This new validation is triggered if any pupil with a SEN status of A, P or S has no SEN need.Additional Resources:PLASC 2017 Validation Errors and Resolutions guide
Designing ReportsReports | Design ReportThe Authorised Date, File Name and Description fields (available when creating a report based on Student and Statutory Returns) now collect cohort information provided when a PLASC return is created. The subsequent report displays details regarding which pupil was included in which return.More Information:
Retrieving Authorised Census Return Files on page 48
2 Producing the PLASC 2017 Return

01| Introduction
PLASC Return Process FlowThe process of producing the PLASC return can be separated into a number of steps, some of which might have to be repeated in order to eliminate validation errors and queries.
Producing the PLASC 2017 Return 3

01| Introduction
Where to Find More InformationOnline help can be accessed by pressing F1 or clicking the applicable Help button in SIMS.A wide range of documentation is available from the SIMS Documentation Centre, including handbooks, quick reference sheets and tutorials. Click the Documentation button (located on the top right-hand side of the SIMS Home Page), select the required category and then select the document you require. Alternatively, use the Search facility to locate the required document.Documentation is also available from the My Account website (https://myaccount.capita-cs.co. u k ).
1. Enter the required text in the Search field to display a list of documents that match the search criteria.
2. To refine the search further, click Documents and then select the required Document type, File type and/or Date range (click Show more to view additional options, if required).Alternatively, click SIMS Publications (located in the Popular Searches list) to display a list of all SIMS publications.The search results are displayed automatically.
Tips for using the My Account Search Facility Here are some key tips for using the search facility in My Account. For additional explanations, please refer to the My Account website.
The search results can be refined further by using the advanced filters, e.g. Sort by relevance or Sort by last modified.The following rules can be applied to your search terms:
Surround a word or phrase with "double quotes" to return results containing that exact phrase.Prefix a words or phrases with + to make them essential.
For example: “end of year procedures” +primary +detailedIn addition to this handbook, an Errors and Resolutions document that provides suggestions on how to resolve any validation errors or queries is also available.To access the PLASC documents, please search for PLASC17 in the SIMS Documentation Centre or My Account.
4 Producing the PLASC 2017 Return

02| Preparing for the PLASC Return
02|Preparing for the PLASC ReturnSetting Permissions......................................................................5What Version of SIMS is Required?................................................6Preparing Data for the PLASC Return.............................................6Specifying the Return Folder Name and Security Message..............9Importing Revised Filesets for Validation and Reports..................11
Setting PermissionsThe following permissions are applicable to users who deal with returns.
Producing the ReturnTo produce the return, you must be a member of the Returns Manager user group in System Manager.
Editing and Preparing DataUsers who edit and prepare data must have permissions to access additional areas of SIMS, e.g. pupil details, school details, etc. These users must be a member of any of the following user groups in System Manager:
Administration AssistantAdmissions OfficerPersonnel Officer School Administrator.
Importing Revised FilesThe Import Fileset functionality enables updates to the Validation Errors Summary and the Summary report (derived from files supplied by the Statutory Body), and detail reports (provided by SIMS), to be imported into SIMS between SIMS releases. To use the Import Fileset functionality (via Tools | Setups | Import Fileset), you must be a member of any of the following user groups in System Manager:
Returns ManagerSystem Manager.
For more information about the Import Fileset functionality, please refer to the applicable preparation guide, available on the My Account website (https://myaccount.capita-cs.co.uk).
Where to find More Information about PermissionsPlease contact your System Administrator/Manager if you are not sure whether you have the required permissions. For more information, please refer to the Managing SIMS Users, Groups and Databases handbook.An Excel spreadsheet describing the numerous permissions available in SIMS is available on the My Account website (https://myaccount.capita-cs.co.uk).To find the spreadsheet, search for <sims version> sims permissions, e.g. 7.172 sims permissions.
Producing the PLASC 2017 Return 5

02| Preparing for the PLASC Return
What Version of SIMS is Required?To run the return, you must have the SIMS 2016 Autumn Release (7.172) or later installed.To check which version of SIMS is installed, open SIMS and then select Help | About SIMS. A dialog similar to the one shown in the following graphic is displayed.The version should read 7.172 or later.
Preparing Data for the PLASC ReturnBefore beginning the process of producing the return, it is advisable to spend time ensuring that all pupil level and school level information is present and up-to-date in SIMS.
IMPORTANT NOTE: If details in SIMS Personnel are updated after the PLASC return is started, the updated information can be added to the return by clicking the Recalculate button in the Teachers or Support Staff panel, as applicable. Please be aware that by doing this, all manual edits in that panel are lost. If manual edits have been made, it is recommended that you make a copy of the return before recalculating, so that they can be re-inserted with confidence.
An Errors and Resolutions document, which provides suggestions on how to resolve validation errors and queries, is also available. This document, together with any other useful information, can be found on the My Account website (https://myaccount.capita-cs.co.uk) by using the search facility to find PLASC17.
Using the Bulk Update RoutineTo prevent validation errors occurring, it is advisable to check your SIMS data, e.g. English as an Additional Language (EAL), ethnicity, SEN status, etc. before the return is created and validated.This can be achieved by using the Bulk Update functionality available within SIMS. It enables you to search for missing or invalid data and then update in bulk. For example, it is possible to search for all pupils who do not have EAL recorded against their name. From the pupils found, a value can be assigned to all or several pupils.This prevents the need for manually entering/changing values for individual pupils.
6 Producing the PLASC 2017 Return

02| Preparing for the PLASC Return
1. Select Routines | Pupil | Bulk Update to display the Bulk update Student page.
2. In the Student Population panel, select the required Group Type and Group from the drop-down lists.The Group Type indicates the type of group to list while the Group enables the specific group of pupils to be listed. For example, selecting a Group Type of Year Group enables a specific year to be selected from the Group drop-down list, such as Year 8.When searching for missing information, the Group Type is usually a field of data, such as Ethnicity and the Group is a specific value, such as <NONE>.It is also possible to use this functionality to review the data entered for all the pupils in the school. This is achieved by selecting Year Group from the Group Type drop-down list and <ANY> from the Group drop-down list and then selecting the required Data Item.
3. The Effective Date is the date on which the membership of the group is based and defaults to today’s date. This can be changed to the start of the academic year, for example, to display pupils who were on-roll on that date.
4. In the Update Data Item panel, select the required Data Item from the drop-down list, e.g. English Additional Language. The Effective Date in this panel is used to determine the date when the change will become effective and defaults to today’s date. In most circumstances, it is best to change this date to the start of the academic year because most data recorded is applicable from the start of the academic year.
5. When the required criteria has been selected, click the Search button to display the Members panel, which displays a list of pupils matching the chosen criteria, in this example the choice of English Additional Language ability levels is displayed:A = New to EnglishB = Early AcquisitionC = Developing CompetencyD = CompetentE = Fluent
Producing the PLASC 2017 Return 7

02| Preparing for the PLASC Return
0 = Not Applicable
TIPS: Use the horizontal and vertical scroll bars to view additional columns or rows as required.
To increase the number of columns visible on the page, right-click any column heading then select Narrow Columns from the pop-up menu.
Bulk Updating Data with the Same Data Item then Editing the ExceptionsOften, the most effective method of populating missing data is to fill all the rows with the same data item, then edit the exceptions (for example, depending on the ethnic range within your school).The following example illustrates how to set all the pupils as B = Early Acquisition then edit the exceptions.
1. Right-click the heading of the B = Early Acquisition data entry column (hover over the heading to see the full title) then select Check All from the pop-up menu.All the cells within that column are populated with ticks.
8 Producing the PLASC 2017 Return

02| Preparing for the PLASC Return
2. Once you have made all the required changes, click the Save button to bulk update the records.
Bulk Updating Data for a Selection of PupilsIt is also possible to bulk edit data for a selection of pupils as follows:
Hold down the Ctrl key and click the row of each required pupil to highlight them. Release the Ctrl key, and then click one of the highlighted cells of the required column. A tick indicates that the pupil has been selected.To enter values for sequentially listed pupils, click the first pupil, hold down the Shift key, then click the last pupil in the list (alternatively, hold down the Shift key and press the Down Arrow key). Release the Shift key then click one of the highlighted cells in the required column. A tick indicates that the pupil has been selected.
Specifying the Return Folder Name and Security MessageBefore creating a PLASC return, a folder in which the return file and report files will be saved must be specified. The security message, which will be displayed at the top of the applicable reports, must also be checked and edited, if required.This procedure must be performed for all returns displayed in the Folder Names and Security Message dialog. Blank fields and fields displaying non-existent folders are highlighted in red when the Save button is clicked. The correct location for all folders must be defined before you can continue with the return process.
Configuring the Return FolderBefore a return can be created, a folder in which the return file and the associated reports will be saved must be specified. The folder must be available to any workstations on which the return will be run.
IMPORTANT NOTE: Due to the sensitive nature of some of the data stored in SIMS, careful consideration should be given when specifying the location of any folder into which you save sensitive data, e.g. census returns, imported and exported CTFs, etc.
You should be mindful of your school’s responsibilities with respect to information security. Consider which users have access to the chosen folder, especially if the folder is shared on a Server. If you are in any doubt, you should consult with your IT Security Officer before proceeding.
Producing the PLASC 2017 Return 9

02| Preparing for the PLASC Return
1. Select Tools | Statutory Return Tools | Folder Names and Security Message to display the Configure Return Folders page.
2. Specify the folder where the PLASC files are to be stored by entering the folder location in the PLASC Folder field.Alternatively, click the PLASC Folder browser button to display a standard Windows® Browse For Folder dialog.
Navigate to the location of the required folder and highlight it. If a suitable folder does not exist, click the Make New Folder button and enter a suitable name for the new folder.
IMPORTANT NOTE: If you are changing the location of the folder, ensure that authorised personnel only have access to the new folder, as it will contain sensitive data. For more information, please see the important note at the beginning of this section.
3. Click the OK button to select or create the folder and return to the Configure Return Folders page.
NOTE: SIMS expects a folder to be specified for each Welsh return applicable to your school. Therefore, ensure that there is an entry in each folder name field before saving the folder names.
10 Producing the PLASC 2017 Return

02| Preparing for the PLASC Return
Specifying the Security Message for ReportsBelow the folder name is a Security Message for Reports field, which contains text that will be displayed at the top of the applicable reports.
1. The security message text defaults to This report contains sensitive information, but can be edited, if required.If any edits are made, you can click the Default Message button to return to the default text.
2. Click the Save button.A message reminds you to ensure that authorised personnel only should have access to this new folder because it will contain sensitive data.
3. Click the Yes button to continue.
Importing Revised Filesets for Validation and ReportsApplicable to the Personnel Officer, Returns Manager and System ManagerThe Validation Errors Summary and the Summary report are derived from files supplied by the Statutory Body. In addition, SIMS provides detail reports to enable the checking of data used to generate the return. These report files are initially installed automatically during the SIMS release upgrade.Occasionally, additions or corrections are made to these files, after a SIMS release, which are required for the forthcoming return. The Import Fileset functionality is provided to enable these files to be imported into SIMS, by the Personnel Officer, Returns Manager or System Manager between the SIMS releases.
IMPORTANT NOTE: The report files are not always updated between releases. Therefore, it is not always necessary to use the Import Fileset routine. A newsfeed will be posted to the My Account website (https://myaccount.capita-cs.co.uk) (under Notifications), if updated files are available for import.
If revised files are supplied, the fileset will be available as a ZIP file, which should be downloaded from My Account, unzipped and then imported into the SIMS Document Management Server (DMS) via Tools | Setups | Import Fileset. Ensure that the DMS is configured correctly before attempting to import the files.
Producing the PLASC 2017 Return 11

02| Preparing for the PLASC Return
TIP: To check which version of the fileset is currently in use, select Routines | Statutory Returns | <census name> to display the Census Return browser. The Validation Fileset ID is displayed in the header of the browser. For information about the latest available Fileset version, please check the applicable newsfeed on the My Account website (https://myaccount.capita-cs.co.uk).
Before Importing the Revised FilesTo enable the file(s) to be imported successfully, ensure that the DMS is configured correctly. This is achieved via Tools | Setups | Document Management Server. Click the Test server connection button to check if the specified DMS is available for use and functioning correctly.If the connection is unsuccessful, check the following details:
The Protocol field defaults to http and should not be edited. The Computer name should be the name/number of the PC on which the DMS is installed.The Port number is usually 8080. The number must be between 0 and 65535.The Active check box must be selected, indicating that the server is in use.
Click the Test server connection button again. If the DMS is now working correctly, click the Save button.Additional Resources:Setting up and Administering SIMS handbook
Importing the Revised Files1. If revised files are supplied, download the required ZIP file from the My
Account website (https://myaccount.capita-cs.co.uk) to a folder of your choice.
2. Unzip the ZIP file to a folder of your choice.3. In SIMS, select Tools | Setups | Import Fileset to display the Import
Fileset page.
4. Click the Browse button to display the Open dialog.5. Navigate to the location of the downloaded fileset. The file name is made up
of the following data fields: <Fileset Number>-StatutoryReturns-<Term and Year>_Fileset.mfs.
12 Producing the PLASC 2017 Return

02| Preparing for the PLASC Return
IMPORTANT NOTE: If more than one MFS file is displayed in the Open dialog, care should be taken to select the correct file.
6. Highlight the file then click the Open button. Alternatively, double-click the required MFS file to return to the Import Fileset page.
NOTE: The following graphics show example data only.
Details of the selected fileset are displayed, including the version Number of the fileset, the Release Date and the fileset description (Title).
7. Click the Import Fileset button to import the fileset into the DMS. When the import process is finished, Import successful is displayed at the bottom left-hand side of the Fileset panel and you are advised to restart SIMS. This ensures that the newly imported data will take effect.
8. Click the OK button then restart SIMS.9. Run the return in the usual way.
Producing the PLASC 2017 Return 13

03| Producing the PLASC Return
03|Producing the PLASC ReturnCreating a New PLASC Return......................................................15Editing Census Details................................................................17Checking School Information.......................................................17Editing Class Information............................................................21Editing Details of Teachers with a Full-Time or Part-Time Contract29Editing Details of Teachers with a Short-Term Contract................30Editing Support Staff Details.......................................................31Entering the Number of Teachers of Welsh..................................33Entering Recruitment Information...............................................34Entering Retention Information...................................................34Entering General Information......................................................36Entering Survey Completion Times..............................................38
Creating a New PLASC ReturnBefore creating a new PLASC return, ensure that:
all pupil and school information is present and up-to-date in SIMS. For more information, please refer to the Managing Pupil/Students handbook.the return storage folders are configured (please see Configuring the Return Folder on page 9).the security message for reports is specified (please see Specifying the Security Message for Reports on page 11).the up-to-date Fileset has been imported, if applicable (please see Importing Revised Filesets for Validation and Reports on page 11). The current Fileset ID is displayed in the PLASC Return browser header.
It is possible to create more than one return. This enables you to carry out dry runs so that you can check what data needs to be added or updated. Any unwanted returns can be deleted (providing they have not been authorised).
Producing the PLASC 2017 Return 15

03| Producing the PLASC Return
1. Select Routines | Statutory Returns | PLASC to display the PLASC Return browser.
NOTE: The first time that the Routines | Statutory Returns | PLASC menu route is selected during each SIMS session, there is a delay while the PLASC files are loaded.
2. Click the New button to display the PLASC Detail page.More Information:
Deleting an Unauthorised PLASC Return File on page 50
Order of Working on the PLASC Detail PageWhen creating a new PLASC return, or opening an existing return for editing, the panels must be visited in order, starting at the top of the page with the Census Details panel then working downwards through each panel in turn.To navigate between panels, click the Next button located at the bottom right-hand side of the panel you have been editing. The contents of the next panel are then activated ready for you to edit.
Next button
To navigate between active panels, click the hyperlinks, e.g. Census Details, School Information, etc. located at the top of the PLASC Detail page or use the vertical scroll bar on the right-hand side of the page.
16 Producing the PLASC 2017 Return

03| Producing the PLASC Return
Editing Census DetailsThe Age at Date is set to 31/08/2016. This date is read-only and cannot be edited.
1. The Census Date defaults to 10/01/2017 but can be edited if required, e.g. if the return is scheduled to be run on a day when the school is closed due to snow, a later Census Date can be entered.If necessary, enter an alternative date (between 05/09/2016 and 30/08/2017) or click the Calendar button then select the required date.
2. The census Description defaults to PLASC 2017 but can be edited, if required.
NOTE: If you are editing the census Description, a unique name must be entered. This prevents overwriting previously created returns and helps to identify the required version of the return, when it is listed in the PLASC Return browser. If the new description is not unique, a warning is displayed at the bottom left-hand side of the screen.
3. Click the Next button to proceed to the School Information panel.
Next button
Checking School InformationThe School Information panel displays details that have previously been recorded on the School Detail page of SIMS (Focus | Pupil | Pupil Details). The information displayed may vary depending on your school and the details entered.The details displayed are read-only but can be amended if necessary via the School Detail button.
Producing the PLASC 2017 Return 17

03| Producing the PLASC Return
1. If any details are missing or incorrect, click the School Detail button to display the School Detail dialog.
2. Add or amend the school details, selecting from the drop-down lists where applicable.
NOTE: The School Name, LA number, Establishment Number and the School Phase cannot be edited. If the information displayed is incorrect, please contact your Local Support Unit.
3. Enter the Federated Governing Body Number, if applicable. The number must be entered in the correct format, e.g. F1234, and must be no more than five alphanumeric characters.
18 Producing the PLASC 2017 Return

03| Producing the PLASC Return
4. Scroll-down to the bottom of the Establishment panel to display the Welsh Medium School field.
The value displayed in the Welsh Medium School field is collected in the PLASC Return. It is also set as the default value in the Classes panel (Welsh Medium column) (please see Editing Class Information on page 21).
5. Ensure that the Welsh Medium School field displays the correct status for your school. If necessary, select an alternative option from the drop-down list, e.g. Dual Stream, Transitional, English (with significant Welsh), etc. For more information about the options available, please refer to the Defining Schools According to Welsh Medium Provision information document, which is available from the Llywodraeth Cymru/Welsh Government website (http://new.wales.gov.uk/splash).
6. Update the other school details, if required.7. Click the Save button then click the OK button to return to the PLASC
Detail page, where the updated details are displayed.8. When all School Information has been checked (and corrected if
necessary), click the Next button.
Next button
The following message is displayed:
Producing the PLASC 2017 Return 19

03| Producing the PLASC Return
9. Click the Yes button to continue. There may be a delay while SIMS calculates the data.Where applicable, the panels below the School Information panel are populated with data stored in SIMS and the next panel is activated.
NOTE: Although there may be panels that are not populated when the calculate details process is performed, they cannot be edited until the applicable panel is active.
Calculating DetailsClicking the Next button in the School Information panel automatically populates several of the panels on the PLASC Detail page with data from SIMS.Using data stored in the database, SIMS automatically calculates some of the details to be included in the PLASC return, e.g. staff and pupil totals. Other PLASC details are taken directly from SIMS, e.g. school details, pupil names, etc.The data calculated/retrieved during this process must be checked. It can then be edited, if required, e.g. after resolving errors raised by the creating and validating routine.
IMPORTANT NOTE: The calculate details process overwrites any edited data with the original data stored in SIMS. Do not use this process if you wish to keep any changes you have made.
Recalculating DetailsThe Recalculate button (displayed in some of the panels) can be used to replace edited data or update calculated data, with the data stored in SIMS.
NOTE: The data must be saved before the Recalculate button is activated.
When a Recalculate button is clicked, the following dialog is displayed:
Click the Yes button to recalculate the details (in the current panel only).If you wish to calculate all details again, click the Next button in the School Information panel.
IMPORTANT NOTE: The recalculate details process overwrites any edited data with the original data stored in SIMS. Do not use this process if you wish to keep any changes you have made.
20 Producing the PLASC 2017 Return

03| Producing the PLASC Return
TIP: If you wish to compare the edited data of the current return with the data held in SIMS, it is recommended that you first make a copy of the current return to ensure that any edits are not lost.
More Information:Deleting an Unauthorised PLASC Return File on page 50
Editing Class InformationThe Classes panel deals with details of classes that take place in your school on census day, e.g. the number of pupils and teaching staff in each class.In Primary schools, the Classes panel is populated automatically with data retrieved from the pastoral structure (Focus | Schools | Pastoral Structure - membership of registration groups and year groups).If the required information is not available in SIMS, the data must be entered manually (please see Adding a Class on page 27).The data displayed in this panel can be edited, if required.
The Class Name column (read-only) lists all classes recorded in SIMS. A red background in this column indicates that the class size is above the recommended number of pupils. If this is the case, a reason for the larger class must be recorded (please see Recording Reasons for Exceptional Class Size on page 23).
Editing Class Data1. Check the data in the Classes panel then, if necessary, edit the information
in the following columns:Type – The class type can be edited by clicking the cell and selecting from the drop-down list.
OtherNurserySpecialMixed e.g. Nursery and Reception.
OnRoll – the number of on-roll pupils in the class can be edited by clicking the cell then entering the required number.Guest – the number of pupils in the class at the selected time who are not registered on-roll at the school can be edited by clicking in the cell then entering the required number.Teachers – the number of teachers in the class at the selected time can be edited by clicking the cell then entering the required number.
Producing the PLASC 2017 Return 21

03| Producing the PLASC Return
Support – defaults to zero. Enter the number of support staff the class at the selected time.Yr Grp – the year group can be edited by clicking the cell and selecting the appropriate year group for the class from the drop-down list.
NOTE: Ensure that a year group is selected for each class. If Mixed Key Stage is displayed (in the Key Stage column) for any class, select Mixed Year in the Yr Grp column.
Key Stage – The key stage can be edited by clicking the cell and selecting the appropriate year group for the class from the drop-down list. For example:
FoundationKey Stage 2Key Stage 3Key Stage 4Mixed YearsBeyond Key Stage 4
State. SEN – The number of pupils in the class with SEN statements can be edited by clicking the cell then entering the required number.Size Type – This column is pre-populated based on the National Curriculum Year group of the class, provided that the data has been entered via Tools | Academic Management. If the class size type cannot be determined, e.g. there are multiple year groups in the class, the class size type is left blank. The class Size Type can be edited by selecting Infant, Junior or Nursery from the drop-down list.
IMPORTANT NOTE: Ensure that the class size type is specified for all classes, irrespective of the number of pupils in the class. A validation error is triggered if the class size type is missing.
Where class size exceptions exist, the record is now highlighted in yellow and a message is displayed on saving, if a reason has not been supplied for the exception.Welsh Medium – The Welsh medium description defaults to the value selected in the School Details page (please see Checking School Information on page 17).This value can be edited by clicking in the cell and selecting an alternative value from the drop-down list:
Welsh is the Sole or Main Medium of InstructionWelsh is used as a teaching medium for part of the curriculumWelsh is taught as a second language onlyNo Welsh is taught.
The Total number of pupils and staff are calculated automatically then displayed at the bottom of the panel.
2. Add and delete classes by clicking the New and Delete buttons respectively, if required.
22 Producing the PLASC 2017 Return

03| Producing the PLASC Return
3. Revert all unsaved edits by clicking the Undo panel button (located in the Classes panel), if required (please see Undoing Changes on page 28).
4. Use the Recalculate option to replace edited data or update calculated data (in the Classes panel only) with data retrieved from SIMS, if required. The data must be saved before the Recalculate button is activated (please see Calculating Details on page 20).
IMPORTANT NOTE: Clicking the Recalculate button overwrites any edited data in the Classes panel with the original data stored in SIMS. Do not click this button if you wish to keep any changes you have made in this panel.
5. Click the Next button to proceed to the Teachers (All Teachers) panel (please see Editing Details of Teachers with a Full-Time or Part-Time Contract on page 29).
Next button
More Information:Adding a Class on page 27Deleting a Class on page 28
Recording Reasons for Exceptional Class SizeInformation about exceptions to class sizes is recorded via the Classes panel. A reason for the exception, the number of pupils in the class and the number of these pupils in the catchment area must be recorded for Infant or Junior classes with exceptional class sizes, e.g. more than 30 pupils with one teacher, more than 60 pupils with two teachers, etc.If the class size is below the recommended number of pupils, the class Size Type must be recorded but additional information is not required.The Number of classes with unexplained excess is displayed at the top of the Classes panel. The applicable record(s) are highlighted in yellow and the associated Class Name(s) is highlighted in red.
Producing the PLASC 2017 Return 23

03| Producing the PLASC Return
1. Select the class record for which the class size reasons needs to be recorded then click the Class Size Exceptions button to display the Class Size Exceptions dialog.
NOTE: The Class Size Exceptions button is enabled only if there are more than thirty pupils in a Foundation, Key Stage 2 or mixed Key Stage class with a size type of Infant or Junior.
A read-only summary of the current information is displayed on the left-hand side of the dialog.
2. Enter the No of Pupils and No in Catchment (i.e. the number of pupils in the catchment area) adjacent to each applicable Reason Code.
24 Producing the PLASC 2017 Return

03| Producing the PLASC Return
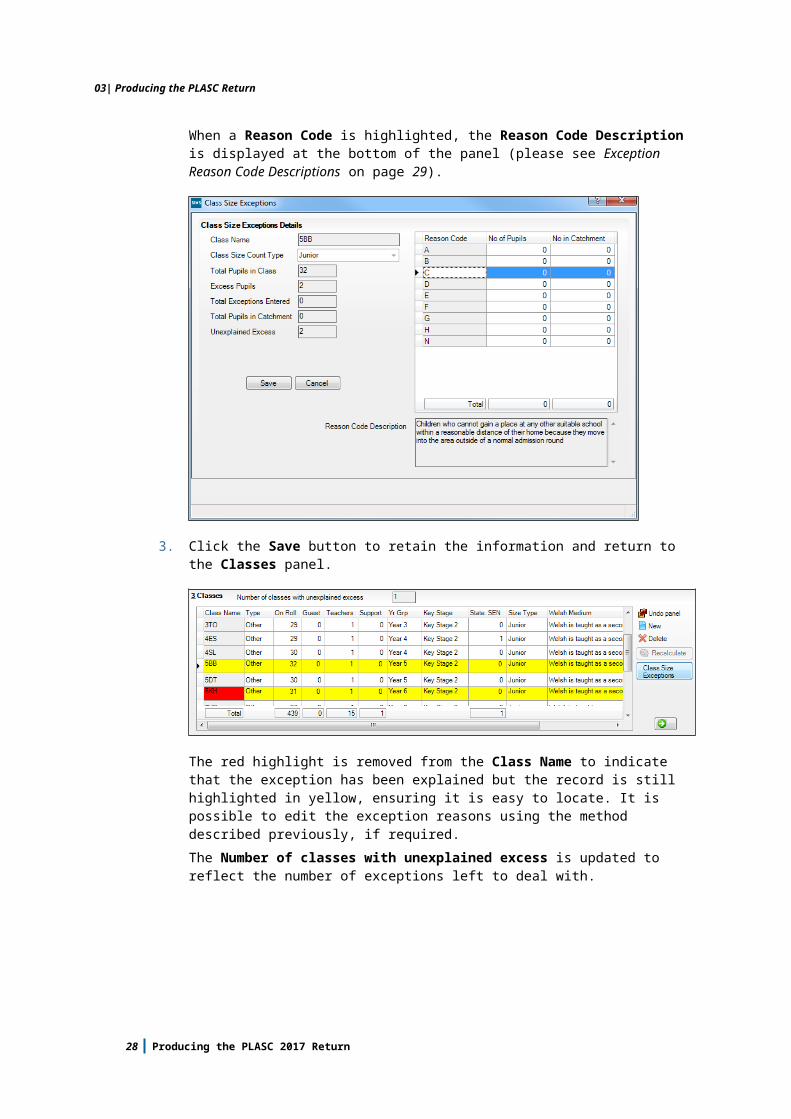
When a Reason Code is highlighted, the Reason Code Description is displayed at the bottom of the panel (please see Exception Reason Code Descriptions on page 25).
3. Click the Save button to retain the information and return to the Classes panel.
The red highlight is removed from the Class Name to indicate that the exception has been explained but the record is still highlighted in yellow, ensuring it is easy to locate. It is possible to edit the exception reasons using the method described previously, if required.The Number of classes with unexplained excess is updated to reflect the number of exceptions left to deal with.
Exception Reason Code DescriptionsThe following codes are available for selection to explain the class size exception for Infants.
Reason Code Description
A Children whose statements of Special Educational Need (SEN) specify that they should be educated at the school concerned, and who were admitted to the school outside a normal admission round.
Producing the PLASC 2017 Return 25

03| Producing the PLASC Return
Reason Code Description
B Children initially refused admission to a school, but subsequently offered a place outside a normal admission round by direction of an admission appeal panel, or because the person responsible for making the original decision recognises that an error was made in implementing the school's admission arrangements.
E Children who are registered pupils at special schools, but who receive part of their education at a mainstream school.
F Children with SEN who are normally educated in a special unit in a mainstream school, but who receive part of their lesson in a non-special class.
G Children who are looked after by local authorities (looked after children), or who have ceased to be looked after (previously looked after children) as a result of being adopted or being placed with a family or given a special guardian and are admitted to the school outside a normal admissions round.
J Children admitted outside the normal admission round who:• the maintaining local authority confirmed cannot gain a place at any other suitable school within a reasonable distance of their home because they have moved into the area outside a normal admission round, or• desire a religious education, or a Welsh speaking education and the school in question is the only suitable school within a reasonable distance.
K Children who were admitted to the school outside the normal admission round after which the school has arranged its classes, and after the first day of the school year, the effect of which would mean that the school would have to take a relevant measure if such children were not excepted pupils.
L Children of armed forces personnel who are admitted outside the normal admission round.
M Children whose twin or other sibling from a multiple birth are admitted as non-excepted pupils, as the final pupil(s) allocated a place before the admission number is reached.
N No valid exception reason.
The following codes are available for selection to explain the class size exception for Juniors.
Reason Code Description
A Children whose statements of SEN specify that they should be educated at the school concerned, and who are admitted to the school outside a normal admission round.
26 Producing the PLASC 2017 Return

03| Producing the PLASC Return
Reason Code Description
B Children initially refused admission to a school, but subsequently offered a place outside a normal admission round by direction of an admission appeal panel, or because the person responsible for making the original decision recognises that an error was made in implementing the school’s admission arrangements.
C Children who cannot gain a place at any other suitable school within a reasonable distance of their home because they move into an area outside a normal admission round. Information is required about how many pupils with this exception are in the catchment area.
D Children who are admitted to a school after the end of the normal admissions round where the admission number relevant to a child’s particular year group has not previously been reached.
E Children for whom education at a school which is Welsh speaking or of a particular religious denomination is desired, where the school concerned is the only such school within a reasonable distance of their home (this also applies to pupils who are admitted outside the normal admission round).
F Children who are registered pupils at special schools, but who receive part of their education at a mainstream school.
G Children with special educational needs who are normally educated in a special unit in mainstream school, but who receive part of their lessons in a non-special class.
H Looked after children who are admitted to schools outside a normal admissions round.
N No valid exception reason.
Adding a Class
IMPORTANT NOTE: If the pupils and/or staff in the new class were counted in a previously recorded class, their numbers must be deducted from their previous class, e.g. if there were three guest pupils in class A but they are now members of the new class, three must be deducted from the total guest pupils entered for class A. Click in the appropriate cell then edit the number of pupils.
1. Click the New button located in the Classes panel to add a row to the bottom of the Classes grid.
2. Click the new Class Name cell and change New Class to the required class name.
Producing the PLASC 2017 Return 27
03| Producing the PLASC Return
3. Click the Type cell then select the applicable class type from the drop-down list (i.e. Other, Nursery, Special or Mixed).
4. Enter the number of On Roll, Guest and Statemented SEN (State. SEN) pupils, Teachers and Support staff present in the new class at the selected time.
5. Select the appropriate year group (Yr Grp), Key Stage and Welsh Medium description from the associated drop-down lists.The Total number of pupils and staff are calculated automatically then displayed at the bottom of the panel.
Deleting a Class1. Highlight the class you wish to delete by clicking anywhere in the record,
then click the Delete button. The following message is displayed:If you delete a class which has pupils, you will have to run ‘Create & Validate’ again for the pupil numbers. Do you want to continue?
2. Click the Yes button to delete the selected class.
NOTE: If a class that contains pupils is deleted after the Create & Validate process is run, create and validate must be run again to establish pupil numbers.
Undoing ChangesAny unsaved edits can be undone by clicking the Undo panel button.
1. Click the Undo panel button. The following message is displayed:Undo will mean your manual changes will be lost on this panel. Are you sure you wish to continue and discard the changes?
2. Click the Yes button to undo any manual edits in the selected panel only. Any data extracted automatically from SIMS is still displayed.
28 Producing the PLASC 2017 Return

03| Producing the PLASC Return
Editing Details of Teachers with a Full-Time or Part-Time ContractThe Teachers (All Teachers) panel deals with full-time and part-time teachers, of each gender, contracted by the school on census day.The number of teaching staff in each category displayed, e.g. Acting head teachers, Assistant head teachers, etc. should be recorded in the appropriate column.If SIMS Personnel is in use, the Teachers (All Teachers) panel is populated automatically with data retrieved from SIMS. The data displayed in this panel can be edited, if necessary.
If SIMS Personnel is not in use, the data must be entered manually. Include teachers on short-term paid absence, e.g. maternity leave, sick leave, secondment for less than one term and relief teachers providing cover for long-term paid absence.
IMPORTANT NOTE: Teachers with a short-term contract are included in the Teacher (Contracts 1 year or less) panel as well as the Teachers (All Teachers) panel if all of the following apply:▪ they have a current valid contract on census day ▪ they have a contract of one year or less▪ their leaving date falls after the census day▪ their contract end date falls after the census day.For example:Contract start date = 01/09/2016Census date (10/01/2017) is in between contract start and end dateContract end date = 01/02/2017
Check the data in the Teachers (All Teachers) panel then, if necessary, edit the figures as follows:
1. Enter the number of teachers in the following columns:FT(M) male teachers on a full-time contractFT(F) female teachers on a full-time contractPT(M) male teachers on a part-time contractPT(F) female teachers on a part-time contract.
The Total for each column is calculated automatically then displayed at the bottom of the panel.
2. For each teacher category, enter the number of contracted hours for part-time teachers in the following columns:
Producing the PLASC 2017 Return 29

03| Producing the PLASC Return
PT Hrs(M) part-time hours male teachersPT Hrs(F) part-time hours female teachers.
The Total for each column is calculated automatically then displayed at the bottom of the panel.
3. To undo all unsaved edits in this panel, click the Undo panel button (located in the Teachers (All Teachers) panel) (please see Undoing Changes on page 28).
4. The Recalculate option can be used to replace edited data or update calculated data (in the Teachers (All Teachers) panel only) with the data stored in SIMS. The data must be saved before the Recalculate button is activated (please see Calculating Details on page 20).
IMPORTANT NOTE: Clicking the Recalculate button overwrites any edited data in the Teachers (All Teachers) panel with the original data stored in SIMS. Do not click this button if you wish to keep any changes you have made in this panel.
5. Click the Next button to proceed to the Teacher (Contracts 1 year or less) panel.
Next button
Editing Details of Teachers with a Short-Term ContractThe Teachers (Contracts 1 year or less) panel deals with full-time and part-time teachers who have a short-term contract. Data must be recorded for male and female teachers of each teaching category, e.g. Acting head teachers, Assistant head teachers, etc.If SIMS Personnel is in use, the Teachers (Contracts 1 year or less) panel is populated automatically with data retrieved from SIMS. This data can be edited, if required.If SIMS Personnel is not in use, the data must be entered manually. Include teachers on short-term paid absence, e.g. maternity leave, sick leave, secondment, for less than one term and relief teachers providing cover for long-term paid absence.
Check the data in the Teachers (Contracts 1 year or less) panel then, if necessary, edit the figures as follows:
30 Producing the PLASC 2017 Return

03| Producing the PLASC Return
1. For each category of teacher, enter the number of teachers on short-term contracts of one year or less in the following columns:
STerm FT(M) short-term full-time male teachersSTerm FT(F) short-term full-time female teachersSTerm PT(M) short-term part-time male teachersSTerm PT(F) short-term part-time female teachers.
The Total for each column is calculated automatically then displayed at the bottom of the panel.
2. For each teacher category, enter the number of contracted hours for teachers on short-term contracts of one year or less in the following columns:
STerm Hrs(M) short-term part-time hour male teachersSTerm Hrs(F) short-term part-time hour female teachers.
The Total for each column is calculated automatically then displayed at the bottom of the panel.
3. To undo all unsaved edits in this panel, click the Undo panel button in the Teachers (Contracts 1 year or less) panel (please see Undoing Changes on page 28).
4. The Recalculate button is inactive the first time the panel is visited. Thereafter, the Recalculate button can be used to update calculated data, and replace any edited data in the Teachers (Contracts 1 year or less) panel only, with the original data from the database (please see Calculating Details on page 20).
IMPORTANT NOTE: Clicking the Recalculate button overwrites any edited data in the Teachers (Contracts 1 year or less) panel with the original data stored in SIMS. Do not click this button if you wish to keep any changes you have made in this panel.
5. Click the Next button to proceed to the Support Staff panel.
Next button
Editing Support Staff DetailsThe Support Staff panel is used to record the total number of support staff (post count) and the total hours contracted by support staff in each category, e.g. Examinations Officer, Pastoral support staff, Teaching Assistants, etc.The Support Staff panel displays the support staff categories, the number of people who fall under each category and the number of collective hours they work. The value in the Type column indicates the code for the support staff category displayed in the Description column.If SIMS Personnel is in use, the Support Staff panel is automatically populated with data from SIMS. This data can be edited, if required.
Producing the PLASC 2017 Return 31

03| Producing the PLASC Return
If SIMS Personnel is not in use, the data must be entered manually.
Check the data in the Support Staff panel then, if necessary, edit the figures as follows:
1. For each support staff category, enter the number of teachers in the following columns:
FT(M) full-time male support staffFT(F) full-time female support staffPT(M) part-time male support staffPT(F) part-time female support staff.
The Total for each column is calculated then displayed automatically.2. For each support staff category, enter the number of hours for part-time
teachers in the following columns:Hours(M) hours contracted by the part-time male support staffHours(F) hours contracted by the part-time female support staff.
NOTE: Staff working a full week but only during term-time should be entered as full-time.
The Total for each column is calculated then displayed automatically.3. To undo all unsaved edits in this panel, click the Undo panel button, in the
Support Staff panel.4. The Recalculate option can be used to replace edited data or update
calculated data (in the Support Staff panel only) with the data stored in SIMS. The data must be saved before the Recalculate button is activated (please see Calculating Details on page 20).
IMPORTANT NOTE: Clicking the Recalculate button overwrites any edited data in the Support Staff panel with the original data stored in SIMS. Do not click this button if you wish to keep any changes you have made in this panel.
5. Click the Next button at the bottom right-hand side of the panel to proceed to the Teachers of Welsh panel.
Next button
32 Producing the PLASC 2017 Return

03| Producing the PLASC Return
Entering the Number of Teachers of WelshThe Teachers of Welsh panel is used to record the number of full-time and part-time teachers of Welsh in each category listed. To view the full Description of a teacher category, hover over the required cell to display the description in the form of a tool tip.Data must be entered manually. However, the Total for each column is calculated automatically then displayed at the bottom of the panel.
1. Enter the number of teachers in the following columns:FT(M) full-time males teaching WelshFT(F) full-time females teaching WelshPT(M) part-time males teaching WelshPT(F) part-time females teaching Welsh.
2. For each teacher category, enter the number of hours for full-time teachers in the following columns:
FT Hrs(M) Welsh teaching hours spent by full-time male teachersFT Hrs(F) Welsh teaching hours spent by full-time female teachers.
3. For each teacher category, enter the number of hours for part-time teachers in the following columns:
PT Hrs(M) Welsh teaching hours spent by part-time male teachersPT Hrs(F) Welsh teaching hours spent by part-time female teachers.
4. To undo all unsaved edits in this panel, click the Undo panel button in the Teachers of Welsh panel (please see Undoing Changes on page 28).
5. Click the Next button to proceed to the Recruitment panel.
Next button
Producing the PLASC 2017 Return 33

03| Producing the PLASC Return
Entering Recruitment InformationThe Recruitment panel enables you to record details of the school’s teacher vacancies. This information is not stored in SIMS and therefore must be entered manually.
1. Click the New button to add a blank recruitment record. 2. Click the Key Stage cell then select the Key Stage associated with this
particular vacancy from the drop-down list.3. If the post requires an ability to teach in Welsh, click in the Welsh Medium
cell then select Yes from the drop-down list.4. Enter the number of applications received for the post in the Application
Received cell.5. If the post is still vacant, ensure that the Appointed cell displays No.6. If the vacancy has been filled, click the Appointed cell then select Yes from
the drop-down list.7. To delete a record, click the narrow column on the left-hand side of the
record to highlight the record then click the Delete button located in the Recruitment panel.
A message informs you that the teacher recruitment details will no longer be available. Click the Yes button to confirm the deletion.
8. Click the Next button at the bottom right-hand side of the panel to proceed to the Retention panel.
Next button
Entering Retention InformationThe Retention panel is used to record details of teachers who have left the school in the previous year (01 January to 31 December).
NOTE: Do not include teachers who have taken up teaching posts elsewhere or who have retired at normal retirement age.
34 Producing the PLASC 2017 Return

03| Producing the PLASC Return
This information is not stored in SIMS and therefore must be entered manually.
1. Click the New button to add a retention record.2. Click the Key Stage cell then select the highest Key Stage level taught by
the leaver from the drop-down list.3. Enter the total number of years of teaching experience gained by the leaver
in the Teaching Experience (in yrs) column.4. To indicate the leaving teacher’s subsequent status, click in the Destination
cell then select one of the following from the drop-down list:Employed in a non-teaching capacity within the education systemEmployed outside educationEarly retirementOtherUnknown.
5. To delete a record, click in the narrow column on the left-hand side of the record to highlight the record then click the Delete button located in the Retention panel.A message informs you that the teacher retention details will no longer be available. Click the Yes button to confirm the deletion.
6. Click the Next button at the bottom right-hand side of the panel to proceed to the General panel.
Next button
Producing the PLASC 2017 Return 35

03| Producing the PLASC Return
Entering General InformationThe General panel is used to record such information as free school meals, full-time attendance on census day and details of the governing body, etc. The information recorded in this panel must be entered manually.
1. Select the required value from the Headteacher’s teaching commitment drop-down list:
NoneAverages less than 50%Averages between 50% and 100%100%.
2. Enter the number of pupils taking free school meals on census day.3. Enter the number of pupils who are paying for school meals on census day.
Free BreakfastsEnter the number of pupils who had a free breakfast on census day in each of the following categories:
Free Breakfasts taken on census dayFree Breakfasts on census day for Free School Meal Eligible pupilsPupils who took Free Breakfasts in the week prior to the census datePupils who took Free Breakfasts in the week prior to the census date for Free School Meal Eligible pupils.
School MilkEnter the number of pupils who:
had free school milk on census day.
36 Producing the PLASC 2017 Return

03| Producing the PLASC Return
paid for school milk on census day.
AttendanceEnter the number of:
full-time pupils who are present in school on census day.part-time pupils who are present in school for at least one session on census day.
Part-time mode of attendanceEnter the number of part-time pupils who are on-roll on census day (including those pupils who are absent from school on census day):
Part-time pupils who attend school in the morning onlyPart-time pupils who attend school in the afternoon onlyPart-time pupils who attend school under other arrangements.
Governors1. If the head teacher is a member of the school's governing body, select the
Headteacher on Governing body check box.2. Enter the number of Male serving governors, Female serving
governors and Welsh speaking governors.3. Enter the number of vacancies on the governing body, if applicable.
LA Special ClassesEnter the following LA Special classes information:
No. of Classes – number of LA designated special classes in the school.Pupils On Roll – number of pupils in special classes in the school.Dual Subsidiary Pupils – number of pupils in special classes who are attending your school (the Host school) under referral arrangements.
Click the Next button at the bottom right-hand side of the panel to continue.
Next button
Producing the PLASC 2017 Return 37

03| Producing the PLASC Return
Entering Survey Completion TimesThe Survey Completion Time panel is used to record the time taken by the various members of staff to complete the PLASC return.In the Completion Time column, enter the time each member of staff has taken to complete the PLASC return.
NOTE: Times must be entered in whole hours only.
When the Survey Completion Time panel is complete and you are satisfied that all details on the PLASC Detail page are correct, the PLASC return file can be created and validated.
38 Producing the PLASC 2017 Return

04| Completing the PLASC Return
04|Completing the PLASC ReturnCreating and Validating the PLASC Return...................................39Producing Detail Reports............................................................42Transferring Report Data to a Spreadsheet..................................44Printing a Report from your Web Browser....................................44Deleting Temporary Web Browser Files........................................45Producing the Summary Report...................................................45Authorising the PLASC Return.....................................................46Submitting the PLASC Return......................................................47Retrieving Authorised Census Return Files...................................48Copying a PLASC Return File.......................................................49Deleting an Unauthorised PLASC Return File................................50
Creating and Validating the PLASC ReturnThe return must be created, validated and authorised before it can be sent to your Local Authority or the Welsh Government.Validating the return creates an unauthorised return file, which is then run against a set of Welsh Government rules. When the validation is complete, the Validation Errors Summary is displayed, listing any errors and queries along with suggested resolutions. An error is caused by either missing or inaccurate data, whilst a query highlights data which is unusual or not as expected, e.g. there are no pupils with special educational needs. Detail reports are available to assist in the resolution of these issues.The Summary report can then be used to check the data before authorising and submitting the return.
1. If the PLASC Return is not already open, select Routines | Statutory Returns | PLASC to display the PLASC Return browser.
2. Double-click the required file to display the return on the PLASC Detail page.
3. Click the Create & Validate button to begin the process. This may take some time depending on the number of pupils at your school.A progress bar is displayed indicating that the Create and Validate process is being performed.
Any errors and queries are displayed in the Validation Errors Summary panel at the bottom of the screen.
Producing the PLASC 2017 Return 39

04| Completing the PLASC Return
Resolving Validation Errors and Checking QueriesAfter creating the return file and validating the data, any errors and queries found are listed in the Validation Errors Summary panel at the bottom of the Census Return Details page.
The Validation Errors Summary panel header displays the number of errors and queries found during the Create and Validate process.Details about the errors and queries that have been found are displayed in the following columns:
Column Description
Type Displays the type of validation rule:Failure (F displayed in red) indicates an error, which must be corrected.Query (Q displayed in black) indicates that there are unusual data conditions. These should be considered and corrected, if necessary.
Sequence Shows the error or query number.
Message Displays the text of the error or query message.
Location Lists the specific record containing the error or query.
Solution Provides a suggestion on how the error can be corrected or the query checked. Many solutions have a hyperlink (indicated by a #) to the appropriate area of SIMS.
To assist in the resolution of any errors and queries:When the mouse pointer is hovered over an error or query row, it changes to a hand if a hyperlink is available to the area of SIMS where the problem can be checked.
NOTE: A hyperlink is also indicated by a hash symbol (#) preceding the Solution text.
40 Producing the PLASC 2017 Return

04| Completing the PLASC Return
Click the appropriate hyperlink to display the specific SIMS area where the record(s) can be checked/corrected.When the pointer is hovered over a Message, Location or Solution cell, hover help displays the entire content of that cell.The Student Search functionality can be used to display all errors and queries relating to a particular pupil. Enter all or part of a UPN, pupil's surname or date of birth in the Student Search field then select the required record from the Student Search drop-down list and click the Find button.
Click the Solution hyperlink to display the area of SIMS where the associated issue can be checked/corrected. When you return to the Validation Errors Summary panel, the details of the applicable pupil are displayed in the Student Search field. Click the Find button to display all errors and queries relating to that pupil.
Use the Error Search to display the required error or query you want to view. This is achieved by selecting ALL, ERRORS, QUERIES or the required number from the drop-down list. By default, when ALL errors and queries is selected, the errors are displayed at the top of the list.
Change the order of the summary by clicking the appropriate column heading. If required, change the width of the columns by dragging the dividing line between the column headings until the required size is achieved.View a summary of validation failures (particularly useful if there are a large number of errors/queries) by clicking the Report button, which is located above the Validation Errors Summary panel. The report is displayed in your web browser, e.g. Windows® Internet Explorer®, from where it can be printed.
Producing the PLASC 2017 Return 41

04| Completing the PLASC Return
The details of the Validation Errors Summary can also be transferred to another application, if required.Resolve as many errors and check as many queries as possible then revalidate the return details. Continue to resolve failures and revalidate the return as many times as necessary.
NOTE: All errors must be resolved and all queries must be investigated.
If at any point you wish to hide the list of error and queries, click the Close button located at the top right-hand side of the Validation Errors Summary panel. The list is displayed again when the Create and Validate process is run.Many of the errors generated can be fixed quickly using bulk update functionality (Routines | Pupil | Bulk Update). For more information, please refer to the Managing Pupil/Students handbook.In addition to the Validation Errors Summary, an Errors and Resolutions document is being prepared that contains a list of all errors/queries that can be generated. Explanations and suggestions on how to resolve the error are also included. The document can also help to identify the order in which errors should be corrected, e.g. a missing UPN might generate several related errors, so adding the missing UPN can prevent (or resolve) these additional errors.The PLASC 2017 Errors and Resolutions document can be found on the My Account website (https://myaccount.capita-cs.co.uk) by using the search facility to find PLASC17.More Information:
Transferring Report Data to a Spreadsheet on page 44
Producing Detail ReportsIMPORTANT NOTE: The PLASC Return must be generated (i.e. created and validated) before the detail reports can be run.
Detail reports can be used to check the SIMS data used to create the census return. The reports can be produced as soon as the return has been created and validated.Each report header displays the security message (as defined via Tools | Statutory Return Tools | Folder Names and Security Message).The report header also includes the Report Criteria, e.g. pupils on-roll on census day, and the Total Pupils shown on the report.The following reports are currently available.
Pupil Basic Details ReportReport Criteria: Pupils on-roll on census day.This report provides basic information about pupils: surname, forename, middle names, year taught in (YTI), date of birth, gender, national identity, ethnicity, ethnicity source (ascribed by the previous school), language type, language, language source (e.g. provided by parent), eligibility for free school meals, in care status, care authority, in care at current school status, enrolment status, date of entry, part-time status, class and postcode.
42 Producing the PLASC 2017 Return

04| Completing the PLASC Return
Pupil Welsh Characteristics ReportReport Criteria: Pupils on-roll on census day.This report provides Welsh related information about pupils: surname, forename, year taught in (YTI), date of birth, gender, speaks Welsh (e.g. fluent in Welsh), speaks Welsh at home, Welsh source (e.g. parents), studying Welsh (e.g. taught Welsh as a first language), English as an additional language status (EAL), e.g. competent, fluent, new to English, etc.
Pupil SEN Data ReportReport Criteria: Pupils on-roll with SEN Provisions (SIMS SEN status) other than N.This report displays a list of pupils who have special educational needs and their relevant information: surname, forename, year taught in (YTI), date of birth, gender, SEN provision, SEN needs, SEN curriculum and teaching methods, SEN grouping and support, SEN specialised resources, SEN advice and assessment.
Pupil Exclusions ReportReport Criteria: Pupils with exclusion in the last academic year.This report displays the following information about pupils who were excluded from school at any time during the last academic year: surname, forename, date of birth, gender, exclusion start date, exclusion reason, exclusion category (e.g. fixed term), number of sessions lost due to exclusion.
Generating Detail ReportsTo select a single detail report, select the required report from the Detail Report drop-down list located at the top of the PLASC Detail page. The selected report is generated automatically.
To select several detail reports, select Multiple reports… from the bottom of the Detail Report drop-down list to display the Detail Reports dialog.
Producing the PLASC 2017 Return 43

04| Completing the PLASC Return
By default, all detail reports are selected. If any reports are not required, deselect the associated check box. Click the Report button to generate the selected reports.The report(s) are displayed in your web browser, e.g. Windows® Internet Explorer, from where the data can be transferred to a spreadsheet such as Microsoft® Excel if required.The report(s) are saved automatically in the PLASC Folder (specified via Tools | Statutory Return Tools | Folder Names and Security Message) with a filename that is made up of the following data fields separated by underscores (‘_’):<LACode><SchoolNumber>_<SurveyType>_<LACode><XX><Year>_ <SerialNumber>_<name of the report>.htmlFor example: 6742999_ASC_674XX17_001_pupil_basic_report.html.
Transferring Report Data to a SpreadsheetTransferring a report to a spreadsheet application enables the data to be sorted, the column order to be changed, etc.In your web browser, right-click the report then select the required option, e.g. Export to Microsoft Excel, from the drop-down list.The spreadsheet contains the same level of sensitive information as the original HTML report from which it was transferred therefore, it is important that the file is saved to a folder with the same level of security.
Printing a Report from your Web BrowserIMPORTANT NOTE: Any printed reports containing information that could identify a person (e.g. their name, address, UPN, etc.) should be used for validation purposes only and should not be retained. The Security Message (displayed at the top of each report) can be customised to include instructions for the destruction of the printed reports, if required.
1. With the generated report displayed in your web browser, select File | Print to display the Print dialog.
2. Ensure that the print settings are correct then click the Print button.3. Click the Close button on the top right-hand corner of the web page to close
the report and return to the census page.
44 Producing the PLASC 2017 Return

04| Completing the PLASC Return
Deleting Temporary Web Browser FilesIt is recommended that, after viewing statutory returns reports, you delete any temporary web browser files to ensure that any cached data (i.e. data stored on the PC itself, which enables high-speed access to previously viewed data) is removed.This prevents the information, e.g. copies of web pages that are stored in the local cache for faster viewing, remaining on the hard disk of the PC in the temporary directory, where they are not secure because they can still be accessed.
Deleting the cache in Windows Internet Explorer 101. Select Tools | Internet options to display the Internet Options dialog.2. Select the General tab.3. In the Browsing history section, click the Delete... button to display the
Delete Browsing History dialog.4. Ensure that the Temporary Internet Files and website files check box is
selected then click the Delete button.All temporary files (including any Statutory Returns reports files) that the browser has cached are deleted.
5. Click the OK button.
Deleting the cache in Windows Internet Explorer 8 and 91. Click the Tools button located on the far right-hand side of the toolbar.2. Select Internet options from the drop-down list to display the Internet
Options dialog.3. Select the General tab.4. In the Browsing history section, click the Delete... button to display the
Delete Browsing History dialog.5. Ensure that the Temporary Internet Files check box is selected then click
the Delete button.All temporary files (including any Statutory Returns reports files) that the browser has cached are deleted.
6. Click the OK button.
Producing the Summary ReportThe Summary Report enables the staff preparing the return to assess its accuracy and completeness. A declaration at the bottom of the report must be signed and dated before it is forwarded to the authorities.Click the Summary button down arrow and select In English or In Welsh from the drop-down list to display the report in your web browser, e.g. Windows® Internet Explorer®.The report is saved automatically in the PLASC Folder (specified via Tools | Statutory Return Tools | Folder Names and Security Message) with a filename that is made up of the following data fields separated by underscores (‘_’):<LACode><SchoolNumber>_<SurveyType>_<LACode><XX><Year>_ <SerialNumber>_<name of the report>.html
Producing the PLASC 2017 Return 45

04| Completing the PLASC Return
For example: 6742999_ASC_674XX17_001_Welsh_Summary_Report.html.
Authorising the PLASC ReturnThe PLASC return must be authorised before it can be submitted to your LA or the Welsh Government.Before authorising the return, you should ensure that all the information displayed on the PLASC Detail page is correct and does not require further editing. This is best achieved by reviewing the Summary report.
1. Click the Authorise button. A message advises you that the return cannot be edited once it has been authorised.
2. Click the Yes button to continue or the No button to return to SIMS, where edits can be made to the data before authorising.
46 Producing the PLASC 2017 Return

04| Completing the PLASC Return
If you choose to continue, the Head teacher authorisation dialog is displayed.
3. Enter any Additional text to be displayed on the authorisation report, if required. This may be requested by your LA, e.g. to explain the reason for a validation failure.
4. Select the confirmation check box to confirm that the Head Teacher is satisfied that the Summary and/or detail reports have been checked and that the return file is ready for upload to your LA or the WG.When the confirmation check box is selected, the Continue button is activated, enabling you to complete the authorisation process.
5. Click the Continue button to authorise the return and generate the reports.The Summary report (English and Welsh versions), Authorisation report and detail reports are generated automatically and stored in your Data Management Server (DMS) at the time of authorisation. The reports are also displayed in your web browser, from where they can be printed, if required.The return file extension changes from .UNA (unauthorised) to .XML (authorised). The reports and the authorised return file are saved automatically in the folder previously specified via Tools | Statutory Return Tools | Folder Names and Security Message.When a return has been authorised, it is no longer possible to edit the details displayed on the Census Return Details page. If you authorise a return and subsequently need to make amendments, you should make a copy of the return then work on the copy or create a new return. More Information:
Producing Detail Reports on page 42
Submitting the PLASC ReturnWhen you wish to submit the PLASC return file, it can be located in the folder defined via Tools | Statutory Return Tools | Folder Names and Security Message.
Producing the PLASC 2017 Return 47

04| Completing the PLASC Return
The PLASC return file should be transferred to your LA or the Welsh Government in the way requested.The return will be checked using the Welsh Government web tool DEWi. If problems are found, you may be asked to resubmit the return. If this is the case, you must copy the submitted return because an authorised return cannot be edited. Therefore, a new version of the return must be created using the data from the submitted return as a guide but ensuring that the issues found previously are addressed.More Information:
Copying a PLASC Return File on page 49
Retrieving Authorised Census Return FilesAuthorised returns are stored in your Document Management Server (DMS). The Returns Manager can download and run the reports associated with previous authorised returns enabling the data for the current return to be compared with that submitted previously.
1. Select Tools | Statutory Returns Tools | Retrieve Authorised Census Return Files to display the Retrieve Authorised Census Return Files for <census name> page.
2. Select the type of census required from the Return Type drop-down list to display a list of previous returns that match the selected criteria.
3. By default, the files Download to the folder specified in the census browser. To specify a different folder:a. Click the Select a Folder button (...) to display a standard Windows®
Browse For Folder dialog. Navigate to the location of the required folder then highlight it. If a suitable folder does not exist, click the Make New Folder button then enter a suitable folder name.
IMPORTANT NOTE: Ensure that authorised personnel only have access to the download folder because the retrieved files contain sensitive information.
For guidance on navigating to files on your local workstation when you are working in a Hosted environment, please contact your System Manager or local Support.
b. Click the OK button to select or create the folder then return to the Retrieve Authorised Return Files for <census name> page where the chosen folder name is displayed in the Download to field.
4. Highlight the return you wish to retrieve then click the Retrieve Files button. The authorised return file (i.e. the XML file) and all reports associated with the selected return are downloaded from your DMS to the specified folder. The folder and its contents are then displayed automatically, enabling you to open the required files in your web browser.
5. The contents of the specified folder can be viewed again by clicking the Folder button adjacent to the Download to field.If you want to create reports based on cohorts, so that items collected in the return can be tracked, a sub-report is available (via Reports | Design Reports).
48 Producing the PLASC 2017 Return

04| Completing the PLASC Return
The Statutory Returns sub-report is available if Student has been selected as the Data Area. When selecting the fields to be included in the report, the Statutory Returns sub-report is located at the bottom of the list (the last node). Three options are available for selection under the sub-report: Authorised Date, File Name and Return Description.
Additional Resources:Designing and Running Reports handbook
Copying a PLASC Return FileAn unauthorised return can be copied and saved as a new return at any time. The copy routine takes a ‘snapshot’ of the unauthorised return enabling a backup of data entered manually to be retained as reference while the actual return is completed.The routine can also be used to make a copy of an authorised return (which cannot be edited). This may be required if, for example, you are asked by your LA or the Welsh Government to resubmit the return. The necessary corrections to the data can be made in the copied return before it is created and validated, authorised then resubmitted.
NOTE: The Copy button is disabled if a return is already displayed on the PLASC Detail page.
1. Select Routines | Statutory Returns | PLASC to display the PLASC Return browser.
2. Highlight the return file to be copied then click the Copy button. The following message is displayed:
Producing the PLASC 2017 Return 49

04| Completing the PLASC Return
This is an exact copy of the calculated totals and the data entered manually at the time of the copy. This can be regarded as a backup. The copy can then be edited and recalculated to obtain current data.Do you want to make a copy of the return?
3. Click the Yes button to confirm that a copy of the selected return should be created. The copied return is displayed in the browser.
4. Highlight the copy of the return, e.g. Copy of <name of selected file>, then click the Open button to display the PLASC Detail page.
5. In the Census Details panel, edit the Description ensuring you enter a unique name, then click the Save button.
6. The renamed return can now be amended, saved and authorised, as required.
Deleting an Unauthorised PLASC Return FileDuring the course of producing a census return, a number of copies of the return may have been made, e.g. to track progress. When a return has been authorised successfully, it is advisable to delete any unauthorised return files that are no longer required. This will keep the number of files listed in the PLASC Return browser to a minimum therefore removing confusion and lessening the risk of opening the wrong one, etc.
NOTE: Census return files that have already been authorised cannot be deleted.
1. Select Routines | Statutory Returns | PLASC to display the PLASC Return browser.
2. Highlight the return to be deleted then click the Delete button. A message prompts for confirmation that the selected return should be deleted.
3. Click the Yes button to delete the selected return.
50 Producing the PLASC 2017 Return

04| Completing the PLASC Return
Producing the PLASC 2017 Return 51

I| Index
IndexAaccess rights...............................................5adding
classes to the classes panel..................27attendance
attendance on census day.....................37part-time mode of attendance...............37
authorisingthe return..............................................47
Ccalculating details.....................................20census details...........................................17classes information
class size exceptions.......................23, 26editing data...........................................21
completion times......................................38configuring
PLASC return folder...............................10copying
return file...............................................50creating and validating
PLASC return.........................................39
Ddeleting
classes from the classes panel..............28temporary web browser files.................45unauthorised return file.........................51
detail reportsgenerating.............................................44printing from web browser....................45producing..............................................43transferring to a spreadsheet................45
Eerrors
resolving................................................40exceptional class size...............................23
exception reason codes.........................26exporting the return.................................48
Producing the PLASC 2017 Return 53

I| Index
Ffailures
resolving................................................40federated governing body number...........17fileset
importing...............................................11folder name
configuring............................................10free breakfasts
entering details.....................................36free school meals
entering details.....................................36
Ggeneral information..................................36governors
entering details.....................................37
Hhead teacher’s teaching commitment
entering details.....................................36
Iimporting
revised files for valdation and reports. . .11preparation.........................................12
LLA special classes
entering details.....................................37
Nnew return
creating.................................................15
Oorder of working.......................................16
Ppart-time mode of attendance
entering details.....................................37permissions................................................5PLASC return
Producing the PLASC 2017 Return 54

I| Index
authorising............................................47copying..................................................50creating.................................................15deleting.................................................51retrieving authorised return files...........49
populating panels.....................................20preparation
checking data..........................................6minimum version of SIMS required..........6permissions.............................................5using the bulk update routine..................6
printingreports...................................................45validation errors summary.....................40
producingdetail reports.........................................43summary report.....................................46the return..............................................15
pupil basic details report..........................43pupil exclusions report.............................43pupil SEN data report...............................43pupil welsh characteristics report.............43
Qqueries
resolving................................................40
Rrecalculating details.................................20recruitment
entering data.........................................34reports
detail reports.........................................43pupil basic details report....................43pupil exclusions report.......................43pupil SEN data report.........................43pupil welsh characteristics report.......43
generating detail reports.......................44printing from web browser....................45producing the summary report..............46
resolvingerrors and queries.................................40
retention
Producing the PLASC 2017 Return 55

I| Index
entering data.........................................35retrieving
authorised census return files...............49return folders
configuring............................................10
Sschool information....................................17school milk
entering details.....................................37security message
specifying..............................................11SIMS
minimum version required......................6specifying
return folder..........................................10security message for reports.................11
submittingthe return file........................................48
summary reportprinting..................................................45producing..............................................46
support staffediting data...........................................31
survey completion timeentering.................................................38
Tteachers
teachers of Welsh..................................33with full-time or part-time contract........29with short-term contract........................30
transferringdetail report to a spreadsheet...............45the return file........................................48
UUK Provider Reference Number................17undoing changes......................................28
Vvalidating
resolving validation errors.....................40
56 Producing the PLASC 2017 Return

I| Index
the return..............................................39
WWelsh medium....................................17, 21
Producing the PLASC 2017 Return 57