Embed Size (px)
Citation preview

151
Chapter 6
Users, Profiles, and Social Networking
SharePoint revolves around user collaboration. User collaboration thrives with user adoption of a SharePoint system, and for a SharePoint solution to engage users requires integration of user identity in the system. In Chapter 7, I shall cover security, which has an identity component and focuses on authentication in SharePoint 2013. In this chapter, I will discuss user profiles, which map user identity to the details about users.
Each user profile in SharePoint retains metadata about a person using the SharePoint platform, such as their role in the organization, photo, summary of skills, office demographics, and so on. After reading this chapter, you will know what constitutes a user profile and how you can configure the User Profile Service (UPS) application in a SharePoint 2013 farm, establishing two-way synchronization between user profiles in SharePoint and those of the organization Active Directory. You will also learn about configuring people search.
Later in this chapter, I shall dive into social networking. Thanks to the proliferation of social networking sites such as Facebook, Google+, and others in most people’s personal lives, social networking has crept into the business world. Microsoft has addressed the need for social networking components, such as newsfeeds, event tracking, and likes, within the SharePoint platform, and I shall highlight some of the new features within SharePoint 2013.
A User’s ProfileA user profile is a collection of data about a person. SharePoint synonymizes the term “people” with “users”; therefore, user profiles in SharePoint consist of data about users of the SharePoint platform. When you think about the profile of a user, you typically think about demographic information—name, address, phone, e-mail, and so on. SharePoint stores this demographic data, and more, as fields in the user profile associated with a user in a SharePoint farm. SharePoint terms these fields “profile properties.”
Users of a SharePoint site may view their profile at any time by clicking their name either on the top right of the ribbon (followed by the About Me link), or next to any document or list item when shown. SharePoint will display a page with main demographic information, a picture (if you have one in your profile), and other information about you—such as the About Me description, and skills. Your profile page also includes an Edit My Profile link, allowing you to edit your own profile. Later on in this chapter, I will demonstrate how to add profile properties, in addition to the default properties included with SharePoint, so that users may add more data about themselves. Figure 6-1 shows the default profile for my user identity in my SharePoint 2013 development farm. Notice that I added a picture to my profile to make it appealing to those viewing it.

Chapter 6 ■ Users, profiles, and soCial networking
152
Similar to the way you view your own profile; other users of SharePoint may see your public profile information by clicking your name where it appears next to list items and documents in the site. Your association with a user governs how you see his or her profile. For example, users can set the visibility of their profile properties to Everyone, Manager, Team, Colleagues, or just themselves.
If you are thinking that user profiles in SharePoint are very much like user records in Active Directory (or any other directory system), you are right. Keeping user profile information in both places may seem like unnecessary work, which is why Microsoft provided the User Synchronization Service in SharePoint, so you can populate user profiles in SharePoint with those in your directory system. User Profile Synchronization now also allows you to establish bidirectional sync, so that users may update their profiles in SharePoint and see the changes reflected in the directory store. I will cover User Profile Synchronization in the next section of this chapter.
The User Profile InfrastructureIn this section, my aim is to give you some context for various architectural components that combine to make the user profile and User Profile Synchronization infrastructure. Figure 6-2 offers a pictorial overview of the components and provides a logical view of the services and service applications involved. Following this infrastructure overview, you will configure a new User Profile Service and Synchronization in a virgin SharePoint 2013 farm.
Figure 6-1. Default Profile page in SharePoint 2013

Chapter 6 ■ Users, profiles, and soCial networking
153
Note ■ although most deployments of User profile synchronization use active directory, there is no reason why you cannot configure User profile synchronization to another directory store, such as an ldap service.
Figure 6-2. The user profile infrastructure architecture
The User Profile Service ApplicationA SharePoint service application exists in a context similar to that of a SharePoint web application—it resides in Internet Information Services (IIS) and offers application presence to other SharePoint and non-SharePoint services on the network. Within Internet Information Services Manager 7.0 (INETMGR), expand the SharePoint Web Services application to see a list of IIS applications, some with GUID names—these are the service applications hosted on the current server of your farm.
The User Profile Service application is actually a WCF (Windows Communication Foundation) service, which exposes service end-points. Other servers in the farm may leverage the User Profile Service application to access user profile data. Discussion of WCF is beyond the scope of this book, but I will say that all SharePoint service applications operate as WCF services and expose functionality via the standard WCF service patterns. The User Profile Service application uses three SharePoint databases to host user profile–related data, which I will discuss in the section on configuration, later in this chapter.
Administrators may configure multiple User Profile Service applications in the farm, but only one User Profile Service application associates with a User Profile Synchronization SharePoint Service.
Chapter 6 ■ Users, profiles, and soCial networking
154
The User Profile ServiceThe User Profile Service is a SharePoint service. Note that a SharePoint service is not the same as a Windows service. SharePoint services exist only in the SharePoint context and consist of functionality abstracted into .NET assemblies within the SharePoint platform and exposed to the administrator in the list of services in the SharePoint farm in Central Administration. Take the following steps to view this list:
1. Open Central Administration.
2. Click the link Manage Services on Server in the System Settings section.
3. Look for the User Profile Service in the list.
Only one server in the SharePoint farm should have the User Profile Service running, which is the service machine instance for the User Profile role.
The User Profile Synchronization ServiceLike the User Profile Service, the User Profile Synchronization Service exists as a SharePoint service and lists alongside its sibling User Profile Service on the server in the farm, delegated as the service machine instance for the User Profile role. This particular service provides .NET wrapper functionality to SharePoint, beyond that provided by the Forefront Identity Manager (discussed next).
Only one server in the farm should run the User Profile Synchronization Service, typically the same server running the User Profile Service. This service associates with only one User Profile Service application and accepts credentials under which the FIM operates.
The Forefront Identity Manager (FIM)SharePoint bundles a lightweight version of the Forefront Identity Manager application, which has the primary job of managing user and server identity. The FIM consists of two Windows services—configured by the User Profile Synchronization Service SharePoint Service.
Note ■ the fiM client tool, part of windows, does not support customizing the fiM services that bundle in sharepoint 2010 and 2013 but supports monitoring and troubleshooting.
The topic of Forefront Identity Management is outside the scope of this book, but it is worth understanding its role in the User Profile Synchronization infrastructure as managing identity as it pertains to users in SharePoint.
You can find the FIM client tool for SharePoint at the following location on the service machine instance: C:\Program Files\Microsoft Office Servers\14.0\Synchronization Service\UIShell\miisclient.exe.

Chapter 6 ■ Users, profiles, and soCial networking
155
Configuring User Profile SynchronizationConfiguration of User Profile Synchronization in SharePoint is a task that seems to give administrators more trouble than any other area of SharePoint installation and configuration. User Profile Synchronization in SharePoint is complicated and therefore gives administrators the most trouble when it does not work. Do not worry, though—I shall guide you through the configuration of User Profile Sync on a virgin SharePoint 2013 environment.
Establishing Managed AccountsEstablishing the correct credentials and configuring the necessary services and service applications under the correct set of credentials is essential to ensuring smooth installation and operation of User Profile Service and Synchronization. Most of the time, when User Profile Service and User Profile Synchronization fails, it is because of incorrect credentials, or credentials with insufficient privileges.
Chapter 2 introduced the notion of managed service accounts in SharePoint—rather than specifying Active Directory account credentials everywhere, you can map these credentials to a managed account name in SharePoint in one central location. Assuming that you have installed SharePoint 2013 and have access to the Central Administration site, the following steps allow you to view a list of managed service accounts in the farm:
1. Open Central Administration.
2. Click the Security section heading.
3. Click the link Configure Managed Accounts in the General Security subsection.
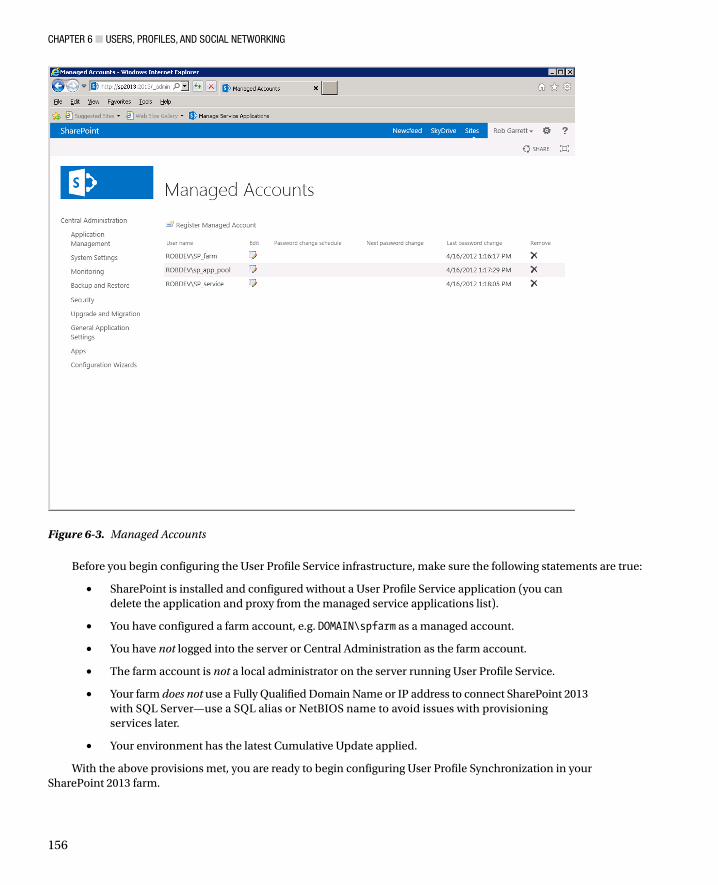
You should see a page similar to Figure 6-3, although you will likely see a different list of managed accounts from that in my environment.
Note ■ the steps in this chapter assume no prior configuration of User profile service and no User profile service application existing in the farm. they also assume the use of active directory (ad) as the source of user profiles, although you may use another directory service.
Chapter 6 ■ Users, profiles, and soCial networking
156
Before you begin configuring the User Profile Service infrastructure, make sure the following statements are true:
SharePoint is installed and configured without a User Profile Service application (you can •delete the application and proxy from the managed service applications list).
You have configured a farm account, e.g. • DOMAIN\spfarm as a managed account.
You have • not logged into the server or Central Administration as the farm account.
The farm account is • not a local administrator on the server running User Profile Service.
Your farm • does not use a Fully Qualified Domain Name or IP address to connect SharePoint 2013 with SQL Server—use a SQL alias or NetBIOS name to avoid issues with provisioning services later.
Your environment has the latest Cumulative Update applied.•
With the above provisions met, you are ready to begin configuring User Profile Synchronization in your SharePoint 2013 farm.
Figure 6-3. Managed Accounts
Chapter 6 ■ Users, profiles, and soCial networking
157
Note ■ follow all steps, from this point on, in sequence. do not be tempted to skip or attempt steps in a different order, or you will risk failure in the setup.
The first step, and pertinent to this section, is to create some service accounts in your organization’s Active Directory forest. In a typical SharePoint 2013 configuration, you will need at least the following three domain accounts:
• DOMAIN\spcontent
• DOMAIN\spservices
• DOMAIN\spups
Ensure that these accounts exist as normal users with no password expiration. The DOMAIN\spups account must have Replicating Directory Changes permission in the Active Directory. This account does not run any Windows or SharePoint services nor does it run any application pools.
Note ■ not granting replicating directory Changes to the User profile service account is typically the first mistake administrators make when configuring User profile synchronization, and this may lead to issues later.
The following steps detail how to grant Replicating Directory Changes from within the Active Directory Users and Computers configuration snap-in (please note that these steps require AD Security Account Operators rights):
1. Log on to your server hosting Active Directory.
2. Right-click the domain name in Active Directory Users and Computers.
3. Choose Delegate Control and then click the Next button.
4. Add the DOMAIN\spups account and click the Next button.
5. Select Create Custom Task to Delegate and click the Next button.
6. Click the Next button again.
7. Select the Replicating Directory Changes permission and click the Next button.
8. Click the Finish button.
Next, you configure Replicating Directory Changes on the Configuration Naming Context for the domain:
1. Run ADSIEDIT.msc.
2. Connect to the Configuration partition.
3. Select Configuration in the Select a Well-Known Naming Context drop-down list.
4. Right-click the Configuration partition and choose Properties.
5. Select the Security tab.
6. Add the DOMAIN\spups user to the list and give it Replicating Directory Changes permission.

Chapter 6 ■ Users, profiles, and soCial networking
158
Note ■ when running the domain Controller on windows 2003 or earlier, add the DOMAIN\spups user to the pre windows 2000 Compatible access built-in group.
The SharePoint farm account must have Log on Locally rights on the server performing User Profile Sync. The following steps detail how to configure this:
1. Log on to the server running SharePoint and host for User Profile Synchronization.
2. Open Administration Tools.
3. Open either Group Policy editor or the Local Security Policy editor.
4. Navigate to Security Settings, Local Policies, User Rights and Assignments.
5. Click Allow Logon Locally.
6. Make sure the farm account is either in one of the groups listed or explicitly listed.
7. If running SharePoint on a domain controller (this is a bad practice), use GPMC.msc to edit the default domain policy.
8. Execute GPUPDATE.exe from an elevated command line to refresh the policy.
Note ■ at this stage, i recommend a server reboot to ensure that the DOMAIN\spups account picks up all permission and policy changes—this will help avoid issues with the service provisioning process hanging later.
Next, register managed accounts for the DOMAIN\spcontent and DOMAIN\spservices accounts:
1. Open Central Administration.
2. Click the Security section heading.
3. Click the link Configure Managed Accounts, in the General Security subsection.
4. Click Register Managed Account.
5. Provide details for the two domain accounts to register.
6. You can register the DOMAIN\spups account if you like, but User Profile Service does not use managed accounts and expects a Windows domain account, so there is little point.
With Windows domain accounts and managed accounts configured, now create two web applications—one to host your site collection and another to act as the My Site Host. Use the content account as the application pool account for both web applications. Create a new site collection in the My Site Host, using the My Site Host Template. Flip back to Chapter 2 if you need a refresher on how to create web applications and site collections.

Chapter 6 ■ Users, profiles, and soCial networking
159
Note ■ as a best practice for large deployment (more than 5000 users), consider hosting a My site host in a separate web application.
After creating a new host application for My Sites, and provisioning service accounts, you can now configure the User Profile Service application.
Creating the User Profile Service ApplicationThe following steps assume that you have completed the steps in the previous section to establish managed service accounts. This is very important; failure to establish correct accounts and permissions affects the steps in this and following subsections. Assuming that you have completed the prior steps with no errors, or issues, follow these steps to provision the User Profile Service application:
1. Open Central Administration.
2. Click the Application Management link.
3. Click the Manage Service Applications link.
4. Make sure no other User Profile Service application or proxy exists in the list. If there are any, delete them.
5. From the ribbon, click the New icon and then select User Profile Service Application from the list.
6. Give the new service application a name, such as User Profile Service Application.
7. Create a new application pool for the application and use the DOMAIN\spservices account.
8. Check the names of the three databases—Profile, Sync, and Social. Either leave the default names, or change them to your desired names.
9. Enter the My Site Host application (the form will validate this entry).
10. Select the managed path and site name scheme.
11. Leave the proxy setting as is.
12. Click the Create button and wait while SharePoint creates the User Profile Service application.
13. If the NetBIOS name is different from the Fully Qualified Domain Name, configure the service application with the following PowerShell script:
$upssa = Get-SpServiceAplication -Id <Guid of the User Profile Service Application>$upssa.NetBIOSDomainNamesEnabled = 1$upssa.Update()
You should now have a working User Profile Service application and proxy in your farm (you may need to refresh the Managed Services List page). The next section details the steps for starting the necessary SharePoint services for User Profile Synchronization.

Chapter 6 ■ Users, profiles, and soCial networking
160
Starting the ServicesAt this point, you should have completed the steps in the previous sections and have a working User Profile Service application and proxy. Take the following steps to start the User Profile Service and User Profile Sync Service SharePoint Services:
1. Add the DOMAIN\spfarm account to the Administrators group on the server running FIM/UPS (you can remove this account from the group later).
2. Perform an IISRESET and reset the SharePoint timer service.
3. Open Central Administration.
4. Click the System Settings section title link.
5. Click the Manage Services on Server link.
6. If not already started, start the User Profile Service, which requires no options.
7. Start the User Profile Sync Service (see Figure 6-4).
Figure 6-4. Starting the User Profile Synchronization Service
8. Select the User Profile Service Application in the drop-down.
9. Enter the farm password and click OK (Yes, the account is hard coded to the farm account, which is less than ideal.).
Chapter 6 ■ Users, profiles, and soCial networking
161
10. Wait. The status of the service will appear as Starting. Do not be alarmed if the status remains in the Starting state for 10 minutes or longer, as SharePoint is doing a lot of work to configure FIM.
11. While you wait, open the services control panel (SERVICES.msc).
12. You should see two Forefront Identity services in the list. The User Profile Sync Service starts these services. Do not be tempted to start these services yourself—this will break User Profile Synchronization in SharePoint.
13. Once the User Profile Sync Service has started, remove the DOMAIN\spfarm account from the administrators group on the FIM/UPS server.
14. Perform an IISRESET and reset the SharePoint timer service.
15. If you have a named instance of SQL, you may need to allow inbound connections to MSDTC on the server running FIM.
If all has gone according to plan and you have a green Started status next to both your User Profile Service and User Profile Sync Service in your Services list, give yourself a pat on the back—if something goes wrong, it typically happens before now.
Importing User Profiles from Active DirectoryThis procedure assumes you have completed the steps in the previous section—and thus have a working User Profile Service application, and the User Profile Service and User Profile Sync Service started in SharePoint. The following steps demonstrate setting up a connection to Active Directory to perform a profile import for the users in the domain:
1. Open Central Administration.
2. Click the Application Management link.
3. Click the link for Manage Service Applications.
4. Find the User Profile Service application, which you created earlier in this chapter.
5. Click to the right of the name to highlight the row; then click Manage from the ribbon.
6. If all is well, you should see a page like that in Figure 6-5.

Chapter 6 ■ Users, profiles, and soCial networking
162
Figure 6-5. User Profile Service Administration page
7. In the Synchronization section, click the Configure Synchronization Connections link.
8. Click the Create New Connection button.
9. Give the connection a name and set the type as Active Directory.
10. Enter the forest name (you can use the domain name for purposes of demonstration).
11. Select the authentication type as Windows.
12. Enter the credentials as DOMAIN\spups and its password; you must use this account as it is the account used by FIM to establish sync with AD.
13. Click the Populate Containers button to get a list of containers, as shown in Figure 6-6.

Chapter 6 ■ Users, profiles, and soCial networking
163
14. You might be tempted to click the check box for the entire domain, or hit that Select All button. Avoid this; instead, expand the hierarchy and select the OU that contains the users.
15. Click the OK button, and SharePoint will configure the import connection.
16. Navigate back to the User Profiles Admin page.
17. Click the Start Profile Synchronization link.
18. On the next page, change the radio button to Full Synchronization and click OK.
19. Refresh the User Profile Service Administration page, and you should see the synchronization status on the right of the page change from Idle to Synchronizing.
20. The synchronization process is very slow! So be prepared to wait a while.
21. To see the status of the import, you can click the Synchronizing link. For a more verbose view of the import status, run the FIM client tool, available from C:\Program Files\Microsoft Office Servers\15.0\Synchronization Service\UIShell\miisclient.exe.
Figure 6-6. Populated containers for AD connection—import
Chapter 6 ■ Users, profiles, and soCial networking
164
22. Assuming there were no errors, once the synchronization job completes, you can see the number of imported profiles in the top right of the Admin page.
23. In the People section, click the Manage User Profiles link to search and view user profiles for those users imported.
This completes configuration of the User Profile Service and Synchronization for what is the equivalent one-way import that you could do with SharePoint 2007. The nice thing about SharePoint 2010 and 2013 is that User Profile Synchronization works both ways—so users may update their profile in SharePoint and see the changes push back to AD (or other LDAP system). The next section covers the additional configuration steps to write back to Active Directory.
Writing Back to Active DirectoryOne-way synchronization from Active Directory to SharePoint is fine, but better is the ability to allow users to update their profile in SharePoint and update the changes back to Active Directory. Two-way User Profile Synchronization defines true user-profile synchronization as opposed to isolated import, which assumed that Active Directory (or the LDAP server) was the single-point authority for all profile data. The following steps configure Active Directory and SharePoint to allow write back of profile changes to Active Directory.
To allow write back to Active Directory, your DOMAIN\spups sync account requires additional directory permissions—Create Child Objects (for the OU you are writing back into).
1. Log on to the server hosting your Active Directory.
2. Run ADSIEdit.msc.
3. Connect to the default-naming context for the domain.
4. Navigate down the tree to the OU that you wish to allow write back.
5. Right click the OU and select Properties.
6. Click the Security tab.
7. At this point, you need to add the DOMAIN\spups user and grant Create Child Objects permission and read and write permissions—but wait!
8. The DOMAIN\spups user already exists in this list because you delegated Directory Replicating Changes permission. If you are tempted to add the additional permissions to this user, do not. This will result in breaking the profile import.
9. From the dialog shown in Figure 6-7, click the Add button, to add the user again.

Chapter 6 ■ Users, profiles, and soCial networking
165
10. Do not click OK just yet.
11. Click the Advanced button, and in the dialog that appears, scroll down to the instance of DOMAIN\spups account that has <not inherited>.
12. Click the Edit button.
13. Ensure that the Apply To combo box value is This Object and All Descendent Objects.
14. Click the check box in the Allow column for the permissions: Write All Properties and Create Child Objects.
15. Click OK several times to get back to the main ADSIEdit.msc window.
At this stage, the profile import connection, which you established in an earlier configuration stage, imports only! If you think about it, this makes sense—could you imagine how upset HR might be if SharePoint were to overwrite its profile data with user changes, without management control?
The following steps configure the User Profile Synchronization Service for more granular control of properties written back to AD:
1. Return to the User Profile Service Administration page.
2. Click the Manage User Properties link.
Figure 6-7. Organzational unit security
Chapter 6 ■ Users, profiles, and soCial networking
166
3. Choose the property, with mapping to AD, to write back.
4. Make a mental note of the AD property-mapped field.
5. Click the combo box over the property name and select Edit.
6. Scroll to the section Property Mapping for Synchronization.
7. Click the Remove button.
8. In the Add New Mapping section, select the AD property in the Attribute combo box.
9. Change the direction to Export.
10. Click the Add button.
11. Click the OK button to save changes.
You can now make changes to the data in the profile field you changed previously, and when the synchronization process runs, you should see the changes for the property reflected in Active Directory.
User Profiles in SharePoint 2013A user profile consists of a series of attributes that define the profile of a given user known to SharePoint. User profiles effectively give individuals of the system—the users—substance in a SharePoint site by providing more details about a user than his or her username, e-mail address, and display name. A user profile is synonymous with a struct, or method-less class, in programming terms, that holds data in various fields. In fact, in the SharePoint API/Object Model, there exists a class to access user profile properties. In a similar vein, DBA folks would synonymize a user profile with a database record or SQL table.
With the basic principle of a user profile covered, the following sections will explore the various properties and subtypes of a user profile in SharePoint 2013, including organizational profiles and properties, as well as audiences and policy for user profiles.
User Profile Properties and SubtypesSharePoint 2013 looks after user profile management via a dedicated managed service application. I will revisit the User Profile Service and User Profile Service application later in this chapter, but at this stage, I can demonstrate view of the user profile properties via the managed service in Central Administration, as follows:
1. Open Central Administration.
2. Click the Application Management link.
3. Click Manage Service Applications in the Service Applications section.
4. Scroll to the User Profile Service application—do not worry if you do not see one in the list; I discussed configuring User Profile Service earlier in this chapter.
5. SharePoint shows the User Profile Service Admin page (see Figure 6-5 earlier in this chapter).
6. Click the Manage User Properties link.
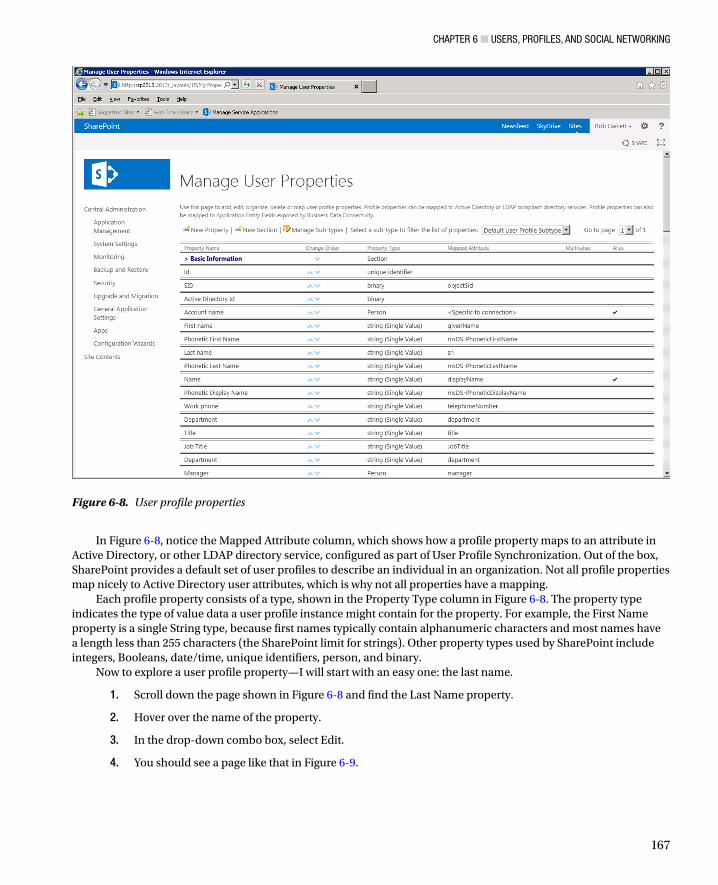
7. You should see a page like that in Figure 6-8.
Chapter 6 ■ Users, profiles, and soCial networking
167
In Figure 6-8, notice the Mapped Attribute column, which shows how a profile property maps to an attribute in Active Directory, or other LDAP directory service, configured as part of User Profile Synchronization. Out of the box, SharePoint provides a default set of user profiles to describe an individual in an organization. Not all profile properties map nicely to Active Directory user attributes, which is why not all properties have a mapping.
Each profile property consists of a type, shown in the Property Type column in Figure 6-8. The property type indicates the type of value data a user profile instance might contain for the property. For example, the First Name property is a single String type, because first names typically contain alphanumeric characters and most names have a length less than 255 characters (the SharePoint limit for strings). Other property types used by SharePoint include integers, Booleans, date/time, unique identifiers, person, and binary.
Now to explore a user profile property—I will start with an easy one: the last name.
1. Scroll down the page shown in Figure 6-8 and find the Last Name property.
2. Hover over the name of the property.
3. In the drop-down combo box, select Edit.
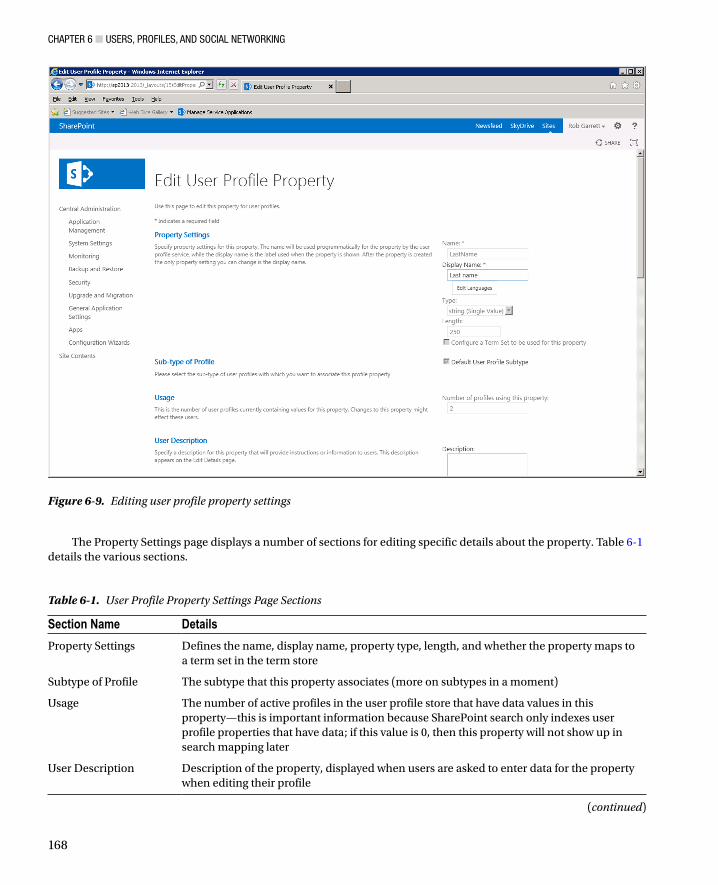
4. You should see a page like that in Figure 6-9.
Figure 6-8. User profile properties
Chapter 6 ■ Users, profiles, and soCial networking
168
The Property Settings page displays a number of sections for editing specific details about the property. Table 6-1 details the various sections.
Figure 6-9. Editing user profile property settings
Table 6-1. User Profile Property Settings Page Sections
Section Name Details
Property Settings Defines the name, display name, property type, length, and whether the property maps to a term set in the term store
Subtype of Profile The subtype that this property associates (more on subtypes in a moment)
Usage The number of active profiles in the user profile store that have data values in this property—this is important information because SharePoint search only indexes user profile properties that have data; if this value is 0, then this property will not show up in search mapping later
User Description Description of the property, displayed when users are asked to enter data for the property when editing their profile
(continued)

Chapter 6 ■ Users, profiles, and soCial networking
169
User Profile SubtypesUser profile subtypes provide a more granular grouping of property types for a user profile. They allow the creation of different kinds of user profiles, each with its own unique fields, for different purposes. For example, suppose an organization wants a special user profile type for contractors to complete, which has all the attributes of a default user profile but with additional properties. The following steps demonstrate creating the Contractor subtype.
1. Open Central Administration.
2. Click the Manage Applications link.
3. Click the Manage Service Applications link under Service Applications.
4. Scroll down to the User Profile Service application.
5. Click to the right of the name and then click Manage from the ribbon.
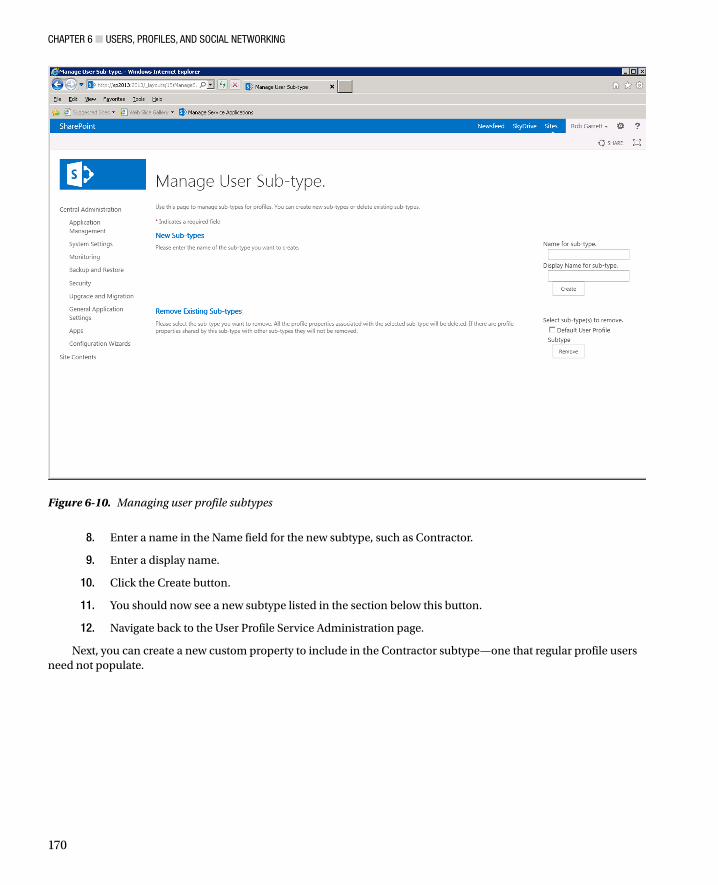
6. From the User Profile Service Administration page shown, click the link Manage User Subtypes.
7. Figure 6-10 shows the page for managing user profile subtypes.
Table 6-1. (continued)
Section Name Details
Policy Policy for the profile property; you will learn more about policy for user profiles later in this chapter
Edit Settings These determine whether users can edit the data in this property or not
Display Settings The context of where this property displays
Search Settings Alias and Index settings for user profile search (more on user profile search later in the chapter)
Property Mapping for Synchronization
I briefly discussed use of this section and the next section in configuring two-way profile synchronization—this section defines the property mappings to Active Directory and LDAP stores
Add New Mapping Section to establish a new mapping to an existing Active Directory or LDAP store connection (configured in User Profile Synchronization)
Chapter 6 ■ Users, profiles, and soCial networking
170
8. Enter a name in the Name field for the new subtype, such as Contractor.
9. Enter a display name.
10. Click the Create button.
11. You should now see a new subtype listed in the section below this button.
12. Navigate back to the User Profile Service Administration page.
Next, you can create a new custom property to include in the Contractor subtype—one that regular profile users need not populate.
Figure 6-10. Managing user profile subtypes
Chapter 6 ■ Users, profiles, and soCial networking
171
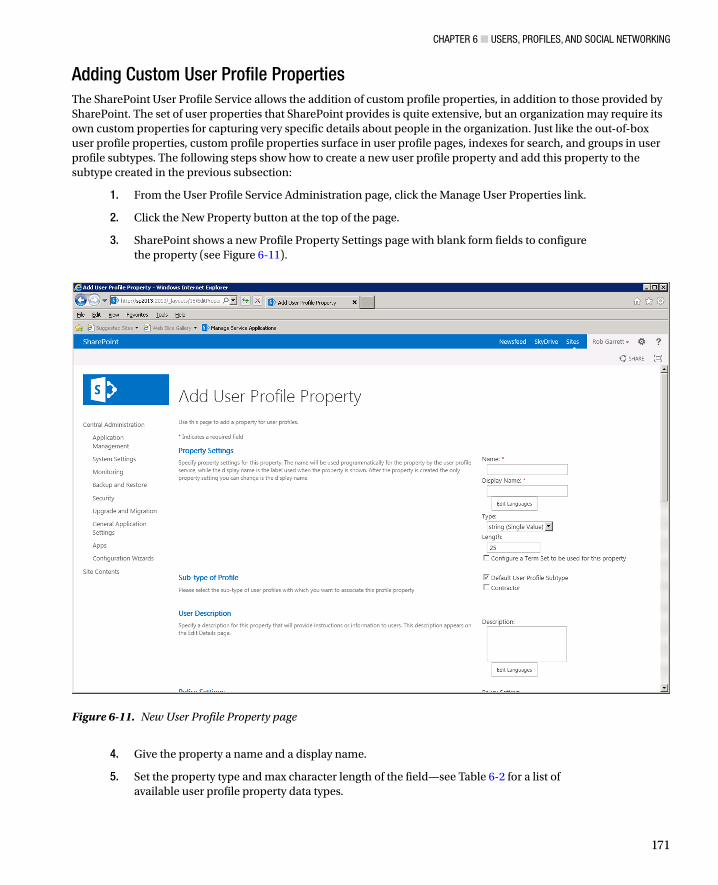
Adding Custom User Profile PropertiesThe SharePoint User Profile Service allows the addition of custom profile properties, in addition to those provided by SharePoint. The set of user properties that SharePoint provides is quite extensive, but an organization may require its own custom properties for capturing very specific details about people in the organization. Just like the out-of-box user profile properties, custom profile properties surface in user profile pages, indexes for search, and groups in user profile subtypes. The following steps show how to create a new user profile property and add this property to the subtype created in the previous subsection:
1. From the User Profile Service Administration page, click the Manage User Properties link.
2. Click the New Property button at the top of the page.
3. SharePoint shows a new Profile Property Settings page with blank form fields to configure the property (see Figure 6-11).
Figure 6-11. New User Profile Property page
4. Give the property a name and a display name.
5. Set the property type and max character length of the field—see Table 6-2 for a list of available user profile property data types.

Chapter 6 ■ Users, profiles, and soCial networking
172
6. Leave the check box for configuring term set unchecked—you will explore term sets in a later chapter—this option effectively couples the property with a term set, so values entered for the profile field map to a term in a term set.
7. In the Subtype of Profile section, choose the user profile subtype you created in the previous subsection, and uncheck the default subtype.
8. Add an optional description.
9. In the Policy Settings section (not shown in Figure 6-11), set the privacy policy for the property and the visibility of the property.
10. In the Search Settings, leave the check box for Indexed checked to surface data for this property in people search results.
11. You may also map the custom property to a synchronization connection (see earlier on in this chapter).
12. Click the OK button to commit the changes.
13. Assuming there are no errors on the form, SharePoint takes you back to the profile properties list—notice the absence of the new property in the list; this is because you created the property for the Contractor subtype, and by default the Properties page shows those properties for the default subtype.
Table 6-2. User Profile Property Data Types
Data Type Description
Big integer Large positive or negative 64-bit number
Binary Binary blog data (usually populated programmatically)
Boolean True or False
Date Date
Date no year Date without the year (ideal for birthday)
Date time Date and time
E-mail E-mail address
Float Floating point number
HTML Text with Hypertext Markup
Integer Positive or negative 32-bit number
Person Username of another user in SharePoint or directory system
String (multivalue) Multiple lines of Unicode text
String (single value) Single line of Unicode text (255 characters)
Time zone Integer value indicating the time zone offset
Unique identifier 32-bit unique HEX based identifier
URL Uniform Resource Locator
Chapter 6 ■ Users, profiles, and soCial networking
173
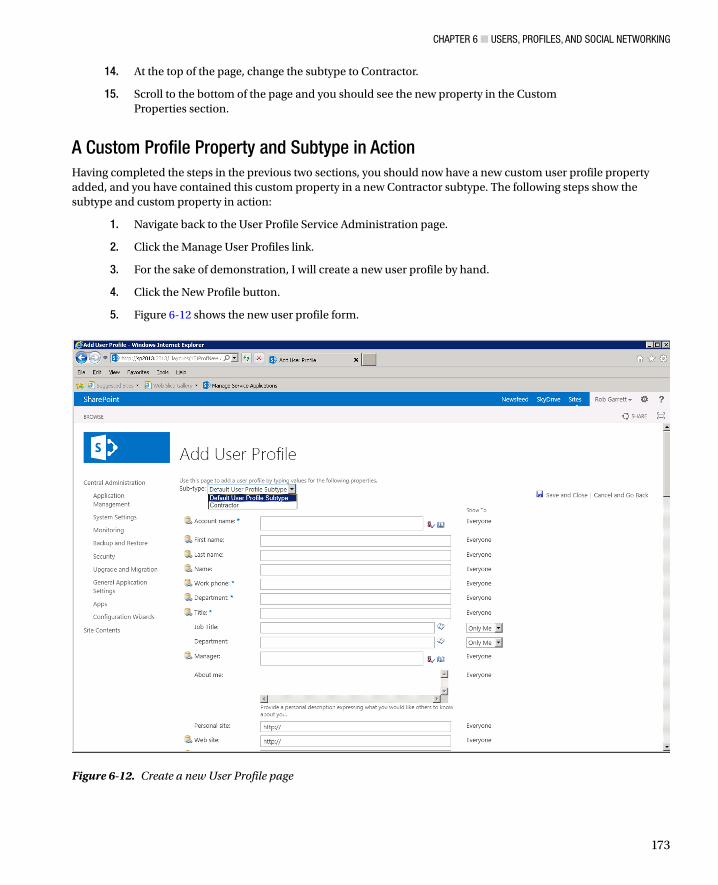
14. At the top of the page, change the subtype to Contractor.
15. Scroll to the bottom of the page and you should see the new property in the Custom Properties section.
A Custom Profile Property and Subtype in ActionHaving completed the steps in the previous two sections, you should now have a new custom user profile property added, and you have contained this custom property in a new Contractor subtype. The following steps show the subtype and custom property in action:
1. Navigate back to the User Profile Service Administration page.
2. Click the Manage User Profiles link.
3. For the sake of demonstration, I will create a new user profile by hand.
4. Click the New Profile button.
5. Figure 6-12 shows the new user profile form.
Figure 6-12. Create a new User Profile page

Chapter 6 ■ Users, profiles, and soCial networking
174
6. Notice the combo box at the top of the page that allows you to change the subtype—select the new Contractor subtype.
7. Changing the subtype to Contractor exposes the new property you added a few subsections back, and thus defines this user profile as type Contractor.
8. Scroll to the bottom of the page to see the new custom property.
Organization ProfilesSharePoint 2007 managed organization staff hierarchy via the Manager property of the profile, which was a property of type Person. The main limitation of this approach is that it does not provide much flexibility to arrange an organization chart. For example, if you reported to multiple managers, or you were not the manager of your direct report, or if you had managers with multiple roles, then the organization chart became unmanageable in SharePoint 2007. The Organization Profile feature of SharePoint 2010 and 2013 User Profile Service aim to remedy this issue with better control over the organization structure.
Organization profiles work in a similar vein to user profiles. Within the User Profile Service Admin page, you should see three links: Manage Organization Properties, Manage Organization Profiles, and Manage Organization Subtypes. The steps for displaying management of organization properties, managing subtypes, and creating organization profiles are similar, so I shall not repeat them; see the earlier sections of this chapter for details. The principles shown there apply to organization profiles as well. Figure 6-13 shows the form to enter organization profile data.
Figure 6-13. Create a new Organization Profile page

Chapter 6 ■ Users, profiles, and soCial networking
175
Following are some points worth noting about organization profiles:
Every organization profile may define one or many leaders•
Every organization profile may include one or many members•
All direct reports of a leader may be members automatically•
Every organization profile has a mandatory parent person or group•
Correct management of your organization chart in SharePoint allows users of your sites to see •a graphical org chart
AudiencesAn audience defines a set of people who see targeted content. Do not confuse audiences with SharePoint security groups—although both combine a set of users, audiences define only those users who see specific content in lists and list items, and you define membership of an audience by rule criteria, not explicit inclusion.
For example, a publishing page on a SharePoint site may include a specific content area that only certain users see. Users who are not in the audience get to see all other content areas on the page, and the page itself. Only members of the audience can view the specific content area with designated audience assigned. To accomplish this same behavior without audiences would involve multiple page instances with different security permissions and duplicate content across these pages.
You must compile audiences before use, and they can allow targeting of content at the list or list item level. The following steps demonstrate how to create a new audience from the User Profile Service application and use the audience in targeted areas. Start configuration in Central Administration.
1. Open Central Administration.
2. Click the Manage Applications link.
3. Click the Manage Service Applications link, under Service Applications.
4. Scroll down to the User Profile Service application.
5. Click to the right of the name and then click Manage from the ribbon.
6. From the User Profile Service Admin page, click the link Manage Audiences.
7. The page shown in Figure 6-14 displays the total existing audiences and any non-compiled audiences.

Chapter 6 ■ Users, profiles, and soCial networking
176
8. Click the New Audience button.
9. Give the audience a name, description, and owner.
10. Decide whether members must satisfy all criteria or some criteria of the rules.
11. Click the OK button.
12. In the next screen, shown in Figure 6-15, Create a rule based on the value of a user/group property or user association.
Figure 6-14. Audience list

Chapter 6 ■ Users, profiles, and soCial networking
177
13. In my example, I created a rule that all users of my audience must have the profile property Office set as Rockville.
14. Click the OK button when ready to save your rule.
The Audience Properties page, shown in Figure 6-16, details the audience you just created and the rule(s) you applied for inclusion of users in the audience. Notice that the status of the audience shows as not compiled. I mentioned earlier that any audience requires compilation. This compilation process allows SharePoint to process the rules and process existing user accounts, such that SharePoint can deliver audience targeted content efficiently for any member of the audience who views a page with targeted content based on this audience. Compilation is an important process; without it, SharePoint would have to process rules for every audience definition applied to targeted content. Compilation provides efficiency because SharePoint has processed rules ahead of time. Of course, this means SharePoint must continually compile audiences as new users join the farm and audience criteria change.
Figure 6-15. Rule creation for an audience

Chapter 6 ■ Users, profiles, and soCial networking
178
Figure 6-16. Audience Properties page
In the prior steps, I demonstrated creating an audience with a single criteria rule—based on a user profile property. Feel free to experiment by adding additional rules for more complex inclusion criteria. With the audience defined, I shall now demonstrate how to compile your audience.
1. Click the Compile Audience link.
2. SharePoint will now include members in the audience that satisfy the audience inclusion criteria.
3. Once compilation completes (without error), click the View Membership link to see all those members in the audience.
Note ■ sharepoint updates audience membership based on a schedule, which you may change from the schedule audience Compilation link in the main User profile service admin page.

Chapter 6 ■ Users, profiles, and soCial networking
179
Once you complete the compilation of an audience, you may then use this audience to target content to those members for list items and Web Parts. The following steps configure audience targeting for a list:
1. For a list in your site collection, click the List Settings from the ribbon.
2. Click the Audience Targeting Settings link in the General Settings section.
3. Check the check box to enable audience targeting for the list.
4. Click the OK button.
To apply audience targeting for a specific list item, follow these steps:
1. View the properties of the list item.
2. Find the item field named Target Audiences.
3. Choose a compiled target audience and save the item.
Web Parts provide a location in their Web Part properties to assign targeted audiences.
Social Networking“Social networking,” also referred to as “social computing,” is the practice of many people collaborating and sharing information about their lives, preferences, thoughts, and feelings online. The IT industry and personal computing space have seen a prolific increase in the adoption of social networking, through community-based web sites like Facebook.com and Twitter.com, and collaboration via blogs and wikis. SharePoint has always been about collaboration in the workspace, and with the large drive in social networking from the home and personal computing space, corporations and non-corporate organizations are waking up to the benefits that social networking provides.
If you ask any person familiar with social networking to define it, he or she will most likely mention Facebook. In recent years, Facebook has become a household name in the social networking space because it provides an intuitive means for those who can use a computer and the Internet to share information about themselves and collaborate on this information with others. Prior to Facebook, those with writing skills, and something to write about, hosted blogs on sites like blogger.com and livejournal.com. In fact, the livejournal.com site today is very different from what it was a few years ago; it embraces collaboration and user adoption through information sharing and is no longer a space to write a monolithic stream of thought.
SharePoint has always provided a level of personal space in the platform, from as far back as SharePoint Portal Server 2003, with My Sites, which allow users in an organization to store documents and lists and disseminate their own content to others in the organization. SharePoint 2007 went the next step and introduced wiki and blog site definitions, and with the addition of public-facing web site capability via the publishing infrastructure, SharePoint could participate in the public blogosphere world. SharePoint included many of the information-sharing and content-tagging features that users have come to expect from other social networking platforms. SharePoint 2010 also introduced the Managed Metadata Service, which allows organizations to build managed taxonomy of tags and allow user self-expression tagging—folksonomy—with custom tagging capabilities. Blogs and wikis still exist in SharePoint, only better—they now include the ability to host rich media in the form of video and audio content in their pages.
How has SharePoint 2013 enhanced the social networking scene? SharePoint 2013 includes all of the aforementioned social networking features of SharePoint 2007 and 2010, with a fresh branding and new layout. SharePoint 2013 also centralizes users’ social networking around their newsfeed—the core of any good social networking platform. Users of SharePoint 2010 had use of the newsfeed. SharePoint 2013 makes the newsfeed easier to use and more intuitive, and organizations no longer need to look to third-party tools to provide the rich immersive experience they have come to expect from social networking.

Chapter 6 ■ Users, profiles, and soCial networking
180
A feature new to SharePoint 2013 is integration of SkyDrive Pro, which allows organizations to treat SharePoint like their professional version of the public SkyDrive offering from Microsoft. Users in the organization can synchronize folders on their workstations with SharePoint, just as they do with the cloud at home. I discuss SkyDrive Pro integration in detail in Chapter 14.
You will visit the social networking features of SharePoint 2013 in the upcoming sections in this chapter. Those of you familiar with SharePoint 2010 will see how Microsoft has enhanced the look and feel and capabilities in the platform.
My SitesEach My Site in SharePoint exists as a personal site collection for individuals in the organization. My Sites provide a space for users to store documents, host custom and out-of-the-box lists, access their profile information, show their news, and contribute thru a blog, feed, and so on. The My Site is the central hub for identity in a SharePoint infrastructure and is the place that each user can call his or her own. Just as a Facebook or Twitter account is the identity of a user in these social network platforms, the My Site is the main area for users in their working social space.
Note ■ sharepoint 2013 does not require users to have a My site to view their user profile information. however, My sites tie together many of the social networking features and are a requirement for many of the social components.
Creating the My Site Host Site CollectionEach My Site exists as a separate site collection. Site collections provide a level of independence in that each defines its own security model and each may reside in different databases from other site collections. Think of each site collection as its own contained ecosystem for data, which makes them ideal for hosting each My Site—an ecosystem for one particular user in the organization (flip back to Chapter 2 for more details on site collections). Since each My Site is its own site collection, each My Site has at least one site collection administrator, who is typically the owner of the My Site and person with whom a user profile associates.
SharePoint maintains many site collections for My Sites in a single web application, called the My Site Host application. If you utilized the Farm Configuration Wizard to configure your SharePoint farm, then you likely have a My Site Host application instantiated. Since this is an administration book, I shall assume that you want to know how to create your own My Site infrastructure without the aid of the wizard. To start, I shall demonstrate the steps to create a new My Site Host application and root site collection using the My Site Host template. As you so often do, start by opening Central Administration.
1. Open Central Administration.
2. Click the Manage Web Applications link from the home page.
3. On the next page, if you see an application with a name that looks like it might be a My Site Host, then the My Site Host application may already exist.
4. Click the New icon from the ribbon.
5. Complete the form for the new web application (see Chapter 2).
Note ■ typically, i like to create a My site host on port 8080 and then create an alternate access mapping on port 80 with a fully qualified domain name, such as http://my.domain.com.

Chapter 6 ■ Users, profiles, and soCial networking
181
6. Return to the Central Administration home page.
7. Click the Application Management link.
8. Click the Create Site Collections link.
9. In the next page, select the correct web application in the drop-down box.
10. Give the site collection a name and description.
11. Choose the My Site Host template.
12. Provide a DOMAIN\name username for the primary and secondary site collection administrators.
13. Leave the quota option default.
14. Click the OK button to create the site collection.
If you completed all of the previous steps without error, you should now have a new My Site Host root site collection residing in a dedicated My Site Host web application. The root My Site Host collection is the administration site for all My Sites. I previously mentioned that each My Site is a site collection that resides in the My Site Host application. The root My Site Host administration site collection allows you to provide settings that pertain to all user My Sites in the application.
Note ■ it is a good practice to create a dedicated web application as a My site host and only store the root My site host site collection and user My sites in this application.
Configuring Managed PathsBefore you are ready to create site collections for user My Sites, you must define a managed path. Managed paths tell SharePoint the location for hosting site collections within a host web application.
By default for each web application, SharePoint creates an explicit managed path for the root (“/”) and a wildcard managed path for offspring site collections (“/sites/”). I shall assume you created a My Site Host application and a My Site Host root site collection in the previous sections.
In my environment, I have a web application at http://myserver:8080/. When users provision their My Site collections, I would like these site collections to reside at http://myserver:8080/personal/name-of-person/. To accomplish my goal, I need to define a wildcard managed path for “/personal/” as follows:
1. Open Central Administration.
2. Click the Manage Web Applications link from the home page.
3. Click to the right of the name of the new My Sites Host application.
4. From the ribbon, click the Managed Paths icon.
5. Add a wildcard managed path for “personal.”
Great! Now you have a My Site Host, My Site administration root site collection, and a wildcard managed path to store all user My Site collections. However, you are not quite done with the configuration. You need to configure the User Profile Service, such that User Profile Service knows where to create new site collections for user My Sites. You will do this now.

Chapter 6 ■ Users, profiles, and soCial networking
182
8. Set the My Site Host location as the location of the root site collection in your My Site Host application (or site collection location if not at the root).
9. Set the personal site location as the managed path you created earlier for the location of user My Site collections.
At this stage, you should have a working My Site Host application and root site collection; you also have a managed path to host all user site collections (personal) and the host application path (my). The next set of steps assumes a working User Profile Service.
1. From the Central Admin home page, click the Application Management link.
2. Click the Manage Service Applications link.
3. Click to the right of the existing User Profile Service application name listed.
4. Click the Manage icon on the ribbon.
5. Scroll to the My Site Settings section.
6. Click the link to Setup My Sites.
7. You should see a page like that in Figure 6-17.
Figure 6-17. My Site Setup page
Chapter 6 ■ Users, profiles, and soCial networking
183
10. Optionally, click the Configure Trusted Host Locations link to configure other trusted host locations. Trusted host locations are other My Site Host locations in which users of a specific audience host their My Site collection. For example, if you have an audience for all contractors in your organization and want their My Sites to host in a separate location from all other users, then Trusted My Site Locations are what you need.
Note ■ if you created an alternate access mapping for your My site host application (perhaps on port 80), change the location in the User profile service application so users can access their My sites on this address.
The My Site Settings section in the User Profile Service application provides a few other options that administrators may deem useful in the organization—personalization site links and publish links to Office applications.
Personalization site links are additional links added to each user My Site, based on audience membership. For example, say your organization has a series of committees, and each user belongs to zero, one, or many committees, stipulated by a profile property. When users visit their My Site, they should see links to their committee sites in the organization. The following steps assume the existence of committee audiences and demonstrate configuration of personalization site links:
1. Navigate to the My Sites Settings section in the User Profile Service Application page.
2. Click the Configure Personalization Site link.
3. Click the New link.
4. Provide the URL to the landing page of the committee, the committee name in the description field, the owner, and the target audience.
Published links to Office applications are a feature that SharePoint provides to expose known locations in your portal that users may access in Microsoft Office applications. For example, if a user wishes to save his or her Microsoft Word document to a common location in SharePoint, and the location is available as a published link, the user may select Save to SharePoint from Microsoft Word and use this link location. Users may similarly save to SharePoint published links in other Office applications. The following steps demonstrate configuration of published links in SharePoint:
1. Navigate to the My Sites Settings section in the User Profile Service Application page.
2. Click the Publish Links to Office Client Applications link.
3. Click the New link.
4. Provide the URL for the published link and description.
5. Select the publication end-point type in the drop-down.
Capacity Planning for My SitesMy Sites are individual site collections, supporting document libraries, lists, and subsites. By default, the owner of a My Site has full control over the collection, and carte blanche on what he or she may store in the collection. This suggests that the size of the default content database for the My Site Host application may grow quite large, as the number of users in an organization (with a My Site) grows. Furthermore, SharePoint provides incentive for users to store content and track events in their My Site, thus increasing user adoption and the need for better capacity planning.

Chapter 6 ■ Users, profiles, and soCial networking
184
It is good practice to ensure portability of the content databases and dispersal of My Sites across many content databases in the host application. You may recall from Chapter 2 that each site collection may occupy at most one content database, but a content database may host multiple site collections. Since each user’s My Site is a site collection, you need to make sure that as more users sign up for My Site space, SharePoint ensures creation of new content databases as the number of site collections grow.
How many content databases do you need, and what limit should you set for the number of My Site collections per database? This depends on the expected amount of content in each My Site (site collection). Microsoft now allows database sizes up to four terabytes, and this limit will grow in the future. Depending on your need for portability and desire for smaller database sizes, the number of site collections in a given database and the expected size of these site collections will roughly define the size of your database. Quota management (see the settings of the My Site Host web application, in the web application list) will allow administrators to restrict the amount of content that users upload to their personal My Sites. If you have the luxury of multiple SQL Servers, you may decide to host My Site content databases on a different server from other areas in your SharePoint farm. The following steps demonstrate restricting My Site collections in a content database to 50 instances:
1. Open Central Administration.
2. Click the Application Management link.
3. Click the Manage Content Databases link.
4. Select the content database for the My Site Host application.
5. In the Database Capacity Settings section, change the maximum number of sites to 50, and set the warning 10% less (45). This ensures that the administrators receive a warning when the number of sites in the current content database grows to 45 and when at 50 SharePoint will create a new content database.
A Tour of SharePoint 2013 My SitesMy Sites in SharePoint 2013 have a new look and feel compared to those of the previous version. Like the rest of the user interface of SharePoint 2013, Microsoft redesigned the look and feel of user profile information and My Sites for a more social immersive experience. In previous versions of SharePoint, the My Site was clunky and often perceived as an afterthought, and interrupted the flow of the user interface. Even SharePoint 2010 had issues with the clear delineation of My Content and My Profile in the top My Site navigation.
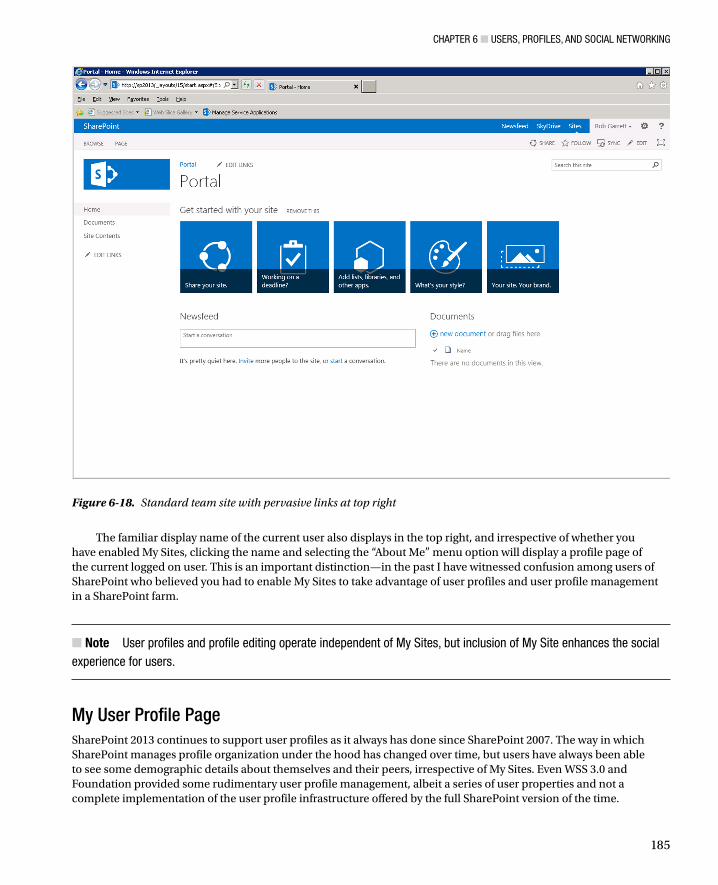
With My Site capability enabled in the farm, users now see a pervasive set of links at the top right of the page; these links link to the current user’s newsfeed, favorite sites, and SkyDrive location in My Site. Figure 6-18 shows an image of the standard team site in my development environment. Because I have My Sites enabled, I see the Newsfeed, SkyDrive, and Sites links at the top right. No matter what page I visit in the site, I always see these links.
Chapter 6 ■ Users, profiles, and soCial networking
185
The familiar display name of the current user also displays in the top right, and irrespective of whether you have enabled My Sites, clicking the name and selecting the “About Me” menu option will display a profile page of the current logged on user. This is an important distinction—in the past I have witnessed confusion among users of SharePoint who believed you had to enable My Sites to take advantage of user profiles and user profile management in a SharePoint farm.
Note ■ User profiles and profile editing operate independent of My sites, but inclusion of My site enhances the social experience for users.
Figure 6-18. Standard team site with pervasive links at top right
My User Profile PageSharePoint 2013 continues to support user profiles as it always has done since SharePoint 2007. The way in which SharePoint manages profile organization under the hood has changed over time, but users have always been able to see some demographic details about themselves and their peers, irrespective of My Sites. Even WSS 3.0 and Foundation provided some rudimentary user profile management, albeit a series of user properties and not a complete implementation of the user profile infrastructure offered by the full SharePoint version of the time.
Chapter 6 ■ Users, profiles, and soCial networking
186
Figure 6-19. Basic user setting with absence of User Profile Service
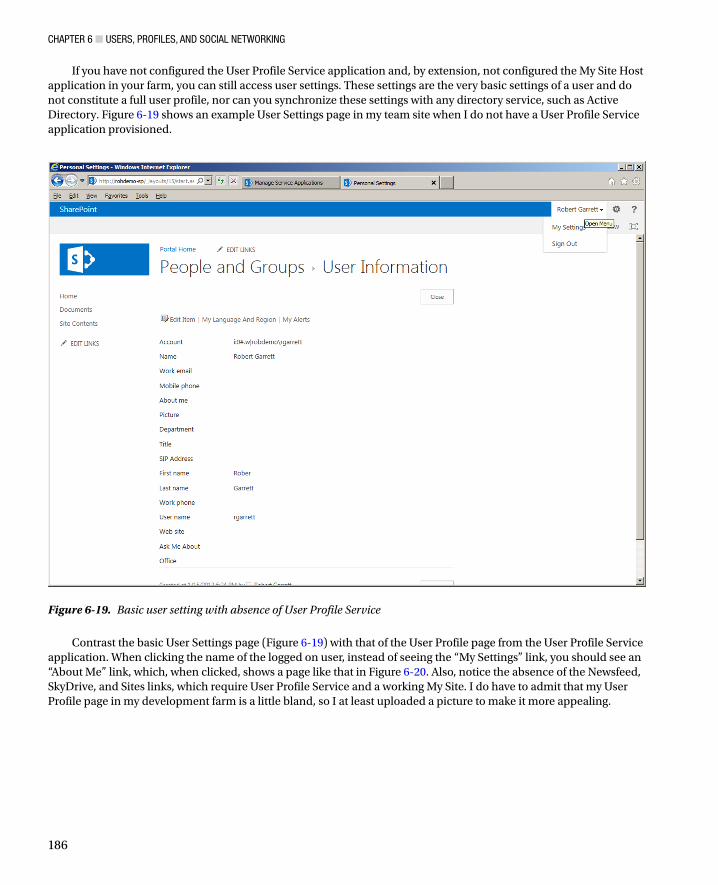
If you have not configured the User Profile Service application and, by extension, not configured the My Site Host application in your farm, you can still access user settings. These settings are the very basic settings of a user and do not constitute a full user profile, nor can you synchronize these settings with any directory service, such as Active Directory. Figure 6-19 shows an example User Settings page in my team site when I do not have a User Profile Service application provisioned.
Contrast the basic User Settings page (Figure 6-19) with that of the User Profile page from the User Profile Service application. When clicking the name of the logged on user, instead of seeing the “My Settings” link, you should see an “About Me” link, which, when clicked, shows a page like that in Figure 6-20. Also, notice the absence of the Newsfeed, SkyDrive, and Sites links, which require User Profile Service and a working My Site. I do have to admit that my User Profile page in my development farm is a little bland, so I at least uploaded a picture to make it more appealing.
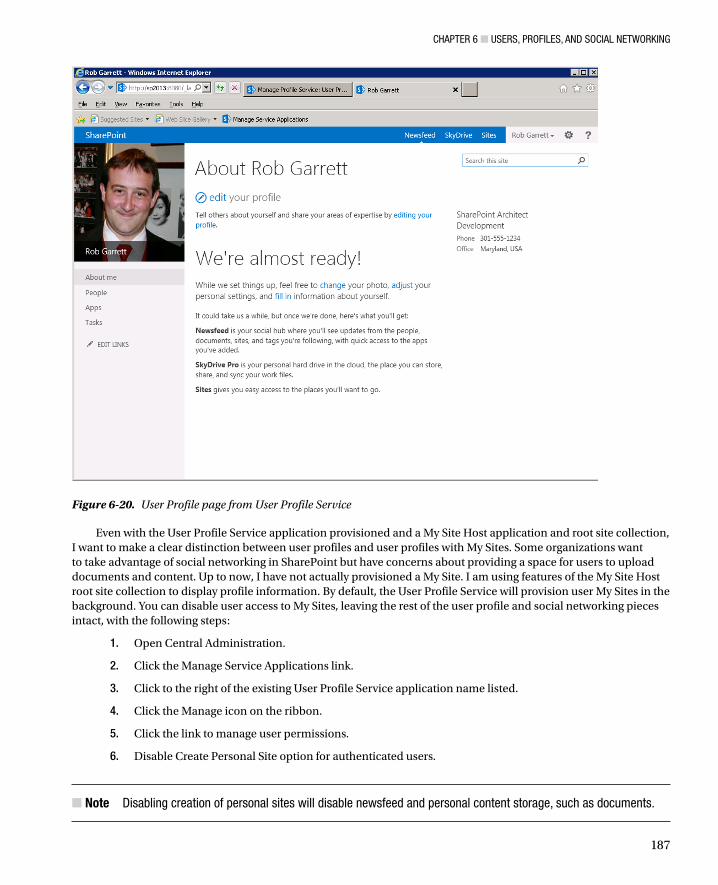
Chapter 6 ■ Users, profiles, and soCial networking
187
Even with the User Profile Service application provisioned and a My Site Host application and root site collection, I want to make a clear distinction between user profiles and user profiles with My Sites. Some organizations want to take advantage of social networking in SharePoint but have concerns about providing a space for users to upload documents and content. Up to now, I have not actually provisioned a My Site. I am using features of the My Site Host root site collection to display profile information. By default, the User Profile Service will provision user My Sites in the background. You can disable user access to My Sites, leaving the rest of the user profile and social networking pieces intact, with the following steps:
1. Open Central Administration.
2. Click the Manage Service Applications link.
3. Click to the right of the existing User Profile Service application name listed.
4. Click the Manage icon on the ribbon.
5. Click the link to manage user permissions.
6. Disable Create Personal Site option for authenticated users.
Note ■ disabling creation of personal sites will disable newsfeed and personal content storage, such as documents.
Figure 6-20. User Profile page from User Profile Service
Chapter 6 ■ Users, profiles, and soCial networking
188
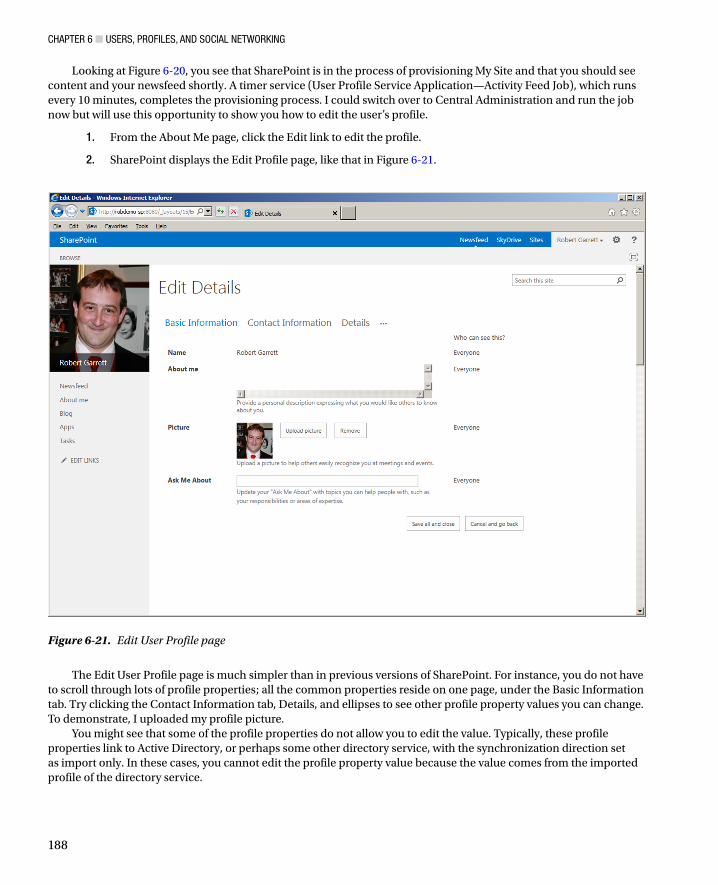
The Edit User Profile page is much simpler than in previous versions of SharePoint. For instance, you do not have to scroll through lots of profile properties; all the common properties reside on one page, under the Basic Information tab. Try clicking the Contact Information tab, Details, and ellipses to see other profile property values you can change. To demonstrate, I uploaded my profile picture.
You might see that some of the profile properties do not allow you to edit the value. Typically, these profile properties link to Active Directory, or perhaps some other directory service, with the synchronization direction set as import only. In these cases, you cannot edit the profile property value because the value comes from the imported profile of the directory service.
Figure 6-21. Edit User Profile page
Looking at Figure 6-20, you see that SharePoint is in the process of provisioning My Site and that you should see content and your newsfeed shortly. A timer service (User Profile Service Application—Activity Feed Job), which runs every 10 minutes, completes the provisioning process. I could switch over to Central Administration and run the job now but will use this opportunity to show you how to edit the user’s profile.
1. From the About Me page, click the Edit link to edit the profile.
2. SharePoint displays the Edit Profile page, like that in Figure 6-21.

Chapter 6 ■ Users, profiles, and soCial networking
189
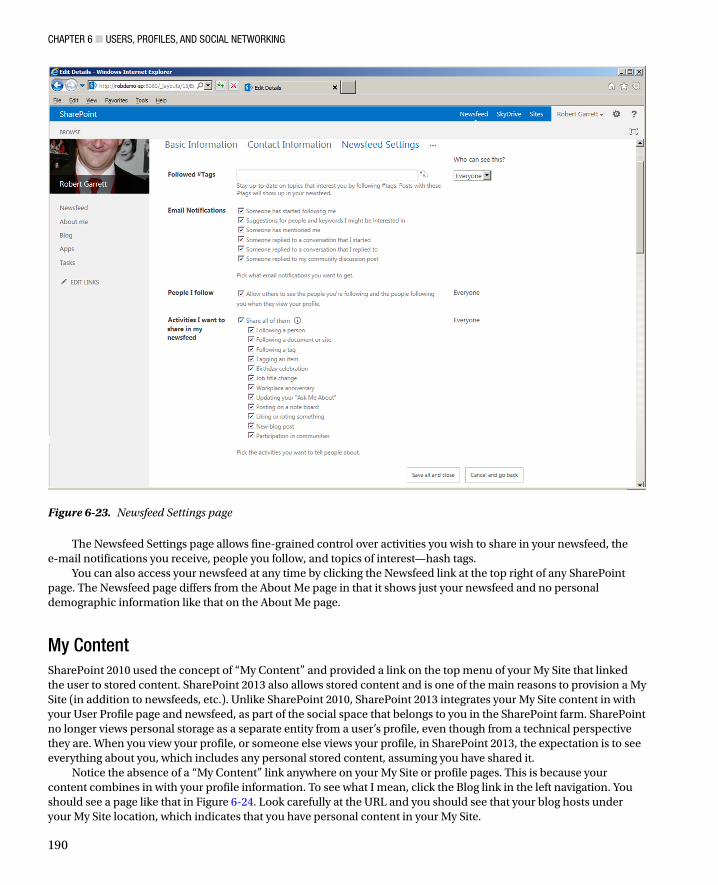
SharePoint tracks many social networking activities across the farm. By default, your newsfeed will show everything you do, but you might want to change the sorts of events that appear on your newsfeed. You can change which activities and events show in your newsfeed from your Edit User Profile page, as follows:
1. From your About Me page, click the Edit link to edit your user profile.
2. Click the ellipses.
3. Click the Newsfeed Settings tab.
4. SharePoint displays a page like that in Figure 6-23.
My NewsfeedThe newsfeed is akin to those seen on Facebook and Twitter and shows a feed of current activity of my colleagues and me. Activities on the newsfeed consist of a list of SharePoint tracked events, configured in each personal profile. Clicking the name of any of my colleagues in the newsfeed takes me to that colleague’s Profile page, which includes a newsfeed filtered to that person’s activities.
After SharePoint finished completing provisioning of My Site, the About Me page for my profile shows my newsfeed, as in Figure 6-22. Since I have not yet interacted with SharePoint socially, you do not see any activities in my feed. As I begin interacting with other users and adding content to My Site, my newsfeed will start to show activities.
Figure 6-22. User Profile page with empty newsfeed
Chapter 6 ■ Users, profiles, and soCial networking
190
Figure 6-23. Newsfeed Settings page
The Newsfeed Settings page allows fine-grained control over activities you wish to share in your newsfeed, the e-mail notifications you receive, people you follow, and topics of interest—hash tags.
You can also access your newsfeed at any time by clicking the Newsfeed link at the top right of any SharePoint page. The Newsfeed page differs from the About Me page in that it shows just your newsfeed and no personal demographic information like that on the About Me page.
My ContentSharePoint 2010 used the concept of “My Content” and provided a link on the top menu of your My Site that linked the user to stored content. SharePoint 2013 also allows stored content and is one of the main reasons to provision a My Site (in addition to newsfeeds, etc.). Unlike SharePoint 2010, SharePoint 2013 integrates your My Site content in with your User Profile page and newsfeed, as part of the social space that belongs to you in the SharePoint farm. SharePoint no longer views personal storage as a separate entity from a user’s profile, even though from a technical perspective they are. When you view your profile, or someone else views your profile, in SharePoint 2013, the expectation is to see everything about you, which includes any personal stored content, assuming you have shared it.
Notice the absence of a “My Content” link anywhere on your My Site or profile pages. This is because your content combines in with your profile information. To see what I mean, click the Blog link in the left navigation. You should see a page like that in Figure 6-24. Look carefully at the URL and you should see that your blog hosts under your My Site location, which indicates that you have personal content in your My Site.

Chapter 6 ■ Users, profiles, and soCial networking
191
Just like any other site collection for which you have owner or site collection administration rights, you can click the gear icon in the top right corner and see all site content and site settings for your My Site. Since your My Site is just another site collection, the settings behave similarly to those of any other site collection settings you have seen in this book.
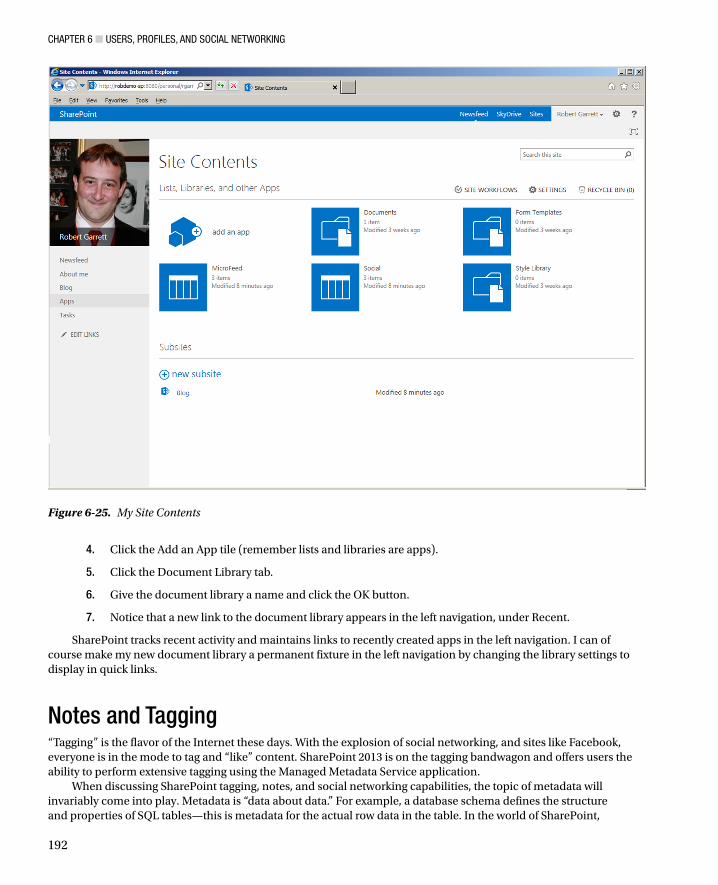
As a simple example to demonstrate further hosting your own personal content in your My Site, I shall demonstrate creating a new document library in your My Site (there already exists document libraries and lists, which you can access from the gear icon and site content).
1. Click the gear icon in the top right of any of your profile pages.
2. Click the Site Contents menu item.
3. You should see a familiar page, like that in Figure 6-25.
Figure 6-24. My blog in My Site
Chapter 6 ■ Users, profiles, and soCial networking
192
Figure 6-25. My Site Contents
4. Click the Add an App tile (remember lists and libraries are apps).
5. Click the Document Library tab.
6. Give the document library a name and click the OK button.
7. Notice that a new link to the document library appears in the left navigation, under Recent.
SharePoint tracks recent activity and maintains links to recently created apps in the left navigation. I can of course make my new document library a permanent fixture in the left navigation by changing the library settings to display in quick links.
Notes and Tagging“Tagging” is the flavor of the Internet these days. With the explosion of social networking, and sites like Facebook, everyone is in the mode to tag and “like” content. SharePoint 2013 is on the tagging bandwagon and offers users the ability to perform extensive tagging using the Managed Metadata Service application.
When discussing SharePoint tagging, notes, and social networking capabilities, the topic of metadata will invariably come into play. Metadata is “data about data.” For example, a database schema defines the structure and properties of SQL tables—this is metadata for the actual row data in the table. In the world of SharePoint,
Chapter 6 ■ Users, profiles, and soCial networking
193
The SharePoint Follow icon is synonymous with “Like.” When clicking the Follow icon, SharePoint tags the site and it appears under favorite sites, which you may access at any time from the Sites link in the top right. SharePoint allows following of various objects in the platform, including
Sites•
Lists•
Libraries•
List Items•
Documents and Images•
Pages•
I clicked Follow on a few sites and a document in my development environment. As you can see from Figure 6-27, activities are starting to show up in my newsfeed. Just like with Facebook, the more interaction you have with SharePoint, the more populated your newsfeed becomes.
tags are metadata, because they give the reader of certain content some level of categorization and thus context. SharePoint bakes metadata into the platform and surfaces it in basic lists, document libraries, document and records management, publishing, and social networking. The topic of metadata is vast enough that I cover it in Chapter 9.
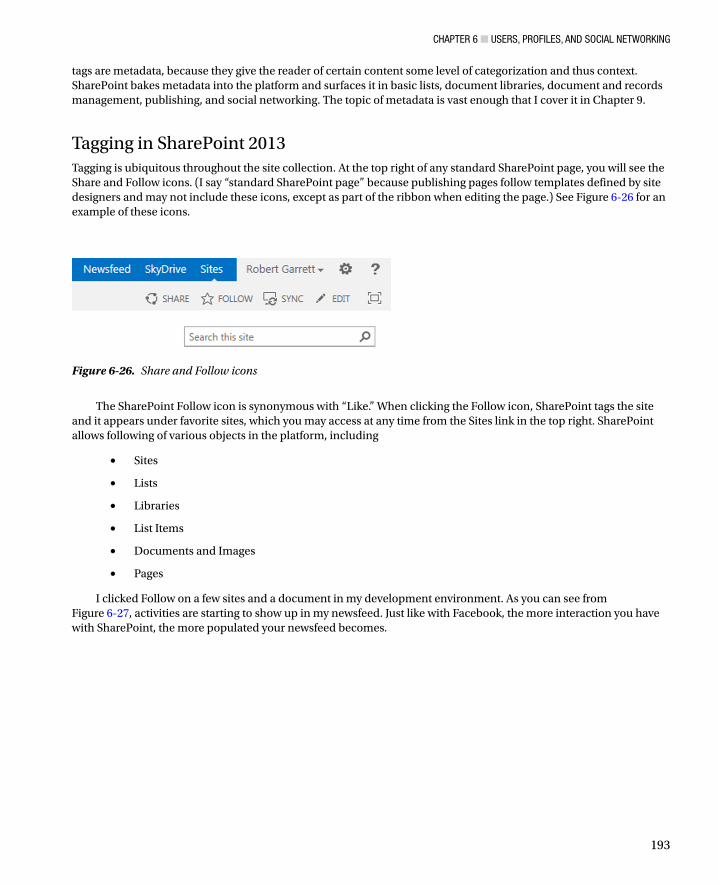
Tagging in SharePoint 2013Tagging is ubiquitous throughout the site collection. At the top right of any standard SharePoint page, you will see the Share and Follow icons. (I say “standard SharePoint page” because publishing pages follow templates defined by site designers and may not include these icons, except as part of the ribbon when editing the page.) See Figure 6-26 for an example of these icons.
Figure 6-26. Share and Follow icons

Chapter 6 ■ Users, profiles, and soCial networking
194
Figure 6-27. Activities are showing up in my newsfeed
Note ■ new content tagged or new notes added to your sharepoint Mysite do not show up in your newsfeed immediately. the activity feed Job in Central administration updates newsfeeds on a schedule.
Document libraries do not enable the tagging capability on contained documents by default. The following set of steps details how to enable tagging for a document library:
1. From any Document Library View page, click the Library tab from the ribbon.
2. Click the Library Settings icon from the ribbon.
3. Click the Enterprise Metadata and Keywords Settings link.
4. Check the Add Enterprise Keywords check box to add the Enterprise Keywords Metadata column to the document library. SharePoint will not allow you to opt out of this option once it is checked and the Settings page saved. The Enterprise Keywords Metadata column allows folksonomy behavior for documents in the library.
5. Check the Metadata Publishing check box to allow any folksonomy tags entered for a document to appear in your newsfeed, profile pages, tag cloud, and so on, as a social tag.
Chapter 6 ■ Users, profiles, and soCial networking
195
Note ■ when saving a document from Microsoft word to a sharepoint 2010/2013 document library with an enterprise keywords column, the save as dialog displays a tags text box to save entered tags to the enterprise keywords column in the library list item associated with the document.
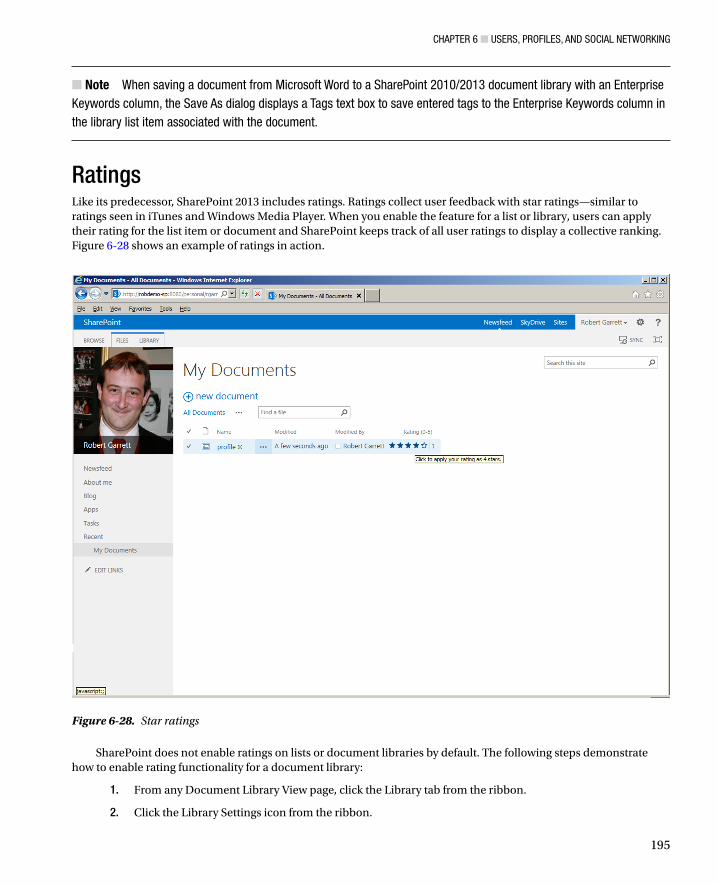
Figure 6-28. Star ratings
SharePoint does not enable ratings on lists or document libraries by default. The following steps demonstrate how to enable rating functionality for a document library:
1. From any Document Library View page, click the Library tab from the ribbon.
2. Click the Library Settings icon from the ribbon.
RatingsLike its predecessor, SharePoint 2013 includes ratings. Ratings collect user feedback with star ratings—similar to ratings seen in iTunes and Windows Media Player. When you enable the feature for a list or library, users can apply their rating for the list item or document and SharePoint keeps track of all user ratings to display a collective ranking. Figure 6-28 shows an example of ratings in action.

Chapter 6 ■ Users, profiles, and soCial networking
196
Figure 6-29. Like voting style
3. Click the Rating Settings link.
4. Set the radio button option for Allow Items in This List to Be Rated as Yes.
Note ■ if you are trying to find the rating settings and not seeing it (perhaps you are attempting the preceding steps for a document library on your My site), then ensure that you have enabled the site Collection publishing feature.
In Figure 6-28, I am hovering the mouse over the rating for a document in one of my document libraries. SharePoint indicates that I have rated the document with four stars. SharePoint keeps current track of my rating but collates all user ratings for the document. Notice the numeric counter next to the rating that shows how many ratings this document has received.
SharePoint also supports “Like” ratings as an alternative to star ratings. Navigate back to the rating settings of your document library and change the voting experience to “Like.” Instead of star ratings, users can now elect to like your list items, as shown in Figure 6-29.

Chapter 6 ■ Users, profiles, and soCial networking
197
BlogsLong before sites like Facebook and Twitter, blogs (short for weblogs) existed for those people who had something to share with the Internet. Initially, techie and literary folks had blogs and wrote articles for select pockets of readership. Around the year 2000, the blogosphere evolved and people woke up to the fact that they could easily host a blog and say whatever they wanted to the world via the Internet. It seemed that everyone had a blog, ranging from intellectual ideas to ramblings of one’s personal life and social sharing. Sites such as Live Journal promoted personal blogging and were part of the beginnings of social networking.
Microsoft acknowledged the demand for blog engines and incorporated the blog site definition in SharePoint 2007. SharePoint 2010, and now 2013, continues to offer blogging capabilities and offers more integration with My Sites and social sharing of self-authored content in the enterprise. I’ll begin with blogs in My Sites.
1. Click the name of your logged on user in the upper right corner of the page.
2. Select the menu option “About Me.”
3. Click the Blog link in the left navigation of your My Site.
4. If you do not have a blog, SharePoint will create you one.
5. Your My Site blogs exists at the following location, by default:/mysite-managed-path/<username>/Blog/default.aspx
6. See Figure 6-24 for a typical newly created blog in My Site.
Blogs are not just limited to My Sites; administrators and site owners may add them into the site collection anywhere as subsites. Follow these steps to create a new blog underneath a site of your choice in your site collection:
1. Click the gear icon in the parent site or root site collection.
2. Click the Site Contents menu item.
3. Scroll to the bottom of the page and click the New Subsite link.
4. SharePoint shows a new Subsite Creation page, like that in Figure 6-30.

Chapter 6 ■ Users, profiles, and soCial networking
198
5. Provide a name and description for the blog site.
6. Provide the URL of the blog subsite.
7. Select the Blog template.
8. Change any of the navigation and permissions settings, if you desire.
9. Click the Create button.
Blog posts are effectively a collection of list items in a dedicated list, called Posts, in the blog site. From the Blog landing page, click the gear icon, followed by the Site Contents menu item. You should see the Posts list. Also, notice the Comments and Categories lists, which store—you guessed it—the comments and categories of blog posts.
WikisA wiki is a web site that allows users to create and edit any number of interlinked pages. Wiki pages typically render as HTML, and users edit text and image content on wiki pages using WYSIWYG (What-you-see-is-what-you-get). The purpose of wiki sites is to foster collaboration of content creation and editing by allowing any user to edit the content, regardless of his or her security access. Wiki sites, like Wikipedia.com, have become trusted sources for information on the Internet because readers constantly vet and update the content.
Figure 6-30. New SharePoint Site
Chapter 6 ■ Users, profiles, and soCial networking
199
Microsoft designed wiki sites in SharePoint for ease of use for the content owners and contributors. Like most other content containers in SharePoint, a wiki exists as a list in a site, and the pages of a wiki exist as the list items in the wiki library.
In SharePoint 2007, wiki lists were more of an afterthought, whereas wikis integrate better into the SharePoint 2010 and 2013 platform. For example, the new Team and Blank site definitions now default to use wiki libraries and pages for all content pages. This replaces the legacy Web Part pages of SP 2007, in which content owners would have to drop content Web Parts into specific zones of the page to host content. Content contributors now have free rein to place text content anywhere on the page and still use Web Part zones—determined by site designers in the page layout—thus wrapping text and image content around typical functional Web Parts.
Users create wiki sites in SharePoint 2013 much like any other site, and I shall demonstrate the steps in just a moment. Before doing so, I must distinguish between SharePoint Enterprise wiki sites and Blank or Team sites.
SharePoint 2007 Blank and Team sites used Web Part pages, which are ASPX pages containing HTML markup and Web Part zones for users to drop Web Parts. Site designers would need to use the publishing features and site templates if they wanted to provide page customization and web content management capabilities in SharePoint 2007. Sites created from the Enterprise wiki template in SharePoint 2010 and 2013 include a special library and publishing features typically associated with publishing sites—page ratings, managed metadata, customization capabilities, and so on. Sites created from Team and Blank site templates consist of the standard collaboration features, offered in the Foundation platform, and a Site Pages library, to contain wiki pages. SharePoint Blank and Team sites allow wiki-style editing of content and the placement of Web Parts without the need for Web Part zones, and rudimentary customization of the page, because of the free flow of content editing that wiki pages provide.
Enterprise wiki sites, in SharePoint, provide users with greater control of content, using the publishing features, and adhere more to web content management. Wiki pages in an Enterprise wiki site use page layouts and master pages, so designers may customize metadata on wiki pages, much like on publishing pages.
You may create wiki libraries by creating a new wiki site or by adding a wiki library to an existing site. The following steps demonstrate both approaches:
New wiki site:
1. Click the gear icon and click the Site Contents menu item.
2. Scroll to the bottom of the page and click the New Subsite link.
3. Give the wiki site a name and description.
4. Provide a subsite URL.
5. Click the Publishing tab in the templates section.
6. Your page should look something like that in Figure 6-31.

Chapter 6 ■ Users, profiles, and soCial networking
200
7. Click the Enterprise wiki site.
8. Click the Create button when ready to create the wiki site.
New wiki library:
1. Click the gear icon and click the Site Contents menu item.
2. Click the Add an App tile.
3. Find the Wiki Page Library app and click its tile.
4. Give the library a title and click the Advanced Options link if you wish to apply more options before SharePoint creates the library.
5. Click the Create button.
A wiki site is really just a team site with a default wiki library, with the Site Welcome page pointing to the main landing page in the wiki library.
Since both blogs and wikis consist of list/library containers to store content, site owners and collaborators may make use of all the tagging, notes, and rating social networking tools in the platform in conjunction with blog and wiki content.
Figure 6-31. Create an Enterprise wiki site
Chapter 6 ■ Users, profiles, and soCial networking
201
SummaryIn this chapter, you took an in-depth look at configuring the User Profile Service in SharePoint 2013—one of the most troublesome areas to configure. You read about user profiles, along with their properties and user subtypes and looked at organization profiles in brief. Another key concept is audiences—administrators can generate groups of people based on inclusion rules and then apply those audiences to targeted content areas.
In the second half of this chapter, you read about social networking and some of the features that SharePoint 2013 provides as part of the My Site infrastructure. I demonstrated the newsfeed, tagging, rating, and the use of blogs and wikis as part of social networking.
In Chapter 7, I will switch topics and look at the security aspects of SharePoint 2013.