Embed Size (px)
Citation preview

patienteducation.osumc.edu
Total Hip Replacement
Posterior

Talk to your doctor or health care team if you have any questions about your care.
For more health information, contact the Library for Health Information at 614-293-3707 or e-mail [email protected].
Table of Contents
Total Hip Replacement - Posterior approach ......................................................................... 3
Financial Issues ............................................................................................................................. 5
Dental Clearance .......................................................................................................................... 5
Preparing for Surgery .................................................................................................................. 6
Plan Now for Your Care after Surgery .................................................................................. 10
Day Before and Morning of Surgery ....................................................................................... 12
Getting Your Skin Ready for Surgery .................................................................................... 13
Having Surgery ............................................................................................................................ 15
Care on the Orthopedic Unit ................................................................................................... 16
In Hospital Care and Treatments ........................................................................................... 18
How to Use an Incentive Spirometer: Breathing Exerciser ............................................ 20
Home Care Instructions ............................................................................................................ 21
Exercises ..................................................................................................................................... 26
Using Your Walker ...................................................................................................................... 34
Using Your Cane ......................................................................................................................... 41
Using Equipment in Daily Activities ...................................................................................... 43
Other Important Information ................................................................................................... 48
My Notes ..................................................................................................................................... 50
Posterior Total Hip Replacement

3
.
Total Hip ReplacementPosterior Approach
Normal hip joint
Total hip replacement is a surgery to replace worn or damaged parts of the hip joint. The surfaces of the joint are removed and replaced with an artificial joint. This surgery can relieve pain and improve movement in your hip joint.
You may need a total hip replacement if:
• Other treatments, such as medicine, steroid injections, and physical therapy, no longer stop your pain or help movement of the joint.
• Pain or poor movement in your hip prevents you from doing normal activities.
Your hip is a ball and socket joint where the thigh bone, called the femur, meets the hip bone or pelvis. A healthy hip has layers of smooth cartilage that covers the ball-shaped end of the femur and socket shaped part of the pelvis. The cartilage acts as a cushion and allows the ball of the femur to glide easily within the socket of the pelvis. The muscles around the joint support your weight and help move the joint smoothly.
Worn hip jointThe smooth cartilage layers can wear down on the ball and socket part of the hip joint. The cartilage can wear down as you age, or from injury, arthritis, or as a side effect from certain medicines. When the joint wears down, the smooth surfaces become rough, like sandpaper. As you move your leg, the ball grinds in the socket causing pain and stiffness.

4
.
During surgery, the damaged cartilage and ends of the bones of the hip joint are removed. A new joint is created using an artificial cup and ball made of metal and very strong plastic. The cup replaces the worn hip socket of your pelvis. The new ball is attached to a stem that fits into your femur and may be cemented in place with special bone cement. The metal has a porous surface that your bone will grow into as it heals to create a tight fit.
Your surgery will be done using the posterior approach, which is the most common type. You will be positioned on your side for the surgery. The doctor will make a 6 to 10 inch cut just behind your hip to be able to get to your hip joint. You will have hip precautions that you will need to follow for 6 to 12 weeks to protect your new hip as it heals.
Total hip replacement

5
Financial aid
Financial Issues
Check with your insuranceYour health insurance provider may require pre-authorization for this surgery. Contact your insurance company and talk to the staff in your surgeon’s office.
Please be prepared to pay your co-payment, co-insurance, or deductible on the day of your surgery.
If you insurance has less than 100% coverage, we ask that you pay a deposit of $300 before the procedure.
A representative from the hospital will contact you to pre-register you for your surgery. If you have not received a call by 2 days before your surgery date, please call our Pre-Registration Department at 614-293-8200 or 866-312-7846. The representative will be able to discuss both your physician and hospital coverage and charges.
If you have MyChart, you can log on and complete a pre-registration questionnaire.
We will work with you and your family to help you get the care you need.
If you do not have health insurance or cannot pay your bill, we encourage you to call our Financial Counseling office at 614-293-2100 or 800-678-8037. The staff member will be able to help determine if you might qualify for assistance. They can help:
• Complete applications for government programs.
• Describe other programs that may offset costs.
• Figure out a workable payment plan for the cost of your treatment.
The financial counselor can also help you with options related to the Affordable Care Act.
Ohio State Wexner Medical Center offers a sliding scale financial assistance program based on federal poverty guidelines that would be offered if you qualify.
Dental Clearance
Schedule an appointment with your dentist and take the formBecause the risk of infection could cause serious problems with your replaced hip, you need to have a dental clearance visit. If you do not have a dentist, check with the surgeon’s office to see if they can help you find a dentist.
If you are found to need any teeth removed or repaired, or if you have other problems with your gums, teeth, or dentures, your surgery may need to be delayed until the issues are treated and you have healed.

6
Preparing for SurgeryPosterior Total Hip Replacement
Review these instructions as soon as you get them, so you are well prepared for your surgery. Being well prepared can help you have a better recovery. Follow these instructions to keep your surgery on schedule. Call your doctor’s office if you have any questions.
Attend Buckeye Joint ClassThis is a free class to help you prepare for your joint replacement surgery. We encourage you to come and learn:
• What you need to do to prepare for your surgery.
• What to expect during your hospital stay.
• What you can do to get the best results from your therapy and recovery.
Class lasts about 1 hour and is led by one of the team who will help guide you through the total joint experience.
Classes are offered:
• Every Monday afternoon at 3 PM at CarePoint East, Second floor, 543 Taylor Avenue, Columbus, OH 43203
• First and 3rd Monday at 6 PM at University Hospital East, Room West 107, 181 Taylor Avenue, Columbus, OH 43203. Enter the main entrance and turn left down the hall to get to the class.
Register at your surgeon’s office, and consider bringing your helper to class with you!
Pumps to prevent blood clots after surgeryHome DVT pumps are recommended after joint replacement to reduce your risk of blood clots forming. The pumps should be used on both legs any time you are sitting, resting, or lying down for 4 to 6 weeks after your surgery. The pumps are used along with blood thinner medicines your doctor orders. You should be contacted by Infinity Orthopedics before your pre-admission testing to schedule an appointment to get your pumps and to receive instructions on how to use them. If you have not been contacted before your surgery, please call Infinity Orthopedics at 614-688-6367 between 9 AM and 5 PM, Monday through Friday, or call Customer Service at 800-432-1767.
Pre-admission testing visitYou will be scheduled for some tests to check that you are ready for surgery. You will have a physical exam 1 to 2 weeks before surgery. You will also have blood tests, a chest x-ray, and maybe an electrocardiogram, also called an ECG or EKG to check your heart.
7
Weeks before surgery: medicine changes
� Review a list of all of your medicines with your doctor. Be sure to include all prescription and over the counter medicines, as well as any herbal or vitamin supplements you take. You may need to stop or change certain medicines.
� If you take aspirin or medicines that contain aspirin, ask your doctor if you need to take a different pain medicine before your surgery.
� If you are on blood thinners or antiplatelet medicines, please let your surgeon know in case the medicine needs to be stopped or changed before surgery. This includes medicines such as:
• Arixtra (Fondaparinus)
• Brilinta (Ticagretor)
• Coumadin (Warfarin)
• Effient (Prasugrel)
• Eliquis (Apixiban)
• Fragmin (Dalteparin)
• Lovenox (Enoxaparin)
• Plavix (Clopidogrel)
• Pletal (Cilostazol)
• Pradaxa (Dabigatran)
• Savaysa (Edoxaban)
• Xarelto (Rivaroxaban)
If you have a stent or you have had a blood clot, talk to the doctor who placed the stent or treated your blood clot before you stop taking this medicine. Your medicine may need to be changed or adjusted before surgery.
If your surgery date gets changed, and you had stopped or changed your medicine to prevent clots, call your doctor. You may need to restart the medicine while you wait for your surgery to be rescheduled.
� Stop hormone replacement or birth control pills for 4 weeks before and 4 weeks after surgery unless you have been given other directions from your surgeon.
� Monamine oxidase inhibitors, also called MAOIs, should be stopped 7 to 14 days before surgery. Some of the drugs in this group include:
• Nardil, also known as phenelzine sulfate
• Parnate, also known as tranylcypromine sulfate
• Eldepryl, also known as selequline hydrochloride
� Stop all herbal medicines 7 days before surgery. These may include fish oil, garlic, or glucosamine for example.
� Stop taking non-steroidal anti-inflammatory drugs, also called NSAIDs, for 7 days before surgery. These include diclofenac, Advil, Motrin, Aleve, Celebrex, Mobic, or any generic versions of ibuprofen, naproxen, or meloxicam. Tylenol can be taken if needed.
� Stop taking any multivitamins or vitamin E for 3 days before surgery.
� Stop taking Glucophage, also known as metformin, or any products that contain metformin for 48 hours before surgery.
Other health issues � If you get sick with a cold, sore throat,
cough, or fever, or you have any infection before your surgery, call the office right away. Your surgery may need to be rescheduled until your infection is treated to avoid your new joint getting infected.
� Have good eating habits and control your weight. If you are overweight, losing weight can make your recovery and rehabilitation easier.

8
� Avoid constipation. Talk to your doctor if you have had problems with constipation. If you have not had a bowel movement for a few days before your surgery, check with your doctor about a laxative or enema.
� If you are a smoker or tobacco user, you must quit to heal well after surgery and reduce your risk of infection. Talk to your doctor about help to quit.
• Quitting at least 4 to 6 weeks before and up to 8 weeks after surgery will help your surgical wounds heal quicker and be less likely to get infected.
• Oxygen is needed for wounds to heal properly. Just 10 minutes of smoking can decrease the amount of oxygen in tissue for up to 1 hour!
• Wound healing is harder in homes with a smoker because the dressings absorb smoke.
Practice your exercises to work your leg muscles• Do these exercises to strengthen your leg muscles.
• Do these exercises lying on your back. Exercise both legs. Repeat each exercise 10 times, 2 to 3 times each day, or as directed by your doctor, therapist, or nurse.
• Breathe in as you tighten your muscles and out when you relax them. This helps keep your muscles relaxed. Breathe in normally when you hold a position.
• Continue these exercises after surgery until you become more active.
Ankle Pumping - strengthens your calf muscles in your lower leg.
1. Bend your ankle, pulling your foot up toward your head.
2. Push your foot back down, away from you as far as possible, like you are pushing on the brake pedal of a car.
Quad Setting - works your upper leg or thigh muscles.
1. Tighten the muscles of your upper leg.
2. Keep you knee straight and push your knee down into the bed. To get the idea, have someone place a hand under your knee. Push your knee down into the person’s hand.
3. Hold for a count of 5, and then relax and repeat.
Gluteal Sets - works your buttocks muscles.
1. Squeeze your buttocks together.
2. Hold for a count of 5, and then relax and repeat.

9
Learn and practice coughing and deep breathingYour lungs are not working at their best after surgery. This is because of the length of time you are anesthetized or sleeping during your surgery. After surgery, the nurses will encourage you to cough and deep breathe to exercise your lungs.
Practice these exercises to help strengthen your lungs before your surgery to decrease your risk of pneumonia after surgery. Repeat every 1 to 2 hours when you are awake.
1. Breathe in slowly and deeply through your nose and hold for a few seconds.
2. Purse your lips like you are going to blow out a candle and breathe out slowly.
3. Repeat 5 times, and then take a deep breath in and cough.
4. Do 3 sets of 5 breaths and a cough.
In the hospital, you will be given a device called an incentive spirometer, also called a breathing exerciser. This is used to reduce the chance of you having breathing problems, such as pneumonia. Read more about How to Use an Incentive Spirometer on page 20 of this book.

10
Prepare your home
Buy adaptive equipment
Plan for help
You will need some help to move around safely when you first leave the hospital after surgery. It is easier to have a plan for help ready before you have your surgery.
• Prepare a room with all of your equipment, preferably on the first floor.
• Arrange your furniture to have wide and safe walkways through your home.
• Remove any scatter or throw rugs you have on the floor that may cause you to trip and fall.
• Be sure there are no foot stools, electrical cords, or other small items on the floor that could trip you. This may include small pets.
• Rearrange your kitchen to have those items you use often at an easily reachable level.
• Shop for frozen or canned food that will be easy to prepare. Place them in easy reach between shoulder and waist level.
• Put non-skid strips or pads in your bathtub or shower for safety.
You may need several pieces of equipment to make your daily activities easier and safer after surgery. Your needs may determine whether other pieces of equipment may be useful to you after surgery.
Most of the equipment is not covered by insurance, but check with your insurance company to see what may be covered. You may be able to get some of the equipment from your local drug store or medical supply store. Your social worker, case manager, or PCRM will be able to help you with this.
Your therapist will teach you how to use some of equipment before you go home.
You should have someone with you for the first few days after your surgery. Ask your family and friends to be available to help:
• Give you a ride home from the hospital
• Get you in and out of the car
• Help you with bathing and exercising
• Get you into and out of bed
• Do laundry and light housekeeping
• Get you to your follow up appointments
• Collect your mail
• Care for your loved ones or pets
Our goal is to have you go home, but some patients may require a short stay in a skilled nursing facility or rehabilitation center. If you plan on a stay at a facility, we recommend you contact your insurance provider to find out what facilities are part of your plan before coming to the hospital. You may want to check them out before your surgery. Bring a list of your 1 to 3 preferred facilities when you come for your surgery.
If needed, we can provide you with a list of recommended care providers for home health services, skilled nursing facilities, or rehab centers close to your home. Ask to talk to a social worker, case manager, patient care resource manager (PCRM) to help you plan your care.
Plan Now for Your Care after Surgery

11
Be safe at home
Items you will need:
• Walker: An aid that helps you be safe when moving.
• Elevated toilet seat: Attaches to your toilet seat to raise the height.
• Cushion: Used to raise the seat height of a chair, car seat, or other surfaces. This may be provided to you at the hospital.
Other items that may be helpful to you:
� Reacher: Used to pick up items off of the floor and to help with dressing.
� Long-handled bath sponge: Helps you reach hard to reach areas when bathing.
� Bath seat or shower bench: Allows you to sit for your safety while you are in the tub or shower.
� Dressing stick: Used to help put on pants, skirts, pull up zippers, and other things. Has a hook on one end and a pusher on the other.
� Sock aid: Helps you put on socks without having to bend forward so much.
� Long-handled shoe horn: Allows you to put shoes on while sitting or standing.
� Elastic shoe laces: Make it easier for you to slip in or out of your shoes.
� For some patients, a hospital bed may be needed when you first get home. Talk to your surgeon and physical therapist about your needs.
• Use an apron with several pockets or attach an apron to your walker to carry things.
• Carry hot liquids in covered containers.
• Slide objects along the counter top instead of carrying them.
• Sit on a high stool when working at the counter.
• Do not sit in a low chair or sofa, or in swivel chairs.
• Use a reacher to reach objects on the floor or high in the cupboards. Do not bend down to pick things up.

12
• Have an adult who will be able to bring you to the hospital for your surgery.
• Gather items that you need to bring with you in the morning:
Ì A photo ID.
Ì Insurance card or cards.
Ì Co-payment if required.
Ì A list of all medicines, including prescription and over the counter, vitamins, herbal supplements, and any inhalers or drops you take. Be sure to list the dose amount and the times you take the medicines.
Ì Walker if you have one. If you do not have one, you will be given one at the hospital.
Ì Personal items that you may need for an overnight stay. Include cases for glasses, contacts, dentures, or hearing aids if you use them.
Ì CPAP machine if used for sleep apnea.
Ì This book.
• Also plan to leave these items at home:
Ì All valuables, such as your cell phone, wallet, and purse.
Ì All jewelry including a watch, rings, and any form of piercing.
Ì Any pill bottles or home medicines unless you were instructed to bring them with you.
• Take a shower with CHG soap this evening as instructed. Follow the directions for Getting Your Skin Ready for Surgery on the next pages.
Evening before surgery
• You are not to eat or drink anything after midnight the night before your surgery. This includes no chewing gum, mints, or candy after midnight.
• Do not smoke anything after midnight the night before your surgery. Smoking or chewing tobacco, or using any nicotine can delay wound healing and increase your risk of infection after surgery.
• You may brush your teeth and rinse your mouth after midnight, just be sure you do not swallow anything.
Day Before and Morning of Surgery
No eating or drinking after midnight
Morning of surgery• Take the medicines you were instructed
to take with small sips of water. These may include medicines for heart, blood pressure, seizures, breathing, heart burn, gastric reflux, pain, depression, thyroid, or cholesterol problems.
Ì Do not take water pills, muscle relaxants, digoxin unless it is for irregular heart beat, stool softeners or laxatives, vitamins or mineral supplements, or fenofibrate.
Ì If you take insulin or other diabetes medicine, check your blood sugar the morning of surgery. Only take your insulin as directed the morning of surgery.
• Take another shower with CHG as directed. Be sure to avoid lotions, powder, or other skin products.

13
Because germs live on everyone’s skin, there is a chance of getting an infection when your skin is cut during surgery. To reduce the chance of infection, clean your skin with a special soap, called 4% chlorhexidine gluconate or CHG, sold by the brand name Hibiclens. You may be given or you will need to buy a 8-ounce bottle or larger. Ask your pharmacist where to find it in the drug store. It is often with the first aid supplies.
• Do not shave for 1 week near the site for your surgery cut. Shaving with a razor can irritate your skin and make it easier to develop an infection. If needed, the hair on the site will be trimmed with electric clippers before you go to the operating room.
• CHG soap does not bubble and lather like most soaps.
• Be careful not to get CHG into your eyes, nose, mouth, or ears. If you do, rinse well with clean water.
Shower with CHG as directedYou may be told to shower with CHG soap 2 or 6 times before surgery. Please call your surgeon’s office if you have any questions.
� You need to take 2 showers using CHG. Wash your whole body from the neck down with CHG soap the night before, and then again the morning of your surgery. Use 4 ounces (½ cup) of CHG soap each time you shower.
� You need to take 6 showers using CHG. Starting 5 days before your surgery, shower 1 time each day for 4 days. Then, shower the night before your surgery and again the morning of your surgery. Wash your whole body from the neck down with CHG soap. Use 4 ounces (½ cup) of CHG soap each time you shower.
Follow the steps on the next page, How to shower with CHG soap.
• Be sure to wash for 5 minutes and pay special attention to your hip site where your surgery will be done. Be sure to wash the back of your neck, under your arms, your belly button, private parts, and your legs down to your toes.
• Do not scrub too hard.
If you are not able to showerIf you do not have a shower or if you are not able to get into the shower, do a sponge bath with CHG soap instead.
1. First, bathe with a washcloth and regular soap. Rinse with clean water.
2. Wet a clean washcloth and apply ½ cup of CHG soap to your whole body from the neck down for 5 minutes. Pay special attention to the part of the body where the surgery will be done.
3. Rinse well with another clean washcloth and plain water.
4. Pat yourself dry with a clean, dry towel.
Getting Your Skin Ready for Surgery

14
How to shower with CHG soap
1
5 8
3 4
25 min
6
7
CREAM
LOTION
SPRAY
Wash your hairas usual with your regular shampoo and then wash your body with regular soap.
Rinse well.
Pat yourself dry with a clean towel.
Turn on the shower water and rinse your whole body well.
Put on clean clothes.
Wet a clean washcloth.Turn o� the shower.
Apply some CHG soap to the wet washcloth.
Use the washcloth to wash your whole body from the neck down.
Keep adding more CHG and continue to wash for 5 minutes.
Note: On the morning of surgery when you finish showering, do NOT put on hair or skin care products, deodorant or make-up. Do NOT wear jewelry to the hospital or surgery center.

15
Surgery arrival timeYou will get a call a day or two before your surgery to tell you what time you should be at the hospital for your surgery. If your surgery is scheduled for a Monday, you may be called on Friday.
Arrive on time, so we can prepare you for surgery.
Pre-operative holding area/ambulatory surgery unit (ASU)• When you arrive in the pre-op holding
area or ASU, the nurse will talk to you and give you a gown to change into for your surgery.
• Your clothes are put into a back and placed in a locker for safe keeping.
• Your blood pressure, pulse, temperature, and breathing rate will be checked. Other blood tests may be done if needed.
• A needle will be used to place a small tube, called an IV catheter, into a vein to give you fluids before, during, and after surgery.
• The anesthesiologist will come in to talk to you and have you sign a consent form.
• Dentures or partial plates, contact lenses, eyeglasses, hearing aids, and anything not a normal part of your body should be removed before surgery. Nail polish, makeup, jewelry, and any hair clips must also be removed.
• You will be asked to write your initials on the skin over the hip that is to be replaced. This is part of our safety checks.
• Your hair will be covered with a paper hat.
• Your family will be allowed to stay with you in the pre-operative holding area or ASU. Ask any questions you may have. The nurse will tell your family where they can wait while you are in surgery.
Operating roomYou will be taken into the operating room and all staff will wear gowns, caps, and masks. The room lights will be bright and the room will feel cool.
A nurse in the operating room will greet you and check your ID band. You will be asked some questions. A safety strap will be put over you, so you stay on the table. Staff will talk to you to let you know what they are going to do next.
You will be given medicine through your IV by anesthesiology to keep you pain free and asleep during your surgery.
You will have a tube placed into your bladder to drain urine during surgery. This tube will be removed the day after surgery.
Your surgeon will replace the hip, and then close the incisions. A dressing or mesh will cover the site.
The time for your surgery is an estimate. Your surgery may take a longer or shorter time than you and your family were told. Your family will be able to check a board in the waiting area to see where you are. After surgery, the surgeon will talk with your family.
PACUYou will wake up in the post anesthesia care unit (PACU), also called recovery. The nurses will check your vital signs and your oxygen level, as well as your incision site. X-rays will be taken. You may be in PACU for several hours before going to your hospital room.
Having Surgery

16
Your care teamA team of doctors, registered nurses (RNs), patient care assistants (PCAs), and physical therapists (PTs) will work with you after surgery.
• The nurse will check you, provide treatments and medicines, and teach you about your incision and other care.
• The PCA will help with your care and some procedures.
• The PT will teach you how to get out of bed and exercises to help with your recovery.
Use your call light to get help to get out of bed.
Your room phoneYour room number and telephone number are posted on the whiteboard in your room.
To make outside calls, dial 9 and the number. To dial long distance, use a calling card or phone card, or simply dial “0” for the operator to place a collect call.
Visitors• For their health protection, children
under the age of 12 should not visit.
• All visitors must wash their hands when entering and leaving a patient’s room to reduce the risk of infection. Use the soap and water in the patient room or use the alcohol-based hand sanitizer near the doorway.
• Please do not visit if you are ill.
• We ask that visitors be limited to 2 at a time.
• Isolation precautions must be followed. If there is an isolation sign on the patient’s room door, see the patient’s nurse before entering the room.
• Overnight stays are not recommended, so the patient can rest, and so you can be better rested when you take the patient home. Talk with the nurse if you do plan to stay. Only 1 adult is able to stay overnight.
Do not leave the unitFor your safety, we ask that you stay on the nursing unit unless you are being taken to a test or procedure.
• If you want to leave the nursing unit for any reason, be sure to check each time with your nurse before you leave.
• Please return to the unit within 15 minutes. Let the nurse know when you are back to the room.
Be an active partner in your care• Be sure to tell your nurse right away if
you feel sicker or have a new pain or problem, or if you feel something is just not right.
• Ask if you have questions or concerns. Please ask if anything is different from what you were told to expect.
• Ask a family member or friend to be with you and to be your advocate. They can be an extra set of eyes and ears to watch and hear about your care to help you understand.
• Be sure to share all your health concerns and treatments with your doctor and care team. You may not think it is important, but it may help us to give you the safest care.
Care on the Orthopedic Unit

17
• Sharing information about your health one time is often not enough. Many people may be involved in your care and you may need to let them know about you to help keep you safe.
• Be sure you get the results of any test or procedure. Ask your doctor or nurse when and how you should get the results.
• Make sure you, all your visitors, and anyone giving you care practice good hand cleaning. It is the best way to protect you from an infection.
• Look at medicines you are given to be sure they are correct and the right amount. If you are not sure what medicines you are being given, ask what they are and what they are for.
• Tell the staff if you are given food or drinks that you are not supposed to eat.
• If your ID wristband comes off, please let the staff know, so it can be replaced. You will be asked your name and your ID should be checked before you get medicines and some treatments.
• Learn what you can about your care.
Asking a question again is never a problem when safety and your health are at stake.
Refer to the Patient and Visitor Guide for more information.
We will help you get out of bed or out of the chair• We will help you to get out of bed, so
you do not fall. Medicines that you take, some treatments, and just being in bed more can cause you to be weak and may cause dizziness. Cords and lines from equipment being used for your care can get pulled or trip you.
• Always call us to get help getting out of bed or out of the chair or bathroom.
• Never lean on or use an IV pole for support when you are walking.
• You will be taught how to use your walker to help you get around.
Pain controlPain control is an important part of your overall treatment. Uncontrolled pain can interfere with sleep, healing, thinking, activity, and appetite. Ask for relief from pain before your pain worsens.
You can expect some pain at the incision site and joint for several days after your surgery. You may also have some soreness in other parts of your body because of the way you were positioned during surgery. Pain medicine and increasing your activity each day will help to ease the soreness.
• You will be asked about your pain often.
• You will be asked to rate your pain on a scale of 0 to 10 with 0 being no pain and 10 being the worst pain.
• Your doctor orders medicine to help control your pain. Taking your pain medicine as ordered by your doctor will bring you the most relief as your body heals.
• You may need to take your pain medicine before your exercises or activities to improve your recovery.
• At first, you may have both pain medicine through your IV and pain pills. You will go home on pain pills.
Many patients find that they get added pain relief from:
• Deep breathing exercises
• Massage
• Relaxation exercises
• Visual imagery or meditation
• Listening to music
• Distraction, such as reading or watching a movie
• Heat or cold therapy
Talk to a staff member to learn more about these options

18
In Hospital Care and Treatments
DietYou will have a regular diet unless you are having nausea. Protein, calories, and fluids will help you heal and recover more quickly.
IV fluids and antibiotics• You will receive fluids into your veins
through the IV after surgery. The IV will stay in place until you are eating and drinking fluids after surgery.
• When you are able to eat, your IV will be capped off, so you will not need to have the tubing attached at all times.
• You can expect receive antibiotics to prevent infection for the first day after surgery. Most patients will not be given antibiotics to take at home.
Incision and drains• Your incision may be 6 inches in length
or more where your joint was replaced.
• During surgery, the doctor may have placed a drain. Drains are tubes connected to a collection device outside your body. The drain lets extra blood and fluid drain out of the wound so the incision can heal. The fluid will be removed and measured by the nursing staff. Your doctor will decide when your drain should come out.
• Your incision may have special staples, stitches, or a mesh and glue closure.
• If you have staples, they will be removed in 2 to 3 weeks.
• Your incision will be covered with a dressing at first. Often the dressing is removed the first day after surgery. Unless you have drainage from the site, you may not need to replace the dressing.
• Your nurses will teach you and your caregiver how to care for your incision at home.
Breathing exercises• Use your breathing exercises 10 times
and cough every hour as directed on page 20 of this book.
or
• Do deep breathing and coughing exercises every hour to prevent pneumonia. Raise the head of the bed up as far as you are able or sit up straight in a chair. Have tissue and a waste bag close by.
Deep breathing:
Ì Breathe in deeply through your nose and mouth. Your abdomen will rise as your lungs fill with air.
Ì Hold the breath for a few seconds.
Ì Purse your lips, like you were going to whistle. Let the air out.
Ì Repeat the deep breathing 10 to 15 times and cough after each group of 5 breaths.
Coughing:
Ì To cough, open your mouth and take a deep breath in. Cough 1 or 2 strong coughs from deep in your lungs.
Ì Cover your mouth with a tissue as you cough. Spit any mucus that you cough up into the tissue.

19
Bed exercises in the hospitalAs soon as you are awake and able, start the 3 exercises you practiced before your surgery:
• Ankle pumping
• Quad setting
• Gluteal sets
Each of these exercises plays a role in your recovery.
Do each exercises slowly.
Repeat each exercise 10 times every hour when you are awake.
Refer to page 8 of this book to review these exercises. If you need help, the nurse or therapist will go over the instructions with you.
Heel careA special mattress or rolled blankets may be used to reduce pressure on your heel to prevent skin sores. The rolled blanket may be placed under your ankles to keep your heels off of the bed.
The nurses will check your heels for any signs of redness or pressure.
Prevent blood clotsDuring and after surgery, your limited ability to walk and move around can cause your blood circulation to be sluggish or slow and blood clots can develop. To prevent blood clots, your treatment may include:
• Leg exercises to promote circulation.
• Compression wraps may be used on your legs. The wraps attach to a small pump that pumps air in and out to increase the circulation in your legs.
• You may be given a medicine, called an anti-coagulant or blood thinner.
Moving yourself in bed• You will have metal bars that go over the
top of your bed.
• There will be a triangle shaped bar, called a trapeze, that will hang above you.
• You can use the bar to help you move around in your bed. Your nurse and therapist will teach you how to use it.
Any time you need to shift your weight to change position, you can pull up on the trapeze to help move yourself.
20
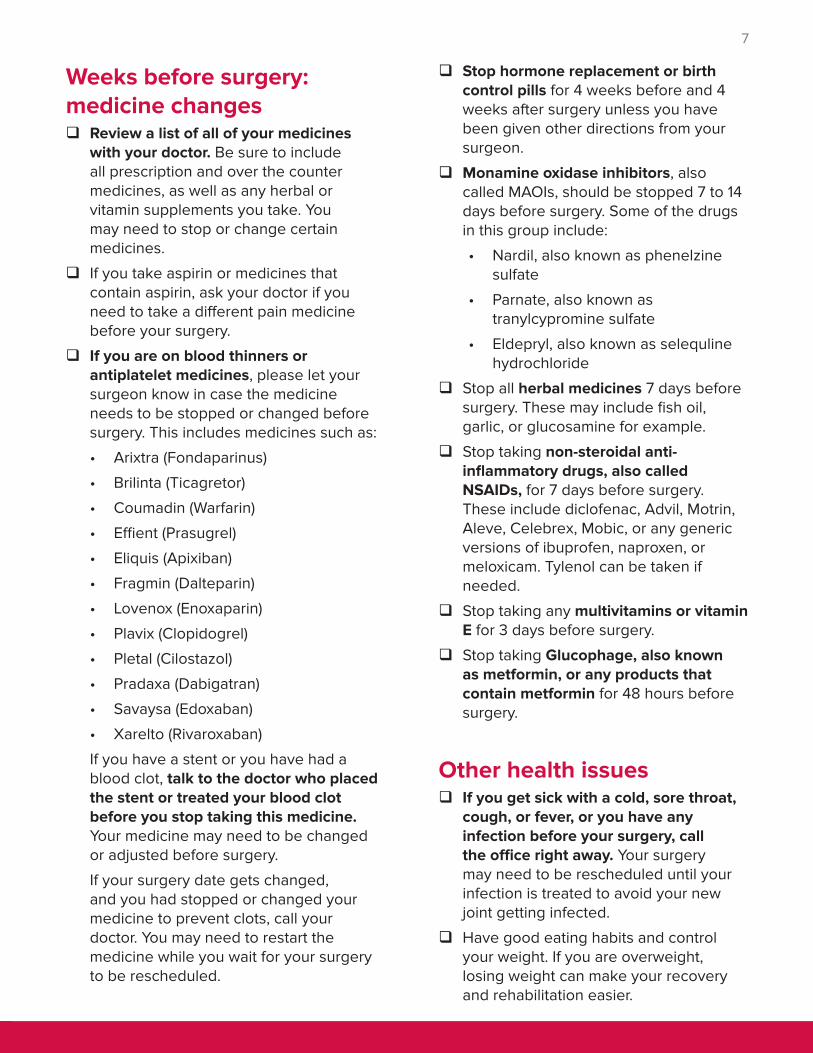
Use your incentive spirometer, also called a breathing exerciser, to help you take deep breaths to open the air sacs in your lungs after surgery. This can help reduce the chance of developing breathing problems like pneumonia.
Do your breathing exercises every hour when you are awake each day. Continue these exercises at home for 2 to 3 weeks or until your cough is dry.
Steps for use1. If possible, sit up straight. It may help to sit on the edge of a
chair or your bed.
2. Hold the incentive spirometer upright.
3. Breathe out, and then close your lips tightly around the mouthpiece. Take in a slow deep breath through your mouth.
4. As you take a deep breath, the piston in the clear chamber of the incentive spirometer will rise. Breathe in slowly to allow the air sacs in your lungs time to open. Your incentive spirometer has an indicator to let you know if you are breathing in too fast.
5. After you breathe in as deeply as you can, hold your breath for 3 to 5 seconds. Set the goal indicator tab at the level that you reached.
6. Take out the mouthpiece and breathe out slowly. Relax and breathe normally for a few seconds until the piston returns to the bottom of the chamber.
7. Repeat these steps a total of 10 times. If you start to feel light headed or dizzy, slow down your breathing and give yourself more time between the deep breaths.
8. After you do the 10 deep breathing exercises, take a deep breath and cough to clear the mucus from your lungs.
Breathing Exerciser
How to Use an Incentive Spirometer

21
Using ice Hip precautions• Follow these precautions for 3 months or
as directed by your doctor or therapist.
• Your new hip has limited range of motion right after surgery. These precautions protect your new hip from sliding out of position or dislocating while the muscles heal.
Follow these hip precautions to protect your new hip joint and allow for healing:
• No bending past 90 degrees at the hip.
• No crossing your legs at the knees or ankles.
• No twisting the hip inward.
Here are some examples of these precautions with actions you can take to protect your hip:
• When you are in bed, keep your legs apart. Place a regular pillow or a wedge pillow between your legs to keep them apart. The pillow also keeps your leg from turning in or out too far.
• Sleep on your back or on your side with pillows placed to prevent you from crossing your legs. Do not sleep on your stomach.
Use ice to help reduce pain and swelling. It is best to use ice after exercise or if you have been very active. Use ice cubes, gel ice packs, or a device that pumps cold water through a sleeve that wraps around your joint, called Ice Man.
• Be sure to use a layer of fabric between your skin and the ice pack, gel ice pack, or Ice Man sleeve to protect your skin. Gel ice packs are much cooler than ice or the Ice Man, and they can quickly hurt your skin if applied directly on your skin.
• The Ice Man can be used around the clock for the first 3 days after surgery. Use it after that as needed as you recover. The temperature can be adjusted, so keep it as cold as you are able to tolerate for the best results.
• If you are using ice packs or gel ice packs instead of the Ice Man, use the packs for 20 to 30 minutes every hour.
• Check your skin often for signs of redness or swelling.
• Tell your doctor or physical therapist if you have:
Ì Increased pain
Ì Numbness or tingling
Ì Redness that does not go away
Home Care Instructions
Full recovery from your total hip replacement surgery is going to take months. This information will help you understand your recovery and care at home. Precautions and exercises to protect and strengthen your new hip are included to help you be active in your care and recovery.

22
• Do not bend your upper body at your waist forward more than 90 degrees.
• Do not plant your feet and twist at your hip. Pick your feet up and move your entire body around when you turn.
• Do not reach for anything below your knees. Use a sock aide, reacher, or other devices.
• Do not reach or twist over your hip to pick up or set down items by your bed or chair. Use your reacher to pick things up off of the floor.
• Do not cross your legs at your knees or ankles when sitting, standing, or lying.
• When sitting, your knees must be lower than your hips. Sit on a cushion to keep your hips higher. Let your knee on the new hip side bend when sitting and keep your toes pointed forward. This keeps your hip from turning. The height from the cushion will also make it easier for you to stand up.
YES!

23
Sitting• Avoid sitting longer than 30 minutes
at a time. Get up often, and walk and change your position.
• During long car trips, stop every 30 minutes to get out of the car and move around. These breaks are important to prevent stiffness and swelling, which could cause blood clots to form.
SwellingSwelling, also called edema, is common after total hip replacement. You may have had some swelling in the hospital or you may not notice it until you get home and get more active. You may not have any swelling at all.
The most common sites to have swelling are the foot, ankle, knee, or thigh of surgery leg.
To help prevent swelling, elevate your feet higher than your heart level while you are lying down.
• Your toes should be higher than your nose. Do not place pillows under bent knees.
• Rest this way for 45 minutes to an hour, 2 or 3 times each day. If your swelling does not decrease after sleeping all night and elevating your legs during the day, call the doctor’s office.
Prevent blood clots• Do your exercises and wear your
home DVT pumps any time you are sitting, resting or lying down.
• you may be given a prescription for an anticoagulant, also called a blood thinner, to prevent blood clots from forming. This medicine is often taken for 1 to 6 weeks, but your doctor will decide how long you need to take it.
• Aspirin and other medicines that contain aspirin may also thin your blood. Do not take aspirin or products with aspirin while you are on anticoagulant medicine unless your doctor has given you approval.
WalkingDo not walk without your walker until your doctor or therapist tells you that it is allowed. You may feel you can do without the walker, but healing is occurring and it takes time. Using the walker protects the healing joint.
Walk on level ground and go outdoors if weather permits or choose a large indoor area like a shopping mall.
Water walkingWhen your doctor feels that your incision is well healed (often 6 weeks after surgery), water walking may be recommended. Do not walk in water unless you have your doctor’s permission.
If you have access to a pool, water walking can be relaxing and strengthens the muscles in your hips and legs. Enter the pool to chest high water. Hold onto the side of the pool and walk for 15 to 20 minutes. Repeat 3 to 5 days each week.
Climbing stairsStair climbing is allowed in moderation. During the first few weeks at home, limit climbing stairs to 1 round trip a day.
Follow the directions for climbing stairs with your walker on pages 37 to 38 of this book.
24
Water bedsDo not use a water bed after surgery until your doctor approves.
Driving and riding in a car• If you are riding in a car, stop and get out
of the car to walk and stretch every 30 minutes.
• Do ankle pumping exercises while you are riding in the car to keep your blood flowing in your legs.
• You may drive in about 6 weeks with your doctor’s permission. Only drive if you have complete control of your surgery leg, and you are no longer on pain medicine.
Air travelFor the first year after your hip replacement, use these precautions to protect your new hip and reduce the risk of problems:
• When booking your flight, tell them you have a total joint in place and request a bulkhead seat, so you have more room to stretch out your leg.
• Be sure to tell the officers at the security check that you have a total hip joint in place.
• Request help to travel through the airport.
• Stand frequently, and do your ankle pumping exercises during the flight.
Activities to avoidYour new hip joint can be damaged or worn out by rough treatment. You need to exercise to keep your muscles and ligaments strong.
There are activities that may cause more stress to the hip joint and should be avoided. These include:
• Jogging or running
• Contact sports
• Jumping rope
• Racket sports
• Pushing weights with your legs
• Lifting objects that weight more than 35 pounds
Recommended activitiesExercises taught by your physical therapist and walking are good activities to start. Your exercises will be advanced as your new joint heals.
Refer to Exercises on page 26.
Do not participate in sports until you have your doctor’s approval. Talk to your doctor about sports you may be interested in, but some that would be options may include:
• Swimming
• Bike riding
• Dancing
• Using a treadmill
• Golf
• Bowling
Do not use exercise equipment, whirlpools, or spas until approved by your doctor.
Talk with your doctor about weight lifting with your operative leg.

25
Call your doctor right awayAs your hip incision heals, check it every day. Please report any of these signs to your surgeon’s office:
• Redness, swelling, or drainage from the incision site
• Fever of 101 degrees F or 38 degrees C or more
• Edges of the wound start to separate
• Coldness of the leg
• Leg turns pale or blue in color
• Tingling or numbness in the leg
• Leg pain
Dental care after joint replacementDental health is important, but because you have a joint replacement, you need to take extra caution. The bacteria that cause infections in your mouth, gums, and teeth can easily travel in your blood stream and settle in your replaced hip. That is not something you want to have happen.
Work with your surgeon and your dentist as you plan dental work in the future. Antibiotics may be recommended for you to take before:
• Teeth removal
• Gum disease procedures
• Dental implants or teeth that are knocked out and are replaced
• Root canal surgery
• Placement of orthodontic bands
• Injections of anesthetic into gums near the jaw
• Cleaning of teeth where bleeding may occur
Resuming sexMost often, it is safe for you to resume sexual activity after 4 to 6 weeks of healing. Having the joint replacement often eases a lot of the pain and stiffness that may have made sex uncomfortable before surgery.
• The skin and muscles of the hip need about 4 to 6 weeks to heal.
• Follow the hip precautions when having sex. After several months, you can resume activity in any comfortable position.
• Be sure your partner knows the hip precautions and the effect of those motions.
• Talk to your partner about you comfort, concerns, and anxieties.

26
For all exercises• Follow the direction of your doctor or therapist for these exercises.
• You may need help with these exercises at first. Have a family member come to the hospital to work with your and your therapist to learn how to help you when you go home.
• Exercise 3 times each day. Do 10 to 15 repetitions of each exercise.
• Do all exercises slowly with smooth motion.
Exercises to be started right away � Ankle pumpingThis exercise can be done while lying in bed or sitting in a chair.
1. Move your foot up and down as if pushing down or letting up on a gas pedal in a car.
2. Repeat 10 to 15 times.
3. Do this exercise with the other foot.
� Hip flexionUse a plastic trash bag or a piece of cardboard under your leg to reduce friction. A small towel under your heel may also help.
1. Lie on your back and slide your heel toward your buttocks, bending your knee up. Do not lift your heel off of the surface. Keep your knee pointed toward the ceiling, so you do not turn your leg in or out.
2. Pause and then slide your heel forward and straighten your knee.
Your therapist will teach you some exercises you need to do before you leave the hospital. Other exercises should be started weeks after your surgery. Follow these guidelines unless you were given different directions from your doctor or therapist.
Exercises

27
� Hip abductionUse a plastic trash bag or a piece of cardboard under your leg to reduce friction. A small towel under your heel may also help.
1. Lie on your back with your legs straight. Have your toes pointed to the ceiling.
2. Slide your surgery leg out to the side, like opening a pair of scissors.
3. Pause and then slide your leg back to the starting position. Do not cross the midline of your body.
� Short arc quads (blanket roll or coffee can exercise)1. Place a blanket roll or 3 pound coffee can under the knee of your surgery leg.
2. Resting your thigh on the roll or can, lift your heel off the bed and straighten your knee as much as you can.
3. Pause and then lower your heel down to the starting position.
This exercise can also be done on your other leg.

28
Start these exercises 1 week after surgery or as directed by your doctor or therapist.
� Leg forwardUse a counter, steady table, or chair for support for this exercise. Stand up straight and be sure the motion is from your hip.
1. Tighten the muscles in the front of your upper leg or thigh.
2. Keeping the muscles tight and your knee straight, lift your leg forward.
3. Hold and then lower your leg to the starting position.
4. Relax and repeat.
� March in place1. Stand with your feet slightly apart, holding onto a chair or
counter for support.
2. Lift your knee up as you breathe out, trying to form a right angle at the hip. Relax your knee and focus on bending your hip.
3. Hold and then lower your leg slowly to the starting position.
4. Relax and repeat.
� Leg to the side (hip abduction)1. Stand to the side of a chair or counter.
2. Move your leg out to the side, keeping your knee straight.
3. Hold and then lower your leg back to the starting position.
4. Relax and repeat.

29
� Leg backUse a counter, steady table, or chair for support for this exercise. Stand up straight and be sure the motion is from your hip.
1. Keeping your leg straight, bring your leg back from your hip, tightening your buttocks muscles.
2. Hold and then lower your leg to the starting position.
3. Relax and repeat.
� Knee extension (Long arc quads)1. Sit on a chair.
2. Lift your foot and straighten your knee and hold.
3. Slowly lower your heel back down to the floor.
4. Relax and repeat.
� Wall slide1. Stand, pressing your back against the wall, and have
your feet shoulder width apart. You may want to hold onto your walker or a chair when you first start to do this exercise.
2. Slide your back down the wall until your knees are bent about 45 degrees.
3. Hold and then return to standing.
4. Relax and repeat.

30
Start these exercises 3 week after surgery or as directed by your doctor or therapist.
� Straight leg raise - lying1. Lie on your back with your surgery leg
straight. Your other leg should be bent at the knee with the foot flat on the floor.
2. Slowly raise your leg off of the bed about 12 to 24 inches, keeping the knee straight.
3. Hold and then lower your leg slowly to the starting position.
4. Relax and repeat.
� Side leg lift1. Lie on your side with your surgery leg
on top. Place a pillow between your legs. Bend your lower leg for support if needed.
2. Keep your top leg straight and lift it about 12 inches, keeping the hip very slightly forward.
3. Hold and then lower the leg to the starting position.
4. Relax and repeat.
� Hip extension1. Lie on your stomach with
your legs straight.
2. Keeping your knee straight, lift your surgery leg off of the bed.
3. Hold and then lower your leg to the starting position.
4. Relax and repeat.

31
Lying on your back
Start these exercises 6 weeks after your surgery or as directed by your doctor or therapist. Repeat each exercise 10 times, 3 times each day.
� Hip flexor stretch1. Lie on your back with both knees bent.
2. Bring your good leg toward your chest, pulling your upper leg just above your knee, and lower your operative leg to the bed.
3. Hold the stretch for 10 seconds, and then relax and repeat.
� Bridging1. Lie on your back with both knees bent.
Tighten your buttocks and stomach.
2. Lift your buttocks up until just before your trunk lines up with your upper legs. Do not arch your back.
3. Hold for 5 seconds, and then relax and repeat.
� Roll toes out - external rotation1. With your toes pointed up, slowly roll the operative leg foot out to
the side as you are able.
2. Hold for 10 seconds, and then relax and repeat.
Bridge
� Leg to side - adductor stretch1. Slide your operative leg out to the side until
you feel a gentle stretch on the inner thigh.
2. Keep your knee cap and toes pointed toward the ceiling.
3. Hold for 10 seconds, and then relax and repeat.
32
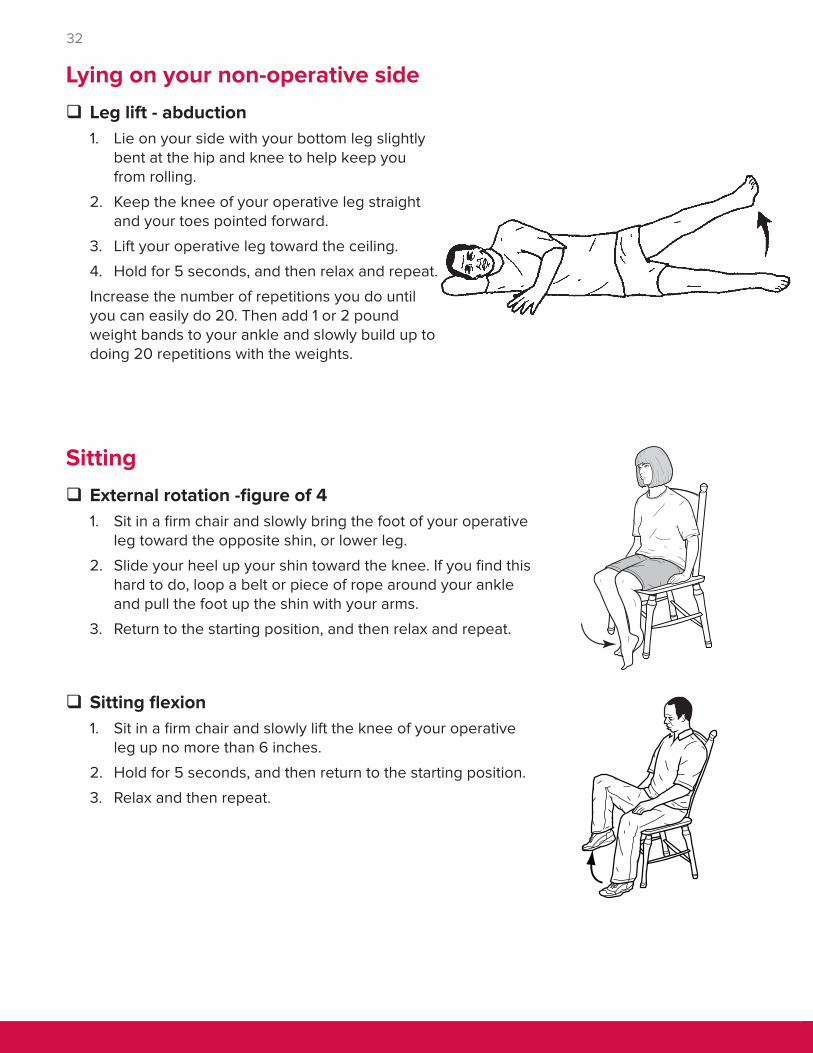
� Leg lift - abduction1. Lie on your side with your bottom leg slightly
bent at the hip and knee to help keep you from rolling.
2. Keep the knee of your operative leg straight and your toes pointed forward.
3. Lift your operative leg toward the ceiling.
4. Hold for 5 seconds, and then relax and repeat.
Increase the number of repetitions you do until you can easily do 20. Then add 1 or 2 pound weight bands to your ankle and slowly build up to doing 20 repetitions with the weights.
Lying on your non-operative side
Sitting � External rotation -figure of 41. Sit in a firm chair and slowly bring the foot of your operative
leg toward the opposite shin, or lower leg.
2. Slide your heel up your shin toward the knee. If you find this hard to do, loop a belt or piece of rope around your ankle and pull the foot up the shin with your arms.
3. Return to the starting position, and then relax and repeat.
� Sitting flexion1. Sit in a firm chair and slowly lift the knee of your operative
leg up no more than 6 inches.
2. Hold for 5 seconds, and then return to the starting position.
3. Relax and then repeat.
33
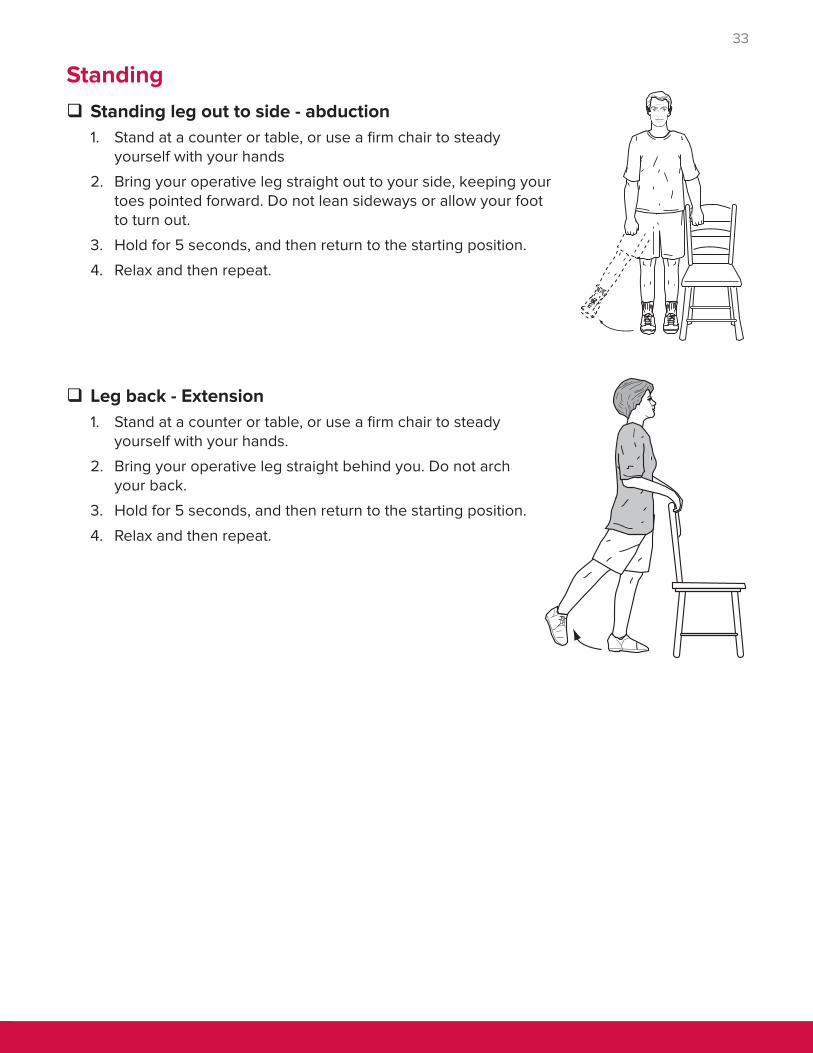
Standing � Standing leg out to side - abduction1. Stand at a counter or table, or use a firm chair to steady
yourself with your hands
2. Bring your operative leg straight out to your side, keeping your toes pointed forward. Do not lean sideways or allow your foot to turn out.
3. Hold for 5 seconds, and then return to the starting position.
4. Relax and then repeat.
� Leg back - Extension1. Stand at a counter or table, or use a firm chair to steady
yourself with your hands.
2. Bring your operative leg straight behind you. Do not arch your back.
3. Hold for 5 seconds, and then return to the starting position.
4. Relax and then repeat.

34
Using Your Walker
As you recover and heal from joint replacement surgery, your new joint needs to be protected while it is healing. You will use an assistive device, such as a walker or cane, to aid you with walking after surgery. Your doctor and your physical therapist will instruct you in how much weight to put on your operative leg after surgery.
Using a walker � Standing with a walker
1. Slide your hips forward to the edge of the bed, chair, or toilet seat. Keep your operative leg outstretched and your good leg beneath you on the floor.
2. Use your arms to push down on the edge of the bed, chair arms, or toilet seat, and lift yourself up.
3. Shift your weight onto your good leg and move your hands to the hand grips of the walker. Bring your operative leg back as you fully straighten your good leg.
4. Do not pull yourself up with the walker because you may fall backwards.
5. Make sure you are steady and balanced before taking a step.

35
� Walking with a walker
1. Lift the walker and place it at a comfortable distance in front of you with all of its legs on the floor. This distance is often equal to an arm’s length.
2. Move your operative leg toward the walker first. Then take a step with your good leg, bringing it slightly ahead of the operative leg.
3. Do not take big steps that place you too close to the walker. There should be space between you and the walker at all times. If you are too close, you may lose your balance.
4. Hold your head up and look straight ahead. It is tempting to watch your feet, but more tiring, and you may run into something.
5. Be sure to walk slowly.

36
� Sitting with a walker
1. Slowly back up to the chair, bed, or toilet until you feel it against the back of your legs.
2. Let go of the walker and reach back for the chair arm, bed, or toilet seat, while sliding your operative leg forward.
3. Slowly lower yourself onto the seat by leaning forward and keeping your operative leg outstretched in front of you. Go slowly, so you do not “plop” into the chair.

37
� Going up stairs with a walker
Always remember, when climbing stairs, start with your good leg going up, and start with your operative leg going down. Up with the good! Down with the bad! When going up and down stairs with a walker, you also should have a sturdy handrail.
1. Approach the stairs and place your feet about 6 inches from the first step.
2. Fold the walker and place it in one hand. Place the other hand on the rail.
3. Lift the folded walker and set it to the back of the step.
4. Step up first with your good leg, and then bring up your operative leg.

38
5. At the top of the stairs, unfold the walker and set it on the landing. Make sure that you hear the walker click into the locked position. Place both hands on the walker.
6. Step up first with your good leg, and then bring up your operative leg.
� Going down stairs with a walker
1. Approach the stairs and place your walker about 2 inches from the top step.
2. Fold the walker and place it in one hand. Place the other hand on the rail.

39
3. Set the folded walker down and to the front edge of the step.
4. Step down first with your operative leg, and then bring down your good leg.
5. At the bottom of the stairs, unfold the walker and set it on the landing. Make sure you hear the walker click into the locked position.
6. Place both hands on the walker. Step down first with your operative leg, and then with your good leg.

40
� Going up a curb with a walker: forward method
1. Walk straight up to the curb. Put all 4 legs of the walker up on the curb.
2. Push straight down on the walker when stepping up with your good leg.
3. Then step up with your operative leg.
� Going up a curb with a walker: backward method
1. Walk up to the curb and turn so your back is to the curb.
2. Step up on the curb with your good leg. Then step up on the curb with your operative leg.
3. Lift the walker and put all 4 legs up on the curb. Turn back around carefully.
� Going down a curb with a walker
1. Walk up to the edge of the curb. Put all 4 legs of the walker on the ground below.
2. Step down first with your operative leg, and then bring down your good leg.
Never go down a curb backwards.

41
� Walking with a cane
1. Cane length should be adjusted, so when you are standing, the handle of the cane is at the level of your wrist.
2. Hold the cane on the side of your good leg unless directed otherwise by your physical therapist.
3. Begin by stepping forward with your operative leg and cane, keeping the 2 parallel to each other.
4. Next, step forward with your good leg, bringing it ahead of the operative leg and cane.
Using Your Cane

42
� Going up stairs with a cane
1. Grasp the hand rail with your free hand. Begin by raising your good leg up to the first step.
2. Then bring your operative leg and cane up together to the same step. Keep your leg and cane parallel to each other.
� Going down stairs with a cane
1. Approach the stairs and put your feet near the steps.
2. Place your cane on the first step down.
3. Place your operative leg on the first step down. Then bring your good leg to the same step.
4. Repeat the above steps until you are at the bottom of the stairs.
43
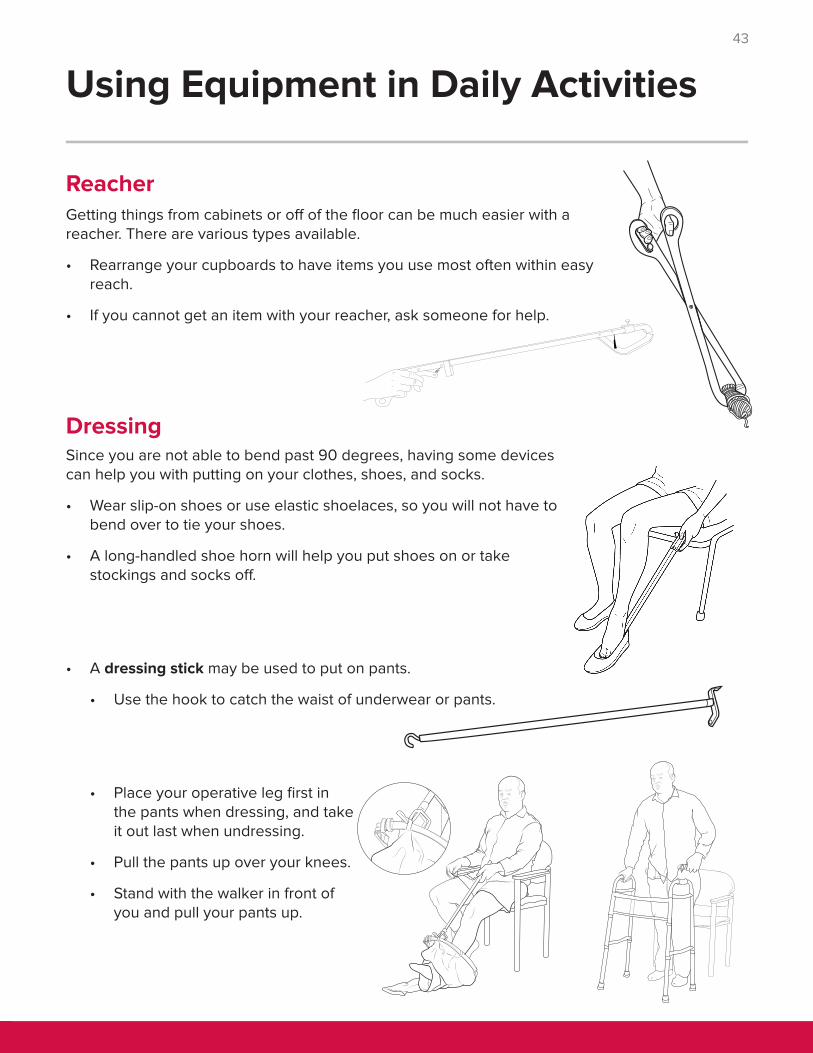
Getting things from cabinets or off of the floor can be much easier with a reacher. There are various types available.
• Rearrange your cupboards to have items you use most often within easy reach.
• If you cannot get an item with your reacher, ask someone for help.
DressingSince you are not able to bend past 90 degrees, having some devices can help you with putting on your clothes, shoes, and socks.
• Wear slip-on shoes or use elastic shoelaces, so you will not have to bend over to tie your shoes.
• A long-handled shoe horn will help you put shoes on or take stockings and socks off.
• A dressing stick may be used to put on pants.
• Use the hook to catch the waist of underwear or pants.
• Place your operative leg first in the pants when dressing, and take it out last when undressing.
• Pull the pants up over your knees.
• Stand with the walker in front of you and pull your pants up.
Using Equipment in Daily Activities
Reacher

44
• Socks and stockings are easier to put on with a sock aid.
• Slide the sock or stocking onto the sock aid. Be sure the heel is at the back of the plastic and the toe is tight against the end.
• Secure the sock in place with the notches on the plastic piece.
• Holding the cords, drop the sock aid out in front of your operative side foot.
• Slip your foot into the sock and pull it on.
• Release the sock from the notches on the plastic piece, using your dressing stick or reacher.
To take the stocking or sock off, use the hook on the dressing stick or the reacher to hook the back of the sock down over your heel and push the sock off of your foot.
• You should get in and out of bed on the same side as you had surgery.
• A hospital bed may be needed at home. Your physical therapist, nurse, case manager or PCRM will talk with you about this if needed.
• Some people find it helpful to wear silky material pajamas to help them slide more easily on the sheets.
• You will need someone to carry your operative leg as you use your arms and your other leg to scoot yourself in and out of bed.
Getting in and out of bed
Unless you have a walk-in shower, you will have to learn a new method for getting in and out of the bathtub. Do not sit down into the tub for 6 to 12 weeks.
• Have someone help you the first time you bathe at home.
• You may sponge bathe at the sink until you are comfortable or have help to shower.
Bathing
• A raised toilet seat will keep you from bending too far when sitting or standing. The higher seat also makes it easier to stand up from the toilet.
• Clean yourself after toileting as you used to, being careful not to bend too far forward or twist too much at the hip.
Using the toilet

45
1. Place the shower bench firmly in the tub. Stand with your back toward the tub. Be sure you have someone with you to help you and hold the bench steady, if needed.
2. Slowly lower yourself onto the shower bench, sliding your operative leg forward as you sit. Reach back to hold onto the shower seat as you sit down.
3. Lean your trunk back as someone helps lift your operative leg over the edge of the tub. By leaning back, you will not bend your hip past 90 degrees.
4. Slide back and make sure you are in a safe sitting position. Have your helper lower your foot to the floor of the tub.
5. To get out of the tub, have someone lift your operative leg out and place your feet flat on the floor before you stand.
Using a shower bench
• If you have a walk-in shower, you may stand and shower as long as you feel steady and balanced.
• If you have a tub shower and need to sit to bathe, you will need a shower bench. Make sure the shower bench is placed firmly in the tub. Have someone adjust the height of the shower bench so it is as tall as it can be to allow you to rest your feet on the floor of the tub when you are sitting.
• Always be sure to turn on the cold water first to avoid burning yourself.
• Have a secure place to put your soap to avoid dropping it. Try soap on a rope or a deep soap dish.
• Use a long-handled sponge or bath brush to reach your lower legs and feet without bending more than 90 degrees at your hips.
• A portable shower hose may be helpful.

46
1. Place the shower bench in the tub in case you tire quickly and need to sit. Stand with your good leg next to the tub.
2. Place your cane or crutches into the tub first, or use grab bars if they are available.
3. Put your weight on the grab bar, cane, or crutch and step into the tub with your good leg. On you operative side, bend your knee back to step into the tub. Do not lift your knee up and over the tub because it will harm your hip.
4. Bring the cane or crutch into the tub. Be careful standing on the wet tub surface.
5. To get out, turn around and repeat the same procedure. Put the cane or crutch on the good side out first, and then the good leg. Then bring your operative leg out, and then the cane or crutch on the operative side.
Standing tub transfer
Getting into a carKnow how to safely get into the car. It is better to ride in a mid-size or large car with regular bench seats rather than bucket seats. Use a thick pillow or cushion on the seat.
• Make sure you stop about every 30 minutes to get out and walk around, or at least shift your weight from one leg to another.
• The best choice after a total hip replacement is to ride in the back seat.
Ì If your right hip was replaced, get in on the passenger’s side back seat.
Ì If your left hip was replaced, get in on the driver’s side back seat.
• To get into the back seat, first lower your bottom onto the cushion on the seat in a semi-reclining position. Have someone support your operative leg as you use your other leg to scoot yourself farther back across the seat. You may want to have a pillow to put behind your back to lean on. Rest your operative leg against the seat back.

47
• To get into the front seat, enter the car on the passenger side and make sure the seat is as far back as possible. Recline the seat back as much as you can, so you will be able to scoot back up the back of the seat.
• Stand with your back toward the car. Put your operative leg out ahead of you and reach your hands back to the door frame, dash, and seat. Do not hold the car door as it can move. Have someone move the walker aside and slowly sit.
• Have someone lift your operative leg into the car as you scoot up the back of the seat. You must scoot up the seat as your operative leg is lifted into the car to prevent bending your hip more than 90 degrees.
• When your operative leg is on the floor of the car, scoot back down to the seat and adjust the seat back up a small amount. Be sure to wear your seat belt.
• To get out of the car, recline the seat back. You will need to scoot back up the seat back while someone lifts your operative leg out of the car and onto the ground. Be sure to avoid bending your hip more than 90 degrees.
If you are using crutches, back up to the passenger seat. Put both crutches on your good leg side and reach back to hold the dash, car frame, or seat. Then slowly sit and have someone help you lift your operative leg as you scoot up the seat.

48
Other Important Information
Clinic hours• Office is open Monday through Friday
from 8:00 AM to 4:30 PM, except for University holidays.
• If you call after office hours, you can wait for the answering service to pick up if you have an immediate need.
• If you would like to speak to the resident on call, they can be paged to contact you.
Phone messages• We try to answer all phone messages
within 1 business day of your calling.
• During clinic hours, phone messages are not checked until the end of day, and those messages may not be answered until the next day.
• If you need to speak to someone right away, please call 614-293-2663.
Pain medicine policyPain management is important for your recovery. We want you to know about our policy related to prescription pain medicines.
• Your primary care doctor is responsible to manage your pain until surgery.
• If you have been on narcotic treatment for pain before surgery, your pain will likely be more difficult to control after surgery. Talk to the doctor who has been providing your narcotic medicine about reducing or eliminating your narcotic use before surgery.
• Patients treated by our Orthopedic doctors may only receive narcotic pain medicine from one provider.
• After surgery, you will be given a prescription for pain medicine, based on your surgery.
Short term disability or family medical leave (FMLA) paperwork• We will gladly complete FMLA or short
term disability forms to cover the period right after your surgery.
• As the patient, you are responsible to obtain the needed documents from your employer to provide to our office.
• Please allow 7 business days for our office to complete these forms. We also ask that you provide as much information as possible when you fax or drop off paperwork to the office.
Please provide the best phone to reach you, in case we have questions.
Long term disability or workers’ compensation casesIf you need long term disability forms, work capacity forms, or determination of permanent disability, we suggest you be seen by Occupational Medicine.
• Proper completion of the paperwork requires a special set of skills and knowledge of the disability guidelines.
• Incorrect completion of the forms could impact your case in a serious way.
If your case is covered by workers’ compensation, our surgeons will not serve as your “physician of record” past the first 90 days from your date of surgery.

49
Pain medicine refills• Pain management will be addressed
during your office or clinic visits.
• Be sure we have your correct pharmacy information. Only 1 pharmacy can be used for your pain medicine refills.
• Ohio law does not allow more than a 7-day supply of narcotic pain medicine.
• Should you need a refill between office visits, you will need to allow 48 hours for this to occur.
Ì Under no circumstances will your prescription be refilled on a walk in basis in clinic or during weekend hours.
Ì You must call during clinic hours only, and before noon on Fridays.
Ì We do not refill prescriptions at night, holidays or over the weekend.
• Prescriptions are most often sent electronically to the pharmacy. In some cases, you will need to either pick up the hand written prescription at the office or the prescription may be mailed to you.
Ì If your prescription is lost or stolen, a police report would be required to issue a new prescription.
Ì If a prescription gets mailed and gets lost in the mail, we will not issue a new prescription.
Risks of narcotic medicines• Our surgeons will manage your pain for no more than 6 weeks.
• If narcotic pain medicine is still needed after 3 months, you will be referred to the Pain Clinic.
• Nausea or upset stomach
• Constipation
• Sexual dysfunction
• Depression
• Fatigue
• Increased sensitivity to pain
• Addiction and drug tolerance

50
My Notes
We want you and your family to learn about your care. Write down your questions and concerns, so you do not forget to ask. It is often hard to remember or you may feel rushed, so it can help to write your questions down. If you do not understand something, please ask us to explain it in a different way.
_________________________________________________________________
_________________________________________________________________
_________________________________________________________________
_________________________________________________________________
_________________________________________________________________
_________________________________________________________________
_________________________________________________________________
_________________________________________________________________
_________________________________________________________________
_________________________________________________________________
_________________________________________________________________
_________________________________________________________________
_________________________________________________________________
_________________________________________________________________
_________________________________________________________________
_________________________________________________________________
_________________________________________________________________
_________________________________________________________________
_________________________________________________________________
_________________________________________________________________
_________________________________________________________________

51

© November 30, 2017, The Ohio State University Wexner Medical Center.