Embed Size (px)
Citation preview

plants. Refer to Table 1 (page 10) for a summary of specialized structures and the plant parts involved in their development.
UndergroUnd Stem modificationS
Bulbs
Bulbs consist of a growing point (stem or shoot tip) surrounded by layers of modified fleshy leaves designed to store food reserves. Both the growing point and the leaves are attached to a compact stem located at the base of the bulb called a basal plate. Thus, bulbs contain both stem and leaf tissue. See Fig. 1 (A and B) for a longitudinal section of a bulb.
introdUction
Most plants reproduce sexually from seeds, but some can be reproduced (or multiplied) by vegeta-tive parts such as stems, roots, and leaves. In addi-tion, some plants produce modified stems and/or roots, referred to here as specialized structures that accumulate food reserves and therefore have built-in regeneration potential and are valuable as vegetative propagules. Plants with specialized structures are well-suited for asexual propagation. For example, potato tubers are modified stems that store starch; such swollen underground structures—known as tu-bers—serve as a seed for raising commercial potato crops. Other plants produce specialized structures to survive under unfavorable conditions and resume growth when conditions become favorable for their survival.
Some plants have growth habits that facilitate vegetative propagation. Such structures usually originate from stems, roots, and sometimes leaves. For example, strawberry and spider plants produce horizontal stems known as runners. Run-ners can produce roots and develop new plantlets at particular nodes on the run-ner. Rooted runners can be detached from the mother plant and grown as indepen-dent plants.
Plants produce a variety of specialized structures useful in plant multiplication or reproduction. This publication offers some basic information and guidelines that can increase the success of your ex-perimentation with new ways of growing
a Pacific nortHWeSt eXtenSion PUBLicationWASHINGTON STATE UNIVERSITY • OREGON STATE UNIVERSITY • UNIVERSITY OF IDAHO
Propagation of Plants from Specialized Structures
PnW164
fig. 1. Longitudinal sections of hyacinth (a) and tulip bulbs (B). Bulbs are modified structures derived from a stem and leaves. the stem is compressed into a base plate carrying flowers or vegetative buds. fleshy leaves with carbohydrate reserves surround the buds in a concentric manner. When planted, adventitious roots grow from the basal plate. the buds develop into flowers on the new plant.
A BTerminal bud
Tunic
Fleshy leaves
Basal plate(condensed stem)
g.n.m. KUmar, W.e. gUSe, f.e. LarSen

There are two types of bulbs, known as either tuni-cate (Figs. 1 and 2A and B) or non-tunicate (scaly) bulbs (Fig. 2C), and either can be multiplied asexu-ally. Onions, composed of concentric layers of fleshy leaves, are tunicate bulbs because the outer layers of leaves dry and form a protective tunic (covering). Lilies are non-tunicate bulbs because their leaves are fleshier and overlap each other, giving a scaly appearance. Since non-tunicate bulbs do not have a protective tunic, they are easily damaged and susceptible to desiccation. For best results, store non-tunicate bulbs in polyethylene bags containing moist sawdust or sphagnum moss.
Many fall-planted bulbs will flower outdoors. Some bulbs lack winter hardiness and must be stored over winter for spring planting. Table 2 (page 11) pro-vides information about the hardiness of various types of bulbs.
Propagation of tunicate bulbsThe most common approach is to simply leave tu-nicate bulbs in the soil between occasional diggings and replantings. The resulting plants may form dense colonies, but many prefer this as a natural look. Alternatively, digging annually prevents over-
crowding and produces better quality and larger bulbs. Dig tunicate bulbs, such as snowdrop and narcissus, after the leaves die back. Earlier digging reduces bulb size and subsequent flower quality. If you choose to dig and store tunicate bulbs an-nually, avoid drying them in the sun, as this can cause scalding. Clean them well after drying by brushing off dried roots and soil. Store tunicate bulbs in trays with wire mesh bottoms to provide adequate ventilation. To prevent root development and mold growth while in storage, maintain a hu-midity that will keep the bulbs dry, but not so dry as to shrivel—usually around 75 percent. Unless otherwise specified, store tunicate bulbs at about 80°F (27°C) for the first two weeks after digging to cure them, and then lower the temperature to around 48°F (9°C) until you plant them. If stored at higher temperatures, the bulbs may not flower properly. An underground cellar usually provides a good storage temperature after curing.
• Offsets: The simplest way to produce more plants from tunicate bulbs is to use offsets. Offsets are small bulbs that develop naturally from parent bulbs. You can enhance tunicate
2
fig. 2. examples of modified plant structures derived from stems and produced underground. tunicate bulb of onion (a) and garlic (B), non-tunicate bulb of lily (c), tubers of potato (d) and Jerusalem arti-choke (e), corms of gladiolus (f), and rhizomes of ginger (g).
A B C
D
E
F G

fig. 3. Variously treated hyacinth bulbs for propagating (a–f). note the development of bulblets from cored (a) and scooped (b) bulbs.
bulb propagation by digging parent bulbs, separating, and planting. Small offsets will usu-ally produce only leaves the first year; do not expect flowers until the second year or later. In Fig. 2A, the smaller bulb developing to the left of the larger bulb is an offset. Some plants, such as hyacinths, do not readily form offsets and therefore require artificial stimulation in the form of scooping, scoring, coring, or sectioning to induce new bulblets.
• Scooping: Scooping involves removing the entire basal plate of a bulb, which includes the main shoot and flower bud at the center of the bulb to expose the bases of the leaf rings (Fig. 3B and C).
Keep the bulbs in a warm (about 70°F or 21°C), dark place for about two weeks to dry and form wound tissue on the cut surface. A common stor-age method during this time is inverting the bulbs in a shallow box with a wire mesh bottom. When the scales begin to swell (by the third week), in-crease the temperature from 70°F (21°C) to about 85°F (29°C) and hold the relative humidity at about 85 percent. Small bulblets will then form at the base of these fleshy leaves (Fig. 3a and b).
Scooped bulblets are ready for planting when new roots begin to develop. The first year, plant them still attached to the mother bulb in loose soil, with the tip of the mother bulb about 1 inch deep. The bulblets will produce only foliage the first year. Dig
and separate when the foliage is yellow and dry. Although scooping produces 25 to 50 bul-blets per mother bulb, these will be small and may require four or five years before flowering. • Scoring: To score a
bulb, make three V-shaped cuts through the basal plate so there are six pie-shaped sections (Fig. 3D). Make cuts deep enough to destroy the main growing shoot and reach just below the widest point of the bulb. Bury cut bulbs upside down in clean, dry sand about 2 inches below the surface. After the wounded tissue has healed, remove the bulbs from the sand and treat the same as scooped bulbs. Scoring produces about half as many bulbs as scooping, but they will be larger and should flower in three or four years.
• Coring: Coring removes the center portion of the basal plate and the main growing point of a bulb. Use a corer as shown in Fig. 3E or an apple corer for this purpose. Treat cored bulbs like scored bulbs. Cored bulbs produce still fewer bulblets than scored bulbs, but they will be larger and should flower in two or three years.
A B C
D E F Coring (E) Sectioning (F)
Scooping (B, C) Scoring (D)
Untreated bulb (A)
Basal plate
a
b
3

• Sectioning: If you cut bulbs into sections with a portion of the basal plate attached (Fig. 3F), bulblets will form from the basal plate of each cutting. These sections can be further divided by slipping a knife between each third or fourth pair of leaf-scale rings and cutting through the basal plate. Each bulb section should include a portion of the basal plate with segments of three or four leaf scales attached.
Propagation of non-tunicate bulbsDig scaly bulbs like lily six to eight weeks after flowering (except as mentioned previously) or after the first light frost. Replant scaly bulbs immediate-ly after digging. Drying of either the bulbs or roots will reduce the flower quality. • Scaling: Propagate scaly bulbs by removing their
outer scales and planting them one-half their length in a medium. Wait to dig these bulbs until after they flower. Plant the scales about an inch apart in rows 6 inches apart. New bulblets will form at the base of the scales (Fig. 4B) by fall, when they can be planted out. A replanted mother bulb will regenerate more scales in one or two years. If you cannot dig scaly bulbs until fall, store the scales in moist sand until spring, and then plant.
• Bulblets: Bulbs will also develop underground on the flower stalks of some lilies (Fig. 4A). Pull the stalk from the plant after flowering
and cover the basal portion with moist root-ing medium. Bulbs formed in this way can be separated and planted out to form new plants that should flower in one to two years.
Forcing bulbsBoth tunicate and non-tunicate bulbs can be planted in pots and “forced” to flower indoors. Plant bulbs for forcing in the fall so that their tips are about one-half inch below the soil (or growing media) surface. Thoroughly water after potting and store in a cool, dark place such as a cellar or base-ment with temperatures between 40°F (4°C) and 45°F (7°C). If this type of storage is not available, bury the pots about 18 inches deep outdoors and cover with soil or straw mulch. After a good set of roots forms in three to ten weeks (depending upon storage conditions and type of bulb), bring the bulbs into your house and place in a sunny loca-tion. Care for them as with any other house plant, and they should produce flowers in the fall. Refer to Brown and Wilkins (2009) for detailed methods.
Corms
Corms are often confused with bulbs, but the two differ substantially. Corms are the swollen bases of flowering stems; each corm is enclosed by a few thin leaves. Solid cores of enlarged stem tissue form beneath these leaves (Fig. 2F). Bulbs, on the other hand, are made up almost entirely of fleshy leaves.
If you want to propagate or replant from corms, dig then in the fall while the leaves are still some-what green or after a light frost. Dry rapidly either outdoors or indoors. Only after the corms and leaves have thoroughly dried should the corms be cleaned and the cormels (described below) sepa-rated. Store in perforated plastic or paper bags, below 60°F (15°C), with about 70 percent relative humid-ity. If corm diseases are a problem, reduce the tem-perature to less than 40°F (4°C). Plant hardy corms such as spring-flowering
4
fig. 4. Lily plants develop underground (mother) bulbs and bulblets, and aerial bul-bils suitable for propagation (a). detached scaly leaves also produce bulblets, which eventually produce new plants (B).
flowering stem
bulb scale
bulblets
undergroundstem bulblet
motherbulb
aerial bulbil
A B
crocus in the fall, and tender corms such as gladi-olus in the spring.
Plants which grow from corms produce a new corm at the base of each shoot every year. The old corm is used up producing the plant. More than one flowering shoot may grow from a large corm. As a result, two (usually more) corms of smaller size will form from the original corm.
Cormels
Small corms called cormels form at the base of new corms. Shallow planting of corms encourages their formation. Separated and planted cormels will flower in one to three years. Plant cormels only about 1 inch deep because of their small size.
Tubers
Tubers are stem tissue which has been modified to become an underground storage organ (Fig. 2D and E). A well-known example of a tuber is the potato (Fig. 2D). The “eyes” of a potato are actually vegetative buds (meristems). When planted, the potato tuber sprouts from the mer-istems and develops a new shoot system. Roots then form from these new stems.
Propagate tubers by cutting them into sec-tions, making sure that each section has a bud. Allow the cut surface to dry and slightly harden (wound heal) for several days prior to planting. Use fungicides as per the manu-facturer’s instructions. Wear gloves to protect yourself from the chemicals.
Rhizomes
A rhizome is a swollen modified stem that runs horizontally just under or partially under the ground (Fig. 2G). Rhizomes are the main axis of a plant and contain vegetative buds. Rhizomes can be used for propagation by cut-ting into sections that each have at least one bud. Plant the sections horizontally, the same way they were growing in the parent plant. Plants suitable for propagation by rhizomes include bearded iris, ginger, and canna.
Tuberous Stems
Some plants, such as the tuberous begonia and gloxinia, have enlarged stems between the regular stem and roots. This area of a plant is known as the hypocotyl region, which means
tuberous stems are modified hypocotyls (Fig. 5C). These enlarged stems grow annually, and can be propagated by cutting into sections with at least one bud. Dry each section for several days after cutting before planting. Use fungicides as per the manufacturer’s instructions. Wear gloves to protect yourself from the chemicals.
Suckers, Slips, and Crowns Plants such as bananas, pineapples, raspberries, and blackberries produce adventitious shoots known as suckers that originate from roots. Propagate suckers by digging, separating from the mother plant, and growing as individual plants. In addition to suckers, pineapple plants produce slips that originate on the fruit stem (Fig. 6). Slips are separated from the mother plant and used for
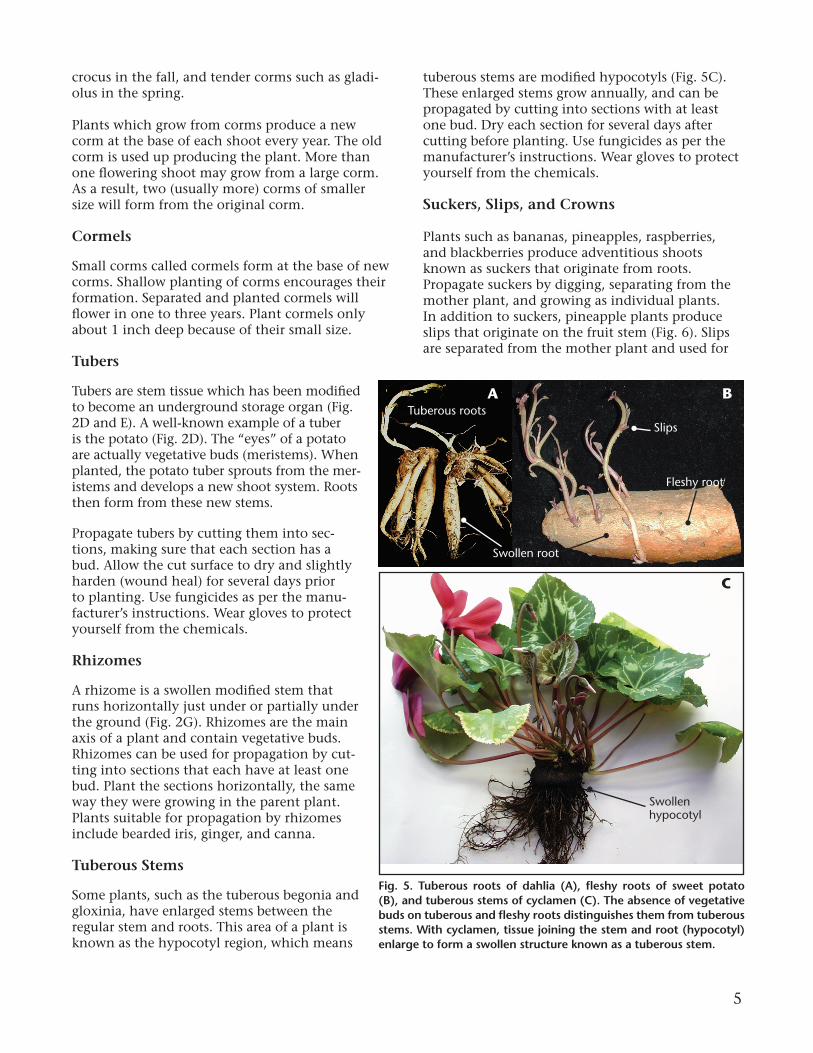
fig. 5. tuberous roots of dahlia (a), fleshy roots of sweet potato (B), and tuberous stems of cyclamen (c). the absence of vegetative buds on tuberous and fleshy roots distinguishes them from tuberous stems. With cyclamen, tissue joining the stem and root (hypocotyl) enlarge to form a swollen structure known as a tuberous stem.
C
Swollenhypocotyl
A B
Swollen root
Tuberous roots
Fleshy root
Slips
5

commercial propagation of pineapples. Crowns that develop on the top of pineapple fruit can also be used for propagation by simply detaching and planting in a moist growing medium.
UndergroUnd root modificationS
Tuberous Roots
Tuberous roots are sometimes confused with tubers. Tuberous roots, however, are actually root tissue and don’t have “eyes” or buds (meristems) on them as tubers do (Fig. 5A). When propagating with tuber-ous roots, include a section of the crown or stem with a bud (Fig. 5A) on it. Tuberous roots such as dahlia are usually divided so that each root has one bud from the crown of the plant with it. Divide the clumps before the buds begin to grow in Febru-
ary or March just before planting. Sweet potatoes are fleshy roots that produce adventitious shoots directly from their root tissue (Fig. 5B), and these shoots then form roots. Such young plants, often called slips, can then be separated and planted. Tu-berous and fleshy roots dug in the fall can be stored on shelves in a cellar where temperatures range from 40°F to 50°F (4°C–10°C). If the storage area is dry, pack the roots in dry peat or dry sand. When loss from drying is expected to be severe, dip the roots in molten paraffin wax floated on hot water to reduce desiccation.
SUB-aeriaL (SUrface) Stem modificationS
Runners, Stolons, and Offsets
Plants such as strawberries produce specialized stems that originate from a leaf axle and grow hori-zontally on the ground. Runners produce roots at certain nodal regions of horizontally-growing stems and form new plants. Runners are also considered stolons. When separated from the mother plant with intact roots, runners serve as units of propaga-tion. Spider plants produce runners with plantlets at their ends (Fig. 7B). To propagate spider plants, sever the plantlets (daughter plants) from the mother plant and plant in a rooting medium. These plant-lets contain pre-formed root initials and root easily when placed in contact with rooting media. Some plants such as mint produce specialized stems known as stolons that form an extensive mat on the ground (Fig. 7D). Such plants generally root at every node and can be separated from the parent plant for propagation. The term “offset” refers to plant structures that develop by the side of mother plants. In fact, slips on pineapple can be considered offsets or offshoots. Fig. 7E shows offset formation in Sansevieria, and Fig. 2A shows offset formation in onion bulb. Offsets are desirable for propagation of Sansevieria plants with yellow mar-gins to produce true-to-type plants.
aeriaL Stem modificationS
Aerial Bulbs (Bulbils)
Some lilies produce tiny aerial bulbs (Fig. 4A) calledbulbils at leaves joining the stem (leaf axils). Similarto bulblets, bulbils can be used to produce new plantsafter separating and planting. They take two or threeyears to reach flowering size. Remove flower budsfrom the plant to encourage aerial bulb formation.
fig. 6. Various parts of pineapple suitable for asexual propagation. in commercial cultivation, pineapple is propagated from slips that develop on the fruit stem. Pineapple can also be propagated from suckers that develop from the underground stem. Pineapple sold in grocery stores carry an intact crown that can be sepa-rated from the fruit and grown as an independent plant.
Sucker
Crown
Fruit
Slip
6

Psuedobulbs
Some orchids produce rhizomes and while others produce a type of modified stem called a pseudobulb (Fig. 8). The exact structure of these organs varies among different species of orchids.
The pseudobulb itself can sometimes be used for propagation. Either back bulbs (those with-out leaves) or green bulbs (those with leaves) can be used to propagate the species Cymbidium. Treating pseudobulbs with the rooting hormone IBA (indolebutyric acid, available as a formulation in talc or powder at most garden centers) helps in rooting. Place the pseudobulb in a rooting medium to about half its depth. When one new shoot forms, separate it with its roots from the pseudobulb, which should then produce additional shoots.
aeriaL Leaf modificationS
Foliar Embryos
Production of plantlets at the leaf margin is a common occurrence in plants such as Bryophyllum (Fig. 7A) and Kalanchoe pinnata. These plantlets are known as foliar embryos, which have pre-formed roots. To propagate such plants, either 1) place a whole leaf-bearing foliar embryo on a moist root-ing medium, wait for roots to develop, and then
fig. 8. Pseudobulbs of orchid. Pseudobulbs can be detached from a mother plant along with the leaves. to facilitate rooting, treat the basal end of the pseudobulb with rooting hormone prior to planting in a medium.
fig. 7. foliar embryos of bryophyllum and piggyback plant (a, c), runners of spider plant (B), stolons of mint (d), and offsets of sansevieria (e). foliar embryos either attached or detached from a leaf can be placed on a moist rooting me-dia and grown as individual plants. Similarly, runners of spider plant and stolons of mint can be separated from their mother plants and used as vegetative propagules. offsets are desirable for the propagation of sansevieria plants with yellow margins to reproduce true-to-type plants. Leaf-blade cutting, a commonly employed method for propagation of sansevieria, fails to reproduce the yellow-margin in the offspring.
CA B
ED
7

fig. 9. examples of inflorescence modifications into bulbils. agave with a large number of bulbils appearing like an inflorescence (a), bulbils in clusters (B), bulbils detached from the inflorescence (c), bulbils planted in a rooting media (d), and aerial bulbils of egyptian walking onion (e). When fully developed, onion bulbils bend toward the ground from their own weight, form roots, and grow into independent plants. detached bulbils can be used as vegetative propagules. Photographs of agave (A–D) are courtesy of Scott Bunnell, Socal Guerrilla Gardening, California (http://socalguerrillagardening.org).
transfer the resulting plantlets into containers, or 2) separate individual plantlets from the leaf and plant in containers.
In piggyback plant (Tolmiea menziesii) new plant-lets originating from the upper surface of the leaves can be excised from the mother plant as shown in the Fig. 7C. Place the excised leaf in a rooting media with its petiole buried. The plant-lets strike roots, resume growth and develop into a new plant.
aeriaL infLoreScence modificationS
Bulbils Plants such as agave produce vegetative buds (bulbils) in the inflorescence instead of flowers (Fig. 9A–D). These bulbils readily form roots and grow into independent plants when planted in soil or a rooting medium. Egyptian walking onions
(top/top-set onions) produce a cluster of aerial bulbs in place of inflorescence that are also known as bulbils (Fig. 9E). The stem carrying the aerial bulbils of Egyptian onion are eventually weighted toward the ground. Once the bulbils make contact with soil, they root and develop into a new plant. Egyptian walking onions can also be propagated by separating bulbils from the mother plant and growing in soil. Wild garlic plants are also known to produce bulbils.
concLUSion
Multiplication of plants using specialized struc-tures that are unique to certain plants can be accomplished with ease in most cases. Do not get discouraged if your attempts fail initially. Instead, experiment with other plants and/or method ad-justments. You can gather additional information to increase your success and enjoyment from the publications listed below.
8
A
B
C
D
E

fUrtHer reading
Brown, D.L. and H.F. Wilkins. 2009. Forcing bulbs for indoor beauty in winter. University of Min-nesota Extension, WW-01116.
http://www.extension.umn.edu/distribution/horticulture/dg1116.html
Hartmann, H.T., D.E. Kester, F. Davies, and R. Geneve. 2002. Plant Propagation: Principles and Practices (7th edition). New York: Prentice-Hall.
Toogood, A. 1999. Plant Propagation: The Fully Illustrated Plant-by-plant Manual of Practical Techniques. American Horticultural Society. New York: DK Publishing.
acKnoWLedgementS
Originally written in 1976 by W.E. Guse, Washing-ton State University Horticulture Teaching Assis-tant; and F.E. Larsen, WSU Horticulture Professor.Revised in 2010 by Mohan Kumar, WSU Horticul-ture and Landscape Architecture Associate Profes-sor. Reviewed in 2010 by Linda McMahan, Oregon State University Extension Community Horti-culturist; and Robert Tripepi, University of Idaho Physiology and Horticulture Professor.
Edited in 2010 by Dora Rollins, WSU Marketing, News, and Educational Communications.
9

10
table 1. Plant parts involved in the development of various modified structures with potential for vegetative propagation.
Location Specialized of growth Plant Structure Stem Hypocotyl root Leaf inflorescence example
Underground Bulb + + Onion Corm + Gladiolus Cormel + Gladiolus Offset + Onion Tuber + Potato Tuberous root + Dahlia Tuberous stem + Cyclamen Rhizome + Ginger Slip (offshoot) + Pineapple Sucker + Banana
Sub-aerial Offset + Sansevieria (surface) Runner + Spider plant Stolon + Mint
aerial Bulbil + + Agave, Lily Crown + Daylily Foliar embryo + Bryophyllum Pseudobulb + Orchid
associated Plant Part

11
tab
le 2
. ch
arac
teri
stic
s o
f co
mm
on
flo
wer
ing
pla
nts
pro
pag
ated
fro
m s
pec
ializ
ed s
truc
ture
s. n
umer
als
in s
had
ed a
reas
ref
er t
o a
pp
roxi
mat
e
pla
nti
ng
dep
th in
inch
es.
Shad
ed a
reas
ind
icat
e h
ard
ines
s, p
lan
tin
g, a
nd
flo
wer
ing
tim
e.
*Ten
der
bulb
s sh
ould
be
dug
and
stor
ed in
door
s du
ring
win
ter.
**Su
itabl
e as
gre
enho
use
or h
ouse
pla
nts
only
; ind
icat
ed p
lant
ing
dep
th r
efer
s to
con
tain
er p
lant
ing.
***A
ll bu
lbs
liste
d ar
e tu
nica
te e
xcep
t th
e A
maz
on li
ly a
nd li
ly.
Mod
ified
from
Har
tman
n, H
.T. a
nd D
.E. K
este
r. 19
75. P
lant
Pro
paga
tion:
Prin
cipl
es a
nd P
ract
ices
, 3rd
edi
tion.
m
od
ified
Par
t c
om
mo
n n
ame
Bo
tan
ical
nam
e H
ard
y Se
mi-
har
dy
ten
der
* Sp
rin
g
fall
Spri
ng
Su
mm
er
fall
B
ulb
***
Am
azon
lily
**
Euch
aris
gra
ndifl
ora
Be
llado
nna
lily
Amar
yllis
bel
lado
nna
4
D
affo
dil
Nar
ciss
us s
pp
.
8-
9
Glo
ry-o
f-th
e-sn
ow
Chi
onod
oxa
luci
liae
3-4
G
rap
e hy
acin
th
Mus
cari
com
osum
3-
4
Har
dy a
mar
yllis
Ly
coris
sp
p.
5
Hip
pea
stru
m**
H
ippe
astr
um s
pp
.
Hya
cint
h H
yacy
nthu
s sp
p.
6
Iris
(bu
lbou
s)
Iris
sp
p.
4-5
Li
ly
Liliu
m s
pp
.
6-
8
Oxa
lis (
bulb
ous)
**
Oxa
lis s
pp
.
Snow
drop
G
alan
thus
sp
p.
3-4
Su
mm
er h
yaci
nth
Gal
toni
a ca
ndic
ans
6-
7
Squi
ll
Scill
a sp
p.
3-4
Tu
bero
se
Poly
anth
a tu
bero
sa
3-
4
Tulip
Tu
lipa
spp
.
8-
9
co
rm
Aut
umn
croc
us
Col
chic
um a
utum
nale
3-
4
Cro
cus
Cro
cus
spp
.
3-
4
Free
sia
Free
sia
spp
.
3-4
G
ladi
olus
G
ladi
olus
sp
p.
4-
5
tub
er
Bego
nia
(aer
ial)
Be
goni
a ev
ansi
ana
C
alad
ium
C
alad
ium
sp
p.
1-
2
tub
ero
us r
oo
t &
ste
m
Blac
k ca
lla**
Ar
um p
alae
stin
um
1-
2
Blee
ding
hea
rt
Dic
entr
a sp
p.
C
ycla
men
**
Cyc
lam
en s
pp
.
1-2
D
ahlia
D
ahlia
sp
p.
6-
7
Elep
hant
's ea
r**
Col
ocas
ia s
pp
.
8-10
G
loxi
nia*
* Si
nnin
gia
spec
iosa
1
Jack
-in-t
he-p
ulp
it Ar
isae
ma
trip
hyllu
m
2
Ra
nunc
ulus
**
Ranu
ncul
us s
pp
.
2
Tu
bero
us b
egon
ia
Bego
nia
spp
.
1-2
W
ind
flow
er
Anem
one
nem
oros
a
1
r
hiz
om
e A
chim
enes
**
Achi
men
es s
pp
.
Bear
ded
iris
Iris
sp
p.
1-2
C
alla
lily
**
Zant
edes
chia
sp
p.
1-
2
Can
na
Can
na s
pp
.
4-6
Li
ly-o
f-th
e-va
lley
Con
valla
ria m
ajal
is
3-4
Plan
t n
ame
flo
wer
ing
Plan
tin
gH
ard
ines
s

©Washington State University 2010
Use pesticides with care. Apply them only to plants, animals, or sites as listed on the label. When mixing and applying pesticides, follow all label precautions to protect yourself and others around you. It is a violation of the law to disregard label directions. If pesticides are spilled on skin or clothing, remove clothing and wash skin thoroughly. Store pesticides in their original containers and keep them out of the reach of children, pets, and livestock.
The law requires that pesticides be used as the label directs. Uses against pests not named on the label and low application rates are permissible exceptions. If there is any apparent conflict between label directions and the pesticide uses suggested in this publication, consult your county Extension agent.
Pacific Northwest Extension publications are produced cooperatively by the three Pacific Northwest land-grant universities: Washington State University, Oregon State University, and the University of Idaho. Similar crops, climate, and topography create a natural geographic unit that crosses state lines. Since 1949, the PNW program has published more than 600 titles, preventing duplication of effort, broadening the availability of faculty specialists, and substantially reducing costs for the participating states.
Pacific Northwest Extension publications contain material written and produced for public distribution. You may reprint written material, provided you do not use it to endorse a commercial product. Please reference by title and credit Pacific Northwest Extension publications.
Issued by Washington State University Extension, Oregon State University Extension Service, the University of Idaho Co-operative Extension System, and the U.S. Department of Agriculture in furtherance of the Acts of May 8 and June 30, 1914. Extension programs, activities, materials, and policies comply with federal and state laws and regulations on nondiscrimina-tion regarding race, sex, religion, age, color, creed, or national or ethnic origin; physical, mental, or sensory disability; marital status or sexual orientation; and status as a Vietnam-era or disabled veteran. Washington State University Extension, The Oregon State University Extension Service, and University of Idaho Extension are Equal Opportunity Employers. Evidence of noncompliance may be reported through your local Extension office. Trade names have been used to simplify information; no endorsement is intended. Revised September 2010.
PNW164


