Embed Size (px)
Citation preview
Red Hat JBoss Enterprise ApplicationPlatform 7.3
How to Configure Server Security
For Use with Red Hat JBoss Enterprise Application Platform 7.3
Last Updated: 2020-03-18


Red Hat JBoss Enterprise Application Platform 7.3 How to ConfigureServer Security
For Use with Red Hat JBoss Enterprise Application Platform 7.3
Legal Notice
Copyright © 2020 Red Hat, Inc.
The text of and illustrations in this document are licensed by Red Hat under a Creative CommonsAttribution–Share Alike 3.0 Unported license ("CC-BY-SA"). An explanation of CC-BY-SA isavailable athttp://creativecommons.org/licenses/by-sa/3.0/. In accordance with CC-BY-SA, if you distribute this document or an adaptation of it, you mustprovide the URL for the original version.
Red Hat, as the licensor of this document, waives the right to enforce, and agrees not to assert,Section 4d of CC-BY-SA to the fullest extent permitted by applicable law.
Red Hat, Red Hat Enterprise Linux, the Shadowman logo, the Red Hat logo, JBoss, OpenShift,Fedora, the Infinity logo, and RHCE are trademarks of Red Hat, Inc., registered in the United Statesand other countries.
Linux ® is the registered trademark of Linus Torvalds in the United States and other countries.
Java ® is a registered trademark of Oracle and/or its affiliates.
XFS ® is a trademark of Silicon Graphics International Corp. or its subsidiaries in the United Statesand/or other countries.
MySQL ® is a registered trademark of MySQL AB in the United States, the European Union andother countries.
Node.js ® is an official trademark of Joyent. Red Hat is not formally related to or endorsed by theofficial Joyent Node.js open source or commercial project.
The OpenStack ® Word Mark and OpenStack logo are either registered trademarks/service marksor trademarks/service marks of the OpenStack Foundation, in the United States and othercountries and are used with the OpenStack Foundation's permission. We are not affiliated with,endorsed or sponsored by the OpenStack Foundation, or the OpenStack community.
All other trademarks are the property of their respective owners.
Abstract
The purpose of this document is to provide a practical guide to securing Red Hat JBoss EnterpriseApplication Platform (JBoss EAP). More specifically, this guide details how to secure all of themanagement interfaces on JBoss EAP. Before reading this guide, users should read through theSecurity Architecture document for Red Hat JBoss Enterprise Application Platform and have a solidunderstanding of how JBoss EAP handles security. This document also makes use of the JBoss EAPCLI interface for performing configuration changes. When completing this document, readersshould have a solid, working understanding of how to secure JBoss EAP.

. . . . . . . . . . . . . . . . . . . . . . . . . . . . . . . . . . . . . . . . . . . . . . . . . . . . . . . . . . . . . . . . . . . . . . . . . . . . . . . . . . . . . . . . . . . . . . . . . . . . . . . . . . . . . . . . . . . . . . . . . . . . . . . . . . . . . . . . . . . . . . . . . . . . . . . . . . . . . . . . . . . . . . . . . . . . . . . . . . . . . . . . . . . . . . . . . . . . . . . . . . . . . . . . . . . . . . . . . . . . . . . . . . . . . . . . . . . . . . . . . . . . . . . . . . . . . . . . . . . . . . . . . . . . . . . . . . . . . . . .
Table of Contents
CHAPTER 1. SECURING THE SERVER AND ITS INTERFACES1.1. BUILDING BLOCKS
1.1.1. Interfaces and Socket Bindings1.1.2. Elytron Subsystem
1.1.2.1. Enable Elytron Security Across the Server1.1.2.2. Create an Elytron Security Domain
Add a Security Domain Using the Management CLIAdd a Security Domain Using the Management Console
1.1.2.3. Create an Elytron Security RealmAdd a Security Realm Using the Management CLIAdd a Security Realm Using the Management Console
1.1.2.4. Create an Elytron Role DecoderAdd a Role Decoder Using the Management CLIAdd a Role Decoder Using the Management Console
1.1.2.5. Create an Elytron Role MapperAdding a Role Mapper Takes the General FormAdding a Role Mapper Using the Management Console
1.1.2.6. Create an Elytron Permission SetAdd a Permission Set Using the Management CLI
1.1.2.7. Create an Elytron Permission MapperAdd a Permission Mapper Using the Management CLIAdd a Permission Mapper Using the Management Console
1.1.2.8. Creating an Authentication ConfigurationAdd an Authentication Configuration Using the Management CLIAdd an Authentication Configuration Using the Management Console
1.1.2.9. Creating an Authentication ContextAdd an Authentication Context Using the Management CLIAdd an Authentication Context Using the Management Console
1.1.2.10. Create an Elytron Authentication FactoryAdd an Authentication Factory Using the Management CLIAdd an Authentication Factory Using the Management Console
1.1.2.11. Create an Elytron KeystoreAdd a Keystore Using the Management CLIAdd a Keystore Using the Management Console
1.1.2.12. Create an Elytron Key ManagerAdd a Key Manager Using the Management CLIAdd a Key Manager Using the Management Console
1.1.2.13. Create an Elytron Truststore1.1.2.14. Create an Elytron Trust Manager1.1.2.15. Using the Out of the Box Elytron Components
1.1.2.15.1. Securing Management Interfaces1.1.2.15.2. Securing Applications1.1.2.15.3. Using SSL/TLS1.1.2.15.4. Using Elytron with Other Subsystems
1.1.2.16. Enable and Disable the Elytron Subsystem1.1.3. Legacy Security Subsystem
1.1.3.1. Enable and Disable the Security Subsystem1.1.4. Legacy Security Realms1.1.5. Using Authentication and Socket Bindings for Securing the Management Interfaces
1.2. HOW TO SECURE THE MANAGEMENT INTERFACESElytron Integration with the Management CLI
88888999999
1010101010101010111111111111
1212121212121313131313141414141414151516171717181819
Table of Contents
1
1.2.1. Configure Networking and Ports1.2.2. Disabling the Management Console1.2.3. Disabling Remote Access to JMX
Removing the Remoting Connector1.2.4. Silent Authentication1.2.5. Enable One-way SSL/TLS for the Management Interfaces Using the Elytron Subsystem
Using a Security CommandUsing Elytron Subsystem CommandsUsing Management Console
1.2.6. Enable Two-way SSL/TLS for the Management Interfaces Using the Elytron Subsystem1.2.7. Enable SASL Authentication for the Management Interfaces Using the CLI Security Command
Reorder SASL MechanismsDisable SASL Authentication for the Management Interfaces
1.2.8. Enable HTTP Authentication for the Management Interfaces Using the CLI Security CommandDisable HTTP Authentication for the Management Interfaces
1.2.9. Configure the Management Interfaces for One-way SSL/TLS with Legacy Core ManagementAuthentication
Create a Keystore to Secure the Management InterfacesEnsure the Management Interfaces Bind to HTTPSOptional: Implement a Custom socket-binding-groupCreate a New Security RealmConfigure the Management Interfaces to Use the New Security RealmConfigure the Management Interfaces to Use the KeystoreUpdate the jboss-cli.xml File
1.2.10. Setting up Two-way SSL/TLS for the Management Interfaces with Legacy Core ManagementAuthentication
Prerequisites1.2.11. HTTPS Listener Reference
1.2.11.1. About Cipher Suites1.2.12. FIPS 140-2 Compliant Cryptography
1.2.12.1. Enable FIPS 140-2 Cryptography for SSL/TLS on Red Hat Enterprise Linux 7 and LaterConfiguring the NSS databaseConfigure the Management CLI for FIPS 140-2 Compliant Cryptography for SSL/TLSConfigure the Elytron and Undertow SubsystemsConfigure Undertow with the Legacy Core Management Authentication
1.2.12.2. Enable FIPS 140-2 Cryptography for SSL/TLS Using Bouncy CastlePrerequisitesConfigure the Management CLI for FIPS 140-2 Compliant Cryptography for SSL/TLS Using ElytronConfigure the Elytron and Undertow Subsystems
1.2.13. FIPS 140-2 Compliant Cryptography on IBM JDK1.2.13.1. Key Storage1.2.13.2. Management CLI Configuration1.2.13.3. Examine FIPS Provider Information
1.2.14. Starting a Managed Domain when the JVM is Running in FIPS ModePrerequisites
1.2.15. Secure the Management Console with Red Hat Single Sign-OnConfigure a Red Hat Single Sign-On Server for JBoss EAP ManagementInstall the Red Hat Single Sign-On Client Adapter on JBoss EAPConfigure JBoss EAP to Use Red Hat Single Sign-On
1.3. SECURITY AUDITING1.3.1. Elytron Audit Logging
File Audit LoggingPeriodic Rotating File Audit Logging
19191919
2021212123232727282828
2929293030323232
3334363637373841
4243454545464747474848485151525253545455
Red Hat JBoss Enterprise Application Platform 7.3 How to Configure Server Security
2

Size Rotating File Audit LoggingSyslog Audit Logging1.3.1.1. Custom Security Event Listeners for Elytron
1.3.2. Configure Security Auditing for the Legacy Security Domains1.4. CONFIGURE ONE-WAY AND TWO-WAY SSL/TLS FOR APPLICATIONS
1.4.1. Automatic Self-signed Certificate Creation for Applications1.4.2. Using Elytron
1.4.2.1. Enable One-way SSL/TLS for Applications Using the Elytron SubsystemUsing a Security CommandUsing Elytron Subsystem CommandsUsing Management Console
1.4.2.2. Enable Two-way SSL/TLS for Applications Using the Elytron Subsystem1.4.3. Configuring Certificate Revocation Using CRL in Elytron1.4.4. Configuring Certification Revocation Using OCSP in Elyton1.4.5. Using Legacy Security Realms
1.4.5.1. Enable One-way SSL/TLS for Applications Using Legacy Security Realms1.4.5.2. Enable Two-way SSL/TLS for Applications Using Legacy Security Realms
Update the Undertow Subsystem1.5. ENABLE HTTP AUTHENTICATION FOR APPLICATIONS USING THE CLI SECURITY COMMAND
Disable HTTP Authentication for the Management Interfaces1.6. SASL AUTHENTICATION MECHANISMS
1.6.1. Choosing SASL Authentication Mechanisms1.6.2. Configuring SASL Authentication Mechanisms on the Server Side1.6.3. Specifying SASL Authentication Mechanisms on the Client Side
sasl-mechanism-selector Grammar1.6.4. Configuring SASL Authentication Mechanism Properties
1.7. ELYTRON INTEGRATION WITH THE MODCLUSTER SUBSYSTEM1.7.1. Defining a Client SSL Context and Configuring ModCluster Subsystem
1.8. ELYTRON INTEGRATION WITH THE JGROUPS SUBSYSTEM1.9. ELYTRON INTEGRATION WITH THE REMOTING SUBSYSTEM
1.9.1. Elytron Integration with Remoting ConnectorsEnable One-way SSL/TLS for Remoting Connectors Using the Elytron SubsystemEnable Two-way SSL/TLS for Remoting Connectors Using the Elytron Subsystem
1.9.2. Elytron Integration with Remoting HTTP ConnectorsEnable One-Way SSL on the Remoting HTTP ConnectorEnable Two-way SSL/TLS on the Remoting HTTP Connectors
1.9.3. Elytron Integration with Remoting Outbound Connectors1.10. SECURING A MANAGED DOMAIN
1.10.1. Configure Password Authentication Between Slaves and the Domain Controller Using Elytron1.10.2. Configure Password Authentication Between Slaves and the Domain Controller Using Legacy CoreManagement Authentication1.10.3. Configuring SSL/TLS Between Domain and Host Controllers Using Elytron1.10.4. Configuring SSL/TLS Between Domain and Host Controllers Using Legacy Core ManagementAuthentication
1.11. ADDITIONAL ELYTRON COMPONENTS FOR SSL/TLS1.11.1. Using an ldap-key-store1.11.2. Using a filtering-key-store1.11.3. Reload a Keystore1.11.4. Reinitialize a Key Manager1.11.5. Reinitialize a Trust Manager
Reinitializing a Trust Manager from the management CLIReinitializing a Trust Manager from the management console
1.11.6. Keystore Alias
555657585858595960606263686969697070717272727373747576767777777878798081
838383
8486
899191
92939393939394
Table of Contents
3
. . . . . . . . . . . . . . . . . . . . . . . . . . . . . . . . . . . . . . . . . . . . . . . . . . . . . . . . . . . . . . . . . . . . . . . . . . . . . . . . . . . . . . . . . . . . . . . . . . . . . . . . . . . . . . . . . . . . . . . . . . . . . . . . . . . . . . . . . . . . . . . . . . . . . . . . . . . . . . . . . . . . . . . . . . . . . . . . . . . . . . . . . . . . . . . . . . . . . . . . . . . . . . . . . . . . . . . . . . . . . . . . . . . . . . . . . . . . . . . . . . . . . . . . . . . . . . . . . . . . . . . . . . . . . . . . . . . . . . . .
1.11.7. Using a client-ssl-context1.11.8. Using a server-ssl-context
Add a Server SSL Context Using the Management CLIAdd a Server SSL Context Using the Management Console
1.11.9. Using a server-ssl-sni-contextConfigure server-ssl-sni-context Using the Management Console
1.11.10. Custom SSL Components1.11.10.1. Add a Custom Component to Elytron1.11.10.2. Including Arguments in a Custom Elytron Component1.11.10.3. Using Custom Trust Managers with Elytron
Requirements for Implementing a Custom Trust ManagerExample ImplementationsAdding the Custom Trust Manager
1.11.11. Default SSLContext1.11.12. Using a Certificate Revocation List1.11.13. Using a Certificate Authority to Manage Signed Certificates
Configure a Let’s Encrypt AccountCreate an Account with the Certificate AuthorityUpdate an Account with the Certificate AuthorityChange the Account Key Associated with the Certificate AuthorityDeactivate the Account with the Certificate AuthorityGet the Metadata Associated with the Certificate AuthorityConfigure a Let’s Encrypt Account Using Management Console
1.11.14. Keystore Manipulation OperationsKeystore Manipulation Operations Using the Management CLIKeystore Manipulation Operations Using the Management Console1.11.14.1. Keystore Certificate Authority Operations
Keystore Certificate Authority Operations Using the Management CLIKeystore Certificate Authority Operations Using the Management Console
1.11.15. Configuring Evidence Decoder for X.509 Certificate with Subject Alternative Name Extension1.11.16. Configuring an Aggregate Evidence Decoder1.11.17. Configuring X.500 Subject Evidence Decoder1.11.18. Using Custom Evidence Decoder Implementation
CHAPTER 2. SECURING USERS OF THE SERVER AND ITS MANAGEMENT INTERFACES2.1. USER AUTHENTICATION WITH ELYTRON
2.1.1. Default Configuration2.1.1.1. Default Elytron HTTP Authentication Configuration2.1.1.2. Default Elytron Management CLI Authentication
2.1.2. Secure the Management Interfaces with a New Identity Store2.1.3. Adding Silent Authentication2.1.4. Mapping Identity for Authenticated Management Users2.1.5. Using Elytron Client with the Management CLI
2.2. IDENTITY PROPAGATION AND FORWARDING WITH ELYTRON2.2.1. Propagating Security Identities for Remote Calls
Configure the Server for Security PropagationReview the Example Application Code That Propagates a Security Identity
2.2.2. Utilizing Authorization Forwarding ModeConfigure the Authentication Client on the Forwarding ServerConfigure the Authorization Forwarding on the Receiving Server
2.2.3. Retrieving Security Identity Credentials2.2.4. Mechanisms That Support Security Identity Propagation
2.3. IDENTITY SWITCHING WITH ELYTRON
949495959596969798989999101101102102102102103103103103103104104105106106106107108108109
110110110111
112114115116118119119
120122124124125126127127
Red Hat JBoss Enterprise Application Platform 7.3 How to Configure Server Security
4
. . . . . . . . . . . . . . . . . . . . . . . . . . . . . . . . . . . . . . . . . . . . . . . . . . . . . . . . . . . . . . . . . . . . . . . . . . . . . . . . . . . . . . . . . . . . . . . . . . . . . . . . . . . . . . . . . . . . . . . . . . . . . . . . . . . . . . . . . . . . . . . . . . . . . . . . . . . . . . . . . . . . . . . . . . . . . . . . . . . . . . . . . . . . . . . . . . . . . . . . . . . . . . . . . . . . . . . . . . . . . . . . . . . . . . . . . . . . . . . . . . . . . . . . . . . . . . . . . . . . . . . . . . . . . . . . . . . . . . . .
2.3.1. Switching Identities in Server-to-server EJB Calls2.4. USER AUTHENTICATION WITH LEGACY CORE MANAGEMENT AUTHENTICATION
2.4.1. Default User Configuration2.4.2. Adding Authentication via LDAP2.4.3. Using JAAS for Securing the Management Interfaces
2.5. ROLE-BASED ACCESS CONTROL2.5.1. Enabling Role-Based Access Control
CLI to Enable RBACManagement CLI Command to Disable RBACXML Configuration to Enable or Disable RBAC
2.5.2. Changing the Permission Combination PolicySetting the Permission Combination Policy
2.5.3. Managing Roles2.5.3.1. Configure User Role Assignment Using the Management CLI
Viewing Role Assignment ConfigurationAdd a New RoleAdd a User as Included in a RoleAdd a User as Excluded in a RoleRemove User Role Include ConfigurationRemove User Role Exclude Configuration
2.5.4. Configure User Role Assignment with the Elytron Subsystem2.5.5. Roles and User Groups2.5.6. Configure Group Role Assignment Using the Management CLI
Viewing Group Role Assignment ConfigurationAdd a New RoleAdd a Group as Included in a RoleAdd a Group as Excluded in a RoleRemove Group Role Include ConfigurationRemove a User Group Exclude Entry
2.5.7. Using RBAC with LDAP2.5.8. Scoped Roles
2.5.8.1. Configuring Scoped Roles from the Management CLIAdd a New Scoped RoleViewing and Editing a Scoped Role MappingDelete a Scoped RoleAdding and Removing Users
2.5.8.2. Configuring Scoped Roles from the Management ConsoleAdd a New Scoped RoleEdit a Scoped RoleView Scoped Role MembersDelete a Scoped RoleAdding and Removing Users
2.5.9. Configuring Constraints2.5.9.1. Configure Sensitivity Constraints2.5.9.2. List Sensitivity Constraints2.5.9.3. Configure Application Resource Constraints2.5.9.4. List Application Resource Constraints2.5.9.5. Configure the Vault Expression Constraint
CHAPTER 3. SECURELY STORING CREDENTIALS3.1. CREDENTIAL STORE
3.1.1. Create a Credential StoreCreate a Credential Store for a Standalone Server
127128128129129130130130131131132132133133133134134135135135136136136136137137138138139139139140140141141141141141
142142142142143143144144145145
147147148148
Table of Contents
5
. . . . . . . . . . . . . . . . . . . . . . . . . . . . . . . . . . . . . . . . . . . . . . . . . . . . . . . . . . . . . . . . . . . . . . . . . . . . . . . . . . . . . . . . . . . . . . . . . . . . . . . . . . . . . . . . . . . . . . . . . . . . . . . . . . . . . . . . . . . . . . . . . . . . . . . . . . . . . . . . . . . . . . . . . . . . . . . . . . . . . . . . . . . . . . . . . . . . . . . . . . . . . . . . . . . . . . . . . . . . . . . . . . . . . . . . . . . . . . . . . . . . . . . . . . . . . . . . . . . . . . . . . . . . . . . . . . . . . . . .
. . . . . . . . . . . . . . . . . . . . . . . . . . . . . . . . . . . . . . . . . . . . . . . . . . . . . . . . . . . . . . . . . . . . . . . . . . . . . . . . . . . . . . . . . . . . . . . . . . . . . . . . . . . . . . . . . . . . . . . . . . . . . . . . . . . . . . . . . . . . . . . . . . . . . . . . . . . . . . . . . . . . . . . . . . . . . . . . . . . . . . . . . . . . . . . . . . . . . . . . . . . . . . . . . . . . . . . . . . . . . . . . . . . . . . . . . . . . . . . . . . . . . . . . . . . . . . . . . . . . . . . . . . . . . . . . . . . . . . . .
Create a Credential Store in a Managed Domain3.1.2. Add a Credential to the Credential Store
Editing Credential Store Aliases Using the Management Console3.1.3. Use a Stored Credential in a Configuration3.1.4. List the Credentials in the Credential Store3.1.5. Remove a Credential from the Credential Store3.1.6. Obtain the Master Password for the Credential Store from an External Source3.1.7. Define a FIPS 140-2 Compliant Credential Store
3.1.7.1. Define a FIPS 140-2 Compliant Credential Store Using an NSS Database3.1.7.2. Define a FIPS 140-2 Compliant Credential Store Using the BouncyCastle Providers
3.1.8. Use a Custom Implementation of the Credential Store3.1.9. Create and Modify Credential Stores Offline with the WildFly Elytron Tool
3.1.9.1. Generate Masked Encrypted Strings Using the WildFly Elytron Tool3.1.9.2. Convert a Password Vault to a Credential Store Using the WildFly Elytron Tool
3.1.10. Using Credential Stores with Elytron Client3.1.11. Using Credential Stores in a Managed Domain
3.2. PASSWORD VAULT3.2.1. Set Up a Password Vault3.2.2. Initialize the Password Vault3.2.3. Use a Password Vault3.2.4. Store a Sensitive String in the Password Vault3.2.5. Use an Encrypted Sensitive String in Configuration3.2.6. Use an Encrypted Sensitive String in an Application3.2.7. Check if a Sensitive String is in the Password Vault3.2.8. Remove a Sensitive String from the Password Vault
Remove a Sensitive String Interactively3.2.9. Configure Red Hat JBoss Enterprise Application Platform to Use a Custom Implementation of thePassword Vault3.2.10. Obtain Keystore Password From External Source
CHAPTER 4. JAVA SECURITY MANAGER4.1. ABOUT THE JAVA SECURITY MANAGER4.2. DEFINE A JAVA SECURITY POLICY
4.2.1. Defining Policies in the Security Manager Subsystem4.2.2. Defining Policies in the Deployment4.2.3. Defining Policies in Modules
4.3. RUN JBOSS EAP WITH THE JAVA SECURITY MANAGER4.4. CONSIDERATIONS MOVING FROM PREVIOUS VERSIONS
4.4.1. Defining Policies4.4.2. JBoss EAP Configuration Changes4.4.3. Custom Security Managers
APPENDIX A. REFERENCE MATERIALA.1. ELYTRON SUBSYSTEM COMPONENTS REFERENCEA.2. CONFIGURE YOUR ENVIRONMENT TO USE THE BOUNCYCASTLE PROVIDERA.3. SASL AUTHENTICATION MECHANISMS REFERENCE
A.3.1. Support Level for SASL Authentication MechanismsA.3.2. SASL Authentication Mechanism Properties
A.4. SECURITY AUTHORIZATION ARGUMENTSMechanism Specific Attributes
A.5. ELYTRON CLIENT SIDE ONE WAY EXAMPLEA.6. ELYTRON CLIENT SIDE TWO WAY EXAMPLE
148149149149150150151152152152153154156157159159160160161
164164167168169171172
173174
175175175175176176177178178178178
179179217218218
220222223224225
Red Hat JBoss Enterprise Application Platform 7.3 How to Configure Server Security
6

Table of Contents
7

CHAPTER 1. SECURING THE SERVER AND ITS INTERFACES
1.1. BUILDING BLOCKS
1.1.1. Interfaces and Socket Bindings
JBoss EAP utilizes its host’s interfaces, for example inet-address and nic, as well as ports forcommunication for both its web applications as well as its management interfaces. These interfaces andports are defined and configured through the interfaces and socket-binding-groups settings in theJBoss EAP.
For more information on how to define and configure interfaces and socket-binding-groups, see theSocket Bindings section of the JBoss EAP Configuration Guide.
Example: Interfaces
Example: Socket Binding Group
1.1.2. Elytron Subsystem
1.1.2.1. Enable Elytron Security Across the Server
There is a simple way to enable Elytron across the server. JBoss EAP 7.1 introduced an exampleconfiguration script that enables Elytron as the security provider. This script resides in theEAP_HOME/docs/examples directory in the server installation.
Execute the following command to enable Elytron security across the server.
<interfaces> <interface name="management"> <inet-address value="${jboss.bind.address.management:127.0.0.1}"/> </interface> <interface name="public"> <inet-address value="${jboss.bind.address:127.0.0.1}"/> </interface></interfaces>
<socket-binding-group name="standard-sockets" default-interface="public" port-offset="${jboss.socket.binding.port-offset:0}"> <socket-binding name="management-http" interface="management" port="${jboss.management.http.port:9990}"/> <socket-binding name="management-https" interface="management" port="${jboss.management.https.port:9993}"/> <socket-binding name="ajp" port="${jboss.ajp.port:8009}"/> <socket-binding name="http" port="${jboss.http.port:8080}"/> <socket-binding name="https" port="${jboss.https.port:8443}"/> <socket-binding name="txn-recovery-environment" port="4712"/> <socket-binding name="txn-status-manager" port="4713"/> <outbound-socket-binding name="mail-smtp"> <remote-destination host="localhost" port="25"/> </outbound-socket-binding></socket-binding-group>
Red Hat JBoss Enterprise Application Platform 7.3 How to Configure Server Security
8
$ EAP_HOME/bin/jboss-cli.sh --file=EAP_HOME/docs/examples/enable-elytron.cli
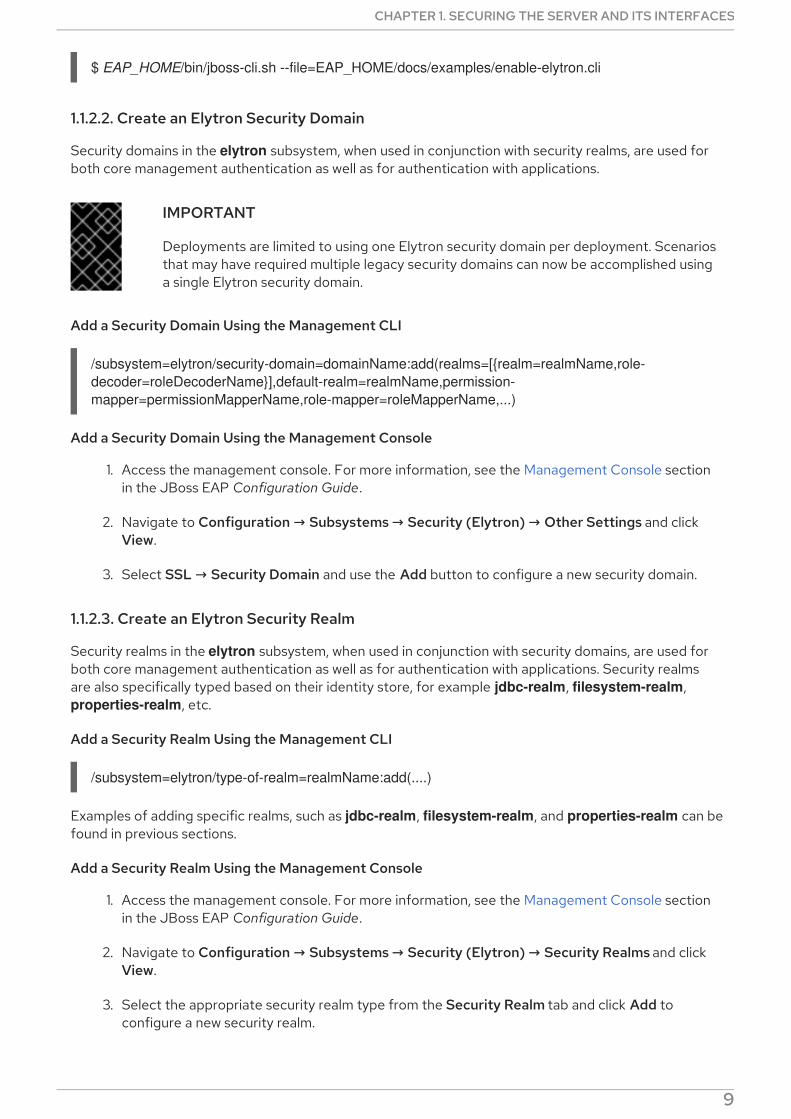
1.1.2.2. Create an Elytron Security Domain
Security domains in the elytron subsystem, when used in conjunction with security realms, are used forboth core management authentication as well as for authentication with applications.
IMPORTANT
Deployments are limited to using one Elytron security domain per deployment. Scenariosthat may have required multiple legacy security domains can now be accomplished usinga single Elytron security domain.
Add a Security Domain Using the Management CLI
/subsystem=elytron/security-domain=domainName:add(realms=[{realm=realmName,role-decoder=roleDecoderName}],default-realm=realmName,permission-mapper=permissionMapperName,role-mapper=roleMapperName,...)
Add a Security Domain Using the Management Console
1. Access the management console. For more information, see the Management Console sectionin the JBoss EAP Configuration Guide.
2. Navigate to Configuration → Subsystems → Security (Elytron) → Other Settings and clickView.
3. Select SSL → Security Domain and use the Add button to configure a new security domain.
1.1.2.3. Create an Elytron Security Realm
Security realms in the elytron subsystem, when used in conjunction with security domains, are used forboth core management authentication as well as for authentication with applications. Security realmsare also specifically typed based on their identity store, for example jdbc-realm, filesystem-realm, properties-realm, etc.
Add a Security Realm Using the Management CLI
/subsystem=elytron/type-of-realm=realmName:add(....)
Examples of adding specific realms, such as jdbc-realm, filesystem-realm, and properties-realm can befound in previous sections.
Add a Security Realm Using the Management Console
1. Access the management console. For more information, see the Management Console sectionin the JBoss EAP Configuration Guide.
2. Navigate to Configuration → Subsystems → Security (Elytron) → Security Realms and clickView.
3. Select the appropriate security realm type from the Security Realm tab and click Add toconfigure a new security realm.
CHAPTER 1. SECURING THE SERVER AND ITS INTERFACES
9

1.1.2.4. Create an Elytron Role Decoder
A role decoder converts attributes from the identity provided by the security realm into roles. Roledecoders are also specifically typed based on their functionality, for example empty-role-decoder, simple-role-decoder, and custom-role-decoder.
Add a Role Decoder Using the Management CLI
/subsystem=elytron/ROLE-DECODER-TYPE=roleDeoderName:add(....)
Add a Role Decoder Using the Management Console
1. Access the management console. For more information, see the Management Console sectionin the JBoss EAP Configuration Guide.
2. Navigate to Configuration → Subsystems → Security (Elytron) → Mappers / Decoders andclick View.
3. Click on Role Decoder, select the appropriate role decoder type and click Add to configure anew role decoder.
1.1.2.5. Create an Elytron Role Mapper
A role mapper maps roles after they have been decoded to other roles. Examples include normalizingrole names or adding and removing specific roles from principals after they have been decoded. Rolemappers are also specifically typed based on their functionality, for example add-prefix-role-mapper, add-suffix-role-mapper, and constant-role-mapper.
Adding a Role Mapper Takes the General Form
/subsystem=elytron/ROLE-MAPPER-TYPE=roleMapperName:add(...)
Adding a Role Mapper Using the Management Console
1. Access the management console. For more information, see the Management Console sectionin the JBoss EAP Configuration Guide.
2. Navigate to Configuration → Subsystems → Security (Elytron) → Mappers / Decoders andclick View.
3. Click on Role Mapper, select the appropriate role mapper type and click Add to configure a newrole mapper.
1.1.2.6. Create an Elytron Permission Set
Permission sets can be used to assign permissions to an identity.
Add a Permission Set Using the Management CLI
/subsystem=elytron/permission-set=PermissionSetName:add(permissions=[{class-name="...", module="...", target-name="...", action="..."}...])
The permissions parameter consists of a set of permissions, where each permission has the followingattributes:
class-name is the fully qualified class name of the permission. This is the only permission
Red Hat JBoss Enterprise Application Platform 7.3 How to Configure Server Security
10

class-name is the fully qualified class name of the permission. This is the only permissionattribute that is required.
module is an optional module used to load the permission.
target-name is an optional target name passed to the permission as it is constructed.
action is an optional action passed to the permission as it is constructed.
1.1.2.7. Create an Elytron Permission Mapper
In addition to roles being assigned to a identity, permissions may also be assigned. A permission mapperassigns permissions to an identity. Permission mappers are also specifically typed based on theirfunctionality, for example logical-permission-mapper, simple-permission-mapper, and custom-permission-mapper.
Add a Permission Mapper Using the Management CLI
/subsystem=elytron/simple-permission-mapper=PermissionMapperName:add(...)
Add a Permission Mapper Using the Management Console
1. Access the management console. For more information, see the Management Console sectionin the JBoss EAP Configuration Guide.
2. Navigate to Configuration → Subsystems → Security (Elytron) → Mappers / Decoders andclick View.
3. Click on Principal Decoder, select the appropriate principal decoder type and click Add toconfigure a new principal decoder.
1.1.2.8. Creating an Authentication Configuration
An authentication configuration contains the credentials to use when making a connection. For moreinformation on authentication configurations, see Configure Client Authentication with Elytron Client inHow to Configure Identity Management for JBoss EAP.
NOTE
Instead of a credential store, you can configure an Elytron security domain to use thecredentials of the accessing user. For instance, a security domain can be used inconjunction with Kerberos for authenticating incoming users. Follow the instructions inConfigure the Elytron Subsystem in How to Set Up SSO with Kerberos for JBoss EAP,and set obtain-kerberos-ticket=true in the Kerberos security factory.
Add an Authentication Configuration Using the Management CLI
/subsystem=elytron/authentication-configuration=AUTHENTICATION_CONFIGURATION_NAME:add(authentication-name=AUTHENTICATION_NAME, credential-reference={clear-text=PASSWORD})
Add an Authentication Configuration Using the Management Console
1. Access the management console. For more information, see the Management Console sectionin the JBoss EAP Configuration Guide.
2. Navigate to Configuration → Subsystems → Security (Elytron) → Other Settings and click
CHAPTER 1. SECURING THE SERVER AND ITS INTERFACES
11
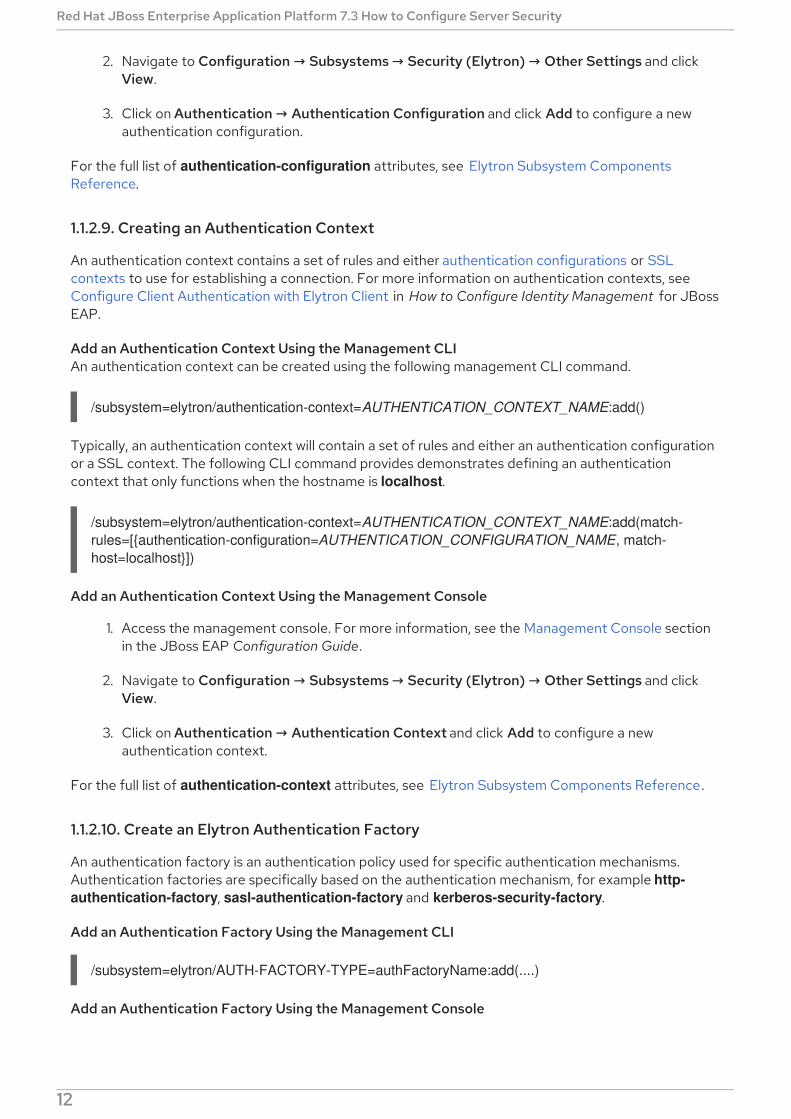
2. Navigate to Configuration → Subsystems → Security (Elytron) → Other Settings and clickView.
3. Click on Authentication → Authentication Configuration and click Add to configure a newauthentication configuration.
For the full list of authentication-configuration attributes, see Elytron Subsystem ComponentsReference.
1.1.2.9. Creating an Authentication Context
An authentication context contains a set of rules and either authentication configurations or SSLcontexts to use for establishing a connection. For more information on authentication contexts, seeConfigure Client Authentication with Elytron Client in How to Configure Identity Management for JBossEAP.
Add an Authentication Context Using the Management CLIAn authentication context can be created using the following management CLI command.
/subsystem=elytron/authentication-context=AUTHENTICATION_CONTEXT_NAME:add()
Typically, an authentication context will contain a set of rules and either an authentication configurationor a SSL context. The following CLI command provides demonstrates defining an authenticationcontext that only functions when the hostname is localhost.
/subsystem=elytron/authentication-context=AUTHENTICATION_CONTEXT_NAME:add(match-rules=[{authentication-configuration=AUTHENTICATION_CONFIGURATION_NAME, match-host=localhost}])
Add an Authentication Context Using the Management Console
1. Access the management console. For more information, see the Management Console sectionin the JBoss EAP Configuration Guide.
2. Navigate to Configuration → Subsystems → Security (Elytron) → Other Settings and clickView.
3. Click on Authentication → Authentication Context and click Add to configure a newauthentication context.
For the full list of authentication-context attributes, see Elytron Subsystem Components Reference.
1.1.2.10. Create an Elytron Authentication Factory
An authentication factory is an authentication policy used for specific authentication mechanisms.Authentication factories are specifically based on the authentication mechanism, for example http-authentication-factory, sasl-authentication-factory and kerberos-security-factory.
Add an Authentication Factory Using the Management CLI
/subsystem=elytron/AUTH-FACTORY-TYPE=authFactoryName:add(....)
Add an Authentication Factory Using the Management Console
1. Access the management console. For more information, see the Management Console section
Red Hat JBoss Enterprise Application Platform 7.3 How to Configure Server Security
12
1. Access the management console. For more information, see the Management Console sectionin the JBoss EAP Configuration Guide.
2. Navigate to Configuration → Subsystems → Security (Elytron) → Factories / Transformersand click View.
3. Click on HTTP Factories, SASL Factories, or Other Factories, choose the appropriate factorytype, and click Add to configure a new factory.
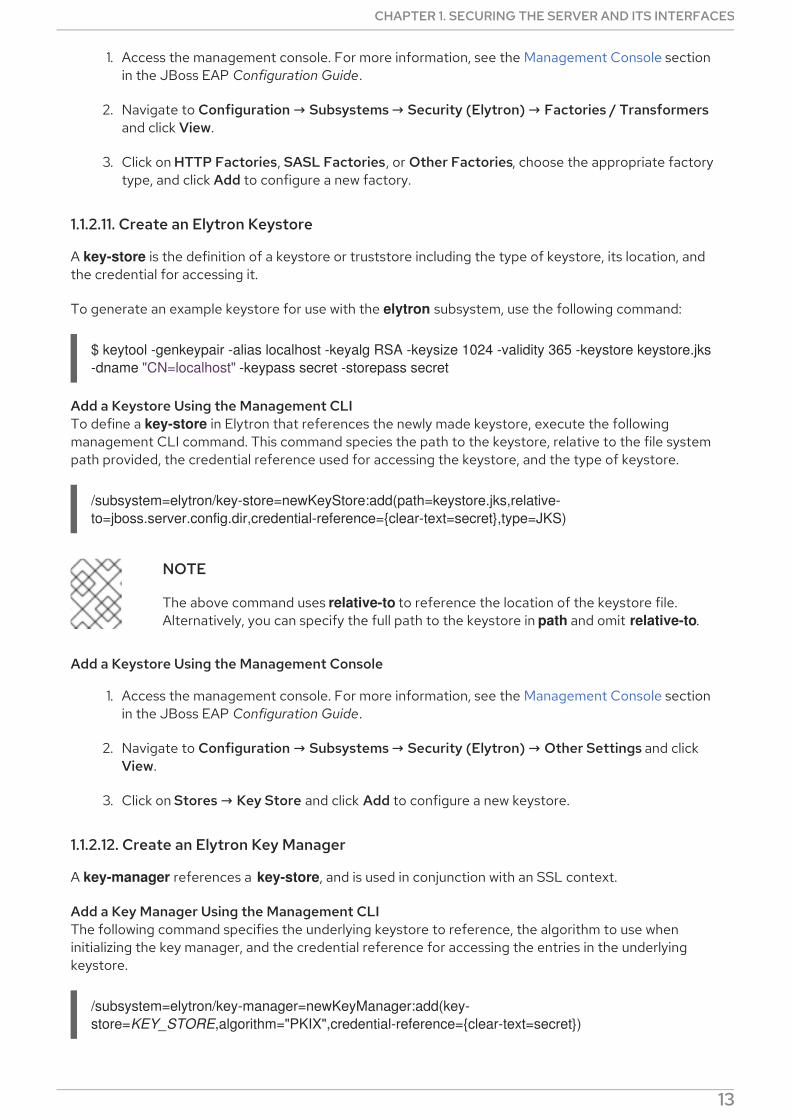
1.1.2.11. Create an Elytron Keystore
A key-store is the definition of a keystore or truststore including the type of keystore, its location, andthe credential for accessing it.
To generate an example keystore for use with the elytron subsystem, use the following command:
Add a Keystore Using the Management CLITo define a key-store in Elytron that references the newly made keystore, execute the followingmanagement CLI command. This command species the path to the keystore, relative to the file systempath provided, the credential reference used for accessing the keystore, and the type of keystore.
/subsystem=elytron/key-store=newKeyStore:add(path=keystore.jks,relative-to=jboss.server.config.dir,credential-reference={clear-text=secret},type=JKS)
NOTE
The above command uses relative-to to reference the location of the keystore file.Alternatively, you can specify the full path to the keystore in path and omit relative-to.
Add a Keystore Using the Management Console
1. Access the management console. For more information, see the Management Console sectionin the JBoss EAP Configuration Guide.
2. Navigate to Configuration → Subsystems → Security (Elytron) → Other Settings and clickView.
3. Click on Stores → Key Store and click Add to configure a new keystore.
1.1.2.12. Create an Elytron Key Manager
A key-manager references a key-store, and is used in conjunction with an SSL context.
Add a Key Manager Using the Management CLIThe following command specifies the underlying keystore to reference, the algorithm to use wheninitializing the key manager, and the credential reference for accessing the entries in the underlyingkeystore.
/subsystem=elytron/key-manager=newKeyManager:add(key-store=KEY_STORE,algorithm="PKIX",credential-reference={clear-text=secret})
IMPORTANT
$ keytool -genkeypair -alias localhost -keyalg RSA -keysize 1024 -validity 365 -keystore keystore.jks -dname "CN=localhost" -keypass secret -storepass secret
CHAPTER 1. SECURING THE SERVER AND ITS INTERFACES
13

IMPORTANT
If an algorithm is not specified, then it will be set to the default KeyManagerFactoryalgorithm name.
The available key manager algorithms are provided by the JDK in use. For example, a JDKthat uses SunJSSE provides the PKIX and SunX509 algorithms.
Add a Key Manager Using the Management Console
1. Access the management console. For more information, see the Management Console sectionin the JBoss EAP Configuration Guide.
2. Navigate to Configuration → Subsystems → Security (Elytron) → Other Settings and clickView.
3. Click on SSL → Key Manager and click Add to configure a new key manager.
1.1.2.13. Create an Elytron Truststore
To create a truststore in Elytron execute the following CLI command.
/subsystem=elytron/key-store=default-trust-store:add(type=JKS, relative-to=jboss.server.config.dir, path=application.truststore, credential-reference={clear-text=password})
In order to successfully execute the command above you must have an application.truststore file insideyour EAP_HOME/standalone/configuration directory. The truststore must contain the certificatesassociated with the endpoint or a certificate chain in case the end point’s certificate is signed by a CA.
Red Hat recommends you to avoid using self-signed certificates. Ideally, certificates should be signed bya CA and your truststore should contain a certificate chain representing your ROOT and intermediaryCAs.
1.1.2.14. Create an Elytron Trust Manager
To define a trust manager in Elytron execute the following CLI command.
/subsystem=elytron/trust-manager=default-trust-manager:add(key-store=TRUST-STORE-NAME)
This sets the defined truststore as the source of the certificates that the application server trusts.
1.1.2.15. Using the Out of the Box Elytron Components
JBoss EAP provides a default set of Elytron components configured in the elytron subsystem. You canfind more details on these pre-configured components in the Out of the Box section of the SecurityArchitecture guide.
1.1.2.15.1. Securing Management Interfaces
You can find more details on the enabling JBoss EAP to use the out of the box Elytron components forsecuring the management interfaces in the User Authentication with Elytron section.
1.1.2.15.2. Securing Applications
The elytron subsystem provides application-http-authentication for http-authentication-factory by
Red Hat JBoss Enterprise Application Platform 7.3 How to Configure Server Security
14
The elytron subsystem provides application-http-authentication for http-authentication-factory bydefault, which can be used to secure applications. For more information on how to configure application-http-authentication, see the Out of the Box section of the Security Architecture guide.
To configure applications to use application-http-authentication, see Configure Web Applications toUse Elytron or Legacy Security for Authentication in How to Configure Identity Management Guide . Youcan also override the default behavior of all applications using the steps in the Override an Application’sAuthentication Configuration section of the JBoss EAP How to Configure Identity Management Guide .
1.1.2.15.3. Using SSL/TLS
JBoss EAP does provide a default one-way SSL/TLS configuration using the legacy core managementauthentication, but it does not provide one in the elytron subsystem. You can find more details onconfiguring SSL/TLS using the elytron subsystem for both the management interfaces as well as forapplications in the following sections:
Enable One-way SSL/TLS for the Management Interfaces Using the Elytron Subsystem
Enable Two-Way SSL/TLS for the Management Interfaces using the Elytron Subsystem
Enable One-way SSL/TLS for Applications using the Elytron Subsystem
Enable Two-Way SSL/TLS for Applications using the Elytron Subsystem
1.1.2.15.4. Using Elytron with Other Subsystems
In addition to securing applications and management interfaces, Elytron also integrates with othersubsystems in JBoss EAP.
batch-jberet
You can configure the batch-jberet subsystem to run batch jobs using an Elytron security domain.For more information, see Configure Security for Batch Jobs in the Configuration Guide.
datasources
You can use a credential store or an Elytron security domain to provide authentication information ina datasource definition. For more information, see Datasource Security in the Configuration Guide.
ejb3
You can create mappings for Elytron security domains in the ejb3 subsystem to be referenced bydeployments. For more information, see Elytron Integration with the EJB Subsystem in DevelopingEJB Applications.
iiop-openjdk
You can use the elytron subsystem to configure SSL/TLS between clients and servers using the iiop-openjdk subsystem. For more information, see Configure IIOP to use SSL/TLS with the ElytronSubsystem in the Configuration Guide.
jca
You can use the elytron-enabled attribute to enable Elytron security for a work manager. For moreinformation, see Configuring the JCA Subsystem in the Configuration Guide.
jgroups
You can configure the SYM_ENCRYPT and ASYM_ENCRYPT protocols to reference keystores orcredential references defined in the elytron subsystem. For more information, see Securing a Clusterin the Configuration Guide.
You can use a credential store to provide authentication information in a server definition in the mail
CHAPTER 1. SECURING THE SERVER AND ITS INTERFACES
15

You can use a credential store to provide authentication information in a server definition in the mailsubsystem. For more information, see Use a Credential Store for Passwords in the ConfigurationGuide.
messaging-activemq
You can secure remote connections to the remote connections used by the messaging-activemqsubsystem. For more information, see the Using the Elytron Subsystem section of ConfiguringMessaging.
modcluster
You can use an Elytron client ssl-context to communicate with a load balancer using SSL/TLS. Formore information, see Elytron Integration with the ModCluster Subsystem.
remoting
You can configure inbound and outbound connections in the remoting subsystem to referenceauthentication contexts, SASL authentication factories, and SSL contexts defined in the elytronsubsystem. For full details on configuring each type of connection, see Elytron Integration with theRemoting Subsystem.
resource-adapters
You can secure connections to the resource adapter using Elytron. You can enable security inflow toestablish security credentials when submitting work to be executed by the work manager. For moreinformation, see Configure Resource Adapters to Use the Elytron Subsystem in the ConfigurationGuide.
undertow
You can use the elytron subsystem to configure both SSL/TLS and application authentication. Formore information on configuring application authentication, see Using SSL/TLS and Configure WebApplications to Use Elytron or Legacy Security for Authentication in How to Configure IdentityManagement.
1.1.2.16. Enable and Disable the Elytron Subsystem
The elytron subsystem comes pre-configured with the default JBoss EAP profiles alongside the legacy security subsystem.
If you are using a profile where the elytron subsystem has not been configured, you can add it by addingthe elytron extension and enabling the elytron subsystem.
To add the elytron extension required for the elytron subsystem:
/extension=org.wildfly.extension.elytron:add()
To enable the elytron subsystem in JBoss EAP:
/subsystem=elytron:add
reload
To disable the elytron subsystem in JBoss EAP:
/subsystem=elytron:remove
reload
IMPORTANT
Red Hat JBoss Enterprise Application Platform 7.3 How to Configure Server Security
16
IMPORTANT
Other subsystems within JBoss EAP may have dependencies on the elytron subsystem. Ifthese dependencies are not resolved before disabling it, you will see errors when startingJBoss EAP.
1.1.3. Legacy Security Subsystem
1.1.3.1. Enable and Disable the Security Subsystem
To disable the security subsystem in JBoss EAP:
/subsystem=security:remove
IMPORTANT
Other subsystems within JBoss EAP may have dependencies on the security subsystem.If these dependencies are not resolved before disabling it, you will see errors whenstarting JBoss EAP.
To enable the security subsystem in JBoss EAP:
/subsystem=security:add
1.1.4. Legacy Security Realms
JBoss EAP uses security realms to define authentication and authorization mechanisms, such as local,LDAP, properties, which can then be used by the management interfaces. For more backgroundinformation on security realms, see the Security Realms section of the Red Hat JBoss EnterpriseApplication Platform Security Architecture guide.
Example: Security Realms
<security-realms> <security-realm name="ManagementRealm"> <authentication> <local default-user="$local" skip-group-loading="true"/> <properties path="mgmt-users.properties" relative-to="jboss.server.config.dir"/> </authentication> <authorization map-groups-to-roles="false"> <properties path="mgmt-groups.properties" relative-to="jboss.server.config.dir"/> </authorization> </security-realm> <security-realm name="ApplicationRealm"> <authentication> <local default-user="$local" allowed-users="*" skip-group-loading="true"/> <properties path="application-users.properties" relative-to="jboss.server.config.dir"/> </authentication> <authorization> <properties path="application-roles.properties" relative-to="jboss.server.config.dir"/> </authorization> </security-realm></security-realms>
CHAPTER 1. SECURING THE SERVER AND ITS INTERFACES
17

NOTE
In addition to updating the existing security realms, JBoss EAP also allows you to createnew security realms. You can create new security realms via the management console aswell as invoking the following command from the management CLI:
/core-service=management/security-realm=NEW-REALM-NAME:add()
If you create a new security realm and want to use a properties file for authentication orauthorization, you must create a new properties file specifically for the new securitydomain. JBoss EAP does not reuse existing files used by other security domains nor doesit automatically create new files specified in the configuration if they do not exist.
1.1.5. Using Authentication and Socket Bindings for Securing the ManagementInterfaces
By default, JBoss EAP defines an http-interface to connect to the management interfaces:
[standalone@localhost:9990 /] /core-service=management:read-resource(recursive=true){ "outcome" => "success", "result" => { "access" => {...}, "ldap-connection" => undefined, "management-interface" => {"http-interface" => { "allowed-origins" => undefined, "console-enabled" => true, "http-authentication-factory" => "management-http-authentication", "http-upgrade" => { "enabled" => true, "sasl-authentication-factory" => "management-sasl-authentication" }, "http-upgrade-enabled" => true, "sasl-protocol" => "remote", "secure-socket-binding" => undefined, "security-realm" => undefined, "server-name" => undefined, "socket-binding" => "management-http", "ssl-context" => undefined }}, "security-realm" => {...}, "service" => undefined }}
You can use a combination socket-binding, http-authentication-factory and http-upgrade to securethe management interfaces using the elytron subsystem. Alternatively, you can use socket-bindingwith security-realm to secure the management interfaces with the legacy core managementauthentication. You can also disable the management interfaces, and configure users of the interfacesto have various roles and access rights.
1.2. HOW TO SECURE THE MANAGEMENT INTERFACES
Red Hat JBoss Enterprise Application Platform 7.3 How to Configure Server Security
18

The following sections show how to perform various operations related to securing the JBoss EAPmanagement interfaces and related subsystems.
NOTE
The management CLI commands shown assume that you are running a JBoss EAPstandalone server. For more details on using the management CLI for a JBoss EAPmanaged domain, see the JBoss EAP Management CLI Guide .
Elytron Integration with the Management CLIThe management interfaces can be secured using resources from the elytron subsystem in the sameway as it is done by the legacy security realms.
The SSL configuration for connections comes from one of these locations:
Any SSL configuration within the CLI specific configuration.
The default SSL configuration that automatically prompts users to accept the server’scertificate.
The java system property.
Client configuration can be modified using the wildfly-config.xml file.
NOTE
If you set the -Dwildfly.config.url property, any file can be used by the client forconfiguration.
1.2.1. Configure Networking and Ports
Depending on the configuration of the host, JBoss EAP may be configured to use various networkinterfaces and ports. This allows JBoss EAP to work with different host, networking, and firewallrequirements.
For more information on the networking and ports used by JBoss EAP, as well as how to configure thesesettings, see the Network and Port Configuration section of the JBoss EAP Configuration Guide.
1.2.2. Disabling the Management Console
Other clients, such as JBoss Operations Network, operate using the HTTP interface for managing JBossEAP. In order to continue using these services, just the web-based management console itself may bedisabled. This is accomplished by setting the console-enabled attribute to false:
/core-service=management/management-interface=http-interface/:write-attribute(name=console-enabled,value=false)
1.2.3. Disabling Remote Access to JMX
Remote access to the jmx subsystem allows for JDK and application management operations to betriggered remotely. To disable remote access to JMX in JBoss EAP, remove the remoting connector inthe jmx subsystem:
Removing the Remoting Connector
CHAPTER 1. SECURING THE SERVER AND ITS INTERFACES
19
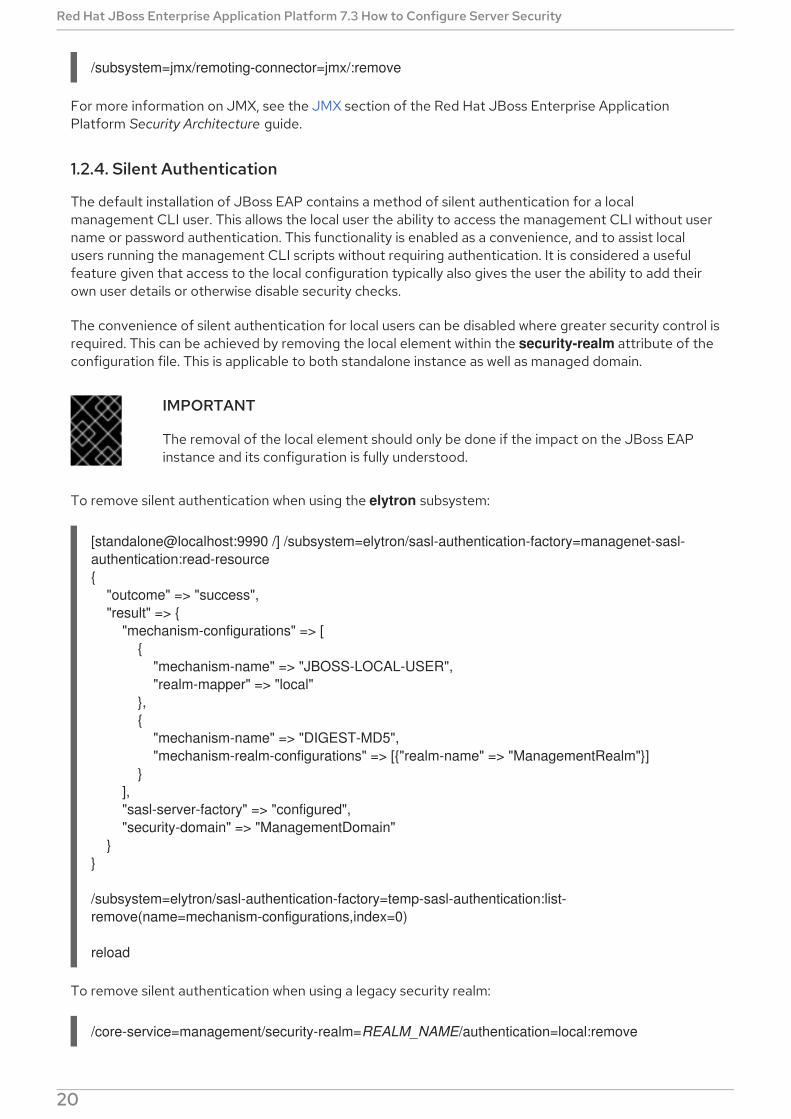
/subsystem=jmx/remoting-connector=jmx/:remove
For more information on JMX, see the JMX section of the Red Hat JBoss Enterprise ApplicationPlatform Security Architecture guide.
1.2.4. Silent Authentication
The default installation of JBoss EAP contains a method of silent authentication for a localmanagement CLI user. This allows the local user the ability to access the management CLI without username or password authentication. This functionality is enabled as a convenience, and to assist localusers running the management CLI scripts without requiring authentication. It is considered a usefulfeature given that access to the local configuration typically also gives the user the ability to add theirown user details or otherwise disable security checks.
The convenience of silent authentication for local users can be disabled where greater security control isrequired. This can be achieved by removing the local element within the security-realm attribute of theconfiguration file. This is applicable to both standalone instance as well as managed domain.
IMPORTANT
The removal of the local element should only be done if the impact on the JBoss EAPinstance and its configuration is fully understood.
To remove silent authentication when using the elytron subsystem:
[standalone@localhost:9990 /] /subsystem=elytron/sasl-authentication-factory=managenet-sasl-authentication:read-resource{ "outcome" => "success", "result" => { "mechanism-configurations" => [ { "mechanism-name" => "JBOSS-LOCAL-USER", "realm-mapper" => "local" }, { "mechanism-name" => "DIGEST-MD5", "mechanism-realm-configurations" => [{"realm-name" => "ManagementRealm"}] } ], "sasl-server-factory" => "configured", "security-domain" => "ManagementDomain" }}
/subsystem=elytron/sasl-authentication-factory=temp-sasl-authentication:list-remove(name=mechanism-configurations,index=0)
reload
To remove silent authentication when using a legacy security realm:
/core-service=management/security-realm=REALM_NAME/authentication=local:remove
Red Hat JBoss Enterprise Application Platform 7.3 How to Configure Server Security
20
1.2.5. Enable One-way SSL/TLS for the Management Interfaces Using the ElytronSubsystem
In JBoss EAP, you can enable one-way SSL/TLS for the management interfaces using the JBoss EAPmanagement CLI or the management console.
In the management CLI, one-way SSL/TLS can be enabled in two ways:
Using security command.
Using elytron subsystem commands.
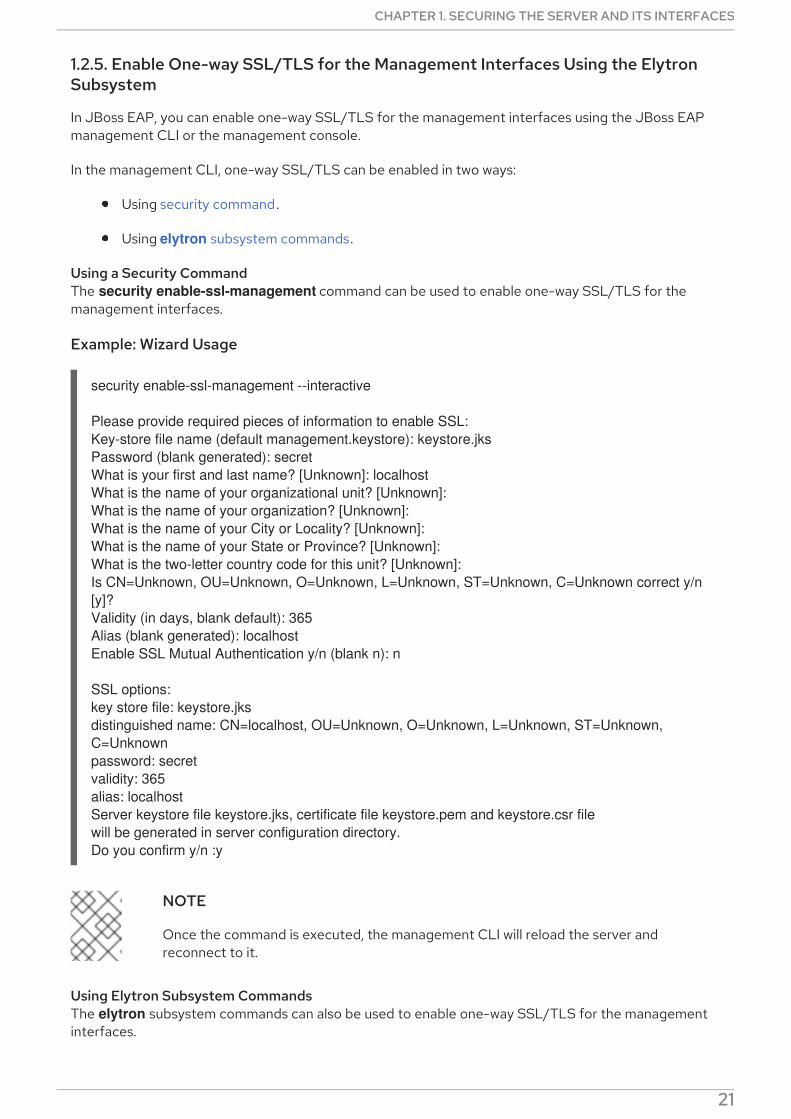
Using a Security CommandThe security enable-ssl-management command can be used to enable one-way SSL/TLS for themanagement interfaces.
Example: Wizard Usage
security enable-ssl-management --interactive
Please provide required pieces of information to enable SSL:Key-store file name (default management.keystore): keystore.jksPassword (blank generated): secretWhat is your first and last name? [Unknown]: localhostWhat is the name of your organizational unit? [Unknown]:What is the name of your organization? [Unknown]:What is the name of your City or Locality? [Unknown]:What is the name of your State or Province? [Unknown]:What is the two-letter country code for this unit? [Unknown]:Is CN=Unknown, OU=Unknown, O=Unknown, L=Unknown, ST=Unknown, C=Unknown correct y/n [y]?Validity (in days, blank default): 365Alias (blank generated): localhostEnable SSL Mutual Authentication y/n (blank n): n
SSL options:key store file: keystore.jksdistinguished name: CN=localhost, OU=Unknown, O=Unknown, L=Unknown, ST=Unknown, C=Unknownpassword: secretvalidity: 365alias: localhostServer keystore file keystore.jks, certificate file keystore.pem and keystore.csr filewill be generated in server configuration directory.Do you confirm y/n :y
NOTE
Once the command is executed, the management CLI will reload the server andreconnect to it.
Using Elytron Subsystem CommandsThe elytron subsystem commands can also be used to enable one-way SSL/TLS for the managementinterfaces.
CHAPTER 1. SECURING THE SERVER AND ITS INTERFACES
21
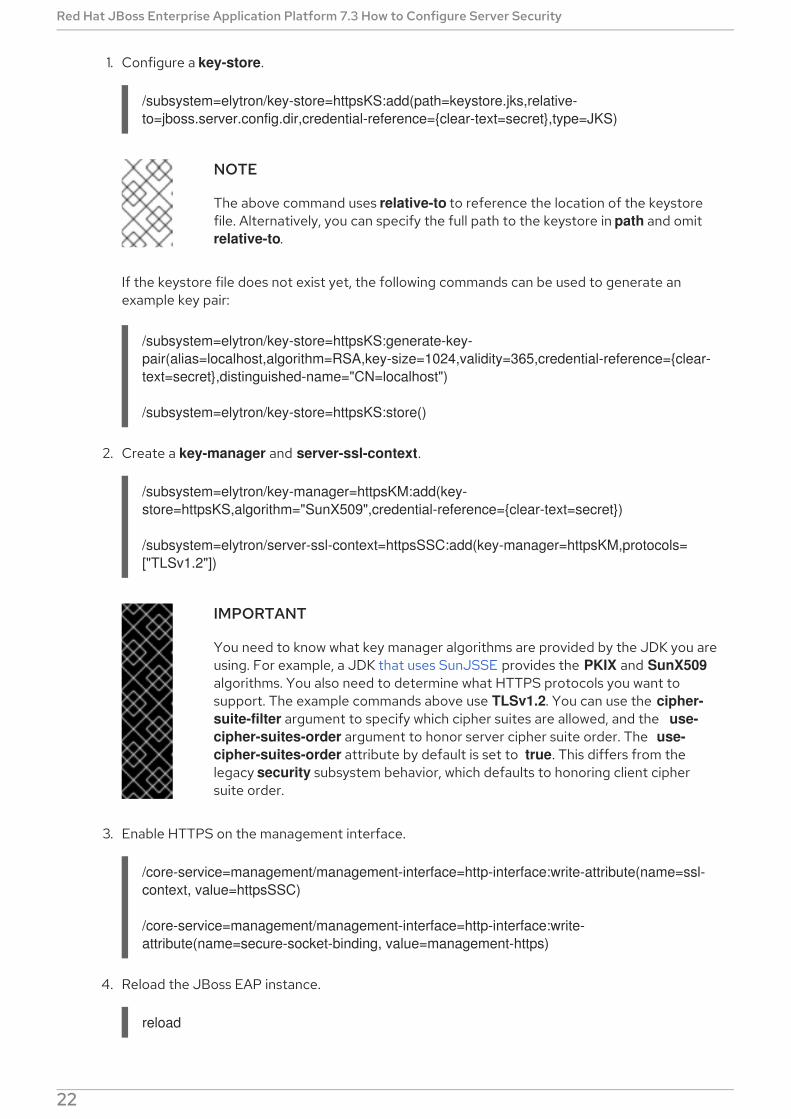
1. Configure a key-store.
/subsystem=elytron/key-store=httpsKS:add(path=keystore.jks,relative-to=jboss.server.config.dir,credential-reference={clear-text=secret},type=JKS)
NOTE
The above command uses relative-to to reference the location of the keystorefile. Alternatively, you can specify the full path to the keystore in path and omit relative-to.
If the keystore file does not exist yet, the following commands can be used to generate anexample key pair:
/subsystem=elytron/key-store=httpsKS:generate-key-pair(alias=localhost,algorithm=RSA,key-size=1024,validity=365,credential-reference={clear-text=secret},distinguished-name="CN=localhost")
/subsystem=elytron/key-store=httpsKS:store()
2. Create a key-manager and server-ssl-context.
/subsystem=elytron/key-manager=httpsKM:add(key-store=httpsKS,algorithm="SunX509",credential-reference={clear-text=secret})
/subsystem=elytron/server-ssl-context=httpsSSC:add(key-manager=httpsKM,protocols=["TLSv1.2"])
IMPORTANT
You need to know what key manager algorithms are provided by the JDK you areusing. For example, a JDK that uses SunJSSE provides the PKIX and SunX509algorithms. You also need to determine what HTTPS protocols you want tosupport. The example commands above use TLSv1.2. You can use the cipher-suite-filter argument to specify which cipher suites are allowed, and the use-cipher-suites-order argument to honor server cipher suite order. The use-cipher-suites-order attribute by default is set to true. This differs from thelegacy security subsystem behavior, which defaults to honoring client ciphersuite order.
3. Enable HTTPS on the management interface.
/core-service=management/management-interface=http-interface:write-attribute(name=ssl-context, value=httpsSSC)
/core-service=management/management-interface=http-interface:write-attribute(name=secure-socket-binding, value=management-https)
4. Reload the JBoss EAP instance.
reload
Red Hat JBoss Enterprise Application Platform 7.3 How to Configure Server Security
22
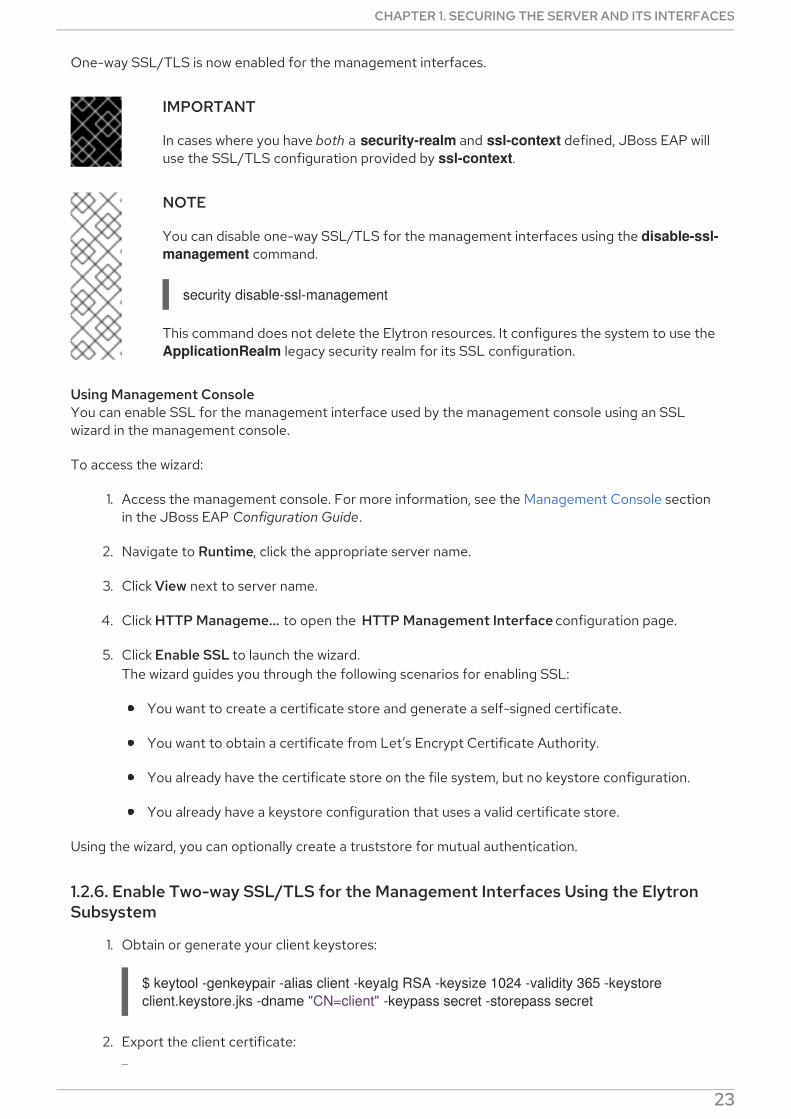
One-way SSL/TLS is now enabled for the management interfaces.
IMPORTANT
In cases where you have both a security-realm and ssl-context defined, JBoss EAP willuse the SSL/TLS configuration provided by ssl-context.
NOTE
You can disable one-way SSL/TLS for the management interfaces using the disable-ssl-management command.
This command does not delete the Elytron resources. It configures the system to use the ApplicationRealm legacy security realm for its SSL configuration.
Using Management ConsoleYou can enable SSL for the management interface used by the management console using an SSLwizard in the management console.
To access the wizard:
1. Access the management console. For more information, see the Management Console sectionin the JBoss EAP Configuration Guide.
2. Navigate to Runtime, click the appropriate server name.
3. Click View next to server name.
4. Click HTTP Manageme… to open the HTTP Management Interface configuration page.
5. Click Enable SSL to launch the wizard.The wizard guides you through the following scenarios for enabling SSL:
You want to create a certificate store and generate a self-signed certificate.
You want to obtain a certificate from Let’s Encrypt Certificate Authority.
You already have the certificate store on the file system, but no keystore configuration.
You already have a keystore configuration that uses a valid certificate store.
Using the wizard, you can optionally create a truststore for mutual authentication.
1.2.6. Enable Two-way SSL/TLS for the Management Interfaces Using the ElytronSubsystem
1. Obtain or generate your client keystores:
2. Export the client certificate:
security disable-ssl-management
$ keytool -genkeypair -alias client -keyalg RSA -keysize 1024 -validity 365 -keystore client.keystore.jks -dname "CN=client" -keypass secret -storepass secret
CHAPTER 1. SECURING THE SERVER AND ITS INTERFACES
23
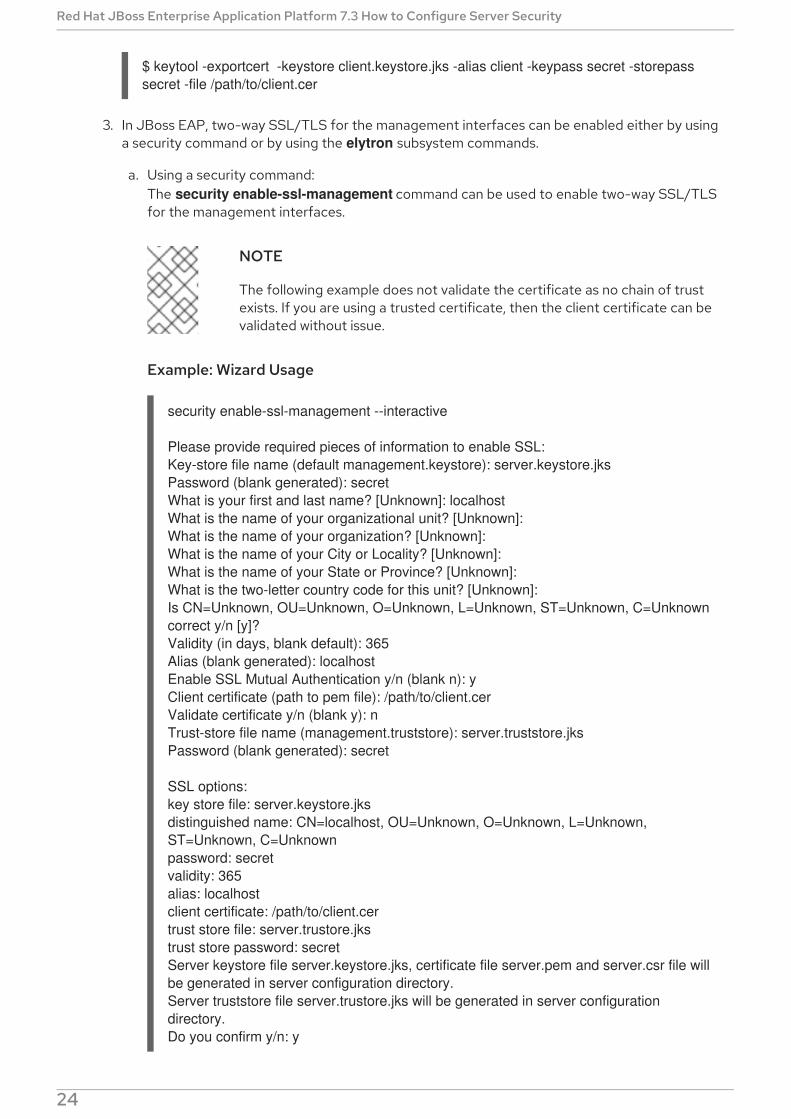
3. In JBoss EAP, two-way SSL/TLS for the management interfaces can be enabled either by usinga security command or by using the elytron subsystem commands.
a. Using a security command:The security enable-ssl-management command can be used to enable two-way SSL/TLSfor the management interfaces.
NOTE
The following example does not validate the certificate as no chain of trustexists. If you are using a trusted certificate, then the client certificate can bevalidated without issue.
Example: Wizard Usage
security enable-ssl-management --interactive
Please provide required pieces of information to enable SSL:Key-store file name (default management.keystore): server.keystore.jksPassword (blank generated): secretWhat is your first and last name? [Unknown]: localhostWhat is the name of your organizational unit? [Unknown]:What is the name of your organization? [Unknown]:What is the name of your City or Locality? [Unknown]:What is the name of your State or Province? [Unknown]:What is the two-letter country code for this unit? [Unknown]:Is CN=Unknown, OU=Unknown, O=Unknown, L=Unknown, ST=Unknown, C=Unknown correct y/n [y]?Validity (in days, blank default): 365Alias (blank generated): localhostEnable SSL Mutual Authentication y/n (blank n): yClient certificate (path to pem file): /path/to/client.cerValidate certificate y/n (blank y): nTrust-store file name (management.truststore): server.truststore.jksPassword (blank generated): secret
SSL options:key store file: server.keystore.jksdistinguished name: CN=localhost, OU=Unknown, O=Unknown, L=Unknown, ST=Unknown, C=Unknownpassword: secretvalidity: 365alias: localhostclient certificate: /path/to/client.certrust store file: server.trustore.jkstrust store password: secretServer keystore file server.keystore.jks, certificate file server.pem and server.csr file will be generated in server configuration directory.Server truststore file server.trustore.jks will be generated in server configuration directory.Do you confirm y/n: y
$ keytool -exportcert -keystore client.keystore.jks -alias client -keypass secret -storepass secret -file /path/to/client.cer
Red Hat JBoss Enterprise Application Platform 7.3 How to Configure Server Security
24

NOTE
Once the command is executed, the management CLI will reload the serverand attempt to reconnect to it.
To complete the two-way SSL/TLS authentication, you need to import theserver certificate into the client truststore and configure your client topresent the client certificate.
b. Using Elytron subsystem commands:The elytron subsystem commands can also be used to enable two-way SSL/TLS for themanagement interfaces.
i. Obtain or generate your keystore. Before enabling one-way SSL/TLS in JBoss EAP, youmust obtain or generate the keystores, truststores and certificates you plan on using. Togenerate an example set of keystores, truststores, and certificates, use the followingcommands.
A. Configure a key-store.
/subsystem=elytron/key-store=twoWayKS:add(path=server.keystore.jks,relative-to=jboss.server.config.dir,credential-reference={clear-text=secret},type=JKS)
/subsystem=elytron/key-store=twoWayKS:generate-key-pair(alias=localhost,algorithm=RSA,key-size=1024,validity=365,credential-reference={clear-text=secret},distinguished-name="CN=localhost")
/subsystem=elytron/key-store=twoWayKS:store()
NOTE
The above command uses relative-to to reference the location ofthe keystore file. Alternatively, you can specify the full path to thekeystore in path and omit relative-to.
B. Export your server certificate.
/subsystem=elytron/key-store=twoWayKS:export-certificate(alias=localhost,path=/path/to/server.cer,pem=true)
C. Create a key-store for the server trust store and import the client certificate intothe server truststore.
NOTE
The following example does not validate the certificate as no chainof trust exists. If you are using a trusted certificate, then the clientcertificate can be validated without issue.
/subsystem=elytron/key-store=twoWayTS:add(path=server.truststore.jks,relative-to=jboss.server.config.dir,credential-reference={clear-text=secret},type=JKS)
CHAPTER 1. SECURING THE SERVER AND ITS INTERFACES
25
/subsystem=elytron/key-store=twoWayTS:import-certificate(alias=client,path=/path/to/client.cer,credential-reference={clear-text=secret},trust-cacerts=true,validate=false)
/subsystem=elytron/key-store=twoWayTS:store()
ii. Configure a key-manager, trust-manager, and server-ssl-context for the serverkeystore and truststore.
/subsystem=elytron/key-manager=twoWayKM:add(key-store=twoWayKS,credential-reference={clear-text=secret})
/subsystem=elytron/trust-manager=twoWayTM:add(key-store=twoWayTS,algorithm="SunX509")
/subsystem=elytron/server-ssl-context=twoWaySSC:add(key-manager=twoWayKM,protocols=["TLSv1.2"],trust-manager=twoWayTM,want-client-auth=true,need-client-auth=true)
IMPORTANT
You need to know what key manager algorithms are provided by the JDKyou are using. For example, a JDK that uses SunJSSE provides the PKIXand SunX509 algorithms. You also need to determine what HTTPSprotocols you want to support. The example commands above use TLSv1.2. You can use the cipher-suite-filter argument to specify whichcipher suites are allowed, and the use-cipher-suites-order argument tohonor server cipher suite order. The use-cipher-suites-order attributeby default is set to true. This differs from the legacy security subsystembehavior, which defaults to honoring client cipher suite order.
A. Enable HTTPS on the management interface.
/core-service=management/management-interface=http-interface:write-attribute(name=ssl-context, value=twoWaySSC)
/core-service=management/management-interface=http-interface:write-attribute(name=secure-socket-binding, value=management-https)
B. Reload the JBoss EAP instance.
reload
NOTE
To complete the two-way SSL/TLS authentication, you need toimport the server certificate into the client truststore and configureyour client to present the client certificate.
C. Configure your client to use the client certificate.You need to configure your client to present the trusted client certificate to theserver to complete the two-way SSL/TLS authentication. For example, if using abrowser, you need to import the trusted certificate into the browser’s trust store.
Red Hat JBoss Enterprise Application Platform 7.3 How to Configure Server Security
26
This results in a forced two-way SSL/TLS authentication, without changing theoriginal authentication to the server management.
If you want to change the original authentication method, see ConfigureAuthentication with Certificates in How to Configure Identity Management forJBoss EAP.
Two-way SSL/TLS is now enabled for the management interfaces.
IMPORTANT
In cases where you have both a security-realm and ssl-context defined, JBoss EAP willuse the SSL/TLS configuration provided by ssl-context.
NOTE
You can disable two-way SSL/TLS for the management interfaces using the disable-ssl-management command.
This command does not delete the Elytron resources. It configures the system to use the ApplicationRealm legacy security realm for its SSL configuration.
1.2.7. Enable SASL Authentication for the Management Interfaces Using the CLISecurity Command
In JBoss EAP, SASL authentication, using an elytron SASL authentication factory, can be enabled forthe management interfaces with the security enable-sasl-management command. This commandcreates all of the non-existing resources required to configure authentication. By default this commandassociates the included SASL factory with the http-interface.
Example: Enable SASL Authentication
security enable-sasl-management
Server reloaded.Command success.Authentication configured for management http-interfacesasl authentication-factory=management-sasl-authenticationsecurity-domain=ManagementDomain
NOTE
Once the command is executed, the management CLI will reload the server andreconnect to it.
If a SASL factory already exists, then the factory is updated to use the mechanism defined by the --mechanism argument.
For a list of arguments, see Authorization Security Arguments.
Reorder SASL Mechanisms
security disable-ssl-management
CHAPTER 1. SECURING THE SERVER AND ITS INTERFACES
27
The order of defined SASL mechanisms dictate how the server authenticates the request, with the firstmatching mechanism being sent to the client. This order can be changed by passing a comma-separated list into the following command.
security reorder-sasl-management --mechanisms-order=MECHANISM1,MECHANISM2,...
Disable SASL Authentication for the Management InterfacesTo remove the active SASL authentication factory use the following command.
security disable-sasl-management
Alternatively, the command can be used to remove specific mechanisms from the active SASLauthentication factory.
security disable-sasl-management --mechanism=MECHANISM
1.2.8. Enable HTTP Authentication for the Management Interfaces Using the CLISecurity Command
In JBoss EAP, HTTP authentication, using an elytron HTTP authentication factory, can be enabled forthe management interfaces with the security enable-http-auth-management command. Thiscommand can only target the http-interface, and with no additional arguments the included HTTPauthentication factory will be associated with this interface.
Example: Enable HTTP Authentication
security enable-http-auth-management
Server reloaded.Command success.Authentication configured for management http-interfacehttp authentication-factory=management-http-authenticationsecurity-domain=ManagementDomain
NOTE
Once the command is executed, the management CLI will reload the server andreconnect to it.
If an HTTP factory already exists, then the factory is updated to use the mechanism defined by the --mechanism argument.
For a list of arguments, see Authorization Security Arguments.
Disable HTTP Authentication for the Management InterfacesTo remove the active HTTP authentication factory use the following command.
security disable-http-auth-management
Alternatively, you can use the following command to remove specific mechanisms from the active HTTPauthentication factory.
Red Hat JBoss Enterprise Application Platform 7.3 How to Configure Server Security
28
security disable-http-auth-management --mechanism=MECHANISM
1.2.9. Configure the Management Interfaces for One-way SSL/TLS with LegacyCore Management Authentication
Configuring the JBoss EAP management interfaces for communication only using one-way SSL/TLSprovides increased security. All network traffic between the client and the management interfaces isencrypted, which reduces the risk of security attacks such as a man-in-the-middle attack.
In this procedure unencrypted communication with the JBoss EAP instance is disabled. This procedureapplies to both standalone server and managed domain configurations. For a managed domain, prefixthe management CLI commands with the name of the host, for example: /host=master.
IMPORTANT
While performing the steps for enabling one-way SSL/TLS on the managementinterfaces, do not reload the configuration unless explicitly instructed. Doing so maycause you to be locked out of the management interfaces.
1. Create a keystore to secure the management interfaces .
2. Ensure the management interfaces bind to HTTPS .
3. Optional: Implement a custom socket-binding-group.
4. Create a new security realm .
5. Configure the management interfaces to use the new security realm .
6. Configure the management interfaces to use the keystore .
7. Update the jboss-cli.xml.
Create a Keystore to Secure the Management Interfaces
NOTE
This keystore must be in JKS format as the management interfaces are not compatiblewith keystores in JCEKS format.
Use the following to generate a keystore, replacing the example values for the parameters, for example alias, keypass, keystore, storepass and dname, with the correct values for the environment.
NOTE
The parameter validity specifies for how many days the key is valid. A value of 730 equalstwo years.
Ensure the Management Interfaces Bind to HTTPS
$ keytool -genkeypair -alias appserver -storetype jks -keyalg RSA -keysize 2048 -keypass password1 -keystore EAP_HOME/standalone/configuration/identity.jks -storepass password1 -dname "CN=appserver,OU=Sales,O=Systems Inc,L=Raleigh,ST=NC,C=US" -validity 730 -v
CHAPTER 1. SECURING THE SERVER AND ITS INTERFACES
29

Running a Standalone Server
To ensure the management interfaces bind to HTTPS, you must add the management-httpsconfiguration and remove the management-http configuration.
Use the following CLI commands to bind the management interfaces to HTTPS:
/core-service=management/management-interface=http-interface:write-attribute(name=secure-socket-binding, value=management-https)
/core-service=management/management-interface=http-interface:undefine-attribute(name=socket-binding)
Running a Managed Domain
Change the socket element within the management-interface attribute by adding secure-port andremoving port configuration.
Use the following commands to bind the management interfaces to HTTPS:
/host=master/core-service=management/management-interface=http-interface:write-attribute(name=secure-port,value=9993)
/host=master/core-service=management/management-interface=http-interface:undefine-attribute(name=port)
Optional: Implement a Custom socket-binding-groupIf you want to use a custom socket-binding-group, you must ensure the management-https binding isdefined, which by default is bound to port 9993. You can verify this from the socket-binding-groupattribute of the server’s configuration file or using the management CLI:
/socket-binding-group=standard-sockets/socket-binding=management-https:read-resource(recursive=true)
{ "outcome" => "success", "result" => { "client-mappings" => undefined, "fixed-port" => false, "interface" => "management", "multicast-address" => undefined, "multicast-port" => undefined, "name" => "management-https", "port" => expression "${jboss.management.https.port:9993}" }}
Create a New Security RealmIn this example, the new security realm using HTTPS, ManagementRealmHTTPS, uses a properties filenamed https-mgmt-users.properties located in the EAP_HOME/standalone/configuration/ directoryfor storing user names and passwords.
1. Create a properties file for storing user name and passwords.User names and passwords can be added to the file later, but for now, you need to create anempty file named https-mgmt-users.properties and save it to that location. The belowexample shows using the touch command, but you may also use other mechanisms, such as a
Red Hat JBoss Enterprise Application Platform 7.3 How to Configure Server Security
30
text editor.
Example: Using the touch Command to Create an Empty File
2. Next, use the following management CLI commands to create a new security realm named ManagementRealmHTTPS:
/core-service=management/security-realm=ManagementRealmHTTPS:add
/core-service=management/security-realm=ManagementRealmHTTPS/authentication=properties:add(path=https-mgmt-users.properties,relative-to=jboss.server.config.dir)
3. Add users to the properties file.At this point, you have created a new security realm and configured it to use a properties file forauthentication. You must now add users to that properties file using the add-user script, whichis available in the EAP_HOME/bin/ directory. When running the add-user script, you mustspecify both the properties file and the security realm using the -up and -r options respectively.From there, the add-user script will interactively prompt you for the user name and passwordinformation to store in the https-mgmt-users.properties file.
IMPORTANT
$ touch EAP_HOME/standalone/configuration/https-mgmt-users.properties
$ EAP_HOME/bin/add-user.sh -up EAP_HOME/standalone/configuration/https-mgmt-users.properties -r ManagementRealmHTTPS...Enter the details of the new user to add.Using realm 'ManagementRealmHTTPS' as specified on the command line....Username : httpUserPassword requirements are listed below. To modify these restrictions edit the add-user.properties configuration file. - The password must not be one of the following restricted values {root, admin, administrator} - The password must contain at least 8 characters, 1 alphabetic character(s), 1 digit(s), 1 non-alphanumeric symbol(s) - The password must be different from the username...Password :Re-enter Password :About to add user 'httpUser' for realm 'ManagementRealmHTTPS'...Is this correct yes/no? yes..Added user 'httpUser' to file 'EAP_HOME/configuration/https-mgmt-users.properties'...Is this new user going to be used for one AS process to connect to another AS process?e.g. for a slave host controller connecting to the master or for a Remoting connection for server to server EJB calls.yes/no? no
CHAPTER 1. SECURING THE SERVER AND ITS INTERFACES
31
IMPORTANT
When configuring security realms that use properties files to store usernamesand passwords, it is recommended that each realm use a distinct properties filethat is not shared with another realm.
Configure the Management Interfaces to Use the New Security RealmUse the following management CLI command to configure the management interfaces to use the newsecurity realm.
/core-service=management/management-interface=http-interface:write-attribute(name=security-realm,value=ManagementRealmHTTPS)
Configure the Management Interfaces to Use the KeystoreUse the below management CLI command to configure the management interfaces to use thekeystore. For the parameters file, password and alias their values must be copied from the Create aKeystore to Secure the Management Interfaces step.
/core-service=management/security-realm=ManagementRealmHTTPS/server-identity=ssl:add(keystore-path=identity.jks,keystore-relative-to=jboss.server.config.dir,keystore-password=password1, alias=appserver)
NOTE
To update the keystore password, use the following CLI command:
/core-service=management/security-realm=ManagementRealmHTTPS/server-identity=ssl:write-attribute(name=keystore-password,value=newpassword)
At this point, you need to reload the server’s configuration:
reload
After reloading the server configuration, the log should contain the following, just before the text whichstates the number of services that are started:
The management interfaces are now listening on port 9993, which confirms that the procedure wassuccessful.
IMPORTANT
At this point, the CLI will disconnect and will be unable to reconnect since the portbindings have changed. Proceed to the next step to update the jboss-cli.xml file to allowthe management CLI to reconnect.
Update the jboss-cli.xml File
If using the management CLI to perform management actions, the following changes must to be made
13:50:54,160 INFO [org.jboss.as] (Controller Boot Thread) WFLYSRV0061: Http management interface listening on https://127.0.0.1:9993/management13:50:54,162 INFO [org.jboss.as] (Controller Boot Thread) WFLYSRV0052: Admin console listening on https://127.0.0.1:9993
Red Hat JBoss Enterprise Application Platform 7.3 How to Configure Server Security
32

If using the management CLI to perform management actions, the following changes must to be madeto the EAP_HOME/bin/jboss-cli.xml file:
Update the value of <default-protocol> to https-remoting.
In <default-controller>, update the value of <protocol> to https-remoting.
In <default-controller>, update the value of <port> to 9993.
Example: jboss-cli.xml
The next time you connect to the management interface using the management CLI, you must acceptthe server certificate and authenticate against the ManagementRealmHTTPS security realm:
Example: Accepting Server Certificate and Authenticating
IMPORTANT
In cases where you have both a security-realm and ssl-context defined, JBoss EAP willuse the SSL/TLS configuration provided by ssl-context.
1.2.10. Setting up Two-way SSL/TLS for the Management Interfaces with LegacyCore Management Authentication
Two-way SSL/TLS authentication, also known as client authentication, authenticates both the client andthe server using SSL/TLS certificates. This differs from the Configure the Management Interfaces forOne-way SSL/TLS section in that both the client and server each have a certificate. This providesassurance that not only is the server who it says it is, but the client is also who it says it is.
In this section the following conventions are used:
<jboss-cli xmlns="urn:jboss:cli:2.0"> <default-protocol use-legacy-override="true">https-remoting</default-protocol> <!-- The default controller to connect to when 'connect' command is executed w/o arguments --> <default-controller> <protocol>https-remoting</protocol> <host>localhost</host> <port>9993</port> </default-controller>...
$ ./jboss-cli.sh -cUnable to connect due to unrecognised server certificateSubject - CN=appserver,OU=Sales,O=Systems Inc,L=Raleigh,ST=NC,C=USIssuer - CN=appserver, OU=Sales, O=Systems Inc, L=Raleigh, ST=NC, C=USValid From - Tue Jun 28 13:38:48 CDT 2016Valid To - Thu Jun 28 13:38:48 CDT 2018MD5 : 76:f4:81:8b:7e:c3:be:6d:ee:63:c1:7a:b7:b8:f0:fbSHA1 : ea:e3:f1:eb:53:90:69:d0:c9:69:4a:5a:a3:20:8f:76:c1:e6:66:b6
Accept certificate? [N]o, [T]emporarily, [P]ermenantly : pAuthenticating against security realm: ManagementRealmHTTPSUsername: httpUserPassword:[standalone@localhost:9993 /]
CHAPTER 1. SECURING THE SERVER AND ITS INTERFACES
33

HOST1
The JBoss server hostname. For example: jboss.redhat.com.
HOST2
A suitable name for the client. For example: myclient. Note this is not necessarily an actualhostname.
CA_HOST1
The DN (distinguished name) to use for the HOST1 certificate. For example: cn=jboss,dc=redhat,dc=com.
CA_HOST2
The DN (distinguished name) to use for the HOST2 certificate. For example: cn=myclient,dc=redhat,dc=com.
Prerequisites
NOTE
If a password vault is used to store the keystore and truststore passwords, which isrecommended, the password vault should already be created. For more information onthe password vault, see the Password Vault section as well as the Password Vault Systemsection of the Red Hat JBoss Enterprise Application Platform 7 Security Architectureguide.
WARNING
Red Hat recommends that SSLv2, SSLv3, and TLSv1.0 be explicitly disabled in favorof TLSv1.1 or TLSv1.2 in all affected packages.
1. Generate the keystores.
2. Export the certificates.
3. Import the certificates into the opposing truststores.
$ keytool -genkeypair -alias HOST1_alias -keyalg RSA -keysize 1024 -validity 365 -keystore HOST1.keystore.jks -dname "CA_HOST1" -keypass secret -storepass secret
$ keytool -genkeypair -alias HOST2_alias -keyalg RSA -keysize 1024 -validity 365 -keystore HOST2.keystore.jks -dname "CA_HOST2" -keypass secret -storepass secret
$ keytool -exportcert -keystore HOST1.keystore.jks -alias HOST1_alias -keypass secret -storepass secret -file HOST1.cer
$ keytool -exportcert -keystore HOST2.keystore.jks -alias HOST2_alias -keypass secret -storepass secret -file HOST2.cer
$ keytool -importcert -keystore HOST1.truststore.jks -storepass secret -alias HOST2_alias -trustcacerts -file HOST2.cer
Red Hat JBoss Enterprise Application Platform 7.3 How to Configure Server Security
34
4. Define a CertificateRealm.Define a CertificateRealm in the configuration for the server (host.xml or standalone.xml) andpoint the interface to it. This can be done using the following commands:
/core-service=management/security-realm=CertificateRealm:add()
/core-service=management/security-realm=CertificateRealm/server-identity=ssl:add(keystore-path=/path/to/HOST1.keystore.jks, keystore-password=secret,alias=HOST1_alias)
/core-service=management/security-realm=CertificateRealm/authentication=truststore:add(keystore-path=/path/to/HOST1.truststore.jks,keystore-password=secret)
5. Change the security-realm of the http-interface to the new CertificateRealm.
/core-service=management/management-interface=http-interface:write-attribute(name=security-realm,value=CertificateRealm)
6. Add the SSL/TLS configuration for the CLI.
IMPORTANT
In addition to adding the two-way SSL/TLS, the management interface shouldalso be configured to bind to HTTPS. For details, see Ensure the ManagementInterfaces Bind to HTTPS in the section entitled Configure the ManagementInterfaces for One-way SSL/TLS with Legacy Core Management Authentication.
Add the SSL/TLS configuration for the CLI, which uses EAP_HOME/bin/jboss-cli.xml as asettings file.
To store the keystore and truststore passwords in plain text, edit EAP_HOME/bin/jboss-cli.xmland add the SSL/TLS configuration using the appropriate values for the variables:
Example: jboss-cli.xml Storing Keystore and Truststore Passwords in Plain Text
To use the keystore and truststore passwords stored in a password vault, you need to add thevault configuration and appropriate vault values to EAP_HOME/bin/jboss-cli.xml:
Example: jboss-cli.xml Storing Keystore and Truststore Passwords in a Password
$ keytool -importcert -keystore HOST2.truststore.jks -storepass secret -alias HOST1_alias -trustcacerts -file HOST1.cer
<ssl> <alias>HOST2_alias</alias> <key-store>/path/to/HOST2.keystore.jks</key-store> <key-store-password>secret</key-store-password> <trust-store>/path/to/HOST2.truststore.jks</trust-store> <trust-store-password>secret</trust-store-password> <modify-trust-store>true</modify-trust-store></ssl>
CHAPTER 1. SECURING THE SERVER AND ITS INTERFACES
35
Example: jboss-cli.xml Storing Keystore and Truststore Passwords in a PasswordVault
IMPORTANT
In cases where you have both a security-realm and ssl-context defined, JBoss EAP willuse the SSL/TLS configuration provided by ssl-context.
1.2.11. HTTPS Listener Reference
For a full list of attributes available for the HTTPS listener, see the Undertow Subsystem Attributessection in the JBoss EAP Configuration Guide.
1.2.11.1. About Cipher Suites
You can configure a list of the encryption ciphers which are allowed. For JSSE syntax, it must be acomma-separated list. For OpenSSL syntax, it must be a colon-separated list. Ensure that only onesyntax is used. The default is the JVM default.
IMPORTANT
Using weak ciphers is a significant security risk. See NIST Guidelines for NISTrecommendations on cipher suites.
See the OpenSSL documentation for a list of available OpenSSL ciphers . Note that the following are notsupported:
@SECLEVEL
SUITEB128
SUITEB128ONLY
SUITEB192
See the Java documentation for a list of the standard JSSE ciphers.
<ssl> <vault> <vault-option name="KEYSTORE_URL" value="path-to/vault/vault.keystore"/> <vault-option name="KEYSTORE_PASSWORD" value="MASK-5WNXs8oEbrs"/> <vault-option name="KEYSTORE_ALIAS" value="vault"/> <vault-option name="SALT" value="12345678"/> <vault-option name="ITERATION_COUNT" value="50"/> <vault-option name="ENC_FILE_DIR" value="EAP_HOME/vault/"/> </vault> <alias>HOST2_alias</alias> <key-store>/path/to/HOST2.keystore.jks</key-store> <key-store-password>VAULT::VB::cli_pass::1</key-store-password> <key-password>VAULT::VB::cli_pass::1</key-password> <trust-store>/path/to/HOST2.truststore.jks</trust-store> <trust-store-password>VAULT::VB::cli_pass::1</trust-store-password> <modify-trust-store>true</modify-trust-store></ssl>
Red Hat JBoss Enterprise Application Platform 7.3 How to Configure Server Security
36
To update the list of enabled cipher suites, use the enabled-cipher-suites attribute of the HTTPSlistener in the undertow subsystem.
Example: Management CLI Command for Updating the List of Enabled Cipher Suites
/subsystem=undertow/server=default-server/https-listener=https:write-attribute(name=enabled-cipher-suites,value="TLS_RSA_WITH_AES_128_CBC_SHA,TLS_RSA_WITH_AES_256_CBC_SHA")
NOTE
The example only lists two possible ciphers, but real-world examples will likely use more.
1.2.12. FIPS 140-2 Compliant Cryptography
It is possible to configure FIPS 140-2 compliant cryptography on Red Hat Enterprise Linux using eitherof the following methods.
Using the SunPKCS11 provider with an NSS database
Using the third party BouncyCastle providers
1.2.12.1. Enable FIPS 140-2 Cryptography for SSL/TLS on Red Hat Enterprise Linux 7 andLater
You can configure Undertow to use FIPS 140-2 compliant cryptography for SSL/TLS. The scope of thisconfiguration example is limited to Red Hat Enterprise Linux 7 and later, using the Mozilla NSS library inFIPS mode.
IMPORTANT
The installed Red Hat Enterprise Linux must already be configured to be FIPS 140-2compliant. For more information, see the solution titled How can I make RHEL 6 or RHEL7 FIPS 140-2 compliant?, which is located on the Red Hat Customer Portal.
WARNING
Using the TLS 1.2 protocol when running JBoss EAP in FIPS mode can cause a NoSuchAlgorithmException to occur. More details on this issue can be found inthe solution titled NoSuchAlgorithmException: no such algorithm:SunTls12MasterSecret, which is located on the Red Hat Customer Portal.
Therefore, it is not possible to configure HTTP/2 in FIPS mode because HTTP/2requires the TLS 1.2 protocol. FIPS mode (PKCS11) supports the TLS 1 and the TLS1.1 protocols so you can use:
TLS 1.1 in case of Oracle/OpenJDK
TLS 1 in case of IBM java
CHAPTER 1. SECURING THE SERVER AND ITS INTERFACES
37

To configure Undertow to use FIPS 140-2 compliant cryptography for SSL/TLS, you must do thefollowing:
Configure the NSS database.
Configure the management CLI for FIPS 140-2 compliant cryptography for SSL/TLS .
Configure the undertow subsystem to use either Elytron or the legacy core managementauthentication.
NOTE
The OpenSSL provider requires a private key, but it is not possible to retrieve a privatekey from the PKCS11 store. FIPS does not allow the export of unencrypted keys from FIPScompliant cryptographic module. Therefore, for both the elytron subsystem as well aslegacy security, it is not possible to use the OpenSSL provider for TLS when in FIPSmode.
Configuring the NSS database
1. Create a directory owned by the appropriate user to house the NSS database.
Example Commands for Creating the NSS Database Directory
NOTE
The jboss user is only an example. You need to replace it with a user on youroperating system that you plan on using for running JBoss EAP.
2. Create the NSS configuration file: /usr/share/jboss-as/nss_pkcsll_fips.cfg.It must specify:
a name
the directory where the NSS library is located
the directory where the NSS database was created in the previous step
Example: nss_pkcsll_fips.cfg
name = nss-fipsnssLibraryDirectory=/usr/lib64nssSecmodDirectory=/usr/share/jboss-as/nssdbnssDbMode = readOnlynssModule = fips
NOTE
$ mkdir -p /usr/share/jboss-as/nssdb$ chown jboss /usr/share/jboss-as/nssdb$ modutil -create -dbdir /usr/share/jboss-as/nssdb
Red Hat JBoss Enterprise Application Platform 7.3 How to Configure Server Security
38
NOTE
If you are not running a 64-bit version of Red Hat Enterprise Linux 6 then set nssLibraryDirectory to /usr/lib instead of /usr/lib64.
3. Edit the Java security configuration file. This configuration file affects the entire JVM, and canbe defined using either of the following methods.
A default configuration file, java.security, is provided in your JDK. This file is used if noother security configuration files are specified. See the JDK vendor’s documentation for thelocation of this file.
Define a custom Java security configuration file and reference it by using the -Djava.security.properties=/path/to/java.security.properties. When referenced in thismanner it overrides the settings in the default security file. This option is useful when havingmultiple JVMs running on the same host that require different security settings.Add the following line to your Java security configuration file:
Example: java.security
security.provider.1=sun.security.pkcs11.SunPKCS11 /usr/share/jboss-as/nss_pkcsll_fips.cfg
NOTE
The nss_pkcsll_fips.cfg configuration file specified in the above line is thefile created in the previous step.
You also need to update the following link in your configuration file from:
security.provider.5=com.sun.net.ssl.internal.ssl.Provider
to
security.provider.5=com.sun.net.ssl.internal.ssl.Provider SunPKCS11-nss-fips
IMPORTANT
Any other security.provider.X lines in this file, for example security.provider.2, must have the value of their X increased by one toensure that this provider is given priority.
4. Run the modutil command on the NSS database directory you created in the previous step toenable FIPS mode.
modutil -fips true -dbdir /usr/share/jboss-as/nssdb
NOTE
You may get a security library error at this point requiring you to regenerate thelibrary signatures for some of the NSS shared objects.
CHAPTER 1. SECURING THE SERVER AND ITS INTERFACES
39
5. Set the password on the FIPS token.The name of the token must be NSS FIPS 140-2 Certificate DB .
modutil -changepw "NSS FIPS 140-2 Certificate DB" -dbdir /usr/share/jboss-as/nssdb
IMPORTANT
The password used for the FIPS token must be a FIPS compliant password. If thepassword is not strong enough, you may receive an error: ERROR: Unable tochange password on token "NSS FIPS 140-2 Certificate DB".
6. Create a certificate using the NSS tools.
Example Command
7. Verify that the JVM can read the private key from the PKCS11 keystore by running the followingcommand:
$ keytool -list -storetype pkcs11
IMPORTANT
$ certutil -S -k rsa -n undertow -t "u,u,u" -x -s "CN=localhost, OU=MYOU, O=MYORG, L=MYCITY, ST=MYSTATE, C=MY" -d /usr/share/jboss-as/nssdb
Red Hat JBoss Enterprise Application Platform 7.3 How to Configure Server Security
40

IMPORTANT
Once you have FIPS enabled, you may see the following error when starting JBoss EAP:
10:16:13,993 ERROR [org.jboss.msc.service.fail] (MSC service thread 1-1) MSC000001: Failed to start service jboss.server.controller.management.security_realm.ApplicationRealm.key-manager: org.jboss.msc.service.StartException in service jboss.server.controller.management.security_realm.ApplicationRealm.key-manager: WFLYDM0018: Unable to start service at org.jboss.as.domain.management.security.AbstractKeyManagerService.start(AbstractKeyManagerService.java:85) at org.jboss.msc.service.ServiceControllerImpl$StartTask.startService(ServiceControllerImpl.java:1963) at org.jboss.msc.service.ServiceControllerImpl$StartTask.run(ServiceControllerImpl.java:1896) at java.util.concurrent.ThreadPoolExecutor.runWorker(ThreadPoolExecutor.java:1142) at java.util.concurrent.ThreadPoolExecutor$Worker.run(ThreadPoolExecutor.java:617) at java.lang.Thread.run(Thread.java:745)Caused by: java.security.KeyStoreException: FIPS mode: KeyStore must be from provider SunPKCS11-nss-fips at sun.security.ssl.KeyManagerFactoryImpl$SunX509.engineInit(KeyManagerFactoryImpl.java:67) at javax.net.ssl.KeyManagerFactory.init(KeyManagerFactory.java:256) at org.jboss.as.domain.management.security.AbstractKeyManagerService.createKeyManagers(AbstractKeyManagerService.java:130) at org.jboss.as.domain.management.security.AbstractKeyManagerService.start(AbstractKeyManagerService.java:83) ... 5 more
This message will appear if you have any existing key managers configured, such as thedefault key manager in legacy core management authentication, that do not use FIPS140-2 compliant cryptography.
Configure the Management CLI for FIPS 140-2 Compliant Cryptography for SSL/TLSYou must configure the JBoss EAP management CLI to work in an environment with FIPS 140-2compliant cryptography for SSL/TLS enabled. By default, if you try to use the management CLI in suchan environment, the following exception is thrown: org.jboss.as.cli.CliInitializationException: java.security.KeyManagementException: FIPS mode: only SunJSSE TrustManagers may be used.
If you are using the legacy security subsystem:Update the javax.net.ssl.keyStore and javax.net.ssl.trustStore system properties in the jboss-cli.sh file, as shown below:
JAVA_OPTS="$JAVA_OPTS -Djavax.net.ssl.trustStore=NONE -Djavax.net.ssl.trustStoreType=PKCS11"JAVA_OPTS="$JAVA_OPTS -Djavax.net.ssl.keyStore=NONE -
CHAPTER 1. SECURING THE SERVER AND ITS INTERFACES
41
Djavax.net.ssl.keyStoreType=PKCS11 -Djavax.net.ssl.keyStorePassword=P@ssword123"
If you are using the elytron subsystem:
1. Create an XML configuration file for the management CLI with the following contents:
Example: cli-wildfly-config.xml
NOTE
If you are using the IBM JDK, see the IBM management CLI configurationexample for the specific configuration required.
2. When starting the management CLI, pass the configuration file to the management CLIscript using the -Dwildfly.config.url property. For example:
$ jboss-cli.sh -Dwildfly.config.url=cli-wildfly-config.xml
Configure the Elytron and Undertow Subsystems
1. Add the FIPS 140-2 compliant cryptography key-store, key-manager and ssl-context.
/subsystem=elytron/key-store=fipsKS:add(type=PKCS11,provider="SunPKCS11-nss-fips",credential-reference={clear-text="P@ssword123"})
/subsystem=elytron/key-manager=fipsKM:add(key-store=fipsKS,algorithm="SunX509",provider=SunPKCS11-nss-fips,credential-reference={clear-text="P@ssword123"})
/subsystem=elytron/server-ssl-context=fipsSSC:add(key-manager=fipsKM,protocols=["TLSv1.1"])
2. Update the undertow subsystem to use the new ssl-context.
NOTE
<configuration> <authentication-client xmlns="urn:elytron:client:1.2"> <key-stores> <key-store name="truststore" type="PKCS11"> <key-store-clear-password password="P@ssword123"/> </key-store> </key-stores> <ssl-contexts> <ssl-context name="client-cli-context"> <trust-store key-store-name="truststore"/> <cipher-suite selector="${cipher.suite.filter}"/> <protocol names="TLSv1.1"/> </ssl-context> </ssl-contexts> <ssl-context-rules> <rule use-ssl-context="client-cli-context"/> </ssl-context-rules> </authentication-client></configuration>
Red Hat JBoss Enterprise Application Platform 7.3 How to Configure Server Security
42

NOTE
https-listener must always have either a security-realm or ssl-contextconfigured. When changing between the two configurations, the commands mustbe executed as a single batch, as shown below.
batch/subsystem=undertow/server=default-server/https-listener=https:undefine-attribute(name=security-realm)/subsystem=undertow/server=default-server/https-listener=https:write-attribute(name=ssl-context,value=fipsSSC)run-batch
reload
In the elytron subsystem, OpenJDK and Oracle JDK in FIPS mode restrict the usage of any advancedfeatures that are based on providing custom KeyManager or TrustManager implementations. Thefollowing configuration attributes do not work on the server:
server-ssl-context.security-domain
trust-manager.certificate-revocation-list
Configure Undertow with the Legacy Core Management AuthenticationOptionally, you can still use the legacy core management authentication instead of the elytronsubsystem to complete the setup of FIPS 140-2 compliant cryptography for SSL/TLS:
1. Configure Undertow to use SSL/TLS.
NOTE
The following commands below must either be run in batch mode, or the servermust be reloaded after adding the ssl server identity. The example below isshown using batch mode.
batch
/core-service=management/security-realm=HTTPSRealm:add
/core-service=management/security-realm=HTTPSRealm/server-identity=ssl:add(keystore-provider=PKCS11, keystore-password="strongP@ssword1")
/subsystem=undertow/server=default-server/https-listener=https:add(socket-binding=https, security-realm=HTTPSRealm, enabled-protocols="TLSv1.1")
run-batch
The basic details for configuring Undertow to SSL/TLS are covered in Setting up an SSL/TLSfor Applications.
2. Configure the cipher suites used by Undertow.Once you have SSL/TLS configured, you need to configure the https listener and security realmto have a specific set of cipher suites enabled:
CHAPTER 1. SECURING THE SERVER AND ITS INTERFACES
43

Required Cipher Suites
SSL_RSA_WITH_3DES_EDE_CBC_SHA, SSL_DHE_RSA_WITH_3DES_EDE_CBC_SHA, TLS_RSA_WITH_AES_128_CBC_SHA, TLS_DHE_DSS_WITH_AES_128_CBC_SHA, TLS_DHE_RSA_WITH_AES_128_CBC_SHA, TLS_RSA_WITH_AES_256_CBC_SHA, TLS_DHE_DSS_WITH_AES_256_CBC_SHA, TLS_DHE_RSA_WITH_AES_256_CBC_SHA, TLS_ECDH_ECDSA_WITH_3DES_EDE_CBC_SHA, TLS_ECDH_ECDSA_WITH_AES_128_CBC_SHA, TLS_ECDH_ECDSA_WITH_AES_256_CBC_SHA, TLS_ECDHE_ECDSA_WITH_3DES_EDE_CBC_SHA, TLS_ECDHE_ECDSA_WITH_AES_128_CBC_SHA, TLS_ECDHE_ECDSA_WITH_AES_256_CBC_SHA, TLS_ECDH_RSA_WITH_3DES_EDE_CBC_SHA, TLS_ECDH_RSA_WITH_AES_128_CBC_SHA, TLS_ECDH_RSA_WITH_AES_256_CBC_SHA, TLS_ECDHE_RSA_WITH_3DES_EDE_CBC_SHA, TLS_ECDHE_RSA_WITH_AES_128_CBC_SHA, TLS_ECDHE_RSA_WITH_AES_256_CBC_SHA, TLS_ECDH_anon_WITH_3DES_EDE_CBC_SHA, TLS_ECDH_anon_WITH_AES_128_CBC_SHA, TLS_ECDH_anon_WITH_AES_256_CBC_SHA
The basics behind enabling cipher suites for the https listener are covered in About CipherSuites. To enable cipher suites on the https listener:
Example Command for Enabling Cipher Suites on the Https Listener
/subsystem=undertow/server=default-server/https-listener=https:write-attribute(name=enabled-cipher-suites,value="SSL_RSA_WITH_3DES_EDE_CBC_SHA,SSL_DHE_RSA_WITH_3DES_EDE_CBC_SHA,TLS_RSA_WITH_AES_128_CBC_SHA,TLS_DHE_DSS_WITH_AES_128_CBC_SHA,TLS_DHE_RSA_WITH_AES_128_CBC_SHA,TLS_RSA_WITH_AES_256_CBC_SHA,TLS_DHE_DSS_WITH_AES_256_CBC_SHA,TLS_DHE_RSA_WITH_AES_256_CBC_SHA,TLS_ECDH_ECDSA_WITH_3DES_EDE_CBC_SHA,TLS_ECDH_ECDSA_WITH_AES_128_CBC_SHA,TLS_ECDH_ECDSA_WITH_AES_256_CBC_SHA,TLS_ECDHE_ECDSA_WITH_3DES_EDE_CBC_SHA,TLS_ECDHE_ECDSA_WITH_AES_128_CBC_SHA,TLS_ECDHE_ECDSA_WITH_AES_256_CBC_SHA,TLS_ECDH_RSA_WITH_3DES_EDE_CBC_SHA,TLS_ECDH_RSA_WITH_AES_128_CBC_SHA,TLS_ECDH_RSA_WITH_AES_256_CBC_SHA,TLS_ECDHE_RSA_WITH_3DES_EDE_CBC_SHA,TLS_ECDHE_RSA_WITH_AES_128_CBC_SHA,TLS_ECDHE_RSA_WITH_AES_256_CBC_SHA,TLS_ECDH_anon_WITH_3DES_EDE_CBC_SHA,TLS_ECDH_anon_WITH_AES_128_CBC_SHA,TLS_ECDH_anon_WITH_AES_256_CBC_SHA")
3. Enable cipher suites on the security realm.
Example Command for Enabling Cipher Suites on the Security Realm
/core-service=management/security-realm=HTTPSRealm/server-identity=ssl:write-attribute(name=enabled-cipher-suites, value=[SSL_RSA_WITH_3DES_EDE_CBC_SHA, SSL_DHE_RSA_WITH_3DES_EDE_CBC_SHA, TLS_RSA_WITH_AES_128_CBC_SHA, TLS_DHE_DSS_WITH_AES_128_CBC_SHA, TLS_DHE_RSA_WITH_AES_128_CBC_SHA, TLS_RSA_WITH_AES_256_CBC_SHA, TLS_DHE_DSS_WITH_AES_256_CBC_SHA, TLS_DHE_RSA_WITH_AES_256_CBC_SHA,
Red Hat JBoss Enterprise Application Platform 7.3 How to Configure Server Security
44

TLS_ECDH_ECDSA_WITH_3DES_EDE_CBC_SHA, TLS_ECDH_ECDSA_WITH_AES_128_CBC_SHA, TLS_ECDH_ECDSA_WITH_AES_256_CBC_SHA, TLS_ECDHE_ECDSA_WITH_3DES_EDE_CBC_SHA, TLS_ECDHE_ECDSA_WITH_AES_128_CBC_SHA, TLS_ECDHE_ECDSA_WITH_AES_256_CBC_SHA, TLS_ECDH_RSA_WITH_3DES_EDE_CBC_SHA, TLS_ECDH_RSA_WITH_AES_128_CBC_SHA, TLS_ECDH_RSA_WITH_AES_256_CBC_SHA, TLS_ECDHE_RSA_WITH_3DES_EDE_CBC_SHA, TLS_ECDHE_RSA_WITH_AES_128_CBC_SHA, TLS_ECDHE_RSA_WITH_AES_256_CBC_SHA, TLS_ECDH_anon_WITH_3DES_EDE_CBC_SHA, TLS_ECDH_anon_WITH_AES_128_CBC_SHA, TLS_ECDH_anon_WITH_AES_256_CBC_SHA])
1.2.12.2. Enable FIPS 140-2 Cryptography for SSL/TLS Using Bouncy Castle
You can configure Undertow to use FIPS 140-2 compliant cryptography for SSL/TLS. The scope of thisconfiguration example is limited to Red Hat Enterprise Linux 7 and later. The Bouncy Castle JARs arenot provided by Red Hat, and must be obtained directly from Bouncy Castle.
Prerequisites
Ensure your environment is configured to use the BouncyCastle provider.
A Bouncy Castle keystore must exist on the server. If one does not exist, it can be created usingthe following command.
$ keytool -genkeypair -alias ALIAS -keyalg RSA -keysize 2048 -keypass PASSWORD -keystore KEYSTORE -storetype BCFKS -storepass STORE_PASSWORD
Configure the Management CLI for FIPS 140-2 Compliant Cryptography for SSL/TLS UsingElytronYou must configure the JBoss EAP management CLI to work in an environment with FIPS 140-2compliant cryptography for SSL/TLS enabled.
1. Create an XML configuration file for the management CLI with the following contents:
Example: cli-wildfly-config.xml
<configuration> <authentication-client xmlns="urn:elytron:client:1.2"> <key-stores> <key-store name="truststore" type="BCFKS"> <file name="${truststore.location}" /> <key-store-clear-password password="${password}" /> </key-store> <key-store name="keystore" type="BCFKS"> <file name="${keystore.location}" /> <key-store-clear-password password="${password}" /> </key-store> </key-stores> <ssl-contexts> <ssl-context name="client-cli-context">
CHAPTER 1. SECURING THE SERVER AND ITS INTERFACES
45

2. When starting the management CLI, pass the configuration file to the management CLI scriptusing the -Dwildfly.config.url property. For example:
$ jboss-cli.sh -Dwildfly.config.url=cli-wildfly-config.xml
Configure the Elytron and Undertow Subsystems
1. Add the FIPS 140-2 compliant cryptography key-store, key-manager and ssl-context. Whendefining the keystore, the type must be BCFKS.
/subsystem=elytron/key-store=fipsKS:add(path=KEYSTORE,relative-to=jboss.server.config.dir,credential-reference={clear-text=STORE_PASSWORD},type="BCFKS")
/subsystem=elytron/key-manager=fipsKM:add(key-store=fipsKS,algorithm="X509",credential-reference={clear-text=PASSWORD})
/subsystem=elytron/server-ssl-context=fipsSSC:add(key-manager=fipsKM,protocols=["TLSv1.2"],cipher-suite-filter="TLS_DHE_DSS_WITH_3DES_EDE_CBC_SHA, TLS_DHE_DSS_WITH_AES_128_CBC_SHA, TLS_DHE_DSS_WITH_AES_128_CBC_SHA256, TLS_DHE_DSS_WITH_AES_256_CBC_SHA, TLS_DHE_DSS_WITH_AES_256_CBC_SHA256, TLS_ECDHE_ECDSA_WITH_3DES_EDE_CBC_SHA, TLS_ECDHE_ECDSA_WITH_AES_128_CBC_SHA, TLS_ECDHE_ECDSA_WITH_AES_128_CBC_SHA256, TLS_ECDHE_ECDSA_WITH_AES_256_CBC_SHA, TLS_ECDHE_ECDSA_WITH_AES_256_CBC_SHA384, TLS_ECDHE_RSA_WITH_3DES_EDE_CBC_SHA,
<key-store-ssl-certificate algorithm="X509" key-store-name="keystore"> <key-store-clear-password password="${password"} /> </key-store-ssl-certificate> <trust-store key-store-name="truststore"/> <trust-manager algorithm="X509"> </trust-manager> <cipher-suite selector="TLS_DHE_DSS_WITH_3DES_EDE_CBC_SHA,TLS_DHE_DSS_WITH_AES_128_CBC_SHA,TLS_DHE_DSS_WITH_AES_128_CBC_SHA256,TLS_DHE_DSS_WITH_AES_256_CBC_SHA,TLS_DHE_DSS_WITH_AES_256_CBC_SHA256,TLS_ECDHE_ECDSA_WITH_3DES_EDE_CBC_SHA,TLS_ECDHE_ECDSA_WITH_AES_128_CBC_SHA,TLS_ECDHE_ECDSA_WITH_AES_128_CBC_SHA256,TLS_ECDHE_ECDSA_WITH_AES_256_CBC_SHA,TLS_ECDHE_ECDSA_WITH_AES_256_CBC_SHA384,TLS_ECDHE_RSA_WITH_3DES_EDE_CBC_SHA,TLS_ECDHE_RSA_WITH_AES_128_CBC_SHA,TLS_ECDHE_RSA_WITH_AES_128_CBC_SHA256,TLS_ECDHE_RSA_WITH_AES_256_CBC_SHA,TLS_RSA_WITH_3DES_EDE_CBC_SHA,TLS_RSA_WITH_AES_128_CBC_SHA,TLS_RSA_WITH_AES_128_CBC_SHA256,TLS_RSA_WITH_AES_256_CBC_SHA,TLS_RSA_WITH_AES_256_CBC_SHA256,TLS_RSA_WITH_AES_256_CCM,TLS_RSA_WITH_AES_128_CCM"/> <protocol names="TLSv1.2"/> </ssl-context> </ssl-contexts> <ssl-context-rules> <rule use-ssl-context="client-cli-context"/> </ssl-context-rules> </authentication-client></configuration>
Red Hat JBoss Enterprise Application Platform 7.3 How to Configure Server Security
46

TLS_ECDHE_RSA_WITH_AES_128_CBC_SHA, TLS_ECDHE_RSA_WITH_AES_128_CBC_SHA256, TLS_ECDHE_RSA_WITH_AES_256_CBC_SHA, TLS_RSA_WITH_3DES_EDE_CBC_SHA, TLS_RSA_WITH_AES_128_CBC_SHA, TLS_RSA_WITH_AES_128_CBC_SHA256, TLS_RSA_WITH_AES_256_CBC_SHA, TLS_RSA_WITH_AES_256_CBC_SHA256,TLS_RSA_WITH_AES_256_CCM,TLS_RSA_WITH_AES_128_CCM")
2. Update the undertow subsystem to use the new ssl-context.
NOTE
https-listener must always have either a security-realm or ssl-contextconfigured. When changing between the two configurations, the commands mustbe executed as a single batch, as shown below.
batch/subsystem=undertow/server=default-server/https-listener=https:undefine-attribute(name=security-realm)/subsystem=undertow/server=default-server/https-listener=https:write-attribute(name=ssl-context,value=fipsSSC)run-batch
reload
1.2.13. FIPS 140-2 Compliant Cryptography on IBM JDK
On the IBM JDK, the IBM Java Cryptographic Extension (JCE) IBMJCEFIPS provider and the IBM JavaSecure Sockets Extension (JSSE) FIPS 140-2 Cryptographic Module (IBMJSSE2) for multi-platformsprovide FIPS 140-2 compliant cryptography.
For more information on the IBMJCEFIPS provider, see the IBM Documentation for IBM JCEFIPS andNIST IBMJCEFIPS – Security Policy . For more information on IBMJSSE2, see Running IBMJSSE2 inFIPS mode.
1.2.13.1. Key Storage
The IBM JCE does not provide a keystore. The keys are stored on the computer and do not leave itsphysical boundary. If the keys are moved between computers they must be encrypted.
To run keytool in FIPS-compliant mode use the -providerClass option on each command like this:
keytool -list -storetype JCEKS -keystore mystore.jck -storepass mystorepass -providerClass com.ibm.crypto.fips.provider.IBMJCEFIPS
1.2.13.2. Management CLI Configuration
To configure the management CLI for FIPS 140-2 compliant cryptography on the IBM JDK, you mustuse a management CLI configuration file specifically for the IBM JDK, such as the following:
Example: cli-wildfly-config-ibm.xml
<configuration>
CHAPTER 1. SECURING THE SERVER AND ITS INTERFACES
47

1.2.13.3. Examine FIPS Provider Information
To examine information about the IBMJCEFIPS used by the server, enable debug-level logging byadding -Djavax.net.debug=true to the standalone.conf or domain.conf files. Information about theFIPS provider is logged to the server.log file, for example:
04:22:45,685 INFO [stdout] (http-/127.0.0.1:8443-1) JsseJCE: Using MessageDigest SHA from provider IBMJCEFIPS version 1.704:22:45,689 INFO [stdout] (http-/127.0.0.1:8443-1) DHCrypt: DH KeyPairGenerator from provider from init IBMJCEFIPS version 1.704:22:45,754 INFO [stdout] (http-/127.0.0.1:8443-1) JsseJCE: Using KeyFactory DiffieHellman from provider IBMJCEFIPS version 1.704:22:45,754 INFO [stdout] (http-/127.0.0.1:8443-1) JsseJCE: Using KeyAgreement DiffieHellman from provider IBMJCEFIPS version 1.704:22:45,754 INFO [stdout] (http-/127.0.0.1:8443-1) DHCrypt: DH KeyAgreement from provider IBMJCEFIPS version 1.704:22:45,754 INFO [stdout] (http-/127.0.0.1:8443-1) DHCrypt: DH KeyAgreement from provider from initIBMJCEFIPS version 1.7
1.2.14. Starting a Managed Domain when the JVM is Running in FIPS Mode
Update each host controller and the master domain controller to use SSL/TLS for communication.
PrerequisitesBefore you begin, make sure you have completed the following prerequisites.
You have implemented a managed domain.For details about configuring a managed domain, see the Domain Management section in theJBoss EAP Configuration Guide.
You have configured FIPS.For details about configuring FIPS, see Enable FIPS 140-2 Cryptography for SSL/TLS on RedHat Enterprise Linux 7 and later.
You have created all necessary certificates and have imported the domain controller’s
<authentication-client xmlns="urn:elytron:client:1.2"> <key-stores> <key-store name="truststore" type="JKS"> <file name="/path/to/truststore"/> <key-store-clear-password password="P@ssword123"/> </key-store> </key-stores> <ssl-contexts> <ssl-context name="client-cli-context"> <trust-store key-store-name="truststore"/> <cipher-suite selector="${cipher.suite.filter}"/> <protocol names="TLSv1"/> </ssl-context> </ssl-contexts> <ssl-context-rules> <rule use-ssl-context="client-cli-context"/> </ssl-context-rules> </authentication-client></configuration>
Red Hat JBoss Enterprise Application Platform 7.3 How to Configure Server Security
48

You have created all necessary certificates and have imported the domain controller’scertificate into each controller’s truststore.
WARNING
Red Hat recommends that SSLv2, SSLv3, and TLSv1.0 be explicitly disabled in favorof TLSv1.1 in all affected packages.
1. On the master domain controller, create an SSL/TLS security realm that is configured to useyour NSS database as a PKCS11 provider..
Example: Security Realm on the Master Domain Controller
2. On each host controller, create a security realm with an SSL/TLS truststore for authentication.
Example: Security Realm on Each Host Controller
NOTE
Repeat this process on each host.
3. Secure the HTTP interface on the master domain controller with the security realm you justcreated.
Example: HTTP Interface
<security-realm name="HTTPSRealm"> <server-identities> <ssl> <engine enabled-protocols="TLSv1.1"/> <keystore provider="PKCS11" keystore-password="strongP@ssword1"/> </ssl> </server-identities> <authentication> <local default-user="\$local"/> <properties path="https-users.properties" relative-to="jboss.domain.config.dir"/> </authentication></security-realm>
<security-realm name="HTTPSRealm"> <authentication> <truststore provider="PKCS11" keystore-password="strongP@ssword1"/> </authentication></security-realm>
<management-interfaces> <http-interface security-realm="HTTPSRealm"> <http-upgrade enabled="true"/>
CHAPTER 1. SECURING THE SERVER AND ITS INTERFACES
49
4. Use the SSL/TLS realm on each host controller to connect to the master domain controller.Update the security realm used for connecting to the master domain controller. Modify the hostcontroller’s configuration file, for example host.xml or host-slave.xml, while the server is notrunning.
Example: Host Controller Configuration File
5. Update how each server connects back to its host controller.
Example: Server Configuration
6. Configure two-way SSL/TLS in a managed domain.To enable two-way SSL/TLS, add a truststore authentication method to the SSL/TLS securityrealm for the master domain controller, execute the following management CLI commands:
/host=master/core-service=management/security-realm=HTTPSRealm/authentication=truststore:add(keystore-provider="PKCS11",keystore-password="strongP@ssword1")
reload --host=master
You also need to update each host controller’s security realm to have an SSL server identity,execute the following management CLI commands:
/host=host1/core-service=management/security-realm=HTTPSRealm/server-identity=ssl:add(keystore-provider=PKCS11, keystore-password="strongP@ssword1",enabled-protocols=["TLSv1.1"])
reload --host=host1
IMPORTANT
You also need to ensure that each host’s certificate is imported into the domaincontroller’s truststore.
<socket interface="management" port="${jboss.management.http.port:9990}"/> </http-interface></management-interfaces>
<domain-controller> <remote security-realm="HTTPSRealm"> <discovery-options> <static-discovery name="primary" protocol="${jboss.domain.master.protocol:remote}" host="${jboss.domain.master.address}" port="${jboss.domain.master.port:9990}"/> </discovery-options> </remote></domain-controller>
<server name="my-server" group="my-server-group"> <ssl ssl-protocol="TLS" trust-manager-algorithm="SunX509" truststore-type="PKCS11" truststore-password="strongP@ssword1"/></server>
Red Hat JBoss Enterprise Application Platform 7.3 How to Configure Server Security
50

1.2.15. Secure the Management Console with Red Hat Single Sign-On
You can secure the JBoss EAP management console with Red Hat Single Sign-On using the elytronsubsystem.
NOTE
This feature is only available when running a standalone server and is not supported whenrunning a managed domain. It is not supported to use Red Hat Single Sign-On to securethe management CLI.
Use the following steps to set up Red Hat Single Sign-On to authenticate users for the JBoss EAPmanagement console.
1. Configure a Red Hat Single Sign-On server for JBoss EAP management .
2. Install the Red Hat Single Sign-On client adapter on JBoss EAP .
3. Configure JBoss EAP to use Red Hat Single Sign-On .
Configure a Red Hat Single Sign-On Server for JBoss EAP Management
1. Download and install a Red Hat Single Sign-On server. See the Red Hat Single Sign-On GettingStarted Guide for basic instructions.
2. Start the Red Hat Single Sign-On server.This procedure assumes that you started the server with a port offset of 100.
$ RHSSO_HOME/bin/standalone.sh -Djboss.socket.binding.port-offset=100
3. Log in to the Red Hat Single Sign-On administration console at http://localhost:8180/auth/.If this is the first time you have accessed the Red Hat Single Sign-On administration console,you are prompted to create an initial administration user.
4. Create a new realm called wildfly-infra.
a. From the drop down next to the realm name, click Add realm, enter wildfly-infra in theName field, and click Create.
5. Create a client application called wildfly-console.
IMPORTANT
The name of this client application must be wildfly-console.
a. Select Clients and click Create.
b. Enter wildfly-console in the Client ID field and click Save.
c. In the Settings screen that appears, set Access Type to public, Valid Redirect URIs to http://localhost:9990/console/*, Web Origins to http://localhost:9990, and click Save.
6. Create a client application called wildfly-management.
a. Select Clients and click Create.
CHAPTER 1. SECURING THE SERVER AND ITS INTERFACES
51
b. Enter wildfly-management in the Client ID field and click Save.
c. In the Settings screen that appears, set Access Type to bearer-only and click Save.
7. Create a role to grant access to the JBoss EAP management console.
a. Select Roles and click Add Role.
b. Enter ADMINISTRATOR in uppercase in the Role Name field and click Save.This procedure uses the ADMINISTRATOR role, but other roles are supported. For moreinformation, see the Role-Based Access Control section of JBoss EAP’s SecurityArchitecture.
8. Create a user and assign the ADMINISTRATOR role to them.
a. Select Users and click Add user.
b. Enter jboss in the Username field and click Save.
c. Select the Credentials tab and set a password for this user.
d. Select the Role Mappings tab, select ADMINISTRATOR and click Add selected to add therole to this user.
Install the Red Hat Single Sign-On Client Adapter on JBoss EAP
1. Download the Red Hat Single Sign-On client adapter for JBoss EAP 7 from the softwaredownloads page.
2. Unzip this file into the root directory of your JBoss EAP installation.
3. Execute the adapter-elytron-install-offline.cli script to configure your JBoss EAP installation.
$ EAP_HOME/bin/jboss-cli.sh --file=adapter-elytron-install-offline.cli
IMPORTANT
This script adds the keycloak subsystem and other required resources in the elytron and undertow subsystems to standalone.xml. If you need to use adifferent configuration file, modify the script as needed.
Configure JBoss EAP to Use Red Hat Single Sign-On
1. In the EAP_HOME/bin/ directory, create a file called protect-eap-mgmt-services.cli with thefollowing contents.
# Create a realm for both JBoss EAP console and mgmt interface/subsystem=keycloak/realm=wildfly-infra:add(auth-server-url=http://localhost:8180/auth,realm-public-key=REALM_PUBLIC_KEY)
# Create a secure-deployment in order to protect mgmt interface/subsystem=keycloak/secure-deployment=wildfly-management:add(realm=wildfly-infra,resource=wildfly-management,principal-attribute=preferred_username,bearer-only=true,ssl-required=EXTERNAL)
# Protect HTTP mgmt interface with Keycloak adapter
Red Hat JBoss Enterprise Application Platform 7.3 How to Configure Server Security
52
2. In this file, replace REALM_PUBLIC_KEY with the value of the public key. To obtain this value,log in to the Red Hat Single Sign-On administration console, select the wildfly-infra realm,navigate to Realm Settings → Keys and click Public key.
3. Start JBoss EAP.
$ EAP_HOME/bin/standalone.sh
IMPORTANT
If you modified the adapter-elytron-install-offline.cli script when installing theRed Hat Single Sign-On client adapter to use a configuration file other than standalone.xml, be sure to start the JBoss EAP using that configuration.
4. Execute the protect-eap-mgmt-services.cli script.
$ EAP_HOME/bin/jboss-cli.sh --connect --file=protect-eap-mgmt-services.cli
Now, when you access the JBoss EAP management console at http://localhost:9990/console/, you areredirected to Red Hat Single Sign-On to log in, and then redirected back to the JBoss EAPmanagement console upon successful authentication.
1.3. SECURITY AUDITING
Security auditing refers to triggering events, such as writing to a log, in response to an authorization orauthentication attempt. Auditing is configured differently depending on the security system in use.
For instructions on configuring auditing with Elytron, see Elytron Audit Logging.
/core-service=management/management-interface=http-interface:undefine-attribute(name=security-realm)/subsystem=elytron/http-authentication-factory=keycloak-mgmt-http-authentication:add(security-domain=KeycloakDomain,http-server-mechanism-factory=wildfly-management,mechanism-configurations=[{mechanism-name=KEYCLOAK,mechanism-realm-configurations=[{realm-name=KeycloakOIDCRealm,realm-mapper=keycloak-oidc-realm-mapper}]}])/core-service=management/management-interface=http-interface:write-attribute(name=http-authentication-factory,value=keycloak-mgmt-http-authentication)/core-service=management/management-interface=http-interface:write-attribute(name=http-upgrade, value={enabled=true, sasl-authentication-factory=management-sasl-authentication})
# Enable RBAC where roles are obtained from the identity/core-service=management/access=authorization:write-attribute(name=provider,value=rbac)/core-service=management/access=authorization:write-attribute(name=use-identity-roles,value=true)
# Create a secure-server in order to publish the JBoss EAP console configuration via mgmt interface/subsystem=keycloak/secure-server=wildfly-console:add(realm=wildfly-infra,resource=wildfly-console,public-client=true)
# reloadreload
CHAPTER 1. SECURING THE SERVER AND ITS INTERFACES
53

For instructions on configuring auditing with the legacy security system, see Configure SecurityAuditing for the Legacy Security Domains.
1.3.1. Elytron Audit Logging
Audit logging for the elytron subsystem enables logging of Elytron authentication and authorizationevents within the application server. Audit log entries are stored in either JSON or SIMPLE, humanreadable format. By default, audit logging is disabled in Elytron.
You can enable audit logging by configuring any of the following log handlers for Elytron, and thenadding them to the desired security domain:
file audit logging
periodic rotating file audit logging
size rotating file audit logging
syslog audit logging
IMPORTANT
Elytron audit logging is distinct from other audit logging, such as audit logging for theJBoss EAP management interfaces. For more information on management interfaceaudit logging options, see the Management Audit Logging section in the JBoss EAPConfiguration Guide.
File Audit LoggingFile audit logging stores audit log messages in one specified file in the file system, without dividing theminto multiple files.
An Elytron file audit logger, named local-audit, is defined by default. Once enabled, it will write Elytronaudit logs to EAP_HOME/standalone/log/audit.log on a standalone server, or EAP_HOME/domain/log/audit.log for a managed domain host.
The attributes of a file audit logger are:
path and relative-to: Defines the location of the log file.
autoflush: Specifies whether the output stream should be flushed after every audit event. If thisattribute is undefined, it uses the value of synchronized.
synchronized: Specifies whether the file descriptor should be synchronized after every auditevent. The default is true.
format: Use SIMPLE for human readable text format, or JSON for storing individual events inJSON.
1. You can use a command similar to the following to create a file audit log.
/subsystem=elytron/file-audit-log=my_audit_log:add(path="my_audit.log",relative-to="jboss.server.log.dir",format=SIMPLE,synchronized=true)
2. Enable the defined file audit logger by adding it to a security domain.
Red Hat JBoss Enterprise Application Platform 7.3 How to Configure Server Security
54

/subsystem=elytron/security-domain=domain-with-file-logger:write-attribute(name=security-event-listener, value=my_audit_log)
Periodic Rotating File Audit LoggingPeriodic rotating file audit logging automatically rotates audit log files based on a configured schedule. Ithas the same basic attributes as the default file audit logger , with the following additional attribute:
suffix: This must be in the java.text.SimpleDateFormat format, for example .yyyy-MM-dd-HH.The period of the rotation is automatically calculated based on this suffix, and the suffix isappended to the end of the log file names.
1. You can use a command similar to the following to create a periodic rotating file audit log.
/subsystem=elytron/periodic-rotating-file-audit-log=my_periodic_audit_log:add(path="my_periodic_audit.log",relative-to="jboss.server.log.dir",format=SIMPLE,synchronized=false,suffix=".yyyy-MM-dd-HH")
2. Enable the defined periodic rotating file audit logger by adding it to a security domain.
/subsystem=elytron/security-domain=domain-with-periodic-file-logger:write-attribute(name=security-event-listener, value=my_periodic_audit_log)
Size Rotating File Audit LoggingSize rotating file audit logging automatically rotates audit log files when the log file reaches a configuredfile size. It has the same basic attributes as the default file audit logger , with the following additionalattributes:
rotate-size: The maximum size that the log file can reach before being rotated. The default is 2m for 2 megabytes.
max-backup-index: The maximum number of files to backup when rotating.
rotate-on-boot: By default, a new log file is not created on server restart. You can set this to true to rotate the log on server restart.
suffix: This optionally adds a date suffix to a rotated log. This must be in the java.text.SimpleDateFormat format, for example .yyyy-MM-dd-HH.
When the log file size exceeds the limit defined by the rotate-size attribute, the suffix .1 is appended tothe end of the current file and a new log file is created. If there are any existing log files, their suffixednumber is incremented by one, for example audit_log.1 is renamed to audit_log.2. This happens untilthe maximum number of log files defined by max-backup-index is reached. When the max-backup-index is exceeded, the file that is over limit, for example audit_log.99, is removed.
1. You can use a command similar to the following to create a size rotating file audit log.
/subsystem=elytron/size-rotating-file-audit-log=my_size_log:add(path="my_size_audit.log",relative-to="jboss.server.log.dir",format=SIMPLE,synchronized=false,rotate-size="2m",max-backup-index=10)
2. Enable the defined size rotating audit logger by adding it to a security domain.
/subsystem=elytron/security-domain=domain-with-size-logger:write-attribute(name=security-event-listener, value=my_size_log)
CHAPTER 1. SECURING THE SERVER AND ITS INTERFACES
55

Syslog Audit LoggingA syslog handler specifies the parameters by which audit log entries are sent to a syslog server,specifically the syslog server’s host name and port on which the syslog server is listening. Sending auditlogging to a syslog server provides more security options than logging to a local file or local syslogserver. Multiple syslog handlers can be defined and be active at the same time.
When a syslog logger is defined for the first time, the logger sends an INFORMATIONAL priority eventto syslog server containing the message:
"Elytron audit logging enabled with RFC format: <format>"
<format> is the RFC format configured for the audit logging handler, defaulting to RFC5424.
Supported log formats:
RFC5424
RFC3164
Supported transmission protocols:
UDP
TCP
TCP with SSL
For a list of syslog-audit-log attributes, see syslog-audit-log Attributes .
Procedure
1. Add a syslog handler.
/subsystem=elytron/syslog-audit-log=syslog-logger:add(host-name=HOST_NAME, port=PORT, server-address=SERVER_ADDRESS, format=JSON, transport=UDP)
2. Enable the defined syslog audit logger by adding it to a security domain.
/subsystem=elytron/security-domain=domain-with-syslog-logger:write-attribute(name=security-event-listener, value=syslog-logger)
IMPORTANT
To send logs to syslog server over TLS, you can add the following configuration:
/subsystem=elytron/syslog-audit-log=remote-audit:add(transport=SSL_TCP,server-address=127.0.0.1,port=9898,host-name=Elytron,ssl-context=audit-ssl)
NOTE
To send security events to more destinations, mainly loggers, the aggregate-security-event-listener resource is used. This delivers all events to all listeners specified in theaggregate listener definition.
Red Hat JBoss Enterprise Application Platform 7.3 How to Configure Server Security
56
1.3.1.1. Custom Security Event Listeners for Elytron
You can define a custom event listener to adjust how incoming security events are processed. Thisevent listener can be used for custom audit logging, or to authenticate users against your internalidentity storage.
1. Create a class that implements the java.util.function.Consumer<org.wildfly.security.auth.server.event.SecurityEvent>interface. For example, the following prints a message whenever a user succeeds or failsauthentication.
2. Add the JAR providing the custom event listener as a module to JBoss EAP, as outlined in Add aCustom Component to Elytron. The following is an example of the management CLI commandthat adds a custom event listener as a module to Elytron.
/subsystem=elytron/custom-security-event-listener=LISTENER_NAME:add(module=MODULE_NAME, class-name=CLASS_NAME)
IMPORTANT
Using the module management CLI command to add and remove modules isprovided as Technology Preview only. This command is not appropriate for use ina managed domain or when connecting to the management CLI remotely.Modules should be added and removed manually in a production environment.For more information, see the Create a Custom Module Manually and Remove aCustom Module Manually sections of the JBoss EAP Configuration Guide.
Technology Preview features are not supported with Red Hat production servicelevel agreements (SLAs), might not be functionally complete, and Red Hat doesnot recommend to use them for production. These features provide early accessto upcoming product features, enabling customers to test functionality andprovide feedback during the development process.
See Technology Preview Features Support Scope on the Red Hat CustomerPortal for information about the support scope for Technology Preview features.
3. Reference the newly defined listener from the security domain, such as ApplicationDomain.
/subsystem=elytron/security-domain=DOMAIN_NAME:write-attribute(name=security-event-listener, value=LISTENER_NAME)
4. Reload the server to begin receiving security events from the provided security domain.
public class MySecurityEventListener implements Consumer<SecurityEvent> { public void accept(SecurityEvent securityEvent) { if (securityEvent instanceof SecurityAuthenticationSuccessfulEvent) { System.err.printf("Authenticated user \"%s\"\n", securityEvent.getSecurityIdentity().getPrincipal()); } else if (securityEvent instanceof SecurityAuthenticationFailedEvent) { System.err.printf("Failed authentication as user \"%s\"\n", ((SecurityAuthenticationFailedEvent)securityEvent).getPrincipal()); } }}
CHAPTER 1. SECURING THE SERVER AND ITS INTERFACES
57
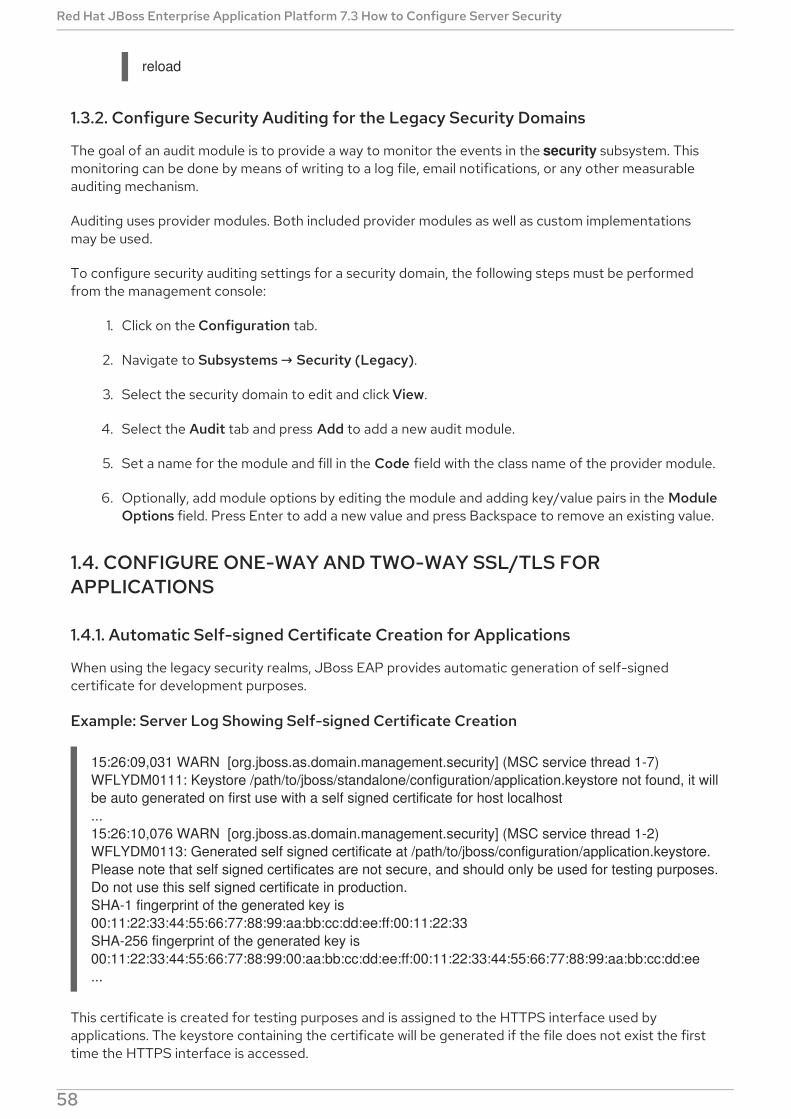
reload
1.3.2. Configure Security Auditing for the Legacy Security Domains
The goal of an audit module is to provide a way to monitor the events in the security subsystem. Thismonitoring can be done by means of writing to a log file, email notifications, or any other measurableauditing mechanism.
Auditing uses provider modules. Both included provider modules as well as custom implementationsmay be used.
To configure security auditing settings for a security domain, the following steps must be performedfrom the management console:
1. Click on the Configuration tab.
2. Navigate to Subsystems → Security (Legacy).
3. Select the security domain to edit and click View.
4. Select the Audit tab and press Add to add a new audit module.
5. Set a name for the module and fill in the Code field with the class name of the provider module.
6. Optionally, add module options by editing the module and adding key/value pairs in the ModuleOptions field. Press Enter to add a new value and press Backspace to remove an existing value.
1.4. CONFIGURE ONE-WAY AND TWO-WAY SSL/TLS FORAPPLICATIONS
1.4.1. Automatic Self-signed Certificate Creation for Applications
When using the legacy security realms, JBoss EAP provides automatic generation of self-signedcertificate for development purposes.
Example: Server Log Showing Self-signed Certificate Creation
15:26:09,031 WARN [org.jboss.as.domain.management.security] (MSC service thread 1-7) WFLYDM0111: Keystore /path/to/jboss/standalone/configuration/application.keystore not found, it will be auto generated on first use with a self signed certificate for host localhost...15:26:10,076 WARN [org.jboss.as.domain.management.security] (MSC service thread 1-2) WFLYDM0113: Generated self signed certificate at /path/to/jboss/configuration/application.keystore. Please note that self signed certificates are not secure, and should only be used for testing purposes. Do not use this self signed certificate in production.SHA-1 fingerprint of the generated key is 00:11:22:33:44:55:66:77:88:99:aa:bb:cc:dd:ee:ff:00:11:22:33SHA-256 fingerprint of the generated key is 00:11:22:33:44:55:66:77:88:99:00:aa:bb:cc:dd:ee:ff:00:11:22:33:44:55:66:77:88:99:aa:bb:cc:dd:ee...
This certificate is created for testing purposes and is assigned to the HTTPS interface used byapplications. The keystore containing the certificate will be generated if the file does not exist the firsttime the HTTPS interface is accessed.
Red Hat JBoss Enterprise Application Platform 7.3 How to Configure Server Security
58
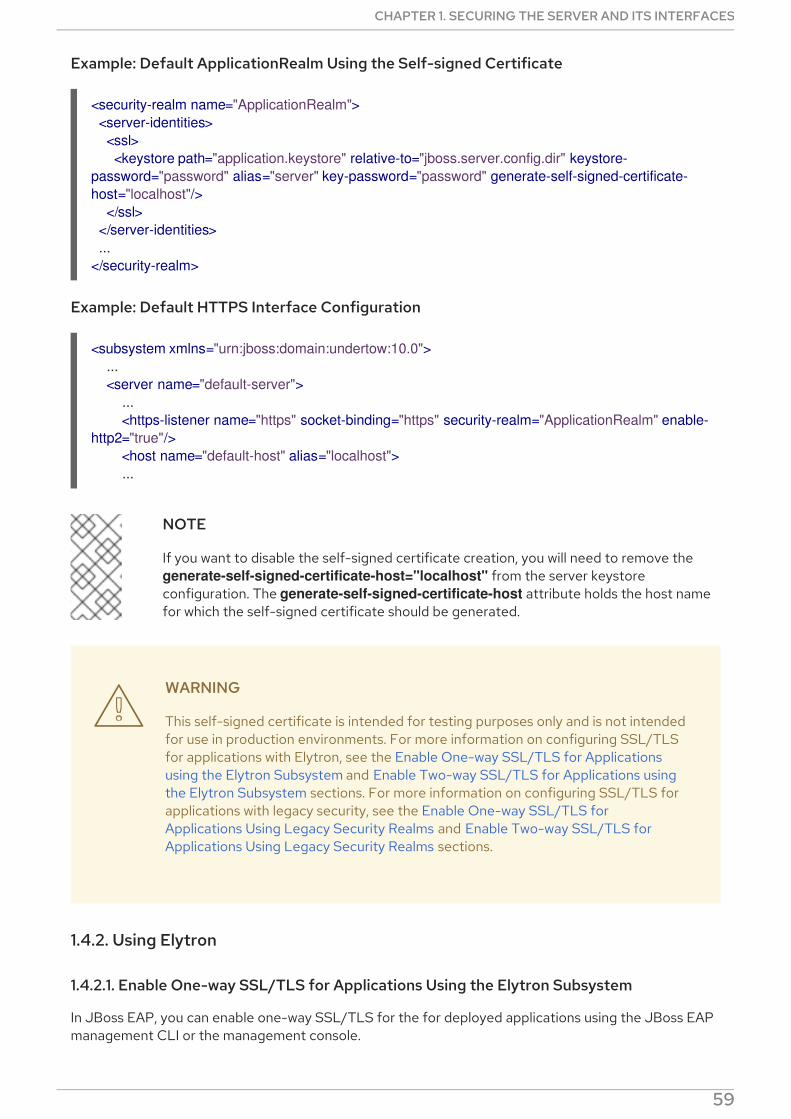
Example: Default ApplicationRealm Using the Self-signed Certificate
Example: Default HTTPS Interface Configuration
NOTE
If you want to disable the self-signed certificate creation, you will need to remove the generate-self-signed-certificate-host="localhost" from the server keystoreconfiguration. The generate-self-signed-certificate-host attribute holds the host namefor which the self-signed certificate should be generated.
WARNING
This self-signed certificate is intended for testing purposes only and is not intendedfor use in production environments. For more information on configuring SSL/TLSfor applications with Elytron, see the Enable One-way SSL/TLS for Applicationsusing the Elytron Subsystem and Enable Two-way SSL/TLS for Applications usingthe Elytron Subsystem sections. For more information on configuring SSL/TLS forapplications with legacy security, see the Enable One-way SSL/TLS forApplications Using Legacy Security Realms and Enable Two-way SSL/TLS forApplications Using Legacy Security Realms sections.
1.4.2. Using Elytron
1.4.2.1. Enable One-way SSL/TLS for Applications Using the Elytron Subsystem
In JBoss EAP, you can enable one-way SSL/TLS for the for deployed applications using the JBoss EAPmanagement CLI or the management console.
<security-realm name="ApplicationRealm"> <server-identities> <ssl> <keystore path="application.keystore" relative-to="jboss.server.config.dir" keystore-password="password" alias="server" key-password="password" generate-self-signed-certificate-host="localhost"/> </ssl> </server-identities> ...</security-realm>
<subsystem xmlns="urn:jboss:domain:undertow:10.0"> ... <server name="default-server"> ... <https-listener name="https" socket-binding="https" security-realm="ApplicationRealm" enable-http2="true"/> <host name="default-host" alias="localhost"> ...
CHAPTER 1. SECURING THE SERVER AND ITS INTERFACES
59
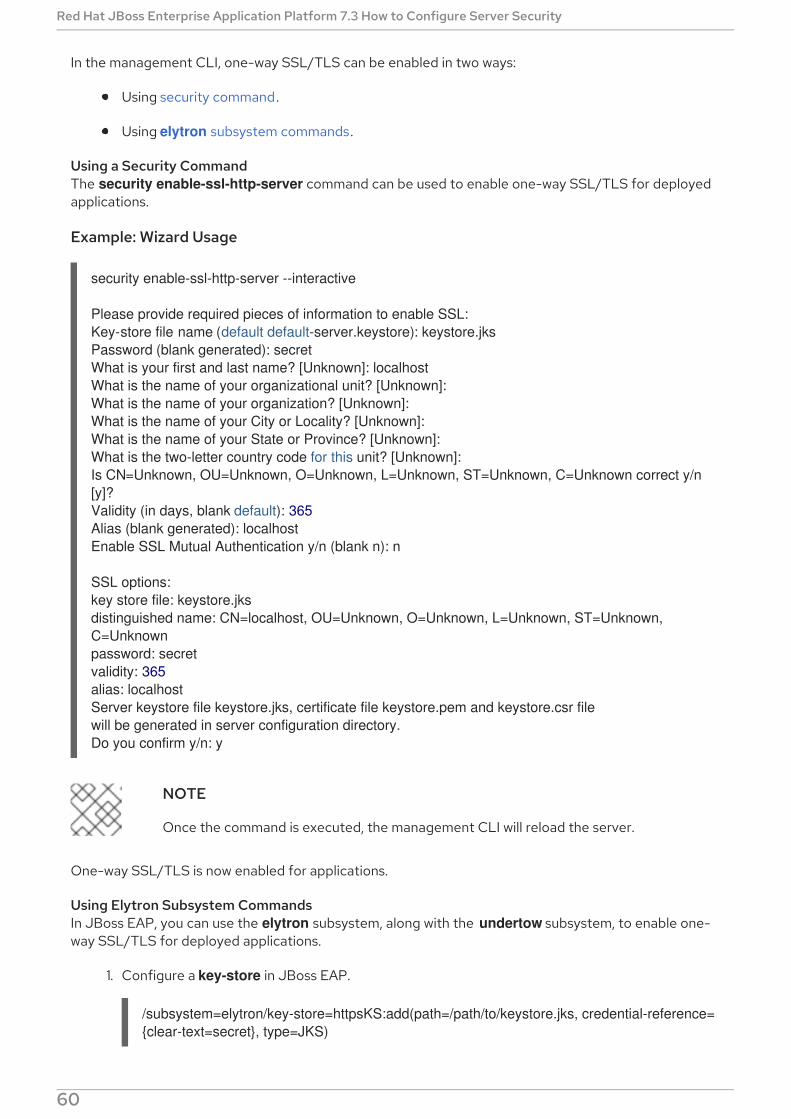
In the management CLI, one-way SSL/TLS can be enabled in two ways:
Using security command.
Using elytron subsystem commands.
Using a Security CommandThe security enable-ssl-http-server command can be used to enable one-way SSL/TLS for deployedapplications.
Example: Wizard Usage
NOTE
Once the command is executed, the management CLI will reload the server.
One-way SSL/TLS is now enabled for applications.
Using Elytron Subsystem CommandsIn JBoss EAP, you can use the elytron subsystem, along with the undertow subsystem, to enable one-way SSL/TLS for deployed applications.
1. Configure a key-store in JBoss EAP.
/subsystem=elytron/key-store=httpsKS:add(path=/path/to/keystore.jks, credential-reference={clear-text=secret}, type=JKS)
security enable-ssl-http-server --interactive
Please provide required pieces of information to enable SSL:Key-store file name (default default-server.keystore): keystore.jksPassword (blank generated): secretWhat is your first and last name? [Unknown]: localhostWhat is the name of your organizational unit? [Unknown]:What is the name of your organization? [Unknown]:What is the name of your City or Locality? [Unknown]:What is the name of your State or Province? [Unknown]:What is the two-letter country code for this unit? [Unknown]:Is CN=Unknown, OU=Unknown, O=Unknown, L=Unknown, ST=Unknown, C=Unknown correct y/n [y]?Validity (in days, blank default): 365Alias (blank generated): localhostEnable SSL Mutual Authentication y/n (blank n): n
SSL options:key store file: keystore.jksdistinguished name: CN=localhost, OU=Unknown, O=Unknown, L=Unknown, ST=Unknown, C=Unknownpassword: secretvalidity: 365alias: localhostServer keystore file keystore.jks, certificate file keystore.pem and keystore.csr filewill be generated in server configuration directory.Do you confirm y/n: y
Red Hat JBoss Enterprise Application Platform 7.3 How to Configure Server Security
60

If the keystore file does not exist yet, the following commands can be used to generate anexample key pair:
/subsystem=elytron/key-store=httpsKS:generate-key-pair(alias=localhost,algorithm=RSA,key-size=1024,validity=365,credential-reference={clear-text=secret},distinguished-name="CN=localhost")
/subsystem=elytron/key-store=httpsKS:store()
2. Configure a key-manager that references your key-store.
/subsystem=elytron/key-manager=httpsKM:add(key-store=httpsKS, algorithm="SunX509", credential-reference={clear-text=secret})
IMPORTANT
You need to know what key manager algorithms are provided by the JDK you areusing. For example, a JDK that uses SunJSSE provides the PKIX and SunX509algorithms.
The example command above uses SunX509 for the key manager algorithm.
3. Configure a server-ssl-context that references your key-manager.
/subsystem=elytron/server-ssl-context=httpsSSC:add(key-manager=httpsKM, protocols=["TLSv1.2"])
IMPORTANT
You need to determine what SSL/TLS protocols you want to support. Theexample command above uses TLSv1.2. You can use the cipher-suite-filterargument to specify which cipher suites are allowed, and the use-cipher-suites-order argument to honor server cipher suite order. The use-cipher-suites-orderattribute by default is set to true. This differs from the legacy securitysubsystem behavior, which defaults to honoring client cipher suite order.
WARNING
Red Hat recommends that SSLv2, SSLv3, and TLSv1.0 be explicitlydisabled in favor of TLSv1.1 or TLSv1.2 in all affected packages.
4. Check and see if the https-listener is configured to use a legacy security realm for its SSLconfiguration.
/subsystem=undertow/server=default-server/https-listener=https:read-attribute(name=security-realm){
CHAPTER 1. SECURING THE SERVER AND ITS INTERFACES
61
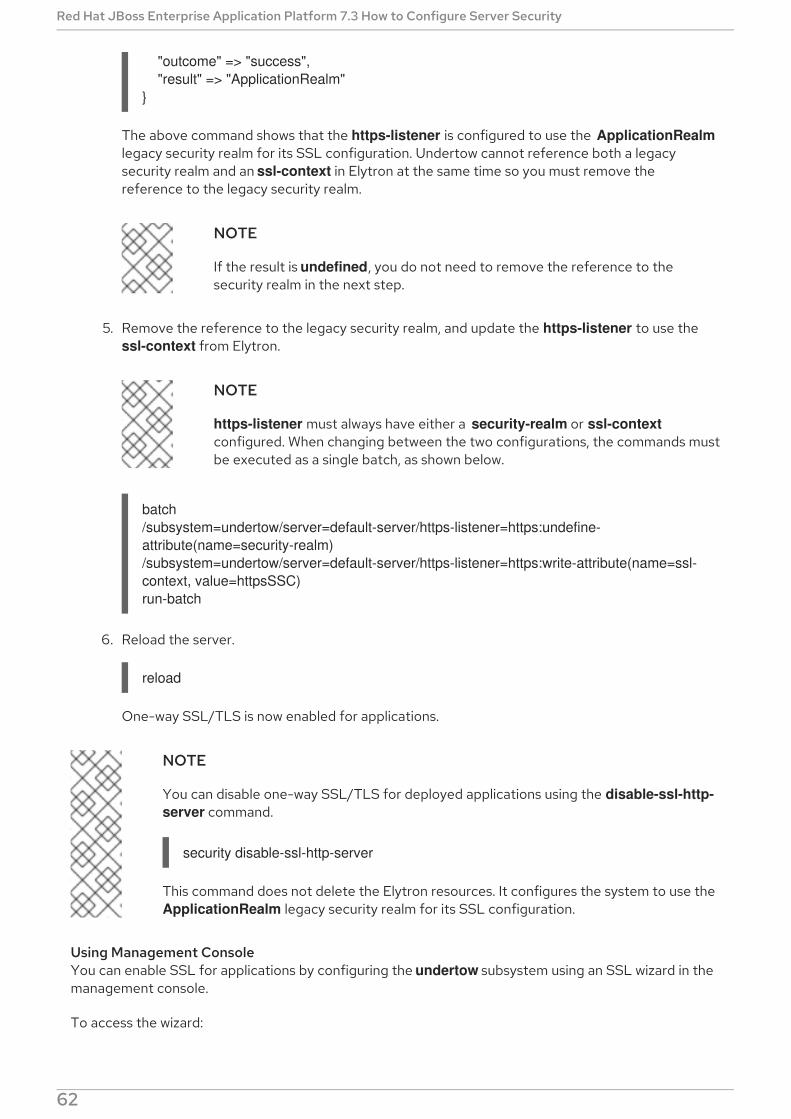
"outcome" => "success", "result" => "ApplicationRealm"}
The above command shows that the https-listener is configured to use the ApplicationRealmlegacy security realm for its SSL configuration. Undertow cannot reference both a legacysecurity realm and an ssl-context in Elytron at the same time so you must remove thereference to the legacy security realm.
NOTE
If the result is undefined, you do not need to remove the reference to thesecurity realm in the next step.
5. Remove the reference to the legacy security realm, and update the https-listener to use the ssl-context from Elytron.
NOTE
https-listener must always have either a security-realm or ssl-contextconfigured. When changing between the two configurations, the commands mustbe executed as a single batch, as shown below.
batch/subsystem=undertow/server=default-server/https-listener=https:undefine-attribute(name=security-realm)/subsystem=undertow/server=default-server/https-listener=https:write-attribute(name=ssl-context, value=httpsSSC)run-batch
6. Reload the server.
reload
One-way SSL/TLS is now enabled for applications.
NOTE
You can disable one-way SSL/TLS for deployed applications using the disable-ssl-http-server command.
This command does not delete the Elytron resources. It configures the system to use the ApplicationRealm legacy security realm for its SSL configuration.
Using Management ConsoleYou can enable SSL for applications by configuring the undertow subsystem using an SSL wizard in themanagement console.
To access the wizard:
1. Access the management console. For more information, see the Management Console section
security disable-ssl-http-server
Red Hat JBoss Enterprise Application Platform 7.3 How to Configure Server Security
62
1. Access the management console. For more information, see the Management Console sectionin the JBoss EAP Configuration Guide.
2. Navigate to Configuration → Subsystems → Web (Undertow) → Server.
3. Click the name of the server to configure.
4. Click View.
5. Navigate to Listener → HTTPS Listener.
6. Select the listener for which SSL is to be enabled, and click Enable SSL to launch the wizard.The wizard guides you through the following scenarios for enabling SSL:
You want to create a certificate store and generate a self-signed certificate.
You want to obtain a certificate from Let’s Encrypt Certificate Authority.
You already have the certificate store on the file system, but no keystore configuration.
You already have a keystore configuration that uses a valid certificate store.
Using the wizard, you can optionally create a truststore for mutual authentication.
1.4.2.2. Enable Two-way SSL/TLS for Applications Using the Elytron Subsystem
1. Obtain or generate your client keystores:
2. Export the client certificate:
3. Enable two-way SSL/TLS for deployed applications.In JBoss EAP, two-way SSL/TLS for deployed applications can be enabled either by using asecurity command or by using the elytron subsystem commands.
a. Using a security command.The security enable-ssl-http-server command can be used to enable two-way SSL/TLSfor the deployed applications.
NOTE
The following example does not validate the certificate as no chain of trustexists. If you are using a trusted certificate, then the client certificate can bevalidated without issue.
Example: Wizard Usage
$ keytool -genkeypair -alias client -keyalg RSA -keysize 1024 -validity 365 -keystore client.keystore.jks -dname "CN=client" -keypass secret -storepass secret
keytool -exportcert -keystore client.keystore.jks -alias client -keypass secret -storepass secret -file /path/to/client.cer
security enable-ssl-http-server --interactive
CHAPTER 1. SECURING THE SERVER AND ITS INTERFACES
63
NOTE
Once the command is executed, the management CLI will reload the server.
To complete the two-way SSL/TLS authentication, you need to import theserver certificate into the client truststore and configure your client topresent the client certificate.
b. Using elytron subsystem commands.In JBoss EAP, you can also use the elytron subsystem, along with the undertow subsystem,to enable two-way SSL/TLS for deployed applications.
i. Obtain or generate your keystore.Before enabling two-way SSL/TLS in JBoss EAP, you must obtain or generate thekeystores, truststores and certificates you plan on using.
A. Create a server keystore:
/subsystem=elytron/key-store=twoWayKS:add(path=/PATH/TO/server.keystore.jks,credential-reference=
Please provide required pieces of information to enable SSL:Key-store file name (default default-server.keystore): server.keystore.jksPassword (blank generated): secretWhat is your first and last name? [Unknown]: localhostWhat is the name of your organizational unit? [Unknown]:What is the name of your organization? [Unknown]:What is the name of your City or Locality? [Unknown]:What is the name of your State or Province? [Unknown]:What is the two-letter country code for this unit? [Unknown]:Is CN=Unknown, OU=Unknown, O=Unknown, L=Unknown, ST=Unknown, C=Unknown correct y/n [y]?Validity (in days, blank default): 365Alias (blank generated): localhostEnable SSL Mutual Authentication y/n (blank n): yClient certificate (path to pem file): /path/to/client.cerValidate certificate y/n (blank y): nTrust-store file name (management.truststore): server.truststore.jksPassword (blank generated): secret
SSL options:key store file: server.keystore.jksdistinguished name: CN=localhost, OU=Unknown, O=Unknown, L=Unknown, ST=Unknown, C=Unknownpassword: secretvalidity: 365alias: localhostclient certificate: /path/to/client.certrust store file: server.trustore.jkstrust store password: secretServer keystore file server.keystore.jks, certificate file server.pem and server.csr file will be generated in server configuration directory.Server truststore file server.trustore.jks will be generated in server configuration directory.Do you confirm y/n: y
Red Hat JBoss Enterprise Application Platform 7.3 How to Configure Server Security
64

{clear-text=secret},type=JKS)
/subsystem=elytron/key-store=twoWayKS:generate-key-pair(alias=localhost,algorithm=RSA,key-size=1024,validity=365,credential-reference={clear-text=secret},distinguished-name="CN=localhost")
/subsystem=elytron/key-store=twoWayKS:store()
NOTE
The command above uses an absolute path to the keystore.Alternatively you can use the relative-to attribute to specify thebase directory variable and path specify a relative path.
/subsystem=elytron/key-store=twoWayKS:add(path=server.keystore.jks,relative-to=jboss.server.config.dir,credential-reference={clear-text=secret},type=JKS)
B. Export the server certificate:
/subsystem=elytron/key-store=twoWayKS:export-certificate(alias=localhost,path=/path/to/server.cer,pem=true)
ii. Create a keystore for the server truststore and import the client certificate into theserver truststore.
NOTE
The following example does not validate the certificate as no chain oftrust exists. If you are using a trusted certificate, then the clientcertificate can be validated without issue.
/subsystem=elytron/key-store=twoWayTS:add(path=/path/to/server.truststore.jks,credential-reference={clear-text=secret},type=JKS)
/subsystem=elytron/key-store=twoWayTS:import-certificate(alias=client,path=/path/to/client.cer,credential-reference={clear-text=secret},trust-cacerts=true,validate=false)
/subsystem=elytron/key-store=twoWayTS:store()
iii. Configure a key-manager that references your keystore key-store.
/subsystem=elytron/key-manager=twoWayKM:add(key-store=twoWayKS, algorithm="SunX509", credential-reference={clear-text=secret})
IMPORTANT
CHAPTER 1. SECURING THE SERVER AND ITS INTERFACES
65

IMPORTANT
You need to know what key manager algorithms are provided by the JDKyou are using. For example, a JDK that uses SunJSSE provides the PKIXand SunX509 algorithms.
The example command below uses SunX509 for the key manageralgorithm.
iv. Configure a trust-manager that references your truststore key-store.
/subsystem=elytron/trust-manager=twoWayTM:add(key-store=twoWayTS, algorithm="SunX509")
IMPORTANT
You need to know what key manager algorithms are provided by the JDKyou are using. For example, a JDK that uses SunJSSE provides the PKIXand SunX509 algorithms.
The example command above uses SunX509 for the key manageralgorithm.
v. Configure a server-ssl-context that references your key-manager, trust-manager,and enables client authentication:
/subsystem=elytron/server-ssl-context=twoWaySSC:add(key-manager=twoWayKM, protocols=["TLSv1.2"], trust-manager=twoWayTM, need-client-auth=true)
IMPORTANT
You need to determine what SSL/TLS protocols you want to support.The example command above uses TLSv1.2. You can use the cipher-suite-filter argument to specify which cipher suites are allowed, and the use-cipher-suites-order argument to honor server cipher suite order.The use-cipher-suites-order attribute by default is set to true. Thisdiffers from the legacy security subsystem behavior, which defaults tohonoring client cipher suite order.
WARNING
Red Hat recommends that SSLv2, SSLv3, and TLSv1.0 be explicitlydisabled in favor of TLSv1.1 or TLSv1.2 in all affected packages.
vi. Check and see if the https-listener is configured to use a legacy security realm for itsSSL configuration.
/subsystem=undertow/server=default-server/https-listener=https:read-
Red Hat JBoss Enterprise Application Platform 7.3 How to Configure Server Security
66

attribute(name=security-realm){ "outcome" => "success", "result" => "ApplicationRealm"}
The above command shows that the https-listener is configured to use the ApplicationRealm legacy security realm for its SSL configuration. Undertow cannotreference both a legacy security realm and an ssl-context in the elytron subsystem atthe same time. So you must remove the reference to the legacy security realm.
NOTE
If the result is undefined, you do not need to remove the reference tothe security realm in the next step.
vii. Remove the reference to the legacy security realm, and update the https-listener touse the ssl-context from Elytron.
NOTE
https-listener must always have either a security-realm or ssl-contextconfigured. When changing between the two configurations, thecommands must be executed as a single batch, as shown below.
batch/subsystem=undertow/server=default-server/https-listener=https:undefine-attribute(name=security-realm)/subsystem=undertow/server=default-server/https-listener=https:write-attribute(name=ssl-context, value=twoWaySSC)run-batch
viii. Reload the server.
reload
NOTE
To complete the two-way SSL/TLS authentication, you need to importthe server certificate into the client truststore and configure your clientto present the client certificate.
$ keytool -importcert -keystore client.truststore.jks -storepass secret -alias localhost -trustcacerts -file /path/to/server.cer
ix. Configure your client to use the client certificate.You need to configure your client to present the trusted client certificate to the serverto complete the two-way SSL/TLS authentication. For example, if using a browser, youneed to import the trusted certificate into the browser’s trust store.
This procedure forces a two-way SSL/TLS but it does not change the originalauthentication method of the application.
CHAPTER 1. SECURING THE SERVER AND ITS INTERFACES
67
If you want to change the original authentication method, see Configure Authenticationwith Certificates in How to Configure Identity Management for JBoss EAP.
Two-way SSL/TLS is now enabled for applications.
NOTE
You can disable two-way SSL/TLS for deployed applications using the disable-ssl-http-server command.
This command does not delete the Elytron resources. It configures the system to use the ApplicationRealm legacy security realm for its SSL configuration.
1.4.3. Configuring Certificate Revocation Using CRL in Elytron
Configure the trust manager used for enabling two-way SSL/TLS to use Certificate Revocation List(CRL) for certificate revocation in Elytron.
Prerequisites
The trust manager is configured to use two-way SSL/TLS.
The trust manager contains the certificate chain to be checked for revocation.
Procedure
1. Configure the trust manager to use CRLs obtained from distribution points referenced in yourcertificates.
/subsystem=elytron/trust-manager=twoWayTM:write-attribute(name=certificate-revocation-list,value={})
2. Override the CRL obtained from distribution points referenced in your certificates.
/subsystem=elytron/trust-manager=twoWayTM:write-attribute(name=certificate-revocation-list.path, value=intermediate.crl.pem)
3. Configure trust-manager to use CRL for certificate revocation.
If an OCSP responder is also configured for certificate revocation, add attribute ocsp.prefer-crls with the value true in the trust manager to use CRL for certificaterevocation:
/subsystem=elytron/trust-manager=twoWayTM:write-attribute(name=ocsp.prefer-crls,value="true")
If no OCSP responder is configured for certificate revocation, the configuration is complete.
Additional Information
For a complete list of CRL attributes, see trust-manager Attributes.
security disable-ssl-http-server
Red Hat JBoss Enterprise Application Platform 7.3 How to Configure Server Security
68
1.4.4. Configuring Certification Revocation Using OCSP in Elyton
Configure the trust manager used for enabling two-way SSL/TLS to use an Online Certificate StatusProtocol (OCSP) responder for certificate revocation. OCSP is defined in RFC6960.
When both OCSP responder and CRL are configured for certificate revocation, the OCSP responder isinvoked by default.
Prerequisites
The trust manager is configured to use two-way SSL/TLS.
Procedure
1. Configure the trust manager to use the OCSP responder defined in the certificate forcertificate revocation.
/subsystem=elytron/trust-manager=twoWayTM:write-attribute(name=ocsp,value={})
2. Override OCSP responder defined in the certificate.
/subsystem=elytron/trust-manager=twoWayTM:write-attribute(name=ocsp.responder,value="http://example.com/ocsp-responder")
Additional Information
For a complete list of attributes, see online-certificate-status Attributes.
1.4.5. Using Legacy Security Realms
IMPORTANT
As a prerequisite, an SSL/TLS encryption key and certificate should be created andplaced in an accessible directory. Additionally, relevant information, such as keystorealiases and passwords, desired cipher suites, should also be accessible. For examples ongenerating SSL/TLS Keys and Certificates, see the first two steps in the Setting up Two-way SSL/TLS for the Management Interfaces section. For more information about theHTTPS listener, including cipher suites, see the HTTPS Listener Reference section.
1.4.5.1. Enable One-way SSL/TLS for Applications Using Legacy Security Realms
This example assumes that the keystore, identity.jks, has been copied to the server configurationdirectory and configured with the given properties. Administrators should substitute their own values forthe example ones.
NOTE
The management CLI commands shown assume that you are running a JBoss EAPstandalone server. For more details on using the management CLI for a JBoss EAPmanaged domain, see the JBoss EAP Management CLI Guide .
1. Add and configure an HTTPS security realm first. Once the HTTPS security realm has been
CHAPTER 1. SECURING THE SERVER AND ITS INTERFACES
69
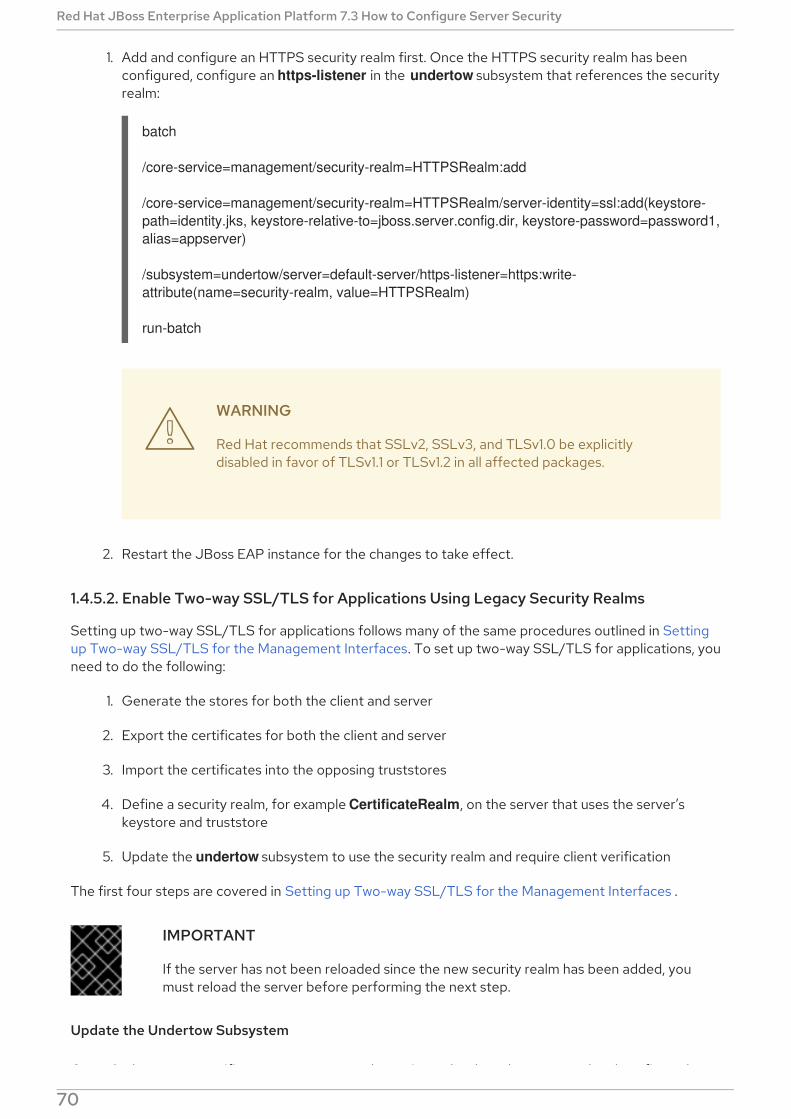
1. Add and configure an HTTPS security realm first. Once the HTTPS security realm has beenconfigured, configure an https-listener in the undertow subsystem that references the securityrealm:
batch
/core-service=management/security-realm=HTTPSRealm:add
/core-service=management/security-realm=HTTPSRealm/server-identity=ssl:add(keystore-path=identity.jks, keystore-relative-to=jboss.server.config.dir, keystore-password=password1, alias=appserver)
/subsystem=undertow/server=default-server/https-listener=https:write-attribute(name=security-realm, value=HTTPSRealm)
run-batch
WARNING
Red Hat recommends that SSLv2, SSLv3, and TLSv1.0 be explicitlydisabled in favor of TLSv1.1 or TLSv1.2 in all affected packages.
2. Restart the JBoss EAP instance for the changes to take effect.
1.4.5.2. Enable Two-way SSL/TLS for Applications Using Legacy Security Realms
Setting up two-way SSL/TLS for applications follows many of the same procedures outlined in Settingup Two-way SSL/TLS for the Management Interfaces. To set up two-way SSL/TLS for applications, youneed to do the following:
1. Generate the stores for both the client and server
2. Export the certificates for both the client and server
3. Import the certificates into the opposing truststores
4. Define a security realm, for example CertificateRealm, on the server that uses the server’skeystore and truststore
5. Update the undertow subsystem to use the security realm and require client verification
The first four steps are covered in Setting up Two-way SSL/TLS for the Management Interfaces .
IMPORTANT
If the server has not been reloaded since the new security realm has been added, youmust reload the server before performing the next step.
Update the Undertow Subsystem
Once the keystores, certificates, truststores, and security realms have been created and configured, you
Red Hat JBoss Enterprise Application Platform 7.3 How to Configure Server Security
70

Once the keystores, certificates, truststores, and security realms have been created and configured, youneed to add an HTTPS listener to the undertow subsystem, use the security realm you created, andrequire client verification:
/subsystem=undertow/server=default-server/https-listener=https:write-attribute(name=security-realm, value=CertificateRealm)
/subsystem=undertow/server=default-server/https-listener=https:write-attribute(name=verify-client, value=REQUIRED)
IMPORTANT
You must reload the server for these changes to take effect.
IMPORTANT
Any client connecting to a JBoss EAP instance with two-way SSL/TLS enabled forapplications must have access to a client certificate or keystore, in other words a clientkeystore whose certificate is included in the server’s truststore. If the client is using abrowser to connect to the JBoss EAP instance, you need to import that certificate orkeystore into the browser’s certificate manager.
NOTE
More details on using certificate-based authentication in applications, in addition to two-way SSL/TLS with applications, can be found in the Configuring a Security Domain toUse Certificate-based Authentication section of the JBoss EAP How to ConfigureIdentity Management Guide.
1.5. ENABLE HTTP AUTHENTICATION FOR APPLICATIONS USING THECLI SECURITY COMMAND
In JBoss EAP, HTTP authentication, using an elytron HTTP authentication factory, can be enabled forthe undertow security domain with the security enable-http-auth-http-server command. By default thiscommand associates the application HTTP factory to the specified security domain.
Example: Enable HTTP Authentication on the Undertow Security Domain
security enable-http-auth-http-server --security-domain=SECURITY_DOMAIN
Server reloaded.Command success.Authentication configured for security domain SECURITY_DOMAINhttp authentication-factory=application-http-authenticationsecurity-domain=SECURITY_DOMAIN
NOTE
Once the command is executed, the management CLI will reload the server andreconnect to it.
If an HTTP factory already exists, then the factory is updated to use the mechanism defined by the --
CHAPTER 1. SECURING THE SERVER AND ITS INTERFACES
71

If an HTTP factory already exists, then the factory is updated to use the mechanism defined by the --mechanism argument.
For a list of arguments, see Authorization Security Arguments.
Disable HTTP Authentication for the Management InterfacesTo remove the active HTTP authentication factory use the following command.
security disable-http-auth-http-server --security-domain=SECURITY_DOMAIN
Alternatively, you can use the following command to remove specific mechanisms from the active SASLauthentication factory.
security disable-http-auth-http-server --mechanism=MECHANISM --security-domain=SECURITY_DOMAIN
1.6. SASL AUTHENTICATION MECHANISMS
Simple Authentication and Security Layer (SASL) authentication mechanisms are used for defining themechanisms for authenticating connections to a JBoss EAP server using the elytron subsystem, and forclients connecting to servers. Clients can be other JBoss EAP instances, or Elytron Client. SASLauthentication mechanisms in JBoss EAP are also significantly used in Elytron integration with the remoting subsystem.
1.6.1. Choosing SASL Authentication Mechanisms
NOTE
Although JBoss EAP and Elytron Client work with a variety of SASL authenticationmechanisms, you must ensure that the mechanisms you use are supported. See this listfor the support levels for SASL authentication mechanisms.
The authentication mechanisms you use depends on your environment and desired authenticationmethod. The following list summarizes the use of some of the supported SASL authenticationmechanisms:
ANONYMOUS
Unauthenticated guest access.
DIGEST-MD5
Uses HTTP digest authentication as a SASL mechanism.
EXTERNAL
Uses authentication credentials that are implied in the context of the request. For example, IPsec orTLS authentication.
Mechanisms beginning with GS
Authentication using Kerberos.
JBOSS-LOCAL-USER
Provides authentication by testing that the client has the same file access as the local user that isrunning the JBoss EAP server. This is useful for other JBoss EAP instances running on the samemachine.
OAUTHBEARER
Red Hat JBoss Enterprise Application Platform 7.3 How to Configure Server Security
72
Uses authentication provided by OAuth as a SASL mechanism.
PLAIN
Plain text username and password authentication.
Mechanisms beginning with SCRAM
Salted Challenge Response Authentication Mechanism (SCRAM) that uses a specified hashingfunction.
Mechanisms ending with -PLUS
Indicates a channel binding variant of a particular authentication mechanism. You should use thesevariants when the underlying connection uses SSL/TLS.
For more information on individual SASL authentication mechanisms, see the IANA SASL mechanismlist and individual mechanism memos.
1.6.2. Configuring SASL Authentication Mechanisms on the Server Side
Configuring SASL authentication mechanisms on the server side is done using SASL authenticationfactories.
There are two levels of configuration required:
A sasl-authentication-factory, where you specify authentication mechanisms.
A configurable-sasl-server-factory that aggregates one or more of sasl-authentication-factory, and configures mechanism properties as well as optionally applying filters to enable ordisable certain authentication mechanisms.
The following example demonstrates creating a new configurable-sasl-server-factory, and a sasl-authentication-factory that uses DIGEST-MD5 as a SASL authentication mechanism for applicationclients.
/subsystem=elytron/configurable-sasl-server-factory=mySASLServerFactory:add(sasl-server-factory=elytron)
/subsystem=elytron/sasl-authentication-factory=mySASLAuthFactory:add(sasl-server-factory=mySASLServerFactory,security-domain=ApplicationDomain,mechanism-configurations=[{mechanism-name=DIGEST-MD5,mechanism-realm-configurations=[{realm-name=ApplicationRealm}]}])
1.6.3. Specifying SASL Authentication Mechanisms on the Client Side
SASL authentication mechanisms used by a client are specified using a sasl-mechanism-selector. Youcan specify any supported SASL authentication mechanisms that are exposed by the server that theclient is connecting to.
A sasl-mechanism-selector is defined in Elytron configurations where authentication is configured:
In the elytron subsystem, this is an attribute of an authentication-configuration. For example:
/subsystem=elytron/authentication-configuration=myAuthConfig:write-attribute(name=sasl-mechanism-selector,value="DIGEST-MD5")
An example of using an authentication-configuration with a sasl-mechanism-selector can beseen in Configuring SSL/TLS Between Domain and Host Controllers Using Elytron .
CHAPTER 1. SECURING THE SERVER AND ITS INTERFACES
73
For Elytron Client, it is specified under the configuration element of authentication-configurations in the client configuration file, usually named wildfly-config.xml. For example:
See How to Configure Identity Management for more information on configuring client authenticationwith Elytron Client.
sasl-mechanism-selector GrammarThe selector string for sasl-mechanism-selector has a specific grammar.
In a simple form, individual mechanisms are specified by listing their names in order, separated by aspaces. For example, to specify DIGEST-MD5, SCRAM-SHA-1, and SCRAM-SHA-256 as allowedauthentication mechanisms, use the following string: DIGEST-MD5 SCRAM-SHA-1 SCRAM-SHA-256.
More advanced usage of the grammar can use the following special tokens:
#ALL: All mechanisms.
#FAMILY(NAME): Mechanisms belonging to the specified mechanism family. For example, thefamily could be DIGEST, EAP, GS2, SCRAM, or IEC-ISO-9798.
#PLUS: Mechanisms that use channel binding. For example, SCRAM-SHA- XXX-PLUS orGS2-XXX-PLUS.
#MUTUAL: Mechanisms that authenticate the server in some way, for example making theserver prove that the server knows the password. #MUTUAL includes families such as #FAMILY(SCRAM) and #FAMILY(GS2).
#HASH(ALGORITHM): Mechanisms that use the specified hash algorithm. For example, thealgorithm could be MD5, SHA-1, SHA-256, SHA-384, or SHA-512.
The above tokens and names can also be used with the following operations and predicates:
-: Forbids
!: Inverts
&&: And
||: Or
==: Equals
?: If
<configuration> <authentication-client xmlns="urn:elytron:client:1.2"> <authentication-rules> <rule use-configuration="default" /> </authentication-rules> <authentication-configurations> <configuration name="default"> <sasl-mechanism-selector selector="#ALL" /> ... </configuration> </authentication-configurations> </authentication-client></configuration>
Red Hat JBoss Enterprise Application Platform 7.3 How to Configure Server Security
74

#TLS: Is true when TLS is active, otherwise false.
Below are some examples of sasl-mechanism-selector strings and their meaning:
#TLS && !#MUTUAL: When TLS is active, all mechanisms without mutual authentication.
#ALL -ANONYMOUS: All mechanisms, except for ANONYMOUS.
SCRAM-SHA-1 SCRAM-SHA-256: Adds those two mechanisms in that order.
(SCRAM-SHA-1 || SCRAM-SHA-256): Adds the two mechanisms in the order that the provideror server presents them.
!#HASH(MD5): Any mechanism that does not use the MD5 hashing algorithm.
#FAMILY(DIGEST): Any digest mechanism.
1.6.4. Configuring SASL Authentication Mechanism Properties
You can configure authentication mechanism properties on both the server side and on the client side.
On the server side, you define authentication mechanism properties in the configurable-sasl-server-factory. The following example defines the com.sun.security.sasl.digest.utf8 propertywith a value of false.
/subsystem=elytron/configurable-sasl-server-factory=mySASLServerFactory:map-put(name=properties,key=com.sun.security.sasl.digest.utf8,value=false)
On the client side, you define authentication mechanisms properties in the client’sauthentication configuration:
In the elytron subsystem, define the authentication mechanism properties in your authentication-configuration. The following example defines the wildfly.sasl.local-user.quiet-auth property with a value of true.
/subsystem=elytron/authentication-configuration=myAuthConfig:map-put(name=mechanism-properties,key=wildfly.sasl.local-user.quiet-auth,value=true)
For Elytron Client, authentication mechanism properties are specified under the configuration element of authentication-configurations in the client configuration file,usually named wildfly-config.xml. For example:
You can see a list of standard Java SASL authentication mechanism properties in the Java
...<authentication-configurations> <configuration name="default"> <sasl-mechanism-selector selector="#ALL" /> <set-mechanism-properties> <property key="wildfly.sasl.local-user.quiet-auth" value="true" /> </set-mechanism-properties> ... </configuration></authentication-configurations>...
CHAPTER 1. SECURING THE SERVER AND ITS INTERFACES
75
You can see a list of standard Java SASL authentication mechanism properties in the Javadocumentation. Other JBoss EAP-specific SASL authentication mechanism properties are listed in theAuthentication Mechanisms Reference .
1.7. ELYTRON INTEGRATION WITH THE MODCLUSTER SUBSYSTEM
One of the security capabilities exposed by elytron subsystem is a client ssl-context that can be usedto configure the modcluster subsystem to communicate with a load balancer using SSL/TLS.
When protecting the communication between the application server and the load balancer, you need todefine a client ssl-context in order to:
Define a truststore holding the certificate chain that will be used to validate load balancer’scertificate.
Define a trust manager to perform validations against the load balancer’s certificate.
1.7.1. Defining a Client SSL Context and Configuring ModCluster Subsystem
The following procedure requires that a truststore and trust manager be configured. For information oncreating these see Create an Elytron Truststore and Create an Elytron Trust Manager .
1. Create the client SSL context.This SSL context is going to be used by the modcluster subsystem when connecting to the loadbalancer using SSL/TLS:
/subsystem=elytron/client-ssl-context=modcluster-client-ssl-context:add(trust-manager=default-trust-manager)
2. Reference the newly created client SSL context using one of the following options.
Configure the modcluster subsystem by setting the ssl-context.
/subsystem=modcluster/mod-cluster-config=configuration:write-attribute(name=ssl-context, value=modcluster-client-ssl-context)
Configure the undertow subsystem by defining the ssl-context attribute of the mod-cluster filter.
/subsystem=undertow/configuration=filter/mod-cluster=modcluster:write-attribute(name=ssl-context,value=modcluster-client-ssl-context)
3. Reload the server.
reload
For configuring the modcluster subsystem and using two-way authentication, along with the trustmanager, the key manager also needs to be configured.
1. Create the keystore.
/subsystem=elytron/key-store=twoWayKS:add(path=/path/to/client.keystore.jks, credential-reference={clear-text=secret},type=JKS)
Red Hat JBoss Enterprise Application Platform 7.3 How to Configure Server Security
76

2. Configure the key manager.
/subsystem=elytron/key-manager=twoWayKM:add(key-store=twoWayKS, algorithm="SunX509", credential-reference={clear-text=secret})
3. Create the client SSL context.
/subsystem=elytron/client-ssl-context=modcluster-client-ssl-context:add(trust-manager=default-trust-manager, key-manager=twoWayKM)
NOTE
If you already have an existing client SSL context, you can add the key-managerto it as follows:
/subsystem=elytron/client-ssl-context=modcluster-client-ssl-context:write-attribute(name=key-manager, value=twoWayKM)
4. Reload the server.
reload
1.8. ELYTRON INTEGRATION WITH THE JGROUPS SUBSYSTEM
Components in the elytron subsystem may be referenced when defining authorization or encryptionprotocols in the jgroups subsystem. Full instructions on configuring these protocols are found in theSecuring a Cluster section of the Configuration Guide.
1.9. ELYTRON INTEGRATION WITH THE REMOTING SUBSYSTEM
1.9.1. Elytron Integration with Remoting Connectors
A remoting connector is specified by a SASL authentication factory, a socket binding, and an optionalSSL context. In particular, the attributes for a connector are as follows:
sasl-authentication-factory
A reference to the SASL authentication factory to use for authenticating requests to this connector.For more information on creating this factory, see Create an Elytron Authentication Factory .
socket-binding
A reference to the socket binding, detailing the interface and port where the connector should listenfor incoming requests.
ssl-context
An optional reference to the server-side SSL Context to use for this connector. The SSL Contextcontains the server key manager and trust manager to be used, and should be defined in instanceswhere SSL is desired.
For example, a connector can be added as follows, where SASL_FACTORY_NAME is an already definedauthentication factory and SOCKET_BINDING_NAME is an existing socket binding.
CHAPTER 1. SECURING THE SERVER AND ITS INTERFACES
77
/subsystem=remoting/connector=CONNECTOR_NAME:add(sasl-authentication-factory=SASL_FACTORY_NAME,socket-binding=SOCKET_BINDING_NAME)
If SSL is desired, a preconfigured server-ssl-context may be referenced using the ssl-contextattribute, as seen below.
/subsystem=remoting/connector=CONNECTOR_NAME:add(sasl-authentication-factory=SASL_FACTORY_NAME,socket-binding=SOCKET_BINDING_NAME,ssl-context=SSL_CONTEXT_NAME)
Enable One-way SSL/TLS for Remoting Connectors Using the Elytron SubsystemBefore enabling one-way SSL/TLS in JBoss EAP, you must configure a key-store, key-manager, and a server-ssl-context that references the defined key-manager.
The following SASL mechanisms support channel binding to external secure channels, such as SSL/TLS:
GS2-KRB5-PLUS
SCRAM-SHA-1-PLUS
SCRAM-SHA-256-PLUS
SCRAM-SHA-384-PLUS
SCRAM-SHA-512-PLUS
To use any of the above mechanisms, a custom SASL factory can be configured, or one of thepredefined SASL authentication factories can be modified to offer any of these mechanisms. A SASLmechanism selector can be used on the client to specify the appropriate SASL mechanism.
1. Create a socket-binding for the connector. The following command defines the oneWayBinding binding that listens on port 11199.
/socket-binding-group=standard-sockets/socket-binding=oneWayBinding:add(port=11199)
2. Create a connector that references the SASL authentication factory, the previously createdsocket binding, and the SSL context.
/subsystem=remoting/connector=oneWayConnector:add(sasl-authentication-factory=SASL_FACTORY,socket-binding=oneWayBinding,ssl-context=SSL_CONTEXT)
IMPORTANT
In cases where you have both a security-realm and ssl-context defined, JBossEAP will use the SSL/TLS configuration provided by ssl-context.
3. Configure the client to trust the server certificate. A generic example client is found at ElytronClient Side One Way Example. This example configures an ssl-context using the client trust-store.
Enable Two-way SSL/TLS for Remoting Connectors Using the Elytron SubsystemBefore enabling two-way SSL/TLS in JBoss EAP, you must configure a separate key-store componentsfor the client and server certificates, a key-manager for the server key-store, a trust-manager for theserver trust-store, and a server-ssl-context that references the defined key-manager and trust-
Red Hat JBoss Enterprise Application Platform 7.3 How to Configure Server Security
78
manager.
The following SASL mechanisms support channel binding to external secure channels, such as SSL/TLS:
GS2-KRB5-PLUS
SCRAM-SHA-1-PLUS
SCRAM-SHA-256-PLUS
SCRAM-SHA-384-PLUS
SCRAM-SHA-512-PLUS
To use any of the above mechanisms, a custom SASL factory can be configured, or one of thepredefined SASL authentication factories can be modified to offer any of these mechanisms. A SASLmechanism selector can be used on the client to specify the appropriate SASL mechanism.
1. Create a socket-binding for the connector. The following command defines the twoWayBinding binding that listens on port 11199.
/socket-binding-group=standard-sockets/socket-binding=twoWayBinding:add(port=11199)
2. Create a connector that references the SASL authentication factory, the previously createdsocket binding, and the SSL context.
/subsystem=remoting/connector=twoWayConnector:add(sasl-authentication-factory=SASL_FACTORY,socket-binding=twoWayBinding,ssl-context=SSL_CONTEXT)
IMPORTANT
In cases where you have both a security-realm and ssl-context defined, JBossEAP will use the SSL/TLS configuration provided by ssl-context.
3. Configure your client to trust the server certificate, and to present its certificate to the server.You need to configure your client to present the trusted client certificate to the server tocomplete the two-way SSL/TLS authentication. For example, if using a browser, you need toimport the trusted certificate into the browser’s truststore. A generic example client is found atElytron Client Side Two Way Example . This example configures an ssl-context using the client trust-store and key-store.
Two-way SSL/TLS is now enabled on the remoting connector.
1.9.2. Elytron Integration with Remoting HTTP Connectors
A remote HTTP connection is specified by referencing a connector in the undertow system and a SASLauthentication factory defined in the elytron subsystem. The HTTP connector provides theconfiguration for the HTTP upgrade-based remoting connector, and connects to an HTTP listenerspecified by the connector-ref attribute.
The attributes for a connector are as follows:
connector-ref
A reference to a predefined undertow listener.
CHAPTER 1. SECURING THE SERVER AND ITS INTERFACES
79

sasl-authentication-factory
A reference to the SASL authentication factory to use for authenticating requests to this connector.For more information on creating this factory, see Create an Elytron Authentication Factory .
For example, a http-connector can be added as follows, where CONNECTOR_NAME references the undertow listener, and SASL_FACTORY_NAME is an already defined authentication factory in the elytron subsystem.
/subsystem=remoting/http-connector=HTTP_CONNECTOR_NAME:add(connector-ref=CONNECTOR_NAME,sasl-authentication-factory=SASL_FACTORY_NAME)
Enable One-Way SSL on the Remoting HTTP ConnectorBefore enabling one-way SSL/TLS in JBoss EAP, you must configure a key-store, key-manager, and a server-ssl-context that references the defined key-manager.
The following SASL mechanisms support channel binding to external secure channels, such as SSL/TLS:
GS2-KRB5-PLUS
SCRAM-SHA-1-PLUS
SCRAM-SHA-256-PLUS
SCRAM-SHA-384-PLUS
SCRAM-SHA-512-PLUS
To use any of the above mechanisms, a custom SASL factory can be configured, or one of thepredefined SASL authentication factories can be modified to offer any of these mechanisms. A SASLmechanism selector can be used on the client to specify the appropriate SASL mechanism.
1. Check whether the https-listener is configured to use a legacy security realm for its SSLconfiguration.
/subsystem=undertow/server=default-server/https-listener=https:read-attribute(name=security-realm){ "outcome" => "success", "result" => "ApplicationRealm"}
The above command shows that the https-listener is configured to use the ApplicationRealmlegacy security realm for its SSL configuration. Undertow cannot reference both a legacysecurity realm and an ssl-context in Elytron at the same time so you must remove thereference to the legacy security realm.
NOTE
If the result is undefined, you do not need to remove the reference to thesecurity realm in the next step.
2. Remove the reference to the legacy security realm, and update the https-listener to use the ssl-context from Elytron.
NOTE
Red Hat JBoss Enterprise Application Platform 7.3 How to Configure Server Security
80

NOTE
https-listener must always have either a security-realm or ssl-contextconfigured. When changing between the two configurations, the commands mustbe executed as a single batch, as shown below.
batch/subsystem=undertow/server=default-server/https-listener=https:undefine-attribute(name=security-realm)/subsystem=undertow/server=default-server/https-listener=https:write-attribute(name=ssl-context, value=SERVER_SSL_CONTEXT)run-batch
3. Create an HTTP connector that references the HTTPS listener and the SASL authenticationfactory.
/subsystem=remoting/http-connector=ssl-http-connector:add(connector-ref=https,sasl-authentication-factory=SASL_FACTORY)
4. Reload the server.
reload
5. Configure the client to trust the server certificate. For example, if using a browser, you need toimport the trusted certificate into the browser’s truststore.
Enable Two-way SSL/TLS on the Remoting HTTP ConnectorsBefore enabling two-way SSL/TLS in JBoss EAP, you must configure separate key-store componentsfor the client and server certificates, a key-manager for the server key-store, a trust-manager for theserver trust-store, and a server-ssl-context that references the defined key-manager and trust-manager.
The following SASL mechanisms support channel binding to external secure channels, such as SSL/TLS:
GS2-KRB5-PLUS
SCRAM-SHA-1-PLUS
SCRAM-SHA-256-PLUS
SCRAM-SHA-384-PLUS
SCRAM-SHA-512-PLUS
To use any of the above mechanisms, a custom SASL factory can be configured, or one of thepredefined SASL authentication factories can be modified to offer any of these mechanisms. A SASLmechanism selector can be used on the client to specify the appropriate SASL mechanism.
1. Check whether the https-listener is configured to use a legacy security realm for its SSLconfiguration.
/subsystem=undertow/server=default-server/https-listener=https:read-attribute(name=security-realm){
CHAPTER 1. SECURING THE SERVER AND ITS INTERFACES
81

"outcome" => "success", "result" => "ApplicationRealm"}
The above command shows that the https-listener is configured to use the ApplicationRealmlegacy security realm for its SSL configuration. Undertow cannot reference both a legacysecurity realm and an ssl-context in Elytron at the same time so you must remove thereference to the legacy security realm.
NOTE
If the result is undefined, you do not need to remove the reference to thesecurity realm in the next step.
2. Remove the reference to the legacy security realm, and update the https-listener to use the ssl-context from Elytron.
NOTE
https-listener must always have either a security-realm or ssl-contextconfigured. When changing between the two configurations, the commands mustbe executed as a single batch, as shown below.
batch/subsystem=undertow/server=default-server/https-listener=https:undefine-attribute(name=security-realm)/subsystem=undertow/server=default-server/https-listener=https:write-attribute(name=ssl-context, value=SERVER_SSL_CONTEXT)run-batch
3. Create an HTTP connector that references the HTTPS listener and the SASL authenticationfactory.
/subsystem=remoting/http-connector=ssl-http-connector:add(connector-ref=https,sasl-authentication-factory=SASL_FACTORY)
4. Reload the server.
reload
5. Configure your client to trust the server certificate, and to present its certificate to the server.You need to configure your client to present the trusted client certificate to the server tocomplete the two-way SSL/TLS authentication. For example, if using a browser, you need toimport the trusted certificate into the browser’s truststore.
Two-way SSL/TLS is now enabled on the remoting HTTP connector.
IMPORTANT
In cases where you have both a security-realm and ssl-context defined, JBoss EAP willuse the SSL/TLS configuration provided by ssl-context.
Red Hat JBoss Enterprise Application Platform 7.3 How to Configure Server Security
82
1.9.3. Elytron Integration with Remoting Outbound Connectors
A remote outbound connection is specified by an outbound socket binding and an authenticationcontext. The authentication context provides all of the security information that is needed for theconnection. In particular, the attributes for a remote-outbound-connection are as follows:
outbound-socket-binding-ref - The name of the outbound socket binding, which is used todetermine the destination address and port for the connection.
authentication-context - A reference to the authentication context, which contains theauthentication configuration and the defined SSL context, if one exists, required for theconnection. For information on defining an authentication context, see Creating anAuthentication Context.
For example, a remote-outbound-connection can be added as follows, whereOUTBOUND_SOCKET_BINDING_NAME is an already defined outbound-socket-binding andAUTHENTICATION_CONTEXT_NAME is an authentication-context that has already been defined in theelytron subsystem configuration.
/subsystem=remoting/remote-outbound-connection=OUTBOUND_CONNECTION_NAME:add(authentication-context=AUTHENTICATION_CONTEXT_NAME, outbound-socket-binding-ref=OUTBOUND_SOCKET_BINDING_NAME)
1.10. SECURING A MANAGED DOMAIN
In addition to securing the management interfaces, you can also secure communication between JBossEAP instances in a managed domain.
For information on concepts and general configuration for the managed domain operating mode, seethe Domain Management section of the JBoss EAP Configuration Guide.
1.10.1. Configure Password Authentication Between Slaves and the DomainController Using Elytron
1. Add a user on the master domain controller.A user needs to be added on the master domain controller for the slave controller to use forauthentication. If you are using the default file based user and group authentication mechanism,this can be done by running EAP_HOME/bin/adduser.sh. Add the username, password andother configurations when prompted.
The add-user utility can be used to manage both the users in the ManagementRealm and theusers in the ApplicationRealm.
NOTE
The server caches the contents of the properties files in memory. However, theserver does check the modified time of the properties files on eachauthentication request and reloads if the time has been updated. This means thatall changes made by the add-user utility are immediately applied to any runningserver.
The slave controller attempts to authenticate using the HTTP interface. If the HTTP interface
CHAPTER 1. SECURING THE SERVER AND ITS INTERFACES
83
The slave controller attempts to authenticate using the HTTP interface. If the HTTP interfacehas been secured with the ManagementRealm Elytron security realm, then you would need toadd a user to ManagementRealm for the slave controller to use.
NOTE
The default name of the realm for management users is ManagementRealm.When the add-user utility prompts for the realm name, just accept the defaultunless you have switched to a different realm.
The following example assumes the user slave with the password password1! has been addedto ManagementRealm.
2. Add an authentication-configuration to the slave controller.
/host=slave/subsystem=elytron/authentication-configuration=slave:add(authentication-name=slave, credential-reference={clear-text=password1!})
3. Add an authentication-context to the slave controller.
/host=slave/subsystem=elytron/authentication-context=slave-context:add(match-rules=[{authentication-configuration=slave}])
4. Specify the domain controller location and authentication-context in the slave controller.
<domain-controller> <remote protocol="remote" host="localhost" port="9990" authentication-context="slave-context"/></domain-controller>
1.10.2. Configure Password Authentication Between Slaves and the DomainController Using Legacy Core Management Authentication
When configuring a managed domain, by default, the master domain controller is configured to requireauthentication for each slave controller that connects to it. To configure slave controllers with theproper credentials, you must do the following:
1. Add a user to the master domain controllerYou need to add a user to the master domain controller using the add-user script. Specifically,you will need to ensure that the user is added to the same realm the master uses to secure itsmanagement interface, which by default is ManagementRealm. You also need to ensure youanswer yes to the Is this new user going to be used for one AS process to connect to another ASprocess? question.
IMPORTANT
After adding the user, the script will output a <secret> element, which will be usedin the next step. You must keep this value for use in the next step.
Example: Adding a Slave User
$ EAP_HOME/bin/add-user.sh
Red Hat JBoss Enterprise Application Platform 7.3 How to Configure Server Security
84

What type of user do you wish to add? a) Management User (mgmt-users.properties) b) Application User (application-users.properties)(a): a
Enter the details of the new user to add.Using realm 'ManagementRealm' as discovered from the existing property files.Username : slave-userPassword recommendations are listed below. To modify these restrictions edit the add-user.properties configuration file. - The password should be different from the username - The password should not be one of the following restricted values {root, admin, administrator} - The password should contain at least 8 characters, 1 alphabetic character(s), 1 digit(s), 1 non-alphanumeric symbol(s)Password :Re-enter Password :What groups do you want this user to belong to? (Please enter a comma separated list, or leave blank for none)[ ]:About to add user 'slave-user' for realm 'ManagementRealm'Is this correct yes/no? yesAdded user 'slave-user' to file '/home/user/EAP-7.3.0/standalone/configuration/mgmt-users.properties'Added user 'slave-user' to file '/home/user/EAP-7.3.0/domain/configuration/mgmt-users.properties'Added user 'slave-user' with groups to file '/home/user/EAP-7.3.0/standalone/configuration/mgmt-groups.properties'Added user 'slave-user' with groups to file '/home/user/EAP-7.3.0/domain/configuration/mgmt-groups.properties'Is this new user going to be used for one AS process to connect to another AS process?e.g. for a slave host controller connecting to the master or for a Remoting connection for server to server EJB calls.yes/no? yesTo represent the user add the following to the server-identities definition <secret value="ABCzc3dv11Qx" />
2. Configure the slave controllers to use the credential.Once you have created the user on the master domain controller, you will need to update eachslave controller to use that credential in the host configuration file, for example host.xml or host-slave.xml. To do so, you need to add the user name to the <remote> element in thedomain controller configuration. You will also need to add the <secret> to the server identitiesof the realm used to secure the <remote> element. Both the user name and <secret> wereobtained when adding the user to the master domain controller in the previous step.
Example: Configuring Slave Controllers
...<security-realm name="ManagementRealm"> <server-identities> <!-- Replace this with either a base64 password of your own, or use a vault with a vault expression --> <secret value="ABCzc3dv11Qx"/> </server-identities>...<domain-controller> <remote security-realm="ManagementRealm" username="slave-user">
CHAPTER 1. SECURING THE SERVER AND ITS INTERFACES
85
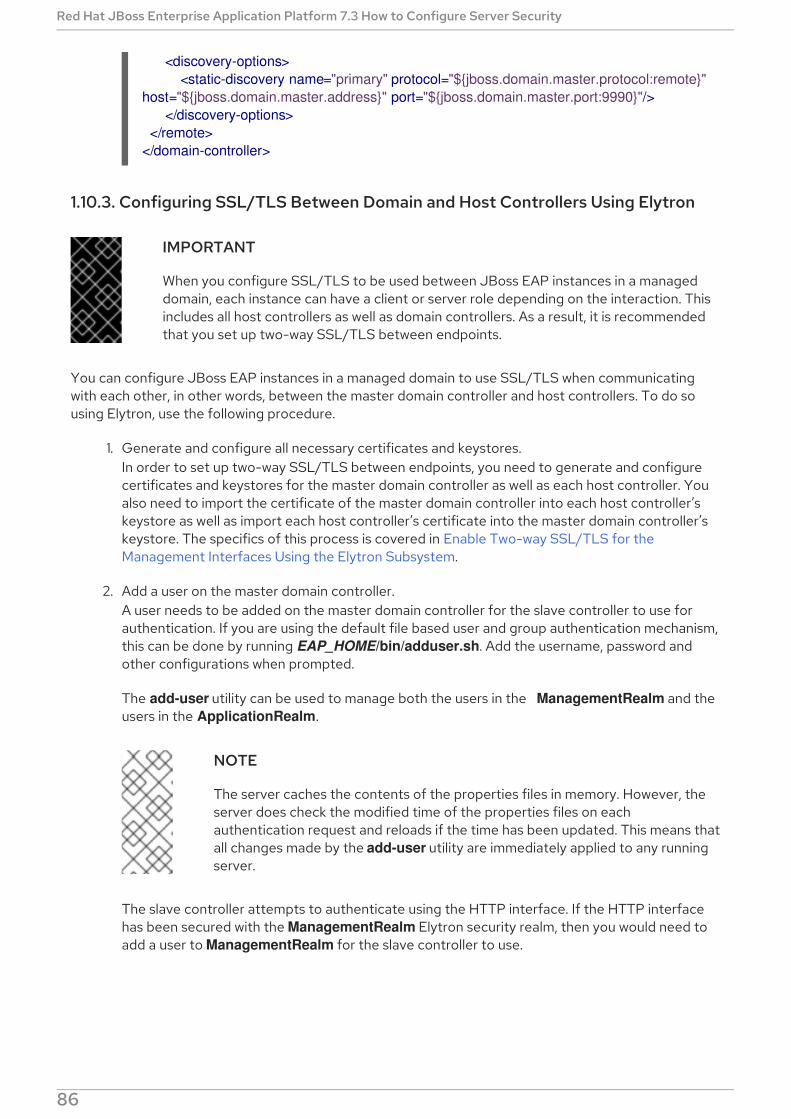
1.10.3. Configuring SSL/TLS Between Domain and Host Controllers Using Elytron
IMPORTANT
When you configure SSL/TLS to be used between JBoss EAP instances in a manageddomain, each instance can have a client or server role depending on the interaction. Thisincludes all host controllers as well as domain controllers. As a result, it is recommendedthat you set up two-way SSL/TLS between endpoints.
You can configure JBoss EAP instances in a managed domain to use SSL/TLS when communicatingwith each other, in other words, between the master domain controller and host controllers. To do sousing Elytron, use the following procedure.
1. Generate and configure all necessary certificates and keystores.In order to set up two-way SSL/TLS between endpoints, you need to generate and configurecertificates and keystores for the master domain controller as well as each host controller. Youalso need to import the certificate of the master domain controller into each host controller’skeystore as well as import each host controller’s certificate into the master domain controller’skeystore. The specifics of this process is covered in Enable Two-way SSL/TLS for theManagement Interfaces Using the Elytron Subsystem.
2. Add a user on the master domain controller.A user needs to be added on the master domain controller for the slave controller to use forauthentication. If you are using the default file based user and group authentication mechanism,this can be done by running EAP_HOME/bin/adduser.sh. Add the username, password andother configurations when prompted.
The add-user utility can be used to manage both the users in the ManagementRealm and theusers in the ApplicationRealm.
NOTE
The server caches the contents of the properties files in memory. However, theserver does check the modified time of the properties files on eachauthentication request and reloads if the time has been updated. This means thatall changes made by the add-user utility are immediately applied to any runningserver.
The slave controller attempts to authenticate using the HTTP interface. If the HTTP interfacehas been secured with the ManagementRealm Elytron security realm, then you would need toadd a user to ManagementRealm for the slave controller to use.
NOTE
<discovery-options> <static-discovery name="primary" protocol="${jboss.domain.master.protocol:remote}" host="${jboss.domain.master.address}" port="${jboss.domain.master.port:9990}"/> </discovery-options> </remote></domain-controller>
Red Hat JBoss Enterprise Application Platform 7.3 How to Configure Server Security
86
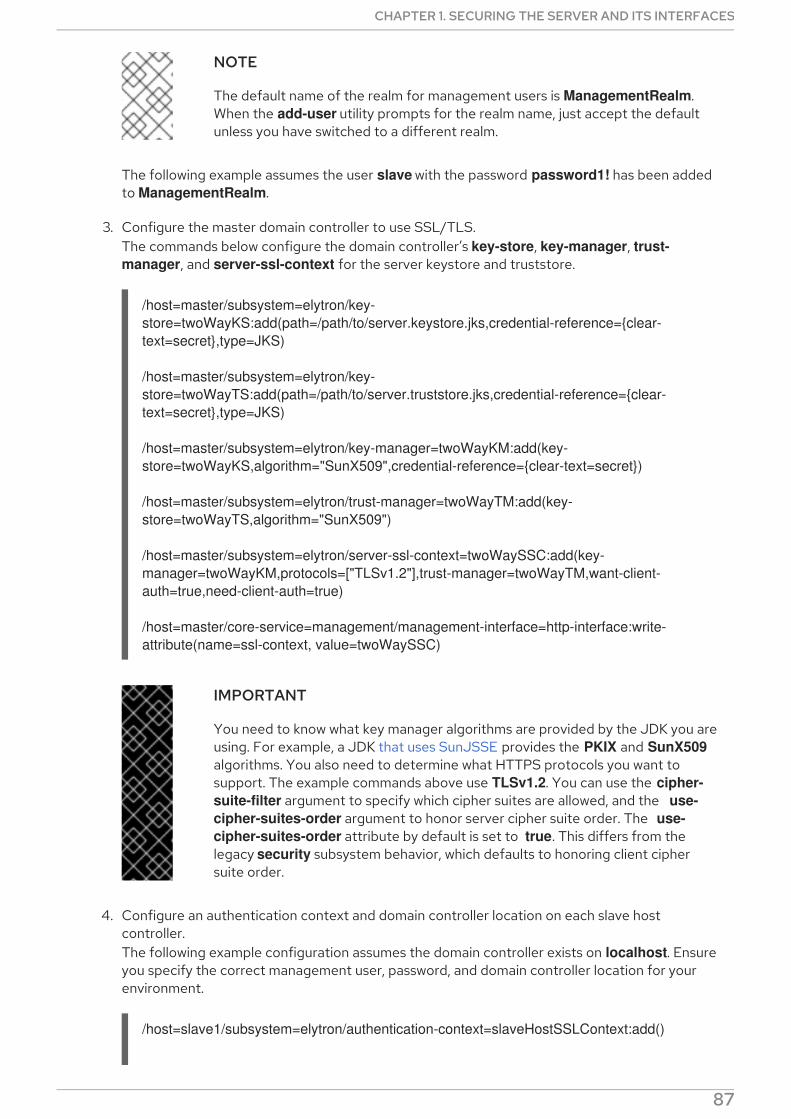
NOTE
The default name of the realm for management users is ManagementRealm.When the add-user utility prompts for the realm name, just accept the defaultunless you have switched to a different realm.
The following example assumes the user slave with the password password1! has been addedto ManagementRealm.
3. Configure the master domain controller to use SSL/TLS.The commands below configure the domain controller’s key-store, key-manager, trust-manager, and server-ssl-context for the server keystore and truststore.
/host=master/subsystem=elytron/key-store=twoWayKS:add(path=/path/to/server.keystore.jks,credential-reference={clear-text=secret},type=JKS)
/host=master/subsystem=elytron/key-store=twoWayTS:add(path=/path/to/server.truststore.jks,credential-reference={clear-text=secret},type=JKS)
/host=master/subsystem=elytron/key-manager=twoWayKM:add(key-store=twoWayKS,algorithm="SunX509",credential-reference={clear-text=secret})
/host=master/subsystem=elytron/trust-manager=twoWayTM:add(key-store=twoWayTS,algorithm="SunX509")
/host=master/subsystem=elytron/server-ssl-context=twoWaySSC:add(key-manager=twoWayKM,protocols=["TLSv1.2"],trust-manager=twoWayTM,want-client-auth=true,need-client-auth=true)
/host=master/core-service=management/management-interface=http-interface:write-attribute(name=ssl-context, value=twoWaySSC)
IMPORTANT
You need to know what key manager algorithms are provided by the JDK you areusing. For example, a JDK that uses SunJSSE provides the PKIX and SunX509algorithms. You also need to determine what HTTPS protocols you want tosupport. The example commands above use TLSv1.2. You can use the cipher-suite-filter argument to specify which cipher suites are allowed, and the use-cipher-suites-order argument to honor server cipher suite order. The use-cipher-suites-order attribute by default is set to true. This differs from thelegacy security subsystem behavior, which defaults to honoring client ciphersuite order.
4. Configure an authentication context and domain controller location on each slave hostcontroller.The following example configuration assumes the domain controller exists on localhost. Ensureyou specify the correct management user, password, and domain controller location for yourenvironment.
/host=slave1/subsystem=elytron/authentication-context=slaveHostSSLContext:add()
CHAPTER 1. SECURING THE SERVER AND ITS INTERFACES
87
/host=slave1/subsystem=elytron/authentication-configuration=slaveHostSSLConfiguration:add()
/host=slave1/subsystem=elytron/authentication-configuration=slaveHostSSLConfiguration:write-attribute(name=sasl-mechanism-selector,value=DIGEST-MD5)
/host=slave1/subsystem=elytron/authentication-configuration=slaveHostSSLConfiguration:write-attribute(name=authentication-name,value=slave)
/host=slave1/subsystem=elytron/authentication-configuration=slaveHostSSLConfiguration:write-attribute(name=realm,value=ManagementRealm)
/host=slave1/subsystem=elytron/authentication-configuration=slaveHostSSLConfiguration:write-attribute(name=credential-reference,value={clear-text=password1!})
/host=slave1/subsystem=elytron/authentication-context=slaveHostSSLContext:write-attribute(name=match-rules,value=[{match-host=localhost,authentication-configuration=slaveHostSSLConfiguration}]
/host=slave1:write-remote-domain-controller(host=localhost,port=9990,protocol=remote,authentication-context=slaveHostSSLContext)
5. Configure each slave host controller to use SSL/TLS.The commands below configure a slave host controller’s key-store, key-manager, trust-manager, client-ssl-context for the server keystore and truststore, as well as the authentication-context.
The following example configuration assumes the domain controller exists on localhost. Ensureyou specify the correct domain controller location for your environment.
/host=slave1/subsystem=elytron/key-store=twoWayKS:add(path=/path/to/client.keystore.jks,credential-reference={clear-text=secret},type=JKS)
/host=slave1/subsystem=elytron/key-store=twoWayTS:add(path=/path/to/client.truststore.jks,credential-reference={clear-text=secret},type=JKS)
/host=slave1/subsystem=elytron/key-manager=twoWayKM:add(key-store=twoWayKS,algorithm="SunX509",credential-reference={clear-text=secret})
/host=slave1/subsystem=elytron/trust-manager=twoWayTM:add(key-store=twoWayTS,algorithm="SunX509")
/host=slave1/subsystem=elytron/client-ssl-context=twoWayCSC:add(key-manager=twoWayKM,protocols=["TLSv1.2"],trust-manager=twoWayTM)
/host=slave1/subsystem=elytron/authentication-context=slaveHostSSLContext:write-attribute(name=match-rules,value=[{match-host=localhost,authentication-configuration=slaveHostSSLConfiguration,ssl-context=twoWayCSC}])
Red Hat JBoss Enterprise Application Platform 7.3 How to Configure Server Security
88

6. Reload all the JBoss EAP hosts in your managed domain.
1.10.4. Configuring SSL/TLS Between Domain and Host Controllers Using LegacyCore Management Authentication
IMPORTANT
When you configure SSL/TLS to be used between JBoss EAP instances in a manageddomain, each instance can have a client or server role depending on the interaction. Thisincludes all host controllers as well as domain controllers. As a result, it is recommendedthat you set up two-way SSL/TLS between endpoints.
You can configure JBoss EAP instances in a managed domain to use SSL/TLS when communicatingwith each other, in other words, between the master domain controller and host controllers. To do sousing legacy core management authentication, use the following procedure.
1. Generate and configure all necessary certificates and keystores.In order to set up two-way SSL/TLS between endpoints, you need to generate and configurecertificates and keystores for the master domain controller as well as each host controller. Youalso need to import the certificate of the master domain controller into each host controller’skeystore as well as import each host controller’s certificate into the master domain controller’skeystore. The specifics of this process is covered in Setting up Two-way SSL/TLS for theManagement Interfaces with Legacy Core Management Authentication.
2. Configure the master domain controller to use SSL/TLS.Once you have configured all certificates and keystores, you need to configure a security realmto use two-way SSL/TLS. This is done by configuring a security realm to use SSL/TLS and torequire it for authentication. That security realm is then used to secure the managementinterface used for connecting between host controllers and the master domain controller.
NOTE
The following commands below must either be run in batch mode, or the servermust be reloaded after adding the ssl server identity. The example below isshown using batch mode.
batch
/host=master/core-service=management/security-realm=CertificateRealm:add()
/host=master/core-service=management/security-realm=CertificateRealm/server-identity=ssl:add(alias=domaincontroller,keystore-relative-to=jboss.domain.config.dir,keystore-path=domaincontroller.jks,keystore-password=secret)
/host=master/core-service=management/security-realm=CertificateRealm/authentication=truststore:add(keystore-relative-to=jboss.domain.config.dir,keystore-path=domaincontroller.jks,keystore-password=secret)
/host=master/core-service=management/security-realm=CertificateRealm/authentication=local:add(default-user=\$local)
/host=master/core-service=management/security-realm=CertificateRealm/authentication=properties:add(relative-
CHAPTER 1. SECURING THE SERVER AND ITS INTERFACES
89
to=jboss.domain.config.dir,path=mgmt-users.properties)
/host=master/core-service=management/management-interface=http-interface:write-attribute(name=security-realm,value=CertificateRealm)
run-batch
3. Configure all host controllers to use SSL/TLS.Once you have the master domain controller configured to use two-way SSL/TLS, you need toconfigure each host controller to use it as well. The process is very much the same as themaster domain controller configuration, except you will need to use the keystore specific toeach host.
NOTE
The following commands below must either be run in batch mode, or the servermust be reloaded after adding the ssl server identity. The example below isshown using batch mode.
batch
/host=instance1/core-service=management/security-realm=CertificateRealm:add()
/host=instance1/core-service=management/security-realm=CertificateRealm/server-identity=ssl:add(alias=instance1,keystore-relative-to=jboss.domain.config.dir,keystore-path=instance1.jks,keystore-password=secret)
/host=instance1/core-service=management/security-realm=CertificateRealm/authentication=truststore:add(keystore-relative-to=jboss.domain.config.dir,keystore-path=instance1.jks,keystore-password=secret)
/host=instance1/core-service=management/security-realm=CertificateRealm/authentication=local:add(default-user="\$local")
/host=instance1/core-service=management/security-realm=CertificateRealm/authentication=properties:add(relative-to=jboss.domain.config.dir,path=mgmt-users.properties)
/host=instance1/core-service=management/management-interface=http-interface:write-attribute(name=security-realm,value=CertificateRealm)
run-batch
Additionally, you will need to update the security realm used when connecting the masterdomain controller. This change must be done directly in the host controller’s configuration file,for example host.xml or host-slave.xml, while the server is not running.
Example: Host Controller Configuration File
<domain-controller> <remote security-realm="CertificateRealm" username="slave-user"> <discovery-options> <static-discovery name="primary" protocol="${jboss.domain.master.protocol:remote}" host="${jboss.domain.master.address}" port="${jboss.domain.master.port:9990}"/>
Red Hat JBoss Enterprise Application Platform 7.3 How to Configure Server Security
90

WARNING
Red Hat recommends that SSLv2, SSLv3, and TLSv1.0 be explicitlydisabled in favor of TLSv1.1 or TLSv1.2 in all affected packages.
1.11. ADDITIONAL ELYTRON COMPONENTS FOR SSL/TLS
The basic concepts behind configuring one-way SSL/TLS and two-way SSL/TLS are covered in thefollowing:
Enable One-way SSL/TLS for Applications Using the Elytron Subsystem
Enable Two-way SSL/TLS for Applications Using the Elytron Subsystem
Enable One-way SSL/TLS for the Management Interfaces Using the Elytron Subsystem
Enable Two-way SSL/TLS for the Management Interfaces Using the Elytron Subsystem
Elytron also offers some additional components for configuring SSL/TLS.
1.11.1. Using an ldap-key-store
An ldap-key-store allows you to use a keystore stored in an LDAP server. You can use an ldap-key-storein the same way as you use a key-store.
NOTE
It is not possible to use a JMX ObjectName to decrypt the LDAP credentials. Instead,credentials can be secured by using a credential store.
To create and use an ldap-key-store:
1. Configure a dir-context.To connect to the LDAP server from JBoss EAP, you need to configure a dir-context thatprovides the URL as well as the principal used to connect to the server.
Example: dir-context
/subsystem=elytron/dir-context=exampleDC:add(url="ldap://127.0.0.1:10389", principal="uid=admin,ou=system", credential-reference={clear-text="secret"})
2. Configure an ldap-key-store.When you configure an ldap-key-store, you need to specify both the dir-context used toconnect to the LDAP server as well as how to locate the keystore stored in the LDAP server. Ata minimum, this requires you to specify a search-path.
</discovery-options> </remote></domain-controller>
CHAPTER 1. SECURING THE SERVER AND ITS INTERFACES
91
Example: ldap-key-store
/subsystem=elytron/ldap-key-store=ldapKS:add(dir-context=exampleDC, search-path="ou=Keystores,dc=wildfly,dc=org")
3. Use the ldap-key-store.Once you have defined your ldap-key-store, you can use it in the same places where a key-store could be used. For example, you could use an ldap-key-store when configuring One-waySSL/TLS and Two-way SSL/TLS for applications.
For the full list of attributes for ldap-key-store as well as other Elytron components, see ElytronSubsystem Components Reference.
1.11.2. Using a filtering-key-store
A filtering-key-store allows you to expose a subset of aliases from an existing key-store, and use it inthe same places you could use a key-store. For example, if a keystore contained alias1, alias2, and alias3, but you only wanted to expose alias1 and alias3, a filtering-key-store provides you several waysto do that.
To create a filtering-key-store:
1. Configure a key-store.
/subsystem=elytron/key-store=myKS:add(path=keystore.jks, relative-to=jboss.server.config.dir, credential-reference={clear-text=secret}, type=JKS)
2. Configure a filtering-key-store.When you configure a filtering-key-store, you specify which key-store you want to filter and thealias-filter for filtering aliases from the key-store. The filter can be specified in one of thefollowing formats:
alias1,alias3, which is a comma-delimited list of aliases to expose.
ALL:-alias2, which exposes all aliases in the keystore except the ones listed.
NONE:+alias1:+alias3, which exposes no aliases in the keystore except the ones listed.This example uses a comma-delimted list to expose alias1 and alias3.
/subsystem=elytron/filtering-key-store=filterKS:add(key-store=myKS, alias-filter="alias1,alias3")
NOTE
The alias-filter attribute is case sensitive. Because the use of mixed-case oruppercase aliases, such as elytronAppServer, might not be recognized bysome keystore providers, it is recommended to use lowercase aliases, such aselytronappserver.
3. Use the filtering-key-store.Once you have defined your filtering-key-store, you can use it in the same places where a key-store could be used. For example, you could use a filtering-key-store when configuring One-way SSL/TLS and Two-way SSL/TLS for applications.
Red Hat JBoss Enterprise Application Platform 7.3 How to Configure Server Security
92
For the full list of attributes for filtering-key-store as well as other Elytron components, see ElytronSubsystem Components Reference.
1.11.3. Reload a Keystore
You can reload a keystore configured in JBoss EAP from the management CLI. This is useful in caseswhere you have made changes to certificates referenced by a keystore.
To reload a keystore:
/subsystem=elytron/key-store=httpsKS:load
1.11.4. Reinitialize a Key Manager
You can reinitialize a key-manager configured in JBoss EAP from the management CLI. This is useful incases where you have made changes in certificates provided by keystore resource and you want to applythis change to new SSL connections without restarting the server.
NOTE
If the key-store is file based then it must be loaded first.
/subsystem=elytron/key-store=httpsKS:load()
To reinitialize a key-manager:
/subsystem=elytron/key-manager=httpsKM:init()
1.11.5. Reinitialize a Trust Manager
You can reinitialize a trust-manager configured in JBoss EAP from the management CLI or themanagement console. This is useful when you have made changes to certificates provided by a keystoreresource and want to apply the changes to the new SSL connections without restarting the server.
Reinitializing a Trust Manager from the management CLI
NOTE
If the key-store is file based then it must be loaded first.
/subsystem=elytron/key-store=httpsKS:load()
To reinitialize a trust-manager:
/subsystem=elytron/trust-manager=httpsTM:init()
Reinitializing a Trust Manager from the management console
1. Navigate to the management console and click the Runtime tab.
2. In the Monitor column, click Security (Elytron).
CHAPTER 1. SECURING THE SERVER AND ITS INTERFACES
93
3. In the Security column, click SSL → View.
4. On the navigation pane, click Trust Manager.
5. Click Initialize on the top right corner of the screen to reinitialize a trust-manager.
1.11.6. Keystore Alias
The alias denotes the stored secret or credential in the store. If you add a keystore to the elytronsubsystem using the key-store component, you can check the keystore’s contents using the aliasrelated key-store operations.
The different operations for alias manipulation are:
read-alias - Read an alias from a keystore.
read-aliases - Read aliases from a keystore.
remove-alias - Remove an alias from a keystore.
For example, to read an alias:
/subsystem=elytron/key-store=httpsKS/:read-alias(alias=localhost)
1.11.7. Using a client-ssl-context
A client-ssl-context is used for providing an SSL context when the JBoss EAP instance creates an SSLconnection as a client, such as using SSL in remoting.
To create a client-ssl-context:
1. Create key-store, key-manager, and trust-manager components as needed.If establishing a two-way SSL/TLS connection, you need to create separate key-storecomponents for the client and server certificates, a key-manager for the client key-store, and atrust-manager for the server key-store. Alternatively, if you are doing a one-way SSL/TLSconnection, you need to create a key-store for the server certificate and a trust-manager thatreferences it. Examples on creating keystores and truststores are available in the Enable Two-way SSL/TLS for Applications using the Elytron Subsystem section.
2. Create a client-ssl-context.Create a client-ssl-context referencing keystores, truststores, as well as any other necessaryconfiguration options.
Example: client-ssl-context
/subsystem=elytron/client-ssl-context=exampleCSC:add(key-manager=clientKM, trust-manager=clientTM, protocols=["TLSv1.2"])
3. Reference the client-ssl-context.
For the full list of attributes for client-ssl-context as well as other Elytron components, see ElytronSubsystem Components Reference.
1.11.8. Using a server-ssl-context
Red Hat JBoss Enterprise Application Platform 7.3 How to Configure Server Security
94

A server-ssl-context is used for providing a server-side SSL context. In addition to the usualconfiguration for an SSL context, it is possible to configure additional items such as cipher suites andprotocols. The SSL context will wrap any additional items that are configured.
1. Create key-store, key-manager, and trust-manager components as needed.If establishing a two-way SSL/TLS connection, you need to create separate key-storecomponents for the client and server certificates, a key-manager for the server key-store, anda trust-manager for the server trust-store. Alternatively, if you are doing a one-way SSL/TLSconnection, you need to create a key-store for the server certificate and a key-manager thatreferences it. Examples on creating keystores and truststores are available in the Enable Two-way SSL/TLS for Applications Using the Elytron Subsystem section.
2. Create a server-ssl-context.Create a server-ssl-context that references the key manager, trust manager, or any otherdesired configuration options using one of the options outlined below.
Add a Server SSL Context Using the Management CLI
/subsystem=elytron/server-ssl-context=newServerSSLContext:add(key-manager=KEY_MANAGER,protocols=["TLSv1.2"])
IMPORTANT
You need to determine what HTTPS protocols will be supported. The example commandsabove use TLSv1.2. You can use the cipher-suite-filter argument to specify which ciphersuites are allowed, and the use-cipher-suites-order argument to honor server ciphersuite order. The use-cipher-suites-order attribute by default is set to true. This differsfrom the legacy security subsystem behavior, which defaults to honoring client ciphersuite order.
Add a Server SSL Context Using the Management Console
1. Access the management console. For more information, see the Management Console sectionin the JBoss EAP Configuration Guide.
2. Navigate to Configuration → Subsystems → Security (Elytron) → Other Settings and clickView.
3. Click on SSL → Server SSL Context and click Add to configure a new server SSL context.
For the full list of attributes for server-ssl-context as well as other Elytron components, see ElytronSubsystem Components Reference.
1.11.9. Using a server-ssl-sni-context
A server-ssl-sni-context is used for providing a server-side SNI matching. It provides matching rules tocorrelate host names to SSL contexts, along with a default in case none of the provided host names arematched. The SSL SNI contexts can be used in place of a standard server SSL context, such as whendefining a context in the undertow subsystem.
1. Create key-store, key-manager, trust-manager, and server-ssl-context components asneeded. There must be a server SSL context defined to create the server-ssl-sni-context.
2. Create a server-ssl-sni-context that provides matching information for the server-ssl-contextelements. A default SSL context must be specified, using the default-ssl-context attribute,
CHAPTER 1. SECURING THE SERVER AND ITS INTERFACES
95
which will be used if no matching host names are found. The host-context-map accepts acomma-separated list of host names to match to the various SSL contexts.
/subsystem=elytron/server-ssl-sni-context=SERVER_SSL_SNI_CONTEXT:add(default-ssl-context=DEFAULT_SERVER_SSL_CONTEXT,host-context-map={HOSTNAME=SERVER_SSL_CONTEXT,...})
The following would be used to define a server-ssl-sni-context that defaults to the serverSSLSSL context, and matches incoming requests for www.example.com to the exampleSSLcontext.
/subsystem=elytron/server-ssl-sni-context=exampleSNIContext:add(default-ssl-context=serverSSL,host-context-map={www\\.example\\.com=exampleSSL})
NOTE
The attribute value for host matching works as a regular expression, so be sure to escapeany periods (.) used to delimit the domain name.
Configure server-ssl-sni-context Using the Management Console
1. Access the management console. For more information, see the Management Console sectionin the JBoss EAP Configuration Guide.
2. Navigate to Configuration → Subsystems → Security (Elytron) → Other Settings and clickView.
3. Click SSL → Server SSL SNI Context to configure the required ssl-sni-context.
For the complete list of attributes for Elytron components, see Elytron Subsystem ComponentsReference.
1.11.10. Custom SSL Components
When configuring SSL/TLS in the elytron subsystem, you can provide and use custom implementationsof the following components:
key-store
key-manager
trust-manager
client-ssl-context
server-ssl-context
Red Hat JBoss Enterprise Application Platform 7.3 How to Configure Server Security
96

WARNING
It is not recommended to provide custom implementations of any componentoutside of the trust-manager without an intimate knowledge of the Java SecureSocket Extension (JSSE).
IMPORTANT
When using FIPS it is not possible to utilize a custom trust manager or key manager, asFIPS requires these managers be embedded in the JDK for security reasons. Similarbehavior can be accomplished by implementing a SecurityRealm that validates X509evidences.
When creating custom implementations of Elytron components, they must present the appropriatecapabilities and requirements. For more details on capabilities and requirements, see the Capabilitiesand Requirements section of the JBoss EAP Security Architecture guide. Implementation details foreach component are provided by the JDK vendor.
1.11.10.1. Add a Custom Component to Elytron
The following steps describe adding a custom component within Elytron.
1. Add the JAR containing the provider for the custom component as a module into JBoss EAP,declaring any required dependencies, such as javax.api:
module add --name=MODULE_NAME --resources=FACTORY_JAR --dependencies=javax.api,DEPENDENCY_LIST
IMPORTANT
Using the module management CLI command to add and remove modules isprovided as Technology Preview only. This command is not appropriate for use ina managed domain or when connecting to the management CLI remotely.Modules should be added and removed manually in a production environment.For more information, see the Create a Custom Module Manually and Remove aCustom Module Manually sections of the JBoss EAP Configuration Guide.
Technology Preview features are not supported with Red Hat production servicelevel agreements (SLAs), might not be functionally complete, and Red Hat doesnot recommend to use them for production. These features provide early accessto upcoming product features, enabling customers to test functionality andprovide feedback during the development process.
See Technology Preview Features Support Scope on the Red Hat CustomerPortal for information about the support scope for Technology Preview features.
2. When the component is added to the elytron subsystem the java.util.ServiceLoader will beused to discover the provider. Alternatively, a reference to the provider can be provided bydefining a provider-loader. There are two methods of creating the loader, and only one shouldbe implemented for each component.
CHAPTER 1. SECURING THE SERVER AND ITS INTERFACES
97

Reference the provider directly when defining the provider-loader:
/subsystem=elytron/provider-loader=LOADER_NAME:add(class-names=[CLASS_NAME],module=MODULE_NAME)
Include a reference to the provider in META-INF/services/java.security.Provider. Thisreference is automatically created when using the @MetaInfServices annotation in org.kohsuke.metainf-services. When using this method only the module needs to bereferenced by the provider-loader, as seen below:
/subsystem=elytron/provider-loader=LOADER_NAME:add(module=MODULE_NAME)
3. Add the custom component into Elytron’s configuration, using the appropriate element for thetype to be added and referencing any defined providers.
/subsystem=elytron/COMPONENT_NAME=NEW_COMPONENT:add(providers=LOADER_NAME,...)
For instance, to define a trust manager, the trust-manager element would be used, as seen inthe following command:
Example: Adding a Custom Trust Manager
/subsystem=elytron/trust-manager=newTrustManager:add(algorithm=MyX509,providers=customProvider,key-store=sampleKeystore)
4. Once defined, the component can be referenced from other elements.
1.11.10.2. Including Arguments in a Custom Elytron Component
You can include arguments within a custom component if your class implements the initialize method,as seen below.
This method allows the custom class to receive a set of configuration strings when defined. These arepassed in using the configuration attribute when defining the component. For instance, the followingexample defines an attribute named myAttribute with a value of myValue.
/subsystem=elytron/COMPONENT_NAME=NEW_COMPONENT:add(class-name=CLASS_NAME,module=MODULE_NAME,configuration={myAttribute="myValue"}
1.11.10.3. Using Custom Trust Managers with Elytron
By implementing a custom trust manager, it is possible to extend the validation of certificates whenusing HTTPS in Undertow, LDAPS in a dir-context, or any place where Elytron is used for SSLconnections. This component is responsible for making trust decisions for the server, and it is stronglyrecommended that these be implemented if a custom trust manager is used.
IMPORTANT
void initialize(final Map<String, String> configuration);
Red Hat JBoss Enterprise Application Platform 7.3 How to Configure Server Security
98
IMPORTANT
When using FIPS it is not possible to utilize a custom trust manager, as FIPS requires thismanager be embedded in the JDK for security reasons. Similar behavior can beaccomplished by implementing a SecurityRealm that validates X509 evidences.
Requirements for Implementing a Custom Trust ManagerWhen using a custom trust manager, the following must be implemented:
A trust manager that implements the X509ExtendedTrustManager interface.
A trust manager factory that extends TrustManagerFactorySpi.
The provider of the trust manager factory.
The provider must be included in the JAR file to be added into JBoss EAP. Any implemented classesmust be included in JBoss EAP as a module. Classes are not required to be in one module, and can beloaded from module dependencies.
Example ImplementationsThe following example demonstrates a provider that registers the custom trust manager factory as aservice.
Example: Provider
The following example demonstrates a custom trust manager. This trust manager contains overloadedmethods on checking if a client or server is trusted.
Example: TrustManager
import org.kohsuke.MetaInfServices;import javax.net.ssl.TrustManagerFactory;import java.security.Provider;import java.util.Collections;import java.util.List;import java.util.Map;
@MetaInfServices(Provider.class)public class CustomProvider extends Provider {
public CustomProvider() { super("CustomProvider", 1.0, "Demo provider");
System.out.println("CustomProvider initialization.");
final List<String> emptyList = Collections.emptyList(); final Map<String, String> emptyMap = Collections.emptyMap();
putService(new Service(this, TrustManagerFactory.class.getSimpleName(),"CustomAlgorithm", CustomTrustManagerFactorySpi.class.getName(), emptyList, emptyMap)); }
}
import javax.net.ssl.SSLEngine;
CHAPTER 1. SECURING THE SERVER AND ITS INTERFACES
99

The following example is a factory used to return instances of the trust manager.
Example: TrustManagerFactorySpi
import javax.net.ssl.X509ExtendedTrustManager;import java.net.Socket;import java.security.cert.CertificateException;import java.security.cert.X509Certificate;
public class CustomTrustManager extends X509ExtendedTrustManager {
public void checkClientTrusted(X509Certificate[] x509Certificates, String s, Socket socket) throws CertificateException { // Insert your code here }
public void checkServerTrusted(X509Certificate[] x509Certificates, String s, Socket socket) throws CertificateException { // Insert your code here }
public void checkClientTrusted(X509Certificate[] x509Certificates, String s, SSLEngine sslEngine) throws CertificateException { // Insert your code here }
public void checkServerTrusted(X509Certificate[] x509Certificates, String s, SSLEngine sslEngine) throws CertificateException { // Insert your code here }
public void checkClientTrusted(X509Certificate[] x509Certificates, String s) throws CertificateException { // Insert your code here }
public void checkServerTrusted(X509Certificate[] x509Certificates, String s) throws CertificateException { // Insert your code here }
public X509Certificate[] getAcceptedIssuers() { // Insert your code here }
}
import javax.net.ssl.ManagerFactoryParameters;import javax.net.ssl.TrustManager;import javax.net.ssl.TrustManagerFactorySpi;import java.security.InvalidAlgorithmParameterException;import java.security.KeyStore;import java.security.KeyStoreException;
public class CustomTrustManagerFactorySpi extends TrustManagerFactorySpi {
Red Hat JBoss Enterprise Application Platform 7.3 How to Configure Server Security
100

Adding the Custom Trust ManagerOnce the provider and trust manager have been created, add them to the elytron subsystem by usingthe steps outlined in Add a Custom Component to Elytron .
1.11.11. Default SSLContext
Many libraries used within deployments might require SSL configuration for connections they establish.These libraries tend to be configurable by the caller. If no configuration is provided, they use the default SSLContext for the process.
The default SSLContext is available using the following method call:
By default this SSLContext is configured using system properties. However, within the elytronsubsystem, it is possible to specify which one of the configured contexts should be associated and usedas the default.
To make use of this feature, configure your SSLContext as normal. The following command can then beused to specify which SSLContext should be used as the default.
/subsystem=elytron:write-attribute(name=default-ssl-context, value=client-context)
As existing services and deployments could have cached the default SSLContext prior to this being set,a reload is required to ensure that the default gets set before the deployments are activated.
:reload
If the default-ssl-context attribute is subsequently undefined, the standard APIs do not provide anymechanism to revert the default. In this situation, the Java process would need be restarted.
/subsystem=elytron:undefine-attribute(name=default-ssl-context){ "outcome" => "success", "response-headers" => { "operation-requires-restart" => true, "process-state" => "restart-required" }}
protected void engineInit(KeyStore keyStore) throws KeyStoreException { // Insert your code here }
protected void engineInit(ManagerFactoryParameters managerFactoryParameters) throws InvalidAlgorithmParameterException { // Insert your code here }
protected CustomTrustManager[] engineGetTrustManagers() { // Insert your code here }
}
javax.net.ssl.SSLContext.getDefault();
CHAPTER 1. SECURING THE SERVER AND ITS INTERFACES
101
1.11.12. Using a Certificate Revocation List
If you want to validate a certificate against a certificate revocation list (CRL), you can configure thisusing the certificate-revocation-list attribute for a trust manager in the elytron subsystem. Forexample:
/subsystem=elytron/trust-manager=TRUST_MANAGER:write-attribute(name=certificate-revocation-list,value={path=/path/to/CRL_FILE.crl.pem}
For more information on the available attributes for a trust manager, see the trust-manager Attributestable.
NOTE
Your truststore must contain the certificate chain in order to check the validity of boththe certification revocation list and the certificate. The truststore should not contain end-entity certificates, just certificate authority and intermediate certificates.
You can instruct the trust manager to reload the certificate revocation list by using the reload-certificate-revocation-list operation.
/subsystem=elytron/trust-manager=TRUST_MANAGER:reload-certificate-revocation-list
1.11.13. Using a Certificate Authority to Manage Signed Certificates
You can obtain and manage signed certificates using the JBoss EAP management CLI and themanagement console. This allows you to create a signed certificate directly from the CLI or the consoleand then import it into the required keystore.
NOTE
Many of the commands in this section have an optional staging parameter that indicateswhether the certificate authority’s staging URL should be used. This value defaults to false, and is designed to assist in testing purposes. This parameter should never beenabled in a production environment.
Configure a Let’s Encrypt AccountAs of JBoss EAP 7.3, Let’s Encrypt is the only supported certificate authority. To manage signedcertificates an account must be created with the certificate authority, and the following informationprovided:
A keystore to contain the alias of the certificate authority account key.
The alias of the certificate authority. If the provided alias does not exist in the given keystore,then one will be created and stored as a private key entry.
An optional list of URLs, such as email addresses, that the certificate authority can contact inthe result of any issues.
/subsystem=elytron/certificate-authority-account=CERTIFICATE_ACCOUNT:add(key-store=KEYSTORE,alias=ALIAS,contact-urls=[mailto:EMAIL_ADDRESS])
Create an Account with the Certificate Authority
Once an account has been configured it may be created with the certificate authority by agreeing to
Red Hat JBoss Enterprise Application Platform 7.3 How to Configure Server Security
102
Once an account has been configured it may be created with the certificate authority by agreeing totheir terms of service.
/subsystem=elytron/certificate-authority-account=CERTIFICATE_ACCOUNT:create-account(agree-to-terms-of-service=true)
Update an Account with the Certificate AuthorityThe certificate authority account options can be updated using the update-account command.
/subsystem=elytron/certificate-authority-account=CERTIFICATE_ACCOUNT:update-account(agree-to-terms-of-service=true)
Change the Account Key Associated with the Certificate AuthorityThe key associated with the certificate authority account can be changed by using the change-account-key command.
/subsystem=elytron/certificate-authority-account=CERTIFICATE_ACCOUNT:change-account-key()
Deactivate the Account with the Certificate AuthorityIf the account is no longer desired, then it may be deactivated by using the deactivate-accountcommand.
/subsystem=elytron/certificate-authority-account=CERTIFICATE_ACCOUNT:deactivate-account()
Get the Metadata Associated with the Certificate AuthorityThe metadata for the account can be queried with the get-metadata command. This provides thefollowing information:
A URL to the terms of service.
A URL to the certificate authority website.
A list of the certificate authority accounts.
Whether or not an external account is required.
/subsystem=elytron/certificate-authority-account=CERTIFICATE_ACCOUNT:get-metadata()
Configure a Let’s Encrypt Account Using Management ConsoleTo configure a Let’s Encrypt account using the management console:
1. Access the management console.For more information, see the Management Console section in the JBoss EAP ConfigurationGuide.
2. Navigate to Runtime → Host → Security (Elytron) → SSL and click View.
3. Click Certificate Auth… to open the Certificate Authority Account page.
4. You can perform the following configurations for the selected alias by clicking the buttons withthe labels:
CreateCreate an account with a certificate authority.
CHAPTER 1. SECURING THE SERVER AND ITS INTERFACES
103

DeactivateDeactivate the selected certificate authority account.
UpdateUpdate the selected account with the certificate authority.
Get MetadataView the following information about the certificate authority account:
Associated alias
Certificate authority name
Contact details
Keystore name
Certificate authority details
Change Account Key
Change the associated key with the certificate authority.
1.11.14. Keystore Manipulation Operations
You can perform various keystore manipulation operations on an Elytron key-store resource using themanagement CLI and the management console.
Keystore Manipulation Operations Using the Management CLIUsing the management CLI, you can perform the following keystore manipulation operations:
Generate a key pair.The generate-key-pair command generates a key pair and wraps the resulting public key in aself-signed X.509 certificate. The generated private key and self-signed certificate will beadded to the keystore.
/subsystem=elytron/key-store=httpsKS:add(path=/path/to/server.keystore.jks,credential-reference={clear-text=secret},type=JKS)
/subsystem=elytron/key-store=httpsKS:generate-key-pair(alias=example,algorithm=RSA,key-size=1024,validity=365,credential-reference={clear-text=secret},distinguished-name="CN=www.example.com")
Generate a certificate signing request.The generate-certificate-signing-request command generates a PKCS #10 certificate signingrequest using a PrivateKeyEntry from the keystore. The generated certificate signing requestwill be written to a file.
/subsystem=elytron/key-store=httpsKS:generate-certificate-signing-request(alias=example,path=server.csr,relative-to=jboss.server.config.dir,distinguished-name="CN=www.example.com",extensions=[{critical=false,name=KeyUsage,value=digitalSignature}],credential-reference={clear-text=secret})
Import a certificate or certificate chain.
The import-certificate command imports a certificate or certificate chain from a file into an
Red Hat JBoss Enterprise Application Platform 7.3 How to Configure Server Security
104
The import-certificate command imports a certificate or certificate chain from a file into anentry in the keystore.
/subsystem=elytron/key-store=httpsKS:import-certificate(alias=example,path=/path/to/certificate_or_chain/file,relative-to=jboss.server.config.dir,credential-reference={clear-text=secret},trust-cacerts=true)
Export a certificate.The export-certificate command exports a certificate from an entry in the keystore to a file.
/subsystem=elytron/key-store=httpsKS:export-certificate(alias=example,path=serverCert.cer,relative-to=jboss.server.config.dir,pem=true)
Change an alias.The change-alias command moves an existing keystore entry to a new alias.
/subsystem=elytron/key-store=httpsKS:change-alias(alias=example,new-alias=newExample,credential-reference={clear-text=secret})
Store changes made to keystores.The store command persists any changes that have been made to the file that backs thekeystore.
/subsystem=elytron/key-store=httpsKS:store()
Keystore Manipulation Operations Using the Management ConsoleTo perform the operations using the management console:
1. Access the management console.For more information, see the Management Console section in the JBoss EAP ConfigurationGuide.
2. Navigate to Runtime → Security (Elytron) → Stores and click View.
3. Click Key Store to open the keystore definitions page.
4. Click the required keystore name.You can perform the following operations for the selected keystore by clicking the buttons withthe labels:
LoadLoad or reload the keystore.
StorePersist changes made to the file backing the keystore.
Generate Key PairGenerate a key pair, wrap the public key in a self-signed X.509 certificate, and add theprivate key and the certificate to the keystore.
Import CertificateImport a certificate chain to the keystore from a file.
Obtain
CHAPTER 1. SECURING THE SERVER AND ITS INTERFACES
105
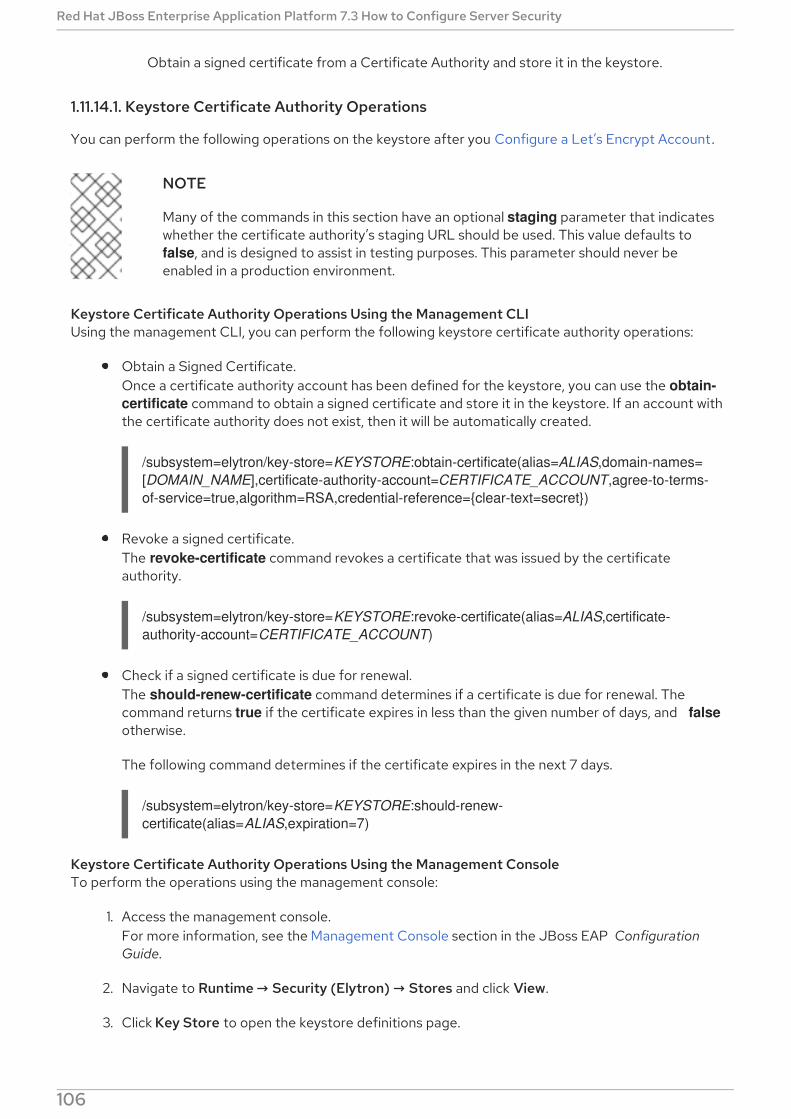
Obtain a signed certificate from a Certificate Authority and store it in the keystore.
1.11.14.1. Keystore Certificate Authority Operations
You can perform the following operations on the keystore after you Configure a Let’s Encrypt Account.
NOTE
Many of the commands in this section have an optional staging parameter that indicateswhether the certificate authority’s staging URL should be used. This value defaults to false, and is designed to assist in testing purposes. This parameter should never beenabled in a production environment.
Keystore Certificate Authority Operations Using the Management CLIUsing the management CLI, you can perform the following keystore certificate authority operations:
Obtain a Signed Certificate.Once a certificate authority account has been defined for the keystore, you can use the obtain-certificate command to obtain a signed certificate and store it in the keystore. If an account withthe certificate authority does not exist, then it will be automatically created.
/subsystem=elytron/key-store=KEYSTORE:obtain-certificate(alias=ALIAS,domain-names=[DOMAIN_NAME],certificate-authority-account=CERTIFICATE_ACCOUNT,agree-to-terms-of-service=true,algorithm=RSA,credential-reference={clear-text=secret})
Revoke a signed certificate.The revoke-certificate command revokes a certificate that was issued by the certificateauthority.
/subsystem=elytron/key-store=KEYSTORE:revoke-certificate(alias=ALIAS,certificate-authority-account=CERTIFICATE_ACCOUNT)
Check if a signed certificate is due for renewal.The should-renew-certificate command determines if a certificate is due for renewal. Thecommand returns true if the certificate expires in less than the given number of days, and falseotherwise.
The following command determines if the certificate expires in the next 7 days.
/subsystem=elytron/key-store=KEYSTORE:should-renew-certificate(alias=ALIAS,expiration=7)
Keystore Certificate Authority Operations Using the Management ConsoleTo perform the operations using the management console:
1. Access the management console.For more information, see the Management Console section in the JBoss EAP ConfigurationGuide.
2. Navigate to Runtime → Security (Elytron) → Stores and click View.
3. Click Key Store to open the keystore definitions page.
Red Hat JBoss Enterprise Application Platform 7.3 How to Configure Server Security
106
4. Click Aliases next to the required keystore name.
5. Click the required alias name.You can perform the following operations for the selected alias by clicking on the buttons withthe labels:
Change AliasChange the alias for the entry.
Export CertificateExport a certificate from a keystore entry to a file.
Generate CSRGenerate a certificate signing request.
Remove AliasRemove the selected alias from the keystore.
DetailsView the details of the certificate associated with the alias.
RevokeRevoke the certificate associated with the alias.
Verify RenewDetermine if the associated certificate is due for renewal.
1.11.15. Configuring Evidence Decoder for X.509 Certificate with Subject AlternativeName Extension
By default, the principal associated with an X.509 certificate in Elytron is the subject name in thecertificate and the principal associated with an X.509 certificate chain is the subject name in the firstcertificate in a certificate chain. You can configure an X509-subject-alt-name-evidence-decoder to usesubject alternative name extension in an X.509 certificate as the principal.
The subject alternative name extension specification for an X.509 certificate and an X.509 certificatechain is defined in RFC 5280.
Prerequisites
You know the expected format of a client certificate, or you have a client certificate availablelocally.
Procedure
1. Identify which subject alternative name extension to use.If you have the client certificate locally, the subject alternative name extension can be viewedusing the keytool command:
keytool -printcert -file /path/to/certificate/certificate.cert
The subject alternative name extension is listed as:
SubjectAlternativeName [
CHAPTER 1. SECURING THE SERVER AND ITS INTERFACES
107

DNS:one.example.org IP Address:127.0.0.1]
2. Create an x509-subject-alt-name-evidence-decoder to use the identified subject alternativename:
/subsystem=elytron/x509-subject-alt-name-evidence-decoder=exampleDnsDecoder:add(alt-name-type=__EXTENSION_TO_USE__)
To use the evidence decoder, reference it in a security-domain:
/subsystem=elytron/security-domain=__Security_Domain_Name__:write-attribute(name="evidence-decoder",value="exampleDnsDecoder")
Additional resources
x509-subject-alternative-name-evidence-decoder Attributes
1.11.16. Configuring an Aggregate Evidence Decoder
You can configure an aggregate evidence decoder to combine two or more evidence decoders. Theevidence decoders are applied in the configured order until an evidence decoder returns a non-nullprincipal or until there are no more evidence decoders left to try.
Prerequisites
The evidence decoders to be aggregated are configured.For information about configuring evidence decoder, see Configuring Evidence Decoder forX.509 Certificate with Subject Alternative Name Extension .
Procedure
1. Create an aggregate evidence decoder from existing the evidence decoders:
/subsystem=elytron/aggregate-evidence-decoder=aggregateDecoder:add(evidence-decoders=[__DECODER_1__,__DECODER_2__,...,__DECODER_N__])
To use the evidence decoder, reference it in a security domain:
/subsystem=elytron/security-domain=__SECURITY_DOMAIN__:write-attribute(name="evidence-decoder",value="aggregateDecoder")
1.11.17. Configuring X.500 Subject Evidence Decoder
Configure x500-subject-evidence-decoder to extract the subject from the first certificate in acertificate chain.
Procedure
Create an x.500 subject evidence decoder:
/subsystem=elytron/x500-subject-evidence-decoder=exampleSubjectDecoder:add()
Red Hat JBoss Enterprise Application Platform 7.3 How to Configure Server Security
108

1.11.18. Using Custom Evidence Decoder Implementation
You can use a custom org.wildfly.security.auth.server.EvidenceDecoder implementation in Elytronby adding it as a module to JBoss EAP.
Procedure
1. Package the custom implementation class as a Java Archive (JAR).
2. Add a module to JBoss EAP containing the JAR.For information about adding modules to JBoss EAP, see Create a Custom Module section inthe Configuration Guide.
3. Add the custom evidence decoder to Elytron:
/subsystem=elytron/custom-evidence-decoder=myCustomEvidenceDecoder:add(module=__MODULE_NAME__, class-name=__FULLY_QUALIFIED_CLASS_NAME__)
CHAPTER 1. SECURING THE SERVER AND ITS INTERFACES
109
CHAPTER 2. SECURING USERS OF THE SERVER AND ITSMANAGEMENT INTERFACES
2.1. USER AUTHENTICATION WITH ELYTRON
2.1.1. Default Configuration
By default, the JBoss EAP management interfaces are secured by the legacy core managementauthentication.
Example: Default Configuration
/core-service=management/management-interface=http-interface:read-resource(){ "outcome" => "success", "result" => { "allowed-origins" => undefined, "console-enabled" => true, "http-authentication-factory" => undefined, "http-upgrade" => {"enabled" => true}, "http-upgrade-enabled" => true, "sasl-protocol" => "remote", "secure-socket-binding" => undefined, "security-realm" => "ManagementRealm", "server-name" => undefined, "socket-binding" => "management-http", "ssl-context" => undefined }
JBoss EAP does provide management-http-authentication and management-sasl-authentication inthe elytron subsystem for securing the management interfaces as well.
To update JBoss EAP to use the default Elytron components:
1. Set http-authentication-factory to use management-http-authentication:
/core-service=management/management-interface=http-interface:write-attribute(name=http-authentication-factory, value=management-http-authentication)
2. Set sasl-authentication-factory to use management-sasl-authentication:
/core-service=management/management-interface=http-interface:write-attribute(name=http-upgrade.sasl-authentication-factory, value=management-sasl-authentication)
3. Undefine security-realm:
/core-service=management/management-interface=http-interface:undefine-attribute(name=security-realm)
4. Reload JBoss EAP for the changes to take affect:
reload
Red Hat JBoss Enterprise Application Platform 7.3 How to Configure Server Security
110
The management interfaces are now secured using the default components provided by the elytronsubsystem.
2.1.1.1. Default Elytron HTTP Authentication Configuration
When you access the management interface over http, for example when using the web-basedmanagement console, JBoss EAP will use the management-http-authentication http-authentication-factory.
/subsystem=elytron/http-authentication-factory=management-http-authentication:read-resource(){ "outcome" => "success", "result" => { "http-server-mechanism-factory" => "global", "mechanism-configurations" => [{ "mechanism-name" => "DIGEST", "mechanism-realm-configurations" => [{"realm-name" => "ManagementRealm"}] }], "security-domain" => "ManagementDomain" }}
The management-http-authentication http-authentication-factory, is configured to use the ManagementDomain security domain.
/subsystem=elytron/security-domain=ManagementDomain:read-resource(){ "outcome" => "success", "result" => { "default-realm" => "ManagementRealm", "permission-mapper" => "default-permission-mapper", "post-realm-principal-transformer" => undefined, "pre-realm-principal-transformer" => undefined, "principal-decoder" => undefined, "realm-mapper" => undefined, "realms" => [ { "realm" => "ManagementRealm", "role-decoder" => "groups-to-roles" }, { "realm" => "local", "role-mapper" => "super-user-mapper" } ], "role-mapper" => undefined, "trusted-security-domains" => undefined }}
The ManagementDomain security domain is backed by the ManagementRealm Elytron security realm,which is a properties-based realm.
IMPORTANT
CHAPTER 2. SECURING USERS OF THE SERVER AND ITS MANAGEMENT INTERFACES
111

IMPORTANT
A properties-based realm is only read when the server starts. Any users added afterserver start, either manually or by using an add-user script, will require a server reload.This reload is accomplished by running the reload command from the management CLI.
reload
/subsystem=elytron/properties-realm=ManagementRealm:read-resource(){ "outcome" => "success", "result" => { "groups-attribute" => "groups", "groups-properties" => { "path" => "mgmt-groups.properties", "relative-to" => "jboss.server.config.dir" }, "plain-text" => false, "users-properties" => { "path" => "mgmt-users.properties", "relative-to" => "jboss.server.config.dir" } }}
2.1.1.2. Default Elytron Management CLI Authentication
By default, the management CLI (jboss-cli.sh) is configured to connect over remote+http.
Example: Default jboss-cli.xml
This will establish a connection over HTTP and use HTTP upgrade to change the communicationprotocol to Remoting. The HTTP upgrade connection is secured in the http-upgrade section of the http-interface using a sasl-authentication-factory.
Example: Configuration with Default Components
/core-service=management/management-interface=http-interface:read-resource(){ "outcome" => "success", "result" => { "allowed-origins" => undefined,
<jboss-cli xmlns="urn:jboss:cli:3.1">
<default-protocol use-legacy-override="true">remote+http</default-protocol>
<!-- The default controller to connect to when 'connect' command is executed w/o arguments --> <default-controller> <protocol>remote+http</protocol> <host>localhost</host> <port>9990</port> </default-controller>
Red Hat JBoss Enterprise Application Platform 7.3 How to Configure Server Security
112

"console-enabled" => true, "http-authentication-factory" => "management-http-authentication", "http-upgrade" => { "enabled" => true, "sasl-authentication-factory" => "management-sasl-authentication" }, "http-upgrade-enabled" => true, "sasl-protocol" => "remote", "secure-socket-binding" => undefined, "security-realm" => undefined, "server-name" => undefined, "socket-binding" => "management-http", "ssl-context" => undefined }}
The default sasl-authentication-factory is management-sasl-authentication.
/subsystem=elytron/sasl-authentication-factory=management-sasl-authentication:read-resource(){ "outcome" => "success", "result" => { "mechanism-configurations" => [ { "mechanism-name" => "JBOSS-LOCAL-USER", "realm-mapper" => "local" }, { "mechanism-name" => "DIGEST-MD5", "mechanism-realm-configurations" => [{"realm-name" => "ManagementRealm"}] } ], "sasl-server-factory" => "configured", "security-domain" => "ManagementDomain" }}
The management-sasl-authentication sasl-authentication-factory specifies JBOSS-LOCAL-USERand DIGEST-MD5 mechanisms.
The ManagementRealm Elytron security realm, used in DIGEST-MD5, is the same realm used in the management-http-authentication http-authentication-factory.
Example: JBOSS-LOCAL-USER Realm
/subsystem=elytron/identity-realm=local:read-resource(){ "outcome" => "success", "result" => { "attribute-name" => undefined, "attribute-values" => undefined, "identity" => "$local" }}
CHAPTER 2. SECURING USERS OF THE SERVER AND ITS MANAGEMENT INTERFACES
113
The local Elytron security realm is for handling silent authentication for local users.
2.1.2. Secure the Management Interfaces with a New Identity Store
1. Create a security domain and any supporting security realms, decoders, or mappers for youridentity store.This process is covered in the Elytron Subsystem section of JBoss EAP How to ConfigureIdentity Management Guide. For example, if you wanted to secure the management interfacesusing a filesystem-based identity store, you would follow the steps in Configure Authenticationwith a Filesystem-based Identity Store.
2. Create an http-authentication-factory or sasl-authentication-factory.
Example: http-authentication-factory
/subsystem=elytron/http-authentication-factory=example-http-auth:add(http-server-mechanism-factory=global, security-domain=exampleSD, mechanism-configurations=[{mechanism-name=DIGEST, mechanism-realm-configurations=[{realm-name=exampleManagementRealm}]}])
Example: sasl-authentication-factory
/subsystem=elytron/sasl-authentication-factory=example-sasl-auth:add(sasl-server-factory=configured, security-domain=exampleSD, mechanism-configurations=[{mechanism-name=DIGEST-MD5, mechanism-realm-configurations=[{realm-name=exampleManagementRealm}]}])
3. Add pattern-filter to the configured configurable-sasl-server-factory.
Example: Add GSSAPI to the Configured configurable-sasl-server-factory
/subsystem=elytron/configurable-sasl-server-factory=configured:list-add(name=filters, value={pattern-filter=GSSAPI})
This is an optional step. When a client attempts to connect to the HTTP managementinterfaces, JBoss EAP sends back an HTTP response with a status code of 401 Unauthorized,and a set of headers that list the supported authentication mechanisms, for example, Digest,GSSAPI, and so on. For more information, see the Local and Remote Client Authentication withthe HTTP Interface section in the JBoss EAP Security Architecture guide.
4. Update the management interfaces to use your http-authentication-factory or sasl-authentication-factory.
Example: Update http-authentication-factory
/core-service=management/management-interface=http-interface:write-attribute(name=http-authentication-factory, value=example-http-auth)
reload
Example: Update sasl-authentication-factory
/core-service=management/management-interface=http-interface:write-attribute(name=http-
Red Hat JBoss Enterprise Application Platform 7.3 How to Configure Server Security
114

upgrade.sasl-authentication-factory, value=example-sasl-auth)
reload
NOTE
When using legacy core management authentication, you can only secure thehttp management interface with a single legacy security realm. This forces theHTTP and SASL configuration to appear in a single legacy security realm. Whenusing the elytron subsystem, you can configure the http-authentication-factoryand sasl-authentication-factory separately, allowing you to use distinct securitydomains for securing the HTTP and SASL mechanisms of the http managementinterface.
NOTE
If two different attributes with similar implementation in legacy security and Elytron,respectively, are configured in the management interface, only the Elytron relatedconfigurations are used. For example, if security-realm for legacy security and http-authentication-factory for Elytron are configured, then authentication is handled by http-authentication-factory configuration.
NOTE
When the management interface includes both http-authentication-factory, or sasl-authentication-factory for the HTTP interface, as well as the security-realm, and the ssl-context attribute is not used, the authentication is handled by Elytron and the SSL ishandled by the legacy security realm.
When the management interface includes both the security-realm and the ssl-context,and the http-authentication-factory or sasl-authentication-factory for the HTTPinterface is not used, then authentication is handled by the legacy security realm and SSLis handled by Elytron.
2.1.3. Adding Silent Authentication
By default, JBoss EAP provides an authentication mechanism for local users, also know as silentauthentication, through the local security realm. You can find more details on silent authentication inthe Silent Authentication section.
Silent authentication must be added to a sasl-authentication-factory.
To add silent authentication to an existing sasl-authentication-factory:
/subsystem=elytron/sasl-authentication-factory=example-sasl-auth:list-add(name=mechanism-configurations, value={mechanism-name=JBOSS-LOCAL-USER, realm-mapper=local})
reload
To create a new sasl-server-factory with silent authentication:
/subsystem=elytron/sasl-authentication-factory=example-sasl-auth:add(sasl-server-factory=configured,security-domain=ManagementDomain,mechanism-configurations=[{mechanism-name=DIGEST-MD5,mechanism-realm-configurations=[{realm-name=exampleManagementRealm}]},
CHAPTER 2. SECURING USERS OF THE SERVER AND ITS MANAGEMENT INTERFACES
115
{mechanism-name=JBOSS-LOCAL-USER, realm-mapper=local}])
reload
NOTE
The above example uses the existing ManagementDomain security domain, but you canalso create and use other security domains. You can find more examples of creatingsecurity domains in the Elytron Subsystem section of the JBoss EAP How to ConfigureIdentity Management Guide.
IMPORTANT
If the Elytron security is used and an authentication attempt comes in using the JBOSS-LOCAL-USER SASL mechanism with an authentication name that does not correspondto a real identity, authentication fails.
Choosing a custom user name for JBOSS-LOCAL-USER is possible with legacy securitysubsystem. There the authentication proceeds by mapping the user name to a specialidentity.
2.1.4. Mapping Identity for Authenticated Management Users
When using the elytron subsystem to secure the management interfaces, you can provide a securitydomain to the management interfaces for identity mapping of authenticated users. This allowsauthenticated users to appear with the appropriate identity when logged into the managementinterfaces.
The application server exposes more than one kind of management interface. Each type of interfacecan be associated with an independent authentication-factory to handle the authenticationrequirements of that interface.
To make the authorization decision, the current security identity is obtained from the security domain.The returned security identity has the role mapping and permission assignment, based on the rulesdefined within that security domain.
NOTE
In most cases, a common security domain is used for all management; for authenticationof the management interfaces as well as for obtaining the security identity used for theauthorization decisions. In these cases, the security domain is associated with theauthentication factory of the management interface and no special access=identityneeds to be defined.
In some cases, a different security domain is used to obtain the identity for theauthorization decisions. Here, the access=identity resource is defined. It contains areference to a security domain to obtain the identity for authorization.
The below example assumes you have secured the management interfaces with the exampleSD Elytronsecurity domain and have it exposed as exampleManagementRealm.
To define the identity mapping, add the identity resource to the management interfaces.
Example: Add the identity Resource
Red Hat JBoss Enterprise Application Platform 7.3 How to Configure Server Security
116
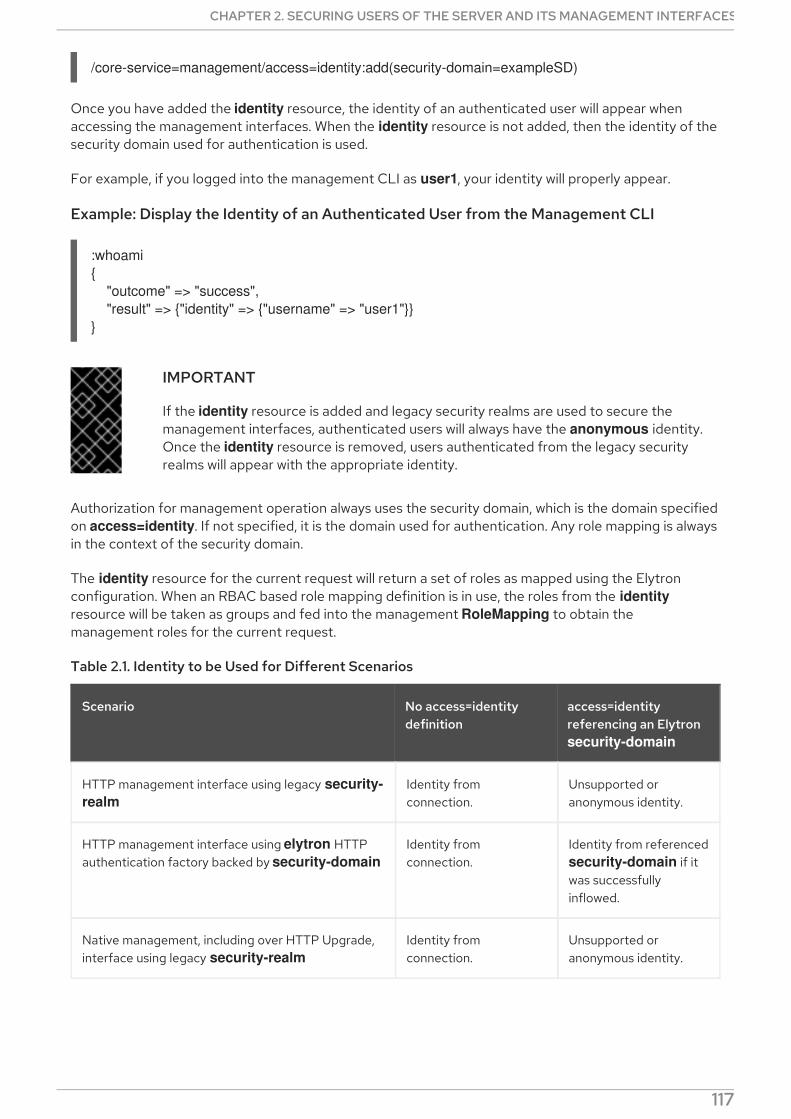
/core-service=management/access=identity:add(security-domain=exampleSD)
Once you have added the identity resource, the identity of an authenticated user will appear whenaccessing the management interfaces. When the identity resource is not added, then the identity of thesecurity domain used for authentication is used.
For example, if you logged into the management CLI as user1, your identity will properly appear.
Example: Display the Identity of an Authenticated User from the Management CLI
:whoami{ "outcome" => "success", "result" => {"identity" => {"username" => "user1"}}}
IMPORTANT
If the identity resource is added and legacy security realms are used to secure themanagement interfaces, authenticated users will always have the anonymous identity.Once the identity resource is removed, users authenticated from the legacy securityrealms will appear with the appropriate identity.
Authorization for management operation always uses the security domain, which is the domain specifiedon access=identity. If not specified, it is the domain used for authentication. Any role mapping is alwaysin the context of the security domain.
The identity resource for the current request will return a set of roles as mapped using the Elytronconfiguration. When an RBAC based role mapping definition is in use, the roles from the identityresource will be taken as groups and fed into the management RoleMapping to obtain themanagement roles for the current request.
Table 2.1. Identity to be Used for Different Scenarios
Scenario No access=identitydefinition
access=identityreferencing an Elytron security-domain
HTTP management interface using legacy security-realm
Identity fromconnection.
Unsupported oranonymous identity.
HTTP management interface using elytron HTTPauthentication factory backed by security-domain
Identity fromconnection.
Identity from referencedsecurity-domain if itwas successfullyinflowed.
Native management, including over HTTP Upgrade,interface using legacy security-realm
Identity fromconnection.
Unsupported oranonymous identity.
CHAPTER 2. SECURING USERS OF THE SERVER AND ITS MANAGEMENT INTERFACES
117
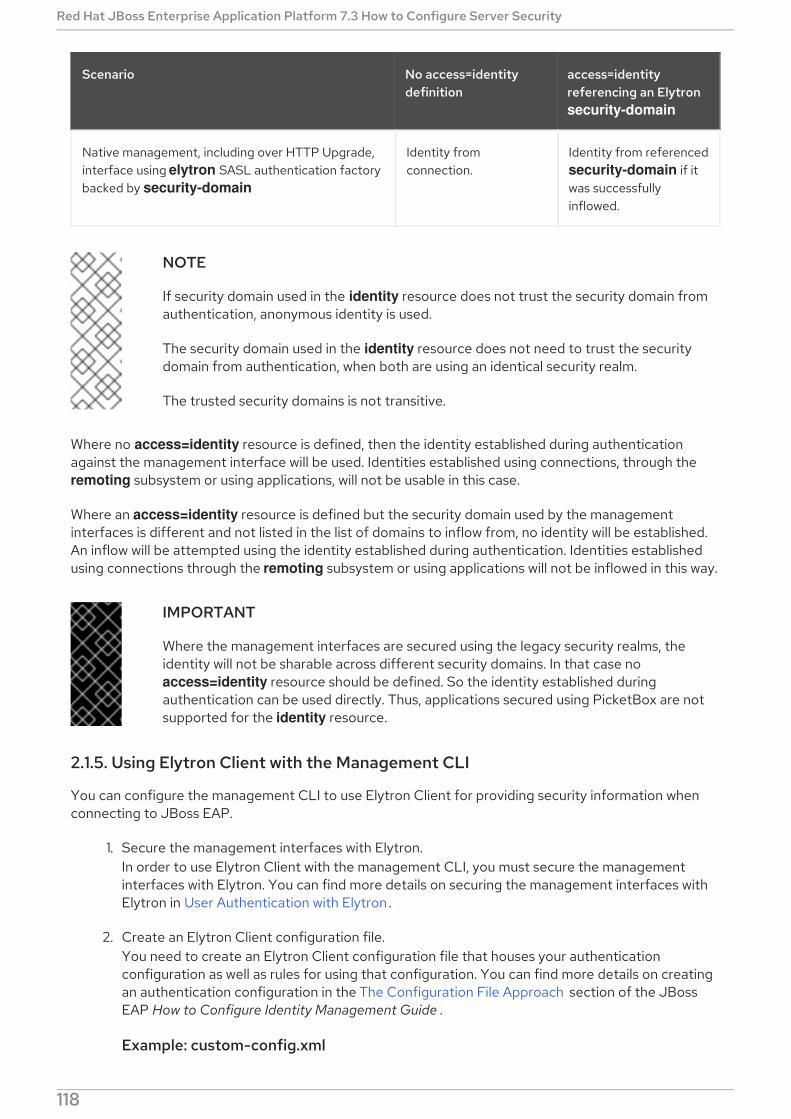
Native management, including over HTTP Upgrade,interface using elytron SASL authentication factorybacked by security-domain
Identity fromconnection.
Identity from referencedsecurity-domain if itwas successfullyinflowed.
Scenario No access=identitydefinition
access=identityreferencing an Elytron security-domain
NOTE
If security domain used in the identity resource does not trust the security domain fromauthentication, anonymous identity is used.
The security domain used in the identity resource does not need to trust the securitydomain from authentication, when both are using an identical security realm.
The trusted security domains is not transitive.
Where no access=identity resource is defined, then the identity established during authenticationagainst the management interface will be used. Identities established using connections, through the remoting subsystem or using applications, will not be usable in this case.
Where an access=identity resource is defined but the security domain used by the managementinterfaces is different and not listed in the list of domains to inflow from, no identity will be established.An inflow will be attempted using the identity established during authentication. Identities establishedusing connections through the remoting subsystem or using applications will not be inflowed in this way.
IMPORTANT
Where the management interfaces are secured using the legacy security realms, theidentity will not be sharable across different security domains. In that case no access=identity resource should be defined. So the identity established duringauthentication can be used directly. Thus, applications secured using PicketBox are notsupported for the identity resource.
2.1.5. Using Elytron Client with the Management CLI
You can configure the management CLI to use Elytron Client for providing security information whenconnecting to JBoss EAP.
1. Secure the management interfaces with Elytron.In order to use Elytron Client with the management CLI, you must secure the managementinterfaces with Elytron. You can find more details on securing the management interfaces withElytron in User Authentication with Elytron .
2. Create an Elytron Client configuration file.You need to create an Elytron Client configuration file that houses your authenticationconfiguration as well as rules for using that configuration. You can find more details on creatingan authentication configuration in the The Configuration File Approach section of the JBossEAP How to Configure Identity Management Guide .
Example: custom-config.xml
Red Hat JBoss Enterprise Application Platform 7.3 How to Configure Server Security
118

3. Use the Elytron Client configuration file with management CLI script.
$ ./jboss-cli.sh -c -Dwildfly.config.url=/path/to/custom-config.xml
2.2. IDENTITY PROPAGATION AND FORWARDING WITH ELYTRON
2.2.1. Propagating Security Identities for Remote Calls
JBoss EAP 7.1 introduced the ability to easily configure the server and your applications to propagate asecurity identity from a client to the server for remoting calls. You can also configure server componentsto run within the security identity of a given user.
The example in this section demonstrates how to forward security identity credentials. It propagates thesecurity identity of a client and an EJB to a remote EJB. It returns a string containing the name of the Principal that called the remote EJB along with the user’s authorized role information. The exampleconsists of the following components.
A secured EJB that contains a single method, accessible by all users, that returns authorizationinformation about the caller.
An intermediate EJB that contains a single method. It makes use of a remote connection andinvokes the method on the secured EJB.
A remote standalone client application that invokes the intermediate EJB.
A META-INF/wildfly-config.xml file that contains the identity information used forauthentication.
You must first enable security identity propagation by configuring the server. Next review the exampleapplication code that uses the WildFlyInitialContextFactory to look up and invoke the remote EJB.
<configuration> <authentication-client xmlns="urn:elytron:client:1.2"> <authentication-rules> <rule use-configuration="configuration1"> <match-host name="localhost" /> </rule> </authentication-rules> <authentication-configurations> <configuration name="configuration1"> <sasl-mechanism-selector selector="DIGEST-MD5" /> <providers> <use-service-loader /> </providers> <set-user-name name="user1" /> <credentials> <clear-password password="password123" /> </credentials> <set-mechanism-realm name="exampleManagementRealm" /> </configuration> </authentication-configurations> </authentication-client></configuration>
CHAPTER 2. SECURING USERS OF THE SERVER AND ITS MANAGEMENT INTERFACES
119
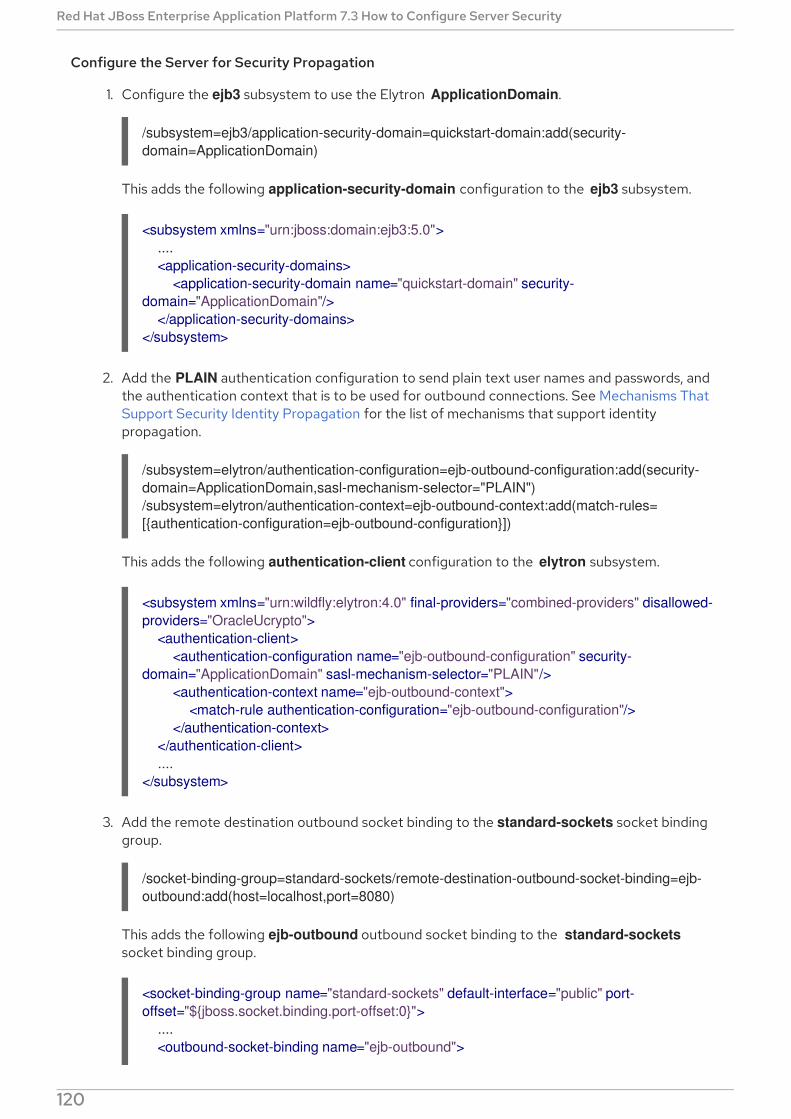
Configure the Server for Security Propagation
1. Configure the ejb3 subsystem to use the Elytron ApplicationDomain.
/subsystem=ejb3/application-security-domain=quickstart-domain:add(security-domain=ApplicationDomain)
This adds the following application-security-domain configuration to the ejb3 subsystem.
2. Add the PLAIN authentication configuration to send plain text user names and passwords, andthe authentication context that is to be used for outbound connections. See Mechanisms ThatSupport Security Identity Propagation for the list of mechanisms that support identitypropagation.
/subsystem=elytron/authentication-configuration=ejb-outbound-configuration:add(security-domain=ApplicationDomain,sasl-mechanism-selector="PLAIN")/subsystem=elytron/authentication-context=ejb-outbound-context:add(match-rules=[{authentication-configuration=ejb-outbound-configuration}])
This adds the following authentication-client configuration to the elytron subsystem.
3. Add the remote destination outbound socket binding to the standard-sockets socket bindinggroup.
/socket-binding-group=standard-sockets/remote-destination-outbound-socket-binding=ejb-outbound:add(host=localhost,port=8080)
This adds the following ejb-outbound outbound socket binding to the standard-socketssocket binding group.
<subsystem xmlns="urn:jboss:domain:ejb3:5.0"> .... <application-security-domains> <application-security-domain name="quickstart-domain" security-domain="ApplicationDomain"/> </application-security-domains></subsystem>
<subsystem xmlns="urn:wildfly:elytron:4.0" final-providers="combined-providers" disallowed-providers="OracleUcrypto"> <authentication-client> <authentication-configuration name="ejb-outbound-configuration" security-domain="ApplicationDomain" sasl-mechanism-selector="PLAIN"/> <authentication-context name="ejb-outbound-context"> <match-rule authentication-configuration="ejb-outbound-configuration"/> </authentication-context> </authentication-client> ....</subsystem>
<socket-binding-group name="standard-sockets" default-interface="public" port-offset="${jboss.socket.binding.port-offset:0}"> .... <outbound-socket-binding name="ejb-outbound">
Red Hat JBoss Enterprise Application Platform 7.3 How to Configure Server Security
120

4. Add the remote outbound connection and set the SASL authentication factory in the HTTPconnector.
/subsystem=remoting/remote-outbound-connection=ejb-outbound-connection:add(outbound-socket-binding-ref=ejb-outbound, authentication-context=ejb-outbound-context)/subsystem=remoting/http-connector=http-remoting-connector:write-attribute(name=sasl-authentication-factory,value=application-sasl-authentication)
This adds the following http-remoting-connector and ejb-outbound-connection configurationto the remoting subsystem.
5. Configure the Elytron SASL authentication to use the PLAIN mechanism.
/subsystem=elytron/sasl-authentication-factory=application-sasl-authentication:write-attribute(name=mechanism-configurations,value=[{mechanism-name=PLAIN},{mechanism-name=JBOSS-LOCAL-USER,realm-mapper=local},{mechanism-name=DIGEST-MD5,mechanism-realm-configurations=[{realm-name=ApplicationRealm}]}])
This adds the following application-sasl-authentication configuration to the elytronsubsystem.
<remote-destination host="localhost" port="8080"/> </outbound-socket-binding></socket-binding-group>
<subsystem xmlns="urn:jboss:domain:remoting:4.0"> .... <http-connector name="http-remoting-connector" connector-ref="default" security-realm="ApplicationRealm" sasl-authentication-factory="application-sasl-authentication"/> <outbound-connections> <remote-outbound-connection name="ejb-outbound-connection" outbound-socket-binding-ref="ejb-outbound" authentication-context="ejb-outbound-context"/> </outbound-connections></subsystem>
<subsystem xmlns="urn:wildfly:elytron:4.0" final-providers="combined-providers" disallowed-providers="OracleUcrypto"> .... <sasl> .... <sasl-authentication-factory name="application-sasl-authentication" sasl-server-factory="configured" security-domain="ApplicationDomain"> <mechanism-configuration> <mechanism mechanism-name="PLAIN"/> <mechanism mechanism-name="JBOSS-LOCAL-USER" realm-mapper="local"/> <mechanism mechanism-name="DIGEST-MD5"> <mechanism-realm realm-name="ApplicationRealm"/> </mechanism> </mechanism-configuration> </sasl-authentication-factory> </sasl> ....</subsystem>
CHAPTER 2. SECURING USERS OF THE SERVER AND ITS MANAGEMENT INTERFACES
121

The server is now configured to enable security propagation for the following example application.
Review the Example Application Code That Propagates a Security IdentityOnce security identity propagation is enabled in the server configuration, the EJB client application canuse the WildFlyInitialContextFactory to look up and invoke the EJB proxy. The EJB is invoked as theuser that authenticated in the client example shown below. The following abbreviated code examplesare taken from the ejb-security-context-propagation quickstart that ships with JBoss EAP 7.3. Seethat quickstart for a complete working example of security identity propagation.
To invoke the EJB as a different user, you can set the Context.SECURITY_PRINCIPAL and Context.SECURITY_CREDENTIALS in the context properties.
Example: Remote Client
Example: Intermediate EJB
public class RemoteClient {
public static void main(String[] args) throws Exception { // invoke the intermediate bean using the identity configured in wildfly-config.xml invokeIntermediateBean();
// now lets programmatically setup an authentication context to switch users before invoking the intermediate bean AuthenticationConfiguration superUser = AuthenticationConfiguration.empty().setSaslMechanismSelector(SaslMechanismSelector.NONE.addMechanism("PLAIN")). useName("superUser").usePassword("superPwd1!"); final AuthenticationContext authCtx = AuthenticationContext.empty(). with(MatchRule.ALL, superUser);
AuthenticationContext.getContextManager().setThreadDefault(authCtx); invokeIntermediateBean(); }
private static void invokeIntermediateBean() throws Exception { final Hashtable<String, String> jndiProperties = new Hashtable<>(); jndiProperties.put(Context.INITIAL_CONTEXT_FACTORY, "org.wildfly.naming.client.WildFlyInitialContextFactory"); jndiProperties.put(Context.PROVIDER_URL, "remote+http://localhost:8080"); final Context context = new InitialContext(jndiProperties); IntermediateEJBRemote intermediate = (IntermediateEJBRemote) context.lookup("ejb:/ejb-security-context-propagation/IntermediateEJB!" + IntermediateEJBRemote.class.getName()); // Call the intermediate EJB System.out.println(intermediate.makeRemoteCalls()); }}
@Stateless@Remote(IntermediateEJBRemote.class)@SecurityDomain("quickstart-domain")@PermitAllpublic class IntermediateEJB implements IntermediateEJBRemote {
Red Hat JBoss Enterprise Application Platform 7.3 How to Configure Server Security
122
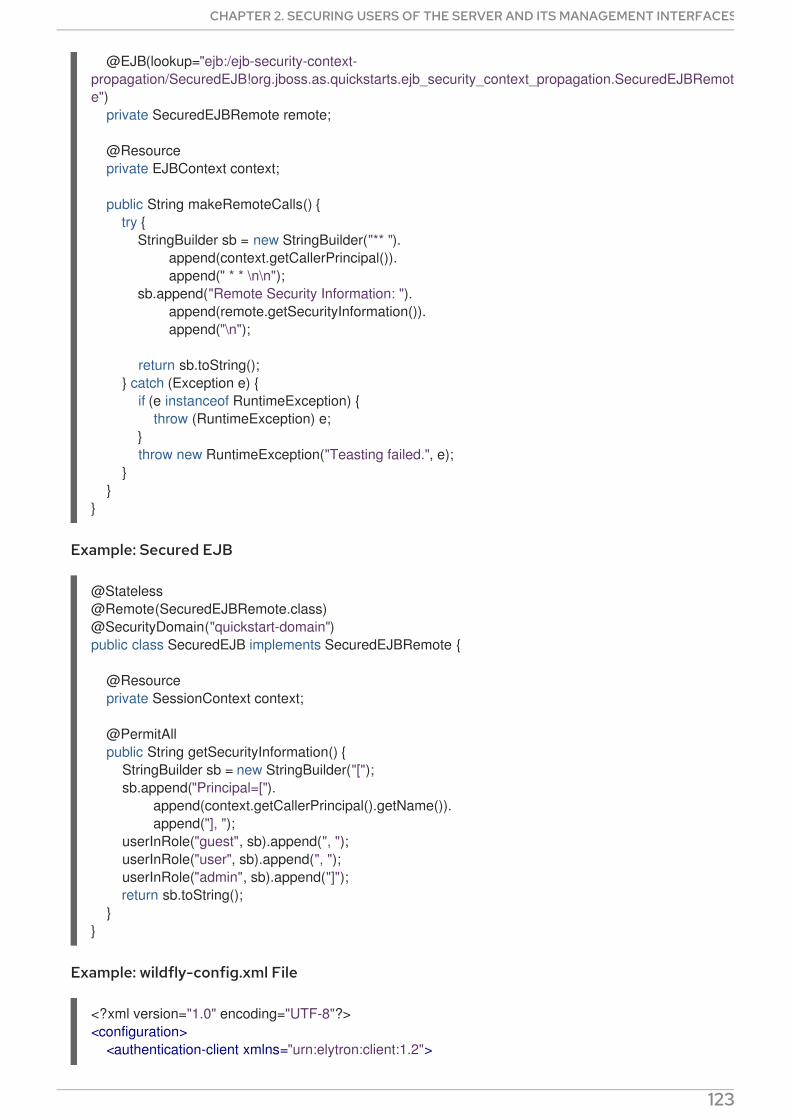
Example: Secured EJB
Example: wildfly-config.xml File
@EJB(lookup="ejb:/ejb-security-context-propagation/SecuredEJB!org.jboss.as.quickstarts.ejb_security_context_propagation.SecuredEJBRemote") private SecuredEJBRemote remote;
@Resource private EJBContext context;
public String makeRemoteCalls() { try { StringBuilder sb = new StringBuilder("** "). append(context.getCallerPrincipal()). append(" * * \n\n"); sb.append("Remote Security Information: "). append(remote.getSecurityInformation()). append("\n");
return sb.toString(); } catch (Exception e) { if (e instanceof RuntimeException) { throw (RuntimeException) e; } throw new RuntimeException("Teasting failed.", e); } }}
@Stateless@Remote(SecuredEJBRemote.class)@SecurityDomain("quickstart-domain")public class SecuredEJB implements SecuredEJBRemote {
@Resource private SessionContext context;
@PermitAll public String getSecurityInformation() { StringBuilder sb = new StringBuilder("["); sb.append("Principal=["). append(context.getCallerPrincipal().getName()). append("], "); userInRole("guest", sb).append(", "); userInRole("user", sb).append(", "); userInRole("admin", sb).append("]"); return sb.toString(); }}
<?xml version="1.0" encoding="UTF-8"?><configuration> <authentication-client xmlns="urn:elytron:client:1.2">
CHAPTER 2. SECURING USERS OF THE SERVER AND ITS MANAGEMENT INTERFACES
123
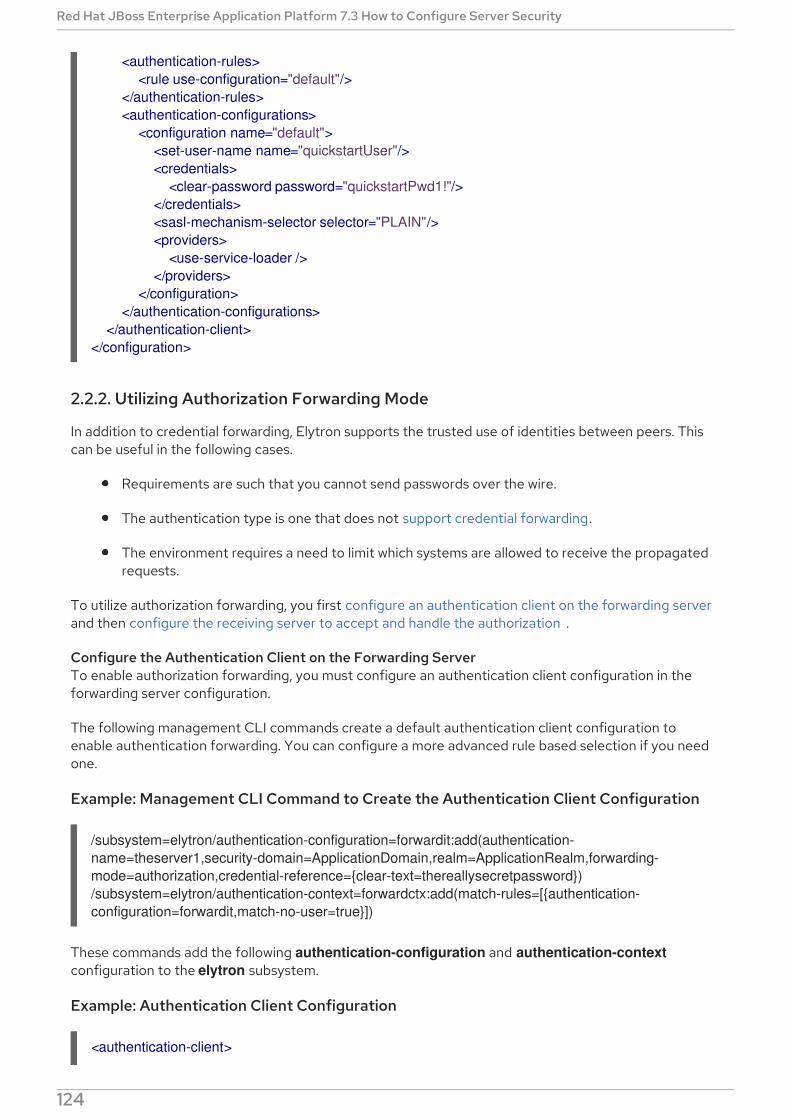
2.2.2. Utilizing Authorization Forwarding Mode
In addition to credential forwarding, Elytron supports the trusted use of identities between peers. Thiscan be useful in the following cases.
Requirements are such that you cannot send passwords over the wire.
The authentication type is one that does not support credential forwarding.
The environment requires a need to limit which systems are allowed to receive the propagatedrequests.
To utilize authorization forwarding, you first configure an authentication client on the forwarding serverand then configure the receiving server to accept and handle the authorization .
Configure the Authentication Client on the Forwarding ServerTo enable authorization forwarding, you must configure an authentication client configuration in theforwarding server configuration.
The following management CLI commands create a default authentication client configuration toenable authentication forwarding. You can configure a more advanced rule based selection if you needone.
Example: Management CLI Command to Create the Authentication Client Configuration
/subsystem=elytron/authentication-configuration=forwardit:add(authentication-name=theserver1,security-domain=ApplicationDomain,realm=ApplicationRealm,forwarding-mode=authorization,credential-reference={clear-text=thereallysecretpassword})/subsystem=elytron/authentication-context=forwardctx:add(match-rules=[{authentication-configuration=forwardit,match-no-user=true}])
These commands add the following authentication-configuration and authentication-contextconfiguration to the elytron subsystem.
Example: Authentication Client Configuration
<authentication-rules> <rule use-configuration="default"/> </authentication-rules> <authentication-configurations> <configuration name="default"> <set-user-name name="quickstartUser"/> <credentials> <clear-password password="quickstartPwd1!"/> </credentials> <sasl-mechanism-selector selector="PLAIN"/> <providers> <use-service-loader /> </providers> </configuration> </authentication-configurations> </authentication-client></configuration>
<authentication-client>
Red Hat JBoss Enterprise Application Platform 7.3 How to Configure Server Security
124
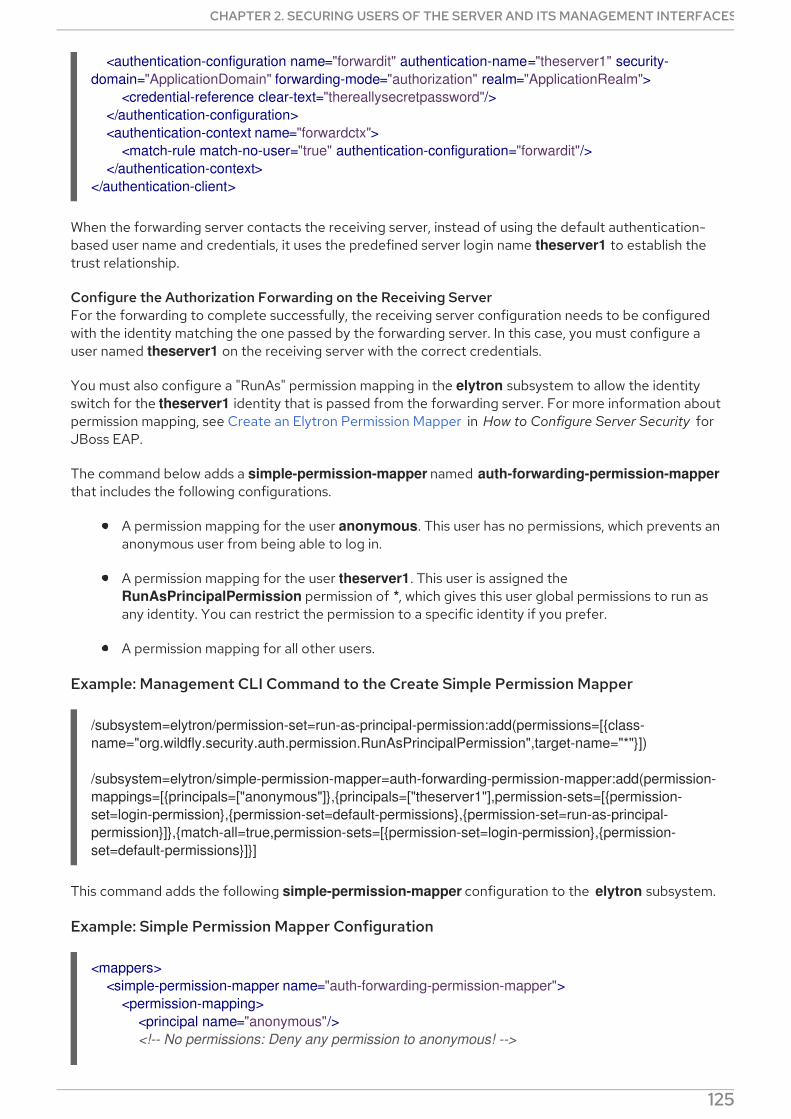
When the forwarding server contacts the receiving server, instead of using the default authentication-based user name and credentials, it uses the predefined server login name theserver1 to establish thetrust relationship.
Configure the Authorization Forwarding on the Receiving ServerFor the forwarding to complete successfully, the receiving server configuration needs to be configuredwith the identity matching the one passed by the forwarding server. In this case, you must configure auser named theserver1 on the receiving server with the correct credentials.
You must also configure a "RunAs" permission mapping in the elytron subsystem to allow the identityswitch for the theserver1 identity that is passed from the forwarding server. For more information aboutpermission mapping, see Create an Elytron Permission Mapper in How to Configure Server Security forJBoss EAP.
The command below adds a simple-permission-mapper named auth-forwarding-permission-mapperthat includes the following configurations.
A permission mapping for the user anonymous. This user has no permissions, which prevents ananonymous user from being able to log in.
A permission mapping for the user theserver1. This user is assigned the RunAsPrincipalPermission permission of *, which gives this user global permissions to run asany identity. You can restrict the permission to a specific identity if you prefer.
A permission mapping for all other users.
Example: Management CLI Command to the Create Simple Permission Mapper
/subsystem=elytron/permission-set=run-as-principal-permission:add(permissions=[{class-name="org.wildfly.security.auth.permission.RunAsPrincipalPermission",target-name="*"}])
/subsystem=elytron/simple-permission-mapper=auth-forwarding-permission-mapper:add(permission-mappings=[{principals=["anonymous"]},{principals=["theserver1"],permission-sets=[{permission-set=login-permission},{permission-set=default-permissions},{permission-set=run-as-principal-permission}]},{match-all=true,permission-sets=[{permission-set=login-permission},{permission-set=default-permissions}]}]
This command adds the following simple-permission-mapper configuration to the elytron subsystem.
Example: Simple Permission Mapper Configuration
<authentication-configuration name="forwardit" authentication-name="theserver1" security-domain="ApplicationDomain" forwarding-mode="authorization" realm="ApplicationRealm"> <credential-reference clear-text="thereallysecretpassword"/> </authentication-configuration> <authentication-context name="forwardctx"> <match-rule match-no-user="true" authentication-configuration="forwardit"/> </authentication-context></authentication-client>
<mappers> <simple-permission-mapper name="auth-forwarding-permission-mapper"> <permission-mapping> <principal name="anonymous"/> <!-- No permissions: Deny any permission to anonymous! -->
CHAPTER 2. SECURING USERS OF THE SERVER AND ITS MANAGEMENT INTERFACES
125
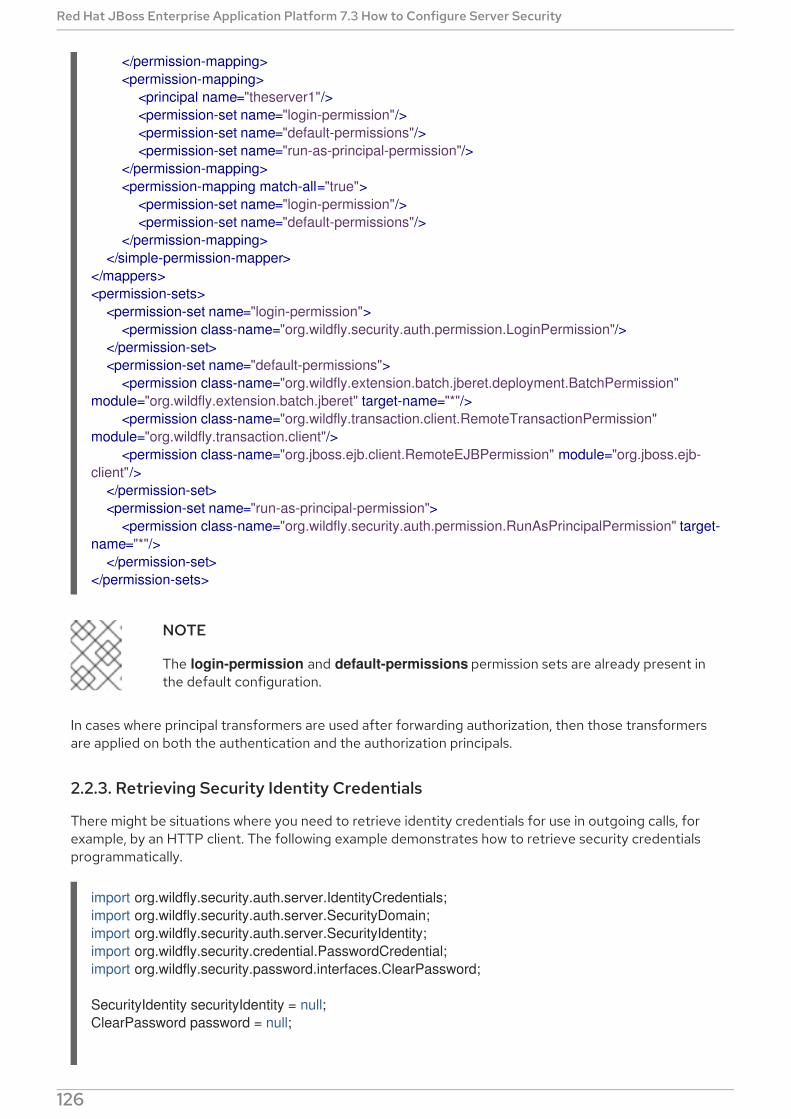
NOTE
The login-permission and default-permissions permission sets are already present inthe default configuration.
In cases where principal transformers are used after forwarding authorization, then those transformersare applied on both the authentication and the authorization principals.
2.2.3. Retrieving Security Identity Credentials
There might be situations where you need to retrieve identity credentials for use in outgoing calls, forexample, by an HTTP client. The following example demonstrates how to retrieve security credentialsprogrammatically.
</permission-mapping> <permission-mapping> <principal name="theserver1"/> <permission-set name="login-permission"/> <permission-set name="default-permissions"/> <permission-set name="run-as-principal-permission"/> </permission-mapping> <permission-mapping match-all="true"> <permission-set name="login-permission"/> <permission-set name="default-permissions"/> </permission-mapping> </simple-permission-mapper></mappers><permission-sets> <permission-set name="login-permission"> <permission class-name="org.wildfly.security.auth.permission.LoginPermission"/> </permission-set> <permission-set name="default-permissions"> <permission class-name="org.wildfly.extension.batch.jberet.deployment.BatchPermission" module="org.wildfly.extension.batch.jberet" target-name="*"/> <permission class-name="org.wildfly.transaction.client.RemoteTransactionPermission" module="org.wildfly.transaction.client"/> <permission class-name="org.jboss.ejb.client.RemoteEJBPermission" module="org.jboss.ejb-client"/> </permission-set> <permission-set name="run-as-principal-permission"> <permission class-name="org.wildfly.security.auth.permission.RunAsPrincipalPermission" target-name="*"/> </permission-set></permission-sets>
import org.wildfly.security.auth.server.IdentityCredentials;import org.wildfly.security.auth.server.SecurityDomain;import org.wildfly.security.auth.server.SecurityIdentity;import org.wildfly.security.credential.PasswordCredential;import org.wildfly.security.password.interfaces.ClearPassword;
SecurityIdentity securityIdentity = null;ClearPassword password = null;
Red Hat JBoss Enterprise Application Platform 7.3 How to Configure Server Security
126

2.2.4. Mechanisms That Support Security Identity Propagation
The following SASL mechanisms support propagation of security identities:
PLAIN
OAUTHBEARER
GSSAPI
GS2-KRB5
The following HTTP mechanisms support propagation of security identities:
FORM 1
BASIC
BEARER_TOKEN
SPNEGO
1 FORM authentication is not automatically handled by the web browser. For this reason, you cannot useidentity propagation with web applications that use FORM authentication when running in an HA cluster.Other mechanisms, such as BASIC and SPNEGO, support identity propagation in an HA clusterenvironment.
2.3. IDENTITY SWITCHING WITH ELYTRON
2.3.1. Switching Identities in Server-to-server EJB Calls
By default, when you make a remote call to an EJB deployed to an application server, the identity usedfor authentication on the remote server is the same one that was used on the source server. In somecases, you might want to run the remote secured EJB within the security context of a different identity.
// Obtain the SecurityDomain for the current deployment.// The calling code requires the// org.wildfly.security.permission.ElytronPermission("getSecurityDomain") permission// if running with a security manager.SecurityDomain securityDomain = SecurityDomain.getCurrent();if (securityDomain != null) { // Obtain the current security identity from the security domain. // This always returns an identity, but it could be the representation // of the anonymous identity if no authenticated identity is available. securityIdentity = securityDomain.getCurrentSecurityIdentity(); // The private credentials can be accessed to obtain any credentials delegated to the identity. // The calling code requires the // org.wildfly.security.permission.ElytronPermission("getPrivateCredentials") // permission if running with a security manager. IdentityCredentials credentials = securityIdentity.getPrivateCredentials(); if (credentials.contains(PasswordCredential.class)) { password = credentials.getCredential(PasswordCredential.class).getPassword(ClearPassword.class); }}
CHAPTER 2. SECURING USERS OF THE SERVER AND ITS MANAGEMENT INTERFACES
127
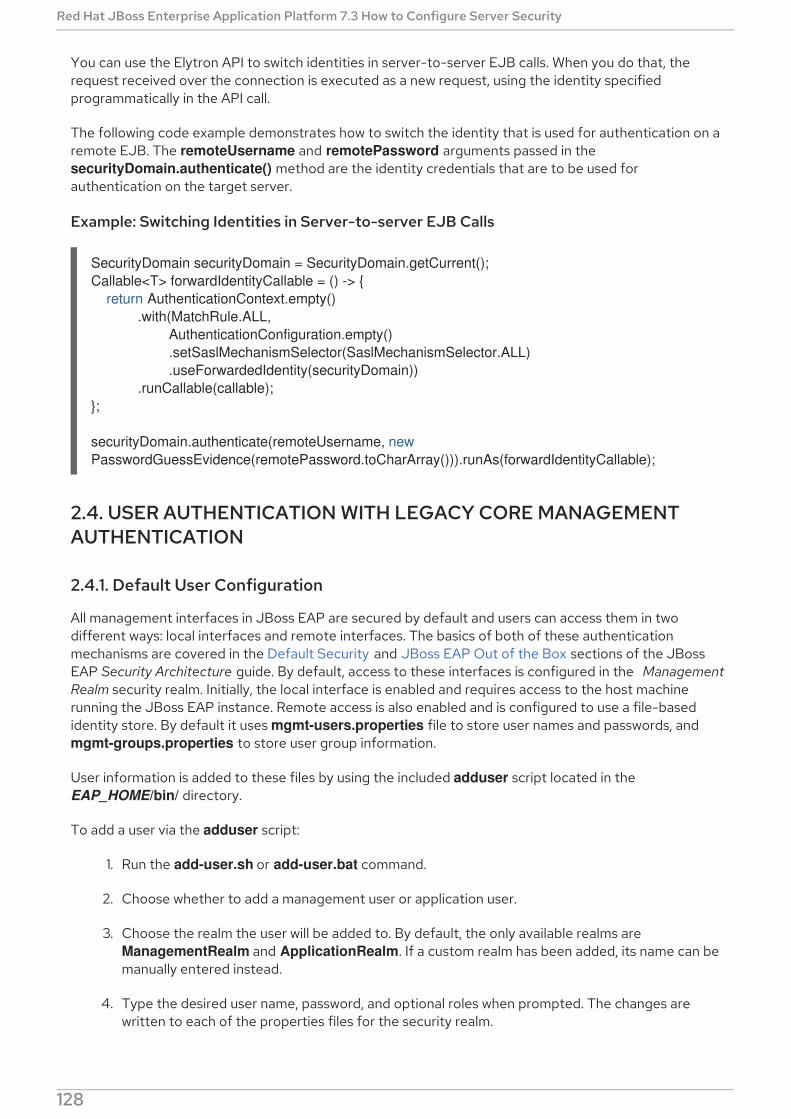
You can use the Elytron API to switch identities in server-to-server EJB calls. When you do that, therequest received over the connection is executed as a new request, using the identity specifiedprogrammatically in the API call.
The following code example demonstrates how to switch the identity that is used for authentication on aremote EJB. The remoteUsername and remotePassword arguments passed in the securityDomain.authenticate() method are the identity credentials that are to be used forauthentication on the target server.
Example: Switching Identities in Server-to-server EJB Calls
2.4. USER AUTHENTICATION WITH LEGACY CORE MANAGEMENTAUTHENTICATION
2.4.1. Default User Configuration
All management interfaces in JBoss EAP are secured by default and users can access them in twodifferent ways: local interfaces and remote interfaces. The basics of both of these authenticationmechanisms are covered in the Default Security and JBoss EAP Out of the Box sections of the JBossEAP Security Architecture guide. By default, access to these interfaces is configured in the ManagementRealm security realm. Initially, the local interface is enabled and requires access to the host machinerunning the JBoss EAP instance. Remote access is also enabled and is configured to use a file-basedidentity store. By default it uses mgmt-users.properties file to store user names and passwords, and mgmt-groups.properties to store user group information.
User information is added to these files by using the included adduser script located in the EAP_HOME/bin/ directory.
To add a user via the adduser script:
1. Run the add-user.sh or add-user.bat command.
2. Choose whether to add a management user or application user.
3. Choose the realm the user will be added to. By default, the only available realms are ManagementRealm and ApplicationRealm. If a custom realm has been added, its name can bemanually entered instead.
4. Type the desired user name, password, and optional roles when prompted. The changes arewritten to each of the properties files for the security realm.
SecurityDomain securityDomain = SecurityDomain.getCurrent();Callable<T> forwardIdentityCallable = () -> { return AuthenticationContext.empty() .with(MatchRule.ALL, AuthenticationConfiguration.empty() .setSaslMechanismSelector(SaslMechanismSelector.ALL) .useForwardedIdentity(securityDomain)) .runCallable(callable);};
securityDomain.authenticate(remoteUsername, new PasswordGuessEvidence(remotePassword.toCharArray())).runAs(forwardIdentityCallable);
Red Hat JBoss Enterprise Application Platform 7.3 How to Configure Server Security
128
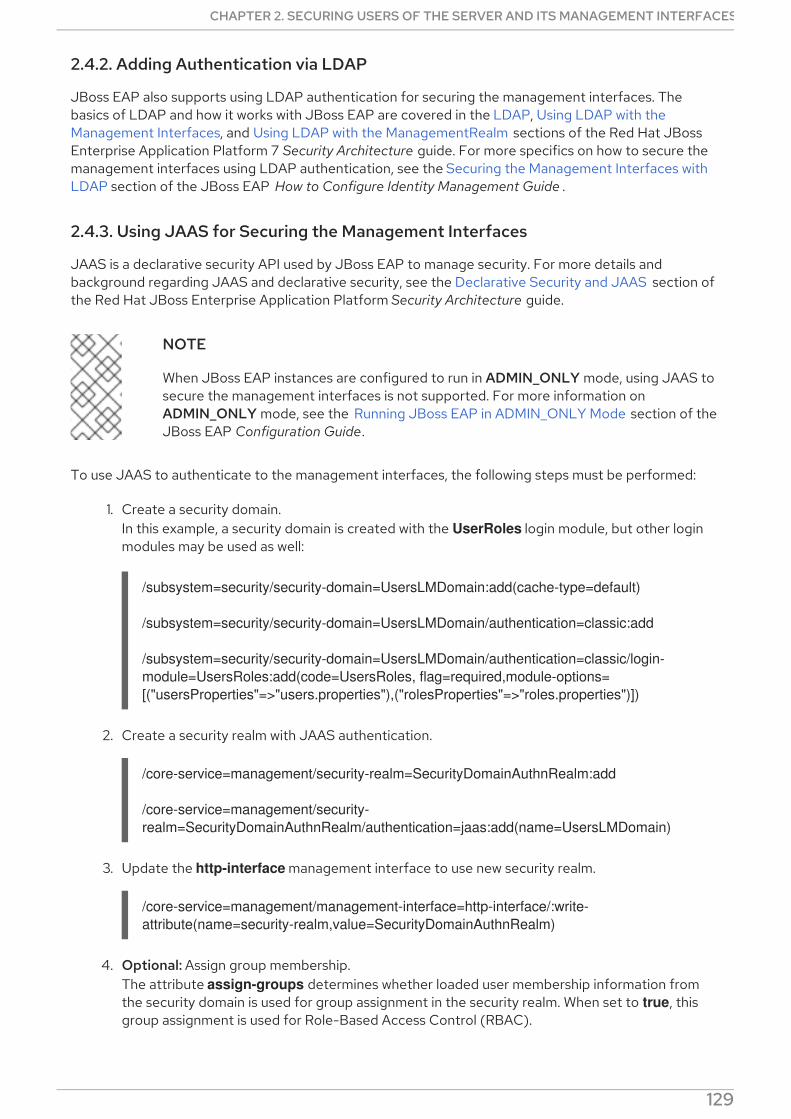
2.4.2. Adding Authentication via LDAP
JBoss EAP also supports using LDAP authentication for securing the management interfaces. Thebasics of LDAP and how it works with JBoss EAP are covered in the LDAP, Using LDAP with theManagement Interfaces, and Using LDAP with the ManagementRealm sections of the Red Hat JBossEnterprise Application Platform 7 Security Architecture guide. For more specifics on how to secure themanagement interfaces using LDAP authentication, see the Securing the Management Interfaces withLDAP section of the JBoss EAP How to Configure Identity Management Guide .
2.4.3. Using JAAS for Securing the Management Interfaces
JAAS is a declarative security API used by JBoss EAP to manage security. For more details andbackground regarding JAAS and declarative security, see the Declarative Security and JAAS section ofthe Red Hat JBoss Enterprise Application Platform Security Architecture guide.
NOTE
When JBoss EAP instances are configured to run in ADMIN_ONLY mode, using JAAS tosecure the management interfaces is not supported. For more information onADMIN_ONLY mode, see the Running JBoss EAP in ADMIN_ONLY Mode section of theJBoss EAP Configuration Guide.
To use JAAS to authenticate to the management interfaces, the following steps must be performed:
1. Create a security domain.In this example, a security domain is created with the UserRoles login module, but other loginmodules may be used as well:
/subsystem=security/security-domain=UsersLMDomain:add(cache-type=default)
/subsystem=security/security-domain=UsersLMDomain/authentication=classic:add
/subsystem=security/security-domain=UsersLMDomain/authentication=classic/login-module=UsersRoles:add(code=UsersRoles, flag=required,module-options=[("usersProperties"=>"users.properties"),("rolesProperties"=>"roles.properties")])
2. Create a security realm with JAAS authentication.
/core-service=management/security-realm=SecurityDomainAuthnRealm:add
/core-service=management/security-realm=SecurityDomainAuthnRealm/authentication=jaas:add(name=UsersLMDomain)
3. Update the http-interface management interface to use new security realm.
/core-service=management/management-interface=http-interface/:write-attribute(name=security-realm,value=SecurityDomainAuthnRealm)
4. Optional: Assign group membership.The attribute assign-groups determines whether loaded user membership information fromthe security domain is used for group assignment in the security realm. When set to true, thisgroup assignment is used for Role-Based Access Control (RBAC).
CHAPTER 2. SECURING USERS OF THE SERVER AND ITS MANAGEMENT INTERFACES
129
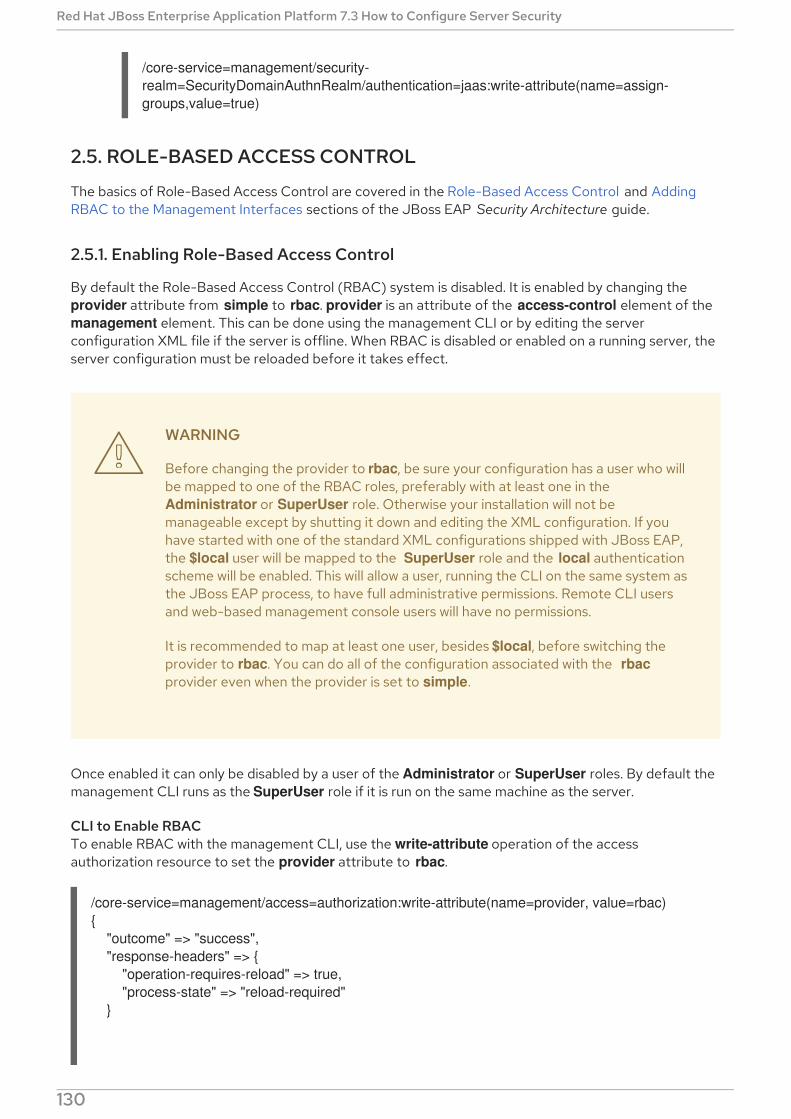
/core-service=management/security-realm=SecurityDomainAuthnRealm/authentication=jaas:write-attribute(name=assign-groups,value=true)
2.5. ROLE-BASED ACCESS CONTROL
The basics of Role-Based Access Control are covered in the Role-Based Access Control and AddingRBAC to the Management Interfaces sections of the JBoss EAP Security Architecture guide.
2.5.1. Enabling Role-Based Access Control
By default the Role-Based Access Control (RBAC) system is disabled. It is enabled by changing the provider attribute from simple to rbac. provider is an attribute of the access-control element of the management element. This can be done using the management CLI or by editing the serverconfiguration XML file if the server is offline. When RBAC is disabled or enabled on a running server, theserver configuration must be reloaded before it takes effect.
WARNING
Before changing the provider to rbac, be sure your configuration has a user who willbe mapped to one of the RBAC roles, preferably with at least one in the Administrator or SuperUser role. Otherwise your installation will not bemanageable except by shutting it down and editing the XML configuration. If youhave started with one of the standard XML configurations shipped with JBoss EAP,the $local user will be mapped to the SuperUser role and the local authenticationscheme will be enabled. This will allow a user, running the CLI on the same system asthe JBoss EAP process, to have full administrative permissions. Remote CLI usersand web-based management console users will have no permissions.
It is recommended to map at least one user, besides $local, before switching theprovider to rbac. You can do all of the configuration associated with the rbacprovider even when the provider is set to simple.
Once enabled it can only be disabled by a user of the Administrator or SuperUser roles. By default themanagement CLI runs as the SuperUser role if it is run on the same machine as the server.
CLI to Enable RBACTo enable RBAC with the management CLI, use the write-attribute operation of the accessauthorization resource to set the provider attribute to rbac.
/core-service=management/access=authorization:write-attribute(name=provider, value=rbac){ "outcome" => "success", "response-headers" => { "operation-requires-reload" => true, "process-state" => "reload-required" }
Red Hat JBoss Enterprise Application Platform 7.3 How to Configure Server Security
130

}
reload
In a managed domain, the access control configuration is part of the domain wide configuration, so theresource address is the same as above, but the management CLI is connected to the master domaincontroller.
/core-service=management/access=authorization:write-attribute(name=provider,value=rbac){ "outcome" => "success", "response-headers" => { "operation-requires-reload" => true, "process-state" => "reload-required" }, "result" => undefined, "server-groups" => {"main-server-group" => {"host" => {"master" => { "server-one" => {"response" => { "outcome" => "success", "response-headers" => { "operation-requires-reload" => true, "process-state" => "reload-required" } }}, "server-two" => {"response" => { "outcome" => "success", "response-headers" => { "operation-requires-reload" => true, "process-state" => "reload-required" } }} }}}}}
reload --host=master
NOTE
As with a standalone server, a reload or restart is required for the change to take effect. Ina managed domain, all hosts and servers in the domain will need to be reloaded orrestarted, starting with the master domain controller.
Management CLI Command to Disable RBACTo disable RBAC with the management CLI, use the write-attribute operation of the accessauthorization resource to set the provider attribute to simple.
/core-service=management/access=authorization:write-attribute(name=provider, value=simple)
XML Configuration to Enable or Disable RBACIf the server is offline the XML configuration can be edited to enable or disable RBAC. To do this, editthe provider attribute of the access-control element of the management element. Set the value to rbacto enable, and simple to disable.
Example: XML Configuration to Enable or Disable RBAC
CHAPTER 2. SECURING USERS OF THE SERVER AND ITS MANAGEMENT INTERFACES
131

2.5.2. Changing the Permission Combination Policy
The Permission Combination Policy determines how permissions are determined if a user is assignedmore than one role. This can be set to permissive or rejecting. The default is permissive.
When set to permissive, if any role is assigned to the user that permits an action, then the action isallowed.
When set to rejecting, if multiple roles are assigned to a user, then no action is allowed. This means thatwhen the policy is set to rejecting each user should only be assigned one role. Users with multiple roleswill not be able to use the management console or the management CLI when the policy is set torejecting.
The Permission Combination Policy is configured by setting the permission-combination-policyattribute to either permissive or rejecting. This can be done using the management CLI or by editingthe server configuration XML file if the server is offline. The permission-combination-policy attributeis part of the access-control element and the access-control element can be found in the management element.
Setting the Permission Combination PolicyUse the write-attribute operation of the access authorization resource to set the permission-combination-policy attribute to the required policy name.
/core-service=management/access=authorization:write-attribute(name=permission-combination-policy, value=POLICYNAME)
The valid policy names are rejecting and permissive.
Example: Management CLI Command for Rejecting Permission Combination Policy
/core-service=management/access=authorization:write-attribute(name=permission-combination-policy, value=rejecting)
If the server is offline the XML configuration can be edited to change the permission combination policyvalue. To do this, edit the permission-combination-policy attribute of the access-control element.
Example: XML Configuration for Rejecting Permission Combination Policy
<management> <access-control provider="rbac"> <role-mapping> <role name="SuperUser"> <include> <user name="$local"/> </include> </role> </role-mapping> </access-control></management>
<access-control provider="rbac" permission-combination-policy="rejecting"> <role-mapping> <role name="SuperUser"> <include>
Red Hat JBoss Enterprise Application Platform 7.3 How to Configure Server Security
132

2.5.3. Managing Roles
When Role-Based Access Control (RBAC) is enabled, what a management user is permitted to do isdetermined by the roles to which the user is assigned. JBoss EAP 7 uses a system of includes andexcludes based on both the user and group membership to determine to which role a user belongs.
A user is considered to be assigned to a role if the user is:
listed as a user to be included in the role, or
a member of a group that is listed to be included in the role.
A user is also considered to be assigned to a role if the user is not:
listed as a user to exclude from the role, or
a member of a group that is listed to be excluded from the role.
Exclusions take priority over inclusions.
Role include and exclude settings for users and groups can be configured using both the managementconsole and the management CLI.
Only users of the SuperUser or Administrator roles can perform this configuration.
2.5.3.1. Configure User Role Assignment Using the Management CLI
The configuration of mapping users and groups to roles is located at: /core-service=management/access=authorization as role-mapping elements.
Only users of the SuperUser or Administrator roles can perform this configuration.
Viewing Role Assignment ConfigurationUse the :read-children-names operation to get a complete list of the configured roles:
/core-service=management/access=authorization:read-children-names(child-type=role-mapping){ "outcome" => "success", "result" => [ "Administrator", "Deployer", "Maintainer", "Monitor", "Operator", "SuperUser" ]}
Use the read-resource operation of a specified role-mapping to get the full details of a specific role:
<user name="$local"/> </include> </role> </role-mapping></access-control>
CHAPTER 2. SECURING USERS OF THE SERVER AND ITS MANAGEMENT INTERFACES
133
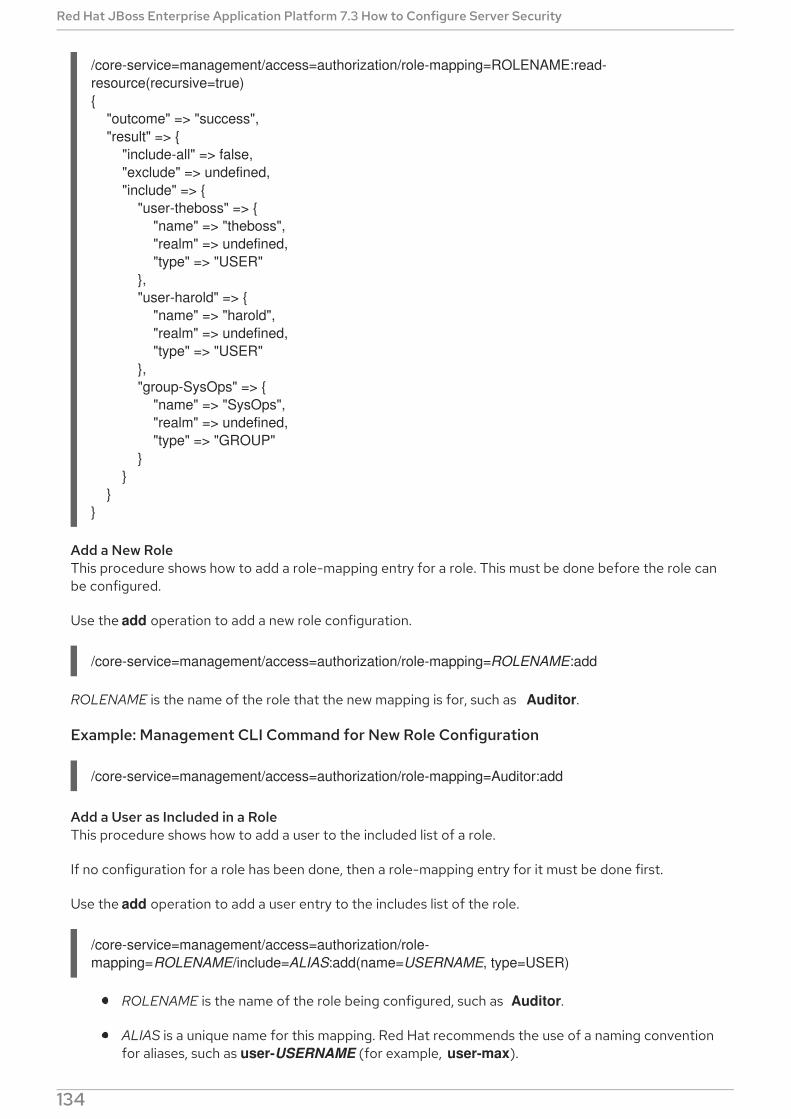
/core-service=management/access=authorization/role-mapping=ROLENAME:read-resource(recursive=true){ "outcome" => "success", "result" => { "include-all" => false, "exclude" => undefined, "include" => { "user-theboss" => { "name" => "theboss", "realm" => undefined, "type" => "USER" }, "user-harold" => { "name" => "harold", "realm" => undefined, "type" => "USER" }, "group-SysOps" => { "name" => "SysOps", "realm" => undefined, "type" => "GROUP" } } }}
Add a New RoleThis procedure shows how to add a role-mapping entry for a role. This must be done before the role canbe configured.
Use the add operation to add a new role configuration.
/core-service=management/access=authorization/role-mapping=ROLENAME:add
ROLENAME is the name of the role that the new mapping is for, such as Auditor.
Example: Management CLI Command for New Role Configuration
/core-service=management/access=authorization/role-mapping=Auditor:add
Add a User as Included in a RoleThis procedure shows how to add a user to the included list of a role.
If no configuration for a role has been done, then a role-mapping entry for it must be done first.
Use the add operation to add a user entry to the includes list of the role.
/core-service=management/access=authorization/role-mapping=ROLENAME/include=ALIAS:add(name=USERNAME, type=USER)
ROLENAME is the name of the role being configured, such as Auditor.
ALIAS is a unique name for this mapping. Red Hat recommends the use of a naming conventionfor aliases, such as user-USERNAME (for example, user-max).
Red Hat JBoss Enterprise Application Platform 7.3 How to Configure Server Security
134
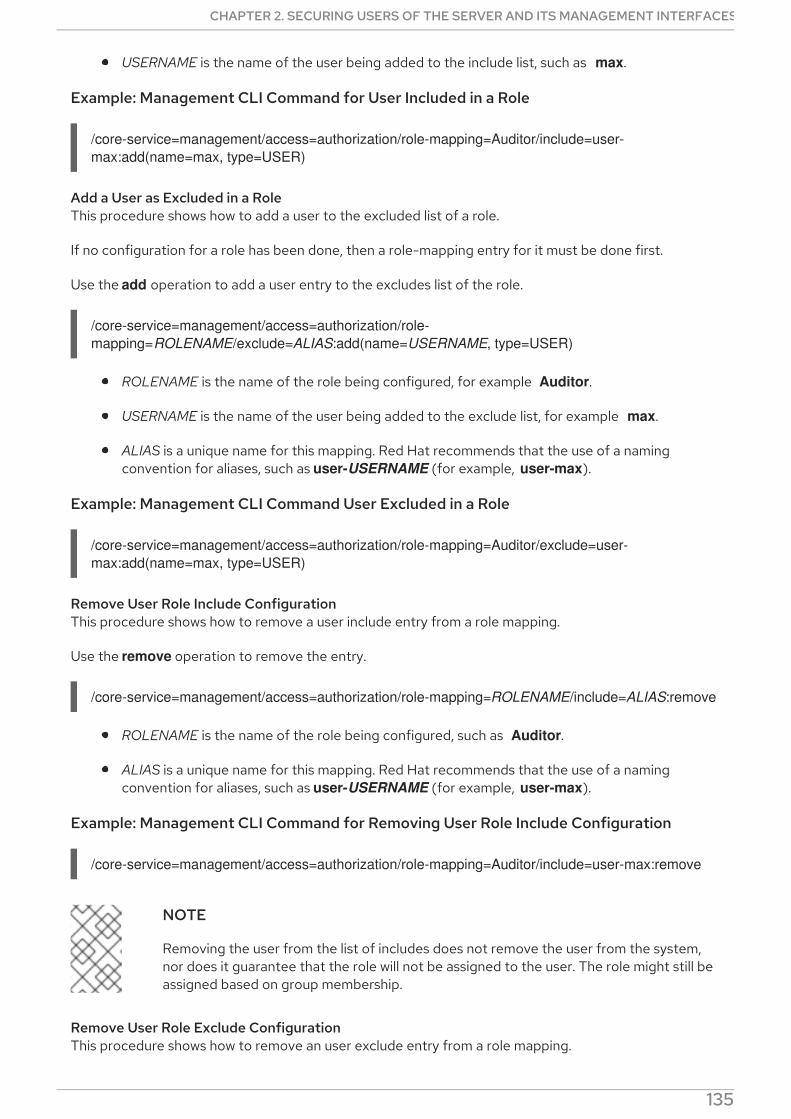
USERNAME is the name of the user being added to the include list, such as max.
Example: Management CLI Command for User Included in a Role
/core-service=management/access=authorization/role-mapping=Auditor/include=user-max:add(name=max, type=USER)
Add a User as Excluded in a RoleThis procedure shows how to add a user to the excluded list of a role.
If no configuration for a role has been done, then a role-mapping entry for it must be done first.
Use the add operation to add a user entry to the excludes list of the role.
/core-service=management/access=authorization/role-mapping=ROLENAME/exclude=ALIAS:add(name=USERNAME, type=USER)
ROLENAME is the name of the role being configured, for example Auditor.
USERNAME is the name of the user being added to the exclude list, for example max.
ALIAS is a unique name for this mapping. Red Hat recommends that the use of a namingconvention for aliases, such as user-USERNAME (for example, user-max).
Example: Management CLI Command User Excluded in a Role
/core-service=management/access=authorization/role-mapping=Auditor/exclude=user-max:add(name=max, type=USER)
Remove User Role Include ConfigurationThis procedure shows how to remove a user include entry from a role mapping.
Use the remove operation to remove the entry.
/core-service=management/access=authorization/role-mapping=ROLENAME/include=ALIAS:remove
ROLENAME is the name of the role being configured, such as Auditor.
ALIAS is a unique name for this mapping. Red Hat recommends that the use of a namingconvention for aliases, such as user-USERNAME (for example, user-max).
Example: Management CLI Command for Removing User Role Include Configuration
/core-service=management/access=authorization/role-mapping=Auditor/include=user-max:remove
NOTE
Removing the user from the list of includes does not remove the user from the system,nor does it guarantee that the role will not be assigned to the user. The role might still beassigned based on group membership.
Remove User Role Exclude ConfigurationThis procedure shows how to remove an user exclude entry from a role mapping.
CHAPTER 2. SECURING USERS OF THE SERVER AND ITS MANAGEMENT INTERFACES
135

Use the remove operation to remove the entry.
/core-service=management/access=authorization/role-mapping=ROLENAME/exclude=ALIAS:remove
ROLENAME is the name of the role being configured, such as Auditor.
ALIAS is a unique name for this mapping. Red Hat recommends that the use of a namingconvention for aliases, such as user-USERNAME (for example, user-max).
/core-service=management/access=authorization/role-mapping=Auditor/exclude=user-max:remove
NOTE
Removing the user from the list of excludes does not remove the user from the system,nor does it guarantee the role will be assigned to the user. Roles might still be excludedbased on group membership.
2.5.4. Configure User Role Assignment with the Elytron Subsystem
In addition to adding role mappings for users directly, as covered in Managing Roles section, you canalso configure RBAC roles to be directly taken from the identity provided by the elytron subsystem.
To configure the RBAC system to use roles provided by the elytron subsystem:
/core-service=management/access=authorization:write-attribute(name=use-identity-roles,value=true)
IMPORTANT
RBAC must be enabled to use this functionality, and the principal must have RBAC roles.
2.5.5. Roles and User Groups
A user group is an arbitrary label that can be assigned to one or more users. When authenticating usingthe management interfaces, users are assigned groups from either the elytron subsystem or coremanagement authentication, depending on how the management interfaces are secured. The RBACsystem can be configured to automatically assign roles to users depending on what user groups they aremembers of. It can also exclude users from roles based on group membership.
2.5.6. Configure Group Role Assignment Using the Management CLI
Groups to be included or excluded from a role can be configured in the management console and themanagement CLI. This topic only shows using the management CLI.
The configuration of mapping users and groups to roles is located in the management API at: /core-service=management/access=authorization as role-mapping elements.
Only users in the SuperUser or Administrator roles can perform this configuration.
Viewing Group Role Assignment ConfigurationUse the read-children-names operation to get a complete list of the configured roles:
/core-service=management/access=authorization:read-children-names(child-type=role-mapping)
Red Hat JBoss Enterprise Application Platform 7.3 How to Configure Server Security
136
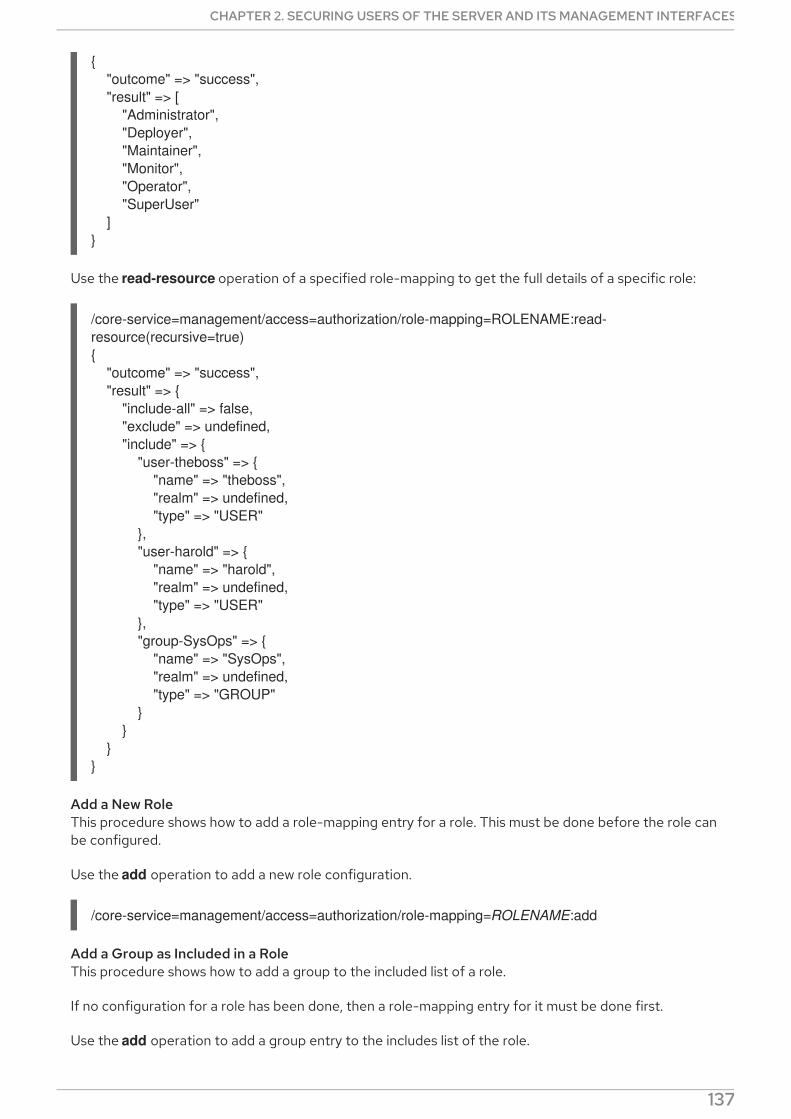
{ "outcome" => "success", "result" => [ "Administrator", "Deployer", "Maintainer", "Monitor", "Operator", "SuperUser" ]}
Use the read-resource operation of a specified role-mapping to get the full details of a specific role:
/core-service=management/access=authorization/role-mapping=ROLENAME:read-resource(recursive=true){ "outcome" => "success", "result" => { "include-all" => false, "exclude" => undefined, "include" => { "user-theboss" => { "name" => "theboss", "realm" => undefined, "type" => "USER" }, "user-harold" => { "name" => "harold", "realm" => undefined, "type" => "USER" }, "group-SysOps" => { "name" => "SysOps", "realm" => undefined, "type" => "GROUP" } } }}
Add a New RoleThis procedure shows how to add a role-mapping entry for a role. This must be done before the role canbe configured.
Use the add operation to add a new role configuration.
/core-service=management/access=authorization/role-mapping=ROLENAME:add
Add a Group as Included in a RoleThis procedure shows how to add a group to the included list of a role.
If no configuration for a role has been done, then a role-mapping entry for it must be done first.
Use the add operation to add a group entry to the includes list of the role.
CHAPTER 2. SECURING USERS OF THE SERVER AND ITS MANAGEMENT INTERFACES
137
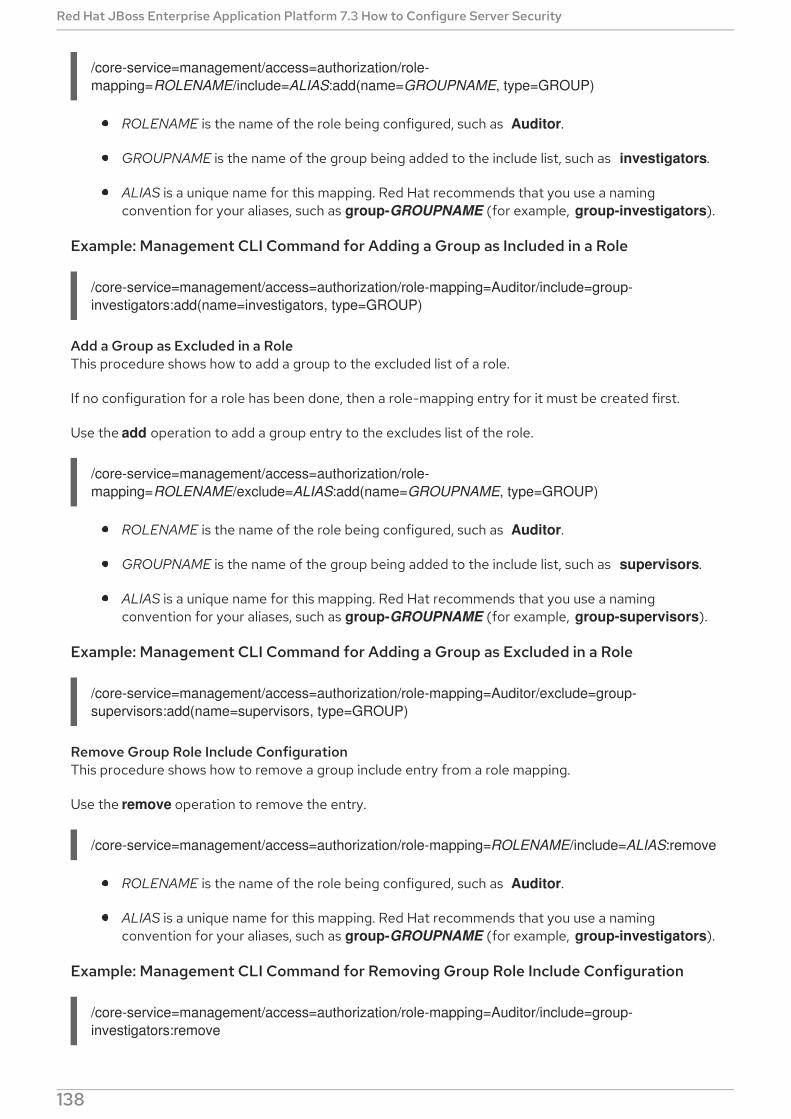
/core-service=management/access=authorization/role-mapping=ROLENAME/include=ALIAS:add(name=GROUPNAME, type=GROUP)
ROLENAME is the name of the role being configured, such as Auditor.
GROUPNAME is the name of the group being added to the include list, such as investigators.
ALIAS is a unique name for this mapping. Red Hat recommends that you use a namingconvention for your aliases, such as group-GROUPNAME (for example, group-investigators).
Example: Management CLI Command for Adding a Group as Included in a Role
/core-service=management/access=authorization/role-mapping=Auditor/include=group-investigators:add(name=investigators, type=GROUP)
Add a Group as Excluded in a RoleThis procedure shows how to add a group to the excluded list of a role.
If no configuration for a role has been done, then a role-mapping entry for it must be created first.
Use the add operation to add a group entry to the excludes list of the role.
/core-service=management/access=authorization/role-mapping=ROLENAME/exclude=ALIAS:add(name=GROUPNAME, type=GROUP)
ROLENAME is the name of the role being configured, such as Auditor.
GROUPNAME is the name of the group being added to the include list, such as supervisors.
ALIAS is a unique name for this mapping. Red Hat recommends that you use a namingconvention for your aliases, such as group-GROUPNAME (for example, group-supervisors).
Example: Management CLI Command for Adding a Group as Excluded in a Role
/core-service=management/access=authorization/role-mapping=Auditor/exclude=group-supervisors:add(name=supervisors, type=GROUP)
Remove Group Role Include ConfigurationThis procedure shows how to remove a group include entry from a role mapping.
Use the remove operation to remove the entry.
/core-service=management/access=authorization/role-mapping=ROLENAME/include=ALIAS:remove
ROLENAME is the name of the role being configured, such as Auditor.
ALIAS is a unique name for this mapping. Red Hat recommends that you use a namingconvention for your aliases, such as group-GROUPNAME (for example, group-investigators).
Example: Management CLI Command for Removing Group Role Include Configuration
/core-service=management/access=authorization/role-mapping=Auditor/include=group-investigators:remove
Red Hat JBoss Enterprise Application Platform 7.3 How to Configure Server Security
138
NOTE
Removing the group from the list of includes does not remove the group from thesystem, nor does it guarantee that the role will not be assigned to users in this group. Therole might still be assigned to users in the group individually.
Remove a User Group Exclude EntryThis procedure shows how to remove a group exclude entry from a role mapping.
Use the remove operation to remove the entry.
/core-service=management/access=authorization/role-mapping=ROLENAME/exclude=ALIAS:remove
ROLENAME is the name of the role being configured, such as Auditor.
ALIAS is a unique name for this mapping. Red Hat recommends that you use a namingconvention for your aliases, such as group-GROUPNAME (for example, group-supervisors).
/core-service=management/access=authorization/role-mapping=Auditor/exclude=group-supervisors:remove
NOTE
Removing the group from the list of excludes does not remove the group from thesystem. It also does not guarantee the role will be assigned to members of the group.Roles might still be excluded based on group membership.
2.5.7. Using RBAC with LDAP
The basics of using RBAC with LDAP as well as how to configure JBoss EAP to use RBAC with LDAP arecovered in the LDAP and RBAC section of the JBoss EAP How to Configure Identity ManagementGuide.
2.5.8. Scoped Roles
Scoped roles are user-defined roles that grant the permissions of one of the standard roles but only forone or more specified server groups or hosts in an JBoss EAP managed domain. Scoped roles allow formanagement users to be granted permissions that are limited to only those server groups or hosts thatare required.
IMPORTANT
Scoped roles can be created by users assigned the Administrator or SuperUser roles.
They are defined by five characteristics:
A unique name.
The standard roles which it is based on.
If it applies to server groups or hosts.
CHAPTER 2. SECURING USERS OF THE SERVER AND ITS MANAGEMENT INTERFACES
139
The list of server groups or hosts that it is restricted to.
If all users are automatically included. This defaults to false.
Once created a scoped role can be assigned to users and groups the same way that the standard rolesare.
Creating a scoped role does not allow for defining new permissions. Scoped roles can only be used toapply the permissions of an existing role in a limited scope. For example, a scoped role could be createdbased on the Deployer role which is restricted to a single server group.
There are only two scopes that roles can be limited to:
Host-scoped roles
A role that is host-scoped restricts the permissions of that role to one or more hosts. This meansaccess is provided to the relevant /host=*/ resource trees but resources that are specific to otherhosts are hidden.
Server-group-scoped roles
A role that is server-group-scoped restricts the permissions of that role to one or more servergroups. Additionally the role permissions will also apply to the profile, socket binding group, serverconfiguration, and server resources that are associated with the specified server-groups. Any sub-resources within any of those that are not logically related to the server-group will not be visible tothe user.
IMPORTANT
Some resources are non-addressable to server-group and host scoped roles in order toprovide a simplified view of the management model to improve usability. This is distinctfrom resources that are non-addressable to protect sensitive data.
For host scoped roles this means that resources in the /host=* portion of themanagement model will not be visible if they are not related to the server groupsspecified for the role.
For server-group scoped roles, this means that resources in the profile, socket-binding-group, deployment, deployment-overlay, server-group, server-config and serverportions of the management model will not be visible if they are not related to the servergroups specified for the role.
2.5.8.1. Configuring Scoped Roles from the Management CLI
IMPORTANT
Only users in the SuperUser or Administrator roles can perform this configuration.
Add a New Scoped RoleTo add a new scoped role, the following operations must be done:
/core-service=management/access=authorization/role-mapping=NEW-SCOPED-ROLE:add
/core-service=management/access=authorization/server-group-scoped-role=NEW-SCOPED-ROLE:add(base-role=BASE-ROLE, server-groups=[SERVER-GROUP-NAME])
Red Hat JBoss Enterprise Application Platform 7.3 How to Configure Server Security
140

Replace NEW-SCOPED-ROLE, BASE-ROLE, and SERVER-GROUP-NAME with the proper information.
Viewing and Editing a Scoped Role MappingA scoped role’s details, including members, can be viewed by using the following command:
/core-service=management/access=authorization/role-mapping=NEW-SCOPED-ROLE:read-resource(recursive=true)
Replace NEW-SCOPED-ROLE with the proper information.
To edit a scoped role’s details, the write-attribute command may be used. For example:
/core-service=management/access=authorization/role-mapping=NEW-SCOPED-ROLE:write-attribute(name=include-all, value=true)
Replace NEW-SCOPED-ROLE with the proper information.
Delete a Scoped Role
/core-service=management/access=authorization/role-mapping=NEW-SCOPED-ROLE:remove
/core-service=management/access=authorization/server-group-scoped-role=NEW-SCOPED-ROLE:remove
Replace NEW-SCOPED-ROLE with the proper information.
IMPORTANT
A scoped role cannot be deleted if users or groups are assigned to it. Remove the roleassignments first, and then delete it.
Adding and Removing UsersAdding and removing users to and from scoped roles follows the same process as adding and removingstandard roles.
2.5.8.2. Configuring Scoped Roles from the Management Console
IMPORTANT
Only users in the SuperUser or Administrator roles can perform this configuration.
Scoped role configuration in the management console can be found by following these steps:
1. Log in to the management console.
2. Click on the Access Control tab.
3. Click on Roles to view all roles, including scoped roles.
The following procedures show how to perform configuration tasks for scoped roles.
Add a New Scoped Role
CHAPTER 2. SECURING USERS OF THE SERVER AND ITS MANAGEMENT INTERFACES
141

1. Log in to the management console.
2. Click on the Access Control tab.
3. Select Roles and click the Add (+) button.
4. Choose Host Scoped Role or Server Group Scoped Role.
5. Specify the following details:
Name: The unique name for the new scoped role.
Base Role: The role which this role will base its permissions on.
Hosts or Server Groups: The list of hosts or server groups that the role is restricted to,depending on the type of scoped role being added. Multiple entries can be selected.
Include All: Whether this role should automatically include all users. Defaults to OFF.
6. Click Add to create the new role.
Edit a Scoped Role
1. Log in to the management console.
2. Click on the Access Control tab.
3. Click on the Roles menu on the left.
4. Click on the desired scoped role to edit and click Edit.
5. Update the desired details to change and click the Save button.
View Scoped Role Members
1. Log in to the management console.
2. Click on the Access Control tab.
3. Click on the Roles menu on the left.
4. Click on the desired scoped role to view the included and excluded members.
Delete a Scoped Role
1. Log in to the management console.
2. Click on the Access Control tab.
3. Click on the Roles menu on the left.
4. Click on the desired scoped role and click Remove from the drop down.
5. Click Yes to remove the role and all of its assignments.
Adding and Removing UsersAdding and removing users to and from scoped roles follows the same process as adding and removingstandard roles. To update a user’s scoped roles:
Red Hat JBoss Enterprise Application Platform 7.3 How to Configure Server Security
142

1. Log in to the management console.
2. Click on the Access Control tab.
3. Click on the Roles menu on the left and click on the desired scoped role.
4. Select the Plus (+) button to include a member or the Minus ( -) button to exclude a member.
2.5.9. Configuring Constraints
2.5.9.1. Configure Sensitivity Constraints
Each sensitivity constraint defines a set of resources that are considered sensitive. A sensitive resourceis generally one that either should be secret, like passwords, or one that will have serious impact on theserver, like networking, JVM configuration, or system properties. The access control system itself is alsoconsidered sensitive. Resource sensitivity limits which roles are able to read, write or address a specificresource.
Sensitivity constraint configuration is at /core-service=management/access=authorization/constraint=sensitivity-classification.
Within the management model each sensitivity constraint is identified as a classification. Theclassifications are then grouped into types. Each classification has an applies-to element which is a listof path patterns to which the classifications configuration applies.
To configure a sensitivity constraint, use the write-attribute operation to set the configured-requires-read, configured-requires-write, or configured-requires-addressable attribute. To make that type ofoperation sensitive set the value of the attribute to true, otherwise to make it nonsensitive set it to false. By default these attributes are not set and the values of default-requires-read, default-requires-write, and default-requires-addressable are used. Once the configured attribute is set it is that valuethat is used instead of the default. The default values cannot be changed.
Example: Make Reading System Properties a Sensitive Operation
/core-service=management/access=authorization/constraint=sensitivity-classification/type=core/classification=system-property:write-attribute(name=configured-requires-read,value=true)
Example: Result
/core-service=management/access=authorization/constraint=sensitivity-classification/type=core/classification=system-property:read-resource
{ "outcome" => "success", "result" => { "configured-requires-addressable" => undefined, "configured-requires-read" => true, "configured-requires-write" => undefined, "default-requires-addressable" => false, "default-requires-read" => false, "default-requires-write" => true, "applies-to" => { "/core-service=platform-mbean/type=runtime" => undefined,
CHAPTER 2. SECURING USERS OF THE SERVER AND ITS MANAGEMENT INTERFACES
143
"/system-property=*" => undefined, "/" => undefined } }}
The roles, and the respective operations that they are able to perform, depend on the configuration ofthe attributes. This is summarized in the following table:
Table 2.2. Sensitivity Constraint Configuration Outcomes
Value requires-read requires-write requires-addressable
true Read is sensitive. Only Auditor, Administrator, SuperUser can read.
Write is sensitive. Only Administrator and SuperUser can write.
Addressing is sensitive.Only Auditor, Administrator, SuperUser canaddress.
false Read is not sensitive.Any management usercan read.
Write is not sensitive.Only Maintainer, Administrator and SuperUser can write. Deployer can also writethe resource is anapplication resource.
Addressing is notsensitive. Anymanagement user canaddress.
2.5.9.2. List Sensitivity Constraints
You can see a list of the available sensitivity constraints directly from the JBoss EAP managementmodel using the following management CLI command:
/core-service=management/access=authorization/constraint=sensitivity-classification:read-resource(include-runtime=true,recursive=true)
2.5.9.3. Configure Application Resource Constraints
Each application resource constraint defines a set of resources, attributes and operations that areusually associated with the deployment of applications and services. When an application resourceconstraint is enabled management users of the Deployer role are granted access to the resources thatit applies to.
Application constraint configuration is at /core-service=management/access=authorization/constraint=application-classification/.
Each application resource constraint is identified as a classification. The classifications are then groupedinto types. Each classification has an applies-to element which is a list of path patterns to which theclassifications configuration applies.
By default the only application resource classification that is enabled is core. Core includesdeployments, deployment overlays, and the deployment operations.
To enable an application resource, use the write-attribute operation to set the configured-applicationattribute of the classification to true. To disable an application resource, set this attribute to false. By
Red Hat JBoss Enterprise Application Platform 7.3 How to Configure Server Security
144

default these attributes are not set and the value of default-application attribute is used. The defaultvalue cannot be changed.
Example: Enabling the logger-profile Application Resource Classification
/core-service=management/access=authorization/constraint=application-classification/type=logging/classification=logging-profile:write-attribute(name=configured-application,value=true)
Example: Result
/core-service=management/access=authorization/constraint=application-classification/type=logging/classification=logging-profile:read-resource
{ "outcome" => "success", "result" => { "configured-application" => true, "default-application" => false, "applies-to" => {"/subsystem=logging/logging-profile=*" => undefined} }}
IMPORTANT
Application resource constraints apply to all resources that match its configuration. Forexample, it is not possible to grant a Deployer user access to one datasource resourcebut not another. If this level of separation is required then it is recommended to configurethe resources in different server groups and create different scoped Deployer roles foreach group.
2.5.9.4. List Application Resource Constraints
You can see a list of the available application resource constraints directly from the JBoss EAPmanagement model using the following management CLI command:
/core-service=management/access=authorization/constraint=application-classification:read-resource(include-runtime=true,recursive=true)
2.5.9.5. Configure the Vault Expression Constraint
By default, reading and writing vault expressions are sensitive operations. Configuring the vaultexpression constraint allows either or both of those operations to be set to nonsensitive. Changing thisconstraint allows a greater number of roles to read and write vault expressions.
The vault expression constraint is found at /core-service=management/access=authorization/constraint=vault-expression.
To configure the vault expression constraint, use the write-attribute operation to set the attributes of configured-requires-write and configured-requires-read to true or false. By default these are not setand the values of default-requires-read and default-requires-write are used. The default valuescannot be changed.
CHAPTER 2. SECURING USERS OF THE SERVER AND ITS MANAGEMENT INTERFACES
145
Example: Making Writing to Vault Expressions a Nonsensitive Operation
/core-service=management/access=authorization/constraint=vault-expression:write-attribute(name=configured-requires-write,value=false)
Example: Result
/core-service=management/access=authorization/constraint=vault-expression:read-resource
{ "outcome" => "success", "result" => { "configured-requires-read" => undefined, "configured-requires-write" => false, "default-requires-read" => true, "default-requires-write" => true }}
The roles, and the respective vault expressions that they will be able to read and write, depend on theconfiguration of the attributes. This is summarized in the following table:
Table 2.3. Vault Expression Constraint Configuration Outcomes
Value requires-read requires-write
true Read operation is sensitive. Only Auditor, Administrator, and SuperUser can read.
Write operation is sensitive. Only Administrator and SuperUsercan write.
false Read operation is not sensitive. Allmanagement users can read.
Write operation is not sensitive. Monitor, Administrator, and SuperUser can write. Deployercan also write if the vaultexpression is in an applicationresource.
Red Hat JBoss Enterprise Application Platform 7.3 How to Configure Server Security
146
CHAPTER 3. SECURELY STORING CREDENTIALSJBoss EAP allows the encryption of sensitive strings outside of configuration files. These strings can bestored in a keystore, and subsequently decrypted for applications and verifications systems. Sensitivestrings can be stored in either of the following:
Credential Store - Introduced in JBoss EAP 7.1, a credential store can safely secure sensitiveand plain text strings by encrypting them in a storage file. Each JBoss EAP server can containmultiple credential stores.
Password Vault - Primarily used in legacy configurations, a password vault uses a Java Keystoreto store sensitive strings outside of the configuration files. Each JBoss EAP server can onlycontain a single password vault.
All of the configuration files in EAP_HOME/standalone/configuration/ and EAP_HOME/domain/configuration/ are world readable by default. It is strongly recommended to notstore plaintext passwords in the configuration files, and instead place these credentials in either acredential store or password vault.
If you decide to place plaintext passwords in the configuration files, then these files should only beaccessible by limited users. At a minimum, the user account under which JBoss EAP 7 is running requiresread-write access.
3.1. CREDENTIAL STORE
Introduced with the elytron subsystem, credential stores allow for secure storage and usage ofcredentials. You can find more background information on credential stores as well as other Elytroncomponents in the Core Concepts and Components section of the Security Architecture guide.
Using a credential store is preferred to using a password vault to store passwords and other sensitivestrings. Credential stores allow for easier credential management within the JBoss EAP managementCLI, without having to use an external tool. You can also use multiple credential stores within a JBossEAP server, compared to the limitation of only one password vault per JBoss EAP server.
The default credential store implementation uses a JCEKS keystore file to store credentials. Whencreating a new credential store, the default implementation also allows you to reference an existingkeystore file or have JBoss EAP automatically create one for you. Currently, the default implementationonly allows you to store clear text passwords.
IMPORTANT
The elytron subsystem does not provide any checks for using the same file as storage tomultiple credential stores. It is strongly advised not to use the same file for multiplecredential stores or even to share the storage file using remote file systems.
If you need to use shared storage file, be sure to set the read-only flag on the credentialstores accessing it. This will prevent the file from being modified. After the file is updatedfrom outside, each credential store has to be reloaded to reflect the changed values. Asimilar process needs to be followed when using credential stores in a managed domain.
Since a credential store contains sensitive information, the directory containing the storeshould be accessible to only limited users. At a minimum the user account under whichJBoss EAP is running requires read-write access.
IMPORTANT
CHAPTER 3. SECURELY STORING CREDENTIALS
147

IMPORTANT
JBoss EAP reads the credential store file into memory and writes changes to it at varyingtimes. You must ensure that the user running the JBoss EAP process has permissions tothe store file, and that you do not externally modify the store file while JBoss EAP isrunning.
If the file is modified externally, you can use the reload() operation on the credentialstore to make JBoss EAP reload the content of the store file.
3.1.1. Create a Credential Store
To create a credential store, you must define a path to the new credential store file, and provide amaster password that is used to encrypt the credential store. The directory containing the store shouldbe accessible to only limited users. At a minimum the user account under which JBoss EAP is runningrequires read-write access.
IMPORTANT
JCEKS keystore implementations differ between Java vendors, so the JBoss EAPinstance must run a JDK from the same vendor that generated the JCEKS keystore.
Like providing paths in other JBoss EAP configuration, you can also use the relative-to attribute toprovide a path relative to another.
Create a Credential Store for a Standalone ServerUse the following management CLI command to create a new credential store:
/subsystem=elytron/credential-store=STORE_NAME:add(location="path/to/store_file", credential-reference={clear-text=STORE_PASSWORD},create=true)
For example, the following command creates a new store named my_store, and creates the file jboss.server.data.dir/cred_stores/my_store.jceks:
/subsystem=elytron/credential-store=my_store:add(location="cred_stores/my_store.jceks", relative-to=jboss.server.data.dir, credential-reference={clear-text=supersecretstorepassword},create=true)
NOTE
If you want to use an implementation other than default, you can explicitly define thetype of a credential store. For more information, see the section on using a customcredential store implementation.
Create a Credential Store in a Managed DomainUse the following management CLI command to create a new credential store in a managed domain:
/profile=PROFILE_NAME/subsystem=elytron/credential-store=STORE_NAME:add(location=path/to/store_file,credential-reference={clear-text="STORE_PASSWORD"},create=true)
For example, the following command creates a new store named my_store, and creates the file jboss.server.data.dir/cred_stores/my_store.jceks:
Red Hat JBoss Enterprise Application Platform 7.3 How to Configure Server Security
148
/profile=full/subsystem=elytron/credential-store=my_store:add(relative-to=jboss.server.data.dir,location="cred_stores/my_store.jceks",credential-reference={clear-text=supersecretstorepassword},create=true)
NOTE
There is no need to define a credential store resource at each server. Every serverrunning the same profile, for which the credential store is created, contains our credentialstore. Therefore, it is good idea to locate the storage file at the server data directory, relative-to=jboss.server.data.dir.
For another way of creating a credential store in a managed domain, see Using Credential Stores in aManaged Domain.
3.1.2. Add a Credential to the Credential Store
To add a new credential to a credential store, you associate an alias to the sensitive string that you arewanting to store.
NOTE
Credential store aliases are case insensitive by default. Any stored alias is displayed inlowercase, and may be referenced using any combination of uppercase and lowercaseletters.
If a custom credential store is used, then case sensitivity will be determined by thecustom implementation.
The following management CLI command adds a credential to a credential store:
/subsystem=elytron/credential-store=STORE_NAME:add-alias(alias=ALIAS, secret-value="SENSITIVE_STRING")
For example, to add a password with the alias database-pw to the store created in the previous section:
/subsystem=elytron/credential-store=my_store:add-alias(alias=database-pw, secret-value="speci@l_db_pa$$_01")
Editing Credential Store Aliases Using the Management Console
1. Log in to the management console and click on the Runtime tab.
2. Select the server and select Security (Elytron) → Stores and click View.
3. Select the credential store and click Aliases to edit the aliases.
3.1.3. Use a Stored Credential in a Configuration
To refer to a password or sensitive string stored in a credential store, use the credential-referenceattribute in your JBoss EAP configuration. You can use credential-reference as an alternative toproviding a password or other sensitive string in most places throughout the JBoss EAP configuration.
CHAPTER 3. SECURELY STORING CREDENTIALS
149

credential-reference={store=STORE_NAME, alias=ALIAS}
For example, to create a new datasource using the password that was added to the credential store inthe previous example , you can use credential-reference like the following:
data-source add --name=my_DS --jndi-name=java:/my_DS --driver-name=h2 --connection-url=jdbc:h2:mem:test;DB_CLOSE_DELAY=-1;DB_CLOSE_ON_EXIT=FALSE --user-name=db_user --credential-reference={store=my_store, alias=database-pw}
In the above example, instead of providing a password using --password, a credential-referenceincluding a store name and alias is provided. If you check the resulting datasource configuration, notethat password is undefined and the credential-reference attribute is defined instead.
/subsystem=datasources/data-source=my_DS:read-resource(){ "outcome" => "success", "result" => { ... "credential-reference" => { "store" => "my_store", "alias" => "database-pw" }, ... "password" => undefined, ... }}
3.1.4. List the Credentials in the Credential Store
You can list the aliases of all the credentials contained in a credential store using the followingmanagement CLI command:
/subsystem=elytron/credential-store=STORE_NAME:read-aliases()
For example:
/subsystem=elytron/credential-store=my_store:read-aliases(){ "outcome" => "success", "result" => [ "database-pw" ]}
3.1.5. Remove a Credential from the Credential Store
You can remove a credential from a credential store using the following command:
/subsystem=elytron/credential-store=STORE_NAME:remove-alias(alias=ALIAS)
For example:
Red Hat JBoss Enterprise Application Platform 7.3 How to Configure Server Security
150

/subsystem=elytron/credential-store=my_store:remove-alias(alias=database-pw)
3.1.6. Obtain the Master Password for the Credential Store from an External Source
Instead of providing your credential store’s master password in the clear, you can choose to provide thatpassword using a pseudo credential store. You have the following options:
EXT
External command using java.lang.Runtime#exec(java.lang.String). If parameters are needed, theyare supplied using a space-separated list of strings. An external command refers to any executablefrom the operation system, for example a shell script or an executable binary. The password is readfrom the standard output of the executed command.
Example
{EXT}/usr/bin/getTheMasterPasswordScript.sh par1 par2
CMD
External command using java.lang.ProcessBuilder. If parameters are needed, they are suppliedusing a comma-separated list of strings. An external command refers to any executable from theoperation system, for example a shell script or an executable binary. The password is read from thestandard output of the executed command.
Example
{CMD}/usr/bin/getTheMasterPasswordScript.sh par1,par2
MASK
Masked password using PBE, or Password Based Encryption. It must be in the following format, whichincludes the SALT and ITERATION values:
MASK-MASKED_VALUE;SALT;ITERATION
Example
MASK-NqMznhSbL3lwRpDmyuqLBW==;12345678;123
IMPORTANT
EXT, CMD, and MASK provide backward compatibility with the legacy security vault styleof supplying an external password. For MASK you must use the above format thatincludes the SALT and ITERATION values.
You can also use a password located in another credential store as the master password for a newcredential store.
Example Credential Store Created with a Password from Another Credential Store
CHAPTER 3. SECURELY STORING CREDENTIALS
151
/subsystem=elytron/credential-store=exampleCS:add(location="cred_stores/exampleCS.jceks", relative-to=jboss.server.data.dir, create=true, credential-reference={store=master-cred-store, alias=master-pw})
3.1.7. Define a FIPS 140-2 Compliant Credential Store
A FIPS 140-2 compliant credential store may be defined using either of the following methods.
Using an NSS Database
Using the BouncyCastle Providers
3.1.7.1. Define a FIPS 140-2 Compliant Credential Store Using an NSS Database
To obtain a FIPS compliant keystore, use a Sun PKCS#11 provider accessing an NSS database.Instructions on defining the database are found at Configuring the NSS Database.
1. Create a secret key to be used in the credential store.
$ keytool -keystore NONE -storetype PKCS11 -storepass STORE_PASSWORD -genseckey -alias ALIAS -keyalg AES -keysize 256
2. Create an external credential store. An external credential store holds a secret key in a PKCS#11keystore, and accesses this keystore using the alias defined in the previous step. This keystore isthen used to decrypt the credentials in a JCEKS keystore. In addition to the credential-storeattributes, the credential-store KeyStoreCredentialStore implementation properties are usedto configure external credential stores.
/subsystem=elytron/credential-store=STORE_NAME:add(modifiable=true, implementation-properties={"keyStoreType"=>"PKCS11","external"=>"true","keyAlias"=>"ALIAS", externalPath="/path/to/EXTERNAL_STORAGE"},credential-reference={clear-text="STORE_PASSWORD"}, create=true)
3. Once created, the credential store can be used to store aliases as normal.
/subsystem=elytron/credential-store=STORE_NAME:add-alias(alias="ALIAS", secret-value="SENSITIVE_STRING")
4. Confirm that the alias has been added successfully by reading from the credential store.
/subsystem=elytron/credential-store=STORE_NAME:read-aliases()
3.1.7.2. Define a FIPS 140-2 Compliant Credential Store Using the BouncyCastle Providers
The following instructions outline how you can use a BouncyCastle provider to obtain a FIPS compliantkeystore.
1. Ensure your your environment is configured to use the BouncyCastle provider.
2. Create a secret key to be used in the credential store.
$ keytool -genseckey -alias KEY_ALIAS -keyalg AES -keysize 128 -keystore KEYSTORE -storetype BCFKS -storepass PASSWORD -keypass PASSWORD
Red Hat JBoss Enterprise Application Platform 7.3 How to Configure Server Security
152
IMPORTANT
The keypass and storepass for the keystore must be identical for FIPScredential stores to be defined in the elytron subsystem.
3. Create an external credential store. An external credential store holds a secret key in a BCFKSkeystore, and accesses this keystore using the alias defined in the previous step. This keystore isthen used to decrypt the credentials in a JCEKS keystore. The credential-store KeyStoreCredentialStore implementation properties are used to configure external credentialstores.
/subsystem=elytron/credential-store=BCFKS_CREDENTIAL_STORE:add(relative-to=jboss.server.config.dir,credential-reference={clear-text=PASSWORD},implementation-properties={keyAlias=KEY_ALIAS,external=true,externalPath=CREDENTIAL_STORE,keyStoreType=BCFKS},create=true,location=KEYSTORE,modifiable=true)
4. Once created, the credential store can be used to store aliases as normal.
/subsystem=elytron/credential-store=BCFKS_CREDENTIAL_STORE:add-alias(alias="ALIAS", secret-value="SENSITIVE_STRING")
5. Confirm that the alias has been added successfully by reading from the credential store.
/subsystem=elytron/credential-store=BCFKS_CREDENTIAL_STORE:read-aliases()
3.1.8. Use a Custom Implementation of the Credential Store
To use a custom implementation of the credential store:
1. Create a class that extends the Service Provider Interface (SPI) CredentialStoreSpi abstractclass.
2. Create a class that implements the Java Security Provider. The provider must add the customcredential store class as a service.
3. Create a module containing your credential store and provider classes, and add it to JBoss EAPwith a dependency on org.wildfly.security.elytron. For example:
module add --name=org.jboss.customcredstore --resources=/path/to/customcredstoreprovider.jar --dependencies=org.wildfly.security.elytron --slot=main
4. Create a provider loader for your provider. For example:
/subsystem=elytron/provider-loader=myCustomLoader:add(class-names=[org.wildfly.security.mycustomcredstore.CustomElytronProvider],module=org.jboss.customcredstore)
5. Create a credential store using the custom implementation.
NOTE
CHAPTER 3. SECURELY STORING CREDENTIALS
153

NOTE
Ensure that you specify the correct providers and type values. The value of typeis what is used in your provider class where it adds your custom credential storeclass as a service.
For example:
/subsystem=elytron/credential-store=my_store:add(providers=myCustomLoader,type=CustomKeyStorePasswordStore,location="cred_stores/my_store.jceks",relative-to=jboss.server.data.dir,credential-reference={clear-text=supersecretstorepassword},create=true)
Alternatively, if you have created multiple providers, you can specify the additional providersusing another provider loader with other-providers. This allows you to have other additionalimplementations for new types of credentials. These specified other providers are automaticallyaccessible in the custom credential store’s initialize method as the Provider[] argument. Forexample:
/subsystem=elytron/credential-store=my_store:add(providers=myCustomLoader,other-providers=myCustomLoader2,type=CustomKeyStorePasswordStore,location="cred_stores/my_store.jceks",relative-to=jboss.server.data.dir,credential-reference={clear-text=supersecretstorepassword},create=true)
3.1.9. Create and Modify Credential Stores Offline with the WildFly Elytron Tool
You can use the WildFly Elytron tool, which you access using the elytron-tool script located in EAP_HOME/bin/, to create and modify a credential store for an offline, or stopped, JBoss EAP server.
IMPORTANT
JCEKS keystore implementations differ between Java vendors, so the JBoss EAPinstance must run a JDK from the same vendor that generated the JCEKS keystore.
IMPORTANT
Using the WildFly Elytron tool to modify a credential store that is in use by a runningJBoss EAP server can result in changes to the store being lost. Instead, you should createand modify credential stores for a running server by using the management CLI, asdescribed in the previous sections .
The following commands are shown using elytron-tool.sh for Red Hat Enterprise Linux and Solarissystems. For Windows Server systems, use the elytron-tool.bat script instead.
Create a Credential Store Using the WildFly Elytron Tool
Create a credential store using the WildFly Elytron tool with the following command:
$ EAP_HOME/bin/elytron-tool.sh credential-store --create --location "path/to/store_file" --password STORE_PASSWORD
For example:
Red Hat JBoss Enterprise Application Platform 7.3 How to Configure Server Security
154

$ EAP_HOME/bin/elytron-tool.sh credential-store --create --location "../cred_stores/my_store.jceks" --password supersecretstorepassword
If you do not want to provide your store password in the command, you can omit that argument and youwill be prompted to enter the password manually using standard input. You can also use a maskedpassword generated by the WildFly Elytron tool for the store password.
Create a Credential Store Using the BouncyCastle Provider with the WildFly Elytron Tool
The following procedure outlines how to create a credential store using the WildFly Elytron tool.
1. Ensure your environment is configured to use the BouncyCastle provider.
2. Define a BCFKS keystore. If this keystore already exists, proceed to the next step.
$ keytool -genkeypair -alias ALIAS -keyalg RSA -keysize 2048 -keypass PASSWORD -keystore KEYSTORE -storetype BCFKS -storepass PASSWORD
IMPORTANT
The keypass and storepass for the keystore must be identical for FIPScredential stores to be defined in the elytron subsystem.
3. Generate a secret key for the credential store.
$ keytool -genseckey -alias KEY_ALIAS -keyalg AES -keysize 128 -keystore KEYSTORE -storetype BCFKS -storepass PASSWORD -keypass PASSWORD
4. Define the credential store using the WildFly Elytron tool with the following command:
$ EAP_HOME/bin/elytron-tool.sh credential-store -c -a ALIAS -x ALIAS_PASSWORD -p PASSWORD -l KEYSTORE -u "keyStoreType=BCFKS;external=true;keyAlias=KEY_ALIAS;externalPath=CREDENTIAL_STORE"
Add a Credential to a Credential Store Using the WildFly Elytron Tool
Add a credential to a credential store using the WildFly Elytron tool with the following command:
$ EAP_HOME/bin/elytron-tool.sh credential-store --location "path/to/store_file" --password STORE_PASSWORD --add ALIAS --secret SENSITIVE_STRING
For example:
$ EAP_HOME/bin/elytron-tool.sh credential-store --location "../cred_stores/my_store.jceks" --password supersecretstorepassword --add database-pw --secret speci@l_db_pa$$_01
Similar to providing the credential store password, if you do not want to provide your secret in thecommand, you can omit that argument and you will be prompted to enter the secret manually usingstandard input.
List All the Credentials in the Credential Store Using the WildFly Elytron Tool
List the credentials in a credential store using the WildFly Elytron tool with the following command:
CHAPTER 3. SECURELY STORING CREDENTIALS
155
$ EAP_HOME/bin/elytron-tool.sh credential-store --location "path/to/store_file" --password STORE_PASSWORD --aliases
For example:
$ EAP_HOME/bin/elytron-tool.sh credential-store --location "../cred_stores/my_store.jceks" --password supersecretstorepassword --aliases
Check If an Alias Exists in the Credential Store Using the Wildfly Elytron Tool
Check if an alias exists in a credential store using the WildFly Elytron tool with the following command:
$ EAP_HOME/bin/elytron-tool.sh credential-store --location "path/to/store_file" --password STORE_PASSWORD --exists ALIAS
For example:
$ EAP_HOME/bin/elytron-tool.sh credential-store --location "../cred_stores/my_store.jceks" --password supersecretstorepassword --exists database-pw
Remove a Credential from the Credential Store Using the WildFly Elytron Tool
Remove a credential from a credential store using the WildFly Elytron tool with the following command:
$ EAP_HOME/bin/elytron-tool.sh credential-store --location "path/to/store_file" --password STORE_PASSWORD --remove ALIAS
For example:
$ EAP_HOME/bin/elytron-tool.sh credential-store --location "../cred_stores/my_store.jceks" --password supersecretstorepassword --remove database-pw
Add a Credential Store Created with the WildFly Elytron Tool to a JBoss EAP Server
After you have created a credential store with the WildFly Elytron tool, add it to your running JBoss EAPserver with the following management CLI command:
/subsystem=elytron/credential-store=STORE_NAME:add(location="path/to/store_file",credential-reference={clear-text=STORE_PASSWORD})
For example:
/subsystem=elytron/credential-store=my_store:add(location="../cred_stores/my_store.jceks",credential-reference={clear-text=supersecretstorepassword})
After adding the credential store to the JBoss EAP configuration, you can then refer to a password orsensitive string stored in the credential store using the credential-reference attribute.
For more information, use the EAP_HOME/bin/elytron-tool.sh credential-store --help command for adetailed listing of available options.
3.1.9.1. Generate Masked Encrypted Strings Using the WildFly Elytron Tool
Red Hat JBoss Enterprise Application Platform 7.3 How to Configure Server Security
156

You can use the WildFly Elytron tool to generate PicketBox-compatible MASK- encrypted strings touse instead of a plain text password for a credential store.
To generate a masked string, use the following command and provide values for the salt and theiteration count:
$ EAP_HOME/bin/elytron-tool.sh mask --salt SALT --iteration ITERATION_COUNT --secret PASSWORD
For example:
$ EAP_HOME/bin/elytron-tool.sh mask --salt 12345678 --iteration 123 --secret supersecretstorepassword
MASK-8VzWsSNwBaR676g8ujiIDdFKwSjOBHCHgnKf17nun3v;12345678;123
If you do not want to provide the secret in the command, you can omit that argument and you will beprompted to enter the secret manually using standard input.
For more information, use the EAP_HOME/bin/elytron-tool.sh mask --help command for a detailedlisting of available options.
3.1.9.2. Convert a Password Vault to a Credential Store Using the WildFly Elytron Tool
You can use the WildFly Elytron tool to convert a password vault to a credential store. To convert apassword vault to a credential store, you need the vault’s values used when initializing the vault .
NOTE
When converting a password vault, aliases in the new credential store are named in thefollowing format based on their equivalent password vault block and attribute name: VAULT_BLOCK::ATTRIBUTE_NAME.
Convert a Single Password Vault
Convert a single password vault to a credential store using the following command:
$ EAP_HOME/bin/elytron-tool.sh vault --keystore "path/to/vault_file" --keystore-password VAULT_PASSWORD --enc-dir "path/to/vault_directory" --salt SALT --iteration ITERATION_COUNT --alias VAULT_ALIAS
For example, you can also specify the new credential store’s file name and location with the --locationargument:
$ EAP_HOME/bin/elytron-tool.sh vault --keystore ../vaults/vault.keystore --keystore-password vault22 --enc-dir ../vaults/ --salt 1234abcd --iteration 120 --alias my_vault --location ../cred_stores/my_vault_converted.cred_store
NOTE
CHAPTER 3. SECURELY STORING CREDENTIALS
157

1
2
3
NOTE
You can also use the --summary argument to print a summary of the management CLIcommands used to convert it. Note that even if a plain text password is used, it is maskedin the summary output. The default SALT and ITERATION values are used unless theyare specified in the command.
Bulk Convert Multiple Password Vaults
To bulk convert multiple password vaults:
1. Put the details of the vaults you want to convert into a description file in the following format:
keystore:path/to/vault_filekeystore-password:VAULT_PASSWORDenc-dir:path/to/vault_directorysalt:SALT 1iteration:ITERATION_COUNTlocation:path/to/converted_cred_store 2alias:VAULT_ALIASproperties:PARAMETER1=VALUE1;PARAMETER2=VALUE2; 3
salt and iteration can be omitted if you are providing a plain text password for the vault.
Specifies the location and file name for the converted credential store.
Optional: Specifies a list of optional parameters separated by semicolons (;). See EAP_HOME/bin/elytron-tool.sh vault --help for a list of available parameters.
For example:
keystore:/vaults/vault1/vault1.keystorekeystore-password:vault11enc-dir:/vaults/vault1/salt:1234abcditeration:120location:/cred_stores/vault1_converted.cred_storealias:my_vault
keystore:/vaults/vault2/vault2.keystorekeystore-password:vault22enc-dir:/vaults/vault2/salt:abcd1234iteration:130location:/cred_stores/vault2_converted.cred_storealias:my_vault2
2. Run the bulk convert command with your description file from the previous step:
$ EAP_HOME/bin/elytron-tool.sh vault --bulk-convert vaultdescriptions.txt
For more information, use the EAP_HOME/bin/elytron-tool.sh vault --help command for a detailedlisting of available options.
Red Hat JBoss Enterprise Application Platform 7.3 How to Configure Server Security
158
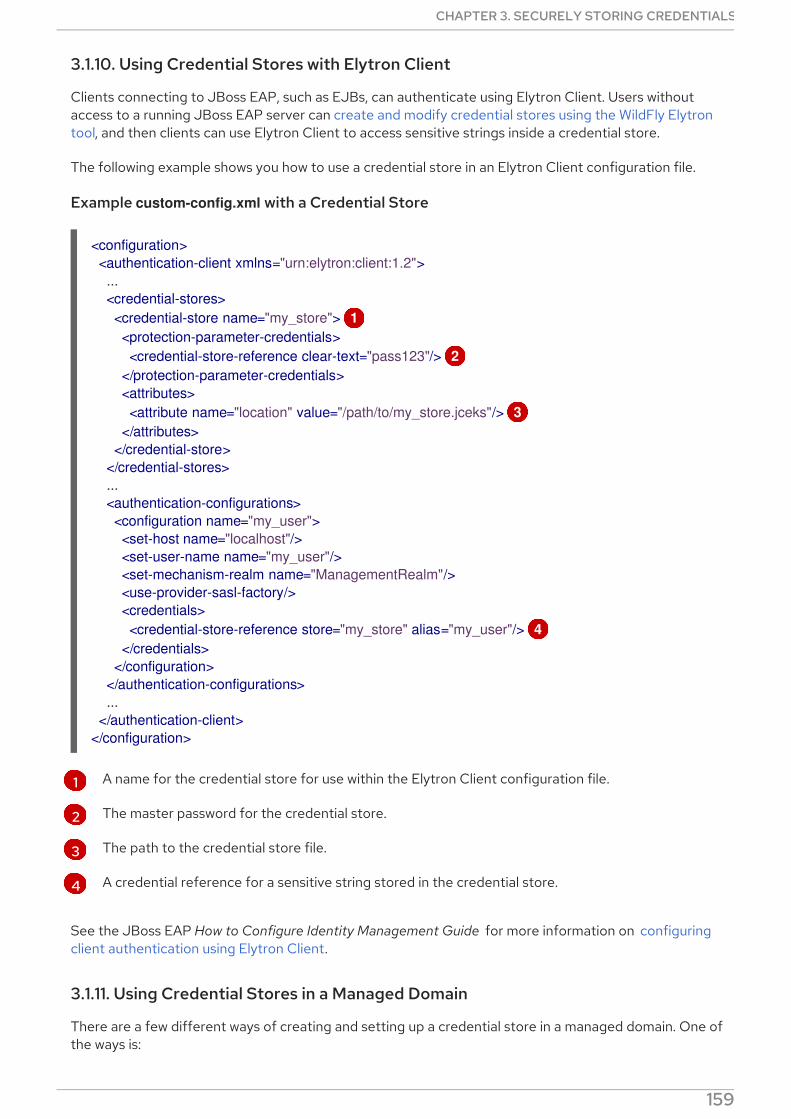
1
2
3
4
3.1.10. Using Credential Stores with Elytron Client
Clients connecting to JBoss EAP, such as EJBs, can authenticate using Elytron Client. Users withoutaccess to a running JBoss EAP server can create and modify credential stores using the WildFly Elytrontool, and then clients can use Elytron Client to access sensitive strings inside a credential store.
The following example shows you how to use a credential store in an Elytron Client configuration file.
Example custom-config.xml with a Credential Store
A name for the credential store for use within the Elytron Client configuration file.
The master password for the credential store.
The path to the credential store file.
A credential reference for a sensitive string stored in the credential store.
See the JBoss EAP How to Configure Identity Management Guide for more information on configuringclient authentication using Elytron Client.
3.1.11. Using Credential Stores in a Managed Domain
There are a few different ways of creating and setting up a credential store in a managed domain. One ofthe ways is:
<configuration> <authentication-client xmlns="urn:elytron:client:1.2"> ... <credential-stores> <credential-store name="my_store"> 1 <protection-parameter-credentials> <credential-store-reference clear-text="pass123"/> 2 </protection-parameter-credentials> <attributes> <attribute name="location" value="/path/to/my_store.jceks"/> 3 </attributes> </credential-store> </credential-stores> ... <authentication-configurations> <configuration name="my_user"> <set-host name="localhost"/> <set-user-name name="my_user"/> <set-mechanism-realm name="ManagementRealm"/> <use-provider-sasl-factory/> <credentials> <credential-store-reference store="my_store" alias="my_user"/> 4 </credentials> </configuration> </authentication-configurations> ... </authentication-client></configuration>
CHAPTER 3. SECURELY STORING CREDENTIALS
159
1. Use the WildFly Elytron Tool to prepare the credential store. For more information on this, seeCreate and Modify Credential Stores Offline with the WildFly Elytron Tool .
2. Distribute the created credential store storage file. For example, distribute it to each server, forexample by using scp, or store it in NFS and use it for all the created credential stores.
3. You can then create a credential store with the create property set to false, using the alreadycreated file.
/profile=full/subsystem=elytron/credential-store=test:add(relative-to=jboss.server.data.dir,location="store.keystore",credential-reference={clear-text="secret2"},create=false)
NOTE
When using one credential store to store all credential stores, when storing it onNFS, you must use the credential store in read-only mode. The read-only modeis used to maintain consistency. It is also prefered to use an absolute path in thiscase.
/profile=full/subsystem=elytron/credential-store=test:add(location=/absolute/path/to/store.keystore,credential-reference={clear-text="secret2"},create=false,modifiable=false)
For other ways of creating a credential store in a managed domain, see Create a Credential Store in aManaged Domain.
3.2. PASSWORD VAULT
Configuration of JBoss EAP and associated applications requires potentially sensitive information, suchas user names and passwords. Instead of storing the password as plain text in configuration files, thepassword vault feature can be used to mask the password information and store it in an encryptedkeystore. Once the password is stored, references can be included in management CLI commands orapplications deployed to JBoss EAP.
The password vault uses the Java keystore as its storage mechanism. Password vault consists of twoparts: storage and key storage. Java keystore is used to store the key, which is used to encrypt ordecrypt sensitive strings in Vault storage.
IMPORTANT
The keytool utility, provided by the Java Runtime Environment (JRE), is utilized for thissteps. Locate the path for the file, which on Red Hat Enterprise Linux is /usr/bin/keytool.
JCEKS keystore implementations differ between Java vendors so the keystore must begenerated using the keytool utility from the same vendor as the JDK used. Using akeystore generated by the keytool from one vendor’s JDK in a JBoss EAP 7 instancerunning on a JDK from a different vendor results in the following exception: java.io.IOException: com.sun.crypto.provider.SealedObjectForKeyProtector
3.2.1. Set Up a Password Vault
Follow the steps below to set up and use a Password Vault.
Red Hat JBoss Enterprise Application Platform 7.3 How to Configure Server Security
160

1. Create a directory to store the keystore and other encrypted information.The rest of this procedure assumes that the directory is EAP_HOME/vault/. Since this directorywill contain sensitive information it should be accessible to only limited users. At a minimum theuser account under which JBoss EAP is running requires read-write access.
2. Determine the parameters to use with keytool utility.Decide on values for the following parameters:
alias
The alias is a unique identifier for the vault or other data stored in the keystore. Aliases arecase-insensitive.
storetype
The storetype specifies the keystore type. The value jceks is recommended.
keyalg
The algorithm to use for encryption. Use the documentation for the JRE and operatingsystem to see which other choices are available.
keysize
The size of an encryption key impacts how difficult it is to decrypt through brute force. Forinformation on appropriate values, see the documentation distributed with the keytool utility.
storepass
The value of storepass is the password that is used to authenticate to the keystore so thatthe key can be read. The password must be at least 6 characters long and must be providedwhen the keystore is accessed. If this parameter is omitted, the keytool utility will prompt forit to be entered after the command has been executed
keypass
The value of keypass is the password used to access the specific key and must match thevalue of the storepass parameter.
validity
The value of validity is the period (in days) for which the key will be valid.
keystore
The value of keystore is the file path and file name in which the keystore’s values are to bestored. The keystore file is created when data is first added to it. Ensure the correct file pathseparator is used: / (forward slash) for Red Hat Enterprise Linux and similar operatingsystems, \ (backslash) for Windows Server.The keytool utility has many other options. See the documentation for the JRE or theoperating system for more details.
3. Run the keytool command, ensuring keypass and storepass contain the same value.
This results in a keystore that has been created in the file EAP_HOME/vault/vault.keystore. Itstores a single key, with the alias vault, which will be used to store encrypted strings, such aspasswords, for JBoss EAP.
3.2.2. Initialize the Password Vault
The password vault can be initialized either interactively, where you are prompted for each parameter’s
$ keytool -genseckey -alias vault -storetype jceks -keyalg AES -keysize 128 -storepass vault22 -keypass vault22 -validity 730 -keystore EAP_HOME/vault/vault.keystore
CHAPTER 3. SECURELY STORING CREDENTIALS
161
The password vault can be initialized either interactively, where you are prompted for each parameter’svalue, or non-interactively, where all parameter values are provided on the command line. Each methodgives the same result, so either may be used.
The following parameters will be needed:
keystore URL (KEYSTORE_URL)
The file system path or URI of the keystore file. The examples use EAP_HOME/vault/vault.keystore.
keystore password (KEYSTORE_PASSWORD)
The password used to access the keystore.
Salt (SALT)
The salt value is a random string of eight characters used, together with the iteration count, toencrypt the content of the keystore.
keystore Alias (KEYSTORE_ALIAS)
The alias by which the keystore is known.
Iteration Count (ITERATION_COUNT)
The number of times the encryption algorithm is run.
Directory to store encrypted files (ENC_FILE_DIR)
The path in which the encrypted files are to be stored. This is typically the directory containing thepassword vault. It is convenient but not mandatory to store all of your encrypted information in thesame place as the keystore. This directory should be only accessible to limited users. At a minimumthe user account under which JBoss EAP 7 is running requires read-write access. The keystoreshould be located in the directory you created when you set up the password vault. Note that thetrailing backslash or forward slash on the directory name is required. Ensure the correct file pathseparator is used: / (forward slash) for Red Hat Enterprise Linux and similar operating systems, \(backslash) for Windows Server.
Vault Block (VAULT_BLOCK)
The name to be given to this block in the password vault.
Attribute (ATTRIBUTE)
The name to be given to the attribute being stored.
Security Attribute (SEC-ATTR)
The password which is being stored in the password vault.
To run the password vault command non-interactively, the vault script located in EAP_HOME/bin/ canbe invoked with parameters for the relevant information:
Example: Initializing Password Vault
Example: Output
$ vault.sh --keystore KEYSTORE_URL --keystore-password KEYSTORE_PASSWORD --alias KEYSTORE_ALIAS --vault-block VAULT_BLOCK --attribute ATTRIBUTE --sec-attr SEC-ATTR --enc-dir ENC_FILE_DIR --iteration ITERATION_COUNT --salt SALT
$ vault.sh --keystore EAP_HOME/vault/vault.keystore --keystore-password vault22 --alias vault --vault-block vb --attribute password --sec-attr 0penS3sam3 --enc-dir EAP_HOME/vault/ --iteration 120 --salt 1234abcd
Red Hat JBoss Enterprise Application Platform 7.3 How to Configure Server Security
162
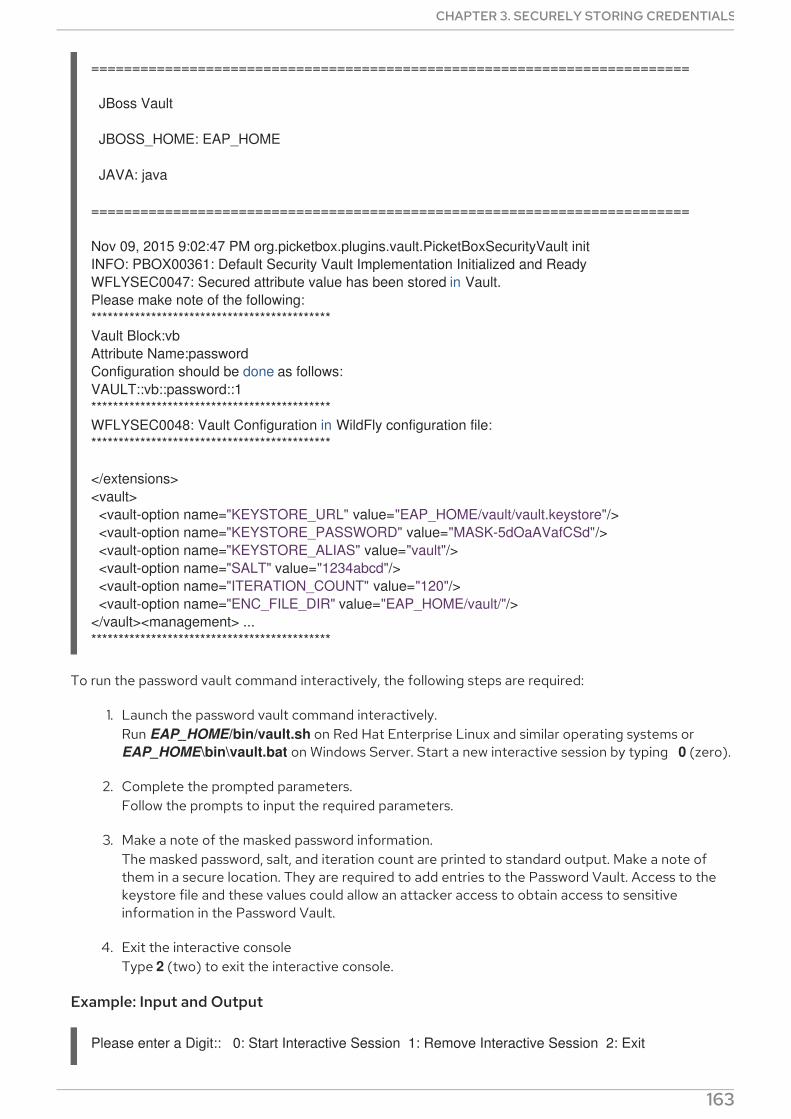
To run the password vault command interactively, the following steps are required:
1. Launch the password vault command interactively.Run EAP_HOME/bin/vault.sh on Red Hat Enterprise Linux and similar operating systems or EAP_HOME\bin\vault.bat on Windows Server. Start a new interactive session by typing 0 (zero).
2. Complete the prompted parameters.Follow the prompts to input the required parameters.
3. Make a note of the masked password information.The masked password, salt, and iteration count are printed to standard output. Make a note ofthem in a secure location. They are required to add entries to the Password Vault. Access to thekeystore file and these values could allow an attacker access to obtain access to sensitiveinformation in the Password Vault.
4. Exit the interactive consoleType 2 (two) to exit the interactive console.
Example: Input and Output
=========================================================================
JBoss Vault
JBOSS_HOME: EAP_HOME
JAVA: java
=========================================================================
Nov 09, 2015 9:02:47 PM org.picketbox.plugins.vault.PicketBoxSecurityVault initINFO: PBOX00361: Default Security Vault Implementation Initialized and ReadyWFLYSEC0047: Secured attribute value has been stored in Vault.Please make note of the following:********************************************Vault Block:vbAttribute Name:passwordConfiguration should be done as follows:VAULT::vb::password::1********************************************WFLYSEC0048: Vault Configuration in WildFly configuration file:********************************************
</extensions><vault> <vault-option name="KEYSTORE_URL" value="EAP_HOME/vault/vault.keystore"/> <vault-option name="KEYSTORE_PASSWORD" value="MASK-5dOaAVafCSd"/> <vault-option name="KEYSTORE_ALIAS" value="vault"/> <vault-option name="SALT" value="1234abcd"/> <vault-option name="ITERATION_COUNT" value="120"/> <vault-option name="ENC_FILE_DIR" value="EAP_HOME/vault/"/></vault><management> ...********************************************
Please enter a Digit:: 0: Start Interactive Session 1: Remove Interactive Session 2: Exit
CHAPTER 3. SECURELY STORING CREDENTIALS
163

+ The keystore password has been masked for use in configuration files and deployments. In addition,the vault is initialized and ready to use.
3.2.3. Use a Password Vault
Before passwords and other sensitive attributes can be masked and used in configuration files, JBossEAP 7 must be made aware of the password vault which stores and decrypts them.
The following command can be used to configure JBoss EAP 7 to use the password vault:
/core-service=vault:add(vault-options=[("KEYSTORE_URL" => PATH_TO_KEYSTORE),("KEYSTORE_PASSWORD" => MASKED_PASSWORD),("KEYSTORE_ALIAS" => ALIAS),("SALT" => SALT),("ITERATION_COUNT" => ITERATION_COUNT),("ENC_FILE_DIR" => ENC_FILE_DIR)])
/core-service=vault:add(vault-options=[("KEYSTORE_URL" => "EAP_HOME/vault/vault.keystore"),("KEYSTORE_PASSWORD" => "MASK-5dOaAVafCSd"),("KEYSTORE_ALIAS" => "vault"),("SALT" => "1234abcd"),("ITERATION_COUNT" => "120"),("ENC_FILE_DIR" => "EAP_HOME/vault/")])
NOTE
If Microsoft Windows Server is being used, use two backslashes (\\) in the file pathinstead using one. For example, C:\\data\\vault\\vault.keystore. This is because a singlebackslash character (\) is used for character escaping.
3.2.4. Store a Sensitive String in the Password Vault
0Starting an interactive sessionEnter directory to store encrypted files:EAP_HOME/vault/Enter Keystore URL:EAP_HOME/vault/vault.keystoreEnter Keystore password: vault22Enter Keystore password again: vault22Values matchEnter 8 character salt:1234abcdEnter iteration count as a number (Eg: 44):120Enter Keystore Alias:vaultInitializing VaultNov 09, 2015 9:24:36 PM org.picketbox.plugins.vault.PicketBoxSecurityVault initINFO: PBOX000361: Default Security Vault Implementation Initialized and ReadyVault Configuration in AS7 config file:********************************************...</extensions><vault> <vault-option name="KEYSTORE_URL" value="EAP_HOME/vault/vault.keystore"/> <vault-option name="KEYSTORE_PASSWORD" value="MASK-5dOaAVafCSd"/> <vault-option name="KEYSTORE_ALIAS" value="vault"/> <vault-option name="SALT" value="1234abcd"/> <vault-option name="ITERATION_COUNT" value="120"/> <vault-option name="ENC_FILE_DIR" value="EAP_HOME/vault/"/></vault><management> ...********************************************Vault is initialized and ready for useHandshake with Vault complete
Red Hat JBoss Enterprise Application Platform 7.3 How to Configure Server Security
164

Including passwords and other sensitive strings in plaintext configuration files is a security risk. Storethese strings instead in the Password Vault for improved security, where they can then be referenced inconfiguration files, management CLI commands and applications in their masked form.
Sensitive strings can be stored in the Password Vault either interactively, where the tool prompts foreach parameter’s value, or non-interactively, where all the parameters' values are provided on thecommand line. Each method gives the same result, so either may be used. Both of these methods areinvoked using the vault script.
To run the password vault command non-interactively, the vault script (located in EAP_HOME/bin/)can be invoked with parameters for the relevant information:
NOTE
The keystore password must be given in plaintext form, not masked form.
Example: Output
$ vault.sh --keystore KEYSTORE_URL --keystore-password KEYSTORE_PASSWORD --alias KEYSTORE_ALIAS --vault-block VAULT_BLOCK --attribute ATTRIBUTE --sec-attr SEC-ATTR --enc-dir ENC_FILE_DIR --iteration ITERATION_COUNT --salt SALT
$ vault.sh --keystore EAP_HOME/vault/vault.keystore --keystore-password vault22 --alias vault --vault-block vb --attribute password --sec-attr 0penS3sam3 --enc-dir EAP_HOME/vault/ --iteration 120 --salt 1234abcd
=========================================================================
JBoss Vault
JBOSS_HOME: EAP_HOME
JAVA: java
=========================================================================
Nov 09, 2015 9:24:36 PM org.picketbox.plugins.vault.PicketBoxSecurityVault initINFO: PBOX00361: Default Security Vault Implementation Initialized and ReadyWFLYSEC0047: Secured attribute value has been stored in Vault.Please make note of the following:********************************************Vault Block:vbAttribute Name:passwordConfiguration should be done as follows:VAULT::vb::password::1********************************************WFLYSEC0048: Vault Configuration in WildFly configuration file:********************************************...</extensions><vault> <vault-option name="KEYSTORE_URL" value="../vault/vault.keystore"/> <vault-option name="KEYSTORE_PASSWORD" value="MASK-5dOaAVafCSd"/> <vault-option name="KEYSTORE_ALIAS" value="vault"/>
CHAPTER 3. SECURELY STORING CREDENTIALS
165

After invoking the vault script, a message prints to standard output, showing the vault block, attributename, masked string, and advice about using the string in your configuration. Make note of thisinformation in a secure location. An extract of sample output is as follows:
To run the password vault command interactively, the following steps are required:
1. Launch the Password Vault command interactively.Launch the operating system’s command line interface and run EAP_HOME/bin/vault.sh (onRed Hat Enterprise Linux and similar operating systems) or EAP_HOME\bin\vault.bat (onMicrosoft Windows Server). Start a new interactive session by typing 0 (zero).
2. Complete the prompted parameters.Follow the prompts to input the required parameters. These values must match those providedwhen the Password Vault was created.
NOTE
The keystore password must be given in plaintext form, not masked form.
3. Complete the prompted parameters about the sensitive string.Enter 0 (zero) to start storing the sensitive string. Follow the prompts to input the requiredparameters.
4. Make note of the information about the masked string.A message prints to standard output, showing the vault block, attribute name, masked string,and advice about using the string in the configuration. Make note of this information in a securelocation. An extract of sample output is as follows:
5. Exit the interactive console.Type 2 (two) to exit the interactive console.
Example: Input and Output
<vault-option name="SALT" value="1234abcd"/> <vault-option name="ITERATION_COUNT" value="120"/> <vault-option name="ENC_FILE_DIR" value="../vault/"/></vault><management> ...********************************************
Vault Block:vbAttribute Name:passwordConfiguration should be done as follows:VAULT::vb::password::1
Vault Block:ds_Example1Attribute Name:passwordConfiguration should be done as follows:VAULT::ds_Example1::password::1
========================================================================= JBoss Vault JBOSS_HOME: EAP_HOME JAVA: java =========================================================================
Red Hat JBoss Enterprise Application Platform 7.3 How to Configure Server Security
166

3.2.5. Use an Encrypted Sensitive String in Configuration
Any sensitive string which has been encrypted can be used in a configuration file or management CLI
********************************** **** JBoss Vault *************** **********************************Please enter a Digit:: 0: Start Interactive Session 1: Remove Interactive Session 2: Exit0Starting an interactive sessionEnter directory to store encrypted files:EAP_HOME/vault/Enter Keystore URL:EAP_HOME/vault/vault.keystoreEnter Keystore password:Enter Keystore password again:Values matchEnter 8 character salt:1234abcdEnter iteration count as a number (Eg: 44):120Enter Keystore Alias:vaultInitializing VaultNov 09, 2015 9:24:36 PM org.picketbox.plugins.vault.PicketBoxSecurityVault initINFO: PBOX000361: Default Security Vault Implementation Initialized and ReadyVault Configuration in AS7 config file: ********************************************...</extensions><vault> <vault-option name="KEYSTORE_URL" value="EAP_HOME/vault/vault.keystore"/> <vault-option name="KEYSTORE_PASSWORD" value="MASK-5dOaAVafCSd"/> <vault-option name="KEYSTORE_ALIAS" value="vault"/> <vault-option name="SALT" value="1234abcd"/> <vault-option name="ITERATION_COUNT" value="120"/> <vault-option name="ENC_FILE_DIR" value="EAP_HOME/vault/"/></vault><management> ... ********************************************Vault is initialized and ready for useHandshake with Vault completePlease enter a Digit:: 0: Store a secured attribute 1: Check whether a secured attribute exists 2: Remove secured attribute 3: Exit0Task: Store a secured attributePlease enter secured attribute value (such as password):Please enter secured attribute value (such as password) again:Values matchEnter Vault Block:ds_Example1Enter Attribute Name:passwordSecured attribute value has been stored in vault.Please make note of the following: ********************************************Vault Block:ds_Example1Attribute Name:passwordConfiguration should be done as follows:VAULT::ds_Example1::password::1 ********************************************Please enter a Digit:: 0: Store a secured attribute 1: Check whether a secured attribute exists 2: Remove secured attribute 3: Exit
CHAPTER 3. SECURELY STORING CREDENTIALS
167

Any sensitive string which has been encrypted can be used in a configuration file or management CLIcommand in its masked form, providing expressions are allowed.
To confirm if expressions are allowed within a particular subsystem, run the following management CLIcommand against that subsystem:
/subsystem=SUBSYSTEM:read-resource-description(recursive=true)
From the output of running this command, look for the value of the expressions-allowed parameter. Ifthis is true, then expressions can be used within the configuration of this subsystem.
Use the following syntax to replace any plaintext string with the masked form.
Example: Datasource Definition Using a Password in Masked Form
3.2.6. Use an Encrypted Sensitive String in an Application
Encrypted strings stored in the password vault can be used in an application’s source code. The belowexample is an extract of a servlet’s source code, illustrating the use of a masked password in adatasource definition, instead of the plaintext password. The plaintext version is commented out so thatyou can see the difference.
Example: Servlet Using a Vaulted Password
${VAULT::VAULT_BLOCK::ATTRIBUTE_NAME::MASKED_STRING}
... <subsystem xmlns="urn:jboss:domain:datasources:5.0"> <datasources> <datasource jndi-name="java:jboss/datasources/ExampleDS" enabled="true" use-java-context="true" pool-name="H2DS"> <connection-url>jdbc:h2:mem:test;DB_CLOSE_DELAY=-1</connection-url> <driver>h2</driver> <pool></pool> <security> <user-name>sa</user-name> <password>${VAULT::ds_ExampleDS::password::1}</password> </security> </datasource> <drivers> <driver name="h2" module="com.h2database.h2"> <xa-datasource-class>org.h2.jdbcx.JdbcDataSource</xa-datasource-class> </driver> </drivers> </datasources> </subsystem>...
@DataSourceDefinition( name = "java:jboss/datasources/LoginDS", user = "sa", password = "VAULT::DS::thePass::1", className = "org.h2.jdbcx.JdbcDataSource", url = "jdbc:h2:tcp://localhost/mem:test"
Red Hat JBoss Enterprise Application Platform 7.3 How to Configure Server Security
168

3.2.7. Check if a Sensitive String is in the Password Vault
Before attempting to store or use a sensitive string in the Password Vault it can be useful to first confirmif it is already stored.
This check can be done either interactively, where the user is prompted for each parameter’s value, ornon-interactively, where all parameters' values are provided on the command line. Each method givesthe same result, so either may be used. Both of these methods are invoked using the vault script.
Use the non-interative method to provide all parameters' values at once. For a description of allparameters, see Initialize the Password Vault . To run the password vault command non-interactively,the vault script located in EAP_HOME/bin/ can be invoked with parameters for the relevantinformation:
Substitute the placeholder values with the actual values. The values for parameters KEYSTORE_URL,KEYSTORE_PASSWORD and KEYSTORE_ALIAS must match those provided when the password vaultwas created.
NOTE
The keystore password must be given in plaintext form, not masked form.
If the sensitive string is stored in the vault block specified, the following message will be displayed:
If the value is not stored in the specified block, the following message will be displayed:
To run the password vault command interactively, the following steps are required:
1. Launch the password vault command interactively.Run EAP_HOME/bin/vault.sh (on Red Hat Enterprise Linux and similar operating systems) or EAP_HOME\bin\vault.bat (on Windows Server). Start a new interactive session by typing 0(zero).
2. Complete the prompted parameters. Follow the prompts to input the required authenticationparameters. These values must match those provided when the password vault was created.
NOTE
)/*old (plaintext) definition@DataSourceDefinition( name = "java:jboss/datasources/LoginDS", user = "sa", password = "sa", className = "org.h2.jdbcx.JdbcDataSource", url = "jdbc:h2:tcp://localhost/mem:test")*/
$ vault.sh --keystore KEYSTORE_URL --keystore-password KEYSTORE_PASSWORD --alias KEYSTORE_ALIAS --check-sec-attr --vault-block VAULT_BLOCK --attribute ATTRIBUTE --enc-dir ENC_FILE_DIR --iteration ITERATION_COUNT --salt SALT
Password already exists.
Password doesn't exist.
CHAPTER 3. SECURELY STORING CREDENTIALS
169

NOTE
When prompted for authentication, the keystore password must be given inplaintext form, not masked form.
Enter 1 (one) to select Check whether a secured attribute exists.
Enter the name of the vault block in which the sensitive string is stored.
Enter the name of the sensitive string to be checked.
If the sensitive string is stored in the vault block specified, a confirmation message like the following willbe output:
If the sensitive string is not stored in the specified block, a message like the following will be output:
Example: Check For a Sensitive String Interactively
A value exists for (VAULT_BLOCK, ATTRIBUTE)
No value has been store for (VAULT_BLOCK, ATTRIBUTE)
========================================================================= JBoss Vault JBOSS_HOME: EAP_HOME JAVA: java ========================================================================= ********************************** **** JBoss Vault *************** **********************************Please enter a Digit:: 0: Start Interactive Session 1: Remove Interactive Session 2: Exit0Starting an interactive sessionEnter directory to store encrypted files:EAP_HOME/vaultEnter Keystore URL:EAP_HOME/vault/vault.keystoreEnter Keystore password:Enter Keystore password again:Values matchEnter 8 character salt:1234abcdEnter iteration count as a number (Eg: 44):120Enter Keystore Alias:vaultInitializing VaultNov 09, 2015 9:24:36 PM org.picketbox.plugins.vault.PicketBoxSecurityVault initINFO: PBOX000361: Default Security Vault Implementation Initialized and ReadyVault Configuration in AS7 config file: ********************************************...</extensions><vault> <vault-option name="KEYSTORE_URL" value="EAP_HOME/vault/vault.keystore"/> <vault-option name="KEYSTORE_PASSWORD" value="MASK-5dOaAVafCSd"/> <vault-option name="KEYSTORE_ALIAS" value="vault"/> <vault-option name="SALT" value="1234abcd"/> <vault-option name="ITERATION_COUNT" value="120"/> <vault-option name="ENC_FILE_DIR" value="EAP_HOME/vault/"/>
Red Hat JBoss Enterprise Application Platform 7.3 How to Configure Server Security
170
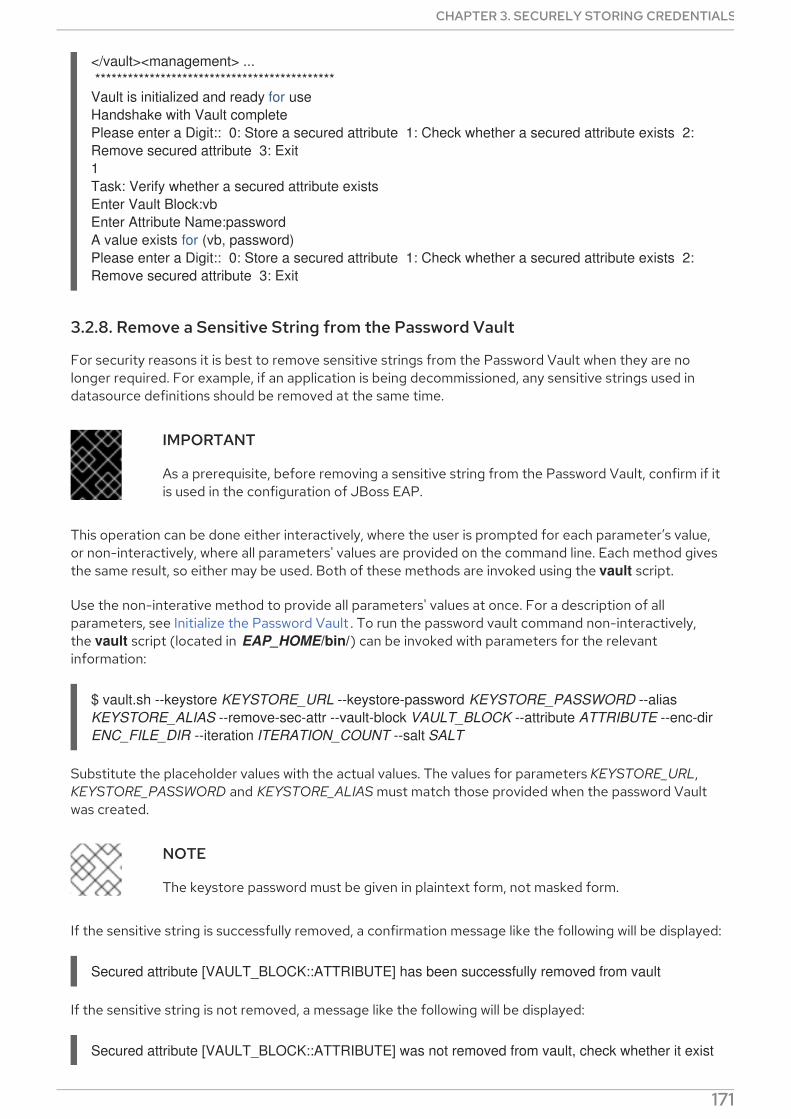
3.2.8. Remove a Sensitive String from the Password Vault
For security reasons it is best to remove sensitive strings from the Password Vault when they are nolonger required. For example, if an application is being decommissioned, any sensitive strings used indatasource definitions should be removed at the same time.
IMPORTANT
As a prerequisite, before removing a sensitive string from the Password Vault, confirm if itis used in the configuration of JBoss EAP.
This operation can be done either interactively, where the user is prompted for each parameter’s value,or non-interactively, where all parameters' values are provided on the command line. Each method givesthe same result, so either may be used. Both of these methods are invoked using the vault script.
Use the non-interative method to provide all parameters' values at once. For a description of allparameters, see Initialize the Password Vault . To run the password vault command non-interactively,the vault script (located in EAP_HOME/bin/) can be invoked with parameters for the relevantinformation:
Substitute the placeholder values with the actual values. The values for parameters KEYSTORE_URL,KEYSTORE_PASSWORD and KEYSTORE_ALIAS must match those provided when the password Vaultwas created.
NOTE
The keystore password must be given in plaintext form, not masked form.
If the sensitive string is successfully removed, a confirmation message like the following will be displayed:
If the sensitive string is not removed, a message like the following will be displayed:
</vault><management> ... ********************************************Vault is initialized and ready for useHandshake with Vault completePlease enter a Digit:: 0: Store a secured attribute 1: Check whether a secured attribute exists 2: Remove secured attribute 3: Exit1Task: Verify whether a secured attribute existsEnter Vault Block:vbEnter Attribute Name:passwordA value exists for (vb, password)Please enter a Digit:: 0: Store a secured attribute 1: Check whether a secured attribute exists 2: Remove secured attribute 3: Exit
$ vault.sh --keystore KEYSTORE_URL --keystore-password KEYSTORE_PASSWORD --alias KEYSTORE_ALIAS --remove-sec-attr --vault-block VAULT_BLOCK --attribute ATTRIBUTE --enc-dir ENC_FILE_DIR --iteration ITERATION_COUNT --salt SALT
Secured attribute [VAULT_BLOCK::ATTRIBUTE] has been successfully removed from vault
Secured attribute [VAULT_BLOCK::ATTRIBUTE] was not removed from vault, check whether it exist
CHAPTER 3. SECURELY STORING CREDENTIALS
171
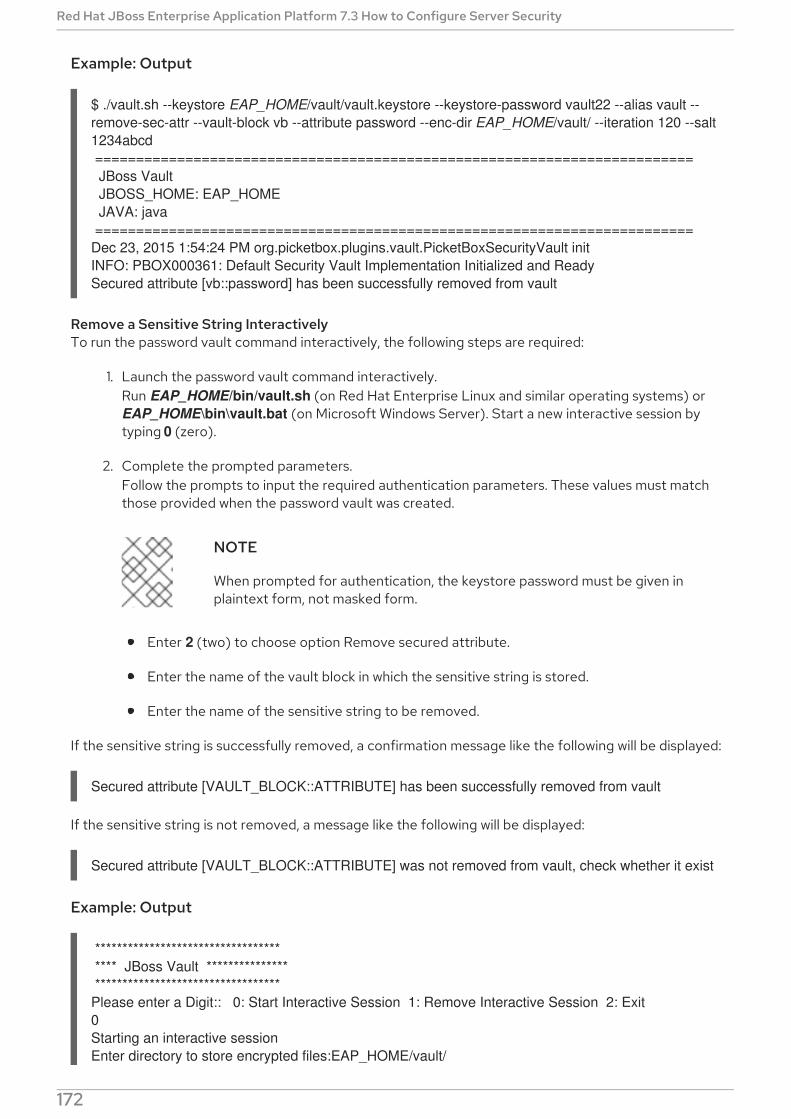
Example: Output
Remove a Sensitive String InteractivelyTo run the password vault command interactively, the following steps are required:
1. Launch the password vault command interactively.Run EAP_HOME/bin/vault.sh (on Red Hat Enterprise Linux and similar operating systems) or EAP_HOME\bin\vault.bat (on Microsoft Windows Server). Start a new interactive session bytyping 0 (zero).
2. Complete the prompted parameters.Follow the prompts to input the required authentication parameters. These values must matchthose provided when the password vault was created.
NOTE
When prompted for authentication, the keystore password must be given inplaintext form, not masked form.
Enter 2 (two) to choose option Remove secured attribute.
Enter the name of the vault block in which the sensitive string is stored.
Enter the name of the sensitive string to be removed.
If the sensitive string is successfully removed, a confirmation message like the following will be displayed:
If the sensitive string is not removed, a message like the following will be displayed:
Example: Output
$ ./vault.sh --keystore EAP_HOME/vault/vault.keystore --keystore-password vault22 --alias vault --remove-sec-attr --vault-block vb --attribute password --enc-dir EAP_HOME/vault/ --iteration 120 --salt 1234abcd ========================================================================= JBoss Vault JBOSS_HOME: EAP_HOME JAVA: java =========================================================================Dec 23, 2015 1:54:24 PM org.picketbox.plugins.vault.PicketBoxSecurityVault initINFO: PBOX000361: Default Security Vault Implementation Initialized and ReadySecured attribute [vb::password] has been successfully removed from vault
Secured attribute [VAULT_BLOCK::ATTRIBUTE] has been successfully removed from vault
Secured attribute [VAULT_BLOCK::ATTRIBUTE] was not removed from vault, check whether it exist
********************************** **** JBoss Vault *************** **********************************Please enter a Digit:: 0: Start Interactive Session 1: Remove Interactive Session 2: Exit0Starting an interactive sessionEnter directory to store encrypted files:EAP_HOME/vault/
Red Hat JBoss Enterprise Application Platform 7.3 How to Configure Server Security
172
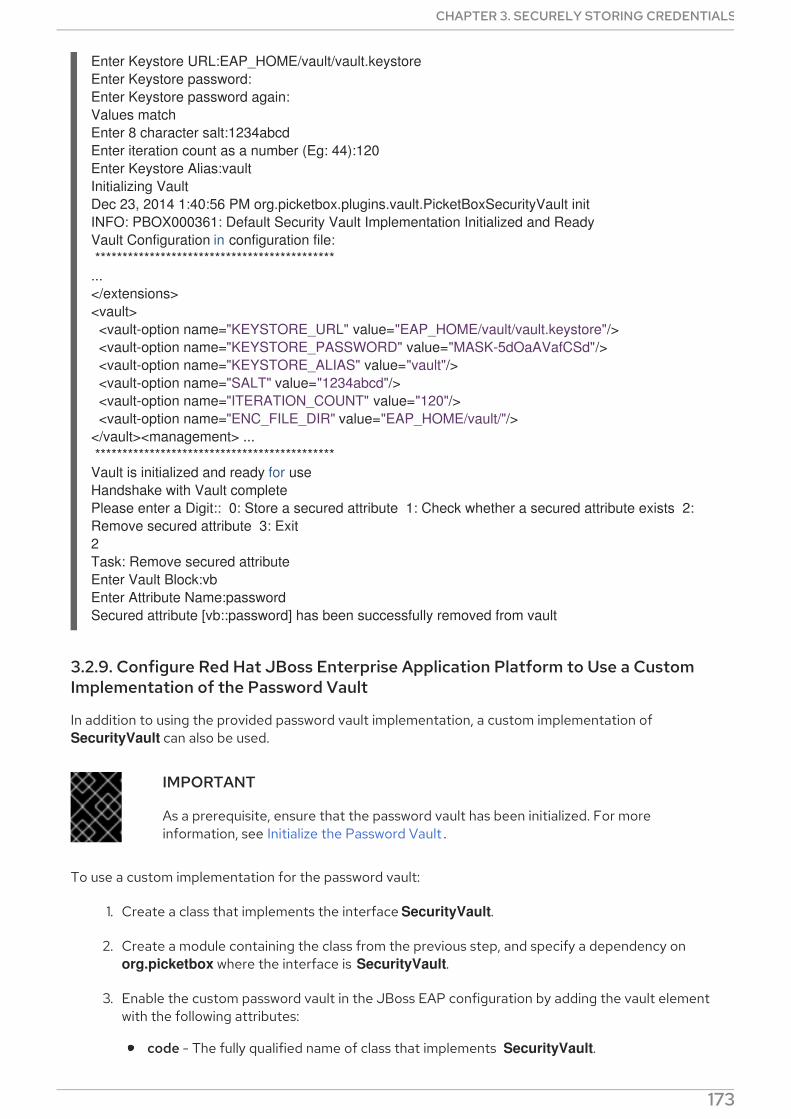
3.2.9. Configure Red Hat JBoss Enterprise Application Platform to Use a CustomImplementation of the Password Vault
In addition to using the provided password vault implementation, a custom implementation of SecurityVault can also be used.
IMPORTANT
As a prerequisite, ensure that the password vault has been initialized. For moreinformation, see Initialize the Password Vault .
To use a custom implementation for the password vault:
1. Create a class that implements the interface SecurityVault.
2. Create a module containing the class from the previous step, and specify a dependency on org.picketbox where the interface is SecurityVault.
3. Enable the custom password vault in the JBoss EAP configuration by adding the vault elementwith the following attributes:
code - The fully qualified name of class that implements SecurityVault.
Enter Keystore URL:EAP_HOME/vault/vault.keystoreEnter Keystore password:Enter Keystore password again:Values matchEnter 8 character salt:1234abcdEnter iteration count as a number (Eg: 44):120Enter Keystore Alias:vaultInitializing VaultDec 23, 2014 1:40:56 PM org.picketbox.plugins.vault.PicketBoxSecurityVault initINFO: PBOX000361: Default Security Vault Implementation Initialized and ReadyVault Configuration in configuration file: ********************************************...</extensions><vault> <vault-option name="KEYSTORE_URL" value="EAP_HOME/vault/vault.keystore"/> <vault-option name="KEYSTORE_PASSWORD" value="MASK-5dOaAVafCSd"/> <vault-option name="KEYSTORE_ALIAS" value="vault"/> <vault-option name="SALT" value="1234abcd"/> <vault-option name="ITERATION_COUNT" value="120"/> <vault-option name="ENC_FILE_DIR" value="EAP_HOME/vault/"/></vault><management> ... ********************************************Vault is initialized and ready for useHandshake with Vault completePlease enter a Digit:: 0: Store a secured attribute 1: Check whether a secured attribute exists 2: Remove secured attribute 3: Exit2Task: Remove secured attributeEnter Vault Block:vbEnter Attribute Name:passwordSecured attribute [vb::password] has been successfully removed from vault
CHAPTER 3. SECURELY STORING CREDENTIALS
173
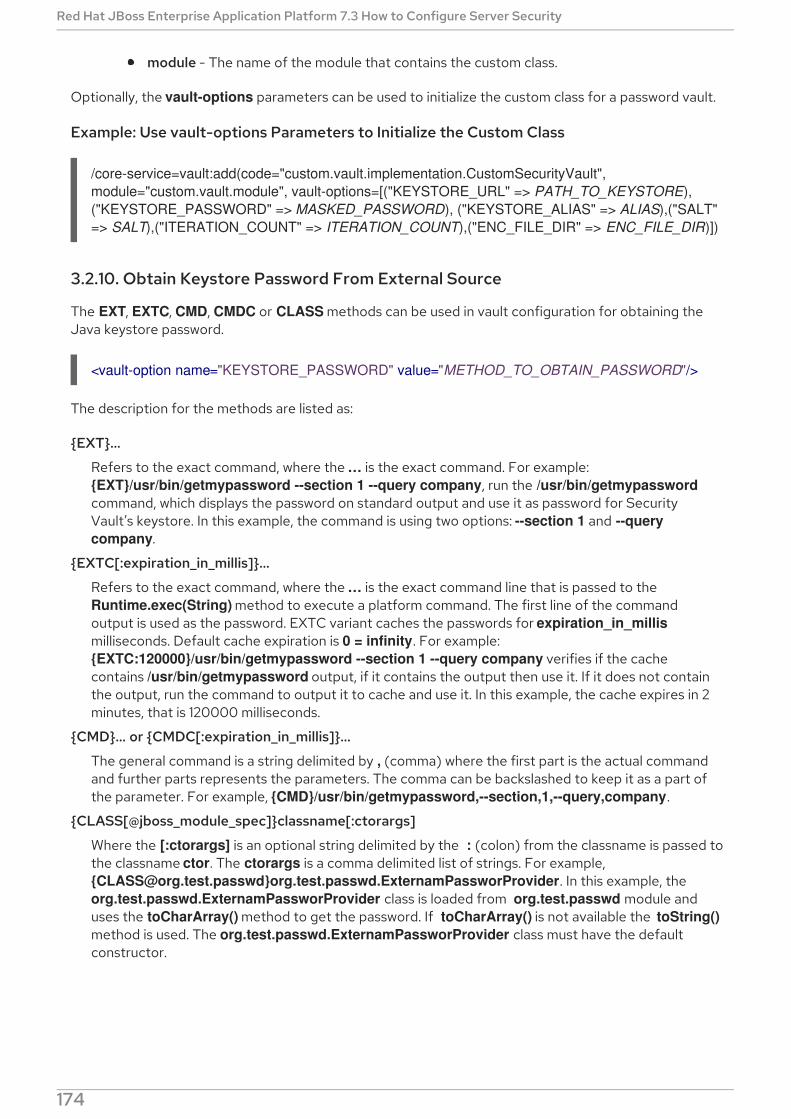
module - The name of the module that contains the custom class.
Optionally, the vault-options parameters can be used to initialize the custom class for a password vault.
Example: Use vault-options Parameters to Initialize the Custom Class
/core-service=vault:add(code="custom.vault.implementation.CustomSecurityVault", module="custom.vault.module", vault-options=[("KEYSTORE_URL" => PATH_TO_KEYSTORE),("KEYSTORE_PASSWORD" => MASKED_PASSWORD), ("KEYSTORE_ALIAS" => ALIAS),("SALT" => SALT),("ITERATION_COUNT" => ITERATION_COUNT),("ENC_FILE_DIR" => ENC_FILE_DIR)])
3.2.10. Obtain Keystore Password From External Source
The EXT, EXTC, CMD, CMDC or CLASS methods can be used in vault configuration for obtaining theJava keystore password.
The description for the methods are listed as:
{EXT}…
Refers to the exact command, where the … is the exact command. For example: {EXT}/usr/bin/getmypassword --section 1 --query company, run the /usr/bin/getmypasswordcommand, which displays the password on standard output and use it as password for SecurityVault’s keystore. In this example, the command is using two options: --section 1 and --query company.
{EXTC[:expiration_in_millis]}…
Refers to the exact command, where the … is the exact command line that is passed to the Runtime.exec(String) method to execute a platform command. The first line of the commandoutput is used as the password. EXTC variant caches the passwords for expiration_in_millismilliseconds. Default cache expiration is 0 = infinity. For example: {EXTC:120000}/usr/bin/getmypassword --section 1 --query company verifies if the cachecontains /usr/bin/getmypassword output, if it contains the output then use it. If it does not containthe output, run the command to output it to cache and use it. In this example, the cache expires in 2minutes, that is 120000 milliseconds.
{CMD}… or {CMDC[:expiration_in_millis]}…
The general command is a string delimited by , (comma) where the first part is the actual commandand further parts represents the parameters. The comma can be backslashed to keep it as a part ofthe parameter. For example, {CMD}/usr/bin/getmypassword,--section,1,--query,company.
{CLASS[@jboss_module_spec]}classname[:ctorargs]
Where the [:ctorargs] is an optional string delimited by the : (colon) from the classname is passed tothe classname ctor. The ctorargs is a comma delimited list of strings. For example, {[email protected]}org.test.passwd.ExternamPassworProvider. In this example, the org.test.passwd.ExternamPassworProvider class is loaded from org.test.passwd module anduses the toCharArray() method to get the password. If toCharArray() is not available the toString()method is used. The org.test.passwd.ExternamPassworProvider class must have the defaultconstructor.
<vault-option name="KEYSTORE_PASSWORD" value="METHOD_TO_OBTAIN_PASSWORD"/>
Red Hat JBoss Enterprise Application Platform 7.3 How to Configure Server Security
174

CHAPTER 4. JAVA SECURITY MANAGER
4.1. ABOUT THE JAVA SECURITY MANAGER
The Java Security Manager is a class that manages the external boundary of the Java Virtual Machine(JVM) sandbox, controlling how code executing within the JVM can interact with resources outside theJVM. When the Java Security Manager is activated, the Java API checks with the security manager forapproval before executing a wide range of potentially unsafe operations. The Java Security Manageruses a security policy to determine whether a given action will be allowed or denied.
4.2. DEFINE A JAVA SECURITY POLICY
A Java security policy is a set of defined permissions for different classes of code. The Java SecurityManager compares actions requested by applications against the security policy. If an action is allowedby the policy, the Security Manager will permit that action to take place. If the action is not allowed bythe policy, the Security Manager will deny that action.
IMPORTANT
Previous versions of JBoss EAP defined policies using an external file, e.g. EAP_HOME/bin/server.policy. JBoss EAP 7 defines Java Security Policies in two ways:the security-manager subsystem and through XML files in the individual deployments.The security-manager subsystem defines minimum and maximum permission for ALLdeployments, while the XML files specify the permissions requested by the individualdeployment.
4.2.1. Defining Policies in the Security Manager Subsystem
The security-manager subsystem allows you do define shared or common permissions for alldeployments. This is accomplished by defining minimum and maximum permission sets. All deploymentswill be granted at the least all permissions defined in the minimum permission. The deployment processfails for a deployment if it requests a permission that exceeds the ones defined in the maximumpermission set.
Example: Management CLI Command for Updating Minimum Permission Set
Example: Management CLI Command for Updating Maximum Permission Set
NOTE
If the maximum permission set is not defined, its value defaults to java.security.AllPermission.
You can find a full reference of the security-manager subsystem in the JBoss EAP ConfigurationGuide.
/subsystem=security-manager/deployment-permissions=default:write-attribute(name=minimum-permissions, value=[{class="java.util.PropertyPermission", actions="read", name="*"}])
/subsystem=security-manager/deployment-permissions=default:write-attribute(name=maximum-permissions, value=[{class="java.util.PropertyPermission", actions="read,write", name="*"}, {class="java.io.FilePermission", actions="read,write", name="/-"}])
CHAPTER 4. JAVA SECURITY MANAGER
175
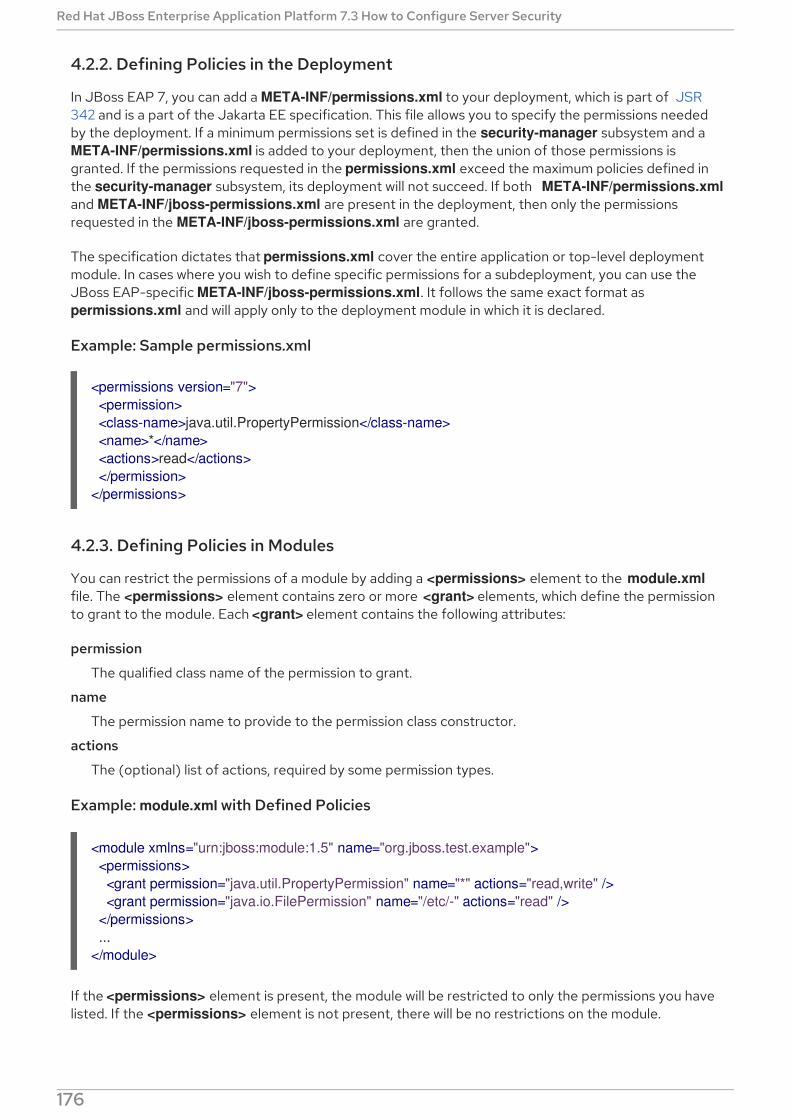
4.2.2. Defining Policies in the Deployment
In JBoss EAP 7, you can add a META-INF/permissions.xml to your deployment, which is part of JSR342 and is a part of the Jakarta EE specification. This file allows you to specify the permissions neededby the deployment. If a minimum permissions set is defined in the security-manager subsystem and a META-INF/permissions.xml is added to your deployment, then the union of those permissions isgranted. If the permissions requested in the permissions.xml exceed the maximum policies defined inthe security-manager subsystem, its deployment will not succeed. If both META-INF/permissions.xmland META-INF/jboss-permissions.xml are present in the deployment, then only the permissionsrequested in the META-INF/jboss-permissions.xml are granted.
The specification dictates that permissions.xml cover the entire application or top-level deploymentmodule. In cases where you wish to define specific permissions for a subdeployment, you can use theJBoss EAP-specific META-INF/jboss-permissions.xml. It follows the same exact format as permissions.xml and will apply only to the deployment module in which it is declared.
Example: Sample permissions.xml
4.2.3. Defining Policies in Modules
You can restrict the permissions of a module by adding a <permissions> element to the module.xmlfile. The <permissions> element contains zero or more <grant> elements, which define the permissionto grant to the module. Each <grant> element contains the following attributes:
permission
The qualified class name of the permission to grant.
name
The permission name to provide to the permission class constructor.
actions
The (optional) list of actions, required by some permission types.
Example: module.xml with Defined Policies
If the <permissions> element is present, the module will be restricted to only the permissions you havelisted. If the <permissions> element is not present, there will be no restrictions on the module.
<permissions version="7"> <permission> <class-name>java.util.PropertyPermission</class-name> <name>*</name> <actions>read</actions> </permission></permissions>
<module xmlns="urn:jboss:module:1.5" name="org.jboss.test.example"> <permissions> <grant permission="java.util.PropertyPermission" name="*" actions="read,write" /> <grant permission="java.io.FilePermission" name="/etc/-" actions="read" /> </permissions> ...</module>
Red Hat JBoss Enterprise Application Platform 7.3 How to Configure Server Security
176
4.3. RUN JBOSS EAP WITH THE JAVA SECURITY MANAGER
IMPORTANT
Previous version of JBoss EAP allowed for the use of the -Djava.security.manager Javasystem property as well as custom security managers. Neither of these are supported inJBoss EAP 7. In addition, the Java Security Manager policies are now defined within the security-manager subsystem, meaning external policy files and the -Djava.security.policy Java system property are not supported JBoss EAP 7.
IMPORTANT
Before starting JBoss EAP with the Java Security Manager enabled, you need make sureall security policies are defined in the security-manager subsystem.
To run JBoss EAP with the Java Security Manager, you need to use the secmgr option during startup.There are two ways to do this:
Use the flag with the startup script To use the -secmgr flag with the startup script, include itwhen starting up your JBoss EAP instance:
Example: Startup Script
./standalone.sh -secmgr
Using the Startup Configuration File
IMPORTANT
The domain or standalone server must be completely stopped before you editany configuration files.
NOTE
If you are using JBoss EAP in a managed domain, you must perform the followingprocedure on each physical host or instance in your domain.
To enable the Java Security Manager using the startup configuration file, you need to edit eitherthe standalone.conf or domain.conf file, depending if you are running a standalone instance ormanaged domain. If running in Windows, the standalone.conf.bat or domain.conf.bat files areused instead.
Uncomment the SECMGR="true" line in the configuration file:
Example: standalone.conf or domain.conf
# Uncomment this to run with a security manager enabledSECMGR="true"
Example: standalone.conf.bat or domain.conf.bat
CHAPTER 4. JAVA SECURITY MANAGER
177

rem # Uncomment this to run with a security manager enabledset "SECMGR=true"
4.4. CONSIDERATIONS MOVING FROM PREVIOUS VERSIONS
When moving applications from a previous version of JBoss EAP to JBoss EAP 7 running with the JavaSecurity Manager enabled, you need to be aware of the changes in how policies are defined as well asthe necessary configuration needed with both the JBoss EAP configuration and the deployment.
4.4.1. Defining Policies
In previous versions of JBoss EAP, policies were defined in an external configuration file. In JBoss EAP 7,policies are defined using the security-manager subsystem and with permissions.xml or jboss-permissions.xml contained in the deployment. More details on how to use both to define your policiesare covered in a previous section.
4.4.2. JBoss EAP Configuration Changes
In previous versions of JBoss EAP, you could use -Djava.security.manager and -Djava.security.policyJava system properties during JBoss EAP startup. These are no longer supported and the secmgr flagshould be used instead to enable JBoss EAP to run with the Java Security Manager. More details on the secmgr flag are covered in a previous section.
4.4.3. Custom Security Managers
Custom security managers are not supported in JBoss EAP 7.
Red Hat JBoss Enterprise Application Platform 7.3 How to Configure Server Security
178

APPENDIX A. REFERENCE MATERIAL
A.1. ELYTRON SUBSYSTEM COMPONENTS REFERENCE
Table A.1. add-prefix-role-mapper Attributes
Attribute Description
prefix The prefix to add to each role.
Table A.2. add-suffix-role-mapper Attributes
Attribute Description
suffix The suffix to add to each role.
Table A.3. aggregate-http-server-mechanism-factory Attributes
Attribute Description
http-server-mechanism-factories The list of HTTP server factories to aggregate.
Table A.4. aggregate-principal-decoder Attributes
Attribute Description
principal-decoders The list of principal decoders to aggregate.
Table A.5. aggregate-principal-transformer Attributes
Attribute Description
principal-transformers The list of principal transformers to aggregate.
Table A.6. aggregate-providers Attributes
Attribute Description
providers The list of referenced Provider[] resources to aggregate.
Table A.7. aggregate-realm Attributes
Attribute Description
APPENDIX A. REFERENCE MATERIAL
179
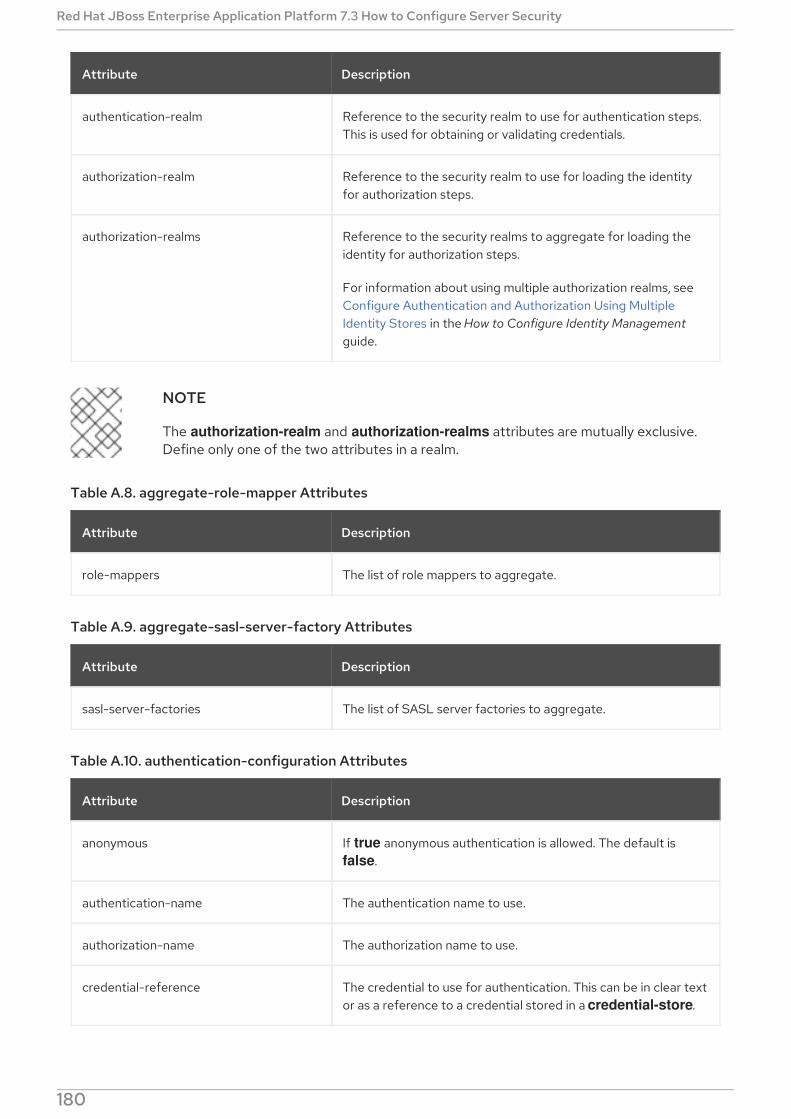
authentication-realm Reference to the security realm to use for authentication steps.This is used for obtaining or validating credentials.
authorization-realm Reference to the security realm to use for loading the identityfor authorization steps.
authorization-realms Reference to the security realms to aggregate for loading theidentity for authorization steps.
For information about using multiple authorization realms, seeConfigure Authentication and Authorization Using MultipleIdentity Stores in the How to Configure Identity Managementguide.
Attribute Description
NOTE
The authorization-realm and authorization-realms attributes are mutually exclusive.Define only one of the two attributes in a realm.
Table A.8. aggregate-role-mapper Attributes
Attribute Description
role-mappers The list of role mappers to aggregate.
Table A.9. aggregate-sasl-server-factory Attributes
Attribute Description
sasl-server-factories The list of SASL server factories to aggregate.
Table A.10. authentication-configuration Attributes
Attribute Description
anonymous If true anonymous authentication is allowed. The default is false.
authentication-name The authentication name to use.
authorization-name The authorization name to use.
credential-reference The credential to use for authentication. This can be in clear textor as a reference to a credential stored in a credential-store.
Red Hat JBoss Enterprise Application Platform 7.3 How to Configure Server Security
180

extends An existing authentication configuration to extend.
host The host to use.
kerberos-security-factory Reference to a kerberos security factory used to obtain a GSSkerberos credential.
mechanism-properties Configuration properties for the SASL authenticationmechanism.
port The port to use.
protocol The protocol to use.
realm The realm to use.
sasl-mechanism-selector The SASL mechanism selector string. See sasl-mechanism-selector Grammar for usage information.
security-domain Reference to a security domain to obtain a forwarded identity.
Attribute Description
Table A.11. authentication-context Attributes
Attribute Description
extends An existing authentication context to extend.
match-rules The rules to match against for this authentication context.
Table A.12. authentication-context match-rules Attributes
Attribute Description
match-abstract-type The abstract type to match against.
match-abstract-type-authority The abstract type authority to match against.
match-host The host to match against.
match-local-security-domain The local security domain to match against.
match-no-user If true, rule will match against no user.
match-path The patch to match against.
APPENDIX A. REFERENCE MATERIAL
181
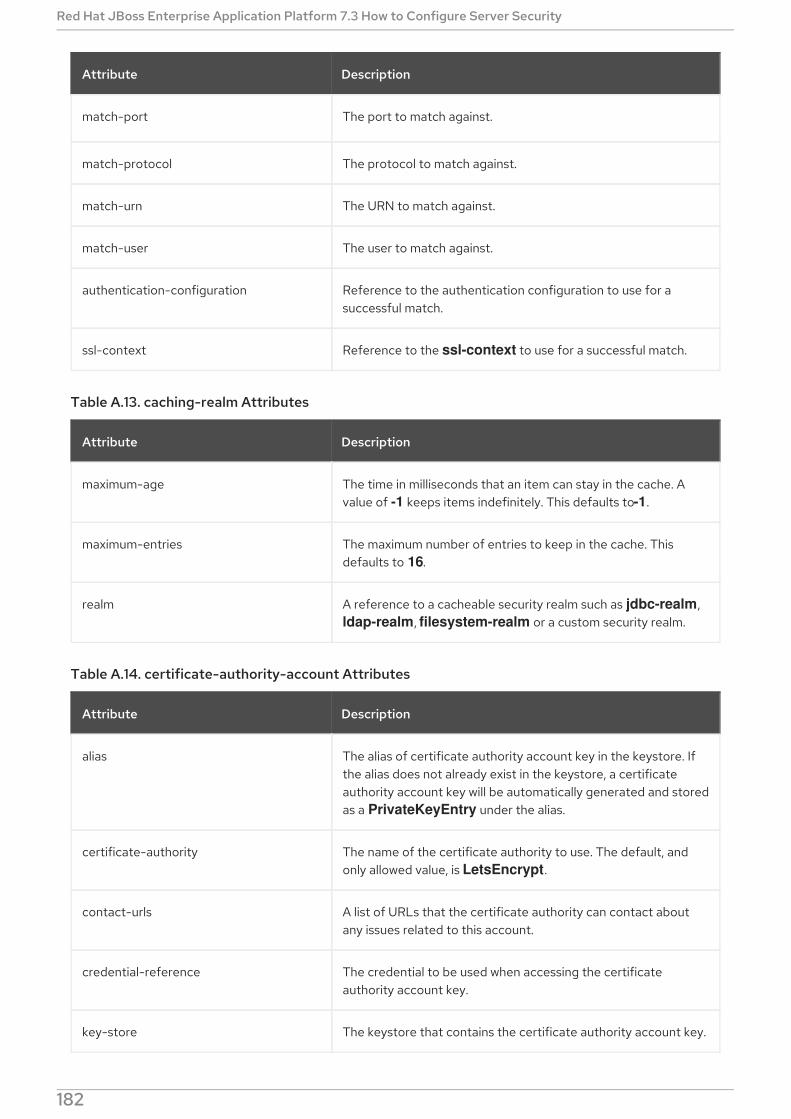
match-port The port to match against.
match-protocol The protocol to match against.
match-urn The URN to match against.
match-user The user to match against.
authentication-configuration Reference to the authentication configuration to use for asuccessful match.
ssl-context Reference to the ssl-context to use for a successful match.
Attribute Description
Table A.13. caching-realm Attributes
Attribute Description
maximum-age The time in milliseconds that an item can stay in the cache. Avalue of -1 keeps items indefinitely. This defaults to -1.
maximum-entries The maximum number of entries to keep in the cache. Thisdefaults to 16.
realm A reference to a cacheable security realm such as jdbc-realm, ldap-realm, filesystem-realm or a custom security realm.
Table A.14. certificate-authority-account Attributes
Attribute Description
alias The alias of certificate authority account key in the keystore. Ifthe alias does not already exist in the keystore, a certificateauthority account key will be automatically generated and storedas a PrivateKeyEntry under the alias.
certificate-authority The name of the certificate authority to use. The default, andonly allowed value, is LetsEncrypt.
contact-urls A list of URLs that the certificate authority can contact aboutany issues related to this account.
credential-reference The credential to be used when accessing the certificateauthority account key.
key-store The keystore that contains the certificate authority account key.
Red Hat JBoss Enterprise Application Platform 7.3 How to Configure Server Security
182
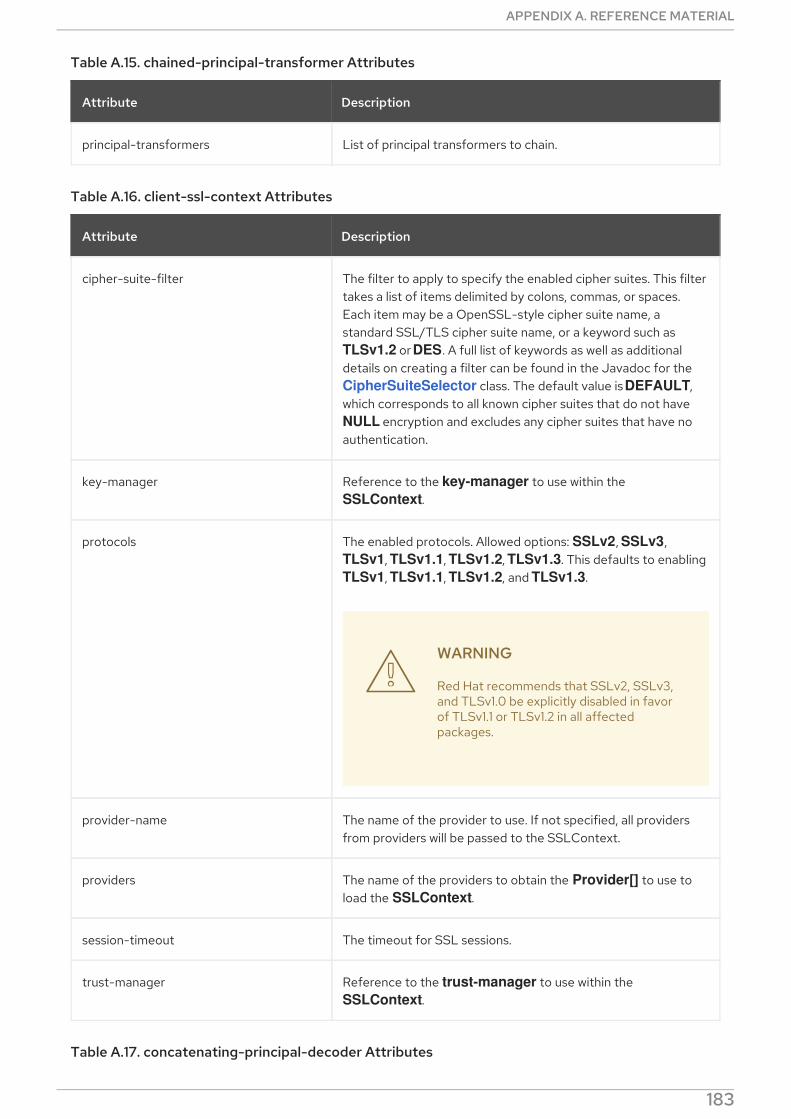
Table A.15. chained-principal-transformer Attributes
Attribute Description
principal-transformers List of principal transformers to chain.
Table A.16. client-ssl-context Attributes
Attribute Description
cipher-suite-filter The filter to apply to specify the enabled cipher suites. This filtertakes a list of items delimited by colons, commas, or spaces.Each item may be a OpenSSL-style cipher suite name, astandard SSL/TLS cipher suite name, or a keyword such as TLSv1.2 or DES. A full list of keywords as well as additionaldetails on creating a filter can be found in the Javadoc for the CipherSuiteSelector class. The default value is DEFAULT,which corresponds to all known cipher suites that do not have NULL encryption and excludes any cipher suites that have noauthentication.
key-manager Reference to the key-manager to use within the SSLContext.
protocols The enabled protocols. Allowed options: SSLv2, SSLv3, TLSv1, TLSv1.1, TLSv1.2, TLSv1.3. This defaults to enabling TLSv1, TLSv1.1, TLSv1.2, and TLSv1.3.
WARNING
Red Hat recommends that SSLv2, SSLv3,and TLSv1.0 be explicitly disabled in favorof TLSv1.1 or TLSv1.2 in all affectedpackages.
provider-name The name of the provider to use. If not specified, all providersfrom providers will be passed to the SSLContext.
providers The name of the providers to obtain the Provider[] to use toload the SSLContext.
session-timeout The timeout for SSL sessions.
trust-manager Reference to the trust-manager to use within the SSLContext.
Table A.17. concatenating-principal-decoder Attributes
APPENDIX A. REFERENCE MATERIAL
183

Attribute Description
joiner The string that will be used to join the values in the principal-decoders attribute.
principal-decoders The list of principal decoders to concatenate.
Table A.18. configurable-http-server-mechanism-factory Attributes
Attribute Description
filters The list of filters to be applied in order to enable or disablemechanisms based on the name.
http-server-mechanism-factory Reference to the http server factory to be wrapped.
properties Custom properties to be passed in to the HTTP server factorycalls.
Table A.19. configurable-http-server-mechanism-factory filters Attributes
Attribute Description
pattern-filter Filter based on a regular expression pattern.
enabling If true the filter will be enabled if the mechanism matches. Thisdefaults to true.
Table A.20. configurable-sasl-server-factory Attributes
Attribute Description
filters List of filters to be evaluated sequentially and combined using or.
properties Custom properties to be passed in to the SASL server factorycalls.
protocol The protocol passed into the factory when creating themechanism.
sasl-server-factory Reference to the SASL server factory to be wrapped.
server-name The server name passed into the factory when creating themechanism.
Table A.21. configurable-sasl-server-factory filters Attributes
Red Hat JBoss Enterprise Application Platform 7.3 How to Configure Server Security
184
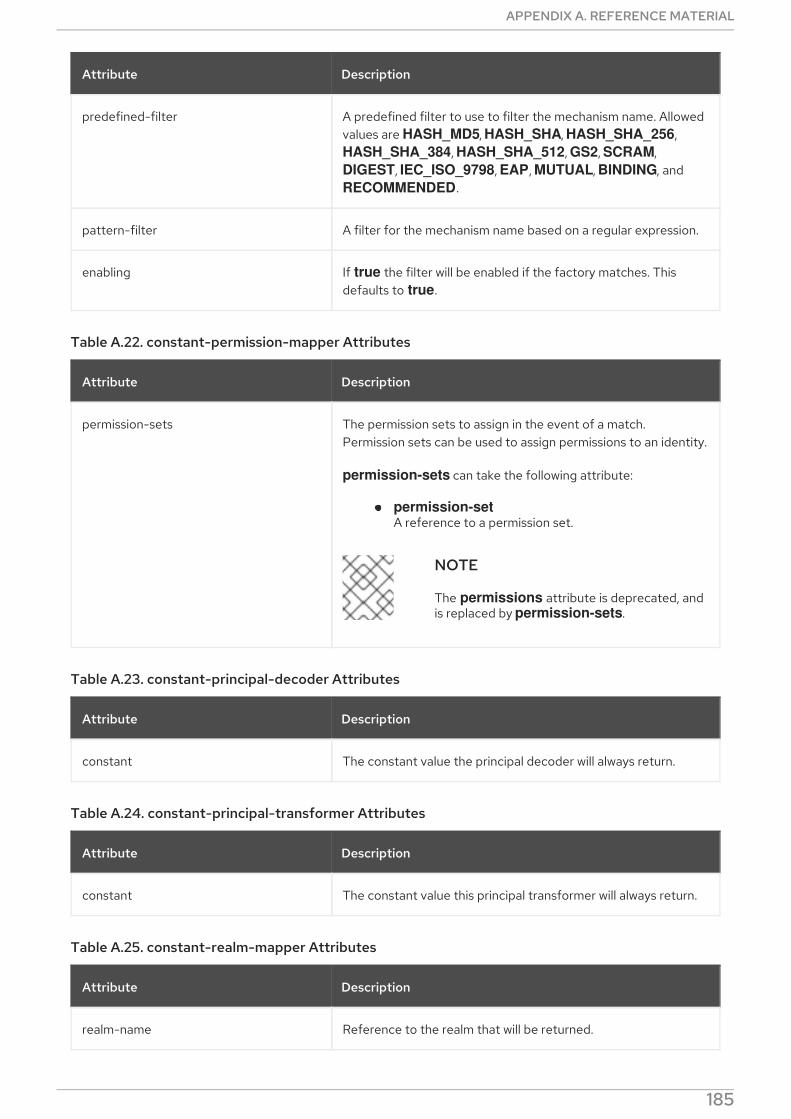
Attribute Description
predefined-filter A predefined filter to use to filter the mechanism name. Allowedvalues are HASH_MD5, HASH_SHA, HASH_SHA_256, HASH_SHA_384, HASH_SHA_512, GS2, SCRAM, DIGEST, IEC_ISO_9798, EAP, MUTUAL, BINDING, and RECOMMENDED.
pattern-filter A filter for the mechanism name based on a regular expression.
enabling If true the filter will be enabled if the factory matches. Thisdefaults to true.
Table A.22. constant-permission-mapper Attributes
Attribute Description
permission-sets The permission sets to assign in the event of a match.Permission sets can be used to assign permissions to an identity.
permission-sets can take the following attribute:
permission-setA reference to a permission set.
NOTE
The permissions attribute is deprecated, andis replaced by permission-sets.
Table A.23. constant-principal-decoder Attributes
Attribute Description
constant The constant value the principal decoder will always return.
Table A.24. constant-principal-transformer Attributes
Attribute Description
constant The constant value this principal transformer will always return.
Table A.25. constant-realm-mapper Attributes
Attribute Description
realm-name Reference to the realm that will be returned.
APPENDIX A. REFERENCE MATERIAL
185
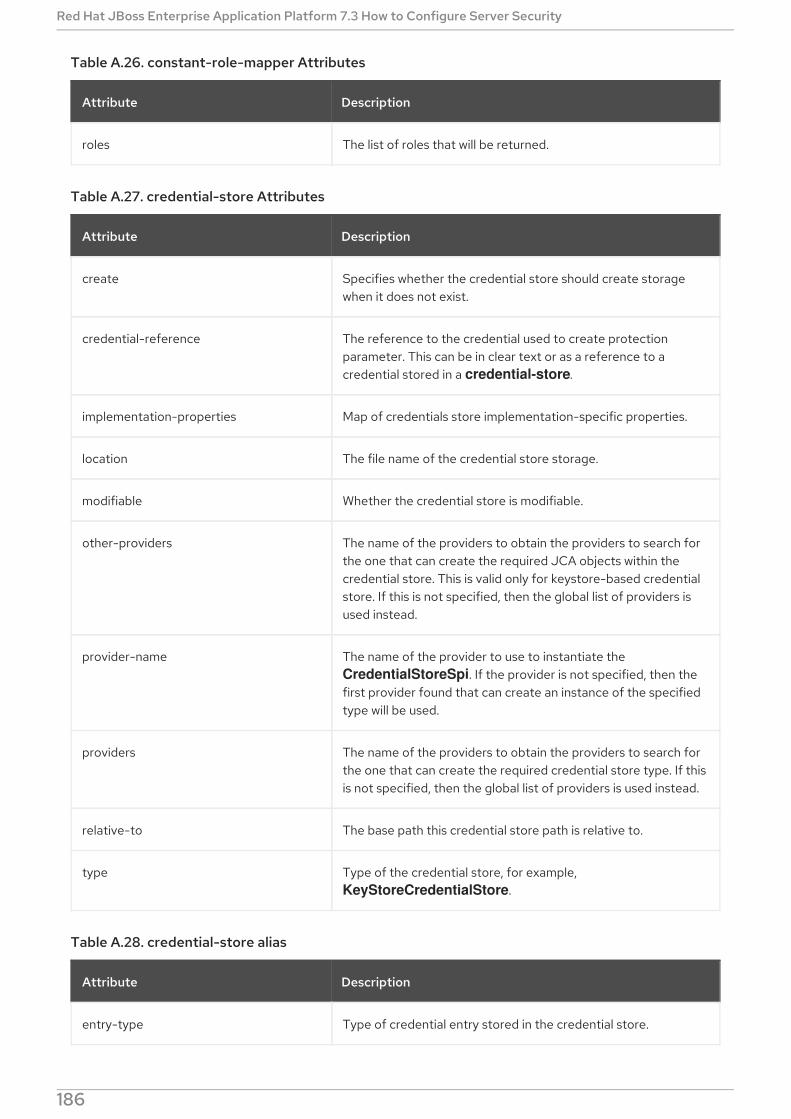
Table A.26. constant-role-mapper Attributes
Attribute Description
roles The list of roles that will be returned.
Table A.27. credential-store Attributes
Attribute Description
create Specifies whether the credential store should create storagewhen it does not exist.
credential-reference The reference to the credential used to create protectionparameter. This can be in clear text or as a reference to acredential stored in a credential-store.
implementation-properties Map of credentials store implementation-specific properties.
location The file name of the credential store storage.
modifiable Whether the credential store is modifiable.
other-providers The name of the providers to obtain the providers to search forthe one that can create the required JCA objects within thecredential store. This is valid only for keystore-based credentialstore. If this is not specified, then the global list of providers isused instead.
provider-name The name of the provider to use to instantiate the CredentialStoreSpi. If the provider is not specified, then thefirst provider found that can create an instance of the specifiedtype will be used.
providers The name of the providers to obtain the providers to search forthe one that can create the required credential store type. If thisis not specified, then the global list of providers is used instead.
relative-to The base path this credential store path is relative to.
type Type of the credential store, for example, KeyStoreCredentialStore.
Table A.28. credential-store alias
Attribute Description
entry-type Type of credential entry stored in the credential store.
Red Hat JBoss Enterprise Application Platform 7.3 How to Configure Server Security
186

secret-value Secret value such as password.
Attribute Description
Table A.29. credential-store KeyStoreCredentialStore implementation properties
Attribute Description
cryptoAlg Cryptographic algorithm name to be used to encrypt decryptentries at external storage. This attribute is only valid if external is enabled. Defaults to AES.
external Whether data is stored to external storage and encrypted by the keyAlias. Defaults to false.
externalPath Specifies path to external storage. This attribute is only valid if external is enabled.
keyAlias The secret key alias within the credential store that is used toencrypt or decrypt data to the external storage.
keyStoreType The keystore type, such as PKCS11. Defaults to KeyStore.getDefaultType().
Table A.30. custom-credential-security-factory Attributes
Attribute Description
configuration The optional key and value configuration for the custom securityfactory.
class-name The class name of the implementation of the custom securityfactory.
module The module to use to load the custom security factory.
Table A.31. custom-modifiable-realm Attributes
Attribute Description
configuration The optional key and value configuration for the custom realm.
class-name The class name of the implementation of the custom realm.
module The module to use to load the custom realm.
APPENDIX A. REFERENCE MATERIAL
187

Table A.32. custom-permission-mapper Attributes
Attribute Description
configuration The optional key and value configuration for the permissionmapper.
class-name Fully qualified class name of the permission mapper.
module Name of the module to use to load the permission mapper.
Table A.33. custom-principal-decoder Attributes
Attribute Description
configuration The optional key and value configuration for the principaldecoder.
class-name Fully qualified class name of the principal decoder.
module Name of the module to use to load the principal decoder.
Table A.34. custom-principal-transformer Attributes
Attribute Description
configuration The optional key and value configuration for the principaltransformer.
class-name Fully qualified class name of the principal transformer.
module Name of the module to use to load the principal transformer.
Table A.35. custom-realm Attributes
Attribute Description
configuration The optional key and value configuration for the custom realm.
class-name Fully qualified class name of the custom realm.
module Name of the module to use to load the custom realm.
Table A.36. custom-realm-mapper Attributes
Red Hat JBoss Enterprise Application Platform 7.3 How to Configure Server Security
188

Attribute Description
configuration The optional key and value configuration for the realm mapper.
class-name Fully qualified class name of the realm mapper.
module Name of the module to use to load the realm mapper.
Table A.37. custom-role-decoder Attributes
Attribute Description
configuration The optional key and value configuration for the role decoder.
class-name Fully qualified class name of the role decoder.
module Name of the module to use to load the role decoder.
Table A.38. custom-role-mapper Attributes
Attribute Description
configuration The optional key and value configuration for the role mapper.
class-name Fully qualified class name of the role mapper.
module Name of the module to use to load the role mapper.
Table A.39. dir-context Attributes
Attribute Description
authentication-context The authentication context to obtain login credentials toconnect to the LDAP server. Can be omitted if authentication-level is none, which is equivalent to anonymous authentication.
authentication-level The authentication level, meaning security level orauthentication mechanism, to use. Corresponds to SECURITY_AUTHENTICATION or java.naming.security.authentication environmentproperty. Allowed values are none, simple and sasl_mechformat. The sasl_mech format is a space-separated list of SASLmechanism names.
connection-timeout The timeout for connecting to the LDAP server in milliseconds.
APPENDIX A. REFERENCE MATERIAL
189

credential-reference The credential reference to authenticate and connect to theLDAP server. This can be omitted if authentication-level is none, which is equivalent to anonymous authentication.
enable-connection-pooling If true connection pooling is enabled. This defaults to false.
module Name of module that will be used as the class loading base.
principal The principal to authenticate and connect to the LDAP server.This can be omitted if authentication-level is none which isequivalent to anonymous authentication.
properties The additional connection properties for the DirContext.
read-timeout The read timeout for an LDAP operation in milliseconds.
referral-mode The mode used to determine if referrals should be followed.Allowed values are FOLLOW, IGNORE, and THROW. Thisdefaults to IGNORE.
ssl-context The name of the SSL context used to secure connection to theLDAP server.
url The connection URL.
Attribute Description
Table A.40. filesystem-realm Attributes
Attribute Description
encoded Whether the identity names should be stored encoded (Base32)in file names.
levels The number of levels of directory hashing to apply. The defaultvalue is 2.
path The path to the file containing the realm.
relative-to The predefined relative path to use with path. For example jboss.server.config.dir.
Table A.41. filtering-key-store Attributes
Red Hat JBoss Enterprise Application Platform 7.3 How to Configure Server Security
190

Attribute Description
alias-filter A filter to apply to the aliases returned from the key-store. Itcan either be a comma-separated list of aliases to return or oneof the following formats:
ALL:-alias1:-alias2
NONE:+alias1:+alias2
NOTE
The alias-filter attribute is case sensitive.Because the use of mixed-case or uppercasealiases, such as elytronAppServer, might notbe recognized by some keystore providers, it isrecommended to use lowercase aliases, such as elytronappserver.
key-store Reference to the key-store to filter.
Table A.42. http-authentication-factory Attributes
Attribute Description
http-server-mechanism-factory The HttpServerAuthenticationMechanismFactory toassociate with this resource.
mechanism-configurations The list of mechanism-specific configurations.
security-domain The security domain to associate with this resource.
Table A.43. http-authentication-factory mechanism-configurations Attributes
Attribute Description
credential-security-factory The security factory to use to obtain a credential as required bythe mechanism.
final-principal-transformer A final principal transformer to apply for this mechanism realm.
host-name The host name this configuration applies to.
mechanism-name This configuration will only apply where a mechanism with thename specified is used. If this attribute is omitted then this willmatch any mechanism name.
APPENDIX A. REFERENCE MATERIAL
191

mechanism-realm-configurations The list of definitions of the realm names as understood by themechanism.
pre-realm-principal-transformer A principal transformer to apply before the realm is selected.
post-realm-principal-transformer A principal transformer to apply after the realm is selected.
protocol The protocol this configuration applies to.
realm-mapper The realm mapper to be used by the mechanism.
Attribute Description
Table A.44. http-authentication-factory mechanism-configurations mechanism-realm-configurations Attributes
Attribute Description
final-principal-transformer A final principal transformer to apply for this mechanism realm.
post-realm-principal-transformer A principal transformer to apply after the realm is selected.
pre-realm-principal-transformer A principal transformer to apply before the realm is selected.
realm-mapper The realm mapper to be used by the mechanism.
realm-name The name of the realm to be presented by the mechanism.
Table A.45. identity-realm Attributes
Attribute Description
attribute-name The name of the attribute associated with this identity.
attribute-values The list of values associated with the identities attribute.
identity The identity available from the security realm.
Table A.46. jaspi-configuration Attributes
Attribute Description
name A name that allows the resource to be referenced in themanagement model.
Red Hat JBoss Enterprise Application Platform 7.3 How to Configure Server Security
192
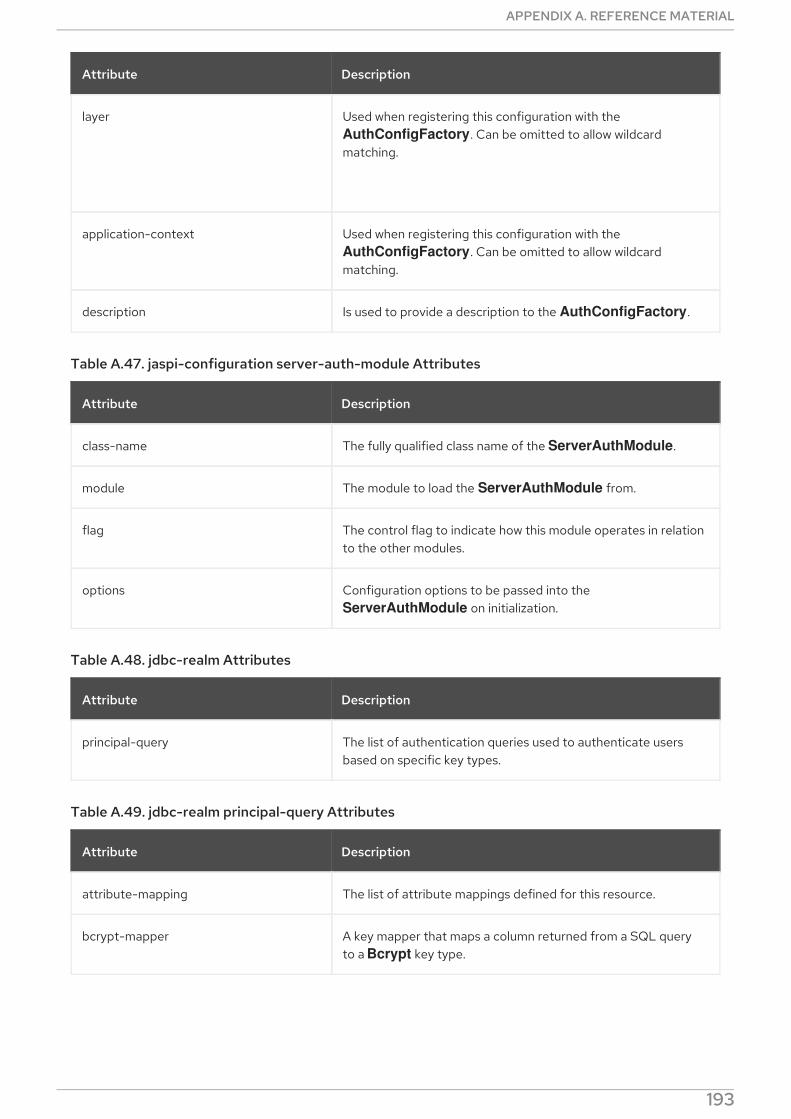
layer Used when registering this configuration with the AuthConfigFactory. Can be omitted to allow wildcardmatching.
application-context Used when registering this configuration with the AuthConfigFactory. Can be omitted to allow wildcardmatching.
description Is used to provide a description to the AuthConfigFactory.
Attribute Description
Table A.47. jaspi-configuration server-auth-module Attributes
Attribute Description
class-name The fully qualified class name of the ServerAuthModule.
module The module to load the ServerAuthModule from.
flag The control flag to indicate how this module operates in relationto the other modules.
options Configuration options to be passed into the ServerAuthModule on initialization.
Table A.48. jdbc-realm Attributes
Attribute Description
principal-query The list of authentication queries used to authenticate usersbased on specific key types.
Table A.49. jdbc-realm principal-query Attributes
Attribute Description
attribute-mapping The list of attribute mappings defined for this resource.
bcrypt-mapper A key mapper that maps a column returned from a SQL queryto a Bcrypt key type.
APPENDIX A. REFERENCE MATERIAL
193

clear-password-mapper A key mapper that maps a column returned from a SQL queryto a clear password key type. This has a password-index childelement that is the column index from an authentication querythat represents the user’s password.
data-source The name of the datasource used to connect to the database.
salted-simple-digest-mapper A key mapper that maps a column returned from a SQL queryto a Salted Simple Digest key type.
scram-mapper A key mapper that maps a column returned from a SQL queryto a SCRAM key type.
simple-digest-mapper A key mapper that maps a column returned from a SQL queryto a Simple Digest key type.
sql The SQL statement used to obtain the keys as table columns fora specific user and map them accordingly with their type.
Attribute Description
Table A.50. jdbc-realm principal-query attribute-mapping Attributes
Attribute Description
index The column index from a query that representing the mappedattribute.
to The name of the identity attribute mapped from a columnreturned from a SQL query.
Table A.51. jdbc-realm principal-query bcrypt-mapper Attributes
Attribute Description
iteration-count-index The column index from an authentication query that representsthe password’s iteration count, if supported.
password-index The column index from an authentication query that representsthe user’s password.
salt-index The column index from an authentication query that representsthe password’s salt, if supported.
Table A.52. jdbc-realm principal-query salted-simple-digest-mapper Attributes
Red Hat JBoss Enterprise Application Platform 7.3 How to Configure Server Security
194

Attribute Description
algorithm The algorithm for a specific password key mapper. Allowedvalues are password-salt-digest-md5, password-salt-digest-sha-1, password-salt-digest-sha-256, password-salt-digest-sha-384, password-salt-digest-sha-512, salt-password-digest-md5, salt-password-digest-sha-1, salt-password-digest-sha-256, salt-password-digest-sha-384, and salt-password-digest-sha-512. The default is password-salt-digest-md5.
password-index The column index from an authentication query that representsthe user’s password.
salt-index The column index from an authentication query that representsthe password’s salt, if supported.
Table A.53. jdbc-realm principal-query simple-digest-mapper Attributes
Attribute Description
algorithm The algorithm for a specific password key mapper. Allowedvalues are simple-digest-md2, simple-digest-md5, simple-digest-sha-1, simple-digest-sha-256, simple-digest-sha-384, and simple-digest-sha-512. The default is simple-digest-md5.
password-index The column index from an authentication query that representsthe user’s password.
Table A.54. jdbc-realm principal-query scram-mapper Attributes
Attribute Description
algorithm The algorithm for a specific password key mapper. The allowedvalues are scram-sha-1 and scram-sha-256. The defaultvalue is scram-sha-256.
iteration-count-index The column index from an authentication query that representsthe password’s iteration count, if supported.
password-index The column index from an authentication query that representsthe user’s password.
salt-index The column index from an authentication query that representsthe password’s salt, if supported.
Table A.55. kerberos-security-factory Attributes
APPENDIX A. REFERENCE MATERIAL
195
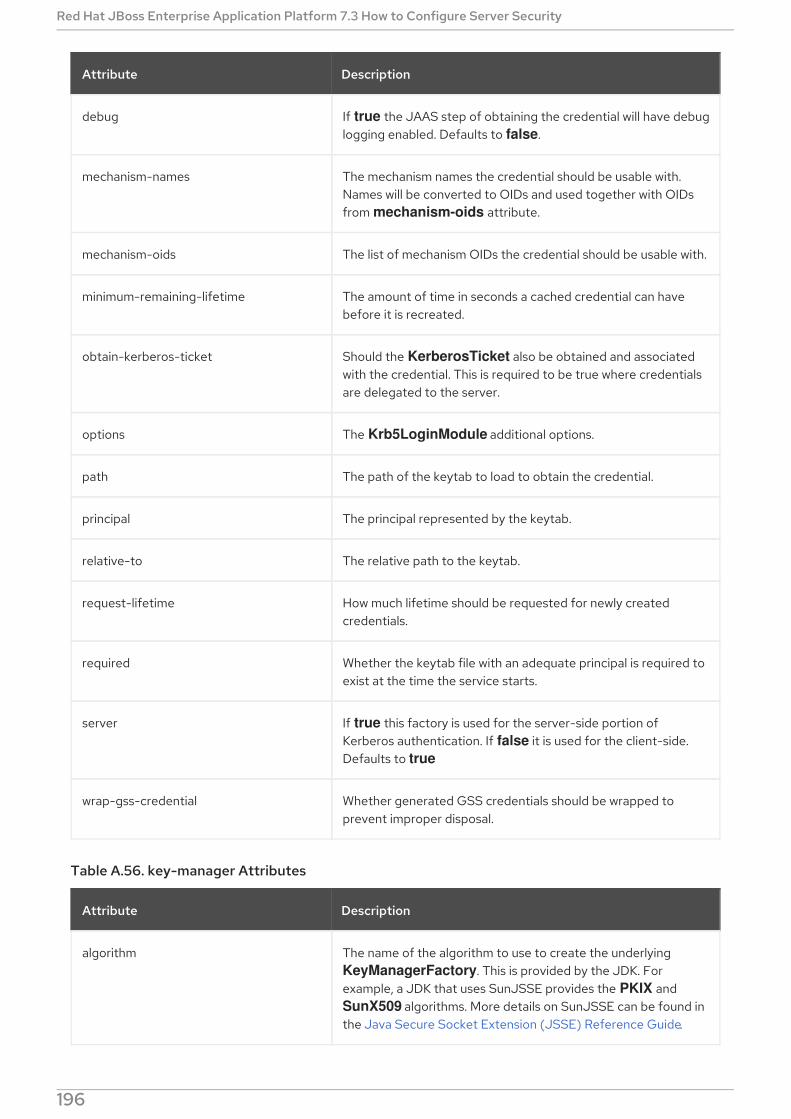
Attribute Description
debug If true the JAAS step of obtaining the credential will have debuglogging enabled. Defaults to false.
mechanism-names The mechanism names the credential should be usable with.Names will be converted to OIDs and used together with OIDsfrom mechanism-oids attribute.
mechanism-oids The list of mechanism OIDs the credential should be usable with.
minimum-remaining-lifetime The amount of time in seconds a cached credential can havebefore it is recreated.
obtain-kerberos-ticket Should the KerberosTicket also be obtained and associatedwith the credential. This is required to be true where credentialsare delegated to the server.
options The Krb5LoginModule additional options.
path The path of the keytab to load to obtain the credential.
principal The principal represented by the keytab.
relative-to The relative path to the keytab.
request-lifetime How much lifetime should be requested for newly createdcredentials.
required Whether the keytab file with an adequate principal is required toexist at the time the service starts.
server If true this factory is used for the server-side portion ofKerberos authentication. If false it is used for the client-side.Defaults to true
wrap-gss-credential Whether generated GSS credentials should be wrapped toprevent improper disposal.
Table A.56. key-manager Attributes
Attribute Description
algorithm The name of the algorithm to use to create the underlying KeyManagerFactory. This is provided by the JDK. Forexample, a JDK that uses SunJSSE provides the PKIX and SunX509 algorithms. More details on SunJSSE can be found inthe Java Secure Socket Extension (JSSE) Reference Guide.
Red Hat JBoss Enterprise Application Platform 7.3 How to Configure Server Security
196
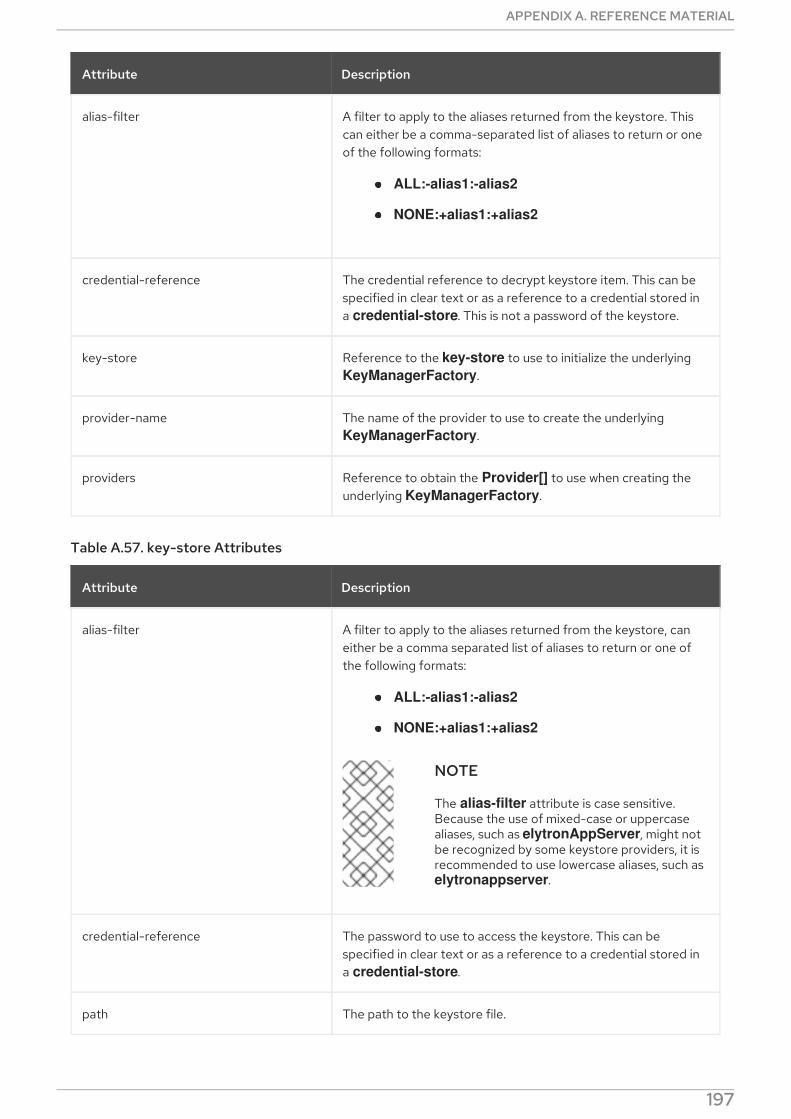
alias-filter A filter to apply to the aliases returned from the keystore. Thiscan either be a comma-separated list of aliases to return or oneof the following formats:
ALL:-alias1:-alias2
NONE:+alias1:+alias2
credential-reference The credential reference to decrypt keystore item. This can bespecified in clear text or as a reference to a credential stored ina credential-store. This is not a password of the keystore.
key-store Reference to the key-store to use to initialize the underlying KeyManagerFactory.
provider-name The name of the provider to use to create the underlying KeyManagerFactory.
providers Reference to obtain the Provider[] to use when creating theunderlying KeyManagerFactory.
Attribute Description
Table A.57. key-store Attributes
Attribute Description
alias-filter A filter to apply to the aliases returned from the keystore, caneither be a comma separated list of aliases to return or one ofthe following formats:
ALL:-alias1:-alias2
NONE:+alias1:+alias2
NOTE
The alias-filter attribute is case sensitive.Because the use of mixed-case or uppercasealiases, such as elytronAppServer, might notbe recognized by some keystore providers, it isrecommended to use lowercase aliases, such as elytronappserver.
credential-reference The password to use to access the keystore. This can bespecified in clear text or as a reference to a credential stored ina credential-store.
path The path to the keystore file.
APPENDIX A. REFERENCE MATERIAL
197

provider-name The name of the provider to use to load the keystore. Settingthis attribute disables searching for the first provider that cancreate a keystore of the specified type.
providers A reference to the providers that should be used to obtain thelist of provider instances to search. If not specified, the global listof providers will be used instead.
relative-to The base path this store is relative to. This can be a full path orpredefined path such as jboss.server.config.dir.
required If true the keystore file referenced is required to exist at thetime the keystore service starts. The default value is false.
type The type of the keystore, for example, JKS.
NOTE
The following keystore types are detectedautomatically:
JKS
JCEKS
PKCS12
BKS
BCFKS
UBER
The other keystore types must be specifiedmanually.
A full list of keystore types can be found in the JavaCryptography Architecture Standard Algorithm NameDocumentation for JDK 8.
Attribute Description
Table A.58. key-store-realm Attributes
Attribute Description
key-store Reference to the keystore used to back this security realm.
Table A.59. ldap-key-store Attributes
Red Hat JBoss Enterprise Application Platform 7.3 How to Configure Server Security
198

Attribute Description
alias-attribute The name of LDAP attribute where the item alias will be stored.
certificate-attribute The name of LDAP attribute where the certificate will be stored.
certificate-chain-attribute The name of LDAP attribute where the certificate chain will bestored.
certificate-chain-encoding The encoding of the certificate chain.
certificate-type The type of the certificate.
dir-context The name of the dir-context which will be used tocommunication with LDAP server.
filter-alias The LDAP filter for obtaining an item in the keystore by alias.
filter-certificate The LDAP filter for obtaining an item in the keystore bycertificate.
filter-iterate The LDAP filter for iterating over all items of the keystore.
key-attribute The name of LDAP attribute where the key will be stored.
key-type The type of keystore that is stored in a serialized manner in theLDAP attribute. For example, JKS. A full list of keystore typescan be found in the Java Cryptography Architecture StandardAlgorithm Name Documentation for JDK 8.
new-item-template Configuration for item creation. This defines how the LDAPentry of newly created keystore item will look.
search-path The path in LDAP where the keystore items will be searched.
search-recursive If the LDAP search should be recursive.
search-time-limit The time limit in milliseconds for obtaining keystore items fromLDAP. Defaults to 10000.
Table A.60. ldap-key-store new-item-template Attributes
Attribute Description
new-item-attributes The LDAP attributes which will be set for newly created items.This takes a list of items with name and value pairs.
APPENDIX A. REFERENCE MATERIAL
199

new-item-path The path in LDAP where the newly created keystore items willbe stored.
new-item-rdn The name of LDAP RDN for the newly created items.
Attribute Description
Table A.61. ldap-realm Attributes
Attribute Description
allow-blank-password Whether this realm supports blank password direct verification. Ablank password attempt will be rejected otherwise.
dir-context The name of the dir-context which will be used to connect tothe LDAP server.
direct-verification If true this realm supports verification of credentials by directlyconnecting to LDAP as the account being authenticated;otherwise, the password is retrieved from the LDAP server andverified in JBoss EAP. If enabled, the JBoss EAP server must beable to obtain the plain user password from the client, whichrequires either the PLAIN SASL or BASIC HTTP mechanism beused for authentication. Defaults to false.
identity-mapping The configuration options that define how principals aremapped to their corresponding entries in the underlying LDAPserver.
Table A.62. ldap-realm identity-mapping Attributes
Attribute Description
rdn-identifier The RDN part of the principal’s DN to be used to obtain theprincipal’s name from an LDAP entry. This is also used whencreating new identities.
use-recursive-search If true identity search queries are recursive. Defaults to false.
search-base-dn The base DN to search for identities.
attribute-mapping List of attribute mappings defined for this resource.
filter-name The LDAP filter for getting identity by name.
iterator-filter The LDAP filter for iterating over identities of the realm.
Red Hat JBoss Enterprise Application Platform 7.3 How to Configure Server Security
200
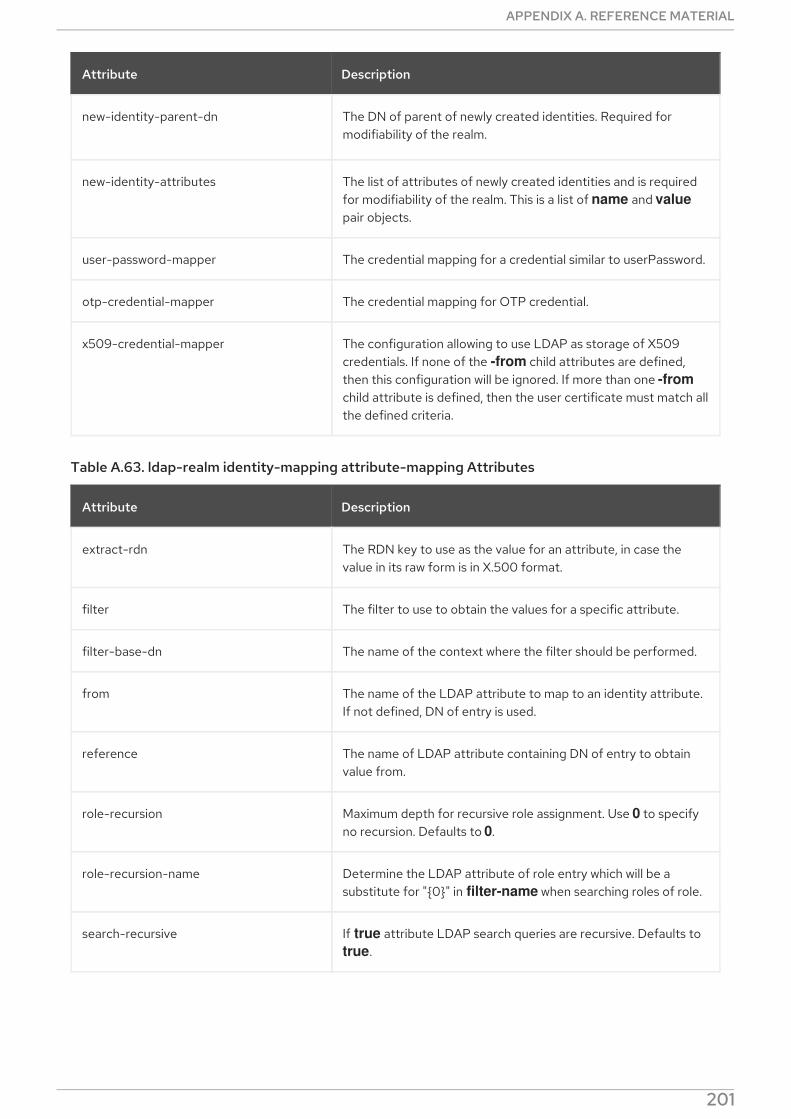
new-identity-parent-dn The DN of parent of newly created identities. Required formodifiability of the realm.
new-identity-attributes The list of attributes of newly created identities and is requiredfor modifiability of the realm. This is a list of name and valuepair objects.
user-password-mapper The credential mapping for a credential similar to userPassword.
otp-credential-mapper The credential mapping for OTP credential.
x509-credential-mapper The configuration allowing to use LDAP as storage of X509credentials. If none of the -from child attributes are defined,then this configuration will be ignored. If more than one -fromchild attribute is defined, then the user certificate must match allthe defined criteria.
Attribute Description
Table A.63. ldap-realm identity-mapping attribute-mapping Attributes
Attribute Description
extract-rdn The RDN key to use as the value for an attribute, in case thevalue in its raw form is in X.500 format.
filter The filter to use to obtain the values for a specific attribute.
filter-base-dn The name of the context where the filter should be performed.
from The name of the LDAP attribute to map to an identity attribute.If not defined, DN of entry is used.
reference The name of LDAP attribute containing DN of entry to obtainvalue from.
role-recursion Maximum depth for recursive role assignment. Use 0 to specifyno recursion. Defaults to 0.
role-recursion-name Determine the LDAP attribute of role entry which will be asubstitute for "{0}" in filter-name when searching roles of role.
search-recursive If true attribute LDAP search queries are recursive. Defaults to true.
APPENDIX A. REFERENCE MATERIAL
201

to The name of the identity attribute mapped from a specificLDAP attribute. If not provided, the name of the attribute is thesame as define in from. If the from is not defined too, value dnis used.
Attribute Description
Table A.64. ldap-realm identity-mapping user-password-mapper Attributes
Attribute Description
from The name of the LDAP attribute to map to an identity attribute.If not defined, DN of entry is used.
verifiable If true password can be used to verify the user. Defaults to true.
writable If true password can be changed. Defaults to false.
Table A.65. ldap-realm identity-mapping otp-credential-mapper Attributes
Attribute Description
algorithm-from The name of the LDAP attribute of OTP algorithm.
hash-from The name of the LDAP attribute of OTP hash function.
seed-from The name of the LDAP attribute of OTP seed.
sequence-from The name of the LDAP attribute of OTP sequence number.
Table A.66. ldap-realm identity-mapping x509-credential-mapper Attributes
Attribute Description
certificate-from The name of the LDAP attribute to map to an encoded usercertificate. If not defined, encoded certificate will not bechecked.
digest-algorithm The digest algorithm, which is the hash function, used tocompute digest of the user certificate. Will be used only if digest-from has been defined.
digest-from The name of the LDAP attribute to map to a user certificatedigest. If not defined, certificate digest will not be checked.
serial-number-from The name of the LDAP attribute to map to a serial number ofuser certificate. If not defined, serial number will not be checked.
Red Hat JBoss Enterprise Application Platform 7.3 How to Configure Server Security
202

subject-dn-from The name of the LDAP attribute to map to a subject DN of usercertificate. If not defined, subject DN will not be checked.
Attribute Description
Table A.67. logical-permission-mapper Attributes
Attribute Description
left Reference to the permission mapper to use to the left of theoperation.
logical-operation The logical operation to use to combine the permission mappers.Allowed values are and, or, xor, and unless.
right Reference to the permission mapper to use to the right of theoperation.
Table A.68. logical-role-mapper Attributes
Attribute Description
left Reference to a role mapper to be used on the left side of theoperation.
logical-operation The logical operation to be performed on the role mappermappings. Allowed values are: and, minus, or, and xor.
right Reference to a role mapper to be used on the right side of theoperation.
Table A.69. mapped-regex-realm-mapper Attributes
Attribute Description
delegate-realm-mapper The realm mapper to delegate to if there is no match using thepattern.
pattern The regular expression which must contain at least one capturegroup to extract the realm from the name.
realm-map Mapping of realm name extracted using the regular expressionto a defined realm name.
Table A.70. mechanism-provider-filtering-sasl-server-factory Attributes
APPENDIX A. REFERENCE MATERIAL
203

Attribute Description
enabling If true no provider loaded mechanisms are enabled unlessmatched by one of the filters. This defaults to true.
filters The list of filters to apply when comparing the mechanisms fromthe providers. A filter matches when all of the specified valuesmatch the mechanism and provider pair.
sasl-server-factory Reference to a SASL server factory to be wrapped by thisdefinition.
Table A.71. mechanism-provider-filtering-sasl-server-factory filters Attributes
Attribute Description
mechanism-name The name of the SASL mechanism this filter matches with.
provider-name The name of the provider this filter matches.
provider-version The version to use when comparing the provider’s version.
version-comparison The equality to use when evaluating the Provider’s version. Theallowed values are less-than and greater-than. The defaultvalue is less-than.
Table A.72. online-certificate-status-protocol Attributes
Attribute Description
responder Override the OCSP Responder URI resolved from the certificate.
responder-certificate Alias for responder certificate located in responder-keystoreor trust-manager keystore if responder-keystore is notdefined.
responder-keystore Alternative keystore for responder certificate. responder-certificate must be defined.
prefer-crls When both OCSP and CRL mechanisms are configured, OCSPmechanism is called first. When prefer-crls is set to true, theCRL mechanism is called first.
Table A.73. properties-realm Attributes
Red Hat JBoss Enterprise Application Platform 7.3 How to Configure Server Security
204

Attribute Description
groups-attribute The name of the attribute in the returned AuthorizationIdentity that should contain the groupmembership information for the identity.
groups-properties The properties file containing the users and their groups.
users-properties The properties file containing the users and their passwords.
Table A.74. properties-realm users-properties Attributes
Attribute Description
digest-realm-name The default realm name to use for digested passwords if one isnot discovered in the properties file.
path The path to the file containing the users and their passwords.The file should contain realm name declaration.
plain-text If true the passwords in properties file stored in plain text. If false they are pre-hashed, taking the form of HEX( MD5( username \":\" realm \":\" password))). Defaults to false.
relative-to The predefined path the path is relative to.
Table A.75. properties-realm groups-properties Attributes
Attribute Description
path The path to the file containing the users and their groups.
relative-to The predefined path the path is relative to.
Table A.76. provider-http-server-mechanism-factory Attributes
Attribute Description
providers The providers to use to locate the factories. If not specified, theglobally registered list of providers will be used.
Table A.77. provider-loader Attributes
APPENDIX A. REFERENCE MATERIAL
205
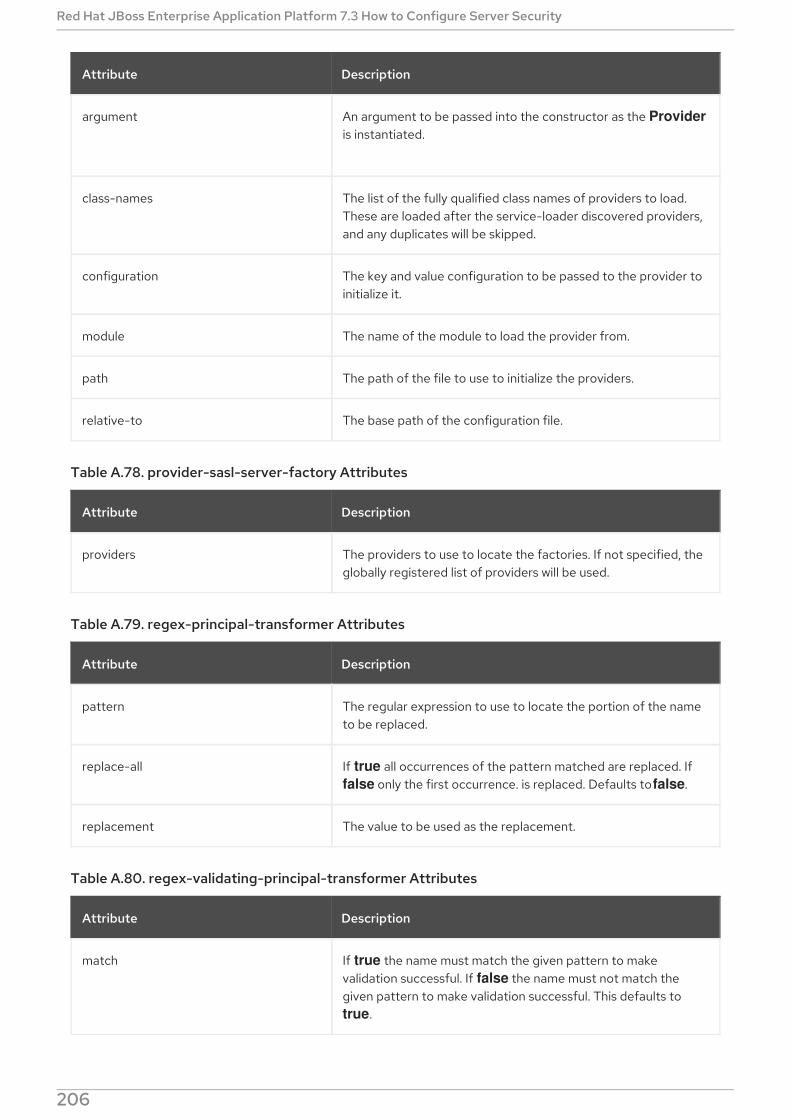
Attribute Description
argument An argument to be passed into the constructor as the Provideris instantiated.
class-names The list of the fully qualified class names of providers to load.These are loaded after the service-loader discovered providers,and any duplicates will be skipped.
configuration The key and value configuration to be passed to the provider toinitialize it.
module The name of the module to load the provider from.
path The path of the file to use to initialize the providers.
relative-to The base path of the configuration file.
Table A.78. provider-sasl-server-factory Attributes
Attribute Description
providers The providers to use to locate the factories. If not specified, theglobally registered list of providers will be used.
Table A.79. regex-principal-transformer Attributes
Attribute Description
pattern The regular expression to use to locate the portion of the nameto be replaced.
replace-all If true all occurrences of the pattern matched are replaced. If false only the first occurrence. is replaced. Defaults to false.
replacement The value to be used as the replacement.
Table A.80. regex-validating-principal-transformer Attributes
Attribute Description
match If true the name must match the given pattern to makevalidation successful. If false the name must not match thegiven pattern to make validation successful. This defaults to true.
Red Hat JBoss Enterprise Application Platform 7.3 How to Configure Server Security
206
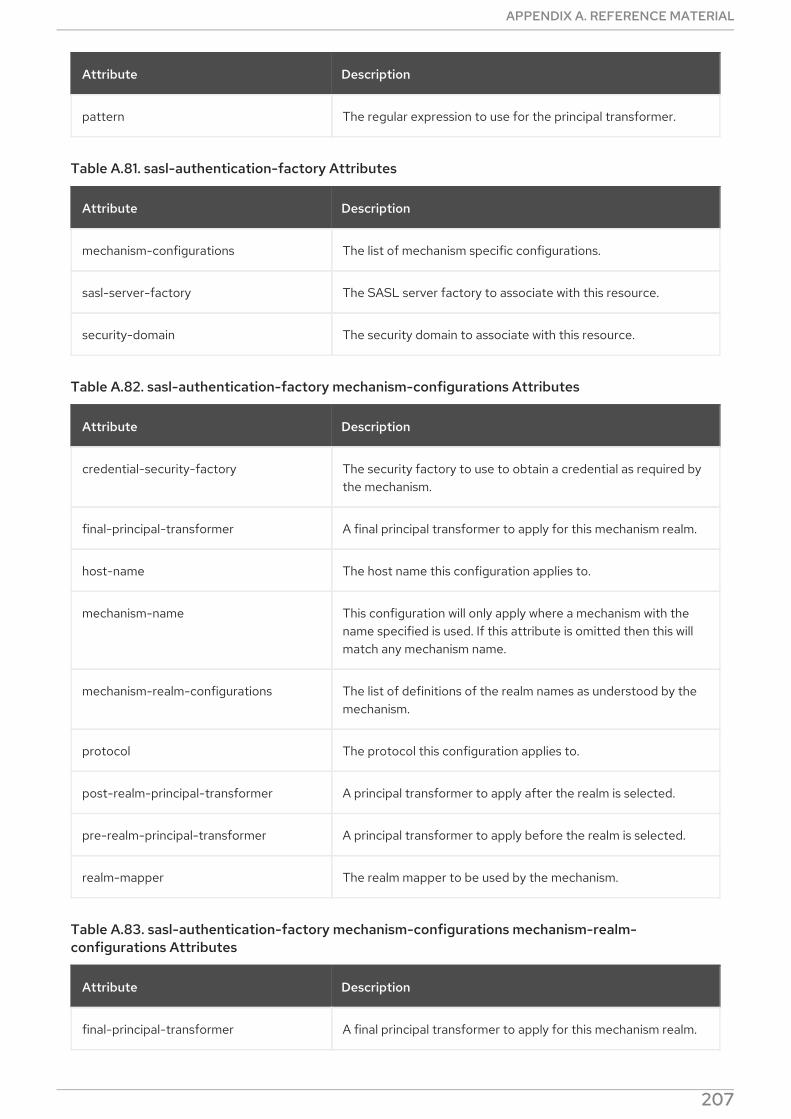
pattern The regular expression to use for the principal transformer.
Attribute Description
Table A.81. sasl-authentication-factory Attributes
Attribute Description
mechanism-configurations The list of mechanism specific configurations.
sasl-server-factory The SASL server factory to associate with this resource.
security-domain The security domain to associate with this resource.
Table A.82. sasl-authentication-factory mechanism-configurations Attributes
Attribute Description
credential-security-factory The security factory to use to obtain a credential as required bythe mechanism.
final-principal-transformer A final principal transformer to apply for this mechanism realm.
host-name The host name this configuration applies to.
mechanism-name This configuration will only apply where a mechanism with thename specified is used. If this attribute is omitted then this willmatch any mechanism name.
mechanism-realm-configurations The list of definitions of the realm names as understood by themechanism.
protocol The protocol this configuration applies to.
post-realm-principal-transformer A principal transformer to apply after the realm is selected.
pre-realm-principal-transformer A principal transformer to apply before the realm is selected.
realm-mapper The realm mapper to be used by the mechanism.
Table A.83. sasl-authentication-factory mechanism-configurations mechanism-realm-configurations Attributes
Attribute Description
final-principal-transformer A final principal transformer to apply for this mechanism realm.
APPENDIX A. REFERENCE MATERIAL
207

post-realm-principal-transformer A principal transformer to apply after the realm is selected.
pre-realm-principal-transformer A principal transformer to apply before the realm is selected.
realm-mapper The realm mapper to be used by the mechanism.
realm-name The name of the realm to be presented by the mechanism.
Attribute Description
Table A.84. server-ssl-context Attributes
Attribute Description
authentication-optional If true rejecting of the client certificate by the security domainwill not prevent the connection. This allows a fall through to useother authentication mechanisms, such as form login, when theclient certificate is rejected by security domain. This has aneffect only when the security domain is set. This defaults to false.
cipher-suite-filter The filter to apply to specify the enabled cipher suites. This filtertakes a list of items delimited by colons, commas, or spaces.Each item may be an OpenSSL-style cipher suite name, astandard SSL/TLS cipher suite name, or a keyword such as TLSv1.2 or DES. A full list of keywords as well as additionaldetails on creating a filter can be found in the Javadoc for the CipherSuiteSelector class. The default value is DEFAULT,which corresponds to all known cipher suites that do not have NULL encryption and excludes any cipher suites that have noauthentication.
final-principal-transformer A final principal transformer to apply for this mechanism realm.
key-manager Reference to the key managers to use within the SSLContext.
maximum-session-cache-size The maximum number of SSL/TLS sessions to be cached.
need-client-auth If true a client certificate is required on SSL handshake.Connection without trusted client certificate will be rejected.This defaults to false.
post-realm-principal-transformer A principal transformer to apply after the realm is selected.
pre-realm-principal-transformer A principal transformer to apply before the realm is selected.
Red Hat JBoss Enterprise Application Platform 7.3 How to Configure Server Security
208

protocols The enabled protocols. Allowed options are SSLv2, SSLv3, TLSv1, TLSv1.1, TLSv1.2, TLSv1.3. This defaults to enabling TLSv1, TLSv1.1, TLSv1.2, and TLSv1.3.
WARNING
Red Hat recommends that SSLv2, SSLv3,and TLSv1.0 be explicitly disabled in favorof TLSv1.1 or TLSv1.2 in all affectedpackages.
provider-name The name of the provider to use. If not specified, all providersfrom providers will be passed to the SSLContext.
providers The name of the providers to obtain the Provider[] to use toload the SSLContext.
realm-mapper The realm mapper to be used for SSL authentication.
security-domain The security domain to use for authentication during SSL/TLSsession establishment.
session-timeout The timeout for SSL/TLS sessions.
trust-manager Reference to the trust-manager to use within theSSLContext.
use-cipher-suites-order If true the cipher suites order defined on the server will be used.If false the cipher suites order presented by the client will beused. Defaults to true.
want-client-auth If true a client certificate will be requested, but not required, onSSL handshake. If a security domain is referenced and supportsX509 evidence, this will be set to true automatically. This isignored when need-client-auth is set. This defaults to false.
wrap If true, the returned SSLEngine, SSLSocket, and SSLServerSocket instances will be wrapped to protectagainst further modification. This defaults to false.
Attribute Description
NOTE
APPENDIX A. REFERENCE MATERIAL
209
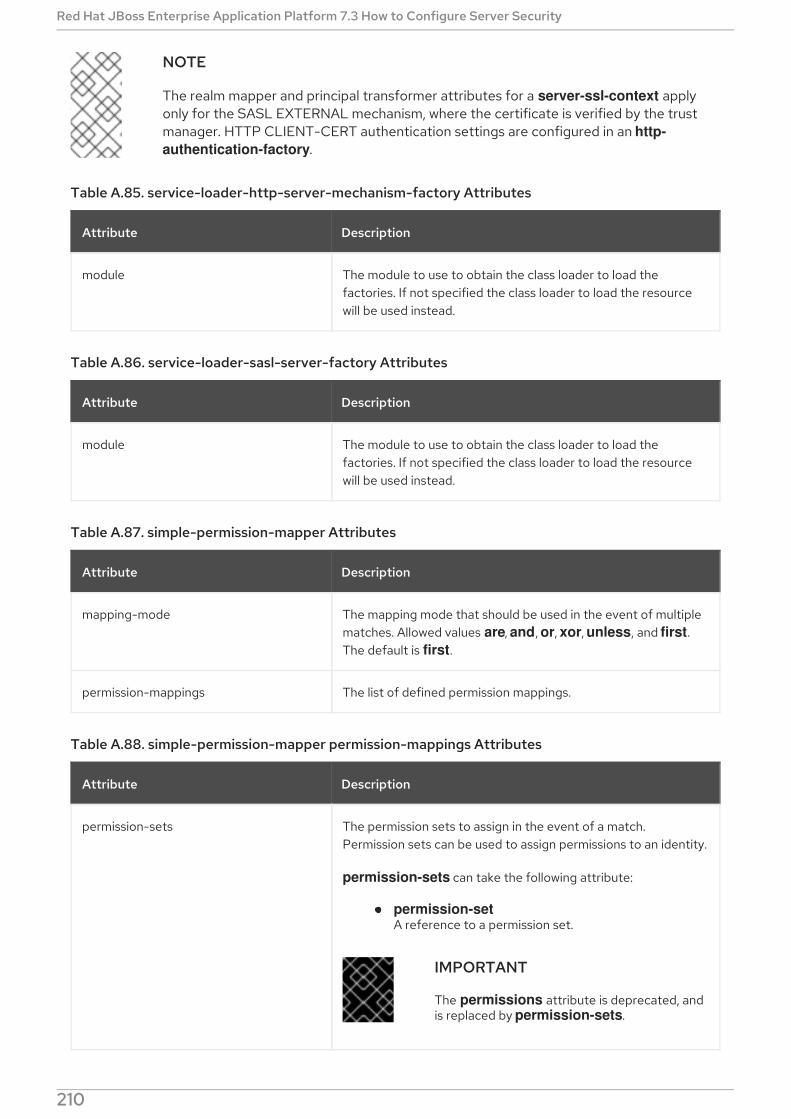
NOTE
The realm mapper and principal transformer attributes for a server-ssl-context applyonly for the SASL EXTERNAL mechanism, where the certificate is verified by the trustmanager. HTTP CLIENT-CERT authentication settings are configured in an http-authentication-factory.
Table A.85. service-loader-http-server-mechanism-factory Attributes
Attribute Description
module The module to use to obtain the class loader to load thefactories. If not specified the class loader to load the resourcewill be used instead.
Table A.86. service-loader-sasl-server-factory Attributes
Attribute Description
module The module to use to obtain the class loader to load thefactories. If not specified the class loader to load the resourcewill be used instead.
Table A.87. simple-permission-mapper Attributes
Attribute Description
mapping-mode The mapping mode that should be used in the event of multiplematches. Allowed values are, and, or, xor, unless, and first.The default is first.
permission-mappings The list of defined permission mappings.
Table A.88. simple-permission-mapper permission-mappings Attributes
Attribute Description
permission-sets The permission sets to assign in the event of a match.Permission sets can be used to assign permissions to an identity.
permission-sets can take the following attribute:
permission-setA reference to a permission set.
IMPORTANT
The permissions attribute is deprecated, andis replaced by permission-sets.
Red Hat JBoss Enterprise Application Platform 7.3 How to Configure Server Security
210
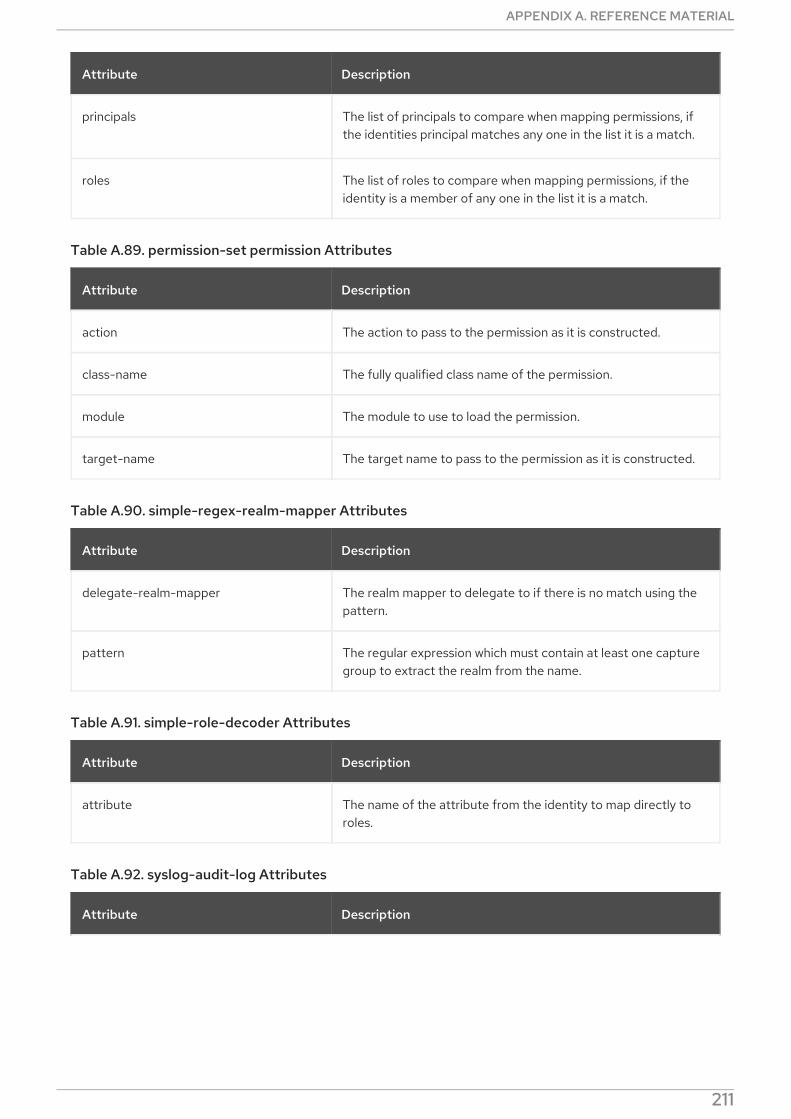
principals The list of principals to compare when mapping permissions, ifthe identities principal matches any one in the list it is a match.
roles The list of roles to compare when mapping permissions, if theidentity is a member of any one in the list it is a match.
Attribute Description
Table A.89. permission-set permission Attributes
Attribute Description
action The action to pass to the permission as it is constructed.
class-name The fully qualified class name of the permission.
module The module to use to load the permission.
target-name The target name to pass to the permission as it is constructed.
Table A.90. simple-regex-realm-mapper Attributes
Attribute Description
delegate-realm-mapper The realm mapper to delegate to if there is no match using thepattern.
pattern The regular expression which must contain at least one capturegroup to extract the realm from the name.
Table A.91. simple-role-decoder Attributes
Attribute Description
attribute The name of the attribute from the identity to map directly toroles.
Table A.92. syslog-audit-log Attributes
Attribute Description
APPENDIX A. REFERENCE MATERIAL
211

format The format that audit events should be recorded in.
Supported values:
SIMPLE
JSON
Default value:
SIMPLE
host-name The host name to be be embedded into all events sent to thesyslog server.
port The listening port on the syslog server.
reconnect-attempts The maximum number of times that Elytron will attempt to sendsuccessive messages to a syslog server before closing theconnection. The value of this attribute is only valid when thetransmission protocol used is UDP.
Supported values:
Any positive integer value.
-1 indicates infinite reconnect attempts.
Default value:
0
server-address IP address of the syslog server, or a name that can be resolvedby Java’s InetAddress.getByName() method.
ssl-context The SSL context to use when connecting to the syslog server.This attribute is only required if transport is set to SSL_TCP.
syslog-format The RFC format to be used for describing the audit event.
Supported values:
RFC5424
RFC3164
Default value:
RFC5424
Attribute Description
Red Hat JBoss Enterprise Application Platform 7.3 How to Configure Server Security
212
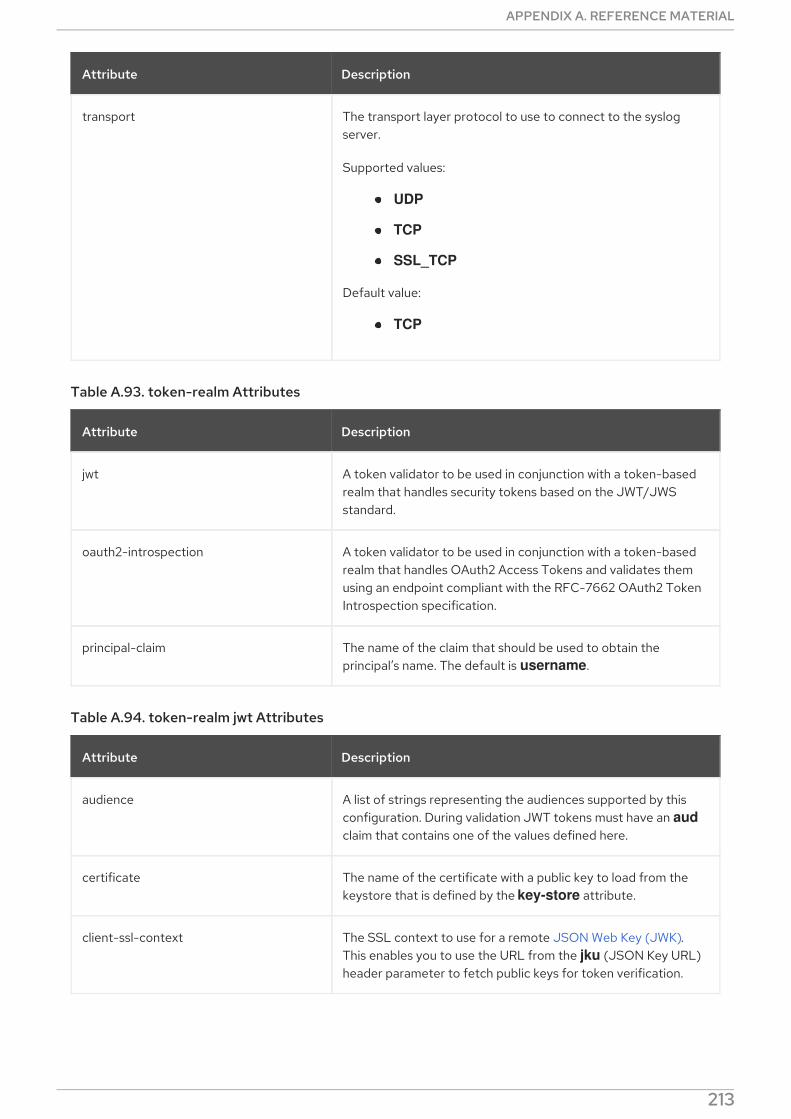
transport The transport layer protocol to use to connect to the syslogserver.
Supported values:
UDP
TCP
SSL_TCP
Default value:
TCP
Attribute Description
Table A.93. token-realm Attributes
Attribute Description
jwt A token validator to be used in conjunction with a token-basedrealm that handles security tokens based on the JWT/JWSstandard.
oauth2-introspection A token validator to be used in conjunction with a token-basedrealm that handles OAuth2 Access Tokens and validates themusing an endpoint compliant with the RFC-7662 OAuth2 TokenIntrospection specification.
principal-claim The name of the claim that should be used to obtain theprincipal’s name. The default is username.
Table A.94. token-realm jwt Attributes
Attribute Description
audience A list of strings representing the audiences supported by thisconfiguration. During validation JWT tokens must have an audclaim that contains one of the values defined here.
certificate The name of the certificate with a public key to load from thekeystore that is defined by the key-store attribute.
client-ssl-context The SSL context to use for a remote JSON Web Key (JWK).This enables you to use the URL from the jku (JSON Key URL)header parameter to fetch public keys for token verification.
APPENDIX A. REFERENCE MATERIAL
213

host-name-verification-policy A policy that defines how host names should be verified whenusing remote JSON Web Keys. Allowed values: ANY, DEFAULT.
issuer A list of strings representing the issuers supported by thisconfiguration. During validation JWT tokens must have an issclaim that contains one of the values defined here.
key-store The keystore from which the certificate with a public key shouldbe loaded. This attribute, along with the certificate attribute,can also be used as an alternative to the public-key.
public-key A public key in PEM Format. During validation, if a public key isprovided, the signature will be verified based on the key valueprovided by this attribute.
Alternatively, you can define a key-store and a certificate toconfigure the public key. This alternative key is used to verifytokens without the kid (Key ID) claim.
Attribute Description
Table A.95. token-realm oauth2-introspection Attributes
Attribute Description
client-id The identifier of the client on the OAuth2 Authorization Server.
client-secret The secret of the client.
client-ssl-context The SSL context to be used if the introspection endpoint isusing HTTPS.
host-name-verification-policy A policy that defines how host names should be verified whenusing HTTPS. The only allowed value is ANY.
introspection-url The URL of token introspection endpoint.
Table A.96. trust-manager Attributes
Attribute Description
algorithm The name of the algorithm to use to create the underlying TrustManagerFactory. This is provided by the JDK. Forexample, a JDK that uses SunJSSE provides the PKIX and SunX509 algorithms. More details on SunJSSE can be found inthe Java Secure Socket Extension (JSSE) Reference Guide.
Red Hat JBoss Enterprise Application Platform 7.3 How to Configure Server Security
214

alias-filter A filter to apply to the aliases returned from the keystore. Thiscan either be a comma-separated list of aliases to return or oneof the following formats:
ALL:-alias1:-alias2
NONE:+alias1:+alias2
certificate-revocation-list Enables the certificate revocation list that can be checked by atrust manager. The attributes of certificate-revocation-listare:
path - The path to the configuration file that is used toinitialize the provider.
relative-to - The base path of the certificaterevocation list file.
maximum-cert-path - The maximum number of non-self-issued intermediate certificates that can exist in acertification path. The default value is 5. (Deprecated.Use maximum-cert-path in trust-manager).
See Using a Certificate Revocation List for more information.
key-store Reference to the key-store to use to initialize the underlying TrustManagerFactory.
maximum-cert-path The maximum number of non-self-issued intermediatecertificates that can exist in a certification path. The defaultvalue is 5.
This attribute has been moved to trust-manager from certificate-revocation-list inside trust-manager in JBossEAP 7.3. For backward compatibility, the attribute is also presentin certificate-revocation-list. Going forward, use maximum-cert-path in trust-manager.
NOTE
Define maximum-cert-path in either trust-manager or in certificate-revocation-listnot in both.
only-leaf-cert Check revocation status of only the leaf certificate. This is anoptional attribute. The default values is false.
provider-name The name of the provider to use to create the underlying TrustManagerFactory.
Attribute Description
APPENDIX A. REFERENCE MATERIAL
215

providers Reference to obtain the Provider[] to use when creating theunderlying TrustManagerFactory.
soft-fail When set to true, certificates with an unknown revocationstatus are accepted. This is an optional attribute. The defaultvalue is false.
Attribute Description
Table A.97. x500-attribute-principal-decoder Attributes
Attribute Description
attribute-name The name of the X.500 attribute to map. This can also bedefined using the oid attribute.
convert When set to true, the principal decoder will attempt to convert aprincipal to a X500Principal, if it is not already of that type. Ifthe conversion fails, the original value is used as the principal.
joiner The joining string. The default value is a period (.).
maximum-segments The maximum number of occurrences of the attribute to map.The default value is 2147483647.
oid The OID of the X.500 attribute to map. This can also be definedusing the attribute-name attribute.
required-attributes The list of attribute names of the attributes that must bepresent in the principal
required-oids The list of OIDs of the attributes that must be present in theprincipal.
reverse If true the attribute values will be processed and returned inreverse order. The default value is false.
start-segment The starting occurrence of the attribute you want to map. Thisuses a zero-based index and the default value is 0.
Table A.98. x509-subject-alternative-name-evidence-decoder Attributes
Attribute Description
Red Hat JBoss Enterprise Application Platform 7.3 How to Configure Server Security
216

alt-name-type The subject alternative name type. Must be one of the following subjectalternative name types:
directoryName
dNSName
iPAddress
registeredID
rfc822Name
uniformResourceIdentifier
This is a required attribute.
segmentThe 0-based occurrence of the subject alternative name tomap.
This attribute is used when there is more than one subjectalternative name of the given type. The default value is 0.
Attribute Description
A.2. CONFIGURE YOUR ENVIRONMENT TO USE THE BOUNCYCASTLE
PROVIDER
You can configure your JBoss EAP installation to use a BouncyCastle provider. The Bouncy CastleJARs are not provided by Red Hat, and must be obtained directly from Bouncy Castle.
IMPORTANT
Java 8 must be used when the BouncyCastle providers are specified, as theBouncyCastle APIs are only certified up to Java 8.
1. Include both BouncyCastle JARs, beginning with bc-fips and bctls-fips, on your JDK’sclasspath. For Java 8 this is accomplished by placing the JAR files in $JAVA_HOME/lib/ext.
2. Using either of the following methods, include the BouncyCastle providers in your Javasecurity configuration file:
A default configuration file, java.security, is provided in your JDK, and can be updated toinclude the BouncyCastle providers. This file is used if no other security configuration filesare specified. See the JDK vendor’s documentation for the location of this file.
Define a custom Java security configuration file and reference it by adding the -Djava.security.properties==/path/to/java.security.properties system property.When referenced using two equal signs the default policy is overwritten, and only theproviders defined in the referenced file are used. When a single equal sign is used, as in -Djava.security.properties=/path/to/java.security.properties, then the providers are
APPENDIX A. REFERENCE MATERIAL
217
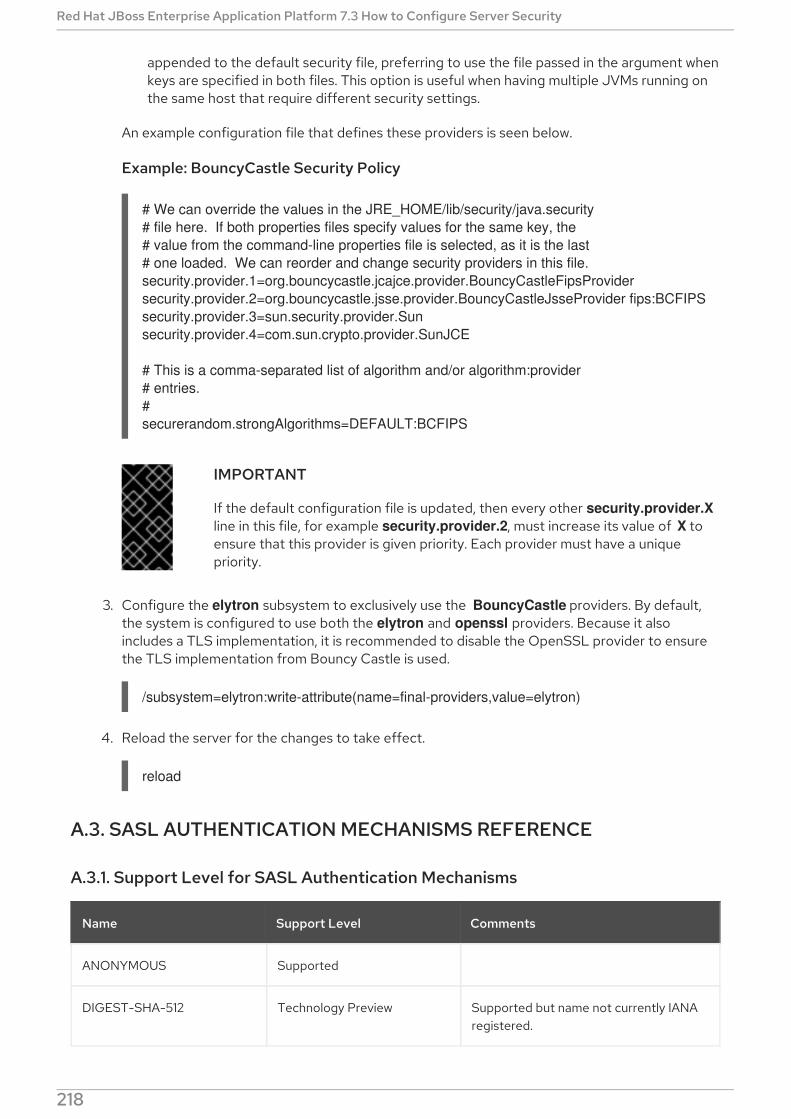
appended to the default security file, preferring to use the file passed in the argument whenkeys are specified in both files. This option is useful when having multiple JVMs running onthe same host that require different security settings.
An example configuration file that defines these providers is seen below.
Example: BouncyCastle Security Policy
# We can override the values in the JRE_HOME/lib/security/java.security# file here. If both properties files specify values for the same key, the# value from the command-line properties file is selected, as it is the last# one loaded. We can reorder and change security providers in this file.security.provider.1=org.bouncycastle.jcajce.provider.BouncyCastleFipsProvidersecurity.provider.2=org.bouncycastle.jsse.provider.BouncyCastleJsseProvider fips:BCFIPSsecurity.provider.3=sun.security.provider.Sunsecurity.provider.4=com.sun.crypto.provider.SunJCE
# This is a comma-separated list of algorithm and/or algorithm:provider# entries.#securerandom.strongAlgorithms=DEFAULT:BCFIPS
IMPORTANT
If the default configuration file is updated, then every other security.provider.Xline in this file, for example security.provider.2, must increase its value of X toensure that this provider is given priority. Each provider must have a uniquepriority.
3. Configure the elytron subsystem to exclusively use the BouncyCastle providers. By default,the system is configured to use both the elytron and openssl providers. Because it alsoincludes a TLS implementation, it is recommended to disable the OpenSSL provider to ensurethe TLS implementation from Bouncy Castle is used.
/subsystem=elytron:write-attribute(name=final-providers,value=elytron)
4. Reload the server for the changes to take effect.
reload
A.3. SASL AUTHENTICATION MECHANISMS REFERENCE
A.3.1. Support Level for SASL Authentication Mechanisms
Name Support Level Comments
ANONYMOUS Supported
DIGEST-SHA-512 Technology Preview Supported but name not currently IANAregistered.
Red Hat JBoss Enterprise Application Platform 7.3 How to Configure Server Security
218
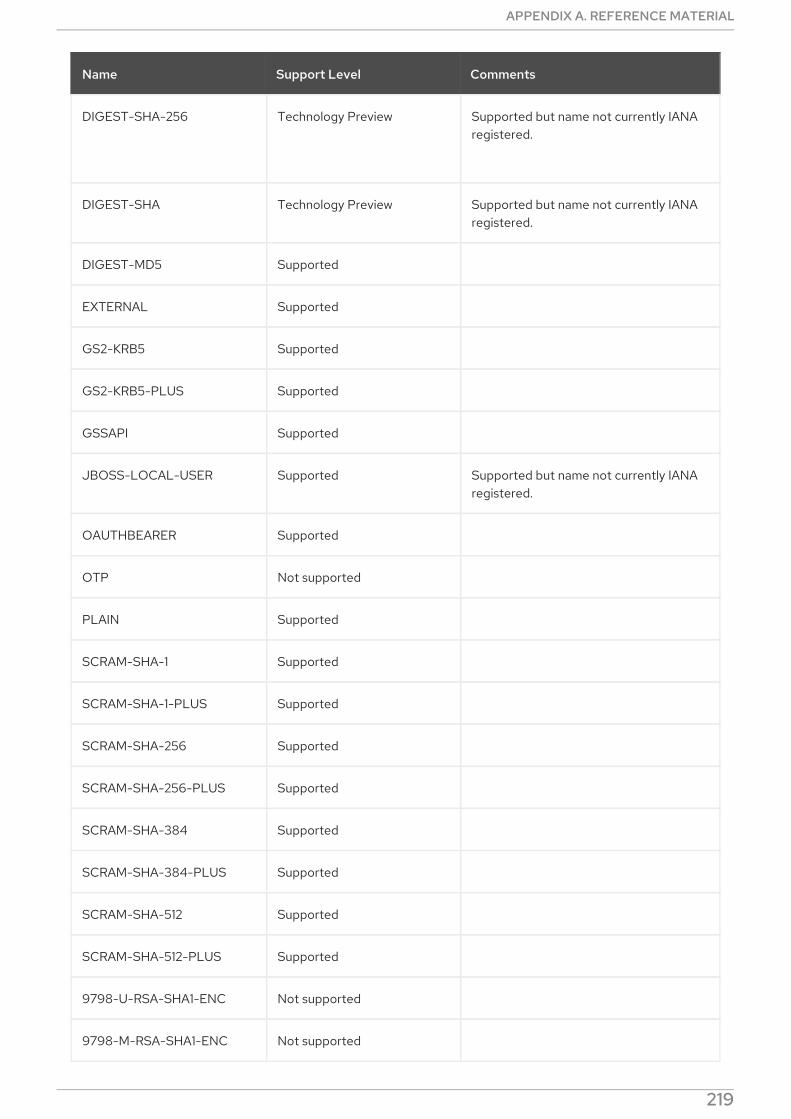
DIGEST-SHA-256 Technology Preview Supported but name not currently IANAregistered.
DIGEST-SHA Technology Preview Supported but name not currently IANAregistered.
DIGEST-MD5 Supported
EXTERNAL Supported
GS2-KRB5 Supported
GS2-KRB5-PLUS Supported
GSSAPI Supported
JBOSS-LOCAL-USER Supported Supported but name not currently IANAregistered.
OAUTHBEARER Supported
OTP Not supported
PLAIN Supported
SCRAM-SHA-1 Supported
SCRAM-SHA-1-PLUS Supported
SCRAM-SHA-256 Supported
SCRAM-SHA-256-PLUS Supported
SCRAM-SHA-384 Supported
SCRAM-SHA-384-PLUS Supported
SCRAM-SHA-512 Supported
SCRAM-SHA-512-PLUS Supported
9798-U-RSA-SHA1-ENC Not supported
9798-M-RSA-SHA1-ENC Not supported
Name Support Level Comments
APPENDIX A. REFERENCE MATERIAL
219
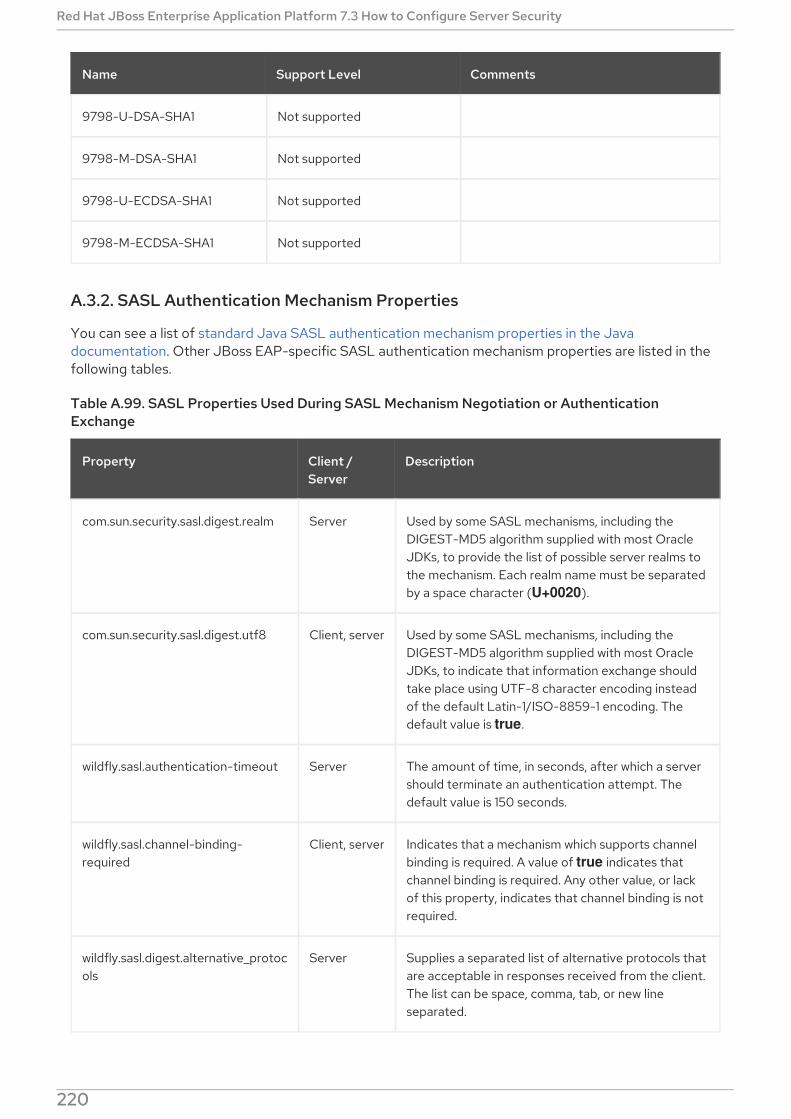
9798-U-DSA-SHA1 Not supported
9798-M-DSA-SHA1 Not supported
9798-U-ECDSA-SHA1 Not supported
9798-M-ECDSA-SHA1 Not supported
Name Support Level Comments
A.3.2. SASL Authentication Mechanism Properties
You can see a list of standard Java SASL authentication mechanism properties in the Javadocumentation. Other JBoss EAP-specific SASL authentication mechanism properties are listed in thefollowing tables.
Table A.99. SASL Properties Used During SASL Mechanism Negotiation or AuthenticationExchange
Property Client /Server
Description
com.sun.security.sasl.digest.realm Server Used by some SASL mechanisms, including theDIGEST-MD5 algorithm supplied with most OracleJDKs, to provide the list of possible server realms tothe mechanism. Each realm name must be separatedby a space character (U+0020).
com.sun.security.sasl.digest.utf8 Client, server Used by some SASL mechanisms, including theDIGEST-MD5 algorithm supplied with most OracleJDKs, to indicate that information exchange shouldtake place using UTF-8 character encoding insteadof the default Latin-1/ISO-8859-1 encoding. Thedefault value is true.
wildfly.sasl.authentication-timeout Server The amount of time, in seconds, after which a servershould terminate an authentication attempt. Thedefault value is 150 seconds.
wildfly.sasl.channel-binding-required
Client, server Indicates that a mechanism which supports channelbinding is required. A value of true indicates thatchannel binding is required. Any other value, or lackof this property, indicates that channel binding is notrequired.
wildfly.sasl.digest.alternative_protocols
Server Supplies a separated list of alternative protocols thatare acceptable in responses received from the client.The list can be space, comma, tab, or new lineseparated.
Red Hat JBoss Enterprise Application Platform 7.3 How to Configure Server Security
220
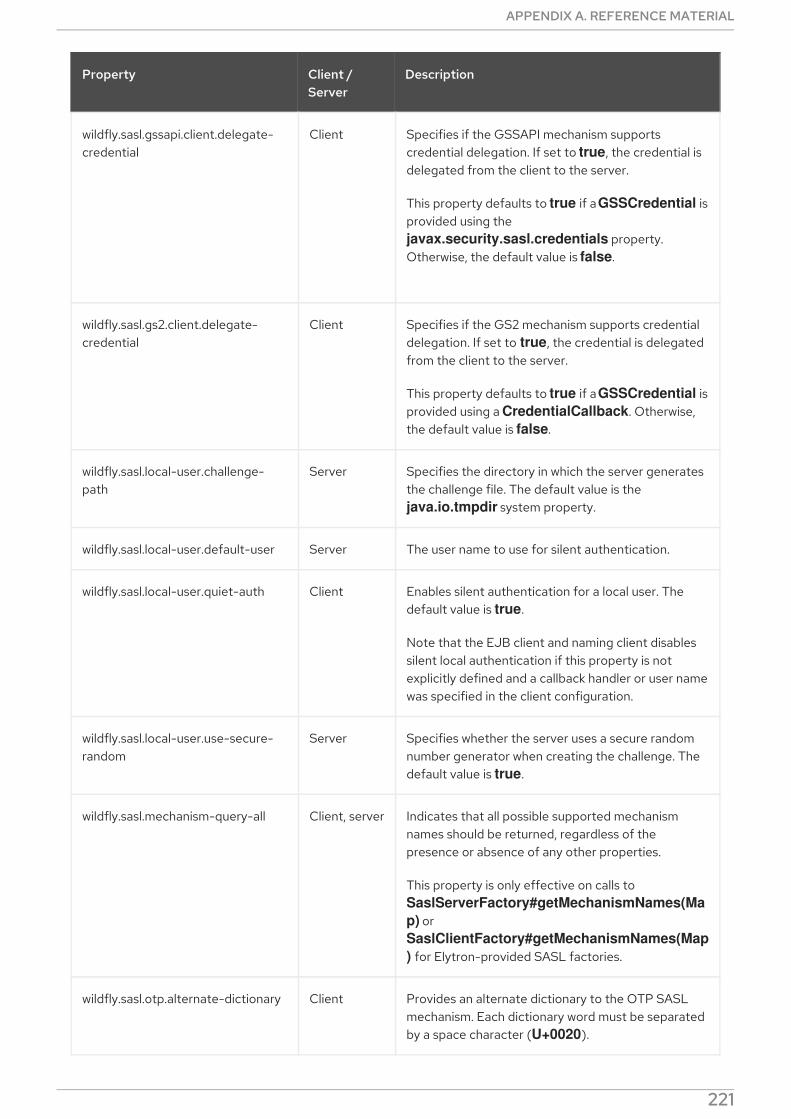
wildfly.sasl.gssapi.client.delegate-credential
Client Specifies if the GSSAPI mechanism supportscredential delegation. If set to true, the credential isdelegated from the client to the server.
This property defaults to true if a GSSCredential isprovided using the javax.security.sasl.credentials property.Otherwise, the default value is false.
wildfly.sasl.gs2.client.delegate-credential
Client Specifies if the GS2 mechanism supports credentialdelegation. If set to true, the credential is delegatedfrom the client to the server.
This property defaults to true if a GSSCredential isprovided using a CredentialCallback. Otherwise,the default value is false.
wildfly.sasl.local-user.challenge-path
Server Specifies the directory in which the server generatesthe challenge file. The default value is the java.io.tmpdir system property.
wildfly.sasl.local-user.default-user Server The user name to use for silent authentication.
wildfly.sasl.local-user.quiet-auth Client Enables silent authentication for a local user. Thedefault value is true.
Note that the EJB client and naming client disablessilent local authentication if this property is notexplicitly defined and a callback handler or user namewas specified in the client configuration.
wildfly.sasl.local-user.use-secure-random
Server Specifies whether the server uses a secure randomnumber generator when creating the challenge. Thedefault value is true.
wildfly.sasl.mechanism-query-all Client, server Indicates that all possible supported mechanismnames should be returned, regardless of thepresence or absence of any other properties.
This property is only effective on calls to SaslServerFactory#getMechanismNames(Map) or SaslClientFactory#getMechanismNames(Map) for Elytron-provided SASL factories.
wildfly.sasl.otp.alternate-dictionary Client Provides an alternate dictionary to the OTP SASLmechanism. Each dictionary word must be separatedby a space character (U+0020).
Property Client /Server
Description
APPENDIX A. REFERENCE MATERIAL
221

wildfly.sasl.relax-compliance Server The specifications for the SASL mechanismsmandate certain behavior and verification of thatbehavior at the opposite side of the connection.When interacting with other SASL mechanismimplementations, some of these requirements areinterpreted loosely. If this property is set to true,checking is relaxed where differences in specificationinterpretation has been identified. The default valueis false.
wildfly.sasl.scram.min-iteration-count
Client, server The minimum iteration count to use for SCRAM. Thedefault value is 4096.
wildfly.sasl.scram.max-iteration-count
Client, server The maximum iteration count to use for SCRAM. Thedefault value is 32786.
wildfly.sasl.secure-rng Client, server The algorithm name of a SecureRandomimplementation to use. Using this property canimprove security, at the cost of performance.
wildfly.security.sasl.digest.ciphers Client, server Comma-separated list of supported ciphers thatdirectly limits the set of supported ciphers for SASLmechanisms.
Property Client /Server
Description
Table A.100. SASL Properties Used After Authentication
Property Client /Server
Description
wildfly.sasl.principal Client Contains the negotiated client principal after asuccessful SASL client-side authentication.
wildfly.sasl.security-identity Server Contains the negotiated security identity after asuccessful SASL server-side authentication.
A.4. SECURITY AUTHORIZATION ARGUMENTS
Arguments to the security commands in JBoss EAP are determined by the defined mechanism. Eachmechanism requires different properties, and it is recommended to use tab completion to examine thevarious requirements for the defined mechanism.
Table A.101. Universal Arguments
Attribute Description
Red Hat JBoss Enterprise Application Platform 7.3 How to Configure Server Security
222
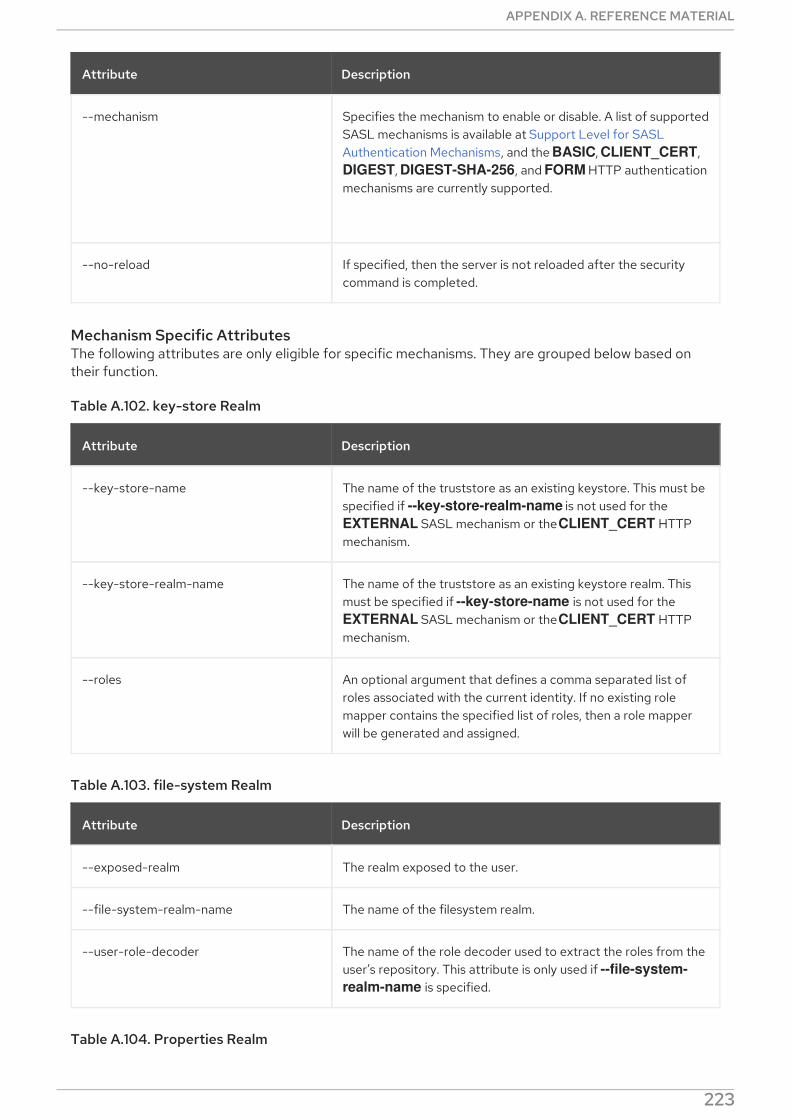
--mechanism Specifies the mechanism to enable or disable. A list of supportedSASL mechanisms is available at Support Level for SASLAuthentication Mechanisms, and the BASIC, CLIENT_CERT, DIGEST, DIGEST-SHA-256, and FORM HTTP authenticationmechanisms are currently supported.
--no-reload If specified, then the server is not reloaded after the securitycommand is completed.
Attribute Description
Mechanism Specific AttributesThe following attributes are only eligible for specific mechanisms. They are grouped below based ontheir function.
Table A.102. key-store Realm
Attribute Description
--key-store-name The name of the truststore as an existing keystore. This must bespecified if --key-store-realm-name is not used for the EXTERNAL SASL mechanism or the CLIENT_CERT HTTPmechanism.
--key-store-realm-name The name of the truststore as an existing keystore realm. Thismust be specified if --key-store-name is not used for the EXTERNAL SASL mechanism or the CLIENT_CERT HTTPmechanism.
--roles An optional argument that defines a comma separated list ofroles associated with the current identity. If no existing rolemapper contains the specified list of roles, then a role mapperwill be generated and assigned.
Table A.103. file-system Realm
Attribute Description
--exposed-realm The realm exposed to the user.
--file-system-realm-name The name of the filesystem realm.
--user-role-decoder The name of the role decoder used to extract the roles from theuser’s repository. This attribute is only used if --file-system-realm-name is specified.
Table A.104. Properties Realm
APPENDIX A. REFERENCE MATERIAL
223
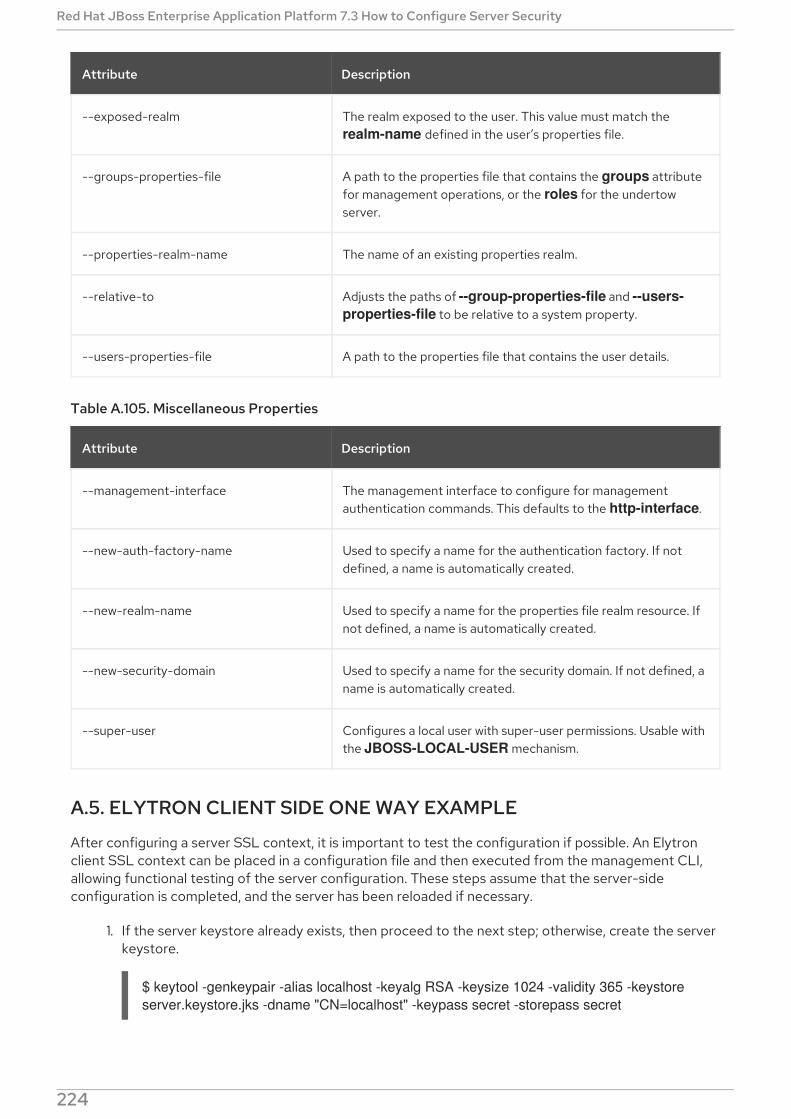
Attribute Description
--exposed-realm The realm exposed to the user. This value must match the realm-name defined in the user’s properties file.
--groups-properties-file A path to the properties file that contains the groups attributefor management operations, or the roles for the undertowserver.
--properties-realm-name The name of an existing properties realm.
--relative-to Adjusts the paths of --group-properties-file and --users-properties-file to be relative to a system property.
--users-properties-file A path to the properties file that contains the user details.
Table A.105. Miscellaneous Properties
Attribute Description
--management-interface The management interface to configure for managementauthentication commands. This defaults to the http-interface.
--new-auth-factory-name Used to specify a name for the authentication factory. If notdefined, a name is automatically created.
--new-realm-name Used to specify a name for the properties file realm resource. Ifnot defined, a name is automatically created.
--new-security-domain Used to specify a name for the security domain. If not defined, aname is automatically created.
--super-user Configures a local user with super-user permissions. Usable withthe JBOSS-LOCAL-USER mechanism.
A.5. ELYTRON CLIENT SIDE ONE WAY EXAMPLE
After configuring a server SSL context, it is important to test the configuration if possible. An Elytronclient SSL context can be placed in a configuration file and then executed from the management CLI,allowing functional testing of the server configuration. These steps assume that the server-sideconfiguration is completed, and the server has been reloaded if necessary.
1. If the server keystore already exists, then proceed to the next step; otherwise, create the serverkeystore.
$ keytool -genkeypair -alias localhost -keyalg RSA -keysize 1024 -validity 365 -keystore server.keystore.jks -dname "CN=localhost" -keypass secret -storepass secret
2. If the server certificate has already been exported, then proceed to the next step; otherwise,
Red Hat JBoss Enterprise Application Platform 7.3 How to Configure Server Security
224
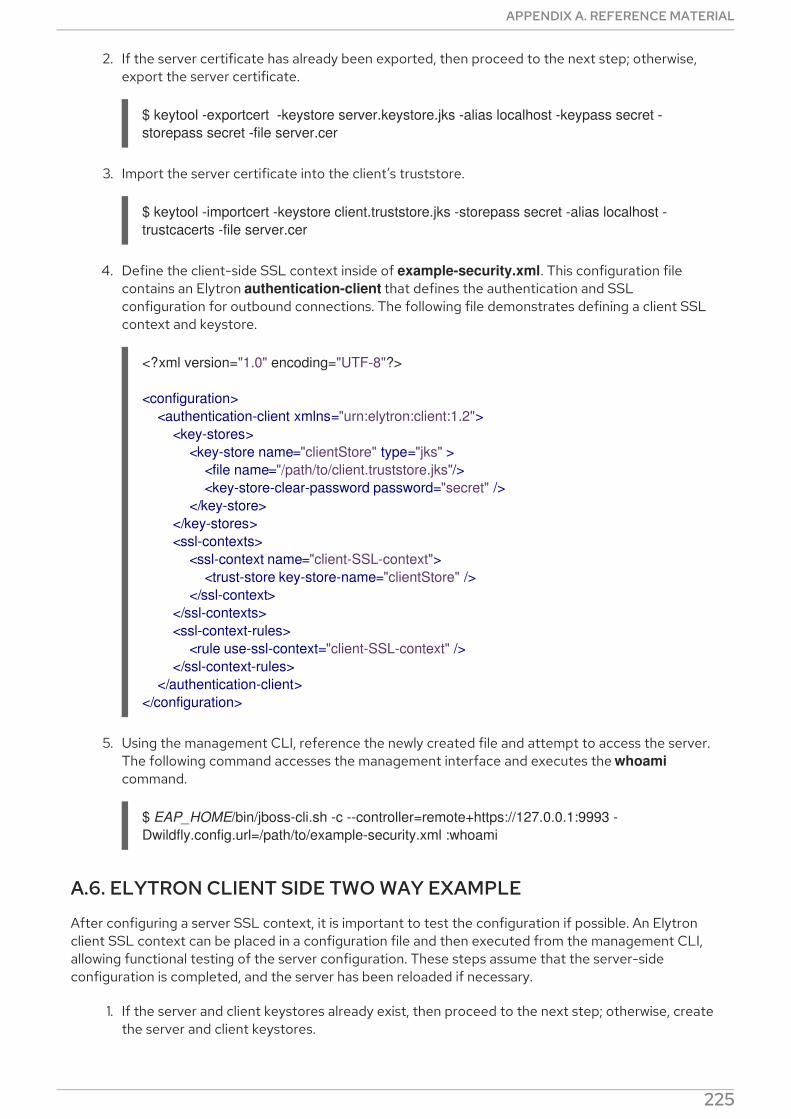
2. If the server certificate has already been exported, then proceed to the next step; otherwise,export the server certificate.
$ keytool -exportcert -keystore server.keystore.jks -alias localhost -keypass secret -storepass secret -file server.cer
3. Import the server certificate into the client’s truststore.
$ keytool -importcert -keystore client.truststore.jks -storepass secret -alias localhost -trustcacerts -file server.cer
4. Define the client-side SSL context inside of example-security.xml. This configuration filecontains an Elytron authentication-client that defines the authentication and SSLconfiguration for outbound connections. The following file demonstrates defining a client SSLcontext and keystore.
5. Using the management CLI, reference the newly created file and attempt to access the server.The following command accesses the management interface and executes the whoamicommand.
$ EAP_HOME/bin/jboss-cli.sh -c --controller=remote+https://127.0.0.1:9993 -Dwildfly.config.url=/path/to/example-security.xml :whoami
A.6. ELYTRON CLIENT SIDE TWO WAY EXAMPLE
After configuring a server SSL context, it is important to test the configuration if possible. An Elytronclient SSL context can be placed in a configuration file and then executed from the management CLI,allowing functional testing of the server configuration. These steps assume that the server-sideconfiguration is completed, and the server has been reloaded if necessary.
1. If the server and client keystores already exist, then proceed to the next step; otherwise, createthe server and client keystores.
<?xml version="1.0" encoding="UTF-8"?>
<configuration> <authentication-client xmlns="urn:elytron:client:1.2"> <key-stores> <key-store name="clientStore" type="jks" > <file name="/path/to/client.truststore.jks"/> <key-store-clear-password password="secret" /> </key-store> </key-stores> <ssl-contexts> <ssl-context name="client-SSL-context"> <trust-store key-store-name="clientStore" /> </ssl-context> </ssl-contexts> <ssl-context-rules> <rule use-ssl-context="client-SSL-context" /> </ssl-context-rules> </authentication-client></configuration>
APPENDIX A. REFERENCE MATERIAL
225
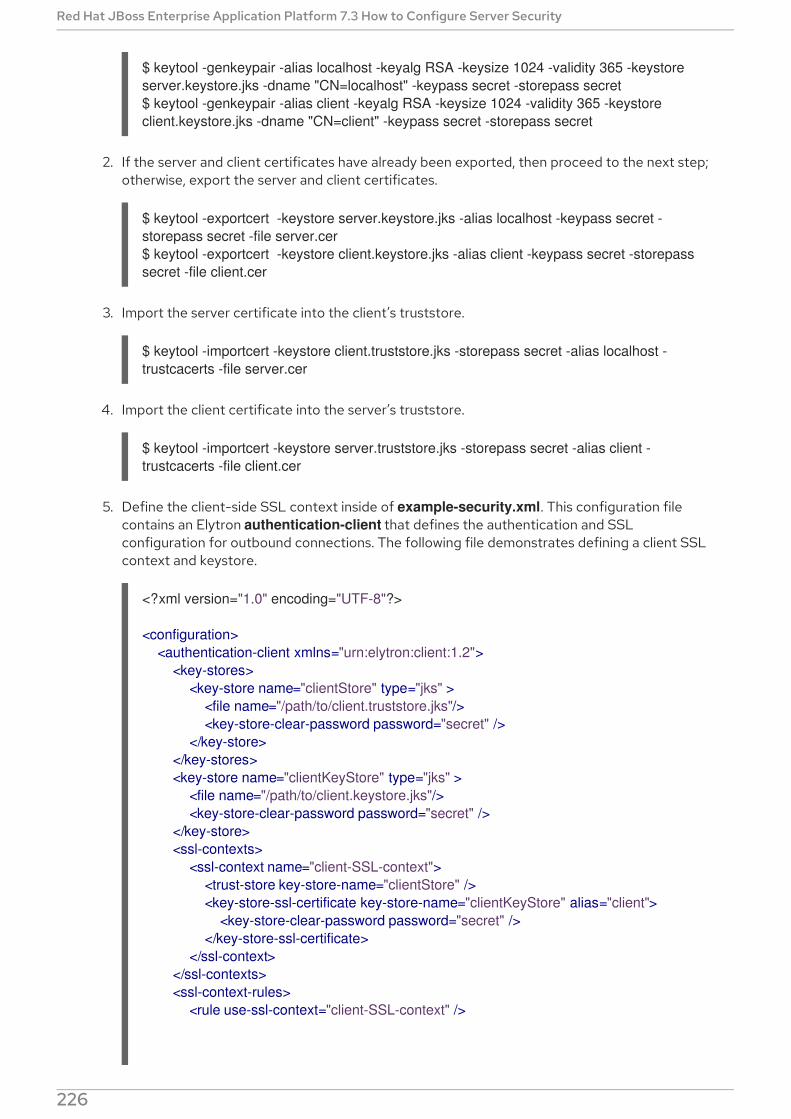
$ keytool -genkeypair -alias localhost -keyalg RSA -keysize 1024 -validity 365 -keystore server.keystore.jks -dname "CN=localhost" -keypass secret -storepass secret$ keytool -genkeypair -alias client -keyalg RSA -keysize 1024 -validity 365 -keystore client.keystore.jks -dname "CN=client" -keypass secret -storepass secret
2. If the server and client certificates have already been exported, then proceed to the next step;otherwise, export the server and client certificates.
$ keytool -exportcert -keystore server.keystore.jks -alias localhost -keypass secret -storepass secret -file server.cer$ keytool -exportcert -keystore client.keystore.jks -alias client -keypass secret -storepass secret -file client.cer
3. Import the server certificate into the client’s truststore.
$ keytool -importcert -keystore client.truststore.jks -storepass secret -alias localhost -trustcacerts -file server.cer
4. Import the client certificate into the server’s truststore.
$ keytool -importcert -keystore server.truststore.jks -storepass secret -alias client -trustcacerts -file client.cer
5. Define the client-side SSL context inside of example-security.xml. This configuration filecontains an Elytron authentication-client that defines the authentication and SSLconfiguration for outbound connections. The following file demonstrates defining a client SSLcontext and keystore.
<?xml version="1.0" encoding="UTF-8"?>
<configuration> <authentication-client xmlns="urn:elytron:client:1.2"> <key-stores> <key-store name="clientStore" type="jks" > <file name="/path/to/client.truststore.jks"/> <key-store-clear-password password="secret" /> </key-store> </key-stores> <key-store name="clientKeyStore" type="jks" > <file name="/path/to/client.keystore.jks"/> <key-store-clear-password password="secret" /> </key-store> <ssl-contexts> <ssl-context name="client-SSL-context"> <trust-store key-store-name="clientStore" /> <key-store-ssl-certificate key-store-name="clientKeyStore" alias="client"> <key-store-clear-password password="secret" /> </key-store-ssl-certificate> </ssl-context> </ssl-contexts> <ssl-context-rules> <rule use-ssl-context="client-SSL-context" />
Red Hat JBoss Enterprise Application Platform 7.3 How to Configure Server Security
226

6. Using the management CLI, reference the newly created file and attempt to access the server.The following command accesses the management interface and executes the whoamicommand.
$ EAP_HOME/bin/jboss-cli.sh -c --controller=remote+https://127.0.0.1:9993 -Dwildfly.config.url=/path/to/example-security.xml :whoami
Revised on 2020-03-18 10:10:52 UTC
</ssl-context-rules> </authentication-client></configuration>
APPENDIX A. REFERENCE MATERIAL
227