Embed Size (px)
Citation preview

Pineleaf’s
Version 1.0
Pineleaf’s Pictorial Primer to Skirmishing
Volume
By Pineleaf Needles for A Casual Stroll to Mordor
http://www.casualstrolltomordor.com
Pineleaf’s Pictorial Primer to Skirmishing
Volume 3: Stand at Amon Sûl
Pineleaf’s Pictorial Primer to Skirmishing
Volume 3: Stand at Amon Sûl
A Casual Stroll to Mordor
http://www.casualstrolltomordor.com
Page | 1
Pineleaf’s Pictorial Primer to Skirmishing

Pineleaf’s Pictorial Primer to Skirmishing
Version 1.0 Volume 3: Stand at Amon Sûl Page | 2
Contents Pineleaf’s Pictorial Primer to Skirmishing ..................................................................................................... 1
Volume 3: Stand at Amon Sûl ........................................................................................................................ 1
Introduction ............................................................................................................................................... 3
Summary ................................................................................................................................................... 5
Skirmish Mark Awards (Level 65, Tier 1, Solo, At level) ........................................................................ 5
Assaults ...................................................................................................................................................... 6
Assault 1 (10 SM) ................................................................................................................................... 6
Assault 2 (16 SM) ................................................................................................................................... 6
Assault 3 (26 SM) ................................................................................................................................... 6
Boss Fight (32 SM) ................................................................................................................................. 6
The Fires .................................................................................................................................................... 6
Campfire Locations ................................................................................................................................ 7
Candaith ................................................................................................................................................ 8
Opponents ................................................................................................................................................. 8
Bats ........................................................................................................................................................ 9
Shades ................................................................................................................................................. 10
Wights.................................................................................................................................................. 11
Lieutenants .............................................................................................................................................. 12
Boss Fight................................................................................................................................................. 13
Narudúr (The General) ........................................................................................................................ 13
Summoned Dead ................................................................................................................................. 14
Encounters ............................................................................................................................................... 14
Laimbenn ............................................................................................................................................. 15
Norgol .................................................................................................................................................. 16
Bloodwing ............................................................................................................................................ 17
Golnauk ............................................................................................................................................... 18
Gwathrengor ....................................................................................................................................... 19
Urkflagit ............................................................................................................................................... 20
Mokum ................................................................................................................................................ 21
Gugaw’s Arm ....................................................................................................................................... 22
Gwandir ............................................................................................................................................... 23
Variations ................................................................................................................................................ 24
Level .................................................................................................................................................... 24
Tier ....................................................................................................................................................... 25
Player Group Size ................................................................................................................................ 25
Deeds ....................................................................................................................................................... 26
Quests ...................................................................................................................................................... 26

Pineleaf’s Pictorial Primer to Skirmishing
Version 1.0 Volume 3: Stand at Amon Sûl Page | 3
Introduction
Welcome to Pineleaf’s Pictorial Primer to Skirmishing. In this series, we will look at each of the
skirmishes you can run in The Lord of the Rings Online™. In this third volume, we will take a look at the
third skirmish players can access: Stand at Amon Sûl.
In this series, we will look at each skirmish in turn, including its scenario, layout, mobs, bosses, and
encounters. While I discuss the lieutenants you will be facing, you will leave any detailed descriptions for
them in Appendix A of this Primer.
I will not be discussing strategy much, as that can vary based on your class and playing style. While I
have played this skirmish with several classes, I have mostly run it with a hobbit warden accompanied by
an archer soldier.
Pineleaf Needles
Follow the latest LotRO news at A Casual Stroll to Mordor at http://www.casualstrolltomordor.com
Pineleaf and Flax prepare to face the enemy on the peak of Weathertop

Pineleaf’s Pictorial Primer to Skirmishing
Version 1.0 Volume 3: Stand at Amon Sûl Page | 4
Skirmish Specifications Name: Stand at Amon Sûl
Scenario: Not long ago a battle was fought upon the peak of
Weathertop between Gandalf the Grey and the nine. Evil
has been drawn to Amon Sûl, where the Ranger Candaith
seeks to hold the hill for the Rangers of the North….
Type: Defensive
Level Range: 35-65
Availability: 495 TP (free for VIP)
Allowed Group Sizes: Solo, Duo, Small Fellowship, Fellowship, and Raid
Tiers: 1-3
Location: Amon Sûl (Weathertop), Lone Lands
Reputation: 700 Eglain
Assaults: 3
Waves per Assault: 8
Opponents: Wights, shades, and bats
Enemy Group Size: Solo 2 swarm or normal
Duo/Small fellowship 2 normal or signature
Fellowship 2 signature or elite
Raid 2 elite or elite master
Available Lieutenants: All
Lieutenant Count: 6 (12 opportunities with a 50% chance)
Defenders: 1 vital
Encounters: 9; Stood at Amon Sûl
SM @ Level 65: 125 (84 CP; 21 defenders; 20 encounters)
Experience Rating: 45
Solo Run Time: 15 minutes
Campaign: Eruilan
Features: Lighting bonfires
Consumables: Food; Fear and Disease Potions; +1 Hope tokens
Useful Damage Types: Light and Westernesse (Beleriand for boss fight)

Pineleaf’s Pictorial Primer to Skirmishing
Version 1.0 Volume 3: Stand at Amon Sûl Page | 5
Summary
“The darkness has encroached far, can you feel it deadening your limbs? I have added herbs to these
campfires, if you light them it will fight back against the darkness and return some of your battle
prowess. Grab a torch, light the fires, keeping them from going out and we may yet win this battle. Here
they come!”
So says Candaith at the start of Stand at Amon Sûl. These words are more than just flavor text: they are
warning you that you will spend some time lighting fires during this skirmish.
Stand at Amon Sûl is set on the peak of Weathertop and the forces of the enemy are attempting to
wrest it from us. We must defend the hilltop and to do that we will need to keep the fires burning.
This is the most chaotic of the defensive skirmishes, despite the low number of attackers in each wave .
In most skirmishes you have some idea of the directions the enemy is coming but at Amon Súl each mob
in a wave comes from a different direction. Therefore, you don’t always know what’s coming.
The object of this skirmish is to defeat each wave of the enemy. After you fight off eight waves, you get
a 30-second break. Each of these groups of eight is called an “assault.” After three assaults, Narudúr, the
Cargûl in charge of the assault, arrives to deal with you and Candaith personally.
Your opponents will mainly be shades, wights, and bats. In addition, you will face an array of lieutenants.
This skirmish features all of the possible skirmish lieutenants (up to 14 in solo runs, 27 in duo and small
fellowship runs, and 41 in full fellowship and raid runs).
This skirmish includes nine encounters that are activated in a variety of ways. The encounter bosses are
weaker than those in Tuckborough (signature rather than elite) as their main challenge comes from
distraction rather than one-on-one power.
Some solo players prefer to ignore the fires and fight this skirmish in the dark. I don’t personally
recommend this unless you really want to increase the challenge of the skirmish.
Any morale levels I give for opponents are for a level 65 Tier 1 solo run.
Skirmish Mark Awards (Level 65, Tier 1, Solo, At level)
L65 Marks
10 First Assault Complete
16 Second Assault Complete
26 Third Assault Complete
32 Defeated the boss
21 One defender (Candaith)
20 Two Encounters
125 Total

Pineleaf’s Pictorial Primer to Skirmishing
Version 1.0 Volume 3: Stand at Amon Sûl Page | 6
Assaults
Stand at Amon Sûl is run as a series of three assaults. Each assault is composed of a series of waves
followed by a 30-second break before the start of the next assault. You earn skirmish marks at the end
of each of the assaults.
Assault 1 (10 SM)
The first assault includes eight waves composed of two basic opponents each. The even numbered
waves have a 50% chance of also including a lieutenant (in a raid, a wave has a chance of including two
lieutenants).
Each opponent in a wave approaches from a random direction. I therefore recommend standing in a
central location.
If Candaith is defeated, you lose the skirmish.
Assault 2 (16 SM)
The second assault operates in exactly the same way as the first assault.
Assault 3 (26 SM)
The third assault operates in exactly the same way as the first assault.
Boss Fight (32 SM)
After you fend off the third assault, the skirmish boss, a Cargûl named Narudúr, arrives from the north.
During the course of the fight, the Cargûl will summon several dead minions to join the battle. These are
similar to the wights and shades that appear in during the various waves.
The Fires
Stand at Amon Sûl features campfires. If you light all the fires, you fight with a bonus; if you allow all the
fires to die out, you fight at a severe penalty. Therefore, you want to light the fires.
There are a total of six campfires. One is at the center of the ruined tower that stands on the hilltop. The
other five campfires are on the inside edges of the ruined tower at the north, northwest, southwest,
southeast, and east.
The central campfire remains lit throughout the scenario and provides a +50% bonus to your damage
and a 5% bonus to your attack and induction speeds. The other five campfires last for only two minutes
each and provide a +25% bonus to your damage and a 2.5% bonus to your attack and induction speeds.
Since the darkness provides a -100% penalty to damage, you will need to be in the light of at least two
outer campfires plus the central campfire to be fighting at your standard levels. If you manage to be in
the light of all the fires, then you will have a net +75% bonus to damage (+175% - 100%).
Both you and Candaith are affected by the darkness and the fires. Your soldier is not affected by either.

Pineleaf’s Pictorial Primer to Skirmishing
Version 1.0 Volume 3: Stand at Amon Sûl Page | 7
The effective radius of a campfire is about the same as the radius of the tower. This means that at some
spots near the central campfire, you will actually be in the radius of all five campfires but anywhere else
you will only be in the range of a few of them. If you leave the bounds of the ruins, you will be outside
the radius of most of the fires, including the central fire.
The campfires can be relit whenever they are out. Lighting an already lit fire has no effect (it does not
extend the duration of the fire). You can generally light two or three fires at a time, so I tend to light
three in one wave and two on another wave. While I generally light all five at the start of the skirmish, I
prefer to have them staggered by the time I reach the third assault. The last thing you want is for all five
campfires to run out during the boss fight.
Campfire Locations
Northwest
North
Central (facing northwest)
East
Southwest
Southeast

Pineleaf’s Pictorial Primer to Skirmishing
Version 1.0 Volume 3: Stand at Amon Sûl Page | 8
Candaith
This skirmish includes a single defender: a ranger named Candaith.
Name: Candaith
Type: Ranger
Morale: 8967
Candaith has ranged, melee, and healing
skills. There is no real way to prevent
Candaith from participating in the battle.
Therefore, he will get a fair number of the
kills during the course of the skirmish. If your
main goal is to get as much experience as
possible, choose another skirmish.
Opponents
There are three types of trash opponents that you face at Amon Sûl: wights, shades, and bats. Each
wave will include two opponents as indicated on the table below.
Number of Players Possible Setups Mob Types
Solo 2 Weak or 2 Hale Weak, Hale
Duo / Small Fellow 2 Hale or 2 Hardy Hale, Hardy
Fellowship 2 Hardy or 2 Strong Hardy, Strong
Raid (12) 2 Strong or 2 Staunch Strong, Staunch
If a lieutenant is present, it will be in addition to these two opponents. A group is either accompanied by
a lieutenant or not.
Many opponents, including the basic mobs, have special abilities. These abilities are controlled by both
the mob name (e.g., “Wight Captain”) and their quality (Weak, Hale, Hardy, etc.). Higher quality mobs
generally have either more special abilities or more powerful special abilities than their lower quality
counterparts. This means that there are certain special abilities that you will only see in group runs.
Some of the mobs do have an aura of dread (+1 dread if you are near the mob), which means that you
may want some means to counteract dread. Hope tokens are the most common item that would allow
this (even the lowest-end hope tokens would prove sufficient). If you’re willing to give up your
headgear, you can don the Bounder Sherriff’s Cap for +2 hope. Some players may also have promotional
items that would prove useful, such as the Glass of Aglaral.

Pineleaf’s Pictorial Primer to Skirmishing
Version 1.0 Volume 3: Stand at Amon Sûl Page | 9
Bats
It’s amazing how much morale those bats have. They have a higher morale than any of the other trash
mobs in the first three skirmishes.
Name: Frenzied Stormwing
Type: Melee
Morale: 4484
Abilities: Wound: Light Wound
Common damage / 2 sec for 10 sec
Name: Malignant Stormwing
Type: Melee
Morale: 4484
Abilities:
Name: Rabid Stormwing
Type: Melee
Morale: 4484
Abilities: Disease: Minor Disease (12 seconds)
Drains 27 power every 3 seconds
Disease: Minor Diseased Frailty (3m)
Penalty to Vitality

Pineleaf’s Pictorial Primer to Skirmishing
Version 1.0 Volume 3: Stand at Amon Sûl Page | 10
Shades
The shades have an aura of dread. Fortunately they do not burrow under the ground in the annoying
way that most other shades do. At least that is the case for weak and hale shades. The more powerful
shades do indeed burrow.
Name: Malignant Terror
Type: Melee
Morale: 4076
Abilities: Dread (Aura)
+1 Dread
Fear: Chilled (20 seconds)
Shadow damage every 4 seconds
Fear: Fright (3 minutes)
Penalty to Fate and Will
Burrow (Hardy+)
Name: Malignant Dread
Type: Tactical
Morale: 3995
Abilities: Dread (Aura)
+1 Dread
Fear: Fright (3 minutes)
Penalty to Fate and Will
Fear: Distraught (32 seconds, Duo+)
Shadow damage every 4 seconds
Burrow (Hardy+)
Fear: Aura of Dread (Hardy+; Area)
Penalty to Fate and Will
Fear: Chilling Wind (Hardy+; Area)
Shadow Damage every 4 seconds

Pineleaf’s Pictorial Primer to Skirmishing
Version 1.0 Volume 3: Stand at Amon Sûl Page | 11
Wights
All wights have an aura of shadow that inflicts shadow damage.
Name: Withering Ruin-Warrior
Type: Melee
Morale: 4117
Abilities: Shadow Aura
Shadow damage every 5 seconds.
Disease: Minor Disease (12 seconds)
Drains power every 3 seconds
Name: Withering Ruin-Archer
Type: Ranged
Morale: 4035
Abilities: Shadow Aura
Shadow damage every 5 seconds.
Name: Withering Ruin-Captain
Type: Melee
Morale: 4117
Abilities: Dread (Aura)
+1 Dread
Shadow Aura
Shadow damage every 5 seconds.
Disease: Disease (21 seconds)
Drains Power every 3 seconds
Disease: Diseased Frailty (4m 30s)
Penalty to Vitality (Hardy+)

Pineleaf’s Pictorial Primer to Skirmishing
Version 1.0 Volume 3: Stand at Amon Sûl Page | 12
Lieutenants
There are 14 lieutenants that appear in the solo setting. 13 more are added in duo and small fellowship
settings. 14 more are added in fellowship and raid settings. This means that there are a total of 41
lieutenants that can appear in this skirmish on the larger group settings. These are all of the lieutenants
that are available in the skirmish system. Details on the various lieutenants are given in Appendix A.
There are 12 points where lieutenants can appear. There is a 50% chance of a lieutenant appearing at
each of those points. In raids, there is a chance of there being two lieutenants in a wave.
These following four lieutenants are the most notable ones in this skirmish.
Blood-rook
At first, this lieuteant appears to be no real threat
in this skirmish as you will only face two other
mobs with it. That does not mean that you can
leave Candaith to solo the bird as you light fires.
Death-Monger
The Death-monger can revive almost any type of
fallen comrade. The only two exceptions I have
noticed are shades and wraiths. Note that they will
raise wights.
Shepherd of Filth
In this skirmish, my first warning of the presence
of the Shepherd could be the explosion of crawlers
on my armor. You can be sure that if you fail to see
the Shepherd, either Candaith or your soldier will
activate the crawler summoning. Yeech!
Venomous Blood-arrow
The only thing worse than a lieutenant with nasty
countdown effects is one that fires them at you
before you know he’s there. Even if I do see him, it
is likely it will be too late to prepare an interrupt.

Pineleaf’s Pictorial Primer to Skirmishing
Version 1.0 Volume 3: Stand at Amon Sûl Page | 13
Boss Fight
A chaotic skirmish naturally has a chaotic finale.
If you survive all three assaults, a Cargûl named
Narudúr, the general for the assaulting force,
arrives to personally deal with you and Candaith.
At first the fight looks strightforward, as the
Cargûl arrives alone. Soon, though, he summons
several wights and shades to fight with him and
total chaos ensues.
Narudúr (The General)
The most important of these abilities to note is Terrible Retribution. This means that it is best to use light
or Beleriand weapons when fighting the Cargûl. Beleriand is preferred as the Cargûl is weakest against
those weapons.
Morale 12,228
Retribution
The Cargûl can protect those around him.
Terrible Retribution (5 minutes)
Attacking the wraith returns cold, shocking pain.
Sometimes the shock is enough to root the
attacker with terror where they stand.
On any Common, Westernesse,
Ancient Dwarf-make, Fire damage:
Reflect 25% of Shadow damage
5% chance to reflect effect:
10 seconds root; 50% break chance on damage
after one second.
Fear: Suppressed Fear (20 seconds)
Applied on expiration if in combat
Root (10 seconds, 50% chance break on hit)
Silence (10 seconds)
Fear: Distraught (32 seconds)
227 Shadow damage every 4 seconds
Fear: Unsettled (12 seconds)
161 Shadow damage every 4 seconds
Fear: Shadow Grip (24 seconds)
Steals morale from target, healing the wraith

Pineleaf’s Pictorial Primer to Skirmishing
Version 1.0 Volume 3: Stand at Amon Sûl Page | 14
Summoned Dead
A number of dead emerge from the ground to aid Narudúr during the final battle. The exact composition
of the adds will be selected at random though each will be one of these four types: Baneful Dread,
Baneful Terror, Frenzied Ruin-warrior, and Frenzied Ruin-Archer. As you can surmise from the names,
they are similar to the mobs you face during the course of the skirmish.
The only significant difference I have seen between these mobs and those in the main skirmish is that
even weak mobs in the final battle have the full set of special abilities that you don’t normally see in the
mobs in the main skirmish until they are Hardy or better. In other words, Weak Baneful shades will have
the Burrowing, Chilling Wind Aura, and Aura of Dread that you only see in the main skirmish when the
mob is Hardy or better.
The boss fight in this skirmish is chaotic. With a Cargûl, four adds, campfires, and fear effects all over the
place, it is difficult to find out which mobs are generting which effects.
In solo runs you will face four wights and shades. In duo and small fellowship runs you will face six. In full
fellowship runs there are nine. What about raids? I have not yet run a raid for this skirmish but I can only
imagine that the fight will be even more chaotic.
Encounters
Each time you run a skirmish, the game selects two encounters that are available. The selected
encounters become active when you perform their triggering actions.
There are a total of nine encounters in Stand at Amon Sûl. As with other defensive skirmishes, the
encounter bosses in this skirmish are all signature in solo runs. The challenge of the encounters in this
skirmish is not with the inherent strength of the encounter bosses but with the difficulty to control the
circumstances of facing the encounter boss.
While you can wait to face the encounters until after you kill the final boss, there are four reasons to do
encounters before then:
1. Only encounters faced before the final boss area treated as happening during the skirmish. You
only really care about this if you care about your skirmish statistics.
2. Since the encounters weren’t done during the skirmish, they do not count for the skirmish’s
encounter deed. Once you do get credit for an encounter in one run you don’t have to worry
about this point in later runs.
3. The emblems or tokens dropped by the encounter bosses wouldn’t be much use since you have
already faced all the tough opposition.
4. Part of the challenge is facing the encounters when intended.
The encounters in this skirmish are quite varied: three are simple spawns, two are tied to the state of
the outer campfires, three require you to kill a lesser mob before the boss is triggered, and three require
you to interact with objects. Wait, isn’t that more than nine? That’s because some of the encounters
have a combination of those factors.

Pineleaf’s Pictorial Primer to Skirmishing
Version 1.0 Volume 3: Stand at Amon Sûl Page | 15
Laimbenn
It’s a good thing that
Laimbenn spawns early in the
skirmish, as you would want
to choose your time in
fighting him. Like most gaunt
men, he starts the fight with
one companion and can
summon a second. If you
have a means to interrupt
Laimbenn during the
summoning process, you can
at least prevent the second
companion from appearing.
The picture to the left shows
you where not to fight
Laimbenn. This is outside the
range of most of the fires and
but within the oppressive
darkness zone.
Name: Laimbenn
Type: Gaunt Man
Trigger: End of the fourth wave of the first assault.
Text: An inhuman wail sounds across the peak of Weathertop.
Location: Southwest of the central campfire.
Morale: 8152
Abilities: Starts with a wight companion; can summon a second wight companion
Wound: Major Laceration
-20% melee / ranged damage; Parry Rating Penalty
Other mobs: Summoned wight (3941); Summoned servant (3902)

Pineleaf’s Pictorial Primer to Skirmishing
Version 1.0 Volume 3: Stand at Amon Sûl Page | 16
Norgol
The flickering is Urgal, a
rather wimpy limrafn. If you
kill Urgal, you receive a
second message telling you
that this was a small one and
that a larger limrafn could be
attracted if you lit all the
fires. Once all the fires are lit
(which for me is generally
immediately since I try to
keep all the fires lit), you get
the message: “With the
flames all on, a large fire
erupts in the south-east.”
The large fire is Norgol, the
encounter boss. You can then
grab Norgol at your leisure
(usually I do this right away).
Name: Norgol
Type: Limrafn
Trigger: End of the first assault.
Text: A flickering comes from the south-east.
Location: Southeast of the central campfire.
Morale: 8152
Abilities: Aura: Intense Heat
Wound: Searing Heat
Fire damage every 2 seconds
Other mobs: Urgal (2038)
Pineleaf’s Pictorial Primer to Skirmishing
Version 1.0 Volume 3: Stand at Amon Sûl Page | 17
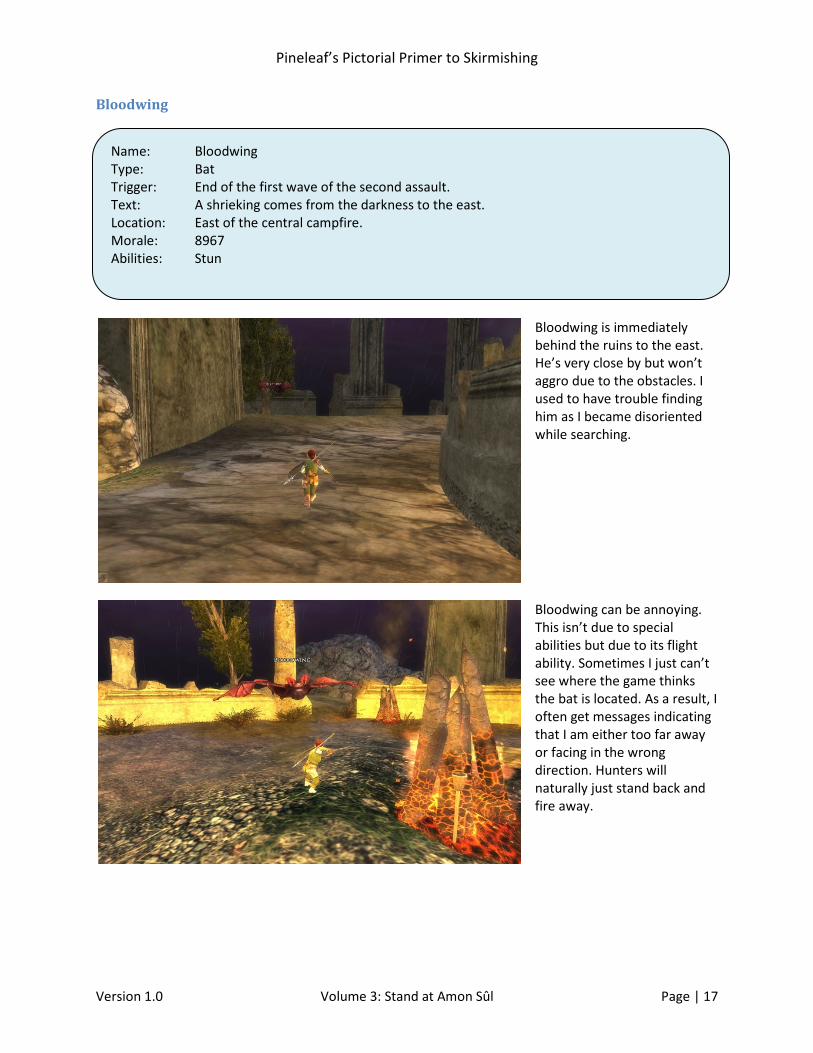
Bloodwing
Bloodwing is immediately
behind the ruins to the east.
He’s very close by but won’t
aggro due to the obstacles. I
used to have trouble finding
him as I became disoriented
while searching.
Bloodwing can be annoying.
This isn’t due to special
abilities but due to its flight
ability. Sometimes I just can’t
see where the game thinks
the bat is located. As a result, I
often get messages indicating
that I am either too far away
or facing in the wrong
direction. Hunters will
naturally just stand back and
fire away.
Name: Bloodwing
Type: Bat
Trigger: End of the first wave of the second assault.
Text: A shrieking comes from the darkness to the east.
Location: East of the central campfire.
Morale: 8967
Abilities: Stun

Pineleaf’s Pictorial Primer to Skirmishing
Version 1.0 Volume 3: Stand at Amon Sûl Page | 18
Golnauk
I find warg riders to be
annoying opponents in
general as they are fast and
they like to fight at range.
Golnauk is certainly no
exception.
You have two choices where
to fight this rider. The best
spot is in the center, where
you can take advantage of
the campfires. The challenge
here is to pull a ranged
fighter into the center.
The other choice is to fight in
the outer perimeter. Wait,
isn’t this outside the range of
all the campfires? Yes, but
the outermost areas are also
outside the range of the
darkness penalty.
Name: Golnauk
Type: Warg Rider
Trigger: End of the third wave of the second assault.
Text: Growling and a snarl come from the north edge of Weathertop.
Location: Northeast of the central campfire.
Morale: 8152
Abilities: Ranged attack
Fleet of Paw: While the warg-rider has high morale, its movement speed is increased
Wound: Hamstring (10 seconds) -50% run speed
Fear: Minor Fright (1 min 20 seconds) Penalty to Fate and Will
Fear: Chilled (20 seconds) Shadow damage every 4 seconds
Corruption: Furious Attack Increased attack speed

Pineleaf’s Pictorial Primer to Skirmishing
Version 1.0 Volume 3: Stand at Amon Sûl Page | 19
Gwathrengor
If you want to fight
Gwathrengor, you need to
violate the first rule of this
skirmish: never let the fires
go out.
When this encounter is
triggered, you need to click
on the central cairn. This
generates a second message
that tells you that the
guardian will not come until
you allow all the outer
campfires to burn out.
Once the last fire burns out,
Gwathrengor spawns to the
south and moves to the
central area.
Once Gwanthrengor spawns,
you can light the campfires
without disrupting the
encounter.
Name: Gwathrengor
Type: Shade
Trigger: End of the second assault.
Text: A glint in the cairn catches your eye.
Location: Arrives from the southwest after all campfires burn out.
Morale: 8152
Abilities:

Pineleaf’s Pictorial Primer to Skirmishing
Version 1.0 Volume 3: Stand at Amon Sûl Page | 20
Urkflagit
With this encounter, you
learn a second use of your
torch: waking wood trolls.
The encounter boss is
sleeping to the northwest of
the central campfire (near
some trees behind the ruins).
If you approach the troll, you
will get a message suggesting
that you should use a torch
to wake the troll. If you
approach the sleeping troll
with a torch, the troll will
wake and attack you.
The fight with the troll is
fairly straightforward if you
don’t mind the occasional
stun or interrupt.
Name: Urkflagit
Type: Wood Troll
Trigger: End of the second assault.
Text: Snoring echoes from the north-west corner of Weathertop.
Location: Northwest of the central campfire.
Morale: 8071
Abilities: Stun
Knockback

Pineleaf’s Pictorial Primer to Skirmishing
Version 1.0 Volume 3: Stand at Amon Sûl Page | 21
Mokum
You need to pick eight plants.
After you pick the first four,
you Candaith will call out,
‘Half-way there, we need
only 4 more.’ After you pick
up all eight, Candaith will call
out, ‘Now quickly, pitch them
into the fire.’
Since throwing the herbs into
the fire will trigger the
encounter boss, you should
wait until a suitable time
before doing so.
After you throw the herbs in
the fire, Candaith calls out,
‘We have been tricked, be on
your guard!’ Mokum is a
rather straightforward fight.
Name: Mokum
Type: Orc
Trigger: End of the second assault.
Text: Candaith calls out, ‘The athelas has bloomed. Quickly grab it all up.’
Location: Runs to the central campfire from the southwest.
Morale: 8152
Abilities:
Pineleaf’s Pictorial Primer to Skirmishing
Version 1.0 Volume 3: Stand at Amon Sûl Page | 22
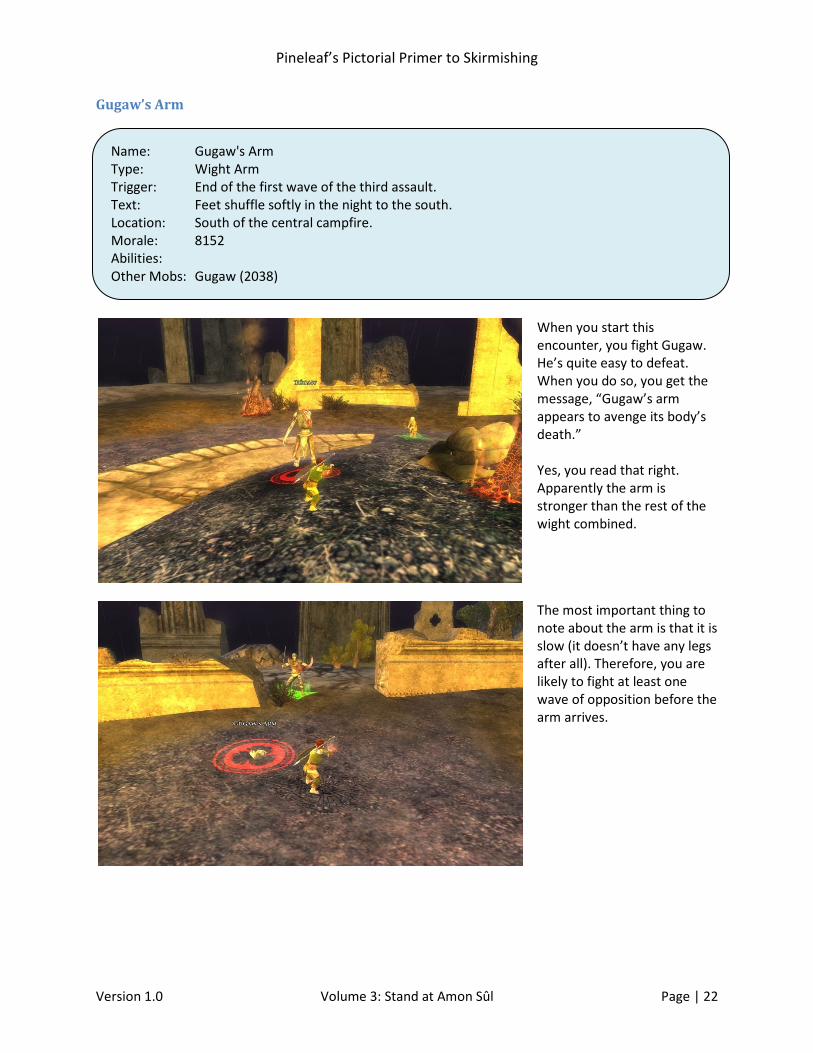
Gugaw’s Arm
When you start this
encounter, you fight Gugaw.
He’s quite easy to defeat.
When you do so, you get the
message, “Gugaw’s arm
appears to avenge its body’s
death.”
Yes, you read that right.
Apparently the arm is
stronger than the rest of the
wight combined.
The most important thing to
note about the arm is that it is
slow (it doesn’t have any legs
after all). Therefore, you are
likely to fight at least one
wave of opposition before the
arm arrives.
Name: Gugaw's Arm
Type: Wight Arm
Trigger: End of the first wave of the third assault.
Text: Feet shuffle softly in the night to the south.
Location: South of the central campfire.
Morale: 8152
Abilities:
Other Mobs: Gugaw (2038)

Pineleaf’s Pictorial Primer to Skirmishing
Version 1.0 Volume 3: Stand at Amon Sûl Page | 23
Gwandir
When this encounter is
triggered, Thadaen is
spawned. He is quite easy to
kill. When you do so, Gwandir
appears and complains that
Thadaen’s bow is his.
The trickiest element of this
encounter is the timing. You
have a very small window of
opportunity to complete this
encounter and two of the
three waves might contain
lieutenants.
Name: Gwandir
Type: Wight
Trigger: End of the fifth wave of the third assault.
Text: Moans come from the East edge of Weathertop.
Location: East of the central campfire.
Morale: 8234
Abilities: Disease: Diseased Frailty (4 min 30 sec)
Penalty to Vitality
Dread +1
Shadow Aura
Shadow damage every 5 seconds
Other Mobs: Thadaen (2818)

Pineleaf’s Pictorial Primer to Skirmishing
Version 1.0 Volume 3: Stand at Amon Sûl Page | 24
Variations
One of the advantages of skirmishes is their scalability. Skirmishes can be scaled in three ways: level,
player group size, and tier.
Level
All skirmishes have a level range. The range for Stand at Amon Sûl is 25 to 65. The default setting for a
skirmish run is the level of the character starting the skirmish. You can set the skirmish to any level
within the level range if required. Most skirmishes, such as Stand at Amon Sûl, cannot be set to a level
higher than the level cap.
Why would you want to change the level for the skirmish? If you are just starting to learn a skirmish, you
may want to set the level lower to allow you to understand how the skirmish works. This isn’t always
possible, though, as you generally first try a skirmish when you reach its minimum level.
Another reason to set the level lower is to compensate for an underpowered soldier. If you start
skirmishing at a high level, your soldier is likely to be under par. Many players in this situation set the
skirmish level one or two levels lower to allow them to complete enough skirmishes to bring their
soldiers to a reasonable rank. You should avoid dropping the skirmish-h level too low, though, as you
want to earn enough skirmish marks to pay for the soldier upgrades.
Some classes may find certain skirmishes or encounters tough and may run that skirmish at a lower level
to make it easier. This should not be an issue with Stand at Amon Sûl, though.
You may also want to adjust the level if not all the members of a group are of the same level or if the
group is short of the recommended size.
Finally, you may want to increase the challenge by raising the level by
one or two. This can be especially useful if you are getting near a level
where the rewards are upgraded. There are reward upgrades at levels
30, 45, 60, and 65. You therefore would generally want to increase the
level to one of these levels and avoid decreasing below one of these
levels.
When you adjust the level of the skirmish, you also adjust the skirmish
mark rewards within the skirmish. These adjustments are based on your
level when you first enter the skirmish (so you are not penalized if you
level during the skirmish). The exact adjustment varies based on your
level. The table to the right includes levels 35 and 65 (note that it is not
possible to increase Stand at Amon Sûl above level 65).
Diff Level 65 Level 35
-10 1% 3%
-9 5% 3%
-8 9% 10%
-7 20% 20%
-6 39% 40%
-5 60% 60%
-4 75% 77%
-3 85% 87%
-2 90% 90%
-1 94% 97%
Even 100% 100%
+1 N/A 107%
+2 N/A 110%
+3 N/A 117%
+4 N/A 123%
+5 N/A 127%
Pineleaf’s Pictorial Primer to Skirmishing
Version 1.0 Volume 3: Stand at Amon Sûl Page | 25
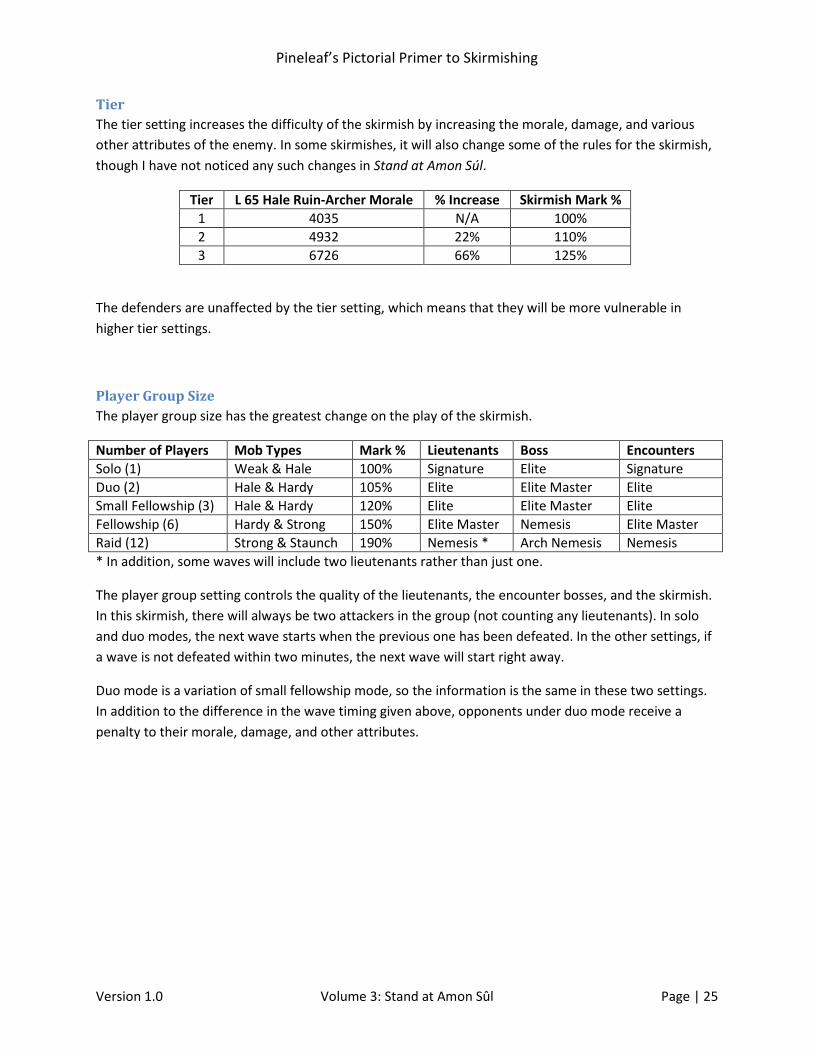
Tier
The tier setting increases the difficulty of the skirmish by increasing the morale, damage, and various
other attributes of the enemy. In some skirmishes, it will also change some of the rules for the skirmish,
though I have not noticed any such changes in Stand at Amon Súl.
Tier L 65 Hale Ruin-Archer Morale % Increase Skirmish Mark %
1 4035 N/A 100%
2 4932 22% 110%
3 6726 66% 125%
The defenders are unaffected by the tier setting, which means that they will be more vulnerable in
higher tier settings.
Player Group Size
The player group size has the greatest change on the play of the skirmish.
Number of Players Mob Types Mark % Lieutenants Boss Encounters
Solo (1) Weak & Hale 100% Signature Elite Signature
Duo (2) Hale & Hardy 105% Elite Elite Master Elite
Small Fellowship (3) Hale & Hardy 120% Elite Elite Master Elite
Fellowship (6) Hardy & Strong 150% Elite Master Nemesis Elite Master
Raid (12) Strong & Staunch 190% Nemesis * Arch Nemesis Nemesis
* In addition, some waves will include two lieutenants rather than just one.
The player group setting controls the quality of the lieutenants, the encounter bosses, and the skirmish.
In this skirmish, there will always be two attackers in the group (not counting any lieutenants). In solo
and duo modes, the next wave starts when the previous one has been defeated. In the other settings, if
a wave is not defeated within two minutes, the next wave will start right away.
Duo mode is a variation of small fellowship mode, so the information is the same in these two settings.
In addition to the difference in the wave timing given above, opponents under duo mode receive a
penalty to their morale, damage, and other attributes.

Pineleaf’s Pictorial Primer to Skirmishing
Version 1.0 Volume 3: Stand at Amon Sûl Page | 26
Deeds
All skirmishes include a deed to complete all the encounters in the skirmish. This deed awards a title
when all of the encounters have been completed at least once. The title for this skirmish is “Stood at
Amon Sûl.” There is no skirmish mark award for completing this deed. You only gain credit for these
deeds if you complete the encounter before killing the skirmish boss and if the encounter boss is at least
green to you (no more than eight levels lower than your level).
Each lieutenant also has an associated slayer deed. There are two tiers for each of these deeds: kill the
lieutenant five times then kill the lieutenant 50 times. All players can access the first tier of the
lieutenant deeds, while only those with the Mirkwood expansion can access the second tier of the deeds
(though this may be made available for separate purchase). There is no title for the deed but you do gain
50 skirmish marks for completing the first tier and 500 skirmish marks for completing the second tier.
Stand at Amon Sûl is a poor source for completing lieutenant deeds as it has a low lieutenant count. A
lieutenant only counts if the level of the lieutenant is at least green.
If you are having trouble finding a group, you may be able to complete the deeds for the duo/trio
lieutenants by running duo skirmishes alone at eight levels below your own (the minimum to get credit).
You can also complete two non-skirmish deeds while running this skirmish: killing wights in the Lone
Lands and Enmity of the Dead.
Quests
Each skirmish includes a daily quest that is granted if you have not yet completed that skirmish during
that day. The first time you complete Stand at Amon Sûl on a day, you receive the following additional
rewards:
• Skirmish marks scaled according to the level at which the skirmish is run (107 at level 65)
• 4651 experience points
• 4682 item experience points
• 700 reputation with the Eglain

Pineleaf’s Pictorial Primer to Skirmishing
Version 1.0 Volume 3: Stand at Amon Sûl Page | 27
We Stand at Amon Sûl
We stand up straight to stop the dead That come to cleave old Candaith in two. We hold the horde of hate that drives A barrow’s blight to the broken hill. Withered wights and wailing shades Do screech and scrabble up the steepest paths. With light we’ll lead the living’s stand Until the time the attackers wane. We stand at Amon Sûl tonight; We stand to stop the strangling foe; We stand to strike a sturdy blow And drive the dark and dead from sight.