Embed Size (px)
Citation preview

Percussion Maps PrimerAn introduction to using Percussion Maps in Finale.
Written by Darrin Smith
Percussion maps are method of instructing Finale how to display and play percussion notation. In their simplest form, percussion maps are nothing more than a translation table in that you enter a note into Finale, and Finale will determine how to display and play that note, based on the map. Let's look at a couple of examples without talking about percussion sounds, just musical tones. Let us say that you wanted, for some reason, Finale to display an entered Middle C as G above Middle C on the staff and play back the note as Middle C.
This can be done via a percussion map. Look at the diagram to see how this is achieved.
You will see that Midi pitch 60 (C4) is selected in the left hand side of the screen. This is middle C.In the Note Definition section of the dialogue, a note name has been defined (“C on G”). Staff position has been set to 4 (Staff positions start at 0 for middle C) and the open and closed Notehead have been left at their default settings.In the section “Notes to Use for [Staff 1]”, “Highlighted note” has been selected. This is important. If you cast you eye back to the left hand side of the screen, you will see an asterisk (*) next to note 60. The presence of that asterisk means that that note is 'active' and will be translated by the map. Any notes inst the staff which do not have that asterisk will be ignored by the percussion map.Now. If you apply this map to a staff, every time you enter a middle C, Finale will actually display that note in the G above Middle C position. On playback, Finale will, when it encounters that note, play back a middle C.
Darrin Smith Page 1 © September 2008
Percussion Maps Primer An introduction to using Percussion Maps in Finale
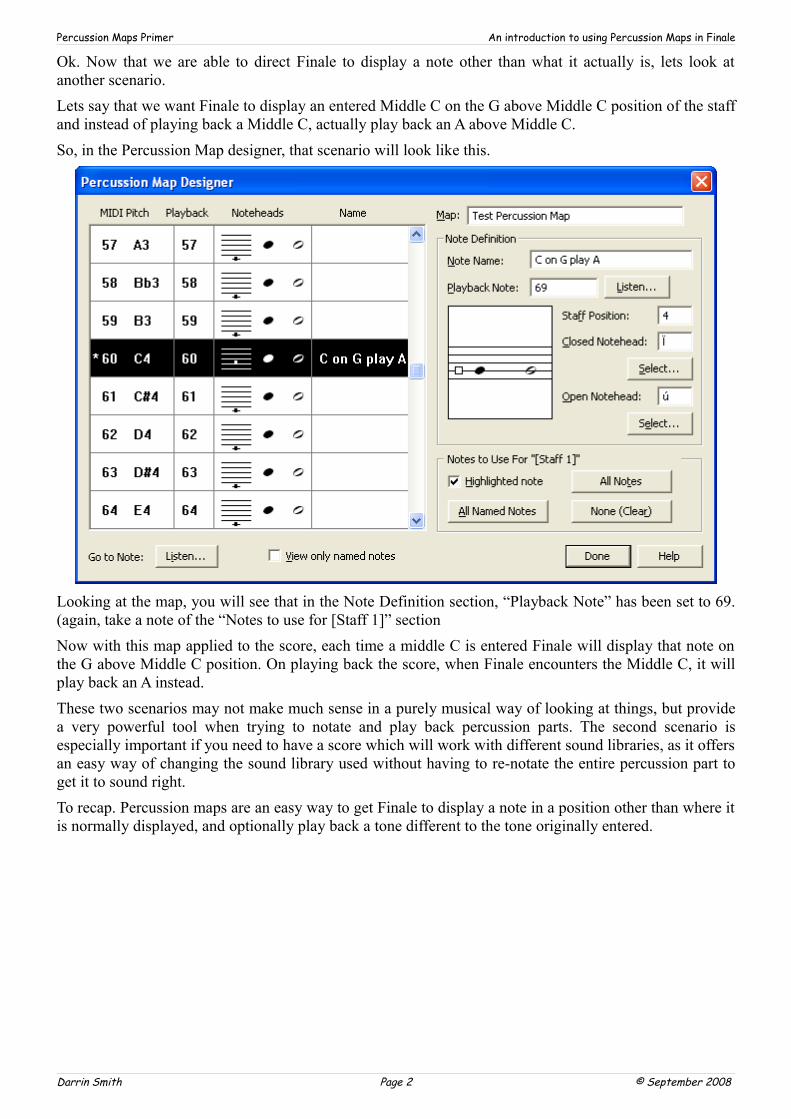
Ok. Now that we are able to direct Finale to display a note other than what it actually is, lets look at another scenario.Lets say that we want Finale to display an entered Middle C on the G above Middle C position of the staff and instead of playing back a Middle C, actually play back an A above Middle C.So, in the Percussion Map designer, that scenario will look like this.
Looking at the map, you will see that in the Note Definition section, “Playback Note” has been set to 69. (again, take a note of the “Notes to use for [Staff 1]” sectionNow with this map applied to the score, each time a middle C is entered Finale will display that note on the G above Middle C position. On playing back the score, when Finale encounters the Middle C, it will play back an A instead.These two scenarios may not make much sense in a purely musical way of looking at things, but provide a very powerful tool when trying to notate and play back percussion parts. The second scenario is especially important if you need to have a score which will work with different sound libraries, as it offers an easy way of changing the sound library used without having to re-notate the entire percussion part to get it to sound right.To recap. Percussion maps are an easy way to get Finale to display a note in a position other than where it is normally displayed, and optionally play back a tone different to the tone originally entered.
Darrin Smith Page 2 © September 2008
Percussion Maps Primer An introduction to using Percussion Maps in Finale
Now. How does this all relate to percussion you ask?When midi was originally created, people decided to create a special case for unpitched percussion sound. Channel 10 was to be dedicated to unpitched percussion and some special effects. Midi notes on that channel would play a different sound thereby allowing midi music to have rich percussion parts. This made notating a percussion part based on midi quite difficult. The Bass Drum is all the way down at C2 (C below the Bass Clef), while a triangle is a high A on the trebel Clef. Look at the diagram and you can see what a mess this is when trying to display it on a typical percussion staff
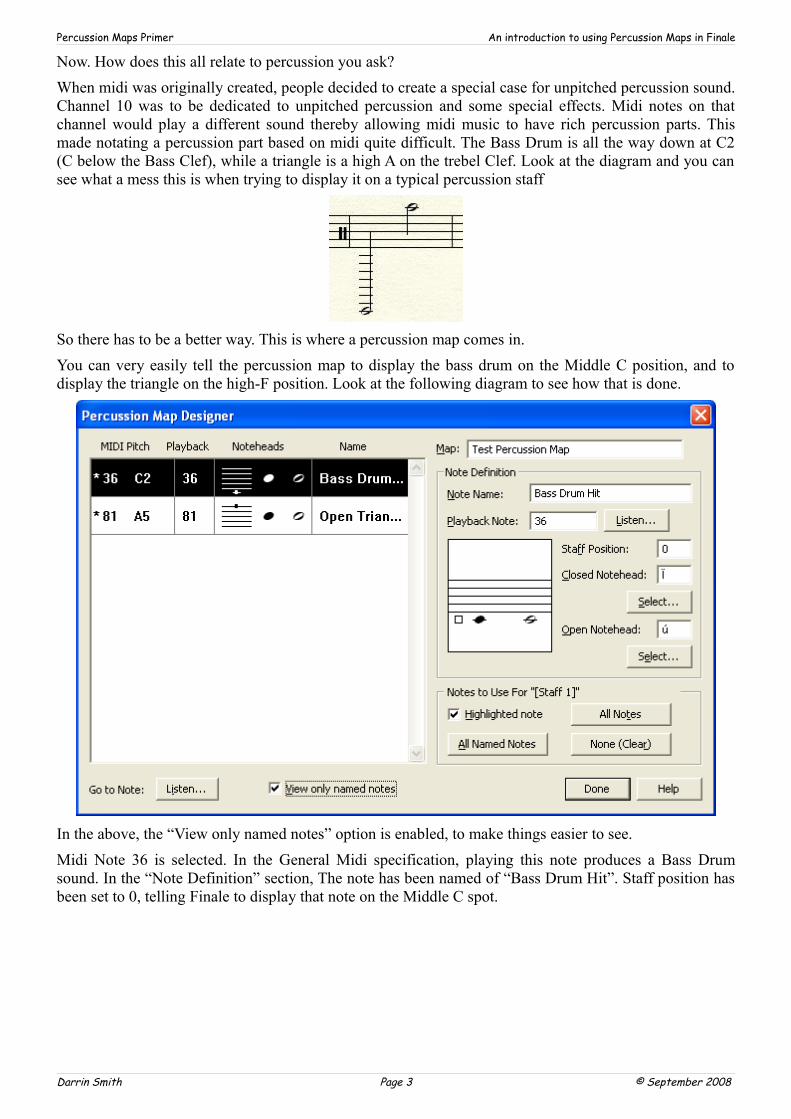
So there has to be a better way. This is where a percussion map comes in.You can very easily tell the percussion map to display the bass drum on the Middle C position, and to display the triangle on the high-F position. Look at the following diagram to see how that is done.
In the above, the “View only named notes” option is enabled, to make things easier to see.Midi Note 36 is selected. In the General Midi specification, playing this note produces a Bass Drum sound. In the “Note Definition” section, The note has been named of “Bass Drum Hit”. Staff position has been set to 0, telling Finale to display that note on the Middle C spot.
Darrin Smith Page 3 © September 2008
Percussion Maps Primer An introduction to using Percussion Maps in Finale
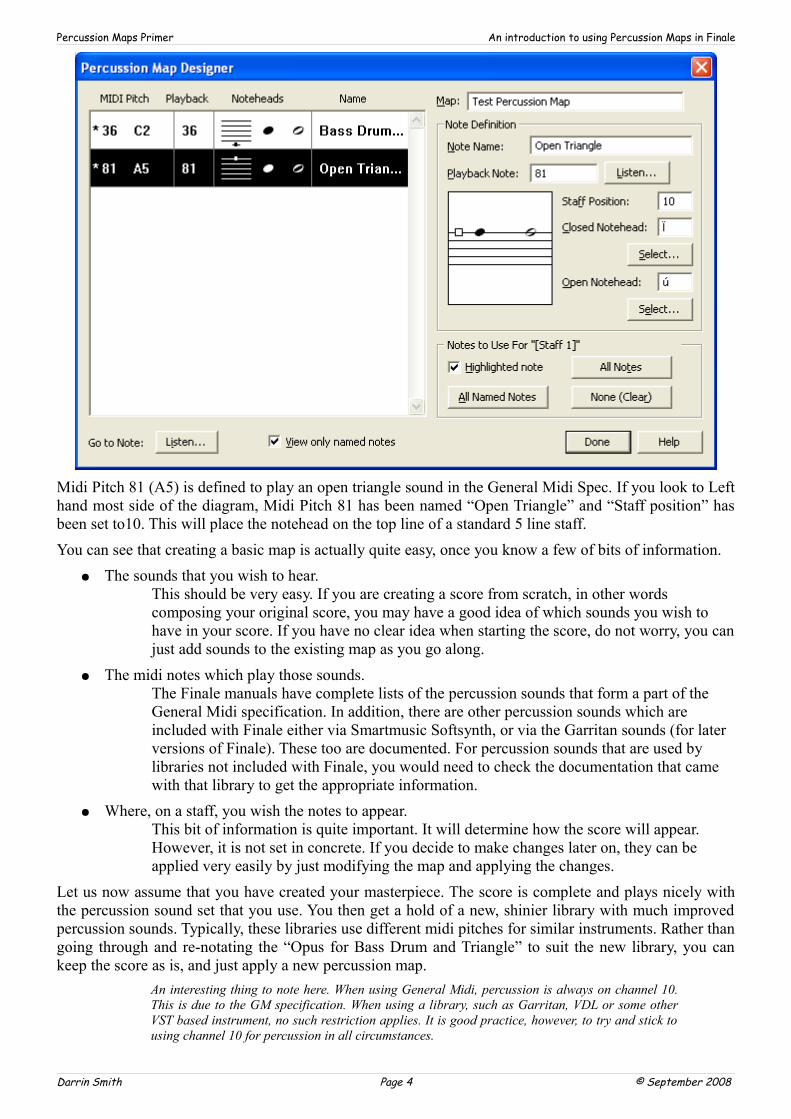
Midi Pitch 81 (A5) is defined to play an open triangle sound in the General Midi Spec. If you look to Left hand most side of the diagram, Midi Pitch 81 has been named “Open Triangle” and “Staff position” has been set to10. This will place the notehead on the top line of a standard 5 line staff.You can see that creating a basic map is actually quite easy, once you know a few of bits of information.
● The sounds that you wish to hear.This should be very easy. If you are creating a score from scratch, in other words composing your original score, you may have a good idea of which sounds you wish to have in your score. If you have no clear idea when starting the score, do not worry, you can just add sounds to the existing map as you go along.
● The midi notes which play those sounds.The Finale manuals have complete lists of the percussion sounds that form a part of the General Midi specification. In addition, there are other percussion sounds which are included with Finale either via Smartmusic Softsynth, or via the Garritan sounds (for later versions of Finale). These too are documented. For percussion sounds that are used by libraries not included with Finale, you would need to check the documentation that came with that library to get the appropriate information.
● Where, on a staff, you wish the notes to appear.This bit of information is quite important. It will determine how the score will appear. However, it is not set in concrete. If you decide to make changes later on, they can be applied very easily by just modifying the map and applying the changes.
Let us now assume that you have created your masterpiece. The score is complete and plays nicely with the percussion sound set that you use. You then get a hold of a new, shinier library with much improved percussion sounds. Typically, these libraries use different midi pitches for similar instruments. Rather than going through and re-notating the “Opus for Bass Drum and Triangle” to suit the new library, you can keep the score as is, and just apply a new percussion map.
An interesting thing to note here. When using General Midi, percussion is always on channel 10. This is due to the GM specification. When using a library, such as Garritan, VDL or some other VST based instrument, no such restriction applies. It is good practice, however, to try and stick to using channel 10 for percussion in all circumstances.
Darrin Smith Page 4 © September 2008
Percussion Maps Primer An introduction to using Percussion Maps in Finale
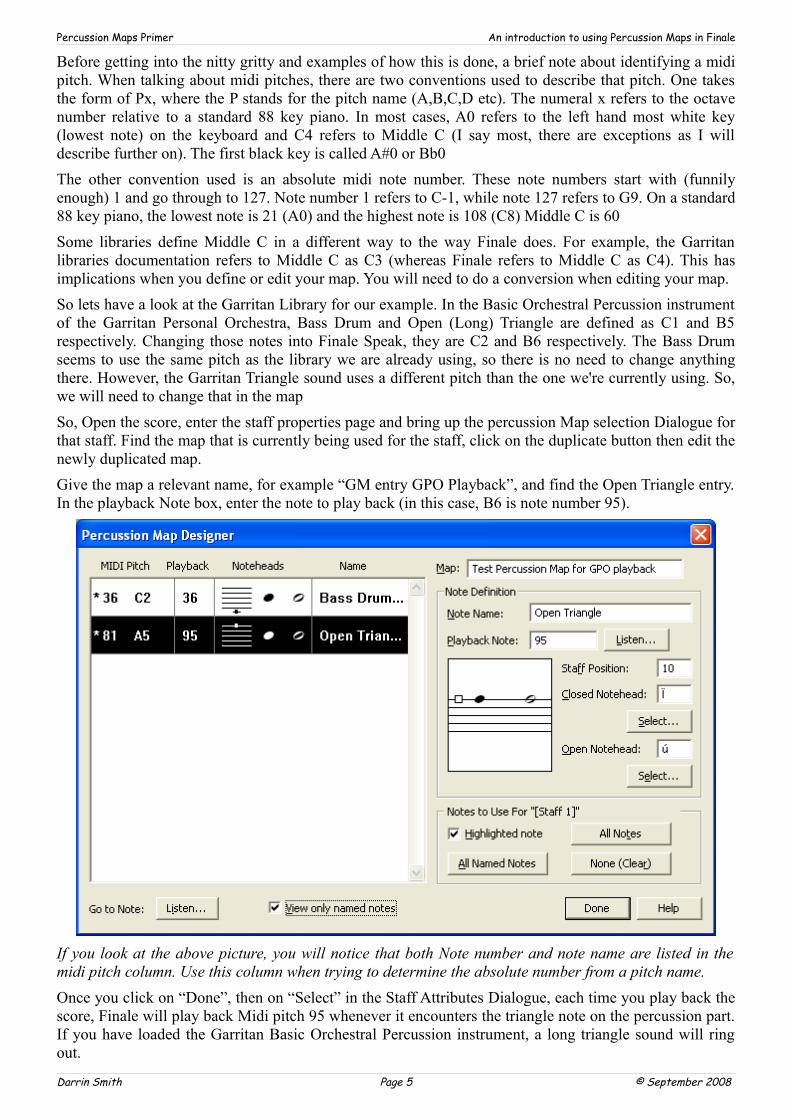
Before getting into the nitty gritty and examples of how this is done, a brief note about identifying a midi pitch. When talking about midi pitches, there are two conventions used to describe that pitch. One takes the form of Px, where the P stands for the pitch name (A,B,C,D etc). The numeral x refers to the octave number relative to a standard 88 key piano. In most cases, A0 refers to the left hand most white key (lowest note) on the keyboard and C4 refers to Middle C (I say most, there are exceptions as I will describe further on). The first black key is called A#0 or Bb0The other convention used is an absolute midi note number. These note numbers start with (funnily enough) 1 and go through to 127. Note number 1 refers to C-1, while note 127 refers to G9. On a standard 88 key piano, the lowest note is 21 (A0) and the highest note is 108 (C8) Middle C is 60Some libraries define Middle C in a different way to the way Finale does. For example, the Garritan libraries documentation refers to Middle C as C3 (whereas Finale refers to Middle C as C4). This has implications when you define or edit your map. You will need to do a conversion when editing your map.So lets have a look at the Garritan Library for our example. In the Basic Orchestral Percussion instrument of the Garritan Personal Orchestra, Bass Drum and Open (Long) Triangle are defined as C1 and B5 respectively. Changing those notes into Finale Speak, they are C2 and B6 respectively. The Bass Drum seems to use the same pitch as the library we are already using, so there is no need to change anything there. However, the Garritan Triangle sound uses a different pitch than the one we're currently using. So, we will need to change that in the mapSo, Open the score, enter the staff properties page and bring up the percussion Map selection Dialogue for that staff. Find the map that is currently being used for the staff, click on the duplicate button then edit the newly duplicated map.Give the map a relevant name, for example “GM entry GPO Playback”, and find the Open Triangle entry. In the playback Note box, enter the note to play back (in this case, B6 is note number 95).
If you look at the above picture, you will notice that both Note number and note name are listed in the midi pitch column. Use this column when trying to determine the absolute number from a pitch name.Once you click on “Done”, then on “Select” in the Staff Attributes Dialogue, each time you play back the score, Finale will play back Midi pitch 95 whenever it encounters the triangle note on the percussion part. If you have loaded the Garritan Basic Orchestral Percussion instrument, a long triangle sound will ring out.
Darrin Smith Page 5 © September 2008
Percussion Maps Primer An introduction to using Percussion Maps in Finale
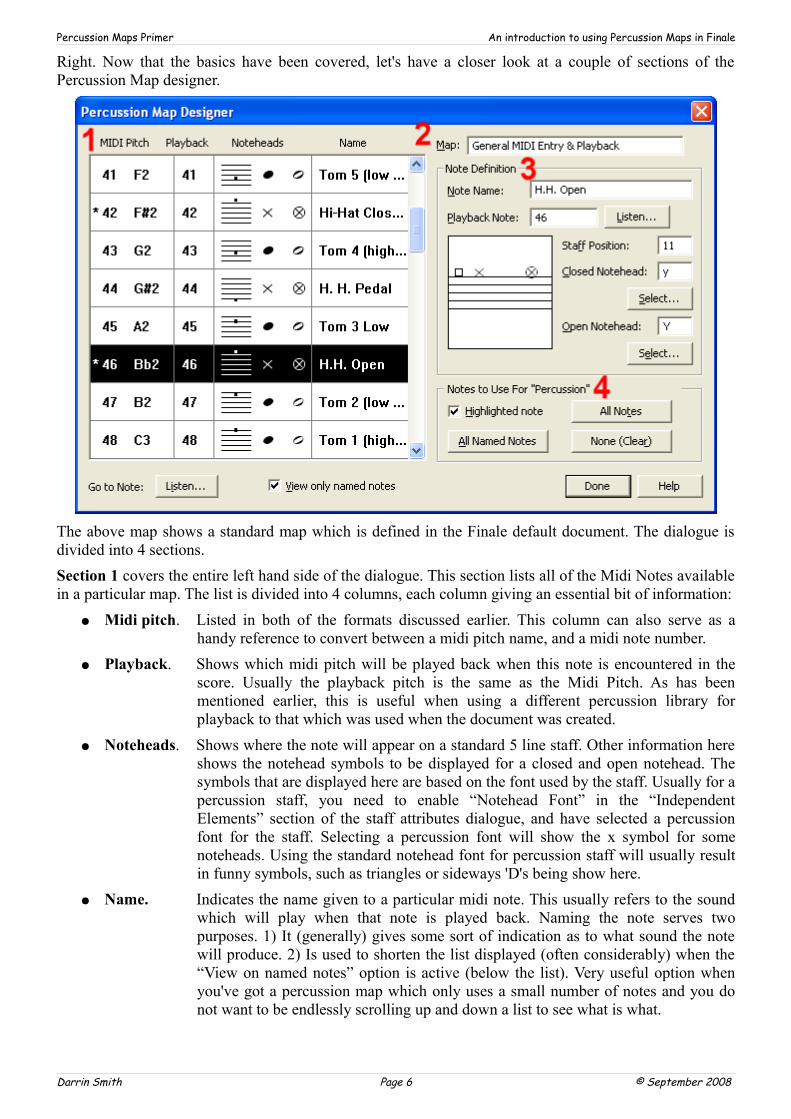
Right. Now that the basics have been covered, let's have a closer look at a couple of sections of the Percussion Map designer.
The above map shows a standard map which is defined in the Finale default document. The dialogue is divided into 4 sections.Section 1 covers the entire left hand side of the dialogue. This section lists all of the Midi Notes available in a particular map. The list is divided into 4 columns, each column giving an essential bit of information:
● Midi pitch. Listed in both of the formats discussed earlier. This column can also serve as a handy reference to convert between a midi pitch name, and a midi note number.
● Playback. Shows which midi pitch will be played back when this note is encountered in the score. Usually the playback pitch is the same as the Midi Pitch. As has been mentioned earlier, this is useful when using a different percussion library for playback to that which was used when the document was created.
● Noteheads. Shows where the note will appear on a standard 5 line staff. Other information here shows the notehead symbols to be displayed for a closed and open notehead. The symbols that are displayed here are based on the font used by the staff. Usually for a percussion staff, you need to enable “Notehead Font” in the “Independent Elements” section of the staff attributes dialogue, and have selected a percussion font for the staff. Selecting a percussion font will show the x symbol for some noteheads. Using the standard notehead font for percussion staff will usually result in funny symbols, such as triangles or sideways 'D's being show here.
● Name. Indicates the name given to a particular midi note. This usually refers to the sound which will play when that note is played back. Naming the note serves two purposes. 1) It (generally) gives some sort of indication as to what sound the note will produce. 2) Is used to shorten the list displayed (often considerably) when the “View on named notes” option is active (below the list). Very useful option when you've got a percussion map which only uses a small number of notes and you do not want to be endlessly scrolling up and down a list to see what is what.
Darrin Smith Page 6 © September 2008
Percussion Maps Primer An introduction to using Percussion Maps in Finale
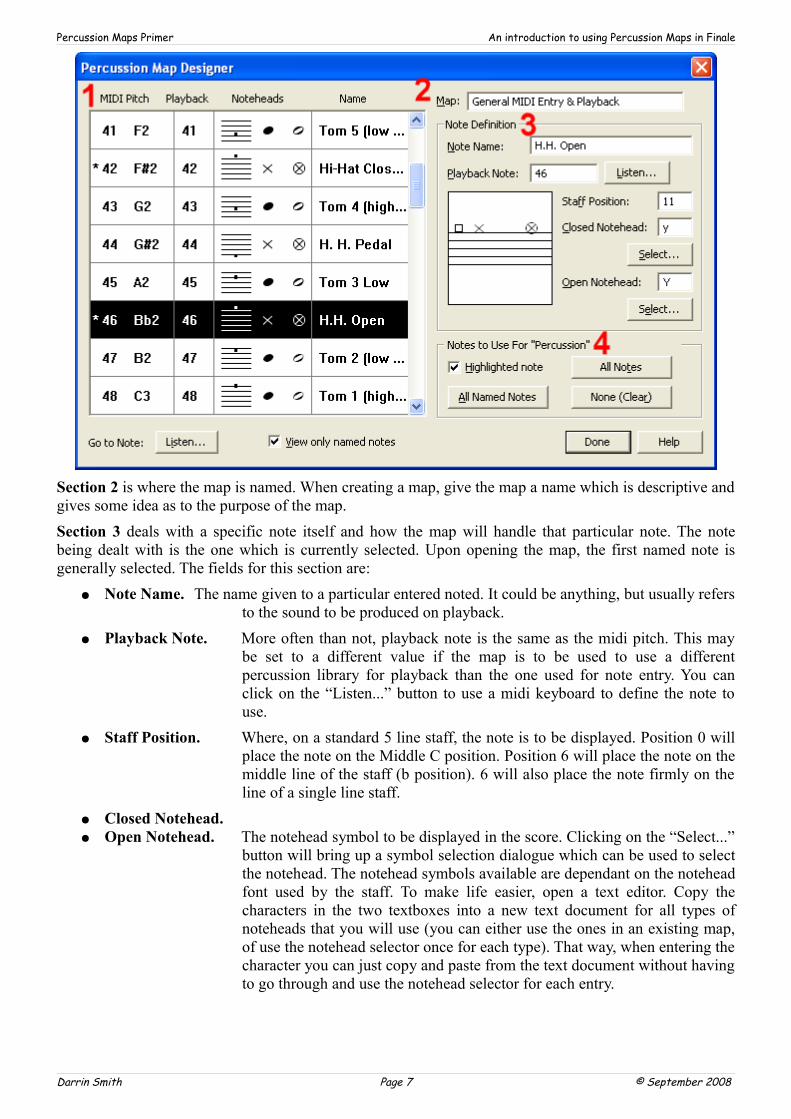
Section 2 is where the map is named. When creating a map, give the map a name which is descriptive and gives some idea as to the purpose of the map.Section 3 deals with a specific note itself and how the map will handle that particular note. The note being dealt with is the one which is currently selected. Upon opening the map, the first named note is generally selected. The fields for this section are:
● Note Name. The name given to a particular entered noted. It could be anything, but usually refers to the sound to be produced on playback.
● Playback Note. More often than not, playback note is the same as the midi pitch. This may be set to a different value if the map is to be used to use a different percussion library for playback than the one used for note entry. You can click on the “Listen...” button to use a midi keyboard to define the note to use.
● Staff Position. Where, on a standard 5 line staff, the note is to be displayed. Position 0 will place the note on the Middle C position. Position 6 will place the note on the middle line of the staff (b position). 6 will also place the note firmly on the line of a single line staff.
● Closed Notehead.● Open Notehead. The notehead symbol to be displayed in the score. Clicking on the “Select...”
button will bring up a symbol selection dialogue which can be used to select the notehead. The notehead symbols available are dependant on the notehead font used by the staff. To make life easier, open a text editor. Copy the characters in the two textboxes into a new text document for all types of noteheads that you will use (you can either use the ones in an existing map, of use the notehead selector once for each type). That way, when entering the character you can just copy and paste from the text document without having to go through and use the notehead selector for each entry.
Darrin Smith Page 7 © September 2008

Percussion Maps Primer An introduction to using Percussion Maps in Finale
Section 4, “Notes to use for [Staff Name]” has to be the least understood and most underused section of the map designer. This section controls which notes will be active for the map in question. Take a look at the above diagram. You will notice that the H.H Open and Hi-Hat Closed notes both have an asterisk (*) net to their respective entries in the left hand most portion of the dialogue box. Further, then currently selected note has the “Highlighted note” checkbox enabled. This means that of all of the visible notes in that box, only the two that are active will be interpreted and acted on by Finale when displaying and playing back the score. The section itself has one checkbox and three buttons which can be used
● Highlighted Note. This will make active the currently selected note. Use this when editing a map and you want to make only a small number of the notes active in the map. An example here might be if your score makes use of the General MIDI Entry & Playback map, but you're only going to be using a few of the large number of defined notes in your score.
● All Notes. Pressing this button will activate all 127 notes. You may wish to make all of the notes active for a particular map for whatever reason. Possibly to then go through and de-active (via the Highlighted note checkbox) a selection of notes which will not be used. Marking all notes as active will ensure that all of the changes that you make to a map will be active in the score, but will produce some headaches when entering in note values (more on this later)
● All Named Notes. This button will mark all notes which have been named as active. Thi button is particularly useful if you're creating a map from scratch. It will ensure that all of the entries that you have created (as long as the notes are actually named) will become active.
● None (Clear).Most useful when editing an existing, active map where you want to use only a small number of the defined notes. Use this button to clear all ative notes, then go through and individually select the notes you wish to make active (via the Highlighted notes checkbox)
At the bottom left of the dialogue is a button marked “Listen”. Use this button to select a note in the map based on a keypress from a midi keyboard.Finally, Next to the Listen button, is a check box allowing only named notes to be displayed. This is useful to reduce the amount of scrolling required when editing already defined notes.
Darrin Smith Page 8 © September 2008
Percussion Maps Primer An introduction to using Percussion Maps in Finale
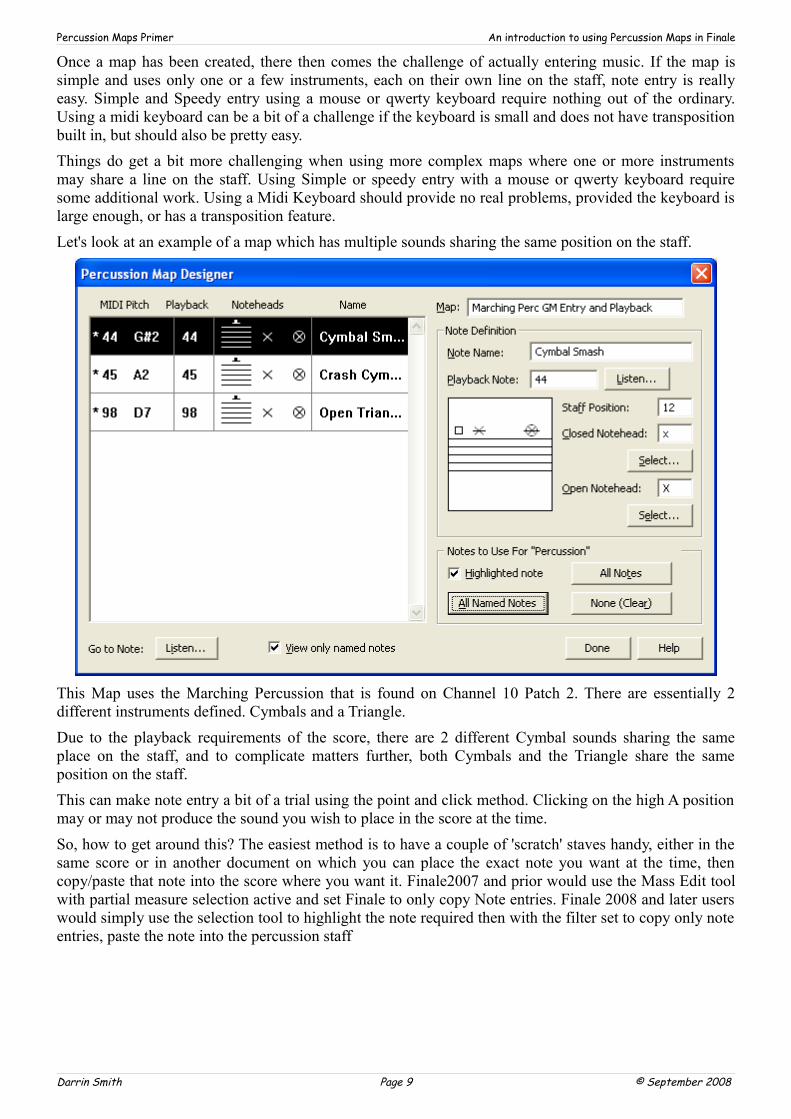
Once a map has been created, there then comes the challenge of actually entering music. If the map is simple and uses only one or a few instruments, each on their own line on the staff, note entry is really easy. Simple and Speedy entry using a mouse or qwerty keyboard require nothing out of the ordinary. Using a midi keyboard can be a bit of a challenge if the keyboard is small and does not have transposition built in, but should also be pretty easy.Things do get a bit more challenging when using more complex maps where one or more instruments may share a line on the staff. Using Simple or speedy entry with a mouse or qwerty keyboard require some additional work. Using a Midi Keyboard should provide no real problems, provided the keyboard is large enough, or has a transposition feature.Let's look at an example of a map which has multiple sounds sharing the same position on the staff.
This Map uses the Marching Percussion that is found on Channel 10 Patch 2. There are essentially 2 different instruments defined. Cymbals and a Triangle.Due to the playback requirements of the score, there are 2 different Cymbal sounds sharing the same place on the staff, and to complicate matters further, both Cymbals and the Triangle share the same position on the staff.This can make note entry a bit of a trial using the point and click method. Clicking on the high A position may or may not produce the sound you wish to place in the score at the time.So, how to get around this? The easiest method is to have a couple of 'scratch' staves handy, either in the same score or in another document on which you can place the exact note you want at the time, then copy/paste that note into the score where you want it. Finale2007 and prior would use the Mass Edit tool with partial measure selection active and set Finale to only copy Note entries. Finale 2008 and later users would simply use the selection tool to highlight the note required then with the filter set to copy only note entries, paste the note into the percussion staff
Darrin Smith Page 9 © September 2008
Percussion Maps Primer An introduction to using Percussion Maps in Finale
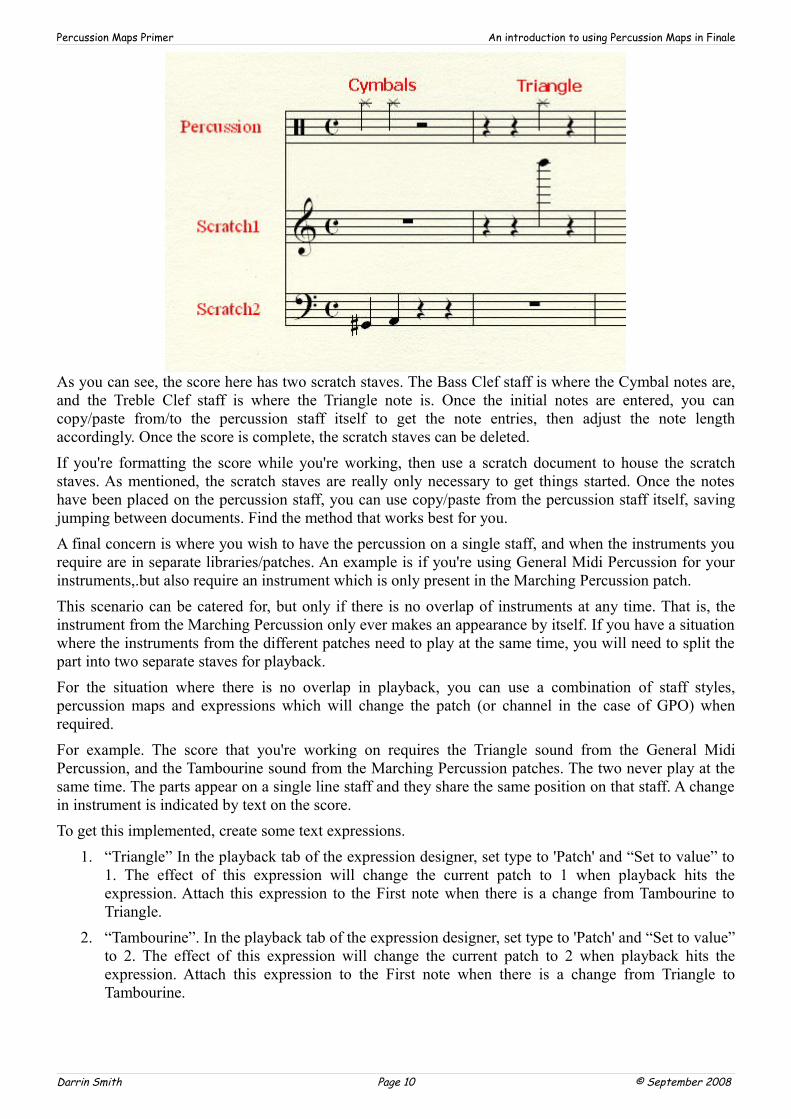
As you can see, the score here has two scratch staves. The Bass Clef staff is where the Cymbal notes are, and the Treble Clef staff is where the Triangle note is. Once the initial notes are entered, you can copy/paste from/to the percussion staff itself to get the note entries, then adjust the note length accordingly. Once the score is complete, the scratch staves can be deleted.If you're formatting the score while you're working, then use a scratch document to house the scratch staves. As mentioned, the scratch staves are really only necessary to get things started. Once the notes have been placed on the percussion staff, you can use copy/paste from the percussion staff itself, saving jumping between documents. Find the method that works best for you.A final concern is where you wish to have the percussion on a single staff, and when the instruments you require are in separate libraries/patches. An example is if you're using General Midi Percussion for your instruments,.but also require an instrument which is only present in the Marching Percussion patch.This scenario can be catered for, but only if there is no overlap of instruments at any time. That is, the instrument from the Marching Percussion only ever makes an appearance by itself. If you have a situation where the instruments from the different patches need to play at the same time, you will need to split the part into two separate staves for playback.For the situation where there is no overlap in playback, you can use a combination of staff styles, percussion maps and expressions which will change the patch (or channel in the case of GPO) when required.For example. The score that you're working on requires the Triangle sound from the General Midi Percussion, and the Tambourine sound from the Marching Percussion patches. The two never play at the same time. The parts appear on a single line staff and they share the same position on that staff. A change in instrument is indicated by text on the score.To get this implemented, create some text expressions.
1. “Triangle” In the playback tab of the expression designer, set type to 'Patch' and “Set to value” to 1. The effect of this expression will change the current patch to 1 when playback hits the expression. Attach this expression to the First note when there is a change from Tambourine to Triangle.
2. “Tambourine”. In the playback tab of the expression designer, set type to 'Patch' and “Set to value” to 2. The effect of this expression will change the current patch to 2 when playback hits the expression. Attach this expression to the First note when there is a change from Triangle to Tambourine.
Darrin Smith Page 10 © September 2008
Percussion Maps Primer An introduction to using Percussion Maps in Finale
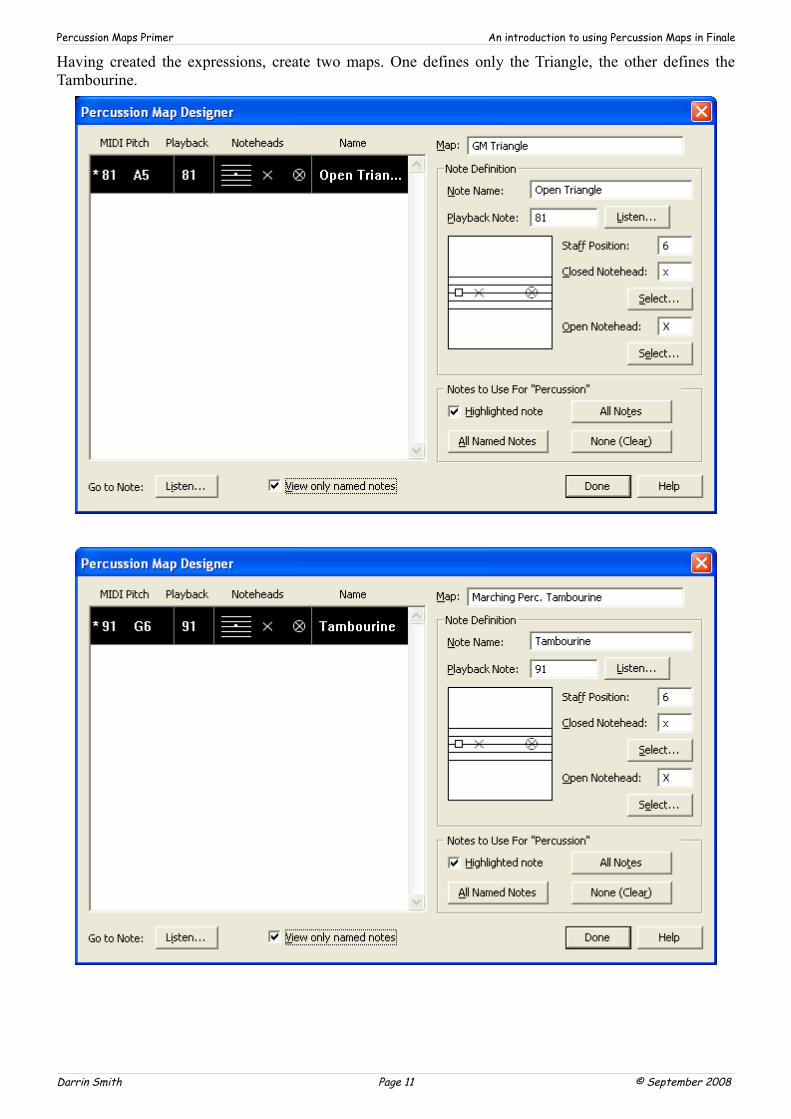
Having created the expressions, create two maps. One defines only the Triangle, the other defines the Tambourine.
Darrin Smith Page 11 © September 2008
Percussion Maps Primer An introduction to using Percussion Maps in Finale
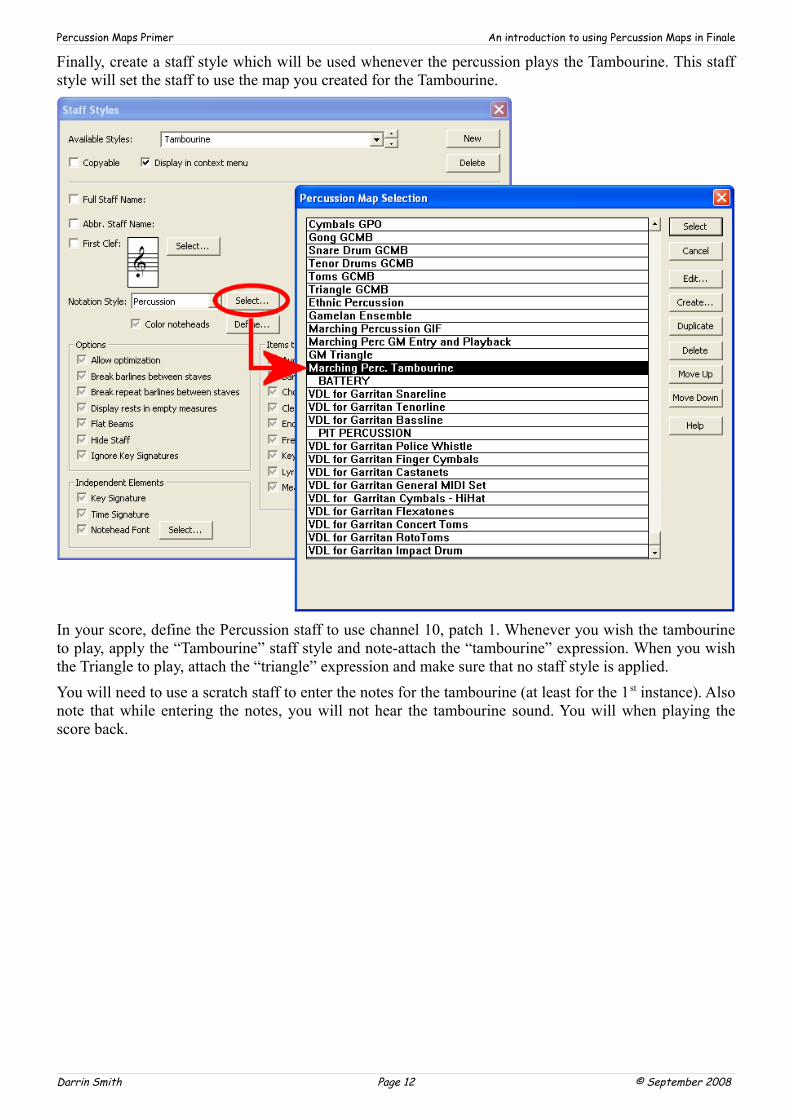
Finally, create a staff style which will be used whenever the percussion plays the Tambourine. This staff style will set the staff to use the map you created for the Tambourine.
In your score, define the Percussion staff to use channel 10, patch 1. Whenever you wish the tambourine to play, apply the “Tambourine” staff style and note-attach the “tambourine” expression. When you wish the Triangle to play, attach the “triangle” expression and make sure that no staff style is applied.You will need to use a scratch staff to enter the notes for the tambourine (at least for the 1st instance). Also note that while entering the notes, you will not hear the tambourine sound. You will when playing the score back.
Darrin Smith Page 12 © September 2008
Percussion Maps Primer An introduction to using Percussion Maps in Finale
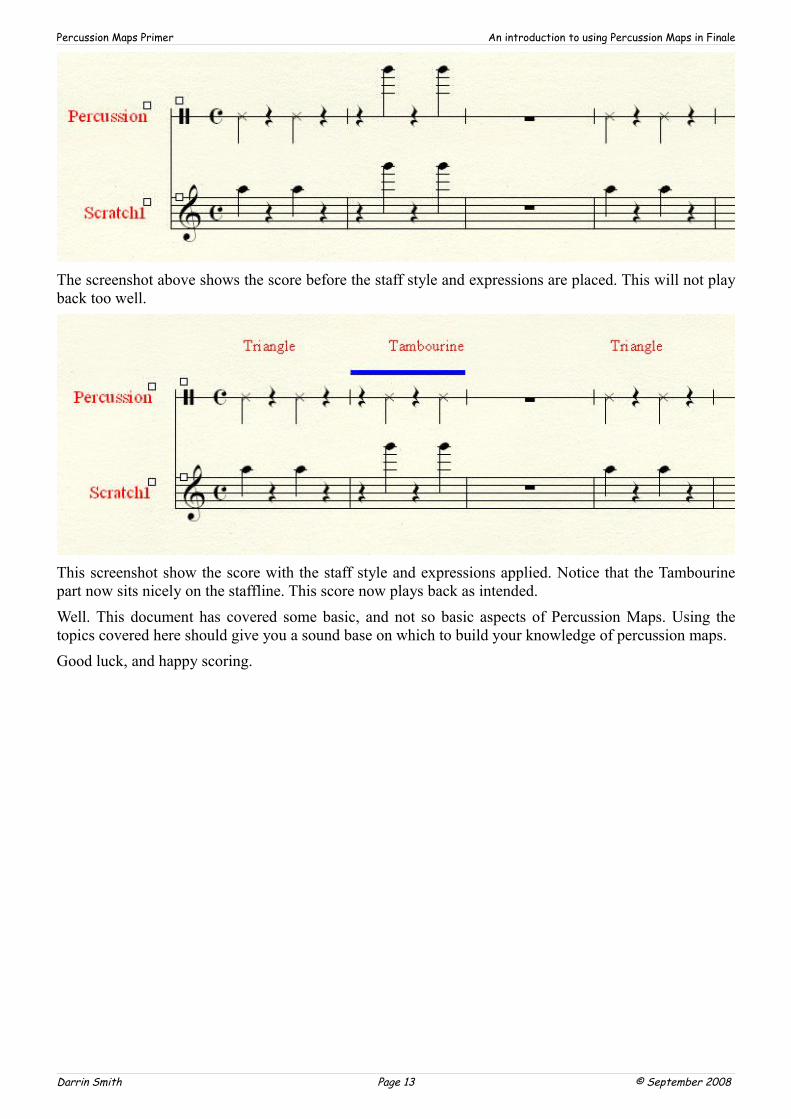
The screenshot above shows the score before the staff style and expressions are placed. This will not play back too well.
This screenshot show the score with the staff style and expressions applied. Notice that the Tambourine part now sits nicely on the staffline. This score now plays back as intended.Well. This document has covered some basic, and not so basic aspects of Percussion Maps. Using the topics covered here should give you a sound base on which to build your knowledge of percussion maps.Good luck, and happy scoring.
Darrin Smith Page 13 © September 2008
Percussion Maps Primer An introduction to using Percussion Maps in Finale
DisclaimerThis document may be freely redistributed in its entirety, or in part if it includes i attribution containing the title, "Percussion Maps Primer - An introduction to using Percussion Maps in Finale" and the Authors name (Darrin Smith). No part of it may be sold for profit or incorporated in a commercial or education institution document without the permission of the copyright holder.This document is provided as is without any express or implied warranties. While some effort has been taken to ensure the accuracy of the information contained in this article, the maintainer assumes no responsibility for errors or omissions, or for damages resulting from use of the information contained herein.The Author may be contacted through the Finale Forums (http://forum.makemusic.com/). Just PM Daz.
Darrin SmithWednesday 10th September 2008
Darrin Smith Page 14 © September 2008