Embed Size (px)
Citation preview

People First User Guide for Employees
Table of Contents
Logging In ........................................................................................................................ 2
Forgot Your Password ..................................................................................................... 3
Forgot Your Login ID ....................................................................................................... 5
Employee Landing Page ................................................................................................. 7
People First Header and Footer Overview .................................................................... 19
Employee Timesheet ..................................................................................................... 21
General Screen Functionality and Navigation ............................................................... 27

2
Logging In
The People First login page provides employees and retirees the ability to log in to the State of Florida’s human resource information system (People First).
Your path is…
https://peoplefirst.myflorida.com
Steps
1. Go to https://peoplefirst.myflorida.com.
Notes:
The People First login page includes an image of one of twelve Florida pictures; images change daily at 12 a.m. Eastern time.
The login page includes links to the following: Forgot Password process, Forgot Logon ID process, and the State of Florida job site.
The login page also includes a Contact Us link that provides contact information for the People First Service Center.
2. Enter your People First login ID and password, and then select
.
Notes:
Options are available to reset your password and to retrieve your login ID if you do not know them. The steps to complete these processes are contained in the next two sections.
Select to unhide your password if you need to verify what you have typed.
The first time you log in to People First after March 25, 2018, you will be prompted to create new security questions.

3
Forgot Your Password
3. Select your security questions; enter an answer for each question; and select
.
Notes:
You will need to select your security questions only the first time you log in to People First after March 25, 2018.
You must select three different security questions.
If you do not remember your People First password, select the Forgot Password link to reset your People First password online. This process takes just a few minutes to complete.
Follow the path to reset your password.
Your path is…
People First login screen > Forgot Password link > Forgot Your Password screens
Steps
1. After selecting the Forgot Password link, enter your People First login ID, Social
Security number (full number). and date of birth. Then select .
4
2. Next select how you wish to receive your security code to reset your password
and select .
Notes:
The number of options to receive your security code is based on the information you have saved in People First. The options include work email, notification email, and mobile phone number(s).
If you get to this screen and don’t have any options available, work with either your manager or one of your agency human resource professionals to update your contact information in People First so that you can complete this process.
Security codes are seven digits.
3. Once you receive the security code, enter it and select .
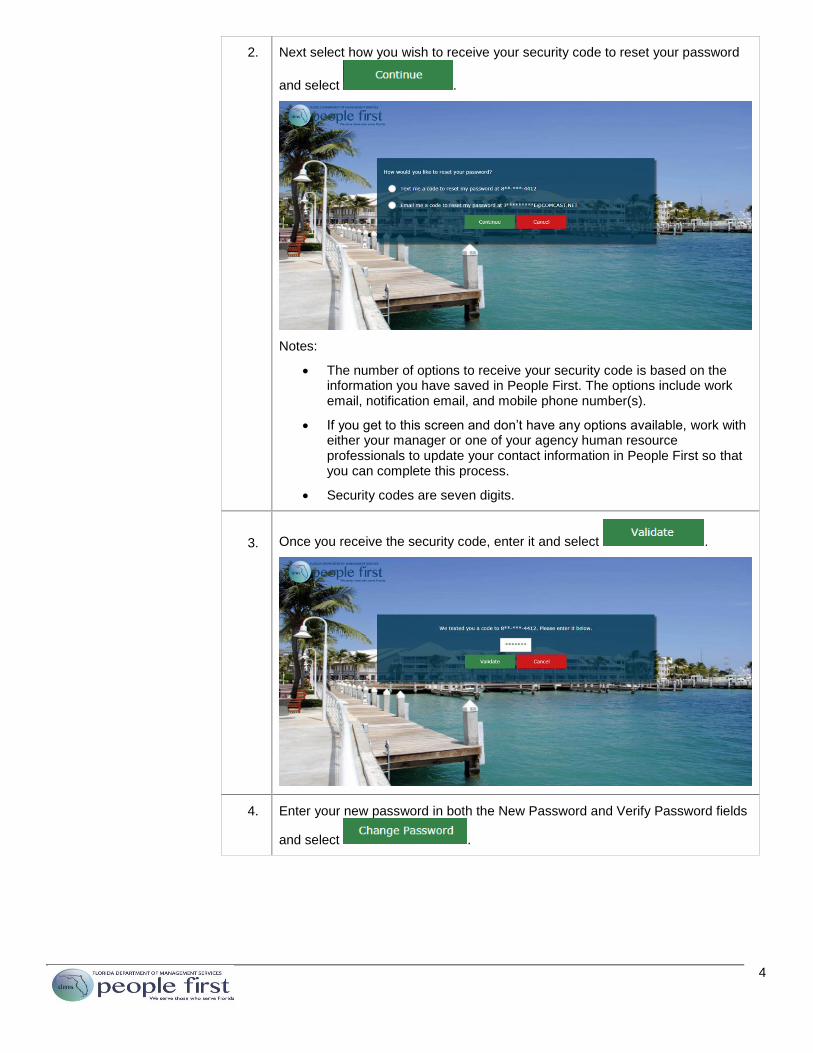
4. Enter your new password in both the New Password and Verify Password fields
and select .
5
Forgot Your Login ID
Notes:
Select to unhide your password if you need to verify what you have typed.
The entries in both fields must match.
If your entry in the New Password field does not meet the password guidelines, a call-out will display showing you which requirements have been met (marked with a check) and which are still needed (marked with an x).
The Password Strength indicator shows you how strong your new password is.
Select the Password Requirements link if you wish to review the password requirements before you start typing in your new password.
Follow the path to recover your login ID.
Your path is…
People First login screen > Forgot Login ID link > Forgot Your Login screens
Steps
1. After selecting the Forgot Login ID link, enter your Social Security number (full
number) and date of birth. Then select .

6
2. Capture your login ID and select .
Notes:
takes you back to the login page, where you can enter your ID and password to log in to People First.
If you don’t know your People First password, you can select the Forgot Password link to start the password reset process.

7
Employee Landing Page
The Employee landing page is the employee’s primary navigation starting point for employee self-service. Except for the areas that are shared across Employee and Manager landing pages (e.g., Inbox, Announcements, Other Resources), all information on this page is for functions specific to the employee. All employees who do not have direct reports and who have a security role code of E (employee only) are defaulted to this page when logging in to People First.
Follow the path to access the Employee landing page.
Your path is…
People First Login screen > Employee landing page
Steps
1. Once you log in, you will be defaulted to your Employee landing page.
Notes:
If you are a manager or a human resource professional, you will be defaulted to the Manager landing page. However, if you are not a manager or human resource professional, you will be defaulted to the Employee landing page and will not have access to the Manager landing page.
Your Employee landing page is designed to allow you to quickly and easily navigate People First. Descriptions for each area of the Employee landing page are described below.
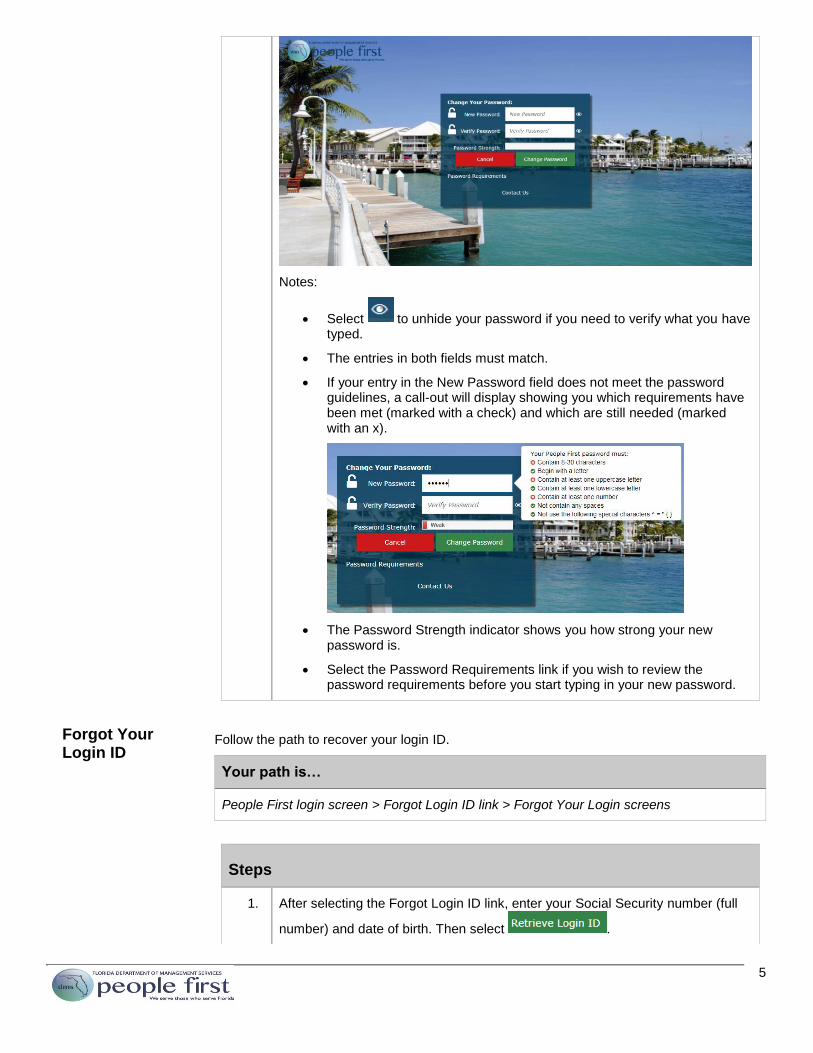
2. The Quick Links section provides quick navigation to specific screens within People First.
8
Notes:
Quick links are generated based on the employee’s access in People
First and cannot be changed.
Quick links can be minimized or presented on all screens.
Employee quick links include the following:
o Open Enrollment – Presented to all benefits-eligible employees and only during the state’s annual Open Enrollment period.
o Timesheet – Navigates employees to their timesheet to view past timesheets and to update timesheets that require action. Is not displayed for employees in the judicial branch.
o Leave and Overtime Request – Displayed only for the State Personnel System agencies and the Florida Department of Lottery; navigates employees to their Leave and Overtime Request screen to view the status of previous leave requests or to create new leave requests. Is not displayed for employees in the judicial branch.
o Leave Balance Overview – Displayed only for the State Personnel System agencies and the Florida Department of Lottery; navigates employees to the Leave Balance Overview screen to view their leave balances and leave history (up to 18 months back). Is not displayed for employees in the judicial branch.
o FSA / HSA – Displayed only for employees who are enrolled in a flexible spending account or a health savings account; navigates employees to their Chard Snyder account landing page.
o Contact Information – Displayed for all employees; navigates employees to their Contact Information screen, where they can update their home, mailing, and notification email addresses.
o Employee Profile – Displayed for all employees; generates a PDF snapshot that contains a summary of the employee’s information and includes: personal information, address information, emergency contact information, and work contact information.
o My Benefits – Displayed for all employees who are enrolled in at least one insurance plan; navigates employees to the My Benefits screen, where they can view their enrolled plan information.
o Training Transcript – Displayed only for State Personnel System agencies, the Justice Administrative Commission, the State Courts System, and the Florida Department of Lottery; generates a PDF training transcript that contains all training that

9
employees have completed and that has been captured in People First.
o Training Videos – Displayed only for State Personnel System
agencies, the Justice Administrative Commission, the State
Courts System, and the Florida Department of Lottery;
navigates employees to the Training Videos landing page,
where they can view available videos.
3. Inbox includes links to items that you need to complete. Select the Inbox task to navigate to the screen where you will complete the activity.
Notes:
Inbox items are presented only when you have an activity that needs to be completed within People First.
Inbox items do not include Performance Management or Recruiting tasks.
A number is presented beside each Inbox item that shows the number of tasks pending for that item.
o Tasks that are due but not overdue will show with a blue circle, with the number of tasks due within it; if at least one task is overdue, the circle will be red, with the number of tasks due within it.
Select the icon to refresh your Inbox.
Employee Inbox items include the following:
o Update Dependent’s SSN – Displayed to employee when at least one registered dependent either has an invalid SSN or has no SSN.
o Choose Benefits Now – Displayed to benefits-eligible employees when the employee has an active qualified status change (QSC) event; shows through the last day of the QSC election period.
o Complete Open Enrollment Now – Displayed to all benefits-eligible employees and only during the state’s annual Open Enrollment period.
o Complete Timesheet – Displayed only for the State Personnel System agencies and the Florida Department of Lottery. Displayed when the employee has at least one past due timesheet (timesheet period ended prior to the system date).

10
o Complete Your Direct Deposit – Displayed only for the State Personnel System agencies, the Justice Administrative Commission, the State Courts System, and the Florida Department of Lottery; displayed when the employee does not have an active direct deposit record.
o Verify Your Information – Displayed to all employees when the annual verification process is activated (August 1 of each year and for all new hires); takes the employee to the step-by-step process to verify or update information.
4. Personal Info provides employees access to view or update personal information, for example, Contact Information (home address, mailing address and notification email address), Direct Deposit, Form W-4, etc. Once you click the Personal Info tile, you will be presented with the Personal lnfo menu that allows you to select the information you need to review or update.
Notes:
The menu options vary based on your employment type. If you work for an agency that uses People First for both payroll preparation and benefits, your screen will look similar to the menu above. If your employer uses People First only for insurance benefits, you will see a limited menu that includes Contact Information, Correspondence History, and Personal Info.
Selecting a menu item will navigate you to the details screen for that item, where you can view or update the information. Some screens are view-only for employees.
Personal Info menu items include the following:
o Contact Information – Allows employees to update their home address, mailing address, and notification email address. Employees should ensure these are always kept up to date in People First.
Both the home and work county are used to determine which HMO health plan the employee is eligible for. Employees can update the home county on their home

11
address record while the work county can be updated only by the employee’s human resource office.
The mailing address is used by People First, the Division of Retirement, the employee’s insurance provider(s), and other state entities to send important information to employees.
The notification email address is used to send notices to employees related to their insurance benefits.
o Correspondence History – Displays (view-only) a history of the insurance benefits notices that were sent from People First to the employee through either standard mail or through emails.
o Direct Deposit – Allows employees to maintain their direct deposit record. The information entered in this screen is used to deposit the employee’s state payroll into his or her bank account. This information is accessible only to the employee.
o EEO-Veteran – Allows employees to maintain their race, ethnicity, military status, and disability status. Disability status is self-reported and visible only to the employee (i.e., managers and human resource professionals cannot see the employee’s disability status).
o Emergency Contact – Allows employees to maintain their emergency contacts.
o Employee Education – Allows the employee’s human resource office to maintain the employee’s work-related education history. Screen is view-only for employees.
o Employee Languages – Allows employees to maintain their related languages. Screen is view-only for employees.
o Form W-4 – Allows employees to maintain their tax status for payroll.
o Licenses and Certifications – Allows the employee’s human resource office to maintain the employee’s work-related licenses and certifications. Screen is view-only for employees.
o Other Employment – Allows the employee’s human resource office to maintain the employee’s other employment. Screen is view-only for employees.
o Personal Info – Displays the employee’s key personal information (e.g., Social Security number, date of birth) that is used for tax reporting and to generate insurance benefits cards.
5. Work Info provides employees view-only access to work-related information. For example, employees can view their Work Contact Information, where they can validate that their work email and work phone number are correct. Once you click the Work Info tile, you will be presented with the Work lnfo menu that allows you to select the information you wish to review.

12
Notes:
If your employer uses People First only for insurance benefits, this tile is not available for you as this type of information is stored in your employer’s separate human resource information system.
All information in the Work Info tile is view-only for the employee. If updates are required, contact either your manager or your human resource office for assistance.
Work Info menu items include the following:
o Action History – Provides a history of the personnel actions that have been processed for the employee in People First. Screen is view-only for employees.
o Appointment Status Details – Provides a history of the employee’s appointment status (e.g., probationary, permanent, exempt) for his or her employment records in People First. Screen is view-only for employees.
o DROP / Retirement – Provides a history of the employee’s retirement codes for his or her employment records in People First. Screen is view-only for employees.
o Employment Screening – Provides a history of when employment screening was completed on the employee and, if rescreening is required, when it’s due. Screen is view-only for employees.
o Key Service Dates – Displays key employment (e.g., agency hire date, state hire date) dates for the employee. Screen does not apply to OPS employment. Screen is view-only for employees.
o Org Work Assignment – Displays key work-related information from the employee’s position. Screen is view-only for employees.
o Work Contact Information – Displays the employee’s work location address, work mailing address, and work email address. Screen is view-only for employees.
6. Insurance Benefits allows eligible employees to access their insurance benefits information, including the ability to process enrollment changes when employees have a qualifying status change and during Open Enrollment. Once you click the Insurance Benefits tile, you will be presented with the Insurance

13
Benefits menu that allows you to select the information you need to review or update.
Notes:
The Insurance Benefits tile is presented only to employees who are eligible to participate in the state group insurance plans.
Insurance Benefits menu items include the following:
o Change My Benefits – Allows employees to create a qualifying status change when a life event such as marriage or birth occurs. Additionally, if the employee has a qualifying work event, an event is created for the employee and available here. The type of event determines the insurance benefit plans the employee is allowed to make enrollment changes to. Refer to the Insurance Benefits Enrollment Process User Guide for step-by-step instructions on completing the enrollment process.
o Confirmation Statement – Allows the employee to view and print insurance benefits confirmation statements for changes over the past seven years. Screen is view-only for employees.
o Health Insurance Tax Forms – Allows the employee to view and print his or her 1095-C insurance tax form. Records are available only for years 2016 and after. Forms are added to this screen for the tax year by January 31 of the year following the tax year. For example, the 2017 forms will be available by January 31, 2018. Screen is view-only for employees.
o My Benefits – Allows employees to view both their current insurance benefits as well as their historical benefits. The screen defaults to current insurance benefits. Employees have the ability to view a history of enrollments for a specific
insurance plan as well as insurance benefit enrollments as of a certain day
.
o My Dependent Information – Allows employees to view registered dependents. Employees can correct the dependent’s Social Security number. However, all other information has to

14
be updated by contacting the People First Service Center. “Registered” does not mean the dependent is covered under any insurance plan. To view which dependents are enrolled, review enrollments in the My Benefits screen.
o Open Enrollment – Allows insurance benefits-eligible employees to make their insurance elections for the next plan year. The Open Enrollment menu item is presented only during the state’s annual Open Enrollment period.
o Premium History – Displays the employees’ premiums paid and due for his or her insurance benefits plans. Screen includes the ability for employees to view underpaid and overpaid premiums
as well as history of premiums paid
. Screen is view-only for employees.
7. Pay Info allows employees access to view (e.g., Employee Gross Salary) or update their pay information (e.g., payroll deductions, if allowed by your agency). Once you click the Pay Info tile, you will be presented with the Pay lnfo menu that allows you to select the information you wish to review or update.
Notes:
If your employer uses People First only for insurance benefits, this tile is not available for you as this type of information is stored in your employer’s separate human resource information system.
Pay Info menu items include the following:
o Employee Gross Salary – Displays all components of the employee’s state gross salary. Screen includes the hourly rate of pay used for overtime (only applies if the employee is eligible for overtime payment) and the hourly rate of pay used for leave payouts (if the employee is eligible for or becomes eligible for a leave payout). Screen is view-only for employees.
o Gross Pay History (Pre-Tax) – Displays the gross salary (pre-payroll deductions) for each payment for the employee. To view your net pay go to the Department of Financial Services, Employee Information Center: https://apps.fldfs.com/EIC/EmployeeInfoCenter/. Screen is view-only for employees.
o Pay Info – Displays the employee’s base pay amount and if eligible, the employee’s Competitive Area Differential (CAD) amount. Screen is view-only for employees.

15
o Payroll Deductions – Displays the employee’s elective post-tax payroll deductions.
To view your insurance deductions for your state sponsored insurance plans, go to the Insurance Benefits, Premium History screen.
Deferred Compensation and collections deductions are only available to view in the Employee Information Center.
Some deductions may be maintained by the employee. This policy is set by your agency’s human resource office.
o Recurring Payments – Displays recurring pay additives for the employee. Screen also includes Criminal Justice Incentive Program and Firefighter Incentive Program records for eligible employees. Screen is view-only for employees.
8. Talent Management navigates employees to their landing page within the Talent Management system (SuccessFactors)
Note: If your employer only uses People First for insurance benefits, this tile is not available for you as this type of information is stored in your employer’s separate human resource information system.
9. Once you click the Time and Attendance tile, you are presented with the Time and Attendance menu that allows you to select the information you wish to review or update.

16
Notes:
If your employer only uses People First for insurance benefits, this tile is not available for you as this type of information is stored in your employer’s separate human resource information system.
Time and Attendance Menu Items include the following:
o Base Work Schedule Assignment – Allows employees to view their current FLSA period (if applicable) and work shift (if applicable). Screen is view-only for employees.
o FMLA/FSWP Leave Request – Allows the employee to request use of Family Medical Leave Act (FMLA) or Family Support Work Program (FSWP) for qualifying events. Employees should discuss with their agency human resource office before submitting a request. Once submitted, the request is submitted to employee’s human resource office for review. Screen is not displayed for employees in the judicial branch.
o Flexible Work Schedule – Allows the employee to request an alternate work schedule. Employees should discuss with their manager before submitting a request. Once submitted, the request is sent to the employee’s manager for consideration. If approved, the schedule is updated on the employee’s timesheet for the requested period(s). Screen is not displayed for employees in the judicial branch.
o Leave Balance Overview – Provides employees access to view their current leave balances, as well as their previous 18-months of leave accruals, usage and balances. Screen is view-only for employees. Screen is not displayed for employees in the judicial branch.
o Leave Payout – Allows the employee to view previous leave payouts that were processed through People First. Screen is view-only for employees. Screen is not displayed for employees in the judicial branch.
o Leave and Overtime Request – Allows the employee to request use of leave (e.g., annual leave). Once submitted, the request is sent to the employee’s manager for consideration. If approved, the leave is prepopulated on the employee’s timesheet for the requested time period. Screen is not displayed for employees in the judicial branch.
o Overtime Election – Allows overtime-eligible employees, in certain agencies, to change their overtime election from pay to accrual. The overtime election default is pay. If you are not overtime-eligible or your agency does not allow you to change your overtime election, this screen is view only for you. Screen is not displayed for employees in the judicial branch.
o Timesheet – Allows employees to enter their time worked and leave used, and submit for their manager’s approval. Refer to the Employee Timesheet section of this user guide for more details on the timesheet. Screen is not displayed for employees in the judicial branch.
10. A The Announcements tile includes important messages for upcoming and on-going activities (e.g., Open Enrollment).

17
Notes:
Employees should review all messages presented each time they log in to People First.
The same messages are presented for all employees; messages are not employee-specific or agency-specific.
Some messages may not apply to some employees. For example, Open Enrollment messages will not apply to employees who are not benefits-eligible.
11. The Other Resources tile includes icons that allow employees to log in directly to their Securian (life insurance) beneficiary management account or their Chard Snyder (flexible spending account and health savings account) account.
Notes:
Chard Snyder – Only displayed for employees who are enrolled in a Flexible Spending Account (FSA) or the Health Savings Account (HSA); navigates employees to their Chard Snyder account landing page.
Securian – Only displayed for employees who are enrolled in basic life or Vested Legislator life insurance; navigates employees to their Securian account where they can manage their beneficiaries for life insurance.

18
If an employee is not enrolled in an FSA, HSA or life insurance plan, the Other Resources tile will not be displayed.
19
People First Header and Footer Overview
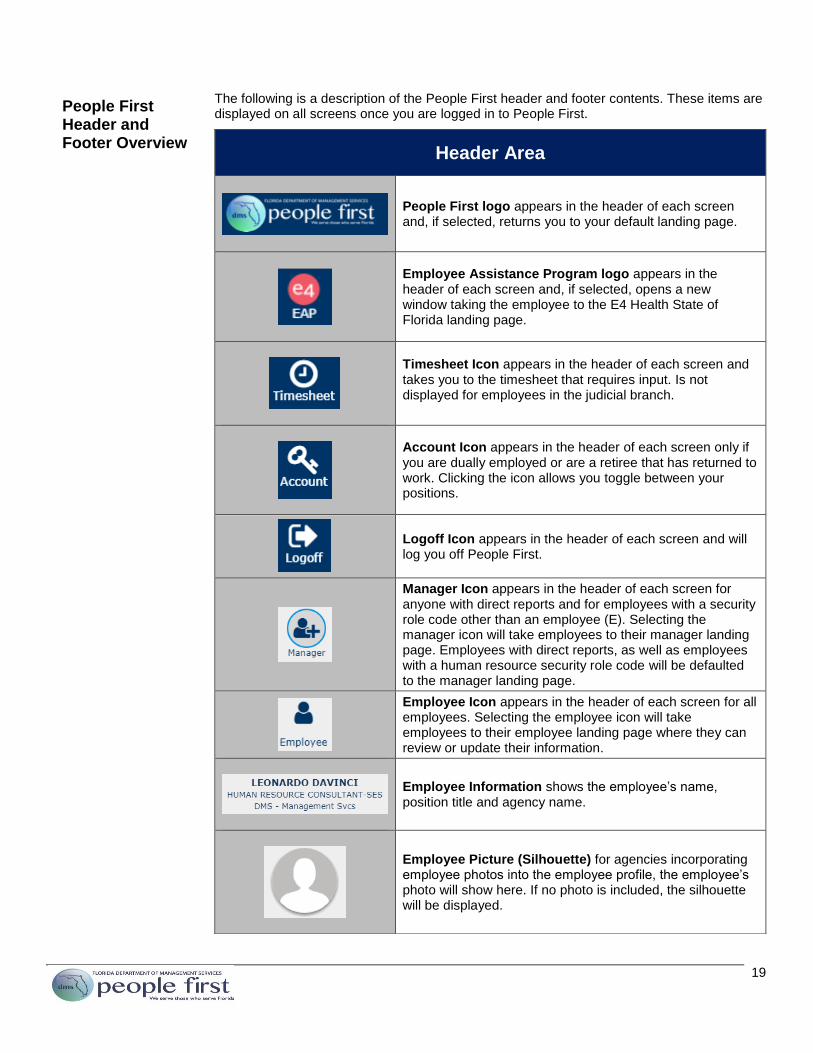
The following is a description of the People First header and footer contents. These items are displayed on all screens once you are logged in to People First.
Header Area
People First logo appears in the header of each screen and, if selected, returns you to your default landing page.
Employee Assistance Program logo appears in the header of each screen and, if selected, opens a new window taking the employee to the E4 Health State of Florida landing page.
Timesheet Icon appears in the header of each screen and takes you to the timesheet that requires input. Is not displayed for employees in the judicial branch.
Account Icon appears in the header of each screen only if you are dually employed or are a retiree that has returned to work. Clicking the icon allows you toggle between your positions.
Logoff Icon appears in the header of each screen and will log you off People First.
Manager Icon appears in the header of each screen for anyone with direct reports and for employees with a security role code other than an employee (E). Selecting the manager icon will take employees to their manager landing page. Employees with direct reports, as well as employees with a human resource security role code will be defaulted to the manager landing page.
Employee Icon appears in the header of each screen for all employees. Selecting the employee icon will take employees to their employee landing page where they can review or update their information.
Employee Information shows the employee’s name, position title and agency name.
Employee Picture (Silhouette) for agencies incorporating employee photos into the employee profile, the employee’s photo will show here. If no photo is included, the silhouette will be displayed.

20
Footer Area
Contact Info provides key phone and address information for the People First Service Center and the Chard Snyder Service Center.
Settings option allows employees to customize their experience in People First, as well as change their People First password and security questions.
High Contrast
Allows employees to turn high contrast theming on and off; high contrast converts background colors to black and text to white; the employee’s preference is saved for future log in, but can be changed.
Keys On
By default, alpha descriptions are displayed and not the associated numeric code; however, employees that prefer to view both the code and the description can turn their keys on; the employee’s preference is saved for future log in, but can be changed.
Animation
By default, there are very subtle animations built into People First when transitioning from screen to screen, when data is loading and when hovering over certain buttons and links; however, employees can turn it off if preferred; the employee’s preference is saved for future log ins, but can be changed.
Change Password
If employees want to change their current password, they can change it after they have logged in to People First; process requires entry of the current password, as well as entering and verifying the new password.
Security Questions
Allows employees to view and update their existing People First security questions.
Security questions may be used for additional identification purposes when calling the People First Service Center.
All security questions used prior to March 16, 2018 have been reset. The first time you log into People First after March 25, 2018, you will be prompted to create new security questions.
21
Employee Timesheet
The following provides details on how to complete your timesheet in People First.
Follow the path to access your timesheet.
Your path is…
People First login screen > Employee landing page > Timesheet icon in header
Steps
1. 1
.
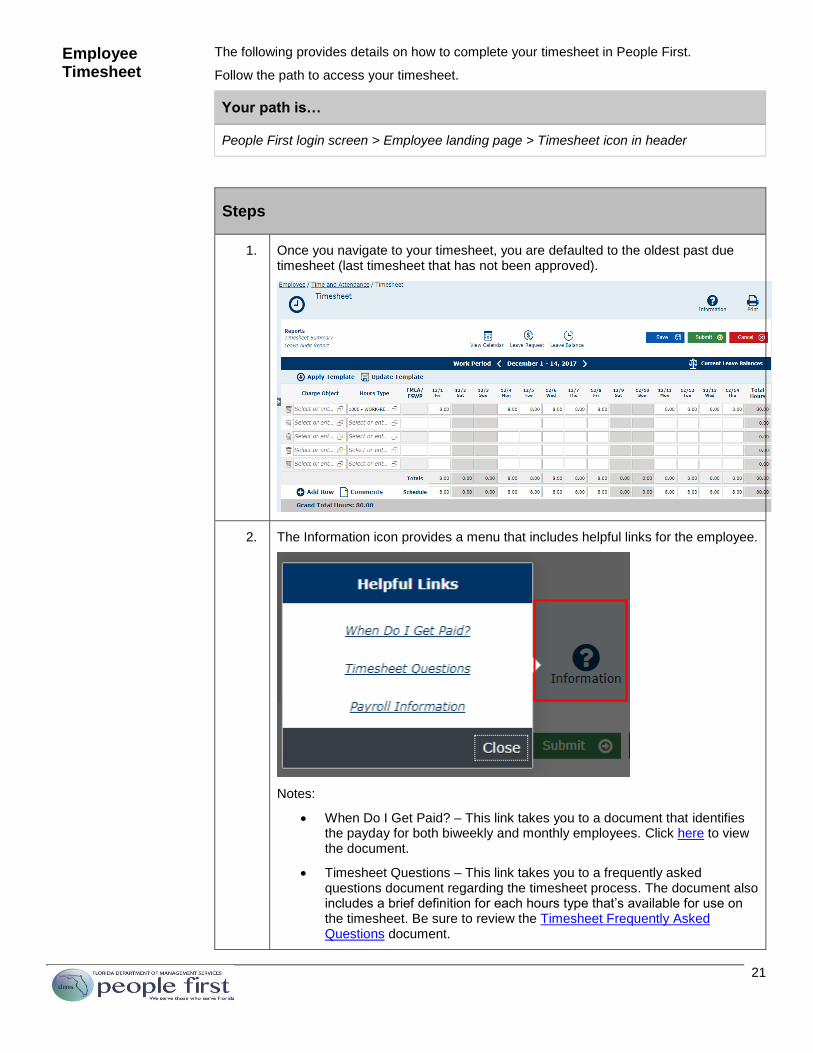
Once you navigate to your timesheet, you are defaulted to the oldest past due timesheet (last timesheet that has not been approved).
2. The Information icon provides a menu that includes helpful links for the employee.
Notes:
When Do I Get Paid? – This link takes you to a document that identifies the payday for both biweekly and monthly employees. Click here to view the document.
Timesheet Questions – This link takes you to a frequently asked questions document regarding the timesheet process. The document also includes a brief definition for each hours type that’s available for use on the timesheet. Be sure to review the Timesheet Frequently Asked Questions document.

22
Payroll Information – This link takes you to the Department of Financial Services, Employee Information Center where you can log in and view your payroll statements, travel reimbursements and your Form W-2.
3. Within the timesheet, employees have access to run two different reports for their past timesheet data. Each report can be run back to the start of the employees’ employment with their current employer.
Notes:
Timesheet Summary – Allows employees to run a report for either a specific timesheet period, or for a specified date range. While the timesheet presentation is restricted to 18-months back, the data in the timesheet summary allows employees to access timesheet data prior to this period. However, the data in this report is specific to the employees’ current employment and cannot go back prior to their start date with their current employer.
Leave Audit Report – Allows employees to run a report that includes all leave earned, used, paid out and forfeited. The data in this report is specific to the employees’ current employment and cannot go back prior to their start date with their current employer.
4. Navigation icons allow the employee to quickly navigate to other time and attendance processes in People First.
Notes:
View Calendar – Allows employees to access a calendar that allows quick navigation to a past or future timesheet period.
Leave Request – Allows employees to navigate directly to the Leave and Overtime Request screen to view past requests, as well as create new requests.
Leave Balance – Allows employees to navigate directly to the Leave Balance Overview screen to view their current and previous leave balance details.
5. Various buttons are available within the timesheet that allows employees to complete actions within the timesheet.
Notes:
Buttons are dynamically presented based on the status of the timesheet.
Save, Submit and Cancel are only presented if the timesheet has not been submitted for approval and when editing a submitted timesheet. Once Submitted for approval, the Edit button is presented.
23
Save – Allows employees to save their current timesheet entries.
Submit – Allows employees to submit their timesheet for approval. When selected, validates that the employees’ timesheet entry meets state leave policies. If updates are required, the employee is presented with error messages advising what updates are needed. By selecting this button, the employee is certifying the timesheet is true and accurate.
Cancel – Allows employees to cancel their timesheet entries and changes the timesheet to view only.
Edit – Allows employees to update submitted time (time must be in a submitted status; once approved employees cannot update) and to record additional time. Once time has been modified the employee must resubmit the timesheet for approval.
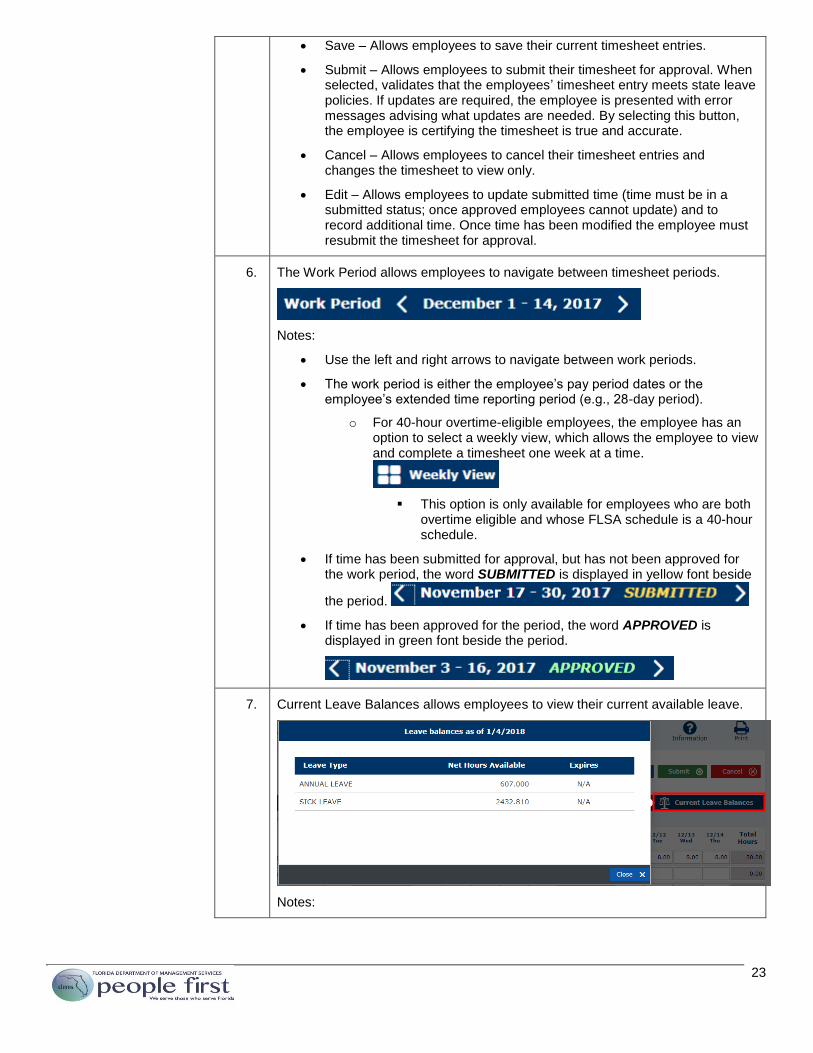
6. The Work Period allows employees to navigate between timesheet periods.
Notes:
Use the left and right arrows to navigate between work periods.
The work period is either the employee’s pay period dates or the employee’s extended time reporting period (e.g., 28-day period).
o For 40-hour overtime-eligible employees, the employee has an option to select a weekly view, which allows the employee to view and complete a timesheet one week at a time.
This option is only available for employees who are both overtime eligible and whose FLSA schedule is a 40-hour schedule.
If time has been submitted for approval, but has not been approved for the work period, the word SUBMITTED is displayed in yellow font beside
the period.
If time has been approved for the period, the word APPROVED is displayed in green font beside the period.
7. Current Leave Balances allows employees to view their current available leave.
Notes:

24
Allows employees to view their current available (net) leave balances without navigating away from the timesheet (presents in an overlay on the timesheet).
Balances (net) presented are as of the moment the employee selects the icon.
Includes an expiration date for leave types that expire (e.g., special holiday compensatory leave, personal holiday); expiration date is the last timesheet day the leave can be used.
8. Timesheet template options allow employees to create, modify and apply their timesheet template.
Notes:
The timesheet template functionality is designed for employees who consistently use multiple charge objects. This functionality allows employees to enter charge objects one time and save them as a timesheet template for future use.
To create a timesheet template, enter the entries on your timesheet and select Save Template.
Selecting Save Template will save your charge objects and hours type(s), but will not save the actual time incurred under each day.
You can save up to 50 rows within a timesheet template.
Apply Template is only available after you have created your timesheet template. Once selected, it applies your timesheet template to the timesheet period you are completing.
After you initially create your timesheet template, the Save Template link will change to Update Template. If you need to modify your template later, apply it to your timesheet, modify it and select the Update Template link.
9. Employees who report their time on a monthly work period or a 28-day work period will have a scroll functionality available to display the remaining days in the work period.
Notes:
The timesheet is defaulted to the start of the work period. If additional days are available for the work period, the scroll right link is available.
Once the employee scrolls right, an option to scroll left is available.
The scroll right and scroll left options are only available if the employee’s work period is greater than 14-days.
For monthly included employees, it’s recommended that you use the weekly view to complete your timesheet in a more simplified format.
10. The timesheet entry section allows employees to enter their time worked and leave used for the work period.

25
Notes:
Charge Object column – Allows employees to select the applicable charge object to record time worked. Your agency will instruct you on when you should use charge objects and what charge objects to use. Not all agencies require employees to use charge objects.
Hours Type column – Allows employees to select the applicable time worked and leave codes.
o Hours type 1000 – Hours Worked and hours type 1005 – State Paid are defaulted on the employee’s timesheet based on the employee’s work schedule.
o Hours are not defaulted for OPS employees.
o To view a definition for each hours type, select the Questions icon, then select the Timesheet Questions link.
FMLA/FSWP column – If employees have an approved Family Medical Leave Act or Family Support Work Program request, a dropdown is provided to employees to allow them to record their leave used to the appropriate request type.
Day fields – Allows employees to record hours for each hours type, for each day.
Total Hours column – Allows employees to view the total hours entered per row.
Totals row – Allows employees to view the total hours entered per day.
Schedule – Allows employees to view the number of hours they are scheduled to work each day. If the schedule does not reflect your work schedule, submit a Flexible Work Schedule request to your manager for review and approval.
Delete icon – Allows employees to delete a row within the timesheet.
Add Row link – Allows employees to add an additional row to the selected work period. The timesheet is defaulted to five rows; if you enter more than five rows, you will have a scroll bar on the right to scroll between the days. Only five rows are presented on the screen at one time.
Comments link – Allows employees to add timesheet-specific comments as well as view previously added comments. Once a comment is added, it cannot be modified or deleted, so be sure the comment is accurate before saving it.
Grand Total Hours – Allows employees to view the total hours recorded for the work period.
11. Once you have completed your timesheet, select to send the timesheet to your manager for approval. When you select this button, it validates

26
that your timesheet entry meets state policy. If updates are required, you will be presented with error messages advising what updates are needed.
12. Once you have successfully submitted your timesheet, your timesheet entries will be shown with a yellow outline and the word SUBMITTED will be added in the Work Period section.
Note:
Once your manager takes action on your submitted timesheet, you will receive a notice on whether any further action is needed.
27
General Screen Functionality and Navigation
The following provides details on general screen functionality and navigation in People First.
Your path is…
People First Login screen > Employee Landing page > Functional tile > Desired screen
Steps
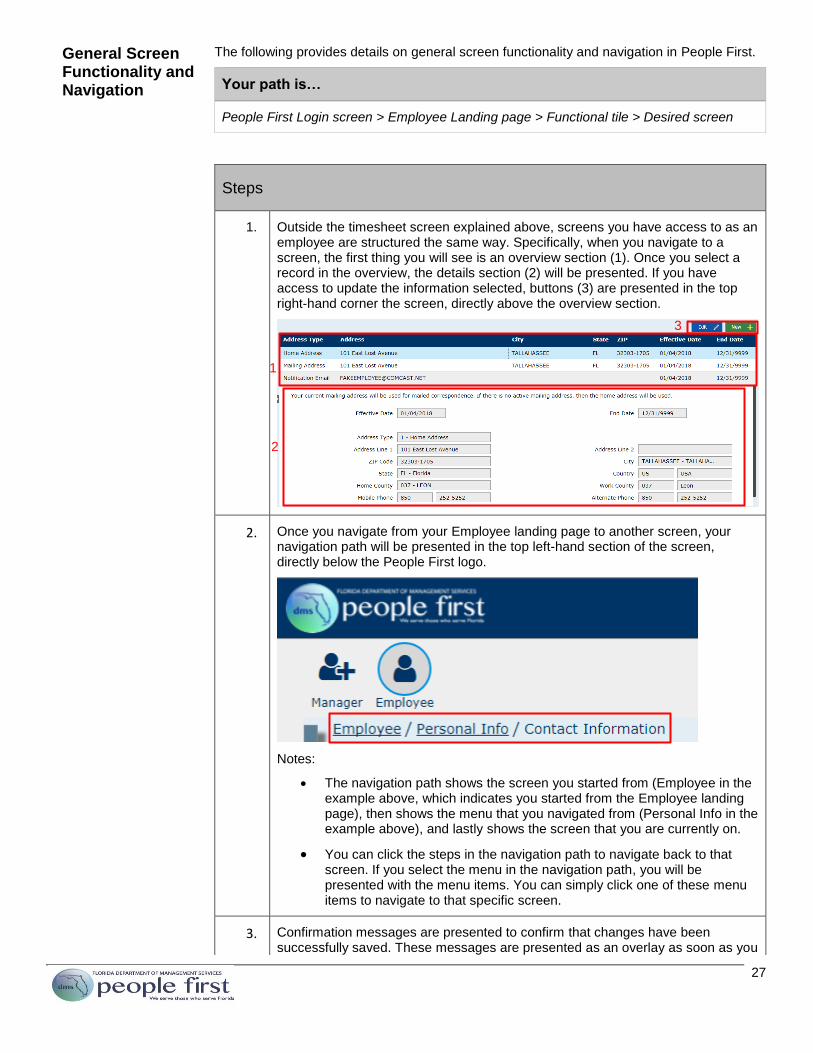
1. Outside the timesheet screen explained above, screens you have access to as an employee are structured the same way. Specifically, when you navigate to a screen, the first thing you will see is an overview section (1). Once you select a record in the overview, the details section (2) will be presented. If you have access to update the information selected, buttons (3) are presented in the top right-hand corner the screen, directly above the overview section.
2. Once you navigate from your Employee landing page to another screen, your navigation path will be presented in the top left-hand section of the screen, directly below the People First logo.
Notes:
The navigation path shows the screen you started from (Employee in the example above, which indicates you started from the Employee landing page), then shows the menu that you navigated from (Personal Info in the example above), and lastly shows the screen that you are currently on.
You can click the steps in the navigation path to navigate back to that screen. If you select the menu in the navigation path, you will be presented with the menu items. You can simply click one of these menu items to navigate to that specific screen.
3. Confirmation messages are presented to confirm that changes have been successfully saved. These messages are presented as an overlay as soon as you
1
2
3
28
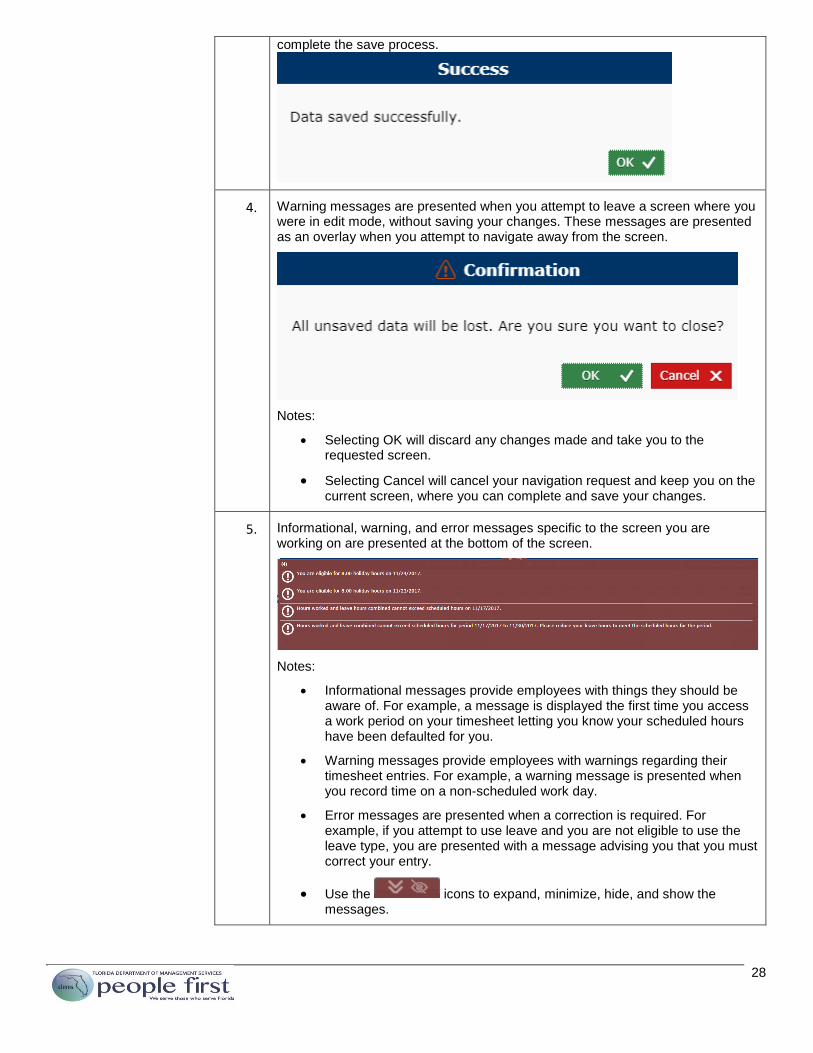
complete the save process.
4. Warning messages are presented when you attempt to leave a screen where you were in edit mode, without saving your changes. These messages are presented as an overlay when you attempt to navigate away from the screen.
Notes:
Selecting OK will discard any changes made and take you to the requested screen.
Selecting Cancel will cancel your navigation request and keep you on the current screen, where you can complete and save your changes.
5. Informational, warning, and error messages specific to the screen you are working on are presented at the bottom of the screen.
Notes:
Informational messages provide employees with things they should be aware of. For example, a message is displayed the first time you access a work period on your timesheet letting you know your scheduled hours have been defaulted for you.
Warning messages provide employees with warnings regarding their timesheet entries. For example, a warning message is presented when you record time on a non-scheduled work day.
Error messages are presented when a correction is required. For example, if you attempt to use leave and you are not eligible to use the leave type, you are presented with a message advising you that you must correct your entry.
Use the icons to expand, minimize, hide, and show the messages.