Embed Size (px)
Citation preview

7/30/2019 PARIS POG
http://slidepdf.com/reader/full/paris-pog 1/32

7/30/2019 PARIS POG
http://slidepdf.com/reader/full/paris-pog 2/32
WARNING
P.A.R.I.S™PACK TO ARMOUR RAPID INTEGRATION SYSTEM
Failure to heed the inormation in this
manual may result in suboptimal perormance
o this equipment.
Improper assembly and confguration o thisequipment may lead to ailure in the feld.
This is an interace system that requires a
CTOMS 2ndLine Pack and a MOLLE covered
plate carrier.
This system will only work with the new MQRB
Shoulder Straps on the 2ndLine Pack. I you
have older Snap Dragon Shoulder Straps, pleasecontact CTOMS to purchase upgrade to the
MQRB system.
Assembly required.

7/30/2019 PARIS POG
http://slidepdf.com/reader/full/paris-pog 3/32
PRODUCT OPTIMIZATION GUIDE
TOC
TABLE OF CONTENTS

7/30/2019 PARIS POG
http://slidepdf.com/reader/full/paris-pog 4/32
1
P.A.R.I.S.™ ADVANTAGES
The Pack to Armour Rapid Integration System allows a quick
attachment o the CTOMS 2ndLine Pack to any MOLLE plate carrier
eliminating the traditional shoulder strap conguration that can cause
problems such as:
Restricting circulation to the arms;
Restricting shoulder and arm range o motion;
Aecting shooting stance;
Aecting mobility, fexibility and agility; and
Aecting long term comort.
The P.A.R.I.S.™ alleviates those issues. It is a retrot to the CTOMS
2ndLine Pack with the new MQRB Shoulder Straps. It is compatible
with most MOLLE armour/plate carriers and integrates with minimal
eect on mounted pouches and equipment.

7/30/2019 PARIS POG
http://slidepdf.com/reader/full/paris-pog 5/32
2
P.A.R.I.S™ AVAILABLE ACCESSORIES & ASSOCIATED PRODUCTS
WITHOUT P.A.R.I.S.™
WITH P.A.R.I.S.™

7/30/2019 PARIS POG
http://slidepdf.com/reader/full/paris-pog 6/32
3
WITHOUT P.A.R.I.S.™
WITH P.A.R.I.S.™

7/30/2019 PARIS POG
http://slidepdf.com/reader/full/paris-pog 7/32
4
COMPONENT REFERENCE:In the package:
1. 2 x Pack Attachment Straps 4. 4 x Male Side Release Buckle
2. 2 x Armour Shoulder Straps 5. Tri-glide buckles
3. 2 x MQRB Assembly
P.A.R.I.S™ COMPONENT REFERENCE
12
3
4
5

7/30/2019 PARIS POG
http://slidepdf.com/reader/full/paris-pog 8/32
5
SHOULDER STRAP RECONFIGURATION
1. Completely remove all components o the Sternum Strap i one is
attached.
2. Remove Shoulder Straps rom the 2ndLine Pack.
a. At the bottom, release the MQRB Buckle by pulling the
Beaded Pull.
b. At the top, unthread the top straps rom the Ladder Lock Buckle
and Tri-glide.
3. Strip the shoulder strap o all non-permanent parts; buckles, elastic
retainers etc. Move the top Tri-glide that cannot be removed as high
up as possible until it is touching the stitching. Move the bottom
Tri-glide to approximately ½” above the bottom stitching.
4. At the top o the shoulder strap, thread a male Side release buckle on
the webbing all the way to the stitching.5. Thread the webbing through the Tri-glide, through the D-Ring, then the
second Tri-glide.

7/30/2019 PARIS POG
http://slidepdf.com/reader/full/paris-pog 9/32
6
6. Thread the MQRB onto the bottom webbing up to the stitching.
7. Thread the webbing through the bottom Tri-glide.
8. Thread the ree Tri-glide onto the webbing.
P.A.R.I.S™ SHOULDER STRAP RECONFIGURATION

7/30/2019 PARIS POG
http://slidepdf.com/reader/full/paris-pog 10/32
7
9. Thread the webbing through the D-Ring, around a male Side Release
buckle, back through the D-Ring and then thread the webbing through
the Tri-glide. About 1 to 1.5 inches o webbing should be measured
between the Tri-Glide and the Male Side Release buckle.
It is important to ensure the spacing o the end o the male Side
Release Buckle is just touching or slightly overlapping the top Tri-glide
Buckle at its tip.10. Thread the webbing back through the same Tri-glide creating a
locking bite.
11. Thread the webbing through the D-Ring.

7/30/2019 PARIS POG
http://slidepdf.com/reader/full/paris-pog 11/32
8
12. Thread the webbing through the slot in the male Side Release Buckle.
13. Thread the webbing through the top Tri-glide.
14. Repeat the same procedure or the second shoulder strap. Ensure
buckle spacing is similar on both shoulder straps, especially the
middle male Side Release Buckle, to ensure a symmetrical t o the
pack when worn.
P.A.R.I.S™ SHOULDER STRAP RECONFIGURATION
7/30/2019 PARIS POG
http://slidepdf.com/reader/full/paris-pog 12/32
9
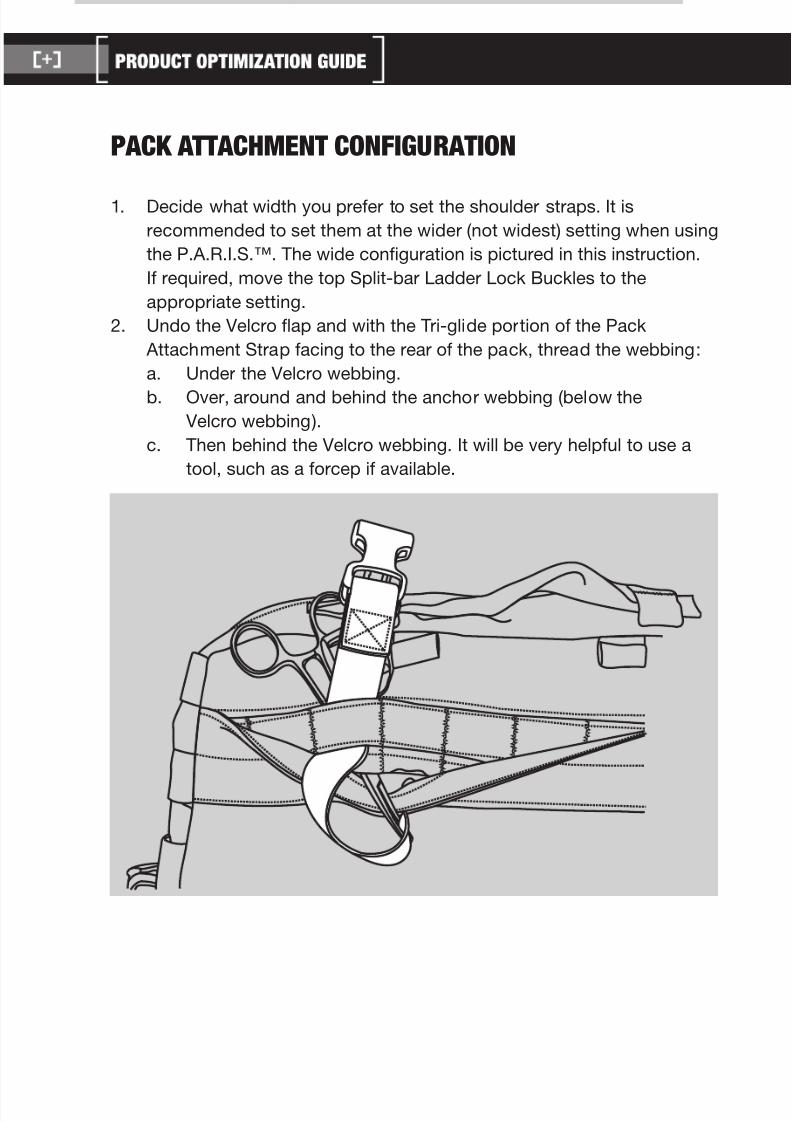
PACK ATTACHMENT CONFIGURATION
1. Decide what width you preer to set the shoulder straps. It is
recommended to set them at the wider (not widest) setting when using
the P.A.R.I.S.™. The wide conguration is pictured in this instruction.
I required, move the top Split-bar Ladder Lock Buckles to the
appropriate setting.
2. Undo the Velcro fap and with the Tri-glide portion o the Pack
Attachment Strap acing to the rear o the pack, thread the webbing:
a. Under the Velcro webbing.
b. Over, around and behind the anchor webbing (below the
Velcro webbing).
c. Then behind the Velcro webbing. It will be very helpul to use a
tool, such as a orcep i available.

7/30/2019 PARIS POG
http://slidepdf.com/reader/full/paris-pog 13/32
10
3. Pull the webbing tight, pulling the doubled over and box stitched
webbing section under the Velcro webbing o the pack. Close the
Velcro fap.
Thread the webbing through the Tri-glide.
P.A.R.I.S™ PACK ATTACHMENT CONFIGURATION

7/30/2019 PARIS POG
http://slidepdf.com/reader/full/paris-pog 14/32
11
4. Thread the webbing back through the Tri-glide creating a locking bite.
5. Tuck the running end o the webbing into the slot behind
the attachment.
7/30/2019 PARIS POG
http://slidepdf.com/reader/full/paris-pog 15/32
12
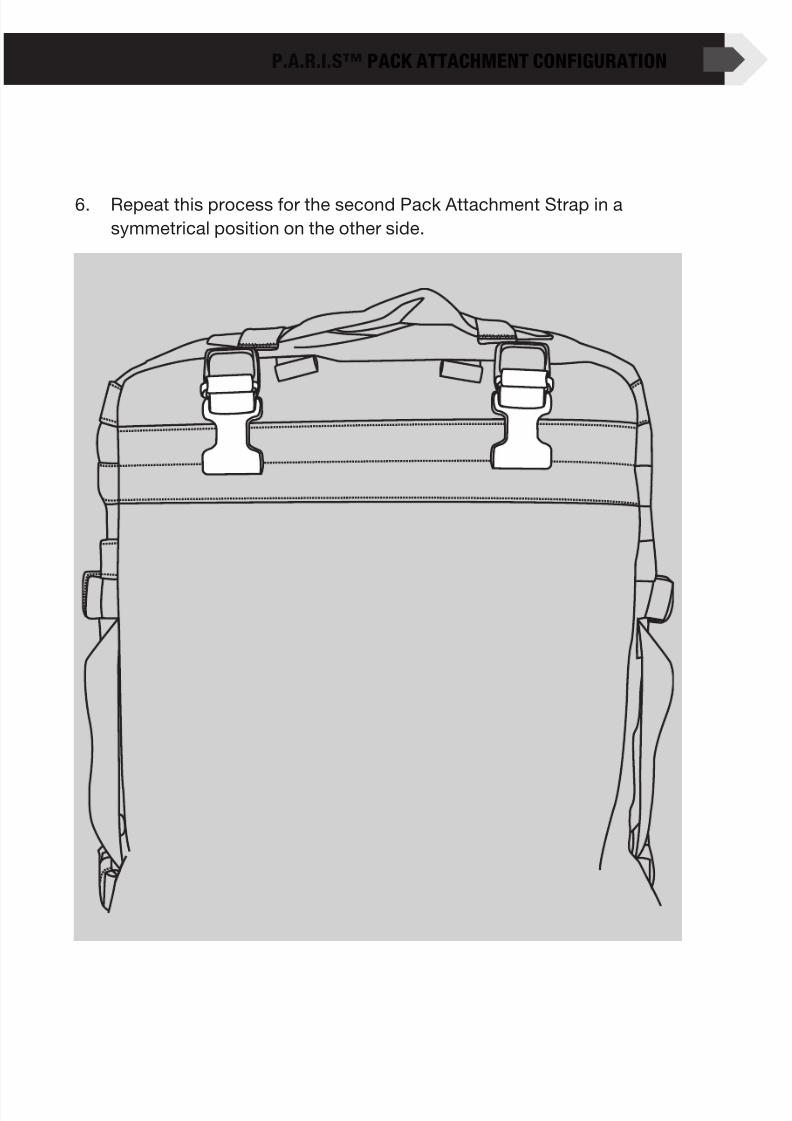
6. Repeat this process or the second Pack Attachment Strap in a
symmetrical position on the other side.
P.A.R.I.S™ PACK ATTACHMENT CONFIGURATION

7/30/2019 PARIS POG
http://slidepdf.com/reader/full/paris-pog 16/32
13
SHOULDER STRAP ATTACHMENT(TRADITIONAL SHOULDER STRAP CONFIGURATION)
1. Ensure that the shoulder straps are being attached to the correct side
o the pack. The bottom o the shoulder straps curve outward.
2. Insert the top male Side Release Buckle into the emale Side Release
Buckle o the Pack Attachment Strap.
3. Thread the shoulder strap webbing through the Ladder Lock Buckle.

7/30/2019 PARIS POG
http://slidepdf.com/reader/full/paris-pog 17/32
14
4. Repeat the process or the second Shoulder Strap. Attach the MQRB
to the lower shoulder strap adjustment webbing on both sides.
5. The pack can now be worn in the traditional manner.
P.A.R.I.S™ SHOULDER STRAP ATTACHMENT

7/30/2019 PARIS POG
http://slidepdf.com/reader/full/paris-pog 18/32
15
SHOULDER STRAP ATTACHMENT(PACK TO ARMOUR INTEGRATION CONFIGURATION
FROM TRADITIONAL CONFIGURATION)
1. Release the MQRB Buckles by pulling the Beaded Pulls.
2. Release one Shoulder Strap top Side Release Buckle.

7/30/2019 PARIS POG
http://slidepdf.com/reader/full/paris-pog 19/32
16
3. Unthread top Shoulder Strap webbing rom the Ladder Lock Buckle.
4. Release the other Shoulder Strap Side Release Buckle.
P.A.R.I.S™ SHOULDER STRAP ATTACHMENT

7/30/2019 PARIS POG
http://slidepdf.com/reader/full/paris-pog 20/32
17
5. Unthread top Shoulder Strap webbing rom the Ladder Lock Buckle
then insert the CENTER male Side Release Buckle into the OPPOSITE
side emale Side Release Buckle on the Pack Attachment Strap.
6. Thread the top Shoulder Strap webbing through the slot in the back o
the Side Release Buckle.

7/30/2019 PARIS POG
http://slidepdf.com/reader/full/paris-pog 21/32
18
7. Thread the webbing through the Ladder Lock Buckle and pull taught.
8. Repeat the process or the second Shoulder Strap.
P.A.R.I.S™ COMPONENT REFERENCE

7/30/2019 PARIS POG
http://slidepdf.com/reader/full/paris-pog 22/32
19
ARMOUR CARRIER CONFIGURATION
1. It is best to rst strip pouches o the Armour Carrier however
conguration can occur with pouches still attached. For ease o
demonstration, all pouches have been removed rom this
Armour Carrier.
2. The P.A.R.I.S.™ works on most MOLLE Armour Carriers. Some
dierences may exist between your Armour Carrier and the one
pictured in these instructions. It may be necessary to amend these
instructions in order or the system to integrate better with
your system.
3. Strip the MQRB Ladder Lock and Elastic Retainer o the Armour
Shoulder Strap i it is threaded on. Thread the Armour Shoulder
Strap through the MOLLE on the ront o the Armour Carrier directed
upward. It is best to thread it through the MOLLE channel urthest
to the outside o the plate. It may be threaded at any height (any
row or MOLLE) and is best to be congured at the level o personal
preerence. You may thread the elastic retainer in between two MOLLErows i you wish to old and stow excess webbing. It is best to thread it
as high as possible on the Armour Carrier.

7/30/2019 PARIS POG
http://slidepdf.com/reader/full/paris-pog 23/32
20
4. Thread the MQRB Ladder Lock onto the Armour Shoulder Strap
webbing and tighten.
P.A.R.I.S™ ARMOUR CARRIER CONFIGURATION
7/30/2019 PARIS POG
http://slidepdf.com/reader/full/paris-pog 24/32
21
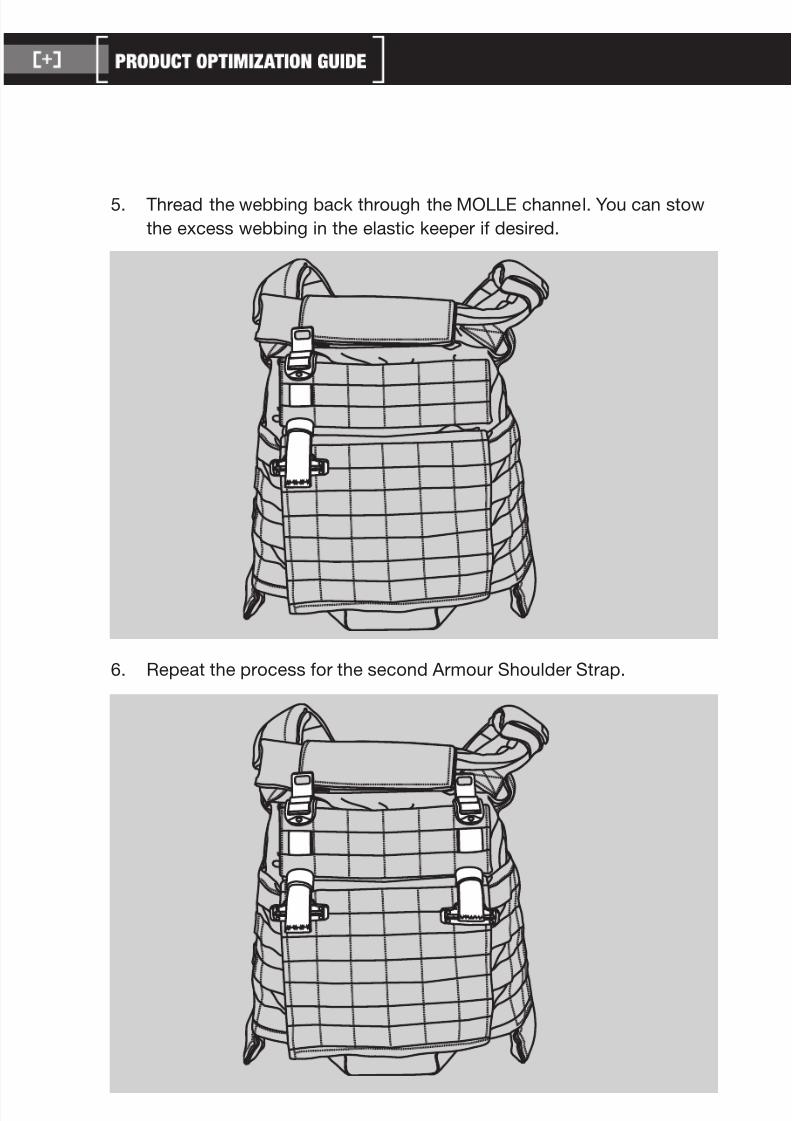
5. Thread the webbing back through the MOLLE channel. You can stow
the excess webbing in the elastic keeper i desired.
6. Repeat the process or the second Armour Shoulder Strap.

7/30/2019 PARIS POG
http://slidepdf.com/reader/full/paris-pog 25/32
22
7. Pouches and equipment may now be placed over top o the Armour
Shoulder Straps. It is best to keep the MQRB Buckles clear though.
8. Insert the side MQRB Assembly into MOLLE on both sides o the
Armour Carrier. It is best i the placements are symmetrical, low
and as ar orward as possible. Keep in mind though, that the lower
pack strap will run over any pouch or equipment between the MQRB
Assembly and the Pack on the back.
P.A.R.I.S™ COMPONENT REFERENCE

7/30/2019 PARIS POG
http://slidepdf.com/reader/full/paris-pog 26/32
23
PACK TO ARMOUR INTEGRATION(DONNING THE PACK)
1. While the pack is congured in Armour to Pack Integration
Conguration, grasp the Shoulder Straps and swing the pack over
your head and onto your back. Ensure that there are no twists in
the Shoulder Straps that run between your back and the pack and
ensuring that they are not olded over. The best way to do this is while
holding the pack by its straps over your shoulders, reach back and
down as ar as you can, then bring the pack into your back and drag it
up into position. This should remove any olds in the straps and dress
the shoulder straps o.2. Lean orward to support the weight o the pack without it sliding down
and secure the Shoulder MQRBs on each side. Pull on the beaded pull
with one hand while inserting the other end into the buckle with the
other hand. Release the beaded pull and ensure it seats securely to
lock the buckle closed. You may now stand up however the pack
will pull the Amour Carrier up to the neck. This will be solved in the
next steps.
3. Secure the side MQRBs on each side. With practice, it is possible toaccomplish this one handed.
4. Pull the side webbing running through the MQRB’s as tight as is
comortable while shiting the load o the pack upwards. These
side straps prevent the armor rom riding upward while wearing a
heavy pack.
5. The pack is now integrated with the Armour Carrier.
6. In an emergent donning situation, only one MQRB shoulder strap can
be attached to support the pack.

7/30/2019 PARIS POG
http://slidepdf.com/reader/full/paris-pog 27/32
24
PACK REMOVAL(DOFFING THE PACK)
1. Release the lower side MQRBs by grasping and pulling the beaded
pulls on both sides.
2. Release the shoulder MQRBs by grasping and pulling the beaded pulls
on both sides simultaneously. Maintain hold on the beads holding the
weight o the pack.
P.A.R.I.S™ PACK TO ARMOUR INTEGREATION

7/30/2019 PARIS POG
http://slidepdf.com/reader/full/paris-pog 28/32
25
3. Lower the pack to the ground under control.
HALF PACK REMOVAL(IF IMMEDIATE EMERGENT MOVEMENT IS ANTICIPATED)
1. Release one lower side MQRB by grasping and pulling the beaded pull.
7/30/2019 PARIS POG
http://slidepdf.com/reader/full/paris-pog 29/32
26
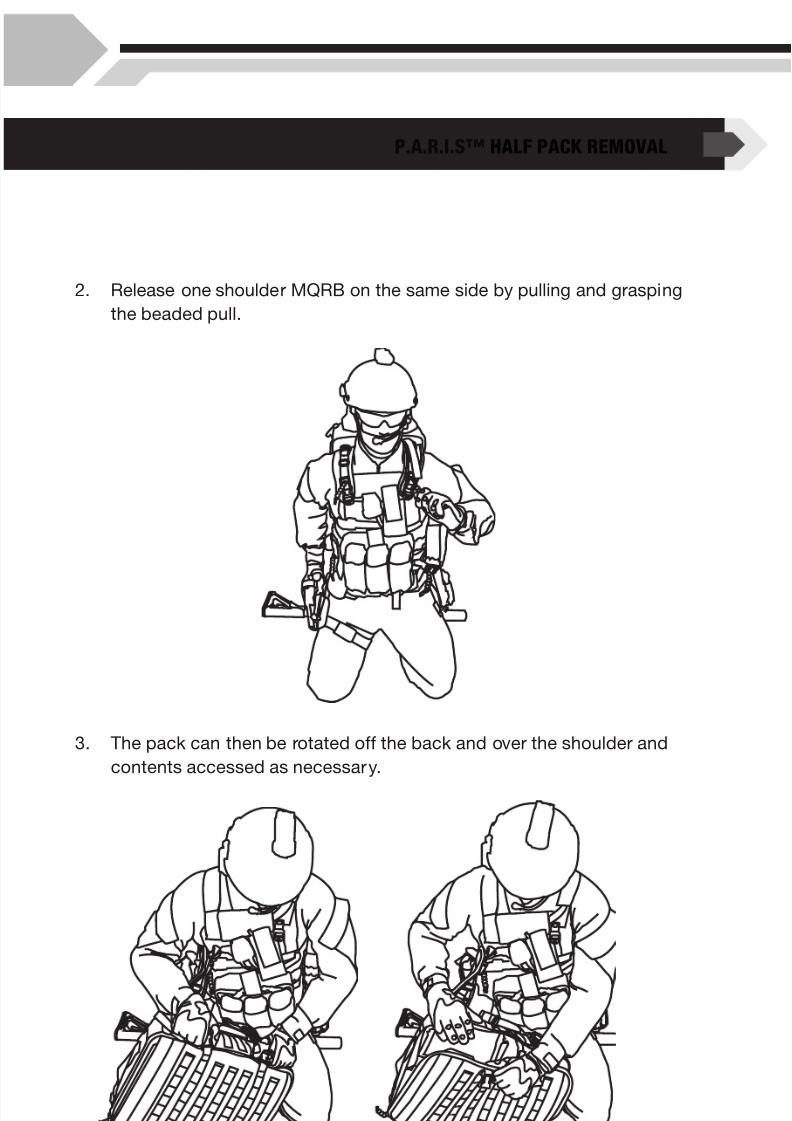
2. Release one shoulder MQRB on the same side by pulling and grasping
the beaded pull.
3. The pack can then be rotated o the back and over the shoulder and
contents accessed as necessary.
P.A.R.I.S™ HALF PACK REMOVAL

7/30/2019 PARIS POG
http://slidepdf.com/reader/full/paris-pog 30/32
27
4. I required the pack can then be quickly slung back onto the back
without doing up any buckles.

7/30/2019 PARIS POG
http://slidepdf.com/reader/full/paris-pog 31/32
28
NOTES:
PERSONAL LOG/NOTES

7/30/2019 PARIS POG
http://slidepdf.com/reader/full/paris-pog 32/32


![Blast Boxers / POG [UK]](https://img.dokumen.tips/doc/110x75/568bdc2b1a28ab2034b13634/blast-boxers-pog-uk.jpg)


![Active Directory POG[1]](https://img.dokumen.tips/doc/110x75/577cc91c1a28aba711a3608b/active-directory-pog1.jpg)


