Embed Size (px)
Citation preview
Page - 1
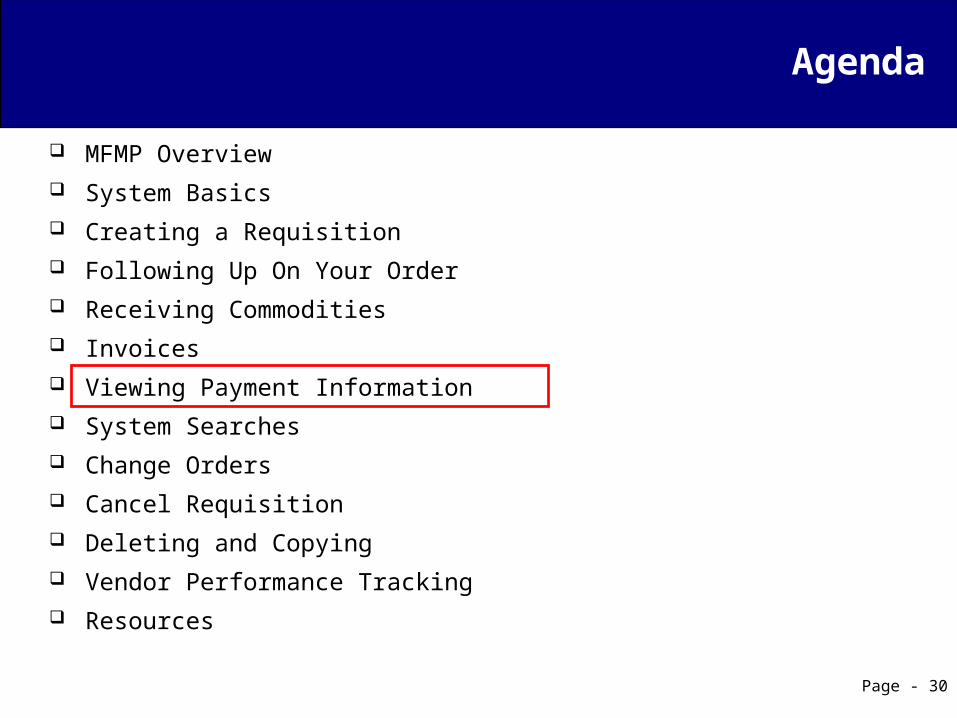
Agenda
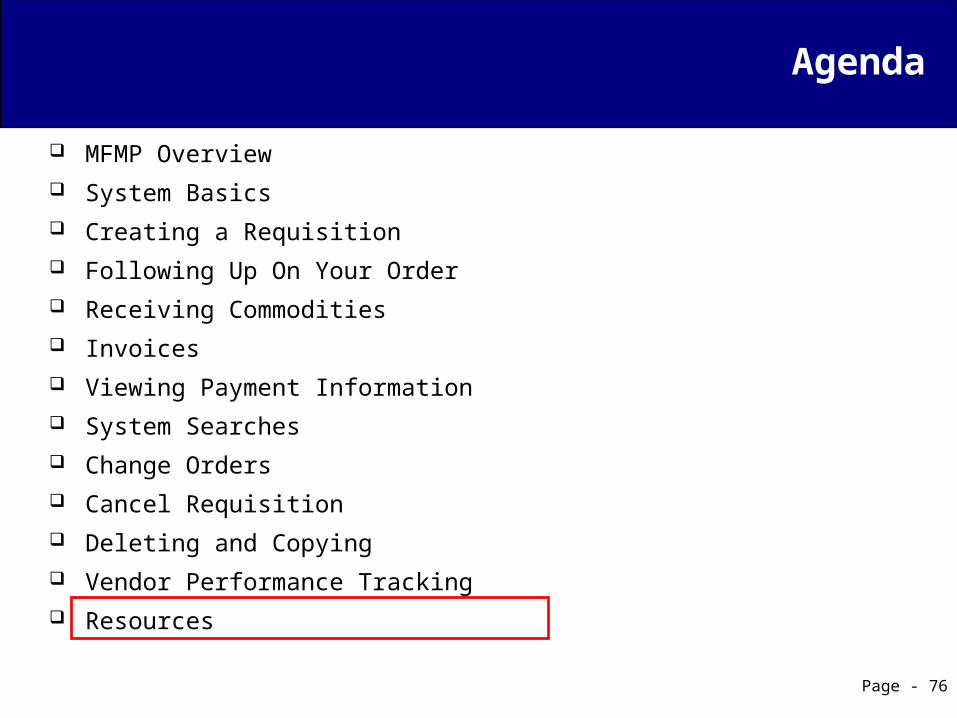
MFMP Overview System Basics Creating a Requisition Following Up On Your Order Receiving Commodities Invoices Viewing Payment Information System Searches Change Orders Cancel Requisition Deleting and Copying Vendor Performance Tracking Resources
Page - 2
Receiving Commodities
Chapter 215.422, Florida Statutes, requires that goods and/or services must be inspected and approved within five (5) calendar days of the physical receipt
Receipts must be completed by the Desktop Receiver (Requester or OBO) or the Central Receiver – whatever method your agency employs
Page - 3
Receiving Commodities
Negative Receiving
Negative receipts: Reduce the amount of items previously over-received or received in
error Can only be able to be initiated up to the amount previously accepted Can only be able to be initiated up to the amount previously paid
If payment has already been made, a warning message will populate. If the item was received and now paid in error, the receiver will need to communicate with their Finance and Accounting staff to handle the overpayment
Page - 4
Receiving Commodities
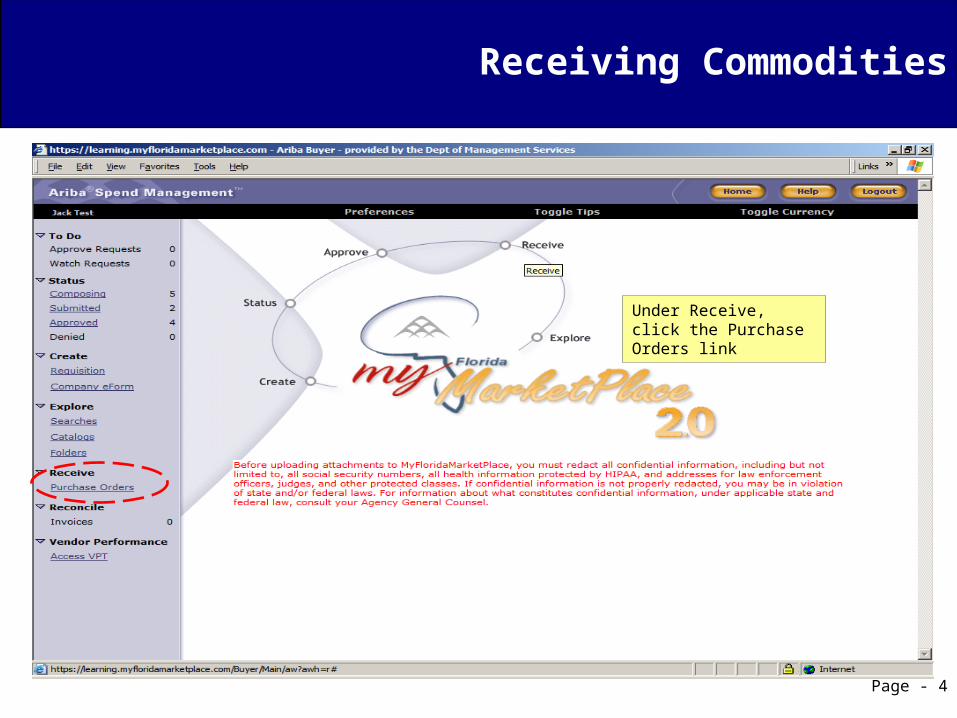
Under Receive, click the Purchase Orders link
Receiving Commodities
Page - 5
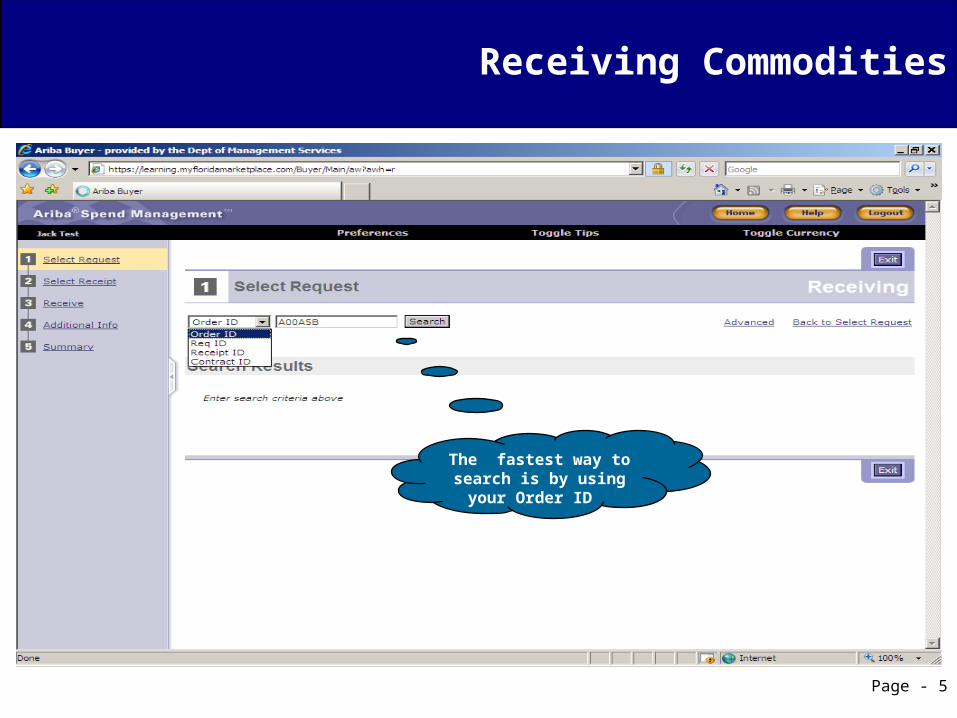
The fastest way to search is by using your
Order ID
Page - 6
Receiving Commodities
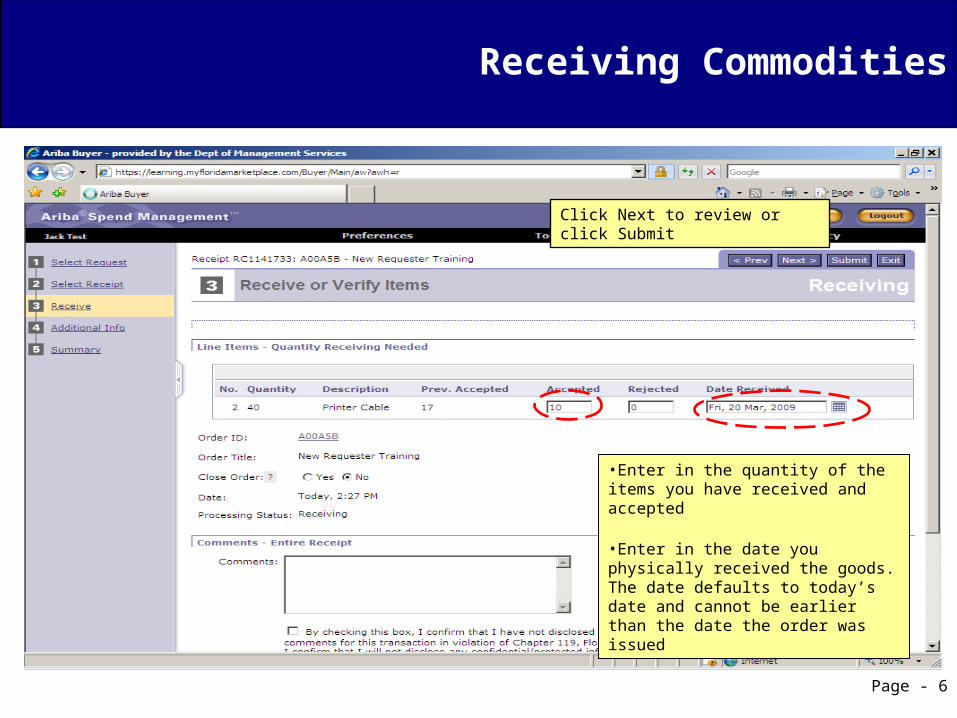
Click Next to review or click Submit
•Enter in the quantity of the items you have received and accepted
•Enter in the date you physically received the goods. The date defaults to today’s date and cannot be earlier than the date the order was issued
Page - 7
Receiving Commodities
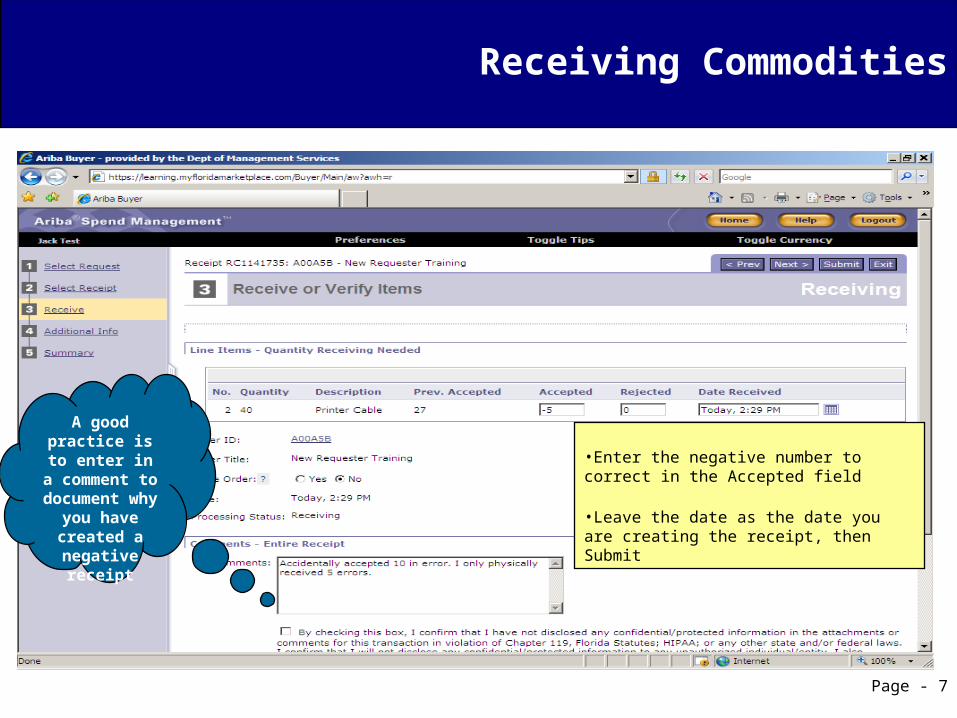
A good practice is to enter in a
comment to document why
you have created a
negative receipt
•Enter the negative number to correct in the Accepted field
•Leave the date as the date you are creating the receipt, then Submit
Receiving Commodities
Page - 8
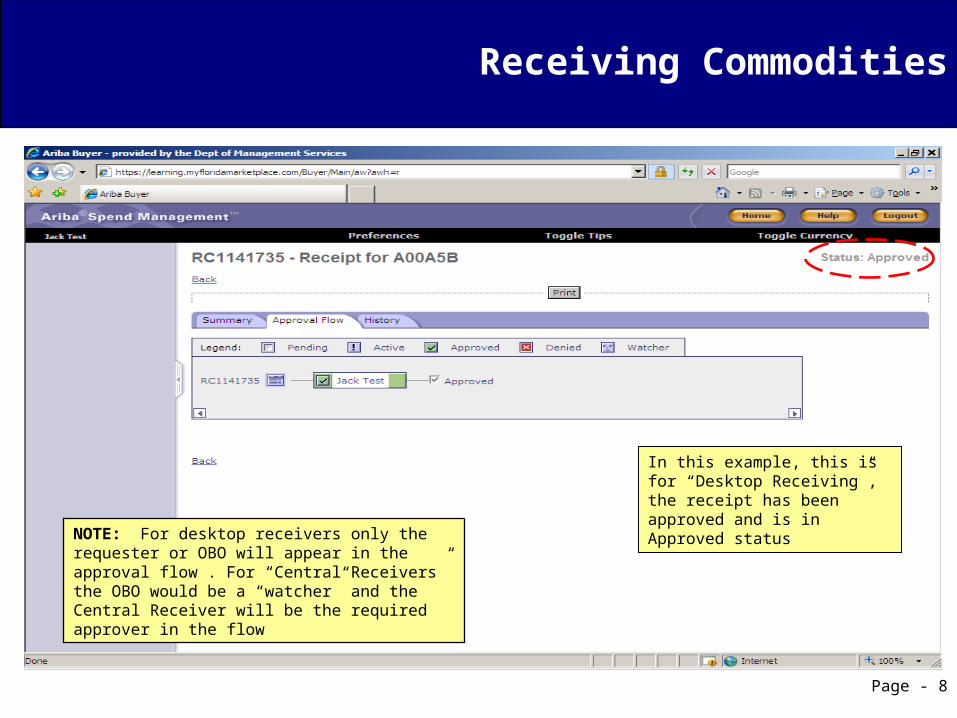
NOTE: For desktop receivers only the requester or OBO will appear in the approval flow . For “Central Receivers” the OBO would be a “watcher” and the Central Receiver will be the required approver in the flow
In this example, this is for “Desktop Receiving”, the receipt has been approved and is in Approved status
Receiving Commodities
Page - 9
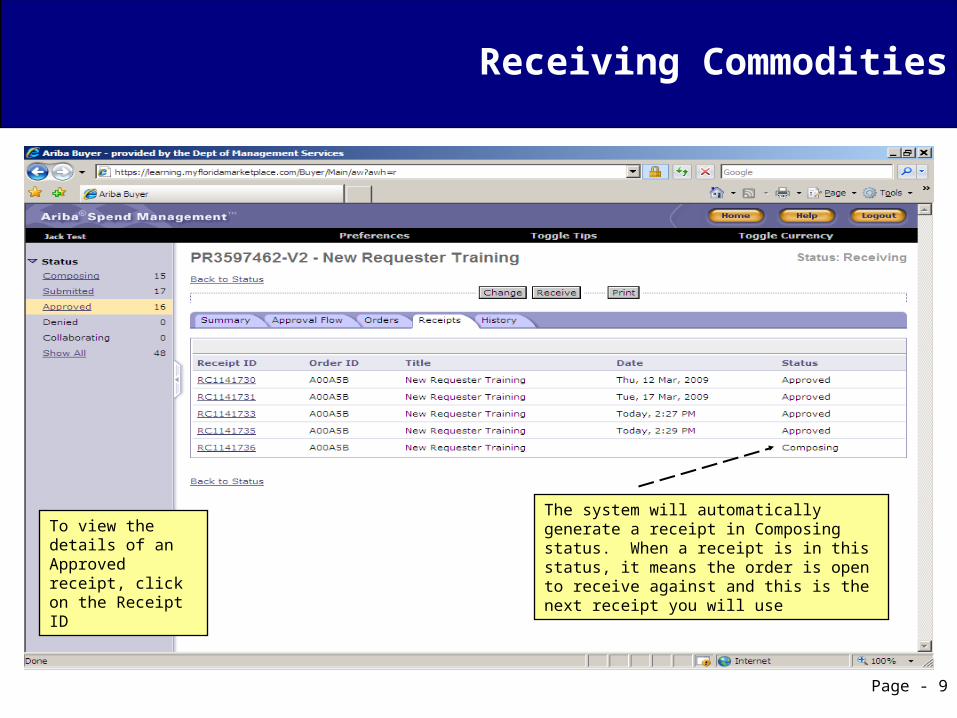
To view the details of an Approved receipt, click on the Receipt ID
The system will automatically generate a receipt in Composing status. When a receipt is in this status, it means the order is open to receive against and this is the next receipt you will use

Page - 10
Practical Exercise #4 (Receiving Commodities)
If you have questions, please raise your hand for assistance
Page - 11
Agenda
MFMP Overview System Basics Creating a Requisition Following Up On Your Order Receiving Commodities Invoices Viewing Payment Information System Searches Change Orders Cancel Requisition Deleting and Copying Vendor Performance Tracking Resources
InvoicesInvoice eForm
Page - 12
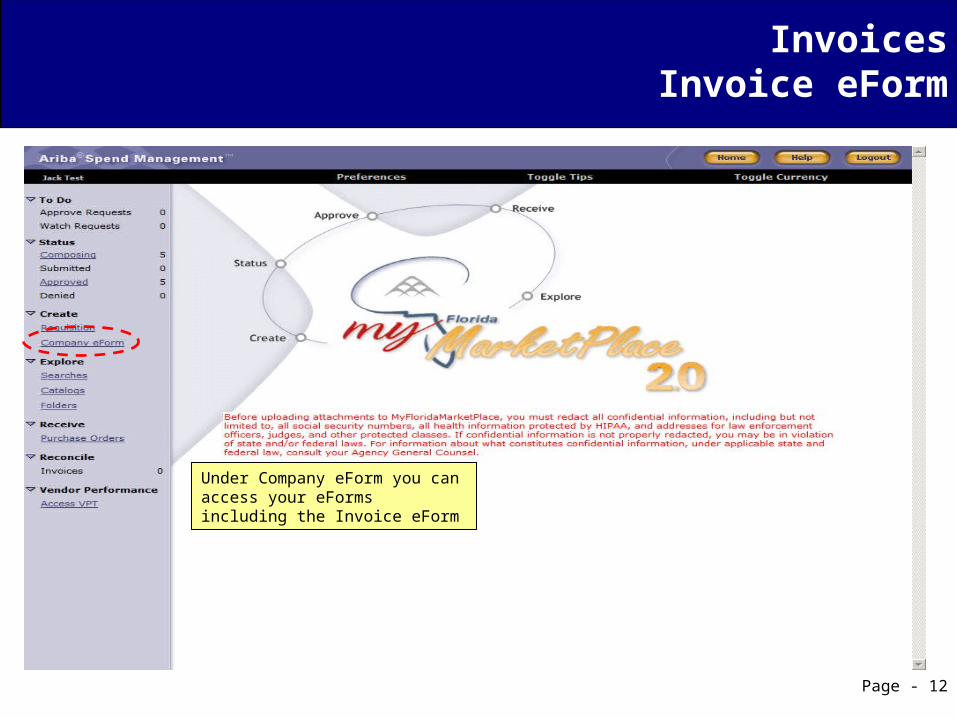
Under Company eForm you can access your eForms including the Invoice eForm

Page - 13
InvoicesInvoice eForm
Select Invoice eForm
InvoicesInvoice eForm
Page - 14
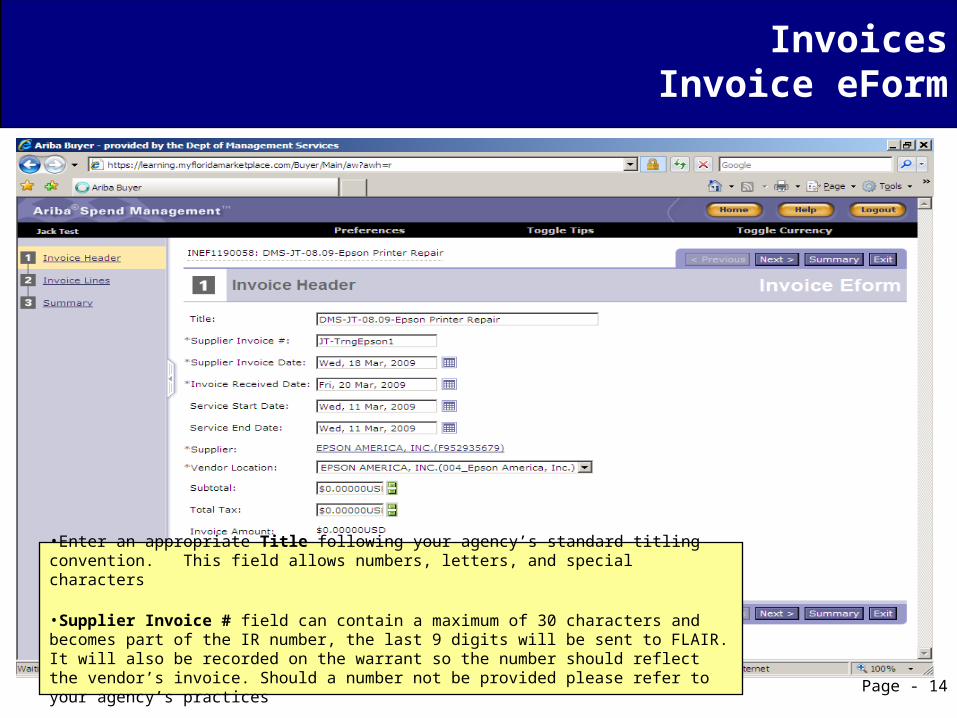
•Enter an appropriate Title following your agency’s standard titling convention. This field allows numbers, letters, and special characters
•Supplier Invoice # field can contain a maximum of 30 characters and becomes part of the IR number, the last 9 digits will be sent to FLAIR. It will also be recorded on the warrant so the number should reflect the vendor’s invoice. Should a number not be provided please refer to your agency’s practices
InvoicesInvoice eForm
Page - 15
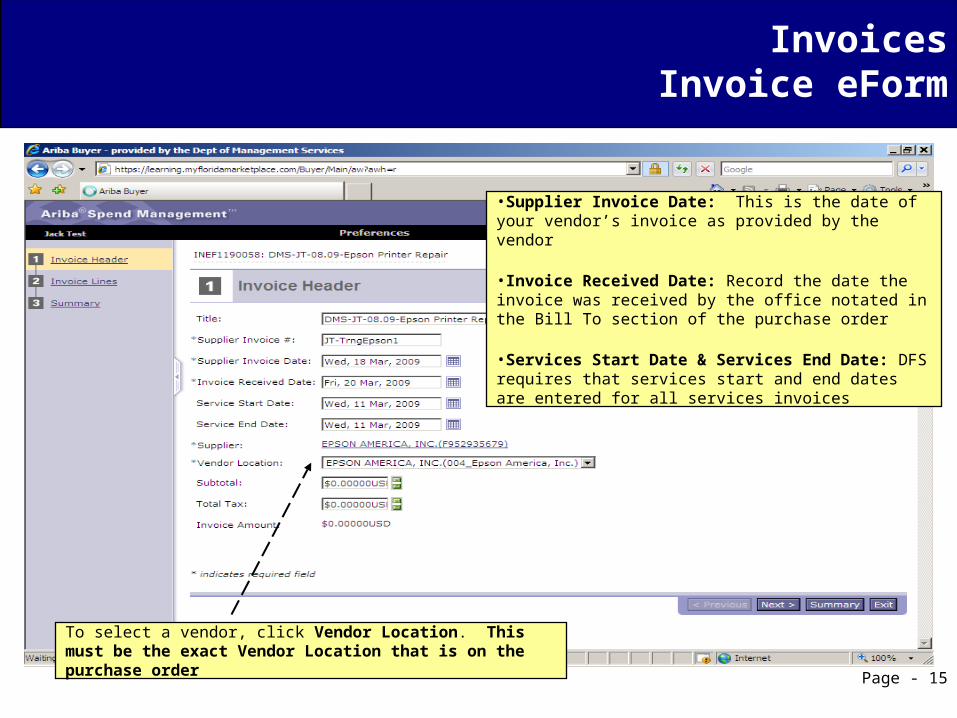
To select a vendor, click Vendor Location. This must be the exact Vendor Location that is on the purchase order
•Supplier Invoice Date: This is the date of your vendor’s invoice as provided by the vendor
•Invoice Received Date: Record the date the invoice was received by the office notated in the Bill To section of the purchase order
•Services Start Date & Services End Date: DFS requires that services start and end dates are entered for all services invoices
InvoicesInvoice eForm
Page - 16
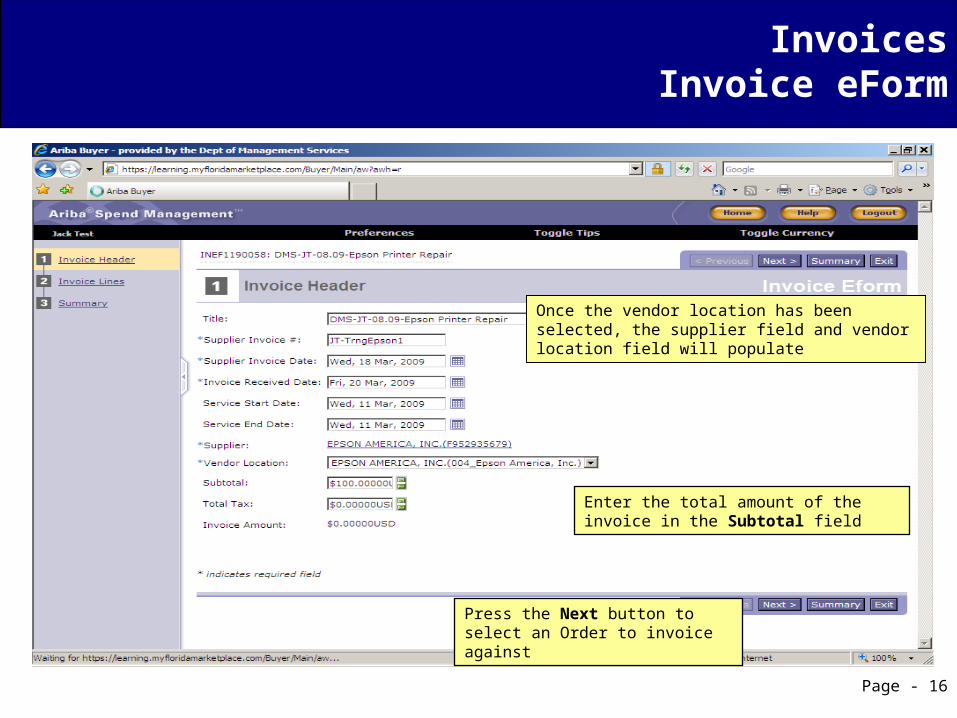
Enter the total amount of the invoice in the Subtotal field
Press the Next button to select an Order to invoice against
Once the vendor location has been selected, the supplier field and vendor location field will populate
InvoicesInvoice eForm
Page - 17
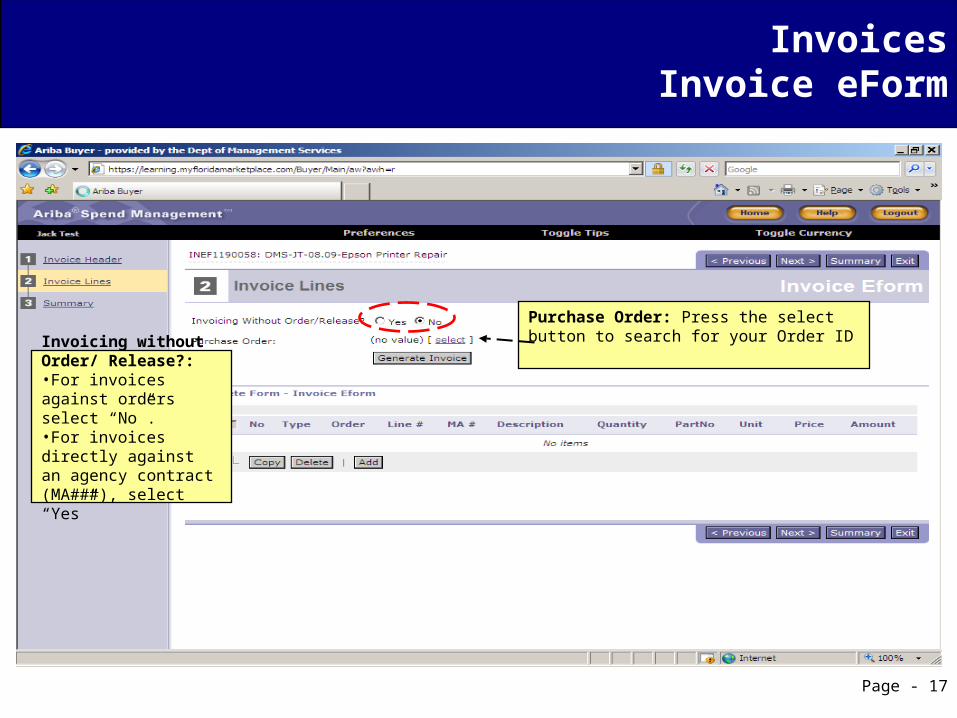
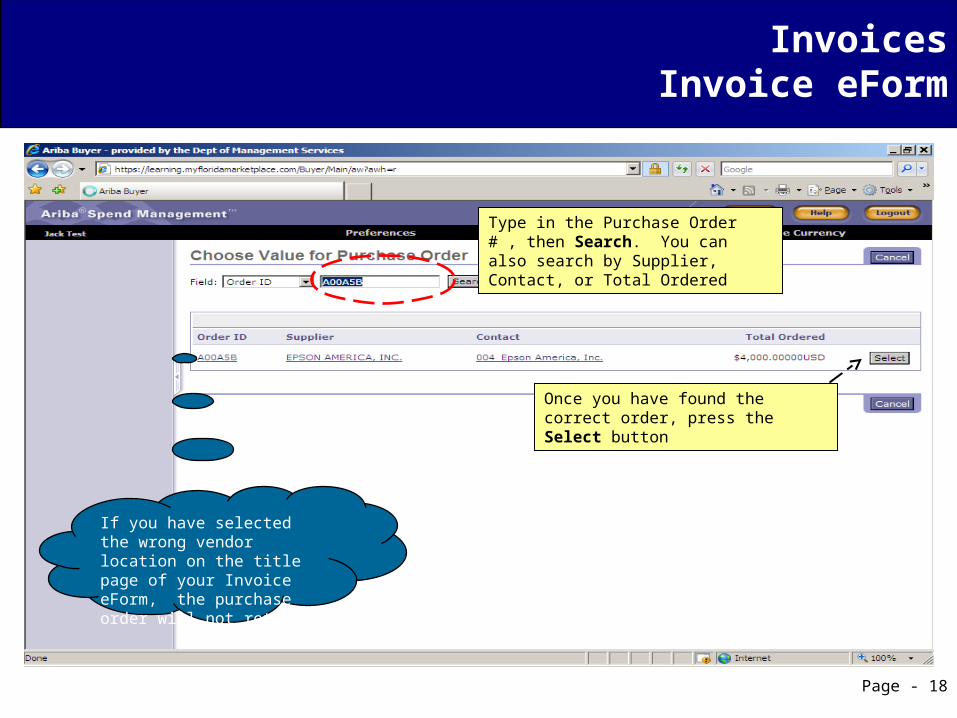
Purchase Order: Press the select button to search for your Order ID
Invoicing without Order/ Release?: •For invoices against orders select “No”. •For invoices directly against an agency contract (MA###), select “Yes”
InvoicesInvoice eForm
Page - 18
Once you have found the correct order, press the Select button
If you have selected the wrong vendor location on the title page of your Invoice eForm, the purchase order will not return.
Type in the Purchase Order # , then Search. You can also search by Supplier, Contact, or Total Ordered
InvoicesInvoice eForm
Page - 19
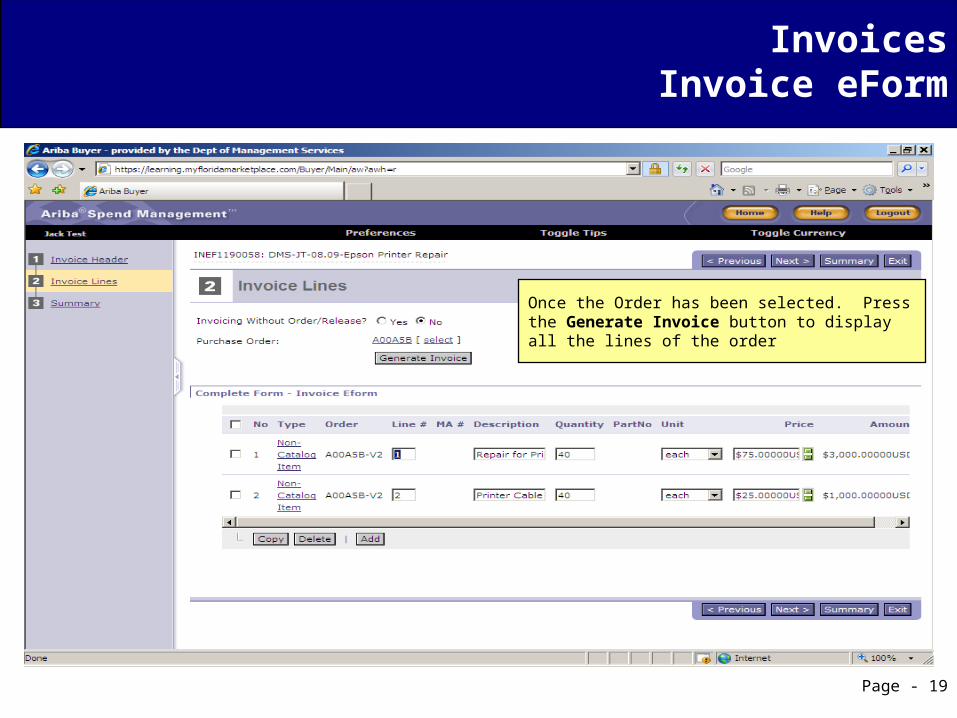
Once the Order has been selected. Press the Generate Invoice button to display all the lines of the order
InvoicesInvoice eForm
Page - 20
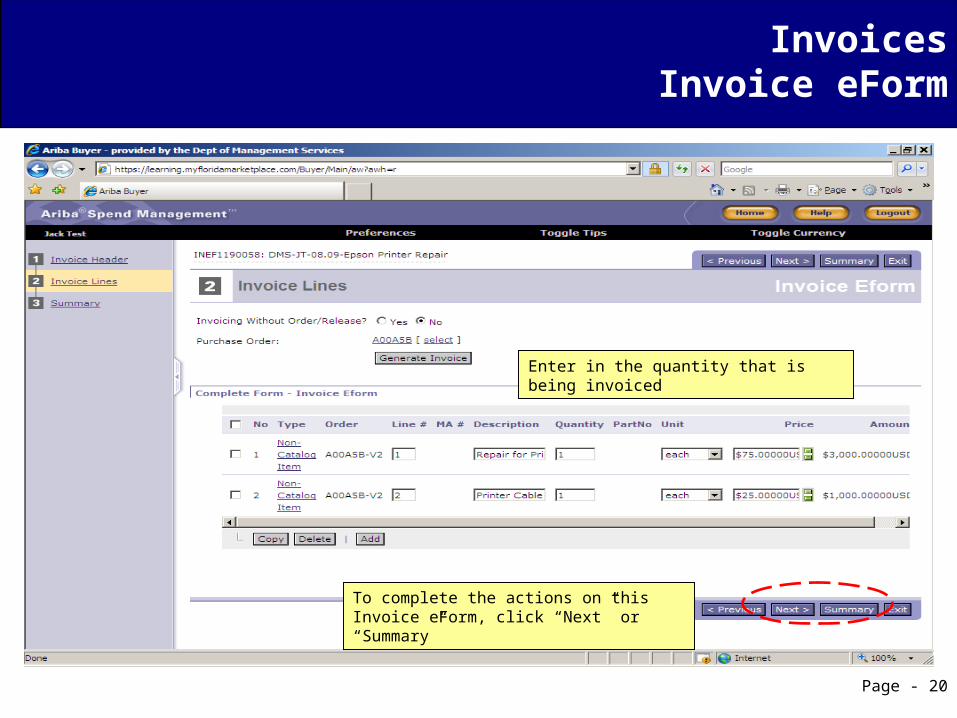
To complete the actions on this Invoice eForm, click “Next” or “Summary”
Enter in the quantity that is being invoiced
InvoicesInvoice eForm
Page - 21
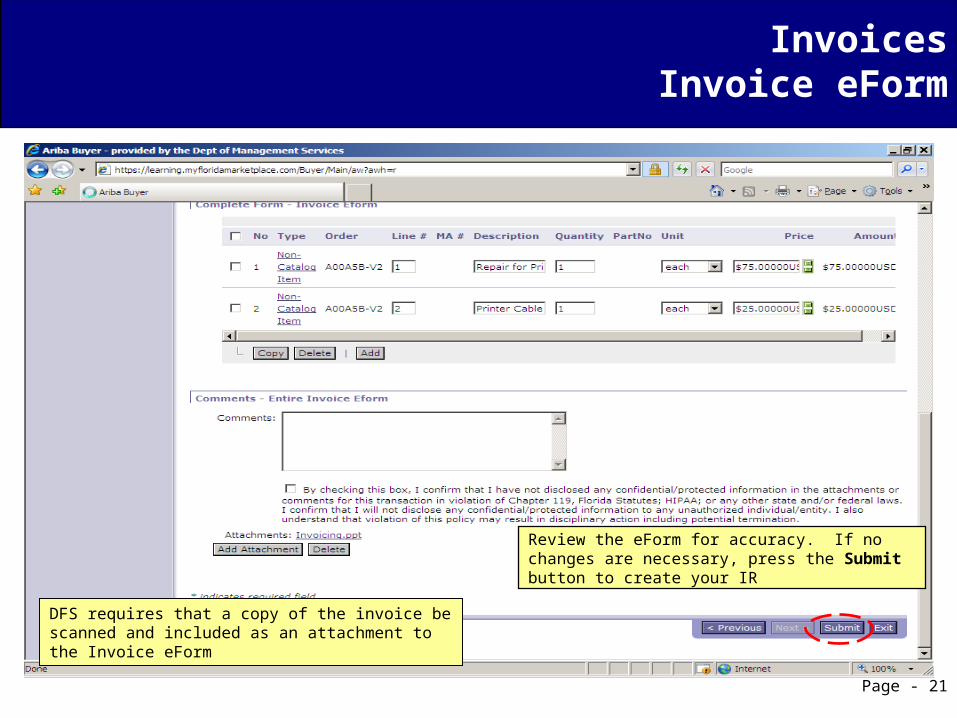
DFS requires that a copy of the invoice be scanned and included as an attachment to the Invoice eForm
Review the eForm for accuracy. If no changes are necessary, press the Submit button to create your IR
Invoice eFormReconciling Invoices
Page - 22
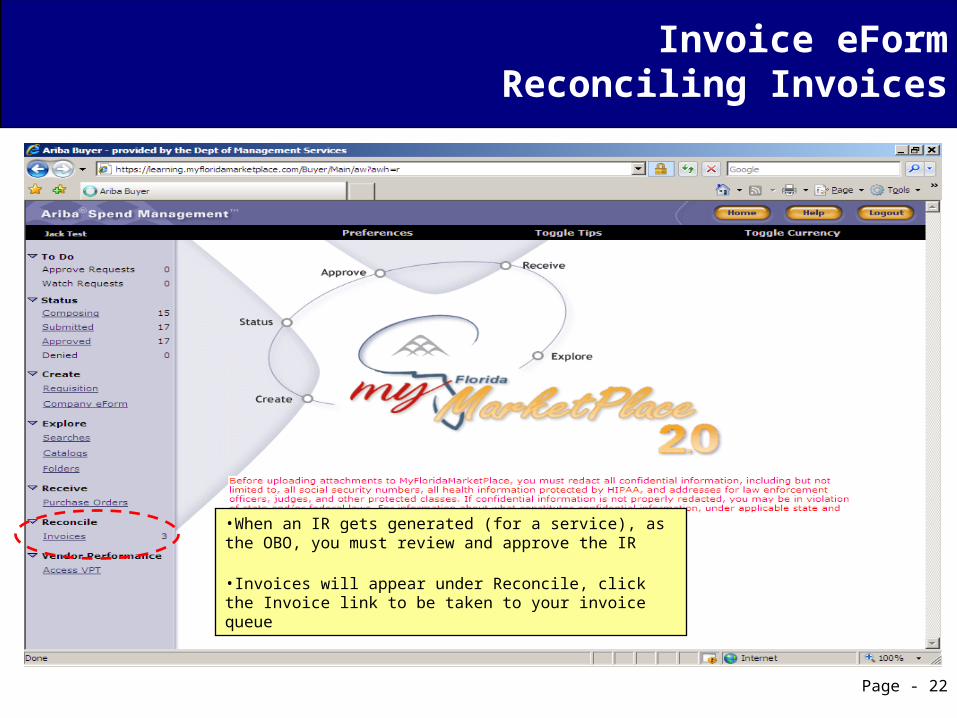
•When an IR gets generated (for a service), as the OBO, you must review and approve the IR
•Invoices will appear under Reconcile, click the Invoice link to be taken to your invoice queue
Invoice eFormReconciling Invoices
Page - 23
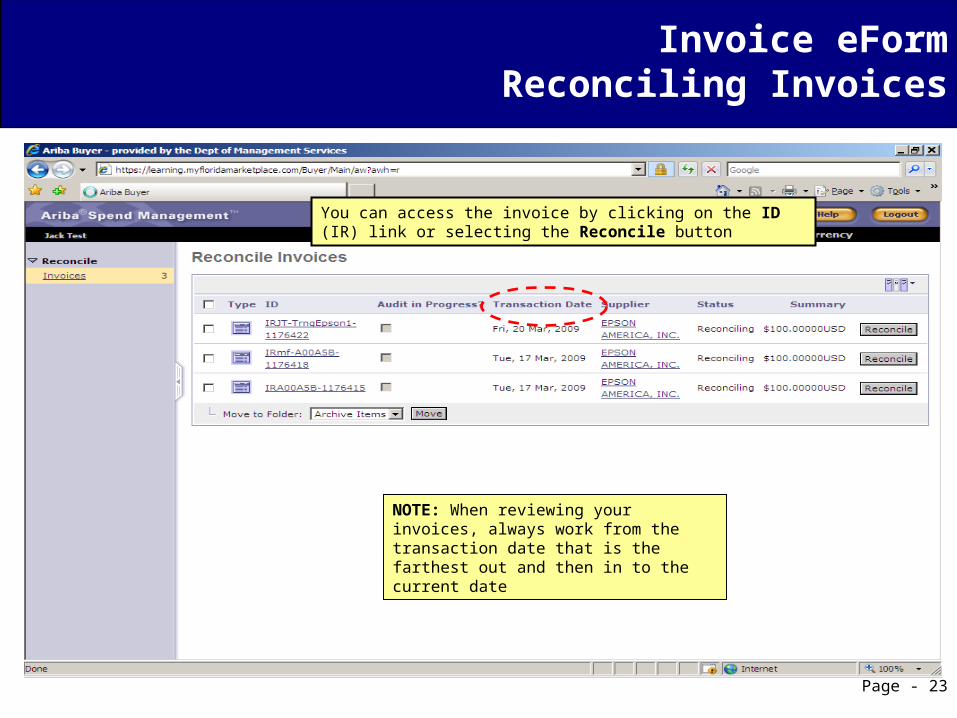
NOTE: When reviewing your invoices, always work from the transaction date that is the farthest out and then in to the current date
You can access the invoice by clicking on the ID (IR) link or selecting the Reconcile button

Invoice eFormReconciling Invoices
Page - 24
•You want to always view the details of your IR, before you approve
•To view the details, click on the Invoice Tab or the Invoice eForm link
Invoice eFormReconciling Invoices
Page - 25
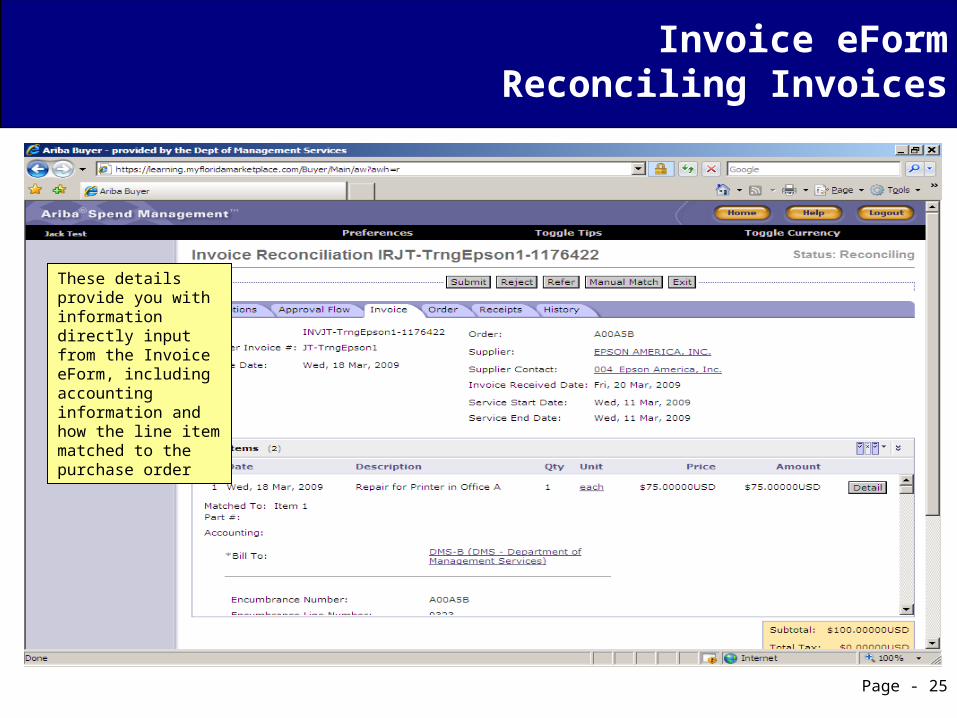
These details provide you with information directly input from the Invoice eForm, including accounting information and how the line item matched to the purchase order
Invoice eFormReconciling Invoices
Page - 26
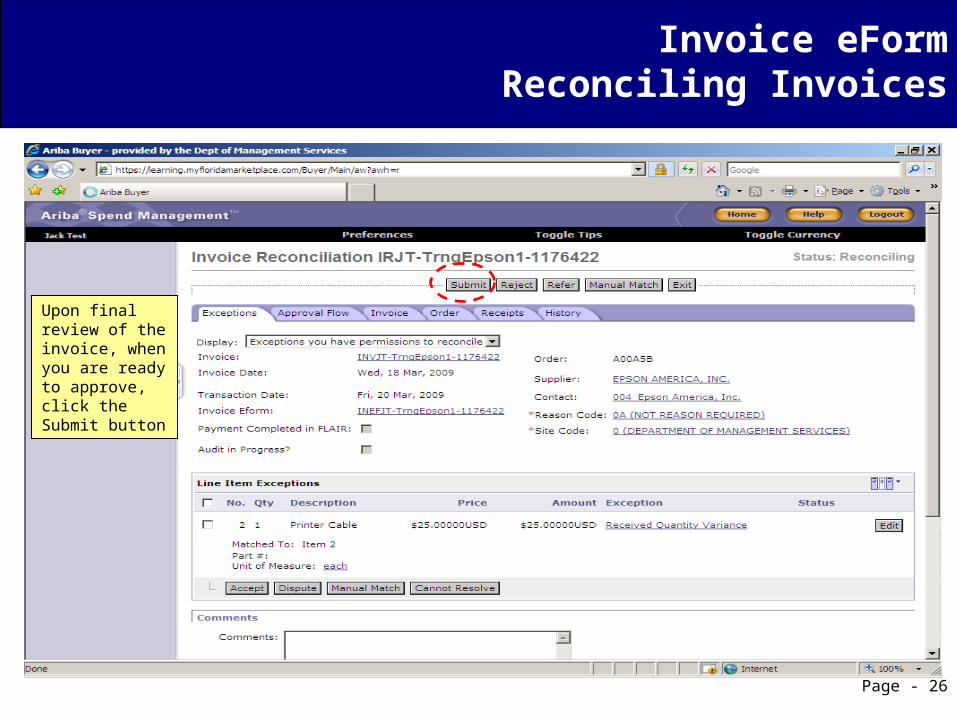
Upon final review of the invoice, when you are ready to approve, click the Submit button
Invoice eFormReconciling Invoices
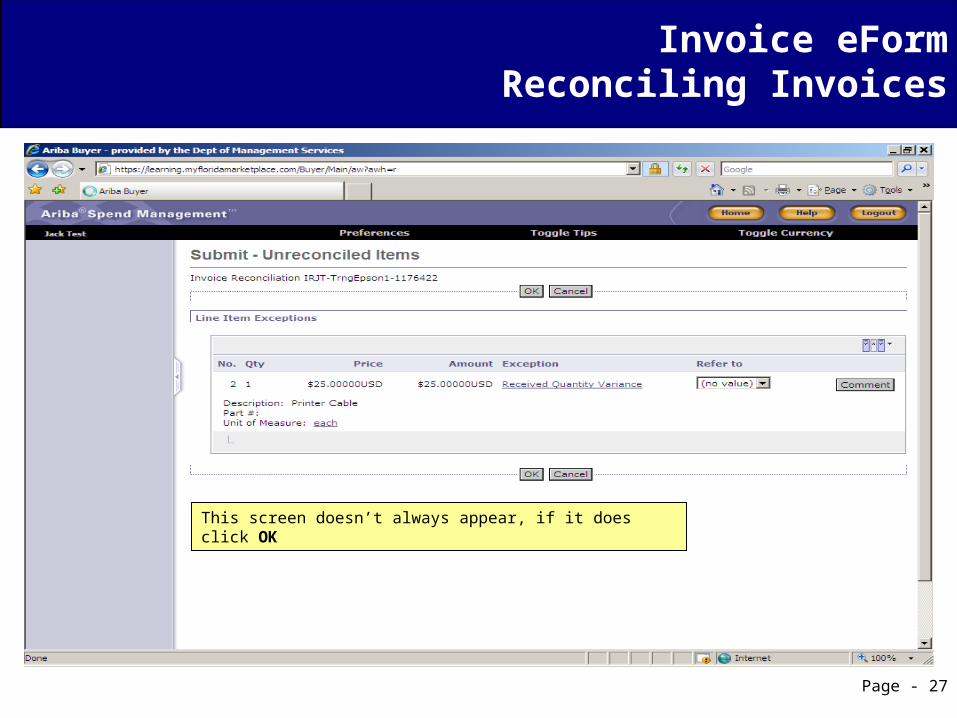
Page - 27
The approval flow verifies you have approved the IR and it’s now active with the Exception Handler for your agency
This screen doesn’t always appear, if it does click OK
Invoice eFormReconciling Invoices
Page - 28
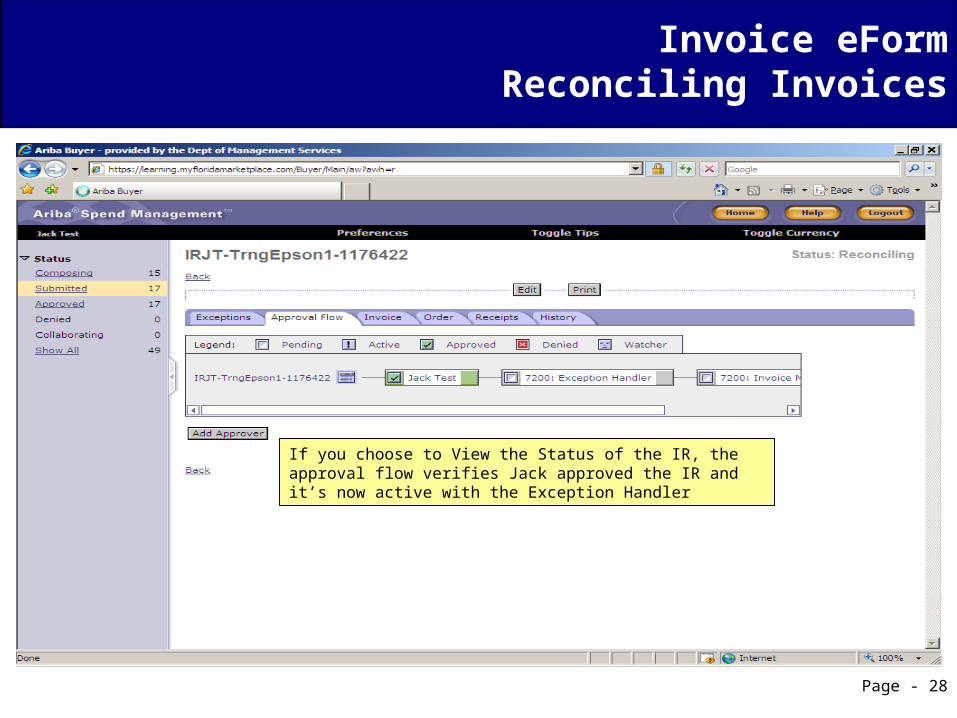
If you choose to View the Status of the IR, the approval flow verifies Jack approved the IR and it’s now active with the Exception Handler

Page - 29
Practical Exercise #5 & #6 (Invoices)
If you have questions, please raise your hand for assistance
Page - 30
Agenda
MFMP Overview System Basics Creating a Requisition Following Up On Your Order Receiving Commodities Invoices Viewing Payment Information System Searches Change Orders Cancel Requisition Deleting and Copying Vendor Performance Tracking Resources
Page - 31
Viewing Payment Information
Once your requisition is in an Ordered Status and the Order is issued, a PO balance will appear on the Order view (only)
As long as all payments are processed directly through MFMP the PO balance will be updated
All IRs that appear on the Order will include the transaction date, paid date, and amount of payment. Click the IR link to be taken to the IR to view the invoice and the payment information, including the warrant #
Only IRs in a “Paid” status will affect the PO balance. IR’s rejected, or in an approving or reconciling status will not be reflected in the PO balance
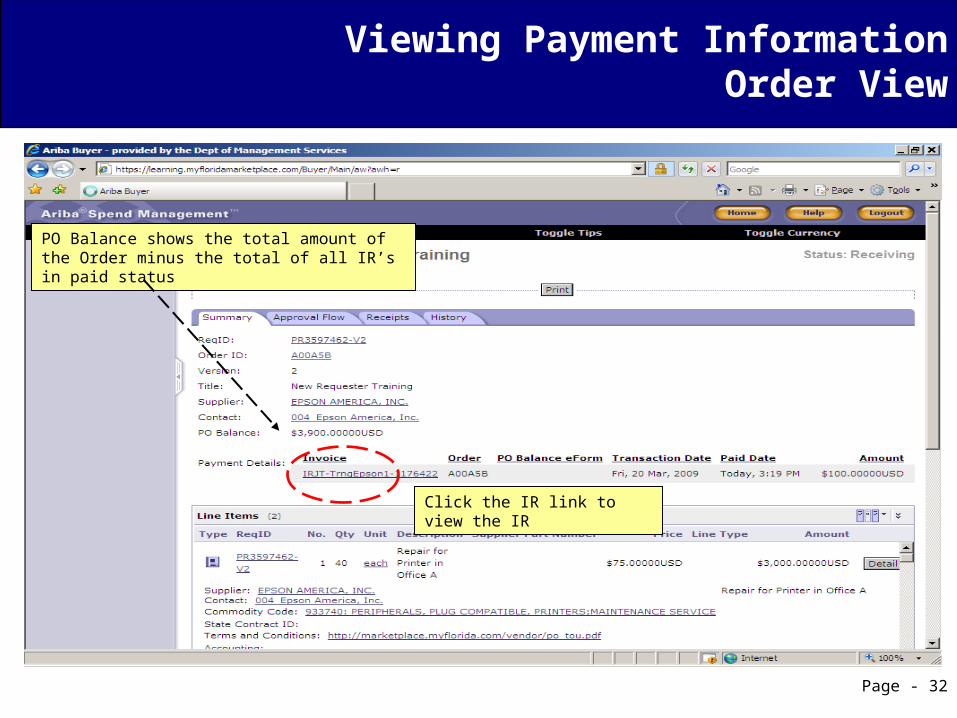
Viewing Payment InformationOrder View
Page - 32
Click the IR link to view the IR
PO Balance shows the total amount of the Order minus the total of all IR’s in paid status
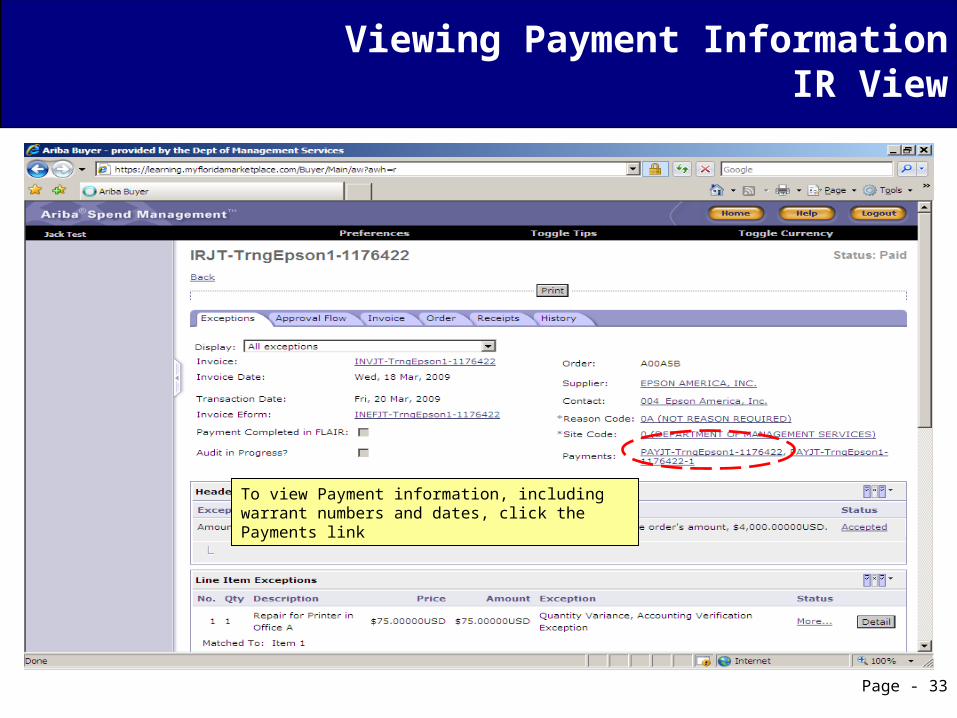
Viewing Payment InformationIR View
Page - 33
To view Payment information, including warrant numbers and dates, click the Payments link
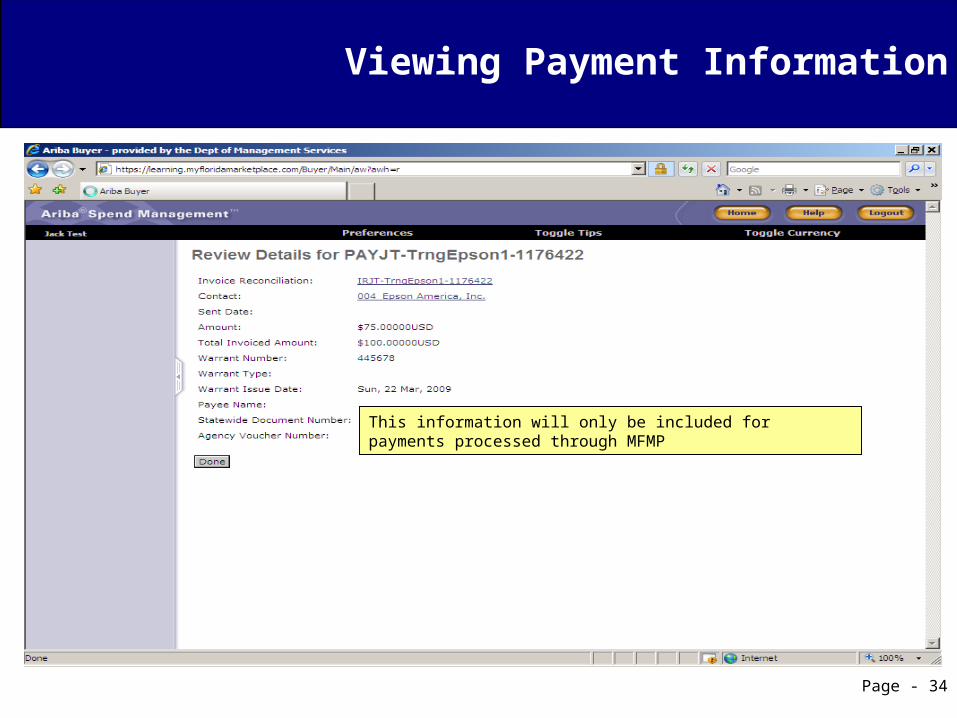
Viewing Payment Information
Page - 34
This information will only be included for payments processed through MFMP
Page - 35
Agenda
MFMP Overview System Basics Creating a Requisition Following Up On Your Order Receiving Commodities Invoices Viewing Payment Information System Searches Change Orders Cancel Requisition Deleting and Copying Vendor Performance Tracking Resources
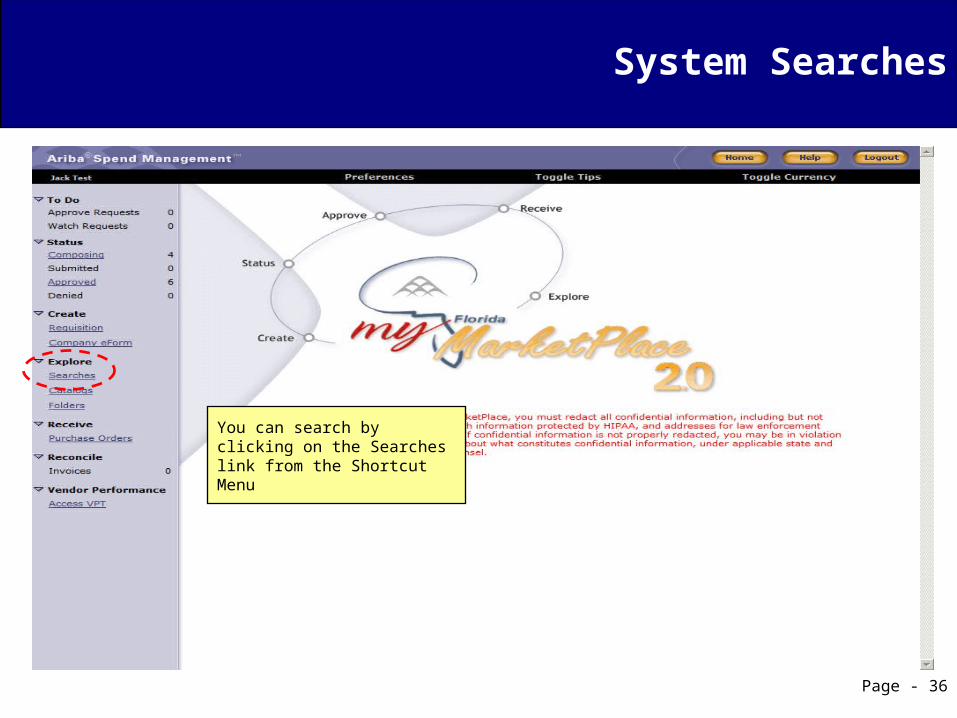
System Searches
Page - 36
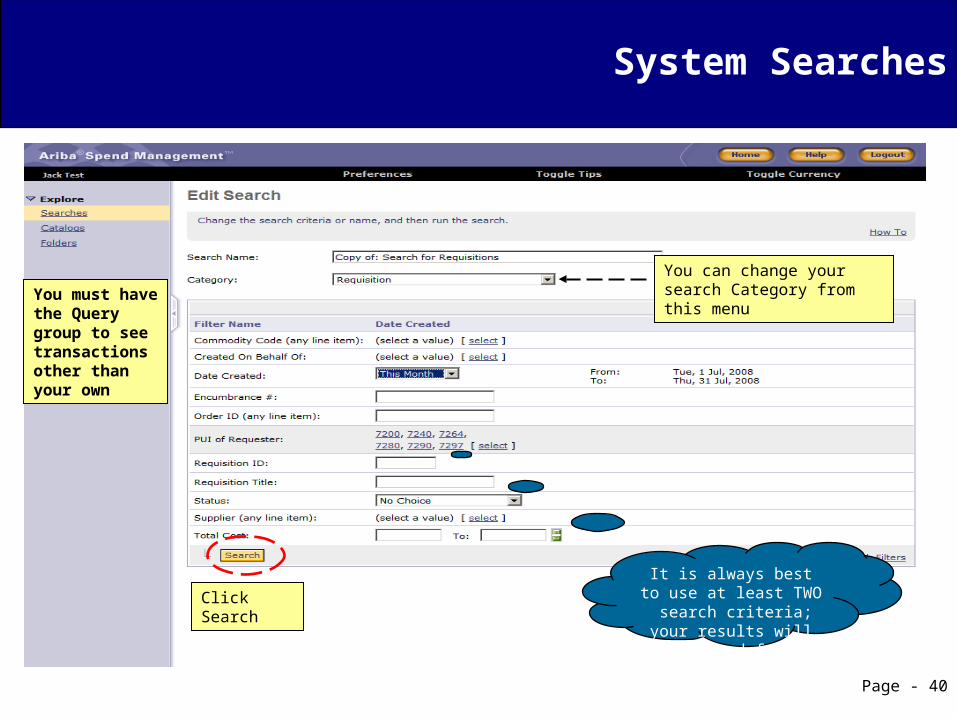
You can search by clicking on the Searches link from the Shortcut Menu
Page - 37
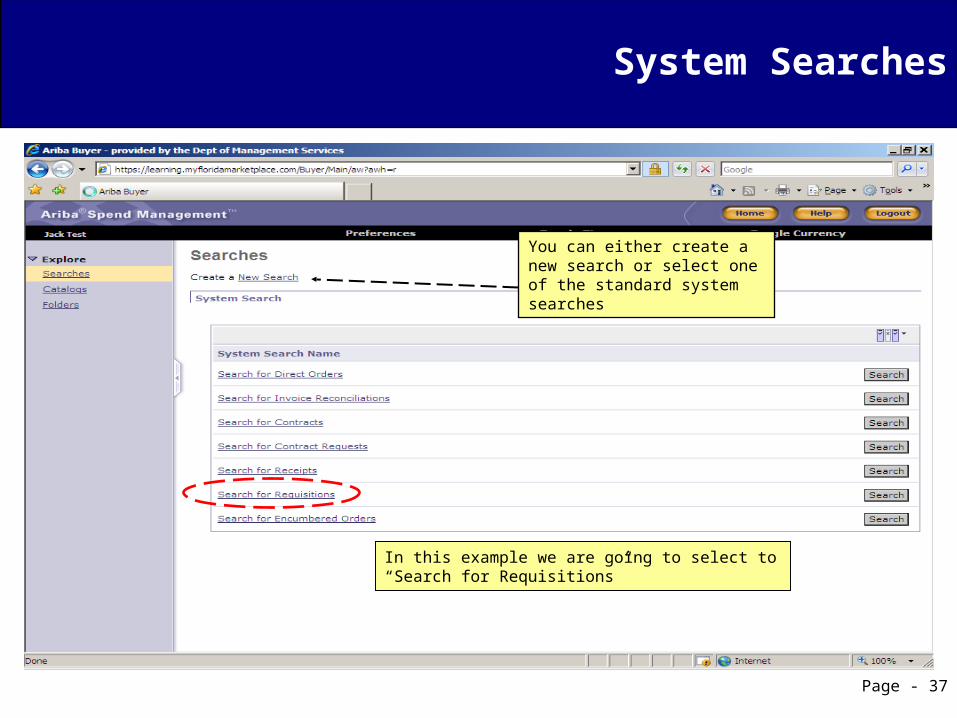
System Searches
You can either create a new search or select one of the standard system searches
In this example we are going to select to “Search for Requisitions”
System Searches
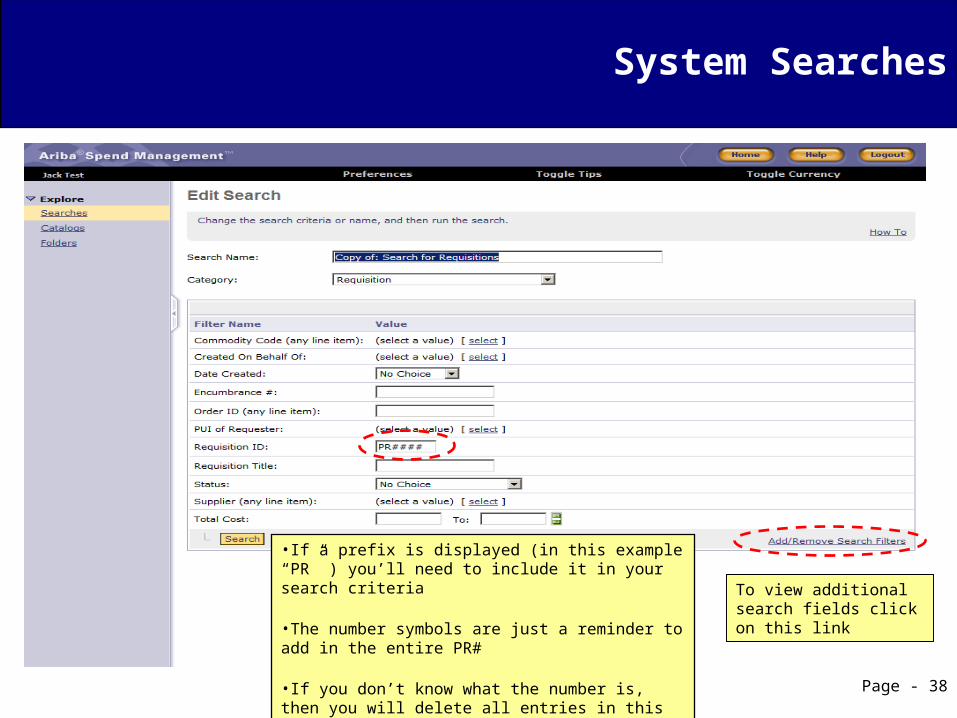
Page - 38
•If a prefix is displayed (in this example “PR” ) you’ll need to include it in your search criteria
•The number symbols are just a reminder to add in the entire PR#
•If you don’t know what the number is, then you will delete all entries in this field
To view additional search fields click on this link
System Searches
Page - 39
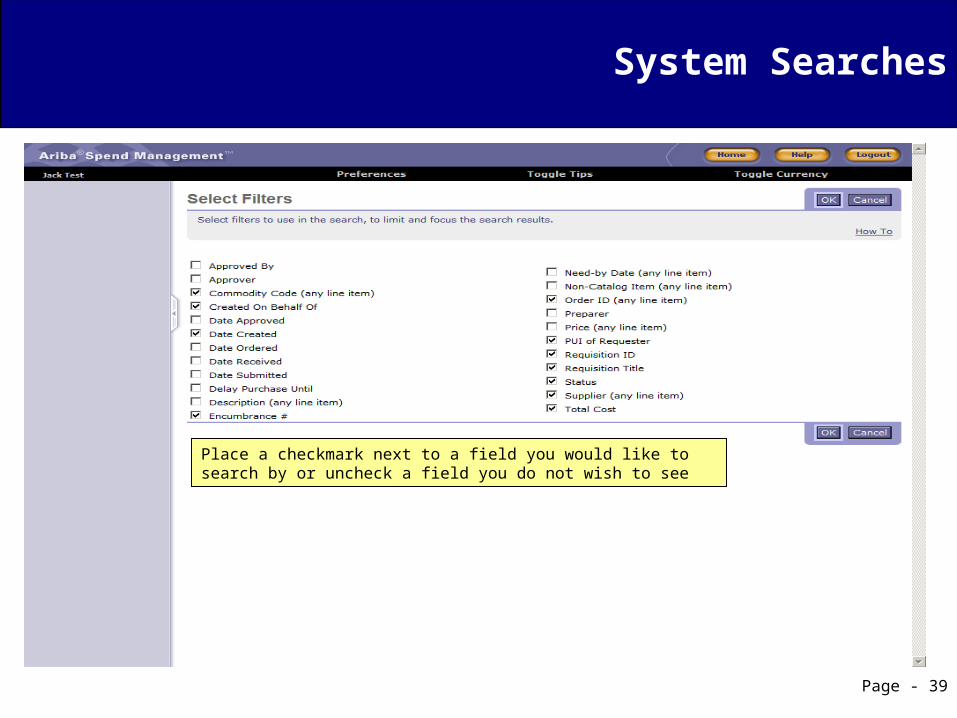
Place a checkmark next to a field you would like to search by or uncheck a field you do not wish to see
System Searches
Page - 40
It is always best to use at least TWO search criteria;
your results will be returned faster.
You can change your search Category from this menuYou must have
the Query group to see transactions other than your own
Click Search
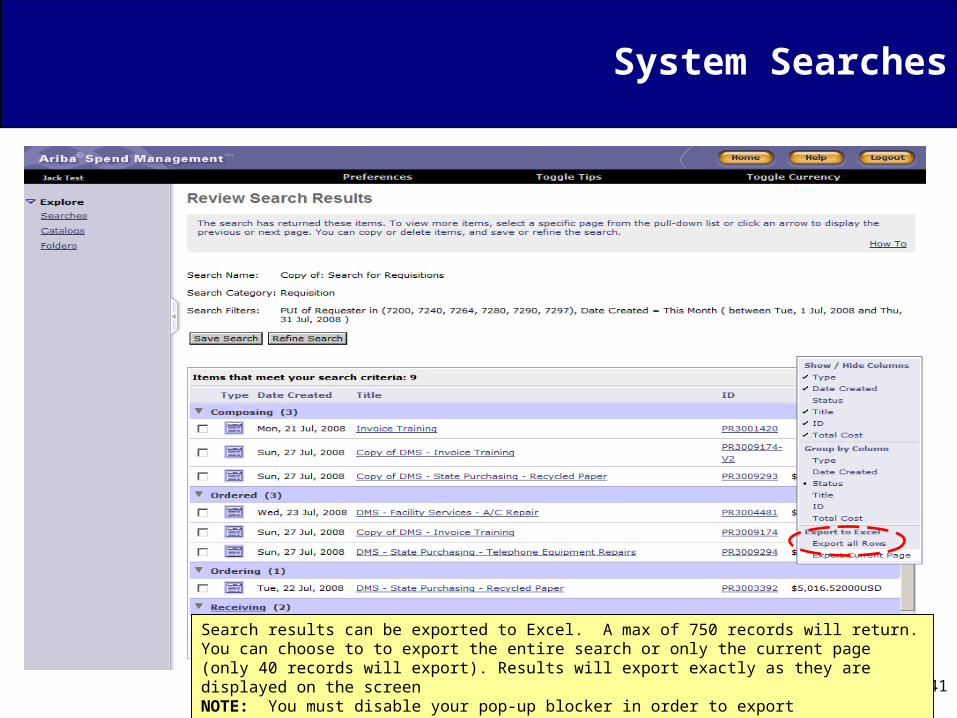
System Searches
Page - 41
Search results can be exported to Excel. A max of 750 records will return. You can choose to to export the entire search or only the current page (only 40 records will export). Results will export exactly as they are displayed on the screenNOTE: You must disable your pop-up blocker in order to export
Page - 42
System Searches
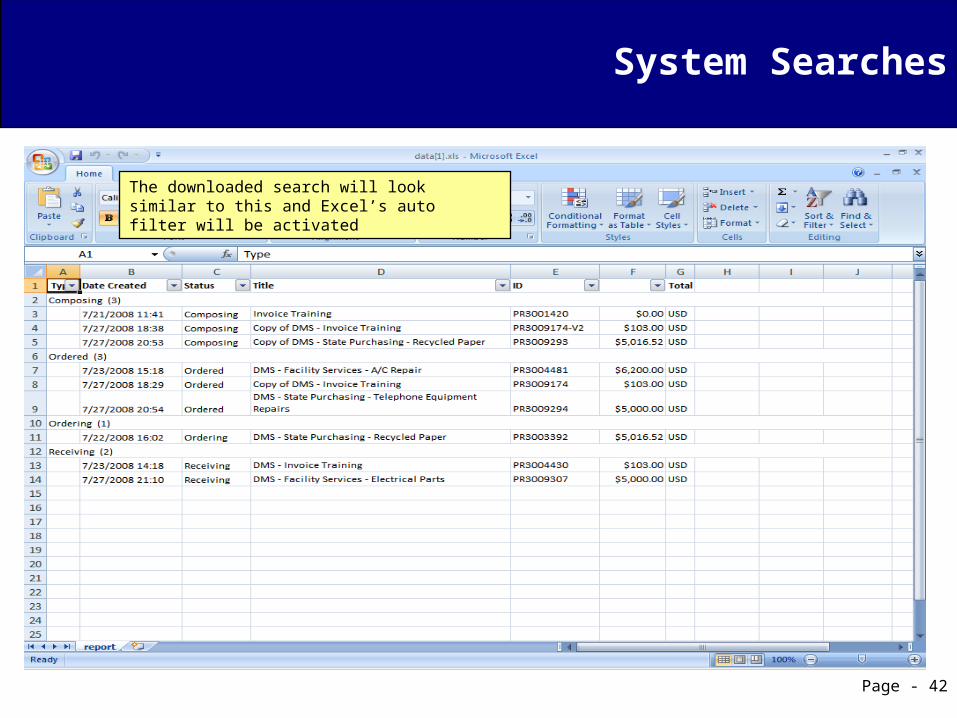
The downloaded search will look similar to this and Excel’s auto filter will be activated
Page - 43
System Searches
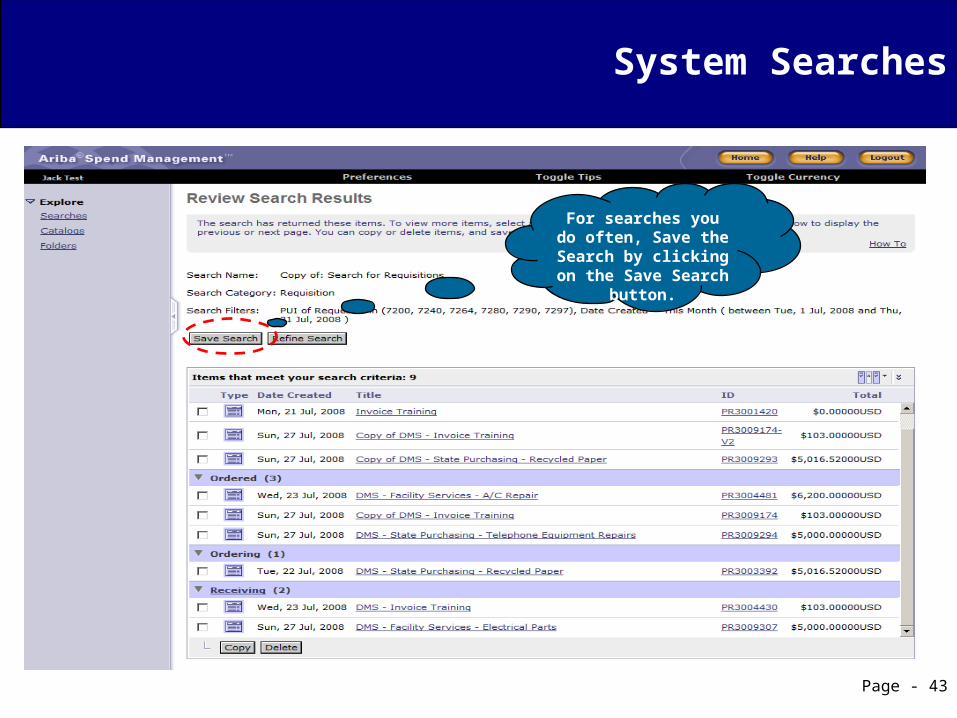
For searches you do often, Save the Search
by clicking on the Save Search button.
System Searches
Page - 44
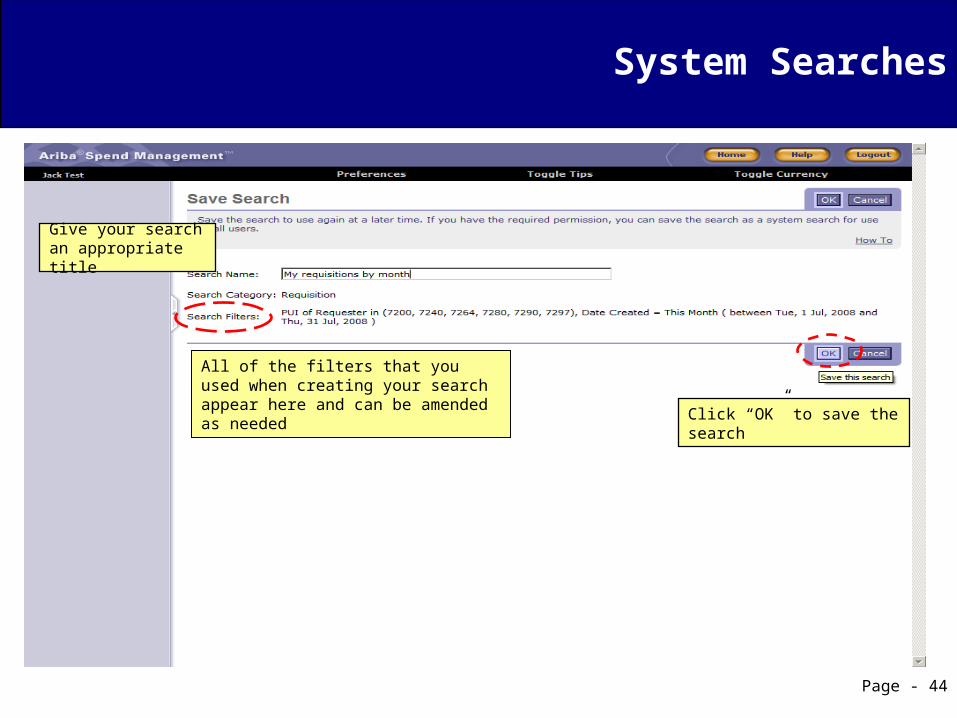
Give your search an appropriate title
Click “OK” to save the search
All of the filters that you used when creating your search appear here and can be amended as needed
System Searches
Page - 45
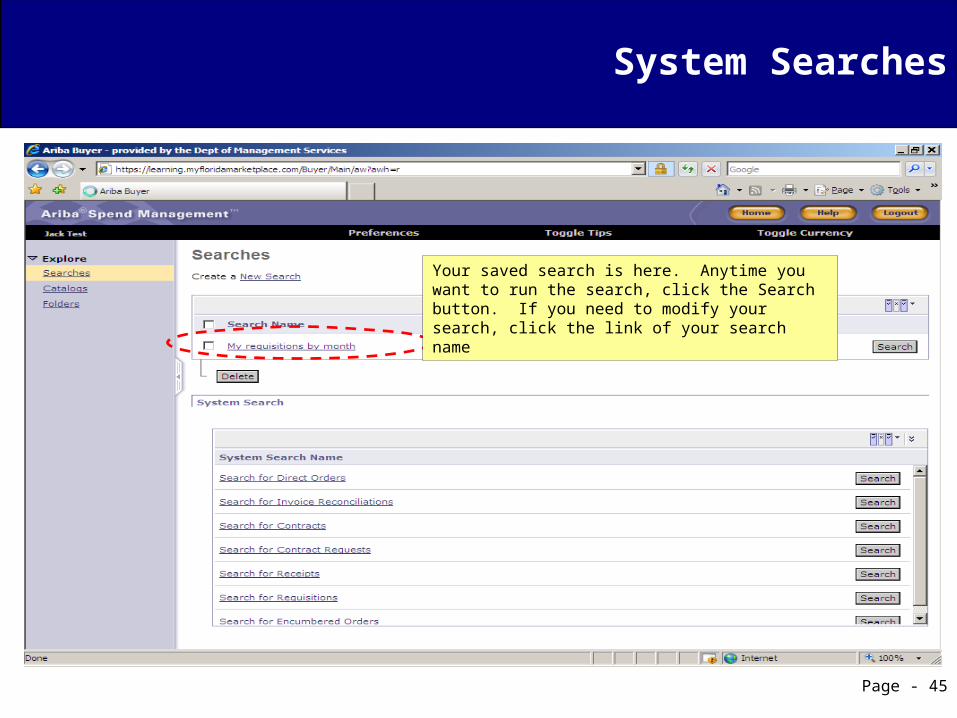
Your saved search is here. Anytime you want to run the search, click the Search button. If you need to modify your search, click the link of your search name
Page - 46
Agenda
MFMP Overview System Basics Creating a Requisition Following Up On Your Order Receiving Commodities Invoices Viewing Payment Information System Searches Change Orders Cancel Requisition Deleting and Copying Vendor Performance Tracking Resources
Page - 47
Change Orders
A change order should be initiated to make any changes to an order: The vendor will be notified of the change order To match your balance in FLAIR for an encumbered order
A change button may not be viewable on the requisition for the following reasons: An IR is in an “ing” status (reconciling, approving, rejecting) A change order has already been initiated on that order and is in
Composing or Submitted status
Anytime a change order is initiated it will go through the same approval flow as the original version (unless the initiator has the CO No Workflow group)
Most information can be changed with the exception of the vendor
Change Orders
Page - 48
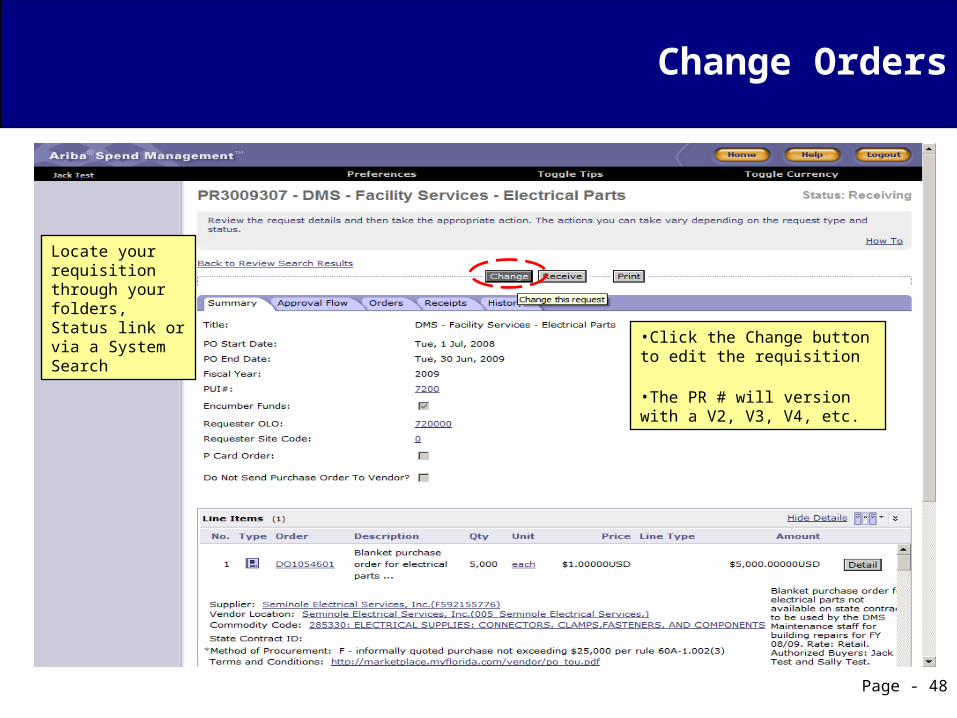
•Click the Change button to edit the requisition
•The PR # will version with a V2, V3, V4, etc.
Locate your requisition through your folders, Status link or via a System Search
Change Orders
Page - 49
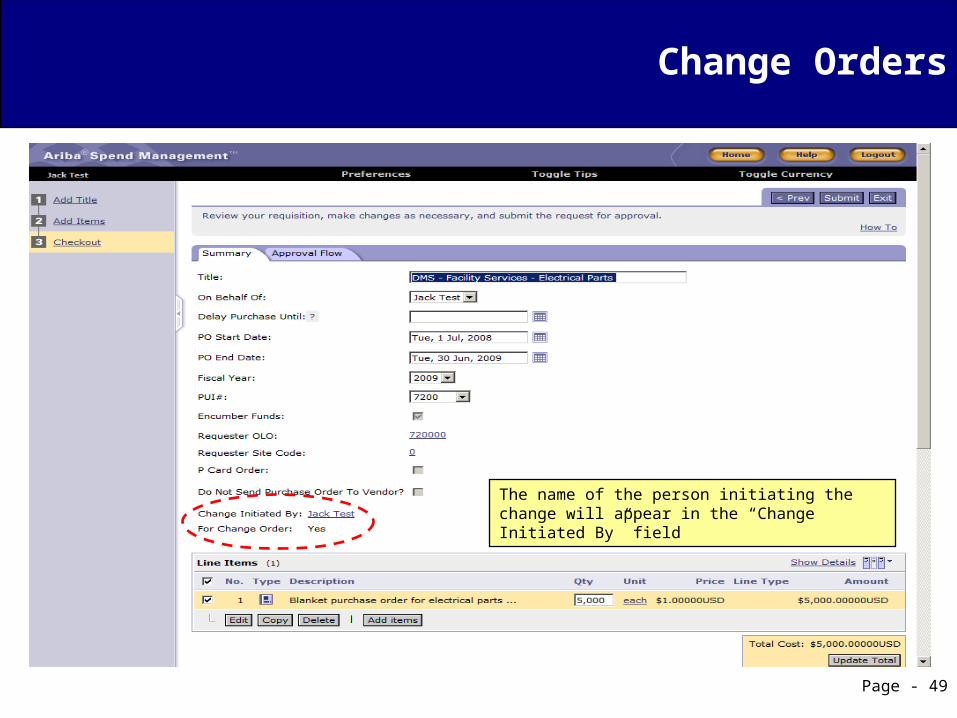
The name of the person initiating the change will appear in the “Change Initiated By” field
Change Orders
Page - 50
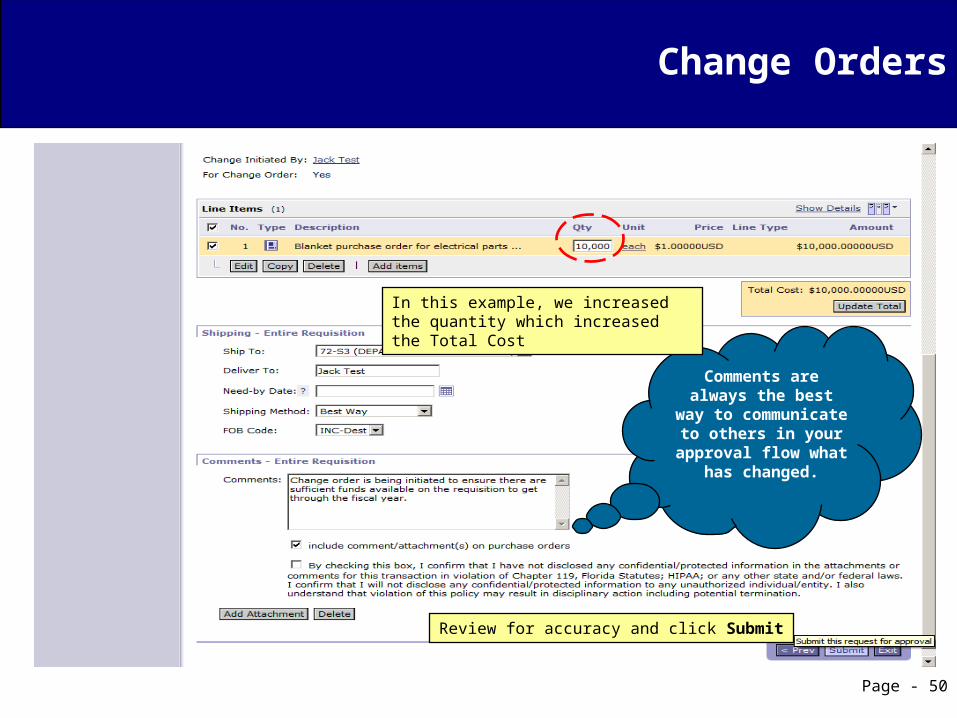
Comments are always the best way to
communicate to others in your approval flow
what has changed.
In this example, we increased the quantity which increased the Total Cost
Review for accuracy and click Submit
Change Orders
Page - 51
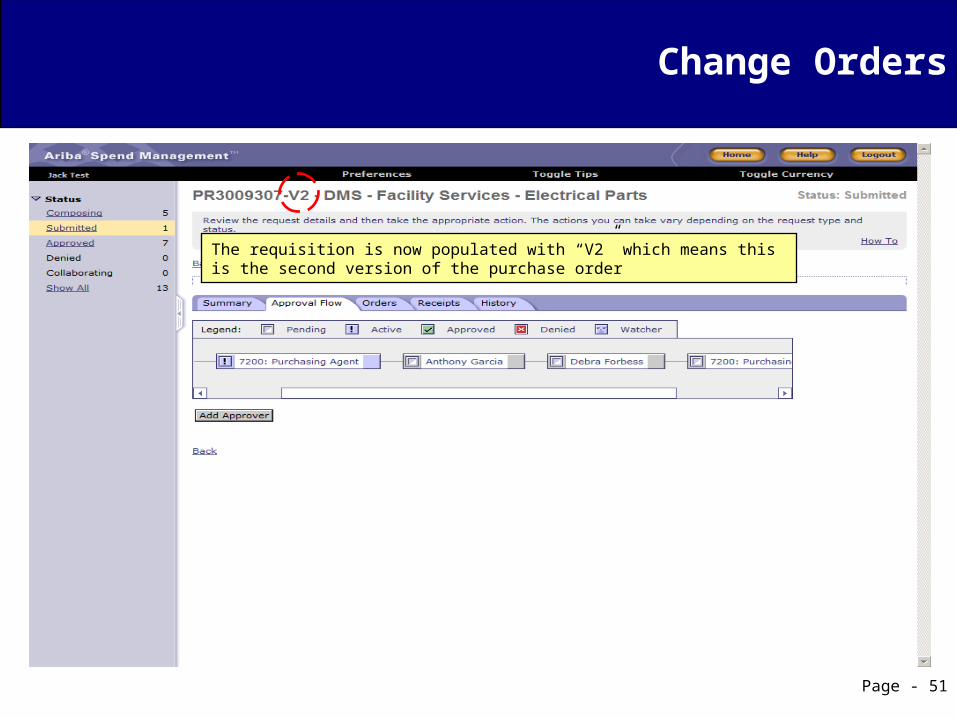
The requisition is now populated with “V2” which means this is the second version of the purchase order

Page - 52
Agenda
MFMP Overview System Basics Creating a Requisition Following Up On Your Order Receiving Commodities Invoices Viewing Payment Information System Searches Change Orders Cancel Requisition Deleting and Copying Vendor Performance Tracking Resources
Page - 53
Cancel Requisition
Purchase Orders should only be canceled if the non-received goods and/or services are no longer needed
Depending on your agency’s business rules, a Cancellation Approver will populate in the approval flow for any cancellation request, or may only populate based on the amount of the purchase. If you have any questions about this process, please contact your Agency Purchasing Office
The recommended way to cancel a requisition is to access the Company eForms and select the Cancel Requisition eForm
Page - 54
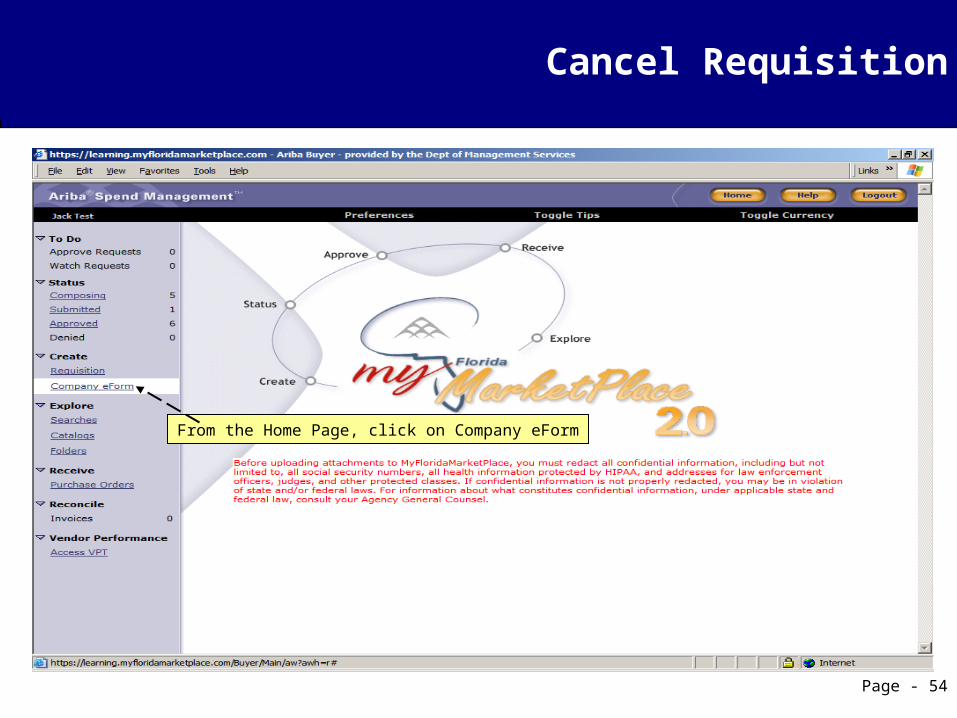
Cancel Requisition
From the Home Page, click on Company eForm
Page - 55
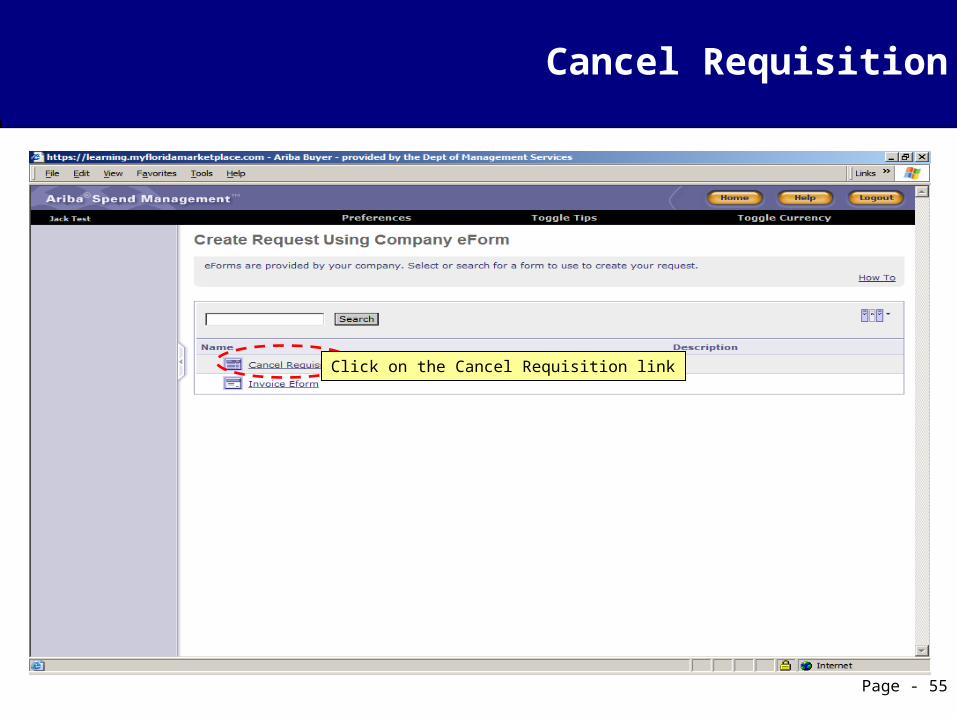
Cancel Requisition
Click on the Cancel Requisition link
Page - 56
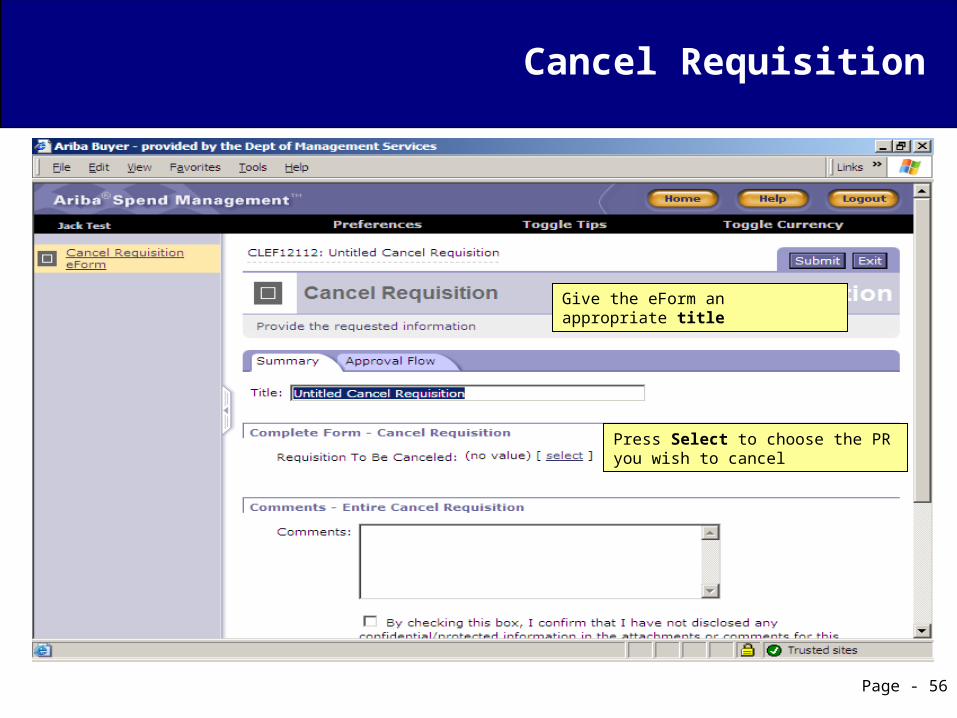
Cancel Requisition
Give the eForm an appropriate title
Press Select to choose the PR you wish to cancel

Page - 57
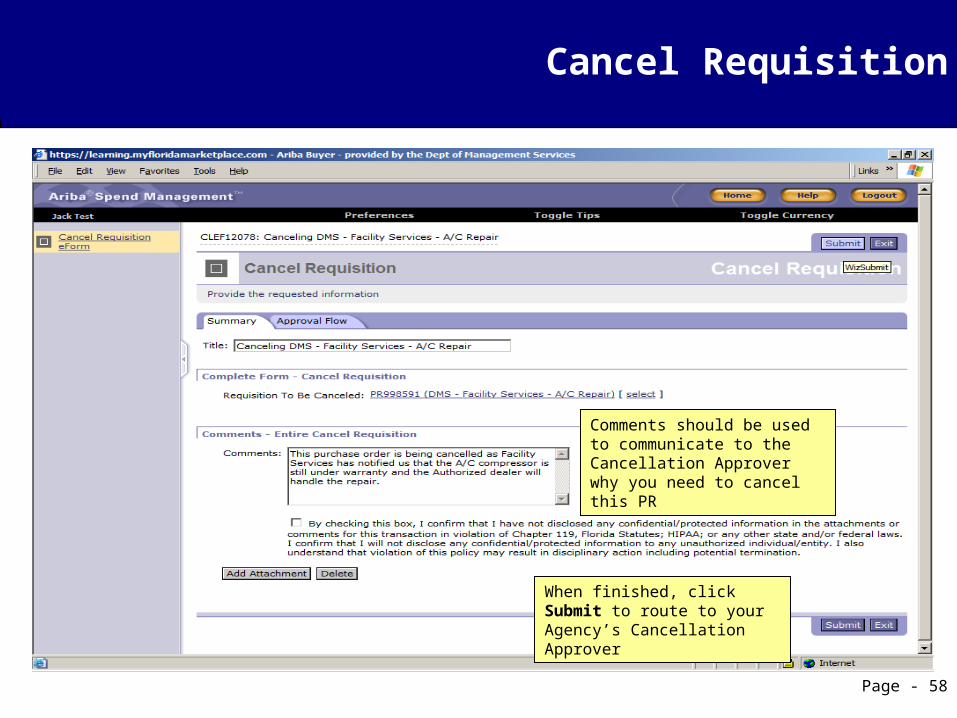
Cancel Requisition
Search using the PR #, then click SelectNote: If the PR you wish to cancel cannot be cancelled the search will return no results
Page - 58
Cancel Requisition
Comments should be used to communicate to the Cancellation Approver why you need to cancel this PR
When finished, click Submit to route to your Agency’s Cancellation Approver
Page - 59
Cancel Requisition
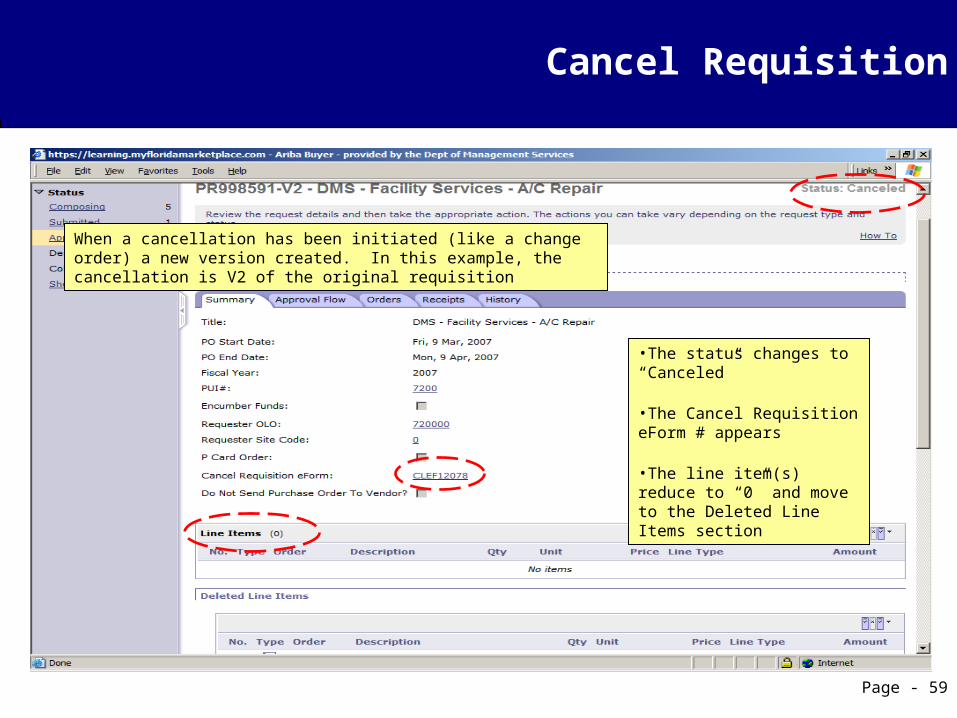
When a cancellation has been initiated (like a change order) a new version created. In this example, the cancellation is V2 of the original requisition
•The status changes to “Canceled”
•The Cancel Requisition eForm # appears
•The line item(s) reduce to “0” and move to the Deleted Line Items section

Page - 60
Cancel Requisition
•If the order was encumbered, follow-up to ensure the encumbrance has been released
•If the confirmation message does not appear to confirm the encumbrance has been released within two days, contact your Purchasing and/or Finance and Accounting professionals for assistance
Page - 61
Agenda
MFMP Overview System Basics Creating a Requisition Following Up On Your Order Receiving Commodities Invoices Viewing Payment Information System Searches Change Orders Cancel Requisition Deleting and Copying Vendor Performance Tracking Resources

Deleting and Copying
Page - 62
To view the status of all your transactions, click on the Status link on your “Swoosh”
Deleting and Copying
Page - 63
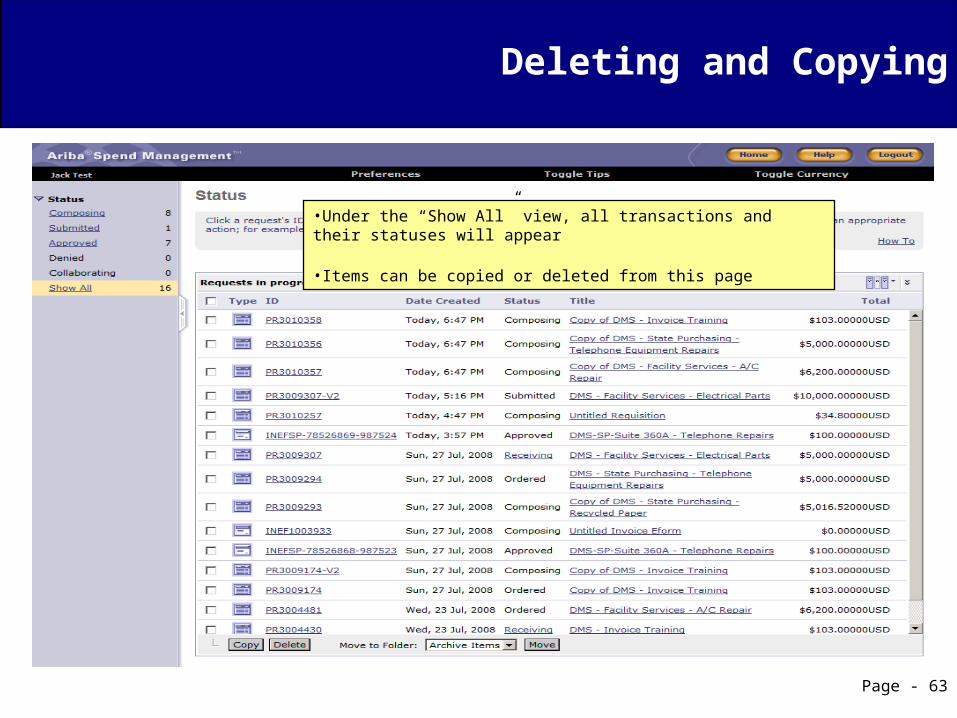
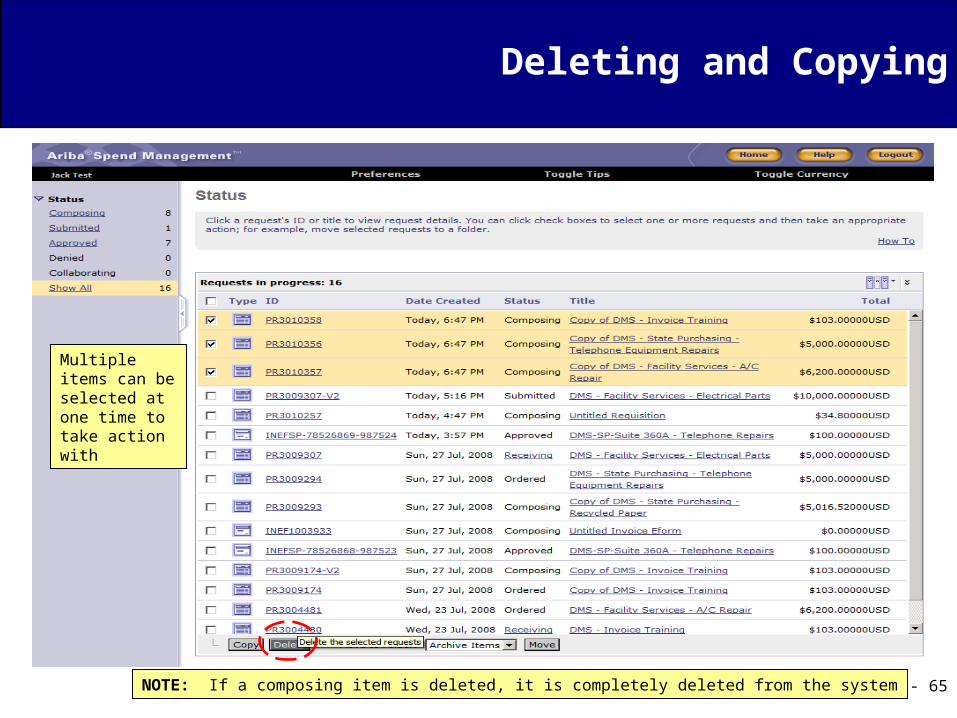
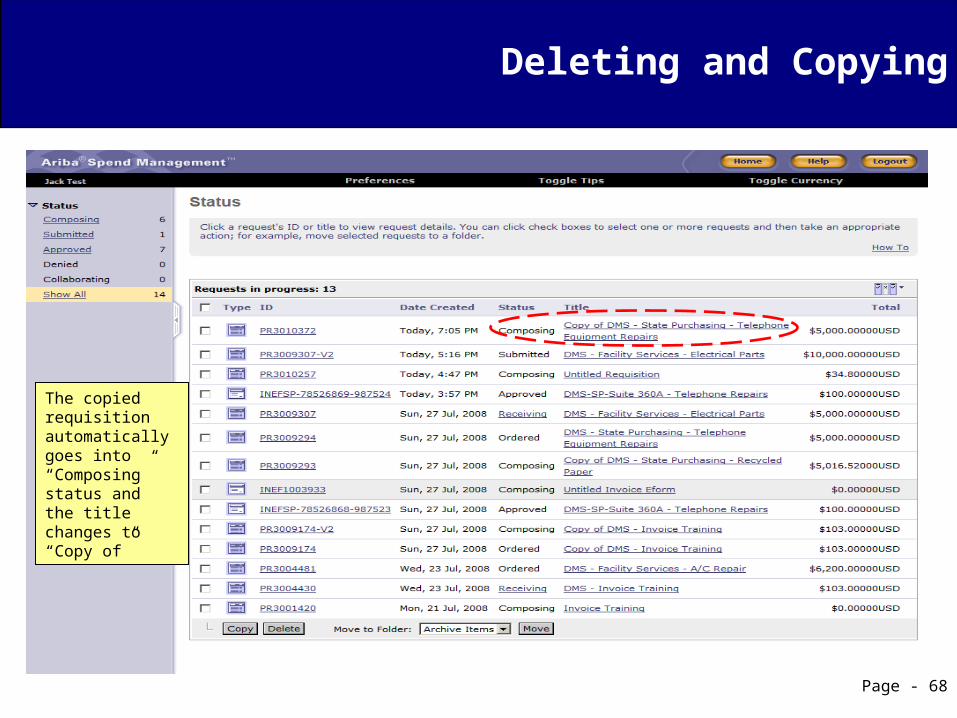
•Under the “Show All” view, all transactions and their statuses will appear
•Items can be copied or deleted from this page
Page - 64
Deleting and Copying
Delete – Transactions can only be deleted while they are in a Composing Status, you can locate them in the Composing folder within the Status queue.
Locate your transaction, within your Status queue, in your folders or through a System Search
Click the box to the left of the item At the bottom of the page, click the Delete button Once the delete button is clicked the item is gone from the system
forever
Deleting and Copying
Page - 65
Multiple items can be selected at one time to take action with
NOTE: If a composing item is deleted, it is completely deleted from the system
Page - 66
Deleting and Copying
Copy – A transaction can be copied and edited for future use
Locate your transaction, within your Status queue, in your folders or through a System Search
Click the box to the left of the item At the bottom of the page, click the Copy button The requisition will automatically go into the Composing folder within the
Status queue to be edited and submitted at any time
Deleting and Copying
Page - 67
Deleting and Copying
Page - 68
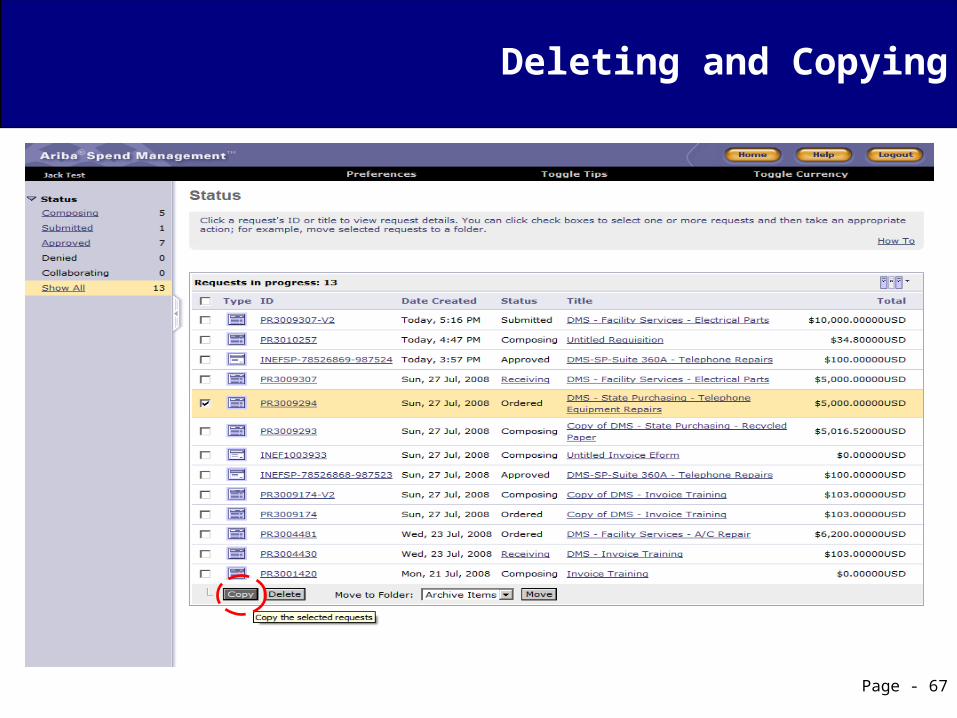
The copied requisition automatically goes into “Composing” status and the title changes to “Copy of”
Page - 69
Agenda
MFMP Overview System Basics Creating a Requisition Following Up On Your Order Receiving Commodities Invoices Viewing Payment Information System Searches Change Orders Cancel Requisition Deleting and Copying Vendor Performance Tracking Resources
Page - 70
Vendor Performance Tracking
The State of Florida does business with more than 111,000 vendors. To ensure the State receives the best goods / services from its vendors a Vendor Performance Tracking (VPT) tool was created. The purpose of VPT is to:
Provide useful vendor performance history so the agency customer can make informed decisions when selecting vendors
Provide customer feedback to contract managers assigned to multi-customer contracts for managing vendor performance to contract requirements and customer expectations
Provide constructive feedback for the vendors to assist them to make improvements for the delivery of their services / goods
Page - 71
Vendor Performance Tracking
Vendor Performance Tracking is a monitoring tool to rate vendor performance on a per transaction level
A VPT survey is automatically generated, and email notifications are sent to the Requester (OBO) associated with a Purchase Order (DO) when paid invoices are completed in MyFloridaMarketPlace against the following: All State Term Contracts (STC) All State Purchasing Agreements (SPA) All Agency Term Contracts All Other transactions equal to or above $2,500
The survey is available for 30 days and is pre-populated with transaction-specific information
Vendor Performance Tracking
Page - 72
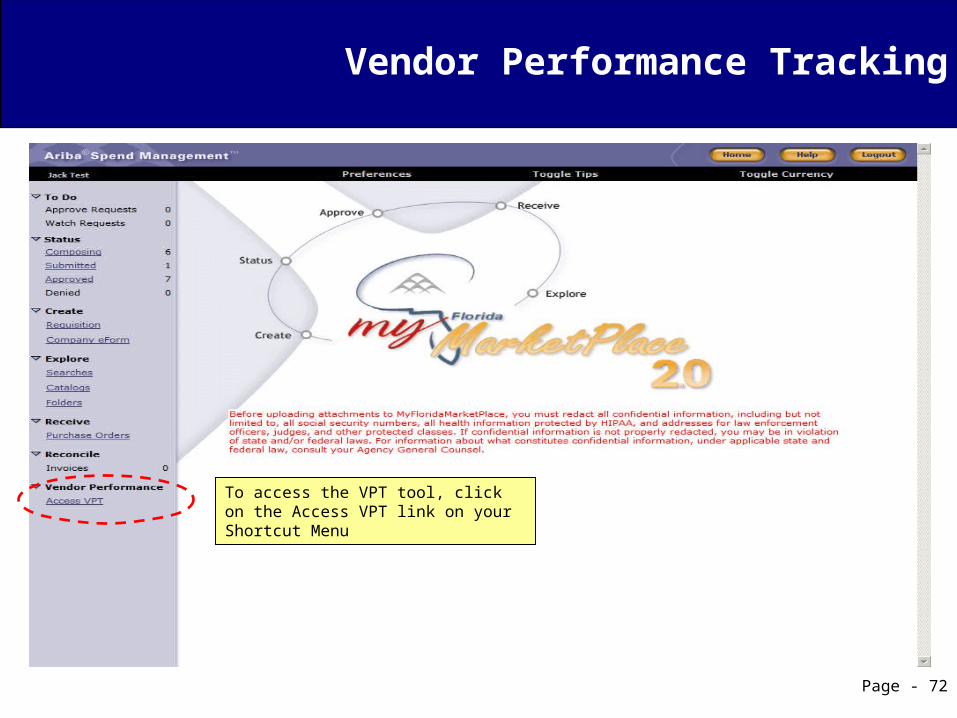
To access the VPT tool, click on the Access VPT link on your Shortcut Menu
Page - 73
Vendor Performance Tracking
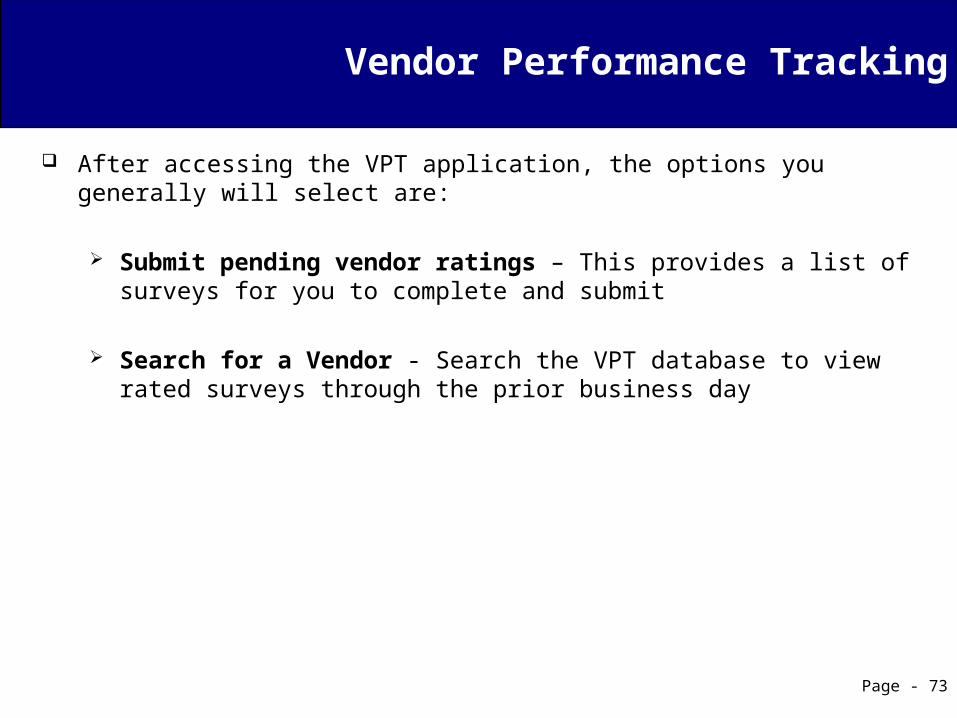
After accessing the VPT application, the options you generally will select are:
Submit pending vendor ratings – This provides a list of surveys for you to complete and submit
Search for a Vendor - Search the VPT database to view rated surveys through the prior business day
Page - 74
Vendor Performance Tracking
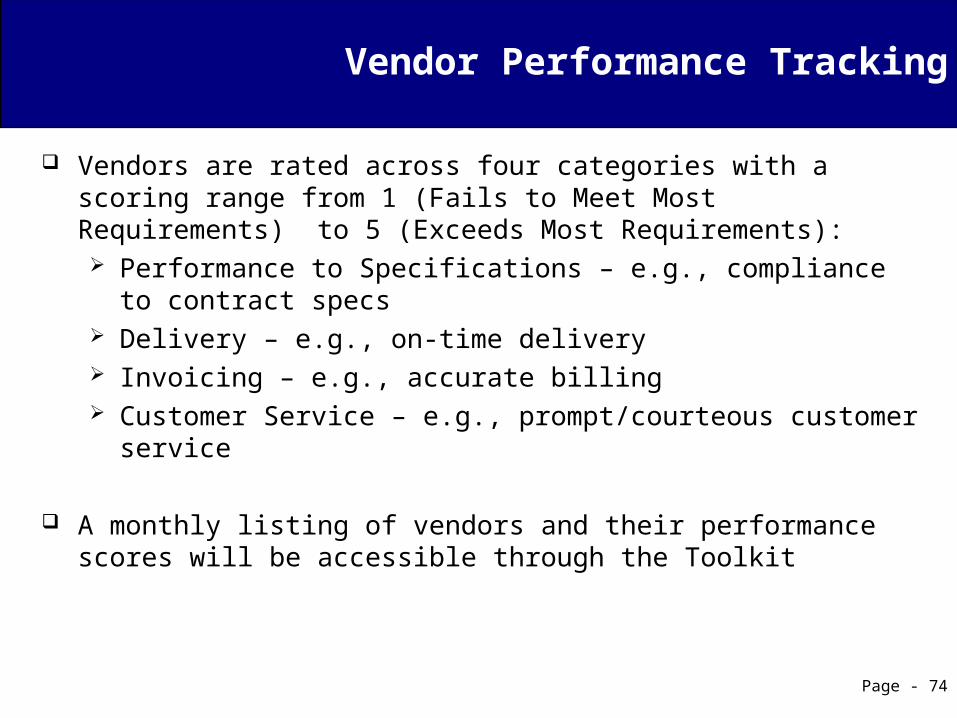
Vendors are rated across four categories with a scoring range from 1 (Fails to Meet Most Requirements) to 5 (Exceeds Most Requirements): Performance to Specifications – e.g., compliance to contract specs Delivery – e.g., on-time delivery Invoicing – e.g., accurate billing Customer Service – e.g., prompt/courteous customer service
A monthly listing of vendors and their performance scores will be accessible through the Toolkit
Page - 75
Vendor Performance Tracking
The Requester’s name and comments will not be provided to the general public
The public can view a vendor’s performance on the State Purchasing website. These files, updated monthly, show cumulative scores, but not the associated invoice numbers
A Requester can also view a vendor’s VPT rating when creating a requisition
Vendors can log in to their MFMP registration to view their cumulative ratings including the invoice number associated with each rating, and can determine the agency and rater from the information associated with the invoice number in their records
For additional information on Vendor Performance Tracking please access: http://dms.myflorida.com/business_operations/state_purchasing/vendor_information/vendor_performance_tracking_vpt
Page - 76
Agenda
MFMP Overview System Basics Creating a Requisition Following Up On Your Order Receiving Commodities Invoices Viewing Payment Information System Searches Change Orders Cancel Requisition Deleting and Copying Vendor Performance Tracking Resources
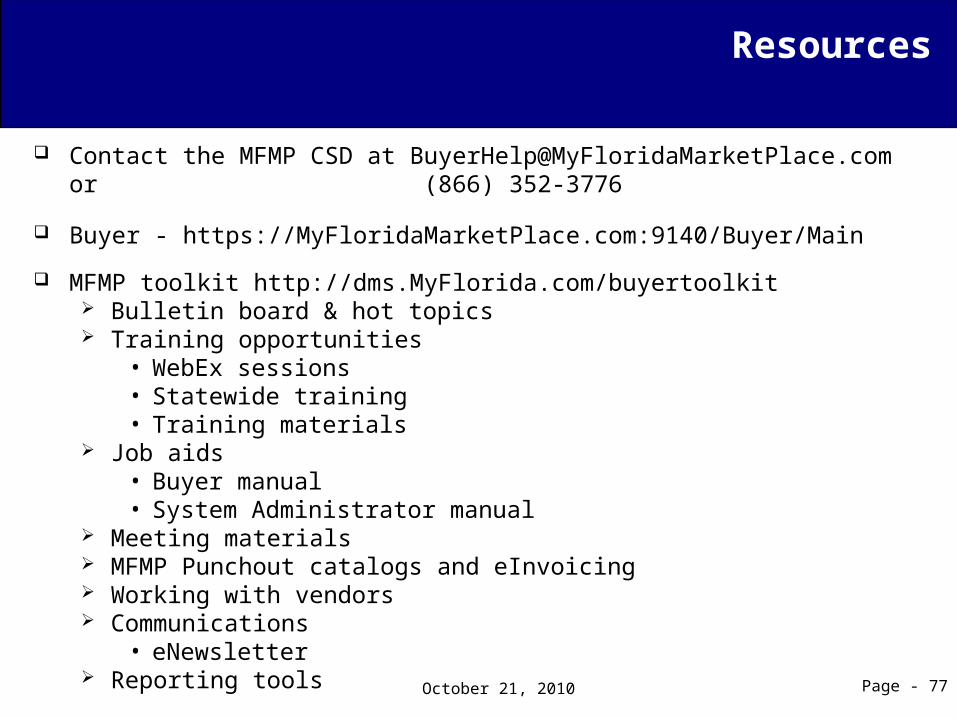
Contact the MFMP CSD at [email protected] or (866) 352-3776
Buyer - https://MyFloridaMarketPlace.com:9140/Buyer/Main
MFMP toolkit http://dms.MyFlorida.com/buyertoolkit Bulletin board & hot topics Training opportunities
• WebEx sessions• Statewide training• Training materials
Job aids• Buyer manual• System Administrator manual
Meeting materials MFMP Punchout catalogs and eInvoicing Working with vendors Communications
• eNewsletter Reporting tools
Resources
Page - 77October 21, 2010

Contact your agency system administrator for password resets
Vendor searches: Vendor Administrative Lookup tool:
https://vendor.MyFloridaMarketPlace.com/admin/index.jhtm
• Username and password: ‘publicuser’ (must be entered in lower case)
SPURSView:http://fcn.state.fl.us/owa_spurs/owa/spurs_www.main_menu_form Username or password is not required
Contact the vendor CSD at [email protected] or (866) 352-3776
Resources
Page - 78October 21, 2010
Page - 79
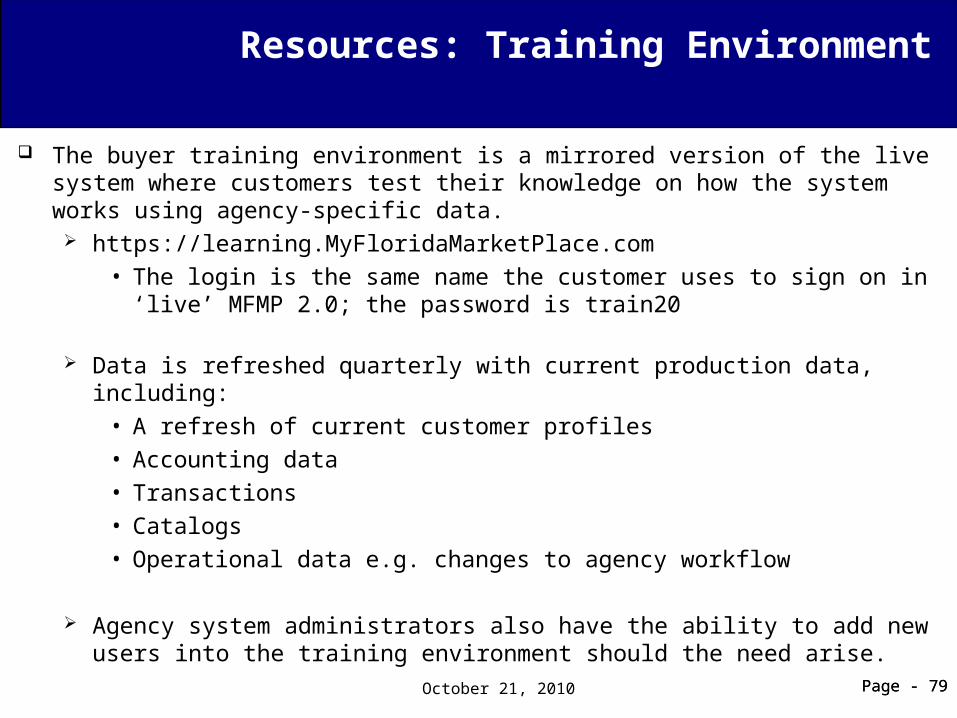
The buyer training environment is a mirrored version of the live system where customers test their knowledge on how the system works using agency-specific data. https://learning.MyFloridaMarketPlace.com
• The login is the same name the customer uses to sign on in ‘live’ MFMP 2.0; the password is train20
Data is refreshed quarterly with current production data, including:
• A refresh of current customer profiles
• Accounting data
• Transactions
• Catalogs
• Operational data e.g. changes to agency workflow
Agency system administrators also have the ability to add new users into the training environment should the need arise.
Resources: Training Environment
Page - 79October 21, 2010

Page - 80
Buyer 2.0 Web-based Training OnDemand is a Web-based training program that allows you to learn at your
convenience.
You can gain well-rounded knowledge of software functionality, complete with conceptual understanding in a simulated environment.
OnDemand demonstrates how to complete a task and guides you as you work.
View and find available training modules, lessons, and topics, and then launch training for a specific topic at: http://training.MyFloridaMarketPlace.com/buyer
If the page does not automatically display, disable pop-up blockers.
Resources: OnDemand Training
Page - 80October 21, 2010
Page - 81October 21, 2010 Page - 81
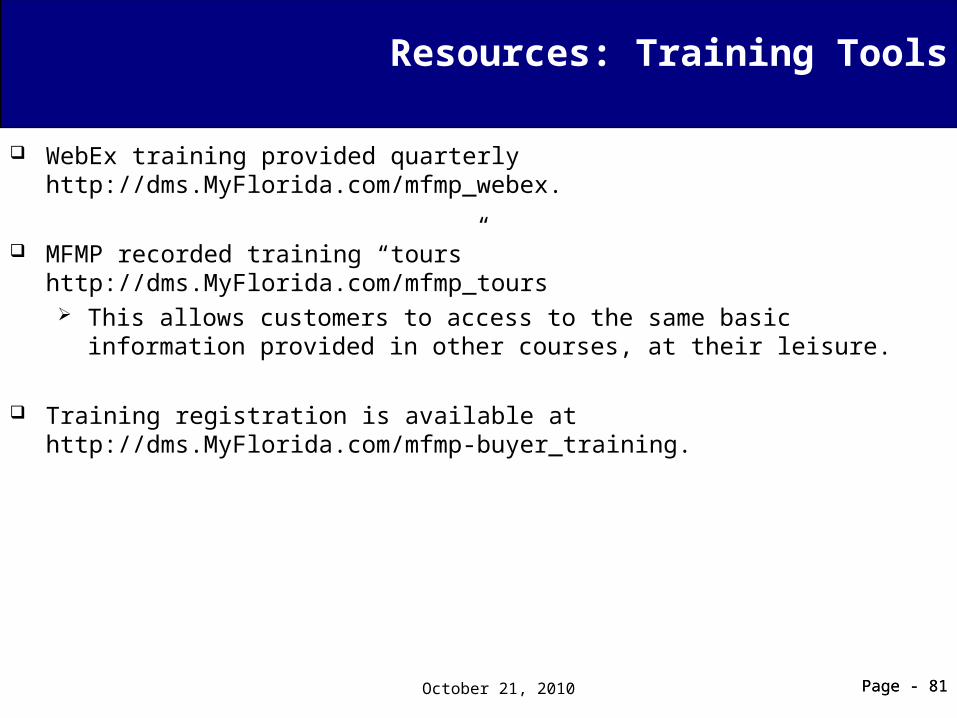
WebEx training provided quarterly http://dms.MyFlorida.com/mfmp_webex.
MFMP recorded training “tours” http://dms.MyFlorida.com/mfmp_tours This allows customers to access to the same basic information provided in other
courses, at their leisure.
Training registration is available at http://dms.MyFlorida.com/mfmp-buyer_training.
Resources: Training Tools
Page - 82
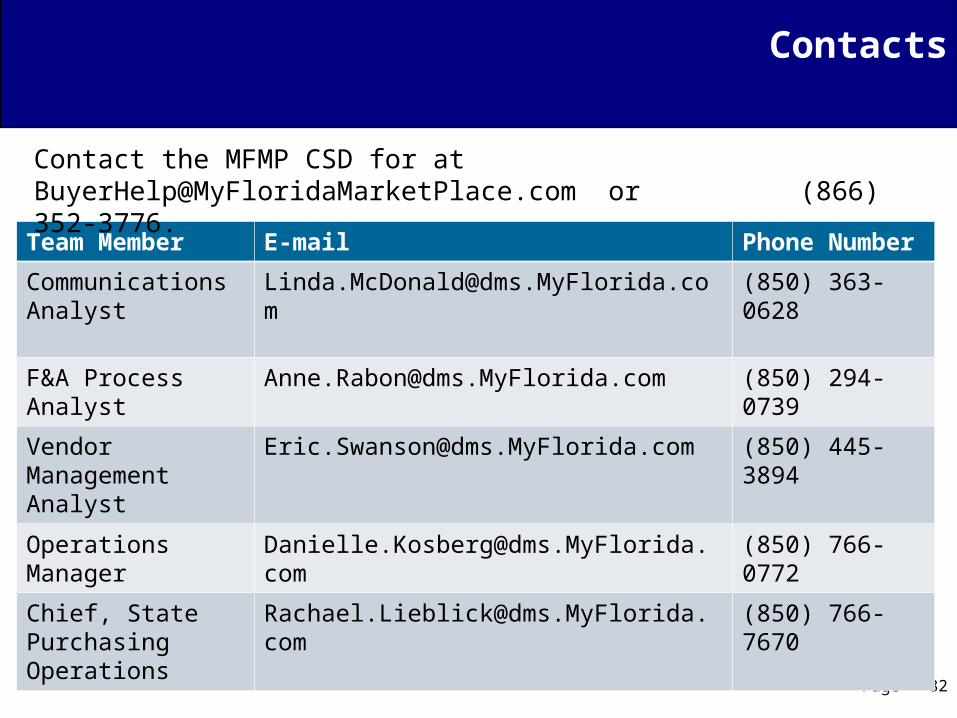
Team Member E-mail Phone Number
Communications Analyst
[email protected] (850) 363-0628
F&A Process Analyst
[email protected] (850) 294-0739
Vendor Management Analyst
[email protected] (850) 445-3894
Operations Manager [email protected] (850) 766-0772
Chief, State Purchasing Operations
[email protected] (850) 766-7670
Contact the MFMP CSD for at [email protected] or (866) 352-3776.
Contacts