Embed Size (px)
Citation preview

MANUAL DE USER SOFTWARE USER SOFTWARE MANUAL

2
SENSOR ID egister your ROTOR INpower
R

3
1. REQUISITOS MÍNIMOS
2. Programa User Software.
1. PC con S.O. Windows 7 / 8 / 10. Mac OS 10.7 (Lion) y posteriores.
TM3. USB ANT Stick (010-01058-00) insertado en un puerto USB con sus drivers instalados.
TM Nota: También compatible con otras antenas ANT+ .
2. ÍNDICE DE CONTENIDO1. Connect to INpower/2INpower (Conectar a INpower/2INpower)
2. Basic training mode (Modo básico de entrenamiento)
3. Advanced training mode (Modo avanzado de entrenamiento)
4. Service (Herramientas)
5. Documentation (Documentación)
Requisitos mínimos / Índice de contenido
Para el correcto funcionamiento del User TMSoftware con ANT+ es necesario:
2. Programa User Software.
1. PC con S.O. Windows 10. Mac OS 10.7 (Lion) y posteriores.
3. Bluetooth® Smart Stick insertado en un puerto USB. No es necesario pero sí mejora la conexión.
Para el correcto funcionamiento del User Software con Bluetooth® Smart (sólo para 2INpower) es necesario:
ES
EN

4 Connect to INpower/2INpower
Para conectar el User Software a su potenciómetro INpower/2INpower debe pulsar sobre el recuadro “Connect to INpower”.
2.1. CONNECT TO INpower/2INpower (Conectar a INpower/2INpower)

5Connect to INpower/2INpower
Una vez pulsado se abrirá la siguiente ventana:
Sensor ID: 00002
TMSeleccione si desea conectar su potenciómetro por ANT+ o por Bluetooth® Smart. Introduzca el Sensor ID de su INpower/2INpower y pulse “Connect”. Nota: Puede encontrar su Sensor ID en uno de los laterales de la biela (en la imagen).
ES
EN

6 Connect to INpower/2INpower
CÓMO NAVEGAR: Una vez conectado su INpower/2INpower, utilice la barra superior para navegar por los diferentes apartados.

7Basic training mode
El modo básico de entrenamiento le permite entrenar en casa viendo al mismo tiempo los valores instantáneos de potencia, cadencia, balance izquierda-derecha, torque effectiveness y pedal smoothness que está desarrollando, así como las medias de esos parámetros a lo largo de su entrenamiento.
2.2. BASIC TRAINING MODE (Modo básico de entrenamiento)
ES
EN

8 Basic training mode
Para grabar los datos de su entrenamiento, pulse el botón “START”, en la esquina superior izquierda de la pantalla, y posteriormente elija la carpeta en la que desea guardar el archivo (por defecto se ofrece la carpeta “basic_training” en la ruta en la que haya instalado el User Software).
Cuando haya terminado el entrenamiento pulse el botón “STOP” que aparecerá sustituyendo al de “START” una vez que empiece a grabar.
El archivo se guardará en formato .csv. Para exportarlo a formato .fit pulse el botón “EXPORT FIT” y elija el archivo que desea convertir.

9Advanced training mode
El modo avanzado de entrenamiento le permite dos configuraciones de gráficos para su entrenamiento indoor. La configuración por defecto es el gráfico TORQUE 360, el cual representa en coordenadas polares su pedaleo en tiempo real. En él puede observar cuánta fuerza está aplicando en cada momento, tanto de manera conjunta con las dos piernas como de forma individual con cada una de ellas, y en qué ángulo su pedaleo es más eficiente.
2.3. ADVANCED TRAINING MODE (Modo avanzado de entrenamiento)
Empuje (positivo) de la pierna derecha y zona de subida (positivo o negativo) de la pierna izquierda.
Empuje (positivo) de la pierna izquierda y zona de subida (positivo o negativo) de la pierna derecha.
El gráfico TORQUE 360 de las dos piernas al mismo tiempo queda de la siguiente manera:
ES
EN

10
Para cambiar la configuración del gráfico pulse el botón “SETUP”, en la esquina superior izquierda. Una vez pulsado se le abrirá la pantalla mostrada a la derecha. Deje marcado “Torque 360º” para ver el gráfico anterior o marque“Linear” si prefiere ver el gráfico en coordenadas lineales. En cualquiera de los casos le aparecerán una serie de parámetros preseleccionados que podrá cambiar cuando quiera.
Esta pantalla le permite activar tantos parámetros como desee observar (hasta un máximo de seis), y usar los desplegables para elegir cuáles. De los dos primeros parámetros (”FAST DATA”) el software maneja 50 datos por segundo, permitiendo una representación muy precisa. De los hasta cuatro últimos (”SLOW DATA”) el software maneja 5 muestras por segundo.
Advanced training mode
Un ejemplo del gráfico TORQUE 360 de cada pierna por separado sería el siguiente:
Empuje (positivo) de la pierna derecha.
Zona de subida (en este caso la contribución es negativa) de la pierna derecha.
Empuje (positivo) de la pierna izquierda.
Zona de subida (en este caso la contribución es negativa) de la pierna izquierda.

11Advanced training mode
La configuración del gráfico lineal consta por defecto de los parámetros que se ven en la figura siguiente:
Tanto en el TORQUE 360 como en el gráfico lineal, en la columna de la izquierda se muestran los valores instantáneos y medios de los parámetros seleccionados, y en la barra superior se muestra información sobre la relación entre el ángulo de mayor eficiencia de su pedaleo (OCA: Optimun Chainring Angle) y la posición OCP (Optimum Chainring Position) recomendada.
ES
EN

12 Service
En esta sección podrá acceder a la información sobre el estado actual de su biela, además de a las herramientas necesarias para calibrarla, actualizar el firmware y modificar su balance (esto último sólo para INpower).
En el apartado “BATTERY INFORMATION” tiene información sobre el voltaje actual de la pila de su potenciómetro y una estimación de las horas de vida que todavía tiene por delante.
2.4. SERVICE (Herramientas)
Sólo para INpower

13Service
Una vez terminado el proceso aparecerá un mensaje de “Firmware Loaded”. En caso de que el proceso de actualización fallase, acerque su INpower/2INpower a su ordenador para aumentar el nivel de la señal y vuelva a intentarlo.
En el recuadro “PRODUCT INFORMATION” se muestra el número de biela y el firmware que tiene cargado. Compruebe la última versión del firmware disponible en la web de ROTOR y actualice su biela si ésta posee un firmware anterior. Para actualizar sólo tiene que pulsar en “Select File” y seleccionar el nuevo firmware de la carpeta en la que se encuentre. Una vez seleccionado pulse “Load File” y comenzará la actualización.
ES
EN
14 Service
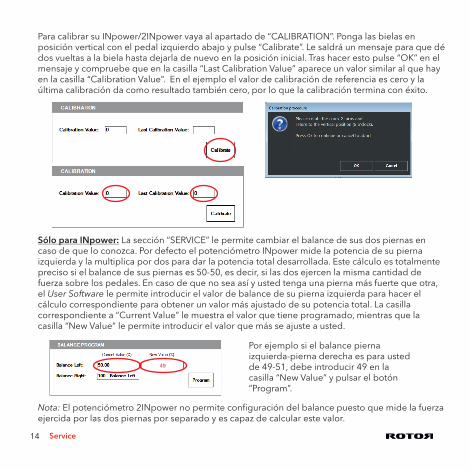
Para calibrar su INpower/2INpower vaya al apartado de “CALIBRATION”. Ponga las bielas en posición vertical con el pedal izquierdo abajo y pulse “Calibrate”. Le saldrá un mensaje para que dé dos vueltas a la biela hasta dejarla de nuevo en la posición inicial. Tras hacer esto pulse “OK” en el mensaje y compruebe que en la casilla “Last Calibration Value” aparece un valor similar al que hay en la casilla “Calibration Value”. En el ejemplo el valor de calibración de referencia es cero y la última calibración da como resultado también cero, por lo que la calibración termina con éxito.
Sólo para INpower: La sección “SERVICE” le permite cambiar el balance de sus dos piernas en caso de que lo conozca. Por defecto el potenciómetro INpower mide la potencia de su pierna izquierda y la multiplica por dos para dar la potencia total desarrollada. Este cálculo es totalmente preciso si el balance de sus piernas es 50-50, es decir, si las dos ejercen la misma cantidad de fuerza sobre los pedales. En caso de que no sea así y usted tenga una pierna más fuerte que otra, el User Software le permite introducir el valor de balance de su pierna izquierda para hacer el cálculo correspondiente para obtener un valor más ajustado de su potencia total. La casilla correspondiente a “Current Value” le muestra el valor que tiene programado, mientras que la casilla “New Value” le permite introducir el valor que más se ajuste a usted.
49
Por ejemplo si el balance pierna izquierda-pierna derecha es para usted de 49-51, debe introducir 49 en la casilla “New Value” y pulsar el botón “Program”.
Nota: El potenciómetro 2INpower no permite configuración del balance puesto que mide la fuerza ejercida por las dos piernas por separado y es capaz de calcular este valor.

15
Aquí encontrará los principales enlaces web de acceso a la información técnica asociada al ROTOR INpower/2INpower.
- http://www.rotorbike.com/Web oficial de ROTOR donde encontrará información técnica de todos sus productos. - http://inpower.rotorbike.com/Website dedicado exclusivamente al producto ROTOR INpower/2INpower. - http://www.thisisant.com/directory/inpower
TMWeb específica de ANT+ donde se muestra la compatibilidad con los diferentes dispositivos TMANT+ del mercado.
- http://trainingpeaks.com/rotorWebsite de la alianza establecida entre ROTOR y TrainingPeaks que le permite grandes beneficios a la hora de analizar sus archivos de entrenamiento.
2.5. DOCUMENTATION (Documentación)
Documentation
ES
EN

16
Este software se provee de forma gratuita por ROTOR y no se garantiza la compatibilidad ni funcionamiento apropiado de este software en cualquier equipo. ROTOR nunca será responsable del fallo en su equipo debido a este software.
En caso de cualquier duda o consulta contacte con el servicio técnico de ROTOR: [email protected]
O visite nuestra web oficial donde se muestran todos nuestros productos: www. rotorbike.com www.power.rotorbike.com

17Minimum requirements / Contents
1. MINIMUM REQUIREMENTS
2. CONTENTS1. Connect to INpower/2INpower
2. Basic training mode
3. Advanced training mode
4. Service
5. Documentation
2. INpower/2INpower User Software.
1. PC with Windows 7 / 8 / 10. Mac OS 10.7 (Lion) or later.
TM3. USB ANT Stick (010-01058-00) inserted into a USB port with the correct drivers installed.
TM Note: Also compatible with other ANT+ dongles.
TMTo correctly use the User Software with ANT+ you must have:
2. INpower/2INpower User Software.
1. PC with Windows 10. Mac OS 10.7 (Lion) or later.
3. Bluetooth® Smart Stick inserted into a USB port. It is not necessary but will improve the quality of the connection.
To correctly use the User Software with Bluetooth® Smart (only for 2INpower) you must have:
ES
EN

18 Connect to INpower/2INpower
To connect the User Software with your INpower/2INpower, click “Connect to INpower”.
2.1. CONNECT TO INpower/2INpower

19Connect to INpower/2INpower
The following window will appear:
Sensor ID: 00002
TMSelect whether you want to connect your power meter by ANT+ or Bluetooth® Smart. Enter the Sensor ID for your INpower/2INpower and press “Connect”. Note: you can find your Sensor ID on the side of your crank (image).
ES
EN
20 Connect to INpower/2INpower
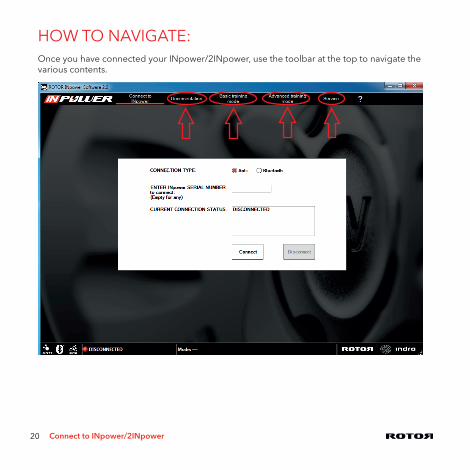
HOW TO NAVIGATE: Once you have connected your INpower/2INpower, use the toolbar at the top to navigate the various contents.

21Basic training mode
The Basic training mode allows you to train while simultaneously viewing the power, cadence, left-right balance, torque effectiveness and pedal smoothness values, as well as the average cumulative numbers for those parameters.
2.2. BASIC TRAINING MODE ES
EN

22 Basic training mode
To save the data from your training session, press the “START” button in the left top corner of the screen, and then select the folder where to save it (by default a folder named “basic_training” will appear in the same root folder where the User Software is located).
Once you have finished training, press the “STOP” button that will appear in place of the “START” button.
The file will be saved in .csv format. To export it to .fit format, press the “EXPORT FIT” button and choose the file you want to export.

23Advanced training mode
The Advanced training mode allows two different configurations of the graph to be viewed during your indoor training session. The default graph is TORQUE 360, which represents your pedaling in real time. This graph shows how much force you are applying in each moment with each leg independently or with both at the same time. It also shows your most efficient pedaling angle.
2.3. ADVANCED TRAINING MODE
The TORQUE 360 graph representing the combined pedal stroke for both legs is as follows:
Down-stroke (positive) from the right leg and up-stroke (positive or negative) from the left leg.
Down-stroke (positive) from the left leg and up-stroke (positive or negative) from the right leg.
ES
EN

24 Advanced training mode
In order to change the graph configuration, press the “SETUP” button in the top left corner. The screen on the right will appear. Leave “Torque 360º” selected if you want to train with the graph explained previously or select “Linear” if you prefer to train with the graph with linear coordinates. In any case, there will be some preselected parameters that you will be able to change whenever you want.
You can activate up to six parameters by using the dropdown menu to select them. From the first two parameters (”FAST DATA”), the software shows 50 data samplings per second, resulting in an accurate data representation. From the last four parameters (”SLOW DATA”) the software shows 5 data samplings per second.
An example of the TORQUE 360 graph for each leg indepentently would be the following:
Down-stroke (positive) from the right leg.
Up-stroke (in this case negative contribution) from the right leg.
Down-stroke (positive) from the left leg.
Up-stroke (in this case negative contribution) from the left leg.

25Advanced training mode
The linear graph configuration shows by default the following parameters:
Both in the TORQUE 360 graph and in the linear graph, the left column shows the actual and the average numbers of the selected parameters. Directly under the toolbar you will find information about the correlation between the most efficient angle of your pedal stroke (OCA: Optimum Chainring Angle) and the recommended OCP (Optimum Chainring Position).
ES
EN

26 Service
In this section you will find information about the current state of your power meter, together with the necessary tools to calibrate it, update the firmware and modify the balance.
The “BATTERY INFORMATION” section has information about the battery’s remaining charge and its estimated remaining life.
2.4. SERVICE
INpower only

27Service
When the process has finished, a message saying “Firmware Loaded” will appear. In case the upgrade process fails, please bring your INpower/2INpower closer to your computer to improve the transmission signal and try again.
In the “PRODUCT INFORMATION” section, the crank’s serial number and its current firmware can be seen. Check the latest available firmware in the “Download” section of the website and update your firmware in case it is using an outdated version. To update it, you only have to press “Select File” and select the new firmware from the correct folder. Once it is selected, press “Load File” and the upgrade process will start.
ES
EN

28 Service
To calibrate your INpower/2INpower, go to the “CALIBRATION” section. Place your cranks in a vertical position with the left pedal facing down and press “Calibrate”. You will see a message asking you to turn the cranks twice until they have been returned to the original position. When you finish, press “OK” and check to see that the “Last Calibration Value” has a similar value to that appearing with the name “Calibration Value”. In the example below, the calibration number of reference is zero and the last calibration number is zero as well, so calibration is satisfactory.
For INpower only: the “SERVICE” section allows you to change the balance number for your legs in case you know it. By default INpower measures your left leg’s power and multiplies it by two in order to obtain the total power. This is an absolutely accurate calculation if your balance is 50-50, that is, if both of your legs apply the same force to the pedals. If this is not the case and one leg is stronger than the other, the User Software allows you to introduce the balance value of your left leg in order to calculate a more accurate total power. The “Current Value” is the actual value at that moment. You can change that number by entering your left leg’s value in the “New Value” square and pressing “Program”.
49
For example if your left-right balance is 49-51, you should introduce 49 in the “New Value” square and press “Program”.
Note: 2INpower does not allow balance configuration as it measures force from the two legs independently and is able to calculate this value itself.

29
Here you will find the main web links to access technical information regarding ROTOR INpower/2INpower.
- http://www.rotorbike.com/Official ROTOR website with technical information about every ROTOR product. - http://inpower.rotorbike.com/Exclusive website dedicated to ROTOR INpower/2INpower cranks. - http://www.thisisant.com/directory/inpower
TMSpecific ANT+ website showing compatibility between different devices currently available. - http://trainingpeaks.com/rotorROTOR has partnered with TrainingPeaks.com to offer you additional tools to analyze your power files.
2.5. DOCUMENTATION
Documentation
ES
EN

30
This software is provided free of charge by ROTOR Bike Components. Software compatibility and/or proper functioning are not guaranteed on any computer or device. ROTOR is not responsible for any computer failures related to this software.
For questions or queries, contact ROTOR technical service at: [email protected]
Or visit our website for product descriptions and information: www. rotorbike.com www.power.rotorbike.com


FOLLOW US