Embed Size (px)
Citation preview

www.skoda-auto.com
BluesInfotainment anglicky 11.2013S00.5614.20.205E0 012 720 CC
SIMPLY CLEVER
Infotainment Radio BluesOwner's Manual
Structure of this Owner's Manual(explanations)
This Owner's Manual has been systematically designed to make it easy for you tosearch for and obtain the information you require.
At the beginning of this manual you will find a table of contents where all the top-ics described are arranged sequentially. At the end of this manual you will find analphabetical index.
Direction indicationsAll direction indications such as “left”, “right”, “front”, “rear” relate to the direction oftravel of the vehicle.
Explanation of symbols Denotes the end of a section.
Denotes the continuation of a section on the next page.
® Denotes a registered trademark.
Examples of the information listed in the Owner's ManualPress the SETUP → Sound button.
This information indicates that you must first press the SETUP button and then se-lect and confirm the Sound menu.
The “→” symbol indicates the next step.
Example of the menu, the available menus, menu items or functions.■ xyz - the first menu level
■ xyz - the second menu level■ xyz - the third menu level
■ xyz - the first menu level
Notes
WARNING
The most important notes are marked with the heading WARNING. TheseWARNING notes draw your attention to a serious risk of accident or injury.
CAUTION
A Caution note draws your attention to the possibility of damage to your vehicle(e.g. damage to gearbox), or points out general risks of an accident.
Note
A normal Note draws your attention to important information about the operationof your vehicle.

Preface
You have chosen a ŠKODA vehicle, which is fitted with an Infotainment Radio Blues (hereafter called theunit) – we thank you for your confidence in us.The new operating concept allows you to make vehicle settings and to operate electronic systems centrallyfrom the device.
Please read this Owner's Manual carefully, because the operation in accordance with these instructions is aprerequisite for proper use of the unit.
Please note that these instructions are meant only as an addendum to the information presented in theOwner's Manual of your vehicle. Therefore, they can be used only in conjunction with the latest manual forthis vehicle. For a detailed description of some functions listed in these instructions, see the Owner's Manualfor your vehicle.
If you have any questions about your device, please contact a ŠKODA Partner.
Your ŠKODA AUTO a.s. (hereinafter referred to as ŠKODA)

Table of Contents
Abbreviations
Introductory information
Important notes 4
Description and operation of the device 5
Operating the device 6
Device settings 9
Audio
Radio 12
Media 14
Vehicle systems
Vehicle settings 19
Index
2 Table of Contents

Abbreviations
Abbreviation Definition
ACC Adaptive cruise control
AF Alternative frequencies - alternative frequencies of the cur-rent radio station
AM Amplitude modulation - identification of the radio frequencyband
TCS Traction Control of the drive wheels
DRM Digital Rights Management - technical methods to monitor orrestrict the use of digital media content
ESC Electronic Stability Control
FM Frequency modulation - identification of the radio frequencyband
HFP Hands-free profile - a software profile for data transfer viaBluetooth ®,, which allows for communication between a mo-bile phone and the hands-free equipment in the vehicle
ID3 tag an additional feature of a music file, which allows for the dis-play of artist, title, album name, etc.
KESSY keyless unlocking, starting and locking
MP3 compressed audio format
PI Program identification - Station identification by means of aunique RDS code
PTY Programme type - sorts radio stations into categories (such asNews, Sports, etc.) using the transmitted RDS code
RDS Radio Data System - system for the transmission of additionalinformation for FM radio reception
TP Traffic Program identification - program identifier for thetransmission of traffic information
VIN Vehicle identification number
WMA Windows Media Audio - compressed audio format
3Abbreviations

Introductory information
Important notes
Introduction
This chapter contains information on the following subjects:
Declaration of conformity 4Warning statement 4Component protection 4
This Owner's Manual describes all possible equipment variants without identify-ing them as special equipment, model variants or market-dependent equipment.
Consequently, this vehicle does not need to contain all of the equipment compo-nents described in these operating instructions.
The level of equipment of your vehicle refers to your purchase contract of the ve-hicle. For more information, please contact your ŠKODA Partner.
The illustrations in this manual can differ in minor details from your vehicle; theyare only intended for general information.
WARNING
■ Concentrate fully at all times on your driving! As the driver you are fully re-sponsible for the operation of your vehicle.■ Only use the device in a way that ensures that you are in full control of yourvehicle in every traffic situation - there is a risk of accident!■ Adjust the volume to ensure that acoustic signals from outside, e.g. sirensfrom vehicles which have the right of way, such as police, ambulance and firebrigade vehicles, can be heard at all time.■ High volumes can cause hearing damage.
Declaration of conformity
First read and observe the introductory information and safety warn-ings on page 4.
ŠKODA AUTO a.s. hereby declares that the ŠKODA Infotainment systems meet thebasic requirements and additional provisions of Directive 1999/5/EC.
Warning statement
First read and observe the introductory information and safety warn-ings on page 4.
FCC § 15.19 Labelling requirementsThis device complies with part 15 of the FCC Rules and Industry Canada license-exempt RSS standard(s). Operation is subject to the following two conditions:
(1) This device may not cause harmful interference, and
(2) This device must accept any interference received, including interference thatmay cause undesired operation.
FCC § 15.21 Information to userChanges or modifications not expressly approved by the party responsible forcompliance could void the user’s authority to operate the equipment.
INDUSTRY CANADA StatementsLe présent appareil est conforme aux CNR d'Industrie Canada applicables auxappareils radio exempts de licence. L'exploitation est autorisée aux deuxconditions suivantes : (1) l'appareil ne doit pas produire de brouillage, et (2)l'utilisateur de l'appareil doit accepter tout brouillage radioélectrique subi, mêmesi le brouillage est susceptible d'en compromettre le fonctionnement.
Component protection
First read and observe the introductory information and safety warn-ings on page 4.
Some electronic control units are factory-equipped with component protection.
The component protection was developed as a protection mechanism for:
4 Introductory information

› impairment of factory-fitted control units or control units fitted by a specialistgarage following installation in another vehicle (after a theft, for example);
› impairment of components operated outside of the vehicle;› the possibility of a legitimate installation or replacement of control units during
repairs at a ŠKODA specialist garage.
When component protection is activated, the following message appears on thedevice display screen: Component theft protection - Restricted function. Switchon ignition.
If the component protection does not deactivate when the ignition is switchedon, please contact a specialist garage.
Description and operation of the device
Introduction
This chapter contains information on the following subjects:
Description of the device 5Switching the device on/off 6Adjusting the volume 6
First and foremost, pay attention to the safety instructions » page 4, Importantnotes.
Description of the device
Fig. 1 Description of the device
First read and observe the introductory information given on page 5.
- Knob for switching the device on/off; adjusting the volumeMenu button for calls and confirmationsFunction keys (the functions for these keys are described in the relevantchapters)DisplayRADIO - Radio menu » page 12MEDIA - Media menu » page 14MUTE - MuteSETUP - Device settings » page 9CAR - Settings for the vehicle system » page 19BACK - Return to higher-level menu - Backward and forward menu navigation (the key functions are descri-bed in the relevant chapters)
1
2
3
4
5
6
7
8
9
10
11
5Introductory information

Switching the device on/off
First read and observe the introductory information given on page 5.
› Press the knob to switch the device on or off.
When the device is switched on, the audio source and operating mode that wereactive before switching off the device will be restored.
If the vehicle key is pulled out of the ignition lock while the unit is switched on,the unit will switch off automatically. After switching on the ignition, the unit isturned on automatically.
If the device was switched off using the knob, then the device will not switchon automatically after switching on the ignition.
If your vehicle is fitted with the KESSY system, the device will switch off automat-ically after the engine has been turned off and the door opened.
When the ignition is switched off, the system switches off automatically after ap-prox. half an hour (discharge protection of the vehicle battery).
Adjusting the volume
First read and observe the introductory information given on page 5.
Increase the volume› Turn the knob to the right.
Reduce the volume› Turn the knob to the left.
Muting› Press the MUTE button
or
› Set the volume to 0 using the knob.
CAUTION
Car speakers may be damaged if playback is too loud or distorted.
Note
■ The change in volume is displayed on the device display screen.■ The corresponding symbol appears in the display when the sound is muted. .■ Some connected sources allow the volume to be changed directly at the source.■ Excessively high volumes can cause sound resonance in the vehicle.■ The loudspeakers in the vehicle are designed for a device power output of 4 x20 W.
Operating the device
Introduction
This chapter contains information on the following subjects:
Operating via the device screen 7Operating using the buttons on the control lever 7Operating using the buttons/dials on the multi-function steering wheel -Audio menu 8
First and foremost, pay attention to the safety instructions » page 4, Importantnotes.
Some features of the device are also displayed in the Maxi DOT display1). Depend-ing on the vehicle equipment, these features can be operated as follows.
■ Using the buttons on the operating lever » page 7■ Using the buttons/dials on the multi-function steering wheel » page 8
Note
If the ignition and the side light are switched on, the buttons and dials on themultifunction steering wheel will also be illuminated.
1) Description of the display in the Maxi DOT display » Owner's Manual, chapter Information system
6 Introductory information

Operating via the device screen
Fig. 2 Displays
First read and observe the introductory information given on page 6.
Display of menus, menu items and functionsCurrently selected menu/menu itemPrevious menu itemNext menu itemHigher-level menuFunction with “checkbox”› - Function is switched on.› - Function is switched offFunction of button 3 » Fig. 1 on page 5 in the current menu/menu item
Selecting menu/menu itemSelect by turning the menu button 2 » Fig. 1 on page 5.
A
B
C
D
E
F
Confirming menu/menu itemConfirm by pressing the menu button 2 .
Confirming function of menu/menu itemConfirm the function of menu/menu item F » Fig. 2 by pressing the correspond-ing button 3 » Fig. 1 on page 5.
Returning to higher-level menuReturn by pressing the BACK button.
Switching function on/off with “checkbox”Switch the function on/off by pressing the menu button 2 .
Note
■ Greyed out menus or menu items are not enabled or available.■ For some menus or menu items, the current setting is displayed, e.g. Distance:km or Distance: mi.■ If the device is not currently being used, the display will return to the higher-level menu after a few seconds.
Operating using the buttons on the control lever
Fig. 3 Buttons on the control lever
First read and observe the introductory information given on page 6.
The individual menus and corresponding menu items displayed in the MAXI DOTdisplay can be operated using the buttons on the control lever.
Press and hold - open main menuPress briefly - select individual menu items or menusPress briefly - select menu item or menu
A
A
B
7Introductory information

Operating using the buttons/dials on the multi-function steering wheel - Audio menu
Fig. 4 Multifunction steering wheel: Control buttons and dials
First read and observe the introductory information given on page 6.
The individual menu items displayed in the MAXI DOT display in the Audio menucan be operated using the buttons/dials on the multi-function steering wheel.
Control buttons and dialsButton/
di-al
» Fig. 4
Action Radio Media
1 Press briefly Change source, change frequency band
1 Press and holdSwitch between the Radio and Media operating modes, and open the most recent context status (e.g. the last radio station or track to
be played)a)
2 Press brieflySwitches tone on/offb)
Start/stop playback
2 Turn upwards Increase the volume
2 Turn downwards Reduce the volume
3 Press brieflyGo to the next radio station stored in the station listor to the next radio station stored in the preset listc)
Interrupt traffic reportSkip to next tracka)
3 Press and hold Interrupt traffic report Fast forwarda)
4 Press brieflyGo to the previous radio station stored in the station list
or to the next radio station stored in the preset listInterrupt traffic report
Go to the previous track within 3 s of playback,go to the start of the track after 3 sa)
4 Press and hold Interrupt traffic report Fast rewinda)
5 Press briefly Interrupt traffic report without function
5 Turn upwardsDisplay list of available stations
Scroll upwardsSwitch to previous tracka)
8 Introductory information

Button/di-al
» Fig. 4
Action Radio Media
5 Turn downwardsDisplay list of available stations
Scroll downwardsSkip to next tracka)
6 Press briefly Open the main menu
a) Does not apply for AUX.b) The sound is turned on again by pressing or turning dial 2 .c) Context-dependent selection.
Note
■ The buttons with the symbol for voice control and for the phone are notsupported by the device.
Device settings
Introduction
This chapter contains information on the following subjects:
Main menu 9Sound settings 10Radio settings 10Media settings 10Device system settings 11
First and foremost, pay attention to the safety instructions » page 4, Importantnotes.
Main menu
Fig. 5 Setup main menu
First read and observe the introductory information given on page 9.
Opening the main menu for unit setup› Press the button SETUP .
Menu items in the main menu for device setup■ Sound - Sound settings » page 10■ Radio setup - Radio settings » page 10■ Media - Media settings » page 10■ System - System settings » page 11
9Introductory information

Sound settings
First read and observe the introductory information given on page 9.
› Press the SETUP → Sound button.
■ Bass - Bass settings■ Mid - Mid-range settings■ Treble - Treble settings■ Balance - Sets the balance between the left and right-hand sides■ Fader - Sets the balance between the front and the rear■ Volume - Volume settings
■ Maximum switch-on volume - Volume after switching on■ Traffic announcement - sets the volume for the traffic program alerts (TP)■ Speed-dependent vol. adjustment - increases the volume as speed increases■ AUX volume - Adjusts the playback volume of an external source
■ Quiet - Low volume■ Medium - Medium volume■ Loud - High volume
Radio settings
First read and observe the introductory information given on page 9.
› Press the button SETUP → Radio setup.
■ Radio text - Switches radio text display on/off■ Alternative frequency (AF) - Activates/deactivates search for alternative fre-
quencies for the station currently being listened to■ Arrow keys - Sets the station selection function in RADIO mode
■ Station list - Switches all stations currently in range for the selected fre-quency band
■ Preset list - Switches only the stored stations in the selected frequency band■ RDS regional - Activates/deactivates the automatic tracking of related regional
stations■ Fixed - The selected regional station is kept permanently (another regional
station must be set manually if signal is lost)■ Automatic - Automatic tracking of regional stations (the radio will automati-
cally switch to another available regional station if reception is lost in the re-gion in question)
■ PTY filter - Selects radio stations by the type of programme being broadcast■ Off - Switches off■ News - News■ Music - Music■ Sport - Sports■ Culture - Culture■ Special - Other
■ Station list sort - Sorts the saved radio stations■ Default - by the programme identification (PI code)■ A-Z - In alphabetical order and also based on the frequency number (if the sta-
tion name changes during the programme, it can be displayed just at the endof the list)
■ Name of station - Displays the station name■ Variable - Allows changes to the station name■ Fixed - The station name is fixed (suitable for the A-Z listing)
■ Delete presets - Deletes the stored stations in the device memory
Note
■ The Radio Data System (RDS) is used to transfer additional information. TheRDS enables program identification, program type identification (PTY), the recep-tion of traffic reports (TP) or automatic station tracking, for example. If there issufficient reception, RDS-compatible radio stations will be displayed by stationname rather than station frequency.■ The Alternative frequency (AF) function ensures that the best receivable fre-quency for the selected station is set automatically.■ In countries where the RDS function is not adequately supported, the devicemay not be fully functional. We therefore recommend switching off the RDS re-gional setting as well as the Alternative frequency (AF) setting, if applicable. Oth-erwise, these settings can affect the functionality of the radio.
Media settings
First read and observe the introductory information given on page 9.
› Press the button SETUP → Media.
10 Introductory information

■ Activate AUX - Activates/deactivates AUX input■ Mix/Repeat including subfolders - Activates/deactivates playback of the tracks
in the Mix and Repeat modes, including subfolders■ Display ID3 tags - Activates/deactivates display of the artist, album and track
name in the device display screen1)
Device system settings
First read and observe the introductory information given on page 9.
› Press the button SETUP → System.
■ Language - Sets the device language2)
■ Time/date - Time and date settings■ Time - Time settings■ Date - Date settings■ Summer (DST) - Switches summer time adjustment on/off■ Time format - Sets the time format
■ 24h■ 12h
■ Date format - sets the date format■ DD.MM.YYYY - Day - Month - Year■ YYYY-MM-DD - Year - Month - Day■ MM.DD.YYYY - Month - Day - Year
■ Units - Sets the units■ Distance - Distance units
■ km - Kilometres■ mi - Miles
■ Temperature - Temperature units■ °C - Degrees Celsius■ °F - Degrees Fahrenheit
■ Volume - Volume units■ l - Litres■ gall. (UK) - Gallons (UK)■ gall. (US) - Gallons (US)
■ Speed - Speed units■ km/h - Kilometres per hour■ mph - Miles per hour
■ Consumption - Consumption units■ l/100km - Litres per 100 kilometres■ km/l - Kilometres per litre■ mpg (US) - Miles per gallon (US)■ mpg (UK) - Miles per gallon (UK)
■ Gas consumption - Gas consumption units■ kg/100km - Kilograms per 100 km■ km/kg - Kilometres per kilogram
■ Display - screen setting■ Brightness - Adjusts the brightness of the screen
■ Brightest - brightest level■ Brighter - brighter level■ Medium - medium level■ Darker - darker level■ Darkest - darkest level
■ Clock in standby mode - Time display on the screen when the ignition isswitched on and the device switched off
■ Remove USB device safely - Safe removal of USB device3)
■ Factory settings - Restore to factory settings■ All - All settings■ Sound - Sound settings■ Radio setup - Radio settings■ Vehicle - Vehicle system settings■ Media - Media settings■ System - System settings■ Driving profile - Choice of driving mode
■ Display off - Activates/deactivates the screen in power-saving mode, where thescreen is black (the screen can be switched on again by pressing any button)
■ System information - Displays system information■ Versions data - Displays version information
■ Device part number: ... - Device part number■ Hardware: ... - Version of the hardware used■ Software version: ... - Version of the software used
■ Copyright - Information on licences and copyrights used
1) Regardless of the setting, the ID3 tag is always displayed in the Audio menu in the MAXI DOT display.2) The correct display of country-specific characters (e.g. ID3 tag information) can not always be guaran-
teed.3) If a sound is currently played from the USB data carrier, this function is not active.
11Introductory information

Audio
Radio
Introduction
This chapter contains information on the following subjects:
Main menu 12Search for and save radio stations 12Selecting a frequency band and radio station 13Activating/deactivating traffic programme TP 14
First and foremost, pay attention to the safety instructions » page 4, Importantnotes.
The device allows you to receive a radio broadcast in the FM or AM frequencybands and to receive additional information from the RDS station in the FM fre-quency band.
Main menu
First read and observe the introductory information given on page 12.
Accessing radio mode in main menu› Press the RADIO button.
The most recently tuned radio station plays.
Symbols in the displaySymbol Importance
Sound is muted
Traffic information station
Station without traffic information
, , , Currently selected frequency band and memory group
a) Radio station is selected based on desired station top-ic » page 10, Radio settings
Symbol Importance
Radio station from the station list is a station from thepreset list
Automatic playing of available radio stations for 10 sec-onds
a) PTY (programme type) - refers to the type of programme transmitted by the radio station.
Search for and save radio stations
First read and observe the introductory information given on page 12.
If no memory group is displayed for the frequency bands,
› press the RADIO button → press menu button 2 » Fig. 1 on page 5.
The station search is influenced by selecting the PTY filter function » page 10 andby switching the TP function on or off.
Search options■ TP - switches traffic programme on/off » page 14■ Manual - Manual station search■ Scan - Successive play of all available stations in the current frequency band or
the current station buttons for five seconds each■ OK - Stops auto-play function at the current radio station■ Skip - Selects another radio station
■ Auto store - Automatic station search
Manual station searchPressing the Manual button starts a manual station search.
The manual station search is initiated by turning the menu button 2 » Fig. 1 onpage 5 or using the buttons .
Pressing the OK button ends the manual station search at the currently tuned ra-dio station.
Automatic station searchPressing the Auto store button starts an automatic station search.
Auto store... is displayed on the device display screen when searching and stor-ing.
At the end of the automatic station search, the five radio stations with the stron-gest signal are stored in the memory group for the current frequency band.
12 Audio

If radio stations have already been stored under the preset buttons, then the sta-tion keys will be overwritten with newly located stations after the automatic sta-tion search.
Storing stationsSet the desired radio station and press and hold the corresponding button3 » Fig. 1 on page 5 until a beep is heard. The station is stored in the device
memory and its name appears above the corresponding button 3 .
Selecting a frequency band and radio station
Fig. 6 Main menu/selecting the frequency band
First read and observe the introductory information given on page 12.
Selecting a frequency bandThe device can receive the frequency bands FM (FM1 and FM2 memory group) andAM (AM1 and AM2 memory group).
Pressing the RADIO → button and the corresponding button 3 » Fig. 1 on page 5for the memory group
or
repeatedly pressing the RADIO button prompts the device to switch between thememory groups.
Press the menu button 2 to confirm the selected memory group.
Selecting radio stationsDepending on the setting of the Arrow keys » page 10, Radio settings, the devicesets a radio station from the following list in the current frequency band:
■ List of available stations■ List of stations stored in the device memory
Briefly pressing the button or prompts the device to switch to the previousor next radio station.
Press and hold the button or to start the search in the selected directionand stop at the next radio station.
or
Turning the menu button 2 » Fig. 1 on page 5 will prompt the device to switch tothe previous or next radio station.
Press the menu button 2 to select the set station.
Five presets are available in each memory group.
In addition to the station name, the type of program broadcast by the radio sta-tion according to PTY 1) will also be displayed.
If the station is stored in the device memory, then the symbol will also be dis-played.
The device will automatically search for radio stations if no list of available sta-tions is available.
1) PTY (programme type) - refers to the type of programme transmitted by the radio station.
13Audio

Activating/deactivating traffic programme TP
First read and observe the introductory information given on page 12.
Certain radio stations transmit traffic reports. The device enables playback ofthese traffic reports.
› Press the RADIO button → menu button 2 » Fig. 1 on page 5 → TP.
Screen displayThe functionality of the traffic monitoring system is displayed in the screen by thesymbol in conjunction with the station name (e.g. in the station list or presetlist).
If the radio station does not broadcast traffic reports, or if no traffic stations canbe found (due to a general radio reception interruption, for example), then thesymbol is displayed on the screen.
If a radio station is tuned in that does not support traffic reports, then the mostsuitable station is automatically set in the background in order to ensure thecontinuous reception of traffic reports.
The device will function in exactly the same way with the selected frequencyband.
When playing in Media mode, the most recently selected radio station continuesto be received in the background if this station supports traffic reports.
Interrupting/stopping the traffic programmeWhen the traffic programme is being received, Traffic announcement is displayedon the device display screen along with the following options:
■ TP off - Switches off the traffic announcement currently being broadcast■ Cancel - Deactivates the traffic programme function
Media
Introduction
This chapter contains information on the following subjects:
Selecting sources 15Supported sources and file formats 15Operation 16
Adjusting additional functions 17USB and AUX inputs 17
First and foremost, pay attention to the safety instructions » page 4, Importantnotes.
The device allows you to play audio files in various formats and to connect differ-ent source types » page 15.
When the source has been connected, the device starts to automatically play au-dio files in alphabetical order.
WARNING
■ Never place external sources on the console panel. They could be thrown in-to the passenger compartment during sudden driving manoeuvres, thereby in-juring the occupants.■ Never place external sources close to the airbags. They could be thrown intothe passenger compartment when the airbags are deployed, injuring the oc-cupants.■ Never hold external sources in your hand or on your knees while driving.They could be thrown into the passenger compartment during sudden drivingmanoeuvres, thereby injuring the occupants.■ Always route the connection cable for the external source such that it doesnot restrict you when driving.
CAUTION
Do not store any important data on the connected external sources. ŠKODA as-sumes no responsibility for lost or damaged files or connected devices.
Note
See the owner's manual of the specific manufacturer for instructions on operat-ing the external source.
14 Audio

Selecting sources
Fig. 7 Main menu/USB operation
First read and observe the introductory information and safety warn-ings on page 14.
Accessing main menu in media mode› Press the button MEDIA .
Selecting the audio source■ USB - Changes to an external audio source connected to the USB in-
put1) » page 17■ AUX - Changes to an external audio source connected to the AUX in-
put » page 17
Symbols in the display
Symbol Importance
Track repeat
Folder/source repeat
Random play
, Currently selected audio source
Auto-play function for 10 seconds
Supported sources and file formats
First read and observe the introductory information and safety warn-ings on page 14.
Supported sourcesUSB devices USB stick, USB MP3 player, HDD (without special software)
Other externalsources
Portable playback devices with AUX connection, MTP (MSC)players
At the time of publication, the device has been tested with most products andmedia available on the various markets. However, it is possible that some devices,media or files will be unreadable or unplayable.
Supported files Audio files
Codec type (fileformats)
MPEG-1/2 (layer 3)Windows Media Audio
7, 8, 9 and 10
File suffix mp3 wma
Playlists m3u, pls, wpl, m3u8; asx
The name of the artist, the album and the title of the played file can be displayedif the information is available as a so-called ID3 tag. If no ID3 tag is available, onlythe folder name is displayed.
To ensure good playback, we recommend using compressed MP3 files at a bit rateof at least 160 kb/s. For audio files with variable bitrates, the indicated remainingplayback time does not correspond to the actual remaining playback time.
1) Operating a connected external audio source is only possible with certain restrictions, depending onthe type of the connected device.
15Audio

The WMA files can only be played if they are not additionally copyrighted by DRM.These kinds of WMA files are not supported by the device.
The more files, folders or playlists on one source, the longer it will take to readthe source. It is a good idea to create subfolders with files (e.g. by artist or albumnames) in order to save time.
Source properties
Specifications for USBsources
USB 1.x and 2.x or higher with USB 2.x support(the maximum data transfer speed will then corre-spond to the USB 2.x speed)Speed class of max. 480 Mb/s
File system for the USBsource
FAT16, VFAT, FAT32
File propertiesBitrate max. 320 kb/s
Sampling rate max. 48 kHz
Operation
First read and observe the introductory information and safety warn-ings on page 14.
The and buttons always affect the audio source currently being listened to,regardless of the menu being used.
It is also possible to change tracks using the buttons 3 » Fig. 1 on page 5 fromwithin the menu of the audio source currently being played.
A list of buttons 3 is displayed in the menu of the audio source currently beingplayed after the menu button 2 is turned.
■ Play - Plays the current track■ Up - Returns to a higher level
Press menu button 2 to start playback of the current track or to open the cur-rent folder.
Button
Action Function
Press briefly
Go to the start of the track being played if the trackhas been playing for more than 3 seconds
Go to the start of the previous track if the track hasbeen playing for less than 3 seconds
Press and hold Fast rewind of the track
Button
Action Function
Press briefly Go to the start of the next track
Press and hold Fast forward of the track
Button /Action Function
Press briefly
Playback/pause: the play function is stopped in thecurrent position and the symbol changes to - whenpressed again, playback will continue from this posi-tion.
Button Action Function
Press briefly
Go to the start of the track being played if the trackhas been playing for more than 3 seconds
Go to the start of the previous track if the track hasbeen playing for less than 3 seconds
Press and hold Fast rewind of the track
Button Action Function
Press briefly Go to the start of the next track
Press and hold Fast forward of the track
Button Action Function
Press briefly Scrolling down in folders
16 Audio
Button Action Function
Press briefly Scrolling up in folders
Adjusting additional functions
First read and observe the introductory information and safety warn-ings on page 14.
› Press the MEDIA button → menu button 2 » Fig. 1 on page 5.
■ TP - switches traffic programme on/off■ - Displays the artist, album and track name from ID3 tag1)
■ Repeat - Sets repeat play■ Off - Switches repeat function off■ Track - Repeats the current track■ Folder - Repeats all tracks in folder
■ Mix - Random playback■ Off - Switches random playback function off■ All - Sets random playback of all tracks in the current audio source■ Folder - Repeats all tracks in folder
■ Scan - Consecutive playback of the tracks for 10 seconds■ OK - Stops auto-play function at the current track■ Skip - Selects another track■ Cancel - Changes to the track played originally
USB and AUX inputs
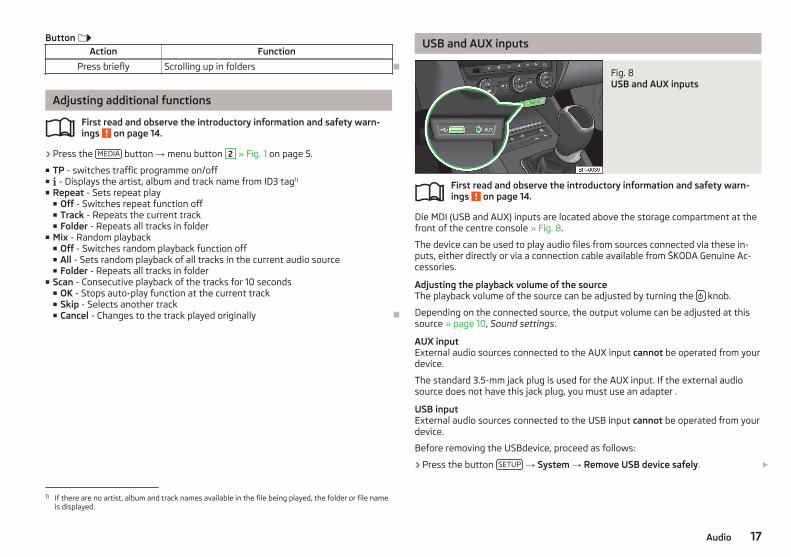
Fig. 8 USB and AUX inputs
First read and observe the introductory information and safety warn-ings on page 14.
Die MDI (USB and AUX) inputs are located above the storage compartment at thefront of the centre console » Fig. 8.
The device can be used to play audio files from sources connected via these in-puts, either directly or via a connection cable available from ŠKODA Genuine Ac-cessories.
Adjusting the playback volume of the sourceThe playback volume of the source can be adjusted by turning the knob.
Depending on the connected source, the output volume can be adjusted at thissource » page 10, Sound settings.
AUX inputExternal audio sources connected to the AUX input cannot be operated from yourdevice.
The standard 3.5-mm jack plug is used for the AUX input. If the external audiosource does not have this jack plug, you must use an adapter .
USB inputExternal audio sources connected to the USB input cannot be operated from yourdevice.
Before removing the USBdevice, proceed as follows:
› Press the button SETUP → System → Remove USB device safely.
1) If there are no artist, album and track names available in the file being played, the folder or file nameis displayed.
17Audio

Do not use USB extension cables or adapters. This can impair the function of theconnected source.
USB hubs are not supported.
CAUTION
The AUX input must only be used for audio sources!
Note
■ If an external audio source is connected to the AUX input, which is equippedwith an adapter for external power supply, the sound may be impaired. This de-pends on the quality of the adapter which is used.■ See the owner's manual of the specific manufacturer for operating the externalaudio source.■ Some devices connected via USB can be charged via the device.
18 Audio

Vehicle systems
Vehicle settings
Introduction
This chapter contains information on the following subjects:
Selecting driving mode 19Driving assistants 20Deactivating traction control (ASR) 21Speed limit for winter tyres 21Light 21Visibility 21Opening and closing 21Seats 22Setting Climatronic 22Auxiliary heating and ventilation 23Vehicle status 23Details of the multifunction display 23Service 24Resetting to factory settings 24
First and foremost, pay attention to the safety instructions » page 4, Importantnotes.
Settings relating to the vehicle systems can only be made when the ignition isswitched on.
Note
■ The individual systems are described in the » Vehicle Owner's Manual.■ For safety reasons, if any system functions are disabled, then some functions,such as parts of the ESC system, are automatically enabled again after switchingthe ignition off and on.
Selecting driving mode
Fig. 9 Button for selecting the drivingmode
First read and observe the introductory information given on page 19.
The menu for selecting the driving mode allows you to set the vehicle to one ofthe three preset driving modes (Normal, Sport and Eco), or to the Individual driv-ing mode, which allows customised settings to be applied.
If a driving mode other than Normal is selected, then the » Fig. 9symbol lightsup in the button.
Open the main menu› Press the button » Fig. 9.
■ Normal - Activates Normal mode■ Info - Displays the mode settings
■ Sport - Activates Sport mode■ Info - Displays the mode settings
■ Eco - Activates the fuel-saving mode■ Info - Displays the mode settings
■ Individual - Activates the Individual mode■ Settings - Individual settings
■ Steering action - Sets the power steering characteristics■ Normal - Normal■ Sport - Sports
■ Engine - Sets the engine (drive) characteristics■ Normal - Normal■ Sport - Sports■ Eco - Economical
19Vehicle systems

■ ACC driving programme - Sets the vehicle acceleration when adaptive cruisecontrol is activated■ Normal - Normal■ Sport - Sports■ Eco - Economical
■ Advanced FrontLighting System (AFS) - Sets the characteristics of theadaptive headlights■ Normal - Normal■ Sport - Sports■ Eco - Economical
■ Air conditioning - Sets the Climatronic characteristics■ Normal - Normal■ Eco - Economical
■ Reset - Sets the mode to Normal
Note
If the device is not operated for longer than 10 seconds in the "Select drivingmode" main menu, it will switch to the most recently selected menu or switch it-self off.
Driving assistants
Fig. 10 Parking assistance: Illustrations
First read and observe the introductory information given on page 19.
Parking aid: Explanation of graphicObstacle detected in the scanned area (the vehicle can still continue to travelin the direction of the obstacle)Obstacle detected in the collision area (do not continue to drive in the direc-tion of the obstacle)
More information on the parking aid can be found in the » Vehicle Owner's Man-ual, chapter Assistance systems.
› Press the button CAR → Assistants.
■ Front Assist - Sets the assistant for distance monitoring to the vehicles ahead■ Active - Activates/deactivates the assistant■ Advance warning - Activates/deactivates advance warning function■ Display distance warning - Activates/deactivates distance warnings
■ ACC (adaptive cruise control) - Sets the adaptive cruise control■ Distance - Sets the distance monitoring to the vehicles ahead
■ Very close - Very small distance■ Close - Small distance■ Medium - Medium distance■ Far - Large distance■ Very far - Very large distance
■ Last distance selected - Last selected distance on/off■ Driving programme - Sets the vehicle acceleration when adaptive cruise con-
trol is active1)
■ Normal - Normal■ Sport - Sports■ Eco - Economical
■ Park Assist - Sets the parking aid■ Front volume - Adjusts the volume of the front sensors■ Front tone setting - Adjusts the tone of the front sensors■ Rear volume - Adjusts the volume of the rear sensors■ Rear tone setting - Adjusts the tone of the rear sensors■ Audio lowering - Lowers the volume
■ Off - No lowering of the volume■ Light - Slight lowering of the volume
A
B
1) This can be set in the menu on vehicles with driving mode selection option » page 19, Selecting driv-ing mode.
20 Vehicle systems

■ Medium - Medium lowering of the volume■ Strong - Strong lowering of the volume
■ ProActive passenger protection - Activates/deactivates proactive passengerprotection
■ Fatigue detection - Activates/deactivates the fatigue detection function
Deactivating traction control (ASR)
First read and observe the introductory information given on page 19.
› Press the CAR button → ASR off - Switches deactivation of traction control(ASR) on/off.
Speed limit for winter tyres
First read and observe the introductory information given on page 19.
› Press the button CAR → Winter tyres limit.
■ Winter tyres warning - Activates/deactivates the winter tyres warning function■ Warning at: ... km/h - Sets the speed for the warning
Note
This function is, for example, used for winter tyres where the maximum permissi-ble speed is lower than the maximum speed of the vehicle.
Light
First read and observe the introductory information given on page 19.
› Press the button CAR → Lights.
■ Light Assist - Sets the light assist■ Switch-on time - Sets the sensitivity of the light sensor to the change in in-
tensity of the ambient light■ Early - High sensitivity■ Medium - Medium sensitivity■ Late - Low sensitivity
■ Light Assist - Activates/deactivates the head light assist function■ Automatic headlight control (rain) - Activates/deactivates automatic head-
light control in rain■ Daytime running lights - Activates/deactivates daytime running lights■ Lane change flash - Activates/deactivates lane change flashing■ Travel mode - Sets the travel mode
■ Left-hand traffic - For left-hand traffic■ Right-hand traffic - For right-hand traffic
■ Interior lighting - Sets the interior lighting■ Instrument lighting - Sets the brightness of the instrument/switch lighting■ Footwell light - Sets the brightness of the footwell light
■ Coming home - Activates/deactivates the function and sets the illumination pe-riod after leaving the vehicle (5-30 seconds)
■ Leaving home - Activates/deactivates the function and sets the illumination pe-riod after unlocking the vehicle (5-30 seconds)
Visibility
First read and observe the introductory information given on page 19.
› Press the button CAR → Vision.
■ Mirrors - Adjusts the mirrors■ Synchronous mirror adjustment - Activates/deactivates synchronous mirror
adjustment■ Lowering in reverse - Activates/deactivates the lowering of the front passen-
ger mirror when reversing■ Fold in while parking - Activates/deactivates folding of the mirrors via remote
control or using the sensor in the handle (KESSY)■ Wipers - Adjusts the windscreen wipers
■ Automatic wiping in rain - Activates/deactivates automatic windscreen wip-ing in rain
■ Automatic rear wiper - Activates/deactivates automatic rear window wiping
Opening and closing
First read and observe the introductory information given on page 19.
› Press the button CAR → Opening/closing.
21Vehicle systems

■ Windows - Sets the window operation■ Convenience opening - Sets the convenience opening
■ Off - Deactivates convenience opening■ All windows - All windows■ Driver - Driver's window only
■ Central locking - Settings for opening and closing of doors■ Door unlocking - Sets the door unlocking
■ All - All doors■ Single door - Driver's door or driver's or passenger door with KESSY system■ Driver side - Doors on the driver's side or on the driver's or passenger's side
with KESSY system■ Automatic locking - Activates/deactivates automatic locking when setting off
and unlocking after removing the ignition key■ Alarm system confirmation - Activates/deactivates acoustic signals when un-
locking/locking a vehicle with an anti-theft alarm system
Seats
First read and observe the introductory information given on page 19.
› Press the button CAR → Seats.
■ Store driver's seat position on key - Activates/deactivates the storage of thedriver's seat position and exterior mirror position in the remote control keywhen locking the vehicle
Setting Climatronic
Fig. 11 Main menu Climatronic
First read and observe the introductory information given on page 19.
Open the main menu› Press the button SETUP on the Climatronic control panel.
Explanation of graphicFunction On - illuminated lineFunction off - greyed-out lineSet interior temperature on driver's sideSet interior temperature on front passenger's sideSet airflow direction
■ Profile - Sets the Climatronic operating mode■ Light - Low power, quiet operation■ Medium - Basic power■ Strong - High power
■ - Activates/deactivates automatic air recirculation■ - Activates/deactivates quick interior heating■ - Access to the auxiliary heater and ventilation settings » page 23
Note
■ The Climatronic Profile mode can be set by pressing the button 3 » Fig. 1 onpage 5 again.■ If the device is not operated for longer than 10 seconds in the Climatronic menu,it will switch to the most recently selected menu or switch itself off.
A
B
C
D
E
22 Vehicle systems

Auxiliary heating and ventilation
Fig. 12 Screen information and selection of the preset time
First read and observe the introductory information given on page 19.
Open the main menu› Press on in the main Climatronic menu » page 22 or press the CAR button →
Auxiliary heater for vehicles with manual air conditioning.
Explanation of graphicNext start: Day and time when the vehicle is to be ready for useSet operating mode, set operating durationActivated preset time - illuminated line
■ Timer - Selects the preset times when the vehicle is to be ready for use■ Timer 1 - Preset time 1■ Timer 2 - Preset time 2■ Timer 3 - Preset time 3
■ Mode - Sets the operating mode■ Heating - Heating mode■ Ventilation - Ventilation mode
■ Timer off - Switches off the preset time■ Settings - Sets the day and time when the vehicle is to be ready for use
■ Timer 1 - Sets the preset time 1■ Timer 2 - Sets the preset time 2■ Timer 3 - Sets the preset time 3■ Set running time - Sets the time frame in which to run the device (10 - 60 mi-
nutes)
After setting the desired time, press the button BACK to save the preset time.
A
B
C
Note
■ Only one preset time can be active. The activated preset time will be deactiva-ted again after it has started automatically. For the next start, activate one of thepreset times.■ In the selection of the day in the preset time, there is an option between Sun-day and Monday without the specified day. If this setting is made, the vehicle willbe ready for use at the selected time, regardless of the current day.■ The system in operation switches off on expiration of the running time or canbe deactivated by pressing the direct on/off button or by using the radio re-mote control.■ If a different time is set » page 11, Device system settings, the activated presettime is automatically deactivated. The preset time must be reactivated.
Vehicle status
First read and observe the introductory information given on page 19.
› Press the button CAR → Vehicle status.
■ Convenience consumers - Displays up to three consumers that use the largestshare of fuel and displays the fuel consumption required to run all convenienceconsumers; see » Vehicle Owner's Manual, chapter Economical driving and envi-ronmental sustainability
■ Tyre pressure monitoring - Starts a new calibration process for the tyre pres-sure monitor
■ Start/stop status - Displays information about the status of the START-STOPsystem
Details of the multifunction display
First read and observe the introductory information given on page 19.
› Press the button CAR → Driving data.
■ Current consumption - Activates/deactivates the current fuel consumption dis-play in the instrument cluster
■ Travelling time - Activates/deactivates the travelling time display in the instru-ment cluster
23Vehicle systems

■ Distance travelled - Activates/deactivates the display of the distance travelledin the instrument cluster
■ Average speed - Activates/deactivates the average speed display in the instru-ment cluster
■ Average consumption - Activates/deactivates the average consumption displayin the instrument cluster
■ Digital speed - Activates/deactivates the digital speed display in the instrumentcluster
■ Oil temperature - Activates/deactivates the oil temperature display in the in-strument cluster
■ Winter tyres warning - Activates/deactivates the winter tyres warning displayin the instrument cluster
■ Coolant temperature - Activates/deactivates the coolant temperature display inthe instrument cluster
■ Refuel quantity - Activates/deactivates the refuel quantity display in the instru-ment cluster
■ Eco tips - Activates/deactivates the display of tips for economical driving in theinstrument cluster
■ Convenience consumers - Activates/deactivates the consumption display forconvenience consumers in the instrument cluster
■ Reset Since start driving data - Resets the single-trip memory in the instru-ment cluster display
■ Reset Long-term driving data - Resets the long-term memory in the instrumentcluster display
Service
First read and observe the introductory information given on page 19.
› Press the button CAR → Service.
■ Oil change service - Overdue engine oil change■ Oil change service due in … days / … km - Displays the days and distance until
the next engine oil change■ Inspection - Compulsory inspection
■ Inspection due in … days / … km - Displays the days and distance until thenext inspection
■ Vehicle ID - Displays the vehicle identification number
Resetting to factory settings
First read and observe the introductory information given on page 19.
› Press the CAR button → Factory settings.
■ All - Resets settings for all menu items■ Assistants - Resets the Assistants menu item settings■ Vision - Resets the Vision menu item settings■ Lights - Resets the Lights menu item settings■ Opening/closing - Resets the Opening/closing menu item settings■ Seats - Resets the Seats menu item settings■ Driving data - Resets the Driving data menu item settings
24 Vehicle systems

Index
AAdjusting the volume 6AF 10AM 13Anti-theft device 4Audio 12
Media 14Multi-function steering wheel 8Radio 12
Automatic headlight in rain 21Automatic locking 21Automatic rear windscreen wiping 21Automatic windscreen wiping in rain 21AUX 10, 17Auxiliary heating and ventilation
Settings 23
CClimatronic
Automatic air recirculation 22Automatic mode 22Operating mode 22
COMING HOME 21Component protection 4Control lever 7Convenience consumers 23
DDate 11Daytime running lights 21Declaration of conformity 4Description and operation of the device 5Description of the device 5
DeviceSettings 9
Device screen 7, 11Device screen display 7Device settings 9Driving mode 19
EEco tips 23
FFactory settings 11Fatigue detection system 20File formats 15FM 13Folding down the exterior mirrors - folding in
while parking 21Frequency band 13
HHead Light Assist 21
IID3 tag 10Important notes 4Instrument lighting 21Introductory information 4
Component protection 4Declaration of conformity 4
LLane change flash 21Language 11LEAVING HOME 21Light sensor - light switch-on time 21
MMAXI DOT 7, 8MDI 17Media 14
Adjusting additional functions 17AUX 17File formats 15Operation 16Selecting sources 15Settings 10Supported media 15USB 17
Mix 10, 17Multi-function steering wheel
Audio 8Multifunction display 23
OOperating the device 5, 6
Control lever 7Device 7
PParking aid 20PI 10ProActive passenger protection 20PTY 10
RRadio 12
Save radio stations 12Search for radio stations 12Selecting a radio station 13Settings 10Symbols 12Traffic programme (TP) 14
RDS 10
25Index

Remote control key memory function 22Repeat 17
SSave radio stations 12Scan
Media 17Radio 12
Search for radio stations 12Seats
Settings 22Selecting a radio station 13Selecting driving mode 19Selecting sources 15Settings
Device 9Device system 11Driving mode 19Media 10Radio 10Sound 10Volume 6
Setup 9Sound
Settings 10Speed limit for winter tyres 21START-STOP 23Switching the device off 6Switching the device on 6Synchronous adjustment of both mirrors 21System
Settings 11
TTilting the mirror surface - lowering in reverse 21Time 11TP 12, 14Traffic programme 14
Travel light - travel mode 21Tyre pressure monitor 23
UUnits 11Unlocking doors 21USB 17
VVehicle identification number 24Vehicle settings 19
Auxiliary heating and ventilation 23Climatronic 22Details of the multifunction display 23Driving assistant 20Light 21Opening and closing 21Resetting to factory settings 24Seats 22Service 24Speed limit for winter tyres 21Traction control (ASR) 21Vehicle status 23Visibility 21
Vehicle systems 19Version 11Versions data 11VIN number 24Visual parking system (OPS) 20
WWindow convenience operation 21
26 Index

ŠKODA AUTO a.s. pursues a policy of constant product and model development.Please understand that changes to models in terms of shape, equipment and en-gineering may therefore be introduced at any time. The information about ap-pearance, performances, dimensions, weight, standards and functions of the ve-hicle is correct at the time of publication. Some equipment might only be intro-duced at a later date, or might only be offered in certain markets; information isprovided by ŠKODA Partners. It is therefore not possible for legal claims to bemade based on the data, illustrations and descriptions contained in this Owner'sManual.
Reprinting, reproduction, translation, or any other use, either in whole or in part,is not permitted without the written consent of ŠKODA AUTO a.s..
ŠKODA AUTO a.s. expressly reserves all rights relating to copyright laws.
Subject to change.
Issued by: ŠKODA AUTO a.s.
© ŠKODA AUTO a.s. 2013

www.skoda-auto.com
BluesInfotainment anglicky 11.2013S00.5614.20.205E0 012 720 CC
SIMPLY CLEVER
Infotainment Radio BluesOwner's Manual