Embed Size (px)
Citation preview

ownCloud Client ManualRelease 2.5.2
The ownCloud developers
Nov 22, 2018


CONTENTS
1 Introduction 11.1 Improvements and New Features . . . . . . . . . . . . . . . . . . . . . . . . . . . . . . . . . . . . 1
2 Installing the Desktop Synchronization Client 32.1 System Requirements . . . . . . . . . . . . . . . . . . . . . . . . . . . . . . . . . . . . . . . . . . 32.2 Customizing the Windows installation . . . . . . . . . . . . . . . . . . . . . . . . . . . . . . . . . . 32.3 Installation Wizard . . . . . . . . . . . . . . . . . . . . . . . . . . . . . . . . . . . . . . . . . . . . 5
3 Using the Synchronization Client 93.1 Systray Icon . . . . . . . . . . . . . . . . . . . . . . . . . . . . . . . . . . . . . . . . . . . . . . . 93.2 File Manager Overlay Icons . . . . . . . . . . . . . . . . . . . . . . . . . . . . . . . . . . . . . . . 123.3 Sharing From Your Desktop . . . . . . . . . . . . . . . . . . . . . . . . . . . . . . . . . . . . . . . 133.4 Activity Window . . . . . . . . . . . . . . . . . . . . . . . . . . . . . . . . . . . . . . . . . . . . . 153.5 Server Notifications . . . . . . . . . . . . . . . . . . . . . . . . . . . . . . . . . . . . . . . . . . . 163.6 General Window . . . . . . . . . . . . . . . . . . . . . . . . . . . . . . . . . . . . . . . . . . . . . 163.7 Using the Network Window . . . . . . . . . . . . . . . . . . . . . . . . . . . . . . . . . . . . . . . 183.8 Using the Ignored Files Editor . . . . . . . . . . . . . . . . . . . . . . . . . . . . . . . . . . . . . . 18
4 Conflicts 214.1 Overview . . . . . . . . . . . . . . . . . . . . . . . . . . . . . . . . . . . . . . . . . . . . . . . . . 214.2 Example . . . . . . . . . . . . . . . . . . . . . . . . . . . . . . . . . . . . . . . . . . . . . . . . . 214.3 Uploading conflicts (experimental) . . . . . . . . . . . . . . . . . . . . . . . . . . . . . . . . . . . 21
5 Advanced Usage 235.1 Options . . . . . . . . . . . . . . . . . . . . . . . . . . . . . . . . . . . . . . . . . . . . . . . . . . 235.2 Configuration File . . . . . . . . . . . . . . . . . . . . . . . . . . . . . . . . . . . . . . . . . . . . 235.3 Environment Variables . . . . . . . . . . . . . . . . . . . . . . . . . . . . . . . . . . . . . . . . . . 245.4 ownCloud Command Line Client . . . . . . . . . . . . . . . . . . . . . . . . . . . . . . . . . . . . 255.5 Low Disk Space . . . . . . . . . . . . . . . . . . . . . . . . . . . . . . . . . . . . . . . . . . . . . 26
6 The Automatic Updater 276.1 Basic Workflow . . . . . . . . . . . . . . . . . . . . . . . . . . . . . . . . . . . . . . . . . . . . . 276.2 Preventing Automatic Updates . . . . . . . . . . . . . . . . . . . . . . . . . . . . . . . . . . . . . . 28
7 Appendix A: Building the Client 317.1 Compiling via ownBrander . . . . . . . . . . . . . . . . . . . . . . . . . . . . . . . . . . . . . . . 317.2 Getting Source Code . . . . . . . . . . . . . . . . . . . . . . . . . . . . . . . . . . . . . . . . . . . 317.3 Linux . . . . . . . . . . . . . . . . . . . . . . . . . . . . . . . . . . . . . . . . . . . . . . . . . . . 317.4 macOS . . . . . . . . . . . . . . . . . . . . . . . . . . . . . . . . . . . . . . . . . . . . . . . . . . 327.5 Windows Development Build . . . . . . . . . . . . . . . . . . . . . . . . . . . . . . . . . . . . . . 337.6 Windows Installer Build (Cross-Compile) . . . . . . . . . . . . . . . . . . . . . . . . . . . . . . . . 34
i

7.7 Generic Build Instructions . . . . . . . . . . . . . . . . . . . . . . . . . . . . . . . . . . . . . . . . 34
8 Appendix B: History and Architecture 378.1 The Synchronization Process . . . . . . . . . . . . . . . . . . . . . . . . . . . . . . . . . . . . . . 378.2 Synchronization by Time versus ETag . . . . . . . . . . . . . . . . . . . . . . . . . . . . . . . . . . 378.3 Comparison and Conflict Cases . . . . . . . . . . . . . . . . . . . . . . . . . . . . . . . . . . . . . 388.4 Checksum Algorithm Negotiation . . . . . . . . . . . . . . . . . . . . . . . . . . . . . . . . . . . . 398.5 Ignored Files . . . . . . . . . . . . . . . . . . . . . . . . . . . . . . . . . . . . . . . . . . . . . . . 428.6 The Sync Journal . . . . . . . . . . . . . . . . . . . . . . . . . . . . . . . . . . . . . . . . . . . . . 438.7 Custom WebDAV Properties . . . . . . . . . . . . . . . . . . . . . . . . . . . . . . . . . . . . . . . 438.8 Server Side Permissions . . . . . . . . . . . . . . . . . . . . . . . . . . . . . . . . . . . . . . . . . 438.9 File- or Directory Size . . . . . . . . . . . . . . . . . . . . . . . . . . . . . . . . . . . . . . . . . . 448.10 FileID . . . . . . . . . . . . . . . . . . . . . . . . . . . . . . . . . . . . . . . . . . . . . . . . . . . 44
9 Appendix C: Troubleshooting 459.1 Identifying Basic Functionality Problems . . . . . . . . . . . . . . . . . . . . . . . . . . . . . . . . 459.2 “CSync unknown error” . . . . . . . . . . . . . . . . . . . . . . . . . . . . . . . . . . . . . . . . . 469.3 Isolating other issues . . . . . . . . . . . . . . . . . . . . . . . . . . . . . . . . . . . . . . . . . . . 469.4 Log Files . . . . . . . . . . . . . . . . . . . . . . . . . . . . . . . . . . . . . . . . . . . . . . . . . 469.5 Core Dumps . . . . . . . . . . . . . . . . . . . . . . . . . . . . . . . . . . . . . . . . . . . . . . . 48
10 FAQ 4910.1 Some Files Are Continuously Uploaded to the Server, Even When They Are Not Modified. . . . . . 4910.2 Syncing Stops When Attempting To Sync Deeper Than 100 Sub-directories. . . . . . . . . . . . . . 4910.3 I See a Warning Message for Unsupported Versions. . . . . . . . . . . . . . . . . . . . . . . . . . . 4910.4 There Was A Warning About Changes In Synchronized Folders Not Being Tracked Reliably. . . . . . 5010.5 I Want To Move My Local Sync Folder . . . . . . . . . . . . . . . . . . . . . . . . . . . . . . . . . 50
11 Glossary 55
Index 57
ii

CHAPTER
ONE
INTRODUCTION
Available for Windows, Mac OS X, and various Linux distributions, the ownCloud Desktop Sync client enables youto:
• Specify one or more directories on your computer that you want to synchronize to the ownCloud server.
• Always have the latest files synchronized, wherever they are located.
Your files are always automatically synchronized between your ownCloud server and local PC.
Because of various technical issues, desktop sync clients older than 2.2.1 will not allowed to connect and sync withthe ownCloud 8.1+ server. It is highly recommended to keep your client updated.
1.1 Improvements and New Features
The 2.5 release of the ownCloud desktop sync client has many new features and improvements. (See the completechangelog.)
1

ownCloud Client Manual, Release 2.5.2
2 Chapter 1. Introduction

CHAPTER
TWO
INSTALLING THE DESKTOP SYNCHRONIZATION CLIENT
You can download the latest version of the ownCloud Desktop Synchronization Client from the ownCloud downloadpage. There are clients for Linux, macOS, and Microsoft Windows.
Installation on Mac OS X and Windows is the same as for any software application: download the program and thendouble-click it to launch the installation, and then follow the installation wizard. After it is installed and configuredthe sync client will automatically keep itself updated; see The Automatic Updater for more information.
Linux users must follow the instructions on the download page to add the appropriate repository for their Linuxdistribution, install the signing key, and then use their package managers to install the desktop sync client. Linux userswill also update their sync clients via package manager, and the client will display a notification when an update isavailable.
Linux users must also have a password manager enabled, such as GNOME Keyring or KWallet, so that the sync clientcan login automatically.
You will also find links to source code archives and older versions on the download page.
2.1 System Requirements
• Windows 7+
• Mac OS X 10.7+ (64-bit only)
• CentOS 6 & 7 (64-bit only)
• Debian 8.0 & 9.0
• Fedora 25 & 26 & 27
• Ubuntu 16.04 & 17.04 & 17.10
• openSUSE Leap 42.2 & 42.3
Note: For Linux distributions, we support, if technically feasible, the latest 2 versions per platform and the previousUbuntu LTS.
2.2 Customizing the Windows installation
If you just want to install ownCloud Desktop Synchronization Client on your local system, you can simply launch the.msi file and configure it in the wizard that pops up.
3
ownCloud Client Manual, Release 2.5.2
2.2.1 Features
The MSI installer provides several features that can be installed or removed individually, which you can also controlvia command-line, if you are automating the installation, then run the following command:
msiexec /passive /i ownCloud-x.y.z.msi
The command will install the ownCloud Desktop Synchronization Client into the default location with the defaultfeatures enabled. If you want to disable, e.g., desktop shortcut icons you can simply change the above command tothe following:
msiexec /passive /i ownCloud-x.y.z.msi REMOVE=DesktopShortcut
See the following table for a list of available features:
Installation
You can also choose to only install the client itself by using the following command:
msiexec /passive /i ownCloud-x.y.z.msi ADDDEFAULT=Client
If you for instance want to install everything but the DesktopShortcut and the ShellExtensions feature, youhave two possibilities:
1. You explicitly name all the features you actually want to install (whitelist) where Client is always installedanyway:
msiexec /passive /i ownCloud-x.y.z.msi ADDDEFAULT=StartMenuShortcuts
2. You pass the NO_DESKTOP_SHORTCUT and NO_SHELL_EXTENSIONS properties:
msiexec /passive /i ownCloud-x.y.z.msi NO_DESKTOP_SHORTCUT=”1”NO_SHELL_EXTENSIONS=”1”
Note: The ownCloud .msi remembers these properties, so you don’t need to specify them on upgrades.
Note: You cannot use these to change the installed features, if you want to do that, see the next section.
Changing Installed Features
You can change the installed features later by using REMOVE and ADDDEFAULT properties.
1. If you want to add the desktop shortcut later, run the following command:
msiexec /passive /i ownCloud-x.y.z.msi ADDDEFAULT=”DesktopShortcut”
2. If you want to remove it, simply run the following command:
msiexec /passive /i ownCloud-x.y.z.msi REMOVE=”DesktopShortcut”
Windows keeps track of the installed features and using REMOVE or ADDDEFAULT will only affect the mentionedfeatures.
Compare REMOVE and ADDDEFAULT on the Windows Installer Guide.
4 Chapter 2. Installing the Desktop Synchronization Client

ownCloud Client Manual, Release 2.5.2
Note: You cannot specify REMOVE on initial installation as it will disable all features.
2.2.2 Installation Folder
You can adjust the installation folder by specifying the INSTALLDIR property like this
msiexec /passive /i ownCloud-x.y.z.msi INSTALLDIR="C:\Program Files (x86)\Non→˓Standard ownCloud Client Folder"
Be careful when using PowerShell instead of cmd.exe, it can be tricky to get the whitespace escaping right there.Specifying the INSTALLDIR like this only works on first installation, you cannot simply re-invoke the .msi with adifferent path. If you still need to change it, uninstall it first and reinstall it with the new path.
2.2.3 Disabling Automatic Updates
To disable automatic updates, you can pass the SKIPAUTOUPDATE property.
msiexec /passive /i ownCloud-x.y.z.msi SKIPAUTOUPDATE="1"
2.2.4 Launch After Installation
To launch the client automatically after installation, you can pass the LAUNCH property.
msiexec /i ownCloud-x.y.z.msi LAUNCH="1"
This option also removes the checkbox to let users decide if they want to launch the client for non passive/quiet mode.
Note: This option does not have any effect without GUI.
2.2.5 No Reboot After Installation
The ownCloud Client schedules a reboot after installation to make sure the Explorer extension is correctly (un)loaded.If you’re taking care of the reboot yourself, you can set the REBOOT property
msiexec /i ownCloud-x.y.z.msi REBOOT=ReallySuppress
This will make msiexec exit with error ERROR_SUCCESS_REBOOT_REQUIRED (3010). If your deployment toolinginterprets this as an actual error and you want to avoid that, you may want to set the DO_NOT_SCHEDULE_REBOOTinstead
msiexec /i ownCloud-x.y.z.msi DO_NOT_SCHEDULE_REBOOT="1"
2.3 Installation Wizard
The installation wizard takes you step-by-step through configuration options and account setup. First you need to enterthe URL of your ownCloud server.
2.3. Installation Wizard 5

ownCloud Client Manual, Release 2.5.2
Enter your ownCloud login on the next screen.
On the “Local Folder Option” screen you may sync all of your files on the ownCloud server, or select individual
6 Chapter 2. Installing the Desktop Synchronization Client

ownCloud Client Manual, Release 2.5.2
folders. The default local sync folder is ownCloud, in your home directory. You may change this as well.
When you have completed selecting your sync folders, click the “Connect” button at the bottom right. The client willattempt to connect to your ownCloud server, and when it is successful you’ll see two buttons:
• one to connect to your ownCloud Web GUI
• one to open your local folder
It will also start synchronizing your files.
2.3. Installation Wizard 7

ownCloud Client Manual, Release 2.5.2
8 Chapter 2. Installing the Desktop Synchronization Client

CHAPTER
THREE
USING THE SYNCHRONIZATION CLIENT
The ownCloud Desktop Client remains in the background and is visible as an icon in the system tray (Windows, KDE),menu bar (macOS), or notification area (Linux).
The status indicator uses icons to indicate the current status of your synchronization. The green circle with the whitecheckmark tells you that your synchronization is current and you are connected to your ownCloud server.
The blue icon with the white semi-circles means synchronization is in progress.
The yellow icon with the parallel lines tells you your synchronization has been paused. (Most likely by you.)
The gray icon with three white dots means your sync client has lost its connection with your ownCloud server.
When you see a white circle with the letter “i” that is the informational icon, so you should click it to see what it hasto tell you.
The red circle with the white “x” indicates a configuration error, such as an incorrect login or server URL.
3.1 Systray Icon
A right-click on the systray icon opens a menu for quick access to multiple operations.
This menu provides the following options:
• Quick access to your accounts
• Sync status
• Recent Changes, showing latest activities
9

ownCloud Client Manual, Release 2.5.2
10 Chapter 3. Using the Synchronization Client

ownCloud Client Manual, Release 2.5.2
• Settings
• Help menu
• Pause synchronizations
• An option to log in or log out of all of your accounts at once
• Quit ownCloud, logging out and closing the client
A left-click on your systray icon opens the desktop client to the account settings window.
3.1.1 Configuring ownCloud Account Settings
At the top of the window are tabs for each configured sync account, and three others for Activity, General and Networksettings. On your account tabs you have the following features:
• Connection status, showing which ownCloud server you are connected to, and your ownCloud username.
3.1. Systray Icon 11

ownCloud Client Manual, Release 2.5.2
• An Account button, which contains a dropdown menu with Add New, Log Out, and Remove.
• Used and available space on the server.
• Current synchronization status.
• Add Folder Sync Connection button.
The little button with three dots (the overflow menu) that sits to the right of the sync status bar offers four additionaloptions:
• Open Folder
• Choose What to Sync (This appears only when your file tree is collapsed, and expands the file tree)
• Pause Sync / Resume Sync
• Remove folder sync connection
Open Folder opens your local ownCloud sync folder.
Pause Sync pauses sync operations without making any changes to your account. It will continue to update file andfolder lists, without downloading or updating files. To stop all sync activity use Remove Folder Sync Connection.
Note: ownCloud does not preserve the mtime (modification time) of directories, though it does update the mtimes onfiles. See Wrong folder date when syncing for discussion of this.
3.1.2 Adding New Accounts
You may configure multiple ownCloud accounts in your desktop sync client. Simply click the Account > Add Newbutton on any account tab to add a new account, and then follow the account creation wizard. The new account willappear as a new tab in the settings dialog, where you can adjust its settings at any time. Use Account > Remove todelete accounts.
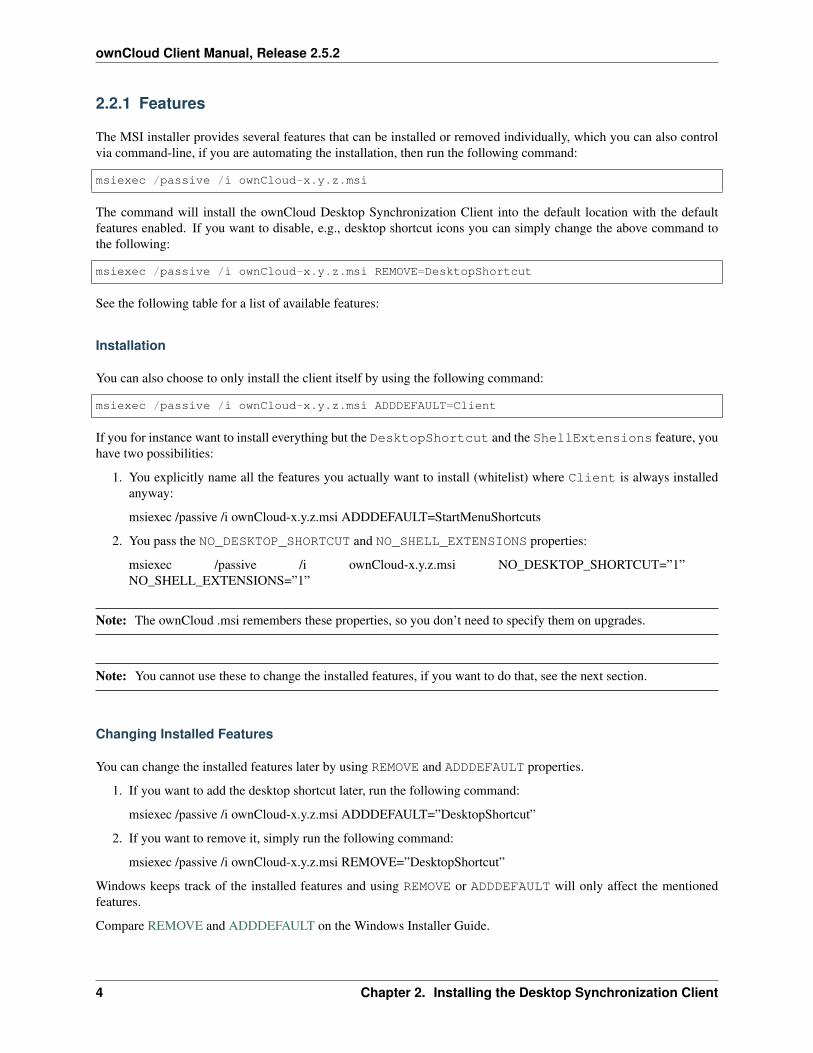
3.2 File Manager Overlay Icons
The ownCloud sync client provides overlay icons, in addition to the normal file type icons, for your system file manager(Explorer on Windows, Finder on Mac and Nautilus on Linux) to indicate the sync status of your ownCloud files.
The overlay icons are similar to the systray icons introduced above. They behave differently on files and directoriesaccording to sync status and errors.
The overlay icon of an individual file indicates its current sync state. If the file is in sync with the server version, itdisplays a green checkmark.
If the file is ignored from syncing, for example because it is on your exclude list, or because it is a symbolic link, itdisplays a warning icon.
If there is a sync error, or the file is blacklisted, it displays an eye-catching red X.
12 Chapter 3. Using the Synchronization Client
ownCloud Client Manual, Release 2.5.2
If the file is waiting to be synced, or is currently syncing, the overlay icon displays a blue cycling icon.
When the client is offline, no icons are shown to reflect that the folder is currently out of sync and no changes aresynced to the server.
The overlay icon of a synced directory indicates the status of the files in the directory. If there are any sync errors, thedirectory is marked with a warning icon.
If a directory includes ignored files that are marked with warning icons that does not change the status of the parentdirectories.
3.3 Sharing From Your Desktop
The ownCloud desktop sync client integrates with your file manager: Finder on Mac OS X, Explorer on Windows, andNautilus on Linux. (Linux users must install the owncloud-client-nautilus plugin.) You can create sharelinks, and share with internal ownCloud users the same way as in your ownCloud Web interface.
Right-click your systray icon, hover over the account you want to use, and left-click “Open folder [folder name] toquickly enter your local ownCloud folder. Right-click the file or folder you want to share to expose the share dialog,and click Share with ownCloud.
The share dialog has all the same options as your ownCloud Web interface.
3.3. Sharing From Your Desktop 13

ownCloud Client Manual, Release 2.5.2
14 Chapter 3. Using the Synchronization Client

ownCloud Client Manual, Release 2.5.2
Use Share with ownCloud to see who you have shared with, and to modify their permissions, or to delete the share.
3.4 Activity Window
The Activity window contains the log of your recent activities, organized over three tabs: Server Activities, whichincludes new shares and files downloaded and deleted, Sync Protocol, which displays local activities such as whichlocal folders your files went into, and Not Synced shows errors such as files not synced. Double clicking an entrypointing to an existing file in Server Activities or Sync Protocol will open the folder containing the file and highlightit.
3.4. Activity Window 15

ownCloud Client Manual, Release 2.5.2
3.5 Server Notifications
Starting with version 2.2.0, the client will display notifications from your ownCloud server that require manual inter-action by you. For example, when a user on a remote ownCloud creates a new Federated share for you, you can acceptit from your desktop client.
The desktop client automatically checks for available notifications automatically on a regular basis. Notifications aredisplayed in the Server Activity tab, and if you have Show Desktop Notifications enabled (General tab) you’ll alsosee a systray notification.
This also displays notifications sent to users by the ownCloud admin via the Announcements app.
3.6 General Window
The General window has configuration options such as Launch on System Startup, Use Monochrome Icons, andShow Desktop Notifications. This is where you will find the Edit Ignored Files button, to launch the ignored fileseditor, and Ask confirmation before downloading folders larger than [folder size].
16 Chapter 3. Using the Synchronization Client

ownCloud Client Manual, Release 2.5.2
3.6. General Window 17

ownCloud Client Manual, Release 2.5.2
3.7 Using the Network Window
The Network settings window enables you to define network proxy settings, and also to limit download and uploadbandwidth.
3.8 Using the Ignored Files Editor
You might have some local files or directories that you do not want to backup and store on the server. To identify andexclude these files or directories, you can use the Ignored Files Editor (General tab.)
For your convenience, the editor is pre-populated with a default list of typical ignore patterns. These patterns arecontained in a system file (typically sync-exclude.lst) located in the ownCloud Client application directory.You cannot modify these pre-populated patterns directly from the editor. However, if necessary, you can hoverover any pattern in the list to show the path and filename associated with that pattern, locate the file, and edit thesync-exclude.lst file.
Note: Modifying the global exclude definition file might render the client unusable or result in undesired behavior.
Each line in the editor contains an ignore pattern string. When creating custom patterns, in addition to being ableto use normal characters to define an ignore pattern, you can use wildcards characters for matching values. As an
18 Chapter 3. Using the Synchronization Client

ownCloud Client Manual, Release 2.5.2
3.8. Using the Ignored Files Editor 19

ownCloud Client Manual, Release 2.5.2
example, you can use an asterisk (*) to identify an arbitrary number of characters or a question mark (?) to identify asingle character.
Patterns that end with a slash character (/) are applied to only directory components of the path being checked.
Note: Custom entries are currently not validated for syntactical correctness by the editor, so you will not see anywarnings for bad syntax. If your synchronization does not work as you expected, check your syntax.
Each pattern string in the list is preceded by a checkbox. When the check box contains a check mark, in addition toignoring the file or directory component matched by the pattern, any matched files are also deemed “fleeting metadata”and removed by the client.
In addition to excluding files and directories that use patterns defined in this list:
• The ownCloud Client always excludes files containing characters that cannot be synchronized to other filesystems.
• Files are removed that cause individual errors three times during a synchronization. However, the client providesthe option of retrying a synchronization three additional times on files that produce errors.
For more detailed information see Ignored Files.
20 Chapter 3. Using the Synchronization Client

CHAPTER
FOUR
CONFLICTS
4.1 Overview
The ownCloud desktop client uploads local changes and downloads remote changes. When a file has changed on thelocal side and on the remote between synchronization runs the client will be unable to resolve the situation on itsown. It will create a conflict file with the local version, download the remote version and notify the user that a conflictoccured which needs attention.
4.2 Example
Imagine there is a file called mydata.txt your synchronized folder. It has not changed for a while and contains thetext “contents” locally and remotely. Now, nearly at the same time you update it locally to say “local contents” whilethe file on the server gets updated to contain “remote contents” by someone else.
When attempting to upload your local changes the desktop client will notice that the server version has also changed.It creates a conflict and you will now have two files on your local machine:
• mydata.txt containing “remote contents”
• mydata (conflicted copy 2018-04-10 093612).txt containing “local contents”
In this situation the file mydata.txt has the remote changes (and will continue to be updated with further remotechanges when they happen), but your local adjustments have not been sent to the server (unless the server enablesconflict uploading, see below).
The desktop client notifies you of this situation via system notifications, the system tray icon and a yellow “unresolvedconflicts” badge in the account settings window. Clicking this badge shows a list that includes the unresolved conflictsand clicking one of them opens an explorer window pointing at the relevant file.
To resolve this conflict, open both files, compare the differences and copy your local changes from the “conflictedcopy” file into the base file where applicable. In this example you might change mydata.txt to say “local andremote contents” and delete the file with “conflicted copy” in its name. With that, the conflict is resolved.
4.3 Uploading conflicts (experimental)
By default the conflict file (the file with “conflicted copy” in its name that contains your local conflicting changes) isnot uploaded to the server. The idea is that you, the author of the changes, are the best person for resolving the conflictand showing the conflict to other users might create confusion.
However, in some scenarios it makes a lot of sense to upload these conflicting changes such that local work can becomevisible even if the conflict won’t be resolved immediately.
21

ownCloud Client Manual, Release 2.5.2
In the future there might be a server-wide switch for this behavior. For now it can already be tested by setting theenvironment variable OWNCLOUD_UPLOAD_CONFLICT_FILES=1.
22 Chapter 4. Conflicts

CHAPTER
FIVE
ADVANCED USAGE
5.1 Options
You have the option of starting your ownCloud desktop client with the owncloud command. The following optionsare supported:
owncloud -h or owncloud --help Displays all command options.
The other options are:
--logwindow Opens a window displaying log output.
--logfile <filename> Write log output to the file specified. To write to stdout, specify - as the filename.
--logdir <name> Writes each synchronization log output in a new file in the specified directory.
--logexpire <hours> Removes logs older than the value specified (in hours). This command is used with--logdir.
--logflush Clears (flushes) the log file after each write action.
--logdebug Also output debug-level messages in the log (equivalent to setting the env varQT_LOGGING_RULES=”qt.*=true;*.debug=true”).
)
--confdir <dirname> Uses the specified configuration directory.
5.2 Configuration File
The ownCloud Client reads a configuration file. You can locate this configuration file as follows:
On Linux distributions: $HOME/.config/ownCloud/owncloud.cfg
On Microsoft Windows systems: %APPDATA%\ownCloud\owncloud.cfg
On MAC OS X systems: $HOME/Library/Preferences/ownCloud/owncloud.cfg
The configuration file contains settings using the Microsoft Windows .ini file format. You can overwrite changes usingthe ownCloud configuration dialog.
Note: Use caution when making changes to the ownCloud Client configuration file. Incorrect settings can produceunintended results.
Some interesting values that can be set on the configuration file are:
23

ownCloud Client Manual, Release 2.5.2
[ownCloud] sectionVariable Default MeaningremotePollInterval 30000 Specifies the poll time for the remote repository in milliseconds.forceSyncInterval 7200000The duration of no activity after which a synchronization run shall be
triggered automatically.fullLocalDiscoveryInterval3600000The interval after which the next synchronization will perform a full
local discovery.notificationRefreshInterval300000 Specifies the default interval of checking for new server notifications
in milliseconds.
[General] sectionVariable De-
faultMeaning
chunkSize 5242880Specifies the chunk size of uploaded files in bytes.promptDeleteAllFilestrue If a UI prompt should ask for confirmation if it was detected that all files and folders were
deleted.maxLogLines20000Specifies the maximum number of log lines displayed in the log window.timeout 300 The timeout for network connections in seconds.moveToTrashfalseIf non-locally deleted files should be moved to trash instead of deleting them completely.
This option only works on linuxshowExperimentalOptionsfalseWhether to show experimental options that are still undergoing testing in the user interface.
Turning this on does not enable experimental behavior on its own. It does enable userinferface options that can be used to opt in to experimental features.
[Proxy] sectionVariable Default Meaninghost 127.0.0.1 The address of the proxy server.port 8080 The port were the proxy is listening.type 2 0 for System Proxy.
1 for SOCKS5 Proxy.2 for No Proxy.3 for HTTP(S) Proxy.
5.3 Environment Variables
The behavior of the client can also be controlled using environment variables. The value of the environment variablesoverrides the values in the configuration file.
The environment variables are:
• OWNCLOUD_CHUNK_SIZE (default: 5242880; 5 MiB) – Specifies the chunk size of uploaded files in bytes.Increasing this value may help with synchronization problems in certain configurations.
• OWNCLOUD_TIMEOUT (default: 300 s) – The timeout for network connections in seconds.
• OWNCLOUD_CRITICAL_FREE_SPACE_BYTES (default: 50*1000*1000 bytes) - The minimum disk spaceneeded for operation. A fatal error is raised if less free space is available.
• OWNCLOUD_FREE_SPACE_BYTES (default: 250*1000*1000 bytes) - Downloads that would reduce the freespace below this value are skipped. More information available under the “Low Disk Space” section.
• OWNCLOUD_MAX_PARALLEL (default: 6) - Maximum number of parallel jobs.
24 Chapter 5. Advanced Usage

ownCloud Client Manual, Release 2.5.2
• OWNCLOUD_BLACKLIST_TIME_MIN (default: 25 s) - Minimum timeout for blacklisted files.
• OWNCLOUD_BLACKLIST_TIME_MAX (default: 24*60*60 s; one day) - Maximum timeout for blacklistedfiles.
5.4 ownCloud Command Line Client
The ownCloud Client packages contain a command line client, owncloudcmd, that can be used to synchronizeownCloud files to client machines.
owncloudcmd performs a single sync run and then exits the synchronization process. In this manner,owncloudcmd processes the differences between client and server directories and propagates the files to bring bothrepositories to the same state. Contrary to the GUI-based client, owncloudcmd does not repeat synchronizations onits own. It also does not monitor for file system changes.
To invoke owncloudcmd, you must provide the local and the remote repository URL using the following command:
owncloudcmd [OPTIONS...] sourcedir owncloudurl
where sourcedir is the local directory and owncloudurl is the server URL.
Other command line switches supported by owncloudcmd include the following:
--user, -u [user] Use user as the login name.
--password, -p [password] Use password as the password.
-n Use netrc (5) for login.
--non-interactive Do not prompt for questions.
--silent, --s Inhibits verbose log output.
--trust Trust any SSL certificate, including invalid ones.
--httpproxy http://[user@pass:]<server>:<port> Uses server as HTTP proxy.
--nonshib Uses Non Shibboleth WebDAV Authentication
--davpath [path] Overrides the WebDAV Path with path
--exclude [file] Exclude list file
--unsyncedfolders [file] File containing the list of un-synced remote folders (selective sync)
--max-sync-retries [n] Retries maximum n times (defaults to 3)
-h Sync hidden files,do not ignore them
5.4.1 Credential Handling
owncloudcmd requires the user to specify the username and password using the standard URL pattern, e.g.,
$ owncloudcmd /home/user/my_sync_folder https://carla:secret@server/owncloud/remote.→˓php/webdav/
To synchronize the ownCloud directory Music to the local directory media/music, through a proxy listening onport 8080, and on a gateway machine using IP address 192.168.178.1, the command line would be:
5.4. ownCloud Command Line Client 25
ownCloud Client Manual, Release 2.5.2
$ owncloudcmd --httpproxy http://192.168.178.1:8080 \$HOME/media/music \https://server/owncloud/remote.php/webdav/Music
owncloudcmd will prompt for the user name and password, unless they have been specified on the command line or-n has been passed.
5.4.2 Exclude List
owncloudcmd requires access to an exclude list file. It must either be installed along with owncloudcmd and thusbe available in a system location, be placed next to the binary as sync-exclude.lst or be explicitly specifiedwith the --exclude switch.
5.5 Low Disk Space
When disk space is low the ownCloud Client will be unable to synchronize all files. This section describes its behaviorin a low disk space situation as well as the options that influence it.
1. Synchronization of a folder aborts entirely if the remaining disk space falls below 50 MB. This threshold can beadjusted with the OWNCLOUD_CRITICAL_FREE_SPACE_BYTES environment variable.
2. Downloads that would reduce the free disk space below 250 MB will be skipped or aborted. The downloadwill be retried regularly and other synchronization is unaffected. This threshold can be adjusted with theOWNCLOUD_FREE_SPACE_BYTES environment variable.
26 Chapter 5. Advanced Usage
CHAPTER
SIX
THE AUTOMATIC UPDATER
The Automatic Updater ensures that you always have the latest features and bug fixes for your ownCloud synchroniza-tion client.
The Automatic Updater updates only on Mac OS X and Windows computers; Linux users only need to use theirnormal package managers. However, on Linux systems the Updater will check for updates and notify you when a newversion is available.
Note: Because of various technical issues, desktop sync clients older than 1.7 will not be allowed to connect and syncwith the ownCloud 8.1+ server. It is highly recommended to keep your client updated.
6.1 Basic Workflow
The following sections describe how to use the Automatic Updater on different operating systems.
6.1.1 Windows
The ownCloud client checks for updates and downloads them when available. You can view the update status underSettings -> General -> Updates in the ownCloud client.
If an update is available, and has been successfully downloaded, the ownCloud client starts a silent update prior to itsnext launch and then restarts itself. Should the silent update fail, the client offers a manual download.
Note: Administrative privileges are required to perform the update.
6.1.2 Mac OS X
If a new update is available, the ownCloud client initializes a pop-up dialog to alert you of the update and requestingthat you update to the latest version. Due to their use of the Sparkle frameworks, this is the default process for MacOS X applications.
6.1.3 Linux
Linux distributions provide their own update tools, so ownCloud clients that use the Linux operating system do notperform any updates on their own. The client will inform you (Settings -> General -> Updates) when anupdate is available.
27

ownCloud Client Manual, Release 2.5.2
6.2 Preventing Automatic Updates
In controlled environments, such as companies or universities, you might not want to enable the auto-update mech-anism, as it interferes with controlled deployment tools and policies. To address this case, it is possible to disablethe auto-updater entirely. The following sections describe how to disable the auto-update mechanism for differentoperating systems.
6.2.1 Preventing Automatic Updates in Windows Environments
Users may disable automatic updates by adding this line to the [General] section of their owncloud.cfg files:
skipUpdateCheck=true
Windows administrators have more options for preventing automatic updates in Windows environments by using oneof two methods. The first method allows users to override the automatic update check mechanism, whereas the secondmethod prevents any manual overrides.
To prevent automatic updates, but allow manual overrides:
1. Edit these Registry keys:
a. (32-bit-Windows) HKEY_LOCAL_MACHINE\Software\ownCloud\ownCloud
b. (64-bit-Windows) HKEY_LOCAL_MACHINE\Software\Wow6432Node\ownCloud\ownCloud
2. Add the key skipUpdateCheck (of type DWORD).
3. Specify a value of 1 to the machine.
To manually override this key, use the same value in HKEY_CURRENT_USER.
To prevent automatic updates and disallow manual overrides:
Note: This is the preferred method of controlling the updater behavior using Group Policies.
1. Edit this Registry key:
HKEY_LOCAL_MACHINE\Software\Policies\ownCloud\ownCloud
2. Add the key skipUpdateCheck (of type DWORD).
3. Specify a value of 1 to the machine.
Note: Enterprise branded clients (see Building Branded ownCloud Clients) have different key names, which are setin ownBrander using the Application Vendor and Application Name fields. Your key names look like this:
``HKEY_LOCAL_MACHINE\Software\Policies\myCompanyName\myAppName``
6.2.2 Preventing Automatic Updates in Mac OS X Environments
You can disable the automatic update mechanism, in the Mac OS X operating system, by copying thefile owncloud.app/Contents/Resources/deny_autoupdate_com.owncloud.desktopclient.plist to /Library/Preferences/com.owncloud.desktopclient.plist.
28 Chapter 6. The Automatic Updater

ownCloud Client Manual, Release 2.5.2
6.2.3 Preventing Automatic Updates in Linux Environments
Because the Linux client does not provide automatic updating functionality, there is no need to remove the automatic-update check. However, if you want to disable it edit your desktop client configuration file, $HOME/.config/ownCloud/owncloud.cfg. Add this line to the [General] section:
skipUpdateCheck=true
6.2. Preventing Automatic Updates 29

ownCloud Client Manual, Release 2.5.2
30 Chapter 6. The Automatic Updater

CHAPTER
SEVEN
APPENDIX A: BUILDING THE CLIENT
This section explains how to build the ownCloud Client from source for all major platforms. You should read thissection if you want to develop for the desktop client.
Note: Build instructions are subject to change as development proceeds. Please check the version for which you wantto build.
These instructions are updated to work with version 2.5 of the ownCloud Client.
7.1 Compiling via ownBrander
If you don’t want to go through the trouble of doing all the compile work manually, you can use ownBrander to createinstaller images for all platforms.
7.2 Getting Source Code
The Generic Build Instructions pull the latest code directly from GitHub, and work on Linux, Mac OS X, and Win-dows.
See the next section for instructions on getting source code from Linux packages.
7.3 Linux
You may wish to use source packages for your Linux distribution, as these give you the exact sources from which thebinary packages are built. These are hosted on the ownCloud repository from OBS. Go to the Index of repositories tosee all the Linux client repos.
1. The source RPMs for CentOS, RHEL, Fedora, SLES, and openSUSE are at the bottom of thepage for each distribution <https://software.opensuse.org/download/package?project=isv:ownCloud:desktop&package=owncloud-client> the sources for DEB and Ubuntu based distributions are at e.g. http://download.opensuse.org/repositories/isv:/ownCloud:/desktop/Ubuntu_16.04/
To get the .deb source packages add the source repo for your Debian or Ubuntu version, like this example forDebian 8 (run as root):
echo 'deb-srchttp://download.opensuse.org/repositories/isv:/ownCloud:/desktop/Debian_8.0/ /' >>→˓ /etc/apt/sources.list.d/owncloud-client.list
31

ownCloud Client Manual, Release 2.5.2
2. Install the dependencies using the following commands for your specific Linux distribution. Make sure the reposi-tories for source packages are enabled.
• Debian/Ubuntu: apt-get update; apt-get build-dep owncloud-client
• openSUSE/SLES: zypper ref; zypper si -d owncloud-client
• Fedora/CentOS/RHEL: yum install yum-utils; yum-builddep owncloud-client
3. Follow the Generic Build Instructions, starting with step 2.
7.4 macOS
In addition to needing XCode (along with the command line tools), developing in the Mac OS X environment requiresextra dependencies. You can install these dependencies through MacPorts or Homebrew. These dependencies arerequired only on the build machine, because non-standard libs are deployed in the app bundle.
The tested and preferred way to develop in this environment is through the use of HomeBrew. The ownCloud teamhas its own repository containing non-standard recipes.
To set up your build environment for development using HomeBrew:
1. Install Xcode
2. Install Xcode command line tools:: xcode-select –install
3. Install homebrew:: /usr/bin/ruby -e “$(curl -fsSL https://raw.githubusercontent.com/Homebrew/install/master/install)”
4. Add the ownCloud repository using the following command:
brew tap owncloud/owncloud
5. Install a Qt5 version, ideally from from 5.10.1:
brew install qt5
6. Install any missing dependencies:
brew install $(brew deps owncloud-client)
7. Install qtkeychain from here: git clone https://github.com/frankosterfeld/qtkeychain.git make sure you makethe same install prefix as later while building the client e.g. -DCMAKE_INSTALL_PREFIX=/Path/to/client/../install
8. For compilation of the client, follow the Generic Build Instructions.
9. Install the Packages package creation tool.
10. In the build directory, run admin/osx/create_mac.sh <CMAKE_INSTALL_DIR> <build dir><installer sign identity>. If you have a developer signing certificate, you can specify its CommonName as a third parameter (use quotes) to have the package signed automatically.
Note: Contrary to earlier versions, ownCloud 1.7 and later are packaged as a pkg installer. Do not call“make package” at any time when compiling for OS X, as this will build a disk image, and will not workcorrectly.
32 Chapter 7. Appendix A: Building the Client

ownCloud Client Manual, Release 2.5.2
7.5 Windows Development Build
If you want to test some changes and deploy them locally, you can build natively on Windows using MinGW. If youwant to generate an installer for deployment, please follow Windows Installer Build (Cross-Compile) instead.
1. Get the required dependencies:
• Make sure that you have CMake and Git.
• Download the Qt MinGW package. You will use the MinGW version bundled with it.
• Download an OpenSSL Windows Build (the non-“Light” version)
2. Get the QtKeychain sources as well as the latest versions of the ownCloud client from Git as follows:
git clone https://github.com/frankosterfeld/qtkeychain.gitgit clone git://github.com/owncloud/client.git
3. Open the Qt MinGW shortcut console from the Start Menu
4. Make sure that OpenSSL’s bin directory as well as your qtkeychain source directories are in your PATH. Thiswill allow CMake to find the library and headers, as well as allow the ownCloud client to find the DLLs atruntime:
set PATH=C:\<OpenSSL Install Dir>\bin;%PATH%set PATH=C:\<qtkeychain Clone Dir>;%PATH%
5. Build qtkeychain directly in the source directory so that the DLL is built in the same directory as the headersto let CMake find them together through PATH:
cd <qtkeychain Clone Dir>cmake -G "MinGW Makefiles" .mingw32-makecd ..
6. Create the build directory:
mkdir client-buildcd client-build
7. Build the client:
cmake -G "MinGW Makefiles" -DNO_SHIBBOLETH=1 ../clientmingw32-make
Note: You can try using ninja to build in parallel using cmake -G Ninja ../client and ninja instead.
Note: Refer to the Generic Build Instructions section for additional options.
The ownCloud binary will appear in the bin directory.
7.5. Windows Development Build 33

ownCloud Client Manual, Release 2.5.2
7.6 Windows Installer Build (Cross-Compile)
Due to the large number of dependencies, building the client installer for Windows is currently only officially sup-ported on openSUSE, by using the MinGW cross compiler. You can set up any currently supported version ofopenSUSE in a virtual machine if you do not have it installed already.
In order to make setup simple, you can use the provided Dockerfile to build your own image.
1. Assuming you are in the root of the ownCloud Client’s source tree, you can build an image from this Dockerfilelike this:
cd admin/win/dockerdocker build . -t owncloud-client-win32:<version>
Replace <version> by the version of the client you are building, e.g. 2.5 for the release of the client that thisdocument describes. If you do not wish to use docker, you can run the commands in RUN manually in a shell,e.g. to create your own build environment in a virtual machine.
Note: Docker images are specific to releases. This one refers to 2.5. Newer releases may have differentdependencies, and thus require a later version of the docker image! Always pick the docker image fitting yourrelease of ownCloud client!
2. From within the source tree Run the docker instance:
docker run -v "$PWD:/home/user/client" owncloud-client-win32:<version> \/home/user/client/admin/win/docker/build.sh client/ $(id -u)
It will run the build, create an NSIS based installer, as well as run tests. You will find the resulting binary in annewly created build-win32 subfolder.
If you do not wish to use docker, and ran the RUN commands above in a virtual machine, you can run theindented commands in the lower section of build.sh manually in your source tree.
4. Finally, you should sign the installer to avoid warnings upon installation. This requires a Microsoft AuthenticodeCertificate osslsigncode to sign the installer:
osslsigncode -pkcs12 $HOME/.codesign/packages.pfx -h sha256 \-pass yourpass \-n "ACME Client" \-i "http://acme.com" \-ts "http://timestamp.server/" \-in ${unsigned_file} \-out ${installer_file}
For -in, use the URL to the time stamping server provided by your CA along with the Authenticode certificate.Alternatively, you may use the official Microsoft signtool utility on Microsoft Windows.
If you’re familiar with docker, you can use the version of osslsigncode that is part of the docker image.
7.7 Generic Build Instructions
To build the most up-to-date version of the client:
1. Clone the latest versions of the client from Git as follows:
34 Chapter 7. Appendix A: Building the Client

ownCloud Client Manual, Release 2.5.2
git clone git://github.com/owncloud/client.gitcd client# master this default, but you can also check out a tag like v2.4.1git checkout mastergit submodule initgit submodule update
2. Create the build directory:
mkdir client-buildcd client-build
3. Configure the client build:
cmake -DCMAKE_PREFIX_PATH=/usr/local/opt/qt5 -DCMAKE_INSTALL_PREFIX=/Users/path/→˓to/client/../install/ -DNO_SHIBBOLETH=1 ..``
Note: You must use absolute paths for the include and library directories.
Note: On Mac OS X, you need to specify -DCMAKE_INSTALL_PREFIX=target, where target is a privatelocation, i.e. in parallel to your build dir by specifying ../install.
Note: qtkeychain must be compiled with the same prefix e.g -DCMAKE_INSTALL_PREFIX=/Users/path/to/client/../install/
4. Call make.
The owncloud binary will appear in the bin directory.
5. (Optional) Call make install to install the client to the /usr/local/bin directory.
The following are known cmake parameters:
• QTKEYCHAIN_LIBRARY=/path/to/qtkeychain.dylib -DQTKEYCHAIN_INCLUDE_DIR=/path/to/qtkeychain/:Used for stored credentials. When compiling with Qt5, the library is called qt5keychain.dylib.You need to compile QtKeychain with the same Qt version. If you install QtKeychain into theCMAKE_PREFIX_PATH then you don’t need to specify the path manually.
• WITH_DOC=TRUE: Creates doc and manpages through running make; also adds install statements, providingthe ability to install using make install.
• CMAKE_PREFIX_PATH=/path/to/Qt5.10.1/5.10.1/yourarch/lib/cmake/: Builds using thatQt version.
• CMAKE_INSTALL_PREFIX=path: Set an install prefix. This is mandatory on Mac OS
7.7. Generic Build Instructions 35

ownCloud Client Manual, Release 2.5.2
36 Chapter 7. Appendix A: Building the Client

CHAPTER
EIGHT
APPENDIX B: HISTORY AND ARCHITECTURE
ownCloud provides desktop sync clients to synchronize the contents of local directories from computers, tablets, andhandheld devices to the ownCloud server.
Synchronization is accomplished using csync, a bidirectional file synchronizing tool that provides both a commandline client as well as a library. A special module for csync was written to synchronize with the ownCloud built-inWebDAV server.
The ownCloud Client software is written in C++ using the Qt Framework. As a result, the ownCloud Client runs onLinux, Windows, and MacOS.
8.1 The Synchronization Process
The process of synchronization keeps files in two separate repositories the same. When synchronized:
• If a file is added to one repository it is copied to the other synchronized repository.
• When a file is changed in one repository, the change is propagated to any other synchronized repository.
• If a file is deleted in one repository, it is deleted in any other.
It is important to note that the ownCloud synchronization process does not use a typical client/server system where theserver is always master. This is a major difference between the ownCloud synchronization process and other systemslike a file backup, where only changes to files or folders and the addition of new files are propagated, but these filesand folders are never deleted unless explicitly deleted in the backup.
During synchronization, the ownCloud Client checks both repositories for changes frequently. This process is referredto as a sync run. In between sync runs, the local repository is monitored by a file system monitoring process that startsa sync run immediately if something was edited, added, or removed.
8.2 Synchronization by Time versus ETag
Until the release of ownCloud 4.5 and ownCloud Client 1.1, the ownCloud synchronization process employed a singlefile property – the file modification time – to decide which file was newer and needed to be synchronized to the otherrepository.
The modification timestamp is part of the files metadata. It is available on every relevant filesystem and is the typicalindicator for a file change. Modification timestamps do not require special action to create, and have a general meaning.One design goal of csync is to not require a special server component. This design goal is why csync was chosen asthe backend component.
37

ownCloud Client Manual, Release 2.5.2
To compare the modification times of two files from different systems, csync must operate on the same base. BeforeownCloud Client version 1.1.0, csync required both device repositories to run on the exact same time. This requirementwas achieved through the use of enterprise standard NTP time synchronization on all machines.
Because this timing strategy is rather fragile without the use of NTP, ownCloud 4.5 introduced a unique number (foreach file?) that changes whenever the file changes. Although this number is a unique value, it is not a hash of the file.Instead, it is a randomly chosen number, that is transmitted in the Etag field. Because the file number changes if the filechanges, its use is guaranteed to determine if one of the files has changed and, thereby, launching a synchronizationprocess.
Note: ownCloud Client release 1.1 and later requires file ID capabilities on the ownCloud server. Servers that runwith release earlier than 4.5.0 do not support using the file ID functionality.
Before the 1.3.0 release of the Desktop Client, the synchronization process might create false conflict files if timedeviates. Original and changed files conflict only in their timestamp, but not in their content. This behavior waschanged to employ a binary check if files differ.
Like files, directories also hold a unique ID that changes whenever one of the contained files or directories is modified.Because this is a recursive process, it significantly reduces the effort required for a synchronization cycle, because theclient only analyzes directories with a modified ID.
The following table outlines the different synchronization methods used, depending on server/client combination:
Server Version Client Version Sync Methods4.0.x or earlier 1.0.5 or earlier Time Stamp4.0.x or earlier 1.1 or later n/a (incompatible)4.5 or later 1.0.5 or earlier Time Stamp4.5 or later 1.1 or later File ID, Time Stamp
We strongly recommend using ownCloud Server release 4.5 or later when using ownCloud Client 1.1 or later. Usingan incompatible time stamp-based synchronization mechanism can lead to data loss in rare cases, especially whenmultiple clients are involved and one utilizes a non-synchronized NTP time.
8.3 Comparison and Conflict Cases
As mentioned above, during a sync run the client must first detect if one of the two repositories have changed files. Onthe local repository, the client traverses the file tree and compares the modification time of each file with an expectedvalue stored in its database. If the value is not the same, the client determines that the file has been modified in thelocal repository.
Note: On the local side, the modification time is a good attribute to use for detecting changes, because the value doesnot depend on time shifts and such.
For the remote (that is, ownCloud server) repository, the client compares the ETag of each file with its expected value.Again, the expected ETag value is queried from the client database. If the ETag is the same, the file has not changedand no synchronization occurs.
In the event a file has changed on both the local and the remote repository since the last sync run, it can not easily bedecided which version of the file is the one that should be used. However, changes to any side will not be lost. Instead,a conflict case is created. The client resolves this conflict by renaming the local file, appending a conflict label andtimestamp, and saving the remote file under the original file name.
38 Chapter 8. Appendix B: History and Architecture
ownCloud Client Manual, Release 2.5.2
Example: Assume there is a conflict in message.txt because its contents have changed both locally and remotely sincethe last sync run. The local file with the local changes will be renamed to “message (conflicted copy 2016-01-01153110).txt” and the remote file will be downloaded and saved as message.txt.
Conflict files are always created on the client and never on the server.
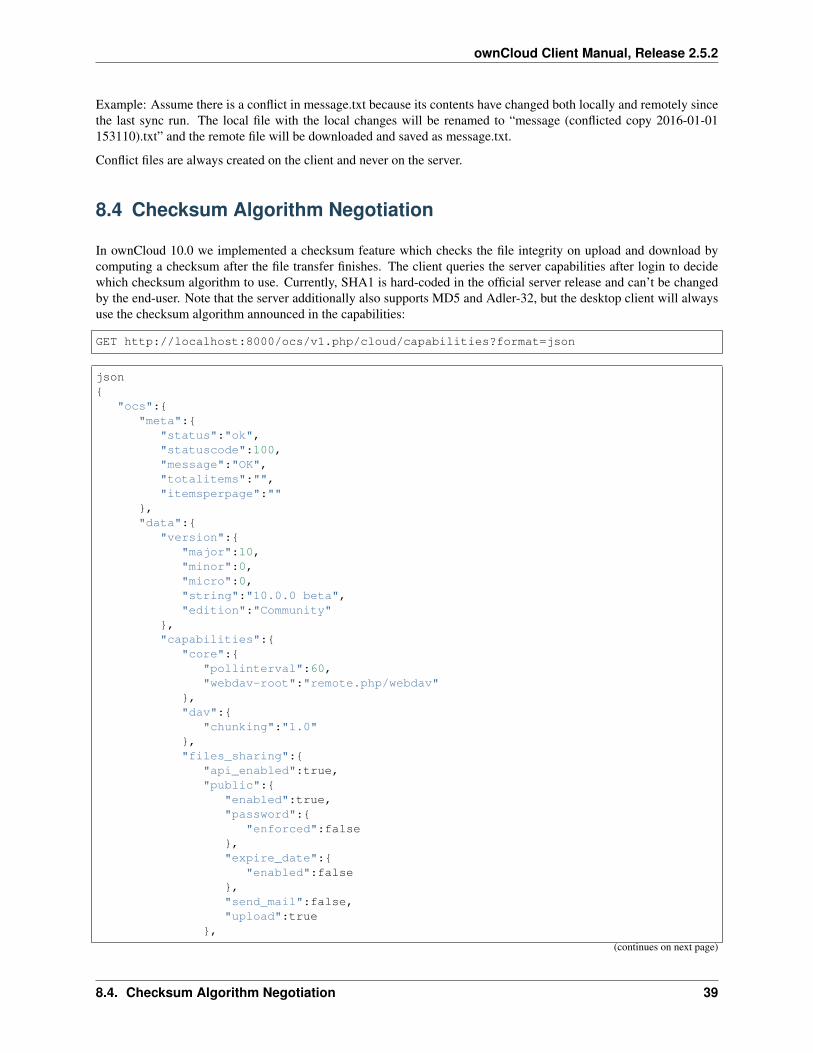
8.4 Checksum Algorithm Negotiation
In ownCloud 10.0 we implemented a checksum feature which checks the file integrity on upload and download bycomputing a checksum after the file transfer finishes. The client queries the server capabilities after login to decidewhich checksum algorithm to use. Currently, SHA1 is hard-coded in the official server release and can’t be changedby the end-user. Note that the server additionally also supports MD5 and Adler-32, but the desktop client will alwaysuse the checksum algorithm announced in the capabilities:
GET http://localhost:8000/ocs/v1.php/cloud/capabilities?format=json
json{
"ocs":{"meta":{
"status":"ok","statuscode":100,"message":"OK","totalitems":"","itemsperpage":""
},"data":{
"version":{"major":10,"minor":0,"micro":0,"string":"10.0.0 beta","edition":"Community"
},"capabilities":{
"core":{"pollinterval":60,"webdav-root":"remote.php/webdav"
},"dav":{
"chunking":"1.0"},"files_sharing":{
"api_enabled":true,"public":{
"enabled":true,"password":{
"enforced":false},"expire_date":{
"enabled":false},"send_mail":false,"upload":true
},
(continues on next page)
8.4. Checksum Algorithm Negotiation 39

ownCloud Client Manual, Release 2.5.2
(continued from previous page)
"user":{"send_mail":false
},"resharing":true,"group_sharing":true,"federation":{
"outgoing":true,"incoming":true
}},"checksums":{
"supportedTypes":["SHA1"
],"preferredUploadType":"SHA1"
},"files":{
"bigfilechunking":true,"blacklisted_files":[
".htaccess"],"undelete":true,"versioning":true
}}
}}
}
8.4.1 Upload
A checksum is calculated with the previously negotiated algorithm by the client and sent along with the file in anHTTP Header. `OC-Checksum: [algorithm]:[checksum]`
40 Chapter 8. Appendix B: History and Architecture

ownCloud Client Manual, Release 2.5.2
During file upload, the server computes SHA1, MD5, and Adler-32 checksums and compares one of them to thechecksum supplied by the client.
On mismatch, the server returns HTTP Status code 400 (Bad Request) thus signaling the client that the upload failed.The server then discards the upload, and the client blacklists the file:
<?xml version='1.0' encoding='utf-8'?><d:error xmlns:d="DAV:" xmlns:s="http://sabredav.org/ns">
<s:exception>Sabre\DAV\Exception\BadRequest</s:exception>
(continues on next page)
8.4. Checksum Algorithm Negotiation 41
ownCloud Client Manual, Release 2.5.2
(continued from previous page)
<s:message>The computed checksum does not match the one received from theclient.</s:message></d:error>
The client retries the upload using exponential back-off. On success (matching checksum) the computed checksumsare stored by the server in oc_filecache alongside the file.
8.4.2 Chunked Upload
Mostly same as above. The checksum of the full file is sent with every chunk of the file. But the server only comparesthe checksum after receiving the checksum sent with the last chunk.
8.4.3 Download
The server sends the checksum in an HTTP header with the file. (same format as above). If no checksum is foundin oc_filecache (freshly mounted external storage) it is computed and stored in oc_filecache on the firstdownload. The checksum is then provided on all subsequent downloads but not on the first.
8.5 Ignored Files
The ownCloud Client supports the ability to exclude or ignore certain files from the synchronization process. Somesystem wide file patterns that are used to exclude or ignore files are included with the client by default and theownCloud Client provides the ability to add custom patterns.
By default, the ownCloud Client ignores the following files:
• Files matched by one of the patterns defined in the Ignored Files Editor.
• Files starting with ._sync_*.db*, .sync_*.db*, .csync_journal.db*, .owncloudsync.log*,as these files are reserved for journalling.
• Files with a name longer than 254 characters.
• The file Desktop.ini in the root of a synced folder.
• Files matching the pattern *_conflict-* unless conflict file uploading is enabled.
• Files matching the pattern *(conflicted copy* unless conflict file uploading is enabled.
• Windows only: Files containing characters that do not work on typical Windows filesystems (`\, /, :,?, *, ", >, <, |`).
• Windows only: Files with a trailing space or dot.
• Windows only: Filenames that are reserved on Windows.
If a pattern selected using a checkbox in the ignoredFilesEditor-label (or if a line in the exclude file starts with thecharacter ] directly followed by the file pattern), files matching the pattern are considered fleeting meta data.
These files are ignored and removed by the client if found in the synchronized folder. This is suitable for meta filescreated by some applications that have no sustainable meaning.
If a pattern ends with the forward slash (/) character, only directories are matched. The pattern is only applied fordirectory components of filenames selected using the checkbox.
42 Chapter 8. Appendix B: History and Architecture

ownCloud Client Manual, Release 2.5.2
To match filenames against the exclude patterns, the UNIX standard C library function fnmatch is used. This processchecks the filename against the specified pattern using standard shell wildcard pattern matching. For more information,please refer to The opengroup website.
The path that is checked is the relative path under the sync root directory.
Pattern and File Match Examples:
Pattern File Matches~$* ~$foo, ~$example.docfl?p flip, flapmoo/ map/moo/, moo/
8.6 The Sync Journal
The client stores the ETag number in a per-directory database, called the journal. This database is a hidden filecontained in the directory to be synchronized.
If the journal database is removed, the ownCloud Client CSync backend rebuilds the database by comparing the filesand their modification times. This process ensures that both server and client are synchronized using the appropriateNTP time before restarting the client following a database removal.
8.7 Custom WebDAV Properties
In the communication between client and server a couple of custom WebDAV properties were introduced. They areeither needed for sync functionality or help have a positive effect on synchronization performance.
This chapter describes additional XML elements which the server returns in response to a successful PROPFINDrequest on a file or directory. The elements are returned in the namespace oc.
8.8 Server Side Permissions
The XML element <oc:permissions> represents the permission- and sharing state of the item. It is a list ofcharacters, and each of the chars has a meaning as outlined in the table below:
Code Resource DescriptionS File or Folder is sharedR File or Folder can share (includes re-share)M File or Folder is mounted (like on Dropbox, Samba, etc.)W File can write fileC Folder can create file in folderK Folder can create folder (mkdir)D File or Folder can delete file or folderN File or Folder can rename file or folderV File or Folder can move file or folder
Example:
<oc:permissions>RDNVCK</oc:permissions>
8.6. The Sync Journal 43

ownCloud Client Manual, Release 2.5.2
8.9 File- or Directory Size
The XML element <oc:size> represents the file- or directory size in bytes. For directories, the size of the wholefile tree underneath the directory is accumulated.
Example:
<oc:size>2429176697</oc:size>
8.10 FileID
The XML element <oc:id> represents the so called file ID. It is a non volatile string id that stays constant as longas the file exists. It is not changed if the file changes or is renamed or moved.
Example:
<oc:id>00000020oc5cfy6qqizm</oc:id>
44 Chapter 8. Appendix B: History and Architecture

CHAPTER
NINE
APPENDIX C: TROUBLESHOOTING
The following two general issues can result in failed synchronization:
• The server setup is incorrect.
• The client contains a bug.
When reporting bugs, it is helpful if you first determine what part of the system is causing the issue.
9.1 Identifying Basic Functionality Problems
Performing a general ownCloud Server test The first step in troubleshooting synchronization issues isto verify that you can log on to the ownCloud web application. To verify connectivity to the own-Cloud server try logging in via your Web browser.
If you are not prompted for your username and password, or if a red warning box appears on thepage, your server setup requires modification. Please verify that your server installation is workingcorrectly.
Ensure the WebDAV API is working If all desktop clients fail to connect to the ownCloud Server, butaccess using the Web interface functions properly, the problem is often a misconfiguration of theWebDAV API.
The ownCloud Client uses the built-in WebDAV access of the server content. Verify that you canlog on to ownCloud’s WebDAV server. To verify connectivity with the ownCloud WebDAV server:
• Open a browser window and enter the address to the ownCloud WebDAV server.
For example, if your ownCloud instance is installed at http://yourserver.com/owncloud,your WebDAV server address is http://yourserver.com/owncloud/remote.php/webdav.
If you are prompted for your username and password but, after providing the correct credentials,authentication fails, please ensure that your authentication backend is configured properly.
Use a WebDAV command line tool to test A more sophisticated test method for troubleshooting syn-chronization issues is to use a WebDAV command line client and log into the ownCloud WebDAVserver. One such command line client – called cadaver – is available for Linux distributions.You can use this application to further verify that the WebDAV server is running properly usingPROPFIND calls.
As an example, after installing the cadaver app, you can issue the propget command to obtainvarious properties pertaining to the current directory and also verify WebDAV server connection.
45

ownCloud Client Manual, Release 2.5.2
9.2 “CSync unknown error”
If you see this error message stop your client, delete the ._sync_xxxxxxx.db file, and then restart your client.There is a hidden ._sync_xxxxxxx.db file inside the folder of every account configured on your client.
Note: Please note that this will also erase some of your settings about which files to download.
See https://github.com/owncloud/client/issues/5226 for more discussion of this issue.
9.3 Isolating other issues
Other issues can affect synchronization of your ownCloud files:
• If you find that the results of the synchronizations are unreliable, please ensure that the folder to which you aresynchronizing is not shared with other synchronization applications.
• Synchronizing the same directory with ownCloud and other synchronization software such as Unison, rsync,Microsoft Windows Offline Folders, or other cloud services such as Dropbox or Microsoft SkyDrive is notsupported and should not be attempted. In the worst case, it is possible that synchronizing folders or files usingownCloud and other synchronization software or services can result in data loss.
• If you find that only specific files are not synchronized, the synchronization protocol might be having an effect.Some files are automatically ignored because they are system files, other files might be ignored because theirfilename contains characters that are not supported on certain file systems. For more information about ignoredfiles, see Ignored Files.
• If you are operating your own server, and use the local storage backend (the default), make sure that ownCloudhas exclusive access to the directory.
Warning: The data directory on the server is exclusive to ownCloud and must not be modified manually.
• If you are using a different file backend on the server, you can try to exclude a bug in the backend by revertingto the built-in backend.
• If you are experiencing slow upload/download speed or similar performance issues be aware that those could becaused by on-access virus scanning solutions, either on the server (like the files_antivirus app) or the client.
9.4 Log Files
Effectively debugging software requires as much relevant information as can be obtained. To assist the ownCloudsupport personnel, please try to provide as many relevant logs as possible. Log output can help with tracking downproblems and, if you report a bug, log output can help to resolve an issue more quickly.
The client log file is often the most helpful log to provide.
9.4.1 Obtaining the Client Log File
There are several ways to produce log files. The most commonly useful is enabling logging to a temporary directory,described first.
46 Chapter 9. Appendix C: Troubleshooting

ownCloud Client Manual, Release 2.5.2
Note: Client log files contain file and folder names, metadata, server urls and other private information. Only uploadthem if you are comfortable sharing the information. Logs are often essential for tracking down a problem though, soplease consider providing them to developers privately.
Logging to a Temporary Directory
1. Open the ownCloud Desktop Client.
2. Press F12 or Ctrl-L or Cmd+L on your keyboard.
The Log Output window opens.
3. Enable the ‘Permanently save logs’ checkbox.
4. Look at its tooltip and take note of the directory the logs will be saved to.
5. Navigate to this directory.
6. Select the logs for the timeframe in which the issue occurred.
Note that the choice to enable logging will be persist across client restarts.
Saving Files Directly
The ownCloud client allows you to save log files directly to a custom file or directory. This is a useful option for easilyreproducible problems, as well as for cases where you want logs to be saved to a different location.
To save log files to a file or a directory:
1. To save to a file, start the client using the --logfile <file> command, where <file> is the filename towhich you want to save the file.
2. To save to a directory, start the client using the --logdir <dir> command, where <dir> is an existingdirectory.
When using the --logdir command, each sync run creates a new file. To limit the amount of data that accumu-lates over time, you can specify the --logexpire <hours> command. When combined with the --logdircommand, the client automatically erases saved log data in the directory that is older than the specified number ofhours.
9.4. Log Files 47

ownCloud Client Manual, Release 2.5.2
Adding the --logdebug flag increases the verbosity of the generated log files.
As an example, to define a test where you keep log data for two days, you can issue the following command:
` owncloud --logdir /tmp/owncloud_logs --logexpire 48 `
9.4.2 ownCloud server Log File
The ownCloud server also maintains an ownCloud specific log file. This log file must be enabled through the ownCloudAdministration page. On that page, you can adjust the log level. We recommend that when setting the log file levelthat you set it to a verbose level like Debug or Info.
You can view the server log file using the web interface or you can open it directly from the file system in the ownCloudserver data directory.
Todo: Need more information on this. How is the log file accessed? Need to explore procedural steps in access andin saving this file . . . similar to how the log file is managed for the client. Perhaps it is detailed in the Admin Guideand a link should be provided from here. I will look into that when I begin heavily editing the Admin Guide.
9.4.3 Webserver Log Files
It can be helpful to view your webserver’s error log file to isolate any ownCloud-related problems. For Apache onLinux, the error logs are typically located in the /var/log/apache2 directory. Some helpful files include thefollowing:
• error_log – Maintains errors associated with PHP code.
• access_log – Typically records all requests handled by the server; very useful as a debugging tool becausethe log line contains information specific to each request and its result.
You can find more information about Apache logging at http://httpd.apache.org/docs/current/logs.html.
9.5 Core Dumps
On Mac OS X and Linux systems, and in the unlikely event the client software crashes, the client is able to write a coredump file. Obtaining a core dump file can assist ownCloud Customer Support tremendously in the debugging process.
To enable the writing of core dump files, you must define the OWNCLOUD_CORE_DUMP environment variable on thesystem.
For example:
` OWNCLOUD_CORE_DUMP=1 owncloud `
This command starts the client with core dumping enabled and saves the files in the current working directory.
Note: Core dump files can be fairly large. Before enabling core dumps on your system, ensure that you have enoughdisk space to accommodate these files. Also, due to their size, we strongly recommend that you properly compressany core dump files prior to sending them to ownCloud Customer Support.
48 Chapter 9. Appendix C: Troubleshooting

CHAPTER
TEN
FAQ
10.1 Some Files Are Continuously Uploaded to the Server, EvenWhen They Are Not Modified.
It is possible that another program is changing the modification date of the file. If the file is usesthe .eml extension, Windows automatically and continually changes all files, unless you remove\HKEY_LOCAL_MACHINE\SOFTWARE\Microsoft\Windows\CurrentVersion\PropertySystem\PropertyHandlersfrom the windows registry. See http://petersteier.wordpress.com/2011/10/22/windows-indexer-changes-modification-dates-of-eml-files/ for more information.
10.2 Syncing Stops When Attempting To Sync Deeper Than 100 Sub-directories.
The sync client has been intentionally limited to sync no deeper than 100 sub-directories. The hard limit exists to guardagainst bugs with cycles like symbolic link loops. When a deeply nested directory is excluded from synchronization itwill be listed with other ignored files and directories in the “Not synced” tab of the “Activity” pane.
10.3 I See a Warning Message for Unsupported Versions.
Keeping software up to date is crucial for file integrity and security – if software is outdated, there can be unfixed bugs.That’s why you should always upgrade your software when there is a new version.
The ownCloud Desktop Client talks to a server, e.g. the ownCloud server – so you don’t only have to upgrade yourclient when there is a new version for it, also the server has to be kept up-to-date by your sysadmin.
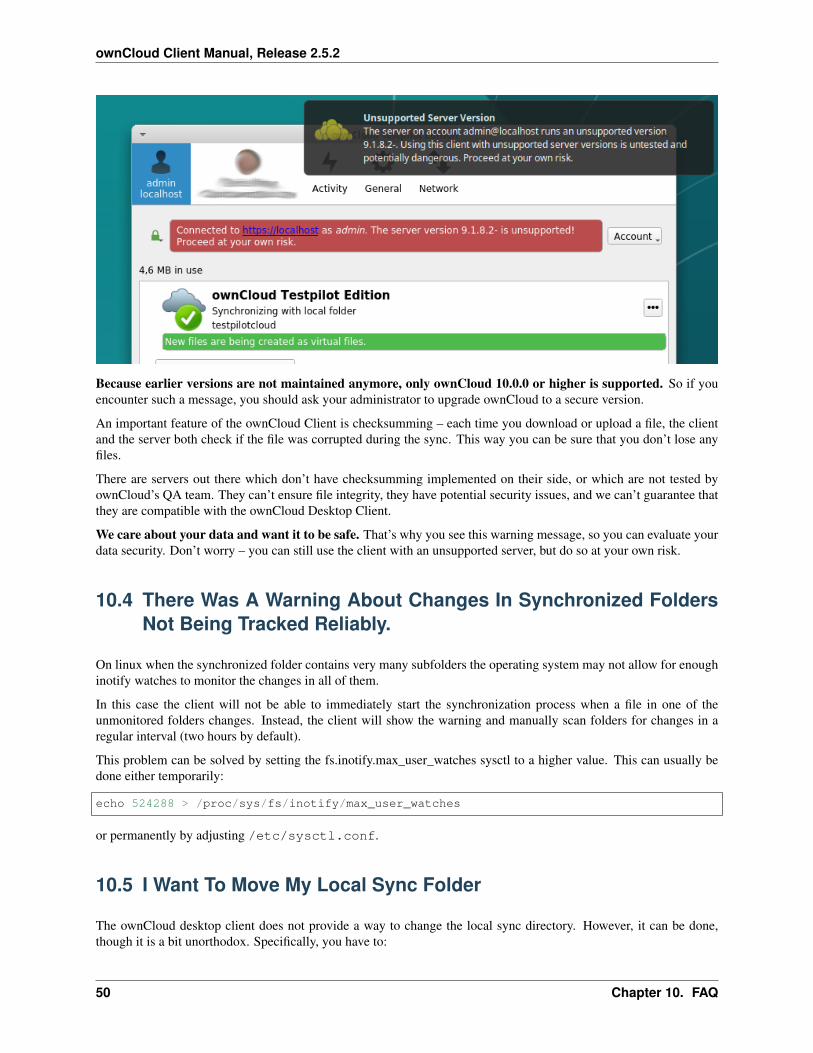
Starting with version 2.5.0, the client will show a warning message if you connect to an outdated or unsupportedserver:
49
ownCloud Client Manual, Release 2.5.2
Because earlier versions are not maintained anymore, only ownCloud 10.0.0 or higher is supported. So if youencounter such a message, you should ask your administrator to upgrade ownCloud to a secure version.
An important feature of the ownCloud Client is checksumming – each time you download or upload a file, the clientand the server both check if the file was corrupted during the sync. This way you can be sure that you don’t lose anyfiles.
There are servers out there which don’t have checksumming implemented on their side, or which are not tested byownCloud’s QA team. They can’t ensure file integrity, they have potential security issues, and we can’t guarantee thatthey are compatible with the ownCloud Desktop Client.
We care about your data and want it to be safe. That’s why you see this warning message, so you can evaluate yourdata security. Don’t worry – you can still use the client with an unsupported server, but do so at your own risk.
10.4 There Was A Warning About Changes In Synchronized FoldersNot Being Tracked Reliably.
On linux when the synchronized folder contains very many subfolders the operating system may not allow for enoughinotify watches to monitor the changes in all of them.
In this case the client will not be able to immediately start the synchronization process when a file in one of theunmonitored folders changes. Instead, the client will show the warning and manually scan folders for changes in aregular interval (two hours by default).
This problem can be solved by setting the fs.inotify.max_user_watches sysctl to a higher value. This can usually bedone either temporarily:
echo 524288 > /proc/sys/fs/inotify/max_user_watches
or permanently by adjusting /etc/sysctl.conf.
10.5 I Want To Move My Local Sync Folder
The ownCloud desktop client does not provide a way to change the local sync directory. However, it can be done,though it is a bit unorthodox. Specifically, you have to:
50 Chapter 10. FAQ

ownCloud Client Manual, Release 2.5.2
1. Remove the existing connection which syncs to the wrong directory
2. Add a new connection which syncs to the desired directory
To do so, in the client UI, which you can see above, click the “Account” drop-down menu and then click “Remove”.This will display a “Confirm Account Removal” dialog window.
If you’re sure, click “Remove connection”.
Then, click the Account drop-down menu again, and this time click “Add new”.
This opens the ownCloud Connection Wizard, which you can see above, but with an extra option. This option providesthe ability to either: keep the existing data (synced by the previous connection) or to start a clean sync (erasing theexisting data).
10.5. I Want To Move My Local Sync Folder 51

ownCloud Client Manual, Release 2.5.2
52 Chapter 10. FAQ
ownCloud Client Manual, Release 2.5.2
Important: Be careful before choosing the “Start a clean sync” option. The old sync folder may contain a consider-able amount of data, ranging into the gigabytes or terabytes. If it does, after the client creates the new connection, itwill have to download all of that information again. Instead, first move or copy the old local sync folder, containinga copy of the existing files, to the new location. Then, when creating the new connection choose “keep existing data”instead. The ownCloud client will check the files in the newly-added sync folder and find that they match what is onthe server and not need to download anything.
Make your choice and click “Connect. . . ”. This will then step you through the Connection Wizard, just as you didwhen you setup the previous sync connection, but giving you the opportunity to choose a new sync directory.
10.5. I Want To Move My Local Sync Folder 53

ownCloud Client Manual, Release 2.5.2
54 Chapter 10. FAQ

CHAPTER
ELEVEN
GLOSSARY
mtime
modification time
file modification time File property used to determine whether the servers’ or the clients’ file is more recent. Standardprocedure in oCC 1.0.5 and earlier, used by oCC 1.1 and later only when no sync database exists and files alreadyexist in the client directory.
ownCloud Server The server counter part of ownCloud Client as provided by the ownCloud community.
ownCloud Sync Client
ownCloud Client Name of the official ownCloud syncing client for desktop, which runs on Windows, Mac OS X andLinux. It uses the CSync sync engine for synchronization with the ownCloud server.
unique id
ETag ID assigned to every file starting with ownCloud server 4.5 and submitted via the HTTP Etag. Used to checkif files on client and server have changed.
55

ownCloud Client Manual, Release 2.5.2
56 Chapter 11. Glossary

INDEX
Aaccount settings, 11Advanced Usage, 23architecture, 37
Bbandwith, 18
Ccommand line, 23command line switches, 23compatiblity table, 38config file, 23conflicts, 21
Ddisk space, 26
Eenv vars, 24ETag, 55etag, 37exclude files, 18
Ffile modification time, 55file times, 37
Iignored files, 18
Llimiting, 18
Mmodification time, 55mtime, 55
Nnavigating, 9
Ooptions, 23ownCloud Client, 55ownCloud Server, 55ownCloud Sync Client, 55owncloudcmd, 25
Pparameters, 23password, 11pattern, 18proxy settings, 18
SServer URL, 11SOCKS, 18
Tthrottling, 18time stamps, 37
Uunique id, 37, 55usage, 9user, 11
57