Embed Size (px)
Citation preview

Outdoor ModemInstallation Guide
OutdoorModem
SignalTower

Welcome to Rogers Yahoo! Hi-Speed Internet
You're about to experience High Speed Internet access in areas where fast Internet services are not traditionally avail-able. By installing the outdoor modem on the exterior of your building, you'll be able to connect to the nearest servicetower wirelessly and enjoy the Internet the way it was meant to be - Fast!
Using this GuideThis Installation Guide is designed to help you install the Rogers Outdoor Modem, also known as an OSU, with simple,step-by-step instructions. Be sure to read through all of the instructions before you begin to ensure you are comfortablewith the process and have the proper tools on hand. The instructions in this guide have been laid out in a logicalsequence to allow you to verify service availability first before any drilling or physical mounting takesplace. Please take the time to read this Installation Guide in full before you begin.
Chapter 1 – Get readyThis chapter provides an overview of everything you’ll need to do to install the Outdoor Modem. As well, it lists theitems included with the kit and anything else that you'll need to provide to complete a successful installation.
Chapter 2 – Where should I install the Outdoor Modem?This will help you find the strongest signal outside your building. You will also learn how to connect the modem to yourcomputer and determine the best location to install the Outdoor Modem.
Chapter 3 – How should I install the Outdoor Modem?This chapter provides detailed instructions on how to install the Outdoor Modem on the exterior of your building, or on apole, and connect the modem to your computer.
Chapter 4 – How do I ensure the best possible reception?This chapter shows you how to get the best signal with your Outdoor Modem.
Chapter 5 – How do I get on the Web?This chapter will show you how to get online and activate your e-mail account.
Chapter 6 – Troubleshooting and Frequently Asked QuestionsThis chapter will show you how to troubleshoot potential connection problems and provides answers to frequently askedquestions.
Rogers Yahoo! Hi-Speed Internet Outdoor Modem Installation Guide
DisclaimerThis Installation Guide was designed to help you use and troubleshoot the Rogers Yahoo! Hi-Speed Internet services. We have made a sincere effort toensure the accuracy of the material provided herein; however, you acknowledge and agree that neither Rogers™ nor Yahoo!® is liable or responsibleto you or any third party for the Installation Guide, or your use of the Installation Guide. Neither Rogers nor Yahoo! accepts liability for or makes anyrepresentations, warranties or conditions regarding the Installation Guide, including, without limitation, the Installation Guide’s accuracy, suitability fora particular purpose, merchantable quality, or otherwise. You bear the entire risk and cost associated with the use of the Installation Guide.
No security program is 100% effective; not all viruses and spyware can be detected and/or removed. Please remember there are risks associated withactivities such as downloading and sending attachments through e-mail, using external computer disks and drives and installing programs from ques-tionable sources on your computer. Neither Rogers nor Yahoo! and their licensors are responsible for your decision to undertake these activities. If youhave any comments or suggestions concerning this manual, please e-mail them to [email protected]
Copyright and Trademark NoticesThe software, computer and product names mentioned in this User Guide are manufacturer and publisher trademarks and are used only for the pur-pose of identification.
© 2007 by Rogers Cable Communications Inc. and Yahoo! Inc. All rights reserved. This Installation Guide may not in whole or in part be copied, repro-duced, or reduced to any electronic medium or machine-readable form without prior consent in writing from Rogers Cable Communications Inc.
™Trademarks of Rogers Communications Inc. used under license. ®YAHOO! is a registered trademark of Yahoo! Inc., used under license. All othertrademarks are the property of their respective owners.
This Class C digital apparatus complies with Canadian ICES-003.
Page 2
Welcome

Table of Contents
Welcome to the Rogers Yahoo! Hi-Speed Service - Outdoor ModemUsing this Guide
Chapter 1 – Get readyThe Installation ProcessMaterials we provideMaterials that you will need to provide
Chapter 2 - Where do I install the Outdoor Modem?Connect your modem to an external power outletFind the strongest signal
Chapter 3 – How should I install the Outdoor Modem?Drill the hole for the Outdoor Ethernet cableInstall the Outdoor Modem Mounting Bracket on a wallInstall the Outdoor Modem Mounting Bracket on a poleAttach the Outdoor Modem to the Mounting BracketGrounding Appendix
Chapter 4 – How do I ensure the best possible reception?Fine tune the signal strengthFinalize the installation
Chapter 5 – How do I get on the Web?Create your account/activate your modemSetting up your computer to access the InternetRegister your account and create your rogers.com e-mail account
Chapter 6 - Troubleshooting and Frequently Asked QuestionsTroubleshootingFrequently Asked Questions
Page 3
Table of Contents

Chapter 1: Get ready
Page 4
The Installation ProcessThe person who installs your Rogers Outdoor Modem should understand the construction of your building including thelocation of studs, electrical wiring and water pipes in order to safely drill a hole to route the connection cable outside.
To install the Outdoor Modem, you will need to:
� Have all the required materials on hand� Dedicate one to two hours to complete the installation process� Drill a 1/2” hole through an exterior wall� Run a cable through the 1/2” hole to the Outdoor Modem� Connect an Ethernet cable to an Ethernet port on your PC� Drill four 1
/4” holes into an exterior wall (wall mount only)� Mount the modem above eye-level on the exterior wall or a pole� Connect ground wire from the Outdoor Modem to an external ground point� Seal the 1/2” hole in your exterior wall
Note: Before purchasing any tools or equipment or drilling through your walls, ensure that your modem has a strongsignal by following the steps in Chapter 2.
At the end of the installation, your Outdoor Modem should look like this if it iswall mounted.
OutdoorModem
Yourcomputer
GroundWire
OutdoorEthernet cable
PowerSupply
ComputerEthernet cable

Chapter 1: Get ready
Page 5
Although Rogers provides most of the materials that you'll need to install your Outdoor Modem, there are other toolsand materials that you'll need to have on hand which are listed on the next page.
Materials we provide
In the Rogers Outdoor Modem Installation Kit, you will find the following:
• This Installation Guide (1) (not shown) A) ¼”-20 x 5/8” Hex bolts (4)• Silicone grease packet (1) (not shown) B) 5/16” x 1 1/2” Hex bolts (2) • Outdoor Modem (1) C) 5/16” Hex bolts x 3.00 (2) • Mounting Bracket (2) D) ¼” x 2” Lag bolts (4) • Bracket Arm (1) E) 5/16” Hex nuts, nyloc, medium (2) • Pole Clamp (1) F) 5/16” Flat washers, large (4) • Ground Lug and Lug hex bolt (1) G) 5/16” Split lock washers, large (2) • Power Supply (1) H) ¼” Flat washers (5) • Power Cord (1) I) External tooth lock washers (3) • Outdoor Ethernet cable 100’ (1) J) ¼” Split lock washers (5) • Computer Ethernet cable 6’ (1)
If any of the items are missing or damaged, return to the point of purchase and they will arrange for you to receivereplacement materials.
Outdoor Modem 2 x Wall/Pole MountingBrackets
Bracket Arm Pole Clamp
Ground Lug andLug Hex Bolt
Power Supply Power Cord 100’ Outdoor Ethernet and 6’ Computer Ethernet cables
Hex Bolts 4 x 2” Lag Bolts Nyloc Hex Nuts and Washers
(A)
(D)
(G)
(H) (I)
(B)
(C)
(E) (F)
(J)

Materials that you will need to provide
Each installation will be slightly different as no two buildings are alike. As such, you will have to supply some materialsspecific to your building. Once you have verified that your modem can receive a strong signal, make sure you haveeverything listed below that is required for your installation before you begin.
You will need to provide the following:
Required• Computer with Windows 98 (minimum) or System 8.5 (minimum) and an Ethernet port• Power Extension Cord• Drill powerful enough to drill through the exterior of your building
• 1/2” drill bit long enough and capable of drilling through your building's exterior wall materials(Aluminum, Vinyl, Masonry etc)
• Drill bit capable of drilling through your building's exterior wall (Aluminum, Vinyl, Masonry) to createMounting Bracket bolt holes
• Wrench or socket driver to tighten 1/2”, 5/8”, or 3/4” hex head bolts on your modem to secure it to theMounting Bracket
• Grounding Kit or a 14 AWG ground wire to ground your Outdoor Modem• Silicon/acrylic caulking compound and applicator gun • External clips to fasten cabling along your building’s exterior wall (Aluminum, Vinyl, Masonry)
Optional• If the modem is to be pole mounted, the pole must be no greater than 8cm or 3 1/8” inches in diameter• Screw anchors appropriate to your building’s exterior siding (Aluminum, Vinyl, Masonry) • Plastic wall plate and screws to cover the hole inside the building • Screw driver to fasten the plastic wall plate • Ladder
Note: If you do not feel comfortable with the modem installation requirements, you may wish to enlist thehelp of someone knowledgeable in the installation of similar equipment (satellite dishes, electrical appli-ances, etc). If you do use a third party installer, be sure to provide these instructions to him and havehim fully review all of the steps before proceeding.
Once you have verified that you have access to all of the materials listed, please go to Chapter 2 and follow the instruc-tions to determine if your modem can receive a strong signal.
Chapter 1: Get ready
Page 6

Chapter 2: Where should I install the Outdoor Modem?
Page 7
This section will help you decide where to install the Outdoor Modem in order to get the best signal strength.
What You Will Need
Provided:• Power Supply• Power Cord• Outdoor Ethernet cable to connect the modem to
the Power Supply• Outdoor Modem• Computer Ethernet cable to connect the Power
Supply to the computer
Not provided:• Computer with an Ethernet port• Available external power outlet• Power Extension cord
Optional:• Ladder • Pole
What You Will Have To Do
• Connect the modem to an external power outlet• Scan for a strong signal• Determine the best place to vertically mount your
Outdoor Modem
Remember, at this point you are only checking for a signal.You will not permanently install the outdoor modem, orpurchase any equipment, until after you have verified yoursignal strength.
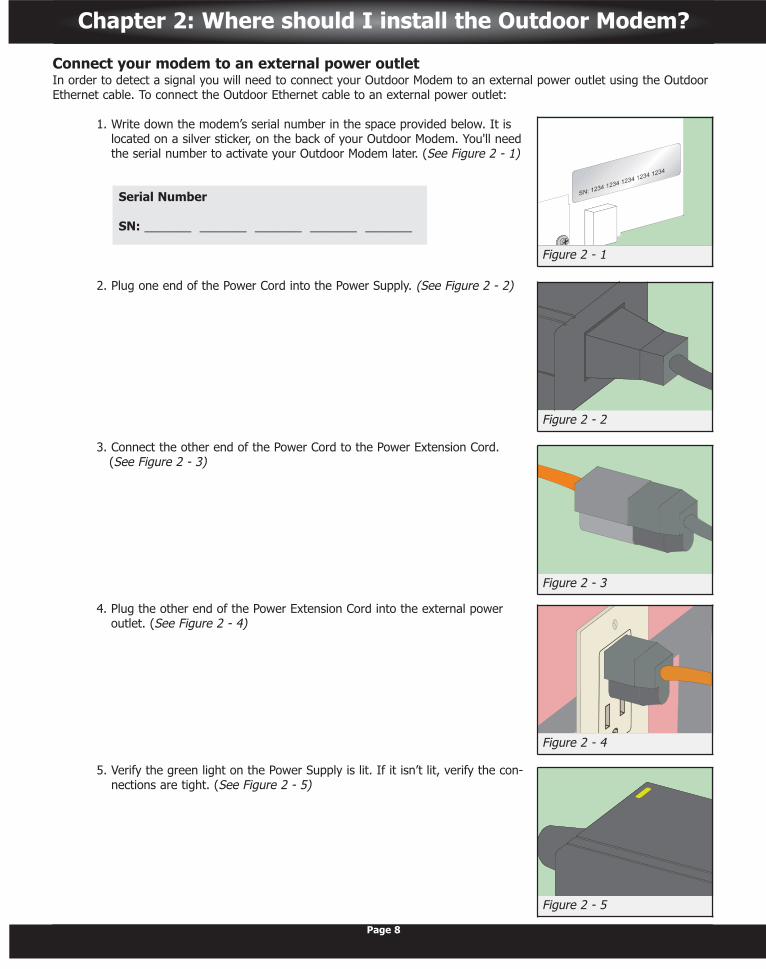
Connect your modem to an external power outletIn order to detect a signal you will need to connect your Outdoor Modem to an external power outlet using the OutdoorEthernet cable. To connect the Outdoor Ethernet cable to an external power outlet:
1. Write down the modem’s serial number in the space provided below. It islocated on a silver sticker, on the back of your Outdoor Modem. You'll needthe serial number to activate your Outdoor Modem later. (See Figure 2 - 1)
2. Plug one end of the Power Cord into the Power Supply. (See Figure 2 - 2)
3. Connect the other end of the Power Cord to the Power Extension Cord. (See Figure 2 - 3)
4. Plug the other end of the Power Extension Cord into the external power outlet. (See Figure 2 - 4)
5. Verify the green light on the Power Supply is lit. If it isn’t lit, verify the con-nections are tight. (See Figure 2 - 5)
Figure 2 - 2
Chapter 2: Where should I install the Outdoor Modem?
Page 8
Figure 2 - 4
Figure 2 - 3
Figure 2 - 5
Serial Number
SN: _______ _______ _______ _______ _______
Figure 2 - 1
Chapter 2: Where should I install the Outdoor Modem?
Page 9
Connect your modem to an external power outlet (Continued)
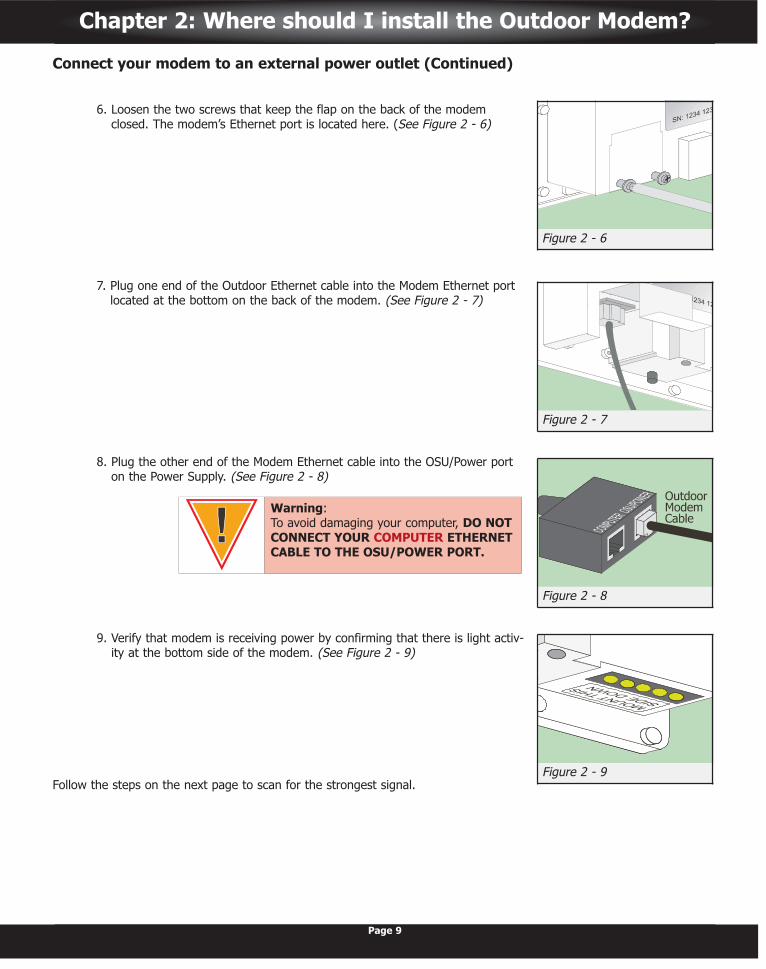
6. Loosen the two screws that keep the flap on the back of the modemclosed. The modem’s Ethernet port is located here. (See Figure 2 - 6)
7. Plug one end of the Outdoor Ethernet cable into the Modem Ethernet portlocated at the bottom on the back of the modem. (See Figure 2 - 7)
8. Plug the other end of the Modem Ethernet cable into the OSU/Power porton the Power Supply. (See Figure 2 - 8)
9. Verify that modem is receiving power by confirming that there is light activ-ity at the bottom side of the modem. (See Figure 2 - 9)
Follow the steps on the next page to scan for the strongest signal.
Figure 2 - 7
Figure 2 - 9
Figure 2 - 8
Warning:To avoid damaging your computer, DO NOTCONNECT YOUR COMPUTER ETHERNETCABLE TO THE OSU/POWER PORT.
Figure 2 - 6
Chapter 2: Where should I install the Outdoor Modem?
Page 10
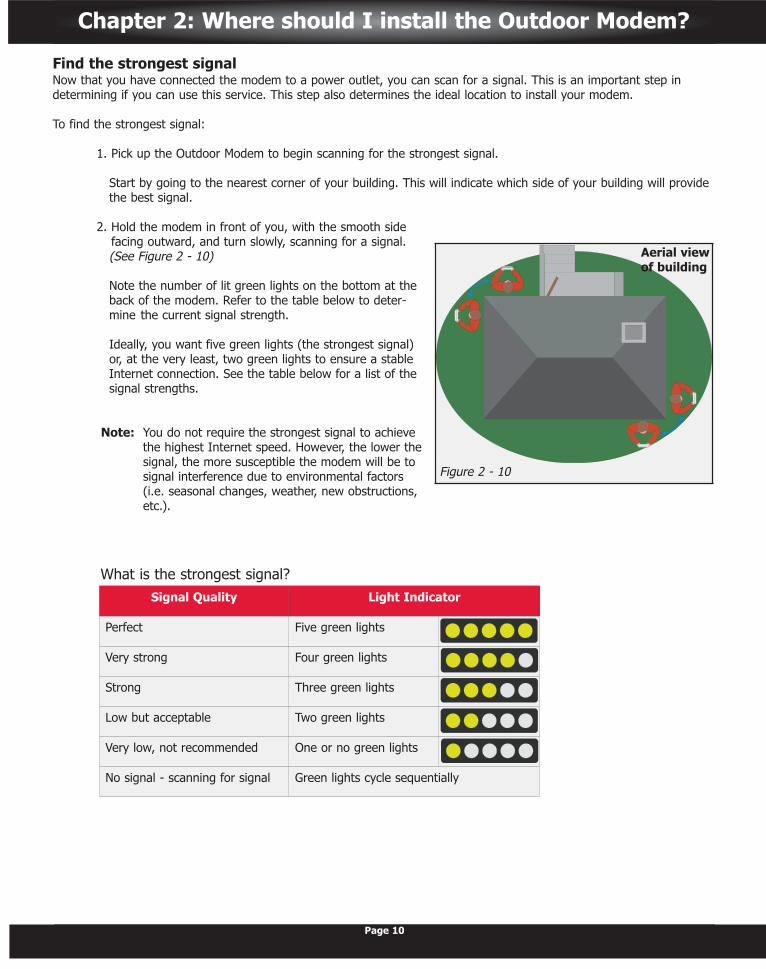
Find the strongest signalNow that you have connected the modem to a power outlet, you can scan for a signal. This is an important step indetermining if you can use this service. This step also determines the ideal location to install your modem.
To find the strongest signal:
1. Pick up the Outdoor Modem to begin scanning for the strongest signal.
Start by going to the nearest corner of your building. This will indicate which side of your building will providethe best signal.
2. Hold the modem in front of you, with the smooth sidefacing outward, and turn slowly, scanning for a signal. (See Figure 2 - 10)
Note the number of lit green lights on the bottom at theback of the modem. Refer to the table below to deter-mine the current signal strength.
Ideally, you want five green lights (the strongest signal)or, at the very least, two green lights to ensure a stableInternet connection. See the table below for a list of thesignal strengths.
Note: You do not require the strongest signal to achievethe highest Internet speed. However, the lower thesignal, the more susceptible the modem will be tosignal interference due to environmental factors(i.e. seasonal changes, weather, new obstructions,etc.).
Figure 2 - 10
Signal Quality Light Indicator
Perfect Five green lights
Very strong Four green lights
Strong Three green lights
Low but acceptable Two green lights
Very low, not recommended One or no green lights
No signal - scanning for signal Green lights cycle sequentially
What is the strongest signal?
Aerial view of building
Chapter 2: Where should I install the Outdoor Modem?
Page 11
Find the strongest signal (Continued)
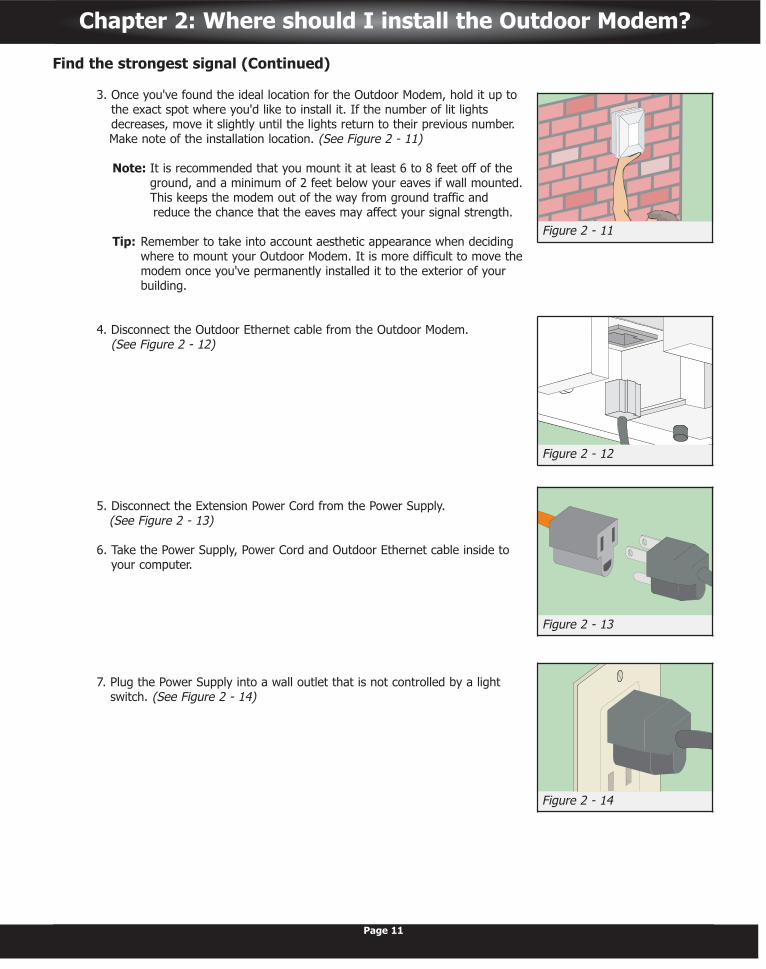
3. Once you've found the ideal location for the Outdoor Modem, hold it up tothe exact spot where you'd like to install it. If the number of lit lightsdecreases, move it slightly until the lights return to their previous number. Make note of the installation location. (See Figure 2 - 11)
Note: It is recommended that you mount it at least 6 to 8 feet off of theground, and a minimum of 2 feet below your eaves if wall mounted.This keeps the modem out of the way from ground traffic and reduce the chance that the eaves may affect your signal strength.
Tip: Remember to take into account aesthetic appearance when deciding where to mount your Outdoor Modem. It is more difficult to move themodem once you've permanently installed it to the exterior of your building.
4. Disconnect the Outdoor Ethernet cable from the Outdoor Modem.(See Figure 2 - 12)
5. Disconnect the Extension Power Cord from the Power Supply. (See Figure 2 - 13)
6. Take the Power Supply, Power Cord and Outdoor Ethernet cable inside toyour computer.
7. Plug the Power Supply into a wall outlet that is not controlled by a lightswitch. (See Figure 2 - 14)
Figure 2 - 11
Figure 2 - 12
Figure 2 - 14
Figure 2 - 13

Chapter 2: Where should I install the Outdoor Modem?
Page 12
Finding the strongest signal (Continued)
9. Plug one end of your Computer Ethernet cable into the COMPUTER port ofthe Power Supply. (See Figure 2 - 15)
10. Plug the other end of their Computer Ethernet cable into the Ethernet porton your computer. (See Figure 2 - 16)
Note: Signal strength can degrade or be lost overtime due to new obstructions, such as buildings going up betweenyour Outdoor Modem and the signal tower. Even tree growth can affect your reception. If you are going to buildor add anything to your property, ensure that it will not block your Internet signal.
Once you've located the ideal spot for your Outdoor Modem, follow the steps in the next section to install the modempermanently.
ComputerEthernetCable
Figure 2 - 15
Figure 2 - 16
Page 13
Chapter 3: How should I install the Outdoor Modem?
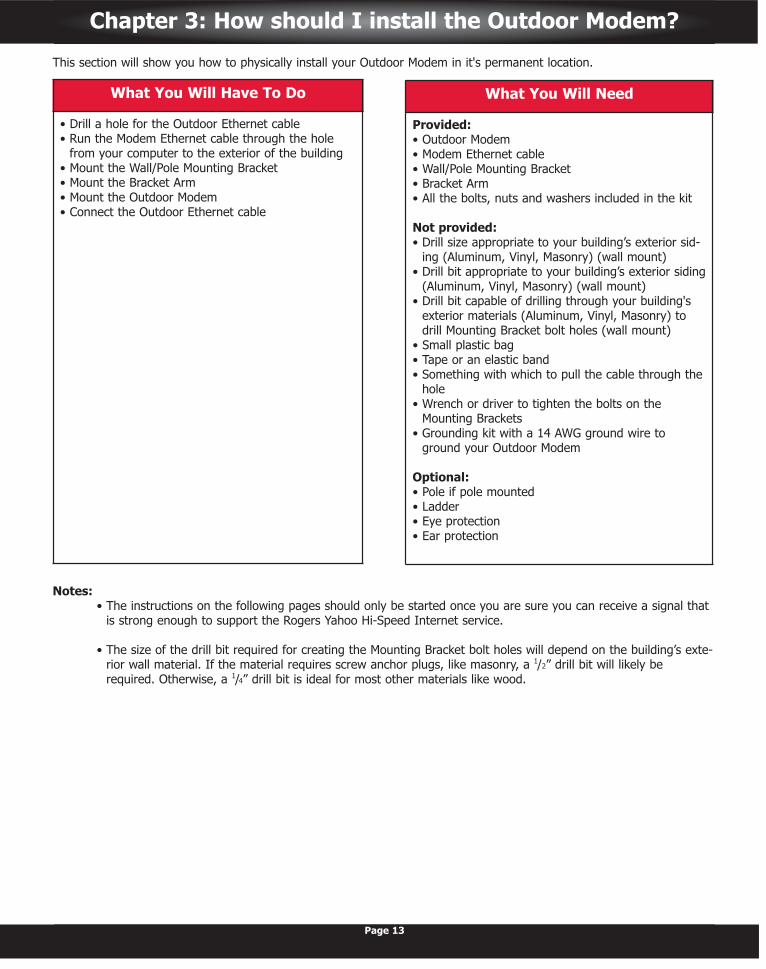
This section will show you how to physically install your Outdoor Modem in it's permanent location.
Notes:• The instructions on the following pages should only be started once you are sure you can receive a signal that
is strong enough to support the Rogers Yahoo Hi-Speed Internet service.
• The size of the drill bit required for creating the Mounting Bracket bolt holes will depend on the building’s exte-rior wall material. If the material requires screw anchor plugs, like masonry, a 1/2” drill bit will likely berequired. Otherwise, a 1/4” drill bit is ideal for most other materials like wood.
What You Will Need
Provided:• Outdoor Modem• Modem Ethernet cable• Wall/Pole Mounting Bracket• Bracket Arm• All the bolts, nuts and washers included in the kit
Not provided:• Drill size appropriate to your building’s exterior sid-
ing (Aluminum, Vinyl, Masonry) (wall mount)• Drill bit appropriate to your building’s exterior siding
(Aluminum, Vinyl, Masonry) (wall mount)• Drill bit capable of drilling through your building's
exterior materials (Aluminum, Vinyl, Masonry) todrill Mounting Bracket bolt holes (wall mount)
• Small plastic bag • Tape or an elastic band• Something with which to pull the cable through the
hole• Wrench or driver to tighten the bolts on the
Mounting Brackets• Grounding kit with a 14 AWG ground wire to
ground your Outdoor Modem
Optional:• Pole if pole mounted • Ladder• Eye protection• Ear protection
What You Will Have To Do
• Drill a hole for the Outdoor Ethernet cable • Run the Modem Ethernet cable through the hole
from your computer to the exterior of the building• Mount the Wall/Pole Mounting Bracket • Mount the Bracket Arm • Mount the Outdoor Modem• Connect the Outdoor Ethernet cable

Drill the hole for the Outdoor Ethernet cableWhen installing the Outdoor Modem, you must drill a ½” hole through your wall to run the Outdoor Ethernet cable fromthe power supply, to the outside of the building.
Note: If you know of another method of running a cable from inside the building to the outside which will avoid drillinga hole, please feel free to use it. For example, if you have other cabling leading to the outside of your buildingthrough an existing hole or conduit, consider routing the Outdoor Ethernet cable through the same hole/conduit.However, be aware of any hazards that could damage your Outdoor Ethernet cable and cause connection prob-lems.
When drilling through your wall for the Outdoor Ethernet cable, you must take into account safety, where you aredrilling, and be aware of things to avoid.
Safety• Safety goggles• Ear protection• Ensure there are no people or animals near the drill’s exit hole• Know your drilling site. Ensure it is not near any hazards such as gas lines, hydro, water, wall studs, etc.
Hazards:• Drilling through ceramic tiles may damage them• Drilling through the frame of a window may damage the window seal• Drilling through baseboards may strike wiring
To drill the hole for the Outdoor Ethernet cable, you need to:
1. Decide where on the inside wall you will drill the hole to route the OutdoorEthernet cable. (See Figure 3 - 1)
TIPS:• Whenever possible, drill from the inside of the building to the outside• Always inspect the area you are going to drill, both inside and out
2. Drill the hole using the appropriate drill and bit. (See Figure 3 - 2)
TIPS:• Let the drill do the work for you. If you push too hard while drilling, you
may damage the wall or the drill• Moderate the drill speed, depending on the material you are drilling
through. Harder materials may require a slower drilling speed
Figure 3 - 1
Figure 3 - 2
Page 14
Chapter 3: How should I install the Outdoor Modem?

Drill the hole for the Outdoor Ethernet cable (Continued)
3. Place a small bag over the remaining end of the Outdoor Ethernet cableand attach it to the cable using tape or an elastic band. This is to protectthe connector pins as you pull it through the wall.(See Figure 3 - 3)
4. Insert a long rigid object, like a coat hanger, through the hole and use it topull the Outdoor Ethernet cable through the hole.(See Figure 3 - 4)
Note: Be careful not to damage the Outdoor Ethernet cable when pushingit through as a damaged cable could reduce your signal strength.
Gather the rest of the parts included in the Installation Kit and take themoutside to the exit point of the hole you drilled.
5. Gently pull just enough Outdoor Ethernet cable through the hole for the cable to reach the Outdoor Modemmounting location.
Now that the hole has been drilled and sufficient cable has been pulled outside, you can proceed to the next step andmount the Modem Mounting Bracket.
Page 15
Chapter 3: How should I install the Outdoor Modem?
Figure 3 - 3
Figure 3 - 4
If you wish to mount your modem on a wall, go to page 16.
If you wish to mount your modem on a pole, go to page 18
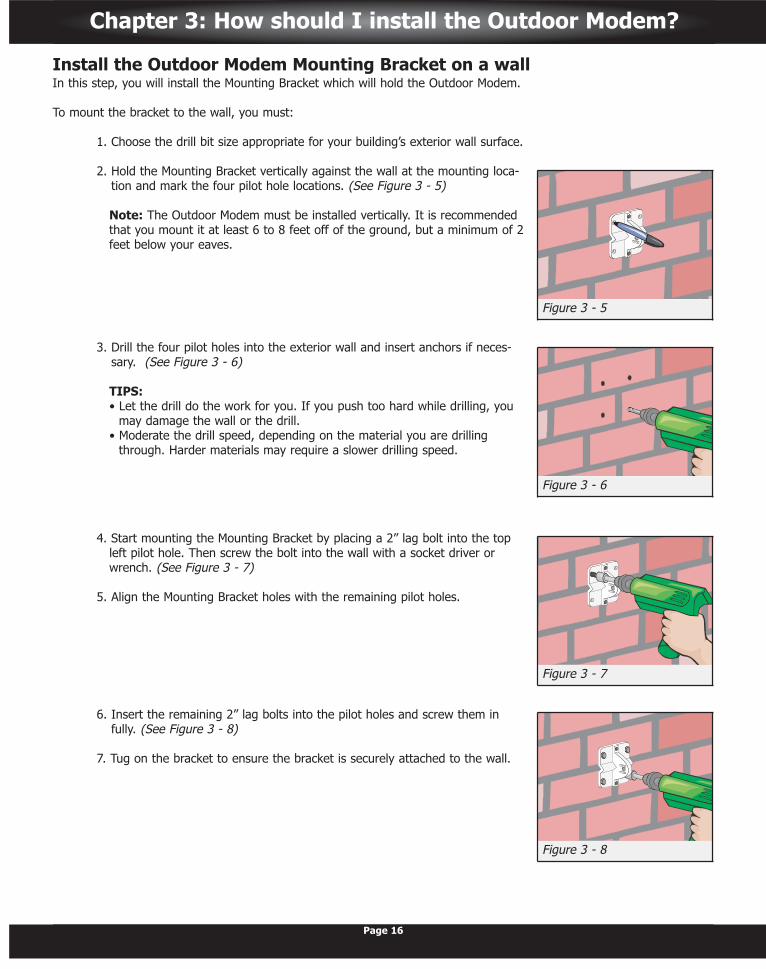
Install the Outdoor Modem Mounting Bracket on a wallIn this step, you will install the Mounting Bracket which will hold the Outdoor Modem.
To mount the bracket to the wall, you must:
1. Choose the drill bit size appropriate for your building’s exterior wall surface.
2. Hold the Mounting Bracket vertically against the wall at the mounting loca-tion and mark the four pilot hole locations. (See Figure 3 - 5)
Note: The Outdoor Modem must be installed vertically. It is recommendedthat you mount it at least 6 to 8 feet off of the ground, but a minimum of 2feet below your eaves.
3. Drill the four pilot holes into the exterior wall and insert anchors if neces-sary. (See Figure 3 - 6)
TIPS: • Let the drill do the work for you. If you push too hard while drilling, you
may damage the wall or the drill. • Moderate the drill speed, depending on the material you are drilling
through. Harder materials may require a slower drilling speed.
4. Start mounting the Mounting Bracket by placing a 2” lag bolt into the top left pilot hole. Then screw the bolt into the wall with a socket driver orwrench. (See Figure 3 - 7)
5. Align the Mounting Bracket holes with the remaining pilot holes.
6. Insert the remaining 2” lag bolts into the pilot holes and screw them infully. (See Figure 3 - 8)
7. Tug on the bracket to ensure the bracket is securely attached to the wall.
Figure 3 - 5
Figure 3 - 6
Figure 3 - 7
Figure 3 - 8
Chapter 3: How should I install the Outdoor Modem?
Page 16

Page 17
Chapter 3: How should I install the Outdoor Modem?
Install the Outdoor Modem Mounting Bracket on a wall (Continued)
8. Insert a 5/16” x 1 1/2” hex bolt through the Mounting Bracket on the sidewith the two lock bars. (See Figure 3 - 9)
9. Slide a tooth lock washer over the bolt. (See Figure 3 - 10)
10. Slide the Bracket Arm over the bolt end, effectively sandwiching the toothlock washer between the Bracket Arm and the Mounting Bracket. (See Figure 3 - 11)
11. Slide a flat washer over the bolt end and screw on the nyloc hex nut.Don’t fully tighten only for now. (See Figure 3 - 12)
Go to page 20.
Figure 3 - 9
Figure 3 - 10
Figure 3 - 11
Figure 3 - 12
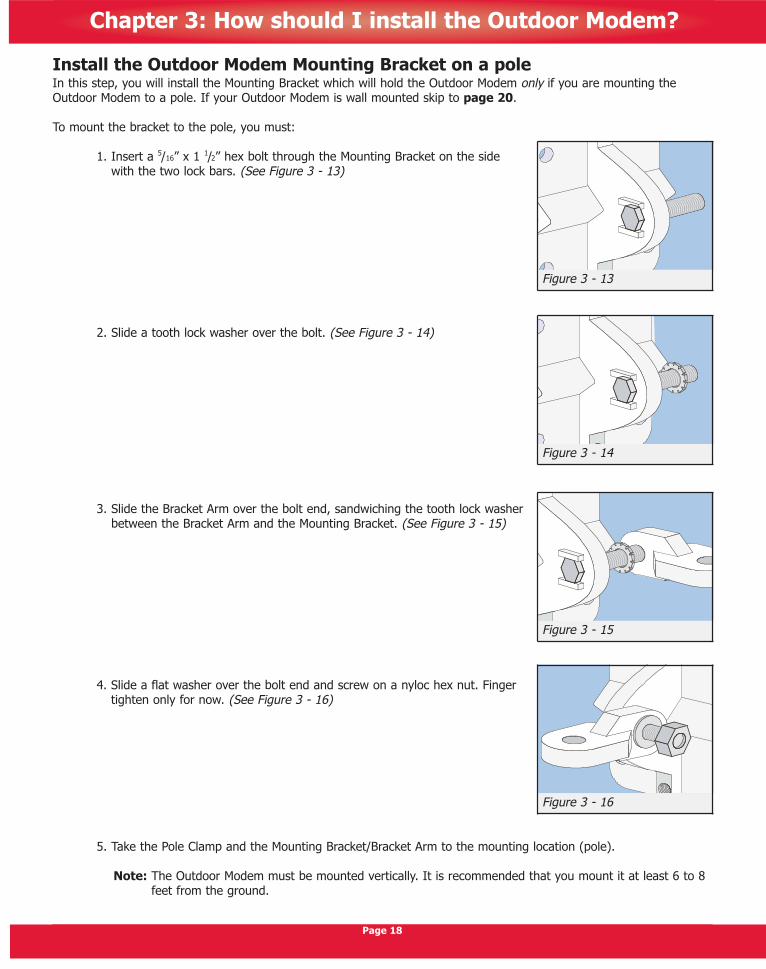
Install the Outdoor Modem Mounting Bracket on a poleIn this step, you will install the Mounting Bracket which will hold the Outdoor Modem only if you are mounting theOutdoor Modem to a pole. If your Outdoor Modem is wall mounted skip to page 20.
To mount the bracket to the pole, you must:
1. Insert a 5/16” x 1 1/2” hex bolt through the Mounting Bracket on the sidewith the two lock bars. (See Figure 3 - 13)
2. Slide a tooth lock washer over the bolt. (See Figure 3 - 14)
3. Slide the Bracket Arm over the bolt end, sandwiching the tooth lock washerbetween the Bracket Arm and the Mounting Bracket. (See Figure 3 - 15)
4. Slide a flat washer over the bolt end and screw on a nyloc hex nut. Fingertighten only for now. (See Figure 3 - 16)
5. Take the Pole Clamp and the Mounting Bracket/Bracket Arm to the mounting location (pole).
Note: The Outdoor Modem must be mounted vertically. It is recommended that you mount it at least 6 to 8feet from the ground.
Figure 3 - 13
Figure 3 - 14
Figure 3 - 15
Figure 3 - 16
Chapter 3: How should I install the Outdoor Modem?
Page 18
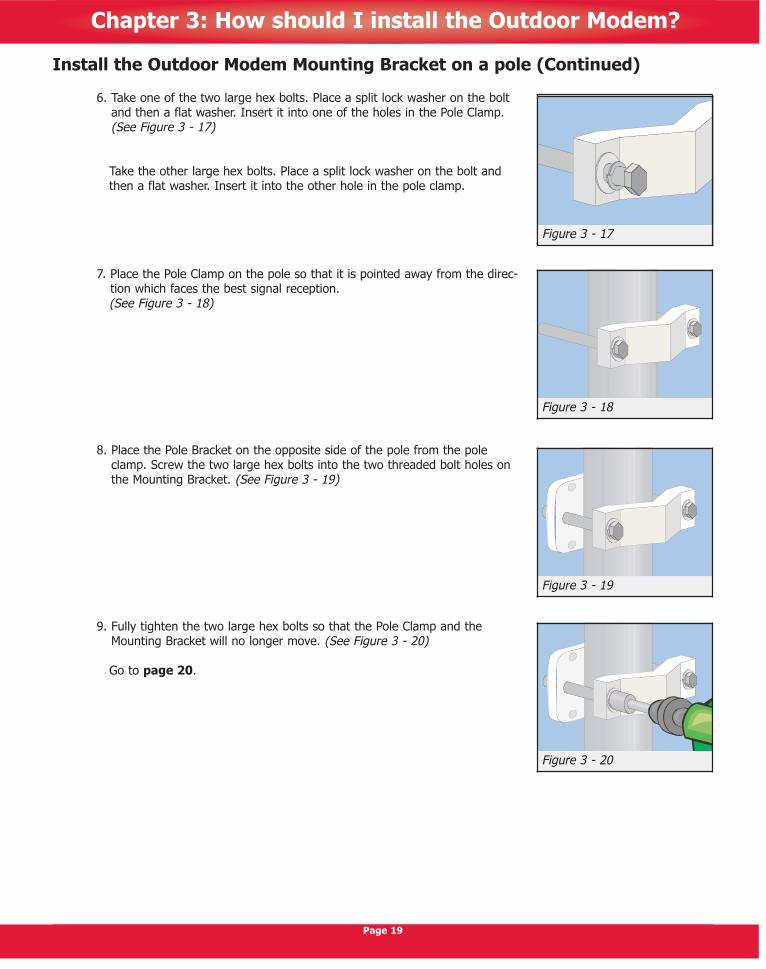
Install the Outdoor Modem Mounting Bracket on a pole (Continued)
6. Take one of the two large hex bolts. Place a split lock washer on the boltand then a flat washer. Insert it into one of the holes in the Pole Clamp.(See Figure 3 - 17)
Take the other large hex bolts. Place a split lock washer on the bolt andthen a flat washer. Insert it into the other hole in the pole clamp.
7. Place the Pole Clamp on the pole so that it is pointed away from the direc-tion which faces the best signal reception.(See Figure 3 - 18)
8. Place the Pole Bracket on the opposite side of the pole from the poleclamp. Screw the two large hex bolts into the two threaded bolt holes onthe Mounting Bracket. (See Figure 3 - 19)
9. Fully tighten the two large hex bolts so that the Pole Clamp and theMounting Bracket will no longer move. (See Figure 3 - 20)
Go to page 20.
Figure 3 - 18
Figure 3 - 19
Figure 3 - 20
Chapter 3: How should I install the Outdoor Modem?
Page 19
Figure 3 - 17

Attach the Outdoor Modem to the Mounting Bracket In this step you will attach the Outdoor Modem to the Mounting Bracket. To do this you must:
1. Remove the covering you placed on the round end of the Outdoor Ethernet cable prior to pulling it through the wall.
2. Connect the Outdoor Ethernet cable to the modem’s Ethernet port. (See Figure 3 - 21)
3. Confirm that the green lights on the bottom of the modem are flashing. (See Figure 3 - 22)
4. Tighten the two screws to close the Ethernet port flap so that the OutdoorEthernet cable is held firmly in place. (See Figure 3 - 23)
5. Place the remaining Mounting Bracket on the back of the modem and alignthe four holes on the bracket to the bolt holes on the back of the modem. (See Figure 3 - 24)
Note: If the pole is vertical then the Mounting Bracket must be mounted sothe triangular ridge runs across the width of the modem as seen in the diagram to the right.
If you are mounting the modem on a pole that is horizontal, then make sure the bracket is mounted on the back of the modem so thatthe triangular ridge runs lengthwise across the pole.
Figure 3 - 22
Figure 3 - 21
Figure 3 - 23
Figure 3 - 24
Page 20
Chapter 3: How should I install the Outdoor Modem?
Page 21
Chapter 3: How should I install the Outdoor Modem?
Attach the Outdoor Modem to the Mounting Bracket (Continued)
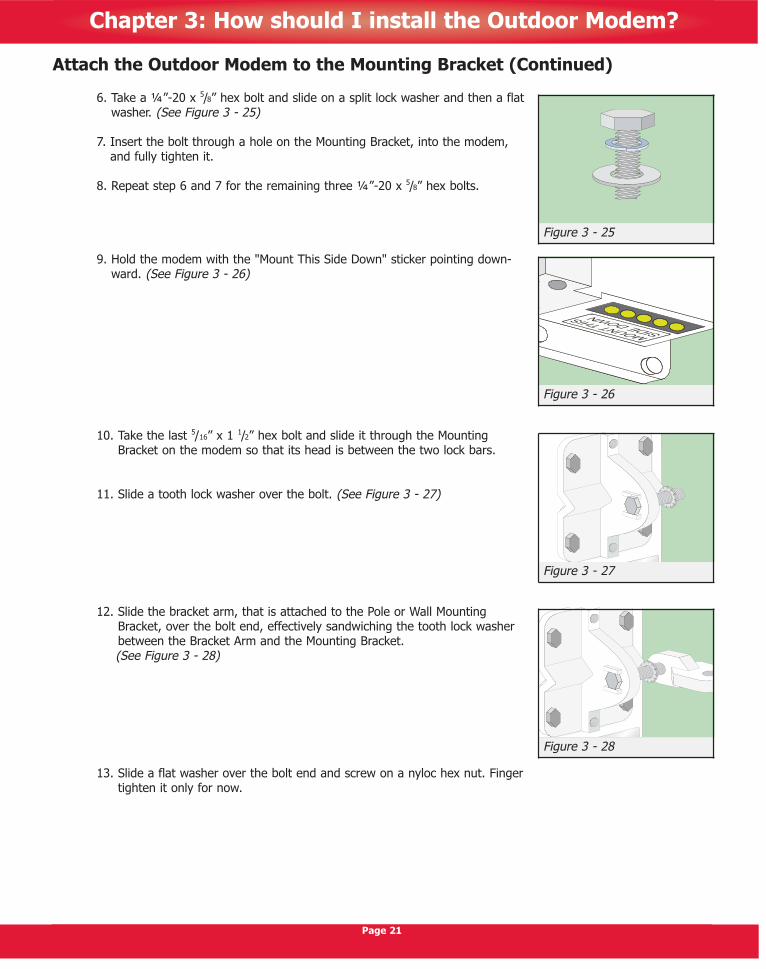
6. Take a ¼”-20 x 5/8” hex bolt and slide on a split lock washer and then a flatwasher. (See Figure 3 - 25)
7. Insert the bolt through a hole on the Mounting Bracket, into the modem,and fully tighten it.
8. Repeat step 6 and 7 for the remaining three ¼”-20 x 5/8” hex bolts.
9. Hold the modem with the "Mount This Side Down" sticker pointing down-ward. (See Figure 3 - 26)
10. Take the last 5/16” x 1 1/2” hex bolt and slide it through the MountingBracket on the modem so that its head is between the two lock bars.
11. Slide a tooth lock washer over the bolt. (See Figure 3 - 27)
12. Slide the bracket arm, that is attached to the Pole or Wall MountingBracket, over the bolt end, effectively sandwiching the tooth lock washerbetween the Bracket Arm and the Mounting Bracket. (See Figure 3 - 28)
13. Slide a flat washer over the bolt end and screw on a nyloc hex nut. Fingertighten it only for now.
Figure 3 - 25
Figure 3 - 26
Figure 3 - 27
Figure 3 - 28

Attach the Outdoor Modem to the Mounting Bracket (Continued)
Note: The following steps are not required if the POLE that the Outdoor Modem is mounted on is alreadygrounded. If the pole is not grounded, or your are mounting the Outdoor Modem on a wall, proceed tostep 14.
14. Take a lug hex bolt and slide on a split lock washer and then a flat washer. (See Figure 3 - 29)
15. Place the ground lug over the bolt hole on the bottom of the modem.(See Figure 3 - 30)
16. Slide the lug hex bolt through the ground lug and into the bolt hole andfully tighten it. (See Figure 3 - 31)
17. Run your ground wire (if required in your situation) through the groundlug and tighten the ground lug tap with a standard screwdriver until snug.(See Figure 3 - 32)
18. Prepare the ground wire. Follow the steps on page 23 to attach theground wire to the grounding point.
Follow the instructions on the next page to fine tune the reception of your Outdoor Modem.
Figure 3 - 29
Figure 3 - 30
Figure 3 - 31
Figure 3 - 32
Chapter 3: How should I install the Outdoor Modem?
Page 22
Chapter 3: How should I install the Outdoor Modem?
Page 23
Grounding AppendixAll electrical appliances should be grounded and the Outdoor Modem is no exception. You have two grounding options.You can buy a grounding kit from your local hardware store and install it or you can purchase a ground wire and con-nect the Outdoor Modem to an existing ground.
SafetyIf you purchase a grounding kit, be sure to follow the manufacturer's safety and installation instructions to prevent elec-trical injury.
Grounding TipsThe Outdoor Modem should always be grounded to reduce the chance of damage to the building or computer in theevent of a lightning strike. Please refer to the local codes in your area for specific rules and regulations.
If there are no specific codes, it is recommended that you:
• Wear the appropriate safety protection• Run a 14 AWG solid copper ground wire from the Outdoor Modem to a grounding point. The ideal ground
should be connected directly to a cold water pipe or hydro meter if possible• Purchase a ground kit if the above option isn’t possible• Run the ground wire as straight as possible from the Outdoor Modem to the grounding point by following mor-
tar grooves or siding joints• Attach the grounding wire to the building’s exterior using the appropriate clips (for vinyl or metallic siding) or
staples (for mortar or wood), every three feet. These clips or staples can be purchased where you would nor-mally buy your grounding kit or ground wire
• Use sandpaper to clean the grounding point to ensure a complete circuit between it and your Outdoor Modem• If your modem is pole mounted, and the pole is grounded, you do not need to ground the modem itself
NEVER ground to a:• Gas pipe• Hot water pipe• Steam pipe
Use the instructions in this step to fine tune the reception for your Outdoor Modem.
Chapter 4: How do I ensure the best possible reception?
Page 24
What You Will Need
Provided:• Mounted Outdoor Modem
Not provided:• Wrench or socket driver to tighten the bolts on the
Outdoor Modem• Ground wire cable clips appropriate to your build-
ing’s exterior siding (aluminum for mortar, plasticfor vinyl siding)
• Outdoor Ethernet cable clips appropriate to yourbuilding’s exterior siding (aluminum for mortar,plastic for vinyl siding)
• Silicon or acrylic caulking• Caulking gun
Optional:• Plastic wall plate and screws • Screw driver • Ladder
What You Will Have To Do
• Adjust the modem until you receive the strongestsignal
• Secure the Outdoor Ethernet cable to the exteriorwall with clips
• Create a drip loop • Clip the ground wire to the exterior wall • Seal the hole with caulking

Page 25
Chapter 4: How do I ensure the best possible reception?
Fine tune the signal strengthNow that you have your Outdoor Modem installed, you can ensure you receive the best signal by fine tuning yourOutdoor Modem’s orientation.
To fine tune your Outdoor Modem you must:
1. Slowly adjust the Outdoor Modem in the Mounting Bracket, while watchingthe green lights, until you obtain the strongest signal. (See Figure 4 - 1)
Note: There should be at least two lit lights for you to receive a stableInternet connection. (See the table below.)
2. Once the best signal is acquired, fully tighten the bolts on the OutdoorModem assembly so that it is secured and will not easily move. (See Figure 4 - 2)
Follow the steps on the next page to ground your Outdoor Modem, secure the Outdoor Ethernet cable and seal thehole.
Figure 4 - 2
Figure 4 - 1
What is the strongest signal?Signal Quality Light Indicator
Perfect Five green lights
Very strong Four green lights
Strong Three green lights
Low but acceptable Two green lights
Very low, not recommended One or no green lights
No signal - scanning for signal Green lights cycle sequentially

Finalize the installationNow that you have installed the Outdoor Modem and found the best signal, you can finish the installation by connectingthe ground wire and sealing the exterior and interior holes in your wall.
1. Go outside to the Outdoor Modem.
2. Take the loose end of the ground wire and attach it to the grounding point. Refer to the Grounding Appendixon page 23 for grounding tips.
3. Using the clips that you've provided, fasten the Outdoor Ethernet cable andgrounding wire to the side of your building. Fasten the Outdoor Ethernetcable leading from the modem to the wall, one foot before the hole youdrilled in the wall. Fasten the ground wire all the way to the groundingpoint. (See Figure 4 - 3)
TIPS:• Use aluminum clips for brick walls and insert them into the mortar, not the brick• Use plastic clips for aluminum siding• Clip (secure) the cable or wire every two to three feet • Use the mortar groove or siding edge as a guide to run the cable or ground wire
4. Before sealing the hole, ensure any slack in the Outdoor Ethernet cable isdrawn into the building, leaving only enough on the outside to create a"drip loop", as shown in the picture at the right, to draw water away fromthe hole. (See Figure 4 - 4)
5. Seal the drilled hole with the silicon/acrylic caulking compound.
TIPS:• Make sure the area to be caulked is free of dirt and debris• Puncture the nozzle seal with a wire or long nail• Insert the caulking gun at a right angle to the hole to force the caulking
compound into the hole and fill it completely• Surround the cable with caulking to ensure a tight seal
6. Go inside to your computer.
Optional stepsTo make your installation appear neat and tidy, you may choose to install a plastic wall plate over the drilled hole on theinside of your building and pass the Outdoor Ethernet cable through it. To do this:
7. Unplug the Outdoor Ethernet cable from the Power Supply’s OSU/Power port, feed it through the plastic wallplate and pull the cable through.
8. Place the plastic wall plate over the drilled hole with the cable pulled through it and secure it to the wall.
9. Plug the Outdoor Ethernet cable into the Power Supply’s OSU/Power port.
In the final step, you will need to configure your computer to access the Internet.
Figure 4 - 3
Figure 4 - 4
Page 26
Chapter 4: How do I ensure the best possible reception?
Warning:• Don’t run the cable where it could be damaged• Don’t kink or sharply bend the cable or ground
wire• Don’t run the cable and ground wire through the
same clips

Page 27
Chapter 5: How do I get on the Web?
This section will show you how to activate your Outdoor Modem and set up your computer to access the Internet.
To help determine your next steps, which of the following scenarios best describes how you received your OutdoorModem?
• I purchased the modem from a retail store and it was activated there - please go to page 28 and follow theinstructions.
• My modem was delivered by courier - please go to page 28 and follow the instructions. Once completed, goto the self-activation website at rogers.yahoo.com/start and follow the onscreen instructions to activateyour modem.
• I purchased the modem from a retail store and it was not activated there - please follow the instructionsbelow to activate your modem.
Create your account /activate your modemWhen your Outdoor Modem is fully installed, you must call Rogers to create your account and receive your RegistrationKey and Registration Number.
Note: During this process you will need the modem serial number. If you did not note the serial number on page 8 ofthis guide, you will have to go outside to the modem and note the number located on the back.
To activate your Outdoor Modem and create your account:
1. Call Rogers at 1 877 236-7208 and speak with an agent.
2. Inform them that you have purchased an Outdoor Modem and wish to create an account.
Note: If you have an existing account with Rogers, be sure to tell the agent so your Outdoor Modemaccount can be associated with it.
3. Provide your registration details (name, address, etc.) and the Outdoor Modem’s serial number.
4. The agent will then set up your account and provide you with a Registration Key and a Registration Number. Be sure to write these below.
The last step is to configure your computer to access the Internet.
What You Will Need
• Your Outdoor Modem’s serial number (Recorded onpage 8 of this guide)
What You Will Have To Do
• Call Rogers and create your account• Access the Rogers website and activate your
account• Set your computer to automatically receive an IP
address
Registration Key: ________________________________
Registration Number: _____________________________

Page 28
Chapter 5: How do I get on the Web?
Setting up your computer to access the InternetOnce your account has been created, you must now set your computer to automatically receive an IP address in orderto access the Internet. Each operating system has a different set of instructions so find the configuration specific to youroperating system and follow the instructions below:
Configuration for Windows 98/ME1. On the windows desktop, click Start then Settings and open the Control Panel.
2. Double-click the Network icon to open the Network screen.
3. In the Network window, select the Configuration tab. Click TCP/IP then click the Properties button.
4. In the TCP/IP properties window, select the IP Address tab. If Obtain an IP address automatically isselected, your computer is already configured to receive an IP address. If not, select this option.
5. Open Internet Explorer and click the Stop button, then choose the Tools menu and click on InternetOptions.
6. In the Internet Options window, click the Connections tab, and then click the LAN Settings… button.
7. Ensure Automatically detect settings is checked. Click OK, and then click OK again to close the InternetOptions window. Internet Explorer is now ready to connect to the Internet.
Once you have set your computer to automatically receive an IP address, you can now connect to the Internet and goto the Rogers website and create your first rogers.com e-mail address. Turn to page 30 to register your account andcreate your e-mail address.
Configuration for Windows 20001. On the windows desktop, click Start then Settings and double click Network and Dial-up Connections.
2. Right-click on the Local Area Network icon and select Properties.
3. Double-click Internet Protocol (TCP/IP).
4. If Obtain an IP address automatically and Obtain DNS server address automatically are selected,your computer is already configured to receive an IP address. If not, select these options. Click OK to closeeach window.
5. Open Internet Explorer and click the Stop button, then choose the Tools menu and click on InternetOptions.
6. In the Internet Options window, click the Connections tab, and then click the LAN Settings… button.
7. Ensure Automatically detect settings is checked. Click OK and then click OK again to close the InternetOptions window. Internet Explorer is now ready to connect to the Internet.
Once you have set your computer to automatically receive an IP address, you can now connect to the Internet and goto the Rogers website and create your first rogers.com e-mail address. Turn to page 30 to register your account andcreate your e-mail address.

Page 29
Configuration for Windows XP1. On the windows desktop, click Start then Settings and open the Control Panel.
2. In the Control Panel window, click Network Connections.
3. The Network Connections window appears. Right-click the Local Area Network icon and select Properties.
4. Double-click Internet Protocol (TCP/IP).
5. If Obtain an IP address automatically and Obtain DNS server address automatically are selected,your computer is already configured to receive an IP address. If not, select these options. Click OK to closeeach window.
6. Open Internet Explorer and click the Stop button, then choose the Tools menu and click InternetOptions.
7. In the Internet Options window, click the Connections tab, and then click the LAN Settings… button.
8. Ensure Automatically detect settings is checked. Click OK, and then click OK again to close the InternetOptions window. Internet Explorer is now ready to connect to the Internet.
Once you have set your computer to automatically receive an IP address, you can now connect to the Internet and goto the Rogers website and create your first rogers.com e-mail address. Turn to page 30 to register your account andcreate your e-mail address.
Configuration for Windows Vista1. On the windows desktop, click Start then Settings and open the Control Panel.
2. In the Control Panel window, click Network & Internet.
3. The Network and Sharing Center window appears. Click the View Status link for your Rogers connection andselect Properties (click Continue if prompted).
4. The Local Area Connection Properties window appears. Double-click the Internet Protocol Version 4(TCP/IPv4) item.
5. From the Internet Protocol Version 4 (TCP/IPv4) Properties dialog box ensure that Obtain an IP addressautomatically and Obtain DNS server address automatically are checked.
6. Click OK.
Once you have set your computer to automatically receive an IP address, you can now connect to the Internet and goto the Rogers website and create your first rogers.com e-mail address. Turn to page 30 to register your account andcreate your e-mail address.
Chapter 5: How do I get on the Web?

Page 30
Chapter 5: How do I get on the Web?
Register your account and create your @rogers.com e-mail addressThe next step is to register your account with Rogers.
To do this:
1. Launch Internet Explorer and enter this address in the address bar: http://rogers.yahoo.com/start
2. Follow the on-screen steps and enter your Registration Key and Number when prompted to activate yourRogers Yahoo! Hi-Speed Internet account. You received the Registration Key and Number when you calledRogers to create your account. (Recorded on page 27 of this guide.)
3. Follow the on screen instructions to create your first @rogers.com e-mail address.
Registering your account is covered in more depth in the User Guide. Please refer to the User Guide, included in yourInstallation Kit, for more tips and instructions on how to maximize your Rogers Yahoo! Hi-Speed Internet service.

Page 31
Troubleshooting
Troubleshooting Internet connection problemsTo verify the strength of your modem’s signal, go to the modem:
1. Look at the number of lights that are lit on the bottom of the modem.
2. Verify at least two of the lights are lit.
If you do not receive a signal you may have a problem with your modem or cabling. Check the following possibilities toisolate the problem:
Cords and wires• Are all the cords and cables plugged into the computer, modem and power supply securely?• Was there any damage done to the cable during installation? This could cause a degradation in your signal
strength.• Does the Outdoor Ethernet cable have excessive strain placed on it by the position of the Outdoor Modem and
the Mounting Bracket? • Was there any damage done to the cable when you attached it to the exterior wall? • Has the cable been damaged recently or accidentally pulled from the wall?• Has the cable been moved or damaged by animals?
Modem• Is it still securely attached to the Mounting Bracket?• Is the front of the modem covered by anything such as paint, debris, ice, or dirt?• Has the modem been moved or damaged by animals?• Have you tried restarting the modem by unplugging it from the wall outlet?
If none of the above steps explain the cause of your poor signal strength, there may be conditions beyond your controlsuch as:
• You may be experiencing temporary network issues. Please try connecting to the Internet at a later time. • Something has been built or placed between your modem and the cell tower such as buildings or growing
trees.
If the above does not explain your modem’s signal loss, please contact Rogers Technical Support at 1 866 579-7215.
If you receive a strong signal but are still unable to connect to the Internet, you may have a problem with your comput-er. Please try the following:
1. Turn off your computer.
2. Unplug the modem from the electrical outlet.
3. Unplug your router (if you have one) from the electrical outlet.
4. Wait 10 seconds.
5. Plug the modem back into the electrical outlet.
6. Plug the router (if you have one) back into the electrical outlet.
7. Restart your computer.
Chapter 6: Troubleshooting and FAQs

Frequently Asked Questions
General InformationQ: How does my Outdoor Modem speed rank with other Internet modems (ADSL, cable, etc.)?A: Generally, you will experience speeds comparable to DSL and cable. Factors such as mounting location, geog-
raphy or intervening objects (like buildings) could affect your signal strength and may reduce your band-width. Further details concerning speeds can be found on rogers.com.
Q: Does this modem use line of sight technology? A: No, but interposing obstacles may degrade the quality of the signal.
Q: How does my Outdoor Modem receive its signal?A: It is a non line-of-sight (NLOS) Broadband Wireless Internet modem. It receives a signal from the tower that
it is oriented towards.
Q: If I can’t receive a strong signal from my modem, can I still use the service?A: You can still use the service, but the signal strength and connection integrity may be compromised. It is rec-
ommended that you only use the service if you can receive the minimum strength signal (two lit LED lightson the modem). See page 10 for more information on signal strength.
Q: Can I paint my modem face to match the rest of the building?A: No. Anything placed on the flat portion of the Outdoor Modem may reduce the strength of your reception or
may damage the plastic. It is recommended that you do not paint your Outdoor Modem.
Q: How do I clean my modem?A: You can use a damp cloth to clean the surface of the Outdoor Modem. Do not use any abrasive or astringent
cleaners as you may damage the exterior of the modem and make it vulnerable to the elements. Make sureyou do not knock the modem out of alignment when cleaning it.
Installation Q: I don’t want to drill a hole in my home to install this modem. Is there another way to install it?A: Rogers suggests that you follow the instructions in this Installation Guide, but you are free to install it in any
manner that you wish. Be sure to read the entire Installation Guide to better understand material and mount-ing requirements, before attempting to install it in another manner.
Note: Be aware that installing the Outdoor Modem in a manner other than described in this Installation Guidemay reduce its usability or even damage the Outdoor Modem and/or its components.
Q: Can Rogers install this modem for me?A: Currently, Rogers is not offering installation services for this product. However, there may be other service
providers, such as TV satellite dish installers, in your area that may install this product for you.
Q: How high does the unit need to be installed? A: The unit should be installed as high as possible to achieve the best signal with the least amount of interfer-
ence. Under normal circumstances it is recommended that the unit be installed on a wall 6 to 8 feet from theground, with a minimum two feet space allowance below the eaves.
Q: How can I determine where the best signal is coming from during my installation?A: During the initial steps of installation, prior to drilling any holes in the walls, this installation guide will guide
you through the process for determining the best signal using the modem and your computer.
Page 32
Chapter 6: Troubleshooting and FAQs
Frequently Asked Questions
Signal StrengthQ: Can the weather affect my Outdoor Modem’s connection?A: Severe weather may cause interference and affect your connection.
Q: Can my signal strength change over time?A: Yes it can. When your signal strength changes it is usually due to obstacles being introduced or removed
between your modem and the cell tower. For example, things such as buildings, trees, and construction onyour property, etc. could potentially reduce your signal strength.
Q: I have a Cell Tower close to my location but I cannot achieve a good signal, why?A: The Rogers Portable Internet network devices that provide Hi-Speed Internet wireless service are not cur-
rently mounted on all Cellular towers therefore there may not be a Hi-Speed Internet signal coming from theclosest cellular tower to your location.
Technical SupportQ: How do I contact technical support? A: For any technical troubleshooting with your Internet service, please contact Rogers Technical Support on the
web at http://rogers.yahoo.com, via e-mail at [email protected], or by phone at 1 866 579-7215.
Chapter 6: Troubleshooting and FAQs
Page 33
Modem Specifications and IC/FCC Information
Modem SpecificationsStandards: IEEE 802.3 (10 Base-T)Network Protocols - IP EthernetLED Indicators: Integral Signal StrengthPower Consumption: 10 wattsElectrical Specification: 50-240 VAC; 47-64 HzPhysical Interface: 10 Base-T RJ-45Dimensions: 7” x 8.5” x 2.5” (17.8 cm x 21.5 cm x 6.3 cm)
The device is intended to be powered by Listed/CN ITE LPS or Class II power supply with output rated 13Vdc, 1.3A minimum.
IC/FCC InformationNOTICE: This equipment has been tested and found to comply with the IC/FCC Radio Frequency RadiationExposure Limits. A minimum of 20 centimeters separation between the Outdoor Modem and the operator andall other persons should be maintained.

If you encounterproblems with your Internet Service,
contact Rogers [email protected]
http://rogers.yahoo.com
1 866 579-7215and ask for Technical Support.
Version 2.0June 2007