Embed Size (px)
Citation preview
Outdoor / External 20mm Installation Guide
www.wallsandfloors.co.uk 01536 314730
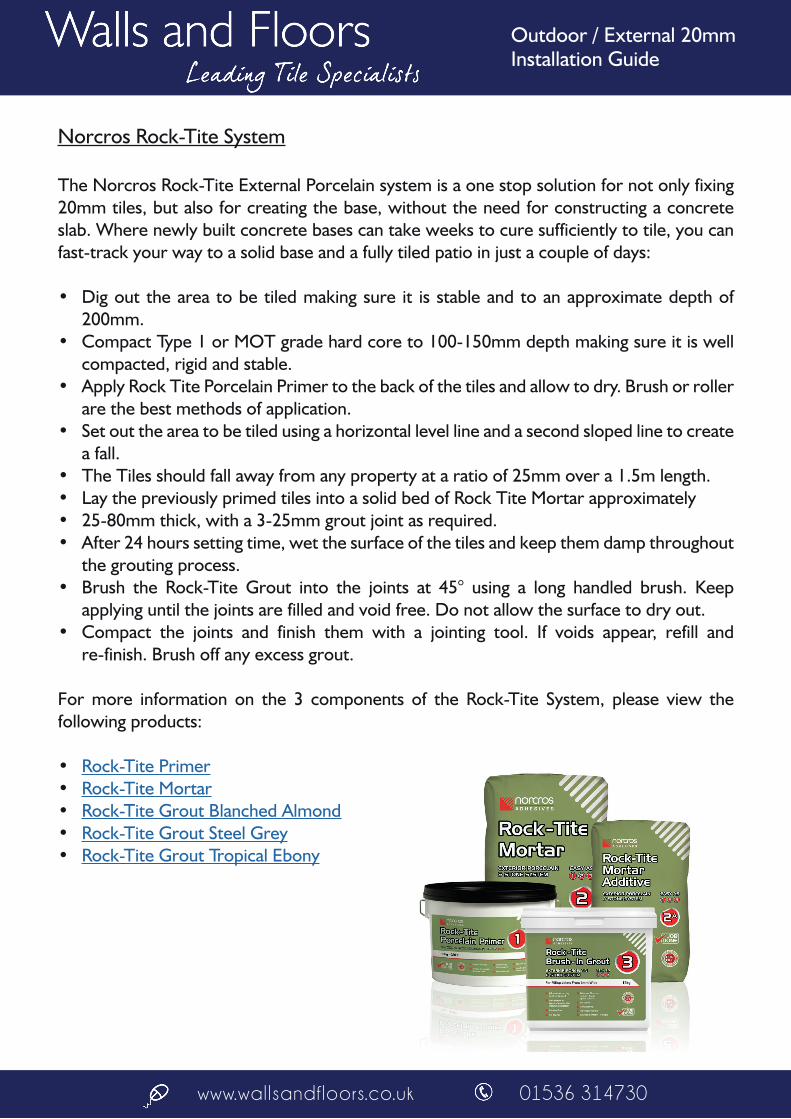
Norcros Rock-Tite System
The Norcros Rock-Tite External Porcelain system is a one stop solution for not only fixing 20mm tiles, but also for creating the base, without the need for constructing a concrete slab. Where newly built concrete bases can take weeks to cure sufficiently to tile, you can fast-track your way to a solid base and a fully tiled patio in just a couple of days:
• Dig out the area to be tiled making sure it is stable and to an approximate depth of 200mm.
• Compact Type 1 or MOT grade hard core to 100-150mm depth making sure it is well compacted, rigid and stable.
• Apply Rock Tite Porcelain Primer to the back of the tiles and allow to dry. Brush or roller are the best methods of application.
• Set out the area to be tiled using a horizontal level line and a second sloped line to create a fall.
• The Tiles should fall away from any property at a ratio of 25mm over a 1.5m length.• Lay the previously primed tiles into a solid bed of Rock Tite Mortar approximately • 25-80mm thick, with a 3-25mm grout joint as required.• After 24 hours setting time, wet the surface of the tiles and keep them damp throughout
the grouting process.• Brush the Rock-Tite Grout into the joints at 45° using a long handled brush. Keep
applying until the joints are filled and void free. Do not allow the surface to dry out.• Compact the joints and finish them with a jointing tool. If voids appear, refill and
re-finish. Brush off any excess grout.
For more information on the 3 components of the Rock-Tite System, please view the following products:
• Rock-Tite Primer• Rock-Tite Mortar• Rock-Tite Grout Blanched Almond• Rock-Tite Grout Steel Grey• Rock-Tite Grout Tropical Ebony

Solid Bed Fixing
Applying the tiles with tile adhesive onto a solid substrate is a commonly used fixing method. Use of 20mm porcelain is preferable to regular tiles for areas that require additional strength to withstand heavy loads. With solid bed fixing, they can be installed in car showrooms, garages, driveways and forklift operating areas.
In addition to such special areas, the product is also suitable for solid be fixing onto balconies, terraces, pool surrounds, sports halls and spas, due to the ease of cleaning and low water absorption. When installing tiles externally, they can only be applied to a solid substrate such as concrete or a sand/ cement screed.
Method:1. Ensure the area you are tiling is perfectly flat and has the correct fall to allow water drainage. If the floor has any undulations, a suitable external grade smoothing com pound can be used (such as Norcros Pro 50 Leveller).2. Depending on the size of the area expansion joints may be required. We’d recommend the floor is divided into bays no larger than 36sqm with no expanse being longer than 6m in length, separated with a suitable movement strip.3. Using a suitable trowel, spread the adhesive (Mapei Keraquick S1 Grey Adhesive) on both the floor and the back of the tile.4. Press the tile into the adhesive bed and twist to ensure the ribs of adhesive collapse to give you 100% coverage of adhesive between the substrate and the tile. If in doubt, lift a tile and check before continuing.5. Adjust the tile to give you a minimum grout joint of 3mm. Larger can be used if required.6. Grout with a suitable flexible grout (Mapei Ultracolour Plus Grout).
20mm Tile
www.wallsandfloors.co.uk 01536 314730
Outdoor / External 20mm Installation Guide
(Mapei Keraquick S1 Grey Adhesive)
(Mapei Keraquick S1 Grey Adhesive)
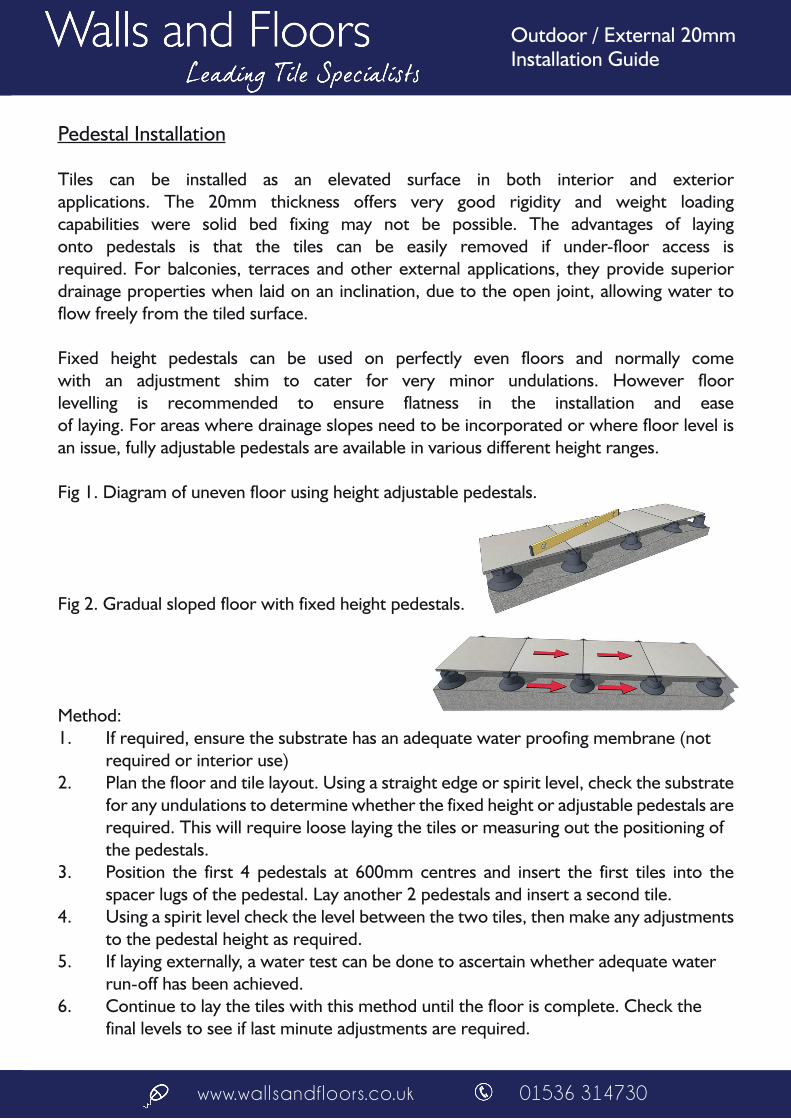
Pedestal Installation
Tiles can be installed as an elevated surface in both interior and exterior applications. The 20mm thickness offers very good rigidity and weight loading capabilities were solid bed fixing may not be possible. The advantages of laying onto pedestals is that the tiles can be easily removed if under-floor access is required. For balconies, terraces and other external applications, they provide superior drainage properties when laid on an inclination, due to the open joint, allowing water to flow freely from the tiled surface.
Fixed height pedestals can be used on perfectly even floors and normally come with an adjustment shim to cater for very minor undulations. However floor levelling is recommended to ensure flatness in the installation and ease of laying. For areas where drainage slopes need to be incorporated or where floor level is an issue, fully adjustable pedestals are available in various different height ranges.
Fig 1. Diagram of uneven floor using height adjustable pedestals.
Fig 2. Gradual sloped floor with fixed height pedestals.
Method:1. If required, ensure the substrate has an adequate water proofing membrane (not required or interior use)2. Plan the floor and tile layout. Using a straight edge or spirit level, check the substrate for any undulations to determine whether the fixed height or adjustable pedestals are required. This will require loose laying the tiles or measuring out the positioning of the pedestals.3. Position the first 4 pedestals at 600mm centres and insert the first tiles into the spacer lugs of the pedestal. Lay another 2 pedestals and insert a second tile.4. Using a spirit level check the level between the two tiles, then make any adjustments to the pedestal height as required.5. If laying externally, a water test can be done to ascertain whether adequate water run-off has been achieved.6. Continue to lay the tiles with this method until the floor is complete. Check the final levels to see if last minute adjustments are required.
www.wallsandfloors.co.uk 01536 314730
Outdoor / External 20mm Installation Guide

Fixing onto lawns
The tiles can be dry laid into lawns to add a decorative feature of a path in a stepping stone formation. With this method of installation, they are not only suitable for domestic gardens, but also for larger and private parks and leisure areas.
Each tile can be installed easily as a DIY project without the need to pay out for professional installers. They are easy to remove and reposition if required and being porcelain, are extremely resistant to moss, algae’s and chemicals such as pesticides, as well as adverse weather conditions.
The rigidity of the tiles also makes them able to bear the weight of garden furniture or planters, giving them the ability to integrate into your garden as decorative and practical design feature.
Method:1. Loose lay the tiles on the lawn to decide the final layout. A gap of 50mm is recommended between each tile.2. Mark the edges of the tile with a spade, remove the tile and dig out the turf to approximately 50 to 60mm in depth.3. Cover the soil with at least 30mm of 2-6mm gravel or chippings and compress down until sturdy4. Position the tile so that it is level with the turf. Remove the tile and adjust the gravel depth as required. Hammer the tile into position with a rubber mallet until the required level is achieved.
www.wallsandfloors.co.uk 01536 314730
Outdoor / External 20mm Installation Guide

Laying onto gravel
Dry laying onto gravel adds a modern look to a practical and versatile external floor. This method of fixing can be used to produce eye-catching paths, patios and courtyards.
As with previous dry laying methods, this also offers easy removal and repositioning if required. They are laid with out grout or adhesive so offers an exceptional drainage solution with water run-off through the open joints and eliminates the need for expansion strips in large areas. Although the tiles can be cut to size to fill and area, a perimeter gap can be left to create decorative border.
Method:1. Dig the current floor to a depth of 150-200mm into the soil. Where a retaining wall is no present, a kerb can be inserted around the perimeter instead, to contain the gravel.2. Level the soil as required and insert a layer of geotextile fabric (weed control sheeting)3. Add a layer of 40mm crushed concrete or gravel and compact it down so that it has a 2% inclination to allow efficient drainage for the tiles.4. Add a further layer of geotextile over the top and lay a 50-100mm of smaller 2-6mm gravel or chippings.5. Flatten the chippings using a straight edge to ensure it is even and that the 2% inclination remains6. Lay the tiles individually, hammering them into place with a white rubber mallet, leaving an open joint of 5mm minimum between each tile. Lay a spirit level or straight edge over multiple tiles to ensure they are even. They can also be laid as stepping stone with much wider gaps if desired.7. Once complete, if a gap has been left around the perimeter, decorative gravel can be inlayed around the tiles as a border.
20mm Tile
www.wallsandfloors.co.uk 01536 314730
Outdoor / External 20mm Installation Guide


![Indoor & Outdoor Tiles | Pavers | Stone Walls | Amber Tiles - … · 2019. 3. 7. · Title: Microsoft Word - Landscapers How to Lay 20MM PORCELAIN PAVERS[3].docx Created Date: 20160627054028Z](https://img.dokumen.tips/doc/110x75/60ab52f2542e6f49167175bc/indoor-outdoor-tiles-pavers-stone-walls-amber-tiles-2019-3-7.jpg)