Embed Size (px)
Citation preview

Oracle® Hyperion Financial DataQuality Management, EnterpriseEditionAdministrator's Guide
Release 11.1.2.4.220E73556-07December 2017

Oracle Hyperion Financial Data Quality Management, Enterprise Edition Administrator's Guide, Release11.1.2.4.220
E73556-07
Copyright © 2009, 2017, Oracle and/or its affiliates. All rights reserved.
Primary Author: EPM Information Development Team
This software and related documentation are provided under a license agreement containing restrictions onuse and disclosure and are protected by intellectual property laws. Except as expressly permitted in yourlicense agreement or allowed by law, you may not use, copy, reproduce, translate, broadcast, modify,license, transmit, distribute, exhibit, perform, publish, or display any part, in any form, or by any means.Reverse engineering, disassembly, or decompilation of this software, unless required by law forinteroperability, is prohibited.
The information contained herein is subject to change without notice and is not warranted to be error-free. Ifyou find any errors, please report them to us in writing.
If this is software or related documentation that is delivered to the U.S. Government or anyone licensing it onbehalf of the U.S. Government, then the following notice is applicable:
U.S. GOVERNMENT END USERS: Oracle programs, including any operating system, integrated software,any programs installed on the hardware, and/or documentation, delivered to U.S. Government end users are"commercial computer software" pursuant to the applicable Federal Acquisition Regulation and agency-specific supplemental regulations. As such, use, duplication, disclosure, modification, and adaptation of theprograms, including any operating system, integrated software, any programs installed on the hardware,and/or documentation, shall be subject to license terms and license restrictions applicable to the programs.No other rights are granted to the U.S. Government.
This software or hardware is developed for general use in a variety of information management applications.It is not developed or intended for use in any inherently dangerous applications, including applications thatmay create a risk of personal injury. If you use this software or hardware in dangerous applications, then youshall be responsible to take all appropriate fail-safe, backup, redundancy, and other measures to ensure itssafe use. Oracle Corporation and its affiliates disclaim any liability for any damages caused by use of thissoftware or hardware in dangerous applications.
Oracle and Java are registered trademarks of Oracle and/or its affiliates. Other names may be trademarks oftheir respective owners.
Intel and Intel Xeon are trademarks or registered trademarks of Intel Corporation. All SPARC trademarks areused under license and are trademarks or registered trademarks of SPARC International, Inc. AMD, Opteron,the AMD logo, and the AMD Opteron logo are trademarks or registered trademarks of Advanced MicroDevices. UNIX is a registered trademark of The Open Group.
This software or hardware and documentation may provide access to or information about content, products,and services from third parties. Oracle Corporation and its affiliates are not responsible for and expresslydisclaim all warranties of any kind with respect to third-party content, products, and services unless otherwiseset forth in an applicable agreement between you and Oracle. Oracle Corporation and its affiliates will not beresponsible for any loss, costs, or damages incurred due to your access to or use of third-party content,products, or services, except as set forth in an applicable agreement between you and Oracle.

Contents
Documentation Accessibility
Documentation Feedback
1 Using FDMEE
Supported Source Systems 1-1
File-Based Data Loads 1-2
Supported EPM System Target Applications 1-2
Key FDMEE Benefits 1-3
FDMEE Application Folder Architecture 1-3
FDMEE Architecture 1-6
Drilling Through 1-8
Drilling Through to the FDMEE Landing Page 1-9
Configuring Oracle Data Integrator With FDMEE 1-10
Set up the Data Server Based on the Enterprise Resource Planning (ERP)Source System 1-10
Setting up Physical Schemas 1-11
Setting up the ODI Context Code 1-12
Setting up ODI to Integrate with JD Edwards 1-12
Security 1-17
Integration Process Overview 1-19
Extracting General Ledger Data 1-19
Writing Back Data from EPM Applications 1-19
Integrating Metadata 1-20
Understanding General Ledger Integration 1-20
Requirements 1-21
Required Dimensions 1-22
Member Properties Sourced from the Enterprise Resource Planning (ERP)System 1-22
How Dimensions Are Processed 1-26
How Languages Are Processed 1-27
iii
How Currencies Are Processed 1-28
Defining Metadata Rules 1-29
Loading Source System Hierarchies into EPM Dimensions 1-36
Extracting Human Resource Data 1-36
Navigating FDMEE 1-37
Toolbars 1-37
Help Menu 1-37
Task Pane Options 1-37
Workflow Tasks 1-37
Setup Tasks 1-38
Working with Data in Grids 1-38
FDMEE User Interface Elements 1-39
Advanced Search Options 1-40
Using the POV Bar 1-41
Selecting the Location POV 1-41
Setting the Period POV 1-42
Setting the Category POV 1-42
Locking and Unlocking a POV 1-43
Administration Tasks 1-44
Predefining a List of Profiles 1-44
Setting System-Level Profiles 1-44
Setting Application-Level Profiles 1-52
Setting User Level Profiles 1-57
Setting Security Options 1-59
Setting up Source Systems 1-63
Registering Enterprise Resource Planning (ERP) Source Systems 1-64
Registering File-Based Source Systems 1-66
Deleting Registered Source Systems 1-66
Editing Registered Source System Details 1-67
Adding File-Based Data Load Definitions 1-67
Working with Source Adapters 1-67
Using a Prepackaged Integration for SAP 1-68
Adding Source Adapter Definitions 1-69
Defining Source Adapter General Information 1-69
Defining Source Adapter Detail 1-72
Registering Target Applications 1-78
Creating a Custom Target Application 1-80
Adding Lookup Dimensions 1-83
Defining Application Dimension Details 1-83
Defining Application Options for Essbase and Planning 1-84
Defining Application Options for Profitability and Cost Management (HPCM) 1-92
iv

Defining Application Options for Public Sector Planning and Budgeting 1-95
Defining Application Options for Financial Management 1-96
Deleting Registered Target Applications 1-106
Reusing Target Application Names Multiple Times 1-107
Selecting Source Accounting Entities 1-107
Assigning General Ledger Responsibility 1-108
Working with Source Accounting Entity Groups 1-109
Loading Excel Data 1-110
Downloading to Excel 1-111
Uploading from Excel 1-112
2 Integrating Tasks
Working with Import Formats 2-1
Defining the Import Format 2-2
Viewing Import Format Information 2-2
Adding Import Formats 2-2
Deleting an Import Format 2-5
Querying by Example 2-5
Defining Import Format Mappings 2-6
Defining the Import Format Mappings 2-7
Concatenating Source Dimensions for Enterprise Resource Planning (ERP)Segments 2-8
Adding Import Expressions 2-9
Import Expression Types 2-10
Processing Order 2-13
Defining Import Formats for File-Based Mappings 2-13
Concatenating Source Dimensions for a File-Based Source 2-16
Using the Import Format Builder 2-17
All Data Types Data Loads 2-19
All Data Types Data Load Process Description 2-19
Setting the All Data Types Load Method 2-20
Setting the All Data Types Load Method 2-21
Setting the Import Format Data Types 2-22
Setting the Import Format for Multi-Column Data Types 2-23
Loading Incremental Data using the LINEITEM Flag to an EPM Application 2-28
Loading Multi-Column Numeric Data 2-31
Loading Periods As a Column from the Data File 2-34
Write-Back Mappings 2-35
Defining Import Formats for Data Synchronization Between EPM Applications 2-36
Defining Import Formats for Data Synchronization Between Enterprise ResourcePlanning (ERP) and EPM Applications 2-37
v
Defining the Write-Back Mappings (E-Business Suite and PeopleSoft only) 2-39
Defining Locations 2-39
Defining Period Mappings 2-42
Global Mappings 2-45
Application Mappings 2-45
Source Mappings 2-46
Defining Category Mappings 2-48
Global Mappings 2-49
Application Mappings 2-49
3 Integrating Data
Loading Data 3-1
Creating Member Mappings 3-1
Creating Mappings Using the Explicit Method 3-3
Creating Mappings Using the Between Method 3-4
Creating Mappings Using the In Method 3-4
Creating Mappings Using the Multi-Dimension Method 3-5
Using Special Characters in Multi-Dimensional Mapping 3-6
Creating Mappings Using the Like Method 3-7
Using Special Characters in the Source Value Expression for Like Mappings3-7
Automap Wildcarding 3-10
Using Special Characters in the Target Value Expression 3-12
Format Mask Mapping for Target Values 3-13
Ignoring Member Mappings 3-16
Importing Member Mappings 3-17
Downloading an Excel Template (Mapping Template) 3-19
Importing Excel Mappings 3-20
Exporting Member Mappings 3-22
Deleting Member Mappings 3-22
Restoring Member Mappings 3-23
Defining Data Load Rules to Extract Data 3-23
Defining Data Load Rule Details 3-23
Defining Data Load Rule Details for a File-Based Source System 3-42
Defining Source Parameters for Planning and Essbase 3-44
Defining Source Parameters for Financial Management 3-45
Managing Data Load Rules 3-47
Editing Data Load Rules 3-47
Running Data Load Rules 3-47
Scheduling Data Load Rules 3-52
Checking the Data Load Rule Status 3-52
vi

Deleting Data Load Rules 3-52
Working with Target Options 3-53
Creating Custom Options 3-53
Loading Exchange Rates to Financial Management 3-53
Using Drilling Through 3-55
Creating the Drill Region 3-55
Drill Through Components 3-56
Adding the Server Component for the Drill Through URL 3-56
Adding the Detail Component for the Drill Through URL 3-57
Viewing the Drill Through Results 3-59
Integrating with the EPM Cloud 3-62
Configuring the Secure Sockets Layer (SSL) Certificate 3-63
Pre-requisites 3-65
Setting up the EPM Cloud Deployment 3-66
Loading Data to the EPM Cloud or On-Premise Application 3-66
Exporting the EPM Cloud Application 3-66
Using the Data Load Workbench 3-66
Workflow Grid 3-67
Processing Data 3-67
Using the Workbench Data Grid 3-71
Viewing Process Details 3-79
Integrating with the Oracle Financials Cloud 3-80
Integration Process Description 3-81
Configuring a Source Connection 3-82
Working with Import Formats 3-85
Defining Locations 3-86
Defining Category Mappings 3-88
Data Load Mapping 3-88
Adding Data Load Rules 3-90
Processing Oracle General Ledger Adjustment Periods 3-91
Adding Filters for Data Load Rules 3-93
Drilling Through to the Oracle Financials Cloud 3-95
Writing Back to the Oracle Financials Cloud 3-95
Extracting the Integrated EPM Cloud and Oracle General Ledger Data to aFlat File 3-99
Using Excel Trial Balance Files to Import Data 3-102
Text Trial Balance Files Versus Excel Trial Balance Files 3-103
Downloading an Excel Trial Balance Template 3-103
Defining Excel Trial Balance Templates 3-103
Adding a Multiple Period Data Load Using Excel 3-104
Importing Excel Mapping 3-105
vii
Using Journal Templates to Import Data 3-106
Additional Considerations for Loading Journal Templates 3-106
Integrating Financial Management Journals 3-106
Downloading a Journal Template 3-108
Defining Journal Templates 3-108
Processing Journals 3-111
Loading Data Using a Universal Data Adapter 3-114
Defining a Universal Data Adapter in Oracle Database Integrator (ODI) 3-114
Configuring SAP HANA 3-117
Working with a Universal Data Adapter in FDMEE 3-118
Universal Data Adapter Source Systems and Import Formats 3-124
Universal Data Adapter Source Systems and Locations 3-125
Data Load Mapping for Universal Data Adapter Related Sources 3-125
Data Load Rules for Universal Data Adapter Related Source 3-125
Integrating Data Relationship Management with FDMEE 3-128
Setting up the Integration 3-129
Data Relationship Management and FDMEE Locations 3-130
Data Relationship Management and FDMEE Metadata Rules 3-131
Importing Data Load Mappings from Data Relationship Management 3-132
Financial Close Management Integration with FDMEE 3-133
Data Load, Synchronization and Write Back 3-133
Overview 3-134
Synchronizing and Writing Back Data 3-134
Data Synchronization 3-134
Write-Back 3-141
Loading Human Resources Data 3-152
Understanding Human Resource Data Integration 3-152
Requirements 3-153
Running Processes in PeopleSoft Human Capital Management 3-153
Defining the Data Load Settings in Planning 3-153
Public Sector Planning and Budgeting Dimensions 3-154
Smart Lists 3-154
Using Loaded Data in Public Sector Planning and Budgeting 3-155
Defining Human Resource Data Load Rules 3-155
Defining the Rule Details 3-155
Creating Rule Line Definitions by Copying 3-156
Creating Rule Line Definitions by Using a Template Mapping 3-157
Creating Rule Line Definitions 3-157
Creating Mapping Definitions 3-158
Managing Human Resource Data Load Rules 3-159
Editing Human Resource Data Load Rules 3-159
viii
Running Human Resource Data Load Rules 3-159
Deleting Human Resource Data Load Rules 3-161
Checking the Human Resource Data Load Rule Status 3-161
4 Logic Accounts
Overview of Logic Accounts 4-1
Creating a Logic Group 4-1
Creating Accounts In A Simple Logic Group 4-2
Logic Group Fields 4-2
Operator and Value/Expression 4-3
Expressions and Functions 4-4
Value/Expression 4-7
Seq 4-7
Export 4-7
Creating Summarized Logic Accounts 4-7
Creating Complex Logic Accounts 4-8
Complex Logic Example 1: CashTx 4-9
Sample Imported Values 4-10
Sample Imported Account Names 4-10
Final Result 4-10
Complex Logic Example 2: CashTx 4-10
Sample Imported Values 4-11
Logic Members 4-11
Final Result 4-12
5 Check Rules
Overview of Check Rules 5-1
Creating Check Rule Groups 5-2
Creating a Check Rule 5-2
Rule Logic 5-4
Using the Rule Logic Editor to Create Check Rules 5-4
Adding Rule Logic 5-6
Adding a Rule Logic Statement as Free Form Text 5-11
Testing Check Rule Expressions 5-12
Running Check Reports for Profitability and Cost Management BSOEssbase Cube 5-13
Creating Check Entity Groups 5-14
ix

6 Batch Processing
Working with Batch Definitions 6-1
Adding a Batch Group 6-7
Executing Batches 6-8
Using Open Batches 6-8
Name Format for Open Batch Files 6-9
Naming Conventions 6-9
Open Batch Import and Export Load Methods 6-10
Creating Open Batches 6-11
Creating an Open Batch to Run an Integration with E-Business Suite 6-13
Creating Open Batches for Multiple Periods 6-13
Scheduling Jobs 6-15
Canceling a Scheduled Job 6-18
Working with Batch Scripts 6-18
Using Password Encryption 6-19
Executing the Batch Script for Data Load Rules 6-19
Setting the Parameters for Data Load Rules 6-20
Executing the Batch Script for Metadata Rules 6-21
Setting the Parameters for Metadata Rules 6-21
Executing the Batch Script for HR Data Rules 6-21
Setting the Parameters for HR Data Rules 6-22
Executing the Batch Script to Import Mapping Rules 6-22
Setting the Parameters to Import Mappings Rules 6-22
Executing the Batch Script for Data Load Rules to Write Back 6-23
Running a Batch 6-23
Setting the Parameters for Running the Batch 6-24
7 Creating and Using Scripts
Overview 7-1
Key Jython Concepts 7-1
Using the Script Editor 7-2
Overview 7-2
Launching the Script Editor 7-2
Script Editor Layout 7-2
Using Import Scripts 7-2
Overview 7-3
Creating Import Scripts 7-3
Import Script Parameters 7-4
Assigning Import Scripts to Import Formats 7-4
Using Import Script Functions 7-6
x

Extracting Beginning Characters 7-6
Extracting Middle Characters 7-7
Extracting End of String 7-7
Using Split Functions 7-8
Using the Skip Function (Conditional Skip) 7-9
Storing and Retrieving Temporary Variables 7-9
Storing Temporary Variables 7-9
Retrieving Temporary Variables 7-11
Import Script Sample 7-11
Using Mapping Scripts 7-13
Overview 7-13
Creating Mapping Scripts 7-13
Using Jython Objects with Mapping Scripts 7-15
Mapping Script Samples 7-16
Using Event Scripts 7-17
Overview 7-17
FDMEE Supported Event Scripts 7-17
Creating Event Scripts 7-20
Stopping the Execution of FDMEE from within a Script 7-21
Dynamically Changing Import Formats 7-21
Using the File System Object in Event Scripts 7-21
Events Script Sample 7-22
Using Custom Scripts 7-25
Overview 7-25
Creating a Custom Script 7-25
Working with Custom Scripts 7-25
Adding a Custom Script Group 7-26
Registering Scripts 7-26
Executing a Custom Script 7-28
Executing a Custom Script from a Command Line 7-28
Custom Script Sample using Jython 7-28
Submitting a Data Load Rule 7-28
Submitting a Report 7-30
Using the JAVA API 7-31
Overview 7-31
JAVA API List 7-33
Working with UNICODE Characters in Jython Scripts 7-42
Using JAVA IDE to Develop Scripts 7-43
Using Visual Basic API and Samples 7-44
Overview 7-44
Registering the Visual Basic API DLL Manually 7-44
xi

Visual Basic API List 7-45
API Class (clsAppServerDM) 7-45
Application Class (clsApp) 7-45
Connection Class (clsConnection) 7-46
DataManipulation Class 7-47
Utilities Class (clsUtilities.cls) 7-48
Data Access Class (clsDataAccess) 7-48
SQL Manager Class (clsSQLMgr) 7-54
SQL Class (clsSQL) 7-58
DB Tools Class (clsDBTools) 7-59
Maintenance Manager Class (clsMaintenanceMgr) 7-61
POV Manager Class (clsPOVMgr) 7-62
State Class (clsState) 7-64
Visual Basic Sample Scripts 7-66
Visual Basic Script to Send Email 7-66
Visual Basic Script to Copy a File to the Inbox 7-69
Visual Basic Script to Execute SQL 7-71
Visual Basic Script to Access Various Properties 7-73
8 FDMEE Reports
FDMEE Reports 8-1
Working with Query Definitions 8-2
Working with Report Definitions 8-3
Adding Report Groups 8-3
Working with Report Definitions 8-4
Creating a Report Template 8-6
Creating a XLIFF File for Translated Report Templates 8-7
Running Reports 8-8
FDMEE Detail Reports 8-10
Audit Reports 8-10
Account Chase Wildcard (TargAcct, Per, Cat) 8-10
Account Chase - Freeform (TargAcct, Per, Cat) 8-11
Map Monitor for Location 8-11
Map Monitor for User 8-12
Check Reports 8-13
Check Report 8-13
Check Report Period Range (Cat, Start Per, End Per) 8-14
Check Report With Warnings 8-14
Check Report By Validation Entity Seq. 8-14
Base Trial Balance Reports 8-15
xii

TB Current Location, with Targets (Cat, Per) 8-15
TB Current Location with Rules (Cat, Per) 8-15
TB Current Locations, All Dimensions-Targets, by Target Entity-Account(Cat, Per) 8-16
TB Current Locations, All Dimensions-Targets (Cat, Per) 8-16
TB Current Location, by Target Acct (Cat, Per) 8-17
TB Current Location, By Target Entity Account (Cat, Per) 8-17
TB Converted Current Location by Target Entity/Account 8-17
Listing Reports 8-18
Import Formats by Location 8-18
Location Listing 8-18
Location Analysis 8-19
Dimension Map (Dimension) 8-19
Dimension Map For POV (Dimension, Cat, Per) 8-19
Process Monitor Reports 8-19
Process Monitor (Cat, Per) 8-20
Process Status Period Range (Cat, Start Per, End Per) 8-20
Process Monitor All Categories (Cat, Per) 8-20
Variance Reports 8-21
Account Chase Variance 8-21
Trial Balance Variance 8-21
A FDMEE Web Service
executeDataRule A-1
executeMetaDataRule A-2
getDataRuleNames A-2
getLocationNames A-3
getPeriodNames A-3
lockPOV A-3
unlockPOV A-4
B FDMEE REST APIs
URL Structure for FDMEE B-1
Running Data Rules B-1
Running Batch Rules B-4
Import Data Mapping B-6
Export Data Mapping B-8
Execute Reports B-10
xiii

C Source System Tables Used by FDMEE
Fusion and E-Business Suite Source System Tables C-1
PeopleSoft Enterprise Financial Management Source System Tables C-3
PeopleSoft Human Capital Management Source System Tables C-5
PeopleSoft Commitment Control Source System Tables C-5
Creating Synonyms for E-Business Suite Tables C-6
D Creating an Alternate Schema in an Enterprise Resource Planning(ERP) Source System
E Staging Tables
FDMEE Staging Tables E-1
Staging Table Used for Import from Source E-2
Data Tables Used for Drill Through E-2
Views Used for Export to Target E-2
PeopleSoft Human Capital Management Staging Tables E-3
PS90HCM E-3
CHARTFIELD E-15
F Archiving the TDATAMAPSEG Table
G Working with Open Interface Adapters
Setting up the Open Interface Adapter G-1
Using the Open Interface Table G-1
Loading Source Data using Custom Loaders G-2
Customizing ODI to Load Data from a Custom Source G-3
Migrating the Customization G-4
H PeopleSoft Commitment Control
I Report Query Table Reference
TDATASEG Table Reference I-1
TLOGPROCESS Table Reference I-5
xiv
J System Maintenance Tasks
Maintain Application Folder J-1
Maintain Process Table J-2
Maintain EBS GL Balances Table J-2
Maintain PeopleSoft Ledger Table J-2
Maintain FDMEE Data Tables J-3
Executing Purge Scripts J-3
K Setting up Jython, Eclipse and Python
xv

Documentation Accessibility
For information about Oracle's commitment to accessibility, visit the OracleAccessibility Program website at http://www.oracle.com/pls/topic/lookup?ctx=acc&id=docacc.
Access to Oracle Support
Oracle customers that have purchased support have access to electronic supportthrough My Oracle Support. For information, visit http://www.oracle.com/pls/topic/lookup?ctx=acc&id=info or visit http://www.oracle.com/pls/topic/lookup?ctx=acc&id=trsif you are hearing impaired.
Documentation Accessibility
xvi

Documentation Feedback
Send feedback on this documentation to: [email protected]
Follow EPM Information Development on these social media sites:
LinkedIn - http://www.linkedin.com/groups?gid=3127051&goback=.gmp_3127051
Twitter - http://twitter.com/hyperionepminfo
Facebook - http://www.facebook.com/pages/Hyperion-EPM-Info/102682103112642
Google+ - https://plus.google.com/106915048672979407731/#106915048672979407731/posts
YouTube - https://www.youtube.com/user/EvolvingBI
xvii

1Using FDMEE
Oracle Hyperion Financial Data Quality Management, Enterprise Edition enables youto perform the following tasks:
• integrate metadata and data from an Enterprise Resource Planning (ERP) sourcesystem, data from a file, or an Open Interface table into an EnterprisePerformance Management (EPM) target application.
• integrate Oracle General Ledger data with an EPM application if you use FusionCloud Release 11 or higher.
FDMEE also supports the Financials Accounting Hub (FAN) and the FinancialAccounting Hub Reporting Cloud Service (FRACAS) as part of its integration withthe Oracle General Ledger.
• drill through from the EPM target application and view data in the EnterpriseResource Planning (ERP) source system.
• synchronize data between EPM applications—Move data between EPMapplications, for example, copying data from Financial Management to Essbasefor reporting.
• write back budget data to the source system from any Oracle Hyperion Planning,Oracle Essbase aggregate storage, or Essbase block storage application.
• write back data from Oracle Hyperion Financial Management to Oracle E-BusinessSuite.
For information on supported EPM System versions, see the Oracle EnterprisePerformance Management System 11th Release Certification Matrix.
For FDMEE issues and workaround, see the Oracle Hyperion Financial Data QualityManagement Readme.
Supported Source SystemsOracle Hyperion Financial Data Quality Management, Enterprise Edition supportsgeneral ledger data from:
• File-based data loads that enable users to import balances from delimited or fixed-width text files.
• Text files and Excel files
• Oracle E-Business Suite 11i
• Oracle E-Business Suite 12
• Oracle Financials Cloud
• PeopleSoft Enterprise Financial Management 9
• PeopleSoft Commitment Control
• SAP ERP Financial
1-1

• SAP BW (Business Warehouse)
• JD Edwards General Ledger system
FDMEE supports human resource data load for PeopleSoft Human CapitalManagement 9.
Integration includes data load and drill through. The integration is supported for thefollowing SAP ERP Financial modules as well:
• Classic and new General Ledger
• Profit Center
• Cost Center
• Vendor Balances
• Customer Balances
In addition FDMEE provides support for Open Interface Adapter. The Open InterfaceAdapter enables you to import data from any source system using the interface table.
For information on supported technologies for each source system, see the OracleHyperion Enterprise Performance Management System Certification Matrix.
File-Based Data LoadsFile-based imports and write back are supported for those users who do not have adirect connection to their Enterprise Resource Planning (ERP) source data, but havedata available from their sources in a text file. Any file, whether it is a fixed width file ora delimited file, can be easily imported into the target EPM application. For example,you can take a trial balance report generated from your source system, and map it intoOracle Hyperion Financial Data Quality Management, Enterprise Edition by way of theimport format feature. You can instruct the system where the account, entity, datavalues and so on reside in the file, as well as which rows to skip during the dataimport. This feature enables a business user to easily import data from any source,and requires limited technical help, if any, when loading into a target application.
You can also define data load rules which determine how you want to extract or writeback data from an EPM system to a file system. For example, you may want to writeback budget data.
Supported EPM System Target ApplicationsSupported Oracle Enterprise Performance Management System target applications(Oracle Hyperion EPM Architect and Classic) are:
• Oracle Hyperion Planning
• Oracle Hyperion Public Sector Planning and Budgeting
• Oracle Hyperion Financial Management (including Tax Provision Application)
• Oracle Essbase aggregate storage and Essbase block storage—If Essbase hasbeen deployed in standalone mode, it must be registered with Shared Servicesbecause it does not work directly with Oracle Hyperion Financial Data QualityManagement, Enterprise Edition. Planning applications that rely on the standaloneEssbase application cannot work directly with FDMEE either.
• Oracle Hyperion Profitability and Cost Management
Chapter 1File-Based Data Loads
1-2

• Account Reconciliation Manager (ARM)
Key FDMEE BenefitsKey benefits supported in Oracle Hyperion Financial Data Quality Management,Enterprise Edition include:
• Improved User Experience—Integrated in Oracle Enterprise PerformanceManagement System. The FDMEE user interface is consistent with the OracleHyperion Planning and Oracle Hyperion Financial Management user interfaces.
• Improved performance—Improved user interface and data load performance
• Close Oracle Hyperion Shared Services integration—All native Shared Servicesfeatures are supported (for example, user groups).
• Support for Internet Explorer and Firefox browsers
• Support for Oracle Hyperion Enterprise Performance Management SystemLifecycle Management—Consistent Lifecycle Management support like other EPMSystem products
You can migrate a Lifecycle Management application from release 11.1.2.3 torelease 11.1.2.4.
• Support for multiple platforms—All supported platforms.
• Consistent Scaling and Load Balancing—All scale out configuration and loadbalancing steps are consistent with other EPM System products.
Also see the Oracle® Enterprise Performance Management System DeploymentOptions Guide.
• FDMEE can be used as a primary gateway to integrate on-premise and cloudbased applications. This
as a primary gateway to integrate on-premise and cloud based applications. Thisfeature EPM customers to adapt cloud deployments into their existing EPMportfolio.
• Data synchronization that enables you to easily move data between the EPMapplications irrespective of the dimensionality of the application without having tocreate a data file from the EPM source application. You specify the source andtarget EPM application, and then map the data. Given the powerful mappingfeatures already available, the data can be easily transformed from one applicationto another application. For example, synchronizing data enables you to move datafrom Financial Management to Oracle Essbase for reporting.
• Write-back support from all EPM applications (except the Accounts ReconciliationManger) to Enterprise Resource Planning (ERP) applications. This feature offerssignificant advantages, such as writing back budgets created in Planning toPeoplesoft or E-Business Suite ERP GL, or moving adjustment journals fromFinancial Management to ERP Systems like Oracle E-Business Suite orPeoplesoft. Other target systems still need to use a custom application framework.
FDMEE Application Folder ArchitectureOracle Hyperion Financial Data Quality Management, Enterprise Edition uses a set offolders that are created under the application root folder. The application root folder is
Chapter 1Key FDMEE Benefits
1-3

created by the system administrator on the server where FDMEE is installed, and thendefined in the System Settings under Configure in FDMEE.
To create the basic file structure click the Create Application Folder button from theSystem Settings screen. In addition application folders and location folders can also becreated. If application folders are not used, then location folders are created in the toplevel inbox. When application folders are used, then location folders are created in therelated application folder.
Here is an example of a possible folder structure:
The standard FDMEE application uses the following folder structure:
Chapter 1Key FDMEE Benefits
1-4
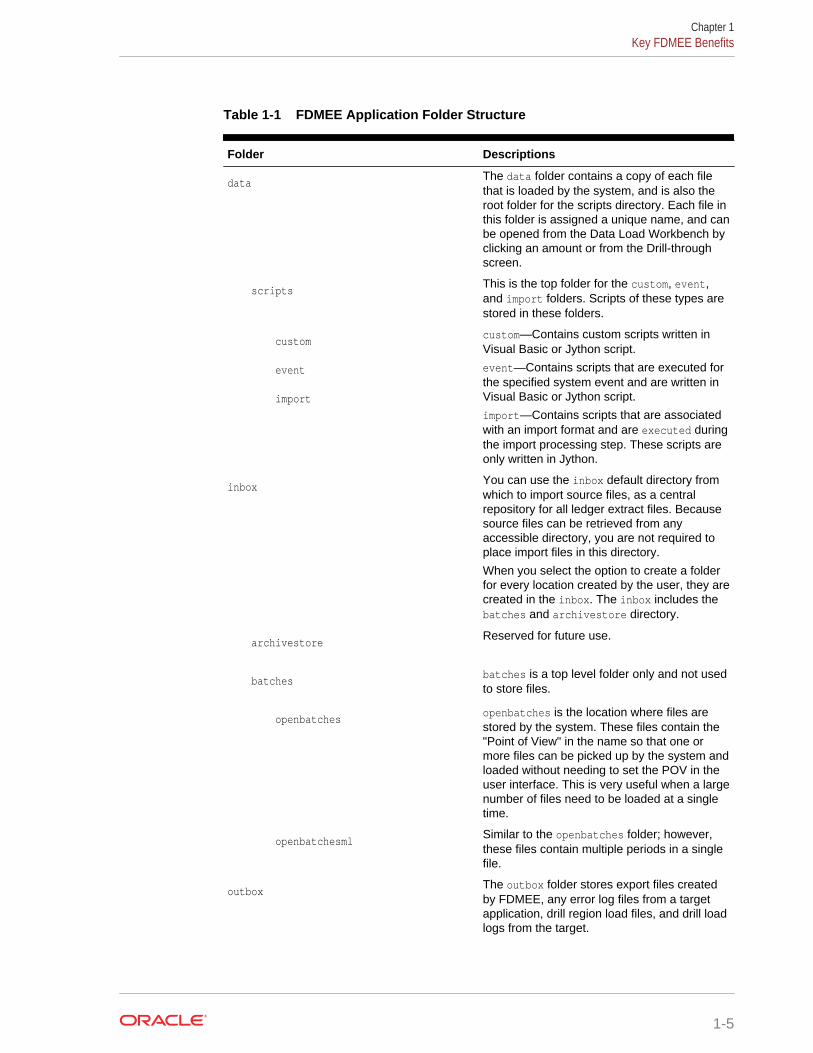
Table 1-1 FDMEE Application Folder Structure
Folder Descriptions
dataThe data folder contains a copy of each filethat is loaded by the system, and is also theroot folder for the scripts directory. Each file inthis folder is assigned a unique name, and canbe opened from the Data Load Workbench byclicking an amount or from the Drill-throughscreen.
scriptsThis is the top folder for the custom, event,and import folders. Scripts of these types arestored in these folders.
custom
event
import
custom—Contains custom scripts written inVisual Basic or Jython script.
event—Contains scripts that are executed forthe specified system event and are written inVisual Basic or Jython script.
import—Contains scripts that are associatedwith an import format and are executed duringthe import processing step. These scripts areonly written in Jython.
inboxYou can use the inbox default directory fromwhich to import source files, as a centralrepository for all ledger extract files. Becausesource files can be retrieved from anyaccessible directory, you are not required toplace import files in this directory.
When you select the option to create a folderfor every location created by the user, they arecreated in the inbox. The inbox includes thebatches and archivestore directory.
archivestoreReserved for future use.
batchesbatches is a top level folder only and not usedto store files.
openbatchesopenbatches is the location where files arestored by the system. These files contain the"Point of View" in the name so that one ormore files can be picked up by the system andloaded without needing to set the POV in theuser interface. This is very useful when a largenumber of files need to be loaded at a singletime.
openbatchesmlSimilar to the openbatches folder; however,these files contain multiple periods in a singlefile.
outboxThe outbox folder stores export files createdby FDMEE, any error log files from a targetapplication, drill region load files, and drill loadlogs from the target.
Chapter 1Key FDMEE Benefits
1-5

Table 1-1 (Cont.) FDMEE Application Folder Structure
Folder Descriptions
archivestoreReserved for future use.
logsStores logs generated by the load processesin the format EPM-APPLICATION-NAME_PROCESS-ID.log. These logs can beviewed using the Show Log link in the ProcessDetails page of FDMEE.
reportsThe reports folder stores report outputgenerated by the batch reporting process inPDF, HTML or XLS. Also includes output fromreports run in offline mode.
Note:
To create the folder structure for applications, define the root folder in theApplication Settings screen, and then select the Create Application foldersoption. For example, when you want to run a set of scripts for a specifiedapplication, then the use of the application folders is required.
FDMEE ArchitectureOracle Hyperion Financial Data Quality Management, Enterprise Edition is the keyapplication for integrating Enterprise Resource Planning (ERP) systems with Oracle'sHyperion EPM applications. FDMEE is accessed through Oracle Hyperion EnterprisePerformance Management Workspace, which uses Oracle Hyperion Shared Servicesto authenticate users. The key to its integration lies within its underlying engine, OracleData Integrator.
FDMEE sits on top of Oracle Data Integrator and orchestrates the movement ofmetadata and data into EPM applications. The application server can be deployed onmultiple platforms (see the Oracle Hyperion Enterprise Performance ManagementSystem Certification Matrix) and connects with EPM applications such as OracleHyperion Financial Management, Oracle Hyperion Planning, Profitability, AccountReconciliation Manager, and Oracle Essbase.
The ODI Agent installed and used by FDMEE is exclusively for processes launched aspart of FDMEE processing, including the FDMEE user interface, FDMEE batches, orFDMEE jobs executed by way of a Windows or Lynx batch. The FDMEE repository isfor exclusive use of FDMEE objects shipped by Oracle, or for castigations made by thecustomer to these objects. The ODI agent or repository used by FDMEE cannot beused for any other purpose by the customer. Any other ODI work needs to use aseparate agent and repository.
The following diagram shows the technical architecture structure of FDMEE:
Chapter 1FDMEE Architecture
1-6

The following diagram shows the flow of data in FDMEE:
Chapter 1FDMEE Architecture
1-7

The following diagram shows FDMEE High Availability:
Drilling ThroughOracle Hyperion Financial Data Quality Management, Enterprise Edition provides theframework to drill through from EPM applications back to the general ledger source.Drill through is not supported for human resource data. Users can drill through to detailin the source system through FDMEE.
The ability to create a drill region is enabled in Target Application options. FDMEEcreates drill region by scenarios. For any cube (Planning plan types or Essbase
Chapter 1Drilling Through
1-8
databases, the name of the drill region is FDMEE_<name of the scenario member).When creating the drill region, FDMEE checks if a dimension is enabled for the drill.Members of enabled dimensions selected in data loads, are included in the drill regionfilter. If no dimensions are enabled, the following dimensions are enabled by default:Scenario, Version, Year, and Period. You can enable additional dimensions, and thesubsequent data load considers members of newly enabled dimensions. If you disableany dimensions which were previously included in a drill region used for drill creation,members of such dimensions are not deleted during the subsequent data loads. Ifneeded, you can remove obsolete members manually.
Note:
If the source system is Oracle E-Business Suite/PeopleSoft and you havemetadata rules, then the drill region is created based on the metadata rule.Otherwise, it is created based on the target members in the data loadmappings. For Year, Period, and Scenario, FDMEE uses audit information tocreate the drill region.
Note:
In Oracle Smart View for Office and Oracle Hyperion Financial Reporting, youcan drill through only if the data source is Oracle Hyperion FinancialManagement, Oracle Hyperion Planning, Oracle Essbase, and Oracle HyperionProfitability and Cost Management.
Note:
Drill through is not supported for Financial Management journals andintercompany transactions.
When you drill through, if data was loaded by FDMEE, a landing page is displayed in anew Oracle Hyperion Enterprise Performance Management Workspace tab or a newwindow. The landing page is a gateway to the data in the source system. See DrillingThrough to the FDMEE Landing Page.
Drilling Through to the FDMEE Landing PageThe Oracle Hyperion Financial Data Quality Management, Enterprise Edition landingpage displays general ledger accounts and the hyperlinked balances that were used topopulate the cells in the EPM application. When you click a linked data value, you candrill through to the source system and view the associated journal entries for theselected general ledger account.
You can drill through to balances to display data loaded from your source system.When you navigate to the Oracle General Ledger Balances page after login validation,you can view a table listing the general ledger accounts that contributed to the drilledvalue shown in the EPM application for the specific period.
Chapter 1Drilling Through
1-9

This table includes a breakdown of all general ledger accounts values with hyperlinks,enabling users to further drill into the Journal Lines page in Oracle General Ledger.Users can then view the associated journal entries for the selected Oracle GeneralLedger account.
When you navigate to PeopleSoft Enterprise Financial Management, the LedgerInquiry page is displayed after login validation. Users can then view information on theJournal Inquiry page. See PeopleSoft Enterprise General Ledger 9.1 PeopleBook foradditional information on drill through capabilities.
Configuring Oracle Data Integrator With FDMEEOracle Hyperion Financial Data Quality Management, Enterprise Edition relies onOracle Data Integrator as the engine that extracts data and metadata from the definedsources, and then populates the Performance Management Architect interface tablesor populates the Classic applications with the extracted artifacts. The Oracle HyperionEnterprise Performance Management System Installer installs ODI when FDMEE isinstalled. The installer also configures the ODI Master and Work Repository and ODIJ2EE Agent as part of install process.
In addition, you must perform some manual configuration steps in Oracle DataIntegrator before using FDMEE.
Note:
You only need to configure ODI when you load data from a source other than afile. File-based data loads work out of the box without additional ODIconfigurations.
1. Set up the data server based on the Enterprise Resource Planning (ERP) sourcesystem.
2. Set up the Physical Schemas.
3. Set up the ODI Context Code.
Set up the Data Server Based on the Enterprise Resource Planning(ERP) Source System
You must set up the appropriate data servers based on the Enterprise ResourcePlanning (ERP) source system used to source metadata and/or data.
When importing from Enterprise Resource Planning (ERP) sources (Oracle E-Business Suite/PeopleSoft/Fusion/JDE/SAP), set up the applicable data servers listedbelow:
• EBS_DATA_SERVER—For E-Business Suite General Ledger
• PSFT_FMS_DATA_SERVER—For PeopleSoft General Ledger and CommitmentControl
• PSFT_HCM_DATA_SERVER—For PeopleSoft Human Capital Management(HCM)
Chapter 1Configuring Oracle Data Integrator With FDMEE
1-10
• FUSION_DATA_SERVER—For Fusion General Ledger
• JDE_DATA_SERVER—JD Edwards Enterprise (JDE) General Ledger
• SAP_SERVER—SAP FICO
To update server connections information:
1. Access the Oracle Data Integrator Console.
2. Select the Browse tab.
3. Expand Topology.
4. Select the operating data server to update, and then click Edit.
For example, select EBS_DATA_SERVER or PSFT_FMS_DATA_SERVER.
5. In Edit Data Servers, under JDBC Details, enter the JDBC driver in JDBCDriver.
For example, enter oracle.jdbc.OracleDriver
6. In JDBC URL, enter the JDBC URL address.
For example, enter jdbc:oracle:thin:@<host>:<port>:<sid>
7. In User, enter the user name.
8. In JDBC Password, enter the password.
9. Click Save.
Setting up Physical SchemasTo update a physical schema:
1. Access the Oracle Data Integrator Console.
2. Select the Browse tab.
3. Expand Schemas.
4. Expand Physical Schemas.
5. Select the schema to update, and then click Edit.
For example, select EBS_DATA_SERVER or PSFT_FMS_DATA_SERVER.
6. In Schema Name, enter the schema name in uppercase characters.
7. Click Save.
Chapter 1Configuring Oracle Data Integrator With FDMEE
1-11

Caution:
Extensive problems can occur if you switch the Enterprise Resource Planning(ERP) system connection information for the Physical Schema in the OracleData Integrator Topology Manager after you have completed initialconfiguration. For example, extensive problems can occur if you start using onephysical schema (ERPTEST) pointing to ERP Test Instance1 in the OracleData Integrator Topology Manager, and then change to a connectioninformation in this physical schema to point to ERP Test Instance2 without firstcreating a new context in Oracle Data Integrator. The correct procedure is tocreate two physical schemas (ERPTEST1 and ERPTEST2) each pointing to adifferent ERP instance. Then, create two contexts and associate theappropriate physical schema to the logical schema in the context.
Setting up the ODI Context CodeYou can set up the default "GLOBAL" ODI context code. The ODI context code refersto the context defined in Oracle Data Integrator. A context groups the source andtarget connection information.
To set up the default "GLOBAL" ODI context code:
1. Access the Oracle Data Integrator Console.
2. Select the Browse tab.
3. Expand Contexts.
4. Select Global update, and then click Edit.
5. In Edit Context Global, in Context Name, enter GLOBAL.
Enter the word "GLOBAL" in uppercase characters only, that is, enter GLOBAL.
6. Select Default Context.
7. Click Save.
Setting up ODI to Integrate with JD EdwardsTo set up ODI to integrate with JD Edwards:
1. Download the JD Edwards EnterpriseOne Data Access Driver (DAD) driver:
a. Display My Support by clicking My Oracle Support.
b. Select the Patches and Updates tab, and then select JD Edwards Patches.
c. From JDEdwards, enter EnterpriseOne Tools Releases.
d. In Release, select All Releases.
e. In Platform, select Multiplatform.
f. In Description (*text*), enter *Data Access Driver* .
Include asterisks as it is a wildcard search.
g. Select the License Agreement check box.
h. Click Search.
Chapter 1Configuring Oracle Data Integrator With FDMEE
1-12

i. Click the plus sign (+) to add Tools 9.1,* Data Access Driver to theDownload Basket.
Note:
Oracle Hyperion Financial Data Quality Management, EnterpriseEdition supports JD Edwards Tools 9.1 and 9.2. If you use JDE Tools9.2.x.x, then use the 9.2.x.x DAD Driver. If you use JDE Tools 9.1.x.x,then use the 9.1.x.x DAD Driver.
j. Click the Item(s) hyperlink and download the tools release specific item.
2. To copy the DAD driver:
The DAD driver has a .par extension, but it can be unzipped.
a. Unzip the archive file to a temporary directory.
b. Extract (or unzip) the JAR file DADriver_EAR.jar.
c. Copy the extracted contents of the DADriver_EAR.jar to theEPM_MIDDLEWARE_HOME\odi\odi_misc directory.
Typically, EPM_MIDDLEWARE_HOME is C:\Oracle\Middleware
3. Request that the JD Edwards system administrator provide you with the followingfiles:
• jdbj.ini
• jas.ini
• jdelog.properties
These files are generated when you register the JD Edwards EnterpriseOne DataAccess Driver using the JD Edwards Server Manager.
4. Copy the jas.ini, jdbj.ini, and jdelog.properties files from the JDE ApplicationServer to the EPM_MIDDLEWARE_HOME\odi\odi_misc directory.
Typically, EPM_MIDDLEWARE_HOME is C:\Oracle\Middleware
5. Ensure that the security server of the jas.ini file is set up correctly.
6. Review and edit the jdbj.ini file as follows:
a. If the JD Edwards application database is Oracle, update the location in thetnsnames.ora file:
For example, modify tns= C:\Oracle\Middleware\user_projects\config\dbclient/tnsnames.ora in the jdbj.ini file.
Forward or backward slashes can be used.
b. Encrypt the {JDBj-BOOTSTRAP SESSION] stanza, and then the password value.
If the stanza has not changed, no update is required.
c. Modifications to the .INI file password encryption can be accomplished usingthe Server Manager.
d. Set the value of the following parameters under [JDBj-RUNTIME PROPERTIES]stanza to:
resultSetTimeout=-1
Chapter 1Configuring Oracle Data Integrator With FDMEE
1-13

transactionTimeout=-1
usageExecutionThreshold=20000
usageResultSetOpenThreshold=120000
usageTracking=false
msSQLQueryTimeout=1800000
e. Edit the tnsnames.ora file.
If the tnsnames.ora entry exists, copy and rename it.
The tnsnames.ora file must include the reference to the JDE server, forexample,
jra91dl =
(DESCRIPTION = (ADDRESS = (PROTOCOL = TCP)(HOST = dene1lx7.us.oracle.com)(PORT = 1530))
(CONNECT_DATA =
(SERVER = DEDICATED)
(SERVICE_NAME = jra91dl)
)
)
The tnsnames.ora file is located in C:\Oracle\Middleware\user_projects\config\dbclient/tnsnames.ora.
7. Edit the jdelog.properties file, and set the log level as needed in all references inthe file.
In a production environment, set the log level to SEVERE so that only severe errorsare reported in the log file.
8. Change the file path in jdelog.properties for log to C:\Oracle\Middleware\user_projects\epmsystem1\tmp
For example, specify: FILE=C:\Oracle\Middleware\user_projects\epmsystem1\tmp/at9062056.log in all instances found in the file.
9. Ensure that you can access the server specified in the jdbj.ini file from the ODIServer.
You can do so from the command line by issuing a ping to the server.
10. Make sure that environmental variables JAVA_HOME and TEMP are set up correctly.
JAVA_HOME is an environmental variable and points to java.exe under C:\Oracle\Middleware\jdk160_35\bin
TEMP is a user variable and points to %USERPROFILE%\AppData\Local\Temp.
Setting environmental variables might require restarting the machine.
11. If you use JDE Tools 9.1.2 or 9.1.3, run the script copyfilesJDE912.bat / sh fromthe following directory:
EPM_ORACLE_HOME \products\FinancialDataQuality\bin
Chapter 1Configuring Oracle Data Integrator With FDMEE
1-14

If you use JDE Tools 9.1.4 or later, run the script: copyfilesJDE914.bat / sh fromthe EPM_ORACLE_HOME \products\FinancialDataQuality\bin directory.
When you run the script, the following is displayed:
C:\Users\hitinstall>C:\Oracle\Middleware\EPMSystem11R1\products\FinancialDataQuality\bin\copyfilesJDE914.bat
"Copy required JAR Files"
1 file(s) copied.
1 file(s) copied.
"Script completed successfully"
12. If JD Edwards uses Microsoft SQL Server or IBM databases, then download theJDBC driver and copy it to the DOMAIN HOME/lib directory.
Typically this is the C:\Oracle\Middleware\user_projects\domains\EPMSystem\libdirectory.
Refer to the JD Edwards Tools documentation for the supported versions of theJDBC driver for the database platform.
13. Look for the following information in jdbj.ini and verify that it is in thetnsnames.ora file.
databaseType=O
serverPort=1530
name=System - 910
database=jra91dl
server=dene1lx7
physicalDatabase=
owner=SY910
lob=true
unicode=true
Specifically, the database name is referenced in the tnsnames.ora file.
14. In Oracle Data Integrator, perform a JDE Test Connection with the ODI Agent.
a. From the ODI Studio, launch the Oracle Data Integrator.
b. From Physical Architecture, then Technologies, and then Oracle, selectJDE_Data_Server.
Test the JDE Test Connection with the ODIAgent and not the local Agent.
c. Click Test Connection.
d. From Test Connection for, select OracleDIAgent, and then click Test.
e. From Physical Architecture, then Agents, then OracleDIAgent, right click,and select Test.
An Information window displays when the test is successful.
Chapter 1Configuring Oracle Data Integrator With FDMEE
1-15

f. Search for "environment" in the jdbj.ini file and note the environment values:
[JDBj-BOOTSTRAP SESSION]
user=EOSVM
password=ACHCJKEBHCJKBKEEGLDDFKBCLBCDBCGBDCMJMBPGKLNO
role=*ALL
environment=PY910
g. From ODI Studio, then Topology, then Technologies, and then Oracle,select JDE_DATA_SERVER.
h. In the Definition section, specify the following values:
i. In User, specify JDE_USER.
ii. In Password, specify JDE_USER.
i. In the JDBC section, specify the following values:
i. In JDBC Driver, specify JDBC Drivercom.jdedwards.jdbc.driver.JDBCDriver.
ii. In JDBC Password, specify JDBC URL jdbc:oracle:enterpriseone://PY910;RMNEQN=1;enterpriseone.role=*ALL.
• JDBC Driver com.jdedwards.jdbc.driver.JDBCDriver
• JDBC URL jdbc:oracle:enterpriseone://PY910;RMNEQN=1;enterpriseone.role=*ALL
j. From Physical Schema, select JDE for the user.
Select the second (indented) JDE server which is the Physical Schema.
15. Restart the FDMEE service for the changes to take effect.
16. Verify the import of the JD Edwards source system.
If the import did not occur, see Importing a Source Adapter.
Chapter 1Configuring Oracle Data Integrator With FDMEE
1-16
SecurityOracle Hyperion Financial Data Quality Management, Enterprise Edition supports thefollowing roles:
Table 1-2 Security Roles and Task Descriptions
FDMEE Roles Tasks per Role
Administrator Manages applications and performs any actionin FDMEE. When you log in with theAdministrator role, all links are visible in theTasks pane.
Create Integration Creates FDMEE metadata and data rules. Ifyou have the Create Integration role, you can:
• Create, delete, and edit metadata rulesand data rules
• View process details• Perform period mappings
Note:
You cannot runrules, view, create,edit, or deletesource systemregistrations, targetsystemregistrations, orsource accountingentities.
When you log in with the Create Integrationrole, these links are visible in the Tasks pane:Data Load, Member Mapping, HR Data Load,Metadata, and Process Detail.
Drill Through Controls the ability to drill through to thesource system.
In FDMEE, this role controls whether you candrill to the FDMEE landing page, whichcontrols drilling to the source system.
Chapter 1Security
1-17
Table 1-2 (Cont.) Security Roles and Task Descriptions
FDMEE Roles Tasks per Role
Run Integration Runs existing FDMEE metadata and datarules. If you log in with the Run Integrationrole, you can:• Run metadata rules or data rules• View process details
Note:
You cannot view,create, edit, ordelete sourcesystemregistrations, targetsystem registrationsor sourceaccounting entities.
FDMEE users who need to extract data fromOracle or PeopleSoft Enterprise FinancialManagement must be granted this role to rundata rules.
When you log in with the Run Integration role,links are visible in the Workflow tasks: DataLoad Workbench, Data Load, MemberMapping, HR Data Load, Metadata, andProcess Detail.
HR Integration Runs Human Resource data rules and fills outruntime parameters. Can view transactionlogs.
Intermediate 2-9 Roles 2-9 for intermediate levels are definedby the administrator.
Note:
FDMEE users are enabled to define mappings only to target applications towhich they have access.
Note:
Planning and Essbase do not use member-level security at this time.
Chapter 1Security
1-18

Integration Process OverviewYou can use Oracle Hyperion Financial Data Quality Management, Enterprise Editionto integrate metadata and data from your Enterprise Resource Planning (ERP) sourcesystem in these ways:
• Extracting General Ledger Data
• Writing Back Data from EPM Applications
• Integrating Metadata
• Extracting Human Resource Data
Extracting General Ledger DataFollow this process to extract general ledger metadata and data and push into targetEPM applications:
1. Register source systems in Oracle Hyperion Financial Data Quality Management,Enterprise Edition by adding details for Oracle Data Integrator and FDMEE, whichare specific to the source system.
2. Register target applications for use with FDMEE.
3. Select the Source Accounting Entities.
4. Define import formats and locations.
5. Create metadata rules.
6. Create period mappings for Year and Period dimensions.
7. Create category mappings.
8. Create the member mappings and data load rules.
9. Run the metadata rules to import metadata into Oracle Hyperion FinancialManagement, Oracle Hyperion Planning applications, and Oracle HyperionProfitability and Cost Management.
If you use Oracle Hyperion EPM Architect, you also deploy or redeploy theapplications.
10. Run data rules to extract data from the source system and push it into the targetapplications. Data and metadata are staged in the FDMEE staging tables,extracted from the source system, and loaded into the target application.
The data loaded is used for multiple purposes by the respective target applications(Planning, Financial Management, or Oracle Essbase). In addition, you can usethe sourced data to drill through from web forms in the applications, or OracleSmart View for Office and Oracle Hyperion Financial Reporting.
Writing Back Data from EPM ApplicationsFollow this process to write back data from EPM applications to your general ledgersource system:
1. Perform steps 1-5 and step 7–8 in Extracting General Ledger Data.
2. Define write-back mappings for required segments or chartfields.
Chapter 1Integration Process Overview
1-19

You can select an EPM application as a source, and an Enterprise ResourcePlanning (ERP) as a target, and this writes to the journal interface table.
3. Run data load rules to push the data from supported target applications (OracleHyperion Planning, Oracle Essbase aggregate storage, Essbase block storage,and Oracle Hyperion Financial Management) into your general ledger sourcesystem.
Note:
You cannot write back data to SAP General Ledger and PeopleSoft HumanCapital Management source systems.
Note:
Write-back from Financial Management is limited only to the Oracle E-Business Suite General Ledger. To write back data from an EPM to legacyor any other unsupported Enterprise Resource Planning (ERP) system,Oracle suggests that you extract data to a custom target application. Afterextracting the data, convert the data files to a format acceptable to thoseEnterprise Resource Planning (ERP) systems and import them there.
4. Load the data into E-Business Suite or PeopleSoft Enterprise FinancialManagement by running a process in Oracle General Ledger or PeopleSoftGeneral Ledger.
Integrating MetadataRelated Topics
• Understanding General Ledger Integration
• Requirements
• Required Dimensions
• Member Properties Sourced from the Enterprise Resource Planning (ERP)System
• How Dimensions Are Processed
• How Languages Are Processed
• How Currencies Are Processed
• Defining Metadata Rules
• Loading Source System Hierarchies into EPM Dimensions
Understanding General Ledger IntegrationOracle Hyperion Financial Data Quality Management, Enterprise Edition supportsloading data into EPM applications from general ledger source systems and writingback data from target EPM Oracle Hyperion Planning applications to general ledgersource systems.
Chapter 1Integration Process Overview
1-20

• Loading data from the General Ledger source system—FDMEE supports loadingdata from general ledger source systems. FDMEE can load both metadata(dimension members and hierarchies from Oracle E-Business Suite, OracleFusion Financials and PeopleSoft Enterprise Financial Management only) anddata from the Enterprise Resource Planning (ERP) source systems.
• Writing back data to the General Ledger source system—FDMEE enables you toextract data from Planning, Oracle Essbase aggregate storage, Essbase blockstorage, Oracle Hyperion Financial Management, and then load it into the Generalledger source system.
Data load to write-back is unavailable for SAP and JD Edwards. The suggestedapproach to write back to these Enterprise Resource Planning (ERP) systems andother legacy applications is to extract data to a custom application (data file) andconverting them to a format acceptable to ERP systems and importing them asjournals.
RequirementsBefore you begin using Oracle Hyperion Financial Data Quality Management,Enterprise Edition, consider the following:
• Verify that you have met the EPM dimension requirements:
You can build EPM applications with any combination of dimensions. Thecombination must include required dimensions for the selected application. Member Properties Sourced from the Enterprise Resource Planning (ERP)System describes how member properties are sourced from the EnterpriseResource Planning (ERP) source system.
• Verify that you have met the EPM member requirements:
– Duplicate Members—To avoid issues with duplicate member names, as a bestpractice, include a unique prefix or suffix for each dimension so each memberis always unique.
– Duplicate Alias Members—If your application has duplicate alias members, itis important to remove any duplicates in the target application or validationerrors occur when you deploy the application in Oracle Hyperion EPMArchitect.
Note:
Source descriptions must be unique to avoid alias validation errors withPerformance Management Architect.
When moving dimensions and members from a source system into a target EPMapplication, it is important to understand the naming restrictions. For PerformanceManagement Architect, see the Oracle Hyperion Enterprise Performance ManagementArchitect Administrator’s Guide. For Oracle Hyperion Planning, see the OracleHyperion Planning Administrator’s Guide. For Oracle Hyperion Financial Management,see the Oracle Hyperion Financial Management Administrator’s Guide.
Chapter 1Integration Process Overview
1-21

Required DimensionsYou can build EPM applications with any combination of dimensions, as long as thecombination includes those required for the selected application. For example, OracleHyperion Planning requires different dimensions to be present in an application than inOracle Hyperion Financial Management.
For detailed information on dimensions required and properties for Oracle HyperionEPM Architect applications, see the Oracle Hyperion Enterprise PerformanceManagement Architect Administrator's Guide. For Classic Planning applications, seethe Oracle Hyperion Planning Administrator's Guide. For Classic FinancialManagement applications, see the Oracle Hyperion Financial ManagementAdministrator's Guide. For Classic Oracle Essbase, see the Oracle Essbase DatabaseAdministrator's Guide.
The following dimensions require special considerations when integrating with OracleHyperion Financial Data Quality Management, Enterprise Edition:
• Account
• Currency
• Entity
• Scenario
• Version
• View
• Year
• Period
In addition to the above list, review properties set by FDMEE in the Custom dimension.See Custom.
For information on special considerations and requirements for Oracle Hyperion PublicSector Planning and Budgeting, see Loading Human Resources Data.
Member Properties Sourced from the Enterprise Resource Planning (ERP)System
For each required dimension, specific properties must be defined. The requireddimension properties relate to Oracle Hyperion Planning, Oracle Hyperion FinancialManagement, or Oracle Essbase applications, and in some cases both.
Note:
Oracle Hyperion Financial Data Quality Management, Enterprise Edition setssome of the required properties, but not all.
AccountThe Account dimension represents a hierarchy of natural accounts. Accounts storefinancial data for entities and scenarios in an application. Each account has a type,
Chapter 1Integration Process Overview
1-22

such as Revenue or Expense, that defines its accounting behavior. The Accountdimension is mapped from the source accounting entity to the EPM Accountdimension as defined in the dimension mapping definition for the selected chart ofaccounts or business unit. The properties set by Oracle Hyperion Financial DataQuality Management, Enterprise Edition are shown below. (Any properties not set aredefaulted by the application or Oracle Hyperion EPM Architect).
Table 1-3 Account Dimension Required Properties
Property Application Type Population Method/Value
Consolidation Account Type Consolidation Populated from the account type inthe source accounting entity with thedomain of revenue, expense, asset,or liability. If source type is equity, itis changed to liability for use byOracle Hyperion FinancialManagement applications.
Account Type Planning Populated from the account type inthe source accounting entity with thedomain of revenue, expense, asset,liability, or equity.
Variance Reporting Planning, Essbase aggregatestorage, and Essbase block storage
Set to “Expense” if account type isexpense; otherwise set to“NonExpense.” (NonExpense is thedefault).
Description, Display String System Populate from the source accountingentity description.
Time Balance Planning, Essbase aggregatestorage, Essbase block storage
For income statement accounts,(revenue and expenses) set to“Flow” for Planning applications.
For Essbase aggregate storage andblock storage applications, set to“Last.”
For balance sheet accounts (asset,liability, and equity), set to “Balance.”
These properties can be set whenyou create metadata rules. See Defining Metadata Rules.
Entity and IntercompanyThe Entity dimension represents the organizational structure of the company, such asthe management and legal reporting structures. Entities can represent divisions,subsidiaries, plants, regions, countries, legal entities, business units, departments, orany organizational unit. You can define unlimited entities.
The Intercompany dimension represents all intercompany balances that exist for anaccount. This is a reserved dimension that is used in combination with the Accountdimension and any custom Oracle Hyperion Financial Management dimension.
Financial Management requires that members of the Entity dimension have the IsICPproperty set for those members that are intercompany members. When an applicationis populated, Oracle Hyperion EPM Architect populates the ICP (intercompany)dimension with the appropriate members based on the Entity members that areflagged as ICP (intercompany) entities.
Chapter 1Integration Process Overview
1-23

E-Business Suite has two scenarios for mapping source segments to the Entitydimension: 1) an intercompany segment exists in the source chart of accounts, and 2)an intercompany segment does not exist in the source chart of accounts. ForPeopleSoft, the business unit is mapped to the entity and the affiliate is mapped to theICP.
The properties set by Oracle Hyperion Financial Data Quality Management, EnterpriseEdition are shown below. (Any properties not set are defaulted by the application orPerformance Management Architect.
Table 1-4 Entity and Intercompany Required Properties
Property Application Type Population Method/Value
Name Consolidation, System Populated from the code/value in thesource accounting entity.
Description System Populated from the name in thesource accounting entity.
IsICP Consolidation If the intercompany segment exists inthe source, then this flag is setautomatically per the rules defined.
If the intercompany segment doesnot exist, then you specify how thisproperty is set. See Entity andIntercompany.
For ICP transaction data to loadcorrectly, you must manually set theproperty ISICP="Y" for thoseaccounts participating in ICP. InPerformance Management Architect,you can use the Property Grid tomodify the property. If usingFinancial Management Classicapplication administration, extract themetadata, update, and then re-importit back. After modifying the property,you can load data correctly for ICPtransactions.
Currency Consolidation, Essbase, Planning For Financial Management targetapplications:
The entity currency is set based onthe default defined in the mappingrule for the Entity dimension. (Allmembers are assigned the samecurrency.) As the administrator,ensure that the functional currency ofthe source is consistent with thedefault Entity currency.
Note:
These are the only properties that are set as part of the FDMEE integration, allothers are defaults when you create new members. If a property was originallyset by FDMEE, and you change it later, the property is overridden.
Chapter 1Integration Process Overview
1-24
ScenarioThe Scenario dimension represents a set of data, such as Budget, Actual, or Forecast.For example, the Actual scenario can contain data from a general ledger, reflectingpast and current business operations. The Budget scenario can contain data thatreflects the targeted business operations. The Forecast scenario typically containsdata that corresponds to predictions for upcoming periods. A Legal scenario cancontain data calculated according to legal GAAP format and rules.
VersionThe Version dimension is specific to EPM applications and usually does not have asource in the source accounting entity. Since it is required, you must specify thenecessary default value in the member mapping by using the "Like" mapping type.When defining the data rule in Oracle Hyperion Financial Data Quality Management,Enterprise Edition, select the desired “Version” to include with the extracted data.Since the Version dimension is not extracted from the source system, it is notnecessary to define specific properties.
ViewThe View dimension represents various modes of calendar intelligence; for example,Periodic, Year-to-Date, and Quarter-to-Date frequencies. Oracle Hyperion FinancialData Quality Management, Enterprise Edition extracts only data that is below thequarter level. You select the view as part of the data rule definition, and when the datais extracted, it includes the View selection as the value for the dimension on each row.See Defining Data Load Rules to Extract Data. Since the View dimension is usuallynot extracted from the source system, it is not necessary to define specific properties.However, before the data extraction process, you must create all members in the Viewdimension manually.
Year and PeriodThe mapping between the source system calendar and the Year and Perioddimensions is managed using the period mapping feature described in Defining PeriodMappings. Before you perform period mapping, create the necessary Year and Periodmembers. In Oracle Hyperion Financial Data Quality Management, Enterprise Edition,you select the calendar periods to include in the data extraction process and on thePeriod Mapping page to define the appropriate target year and target perioddimensions to assign to the data. Since the Year and Period dimensions are notextracted from the source system, you need not define specific properties.
Note:
For Oracle Hyperion Planning applications, it is required that you must have thesame number of children in each branch of the Period dimension. For example,Q4 has October, November, December children and an adjustment period inOracle Hyperion EPM Architect.
Chapter 1Integration Process Overview
1-25
AliasFor Oracle Hyperion Planning and Oracle Essbase, the Alias dimension or table isrequired to support languages. Keep in mind these special considerations:
• The Alias dimension must include a member named "Default."
• If the dimension name is not the same as the Alias name in an Oracle HyperionEPM Architect Planning application, the drill through landing page does not returnany data.
• When creating Alias table members in a dimension, define them with the samename that is displayed in Oracle Fusion, E-Business Suite, or PeopleSoft. This isthe value of the NLS_LANGUAGE column.
CustomThe properties set by Oracle Hyperion Financial Data Quality Management, EnterpriseEdition are shown below. (Any properties not set defaults in the application or inOracle Hyperion EPM Architect.)
Table 1-5 Custom Dimensions Required Properties
Property Application Type Population Method/Value
Name System In E-Business Suite, this value ispopulated from the Segment Name.
In PeopleSoft Enterprise FinancialManagement, this value is populatedfrom the chartfield value.
Description System In E-Business Suite, this value ispopulated from the Segment Value.
In PeopleSoft Enterprise FinancialManagement, this value is populatedfrom the chartfield value.
How Dimensions Are ProcessedFor Oracle Hyperion EPM Architect applications, the dimension extract processpopulates the interface tables with dimension members based on the mapping ruledetails created in Oracle Hyperion Financial Data Quality Management, EnterpriseEdition. For Classic Oracle Hyperion Planning and Oracle Hyperion FinancialManagement applications, the dimension extract process populates dimensionmembers directly into the application based on the mapping rule details created inFDMEE.
As part of the extract process, the dimension members are directly loaded into thetarget Performance Management Architect dimension, with specific properties definedas described in Member Properties Sourced from the Enterprise Resource Planning(ERP) System. In addition to loading dimension members, the related alias entries arealso loaded to provide the appropriate language support.
Shared dimensions from EPMA are not selected directly from the shared library forloading. FDMEE presents the dimensions in the target application for inclusion in ametadata rule, and then updates the shared library automatically when updating the
Chapter 1Integration Process Overview
1-26

target application. Dimensions in the shared library cannot be directly loaded, but mustbe included in a target application to enable loading from an Enterprise ResourcePlanning (ERP) source.
The FDMEE dimension extract process includes:
1. Extracts the general ledger segment or chartfield value sets from the sourcesystem.
• Only general ledger segment value set members or chartfield members thatare relevant to the source chart of account segments or chartfields mapped toClassic Financial Management, or Planning are extracted.
• The members are loaded into a staging table on the target instance. Beforeloading them into the staging table, FDMEE assigns the segment values aprefix defined for the corresponding EPM application dimension.
2. Processes dimensions mapped to single segments or chartfields.
For Classic applications, dimensions are loaded directly into the target application.The interface tables for dimensions map to a single general ledger segment orchartfield. This consists of filtering the data from the staging table loaded in step 1,on the basis of the segment value set mapped to a particular dimension, andloading the corresponding dimension member interface table and dimensionmember property array table (for aliases).
In most cases, dimensions are mapped as a single segment in Fusion and E-Business Suite source systems or single chartfield in PeopleSoft source systemsfrom the source chart of accounts to a target dimension and you select the startingnode in the source dimension as the basis for the new dimension.
3. Processes the dimensions mapped to multiple segments or chartfields.
For Performance Management Architect, the member interface tables arepopulated for the dimensions mapped from more than one E-Business Suitegeneral ledger chart of accounts segment or PeopleSoft chartfield. The individualsegment values must be concatenated to create the dimension member values.
The dimension extract process creates the required member entries, properties,and alias entries if they exist in the source system, and then applies defaults tothose properties if they do not exist. Users should update member properties if thesource system value was unavailable or in cases where a different value isdesired.
In some cases, you can sometimes create target dimension members based onthe concatenation of one or more source segments. When dimensions aremapped as a concatenated segment, the new dimension is created based on auser-defined traversal order of the source hierarchies into the concatenatedmember target hierarchy.
How Languages Are ProcessedAs part of the source system registration, Oracle Hyperion Financial Data QualityManagement, Enterprise Edition gets the list of available source system languages, inaddition to the base language. The base language is typically the language selectedwhen the Enterprise Resource Planning (ERP) source system is installed. Additionalavailable languages that are not the base language are referred to as the “enabledlanguages.”
Chapter 1Integration Process Overview
1-27

Languages from the source system that are mapped to the languages defined in thetarget application are independent of the languages available for selection via theFDMEE browser selection. The languages available in the browser might be differentfrom the languages available in the Enterprise Resource Planning (ERP) sourcesystem and the target EPM application. For information on languages that FDMEEsupports, see the Oracle Hyperion Enterprise Performance Management SystemCertification Matrix.
When you register a target application for use with FDMEE, the Default Languagecolumn on the Target Application Registration page is used as follows:
• The languages displayed in the Default Language drop-down list are FDMEEsupported languages. These languages are mapped behind the scenes to theEnterprise Resource Planning (ERP) source system languages.
• The Alias dimension in Oracle Essbase and Oracle Hyperion Planning applicationshas a required "Default" member. The FDMEE language that you select whenregistering a target application is automatically mapped to the "Default" member.Because the FDMEE language is mapped to the source language for the memberdescription, you map the base or enabled source language in the source system tothe "Default" alias member. During processing, all other languages are mapped tothe other alias members as long as the alias member exactly matches the FDMEEsource language for the member description.
Note:
Language processing is the same for Essbase and Planning applications.
Note:
Oracle Hyperion Financial Management languages are processed based on thedefault language that you select on the Target Application Registration page.
See Registering Target Applications.
How Currencies Are ProcessedWhen you define a data rule, you can specify how to extract exchange rates from theEnterprise Resource Planning (ERP) source system. If your target application has themulti-currency option enabled, you can specify how to process exchange rates.
All rates are extracted and inserted into the AIF_HS_EXCHANGE_RATES table. Thistable is populated using the ISO currency code for each currency from the sourcesystem. The ISO numeric code is not used in this processing.
Exchange rates are pushed into Oracle Hyperion Planning or Oracle HyperionFinancial Management based on a match between the ISO currency code in theAIF_HS_EXCHANGE_RATES table and the currencies defined in the multi-currencyPlanning or Financial Management application. (It is important to set up the currenciesin the Planning or Financial Management application with ISO currency codes.) Then,perform any currency conversions with those rates, as nothing is recalculated as partof this process.
Chapter 1Integration Process Overview
1-28

Any data that is coming in with the default currency of the application is loaded tolocale.
Note:
Intersection checks are not performed on exchange rates. In addition, youcannot drill through on exchange rates.
Defining Metadata RulesYou can create metadata rules once and rerun the rules as necessary.
For general ledger source systems:
• For Fusion and E-Business Suite source systems, the chart of accounts is thecollection of general ledger segments with various value sets, which are mappedto the dimensions to pull the dimension members and hierarchies.
• Similarly for PeopleSoft Enterprise Financial Management, the chartfields aremapped to the dimensions to pull the dimension members and hierarchies.
Note:
Metadata rules are not used in Oracle Hyperion Financial Data QualityManagement, Enterprise Edition integrations with human resources sourcesystems.
Before you define metadata rules:
• Ensure that your source system data does not include special characters, whichare not supported in Oracle Hyperion Financial Management target applications.
• Register your source systems and target applications for use with FDMEE. See Registering Enterprise Resource Planning (ERP) Source Systems and RegisteringTarget Applications.
• Select the source accounting entities in the registered source system. See Selecting Source Accounting Entities.
• Define the import format. See Working with Import Formats.
• Define the location. See Defining Locations.
Note:
Oracle Hyperion EPM Architect supports Shared and Local dimensions.FDMEE also supports Shared and Local dimensions in applications.
At a high level, follow this process to define metadata rules:
1. Create the metadata rule.
Chapter 1Integration Process Overview
1-29
2. Select the dimension.
3. Define the mapping details and determine how you want to handle intercompanysegments.
4. Define dimension attributes. See Defining Dimension Attributes.
5. Optional: Define the segment hierarchies or chartfield trees to be extracted.
6. Save and run the metadata rule.
7. Optional: Check the status of the rule. See Viewing Process Details.
To create metadata rules:
1. On the Workflow tab, under Metadata, select Metadata Rule.
Note:
You cannot create multiple metadata rules for the same ledger or businessunit for each target application.
2. From the POV bar, select the location to use for the metadata rule.
3. Click Add.
A blank line is displayed at the top of the Dimension Mappings summary grid.
4. In the Mapping details area, from Dimension, select the dimension.
The dimensions listed are based on the import format.
When a Dimension is selected, the Dimension Classification field prefills.
5. Define the mapping details for each dimension that you select.
6. Repeat steps 4-5 for each dimension.
7. Click Save.
Defining the Metadata Rule DetailsSingle segment or chartfield mappings define a simple one-to-one mapping betweensource and target dimension members. When you create single segment or chartfieldmappings, you can optionally define:
• A member prefix or suffix type and value
• Segment hierarchies to extract from the source system
• Orphan member handling
• Statistical Account handling
To define the mapping details:
1. Optional: In Prefix/Suffix Type, select Prefix or Suffix.
2. In Prefix/Suffix Value, enter the member prefix or suffix.
Member prefixes are inserted before the source member code. Although optional,it is important to prefix the segment values with a prefix defined for thecorresponding dimension when those members do not exist in the targetapplication.
Chapter 1Integration Process Overview
1-30

Member suffixes are inserted after the source member code.
Note:
When you perform the next steps to define the hierarchy region startingparent, consider that Oracle Hyperion Planning, Oracle Essbase, andOracle Hyperion Financial Management do not allow members to roll up tothe parent under the same root. When extracting, specify hierarchies whereevery node has one parent. Fusion and E-Business Suite support instanceswhere a segment value can roll up to two parents.
3. Select Concatenate Name to Alias to concatenate the Name and Alias.
4. From EPMA Option, select the EPMA metadata load option.
Metadata load options:
• Merge as Primary—Merge as Primary processes all sections and adds newdimensions, members, relationships, properties and associations that exist inthe source, but do not exist in the Shared Library or target application. Nodimensions, members, relationships, properties, or associations are removed.If a dimension, relationship, member, or property specified in the source existsin the Shared Library or target application it is overwritten with the valuespecified in the source. (Members are not moved, but overwritten.) Propertiesnot included in the source are unchanged in the Shared Library or targetapplication.
Note:
If a member has multiple instances in a dimension, the IsPrimarycolumn specifies which instance is primary and which instances areshared. The IsPrimary parameter is optional; however, Oracle stronglyrecommend that you use it. If left undefined, it defaults to “True,” whichassumes that the member is primary. If you do not define the IsPrimaryparameter or when there are duplicate members defined as primary, awarning is displayed in the Import Results file.
• Merge as Move—This mode processes only members with IsPrimary set totrue, and ignores any others. During processing, the first line specifying aprimary location for a member is executed, any subsequent lines specifying adifferent primary location are ignored, and a warning message is displayed.
• Replace—All new elements are added and all property updates are made.Then, any members or member relationships that are not specified in thesource are deleted from the Shared Library or target application. You can alsouse replace mode to reorder members under a parent. Properties not includedin the source are unchanged in the Shared Library or target application.
This mode does not create Shared members unless they are defined in theimport file (IsPrimary=false). This mode can detect a primary member under anew parent and process it as a move.
Chapter 1Integration Process Overview
1-31
Note:
The Replace option does not display the Reorder Type and ReorderExisting Members options.
5. For Fusion and E-Business Suite source systems:
a. For Planning and Essbase applications—Account dimension mapping details.Select the Time Balance Property for Balance Sheet Accounts and TimeBalance Property for Income Statement Accounts.
The time balance property specifies how the value of summary time periods iscalculated. If set to Flow, it is an aggregate of all values for a summary timeperiod as a period total. If the time balance property is set to "Balance," it isconsidered an ending value in a summary time period for the period total.
b. From the Hierarchy Region tab, click Add to define the hierarchy region.
c. Click or enter the Starting Parent.
d. Select Base Hierarchy.
The base hierarchy indicates the part of the hierarchy that is the base, andthose parts of the hierarchy that share the same parent. All nonsharedmembers of base hierarchies have the “Store Data” property set. However,shared members cannot be set to “Store Data.”
e. Select a prefix or suffix for the hierarchy, and then enter a prefix/suffix value.
The parent prefix is applied only to the parent. To enable alternate rolluphierarchies, the Prefix/Suffix value applies only to parent members. Parentmembers cannot be shared and must have a unique name. In addition, parentmembers do not store data.
6. For PeopleSoft source systems:
a. From the Hierarchy Region tab, click Add to define the hierarchy region tree.
b. In Tree, enter the tree name for the hierarchical structure.
Trees depict hierarchical structures that represent a group of summarizationrules for a particular database field. For example, a tree can specify how yourmanufacturing locations should be summarized, or rolled up, for reportingpurposes. A tree can also show the reporting relationships within anorganization by specifying which individual department should be summarizedinto territories, territories into regions, and regions into countries. Similarly, atree can categorize items in a catalog.
c. in Effective Date, specify the effective date of the tree.
Using effective dates with trees enables you to specify new objects,departments, reporting relationships, or organizational structures in advanceand have them take effect automatically. You can also use trees with past,present, or future effective dates when reporting on current or historic data.
d. Click or enter the Starting Parent.
e. Select Base Hierarchy.
In a base hierarchy, other parts of the hierarchy that share a parent areshared. They cannot be set to "Store Data." Unshared members; however,
Chapter 1Integration Process Overview
1-32
have the "Store Data" property set. All nonshared members of basehierarchies have the “Store Data” property set. However, shared memberscannot be set to “Store Data.”
f. Select a prefix or suffix for the hierarchy, and then enter a prefix/suffix value.
The parent prefix is applied only to the parent. To enable alternate rolluphierarchies, the Prefix/Suffix value applies only to parent members. Parentmembers cannot be shared and must have a unique name. In addition, parentmembers do not store data.
g. From Select how to process source orphan members, select the methodfor handling orphan members:
• Ignore—No orphan members from the source are extracted.
• Create as Root Member—Root members are created, and orphanmembers are not. All members are created at the top level of thehierarchy.
• Create as Children of—Orphan members are placed as children of themember specified in the entry field to the right "Create as Children offield."
7. Planning only: Select the Plan Type for the Accounting and Entity dimensions.
8. Financial Management only: If you are mapping an Entity dimension, enter thefollowing details for intercompany segments, depending on your source system:
• Intercompany Segment Value
• For Intercompany Default, select Yes or No.
In the scenario where the Intercompany segment is defined, the Intercompanytransactions are identified based on the Intercompany segment. Typically, one setof natural accounts is required for accounting the receivable and payable amongthe Intercompanies.
In the scenario where there is no Intercompany segment, identify theIntercompany transactions based explicitly on the natural account segment.Typically, all combinations of receivable and payable accounts exist among thetransacting partner companies. Only with these natural accounts are thereceivable and payable positions between the Intercompanies known.
9. Click Save.
Defining Dimension AttributesThe Attribute tab provides a table with a list of attributes for dimension. For eachattribute, you can specify a default value. Note that the attributes vary by applicationtype and dimension as shown below.
Note:
The default values are not validated. Refer to your application documentationfor valid values.
Chapter 1Integration Process Overview
1-33

Table 1-6 Dimension Attributes by Application Type
Application Type Dimension Attribute
Planning Account Time Balance for Balance Sheet
Time Balance for Income Statement
Data Storage Parent (sets the defaultfor a parent node that you want tomake different from the child node. Insome cases, the child and parentdata storage attributes are not thesame, and this lets you specify theappropriate default for this attributefor a parent.)
Data Storage
Expense Reporting
Account Type
HFM Account Consolidation Account Type
Custom 1 Top Member
Custom 2 Top Member
Custom 3 Top Member
Custom 4 Top Member
HFM Entity IsICP
Currency
Essbase Account
To specify metadata attributes for a Peoplesoft source system:
1. From the Attribute tab, click Add.
2. In Time Balance for Balance Sheet, Time Balance for Income Statement, andExpense Reporting, specify how the value of the summary time periods iscalculated.
"Flow" it is an aggregate of all values for a summary time period as a period total.If the time balance property is set to "Balance," then it is considered an endingvalue in a summary time period for the period total.
To use the system default, click Use System Default.
To specify a custom default value:
1. Select the Attribute tab.
2. Enter the default value for the attribute.
3. To use the custom default value, clear the Use System Default field.
4. Click Save.
Managing Metadata RulesYou can perform the following tasks:
• Edit metadata rules—See Editing Metadata Rules.
• Run metadata rules—See Running Metadata Rules.
Chapter 1Integration Process Overview
1-34

• Check the metadata rule process details—See Deleting Metadata Rules.
• Delete dimension mappings or hierarchies in metadata rules—See Checking theMetadata Rule Status.
Editing Metadata Rules
If the metadata rule is not running, you can modify the rule.
To edit metadata rules:
1. On the Workflow tab, under Metadata, select Location.
2. Enter the Location Name or click to select the location.
3. Add or modify the dimension mappings or mapping details as necessary.
4. Click Save.
Running Metadata Rules
You can run the metadata rule to load updates and push the metadata into the targetapplication. All submitted rules are processed by Oracle Data Integrator.
To submit the metadata rule:
1. On the Workflow tab, under Metadata, select Metadata Rule.
2. In Metadata, enter the Location Name or click to select the location.
3. Select the metadata rule.
4. Click Execute, and then click OK.
Checking the Metadata Rule Status
After you run a metadata rule, you can check the status on the Process Details page.You can click the Status icon on the Metadata page to link to the Process Details pageand view the process details. See Viewing Process Details.
Tip:
You can also check the status of the rule in Oracle Data Integrator.
Deleting Metadata Rules
You can delete dimension mappings or hierarchies in the mapping details for metadatarules created in Oracle Hyperion Financial Data Quality Management, EnterpriseEdition.
To delete dimension mappings or hierarchies in a metadata rule:
1. On the Workflow tab, under Metadata, select Metadata Rule.
2. In Metadata, enter the Location Name or click to select the location.
3. Select the row in the Dimension Mappings or Hierarchy Region area.
Chapter 1Integration Process Overview
1-35
4. Click Delete.
Loading Source System Hierarchies into EPM DimensionsMetadata within the source system changes over time, as well as the metadata andhierarchies in the target system.
The management of hierarchies is an ongoing process, with frequent changes due toupdates in business functions and organizations. When managing hierarchies betweensource and target systems, users generally create new hierarchies, replace oldhierarchies with new hierarchies or update hierarchies.
Managing hierarchies between systems becomes difficult because of the size of thehierarchies, the latency between system updates, and the needs of operationalsystems versus analytical systems. When managing hierarchies as part of the generalledger integration process, consider:
• The only operations between hierarchy management in the source system andtarget application are creating and updating the hierarchies by merging in thetarget. Oracle Hyperion Financial Data Quality Management, Enterprise Editionnever deletes hierarchies or members in a target application. If additionalmembers or hierarchies are not specified, FDMEE ignores them.
• When you integrate a hierarchy from the source system to the target system,select the node from the source that serves as the root node in the target.
• The integration pushes the hierarchy into the target system and reports any errorsencountered during the process.
You can use the Process Details page to view errors logged in FDMEE. You canalso select the Log link to review the Oracle Data Integrator log file. For OracleHyperion EPM Architect applications, you can also view profile creation errors inthe Job Console. See Viewing Process Details or the appropriate productdocumentation for additional information.
• A hierarchy selection in the dimension mapping is optional; however, you must atleast determine how to handle members not in a hierarchy. For example, you cancreate children of a selected node as orphans, or you can choose not to carry overorphans. (This option applies only to Performance Management Architect).
Extracting Human Resource DataFollow this process to extract metadata and data from human resource sourcesystems into Oracle Hyperion Public Sector Planning and Budgeting targetapplications:
1. Register source systems in Oracle Hyperion Financial Data Quality Management,Enterprise Edition by adding details for Oracle Data Integrator and FDMEE, whichare specific to the PeopleSoft Human Capital Management source system.
2. Register your target application.
3. Select the Source Accounting Entities (Business Units).
4. Create the human resource data load rules.
5. Run human resource data rules to extract data and/or metadata from the sourcesystem and push it into the target applications.
Chapter 1Integration Process Overview
1-36

Data and metadata are staged in the FDMEE staging tables, extracted from thePeopleSoft Human Capital Management source system, and then loaded into thetarget application.
Navigating FDMEEFrom Oracle Hyperion Enterprise Performance Management Workspace, you canaccess Oracle Hyperion Financial Data Quality Management, Enterprise Edition fromthe Navigate menu. (Navigate, Administer, Data Management)
Toolbars
Help MenuUse the Help menu to access Oracle Hyperion Financial Data Quality Management,Enterprise Edition online help, Oracle technical support, the EPM documentationlocated on the Oracle Technology Network, Oracle website, and information aboutFDMEE.
Task Pane OptionsThe Tasks pane is a resizeable window to the left of Oracle Hyperion Financial DataQuality Management, Enterprise Edition Workspace. It provides easy access toFDMEE options and features. The Tasks pane consists of the Workflow and Setuptabs.
Workflow TasksFrom the Workflow tab, you can integrate metadata and data from an EnterpriseResource Planning (ERP) source system into an Enterprise PerformanceManagement (EPM) target application:
You can also load data from a file and other source systems.
• Data Load
– Data Load Workbench
– Data Load Rule
– Data Load Mapping
• Metadata––Metadata Rule
• HR Data Load––HR Data Load Rule
• Other
– Batch Execution
– Report Execution
– Script Execution
• Monitor––Process Details
Chapter 1Navigating FDMEE
1-37
Setup TasksFrom the Setup tab you can administer source and target systems, specify report andbatch definitions, and manage application settings.
Available tasks:
• Configure
– System Settings
– Application Settings
– Security Settings
– User Settings
• Register
– Source System
– Target Application
– Source Accounting Entity
– Source Adapter
• Integration Setup
– Import Format
– Location
– Period Mapping
– Category Mapping
– Excel Interface
• Data Load Setup
– Logic Group
– Check Rule Group
– Check Entity Group
• Scripts
– Script Editor
– Script Registration
• Reports
– Query Definition
– Report Definition
• Batch––Batch Definition
Working with Data in GridsMost screens display data in one or more grids. To manipulate grid data, perform oneor more actions:
• To add a record, click Add.
Chapter 1Navigating FDMEE
1-38

• To delete, select a record, and then click Delete.
• To delete all records in a grid, click Delete All.
• To edit a record, click within its cell, and start typing. When applicable, you can
also select the value to edit, and then click .
• To search items in a column, enter the search value in the blank field above thecolumn of the value, and then press Enter. If the value is matched, it is displayedas the first item.
• To cancel all changes made to a row, select the row, and then click Cancel.
• To save all changes made to a row, select Save.
FDMEE User Interface ElementsThe following elements are common on Oracle Hyperion Financial Data QualityManagement, Enterprise Edition pages.
Table 1-7 Elements Common on FDMEE Pages
Button Description
Customize your view. Options include:
• Columns—You can choose “Show All” todisplay all columns or choose individualcolumns to display.
• Detach—Use to detach the column grid.When you detach the grid, the columnsdisplay in their own window. To return tothe default view, select View, and thenclick Attach or click Close.
• Reorder Columns—Use to change theorder of the columns that are displayed.You can select a column, and then usethe buttons on the right to change thecolumn order.
Use to detach the column grid. When youdetach the grid, the columns are displayed intheir own window. To return to the defaultview, select View, and then click Attach orclick Close.
Refreshes the data. For example, if you submita rule, refresh to see if the status changesfrom Running to Complete.
Note:
Refresh does notdisplay on theFDMEE setupscreens.
Chapter 1Navigating FDMEE
1-39
Table 1-7 (Cont.) Elements Common on FDMEE Pages
Button Description
Use to toggle the filter row. You can use thefilter row to enter text to filter the rows that aredisplayed for a specific column.
You can enter text to filter on, if available, for aspecific column, and then press [Enter]. Forexample, on the Process Details page, to viewonly processes for a specific location, enterthe name of the location in the Location textbox.
The Query by Example button displays on thefollowing FDMEE setup screens: TargetApplication, Source Accounting Entities,Import Format, Location, Data LoadWorkbench, and Process Details.
To clear a filter, remove the text to filter by inthe text box, and then press [Enter].
All text is case sensitive.
Use to select an artifact on a page, such as atarget application, member, or general ledgerresponsibility. When you click the Searchbutton, the Search and Select dialog box isdisplayed. In some cases available advancedsearch options enable you to enter additionalsearch conditions. See Advanced SearchOptions.
Advanced Search OptionsThe Search button is common to many Oracle Hyperion Financial Data QualityManagement, Enterprise Edition pages. When you select the Search button, if theAdvanced Search button is available, you can enter additional search conditions. Thefields that are displayed in the advanced search options differ depending on whatartifact you are selecting. The following operators are supported:
• Starts with
• Ends with
• Equals
• Does not equal
• Less than
• Greater than
• Less than or equal to
• Greater than or equal to
• Between
• Not between
• Contains
Chapter 1Navigating FDMEE
1-40

• Does not contain
• Is blank
• Is not blank
Using the POV BarFor the Data Load Workbench, the POV bar shows the current:
• Location
• Period
• Category
• Data Rule
By default, only the data rule assigned to the Category POV is displayed.
The Source System and Target Application are displayed as context information.
Selecting the Location POV
To select another Location POV:
1. On the Workflow tab, under Data Load, select Data Load Workbench.
2. From the POV bar, double-click the Location field.
3. In Select Point of View, in Location, enter a full or partial string for the newlocation, and then click OK.
Chapter 1Navigating FDMEE
1-41

4. Optional: To search on another location, from the Location drop-down, clickMore, navigate to the location on the Search and Select: Location screen, andthen click OK.
5. Optional: In Select Point of View, select Set as Default to use the new locationas the default location.
When a POV selection is set as a default, the user profile is updated with thedefault selection.
6. Click OK.
Setting the Period POVThe Oracle Hyperion Financial Data Quality Management, Enterprise Editionadministrator controls which accounting period is active for all users. This featureprevents users from inadvertently loading data into incorrect periods. When you log onto FDMEE, the application identifies the global period value and automatically sets thePOV to the current value.
To select another Period POV:
1. On the Workflow tab, under Data Load, select Data Load Workbench.
2. From the POV bar, double-click the Location field.
3. From Select Point of View, in Period, enter a full or partial string for the newperiod, and then click OK.
4. Optional: To search on another period, from the Period drop-down, click More,navigate to the period on the Search and Select: period screen, and then clickOK.
5. Optional: In Select Point of View, select Set as Default to use the new period asthe default period.
When a new POV selection is set as a default, the user profile is updated with thedefault selection.
6. Click OK.
Setting the Category POVThe Oracle Hyperion Financial Data Quality Management, Enterprise Editionadministrator controls the data category active for all users. This feature preventsusers from inadvertently loading data to incorrect categories.
To select another Category POV:
1. On the Workflow tab, under Data Load, select Data Load Workbench.
2. From the POV bar, double-click the Location field.
3. In Select Point of View, in Category, select the new category, and then click OK.
4. Optional: In Rule, select the rule assigned to the Category POV.
5. Select Set as Default to use the new category as the default category.
When a POV is set as a default, the user profile is updated with the defaultselection.
6. Click OK.
Chapter 1Navigating FDMEE
1-42
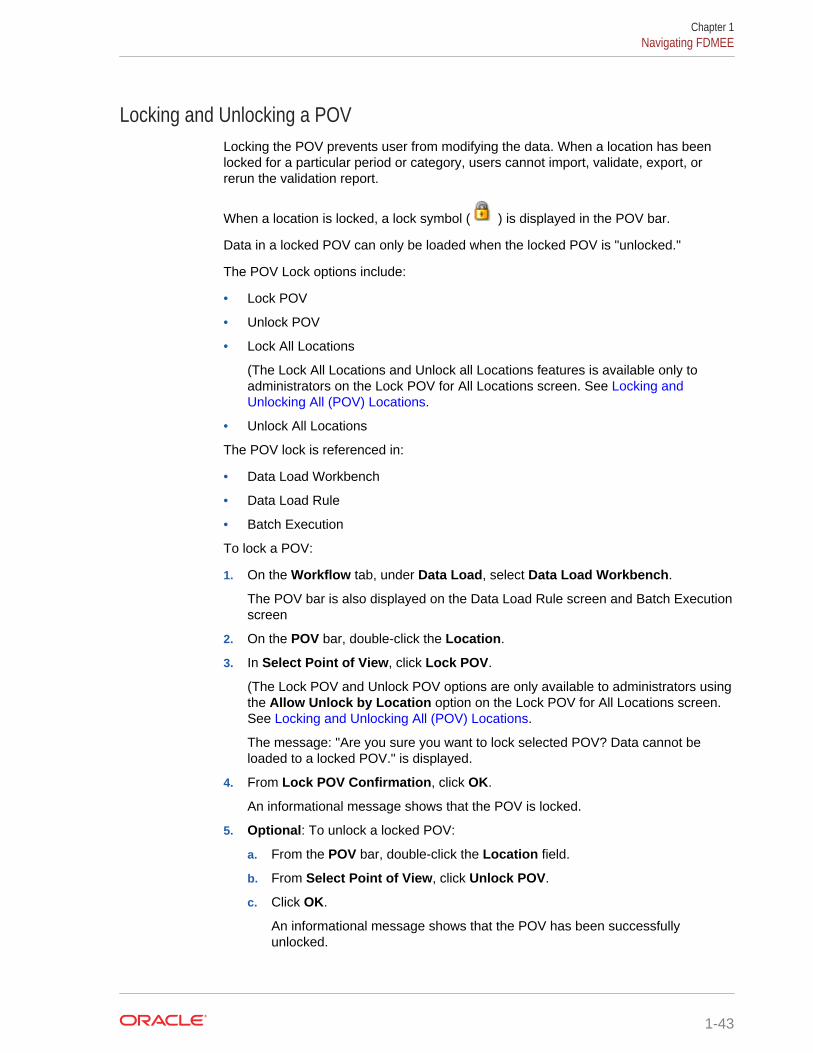
Locking and Unlocking a POVLocking the POV prevents user from modifying the data. When a location has beenlocked for a particular period or category, users cannot import, validate, export, orrerun the validation report.
When a location is locked, a lock symbol ( ) is displayed in the POV bar.
Data in a locked POV can only be loaded when the locked POV is "unlocked."
The POV Lock options include:
• Lock POV
• Unlock POV
• Lock All Locations
(The Lock All Locations and Unlock all Locations features is available only toadministrators on the Lock POV for All Locations screen. See Locking andUnlocking All (POV) Locations.
• Unlock All Locations
The POV lock is referenced in:
• Data Load Workbench
• Data Load Rule
• Batch Execution
To lock a POV:
1. On the Workflow tab, under Data Load, select Data Load Workbench.
The POV bar is also displayed on the Data Load Rule screen and Batch Executionscreen
2. On the POV bar, double-click the Location.
3. In Select Point of View, click Lock POV.
(The Lock POV and Unlock POV options are only available to administrators usingthe Allow Unlock by Location option on the Lock POV for All Locations screen.See Locking and Unlocking All (POV) Locations.
The message: "Are you sure you want to lock selected POV? Data cannot beloaded to a locked POV." is displayed.
4. From Lock POV Confirmation, click OK.
An informational message shows that the POV is locked.
5. Optional: To unlock a locked POV:
a. From the POV bar, double-click the Location field.
b. From Select Point of View, click Unlock POV.
c. Click OK.
An informational message shows that the POV has been successfullyunlocked.
Chapter 1Navigating FDMEE
1-43

Administration TasksThese sections describe how to perform key operations in Oracle Hyperion FinancialData Quality Management, Enterprise Edition.
Predefining a List of ProfilesOracle Hyperion Financial Data Quality Management, Enterprise Edition uses apredefined list of profiles. You can define values for these profiles to accommodatevarious business needs. Profiles can be set at the following levels:
• System (applies to the entire system)
• Application (applies to specific target application)
• User (applies to a specific user)
• Security (Role, Report, Batch, Custom Script, and Location)
Setting System-Level ProfilesUse the System Settings Option to update or clear System level profiles that apply toentire system.
To define system settings:
1. On the Setup tab, under Configure, select System Settings.
2. In System Settings, in Profile Type, select the specific profile to list on theSystem Settings screen.
Available profile types:
• All
• File—In addition to file-specific system settings, selecting the File profile typedisplays the "Create Application Folders" button. This feature instructs thesystem to create a folder structure in the path specified in the Application RootDirectory setting.
• ODI—Use to set ODI password and repository connection information. Whenthis information gas been added or changed, you can click Check ODIConnection to view if connection to the ODI agent was made successfully.
• Other—Use to set profiles associated with an EPMA data source, UserLanguage, User Interface Theme, and Default Check Report.
• Point-of-View
The profile type that you select determines the settings that you can add or modifyon the screen.
3. Select the option and add the new value in Value.
If is displayed in the Select field, you can search on the value.
Chapter 1Administration Tasks
1-44

Note:
When you install and configure Oracle Hyperion Financial Data QualityManagement, Enterprise Edition, Oracle Data Integrator is automaticallyinstalled and configured for you. The database for Oracle Data Integrator isin the same database as FDMEE and the Oracle Data Integrator agentdeployed to the FDMEE Managed Server. You should be familiar withOracle Data Integrator and review the Oracle Data Integratordocumentation set before specifying or changing the installation defaults.
4. Click Save.
Table 1-8 System Setting Profile Options
Profile Type Profile Option Profile Description
All Includes all profile types
Chapter 1Administration Tasks
1-45
Table 1-8 (Cont.) System Setting Profile Options
Profile Type Profile Option Profile Description
File Application Root Folder The Application Root Directory mustbe set up on the server, specified inthis field, and the CreateApplication Folder option must beexecuted as first steps when usingFDMEE.
The Application Root folder identifiesthe root directory of the FDMEEapplication. This folder is located onthe FDMEE server and functions asthe root folder for all FDMEEactivities. Based on this parameter,FDMEE saves log files, generatedfiles and reports to the appropriatefolder under this root directory.Parameters must be set up on theserver separately from this setupstep.
When you select the File profile type,the System Setting screen displaysthe Create Application Folderbutton. This feature instructs thesystem to create a folder structure inthe path specified in this field. Thefolder structure is (with sub-folders ineach):
datainbox
outbox
Within the inbox, locations arecreated when they are added in theLocations option. See also FDMEEApplication Folder Architecture.When you specify a folder at theapplication level, and select theCreate Application Folders option,a set of folders is created for theapplication that includes a scriptsfolder. Create scripts specific to anapplication in this folder. This isespecially important for event scriptsthat are different betweenapplications. If you do not set up anapplication level folder, then youcannot have different event scriptsby application.
If you specify a Universal NamingConvention (UNC) path, sharepermissions on the folder must allowaccess to the DCOM user for read/write operations. Use a UniversalNaming Convention (UNC) path forthe application root folder whenOracle Hyperion Financial
Chapter 1Administration Tasks
1-46
Table 1-8 (Cont.) System Setting Profile Options
Profile Type Profile Option Profile Description
Management and FDMEE are onseparate servers. Contact yourserver administrator to define therequired UNC definition.
If an UNC path is not entered, thenyou must enter the absolute path.For example, specify C:\Win-Ovu31e2bfie\fdmee
File Create Location Folder This setting instructs the system tocreate a location folder in the inboxwhen a location is created. Availablevalues are Yes or No. Set this optiononce and do not change it. Thissetting is optional but recommended.
File Archive Mode Specifies whether archived files arecopied or moved to the archivelocation. Enter Copy, Move, orNone.
If you select Copy, then the file is leftin the inbox.
If you select Move, then the file iscopied to the archive folder anddeleted from the inbox.
The folder named data is the archivefolder.
When the file is moved to the archivelocation, it is renamed as follows:<ProcessID><Year><Month><Day>.<OriginalExtension>
For example, if the source file nameis BigFile.csv, and it was loaded forperiod Mar-07 with a period key of03/01/2007, and if the process idwas 983, then the resulting file nameis 98320070301.csv.
File Excluded File Upload Wild Cards Specify file extensions that cannot beuploaded.
Enter *.* to disallow all file uploads.
Chapter 1Administration Tasks
1-47

Table 1-8 (Cont.) System Setting Profile Options
Profile Type Profile Option Profile Description
File Batch Size Specify the number of rows read at atime from the file to memory. Thisparameter is mainly used forperformance. When data is loaded,this setting determines how manyrecords are stored in the cache. Forexample, when 1000 is specified; thesystem stores 1,000 records incache. Similarly, when 5000 isspecified, the system stores 5,000records in cache and commit.Determine this setting by ServerMemory, and adjust as needed.
File File Character Set Specify the method for mapping bitcombinations to characters forcreating, storing, and displaying text.
Each encoding has a name; forexample, UTF-8. Within an encoding,each character maps to a specific bitcombination; for example, in UTF-8,uppercase A maps to HEX41.
Click to view available charactersets.Encoding refers to mapping bitcombinations to characters forcreating, storing, and displaying text.
Convert the encoding to UNICODE ifyour source file is not in one of thesupported formats.
File Encrypted Password Folder Specify the directory where the filesthat store passwords in encryptedform is located.
This encrypted password folder isused with the “Update ConfigurationFile” button. See Working with BatchScripts.
ODI ODI User Name Specifies the Oracle Data Integratoruser name used to access theOracle Data Integrator masterrepository. For example, enterSupervisor.This setting is defined automaticallywhen ODI is configured, but you cancustomize it if necessary.
Chapter 1Administration Tasks
1-48

Table 1-8 (Cont.) System Setting Profile Options
Profile Type Profile Option Profile Description
ODI ODI Password Specifies the Oracle Data Integratordatabase schema used to access theOracle Data Integrator masterrepository. For example, enterMaster.This setting is defined automaticallywhen ODI is configured, but you cancustomize it if necessary.
ODI ODI Execution Repository Specifies the repository where allscenarios are stored. For example,enter ERPI_REF.
This setting is defined automaticallywhen ODI is configured, but you cancustomize it if necessary.
ODI ODI Work Repository Specifies the (execution) repositorywhich contains runtime objects (forexample, scenarios). The workrepository can be linked with onlyone Master Repository.
For example, enterFDMEE_WORK_REF.
ODI ODI Master Repository Driver Specifies the driver of the ODImaster repository.
This setting is defined automaticallywhen ODI is configured, but you cancustomize it if necessary.
ODI ODI Master Repository URL Specifies the URL of the serverwhere the Oracle Data Integratormaster repository is installed.
This setting is defined automaticallywhen ODI is configured, but it can becustomized if necessary.
For example, enterjdbc:oracle:thin:@serverdatabase.oracle.com:1521:orcl.
ODI ODI Master Repository User Specifies the Oracle Data Integratormaster repository user name.
This setting is defined automaticallywhen ODI is configured, but you cancustomize it if necessary.
ODI ODI Master Repository Password Specifies the Oracle Data Integratormaster repository password.
This setting is defined automaticallywhen ODI is configured, but you cancustomize it if necessary.
Other EPMA Data Source Name Specifies the EPMA Data Sourcename for the EPMA Interface DataSource.
Chapter 1Administration Tasks
1-49

Table 1-8 (Cont.) System Setting Profile Options
Profile Type Profile Option Profile Description
Other User Language Specify the system default languageof the user version of FDMEE.
FDMEE uses the user language toquery the language data, forexample, column titles, segmentname, and so on.
Other User Interface Theme The default theme contains all thecolors, styles, and general-use iconsthat are displayed in the userinterface. FDMEE uses BLAF+ asthe default value.
Other Default Check Report Specify the type of Check Report touse as the default check report. Thefollowing are pre-seeded checkreports, but you can create a newone and specify it here:
• Check Report—displays theresults of the validation rules forthe current location (pass or failstatus).
• Check Report Period Range(Cat, Start per, End per)—Displays the results of thevalidation rules for a categoryand selected periods.
• Check Report by Val. EntitySeq.—Displays the results of thevalidation rules for the currentlocation (pass or fail status);sorted by the sequence definedin the validation entity group.
• Check Report with Warnings—Displays the results of thevalidation rules for the currentlocation. Warnings are recordedin validation rules and shown ifwarning criteria are met. Thisreport does not show rules thatpassed the validation.
Other Default Intersection Report Specify the type of IntersectionCheck Report to use as the defaultintersection check report at thesystem level. Intersection reportsidentify data load errors and aregenerated as part of the datavalidation step in the Data LoadWorkbench. The reports areavailable in two formats: DynamicColumn or Fixed Column format. TheFixed Column displays up to fourcustom dimensions.
Chapter 1Administration Tasks
1-50
Table 1-8 (Cont.) System Setting Profile Options
Profile Type Profile Option Profile Description
Other Batch Timeout in Minutes When a batch job is run in syncmode (immediate processing),specify the maximum time the jobcan run. In sync mode, FDMEE waitsfor the job to complete beforereturning control.
Other Enable Event Script Execution Select Yes to enable the executionof application events such as beforeloading data (BefLoad) or aftervalidation (AftValidate). Select No todisable the execution of applicationevents.
Other SQL Server Database Provider Specify the name of the SQL Serverdatabase provider.
Available SQL Server databaseproviders:
• SQLOLEDB• SQLNCLI10 (SQL Server 2008)• "Need Name" (SQL Server
2012)
Other Log Level Specify the level of detail displayedin the logs. A log level of 1 shows theleast detail. A log level of 5 showsthe most detail.
Logs are displayed in ProcessDetails by selecting the Log link.
Other Check Report Precision Specify the total number of decimaldigits for rounding numbers, wherethe most important digit is the left-most nonzero digit, and the leastimportant digit is the right-mostknown digit.
Other Display Data Export Option "OverrideAll Data"
Specify Yes to display the OverrideAll Data option in the Export Modedrop-down located on the ExecuteRule screen.
When you select to override all data,the following message is displayed"Warning: Override All Data optionwill clear data for the entireapplication. This is not limited to thecurrent Point of View. Do really wantto perform this action."
Other Enable Map Audit Set to Yes to create audit records forthe Map Monitor reports (MapMonitor for Location, and MapMonitor for User). The default valuefor this setting is No.
Chapter 1Administration Tasks
1-51

Table 1-8 (Cont.) System Setting Profile Options
Profile Type Profile Option Profile Description
Other Access to Open Source Document When drilling down to the FDMEElanding page, this setting determinesaccess to the Open SourceDocument link (which opens theentire file that was used to loaddata).
• Administrator—Access to OpenSource Document link isrestricted to the administratoruser.
• All Users—Access to the OpenSource Document link isavailable to all users. All Usersis the default setting.
Other Map Export Delimiter Sets the column delimiter valuewhen exporting member mappings.
Available delimiters are:
• ! (exclamation mark)• , (comma)• ; (semi-colon)• | (pipe)
POV Default POV Location Specifies the default POV location.
These preferences take precedencewhen no equivalent settings are inApplication Settings or User Settings.
POV Default POV Period Specifies the default POV Period.
These preferences take precedencewhen no equivalent settings are inApplication Settings or User Settings.
POV Default POV Category Specifies the default POV Category.These preferences take precedencewhen no equivalent settings are inApplication Settings or User Settings.
POV Global POV Mode When this is set to Yes, other POVs(Application Level and User LevelPOVs) are ignored.
Setting Application-Level ProfilesUse the Application Settings option to update or clear application-level profiles thatapply to the target application.
To set an application level profile:
1. On the Setup tab, under Configure, select Application Settings.
2. In Application Settings, in the Target Application drop-down, select the targetapplication to which the application profile applies.
3. Select application level profile settings.
4. Optional: To clear a setting, select the value, and then click Delete.
Chapter 1Administration Tasks
1-52

The value is removed but is deleted only when you save it.
5. Click Save.
Table 1-9 Application Level Profile Options
Option Description
Application Root Folder The Application Root folder is the root folderfor storing all files used to load data to thisEPM application. You can use a separate rootfolder for each EPM application.
Based on this parameter, Oracle HyperionFinancial Data Quality Management,Enterprise Edition saves log files, generatedfiles and reports to the appropriate folderunder this root directory. Parameters must beset up on the server separately from this setupstep.
Selecting the Create Application Folderbutton instructs the system to create a folderstructure in the path specified in this field. Thefolder structure is (with sub-folders in each):
datainbox
outbox
When you specify a folder at the applicationlevel, and select the Create ApplicationFolder option, a set of folders is created forthe application that includes a scripts folder.Create scripts specific to an application in thisfolder. This is especially important for eventscripts that are different between applications.If you do not set up an application level folder,then you cannot have different event scripts byapplication.
If you specify a Universal Naming Convention(UNC) path, share permissions on the foldermust allow access to the DCOM user for read/write operations. Use a Universal NamingConvention (UNC) path for the application rootfolder when Oracle Hyperion FinancialManagement and FDMEE are on separateservers. Contact your server administrator todefine the required UNC definition.
If an UNC path is not entered, then you mustenter the absolute path. For example, specifyC:\Win-Ovu31e2bfie\fdmee
Chapter 1Administration Tasks
1-53
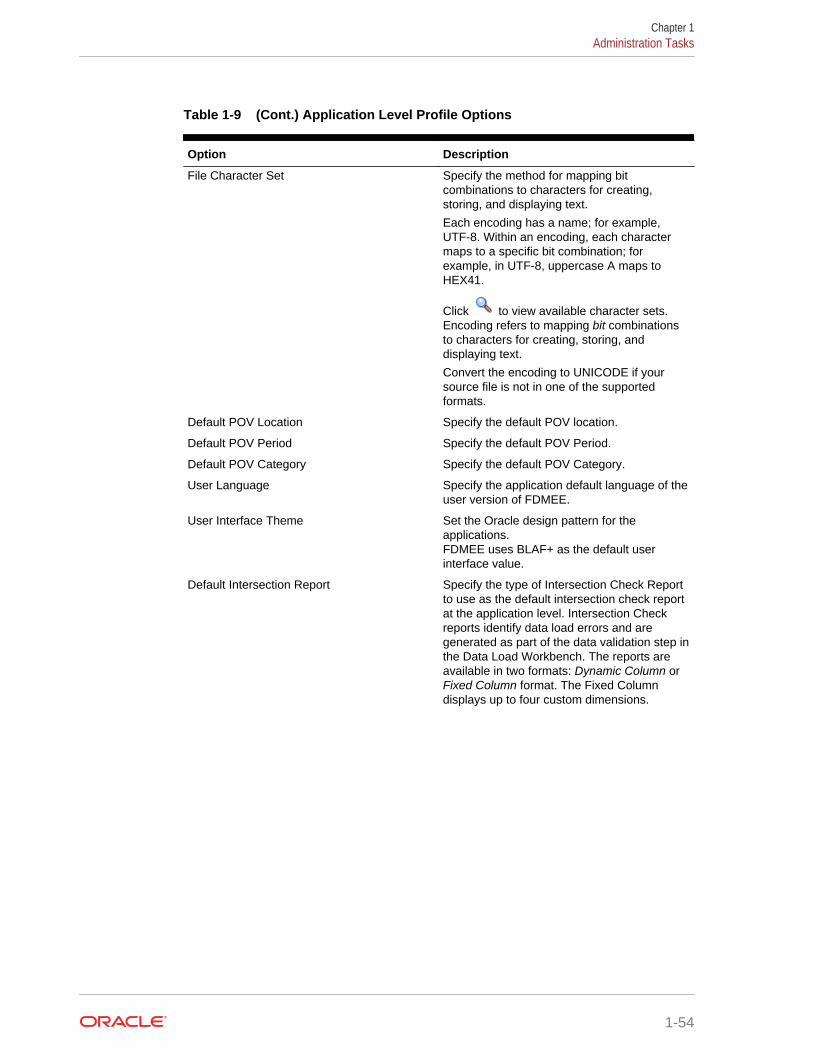
Table 1-9 (Cont.) Application Level Profile Options
Option Description
File Character Set Specify the method for mapping bitcombinations to characters for creating,storing, and displaying text.
Each encoding has a name; for example,UTF-8. Within an encoding, each charactermaps to a specific bit combination; forexample, in UTF-8, uppercase A maps toHEX41.
Click to view available character sets.Encoding refers to mapping bit combinationsto characters for creating, storing, anddisplaying text.
Convert the encoding to UNICODE if yoursource file is not in one of the supportedformats.
Default POV Location Specify the default POV location.
Default POV Period Specify the default POV Period.
Default POV Category Specify the default POV Category.
User Language Specify the application default language of theuser version of FDMEE.
User Interface Theme Set the Oracle design pattern for theapplications.FDMEE uses BLAF+ as the default userinterface value.
Default Intersection Report Specify the type of Intersection Check Reportto use as the default intersection check reportat the application level. Intersection Checkreports identify data load errors and aregenerated as part of the data validation step inthe Data Load Workbench. The reports areavailable in two formats: Dynamic Column orFixed Column format. The Fixed Columndisplays up to four custom dimensions.
Chapter 1Administration Tasks
1-54
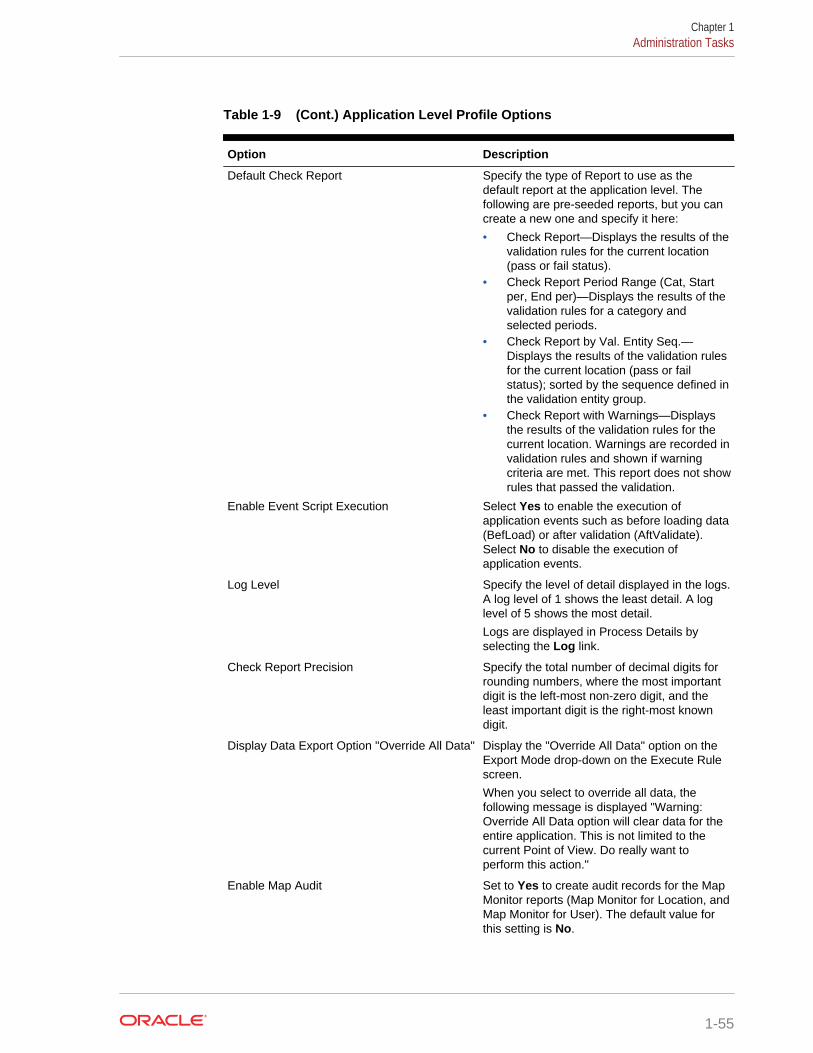
Table 1-9 (Cont.) Application Level Profile Options
Option Description
Default Check Report Specify the type of Report to use as thedefault report at the application level. Thefollowing are pre-seeded reports, but you cancreate a new one and specify it here:
• Check Report—Displays the results of thevalidation rules for the current location(pass or fail status).
• Check Report Period Range (Cat, Startper, End per)—Displays the results of thevalidation rules for a category andselected periods.
• Check Report by Val. Entity Seq.—Displays the results of the validation rulesfor the current location (pass or failstatus); sorted by the sequence defined inthe validation entity group.
• Check Report with Warnings—Displaysthe results of the validation rules for thecurrent location. Warnings are recorded invalidation rules and shown if warningcriteria are met. This report does not showrules that passed the validation.
Enable Event Script Execution Select Yes to enable the execution ofapplication events such as before loading data(BefLoad) or after validation (AftValidate).Select No to disable the execution ofapplication events.
Log Level Specify the level of detail displayed in the logs.A log level of 1 shows the least detail. A loglevel of 5 shows the most detail.
Logs are displayed in Process Details byselecting the Log link.
Check Report Precision Specify the total number of decimal digits forrounding numbers, where the most importantdigit is the left-most non-zero digit, and theleast important digit is the right-most knowndigit.
Display Data Export Option "Override All Data" Display the "Override All Data" option on theExport Mode drop-down on the Execute Rulescreen.
When you select to override all data, thefollowing message is displayed "Warning:Override All Data option will clear data for theentire application. This is not limited to thecurrent Point of View. Do really want toperform this action."
Enable Map Audit Set to Yes to create audit records for the MapMonitor reports (Map Monitor for Location, andMap Monitor for User). The default value forthis setting is No.
Chapter 1Administration Tasks
1-55

Table 1-9 (Cont.) Application Level Profile Options
Option Description
Access to Open Source Document When drilling down to the FDMEE landingpage, this setting determines access to theOpen Source Document link (which opens theentire file that was used to load data).
• Administrator—Access to Open SourceDocument link is restricted to theadministrator user.
• All Users—Access to the Open SourceDocument link is available to all users. AllUsers is the default setting.
Map Export Delimiter Sets the column delimiter value whenexporting member mappings.
Available delimiters are:
• ! (exclamation mark)• , (comma)• ; (semi-colon)• | (pipe)
Locking and Unlocking All (POV) LocationsThe lock all locations feature prevents data from being loaded to a selected POV bylocking all locations related to the current period and category for an entire targetapplication. When a location has been locked, you cannot import, validate, export, orre-run the validation.
When a location is locked, a lock symbol ( ) is displayed in the POV bar.
The Lock All Locations feature is referenced in the:
• Data Load Workbench
• Data Load Rule
• Batch Execution
An “Unlock All Location” option is also available so that you can unlock all lockedlocation. You can provide an option on the Select Point of View screen that enablesusers to unlock a POV by location.
For information on locking and unlocking an individual POV, see Locking andUnlocking a POV
To lock all locations for a POV:
1. On the Setup tab, under Configure, select Application Settings.
2. In Application Settings, from the Target Application drop-down, select thetarget application to which the application profile applies.
3. Click Lock All Locations.
4. In Period, select the period to lock.
5. In Category, select the category to lock.
Chapter 1Administration Tasks
1-56

6. Click Allow Unlock by Location to provide the Unlock POV option on the SelectPoint of View screen.
If Allow Unlock by Location is disabled, then the Unlock POV and Lock POVfields are not displayed on the Select Point of View screen.
7. Click OK.
All locations for the selected target application are locked.
To unlock a POV for all locations:
1. On the Setup tab, under Configure, select Application Settings.
2. In Application Settings, from the Target Application drop-down, select thetarget application to which the application profile applies.
3. Click Unlock All Locations.
4. In Period, select the period to unlock.
5. In Category, select the category to unlock.
6. Click OK.
All locations for the selected target application are unlocked.
Setting User Level ProfilesUse the User Settings option to update or clear user level profiles that apply to theuser.
Note:
When the Global mode is defined, then user level profiles for the POV are notapplicable.
To set a user level profile:
1. On the Setup tab, under Configure, select User Settings.
2. In User Setting, select the options to add or modify.
3. Optional: To clear a setting, select the value and from your keyboard, and thenclick Delete.
The value is removed, but it is deleted only when you save it.
4. Click Save.
Chapter 1Administration Tasks
1-57

Table 1-10 User Level Profile Settings
Option Description
File Character Set Specify the method for mapping bitcombinations to characters for creating,storing, and displaying text.
Each encoding has a name; for example,UTF-8. Within an encoding, each charactermaps to a specific bit combination; forexample, in UTF-8, uppercase A maps toHEX41.
Click to view available character sets onthe Search and Select screen.Encoding refers to mapping bit combinationsto characters for creating, storing, anddisplaying text.
You should convert the encoding to UNICODEif your source file is not in one of the supportedformats.
Default POV Location Specify the default POV location.
Default POV Period Specify the default POV Period.
Default POV Category Specify the default POV Category.
User Language Select the default language of the user versionOracle Hyperion Financial Data QualityManagement, Enterprise Edition userinterface.
User Interface Theme Specify the default theme of the user versionof the FDMEE user interface.
Default Check Report Specify the type of Check Report to use as thedefault check report at the user level. Thefollowing are pre-seeded check reports, butyou can create a new one and specify it here:
• Check Report—Displays the results of thevalidation rules for the current location(pass or fail status).
• Check Report Period Range (Cat, Startper, End per)—Displays the results of thevalidation rules for a category andselected periods.
• Check Report by Val. Entity Seq.—Displays the results of the validation rulesfor the current location (pass or failstatus); sorted by the sequence defined inthe validation entity group.
• Check Report with Warnings—Displaysthe results of the validation rules for thecurrent location. Warnings are recorded invalidation rules and shown if warningcriteria are met. This does not show rulesthat passed the validation.
Chapter 1Administration Tasks
1-58

Table 1-10 (Cont.) User Level Profile Settings
Option Description
Default Intersection Report Specify the type of Intersection Check Reportto use as the default intersection check reportat the user level. Intersection reports identifydata load errors and are generated as part ofthe data validation step in the Data LoadWorkbench. The reports are available in twoformats: Dynamic Column or Fixed Columnformat. The Fixed Column displays up to fourcustom dimensions.
Log Level Specify the level of detail displayed in the logs.A log level of 1 shows the least detail. A loglevel of 5 shows the most detail.
Logs are displayed in Process Details byselecting the Log link.
Map Export Delimiter Sets the column delimiter value whenexporting member mappings.
Available delimiters are:
• ! (exclamation mark)• , (comma)• ; (semi-colon)• | (pipe)
Setting Security OptionsIn Oracle Hyperion Financial Data Quality Management, Enterprise Edition,administrators can enable location almost any user interface and report feature.FDMEE supports five levels of security:
• Role level security—Controls access to components of the user interface that eachuser can access.
• Report security—Controls the reports that can be executed based on the reportgroups assigned to a role.
• Batch security—Controls the batches that can be executed based on the batchgroups assigned to a role.
• Custom scripts security—Controls the custom scripts that can be executed basedon the custom script groups assigned to a role.
• Location security—Controls access to locations.
Security levels apply to users. Role and Location security levels assigned to users arecompared at runtime. If a user is assigned a level that is equal to the level assigned tothe feature that the user is trying to access, the feature is available to the user.
Role Level SecurityOracle Hyperion Financial Data Quality Management, Enterprise Edition securityenables you to customize user access to user interface functions using the concept ofroles. Roles are permissions that grant user access to functions. In FDMEE, defaultroles are assigned to functions that aggregate and tailor specific requirements. After
Chapter 1Administration Tasks
1-59

the functions are assigned to a role, the corresponding role is mapped to users whenprovisioning users in Oracle Hyperion Shared Services. The process of granting rolesto users is described in the Oracle® Enterprise Performance Management SystemUser and Role Security Guide.
To add role level security:
1. On the Setup tab, under Configure, select Security Settings.
2. In Security Setting, select the User Interface tab.
3. In Role, select the role category to which to assign access.
A list of roles is described in Table 1.
The role category determines the display of functions associated with the selectedrole.
4. In Function, select the function to assign to the role.
5. Click Save.
Table 1-11 Role and Descriptions
Role Description
Administrator Grants access to all FDMEE functions.
Create Integration Creates FDMEE metadata and data loadrules.
Run Integration Runs FDMEE metadata and data rules andfills out runtime parameters. Can viewtransaction logs.
Drill Through Controls whether you can drill to the FDMEElanding page, which controls drilling to thesource system.
HR Integration Runs Human Resource data rules and fills outruntime parameters. Can view transactionlogs.
Intermediate 2-9 Roles for intermediate levels are defined bythe administrator.
Defining User Interface SecurityTo add user security:
1. On the Setup tab, under Configure, select Security Settings.
2. Select the Role Security tab.
3. From Role, select the role to which to assign access.
4. Select the User Interface tab.
5. In Function, select the user interface function to which to assign user interfacesecurity.
6. Click Save.
Chapter 1Administration Tasks
1-60
Defining Report SecurityTo define report security, you assign reports of a selected type to a group (see AddingReport Groups). Next, you assign the report group to a role. The role has access to allreports in the groups at execution time.
To add report level security:
1. On the Setup tab, under Configure, select Security Settings.
2. In Role, select the role to which to assign the report security.
A list of roles is described in Table 1.
3. Select the Report tab.
4. In Report Group, select the report group to which to assign report security.
5. Click Save.
Defining Batch SecurityTo define batch security, you assign batches of a selected type to a group (see Addinga Batch Group). Next you assign the batch group to a role. The role has access to allbatches in the groups at execution time.
To add batch security:
1. On Setup tab, under Configure, select Security Settings.
2. From Role, select the role to which to assign batch security.
A list of roles is described in Table 1.
3. Select the Batch tab.
4. In Batch Group, select the batch group to assign batch security.
5. Click Save.
Defining Custom Script SecurityTo define custom scrip security, you assign custom scripts of a selected type to agroup (see Adding a Custom Script Group). Next you assign the custom scripts groupto a role. The role has access to all custom scripts in the groups at execution time.
To add role level security:
1. On the Setup tab, under Configure, select Security Settings.
2. From Role, select the role to which to assign custom script security.
A list of roles is described in Table 1.
3. Select the Custom Script tab.
4. From Custom Script Group, select the custom script group to which to assigncustom script security.
5. Click Save.
Chapter 1Administration Tasks
1-61
Defining Location SecurityLocation security (user access to locations) for Oracle Hyperion Financial Data QualityManagement, Enterprise Edition is configured and enforced by options on the LocationSecurity Settings tab. You define the user groups to create for each location. When alocation is created or updated, then you can create as many groups as defined in thesystem settings for the location. Additionally, a Maintain User Groups option enablesyou to create user groups in mass for all the existing locations.
Several dependent processes must occur before Location Security is fullyimplemented:
1. When a Location is created, User Groups are created automatically in OracleHyperion Shared Services.
The user group contains the name of the location and additional prefix and suffixinformation based on the user preference. In addition, roles are provisioned forUser Groups.
2. The administrator provisions the users to the User Groups.
3. When the user logs in, FDMEE determines the groups assigned to the user.
Based on the name of the group, FDMEE determines the accessible locations.
4. The POV region filters the locations based on the user access.
Note:
If the web services and batch scripts are used, then location security is stillmaintained and enforced.
To display the Location Security tab:
1. On the Setup tab, under Configure, select Security Settings.
2. Select the Location Security tab.
To add a user group for location security:
1. On the Setup tab, under Configure, select Security Settings.
2. Select the Location Security tab.
3. In the Location summary grid, click Add.
A LOCATION name row is added. When the group is saved, the Group name is inthe form of Prefix_Location_Suffix, for example, FDMEE_LOCATION_DATA.
The prefix and suffix help identify groups in Common Shared Services (CSS).
4. In the Security Setting Details grid, enter a description of the user group in theDescription field.
For example, enter: Group for Creating and Running Integration.
5. In the Prefix field, enter FDMEE.
When the group is saved, the prefix is prepended to the group name.
Chapter 1Administration Tasks
1-62

Note:
Underscore is not supported in the prefix or suffix for group names.
6. In the Suffix field, select the name of the function or rule that the user isprovisioned to access.
Note:
Underscore is not supported in the prefix or suffix for group names.
For example, specify:
• Data Rule Metadata Rule (Run Integration role)
• HR Rule (HR Integration role)
• Create Integration
• Drill Through
When the group is saved, the suffix is appended to the group name.
7. Select the list of roles provisioned for the user group by selecting the appropriateroles:
• Create Integration
• Drill Through
• Run Integration
• HR Integration
• Intermediate 2-9
The list of roles is described in Table 1.
8. Click Save.
9. To create users groups in mass for the location, click Maintain User Groups.
To disable security by location:
1. On the Setup tab, under Configure, select Security Settings.
2. Select the Location Security tab.
3. Click Disable Security by location.
When security by location is disabled, this message is displayed: Security byLocation is disabled. Would you like to enable the feature?
4. Click Save.
Setting up Source SystemsIn some cases, you have multiple general ledger or human resource source systems.You can use Oracle Hyperion Financial Data Quality Management, Enterprise Editionto extract data and metadata from any instance.
Chapter 1Administration Tasks
1-63

For information on the source systems that FDMEE supports, see the Oracle HyperionEnterprise Performance Management System Certification Matrix.
1. Register a source system. See Registering Enterprise Resource Planning (ERP)Source Systems.
2. Edit source system settings as necessary. See Editing Registered Source SystemDetails.
For information on removing a registered source system, see Deleting RegisteredSource Systems.
Note:
For information on viewing FDMEE processes or jobs, see Viewing ProcessDetails.
Registering Enterprise Resource Planning (ERP) Source SystemsThe source system page displays all registered source systems in a table in theSummary pane. By default, the following columns are displayed:
• Name—Name of the source system
• Type—Type of source system
• Description—The description that you entered when the source system wasregistered.
• Drill URL—The drill URL selected when the source system was registered.
To add a source system:
1. On the Setup tab, under Register, select Source System.
2. In Source System, click Add.
3. Enter the source system details:
a. In Source System Name, enter the source system name.
b. In Source System Description, enter a description of the source system.
c. In Source System Type, select the source system type.
Available source systems:
• E-Business Suite Release 11i
• PeopleSoft Financials Release 9
• Peoplesoft HCM Release 9
• Fusion Applications
• SAP ERP Financial
• SAP BW (Business Warehouse)
• JD Edwards Enterprise One
• File
• Others
Chapter 1Administration Tasks
1-64
d. Enter the Drill URL.
The Drill-Through URL identifies the URL to use for drilling through. Forexample, you might specify http://machinename.us.oracle.com:6362
The URL is used to launch Fusion, E-Business Suite, or PeopleSoft.
You can drill through to any location as long as a URL is available, or as longas the user can specify a JavaScript that provides the necessary drill-throughoptions. Drill through is available for predefined adapters, files, and openinterface sources.
Additionally you can drill through to the Oracle General Ledger or PeopleSoftEnterprise Financial Management from an Enterprise PerformanceManagement (EPM) system application that displays data loaded from thesource system. When you click a hyperlink, you can navigate to the OracleGeneral Ledger Balances page or PeopleSoft Enterprise FinancialManagement Inquiry page.
For JD Edward source systems, you can drill through to the JD Edwardsbalances page.
Note:
Drill through is not supported for Oracle Hyperion FinancialManagement journals and intercompany transactions.
e. In ODI Context Code, enter the context code.
The ODI context code refers to the context defined in Oracle Data Integrator.A context groups the source and target connection information.
The default context code is GLOBAL.
4. Optional: If you use PeopleSoft's Commitment Control functionality, select EnableCommitment Control.
See PeopleSoft Commitment Control.
5. Click Save.
After you add a source system, you can select the source system in the table, andthe details are displayed in the lower pane.
After you register a source system, you must initialize the source system.Initializing the source system fetches all metadata needed in Oracle HyperionFinancial Data Quality Management, Enterprise Edition, such as ledgers, chart ofaccounts, and so on. It is also necessary to initialize the source system when thereare new additions, such as chart of accounts, segments/chartfields, ledgers, andresponsibilities in the source system.
6. To initialize a source system, click Initialize.
Note:
Depending on the size of the source system, initializing might take severalminutes.
Chapter 1Administration Tasks
1-65

Registering File-Based Source SystemsThe source system page displays all registered source systems in a table in theSummary pane. By default, the following columns are displayed:
• Name—Name of the source system
• Type—A file-based source system is the only supported source system.
• Description—The description that you entered when you registered the sourcesystem.
• Drill URL—The drill URL you entered when you registered the source system.
To add a file-based source system:
1. On the Setup tab, under Register, select Source System.
2. Click Save.
After you add a source system, you can select the source system in the table, andthe details are displayed in the lower pane.
Deleting Registered Source SystemsYou can delete registered source systems if you do not plan to use the source systemwith Oracle Hyperion Financial Data Quality Management, Enterprise Edition.
Caution:
Use caution when deleting registered source systems! Part of the procedure fordeleting a source system is to delete the target application. When you deletethe target application, other artifacts are deleted. When you delete a registeredsource system, the source system is removed from the Source Systemscreen, and all import formats, locations, metadata rules, and data rulesassociated with the source system are removed.
To remove a registered source system:
1. On the Setup tab, under Register, select Target Application.
Use the Target Application page to remove all target applications that have rulesor mappings to the source system.
2. On the Setup tab, under Register, select Source System.
3. In Source System, select the source system to remove, and then click Delete.
Tip:
To undo a deletion, click Cancel.
4. Click OK.
Chapter 1Administration Tasks
1-66

Editing Registered Source System DetailsSometimes, source system details change. You can edit the source system details asneeded. Keep in mind that after you add a source system type, you should not modifyit.
To edit registered source system settings:
1. On the Setup tab, under Register, select Source System.
2. Select the source system.
3. Edit the source system details or ODI details as necessary.
4. Click Save.
If you make metadata changes in the source system, (for example, you add a newsegment, chartfield values, or hierarchies), you must initialize the source system.
5. Click Initialize.
Adding File-Based Data Load DefinitionsSource systems with the type "file" are used in import formats to load data from fixedand delimited files.
Oracle Hyperion Financial Data Quality Management, Enterprise Edition creates a file-based data load system automatically. If you need to create an alternate file-baseddata load source system, follow the procedure below.
To use file-based import formats, you must define a file-based data load.
To add a file-based data load definition:
1. On the Setup tab, under Register, select Source System.
2. In Source System, click Add.
3. Enter the source system details:
a. In Source System Name, enter the file-based data load system name.
b. In Source System Description, enter a description.
c. In Source System Type, select File.
d. In Drill Through URL, specify the URL that identifies the URL to use fordrilling through.
e. In ODI Context Code, enter the context code.
The ODI context code refers to the context defined in Oracle Data Integrator.A context groups the source and target connection information.
4. Click Save.
After you add a file-based data load system, select the source system in the table.The details of the system are displayed in the lower pane.
Working with Source AdaptersA source adapter is an integration framework in Oracle Hyperion Financial DataQuality Management, Enterprise Edition that enables you to extract data from source
Chapter 1Administration Tasks
1-67
system in a flexible and customizable manner. A source adapter consists of twocomponents:
• Oracle Data Integrator (ODI) Project—Contains the code to extract and load thedata from the source system to the FDMEE staging tables.
• Adapter Definition XML—Contains the definition of the integration. It contains threecomponents: source columns, parameters and the drill URL.
Three pre-packaged integrations are delivered using this framework:
• SAP ERP Financials
• Open interface to load from any source system
• JD Edwards
Using a Prepackaged Integration for SAPFor prepackaged integrations for SAP, review the instructions in the readme todownload the necessary information from Oracle's integration partner. Oracle deliversthe Oracle Data Integrator (ODI) Project and an Adapter Definition XML file. For theSAP integrations, the integration partner delivers the ODI Project and Adapter XML.
To use the prepackaged integration:
1. Use the ODI Console to import the Project & Model definitions into the WorkRepository setup for Oracle Hyperion Financial Data Quality Management,Enterprise Edition.
2. Copy the Adapter Definition XML to a location under the directory that has beenset up as the Application Root directory in System Settings.
3. Use the Source Adapter screen to import the Adapter XML file.
To import a file:
a. On the Setup tab, under Configure, select Source Adapter.
b. In the Source Adapter, select Import.
c. In Select file to import, navigate to the file to import, and then click OK.
The file name depends on the adapter desired. For example, select:
• SAP_GLNew_Adapter.xml
• SAP_GLClassic_Adapter.xml
• SAP_PC_Adapter.xml
• SAP_CC_Adapter.xml
• SAP_AP_Adapter.xml
• SAP_AR_Adapter.xml
d. Optional: To browse for a file, select Upload.
e. In Select a file to upload, click Browse to navigate to the file to import, andthen click OK.
4. Create an import format of new type Source Adapter that defines the mappingbetween the source columns (identified in the source adapter) and the targetapplication dimensions.
5. Define the Locations and Data Rule.
Chapter 1Administration Tasks
1-68

When you execute the data rule, the new ODI Scenario associated with the importformat is used to extract the data from the source and stage it in the FDMEEstaging table (TDATASEG).
Adding Source Adapter DefinitionsUse the Source Adapter screen to review prepackaged adapters or to customizeprepackaged adapters. Do not directly modify the prepackaged adapters. As Oracleships updates to the prepackaged adapter, the changes you make are overwritten.Always make a copy of the prepackaged adapter and make the necessary changes.You can also use this screen to create new custom adapters for custom loadintegrations.
The Source Adapter screen includes three sections:
• Source adapter information summary. See Defining Source Adapter GeneralInformation.
• Source adapter detail. See Defining Source Adapter Detail.
• Three sub-tabs from which you select: source columns information, parameters topass to the ODI scenario, and URLs for drill through.
See:
– Selecting Source Columns
– Defining Parameters
– Defining URLs for Drill Through
Defining Source Adapter General InformationUse the Source Adapter Summary section to view, define, delete, export, import, andcopy summary information about a source adapter.
Adding a Source AdapterTo add a source adapter:
1. On the Setup tab, under Register, select Source Adapter.
2. In Source Adapter, from the Source Adapter summary task bar, click Add.
Blank entry rows are added to the Source Adapter summary section.
Complete the following steps in the Source Adapter details section.
3. In Adapter Key, enter a user defined identifier for the adapter.
For example, for an Open Interface source adapter, enter OPENINT. You cannotmodify the value in this field after it has been created.
4. In Adapter Name, enter a user defined name for the adapter.
For example, enter Open Interface Adapter.
5. In ODI Object Name, enter the name of the package or scenario.
6. In ODI Object Type, select Package or Scenario.
• Package—A Package is a sequence of steps organized into an executiondiagram. Packages are the main objects used to generate scenarios for
Chapter 1Administration Tasks
1-69

production. When you select Package as the ODI object type, then the sourcecolumns are shown, and you can specify maps in the import format in whichthe scenario is generated.
• Scenario—ODI compiled code that must match exactly as specified in theODI.
7. In ODI Object Project code, enter the template ODI project code.
8. In Source System Type, select the source application type.
9. Click Save.
Deleting a Source AdapterDeleting a source adapter removes the parameters, drill-down URLs and sourcecolumns associated with the source adapter.
To delete a source adapter:
1. On the Setup tab, under Register, select Source Adapter.
2. In the Source Adapter summary grid, select the source adapter and click Delete.
The message is displayed: This also deletes associated Parameters, Drill DownURLs and Source Columns. Delete Source Adapter?
3. Click OK.
Exporting a Source AdapterUse the Export feature to migrate an adapter definition from one environment toanother in the XML file format.
To export a file:
1. On the Setup tab, under Register, select Source Adapter.
2. In Source Adapter, on the Source Adapter summary task bar, in Export, selectExport Current or Export All.
• Export Current—Exports a selected source adapter from the Source AdapterSummary list.
• Export All—Exports all source adapters from the Source Adapter summary list.
3. To export a selected file, in Specify file location, navigate to the file to export,and then click OK.
You can enter the full path name and file name in the File Name field.
4. Optional: From Open File, save the file to a local directory on the desktop.
5. Optional: To browse for a file to export, select Upload, and then browse to the fileto export. When the File Upload screen is displayed, navigate to the file to upload,and then click Open.
6. Click OK.
Importing a Source AdapterTo import a source adapter:
1. On the Setup tab, under Register, select Source Adapter.
Chapter 1Administration Tasks
1-70

2. In Source Adapter, on the Source Adapter summary task bar, select Import.
3. In Specify file to import, navigate to the file, and then click OK.
4. in Open File, open the XML file or save it to a directory of your choice.
5. Optional: To browse to a file, select Upload. When the File Upload screen isdisplayed, navigate to the file, and then click Open.
6. Click OK.
The source adapter is added to the summary list.
Copying a Source Adapter KeyYou can copy a source adapter key and its associated detail to a new adapter key.
To copy a source adapter key:
1. On the Setup tab, under Register, select Source Adapter.
2. In Source Adapter, on the Source Adapter summary task bar, select Copy.
3. In Copy, enter the name of the new adapter key, and then click OK.
Using the SAP BW Source AdapterYou can use an SAP Business Warehouse (BW) source adapter to extract metadataand data from an SAP BW source system. The SAP BW integration with OracleHyperion Financial Data Quality Management, Enterprise Edition differs from thestandard and prepackaged integration frameworks. SAP (BW) comes with manypredefined InfoCubes, or you can define your own InfoCubes.
Dimensions and hierarchies can be extracted from the SAP BW cube. After selectingthe Infocube from the Source Adapter screen, metadata rules can be created to bringover dimensions and hierarchies.
To add an SAP BW source adapter:
1. On the Setup tab, under Register, select Source Adapter.
2. In Source Adapter, on the Source Adapter summary task bar, click Add.
Blank entry rows are added to the Source Adapter summary section.
3. In the Source Adapter details grid, in Adapter Key, enter a user defined identifierfor the adapter.
For example, for an SAP BW source adapter, enter NK_SAP. The value in this fieldcannot be modified after it is created.
4. In Adapter Name, enter a user defined name for the SAP BW adapter.
For example, enter NK_SAP.
5. In ODI Package Name, enter the name of the package.
For example, enter NK_SAP.
6. In ODI Project Code, enter the template ODI project code name.
The ODI Object Project code identifies an object within the project.
7. In Source System Type select the SAP BW source system.
8. In Cube Name, enter the predefined InfoCube name.
Chapter 1Administration Tasks
1-71

9. Click Import Cube Definition.
The SAP BW cube information is imported into FDMEE, which creates the sourcecolumns in the Source Column tab.
10. In the Source Column grid, map each SAP BW cube column in the ColumnName field to the type of data column in Classification.
For example, for the IOPK_0FIGL_C101_0CO_AREA_PK_CO_AREA column, select the Factclassification.
Classification types:
• Fact
• Year
• Period
• Period Number
11. In Display Name, enter the name to display for the column.
The name is shown on the Import Format screen and Data Load Workbench.
12. Select the Parameters tab, and specify any filter parameters.
See Defining Parameters.
13. In the Source Adapter summary grid, click Generate Template Package.
The template package is used to generate the final scenario based on the importformat mappings. If any customizations are required, you can customize the autogenerated template package.
14. Click Save.
15. Define the import format and generate the process.
Defining Source Adapter DetailWhen you have associated the source adapter with a source system type, the nextsteps include:
• Selecting Source Columns. See Selecting Source Columns.
• Defining Parameters. See Defining Parameters.
• Defining URLs for drill through. See Defining URLs for Drill Through.
Selecting Source ColumnsUse source columns to specify the columns that are available for mapping in theimport format. There is no validation of the table or column names in this section—thesource columns are registered so that they are available in import format for mapping.
Adding Source Columns
The source columns added in this section must match the columns specified in thedata model for the source table in the Oracle Data Integrator.
To add a source column:
1. On the Setup tab, under Register, select Source Adapter.
Chapter 1Administration Tasks
1-72

2. In Source Adapter, select the Source Column tab.
3. From the Source Column task bar, select Add.
Entry fields are displayed for the Column Name, Table Name, and Display Namecolumns.
4. In Column Name, enter the source column name.
For example, enter SEGMENT1. The source column name must have a correspondingcolumn name in the ODI model.
5. In Table Name, enter the table name.
For example, enter LOGICAL_BALANCES. The table name must have a correspondingtable name in the ODI model.
6. In Display Name, enter the display name used for the import format.
Defining ParametersUse the Parameters tab to specify the list of parameters for an ODI Scenario. Theparameter definition includes a non-translated parameter name and a translatedprompt. The prompt is used for display on the data rule page.
This section includes information on:
• Adding Parameters. See Adding Parameters.
• Deleting Parameters. See Deleting Parameters.
Adding Parameters
When you add a parameter for the source adapter, a definition is created, whichincludes a non-translated parameter name and a translated prompt.
To add a source column:
1. On the Setup tab, under Register, select Source Adapter.
2. In Source Adapter, select the Parameters tab.
3. From the Parameters task bar, select Add.
Entry fields are displayed for the Parameter Name, Parameter Data Type, andParameter Prompt columns.
4. In Parameter Name, enter the parameter name.
For example, enter p_actual_flag. This is the name of the parameter in the ODIproject.
5. In Parameter Data Type, select the data type of the parameter:
• Char
• Number
• Date
6. In Parameter Prompt, enter the parameter prompt.
For example, enter Balance Type in this row.
Chapter 1Administration Tasks
1-73
Note:
When a new parameter is added and you are in a multi-languageenvironment, then set the browser locale to the appropriate language andedit the prompts as needed in that language.
Deleting Parameters
To delete a parameter:
1. On the Setup tab, under Register, select Source Adapter.
2. In Source Adapter, select the Parameters tab.
3. On the Parameters task bar, select the parameter, and then click Delete.
4. Click OK.
Defining URLs for Drill ThroughOracle Hyperion Financial Data Quality Management, Enterprise Edition provides aframework for using URLs for drill through. You click the hyperlink in the amount cell,and the source system is launched in a new EPM Workspace tab or a new window.Multiple drill through URLs are provided to drill to different pages in the source systembased on the import format mapping.
See also Drilling Through.
Adding Drill Through URLs
Use these steps to add the drill through URL in Oracle Hyperion Financial Data QualityManagement, Enterprise Edition. There is a server component and a detailedcomponent when defining the drill URL. The server component is added to the sourcesystem definition and the detailed component is added to the import format definition.
Note:
For information on adding a drill through to file based source systems, see Using Drilling Through.
To create a drill through URL, specify the URL name, URL, request method, and URLprompt.
To add a drill through URL:
1. On the Setup tab, under Register, select Source Adapter.
2. In Source Adapter, select the Drill URL tab.
3. On the Drill URL task bar, select Add.
Entry fields are displayed for the Drill URL Name, Drill URL, Request Method, andDrill URL Prompt columns.
4. In Drill URL Name, enter a user defined name for the drill through URL.
Chapter 1Administration Tasks
1-74

5. In Drill URL, enter the URL used for the drill through.
Enter the URL without the server and port information. The URL must contain theparameter name and column name from the TDATASEG table enclosed in thesymbol $.
For example, enter: LEDGER_ID=$ATTR1$&GL_PERIOD=$ATTR2$.
In the above example the value of ATTR1 is passed as a value for the LEDGER_IDparameter, and ATTR2 is passed as the value for the GL_PERIOD parameter.Parameters are separated by the "&" character.
To specify the request-response between a client and server for the drill URLformat, enter either:
• GET—Form data is encoded into the URL. For example, specify: GET@http://www.oracle.com/. If no method is specified, then GET is the assumed request-response.
• POST—Form data is displayed in the message body. For example, specify:POST@http://www.oracle.com/.
Note:
A JavaScript specification can also be used for the drill-through. See DrillThrough using JavaScript.
6. In the Drill URL Prompt, enter a user-defined prompt for the drill-through prompt.
For example, enter Default.
Drill Through using JavaScript
You can specify a JavaScript based drill through that enables you to drill through to agraphical user interface instead of an URL. To do this, you write a script in the ScriptEditor and store it in a custom script directory.
The JavaScript for the drill through is associated with the source adapter. You invokeJavaScript from the drill through link by specifying "#javascript" instead of "http URL" inthe source system. You can also pass contextual parameters to a JavaScript functionsimilar to the http drill URL.
To add a drill through using JavaScript:
1. On the Setup tab, under Register, select Source System.
See Setting up Source Systems.
2. Select the source system file for the JavaScript based drill through.
3. In the detail section, from Drill Through URL, enter #javascript.
4. Click Save.
5. On the Setup tab, under Scripts, select Script Editor.
6. On the Script Editor, click New.
7. From the Create Script Options window, in Script Type, select Drill.
Chapter 1Administration Tasks
1-75

Note:
The Technology drop-down is JavaScript because drill through scripts canonly be created based on JavaScript.
8. In File Name, enter a name for the script.
9. Click OK.
10. In Target Application, select the target application for this drill through script.
11. Write the code for the custom script in the Script Editor.
Ensure the name of the JavaScript function is same as the file name.
For example,
function main($ATTR1$,$ATTR2$){
var ledger_id = $ATTR2$;
var currency = $ATTR1$;
var resp_id = 300;
if(ledger_id==1)
resp_id = 100
else if(ledger_id ==2)
resp_id = 200
alert('Currency:' + $ATTR1$);
alert('ledger_id:' + ledger_id);
var url = 'http://machinename.us.oracle.com:6362/OA_HTML/RF.jsp?function_id=1045073&CALLING_PAGE=FDM_DRILLDOWN&resp_appl_id=&resp_id=&SOB_ID=1&LED_ID='+ledger-id+'&fdm_per=Jan-03&fdmccid=13098&fdm_currency+'+currency+'fdm_balance_type=A
alert('url:' + url);
window.open(url);
}
Chapter 1Administration Tasks
1-76

12. Click Save.
13. On the Setup tab, under Register, select Source Adapter.
See Working with Source Adapters.
14. In Source Adapter, select the Drill URL tab.
15. On the Drill URL task bar, select Add.
Entry fields are displayed for the Drill URL Name, Drill URL, Request Method, andDrill URL Prompt columns.
16. In Drill URL Name, enter a user defined name for the drill through URL.
17. In the Drill URL, enter the Function name of the drill through.
The Function name should be same as the file name.
For example, enter: main($ATTR1$,$ATTR2$).
18. In Drill URL Prompt, enter a user-defined prompt for the drill-through prompt.
19. Click Save.
When you drill down from the workbench, a new window is launched with thespecified URL.
Deleting Drill URLs
To delete a drill through URL:
1. On the Setup tab, under Register, select Source Adapter.
2. In Source Adapter, select the Drill URL tab.
3. From the Drill URL summary area, select the drill-through URL, and then clickDelete.
4. In Delete Source Adapter Drill URL, click OK.
Chapter 1Administration Tasks
1-77

Registering Target ApplicationsTarget applications enable Oracle Hyperion Financial Data Quality Management,Enterprise Edition to be used as a primary gateway to integrate data between differentsource systems and target applications. In this way, you can deploy local OracleEnterprise Performance Management Cloud applications, service instance to serviceinstance deployments (cloud to cloud applications), and custom applications into yourexisting EPM portfolio. The process to integrate source applications with targetapplications provides data visibility, integrity, and verification systems.
The following application types describe the types of target application that can beused:
• local—This application type refers to a local EPM application (onpremisedeployment) in the current service.
You might use the integration to import data from existing on-premise ERPapplications, or synchronize data between on-premise EPM applications.
For example, Oracle Hyperion Financial Management customers can add OracleHyperion Planning, data or a Planning customer can add more Planningapplications. In addition, this integration enables you to write back from a cloud toan on-premise application or other external reporting applications.
• Cloud—This application type refers to a service instance that uses a remoteservice to integrate data. A service instance is a self-contained unit oftencontaining the web server and the database application. In this case, connectioninformation must be selected between the two service instances. Serviceinstances available include:
This feature enables EPM customers to adapt cloud deployments into theirexisting EPM portfolio including
– Oracle Enterprise Planning and Budgeting Cloud
– Oracle Planning and Budgeting Cloud
– Oracle Financial Consolidation and Close Cloud
– Oracle Hyperion Profitability and Cost Management
– Oracle Tax Reporting Cloud
To register a target application:
1. Select the Setup tab, and then under Register, select Target Application.
2. In Target Application, in the summary grid, click Add, and then select the type ofdeployment.
Available options are Cloud (for a Cloud deployment) or Local (for an on-premisedeployment).
For a Cloud deployment, go to step 3.
For a Local deployment, go to step 4.
3. To register a Cloud deployment, select Cloud and then complete the followingsteps on the EPM Cloud Credentials screen:
a. In URL, specify the service URL that you use to logon to your service.
b. In User name, specify the user name for the Cloud Service application.
Chapter 1Administration Tasks
1-78

c. In Password, specify the password for the Cloud Service application.
d. In Domain, specify the domain name associated with the Cloud ServiceApplication.
An identity domain controls the accounts of users who need access to serviceinstances. It also controls the features that authorized users can access. Aservice instance belongs to an identity domain.
Note:
Administrators can update the domain name that is presented to theuser, but FDMEE requires the original domain name that was providedwhen the customer signed up for the service. Alias domain namescannot be used when setting up EPM Cloud connections from FDMEE.
e. Click OK.
You can add or edit EPM Cloud credentials on the Application Options tab ofthe target application.
4. From Select Application, and then from the Type drop-down, select the targetapplication name and click OK.
5. To register a target application with the same name as an existing targetapplication, in Prefix, specify a prefix to make the name unique.
The prefix name is joined to the existing target application name. For example, ifyou want to name a demo target application the same name as the existing"Vision" application, you might assign theDemo prefix to designate the targetapplication with a unique name. In this case, the FDMEE joins the names to formthe name DemoVision.
It is recommended when specifying the prefix, use between three to sixcharacters.
6. In Application Details, enter the application name.
7. Click OK.
8. If using an Essbase database, select the Essbase Database Name.
9. Click Refresh Members.
10. Click Save.
Chapter 1Administration Tasks
1-79

11. Define the dimension details.
See Defining Application Dimension Details.
Note:
Do not modify dimensions in the EPMA application after you haveregistered the target application in FDMEE. Any action such as sharing orremoving the dimension, and then re-adding it, alters the dimensions IDand creates a mismatch between EPMA and FDMEE.
Optional: If not all dimensions are displayed, click Refresh Metadata
12. Select the application options.
For Planning applications, see Defining Application Options for Essbase andPlanning.
For Oracle Hyperion Public Sector Planning and Budgeting, see DefiningApplication Options for Public Sector Planning and Budgeting.
For Financial Management, see #unique_124.
Note:
No application options are available for the Account ReconciliationManager.
Creating a Custom Target ApplicationA custom target application enables you to load data from an EPM supported source,and then extract the data into a flat file instead of loading it to Oracle Essbase, OracleHyperion Planning, and Oracle Hyperion Financial Management. You can define thecustom target application with required dimensionality. Instead of exporting the data toa target application, Oracle Hyperion Financial Data Quality Management, EnterpriseEdition generates a data file that can be loaded to an external system using a customprocess.
When creating a custom target application, note the following:
• Data is written to the file in the following predefined order: Account, Entity, UD1,UD2 ... UD20, AMOUNT.
• The sequence that is specified when you create the custom application definitionis used to order the dimensions for mapping processing. Note the sequence incase you have scripts that have an order of processing dependency.
• Data Rule—The POV category is not validated.
• Data Load Mapping—Target values are not validated for custom applications.
• Data Load Execution—When the option to export the data file is enabled, FDMEEcreates an output data file. The name of the data file is <Target App Name>_<ProcessID>.dat, and it is written to the <APPL ROOT FOLDER>/outbox directory. You canaccess the data file from the Process Details page from the OUTPUT file column.
Chapter 1Administration Tasks
1-80
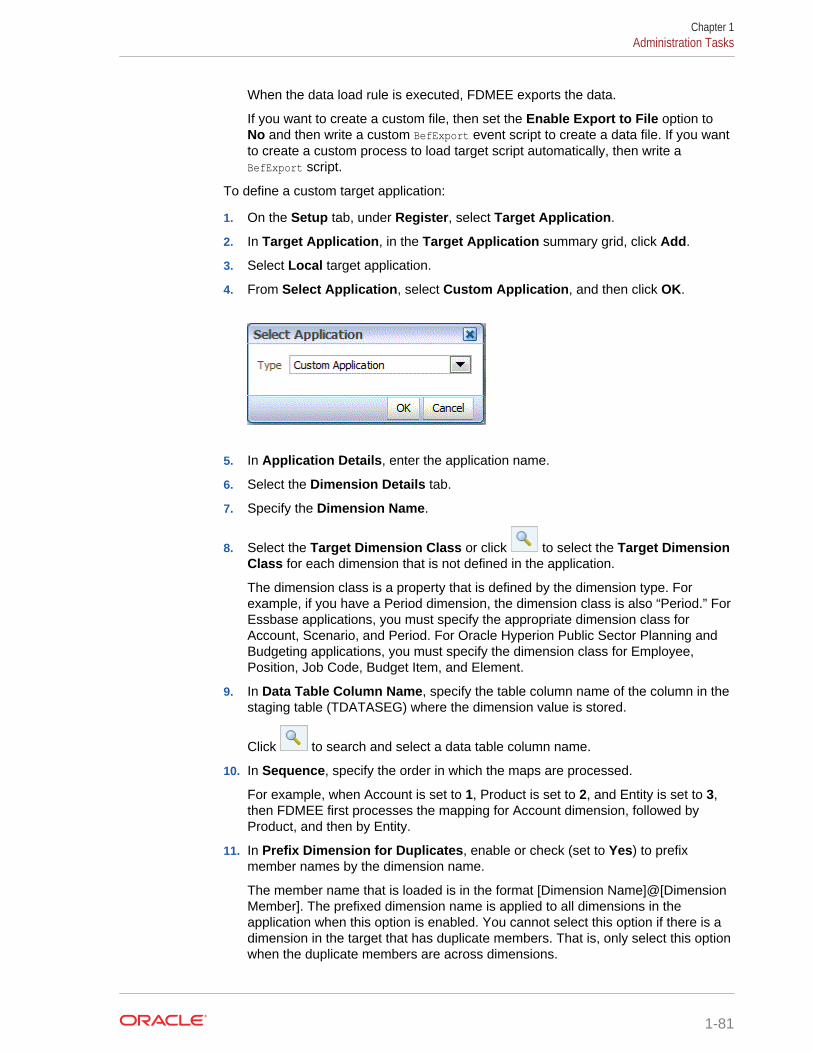
When the data load rule is executed, FDMEE exports the data.
If you want to create a custom file, then set the Enable Export to File option toNo and then write a custom BefExport event script to create a data file. If you wantto create a custom process to load target script automatically, then write aBefExport script.
To define a custom target application:
1. On the Setup tab, under Register, select Target Application.
2. In Target Application, in the Target Application summary grid, click Add.
3. Select Local target application.
4. From Select Application, select Custom Application, and then click OK.
5. In Application Details, enter the application name.
6. Select the Dimension Details tab.
7. Specify the Dimension Name.
8. Select the Target Dimension Class or click to select the Target DimensionClass for each dimension that is not defined in the application.
The dimension class is a property that is defined by the dimension type. Forexample, if you have a Period dimension, the dimension class is also “Period.” ForEssbase applications, you must specify the appropriate dimension class forAccount, Scenario, and Period. For Oracle Hyperion Public Sector Planning andBudgeting applications, you must specify the dimension class for Employee,Position, Job Code, Budget Item, and Element.
9. In Data Table Column Name, specify the table column name of the column in thestaging table (TDATASEG) where the dimension value is stored.
Click to search and select a data table column name.
10. In Sequence, specify the order in which the maps are processed.
For example, when Account is set to 1, Product is set to 2, and Entity is set to 3,then FDMEE first processes the mapping for Account dimension, followed byProduct, and then by Entity.
11. In Prefix Dimension for Duplicates, enable or check (set to Yes) to prefixmember names by the dimension name.
The member name that is loaded is in the format [Dimension Name]@[DimensionMember]. The prefixed dimension name is applied to all dimensions in theapplication when this option is enabled. You cannot select this option if there is adimension in the target that has duplicate members. That is, only select this optionwhen the duplicate members are across dimensions.
Chapter 1Administration Tasks
1-81

If the application supports duplicate members and Prefix Dimension for Duplicatesis disabled or unchecked (set to no), then the user must specify the fully qualifiedmember names. Refer to the Essbase documentation for the fully qualifiedmember name format.
Note:
Planning does not support duplicate members.
12. Click Application Options.
13. In Enable export to file, select Yes to have FDMEE create an output data file forthe custom target application.
A file is created in the outbox folder on the server with the following name format:<LOCATION>_<SEQUENCE>.dat. For example, when the location is namedTexas and the next sequence is 16, then the file name is Texas_15.dat. The file iscreated during the export step of the workflow process.”
When the Enable export to file option is set to No, then the Export to Targetoption is unavailable in the execution window.
14. In File Character Set, select the file character set.
The file character set determines the method for mapping bit combinations tocharacters for creating, storing, and displaying text. Each encoding has a name;for example, UTF-8. Within an encoding, each character maps to a specific bitcombination; for example, in UTF-8, uppercase A maps to HEX41.
15. In Column Delimiter, select the character to use for delimiting columns in theoutput file.
Available column delimiters are:
• ,
• |
• !
• ;
• :
16. In File Name to Download, enter the file name to copy.
17. Click Save.
Chapter 1Administration Tasks
1-82

Adding Lookup DimensionsLookup dimensions can be created and assigned with data columns for targetapplications. Lookup dimensions are used for mapping and reference. They can onlybe used in Oracle Hyperion Financial Data Quality Management, Enterprise Editionand do not affect the dimensionality of a target application. They can also be used withmember mapping functionality to cross-reference multiple source segments andchartfields and assign a target value.
To add a lookup dimension:
1. On the Setup tab, under Register, select Target Application.
2. In the Target Application summary grid, select a target application.
3. Select the Dimension Details tab.
4. Click Add.
Blank dimension name and data table column name entry fields are displayed.
5. In Dimension Name, enter the lookup dimension name.
6. In Data Table Column Name, select the data column from which to base thelookup dimension.
Note:
The data table column name value must be a user-defined dimensiongreater than the selected target dimension. For example if the applicationhas four custom dimensions, select UD5.
7. Click OK.
The lookup dimension is added to the dimension detail list with the targetdimension class name of "LOOKUP." To use the lookup dimension as a sourcedimension, make sure you map it in the import format.
Defining Application Dimension Details
The dimension details differ for each application type. For Oracle Hyperion PublicSector Planning and Budgeting and Oracle Essbase applications, you reclassify thedimensions and change the dimension class, as necessary.
To define dimension details:
1. On the Setup tab, under Register, select Target Application.
2. In the Target Application summary grid, select an Essbase or Oracle HyperionPlanning application.
3. Select the Dimension Details tab.
4. Select the Target Dimension Class or click to select the Target DimensionClass for each dimension that is not defined in the application.
The dimension class is a property that is defined by the dimension type. Forexample, if you have a Period dimension, the dimension class is also “Period.” For
Chapter 1Administration Tasks
1-83
Essbase applications, you must specify the appropriate dimension class forAccount, Scenario, and Period. For Public Sector Planning and Budgetingapplications, you must specify the dimension class for Employee, Position, JobCode, Budget Item, and Element.
5. Optional: Click Refresh Metadata to synchronize the application metadata fromthe target application.
6. In Data Table Column Name, specify the table column name of the column in thestaging table (TDATASEG) where the dimension value is stored.
Click to search and select a data table column name.
7. In Sequence, specify the order in which the maps are processed.
For example when Account is set to 1, Product is set to 2, and Entity is set to 3,then Oracle Hyperion Financial Data Quality Management, Enterprise Edition firstprocesses the mapping for Account dimension, followed by Product, and then byEntity.
8. Click Save.
The target application is ready for use with FDMEE.
Tip:
To edit the dimension details, select the target application, then edit theapplication or dimension details, as necessary. To filter applications on theTarget Application page, ensure that the filter row is displaying above the
column headers. (Click to toggle the filter row.) Then, enter the text to filter.
Defining Application Options for Essbase and PlanningAfter defining the application details and dimension details, for Oracle Essbase andOracle Hyperion Planning, define the application options.
Note:
The user attempting to load data to Planning must be provisioned with Essbaseadministrator or Planning administrator rights.
To define application options for Essbase or Planning applications:
1. On the Setup tab, under Register, select Target Application.
2. In the Target Application summary grid, select a Planning target application orEssbase target application.
3. After defining the application details and dimension details in Application Detail,select the Application Options tab.
4. Complete the application options as needed.
5. Click Save.
Chapter 1Administration Tasks
1-84

Table 1-12 Essbase and Planning Application Options and Descriptions
Option Description
Purge Data File When a file based data load to Essbase issuccessful, specify whether to delete the datafile from the application outbox directory.Select Yes to delete the file, or No to retainthe file.
Prefix Dimension for Duplicate Members When this option is set to Yes, then membernames are prefixed by the Dimension Name.The member name that is loaded is in theformat [Dimension Name]@[DimensionMember]. The prefixed dimension name isapplied to all dimensions in the applicationwhen this option is enabled. You cannot selectthis option if there is a dimension in the targetthat has duplicate members. That is, onlyselect this option when the duplicate memberscross dimensions.
If the application supports Duplicate Membersand the Prefix is set to No, then the user mustspecify the fully qualified member names.Refer to Essbase documentation for the fullyqualified member name format.
Note:
Planning does notsupport duplicatemembers.
Global User for Application Access Option to override the Single Sign-On logon tothe Essbase and the Planning applications.When a user name is specified for this option,this user name is used to access Essbase/Planning applications instead of the OracleHyperion Financial Data Quality Management,Enterprise Edition sign-on user name.
Specify the user name of a user who hasadministrator access to the Planningapplication, and/or Application/DatabaseManager access to the Essbase applications.
Batch Size Specify the batch size used to write data tofile. The default size is 10,000.
Chapter 1Administration Tasks
1-85
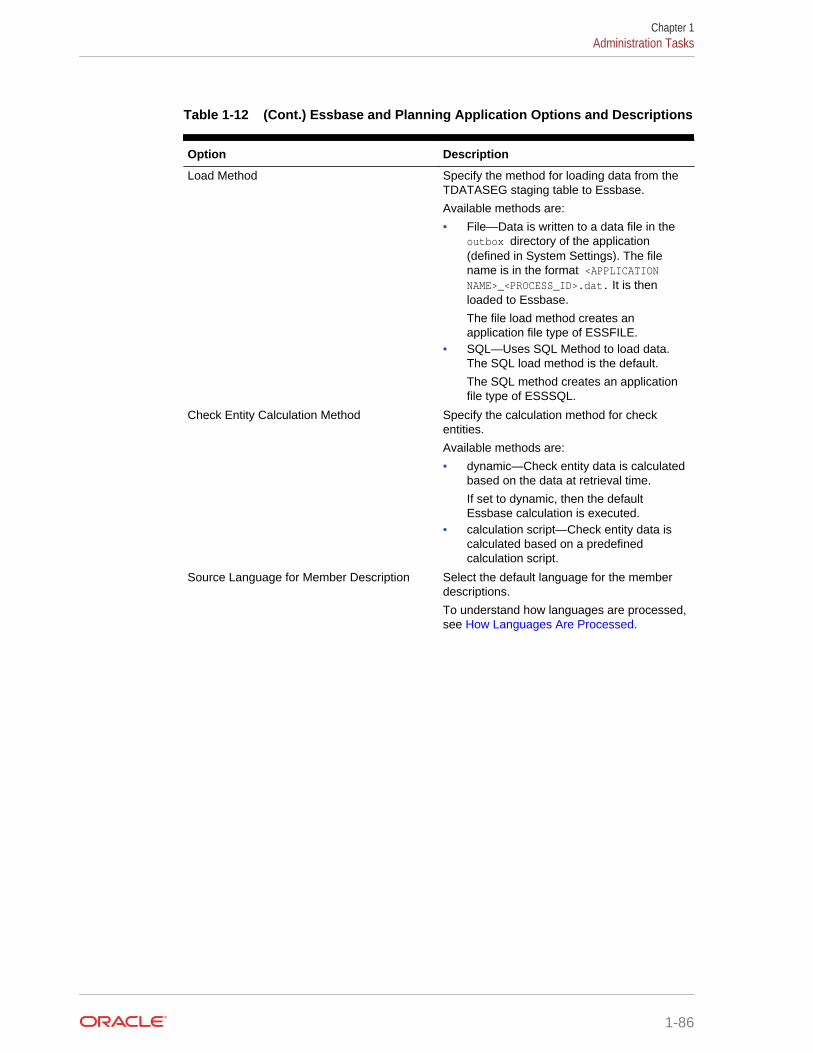
Table 1-12 (Cont.) Essbase and Planning Application Options and Descriptions
Option Description
Load Method Specify the method for loading data from theTDATASEG staging table to Essbase.
Available methods are:
• File—Data is written to a data file in theoutbox directory of the application(defined in System Settings). The filename is in the format <APPLICATIONNAME>_<PROCESS_ID>.dat. It is thenloaded to Essbase.
The file load method creates anapplication file type of ESSFILE.
• SQL—Uses SQL Method to load data.The SQL load method is the default.
The SQL method creates an applicationfile type of ESSSQL.
Check Entity Calculation Method Specify the calculation method for checkentities.
Available methods are:
• dynamic—Check entity data is calculatedbased on the data at retrieval time.
If set to dynamic, then the defaultEssbase calculation is executed.
• calculation script—Check entity data iscalculated based on a predefinedcalculation script.
Source Language for Member Description Select the default language for the memberdescriptions.
To understand how languages are processed,see How Languages Are Processed.
Chapter 1Administration Tasks
1-86

Table 1-12 (Cont.) Essbase and Planning Application Options and Descriptions
Option Description
Drill Region Select Yes to create a drill region. A drillableregion is created to use the drill throughfeature.
Note:
FDMEE does notsupport drillingthrough to humanresource data.
When loading data from FDMEE, the drillregion is loaded to Planning data.
FDMEE creates drill region by scenarios. Forany cube (Planning plan types or Planningdatabases, the name of the drill region isFDMEE_<name of the scenario member).When creating the drill region, FDMEE checksif a dimension is enabled for the drill.
Members of enabled dimensions selected indata loads, are included in the drill region filter.If no dimensions are enabled, the followingdimensions are enabled by default: Scenario,Version, Year, and Period. You can enableadditional dimensions, and the subsequentdata load considers members of newlyenabled dimensions. If you disable anydimensions, which were previously included ina drill region used for drill creation, membersof such dimensions are not deleted during thesubsequent data loads. If needed, you canremove obsolete members manually.
Date Format Use the date format based on the localesettings for your locale. For example, in theUnited States, enter the date using the formatMM/DD/YY format.
Data Dimension for Auto-Increment Line Item Select the data dimension that matches thedata dimension you specified in Planning.
Used for loading incremental data using aLINEITEM flag. See Loading Incremental Datausing the LINEITEM Flag to an EPMApplication.
Driver Dimension for Auto-Increment Line Item Select the driver dimension that matches thedriver dimension you specified in Planning.
Used for loading incremental data using aLINEITEM flag. See Loading Incremental Datausing the LINEITEM Flag to an EPMApplication.
Chapter 1Administration Tasks
1-87
Table 1-12 (Cont.) Essbase and Planning Application Options and Descriptions
Option Description
Member name may contain comma To export a dimension member namecontaining a comma to Planning, select Yes.Otherwise, select No.
Working with Duplicate Members in EssbaseThe table below provides details how duplicate members are referenced in an OracleEssbase application
Table 1-13 How Duplicate members are referenced in an Essbase application
Scenario Qualified Name Syntax Example
Duplicate member names exist atgeneration 2
[DimensionMember].[DuplicateMember]
[Year].[Jan]
Duplicate member names exist in anoutline but are unique within adimension
[DimensionMember]@[DuplicateMember]
[Year]@[Jan]
Duplicate member names have aunique parent
[ParentMember].[DuplicateMember] [East].[New York]
Duplicate member names exist atgeneration 3
[DimensionMember].[ParentMember].[DuplicateMember]
[Products].[Personal Electronics].[Televisions]
Duplicate member names exist at anamed generation or level, and themember is unique at its generation orlevel
DimensionMember]@[GenLevelName]|[DuplicateMember]
[2006]@[Gen1]|[Jan]
In some scenarios, the differentiatingancestor method is used as ashortcut.
DifferentiatingAncestor].[Ancestors...].[DuplicateMember]
[2006].[Qtr1].[Jan]
Using Calculation ScriptsWhen loading data to Oracle Essbase or Oracle Hyperion Planning, Oracle HyperionFinancial Data Quality Management, Enterprise Edition enables you to run customcalculation scripts. A calculation script is a series of calculation commands, equations,and formulas that enable you to define calculations other than those defined by thedatabase outline. Calculation scripts are defined in Essbase and Planning.
Custom calculation scripts are supported in the target application and the check entitygroup. In the target application:
• parameterize the script so that you can specify a parameter for each script.
• assign scripts to run before or after the data load.
• assign a scope of applicability to scripts. The scope can be at the application,category, location, and data rule level. If scripts are assigned at the lowest level,then they take precedence over script at higher level. The data Rule is the lowestlevel and application is the highest level. Only scripts at one level are executed.
To add a calculation script:
1. On the Setup tab, under Register, select Target Application.
Chapter 1Administration Tasks
1-88
2. From the Calculation Script tab, select a calculation script.
3. Click to display the Parameter window.
4. For Planning applications only, select the Plan Type to retrieve the parametersdefined in the calculation script.
5. Click the Add to add a script parameter.
6. Select the parameter that has been defined for the script.
You can also click Browse, select the parameter, and click OK. You can alsomanually type in the parameter name.
7. In Script Value select a predefined parameter value, or select Custom to specifyyour own script value.
8. Optional: If you selected Custom in the Script Value field, enter the value inCustom.
For example, enter 0001.
9. Click OK.
10. In Script Name, specify the name of the script.
11. Click to add the parameters for the calculation script.
See Using Calculation Scripts.
12. In Script Scope, select the scope of applicability,
Note that scripts assigned at the lowest level take precedence over scripts athigher level.
Available scopes in order of highest scope to lowest are:
• Application (default scope)
• Category
• Location
• Data Rule
13. In Scope Entity, select the specific value associated with the script scope.
For example, if the script scope is "Location," select the location associated withthe application.
The Scope Entity is disabled for the Application Script Scope.
14. In Event, select the event that executes the calculation script.
Available events:
• Before Data Load
• After Data Load
• Before Check
• After Check
15. In Sequence, specify the order in which the script is executed.
Chapter 1Administration Tasks
1-89

Since multiple scripts can be executed for an event, this sequence value providesthe numeric order in which each script is executed. You can enter any number, butthe number has to be unique within an event.
16. Click Save.
Adding Calculation Script Parameters
You parameterize calculation scripts by identifying and defining the list of values in thescripts. Parameter values can be predefined for a list of values, for example, the POVPeriod, POV Location, POV Category, Check Group Entity, and all data load entities.
You can also specify custom parameters, in which case, you can enter any OracleEssbase filter syntax.
Additionally, you can reference values stored in the Integration Option 1-4 fields in theLocation table to drive calculation logic. Location Option 1, Location Option 2, LocationOption 3, and Location Option 4 values can be referenced. In this case, the exactstring that is passed as a parameter has to be stored in the Integration Option field ofthe Location table.
Similarly, you can reference four option fields in the Data Rule for parameters. Thesefields are Data Rule Option 1, Data Rule Option 2, Data Rule Option 3, and Data RuleOption 4. The column added to the Data Rule is called RULE_OPTION1,RULE_OPTION2, RULE_OPTION3 and RULE_OPTION4.
To add calculation script parameters:
1. From the Calculation Script tab, add or select a calculation script.
2. Click to add the parameters for the calculation script.
3. For Planning applications only: select the Plan Type for Accounting and Entitydimensions.
Chapter 1Administration Tasks
1-90

4. In Script Parameters, select the parameter that has been defined for the script.
You can click the Browse icon, select the parameter, and click OK.
5. In Script Value, select the value to which to apply the calculation script and clickOK.
To add a custom script parameter:
1. From the Calculation Script tab, add or select a calculation script.
2. Click to add the parameters for the calculation script.
Chapter 1Administration Tasks
1-91

3. In Script Parameters, select the parameter that has been defined for the script.
You can click the Browse icon, select the parameter, and click OK.
4. In Script Value, select Custom and click OI.
5. In Custom, enter the filter syntax for the custom value.
For example, enter 0001.
Defining Application Options for Profitability and Cost Management (HPCM)After defining the application details and dimension details, define the applicationoptions.
Oracle Hyperion Profitability and Cost Management uses EPMA for applicationdefinition and metadata management. It uses Oracle Essbase for data storage andcalculation.
Profitability and Cost Management support only and EPMA deployment, and for thisreason, available Profitability and Cost Management applications must be registeredfrom the EPMA Application Library.
To define options for an Profitability and Cost Management application:
1. On the Setup tab, under Register, select Target Application.
2. In the Target Application summary grid, click Add.
3. In Select Application, in Type, select Profitability.
4. From Name, select the Profitability and Cost Management application and clickOK.
5. After defining the application details and dimension details in Application Detail,select the Application Options tab.
6. Complete the application options as needed.
7. Click Save.
Chapter 1Administration Tasks
1-92

Table 1-14 Profitability and Cost Management Application Options andDescriptions
Property Value
Drill Region Select Yes to create a drill region. A drillableregion is created to use the drill throughfeature for Profitability and Cost Managementdata.
Note:
Oracle HyperionFinancial DataQualityManagement,Enterprise Editiondoes not supportdrilling through tohuman resourcedata.
The drill region URL allows Essbase, OracleSmart View for Office, and Oracle HyperionFinancial Reporting to drill to the properlanding page.
When loading data from FDMEE, the drillregion is loaded to Oracle Hyperion Planningdata.
A drill region includes the Entity/Account/Scenario/Year/Period for Planning, a URL toget back to FDMEE, and a region name. ForEssbase, you select the dimension to use forthe drill region.
Select Yes to enable or No to disable.
Source Language for Member Description Select the default language for the memberdescriptions.
To understand how languages are processed,see How Languages Are Processed.
Batch Size Specify the batch size used to write data tofile. The default size is 10,000.
Chapter 1Administration Tasks
1-93

Table 1-14 (Cont.) Profitability and Cost Management Application Options andDescriptions
Property Value
Check Entity Calculation Method Specify the calculation method for checkentities.
Available methods are:
• dynamic—Check entity data is calculatedbased on the data at retrieval time.
"dynamic" is the default check entitycalculation method.
• calculation script—Check entity data iscalculated based on a predefinedcalculation script.
If the calculation method is set to "dynamic",the default calculation is performed duringEssbase consolidation. If the method is set to"calculation script", then the script name givenon check entity screen is used to perform theconsolidation in target system.
Prefix Dimension for Duplicate Members When set to Yes member names are prefixedby the Dimension Name. The member namethat is loaded is in the format [DimensionName]@[Dimension Member]. The prefixeddimension name is applied to all dimensions inthe application when this option is enabled.You cannot select this option if there is adimension in the target that has duplicatemembers. That is, only select this option whenthe duplicate members cross dimensions.
If the application supports Duplicate Membersand Prefix is set to No, then the user isresponsible to specify the fully qualifiedmember names. Refer to EssbaseDocumentation for fully qualified membername format.
Note:
Planning does notsupport duplicatemembers.
Chapter 1Administration Tasks
1-94
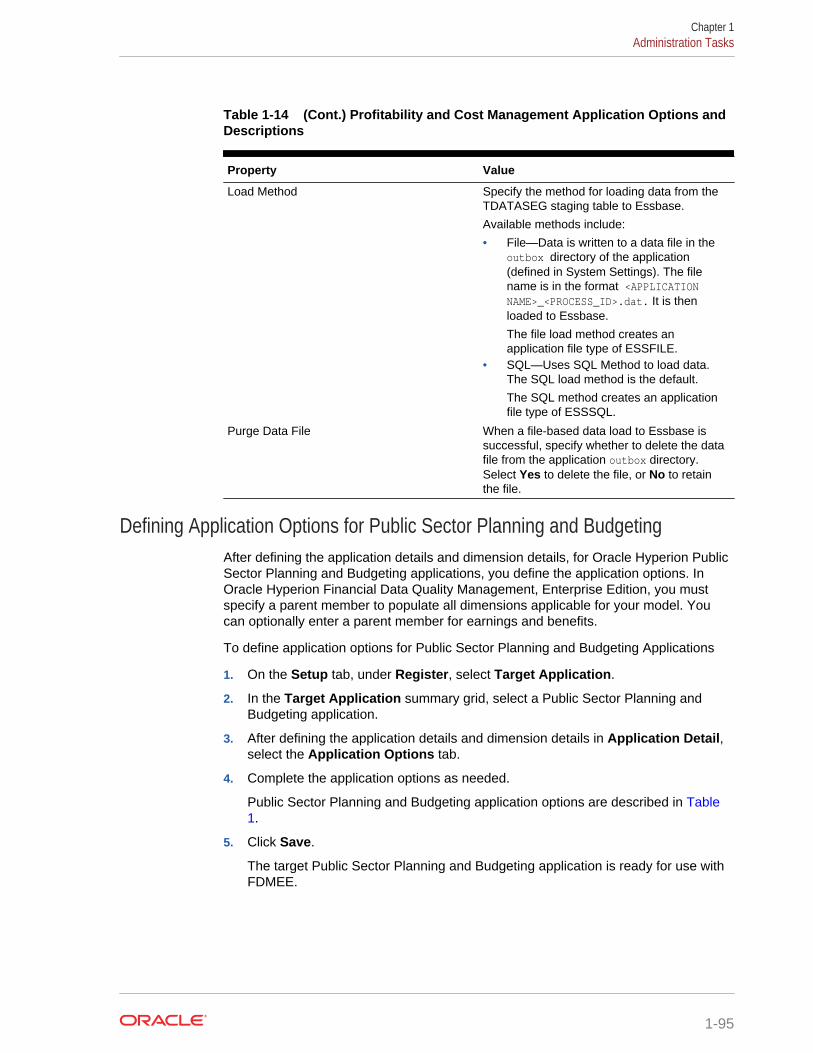
Table 1-14 (Cont.) Profitability and Cost Management Application Options andDescriptions
Property Value
Load Method Specify the method for loading data from theTDATASEG staging table to Essbase.
Available methods include:
• File—Data is written to a data file in theoutbox directory of the application(defined in System Settings). The filename is in the format <APPLICATIONNAME>_<PROCESS_ID>.dat. It is thenloaded to Essbase.
The file load method creates anapplication file type of ESSFILE.
• SQL—Uses SQL Method to load data.The SQL load method is the default.
The SQL method creates an applicationfile type of ESSSQL.
Purge Data File When a file-based data load to Essbase issuccessful, specify whether to delete the datafile from the application outbox directory.Select Yes to delete the file, or No to retainthe file.
Defining Application Options for Public Sector Planning and BudgetingAfter defining the application details and dimension details, for Oracle Hyperion PublicSector Planning and Budgeting applications, you define the application options. InOracle Hyperion Financial Data Quality Management, Enterprise Edition, you mustspecify a parent member to populate all dimensions applicable for your model. Youcan optionally enter a parent member for earnings and benefits.
To define application options for Public Sector Planning and Budgeting Applications
1. On the Setup tab, under Register, select Target Application.
2. In the Target Application summary grid, select a Public Sector Planning andBudgeting application.
3. After defining the application details and dimension details in Application Detail,select the Application Options tab.
4. Complete the application options as needed.
Public Sector Planning and Budgeting application options are described in Table1.
5. Click Save.
The target Public Sector Planning and Budgeting application is ready for use withFDMEE.
Chapter 1Administration Tasks
1-95
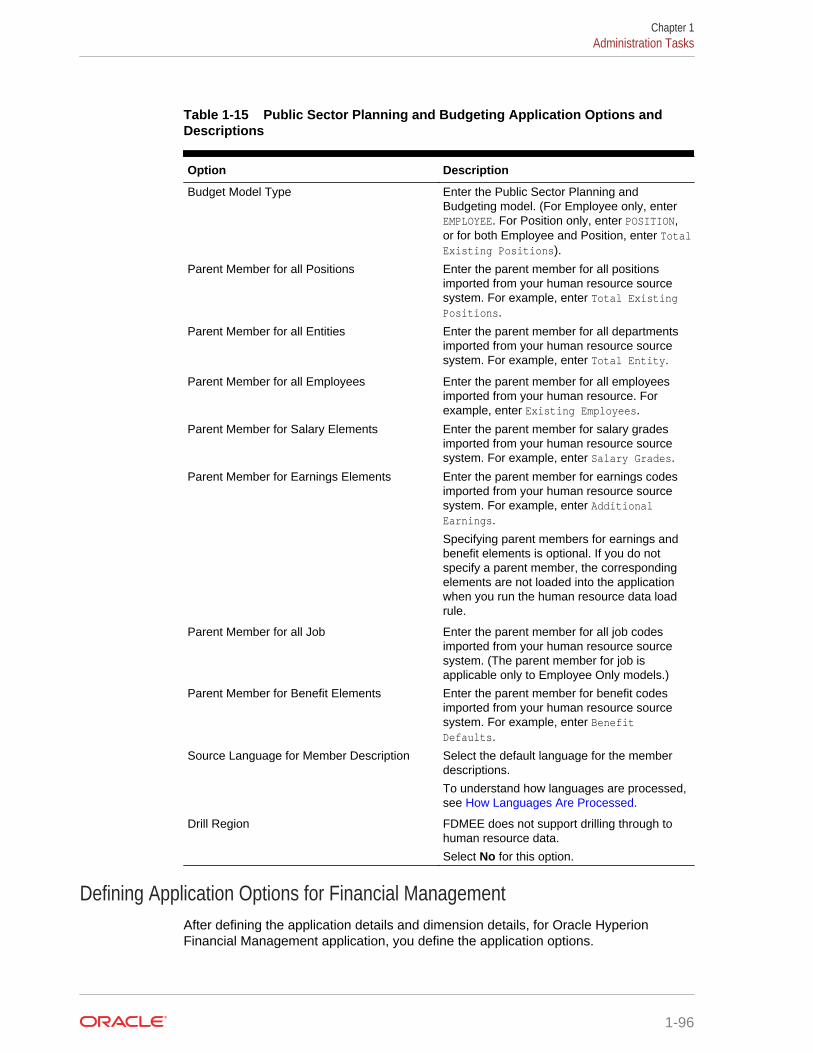
Table 1-15 Public Sector Planning and Budgeting Application Options andDescriptions
Option Description
Budget Model Type Enter the Public Sector Planning andBudgeting model. (For Employee only, enterEMPLOYEE. For Position only, enter POSITION,or for both Employee and Position, enter TotalExisting Positions).
Parent Member for all Positions Enter the parent member for all positionsimported from your human resource sourcesystem. For example, enter Total ExistingPositions.
Parent Member for all Entities Enter the parent member for all departmentsimported from your human resource sourcesystem. For example, enter Total Entity.
Parent Member for all Employees Enter the parent member for all employeesimported from your human resource. Forexample, enter Existing Employees.
Parent Member for Salary Elements Enter the parent member for salary gradesimported from your human resource sourcesystem. For example, enter Salary Grades.
Parent Member for Earnings Elements Enter the parent member for earnings codesimported from your human resource sourcesystem. For example, enter AdditionalEarnings.
Specifying parent members for earnings andbenefit elements is optional. If you do notspecify a parent member, the correspondingelements are not loaded into the applicationwhen you run the human resource data loadrule.
Parent Member for all Job Enter the parent member for all job codesimported from your human resource sourcesystem. (The parent member for job isapplicable only to Employee Only models.)
Parent Member for Benefit Elements Enter the parent member for benefit codesimported from your human resource sourcesystem. For example, enter BenefitDefaults.
Source Language for Member Description Select the default language for the memberdescriptions.
To understand how languages are processed,see How Languages Are Processed.
Drill Region FDMEE does not support drilling through tohuman resource data.
Select No for this option.
Defining Application Options for Financial ManagementAfter defining the application details and dimension details, for Oracle HyperionFinancial Management application, you define the application options.
Chapter 1Administration Tasks
1-96
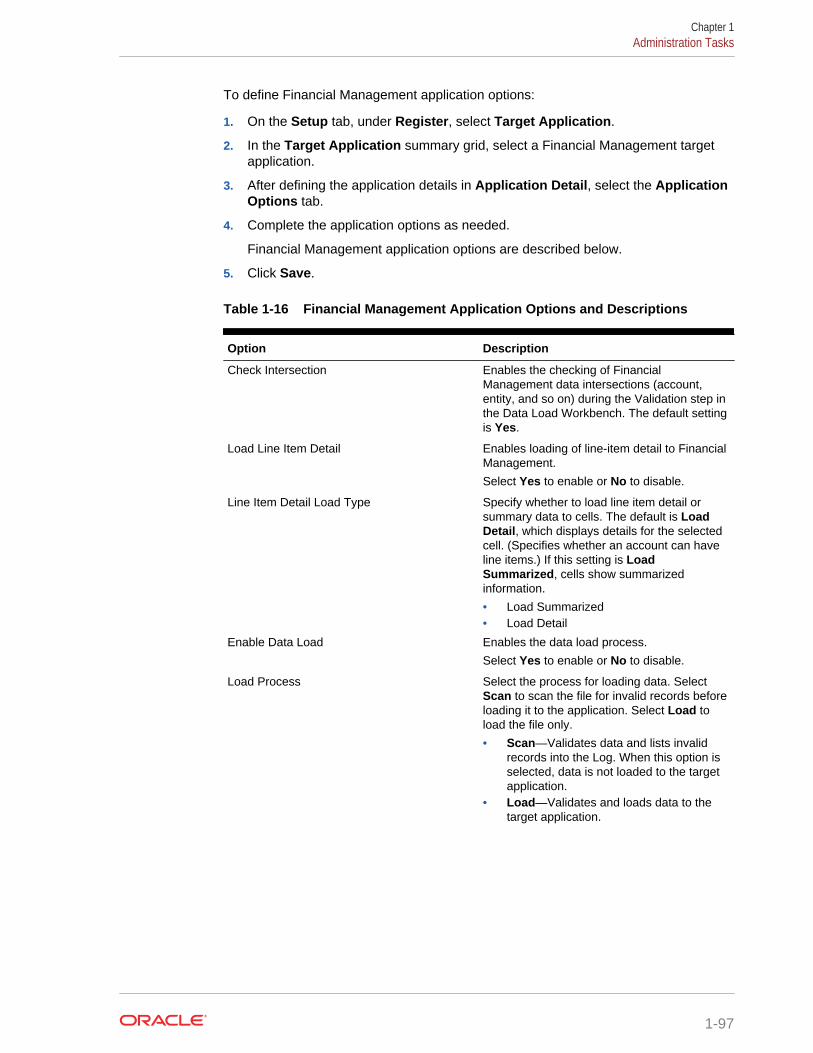
To define Financial Management application options:
1. On the Setup tab, under Register, select Target Application.
2. In the Target Application summary grid, select a Financial Management targetapplication.
3. After defining the application details in Application Detail, select the ApplicationOptions tab.
4. Complete the application options as needed.
Financial Management application options are described below.
5. Click Save.
Table 1-16 Financial Management Application Options and Descriptions
Option Description
Check Intersection Enables the checking of FinancialManagement data intersections (account,entity, and so on) during the Validation step inthe Data Load Workbench. The default settingis Yes.
Load Line Item Detail Enables loading of line-item detail to FinancialManagement.
Select Yes to enable or No to disable.
Line Item Detail Load Type Specify whether to load line item detail orsummary data to cells. The default is LoadDetail, which displays details for the selectedcell. (Specifies whether an account can haveline items.) If this setting is LoadSummarized, cells show summarizedinformation.
• Load Summarized• Load Detail
Enable Data Load Enables the data load process.
Select Yes to enable or No to disable.
Load Process Select the process for loading data. SelectScan to scan the file for invalid records beforeloading it to the application. Select Load toload the file only.
• Scan—Validates data and lists invalidrecords into the Log. When this option isselected, data is not loaded to the targetapplication.
• Load—Validates and loads data to thetarget application.
Chapter 1Administration Tasks
1-97
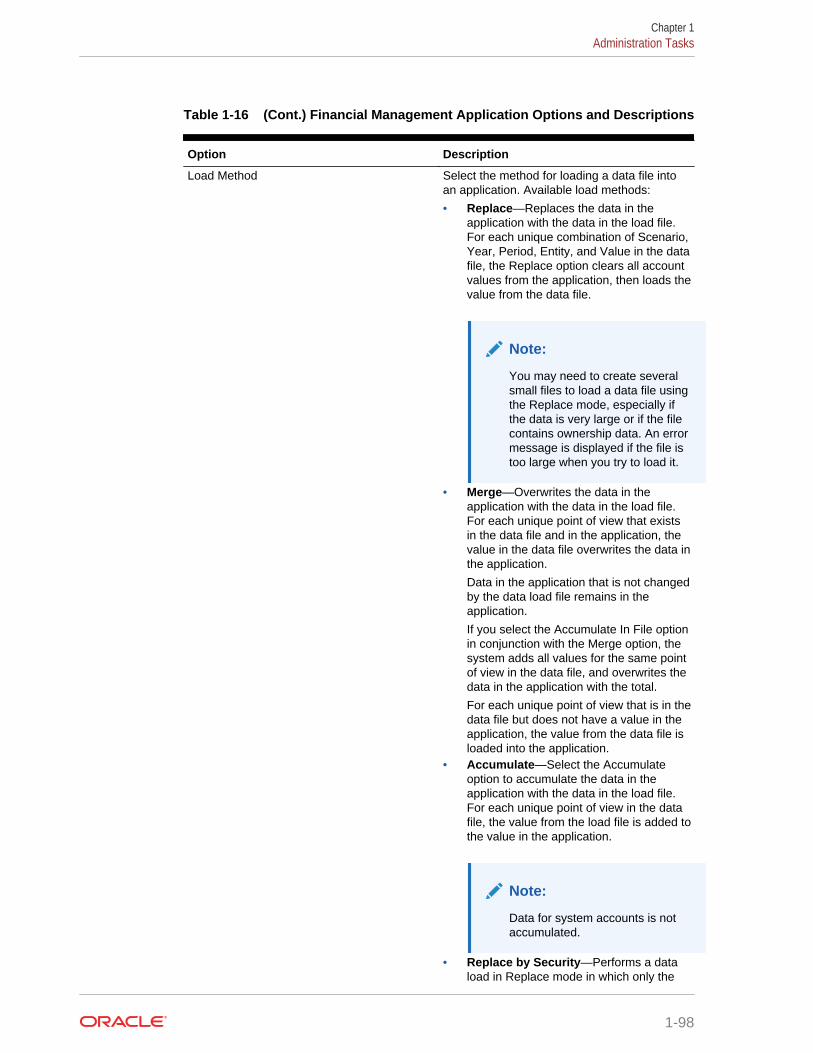
Table 1-16 (Cont.) Financial Management Application Options and Descriptions
Option Description
Load Method Select the method for loading a data file intoan application. Available load methods:
• Replace—Replaces the data in theapplication with the data in the load file.For each unique combination of Scenario,Year, Period, Entity, and Value in the datafile, the Replace option clears all accountvalues from the application, then loads thevalue from the data file.
Note:
You may need to create severalsmall files to load a data file usingthe Replace mode, especially ifthe data is very large or if the filecontains ownership data. An errormessage is displayed if the file istoo large when you try to load it.
• Merge—Overwrites the data in theapplication with the data in the load file.For each unique point of view that existsin the data file and in the application, thevalue in the data file overwrites the data inthe application.
Data in the application that is not changedby the data load file remains in theapplication.
If you select the Accumulate In File optionin conjunction with the Merge option, thesystem adds all values for the same pointof view in the data file, and overwrites thedata in the application with the total.
For each unique point of view that is in thedata file but does not have a value in theapplication, the value from the data file isloaded into the application.
• Accumulate—Select the Accumulateoption to accumulate the data in theapplication with the data in the load file.For each unique point of view in the datafile, the value from the load file is added tothe value in the application.
Note:
Data for system accounts is notaccumulated.
• Replace by Security—Performs a dataload in Replace mode in which only the
Chapter 1Administration Tasks
1-98

Table 1-16 (Cont.) Financial Management Application Options and Descriptions
Option Description
members to which you have access areloaded. This option enables you toperform a data load in Replace modeeven if you do not have access to allaccounts. When you perform the Clearoperation for a period in a sub-cube, onlythe cells to which you have access arecleared. Data, cell text, and line itemdetail are cleared, but cell attachmentsare not cleared.
Accumulate in File You use the Accumulate in File option inconjunction with the Merge and Replaceoptions. When a data load file containsmultiple lines of data for the same point ofview, this option first accumulates the data inthe file, and then loads the totals into theapplication based on the selected load option.For each unique point of view in the data file,the value from the load file is added to thevalue in the application. For example, if youhave 10, 20 and 30 in the file, 60 is loaded.Select Yes to enable or No to disable.
Has Ownership If the file that you are loading containsownership data, you must indicate this option.If you do not select this option and the data filecontains ownership or shares data, an erroroccurs when you load the file.
Select Yes to enable or No to disable.
Enable Data Protection Enables Oracle Hyperion Financial DataQuality Management, Enterprise Edition toprotect target-system data from beingoverwritten during data loads; is based on aspecified protection value. Use this optionwhen data is entered into the target systemthrough a method other than FDMEE.
Select Yes to enable or No to disable.
Protection Value The value that is to be protected during theLoad step when Enable Data Protection isenabled. The value in this field is to be adimension value inside of FinancialManagement across any dimension.
For example, enter Protect This.
Protection Operator Select operator (= or <>). This is used onlywhen the Enable Data Protection option isenabled. The option enables you to state thatthe data to be protected is equal (=) or notequal (<>) to the “Protection Value.”
Chapter 1Administration Tasks
1-99
Table 1-16 (Cont.) Financial Management Application Options and Descriptions
Option Description
Enable Journal Load Enables the loading of journal files.
You can load working, rejected, submitted,approved, and posted journals as well asstandard and recurring journal templates. Youcannot load automated consolidation journalsbecause they are created by the consolidationprocess.
The default setting for this option is No.This setting is also used with the Data Valueselected for the location on the Locationscreen to determine when and how data isloaded to Financial Management as journals.
Select Yes to enable or No to disable.
Drill Region Select Yes to create a drill region.
Drillable region definitions are used to definethe data that is loaded from a general ledgersource system and specify the data drillable toFDMEE.
In data grids and data forms, after the regionshave been loaded, cells that are drillable areindicated by a light blue icon at the top leftcorner of the cell. The cell context menudisplays the defined display name, which thenopens the specified URL.
A region definition load file consists of thefollowing information:
• Scenario, Year, Period, Entity, Account• Display Name (for cell context menu) and
URL (to drill to)
Chapter 1Administration Tasks
1-100

Table 1-16 (Cont.) Financial Management Application Options and Descriptions
Option Description
Enable Cell Text Loading Enables the loading of text and documents toa data cell. FDMEE archives documents in theEPM_ORACLE_HOME/ products/FinancialDataQuality/data directory.
Select Yes to enable or No to disable.
Note:
FDMEE does notload multiple celltext to anintersection inFinancialManagement. If aload using anappend mode is runand new cell text isadded to anintersection thatalready has celltext, the old cell textis replaced by thenew cell text andnot appended.
Enable Consolidation Enables consolidation in the data load.
Consolidation is the process of gathering datafrom dependent entities and aggregating thedata to parent entities. Launchingconsolidation runs the consolidation processfor the specified scenario, year, period, entity,and value. As a part of that process,consolidation for all descendant entities and allprior time periods within the same year is run,if it has not been run previously. Theconsolidation process runs all calculation rulesfunctions for each affected entity and value,and the translation process runs as necessaryto convert from child entities to parent entities.
Select Yes to enable or No to disable.
Chapter 1Administration Tasks
1-101

Table 1-16 (Cont.) Financial Management Application Options and Descriptions
Option Description
Consolidation Type Select the consolidation type for the data load.
Available consolidation types:
• Impacted—The Consolidate (ImpactedConsolidation) option is available for anyparent entity with a calculation status ofCN or CN ND. When you select thisoption for a parent entity, the systemperforms calculations (Calculate,Translate, Consolidate) for any dependententity within the consolidation path of theselected parent that has a calculationstatus of CN, CN ND, CH, TR, or TR ND,on the current period or on any priorperiod in the current year. Consolidate isthe most efficient option because onlyentities that require consolidation areupdated.
Process units with a status of NODATAon the current period and all prior periodsare skipped. Process units with a status ofOK or OK SC on the current period arenot recalculated, retranslated, orreconsolidated. If the selected parent hasa status of CN or CN ND in the priorperiod, consolidation runs for all periodsfrom the first period in the current yearwhere the parent is impacted until thecurrent period.
• All with Data—The Consolidate All withData option is available for any parententity, regardless of its status. When youselect this option for a parent entity, thesystem consolidates every dependententity within the consolidation path of theselected parent that contains data,regardless of its status, in the currentperiod or in any of the prior periods. Thesystem also runs calculation rules for thedependent entities. It does not perform aconsolidation on entities that containzeroes or no data. This option is useful forupdating system status from OK SC to OKafter metadata changes.
Process units with a status of NODATAon the current period and all prior periodsare skipped. Consolidation Options unitswith a status of OK or OK SC on thecurrent period are recalculated,retranslated, and reconsolidated. If theselected parent has a status of CN or CNND in the prior period, consolidation runsfor all periods from the first period in thecurrent year where the parent is impacteduntil the current period.
Chapter 1Administration Tasks
1-102

Table 1-16 (Cont.) Financial Management Application Options and Descriptions
Option Description
• All—The Consolidate All option isavailable for any parent entity, regardlessof its status. When you select this optionfor a parent entity, the system performscalculations for every process unit withinthe consolidation path of the selectedparent, regardless of its status. Itconsolidates all entities whether theycontain data or not. This option is usefulwhen an update from prior periods isrequired, or when an entity with no dataneeds to be populated using allocations.This option should be used sparinglybecause the system does not omit entitieswith no data, which can have a significantimpact on consolidation performance.
Process units with a status of NODATAon the current period are calculated,translated, and consolidated. Processunits with a status of OK or OK SC on thecurrent period are recalculated,translated, and reconsolidated. If theselected parent has a status of CN or CNND in the prior period, consolidation runsfor all periods from the first period in thecurrent year where the parent is impacteduntil the current period.
• Entity—Calculates the contribution ofeach entity to its parent, and then totals allcontributions to arrive at the consolidatednumbers.
• Force Entity Only—Forces calculation torun for all selected contribution values toarrive at the consolidation numbers.
Enable Force Calc Enables the execution of the defaultcalculation call prior to a consolidation run.
Select Yes to enable or No to disable.
Enable Force Translate Enable to force translation to run for allselected cells.
Select Yes to enable or No to disable.
Translation Level Determines the translation level (levels toinclude for translation) of rows and columnswhen loading data. Available levels:
• <Entity Curr Adjs>• <Entity Curr Total>• <Entity Currency>• <Parent Curr Adjs>• <Parent Curr Total>• <Parent Currency> (Default)
Enable Multi-Load Zero Loading Select Yes to load 0 values during a multipleperiod load.
Chapter 1Administration Tasks
1-103

Table 1-16 (Cont.) Financial Management Application Options and Descriptions
Option Description
Journal Status To load journals with a specific status, selectthe status. The journal status indicates thecurrent state of the journal.
Available journal statuses:
• 1—Working: Journal is created. It hasbeen saved, but it can be incomplete. Forexample, a label or single entity may needto be assigned.
• 2—Submitted: Journal is submitted forapproval.
• 3—Approved: Journal is approved forposting.
• 4—Posted: Journal adjustments areposted to the database (default).
• 5—Journal is rejected or unposted.
Journal Default Value Specify the default value of the journal. Thedefault setting for this option is <Entity CurrAdjs>.
Available values are:
• [Contribution Adjs]• [Parent Adjs]• <Entity Curr Adjs>• <Parent Curr Adjs>
Journal Enable JV ID per Entity Assign a journal id (journal numbering) toentities that are being loaded.
Select Yes to assign one journal id for eachentity in the POV. Select No, to assign one idfor all data in the POV. This option is onlyused when loading journals.
The default setting is Yes.
This option only applies to FDMEE data that isimported as data and not through the Journalinterface. Because regular data that isimported into FDMEE can be loaded toFinancial Management as a journal andFinancial Management requires all journals tohave a JV ID, this option enables FDMEE todetermine how the JV IDs' are created.
Journal Balancing Attribute Select the journal balancing attribute used inthe journal subsection.
Available attributes are:
• B—Balanced• U—Unbalanced• E—Balanced By EntityThis option is only used when loading journalsto Financial Management. The default settingis U-Unbalanced.
Currency Rate Account for Beginning Rate Specify the Financial Management targetapplication currency rate account for thebeginning rate.
Chapter 1Administration Tasks
1-104

Table 1-16 (Cont.) Financial Management Application Options and Descriptions
Option Description
Currency Rate Account for Ending Rate Specify the Financial Management targetapplication currency rate account for theending rate.
Currency Rate Account for Average Rate Specify the Financial Management targetapplication currency rate account for theaverage rate.
Source Language for Member Description Specify the source language for thedescription when members are loaded.
Available languages are shown on the drop-down.
Global User for Application Access Option to override the Single Sign-On logon tothe Financial Management applications. Whena user name is specified for this option, thisuser name is used to access the FinancialManagement application instead of theFDMEE sign-on user name. Specify the username of a user who has administrator accessto the Financial Management application.
Enabling Intercompany Partner Dimensions for Financial ManagementOracle Hyperion Financial Data Quality Management, Enterprise Edition supportsintercompany partner (ICP) dimensions used by Oracle Hyperion FinancialManagement. The ICP dimension represents a container for all intercompanybalances that exist for an account. ICP is a reserved dimension used in combinationwith the account dimension and custom dimensions to track and eliminateintercompany transaction details.
When working with ICP transaction in FDMEE, note the following:
• ICP transactions can be loaded only from a file.
• If the import format contains a dimension of type "ICPTRANS, "then it isconsidered an ICP Transaction load.
• If the import format does not contain any dimension of type "ICPTRANS," then it isconsidered a standard data load.
• When ICP transactions are enabled, the following attributes are included:
– Attr1 – Transaction ID
– Attr2 – Transaction Sub ID
– Attr3 – Reference ID
– Attr4 – Transaction Date
– Attr5 – Entity Currency Amount
– Attr6 – Transaction Currency
– Attr7 – Conversion Rate
– Attr11 - Comment
ICP transactions are included in the import format.
Chapter 1Administration Tasks
1-105
When registering a Financial Management application, an “Enable ICP Transactions”option is available. When this option is enabled, additional ICP dimensions are addedto Dimension Details. These dimensions are registered with dimension classification"ICPTRANS" (ICP Transactions) and the attributes of the values are stored in the datatable column name "ATTR." Source values of the ICP dimensions cannot betransformed by mapping. If some transformation is required, then you use a script fromanother dimension map. Also see Entity and Intercompany.
To enable intercompany partner dimensions:
1. On the Setup tab, under Register, select Target Application.
2. In the Target Application summary grid, select a Financial Managementapplication.
3. Select the Dimension Details tab.
4. Click Enable ICP Transactions.
5. When the Refresh Metadata Confirmation window is displayed, click Continueand Save Later to add the ICP transactions.
In this case, to save the ICP transactions, you need to click Save to save thetransactions with the dimension details.
To add and save the ICP transactions immediately, click Save.
6. Click Save.
Deleting Registered Target ApplicationsUse caution when deleting registered target applications. When you delete aregistered target application, the target application is removed from the TargetApplication screen, and all metadata and data rules associated with the application areremoved.
To delete a registered target application:
1. On the Setup tab, under Register, select Target Application.
2. In Target Application, select the target application, and then click Delete.
3. Click OK.
When you delete a target application, the application is marked for deletion and isunavailable for any metadata or data rule processes, including the import formatand location creation options. All the existing rules involving the target applicationare removed.
Note:
After a target application is deleted and the process has run successfully,use the Target Application screen to set up the same application andredefine the rules.
4. Click Save.
Chapter 1Administration Tasks
1-106
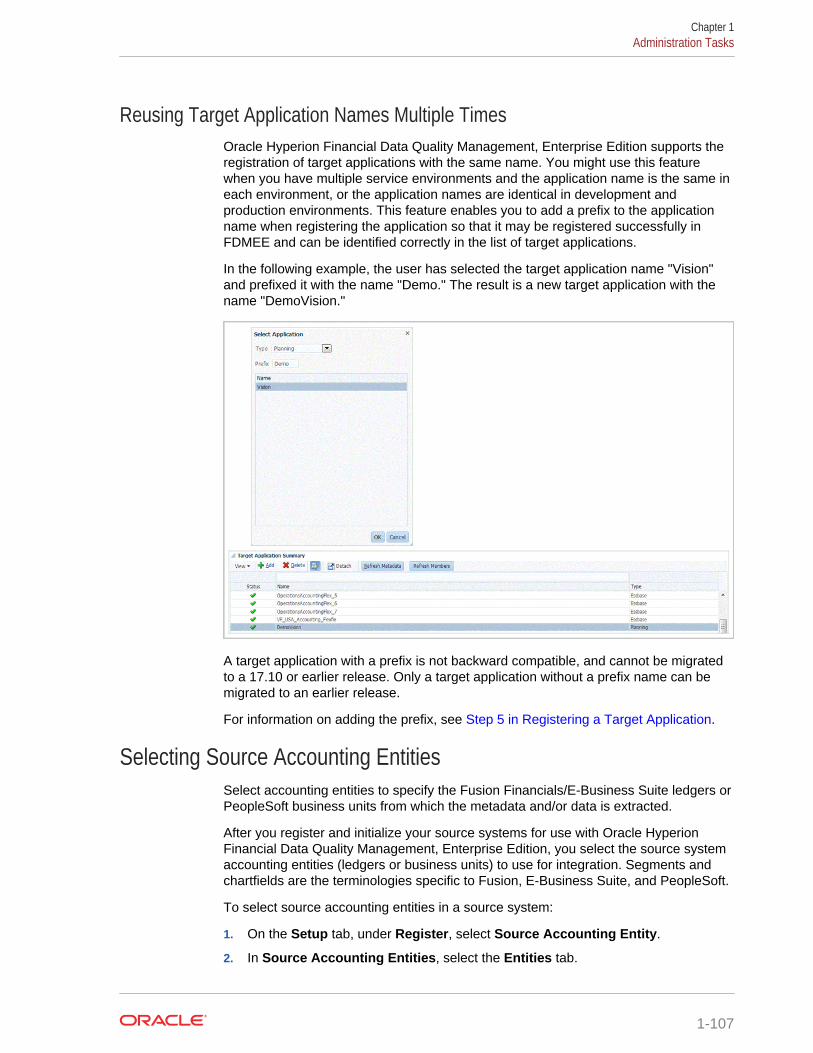
Reusing Target Application Names Multiple TimesOracle Hyperion Financial Data Quality Management, Enterprise Edition supports theregistration of target applications with the same name. You might use this featurewhen you have multiple service environments and the application name is the same ineach environment, or the application names are identical in development andproduction environments. This feature enables you to add a prefix to the applicationname when registering the application so that it may be registered successfully inFDMEE and can be identified correctly in the list of target applications.
In the following example, the user has selected the target application name "Vision"and prefixed it with the name "Demo." The result is a new target application with thename "DemoVision."
A target application with a prefix is not backward compatible, and cannot be migratedto a 17.10 or earlier release. Only a target application without a prefix name can bemigrated to an earlier release.
For information on adding the prefix, see Step 5 in Registering a Target Application.
Selecting Source Accounting EntitiesSelect accounting entities to specify the Fusion Financials/E-Business Suite ledgers orPeopleSoft business units from which the metadata and/or data is extracted.
After you register and initialize your source systems for use with Oracle HyperionFinancial Data Quality Management, Enterprise Edition, you select the source systemaccounting entities (ledgers or business units) to use for integration. Segments andchartfields are the terminologies specific to Fusion, E-Business Suite, and PeopleSoft.
To select source accounting entities in a source system:
1. On the Setup tab, under Register, select Source Accounting Entity.
2. In Source Accounting Entities, select the Entities tab.
Chapter 1Administration Tasks
1-107
3. Select the source system type.
4. Select a source system.
The source accounting entities are displayed in a grid. You can click the columnheader to sort any column. The Entities tab displays the following columns:
For Fusion and E-Business Suite source systems:
• Select—A check mark indicates that the accounting entity (ledger) is available.
• Accounting Entity—Name of the ledger
• Chart of Accounts—Chart of accounts name
• Currency—The functional currency of the Fusion and E-Business Suite ledger
• Calendar—The Fusion and E-Business Suite ledger calendar. The Fusion andE-Business Suite ledger is a collection of chart of accounts, currency, andcalendar. For example, 4–4–5, Weekly, Accounting, and so on.
• Responsibility Name—Displays the general ledger drill-through responsibility.The drill through responsibility must be set in FDMEE to enable users to drillthrough to E-Business Suite. The responsibility selected must have theauthority to view summary journals and journal details for the selected ledgerin the E-Business Suite.
For PeopleSoft source systems:
• Select—Select the check box to make the business unit available.
• Business Unit—Business unit name
• Currency—The base currency for the business unit
5. For Fusion and E-Business Suite source systems, select the general ledgerResponsibility Name. See Assigning General Ledger Responsibility.
6. For each ledger or business unit that you want to make available in FDMEE, selectthe check box.
7. Click Save.
Tip:
To filter by the business unit or accounting entity, ensure that the filter row is
displayed above the column headers. (Click the to toggle the filter row.)Then, enter the text to filter.
Assigning General Ledger ResponsibilityIn the E-Business Suite General Ledger, the system administrator assigns usersgeneral ledger responsibility. General ledger responsibility provides the authenticationrequired for Oracle Hyperion Financial Data Quality Management, Enterprise Edition todrill through to the Fusion and E-Business Suite journal summary page.
To assign general ledger responsibility:
1. In Source Accounting Entities, in the Responsibility Name column, click toselect a General Ledger Responsibility.
Chapter 1Administration Tasks
1-108

The Responsibility Name is the Responsibility ID the user is logged in under whendrilling through to the source system. Select the responsibility name only if youwant to drill through; otherwise, leave it blank.
2. Repeat the above process as necessary for all selected ledgers in the sourcesystem.
3. Click Save.
Working with Source Accounting Entity GroupsAn accounting entity group is a logical grouping of common accounting entities (forexample, the same Chart of Accounts, the same Calendar, or the same currency).Accounting entity groups are used to extract data from multiple accounting entities in asingle data rule execution. They facilitate sharing the same data because multipleaccounting entities can belong to more than one accounting entity groups.
To work with accounting entity groups, note the following:
• Accounting entity groups can be used only with data rules.
• When a data rule in a location includes an accounting entity, then the rule isconstrained by the accounting entity in the definition. In this case, the data rule inthe location cannot use an accounting entity group.
• When a data rule in a location has no accounting entity, then an accounting entityor an accounting entity group must be specified in the definition. The data ruleexecution extracts data from a single accounting entity or from all the accountingentities in an accounting entity group.
• Data load to write-back rules accept only an accounting entity (and not anaccounting entity group) in their definition.
• Metadata rules accept only an accounting entity (and not an accounting entitygroup) in their definition.
• Oracle Hyperion Financial Data Quality Management, Enterprise Edition does notenforce that entities belong to the same Chart of Accounts.
You view and maintain accounting entity groups using the Entity Groups tab in theSource Accounting Entities feature. The Entity Groups tab consists of two regions:Entity Groups, to which you can add a new group, and the Entity Groups Entities, fromwhich you can add accounting entities.
To add a source accounting entity group:
1. On the Setup tab, under Register, select Source Accounting Entity.
2. In Source Accounting Entities, select the Entity Groups tab.
3. Select the source system type.
4. In the Entity Groups grid, click Add.
Blank Name and description rows are added at the top of the grid.
5. In Name, enter the name of the accounting entity group.
6. In Description, enter a description of the accounting entity group.
7. In the Entity Group Entities grid, select the accounting entities to add.
Chapter 1Administration Tasks
1-109
The source accounting entities are displayed in the Entity Group Entities grid. Youcan click the column header to sort any column. The Entity Group Entities griddisplays the following columns:
For Fusion and E-Business Suite source systems:
• Select—A check mark indicates that the accounting entity (ledger) is available.
• Accounting Entity—Name of the ledger
• Chart of Accounts—Chart of accounts name
• Currency—The functional currency of the Fusion and E-Business Suite ledger
• Calendar—The Fusion and E-Business Suite ledger calendar. The Fusion andE-Business Suite ledger is a collection of chart of accounts, currency, andcalendar. For example, 4–4–5, Weekly, Accounting, and so on.
• Responsibility Name—Displays the general ledger drill-through responsibility.The drill-through responsibility must be set in FDMEE to enable users to drillthrough to E-Business Suite. The responsibility selected must have theauthority to view summary journals and journal details for the selected ledgerin the E-Business Suite.
For PeopleSoft source systems:
• Select—Select the check box to make the business unit available for theaccounting entity group.
• Business Unit—Business unit name
• Currency—The base currency for the business unit
8. Click Save.
Loading Excel DataUse the Load from Excel feature to load data to and from a Microsoft Excel workbook.This feature enables you to load large amounts of application information and entitytypes without having to enter each line manually, and to push data into tables withoutSQL access.
Available options include:
• Download to Excel—Select an entity and download the data from thecorresponding table to an Excel spreadsheet.
• Upload from Excel—Import source data representing one more ranges from anExcel spreadsheet.
Caution:
When loading data using this method, Oracle Hyperion Financial Data QualityManagement, Enterprise Edition does not validate the data. It is theresponsibility of the user to validate the date using this method.
Chapter 1Administration Tasks
1-110

Downloading to ExcelYou can select an Oracle Hyperion Financial Data Quality Management, EnterpriseEdition entity and download the data from the corresponding table to an Excelspreadsheet.
When downloading to Excel, note that the format of the Excel file must include:
• table name
• Column names in the second row
• Data from the table
The following example shows how a Period entity is mapped in Excel:
To download data to an Excel spreadsheet:
1. On the Setup tab, under Integration Setup, select Excel Interface.
2. From Excel Interface, then Download to Excel, and then from Entity Type,select the FDMEE entity from which to download data.
Available entity types:
• Application Category Mapping
• Application Period Mapping
• Batch Definition
• Batch Groups
• Batch Jobs
• Category Mapping
• Check Entity Group
• Check Entity Item
• Check Entity Detail
• Check Entity Header
• Data Rule
• Data Rule Parameters
• Import Format Detail-Adapter
• Import Format Detail-ERP
• Import Format Detail-File
• Import Format Header
• Location
Chapter 1Administration Tasks
1-111

• Logic Group Detail
• Logic Group Header
• Period Mapping
• Source Period Mapping
• User Setting
• Other (prompts for table name)
3. Optional: If you selected an Other entity type, enter the name of the table in theTable Name field.
4. In File, enter the name of the Excel file to which to download the data.
You can also download a file by clicking Select, navigating to the file on the Selectscreen, entering the new file name, and then clicking Download.
5. Click Download.
When the Excel spreadsheet is uploaded, the names of the tables and columnsthat have been downloaded are shown, and the message: "File importedsuccessfully" is displayed.
6. Optional: To open the downloaded Excel file, next to the File name field, clickSelect.
From the Select screen, choose the Excel spreadsheet and click Download.
Save or open the Excel spreadsheet.
Uploading from ExcelAn Excel spreadsheet that is used as an import source represents one or moreranges. The first cell of a range contains the name of the Oracle Hyperion FinancialData Quality Management, Enterprise Edition table to be imported. The second row ofa range contains the column names of the table identified in the first row. Rows 3 andhigher contain the data to be loaded to FDMEE.
Range names begin with the FDMEE import identifier ups, for example, upsCategory.When imported tables are related, the parent table must be imported prior to the childtable. Range names process in alphabetical order. To ensure the correct parent-childorder, assign range names such as upsAParent and upsBChild.
Also note the following behavior when uploading data from Excel:
• Data is only inserted. It cannot updated or deleted.
• Data is not validated.
• When FDMEE encounters a duplicate row, the row is skipped.
To upload data from an Excel spreadsheet:
1. On the Setup tab, under Integration Setup, select Excel Interface.
Chapter 1Administration Tasks
1-112

2. From Excel Interface, and then Upload from Excel, in File, enter the name of theExcel file to upload.
You can also select a file by clicking Select, navigating to the file on the Selectscreen, and clicking OK.
3. Click Upload.
4. Optional: To open the downloaded Excel file, next to the File name field, clickSelect.
5. Optional: You can also click Upload and browse to and select an Excelspreadsheet from an alternate directory.
When the Excel spreadsheet is uploaded correctly, the Status pane shows theprocessed ranges, and the message: "File imported successfully" is displayed.
Chapter 1Administration Tasks
1-113

2Integrating Tasks
Related Topics
• Working with Import Formats
• Defining Locations
• Defining Period Mappings
• Defining Category Mappings
Working with Import FormatsImport formats define:which fields (columns) are extracted from the source system and how the data isstored in the Oracle Hyperion Financial Data Quality Management, Enterprise Editionstaging table.
the data format and mapping information for columns in the Oracle Hyperion Planningsource system and target applications for a source adapter based integrations.
• mapping between the source system segments or chartfields and the dimensions(used in the metadata load and data load process).
• mapping between the EPM dimensions and the source system segments orchartfields (used in the write-back process).
• mapping information for source adapter based integrations
• mapping information between source and target EPM dimensions for datasynchronization.
Note:
You do not need to define import mappings for use with human resourcessource systems. This is only applicable to the rebuilt Peoplesoft HCMintegration.
Import formats are created for a single accounting entity. However, if you are importingdata from multiple accounting entities that have the same Chart of Accounts, you candefine one Import Format using a representative accounting entity, and then use it forimporting data for all accounting entities with the same Chart of Accounts.
You define import formats to map source segments or chartfields to target dimensions.You can create import formats to:
You work with import formats on the Import Format screen, which consists of threesections:
2-1

• Import Format Summary—Displays common information relevant to the sourceand target applications.
• Import Format Detail—Enables you to add and maintain import format information.
• Import Format Mappings—Enables you to add and maintain import formatmapping information.
Defining the Import FormatUse the Import Format summary section to view, add, and delete import formatsummary information.
Viewing Import Format Information
Table 2-1 Import Format View Options and Descriptions
View Option Description
Customizes views. Options include:
• Columns-Select the columns to display inthe data grid including:
– Show All– Name– Source System– Accounting Entity– Source Adapter– Target Application
• Reorder Columns-Use to change theorder of the columns. When you select thisoption, the Reorder Columns screen isdisplayed. You can select a column, andthen use the scroll buttons on the right tochange the column order.
• Detach/Attach-Detaches columns fromthe data grid. Detached columns aredisplayed in their own window. To return tothe default view, select View, and thenclick Attach or click Close.
• Query by Example-Use to toggle the filterrow. You can use the filter row to entertext to filter the rows that are displayed fora specific column. To clear a filter, removethe text to filter by in the text box, and thenthe press [Enter] key. All text is casesensitive.
Adding Import FormatsYou work with import formats on the Import Format screen, which consists of threesections:
• Import Format Summary—Displays common information relevant to the sourceand target applications.
• Import Format Detail—Enables you to add and maintain import format information.
Chapter 2Working with Import Formats
2-2

• Import Format Mappings—Enables you to add and maintain import formatmapping information.
To add an import format for an Enterprise Resource Planning (ERP) source:
1. On the Setup tab, under Integration Setup, select Import Format.
2. In the Import Format summary task bar, select Add.
In the upper grid of the Import Formats screen, a row is added.
3. In Name, enter a user-defined identifier for the import format.
You cannot modify value in this field after a mapping is created for this importformat.
4. In Source, select the source system.
5. In Target, select the target system.
6. Optional: In Concatenation Character, specify the character to use forconcatenating two segments when multiple segments are specified for sources.
Set the concatenation member by specifying the concatenation character.
For non-ARM data loads and metadata loads, the underscore character “_” is usedto concatenate two segments. For ARM data loads, you cannot use an underscorecharacter with a mapping that uses the “Like” method. Therefore, for ARMmappings, specify a different concatenation character for the data load mappingdetails.
7. In Description, enter a description of the import format.
8. In Accounting Entity, select the accounting entity.
For Fusion and E-Business Suite source systems, the accounting entity is theledger. For PeopleSoft source systems, the accounting entity is the business unit.
9. Define the import mappings from source to target.
See Defining the Import Format Mappings.
For information on one-to-one mappings and many-to-one mappings, see DefiningImport Format Mappings.
To add an import format for a source adapter (open interface adapter):
1. On the Setup tab, under Integration Setup, select Import Format.
2. On the Import Format summary task bar, select Add.
In the upper grid of the Import Formats screen, a row is added.
3. In Name, enter a user defined identifier for the import format.
You cannot modify the value in this field after mapping is created for this importformat.
Note:
Do use non-ASCII characters in an import format name when the importsource is an adapter.
4. In the Description, enter a description of the import format.
Chapter 2Working with Import Formats
2-3
5. In Source, select the source for the source adapter.
6. In Source Adapter, select the source adapter name.
7. In Target, select EPM and select the target system.
8. In Drill URL, enter the URL that identifies the URL to use for drilling through whenusing this import format.
9. Define the import mappings from source to target. See Defining the Import FormatMappings.
For information on one-to-one mappings and many-to-one mappings, see DefiningImport Format Mappings.
To add an import format for a file-based data load system:
1. On the Setup tab, under Integration Setup, select Import Format.
2. In the Import Format summary task bar, select Add.
In the upper grid of the Import Formats screen, a row is added.
3. In Name, enter a user-defined identifier for the import format.
You cannot modify the value in this field after a mapping has been created for thisimport format.
4. In Description, enter a description of the import format.
5. In Source, select File for the source system.
6. From File Type, select the format of the file.
• Fixed - Numeric Data
See Defining Import Formats for File-Based Mappings.
• Delimited - Numeric Data
See Defining Import Formats for File-Based Mappings.
• Multi Column - Numeric DataSee Loading Multi-Column Numeric Data.
• Delimited Data - All Data Type
See Setting the Import Format Data Types.
• Fixed Data - All Data Type
See Setting the Import Format Data Types.
• Multi Column - All Data Type
7. If the file type is "delimited," in the File Delimiter field, select a type of delimiter.
Available delimiter symbols:
• comma (,)
• exclamation (!)
• semicolon (;)
• colon (:)
• pipe (|)
• tab
Chapter 2Working with Import Formats
2-4
• tilde (~)
8. In Target, select the target system.
9. In Drill URL, enter the URL used for the drill-through.
To display the Drill URL editor, click .
10. In the Mapping section, map any dimensions.
11. Click Save.
To define import formats for file-based mappings, see Defining Import Formats forFile-Based Mappings.
Import Formats and Data Load RulesDepending on the source and target types that you select in import formats, differenttypes of data load rules can be created.
Table 2-2 Data Load Rule
Source System Target System
ERP (Enterprise Resource Planning) EPM (Enterprise Performance Management)
Table 2-3 Write-Back Rule
Target System Source System
EPM ERP
Table 2-4 Data Synchronization
Source System Target System
EPM EPM
Deleting an Import FormatTo delete an import format:
1. On the Setup tab, under Integration Setup, select Import Format.
2. In Import Format, from the Import Format summary grid, select the importformat, and then click Delete.
3. In Delete Import Format, click OK.
Querying by ExampleYou can filter the import formats in the Import Format summary section using theQuery by Example feature. To filter by Import Format Name, ensure that the filter rowis displayed above the column headers.
To query by example:
1. On the Setup tab, under Integration Setup, select Import Format.
Chapter 2Working with Import Formats
2-5

2. In Import Format, on the Import Format task bar, select .
A blank row is displayed above the column headers.
3. Enter text to filter the rows that are displayed.
Defining Import Format MappingsThe import format identifies the content structure of the source file or system. Whenyou create an import format, you define the settings and the import format mappingdefinition between the source and target system dimensions. You can create:
• One-to-One Mappings—Single Segment and Single Chartfield mappings:
– Define a simple one-to-one mapping between source segments and targetdimension members.
– Pull all members from the source value set as members into the targetdimension.
Note:
The topic is unavailable for file-based data load definitions.
The following figure shows a one-to-one mapping between segments or chartfieldsin a source system and dimensions in a target EPM application.
Note:
Each member in the source is created as a single member in the targetdimension.
Note:
When importing a mapping file that has maps for one dimension, thedimension name needs to be in the first field of the file.
• Many-to-One Mappings—You can concatenate segments or chartfields to mapmultiple segments or chartfields from the source into a single EPM dimensionmember.
Chapter 2Working with Import Formats
2-6

When dimensions are mapped as a concatenated segment, the new dimension iscreated based on the traversal order that you define for the source hierarchies intothe concatenated member target dimension. Unlimited number segments may beconcatenated into the target dimension. The following table shows how thesegments map to dimensions. In this example, two segments (Company andDepartment) map to one dimension (Entity).
Table 2-5 Segment Mappings to EPM Dimensions
Segment/Chartfield EPM Dimension
Company Entity
Department
Product Product
Account Account
• Concatenations of any number of source segments for Enterprise ResourcePlanning (ERP) sources like Oracle E-Business Suite and PeopleSoft.
Defining the Import Format MappingsWhen you define an import format, you define the import format mappings for themetadata and data rule from the Enterprise Resource Planning (ERP) source system.
To define the Enterprise Resource Planning (ERP) system import format mappings:
1. On the Setup tab, under Integration Setup, select Import Format.
2. From the Import Format Summary section, select an import format.
3. Go to the Import Format Mapping section.
4. In Add, select the target.
5. From Source Column, specify the source column from which to map.
For Fusion and E-Business Suite source systems, you can concatenate segmentsto map multiple segments from the source into a single EPM target dimension.The drop-down list displays all of the source system segments for the accountingentity that you selected when you defined the import format details.
Note:
Verify your entries and ensure that, if you enter Segment 1, Segment 2,and Segment 3 that, the segments are displayed in sequence. Forexample, Segment 3 should not come before Segment 1. Enteringsegments out of sequence can cause an error.
For Oracle Hyperion Financial Management applications, concatenate segmentsare not available if your target dimension is an Entity dimension type. Typically, theintercompany segment in Fusion and E-Business Suite or affiliate in PeopleSoft isrelated to a company or business unit. If concatenation was enabled, you couldnot determine the ICP dimension value.
Chapter 2Working with Import Formats
2-7

For PeopleSoft source systems, select chartfields as necessary. The drop-downlist displays the source system chartfields for the Accounting Entity (business unit)that you selected for the import format.
When the target application is an ARM data load type, you can set theconcatenation member by specifying the concatenation character.
For non- ARM data and metadata loads, the underscore character “_” is used toconcatenate two segments. For ARM data loads, you cannot use an underscorecharacter with a mapping that uses the “Like” method. Therefore, for ARMmappings, specify a different concatenation character for the data load mappingdetails.
6. For EPM and file-based source systems, you can add expressions in theExpression field. See Adding Import Expressions.
7. Click Save.
Concatenating Source Dimensions for Enterprise Resource Planning(ERP) Segments
The Import Format enables you to concatenate Enterprise Resource Planning (ERP)segments and define mappings on the concatenated code combinations.Concatenation facilitates a simple set of data load mappings with an unlimited numberof segments that can be concatenated.
The order of concatenation is based on the order columns are inserted.
For Oracle E-Business Suite metadata loads you load the concatenated dimensionand the load does not require hierarchies to be associated with it. PeopleSoft sourcedapplications handle metadata loads differently than E-Business Suite. For PeopleSoftsource applications you must have hierarchies associated with the concatenateddimension. This is a requirement for PeopleSoft metadata loads.
To concatenate a source dimension:
1. On the Setup tab, under Integration Setup, select Import Format.
2. In the Import Format summary task bar, select the import format.
3. In the Import Format Detail section, from the Concatenation Character, selectthe concatenation character.
For non-ARM data loads and metadata loads, the underscore character “_” is usedto concatenate two segments. For ARM data loads, you cannot use an underscorecharacter with a mapping that uses the “Like” method.
4. In Data Load Mapping, click Add.
5. Select Dimension Row, and then the target dimension.
6. In Source Column, select the first source column to concatenate to the target.
For example, to have two source columns (Company and Account separated by adash), select the Company source columns.
7. In Data Load Mapping, click Add.
8. In Source Column, select the second source column to concatenate to the target.
Chapter 2Working with Import Formats
2-8

Note:
Only EPM source types enable you to specify a value in the Expressionfield.
9. Repeat steps 4-8 for each source column to concatenate.
10. Click Save.
Adding Import ExpressionsOracle Hyperion Financial Data Quality Management, Enterprise Edition provides a setof powerful import expressions that enable it to read and parse virtually any trialbalance file into the FDMEE database. Advanced expressions are entered into theExpression column of the field grid of the Import Formats screen. Import expressionsoperate on the value that is read from the import file.
Also see Stacking Import Expressions and Processing Order.
To add an import format expression:
1. On the Setup tab, under Integration Setup, select Import Format.
2. In Import Format, from the Import Format Mapping grid, select the file-basedsource column.
3. In Expression, specify the import expression.
4. Optional: You can also specify the expression type and value on the AddExpression field.
a. Click .
b. In Add Expression, under Expression Type, select the expression type.
The number and types of expressions available depend on the field that isbeing modified (for example, Account or Account Description).
c. In Expression Value, enter the value to accompany the expression and clickOK.
5. In Import Format Mapping, click OK.
Chapter 2Working with Import Formats
2-9
Import Expression TypesExpressions supported by Oracle Hyperion Financial Data Quality Management,Enterprise Edition:
• Nonstandard Numeric Sign Conventions
• Converting from European to U.S. Notation
• Padding Fields with Leading Fills
• Padding Fields with Trailing Fills
• Multiplying by Whole-Number and Decimal Factors
• Disabling Zero Suppression
Nonstandard Numeric Sign ConventionsThe Sign expression is used to manage nonstandard numeric sign conventions.Oracle Hyperion Financial Data Quality Management, Enterprise Edition interpretsnumbers with leading and trailing minus signs and numbers within parentheses asnegative numbers. You can also use other leading and trailing characters to indicatenegative numbers. To define custom signs, use expressions that follow this form:Sign=[Positive String],[Negative String].
For example, if positive numbers are followed by DR (1,000.00DR), and negativenumbers are followed by CR (1,000.00CR), the expression is Sign=DR,CR.
Numbers within <> are also treated as negative. For example, if you specify (100.00)and <100.00> both are treated as negative numbers.
If positive numbers are unsigned (1,000.00), and negative numbers are followed by CR(1,000.00CR), the expression is Sign=,CR.
Displaying Debit and Credit ColumnsThe DRCRSplit expression is used to parse split numeric columns. By default, OracleHyperion Financial Data Quality Management, Enterprise Edition assumes thatnumeric values in Amount fields are debits. However, you can position debit values onthe left and credit values on the right.
Table 2-6 DRCRSplit expression example
Account Number Description Debit Credit
1000-000-00 Cash-OperatingAccount
68,603.91
1010-000-00 Cash-FANB-AP 177,216.16
DRCRSplit, which enables FDMEE to interpret left-right positioning and to assign thecorrect sign, follows the format DRCRSplit=Mid Point of the DR and CR columns.
When the file is imported, credit amounts are assigned negative signs (and thus areinterpreted as positive), and debit amounts are unchanged (and thus are interpretedas negative).
Chapter 2Working with Import Formats
2-10
Converting from European to U.S. NotationThe Fill=EuroToUS expression is used with the Amount field to trigger a number formatconversion from (.,) to (,.) format.
Padding Fields with Leading FillsThe FillL=LeadingFill expression is used to fill fields with leading characters. Textvalues that are shorter than the specified fill expression are padded, as directed by thefill expression.
Padding Fields with Trailing FillsThe Fill=TrailingFill expression is used to fill fields with trailing characters. Textvalues that are shorter than the specified fill expression are padded, as directed by thefill expression. For example, if the account number is 103950- and the expressionFill=000000000 is used, the account number after import is 103950-000. Anotherexample is an account number of 243150 with the expression Fill=111111111. Theaccount number after import is 243150111.
Multiplying by Whole-Number and Decimal FactorsThe Factor=Value expression is used to factor source-file amounts by user-definedvalues.
Amounts can be multiplied by whole numbers or decimals; thus, for example, amountscan be doubled or halved.
Disabling Zero SuppressionThe NZP expression is used to disable zero suppression during the data-load process.By default, Oracle Hyperion Financial Data Quality Management, Enterprise Editionbypasses accounts in the trial balance that have zero balances. In certaincircumstances, you may want to load all accounts, to ensure that values that should bezero are replaced. You enter NZP in the Expression column of the Amount field todisable zero suppression.
Stacking Import ExpressionsOne field can use multiple import expressions. To stack expressions, separate theexpressions with a semicolon. Consider the order in which the layered expressions areprocessed.
For example, to stack the import expression for the General Ledger Amount column,enter the expression: Script=ParseAcct.py;Fill=0000000.
Defining a Multiple Period Data Load in Import FormatsWhen you need to load date for an entire fiscal year or multiple years (such as forbudgeting and forecasting data); you can use a multi-period file to load the data. Witha multi- period file-based load, you can import one single file that has data for multipleperiods in multiple columns.
To define a multiple period data load:
Chapter 2Working with Import Formats
2-11

1. On the Setup tab, under Integration Setup, select Import Format.
2. In Import Format, from the Import Format summary grid, select the file in whichto define a multiple period data load.
3. In File Type, select Multi-Period - Numeric Data.
4. In File Delimiter, select the delimited based on the source file.
5. Add column mappings by mapping the source files column numbers with the targetapplication dimensions.
6. From the Expression column for Amount, click the Add Expression editor.
7. From Add Import Format Mapping Expression screen, and then from theExpression Type drop-down, select Column=start,end.
8. From Expression Value, enter the column number of the first amount in thesource file, and then the column number of the last amount in the source file.For example, if the source file has forecasting values from January to December,and the amount for January begins from column 6, the December amount is at 17.In this case, when you specify 6, 17, the Expression Value includes the amountsbeginning from column 6, and then load value for the next 12 months up toDecember.
9. Click Save to save the import format.
10. Optional: If necessary, create a location that includes the import format for themulti-periods.
For more information, see Defining Locations.
11. Optional If necessary, create a data load rule.
Chapter 2Working with Import Formats
2-12

For more information, see Defining Data Load Rules to Extract Data.
12. From Data Load, then Data Load Rule, click Execute to execute the data loadrule.For more information, see Running Data Load Rules.
Note:
Locations with multi-period import formats cannot be executed from theData Load Workbench. They are executed using the Data Load Rule only.
Processing OrderFor all fields except the Amount field, Oracle Hyperion Financial Data QualityManagement, Enterprise Edition processes stacked expressions in the following order:
1. Script
2. Fill or FillL
For the Amount field, FDMEE processes stacked expressions in the following order:
1. DRCRSplit
2. Fill=EuroToUS
3. Script
4. Sign
5. Scale
6. NZP
Defining Import Formats for File-Based MappingsWhen the source is a file-based data load, you define the settings and the importformat mapping definition, which determines which fields (columns) are extracted fromthe source system and how data is stored in the staging table.
For detailed information about working with import formats, see Working with ImportFormats. For information about working with all data types data loads in importformats, see All Data Types Data Loads.
You can add a mapping row to the import format definition based on the followingoptions:
• Skip
• Currency
• Attribute
• Description
• Dimension Row
Chapter 2Working with Import Formats
2-13

Table 2-7 Import format definition options
Import Definition Option Description
Skip The skip option is used to indicate rows in theinput file that should be skipped. For example,rows with no data, negative numbers, or forspecific accounts. The specification for a skiprow is defined in the same way as that for adata row, and the system looks for the exacttextual match for text entered in theexpression field in the indicated location in theinput file.
The system automatically skips rows in theinput file that have "spaces" and "non-numeric"characters in the amount location, so a skipspecification is only needed when non-amountdata is present in a row of the input file in thesame location as the amount. For example,the input file may contain a label named"date." Add an entry for a skip row to indicatethe starting column of the text "date," thelength of the text, and the exact text to match.
The Skip row option is available for both fixedand delimited file types.
Attribute The TDATASEG table includes 13 attributecolumns that you can load from the selectedinput file. You can provide the location of theattribute in the input file by specifying thestarting location and length, or plug the valueduring processing by entering the value for theattribute in the expression field. If the value forthe attribute is entered in the expression field,then a starting location and length are notneeded.
The attribute fields are generally used to helpcompose a drill-through URL or for history ordocumentation needs. You may want topopulate the attribute field to supportsearching and filtering in the Data LoadWorkbench.
Description The TDATASEG table includes two descriptioncolumns, and you can load these columns inthe same way as the attribute columns. Youcan specify the location in the input row thatcontains a description, or specify an explicitvalue by entering it in the expression field inthe mapping table.
Chapter 2Working with Import Formats
2-14
Table 2-7 (Cont.) Import format definition options
Import Definition Option Description
Currency Oracle Hyperion Financial Data QualityManagement, Enterprise Edition supports theability to load data that is of a currencydifferent from the default currency of theselected location. This option enables you tospecify the location in the input line thatspecifies the currency for the related amountfield. For the file import format, specify acurrency on each row of data, or make surethat a currency is specified in the location thatuses the selected import format.
Note:
You may encounterissues with loadingdata if the currencyis not specifiedcorrectly.
Dimension FDMEE supports multiple entries for adimension in the import format when thedimension specification is spread betweenmultiple locations on the same line. Thisfeature enables you to concatenate fields forfile-based data. To use this option, select thedimension, start and end positions, and theexpression.
To define an import format for numeric data files with a fixed length:
Note:
For information about defining import formats for fixed length all data type datafiles, see Setting the Import Format Data Types.
1. On the Setup tab, under Integration Setup, select Import Format.
2. In Import Format, from the Import Format summary grid, select the file.
3. In the Import Format Detail grid, select the type or row to add from the Add drop-down.
Available options:
• Skip Row
• Currency Row
• Attribute Row
Chapter 2Working with Import Formats
2-15

• Description Row
• Dimension Row
4. In the Start field, specify where on the file the column starts.
5. In the Length field, enter the length of column.
6. In the Expression field, enter the expression that overwrites the contents of thecolumn.
When entering a constant, enter a starting position and length. Use a start positionof "1 " and a length of "1."
See Adding Import Expressions.
7. Click Save.
To define an import format for delimited numeric data files:
Note:
For information about defining import formats for delimited all data type datafiles, see Setting the Import Format Data Types.
1. On the Setup tab, under Integration Setup, select Import Format.
2. In Import Format, from the Import Format summary grid, select a file.
3. In the Data Load Mappings section, click Add, and select the type or row to add.
Available options are:
• Currency Row
• Attribute Row
• Description Row
• Dimension Row
4. In Field Number, enter the field to import.
The Expression field ignores the Field Number value when you provide a columnexpression for a multiple period data load.
5. In the Expression field, enter the expression that overwrites the contents of thefield.
See Adding Import Expressions.
6. Click Save.
Concatenating Source Dimensions for a File-Based SourceThe Import Format enables for the concatenation of file-based dimensions as thesource of target application dimensions. Concatenation facilitates a simple set of dataload mappings with an unlimited number of fields that can be concatenated.
To concatenate a file-based source dimension:
1. On the Setup tab, under Integration Setup, select Import Format.
Chapter 2Working with Import Formats
2-16
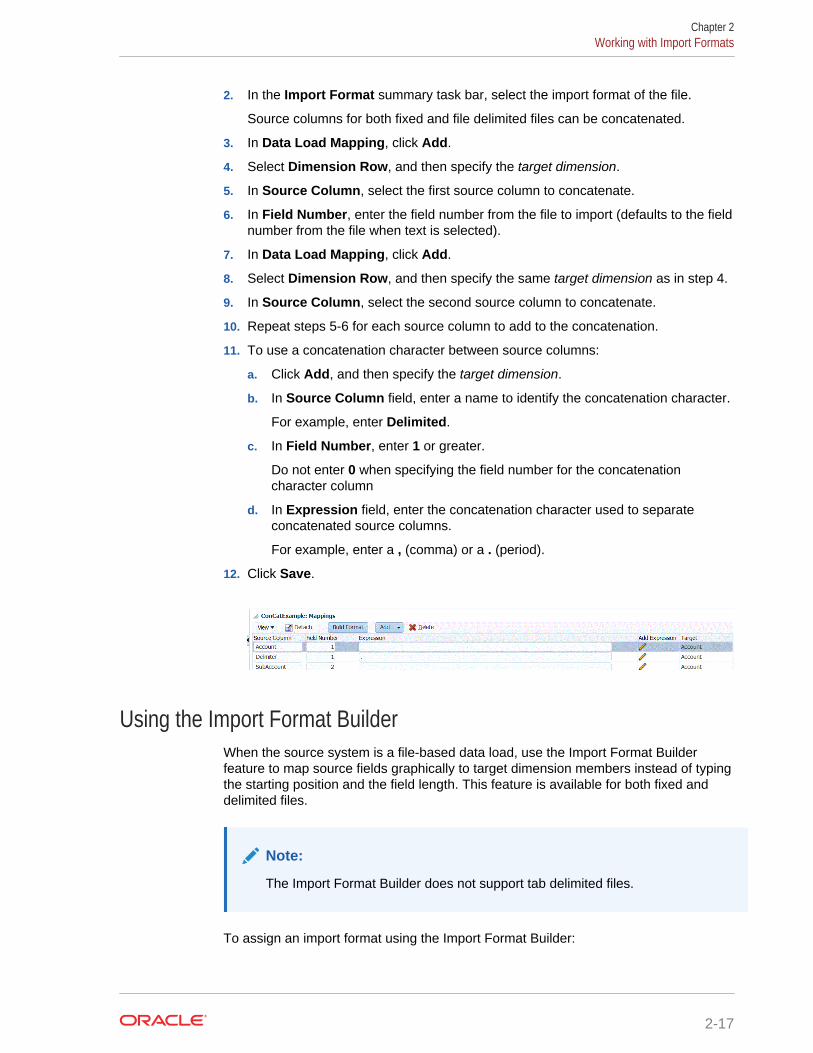
2. In the Import Format summary task bar, select the import format of the file.
Source columns for both fixed and file delimited files can be concatenated.
3. In Data Load Mapping, click Add.
4. Select Dimension Row, and then specify the target dimension.
5. In Source Column, select the first source column to concatenate.
6. In Field Number, enter the field number from the file to import (defaults to the fieldnumber from the file when text is selected).
7. In Data Load Mapping, click Add.
8. Select Dimension Row, and then specify the same target dimension as in step 4.
9. In Source Column, select the second source column to concatenate.
10. Repeat steps 5-6 for each source column to add to the concatenation.
11. To use a concatenation character between source columns:
a. Click Add, and then specify the target dimension.
b. In Source Column field, enter a name to identify the concatenation character.
For example, enter Delimited.
c. In Field Number, enter 1 or greater.
Do not enter 0 when specifying the field number for the concatenationcharacter column
d. In Expression field, enter the concatenation character used to separateconcatenated source columns.
For example, enter a , (comma) or a . (period).
12. Click Save.
Using the Import Format BuilderWhen the source system is a file-based data load, use the Import Format Builderfeature to map source fields graphically to target dimension members instead of typingthe starting position and the field length. This feature is available for both fixed anddelimited files.
Note:
The Import Format Builder does not support tab delimited files.
To assign an import format using the Import Format Builder:
Chapter 2Working with Import Formats
2-17

1. On the Setup tab, under Integration Setup, select Import Format.
2. In the Import Format summary grid, select a file-based source system.
3. In the Import Format Mapping detail grid, click Build Format.
4. In Select file to Load, locate and choose the file to import, and then click OK.
In addition to selecting a file to load, you can:
• Create a new folder under the inbox directory.
• Delete a file.
• Download a file
• Upload a file
The file contents are shown on the Import Format Builder screen.
5. Select the text to import.
6. In Assign selected text as Source Dimension Name, select N to specify thesource dimension name on the Enter Dimension Mapping Detail screen.
Select Y to use the selected text as the source dimension name and to use theone-to-one mapping between the source dimension and target dimensionmembers.
7. To change dimension mappings details, click Assign Dimension.
You must add or change dimension details if you selected N in Assign selectedtext as Source Dimension Name.
Chapter 2Working with Import Formats
2-18

8. On Enter Dimension Mapping Details, from Source Dimension Name, specifythe name of source dimension to which to assign the selected text.
9. In Select Target Dimension, select the target dimension to which to map thesource dimension.
10. In Selection Field Number, specify the field number from the file to import(defaults to the field number from the file when text is selected).
11. Click OK.
When you assign or change source dimension information, the information isshown in the Add New Mapping summary grid.
All Data Types Data LoadsUsing the all data type load method, you can load data files that support the followingdata types to Oracle Hyperion Planning:
• numbers
• text
• Smartlists
• Date
Additionally, you can load data files that include multiple balance columns for aselected calendar period.
Note:
The All Data Type with Security loads only to the currency specified in theimport.
All Data Types Data Load Process DescriptionAt a high level, when working with the all data types load method, note the following:
1. In the Target Application feature, on the Application Options tab, select the (either"All data types with auto-increment of line item" or "all data types with security"load method.
2. In the Import Format option, select the file type for the All Data Type load method:
3. For multi-column types only in the Data Load Rule, assign any driver dimensionmember(s) for multi column data types. The driver dimension is the member intowhich data is loaded. The driver dimension is only applicable to the multi-columntype, not delimited or fixed. If no header record or member expressions areassigned, you can select the members from the Member Selector screen in theimport format or the data load rule.
Chapter 2Working with Import Formats
2-19

4. In the Data Load Workbench, verify the values of the data type in the DataColumn.
The Data Load Workbench displays the Data Column instead of the AmountColumn.
a. Use the Import from Source feature to import the data from the source system,performs the necessary transformation, such as import, map and validate thedata.
b. Validate the source data.
c. Export the data to the Oracle Hyperion Planning application.
For more information about how data is loaded in Planning, see the Outline LoadUtility in Oracle Hyperion Planning Administrator's Guide.
Setting the All Data Types Load MethodYou can select the method to use when loading metadata and data for Account,Period, Year, Scenario, Version, Currency, Entity, user-defined dimensions, attributes,UDAs, exchange rates, Smart Lists, and planning unit hierarchies.
Note:
To load numeric data, use the Numeric Data Only load method.
1. Select the Setup tab, and then under Register, select Target Application.
2. In Target Application, in the Target Application summary grid, click Add, andthen select either Local or Cloud.
Available options are Cloud (for a Cloud deployment) or Local (for an on-premisedeployment).
3. In Target Application under Application Options, from the Load Method drop-down, select all data types with security.
Available load method descriptions:
• All data types with auto-increment of line item.This method requires that you define the data and driver dimensions, andunique identifiers for the Oracle Enterprise Performance Management Cloudapplication. You define data load and driver dimension in the Data Dimensionfor Auto-Increment Line Item field and Driver Dimension for Auto-IncrementLine Item field on the Target Options page in the Data Load Rule.
Chapter 2Working with Import Formats
2-20

For detailed information on this option, see Loading Incremental Data usingthe LINEITEM Flag to an EPM Application.
• Numeric—Loads numeric data only. Oracle Hyperion Planning data security isnot enforced in this method.
• all data types with security— Loads Numeric, Text, Smartlist, Date data types.If the Planning administrator loads data, Planning data security is notenforced. If a Planning non-administrator user loads data, then Planning datasecurity is enforced. A Planning non administrator user can load only 500,000cells of data.
4. From the Date Format drop-down, specify the format of the date data:
• DD-MM-YYYY
• MM-DD-YYYY
• YYYY-MM-DD
5. Click Save.
Setting the All Data Types Load MethodThere are two export load methods in Oracle Hyperion Financial Data QualityManagement, Enterprise Edition: Numeric Data Only and All Data Type with Security.The All Data Type with Security loads only to the currency specified in the import.
You can select the method to use when loading metadata and data for Account,Period, Year, Scenario, Version, Currency, Entity, user-defined dimensions, attributes,UDAs, exchange rates, Smart Lists, and planning unit hierarchies.
Note:
To load numeric data, use the Numeric Data Only load method.
1. Select the Setup tab, and then under Register, select Target Application.
2. In Target Application, in the Target Application summary grid, click Add, andthen select either Local or Cloud.
Available options are Cloud (for a Cloud deployment) or Local (for an on-premisedeployment).
3. In Target Application under Application Options, from the Load Method drop-down, select all data types with security.
Available load method descriptions:
• Numeric—Loads numeric data only. Oracle Hyperion Planning data security isnot enforced in this method.
• all data types with security— Loads Numeric, Text, Smartlist, Date data types.If the Planning administrator loads data, Planning data security is notenforced. If a Planning non-administrator user loads data, then Planning datasecurity is enforced. A Planning non administrator user can load only 500,000cells of data.
4. From the Date Format drop-down, specify the format of the date data:
• DD-MM-YYYY
Chapter 2Working with Import Formats
2-21
• MM-DD-YYYY
• YYYY-MM-DD
5. Click Save.
Setting the Import Format Data TypesWhen loading data, specify the type of data for the import format:
• Delimited–Numeric data
• Fixed–Numeric data
• Multi-Column–Numeric Data
• Delimited–All Data Type
• Fixed–All Data Type
• Multi Column–All Data Type
1. On the Setup tab, under Integration Setup, select Import Format.
2. In the Import Format summary task bar, select Add.
In the upper grid of the Import Formats screen, a row is added.
3. In Name, enter a user-defined identifier for the import format.
You cannot modify the value in this field after a mapping has been created for thisimport format.
4. In Source, select the source system.
5. In Target, select the target system.
6. In Description, enter a description of the import format.
7. In Import Format, in File Type, select the type of non-numeric data file.
Options include:
• Fixed - Numeric Data
See Defining Import Formats for File-Based Mappings.
• Delimited - Numeric Data
See Defining Import Formats for File-Based Mappings.
• Multi Column - Numeric DataSee Loading Multi-Column Numeric Data.
• Delimited - All Data Type
See Setting the Import Format Data Types.
• Fixed - All Data Type
See Setting the Import Format Data Types.
• Multi Column - All Data Type
8. If the file type is delimited, in the File Delimiter field, select the type of delimiter:
• comma (,)
• exclamation (!)
• semi-colon (;)
Chapter 2Working with Import Formats
2-22
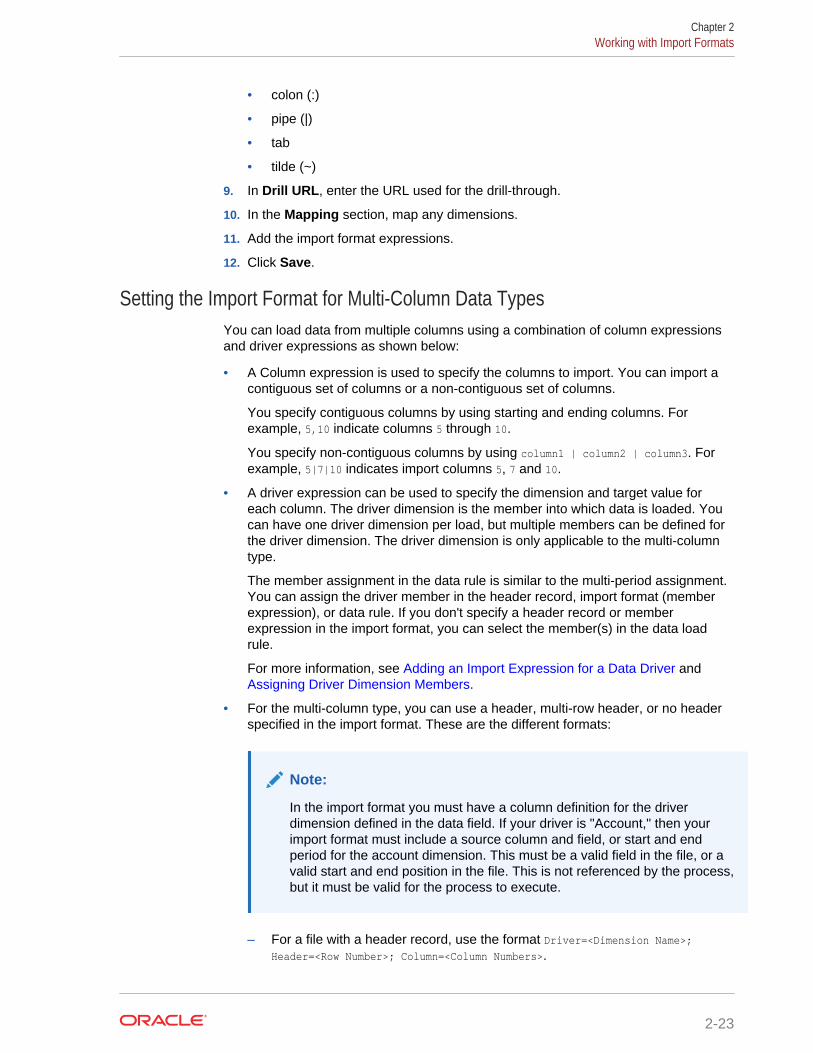
• colon (:)
• pipe (|)
• tab
• tilde (~)
9. In Drill URL, enter the URL used for the drill-through.
10. In the Mapping section, map any dimensions.
11. Add the import format expressions.
12. Click Save.
Setting the Import Format for Multi-Column Data TypesYou can load data from multiple columns using a combination of column expressionsand driver expressions as shown below:
• A Column expression is used to specify the columns to import. You can import acontiguous set of columns or a non-contiguous set of columns.
You specify contiguous columns by using starting and ending columns. Forexample, 5,10 indicate columns 5 through 10.
You specify non-contiguous columns by using column1 | column2 | column3. Forexample, 5|7|10 indicates import columns 5, 7 and 10.
• A driver expression can be used to specify the dimension and target value foreach column. The driver dimension is the member into which data is loaded. Youcan have one driver dimension per load, but multiple members can be defined forthe driver dimension. The driver dimension is only applicable to the multi-columntype.
The member assignment in the data rule is similar to the multi-period assignment.You can assign the driver member in the header record, import format (memberexpression), or data rule. If you don't specify a header record or memberexpression in the import format, you can select the member(s) in the data loadrule.
For more information, see Adding an Import Expression for a Data Driver and Assigning Driver Dimension Members.
• For the multi-column type, you can use a header, multi-row header, or no headerspecified in the import format. These are the different formats:
Note:
In the import format you must have a column definition for the driverdimension defined in the data field. If your driver is "Account," then yourimport format must include a source column and field, or start and endperiod for the account dimension. This must be a valid field in the file, or avalid start and end position in the file. This is not referenced by the process,but it must be valid for the process to execute.
– For a file with a header record, use the format Driver=<Dimension Name>;Header=<Row Number>; Column=<Column Numbers>.
Chapter 2Working with Import Formats
2-23
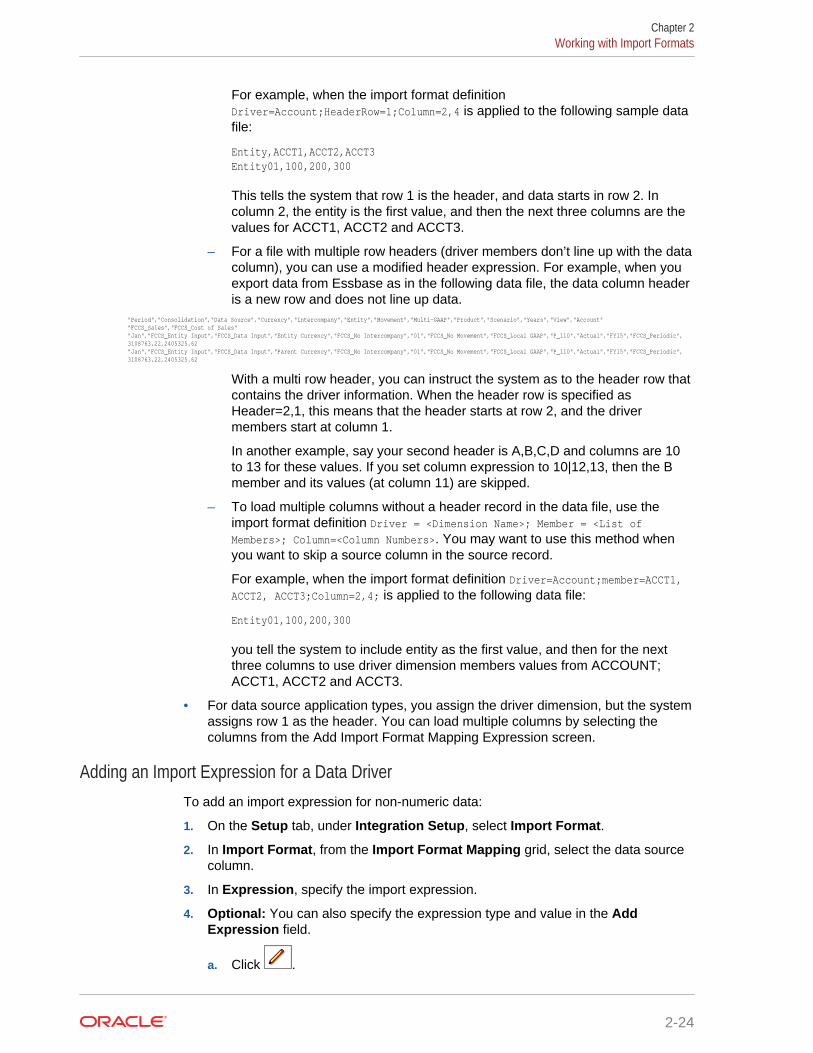
For example, when the import format definitionDriver=Account;HeaderRow=1;Column=2,4 is applied to the following sample datafile:
Entity,ACCT1,ACCT2,ACCT3Entity01,100,200,300
This tells the system that row 1 is the header, and data starts in row 2. Incolumn 2, the entity is the first value, and then the next three columns are thevalues for ACCT1, ACCT2 and ACCT3.
– For a file with multiple row headers (driver members don’t line up with the datacolumn), you can use a modified header expression. For example, when youexport data from Essbase as in the following data file, the data column headeris a new row and does not line up data.
"Period","Consolidation","Data Source","Currency","Intercompany","Entity","Movement","Multi-GAAP","Product","Scenario","Years","View","Account""FCCS_Sales","FCCS_Cost of Sales""Jan","FCCS_Entity Input","FCCS_Data Input","Entity Currency","FCCS_No Intercompany","01","FCCS_No Movement","FCCS_Local GAAP","P_110","Actual","FY15","FCCS_Periodic",3108763.22,2405325.62"Jan","FCCS_Entity Input","FCCS_Data Input","Parent Currency","FCCS_No Intercompany","01","FCCS_No Movement","FCCS_Local GAAP","P_110","Actual","FY15","FCCS_Periodic",3108763.22,2405325.62
With a multi row header, you can instruct the system as to the header row thatcontains the driver information. When the header row is specified asHeader=2,1, this means that the header starts at row 2, and the drivermembers start at column 1.
In another example, say your second header is A,B,C,D and columns are 10to 13 for these values. If you set column expression to 10|12,13, then the Bmember and its values (at column 11) are skipped.
– To load multiple columns without a header record in the data file, use theimport format definition Driver = <Dimension Name>; Member = <List ofMembers>; Column=<Column Numbers>. You may want to use this method whenyou want to skip a source column in the source record.
For example, when the import format definition Driver=Account;member=ACCT1,ACCT2, ACCT3;Column=2,4; is applied to the following data file:
Entity01,100,200,300
you tell the system to include entity as the first value, and then for the nextthree columns to use driver dimension members values from ACCOUNT;ACCT1, ACCT2 and ACCT3.
• For data source application types, you assign the driver dimension, but the systemassigns row 1 as the header. You can load multiple columns by selecting thecolumns from the Add Import Format Mapping Expression screen.
Adding an Import Expression for a Data DriverTo add an import expression for non-numeric data:
1. On the Setup tab, under Integration Setup, select Import Format.
2. In Import Format, from the Import Format Mapping grid, select the data sourcecolumn.
3. In Expression, specify the import expression.
4. Optional: You can also specify the expression type and value in the AddExpression field.
a. Click .
Chapter 2Working with Import Formats
2-24

b. From the Expression Type drop-down, select Driver.
c. In Add Import Format Mapping Expression when entering a driver, enterthe values for the expression and click OK.
In Dimension, select the dimension to which the expression applies.
Chapter 2Working with Import Formats
2-25

In Member(s), select the dimension members. You can also browse andselect members on the Member Selector screen.
In Header row, select the header row of the file for the expression.
In Column(s), specify the data columns in the expression. To use a range ofDATA columns, specify columns using a comma (,). To use non-contiguousDATA columns, specify columns using the pipe (|) delimiter.
d. Click OK.
In the following example, the "Project Element" is the driver member of the firstheader row, and includes contiguous rows "2,3", and non-contiguous rows"5,7".
Assigning Driver Dimension MembersA driver dimension member can be assigned in the data rule (as well as the headerrecord or import format (member expression)). This tab is only displayed in the dataload rule if the members are not specified in the import format, or if the header row isnot specified in the import format.
1. On the Workflow tab, under Data Load, select Data Load Rule.
2. In the Data Load summary area, click Add to add a new date load rule, or changethe location name from the POV bar, and select the data load rule.
Chapter 2Working with Import Formats
2-26

For information on adding a data load rule, see Defining Data Load Rule Detailsfor a File-Based Source System.
3. Select the Target Member tab.
You see this tab only when the driver dimension members are not defined in theimport format.
The columns to which you can select driver dimension members are available foredit.
4. In the Value field, enter the name of the driver dimension member to use in theheader record or member expression.
5. Optional: To search on driver dimension members, click the Search button andnavigate to the driver dimension on the Member Selection screen.
Chapter 2Working with Import Formats
2-27
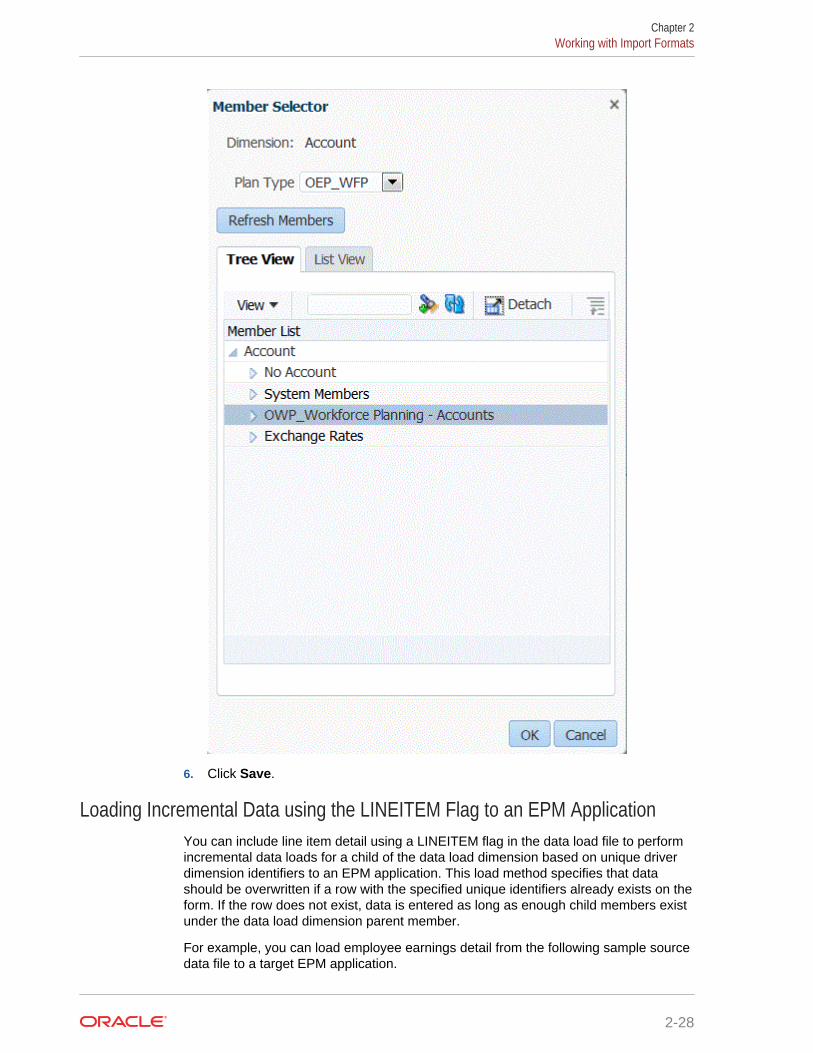
6. Click Save.
Loading Incremental Data using the LINEITEM Flag to an EPM ApplicationYou can include line item detail using a LINEITEM flag in the data load file to performincremental data loads for a child of the data load dimension based on unique driverdimension identifiers to an EPM application. This load method specifies that datashould be overwritten if a row with the specified unique identifiers already exists on theform. If the row does not exist, data is entered as long as enough child members existunder the data load dimension parent member.
For example, you can load employee earnings detail from the following sample sourcedata file to a target EPM application.
Chapter 2Working with Import Formats
2-28
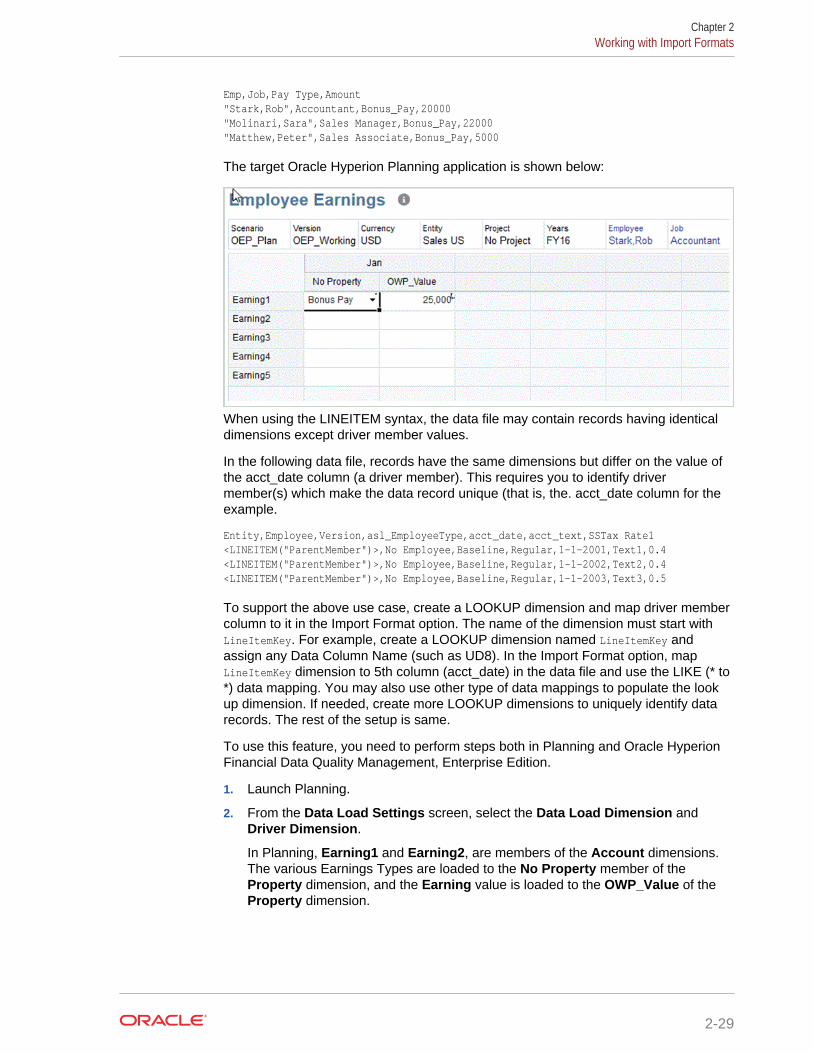
Emp,Job,Pay Type,Amount"Stark,Rob",Accountant,Bonus_Pay,20000"Molinari,Sara",Sales Manager,Bonus_Pay,22000"Matthew,Peter",Sales Associate,Bonus_Pay,5000
The target Oracle Hyperion Planning application is shown below:
When using the LINEITEM syntax, the data file may contain records having identicaldimensions except driver member values.
In the following data file, records have the same dimensions but differ on the value ofthe acct_date column (a driver member). This requires you to identify drivermember(s) which make the data record unique (that is, the. acct_date column for theexample.
Entity,Employee,Version,asl_EmployeeType,acct_date,acct_text,SSTax Rate1<LINEITEM("ParentMember")>,No Employee,Baseline,Regular,1-1-2001,Text1,0.4<LINEITEM("ParentMember")>,No Employee,Baseline,Regular,1-1-2002,Text2,0.4<LINEITEM("ParentMember")>,No Employee,Baseline,Regular,1-1-2003,Text3,0.5
To support the above use case, create a LOOKUP dimension and map driver membercolumn to it in the Import Format option. The name of the dimension must start withLineItemKey. For example, create a LOOKUP dimension named LineItemKey andassign any Data Column Name (such as UD8). In the Import Format option, mapLineItemKey dimension to 5th column (acct_date) in the data file and use the LIKE (* to*) data mapping. You may also use other type of data mappings to populate the lookup dimension. If needed, create more LOOKUP dimensions to uniquely identify datarecords. The rest of the setup is same.
To use this feature, you need to perform steps both in Planning and Oracle HyperionFinancial Data Quality Management, Enterprise Edition.
1. Launch Planning.
2. From the Data Load Settings screen, select the Data Load Dimension andDriver Dimension.
In Planning, Earning1 and Earning2, are members of the Account dimensions.The various Earnings Types are loaded to the No Property member of theProperty dimension, and the Earning value is loaded to the OWP_Value of theProperty dimension.
Chapter 2Working with Import Formats
2-29

For more information about the Data Load Settings screen, see the OracleHyperion Planning Administrator's Guide.
3. Launch FDMEE, then select Setup, and then select Import Format.
4. From the Import Format Mapping grid, select the data source column.
5. In Expression, add an import expression for the data driver.
For example, add the import format expression: Driver=Property;member="NoProperty","OWP_value";Column=3,4.
For more information about adding drivers FDMEE, see Adding an ImportExpression for a Data Driver and Assigning Driver Dimension Members.
6. From Workflow, select Data Load Mapping.
In Data Load Mapping, you identify how source dimensionality translates to thetarget dimensionality. As shown below for a "Like" mapping, the Earning sourcevalue (represented by the asterisk) is loaded to OWP_Total Earnings of theAccount dimension.
7. From Workflow, select Data Load Rule.
8. Select the Target Options tab.
9. From the Load Method drop-down, select All data types with auto-increment ofline item.
Chapter 2Working with Import Formats
2-30

10. In Data Dimension for Auto-Increment Line Item, select the data dimension thatmatches the data dimension you specified in Planning.
In this example, the data dimension is Account.
11. In Driver Dimension for Auto-Increment Line Item, select the driver dimensionthat matches the driver dimension you specified in Planning.
In this example, the driver dimension is Property.
Loading Multi-Column Numeric DataOracle Hyperion Financial Data Quality Management, Enterprise Edition enables youto load data for multiple dimension members of a selected dimension in a single row ofdata. The definition of the members to load can be included in a header record in theload file, or in the import format definition.
• text data file with multi-columns of numeric data with no headers to contiguousperiods by executing a data load rule with start and end periods.
• text data file with multiple columns of numeric data to a period or any otherdimension as a column header by specifying the:
– column header in the data file
– column header member list in the import format
– column header member in the data rule
• Excel data file with multiple columns of numeric data to a period as a columnheader. The Excel file may or may not contain a header.
To load multi-column numeric data:
1. On the Setup tab, under Integration Setup, select Import Format.
2. In the Import Format summary task bar, select Add.
In the upper grid of the Import Formats screen, a row is added.
3. In Name, enter a user-defined identifier for the import format.
You cannot modify the value in this field after a mapping has been created for thisimport format.
4. In Description, enter a description of the import format.
5. In Source, select File for the source.
6. From File Type drop-down, select Multi Column - Numeric Data as the format ofthe file.
7. From the File Delimiter drop-down, select a type of delimiter.
Chapter 2Working with Import Formats
2-31

Available delimiter symbols:
• comma (,)
• exclamation (!)
• semicolon (;)
• colon (:)
• pipe (|)
• tab
• tilde (~)
8. In Target, select EPM and select any EPM application as a target.
9. Optional: In Drill URL, enter the URL used for the drill-through.
10. In the Mapping section, select the Amount dimensions
and click .
11. From the Expression Type drop-down, select Column=start,end.
12. In Expression value, specify the columns to import.
You can import a contiguous set of columns or a non-contiguous set of columns.To use a range of Amount (data) columns, specify columns using a comma (,). Touse non-contiguous amount columns, specify columns using the pipe (|) delimiter.
You specify contiguous columns by using starting and ending columns. Forexample, 5,10 indicates columns 5 through 10.
You specify non-contiguous columns by using column1 | column2 | column3. Forexample, 5|7|10 indicates import columns 5, 7, and 10.
13. Optional: Specify any drivers and header rows of the file for the expression.
14. Click OK.
Chapter 2Working with Import Formats
2-32
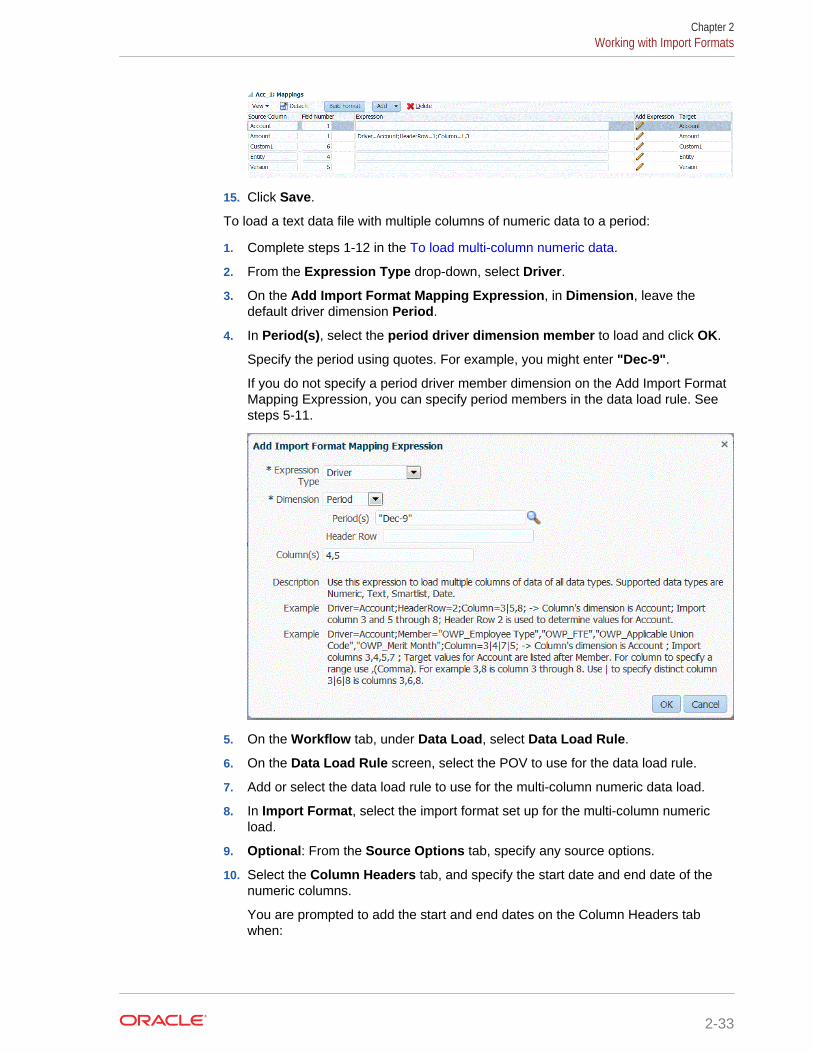
15. Click Save.
To load a text data file with multiple columns of numeric data to a period:
1. Complete steps 1-12 in the To load multi-column numeric data.
2. From the Expression Type drop-down, select Driver.
3. On the Add Import Format Mapping Expression, in Dimension, leave thedefault driver dimension Period.
4. In Period(s), select the period driver dimension member to load and click OK.
Specify the period using quotes. For example, you might enter "Dec-9".
If you do not specify a period driver member dimension on the Add Import FormatMapping Expression, you can specify period members in the data load rule. Seesteps 5-11.
5. On the Workflow tab, under Data Load, select Data Load Rule.
6. On the Data Load Rule screen, select the POV to use for the data load rule.
7. Add or select the data load rule to use for the multi-column numeric data load.
8. In Import Format, select the import format set up for the multi-column numericload.
9. Optional: From the Source Options tab, specify any source options.
10. Select the Column Headers tab, and specify the start date and end date of thenumeric columns.
You are prompted to add the start and end dates on the Column Headers tabwhen:
Chapter 2Working with Import Formats
2-33

• a text data file has no header in the header record of the data file, in the importformat, or data rule.
• you are using an Excel file in all cases. If header information is specified in theExcel file, only periods that fall within the start and end period range areprocessed.
11. Save and execute the data load rule.
Loading Periods As a Column from the Data File“Period” dimensions are supported as columns in a data file. If you have data formultiple periods in a single file, then you can include the year and period on each rowof the data file that gets loaded to the target application.
You load a period as a column from a data file by defining the load definition throughthe import format, and the data load rule.
To include a period as a column from the data file:
1. On the Setup tab, under Integration Setup, select Import Format.
2. In the Import Format summary task bar, select the Oracle Financial Consolidationand Close Cloud consolidation application or file.Typically this is a single file with multiple periods, such as Year and Period.
3. From the Import Format Detail Mapping grid, select the source column and clickAdd.
4. Select the period rows to include:
a. To map to a "Year" row, click Source Period Row, and then select Year tomap to the Year dimension in the target application.
Chapter 2Working with Import Formats
2-34

b. In Source Column, select the dimension to map to the Year row.
c. In Field Number, enter the field number from the file to import (defaults tothe field number from the file when text is selected.)
d. In Expression, specify the expression to apply to the Year row.
e. To map to a period row, click Add, select Source Period Row, and thenselect Period.
f. In Field Number, enter the field number from the file to import (defaults to thefield number from the file when text is selected.)
g. In Expression, specify the expression to apply to the Period row.
h. To map to a period number row, click Add, select Source Period Row, andthen select Period Number.
i. In Field Number, enter the Field number from the file to import (defaults tothe field number from the file when text is selected.)
j. In Expression, specify the expression to apply to the Period Number row.
5. Click Save.
6. Specify the parameters of the data load rule, and then execute it.
See Defining Data Load Rules to Extract Data.
Write-Back MappingsWhen you are setting up an integration to pull from an EPM application and write backto Oracle E-Business Suite or PeopleSoft, consider the following:
• Before you create a data load rule to write back, create the write-back mappings.Write-back mappings occur at the member level. (For example, loading data froman Oracle Hyperion Planning application to your Enterprise Resource Planning(ERP) source system.)
• You create write-back mappings to replace outgoing dimension members withsource segment members. More specifically, during budget write-back, the write-back mapping is referred to when replacing outgoing dimension members withsegment values.
The following interface tables require “write” security privileges for the data load towrite-back process:
E-Business Suite
• GL_INTERFACE
• GL_INTERFACE_CONTROL
• GL_BUDGET_INTERFACE
Standard PeopleSoft—PS_HPYPB_ACCT_LN
PeopleSoft Commitment Control
• PS_HYP_KK_BD_HDR
• PS_HYP_KK_BD_LN
To create write-back mappings:
1. On the Setup tab, under Integration Setup, select Import Format.
Chapter 2Working with Import Formats
2-35

2. In Import Format, if necessary, select the Write Back Mapping tab.
3. In Source Dimension, select the source dimension to map to the sourcedimension.
4. Optional: To have Oracle Hyperion Financial Data Quality Management,Enterprise Edition create the write back mapping automatically, click Auto Create.
When prompted to create the write back mapping, click OK.
5. Click Save.
Defining Import Formats for Data Synchronization Between EPMApplications
The import format determines which fields (columns) to store and push from theOracle Hyperion Planning application to the Oracle Financial Consolidation and CloseCloud target application dimensions.
To add an import format for data synchronization between EPM applications:
1. On the Setup tab, under Integration Setup, select Import Format.
2. In the Import Format summary task bar, select Add.
In the upper grid of the Import Formats screen, a row is added.
3. In Name, enter a user-defined identifier for the import format.
The value in this field cannot be modified after a mapping is created for this importformat.
4. In Description, enter a description of the import format.
5. In Source, select the source system.
For an EPM source system, select the EPM source application or file from whichto move data.
For an Enterprise Resource Planning (ERP) source system, select the ERPsource application (for example Oracle E-Business Suite, Peoplesoft Financials,Fusion) from which to move data.
6. In Target, select the target system.
For an EPM target system, select the EPM target application to which to movedata.
For an Enterprise Resource Planning (ERP) target system, select the ERP targetapplication to which to move data.
When you use an E-Business Suite and Fusion target system, you must enter theChart of Accounts. The Accounting Entity is captured at the Location or Data Rulelevel.
7. From Drill URL, specify the drill information.
See Adding Drill Through URLs.
8. Define the import mappings from the EPM or Enterprise Resource Planning (ERP)application.
To add an import mapping for an EPM source application to an EPM targetapplication.
Chapter 2Working with Import Formats
2-36

1. On the Setup tab, under Integration Setup, select Import Format.
2. In Import Format, from the Import Format summary grid, select an EPM sourceapplication.
3. In the Import Format Detail grid, and then in Source Column, select thedimension to map.
4. Optional: Add other dimensions as needed by selecting a dimension type fromthe Add drop-down.
Available options:
• Currency Row
• Attribute Row
• Description Row
• Dimension Row
5. In the Expression field, enter an expression or import script to the import format.
When entering a constant, you must still enter a starting position and length. Use astart position of “1 ” and a length of “1.”
See Adding Import Expressions.
6. Click Save.
Defining Import Formats for Data Synchronization Between EnterpriseResource Planning (ERP) and EPM Applications
Data synchronization also enables Oracle Hyperion Financial Data QualityManagement, Enterprise Edition to map the Oracle Enterprise PerformanceManagement System application dimension to the Enterprise Resource Planning(ERP) Segment/Chartfield.
To create Enterprise Resource Planning (ERP) to EPM mappings:
1. On the Setup tab, under Integration Setup, select Import Format.
2. In Import Format, from the Import Format summary grid, select an EnterpriseResource Planning (ERP) source application.
Depending on your selection in this field, the Source field shows only theregistered Enterprise Resource Planning (ERP) sources and file for an ERPsource type; or registered EPM applications.
For example, the Source field may be an Oracle Hyperion Financial Managementor Oracle Hyperion Planning for an EPM source type.
3. In the Import Format Detail grid, select the dimension to map from the SourceColumn drop-down.
4. Optional: Add other dimensions as needed by selecting a dimension type fromthe Add drop-down.
Available options include:
• Currency Row
• Attribute Row
• Description Row
Chapter 2Working with Import Formats
2-37

• Dimension Row
5. In the Expression field, enter an expression or import script to the import format.
When entering a constant, you must still enter a starting position and length. Use astart position of “1 ” and a length of “1.”
See Adding Import Expressions.
6. Click Save.
To create EPM to Enterprise Resource Planning (ERP) (Write-back) mapping:
1. On the Setup tab, under Integration Setup, select Import Format.
2. In Import Format, from the Import Format summary grid, select an EPM sourceapplication.
3. Select the Segment.
4. Choose the type of mapping by selecting either the Explicit tab, Between tab,Multi-Dimension, or Like tab.
• Explicit—The source value is matched exactly and replaced with the targetvalue. For example, the source value, “ABC” is replaced with the target value,“123.” "Explicit" write-back mappings are created the same for data load anddata write-back rules. See Creating Mappings Using the Explicit Method.
• Between—The range of source values is replaced with a single target value.For example, a range from “001” to “010” is replaced as one value: “999.”"Between" write-back mappings are created the same for data load and datawrite-back rules. See Creating Mappings Using the Between Method.
• In—In mappings enable a list of non-sequential source accounts to bemapped to one target account. In this case, multiple accounts are mapped toone account within one rule, eliminating the need to create multiple rules (as isrequired for an Explicit map).
• Like—The string in the source value is matched and replaced with the targetvalue. For example, the source value, “Department” is replaced with the targetvalue, 'Cost Center A. See Creating Mappings Using the Like Method.
Write-back mappings provide a means to remove or strip characters that wereadded during the data load process. "Like" write back mappings are createdsimilar to, but reverse from the data load.
• Multi-Dimension—Define member mapping based on multiple source columnvalues.
Tip:
You can click Refresh Values to refresh the list of segment or chartfieldvalues that appear in the drop-down list from the source system. This isespecially helpful when creating “Explicit,” “Between,” “Like”, and "Multi-Dimension" mappings for data write-back data loads.
Chapter 2Working with Import Formats
2-38

Defining the Write-Back Mappings (E-Business Suite and PeopleSoftonly)
When you define an import format, you can also define the import format mappingsfrom the EPM application for the data write-back rule.
To define the write-back import format mappings:
1. In Import Format, select the Import Name.
2. In Source select the Planning or Essbase as the source system.
3. In Target , select EBS or PeopleSoft as a target system.
4. Select the Accounting Entity.
Select Ledger for Oracle E-Business Suite.
Select Business Unit for PeopleSoft.
5. Click Save.
Defining LocationsA location is associated with one source system, but you can import data from multipleledgers from that system. Each location is assigned an import format enabling you touse the same import format for more than one target application where thedimensionality of the target applications is the same.
The Location feature also enables you to specify free form text or a value using theintegration option feature. Text or values entered for a location can be used with yourOracle Hyperion Financial Data Quality Management, Enterprise Edition scripts.
Note:
You can create duplicate locations with the same source system andapplication combination.
To create, edit, and delete import locations:
1. On the Setup tab, under Integration Setup, select Location.
2. In Location, click Add.
3. From Location Details, in Name, enter the location name.
4. From Import Format, enter the import format.
The Import Format describes the source file structure, and it is executed during thesource file import step. FDMEE supports file-based imports for those users who donot have direct connections to their source data, but do have source data residingin a text file. A corresponding import format must exist before it can be used with alocation.
Additionally:
• The source system is automatically populated based on the import format.
Chapter 2Defining Locations
2-39

• The Source field displays the source application based on the import format.
You can also click and select an import format.
5. In Accounting Entity, specify the source system accounting entities (businessunits or ledgers) to use for the location.
For Fusion and E-Business Suite source systems, the Accounting Entity is theledger. For PeopleSoft source systems, the Accounting Entity is the business unit.
If the accounting entity is selected here, then in the Data Load Rules, accountingentity populates automatically.
If the accounting entity is not specified here, you can specify the accounting entityin data rules. Doing so enables you to load data from multiple ledgers to businessunits from one location.
You can use locations with multiple import formats. For example, you can definethe import format for the first location, Ledger 1. Then, define another importformat for Ledger 2. In this case, you would create multiple locations with thesame import format. You can also define multiple locations for target applicationsthat are the same. In this case, you can define multiple locations for each businessunit or ledger and reuse the import format.
6. In Target Application, specify the target application associated with this location.
You can also click to search for a target application.
7. Optional: Enter or click to select the Accounting Entity. (For E-BusinessSuite, select the ledger. For PeopleSoft, select the business unit.)
8. In Functional Currency, specify the currency of the location.
Note:
When you create a location using a PeopleSoft Human CapitalManagement source system, the Functional Currency column displays"NA." Unlike PeopleSoft Enterprise Financial Management source systems,when FDMEE human resources data loads occur, there is no break out ofamount by functional, entered, or translated currencies.
9. In Parent Location, enter the parent assigned to the location.
Parent mapping are used to share mappings with other locations. Enter mappingsat the parent location, and the related locations can use the same mappings.Multiple locations can share a parent. This feature is useful when multiplelocations use one chart of accounts. Changes to a child or parent mapping tableapply to all child and parent locations.
10. In Data Value, specify the extra dimension that is used only for integration withmultiple dimension target systems.
This dimension is associated with a data load location. In Oracle HyperionFinancial Management, the data value is the value dimension. When FDMEEcreates the load file, the dimension value is entered for every data line that isloaded by the location. For example, the Data Value dimension is associated withthe Value dimension in Financial Management. By default, if no value is entered in
Chapter 2Defining Locations
2-40
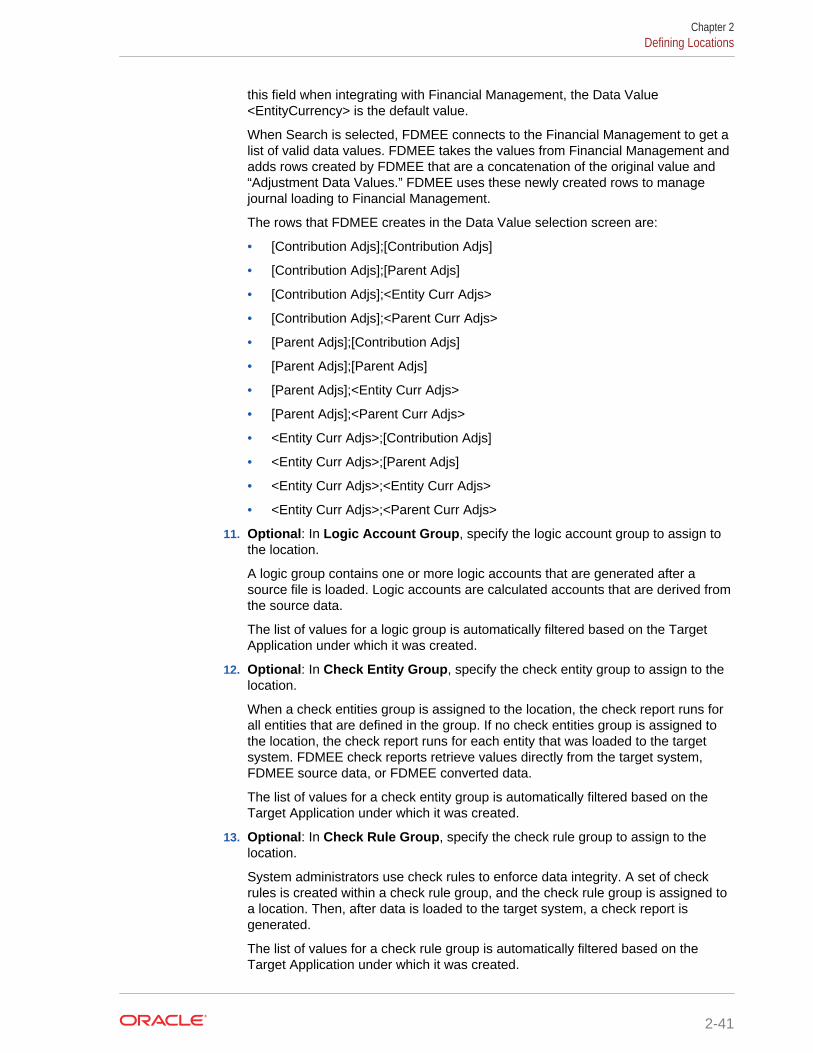
this field when integrating with Financial Management, the Data Value<EntityCurrency> is the default value.
When Search is selected, FDMEE connects to the Financial Management to get alist of valid data values. FDMEE takes the values from Financial Management andadds rows created by FDMEE that are a concatenation of the original value and“Adjustment Data Values.” FDMEE uses these newly created rows to managejournal loading to Financial Management.
The rows that FDMEE creates in the Data Value selection screen are:
• [Contribution Adjs];[Contribution Adjs]
• [Contribution Adjs];[Parent Adjs]
• [Contribution Adjs];<Entity Curr Adjs>
• [Contribution Adjs];<Parent Curr Adjs>
• [Parent Adjs];[Contribution Adjs]
• [Parent Adjs];[Parent Adjs]
• [Parent Adjs];<Entity Curr Adjs>
• [Parent Adjs];<Parent Curr Adjs>
• <Entity Curr Adjs>;[Contribution Adjs]
• <Entity Curr Adjs>;[Parent Adjs]
• <Entity Curr Adjs>;<Entity Curr Adjs>
• <Entity Curr Adjs>;<Parent Curr Adjs>
11. Optional: In Logic Account Group, specify the logic account group to assign tothe location.
A logic group contains one or more logic accounts that are generated after asource file is loaded. Logic accounts are calculated accounts that are derived fromthe source data.
The list of values for a logic group is automatically filtered based on the TargetApplication under which it was created.
12. Optional: In Check Entity Group, specify the check entity group to assign to thelocation.
When a check entities group is assigned to the location, the check report runs forall entities that are defined in the group. If no check entities group is assigned tothe location, the check report runs for each entity that was loaded to the targetsystem. FDMEE check reports retrieve values directly from the target system,FDMEE source data, or FDMEE converted data.
The list of values for a check entity group is automatically filtered based on theTarget Application under which it was created.
13. Optional: In Check Rule Group, specify the check rule group to assign to thelocation.
System administrators use check rules to enforce data integrity. A set of checkrules is created within a check rule group, and the check rule group is assigned toa location. Then, after data is loaded to the target system, a check report isgenerated.
The list of values for a check rule group is automatically filtered based on theTarget Application under which it was created.
Chapter 2Defining Locations
2-41

14. Click Save.
15. Optional: Perform these tasks:
• To edit an existing location, select the location to modify, and then makechanges as necessary. Then, click Save.
• To delete a location, click Delete.
When a location is deleted, the location is removed from all other FDMEEscreens, such as Metadata, and Data Load.
Tip:
To filter by the location name, ensure that the filter row is displayed above
the column headers. (Click to toggle the filter row.) Then, enter the textto filter.
To specify free form text or values for use with scripts:
1. On the Setup tab, under Integration Setup, select Location.
2. In the Location Detail, click the Integration Option tab.
3. From Integration Option, in Integration Option 1-4, specify the free form text orvalue, and then click OK.
The information is accessible from the Integration Option fields in the Locationtable.
Defining Period MappingsYou have the flexibility to use various kinds of calendars (for example, monthly,weekly, or daily) based on your business and statutory requirements. In your EPMsystem, you can also use different calendars, based on your application requirements(for example, different levels of periods). Because Oracle Hyperion Financial DataQuality Management, Enterprise Edition extracts the Enterprise Resource Planning(ERP) source system data to the target EPM application, establish the mappingrelationship by defining a period mapping between the source ERP source systemperiods and the target EPM application periods.
Before you can define data rules, define the period mappings. Period mappings definethe mapping between Enterprise Resource Planning (ERP) calendars and the EPMapplication year or periods. You can define period mappings in three ways:
• Global Mapping—You define a global mapping in cases where you do not havemany target applications getting data from multiple source systems with differenttypes of source calendars. Use a global mapping to ensure that various periodsare accommodated in the individual mapping. As a first step, define a globalmapping.
• Application Mapping—If you have multiple target applications, getting data fromvarious source systems with complex period types, you can create applicationmappings in addition to global mappings. When you define an applicationmapping, you can modify the Target Period Month as necessary.
• Source Mapping—Specifies source period mapping for adapter basedintegrations.
Chapter 2Defining Period Mappings
2-42

Global Mapping—Sample Monthly Period Mapping
The following table shows how a monthly calendar from a source maps to monthlyperiods in a target application.
Note:
You should define global mapping at the most granular level. For example, ifyou have a monthly calendar and a weekly calendar, define your globalmapping at the lowest level of granularity. In this case, the period keys are atthe week level and you map weeks to months. You can create applicationmappings for the higher-level periods.
Table 2-8 Sample Monthly Period Mapping
Period Key Prior PeriodKey
PeriodName
TargetPeriodMonth
TargetPeriodQuarter
TargetPeriod Year
TargetPeriod Day
Year Target
Jan 1 2010 Dec 1 2009 January 1,2010
Jan Q1 FY10
Feb 1 2010 Jan 1 2010 February 1,2010
Feb Q1 FY10
Mar 1 2010 Feb 1 2010 March 1,2010
Mar Q1 FY10
April 1 2010 March 12010
April 1, 2010 Apr Q2 FY10
May 1 2010 April 1 2010 May 1, 2010 May Q2 FY10
Global Mapping—Sample Weekly Period Mapping
The following table shows how a weekly calendar from an Enterprise ResourcePlanning (ERP) source system maps to monthly periods in the EPM application.
Table 2-9 Sample Weekly Period Mapping
Period Key Prior PeriodKey
PeriodName
TargetPeriodMonth
TargetPeriodQuarter
TargetPeriod Year
TargetPeriod Day
Year Target
Jan 26 2009 Jan 19 2009 January 26,2010
Jan Q1 FY09
Feb 2 2009 Jan 26 2009 February 2,2010
Feb Q1 FY09
Feb 9 2009 Feb 2 2009 February 9,2010
Feb Q1 FY09
Feb 16 2009 Feb 9 2009 February 16,2010
Feb Q1 FY09
Application Mapping—Sample Target Application Sourcing from a MonthlyCalendar Source
The following table shows a sample where the target application is sourcing from amonthly calendar. This mapping is performed on the Application Mapping tab.
Chapter 2Defining Period Mappings
2-43
Table 2-10 Sample Application Mapping—Target Application #1 with a Monthly CalendarSource
Period Key Target PeriodMonth
Target PeriodQuarter
Target PeriodYear
Target PeriodDay
Year Target
Jan 1 2009 Jan Q1 FY09
Feb 1 2009 Feb Q1 FY09
Mar 1 2009 Mar Q1 FY09
Application Mapping—Sample Target Application #2 Sourcing from a WeeklyCalendar Source
The following table shows a sample where the target application is derived from aweekly calendar. This mapping is performed on the Application Mapping tab.
Table 2-11 Sample Application Mapping—Target Application #2 with a Weekly Calendar Source
Period Key Target PeriodMonth
Target PeriodQuarter
Target PeriodYear
Target PeriodDay
Year Target
Jan 26 2009 Jan Q1 FY09
Feb 2 2009 Feb Q1 FY09
Feb 9 2009 Feb Q1 FY09
Feb 16 2009 Feb Q1 FY09
Note:
To avoid double counting on Income Statement accounts, be sure not to definea mapping where the adjustment period of one year goes into the period of thenext fiscal year.
Adjustment Period Mapping—Mapping the Period Key to the Adjustment Period
Note:
If YTD is selected as the Enterprise Resource Planning (ERP) source, then theadjustment period becomes the ending balance (replaces the period 12). IfPTD, then the adjustment period gets added to period 12.
Table 2-12 Sample Adjustment Period Mapping—Mapping the period to theadjustment period
Period Key Calendar Adjustment Period Description
Dec-2003 Accounting 13 13-03 Adj Period for 2003
Dec-2004 Accounting 13 13-04 Adj Period for 2004
Dec-2005 Accounting 13 13-05 Adj Period for 2005
Chapter 2Defining Period Mappings
2-44
Table 2-12 (Cont.) Sample Adjustment Period Mapping—Mapping the period tothe adjustment period
Period Key Calendar Adjustment Period Description
Dec-2007 Accounting 13 13-07 Adj Period for 2007
Note:
If the source is PeopleSoft General Ledger, set the adjustment period mappingwith the related accounting year.
Global MappingsYou can define one global mapping to map various periods to the individual mapping.
To define a global mapping:
1. On the Setup tab, under Integration Setup, select Period Mapping.
2. Select the Global Mapping tab.
3. Click Add.
4. Select the Period Key.
5. Select the Prior Period Key.
6. Enter the following:
a. Period Name; for example, August 2005.
b. Target Period Month; for example, August.
c. Target Period Quarter
d. Target Period Year
e. Target Period Day
f. Year Target
Note:
Period dimension members in Oracle Hyperion EPM Architect that have the"Data Storage" property set to "Label Only," "Dynamic Calc," or"DynamicCalcandStore " are not displayed.
7. Click Save.
Application MappingsYou can define application mappings in cases where you want to define a specialperiod mapping for a specific target application. The mappings that you create hereapply to an individual target application.
Chapter 2Defining Period Mappings
2-45

To create period mappings for an application:
1. On the Setup tab, under Integration Setup, select Period Mapping.
2. Select the Application Mapping tab.
3. In Target Application, select the target application.
4. Click Add.
5. Select the Period Key.
6. Enter the following:
a. Target Period Month
b. Target Period Quarter
c. Target Period Year
d. Target Period Day
e. Year Target
7. Click Save.
Source MappingsSource mappings include explicit and adjustment period mappings. You can createexplicit period mappings to ensure that the Oracle Hyperion Financial Data QualityManagement, Enterprise Edition periods map correctly to the source system calendarperiods. An adjustment period mapping is used only when you select the IncludeAdjustment Periods option when creating the data load rule.
The Source Mapping tab consists of two areas:
• Master—Selects the source system and mapping type.
• Grid—Defines the period mapping. The mapping can be defined only for periodsdefined on the Global Mapping. New FDMEE periods cannot be created on thistab.
For (Oracle E-Business Suite, Fusion, and PeoplesSoft) source systems, you canselect explicit or adjustment systems. For all other systems, you can select only anexplicit mapping.
Note:
In Data Rules, you can choose between Default period mapping and ExplicitPeriod mapping. If you choose Period mapping, then source periods aremapped based on the period key and previous period.
To create source mappings:
1. On the Setup tab, under Integration Setup, select Period Mapping.
2. Select the Source Mapping tab.
3. In Source System, select the source system.
4. In Mapping Type, select Explicit.
Chapter 2Defining Period Mappings
2-46

For SAP and JD Edwards source systems, you must select Explicit periodmappings.
For all other systems (for example, file-based), you can select Explicit orAdjustment.
5. Click Add.
6. Enter the source system Period Name, and then click OK.
Note:
Period names cannot include spaces if used in a batch script.
7. Enter the source system Period Key, and then click OK.
8. Enter the source system Calendar, and then click OK.
9. Enter the source system GL Period, and then click OK.
The GL Period Number is prefilled based on the Period Name.
10. Enter the source system GL Name, and then click OK.
11. Optional: Enter a description for the mapping.
12. Click Save.
To create source period mappings:
1. On the Setup tab, under Integration Setup, select Period Mapping.
2. In Period Mapping, select the Source Mapping tab.
3. In Source System, select the source system.
4. Click Add.
5. Click to select the source system Period Key, and then click OK.
6. Click to select the source system Calendar, and then click OK.
7. Click to select the source system Adjustment Period, and then click OK.
8. For PeopleSoft source systems only: In GL Period Year, enter the generalledger period year.
The General Ledger period year is required for PeopleSoft source systemsbecause PeopleSoft Adjustment Periods definitions do not include a Year value.To properly map adjustment period data from PeopleSoft, define the sourceaccounting period and fiscal year intersections for all PeopleSoft adjustmentperiods.
9. Optional: Enter a description for the mapping.
10. Click Save.
To create budget period mappings (for PeopleSoft Commitment Control only):
1. Select Source Mapping.
2. In Source System, select the source system.
Chapter 2Defining Period Mappings
2-47
3. Click Add.
4. In Mapping Type, select Budget.
Note:
From PeopleSoft Commitment Control, only Budget Period data can beextracted. The source calendar/period are based on the control budgetdefinition in PeopleSoft.
5. In Period Name, specify the period name.
You can also click to search for the period name.
Note:
Period names cannot include spaces if used in a batch script.
6. Enter the source system Calendar, and then click OK.
You can also click to search for the calendar name.
7. Enter the source system GL Period, and then click OK. You can also or click to search for and select the General Ledger period name.
The GL Period Number is prefilled automatically based on the Period Name.
8. Optional: Enter a description for the mapping.
9. Click Save.
Tip:
To delete a mapping, select the mapping, and then click Delete.
Defining Category MappingsYou define category mappings for categorizing and mapping source system data to atarget EPM Scenario dimension member. For example, in an Oracle HyperionFinancial Management application, you may have a Scenario dimension membercalled “Actuals” for storing actual balances from a source system. In an OracleHyperion Planning application, the same source system data is stored using theScenario dimension member “Current.” In Oracle Hyperion Financial Data QualityManagement, Enterprise Edition, you can create one category mapping to give bothone name to represent their respective scenarios.
Chapter 2Defining Category Mappings
2-48
Global MappingsYou can define one global mapping to map various Scenario dimensions to theindividual mapping.
The global category mapping lets you define mappings that cross multipleapplications. For example, you may have a case where a source category of an actualmay map to a target of an actual in the majority of the cases. But you may have a casewhere you have a target application where the actual may map to current. In this case,it provides the ability to override the global mapping on an application basis.
To define a global category mapping:
1. On the Setup tab, and then under Integration Setup, select Category Mapping.
2. Select Global Mapping.
3. Click Add.
A blank entry row is displayed.
4. In Category, enter the name of the category.
5. In Description, enter a description of the category.
6. In Frequency, select the frequency of the category.
The category indicates the frequency defined in the period mapping, for example,Daily, Monthly, Quarterly, or Yearly.
7. Enter the target category.
8. Click Save.
9. Optional: Perform these tasks:
• To edit a mapping, select the mapping, make changes as necessary, and thenclick Save.
• To delete a mapping, click Delete.
Application MappingsUnlike global mappings, application mappings can be defined for a target application.
To define application category mappings:
1. On the Setup tab, under Integration Setup, select Category Mapping.
2. In Category Mappings, select the Application Mapping tab.
3. From Target Application, select the target application.
4. Click Add.
A blank entry row is displayed.
5. Select the category.
6. Enter the target category or click to search for a target category.
7. Click Save.
8. Optional: Perform these tasks:
Chapter 2Defining Category Mappings
2-49

• To edit a mapping, select the mapping, and then make changes as necessary.Then, click Save.
• To delete a mapping, click Delete.
Chapter 2Defining Category Mappings
2-50
3Integrating Data
Related Topics
• Loading Data
• Data Load, Synchronization and Write Back
• Loading Human Resources Data
Loading DataOracle Hyperion Financial Data Quality Management, Enterprise Edition is a solutionthat allows business analysts to develop standardized financial data managementprocesses and validate data from any source system—all while reducing costs andcomplexity. FDMEE puts the finance user in total control of the integration process todefine source data, create mapping rules to translate data into the required targetformat, and to execute and manage the periodic data loading process.
Note:
To load data to Oracle Hyperion Financial Management, you must be a validFinancial Management user, and you must be assigned either the "Admin" or"Extended analytics" roles.
Creating Member MappingsYou use member mappings to identify how source dimensionality translates to targetdimensionality based on source values. Member mappings are referenced during thedata load, enabling Oracle Hyperion Financial Data Quality Management, EnterpriseEdition to determine how to dimensionalize the data that is loaded to the targetapplication. They define relationships between source members and target dimensionmembers within a single dimension. You must create a member mapping for eachtarget dimension.
The five types of member mappings:
• Explicit—The source value is matched exactly and replaced with the target value.
• Between—The range of source values is replaced with a single target value.
• In—Enables a list of non-sequential source values to be mapped to one targetvalue.
• Multi-Dimension—Target value is assigned for a combination of source segment/chartfields.
• Like—The string in the source value is matched and replaced with the targetvalue.
3-1
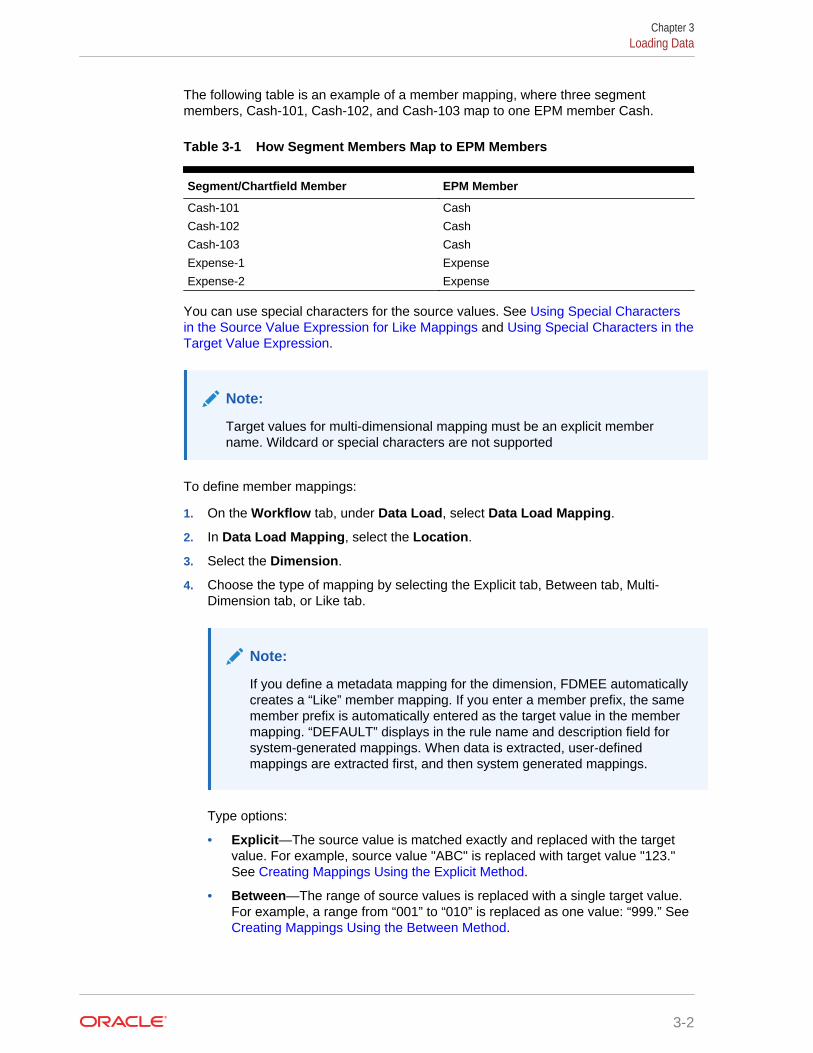
The following table is an example of a member mapping, where three segmentmembers, Cash-101, Cash-102, and Cash-103 map to one EPM member Cash.
Table 3-1 How Segment Members Map to EPM Members
Segment/Chartfield Member EPM Member
Cash-101 Cash
Cash-102 Cash
Cash-103 Cash
Expense-1 Expense
Expense-2 Expense
You can use special characters for the source values. See Using Special Charactersin the Source Value Expression for Like Mappings and Using Special Characters in theTarget Value Expression.
Note:
Target values for multi-dimensional mapping must be an explicit membername. Wildcard or special characters are not supported
To define member mappings:
1. On the Workflow tab, under Data Load, select Data Load Mapping.
2. In Data Load Mapping, select the Location.
3. Select the Dimension.
4. Choose the type of mapping by selecting the Explicit tab, Between tab, Multi-Dimension tab, or Like tab.
Note:
If you define a metadata mapping for the dimension, FDMEE automaticallycreates a “Like” member mapping. If you enter a member prefix, the samemember prefix is automatically entered as the target value in the membermapping. “DEFAULT” displays in the rule name and description field forsystem-generated mappings. When data is extracted, user-definedmappings are extracted first, and then system generated mappings.
Type options:
• Explicit—The source value is matched exactly and replaced with the targetvalue. For example, source value "ABC" is replaced with target value "123."See Creating Mappings Using the Explicit Method.
• Between—The range of source values is replaced with a single target value.For example, a range from “001” to “010” is replaced as one value: “999.” See Creating Mappings Using the Between Method.
Chapter 3Loading Data
3-2

• In—In mappings enable a list of non-sequential source values to be mappedto one target value. In this case, multiple values are mapped to one valuewithin one rule, eliminating the need to create multiple rules (as is required foran Explicit map). For example, you could have source accounts 1503, 1510,and 1515 map to the target account 15000010.
• Multi-dimension—For the specified combination of multiple source values atarget value is assigned.
For example, if the source value combination is Entity-001,002 Department-ABC, XYZ Account-1222, 1333, then the target value assigned for AccountDimension is 1200.
• Like—The string in the source value is matched and replaced with the targetvalue. For example, the source value “Department” is replaced with the targetvalue “Cost CenterA.” See Creating Mappings Using the Like Method.
When processing the source values for transformations, multiple mappings mayapply to a specific source value. The order of precedence is Explicit, Between, In,Multi-Dimension, and Like. Within Between and Like types, mappings can overlap.
The rule name determines precedence within a mapping type. Rules areprocessed in alphabetical order of the rule name within a mapping type. Numbersmay also be used to help with ordering. For example, if numbering by tens or onehundreds, you can insert new rules between existing ones. So if rules arenumbered 10, 20, and 30, you can add a rule that starts with 25 and need notrename other rules.
Tip:
You can click Refresh Values to refresh the list of segment or chartfieldvalues that are displayed. Doing so is helpful when you're creating Explicitmappings.
Creating Mappings Using the Explicit MethodExplicit mappings enable you to enter a source value to be matched exactly andreplaced with a target value. Use an explicit mapping to explicitly map the membersfrom the source to a target application. For example, you can map Account1 to theAccount100 in your target application. This enables you to explicitly define how todimensionalize the data file that is loaded into the target application.
To create an Explicit mapping:
1. On the Workflow tab, under Data Load, select Data Load Mapping.
2. From Dimensions, select the dimension name.
3. Select the Explicit tab.
4. Click Add.
5. Enter the Source Value or click to select a value.
See Using Special Characters in the Source Value Expression for Like Mappings.
6. Optional: Enter a description for the mapping.
Chapter 3Loading Data
3-3

7. Enter the Target Value or click to select a member.
See Using Special Characters in the Target Value Expression.
8. To reverse the sign of the target account specified, select Change Sign.
9. In Description, specify a description of the mapping.
10. Select Apply to Rule to apply the mapping only to the specific data rule in thelocation.
For other data rules in the location the mappings are not applied.
By default, mappings specified at a location are applicable to all data rules in alocation.
11. Click Save.
Creating Mappings Using the Between MethodBetween mappings enable you to enter a range of source values, separated with acomma. The range of source values is replaced with a single target value. Use aBetween mapping to consolidate several accounts from your ledger to a singleaccount in the plan.
To create a Between mapping:
1. On the Workflow tab, under Data Load, select Data Load Mapping.
2. From Dimensions, select the dimension name.
3. Select the Between tab.
4. Click Add.
5. Enter source values in the Source Value range.
6. Enter the Target Value or click to select a member.
The target value is the dimension member name. See Using Special Characters inthe Target Value Expression.
7. To reverse the sign of the target account specified, select Change Sign.
8. Enter the Rule Name.
9. In Description, enter a description for the mapping.
10. Select Apply to Rule to apply the mapping only to the specific data rule in thelocation.
For other data rules in the location the mapping are not applied.
By default, mappings specified at a location apply to all data rules in a location.
11. Click Save.
Creating Mappings Using the In MethodIn mappings enable a list of non-sequential source accounts to be mapped to onetarget account. In this case, multiple accounts are mapped to one account within onerule, eliminating the need to create multiple rules (as is required for an Explicit map).
To create an In mapping:
Chapter 3Loading Data
3-4

1. On the Workflow tab, under Data Load, select Data Load Mapping.
2. In Data Load Mapping, click Add.
A blank row is added.
3. From Dimensions, select the dimension name.
4. Enter source values in the Source Value range.
The source value is the Enterprise Resource Planning (ERP) segment value. Inmappings enable you to specify non-sequential source values. Separate sourcevalues with a comma, for example, specify 100,199.
5. Enter the Target Value or click to select a member.
6. To reverse the sign of the target account specified, select Change Sign.
7. Enter the Rule Name.
8. Enter a description of the In mapping in the Description.
9. Select Apply to Rule to apply the mapping only to a specific data rule in thelocation.
For other data rules in the location the mapping are not applied.
By default, mappings specified at a location apply to all data rules in a location.
10. Click Save.
Creating Mappings Using the Multi-Dimension MethodMulti-dimension mapping enables you to define member mapping based on multiplesource column values. This functionality provides you with the ability to load data intodimensions unavailable in the target application. For example, the mapping forAccount dimension can be based on source values of Entity, Product, and Project.Multi-dimension mappings derive the target values based on the combination ofsource values. In addition, Lookup dimensions can be added to Target Applicationregistration. These dimensions contain source dimensions that do not exist in thetarget application. They provide even more flexibility in creating multi-dimension filters.It is a way to facilitate conditional data loading.
Note:
When using multi-dimensional mapping, the source needs to be less than orequal to 75 characters.
To create mappings using multiple dimensions:
1. On the Workflow tab, under Data Load, select Data Load Mapping.
2. From Dimensions, select the dimension name.
3. Select the Multi-Dimension tab.
4. In Multi Dimension, click Edit.
5. In Rule Name, enter the name of the rule.
6. In Target Value, specify the target dimension member.
Chapter 3Loading Data
3-5

You can also click to select a target value.
The target values for multi-dimensional mapping must be an explicit membername. Wildcard or special characters are not supported
7. To reverse the sign of the source account value, select Change Sign.
8. In Description, enter a description of the mapping.
9. Click Add to create blank rows for specifying mapping conditions.
10. In Dimension, select the dimension to add.
For context, the source Segment/Chartfield column and Data Table columns areshown.
11. In Condition, select the method for mapping values.
Available conditions:
• Explicit
• Between
• Like
• In
12. In Value, specify the dimension member name.
13. Repeat steps 9-12 to specify multiple conditions.
14. Select Apply to Rule to apply the mapping only to a specific data rule in thelocation.
For other data rules in the location the mapping are not applied.
By default, mappings specified at a location are applicable to all data rules in alocation.
15. Click Save.
Using Special Characters in Multi-Dimensional MappingThe Source and Target Value expressions can use special characters. Thesecharacters (typically ? and *) can be prefixed or suffixed by one or more characters,which filters the source value by that prefix or suffix.
Special characters include:
• Asterisk (*)—An asterisk (*) represents the source value. The asterisk (*) can beprefixed or suffixed by one or more characters, which filters the source value bythat prefix or suffix. The wild card or strips (data load to write back) takes whateveris present in the source and puts it in the target column, usually adding a prefix. Anasterisk (*) represents the source value. The asterisk (*) can be prefixed orsuffixed by one or more characters, which filters the source value by that prefix orsuffix. The wild card takes whatever is present in the source and puts it in thetarget column, usually adding a prefix.
• Question Mark (?)—The question mark (?) strips a single character from thesource value. You can use one or more question marks (?) in the expression. Youcan also use question marks in combination with other expressions. For example:A?? finds members that start with A and have any two characters following andselects the members or strips off the two characters.
Chapter 3Loading Data
3-6

For multiple dimensions, the source dimension is the value brought over and the wildcard applies to it alone. The dimensions can be present in a multiple dimensional ruleand use wild cards. The prefix/suffix applies only to the source, which equals the targetdimension (the dimension on which the rule resides).
Creating Mappings Using the Like MethodLike mappings enable you to enter a string in the source value that is matched andreplaced with the target value.
To create a Like mapping:
1. On the Workflow tab, under Data Load, select Data Load Mapping.
2. From Dimensions, select the dimension name.
3. Select the Like tab.
4. Click Add.
A blank row is added.
5. Enter the Source Value string.
The source value is the Enterprise Resource Planning (ERP) segment value. Likesource write-back mappings support special characters. See Using SpecialCharacters in the Source Value Expression for Like Mappings.
6. Select the Target Value or click to select a member.
The target value is the EPM dimension member name. Like target write-backmappings support special characters. See Using Special Characters in the TargetValue Expression.
7. To reverse the sign of the target account specified, select Change Sign.
8. Enter the Rule Name.
9. In Description, enter a description of the Like.
10. Select Apply to Rule to apply the mapping only to a specific data rule in alocation.
For other data rules in the location the mapping are not applied.
By default, mappings specified at a location apply to all data rules in a location.
11. Click Save.
Using Special Characters in the Source Value Expression for Like MappingsThe Source and Target Value expressions can have one or more special characters.Special characters are supported for Like mappings only.
• Asterisk (*)
An asterisk (*) represents the source value. The asterisk (*) can be prefixed orsuffixed by one or more characters, which filters the source value by that prefix orsuffix. The wild card or strips (data load to write back) takes whatever is present inthe source and puts it in the target column, usually adding a prefix.
• Question Mark (?)
Chapter 3Loading Data
3-7

The question mark (?) strips a single character from the source value. You canuse one or more question marks (?) in the expression. You can also use questionmarks in combination with other expressions. For example, A?? finds membersthat start with A and have any two characters following and selects the membersor strips off the two characters.
• <1>, <2>, <3>, <4>, <5>
Processes rows that have concatenated values and extracts the correspondingsegment value (identified by the segment number). Each segment is separated byan underscore character (_). Only one segment value can be extracted in a sourcevalue expression. The source member must use the "_" character as theseparator.
Note:
<1>, <2>, <3>, <4>, <5> can be used with a question mark (?) but cannotbe used with an asterisk (*).
• <BLANK>
Processes only rows that contain the blank character (space).
The system only reads the expression where the source member is ‘ ‘ as<BLANK>. In this case, single quotes surround a single space character. If thesource has NULL, which is shown like ,, or as a space surrounded by “ “, thenthe system does not interpret the NULL as a <BLANK>. Only the ‘<space char>expression is interpreted.
Note:
The <BLANK> notation may be used in both source and targetexpressions. If used in a target expression, it writes a blank space to thetarget.
Use the <BLANK> target when you need to write back to the Peoplesoftjournal interface table for any blank fields.
This is true for both single and concatenated segment or chartfielddimension mappings.
Chapter 3Loading Data
3-8

Table 3-2 Examples of Expressions Using Special Characters
SpecialCharacter(s)Used
Mapping Type Source Value Target Value Result Notes
* Data Load * 1000 1000 returns 1000
WXYZ returns 1000
In this example,Oracle HyperionFinancial DataQualityManagement,Enterprise Editionprocesses allrows andoverrides thesource value witha default value of1000. In thisexpression, WXYZalso returns 1000.Because youentered anasterisk for thesource valueFDMEE replacesany source valuewith the targetvalue of 1000.
* Data Load * * 1000 returns 1000
WXYZ returns WXYZ
In this example,FDMEEprocesses allrows andreplaces thesource value asis.
* Stripping * A* 101 returns A101 Processes allsource members,and adds an "A"as a prefix.
* Stripping *_DUP * 1000_DUP returns1000
Processes andstrips off onlysource valuesending with“_DUP.”
? Stripping ?* * A1000 returns1000
B2000 returns2000
This resultprocesses onlysource values ofone or morecharacters inlength.
Strips off the firstcharacter
Chapter 3Loading Data
3-9
Table 3-2 (Cont.) Examples of Expressions Using Special Characters
SpecialCharacter(s)Used
Mapping Type Source Value Target Value Result Notes
? Stripping *???? * 1000_DUP returns1000
A1000 returns A
This resultprocesses onlysource values offour or morecharacters inlength.
Strips off the last4 characters
<1>, <2>, <3>,<4>, <5>
Data Load <1> * 01_420 returns 01
<1>, <2>, <3>,<4>, <5>
Data Load <2> * 01_420 returns420
<1>, <2>, <3>,<4>, <5>
Data Load <3> * 01_420_AB_CC1_001 returns AB
<1>, <2>, <3>,<4>, <5>
Stripping ?<1> * A01_420 returns01
<BLANK> Data Load <BLANK> [None] ' ' returns[None]
'01_ ' returns[None]
Single quotationmarks are shownfor illustrationonly.
Automap WildcardingOracle Hyperion Financial Data Quality Management, Enterprise Edition enablestarget-account or target-entity derivation by permitting wildcard characters (* and ?) insource and target members. Mapping-table records that have wildcard characters inthe source and target column are considered automapped.
FDMEE does not validate the target value.
Example Automap
Table 3-3 Automap Example
Rule Name Rule Description Source Value Target Account
w0011-- Cash Accts 0011?? Cash.??
Example General Ledger Trial Balance Records
Table 3-4 Example of General Ledger Trial Balance
GL Account Center Description Amount
001100 0160000 Cash In Bank 1000.00
001101 0000000 Cash Corp LB 2000.00
Chapter 3Loading Data
3-10

Table 3-4 (Cont.) Example of General Ledger Trial Balance
GL Account Center Description Amount
001116 0001000 Petty Cash 1000.00
223500 0160000 AP 5000.00
Resulting Record Conversion
Table 3-5 Result of Record Conversion
GL Account Hyperion Account
001100 0160000 Cash.00
001101 0000000 Cash.01
001116 0160000 Cash.16
Explanation of the Conversion ProcessThe criteria for the Automap entry (Like 0011??) retrieves the first three records fromthe general ledger trial balance. Because the Automap entry contains wildcardcharacters in the target account column, Oracle Hyperion Financial Data QualityManagement, Enterprise Edition must search the source account to replace thewildcard characters within the target account with actual characters from the sourceaccount.
The source-account characters represented by ?? marks (under Source Value) areused to replace the two question marks that follow Cash (under Target Account).
Conditional Mapping using a Mapping ScriptWith conditional mapping, source members are mapped to script expressions ratherthan to hard-coded target members. Conditional mapping is valid only for rule-basedmapping (Between, In, and Like). You can activate conditional mapping byplacing#SCRIPT or #SQL in the Target value column. Use #SCRIPT for Jython Script and#SQL for SQL script. Conditional mapping, in conjunction with dimension processingorder, enables mapping that is based on the results of dimension mappings. That is,dimension mappings that have already been processed. See Using Mapping Scripts.
Note:
In Oracle Hyperion Financial Data Quality Management, Enterprise Edition,Jython script is not supported for conditional mapping (#SCRIPT cannot be usedin the Target value column.)
To apply conditional mapping:
1. On the Workflow tab, under Data Load, select Data Load Mapping.
2. In Data Load Mapping, click Add.A blank row is added.
Chapter 3Loading Data
3-11

3. From Dimensions, select the dimension name.
4. Select either the Between, In, or Like tab.
5. Enter source values in the Source Value range.
6. In Target Value, enter #SQL.To use Jython script, enter #SCRIPT. For more information, see Using JythonObjects with Mapping Scripts.
The pencil icon is enabled.
7. Click the pencil icon.
8. On the Edit Script screen, specify your SQL script.This sample script uses the SQL Cast statement to conditionally process assignedvalues for the target column.
FDMEE does not perform an error check or validate the script. You need to testthe script on your data files in a test environment and verify the results.
9. In Rule Name, specify the data load rule to use with the mapping script.
10. Click Save.
Using Special Characters in the Target Value ExpressionYou can us only an asterisk (*) in the target expression, and you can prefix or suffixany number of characters to the asterisk (*) character. When you run the rule, theasterisk (*) is replaced by the resulting source value (which may or may not have itsown source expression), and is concatenated to any prefix or suffix that you havespecified in the target expression. For example:
Target Value:
Chapter 3Loading Data
3-12

A*
Result:
1000 = A1000
Target Value:
*_DUP
Result:
1000 = 1000_DUP
Note:
<BLANK> is supported in the target value expression in data mappings andcan be used in all mapping types (Like, Between, Explicit, and Multi-dimension). When writing data to an Enterprise Resource Planning (ERP) GLinterface table, the <BLANK> notation may be used for a target dimensionmapping in order to successfully pass the validation step in the workflowprocess. For example, when writing back to the Peoplesoft journal interfacetable, the specification of <BLANK> can be used when the user does not wantto provide a value for a chart field value, but needs to successfully validate thewrite-back data.
Format Mask Mapping for Target ValuesOracle Hyperion Financial Data Quality Management, Enterprise Edition supports theability to specify a format mask for a target member. The format mask defines thetarget member based on a combination of the source member details, and optionaluser defined text. This functionality is useful when designating the target memberbased on some part of the source member, an additional prefix, suffix, or replacementtext for the target.
The format mask is available for the target member specification for all mapping typesexcept explicit. Common usage of this mapping type falls into three categories:replacing segments from the source, replacing segments with string operations, andreplacing segments with string operations using a prefix or a suffix.
#FORMAT Mapping Type ComponentsThe #FORMAT mapping type consists of the following components:
Table 3-6 #Format Mapping Type Components
Component Description
#FORMAT Indicates that a mapping type of FORMAT isspecified in the target member.
Chapter 3Loading Data
3-13
Table 3-6 (Cont.) #Format Mapping Type Components
Component Description
<format mask> User defined format mask with the followingcharacters used to define the format:• "?"—Include a character from a specific
position in the source member or segmentwithin a member.
• "#"—Skip or drop a character from thesource when creating the target member.
• "character"—Include the user definedcharacter on the target “as- is”. Used forprefixing, suffixing or any fixed string orrequired character. This can be used inconjunction with the special format maskcharacters.
• "*"—Include all characters from the sourcesegment or source. When "*" is used asthe only format mask character in asegment, then the entire segment value iscopied from the source.
When "*" is used in conjunction with "#" orthe "?" character, then all remaining andunused characters are brought over.
"*" is a wildcard character that takes theremaining characters not specified by "?"or "#". For example, when the source is“abcd” and “*” is used, then the target is“abcd.” When the target is “?#*,” then theresult is “acd.”
If Oracle Hyperion Financial Data QualityManagement, Enterprise Editionencounters a “*” within a segment, thenanything specified after the “*” is ignoredother than the “character” specified on theformat.
<segment delimiter> The optional segment delimiter defines thecharacter that is used to delimit the segmentsin the source and target member. For this ruletype, the source and target delimiter must bethe same. When the segment delimiter is notspecified, then the format mask is applied tothe entire member independent of anysegment specification or delimiter.
#FORMAT Mapping Example
The following is an example that uses all options provided by #FORMAT:
Chapter 3Loading Data
3-14

Table 3-7 #Format Mapping Type Example
Source Target Result
12345-6789-012-3456ABC-001 #FORMAT(“???-*-GROUP-AA##?#*X-GROUP”,”-“)Explanation: Take the first threecharacters of the first segment, takethe entire second segment, replacethe third segment with the text“GROUP,” prefix the fourth segmentwith AA, drop the third and fourthcharacters, keep the fifth character,drop the sixth character, keep ABCand add suffix “X, replace the fifthsegment with the text “GROUP.”
123-6789-GROUP-AA5ABCX-GROUP
Replacing SegmentsYou may want to use the format of the source member as the definition of the targetmember, but replace some of the source segments rather than reuse the values fromthe source. For example, you may have a requirement to filter the source by the valueof the 4th segment, replace the 7th segment with an explicit value, and then retain thevalues of the other segments as in the following:
Source:
??????-??????-?-012000000-??????-???-???????-??????-??????-??????-???
Target:
??????-??????-?-012000000-??????-???-GROUP-??????-??????-??????-???
Replacing Segments with String OperationsYou may also need to perform a string operation on a segment that is being replaced.For example, you may have a value of 11002293, but when the segments are written,you want to only take the last four digits, or the first six digits. Examples using themember 11002293:
• Ignore the first two characters and provide the result: 002293. Use#FORMAT(“##*”).
• Truncate the last three characters provide the result: 11002. Use#FORMAT(“?????”).
• Ignore the first two and truncate the last three with the result: 002. Use#FORMAT(“##???”).
Replace Segments with String Operations and Using an Prefix or SuffixYou may want to use the segment value from the source as-is in the correspondingsegment in the target. For example, if the source is A100, you can map the value asthe value in the target, and you can map this value as the value in the target. In thiscase, use a wildcard on the source, and then specify the explicit value for thatsegment in the target based on the source.
Chapter 3Loading Data
3-15
Note:
If any other string operation is desired, then use scripting.
Using the #FORMAT Mapping TypeTo use the #FORMAT mapping type:
1. On the Workflow tab, under Data Load, select Data Load Mapping.
2. In Dimensions, select the dimension name.
3. Select the Between, In, or Like tab.
4. Click Add.
5. In Source Value, enter the segment to map.
For example, on the Like tab, enter: 12345-6789-012-3456ABC-001 in the SourceValue field.
6. Select the format map for the target member using the #FORMAT(<format mask>,<segment delimiter>).
For example, enter #FORMAT(“???-*-GROUP-AA##?#*X-GROUP”,”-“).
See #FORMAT Mapping Type Components.
7. To reverse the sign of the target account specified, select Change Sign.
8. Enter the Rule Name.
9. In Description, enter a description of the mapping.
10. Select Apply to Rule to apply the mapping only to a specific data rule in alocation.
By default, mappings specified at a location apply to all data rules in a location.
11. Click Save.
The result of applying format map created in steps 5 and 6: 123-6789-GROUP-AA5ABCX-GROUP.
Ignoring Member MappingsYou can ignore loading data to a particular dimension member.
To ignore member mappings:
1. On the Workflow tab, under Data Load, select Data Load Mapping.
2. Select a source value, and in Target Value, enter ignore.
For example, assume that a business user does not require extraction of datarelating to Departments 101, 103 and 105. You specify an In mapping with thesource values, 101, 103, and 105, and then for the target value, you specifyignore. In this way, data relating to Departments 101, 103 and 105 is extracted,but not written to the application in the Import Format option.
Chapter 3Loading Data
3-16

Importing Member MappingsYou can import member mappings from a selected .CSV and .TXT file, and then youcan create mappings. Import member mappings support merge or replace modes,along with validate or no validate options for target members.
Importing member mappings can be executed in either online or offline mode.
You can also import mappings from Excel or download an Excel template.
. See Importing Excel Mappings and Downloading an Excel Template (MappingTemplate)
To import member mappings:
1. On the Workflow tab, under Data Load, select Data Load Mapping.
2. From the Import drop-down, select one of the following:
• Current Dimension
• All Dimensions
• Import from Excel
See Using Excel Trial Balance Files to Import Data.
• Download Excel Template
See Downloading an Excel Trial Balance Template.
The Select file to import screen is displayed.
3. Navigate to the file to import and click OK.
4. Optional: If necessary, click Upload to navigate to the file to import, and then clickOK.
The Select Import Mode and Validation screen is displayed.
5. From Import Mode, select the import mode:
• Merge—Overwrites the data in the application with the data in the data loadfile.
• Replace—Clears values from dimensions in the data load file and replaces itwith values in the existing file.
6. From Validate, select to validate the member mappings.
Chapter 3Loading Data
3-17

Validate ensures that all data in the imported General Ledger has a correspondingmapping.
7. In Execution Mode, select the mode for executing the import:
• Online—Processes the import immediately.
• Offline—Runs the import in the background.
8. Click OK.
In the member mapping import files, Oracle Hyperion Financial Data QualityManagement, Enterprise Edition supports one of the following characters as columnseparators:
• ,
• |
• ;
The order of the columns:
• source value
• target value
• rule name
• rule description
Note:
If you add a minus sign in front of a target account value, then it is importedwith the “Change Sign” selected.
Table 3-8 Mapping Source Types
Column Mapping
100, Cash, 100, Explicit Mapping Explicit Mapping
100>199, Cash, R2, Between Mapping ">" indicates its BETWEEN mapping.
1*, Cash, R3, Like Mapping "*" indicates its LIKE mapping.
#MULTIDIM ACCOUNT=[4*] ANDUD3=[000],Cash,R4,Multi Dimension Mapping
"#MULTIDIM" indicates a multiple dimensionmapping. The actual column name used forthe mapping is the Data Table Column Name.The easiest way to create a multipledimension mapping is to create a mappingthrough the user interface and export it to thefile. You can then modify the file by applyingadditional mapping.
10, 20, In Mapping Source values are enclosed with " " andseparated by a comma (,) for the In mapping.For example IN 10, 20 is defined as “10,20” inthe source column of the import file.
Chapter 3Loading Data
3-18
Downloading an Excel Template (Mapping Template)In Data Load Mapping using the import feature, you can select and import an Excelmapping, and specify whether to merge or replace the mappings. Excel mappingtemplates with correct formatting are included in the EPM_ORACLE_HOME/products/FinancialDataQuality/templates directory.
The mapping template also includes a macro script that pulls Oracle HyperionFinancial Management dimensions directly from the target application to which you areconnecting.
You must upload the Excel template to the Oracle Hyperion Financial Data QualityManagement, Enterprise Edition server, and then pick the excel file as the file to loadin the data load rule, or when prompted by the system if the file name is left blank. Thesystem determines if the file being processed is an Excel file, and then reads therequired formatting to load the file.
When working with a mapping template in Excel:
• Do not have any blank lines in the map template.
• You can insert lines in the template, but you have to keep new lines in thedesignated area.
• Each template supports a single dimension.
To download an Excel template:
1. On the Workflow tab, under Data Load, select Data Load Mapping.
2. Select the All Mapping tab.
3. In the Import drop-down, select Download Excel Template.
A Maploader.xls file is downloaded. Copy or save the file to your hard drive.
4. Open the Maploader.xls file.
5. Select the Map tab.
6. Enter the Location in cell B1, Location ID in cell B2, and select the dimensionfrom the Dimension drop-down in cell B3.
7. Complete the following column fields:
a. In Source, enter the source dimension value.
You can specify wildcards and ranges when entering the source dimension.
• Wildcards for unlimited characters—Use asterisks (*) to denote unlimitedcharacters. For example, enter 548* or *87.8.
• Wildcards for single character place holders—Use questions marks (?) todenote single character place holders. For example,
– 548??98
– ??82???
– ??81*
• Range—Use commas (,) to denote ranges (no wildcard characters areallowed). For example, specify a range as 10000,19999.
Chapter 3Loading Data
3-19

(This range evaluates all values from 10000 to 19999 inclusive of bothstart and end values.)
In this case, FDMEE considers all values from 10000 to 19999 to includefor both start and end values.
• In map—Use commas (,) to separate entries (no wildcard are charactersallowed). You must have at least three entries or the map shows as abetween map. For example, specify an In map as 10,20,30.
• Multi-Dimension map—Use #MULTIDIM to indicate its multidimensionalmapping. Enter the DIMENSION NAME=[VALUE] and the value. The valuefollows the logic as wildcard, range, and In map. In the following examplethe search criteria is all accounts starting with 77 and UD1 = 240. Forexample, #MULTIDIM ACCOUNT=[77*] AND UD1=[240].
b. In Source Description, enter a description of the source value.
c. In Target, enter the target dimension value.
d. In Change Sign, enter True to change the sign of the Account dimension.Enter False to keep the sign of the Account dimension. This setting is onlyused when mapping the Account dimension.
e. In Data Rule Name, enter the data rule name when the mapping applies to aspecific data rule name.
Note:
If you are adding an Explicit mapping, the rule name must equal thesource value.
Importing Excel MappingsYou can import Excel mappings by selecting the Import option and selecting an Excelmapping.
Note:
The import of mapping rules using an Excel template provides a place tospecify a mapping script.
To import an Excel mapping:
Chapter 3Loading Data
3-20

1. On the Workflow tab, under Data Load, select Data Load Mapping.
2. Select the All Mapping tab.
3. In the Import drop-down, select Import from Excel.
4. In Select a file to import, select the Excel file to import, and then click OK.
Note:
If you are importing an Excel 2010 or 2016 file that has already beenexported, open the file before importing it. This step launches macros in theExcel file that are required for the import process.
5. Optional: If necessary, click Upload to navigate to the file to import, and then clickOK.
The Select Import Mode and Validation screen is displayed.
6. From Import Mode, select the import mode:
• Merge—Overwrites the data in the application with the data in the Excel dataload file.
• Replace—Clears values from dimensions in the Excel data load file andreplaces it with values in the existing file.
7. From Validate, select to validate the member mappings.
Ensures that all data in the imported General Ledger has a correspondingmapping.
8. In Execution Mode, select the mode for executing the import:
• Online—Process the import immediately.
• Offline—Runs the import in the background.
9. Click OK.
10. Click OK.
The mapping inherits the default data load rule, and shows the description of"System Generated Mappings."
If you use Explicit mapping, the data rule name must equal the source value.
Chapter 3Loading Data
3-21

Exporting Member MappingsYou can export member mappings to a selected file, or an Excel file.
To export member mappings:
1. On the Workflow tab, under Data Load, select Data Load Mapping.
2. Select Export.
3. In the Export drop-down, select a method:
Export options:
• Current Dimension
• All Dimensions
• Export to Excel
4. From the Specify file location for Current Dimension and All Dimensionsexport methods, specify the file name in File Name, or navigate to the file toexport, and then click OK.
For the Export to Excel method, mappings are exported to a Microsoft Excelspreadsheet. Open or save the XLS file as desired.
When you export to Excel, you cannot re-import in that format.
When the file has been exported, Oracle Hyperion Financial Data QualityManagement, Enterprise Edition displays the message: "File exportedsuccessfully."
5. Optional: Click Upload or Download and navigate to the file to export, and thenclick OK.
Deleting Member MappingsYou can delete all member mappings or only those mappings for which there is a tabin which mappings have been added. You can delete all the mappings in thedimension you are currently on, or just the row.
To delete member mapping from a selected tab:
1. On the Workflow tab, under Data Load, select Data Load Mapping.
2. Select the tab from which to delete mappings.
For example, select the Explicit tab to view explicit type mappings.
To view all mappings, select the All Mappings tab.
3. Select the mapping and click Delete Mappings.
To delete multiple mappings, use the Shift key to select multiple mappings.
To delete all mappings, use Ctl+A key.
4. In Are you sure you want to delete the selected data load mapping(s), clickOK.
5. Click Save.
Chapter 3Loading Data
3-22

Note:
To delete all mappings, select "Delete All Mappings."
Restoring Member MappingsRestoring member mappings deletes mappings made in the current session andrestores mappings based on the point of view.
You can restore member mappings only from the last data load for the POV.
To restore a member mapping:
1. On the Workflow tab, under Data Load, select Data Load Mapping.
2. Select Restore Mapping.
3. In Restore Mapping Confirmation, click OK.
Defining Data Load Rules to Extract DataAfter you define member mappings for the data load rule, define data load rules forledgers or business units in your source system. Data load rules allow you to create anintegration definition that can be reused for each period. They use a point of viewspecified by a user for a period and category. Data load rules are defined for locationsthat you have set up. Data load rules are specific to:
• locations
• Ledgers for Fusion and E-Business Suite source systems
• Business units for PeopleSoft Enterprise Financial Management source systems
You can create multiple data load rules for a target application so that you can importdata from multiple sources into a target application. Use the following high-levelprocess to create a data load rule:
1. Create the data load rule.
2. Define data load rule details.
3. Execute the data load rule.
Defining Data Load Rule DetailsYou create and modify data load rules on the Data Load screen. The Data Load Rulescreen window sections:
• Data Rule Summary
• Data Load Details
• Source Filters, which consist of four tabs: Source Options, Target Members (forfile-based data load rules in which a driver is specified), Target Options, andCustom Options)
See Working with Target Options (by location) and Registering TargetApplications.
Chapter 3Loading Data
3-23

See Creating Custom Options.
Note:
Before you create data load rules, ensure that your source system data doesnot include special characters, which are not supported in Oracle HyperionFinancial Management target applications.
To define the data load details for a source system:
1. On the Workflow tab, under Data Load, select Data Load Rule.
2. In the Data Load summary area, click Add.
3. In Details, in Name, enter the data load rule name.
4. Select a Category.
The categories listed are those that you created in the Oracle Hyperion FinancialData Quality Management, Enterprise Edition setup. See Defining CategoryMappings.
5. In Period Mapping Type, select the period mapping type for each data rule.
Valid options:
• Default—The Data Rule uses the Period Key and Prior Period Key defined inFDMEE to determine the Source General Ledger Periods mapped to eachFDMEE period included in a Data Rule execution.
• Explicit—The Data Rule uses the Explicit period mappings defined in FDMEEto determine the source General Ledger Periods mapped to each FDMEEPeriod included in a Data Rule execution. Explicit period mappings enablesupport of additional General Ledger data sources where periods are notdefined by start and end dates.
• None—With source adaptors use this option to ignore source periodmappings. Thus, all imported data rows are mapped to the FDMEE periodselected in a Data Rule execution.
These options are unavailable for a file-based definition.
Table 3-9 Period Mapping Types
Location Type Import FormatType
Period MappingDefault
Explicit PeriodMappingExplicit
Period Mapping IncludeAdjustmentPeriods
With AccountingEntity
Standard Yes Yes N/A Yes
WithoutAccounting Entity
Standard Yes Yes N/A Yes
With AccountingEntity
Source Adapter N/A N/A Yes Explicit: YesNone: N/A
WithoutAccounting Entity
Source Adapter N/A N/A Yes Explicit: YesNone: N/A
6. Optional: Enter a description.
Chapter 3Loading Data
3-24

7. From Target Plan Type, select the plan type of the target system.
8. Select the source options.
The following options may appear in the Details section or the Source Optionssection depending on the source system.
• Target Plan Type (Oracle Hyperion Planning and Oracle Essbase)—Select theplan type which contains only the dimensions, members, and data valuesrelevant to that plan type. The plan type applies to the source or target systemdepending on the POV location for this data load rule.
FDMEE supports data loads for up to six plan types (including custom andPlanning applications.)
• Zero Balances—For SAP and JDE, select the zero balances option:
– Include—Includes a zero balance for any reason.
For example when there is a debit of 5 and a credit of 5, then the zeroamount is included.
– Exclude No Activity—Zero balances are excluded when the beginningbalance debit, beginning balance credit, period debit and period creditequal 0 (begin_bal_dr, begin_bal_cr, period_dr, period_cr all have 0 forthe YTD balance type, or the period debit and the period credit have aperiod for the period balance type (period_dr, period_cr equals 0 for thePeriodic balance type).
– Exclude Zero Net Balance—Zero net balances are excluded when thebeginning balance debit minus the beginning balance credit plus theperiod debit minus the beginning credit plus period debit minus the periodcredit equals 0 for the Year to Data balance type (begin_bal_dr –begin_bal_cr + period_dr – period_cr = 0 for the YTD balance type, or theperiod debit minus the period credit equals zero (period_dr – period_cr = 0for the Periodic balance type).
The following example shows how each include zero balance option affectsaccount balances.
Table 3-10 Zero Balance options
Amount Opening Balance Transaction Debit Transaction Credit Closing Balance
4000 40000 0 40000 0
5000 50000 25000 75000 0
6000 0 0 0 0
7000 0 35000 35000 0
When the Zero Balance is "Include," Accounts 4000, 5000, 6000 and 7000qualify for this condition because all zero balanced accounts are included.
Note:
The Include Zero Balance option is not applicable when pulling datafrom Peoplesoft.
Chapter 3Loading Data
3-25

When the Zero Balance is" Exclude No Activity" is selected, only Account6000 is excluded because the Opening, Transaction and Closing balances areall zero and there is no activity. Accounts 4000, 5000, and 7000 are extracted.
When the Zero Balance is "Exclude Net Zero" is selected, Accounts 4000,5000, 6000 and 7000 are excluded because their closing balance is zero.
• Include Adjustment Periods—Select to include adjustment periods.
Adjustment periods ensure that the FDMEE adjustment periods map correctlyto the source system adjustment periods.
When you explicitly map period 13 to December/Period 12, and select theInclude Adjustment Period option, then the following occurs:
– For YTD balances, period 13 becomes the ending balance.
– For PTD balances, period 13 and December/Period12, are added.
To define source options:
1. On the Workflow tab, under Data Load, select Data Load Rule.
2. In Data Load Rule, select a data load rule or click Add.
3. Select the Source Options tab.
4. Complete the source options or source filter options based on the source system:
Source filter option:
• For Fusion and E-Business Suite source systems, see Defining Source FilterOptions for E-Business Suite Source Systems.
• For PeopleSoft Enterprise Financial Management source systems, see Defining Source Filter Options for PeopleSoft Enterprise FinancialManagement Source Systems.
• For PeopleSoft human resource source systems, see Defining HumanResource Data Load Rules.
• For JD Edwards GL, see Defining Source Filter Options for JD Edwards GLSource Systems.
• For SAP, see Defining Source Filter Options for SAP Adapters.
• For the Open Interface Adapter, see Defining Source Filter Options for theOpen Interface Adapter.
• For Financial Management source systems, see Defining Source FilterOptions for Financial Management. For information about FinancialManagement source parameters, see Defining Source Parameters forFinancial Management.
• For file-based source systems, see Defining Data Load Rule Details for a File-Based Source System.
5. Optional: If you are working with a multi-column data load, select the ColumnHeaders tab, and specify the start date and end date of the numeric columns.
See Loading Multi-Column Numeric Data.
6. Optional: To work with target options, select the Target Options tab, and selectany options.
7. Optional: You can specify free form text or a value by selecting Custom Optionsand specifying the text you want to associate with the data load rule.
Chapter 3Loading Data
3-26

See Creating Custom Options.
8. Click Save.
Defining Source Filter Options for E-Business Suite Source SystemsWhen defining data load mapping details, you can define the data to extract, includingwhether or not to extract:
• The amount type—Only monetary, statistical, or both, monetary and statisticalamounts
• Zero balance accounts where the debits and credits for an account total zero andthere is not period activity.
• Adjustment periods—Determines whether to extract balances in the adjustmentperiod
• Standard or Average balances—Average balances contain only balance sheetdata.
• Source balance type—Actual, Budget, or Encumbrance
In Oracle Hyperion Financial Data Quality Management, Enterprise Edition, youclassify the data to transfer with the valid types in the source accounting entity ofActual, Budget, and Encumbrance. Typically, you do not map a segment from thechart of accounts to the Scenario dimension, so you choose a default member aspart of the data rule definition.
You can extract functional balances, which are stored in the base currency of theselected ledger or business unit. For example, when transactions are entered inmultiple currencies, the total of all transaction balances is expressed in the functionalcurrency.
You can also extract entered balances, which are balances associated with a currencyattached to a primary ledger other than functional/local currency.
Additionally, FDMEE can import the data in a currency specified by the user. In thiscase, the balances must be translated to the specified currency in the source system.This can be achieved by running the Currency Translation process in the sourceEnterprise Resource Planning (ERP) system. (FDMEE does not perform any currencytranslations.)
Oracle E-Business Suite currently does not provide a page to call for displayingcommitment data.
To define the data load source filter for Fusion and E-Business Suite source systems:
1. On the Workflow tab, under Data Load, select Data Load Rule.
2. In Data Load Rule, select a data load rule or click Add.
3. Select the Source Options tab.
4. In Accounting Entity, specify the accounting entity from the list of values of thesource system.
You can select the accounting entity in this field, or when entering location detail.Data rules in locations without an accounting entity require you to select anAccounting Entity.
This functionality applies only to data rules in a location using a standard importformat.
Chapter 3Loading Data
3-27

You cannot modify the accounting entity once the Data Rule has been executed.
5. In Accounting Entity Group, specify the accounting entity group name if thelocation is associated with an accounting entity group.
When a data rule in a location includes an accounting entity, then the rule isconstrained by the accounting entity in the definition. In this case, the data rule inthe location cannot use an accounting entity group.
6. In Include Adjustment Periods, select yes or no.
Adjustment periods ensure that FDMEE adjustment periods map correctly to thesource system adjustment periods.
When you explicitly map period 13 to December/Period 12, and select the IncludeAdjustment Period option, then the following occurs:
• For YTD balances, period 13 becomes the ending balance.
• For PTD balances, period 13 and December/Period12, are added.
7. Select the Amount Type:
• Monetary
• Statistical—The balance selection of entered or functional currency does notapply.
• Monetary and Statistical
8. From Currency Type, select the currency type by which to extract balances:
9. In the Zero Balances drop-down, select the zero balances option:
• Include—Includes a zero balance for any reason.
For example, when there is a debit of 5 and a credit of 5, then the zero amountis included.
• Exclude No Activity—Zero balances are excluded when the beginning balancedebit, beginning balance credit, period debit and period credit equal 0(begin_bal_dr, begin_bal_cr, period_dr, period_cr all have 0 for the YTDbalance type, or the period debit and the period credit have a period for theperiod balance type (period_dr, period_cr equals 0 for the Periodic balancetype).
• Exclude Zero Net Balance—Zero net balances are excluded when thebeginning balance debit minus the beginning balance credit plus the perioddebit minus the beginning credit plus period debit minus the period creditequals 0 for the Year to Data balance type (begin_bal_dr – begin_bal_cr +period_dr – period_cr = 0 for the YTD balance type, or the period debit minusthe period credit equals zero (period_dr – period_cr = 0 for the Periodicbalance type).
The following example shows how each include zero balance option affectsaccount balances.
Table 3-11 Zero Balance options
Amount Opening Balance Transaction Debit Transaction Credit Closing Balance
4000 40000 0 40000 0
5000 50000 25000 75000 0
6000 0 0 0 0
Chapter 3Loading Data
3-28

Table 3-11 (Cont.) Zero Balance options
Amount Opening Balance Transaction Debit Transaction Credit Closing Balance
7000 0 35000 35000 0
When the Zero Balance is "Include," Accounts 4000, 5000, 6000, and 7000 qualifyfor this condition because all zero balanced accounts are included.
When the Zero Balance is" Exclude No Activity" is selected, only Account 6000 isexcluded because the Opening, Transaction, and Closing balances are zero andthere is no activity. Accounts 4000, 5000, and 7000 are extracted.
When the Zero Balance is "Exclude Net Zero" is selected, Accounts 4000, 5000,6000, and 7000 are excluded because their closing balance is zero.
10. In Signage Method, select the method to flip the sign of amounts when data isloaded.
Available methods:
• Absolute—Loads the data based on the following rules:
Table 3-12 Absolute Signage rules
Account Type GL (GAAP) EPM (Absolute)
Revenue naturally negative signage flipped
Liability naturally negative signage flipped
Equity naturally negative signage flipped
Expense naturally positive signage unchanged
Asset naturally positive signage unchanged
• Same as source—Loads the same sign as recorded in the source system.
• Reverse from source—Loads the reverse of the sign as recorded in the sourcesystem.
11. Select the Amount for Balance Sheet Accounts and Amount for IncomeStatement Accounts:
• YTD—Year-to-date account balance, where account balances accumulatefrom the beginning of the year to the current period. Typically, balance sheetaccounts (assets, liabilities, and equities) are specified with a YTD balance.(The default is YTD.)
• Periodic—Account balance for the specific period. Typically, incomestatement accounts (revenues and expenses) are specified with a periodicbalance. (The default is PTD.)
12. From Currency Type, select the currency type by which to extract balances:
• Functional—Balances stored in the base currency of the selected ledger orbusiness unit (local currency)
• Entered—Balances associated with a currency attached to primary ledgerother than the functional/local currency that you specify in the Currency Codefield.
• Translated—FDMEE can import the data in a currency specified by the user.In this case, the balances must be translated to the specified currency in thesource system. This task can be achieved by running the Currency Translation
Chapter 3Loading Data
3-29

process in the Enterprise Resource Planning (ERP) system. (FDMEE does notperform any currency translations.) Additionally, you need to specify thetranslated currency code in the Currency Code field.
13. From Currency Code (Entered and Translated currency types only), select theISO 4217 currency code to use with an entered or translated currency type.
For example, enter EUR to select the EURO currency code.
14. Select the Balance Method:
• Standard—In Oracle General Ledger, accounting transaction balances arestored as-is, also known as standard balances.
• Average—Average balances only contain balance sheet data. If you selectedStatistical as the amount type, the Balance Method is ignored.
15. Select the balance type to extract:
• Actual
• Budget—If you select the Budget source balance type, click Add to selectbudget types to include in the extraction.
• Encumbrance—If you select the Encumbrance source balance type, clickAdd to select encumbrance types to include in the extraction.
16. Select the segment values to extract.
If you do not want to extract all data from the source general ledger, filter data bythe balancing segments of the source. Options:
• All
• Selected
In Oracle E-Business Suite, the balancing segment ensures that at this level,balancing debits equal credits. When you create a data load rule, you canextract the general ledger balances relating to all the members of thebalancing segment or for specific members of it.
To select the balancing segment values, click , and then select segmentvalues, and then click OK.
To deselect a value, click , and then in the Select Balancing SegmentValues dialog box, clear any values, and then click OK.
17. Select the Beginning, Ending, and Average exchange rate options.
Enterprise Resource Planning (ERP) source systems maintain comprehensiveexchange rate information for transaction processing. Target applications can usethis information by extracting the exchange rates. You can select a beginning,ending, and average rate type from the source system. (The types in the sourcesystem may not explicitly define those rates types but are mapped to the ratestypes in the FDMEE interface table.)
Note:
For Oracle Hyperion Planning applications, exchange rates are loaded onlywhen the "Classic" data load method is selected.
Chapter 3Loading Data
3-30
Note:
You define exchange rate options only when the target application is multi-currency.
Note:
For Account Reconciliation Manager applications, you must not choosemultiple rate options.
18. Click Save.
19. Define the target filter options.
After you define the target filter options, run the data rule. See Running Data LoadRules.
Defining Source Filter Options for PeopleSoft Enterprise Financial Management SourceSystems
When defining data load rule details, you can specify various data extraction optionsas described below.
To define the source filter options for PeopleSoft Enterprise Financial Managementsource systems:
1. On the Workflow tab, under Data Load, select Data Load Rule.
2. In Data Load Rule, select a data load rule or click Add.
3. Select the Source Options tab.
4. Select the Amount Type:
• Monetary
• Statistical—The balance selection of entered or functional currency does notapply.
• Monetary and Statistical
5. In Signage Method, select the method to flip the sign of amounts when data isloaded.
Available methods:
• Absolute—Loads the default debit or credit sign.
Table 3-13 Absolute Signage rules
Account Type GL (GAAP) EPM (Absolute)
Revenue Naturally negative Signage flipped
Liability Naturally negative Signage flipped
Equity Naturally negative Signage flipped
Expense Naturally positive Signage unchanged
Chapter 3Loading Data
3-31
Table 3-13 (Cont.) Absolute Signage rules
Account Type GL (GAAP) EPM (Absolute)
Asset Naturally positive Signage unchanged
• Same as source—Loads the same sign as recorded in the source system.
• Reverse from source—Loads the reverse of the sign as recorded in the sourcesystem.
6. Select the Amount for Balance Sheet Accounts and Amount for IncomeStatement Accounts:
• YTD—Year-to-date account balance, where account balances areaccumulated from the beginning of the year to the current period. Typically,balance sheet accounts (assets, liabilities, and equities) are specified with aYTD balance.
• Periodic—Account balance for the specific period. Typically, incomestatement accounts (revenues and expenses) are specified with a periodicbalance.
7. From Currency Type, select the currency type by which to extract balances:
• Functional—Balances stored in the base currency of the selected ledger orbusiness unit (local currency)
• Entered—Balances associated with a currency attached to primary ledgerother than the functional/local currency that you specify in the Currency Codefield.
Note:
The default when Oracle Hyperion Financial Data Quality Management,Enterprise Edition pulls from PeopleSoft is POSTED_TOTAL_AMT. If youselect an entered currency, FDMEE pulls from POSTED_TRAN_AMT. Ifyou want the BASE amount, then create an alternate schema and create aview PS_LEDGER to switch the amount.
8. From Currency Code, select the ISO 4217 currency code to use with an enteredcurrency type.
For example, enter EUR to select the EURO currency code.
9. Select the Ledger Group.
10. Select the Ledger.
In PeopleSoft, a business unit may have multiple ledger groups. In this list,FDMEE displays only the ledger groups associated with the ledger.
11. Optional: To select book code values, click , select book code values, andthen click OK.
To clear a book code, click . Then, in the Select Book Code dialog box, clearbook codes, and then click OK.
12. To select budget values, click , select budget values, and then click OK.
Chapter 3Loading Data
3-32
You specify the budget values when the ledger that you selected has the datatable “Ledger_Budg.”
To deselect budget values, click . Then, in Select Budget Scenario values,clear values, and then click OK.
13. Click Save.
14. Define target filter options.
After you define target filter options, run the data rule. See Running Data LoadRules.
Defining Source Filter Options for JD Edwards GL Source SystemsWhen defining data load mapping details, define the data to extract, including whetherto extract the company code, ledger type, amount type.
To define the source filter options for a JD Edwards GL source system:
1. On the Workflow tab, under Data Load, select Data Load Rule.
2. In Data Load Rule, select a data load rule or click Add.
3. Select the Source Options tab.
4. Select the Amount Type.
Select PTD for Period to Date, or YTD for Year to Date balances.
5. Select the Company Code.
Specify the company code in four characters or less using alphanumericcharacters.
6. Select the Ledger.
Specify the ledger in two characters or less using alphanumeric characters fromthe JD Edwards source system. For example, ledger types include:
• AA–Actual
• BA–Budget
• CA–Original Currency Transaction
7. Click Save.
Defining Source Filter Options for SAP AdaptersThis section provides background information on the SAP integration, and specificadapter detail.
SAP Integration Process Background
Oracle Data Integrator creates an ABAP program to extract the data from SAP into afile and then transfers the file to a FTP Server or Shared File system. The ABAPprogram is generated based on the mappings in the import format and options definedin the rule. The ABAP program is created and uploaded to SAP system when you runa data load rule. In the SAP deployment, ABAP programs are created and modified ina development environment, and locked from modification in the productionenvironment.
Chapter 3Loading Data
3-33

In order to support this requirement, ODI provides an option UPLOAD_ABAP_CODEin the SAP Load Knowledge Module. This option is set to "Yes" in a developmentenvironment, and "No" in a production environment. The ABAP programs aretransferred from development to production using SAP Transport requests.
Because the ABAP code that is run in a production environment is not modified, usersshould create the import format in the exact format as the development environment.In addition there are options in the data rule that impact the logic of the ABAPprogram. These options must be set to the same value as they are set in thedevelopment environment. Changing these options in the data rule in a productionenvironment does not have any impact on the extraction process. If changes arerequired to these options, make them in the development environment and the ABAPcode transported to the production environment. The options that impact the ABAPcode generation are noted in the SAP adapter sections.
Defining Source Filter Options for the SAP_FDM_GLBALANCES_CLASSICS Adapter
Before executing a data load rule using a SAP source adapter, you are required tohave generated the Import Format’s ODI Scenario. Once the ODI Scenario exists inthe Execution Repository, you can execute the data load rule any number of times.
To define the source filter options for the SAP_FDM_GLBALANCES_CLASSICSadapter:
1. In Include Account Description, select one of the following:
• Yes—include the GL Account description
• No—include all other conditions
Impacts ABAP program
2. In Amount Type, select one of the following:
• PTD—Period to Date
• YTD—Year to Date
No impact on ABAP program
3. In Company Code, specify the company code in four characters or less usingalphanumeric characters.
No impact on ABAP program
4. In Currency Type, specify one of the following types:
• 00—Transaction currency
• 10—Company code currency
• 30—Group currency
No Impact on ABAP program
5. In Language, specify the language code in two characters or less, usinguppercase characters.
For example, specify "EN" for English.
Refer to the SAP documentation for the language code.
No impact on ABAP program
6. In Ledger, specify the ledger code in two characters or less using alphanumericcharacters.
Chapter 3Loading Data
3-34

No impact on ABAP program
7. In Record Type, select one of the following record types:
• 0—Actual
• 1—Plan
Impacts ABAP program
Defining Source Filter Options for the SAP_FDM_GLBALANCES_NEW Adapter
Before executing a data load rule using a SAP source adapter, you are required tohave generated the Import Format’s ODI Scenario. Once the ODI Scenario exists inthe Execution Repository, you can execute the data load rule any number of times.
To define the source filter options for a SAP_FDM_GLBALANCES_NEW adapter:
1. In Amount Type, select one of the following:
• PTD—Period to Date
• YTD—Year to Date
No impact on ABAP program
2. In Company Code, specify the company code in four characters or less usingalphanumeric characters.
No impact on ABAP program
3. In Currency Type, select one of the following types:
• 00—Transaction currency
• 10—Company code currency
• 30—Group currency
• 40—Hard currency
• 50—Index based currency
• 60—Global company currency
No impact on ABAP program
4. In Include Account Description, select one of the following:
• Yes—include the GL Account description
• No—include all other conditions
Impacts ABAP program
5. In Language, specify the language code in two characters or less, usinguppercase characters.
For example, specify "EN" for English.
Refer to the SAP documentation for the language code.
No impact on ABAP program
6. In Ledger, specify the ledger code in two characters or less using alphanumericcharacters.
No impact on ABAP program
7. In Record Type, select one of the following record types:
Chapter 3Loading Data
3-35
• 0—Actual
• 1—Plan
No impact on ABAP program
Defining Source Filter Options for the SAP_FDM_COST_CENTER Adapter
Before executing a data load rule using a SAP source adapter, you are required tohave generated the Import Format’s ODI Scenario. When the ODI Scenario exists inthe Execution Repository, you can execute the data load rule any number of times.
To define the source filter options for a SAP_FDM_COST_CENTER adapter:
1. In Activity Type, select one of the following:
• Yes—include the activity type
• No—exclude the activity type
Impacts ABAP program
2. In Activity Type Description, select whether to include or exclude the activitytype description:
• Yes—include the activity type description
• No—exclude the activity type description
Impacts ABAP program
3. In Amount Type, select one of the following:
• PTD—Period to date balances
• YTD—Year to date balances
No impact on ABAP program
4. In Controlling Area, specify the controlling area in four characters or less usingalphanumeric characters.
No impact on ABAP program
5. In Include Cost Element Description, select whether to include the cost elementdescription:
• Yes—include the cost element description
• No—exclude the cost element description
Impacts ABAP program
6. In Currency Type, select one of the following:
• 20—Controlling Area currency
• 00—Transaction currency
• 70—Cost Center currency
• (blank)—leave blank when the Quantity filter is Yes or the Activity Type filteris Yes.
Impacts ABAP program
7. In Flow Check, select one of the following:
• External—load external balances
Chapter 3Loading Data
3-36

• Internal—load internal allocations
Impacts ABAP program
8. In Language Code, specify the language code in two characters or less, usinguppercase characters.
For example, specify "EN" for English.
No impact on ABAP program
9. In Ledger Code, specify the ledger code in two characters or less usingalphanumeric characters.
No impact on ABAP program
10. In Statistical Key Figure, select to extract statistical key figure totals:
• Yes—extract the data for Statistical key figure totals
• No—extract data for activity type totals
Impacts ABAP program
11. In Group Code, select one of the following group codes:
For external balances, select:
• 0101—data extracted is for the Cost Center Group
• 0102—data extracted is for the Account Group
For internal balances, select:
• 0101—data extracted is for the Cost Center Group
• 0102—data extracted is for the Account Group
• 0104—data extracted is for the Statistical Key Figure Group
• 0105—data extracted is for the Account Group
• (Null)—no grouping is required
Impacts ABAP program
12. In Value Type, select one of the following:
• 04—Actual
• 01—Plan
No impact on ABAP program
Defining Source Filter Options for the SAP_FDM_PROFIT_CENTER Adapter
Before executing a data load rule using a SAP source adapter, you are required tohave generated the Import Format’s ODI Scenario. Once the ODI Scenario exists inthe Execution Repository, you can execute the data load rule any number of times.
To define the source filter options for a SAP_FDM_PROFIT_CENTER adapter:
1. In Amount Type, select one of the following:
• PTD—Period to date balances
• YTD—Year to date balances
No impact on ABAP program
Chapter 3Loading Data
3-37

2. In Controlling Area, specify the value for the controlling area.
No impact on ABAP program.
3. In Currency Type, select one of the following:
• 10—Company code currency
• 00—Transaction currency
• 70—Profit Center currency
• (blank)—Select blank when Quantity is set to YES.
No impact on ABAP program
4. In Dummy Prctr, select:
• Yes—include balances related to the dummy profit center.
• No—include other conditions.
No impact on ABAP program
5. In Language, select the language code in two characters or less, using uppercasecharacters.
For example, specify "EN" for English.
No impact on ABAP program
6. In Ledger, select the ledger code in two characters or less using alphanumericcharacters.
No impact on ABAP program
7. In Statistical Key Figure, select to extract statistical key figure totals:
• Yes—extract the data for Statistical key figure totals
• No—extract data for activity type totals
Impacts ABAP program
8. In Group Code, select one of the following group codes:
• 0106—Profit Center Group
• 0109—Account Group
• (blank)—no group is required
Impacts ABAP program
9. In Record Type, select one of the following types:
• 0—Actual
• 1—Plan
No impact on ABAP program
Defining Source Filter Options for the SAP_FDM_CUSTOMER_BALANCES Adapter
Before executing a data load rule using a SAP source adapter, you are required tohave generated the Import Format’s ODI Scenario. Once the ODI Scenario exists inthe Execution Repository, you can execute the data load rule any number of times.
To define the source filter options for a SAP_FDM_CUSTOMER_BALANCES adapter:
Chapter 3Loading Data
3-38

1. In Amount Type, select one of the following:
• PTD—Period to date balances
• YTD—Year to date balances
No impact on ABAP program
2. In Company Code, specify the company code in four characters or less usingalphanumeric characters.
No impact on ABAP program
3. In Currency Type, select one of the following:
• 10—Company code currency
• 00—Transaction currency
No impact on ABAP program
4. In Customer, select the customer code in ten characters when the balance isrequired for a specific customer.
Otherwise, set to blank.
No impact on ABAP program
5. In Customer Details, select to include customer details:
• Yes—include customer details
• No—exclude customer details
Impacts ABAP program
6. In Flow Check, select one of the following:
• Open—load open item balances
• Cleared—load cleared item balances
• All—load all item balances
Impacts ABAP program
7. In Special GL Transactions, select one of the following:
• Yes—load special General Ledger balances
• No—load other balances
Impacts ABAP program
8. In Trading Partner, select to include trading partner balances:
• Yes—load trading balances
• No—load other conditions
No impact on ABAP program
Defining Source File Options for the SAP_FDM_VENDOR_BALANCES Adapter
Before executing a data load rule using a SAP source adapter, you are required tohave generated the Import Format’s ODI Scenario. Once the ODI Scenario exists inthe Execution Repository, you can execute the data load rule any number of times.
To define the source filter options for the SAP_FDM_VENDOR_BALANCES adapter:
Chapter 3Loading Data
3-39

1. In Amount Type, select one of the following:
• PTD—Period to date balances
• YTD—Year to date balances
No impact on ABAP program
2. In Company Code, specify the company code in four characters or less usingalphanumeric characters.
No impact on ABAP program
3. In Currency Type, select one of the following:
• 10—Company code currency
• 00—Transaction currency
No impact on ABAP program
4. In Flow Check, select one of the following:
• Open—load open item balances
• Cleared—load cleared item balances
• All—load all item balances
Impacts ABAP program
5. In Special GL Transactions, select one of the following:
• Yes—load special General Ledger balances
• No—load other balances
Impacts ABAP program
6. In Trading Partner, select to include trading partner balances:
• Yes—load trading balances
• No—load other conditions
No impact on ABAP program
7. In Vendor, specify the vendor code in ten characters when the balance is requiredfor a specific vendor.
Otherwise, set to blank.
No new ABAP code is uploaded for this filter.
8. Specify Vendor Details, select whether to include vendor details:
• Yes—include vendor details
• No—exclude vendor details
No impact on ABAP program
Defining Source Filter Options for the Open Interface AdapterBefore executing a Data Rule using open interface adapter, you are required to havegenerated the Import Format’s ODI Scenario. Once the ODI Scenario exists in theExecution Repository, you can execute the Data Rule any number of times.
To define the source filter options for an open interface adapter:
Chapter 3Loading Data
3-40
1. In Batch Name, enter the name of the batch used to identify the data in theinterface table.
2. In Record Type, specify whether to delete data after importing the data byselecting Y (for yes) or N.
To delete the data, select Y. To retain the data, select N.
3. Click Save.
Defining Source Filter Options for Financial ManagementWhen defining data load rule details, you can specify various data extraction options.
For journals, the journals are extracted based on Scenario, Year, Period, Entity andValue.
For data (including journalized value members), any dimension can be filtered by anymember or multiple members.
You can select an individual member. If you do not select specific members, thesystem assumes that you want to extract all members for the dimension. However, ifyou specifically select members, the system displays a plus sign ( + ) next to thedimension to indicate multiple selections.
To define the source filter options for source systems:
1. On the Workflow tab, under Data Load, select Data Load Rule.
2. In Data Load Rule, select a data load rule or click Add.
3. Select the Source Options tab.
4. Click Add.
5. In the Source Filters area, click Add.
6. Select the Dimension Name.
7. To assign a filter condition, perform an action:Enter a member name or filter condition in the Filter Condition text box.
To assign a filter condition, perform an action:
• Enter a member name or filter condition in the Filter Condition text box.
For example, enter a member name or filter condition using Oracle Essbasesyntax. Depending on the dimension, you can select one or more members asa filter condition used for extracting the budget data. For example, for theEntity dimension, you may select the following members: E1, E5, and E6.
• Click to display the Member Select screen and select a member usingthe member selector. Then, click OK.
The Member Selector dialog box is displayed. The member selector enables youto view and select members within a dimension. Expand and collapse memberswithin a dimension using the [+] and [-].
The Selector dialog box has two panes—all members in the dimension on the leftand selections on the right. The left pane, showing all members available in thedimension, displays the member name and a short description, if available. Theright pane, showing selections, displays the member name and the selection type.
Chapter 3Loading Data
3-41

You can use the V button above each pane to change the columns in the memberselector.
You can also click Refresh Members to show the latest member list.
Note:
Assign filters for dimensions. If you do not assign filters, numbers from thesummary members are also retrieved.
To use the member selector:
In the list of available dimensions and members on the left, select a member and
click .To deselect a member from the list of members, click .To add special
options for the member, click and select an option.In the member options, “I” indicates inclusive. For example, “IChildren” adds allchildren for the member, including the selected member, and “IDescendants” addsall the descendants including the selected member. If you select “Children,” theselected member is not included and only its children are included.
The member is moved to the right and displays the option you selected in theSelection Type column. For example, “Descendants” displays in the SelectionType column.
Tip:
To clear all members from the list of selections, click .
Click OK twice to continue defining the source filter details.The selected member is displayed in Essbase syntax in the Filter Condition field.
Click Save.
Defining Data Load Rule Details for a File-Based Source SystemWhen defining data load detail for a file-based data load system, load data to a singleperiod or a range of periods. For a single period, enter the file name in the data rule,and then run the rule for a single period. To load multiple periods, create a file for eachperiod and append the period name or period key to the file name. When the rule isexecuted for a range of periods, the process constructs the file name for each period,and then uploads the appropriate data to the POV.
To define the data load details for a file-based source system:
1. In Name, enter the data load rule name.
2. In Category, select a category.
The categories listed are those that you created in the Oracle Hyperion FinancialData Quality Management, Enterprise Edition setup, such as "Actual." See Defining Category Mappings.
Chapter 3Loading Data
3-42
3. Optional: In Description, specify a description of the data load rule.
4. Optional: From the Target Plan Type drop, select the plan type of the targetsystem.
5. Optional: In Import Format, if the file type is a multiple period text file (withcontiguous periods, or noncontiguous periods), select the import format to use withthe file, so you can override the import format. For example, specify an importformat for single and multiple period data rules, which enables you to load singleor multiple period files from the same location. In this case, the import formatselected must have the same target as the location selected in the POV. If theimport format is unspecified, then the import format from the location is used.
The starting and ending period selected for the rule determine the specific periodsin the file when loading a multiple period text file.
In the file, when amounts are unavailable for contiguous periods, then you canexplicitly map the respective amount columns to required periods in the data rulein Data Load Mapping. When you execute the rule, the data is loaded to theperiods as specified in the explicit mapping.
6. Optional: Enter a description.
7. In Directory, enter the relative path where the file is located.
8. Select the Source Options tab.
9. In the File Name field, enter the static name of the file.
When only the file name is provided, then data must be entered for a single periodon the Rules Execution window.
To load multiple periods, create a file for each period and append a period nameor period key to the file name. When the rule is executed for a range of periods,the process constructs the file name for each period and uploads it to theappropriate POV.
Note:
If used in a batch script, period names cannot include spaces.
To navigate to a file located in a FDMEE directory, click Select, and then choose afile on the Select screen. You can also select Upload on the Select screen, andnavigate to a file on the Select a file to upload screen.
If you do not specify a file name, then FDMEE prompts you for the file name whenyou execute the rule.
10. To load data into multiple periods, in the File Name Suffix Type drop-down, selectPeriod Description or Period Key.
A suffix is appended to the file name, and FDMEE adds the file extension afteradding the suffix. If you leave the file name blank, then FDMEE looks for a file withSuffix. When the file name suffix type is provided, then the file name is optional inthis case, and it is not required on the Rule Execution window.
If the file name suffix type is a period key, the suffix indicator and period dateformat are required (as the suffix set) in the file name, and must be validated as avalid date format.
Chapter 3Loading Data
3-43

For example, specify:
a. 1_Jan-2013.txt
b. 1_Feb-2013.txt
c. 1_Mar-2013.txt
In this case, when you run the rule, enter 1_.txt in the file name field and select"Period Name" for the suffix indicator. Then run the rule for the January to Marchperiods.
11. In Period Key Date Format, specify the data format of the period key that isappended to the file name in JAVA date format (SimpleDateFormat).
12. Click Save.
Defining Source Parameters for Planning and EssbaseIn data synchronization, when Oracle Hyperion Planning and Oracle Essbase are thesource systems, you can specify additional source parameters.
To define source options:
1. On the Workflow tab, under Data Load, select Data Load Rule.
2. In Data Load Rule, select a data load rule for a Planning and Essbase source,and then click Add.
3. Select the Source Parameters tab.
4. In Extract Dynamic Calculated Data, specify to include dynamically calculateddata.
Note:
If you set the Extract Dynamic Calculated Data option on the Data LoadRule screen to "Yes," and a leaf level member’s (Level 0) Data Storage isset to "Dynamic," then the data is not picked up by the extraction process.To pick up the data, set the member’s Data Storage to something besides"Dynamic," to include the value in the selection from the source application.
• Yes—Dynamically calculated values are included in the export.
By default, dynamically calculated data is included.
• No—Dynamically calculated values are excluded in the export.
5. In Data Precision, specify the number of decimal places displayed in numbers tobe exported.
Data precision refers to numeric data with the emphasis on precision (accuracy).Depending on the size of a data value and number of decimal positions, somenumeric fields may be written in exponential format; for example, 678123e+008.You might consider using data precision when data ranges from very large to verysmall values. The output files typically are smaller and data values are moreaccurate.
The default value for this option is 16.
Chapter 3Loading Data
3-44

6. In Data Number of Decimal, specify the maximum number of decimal positions tobe exported.
Specify a value between 0 and 16. If no value is provided, the number of decimalpositions of the data to be exported is used, up to 16 positions, or a valuedetermined by Data Precision option if that value is specified.
This parameter is used with an emphasis on legibility; output data is in straight textformat. Regardless of the number of decimal positions in the data, the specifiednumber is output. Note that it is possible the data can lose accuracy, particularly ifthe data ranges are from very large values to very small values, above and belowthe decimal point.
By default, 16 positions for numeric data are supported, including decimalpositions. If both the Data Precision option and the Data Number of Decimal optionare specified, the Data Precision option is ignored.
7. Click Save.
Defining Source Parameters for Financial ManagementWhen Oracle Hyperion Financial Management is the source system, you can specifyadditional source parameters such as the journal status, journal type, balance type,and the type of data to extract.
To define source parameter options:
1. On the Workflow tab, under Data Load, select Data Load Rule.
2. In Data Load Rule, select a data load rule.
3. Go to the Source Parameters region.
4. Click Add.
5. Select the parameter(s) row to add, and then select the parameter value from thedrop-down:Options:
• Add Journal Status: Specify the journal status to extract.The journal status indicates the current state of the journal. The status of ajournal changes when you create, submit, approve, reject, or post the journal.
Options:
– Working—Journal is created. It has been saved, but it can be incomplete.For example, it might need to have a label or single entity assigned.
– Submitted—Journal is submitted for approval.
– Approved—Journal is approved for posting.
– Rejected—Journal is rejected or unposted.
– Posted—Journal adjustments are posted to the database.
• Add Journal Type: Specify the type of journal:
– Auto-Reversal—Loads a posted auto-reversing journal.
– Auto-Reversing—Loads an auto-reversing journal that containsadjustments that need to be reversed in the next period. That is, thejournal posts in the next period by reversing the debit and credit.
Chapter 3Loading Data
3-45
– Regular—Load journals using the Replace mode, which clears all data fora particular journal label before loading the new journal data.
• Add Balance Type: Specify the type of balance to extract:
– Balanced—All debits and credits are balanced.
– Unbalanced—Debits and Credits are not balanced.
– Balanced by entity—Debits and Credits for particular entity are balanced.
• From Extract Type, select one of the following:
– Data—Extract base-level input data and some calculated data from anapplication. When you extract data, you must specify a member for theScenario and Year dimensions. You can specify one or more members forthe Period, Entity, and Account dimensions.
– Journal—You can extract base-level input data and some calculated datafrom an application. When you extract data, you must specify a memberfor the Scenario and Year dimensions. You can specify one or moremembers for the Period, Entity, and Account dimensions.
• In Extract Dynamic Account, specify to extract dynamic accounts.Dynamic accounts are accounts with values that are dynamically calculatedwhen the data is requested. The values for dynamic accounts are not stored.The most common type of dynamic calculation is ratio calculation.
Extract Dynamic Account options:
– Yes—Dynamic accounts are extracted.
– No—Dynamic accounts are not extracted.
By default, dynamic accounts are not extracted.
• In Extract Calculated Data, specify whether to extract calculated data.Options:
– Consolidated data for parent entities
– Base accounts and custom dimension members that are calculated byrules
– Parent accounts intersecting with their respective CustomTop memberand [ICPTop] member. If the CustomTop metadata attribute is blank orALL, then the [None] member is used.
Extract calculated data options:
– Yes—Calculated data is extracted.
– No—Calculated data is not extracted.
By default, calculated data is not extracted.
• In Extract Derived Data, specify whether to extract derived data.Derived data a data derived from other data values, such as calculated data orarithmetic formulas.
– Yes—Derived data is extracted.
– No—Derived data is not extracted.
6. Click Save.
Chapter 3Loading Data
3-46
Managing Data Load RulesYou can perform the following tasks:
• Edit data load rules—See Editing Data Load Rules.
• Run data load rules—See Running Data Load Rules.
• Delete data load rules—See Deleting Data Load Rules.
• View data load rules before executing them—See Using the Data LoadWorkbench.
• Schedule data load rules—Scheduling Data Load Rules
• Check the data rule process details—See Viewing Process Details.
Editing Data Load RulesIf the data load rule is not in the process of running, you can modify rule details.
To edit data rules:
1. On the Workflow tab, under Data Load, select Data Load Rule.
2. Select the data load rule.
3. Modify any of the data load rule details, as necessary.
4. Click Save.
Running Data Load RulesYou run the data load rule to load updates and push the data into the targetapplication. All submitted rules are processed by Oracle Data Integrator. When yousubmit a data load rule, specify the data extract options.
Data Load Rules can be executed by selecting one of the methods below:
• Execute command on the Data Load Rule screen.
• Import Source option in the Data Load Workbench option.
• Executing a batch. See Executing Batches.
• Running a batch script. See Working with Batch Scripts.
When a data load rule is run, Oracle Hyperion Financial Data Quality Management,Enterprise Edition loads the data, and creates a drill region (optional), which enablesusers to drill through to the source data.
Note:
In Oracle Financial Consolidation and Close Cloud for YTD data loads, data isstored in Periodic view. In this case, the user must select this option so that a“pre-processing” is done to convert the YTD data from the file to periodic datafor loading purpose.
When you run a data load rule, you have several options:
Chapter 3Loading Data
3-47
Note:
When a data load rule is run for multiple periods, export step occurs only oncefor all of the period.
• Import from Source—FDMEE imports the data from the source system, performsthe necessary transformations, and exports the data to the FDMEE staging table.
Select this option only when:
– You are running a data load rule for the first time.
– Your data in the source system changed. For example, if you reviewed thedata in the staging table after the export, and it was necessary to modify datain the source system.
In many cases, source system data may not change after you import the data fromthe source the first time. In this case, it is not necessary to keep importing the dataif it has not changed.
When the source system data has changed, you need to recalculate the data.
Note:
Oracle E-Business Suite and source imports require a full refresh of dataload rules. The refresh only needs to be done once per chart of accounts.
• Export to Target—Exports the data to the target application.
Select this option after you have reviewed the data in the staging table and youwant to export it to the target application.
Note:
Select both options only when the data has changed in the source system andto export the data directly to the target application.
To submit the data load rule for an Oracle Hyperion Planning General Ledger orEnterprise Resource Planning (ERP):
1. On the Workflow tab, under Data Load, select Data Load Rule.
2. In Data Load, select the data load rule.
3. Click Execute.
When the data rule is run for Oracle Hyperion Financial Management targetapplications, the Exchange Rates from the source are populated only up to theFDMEE interface table AIF_HS_EXCHANGE_RATES. The Core Exchange Ratestable in Financial Management is not updated.
4. From Execute Rule, to extract data, metadata or both from the source system andpush it into target applications, select Import from Source, and then select theStart Period and End Period.
Chapter 3Loading Data
3-48
Tip:
You can use a utility outside of FDMEE to view the data in the stagingtable. After you review the exported data, return to FDMEE, makemodifications, and run the rule again. If you are sure that the information inthe staging table is correct, run the rule again and select “Export to Target.”
5. Select Recalculate to remap all imported source data using the current mappingtable and to recreate all logic accounts.
6. Select Export to Target to export data to the target application.
7. Select Execute Check to generate the date, and then run the Check Report.
8. In Start Period, select the beginning period of the POV from which to import thedata from the source system.
9. In End Period, select the ending period of the POV to which to import the datafrom the source system.
10. In Import Mode, select the mode to extract data all at once for an entire period orincrementally during the period.
Note:
The snapshot import mode is the only way data can be extracted from aSAP and JD Edwards source system.
Data extract types:
• Snapshot—Extracts everything for the selected source set for an entire period
– When source data for the selected period has never been run, FDMEEextracts the data from the source.
– When the source data for the selected period has been run, FDMEEextracts the data from the FDMEE staging tables and not from the source.
When you have locations that extract from the same Enterprise ResourcePlanning (ERP) source, FDMEE extracts the data once. When you loaddata to Financial Management from the E-Business Suite for a selectedperiod, and then run the integration to ARM for the same source andperiod, FDMEE does not pull again from E-Business Suite, but uses thedata in the interface tables. This results in a significant performance gainfor any subsequent data loads. The first extraction takes take the longest,but any other subsequent extractions are faster.
• Incremental—Extracts the records that were added after the previous dataextract
• Full Refresh—Performs a clean extraction from the source system, therebyclearing any existing data rows in the appropriate FDMEE staging tables for agiven source Ledger (or Business Unit) and source period.
Chapter 3Loading Data
3-49

Note:
The import mode options (Snapshot, Incremental, and Full Refresh)apply only to data rules in a location using a standard import format.
Note:
E-Business Suite and Fusion source imports require a full refresh ofdata load rules before export after upgrading from an 11.1.2.2 release.
Note:
If you run a data load in Full Refresh mode in the AccountReconciliation Manager (ARM), select all locations that have data.Otherwise, FDMEE contains data for locations not selected in ARM(but ARM does not). This results in a discrepancy between what is inFDMEE and what is in ARM.
Note:
E-Business Suite and Fusion source imports require a full refresh of dataload rules before export after upgrading from an 11.1.2.2 release.
11. In Export Mode, select the mode for exporting data:
• Store Data—Inserts the data from the source or file into the target application,replacing any current value.
• Replace Data—Replaces the data in the application with the data in the loadfile. The Replace Data option clears account values only for data between thestart-period and end-period parameters specified when running the data rule.When account values are cleared, the data from the data load file is thenpushed into the application.
Note:
You can clear an Essbase ASO cube before you load the data byselecting the replace option
• Add Data—Adds the value from the source or file to the value that exists in thetarget application. For example, if you have 100 in the source, and 200 in thetarget, then the result is 300.
• Subtract Data—Subtracts the value in the source or file from the value thatexists in the target application. For example, if you have 300 in the target, and100 in the source, then the result is 200.
Chapter 3Loading Data
3-50

• Override All Data—Clears all data in the target, and then loads from thesource or file. For example, if you have a year of data in your Planningapplication, but are loading only a single month, this option clears the entireyear before performing the load.
When you select to override all data, the following message is displayed"Warning: Override All Data option will clear data for the entire application.This is not limited to the current Point of View. Do really want to perform thisaction."
Available export modes for Financial Management:
• Merge—Overwrites the data in the application with the data in the load file. Foreach unique point of view that exists in the data file and in the application, thevalue in the data file overwrites the data in the application.
Note:
If the data load file includes multiple values in the file for the same pointof view, the system loads the value for the last entry.
Note:
Data in the application that is not changed by the data load file remainsin the application.
• Accumulate—accumulate the data in the application with the data in the loadfile. For each unique point of view in the data file, the value from the load file isadded to the value in the application.
• Replace—Replaces the data in the application with the data in the load file.For each unique combination of Scenario, Year, Period, Entity, and Value inthe data file, the Replace option clears all account values from the application,then loads the value from the data file.
Note:
You can clear an Essbase ASO cube before you load the data byselecting the replace option
• Replace by Security—Performs a data load in Replace mode in which only themembers to which you have access are loaded. This option enables you toperform a data load in Replace mode even if you do not have access to allaccounts. When you perform the Clear operation for a period in a sub-cube,only the cells to which you have access are cleared. Data, cell text, and lineitem detail are cleared, but cell attachments are not cleared.
12. Select Include Exchange Rates to load exchange rates.
13. Click Run.
Chapter 3Loading Data
3-51
After you click Run, the rule is locked from any updates to ensure that the drillthrough path is intact. To check the status of the rule, see Checking the Data LoadRule Status.
Scheduling Data Load RulesThe scheduling jobs feature provides a method to orchestrate the execution times ofdata load rules.
To schedule data load rules to run:
1. On the Workflow tab, under Data Load, select Data Load Rule.
2. In Data Load, select the data load rule.
3. Click Schedule.
For information on scheduling jobs, see Scheduling Jobs.
To cancel a scheduled job:
1. On the Workflow tab, under Data Load, select Data Load Rule.
2. In Data Load, select the data load rule.
3. Click Cancel Schedule.
When you cancel a job from the Oracle Hyperion Financial Data QualityManagement, Enterprise Edition user interface, all instances of a schedule for theobject selected are cancelled. To cancel a specific instance of a schedule, cancelthe job from the ODI studio or ODI console.
Checking the Data Load Rule StatusAfter you run a data rule, you can check the status on the Process Details page. See Viewing Process Details.
Deleting Data Load RulesYou can delete data load rules created in Oracle Hyperion Financial Data QualityManagement, Enterprise Edition. You cannot delete data load rules when they arerunning.
When you delete a rule, all data loaded using the data rule are also deleted.
Note:
After you delete data load rules, you can delete a source system. After youexecute a deletion, users cannot drill through to an Enterprise ResourcePlanning (ERP) source.
To delete a data load rule:
1. On the Workflow tab, under Data Load, select Data Load Rule.
2. Enter the Location Name or click to select the location.
Chapter 3Loading Data
3-52

3. Select the data load rule.
4. Click Delete.
Working with Target OptionsWhen working with data load rules, you can specify target application options specificto a location. For example, using the Target Options feature, you can specify differentdata protection values for each location.
Note:
For information on the required target options for data load rules to write back,see Defining Application Options for Essbase and Planning.
To specify integration information:
1. On the Workflow tab, under Data Load, select Data Load Rule.
2. From the POV bar, select a location.
3. Select the Target Options tab.
4. Add or modify any options.
See Registering Target Applications.
5. Click Save.
Creating Custom OptionsYou can specify free form text or a value about a location or data load using theintegration option feature. Text or values entered can be used with your OracleHyperion Financial Data Quality Management, Enterprise Edition scripts.
Additionally, if you use Oracle Data Relationship Management to export dimensionsand hierarchies from ERP systems to Data Relationship Management, or import dataload mapping from Data Relationship Management to FDMEE, you can specify DataRelationship Management import and export profiles.
Data Relationship Management integration is enabled on the Target Applicationscreen. See Registering Target Applications for more information.
To specify integration information:
1. On the Workflow tab, under Data Load, select Data Load Rule.
2. Select the Custom Options tab.
3. In Integration Option 1-4, specify the free form text or value, and click OK.
The information that you specify is accessible from the Integration Option fields ofthe Location table.
Loading Exchange Rates to Financial ManagementWhen you define a data rule for an Oracle Hyperion Financial Management targetapplication, you can specify how to extract exchange rates from the Enterprise
Chapter 3Loading Data
3-53

Resource Planning (ERP) source system. Exchange rates are captured, if applicable,for the currency rate account for the Beginning Rate, currency rate account for theEnding Rate, and the currency rate account for the Average Rate.
If your target application has the multi-currency option enabled, you can specify how toprocess exchange rates. All rates are extracted and inserted into theAIF_HS_EXCHANGE_RATES table. This table is populated using the ISO currencycode for each currency from the source system. The ISO numeric code is not used inthis processing. Exchange rates are pushed into Financial Management based on amatch between the ISO currency code in the AIF_HS_EXCHANGE_RATES table andthe currencies defined in the multi-currency Financial Management application. (It isimportant to set up the currencies in the Financial Management application with theISO currency).
To load exchange rates to Financial Management:
1. On the Setup tab, under Register, select Target Application.
2. In the Target Application summary grid, select a Financial Management targetapplication.
3. After defining the application details in Application Detail, select the ApplicationOptions tab.
4. Specify the account names in the following fields:
• Currency Rate Account for Beginning Rate
• Currency Rate Account for Beginning Rate
• Currency Rate Account for Beginning Rate
For information about working with other application options, see RegisteringTarget Applications.
5. On the Workflow tab, under Data Load, select Data Load Rule.
6. In Data Load Rule, select a data load rule or click Add.
7. Select the Source Options tab.
8. Select the Beginning, Ending, and Average exchange rate options.
Enterprise Resource Planning (ERP) source systems maintain comprehensiveexchange rate information for transaction processing. Target applications can use
Chapter 3Loading Data
3-54

this information by extracting the exchange rates. You can select a beginning,ending, and average rate type from the source system. (The types in the sourcesystem may not explicitly define those rates types but are mapped to the ratestypes in the Oracle Hyperion Financial Data Quality Management, EnterpriseEdition interface table.)
For more information about source options, see Defining Source Filter Options forE-Business Suite Source Systems.
Using Drilling ThroughOracle Hyperion Financial Data Quality Management, Enterprise Edition provides aframework that enables you to drill through from your Oracle Enterprise PerformanceManagement System application to the onpremise application. Use drill through whenyou want to understand the source of a data value, or you need a granular level ofdetail for a value without leaving the workspace.
When you load data to an EPM System target application using FDMEE, you canspecify an optional drill region flag. When set to" Yes," a drill region definition ispassed to the target application, in addition to the actual data, to indicate that a cell is"drillable."
When drilling through from the EPM System application, a landing page is displayed ina separate workspace tab that shows all rows that comprise the amount from theselected cell in the Oracle Enterprise Performance Management Cloud application.From this landing page, you can open the source document or continue to drill-throughto the defined source system landing page.
Drill through based on a URL requires that you are connected to the server on whichthe data resides. Drill through works only for data loaded through FDMEE. In additionbecause drill through is available in the target application, data load mappings musthave at least one explicit mapping for the drill through to work.
Creating the Drill RegionA drill region is a named region of data intersections in an Oracle EnterprisePerformance Management System application that can be viewed with the drill-through functionality. The data in the drill region is loaded to the EPM Systemapplication with Oracle Hyperion Financial Data Quality Management, EnterpriseEdition. In the workspace, you can view the drill region in the data forms of theapplication.
The drill region stores the uniform resource locator (URL) to get back to FDMEE, anda region name. When you enable drill regions, FDMEE populates them in the FDMEEtarget application after data is loaded and consolidated. A cell is considered drillable inthe target application when it is contained in the drill regions. For EPM Systemapplications, the drill region includes the Entity, Account, Scenario, Year, and Perioddimensions.
FDMEE creates drill region by scenarios. For any cube (Oracle Hyperion Planningplan types or Planning databases), the name of the drill region is FDMEE_<name ofthe scenario member>. When creating the drill region, FDMEE checks if a dimensionis enabled for the drill.
Drill regions to the source system work only when there is an identical intersection ofthe data loaded by FDMEE. For example, if you loaded $5000 to Entity2;Account2
Chapter 3Loading Data
3-55

intersection, you cannot drill-through from Entity2;ParentAccount2 since no data wasloaded for that particular intersection.
Members of enabled dimensions selected in data loads, are included in the drill regionfilter. If no dimensions are enabled, the following dimensions are enabled by default:Scenario, Version, Year, and Period. You can enable additional dimensions, and thesubsequent data load considers members of newly enabled dimensions. If you disableany dimensions which were previously included in a drill region used for drill creation,members of such dimensions are not deleted during the subsequent data loads. Ifneeded, you can remove obsolete members manually.
To add a drill region for the FDMEE target application:
1. On the Setup tab, under Register, select Target Application.
2. In the Target Application summary grid, select the EPM System targetapplication.
3. Select the Application Options tab.
4. In Drill Region, enter Yes.
Note:
Administrators can set the drill region setting at the application level in theTarget Application option. Additionally they can change the setting for aspecific target application in data load rules.
5. Click Save.
Drill Through ComponentsThe Oracle Hyperion Financial Data Quality Management, Enterprise Edition landingpage is called by a drill through URL. Two components define the drill-through URL:
• Server component—defined for each source system
• Detail Component – defined manually for file-based integrations
Adding the Server Component for the Drill Through URLUse these steps to define the server component drill through URL in Oracle HyperionFinancial Data Quality Management, Enterprise Edition. The server component isadded to the source system definition.
Chapter 3Loading Data
3-56
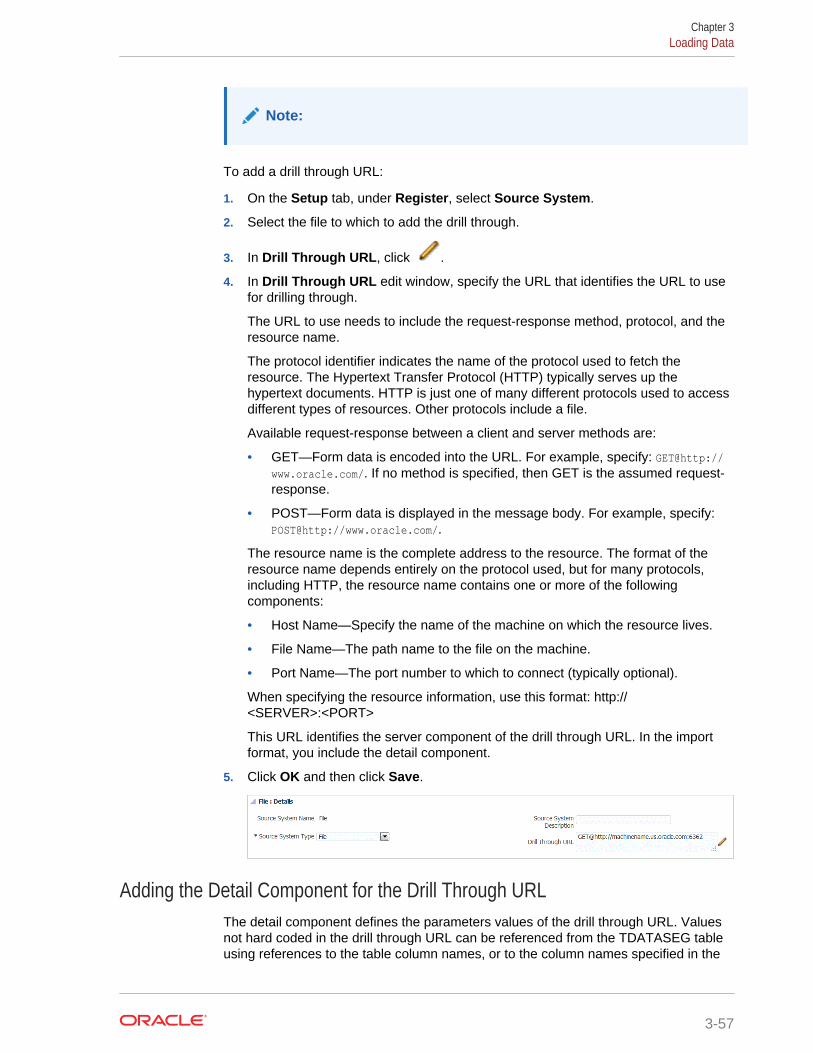
Note:
To add a drill through URL:
1. On the Setup tab, under Register, select Source System.
2. Select the file to which to add the drill through.
3. In Drill Through URL, click .
4. In Drill Through URL edit window, specify the URL that identifies the URL to usefor drilling through.
The URL to use needs to include the request-response method, protocol, and theresource name.
The protocol identifier indicates the name of the protocol used to fetch theresource. The Hypertext Transfer Protocol (HTTP) typically serves up thehypertext documents. HTTP is just one of many different protocols used to accessdifferent types of resources. Other protocols include a file.
Available request-response between a client and server methods are:
• GET—Form data is encoded into the URL. For example, specify: GET@http://www.oracle.com/. If no method is specified, then GET is the assumed request-response.
• POST—Form data is displayed in the message body. For example, specify:POST@http://www.oracle.com/.
The resource name is the complete address to the resource. The format of theresource name depends entirely on the protocol used, but for many protocols,including HTTP, the resource name contains one or more of the followingcomponents:
• Host Name—Specify the name of the machine on which the resource lives.
• File Name—The path name to the file on the machine.
• Port Name—The port number to which to connect (typically optional).
When specifying the resource information, use this format: http://<SERVER>:<PORT>
This URL identifies the server component of the drill through URL. In the importformat, you include the detail component.
5. Click OK and then click Save.
Adding the Detail Component for the Drill Through URLThe detail component defines the parameters values of the drill through URL. Valuesnot hard coded in the drill through URL can be referenced from the TDATASEG tableusing references to the table column names, or to the column names specified in the
Chapter 3Loading Data
3-57
import format. Drill through attributes that are different for each row of data, like theCCID (code combination ID for Oracle E-Business Suite applications) must beincluded in the input file and mapped to an attribute column in the import format. Whenformatting the drill URL, these parameters can be referenced from the TDATASEGtable using the $<TDATASEG_COLUMN>$ notation, or from the import format usingthe $$<IMPORT_FORMAT_COL>$$ notation.
To add the detail component of the drill through URL:
1. On the Setup tab, under Integration Setup, select Import Format.
2. From the Import Format Summary section, select the import format.
3. In the Import Format Detail section, in the Drill URL, click .
4. Click Add, and specify the import format name, source, target, file type, and filedelimiter.
5. In the Drill URL edit window, specify the parameters of the drill through URL.
Parameters may include any specific source system required information, and theattributes used to populate the actual drill region.
The attribute refers to the source columns (dimensions) in the TDATASEG table.You can provide the location of the attribute in the input file by specifying thestarting location and length.
In the following example, the drill through URL enables a user to drill through to anE-Business Suite source system.
In addition to the attributes selected for the drill through, the function ID, callingpage, and Resp_Appl_ID and Resp_id information are specified.
The function ID is E-Business Suite system specific, and is generated at the timethe E-Business Suite system is installed and configured. The calling pageparameter indicates the origin of the HTTP call. This is hard coded in the URL asFDM_DRILLDOWN. The Resp_Appl_ID and Resp_id parameters are theapplication ID and responsibility ID from E-Business Suite. These can be set to -1if unknown. The E-Business Suite source system prompts the user for the username, password and responsibility if not provided on initial authentication.Attributes may include:
• SOB_ID—Internal Set of Books ID
• LED_ID—Internal Ledger ID
• fdm_per—the E-Business Suite period name. This value must be the same asthe period name in the E-Business Suite system.
• fdm_ccid—the Code Combination ID (CCID) for the requested account.
• fdm_currency—the E-Business Suite ledger currency
• fdm_balance_type —"A" for Actual, "B" for Budget
Chapter 3Loading Data
3-58

6. In the Mappings grid of the import format, map the columns in the source columnto the dimensions in the target application to which to drill through.
7. Click OK and then click Save.
Viewing the Drill Through ResultsWhen you set up a drill through for data was loaded by Oracle Hyperion Financial DataQuality Management, Enterprise Edition, you can select the data form in the OracleEnterprise Performance Management System application and then display the generalledger accounts and the hyperlinked balances that were used to populate the cells inthe onpremise application.
When you set up a drill through for data was loaded by FDMEE, you can select thedata form in the Oracle Enterprise Performance Management Cloud application andthen display the general ledger accounts and the hyperlinked balances that were usedto populate the cells in the onpremise application.
From a linked data value, you can drill through to the source system from the landingpage and then view the associated journal entries and sub-ledger entries for theselected account.
To view the drill through results in the onpremise application
1. In the EPM Cloud application, open the data form of the loaded source data.
2. From a cell that contains drill-down data, click Actions, and then select DrillThrough.
A drill through icon in the right top corner of a cell indicates that it has drill-throughdata:
Chapter 3Loading Data
3-59

3. Click Drill Through to Source.
4. From the landing page, click the drill through icon.
5. Click Drill Through to Source.
6. Log into the onpremise application by providing any required credentials.
In the following example, an Oracle E-Business Suite logon screen is shown.
Chapter 3Loading Data
3-60

7. Drill down to the level of detail that you want to view.
In the following example, you can drill through to the ledger details that support thebalance:
In the next example, you can drill through to the sub-ledger that supports thebalance:
Chapter 3Loading Data
3-61

In the next example, you can view additional information associated with thebalance:
Integrating with the EPM CloudOracle Hyperion Financial Data Quality Management, Enterprise Edition can be usedas a primary gateway to integrate on-premise and cloud based applications. Thisfeature allows EPM customers to adapt cloud deployments into their existing EPMportfolio. You might use the integration to import data from existing on-premise ERPapplications, or synchronize data from on-premise EPM applications. For example,Oracle Hyperion Financial Management customers can add Oracle Hyperion Planningdata or a Planning customer can add more Planning applications. In addition, thisintegration includes writing back from a cloud to an on-premise application or otherexternal reporting applications.
This type of integration supports sources such as:
Chapter 3Loading Data
3-62
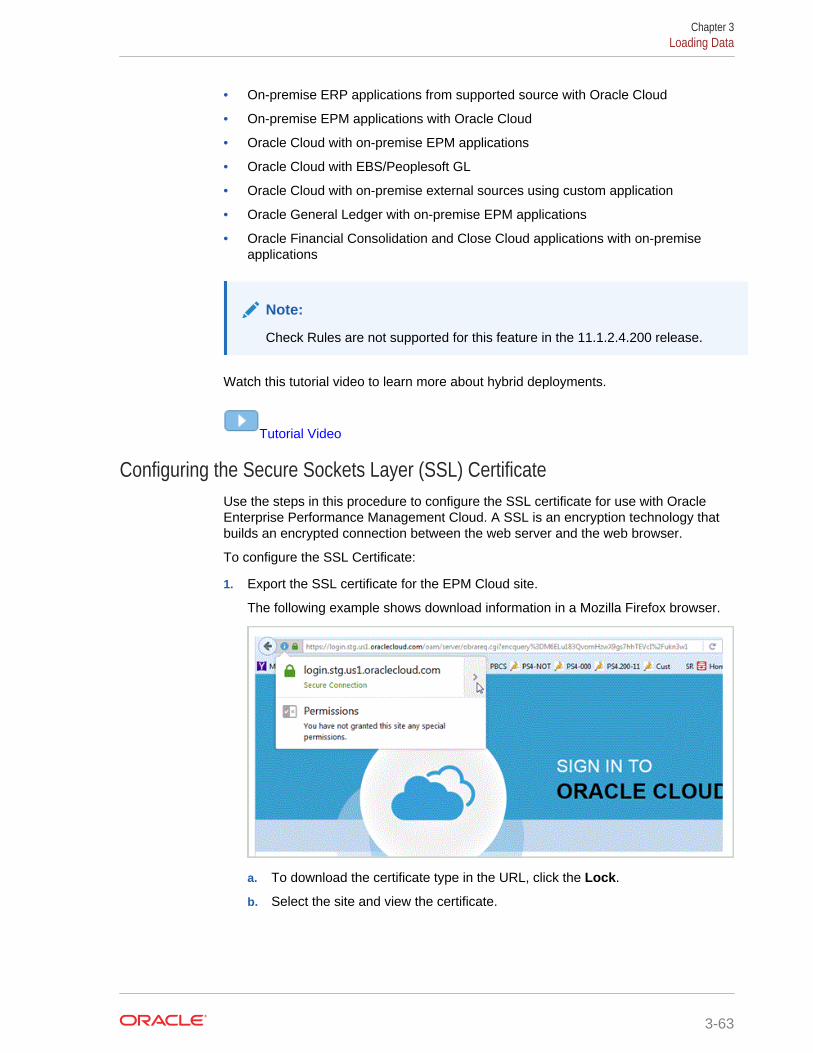
• On-premise ERP applications from supported source with Oracle Cloud
• On-premise EPM applications with Oracle Cloud
• Oracle Cloud with on-premise EPM applications
• Oracle Cloud with EBS/Peoplesoft GL
• Oracle Cloud with on-premise external sources using custom application
• Oracle General Ledger with on-premise EPM applications
• Oracle Financial Consolidation and Close Cloud applications with on-premiseapplications
Note:
Check Rules are not supported for this feature in the 11.1.2.4.200 release.
Watch this tutorial video to learn more about hybrid deployments.
Tutorial Video
Configuring the Secure Sockets Layer (SSL) CertificateUse the steps in this procedure to configure the SSL certificate for use with OracleEnterprise Performance Management Cloud. A SSL is an encryption technology thatbuilds an encrypted connection between the web server and the web browser.
To configure the SSL Certificate:
1. Export the SSL certificate for the EPM Cloud site.
The following example shows download information in a Mozilla Firefox browser.
a. To download the certificate type in the URL, click the Lock.
b. Select the site and view the certificate.
Chapter 3Loading Data
3-63
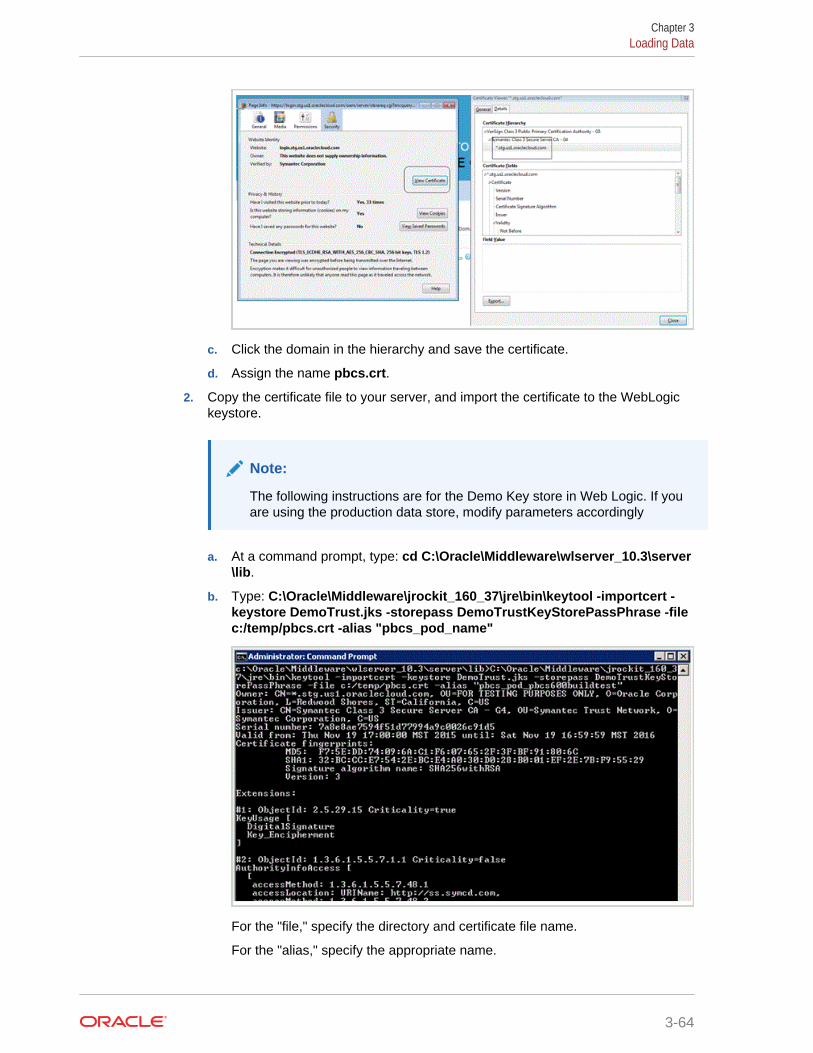
c. Click the domain in the hierarchy and save the certificate.
d. Assign the name pbcs.crt.
2. Copy the certificate file to your server, and import the certificate to the WebLogickeystore.
Note:
The following instructions are for the Demo Key store in Web Logic. If youare using the production data store, modify parameters accordingly
a. At a command prompt, type: cd C:\Oracle\Middleware\wlserver_10.3\server\lib.
b. Type: C:\Oracle\Middleware\jrockit_160_37\jre\bin\keytool -importcert -keystore DemoTrust.jks -storepass DemoTrustKeyStorePassPhrase -filec:/temp/pbcs.crt -alias "pbcs_pod_name"
For the "file," specify the directory and certificate file name.
For the "alias," specify the appropriate name.
Chapter 3Loading Data
3-64
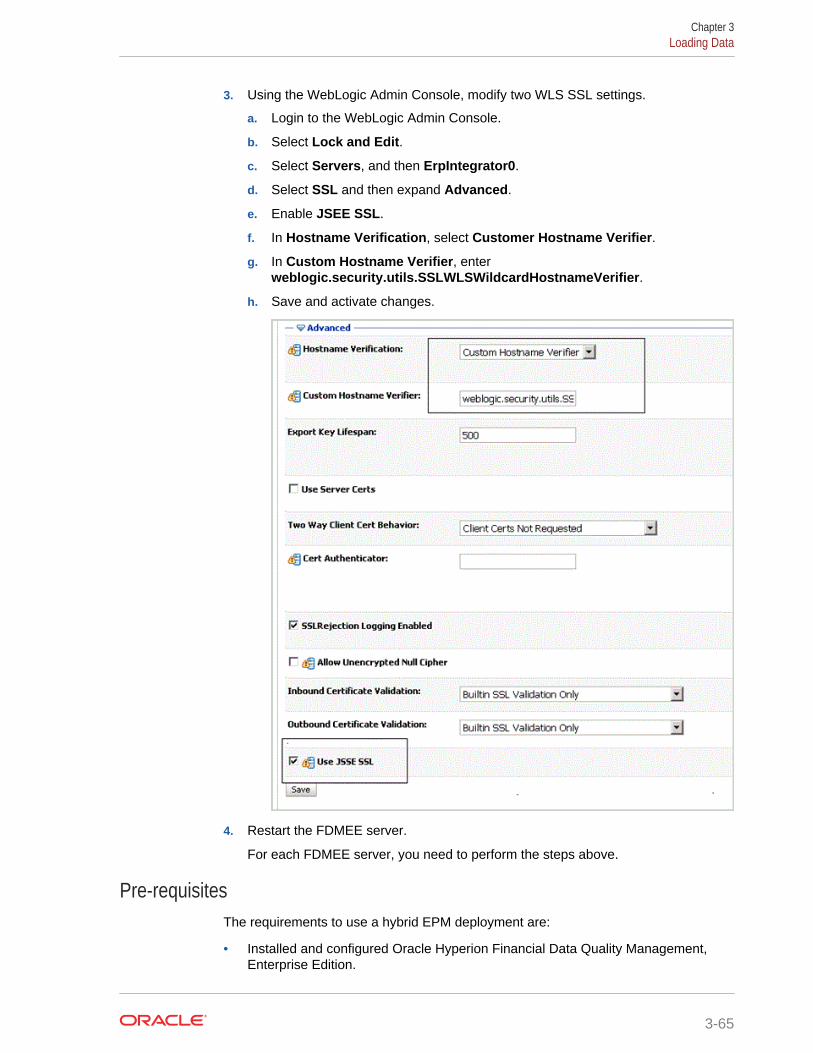
3. Using the WebLogic Admin Console, modify two WLS SSL settings.
a. Login to the WebLogic Admin Console.
b. Select Lock and Edit.
c. Select Servers, and then ErpIntegrator0.
d. Select SSL and then expand Advanced.
e. Enable JSEE SSL.
f. In Hostname Verification, select Customer Hostname Verifier.
g. In Custom Hostname Verifier, enterweblogic.security.utils.SSLWLSWildcardHostnameVerifier.
h. Save and activate changes.
4. Restart the FDMEE server.
For each FDMEE server, you need to perform the steps above.
Pre-requisitesThe requirements to use a hybrid EPM deployment are:
• Installed and configured Oracle Hyperion Financial Data Quality Management,Enterprise Edition.
Chapter 3Loading Data
3-65
• Subscription to the Oracle Cloud
• Details of URL and user name
Setting up the EPM Cloud DeploymentThe Oracle Enterprise Performance Management Cloud application is registered withthe target application type of the EPM Cloud application, and the deployment mode ofCloud. When prompted, specify the connection information. All other setup definitions,such as import format, location, and data rule are defined in the exact same way asany other EPM application.
Loading Data to the EPM Cloud or On-Premise ApplicationThe basic data flow for loading data to the Oracle Enterprise PerformanceManagement Cloud is:
1. Register the EPM Cloud application as a target application in Oracle HyperionFinancial Data Quality Management, Enterprise Edition.
For information on registering an EPM Cloud or on-premise application, see Registering Target Applications.
To do this, on the Setup tab, under Register, select Target Application.
2. Define the import format to map the source to the EPM Cloud or on-premiseapplication.
3. Define the location, data load mapping, and the data load rule in the exact samemanner using the normal procedures.
Exporting the EPM Cloud ApplicationThe export data process from Oracle Planning and Budgeting Cloud to OracleHyperion Financial Data Quality Management, Enterprise Edition is:
1. Define the import format to map Oracle Enterprise Performance ManagementCloud to the FDMEE ERP application for write-back or the FDMEE EPMapplication (custom or other EPM ) for data synchronization.
2. Add a location for the Import Format created above.
3. When you run the data load the on-premise FDMEE generates a DATAEXPORTcalc script for EPM Cloud. This calc script is executed in the EPM Cloud and theoutput file is downloaded to FDMEE.
4. Add maps for the applicable target dimensions.
5. When the file is downloaded, it flows through the write-back/data synchronizationworkflow process.
Using the Data Load WorkbenchThe Data Load Workbench feature provides a framework to import, view and verify,and export data from source systems in the Oracle Hyperion Financial Data QualityManagement, Enterprise Edition.
Key features of the Workbench include:
• Interactive Load Process with options for Import, Validate, Export, and Check.
Chapter 3Loading Data
3-66

• Provision to view Source (All)/Source (Mapped)/Target/Source and Target values
• PTD/YTD Value display for ready reference
• Display options for Valid, Invalid, Ignored, and All Data
• Online and Offline Load process
• Query option for Historical Loads
• Historical Loads Export to Excel
• Drill back to source from the Workbench
• Load, check and post journals for Oracle Hyperion Financial Managementapplications
Note:
When you log in with the Run Integration role, these links are visible in theTasks pane: Data Load Workbench, Data Load, Member Mapping, HR DataLoad, Metadata, and Process Detail.
The Data Load Workbench consists of four sections:
• Workflow Grid
• POV Bar—See Using the POV Bar.
• Status
• Data Grid
Workflow GridWhen you select a Workflow step, the following occurs:
Oracle Hyperion Financial Data Quality Management, Enterprise Edition uses fishicons to indicate the status of each step. When a Workflow step is completedsuccessfully, the fish is orange. If the step is unsuccessful, the fish is gray.
Note:
You can customize the icons that show a "successful process" and a "failedprocess" by replacing the ProcessSucceeded and ProcessFailed icons in the%EPM_ORACLE_HOME%\epmstatic\aif\images\general folder.
Processing Data
Step 1: Importing Source DataThe Import from Source feature enables the Oracle Data Integrator to import the datafrom the source system, performs the necessary transformation, such as import, map
Chapter 3Loading Data
3-67

and validate the data. The Import from Source features also enables you to import thesource online (immediate processing) or offline (runs in background).
Select this feature only when:
• Running a data load rule for the first time.
• Data in the source system has changed. For example, if you reviewed the data inthe staging table after the export, and it was necessary to modify data in thesource system.
In many cases, source system data may not change after you import the data from thesource the first time. You don't need to keep importing unchanged data.
To import source data:
1. On the Workflow tab, under Data Load, select Data Load Workbench.
2. Optional: When you import a source file, Oracle Hyperion Financial Data QualityManagement, Enterprise Edition uses the current POV to determine location,category, and period.
To import another source file, you must change the POV. For information onchanging the POV, see Using the POV Bar.
3. At the top of the screen, click Import.
4. In Execution Mode, select the mode of importing the source.
• online—ODI processes the data in sync mode (immediate processing).
• offline—ODI processes the data in async mode (runs in background).
Click to navigate to the Process Detail page to monitor the ODI jobprogress.
5. Click OK.
The Import fish changes to orange.
Step 2: Validating Source DataOracle Hyperion Financial Data Quality Management, Enterprise Edition Validation ofthe source data confirms that all members are mapped to a valid target systemaccount. If there are any unmapped dimension maps within the source file, a validationerror occurs. Validation compares the dimension mapping to the source file andidentifies unmapped dimensions. The process flow cannot continue until alldimensions are properly mapped.
To run the validation process:
1. On the Workflow tab, under Data Load, select Data Load Workbench.
2. Select Validate.
Validation with No Mapping Errors
When validation is successful, the orange Validate fish is displayed in the header ofthe Oracle Hyperion Financial Data Quality Management, Enterprise Edition screen.
Chapter 3Loading Data
3-68
Validation with Mapping Errors
Because newly added dimension members may be unmapped, the addition ofdimension members to source systems can produce validation errors. If a dimensionmember is unmapped, the Validate fish is grey and a Validation Error screen islaunched in the Workbench, which shows the number of dimension members that arenot mapped (consequently, undefined). You must correct any unmapped dimensionmembers before running the validation again.
To correct conversion-table errors:
1. In the top region of the Validation screen, highlight a row that requires correction.
2. Correct any unmapped accounts.
In the top region of the Validation Error screen, the unmapped item is inserted intothe Source value, and the bottom region shows all rows with that source value. Forexample if the top region displays a value of Entity dimension with Source Value01, then the bottom region should show all rows where ENTITY = ‘01.’
See Defining the Import Format Mappings.
3. Click Validate to refresh the validation form.
Source data that passes the validation process can be loaded to the targetsystem.
Fixing the Mapping Errors
In the Data Load Workbench, you can view mapping errors and fix them instantlywhen mapping errors have occurred.
To fix mapping errors:
1. From Data Load Workbench, select the Validation Errors tab.
2. Select Fix Maps to access the mappings.
3. From the Data Load Mappings screen, fix any errors.
Chapter 3Loading Data
3-69
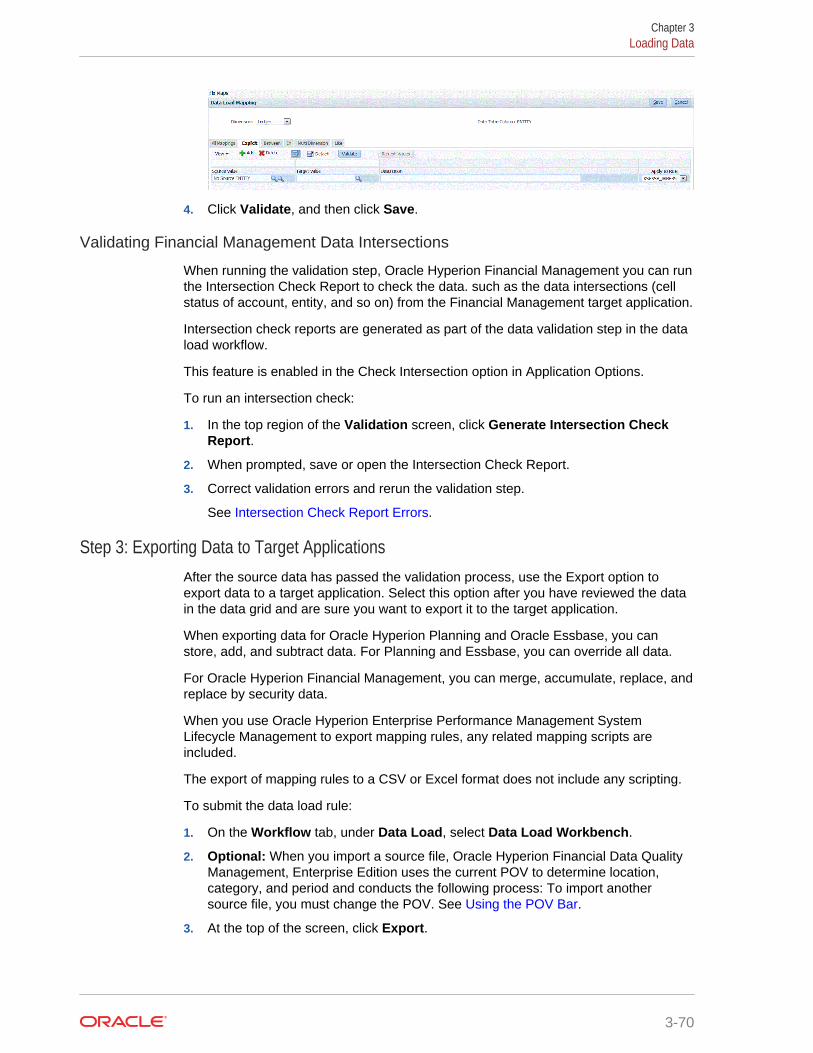
4. Click Validate, and then click Save.
Validating Financial Management Data Intersections
When running the validation step, Oracle Hyperion Financial Management you can runthe Intersection Check Report to check the data. such as the data intersections (cellstatus of account, entity, and so on) from the Financial Management target application.
Intersection check reports are generated as part of the data validation step in the dataload workflow.
This feature is enabled in the Check Intersection option in Application Options.
To run an intersection check:
1. In the top region of the Validation screen, click Generate Intersection CheckReport.
2. When prompted, save or open the Intersection Check Report.
3. Correct validation errors and rerun the validation step.
See Intersection Check Report Errors.
Step 3: Exporting Data to Target ApplicationsAfter the source data has passed the validation process, use the Export option toexport data to a target application. Select this option after you have reviewed the datain the data grid and are sure you want to export it to the target application.
When exporting data for Oracle Hyperion Planning and Oracle Essbase, you canstore, add, and subtract data. For Planning and Essbase, you can override all data.
For Oracle Hyperion Financial Management, you can merge, accumulate, replace, andreplace by security data.
When you use Oracle Hyperion Enterprise Performance Management SystemLifecycle Management to export mapping rules, any related mapping scripts areincluded.
The export of mapping rules to a CSV or Excel format does not include any scripting.
To submit the data load rule:
1. On the Workflow tab, under Data Load, select Data Load Workbench.
2. Optional: When you import a source file, Oracle Hyperion Financial Data QualityManagement, Enterprise Edition uses the current POV to determine location,category, and period and conducts the following process: To import anothersource file, you must change the POV. See Using the POV Bar.
3. At the top of the screen, click Export.
Chapter 3Loading Data
3-70

4. In Execution Mode drop-down, select the mode for exporting the source data tothe target application.
• online—ODI processes the data in sync mode (immediate processing).
• offline—ODI processes the data in async mode (runs in background).
Click to navigate to the Process Detail page to monitor the ODI jobprogress.
5. Click OK.
Step 4: Checking the DataAfter exporting data to the target system, execute the Check step to display the Checkreport for the current POV. If check report data does not exist for the current POV, ablank page is displayed.
You can select the default report type that is used when Check reports are run. Bydefault, the Publish Type field on the Reports page is set to the selected report-typevalue. Selections for this field are PDF, Excel, Word, Rich Text, and HTML.
Note:
When you run and open the check report from the Workbench, it is not saved tothe Oracle Hyperion Financial Data Quality Management, Enterprise Editionfolder on the server.
Using the Workbench Data GridThe data grid includes two tabs in the main grid:
• Load Data/Load POV—Use to import, view and verify and export data from sourcesystems.
Chapter 3Loading Data
3-71

• drill through to the source data
• view mapping details
You perform tasks on the data grid by selecting options on the Table Action including:
• Viewing Data
• Formatting Data
• Showing Data
• Opening Loaded Data in Microsoft Excel
• Querying by Example
• Freezing Data
• Detaching Data
• Wrapping Text
• Attaching Cell Text and Documents to a Data Cell
Viewing DataThe View data provides multiple ways to view data including:
Table—Selects the source or target data to display in the grid:
• Source (All)—Shows both mapped and unmapped source dimensions (ENTITY,ACCOUNT, UD1, UD2,… AMOUNT).
• Source (Mapped)—Shows only mapped source dimensions.
• Target—Shows only target dimensions (ENTITYX, ACCOUNTX, UD1X, UD2X,….AMOUNTX).
• Source and Target—Shows both source and target dimensions (ENTITY,ENTITYX, ACCOUNT, ACCOUNTX, UD1, UD1X, AMOUNT, AMOUNTX).
Columns—Selects the columns to display in the data:
• Show All
• Entity
• Account
• Version
• Product
• Department
• STAT
• Amount
• Source Amount
Note:
For Oracle E-Business Suite and PeopleSoft, the Account Descriptions is alsoavailable for viewing.
Chapter 3Loading Data
3-72

Freeze/Unfreeze—Locks a column in place and keeps it visible when you scroll thedata grid. The column heading must be selected to use the freeze option. To unfreezea column, select the column and from the shortcut menu, select Unfreeze.
Detach/Attach—Detaches columns from the data grid. Detached columns display intheir own window. To return to the default view, select View, and then click Attach orclick Close.
Sort—Use to change the sort order of columns in ascending or descending order. Amultiple level sort (up to three levels and in ascending and descending order) isavailable by selecting Sort, and then Advanced. From the Advanced Sort screen,select the primary "sort by" column, and then the secondary "then by" column, andthen the third "then by" column.
The search fields that are displayed in the advanced search options differ dependingon what artifact you are selecting.
Reorder Columns—Use to change the order of the columns. When you select thisoption, the Reorder Columns screen is displayed. You can select a column, and thenuse the scroll buttons on the right to change the column order.
Query by Example—Use to toggle the filter row. You can use the filter row to entertext to filter the rows that are displayed for a specific column. You can enter text tofilter on, if available, for a specific column, and then press [Enter]. To clear a filter,remove the text to filter by in the text box, then press [Enter]. All text you enter is casesensitive.
Formatting DataYou can resize the width of a column by the number pixel characters or a percentage.You can also wrap text for each cell automatically when text exceeds the columnwidth.
To resize the width of a column:
1. Select the column to resize.
2. From the table action bar, select Format, and then Resize.
3. In the first Width field, enter the value by which to resize.
You can select a column width from 1 to 1000.
4. In the second Width field, select pixel or percentage as the measure to resize by.
5. Select OK.
To wrap the text of a column:
1. Select the column with the text to wrap.
2. From the table action bar, select Format, and then Wrap.
Showing DataYou can select the type of data to display in the data grid including:
• Valid Data—Data that was mapped properly and is exported to the targetapplication.
• Invalid Data—One or more dimensions that was not mapped correctly and as aresult, the data is not exported to target.
Chapter 3Loading Data
3-73

• Ignored Data—User defined explicit map to ignore a source value when exportingto target. This type of map is defined in the member mapping by assigning aspecial target member with the value of ignore.
• All Data—Shows all valid, invalid and ignored data.
To show a type of data:
1. Select Show.
2. Select from one of the following:
• Valid Data
• Invalid Data
• Ignored Data
• All Data
Drilling Through to Source Data and Viewing MappingsWhen data has been displayed in the Data Load Workbench, you can drill through tothe source, view mappings and open the source document.
Note:
If the source system is Oracle E-Business Suite/PeopleSoft and you havemetadata rules, then the drill region is created based on the metadata rule.Otherwise, it is created based on the target members in the data loadmappings. For Year, Period, and Scenario, Oracle Hyperion Financial DataQuality Management, Enterprise Edition uses audit information to create thedrill region.
To drill through to the source mapping:
1. Select the type of data to display in the data grid.
See Showing Data.
2. In Source Amount column, select an amount.
3. Click the source amount link and select Drill through to source.
To view the source mapping detail:
1. Select the type of data to display in the data grid.
See Showing Data.
2. From the Source Amount column, select an amount.
3. Click the source amount link and select View Mappings.
Chapter 3Loading Data
3-74

Opening Loaded Data in Microsoft ExcelWhen reviewing data in the workbench, users can drill down from the amount to theEnterprise Resource Planning (ERP) source system. In the source system the data isdisplayed in the granularity with which it was loaded.
You can open loaded data in Microsoft Excel and review how the data is defined.
To open loaded data in Microsoft Excel:
1. From the table action bar, click .
2. Open the loaded data in Microsoft Excel.
Querying by ExampleUse the Query by Example feature to filter rows that are displayed for a specificcolumn. You can enter text to filter on, if available, for a specific column, and thenpress [Enter]. To clear a filter, remove the text to filter by in the text box, then press[Enter]. All text you enter is case sensitive.
To query by example:
1. From the table action bar, click to enable the filter row.
The filter row must appear above the columns to use this feature.
2. Enter the text by which to filter the values in the column and press [Enter].
Note:
When entering text to filter, the text or partial text you enter is case-sensitive. The case must match exactly. For example, to find all targetapplications prefixed with “HR,” you cannot enter “Hr” or “hr.”
Chapter 3Loading Data
3-75

Freezing DataUse the Freeze feature to lock a column in place and keeps it visible when you scrollthe data grid.
To freeze a column:
1. Select the column to freeze.
2. From the table action bar, click .
To unfreeze a column:
1. Select the frozen column.
2. On the shortcut menu, select Unfreeze.
Detaching DataUse the Detach feature to detach columns from the data grid. When you detach thegrid, columns display in their own window. To return to the default view, select View,and then click Attach or click Close.
To detach columns:
1. Select the column to detach.
2. From the table action bar, click .
The data grid is displayed in a separate window.
To reattach columns to the data grid:
1. Select the column to reattach.
2. From the table action bar, select View, and then Attach.
Wrapping TextYou can wrap text for each cell automatically when text exceeds the column width.
To wrap text for a column:
1. Select the column with the text to wrap.
2. Click .
Attaching Cell Text and Documents to a Data CellThe cell text feature enables you to attach text and documents to a data cell. Multipleinstances of cell text can be added as needed. Oracle Hyperion Financial Data QualityManagement, Enterprise Edition archives documents in EPM_ORACLE_HOME/products/FinancialDataQuality/data directory. Cell text can only be exported in Oracle HyperionFinancial Management applications.
Chapter 3Loading Data
3-76

Note:
FDMEE does not load multiple cell text to an intersection in FinancialManagement. If a load using an append mode is run and new cell text is addedto an intersection that already has cell text, the old cell text is replaced by thenew cell text and not appended.
To assign cell text and attach documents:
1. On the Workflow tab, under Data Load, select Data Load Workbench.
2. In Data Load Workbench, select the data cell.
3. From the memo column ( ) in the column heading, click the memo link
( ) to the left the data cell.
4. From Edit Memo Items, click Add.
5. In the Name field, enter a name of the memo.
6. In the Description field, enter a description of the memo.
7. Click Add (to the right of an Attachment field).
8. On the Select screen, browse and select an attachment, and then click OK.
9. Click Update.
10. Click Close.
Chapter 3Loading Data
3-77

11. Optional: To remove an attachment, click Remove (to the right of an Attachmentfield).
Intersection Check Report ErrorsWhen Intersection Check reports are generated as part of the data validation step, iferrors are encountered, the Intersection check report provides information on theerrors.
There are four Intersection Check Report errors:
• Invalid Intersection
• Cannot Write
• Locked Intersection
• Invalid Member
Invalid Intersection (highlighted in red)
Invalid intersection errors occur due to the following errors:
• The intersection is not valid.
• The ICP member is not valid for the account. The ICP must be a child of"TopCustom" in the ICP hierarchy.
• The account does not allow intercompany activity. The ICP member value must beset to" ([ICP None])" or the account must be changed.
• The entity does not allow intercompany activity. The ICP member value must beset to" ([ICP None])" or a valid ICP entity.
• The custom member is not valid for the account. The custom member must be achild of "TopCustom" in the custom hierarchy.
Cannot Write (highlighted in purple)
Cannot write errors occur due to the following:
• No read or write access. (Oracle Hyperion Financial Management cell status is noread access or no write access.)
• Financial Management cell status can write and support line items, but the celldoes not support IC transactions.
• Financial Management cell status is derived.
• Financial Management cell status is parent level input.
Locked Intersection (highlighted in green)
Locked intersection. (Financial Management cell status is locked.)
Invalid Member (highlighted in orange)
Invalid member mapping error due to the following:
• The target member is not valid in Financial Management or the user does not haveaccess to it in Financial Management.
• Intercompany with self is restricted. The ICP dimension value must not equal theentity dimension value.
Chapter 3Loading Data
3-78
Viewing Process DetailsYou use the Process Details page to view submitted rule status and logs.
To view data rule process details:
1. On the Workflow tab, under Monitor, select Process Details.
The Process Details page is displayed, showing processes for all source systems.The following columns are displayed for each process:
• Process ID—An automatically generated identification number
• Status—Displays a visual indicator for the status of the process. You can restthe cursor over the icon to view a Screen Tip. Available statuses:
– —Rule Processed Successfully
– —Rule Execution did not complete successfully
• Log—Click Show to display the log file.
• Location—Displays the location name
• Process Name—Type of process
Types of processes include:
– Data Load—Initiated when you run a data load rule.
– Metadata Load—Initiated when you run a metadata load rule.
– HR Load—Initiated when you run an HR data load rule.
– Purge Process—Initiated when you remove an artifact, such as a targetapplication or source system.
– Initialize Source System—Initiated when you initialize a source system.
• Rule Name—Name of the rule
• Source System—Name of the source system
• Accounting Entity—Name of the source accounting entity
• Target Application—Name of the target application
• ODI Session Number—The session number in Oracle Data Integrator. Youcan use this to look up a session in Oracle Data Integrator.
Note:
The ODI Session number is present in Process Details only when thedata is processed during an offline execution.
• Job ID—The Oracle Hyperion EPM Architect job ID
Process By—The user ID who initiated the process
• Reset Status—Resets the status to failed if a process continues to stay in arunning status for a long period of time.
Chapter 3Loading Data
3-79

• Link—Shows the log information for the process step. In the case of FileImport, it shows skipped rows, and in the case of export to Oracle HyperionPlanning, it shows rejected rows and so on.
2. Select a process to display the details:
• Status—For each process step, the status is displayed. You can troubleshoota problem by viewing at which point the process failed.
• Process Step—Displays the steps in the process.
• Process Start Time—Time that the process step started.
• Process End Time—Time the process step ended.
• Log—If a log is available, you can click Show to display the log contents.
3. Optional: To filter the rows that are displayed, ensure that the filter row appears
above the column headers. (Click to toggle the filter row.) Then, enter the textto filter.
You can filter by:
• Process ID
• Location
• Rule Name
• Source System
• Accounting Entity
• Target Application
Note:
When entering text to filter, the text or partial text that you enter is casesensitive. For example, to find all target applications prefixed with “HR,” youcannot enter “Hr” or “hr.” For additional information on filtering, see FDMEEUser Interface Elements.
Integrating with the Oracle Financials CloudYou can integrate Oracle General Ledger data from the Oracle Financials Cloud withyour EPM application if you use Oracle Financials Cloud Release 11 or higher. Thisintegration enables you to simply pick the desired source ledger from the OracleFinancials Cloud, set up a few simple mappings and then push a button to pull thedata into the EPM application. This integration can be run manually, or scheduled for aspecific time.
Note:
The Average Daily Balances (ADB) ledger is not supported in the currentintegration.
Chapter 3Loading Data
3-80

Note:
Oracle Hyperion Financial Data Quality Management, Enterprise Edition alsosupports the Financials Accounting Hub (FAH) and the Financial AccountingHub Reporting Cloud Service (FAHRCS) as part of its integration with theOracle General Ledger.
The integration sets up the drill definition automatically.
FDMEE facilitates not only data loading, but write-back to the Oracle Financials Cloud.
Integration Process DescriptionAt a high level, this is how you integrate Oracle General Ledger data from the OracleFinancials Cloud with your EPM application:
1. Set up the Oracle General Ledger source system from the Oracle Financials Cloudconnection information and initialize the source system.
The initialize process brings over the Oracle General Ledger data into the EPMapplication as Oracle Essbase cubes. Each Essbase target application representsa chart of accounts definition from the source Oracle General Ledger.
See Configuring a Source Connection.
2. Create the EPM target application that requires the Oracle General Ledger datafrom the Oracle General Ledger source system.
Chapter 3Loading Data
3-81
3. Create the target application that requires data from one or more source systems.
If you are loading data from an Oracle General Ledger application to an EPMapplication, add the EPM application as the target application type (for example,add Oracle Hyperion Planning as the target application type.)
4. Set up the integration mapping between Oracle General Ledger and the EPMapplication dimensions in Oracle Hyperion Financial Data Quality Management,Enterprise Edition by building an import format.
See Working with Import Formats in this section
5. Define the location used to associate the import format with the Oracle GeneralLedger segments.
See Defining Locations in this section
6. Create category mapping for scenario dimension members in the EPM applicationto which Oracle General Ledger balances are loaded.
See Defining Category Mappings in this section.
7. Define data load mapping to convert the chart of accounts values from the OracleGeneral Ledger to dimension members during the transfer.
See Data Load Mapping in this section.
8. Define a data rule with the necessary filters and execute the rule.
A default filter is provided that includes all dimensions of the Essbase cube. Thecube may have duplicate members so fully qualified member names are required.The Essbase cubes work off the Oracle General Ledger segments, and there is aone to many relationships of Chart of Accounts to ledgers in the Oracle GeneralLedger.
FDMEE creates filters when a rule is created. You can modify the filters as neededbut cannot delete them. (If the filters are deleted, FDMEE recreates the defaultvalues). For information about these filters, see Adding Filters for Data LoadRules.
The process extracts and loads the data from Oracle Financials Cloud to FDMEE.
See Adding Data Load Rules
9. Optional: Write back the data to the Oracle Financials Cloud.
To write back data to Oracle Financials Cloud from a Planning or an OracleEnterprise Planning and Budgeting Cloud source system, set up a data rule. In thiscase, the filters are applied against the Planning or Oracle Enterprise Planningand Budgeting Cloud application.
Optionally, you can write back budget data from a Planning to a flat file using acustom target application. This output file may be used to load data to any otherapplication.
Configuring a Source ConnectionTo begin integrating the Oracle General Ledger with the Oracle EnterprisePerformance Management Cloud, you first create and register the source system withthe type “Oracle Financial Cloud.”
After the source system and connection information are specified, you initialize thesource system to copy the Oracle General Ledger Chart of Account information toOracle Hyperion Financial Data Quality Management, Enterprise Edition as one of
Chapter 3Loading Data
3-82
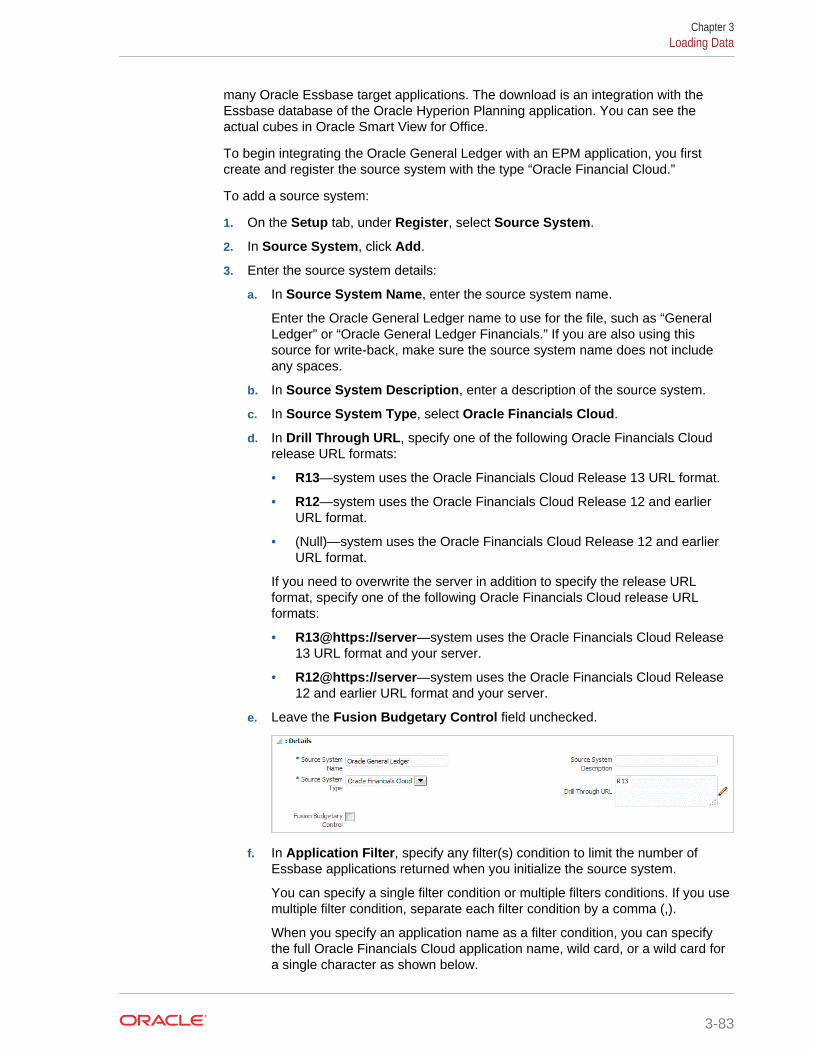
many Oracle Essbase target applications. The download is an integration with theEssbase database of the Oracle Hyperion Planning application. You can see theactual cubes in Oracle Smart View for Office.
To begin integrating the Oracle General Ledger with an EPM application, you firstcreate and register the source system with the type “Oracle Financial Cloud.”
To add a source system:
1. On the Setup tab, under Register, select Source System.
2. In Source System, click Add.
3. Enter the source system details:
a. In Source System Name, enter the source system name.
Enter the Oracle General Ledger name to use for the file, such as “GeneralLedger” or “Oracle General Ledger Financials.” If you are also using thissource for write-back, make sure the source system name does not includeany spaces.
b. In Source System Description, enter a description of the source system.
c. In Source System Type, select Oracle Financials Cloud.
d. In Drill Through URL, specify one of the following Oracle Financials Cloudrelease URL formats:
• R13—system uses the Oracle Financials Cloud Release 13 URL format.
• R12—system uses the Oracle Financials Cloud Release 12 and earlierURL format.
• (Null)—system uses the Oracle Financials Cloud Release 12 and earlierURL format.
If you need to overwrite the server in addition to specify the release URLformat, specify one of the following Oracle Financials Cloud release URLformats:
• R13@https://server—system uses the Oracle Financials Cloud Release13 URL format and your server.
• R12@https://server—system uses the Oracle Financials Cloud Release12 and earlier URL format and your server.
e. Leave the Fusion Budgetary Control field unchecked.
f. In Application Filter, specify any filter(s) condition to limit the number ofEssbase applications returned when you initialize the source system.
You can specify a single filter condition or multiple filters conditions. If you usemultiple filter condition, separate each filter condition by a comma (,).
When you specify an application name as a filter condition, you can specifythe full Oracle Financials Cloud application name, wild card, or a wild card fora single character as shown below.
Chapter 3Loading Data
3-83

• Vision (Full Name)
• VF* (Wild Card)
• VF??COA (Wild Card for single char_
When you run the initialize process, the system imports all the applicationsthat match the filter condition. If no filters are provided, all applications areimported.
4. Click Configure Source Connection.
The Configure Source Connection screen is used to configure the connection tothe Oracle Financials Cloud.
The source connection configuration is used to store the Oracle Financials Clouduser name and password. It also stores the WSDL connection for the OracleFinancials Cloud user name and password.
5. In User Name, enter the Oracle Financials Cloud user name.
Enter the name of the Oracle Financials Cloud user who launches the processrequests to send information between Planning and the Oracle Financials Cloud.This user must have an assigned Oracle General Ledger job role such as"Financial Analyst," "General Accountant," or "General Accounting Manager."
6. In Password, enter the Oracle Financials Cloud password.
You must update this password anytime you change your Oracle Financials Cloudpassword.
7. In Fusion Web Services URL, enter the URL for the Fusion web service.
For example, you might specify: https://server/publicFinancialCommonErpIntegration/ErpIntegrationService?WSDL
Replace "fs" with "fin" in the URL from the one that is used to log on.
8. Click Test Connection.
9. Click Configure.
The confirmation “Source system [source system name] configuration has beenupdated successfully” is displayed.
Chapter 3Loading Data
3-84

10. On the Source System screen, click Initialize.
Initializing the source system fetches all metadata needed in FDMEE, such asledgers, chart of accounts, and so on. It is also necessary to initialize the sourcesystem when there are new additions, such as chart of accounts, segments/chartfields, ledgers, and responsibilities in the source system.
The initialize process may take a while, and you can watch the progress in the jobconsole.
Note:
When re-initializing an Oracle General Ledger source, application periodmappings are reset/removed from the system. If specific period mappingsare required, then use the source period mapping tab to specify the periodmappings.
11. Click Save.
After you add a source system, select the source system in the table, and thedetails are displayed in the lower pane.
The initialize process may take a while, so the user can watch the progress in thejob console.
Working with Import FormatsThe import format enables you to set up the integration mapping between the OracleGeneral Ledger (Chart of Accounts) segments and the dimensions in the EPMapplication.
When you select the source and target, Oracle Hyperion Financial Data QualityManagement, Enterprise Edition populates the source and target columnsautomatically.
Note:
Oracle General Ledger creates one Essbase cube per Chart of Account/Calendar combination. In this case, you can use the same import format toimport data from Ledgers sharing this Chart of Accounts. Ledgers can bespecified as a filter in the data load rule.
You work with import formats on the Import Format screen, which consists of threesections:
• Import Format Summary—Displays common information relevant to the sourceand target applications.
• Import Format Detail—Enables you to add and maintain import format information.
• Import Format Mappings—Enables you to add and maintain import formatmapping information.
To add an import format for an Oracle General Ledger based source system:
1. On the Setup tab, under Integration Setup, select Import Format.
Chapter 3Loading Data
3-85
2. In the Import Format summary task bar, select Add.
In the upper grid of the Import Formats screen, a row is added.
3. In Name, enter a user-defined identifier for the import format.
You cannot modify the value in this field after a mapping has been created for thisimport format.
4. In Description, enter a description of the import format.
5. In Source, select the Oracle General Ledger Chart of Accounts from the dropdown.
6. In Target, select the EPM target application.
7. Optional: In Expression, add any import expressions.FDMEE provides a set of powerful import expressions that enable it to read andparse virtually any trial balance file into the FDMEE database. Advancedexpressions are entered into the Expression column of the field grid of the ImportFormats screen. Import expressions operate on the value that is read from theimport file.
For more information, see Adding Import Expressions.
8. Click Save.
Defining LocationsA location is the level at which a data load is executed in Oracle Hyperion FinancialData Quality Management, Enterprise Edition. Each location is assigned an importformat. Data load mapping and data load rules are defined per location. You definelocations to specify where to load the data. Additionally, locations enable you to usethe same import format for more than one target application where the dimensionalityof the target applications is the same. However; if you are using multiple importformats, you must define multiple locations.
Note:
You can create duplicate locations with the same source system andapplication combination.
To create, edit, and delete import locations:
1. On the Setup tab, under Integration Setup, select Location.
2. In Location, click Add.
3. From Location Details, in Name, enter the location name.
4. From Import Format, enter the import format.
The import format describes the source system structure, and it is executed duringthe source system import step. A corresponding import format must exist before itcan be used with a location.
Additionally:
• Source name is populated automatically based on the import format.
Chapter 3Loading Data
3-86

• Target name is populated automatically based on the import format.
You can also click and select an import format.
5. In Functional Currency, specify the currency of the location.
Note:
You must specify the budget currency of the control budget to which budgetis written back.
6. In Parent Location, enter the parent assigned to the location.
Parent mapping are used to share mappings with other locations. Enter mappingsat the parent location, and the related locations can use the same mappings.Multiple locations can share a parent. This feature is useful when multiplelocations use one chart of accounts. Changes to a child or parent mapping tableapply to all child and parent locations.
Note:
If a location has a parent, the mappings are carried over to the child.However; changes to mapping can only be performed on the parentlocation.
7. Optional: In Logic Account Group, specify the logic account group to assign tothe location.
A logic group contains one or more logic accounts that are generated after asource file is loaded. Logic accounts are calculated accounts that are derived fromthe source data.
The list of values for a logic group is automatically filtered based on the TargetApplication under which it was created.
8. Optional: In Check Entity Group, specify the check entity group to assign to thelocation.
When a check entities group is assigned to the location, the check report runs forall entities that are defined in the group. If no check entities group is assigned tothe location, the check report runs for each entity that was loaded to the targetsystem. FDMEE check reports retrieve values directly from the target system,FDMEE source data, or FDMEE converted data.
The list of values for a check entity group is automatically filtered based on thetarget application under which it was created.
9. Optional: In Check Rule Group, specify the check rule group to assign to thelocation.
System administrators use check rules to enforce data integrity. A set of checkrules is created within a check rule group, and the check rule group is assigned toa location. Then, after data is loaded to the target system, a check report isgenerated.
The list of values for a check rule group is automatically filtered based on thetarget application under which it was created.
Chapter 3Loading Data
3-87

10. Click Save.
11. Optional: Perform these tasks:
• To edit an existing location, select the location to modify, and then makechanges as necessary. Then, click Save.
• To delete a location, click Delete.
When a location is deleted, the location is removed from all other FDMEEscreens, such as Data Load.
Tip:
To filter by the location name, ensure that the filter row is displayed above
the column headers. (Click to toggle the filter row.) Then, enter the textto filter.
You can filter locations by target application using the drop down at the topof the screen.
Defining Category MappingsYou define category mappings for categorizing and mapping source system data to atarget EPM Scenario dimension member. For example, you may have a Scenariodimension member called Actuals for storing actual balances from an Oracle GeneralLedger application. In an Oracle Hyperion Planning application, the same sourcesystem data is stored using the Scenario dimension member “Current.” In OracleHyperion Financial Data Quality Management, Enterprise Edition, you can create onecategory mapping to give both one name to represent their respective scenarios.
You create category mapping for the scenario dimension member in Planning fromwhich budget is written back.
1. On the Setup tab, under Integration Setup, select Category Mapping.
2. Select Global Mapping.
3. Click Add.
A blank entry row is displayed.
4. In Category, enter a name that corresponds to the Planning application Scenariodimension member from which you want to load data.
5. In Target Category, enter the name of the Planning Scenario dimension membersfrom which you want to load data.
6. Click Save.
Data Load MappingData load mappings convert the chart of accounts values from the Oracle GeneralLedger to the dimension members of the EPM application during the transfer. Thisallows Oracle Hyperion Financial Data Quality Management, Enterprise Edition tocategorize Oracle General Ledger balances.
In the following example, based on the chart of accounts segment, the Oracle GeneralLedger breaks down administrative expenses as a range of accounts from 4001-4003.
Chapter 3Loading Data
3-88
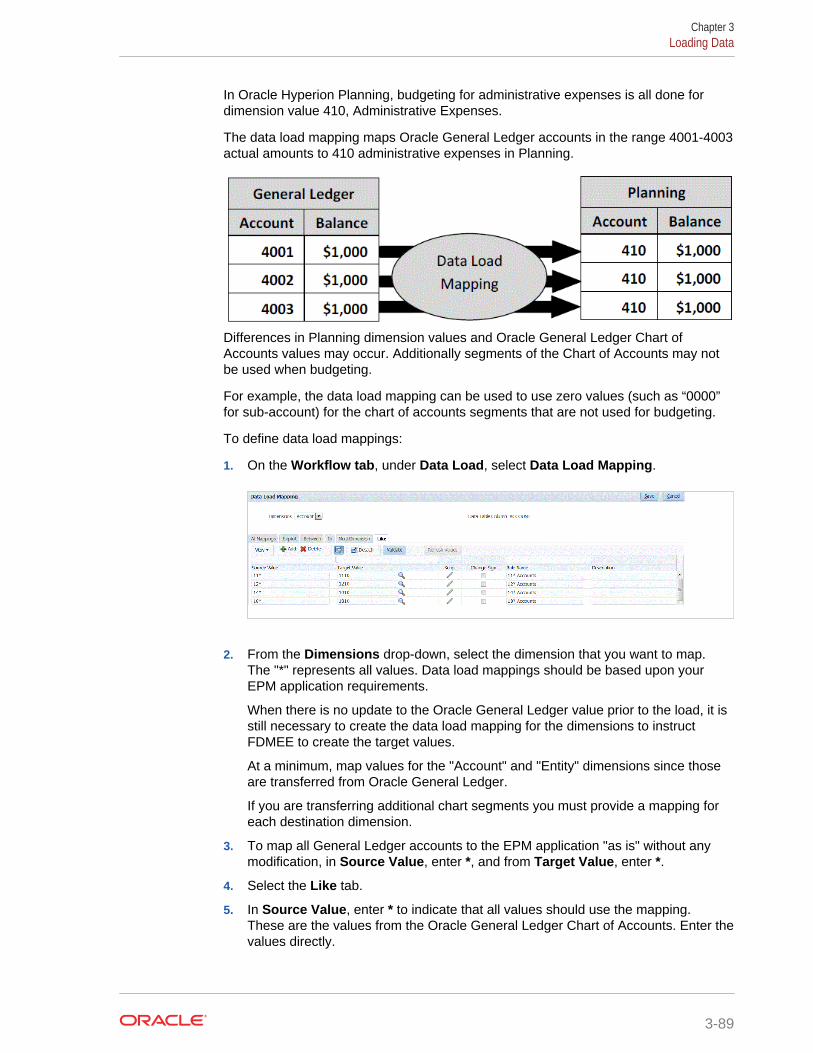
In Oracle Hyperion Planning, budgeting for administrative expenses is all done fordimension value 410, Administrative Expenses.
The data load mapping maps Oracle General Ledger accounts in the range 4001-4003actual amounts to 410 administrative expenses in Planning.
Differences in Planning dimension values and Oracle General Ledger Chart ofAccounts values may occur. Additionally segments of the Chart of Accounts may notbe used when budgeting.
For example, the data load mapping can be used to use zero values (such as “0000”for sub-account) for the chart of accounts segments that are not used for budgeting.
To define data load mappings:
1. On the Workflow tab, under Data Load, select Data Load Mapping.
2. From the Dimensions drop-down, select the dimension that you want to map.The "*" represents all values. Data load mappings should be based upon yourEPM application requirements.
When there is no update to the Oracle General Ledger value prior to the load, it isstill necessary to create the data load mapping for the dimensions to instructFDMEE to create the target values.
At a minimum, map values for the "Account" and "Entity" dimensions since thoseare transferred from Oracle General Ledger.
If you are transferring additional chart segments you must provide a mapping foreach destination dimension.
3. To map all General Ledger accounts to the EPM application "as is" without anymodification, in Source Value, enter *, and from Target Value, enter *.
4. Select the Like tab.
5. In Source Value, enter * to indicate that all values should use the mapping.These are the values from the Oracle General Ledger Chart of Accounts. Enter thevalues directly.
Chapter 3Loading Data
3-89

6. In Target Value, enter the value for the accounting scenario to use to load thebudget information.Enter the values that should be used in the EPM application to store the OracleGeneral Ledger actual balances that are transferred.
7. In Rule Name, enter the name of the data load rule used to transfer budgetamounts to the Oracle General Ledger.
Note:
Rules are evaluated in rule name order, alphabetically. Explicit rules haveno rule name. The hierarchy of evaluation is from Explicit to (In/Between/Multi) to Like.
8. In Description, enter a description of the mapping.For example, enter a description such as “Map to the General Ledger.”
9. Optional: In Apply to Rule to apply the mapping only to the specific data rule inthe location.See Creating Member Mappings.
Adding Data Load RulesAfter you define member mappings for the location, define data load rules for ledgersor business units in your source system to extract the data from the Oracle GeneralLedger and move it to the EPM application.
Data load rules are defined for locations that you have already set up. Data load rulesare specific to locations. You can create multiple data load rules for a targetapplication so that you can import data from multiple sources into a target application.
The data load rule is created once, but used each time there is a transfer.
To create a data load rule for synchronization:
1. On the Workflow tab, under Data Load, select Data Load Rule.
2. From the POV Bar, select the location to use for the data load rule.Data load rules are processed within the context of a point of view. The defaultpoint of view is selected automatically. The information for the point of view isshown in the POV bar at the bottom of the screen.
3. Click Add
4. In Name, enter the name of the data load rule.
5. In Category, leave the default category value.The categories listed are those that you created in the Oracle Hyperion FinancialData Quality Management, Enterprise Edition setup. See Defining CategoryMappings.
6. In Period Mapping Type, select the period mapping type for each data rule.
Valid options:
• Default—The Data Rule uses the Period Key and Prior Period Key defined inFDMEE to determine the source General Ledger periods mapped to eachFDMEE period included in a Data Rule execution.
Chapter 3Loading Data
3-90

• Explicit—The Data Rule uses the Explicit period mappings defined in FDMEEto determine the source General Ledger periods mapped to each FDMEEperiod included in a data load rule execution. Explicit period mappings enablesupport of additional Oracle General Ledger data sources where periods arenot defined by start and end dates.
• Click Save.
Processing Oracle General Ledger Adjustment PeriodsYou can include adjustment periods from an Oracle General Ledger source system inthe Oracle Financials Cloud when loading balances to an EPM application.
Adjustment periods are additional periods that are related to regular periods from thesource. An "adjustment period" refers to any accounting period set up to adjustbalances prior to the closing period of the year. These periods are adjusted to per12and consequently are referred to as “per13.” Typically dates within the adjustmentperiod overlap regular accounting periods. A customer might use a “Year OpenPeriod” that refers to the first period in the accounting calendar to adjust last year’sbalance carried forward amount. Additionally, the customer can set up the last periodof the accounting calendar as the “Year Close Period” to adjust transactions made inthe current accounting calendar.
In Oracle Hyperion Financial Data Quality Management, Enterprise Edition,adjustments are processed in Period Mappings where you indicate how theadjustment period maps to the period in the target application. The method for howadjustments get processed is specified in the data load rule. This feature enables youto map Oracle General Ledger source periods in FDMEE simply by pointing to thecalendar and periods from the Oracle General Ledger application to the period in theEPM application.
When setting up the data load rule, you can either load to regular and adjustmentperiods when an adjustment period mapping exists, or load an adjustment period onlywhen an adjustment period mappings exists.
For example, when you map period 13 to December/Period 12, and select the IncludeAdjustment Period option, then the following occurs:
• For YTD balances, period 13 becomes the ending balance.
• For PTD balances, period 13 and December/Period12, are added.
To include adjustment periods from an Oracle General Ledger source system:
1. On the Setup tab, under Integration Setup, select Period Mapping.
2. Select the Source Mapping tab.
3. From Source System, select the Oracle General Ledger source system.
4. From Target Application, select the EPM application to which the adjustmentapplies.
5. From Mapping Type, select Adjustment.
6. Click Add.
7. In Source Period Key, specify the last day of the month to be mapped from theOracle General Ledger source system.
Use the date format based on the locale settings for your locale. For example inthe United States, enter the date using the MM/DD/YY format.
Chapter 3Loading Data
3-91

You can also click and browse to and select the source period key.
When you select the Source Period Key, FDMEE populates the Source Periodand Source Period Year fields automatically.
8. In Adjustment period, specify the name of the adjustment period from the OracleGeneral Ledger source.
For example, if the adjustment period from the Oracle General Ledger is Adj-Dec-16, then enter Adj-Dec-16 in this field.
9. In Target Period Key, specify the last day of the month to be mapped from thetarget system.
Use the date format based on the locale settings for your locale. For example inthe United States, enter the date using the MM/DD/YY format.
You can also click and browse to and select the target period key.
When you select the Target Period Key, FDMEE populates the Target PeriodName, Target Period Month, and Target Period Year fields automatically.
10. Click Save.
11. On the Workflow tab, under Data Load, select Data Load Rule.
12. From the POV Bar, select the location to use for the data load rule.
Data load rules are processed within the context of a point of view. The defaultpoint of view is selected automatically. The information for the point of view isshown in the POV bar at the bottom of the screen.
13. Click Add.
14. In Name, enter the name of the data load rule.
15. In Category, specify the default category value.
The categories listed are those that you created in the FDMEE setup.
See Defining Category Mappings.
16. In Period Mapping Type, select the period mapping type for each data rule.
Valid options:
• Default—The Data Rule uses the Period Key and Prior Period Key defined inFDMEE to determine the source General Ledger periods mapped to eachFDMEE period included in a Data Rule execution.
• Explicit—The Data Rule uses the Explicit period mappings defined in FDMEEto determine the source General Ledger periods mapped to each FDMEEperiod included in a data load rule execution. Explicit period mappings enablesupport of additional Oracle General Ledger data sources where periods arenot defined by start and end dates.
17. From Include Adjustment Period, select one of the following options forprocessing adjustment periods:
Chapter 3Loading Data
3-92

• No—Adjustment periods are not processed. The system processes onlyregular period mappings (as setup for "default" and "explicit" mappings). No isthe default option for processing adjustments.
• Yes—If Yes is selected, then the regular period and adjustment period areincluded. If the adjustment period does not exist, then only the regular periodis processed.
• Yes (Adjustment Only)—If Yes (Adjustment Only) is selected, the systemprocesses the adjustment period only. However, if the adjustment period doesnot exist, the system pulls the regular period instead.
18. Click Save.
Adding Filters for Data Load RulesFor data rules used to import data from the Oracle General Ledger and use filters tolimit the results.
Oracle Hyperion Financial Data Quality Management, Enterprise Edition automaticallycreates filters when a rule is created. You can modify the filters as needed but cannotdelete them. (If filters are deleted, FDMEE recreates the default value.)
Data load rule filters:
Oracle General Ledger Dimension Filter
Scenario Actual
Balance Amount Ending Balance
Amount Type YTD
Currency Type Total
All Other Dimensions '@ILvl0Descendants("All '||TARGET_DIMENSION_NAME||' Values")'
Note:
Drill Through is only supported if you load leaf level data for Oracle GeneralLedger Chart of Account segments. If you load summary level data, then drillthrough does not work.
To assign a filter to the data load rule:
1. On the Workflow tab, under Data Load, select Data Load Rule.
2. Select the data load rule to which to add a filter.
3. Select the Source Options tab.
Chapter 3Loading Data
3-93

4. In the Source Filters area, click .
5. Select the Dimension Name.
6. In Filter Condition specify the filter condition:
• Enter a member name or filter condition in the Filter Condition text box.
• Click to display the Member Select screen and select a member usingthe member selector. Then, click OK.
The Member Selector dialog box is displayed. The member selector enables youto view and select members within a dimension. Expand and collapse memberswithin a dimension using the [+] and [-].
The Selector dialog box has two panes—all members in the dimension on the leftand selections on the right. The left pane, showing all members available in thedimension, displays the member name and a short description, if available. Theright pane, showing selections, displays the member name and the selection type.
You can use the V button above each pane to change the columns in the memberselector.
Note:
Assign filters for dimension. If you do not assign filters, numbers from thesummary members are also retrieved.
To use the member selector:
a. In the list of available dimensions and members on the left, select a member
and click .
b. To deselect a member from the list of members, click .
c. To add special options for the member, click and select an option.
In the member options, “I” indicates inclusive. For example, “IChildren” addsall children for the member, including the selected member, and“IDescendants” adds all the descendants including the selected member. Ifyou select “Children,” the selected member is not included and only itschildren are included.
Chapter 3Loading Data
3-94

The member is moved to the right and displays the option you selected in theSelection Type column. For example, “Descendants” displays in the SelectionType column.
Tip:
To clear all members from the list of selections, click .
d. Click OK twice to continue defining the source filter details.
The selected member is displayed in Oracle Essbase syntax in the Filter Conditionfield.
Drilling Through to the Oracle Financials CloudDrill though enables you to display and view the account balance summary page in theOracle Financials Cloud.
When integrating with the Oracle General Ledger, Oracle Hyperion Financial DataQuality Management, Enterprise Edition determines the drill URL definition based onthe connection information automatically such as system and fixed information. You donot need to set up when drilling through to the Oracle General Ledger.
Writing Back to the Oracle Financials CloudOnce budget information is complete in your application, you can define the OracleEnterprise Performance Management Cloud application as a source and then writeback data to the Oracle General Ledger a target. After specifying any necessary filters,you can then extract budget values from EPM Cloud and write them to Oracle GeneralLedger. In the Export workflow step, the data is written to a flat file, which in turn iscopied to a file repository.
For Oracle Planning and Budgeting Cloud users, watch this tutorial video to learnabout writing back EPM Cloud budgets to the Oracle General Ledger:
Tutorial Video
For Oracle Enterprise Planning and Budgeting Cloud users, see the Tutorial Video.
To write back to the Oracle General Ledger:
1. Create an import format to map dimensions to the Oracle General Ledger:
a. On the Setup tab, under Integration Setup, select Import Format.
b. Click Add.
c. In Name, enter the name of the import format.
d. In Source, select the name of the EPM application from the drop-down.
e. In Description, enter a description that can be used to identify the importformat.
f. In Drill URL leave blank.
g. Click Save to save the import format and see the lower portion populated.
Chapter 3Loading Data
3-95

h. Scroll down to the lower region of the Import Format screen to map EPMCloud dimensions to the general ledger dimensions.
i. Map a source for the target dimension "Ledger."You can map a dimension like "Entity" to the ledger, and define any necessarydata load mapping to convert to the Oracle General Ledger name. If you arewriting back to a single ledger, enter the name of the ledger in the expressioncolumn.
j. Click Target Options, select Budget Name.
k. In Expression, leave blank.
If the target is the budget name, enter the value of the accounting scenariothat you plan to use.
2. Create a location.The location is used to execute the transfer of budget amounts to the OracleGeneral Ledger. The import format is assigned to the location. If you are usingmultiple import formats, you also need to define multiple locations.
a. On the Setup tab, under Integration Setup, select Location.
b. Click Add.
c. In Name, enter a name for the location.
The location name is displayed when you initiate the transfer from the EPMapplication to the Oracle General Ledger.
d. In Import Format, select the name of the import format you to use during thetransfer.
Note:
The Source and Target field names are populated automatically basedon the import format.
e. In Parent Location, enter the parent assigned to the location.Parent mapping are used to share mappings with other locations. Entermappings at the parent location, and the related locations can use the samemappings. Multiple locations can share a parent. This feature is useful whenmultiple locations use one chart of accounts. Changes to a child or parentmapping table apply to all child and parent locations.
f. In Source, the source is populated automatically.
g. In Functional Currency, specify the currency of the location.
h. Optional: In Logic Account Group, specify the logic account group to assignto the location.
i. Optional: In Check Entity Group, specify the check entity group to assign tothe location.
j. Optional: In Check Rule Group, specify the check rule group to assign to thelocation.
k. Save the location.
See Defining Locations.
3. Create period mappings.
Chapter 3Loading Data
3-96
The period mapping is used to convert periods to Oracle General Ledgeraccounting calendar periods for the transfer.
Note:
When specifying the period, the starting and ending periods should bewithin a single fiscal year. Providing date ranges that cross fiscal yearresults in duplicate data.
a. On the Setup tab, under Integration Setup, select Period Mapping.
b. Click Add and add a separate row for each period that is to receive budgetamounts.
Use the period names from the accounting calendar used by the ledger in thegeneral ledger.
c. Define a Period Key.
Once you select a value, information about the period key, prior period key,period name, and the target period month are populated automatically.
• Target Period Month—The values in this field need to match theaccounting calendar for the ledger in the Oracle General Ledger, whichreceives the transferred amounts.
• Target Period Year—Use values that corresponds to the accountingperiod (as defined in the Target Period Month column).
See Defining Period Mappings.
4. Define the data load rule.
A data load rule is used to submit the process to transfer balances from the EPMapplication to the Oracle General Ledger. The data load rule is created once, butused each time there is a transfer.
a. On the Workflow tab, under Data Load, select Data Load Rule.
b. From the POV Bar, select the location to use for the data load rule.
Data load rules are processed within the context of a point of view. The defaultpoint of view is selected automatically. The information for the point of view isshown in the POV bar at the bottom of the screen.
c. Click Add.
d. In Name, enter the name of the data load rule.
e. In Category, leave the default category value.
f. In Description, enter a description to identify the data load rule when youlaunch the request to transfer general ledger balances.
g. In Target Plan Type, select a plan type.
h. In Period Mapping Type, select the period mapping type for each data rule.
Valid options:
• Default—The Data Rule uses the Period Key and Prior Period Key definedin Oracle Hyperion Financial Data Quality Management, Enterprise Edition
Chapter 3Loading Data
3-97

to determine the Source General Ledger Periods mapped to each FDMEEperiod included in a Data Rule execution.
• Explicit—The Data Rule uses the Explicit period mappings defined inFDMEE to determine the source GL Periods mapped to each FDMEEPeriod included in a Data Rule execution. Explicit period mappings enablesupport of additional GL data sources where periods are not defined bystart and end dates.
i. Click Save.
5. Add Source Option filters to the data load rule for write-back.
a. On the Workflow tab, under Data Load, select Data Load Rule.
b. From the POV Bar, select the location to use for the data load rule.
Data load rules are processed within the context of a point of view. The defaultpoint of view is selected automatically. The information for the point of view isshown in the POV bar at the bottom of the screen.
c. Select the data load rule to which to add a filter.
d. Select the Source Options tab.
e. In the Source Filters area, click .
f. Select the Dimension Name.
g. In Filter Condition specify the filter condition:
• Enter a member name or filter condition in the Filter Condition text box.
• Click to display the Member Select screen and use a memberselector to specify functions for filtering. Then, click OK.
To use the member selector:
i. In the list of available dimensions and members on the left, select a
member and click .
ii. To deselect a member from the list of members, click .
iii. To add special options for the member, click and select an option.
In the member options, “I” indicates inclusive. For example, “IChildren”adds all children for the member, including the selected member, and“IDescendants” adds all the descendants including the selected member.If you select “Children,” the selected member is not included and only itschildren are included.
The member is moved to the right and displays the option you selected inthe Selection Type column. For example, “Descendants” displays in theSelection Type column.
Tip:
To clear all members from the list of selections, click .
Chapter 3Loading Data
3-98

iv. Click OK twice to continue defining the source filter details.
The selected member is displayed in Oracle Essbase syntax in the FilterCondition field.
6. Execute the data load rule to write back.
a. On the Workflow tab, under Data Load, select Data Load Rule.
b. From the POV Bar, verify the location and period to use for the data load rule.
c. Select Execute to submit a request to transfer budget amounts to the OracleGeneral Ledger.
d. In Import from Source, select to import the budget information from OracleHyperion Planning.
e. In Recalculate, leave blank.
f. In Export to Target, select to export the information to the Oracle GeneralLedger.
g. In Start Period, select the earliest general ledger period to transfer.
The list of values includes all the general ledger periods that you have definedin the period mapping. This is typically the first period of the year for the initialbudget load, and then the current period or a future period during the year ifthere are updates to the budget that are to be transferred to the OracleGeneral Ledger.
h. In End Period, select the latest General Ledger period to transfer.
The list of values includes all the general ledger periods you have defined inthe period mapping.
i. In Import Mode, select Replace to overwrite existing budget information inOracle General Ledger for the period range you selected (from the start periodand end period options).
Select Append to add information to existing Oracle General Ledger budgetamounts without overwriting existing amounts.
j. Click Run.
Extracting the Integrated EPM Cloud and Oracle General Ledger Data to a FlatFile
After completing a planning or budgeting cycle in the EPM application, data can bewritten out to a text file for use in an external application. Exporting data from the EPMapplication is facilitated through the use of a custom application.
If multiple charts of accounts are used in the Oracle General Ledger and they need tobe mapped differently, create a separate target application for each chart of accountsstructure. It may be useful to include the chart of accounts name as part of the targetapplication to identify the target applications when completing later configurations.
To extract the data from the integrated file:
1. Create a custom target application.
a. On the Setup tab, under Register, select Target Application.
b. In Target Application, in the Target Application summary grid, click Add.
Chapter 3Loading Data
3-99

c. From Select Application, select Custom Application, and then click OK.
d. In Application Details, enter the application name.
Note:
Do not use spaces between words in the name or the transfer willfail.
e. Select the Dimension Details tab.
f. Specify the Dimension Name.
Oracle Hyperion Planning uses dimensions to create and maintain budgetinformation. These dimensions must be mapped to the EPM application. Thisenables you to transfer the budget information in a manner recognized by theEPM application. Include the dimensions in the custom application that youwant in your output file. You then map the EPM application dimensions to thedimensions in the custom application.
Create a row for each EPM application dimension that should be mapped tothe Oracle General Ledger.
The following dimension names must be mapped as follows:
• Budget Name must be mapped to the target dimension class "Account."Data Table Column Name must be "Account." This is distinct frommapping the account field of the chart of accounts, which must be doneseparately.
This is also distinct from mapping the account field of the chart ofaccounts, which must be done separately.
• Ledger must be mapped to the Target Dimension Class Entity. The datatable column name must be ENTITY.
Additionally, there should be a mapping from the EPM application for eachsegment of the chart of accounts.
g. In Target Dimension Class, use the value "Generic" for all rows exceptAccount and Entity, as described under Dimension Name.
h. In Data Table Column Name, use the values UD1, UD2, UD3 based upon theorder of the segments from the chart of accounts definition.
UD stands for "User Defined."
For example, a chart of accounts structure has three segments defined in thisorder: Company, Cost Center, and Account, and the values for the data tablecolumn names would be:
Chapter 3Loading Data
3-100

• "Company" uses the data table column name UD1.
• "Cost Center" uses the data table column name UD2.
• "Account" uses the data table column name UD3.
If there is a fourth segment of the chart such as Subaccount, map it to UD4.
i. In Sequence, leave blank.
j. Click Application Options.
k. In Enable export to file, select Yes to have Oracle Hyperion Financial DataQuality Management, Enterprise Edition create an output data file for thecustom target application.
As part of the transfer, FDMEE calls the General Ledger Validate and UploadBudgets.
A file is created in the outbox folder on the server. For example when thelocation is named “Texas” and the next sequence is 16, then the file name isTexas_15.dat. The file is created during the export step of the workflowprocess.
l. In File Character Set, select the file character set.
The file character set determines the method for mapping bit combinations tocharacters for creating, storing, and displaying text. Each encoding has aname; for example, UTF-8. Within an encoding, each character maps to aspecific bit combination; for example, in UTF-8, uppercase A maps to HEX41.
m. In Column Delimiter, select the character to use for delimiting columns in theoutput file.
Available column delimiters are:
• ,
• |
• !
• ;
• :
2. Create an import format.
a. On the Setup tab, under Integration Setup, select Import Format.
b. Click Add.
c. In Name, enter the name of the import format.
d. In Source, enter the name of the Planning application.
Chapter 3Loading Data
3-101

e. In Description, enter a description that can be used to identify the importformat.
f. In Drill URL leave blank.
g. In Target Type, select EPM.
h. In Target, enter the name of the custom target application that you defined forthe transfer.
i. Scroll down to the lower region of the Import Format screen to map the EPMdimensions.
j. In Source Column, select the appropriate values from the EPM application asfollows:
To map the Budget Name, and the natural account segment of the chart ofaccounts, select "Account."
To map the Ledger and chart of accounts segment that are based upon theentity (such as the company or department), select "Entity."
k. In Expression, leave blank.
If the target is the budget name, enter the value of the accounting scenariothat you plan to use.
3. Define locations.
See Defining Locations.
4. Enter the General Ledger Period name in the Target Period Month to define theApplication Period mapping.
See Application Mappings.
5. Define data load mappings by mapping the Ledger, Budget, and Segments.
See Creating Member Mappings.
6. Define the data load rule.
7. Execute the data load rule.
See Running Data Load Rules.
When you run the data load rule, the output file is created and can then bedownloaded. You go to the process details screen, find the job that you justexecuted and scroll to the far right until you see the download link, and click onthis link to download the file that was just created.
8. On the Workflow tab, under Monitor, select Process Details.
9. Select the job that you just executed and scroll to the far right until you see thedownload link.
10. Click the link to download the file that was just created.
Using Excel Trial Balance Files to Import DataAn Excel trial-balance file is an Excel spreadsheet that, through the import screen, isformatted to one more periods, categories, and locations.
Chapter 3Loading Data
3-102

Text Trial Balance Files Versus Excel Trial Balance FilesText trial-balance files and Excel trial-balance files are similar in two ways: They areboth loaded to the current POV (category and period), and, on the import form, theyuse the same Append and Replace options.
Text trial-balance files and Excel trial-balance files differ in one way: text files can useonly the standard import format, but Excel data files do not use any import formats.
When you an Excel Trail Balance template, the template can contain one or moreperiods. When doing a multiple period load, you need to create a dummy import formatthat indicates multiple periods. If just a single data value is in the Excel file, then youdon't need an import format.
Downloading an Excel Trial Balance TemplateTo download an Excel trial balance template:
1. On the Workflow tab, under Data Load, select Data Load Workbench.
2. From the Download Template drop-down, select Trial Balance.
3. From the Open screen, open or save the template and click OK.
Defining Excel Trial Balance TemplatesTo define an Excel trial-balance template, you define the first row of the named region,which contains the metadata tags. Other information may be defined outside of theregion, but the system only considers what is within the named region. For example,the template includes a title and an amount summary. These are outside the namedregion and are not processed when loading data.
To load data using a template, the system uses a named range definition to find thedimensions and the related data. For the trial balance template, the predefined rangeis called upsTB, and it can be seen using the "Name Manager" option in Excel.
The following template contains one line of metadata (row 1) and three lines ofimported data (rows 5–7).
Dimension Values and Amount should be populated in the respective columns as perthe Tags defined in row 1. To add additional dimension tags, add columns. Add databy adding rows.
When adding rows or columns, add them within the named region. Excel updates theregion definition automatically. If you add rows outside of the region, update the regionto include these new rows or columns. When adding dimension columns, add adimension tag to specify when the column is an account, entity, intercompanytransaction, amount or user defined (UD) dimension. Note that the entity dimension isrepresented by the tag for "Center."
Table 3-14 FDMEE dimension tags and the corresponding tags
Oracle Hyperion Financial Data QualityManagement, Enterprise EditionDimension
Valid Tags
Account (Required) A, Account, SrcAcctKey
Chapter 3Loading Data
3-103

Table 3-14 (Cont.) FDMEE dimension tags and the corresponding tags
Oracle Hyperion Financial Data QualityManagement, Enterprise EditionDimension
Valid Tags
Center (Required) C, Center, SrcCenterKey
Description (Optional) D, Description, SrcAcctDesc
IC Counter Party (Optional) I, IC, ICCoParty
User Defined 1-User Defined 20 (Optional) 1-20, UD1-UD20, UserDefined1-UserDefined20
Amount (Required) V, Amount, SrcAmount
In the template that is provided with FDMEE, some of the rows are hidden. To updatethe columns and the column tags, you need to unhide these rows. To do this, selectthe row above and below the hidden rows, and then update the cell height. A setting of12.75 is the standard height for cells, and this should show all of the hidden rows forthe selected range in the sheet. You may want to re-hide the rows after you havemade the necessary changes.
Adding a Multiple Period Data Load Using ExcelYou may also use the Excel Trial Balance template to load data to multiple periods. Todo this, create a data rule using a multiple period import format. The import formatdoes not have to contain any detail mappings, only the definition must have a multipleperiod. Using the multiple period data rule you can import the Excel Trial Balance File.You create a dummy import format and only select the specification for the multipleperiods. To load data for multiple periods, the column header must be in the formatV1:PeriodKey, V2:Periodkey, etc. The period key must be specified in YYYY/MM/DDformat. You do not have to define the source period mapping in the data rule. You alsoneed to update the range to make sure any additional columns are included in therange. Below is a sample of an Excel file.
Note:
You only need to include a period key (for example, V1:2016/1/31) with the tagif the periods are non-contiguous. If contiguous periods, then the period keysare ignored and the start/end selected when running the rule is used to definethe periods.
Chapter 3Loading Data
3-104
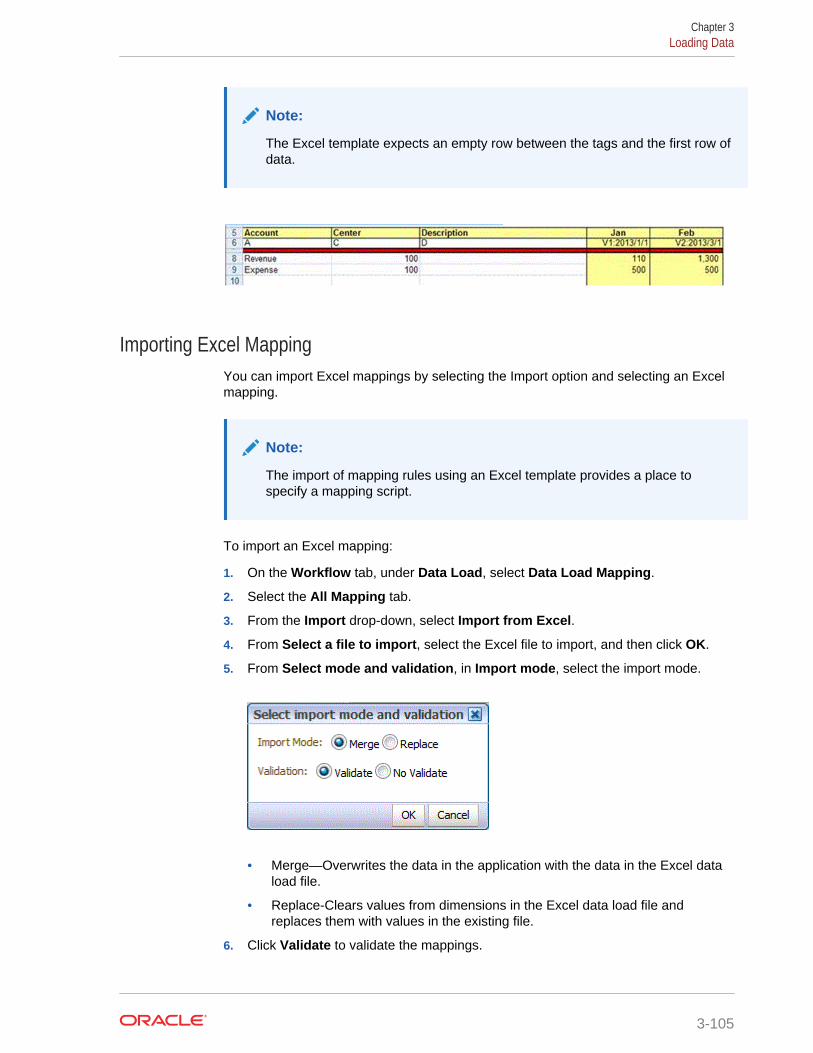
Note:
The Excel template expects an empty row between the tags and the first row ofdata.
Importing Excel MappingYou can import Excel mappings by selecting the Import option and selecting an Excelmapping.
Note:
The import of mapping rules using an Excel template provides a place tospecify a mapping script.
To import an Excel mapping:
1. On the Workflow tab, under Data Load, select Data Load Mapping.
2. Select the All Mapping tab.
3. From the Import drop-down, select Import from Excel.
4. From Select a file to import, select the Excel file to import, and then click OK.
5. From Select mode and validation, in Import mode, select the import mode.
• Merge—Overwrites the data in the application with the data in the Excel dataload file.
• Replace-Clears values from dimensions in the Excel data load file andreplaces them with values in the existing file.
6. Click Validate to validate the mappings.
Chapter 3Loading Data
3-105
7. Click OK.
The mapping inherits the default data load rule, and the description of "SystemGenerated Mappings."
Using Journal Templates to Import DataIn Oracle Hyperion Financial Management, you use journals to adjust data after it hasbeen entered or loaded into base level entities. Journals provide an audit trail ofchanges made in the application and indicate, which users made adjustments andwhich accounts, entities, and time periods are affected.
Oracle Hyperion Financial Data Quality Management, Enterprise Edition enables youto load Financial Management journal entries with journal templates. These templatesare Excel spreadsheets that are formatted as journal entry input screens.
FDMEE journal templates are typically used for the following types of adjustments:
• GAAP adjustments to general ledger files
• Transformations of gross balance accounts into roll-forward accounts (Beg, Add,Del, End)
• Supplemental data entries (Head Count, Ratios, and so on)
Additional Considerations for Loading Journal TemplatesNote the following when loading journal templates:
1. Journals may only be loaded manually by way of the Oracle Hyperion FinancialData Quality Management, Enterprise Edition user interface. You cannot loadjournals in offline or batch mode.
2. The Oracle Hyperion Financial Management journal group is not supported, onlythe journal label. The journal ID from the journal template is used as the journallabel when loading to Financial Management, and the group is left blank.
3. Only one description per journal is loaded, and the load process uses the lastdescription it finds as the description for the journal.
4. The UpCheck feature that was available in the legacy Oracle Hyperion FinancialData Quality Management product for journal data validation is not available inFDMEE. Users can provide similar functionality by using a custom event script.See Using Event Scripts.
Integrating Financial Management JournalsIntegrating Oracle Hyperion Financial Management journal feature with OracleHyperion Financial Data Quality Management, Enterprise Edition involves setting upthe FDMEE application options, and integrating data values.
Financial Management Application OptionsThe following Oracle Hyperion Financial Management application options must beconfigured before using the Journal feature in Oracle Hyperion Financial Data QualityManagement, Enterprise Edition:
• Enable Journal Load
Chapter 3Loading Data
3-106

• Journal Enable JV ID per Entity
• Journal Balancing Attribute
• Journal Status
For information on setting up any of the above options, see #unique_124.
Data ValuesData value is an extra dimension that is only used when integrating with an OracleHyperion Financial Management multi-dimension target system. The name of thedimension is “Value.” The members in this dimension are: [Contribution Adjs], and[Parent Adjs]. When data is loaded to Financial Management, specify a member of thevalue dimension to indicate where the data is loaded. In the Location definition inOracle Hyperion Financial Data Quality Management, Enterprise Edition, specify anentry for the value dimension in the Data Value field. The Data Value is set on theLocation screen by selecting the Search link.
When FDMEE creates the load file, this dimension value is entered for every data lineloaded by this location. You must enter a value in this field to integrate with FinancialManagement, or else the validation fails. The default value is Data Value <EntityCurrency>.
If you load journals to Financial Management, you can specify the value dimensionmember for data loads and for journal loads. The first “;” is the value member used fordata loads, and the second field by “;” is the value member for journal loads.
When using the template, the system picks up the value member by looking for thesecond field delimited by" ;" in the value member field in the location
When Search is selected, FDMEE connects to the Financial Management to get a listof valid data values. FDMEE takes the values from Financial Management and addsrows created by FDMEE that are a concatenation of the original value and “AdjustmentData Values”. FDMEE uses these newly created rows to manage journal loading toFinancial Management.
The rows that FDMEE creates in the Data Value selection screen are:
• [Contribution Adjs];[Contribution Adjs]
• [Contribution Adjs];[Parent Adjs]
• [Contribution Adjs];<Entity Curr Adjs>
• [Contribution Adjs];<Parent Curr Adjs>
• [Parent Adjs];[Contribution Adjs]
• [Parent Adjs];[Parent Adjs]
• [Parent Adjs];<Entity Curr Adjs>
• [Parent Adjs];<Parent Curr Adjs>
• <Entity Curr Adjs>;[Contribution Adjs]
• <Entity Curr Adjs>;[Parent Adjs]
• <Entity Curr Adjs>;<Entity Curr Adjs>
• <Entity Curr Adjs>;<Parent Curr Adjs>
Chapter 3Loading Data
3-107
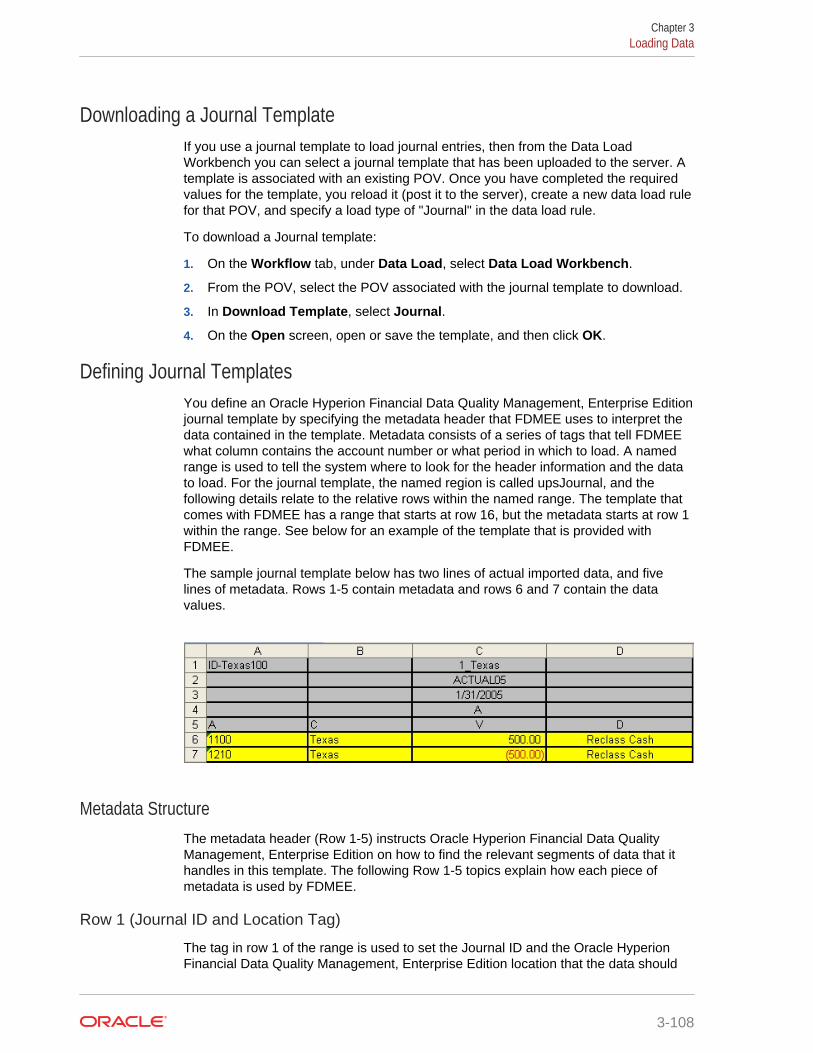
Downloading a Journal TemplateIf you use a journal template to load journal entries, then from the Data LoadWorkbench you can select a journal template that has been uploaded to the server. Atemplate is associated with an existing POV. Once you have completed the requiredvalues for the template, you reload it (post it to the server), create a new data load rulefor that POV, and specify a load type of "Journal" in the data load rule.
To download a Journal template:
1. On the Workflow tab, under Data Load, select Data Load Workbench.
2. From the POV, select the POV associated with the journal template to download.
3. In Download Template, select Journal.
4. On the Open screen, open or save the template, and then click OK.
Defining Journal TemplatesYou define an Oracle Hyperion Financial Data Quality Management, Enterprise Editionjournal template by specifying the metadata header that FDMEE uses to interpret thedata contained in the template. Metadata consists of a series of tags that tell FDMEEwhat column contains the account number or what period in which to load. A namedrange is used to tell the system where to look for the header information and the datato load. For the journal template, the named region is called upsJournal, and thefollowing details relate to the relative rows within the named range. The template thatcomes with FDMEE has a range that starts at row 16, but the metadata starts at row 1within the range. See below for an example of the template that is provided withFDMEE.
The sample journal template below has two lines of actual imported data, and fivelines of metadata. Rows 1-5 contain metadata and rows 6 and 7 contain the datavalues.
Metadata StructureThe metadata header (Row 1-5) instructs Oracle Hyperion Financial Data QualityManagement, Enterprise Edition on how to find the relevant segments of data that ithandles in this template. The following Row 1-5 topics explain how each piece ofmetadata is used by FDMEE.
Row 1 (Journal ID and Location Tag)
The tag in row 1 of the range is used to set the Journal ID and the Oracle HyperionFinancial Data Quality Management, Enterprise Edition location that the data should
Chapter 3Loading Data
3-108

be loaded into. The Journal ID must be placed in row 1 of the Account column. Placethe Location tag in row 1 of the Amount column.
Row 2 (FDMEE Category Tag)
The tag in row 2 of the range sets the Oracle Hyperion Financial Data QualityManagement, Enterprise Edition category into which the journal loads. The categorymust be a valid FDMEE category. The FDMEE Category tag must be placed in theAmount column.
Row 3 (FDMEE Period Tag)
The tag in row 3 of the range sets the period that the data should be loaded into. Theperiod must be a valid Oracle Hyperion Financial Data Quality Management,Enterprise Edition period. This tag must be placed in the Amount column.
Row 4 (Load Method Tag)
The tag in row 4 of the range sets the journal load method within Oracle HyperionFinancial Data Quality Management, Enterprise Edition. To append to an existingjournal with the same Journal ID, type the letter A. If a journal exists with the sameJournal ID within the same FDMEE point of view, then the new journal is appended tothe previously submitted journal. To replace an existing journal with the same JournalID, type the letter R.
If a journal exists with the same journal ID within the same FDMEE point of view, thenthe new journal replaces the old journal. This tag must be placed in the Amountcolumn. The table below defines the possible tags. The "AZ" and "RZ" settings workthe same as the "A" and "R" methods except that all zero value amounts aresuppressed.
Table 3-15 Journal Load Methods and Corresponding Tags
Method Valid Tags
Append Journal A, Append
Replace Journal (default) R Replace
Append journal - Zero Suppress AZ
Replace journal - Zero Suppress RZ
Row 5 (Dimension Tags)
The tags in row five define the dimension that the amounts are loaded into. The tablebelow defines the possible dimension tags.
Table 3-16 Journal Load Method and Corresponding Tags
Oracle Hyperion Financial Data QualityManagement, Enterprise EditionDimension
Valid Tags
Account (Required) A, Account, SrcAcctKey
Center (Required) C, Center, SrcCenterKey
Description (Optional) D, Description, SrcAcctDesc
Chapter 3Loading Data
3-109

Table 3-16 (Cont.) Journal Load Method and Corresponding Tags
Oracle Hyperion Financial Data QualityManagement, Enterprise EditionDimension
Valid Tags
IC Counter Party (Optional) I, IC, ICCoParty
User Defined 1-User Defined 20 (Optional) 1-20, UD1-UD20, UserDefined1-UserDefined20
Amount (Required) V, Amount, SrcAmount
Creating Range Names Within Journal TemplatesA range of columns comes predefined in the template, and you can simply fill out thetop section in rows 5-13 and add any necessary columns. Oracle Hyperion FinancialData Quality Management, Enterprise Edition evaluates the named range to determinethe POV, load method, and data to load.
To create your own journal template, you create a range name that includes allmetadata and data cells, and that begin with the prefix ups. For example, for astandard template, create the range name [upsStandardJV (B16 to J33].
The following illustration depicts a journal template. Note that in this template, themetadata are not in rows 1–5, but in rows 16–20. The template has an upsJournalstarting from row 16. Therefore, rows 16–20 are the first five rows in the upsJournal.Rows 4–14 is a simple interface to assist users with creating the metadata header.Metadata information is entered here, and referenced by the metadata header.
(Enter journal data against the respective columns and by adding more rows within therange. The easiest thing to do is to add rows to the existing range and just use a singlerange, and use the default upsJournal. You add columns to the spreadsheet based onthe dimensionality of the target application.)
The journal template must contain the following dimensions:
• Account—It is the journal account (required).
• Entity—It is the journal entity (required).
• Intercompany— (Optional unless being used by Oracle Financial Consolidationand Close Cloud.)
Chapter 3Loading Data
3-110

• Movement—Data changes from period to period (required)
• Multi GAAP—Data changes from period to period (optional)
• Custom1, Custom2 Dimensions—Optional unless used by the target application
• Amount—(required)
• Description—(optional)
Processing JournalsThe process for processing journals is:
1. Load the journal file in Excel format from the inbox directory.
2. Check whether the POV entered in the journal matches the current POV in OracleHyperion Financial Data Quality Management, Enterprise Edition. The ups range isalso checked.
When a journal is checked in, FDMEE examines the template for all ranges withnames beginning with ups. It then examines and validates the metadata tags foundin each ups range. FDMEE does not check in metadata segments that include aninvalid range.
3. Post the journal.
Loading JournalsTo load a journal:
1. On the Workflow tab, under Data Load, select Data Load Workbench.
When you load a journal, Oracle Hyperion Financial Data Quality Management,Enterprise Edition uses the current POV to determine location, category, andperiod. To use another POV, select another POV on the Data Load Workbench.
2. Click Load Journal.
3. On the Load Journal screen, to browse for a journal file, click Select.
Chapter 3Loading Data
3-111

a. Select a journal template to load from the server to which you uploaded oneand click OK.
When a journal has been successfully loaded, the Check button is enabled.
Note:
When loading journals to an Oracle Financial Consolidation and CloseCloud target, consider that FDMEE does not determine the accounttypes or select the credits/debits. All positive numbers are loaded ascredits and all negative numbers are loaded as debits. If you need todesignate other credit or debit signs for your account type, use thechange sign feature in Data Load Mappings or another customizedmethod to handle credits/debits changes for your journal loads.
b. Optional: To download a journal file, click Download and open or save thejournal file.
c. Optional: To upload a journal file, click Upload, then navigate to the file toupload, and click OK.
4. Click Check to validate and load the journal.
See Checking Journals.
Chapter 3Loading Data
3-112
Checking Journals
Before journals can be posted, they must be checked. This process verifies whetherthe POV entered in the Excel file for the journal matches the current POV. It alsoensures that the ups range is valid. If the validation is successful, the Post button isenabled.
Note:
If the journal import file is not XLS or XLSX, then the check feature is notavailable.
To check a journal:
1. Make sure that a successfully loaded journal file is in the File field.
The journal file must be an Excel (.xls) file type.
2. Click Check.
3. Select Online or Offline for the processing method.
Online checking runs immediately, and offline checking runs in the background.
When a journal is checked, Oracle Hyperion Financial Data Quality Management,Enterprise Edition examines the journal file for all ranges with names beginningwith ups. It then examines and validates the metadata tags found in each upsrange. FDMEE does not check metadata segments that include an invalid range.
When FDMEE validates the journal, you get the following message: "The journalfile checked successfully."
Posting Journals
After a journal has been validated (checked) successfully, you can post the journal.Posting a journal appends or replaces the data displayed in the Import Format screen(as determined by the load method specified in the journal).
To post the journal:
1. Select the journal.
2. Click Post.
When Oracle Hyperion Financial Data Quality Management, Enterprise Editionposts the journal, you get the following message: "The journal file loadedsuccessfully."
Journal Security
If the POV Lock option is enabled, Oracle Hyperion Financial Data QualityManagement, Enterprise Edition administrators and end users are restricted to postingjournals to the FDMEE global POV.
Chapter 3Loading Data
3-113

Loading Data Using a Universal Data AdapterThe Universal Data Adapter enables you to integrate external source table/viewinformation directly into Oracle Hyperion Financial Data Quality Management,Enterprise Edition bypassing the open interface table. This feature allows the user toeasily connect to any source data where they have access to the underlying databasein the case where a prepackaged adapter is not available, or if the pre-packagedadapter does not provide the required data. This feature effectively provides directintegration to any source table or view.
At a high level, the process for integrating a Universal Data Adapter with FDMEE is:
1. In Oracle Database Integrator, create a data server and physical schema for thesource system.
2. Create a logical schema for the appropriate technology of the adapter in ODI andmap it to the physical schema.
3. In FDMEE, register the source system.
4. Create a source adapter.
5. Register the target application (as an Oracle Enterprise Performance ManagementSystem Application).
6. Create an import format (map the source table/view columns and targetdimensions). Then regenerate the ODI Scenario.
7. Create the location.
8. Create the period mapping.
9. Create the category mapping.
10. Create the data load mapping.
Defining a Universal Data Adapter in Oracle Database Integrator (ODI)Universal data adapters depend on Oracle Data Integrator (ODI) to import, transform,and validate end export data into target applications. As such, you need to specify howthe data is seeded to Oracle Hyperion Financial Data Quality Management, EnterpriseEdition in ODI.
Create a Data Server and Physical Schema for the Universal Data Adapter SourceThis section describes how to create a data server and a physical schema foruniversal data adapters provided by Oracle Hyperion Financial Data QualityManagement, Enterprise Edition (Oracle, MSSQL Server, MySQL, Teradata, andDB2).
To create a data server and physical schema for the Universal Data Adapter source:
1. Start the Oracle Data Integrator Studio (ODI).
2. From Topology, then Physical Architecture, and then Technologies, select thetechnology of the data server.
Chapter 3Loading Data
3-114
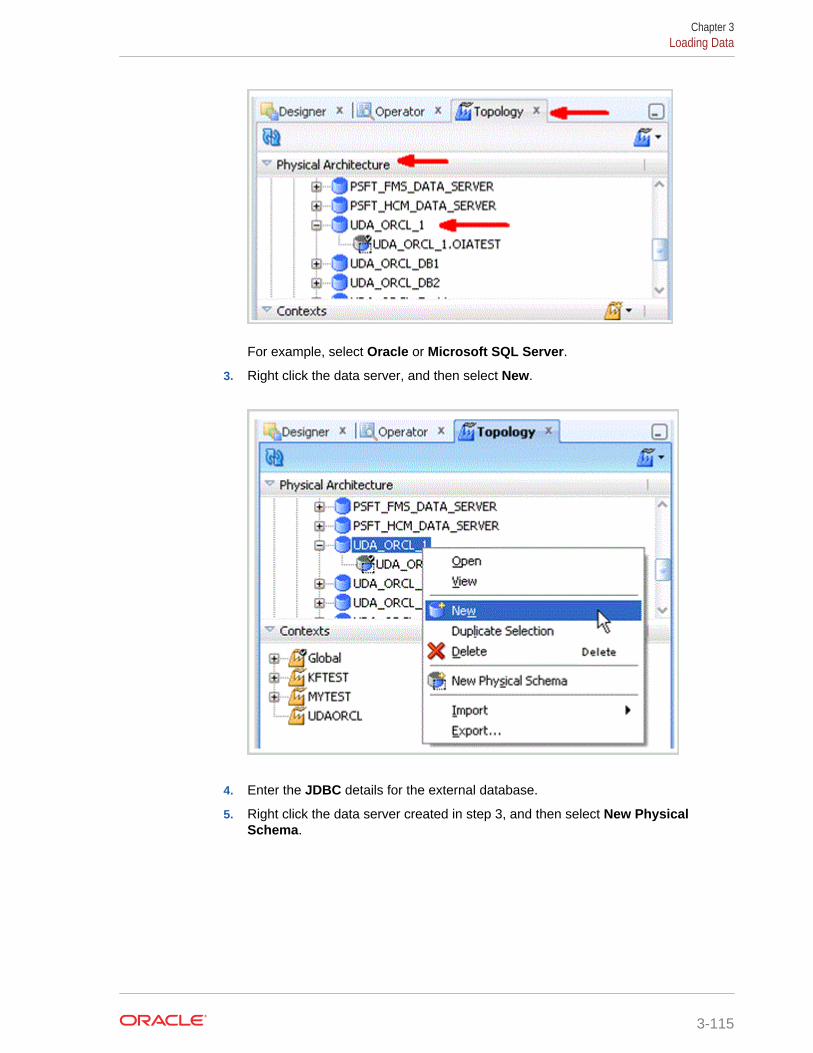
For example, select Oracle or Microsoft SQL Server.
3. Right click the data server, and then select New.
4. Enter the JDBC details for the external database.
5. Right click the data server created in step 3, and then select New PhysicalSchema.
Chapter 3Loading Data
3-115

6. From Topology, then Logical Architecture, and then Technologies, select thetechnology for the logical schema.
Name each logical schema as shown below for each of the databasetechnologies:
• Universal Data (Oracle)—UDA_ORCL
• Universal Data (SQL Server)—UDA_MSSQL
• Universal Data (MySQL)—UDA_MYSQL
• Universal Data (Teradata)—UDA_TD
• Universal Data (DB2)—UDA_UDB
Chapter 3Loading Data
3-116
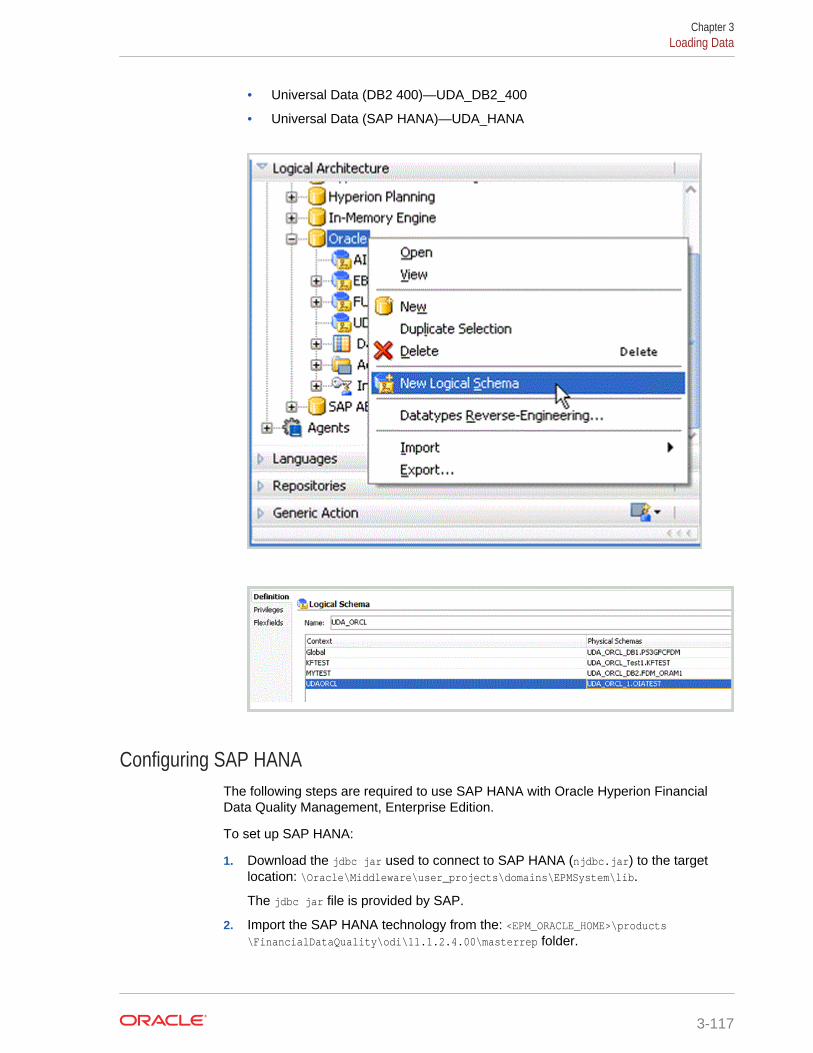
• Universal Data (DB2 400)—UDA_DB2_400
• Universal Data (SAP HANA)—UDA_HANA
Configuring SAP HANAThe following steps are required to use SAP HANA with Oracle Hyperion FinancialData Quality Management, Enterprise Edition.
To set up SAP HANA:
1. Download the jdbc jar used to connect to SAP HANA (njdbc.jar) to the targetlocation: \Oracle\Middleware\user_projects\domains\EPMSystem\lib.
The jdbc jar file is provided by SAP.
2. Import the SAP HANA technology from the: <EPM_ORACLE_HOME>\products\FinancialDataQuality\odi\11.1.2.4.00\masterrep folder.
Chapter 3Loading Data
3-117

3. Create the SAP Model in the model folder " Universal Data Adapter Model" withthe following values:
• Name––HANA source
• Code––HANA_SOURCE
• Technology––SAP HANA
• Logical Schema––UDA_HANA
Note:
If the model folder "Universal Data Adapter Model" is not available, import itfrom the following location: <EPM_ORACLE_HOME>\products\FinancialDataQuality\odi\11.1.2.4.00\workrep.
4. Import the HANA Adapter Project.
5. Create a connection to HANA, and map the logical schema UDA_HANA to it in thecontext.
Working with a Universal Data Adapter in FDMEEThese sections explains how to configure and use universal data adapters in OracleHyperion Financial Data Quality Management, Enterprise Edition.
Working with Universal Data Adapter Source SystemsBefore you use the universal data adapter in Oracle Hyperion Financial Data QualityManagement, Enterprise Edition, register the data source from which you want toimport data.
FDMEE supports data extraction from the following data sources:
• Oracle Data Source – UDA_ORCL
• MSSQL Server Data Source – UDA_MSSQL
• MySQL Data Source – UDA_MYSQL
• Teradata Data Source – UDA_TD
• DB2 Data Source – UDA_UDB
• DB2 400 Data Source - UDA_DB2/400
• SAP Hana – UDA_HANA
To add a source system for a universal data adapter:
1. On the Setup tab, under Register, select Source System.
2. In Source System, click Add.
3. Enter the source system details:
a. In Source System Name, enter the source system name.
Enter the name you want to use for the Data Source, such as "OracleReceivables Data" or "MYSQL Payables Data", which indicates the specificdata source.
Chapter 3Loading Data
3-118

b. In Source System Description, enter a description of the source system.
c. In Source System Type, select the type of source system of the universaldata adapter.
d. In ODI Context Code, specify the context code defined in ODI for theconnection to the specific instance.
The ODI context code refers to the context defined in Oracle Data Integrator.A context groups the source and target connection information.
When data is sourced from another instance of a same seeded technology(Oracle, MSSQL, MYSQL, Teradata, DB2, or DB2 400), then another sourcesystem of same technology type with a different Context. In the Context, theyshould map the logical schema belonging to the source system type to theother instance.
4. Click Save.
After you add a source system, select the source system in the summary region,and the details are displayed in the lower pane.
Working with Universal Data Adapter Source Systems and Target ApplicationsThe Oracle Hyperion Financial Data Quality Management, Enterprise Edition TargetApplication feature requires no additional steps when working with universal dataadapter source systems.
Creating the Source AdapterA source adapter is an integration framework in Oracle Hyperion Financial DataQuality Management, Enterprise Edition that enables you to extract data from thesource system in a flexible and customizable manner. When you configure OracleData Integrator with a universal source adapter, ODI extracts the data directly to atemporary data table used for transforming data from source to target in a data ruleexecution (tdataseg_t).
Chapter 3Loading Data
3-119

As another step in implementing the universal data adapter feature, create a definitionthat instructs how data is populated in FDMEE from the source table through ODI.
For the source adapter, FDMEE seeds and sets up the source adapter for thefollowing six data sources:
• Oracle
• MSSQL
• MYSQL
• Teradata
• DB2
• DB2 400
• SAP Hana
To create the source adapter:
1. On the Setup tab, under Register, select Source Adapter.
2. In Source Adapter, from the Source Adapter summary task bar, click Add.
A blank entry row is added to the Source Adapter summary section.
Complete the following steps in the Source Adapter details section.
3. In Adapter Key, enter a user defined identifier for the adapter.
4. In Adapter Name, enter a user defined name for the adapter.
5. In Source System Type, select the technology type:
Available options:
• Oracle
• MSSQL
• MYSQL
• Teradata
• DB2 UDB
• DB2 400
• SAP Hana
Based on the source system type, the following fields are populated automatically:
• ODI Package Name
• ODI Project Code
6. In Table Name, specify the source table name.
7. Click Save.
Adding Source ColumnsTo add a source column:
1. On the Setup tab, under Register, select Source Adapter.
2. Select the universal data adapter.
Chapter 3Loading Data
3-120

3. Click Import Table Definition to return all column details from the source table.
4. In Context Code, specify the context, and then click OK.
The ODI context code refers to the context defined in Oracle Data Integrator. Acontext groups the source and target connection information.
When the context is selected, all the columns of the source table are displayed inthe Source Column tab.
5. Optional: in Column Name, enter the source column name.
By default, the Column Name is populated automatically when you select step 3Import Table Definition).
When using a view as a source for the Universal Data Adapter, don’t includecolumn names that are reserved words for the selected technology. For example,the work “Year” is a reserved word for Teradata, and should not be used in a view.
6. Based on the column type, from Classification, select the classification:
For example, select:
• Amount
• Year
• Period
• Period Number
7. Optional: in Display Name, enter the display name used for the import format.
By default, the Display Name is populated automatically when you select step 3(Import Table Definition). Typically it is the function name of the column.
Defining ParametersUse the Parameters tab to specify the list of parameters (filter) for the universal dataadapter. The parameter definition includes a non-translated parameter name and atranslated prompt. The prompt is used for display on the data rule page.
To add a parameter:
1. On the Setup tab, under Register, select Source Adapter.
2. Select the universal data adapter.
3. In the details section, select the Parameters tab.
4. From the Parameters task bar, select Add.
Entry fields are displayed for the Parameter Name, Parameter Data Type,Condition, Column Name, Default Value, and Parameter Prompt.
5. In Parameter Name, enter the parameter name.
For example, enter p_actual_flag. This is the name of the parameter in the ODIproject.
6. In Parameter Data Type, select the data type of the parameter
Available data types:
• Char
• Number
Chapter 3Loading Data
3-121

• Date
7. In Condition, specify the type of the parameter:
• Explicit—You re prompted to provide an explicit value in the Data Rule, whichis matched exactly in the source table to pull data.
• Between—You are prompted to provide a between values in the Data Rule,and these range of values are matched in the source table to pull data.
In—When this type is selected, you prompted to provide multiple values inData Rule, and these values are matched in the source table to pull data.
• Like—You are prompted to provide a string in the Data Rule. Values startingwith the string are matched in the source table to pull data.
8. In Column Name, enter the column name to use as a filter.
9. In Default Value, enter the value to default on the Data Load Rule screen.
When entering an "Explicit" value, use the 'X','XX,'XXX' format.
When entering a "Between" value, use the ‘X’ and ‘XX’ format.
10. In Parameter Prompt, enter the label to display for the parameter on the DataRule screen.
When a new parameter is added and you are in a multi-language environment,then set the browser locale to the appropriate language and edit the prompts asneeded in that language.
11. Click Save.
12. Click Generate Template Package.
This example shows a typical Structure of Fixed Asset Data Table:
Chapter 3Loading Data
3-122

In the data structure of the fixed asset table, you could add the yellow marked columnsas parameters to use as a filter in data rules.
On the Source Adapter screen using the table above, you might create parameters asfollows:
Defining URLs for Drill ThroughOracle Hyperion Financial Data Quality Management, Enterprise Edition provides aframework for using URLs for drill through. You click the hyperlink in the amount cell,and the source system is launched in a new EPM Workspace tab or a new window.Multiple drill through URLs are provided to drill to different pages in the source systembased on the import format mapping.
To add a drill through URL:
Chapter 3Loading Data
3-123

1. On the Setup tab, under Register, select Source Adapter.
2. In Source Adapter, select the Drill URL tab.
3. On the Drill URL task bar, select Add.
Entry fields are displayed for the Drill URL Name, Drill URL, Request Method, andDrill URL Prompt columns.
4. In Drill URL Name, enter a user defined name for the drill through URL.
5. In Drill URL, enter the URL used for the drill through.
Enter the URL without the server and port information. The URL must contain theparameter name and column name from the TDATASEG table enclosed in thesymbol $.
For example, enter: LEDGER_ID=$ATTR1$&GL_PERIOD=$ATTR2$.
In the above example the value of ATTR1 is passed as a value for the LEDGER_IDparameter, and ATTR2 is passed as the value for the GL_PERIOD parameter.Parameters are separated by the "&" character.
To specify the request-response between a client and server for the drill URLformat, enter either:
• GET—Form data is encoded into the URL. For example, specify: GET@http://www.oracle.com/. If no method is specified, then GET is the assumed request-response.
• POST—Form data is displayed in the message body. For example, specify:POST@http://www.oracle.com/.
6. In the Drill URL Prompt, enter a user-defined prompt for the drill-through prompt.
For example, enter Default.
Universal Data Adapter Source Systems and Import FormatsIn the import format, you can map the source system and target application, and mapsource columns and target dimensions After creating or making any changes to theimport format, click "Regenerate ODI Scenario."
Chapter 3Loading Data
3-124

Universal Data Adapter Source Systems and LocationsWhen working with universal data adapter source systems, no additional steps arerequired in Oracle Hyperion Financial Data Quality Management, Enterprise Editionlocations.
The location typically supports the import format, which has been already created forthe universal data adapter.
Data Load Mapping for Universal Data Adapter Related SourcesData load mapping for the specified dimensions are similar to file or any other sourcesystem.
Data Load Rules for Universal Data Adapter Related SourceData Load rules can be executed on an as needed basis to load balances from sourceto target applications.
Source Adapter Parameters
Parameters defined in the Source Adapter page are available for the user to select indata load mapping rules:
Chapter 3Loading Data
3-125

Category Mappings
You can create categories based on various target scenario dimension members.
To do this, you create required categories with assigned scenario members. Thesecategories are captured during the Data Rule creation.
Period Mappings
On the Source Mapping tab, you select the source system for the universal dataadapter, and specify the mappings as needed. In the following example, GL Year, GLPeriod and, GL Period Number are matched with the Source Columns classified asYear, Period Number, Period respectively.
Note that the GL Year, GL Period, and GL Period Number columns have beenmapped to the fields classified on the Source Adapter screen for the source tablecolumns as shown below.
Chapter 3Loading Data
3-126

Multi-Periods
Oracle Hyperion Financial Data Quality Management, Enterprise Edition supportsmulti-period data loading for external table/view data.
To set up multiple period data loading for external table/view data:
1. On the Source Adapter screen, classify the source columns for Year, Period, andPeriod Number.
2. On the Period Mapping screen, define the source mappings.
For more information, see Defining Period Mappings.
3. On the Data Load Rule, from Period Mapping Type, select Explicit.
4. In Calendar, select the calendar specified on the Source Period Mapping screen.
Chapter 3Loading Data
3-127

Example 3-1 Executing the Data Load Rule
When executing the Data Load Rule, specify the range of periods.
Integrating Data Relationship Management with FDMEEOracle Data Relationship Management functions as a hub where reporting structuresare maintained, analyzed, and validated before moving throughout the enterprise. It isa change management solution for building and retaining consistency within master
Chapter 3Loading Data
3-128

data assets. Used in combination with Oracle Hyperion Financial Data QualityManagement, Enterprise Edition, you can:
• export dimensions and hierarchies from an ERP system to Data RelationshipManagement.
• import data load mapping from Data Relationship Management for integrationbetween ERP systems and EPM systems.
Setting up the IntegrationOracle Data Relationship Management integration with Oracle Hyperion FinancialData Quality Management, Enterprise Edition is enabled in the Target Application.When Data Relationship Management integration is enabled, you can export metadatato Data Relationship Management and import member mapping from DataRelationship Management.
To begin integrating Data Relationship Management with FDMEE, apply DataRelationship Management Release 11.1.2.4.340 Patch Number 23012151. Refer tothe readme for patch 23012151 for install instructions. The FDMEE applicationtemplate is installed as part of the Data Relationship Management installation. Youuse the template to configure the Data Relationship Management metadata to enableintegration with FDMEE.
To register target applications:
1. On the Setup tab, under Register, select Target Application.
2. In Target Application, in the Target Application summary grid, click Add.
3. Add a target application or select a target application.
For information on adding a target, see Registering Target Applications.
4. Click Enable DRM.
5. From Application Details, select the DRM Options tab.
6. In Adapter API URL, specify the full Data Relationship Management API adapterURL.
The adapter URL specifies the Data Relationship Management application to usefor internal communication with the Web Service.
7. In Web Service URL, specify the URL of the full Data Relationship ManagementWeb Service Definition Language (WSDL) of the web service used to access theData Relationship Management web service.
Chapter 3Loading Data
3-129
Enter the machine computer name of the Web Services application, and the portnumber to which oracle-epm-drm-webservices is deployed.
8. In Username, specify the user name used to access the Data RelationshipManagement.
9. In Password, specify the password used to access the Data RelationshipManagement.
10. In Import to DRM Profile (Metadata), specify the name of the import profile.
Import profiles update dimensions from Data Relationship Management, interfacetables, and flat files. Import profiles also enable you to merge dimension updatesmerged with the shared library, or replace the entire contents of the dimension.Import profiles may map the columns from the source to their correspondingEPMA properties.The Import profile contains the FDMEE target application name, IP address, andData Relationship Management target application name.
The import profile can be overridden in the Integration option tab in locations.
Import profiles are built in Data Relationship Management. Data RelationshipManagement ships template profiles, which can be used as is or customized.Template profile names are stored in FDMEE.
11. In Export from DRM Profile (Mapping), specify the name of the export profile.
An export profile enables you to export segment values and hierarchies from DataRelationship Management. Export profiles are based on export types which outputdata in different formats. Export types can include hierarchy, comparison,integration, version, property, and log exports.
The DRM Export Profile contains the FDMEE target application name, IP address,and Data Relationship Management target application name.
The export profile can be overridden in the Integration option tab in locations.
Export profiles are built in Data Relationship Management. Data RelationshipManagement ships template profiles, which can be used as is or customized.Template profile names are stored in FDMEE.
12. In Target Application, click Save.
13. Click Refresh DRM Profiles to show the list of Import Profiles, Export Profiles,and domains in list of values.
14. Define the dimension details.
See Defining Application Dimension Details.
Data Relationship Management and FDMEE LocationsBy default Oracle Data Relationship Management import and export profiles aredefined at the application level. If you have multiple source systems from which toimport and export Data Relationship Management data, you can select import orexport profiles at the location level instead of the application level. This enables you tospecify the Oracle Hyperion Financial Data Quality Management, Enterprise Editionlocation context so that only export mappings for the source values coming from aselected source system (for example, EBS or PeopleSoft) are made. Different DataRelationship Management import and export profiles can be selected on theIntegration Options tab of the Location option.
Chapter 3Loading Data
3-130
Data Relationship Management and FDMEE Metadata RulesDimensions can be imported into Data Relationship Management where users canthen edit the properties and maintain the dimensions. This information can then beexported out of Data Relationship Management to other EPM applications.Dimensions map to hierarchies in Data Relationship Management using an OracleData Relationship Management import profile.
Oracle Hyperion Financial Data Quality Management, Enterprise Edition supportsloading dimensions and hierarchies from ERP systems to Data RelationshipManagement. Key points of the metadata load include:
• You must specify the Data Relationship Management domain for each dimension.This domain is required if the Data Relationship Management integration isenabled for the target application. From the LOV, select the appropriate DRMDomain.
• The dimension name is the target dimension name.
FDMEE uses the effective date to determine the hierarchy version.
• FDMEE does not concatenate the version to the parent members because DataRelationship Management supports multiple hierarchies.
To create metadata rules for the Data Relationship Management:
1. On the Workflow tab, under Metadata, select Metadata Rule.
Note:
You cannot create multiple metadata rules for the same ledger or businessunit for each target application.
2. From the POV bar, select the location to use for the metadata rule.
3. Click Add.
A blank line is displayed at the top of the Dimension Mappings summary grid.
4. In the Integration Option Mapping details area, from Dimension, select thedimension.
The dimensions listed are based on the import format.
When a Dimension is selected, the Dimension Classification field prefills.
5. In DRM Domain, select the domain name.
Domains are created by administrators and associated with versions by DataManager role users or version owners.
Examples of domains include Accounts, Entities, Departments, Products,Employees, and Projects.
6. Define the mapping details for each dimension that you select.
7. Repeat steps 4-6 for each dimension.
8. Click Save.
Chapter 3Loading Data
3-131

Importing Data Load Mappings from Data Relationship ManagementYou can import member mappings from Oracle Data RelationshipManagement .Import member mappings from Data Relationship Management supportmerge or replace modes, along with validate or no validate options for targetmembers.
Once the mappings have been validated and imported, the imported maps aredisplayed on the Data Load Mapping screen.
To import member mappings from Data Relationship Management:
1. On the Workflow tab, under Data Load, select Data Load Mapping.
2. From Import options, select Import from DRM.
3. From Import Mode, select the import mode:
• Merge—Overwrites the data in the application with the data in the data loadfile.
• Replace—Clears values from dimensions in the data load file and replaces itwith values in the existing file.
4. From Validation, select to validate the member mappings.
Validation ensures that all data in the imported GL has a corresponding mapping.
5. In Execution Mode, select the mode for executing the import:
• Online—Process the import immediately.
• Offline—Runs the import in the background.
6. Click OK.
The following message is displayed: "Import Map from DRM has been submittedsuccessfully."
Chapter 3Loading Data
3-132
After the successful completion of the Import Process from DRM, data loadmappings are available for edits and updates.
You can check the status of the import using Process Details.
Financial Close Management Integration with FDMEEAs part of the overall Financial Close process, Oracle Hyperion Financial Data QualityManagement, Enterprise Edition enables data load from Enterprise Resource Planning(ERP) systems and files to EPM Applications. Oracle Hyperion Financial CloseManagement, which manages the period end close activities, initiates data loadactivities from within Financial Close Management. As the financial close processesare time-bound and work flow driven, Financial Close Management users trigger theprocesses based on task alerts and notifications.
Integration between FDMEE and Financial Close Management is achieved using theinteractive mode. This type of integration enables Financial Close Management usersto reach the Data Load Workbench of FDMEE by clicking a task link (URL) in FinancialClose Management.
In this scenario, a user may respond to an email notification of a task to load data.When a user clicks the link (URL) in the mail, he or she can access the FDMEE fromwhich to load data.
The Financial Close Management user transfers control to the Data Load Workbenchand can continue with the rule execution process in an interactive way.
An example of the link (URL) is:
http://<YourServer>:19000/workspace/index.jsp?
module=aif.launch&povLocationName=COMMA7DIM&povPeriodName=Jan-05&povCategoryName=A
ctual&povRuleName=COMMA7DIM
Parameters passed to the Data Load Workbench are:
• povRuleName—Data Rule Name
• povLocation—Location
• povCategory—Category
• povPeriodName—Period
When the URL is defined in Financial Close Management, note the following:
• The URL requires all parameters.
• When a parameter has a space, enter the parameter with the spaces, but do notspecify quotation marks ("()") around the parameter. (Parameters are passed in astandard URL request format).
• The delimiter is "&" in the URL.
Data Load, Synchronization and Write BackRelated Topics
• Overview
• Synchronizing and Writing Back Data
Chapter 3Data Load, Synchronization and Write Back
3-133

OverviewOracle Hyperion Financial Data Quality Management, Enterprise Edition supports avariety of ways for importing data from a range of financial data sources, and thentransforming and validating the data:
• Data Loading—define the mappings from a source system to a target system; drillthrough and view data in the ERP source system from an EPM target application;load data from file-based source systems to an EPM target application; define dataload rules, which describe how to extract and push data from source to targetsystems.
• Synchronizing—move data between the EPM applications irrespective of thedimensionality of the application without having to create a data file from the EPMsource application.
• Write-back—write-back budget data to the source system from all EPMapplications to ERP applications. This feature offers significant advantages, suchas writing back budgets created in Oracle Hyperion Planning to Peoplesoft or theOracle E-Business Suite ERP GL, or moving adjustment journals from OracleHyperion Financial Management to ERP systems like E-Business Suite orPeoplesoft. Write-back budget data is also available to a file-based source systemfrom Planning, Oracle ASO Essbase, and Essbase ESO applications.
Synchronizing and Writing Back DataData rules must be defined to load from an Enterprise Resource Planning (ERP) to anEPM application, synchronize data between two EPM applications, or write back froman EPM to an ERP system.
• EPM Applications to EPM Applications (data synchronization)—Moves databetween EPM applications, for example, copying data from Oracle HyperionFinancial Management to Oracle Essbase for reporting.
• EPM Applications to Enterprise Resource Planning (ERP) Applications (write-back)—Moves data from EPM Applications to ERP applications, for example,writing back budgets created in Oracle Hyperion Planning to Peoplesoft or OracleE-Business Suite ERP GL, or moving Adjustment Journals from FinancialManagement or the Accounts Reconciliation Manager to ERP Systems like E-Business Suite or Peoplesoft.
Data SynchronizationData synchronization enables you to synchronize and map data between EPM sourceto target applications irrespective of the dimensionality of the application simply byselecting the source and target EPM application, and then mapping the data. Giventhe powerful mapping features already available, the data can be easily transformedfrom one application to another application.
Tasks enabled by the data synchronization:
• Create and modify synchronizations.
• Select source and target applications.
• Define mappings between sources and targets.
Chapter 3Data Load, Synchronization and Write Back
3-134

• Copy data from Oracle Hyperion Financial Management to Oracle Essbase forreporting purposes.
• Copy consolidated data from Financial Management to Oracle Hyperion Planningfor future planning.
• Copy from one Financial Management application to another FinancialManagement used for different statutory reporting purposes.
• Write data from Oracle Enterprise Performance Management System to EnterpriseResource Planning (ERP) applications.
• Validate synchronizations.
• Execute synchronizations.
• View logs of synchronization activities.
At a high level, the steps to synchronize data in Oracle Hyperion Financial DataQuality Management, Enterprise Edition include:
1. Import Format—Select the source and target EPM System applications.
The dimensional mapping is also defined in the import format. You map thedimensions that comprise each source and target application so that thesynchronization can recognize all relevant elements.
2. Data Load Rule—Define the source filter parameters.
3. Execute—When the data rule is executed, data from the source EPM System isextracted to a file. The data can be imported and processed using the data loadworkflow process.
4. Export—Synchronizes the data.
Using Data Load Rules for SynchronizationWhen synchronizing data, you specify which records (rows) are extracted from thesource EPM Application to the target EPM Application.
Additionally, you can:
• Specify the source filter option to select a dimension, and then enter the filtercriteria for each dimension.
• Browse and select members within a dimension.
• Load data to a single period or a range of periods.
• Add or change any target options for the application.
To define the data load details for a target EPM or Enterprise Resource Planning(ERP) system (file-based source system):
1. In Name, enter the data load rule name.
2. In Category, select a category.
The categories listed are those that you created in the Oracle Hyperion FinancialData Quality Management, Enterprise Edition setup, such as "Actual." See Defining Category Mappings.
3. Optional: Enter a description.
4. In Plan Type, select the plan type.
Chapter 3Data Load, Synchronization and Write Back
3-135

FDMEE supports data loads for up to six plan types (including custom and OracleHyperion Planning applications.)
5. In Period Mapping Type, select Default or Explicit.
6. Optional: Add or change any source filter options.
See Defining Source Filters.
7. Optional: Add or change any target options.
See Registering Target Applications.
8. Click Save.
Using Default or Explicit Period Mapping Types
You can run data rules for one period or a range of them. The global or applicationperiod mappings of the target application are used as in the standard data loadprocess.
Note:
When specifying a period range, make sure the start and ending periods arewithin a single fiscal year. When data ranges cross fiscal years, duplicate dataresults.
The source periods to be extracted are determined by the period mapping type.
Default Period MappingDefault period mappings default to the list of source application periods using theapplication or global period mappings based on the period key. The list of sourceperiods is added as Year and Period filters. For example, you can load data loadingfrom Oracle Hyperion Financial Management to Oracle Essbase.
In the following example, Financial Management Application Period Mapping areloaded to Essbase Application Period Mapping for the period Jan-14 to Mar-15:
Table 3-17 Financial Management Application Period Mapping
Period Year Month
1/1/2014 2014 Jan
2/1/2014 2014 Feb
3/1/2014 2014 Mar
Table 3-18 Essbase Application Period Mapping
Period Year Month
1/1/2014 FY14 January
2/1/2014 FY14 February
3/1/2014 FY14 March
Chapter 3Data Load, Synchronization and Write Back
3-136

Using the example above, when the data is loaded, Oracle Hyperion Financial DataQuality Management, Enterprise Edition:
1. Uses the Essbase period mapping to determine the list of period keys: 1/1/2014,2/1/2014, and 3/1/2014.
2. Determines the Financial Management period mapping, and inserts them into theAIF_PROCESS_PERIODS table.
Note:
You can have multiple source Financial Management period mappings to agiven target Essbase period when the target application has a larger timeframe (for example, Quarter) than the source period (for example, byMonth).
3. Adds 2014 as a Year filter and Jan, Feb, Mar as Period filters.
Explicit Period MappingThe Explicit method for loading data is used when the granularity of the source periodsand target application periods are not the same.
For example, you need to load data from an Oracle Hyperion Financial Managementapplication with monthly periods and an Oracle Hyperion Planning with quarterlyperiods.
In the following example, Financial Management Application Period Mapping areloaded to Oracle Essbase Application Period Mapping for the period Jan-14 to Mar-15:
Table 3-19 Financial Management Application Period Mapping
Period Year Month
1/1/2014 2014 Jan
2/ 1/2014 2014 Feb
3/1/2014 2014 Mar
4/1/2014 2014 April
5/1/2014 2014 May
6/1/2014 2014 June
Table 3-20 Planning Application Period Mapping
Period Year Month
1/1/2014 FY14 Q1
4/1/2014 FY14 Q2
The result of this method of mapping:
Chapter 3Data Load, Synchronization and Write Back
3-137

Table 3-21 Result of loading Financial Management Application Period Mapping to PlanningApplication Period Mapping
Period Year Month Fiscal Year Quarter
1/1/2014 2014 Jan FY14 Q1
2/1/2014 2014 Feb FY14 Q1
3/1/2014 2014 Mar FY14 Q1
4/1/2014 2014 April FY14 Q2
5/1/2014 2014 May FY14 Q2
6/1/2014 2014 June FY14 Q2
Using the example above, when the data is loaded, Oracle Hyperion Financial DataQuality Management, Enterprise Edition:
1. Determines the period key which is 1/1/2014, 4/1/2014.
2. Determines the Financial Management from the Financial Management periodmapping to these period keys.
This mapping returns Year: 2014 and Periods: Jan. Feb, Mar, Apr, May, and Jun.
3. Adds Year and Period as source filters.
Defining Source Filters
Source filters enable you select a dimension, and then enter filter criteria for eachdimension.
You can define source filter options to specify the subset of budget data to extract fromyour Oracle Hyperion Planning application and load it to the general ledger.
To define the EPM source filter options:
1. In Source Filters, click .
2. Select the Dimension Name.
3. To assign a filter condition, perform an action:
• Enter a member name or filter condition in the Filter Condition text box.
For example, enter a member name or filter condition using Oracle Essbasesyntax. Depending on the dimension, you can select one or more members asa filter condition used for extracting the budget data. For example, for theEntity dimension, you may select the following members: E1, E5, and E6. Forinformation on Essbase syntax, see the Oracle Essbase DatabaseAdministrator's Guide.
• Click to display the Member Select screen and select a member usingthe member selector. Then, click OK.
The Member Selector dialog box is displayed. The member selector enables youto view and select members within a dimension. Expand and collapse memberswithin a dimension using the [+] and [-].
The Selector dialog box has two panes—all members in the dimension on the leftand selections on the right. The left pane, showing all members available in the
Chapter 3Data Load, Synchronization and Write Back
3-138
dimension, displays the member name and a short description, if available. Theright pane, showing selections, displays the member name and the selection type.
You can use the V button above each pane to change the columns in the memberselector.
You can also click Refresh Members to show the latest member list.
Note:
Assign filters for dimensions. If you do not assign filters, numbers from thesummary members are also retrieved.
To use the member selector:
a. In the list of available dimensions and members on the left, select a member
and click .
b. To deselect a member from the list of members, click .
c. To add special options for the member, click and select an option.
In the member options, “I” indicates inclusive. For example, “IChildren” addsall children for the member, including the selected member, and“IDescendants” adds all the descendants including the selected member. Ifyou select “Children,” the selected member is not included and only itschildren are included.
The member is moved to the right and displays the option you selected in theSelection Type column. For example, “Descendants” displays in the SelectionType column.
Tip:
To clear all members from the list of selections, click .
d. Click OK twice to continue defining the source filter details.
The selected member is displayed in Essbase syntax in the Filter Condition field.
4. Click Save.
5. Optional: Change or add any target options.
Defining Target Options
Target options define the options for importing a journal.
Chapter 3Data Load, Synchronization and Write Back
3-139
Note:
For information on the required target options for data load rules to write back,see Defining Application Options for Essbase and Planning.
To define target Enterprise Resource Planning (ERP) source system options:
1. For Oracle Fusion and E-Business Suite source systems:
a. Select whether to create a budget journal.
b. Enter the Budget or click to select the budget.
c. Enter the Budget Organization or click to select the budgetorganization.
2. Click Save.
3. For PeopleSoft Enterprise Financial Management source systems, enter or click
to make selections:
a. Budget Scenario
b. Ledger Group
c. Ledger
4. Click Save.
5. Execute the data load rule.
Executing Data Synchronization
You execute the data synchronization by clicking Execute on the Data Load Rulescreen. When the data load rule is executed, the data is extracted from the OracleEnterprise Performance Management System application based on the filter criteriaspecified in the data rule. The data extracted is written to a data file. If multiple periodsare specified in the source filter, then the amount columns are written as multiplecolumns. The data file contains the header record with the list of dimensions in theorder in which they appear in the file. The file is created in the data folder with thename: EPM App Name_PROCESS_ID.dat.
Note:
When a data load rule is run for multiple periods, export step occurs only oncefor all of the period.
Data Import
The data import process imports the data file created during the extraction process.The import process evaluates the import format based on the header record in the fileand mapping of the source to target dimension.
Chapter 3Data Load, Synchronization and Write Back
3-140

When the number and order of columns is determined, the column position is stored inthe import format tables. File import expressions and scripts remain available duringimport.
Mapping and Export
During the mapping and export, Oracle Hyperion Financial Data Quality Management,Enterprise Edition:
• Imports data from Oracle Hyperion Planning and writes it to FDMEE staging table.
• Applies the necessary transformation in the staging table.
• Imports data from Planning and writes it to FDMEE staging table.
• Applies the necessary transformation in the staging table.
• Exports data from the FDMEE staging table to a general ledger interface table.
You use the mapping to format data in journal import tables.
• For Oracle Hyperion Financial Management, FDMEE extracts data and ICPtransactions. FDMEE does not extract cell text or line-item detail.
After a successful execution of the data load rule used to write back data, log in to thegeneral ledger source system and run the budget import process in the general ledger.
Drill-Through to Source
Oracle Hyperion Financial Data Quality Management, Enterprise Edition provides theframework to drill through from the Oracle Enterprise Performance ManagementSystem applications back to the general ledger from the EPM System source. Drillthrough works only for data loaded through FDMEE.
For example, you can drill through from where data was loaded from Oracle E-Business Suite to Oracle Hyperion Financial Management, and then from FinancialManagement to Oracle Essbase. When you viewing Essbase data in Oracle SmartView for Office, you can drill from the Essbase data cell and go to the FDMEE landingpage.
Write-BackFinancial budgeting information often must be compared with and controlled withactuals and stored in the general ledger system. In Oracle Hyperion Financial DataQuality Management, Enterprise Edition, write-back functionality is available with theExport step of the data load process. In this way both loading to the Oracle HyperionPlanning application and write-back to General Ledger are performed in as a singleconsistent process.
Data Load Rules for Write-BackYou can write back budgets created in Oracle Hyperion Planning to their ERP GeneralLedger or a flat file. The write-back functionality is available with the Export step of thedata load process. In this way both loading to the Planning application and write-backto General Ledger are performed in as a single consistent process.
For Oracle E-Business Suite, multiple ledgers can be used for the data load to writeback with the following criteria:
• Ledgers must share the same chart of accounts.
Chapter 3Data Load, Synchronization and Write Back
3-141

• "Actuals" can be posted to multiple ledgers.
• "Budget" is associated with one ledger. One ledger can be posted from only onedata load rule.
For Peoplesoft, "Actuals" can be posted without specifying the Budget Scenario. Inaddition, the write-backs can be made to multiple business units.
Available Source to Target Write-BacksThe target system for a write back must be a file-based application that usesdimensions that match the General Ledger Chart of Accounts. You can create the file-based application using the Custom Target Application feature (see Creating aCustom Target Application). When creating the application, ensure that the Export toFile option is “Yes.”
You can define data load rules to write back for Oracle Hyperion Planning, OracleEssbase aggregate storage (ASO), and Essbase block storage (BSO) 11.1.2.xapplications only as the source and for these target source systems:
• PeopleSoft Enterprise Financial Management
• Oracle E-Business Suite
• Fusion General Ledger
• Oracle Hyperion Financial Management to Oracle E-Business Suite
Budget & Actuals may be exported to Peoplesoft interface table:PS_HPYPB_ACCT_LN. Peoplesoft provides a Generate Journal Process only forBudget data. There is no process pre-defined to Generate Journal for Actual data. Youmust write a custom Journal template for the actual data.
Other Considerations:
• Data load to write back is supported only for Planning, Essbase aggregatestorage, and Essbase block storage 11.1.2.x applications only. Applicationscreated in earlier releases are not supported.
• For BSO Essbase applications, Oracle Hyperion Financial Data QualityManagement, Enterprise Edition requires that the Period dimension be designatedas "Dense." Other dimensions can be Dense, but Period must be designated asdense to write back.
• For E-Business Suite source systems, you can post to budgets with or withoutbudget journals.
• Only monetary amounts may be written back to the source ERP’s that provide asource adapter. If statistical amounts, or other data needs to be written back, thenuse scripting.
• You cannot create data load rules to write back to PeopleSoft Human CapitalManagement source systems.
• FDMEE loads data into the specific data interface table. You must then run thebudget load routines provided by Oracle Fusion, E-Business Suite, or PeopleSoftEnterprise Financial Management.
• Allocation from a source amount to multiple target amounts is not provided.
• Data Load rules to write-back can be performed without first loading data from aGeneral Ledger source to an EPM target.
Chapter 3Data Load, Synchronization and Write Back
3-142
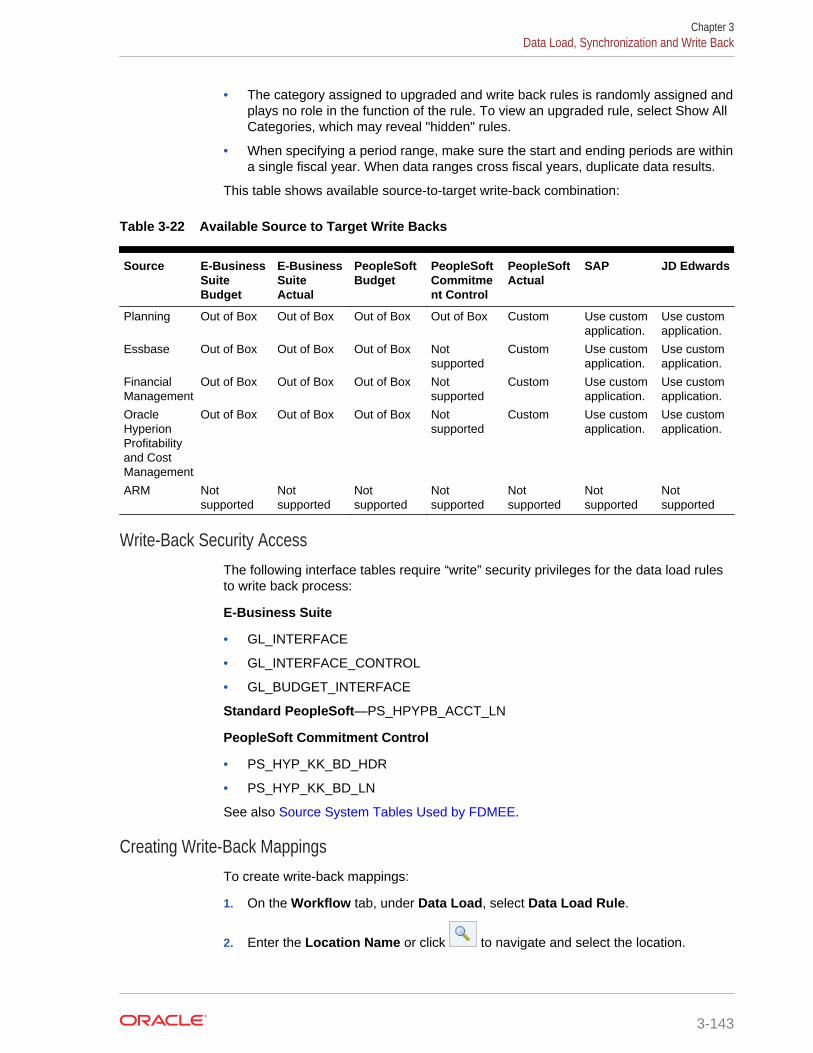
• The category assigned to upgraded and write back rules is randomly assigned andplays no role in the function of the rule. To view an upgraded rule, select Show AllCategories, which may reveal "hidden" rules.
• When specifying a period range, make sure the start and ending periods are withina single fiscal year. When data ranges cross fiscal years, duplicate data results.
This table shows available source-to-target write-back combination:
Table 3-22 Available Source to Target Write Backs
Source E-BusinessSuiteBudget
E-BusinessSuiteActual
PeopleSoftBudget
PeopleSoftCommitment Control
PeopleSoftActual
SAP JD Edwards
Planning Out of Box Out of Box Out of Box Out of Box Custom Use customapplication.
Use customapplication.
Essbase Out of Box Out of Box Out of Box Notsupported
Custom Use customapplication.
Use customapplication.
FinancialManagement
Out of Box Out of Box Out of Box Notsupported
Custom Use customapplication.
Use customapplication.
OracleHyperionProfitabilityand CostManagement
Out of Box Out of Box Out of Box Notsupported
Custom Use customapplication.
Use customapplication.
ARM Notsupported
Notsupported
Notsupported
Notsupported
Notsupported
Notsupported
Notsupported
Write-Back Security AccessThe following interface tables require “write” security privileges for the data load rulesto write back process:
E-Business Suite
• GL_INTERFACE
• GL_INTERFACE_CONTROL
• GL_BUDGET_INTERFACE
Standard PeopleSoft—PS_HPYPB_ACCT_LN
PeopleSoft Commitment Control
• PS_HYP_KK_BD_HDR
• PS_HYP_KK_BD_LN
See also Source System Tables Used by FDMEE.
Creating Write-Back MappingsTo create write-back mappings:
1. On the Workflow tab, under Data Load, select Data Load Rule.
2. Enter the Location Name or click to navigate and select the location.
Chapter 3Data Load, Synchronization and Write Back
3-143

3. Select the Segment.
4. Choose the type of mapping by selecting one of the following tabs: Explicit tab,Between tab, In Multi-Dimension, or Like tab.
• Explicit—The source value is matched exactly and replaced with the targetvalue. For example, the source value, “ABC” is replaced with the target value,“123.” "Explicit" write-back mappings are created the same for data load anddata load to write back rules. See Creating Mappings Using the ExplicitMethod.
• Between—The range of source values is replaced with a single target value.For example, a range from 001 to 010 is replaced with 999. "Between" write-back mappings are created the same for data load and data load to write backrules. See Creating Mappings Using the Between Method.
• In—In mappings enable a list of non-sequential source values to be mappedto one target value. In this case, multiple values are mapped to one valuewithin one rule, eliminating the need to create multiple rules (as is required foran Explicit map).
• Multi-Dimension—Define member mapping based on multiple source columnvalues.
• Like—The string in the source value is matched and replaced with the targetvalue. For example, source value Department is replaced by Cost Center A.See Creating Mappings Using the Like Method.
Write-back mappings provide a means to remove or strip characters that wereadded during the data load process. "Like" write-back mappings are createdlike a reverse data load.
Tip:
You can click Refresh Values to refresh the list of segment or chartfieldvalues that appear in the drop-down list from the source system. This isespecially helpful when creating “Explicit,” “Between,” “Like,” and "Multi-Dimension" mappings for data load rules to write back.
Defining Data Load Rules for Write-Back Scenarios (Data from EPM Cloud / EssbaseApplications to Oracle Enterprise Resource Planning (ERP) Sources)
You create a data load rules to write back to extract budget data from application to ageneral ledger instance and ledger source.
You can create data load rules to write-back in these ways:
• Choose the Oracle Enterprise Performance Management Cloud application.
• Choose the Oracle Essbase aggregate storage (ASO) or Essbase block storageapplication (BSO).
• For Oracle Hyperion Public Sector Planning and Budgeting applications where youhave consolidated personnel (HR) and non-personnel expenses in the aggregatestorage cube, you pull information from the aggregate storage application. Fornonpersonnel-related expenses you see only the total number (combination) in theaggregate storage application.
Chapter 3Data Load, Synchronization and Write Back
3-144

Note:
Public Sector Planning and Budgeting requires that you combine theregular planning results from an Essbase block storage cube, with thepersonnel position budget information in an Essbase aggregate storagecube to a new aggregate storage cube.
When performing the data load rule to write back for a Public SectorPlanning and Budgeting application, you select the aggregate storage cubethat you created in Public Sector Planning and Budgeting. You can alsoselect an Oracle Hyperion Planning application as the source for the write-back.
The process at a high level:
1. Oracle Hyperion Financial Data Quality Management, Enterprise Edition importsdata from EPM Cloud and writes it to a FDMEE staging table.
2. FDMEE applies the necessary transformation in the staging table.
3. Data is exported from the FDMEE staging table to a file-based application.
4. After a successful execution of the data load rule to write back, view the results ofthe balances transfer from the EPM Cloud application to the file using the DataLoad Workbench.
To define data load rules to write back:
1. On the Workflow tab, under Data Load, select Data Load Rule.
2. Select the Location Name or click to select the location name.
3. Click Add to add a data load to write-back rule.
4. Enter the Name.
5. For EPM Cloud applications: Select the Plan Type.
FDMEE supports data loads for up to six plan types (including custom and EPMCloud applications.)
6. Optional: Enter a description.
7. Click Save.
8. Define the source and target options.
Defining the Source Filter OptionYou can define source filter options to specify the subset of budget data to extract fromyour Oracle Hyperion Planning application and load it to the general ledger.
To define the source filter options:
1. On the Workflow tab, under Data Load, select Data Load Rule.
2. From the Data Load Summary, select the data load rule.
3. Select the Source Options tab.
4. In the Source Filters area, click .
Chapter 3Data Load, Synchronization and Write Back
3-145

5. Select the Dimension Name.
6. To assign a filter condition, perform an action:
• Enter a member name or filter condition in the Filter Condition text box. Theselection syntax is based on the source system.
For example, if Oracle Essbase is the source system, enter the member nameor filter condition using Essbase syntax. Depending on the dimension, you canselect one or more members as a filter condition used for extracting thebudget data. For example, for the Entity dimension, you may select thefollowing members: E1, E5, and E6. For information on Essbase syntax, seethe Oracle Essbase Database Administrator's Guide.
Note:
For any dimensions not included in the source filter, Oracle HyperionFinancial Data Quality Management, Enterprise Edition includes levelzero members. However, it is possible to have an alternate hierarchy inFor Planning applications where a member that is a parent in thebase hierarchy, is also a level 0 member in a shared hierarchy.
• Click to select a member using the member selector, and then clickBrowse.
The Selector dialog box is displayed. The member selector enables you to viewand select members within a dimension. Expand and collapse members within adimension using the [+] and [-].
The Selector dialog box has two panes—all members in the dimension on the leftand selections on the right. The left pane, showing all members available in thedimension, displays the member name and a short description, if available. Theright pane, showing selections, displays the member name and the selection type.
You can use the Menu button above each pane to change the columns in themember selector.
Note:
Assign filters for dimensions. If you do not assign filters, numbers from thesummary members are also retrieved.
To use the member selector:
a. In the list of dimensions and members on the left, select a member, and then
click .
b. To clear a member from the list of members, click .
c. To add special options for the member, click , and then select an option.
Chapter 3Data Load, Synchronization and Write Back
3-146

In the member options, “I” indicates inclusive. For example, “IChildren” addsall children for the member, including the selected member. If you select“Children,” the selected member is not included, only its children are included.
The member is moved to the right and displays the option you selected in theSelection Type column. For example, “Descendants” displays in the SelectionType column.
Tip:
To clear all members from the list of selections, click .
d. Click OK twice to continue defining the source filter details.
The member that you selected is displayed in an Essbase syntax in the FilterCondition field.
7. Click Save.
8. Define the target options.
Defining Target Options (for Data Load Rules to Write back)To write back to an Oracle E-Business Suite target, Oracle Hyperion Financial DataQuality Management, Enterprise Edition captures the Enterprise Resource Planning(ERP) options (such as "Budget," "Journal Source," and "Journal Category") on theTarget Options tab. For example, if you are writing back to the E-Business SuiteActual, you must select the balance type "A," and then you also need to specify thejournal source and journal category. Or if you are writing back to the E-Business SuiteBudget journal, then select balance type "B," specify "Y" for the "Create Journal"option, and specify the journal source.
Required data rule E-Business Suite target options are shown in the table below.
Table 3-23 Required E-Business Suite Target Options
E-Business Suite Target Balance Type Budget Option
E-Business Suite Actual A Journal Source, JournalCategory
E-Business Suite BudgetJournal
B Create Journal = Y, JournalSource, Journal Category,Budget
E-Business Suite Budget B Create Journal = Y, Budget
Required data load rule Peoplesoft target options are in the table below.
Table 3-24 Required Peoplesoft Target Options
PeopleSoft Target Option
Peoplesoft Budget Ledger Group, Ledger, Budget Scenario
Peoplesoft Actual Ledger Group, Ledger
The target options define the options for importing a journal.
Chapter 3Data Load, Synchronization and Write Back
3-147

To define target Enterprise Resource Planning (ERP) source system options:
1. For Oracle Fusion and E-Business Suite source systems:
a. Select whether to create a budget journal.
b. Enter the Budget or click to select the budget.
c. Enter the Budget Organization or click to select the budgetorganization.
2. Click Save.
3. For PeopleSoft Enterprise Financial Management source systems, enter or click
to make selections:
a. Budget Scenario
b. Ledger Group
c. Ledger
4. Click Save.
5. Run the data load rule for the write back.
After you run the rule, perform required tasks in Fusion, E-Business Suite, andPeopleSoft Enterprise Financial Management.
Defining Financial Management to E-Business Suite Data Load Rules to Write-Back
Note:
For required Oracle E-Business Suite target options, see Table 1.
To define Oracle Hyperion Financial Management to E-Business Suite data load rulesto write back:
1. On the Workflow tab, under Data Load Rule, select Data Load Rule.
2. From the Data Load Summary, select the data load rule.
3. Select the Target Options tab.
4. In Create Budget Journal, select Yes or No to create the Budget Journal.
5. In Budget, select the budget value.
6. In Journal Source, select the source value.
7. In Journal Category, select the category value.
8. In Budget Organization, select the organization value.
9. In Balance Type select the Actual or Budget balance type.
10. Click Save.
Chapter 3Data Load, Synchronization and Write Back
3-148

Defining PeopleSoft Commitment Control Data Load Rules to Write-BackTo define PeopleSoft Commitment Control data load rules to write back:
1. Make sure that the PS_HYP_KK_BD_HDR and PS_HYP_KK_BD_LN interfacetables have "write" privileges.
2. When writing back to PeopleSoft Commitment Control, in Data Load Rule, definea data load rule to write back by selecting parameters for the following:
• Ledger Group
• Ledger
• Accounting Date—The accounting date indicates when a transaction isrecognized, as opposed to the date the transaction actually occurred. Theaccounting date and transaction date can be the same. The accounting datedetermines the period in the General Ledger to which the transaction is to beposted. You can only select an accounting date that falls within an open periodin the ledger to which you are posting. The accounting date for an item isnormally the invoice date.
• As of Date—The date on which data you are searching for or performing afunction on is valid. For example, if you are defining a budget closing set,entering the "as of" date of 12/31/2016 instructs the PeopleSoft CommitmentControl process to execute balance roll forward calculations based on theledger amounts that are or were valid on that date.
• Transaction Type—Select "check" to validate the rules or "post" to validateand post the rules.
• Budget Transaction Type
• Generate Parent Budget
• Parent Budget Transaction Type
• Default Entry Date—The maximum effective date budget definition that is lessthan the end date of the year is considered the correct budget definition to beused for all validations and entry event codes.
3. In Data Load Rule, define the source filters that identify the portions of budgetdata to load to PeopleSoft.
4. Optional: Delete previous data load rules to write back by selecting Delete on theExecute Rules Options screen.
5. Run the PeopleSoft Commitment Control data load rule to write back.
If you have selected a transaction type of "post," the rules are validated, thebudget is written to Commitment Control interface tables and the posting processis initiated after writing the data. Any errors are forwarded to Public SectorPlanning and Budgeting.
Running Data Load Rules to Write BackAfter you create a data load rule to write back, you must run the data load rule to writeback the data from the Planning application to the general ledger system.
To run a data load rule to write back:
1. From Data Rule Summary, select the data load rule.
Chapter 3Data Load, Synchronization and Write Back
3-149
2. Click Execute.
After the extraction process is successful, you must log in to Oracle GeneralLedger or PeopleSoft General Ledger and import the budget data.
3. To load data from the source EPM application, select Import from Source.
Select this option to review the information in a staging table, before exportingdirectly to the target general ledger system.
When you select “Import from Source,” Oracle Hyperion Financial Data QualityManagement, Enterprise Edition imports the data from the EPM target application,performs the necessary transformations, and exports the data to the FDMEEstaging table.
4. To export data to the target general ledger system, select Export to Target.
FDMEE transfers the data into the general ledger system.
5. Click Run.
Note:
After the rule runs successfully, view the information in the staging table.See Staging Table Used for Import from Source.
6. After the rule runs, perform the required tasks in your general ledger system.
Exporting to TargetUse the Export to Target feature to export data to a target application, which is theEnterprise Resource Planning (ERP) application. Select this option after you havereviewed the data in the data grid and need to export it to the target application.
When exporting data for Oracle Hyperion Planning, the following options are available:
• Store Data—Inserts the value from the source or file into the target application,replacing any value that currently exists.
• Replace Data—Clears all data for the POV in the target, and then loads from thesource or file. For example, when you have a year of data in your Planningapplication but are only loading a single month, this option clears the entire yearbefore performing the load.
• Add Data—Adds the value from the source or file to the value in the targetapplication. For example, when you have 100 in the source, and 200 in the target,then the result is 300.
• Subtract Data—Subtracts the value in the source or file from the value in the targetapplication. For example, when you have 300 in the target, and 100 in the source,then the result is 200.
To submit the data load rule:
1. From the table action bar, in Data Rule, and choose the data load rule.
2. Click .
3. In Execution Mode, select the mode of exporting to the target.
Chapter 3Data Load, Synchronization and Write Back
3-150
Execution modes:
• online—ODI processes the data in sync mode (immediate processing).
• offline—ODI processes the data in async mode (runs in background).
Click to navigate to the Process Detail page to monitor the ODI jobprogress.
4. In Export, select the export method.
Export options:
• Current Dimension
• All Dimensions
• Export to Excel
5. For Current Dimension and All Dimensions export methods, in Select filelocation, navigate to the file to export, and then click OK.
For the Export to Excel method, mappings are exported to a Microsoft Excelspreadsheet.
6. Click OK.
After you exported data to the target, the status of the export is shown in theStatus field for the data load rule in the Data Load Summary.
Loading Data into Supported Source SystemsTo complete the data load to write back process, you must perform required tasks inyour supported source system.
Loading Data into Oracle E-Business Suite
If the target source system is Oracle E-Business Suite, you must import the budgetdata using Oracle General Ledger.
Refer to the Oracle Fusion and E-Business Suite user documentation for detailedinformation. At a high level, follow this process:
1. Launch Oracle General Ledger.
2. Run the Journal Import process.
If you select the Create Journal option:
• Data is extracted to the journal interface table (GL_INTERFACE).
• Oracle Hyperion Financial Data Quality Management, Enterprise Editionstores the process ID in the GROUP_ID column. You can check the data thatwas created by filtering on the process ID.
• If no errors occur, a journal entry is created.
If you clear the Create Journal option:
• Data is extracted to the budget interface table (GL_BUDGET_INTERFACE).
• Carefully select Budget Name (BUDGET_NAME) and Budget Organization(BUDGET_ENTITY_NAME) when loading data into theGL_BUDGET_INTERFACE table.
• If no errors occur, the budget balances are posted.
Chapter 3Data Load, Synchronization and Write Back
3-151

3. Review the journal or budget balances.
Loading Data into PeopleSoft Enterprise Financial Management
If the target is PeopleSoft, you must import the budget data using PeopleSoft GeneralLedger.
Refer to the PeopleSoft Enterprise Financial Management user documentation fordetailed information. At a high level, follow this process:
1. Launch PeopleSoft General Ledger.
2. Run the Generate Journals process.
3. When generating a journal request, define these required options:
• Accounting Definition Name—Select HYPDEFN
• Template—Select HYP_STDBUD
The data is staged in the PS_HPYPB_ACCT_LN interface table. Oracle HyperionFinancial Data Quality Management, Enterprise Edition stores the process ID inthe JRNL_LN_REF table. You can check the data that was created by filtering onthe process ID.
4. Run the process.
If the process runs without errors, the journals are created.
5. Review the journal, create balancing entries, and then post the journal.
Loading Human Resources DataThis section explains how to load human resources data.
Understanding Human Resource Data IntegrationOracle Hyperion Financial Data Quality Management, Enterprise Edition supportsloading human resource data from your PeopleSoft Human Capital Managementsource system into Oracle Hyperion Public Sector Planning and Budgetingapplications.
You load human resource data by creating mappings in FDMEE to map the data fromyour PeopleSoft Human Capital Management source system to Public Sector Planningand Budgeting accounts.
FDMEE supports loading human resource data into Public Sector Planning andBudgeting applications. At this time, no other application types are supported.
If you have made revisions to properties in your Public Sector Planning and Budgetingapplication, loading human resource data from your source system into the applicationautomatically overrides any modified application properties.
FDMEE supports loading data into the following Public Sector Planning and Budgetingmodels:
• Employee
• Position
• Employee and Position (both)
Chapter 3Loading Human Resources Data
3-152
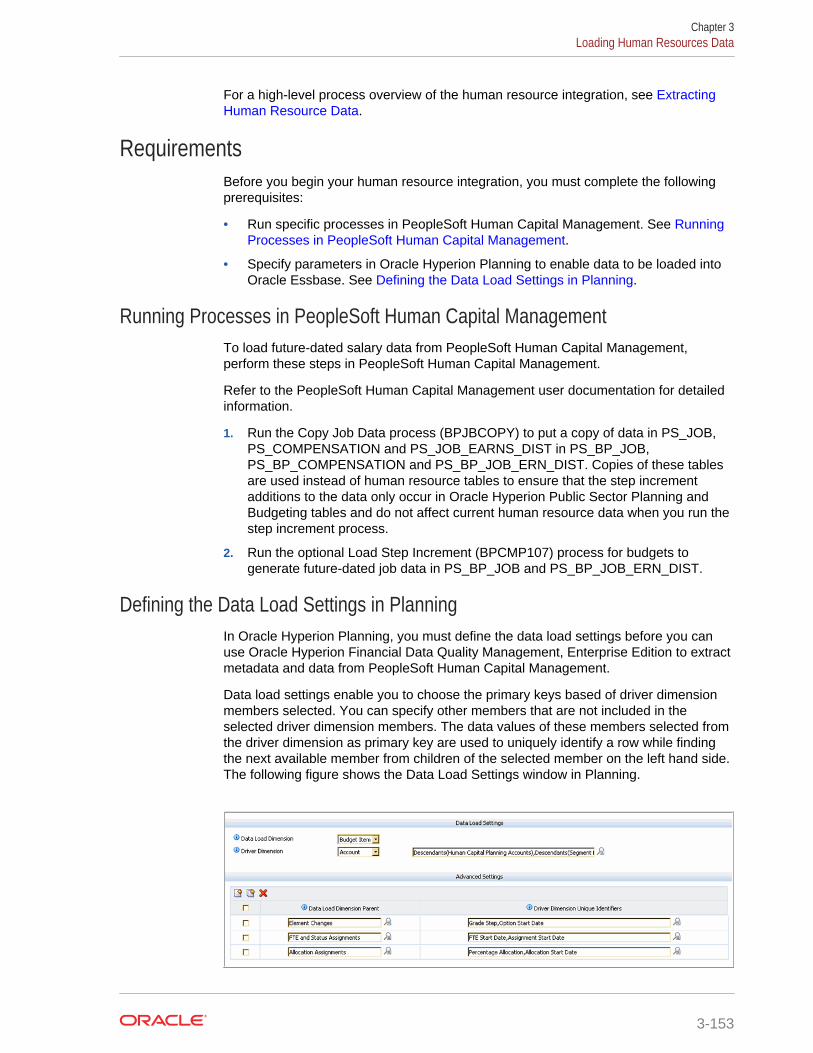
For a high-level process overview of the human resource integration, see ExtractingHuman Resource Data.
RequirementsBefore you begin your human resource integration, you must complete the followingprerequisites:
• Run specific processes in PeopleSoft Human Capital Management. See RunningProcesses in PeopleSoft Human Capital Management.
• Specify parameters in Oracle Hyperion Planning to enable data to be loaded intoOracle Essbase. See Defining the Data Load Settings in Planning.
Running Processes in PeopleSoft Human Capital ManagementTo load future-dated salary data from PeopleSoft Human Capital Management,perform these steps in PeopleSoft Human Capital Management.
Refer to the PeopleSoft Human Capital Management user documentation for detailedinformation.
1. Run the Copy Job Data process (BPJBCOPY) to put a copy of data in PS_JOB,PS_COMPENSATION and PS_JOB_EARNS_DIST in PS_BP_JOB,PS_BP_COMPENSATION and PS_BP_JOB_ERN_DIST. Copies of these tablesare used instead of human resource tables to ensure that the step incrementadditions to the data only occur in Oracle Hyperion Public Sector Planning andBudgeting tables and do not affect current human resource data when you run thestep increment process.
2. Run the optional Load Step Increment (BPCMP107) process for budgets togenerate future-dated job data in PS_BP_JOB and PS_BP_JOB_ERN_DIST.
Defining the Data Load Settings in PlanningIn Oracle Hyperion Planning, you must define the data load settings before you canuse Oracle Hyperion Financial Data Quality Management, Enterprise Edition to extractmetadata and data from PeopleSoft Human Capital Management.
Data load settings enable you to choose the primary keys based of driver dimensionmembers selected. You can specify other members that are not included in theselected driver dimension members. The data values of these members selected fromthe driver dimension as primary key are used to uniquely identify a row while findingthe next available member from children of the selected member on the left hand side.The following figure shows the Data Load Settings window in Planning.
Chapter 3Loading Human Resources Data
3-153

See Oracle Hyperion Planning Administrator’s Guide for detailed information.
Public Sector Planning and Budgeting DimensionsThe following Oracle Hyperion Public Sector Planning and Budgeting dimensions arepopulated by Oracle Hyperion Financial Data Quality Management, Enterprise Edition:
• Position
• Employee
• Element
• Job Code
• Entity
These dimensions are associated with the following tables:
Table 3-25 Dimensions populated by FDMEE
Dimension Database Table
Position AIF_PS_POSITION_DATA_STG
Employee AIF_PS_JOB_STG
Job Code AIF_PS_JOBCODE_TBL_STG
Element AIF_PS_SAL_PLAN_TBL_STG
AIF_PS_SAL_GRADE_TBL_STG
AIF_PS_SAL_STEP_TBL_STG
AIF_PS_EARNINGS_TBL_STG
AIF_PS_BENEF_PLAN_TBL_STG
Entity AIF_PS_DEPT_TBL_STG
For a complete list of Public Sector Planning and Budgeting tables, see StagingTables.
Smart ListsHuman Resource data such as salary information, union codes, and status are SmartLists in Oracle Hyperion Public Sector Planning and Budgeting applications. OracleHyperion Financial Data Quality Management, Enterprise Edition automaticallyrecognizes Smart Lists and populates the data accordingly.
FDMEE enables you to assign a prefix to Smart Lists in the Compensation Allocationpoint of view (POV). For general ledger integrations, you create metadata mappingsand can optionally define member prefixes. For human resource integrations, you canoptionally assign a Smart List prefix in the rule line mapping definition. You shouldensure that member prefixes (used in a general ledger metadata mapping) areidentical to Smart List prefixes (used in a human resource data rule mapping). Forinformation on human resource rule mappings, see Creating Mapping Definitions. Forinformation on general ledger metadata mappings, see Defining Metadata Rules.
For information about using Smart Lists in Oracle Hyperion Planning and Public SectorPlanning and Budgeting, see the Oracle Hyperion Planning Administrator’s Guide andthe Oracle Hyperion Public Sector Planning and Budgeting User’s Guide.
Chapter 3Loading Human Resources Data
3-154

Using Loaded Data in Public Sector Planning and BudgetingAfter loading human resource data, perform these tasks:
• For Classic Oracle Hyperion Planning applications, in Planning, refresh theapplication database as required. See the Oracle Hyperion PlanningAdministrator’s Guide.
• For Planning applications administered in Enterprise Oracle Hyperion EPMArchitect, navigate to the Application Library and redeploy the application. See theOracle Hyperion Enterprise Performance Management Architect Administrator’sGuide.
• To view the data and use it as part of Oracle Hyperion Public Sector Planning andBudgeting, see the Oracle Hyperion Planning Administrator’s Guide and theOracle Hyperion Public Sector Planning and Budgeting User’s Guide.
Defining Human Resource Data Load RulesAt a high level, creating human resource data load rules that enable you to populatemetadata and in Oracle Hyperion Public Sector Planning and Budgeting applicationsinvolves these steps:
• Create the human resource data rule and define the rule details. See Defining theRule Details.
• Create the rule line definitions and mappings manually or by running a script. See Creating Rule Line Definitions by Using a Template Mapping and Creating RuleLine Definitions.
• Creating Mapping Definitions.
Before you begin, ensure that you have performed all required tasks described in Loading Human Resources Data.
• Running Processes in PeopleSoft Human Capital Management.
• Defining the Data Load Settings in Planning.
Before you create a human resource data load rule:
1. Register your human resource source system.
2. Register your target Public Sector Planning and Budgeting application.
3. Review the selected Source Accounting Entities.
4. Define import formats and locations.
For a high-level process overview, see Extracting Human Resource Data.
Defining the Rule DetailsTo define rule details:
1. On the Workflow tab, under HR Data Load, select HR Data Load.
2. Enter or click to select the Location.
3. In the Rule Name area, click Add.
Chapter 3Loading Human Resources Data
3-155

4. In the Rule Definition area, enter the Rule Name.
5. Enter or click to select the value of the Scenario dimension you identifiedwhen you registered the application. This enables you to classify and collect time-specific data.
6. Optional: Enter a Description.
7. Select the Salary Assignment Option to specify the salary assignment details toload by the database table.
Salary Assignment Options:
• Standard—Load data from PS_JOB table that is live on a given “As of Date.”
• Auto Increment—Load data from PS_BP_JOB table that is live on a given“As of Date” or is later than it.
Note:
To use this option, perform these steps in Running Processes inPeopleSoft Human Capital Management.
• Standard - Include Future Dated—Load data from PS_JOB table that is liveon a given “As of Date” or is later than it.
8. Enter or click to select the member of the Version dimension.
9. Click Save.
10. Next, create the rule line definition.
You have three options to create the rule line definition:
• Copy a rule—See Creating Rule Line Definitions by Copying.
• Use a template to create the rule line definitions—See Creating Rule LineDefinitions by Using a Template Mapping.
• Create the rule line definitions manually—See Creating Rule Line Definitions.
Creating Rule Line Definitions by CopyingYou can create a rule line definition by copying a human resource data rule. Copying arule copies all the POV rules and their mapping details.
Note:
You cannot copy rules across applications.
To create rule line definitions by copying:
1. Perform the steps in Defining the Rule Details.
2. In the Rule Definition area of the HR Data Load page, select Create Mapping,and then Copy from another rule.
Chapter 3Loading Human Resources Data
3-156

3. Select the source rule.
4. Click Copy.
5. Click OK.
The POV rules and their mapping details are displayed in the Rule Line area.
6. Edit the mappings as necessary. See Creating Mapping Definitions.
Creating Rule Line Definitions by Using a Template MappingYou can use a template mapping to automatically create rule line definitions for OracleHyperion Public Sector Planning and Budgeting dimensions.
To create rule line definitions using a template:
1. Perform the steps in Defining the Rule Details.
2. Select Create Mapping, and then select Create Template Mapping.
3. Select the Language.
4. Click OK.
5. Click OK.
The Rule Line Definition area is populated with POVs from the template.
6. Edit the rule line definitions or add new rule line definitions, as necessary. See Editing Human Resource Data Load Rules.
7. Run the data load rule. See Running Human Resource Data Load Rules.
Creating Rule Line DefinitionsYou create rule line definitions to map dimension members to an Oracle HyperionPlanning account.
To create rule line definitions:
1. In the Rule Line area, click .
2. In POV Name, enter a descriptive name for the point of view.
3. In POV Type, select the set of dimensions:
• Position Property—Position dimension member properties
• Employee Property—Employee dimension member properties
• Position and/or Employee Assignment—Property and salary dataassociated with positions and employees.
• Compensation Allocation—Allocation of salary costs to general ledgeraccounts for positions and employees.
• Jobcode Property—Available if you created an Employee Only application inPlanning, this dimension provides position and employee member properties.
• Salary Grade—Rates for Element dimension members that correspond tosalary grades.
• Salary Step—Rates for Element dimension members that correspond tosalary steps.
Chapter 3Loading Human Resources Data
3-157

4. Define the mappings for the POV. See Creating Mapping Definitions.
5. Repeat steps 1 - step 3 through for each POV you want to define.
Creating Mapping DefinitionsYou define mapping definitions to specify which Oracle Hyperion Public SectorPlanning and Budgeting accounts to load with the extracted human resource data. Foreach dimension in the point of view, you must select a member, and then map thecolumn in the source system to an Oracle Hyperion Planning account.
To create mapping definitions:
1. In the Rule Line area, click to add a rule line mapping.
The Rule Line Mapping page is displayed.
2. In the Rule Line Point of View area, enter or click to search for a member andmap the members for dimensions in the point of view (POV).
You must enter a member for:
• Budget Item—For Budget Item dimensions, you may want Oracle HyperionFinancial Data Quality Management, Enterprise Edition to automatically createthe budget item values. This option is available only for the UnspecifiedBudget Member. You must select a parent member if you plan to select theoptional Auto create flag setting.
Note:
The parent member that you select must match what you selected inthe Planning Data Load Settings window. See Defining the Data LoadSettings in Planning.
• Year
• Period
Selecting a member for all other dimensions is optional. If you do not select amember for a dimension, FDMEE loads the values as-is from the source system.
3. In the Rule Line Mapping area, define the source column to account mappings. To
add a mapping, click .
4. Enter or click to select the Source Column.
You select the source column in the PeopleSoft Human Capital Management tablethat contains the human resource data to load. For example, if you are creating arule line mapping for Salary Grade, select the source column “Grade” in thePeopleSoft human resource table. The source columns are specific to the POVType that you selected when you created the rule line definition.
5. Enter or click to select the Account.
Chapter 3Loading Human Resources Data
3-158

You select the Public Sector Planning and Budgeting account into which to loadthe extracted human resource data. For example, to load employee names andIDs, select Employee Name and Employee Number. For a list of all tables andcolumns, see Staging Tables.
The Data Type and Smart List Name fields are automatically populated based onthe Account you selected.
Note:
Several Smart Lists in Public Sector Planning and Budgeting applicationsare paired (for example, Account Segment and Account SegmentDescription). When you map from the source system to a paired Smart List,map one of the paired Smart List members (for example, AccountSegment, but not Account Segment Description).
6. Click Save.
7. Click Back to return to the HR Data Load page.
8. Next, run the data load rule. See Editing Human Resource Data Load Rules.
Managing Human Resource Data Load RulesPerform the following tasks to manage your data rules:
• Edit data load rules—Typically, if you used a script to create the rule linedefinitions, you may want to add or edit the mappings. See Editing HumanResource Data Load Rules.
• Run data load rules. See Editing Human Resource Data Load Rules.
• Delete data load rules. See Deleting Human Resource Data Load Rules.
• Check the data rule process details. See Checking the Human Resource DataLoad Rule Status.
Editing Human Resource Data Load RulesTo edit human resource data load rules:
1. On the Workflow tab, under HR Data Load, select HR Data Load.
2. Enter or click to select the Location.
3. Select the rule to modify and change the rule details, rule line definition, andmapping settings. See Editing Human Resource Data Load Rules.
4. Click Save.
Running Human Resource Data Load RulesTo extract and load data from PeopleSoft Human Capital Management, run the humanresource data load rule that you defined.
When you run a human resource data load rule, you have several options.
Chapter 3Loading Human Resources Data
3-159

• Import from Source—Oracle Hyperion Financial Data Quality Management,Enterprise Edition imports the data from the source system, performs thenecessary transformations, and loads the data to the FDMEE staging table.
Select this option only in these situations:
– You are running a data load rule for the first time.
– Your data in the source system changed. For example, if you reviewed thedata in the staging table after the export and it was necessary to modify datain the source system.
In many cases, your source system data may not change after you import the datafrom the source the first time. Therefore, you need not import the data.
• Export to Target—Exports the data to the target application.
Select this option after you have reviewed the data in the staging table and aresure you want to export it to the target application.
Note:
Select both options only in cases where you want to load the data directly intothe target application.
To run human resource data load rules:
1. On the HR Data Load page, select the rule.
2. Click Execute.
3. Enter or select the As of Date from which to load data from the human resourcesource system.
4. To extract data from the source system, select Import from Source.
For information on staging tables, see Staging Table Used for Import from Source.
5. To seed loaded data into your target Oracle Hyperion Public Sector Planning andBudgeting application, select Export to Target.
Selecting export to target exports the data to the target application.
6. If you selected Export to Target, perform these actions:
a. To load data and/or metadata into a Classic Public Sector Planning andBudgeting application: Select the Load Type:
• Data—Loads only the data.
• Metadata—Loads only the Public Sector Planning and Budgetingmetadata.
• Both—Loads the data and metadata.
Note:
Choose Metadata or Both as the load type on a new application;otherwise the data load fails.
Chapter 3Loading Human Resources Data
3-160

b. To load data and/or metadata into an Enterprise Oracle Hyperion EPMArchitect Public Sector Planning and Budgeting application:
i. Select Metadata and run the data load rule.
ii. After the rule runs successfully, in Performance Management Architect,deploy the application.
iii. Return to FDMEE. On the HR Data Load page, locate the rule.
iv. Click Execute to run the data load rule, and then select Data.
c. Select the Department Load Option to indicate whether to load all or specificdepartments and department data in the business unit:
• All—Load data for all departments to the target application.
• Selected—Load data for departments that you select to the targetapplication. You can press the [Ctrl] key and select multiple departments.
Note:
FDMEE merges data and does not "replace" balance data in atarget application.
7. Click Run.
Data is loaded into your Public Sector Planning and Budgeting accounts.
Deleting Human Resource Data Load RulesWhen you delete a human resource data rule, only the rule is removed. The extracteddata or dimensions are not removed. You cannot delete a data rule if it is running.
To delete human resource data rules:
1. From the Workflow tab, under HR Data Load, select HR Data Load.
2. Enter or click to select the Location.
3. Select the rule to remove, and then click Delete.
The Delete Confirmation dialog box is displayed.
4. Click Yes.
The rule is deleted.
Checking the Human Resource Data Load Rule StatusTo check data load rule status:
1. On the Workflow tab, under Monitor, select Process Details.
2. From Process Name, select the HR load rule to check.
Chapter 3Loading Human Resources Data
3-161

Note:
See the aif_<process_id>.log in the java.io.tmpdir folder (for example, C:\Oracle\Middleware\user_projects\epmsystem1\tmp\aif_2548.log) to view detailsof any rows rejected during the export step.
Chapter 3Loading Human Resources Data
3-162

4Logic Accounts
Related Topics
• Overview of Logic Accounts
• Creating a Logic Group
• Creating Accounts In A Simple Logic Group
• Creating Complex Logic Accounts
Overview of Logic AccountsLogic accounts are dynamically generated accounts, and are used to calculatesupplemental values that are not provided in source files. Logic groups are associatedwith a target application. (The logic group list of values is filtered in the location userinterface based on the target application in which it was created.) Like all other sourceaccounts, logic accounts can be mapped and loaded into target systems. Logicaccounts are used for various functions:
• Statistical loading—Map one source account to multiple target accounts
• Conditional mapping—Map a source account based on its value
• Arithmetic mapping—Perform arithmetic operations on source values
Creating a Logic GroupThe first step in creating logic accounts is to create a logic group. The logic group isthen assigned to one or more locations. When a source file or source system is loadedto a location, logic accounts are generated when the logic group is assigned to alocation.
A logic group must be defined as simple or complex. A simple logic group enables youto derive logic items only from the source account dimension. A complex logic groupenables you to derive logic items from any combination of dimensions.
To create a logic group:
1. On the Setup tab, under Data Load Setup, select Logic Group.
2. In Target Applications, select the target application for this logic group.
3. In Logic Group, select Add.
A row is added to the grid.
4. In Logic Group Name, enter a unique name.
Optional: In Description, enter a description of the logic group.
5. In Logic Type, select Simple Logic or Complex Logic.
6. Click Save.
4-1

Creating Accounts In A Simple Logic GroupWithin a simple logic group, you can create individual logic accounts.
To create accounts in a simple logic group:
1. On the Setup tab, under Data Load Setup, select Logic Group.
2. From the Logic Group summary grid, select the logic group.
The logic accounts currently contained in with the selected logic group are listed.
3. From the Logic Items grid, click Add.
4. Provide the requested information.
See Logic Group Fields.
Logic Group FieldsLogic accounts consist of the following fields:
• Item
• Description
• Criteria Type
• Criteria Value
• Operator
• Value/Expression
• Seq
• Export
Item
Specify the name of the logic account using the item field. The logic account that isnamed in the item field is displayed in the Workbench grid as the source account. Thissame account can be used as a source in a mapping rule. Oracle recommends thatyou prefix the names of logic accounts with an "L" or some other character to indicatethat an account came from a source file, or was generated from a logic rule. Logicaccounts can only be loaded to a target application when they are mapped to a targetaccount.
Description
The description that you enter in the Description field is displayed in the AccountDescription field in the Workbench.
Criteria Type and Criteria Value
The operator in the Criteria Type field works with the source account that is specifiedin the Criteria Value field to determine from which source accounts the logic account isderived. One logic account can be derived from multiple source accounts.
Valid values for the Type field:
• Between
Chapter 4Creating Accounts In A Simple Logic Group
4-2
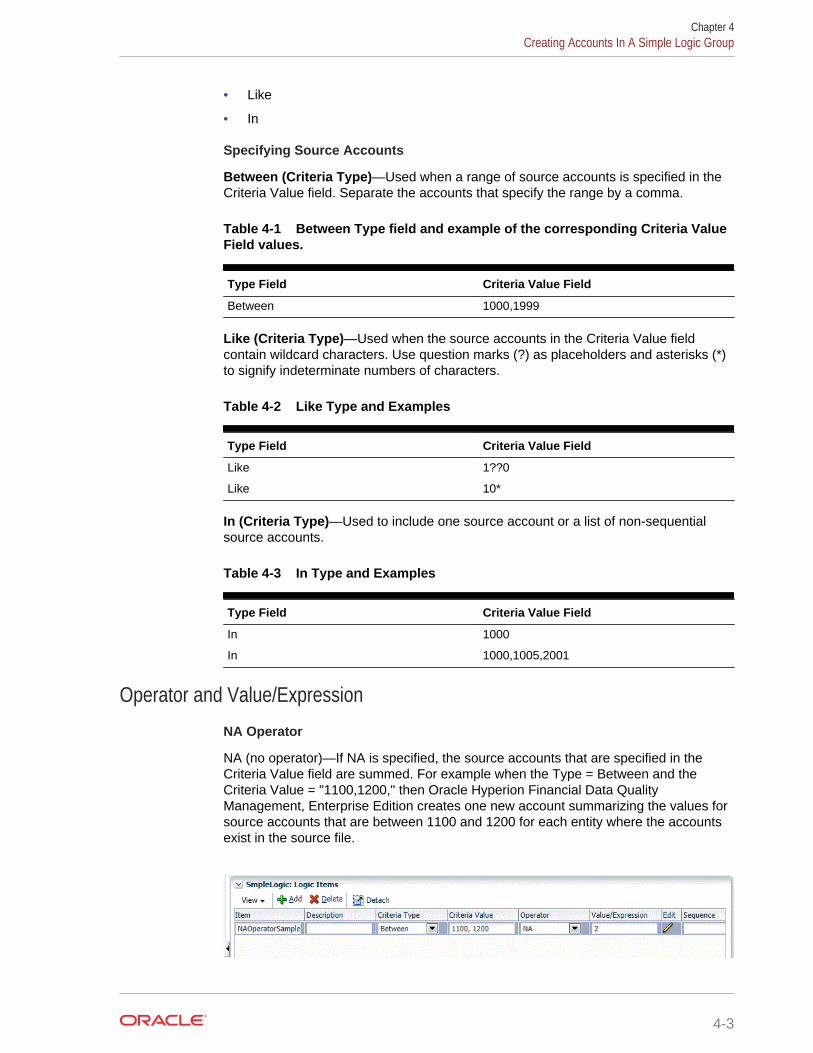
• Like
• In
Specifying Source Accounts
Between (Criteria Type)—Used when a range of source accounts is specified in theCriteria Value field. Separate the accounts that specify the range by a comma.
Table 4-1 Between Type field and example of the corresponding Criteria ValueField values.
Type Field Criteria Value Field
Between 1000,1999
Like (Criteria Type)—Used when the source accounts in the Criteria Value fieldcontain wildcard characters. Use question marks (?) as placeholders and asterisks (*)to signify indeterminate numbers of characters.
Table 4-2 Like Type and Examples
Type Field Criteria Value Field
Like 1??0
Like 10*
In (Criteria Type)—Used to include one source account or a list of non-sequentialsource accounts.
Table 4-3 In Type and Examples
Type Field Criteria Value Field
In 1000
In 1000,1005,2001
Operator and Value/Expression
NA Operator
NA (no operator)—If NA is specified, the source accounts that are specified in theCriteria Value field are summed. For example when the Type = Between and theCriteria Value = "1100,1200," then Oracle Hyperion Financial Data QualityManagement, Enterprise Edition creates one new account summarizing the values forsource accounts that are between 1100 and 1200 for each entity where the accountsexist in the source file.
Chapter 4Creating Accounts In A Simple Logic Group
4-3

Math Operator
Math Operators (+, -, x, /)—If a math operator is selected, then the new logic recordshas an amount that equals the original amount is calculated with the specified Value/Expression. For example, when the operator “x” was selected and 2 is entered in theValue/Expression field, then the new record has an amount two times the originalamount.
Use a numeric operator to perform simple mathematical calculations:
• NA (no operator)
• + (addition)
• - (subtraction)
• X (multiplication)
• / (division)
• Exp (expression operators)
• Function—see Function
In this example, one logic account is created because one Entity had a row meetingthe account criteria.
Expressions and FunctionsAn expression enables you to perform the following in the Value/Expression field:
• Execute a simple math equation.
• Use a CURVAL parameter to specify the value of a logic account operation. TheCURVAL parameter can be used within expressions, as it can within logicfunctions, except that, with expressions, CURVAL must be enclosed in pipes. Forexample, the CURVAL expression includes the specification of an account usingthe notation of |Account| and the specification of a value using POV details ofentity, category, period and account.
Functions enable the use of simple logic with if/else using Jython syntax. Jythoncommands can be used in a function and can be more complex than an expression.
Exp
Use Expression operators to execute custom logic expressions, which are defined inthe Value/Expression field. Logic expressions, which cannot use variables or Ifstatements, are simpler than logic functions. Except for |CURVAL|, expressions do nothave built-in parameters. For expressions, you do not need to assign a value to RESULT.
Chapter 4Creating Accounts In A Simple Logic Group
4-4

Expressions execute faster than logic functions. You can use the Oracle HyperionFinancial Data Quality Management, Enterprise Edition Lookup function withinexpressions, as it is used within logic functions. To write a custom expression, double-click the Value/Exp field to open the expression editor.
|CURVAL| + |810| + |238|
The function above uses the FDMEE Lookup function to add two source accounts tothe value of the logic account. Notice that the CURVAL parameter can be used withinexpressions, as it can within logic functions, except that, with expressions, CURVAL mustbe enclosed in pipes.
(|CURVAL| + |000,10,09/30/01,810|) * 100
The function above uses the FDMEE Lookup function to add a source account (810)and a source account from a specified center, FDMEE category, and FDMEE period tothe value of the logic account, and then multiplies the resulting sum by 100.
Function
Use function operators to execute a custom logic function defined in the Value/Expression field.
To write a function, select Function from the Operator drop-down list in the Logic Itemline, and then click the edit icon to open the edit window. Logic functions are usuallyused for conditional mapping and other complex operations that involve multiplesource accounts. Logic functions enable the use of Jython commands includingvariables, if/elif/else statements, numeric functions, and other Jython constructs.
The logic function enables the use of predefined function parameters, and alsorequires that you assign a value to the RESULT variable so that a value can beupdated for the newly created logic account. The following function parameters can beused in a logic function, and these do not require using the “|” notation:
Table 4-4 Function Operators and descriptions
Function Operator Description
CURVAL Source value of the logic account operation
StrLocation Active location name
StrCenter Logic account entity
StrCatKey Active category key, not the name. You needtoo lookup the category key in the database touse this parameter.
StrPerKey Active period
Entity, Category, Period, Account| Lookup notation may be used in a logicfunction. This is the same notation provided inthe logic expression.
Skip If “Skip” is assigned to the keyword RESULT,then the logic account is not created.
You can define function parameters in uppercase, lowercase, or mixed case letters.However, the keyword RESULT must be in uppercase letters.
Chapter 4Creating Accounts In A Simple Logic Group
4-5
Assigning Function Return Values
The result of a Logic Function must be assigned to the keyword RESULT. If a returnvalue is not assigned to the RESULT keyword, then the logic engine automatically setsthe value of result to zero. This causes the calculation to be skipped and the logicaccount is not created.
The following function assigns the result of the logic account calculation (using theCURVAL parameter) to the logic account (RESULT) when the logic accountcalculation returns a value greater than zero. If the first condition is not met, then thelogic account is not created because of the keyword “Skip.”
if CURVAL > 0:
RESULT = CURVAL
else:
RESULT = “Skip”
Note:
You must use the Jython notation and indentation for the logic function.
The following function only assigns the result of the logic account calculation to thelogic account when "10" is the active FDMEE category key.
if StrCatKey == “10”:
RESULT = CURVAL
else:
RESULT=”Skip”
This function assigns the result of the logic account calculation to the logic accountonly when the Criteria Account Entity is "000."
if StrCenter == “000”:
RESULT = CURVAL * 100
else:
RESULT=”Skip”
This function uses the FDMEE Lookup function to add a source account (810) to thevalue of the logic account if the current FDMEE period is “Dec 2013.”
if StrPerKey == “12/31/2013”:
RESULT = CURVAL + |810|
else:
RESULT=”Skip”
Chapter 4Creating Accounts In A Simple Logic Group
4-6

This function uses the FDMEE Lookup function to add another source account from adifferent Entity, FDMEE category, and FDMEE period to the value of the logic accountwhen the active location is “Texas.”
If StrLocation == “Texas”:
RESULT = CURVAL + |000,10,09/30/13,810|
else:
RESULT=”Skip”
Value/ExpressionTo perform calculations and thereby, to derive values for a logic account, you select anoperator, from the Operator field, to work with the Value/Expression value.
SeqThis field specifies the order in which the logic accounts are processed. Orderspecification enables one logic account to be used by another logic account, providedthat the dependant account is processed first.
ExportA Yes-No switch determines whether a logic account is considered an export accountand therefore is subjected to the conversion table validation process. If the switch isset to Yes, then you must map the logic account.
Creating Summarized Logic AccountsBy default, a logic account is created for each center in the trial balance. For example,when the Criteria Value field is 12300, the result is a logic account created for eachsource center that is associated with account 12300.
You can create a logic account that summarizes multiple source centers by, in theCriteria Value field, placing a semicolon after the account name and entering thenumber that identifies the number of characters to group by.
For example, when the value in the Criteria Value field is 12300;4, the result is asummarized account that includes all source centers that have the same first fourcharacters in the source center name. The source center assigned to account 12300 isthe four characters that start at position 1. In addition, when the value in the CriteriaValue field is 12300;3;4, the result is a summarized account that includes all sourcecenters that have the same three characters in the source center, starting at position4. The source center assigned to account 12300 is the three characters that start atposition 4.
To create a logic account that summarizes all source centers by, in the Criteria Valuefield, place a semicolon after the account name and enter a text value. This hard-coded text value becomes the center for the summarized logic account. For example,when the value in the Criteria Value field is 12300;Dept100, then the result is asummarized account that includes all source centers. The source center assigned toaccount 12300 is Dept100.
Chapter 4Creating Accounts In A Simple Logic Group
4-7

Creating Complex Logic AccountsIndividual logic items are defined within a complex logic group. Each of the fields for acomplex logic rule operates the same as a simple logic rule except for the CriteriaValue and Include Calc fields. Complex logic accounts enable the user to enter acriteria value that includes other dimensions besides the account dimension. Inaddition, you can specify a “group by” and “group level” to alter how the generatedlogic accounts are displayed within the Workbench.
Criteria Value
To enter criteria for each dimension, click the Criteria Value icon to open the criteriaform. The logic item is created only from the source line items that meet the specifiedcriteria for each dimension. Descriptions of each complex logic criteria field is asfollows:
Dimension
This field enables the selection of any enabled source dimension. You can select eachdimension only once.
Criteria Type
This field works in conjunction with the Source Dimension and Criteria Value fields todetermine from which source values the logic items are derived. Criteria typesavailable are In, Between, and Like. The Criteria Type determines how the criteriavalue is interpreted.
Criteria Value
The criteria type uses this field to determine the members to include in the logiccalculation for any given logic dimension.
Group By
When viewing the derived logic item in the Workbench, the Group By field enables thelogic item to override the displayed member in the appropriate dimensions field. Youcan override to group the dimension based on the value entered in the Group By field.Use this field to hard code the returned member, or append hard-coded values to theoriginal members by entering a hard-coded member and an asterisk (*) in the GroupBy field.
For example, by placing the word “Cash” in the row with account selected fordimension, the Import form displays “Cash” in the Account field for the logic item. Ifyou place “L-*” in the Group By field, the import form displays “L-1100” where 1100 isthe original account that passed the logic criteria.
If you enter no value in the Group By field, no grouping occurs for this dimension, anda separate logic item is created for each unique dimension member.
Group Level
When viewing the logic item in the Workbench, the Group Level field works with theGroup By field to override the displayed member in the appropriate dimensions field.This field accepts only numeric values.
Chapter 4Creating Complex Logic Accounts
4-8

When you enter a value of 3 in the Group Level field, the left three characters of theGroup By field are returned. If no value is entered in the Group By field, then when youspecify 3 in the Group Level field, first three characters of the original sourcedimension member are returned. The logic items displayed on the Import form can begrouped to the desired level.
For example, when you enter L-* in the Group By field, the logic item displays in theImport form as “L-1100,” where 1100 is the original account that passed. Whenviewing the logic item in the Workbench, the Group Level field works with the GroupBy field to override the displayed member in the appropriate dimensions field. Thisfield accepts only numeric values.
+ displays “L-11.” If you enter the Group level1 for this row, then the Import formdisplays “L-1.”
Include Calc
If it meets the logic item criteria, the Include Calc field enables the logic item to includepreviously calculated Oracle Hyperion Financial Data Quality Management, EnterpriseEdition values in its calculations.
Note:
Each logic item has a sequence attached, and the logic items are calculated inthis sequence. If the second, or later, logic item has this field enabled, then anypreviously calculated logic items are included, provided they meet the logiccriteria.
Complex Logic Example 1: CashTx
Table 4-5 Complex Logic Example 1: CashTx
Dimension Criteria Type Criteria Value Group By Group Level
Account Like 11* Cash 0
Entity Like Tx Texas 0
ICP Between 00,99 ICP 0
UDI In 00,01,02 UD1 0
The first row specifies that any accounts that begin with “11” are included in thecalculated result for “Calc Item: CashTx.”
The second row further qualifies the results by specifying that the source record mustalso have the entity like “TX.”
The third line reduces the results to only those source records that have an ICP valuebetween 00 and 09.
The last line reduces the results to only those source records that have a Custom 1(UD1) of either: 00, 01 or 02. Imported lines that do not meet the listed criteria areexcluded from the calculated results.
Chapter 4Creating Complex Logic Accounts
4-9

In the following table, only one new logic item is derived from multiple source records.Using the preceding graphic example as the logic criteria, and the first grid that followsas the source line items, you can see how Oracle Hyperion Financial Data QualityManagement, Enterprise Edition derives the value of a single logic item. Note theGroup By field. Each Group By field includes a hard-coded value. Therefore, for everyline that passes the specified criteria, the original imported member is replaced withthe member listed in the Group By field.
Sample Imported Values
Table 4-6 Imported Values Sample
Account Entity ICP UD1 Amount Include orExclude
1150 Tx 07 01 50,401.07 Include
1176 Tx 04 02 10,996.00 Include
1201 Tx 01 00 500.00 Exclude
Sample Imported Account Names
Table 4-7 Sample Imported Account Names
Account Entity ICP UD1 Amount
Cash Texas ICP UD1 50,401.07
Cash Texas ICP UD1 10,996.00
Oracle Hyperion Financial Data Quality Management, Enterprise Edition groups andsummarizes the rows that include identical member combinations and thus creates thefollowing result:
Final Result
Table 4-8 Imported Account Names and Numbers
Account Entity ICP UD1 Amount
Cash Texas ICP UD1 61,397.07
Complex Logic Example 2: CashTx
Table 4-9 Complex Logic Example 2
Dimension Criteria Type Criteria Value Group By Group Level
Account Like 11* Cash 0
Entity Like Tx Texas 0
ICP Between 000,100 * 2
UDI In 00,01,02 UD1-* 0
Chapter 4Creating Complex Logic Accounts
4-10

The first row in the preceding table specifies accounts that begin with “11” are to beincluded in the calculated result for “Calc Item: CashTx.”
The second row further qualifies the results by specifying that the source record mustalso have the entity like “TX.”
The third line reduces the results to only those source records that have an ICP valuebetween 000 and 100.
The last line reduces the results to only those source records that have a Custom 1(UD1) of either: “00,” “01.” or “02.” Any imported line that does not meet all of the listedcriteria is excluded from the calculated results.
In the following tables, two logic items are derived from the source records because ofthe values entered in the Group By and Group Level fields. Two of the Group By fieldshave hard-coded values listed and two have an asterisk. Therefore, for every line thatpasses the specified criteria, the original imported members for the Account and Entitydimensions are replaced with the member listed in the Group By field. The otherdimensions return all or part of the original members based on the Group Levelentered.
Sample Imported Values
Table 4-10 Sample Imported Account Numbers
Account Entity ICP UD1 Amount Include orExclude
1150 Tx 070 01 50,401.07 Include
1176 Tx 040 02 10,996.00 Include
1121 Tx 045 02 9,050.41 Include
1201 Tx 100 00 500.00 Exclude
Logic Members
Table 4-11 Logic Members Imported Account Names
Account Entity ICP UD1 Amount
Cash Texas 07 UD1-01 50,401.07
Cash Texas 04 UD1-02 10,996.00
Cash Texas 04 UD1-02 9,050.41
Oracle Hyperion Financial Data Quality Management, Enterprise Edition groups andsummarizes the rows that include identical member combinations and thus creates thefollowing result.
Chapter 4Creating Complex Logic Accounts
4-11

Final Result
Table 4-12 Final Result of Imported Account Names and Numbers
Account Entity ICP UD1 Amount
Cash Texas 07 UD1-01 50,401.07
Cash Texas 04 UD1-02 20,046.41
Chapter 4Creating Complex Logic Accounts
4-12

5Check Rules
Related Topics
• Overview of Check Rules
• Creating Check Rule Groups
• Creating a Check Rule
• Creating Check Entity Groups
Overview of Check RulesSystem administrators use check rules to enforce data integrity. A set of check rules iscreated within a check rule group, and the check rule group is assigned to a location.Then, after data is loaded to the target system, a check report is generated.
If a check entities group is assigned to the location, then check report runs for allentities that are defined in the group. If no check entities group is assigned to thelocation, the check report runs for each entity that was loaded to the target system.Oracle Hyperion Financial Data Quality Management, Enterprise Edition check reportsretrieve values from the target system, FDMEE source data, or FDMEE converteddata.
FDMEE analyzes the check report and inserts a status entry in the process monitoringtable. The location associated with the report shows a status of True only when allrules within the check report pass. For rules used only for warning, no rule logic isassigned.
Check reports run as data is loaded. You can also run the reports manually.
Note:
Check rules are not applicable when loading to Accounts ReconciliationManager.
Note:
If the Entity dimension has shared hierarchies, then members needs mustspecified in parent.child format in the check entity group or data load mappingsfor check rules to work with Oracle Financial Consolidation and Close Cloudand Oracle Tax Reporting Cloud.
5-1

Creating Check Rule GroupsTo create check rule groups:
1. On the Setup tab, under Data Load Setup, select Check Rule Group.
2. In the Check Rule Group summary grid, click Add.
A row is added to the top grid.
3. In Check Rule Group Details, enter a name for the group in the Name field.
Optional: In Description, enter a description of the group.
4. Click Save.
Creating a Check RuleEach line of a Check Rule report represents a check rule.
To create check rules:
1. On the Setup tab, under Data Load Setup, select Check Rule Group.
2. Optional: In Check Rules, select the POV Location, POV Period, or POVCategory.
See Using the POV Bar.
3. In the Check Rule Group summary grid, select the check rule group.
4. In the Rule Item details grid, click Add.
A row is added to the grid.
5. In each field, enter check rule information:
• Display Value—See Display Value.
• Description (optional)—See Description.
• Rule Name—See Rule Name.
• Rule Text—See Rule Text.
• Category—See Category.
• Sequence—See Sequence.
• Rule Logic (optional)
6. Click Save.
Example 5-1 Display Value
The Display Value field, which controls how Oracle Hyperion Financial Data QualityManagement, Enterprise Edition formats the data rows of check reports, is used toselect target accounts or report format codes. For fields that contain report formatcodes, no value lookup is attempted.
Example 5-2 Browse for Target Account
This option, which displays the Search and Select: Target Value screen, enables youto search and insert a target account (from a list of target-system application accounts)into the check rules form.
Chapter 5Creating Check Rule Groups
5-2

Example 5-3 Select Format Code
This option enables you to enter format codes into the Target Account column.
Format codes determine the display of check reports.
Table 5-1 Format Codes and Corresponding Actions Performed on CheckReports
Format Code Action Performed on Check Reports
#ModeList Sets the report to display the Display Value,Description, and Amount column values. Thesystem defaults to #ModeRule if nothing isspecified.
#ModeRule (Default) Sets the report to display the RuleName, Rule Text, and Amount column values.
The report evaluates each expression of theRule Logic column and tests the True or Falsecondition of each rule. The status of each rule(OK or Error) is displayed in the report.
#Title Inserts the text of the associated Descriptionfield as a title line on the check report.
#Subtitle Inserts the text of the associated Descriptionfield as a subtitle line on the check report.
Example 5-4 Description
Displayed only for check reports in #ModeList mode, the Description column displaysaccount descriptions (which may be designated as titles or subtitles).
Example—Description
Out-of-Balance Account
Example 5-5 Rule Name
Displayed only for check reports in #ModeRule mode, the Rule Name column, storesidentifiers for check rules. Rule Name values should be unique and easy to identify.
Example—Rule Name
Out-of-Balance Check
Example 5-6 Rule Text
Displayed only for reports in #ModeRule mode, the Rule Text column defines the logicbehind rules. In check reports, the primary statement for a rule is the text of the RuleText field associated with the rule.
Example—Rule Text
This account must be between [+10 and –10].
Example 5-7 Category
In the Category column, select the FDMEE category to restrict a check rule to oneFDMEE category. The rule is displayed in the check report only when the FDMEE
Chapter 5Creating a Check Rule
5-3

category that is selected in the Category field associated with the rule is the FDMEEcategory set in the POV. To display the check rule in the check report regardless ofthe category set in the POV, you must select All.
Example 5-8 Sequence
Sequence column values (numbers) determine the order in which format codes andrules are processed. It is good practice to increment sequence numbers by 10—toprovide a range for the insertion of format codes and rules.
Rule LogicThe Rule Logic column is used to create multidimensional lookups and check ruleexpressions. Rule Logic columns are processed for reports only in #ModeRule or#ModeList mode. After a rule logic is processed for a rule in the check report, OracleHyperion Financial Data Quality Management, Enterprise Edition flags the rule aspassing or failing.
Check Rule Condition Expressions
Check rule expressions are used primarily to validate target-system account balanceswhen performing multidimensional lookups. The expressions return a True or Falseresult.
For example, the following returns true (OK) if Cash (a target account) has a positivebalance, and false (Error) when it does not:
|,,,YTD,<Entity Currency>,,Cash,[ICP None],[None],[None],[None],
[None],,,,,,,,,,,,,,,,|>0
In this example, the check rule expression returns true (OK) when the value of Cash (atarget account) plus $1000 is greater or equals the value of AccruedTax (anothertarget account), and false (Error) when it does not:
|,,,YTD,<Entity Currency>,,Cash,[ICP None],[None],[None],[None],
[None],,,,,,,,,,,,,,,,|+1000>=|,,,YTD,<Entity Currency>,,AccruedTax,[ICP None],
[None],[None],[None],[None],,,,,,,,,,,,,,,,|
Using the Rule Logic Editor to Create Check RulesThe Rule Logic Editor facilitates creation of check rules. It helps you develop rule logicand enables you to create rules from the Rule Logic Editor. You use the Rule LogicEditor to modify check rules.
Chapter 5Creating a Check Rule
5-4

To open the Rule Logic Editor:
1. On the Setup tab, under Data Load Setup, select Check Rule Group.
2. From Check Rules, in the Check Rule Group summary grid, select a check rulegroup.
3. From the Rule Item Details grid, click Add.
A row is added to the grid.
4. In each field, enter check rule information:
• Display Value—See Display Value.
• Description—(optional) See Description.
• Rule Name—See Rule Name.
• Rule Text—See Rule Text.
• Category—See Category.
• Sequence—See Sequence.
5. Click .
The Rule Logic screen includes three tabs:
• Rule Logic Add/Edit
• Rule Logic Add/Edit as Text
• Rule Logic Test Expression
Chapter 5Creating a Check Rule
5-5

Adding Rule LogicUse the Rule Logic Add/Edit tab to add each row for the rule logic statement with a listof member values.
The Rule Logic Add/Edit tab consists of these elements:
• Condition Summary—Provides the logic for the check rule by enabling thespecification of conditional expression that evaluates to "true" or "false."
If the Condition Summary does not contain a condition, it does not show OK orError, but it does show an intersection that you can specify.
The Condition Summary and Display Summary options are optional, but if omitted,they display only 0.00.
• Display Summary—Enables the specification of a multiple-dimensional lookup tobe used as the display value.
The display value is ignored and if the row has no rule logic at all and just adisplay value, the row is ignored and the report is terminated. The only valuedisplayed in the Value column on the report is whatever expression is contained inthe Display Summary. The display summary is optional.
• Add—Adds a row in the summary.
• Delete—Removes a row in the summary.
To add a rule logic statement:
1. On Rule Logic Editor, select the Rule Logic Add/Edit tab.
2. From the Condition or Display summary grid, click Add.
A blank line is displayed.
3. Enter the rule to test.
Note:
When using the equal sign for evaluating amounts, use double equal signs(==).
4. Optional: Click .
5. From Rule Logic in the Intersection Type field, select the intersection type forthe multidimensional lookup.
Available intersection types:
• Source intersection—Values are enclosed by the " ~" character.
• Converted source intersection—Values are enclosed by the ' character.
• Target intersection—Values are enclosed by the " |" character.
See Multidimensional Lookup.
6. From Dimension, select the dimension from which to retrieve values.
7. From Member Value, select a value from the dimension.
Chapter 5Creating a Check Rule
5-6

8. Click Add to Intersection.
The member value is added to the Display area.
9. Click OK.
Rule Logic IntersectionUse the Rule Logic Intersection screen, from which you can select dimensionsdirectly from the target system, to ensure that required dimensions are entered andordered correctly.
Display the Rule Logic Intersection screen by clicking from the ConditionSummary or Display summary grid on the Rule Logic Add/Edit screen.
Chapter 5Creating a Check Rule
5-7

The Rule Logic Intersection screen enables you to select the type of retrieval formatfor the target dimensions.
Oracle Hyperion Financial Data Quality Management, Enterprise Edition uses theintersection type when multidimensional lookups are selected for a rules logicstatement. The multidimensional lookup retrieves account values from the targetsystem, FDMEE source data, target data or FDMEE source converted data. See Multidimensional Lookup.
Multidimensional LookupThe multidimensional lookup retrieves account values from the target system, OracleHyperion Financial Data Quality Management, Enterprise Edition source data, orFDMEE converted data. You can use multidimensional lookups in the rule conditionand in the display of the rule logic.
Rule Data Sources
Oracle Hyperion Financial Data Quality Management, Enterprise Edition can retrievedata from three sources:
• Target-system data
• FDMEE source data
• FDMEE converted data
Target System DataThe following format, which begins and ends the rule with the pipe character (|),enables Oracle Hyperion Financial Data Quality Management, Enterprise Edition toretrieve target-system values for any dimension.
Unless otherwise specified, parameters are optional.
|Scenario, Period, Year, View, Value, Entity, Account (Required), ICP, Custom1, Custom2,Custom3, Custom4, Custom5, Custom6, Custom7, Custom8, Custom9, Custom10, Custom11, Custom12, Custom13, Custom14, Custom15, Custom16, Custom17, Custom18, Custom19, Custom20|
The following examples illustrate ways that target-system values can be retrieved. Ineach example, Balance is a target account. For dimensions that are not referenced,you must use commas as placeholders.
Note the following:
• The Year dimension defaults to the year set in the POV.
• The Currency dimension defaults to 0.
• The View dimension defaults to YTD.
• The Value dimension defaults to <Entity Currency>.
Example 1
Look up the value of Balance for the target period and scenario (category) set in thePOV and for each entity of the FDMEE check entity group that is assigned to thelocation. The example rule passes the check when the target account is less than $10and greater than -10.
|,,,,,Balance,,,,,,,,,,,,,,,,,,,,,,| > -10.00 AND |,,,,,Balance,,,,,,,,,,,,,,,,,,,,,,| < 10.00
Chapter 5Creating a Check Rule
5-8

Example 2
Look up the value of Balance for the specified dimensions.
|Actual,March,2002,YTD,Ohio,Balance,Michigan,Engines,Ford,Trucks,[None],,,,,,,,,,,,,,,,,USD| > 0
Example 3
Look up the value of Balance for the specified dimensions and the previous period.
|Actual,-1,2002,YTD,Ohio,Balance,Michigan,Engines,Ford,Trucks,[None],,,,,,,,,,,,,,,,,USD| > 0
Example 4
Look up the value of Balance for the target scenario (category) set in the FDMEEPOV, the previous target period, and each entity of the FDMEE check entity group thatis assigned to the location.
Example 1
The following shows how to use +n and -n to specify a relative offset in the check rulewhen the current year dimension is "2015":
-1 result is 2015 - 1 = 2014 (Year - n)
+1 result is 2015 + 1 = 2016 (Year + n)
Example 2
The following shows how to use +n and -n to specify a relative offset in the check rulewhen the current period dimension is "January":
-1 result is January - 1 = January
+1 result is January + 1 = February
+12 result is January + 12 = December
FDMEE Source DataThe following format, which begins and ends the rule with the tilde character (~),retrieves values from data that was mapped to a target member, and then loaded intoOracle Hyperion Financial Data Quality Management, Enterprise Edition.
Unless otherwise specified, parameters are optional. Parameters designated UD# areuser-defined.
~FDMEE Category, FDMEE Period, Year (Field Not Applicable), FDMEE View, FDMEE Location, Source Entity(Required), Source Account(Required), Source ICP, Source UD1,Source UD2, Source UD3, Source UD4, Source UD5, Source UD6, Source UD7,Source UD8, Source UD9, Source UD10, Source UD11, Source UD12, Source UD13,Source UD14, Source UD15, Source UD16, Source UD17, Source UD18, Source UD19, Source UD20~
FDMEE Converted DataThe following format, which begins and ends the rule with the grave accent character(`), retrieves pull values from data that was loaded into Oracle Hyperion Financial DataQuality Management, Enterprise Edition. Unless otherwise specified, the parametersare optional.
`FDMEE Category, FDMEE Period, Year (Field Not Applicable), FDMEE View, FDMEE Location, Entity(Required), Account(Required), ICP, Custom1, Custom2, Custom3,
Chapter 5Creating a Check Rule
5-9

Custom4, Custom5, Custom6, Custom7, Custom8, Custom9, Custom10, Custom11, Custom12, Custom13, Custom14, Custom15, Custom16, Custom17, Custom18, Custom19, Custom20`
Math OperatorsMath Operators (+, -, *, /)—If you select a math operator, then the check rule has anamount that equals the original amount calculated with the specified expression. Forexample, when you select the operator “*” and enter 2 in the rule field, then the newrecord is an amount two times the original amount. The math operators available in theexpressions:
• + (addition)
• - (subtraction)
• * (multiplication)
• / (division)
• abs ()
If/Then/ElseCheck rules accept If/Then/Else statements that enables you to create a morecomplex conditional tests on the Add/Edit as Text tab. This statement provides aprimary path of execution when the if statement evaluates to "true," and a secondarypath of execution when the if statement evaluates to "false."
Using the If/Then/Else statement, you can use custom-field values within reports aswarning messages and flags.
In the following example, when the Result is between 100 to 1500, the Check Reportwith Warning prints "Amount between 100 and 1500." The example references threedata accounts:
1. 24000050: 1000
2. 24000055: 500
3. 24000060: 10
This calculation for this example is 1000 + 500/10, with the result of 1050.
The script is written using Jython code:
def runVal():
dbVal=abs((|,,,,,BERLIN,24000050,[ICP None],[None],[None],[None],[None],,,,,,,,,,,,,,,,|)+(|,,,,,BERLIN,24000055,[ICP None],[None],[None],[None],[None],,,,,,,,,,,,,,,,|)/(|,,,,,BERLIN,24000060,[ICP None],[None],[None],[None],[None],,,,,,,,,,,,,,,,|))
PstrCheckMessage1=''
msg2=''
msg3=''
if(dbVal<100):
RESULT=True
Chapter 5Creating a Check Rule
5-10

PstrCheckMessage1='Amount < 100.'
elif(dbVal>100 and dbVal<=1500):
RESULT=True
PstrCheckMessage1='Amount between 100 and 1500.'
elif(dbVal>1500 and dbVal<=9999):
RESULT=True
PstrCheckMessage1='Amount between 1501 and 9999.'
else:
RESULT=False
PstrCheckMessage1='Amount greater than 9999!'
return [RESULT,PstrCheckMessage1,msg2,msg3]
Note:
You must include three message parameters with the return statement to writedata to the status table. Regardless of whether you are only writing a singlemessage, the other two message parameters are required.
The result of running this script is shown in the Check Report with Warnings:
Adding a Rule Logic Statement as Free Form TextUse the Rule Logic Add/Edit as Text tab to add the rule to test manually as free-formtext. This feature enables you to instruct the system on how to display the actual valuefrom the check rule logic. It always provides you with a way to cut and paste text ratherthan entering text line by line. If you do not specify a display summary, then the reportshows a "0" value.
When the Display area is active, all interactions take place in the Display area. Forexample, pasting a tree copies all tree members to the Display area. When the Rule
Chapter 5Creating a Check Rule
5-11

area is active, all interactions take place in the Condition area. Changes made on theLookup tab are reflected on the Rule tab in related editors.
To add a rule logic statement:
1. On the Rule Logic Editor, select the Rule Logic Add/Edit as Text tab.
2. In Rule, enter the rule.
Do not use a semicolon (;) in check rules. The semicolon is a reserved as theseparator between the rule value and the display value.
When using the equal sign for evaluating amounts, use double equal signs (==)instead of the single equal sign (=). For example, use a – b == 0, and not a - b=0.
3. Click OK.
Testing Check Rule ExpressionsYou can test a rule in the Test Expression tab of the Rule Logic tab and validateconditions for a combination of dimensions. When a test check rule is submitted, youcan display errors that were found in the rule being tested.
The Text Expression screen contains the following elements:
• Expression—Area that displays the rule being tested
• Expression After Lookup (Scratch Pad)—Area that displays the results of theexpression being tested. (You can use the area for temporary storage of text andexpressions by selecting text and right-clicking.)
Any expression in this field is removed when you click Test Condition or TestDisplay.
• Result—Area that displays the results of the test condition (True or False)
• Lookup Errors—Area that displays errors that were found in the expression beingtested
• Select POV—Enables you to select the Check Rule POV.
On the Select Point of View screen, you can select another POV, or select aspecific entity on the Member Selector screen.
Chapter 5Creating a Check Rule
5-12

Note:
The POV can only be set after data was exported to the application for aspecific POV. Then you can enter the POV and run the rule being tested.The POV entered remains set for the current session. You can navigate tothe workbench and return without having to reset the POV.
• Test Condition and Test Display—Buttons that are used to run, respectively, theexpression in the Condition or Display area on the Rule tab
To test a rule logic statement:
1. On the Rule Logic Editor, select the Test Expression tab.
2. Click Select POV to select the POV for the rule.
Optionally, you can click the Entity look up and select a member from theMember Selector screen.
3. Click Test Condition or Test Display to test the condition or display specified onthe other tabs.
If you need to edit an expression, move to the other Rule tabs (Add Edit and Add /Edit as Text) and change the expression.
4. Click OK.
Running Check Reports for Profitability and Cost Management BSO EssbaseCube
Before running a Check Report for an Oracle Hyperion Profitability and CostManagement BSO Essbase cube, make sure that a fully qualified name is used to
Chapter 5Creating a Check Rule
5-13

differentiate any duplicate members used within dimensions or across dimensions. Toconstruct a fully qualified name from a duplicate member name, add the fully qualifiedname as a rule logic statement on the Rule Logic Add/Edit as Text screen (see Addinga Rule Logic Statement as Free Form Text).
Note that a fully qualified member name comprises the duplicate member or aliasname and all ancestors up to and including the dimension name. Each name must beenclosed in brackets ([ ]) and separated by a period (.). The syntax is as follows:
[DimensionMember].[Ancestors...].[DuplicateMember]
For example:
[Market].[East].[State].[New York]
[Market].[East].[City].[New York]
See Oracle® Essbase Database Administrator’s Guide.
Creating Check Entity GroupsA check entity group consists of one or more target-system entities. When a checkreport is generated, the entities of the entity groups that are assigned to the reportlocation are consolidated and displayed in the report. You activate check entity groupsby assigning them to locations. You define the check entities of a check entity groupby entering values in the fields of the check entities form of the Check Entities screen.
The Check Entity Group screen consists of three grids:
• Check Entity Group Summary—Summary area that lists the names of the checkentity group, and enables you to create a new check entity group.
• Check Entity Group Details—Detail area where you can name and describe thecheck entity group.
• Entity Details—Detail area where you can add information about the entity.
To add a check entity group:
1. On the Setup tab, under Data Load Setup, select Check Entity Group.
2. On the Check Entity Group grid, click Add.
A blank row is added at the top of the grid.
3. From the Check Entity Group Detail area, enter the check entity group name in theName field.
Optional: In the Description field, enter a description of the check entity group.
4. Click Save.
To add an entity detail:
1. In Check Entity Group summary grid, select a check entity group.
2. In Entity details grid, click Add.
Blank options lines are displayed.
3. Complete the following fields:
• Parent
Chapter 5Creating Check Entity Groups
5-14

• Entity
• Consolidate
• On Report
• Sequence
4. Click Save.
Table 5-2 Entity Detail Options and Descriptions
Option Description
Parent Specify the organization in which the entity isconsolidated. For other target systems, youselect the parent of the entity. If theConsolidate option is not selected, theselection is irrelevant.
Script Name For Planning and Essbase calculation scripts,specify the calculation script name to execute.This field is only available when the CheckEntity Calculation method is set to "calculationscript" in the Essbase or Planning applicationoptions.
Calc Script ParametersClick to browse and set the script for thecalculation script on the Set Calculation ScriptParameters screen. You can also add acalculation script on the Set Calculation ScriptParameters screen.As part of the check rule process, OracleHyperion Financial Data Quality Management,Enterprise Edition references any calculationscript parameters included in customcalculation scripts. A calculation script is aseries of calculation commands, equations,and formulas that enable you to definecalculations other than those defined by thedatabase outline. Calculation scripts aredefined in Essbase and Planning targetapplication options, see Using CalculationScripts.
This field is only available when the CheckEntity Calculation method is set to" calculationscript" in the Essbase or Planning applicationoptions.
If the Check Entity Calculation method is set to"dynamic", this field is unavailable.
Entity Specify the target entity to consolidate anddisplay in the check report. If the Consolidateoption is selected, the entity is consolidatedbefore it is displayed in the check report.
Chapter 5Creating Check Entity Groups
5-15
Table 5-2 (Cont.) Entity Detail Options and Descriptions
Option Description
Consolidate Select to consolidate an entity prior todisplaying it in the check report.FDMEE also runs a consolidation after loadingthe target system (assuming a check entitygroup is assigned to the location). Theconsolidated entities are specified in the checkentity group that is assigned to the activelocation.
Oracle Hyperion Planning—Runs the defaultcalculation or calculation script specified in theCalc Script Name depending on the "CheckEntity Calculation Method" property of thetarget Application.
Oracle Essbase—Runs the default calculationor calculation script specified in the Calc ScriptName depending on the "Check EntityCalculation Method" property of the targetApplication.
Oracle Hyperion Financial Management—Theconsolidation of data occurs in the FinancialManagement database.
On Report The option selected in the On Report columndetermines whether an entity is displayed inthe check report. If On Report is not selectedand Consolidate is selected, the entity isconsolidated but not displayed.
Sequence Specify the order in which entities areconsolidated and displayed in the checkreport.It is good practice to increment the sequencenumber by 10, to provide a range for theinsertion of entities.
Chapter 5Creating Check Entity Groups
5-16

6Batch Processing
Using the Oracle Hyperion Financial Data Quality Management, Enterprise Editionbatch processing feature, you can:
• Combine one or more load rules in a batch and execute it at one time.
• Run jobs in a batch in serial or parallel mode.
• Define the parameters of the batch.
• Derive the period parameters based on POV settings.
• Create a "master" batch that includes multiple batches with different parameters.
For example, you can have one batch for metadata rules run in serial mode, and asecond batch for the data rule run in parallel mode.
• Associate a batch with a batch group for ease of use and security.
• Instruct the batch to submit included jobs in parallel mode and return control.
• Instruct the batch to submit included jobs in parallel mode and return control onlywhen all jobs are complete.
Batch processing options are available on the FDMEE task pane, or by executingbatch scripts.
If you process batches from the FDMEE task pane, use the Batch Definition option tocreate a batch, and specify its parameters and tasks included in the batch. See Working with Batch Definitions. Use the Batch Execution option to execute batches.See Executing Batches.
Note:
FDMEE batch load features are unavailable to the Account ReconciliationManager. For Accounts Reconciliation Manager load and scheduling features,see the Oracle Hyperion Financial Close Management User's Guide.
Working with Batch DefinitionsA batch definition is used to define the batch jobs and parameters, and the type ofrules included in the batch. A batch can contain one type of rule only. Valid types ofrules are:
• metadata
• data
• batch
• open batch
6-1

Note:
Only an administrator can create batch definitions.
The Batch Definition features consist of three regions:
• Batch Definition detail—Enables you to add and delete a batch definition. If addingor modifying a definition, specify the definition name, target application, processmethod, return control method, and wait parameters.
• Batch Definition parameters—Enables you to derive period parameters based onthe Import to Source, Export to Target, POV period, and to indicate data extractparameters. The parameter definition is unavailable for the batch types "batch"and "metadata (rules)."
• Batch Definition jobs—Enables you to add and delete jobs in a batch. Based onthe type of batch, specific types of rules are allowed.
To add a batch definition:
1. On the Setup tab, under Batch, select Batch Definition.
2. In the Batch Definition summary section, click Add.
Use the blank Name and Target Application fields in the Batch Definition summarygrid to enter a batch name or target application on which to search.
3. In Batch Definition detail section, select the Definition tab.
4. In Name, specify the name of the batch definition.
The name must contain only alpha, numeric or underscore characters. Do notenter spaces or any other character.
5. From Target Application, select the name of the target application.
6. From Type, select the type of rule for the definition.
Available types are:
• metadata
• data
• batch
• open batch—file based data sources
• open batch multi-period file-based data sources that include starting andending periods.
The Open Batch type is used only for file-based data sources and does notcontain any batch jobs. When you run this type of batch, the process reads thefiles automatically from the openbatch directory and imports them into theappropriate POV based on the file name. When the open batch is run, the masterfolder is emptied.
7. From Execution Mode, select the batch process method.
• Serial—Processes files sequentially, requiring that one file complete itsprocess before the next file starts its process.
• Parallel—Processes files simultaneously.
Chapter 6Working with Batch Definitions
6-2
Note:
Files are not grouped by location in parallel mode.
8. For batch processing run in parallel mode, complete the following fields
• Wait for Completion—Select Wait to return control only when the batch hasfinished processed.
Select No Wait to run the batch in the background. In this case, control isreturned immediately.
• Timeout—Specify the maximum time the job can run. Oracle HyperionFinancial Data Quality Management, Enterprise Edition waits for the job tocomplete before returning control.
The Timeout can be in seconds or minutes. Enter a number followed by a Sfor seconds or M for minutes.
9. In Open Batch Directory for an open batch type, specify the folder under Home\inbox\batches openbatch where the files to be imported are copied. If this field isblank or null, all files under Home\inbox\batches\openbatch are processed.
10. In File Name Separator for an open batch, select the character to use whenseparating the five segments of an open batch file name.
Options:
• ~
• @
• ;
• _
11. Select Auto Create Data Rule to create the data rule automatically for file-baseddata loads.
Note:
The Auto Create Data Rule option is available when the rule type is “openbatch.”
When FDMEE assigns the data rule name, it checks whether a data rule with thename "Location_Category" exists. If this name does not exist, FDMEE creates thedata rule using the following file naming conventions:
• Rule Name—Location_Category
• Description—“Auto created data rule”
• Category—Category
• File Name—Null
• Mode—Replace
12. Optional: In the Description field, enter a description of the batch definition.
13. Click Save.
Chapter 6Working with Batch Definitions
6-3

14. Optional: In Batch Group, select the batch group to associate with the batch.
For more information, see Adding a Batch Group.
15. Optional: In Number of Parallel Jobs, specify the maximum number of parallelprocesses submitted by a batch at any time.
This option is used in conjunction with the Wait for Completion and Timeoutfields.
If Wait for Completion and a time-out period options are set, but the number ofparallel jobs is not, then FDMEE waits for all batch jobs to complete and thenreturns control.
When the number of parallel jobs count is set and Wait for Completion/time-outmodes are enabled, the system submits the specified number of jobs forprocessing at one time. If the wait time is reached before all the jobs are complete,the system exits the batch processing procedure.
The Wait for Completion setting is not for each subset, but for the whole batch. Forexample, let's suppose you have 20 jobs where the number of parallel jobs is setto 4 and the time-out period is 10 M. If only 15 jobs are completed in 10 M, thesystem still exits.
If No Wait is specified, the system submits all jobs and returns control submittedimmediately without waiting for any running processes to finish.
16. Optional: In Before Batch Script, enter the name of the custom script to runbefore the batch.
You can browse and select, or upload a custom script on the Select screen by
clicking .
Note:
If the custom script is run in a "Before Batch Script " attached to a batchdefinition, store parameters in a custom table or file so that the parameterscan be read.
The custom script can be written in Jython or Visual Basic script.
17. Optional: In After Batch Script, enter the name of the custom script to run afterthe batch.
You can browse and select, or upload a custom script on the Select screen by
clicking .
The custom script can be written in Jython or Visual Basic script.
18. Click Save.
To add batch definition parameters:
1. On the Setup tab, under Batch, select Batch Definition.
2. In Batch Definition, under Batch Definition Detail, select the Parameter tab.
3. In Parameters, select Import From Source to import the data from the sourcesystem, perform the necessary transformations, and export the data to the FDMEEstaging table.
Chapter 6Working with Batch Definitions
6-4

4. Select Export To Target to export the data to the target application.
5. Select POV Period to derive the period parameters based on POV settings.
If the POV period is selected, the period key start and end period fields aredisabled.
This field is only available for a data load batch.
When setting up a batch, you can choose the POV to drive the period, or enter theperiods explicitly. If you select the POV, it is pulled from the Default POV Periodsetting in System/Application, or User settings.
6. Specify dates in the Start Period and End Period to derive period parametersthrough which the data is processed.
Use the date format based on the locale settings for your locale. For example, inthe United States, enter the date using the format MM/DD/YY format.
If the Start Period and End Period fields are selected, the POV Period field isdisabled.
This field is only available for a data load batch.
7. In the Import Mode drop-down, select the mode to extract data all at once for anentire period or incrementally during the period.
Option are:
• Snapshot—Extracts everything for the selected source set for an entireperiod.
Note the following behavior of Snapshot mode:
– When the source data for the selected period has never been run, data isextracted from the source.
– When the source data for the selected period has been run, data isextracted from the FDMEE staging table, and not from the source. Thismeans that if a user has two locations that extract from the sameEnterprise Resource Planning (ERP) source, data is extracted from thesource only once (and the first time only).
For example, if you load data to Oracle Hyperion Financial Managementfrom the Oracle E-Business Suite for a selected period, but you run theintegration to ARM for the same source and period, use what is in theinterface tables since data is only extracted the first time from the source.This result in a significant performance gain for any subsequent dataloads. The first extraction take the longest, but any other subsequentextractions are fast.
• Incremental—Extracts those records that were added after the prior dataextract
Chapter 6Working with Batch Definitions
6-5

Note:
When using incremental mode to pull data from Peoplesoft, note thatthe system determines the records to pull based on the most recentPROCESS_INSTANCE entry on the Peoplesoft General Ledger tables.For example, if a job is scheduled at 8:00 am to run at noon, and auser executes a job at 10 am, then only the records posted at 10 amare pulled for an incremental run. If records are not pulled over usingincremental mode, then the user should run a full refresh to get allrecords.
• Full Refresh—Performs a clean extraction from the source system, therebyclearing any existing data rows in the appropriate FDMEE staging tables for agiven source Ledger (or Business Unit) and source period.
When defining the file name for an open batch that uses multi-periods, specifythe starting and ending periods in the file name, for example,10~Filerule~Jan03~Mar03~FR.txt.
When defining the file for an open batch that uses a single period, specify theperiod in the file name, for example, 10-OBFilerule-Jan03-FR.txt.
Note:
The import mode options (Snapshot, Incremental and Full Refresh) areonly applicable to Data Rules in a Location using a Standard ImportFormat. Data Rules in a Location with a Source Adapter Import formatalways perform a full data extraction (similar to Full Refresh) directlyinto the TDATASEG_T table.
• Append—Existing rows for the POV remain the same, but new rows areappended to the POV. For example, a first time load has 100 rows and secondload has 50 rows. In this case, FDMEE appends the 50 rows. After this load,the row total for the POV is 150.
• Replace—Replaces the rows in the POV with the rows in the load file (that is,replaces the rows in TDATASEG). For example, a first time load has 100rows, and a second load has 70 rows. In this case, FDMEE first removes the100 rows, and loads the 70 rows to TDATASSEG. After this load, the row totalfor the POV is 70.
Note:
If you run data load in Full Refresh mode in the Account ReconciliationManager (ARM), select all locations that have data. Otherwise, FDMEEcontains data for locations not selected in ARM (but ARM does not). Thisresults in a discrepancy between what is in FDMEE and what is in ARM.
Chapter 6Working with Batch Definitions
6-6

Note:
E-Business Suite and FUSION source imports require a full refresh of dataload rules before export after upgrading from an 11.1.2.2 release.
This field is only available for a data load batch.
8. Select Extract Exchange Rate to extract the exchange rate.
See How Currencies Are Processed.
(This option is not applicable for file-based source systems).
9. For Oracle Essbase, Oracle Hyperion Planning, and Options for the FinancialManagement applications, in the Export Mode drop-down, select the mode ofexporting data.
Options for Essbase or Planning applications:
• STORE_DATA
• REPLACE_DATA
• ADD_DATA
• SUBTRACT_DATA
• OVERRIDE_ALL_DATA
This field is only available for a data load batch.
Options for the Financial Management applications:
• Accumulate
• Replace
• Merge
• Replace by Security
10. For Essbase or Planning, from the Plan Type drop-down, select the plan type ofthe application.
11. Click Save.
To add a batch job:
1. On the Setup tab, under Batch, select Batch Definition.
2. In Batch Definition, under Batch Jobs, click Add.
In Rule Name, specify the rule name associated with the batch job.
You can also select the to navigate to and select the rule name.
3. In Job Sequence, specify the order in which to sequence the batch.
4. Click Save.
Adding a Batch GroupBatch groups enable you to determine security eligibility when executing batches.
Chapter 6Adding a Batch Group
6-7

See Setting Security Options.
To add a batch group:
1. On the Setup tab, under Batch, select Batch Definition.
2. Select the Batch Group tab.
3. Click Add.
4. In Name, specify the batch group name.
5. Click Save.
6. Optional: Associate a batch with a batch group:
a. Select the Batch tab.
b. From the Batch summary section, select the batch to associate with a batchgroup.
c. From the Batch detail section, select the Definition tab.
d. In Batch Group, select the batch group to associate with the batch.
e. Click Save.
Executing BatchesUse the Batch Execution feature to show all batches that you have accessed based onthe batch group assigned. You can also use the Batch Execution feature to select abatch and execute a rule after parameters passed with the rule have been validated.
Batch Execution shows all batches to which you have access based on the batchgroup assigned.
Note:
The Batch Execution option is only accessible to a user with a Run Integrationrole.
To execute a rule:
1. On the Workflow tab, under Other, select Batch Execution.
2. In the Batch Execution summary area, select a batch name, and then clickExecute.
3. Optional: You can also schedule a job by clicking Schedule (see SchedulingJobs). You can check the status of the batch by clicking Check Status (see Viewing Process Details).
Using Open BatchesThe open batch functionality is used to read file-based data sources and import theminto the appropriate POV based on the file name. It is a batch definition type thatenables you to automate and schedule the workflow process (such as four fish stepsin the Data Load Workbench: import, validate, export, and check), particularly when
Chapter 6Executing Batches
6-8

you have a need to process the loading large number of external files. Open batchescannot contain jobs. Additionally, open batches can be scheduled to run periodically.
The high-level process overview of the Open Batches function consists of:
1. In Batch Definition, add a new batch definition with the type of Open Batch.
2. Create an openbatch folder in the application inbox\batches subdirectory where thefiles to be imported are copied.
After a batch is processed, a directory is created and all files within the OpenBatchdirectory are moved into it. The new directory is assigned a unique batch ID.
3. Select the File Name Separator character.
This character is used to separate the five segments of an open batch file name.
4. Select the Auto Create Data Rule option.
5. Stage the open batch files by copying files to the inbox\batches\openbatch folderusing the name format for batch files.
6. In Batch Execution, process the batch.
Name Format for Open Batch FilesThe names of open batch files consist of the following segments:
• POV—Point-of-View where Oracle Hyperion Financial Data Quality Management,Enterprise Edition processes the data, such as location, period, and category
• Import load method—how FDMEE imports data to the POV
• Export load method—how FDMEE exports data to the target application
Open batches are located in the inbox\batches\openbatch, and under a sub-folder ifone has been created for them.
Naming ConventionsOracle Hyperion Financial Data Quality Management, Enterprise Edition uses thefollowing methods to name open batch files:
1. Auto Create Data Load Rule—used when the data load rule is created the firsttime.
2. Existing Data Load Rule—used when the data load rule has been created inFDMEE.
When FDMEE creates the data rule name automatically, it checks whether a data rulewith the " Location_Category " name exists. If the name does not exist, FDMEEcreates the data rule using the file namingconvention:FileID~Location~Category~Period~RR.ext (this example uses a ~ (tilde) filename separator).
• File ID–a free-form value used to sort the file for a given Location. Files are sortedby Location and within a location, the File ID is used to sort the files.
• Location–POV location
• Category–POV Category
• Period–POV Period
Chapter 6Using Open Batches
6-9

• load method–a two character value. The first character indicates the importFormat, and the second character indicates the export format.
Valid values for import mode are A and R.
Valid values for export mode are A, R, M, and S.
For more information, see Open Batch Import and Export Load Methods.
• ext-–file extension (txt or csv)
When FDMEE finds that a data rule already exists for an open batch, it uses the filenaming convention: FileID~Period~RR.ext (this example uses a ~ (tilde) file nameseparator)
• File ID–a free-form value used to define the load order of batch execution. Batchfiles load in alphabetic order by file name.
• Data Load Rule–Data Load Rule name
• Period–POV Period
• load method–a two character value. The first character indicates the importFormat, and the second character indicates the export format.
Valid values for import mode are A and R.
Valid values for export mode are A, R, M, and S.
For more information, see Open Batch Import and Export Load Methods.
• ext-–file extension (txt or csv)
Open Batch Import and Export Load MethodsImport load methods include:
Import Load Method File-Based Fusion/E-Business Suite/PeopleSoft
A Append not applicable
R Replace not applicable
F not applicable Full Refresh
I not applicable Incremental
S not applicable Snapshot
Export load methods include:
Export Load Method Hyperion FinancialManagement
Planning/Essbase/HyperionProfitability
A (ADD_DATA) Accumulate not applicable
R Replace Applicable for Planning only
M (STORE_DATA) Merge Merge for Essbase, FullRefresh for HyperionProfitability. (The mergeexport load method is notavailable for Planning).
S Replace by Security Subtract for Planning, Replacefor Essbase, Incremental forHyperion Profitability
Chapter 6Using Open Batches
6-10

Export load methods include:
Creating Open BatchesTo create and process open batch:
1. On the Setup tab, under Batch, select Batch Definition.
2. In the Batch Definition summary section, click Add.
Use the blank Name and Target Application fields in the Batch Definition summarygrid to enter a batch name or target application on which to search.
3. In Batch Definition Detail section, select the Definition tab.
4. In Name, specify the name of the batch definition.
5. From the Target Application drop-down, select the name of the targetapplication.
6. In the Type drop-down, select Open Batch.
7. In the Execution Mode drop-down, select Serial.
The serial execution mode processes files sequentially, requiring that one filecomplete its process before the next file starts its process.
8. In Open Batch Directory, specify the folder under inbox\batches\openbatchsubdirectory where the files to be imported are copied. If this field is blank or null,all files under inbox\batches\openbatch are processed.
9. In File Name Separator, for an open batch type, select the character to use whenseparating the five segments of a batch file name.
Options:
• ~
• @
• _
• ;
10. Select Auto Create Data Rule to create the data rule automatically for file-baseddata loads.
When Oracle Hyperion Financial Data Quality Management, Enterprise Editionassigns the data rule name, it checks whether a data rule withthe"Location_Category" name exists. If the name does not exist, FDMEE createsthe data rule.
To use predefined data rules that load data based on specific categories, leavethis field blank.
11. Optional: In the Description field, enter a description of the batch definition.
12. Click Save.
13. Stage the file-based data source files by copying them to inbox\batches\openbatchusing one of the following methods:
• Predefined Data Load Rule—To use a predefined data rule that loads databased on specific categories, leave the Auto Create Data Rule field blank onthe Batch Definition screen and create the data load rule (see Defining DataLoad Rules to Extract Data).
Chapter 6Using Open Batches
6-11
Next, create the open batch file name using the following format:FileID_RuleName_Period_LoadMethod. The file id is a free-form field that you canuse to control the load order. Batch files load in alphabetic order by file name.
The load method is defined using two-character code identifying the loadmethod where the first code represents the append or replace method for thesource load, and second character represents the accumulate or replacemethod for the target load.
For the import load method, depending on the source system, available valuesare:
– A—Append
– R—Replace Data
– F—Full Refresh
– I—Incremental
– S—Replace by Security
For Oracle Hyperion Financial Management the export load method are:
– A—Accumulate
– R—Replace
– M—Merge
– S—Replace by Security
For Oracle Hyperion Planning, the export modes are:
– A—ADD_DATA
– R—REPLACE_DATA
– M—STORE_DATA
– S—SUBTRACT_DATA
ExaOracle Tax Reporting Cloudmples of an open batch file name are:a_Texas_Actual04_Jan-2004_RR.txt and b_Texas_Actual04_Jan-2004_RR.txt
• Auto-Created Data Load Rule—To load data to any location category andhave FDMEE create the data load rule automatically, create the open batchfile name using the following format:“FileID_Location_Category_Period_LoadMethod”.
In this case, FDMEE looks for the data rule with the name“Location_Category.” If it does not exist, FDMEE creates the data ruleautomatically with the name “Location_Category.”
14. Optional: Apply any scheduling conditions to the open batch file.
See Scheduling Jobs.
15. On the Workflow tab, under Other, select Batch Execution.
16. In the Batch Execution summary area, select the open batch file, and then clickExecute.
After an open batch is processed, a directory is created, all files within theopenbatch directory are moved into the new directory, and the new directory isassigned a unique batch ID.
Chapter 6Using Open Batches
6-12

Note:
The Open batch feature is unavailable for the Account ReconciliationManager.
Creating an Open Batch to Run an Integration with E-Business SuiteYou can use Open Batch functionality to run an integration with Oracle E-BusinessSuite. To do this, you create an empty file with the POV and the data load rule in thefile name, and then save it to the open batch folder on the server. When you run theopen batch process, Oracle Hyperion Financial Data Quality Management, EnterpriseEdition runs the E-Business Suite integration for the specified rule and POV.
Creating Open Batches for Multiple PeriodsYou can use the open batch functionality to read file-based data sources with multipleperiods and import them into the appropriate POV based on the file name. This featureenables you to automate the process of loading large number of files. Open batchesfor multiple periods cannot contain jobs. Additionally, open batches for multiple periodscan be scheduled to run periodically.
Files for an open batch multiple period load are stored in the inbox\batches\openbatchml directory.
The names of multiple period batch files consist of the following segments in thefollowing order:
• File ID—A free-form field used to control load order. Batch files load in alphabeticorder by file name.
• Location
• Category
• Start Period
• End Period
• Load Method—A two-character item (Character 1 = append or replace, andCharacter 2 = target append or replace). Valid values are A and R.
Examples of open batch for a multiple period file name:
a_Texas_Actual_ Jan-2004_ Jun-2004_RR.txt (Loc, Cat, Start Period, End Period)
and
b_TexasDR1_ Jan-2004_ Jun-2004_RR.txt (Data Rule, Start Period, End Period)
To create and process an open batch:
1. On the Setup tab, under Batch, select Batch Definition.
2. In the Batch Definition summary area, click Add.
Use the blank Name and Target Application fields in the Batch Definition summarygrid to enter a batch name or target application on which to search.
3. In Batch Definition Detail section, select the Definition tab.
Chapter 6Using Open Batches
6-13

4. In Name, specify the name of the batch definition.
5. From Target Application, select the name of the target application.
6. From Type, select Open Batch Multi-Period.
7. In the Execution Mode drop-down, select Serial.
The serial execution mode processes files sequentially, requiring that one filecomplete its process before the next file starts to process.
8. In Open Batch Directory, specify the folder under: inbox\batches\openbatchmlsubdirectory where the files to be imported are copied. If this field is blank or null,all files under: inbox\batches\openbatchml are processed.
9. In File Name Separator, for an open batch type, select the character to use whenseparating the five segments of a batch file name.
Options:
• ~
• @
• ;
• _
10. Select Auto Create Data Rule to create the data rule automatically for file-baseddata loads.
When Oracle Hyperion Financial Data Quality Management, Enterprise Editionassigns the data rule name, it checks whether a data rule with the"Location_Category" name exists. If the name does not exist, FDMEE creates thedata rule using the following file name convention:
• Rule Name–Location_Category
• Description–"Auto-created data rule"
• Category–Category
• File Name–Null
• Mode–Replace
To use predefined data rules that load data based on specific categories, leavethis field blank
11. Optional: In the Description field, enter a description of the batch definition.
12. Click Save.
13. Stage the file-based data source files by copying them to inbox\batches\openbatchusing one of the following methods:
• Predefined Data Load Rule—To use a predefined data rule that loads databased on specific categories, leave the Auto Create Data Rule field blank onthe Batch Definition screen and create the data load rule (see Defining DataLoad Rules to Extract Data).
If you have to load to noncontiguous periods in the open batch, create thedata rule in which the source period mapping are defined, and use this option.
Next, create the open batch file name using the following format:FileID_RuleName_Period_LoadMethod. The file id is a free-form field that you canuse to control the load order. Batch files load in alphabetic order by file name.
Chapter 6Using Open Batches
6-14

The load method is defined using two-character code identifying the loadmethod where the first code represents the append or replace method for thesource load, and second character represents the accumulate or replacemethod for the target load.
For the source load method, available values are:
– A—Append
– R—Replace
For the target load method, available values are:
– A—Accumulate
– R—Replace
Examples of an open batch file name are: a_Texas_Actual04_Jan-2004_RR.txtand b_Texas_Actual04_Jan-2004_RR.txt
• Auto-Created Data Load Rule—To load data to any location category andhave FDMEE create the data load rule automatically, create the open batchfile name using the format: “FileID_Location_Category_Period_LoadMethod.”
In this case, FDMEE looks for the data rule with the name“Location_Category.” If it does not exist, FDMEE creates the data ruleautomatically with the name “Location_Category.”
An auto-create data rule is only applicable for contiguous period loads. To loadto noncontiguous periods, create the data rule in which the source periodmappings are defined.
14. Optional: Apply any scheduling conditions to the open batch file.
See Scheduling Jobs.
15. On the Workflow tab, under Other, select Batch Execution.
16. In the Batch Execution summary area, select an open batch file, and then clickExecute.
After an open batch is processed, a directory is created and all files within theopenbatch directory are moved to it. The new directory is assigned a unique batchID.
Note:
The Open batch feature is unavailable for the Account ReconciliationManager.
Scheduling JobsThe scheduling jobs feature provides a method to orchestrate the execution times ofmetadata load rules and data load rules.
Chapter 6Scheduling Jobs
6-15

Note:
When you cancel a job from the Oracle Hyperion Financial Data QualityManagement, Enterprise Edition user interface, all instances of a schedule forthe object selected are cancelled. To cancel a specific instance of a schedule,cancel the job from the ODI studio or ODI console.
To schedule a job:
1. From the Batch Execution screen, Metadata screen, or Data Load Rule screen,select the batch name (from the Batch Execution screen) or rule (from theMetadata screen or Data Load Rule screens) to schedule and click Schedule.
2. In Schedule, select any rule feature specific options.
For example, if you select the Schedule option from the Data Load Rule screen,specify the Import from Source, Recalculate, Export to Target, and so on options.
3. Specify the type of scheduling and select the associated date and timeparameters.
See Table 1.
4. Click OK.
Table 6-1 Schedule Types and Parameters
Schedule Type Data and Time Parameters
Simple Submits the job for execution at a specific dayand time, but does not repeat:
Available options:
• Timezone• Date• Hour(s)• Minute(s)• Second(s)• Select (AM/PM)
Chapter 6Scheduling Jobs
6-16
Table 6-1 (Cont.) Schedule Types and Parameters
Schedule Type Data and Time Parameters
Hourly Executes at the specified minutes andseconds after the top of the hour every houruntil cancelled.
Available options:
• Timezone• Minute(s)• Second(s)
Daily Executes at the same time each day.
Available options:
• Timezone• Hour(s)• Minute(s)• Second(s)• Select (AM/PM)
Weekly Executes at the specific time for each dayselected.
Available options:
• Timezone• Monday-Sunday• Hour(s)• Minute(s)• Second(s)• Select (AM/PM)
Monthly (day of month) Execute at the specific time for the day of themonth selected. Also enables you to select the“Last Day of Month” or “Day Before End ofMonth.”
Available options:
• Timezone• Monthly Date• Hour(s)• Minute(s)• Second(s)• Select (AM/PM)
Chapter 6Scheduling Jobs
6-17

Table 6-1 (Cont.) Schedule Types and Parameters
Schedule Type Data and Time Parameters
Monthly (week day) You can select the first, second, third, fourth,fifth, last, and then the specific day or theweek on which to execute the job.
Available options:
• Day of Month• Day• Hour(s)• Minute(s)• Second(s)• Select (AM/PM)
Note:
The Timezoneoption isunavailable for theMonthly (week day)schedule type.
Canceling a Scheduled JobWhen you cancel a scheduled job from Oracle Hyperion Financial Data QualityManagement, Enterprise Edition, all instances of the scheduled job for the objectselected are cancelled. To cancel a specific instance of a schedule, use the ODIStudio or ODI Console.
To can a scheduled job:
1. On the Batch Execution screen, select the batch.
2. Click Cancel Schedule.
Working with Batch ScriptsOracle Hyperion Financial Data Quality Management, Enterprise Edition provides a setof Windows batch/UNIX shell scripts that enable users to execute data load rules froma command line or schedule loads from any scheduler without writing Java code.Batch scripts can be invoked from the command line. In turn, scripts call the data loadand metadata load API in the FDMEE application server that execute the rules usingthe normal process used in data rule and workbench. Batch scripts are located undera <EPM_ORACLE_INSTANCE>/FinancialDataQuality directory(<EPM_ORACLE_INSTANCE> is typically is located at: C:\Oracle\Middleware\user_projects\epmsystem1).
Using a batch script to run data load rules includes:
• Executing the batch script for data load rules. See Executing the Batch Script forData Load Rules.
Chapter 6Working with Batch Scripts
6-18
• Executing the batch script for metadata rules.
Note:
Period names cannot include spaces if used in a batch script.
Using Password EncryptionOracle Hyperion Financial Data Quality Management, Enterprise Edition provides aWin/UNIX script to encrypt a password and store in a file. Scriptencryptpassword.bat/sh is located in EPM ORACLE INSTANCE/FinancialDataQualitydirectory.
To encrypt a password:
1. Navigate to the directory that has the batch files.
Typically, the batch file directory is EPM ORACLE INSTANCE/FinancialDataQualitydirectory
2. From the EPM ORACLE INSTANCE/FinancialDataQuality directory, at a commandprompt, run the script encryptpassword.bat <passwordfile>.
3. When prompted, enter the password, and then click Enter.
Note the following:
• The password is masked when you type it.
• When running the batch script, you can provide the password by file name asa parameter in the following format: –f:passwordfile. The file name used as aparameter is placed in the location defined in “Encrypted Password Folder”option of System Settings.
• Do not include a disk or directory specification as part of the file name, justenter a file name with or without an extension.
• Replace the [file] with the actual file name, and do not include the brackets.
• The script encrypts the password and writes it to the file provided as aparameter.
• For information on running a data load rule batch script with a password froma file, see Executing the Batch Script for Data Load Rules.
• For information on running a metadata load rule batch script with a passwordfrom a file, see Executing the Batch Script for Metadata Rules.
Executing the Batch Script for Data Load RulesTo run the data load rule batch script with a plain text password:
1. Display a Windows command window or UNIX shell.
2. Paste and run the following command: loaddata USER PASSWORD RULE_NAMEIMPORT_FROM_SOURCE EXPORT_TO_TARGET EXPORT_MODE IMPORT_MODE LOAD_FX_RATE
START_PERIOD_NAME END_PERIOD_NAME SYNC_MODE
To run the data load rule batch script with a password from a file:
Chapter 6Working with Batch Scripts
6-19

1. Display a Windows command window or UNIX shell.
2. Paste and run the following command: loaddata USER -f:PASSWORD_FILE RULE_NAMEIMPORT_FROM_SOURCE EXPORT_TO_TARGET EXPORT_MORE IMPORT_MODE LOAD_FX_RATE
START_PERIOD_NAME END_PERIOD_NAME SYNC_MODE
Setting the Parameters for Data Load RulesThe parameters used to execute a batch script for data load rules are:
Table 6-2 Parameters for Data Load Rules
Parameter Value
User Username
Password Password or –f:Password file name
IMPORT_FROM_SOURCE Y or N
EXPORT_TO_TARGET Y or N
EXPORT_MODE Oracle Essbase and Oracle Hyperion Planningapplications export modes:
• STORE_DATA• ADD_DATA• SUBTRACT_DATA• REPLACE_DATA• OVERRIDE_ALL_DATAThe Oracle Hyperion Financial Managementapplication export mode:
• Accumulate• Replace• Merge• Replace_By_Security
IMPORT_MODE • Snapshot• Incremental• Full RefreshThe file-based source system export modes:
• Append• Replace
Note:
Oracle E-BusinessSuite and FUSIONsource importsrequire a full refreshof data load rulesbefore export afterupgrading from an11.1.2.2 release.
LOAD_FX_RATE Load exchange rate flag. Y or N
Chapter 6Working with Batch Scripts
6-20
Table 6-2 (Cont.) Parameters for Data Load Rules
Parameter Value
START_PERIOD_NAME Period Name or POV if the POV specifiedperiod value is retrieved from the periodprofile.
END_PERIOD_NAME Period Name or POV if the POV specifiedperiod value is retrieved from the periodprofile.
SYNC_MODE SYNC/ASYNC• SYNC—Process runs immediately and
control returns when process completes.• ASYNC—When the ODI job is submitted,
control returns. The load processcontinues to execute in ODI.
Executing the Batch Script for Metadata RulesTo run the metadata load rule batch script with a plain text password:
1. Display a Windows command window or UNIX shell.
2. At a Windows command window or UNIX shell, paste and run the followingcommand: loadmetadata USER PASSWORD LOCATION_NAME SYNC_MODE
To run the metadata load rule batch script with a password from a file:
1. Display a Windows command window or UNIX shell.
2. At a Windows command window or UNIX shell, paste and run the followingcommand: loadmetadata USER -f:PASSWORD_FILE LOCATION_NAME SYNC_MODE
Setting the Parameters for Metadata RulesThe parameters used to execute a batch script for metadata rules are:
Table 6-3 Parameters for Metadata Rules
Parameter Value
User Username
Password Password or –f:Password file name
Location Location Name
SYNC_MODE SYNC/ASYNC• SYNC—Process run immediately and
control returns when the processcompletes.
• ASYNC—When ODI job is submitted,control returns. The load processcontinues to execute executed in ODI.
Executing the Batch Script for HR Data RulesTo run the HR data rule batch script with a plain text password:
Chapter 6Working with Batch Scripts
6-21

1. Display a Windows command window or UNIX shell.
2. Paste and run the following command: loadhrdata USER PASSWORD LOCATION_NAMESYNC_MODE
To run the HR data d rule batch script with a password from a file:
1. Display a Windows command window or UNIX shell.
2. Paste and run the following command: loadhrdata USER -f:PASSWORD_FILELOCATION_NAME SYNC_MODE.
Setting the Parameters for HR Data RulesThe parameters used to execute a batch script for HR data rules are:
Table 6-4 Parameters for Human Resources Rules
Parameter Value
User Username
Password Password or –f:Password file name
Rule Name HR data rule name
IMPORT_FROM_SOURCE Y or N
EXPORT_TO_TARGET Y or N
As of Date Date used to determine applicable effectivedate. Date must be in the YYYY-MM-DDformat.
Load Type Specify the load type:• Data—Loads only the data• Metadata—Loads only the Public Sector
Planning and Budgeting metadata• Both—Loads the data and metadata.
Executing the Batch Script to Import Mapping RulesYou can use the importmapping batch script to import mappings rules from a commandline.
To run the import mapping rule batch script with a password from a file:
1. Display a Windows command window or UNIX shell.
2. Paste and run the following command: importmapping USER_NAME ENCY_PASSLOCATION_NAME DIMENSION_NAME FILE_PATH REPLACE VALIDATE SYNC_MODE
Setting the Parameters to Import Mappings RulesThe parameters used to execute a batch script for importing mapping rules:
Table 6-5 Parameters for Data Load Rules
Parameter Value
USER_NAME Username
ENCY_PASS Password or –f:Password file name
Chapter 6Working with Batch Scripts
6-22

Table 6-5 (Cont.) Parameters for Data Load Rules
Parameter Value
LOCATION_NAME Location Name
DIMENSION_NAME Name of the dimension
File_PATH Directory from which to import source files.
Replace Import mode load method:
• A—Append• R—Replace
Validate Y or N
SYNC_MODE SYNC/ASYNC• SYNC—Process runs immediately and
control returns when process completes.• ASYNC—When the ODI job is submitted,
control returns. The load processcontinues to execute in ODI.
Note:
When using the importmapping.sh utility on Linux to import Oracle HyperionFinancial Data Quality Management, Enterprise Edition mappings, and youreceive the following error: "String index out of range: -1", reference thedirectory like this: ./importmapping.sh admin welcome1 EBS_HFM_LOC account\/app\/EPM\\/import\/FDMEE\/FDMEE_Mapping_Account-PROJMGN.txt REPLACE N
SYNC . Then make sure that the file is in Unix format and not in windows format.Run dos2unix to convert the file and then reload.
Executing the Batch Script for Data Load Rules to Write BackUse the "Loaddata" script to extract data from source EPM applications to targetEnterprise Resource Planning (ERP) systems. See Executing the Batch Script forData Load Rules.
Running a BatchTo run the batch with a plain text password:
1. Display a Windows command window or UNIX shell.
2. Paste and run the following command: runbatch USER PASSWORD BATCH_NAMESYNC_MODE.
To run the batch with a password from a file:
1. Display a Windows command window or UNIX shell.
2. Paste and run the following command: runbatch USER -f:PASSWORD_FILE BATCH_NAMESYNC_MODE.
Chapter 6Working with Batch Scripts
6-23

Setting the Parameters for Running the BatchThe parameters used to run the batch are:
Table 6-6 Parameters for running a batch.
Parameter Value
User Username
Password Password or –f:Password file name
Rule Name Batch Name
Chapter 6Working with Batch Scripts
6-24
7Creating and Using Scripts
Related Topics
• Overview
• Key Jython Concepts
• Using the Script Editor
• Using Import Scripts
• Using Mapping Scripts
• Using Event Scripts
• Using Custom Scripts
• Using the JAVA API
• Using Visual Basic API and Samples
OverviewOracle Hyperion Financial Data Quality Management, Enterprise Edition offers apowerful extensibility framework by providing Jython and Visual Basic based scripting.Using the rich set of the API library, users can extend and customize the product tobest fit their needs. FDMEE supports four types of scripts:
• Import scripts—Executed as source files are imported. Uses Jython script only.
• Mapping scripts—Used to build mapping logic to derive target members based onmultiple source column and IF THEN logic. Uses Jython and SQL script.
• Event script—Executed in response to FDMEE such as before or after an import.Uses Jython and Visual Basic script.
• Custom script—Enables manual execution of scripts. Uses Jython and VisualBasic script.
FDMEE provides a set of Java APIs that enable you to look up frequently used dataload properties or to perform a common action. FDMEE also supports Visual Basicbased event scripts.
Key Jython ConceptsBefore using scripts, be familiar with the following important Jython concepts:
• Code Indentation
• No Data Type Declaration
• Array Index starts at 0
• Substring is str[Start Position: Start Position + Length].
• ability to access any Java library
7-1

For information on Jython concepts: see:
• www.jython.org
• www.python.org
For information on using exception handling mechanisms in Jython, see www.jython.org.
For an example of how a "try-except block" is used in an Event script, see EventsScript Sample.
Using the Script EditorThe section explains how to use the Oracle Hyperion Financial Data QualityManagement, Enterprise Edition Script Editor.
OverviewThe Script Editor is used to define Jython scripts that run in response to OracleHyperion Financial Data Quality Management, Enterprise Edition events or during thefile import processes. Scripts are saved in the data\scripts directory of the FDMEEapplication (with a .py extension for Jython scripts or a .vbs extension for Visual Basicscripts). Import scripts are saved to the data\scripts\import subdirectory, event scriptsare saved to the data\scripts\event subdirectory, and custom scripts are saved to thedata\scripts\custom subdirectory. Scripts can be copied to other FDMEE environmentsand edited using a text editor.
Launching the Script EditorTo access the Script Editor:
1. On the Setup tab, select Scripts.
2. Select Script Editor.
Script Editor LayoutThe left pane of the Script Editor lists the directories that contain the two types ofOracle Hyperion Financial Data Quality Management, Enterprise Edition scripts:Import and Event. The right pane enables you to write and copy the code for script.
Using Import ScriptsThis section explains how to use import scripts in Oracle Hyperion Financial DataQuality Management, Enterprise Edition.
Chapter 7Using the Script Editor
7-2

Overview
Note:
Oracle Hyperion Financial Data Quality Management, Enterprise Edition importintegration is implemented using the Jython scripting engine. The Visual Basicscripting engine cannot be used with import scripts.
When working with import scripts, note the following considerations:
• Import scripts are executed as source files are imported.
• Import scripts are only valid for file-based data loads.
• Import scripts must be created using Jython functions only. The format is "def<name>(parm1, parm2)" and a return value.
• Import script pass two parameters by FDMEE:
– a dimension value defined by the import format
– an entire record from the source
For example, when the account column is defined as position 2 to position 4characters, then this value gets passed as the value for the field, and the wholeinput line is passed as the second parameter. In the sample script (see ImportScript Sample) these parameters are specified by the StrField and StrRec values,but can be any names as long as you remember that the first parameter is thefield, and the second one is the entire record.
• An import script on the Amount column is always executed first.
• The file name and the function name must be the same.
• The return value from the function populates the source column in the TDATASEGtable for the specified dimension. You can only return a single value.
• It is recommended that you use a text editor to edit your script, and then copy andpaste it into FDMEE.
• Import scripts are not handled in Oracle Hyperion Enterprise PerformanceManagement System Lifecycle Management.
Creating Import ScriptsTo create import scripts:
1. On the Setup tab, under Scripts, select Script Editor.
2. On the Script Editor screen, click New.
3. From Script Type, select Import.
4. In File Name, enter a name for the script.
5. Click OK.
6. Write the code for the custom script in the Script Editor.
Chapter 7Using Import Scripts
7-3

7. Click Save.
Import Script ParametersThe import format script is defined as a Jython function. The Jython function nameshould be same as the script file name. This function accepts two parameters: thecurrent Field and current row being processed.
• strField—The values of the source-file column that is defined in the import format(For example, for import scripts assigned to the Amount column, strField containsamount values, and, for import scripts assigned to the Account column, strFieldcontains account values.
• strRecord—The source-file line (record) that is being scanned.
In following example, the script concatenates the account code with the accountdescription from the source file. For example, the first data line of the file is accountcode 1110 with a description of “Cash”. This script concatenates 1110 with “Cash” andcreates a source account in the TDATASEG table named “1110-Cash”. (See TDATASEG Table Reference). In the script, you select the field that is defined by theimport format, and then the field defined by places 14 through 34 in the current record.(Jython starts numbering columns with 0 rather than 1.)
Assigning Import Scripts to Import FormatsAfter creating and saving a script in the Script Editor, you assign the script to an importfield—any import field within any import format.
To assign import scripts to import fields:
Chapter 7Using Import Scripts
7-4

1. On the Setup tab, under Integration Setup, select Import Format.
2. From the Import Format summary grid, select the import format name.
Note:
Use non-ASCII characters in an import format name when the importsource is an adapter.
3. From the Import Format detail grid, select the Add Expression icon.
You can also type the value directly in the field rather than use the Expressioneditor.
4. From Add Expression, and then from Expression Type, select Script.
5. In Expression Value, browse to and select the script.
6. Click OK.
Chapter 7Using Import Scripts
7-5

The script is assigned to the import field. The name of the import script isdisplayed in the Expression column.
Using Import Script FunctionsWithin import scripts, you use functions to manipulate the data that Oracle HyperionFinancial Data Quality Management, Enterprise Edition imports.
This section uses a problem/solution format to explain how to use the various importscript functions.
Extracting Beginning CharactersProblem: The account numbers of the Indiana_GL screen, which are in the first field ofeach line, include varying numbers of digits. However, the mapping associated withthe file uses only four digits.
Solution: In the Import Scripts screen, assign the following script to the Expressionfield of the Account row. The script assigns the first four-digits of each account number(the first four digits on the left) to Parse_Account:
def Parse_Account (strfield, strrecord):
return strField[:4]
Chapter 7Using Import Scripts
7-6

Result: The import file displays only the first four digits of each account number.
Extracting Middle CharactersProblem: The NewYork file presents cost center, account, and account description as acontinuous string, rather than as three strings. You want to separate the accountstrings from the cost center and account description strings.
Solution: In the Import Formats screen, assign the following script to the Expressionfield of the Account row. In the Import Formats screen, assign the following script tothe Expression field of the Account row. The script extracts and returns the charactersof the account strings (the characters from positions 7 to 10 of the string):
def Parse_Account (strfield, strrecord):
return strField[6:10]
Result: Account strings are separated from cost center and account descriptionstrings.
Result: In the Account column of the import file, only account numbers are displayed.
Extracting End of StringProblem: The NewJersey screen presents account numbers as the last four charactersof account fields. You want to extract only account numbers.
Chapter 7Using Import Scripts
7-7

Solution: In the Import Formats screen, assign the following script to the Expressionfield of the Account row. The script extracts and returns the account numbers (the lastfour characters of the account fields):
def Parse_Account (strfield, strrecord):
return strField[-4:]
Result: In the Account column of the import file, only account numbers are displayed.
Using Split FunctionsProblem: The NewYork screen presents cost center, account, and account descriptionin one field, rather than in three fields. The three strings are separated by dashes (-).You want to present the three strings as three fields.
Solution: In the Import Formats screen, assign the following scripts, each of whichuses the split function, to the Expression fields of the Entity, Account, and AccountDescription rows (first script to Entity, second script to Account, and third script toAccount Description). The first script returns the set of characters before the firsthyphen (a cost center value), the second script returns the set of characters after thefirst hyphen (an account value), and the third script returns the set of characters afterthe second hyphen (an account description value).
def NY_ParseCenter (strfield, strrecord):
seglist = strfield.split(“-“)
return seglist[0].strip()
def NY_ParseAccount (strfield, strrecord):
seglist = strfield.split(“-“)
return seglist[1].strip()
def NY_ParseDesc (strfield, strrecord):
seglist = strfield.split(“-“)
return seglist[2].strip()
Result: In the import file, cost center, account and account description strings arepresented in three separate fields.
Chapter 7Using Import Scripts
7-8

Using the Skip Function (Conditional Skip)Problem: You want Oracle Hyperion Financial Data Quality Management, EnterpriseEdition to skip all lines of the NewYork screen that contain an entity value that beginswith 06.
You must specify fdmSkip as the return value from your function in order to skip a linein the file that is being processed in your import script. You specify fdmSkip as thereturn argument from an import script by entering return fdmSkip. fdmSkip is onlyavailable for import scripts.
Solution: In the Import Scripts screen, you assign the following script to theExpression field of the Entity row. The script parses the entity column and uses a localvariable that is discarded after the script executes:
def NY_Skip06Center(strField, strrecord):
if strfield.count(“-“) > 0:
seglist = split(strField, “-”)
strEntity = seglist[0]
if strEntity[:2] == “06”:
return fdmSkip
else:
return strEntity
Result: No line that contains entity values that begin with 06 is imported.
Storing and Retrieving Temporary VariablesWhen Oracle Hyperion Financial Data Quality Management, Enterprise Edition importsa source file, it skips lines that do not contain valid amounts but executes all importscripts assigned to the Amount column first regardless of whether amounts are valid.Therefore, you can use scripts that run for lines that FDMEE would otherwise skip tostore global variables that can be retrieved by other scripts.
Storing Temporary VariablesWithin source files, not all lines contain all fields. For example, in the Georgia screenshown below, entity values, such as 0565 0565 Test 3, are presented in the header of
Chapter 7Using Import Scripts
7-9
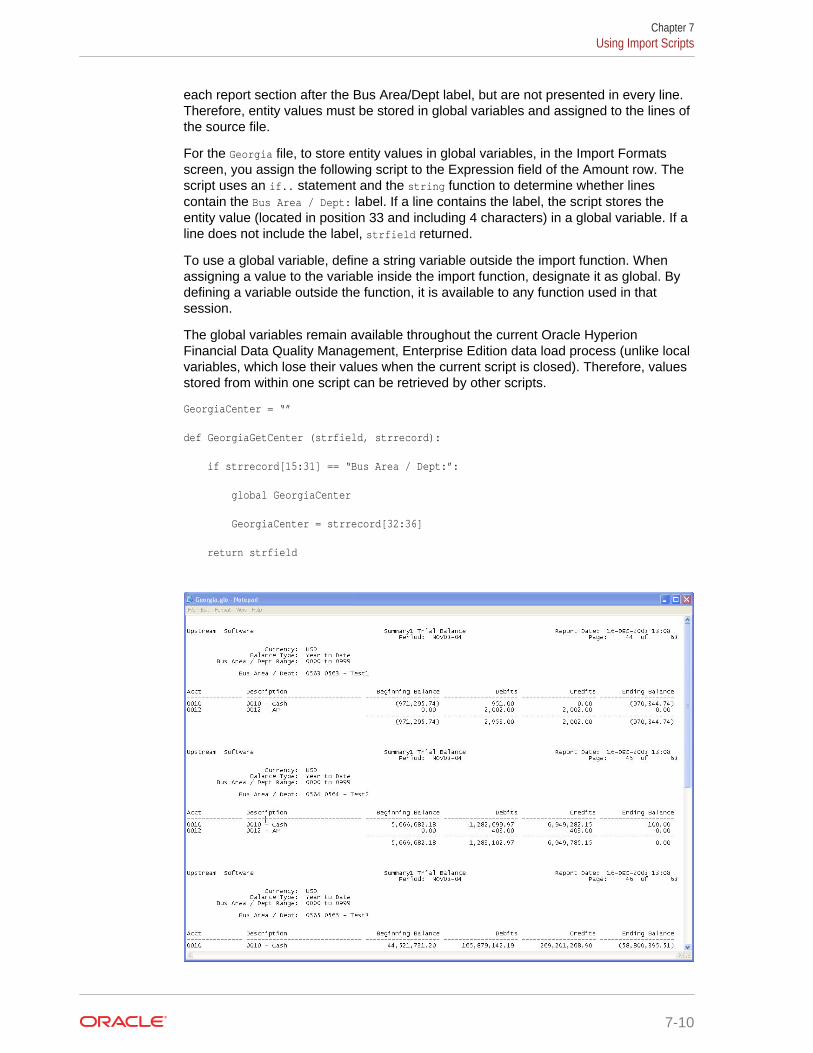
each report section after the Bus Area/Dept label, but are not presented in every line.Therefore, entity values must be stored in global variables and assigned to the lines ofthe source file.
For the Georgia file, to store entity values in global variables, in the Import Formatsscreen, you assign the following script to the Expression field of the Amount row. Thescript uses an if.. statement and the string function to determine whether linescontain the Bus Area / Dept: label. If a line contains the label, the script stores theentity value (located in position 33 and including 4 characters) in a global variable. If aline does not include the label, strfield returned.
To use a global variable, define a string variable outside the import function. Whenassigning a value to the variable inside the import function, designate it as global. Bydefining a variable outside the function, it is available to any function used in thatsession.
The global variables remain available throughout the current Oracle HyperionFinancial Data Quality Management, Enterprise Edition data load process (unlike localvariables, which lose their values when the current script is closed). Therefore, valuesstored from within one script can be retrieved by other scripts.
GeorgiaCenter = “”
def GeorgiaGetCenter (strfield, strrecord):
if strrecord[15:31] == “Bus Area / Dept:”:
global GeorgiaCenter
GeorgiaCenter = strrecord[32:36]
return strfield
Chapter 7Using Import Scripts
7-10

Retrieving Temporary VariablesYou use scripts to assign global, stored variables to the fields of a column. Forexample, if you are working with the Georgia screen, you begin by using the followingscript to assign the global variable GeorgiaCenter to the GeorgiaPutCenter function.
def GeorgiaPutCenter (strfield, strrecord)
return GeorgiaCenter
Then, in the Import Formats screen, you assign the script to the Expression field of theEntity row and, thus, assign the values of the global variables to the Entity fields. Inthis case, entity values are not read from the source file.
Because the Georgia file includes subtotal lines that must not be imported, the Skipfunction is required.
To direct Oracle Hyperion Financial Data Quality Management, Enterprise Edition toskip lines without account numbers, you configure a Skip Row in the Import Format torecognize blank Account fields (15 blank spaces) by defining appropriate start andlength fields for the expression.
Import Script SampleThis sample import script returns the location as a value for the column.
#----------------------------------------------------------------
# Sample shows how to use the value from the fdmContext map, In
# this sample return the Location as value for the column
#----------------------------------------------------------------
def getOrgfromLoc(strfield, strrec):
org = fdmContext['LOCNAME']
return org
Chapter 7Using Import Scripts
7-11

#------------------------------------------------------------------
# Sample to show the Jython string function. The script below is
# used to parse an account column 01-205-4110-0000-000 and return the
# third string
#------------------------------------------------------------------
def getSegfromAcct(strfield, strrec):
if strfield.count("-") > 0:
seglist = strfield.split('-')
result = seglist[2]
return result
#----------------------------------------------------------------
# Sample to process header record in Trial Balance report and
# store value in global variable to be used during detail row
# This should be called from the Amount column in import format
#----------------------------------------------------------------
globalorg = ""
globalcur = ""
def copyglobal(strfield, strrec):
if strrec[18:27] == "Currency:" :
global globalcur
globalcur = strrec[29:32]
if strrec[14:27] == "Organization:" :
global globalorg
globalorg = strrec[29:32]
if strrec[42:47].strip() == 'Total' or strrec[29:34].strip() == 'Total' :
return fdmSkip
return strfield
#----------------------------------------------------------------
# Sample to return the global variable set during amount process
#----------------------------------------------------------------
def getCurrfromGlobal(strfield, strrec) :
Chapter 7Using Import Scripts
7-12
return globalcur
Using Mapping ScriptsThis section explains how to use mapping scripts in Oracle Hyperion Financial DataQuality Management, Enterprise Edition.
OverviewMapping Scripts are used to build mapping logic to derive target members based onmultiple source columns and IF THEN logic. Mapping scripts are added in the DataLoad Mapping screen, and are available for: Between, IN, Like types. They are storedin the TDATAMAP table.
When you use Oracle Hyperion Enterprise Performance Management SystemLifecycle Management to export mapping rules, any related mapping scripts areincluded.
Additionally Oracle Hyperion Financial Data Quality Management, Enterprise Editionsupports the export and import of mapping scripts in a text file. This support includesboth Jython and SQL scripts. The scripts are enclosed in a <!SCRIPT> tag.
Creating Mapping ScriptsFor Like mappings, you can create mapping scripts to designate conditional mapping.This type of mapping enables you to specify source members mapped to scriptexpressions rather than to hard-coded target members. Target values are assigned inthe script value. You activate the mapping script by placing #SQL in the Target valuefield for a SQL script. (The row that uses a script has target value of #SQL). Then thenext row has the <!SCRIPT> delimiter and the actual script, followed by <!SCRIPT>.Mapping scripts, used in conjunction with dimension processing order, enables amapping that is based on the results of dimension mappings. That is, dimensionmappings that have already been processed. See Using Mapping Scripts.
To create a mapping script:
1. From the Workflow tab, select Data Load Mapping.
2. Optional: Select the desired location.
3. Select the Like tab.
Mapping scripts are unavailable for "Explicit" and "Multi-dimension" mappingtypes.
4. Select the Source Value.
5. In Target Value, select one of the following:
• For a Jython based mapping script, enter #SCRIPT.
• For a SQL based mapping script, enter #SQL.
Chapter 7Using Mapping Scripts
7-13

Note:
For SQL based mappings, Oracle Hyperion Financial Data QualityManagement, Enterprise Edition specifies the special value #SQL tothe "Target Value." For this reason, this field cannot be used to specifya value of "IGNORE", which is otherwise used to set the VALID_FLAGto Yes or No. For SQL based mappings, you must include theVALID_FLAG in the SQL script and specify the value of "I" based onthe user selected criteria.
6. In Rule Name, enter the data rule name for the mapping.
7. Click Save.
The Script Editor icon ( ) is enabled.
8. Click the Script Editor icon.
9. In Edit Script, enter the mapping script, and click OK.
For example the following Jython based mapping script checks when the first twocharacters of the account equals 11 and the entity equals 01. When a matchoccurs, then the target is set to Cash2 and the target amount is set to 0. Inaddition, the script also updates the attribute1 column in the TDATASEG table.(See TDATASEG Table Reference). This script uses the fdmResultMap object (see Using Jython Objects with Mapping Scripts).
In this example, SQL script is used logic is implemented in a SQL CASEstatement. The CASE statement is used in the SET command of the internalUPDATE statement. The mapping statement below is converted to the UPDATEstatement listed
Chapter 7Using Mapping Scripts
7-14

UPDATE TDATASEG
SET ACCOUNTX =
CASE
WHEN ACCOUNT LIKE ‘L%’ AND ICP = ‘000’ THEN ‘A4140‘
WHEN ACCOUNT IN (‘110’,’120’,’130’) THEN ‘A100’’
ELSE ‘A’ || ACCOUNT
END
,DESC1 = COALESCE(DESC1, ACCOUNT || ‘.’ || ICP)
WHERE ACCOUNT …..
Using Jython Objects with Mapping ScriptsUse the following predefined Oracle Hyperion Financial Data Quality Management,Enterprise Edition Jython objects within mapping scripts.
Table 7-1 Using Jython Objects with mapping scripts
Jython Object Description
fdmRow fdmRow id used to access any column in thecurrent row being processed by the mappingprocess. You can access any column in theTDATASEG table. To access a value in acolumn, specify the following:fdmRow.getString (“<COLUMN NAME>”). Forexample, to get the value of the ENTITYcolumn, specify fdmRow.getString(“ENTITY”).
fdmResult fdmResult is used to return the value from themapping function. You can set the value asfollows fdmResult = “Cash”. The fdmResultis used to update the value for the targetdimension, which is also referred to as the "X"column.For every dimension in the TDATASEG tablethere are two columns, one for source andanother for target. For example, ENTITYprovides the source value, and ENTITYXprovides target value that is the result of themapping process.
fdmResultMap fdmResultMap is used to update any column inthe TDATASEG table. The column name inthe TDATASEG table is used as the key in themap. For example, to update the ATTR1column use fdmResultMap[“ATTR1”] =“Asset Acct”. To set the target amount to 0use fdmResultMap[“AMOUNTX”] = 0.
Chapter 7Using Mapping Scripts
7-15

Mapping Script SamplesThis sample mapping script evaluates the account and entity columns and assigns avalue for the target column. It also shows how to update the other columns of thecurrent row using the fdmResult map:
#----------------------------------------------------------------
# Sample Jython Mapping Script. Script evaluates account and entity
# columns and assign value for the target column. In addition it
# also shows how to update the other columns of current row using
fdmResultMap
#------------------------------------------------------------------
account = fdmRow.getString("ACCOUNT")
entity = fdmRow.getString("UD1")
# Map based on account and dept column values
fdmResultMap["ATTR1"] = account + "-" + entity
if (account[0:2] == "71"):
fdmResult = "7110"
elif (account[0:2] == "72"):
fdmResult = "7210"
elif (account[0:2] == "77" and entity == "205"):
fdmResult = "7710"
fdmResultMap["AMOUNTX"] = 0
else:
fdmResult = "7310"
This sample script uses the SQL CASE statement to conditionally process assignedvalues for the target column.
#-------------------------------------------------------------------
# Sample SQL script. Script uses SQL CASE statement to conditionally
# process assign value for the target column.
#-------------------------------------------------------------------
CASE
WHEN ACCOUNT LIKE '61%' AND ud1 = '205' THEN '6110'
Chapter 7Using Mapping Scripts
7-16
WHEN ACCOUNT LIKE '61%' AND ud1 = '240' THEN '6120'
ELSE '6130'
END
Using Event ScriptsThis section explains how to use Event scripts in Oracle Hyperion Financial DataQuality Management, Enterprise Edition.
OverviewEvent scripts are executed in response to Oracle Hyperion Financial Data QualityManagement, Enterprise Edition events. You can invoke any custom logic. Forexample, custom logic could be invoked to send an email notification after asuccessful load, or send an email when a validation error occurs. Or an email could besent when you download data from Oracle Hyperion Financial Management and loaddata to Oracle Essbase for reporting. Event scripts are based on Jython or VisualBasic. Jython scripts have a .py extension, and Visual Basic scripts have a .vbsextension. Events associated with a script are highlighted in the list of events. Anyevent that includes a script is executed for that event in selected location.
Note:
Event scripts are not handled in Oracle Hyperion Enterprise PerformanceManagement System Lifecycle Management.
FDMEE Supported Event ScriptsOracle Hyperion Financial Data Quality Management, Enterprise Edition supports thefollowing events for execution, during the data load process:
Table 7-2 FDMEE Events
Event Description
BefImport This event is the initial state of the systembefore any processing for the selected locationhas begun. If the user defines import scripts,they are run between the BefImport andAftImport events. This step in the processingloads data into the TDATASEG_T table.
AftImport Data is present in the TDATASEG_T tableafter this event is processed.
BefCalculate Called for a validation run only, and calledbefore the validation process.
AftCalculate Called for a validation run only, and calledafter the validation process.
BefProcLogicGrp Called before Logic Account is processed.
AftProcLogicGrp Called after the Logic Account is processed.
Chapter 7Using Event Scripts
7-17
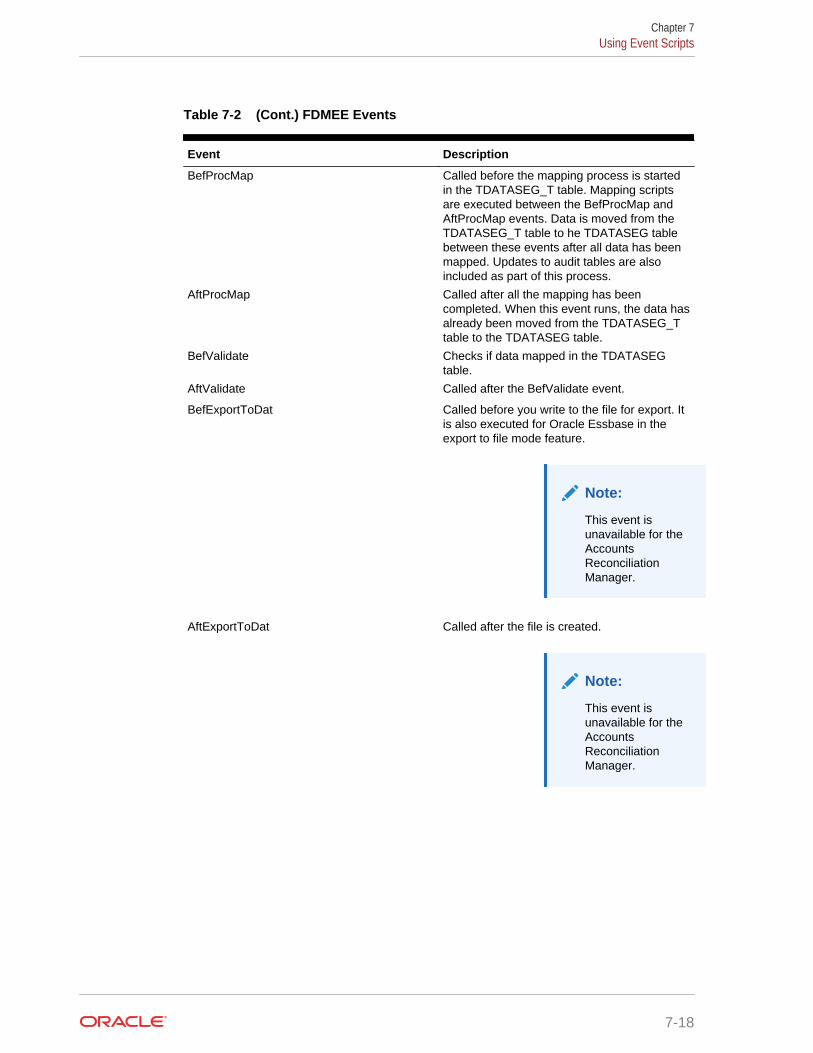
Table 7-2 (Cont.) FDMEE Events
Event Description
BefProcMap Called before the mapping process is startedin the TDATASEG_T table. Mapping scriptsare executed between the BefProcMap andAftProcMap events. Data is moved from theTDATASEG_T table to he TDATASEG tablebetween these events after all data has beenmapped. Updates to audit tables are alsoincluded as part of this process.
AftProcMap Called after all the mapping has beencompleted. When this event runs, the data hasalready been moved from the TDATASEG_Ttable to the TDATASEG table.
BefValidate Checks if data mapped in the TDATASEGtable.
AftValidate Called after the BefValidate event.
BefExportToDat Called before you write to the file for export. Itis also executed for Oracle Essbase in theexport to file mode feature.
Note:
This event isunavailable for theAccountsReconciliationManager.
AftExportToDat Called after the file is created.
Note:
This event isunavailable for theAccountsReconciliationManager.
Chapter 7Using Event Scripts
7-18
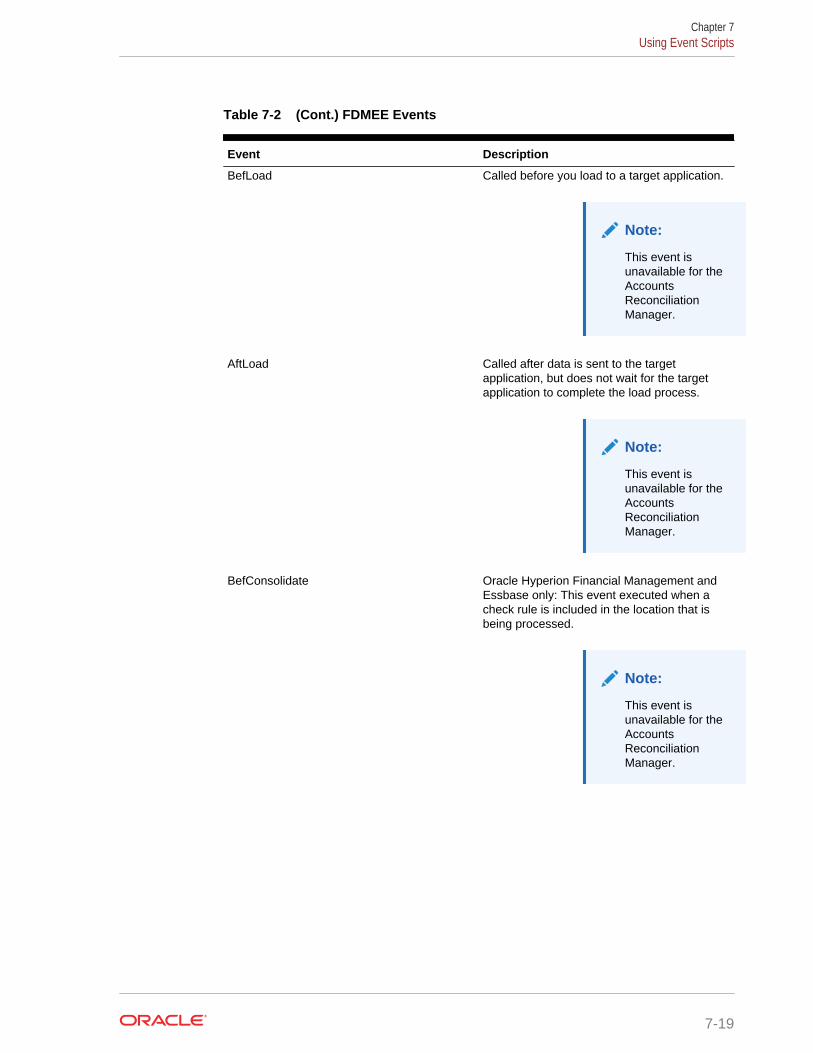
Table 7-2 (Cont.) FDMEE Events
Event Description
BefLoad Called before you load to a target application.
Note:
This event isunavailable for theAccountsReconciliationManager.
AftLoad Called after data is sent to the targetapplication, but does not wait for the targetapplication to complete the load process.
Note:
This event isunavailable for theAccountsReconciliationManager.
BefConsolidate Oracle Hyperion Financial Management andEssbase only: This event executed when acheck rule is included in the location that isbeing processed.
Note:
This event isunavailable for theAccountsReconciliationManager.
Chapter 7Using Event Scripts
7-19

Table 7-2 (Cont.) FDMEE Events
Event Description
AftConsolidate Called after the BefConsolidate event.
Note:
This event isunavailable for theAccountsReconciliationManager.
BefCheck Called before the Check Rule.
Note:
This event isunavailable for theAccountsReconciliationManager.
AftCheck Called after the Check Rule.
Note:
This event isunavailable for theAccountsReconciliationManager.
Creating Event ScriptsTo create event scripts:
1. On the Setup tab, under Scripts, select Script Editor.
2. Single or double-click an event.
3. Write the script in the Script Editor.
Chapter 7Using Event Scripts
7-20

Note:
Before creating event scripts, make sure you check the Application Root Foldersetting in Application Settings. When you specify a folder at the applicationlevel, select Create Application Folders. A set of folders is created for theapplication that includes a scripts folder. Create scripts specific to anapplication in this folder. This is especially important for event scripts that aredifferent between applications. When you do not set up an application levelfolder, then you cannot have different event scripts by application.
Stopping the Execution of FDMEE from within a ScriptTo halt the execution of Oracle Hyperion Financial Data Quality Management,Enterprise Edition from within a script:
1. On the Setup tab, under Scripts, select Script Editor.
2. Single or double-click an event.
3. Add the raise RuntimeError script and the message to display.
For example,
if (categoryName == ""):
raise RuntimeError, "Category name is invalid"
4. Save the script.
Dynamically Changing Import FormatsYou can use the BefFileImport event to modify the import format for a locationdynamically. The following script changes the import group; the change is based onthe file name.
To implement the script, you create two import formats and assign one of them to theOracle Hyperion Financial Data Quality Management, Enterprise Edition location. Thescript evaluates the file name and, if necessary, changes the import format.
if fdmContext["LOCNAME"] == "ITALY":
filename = fdmContext["FILENAME"]
if filename[:12] == "ProductSales":
fdmAPI.updateImportFormat("SALESJOURNAL", fdmContext["LOADID"])
Using the File System Object in Event ScriptsYou can use the Jython file system object to process files and folders. The followingexample uses the file system object to create a file and to copy the contents of anexisting file to the new file.
Read the following Input File
Entity,Currency,ICP,Product,Store,Channel,Custom4,Custom5,Custom6,Custom7,UnitsSold,Sales
Chapter 7Using Event Scripts
7-21

EastSales, USD, [ICP None], H740, Comma_Phone_Stores, Retail_Direct, [None],[None],[None],[None],127,9954.103768
EastSales, USD, [ICP None], H740, Freds, National_Accts, [None],[None],[None],[None],112,6610.371552
EastSales, USD, [ICP None], H740, Good_Buy, National_Accts, [None],[None],[None],[None],112,6610.371552
Write the following Output File
EastSales, USD, [ICP None], H740, Comma_Phone_Stores, Retail_Direct, [None],[None],[None],[None],UnitsSold,127
EastSales, USD, [ICP None], H740, Comma_Phone_Stores, Retail_Direct, [None],[None],[None],[None],Sales,9954.103768
EastSales, USD, [ICP None], H740, Freds, National_Accts, [None],[None],[None],[None],UnitsSold112
EastSales, USD, [ICP None], H740, Freds, National_Accts, [None],[None],[None],[None],Sales6610.371552
EastSales, USD, [ICP None], H740, Good_Buy, National_Accts, [None],[None],[None],[None],UnitsSold,112
EastSales, USD, [ICP None], H740, Good_Buy, National_Accts, [None],[None],[None],[None],Sales,6610.371552
infilename = fdmContext["INBOXDIR"]+"/InputFile.txt"
outfilename = fdmContext["INBOXDIR"]+"/DataFile.txt"
infile = open(infilename, "r")
outfile = open(outfilename, "w")
for line in infile:
column = line.rsplit(',',2)
if column[2].strip() != "Sales" :
outfile.write(column[0] + ",UnitsSold," + column[1] + "\n")
outfile.write(column[0] + ",Sales," + column[2])
outfile.close()
Events Script SampleThis sample Event script updates the table_xyz table during the data load execution:
#-----------------------------------------------------------------------------
# Sample to update table_xyz table during data load rule execution
#-----------------------------------------------------------------------------
Chapter 7Using Event Scripts
7-22

query = "UPDATE table_xyz SET accountx = 'SCRIPT_' || account WHERE loadid = ? and accountx is NULL"
params = [ fdmContext["LOADID"] ]
print fdmAPI.executeDML(query, params, False)
fdmAPI.commitTransaction()
#-----------------------------------------------------------------------------
# Sample to import data from a custom SQL source and upload into FDMEE
# open interface table. This script should be called in BefImport Event.
# This is alternate to the FDMEE integration import script.
#-----------------------------------------------------------------------------
import java.sql as sql
batchName = "Batch_" + str(fdmContext["LOCNAME"])
insertStmt = """
INSERT INTO AIF_OPEN_INTERFACE (
BATCH_NAME
,COL01
,COL02
,AMOUNT
,DESC1
) VALUES (
?
,?
,?
,?
,?
)
"""
sourceConn = sql.DriverManager.getConnection("jdbcUrl", "user", "password");
# Limiting number of rows to 5 during the test runs.
selectStmt = "SELECT * FROM orders WHERE rownum < 6"
stmt = sourceConn.prepareStatement(selectStmt)
Chapter 7Using Event Scripts
7-23

stmtRS = stmt.executeQuery()
while(stmtRS.next()):
params = [ batchName, stmtRS.getBigDecimal("Customer_Id"),
stmtRS.getString("Ship_Country"),
stmtRS.getBigDecimal("Freight"), stmtRS.getString("Ship_Name") ]
fdmAPI.executeDML(insertStmt, params, False)
fdmAPI.commitTransaction()
stmtRS.close()
stmt.close()
sourceConn.close()
#------------------------------------------------------------------------------
# Sample to send email messages using Jython SMTP library
-------------------------------------------------------------------------------
import smtplib
sender = "[email protected]"
receivers = "[email protected]"
message = """ This is a test e-mail message.
This is a test e-mail message. """
try:
smtpServer = smtplib.SMTP('smtp.gmail.com:587')
smtpServer.starttls()
smtpServer.login("user", "password")
smtpServer.sendmail(sender, receivers, message)
print "Successfully sent email"
smtpServer.quit()
except Exception, e:
print "Error: unable to send email: " + str(e)
Chapter 7Using Event Scripts
7-24
Note:
See the online Jython documentation at the following link that explains the listof Jython exceptions, and the syntax to use when trapping exceptions in yourscripts: The Definitive Guide to Jython
This note applies to all script types.
Using Custom ScriptsThis section shows how to use custom scripts in Oracle Hyperion Financial DataQuality Management, Enterprise Edition.
OverviewOracle Hyperion Financial Data Quality Management, Enterprise Edition enables youto perform FDMEE tasks on an "as needed" basis such as executing data load rulesusing custom scripts.
FDMEE supports custom scripts in Jython and Visual Basic. To execute a custom ODIprocess, then use a Jython script. FDMEE stores custom scripts in the <APP DIR>/data/scripts/custom folder.
Creating a Custom ScriptTo create a custom script:
1. On the Setup tab, under Scripts, select Script Editor.
2. On the Script Editor screen, click New.
3. From Script Type, select Custom.
4. From Technology, select Jython or Visual Basic.
Scripts created in Jython are saved with a .py extension. Scripts created in VisualBasic are saved with a .vbs extension.
5. In File Name, enter a name for the script.
6. Click OK.
7. Write the code for the custom script in the Script Editor.
8. Click Save.
Working with Custom ScriptsYou must create custom script groups before registering custom scripts.
You register custom scripts to select the parameters to pass when the script isexecuted.
Chapter 7Using Custom Scripts
7-25
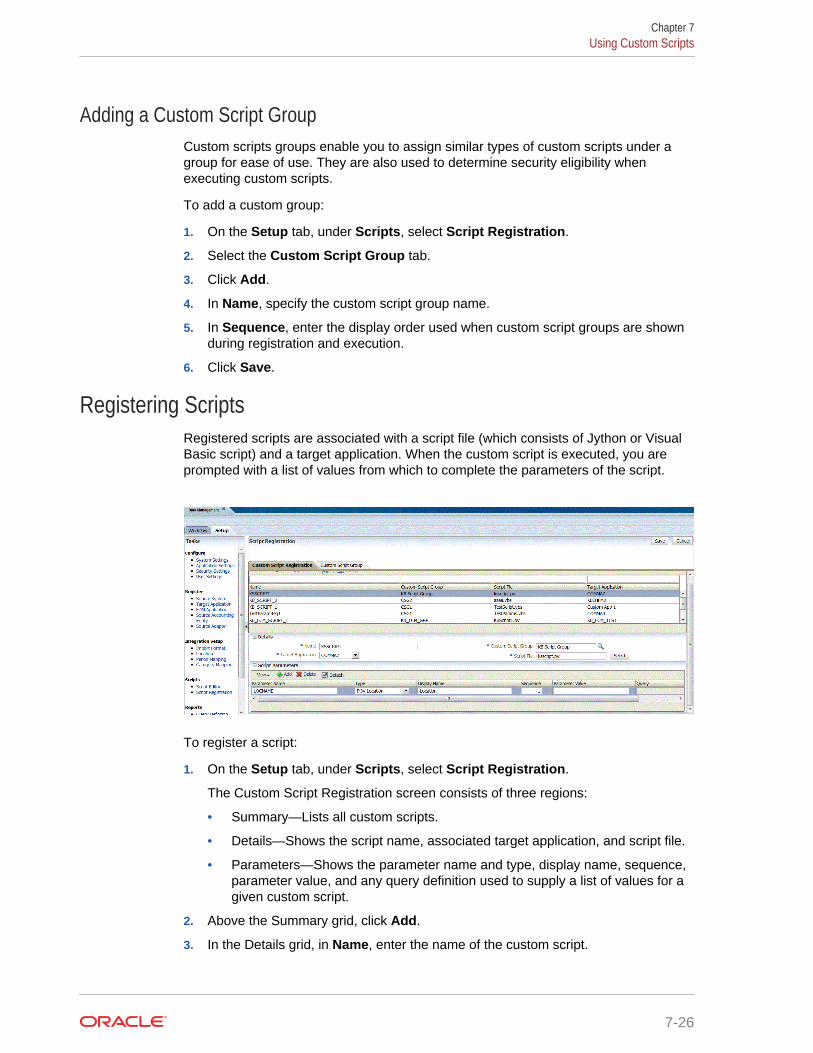
Adding a Custom Script GroupCustom scripts groups enable you to assign similar types of custom scripts under agroup for ease of use. They are also used to determine security eligibility whenexecuting custom scripts.
To add a custom group:
1. On the Setup tab, under Scripts, select Script Registration.
2. Select the Custom Script Group tab.
3. Click Add.
4. In Name, specify the custom script group name.
5. In Sequence, enter the display order used when custom script groups are shownduring registration and execution.
6. Click Save.
Registering ScriptsRegistered scripts are associated with a script file (which consists of Jython or VisualBasic script) and a target application. When the custom script is executed, you areprompted with a list of values from which to complete the parameters of the script.
To register a script:
1. On the Setup tab, under Scripts, select Script Registration.
The Custom Script Registration screen consists of three regions:
• Summary—Lists all custom scripts.
• Details—Shows the script name, associated target application, and script file.
• Parameters—Shows the parameter name and type, display name, sequence,parameter value, and any query definition used to supply a list of values for agiven custom script.
2. Above the Summary grid, click Add.
3. In the Details grid, in Name, enter the name of the custom script.
Chapter 7Using Custom Scripts
7-26

4. In Target Application, select the target application associated with the customscript.
5. To associate the custom script with a custom script group, in Custom ScriptGroup, select the group.
6. In Script File, select the script file to associate with the custom script.
To search on a script file, click Select and choose a script file from the SelectScript File screen.
To upload a script file, click Select. On the Select Script File. click Upload. Thenclick Browse to navigate to the script file to upload and click OK.
7. Click Save.
To define the parameters of the custom script:
1. From the Summary grid, select the name of the custom script to which to addparameters.
2. In the Script Parameters grid, click Add.
A blank line is displayed to which to add parameters.
3. In Parameter Name, enter the name of the parameter that you reference in thescript.
For example, enter POVLOC, for the POV location, POVPeriod for the POV period,POVCAT for POV category, or POVTARGET for the target category.
The parameter name is user-defined. You can select a prefix or suffix todistinguish them in the custom script.
4. In Type, select the type of parameter.
Available types:
• POV—Prompts for the POV location, period, category or rule. The POV valuesdefault from the users' POV when the custom script is executed.
• Query—The Query type enables you to create a query that populates a list ofvalues that a user can select from when the custom script is executed.
• Static—A Static type indicates that the parameter is a constant or a predefinedvalue, and the parameter value is supplied by the user. When the customscript is executed, you can supply a different value to the parameter.
You can use any name for the parameter and also use a prefix or suffix with thename to distinguish them in the custom script.
The parameter name must exactly match what is provided in the script registration
5. In Display Name, enter the name to display for the parameter for the ExecuteScript screen.
6. In Parameter Value, enter the value for the "Static" parameter type.
The parameter value must be retrieved in the custom script using the followingAPI:
fdmAPI.getCustomScriptParameterValue("PARAMETER NAME"))
7. In Sequence, enter the display order of the parameter on the Execute Scriptscreen.
Chapter 7Using Custom Scripts
7-27
8. In Query, specify the query definition that provides a list of values for theparameter.
For example, to show a list of data rules for the user to select on the GenerateReport screen, specify the query definition to define these queries.
9. Click Save.
Executing a Custom ScriptCustom scripts can be executed using the Script Execution option, or from a commandline.
To execute a custom script from the Script Execution option:
1. On the Workflow tab, under Other, select Script Execution.
2. In Script Execution, and then in Custom Script Group, select a custom scriptgroup.
3. From the Scripts grid, select the custom script.
4. Click Execute.
5. When prompted, enter parameter values on the Execute Script screen.
a. If applicable, modify the Period, Category, and Location values.
b. From Execution Mode, select the online method of running the report.
The online method processes the report immediately.
c. Click OK.
Executing a Custom Script from a Command LineOracle Hyperion Financial Data Quality Management, Enterprise Edition allows you toexecute custom scripts from a command line. You can run the custom script with orwithout parameters. If you run a script that has no parameter, FDMEE determines theapplication id associated with the script. If you want to pass parameters, addparameters using the format: Executescript <script name> <Parameter DisplayName>=<Value>.
1. At a command line, type the name of custom script to execute.
2. Click Enter to execute the script.
Custom Script Sample using JythonThese sample custom scripts provide information about the contents of the customscript.
The first example shows how to submit a data load rule by way of a script.
The second example shows how to submit a report using a batch file by way of ascript.
Submitting a Data Load RuleThis example shows how to submit a data load rule by way of a script.
Chapter 7Using Custom Scripts
7-28
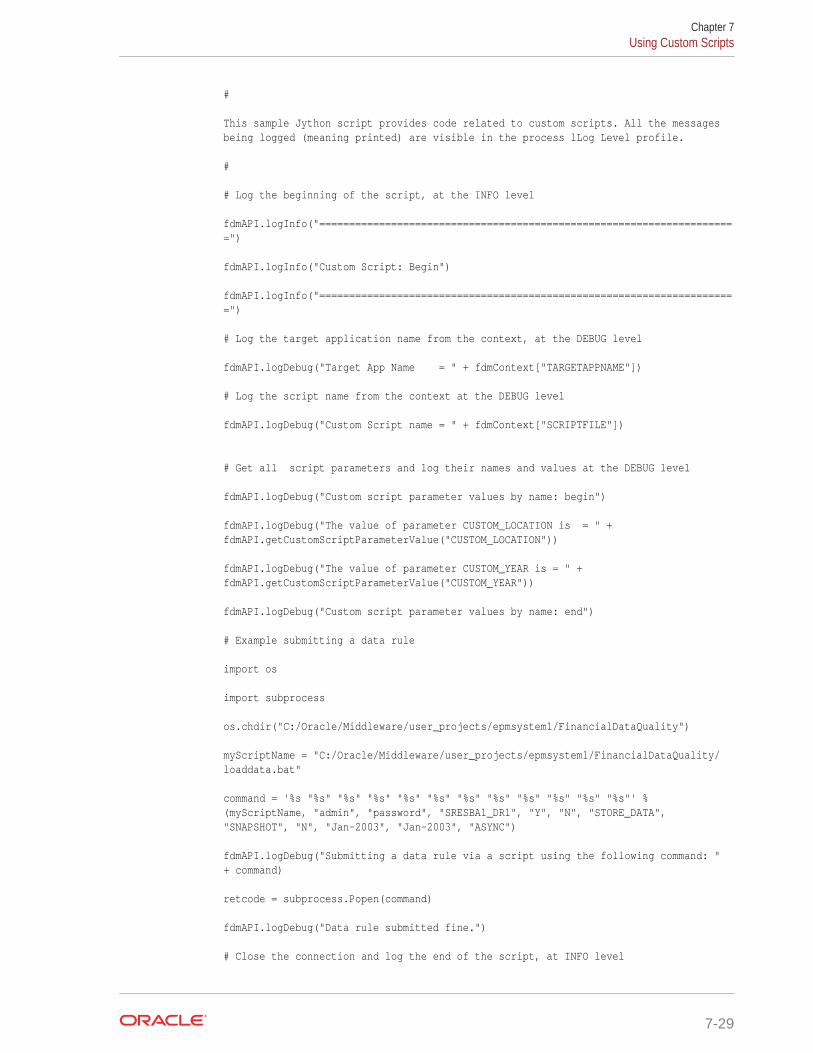
#
This sample Jython script provides code related to custom scripts. All the messages being logged (meaning printed) are visible in the process lLog Level profile.
#
# Log the beginning of the script, at the INFO level
fdmAPI.logInfo("======================================================================")
fdmAPI.logInfo("Custom Script: Begin")
fdmAPI.logInfo("======================================================================")
# Log the target application name from the context, at the DEBUG level
fdmAPI.logDebug("Target App Name = " + fdmContext["TARGETAPPNAME"])
# Log the script name from the context at the DEBUG level
fdmAPI.logDebug("Custom Script name = " + fdmContext["SCRIPTFILE"])
# Get all script parameters and log their names and values at the DEBUG level
fdmAPI.logDebug("Custom script parameter values by name: begin")
fdmAPI.logDebug("The value of parameter CUSTOM_LOCATION is = " + fdmAPI.getCustomScriptParameterValue("CUSTOM_LOCATION"))
fdmAPI.logDebug("The value of parameter CUSTOM_YEAR is = " + fdmAPI.getCustomScriptParameterValue("CUSTOM_YEAR"))
fdmAPI.logDebug("Custom script parameter values by name: end")
# Example submitting a data rule
import os
import subprocess
os.chdir("C:/Oracle/Middleware/user_projects/epmsystem1/FinancialDataQuality")
myScriptName = "C:/Oracle/Middleware/user_projects/epmsystem1/FinancialDataQuality/loaddata.bat"
command = '%s "%s" "%s" "%s" "%s" "%s" "%s" "%s" "%s" "%s" "%s" "%s"' % (myScriptName, "admin", "password", "SRESBA1_DR1", "Y", "N", "STORE_DATA", "SNAPSHOT", "N", "Jan-2003", "Jan-2003", "ASYNC")
fdmAPI.logDebug("Submitting a data rule via a script using the following command: " + command)
retcode = subprocess.Popen(command)
fdmAPI.logDebug("Data rule submitted fine.")
# Close the connection and log the end of the script, at INFO level
Chapter 7Using Custom Scripts
7-29

fdmAPI.closeConnection()
fdmAPI.logInfo("======================================================================")
fdmAPI.logInfo("Custom Script: end")
fdmAPI.logInfo("======================================================================")
The output for the executed custom script is:
2013-09-25 08:12:26,080 INFO [AIF]: ==========================================================================
2013-09-25 08:12:26,081 INFO [AIF]: Custom Script: Begin
2013-09-25 08:12:26,082 INFO [AIF]: ==========================================================================
2013-09-25 08:12:26,083 DEBUG [AIF]: Target App Name = SRESBA1
2013-09-25 08:12:26,084 DEBUG [AIF]: Custom Script name = SRCustomScript1.py
2013-09-25 08:12:26,087 DEBUG [AIF]: CUSTOM_LOCATION = 1
2013-09-25 08:12:26,087 DEBUG [AIF]: CUSTOM_YEAR = 2013
2013-09-25 08:12:26,088 DEBUG [AIF]: Custom script parameter values by name: begin
2013-09-25 08:12:26,091 DEBUG [AIF]: The value of parameter CUSTOM_LOCATION is = 1
2013-09-25 08:12:26,093 DEBUG [AIF]: The value of parameter CUSTOM_YEAR is = 2013
2013-09-25 08:12:26,094 DEBUG [AIF]: Custom script parameter values by name: end
2013-09-25 08:12:26,535 DEBUG [AIF]: Submitting a data rule via a script using the following command: C:/Oracle/Middleware/user_projects/epmsystem1/FinancialDataQuality/loaddata.bat "admin" "****" "SRESBA1_DR1" "Y" "N" "STORE_DATA" "SNAPSHOT" "N" "Jan-2003" "Jan-2003" "ASYNC"
2013-09-25 08:12:26,596 DEBUG [AIF]: Data rule submitted fine.
2013-09-25 08:12:26,635 INFO [AIF]: ==========================================================================
2013-09-25 08:12:26,636 INFO [AIF]: Custom Script: end
2013-09-25 08:12:26,637 INFO [AIF]: ==========================================================================
Submitting a ReportThis example shows how to submit a report. The script calls a batch file that includesthe necessary parameters instead of including the parameters directly in the script.Note that if you try to submit a report script with an equal sign (=) in the parameters,the script fails.
#
Chapter 7Using Custom Scripts
7-30

This sample Jython script provides code related to custom scripts. All the messages being logged (meaning printed) are visible in the process log file as per Log Level profile.
#
# Log the beginning of the script, at the INFO level
fdmAPI.logInfo("======================================================================")
fdmAPI.logInfo("Custom Script: Begin")
fdmAPI.logInfo("======================================================================")
# Execute the subprocess to call and run the batch file
import os
import subprocess
os.chdir("D:/ORCL/MW/EPMSystem11R1/products/FinancialDataQuality/bin")
myScriptName = "D:/ORCL/MW/EPMSystem11R1/products/FinancialDataQuality/bin/myreport.bat"
retcode = subprocess.Popen(myScriptName)
fdmAPI.logDebug("The return code = " + retcode)
The myreport.bat file referenced above can contain the equal sign as a parameter asin the following:
runreport.bat <username> <password> "TB All Columns (Per,Cat,Loc)" "Period=Jan 15" "Category=Actual" "Location=AAA" "Rule Name=AAA" "Report Output Format=PDF"
Using the JAVA APIThis section explains how to use JAVA API with Oracle Hyperion Financial DataQuality Management, Enterprise Edition.
OverviewOracle Hyperion Financial Data Quality Management, Enterprise Edition automaticallyinitializes the data load workflow context information prior to invoking the Import,Mapping and Event scripts. The fdmContext object is initialized with the list ofproperties listed below. The properties can be accessed by referencingfdmContext[“<PROPERTY NAME>”]. For example, to access Location Name, usefdmContext[“LOCNAME”]. To execute a script for a specific data load, write something likethe following:
if fdmContext["LOCNAME"] == "ITALY":
Write script logic here
FDM object properties include:
Chapter 7Using the JAVA API
7-31

• APPNAM
• APPID
• BATCHSCRIPTDIR
• CATKEY
• CATNAME
• CHKSTATUS
• EPMORACLEHOME
• EPMORACLEINSTANCEHOME
• EXPORTFLAG
• EXPORTMODE
• EXPSTATUS
• FILEDIR
• FILENAME
• IMPORTFLAG
• IMPORTFORMAT
• IMPORTMODE
• IMPST
• IMPSTATUS
• INBOXDIR
• LOADID
• LOCKEY
• LOCNAME
• MULTIPERIODLOAD
• OUTBOXDIR
• PERIODNAME
• PERIODKEY
• PROCESSSTATUS
• RULEID
• RULENAME
• SCRIPTSDIR
• SOURCENAME
• SOURCETYPE
• TARGETAPPDB
• TARGETAPPNAME
• VALSTATUS
Chapter 7Using the JAVA API
7-32
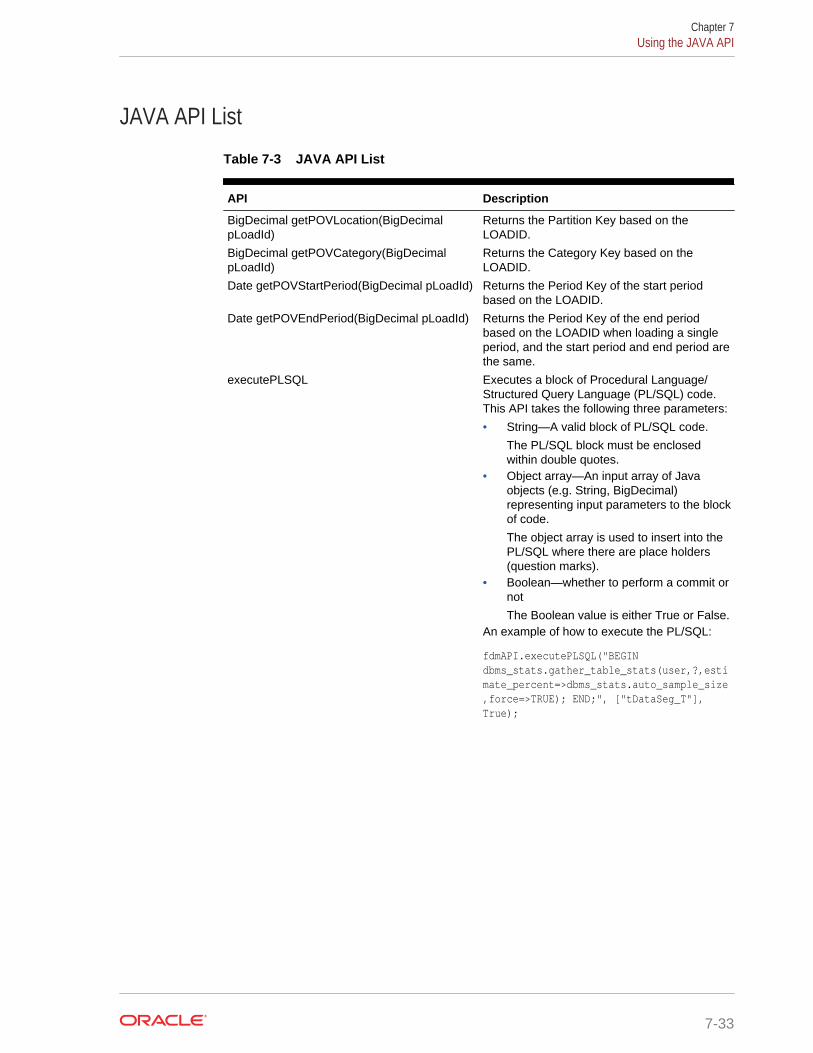
JAVA API List
Table 7-3 JAVA API List
API Description
BigDecimal getPOVLocation(BigDecimalpLoadId)
Returns the Partition Key based on theLOADID.
BigDecimal getPOVCategory(BigDecimalpLoadId)
Returns the Category Key based on theLOADID.
Date getPOVStartPeriod(BigDecimal pLoadId) Returns the Period Key of the start periodbased on the LOADID.
Date getPOVEndPeriod(BigDecimal pLoadId) Returns the Period Key of the end periodbased on the LOADID when loading a singleperiod, and the start period and end period arethe same.
executePLSQL Executes a block of Procedural Language/Structured Query Language (PL/SQL) code.This API takes the following three parameters:
• String—A valid block of PL/SQL code.
The PL/SQL block must be enclosedwithin double quotes.
• Object array—An input array of Javaobjects (e.g. String, BigDecimal)representing input parameters to the blockof code.
The object array is used to insert into thePL/SQL where there are place holders(question marks).
• Boolean—whether to perform a commit ornot
The Boolean value is either True or False.An example of how to execute the PL/SQL:
fdmAPI.executePLSQL("BEGIN dbms_stats.gather_table_stats(user,?,estimate_percent=>dbms_stats.auto_sample_size,force=>TRUE); END;", ["tDataSeg_T"], True);
Chapter 7Using the JAVA API
7-33
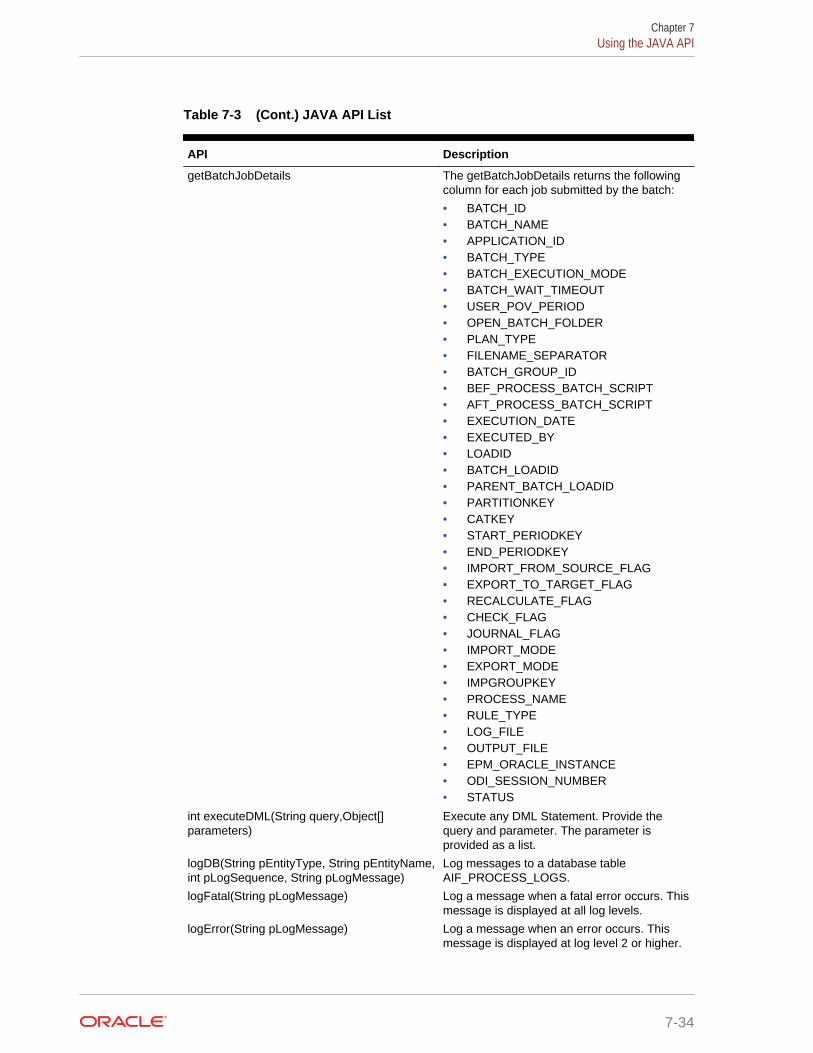
Table 7-3 (Cont.) JAVA API List
API Description
getBatchJobDetails The getBatchJobDetails returns the followingcolumn for each job submitted by the batch:
• BATCH_ID• BATCH_NAME• APPLICATION_ID• BATCH_TYPE• BATCH_EXECUTION_MODE• BATCH_WAIT_TIMEOUT• USER_POV_PERIOD• OPEN_BATCH_FOLDER• PLAN_TYPE• FILENAME_SEPARATOR• BATCH_GROUP_ID• BEF_PROCESS_BATCH_SCRIPT• AFT_PROCESS_BATCH_SCRIPT• EXECUTION_DATE• EXECUTED_BY• LOADID• BATCH_LOADID• PARENT_BATCH_LOADID• PARTITIONKEY• CATKEY• START_PERIODKEY• END_PERIODKEY• IMPORT_FROM_SOURCE_FLAG• EXPORT_TO_TARGET_FLAG• RECALCULATE_FLAG• CHECK_FLAG• JOURNAL_FLAG• IMPORT_MODE• EXPORT_MODE• IMPGROUPKEY• PROCESS_NAME• RULE_TYPE• LOG_FILE• OUTPUT_FILE• EPM_ORACLE_INSTANCE• ODI_SESSION_NUMBER• STATUS
int executeDML(String query,Object[]parameters)
Execute any DML Statement. Provide thequery and parameter. The parameter isprovided as a list.
logDB(String pEntityType, String pEntityName,int pLogSequence, String pLogMessage)
Log messages to a database tableAIF_PROCESS_LOGS.
logFatal(String pLogMessage) Log a message when a fatal error occurs. Thismessage is displayed at all log levels.
logError(String pLogMessage) Log a message when an error occurs. Thismessage is displayed at log level 2 or higher.
Chapter 7Using the JAVA API
7-34

Table 7-3 (Cont.) JAVA API List
API Description
logWarn(String pLogMessage) Log a message when a warning conditionerror occurs. This message is displayed at loglevel 3 or higher.
logInfo(String pLogMessage) Log an informational message. This messageis displayed at log level 4 or higher.
logDebug(String pLogMessage) Log a debug message. This message isdisplayed at log level 5.
Map getProcessStates(BigDecimal pLoadId) Returns status of Workflow process.
Available statuses:
• IMPSTATUS—Returns the status of theimport process.
A 0 status indicates that the process hasnot yet started, or the process failed. A 1status indicates the process is successful.
• VALSTATUS—Returns the status ofvalidation process.
A 0 status indicates that the process hasnot yet started, or the process failed. A 1status indicates the process is successful.
• EXPSTATUS—Returns the status ofexport process.
A 0 status indicates that the process hasnot yet started, or the process failed. A 1status indicates the process is successful.
• CHKSTATUS—Returns the status ofcheck process.
A 0 status indicates that the process hasnot yet started, or the process failed. A 1status indicates the process is successful.
• PROCESSSTATUS—Returns the exacterror code. The detail for the error codecan be found in the tlogprocessstatestable.
Map getPeriodDetail(Date pPeriodKey,StringpApplicationName) //returns PERIODTARGETand YEARTARGET
Returns the Target period mapping for a givenPeriod key.
ObjectgetCustomScriptParameterValue(BigDecimalpLoadId,String pParameterName)
Returns the value for given custom scriptparameter name and loadID.
Object getCustomScriptParameterValue(StringpParameterName)
Returns the value for given custom scriptparameter name and context initialized loaded.
ResultSet getBatchDetails() Returns batch definition information fromAIF_BATCHES table.
The fields returned by getBatchDetails():
• BATCH_ID• BATCH_NAME• APPLICATION_ID• BATCH_TYPE• BATCH_EXECUTION_MOD
Chapter 7Using the JAVA API
7-35

Table 7-3 (Cont.) JAVA API List
API Description
ResultSet getBatchJobDetails(BigDecimalpLoadId)
Retrieves error messages logged to thedatabase table AIF_PROCESS_LOGS for thegiven loadid.
ResultSet getCategoryList() Returns a list of Categories in a result set.
The fields returned by getCategoryList():
• CATKEY• CATNAME
ResultSetgetCheckEntityGroupList(BigDecimalpApplicationId)
Returns a list of Check Groups in a result set.
ResultSet getCheckEntityForGroup(StringpValGroupKey)
Return a list of entities in a Check Group in aresult set.
ResultSetgetCheckEntityGroupList(BigDecimalpApplicationId)
Return a list of Check Rule Groups in a resultset.
ResultSet getCheckEntityForGroup Return a list of Check Rule Group rules in aresult set.
ResultSet getCustomDBLog() Retrieve error messages logged to thedatabase table AIF_PROCESS_LOGS for thecurrent process.
The fields returned by getCustomDBLog():
• ENTITY_TYPE• ENTITY_NAME• LOG_SEQUENCE
ResultSet getCustomDBLog(BigDecimalpLoadId)
Returns the log statements from DB for agiven loadID.
ResultSet getCustomScriptParameters() Returns the list of custom script parameters ina result set for the context initialized loadID.
ResultSetgetCustomScriptParameters(BigDecimalpLoadId)
Returns the list of custom script parameters ina resultset for the given loadID.
ResultSet getPeriodList() Returns a list of Periods in a result set.
The fields returned by getPeriodList():
• PERIODKEY• PERIODDESC
ResultSet executeQuery(String query, Object[]parameters)
Execute any SQL Query Statement. The queryresults are returned in a result set. Provide thequery and parameter. The parameter isprovided as a list.
Chapter 7Using the JAVA API
7-36

Table 7-3 (Cont.) JAVA API List
API Description
ResultSet getImportFormatDetails(StringpImpGroupKey)
Return the Import Format details in a result setbased on the Import Format key.
The fields returned bygetImportFormatDetails(StringpImpGroupKey):
• IMPGROUPKEY• IMPGROUPDESC• IMPGROUPFILETYPE• IMPGROUPDELIMITER• IMPGROUPTYPE• IMPSOURCESYSTEMID• IMPSOURCELEDGERID• IMPSOURCECOAID• IMPTARGETAPPLICATIONID• IMPADAPTERID• IMPDRILLURLID• IMPODISCENARIO• IMPREGENSCEN• IMPDRILLREQUESTMETHOD• IMPDRILLURL• IMPTARGETSOURCESYSTEMID
ResultSet getImportFormatMapDetails(StringpImpGroupKey)
Return the Import Format Mapping details in aresult set for a given Import Format key. Thiscurrently supports only file based importformats.
The fields returned bygetImportFormatMapDetails(StringpImpGroupKey):
• IMPSEQ• IMPGROUPKEY• IMPFLDFIELDNAME• IMPFLDFIXEDTEXT• IMPFLDSTARTPOS• IMPFLDLENGTH• IMPFLDSOURCECOLNAME
Chapter 7Using the JAVA API
7-37

Table 7-3 (Cont.) JAVA API List
API Description
ResultSet getLocationDetails(BigDecimalpPartitionKey)
Return the Location details in a record set fora given Location key.
The fields returned by getLocationDetails:
• PARTITIONKEY• PARTNAME• PARTDESC• PARTNOTES• PARTLASTIMPFILE• PARTLASTEXPFILE• PARTIMPGROUP• PARTLOGICGROUP• PARTVALGROUP• PARTVALENTGROUP• PARTCURRENCYKEY• PARTPARENT• PARTTYPE• PARTSEQMAP• PARTDATAVALUE• PARTSEGMENTKEY• PARTCONTROLSTYPE• PARTCONTROLSGROUP1• PARTCONTROLSGROUP2• PARTCONTROLSAPPROVER• PARTCONTROLSAPPROVERPROXY• PARTCONTROLSREDFLAGLEVEL• PARTCLOGICGROUP• PARTINTGCONFIG1• PARTINTGCONFIG2• PARTINTGCONFIG3• PARTINTGCONFIG4• PARTADAPTOR• PARTSOURCESYSTEMID• PARTSOURCELEDGERID• PARTTARGETAPPLICATIONID• PARTPARENTKEY• PARTSOURCEAPPLICATIONID• PARTTARGETSOURCESYSTEMIDFor example if you want to know the fieldsreturned by the getLocationDetails API, runthe following script:
rs = fdmAPI.getLocationDetails(fdmContext["LOCKEY"])
i = 1
metaData = rs.getMetaData()
while i <= metaData.getColumnCount():
Chapter 7Using the JAVA API
7-38

Table 7-3 (Cont.) JAVA API List
API Description
fdmAPI.logDebug(metaData.getColumnLabel(i))
i +=1
Chapter 7Using the JAVA API
7-39

Table 7-3 (Cont.) JAVA API List
API Description
ResultSet getRuleDetails(BigDecimal pRuleId) Returns the Data Rule details in a record setfor a given Data Rule ID.
The fields returned bygetRuleDetails(BigDecimal pRuleId):
• RULE_ID• SOURCE_SYSTEM_ID• SOURCE_LEDGER_ID• APPLICATION_ID• RULE_NAME• RULE_DESCRIPTION• PLAN_TYPE• LEDGER_GROUP• INCL_ZERO_BALANCE_FLAG• BALANCE_SELECTION• AMOUNT_TYPE• BALANCE_METHOD_CODE• BALANCE_TYPE• BAL_SEG_VALUE_OPTION_CODE• EXCHANGE_RATE_OPTION_CODE• EXCHANGE_BEGIN_RATE_TYPE• EXCHANGE_END_RATE_TYPE• EXCHANGE_AVERAGE_RATE_TYPE• DATA_SYNC_OBJECT• DATA_SYNC_OBJECT_ID• PARTCONTROLSAPPROVERPROXY• PARTCONTROLSREDFLAGLEVEL• STATUS• PARTITIONKEY• CATKEY• INCLUDE_ADJ_PERIODS_FLAG• BALANCE_AMOUNT_BS• BALANCE_AMOUNT_IS• AS_OF_DATE• BLANK_PERIODKEY• BR_MEMBER_NAME• BR_MEMBER_DISP_NAME• CALENDAR_ID• CURRENCY_CODE• DP_MEMBER_NAME• FILE_NAME_DATE_FORMAT• FILE_NAME_STATIC• FILE_NAME_SUFFIX_TYPE• FILE_PATH• LEDGER_GROUP_ID• PERIOD_MAPPING_TYPE• VERSION• SIGNAGE_METHOD• DIRECT_FILE_LOAD_FLAG• LOAD_OPTIONS
Chapter 7Using the JAVA API
7-40

Table 7-3 (Cont.) JAVA API List
API Description
• RULE_ATTR1• RULE_ATTR2• RULE_ATTR3• RULE_ATTR4• ICP_LOAD• MULTI_PERIOD_FILE_FLAG• IMPGROUPKEY• SOURCE_APP_PLAN_TYPE
showCustomDBLog() Show a list of custom messages in the userinterface after completion of a process.Message can be displayed at the end of a dataload workflow step like import, validate, export,check or at the end of a custom scriptexecution. Note messages are displayed onlywhen the process are run in online mode.
showCustomFile(String filePath) Show a custom file (log file, report file) in theuser interface after completion of a process.Message can be displayed at the end of a dataload workflow step like import, validate, export,check or at the end of a custom scriptexecution. Note messages are displayed onlywhen the process are run in online mode.
showCustomMessage(String message) Show a custom message in the user interfaceafter completion of a process. Message can bedisplayed at the end of a data load workflowstep like import, validate, export, check or atthe end of a custom script execution. Notemessages are displayed only when theprocess are run in online mode.
String getCategoryMap(BigDecimalpCatKey,String pApplicationName)
Returns the Scenario for a given Category andApplication Name.
String getCustomMessage() Retrieves the last custom message raised forthe current process.
String getCustomMessage(BigDecimalpLoadId)
Retrieves the last custom message raised forthe given loadid.
String getCustomFile() Retrieves the custom file created for thecurrent process.
String getCustomFile(BigDecimal pLoadId) Retrieves the custom file created for the givenloadid.
String getPOVDataValue(BigDecimalpPartitionKey)
Returns the data value of the Location.
String getDirTopLevel(BigDecimalpApplicationId)
Returns the Top Level directory based on theApplication.
String getDirInbox(BigDecimal pApplicationId) Returns the Inbox directory based on theApplication.
String getDirOutbox(BigDecimalpApplicationId)
Returns the Outbox directory based on theApplication.
String getDirScripts(BigDecimalpApplicationId)
Returns the Scripts directory based on theApplication.
Chapter 7Using the JAVA API
7-41

Table 7-3 (Cont.) JAVA API List
API Description
String getProcessLogFile(BigDecimalpLoadId)
Returns the log file name for the given loadID.
String getProfileOptionValue(StringpProfileOptionName, BigDecimalpApplicationId, String pUserName)
Returns the value set for an option. Optionscan be set at the System Setting, ApplicationSetting, and User Setting. The order ofprecedence is: User, Application, and System.The API determines the appropriate applicablevalue and returns the value.
void writeToProcessLogsDB(BigDecimalpLoadId, String pEntityType, StringpEntityName, int pLogSequence,StringpLogMessage)
Writes the log information to theAIF_PROCESS_LOGS table. Use Entity Typeand Entity Name to group the loggedmessages. Logs can be created only from adata load workflow process.
void writeToProcessLogsFile(BigDecimalpLoadId, String pLogMessage)
Writes the log information to the Data LoadProcess log file. The logs is written based onthe process log level. Logs can be createdonly from a data load workflow process.
Note:
It is recommendedthat you use thelogging API, forexample logDebugor, logInfo API,instead of using thewriteToProcessLogsFile API.
void closeConnection() Use to close the database connection.
void closeResultSet(ResultSet resultSet) Use to close result object.
void updateImportFormat(StringpImpgroupKey,BigDecimal pLoadId)
Update the import format for the current run.This is applicable only for File-based importformats.
Working with UNICODE Characters in Jython ScriptsWhen writing script code in Jython technology, specify any non-English strings inUNICODE by prefixing the letter "u" before the string in double quotes. This meansinstead of defining a string as "MyValue" define it as u"MyValue." See the followingexample used in data load mapping script for the Account dimension:
Chapter 7Using the JAVA API
7-42

The scripts above uses the "u" prefix for the user defined strings. You can optionallyspecify the u prefix for English/ASCII strings (that is, you can use "1110" or u"1110").The following shows the result of the mapping applied on the workbench.
Using JAVA IDE to Develop ScriptsYou can use popular Java IDE tools like Oracle jDeveloper, or Eclipse to develop andtest scripts. Before using Eclipse to develop scripts you must install and configure thePyDev Interpreter. Refer to http://pydev.org for more details. After you have configuredthe IDE environment, copy the following JAR files from the EPM Server where OracleHyperion Financial Data Quality Management, Enterprise Edition is installed (Filelocation EPM_ORACLE_HOME/products/FinancialDataQuality/lib):
1. aif-apis.jar
2. aif-custom.jar
In addition, download appropriate (Oracle or SQL Server) JDBC driver JAR. After youhave copied these files to the Project working directory, include them in the Projectyou create. Below is sample of the initialization steps required when running from yourselected IDE:
#Start Initialize Code
#Required for Dev Mode. Not required in production script
import java.math.BigDecimal as BigDecimal
import java.sql as sql
import com.hyperion.aif.scripting.API as API
fdmAPI = API()
conn = None
Chapter 7Using the JAVA API
7-43
conn = sql.DriverManager.getConnection("jdbc:oracle:thin:@server:1521:orcl", "user", "password");
conn.setAutoCommit(False)
fdmAPI.initializeDevMode(conn);
print "SUCCESS CONNECTING TO DB"
fdmContext = fdmAPI.initContext(BigDecimal(1720))
#End Initialize Code Required for Dev Mode. Not required in production script
#Code to be added to production script
print fdmContext["LOCNAME"]
print fdmContext["LOCKEY"]
print fdmContext["APPID"]
Using Visual Basic API and SamplesThis section explains how to use the Visual Basic API with Oracle Hyperion FinancialData Quality Management, Enterprise Edition. It includes samples.
OverviewThis section includes:
• Registering the Visual Basic API DLL Manually
• Visual Basic API List
• Visual Basic Sample Scripts
Registering the Visual Basic API DLL ManuallyIf you use the Visual Basic API, then you must register the Visual Basic API DLLmanually. Oracle Hyperion Financial Data Quality Management, Enterprise Editiondoes not register the Visual Basic API DLL at installation.
To register the Visual Basic API DLL manually:
1. Open a command window.
2. Navigate to: EPM_ORACLE_HOME\products\FinancialDataQuality\lib\Windows
3. Execute RegisterVBAPI.vbs.
The RegisterVBAPI.vbs script requires one parameter to be passed to it. Theparameter must be the path (wrapped in quotes) to the Oracle Instance Path.
For example, specify RegisterVBAPI.vbs "C:\Oracle\Middleware\user_projects\epmsystem1"
Chapter 7Using Visual Basic API and Samples
7-44

Visual Basic API ListThe API list below shows the objects you can use to programmatically extend OracleHyperion Financial Data Quality Management, Enterprise Edition using Visual Basic.
API Class (clsAppServerDM)
fdmAPI.API Call
Table 7-4 API Class (clsAppServerDM)
API Call Method/Property/ObjectReference
Description
fInitializeMainAPI Method Initialize the VB API. This functionmust be called first in order to usethe VB API.Input: ByVal LoadID As String, ByValToken As String, ByValOracleInstancePath As String, ByValJavaHomePath As String, ByValDatabaseProvider As String
Output: True or False
URLDecodeString Method Decode a URL Encoded string.Input: ByVal value as String
Output: String
Dispose Method Initiates the .Net garbage collectionprocess to destroy the API object.
Application Class (clsApp)
fdmAPI.API.DataWindow.Connection.PobjApp.API Call
Table 7-5 Application Class (clsApp)
API Call Method/Property/ObjectReference
Description
PstrConnInfoCacheFile Property Returns the path to the ccs filestored in the user projects directoryunder the FDM folder. This filecontains the connection informationreturned by COMJNI. This file isencrypted.
PstrConnInfoTempFilePath Property Path of ccs file only
PstrDatabaseName Property Database name
PstrDatabasePassword Property Database password
PstrDatabaseServer Property Database server
PstrDatabaseUserName Property Database user name
PstrDataDir Property Data directory for the LoadID
PstrDBConnectionString Property DB connection string returned fromCOMJNI
Chapter 7Using Visual Basic API and Samples
7-45
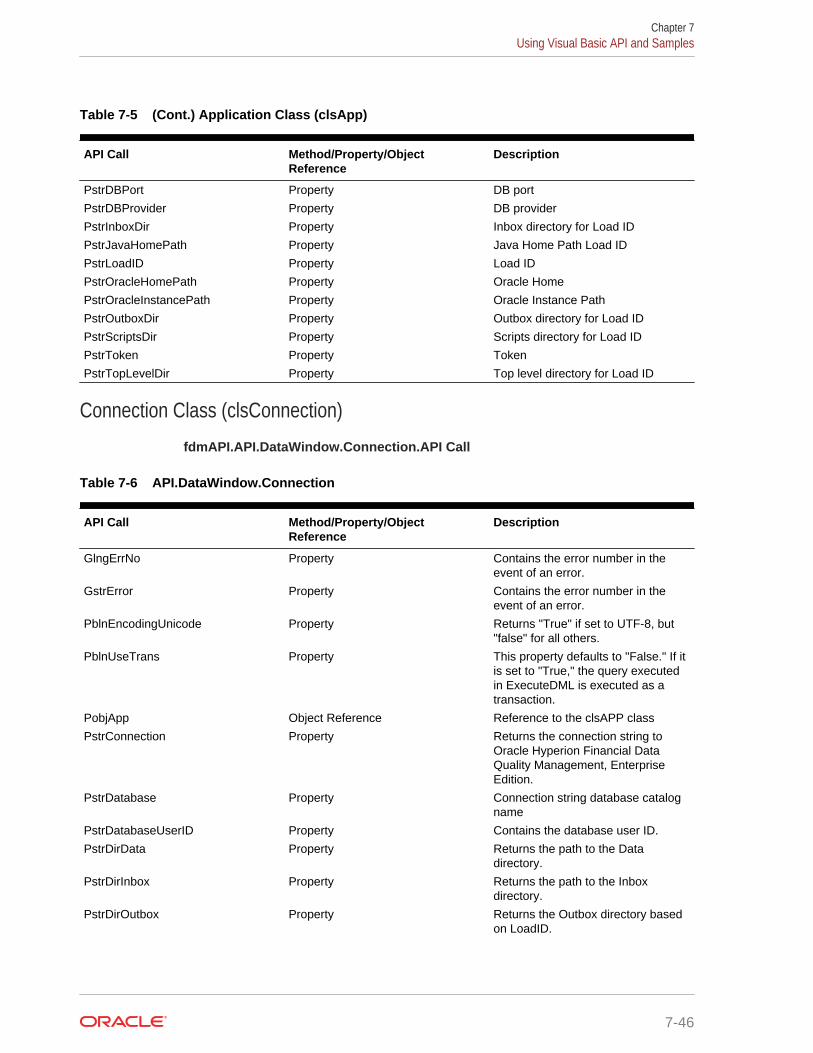
Table 7-5 (Cont.) Application Class (clsApp)
API Call Method/Property/ObjectReference
Description
PstrDBPort Property DB port
PstrDBProvider Property DB provider
PstrInboxDir Property Inbox directory for Load ID
PstrJavaHomePath Property Java Home Path Load ID
PstrLoadID Property Load ID
PstrOracleHomePath Property Oracle Home
PstrOracleInstancePath Property Oracle Instance Path
PstrOutboxDir Property Outbox directory for Load ID
PstrScriptsDir Property Scripts directory for Load ID
PstrToken Property Token
PstrTopLevelDir Property Top level directory for Load ID
Connection Class (clsConnection)
fdmAPI.API.DataWindow.Connection.API Call
Table 7-6 API.DataWindow.Connection
API Call Method/Property/ObjectReference
Description
GlngErrNo Property Contains the error number in theevent of an error.
GstrError Property Contains the error number in theevent of an error.
PblnEncodingUnicode Property Returns "True" if set to UTF-8, but"false" for all others.
PblnUseTrans Property This property defaults to "False." If itis set to "True," the query executedin ExecuteDML is executed as atransaction.
PobjApp Object Reference Reference to the clsAPP class
PstrConnection Property Returns the connection string toOracle Hyperion Financial DataQuality Management, EnterpriseEdition.
PstrDatabase Property Connection string database catalogname
PstrDatabaseUserID Property Contains the database user ID.
PstrDirData Property Returns the path to the Datadirectory.
PstrDirInbox Property Returns the path to the Inboxdirectory.
PstrDirOutbox Property Returns the Outbox directory basedon LoadID.
Chapter 7Using Visual Basic API and Samples
7-46
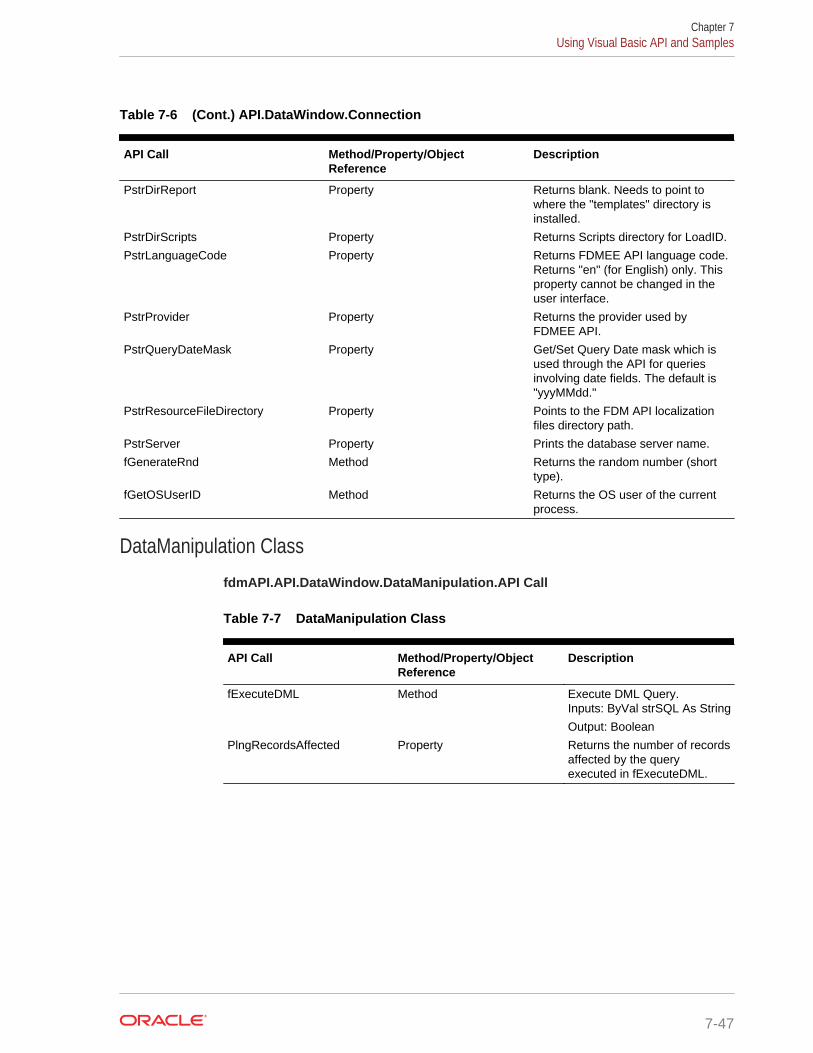
Table 7-6 (Cont.) API.DataWindow.Connection
API Call Method/Property/ObjectReference
Description
PstrDirReport Property Returns blank. Needs to point towhere the "templates" directory isinstalled.
PstrDirScripts Property Returns Scripts directory for LoadID.
PstrLanguageCode Property Returns FDMEE API language code.Returns "en" (for English) only. Thisproperty cannot be changed in theuser interface.
PstrProvider Property Returns the provider used byFDMEE API.
PstrQueryDateMask Property Get/Set Query Date mask which isused through the API for queriesinvolving date fields. The default is"yyyMMdd."
PstrResourceFileDirectory Property Points to the FDM API localizationfiles directory path.
PstrServer Property Prints the database server name.
fGenerateRnd Method Returns the random number (shorttype).
fGetOSUserID Method Returns the OS user of the currentprocess.
DataManipulation Class
fdmAPI.API.DataWindow.DataManipulation.API Call
Table 7-7 DataManipulation Class
API Call Method/Property/ObjectReference
Description
fExecuteDML Method Execute DML Query.Inputs: ByVal strSQL As String
Output: Boolean
PlngRecordsAffected Property Returns the number of recordsaffected by the queryexecuted in fExecuteDML.
Chapter 7Using Visual Basic API and Samples
7-47

Utilities Class (clsUtilities.cls)
fdmAPI.API.DataWindow.Utilities.API Call
Table 7-8 Utilities Class (clsUtilities.cls)
API Call Method/Property/ObjectReference
Description
fParseString Method Extract a substring from a delimitedstring based on its field positionwithin the total number of fields.Inputs: ByVal strRecord As String,ByVal intFldCount As Integer, ByValintFldToReturn As Integer, ByValstrDelimiter As String
Output: String
fGetRandomNumber Method Get a random number based on atwo integer range.Inputs: ByRef intUpper As Short,ByRef intLower As Short
Output: Short
Data Access Class (clsDataAccess)
fdmAPI.API.DataWindow.DataAccess.API Call
Table 7-9 Data Access Class (clsDataAccess)
API Call Method/Property/ObjectReference
Description
farsFireHose Method Open an ADO forward only/read onlyrecordset for fast data streaming.Inputs: ByVal strSQL As String,Optional ByVal blnServerCursor AsBoolean, Optional ByVallngMarshalType As Long
• strSQL—SQL statement toexecute
• blnServerCursor—Optional,Cursor location switch(True=DatabaseServer,False=Client)
• lngMarshalType—Optional,Value used to control how therecordset is returned
Output: ADODB Recordset
Chapter 7Using Visual Basic API and Samples
7-48

Table 7-9 (Cont.) Data Access Class (clsDataAccess)
API Call Method/Property/ObjectReference
Description
farsKeySet Method Open an ADO keyset type recordsetbased on the specified lock type.Inputs: Inputs: ByVal strSQL AsString, Optional ByVal lngLockTypeAs Long, Optional ByValblnServerCursor As Boolean,Optional ByVal lngMarshalType AsLong
• strSQL—SQL statement toexecute
• lngLockType—ADOLockTypeEnum(adLockReadOnly=1;adLockPesimistic=2;adLockOptimistic=3;adLockBatch Optimistic=4)
• blnServerCursor—Optional,cursor location switch(True=DatabaseServer,False=Client)
• lngMarshalType—Optional,Value used to control how therecordset is returned.
Output: ADODB.Recordset
farsPage Method Open an ADO BatchOptimisticrecordset limited to the records foundon the specified page. The record setreturned is programmatically createdand is disconnected.Inputs: ByVal strSQL As String,ByVal lngPageSize As Long, ByVallngPage As Long,lngOPRecordCount As Long,Optional ByVal lngMarshalType AsLong
• strSQL—SQL statement toexecute
• lngPageSize—Number ofrecords per page
• lngPage—Desired page number• lngOPRecordCount—Output
parameter containing record setrecord count
• lngMarshalType—Optional,Value used to control how therecord set is returned
Output: ADODB.Recordset
Chapter 7Using Visual Basic API and Samples
7-49

Table 7-9 (Cont.) Data Access Class (clsDataAccess)
API Call Method/Property/ObjectReference
Description
farsPageFind Method Open an ADO BatchOptimisticrecordset limited to the records foundon the specified page and for thespecified criteria. The recordsetreturned is programmatically createdand is disconnected.Inputs: ByVal strSQL As String,ByVal strCriteria As String, ByVallngStartPosition As Long, ByVallngPageSize As Long,lngOPRecordCount As Long,lngOPFindPostion As Long, OptionalByVal lngMarshalType As Long
• strSQL—SQL statement toexecute
• strCriteria—ADO recordsetFIND criteria statement (SeeADO FIND method)
• lngStartPosition—Record indexto begin the search
• lngPageSize—Number ofrecords per page
• lngPage—Desired page number• lngOPRecordCount—Output
parameter containing recordsetrecord count
• lngOPFindPostion—Outputparameter containing positionwhere record was found
• lngMarshalType—Optional,Value used to control how therecordset is returned
Output: ADODB.Recordset
Chapter 7Using Visual Basic API and Samples
7-50

Table 7-9 (Cont.) Data Access Class (clsDataAccess)
API Call Method/Property/ObjectReference
Description
farsPageFindFromKey Method Open an ADO BatchOptimisticrecordset limited to the records foundon the specified page and for thespecified criteria. The recordsetreturned is programmatically createdand is disconnected.Inputs: ByVal strSelect As String,ByVal strFrom As String, ByValstrWhere As String, ByValstrGroupBy As String, ByValstrHaving As String, ByValstrOrderBy As String, ByValstrKeyFieldName As String, ByValstrFindFieldName As String, ByValstrCriteria As String, ByVallngStartPosition As Long, ByVallngPageSize As Long,lngOPRecordCount As Long,lngOPFindPostion As Long, OptionalByVal
• lngMarshalType—As Long• strSelect—Select clause of SQL
statement to execute• strFrom—From clause of SQL
statement to execute• strWhere—Where clause of
SQL statement to execute• strGroupBy GroupBy—Clause of
SQL statement to execute• strHaving—Having clause of
SQL statement to execute• strOrderBy OrderBy—Clause of
SQL statement to execute• strKeyFieldName—Name of key
field used for fast page location• strFindFieldName—Name of the
field used in the find criteria• strCriteria—Find criteria
statement• lngStartPosition—Record index
to begin the search• lngPageSize—Number of
records per page• lngPage—Desired page number• lngOPRecordCount—Output
parameter containing recordsetrecord count
• lngOPFindPostion—Outputparameter containing positionwhere record was found
Chapter 7Using Visual Basic API and Samples
7-51

Table 7-9 (Cont.) Data Access Class (clsDataAccess)
API Call Method/Property/ObjectReference
Description
• lngMarshalType—Optional,Value used to control how therecordset is returned
Output: ADODB.Recordset
farsPageFromKey Method Open an ADO BatchOptimisticrecordset limited to the records foundon the specified page. This methodis optimized for high volume queries.The recordset returned isprogrammatically created and isdisconnected.Inputs: ByVal strSelect As String,ByVal strFrom As String, ByValstrWhere As String, ByValstrGroupBy As String, ByValstrHaving As String, ByValstrOrderBy As String, ByValstrKeyFieldName As String, ByVallngPageSize As Long, ByVallngPage As Long,lngOPRecordCount As Long,Optional ByVal lngMarshalType AsLong
• strSelect—Select clause of SQLstatement to execute
• strFrom—From clause of SQLstatement to execute
• strWhere—Where clause ofSQL statement to execute
• strGroupBy—GroupBy clause ofSQL statement to execute
• strHaving—Having clause ofSQL statement to execute
• strOrderBy—OrderBy clause ofSQL statement to execute
• strKeyFieldName—Name of keyfield used for fast page location
• lngPageSize—Number ofrecords per page
• lngPage—Desired page number• lngOPRecordCount—Output
parameter containing recordsetrecord count
• lngMarshalType—Optional,Value used to control how therecordset is returned
Output: ADODB.Recordset
Chapter 7Using Visual Basic API and Samples
7-52
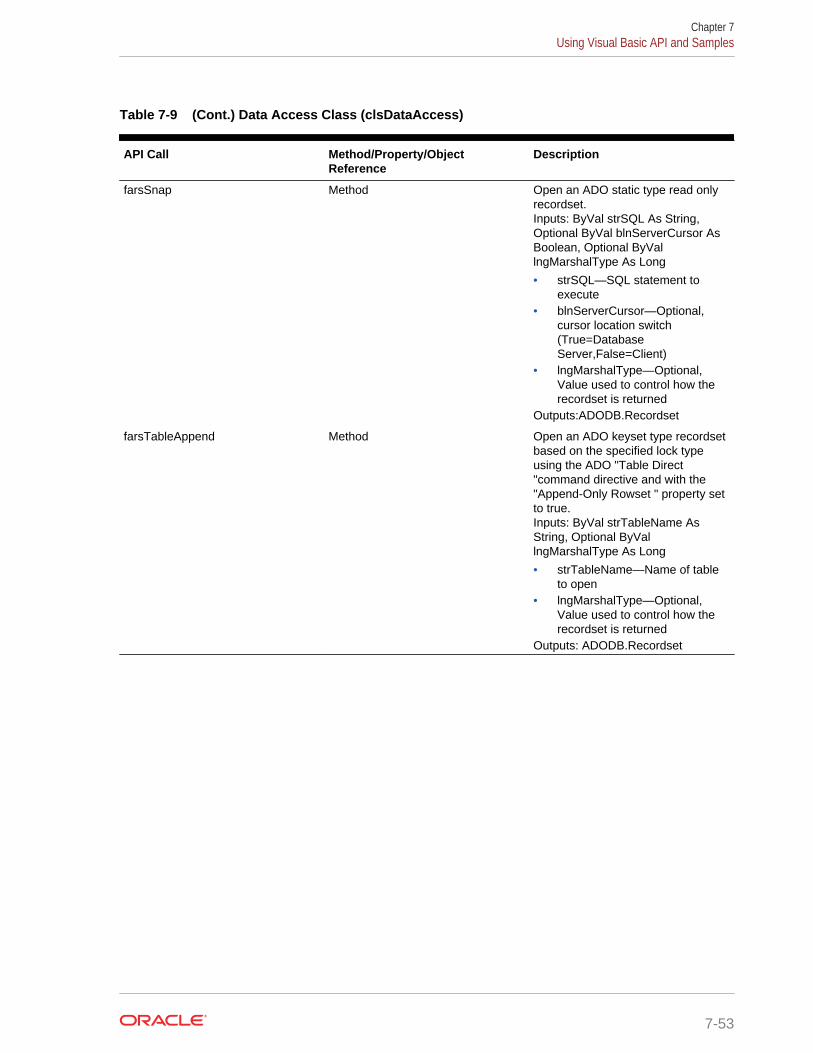
Table 7-9 (Cont.) Data Access Class (clsDataAccess)
API Call Method/Property/ObjectReference
Description
farsSnap Method Open an ADO static type read onlyrecordset.Inputs: ByVal strSQL As String,Optional ByVal blnServerCursor AsBoolean, Optional ByVallngMarshalType As Long
• strSQL—SQL statement toexecute
• blnServerCursor—Optional,cursor location switch(True=DatabaseServer,False=Client)
• lngMarshalType—Optional,Value used to control how therecordset is returned
Outputs:ADODB.Recordset
farsTableAppend Method Open an ADO keyset type recordsetbased on the specified lock typeusing the ADO "Table Direct"command directive and with the"Append-Only Rowset " property setto true.Inputs: ByVal strTableName AsString, Optional ByVallngMarshalType As Long
• strTableName—Name of tableto open
• lngMarshalType—Optional,Value used to control how therecordset is returned
Outputs: ADODB.Recordset
Chapter 7Using Visual Basic API and Samples
7-53

SQL Manager Class (clsSQLMgr)
fdmAPI.API.SQLMgr.API Call
Table 7-10 SQL Manager Class (clsSQLMgr)
API Call Method/Property/ObjectReference
Description
fImpFieldsForGroup Method Returns a recordset containing all ofthe records ("Mappings") for theImport Format name (string) passedin at runtime.Inputs: ByVal strGroupKey As String,Optional ByVal blnReadOnly AsBoolean = False, Optional ByValblnSQLOnly As Boolean = False,Optional ByVal lngMarshalType AsInteger = 0
• strGroupKey—Name of Importgroup key to return field parsinginstructions
• blnReadOnly—Optional, Flag tocreate a read only recordset(Type=farsSnap)
• blnSQLOnly—Optional, Switchfor generating SQL only
• lngMarshalType—Optional,Value used to control how therecordset is returned.
fImpGroup Method Returns a recordset containing allrecords in TBHVIMPGROUP tablefor the Import Format name (string)passed in.Inputs: ByVal strGroupKey As String,Optional ByVal blnReadOnly AsBoolean = False, Optional ByValblnSQLOnly As Boolean = False,Optional ByVal lngMarshalType AsInteger = 0
• strGroupKey—Name of Importgroup key to return field parsinginstructions for
• blnReadOnly—Optional, Flag tocreate a read only recordset(Type=farsSnap)
• blnSQLOnly—Optional, Switchfor generating SQL only
• lngMarshalType—Optional,Value used to control how therecordset is returned
Chapter 7Using Visual Basic API and Samples
7-54

Table 7-10 (Cont.) SQL Manager Class (clsSQLMgr)
API Call Method/Property/ObjectReference
Description
fImpGroupList Method Returns a recordset containing allimport format groups based on grouptype.Inputs: ByVal lngGroupType AsInteger, Optional ByValblnIncludeNone As Boolean = False,Optional ByVal blnReadOnly AsBoolean = False, Optional ByValblnSQLOnly As Boolean = False,Optional ByVal lngMarshalType AsInteger = 0
Output: ADODB.Recordset
fIntDimensionList Method Returns a recordset of dimensionsused in the Target Application.ByVal strApplicationID As String,Optional ByVal blnReadOnly AsBoolean = False, Optional ByValblnSQLOnly As Boolean = False,Optional ByVal lngMarshalType AsInteger = 0
Output: ADODB.Recordset
fLoadDetails Method Return load details for specified LoadID.Inputs: ByVal strLoadID as String,Optional ByVal blnReadOnly asBoolean = False, Optional ByValblnSQLOnly as Boolean = False,Optional ByVal lngMarshalType asInteger = 0
Output: ADODB.Recordset
fPartition Method Returns a recordset containing all ofthe properties of the location passedinto the function.ByVal strLoc As String, OptionalByVal blnReadOnly As Boolean =False, Optional ByVal blnSQLOnlyAs Boolean = False, Optional ByVallngMarshalType As Integer = 0
Output: ADODB.Recordset
fPartitionList Method Returns a recordset containing allproperties of all locations that exist.Inputs: Optional ByValstrLocNoRelatives As String = "",Optional ByVal strLocChildren AsString = "", Optional ByValblnNoParent As Boolean = False,Optional ByVal blnReadOnly AsBoolean = False, Optional ByValblnSQLOnly As Boolean = False,Optional ByVal lngMarshalType AsInteger = 0
Output: ADODB.Recordset
Chapter 7Using Visual Basic API and Samples
7-55

Table 7-10 (Cont.) SQL Manager Class (clsSQLMgr)
API Call Method/Property/ObjectReference
Description
fPeriodKeyList Method Returns a recordset containing thelist of period keys for the loadidpassed to the function.Inputs: ByVal strLoadID As String,Optional ByVal blnReadOnly AsBoolean = False, Optional ByValblnSQLOnly As Boolean = False,Optional ByVal lngMarshalType AsInteger = 0
Output: ADODB.RecordsetOutput:ADODB.Recordset
fPOVDataValue Method Return the data value for thespecified partition key.Inputs: ByVal strPartitionKey AsString, Optional ByVal blnReadOnlyAs Boolean = False, Optional ByValblnSQLOnly As Boolean = False,Optional ByVal lngMarshalType AsInteger = 0
Output: ADODB.Recordset
fProcessBalImpFile Method Return a recordset containing thename of the imported file for a givenload id. For all non-file basedimports, this function returns anempty string.Inputs: ByVal strLoadID As String,Optional ByVal blnReadOnly AsBoolean = False, Optional ByValblnSQLOnly As Boolean = False,Optional ByVal lngMarshalType AsInteger = 0
Output: ADODB.Recordset
fProcessLogForPOV Method Return a single process statusrecord for the specified POV value/intersection.Inputs: ByVal strLoc As String, ByValstrCat As String, ByVal strPer AsString, ByVal strRuleID As String,Optional ByVal blnReadOnly AsBoolean = False, Optional ByValblnSQLOnly As Boolean = False,Optional ByVal lngMarshalType AsInteger = 0
Output: ADODB.Recordset
Chapter 7Using Visual Basic API and Samples
7-56
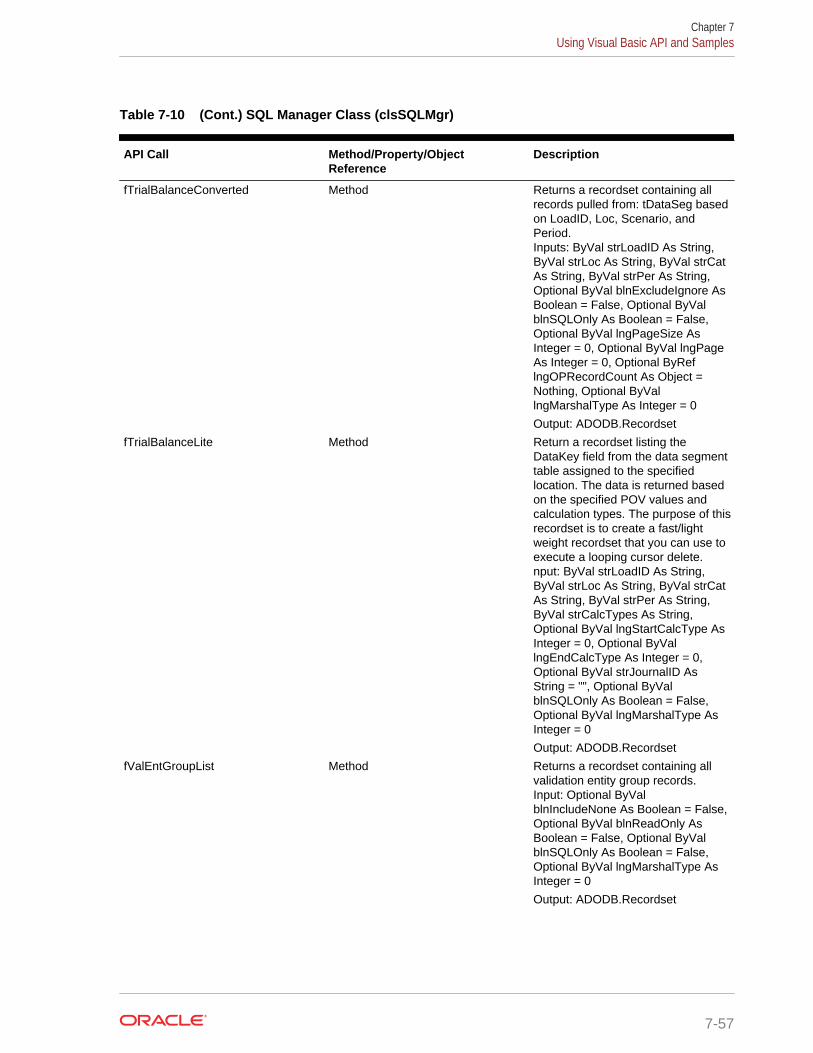
Table 7-10 (Cont.) SQL Manager Class (clsSQLMgr)
API Call Method/Property/ObjectReference
Description
fTrialBalanceConverted Method Returns a recordset containing allrecords pulled from: tDataSeg basedon LoadID, Loc, Scenario, andPeriod.Inputs: ByVal strLoadID As String,ByVal strLoc As String, ByVal strCatAs String, ByVal strPer As String,Optional ByVal blnExcludeIgnore AsBoolean = False, Optional ByValblnSQLOnly As Boolean = False,Optional ByVal lngPageSize AsInteger = 0, Optional ByVal lngPageAs Integer = 0, Optional ByReflngOPRecordCount As Object =Nothing, Optional ByVallngMarshalType As Integer = 0
Output: ADODB.Recordset
fTrialBalanceLite Method Return a recordset listing theDataKey field from the data segmenttable assigned to the specifiedlocation. The data is returned basedon the specified POV values andcalculation types. The purpose of thisrecordset is to create a fast/lightweight recordset that you can use toexecute a looping cursor delete.nput: ByVal strLoadID As String,ByVal strLoc As String, ByVal strCatAs String, ByVal strPer As String,ByVal strCalcTypes As String,Optional ByVal lngStartCalcType AsInteger = 0, Optional ByVallngEndCalcType As Integer = 0,Optional ByVal strJournalID AsString = "", Optional ByValblnSQLOnly As Boolean = False,Optional ByVal lngMarshalType AsInteger = 0
Output: ADODB.Recordset
fValEntGroupList Method Returns a recordset containing allvalidation entity group records.Input: Optional ByValblnIncludeNone As Boolean = False,Optional ByVal blnReadOnly AsBoolean = False, Optional ByValblnSQLOnly As Boolean = False,Optional ByVal lngMarshalType AsInteger = 0
Output: ADODB.Recordset
Chapter 7Using Visual Basic API and Samples
7-57
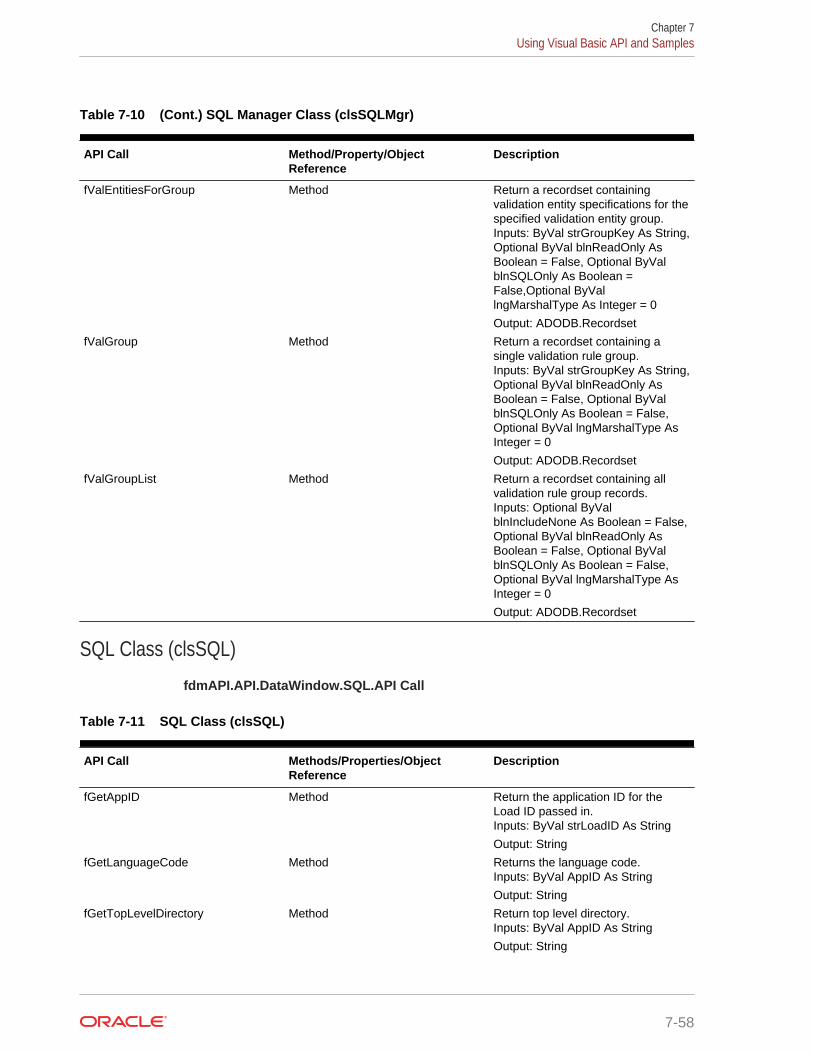
Table 7-10 (Cont.) SQL Manager Class (clsSQLMgr)
API Call Method/Property/ObjectReference
Description
fValEntitiesForGroup Method Return a recordset containingvalidation entity specifications for thespecified validation entity group.Inputs: ByVal strGroupKey As String,Optional ByVal blnReadOnly AsBoolean = False, Optional ByValblnSQLOnly As Boolean =False,Optional ByVallngMarshalType As Integer = 0
Output: ADODB.Recordset
fValGroup Method Return a recordset containing asingle validation rule group.Inputs: ByVal strGroupKey As String,Optional ByVal blnReadOnly AsBoolean = False, Optional ByValblnSQLOnly As Boolean = False,Optional ByVal lngMarshalType AsInteger = 0
Output: ADODB.Recordset
fValGroupList Method Return a recordset containing allvalidation rule group records.Inputs: Optional ByValblnIncludeNone As Boolean = False,Optional ByVal blnReadOnly AsBoolean = False, Optional ByValblnSQLOnly As Boolean = False,Optional ByVal lngMarshalType AsInteger = 0
Output: ADODB.Recordset
SQL Class (clsSQL)
fdmAPI.API.DataWindow.SQL.API Call
Table 7-11 SQL Class (clsSQL)
API Call Methods/Properties/ObjectReference
Description
fGetAppID Method Return the application ID for theLoad ID passed in.Inputs: ByVal strLoadID As String
Output: String
fGetLanguageCode Method Returns the language code.Inputs: ByVal AppID As String
Output: String
fGetTopLevelDirectory Method Return top level directory.Inputs: ByVal AppID As String
Output: String
Chapter 7Using Visual Basic API and Samples
7-58

Table 7-11 (Cont.) SQL Class (clsSQL)
API Call Methods/Properties/ObjectReference
Description
fOptionLIstForKey Method Returns a recordset containing onerecord with values for the specifiedoption name.Inputs: ByVal strOptionName AsString, Optional ByVal blnReadOnlyAs Boolean = False, Optional ByValblnSQLOnly As Boolean = False,Optional ByVal lngMarshalType AsInteger = 0, Optional ByValblnTranslateCaptions As Boolean =False
Output: ADODB.Recordset
DB Tools Class (clsDBTools)
fdmAPI.API.DataWindow.DBTools.API Call
Table 7-12 DB Tools Class (clsDBTools)
API Call Methods/Properties/ObjectReference
Description
fGlobalOptionExists Method Determine when the global systemoption exists.Inputs: ByVal strOptionName AsString
Output: Boolean
fGlobalOptionGet Method Retrieve a global system option as astring containing the current value ofthe option.Inputs: ByVal strOptionName AsString
Output: String
mLog Method Write an entry to the databaseactivity log (AIF_PROCESS_LOGStable).Inputs: ByVal intProcessID AsInteger, ByVal strEntityType AsString, ByVal strEntityName AsString, ByVal intLogSequence AsInteger, ByVal strLogMessage AsString
Output: None
Chapter 7Using Visual Basic API and Samples
7-59
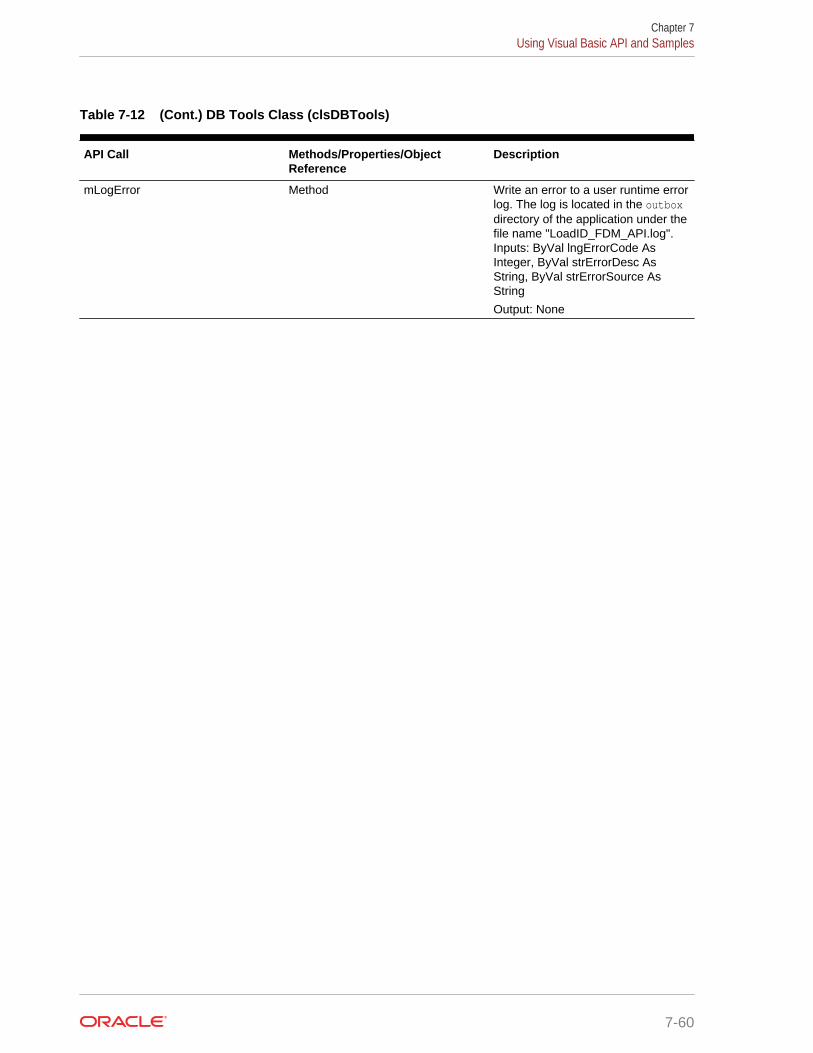
Table 7-12 (Cont.) DB Tools Class (clsDBTools)
API Call Methods/Properties/ObjectReference
Description
mLogError Method Write an error to a user runtime errorlog. The log is located in the outboxdirectory of the application under thefile name "LoadID_FDM_API.log".Inputs: ByVal lngErrorCode AsInteger, ByVal strErrorDesc AsString, ByVal strErrorSource AsString
Output: None
Chapter 7Using Visual Basic API and Samples
7-60

Maintenance Manager Class (clsMaintenanceMgr)
fdmAPI.API.MaintenanceMgr.API Call
Table 7-13 Maintenance Manager Class (clsMaintenanceMgr)
API Call Methods/Properties/ObjectReference
Description
fProcessStatus Method Retrieve the current workflowprocess status for the specified POVvalues. The process status isreturned as a COM object of the type"objProcessStatus". The best way todetermine the current status is tocheck the lngStatus property of thereturn object, which contains a valuethat can be checked against theenumeration "enmProcessState".Inputs: ByVal strLoc As String, ByValstrCat As String, ByVal strPer AsString, ByVal strRuleID As String
Output: objProcessStatus object
objProcessStatus Properties:• strLoc• strCat• strPer• blnImp• strImp• blnTBVal• strTBVal• blnExp• strExp• blnEntLoad• strEntLoad• blnEntVal• strEntVal• lngStatus• dteLastActive• blnCert• strCert• blnAsses• strAsses• blnChildDone• strChildDone• blnUD1• strUD1• blnUD2• strUD2• blnUD3• strUD3• blnUD4• strUD4• blnValDirty
Chapter 7Using Visual Basic API and Samples
7-61

Table 7-13 (Cont.) Maintenance Manager Class (clsMaintenanceMgr)
API Call Methods/Properties/ObjectReference
Description
• blnWCDirty• blnLogicDirty• intLockState
POV Manager Class (clsPOVMgr)
fdmAPI.API.POVMgr.API Call
Table 7-14 POV Manager Class (clsPOVMgr)
API Call Methods/Properties/ObjectReferences
Description
fCategoryKey Method Return the numerical category keyfor the specified category name.Inputs: ByVal strCat As String
Output: Integer
fCategoryName Method Return the text name of a categoryfor the specified category key.Inputs: ByVal lngCatKey As Integer
Output: String
fCheckLocParent Method Check when the requested locationis assigned as the MAPPING parentto any other location.Inputs: ByVal strLoc As String
Output: Boolean
Chapter 7Using Visual Basic API and Samples
7-62

Table 7-14 (Cont.) POV Manager Class (clsPOVMgr)
API Call Methods/Properties/ObjectReferences
Description
fCheckLocProf Method Return all behavior attributes for thespecified location as a COM object oftype "objLocProfile". This object alsocontains the key information of thelocation and the data segmentassignment.Inputs: ByVal strLoc As String
Output: objLocProfileobjLocProfile Properties:
• blnAdapterImport• blnChild• blnExists• blnScriptImport• blnSeq• lngControlsType• lngLocKey• lngParentLocKey• lngRedFlagLevel• lngSegKey• lngType• strAdaptor• strCLogicGrp• strControlsApprover• strControlsApproverProxy• strControlsGrp1• strControlsGrp2• strControlsParent• strCurrency• strDataValue• strImportGrp• strIntgConfig1• strIntgConfig2• strIntgConfig3• strIntgConfig4• strLogicGrp• strNotes• strParent• strValEntityGrp• strValRuleGrp
fGetLocationName Method Return the text name of a locationbased on its numeric key.Inputs: ByVal lngPartKey As Integer
Output: String
Chapter 7Using Visual Basic API and Samples
7-63

Table 7-14 (Cont.) POV Manager Class (clsPOVMgr)
API Call Methods/Properties/ObjectReferences
Description
fPeriodKey Method Return attributes associated with thespecified period value as a COMobject of type "objPeriod". Use thisprocedure to return the prior periodof a location by setting the optionalparameter "blnPriorPer" to true. Bydefault the procedure returns thetarget period associated with the 'M'or 'Monthly' frequency, but theoptional parameter "strFreq" can beused to retrieve a target valueassociated with a different frequency.Inputs: ByVal strPer As String,Optional ByVal blnPriorPer AsBoolean = False, Optional ByValstrFreq As String = ""
Output: objPeriodobjPeriod Properties:
• dblSerialKey• dteDateKey• strDateKey• strSerialKey• strTarget• strTargetYear
State Class (clsState)
API State
Table 7-15 State Class (clsState)
API Call Methods/Properties/ObjectReference
Description
AppID Property Returns the Application ID for theLoadID
bstMaintenanceMgr Object Reference Reference to the clsMaintenanceMgrclass
bstSQLMgr Object Reference Reference to the clsSQLMgr class
CatKey Property Returns the Category Key for theLoadID.
CatName Property Returns the Category Name for theLoadID.
DataValue Property Returns the DataValue assigned tothe Location for the LoadID.
dstConnection Object Reference Reference to the clsConnection class
dstDataAccess Object Reference Reference to the clsDataAccessclass
Chapter 7Using Visual Basic API and Samples
7-64

Table 7-15 (Cont.) State Class (clsState)
API Call Methods/Properties/ObjectReference
Description
dstDataManipulation Object Reference Reference to theclsDataManipulation class
dstDBTools Object Reference Reference to the clsDBTools class
dstSQL Object Reference Reference to the clsSQL class
dstUtilities Object Reference Reference to the clsUtilities class
EndPeriodKey Property Returns the End Period for theLoadID.
ExportFlag Property Returns Y or N. If the Data Rule isexecuted with Export checked, thisproperty returns Y.
ExportMode Property Returns Y or N. If ExportFlag is Y,this property returns the selectedmode for Export (Replace orAppend). Otherwise, it returns anempty string.
FileDir Property Returns the FILE_PATH field fromthe AIF_BAL_RULE_LOADS table.
FileName Property Returns a string containing the nameof the file that was imported.
GstrDateMask Property Returns the date mask.
ImportFlag Property Returns theIMPORT_FROM_SOURCE_FLAGfrom the AIF_BAL_RULE_LOADStable. If LoadID initiates the ImportProcess, this flag is set to Y.Otherwise it is set to F.
ImportFormat Property Returns the Import Format used forthe Load ID being processed.
ImportMode Property Returns REPLACE or APPENDbased on the LoadID. This propertyreturns null if the LoadID did notImport data (that is, Validate only).
LoadID Property Returns the Load ID.
LocKey Property Returns the Location Key for theLocation being processed for theLoadID.
LocName Property Returns the Location Name for thelocation being processed for theLoadID.
MultiPeriodLoad Property Returns True or False. This propertyis True if multiple periods are beingprocessed. Otherwise, returns False.
PeriodKey Property Returns the Period Key for theLoadID.
RuleID Property Returns the Rule ID for the DataRule being processed.
RuleName Property Returns the Rule Name for the DataRule being processed.
Chapter 7Using Visual Basic API and Samples
7-65
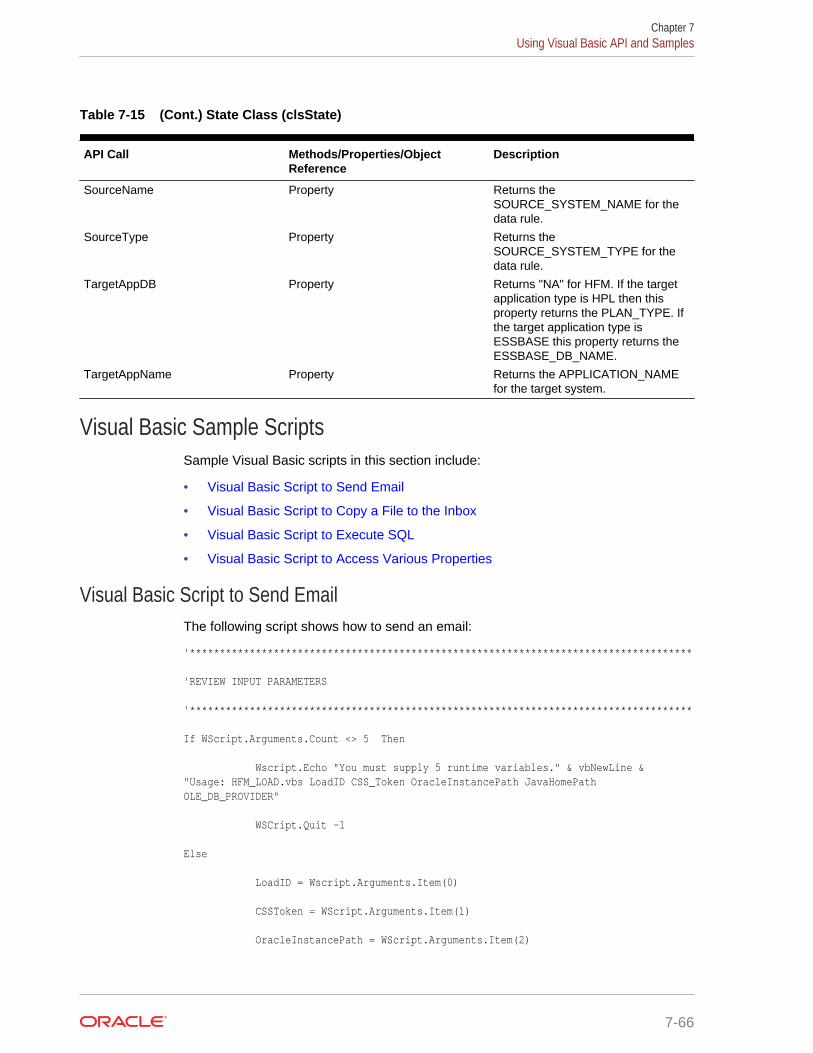
Table 7-15 (Cont.) State Class (clsState)
API Call Methods/Properties/ObjectReference
Description
SourceName Property Returns theSOURCE_SYSTEM_NAME for thedata rule.
SourceType Property Returns theSOURCE_SYSTEM_TYPE for thedata rule.
TargetAppDB Property Returns "NA" for HFM. If the targetapplication type is HPL then thisproperty returns the PLAN_TYPE. Ifthe target application type isESSBASE this property returns theESSBASE_DB_NAME.
TargetAppName Property Returns the APPLICATION_NAMEfor the target system.
Visual Basic Sample ScriptsSample Visual Basic scripts in this section include:
• Visual Basic Script to Send Email
• Visual Basic Script to Copy a File to the Inbox
• Visual Basic Script to Execute SQL
• Visual Basic Script to Access Various Properties
Visual Basic Script to Send EmailThe following script shows how to send an email:
'************************************************************************************
'REVIEW INPUT PARAMETERS
'************************************************************************************
If WScript.Arguments.Count <> 5 Then
Wscript.Echo "You must supply 5 runtime variables." & vbNewLine & "Usage: HFM_LOAD.vbs LoadID CSS_Token OracleInstancePath JavaHomePath OLE_DB_PROVIDER"
WSCript.Quit -1
Else
LoadID = Wscript.Arguments.Item(0)
CSSToken = WScript.Arguments.Item(1)
OracleInstancePath = WScript.Arguments.Item(2)
Chapter 7Using Visual Basic API and Samples
7-66
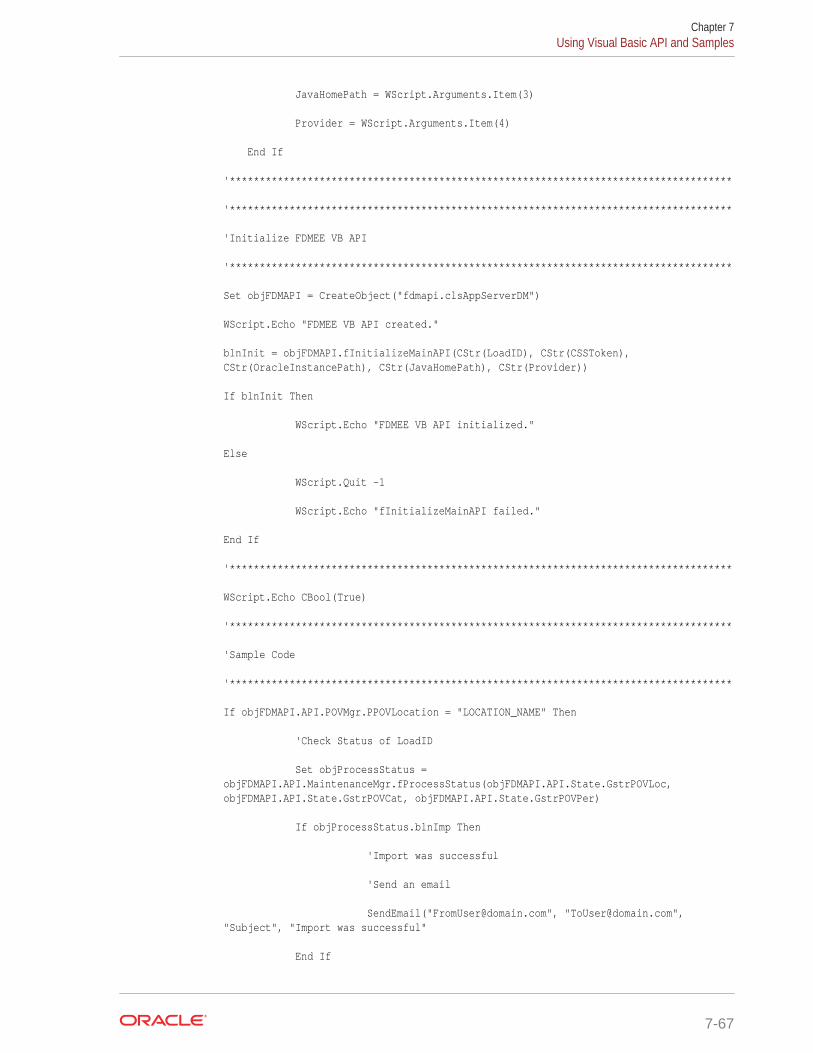
JavaHomePath = WScript.Arguments.Item(3)
Provider = WScript.Arguments.Item(4)
End If
'************************************************************************************
'************************************************************************************
'Initialize FDMEE VB API
'************************************************************************************
Set objFDMAPI = CreateObject("fdmapi.clsAppServerDM")
WScript.Echo "FDMEE VB API created."
blnInit = objFDMAPI.fInitializeMainAPI(CStr(LoadID), CStr(CSSToken), CStr(OracleInstancePath), CStr(JavaHomePath), CStr(Provider))
If blnInit Then
WScript.Echo "FDMEE VB API initialized."
Else
WScript.Quit -1
WScript.Echo "fInitializeMainAPI failed."
End If
'************************************************************************************
WScript.Echo CBool(True)
'************************************************************************************
'Sample Code
'************************************************************************************
If objFDMAPI.API.POVMgr.PPOVLocation = "LOCATION_NAME" Then
'Check Status of LoadID
Set objProcessStatus = objFDMAPI.API.MaintenanceMgr.fProcessStatus(objFDMAPI.API.State.GstrPOVLoc, objFDMAPI.API.State.GstrPOVCat, objFDMAPI.API.State.GstrPOVPer)
If objProcessStatus.blnImp Then
'Import was successful
'Send an email
SendEmail("[email protected]", "[email protected]", "Subject", "Import was successful"
End If
Chapter 7Using Visual Basic API and Samples
7-67

End If
'************************************************************************************
'************************************************************************************
'Destroy objects
'************************************************************************************
objFDMAPI.Dispose
Set objFDMAPI = Nothing
'************************************************************************************
Sub SendEmail(strFromAddress, strToAddress, strSubject,strEmailMsgLine)
'Declare local variables
Dim strFromAddress
Dim strToAddress
Dim strSubject
Dim strEmailMsgLine
Dim objMsg
Dim objConfig
Dim intSendUsing
Dim strSMTPServer
Dim intSendPort
'Initialize Mail Server variables
'SMTP server name
strSMTPServer = "YourMailServer"
'CdoSendUsing enumeration-1=use smtp on local machine, 2=use smtp over network
intSendUsing = 2
'SMTP port on server
intSMTPPort = 25
'Create CDO configuration object
Set objConfig = CreateObject("CDO.Configuration")
'Set Config object settings
With objConfig.Fields
Chapter 7Using Visual Basic API and Samples
7-68
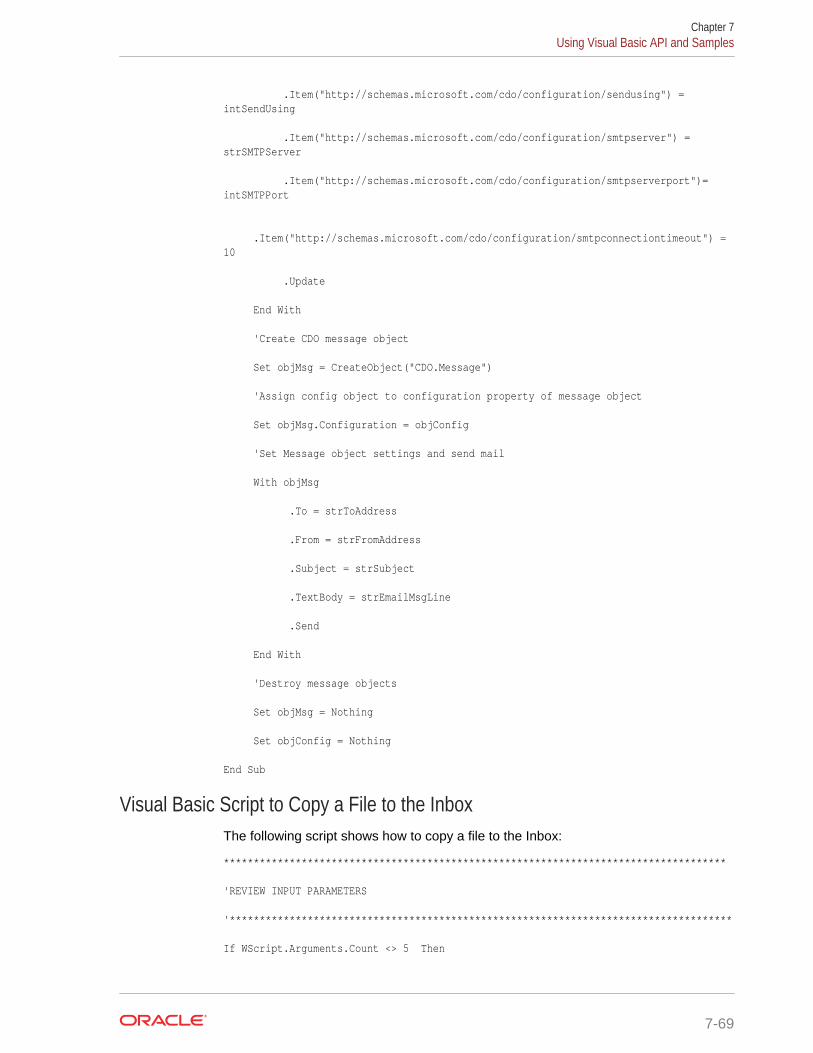
.Item("http://schemas.microsoft.com/cdo/configuration/sendusing") = intSendUsing
.Item("http://schemas.microsoft.com/cdo/configuration/smtpserver") = strSMTPServer
.Item("http://schemas.microsoft.com/cdo/configuration/smtpserverport")= intSMTPPort
.Item("http://schemas.microsoft.com/cdo/configuration/smtpconnectiontimeout") = 10
.Update
End With
'Create CDO message object
Set objMsg = CreateObject("CDO.Message")
'Assign config object to configuration property of message object
Set objMsg.Configuration = objConfig
'Set Message object settings and send mail
With objMsg
.To = strToAddress
.From = strFromAddress
.Subject = strSubject
.TextBody = strEmailMsgLine
.Send
End With
'Destroy message objects
Set objMsg = Nothing
Set objConfig = Nothing
End Sub
Visual Basic Script to Copy a File to the InboxThe following script shows how to copy a file to the Inbox:
************************************************************************************
'REVIEW INPUT PARAMETERS
'************************************************************************************
If WScript.Arguments.Count <> 5 Then
Chapter 7Using Visual Basic API and Samples
7-69

Wscript.Echo "You must supply 5 runtime variables." & vbNewLine & "Usage: HFM_LOAD.vbs LoadID CSS_Token OracleInstancePath JavaHomePath OLE_DB_PROVIDER"
WSCript.Quit -1
Else
LoadID = Wscript.Arguments.Item(0)
CSSToken = WScript.Arguments.Item(1)
OracleInstancePath = WScript.Arguments.Item(2)
JavaHomePath = WScript.Arguments.Item(3)
Provider = WScript.Arguments.Item(4)
End If
'************************************************************************************
'************************************************************************************
'Initialize FDMEE VB API
'************************************************************************************
Set objFDMAPI = CreateObject("fdmapi.clsAppServerDM")
WScript.Echo "FDMEE VB API created."
blnInit = objFDMAPI.fInitializeMainAPI(CStr(LoadID), CStr(CSSToken), CStr(OracleInstancePath), CStr(JavaHomePath), CStr(Provider))
If blnInit Then
WScript.Echo "FDMEE VB API initialized."
Else
WScript.Quit -1
WScript.Echo "fInitializeMainAPI failed."
End If
'************************************************************************************
'************************************************************************************
'Sample Code
'************************************************************************************
If objFDMAPI.API.State.LocName = "MT_COMMA7" Then
************************************************************************************
'Copy file to Inbox
Chapter 7Using Visual Basic API and Samples
7-70
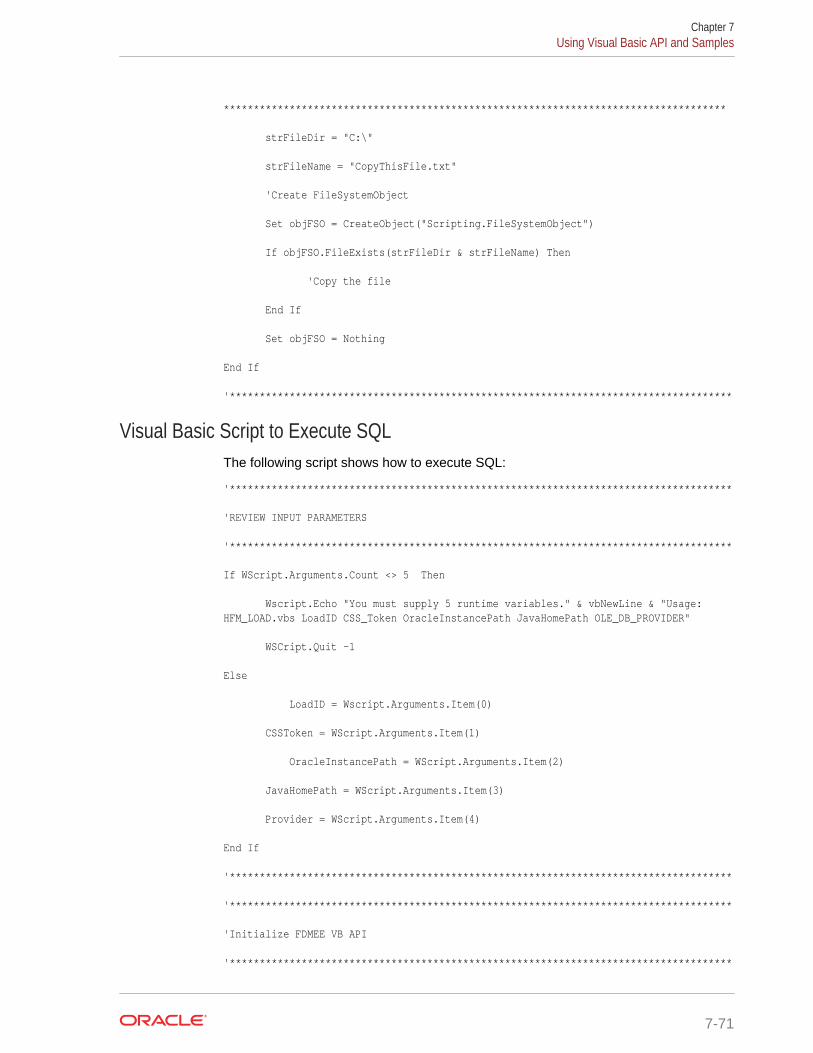
************************************************************************************
strFileDir = "C:\"
strFileName = "CopyThisFile.txt"
'Create FileSystemObject
Set objFSO = CreateObject("Scripting.FileSystemObject")
If objFSO.FileExists(strFileDir & strFileName) Then
'Copy the file
End If
Set objFSO = Nothing
End If
'************************************************************************************
Visual Basic Script to Execute SQLThe following script shows how to execute SQL:
'************************************************************************************
'REVIEW INPUT PARAMETERS
'************************************************************************************
If WScript.Arguments.Count <> 5 Then
Wscript.Echo "You must supply 5 runtime variables." & vbNewLine & "Usage: HFM_LOAD.vbs LoadID CSS_Token OracleInstancePath JavaHomePath OLE_DB_PROVIDER"
WSCript.Quit -1
Else
LoadID = Wscript.Arguments.Item(0)
CSSToken = WScript.Arguments.Item(1)
OracleInstancePath = WScript.Arguments.Item(2)
JavaHomePath = WScript.Arguments.Item(3)
Provider = WScript.Arguments.Item(4)
End If
'************************************************************************************
'************************************************************************************
'Initialize FDMEE VB API
'************************************************************************************
Chapter 7Using Visual Basic API and Samples
7-71
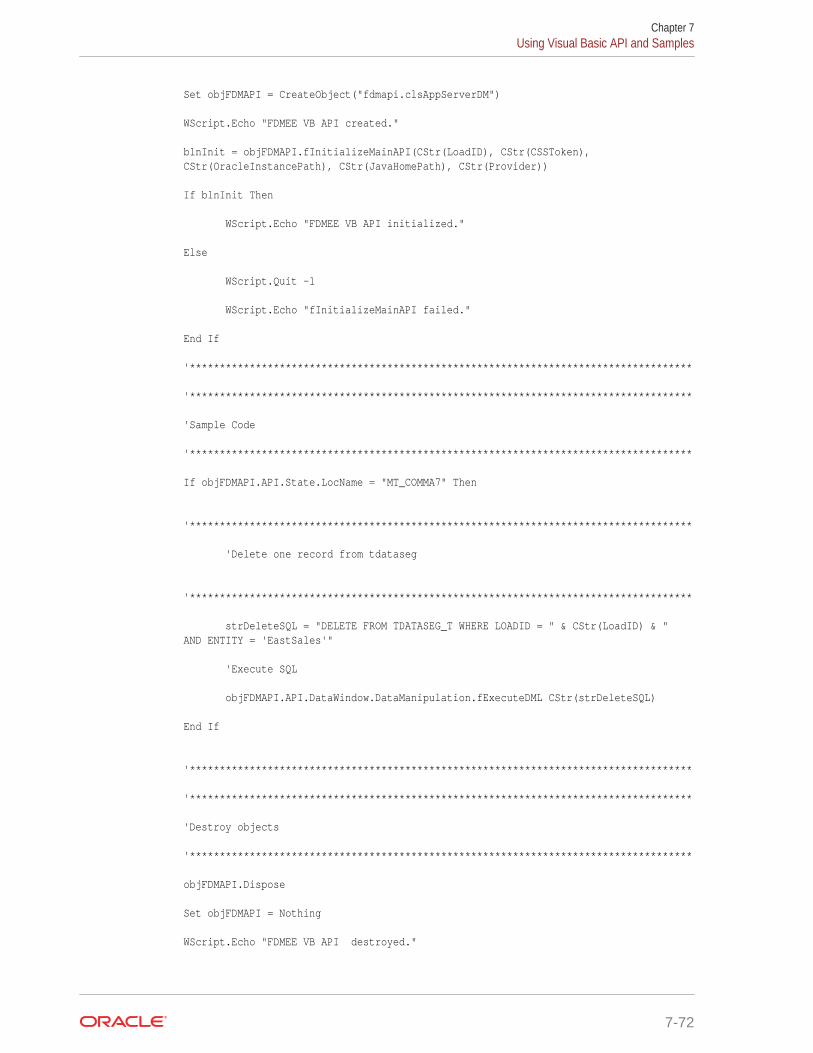
Set objFDMAPI = CreateObject("fdmapi.clsAppServerDM")
WScript.Echo "FDMEE VB API created."
blnInit = objFDMAPI.fInitializeMainAPI(CStr(LoadID), CStr(CSSToken), CStr(OracleInstancePath), CStr(JavaHomePath), CStr(Provider))
If blnInit Then
WScript.Echo "FDMEE VB API initialized."
Else
WScript.Quit -1
WScript.Echo "fInitializeMainAPI failed."
End If
'************************************************************************************
'************************************************************************************
'Sample Code
'************************************************************************************
If objFDMAPI.API.State.LocName = "MT_COMMA7" Then
'************************************************************************************
'Delete one record from tdataseg
'************************************************************************************
strDeleteSQL = "DELETE FROM TDATASEG_T WHERE LOADID = " & CStr(LoadID) & " AND ENTITY = 'EastSales'"
'Execute SQL
objFDMAPI.API.DataWindow.DataManipulation.fExecuteDML CStr(strDeleteSQL)
End If
'************************************************************************************
'************************************************************************************
'Destroy objects
'************************************************************************************
objFDMAPI.Dispose
Set objFDMAPI = Nothing
WScript.Echo "FDMEE VB API destroyed."
Chapter 7Using Visual Basic API and Samples
7-72

'************************************************************************************
Visual Basic Script to Access Various PropertiesThe following script shows how to access various properties:
'************************************************************************************
'REVIEW INPUT PARAMETERS
'************************************************************************************
If WScript.Arguments.Count <> 5 Then
Wscript.Echo "You must supply 5 runtime variables." & vbNewLine & "Usage: HFM_LOAD.vbs LoadID CSS_Token OracleInstancePath JavaHomePath OLE_DB_PROVIDER"
WSCript.Quit -1
Else
LoadID = Wscript.Arguments.Item(0)
CSSToken = WScript.Arguments.Item(1)
OracleInstancePath = WScript.Arguments.Item(2)
JavaHomePath = WScript.Arguments.Item(3)
Provider = WScript.Arguments.Item(4)
End If
'************************************************************************************
'************************************************************************************
'Initialize FDMEE VB API
'************************************************************************************
Set objFDMAPI = CreateObject("fdmapi.clsAppServerDM")
WScript.Echo "FDMEE VB API created."
blnInit = objFDMAPI.fInitializeMainAPI(CStr(LoadID), CStr(CSSToken), CStr(OracleInstancePath), CStr(JavaHomePath), CStr(Provider))
If blnInit Then
WScript.Echo "FDMEE VB API initialized."
Else
WScript.Quit -1
WScript.Echo "fInitializeMainAPI failed."
End If
'************************************************************************************
Chapter 7Using Visual Basic API and Samples
7-73

'************************************************************************************
'Sample Code
'************************************************************************************
WScript.Echo "AppID = " & objFDMAPI.API.State.AppID
WScript.Echo "CatKey = " & objFDMAPI.API.State.CatKey
WScript.Echo "CatName = " & objFDMAPI.API.State.CatName
WScript.Echo "DataValue = " & objFDMAPI.API.State.DataValue
WScript.Echo "EndPeriodKey = " & objFDMAPI.API.State.EndPeriodKey
'Need to test this during Export process
WScript.Echo "ExportFlag = " & objFDMAPI.API.State.ExportFlag
WScript.Echo "ExportMode = " & objFDMAPI.API.State.ExportMode
WScript.Echo "FileDir = " & objFDMAPI.API.State.FileDir
WScript.Echo "FileName = " & objFDMAPI.API.State.FileName
'WScript.Echo "GblnPOVLocal = " & objFDMAPI.API.State.GblnPOVLocal
WScript.Echo "GdtePOVPerKey = " & objFDMAPI.API.State.GdtePOVPerKey
WScript.Echo "GlngPOVCatKey = " & objFDMAPI.API.State.GlngPOVCatKey
WScript.Echo "GlngPOVLocKey = " & objFDMAPI.API.State.GlngPOVLocKey
WScript.Echo "GlngPOVLocType = " & objFDMAPI.API.State.GlngPOVLocType
WScript.Echo "GstrDateMask = " & objFDMAPI.API.State.GstrDateMask
WScript.Echo "GstrMethodID = " & objFDMAPI.API.State.GstrMethodID
WScript.Echo "GstrMsg = " & objFDMAPI.API.State.GstrMsg
WScript.Echo "GstrPOVCat = " & objFDMAPI.API.State.GstrPOVCat
WScript.Echo "GstrPOVLoc = " & objFDMAPI.API.State.GstrPOVLoc
WScript.Echo "GstrPOVPer = " & objFDMAPI.API.State.GstrPOVPer
WScript.Echo "ImportFlag = " & objFDMAPI.API.State.ImportFlag
WScript.Echo "ImportFormat = " & objFDMAPI.API.State.ImportFormat
WScript.Echo "ImportMode = " & objFDMAPI.API.State.ImportMode
WScript.Echo "LoadID = " & objFDMAPI.API.State.LoadID
WScript.Echo "LocKey = " & objFDMAPI.API.State.LocKey
WScript.Echo "LocName = " & objFDMAPI.API.State.LocName
WScript.Echo "MultiPeriodLoad = " & objFDMAPI.API.State.MultiPeriodLoad
Chapter 7Using Visual Basic API and Samples
7-74
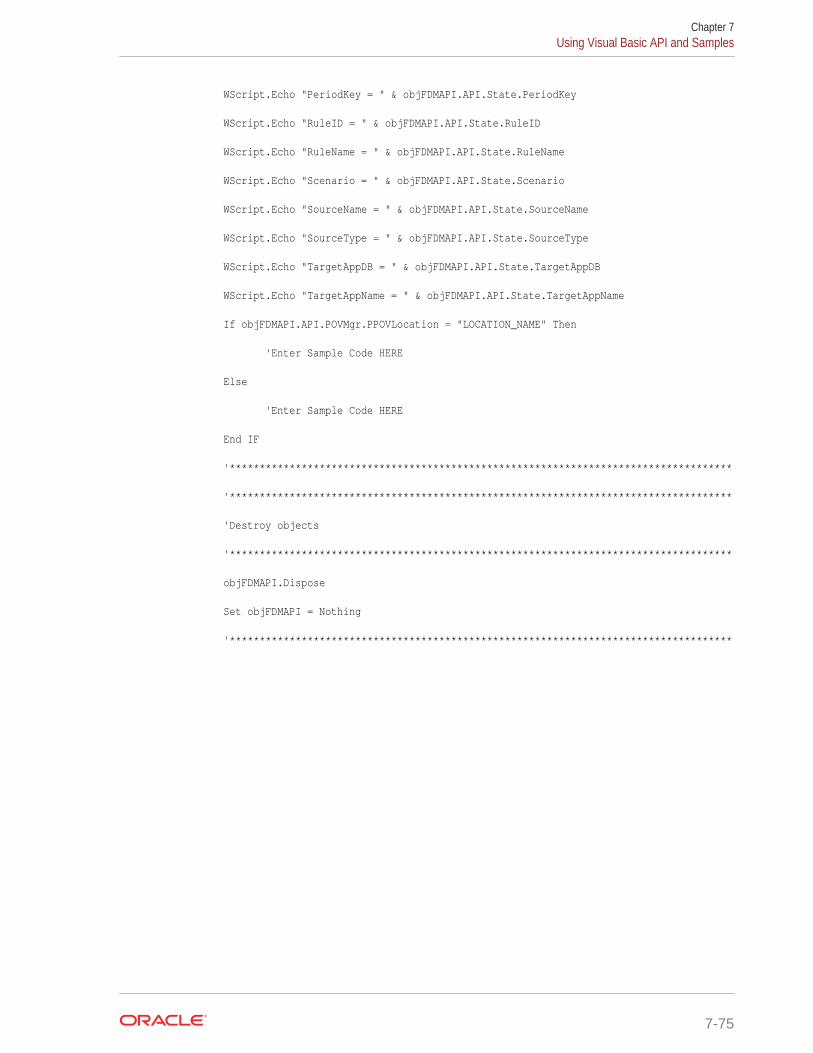
WScript.Echo "PeriodKey = " & objFDMAPI.API.State.PeriodKey
WScript.Echo "RuleID = " & objFDMAPI.API.State.RuleID
WScript.Echo "RuleName = " & objFDMAPI.API.State.RuleName
WScript.Echo "Scenario = " & objFDMAPI.API.State.Scenario
WScript.Echo "SourceName = " & objFDMAPI.API.State.SourceName
WScript.Echo "SourceType = " & objFDMAPI.API.State.SourceType
WScript.Echo "TargetAppDB = " & objFDMAPI.API.State.TargetAppDB
WScript.Echo "TargetAppName = " & objFDMAPI.API.State.TargetAppName
If objFDMAPI.API.POVMgr.PPOVLocation = "LOCATION_NAME" Then
'Enter Sample Code HERE
Else
'Enter Sample Code HERE
End IF
'************************************************************************************
'************************************************************************************
'Destroy objects
'************************************************************************************
objFDMAPI.Dispose
Set objFDMAPI = Nothing
'************************************************************************************
Chapter 7Using Visual Basic API and Samples
7-75

8FDMEE Reports
Oracle Hyperion Financial Data Quality Management, Enterprise Edition providesprebuilt reporting tools that capture business-critical operations and revenue-generating activities within your organization. These reports provide key information onhow metadata and data are integrated from the source to the target.
The FDMEE reporting framework represents a unified solution that incorporatessource and target data, templates, and user-defined SQL queries. Templates, createdin Oracle Business Intelligence Publisher, consume data in XML format and generatereports dynamically. You can add SQL queries to extract data from tables, or couplethem with the report parameters to extend the definition of a standard report.
The FDMEE reporting framework has the following components:
FDMEE reports can be generated as PDF, Excel, Word, or HTML output.
• Query Definition
• Report Group
• Report Definition
• Report Execution
FDMEE ReportsThe standard Oracle Hyperion Financial Data Quality Management, Enterprise Editionreport groups are described below. For information on the subcategories of eachreport, see FDMEE Detail Reports.
8-1

Working with Query DefinitionsTwo types of SQL queries can be used in a report definition: a base query and aparameter query.
A base query enables users to pull data from various tables and display the data asreport output. The base extends the definition of a standard report, and can be reusedwith multiple reports. For example, using one query definition, you can show differentcolumns or groupings. In one report, you can list amounts by account and group byentity, and in another list amount by entity and group by account.
The parameter SQL query enables you to run a query against the parameters in thereport definition. For example, use the query to select the Location, Period, Category,or Account.
For information on the tables and joins you can use to build your SQL queries, see TDATASEG Table Reference and TLOGPROCESS Table Reference in Appendix G.The TDATASEG table is used to store the data loaded by the user, the transformationbetween the source dimension members, and the results of the mapping process. TheTLOGPROCESS table is used to store the workflow process status for a location,category, and period.
You can save a query definition as an XML file, which, in turn, you can use to createcustom templates using Oracle Business Intelligence Publisher or the BI Publisherdesktop addin for Microsoft Word.
To add a query definition:
1. On the Setup tab, under Reports, select Query Definition.
2. In Query Definition, click Add.
3. In Name, enter the name of the query definition.
Chapter 8Working with Query Definitions
8-2

Oracle recommends that you assign a name that corresponds to the reportdefinition in which the SQL is embedded.
4. In Select Clause, specify the SQL Select clause used to query the database andreturn the data that corresponds to your selected criteria.
5. In Where Clause, specify the SQL Where clause used to restrict the data that isreturned to only the specific criteria that you specify.
6. In Group by/Order by Clause, specify the Group by or Order by clause.
The ORDER BY clause sorts the records in the result set. The ORDER BY clausecan be used only in SQL SELECT statements.
The GROUP BY clause fetches data across multiple records and returns theresults grouped by one or more columns.
7. Click Validate Query.
If the query definition is validated, Oracle Hyperion Financial Data QualityManagement, Enterprise Edition returns the message: "Query validationsuccessful."
If the query definition is not validated, FDMEE indicates that an error was found inthe SQL. You must fix the error before validating the query again.
8. Click Save.
9. Optional: To save the query definition to an XML file, click Generate XML.
Working with Report DefinitionsReport definitions are the attributes that determine the content and structure of areport. Using the Report Definition option, you can:
• Associate a report to a Report Group.
• Associate a query definition with the report.
• Associate a Rich Text Format template (RTF) with the report.
• Define report parameters.
Adding Report GroupsReport groups enable you to assemble similar types of reports into one category forease of use.
To add a report group:
1. On the Setup tab, under Reports, select Report Definition.
2. In Report Definition, select the Report Group tab.
3. In Report Group, click Add.
4. In the blank Name field, enter the title of the report group.
For example, enter "Base Trial Balance Reports."
5. In Sequence, enter a numeric value that identifies the display order of the reportgroup on the Report Definition screen.
6. Click Save.
Chapter 8Working with Report Definitions
8-3

Working with Report DefinitionsA report definition can include a query definition created in SQL and any RTF templateset up for use with a selected report. Additionally, you can associate a report with thequery definition that prompts the user with a list of values when selecting theparameters of the report.
To add a report definition:
1. On the Setup tab, under Reports, select Report Definition.
2. In Report Definition, select the Reports tab.
The Report tab consists of three regions:
• Summary—Lists all report definitions.
• Details—Shows the report name, associated base query definition, reportgroup, and associated template.
• Parameters—Shows the parameter name and type, display name, sequence,parameter value, and any query definition used to supply a list of values for agiven report parameter.
3. In the summary grid, click Add.
4. In the detail grid, in Name, enter the name of the report definition.
5. In Group, select the report group name associated with the definition.
To search on a report group, click and choose a report group from theSearch and Select: Group screen.
Report groups are created on the Report Group tab. See Adding Report Groups.
6. In Query, select the name of the query definition to associate with the reportdefinition.
To search on a query definition, click and choose a query definition from theSearch and Select: Query screen.
Query definitions are defined in the Query Definition option. See Working withQuery Definitions.
7. In Template, select the RTF template to associate with the report definition.
To search on a template, click and choose a template from the Search andSelect: Template screen.
Oracle Hyperion Financial Data Quality Management, Enterprise Edition reporttemplates are saved with a Rich Text Format (RTF) file type. The RTF file type is aspecification used by common word processing applications, such as MicrosoftWord. The templates available to the FDMEE report are created in OracleBusiness Intelligence Publisher. See the Report Designer's Guide for OracleBusiness Intelligence Publisher. To download the Oracle BI Publisher Desktop forMicrosoft Office, see: Oracle BI Publisher Downloads.
Chapter 8Working with Report Definitions
8-4

Note:
You can view report descriptions and parameters in the language selectedfor your user interface. Language templates are available at: \Oracle\Middleware \EPMSystem11R1\products\FinancialDataQuality\templates foryou to select and associate with a report definition.
To upload a template, click . In Search and Select: Template, click Upload.Then click Browse to navigate to the template to upload and click OK.
8. Click Save.
To define the parameters of the report definition:
1. From the summary grid, select the name of the report definition to which to addparameters.
2. In the detail grid, click Add.
A blank line is displayed to which to add report parameters.
3. In Parameter Name, enter the POV category to which the parameter belongs.
For example, enter POVLOC, for the POV location, POVPeriod for the POV period,POVCAT for POV category, and POVTARGET for the target category.
4. In Type, select the type of parameter for the report.
Available types:
• POV—Prompts for the POV location, period, category or rule. The POV valuesdefault from the users POV when they run the report parameter.
• Query—The Query type enables you to create a query that populates a list ofvalues that a user can select from when running the report. The parametername entered by the user must match a parameter used in the assignedquery. For example, if the parameter name is “California,” a correspondingparameter in the query must be named California. The name in the query musthave a “~” character as a prefix so that the system can parse the querycorrectly.
• Static—A Static type Indicates that the parameter is a constant or a predefinedvalue, and the parameter value is supplied by the user. When the parameter issupplied and the report is executed, the query uses this parameter as part ofthe Select statement.
• Title (indicates the header part of column title)
5. In Display Name, enter the name to display for the parameter on the GenerateReport screen.
Chapter 8Working with Report Definitions
8-5

6. In Parameter Value, enter the value for the "Static" parameter type. For example,if you have an aging report for 30 days, enter 30 in this field.
7. In Sequence, enter the display order of the parameter on the Generate Reportscreen.
8. In Query, specify the query definition that provides a list of values for theparameter. For example, to show a list of data rules for the user to select in theGenerate Report screen, specify the query definition to define these queries.
9. Click Save.
To copy a report:
1. On the Setup tab, under Reports, select Report Definition.
2. In Report Definition, in the Report summary grid, select the report.
3. In the Report summary grid, click Copy Current Report.
The copied report is added to the list of reports. The name of the report takes theoriginal report name appended with "_copy."
Creating a Report TemplateReport templates, created in Oracle Business Intelligence Publisher, consume data inXML format and generate reports dynamically.
To create a report template:
1. Create a query definition for the report.
Chapter 8Working with Report Definitions
8-6

a. On the Setup tab, under Reports, select Query Definition.
b. In Query Definition, click Add.
c. In Name, enter the name of the query definition.
Oracle recommends that you assign a name that corresponds to the reportdefinition in which the SQL is embedded.
d. In Select Clause, specify the SQL Select clause used to query the databaseand return the data that corresponds to your selected criteria.
e. In Where Clause, specify the SQL Where clause used to restrict the data thatis returned to only the specific criteria that you specify.
f. In Group by/Order by Clause, specify the Group by or Order by clause.
The ORDER BY clause sorts the records in the result set. The ORDER BYclause can be used only in SQL SELECT statements.
The GROUP BY clause fetches data across multiple records and returns theresults grouped by one or more columns.
g. Click Validate Query.
If the query definition is validated, Oracle Hyperion Financial Data QualityManagement, Enterprise Edition returns the message: "Query validationsuccessful."
If the query definition is not validated, FDMEE indicates that an error wasfound in the SQL. You must fix the error before validating the query again.
h. Click Save.
2. Click Generate XML.
3. Create the report template.
a. Install the XML Publisher Desktop.
See the Report Designer's Guide for Oracle Business Intelligence Publisher.To download the Oracle BI Publisher Desktop for Microsoft Office, see OracleBI Publisher Downloads.
b. Load the XML created in step 2.
Reference the template builder tutorial as needed.
c. Save the template, and then upload it to the server.
4. Create report definition with group, query and template.
Creating a XLIFF File for Translated Report TemplatesWhen you required to have a translation of the text strings of the template layout, youcan generate an XLIFF (or RTF) file from the report template.
A "translatable string" is any text in the template that is intended for display in thepublished report, such as table headers and field labels. Text supplied at runtime fromthe data is not translatable, nor is any text that you supply in the Microsoft Word formfields. You can translate the template XLIFF file into as many languages as desiredand then associate these translations to the original template.
Chapter 8Working with Report Definitions
8-7

XLIFF is the XML Localization Interchange File Format. It is the standard format usedby localization providers. For more information about the XLIFF specification, see: XLIFF 1.1 Specification.
To create an XLIFF translation file:
1. Open your template in Microsoft Word with the Template Builder for Wordinstalled.
2. From the Template Builder menu, select Tools, then Translations, and thenExtract Text.
BI Publisher extracts the translatable strings from the template and exports themto an XLIFF (.xlf) file.
3. When prompted, save the file as: TemplateName_<language code>.xlf or .rtfwhere:
• TemplateName is the original template name.
• language code is the two-letter ISO language code (use lower casecharacters).
For example, if your original template is named EmployeeTemplate and you areuploading a translation for Japanese-Japan, name the file:EmployeeTemplate_ja.xlf.
For information on including the" territory code" in the file name, see OracleBusiness Intelligence Publisher Report Designer's Guide.
4. In the report Editor, select the Layouts page to upload the translated XLIFF files.
5. Save the file to the language subdirectory of the <EPM_ORACLE_HOME>\Products\FinancialDataQuality\Templates folder.
Running ReportsTo run reports:
1. On the Workflow tab, under Other, select Report Execution.
2. In Report Execution, in Report Groups, select a report group.
3. In Reports, select a report.
To filter the display listing by a report name within a report group, enter the nameof the report in the blank entry line above the Name field and press Enter. Forexample, to view only reports beginning with Account, enter Account and pressEnter.
To filter the display listing by a base query name within a report group, enter thequery name in the blank entry line above Query.
4. Click Execute.
5. When prompted, enter parameter values on the Generate Report screen.
a. If applicable, modify the Period, Category, and Location values.
b. From the Report Output Format, select the output format.
Available output formats are:
Chapter 8Running Reports
8-8

• HTML
• EXCEL (.XLS)
c. From Execution Mode, select the online method of running the report.
The online method processes the report immediately.
d. Optional: To create a report batch script that generates a report when thescripts are executed, click Create Report Script.
e. Click OK.
To create a report script:
1. On the Workflow tab, under Other, select Report Execution.
2. In Report Execution, in Report Groups, select a report group.
3. In Reports, select a report.
To filter the display listing by a report name within a report group, enter the nameof the report in the blank entry line above the Name field and press Enter. Forexample, to view only reports beginning with Account, enter Account and pressEnter.
To filter the display listing by a base query name within a report group, enter thequery name in the blank entry line above Query.
4. Click Create Report Script.
Note:
Make sure that password encryption has been set up before creating areport script. See Using Password Encryption.
5. On the Generate Report Script screen, select the parameter values.
6. In Report Output Format, select the output format of the batch.
7. Click OK.
A Report Batch Script window is displayed showing the parameters of the reportsscript.
Scripts are located in the EPM Oracle Instance/FinancialDataQuality directory.
8. Copy the script that Oracle Hyperion Financial Data Quality Management,Enterprise Edition generates, and on a Window command window or UNIX shell,paste the script, and then run it.
Chapter 8Running Reports
8-9

For example at a Windows command line, specify:
runreport.bat <username><password> "Check Report With Warnings" "Category=Actual" "Period=March-05" "Location=PKA_TEST" "Report Output Format=PDF"
Note:
When passing program arguments for a batch file execution, Jythonremoves double quotes (“) unless arguments have a leading space in them.Jython uses double quotes for escaping. To avoid conflicts, add a leadingspace in the argument. For example, instead of passing“Period=Mar-2003”, pass “ Period=Mar-2003”.
Note:
You can use a file with an encrypted password when executing reportsfrom batch report scripts, for example, runreport.bat <username><password>file…
FDMEE Detail ReportsThe following reports are available in Oracle Hyperion Financial Data QualityManagement, Enterprise Edition.
Audit ReportsAn audit report displays all transactions for all locations that compose the balance of atarget account. The data returned in this report depends on the location securityassigned to the user.
Account Chase Wildcard (TargAcct, Per, Cat)Shows imported accounts for all Oracle Hyperion Financial Data Quality Management,Enterprise Edition locations, subtotaled by FDMEE location, based on an accountselection that enables use of wildcards.
Runs for
All FDMEE locations
Parameters
Target account, Period, Category
Query
Account Chase Wildcard
Chapter 8FDMEE Detail Reports
8-10
Template
Account Chase WildCard.rtf
Account Chase - Freeform (TargAcct, Per, Cat)Shows one imported account for all Oracle Hyperion Financial Data QualityManagement, Enterprise Edition locations; subtotaled by FDMEE location.
Runs for
All FDMEE locations
Parameters
Target account, Period, Category
Query
Account Chase Freeform
Template
Account Chase Free Form.rtf
Map Monitor for LocationDisplays a list of mapping changes, additions, and deletions made for a location basedon a date range. Shows the user name, and the time and date of the change.
Note:
The Map Monitor reports do not capture historical data earlier than release11.1.2.4.100.
Map Monitor reports are enabled only if the Enable Map Audit is set to "Yes" inSystem Settings.
Map Monitor reports includes data load mappings from:
• Data load mapping option
• Text file imports
• Lifecycle Management imports
• Oracle Data Relationship Management
Runs for
All Oracle Hyperion Financial Data Quality Management, Enterprise Edition locations
Parameters
Location, Start Date, End Date
Chapter 8FDMEE Detail Reports
8-11

Query
Dimension Map Query
Template
Dimension Map for POV.rtf
Map Monitor for UserDisplays a list of mapping changes, additions, and deletions made by a user based ona date range. Report shows the user name, and the time and date of the change.
Note:
The Map Monitor reports do not capture historical data earlier than release11.1.2.4.100.
Map Monitor reports are enabled only if the Enable Map Audit is set to "Yes" inSystem Settings.
Map Monitor reports includes data load mappings from:
• Data load mapping option
• Text file imports
• Oracle Hyperion Enterprise Performance Management System LifecycleManagement imports
• Oracle Data Relationship Management
Runs for
All Oracle Hyperion Financial Data Quality Management, Enterprise Edition locations
Parameters
User name, Start Date, End Date
Query
Dimension Map for POV
Template
Dimension Map for POV.rtf
Intersection Drill Down (Per, Cat)Shows target accounts and amounts; and includes drill-down list of source accountsand amounts that are mapped to target accounts.
Chapter 8FDMEE Detail Reports
8-12

Runs for
Current Oracle Hyperion Financial Data Quality Management, Enterprise Editionlocation
Parameters
Period, Category
Query
Intersection Drill Down Query
Template
Intersection Drill Down.rtf
Check ReportsCheck reports provide information on the issues encountered when data load rules arerun. Note that Check reports return target system values that include aggregation orcalculations from the target system.
Note the following when using check reports:
• When the check report is run and opened from the Workbench, it is not saved tothe Oracle Hyperion Financial Data Quality Management, Enterprise Edition folderon the server.
• When you run a data rule, a check rule report is not generated automatically. Inthis case, run the data rule before executing the check report.
• If you run the report in offline mode, the report is saved to the outbox on theFDMEE server.
• To run a data rule and report in batch mode, run the data load rule from a BAT file,and then the report from a BAT file. In this case, you can put each in the sameBAT file, or call each of them from a BAT file.
Check ReportShows the results of the validation rules for the current location (indicates pass or failstatus).
Runs for
Current Oracle Hyperion Financial Data Quality Management, Enterprise Editionlocation
Parameters
Period, Location and Category
Query
Check Report
Chapter 8FDMEE Detail Reports
8-13

Template
Check Report.rtf
Check Report Period Range (Cat, Start Per, End Per)Shows the results of the validation rules for selected periods.
Runs for
Current Oracle Hyperion Financial Data Quality Management, Enterprise Editionlocation
Parameters
Category, Start Period, End Period
Query
Check Report Within Period Query
Template
Check Report With Period Range.rtf
Check Report With WarningsShows the results of the validation rules for the current location (warnings arerecorded in validation rules).
Runs for
Current Oracle Hyperion Financial Data Quality Management, Enterprise Editionlocation
Parameters
None
Query
Check Report With Warning
Template
Check Report With Warning.rtf
Check Report By Validation Entity Seq.Shows the results of the validation rules for the current location (indicates pass or failstatus); sorted by the sequence defined in the validation entity group.
Runs for
Current Oracle Hyperion Financial Data Quality Management, Enterprise Editionlocation
Chapter 8FDMEE Detail Reports
8-14

Parameters
None
Query
Check Report By Validation Entity
Template
Check Report By Validation Entity Sequence.rtf
Base Trial Balance ReportsThe Trial Balance reports provide detail on how source data is processed in OracleHyperion Financial Data Quality Management, Enterprise Edition. Typically, the TrialBalance is used to display account balances in the General ledger system. As data isloaded from the source General Ledger system to the target EPM application, you canvalidate and compare the balances loaded with the source Trial Balance amounts.
Note:
Before running the base Trial Balance Reports, confirm that the user who runsthe base Trial Balance reports has access to the location associated with thereport. (See Defining Location Security).
TB Current Location, with Targets (Cat, Per)Shows imported source accounts (departments) and their corresponding accounts(entities).
Runs for
Current Oracle Hyperion Financial Data Quality Management, Enterprise Editionlocation
Parameters
Category, Period
Query
Current Trial Balance With Location with Targets
Template
TB Location With Targets.rtf
TB Current Location with Rules (Cat, Per)Shows imported source accounts (departments) and the mapping entity rule (mapwildcard) in which the accounts are included.
Chapter 8FDMEE Detail Reports
8-15

Runs for
Current Oracle Hyperion Financial Data Quality Management, Enterprise Editionlocation
Parameters
Category, Period
Query
TB Location With Query
Template
TB Location with Rules.rtf
TB Current Locations, All Dimensions-Targets, by Target Entity-Account (Cat,Per)
Shows all imported records with all dimensions and their respective targets: groupedby target entity and account.
Runs for
Current Oracle Hyperion Financial Data Quality Management, Enterprise Editionlocation
Parameters
Category, Period
Query
Trial Balance Current Location with Targets
Template
TB/(All Dimensions with Targets) by Target Entity Account.rtf
TB Current Locations, All Dimensions-Targets (Cat, Per)Shows all imported records with all dimensions and their respective targets.
Runs for
Current Oracle Hyperion Financial Data Quality Management, Enterprise Editionlocation
Parameters
Category, Period
Query
Trial Balance Location All Dimension.
Chapter 8FDMEE Detail Reports
8-16

Template
TB with Transaction Currency.rtf
TB Current Location, by Target Acct (Cat, Per)Shows imported accounts: subtotaled by target accounts.
Runs for
Current Oracle Hyperion Financial Data Quality Management, Enterprise Editionlocation
Parameters
Category, Period
Query
Trial Balance Current Location Sorted By Target Account
Template
TB With Target Account.rtf
TB Current Location, By Target Entity Account (Cat, Per)Shows all imported records with all dimensions and their respective targets; groupedby target entity and account.
Runs for
Current Oracle Hyperion Financial Data Quality Management, Enterprise Editionlocation
Parameters
Category, Period
Query
Trial Balance Base Transaction Currency
Template
Base Trial Balance (All Dimensions with Targets).rtf
TB Converted Current Location by Target Entity/AccountShows imported accounts and entities in addition to original and converted accounts:subtotaled by target entity.
Runs for
Current Oracle Hyperion Financial Data Quality Management, Enterprise Editionlocation
Chapter 8FDMEE Detail Reports
8-17
Parameters
Category, Period
Query
Trial Balance Converted by Target Entity/Account Query
Template
TB Converted Current Location by Target Entity Account.rtf
Listing ReportsListing reports summarize metadata and settings (such as the import format, or checkrule) by the current location.
Import Formats by LocationDisplays a list of all import formats; sorted by Oracle Hyperion Financial Data QualityManagement, Enterprise Edition location.
Runs for
N/A
Parameters
None
Query
Import Format By Location
Template
Import Format by Location.rtf
Location ListingShows a list of all mapping rules for a selected period, category, or dimension.
Runs for
Current Oracle Hyperion Financial Data Quality Management, Enterprise Editionlocation
Parameters
Any FDMEE Dimension, Period, Category
Query
Location Listing Query
Chapter 8FDMEE Detail Reports
8-18

Template
Location Listing.rtf
Location AnalysisLocation Analysis reports provide dimension mapping by the current location.
Dimension Map (Dimension)Displays a list of all mapping rules for a selected dimension.
Runs for
Current Oracle Hyperion Financial Data Quality Management, Enterprise Editionlocation
Parameters
Current FDMEE dimension
Query
Dimension Map
Template
Dimension Map.rtf
Dimension Map For POV (Dimension, Cat, Per)Shows a list of all mapping rules for a selected period, category, or dimension.
Runs for
Current Oracle Hyperion Financial Data Quality Management, Enterprise Editionlocation
Parameters
Any FDMEE Dimension, Period, Category
Query
Dimension Map for POV
Template
Dimension Map.rtf
Process Monitor ReportsThe Process Monitor Reports shows locations and their positions within the dataconversion process. You can use the process monitor report to monitor the status ofthe closing process. The report is time-stamped. Therefore, it can be used todetermine to which locations at which time data was loaded.
Chapter 8FDMEE Detail Reports
8-19

Process Monitor (Cat, Per)Shows all locations and their current status (import, validate, export, load, or check).(Locations are displayed alphabetically.)
Runs for
All Oracle Hyperion Financial Data Quality Management, Enterprise Edition locations
Parameters
Category, Period
Query
Process Monitor
Template
Process Monitor.rtf
Process Status Period Range (Cat, Start Per, End Per)Shows a list of all locations and the current load status of each location for each periodof a period range.
Runs for
All Oracle Hyperion Financial Data Quality Management, Enterprise Edition locations,period range
Parameters
Category, Start Period, End Period
Query
PMPeriodRange
TemplatePMPeriodRange.rtf
Process Monitor All Categories (Cat, Per)Shows a list of all locations and the current load status of every location for everycategory.
Runs for
All Oracle Hyperion Financial Data Quality Management, Enterprise Edition categoriesand locations
Parameters
Period
Chapter 8FDMEE Detail Reports
8-20
source
Query
Process Monitor All Categories
Template
Process Monitor All Category.rtf
Variance ReportsThe Variance reports display source and trial balance accounts for one target account,showing data over two periods or categories.
Account Chase VarianceDisplays source input accounts for one target input account, showing variances overtwo periods or categories.
Runs for
All Oracle Hyperion Financial Data Quality Management, Enterprise Edition locations
Parameters
Target Account, Category 1, Period 1, Category 2, Period 2.
Query
Account Chase Variance
Template
Account Chase Variance.rtf
Trial Balance VarianceShows source input accounts, subtotaled by target accounts, showing variances overtwo periods or categories.
Runs for
Current Oracle Hyperion Financial Data Quality Management, Enterprise Editionlocation
Parameters
Category 1, Period 1, Category 2, Period 2
Query
Trial Balance Variance
Template
TB Variance.rtf
Chapter 8FDMEE Detail Reports
8-21
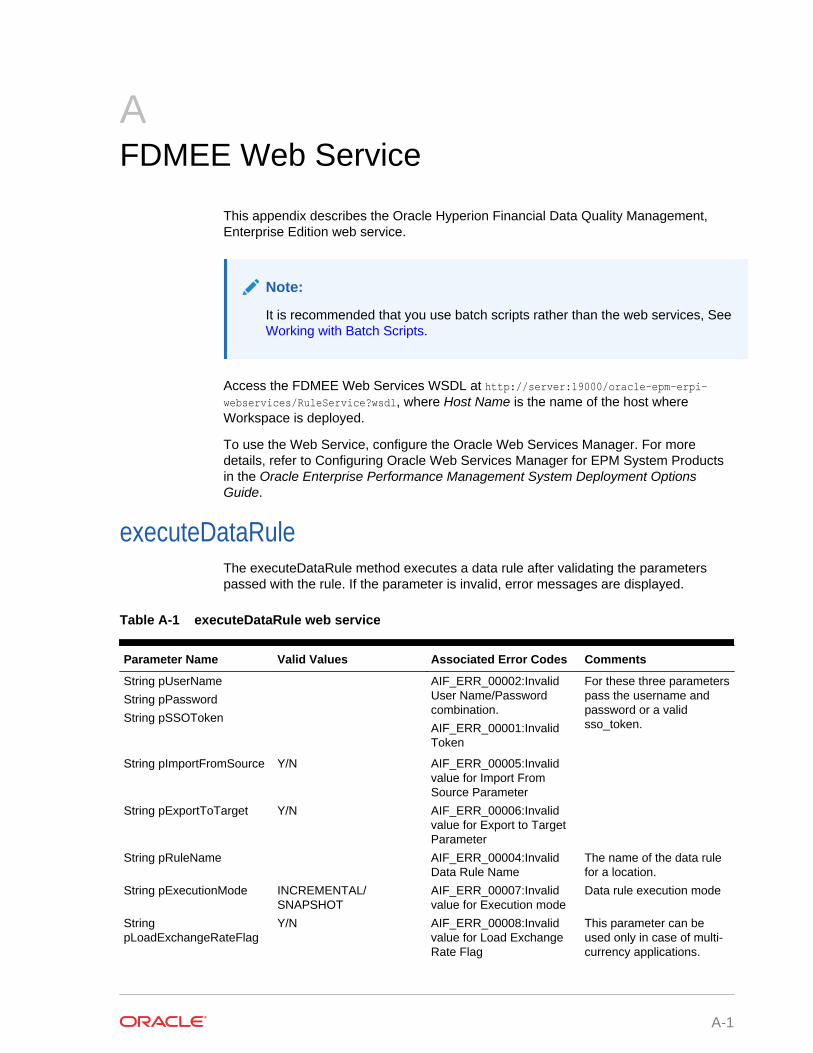
AFDMEE Web Service
This appendix describes the Oracle Hyperion Financial Data Quality Management,Enterprise Edition web service.
Note:
It is recommended that you use batch scripts rather than the web services, See Working with Batch Scripts.
Access the FDMEE Web Services WSDL at http://server:19000/oracle-epm-erpi-webservices/RuleService?wsdl, where Host Name is the name of the host whereWorkspace is deployed.
To use the Web Service, configure the Oracle Web Services Manager. For moredetails, refer to Configuring Oracle Web Services Manager for EPM System Productsin the Oracle Enterprise Performance Management System Deployment OptionsGuide.
executeDataRuleThe executeDataRule method executes a data rule after validating the parameterspassed with the rule. If the parameter is invalid, error messages are displayed.
Table A-1 executeDataRule web service
Parameter Name Valid Values Associated Error Codes Comments
String pUserName
String pPassword
String pSSOToken
AIF_ERR_00002:InvalidUser Name/Passwordcombination.
AIF_ERR_00001:InvalidToken
For these three parameterspass the username andpassword or a validsso_token.
String pImportFromSource Y/N AIF_ERR_00005:Invalidvalue for Import FromSource Parameter
String pExportToTarget Y/N AIF_ERR_00006:Invalidvalue for Export to TargetParameter
String pRuleName AIF_ERR_00004:InvalidData Rule Name
The name of the data rulefor a location.
String pExecutionMode INCREMENTAL/SNAPSHOT
AIF_ERR_00007:Invalidvalue for Execution mode
Data rule execution mode
StringpLoadExchangeRateFlag
Y/N AIF_ERR_00008:Invalidvalue for Load ExchangeRate Flag
This parameter can beused only in case of multi-currency applications.
A-1

Table A-1 (Cont.) executeDataRule web service
Parameter Name Valid Values Associated Error Codes Comments
String pStartPeriodName Start Period name AIF_ERR_00010:InvalidPeriod Keys
String pEndPeriodName End Period name AIF_ERR_00010:InvalidPeriod Keys
String pSyncMode TRUE/FALSE AIF_ERR_00009:Invalidvalue for sync mode
This parameter representswhere the execution shouldtake place synchronouslyor asynchronously. Valueof True executes the jobsynchronously.
executeMetaDataRuleThe executeMetaDataRule method executes a metadata rule after validating thelocationName parameter. If the parameter is invalid, error messages are displayed.
Table A-2 executeMetaDataRule web service
Parameter Name Valid Values Associated Error Codes Comments
String pUserName
String pPassword
String pSSOToken
AIF_COMMON_ERR_00001:Invalid token.
AIF_COMMON_ERR_00002:Invalid User Name/Password combination.
Of these three parameterspass either the usernameand password or a validsso_token.
String locationName AIF_ERR_00015: InvalidLocation Name
The location name
String pSyncMode TRUE/FALSE AIF_ODI_ERR_00002:Invalid value passed forsynchronous modeparameter.
This parameter representswhere the execution shouldtake place synchronouslyor asynchronously. Valueof True executes the jobsynchronously.
getDataRuleNamesThe getDataRuleNames method retrieves a list of data rule names for the location. Ifno location is passed, an empty array is returned.
Appendix AexecuteMetaDataRule
A-2
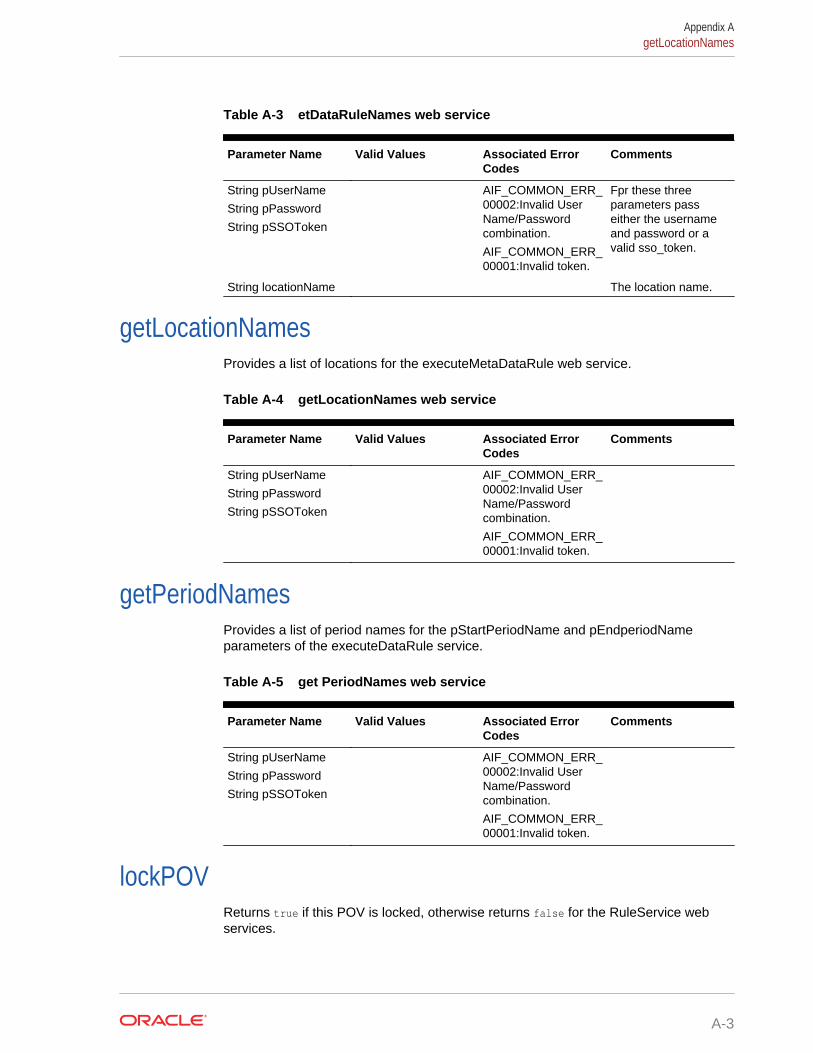
Table A-3 etDataRuleNames web service
Parameter Name Valid Values Associated ErrorCodes
Comments
String pUserName
String pPassword
String pSSOToken
AIF_COMMON_ERR_00002:Invalid UserName/Passwordcombination.
AIF_COMMON_ERR_00001:Invalid token.
Fpr these threeparameters passeither the usernameand password or avalid sso_token.
String locationName The location name.
getLocationNamesProvides a list of locations for the executeMetaDataRule web service.
Table A-4 getLocationNames web service
Parameter Name Valid Values Associated ErrorCodes
Comments
String pUserName
String pPassword
String pSSOToken
AIF_COMMON_ERR_00002:Invalid UserName/Passwordcombination.
AIF_COMMON_ERR_00001:Invalid token.
getPeriodNamesProvides a list of period names for the pStartPeriodName and pEndperiodNameparameters of the executeDataRule service.
Table A-5 get PeriodNames web service
Parameter Name Valid Values Associated ErrorCodes
Comments
String pUserName
String pPassword
String pSSOToken
AIF_COMMON_ERR_00002:Invalid UserName/Passwordcombination.
AIF_COMMON_ERR_00001:Invalid token.
lockPOVReturns true if this POV is locked, otherwise returns false for the RuleService webservices.
Appendix AgetLocationNames
A-3
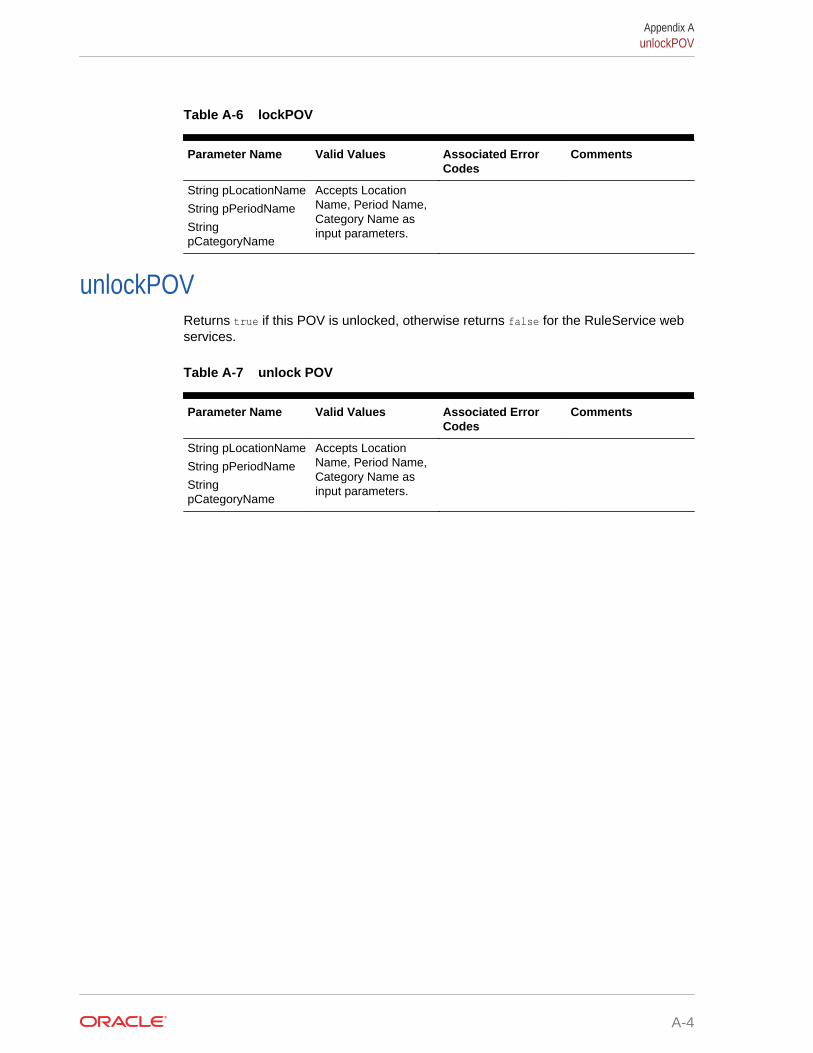
Table A-6 lockPOV
Parameter Name Valid Values Associated ErrorCodes
Comments
String pLocationName
String pPeriodName
StringpCategoryName
Accepts LocationName, Period Name,Category Name asinput parameters.
unlockPOVReturns true if this POV is unlocked, otherwise returns false for the RuleService webservices.
Table A-7 unlock POV
Parameter Name Valid Values Associated ErrorCodes
Comments
String pLocationName
String pPeriodName
StringpCategoryName
Accepts LocationName, Period Name,Category Name asinput parameters.
Appendix AunlockPOV
A-4

BFDMEE REST APIs
Use the Oracle Hyperion Financial Data Quality Management, Enterprise EditionREST (Representational State Transfer) APIs to run data rules, run batches, importand export data mapping, and to execute reports. These APIs provide an alternative tousing the selected components in the web-based user interface.
Completing administrative tasks using FDMEE REST APIs is an alternative to usingthe user interface requires considerable technical and functional expertise. Onlytechnically competent EPM Cloud Administrators and consultants should performFDMEE Administrator administrative tasks.
For more information on using FDMEE and other Oracle Enterprise PerformanceManagement Cloud REST APIs, see the REST API for Oracle Enterprise PerformanceManagement Cloud Guide.
URL Structure for FDMEEURL Structure
Use the following URL structure to access the Oracle Hyperion Financial Data QualityManagement, Enterprise Edition REST resources:
https://<SERVICE_NAME>-<TENANT_NAME>.<dcX>.oraclecloud.com/aif/rest/{api_version}/{path)
Where:
api_version—API version you are developing with. The current REST API version forFDMEE is V1.
path—Identifies the resource
Running Data RulesExecutes an Oracle Hyperion Financial Data Quality Management, Enterprise Editiondata load rule based on the start period and end period, and import or export optionsthat you specify.
Prerequisites
• Data Rules: Data load rules define how Integrations load data from a file. Youmust have predefined data load rules to load data.
• You must have the required privileges to execute a specific data rule.
REST Resource
POST /aif/rest/{api_version}/jobs
Request
Supported Media Types: application/json
B-1
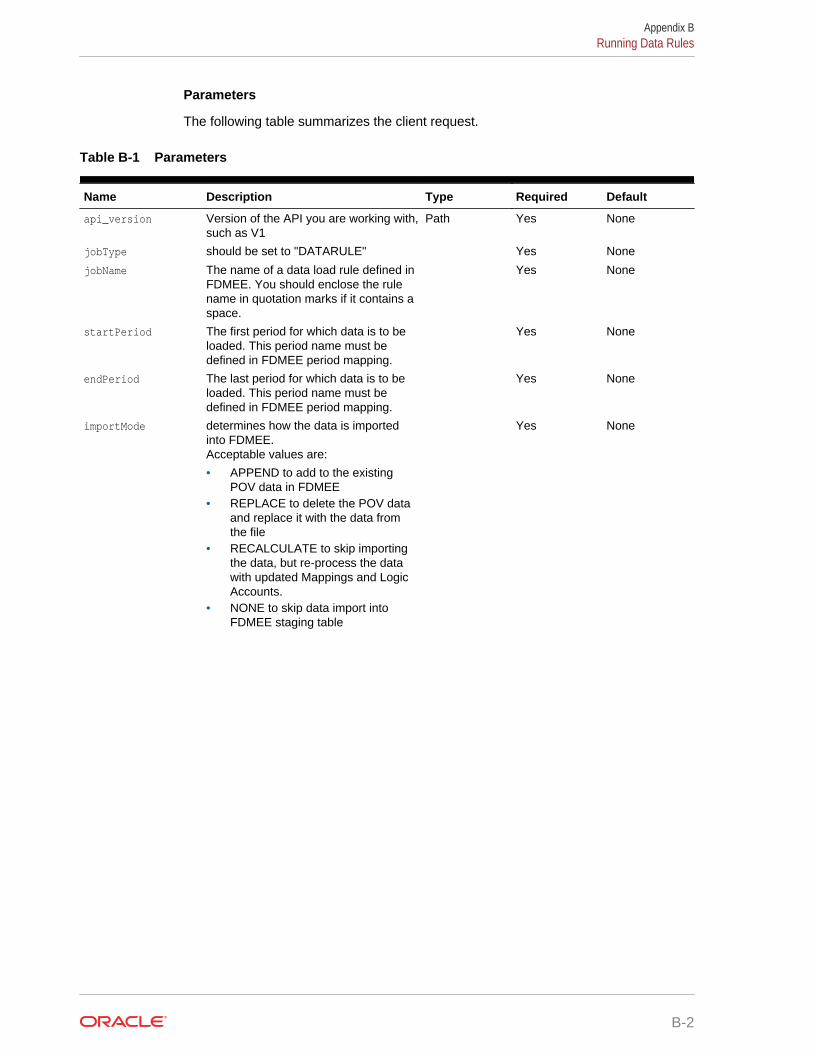
Parameters
The following table summarizes the client request.
Table B-1 Parameters
Name Description Type Required Default
api_version Version of the API you are working with,such as V1
Path Yes None
jobType should be set to "DATARULE" Yes None
jobName The name of a data load rule defined inFDMEE. You should enclose the rulename in quotation marks if it contains aspace.
Yes None
startPeriod The first period for which data is to beloaded. This period name must bedefined in FDMEE period mapping.
Yes None
endPeriod The last period for which data is to beloaded. This period name must bedefined in FDMEE period mapping.
Yes None
importMode determines how the data is importedinto FDMEE.Acceptable values are:
• APPEND to add to the existingPOV data in FDMEE
• REPLACE to delete the POV dataand replace it with the data fromthe file
• RECALCULATE to skip importingthe data, but re-process the datawith updated Mappings and LogicAccounts.
• NONE to skip data import intoFDMEE staging table
Yes None
Appendix BRunning Data Rules
B-2

Table B-1 (Cont.) Parameters
Name Description Type Required Default
exportMode determines how the data is exportedinto FDMEE.Acceptable values for anOracleHyperion Planning application are:
• STORE_DATA to merge the datain the FDMEE staging table withthe existing Planning data
• ADD_DATA to add the data in theFDMEE staging table to Planning
• SUBTRACT_DATA to subtract thedata in the FDMEE staging tablefrom existing Planning data
• REPLACE_DATA to clear the POVdata and replace it with data in theFDMEE staging table. The data iscleared for Scenario, Version,Year, Period, and Entity
• NONE to skip data export fromFDMEE to Planning
Acceptable values for Oracle FinancialConsolidation and Close Cloud andOracle Tax Reporting Cloudapplications are:
• MERGE—By default, all data loadis processed in the Merge mode. Ifdata already existed in theapplication, the system overwritesthe existing data with the new datafrom the load file. If data does notexist, the new data will be created.
• REPLACE—The system first clearsany existing data in the applicationfor those referenced in the dataload file. Then the system performsthe data load in Merge mode.
• NONE—Skips the data export fromFDMEE to Oracle FinancialConsolidation and Close Cloud
Yes None
fileName An optional file name. If you do notspecify a file name, this API imports thedata contained in the file namespecified in the load data rule. The datafile must already reside in the INBOXprior to data rule execution.
Yes None
Example URL
https://<SERVICE_NAME>-<TENANT_NAME>.<dcX>.oraclecloud.com/aif/rest/V1/jobs
Example of Request Body
{"jobType":"DATARULE","jobName":"aso to bso dr","startPeriod":"Dec-18","endPeriod":"Dec-18",
Appendix BRunning Data Rules
B-3

"importMode":"REPLACE","exportMode":"NONE","fileName":""}
Response
Supported Media Types: application/json
Table B-2 Parameters
Name Description
status Status of the job: -1 = in progress; 0 = success; 1 = error; 2 = cancelpending; 3 = cancelled; 4 = invalid parameter
jobStatus A text representation of the job status, with one of the following values“RUNNING”, “SUCCESS”. “FAILED”
jobId The process ID generated in FDMEE for the job
logFileName Log File containing entries for this execution.
outputFileName Name of the output file generated, if any.
processType Type of the process executed. Will contain“COMM_LOAD_BALANCES” for all Data Rule executions
executedBy Login name of the user used to execute the rule.
details Returns the exception stack trace in case of an application error
Example of Response Body
The following shows an example of the response body in JSON format.
{ "jobStatus": "RUNNING""jobId": 2019"logFileName": "\outbox\logs\Account Reconciliation Manager_2019.log""outputFileName": null"processType": "COMM_LOAD_BALANCES""executedBy": "admin""status": -1"links": [1] 0: { "rel": "self" "href": "https://<SERVICE_NAME>-<TENANT_NAME>.<dcX>.oraclecloud.com/aif/rest/V1/jobs/2019" "action": "GET"}"details": null
}
Running Batch RulesExecutes a batch of jobs that have been defined in Oracle Hyperion Financial DataQuality Management, Enterprise Edition .
Prerequisites
Appendix BRunning Batch Rules
B-4

• The batch must be defined in FDMEE before it can be executed using the EPMAutomate Utility.
• You must have the required privileges to execute a specific batch..
REST Resource
POST /aif/rest/{api_version}/jobs
Request
Supported Media Types: application/json
The following table summarizes the client request.
Table B-3 Parameters
Name Description Type Required Default
api_version Version of the API you areworking with, such as V1
Path Yes None
jobType should be set to "BATCH" Yes None
jobName The name of a batch definedin FDMEE.
Yes None
Example URL
https://<SERVICE_NAME>-<TENANT_NAME>.<dcX>.oraclecloud.com/aif/rest/V1/jobs
Example of Request Body
{"jobType":"BATCH","jobName":"BatchDataLoad"}
Response
The following table summarizes the response parameters.
Table B-4 Parameters
Name Description
status Status of the job: -1 = in progress; 0 = success; 1 = error; 2 = cancelpending; 3 = cancelled; 4 = invalid parameter
jobStatus A text representation of the job status, with one of the following values“RUNNING”, “SUCCESS”. “FAILED”
jobId The process Id generated in FDMEE for the job
logFileName Log File containing entries for this execution.
outputFileName Name of the output file generated, if any.
processType Type of the process executed. Will contain “COMM_BATCH” for all DataRule executions
executedBy Login name of the user used to execute the rule.
details Returns the exception stack trace in case of an application error
Supported Media Types: application/json
Appendix BRunning Batch Rules
B-5
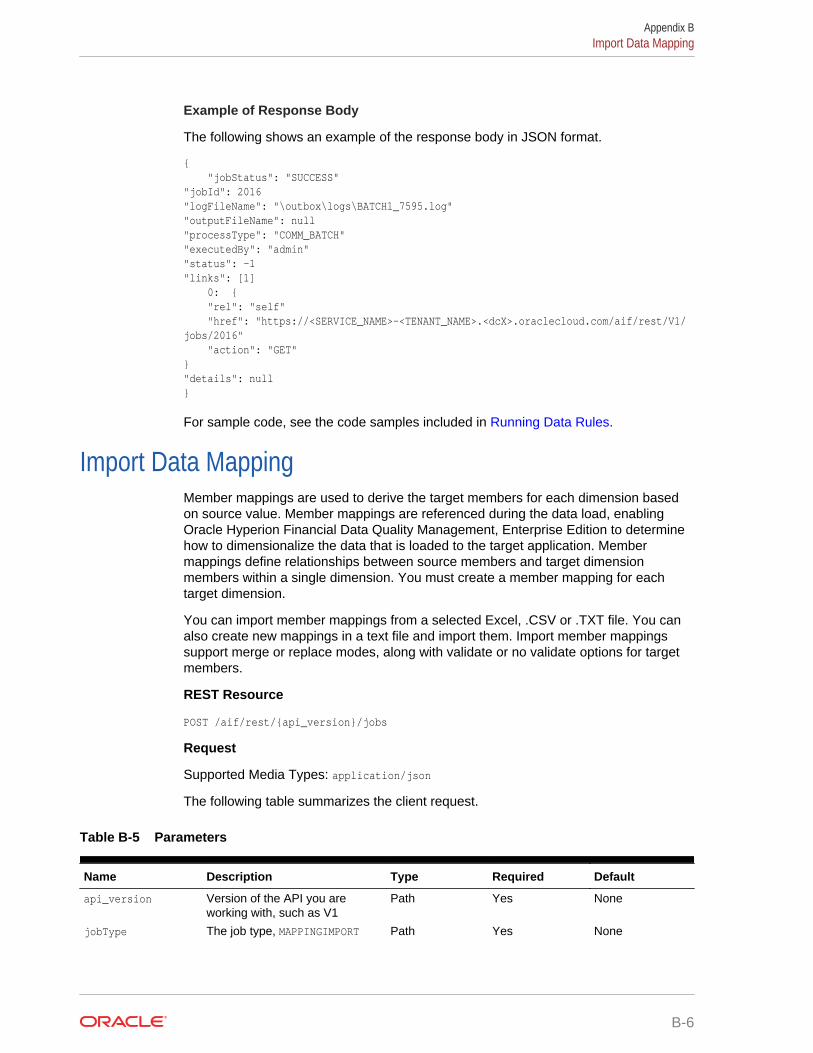
Example of Response Body
The following shows an example of the response body in JSON format.
{ "jobStatus": "SUCCESS""jobId": 2016"logFileName": "\outbox\logs\BATCH1_7595.log""outputFileName": null"processType": "COMM_BATCH""executedBy": "admin""status": -1"links": [1] 0: { "rel": "self" "href": "https://<SERVICE_NAME>-<TENANT_NAME>.<dcX>.oraclecloud.com/aif/rest/V1/jobs/2016" "action": "GET"}"details": null}
For sample code, see the code samples included in Running Data Rules.
Import Data MappingMember mappings are used to derive the target members for each dimension basedon source value. Member mappings are referenced during the data load, enablingOracle Hyperion Financial Data Quality Management, Enterprise Edition to determinehow to dimensionalize the data that is loaded to the target application. Membermappings define relationships between source members and target dimensionmembers within a single dimension. You must create a member mapping for eachtarget dimension.
You can import member mappings from a selected Excel, .CSV or .TXT file. You canalso create new mappings in a text file and import them. Import member mappingssupport merge or replace modes, along with validate or no validate options for targetmembers.
REST Resource
POST /aif/rest/{api_version}/jobs
Request
Supported Media Types: application/json
The following table summarizes the client request.
Table B-5 Parameters
Name Description Type Required Default
api_version Version of the API you areworking with, such as V1
Path Yes None
jobType The job type, MAPPINGIMPORT Path Yes None
Appendix BImport Data Mapping
B-6

Table B-5 (Cont.) Parameters
Name Description Type Required Default
jobName The dimension name for aspecific dimension to import,such as ACCOUNT, or ALL to importall dimensions
Path Yes None
fileName The file and path from which toimport mappings. The file formatcan be .CSV, .TXT, .XLS,or .XLSX. The file must beuploaded prior to importing,either to the inbox or to a sub-directory of the inbox. Include theinbox in the file path, forexample,inbox/BESSAPPJan-06.csv
Path Yes None
importMode The import mode: MERGE to addnew rules or replace existingrules, or REPLACE to clear priormapping rules before import
Path No MERGE
validationMode Whether to use validation mode,true or false An entry of truevalidates the target membersagainst the target application;false loads the mapping filewithout any validations. Note thatthe validation process isresource intensive and takeslonger than the validation modeof false; the option selected bymost customers is false
Path No false
locationName The FDMEE location where themapping rules should be loaded;mapping rules are specific to alocation in FDMEE
Path No None
Example of Request Body
The following shows an example of the request body in JSON format.
{"jobType":"MAPPINGIMPORT","jobName":"ACCOUNT""fileName":"inbox/BESSAPPJan-06.csv","importMode":"MERGE","validationMode":"false","locationName":"BESSAPP"}
For sample code, see the code samples included in Running Data Rules.
Response
The following table summarizes the response parameters.
Appendix BImport Data Mapping
B-7

Table B-6 Parameters
Name Description
jobId The process ID generated in FDMEE for the job, such as 1880
jobStatus The job status, such as RUNNING
logFileName Log file containing entries for this execution, such as outbox/logs/BESSAPP-DB_1880.log
outputFileName Name of the output file generated, if any, or else null
processType Type of process executed, IMPORT_MAPPING
executedBy Login name of the user used to execute the rule, such as admin
details Returns the exception stack trace in case of an application error, ornull
Supported Media Types: application/json
Parameters
Example of Response Body
The following shows an example of the response body in JSON format.
{"links": [0]"status":"-1""details":"null""jobId":"1880""jobStatus":"RUNNING","logFileName":"outbox/logs/BESSAPP-DB_1880.log","outputFileName":"null","processType":"IMPORT_MAPPING","executedBy":"admin"}
For sample code, see the code samples included in Running Data Rules.
Export Data MappingMember mappings are used to derive the target members for each dimension basedon source value. Member mappings are referenced during the data load, enablingOracle Hyperion Financial Data Quality Management, Enterprise Edition to determinehow to dimensionalize the data that is loaded to the target application. Membermappings define relationships between source members and target dimensionmembers within a single dimension. You must create a member mapping for eachtarget dimension.
You can export member mappings to a selected file of format .csv, .txt, .xls, or .xlsx.
REST Resource
POST /aif/rest/{api_version}/jobs
Request
Appendix BExport Data Mapping
B-8

Supported Media Types: application/json
The following table summarizes the client request.
Table B-7 Parameters
Name Description Type Required Default
api_version Version of the API you are workingwith, such as V1
Path Yes None
jobType The job type, MAPPINGEXPORT Path Yes None
jobName The dimension name for a specificdimension to import, such asACCOUNT, or ALL to import alldimensions
Path Yes None
fileName The file and path from which toexport mappings. The file format canbe .CSV, .TXT, .XLS, or .XLSX.Include the outbox in the file path, forexample, outbox/BESSAPPJan-06.csv
Path Yes None
locationName The name of the location, such asBESSAPP
Path Yes None
Example of Request Body
The following shows an example of the request body in JSON format.
{"jobType":"MAPPINGIMPORT","jobName":"ACCOUNT","fileName":"outbox/BESSAPPJan-06.csv","locationName":"BESSAPP"}
For sample code, see the code samples included in Running Data Rules.
Response
The following table summarizes the response parameters.
Table B-8 Parameters
Name Description
jobId The process ID generated in FDMEE for the job, such as 1881
jobStatus The job status, such as SUCCESS
logFileName Log file containing entries for this execution, such as outbox/logs/BESSAPP-DB_1881.log
outputFileName Name of the output file generated, such asoutbox/BESSAPPJan-06.csv
processType The type of process executed, EXPORT_MAPPING
executedBy Login name of the user used to execute the rule, such as admin
details Returns the exception stack trace in case of an application error,or else null
Appendix BExport Data Mapping
B-9

Supported Media Types: application/json
Example of Response Body
The following shows an example of the response body in JSON format.
{"links": [0]"status":"0","details":"null","jobId":"1881","jobStatus":"SUCCESS","logFileName":"outbox/logs/BESSAPP-DB_1881.log","outputFileName":"outbox/BESSAPPJan-06.csv","processType":"EXPORT_MAPPING","executedBy":"admin"}
For sample code, see the code samples included in Running Data Rules.
Execute ReportsThe Oracle Hyperion Financial Data Quality Management, Enterprise Edition reportingframework represents a unified solution that incorporates source and target data,templates, and user-defined SQL queries. Templates, created in Oracle BusinessIntelligence Publisher, consume data in XML format and generate reports dynamically.You can add SQL queries to extract data from tables, or couple them with the reportparameters to extend the definition of a standard report. FDMEE reports can begenerated as PDF, Excel, Word, or HTML output.
REST Resource
POST /aif/rest/{api_version}/jobs
Request
Supported Media Types: application/json
The following table summarizes the client request.
Table B-9 Parameters
Name Description Type Required Default
api_version Version of the API you are workingwith, such as V1
Path Yes None
jobType The job type, REPORT Path Yes None
jobName The name of the report to beexecuted, such as Dimension MapFor POV (Dimension, Cat, Per)
Path Yes None
reportFormatType The file format of the report, pdf,xlsx, html, or excel
Path Yes pdf
parameters Can vary in count and valuesbased on the report
Path Yes None
Appendix BExecute Reports
B-10

Table B-9 (Cont.) Parameters
Name Description Type Required Default
Location The location of the report, such asComma_Vision
Path Yes None
Example of Request Body
The following shows an example of the request body in JSON format.
{"jobType":"REPORT", "jobName":"Dimension Map For POV (Dimension, Cat, Per)","reportFormatType":"PDF","parameters":{ "Dimension Name":"ENTITY", "Category":"Actual", "Period":"Jan15", "Location":"Comma_Vision" }}
For sample code, see the code samples included in Running Data Rules.
Response
The following table summarizes the response parameters.
Table B-10 Parameters
Name Description
jobId The process ID generated in FDMEE for the job, such as 1885
status The job status, such as RUNNING
logFileName Log file containing entries for this execution, such as outbox\logs\BESSAPP-DB_1885.log
outputFileName Name of the output file generated; you can use this name todownload the report
processType Type of process executed, EXECUTE_REPORT
executedBy Login name of the user used to execute the rule, such as admin
details Returns the exception stack trace in case of an application error,or null
Supported Media Types: application/json
Parameters
Example of Response Body
The following shows an example of the response body in JSON format.
{"links": [0]
Appendix BExecute Reports
B-11

"status":"-1","details":"null","jobId":"1885","jobStatus":"RUNNING","logFileName":"outbox/logs/1885.log","outputFileName":"outbox/reports","processType":"EXECUTE_REPORT","executedBy":"admin"}
For sample code, see the code samples included in Running Data Rules.
Appendix BExecute Reports
B-12
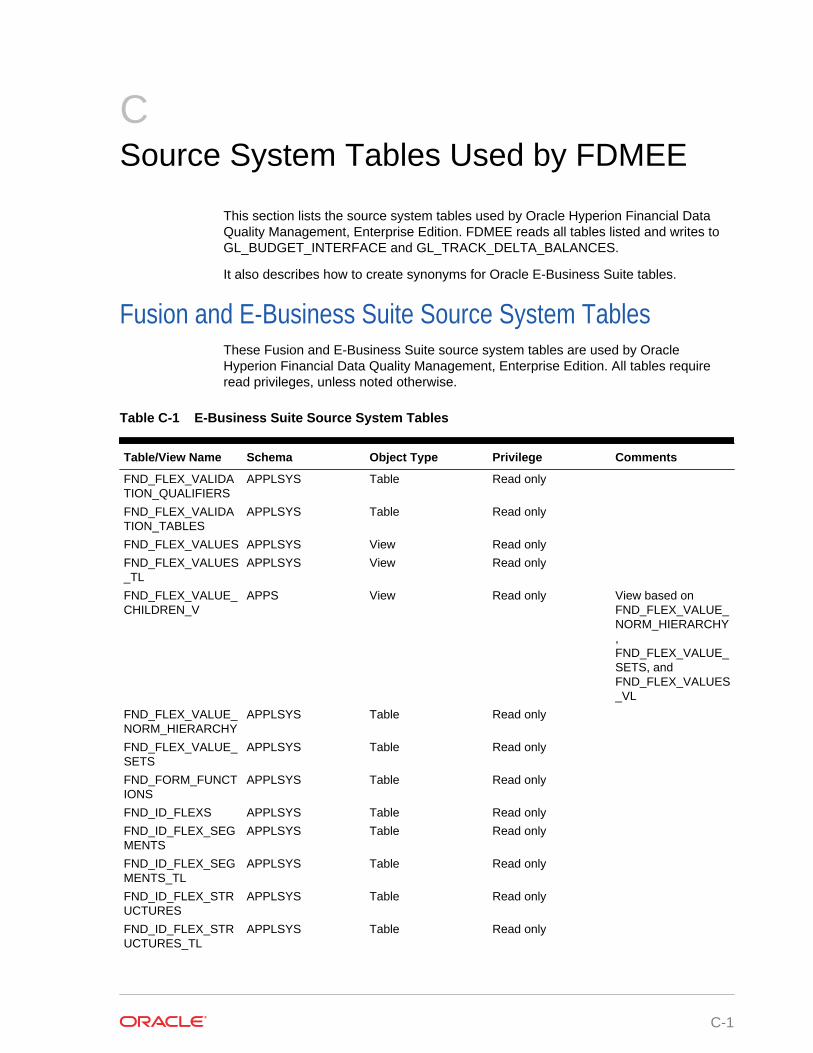
CSource System Tables Used by FDMEE
This section lists the source system tables used by Oracle Hyperion Financial DataQuality Management, Enterprise Edition. FDMEE reads all tables listed and writes toGL_BUDGET_INTERFACE and GL_TRACK_DELTA_BALANCES.
It also describes how to create synonyms for Oracle E-Business Suite tables.
Fusion and E-Business Suite Source System TablesThese Fusion and E-Business Suite source system tables are used by OracleHyperion Financial Data Quality Management, Enterprise Edition. All tables requireread privileges, unless noted otherwise.
Table C-1 E-Business Suite Source System Tables
Table/View Name Schema Object Type Privilege Comments
FND_FLEX_VALIDATION_QUALIFIERS
APPLSYS Table Read only
FND_FLEX_VALIDATION_TABLES
APPLSYS Table Read only
FND_FLEX_VALUES APPLSYS View Read only
FND_FLEX_VALUES_TL
APPLSYS View Read only
FND_FLEX_VALUE_CHILDREN_V
APPS View Read only View based onFND_FLEX_VALUE_NORM_HIERARCHY,FND_FLEX_VALUE_SETS, andFND_FLEX_VALUES_VL
FND_FLEX_VALUE_NORM_HIERARCHY
APPLSYS Table Read only
FND_FLEX_VALUE_SETS
APPLSYS Table Read only
FND_FORM_FUNCTIONS
APPLSYS Table Read only
FND_ID_FLEXS APPLSYS Table Read only
FND_ID_FLEX_SEGMENTS
APPLSYS Table Read only
FND_ID_FLEX_SEGMENTS_TL
APPLSYS Table Read only
FND_ID_FLEX_STRUCTURES
APPLSYS Table Read only
FND_ID_FLEX_STRUCTURES_TL
APPLSYS Table Read only
C-1

Table C-1 (Cont.) E-Business Suite Source System Tables
Table/View Name Schema Object Type Privilege Comments
FND_KF_LABELED_SEGMENTS
FUSION Table Read-only
FND_KF_SEGMENT_LABELS_B
FUSION Table Read-only
FND_LANGUAGES APPLSYS Table Read only
FND_MESSAGES_TL
FUSION Table Read-only
FND_NEW_MESSAGES
APPLSYS Table Read only
FND_NUMBER APPLSYS PL/SQL Package Execute
FND_RESPONSIBILITY
APPLSYS Table Read only
FND_RESPONSIBILITY_TL
APPLSYS Table Read only
FND_SEGMENT_ATTRIBUTE_VALUES
APPLSYS Table Read only
GL_BALANCES GL Table Read only
GL_BALANCES_DELTA
GL Table Read only
GL_BUDGETS GL Table Read only
GL_BUDGET_ENTITIES
GL Table Read only
GL_BUDGET_INTERFACE
GL Table Read and writeprivileges arerequired.
GL_BUDGET_VERSIONS
GL Table Read only
GL_CODE_COMBINATIONS
GL Table Read only
GL_CODE_COMBINATIONS_KFV
APPS View Read only View based onGL_CODE_COMBINATIONS
GL_DAILY_BALANCES
GL Table Read only
GL_DAILY_CONVERSION_TYPES
GL Table Read only
GL_DAILY_CONVERSION_TYPES_V
APPS View Read only View based onGL_DAILY_CONVERSION_TYPES
GL_DAILY_RATES GL Table Read only
GL_ENCUMBRANCE_TYPES
GL Table Read only
GL_INTERFACE GL Table Read/Write
GL_JE_CATEGORIES
GL Table Read only
GL_JE_CATEGORIES_TL
GL Table Read only
Appendix CFusion and E-Business Suite Source System Tables
C-2
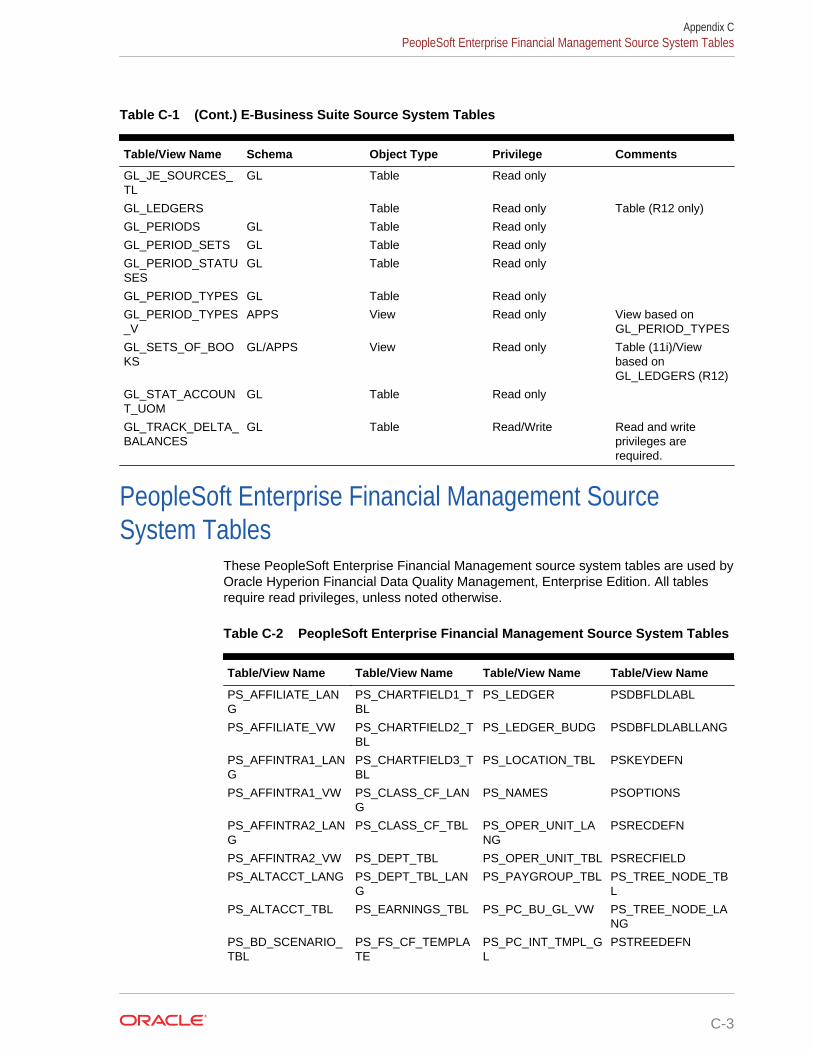
Table C-1 (Cont.) E-Business Suite Source System Tables
Table/View Name Schema Object Type Privilege Comments
GL_JE_SOURCES_TL
GL Table Read only
GL_LEDGERS Table Read only Table (R12 only)
GL_PERIODS GL Table Read only
GL_PERIOD_SETS GL Table Read only
GL_PERIOD_STATUSES
GL Table Read only
GL_PERIOD_TYPES GL Table Read only
GL_PERIOD_TYPES_V
APPS View Read only View based onGL_PERIOD_TYPES
GL_SETS_OF_BOOKS
GL/APPS View Read only Table (11i)/Viewbased onGL_LEDGERS (R12)
GL_STAT_ACCOUNT_UOM
GL Table Read only
GL_TRACK_DELTA_BALANCES
GL Table Read/Write Read and writeprivileges arerequired.
PeopleSoft Enterprise Financial Management SourceSystem Tables
These PeopleSoft Enterprise Financial Management source system tables are used byOracle Hyperion Financial Data Quality Management, Enterprise Edition. All tablesrequire read privileges, unless noted otherwise.
Table C-2 PeopleSoft Enterprise Financial Management Source System Tables
Table/View Name Table/View Name Table/View Name Table/View Name
PS_AFFILIATE_LANG
PS_CHARTFIELD1_TBL
PS_LEDGER PSDBFLDLABL
PS_AFFILIATE_VW PS_CHARTFIELD2_TBL
PS_LEDGER_BUDG PSDBFLDLABLLANG
PS_AFFINTRA1_LANG
PS_CHARTFIELD3_TBL
PS_LOCATION_TBL PSKEYDEFN
PS_AFFINTRA1_VW PS_CLASS_CF_LANG
PS_NAMES PSOPTIONS
PS_AFFINTRA2_LANG
PS_CLASS_CF_TBL PS_OPER_UNIT_LANG
PSRECDEFN
PS_AFFINTRA2_VW PS_DEPT_TBL PS_OPER_UNIT_TBL PSRECFIELD
PS_ALTACCT_LANG PS_DEPT_TBL_LANG
PS_PAYGROUP_TBL PS_TREE_NODE_TBL
PS_ALTACCT_TBL PS_EARNINGS_TBL PS_PC_BU_GL_VW PS_TREE_NODE_LANG
PS_BD_SCENARIO_TBL
PS_FS_CF_TEMPLATE
PS_PC_INT_TMPL_GL
PSTREEDEFN
Appendix CPeopleSoft Enterprise Financial Management Source System Tables
C-3
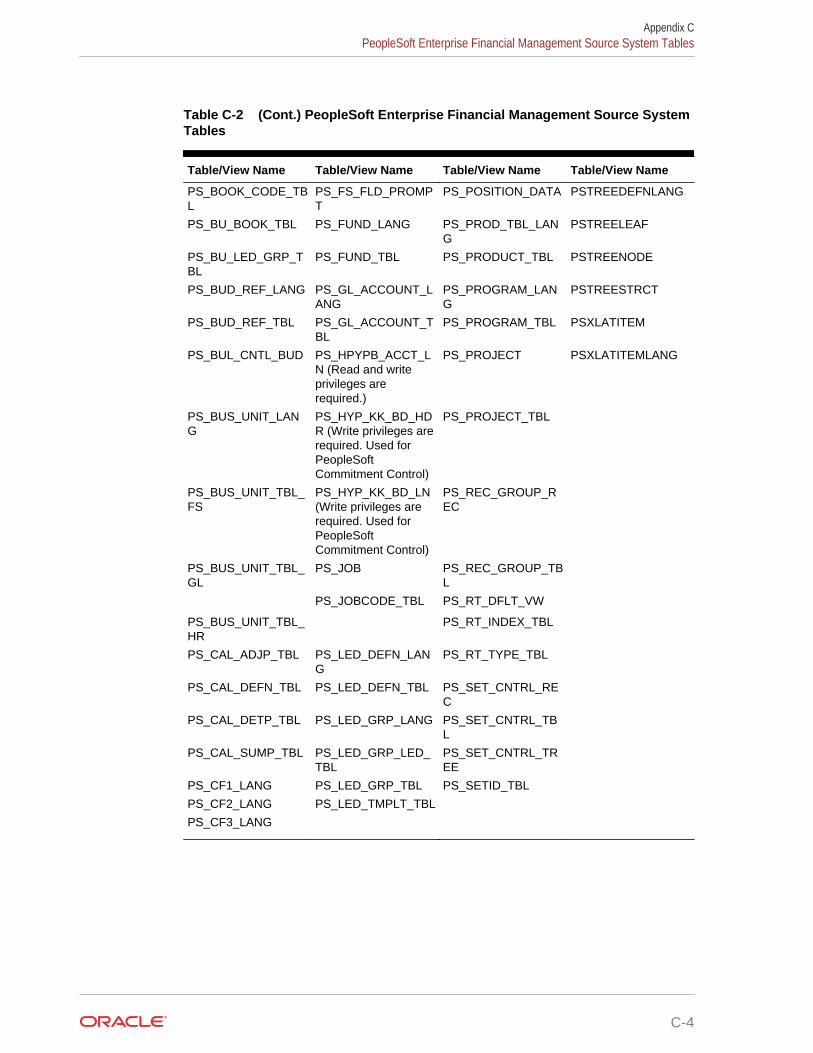
Table C-2 (Cont.) PeopleSoft Enterprise Financial Management Source SystemTables
Table/View Name Table/View Name Table/View Name Table/View Name
PS_BOOK_CODE_TBL
PS_FS_FLD_PROMPT
PS_POSITION_DATA PSTREEDEFNLANG
PS_BU_BOOK_TBL PS_FUND_LANG PS_PROD_TBL_LANG
PSTREELEAF
PS_BU_LED_GRP_TBL
PS_FUND_TBL PS_PRODUCT_TBL PSTREENODE
PS_BUD_REF_LANG PS_GL_ACCOUNT_LANG
PS_PROGRAM_LANG
PSTREESTRCT
PS_BUD_REF_TBL PS_GL_ACCOUNT_TBL
PS_PROGRAM_TBL PSXLATITEM
PS_BUL_CNTL_BUD PS_HPYPB_ACCT_LN (Read and writeprivileges arerequired.)
PS_PROJECT PSXLATITEMLANG
PS_BUS_UNIT_LANG
PS_HYP_KK_BD_HDR (Write privileges arerequired. Used forPeopleSoftCommitment Control)
PS_PROJECT_TBL
PS_BUS_UNIT_TBL_FS
PS_HYP_KK_BD_LN(Write privileges arerequired. Used forPeopleSoftCommitment Control)
PS_REC_GROUP_REC
PS_BUS_UNIT_TBL_GL
PS_JOB PS_REC_GROUP_TBL
PS_JOBCODE_TBL PS_RT_DFLT_VW
PS_BUS_UNIT_TBL_HR
PS_RT_INDEX_TBL
PS_CAL_ADJP_TBL PS_LED_DEFN_LANG
PS_RT_TYPE_TBL
PS_CAL_DEFN_TBL PS_LED_DEFN_TBL PS_SET_CNTRL_REC
PS_CAL_DETP_TBL PS_LED_GRP_LANG PS_SET_CNTRL_TBL
PS_CAL_SUMP_TBL PS_LED_GRP_LED_TBL
PS_SET_CNTRL_TREE
PS_CF1_LANG PS_LED_GRP_TBL PS_SETID_TBL
PS_CF2_LANG PS_LED_TMPLT_TBL
PS_CF3_LANG
Appendix CPeopleSoft Enterprise Financial Management Source System Tables
C-4

PeopleSoft Human Capital Management Source SystemTables
These PeopleSoft Human Capital Management source system tables are used byOracle Hyperion Financial Data Quality Management, Enterprise Edition. All tablesrequire read privileges.
Table C-3 PeopleSoft Human Capital Management Source System Tables
Table/View Name Table/View Name Table/View Name Table/View Name
PS_ACCT_CD_TBL PS_CHARTFIELD3_TBL
PS_JOB_EARNS_DIST
PS_SAL_PLAN_TBL
PS_AFFILIATE_VW PS_CLASS_CF_TBL PS_JOBCODE_TBL PS_SAL_STEP_TBL
PS_ALTACCT_TBL PS_DEPT_BUDGET_ERN
PS_LOCATION_TBL PS_SET_CNTRL_REC
PS_BENEF_PLAN_TBL
PS_DEPT_CF_TBL PS_NAMES PS_UNION_TBL
PS_BP_JOB PS_DEPT_TBL PS_OPER_UNIT_TBL PSOPTIONS
PS_BUD_REF_TBL PS_EARNINGS_TBL PS_PAYGROUP_TBL PSRECFIELD
PS_BUS_UNIT_TBL_FS
PS_FREQUENCY_TBL
PS_POSITION_DATA PSXLATITEM
PS_BUS_UNIT_TBL_GL
PS_FUND_TBL PS_PRODUCT_TBL PSXLATITEMLANG
PS_BUS_UNIT_TBL_HR
PS_GL_ACCOUNT_TBL
PS_PROGRAM_TBL
PS_CHARTFIELD1_TBL
PS_GL_ACCOUNT_VW
PS_PROJECT_TBL
PS_CHARTFIELD2_TBL
PS_JOB PS_SAL_GRADE_TBL
PeopleSoft Commitment Control Source System TablesThese PeopleSoft Commitment Control source system tables are used by OracleHyperion Financial Data Quality Management, Enterprise Edition. All tables requireread privileges.
Table C-4 PeopleSoft Commitment Control Source System Tables
Table/View Name
PS_KK_BUDGET_TYPE
PS_KK_SUBTYPE
PS_KK_FILTER
PS_KK_KEY_CF
PS_KK_BD_OFFSET
PS_CAL_BP_TBL
PS_LEDGER_KK
Appendix CPeopleSoft Human Capital Management Source System Tables
C-5

Table C-4 (Cont.) PeopleSoft Commitment Control Source System Tables
Table/View Name
PS_HYP_KK_BD_HDR
(Used for PeopleSoft Commitment Control)
PS_HYP_KK_BD_LN
(Write privileges are required. Used for PeopleSoft Commitment Control)
Creating Synonyms for E-Business Suite TablesIf a user other than the "apps" user is referenced, you can create synonyms for OracleE-Business Suite tables.
Note:
Synonyms are required for a PeopleSoft setup since PeopleSoft administratorstypically do not provide PeopleSoft schema applications to users forconfigurations.
To create synonyms for E-Business Suite tables:
1. Create synonyms for the E-Business Suite tables listed in this appendix.
2. Assign read access to all the synonyms that you created.
3. Assign write access to the following tables:
• GL_Interface
• GL_Budget_Interface
• GL_Track_Delta_Balances
In ODI Topology for EBS_Data_Server, you can use the synonym for both theuser and the schema.
Appendix CCreating Synonyms for E-Business Suite Tables
C-6

DCreating an Alternate Schema in anEnterprise Resource Planning (ERP)Source System
Prebuilt integrations to an Enterprise Resource Planning (ERP) source system inOracle Hyperion Financial Data Quality Management, Enterprise Edition use a basicfilter for data extraction, and assume that appropriate security has been defined toenable access by FDMEE. In some environments, direct access to the source systemstables is prohibited because of system policies, or you want to define a source systemfilter that is more detailed than what is provided in the FDMEE user interface.
For example, in the Account Reconciliation Manager (ARM) you want to extractbalance sheet accounts or active accounts only from the source system. To do this,create an alternate schema in the source system. This method provides a desiredlevel of security, a different source system filter, or both.
To create an alternate hierarchy for Oracle E-Business Suite and Peoplesoft (PSFT)systems:
1. Create a new schema or user in the source system database.
2. Grant SELECT or SELECT/INSERT access to the list of source tables used byFDMEE to the new schema.
Refer to the source table list provided in Source System Tables Used by FDMEE.
3. For E-Business Suite systems, create a new view namedGL_CODE_COMBINATIONS, which includes the desired source filter.
For Peoplesoft systems, create a view using the PS_LEDGER table.
All columns from the source table must be included in the view.
4. Create synonyms for all remaining source tables that FDMEE references from thesource system in the new schema.
Synonyms point to the base tables in the source system schema.
5. Update Oracle Data Integrator (ODI) to use the new schema in the physicalschema for the related data server.
For example, the view created on the EBS GL_CODE_COMBINATIONS tablemay look like:
CREATE VIEW GL_COMBINATIONS (SEGMENT1, SEGMENT2,…....)
SELECT SEGMENT1, SEGMENT2,…..
FROM APPS.GL_CODE_COMBINATIONS
WHERE “ADD FILTERS”
Any views created in the new schema or synonyms must use the exact same name asspecified in Source System Tables Used by FDMEE. Because the table and view
D-1

names are the same as the core schema, FDMEE can access the updated contentswith a change to the schema specification in ODI.
For SAP or JDE source systems, change the filter definition in the adapter rather thancreating an alternate schema.
Before making any changes, it is recommended that you contact Oracle support toreview the process to ensure a smooth update to the system.
Appendix D
D-2

EStaging Tables
This section describes the Oracle Hyperion Financial Data Quality Management,Enterprise Edition staging tables.
FDMEE Staging TablesThe following sections describe Oracle Hyperion Financial Data Quality Management,Enterprise Edition staging tables.
Note:
Oracle provides powerful tools you can use to insert, update, and deleteinformation. But, if you use Oracle tools like SQL*Plus or Oracle Data Browserto modify Oracle Applications data, you risk destroying the integrity of your dataand you lose the ability to audit changes to your data. Because OracleApplications tables are interrelated, any change you make using an OracleApplications form can update many tables at once. But when you modify OracleApplications data using anything other than Oracle Applications forms, you maychange a row in one table without making corresponding changes in relatedtables. If your tables get out of synchronization with each other, you riskretrieving erroneous information and you risk unpredictable results throughoutOracle Applications. When you use Oracle Applications forms to modify yourdata, Oracle Applications automatically checks that your changes are valid.Oracle Applications also keeps track of who changes information. But, if youenter information into database tables using database tools, you may storeinvalid information. You also lose the ability to track who has changed yourinformation because SQL*Plus and other database tools do not keep a recordof changes.
Consequently, we STRONGLY RECOMMEND that you never use SQL*Plus,Oracle Data Browser, database triggers, or any other tool to modify OracleApplications tables, unless we tell you to do so in our installation,implementation, or open interface guides.
E-1

Staging Table Used for Import from Source
Table E-1 Staging Table Used for Import From Source
Table/View Name Description
TDATASEG_T Temporary data table used for transformingdata from source to target in a data ruleexecution. To ensure read consistency, data isextracted from the corresponding staging table(for example,AIF_EBS_GL_BALANCES_STG,AIF_EBS_GL_DAILY_BAL_STG, orAIF_PS_LEDGER) and copied toTDATASEG_T (partitioned by LOADID), whichis then used for transforming source data totarget data based on the data mappingsspecified in TDATAMAP_T.
Data Tables Used for Drill Through
Table E-2 Data Table Used for Drill Through
Table/View Name Description
TDATASEG Audit table describing the data transformationsin a data rule execution. Only in a successfuldata rule execution data transformationsstored in TDATASEG_T be copied over toTDATASEG.
Views Used for Export to Target
Table E-3 Export to Target Views
Table/View Name Description
AIF_HS_BALANCES Interface view used for exporting data to atarget application in a data rule execution. Thisview queries the TDATASEG_T table directlyby summarizing the target amounts across theunique target dimension membercombinations.
AIF_EBS_GL_INTERFACE_V Interface view used for exporting data back tothe Fusion and E-Business Suite generalledger system in a data load to write back ruleexecution. This view queries the TDATASEGtable directly by summarizing the targetamounts across the unique target segmentvalue combinations.
Appendix EFDMEE Staging Tables
E-2

Table E-3 (Cont.) Export to Target Views
Table/View Name Description
AIF_PS_GL_INTERFACE_V Interface view used for exporting data back tothe PeopleSoft Enterprise FinancialManagement system in a data load rule towrite back rule execution. This view queriesthe TDATASEG table directly by summarizingthe target amounts across the unique targetChartField value combinations.
PeopleSoft Human Capital Management Staging TablesThe following sections describe the columns in each PeopleSoft Human CapitalManagement staging table used by Oracle Hyperion Financial Data QualityManagement, Enterprise Edition.
PS90HCM
Table E-4 AIF_PS_POSITION_DATA_STG Table
Column Name Column Description
DESCR Position Description
Table E-5 AIF_PS_JOBCODE_TBL_STG Table
Column Name Column Description
COMP_FREQUENCY Compensation Frequency
DESCR Description
EFFDT Effective Date
EFF_STATUS Status
STD_HOURS Standard Hours
Table E-6 AIF_PS_JOB_STG Table
Column Name Column Description
ABSENCE_SYSTEM_CD Absence System
ACCDNT_CD_FRA Work Accident Code
ACCT_CD Account Code
ADDS_TO_FTE_ACTUAL Adds to FTE Actual Count
ANNL_BENEF_BASE_RT Annual Benefit Base Rate
APPT_TYPE Appointment Type
ASGN_END_DT Assignment End Date
ASGN_START_DT Assignment Start Date
AUTO_END_FLG Auto End Job
BARG_UNIT Bargaining Unit
Appendix EPeopleSoft Human Capital Management Staging Tables
E-3
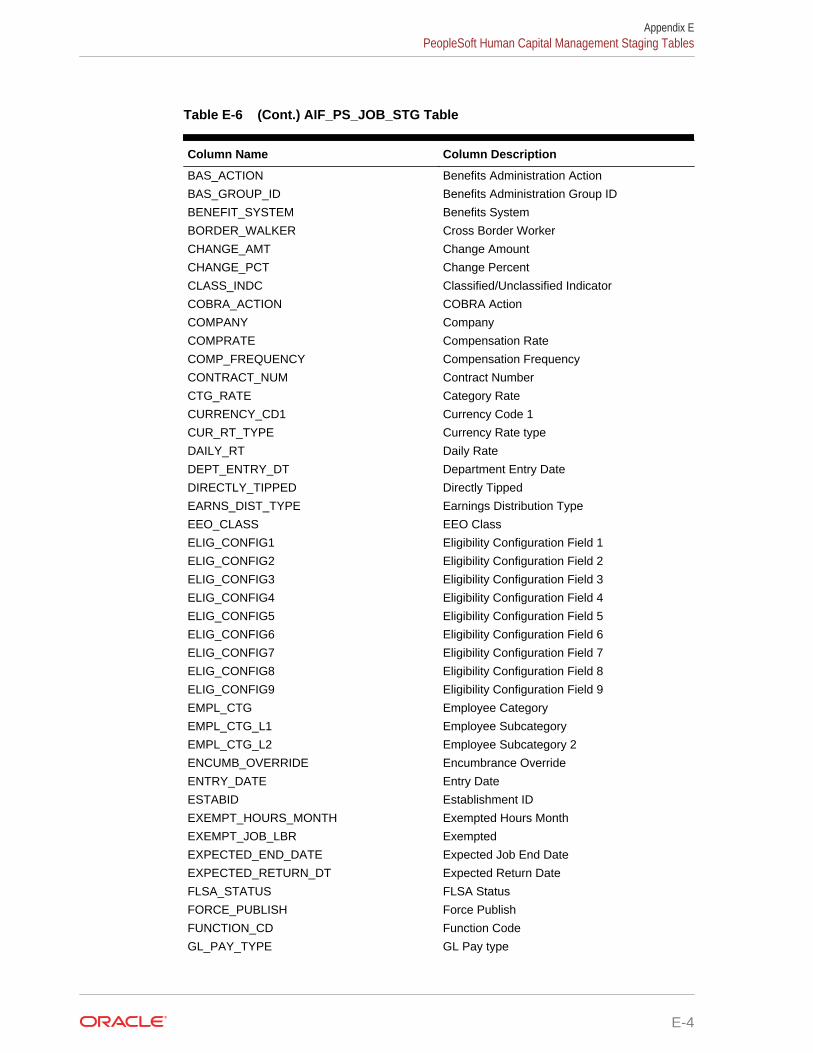
Table E-6 (Cont.) AIF_PS_JOB_STG Table
Column Name Column Description
BAS_ACTION Benefits Administration Action
BAS_GROUP_ID Benefits Administration Group ID
BENEFIT_SYSTEM Benefits System
BORDER_WALKER Cross Border Worker
CHANGE_AMT Change Amount
CHANGE_PCT Change Percent
CLASS_INDC Classified/Unclassified Indicator
COBRA_ACTION COBRA Action
COMPANY Company
COMPRATE Compensation Rate
COMP_FREQUENCY Compensation Frequency
CONTRACT_NUM Contract Number
CTG_RATE Category Rate
CURRENCY_CD1 Currency Code 1
CUR_RT_TYPE Currency Rate type
DAILY_RT Daily Rate
DEPT_ENTRY_DT Department Entry Date
DIRECTLY_TIPPED Directly Tipped
EARNS_DIST_TYPE Earnings Distribution Type
EEO_CLASS EEO Class
ELIG_CONFIG1 Eligibility Configuration Field 1
ELIG_CONFIG2 Eligibility Configuration Field 2
ELIG_CONFIG3 Eligibility Configuration Field 3
ELIG_CONFIG4 Eligibility Configuration Field 4
ELIG_CONFIG5 Eligibility Configuration Field 5
ELIG_CONFIG6 Eligibility Configuration Field 6
ELIG_CONFIG7 Eligibility Configuration Field 7
ELIG_CONFIG8 Eligibility Configuration Field 8
ELIG_CONFIG9 Eligibility Configuration Field 9
EMPL_CTG Employee Category
EMPL_CTG_L1 Employee Subcategory
EMPL_CTG_L2 Employee Subcategory 2
ENCUMB_OVERRIDE Encumbrance Override
ENTRY_DATE Entry Date
ESTABID Establishment ID
EXEMPT_HOURS_MONTH Exempted Hours Month
EXEMPT_JOB_LBR Exempted
EXPECTED_END_DATE Expected Job End Date
EXPECTED_RETURN_DT Expected Return Date
FLSA_STATUS FLSA Status
FORCE_PUBLISH Force Publish
FUNCTION_CD Function Code
GL_PAY_TYPE GL Pay type
Appendix EPeopleSoft Human Capital Management Staging Tables
E-4

Table E-6 (Cont.) AIF_PS_JOB_STG Table
Column Name Column Description
GP_ASOF_DT_EXG_RT Use Rate As Of
GP_DFLT_CURRTTYP Use Pay Group Rate Type
GP_DFLT_ELIG_GRP Use Pay Group Eligibility
GP_DFLT_EXRTDT Use Pay Group As Of Date
GP_ELIG_GRP Eligibility Group
GP_PAYGROUP Pay Group
GRADE_ENTRY_DT Salary Grade Entry Date
HIRE_DT Hire Date
HOLIDAY_SCHEDULE Holiday Schedule
HOURLY_RT Hourly Rate
HOURLY_RT_FRA Hourly Rate France
HR_STATUS HR Status
INTERCTR_WRKS_CNCL Works Council Role
Role that the worker has in the union group
JOB_DATA_SRC_CD Job Source Code
JOB_ENTRY_DT Job Entry Date
JOB_INDICATOR Job Indicator
LABOR_AGREEMENT Labor Agreement
LABOR_FACILITY_ID Labor Facility ID
LABOR_TYPE_GER Labor Type Germany
LASTUPDDTTM Last Update Date/Time
LASTUPDOPRID Last Update User ID
LAST_DATE_WORKED Last Date Worked
LAST_HIRE_DT Last Hire Date
LAYOFF_EXEMPT_FLAG Layoff Exempt Flag
LAYOFF_EXEMPT_RSN Layoff Exempt Reason
LBR_FAC_ENTRY_DT Labor Facility Entry Date
LDW_OVR Override Last Date Worked
LST_ASGN_START_DT Last Assignment Start Date
LUMP_SUM_PAY Lump Sum Pay
MAIN_APPT_NUM_JPN Main Appointment Number
MATRICULA_NBR Matricula Number
MONTHLY_RT Monthly Rate
OFFICER_CD Officer Code
PAID_FTE Paid FTE
PAID_HOURS Paid Hours
PAID_HRS_FREQUENCY Paid Hours Frequency
PAYGROUP Pay Group
PAY_SYSTEM_FLG Pay System Flag
PAY_UNION_FEE Pay Union Fee
PERFORM_GROUP_GER Perform Group Germany
PER_ORG Organizational Relationship
POI_TYPE Person of Interest Type
Appendix EPeopleSoft Human Capital Management Staging Tables
E-5

Table E-6 (Cont.) AIF_PS_JOB_STG Table
Column Name Column Description
POSITION_ENTRY_DT Position Entry Date
POSITION_OVERRIDE Position Override
POSN_CHANGE_RECORD Position Change Record
PRORATE_CNT_AMT Prorate Contract Change Amount
REG_REGION Regulatory Region
REPORTS_TO Reports To
SETID_DEPT SetID Department
SETID_JOBCODE SetID Job Code
SETID_LBR_AGRMNT SetID Labor Agreement
SETID_LOCATION SetID Location
SETID_SALARY SetID Salary
SETID_SUPV_LVL SetID Supervisor Level
SHIFT Shift
SHIFT_FACTOR Shift Factor
SHIFT_RT Shift Rate
SOC_SEC_RISK_CODE Social Security Risk Code
SPK_COMM_ID_GER Spokesman Committee ID
STD_HRS_FREQUENCY Standard Hours Frequency
STEP_ENTRY_DT Step Entry Date
SUPERVISOR_ID Supervisor ID
SUPV_LVL_ID Supervisor Level ID
TARIFF_AREA_GER Tariff Area Germany
TARIFF_GER Tariff Germany
TAX_LOCATION_CD Tax Location Code
TERMINATION_DT Termination Date
UNION_FEE_AMOUNT Union Fee Amount
UNION_FEE_END_DT Union Fee End Date
UNION_FEE_START_DT Union Fee Start Date
UNION_FULL_PART Union Participation
UNION_POS Union Position
UNION_SENIORITY_DT Union Seniority Date
VALUE_1_FRA Value 1
VALUE_2_FRA Value 2
VALUE_3_FRA Value 3
VALUE_4_FRA Value 4
VALUE_5_FRA Value 5
WORK_DAY_HOURS Work Day Hours
WPP_STOP_FLAG Stop Wage Progression
WRKS_CNCL_FUNCTION Work Council Function
WRKS_CNCL_ROLE_CHE Work Council Role
Appendix EPeopleSoft Human Capital Management Staging Tables
E-6
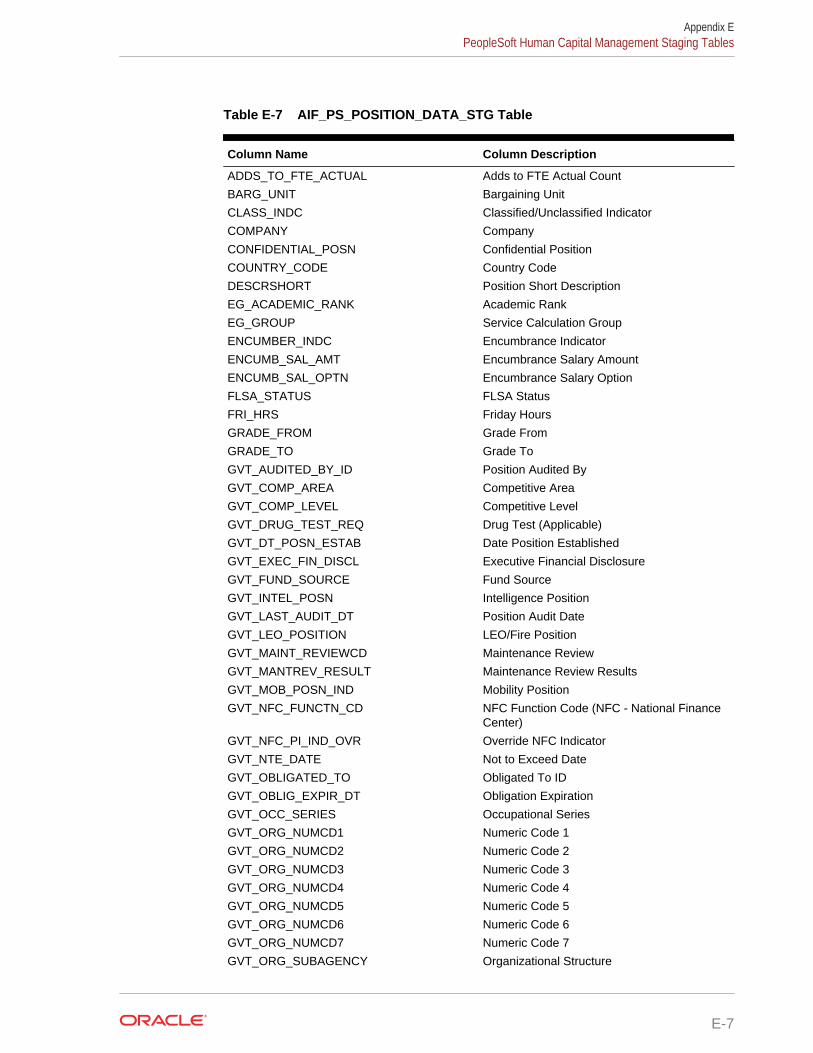
Table E-7 AIF_PS_POSITION_DATA_STG Table
Column Name Column Description
ADDS_TO_FTE_ACTUAL Adds to FTE Actual Count
BARG_UNIT Bargaining Unit
CLASS_INDC Classified/Unclassified Indicator
COMPANY Company
CONFIDENTIAL_POSN Confidential Position
COUNTRY_CODE Country Code
DESCRSHORT Position Short Description
EG_ACADEMIC_RANK Academic Rank
EG_GROUP Service Calculation Group
ENCUMBER_INDC Encumbrance Indicator
ENCUMB_SAL_AMT Encumbrance Salary Amount
ENCUMB_SAL_OPTN Encumbrance Salary Option
FLSA_STATUS FLSA Status
FRI_HRS Friday Hours
GRADE_FROM Grade From
GRADE_TO Grade To
GVT_AUDITED_BY_ID Position Audited By
GVT_COMP_AREA Competitive Area
GVT_COMP_LEVEL Competitive Level
GVT_DRUG_TEST_REQ Drug Test (Applicable)
GVT_DT_POSN_ESTAB Date Position Established
GVT_EXEC_FIN_DISCL Executive Financial Disclosure
GVT_FUND_SOURCE Fund Source
GVT_INTEL_POSN Intelligence Position
GVT_LAST_AUDIT_DT Position Audit Date
GVT_LEO_POSITION LEO/Fire Position
GVT_MAINT_REVIEWCD Maintenance Review
GVT_MANTREV_RESULT Maintenance Review Results
GVT_MOB_POSN_IND Mobility Position
GVT_NFC_FUNCTN_CD NFC Function Code (NFC - National FinanceCenter)
GVT_NFC_PI_IND_OVR Override NFC Indicator
GVT_NTE_DATE Not to Exceed Date
GVT_OBLIGATED_TO Obligated To ID
GVT_OBLIG_EXPIR_DT Obligation Expiration
GVT_OCC_SERIES Occupational Series
GVT_ORG_NUMCD1 Numeric Code 1
GVT_ORG_NUMCD2 Numeric Code 2
GVT_ORG_NUMCD3 Numeric Code 3
GVT_ORG_NUMCD4 Numeric Code 4
GVT_ORG_NUMCD5 Numeric Code 5
GVT_ORG_NUMCD6 Numeric Code 6
GVT_ORG_NUMCD7 Numeric Code 7
GVT_ORG_SUBAGENCY Organizational Structure
Appendix EPeopleSoft Human Capital Management Staging Tables
E-7

Table E-7 (Cont.) AIF_PS_POSITION_DATA_STG Table
Column Name Column Description
GVT_ORG_TTL_CD Organization Position Title Code
GVT_ORG_TTL_DESCR Organization Position Title
GVT_PAREN_TITLE Parenthetical Title
GVT_PAR_NBR Personnel Action Request Number
GVT_PAY_PLAN Pay Plan
GVT_PERF_PLAN Performance Plan
GVT_PI_UPD_IND PI Update Indicator
GVT_POI Personnel Office ID
GVT_POSN_LOC Position Location
GVT_POSN_OCCUPIED Position Occupied
GVT_POSN_SENS_CD Sensitivity Code
GVT_PRESIDENT_APPT Presidential Appointment Position
GVT_PROC_INTEG_PSN Procurement Integration Position
GVT_STAFF_LINE Staff/Line Position
GVT_STATUS_TYPE Status Type
GVT_SUB_AGENCY Sub-Agency
GVT_TARGET_GRADE Target Grade
GVT_VACY_REVW_CD Vacancy Review Code
GVT_WIP_STATUS Work-In-Progress Status
GVT_WORK_SCHED Work Schedule
HEALTH_CERTIFICATE Health Certificate
INCLUDE_SALPLN_FLG Include Salary Plan Flag
JOB_SHARE Job Share
KEY_POSITION Key Position
LANGUAGE_SKILL Language Skill
LASTUPDDTTM Last Update Date/Time
LASTUPDOPRID Last Update User ID
LOCATION Location
MAIL_DROP Mail Drop
MANAGER_LEVEL Manager Level
MILITARY_SERVICE Military Service
MIL_RANK Military Rank
MIL_SVC_COMP_CD Military Service Component
MON_HRS Monday Hours
ORGCODE Organization Hierarchy Code
ORGCODE_FLAG Organization Hierarchy Flag
PHONE Phone
PKG_RULE_ID Package Rule ID
PKG_TEMPLATE_ID Package Template ID
POSITION_POOL_ID Position Pool ID
REG_REGION Regulatory Region
REPORTS_TO Reports To
REPORT_DOTTED_LINE Report Dotted Line
Appendix EPeopleSoft Human Capital Management Staging Tables
E-8
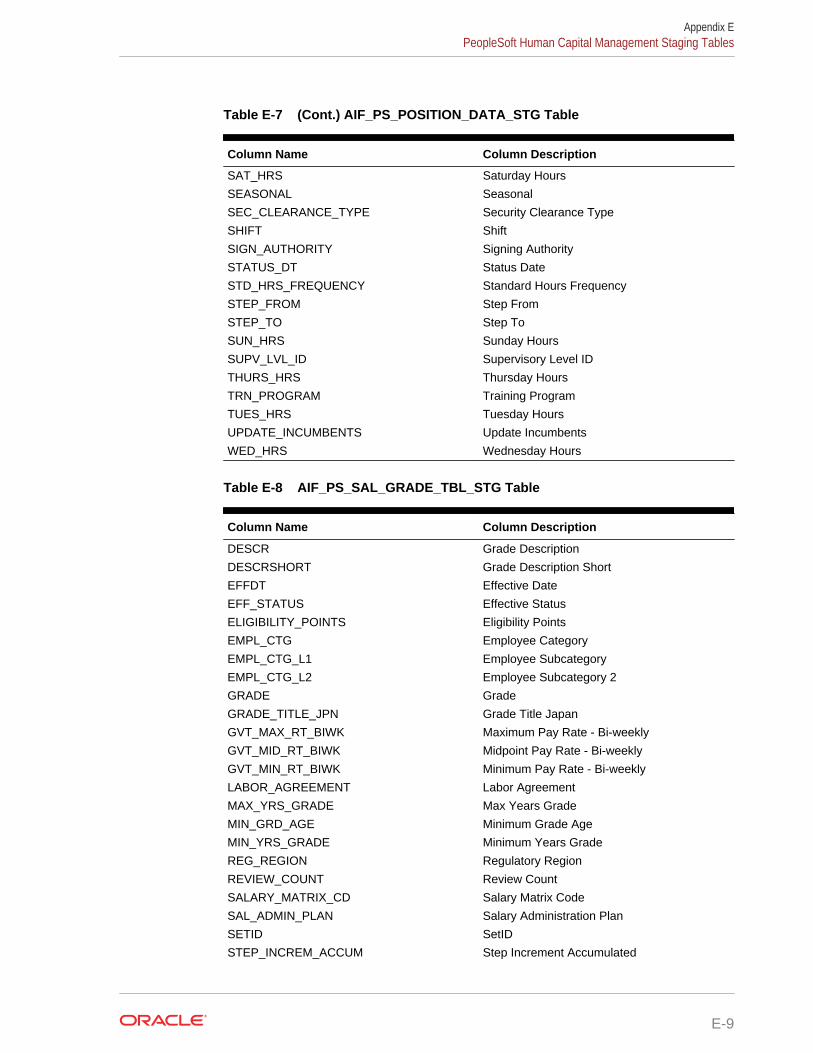
Table E-7 (Cont.) AIF_PS_POSITION_DATA_STG Table
Column Name Column Description
SAT_HRS Saturday Hours
SEASONAL Seasonal
SEC_CLEARANCE_TYPE Security Clearance Type
SHIFT Shift
SIGN_AUTHORITY Signing Authority
STATUS_DT Status Date
STD_HRS_FREQUENCY Standard Hours Frequency
STEP_FROM Step From
STEP_TO Step To
SUN_HRS Sunday Hours
SUPV_LVL_ID Supervisory Level ID
THURS_HRS Thursday Hours
TRN_PROGRAM Training Program
TUES_HRS Tuesday Hours
UPDATE_INCUMBENTS Update Incumbents
WED_HRS Wednesday Hours
Table E-8 AIF_PS_SAL_GRADE_TBL_STG Table
Column Name Column Description
DESCR Grade Description
DESCRSHORT Grade Description Short
EFFDT Effective Date
EFF_STATUS Effective Status
ELIGIBILITY_POINTS Eligibility Points
EMPL_CTG Employee Category
EMPL_CTG_L1 Employee Subcategory
EMPL_CTG_L2 Employee Subcategory 2
GRADE Grade
GRADE_TITLE_JPN Grade Title Japan
GVT_MAX_RT_BIWK Maximum Pay Rate - Bi-weekly
GVT_MID_RT_BIWK Midpoint Pay Rate - Bi-weekly
GVT_MIN_RT_BIWK Minimum Pay Rate - Bi-weekly
LABOR_AGREEMENT Labor Agreement
MAX_YRS_GRADE Max Years Grade
MIN_GRD_AGE Minimum Grade Age
MIN_YRS_GRADE Minimum Years Grade
REG_REGION Regulatory Region
REVIEW_COUNT Review Count
SALARY_MATRIX_CD Salary Matrix Code
SAL_ADMIN_PLAN Salary Administration Plan
SETID SetID
STEP_INCREM_ACCUM Step Increment Accumulated
Appendix EPeopleSoft Human Capital Management Staging Tables
E-9

Table E-8 (Cont.) AIF_PS_SAL_GRADE_TBL_STG Table
Column Name Column Description
STEP_INCREM_TYPE Step Increment Type
Table E-9 AIF_PS_SAL_STEP_TBL_STG Table
Column Name Column Description
APS_MAX_CLS_AUS Maximum Classification
APS_MIN_CLS_AUS Minimum Classification
CLASSN_CURRENT_AUS Job Classification
DAILY_RT Daily Rate
EFFDT Effective Date
GRADE Grade
GVT_BIWEEKLY_RT Bi-weekly Rate
GVT_INCREM_DAYS Days to Next Step Increment
GVT_INCREM_WEEKS Weeks to Next Step Increment
GVT_STEP US Federal Step
GVT_WGI_ADJ Within Grade Increase (WGI) Adjustment
INCREM_HOURS Increment Hours
INCREM_MONTHS Increment Months
SAL_ADMIN_PLAN Salary Administration Plan
SETID SetID
STEP_DESCR Step Description
Table E-10 AIF_PS_BP_JOB_STG Table
Column Name Column Description
ACCDNT_CD_FRA Account Code France
ACCT_CD Account Code
ACTION Action
ACTION_DT Action Date
ACTION_REASON Action Reason
ADDS_TO_FTE_ACTUAL Adds to FTE Actual Count
ANNL_BENEF_BASE_RT Annual Benefit Base Rate
ANNL_BEN_BASE_OVRD Annual Benefit Base Overhead
ANNUAL_RT Annual Rate
APPT_TYPE Appointment Type
BARG_UNIT Bargaining Unit
BAS_ACTION Benefits Administration Action
BAS_GROUP_ID Benefits Administration Group ID
BENEFIT_PROGRAM Benefit Program
BENEFIT_SYSTEM Benefit System
BEN_STATUS Benefit Status
BORDER_WALKER Cross Border Worker
BUSINESS_UNIT Business Unit
Appendix EPeopleSoft Human Capital Management Staging Tables
E-10

Table E-10 (Cont.) AIF_PS_BP_JOB_STG Table
Column Name Column Description
CHANGE_AMT Change Amount
CHANGE_PCT Change Percent
CLASS_INDC Classified/Unclassified Indicator
COBRA_ACTION COBRA Action
COMPANY Company
COMPRATE Compensation Rate
COMP_FREQUENCY Compensation Frequency
CONTRACT_NUM Contract Number
CTG_RATE Category Rate
CURRENCY_CD Currency Code
CURRENCY_CD1 Currency Code 1
CUR_RT_TYPE Currency Rate type
DAILY_RT Daily Rate
DEPTID Department
DEPT_ENTRY_DT Department Entry Date
DIRECTLY_TIPPED Directly Tipped
EARNS_DIST_TYPE Earnings Distribution Type
EEO_CLASS EEO_Class
EFFDT Effective Date
EFFSEQ Effective Sequence
ELIG_CONFIG1 Eligibility Configuration Field 1
ELIG_CONFIG2 Eligibility Configuration Field 2
ELIG_CONFIG3 Eligibility Configuration Field 3
ELIG_CONFIG4 Eligibility Configuration Field 4
ELIG_CONFIG5 Eligibility Configuration Field 5
ELIG_CONFIG6 Eligibility Configuration Field 6
ELIG_CONFIG7 Eligibility Configuration Field 7
ELIG_CONFIG8 Eligibility Configuration Field 8
ELIG_CONFIG9 Eligibility Configuration Field 9
EMPLID Employee ID
EMPL_CLASS Employee Classification
EMPL_CTG Employee Category
EMPL_CTG_L1 Employee Subcategory
EMPL_CTG_L2 Employee Subcategory 2
EMPL_RCD Employee Record Number
EMPL_STATUS Employee Status
EMPL_TYPE Employee Type
ENCUMB_OVERRIDE Encumbrance Override
ENTRY_DATE Entry Date
ESTABID Establishment ID
EXEMPT_HOURS_MONTH Exempted Hours Month
EXEMPT_JOB_LBR Exempted
FICA_STATUS_EE FICA Status
Appendix EPeopleSoft Human Capital Management Staging Tables
E-11

Table E-10 (Cont.) AIF_PS_BP_JOB_STG Table
Column Name Column Description
FLSA_STATUS FLSA Status
FORCE_PUBLISH FTE Force Publish FTE
FULL_PART_TIME Full or Part-Time
FUNCTION_CD Function Code
GL_PAY_TYPE GL Pay type
GP_ASOF_DT_EXG_RT Use Rate As Of
GP_DFLT_CURRTTYP Use Pay Group Rate Type
GP_DFLT_ELIG_GRP Use Pay Group Eligibility
GP_DFLT_EXRTDT Use Pay Group As Of Date
GP_ELIG_GRP Eligibility Group
GP_PAYGROUP Pay Group
GRADE Grade
GRADE_ENTRY_DT Grade Entry Date
GVT_ANNL_RT_NO_LOC Annuity Rate
GVT_ANNUITY_OFFSET Annuity Offset
GVT_ANNUIT_COM_DT Annuity Date
GVT_ANN_IND Annuity
GVT_BASIC_LIFE_RED Basic Life Red
GVT_BIWEEKLY_RT Biweekly Rate
GVT_BW_RT_NO_LOC Biweekly Rate No Location
GVT_CHANGE_FLAG Change Flag
GVT_COMPRATE Compensate Rate
GVT_CONT_EMPLID Contract Employee ID
GVT_CSRS_FROZN_SVC CSRS Frozen Service
GVT_DAILY_RT Daily Rate
GVT_DED_PRORT_DT DED Prorate Date
GVT_DETL_POSN_NBR Position Number
GVT_DLY_RT_NO_LOC Daily Rate No Location
GVT_EFFDT Effective Date
GVT_EFFDT_PROPOSED Effective Date Proposed
GVT_ELIG_FEHB Eligibility FEHB
GVT_FEGLI FEGLI Code
GVT_FEGLI_BASC_PCT FEGLI Basic Percent
GVT_FEGLI_LIVING FEGLI Living Benefits
GVT_FEGLI_OPT_PCT FEGLI Opted Percent
GVT_FEHB_DT FEHB Date
GVT_FEHB_PCT FEHB Percent
GVT_FERS_COVERAGE FERS Coverage
GVT_HRLY_RT_NO_LOC Hourly Rate No Location
GVT_LEG_AUTH_1 Legal Authority 1
GVT_LEG_AUTH_2 Legal Authority 2
GVT_LEO_POSITION LEO/Fire Position (LEO - Law enforcementofficer)
GVT_LIVING_AMT Living Amount
Appendix EPeopleSoft Human Capital Management Staging Tables
E-12

Table E-10 (Cont.) AIF_PS_BP_JOB_STG Table
Column Name Column Description
GVT_LOCALITY_ADJ Locality Adjustment
GVT_MNLY_RT_NO_LOC Monthly Rate No Location
GVT_NID_CHANGE NID Change
GVT_NOA_CODE NOA Code
GVT_OTH_PAY_CHG Other Pay Change
GVT_PAR_AUTH_D1 Authority 1 Description - Part 1
GVT_PAR_AUTH_D1_2 Authority 1 Description - Part 2
GVT_PAR_AUTH_D2 Authority 2 Description - Part 1
GVT_PAR_AUTH_D2_2 Authority 2 Description - Part 1
GVT_PAR_NTE_DATE NTE Date
GVT_PAY_BASIS Pay Basis
GVT_PAY_FLAG Pay Flag
GVT_PAY_PLAN Pay Plan
GVT_PAY_RATE_DETER Pay Rate Determinant
GVT_PI_UPD_IND PI Update Indicator
GVT_POI Personnel Office ID
GVT_POSN_OCCUPIED Position Occupied
GVT_PREV_RET_COVRG Previous Retirement Coverage
GVT_RETIRE_PLAN Retire Plan
GVT_RETRO_BSE_FLAG Retrospective Base Flag
GVT_RETRO_DED_FLAG Retrospective Deduction Flag
GVT_RETRO_FLAG Retrospective Flag
GVT_RETRO_JOB_FLAG Retrospective Job Flag
GVT_ROUTE_NEXT Route to Next
GVT_RTND_GRADE Retained Grade
GVT_RTND_GVT_STEP Retained Government Step
GVT_RTND_PAY_PLAN Retained Pay Plan
GVT_RTND_SAL_PLAN Retained Salary Plan
GVT_RTND_STEP Retained Step
GVT_S113G_CEILING S113G Ceiling
GVT_SF52_NBR SF52 Number
GVT_STATUS_TYPE Status Type
GVT_STEP Step
GVT_SUB_AGENCY Sub Agency
GVT_TRANS_NBR Transaction Number
GVT_TRANS_NBR_SEQ Transaction Number Sequence
GVT_TSP_UPD_IND TSP Status
GVT_TYPE_OF_APPT Type of Appointment
GVT_WIP_STATUS WIP Status
GVT_WORK_SCHED Work Schedule
GVT_XFER_FROM_AGCY Transfer From Agency
GVT_XFER_TO_AGCY Transfer To Agency
HOLIDAY_SCHEDULE Holiday Schedule
Appendix EPeopleSoft Human Capital Management Staging Tables
E-13

Table E-10 (Cont.) AIF_PS_BP_JOB_STG Table
Column Name Column Description
HOURLY_RT Hourly Rate
HOURLY_RT_FRA Hourly Rate France
INTERCTR_WRKS_CNCL Works Council Role
JOBCODE Job Code
JOB_DATA_SRC_CD Job Source Code
JOB_ENTRY_DT Job Entry Date
JOB_INDICATOR Job Indicator
LABOR_AGREEMENT Labor Agreement
LABOR_FACILITY_ID Labor Facility ID
LABOR_TYPE_GER Labor Type Germany
LAYOFF_EXEMPT_FLAG Layoff Exempt Flag
LAYOFF_EXEMPT_RSN Layoff Exempt Reason
LBR_FAC_ENTRY_DT Labor Facility Entry Date
LOCATION Location
LUMP_SUM_PAY Lump Sum Pay
MAIN_APPT_NUM_JPN Main Appointment Number
MATRICULA_NBR Matricula Number
MONTHLY_RT Monthly Rate
OFFICER_CD Officer Code
PAID_FTE Paid FTE
PAID_HOURS Paid Hours
PAID_HRS_FREQUENCY Paid Hours Frequency
PAYGROUP Pay Group
PAY_SYSTEM_FLG Pay System Flag
PAY_UNION_FEE Pay Union Fee
PERFORM_GROUP_GER Perform Group Germany
POSITION_ENTRY_DT Position Entry Date
POSITION_NBR Position Number
POSITION_OVERRIDE Position Override
POSN_CHANGE_RECORD Position Change Record
PRORATE_CNT_AMT Prorate Contract Change Amount
REG_REGION Regulatory Region
REG_TEMP Regular or Temporary
REPORTS_TO Reports To
SAL_ADMIN_PLAN Salary Administration Plan
SETID_DEPT SetID Department
SETID_JOBCODE SetID Job Code
SETID_LBR_AGRMNT SetID Labor Agreement
SETID_LOCATION SetID Location
SETID_SALARY SetID Salary
SHIFT Shift
SHIFT_FACTOR Shift Factor
SHIFT_RT Shift Rate
Appendix EPeopleSoft Human Capital Management Staging Tables
E-14

Table E-10 (Cont.) AIF_PS_BP_JOB_STG Table
Column Name Column Description
SOC_SEC_RISK_CODE Social Security Risk Code
SPK_COMM_ID_GER Spokesman Committee ID
STD_HOURS Standard Hours
STD_HRS_FREQUENCY Standard Hours
STEP Frequency Step
STEP_ENTRY_DT Step Entry Date
SUPERVISOR_ID Supervisor ID
TARIFF_AREA_GER Tariff Area Germany
TARIFF_GER Tariff Germany
TAX_LOCATION_CD Tax Location Code
UNION_CD Union Code
UNION_FEE_AMOUNT Union Fee Amount
UNION_FEE_END_DT Union Fee End Date
UNION_FEE_START_DT Union Fee Start Date
UNION_FULL_PART Union Participation
UNION_POS Union Position
UNION_SENIORITY_DT Union Seniority Date
UPDATE_PAYROLL Update Payroll
VALUE_1_FRA Value 1
VALUE_2_FRA Value 2
VALUE_3_FRA Value 3
VALUE_4_FRA Value 4
VALUE_5_FRA Value 5
WORK_DAY_HOURS Work Day Hours
WPP_STOP_FLAG Stop Wage Progression
WRKS_CNCL_FUNCTION Work Council Function
WRKS_CNCL_ROLE_CHE Work Council Role
CHARTFIELD
Table E-11 Table Type—CHARTFIELD
Table Name Column Name Column Description
AIF_PS_GL_ACCOUNT_TBL_STG
ACCOUNT Account
AIF_PS_AFFILIATE_VW_STG
AFFILIATE Affiliate
AIF_PS_ALTACCT_TBL_STG ALTACCT Alternate Account
AIF_PS_BUD_REF_TBL_STG
BUDGET_REF Budget Ref
AIF_PS_CHARTFIELD1_TBL_STG
CHARTFIELD1 Chartfield 1
AIF_PS_CHARTFIELD2_TBL_STG
CHARTFIELD2 Chartfield 2
Appendix EPeopleSoft Human Capital Management Staging Tables
E-15

Table E-11 (Cont.) Table Type—CHARTFIELD
Table Name Column Name Column Description
AIF_PS_CHARTFIELD3_TBL_STG
CHARTFIELD3 Chartfield 3
AIF_PS_CLASS_CF_TBL_STG
CLASS_FLD Class
AIF_PS_DEPT_CF_TBL_STG DEPTID_CF Department
AIF_PS_FUND_TBL_STG FUND_CODE Fund Code
AIF_PS_OPER_UNIT_TBL_STG
OPERATING_UNIT Operating Unit
AIF_PS_PRODUCT_TBL_STG
PRODUCT Product
AIF_PS_PROGRAM_TBL_STG
PROGRAM_CODE Program
AIF_PS_PROJECT_TBL_STG
PROJECT Project
Appendix EPeopleSoft Human Capital Management Staging Tables
E-16
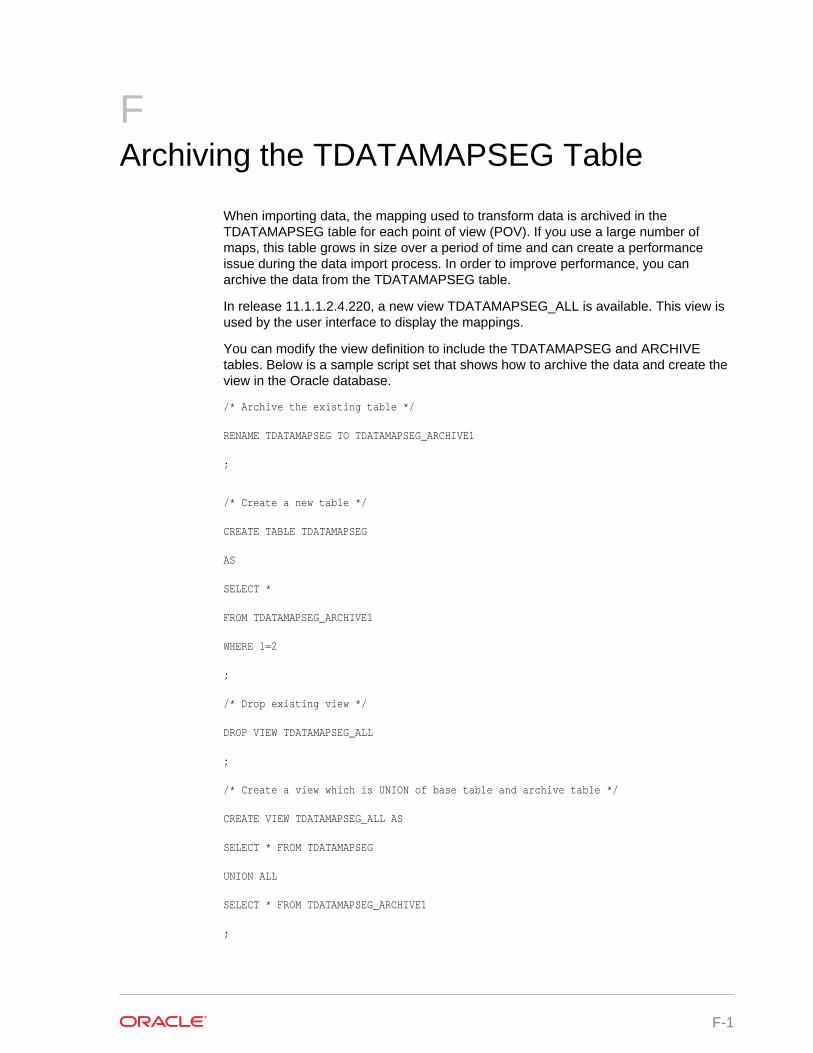
FArchiving the TDATAMAPSEG Table
When importing data, the mapping used to transform data is archived in theTDATAMAPSEG table for each point of view (POV). If you use a large number ofmaps, this table grows in size over a period of time and can create a performanceissue during the data import process. In order to improve performance, you canarchive the data from the TDATAMAPSEG table.
In release 11.1.1.2.4.220, a new view TDATAMAPSEG_ALL is available. This view isused by the user interface to display the mappings.
You can modify the view definition to include the TDATAMAPSEG and ARCHIVEtables. Below is a sample script set that shows how to archive the data and create theview in the Oracle database.
/* Archive the existing table */
RENAME TDATAMAPSEG TO TDATAMAPSEG_ARCHIVE1
;
/* Create a new table */
CREATE TABLE TDATAMAPSEG
AS
SELECT *
FROM TDATAMAPSEG_ARCHIVE1
WHERE 1=2
;
/* Drop existing view */
DROP VIEW TDATAMAPSEG_ALL
;
/* Create a view which is UNION of base table and archive table */
CREATE VIEW TDATAMAPSEG_ALL AS
SELECT * FROM TDATAMAPSEG
UNION ALL
SELECT * FROM TDATAMAPSEG_ARCHIVE1
;
F-1

A similar process can be used for the SQL Server. Multiple archive tables can becreated over a period of time and the view can be modified as needed.
Appendix F
F-2

GWorking with Open Interface Adapters
An open interface adapter is used as a generic staging table in Oracle HyperionFinancial Data Quality Management, Enterprise Edition from which you can move orextract data using any system.
Setting up the Open Interface AdapterThe Open Interface Adapter is used to map data from the open interface table(AIF_OPEN_INTERFACE) to the Oracle Hyperion Financial Data QualityManagement, Enterprise Edition staging tables. Typically, the Open Interface Adapteris used to load from a source not supported with a pre-packaged adapter. The OpenInterface Adapter eliminates the need to process and manage data files, but the useris responsible for loading the table. Load methods include:
• Event script in FDMEE
• ODI
• SQL Loader
• anything
You configure this adapter using FDMEE to populate the staging table with the relateddata from the open interface table. You load the open interface table with the tool ofyour choice like a pl/sql routine, a sql loader script or a custom program. When youuse ODI to load the open interface table, you can customize the Open InterfaceAdapter ODI package shipped with FDMEE to call a custom ODI interface to load theopen interface table as a step in the data load process.
Using the Open Interface TableThe open interface table is called AIF_OPEN_INTERFACE. The table definition is asfollows:
Table G-1 AIF_OPEN_INTERFACE Table Definitions
Column Name Data Type Comment
BATCH_NAME VARCHAR2(200 BYTE) Required. Used to filter thedata
YEAR NUMBER(15,0) Optional. Required if periodmapping is Explicit
PERIOD VARCHAR2(30 BYTE) Optional. Required if periodmapping is Explicit
PERIOD_NUM NUMBER(15,0) Optional. Required if periodmapping is Explicit
CURRENCY VARCHAR2(10 BYTE) Required.
G-1

Table G-1 (Cont.) AIF_OPEN_INTERFACE Table Definitions
Column Name Data Type Comment
DATAVIEW VARCHAR2(8 BYTE) Used for HFM applications.Assign value of YTD orPeriodic. Default value is YTD
DESC1 VARCHAR2(75 BYTE) Optional. Mapped to DESC1
DESC2 VARCHAR2(75 BYTE) Optional. Mapped to DESC2
AMOUNT NUMBER(29,12) Required. Mapped toAMOUNT
AMOUNT_YTD NUMBER(29,12) Optional. Mapped toAMOUNT_YTD
AMOUNT_PTD NUMBER(29,12) Optional. Mapped toAMOUNT_PTD
COL01 VARCHAR2(75 BYTE) Input Source Column 1
COL02 VARCHAR2(75 BYTE) Input Source Column 2
COL03 VARCHAR2(75 BYTE) Input Source Column 3
….
COL30 VARCHAR2(75 BYTE) Input Source Column 30
ATTR1 VARCHAR2(20 BYTE) Optional. Mapped to ATTR1
ATTR2 VARCHAR2(20 BYTE) Optional. Mapped to ATTR2
…
ATTR13 VARCHAR2(20 BYTE) Optional Mapped to ATTR13
ATTR14 VARCHAR2(20 BYTE) Reserved. Do not map.
Loading Source Data using Custom LoadersTo load data using the Open Interface Table and Adapter:
1. Populate the Open Interface table as needed.
2. Create any new period mappings as needed.
3. Create a new source system:
a. On the Setup tab, under Register, then Source System.
b. Select Add to add a new source system.
c. Specify the Name, Source System Type, and ODI Context Code.
The ODI context code refers to the context defined in Oracle Data Integrator.A context groups the source and target connection information.
For the Source system Type, select "Others," and for the ODI Context Code,enter the default "GLOBAL." If the ODI has been set up differently from thedefaults, enter the appropriate ODI Context Code if it is not "GLOBAL."
4. From Source Adapter, copy the Open Interface Adapter to a new adapter.
a. Provide a new adapter key.
The adapter key is ten characters long. Once the adapter key has beencreated, it cannot be modified.
b. Change the "Adapter Name" so that it is different from the copied adaptername.
Appendix GSetting up the Open Interface Adapter
G-2
The adapter name is used in pick lists, and needs to be changed so that thecopied adapter can be distinguished from the original adapter.
5. On the Import Format screen, define a new import format.
a. Select the source system created in Step 3 and the adapter from Step 4.
b. Map the source columns to the appropriate target dimensions.
6. When the import format mappings are complete, select Regenerate ODIScenario.
This step generates the ODI Scenario based on the import format mappings.
7. On the Locations screen, define a new location using the import format.
8. On the Data Rule screen, define the new data rule.
a. Select the appropriate period mapping type.
Provide a value for the batch name. The batch name is used by the system asa filter on the open interface table. This enables multiple users to load datainto a single interface table but then segregate the data by the batch name.
b. Enter Y or N for the Delete Data After Import option.
9. Execute the data rule using one of three methods:
• Data Rule Execution
• Workbench
• Batch Execution Script
Customizing ODI to Load Data from a Custom SourceYou can modify the Open Interface Adapter to meet your business needs, and thenonce fully tested, move the updated content to a different environment for furthertesting or use in production. The steps to perform the customization and migration arelisted below.
Use ODI Studio to perform the following steps. Before performing these steps, backupyou work repository, custom project, and model.
When exporting and importing objects, use the following options:
• When exporting, select the Child Components Export option.
• When importing, use Synonym Mode INSERT_UPDATE as the Import Type.
To modify the Open Interface Adapter:
1. In the Oracle Hyperion Financial Data Quality Management, Enterprise Editionrepository, export the Open Interface Adapter Model and ERPI Target Modelfolders.
2. In the FDMEE repository, export the Open Interface Adapter Project.
3. Create a new work repository with a new ID.
Use a repository ID of 900 or higher to avoid conflicts with Oracle shippedcomponents. This is your development repository when performing customization.It is referred to as the "custom repository" in the following steps.
4. In the custom repository, import the model folders named: Open InterfaceAdapter Model and ERPI Target Model.
Appendix GSetting up the Open Interface Adapter
G-3

5. In the custom repository, import the Open Interface Adapter Project.
6. Perform any customizations in the custom repository.
When customizing objects, do not modify FDMEE seeded objects imported fromthe FDMEE repository. Instead, copy needed objects, use the" Custom" suffix innames to identify them, and then modify them.
For example, copy the "Open Interface Balances" package as "Open InterfaceBalances Custom," and make any edits to it.
7. Export customized objects (for example, Project, Packages, Interfaces) from thecustom repository and import them into the FDMEE repository.
8. Using the FDMEE Source Adapter user interface, copy the Open InterfaceAdapter to a new adapter and complete the following:
• For the new adapter, provide a new adapter key. The adapter key can be tencharacters long. Once it has been created, it cannot be modified.
• Make any necessary modifications to the Display Names. Display Name areshown in the Import Format and Data Load Workbench.
• Specify the ODI Package Name and ODI Project Code as specified in thecustom project.
Migrating the CustomizationTo migrate a customization from a test or production repository:
1. Export the model and project from the custom repository.
2. Import the model and project into the target Oracle Hyperion Financial DataQuality Management, Enterprise Edition repository (using the Synonym ModeINSERT_UPDATE as the Import Type).
Appendix GSetting up the Open Interface Adapter
G-4

HPeopleSoft Commitment Control
PeopleSoft's Commitment Control is a budgetary control feature in the PeopleSoftGeneral Ledger product, which supports the posting of budgets and tests transactionsagainst budgetary balances according to the rules configured by users. UsingCommitment Control, you can define an alternate structure from the General Ledger tomanage budgets based on the Chartfield (account segments) and calendars. Forexample, you can choose to control budgets at a Division level by Quarter whereasactual expenses are recorded at the Cost Center level by month.
Additionally, you can make large scale changes to budgets, and write revisions asjournals back to source systems for posting while maintaining distinctions inPeopleSoft budgets between original proposals, adjustments, revisions, and adjustedbudgets. Oracle Hyperion Planning, for example, can be used to prepare the initialbudget at the start of the fiscal year. It can also be used to make revisions to thebudgets throughout the fiscal year. As budgets are prepared and revised, they have tobe validated and posted to Commitment Control, which manages and controls theactual revenue and expenses.
Oracle Hyperion Financial Data Quality Management, Enterprise Edition integrateswith Commitment Control by enabling you to use Hyperion Planning to prepare andmaintain the budgets. The integration involves:
• loading the Actual from Commitment Control
• validating budgets during preparation and revision against Commitment Controlbudget definitions
• posting the initial budget to Commitment Control
• posting ongoing budget revisions to Commitment Control
To use Commitment Control within the context of FDMEE, complete the following:
1. In Source System, register your General Ledger and HRMS source systems.
2. In Source System, to use PeopleSoft Commitment Control, select EnableCommitment Control.
3. In Target Application, register the target application.
4. In Import Format, define an import format that specifies how to map PeopleSoftchart fields to dimensions in the Public Sector Planning and Budgetingapplications.
5. In Data Load Rule, define a location that identifies the PeopleSoft accountingentity (business unit) from which to load data.
6. In Data Load Rule, specify a period mapping type of "Budget."
7. In Data Load Rule define global, application, and source mappings that specifyhow period keys in the PeopleSoft calendar and time periods correspond toperiods in your Public Sector Planning and Budgeting budget application such asmonths, quarters, and years. Options include:
• Select an "As of Date."
H-1

The “As of Date” to determine effective dated records, for example, BudgetDefinition.
• Select a "Target for Blank Period" if the budget is based on a project period.
• Optionally, in Period Mappings, map a budget period by mapping a calendarand period to an FDMEE period.
Commitment Control enables different calendars to be used for different rules.The calendar can be of different granularity and duration. For example, youcan map the Chartfield used for rule ranges to the Hyperion Planning Entitydimension. When you specify an explicit period mapping, you can map aBudget period by pointing to a calendar and period to an FDMEE period. Thesame FDMEE period can be mapped to multiple source periods from differentcalendars.
8. Run the data load rules.
9. In Import Format define an import format that contains write back mappings thatidentify the Public Sector Planning and Budgeting data to write to the PeopleSoftaccounting entity chart fields.
10. In Data Load Rule, define a data load rule to write back.
Write-back period mapping is based on explicit period maps. Every Entity isassociated with a different Budget Calendar.
11. Run the data load rule to write.
Appendix H
H-2

IReport Query Table Reference
When creating reports, you can use a base SQL query and a parameter SQL query toenhance the data shown in the report. The base SQL query can be used to pull datafrom various tables and display the data as report output. For example, using onequery definition, you can show different columns or groupings. In one report, you canlist amounts by account and group by entity, and in another list amount by entity andgroup by account.
The parameter SQL query enables you to run a query against the parameters in thereport definition. For example, the query can be used to select the Location, Period,Category, or Account groupings. In one report, you can list amounts by account andgroup by entity, and in another list amount by entity and group by account.
The Oracle Hyperion Financial Data Quality Management, Enterprise Edition tablesthat are used in the base and parameter SQL query are:
• TDATASEG
• TLOGPROCESS
TDATASEG Table ReferenceThe TDATASEG table is used to store the data loaded by the user, and thetransformation between the source dimension members and results of the mappingprocess.
Note:
When loading text, the column in TDATASEG it is loaded to is DATA, and themapped result is loaded to DATAX.
Table I-1 TDATASEG Table Reference
Column Name Definition Description
DATAKEY NUMBER(31,0) NOT NULL ENABLE System generated unique key foreach row of data
PARTIONNKEY NUMBER(10,0) NOT NULL ENABLE Location key. Join toTPOVPARTITION to retrieve locationinformation.
CATKEY NUMBER(10,0) NOT NULL ENABLE Category Key. Join toTPOVCATEGORY to retrievecategory information.
PERIODKEY DATE NOT NULL ENABLE Period Key. Join to TPOVPERIOD toretrieve Oracle Hyperion FinancialData Quality Management,Enterprise Edition to EPM periodmapping details.
I-1

Table I-1 (Cont.) TDATASEG Table Reference
Column Name Definition Description
DATAVIEW VARCHAR2(8 CHAR) DEFAULT'YTD' NOT NULL ENABLE
Hard coded to YTD for file, and set toYTD for balance sheet and PTD forincome statement when pulling datafrom an Enterprise ResourcePlanning (ERP) system.
CURKEY VARCHAR2(10 CHAR) DEFAULT Currency code of the data.
CALCACCTTYPE NUMBER(6,0) DEFAULT 9 NOTNULL ENABLE
Indicates if row was imported fromsource or computed by Logic Group:• 9=Imported• 5=Calculated and Exported• 1=Calculated, and Not Exported
CHANGESIGN NUMBER(1,0) DEFAULT 0 NOTNULL ENABLE
Indicates that the sign of theimported amount should bereversed:• 0=No Change• 1=Reverse Sign
JOURNALID VARCHAR2(10 CHAR) DEFAULT ID for the Journal. User providedvalue
AMOUNT NUMBER(29,12) DEFAULT 0 NOTNULL ENABLE
Amount loaded from source
AMOUNTX NUMBER(29 12) DEFAULT 0 NOTNULL ENABLE
Amount after any transformationrules. This value is loaded to thetarget application.
DESC1 VARCHAR2(240 CHAR) DEFAULT Description can be imported from file
DESC2 VARCHAR2(75 CHAR) DEFAULT Description can be imported from file
ACCOUNT VARCHAR2(75 CHAR) NOT NULLENABLE
Account member from source
ACCOUNTX VARCHAR2(4000 CHAR) DEFAULT Account member after mapping rulesprocessed
ACCOUNTR NUMBER(10,0) DEFAULT 0 NOTNULL ENABLE
Key to Mapping used for thisdimension. Refers to DATAKEY inTDATAMAPSEG.
ACCOUNTF NUMBER(6,0) DEFAULT 0 NOTNULL ENABLE
Map types:• 1=Exception• 3=Between• 4=Range
ENTITY VARCHAR2(75 CHAR) DEFAULT Entity member from source
ENTITYX VARCHAR2(75 CHAR) DEFAULT Entity member after mapping rulesprocessed. This value is exported.
ENTITYR NUMBER(10,0) DEFAULT 0 NOTNULL ENABLE
Key to Mapping used for thisdimension. Refers to DATAKEY inTDATAMAPSEG
ENTITYF NUMBER(6,0) DEFAULT 0 NOTNULL ENABLE
Map types:• 1=Exception• 3=Between• 4=Range
ICP VARCHAR2(75 CHAR) DEFAULT ICP from source
ICPX VARCHAR2(75 CHAR) DEFAULT ICP after mapping rules processed.This value is exported.
Appendix ITDATASEG Table Reference
I-2

Table I-1 (Cont.) TDATASEG Table Reference
Column Name Definition Description
ICPR NUMBER(10,0) DEFAULT 0 NOTNULL ENABLE
Key to mapping used for thisdimension. Refers to DATAKEY inTDATAMAPSEG.
ICPF NUMBER(6,0) DEFAULT 0 NOTNULL ENABLE
Map type:• 1=Exception• 3=Between• 4=Range
UD1 VARCHAR2(75 CHAR) DEFAULT UD1 from source
UD2 VARCHAR2(75 CHAR) DEFAULT UD2 from source
UD3 VARCHAR2(75 CHAR) DEFAULT UD3 from source
UD4 VARCHAR2(75 CHAR) DEFAULT UD4 from source
UD5 VARCHAR2(75 CHAR) DEFAULT UD5 from source
UD6 VARCHAR2(75 CHAR) DEFAULT UD6 from source
UD7 VARCHAR2(75 CHAR) DEFAULT UD7 from source
UD8 VARCHAR2(75 CHAR) DEFAULT UD8 from source
UD9 VARCHAR2(75 CHAR) DEFAULT UD9 from source
UD10 VARCHAR2(75 CHAR) DEFAULT UD10 from source
UD11 VARCHAR2(75 CHAR) DEFAULT UD11 from source
UD12 VARCHAR2(75 CHAR) DEFAULT UD12 from source
UD13 VARCHAR2(75 CHAR) DEFAULT UD13 from source
UD14 VARCHAR2(75 CHAR) DEFAULT UD14 from source
UD15 VARCHAR2(75 CHAR) DEFAULT UD15 from source
UD16 VARCHAR2(75 CHAR) DEFAULT UD16 from source
UD17 VARCHAR2(75 CHAR) DEFAULT UD17 from source
UD18 VARCHAR2(75 CHAR) DEFAULT UD18 from source
UD19 VARCHAR2(75 CHAR) DEFAULT UD19 from source
UD20 VARCHAR2(75 CHAR) DEFAULT UD20 from source
UD1X VARCHAR2(75 CHAR) DEFAULT UD1 after mapping rules processed.This value is exported.
UD1R NUMBER(10,0) DEFAULT 0 NOTNULL ENABLE
Key to Mapping used for thisdimension. Refers to DATAKEY inTDATAMAPSEG
UD1F NUMBER(6,0) DEFAULT 0 NOTNULL ENABLE
Map type:• 1=Exception• 3=Between• 4=Range
ARCHIVEID NUMBER(31,0) DEFAULT 0 NOTNULL ENABLE
Future use
HASMEMOITEM NUMBER(1,0) DEFAULT 0 NOTNULL ENABLE
Future use
STATICDATAKEY NUMBER(31,0) DEFAULT 0 NOTNULL ENABLE
Future use
ATTR1 VARCHAR2(20 CHAR) DEFAULT User defined attribute - used asneeded for mapping or drill-through
ATTR2 VARCHAR2(20 CHAR) DEFAULT User defined attribute - used asneeded for mapping or drill-through
Appendix ITDATASEG Table Reference
I-3

Table I-1 (Cont.) TDATASEG Table Reference
Column Name Definition Description
ATTR3 VARCHAR2(20 CHAR) DEFAULT User defined attribute - used asneeded for mapping or drill-through
ATTR4 VARCHAR2(20 CHAR) DEFAULT User defined attribute - used asneeded for mapping or drill-through
ATTR5 VARCHAR2(20 CHAR) DEFAULT User defined attribute - used asneeded for mapping or drill-through
ATTR6 VARCHAR2(20 CHAR) DEFAULT User defined attribute - used asneeded for mapping or drill-through
ATTR7 VARCHAR2(20 CHAR) DEFAULT User defined attribute - used asneeded for mapping or drill-through
ATTR8 VARCHAR2(20 CHAR) DEFAULT User defined attribute - used asneeded for mapping or drill-through
ATTR9 VARCHAR2(20 CHAR) DEFAULT User defined attribute - used asneeded for mapping or drill-through
ATTR10 VARCHAR2(20 CHAR) DEFAULT User defined attribute - used asneeded for mapping or drill-through
ATTR11 VARCHAR2(20 CHAR) DEFAULT User defined attribute - used asneeded for mapping or drill-through
ATTR12 VARCHAR2(20 CHAR) DEFAULT User defined attribute - used asneeded for mapping or drill-through
ATTR13 VARCHAR2(20 CHAR) DEFAULT User defined attribute - used asneeded for mapping or drill-through
ATTR14 VARCHAR2(20 CHAR) DEFAULT User defined attribute - used asneeded for mapping or drill-through
CODE_COMBINATION_ID VARCHAR2(155 CHAR) Used for integration with Oracle E-Business Suite.
AMOUNT_YTD NUMBER(29,12) YTD Amount. Used for E-BusinessSuite, Peoplesoft, Fusion datasources
AMOUNT_PTD NUMBER(29,12) PTD Amount. Used for E-BusinessSuite, Peoplesoft, Fusion datasources
LOADID NUMBER(15,0) Process ID that created or updatedthis row.
RULE_ID NUMBER(15,0) Data Rule ID used to create this row.Join to AIF_BALANCE_RULES fordetails.
STAT_BALANCE_FLAG VARCHAR2(1 CHAR) Indicates if balance is a statistic:• Y=Stat• N=Balance
VALID_FLAG VARCHAR2(1 CHAR) Indicates if row has valid mappings:• Y=Valid• N=Not Valid• I=Ignore
Appendix ITDATASEG Table Reference
I-4

TLOGPROCESS Table ReferenceThe TLOGPROCESS table is used to store the workflow process status for a location,category, and period.
Table I-2 TLOGPROCESS Table Reference
Column Name Definition Description
PARTITIONKEY NUMBER(10,0) NOT NULL ENABLE Location key. Join toTPOVPARTITION to retrieve locationinformation.
CATKEY NUMBER(10,0) NOT NULL ENABLE Category Key. Join toTPOVCATEGORY to retrievecategory information.
PERIODKEY DATE NOT NULL ENABLE Period Key. Join to TPOVPERIOD toretrieve Oracle Hyperion FinancialData Quality Management,Enterprise Edition to EPM periodmapping details.
RULE_ID NUMBER(15,0) NOT NULL ENABLE Data Rule ID. Join toAIF_BALANCE_RULES for details.
PROCESSIMP NUMBER(1,0) DEFAULT 0 NOTNULL ENABLE
Status for Import step:• 0=Not started or failed• 1=Successful
PROCESSIMPNOTE VARCHAR2(50 CHAR) DEFAULTNULL
Textual note on Validate status:• Import Successful• Recalculated OK• Import Error• Recalculate Failed• MultiLoad• BypassDataLoad• Logic Calc Err• Map Calc Err
PROCESSVAL NUMBER(1,0) DEFAULT 0 NOTNULL ENABLE,
Status for Validate step:• 0=Not started or failed• 1=Successful
PROCESSVALNOTE VARCHAR2(50 CHAR) DEFAULTNULL,
Textual note on Validate step:• Validate Successful• Error= x records (Where X =
how many members did nothave map rules)
• BypassDataLoad
PROCESSEXP NUMBER(1,0) DEFAULT 0 NOTNULL ENABLE,
Status for Export step:• 0=Not started or failed• 1=Successful
PROCESSEXPNOTE VARCHAR2(50 CHAR) DEFAULTNULL
Textual note on Export step:• Last successful export• Export -B Successful• Export Successful• BypassDataLoad
Appendix ITLOGPROCESS Table Reference
I-5

Table I-2 (Cont.) TLOGPROCESS Table Reference
Column Name Definition Description
PROCESSENTLOAD NUMBER(1,0) DEFAULT 0 NOTNULL ENABLE
Status for Load step:• 0=Not started or failed• 1=Successful
PROCESSENTLOADNOTE VARCHAR2(50 CHAR) DEFAULTNULL
Textual note on Load status:• Time Date stamp for success• Load Error• BypassDataLoad
PROCESSENTVAL NUMBER(1,0) DEFAULT 0 NOTNULL ENABLE,
Status for Check step:• 0=Not started or failed• 1=Successful
PROCESSENTVALNOTE VARCHAR2(50 CHAR) DEFAULTNULL
Textual note on Check step:• Check Successful• Check Error• BypassDataLoad
PROCESSCERT NUMBER(1,0) DEFAULT 0 NOTNULL ENABLE,
Status for Certification step:• 0=Not started or unsubmitted• 1=Submitted
PROCESSCERTNOTE VARCHAR2(50 CHAR) DEFAULTNULL,
Textual note on Load status:• Controls Submitted• Controls Cleared• Not Submitted• No Controls Found for Profile• No Controls Group Assigned• Error Setting Status
PROCESSASSES NUMBER(1,0) DEFAULT 0 NOTNULL ENABLE,
Status for Assessment (processexplorer) step:• 0=Not started or unsubmitted• 1=Submitted
PROCESSASSESNOTE VARCHAR2(50 CHAR) DEFAULTNULL,
Textual note on Load status:• Controls Submitted• Controls Cleared• Not Submitted• No Controls Found for Profile• No Controls Group Assigned• Error Setting Status
PROCESSCHILDDONE NUMBER(1,0) DEFAULT 0 NOTNULL ENABLE
Status for Certification status forparent locations step:• 0=Not started or all children not
complete• 1=All children complete
PROCESSCHILDDONENOTE VARCHAR2(50 CHAR) DEFAULTNULL
Textual note on Certification statusfor parent location:• Children Submitted• No Children
PROCESSUD1 NUMBER(1,0) DEFAULT 0 NOTNULL ENABLE
Not used
PROCESSUD1NOTE VARCHAR2(50 CHAR) DEFAULTNULL
Not used
Appendix ITLOGPROCESS Table Reference
I-6

Table I-2 (Cont.) TLOGPROCESS Table Reference
Column Name Definition Description
PROCESSUD2 NUMBER(1,0) DEFAULT 0 NOTNULL ENABLE
Not used
PROCESSUD2NOTE VARCHAR2(50 CHAR) DEFAULTNULL
Not used
PROCESSUD3 NUMBER(1,0) DEFAULT 0 NOTNULL ENABLE
Not used
PROCESSUD3NOTE VARCHAR2(50 CHAR) DEFAULTNULL
Not used
PROCESSUD4 NUMBER(1,0) DEFAULT 0 NOTNULL ENABLE
Not used
PROCESSUD4NOTE VARCHAR2(50 CHAR) DEFAULTNULL
Not used
PROCESSENDTIME DATE DEFAULTTO_DATE('01/01/1900', 'MM/DD/YYYY') NOT NULL ENABLE
Last update time/date
BLNWCDIRTY NUMBER(1,0) DEFAULT 0 NOTNULL ENABLE
Flag used to indicate that maps (WC= WildCard) must be recalculatedprior to validating:• 0=OK• 1=Re-caculate locationMap rules have changed after datawas imported. This causes theCalculate flag to be displayed
BLNLOGICDIRTY NUMBER(1,0) DEFAULT 0 NOTNULL ENABLE
Flag used to indicate the LOGICmust be recalculated prior tovalidating
BLNVALDIRTY NUMBER(1,0) DEFAULT 1 NOTNULL ENABLE
Flag used to indicate whenValidation workflow must be re-run:• 0=OK• 1=re-process validationsMap rules have changed after datawas imported. This causes theCalculate flag to be displayed.
INTLOCKSTATE NUMBER(6,0) DEFAULT 50 NOTNULL ENABLE
Location POV lock status:• 50=open• 60=locked
PROCESSSTATUS NUMBER(10,0) DEFAULT 0 NOTNULL ENABLE
Current state of workflow for location/category/per. Valid status fromtLogProcessStates
Appendix ITLOGPROCESS Table Reference
I-7
JSystem Maintenance Tasks
You can run system processes to maintain and cleanup all runtime artifacts, such asthe Process tables, Staging tables or Inbox / Outbox folders. Often the tables andfolders contain vast amounts of data, which you may no longer need. With the SystemMaintenance Tasks feature, you can purge standard tables and folder by schedulingsystem processes and executing them.
Note:
All applications not assigned to a folder are purged when a single application isselected for a purge. The default application folder is generic and the purgescript focuses on the folder in which the selected application resides. In thiscase if you want to prevent an application from being purged, save it to anindependent folder
To facilitate the use of the Purge Scripts, Oracle Hyperion Financial Data QualityManagement, Enterprise Edition provides the following:
• A set of custom scripts is shipped to the bin/system directory.
The scripts include:
– Maintain Application Folder
– Maintain Process Table
– Maintain EBS GL Balances Table
– Maintain PeopleSoft Ledger Table
– Maintain FDMEE Data Tables
• Scripts are registered as system scripts in script registration.
• Script are registered as part of installation with QUERYID = 0 andAPPLICATIONID = 0.
• The script group "System" is created and system scripts are assigned to it.
• Script execution displays system scripts when the user has access irrespective ofthe target application in the POV.
• You can run purge scripts from the Script Execution screen.
• The ODI process executes the scripts from the bin/system dir instead of the data/scripts/custom directory.
Maintain Application FolderThe Maintain Application Folder process purges files from the inbox, outbox, and datafolder directories. Oracle Hyperion Financial Data Quality Management, Enterprise
J-1
Edition accepts a separate Days to Keep parameter for each of the folders. If the valueis not specified for a specific folder, FDMEE skips the folder.
In addition, FDMEE checks the inbox and outbox subdirectories under the respectivefolders and deletes any files. In the data subdirectory, FDMEE skips the scriptsdirectory because it holds customer scripts.
Maintain Process TableThis process maintains the following execution tables:
• AIF_PROCESSES
• AIF_PROCESS_DETAILS
• AIF_PROCESS_LOGS
• AIF_PROCESS_PARAMETERS
• AIF_PROCESS_PERIODS
• AIF_PROCESS_STEPS
• AIF_BAL_RULE_LOADS
• AIF_BAL_RULE_LOAD_PARAMS
• AIF_BATCH_JOBS
• AIF_BATCH_LOAD_AUDIT
• AIF_TEMP
It accepts the number of days to keep as a parameter.
Maintain EBS GL Balances TableThis process maintains the AIF_EBS_GL_BALANCES_STG table. EBS GeneralLedger balances contain a snapshot of the General Ledger balances and are deletedbased on a General Ledger period.
The process determines the list of General Ledger periods between the start and endperiods.
The parameter for this process are:
• Source System
• Start Period
• End Period
Maintain PeopleSoft Ledger TableThis process maintains the AIF_PS_LEDGER_STG table. PeopleSoft General Ledgerbalances contain a snapshot of the General Ledger balances and are deleted basedon General Ledger period.
The process determines the list of General Ledger periods between the start and endperiods.
The parameter for this process are:
Appendix JMaintain Process Table
J-2
• Source System
• Start Period
• End Period
Maintain FDMEE Data TablesThe Oracle Hyperion Financial Data Quality Management, Enterprise Edition datatables store archives of exported data for audit and drill down purposes. These tablescan grow over period of time and you can purge these tables as needed. Themaintenance process deletes the following tables:
• TDATAMAPSEG
• TDATASEG
• TPROCESSLOG
The parameters are:
• Target Application
• Category
• Start Period
• End Period
Executing Purge ScriptsTo execute a purge script:
1. On the Workflow tab, under Other, select Script Execution.
2. In Script Execution, and then in Custom Script Group, select SystemMaintenance Task.
3. From the Scripts grid, select the purge script.
4. Click Execute.
5. When prompted, enter parameter values on the Execute Script screen.
For example, you might select the target application, Start Period, or End Period.
6. Optional, click Schedule.
For information on scheduling jobs, see Scheduling Jobs.
7. From Execution Mode, select the online method of running the report.
The online method processes the report immediately.
8. Click OK.
Appendix JMaintain FDMEE Data Tables
J-3

KSetting up Jython, Eclipse and Python
This appendix explains how to set up Jython, Eclipse and PyDev for use with theOracle Hyperion Financial Data Quality Management, Enterprise Edition scriptingcomponent.
This section is specific to the 11.1.2.3.100 release of FDMEE. Because Jython,Eclipse and Python are not Oracle products, always refer to these products'documentation for the latest updates and changes. Also see PyDev manual.
To set up Jython:
1. Create a working directory.
For example, create: C:\FDMEE.
2. Download Jython to the working directory.
The download is available at Jython download site.
Double-click the Jython installer jar and select the following options:
• English Language
• Standard Install
• Default Location (C:\FDMEE\jython2.5.1)
• Current Java Home
3. Download Eclipse to working directory and extract.
The Eclipse download is available at http://www.eclipse.org/downloads
Note:
In addition to Eclipse, users may use Notepad++ with the Jython add-in, orthe Python Fiddle site to write and test scripts. Pythonfiddle is a good sitefor writing event scripts, and the Chrome browser is recommended forpythonfiddle. For more advanced scripts, Eclipse or Jdeveloper arerecommended
4. Launch Eclipse from the C:\FDMEE\eclipse\eclipse.exe.
5. Select the directory and select a default location for your Workspace.
For example select c:\FDMEE\Workspace
6. If the Welcome page is displayed, skip it by selecting the Workbench link in the topright corner.
7. Select the following menu option to update your preferences:
a. Select Windows, and then select Preferences.
b. Add PyDev to the Available Software Sites:
K-1

To do this:
i. Select Install/Update, then select Available Software Sites, and thenclick Add.
ii. In Name, enter PyDev.
iii. In Location, enter: PyDev site.
8. Change the default text editor options:
To do this:
a. Select General, then select Editors, and then select Text Editors.
b. For the Displayed tab width, enter 2.
c. Enable the Insert spaces for tabs option.
d. Enable the Show print margin option.
e. Enable the Show line numbers option.
9. Select the Menu option.
To do this:
a. Select Help, and then select Install New Software...
b. In Work with, select PyDev.
c. From PYDev available software list, select the PyDev node, and then clickNext.
d. Confirm the PyDev for Eclipse installation, and then click Next.
e. Accept the licensing terms, and then click Finish.
f. Once the install starts, you are prompted about Aptana PyDev; and PyDev;Aptana certificates. Make sure you select the certificates, and then click OK.
g. Restart Eclipse to complete the PyDev installation.
10. Update your PyDev preferences:
To do this:
a. Select Windows, and then select Preferences.
b. Configure the Jython interpreter used by PyDev:
i. Select PyDev, and then select Interpreter-Jython.
ii. Click New.
iii. Click Browse.
iv. Select C:\FDMEE\jython2.5.1\jython.jar
v. Click OK.
vi. When prompted to select the folders to add to the SYSTEM python path,do not change any selection, and then click OK.
vii. Click OK to close the Preferences window.
Appendix K
K-2