Embed Size (px)
Citation preview

[1] Oracle® Identity ManagerConnector Guide for IBM RACF Advanced
Release 9.0.4
E10451-24
August 2018

Oracle Identity Manager Connector Guide for IBM RACF Advanced, Release 9.0.4
E10451-24
Copyright © 2009, 2018 Oracle and/or its affiliates. All rights reserved.
Primary Author: Balakrishnan Nanjan
Contributing Authors: Prakash Hulikere, Vagdevi Jayashankar, Binika Kumar, Alankrita Prakash
This software and related documentation are provided under a license agreement containing restrictions on use and disclosure and are protected by intellectual property laws. Except as expressly permitted in your license agreement or allowed by law, you may not use, copy, reproduce, translate, broadcast, modify, license, transmit, distribute, exhibit, perform, publish, or display any part, in any form, or by any means. Reverse engineering, disassembly, or decompilation of this software, unless required by law for interoperability, is prohibited.
The information contained herein is subject to change without notice and is not warranted to be error-free. If you find any errors, please report them to us in writing.
If this is software or related documentation that is delivered to the U.S. Government or anyone licensing it on behalf of the U.S. Government, then the following notice is applicable:
U.S. GOVERNMENT END USERS: Oracle programs, including any operating system, integrated software, any programs installed on the hardware, and/or documentation, delivered to U.S. Government end users are "commercial computer software" pursuant to the applicable Federal Acquisition Regulation and agency-specific supplemental regulations. As such, use, duplication, disclosure, modification, and adaptation of the programs, including any operating system, integrated software, any programs installed on the hardware, and/or documentation, shall be subject to license terms and license restrictions applicable to the programs. No other rights are granted to the U.S. Government.
This software or hardware is developed for general use in a variety of information management applications. It is not developed or intended for use in any inherently dangerous applications, including applications that may create a risk of personal injury. If you use this software or hardware in dangerous applications, then you shall be responsible to take all appropriate fail-safe, backup, redundancy, and other measures to ensure its safe use. Oracle Corporation and its affiliates disclaim any liability for any damages caused by use of this software or hardware in dangerous applications.
Oracle and Java are registered trademarks of Oracle and/or its affiliates. Other names may be trademarks of their respective owners.
Intel and Intel Xeon are trademarks or registered trademarks of Intel Corporation. All SPARC trademarks are used under license and are trademarks or registered trademarks of SPARC International, Inc. AMD, Opteron, the AMD logo, and the AMD Opteron logo are trademarks or registered trademarks of Advanced Micro Devices. UNIX is a registered trademark of The Open Group.
This software or hardware and documentation may provide access to or information about content, products, and services from third parties. Oracle Corporation and its affiliates are not responsible for and expressly disclaim all warranties of any kind with respect to third-party content, products, and services unless otherwise set forth in an applicable agreement between you and Oracle. Oracle Corporation and its affiliates will not be responsible for any loss, costs, or damages incurred due to your access to or use of third-party content, products, or services, except as set forth in an applicable agreement between you and Oracle.

iii
Contents
Preface ................................................................................................................................................................. ix
Audience....................................................................................................................................................... ixDocumentation Accessibility ..................................................................................................................... ixRelated Documents ..................................................................................................................................... ixConventions ................................................................................................................................................. ix
What's New in the Oracle Identity Manager Advanced Connector for IBM RACF?.. xi
Software Updates ........................................................................................................................................ xiDocumentation-Specific Updates.......................................................................................................... xxix
1 About the Connector
1.1 Certified Components ................................................................................................................ 1-11.2 Certified Languages.................................................................................................................... 1-31.3 Connector Architecture.............................................................................................................. 1-31.3.1 Connector Components ...................................................................................................... 1-31.3.2 Connector Operations ......................................................................................................... 1-41.3.2.1 Full Reconciliation Process.......................................................................................... 1-41.3.2.2 Initial LDAP Population and Reconciliation Process.............................................. 1-51.3.2.3 Provisioning Process .................................................................................................... 1-51.4 Features of the Connector .......................................................................................................... 1-61.4.1 Full and Incremental Reconciliation ................................................................................. 1-61.4.2 Encrypted Communication Between the Target System and Oracle Identity Manager ...
1-71.4.3 High Availability Feature of the Connector .................................................................... 1-71.5 Connector Objects Used During Reconciliation and Provisioning ..................................... 1-81.5.1 Supported Functions for Target Resource Reconciliation ............................................. 1-81.5.2 Supported Functions for Provisioning ............................................................................. 1-81.5.3 User Attributes for Target Resource Reconciliation and Provisioning........................ 1-91.5.4 Group Attributes for Target Resource Reconciliation and Provisioning ................. 1-111.5.5 Security Attributes for Provisioning .............................................................................. 1-111.5.6 Dataset Profile Attributes for Provisioning .................................................................. 1-121.5.7 Resource Profile Attributes for Provisioning................................................................ 1-121.5.8 Reconciliation Rule ........................................................................................................... 1-131.5.9 Reconciliation Action Rules ............................................................................................ 1-13

iv
2 Deploying the IDF Advanced Adapter for IBM RACF
2.1 IDF Mainframe Adapters Functional Characteristics............................................................ 2-12.1.1 Pioneer................................................................................................................................... 2-22.1.2 Voyager ................................................................................................................................. 2-32.2 Prerequisites ................................................................................................................................ 2-42.2.1 Message Transport Requirements..................................................................................... 2-42.2.2 APF Authorization .............................................................................................................. 2-42.3 Mainframe Adapter Installation .............................................................................................. 2-42.3.1 Extracting the Files for Deployment from the Distribution Zip Archive File............. 2-42.3.2 Uploading Files ................................................................................................................... 2-52.3.3 Extracting the XMIT Files ................................................................................................... 2-72.3.4 Editing the Mainframe Batch Job Files to Match the Settings for the Customer's Site ......
2-112.3.5 Submitting Batch Job Streams......................................................................................... 2-172.3.6 Activating and Loading the Exits................................................................................... 2-172.3.7 Creating a RACF UserID for Pioneer and Voyager with Permissions ..................... 2-182.3.8 Adding Pioneer/Voyager to the Facility Class Profiles (IRR) ................................... 2-202.3.9 Testing the Installation..................................................................................................... 2-22
3 Connector Deployment on Oracle Identity Manager
3.1 Files and Directories That Comprise the Connector.............................................................. 3-13.2 Running the Connector Installer............................................................................................... 3-23.3 Configuring the IT Resource ..................................................................................................... 3-33.4 Configuring Oracle Identity Manager ..................................................................................... 3-53.4.1 Creating Additional Metadata, Running Entitlement, and Catalog Synchronization
Jobs 3-53.4.1.1 Creating and Activating a Sandbox........................................................................... 3-63.4.1.2 Creating a New UI Form ............................................................................................. 3-63.4.1.3 Creating an Application Instance............................................................................... 3-63.4.1.4 Publishing a Sandbox................................................................................................... 3-73.4.1.5 Harvesting Entitlements and Sync Catalog .............................................................. 3-73.4.1.6 Updating an Existing Application Instance with a New Form ............................ 3-73.4.2 Localizing Field Labels in UI Forms ................................................................................. 3-83.4.3 Clearing Content Related to Connector Resource Bundles from the Server Cache 3-103.4.4 Enabling Logging.............................................................................................................. 3-103.4.4.1 Enabling Logging for the LDAP Gateway............................................................. 3-103.4.4.2 Enabling Logging on Oracle Identity Manager .................................................... 3-123.5 Installing and Configuring the LDAP Gateway.................................................................. 3-13
4 Using the Connector
4.1 Guidelines on Using the Connector ......................................................................................... 4-14.2 Scheduled Tasks for Lookup Field Synchronization ............................................................. 4-24.3 Configuring the Security Attributes Lookup Field................................................................ 4-44.4 Configuring Reconciliation........................................................................................................ 4-64.4.1 Configuring Incremental Reconciliation .......................................................................... 4-64.4.2 Performing Full Reconciliation.......................................................................................... 4-6

v
4.4.3 Reconciliation Scheduled Tasks ........................................................................................ 4-74.4.3.1 RACF Reconcile All Users........................................................................................... 4-74.4.3.2 RACF Deleted User Reconciliation Using OIM ....................................................... 4-84.4.3.3 RACF Reconcile Users to Internal LDAP.................................................................. 4-94.4.3.4 RACF Reconcile All LDAP Users............................................................................... 4-94.4.4 Configuring Filtered Reconciliation to Multiple Resource Objects........................... 4-104.5 Configuring Account Status Reconciliation......................................................................... 4-114.6 Configuring Scheduled Tasks ............................................................................................... 4-114.7 Performing Provisioning Operations.................................................................................... 4-13
5 Extending the Functionality of the Connector
5.1 Adding Custom Fields for Target Resource Reconciliation ................................................. 5-15.1.1 Adding Custom Fields for Reconciliation........................................................................ 5-25.1.2 Adding Custom Fields to Oracle Identity Manager ....................................................... 5-25.2 Adding Custom Multivalued Fields for Reconciliation........................................................ 5-35.2.1 Adding Custom Multivalued Fields to the Reconciliation Component...................... 5-35.2.2 Adding Custom Multivalued Fields to Oracle Identity Manager ................................ 5-45.3 Adding Custom Fields for Provisioning ................................................................................. 5-95.4 Removing Attributes Mapped for Target Resource Reconciliation ................................. 5-115.5 Using the Provisioning Agent to Run IBM z/OS Batch Jobs ............................................ 5-115.6 Configuring the Connector for Provisioning to Multiple Installations of the Target System .
5-145.7 Initial LDAP Gateway Population and Full Reconciliation............................................... 5-155.7.1 Reconcile User Extract File .............................................................................................. 5-175.8 Configuring Windows Service............................................................................................... 5-195.9 Customizing Log File Locations ............................................................................................ 5-205.10 LDAP Reconciliation Supported Queries............................................................................. 5-205.11 Handling PIONEER Error Messaging Exceptions in the Gateway .................................. 5-21
6 Troubleshooting
7 Known Issues and Workarounds
A APF-Authorized Libraries
B Pioneer Datasets
C Reconciliation Agent (Voyager) Messages
D Provisioning Agent (Pioneer) Messages
E Mainframe Problem Source Identification and Problem Determination
F Creating Custom Scheduled Tasks
F.1 Code for Searching All Users and All User Data .................................................................. F-1

vi
F.2 Code for Searching All Groups and All Group Data............................................................ F-2F.3 Code for Searching All Datasets and All Dataset Data ........................................................ F-2
G Voyager and Pioneer Control File Parameters
H Configuring RACF Starter User ID and Access for Voyager Agent and Pioneer Agent Started Tasks
I Customizing AES Encryption Key
J Mainframe Language Environment Runtime Options
Index

vii
List of Figures
1–1 Provisioning Process................................................................................................................... 1-65–1 Multivalued Field Added on a New Form.............................................................................. 5-55–2 Child Form Added to the Process Form.................................................................................. 5-65–3 New reconciliation Field Added in the resource Object ....................................................... 5-75–4 Entry Added in the Lookup Definition ................................................................................... 5-85–5 New Reconciliation Field Mapped to a Process Data Field.................................................. 5-9
viii
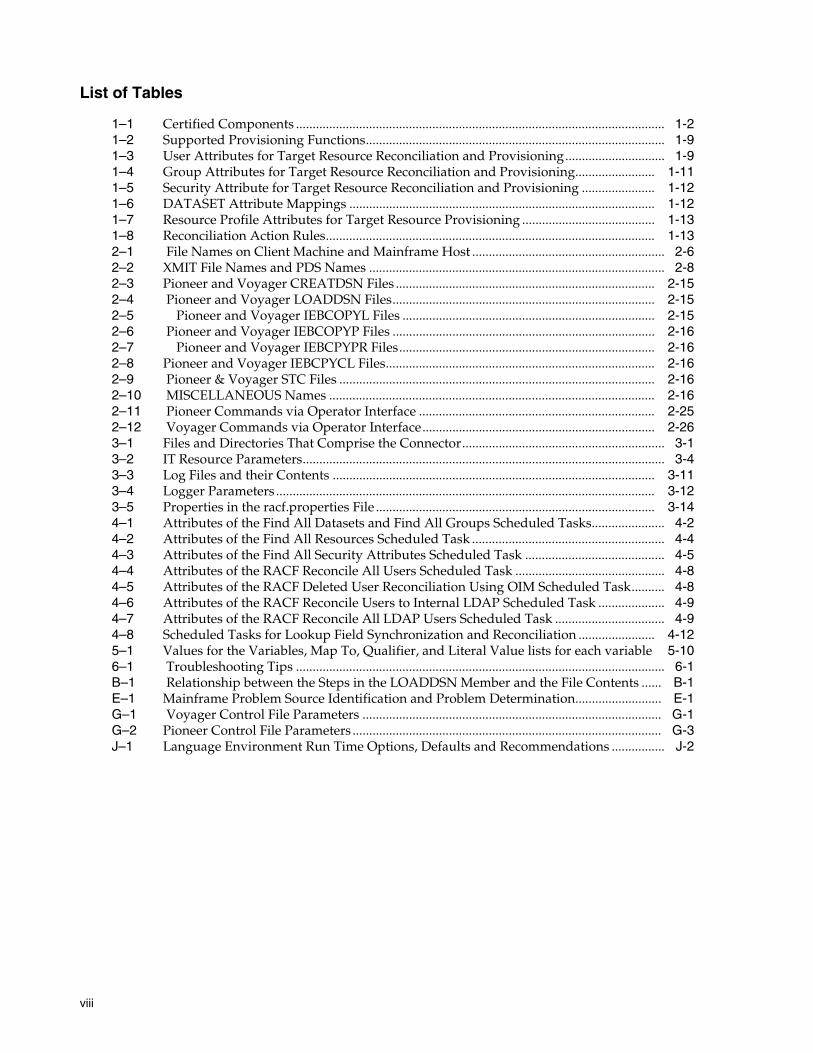
List of Tables
1–1 Certified Components ............................................................................................................... 1-21–2 Supported Provisioning Functions.......................................................................................... 1-91–3 User Attributes for Target Resource Reconciliation and Provisioning.............................. 1-91–4 Group Attributes for Target Resource Reconciliation and Provisioning........................ 1-111–5 Security Attribute for Target Resource Reconciliation and Provisioning ...................... 1-121–6 DATASET Attribute Mappings ............................................................................................ 1-121–7 Resource Profile Attributes for Target Resource Provisioning ........................................ 1-131–8 Reconciliation Action Rules................................................................................................... 1-132–1 File Names on Client Machine and Mainframe Host .......................................................... 2-62–2 XMIT File Names and PDS Names ......................................................................................... 2-82–3 Pioneer and Voyager CREATDSN Files .............................................................................. 2-152–4 Pioneer and Voyager LOADDSN Files............................................................................... 2-152–5 Pioneer and Voyager IEBCOPYL Files ............................................................................ 2-152–6 Pioneer and Voyager IEBCOPYP Files ............................................................................... 2-162–7 Pioneer and Voyager IEBCPYPR Files............................................................................. 2-162–8 Pioneer and Voyager IEBCPYCL Files................................................................................. 2-162–9 Pioneer & Voyager STC Files ............................................................................................... 2-162–10 MISCELLANEOUS Names .................................................................................................. 2-162–11 Pioneer Commands via Operator Interface ....................................................................... 2-252–12 Voyager Commands via Operator Interface...................................................................... 2-263–1 Files and Directories That Comprise the Connector............................................................. 3-13–2 IT Resource Parameters............................................................................................................. 3-43–3 Log Files and their Contents ................................................................................................. 3-113–4 Logger Parameters .................................................................................................................. 3-123–5 Properties in the racf.properties File .................................................................................... 3-144–1 Attributes of the Find All Datasets and Find All Groups Scheduled Tasks...................... 4-24–2 Attributes of the Find All Resources Scheduled Task .......................................................... 4-44–3 Attributes of the Find All Security Attributes Scheduled Task .......................................... 4-54–4 Attributes of the RACF Reconcile All Users Scheduled Task ............................................. 4-84–5 Attributes of the RACF Deleted User Reconciliation Using OIM Scheduled Task.......... 4-84–6 Attributes of the RACF Reconcile Users to Internal LDAP Scheduled Task .................... 4-94–7 Attributes of the RACF Reconcile All LDAP Users Scheduled Task ................................. 4-94–8 Scheduled Tasks for Lookup Field Synchronization and Reconciliation ....................... 4-125–1 Values for the Variables, Map To, Qualifier, and Literal Value lists for each variable 5-106–1 Troubleshooting Tips ............................................................................................................... 6-1B–1 Relationship between the Steps in the LOADDSN Member and the File Contents ...... B-1E–1 Mainframe Problem Source Identification and Problem Determination.......................... E-1G–1 Voyager Control File Parameters .......................................................................................... G-1G–2 Pioneer Control File Parameters ............................................................................................. G-3J–1 Language Environment Run Time Options, Defaults and Recommendations ................ J-2
ix
Preface
This guide describes the advanced connector that is used to integrate Oracle Identity Manager with IBM RACF.
AudienceThis guide is intended for resource administrators and target system integration teams. Installation of the connector components on the mainframe requires experience with IBM RACF and various z/OS technologies and components, including TCP/IP, QSAM (flat files), and z/OS libraries.
Documentation AccessibilityFor information about Oracle's commitment to accessibility, visit the Oracle Accessibility Program website at http://www.oracle.com/pls/topic/lookup?ctx=acc&id=docacc.
Access to Oracle SupportOracle customers that have purchased support have access to electronic support through My Oracle Support. For information, visit http://www.oracle.com/pls/topic/lookup?ctx=acc&id=info or visit http://www.oracle.com/pls/topic/lookup?ctx=acc&id=trs if you are hearing impaired.
Related DocumentsFor information about installing and using Oracle Identity Manager, visit the following Oracle Help Center page:
http://docs.oracle.com/cd/E52734_01/index.html
For information about Oracle Identity Manager 9.0.4.x Connectors documentation, visit the following Oracle Help Center page:
http://docs.oracle.com/cd/E10384_01/index.htm
ConventionsThe following text conventions are used in this document:

x
Convention Meaning
boldface Boldface type indicates graphical user interface elements associated with an action, or terms defined in text or the glossary.
italic Italic type indicates book titles, emphasis, or placeholder variables for which you supply particular values.
monospace Monospace type indicates commands within a paragraph, URLs, code in examples, text that appears on the screen, or text that you enter.
xi
What's New in the Oracle Identity ManagerAdvanced Connector for IBM RACF?
This chapter provides an overview of the updates made to the software and documentation for the Oracle Identity Manager Advanced Connector for IBM RACF in release 9.0.4.25.
The updates discussed in this chapter are divided into the following categories:
■ Software Updates
This section describes updates made to the connector software. This section also points out the sections of this guide that have been changed in response to each software update.
■ Documentation-Specific Updates
This section describes major changes made to this guide. These changes are not related to software updates.
Software UpdatesThe following sections discuss the software updates:
■ Software Updates in Release 9.0.4.25
■ Software Updates in Release 9.0.4.24
■ Software Updates in Release 9.0.4.23
■ Software Updates in Release 9.0.4.22
■ Software Updates in Release 9.0.4.21
■ Software Updates in Release 9.0.4.20
■ Software Updates in Release 9.0.4.19
■ Software Updates in Release 9.0.4.17
■ Software Updates in Release 9.0.4.16
■ Software Updates in Release 9.0.4.15
■ Software Updates in Release 9.0.4.14
■ Software Updates in Release 9.0.4.13
■ Software Updates in Release 9.0.4.12
■ Software Updates in Release 9.0.4.11
xii
■ Software Updates in Release 9.0.4.4
■ Software Updates in Release 9.0.4.3
■ Software Updates Up to Release 9.0.4.2
Software Updates in Release 9.0.4.25The following are the software updates in release 9.0.4.25:
■ End of Life Support for Real-Time Reconciliation
■ Support for Oracle Identity Manager 11g Release 2 PS2 and PS3
■ Support for New Version of the Target System
■ Replacement of DNS_RECOVERY_INTERVAL and IP_RECOVERY_INTERVAL Voyager Control Cards Input
■ End of Life Support for Trusted Source Reconciliation
■ Enhancement to the Scheduled Tasks for Lookup Field Synchronization
■ Resolved Issues in Release 9.0.4.25
End of Life Support for Real-Time ReconciliationFrom this release onward, the connector no longer supports the real-time mode of reconciliation and it is no longer included in the connector package.
Support for Oracle Identity Manager 11g Release 2 PS2 and PS3 From this release onward, the connector can be installed and used on the following versions:
■ Oracle Identity Manager 11g Release 2 PS2 (11.1.2.2.0) and any later BP in this release track.
■ Oracle Identity Manager 11g Release 2 PS3 (11.1.2.3.0) and any later BP in this release track.
These Oracle Identity Manager release versions are mentioned in Table 1–1, " Certified Components".
Support for New Version of the Target SystemFrom this release onward, the connector adds support for z/OS 2.2 as a target system. This information is mentioned in Table 1–1, " Certified Components".
Replacement of DNS_RECOVERY_INTERVAL and IP_RECOVERY_INTERVAL Voyager Control Cards InputThe DNS_RECOVERY_INTERVAL and IP_RECOVERY_INTERVAL Voyager control cards input have been removed as they are no longer supported in Voyager. They have been replaced with the following new Voyager Control File parameters:
■ CONNECT_INTV=
■ CONNECT_RETRY=
■ EXTRACT=
Note: For z/OS 2.2 target system installation that supports special characters in passwords, the connector has been validated only for the at sign (@), number sign (#), and dollar sign ($) special characters.

xiii
If no value is set for the EXTRACT= parameter, then VOYAGER defaults to EXTRACT=Y.
See Table G–1, " Voyager Control File Parameters" for more information about these new Voyager Control File parameters.
End of Life Support for Trusted Source ReconciliationFrom this release onward, the connector no longer supports the trusted source mode of reconciliation and it is no longer included in the connector package. Target source mode of reconciliation is still supported by the connector.
Enhancement to the Scheduled Tasks for Lookup Field SynchronizationFrom this release onward, the scheduled tasks for lookup field synchronization can successfully reconcile deleted entitlements. In addition to the existing Append or Replace values for the Recon Type attribute, the scheduled jobs for lookup field synchronization provides support for a new value named Merge, which is the default value now.
See Section 4.2, "Scheduled Tasks for Lookup Field Synchronization" for more information about the values that you can set for the Recon Type attribute of the scheduled job.
Resolved Issues in Release 9.0.4.25The following table lists issues resolved in release 9.0.4.25:
Note: It is recommended not to use EXTRACT=N.
Bug Number Issue Resolution
18781115 When there was a mismatch between the encryption key used by the LDAP and mainframe agents, neither the LDAP gateway nor the agent specified the mismatch in the log file.
This issue has been resolved.
19827155 The policy key in RACF groups or entitlement child table (UD_GROUP) was being updated to null when a full reconciliation run was performed.
This issue has been resolved. The policy key is being updated with correct entitlements.
20167028 The RACF Advanced connector did not include timeouts in the LDAP connections to Oracle Identity Manager. This caused the connector to stop responding.
This issue has been resolved. The IT resource for the target system now includes two new parameters namely idfConnectTimeoutMS and idfReadTimeoutMS.
If you are upgrading your connector to release 9.0.4.25 (not using a fresh installation) and there is customization in your production environment, then during connector upgrade, you must import IT Resource definition using the oimRacfAdvR2Connector.xml file.
You can import the oimRacfAdvR2Connector.xml file using the Deployment Manager, as described in Importing Deployments in Oracle Fusion Middleware Administering Oracle Identity Manager.
See Section 3.3, "Configuring the IT Resource" for more information about the new parameters.

xiv
20562252 The following Voyager message was incorrect:
IDMV109I PIONEER WRITE SUCCESSFUL and PIONEER_ID= control end of life
This issue has been resolved. The message has been corrected to "IDMV109I VOYAGER WRITE SUCCESSFUL and the PIONEER_ID= control card is no longer supported."
20564721 The idf.schema file missed definitions for the UUID, krb5PrincipalRealm, and ipServiceProtocol LDAP attributes.
This issue has been resolved. The idf.schema file in LDAP has been updated now.
20681560 The RACF Deleted User Reconciliation Using OIM scheduled task caused a NullPointerException because it missed information about the domain from which deleted users were to be reconciled.
This issue has been resolved. The RACF Deleted User Reconciliation Using OIM scheduled task has been updated to include the Users List and domainOu attributes. See Section 4.4.3.2, "RACF Deleted User Reconciliation Using OIM" for more details about this scheduled task.
20687226 The ADDSD command to add dataset profile to IBM RACF did not complete successfully and returned the following error message:
ERROR PERFORMING OPERATION: NO DATA RETURNED
This issue has been resolved.
21195665 Although uninstallation of the LDAP Gateway was successful, the following error was encountered when the IdentityForgeServiceUninstall.bat file was run:
Unrecognized cmd option -uninstall
This issue has been resolved. The error message is no longer displayed upon successful uninstallation of LDAP Gateway.
21419200 The run.sh and run.bat files had a dependency on the spring-expression-3.2.4.RELEASE library which failed to start the LDAP gateway.
This issue has been resolved. The missing dependency has been corrected in the run.sh and run.bat files.
21542074 The idfserver logs size and amount need to be configured or at least go to 100 MB.
The amount of log space for the idfserver log file can be modified now. The size of the log file can be configured from the default 10MB to the maximum size which can be set before the rollover. See Section 3.4.4.1, "Enabling Logging for the LDAP Gateway" for more details.
21659079 A Create User or Modify User provisioning operation failed and the following RACF message and code was encountered:
ICH01015I Command processing completed but unable to update SYS1.BRODCAST
This issue has been resolved. The connector processing has been corrected to ignore this message for successful creation or modification of a user.
21780125 The following exception was encountered during a RACF Reconcile Deleted Users scheduled task run:
JAVA.LANG.NULLPOINTEREXCEPTION
This issue has been resolved. The JAVA.LANG.NULLPOINTEREXCEPTION has been addressed now.
21869258 Although the sap-ecc-agent.jar file was not included with the RACF Gateway files, the run.sh and run.bat files contained the following entry:
${APP_HOME}/lib/sap-ecc-agent.jar
This issue has been resolved The reference to the sap-ecc-agent.jar file has been removed from the run.sh and run.bat files.
Bug Number Issue Resolution

xv
Software Updates in Release 9.0.4.24The following are the software updates in release 9.0.4.24:
■ Support for the SECURE_ID Program
■ Support for the SECURE_ID= Pioneer Parameter
■ Support for MYRADMIN Function Usage Has Changed
■ Support for Writing SMF Records During SECURE_ID Processing
■ Support for Pioneer- RACF Validation Has Been Added
21869254 The run.sh and run.bat files contained the following incorrect entry due to which LDAP Gateway failed to start:
${APP_HOME}/lib/ofdl.jar
This issue has been resolved. The value of the jar file has been corrected in the run.sh and run.bat files. The correct value is ojdl.jar.
22451595 Passwords were being logged in clear text in DEBUG mode.
This issue has been resolved. Passwords are now masked by asterisk (*) in the log file.
22553251 The DCB value for the CREATDSN member of the JCLLIB partition dataset and REXXOUT data set was incorrect. This caused reconciliation to not work accurately as some reconciliation records may not have been selected.
This issue has been resolved. The DCB value has been updated to DSORG=PS,RECFM=FB,LRECL=300,BLKSIZE=0.
Reconciliation is now performed successfully.
22650535 The following error was encountered when the ALTUSER command contained an apostrophe (') in the INSTDATA or NAME attributes:
OIM connection LDAP Error Code 52 LDAP_UNAVAILABLE
This issue has been resolved. The ALTUSER command containing apostrophe in INSTDATA or NAME processing has been corrected now.
22717070 Pioneer displayed a success message when the DELDSD command was run, but idfserver.log reported it as failed. Therefore, DELUSER command was rejected with the following RACF message and code:
ICH04009I userid CANNOT BE DELETED. DATA SET PROFILES STILL EXIST.
This issue has been resolved. The DELDSD command processing has been corrected now and is no longer causing this issue.
23026137 Intermittent failures were reported for the ADDUSER and ALTUSER command processing.
This issue has been resolved. The processing of the ADDUSER and ALTUSER commands has been corrected.
23107391 When RACF requested AddUserToGroup task, the request was rejected by the zSecure command verifier and Oracle Identity Manager received 0 response code.
To address this issue, the ability to customize the response code based on Pioneer error messaging exceptions in the gateway was required.
This issue has been resolved. The existing error handling routines have been enhanced to allow for the ability to configure that a request sent to Pioneer has succeeded or failed. See Section 5.11, "Handling PIONEER Error Messaging Exceptions in the Gateway" for more information.
23626975 Group assignments to users failed with the error code 1.
This issue has been resolved. Group assignments are processed correctly.
Note: Documentation for release 9.0.4.24 of the connector is skipped on Oracle Help Center because release 9.0.4.23 BPE of the connector is considered as release 9.0.4.24.
Bug Number Issue Resolution

xvi
■ Support for the DEFINE, DELETE, and LIST Functions Have Been Changed
■ Resolved Issues in Release 9.0.4.24
Support for the SECURE_ID ProgramFrom this release onward, the connector supports a new SECURE_ID program that encrypts a RACF userid for usage with Pioneer. This information is also discussed in Section 2.1, "IDF Mainframe Adapters Functional Characteristics."
Support for the SECURE_ID= Pioneer ParameterFrom this release onward, the connector supports the new SECURE_ID= Pioneer Parameter for SECURE_ID= processing. This information is also discussed in Section 2.1, "IDF Mainframe Adapters Functional Characteristics."
Support for MYRADMIN Function Usage Has ChangedFrom this release onward, this function is used for only RACF, LIST, and SEARCH functions in Pioneer and Voyager. This information is also discussed in Section 2.1.1, "Pioneer."
Support for Writing SMF Records During SECURE_ID ProcessingFrom this release onward, the connector supports for writing SMF type 245 subtype 1 and 2 records. When the Pioneer parameter SMF=N is specified, all RACF non-LIST functions will use IDFRADMN to process the RACF commands. If SMF=Y is specified, then IDFRADMS will be used to process the RACF commands and create SMF records. This information is also discussed in Section 2.1.1, "Pioneer" and Appendix G, "Voyager and Pioneer Control File Parameters."
Support for Pioneer- RACF Validation Has Been AddedFrom this release onward, Pioneer start calls three programs that will aid in the validation of Pioneer's RACF Userid permissions. IDFGETIF extracts JOBNAME, JOBID and USERID. IDFCHKAU verifies that RACF userid has the permission to "read" the security facility that Pioneer requires. IDFCHKIR verifies that RACF userid has the permission to "read" the "irr.radmin.*" profiles required for MYRADMIN, IDFRADMN, and IDFRADMS. This information is also discussed in Section 2.3.9, "Testing the Installation."
Support for the DEFINE, DELETE, and LIST Functions Have Been ChangedFrom this release onward, IBMs IDCAM which are the 'DEFINE, DELETE, and LIST' functions are now incorporated internally by Pioneer. Batch execution is no longer required. This information is also discussed in Section 2.1.1, "Pioneer."
Resolved Issues in Release 9.0.4.24The following table lists issues resolved in release 9.0.4.24:
Bug Number Issue Resolution
18272376 The Pioneer and Voyager agents that have to be installed on the Mainframe system as part of the RACF connector for Oracle Identity Manager needs to be enhanced.
This issue has been resolved. For more information, see Oracle Identity Manager Connector Guide for IBM RACF Advanced.

xvii
Software Updates in Release 9.0.4.23The following are the software updates in release 9.0.4.23:
■ Support for New Oracle Identity Manager Release
■ Support for Provisioning Default Group Updates
■ Support for Universal Groups
■ Resolved Issues in Release 9.0.4.23
End of Life Support for Real-Time ReconciliationFrom this release onward, the connector no longer supports the real-time mode of reconciliation and it is no longer included in the connector package.
Support for New Oracle Identity Manager ReleaseFrom this release onward, the connector can be installed and used on Oracle Identity Manager 11g release 2 (11.1.2.0.1) or later.
This information is also discussed in Section 1.1, "Certified Components."
Support for Provisioning Default Group UpdatesFrom this release onward, the connector supports provisioning of updates to a user's default group. When a change default group request is provisioned to the target system, the LDAP gateway automatically adds the user to the new default group, and then updates the user's DFLTGRP attribute to the new group. This information is also discussed in Section 1.5.3, "User Attributes for Target Resource Reconciliation and Provisioning."
Support for Universal GroupsFrom this release onward, the connector supports the use of universal groups in provisioning and reconciliation operations. Universal groups can have unlimited number of AUTH(USE) userIDs on the target system. This information is also discussed in Table 3–5 in Section 3.9, "Installing and Configuring the LDAP Gateway."
Resolved Issues in Release 9.0.4.23The following table lists issues resolved in release 9.0.4.23:
19261863 A COBOL run-time condition, IGZ0074S, occurred during execution of program PIONEERX.
This issue has been resolved. The sequential instruction to be executed in program PIONEERX was at displacement 00018A3C, and has now been fixed.
Note: As of RACF 9.0.4.23 and above, all reconciliation is performed via scheduled tasks.
Bug Number Issue Resolution
16568815 The FindAllDatasets scheduled task did not reconcile datasets whose dataset name started with a pound (#) character.
This issue has been resolved. The LDAP gateway can now reconcile datasets that begin with a pound character.
Bug Number Issue Resolution

xviii
Software Updates in Release 9.0.4.22The following are the software updates in release 9.0.4.22:
■ New Additions:
■ Support for Reconciliation Agent
■ Support for Provisioning Agent
■ Support for TCPIP
■ Support for Pioneer's Support Clist
■ Resolved Issues in Release 9.0.4.22
New Additions:■ A new function "Delete Alias" has been added to the connector guide. See
Table 1–2 for more details.
■ Table 3–5 has been updated for new properties.
Support for Reconciliation AgentAs of this release STARTUP is no longer required to build the Subpool for Voyager. There is a new Voyager control file parameter for the STARTUP integration into Voyager. The parameter is SUBPOOL_SIZE=. Additionally, a new feature has been added to Voyager. The feature is controlled by a Voyager control file parameter, PIONEER_ID=. Three parameters are now optional in the Voyager control file, these are:
1. DELAY=
2. STARTDELAY=
3. PRTNCODE=
The parameter section for Voyager has been updated to reflect the changes. No STC ddnames have changed in Voyager. WRAPUP also has been incorporated in Voyager. Both STARTUP and WRAP procedures and programs will be included in the distribution. See Chapter 2, "Deploying the IDF Advanced Adapter for IBM RACF" for more details.
Support for Provisioning AgentThe batch interface for ALIAS processing and SEARCH classes has now been moved to be processed internally by Pioneer. Three control file parameters have been removed and are no longer needed, these are:
16444260 RACF form password did not follow UD_formname_PASSWORD naming convention, so password policies were not triggered.
This issue has been resolved. The RACF form field for passwords has been renamed to follow the UD_formname_PASSWORD context so that password policies are automatically triggered.
13791726 User names containing apostrophes (') were truncated during provisioning operations.
This issue has been resolved. Apostrophes are no longer causing the CN or NAME fields to be truncated.
16477390 Provisioning operations failed if user names contained special characters (for example, accent marks).
This issue has been resolved. Use of special characters in user names is no longer causing provisioning operations to fail.
Bug Number Issue Resolution
xix
1. RWAIT=
2. JWAIT=
3. QUEUE_DSN=
All parameters for Pioneer are now contained in the control file. Pioneer STC ddnames have been changed:
Support for TCPIPPioneers TCP message size has changed from 32K to 65K. Pioneer's INITAPI now sets MAXSOC to 5000 sockets. Pioneer's Read Socket logic was modified to ignore any inbound message size less than 1600 bytes. The LDAP sends only 1600 bytes.
Support for Pioneer's Support ClistPioneer's Rexx clist library now only contains following clists. They are called internally by Pioneer using "IRXJCL".
■ IDFRACFC
■ RACFUSRP
■ RACFUSRG
■ RACFUSRD
See Chapter 2, "Deploying the IDF Advanced Adapter for IBM RACF" more details.
Resolved Issues in Release 9.0.4.22The following table lists issues resolved in release 9.0.4.22:
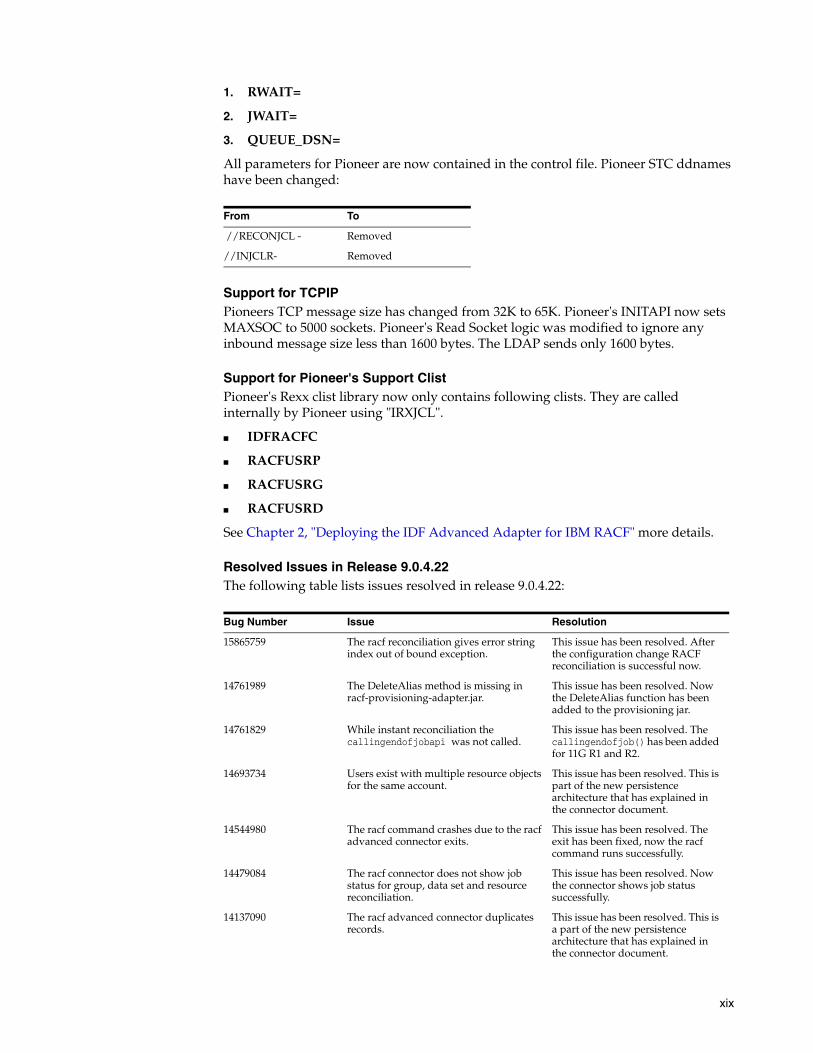
From To
//RECONJCL - Removed
//INJCLR- Removed
Bug Number Issue Resolution
15865759 The racf reconciliation gives error string index out of bound exception.
This issue has been resolved. After the configuration change RACF reconciliation is successful now.
14761989 The DeleteAlias method is missing in racf-provisioning-adapter.jar.
This issue has been resolved. Now the DeleteAlias function has been added to the provisioning jar.
14761829 While instant reconciliation the callingendofjobapi was not called.
This issue has been resolved. The callingendofjob() has been added for 11G R1 and R2.
14693734 Users exist with multiple resource objects for the same account.
This issue has been resolved. This is part of the new persistence architecture that has explained in the connector document.
14544980 The racf command crashes due to the racf advanced connector exits.
This issue has been resolved. The exit has been fixed, now the racf command runs successfully.
14479084 The racf connector does not show job status for group, data set and resource reconciliation.
This issue has been resolved. Now the connector shows job status successfully.
14137090 The racf advanced connector duplicates records.
This issue has been resolved. This is a part of the new persistence architecture that has explained in the connector document.

xx
Software Updates in Release 9.0.4.21The following are the software updates in release 9.0.4.21:
■ Support for New RACF CREATDSN Members
■ Voyager and Pioneer Audit Examples
■ Resolved Issues in Release 9.0.4.21
Support for New RACF CREATDSN MembersFrom this release onward, the connector supports new RACF CREATDSN members. See Chapter 2, "Deploying the IDF Advanced Adapter for IBM RACF" for more details.
Voyager and Pioneer Audit ExamplesFrom this release onward, the Voyager and Pioneer Audit Examples have been included in the connector. See Chapter 2, "Deploying the IDF Advanced Adapter for IBM RACF" for more details.
Resolved Issues in Release 9.0.4.21There are no resolved issues in release 9.0.4.21.
Software Updates in Release 9.0.4.20The following are the software updates in release 9.0.4.20:
■ Support for New Dataset
■ Support for New Feature
■ Support for User-Defined Resources Reconciliation Queries
■ Resolved Issues in Release 9.0.4.20
Support for New DatasetFrom this release onwards, the connector supports new datasets for Voyager and pioneer. See Chapter 2, "Deploying the IDF Advanced Adapter for IBM RACF" for more details.
Support for New FeatureFrom this release onwards, the connector supports a new feature Audit log.
See Chapter 2, "Deploying the IDF Advanced Adapter for IBM RACF" for more details.
Support for User-Defined Resources Reconciliation QueriesFrom this release onwards, the connector supports User-Defined Resources Reconciliation Queries. See Section 5.10, "LDAP Reconciliation Supported Queries" for more details.
Resolved Issues in Release 9.0.4.20The following table lists issues resolved in release 9.0.4.20:
13791726 The apostrophe (') makes name truncated in racf connector when provisioning from Oracle Identity Manager.
This issue has been resolved. You need to add double quotes (" ") to Oracle Identity Manager name form field.
Bug Number Issue Resolution

xxi
Software Updates in Release 9.0.4.19The following are the software updates in release 9.0.4.19:
■ Support for New Functions
■ Support for New Parameters in Property File
■ Enhanced Reconciliation
■ Resolved Issues in Release 9.0.4.19
Support for New FunctionsFrom this release onwards, the connector supports new functions (create group, alter group, and delete group). See Section 1.5, "Connector Objects Used During Reconciliation and Provisioning," for details.
Support for New Parameters in Property FileFrom this release onwards, the connector supports new Parameters in the property file useExtractUser, _configExtractAttrs_, and _allowDeleteDS_. See Table 3–5 for more details.
Enhanced ReconciliationFrom this release onwards, the connector supports enhanced reconciliation. See Section 5.11, "Use and Build Custom Real-Time Reconciliation Adapter," and Section 5.10, "LDAP Reconciliation Supported Queries" for more details.
Resolved Issues in Release 9.0.4.19The following table lists issues resolved in release 9.0.4.19:
Bug Number Issue Resolution
13905563 Enhancement request for RACF connector for INJCLR1 and ReconJCL DD statements in Pioneer Started Tasks.
This issue has been resolved. The INJCLR1 and ReconJCL DD statements in Pioneer Started Tasks have been enhanced.
14043036 The connector needs to extend the functionality to import resources for custom class types.
This issue has been resolved. The latest RACF connector supports reconciling resources of class type.
14091677 The deployment fails with error when trying to deploy IBM RACF advanced connector on Oracle Identity Manager.
This issue has been resolved. Now the IBM RACF advanced can be successfully deployed on Oracle Identity Manager.
14137090 RACF advanced connector duplicates records.
This issue has been resolved. A parameter called Voyager Delay has been added.
Bug Number Issue Resolution
13846604 When installing 13778002 patch, it show version as 9.0.4.17.
This issue has been resolved. The version has been corrected in this patch.

xxii
Software Updates in Release 9.0.4.17The following are the software updates in release 9.0.4.17:
■ Support for Multiple Target Resource Reconciliation Through a Single LPAR
■ Change in Pioneer's Dataset Definition
■ New Parameter for Voyager
■ Resolved Issues in Release 9.0.4.17
Support for Multiple Target Resource Reconciliation Through a Single LPARFrom this release onward, change-based reconciliation using a single LDAP gateway installation from multiple target resource systems is supported. As part of this update, the VOYAGER_ID.properties file (previously known as racfConnection.properties) must be renamed to match the Voyager server's VOYAGER_ID control file property.
Change in Pioneer's Dataset DefinitionPioneer's Dataset Definition (DD) for SYSTSPRT has been changed from RECFM=F to RECFM=FB, Changes were in called programs RACFUSRP and RACFUSRG. Disk space for the file is now blocked, better utilizing the file space.
New Parameter for VoyagerVoyager has a new parameter in the control file. The parameter is VOYAGER_ID=xxxxxxxx, where xxxxxxxx is a 8 character unique identifier for Voyager. See Chapter 2, "Deploying the IDF Advanced Adapter for IBM RACF" for details.
Resolved Issues in Release 9.0.4.17There are no resolved issues in release 9.0.4.17.
Software Updates in Release 9.0.4.16There are no software updates in release 9.0.4.16.
Resolved Issues in Release 9.0.4.16The following table lists issues resolved in release 9.0.4.16:
Bug Number Issue Resolution
13259031 Ensure that the product can support port reservation.
This issue has been resolved. The IBM RACF Advanced Pioneer/Voyager agent has been enhanced to support port reservation.
13259151 Need to certify that the product functions correctly when RRSF is active.
This issue has been resolved. The connector is certified to function correctly when RRSF is active.
13259097 The connector should work with RACF subsystem.
This issue has been resolved. The connector has been certified to work with RACF subsystem.

xxiii
Software Updates in Release 9.0.4.15The following are the software updates in release 9.0.4.15:
■ Support for New Lookup Definition Scheduled Tasks
■ Support for Initial Reconciliation Via Scheduled Task
■ Support for User's Dataset Reconciliation
■ Resolved Issues in Release 9.0.4.15
Support for New Lookup Definition Scheduled TasksFrom this release onward, the connector includes scheduled tasks for storing all resources, groups, and datasets in lookup definitions. These lookups are used during the provisioning process, allowing the user to select an existing group, resource, or dataset from a lookup list, instead of manually entering the name in the provisioning form.
Support for Initial Reconciliation Via Scheduled TaskFrom this release onward, initial reconciliation is no longer performed using the racf-initial-recon-adapter deployment. Instead, initial reconciliation is supported via the RACF Reconcile All Users scheduled task.
Support for User's Dataset ReconciliationFrom this release onward, user's dataset membership can be reconciled using the RACF Find User's Datasets scheduled task. The list of datasets is stored by default in the Lookup.UsersDatasets lookup definition.
Resolved Issues in Release 9.0.4.15The following table lists issues resolved in release 9.0.4.15:
13259110 Add PDS support to pioneer and voyager started tasks for parmlib members and for JCL references.
This issue has been resolved. The IBM RACF Advanced Pioneer/Voyager agent has been added PDS support for parmlib members and for JCL references.
Bug Number Issue Resolution
11809955 Need to certify the connector to operate with z/OS V1.12
This issue has been resolved. The connector is certified to operate with z/OS V1.12 in this release.
11738283 Need to enhance IBM RACF Advanced Pioneer/Voyager agent to support z/OS Mainframe Application.
This issue has been resolved. The IBM RACF Advanced Pioneer/Voyager agent has been enhanced to support z/OS Mainframe Application.
Bug Number Issue Resolution
xxiv
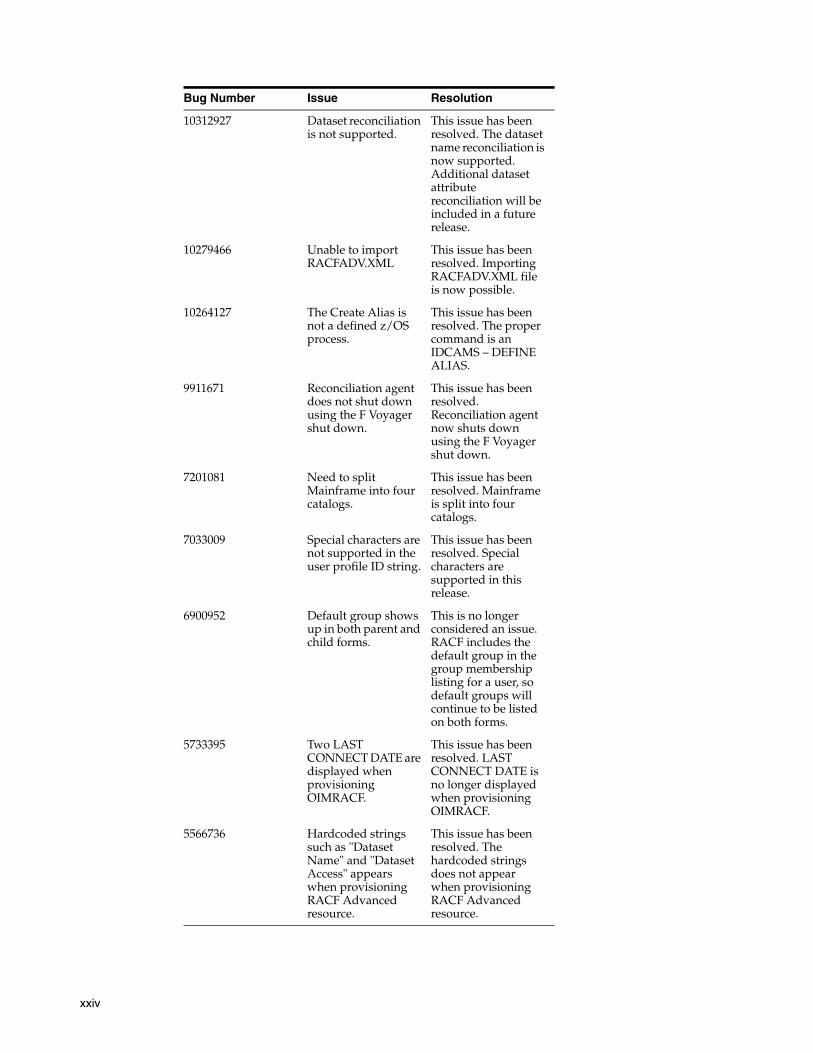
10312927 Dataset reconciliation is not supported.
This issue has been resolved. The dataset name reconciliation is now supported. Additional dataset attribute reconciliation will be included in a future release.
10279466 Unable to import RACFADV.XML
This issue has been resolved. Importing RACFADV.XML file is now possible.
10264127 The Create Alias is not a defined z/OS process.
This issue has been resolved. The proper command is an IDCAMS – DEFINE ALIAS.
9911671 Reconciliation agent does not shut down using the F Voyager shut down.
This issue has been resolved. Reconciliation agent now shuts down using the F Voyager shut down.
7201081 Need to split Mainframe into four catalogs.
This issue has been resolved. Mainframe is split into four catalogs.
7033009 Special characters are not supported in the user profile ID string.
This issue has been resolved. Special characters are supported in this release.
6900952 Default group shows up in both parent and child forms.
This is no longer considered an issue. RACF includes the default group in the group membership listing for a user, so default groups will continue to be listed on both forms.
5733395 Two LAST CONNECT DATE are displayed when provisioning OIMRACF.
This issue has been resolved. LAST CONNECT DATE is no longer displayed when provisioning OIMRACF.
5566736 Hardcoded strings such as "Dataset Name" and "Dataset Access" appears when provisioning RACF Advanced resource.
This issue has been resolved. The hardcoded strings does not appear when provisioning RACF Advanced resource.
Bug Number Issue Resolution

xxv
Software Updates in Release 9.0.4.14The following are the software updates in release 9.0.4.14:
■ Support for New Script for Oracle Identity Manager 11g Release (11.1.1)
■ Resolved Issues in Release 9.0.4.14
Support for New Script for Oracle Identity Manager 11g Release (11.1.1)From this release onward, new script and lib directories are provided for Oracle Identity Manager 11g release 1 (11.1.1) to enable jar and property files to be picked up directly from this new location. See Section 3.1, "Files and Directories That Comprise the Connector" and Section 3.3, "Before Running the Connector Installer" for usage instructions.
Resolved Issues in Release 9.0.4.14The following table lists issues resolved in release 9.0.4.14:
Software Updates in Release 9.0.4.13The following are the software updates in release 9.0.4.13:
■ Support for New Oracle Identity Manager Release
■ Support for Request-Based Provisioning
■ Resolved Issues in Release 9.0.4.13
Support for New Oracle Identity Manager ReleaseFrom this release onward, the connector can be installed and used on Oracle Identity Manager 11g release 1 (11.1.1). Where applicable, instructions specific to this Oracle Identity Manager release have been added in the guide.
See Section 1.1, "Certified Components" for the full list of certified Oracle Identity Manager releases.
Support for Request-Based ProvisioningFrom this release onward, the connector provides support for request-based provisioning on Oracle Identity Manager 11g release 1 (11.1.1).
See Chapter 2, "Deploying the IDF Advanced Adapter for IBM RACF" for more information.
Resolved Issues in Release 9.0.4.13The following table lists issues resolved in release 9.0.4.13:
Bug Number Issue Resolution
10224186 Reconciliation of multiple IT resource for the same target system is not supported.
This issue has been resolved. Reconciliation of multiple IT resource for the same target system is now supported.
10304189 Unable to remove the IBM RACF user from the default group.
This issue has been resolved. The IBM RACF user can now be removed from the default group.

xxvi
Software Updates in Release 9.0.4.12The following table lists issues resolved in release 9.0.4.12:
Software Updates in Release 9.0.4.11■ Support for New Target System Attributes
■ Support for Running IBM z/OS Batch Jobs Through the Provisioning Agent
■ Resolved Issues in Release 9.0.4.11
Support for New Target System AttributesThe following target system attributes have been added for reconciliation and provisioning:
CICS_OPCLASS
CICS_OPIDENT
CICS_OPPRTY
CICS_RSLKEY
Bug Number Issue Resolution
10075543 The status of resource allocation on Oracle Identity Manager was Provisioned even when the Create User provisioning operation failed.
This issue has been resolved. The status of the resource now correctly reflects the outcome of the provisioning operation.
9911671 The Reconciliation Agent could not be shut down by running the F VOYAGER,SHUTDOWN command.
This issue has been resolved. The F VOYAGER,SHUTDOWN command now works as expected.
Bug Number Issue Resolution
9962145 Passwords were displayed in clear text in the logs for the Provisioning Agent.
This issue has been resolved. Passwords are not recorded in the logs.
9031465 During initial reconciliation, a trusted source reconciliation run was immediately followed by target resource reconciliation.
This issue has been resolved. A trusted source reconciliation run is not followed by target resource reconciliation.
7199039 The Resume User (that is, Enable User) provisioning operation worked correctly on the target system. However, the status in Oracle Identity Manager was not correct.
This issue has been resolved. The status in Oracle Identity Manager is now set correctly.
7193225 During a provisioning operation, the tsoProc attribute was updated on the target system even when the TSO Proc Updated process task was rejected on Oracle Identity Manager.
This issue has been resolved. The tsoProc attribute on the target system is modified only when the TSO Proc Updated process task is successfully run on Oracle Identity Manager.
7024223 The initial reconciliation scripts for this connector and the Oracle Identity Manager Connector for CA ACF2 had the same name.
This issue has been resolved. The initial reconciliation scripts have been given new names.
6901000 User status reconciliation was not available by default. After deploying the connector, you had to set up status reconciliation.
This issue has been resolved. User status reconciliation is now available by default.
See Also: Section 1.5.3, "User Attributes for Target Resource Reconciliation and Provisioning" for the full list of supported attributes.

xxvii
CICS_TIMEOUT
CICS_TSLKEY
CICS_XRFSOFF
NETVIEW_CONSNAME
NETVIEW_CTL
NETVIEW_DOMAINS
NETVIEW_IC
NETVIEW_MSGRECVR
NETVIEW_NGMFADMN
NETVIEW_NGMFVSPN
NETVIEW_OPCLASS
OMVS_ASSIZEMAX
OMVS_AUTOUID
OMVS_SHARED
OMVS_CPUTIMEMAX
OMVS_FILEPROCMAX
OMVS_MEMLIMIT
OMVS_MMAPAREAMAX
OMVS_PROCUSERMAX
OMVS_SHMEMMAX
OMVS_THREADSMAX
Support for Running IBM z/OS Batch Jobs Through the Provisioning AgentFrom this release onward, the Provisioning Agent can be configured to run IBM z/OS batch jobs corresponding to provisioning functions you specify. See the following for more information:
■ Chapter 2, "Deploying the IDF Advanced Adapter for IBM RACF"
■ Section 5.5, "Using the Provisioning Agent to Run IBM z/OS Batch Jobs"
Support for IBM z/OS version 1.11From this release onward, IBM z/OS version 1.11 is one of the certified target system identity repositories. This operating system version has been added in Section 1.1, "Certified Components."
Resolved Issues in Release 9.0.4.11The following table lists issues resolved in release 9.0.4.11:
Bug Number Issue Resolution
8935868 The Reconciliation Agent failed and would not recover correctly if the LDAP Gateway was stopped or failed and was then restarted.
This issue has been resolved. The Reconciliation Agent does not fail if the LDAP Gateway is restarted after it fails or is stopped.
xxviii
Software Updates in Release 9.0.4.4The following table lists issues resolved in release 9.0.4.4:
Software Updates in Release 9.0.4.3The following is a software updates in release 9.0.4.3:
■ Support for IBM z/OS version 1.9
Support for IBM z/OS version 1.9From this release onward, IBM z/OS version 1.9 is one of the certified target system identity repositories. This operating system version has been added in Section 1.1, "Certified Components."
Software Updates Up to Release 9.0.4.2The following are software updates up to release 9.0.4.2:
■ IBM RACF user profile, group profile, and data set and resource profile commands supported by the Provisioning Agent have been added in the "Functionality Supported by the Pioneer Provisioning Agent" section.
■ The list of functions supported by the Provisioning Agent has been updated in Section 1.5.2, "Supported Functions for Provisioning."
■ The commands supported by the Reconciliation Agent have been added in Section 1.5.1, "Supported Functions for Target Resource Reconciliation."
■ The list of functions supported by the Reconciliation Agent has been updated in Section 1.5.1, "Supported Functions for Target Resource Reconciliation."
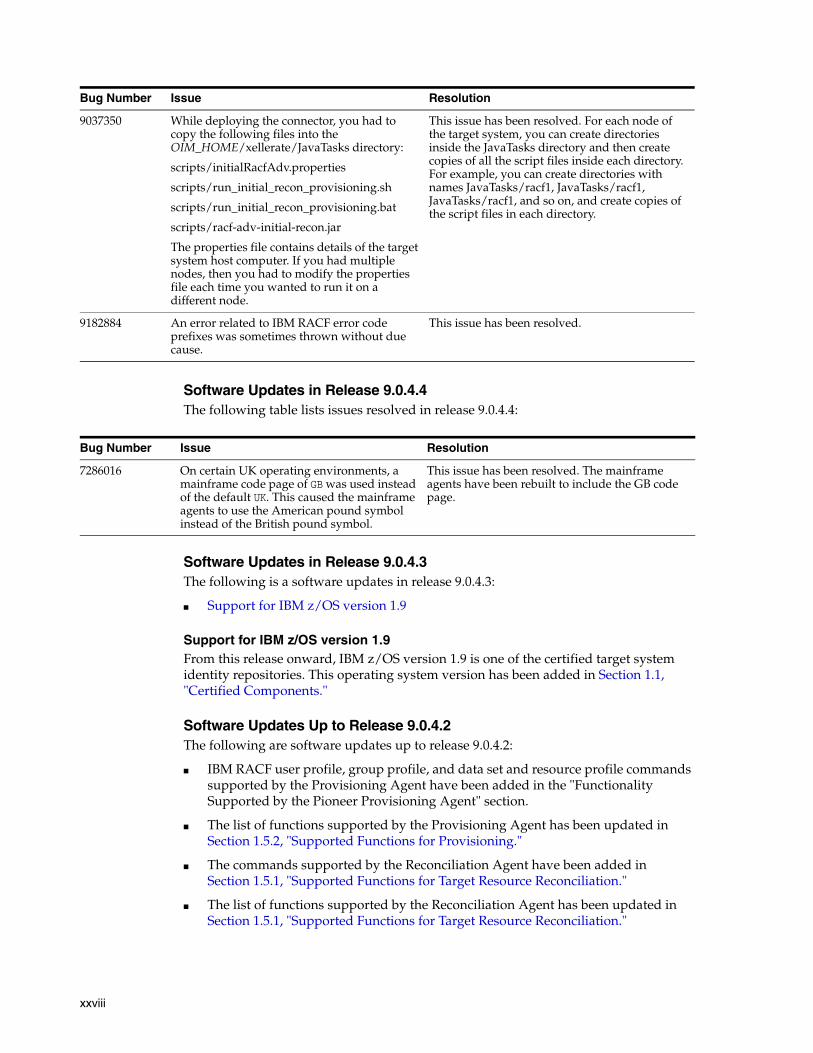
9037350 While deploying the connector, you had to copy the following files into the OIM_HOME/xellerate/JavaTasks directory:
scripts/initialRacfAdv.properties
scripts/run_initial_recon_provisioning.sh
scripts/run_initial_recon_provisioning.bat
scripts/racf-adv-initial-recon.jar
The properties file contains details of the target system host computer. If you had multiple nodes, then you had to modify the properties file each time you wanted to run it on a different node.
This issue has been resolved. For each node of the target system, you can create directories inside the JavaTasks directory and then create copies of all the script files inside each directory. For example, you can create directories with names JavaTasks/racf1, JavaTasks/racf1, JavaTasks/racf1, and so on, and create copies of the script files in each directory.
9182884 An error related to IBM RACF error code prefixes was sometimes thrown without due cause.
This issue has been resolved.
Bug Number Issue Resolution
7286016 On certain UK operating environments, a mainframe code page of GB was used instead of the default UK. This caused the mainframe agents to use the American pound symbol instead of the British pound symbol.
This issue has been resolved. The mainframe agents have been rebuilt to include the GB code page.
Bug Number Issue Resolution

xxix
■ The list of fields reconciled between IBM RACF and Oracle Identity Manager has been updated in the Section 1.5.3, "User Attributes for Target Resource Reconciliation and Provisioning."
■ The IT resource parameters and their corresponding descriptions and sample values have been updated in Section 2.5, "Importing the Connector XML File."
■ The procedure to configure the connector for multiple installations of the target system has been added in Section 5.5, "Configuring the Connector for Multiple Installations of the Target System."
■ Known issues related to the following bugs have been added in Chapter 7, "Known Issues and Workarounds":
– Bug 6668844
– Bug 6904041
– Bug 6920042
– Bug 7033009
Documentation-Specific UpdatesThe following sections discuss documentation-specific updates:
■ Documentation-Specific Updates in Release 9.0.4.24
■ Documentation-Specific Updates in Release 9.0.4.23
■ Documentation-Specific Updates in Release 9.0.4.22
■ Documentation-Specific Updates in Release 9.0.4.21
■ Documentation-Specific Updates in Release 9.0.4.20
■ Documentation-Specific Updates in Release 9.0.4.19
■ Documentation-Specific Updates in Release 9.0.4.17
■ Documentation-Specific Updates in Release 9.0.4.16
■ Documentation-Specific Updates in Release 9.0.4.15
■ Documentation-Specific Updates in Release 9.0.4.14
■ Documentation-Specific Updates in Release 9.0.4.13
■ Documentation-Specific Updates in Release 9.0.4.2 through 9.0.4.12
Documentation-Specific Updates in Release 9.0.4.24The following are the documentation-specific updates in revision "24" of this guide:
■ The titles for Section 1.5.6, "Dataset Profile Attributes for Provisioning" and Section 1.5.7, "Resource Profile Attributes for Provisioning" have been modified to remove the "Target Resource Reconciliation" phrase.
■ Steps 4, 5c, and 7 of Section 3.5, "Installing and Configuring the LDAP Gateway" have been modified.
■ The Note in Step 3n of Section 5.3, "Adding Custom Fields for Provisioning" has been modified.
■ A Note about populating IMPORTG into backend of the LDAP Gateway is added to Step 5 of Section 5.7, "Initial LDAP Gateway Population and Full Reconciliation".

xxx
■ The "CONNECT_INTV" row of Table G–1, " Voyager Control File Parameters" has been updated from "CONNECT-INTV" to "CONNECT_INTV".
■ The description for parameter "VOYAGER_ID=" of Table G–2, " Pioneer Control File Parameters" has been modified.
■ The description for parameter "SMF=" of Table G–2, " Pioneer Control File Parameters" has been modified.
■ The description for parameter "DEBUGOUT=" of Table G–2, " Pioneer Control File Parameters" has been modified.
■ Additional parameters such as EBCDIC_COUNTRY_CODE and EBCDIC_TILDE_CHR have been added to Table G–1, " Voyager Control File Parameters" and Table G–2, " Pioneer Control File Parameters".
■ Information regarding the byte key to use for encrypting data has been modified from 160byte to 16 byte in Step 1 of Appendix I, "Customizing AES Encryption Key".
■ References to ICHPWX01 and ICHRIX02 exits have been removed from the guide as they are no longer supported.
■ In Section 2.3.1, "Extracting the Files for Deployment from the Distribution Zip Archive File", "loadlib.xmi" has been replaced with "loadlib.xmi or linklib.xmi".
■ A note regarding extension file has been added in Section 2.3.1, "Extracting the Files for Deployment from the Distribution Zip Archive File".
■ The following updates have been made in Table 3–5, " Properties in the racf.properties File".
– The property "configAttrs" is modified to "_configAttrs_".
– The property "configDNames" is modified to "_configDNames_".
– New properties "errormsg-sig-file" and "check-return-codes" have been added.
■ In Section 3.5, "Installing and Configuring the LDAP Gateway", step 8 and 9 have been modified to include information on JAVA versions.
The following are the documentation-specific updates in revision "23" of this guide:
■ Section 2.3.1, "Extracting the Files for Deployment from the Distribution Zip Archive File," the third bullet list was changed from "linklib.xmi" to "loadlib.xmi."
■ Information specific to the /ldapgateway/idfserver.jar beans.xml directory in Step 6.a of Section 3.5, "Installing and Configuring the LDAP Gateway," has been updated.
■ Appendix J, "Mainframe Language Environment Runtime Options" has been added.
■ SRCHLG has been changed to SEARCH CLASS (GROUP) throughout the guide.
■ KEYMODER has been changed to KEYMODR throughout the guide.
■ Ebcdic has been changed to EBCDIC throughout the guide.
Note: After release 9.0.4.23 of this connector, there has been no major release. Release 9.0.4.24 of the connector was a bundle patch release. Therefore, this document directly provides updates to release 9.0.4.25 of this connector.
xxxi
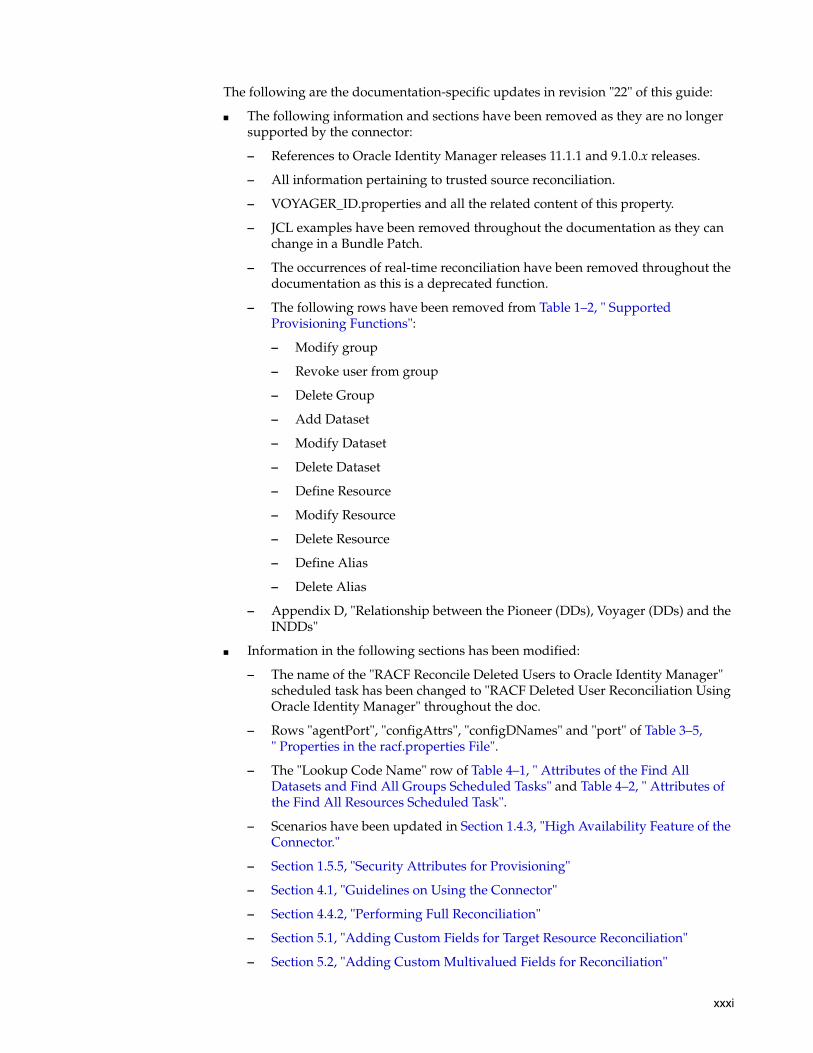
The following are the documentation-specific updates in revision "22" of this guide:
■ The following information and sections have been removed as they are no longer supported by the connector:
– References to Oracle Identity Manager releases 11.1.1 and 9.1.0.x releases.
– All information pertaining to trusted source reconciliation.
– VOYAGER_ID.properties and all the related content of this property.
– JCL examples have been removed throughout the documentation as they can change in a Bundle Patch.
– The occurrences of real-time reconciliation have been removed throughout the documentation as this is a deprecated function.
– The following rows have been removed from Table 1–2, " Supported Provisioning Functions":
– Modify group
– Revoke user from group
– Delete Group
– Add Dataset
– Modify Dataset
– Delete Dataset
– Define Resource
– Modify Resource
– Delete Resource
– Define Alias
– Delete Alias
– Appendix D, "Relationship between the Pioneer (DDs), Voyager (DDs) and the INDDs"
■ Information in the following sections has been modified:
– The name of the "RACF Reconcile Deleted Users to Oracle Identity Manager" scheduled task has been changed to "RACF Deleted User Reconciliation Using Oracle Identity Manager" throughout the doc.
– Rows "agentPort", "configAttrs", "configDNames" and "port" of Table 3–5, " Properties in the racf.properties File".
– The "Lookup Code Name" row of Table 4–1, " Attributes of the Find All Datasets and Find All Groups Scheduled Tasks" and Table 4–2, " Attributes of the Find All Resources Scheduled Task".
– Scenarios have been updated in Section 1.4.3, "High Availability Feature of the Connector."
– Section 1.5.5, "Security Attributes for Provisioning"
– Section 4.1, "Guidelines on Using the Connector"
– Section 4.4.2, "Performing Full Reconciliation"
– Section 5.1, "Adding Custom Fields for Target Resource Reconciliation"
– Section 5.2, "Adding Custom Multivalued Fields for Reconciliation"

xxxii
– Section 5.3, "Adding Custom Fields for Provisioning"
– Section 5.4, "Removing Attributes Mapped for Target Resource Reconciliation"
– Table 6–1, " Troubleshooting Tips"
– Appendix G, "Voyager and Pioneer Control File Parameters"
– Appendix I, "Customizing AES Encryption Key"
■ The following information has been added:
– Rows "Pioneer and Voyager" and "LDAP Gateway operating system and JDK" to Table 1–1, " Certified Components".
– Table 3–3, " Log Files and their Contents"
– The following rows have been added to Table 3–5, " Properties in the racf.properties File":
– isStreamingUsers
– isStreamingGroups
– _extractGrp_
– resumeOnReset
– secretKeyValue
– trimOmvsUid
– trimNum
– newOmvsUidAttr
– usePwdComplexLength
– idMinLength
– idMaxLength
– pwdMinLength
– pwdMaxLength
– type
– Section 4.4.3.3, "RACF Reconcile Users to Internal LDAP"
– Section 4.4.3.4, "RACF Reconcile All LDAP Users"
– Section 4.4.4, "Configuring Filtered Reconciliation to Multiple Resource Objects"
– The following rows have been added to Table 4–8, " Scheduled Tasks for Lookup Field Synchronization and Reconciliation":
– RACF Reconcile Deleted Users to OIM
– RACF Reconcile Users to Internal LDAP
– RACF Reconcile All LDAP Users
– Section 5.4, "Removing Attributes Mapped for Target Resource Reconciliation"
– Section 5.8, "Configuring Windows Service"
– Section 5.9, "Customizing Log File Locations"
– Section 5.11, "Handling PIONEER Error Messaging Exceptions in the Gateway"

xxxiii
Documentation-Specific Updates in Release 9.0.4.23The following documentation-specific updates have been made in revision "21" of release 9.0.4.23:
■ The "Oracle Identity Manager" row of Section 1.1, "Certified Components" has been modified.
■ Section 2.1, "IDF Mainframe Adapters Functional Characteristics" has been added.
■ CREATDSN: sample has been updated. For more details, see Section 2.3.4, "Editing the Mainframe Batch Job Files to Match the Settings for the Customer's Site."
■ Section 2.3.9, "Testing the Installation" has been updated with latest information.
■ VSAMPLE row has been updated with latest information. For more details, see Appendix B, "Pioneer Datasets."
■ Appendix D, "Provisioning Agent (Pioneer) Messages" has been updated with latest information.
■ Appendix G, "Voyager and Pioneer Control File Parameters" has been updated with latest information.
■ Appendix H, "Configuring RACF Starter User ID and Access for Voyager Agent and Pioneer Agent Started Tasks" has been added.
■ Appendix I, "Customizing AES Encryption Key" has been added.
The following documentation-specific updates have been made in revision "20" of release 9.0.4.23:
■ A new Supported Provisioning Function Grant security attribute to user has been added. For more details, see Table 1–2.
■ Additional High Availability scenarios have been added to the connector guide. For more details, see Section 1.4.3, "High Availability Feature of the Connector."
■ Group Attributes for Target Resource Reconciliation and Provisioning have been updated. For more details, see Section 1.5.4, "Group Attributes for Target Resource Reconciliation and Provisioning."
■ Security Attributes for Target Resource Reconciliation and Provisioning have been added. For more details, see Section 1.5.5, "Security Attributes for Provisioning."
■ Dataset Profile Attributes for Target Resource Reconciliation and Provisioning have been updated. For more details, see Section 1.5.6, "Dataset Profile Attributes for Provisioning."
■ Resource Profile Attributes for Target Resource Reconciliation and Provisioning have been updated. For more details, see Section 1.5.7, "Resource Profile Attributes for Provisioning."
■ Table 3–1 has been updated for location of files and directories.
■ Instructions specific to Oracle Identity Manager release 11.1.2.x have been added in the following sections:
– Section 3.3, "Before Running the Connector Installer"
– Section 3.2, "Running the Connector Installer"
– Section 3.4, "Configuring Oracle Identity Manager"
– Section 3.5, "Installing and Configuring the LDAP Gateway"
■ Table 3–3 has been updated for Last Modified Time Stamp.
xxxiv
■ A section about the information on enabling logging for the LDAP Gateway and enabling logging in Oracle Identity Manager has been added. For more details, see Section 3.4.4, "Enabling Logging."
■ Section 4.2, "Scheduled Tasks for Lookup Field Synchronization" has been updated for the scheduled tasks for lookup field synchronization.
■ Section 4.3, "Configuring the Security Attributes Lookup Field" has been updated for new security attributes.
■ The information on Configuring Reconciliation has been added. For more details, see Section 4.4.1, "Configuring Incremental Reconciliation," Section 4.4.2, "Performing Full Reconciliation" and Section 4.4.3, "Reconciliation Scheduled Tasks."
■ Account Status Reconciliation section has been added to the connector guide. For more details, see Section 4.5, "Configuring Account Status Reconciliation."
■ The information on Configuring Scheduled Tasks has been added. For more details, see Section 4.6, "Configuring Scheduled Tasks."
■ The information to perform provisioning operations in Oracle Identity Manager Release 11.1.2 or later has been added. For more details, see Section 4.7, "Performing Provisioning Operations."
■ Custom Fields for Target Resource Reconciliation have been updated. For more details, see Section 5.1, "Adding Custom Fields for Target Resource Reconciliation."
■ Section 5.2, "Adding Custom Multivalued Fields for Reconciliation" has been added for Custom Multivalued Fields for Reconciliation.
■ Custom Fields for Provisioning have been updated. For more details, see Section 5.3, "Adding Custom Fields for Provisioning."
■ Section 5.7, "Initial LDAP Gateway Population and Full Reconciliation" has been updated for Initial LDAP Gateway Population and Full Reconciliation.
■ In Appendix D.1, "LISTINR and IDCAMS," LISTINR and IDCAMS functions have been added.
Documentation-Specific Updates in Release 9.0.4.22The following are the documentation-specific updates in release 9.0.4.22:
■ New sections on initial LDAP population and reconciliation process, and initial LDAP gateway population and reconciliation process have been added to the connector guide. See Section 1.3.2.2, "Initial LDAP Population and Reconciliation Process" and Section 5.7, "Initial LDAP Gateway Population and Full Reconciliation" for more details.
■ In Section 2.3.4, "Editing the Mainframe Batch Job Files to Match the Settings for the Customer's Site," CREATDSN: has been updated.
■ Section 2.3.9, "Testing the Installation" has been updated for executing voyager and JCL for Pioneer and Voyager started task.
■ In Section 2.3.8, "Adding Pioneer/Voyager to the Facility Class Profiles (IRR)," a note on IRR.RADMIN has been updated.
■ Appendix B, "Pioneer Datasets" has been updated for the file content value of the VSAMPLE.

xxxv
■ Appendix D has been updated for the new values of the Pioneer DD, Voyager DD and INDDs.
Documentation-Specific Updates in Release 9.0.4.21There are no documentation-specific updates in release 9.0.4.21.
Documentation-Specific Updates in Release 9.0.4.20The following are the documentation-specific updates in release 9.0.4.20:
■ Table 3–3 has been added for the Log files and their contents.
■ The subpool size and the maximum amount of storage values have been updated.
■ A note on the requirement of //SYSOUT has been added.
■ The code for STC (Started Task) for Pioneer has been updated.
■ New source code lines have been added.
■ The flow for the full reconciliation for user IDs and groups has been updated with the new steps.
■ New Rexx clists SERCHDAT and SERCHFAC have been added.
■ A note on submitting the SERCHFAC and SERCHDAT via the LDAP has been added.
Documentation-Specific Updates in Release 9.0.4.19The following are the documentation-specific updates in release 9.0.4.19:
■ Four new files to support full imports on user IDs and groups have been added. See Chapter 2, "Deploying the IDF Advanced Adapter for IBM RACF" for more details.
■ In Section 5.3, "Adding Custom Fields for Provisioning," a note on enabling password interval provisioning has been added.
Documentation-Specific Updates in Release 9.0.4.17The following are the documentation-specific updates in release 9.0.4.17:
■ In the entire guide, racfConnection.properties has been changed to VOYAGER_ID.properties.
■ See Chapter 2, "Deploying the IDF Advanced Adapter for IBM RACF" for more details on pioneer and voyager.
■ In chapter 5, "Extending the functionality of the connector", a new Section 5.7, "Configuring the Connector for Reconciliation of Multiple Installations of the Target System," has been added.
■ In Table 5-1, new attributes have been added.
Documentation-Specific Updates in Release 9.0.4.16The following are the documentation-specific updates in release 9.0.4.16.
■ A new step (6) has been added in the Section 3.5, "Installing and Configuring the LDAP Gateway" providing information about the configurations for setting up SSL in the LDAP Gateway.
■ A new Chapter 2, "Deploying the IDF Advanced Adapter for IBM RACF" has been added providing details about the processes that Pioneer does via LDAP initiation.

xxxvi
■ In Chapter 2, "Deploying the IDF Advanced Adapter for IBM RACF", commands and examples have been updated for Voyager and Pioneer specific information.
Documentation-Specific Updates in Release 9.0.4.15There are no documentation-specific updates in release 9.0.4.15.
Documentation-Specific Updates in Release 9.0.4.14There are no documentation-specific updates in release 9.0.4.14.
Documentation-Specific Updates in Release 9.0.4.13There are no documentation-specific updates in release 9.0.4.13.
Documentation-Specific Updates in Release 9.0.4.2 through 9.0.4.12The following sections discuss documentation-specific updates have been made in releases 9.0.4.2 to 9.0.4.12:
■ Guidelines that were earlier documented in Chapter 7, "Known Issues and Workarounds" have been moved to Chapter 2, "Deploying the IDF Advanced Adapter for IBM RACF"
■ Information about enabling logging on the LDAP Gateway server has been added in Section 3.5, "Installing and Configuring the LDAP Gateway."
■ In Section 1.2, "Certified Languages," Arabic has been added to the list of languages that the connector supports.
■ The IBM MQ Series protocol for the message transport layer is no longer supported for this connector. All content related to this protocol has been removed from the guide.
■ In Section 1.1, "Certified Components," changes have been made in the second row.
■ Major changes have been made in the structure of the guide. In addition, all references to the prclib.xmi and parmlib.xmi files have been removed from the guide. These files will be introduced in a later release of the connector.
■ In Section 1.1, "Certified Components," the minimum Oracle Identity Manager release has been changed to 9.1.0.1 and the JDK requirement of release 1.5 or later has been added.
■ Appendix F, "Creating Custom Scheduled Tasks" provides code for creating custom scheduled tasks.
■ From this release onward:
The minimum certified release of Oracle Identity Manager is release 9.1.0.1 or later.
The minimum certified release of JDK is release 1.5.
See Section 1.1, "Certified Components" for the complete listing of certified components.

1
About the Connector 1-1
1About the Connector
Oracle Identity Manager automates access rights management, security, and provisioning of IT resources. Oracle Identity Manager connectors are used to integrate Oracle Identity Manager with external, identity-aware applications. This guide discusses the connector that enables you to use IBM RACF as a managed (target) resource for Oracle Identity Manager.
The advanced connector for IBM RACF provides a native interface between IBM RACF installed on an IBM z/OS mainframe and Oracle Identity Manager. The connector functions as a trusted virtual administrator on the target system, performing tasks related to creating and managing user profiles.
The connector allows information about users created or modified directly on the target system to be reconciled into Oracle Identity Manager. In addition, you can use Oracle Identity Manager to perform provisioning operations on the target system.
In the IBM RACF context, the term user profile is synonymous with user account. If IBM RACF is configured as a target resource, then user profiles on IBM RACF correspond to accounts or resources assigned to OIM Users.
This chapter is divided into the following sections:
■ Section 1.1, "Certified Components"
■ Section 1.2, "Certified Languages"
■ Section 1.3, "Connector Architecture"
■ Section 1.4, "Features of the Connector"
■ Section 1.5, "Connector Objects Used During Reconciliation and Provisioning"
1.1 Certified ComponentsTable 1–1 lists the certified components.

Certified Components
1-2 Oracle Identity Manager Connector Guide for IBM RACF Advanced
Table 1–1 Certified Components
Item Requirement
Oracle Identity Manager You can use one of the following releases of Oracle Identity Manager:
■ Oracle Identity Manager 11g Release 2 PS2 (11.1.2.2.0) and any later BP in this release track
■ Oracle Identity Manager 11g Release 2 PS3 (11.1.2.3.0) and any later BP in this release track
Note: In this guide, Oracle Identity Manager release 11.1.2.x has been used to denote Oracle Identity Manager 11g release 2 (11.1.2.x) or future releases in the 11.1.2.x series that the connector supports.
JDK JDK 1.6, update 31 or later.
Target system IBM RACF on z/OS 1.13 to 2.2
Infrastructure Requirements: Message transport layer between the Oracle Identity Manager and the mainframe environment
The infrastructure requirements can be one of the following:
■ TCP/IP with Advanced Encryption Standard (AES) encryption
■ z/OS AES encryption
Target system user account for reconciliation and provisioning operations
IBM Authorized Program Facility (APF) authorized account with System Administrators privileges
See Chapter 2, "Deploying the IDF Advanced Adapter for IBM RACF" for more information.
Product Libraries The following are the product libraries:
■ z/OS standard Load Libraries. These libraries must be APF authorized.
■ IRREVX01 resides in the Product Library.
Pioneer and Voyager Pioneer and Voyager are written in single thread LE Cobol. They were developed to run above the 16M line. Options that can adversely affect these STCs are LE run options:
■ ALL31(OFF) instead of ON
■ STACK(,,,BELOW,,) instead of STACK(,,,ANYWHERE,,)
LDAP Gateway operating system and JDK
The operating system for LDAP Gateway can be any one of the following:
■ Microsoft Windows Server 2008 SP2
■ Microsoft Windows Server 2008 R2 SP1 (64-bit)
■ Microsoft Windows Server 2012 (64-bit)
■ Microsoft Windows Server 2012 R2 (64-bit)
■ Oracle Linux 5.5+
■ Oracle Linux 6.x (32-bit), 6.x (64-bit)
■ Oracle Linux 7.x (64-bit) (7u67 and above)
■ Red Hat Enterprise Linux 5.5+, 6.x (32-bit), 6.x (64-bit)
■ Red Hat Enterprise Linux 7.x (64-bit) (7u67 and above)
■ Suse Linux Enterprise Server 10 SP2, 11.x
■ Suse Linux Enterprise Server 12.x (7u75 and above)
■ Ubuntu Linux 10.04 and above
The following version of JDK is supported:
JDK 1.7 or above

Connector Architecture
About the Connector 1-3
1.2 Certified LanguagesThe connector supports the following languages:
■ Arabic
■ Chinese (Simplified)
■ Chinese (Traditional)
■ Danish
■ English
■ French
■ German
■ Italian
■ Japanese
■ Korean
■ Portuguese (Brazilian)
■ Spanish
1.3 Connector ArchitectureThe connector architecture is described in the following sections:
■ Section 1.3.1, "Connector Components"
■ Section 1.3.2, "Connector Operations"
1.3.1 Connector ComponentsThe connector contains the following components:
■ LDAP Gateway: The LDAP Gateway receives instructions from Oracle Identity Manager in the same way as any LDAP version 3 identity store. These LDAP commands are then converted into native commands for IBM RACF and sent to the Provisioning Agent. The response, which is also native to IBM RACF, is parsed into an LDAP-format response and returned to Oracle Identity Manager.
During reconciliation, the LDAP Gateway receives event notification, converts the events to LDAP format, and then forwards them to Oracle Identity Manager, or events can be stored in the LDAP Gateway internal store and pulled into Oracle Identity Manager by a scheduled task.
■ Provisioning Agent (Pioneer): The Provisioning Agent is a mainframe component. It receives native mainframe IBM RACF provisioning commands from the LDAP Gateway. These requests are processed against the IBM RACF authentication repository, in which all provisioning updates from the LDAP Gateway are stored. The response is parsed and returned to the LDAP Gateway.
■ Reconciliation Agent (Voyager): The Reconciliation Agent captures mainframe events by using exits, which are programs run after events in IBM RACF are
Note: At some places in this guide, the Provisioning Agent is referred to as Pioneer.
Connector Architecture
1-4 Oracle Identity Manager Connector Guide for IBM RACF Advanced
processed. These events include the ones generated at TSO logins, the command prompt, batch jobs, and other native events. These events are stored in a subpool cache area that is established by a supplied, standard z/OS procedure (STARTUP). The Reconciliation Agent captures these events, transforms them into LDAPv3 protocol notification messages, and then sends them to Oracle Identity Manager through the LDAP Gateway.
■ Message Transport Layer: The message transport layer enables the exchange of messages between the LDAP Gateway and the Reconciliation Agent and Provisioning Agent. TCP/IP protocol is used for the transport of messages.
TCP/IP with Advanced Encryption Standard (AES) encryption using 128-bit cryptographic key. The connector supports a message transport layer by using the TCP/IP protocol, which is functionally similar to proprietary message transport layer protocols.
1.3.2 Connector OperationsThis section provides an overview of the following processes:
■ Section 1.3.2.1, "Full Reconciliation Process"
■ Section 1.3.2.2, "Initial LDAP Population and Reconciliation Process"
■ Section 1.3.2.3, "Provisioning Process"
1.3.2.1 Full Reconciliation ProcessFull reconciliation involves fetching existing user profile data from the mainframe to Oracle Identity Manager. If you configure the target system as a target resource, then this user profile data is converted into accounts or resources for OIM Users.
The following is a summary of the full reconciliation process:
1. You set values for the attributes of the RACF Reconcile All Users scheduled task.
2. You run the scheduled task. The task sends a search request to the LDAP Gateway.
3. The LDAP Gateway encrypts the search request and then sends it to the Provisioning Agent on the mainframe.
4. The Provisioning Agent encrypts user profile data received from RACF and then passes this data to the LDAP Gateway.
5. The LDAP Gateway decrypts the user profile data. If the user profile data does not include any changes when compared to the OIM user's existing resource data, then the event is ignored and reconciliation continues with the next user on the target system. If the user profile data includes a change, then the LDAP Gateway passes the data on to Oracle Identity Manager.
6. The user profile data is converted into accounts or resources for OIM Users.
Note: At some places in this guide, the Reconciliation Agent is referred to as Voyager.
Note: For detailed instructions, see Chapter 2, "Deploying the IDF Advanced Adapter for IBM RACF" of this guide.

Connector Architecture
About the Connector 1-5
1.3.2.2 Initial LDAP Population and Reconciliation ProcessThis reconciliation process allows for a faster reconciliation based on an Extracted File configured on the Mainframe that will be used to populate the internal LDAP store, which OIM can then use a normal scheduled task to reconcile all the data to Oracle Identity Manager.
The following is a summary of the full reconciliation process:
1. Use IBM utility to EXTRACT user data to a file.
2. Configure Pioneer to use this file when needed.
Once this file has been created and used by OIM it will become stale and must be deleted. The file can be generated again if needed for re-populating or updating the Internal LDAP for Oracle Identity Manager to reconcile the latest data.
3. Once the above file is generated, run the RACF Reconcile Users To Internal LDAP scheduled task to populate the LDAP Gateway internal store.
4. After the LDAP Gateway internal store is populated, run the RACF Reconcile All LDAP Users scheduled task with one of the following settings:
a. To reconcile all users, set the value of the Last Modified Timestamp attribute to 0.
b. To reconcile all users that have changed since that date, set the value of the Last Modified Timestamp attribute to a date range.
1.3.2.3 Provisioning ProcessFigure 1–1 shows the flow of data during provisioning.
Note: For detailed instructions, see Section 5.7, "Initial LDAP Gateway Population and Full Reconciliation" of this guide.
Note: If the _internalEnt_ property, located in the LDAP_INSTALL_DIR/conf/racf.properties file, is set to true, then the LDAP internal store will also be populated on an ongoing basis by the "real-time" event capture using Voyager and the EXIT(s). So after initial population and reconciliation the process will still continue to use the RACF Reconcile All Ldap Users Task scheduled job using a Date range to reconcile these "real-time" event changes from data captured in the LDAP internal store.

Features of the Connector
1-6 Oracle Identity Manager Connector Guide for IBM RACF Advanced
Figure 1–1 Provisioning Process
The following is a summary of the provisioning process:
1. Provisioning data submitted from Oracle Identity Self Service is sent to the LDAP Gateway.
2. The LDAP Gateway converts the provisioning data into mainframe commands, encrypts the commands, and then sends them to the mainframe computer over TCP/IP.
3. The Provisioning Agent installed on the mainframe computer decrypts and converts the LDAP message from ASCII to EBCDIC.
4. The Provisioning agent executes the commands, runs them on the mainframe and within the Pioneer STC (Started Task) using the RACF API (IRRSEQ00).
5. The Provisioning Agent converts the RACF API output to ASCII and encrypts the message prior to sending back to the LDAP Gateway.
6. The outcome of the operation on the mainframe is displayed in Identity Self Service. A more detailed message is recorded in the connector log file.
1.4 Features of the ConnectorThe following are features of the connector:
■ Section 1.4.1, "Full and Incremental Reconciliation"
■ Section 1.4.2, "Encrypted Communication Between the Target System and Oracle Identity Manager"
■ Section 1.4.3, "High Availability Feature of the Connector"
1.4.1 Full and Incremental ReconciliationAfter you deploy the connector, you perform full reconciliation to bring all existing user profile data from the target system to Oracle Identity Manager. After the first full reconciliation run, the scheduled task works in incremental mode by leveraging the value present in the Last Modified Time Stamp parameter of the IT resource.
Mainframe
LDAP Gateway
IBM RACF
OracleIdentity
Manager
InternalMeta-Store
TCP/IP Communication Link
IBM RACFAdvancedConnector
ProvisioningAgent
(Pioneer)

Features of the Connector
About the Connector 1-7
You can perform a full reconciliation run at any time. See Section 4.4.1, "Configuring Incremental Reconciliation" and Section 4.4.2, "Performing Full Reconciliation" for more information.
1.4.2 Encrypted Communication Between the Target System and Oracle Identity Manager
AES-128 encryption is used to encrypt data that is exchanged between the LDAP Gateway and the Reconciliation Agent and Provisioning Agent on the mainframe.
1.4.3 High Availability Feature of the ConnectorThe following are component-failure scenarios and the response of the connector to each scenario:
■ Scenario 1: The Reconciliation Agent is running and the LDAP Gateway stops responding
1. The Reconciliation Agent stops sending messages (event data) to the LDAP Gateway.
2. Messages that are not sent are stored in the subpool cache.
3. When the LDAP Gateway is brought back online, the Reconciliation Agent reads data from the subpool cache and then sends messages to the LDAP Gateway.
■ Scenario 2: The LDAP Gateway is running and the Reconciliation Agent stops responding
1. Event data is sent to the subpool cache.
2. When the Reconciliation Agent is brought back online, it reads data from the subpool cache and then sends messages to the LDAP Gateway.
■ Scenario 3: The LDAP Gateway is running and the mainframe stops responding
1. Messages that are in the subpool cache are written to disk.
2. When the mainframe is brought back online, event data written to disk is again stored in the subpool cache.
3. The Reconciliation Agent reads data from the subpool cache and then sends messages to the LDAP Gateway.
Note: During SHUTDOWN, there is a possibility that events that had been sent to the LDAP might be saved and re-sent again once the agent is brought back online. This is to ensure that no data lose and this process will re-list the event data to provide the most current view.
Note: During SHUTDOWN, there is a possibility that events that had been sent to the LDAP might be saved and re-sent again once the Agent is brought back online. This is to ensure no data lose and this process will re-list the event data to provide the most current view.

Connector Objects Used During Reconciliation and Provisioning
1-8 Oracle Identity Manager Connector Guide for IBM RACF Advanced
■ Scenario 4: The LDAP Gateway is running and the Provisioning Agent or mainframe stops responding
The process task that sends provisioning data to the LDAP Gateway retries the task.
■ Scenario 5: The subpool is stopped by an administrator
If the subpool is stopped by an administrator, then it shuts down the Reconciliation Agent, thereby destroying any messages that are not transmitted. However, the messages in the AES-encrypted file are not affected and can be recovered.
1.5 Connector Objects Used During Reconciliation and ProvisioningThe following sections provide information about connector objects used during reconciliation and provisioning:
■ Section 1.5.1, "Supported Functions for Target Resource Reconciliation"
■ Section 1.5.2, "Supported Functions for Provisioning"
■ Section 1.5.3, "User Attributes for Target Resource Reconciliation and Provisioning"
■ Section 1.5.4, "Group Attributes for Target Resource Reconciliation and Provisioning"
■ Section 1.5.5, "Security Attributes for Provisioning"
■ Section 1.5.6, "Dataset Profile Attributes for Provisioning"
■ Section 1.5.7, "Resource Profile Attributes for Provisioning"
■ Section 1.5.8, "Reconciliation Rule"
■ Section 1.5.9, "Reconciliation Action Rules"
1.5.1 Supported Functions for Target Resource ReconciliationThe connector supports reconciliation of user data from the following events:
■ Create user
■ Modify user
■ Revoke user
■ Resume user
■ Delete user
■ Add user to group
■ Delete user from group
1.5.2 Supported Functions for ProvisioningTable 1–2 lists the provisioning functions supported by the connector.

Connector Objects Used During Reconciliation and Provisioning
About the Connector 1-9
1.5.3 User Attributes for Target Resource Reconciliation and ProvisioningTable 1–3 lists attribute mappings between IBM RACF and Oracle Identity Manager for target resource reconciliation and provisioning. The OnBoardRacfUser and ModifyUser adapters are used for the Create User and Modify User provisioning operations, respectively.
Table 1–2 Supported Provisioning Functions
Function Description Mainframe Command
Create users Adds new user on IBM RACF ADDUSER
Create groups Adds new group on IBM RACF ADDGRP
Modify users Modifies user information on IBM RACF ALTUSER
Change passwords Changes user password on IBM RACF in response to password changes made on Oracle Identity Manager through user self-service
ALTUSER
Reset passwords Resets user password on IBM RACF
The passwords are reset by the administrator.
ALTUSER
Revoking user accounts Sets IBM RACF user to a REVOKED state ALTUSER
Resuming user accounts Sets IBM RACF user to an ENABLED state ALTUSER
Add user to group Connects user with an IBM RACF group CONNECT
Remove user from group Disconnects user from an IBM RACF group REMOVE
Permit user to dataset Permits user to be part of the data set ACL and gives them access rights to the data set
PERMIT
Remove user from dataset
Removes user from the data set ACL PERMIT
Permit user to access general resource
Permits user to be part of the resource ACL and gives them access rights to the resource
PERMIT
Remove user from general resource
Removes user from the resource ACL PERMIT
Grant security attribute to user
Provides non-value security attribute privileges to user
ALTUSER
Grant user to TSO segment
Provides TSO access and information to user ALTUSER
Grant user to OMVS segment
Provides OMVS information to users ALTUSER
Delete User Deletes user from IBM RACF DELUSER
Table 1–3 User Attributes for Target Resource Reconciliation and Provisioning
Process Form Field IBM RACF Attribute Description
cn NAME Full name
You can specify the format in which Full Name values are stored on the target system. Step 2 of Section 3.5, "Installing and Configuring the LDAP Gateway" describes the procedure.
cicsOpclass CICS_OPCLASS Operator class
cicsOpident CICS_OPIDENT Operator ID
cicsOpprty CICS_OPPRTY Operator priority

Connector Objects Used During Reconciliation and Provisioning
1-10 Oracle Identity Manager Connector Guide for IBM RACF Advanced
cicsRslkey CICS_RSLKEY Resource key 0–99
cicsTimeout CICS_TIMEOUT Timeout value
cicsTslkey CICS_TSLKEY Type key 1–99
cicsXrfsoff CICS_XRFSOFF Transaction off (Force|NoForce)
dfltGrp DEFAULT-GROUP Default group for the user
instdata DATA Installation-defined data for the user
netviewConsname NETVIEW_CONSNAME Console name
netviewCtl NETVIEW_CTL Control
netviewDomains NETVIEW_DOMAINS Domain name
netviewIc NETVIEW_IC Command|Command List
netviewMsgrecvr NETVIEW_MSGRECVR Message receiver
netviewNgmfadmn NETVIEW_NGMFADMN Administration (Y|N)
netviewNgmfvspn NETVIEW_NGMFVSPN View span
netviewOpclass NETVIEW_OPCLASS Operator class
omvsAssizemax OMVS_ASSIZEMAX Address space size
omvsAutouid OMVS_AUTOUID Generate auto user identifier
omvsCputimemax OMVS_CPUTIMEMAX CPU time
omvsFileprocmax OMVS_FILEPROCMAX Files per process
omvsHome HOME Homelocation
omvsMemlimit OMVS_MEMLIMIT Non-shared memory size
omvsMmapareamax OMVS_MMAPAREAMAX Memory map size
omvsProcusermax OMVS_PROCUSERMAX Processes per UID
omvsProgram PROGRAM Program
omvsShared OMVS_SHARED Shared user identifier
omvsShmemmax OMVS_SHMEMMAX Shared memory size
omvsThreadsmax OMVS_THREADSMAX Threads per process
omvsUid UID UID
owner OWNER Owner of the user profile
resumeDate RESUME DATE Future date from which the user will be allowed access to the system
revokeDate REVOKE DATE Future date from which the user's access to the system will be revoked
revoke REVOKE|RESUME Status of the user
tsoAcctNum ACCTNUM Default TSO account number on the TSO/E logon panel
tsoCommand COMMAND Command to be run during TSO/E logon
tsoDest DEST Default SYSOUT destination
tsoHoldclass HOLDCLASS Default hold class
tsoJobclass JOBCLASS Default job class
Table 1–3 (Cont.) User Attributes for Target Resource Reconciliation and Provisioning
Process Form Field IBM RACF Attribute Description
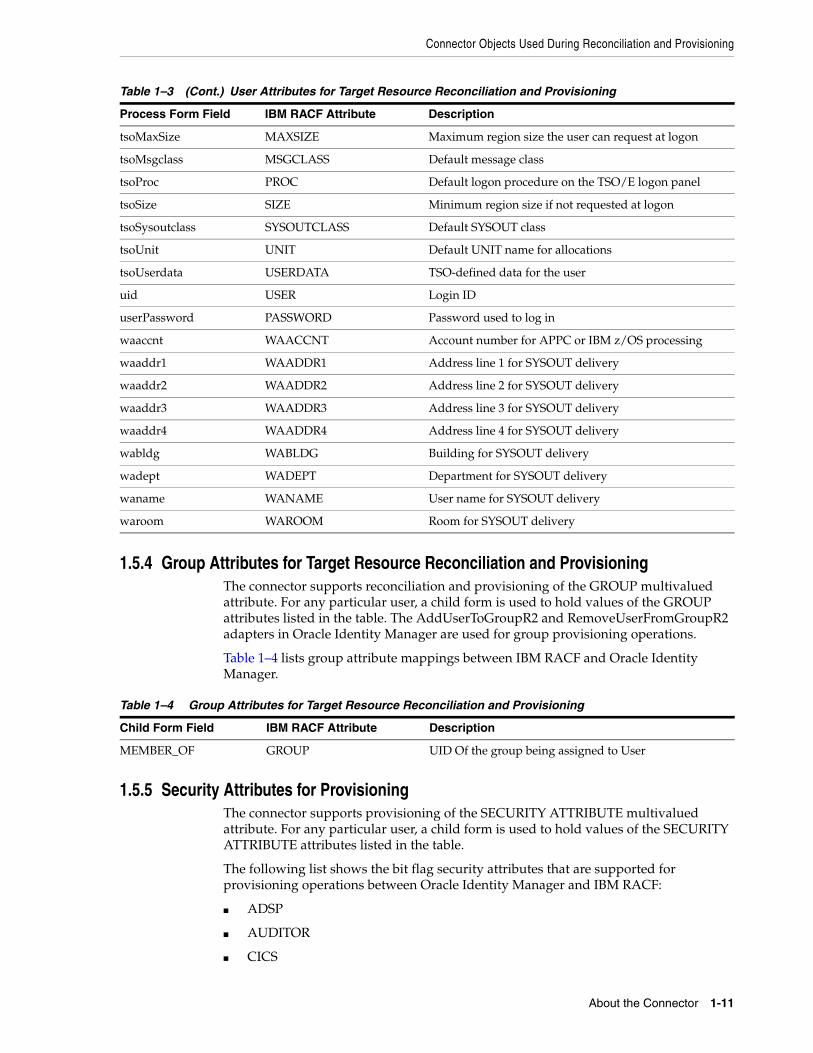
Connector Objects Used During Reconciliation and Provisioning
About the Connector 1-11
1.5.4 Group Attributes for Target Resource Reconciliation and ProvisioningThe connector supports reconciliation and provisioning of the GROUP multivalued attribute. For any particular user, a child form is used to hold values of the GROUP attributes listed in the table. The AddUserToGroupR2 and RemoveUserFromGroupR2 adapters in Oracle Identity Manager are used for group provisioning operations.
Table 1–4 lists group attribute mappings between IBM RACF and Oracle Identity Manager.
1.5.5 Security Attributes for ProvisioningThe connector supports provisioning of the SECURITY ATTRIBUTE multivalued attribute. For any particular user, a child form is used to hold values of the SECURITY ATTRIBUTE attributes listed in the table.
The following list shows the bit flag security attributes that are supported for provisioning operations between Oracle Identity Manager and IBM RACF:
■ ADSP
■ AUDITOR
■ CICS
tsoMaxSize MAXSIZE Maximum region size the user can request at logon
tsoMsgclass MSGCLASS Default message class
tsoProc PROC Default logon procedure on the TSO/E logon panel
tsoSize SIZE Minimum region size if not requested at logon
tsoSysoutclass SYSOUTCLASS Default SYSOUT class
tsoUnit UNIT Default UNIT name for allocations
tsoUserdata USERDATA TSO-defined data for the user
uid USER Login ID
userPassword PASSWORD Password used to log in
waaccnt WAACCNT Account number for APPC or IBM z/OS processing
waaddr1 WAADDR1 Address line 1 for SYSOUT delivery
waaddr2 WAADDR2 Address line 2 for SYSOUT delivery
waaddr3 WAADDR3 Address line 3 for SYSOUT delivery
waaddr4 WAADDR4 Address line 4 for SYSOUT delivery
wabldg WABLDG Building for SYSOUT delivery
wadept WADEPT Department for SYSOUT delivery
waname WANAME User name for SYSOUT delivery
waroom WAROOM Room for SYSOUT delivery
Table 1–4 Group Attributes for Target Resource Reconciliation and Provisioning
Child Form Field IBM RACF Attribute Description
MEMBER_OF GROUP UID Of the group being assigned to User
Table 1–3 (Cont.) User Attributes for Target Resource Reconciliation and Provisioning
Process Form Field IBM RACF Attribute Description

Connector Objects Used During Reconciliation and Provisioning
1-12 Oracle Identity Manager Connector Guide for IBM RACF Advanced
■ DCE
■ DFP
■ EXPIRED
■ GRPACC
■ NETVIEW
■ OIDCARD
■ OMVS
■ OPERATIONS
■ OPERPARM
■ OVM
■ PROTECTED
■ PROXY
■ RESTRICTED
■ SPECIAL
■ TSO
■ UAUDIT
1.5.6 Dataset Profile Attributes for ProvisioningThe connector supports provisioning of the DATASET multivalued attribute. For any particular user, a child form is used to hold values of the DATASET attributes listed in the table.
Table 1–6 lists DATASET attribute mappings between IBM RACF and Oracle Identity Manager.
1.5.7 Resource Profile Attributes for ProvisioningThe connector supports reconciliation and provisioning of the RESOURCE PROFILE multivalued attribute. For any particular user, a child form is used to hold values of the RESOURCE PROFILE attributes listed in the table.
Table 1–5 Security Attribute for Target Resource Reconciliation and Provisioning
Child Form Field IBM RACF Attribute Description
ATTRIBUTE Security Attribute Attribute access authority for user
Table 1–6 DATASET Attribute Mappings
Child Form Field IBM RACF Attribute Description
Dataset Name PROFILE NAME Profile ID
Dataset Access ACCESS User's access level to the dataset
Dataset Generic GENERIC Treat the dataset as a generic name
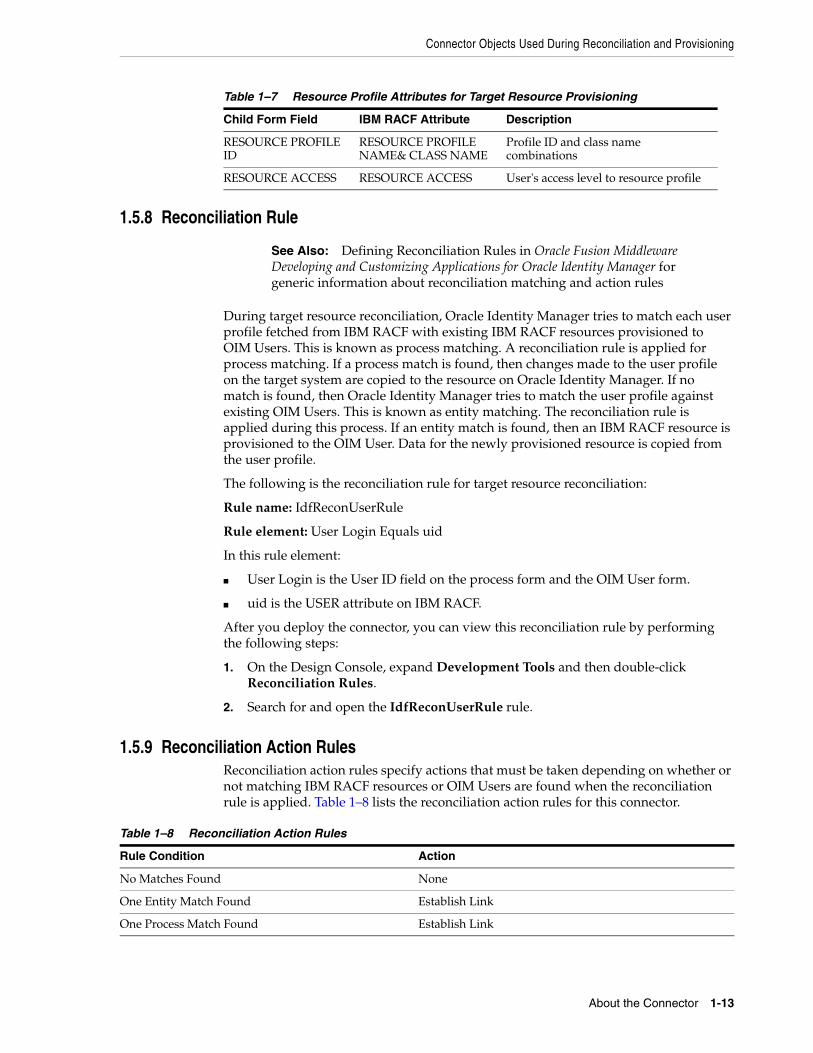
Connector Objects Used During Reconciliation and Provisioning
About the Connector 1-13
1.5.8 Reconciliation Rule
During target resource reconciliation, Oracle Identity Manager tries to match each user profile fetched from IBM RACF with existing IBM RACF resources provisioned to OIM Users. This is known as process matching. A reconciliation rule is applied for process matching. If a process match is found, then changes made to the user profile on the target system are copied to the resource on Oracle Identity Manager. If no match is found, then Oracle Identity Manager tries to match the user profile against existing OIM Users. This is known as entity matching. The reconciliation rule is applied during this process. If an entity match is found, then an IBM RACF resource is provisioned to the OIM User. Data for the newly provisioned resource is copied from the user profile.
The following is the reconciliation rule for target resource reconciliation:
Rule name: IdfReconUserRule
Rule element: User Login Equals uid
In this rule element:
■ User Login is the User ID field on the process form and the OIM User form.
■ uid is the USER attribute on IBM RACF.
After you deploy the connector, you can view this reconciliation rule by performing the following steps:
1. On the Design Console, expand Development Tools and then double-click Reconciliation Rules.
2. Search for and open the IdfReconUserRule rule.
1.5.9 Reconciliation Action RulesReconciliation action rules specify actions that must be taken depending on whether or not matching IBM RACF resources or OIM Users are found when the reconciliation rule is applied. Table 1–8 lists the reconciliation action rules for this connector.
Table 1–7 Resource Profile Attributes for Target Resource Provisioning
Child Form Field IBM RACF Attribute Description
RESOURCE PROFILE ID
RESOURCE PROFILE NAME& CLASS NAME
Profile ID and class name combinations
RESOURCE ACCESS RESOURCE ACCESS User's access level to resource profile
See Also: Defining Reconciliation Rules in Oracle Fusion Middleware Developing and Customizing Applications for Oracle Identity Manager for generic information about reconciliation matching and action rules
Table 1–8 Reconciliation Action Rules
Rule Condition Action
No Matches Found None
One Entity Match Found Establish Link
One Process Match Found Establish Link

Connector Objects Used During Reconciliation and Provisioning
1-14 Oracle Identity Manager Connector Guide for IBM RACF Advanced
After you deploy the connector, you can view the reconciliation action rules for target resource reconciliation by performing the following steps:
1. On the Design Console, expand Resource Management and double-click Resource Objects.
2. Search for and open the OIMRacfResourceObject resource object.
3. Click the Object Reconciliation tab, and then click the Reconciliation Action Rules tab. The Reconciliation Action Rules tab displays the action rules defined for this connector.
Note: No action is performed for rule conditions that are not predefined for this connector. You can define your own action rule for such rule conditions. For information about modifying or creating reconciliation action rules see Setting a Reconciliation Action Rule in Oracle Fusion Middleware Developing and Customizing Applications for Oracle Identity Manager.

2
Deploying the IDF Advanced Adapter for IBM RACF 2-1
2Deploying the IDF Advanced Adapter for IBMRACF
The IDF mainframe adapter is composed of the following main components:
Pioneer: As discussed in one of the earlier chapters, Pioneer (also known as the Provisioning Agent) receives native mainframe identity and authorization change events from the LDAP Gateway. These events are processed against the mainframe authentication repository, in which all provisioning updates from the LDAP Gateway are stored. The response is parsed and returned to the LDAP Gateway.
Voyager: This component is also known as the Reconciliation Agent. The Voyager captures native mainframe events by using System Exits. The Voyager transforms these events into LDAPv3 protocol notification messages through the LDAP Gateway.
System Exits: These are programs that are run after system events in IBM RACF have been detected. System Exits capture these events in real time. They are events occurring from the TSO logins, the command prompt, batch jobs, and other native mainframe events.
The following sections discuss more about deploying the IDM Advanced Adapter for IDB RACF:
■ Section 2.1, "IDF Mainframe Adapters Functional Characteristics"
■ Section 2.2, "Prerequisites"
■ Section 2.3, "Mainframe Adapter Installation"
2.1 IDF Mainframe Adapters Functional CharacteristicsFollowing are the IDF mainframe adapters functional characteristics:
■ Section 2.1.1, "Pioneer"
■ Section 2.1.2, "Voyager"
Note: Before you install the mainframe components of the RACF Advanced Adapter on a Production environment, Oracle recommends that you install the product on a Test and/or Development environment for testing, prior to installing on a Production environment.
IDF Mainframe Adapters Functional Characteristics
2-2 Oracle Identity Manager Connector Guide for IBM RACF Advanced
2.1.1 PioneerPioneer is the Provisioning Agent running on z/OS. It is a socket based server. The messages that are received from the LDAP gateway are encrypted. Pioneer receives the message, decrypts the message and then converts it to EBCDIC. The received message is validated for the following validation functions:
1. RACF commands (all)
■ LISTUSER, LISTGRP, LISTDSD, RLIST, and SEARCH are executed through MYRADMIN that does not require SECURE-ID usage.
■ ADDUSER, ALTUSER, DELUSER, PERMIT, CONNECT, and REMOVE are executed through the new programs IDFRADMN (For SMF=N) and IDFRADMS (For SMF=Y).
2. Define, Delete, and List MVS Aliases
■ LDAP can submit DEFINE, DELETE, or LISTC to Pioneer. Pioneer will allocate the SYSIN for IDCAMS using the Pioneer ddname = IDCAMSD. Pioneer then writes the IDCAMS control records to it. Once completed, Pioneer invokes IDCAMS and uses alternate ddnames for processing. The alternate ddnames permits Pioneer to call SYSIN a ddname of IDCAMSD and sysprint a ddname of LISTINR. Once 'IDCAMS' completes, the output is built into messages and routed back to LDAP. Upon completion, the two files are cleared by Pioneer.
■ The Alias processing is controlled by the usage of a Pioneer parameter in its control file. The parameter is POST_PROC_ALIAS, if this is set to 'T' or true, then it enables post-processing. If set to 'F' or false, then it disables post-processing.
3. Post-Processing
Pioneer can Post-Process. Post-processing is invoked by using an entry in the control file.
For example, C=ADDUSER,M=IDCAMS,L=TEST.CNTL.LIB
Pioneer will dynamically allocate 'TEST.CNTL.LIB', member = IDCAMS and reads and punchs it to the MVS INTRDR. The RACF command for the ADDUSER will also occur. This process will occur for every ADDUSER.
The following RACF commands are supported for Post-Processing.
■ ADDUSER,ALTUSER,DELUSER,CONNECT,REMOVE
■ DELUSER has an additional parameter, DEL=Y or DEL=N. C=DELUSER,M=DELIT,L=TEST.CNTL.LIB,DEL=N
Pioneer will dynamically allocate 'TEST.CNTL.LIB', member = DELIT and reads and punchs it to the MVS INTRDR. This process will occur for 'every' DELUSER. The DEL=N tells Pioneer not to actually perform the RACF DELUSER. If the parameter was coded as 'DEL=Y', then the actual RACF Delete will occur.
If Pioneer finds no 'C=' commands in the control file, then Post-Processing will not occur.
4. Searches
Pioneer can perform any of the following Searches that are LDAP initiated:
■ SEARCH CLASS (GROUP) - Full Recon by RACF Group

IDF Mainframe Adapters Functional Characteristics
Deploying the IDF Advanced Adapter for IBM RACF 2-3
User submitted job stream creates full extract of all RACF groups and builds a QSAM file. This file is pointed to by the Pioneer ddname = FULLIMPG. Once created, the LDAP initiates a SEARCH CLASS (GROUP) to retrieve the data.
■ SRCHLU - Full Recon by RACF Userid
User submitted job stream creates full extract of all RACF userids and builds a QSAM file. This file is pointed to by the Pioneer ddname = FULLIMPU. Once created, the LDAP initiates a SRCHLU to retrieve the data.
■ EXTRACTU - Full user Extract of all RACF segments
LDAP submits a EXTRACTU userid to Pioneer. Pioneer invokes REXX via IRXJCL. It must also have a '//SYSEXEC' JCL statement as well as a '//SYSTSPRT'. The IRXJCL invokes RACFUSRP Rexx clist which does a REXX 'address LINK MVS RACFUSRP'. The RACFUSRP is a RACF assembler program that performs an extract of the passed userid and places the output into the ddname = SYSTSPRT. When completed, Pioneer reads the 'SYSTSPRT ddname and sends the output back to the LDAP. The files are then cleared.
■ EXTRACTG - Full Group Extract
LDAP submits a 'EXTRACTU userid' to Pioneer. Pioneer invokes REXX via IRXJCL. It must also have a '//SYSEXEC' JCL statement as well as a '//SYSTSPRT'. The IRXJCL invokes RACFUSRP Rexx clist which does a REXX' address LINK MVS RACFUSRP'. The RACFUSRP is a RACF assembler program that performs an extract of all userids and places the output into the ddname = SYSTSPRT. When completed, Pioneer reads the 'SYSTSPRT ddname and sends the output back to LDAP. The files are then cleared.
■ SERCHDAT - All RACF dataset Profiles
LDAP submits a 'SERCHDAT' to Pioneer. Pioneer invokes REXX via IRXJCL. It must also have a '//SYSEXEC' JCL statement also as well as a '//SYSTSPRT'. The IRXJCL invokes RACFUSRD Rexx clist which does a REXX 'address LINK MVS RACFUSRD'. The RACFUSRD is a RACF assembler program that performs an extract of all RACF dataset profile and places the output into the ddname = SYSTSPRT. When completed, Pioneer reads the 'SYSTSPRT ddname and sends the output back to the LDAP. The files are then cleared.
■ SRCHRT - All RACF facilities pass SEARCH CLASS(FACILITY) through the MYRADMIN program.
2.1.2 VoyagerVoyager is the Reconciliation Agent running on z/OS. It is a Socket based client/server hybrid. Three exits feed RACF commands and userid information to Voyager via a established Subpool. The subpool using MVS subpool 231 is established using the supplied STC STARTUP or by coding 'SUBPOOL_SIZE=' in the Voyager Control file. Once established, the exits starts passively sending messages to the subpool for storage. Voyager polls the subpool and removes the messages. If there were 1000 message, Voyager will remove the 1000 messages and temporary store them in its own storage. Voyager executes RACF – LISTUSER or EXTRACT depending on the new Voyager parameter: EXTRACT=Y or EXTRACT=N.
The available exit is IRREVX01. The IRREVX01 exit uses an internal caching module 'LOGCACHE' to cache all the messages. The subpool size has to be planned based on number of RACF commands processed by each hour or day.
For example, if the SUBPOOL_SIZE =1000 K then the following is true:

Prerequisites
2-4 Oracle Identity Manager Connector Guide for IBM RACF Advanced
The subpool will hold a maximum of 10240 message (1000 * 1024)/100, the message size is always 100 bytes. Voyager will poll every 200 millisecs.
2.2 PrerequisitesThe prerequisites for installing the IDF Advanced adapter are as follows:
■ Section 2.2.1, "Message Transport Requirements"
■ Section 2.2.2, "APF Authorization"
2.2.1 Message Transport RequirementsBetween the LDAPv3 server and mainframe environments, the software supports TCP/IP. For the TCP/IP message transport layer, ports 5190 and 5790 are the default ports for the Voyager Agent and Pioneer Agent, respectively. You can change the ports for these agents. The procedures to configure these message transport layers are described later in this guide.
2.2.2 APF AuthorizationBoth Agents namely, Pioneer and Voyager require their executable modules residing in a standard Z/OS PDS Load Library be APF authorized. The authorization is required for the invocation of RACF functions through the RACF API or R_admin.
2.3 Mainframe Adapter Installation The following sections of this chapter describe the procedure to install the adapter:
■ Section 2.3.1, "Extracting the Files for Deployment from the Distribution Zip Archive File"
■ Section 2.3.2, "Uploading Files"
■ Section 2.3.3, "Extracting the XMIT Files"
■ Section 2.3.4, "Editing the Mainframe Batch Job Files to Match the Settings for the Customer's Site"
■ Section 2.3.5, "Submitting Batch Job Streams"
■ Section 2.3.6, "Activating and Loading the Exits"
■ Section 2.3.7, "Creating a RACF UserID for Pioneer and Voyager with Permissions"
■ Section 2.3.8, "Adding Pioneer/Voyager to the Facility Class Profiles (IRR)"
■ Section 2.3.9, "Testing the Installation"
2.3.1 Extracting the Files for Deployment from the Distribution Zip Archive FileTo extract the files from the distribution zip file:
Extract the contents of the following file to a temporary directory, distribution zip archive file.
The following are the contents of the zip file:
Note: The extension file such as .xmi or .xmit are available in the ZIP file.

Mainframe Adapter Installation
Deploying the IDF Advanced Adapter for IBM RACF 2-5
■ clistlib.xmi
■ jcllib.xmi
■ linklib.xmi or loadlib.xmi
■ parmlib.xmi
■ proclib.xmi
■ racf-readme.txt
2.3.2 Uploading Files You must upload the files that are extracted with the .xmi extension to the computer that is hosting the mainframe. See Section 2.3.1, "Extracting the Files for Deployment from the Distribution Zip Archive File" for information about extracting the files for deployment.
You can upload the files either by using an emulator or FTP. The following is the procedure to upload files by using the emulator:
1. Log in to the TSO environment of the mainframe, type ISPF at the READY prompt, and then press Enter.
2. From the ISPF menu, on the Option line or at the TSO READY Prompt, enter 6. This may vary by user installation. The Command entry screen to enter TSO commands or through the TSO READY PROMPT directly is displayed.
3. Use the IND$FILE command to upload .xmi files to the mainframe computer hosting using TN3270 emulator/transfer or FTP.
In the following example, the host file name is LINKLIB.XMI and the sending or local file name is as follows:
C:\Users\My_Name\Desktop\test-RACF\linklib.xmi
The .xmi files are binary in transfer - No ASCII/EBCDIC translation and no CRLF.
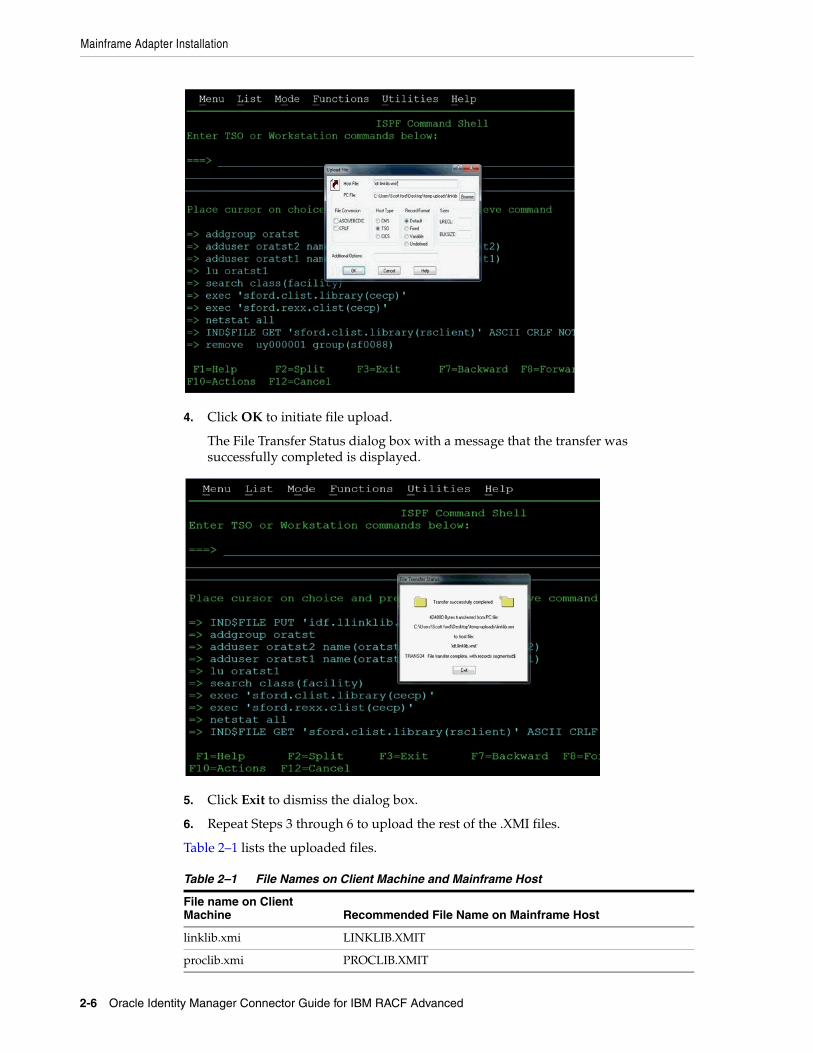
Mainframe Adapter Installation
2-6 Oracle Identity Manager Connector Guide for IBM RACF Advanced
4. Click OK to initiate file upload.
The File Transfer Status dialog box with a message that the transfer was successfully completed is displayed.
5. Click Exit to dismiss the dialog box.
6. Repeat Steps 3 through 6 to upload the rest of the .XMI files.
Table 2–1 lists the uploaded files.
Table 2–1 File Names on Client Machine and Mainframe Host
File name on Client Machine Recommended File Name on Mainframe Host
linklib.xmi LINKLIB.XMIT
proclib.xmi PROCLIB.XMIT

Mainframe Adapter Installation
Deploying the IDF Advanced Adapter for IBM RACF 2-7
2.3.3 Extracting the XMIT FilesThe files uploaded to the computer hosting the mainframe (by using the procedure described in Section 2.3.2, "Uploading Files") are XMIT files. An XMIT file is an archived file format used on the mainframe.
To extract the files or Partition Datasets (PDS) in the XMIT file:
1. Enter the RECEIVE command in the area designated to enter commands.
For example, enter the following command:
receive inda('linklib.xmit')
2. When prompted, enter the following to complete running the RECEIVE command:
Enter restore parameters or "DELETE" or "END" +
3. Enter the name of the PDS that the XMIT file will expand into. In this case, enter the following:
dataset('USER_NAME.idf.FILE_NAME')
In this command, replace:
■ USER_NAME with the user name on the system you have access to.
■ FILE_NAME with the name of the XMIT file to be extracted.
For example:
dataset('idf.test1.linklib')
In this example, the prefix IDF is the user name that is being used in this section. In your environment, replace the prefix IDF with the user name on the system you have access to. If you specify the PDS name within single quotation marks, then the PDS name is specified with the TSO user's name prefix. That is the fully qualified name.
If single quotation marks are not used, then the PDS is created with a prefix of the user name that you are logged on with. In this case, the response is as follows:
dataset(idf.linklib)
Table 2–2 lists the XMIT file names and the corresponding PDS names.
parmlib.xmi PARMLIB.XMIT
jcllib.xmi JCLLIB.XMIT
clistlib.xmi CLISTLIB.XMIT
Note: Filenames in mainframe are case insensitive.
Table 2–1 (Cont.) File Names on Client Machine and Mainframe Host
File name on Client Machine Recommended File Name on Mainframe Host
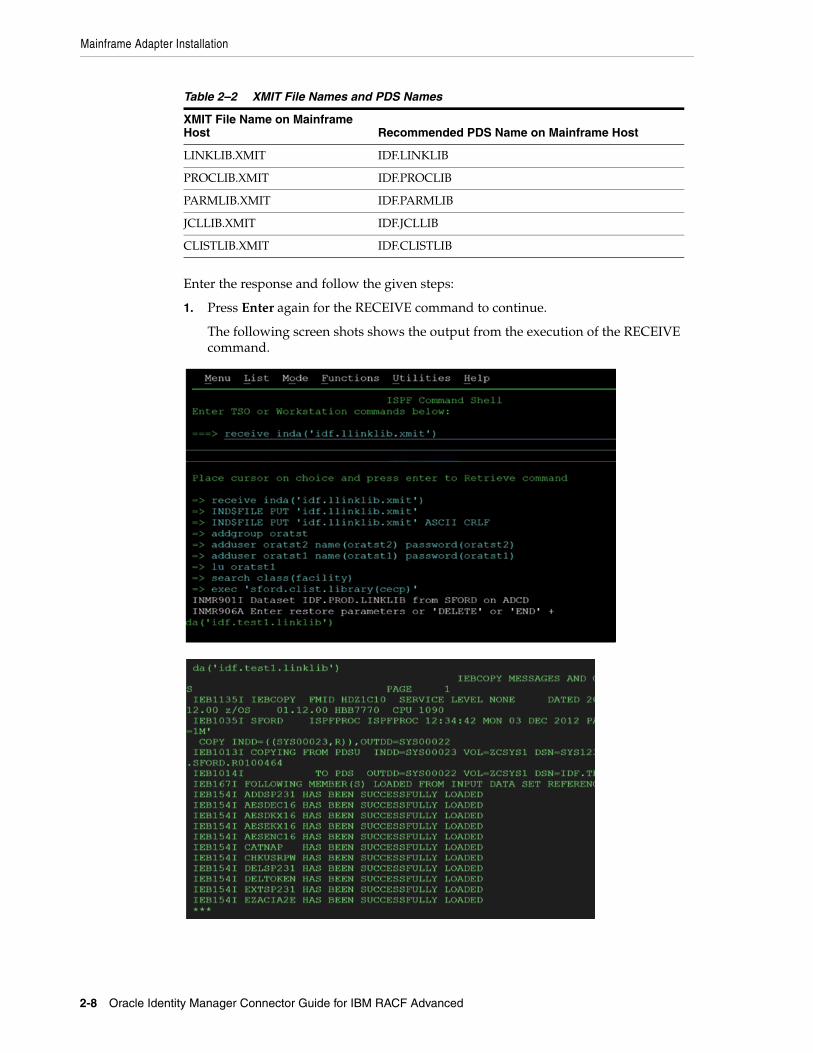
Mainframe Adapter Installation
2-8 Oracle Identity Manager Connector Guide for IBM RACF Advanced
Enter the response and follow the given steps:
1. Press Enter again for the RECEIVE command to continue.
The following screen shots shows the output from the execution of the RECEIVE command.
Table 2–2 XMIT File Names and PDS Names
XMIT File Name on Mainframe Host Recommended PDS Name on Mainframe Host
LINKLIB.XMIT IDF.LINKLIB
PROCLIB.XMIT IDF.PROCLIB
PARMLIB.XMIT IDF.PARMLIB
JCLLIB.XMIT IDF.JCLLIB
CLISTLIB.XMIT IDF.CLISTLIB

Mainframe Adapter Installation
Deploying the IDF Advanced Adapter for IBM RACF 2-9
2. Press Enter for each screen displayed since the output stops when the screen is full.
The RECEIVE command completes when the Restore successful message has been displayed on the screen.
3. Press Enter one last time to bring back the command entry screen.
4. Enter the RECEIVE command for each of the uploaded files using the host files name you selected for them.
5. Enter the restore parameters in response to each RECEIVE command you enter.
6. After all the files have been processed (extracted from the XMIT file with the Receive command), look at the members of each PDS using the Data Set List Utility which is ISPF option 3.4. on the command line to go there from the command entry screen.
Note: The IDF.LINKLIB once "RECEIVED" can be either a STEPLIB or added to the environments existing Linklist. This library MUST be APF authorized.
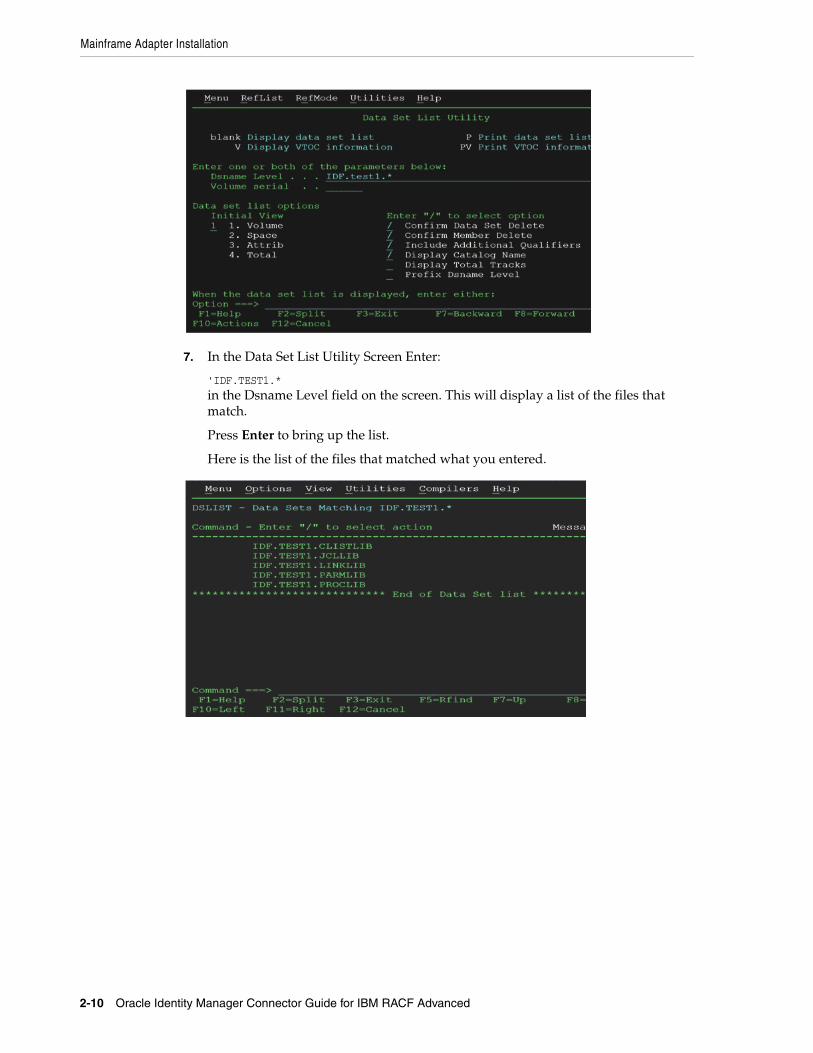
Mainframe Adapter Installation
2-10 Oracle Identity Manager Connector Guide for IBM RACF Advanced
7. In the Data Set List Utility Screen Enter:
'IDF.TEST1.* in the Dsname Level field on the screen. This will display a list of the files that match.
Press Enter to bring up the list.
Here is the list of the files that matched what you entered.

Mainframe Adapter Installation
Deploying the IDF Advanced Adapter for IBM RACF 2-11
8. Enter V (for view) to the left of one file names, and press Enter to view the members in the PDS.
9. Enter E (for edit) to edit the members in the list.
10. Place the cursor to the left of one of the member names on this screen to bring up the editor.
11. Click EDIT mode to make changes.
2.3.4 Editing the Mainframe Batch Job Files to Match the Settings for the Customer's Site
The PDS IDF.JCLLIB contains the CREATEDSN, IEBCOPYL, IEBCOPYP, IEBCPYRP, IEBCPYCL, and LOADDSN members, which will have to be edited to change file names, volsers, and job names to match your installation specifications. Modify the jobcard for each batch job to meet your installation specifications. The job card will usually be the first three lines of the batch file. To make changes to the batch job file will require TSO.
To make changes to the batch job files:
1. Logon to TSO.
2. Go to option ISPF 3.4.
3. Edit the dataset 'IDF.JCLLIB' member CREATDSN as shown below.
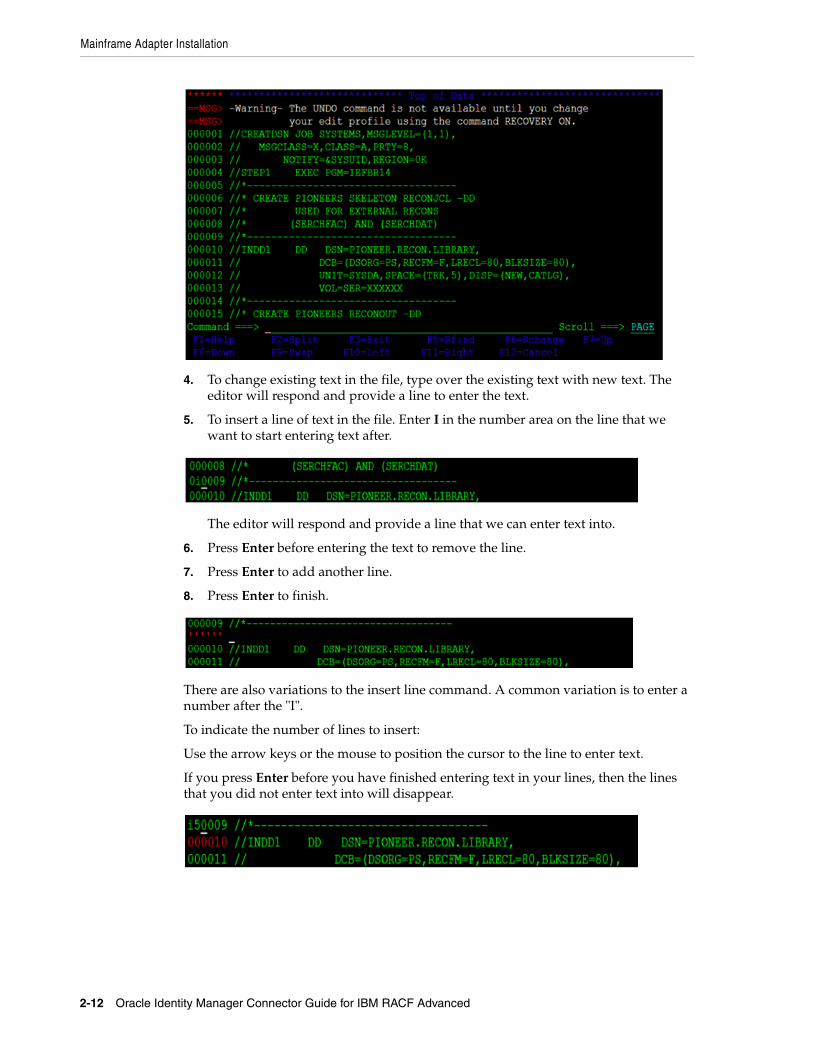
Mainframe Adapter Installation
2-12 Oracle Identity Manager Connector Guide for IBM RACF Advanced
4. To change existing text in the file, type over the existing text with new text. The editor will respond and provide a line to enter the text.
5. To insert a line of text in the file. Enter I in the number area on the line that we want to start entering text after.
The editor will respond and provide a line that we can enter text into.
6. Press Enter before entering the text to remove the line.
7. Press Enter to add another line.
8. Press Enter to finish.
There are also variations to the insert line command. A common variation is to enter a number after the "I".
To indicate the number of lines to insert:
Use the arrow keys or the mouse to position the cursor to the line to enter text.
If you press Enter before you have finished entering text in your lines, then the lines that you did not enter text into will disappear.

Mainframe Adapter Installation
Deploying the IDF Advanced Adapter for IBM RACF 2-13
To delete lines in the file:
1. Enter D in the number area on the line that you want to delete.
2. Press Enter to delete the line.
You can see that after entering a "D" in the first screen and in the second screen the line has been deleted.
There are variations of the delete line command. A common variation is to enter a number after D to indicate the number of lines to delete. For example:
Enter D3 to delete 3 lines.
To navigate through the file you need to use the function keys as follows:
■ Press F7 to scroll the edit screen up a screen to the beginning of the file.
■ Press F8 to scroll the edit screen down a screen to the end of the file.
■ Press F3 to finish editing the file.
This will display the exit options.
The following are the Members of PDS IDF.JCLLIB:
■ The CREATDSN member is an IEFBR14 file creation stream that will build the files required for Pioneer and Voyager. For each dataset name (DSN), PIONEER is used for the High-Level qualifier (HLQ) for Pioneer files and VOYAGER is used for the HLQ for Voyager files. The HLQ will have to be changed to meet installation standards. The VOL=SER= should be changed to point to the installation dasd volumes. The allocations are adequate. Once this member has been reviewed and changed, submit this job and review the output. The return code (RC) should be 0000.

Mainframe Adapter Installation
2-14 Oracle Identity Manager Connector Guide for IBM RACF Advanced
■ The LOADDSN member loads the files created by CREATDSN to the defined load area. For each DSN, PIONEER is used for the HLQ for Pioneer files and VOYAGER is used for the HLQ for Voyager files. The HLQ will have to be changed to meet installation standards. The SYSUT1 value defines the member to be loaded and SYSUT2 value defines the sequential or flat file it is being loaded into. Submit the job and review the output. The RC should be 0000.
■ The IEBCOPYL member copies the RACF exits (LOGPWX01 and LOGRIX02) and the called caching routine IDFCACHE to an installation LPA library that RACF has access to. The exit modules are renamed during the copy process as ICHPWX01 and ICHRIX02. Review and change the LPA library name to meet installation standards. Submit the job and review the output. The RC should be 0000.
■ If your host mainframe has any of the following EXIT(s) in place (LOGPWX01, LOGRIX02, and LOGEVX01), then integration is necessary, contact Consulting Services as needed.
■ The IEBCOPYP member is an IEBCOPY file copy stream that copies the PROG members to an installation defined parameter library. Review and change the parameter library name in //OUTDD1 to point to the destination installation parameter library name (PARMLIB) for the two PROG members. These are required for activation any time a IPL of z/OS occurs. The member PROGID sets APF authorization dynamically for IDF.LINKLIB. This can be added to an existing PROGxx member if desired. The PROG75 member contains the dynamic exit definitions for activation of the LOGEVX01 exit as IRREVX01. The PROG76 member will deactivate it. Submit the JOB stream and review output. The RC should be 0000.
■ The IEBCPYPR member is an IEBCOPY file copy stream for the STC procedures and procedures used by the product. Pioneer and Voyager are STC procedures. Startup and Wrapup are the procedures to build the subpool (STARTUP) and delete the subpool (WRAPUP) for Voyager (See Note). Normally, when z/OS is shutdown the subpool storage area is released. Review the names and change to meet installation specifications. Change the procedure library name to the installation procedure library name. Submit the JOB stream and review the output. The RC should be 0000.
Remember that the jobcard for each of the above batch jobs will have to be changed to meet installation specifications.
Files must not be shared in a SYSPLEX. Each Pioneer and Voyager must have their own set of files.
The IEBCPYCL member is an IEBCOPY file copy stream for the Clists (Command lists) used by the product. Some of the commands are IDFRACFC, RACFUSRP, RACFUSRG, and RACFUSRD.
Note: LOGPWX01 and LOGRIX02 exits are only required for password capture to send the trusted password to OIM.
This feature is deprecated and this reference is only for comments at this time.

Mainframe Adapter Installation
Deploying the IDF Advanced Adapter for IBM RACF 2-15
Table 2–3 lists the CREATDSN variables and corresponding sample values.
Table 2–4 lists the LOADDSN variables and corresponding sample values.
Table 2–5 lists the IEBCOPYL variables and corresponding sample values.
Table 2–6 lists the IEBCOPYP variables and corresponding sample values.
Note: From release 9.0.4.22 onward of this connector, the STARTUP and WRAPUP functions are contained within Voyager. The STARTUP and WRAPUP functions must be executed only in case of an emergency with the guidance of the product support team.
Table 2–3 Pioneer and Voyager CREATDSN Files
CREATDSN Variables Sample Values
Jobcard //CREATDSN JOB SYSTEMS, MSGLEVEL(1,1),
// MSGCLASS=X,CLASS=A,PRTY=8,
// NOTIFY=&SYSUID,REGION=4096K
VOL=SER= ?????? or XXXXXX
Pioneer HLQ DSN=PIONEER.
Voyager HLQ DSN=VOYAGER.
Table 2–4 Pioneer and Voyager LOADDSN Files
LOADDSN Variables Sample Values
Jobcard //LOADDSN JOB SYSTEMS,MSGLEVEL=(1,1),
//MSGCLASS=X,CLASS=A,PRTY=8,
//NOTIFY=&SYSUID,REGION=4096K
SYSUT1 DSN=IDF.PROD.xxxxxx
SYSUT2 Pioneer HLQ DNS=PIONEER.
SYSUT2 Voyager HLQ DNS=VOYAGER.
Note: Each Step has a SYSUT1 and a SYSUT2.
Table 2–5 Pioneer and Voyager IEBCOPYL Files
IEBCOPYL Variables Sample Values
Jobcard //IEBCOPYL JOB SYSTEMS,MSGLEVEL=(1,1),
// MSGCLASS=X,CLASS=A,PRTY=8,
// NOTIFY=&SYSUID,REGION=4096K
INDD DSN=IDF.PROD.LINKLIB
OUTDD DSN=YOUR.LPALIB

Mainframe Adapter Installation
2-16 Oracle Identity Manager Connector Guide for IBM RACF Advanced
Table 2–7 lists the IEBCPYPR variables and corresponding sample values.
Table 2–8 lists the IEBCPYCL variables and corresponding sample values.
Table 2–9 lists the PIONEER & VOYAGER STC and corresponding sample values.
Table 2–10 lists the MISCELLANEOUS names and corresponding sample values.
Table 2–6 Pioneer and Voyager IEBCOPYP Files
IEBCOPYP
Variables Sample Values
Jobcard //IEBCOPYP JOB SYSTEMS,MSGLEVEL=(1,1),
// MSGCLASS=X,CLASS=A,PRTY=8,
// NOTIFY=&SYSUID,REGION=4096K
INDD1 DSN=IDF.PROD.PARMLIB
OUTDD1 DSN=YOUR.PARMLIB
Table 2–7 Pioneer and Voyager IEBCPYPR Files
IEBCPYPR Variables Sample Values
Jobcard //IEBCPYPR JOB SYSTEMS,MSGLEVEL=(1,1),
// MSGCLASS=X,CLASS=A,PRTY=8,
// NOTIFY=&SYSUID,REGION=4096K
INDD2 DSN=IDF.PROD.PROCLIB
OUTDD2 DSN='YOUR HLQ.PROCLIB
Table 2–8 Pioneer and Voyager IEBCPYCL Files
IEBCPYPR Variables Sample Values
Jobcard //IEBCPYCL JOB SYSTEMS,MSGLEVEL=(1,1),
// MSGCLASS=X,CLASS=A,PRTY=8,
// NOTIFY=&SYSUID,REGION=4096K
Table 2–9 Pioneer & Voyager STC Files
PIONEER & VOYAGER STC Sample values
PARMFLE
for Pioneer STC
DSN=PIONEER.CONTROL.FILE
PARMFLE for Voyager STC DSN=VOYAGER.CONTROL.FILE
Table 2–10 MISCELLANEOUS Names
MISCELLANEOUS Sample Values
SYSID SYSTEMNAME or ADCD

Mainframe Adapter Installation
Deploying the IDF Advanced Adapter for IBM RACF 2-17
CREATDSN:
LOADDSN:See Appendix B, "Pioneer Datasets" for the information about the relationships between the DSNs in each step in the LOADDSN member and the file contents that are loaded into Pioneer's datasets.
2.3.5 Submitting Batch Job StreamsFor submitting batch job streams to z/OS for execution and verify jobs completed successfully, after the jcl files have been edited to reflect the settings for the target environment, the jcl needs to be submitted for batch processing, perform the following steps:
1. Submit the jobs from the screen where the members of the JCLLIB were displayed.
2. Type SUBMIT to the left of the member you want to submit for processing.
3. Press Enter to verify that the jobs have completed successfully.
If there are any errors when submitting a job, fix the errors in the job and resubmit the job.
2.3.6 Activating and Loading the ExitsTo activate and loading the Exits:
1. Submit the job IEBCOPYP, which copies the IDF PROGxx members to an installation defined parameter library. These members were PROGID, PROG75, and PROG76.
In the system defined parameter library, member PROG75 contains the following Dynamic Exit definition:
Note: <YOUR-HLQ> is the installation assigned High-Level Qualifier which in turn is assigned to the Pioneer datasets.

Mainframe Adapter Installation
2-18 Oracle Identity Manager Connector Guide for IBM RACF Advanced
EXIT,ADD, EXITNAME=IRREVX01,MODNAME=LOGEVX01,DSNAME=IDF.LINKLIB
2. Activate the IRREVX01 exit by running the console command SET PROG=75 (or T PROG=75). When in SDSF use a / in front of the command (/T PROG=75), depending on whether the RACF has the proper authority and SDSF authority to issue these commands. IRREVX01 can also be activated via a AUTOCMD member in the SYS1.PARMLIB library. Verify that module LOGCACHE is contained in the same Load Library as the exit module IRREVX01. The distribution is shipped with both modules in the same Load Library.
3. To determine if the IRREVX01 exit is active, issue the command below:
When only one exit:
D PROG,EXIT,EXITNAME=IRREVX01CSV461I 10.01.24 PROG,EXIT DISPLAY 867EXIT MODULE STATE MODULE STATE MODULE STATEIRREVX01 LOGEVX01
When more than one exit:
D PROG,EXIT,EXITNAME=IRREVX01CSV461I 10.01.24 PROG,EXIT DISPLAY 867EXIT MODULE STATE MODULE STATE MODULE STATEIRREVX01 LOGEVX01 A C4RMAIN A
4. Set APF authorization for Pioneer and Voyager with PROGID as follows:
a. Verify that the LPA library containing the exits are in the LPA and have been added to the LPALSTxx member of IEASYSXX.
b. Start member of Z/OS, usually contained within the SYS1.PARMLIB.
The executable code (IBM z/OS loadlibs) of Pioneer and Voyager must be APF authorized. This can be achieved by running a dynamic set command (T PROG=ID) or by placing the installation loadlib containing Pioneer and Voyager in the IBM z/OS link list. In order to refresh the LPA library, IPL the IBM z/OS system.
IBM® provides the PROGxx parmlib member as an alternative to IEAAPFxx, which allows you to update the APF list dynamically and specify an unlimited number of APF-authorized libraries. IBM suggests that you use PROGxx to specify the APF list (regardless of whether you plan to take advantage of the dynamic update capability). The system will process IEAAPFxx and PROGxx if both parameters are specified. If you decide to use PROGxx only, then remove APF=xx system parameters from IEASYSxx and IEASYS00.
2.3.7 Creating a RACF UserID for Pioneer and Voyager with PermissionsTo create a RACF UserID for Pioneer and Voyager, perform the following procedure:
1. Add the RACF userid that will start Pioneer.
2. Modify the user to add all the other privileges and segment definitions.
Note: When more than one IRREVX01 exit is in use, LOGEVX01 must be first in the list.
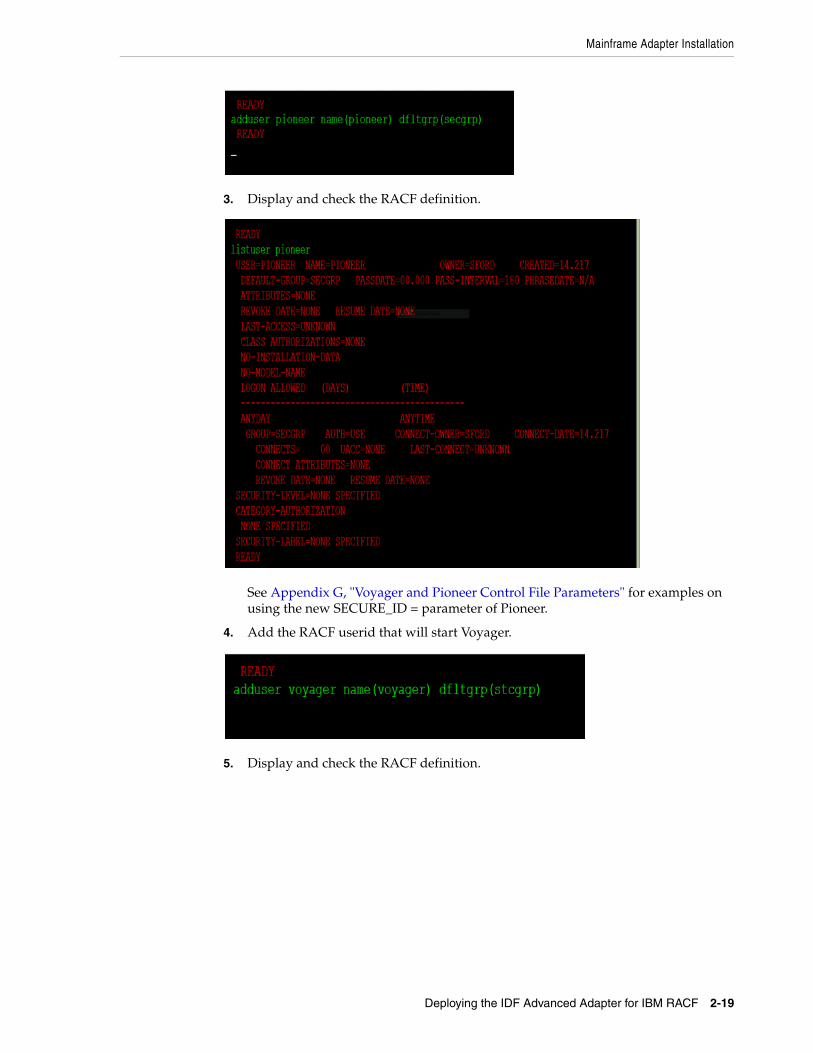
Mainframe Adapter Installation
Deploying the IDF Advanced Adapter for IBM RACF 2-19
3. Display and check the RACF definition.
See Appendix G, "Voyager and Pioneer Control File Parameters" for examples on using the new SECURE_ID = parameter of Pioneer.
4. Add the RACF userid that will start Voyager.
5. Display and check the RACF definition.

Mainframe Adapter Installation
2-20 Oracle Identity Manager Connector Guide for IBM RACF Advanced
2.3.8 Adding Pioneer/Voyager to the Facility Class Profiles (IRR)To add a Pioneer or Voyager to the facility class profiles, add the user (which runs the Pioneer/Voyager STCs) to the Facility class profiles. If the IRR.RADMIN profile does not exist, you need to define it with the RDEFINE command as follows:
RDEFINE FACILITY IRR.RADMIN.* UACC(NONE) <or>RDEFINE FACILITY IRR.RADMIN.xxxxxxx UACC(NONE)(Where the xxxxxxx is the RACF command, please see IBM's Security Server Manual for these commands and permissions)
The userID must be authorized to use the new FACILITY class profiles with the PERMIT command.
PERMIT IRR.RADMIN.* CLASS(FACILITY) ID(PIONEER) ACCESS(READ)<or>PERMIT IRR.RADMIN.xxxxxx CLASS(FACILITY) ID(PIONEER) ACCESS(READ)(where xxxxxx is the RACF command from the above rdefine command)PERMIT IRR.RADMIN.* CLASS(FACILITY) ID(VOYAGER) ACCESS(READ)LIST command
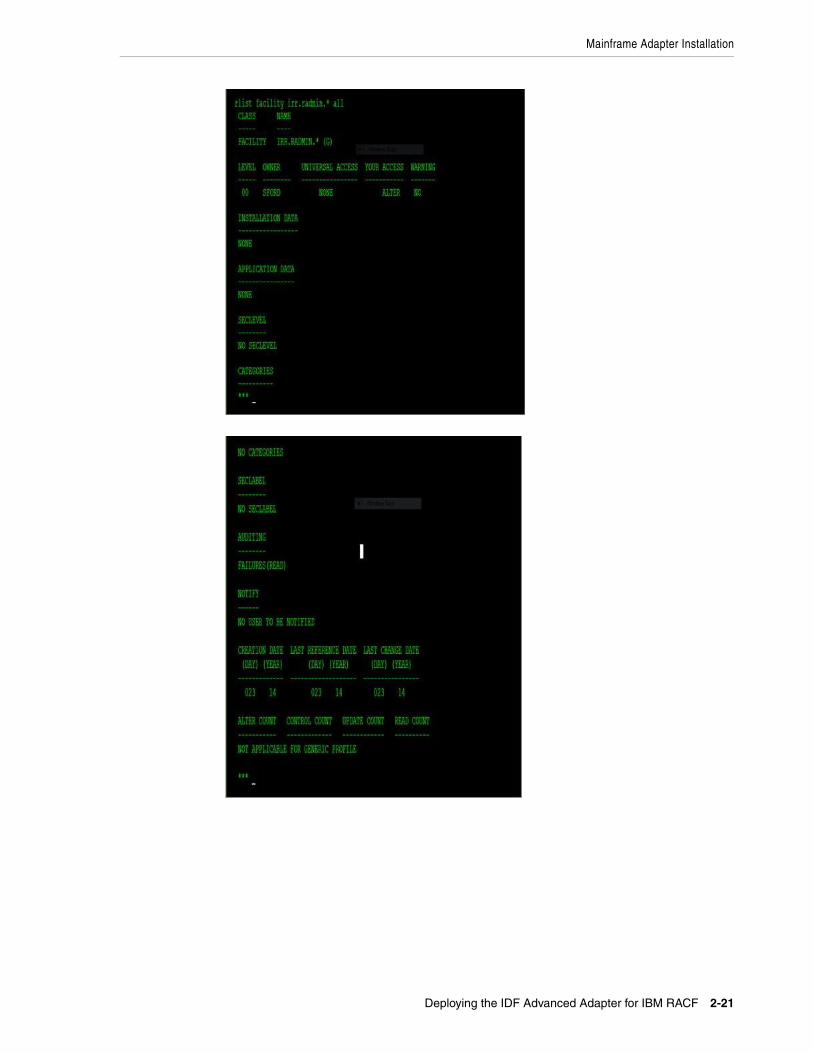
Mainframe Adapter Installation
Deploying the IDF Advanced Adapter for IBM RACF 2-21
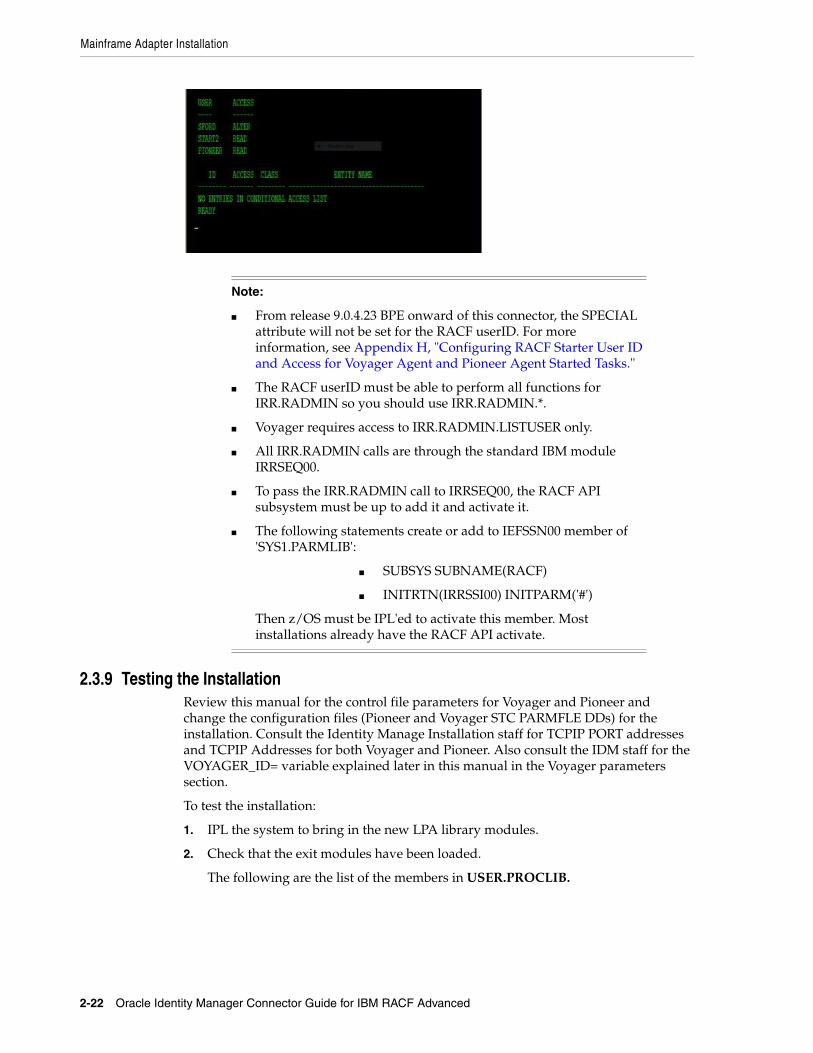
Mainframe Adapter Installation
2-22 Oracle Identity Manager Connector Guide for IBM RACF Advanced
2.3.9 Testing the InstallationReview this manual for the control file parameters for Voyager and Pioneer and change the configuration files (Pioneer and Voyager STC PARMFLE DDs) for the installation. Consult the Identity Manage Installation staff for TCPIP PORT addresses and TCPIP Addresses for both Voyager and Pioneer. Also consult the IDM staff for the VOYAGER_ID= variable explained later in this manual in the Voyager parameters section.
To test the installation:
1. IPL the system to bring in the new LPA library modules.
2. Check that the exit modules have been loaded.
The following are the list of the members in USER.PROCLIB.
Note:
■ From release 9.0.4.23 BPE onward of this connector, the SPECIAL attribute will not be set for the RACF userID. For more information, see Appendix H, "Configuring RACF Starter User ID and Access for Voyager Agent and Pioneer Agent Started Tasks."
■ The RACF userID must be able to perform all functions for IRR.RADMIN so you should use IRR.RADMIN.*.
■ Voyager requires access to IRR.RADMIN.LISTUSER only.
■ All IRR.RADMIN calls are through the standard IBM module IRRSEQ00.
■ To pass the IRR.RADMIN call to IRRSEQ00, the RACF API subsystem must be up to add it and activate it.
■ The following statements create or add to IEFSSN00 member of 'SYS1.PARMLIB':
■ SUBSYS SUBNAME(RACF)
■ INITRTN(IRRSSI00) INITPARM('#')
Then z/OS must be IPL'ed to activate this member. Most installations already have the RACF API activate.
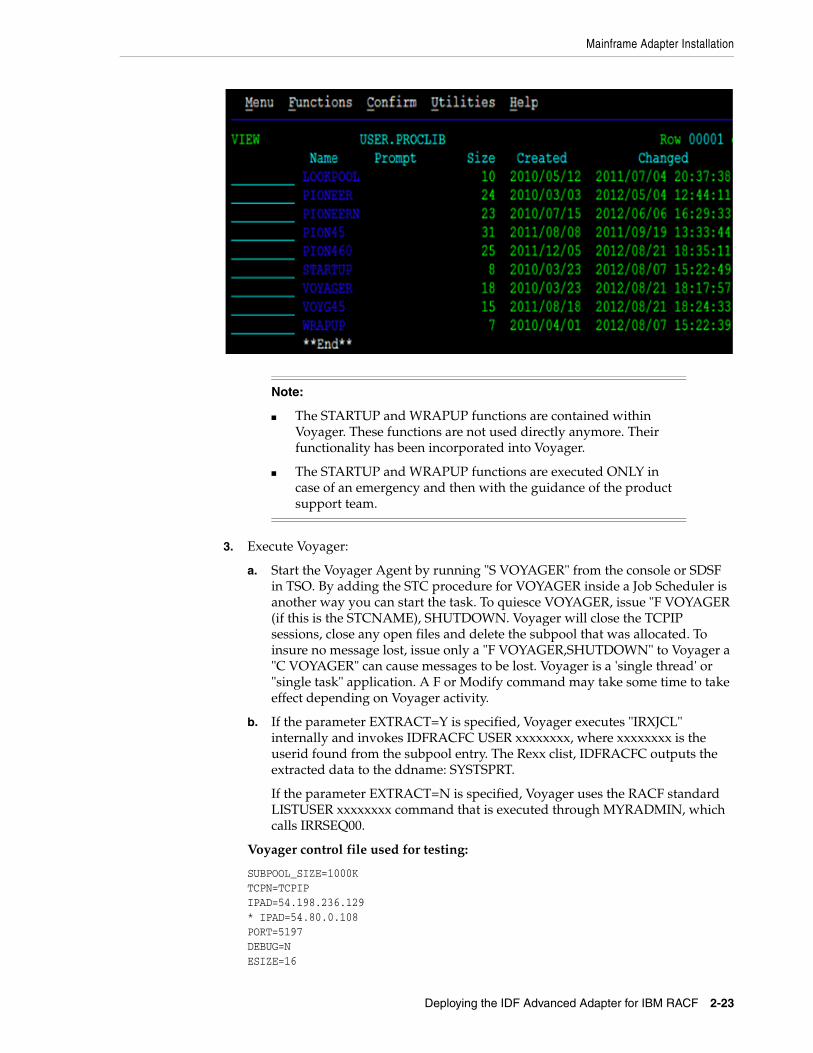
Mainframe Adapter Installation
Deploying the IDF Advanced Adapter for IBM RACF 2-23
3. Execute Voyager:
a. Start the Voyager Agent by running "S VOYAGER" from the console or SDSF in TSO. By adding the STC procedure for VOYAGER inside a Job Scheduler is another way you can start the task. To quiesce VOYAGER, issue "F VOYAGER (if this is the STCNAME), SHUTDOWN. Voyager will close the TCPIP sessions, close any open files and delete the subpool that was allocated. To insure no message lost, issue only a "F VOYAGER,SHUTDOWN" to Voyager a "C VOYAGER" can cause messages to be lost. Voyager is a 'single thread' or "single task" application. A F or Modify command may take some time to take effect depending on Voyager activity.
b. If the parameter EXTRACT=Y is specified, Voyager executes "IRXJCL" internally and invokes IDFRACFC USER xxxxxxxx, where xxxxxxxx is the userid found from the subpool entry. The Rexx clist, IDFRACFC outputs the extracted data to the ddname: SYSTSPRT.
If the parameter EXTRACT=N is specified, Voyager uses the RACF standard LISTUSER xxxxxxxx command that is executed through MYRADMIN, which calls IRRSEQ00.
Voyager control file used for testing:
SUBPOOL_SIZE=1000KTCPN=TCPIPIPAD=54.198.236.129* IPAD=54.80.0.108PORT=5197DEBUG=NESIZE=16
Note:
■ The STARTUP and WRAPUP functions are contained within Voyager. These functions are not used directly anymore. Their functionality has been incorporated into Voyager.
■ The STARTUP and WRAPUP functions are executed ONLY in case of an emergency and then with the guidance of the product support team.

Mainframe Adapter Installation
2-24 Oracle Identity Manager Connector Guide for IBM RACF Advanced
CSDATA=YEXTRACT=YESVOYAGER_ID=AVOYAGTSCACHE_DELAY=005AUDIT_LOG=YESCONNECT_RETRY=100CONNECT_INTV=05
See Appendix G, "Voyager and Pioneer Control File Parameters" for description of the Voyager control file parameters.
4. Starting Pioneer:
Start the Pioneer Agent by running "S PIONEER" from the console or by running /S PIONEER in SDSF under TSO. Adding the STC procedure for PIONEER inside a Job Scheduler is another way you can start the task.
The following programs perform RACF validation during the startup of Pioneer:
1. IDFGETIF
2. DFCHKAU
3. IDFCHKIR
If all the RACF validations are correct then the following message prefixed messages will be displayed: IDMP206I–IDMP210I.
Pioneer Control file used for testing:
TCPN=TCPIPIPAD=0.0.0.0PORT=6001DEBUG=NESIZE=16LPAR=ZPDT-112POST_PROC_ALIAS=FIDLEMSG=NDEBUGOUT=SYSOUT,CLASS(Y)SPIN_CLASS=KAUDIT_LOG=YESSECURE_ID=YES,DEFAULT=NO,ENCRYPT=NO,ID=IDFSUGGSMF=N <or> SMF=Y
See Appendix G, "Voyager and Pioneer Control File Parameters" for information about Pioneer control file parameter descriptions.

Mainframe Adapter Installation
Deploying the IDF Advanced Adapter for IBM RACF 2-25
5. Stop the started tasks:
The operator interface is named POLLOPER in both Voyager and Pioneer. Both STCs are Single thread and commands are passed to them via a z/OS modify("F") command.
Pioneer can be controlled by commands via Operator Interface with the commands given in Table 2–11.
Functions:
Table 2–11 Pioneer Commands via Operator Interface
Pioneer Commands Description
F PIONEER,SHUTDOWN Shuts Down Pioneer
F PIONEER,STATUS Heartbeat message
F PIONEER,DEBUG=Y Turns on Debugging
F PIONEER,DEBUG=N Turns off Debugging
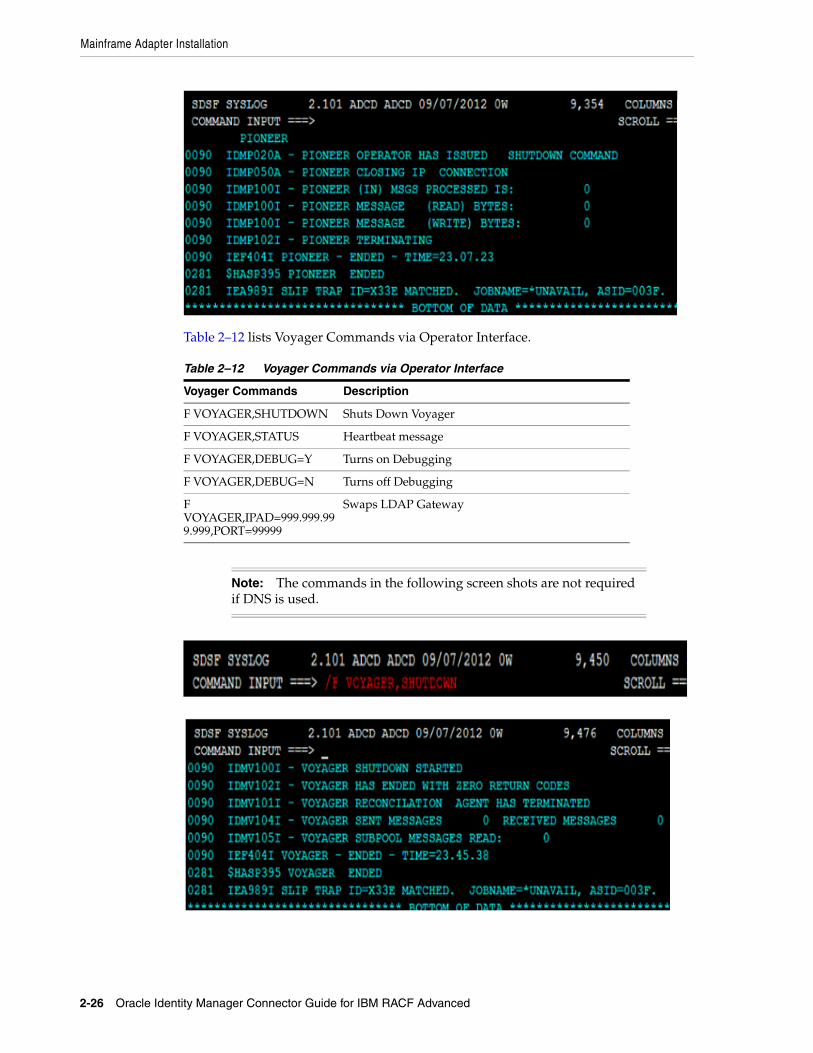
Mainframe Adapter Installation
2-26 Oracle Identity Manager Connector Guide for IBM RACF Advanced
Table 2–12 lists Voyager Commands via Operator Interface.
Table 2–12 Voyager Commands via Operator Interface
Voyager Commands Description
F VOYAGER,SHUTDOWN Shuts Down Voyager
F VOYAGER,STATUS Heartbeat message
F VOYAGER,DEBUG=Y Turns on Debugging
F VOYAGER,DEBUG=N Turns off Debugging
F VOYAGER,IPAD=999.999.999.999,PORT=99999
Swaps LDAP Gateway
Note: The commands in the following screen shots are not required if DNS is used.

3
Connector Deployment on Oracle Identity Manager 3-1
3Connector Deployment on Oracle IdentityManager
The LDAP Gateway acts as the intermediary between Oracle Identity Manager and the connector components on the mainframe. The following sections of this chapter describe the procedure to deploy some components of the connector, including the LDAP Gateway, on the Oracle Identity Manager host computer:
■ Section 3.1, "Files and Directories That Comprise the Connector"
■ Section 3.2, "Running the Connector Installer"
■ Section 3.3, "Configuring the IT Resource"
■ Section 3.4, "Configuring Oracle Identity Manager"
■ Section 3.5, "Installing and Configuring the LDAP Gateway"
3.1 Files and Directories That Comprise the ConnectorTable 3–1 describes the files and directories on the installation media.
Table 3–1 Files and Directories That Comprise the Connector
Files and Directories Description
configuration/RacfAdv.xml This XML file contains configuration information that is used during connector installation.
etc/Gateway/ldapgateway.zip This ZIP file contains the files required to deploy the LDAP Gateway.
etc/Provisioning and Reconciliation Connector/Mainframe_RACF.zip
This ZIP file contains the files required to deploy the Reconciliation and Provisioning Agents on the mainframe. Chapter 2, "Deploying the IDF Advanced Adapter for IBM RACF" describes the files bundled in this ZIP file.
lib/racf-provisioning-adapter.jar This JAR file contains the code for the adapters that are used during connector operations. During connector installation, this file is copied to the Oracle Identity Manager database.
Files in the resources directory Each of these resource bundles contains locale-specific information that is used by the connector. During connector installation, this file is copied to the Oracle Identity Manager database.
Note: A resource bundle is a file containing localized versions of the text strings that include GUI element labels and messages

Running the Connector Installer
3-2 Oracle Identity Manager Connector Guide for IBM RACF Advanced
3.2 Running the Connector InstallerTo run the Connector Installer:
1. Copy the contents of the connector installation media directory into the following directory:
OIM_HOME/server/ConnectorDefaultDirectory
2. Log in to Oracle Identity System Administration.
3. In the left pane, under System Management, click Manage Connector.
4. In the Manage Connector page, click Install.
5. From the Connector List list, select IBM RACF Advanced RELEASE_NUMBER. This list displays the names and release numbers of connectors whose installation files you copy into the default connector installation directory in Step 1.
If you have copied the installation files into a different directory, then:
a. In the Alternative Directory field, enter the full path and name of that directory.
b. To repopulate the list of connectors in the Connector List list, click Refresh.
c. From the Connector List, select IBM RACF Advanced RELEASE_NUMBER.
6. Click Load.
7. To start the installation process, click Continue.
The following tasks are performed in sequence:
a. Configuration of connector libraries
b. Import of the connector Target Resource user configuration XML file (by using the Deployment Manager).
c. Compilation of adapters
On successful completion of a task, a check mark is displayed for the task. If a task fails, then an X mark and a message stating the reason for failure are displayed. Depending on the reason for the failure, make the required correction and then perform one of the following steps:
■ Retry the installation by clicking Retry.
■ Cancel the installation and begin again from Step 1.
scripts/propertyEncrypt.bat
scripts/propertyEncrypt.sh
This script is used to encrypt passwords. Section 3.5, "Installing and Configuring the LDAP Gateway" provides more information.
xml/oimRacfAdvR2Connector.xml This XML file contains definitions of the connector components, such as the IT resource and resource object. These objects are created in Oracle Identity Manager when you import the XML file.
upgrade/PostUpgradeScriptRacf.sql This file is used during the connector upgrade procedure for Oracle Identity Manager release 11.1.2.x.
Table 3–1 (Cont.) Files and Directories That Comprise the Connector
Files and Directories Description

Configuring the IT Resource
Connector Deployment on Oracle Identity Manager 3-3
8. If all three tasks of the connector installation process are successful, then a message indicating successful installation is displayed. In addition, a list of the steps that you must perform after the installation is displayed. These steps are as follows:
a. Ensuring that the prerequisites for using the connector are addressed
b. Configuring the IT resource for the connector
The procedure to configure the IT resource is described later in this guide.
c. Configuring the scheduled tasks that are created when you installed the connector. The procedure to configure these scheduled tasks is described later in this guide.
When you run the Connector Installer, it copies the connector files and external code files to destination directories on the Oracle Identity Manager host computer. These files are listed in Table 3–1.
3.3 Configuring the IT ResourceYou must specify values for the parameters of the RacfResource IT resource as follows:
1. Log in to Identity System Administration.
2. In the left pane, under Configuration, click IT Resource.
3. In the IT Resource Name field on the Manage IT Resource page, enter RacfResource and then click Search.
4. Click the edit icon for the IT resource.
5. From the list at the top of the page, select Details and Parameters.
6. Specify values for the parameters of the IT resource. Table 3–2 describes each parameter.
Note: At this stage, run the Oracle Identity Manager PurgeCache utility to load the server cache with content from the connector resource bundle in order to view the list of prerequisites. See Section 3.4.3, "Clearing Content Related to Connector Resource Bundles from the Server Cache" for information about running the PurgeCache utility.
There are no prerequisites for some predefined connectors.

Configuring the IT Resource
3-4 Oracle Identity Manager Connector Guide for IBM RACF Advanced
Table 3–2 IT Resource Parameters
Parameter Description
AtMap User This parameter holds the name of the lookup definition containing attribute mappings that are used for provisioning.
Default value: AtMap.RACF
Note: You must not change the value of this parameter.
idfConnectTimeoutMS Enter an integer value that specifies the number of milliseconds after which an attempt to establish a connection between the LDAP Gateway and Oracle Identity Manager times out.
If you do not enter a value for this parameter, then the connector uses a default time out of 300000 ms (that is, 5 minutes).
idfPrincipalDn Set a user ID for an account that the connector will use to connect to the LDAP Gateway.
Format: cn=USER_ID,dc=racf,dc=com
Sample value: cn=idfRacfAdmin,dc=racf,dc=com
You also set this user ID in the beans.xml file inside the idfserver.jar file. See Step 4 in Section 3.5, "Installing and Configuring the LDAP Gateway."
idfPrincipalPwd Set a password for the account that the connector will use to connect to the LDAP Gateway. You also set this password in the files listed in the description of the idfPrincipalDn parameter.
Note: Do not enter an encrypted value.
idfReadTimeoutMS Enter an integer value that specifies the number of milliseconds after which an attempt to read data from the target system times out.
If you do not enter a value for this parameter, then the connector uses a default time out of 1800000 ms (that is, 30 minutes).
idfRootContext This parameter holds the root context for IBM RACF.
Default value: dc=racf,dc=com
Note: You must not change the value of this parameter.
idfServerHost This parameter holds the host name of the computer on which you install the LDAP Gateway. For this release of the connector, you install the LDAP Gateway on the Oracle Identity Manager host computer.
Default value: localhost
Note: Do not change the value of this parameter unless you have installed the LDAP Gateway on a different machine from the Oracle Identity Manager host computer.
idfServerPort Enter the number of the port for connecting to the LDAP Gateway.
Sample value: 5389
You also set this port number in the beans.xml inside the idfserver.jar file. See Step 4 in Section 3.5, "Installing and Configuring the LDAP Gateway."
idfSsl This parameter determines whether the LDAP Gateway will use SSL to connect to the target system. Enter true if using SSL; otherwise, enter false.
Sample value: true
idfTrustStore This parameter holds the directory location of the trust store containing the SSL certificate. This parameter is optional, and should only be entered when using SSL authentication. This must be the full path to the directory location.
Sample value: /app/home/ldapgateway/conf/idf.jks

Configuring Oracle Identity Manager
Connector Deployment on Oracle Identity Manager 3-5
7. To save the values, click Update.
3.4 Configuring Oracle Identity ManagerConfiguring Oracle Identity Manager involves performing the following procedures:
■ Section 3.4.1, "Creating Additional Metadata, Running Entitlement, and Catalog Synchronization Jobs"
■ Section 3.4.2, "Localizing Field Labels in UI Forms"
■ Section 3.4.3, "Clearing Content Related to Connector Resource Bundles from the Server Cache"
■ Section 3.4.4, "Enabling Logging"
3.4.1 Creating Additional Metadata, Running Entitlement, and Catalog Synchronization Jobs
You must create additional metadata such as a UI form and an application instance. In addition, you must run entitlement and catalog synchronization jobs. These procedures are described in the following sections:
idfTrustStorePassword This parameter holds the password for the SSL trust store. This parameter is optional, and should only be entered when using SSL authentication.
idfTrustStoreType This parameter holds the trust store type for the SSL trust store. This parameter is optional, and should only be entered when using SSL authentication.
Sample value: jks
Last Modified Time Stamp The most recent start time of the RACF Reconcile All LDAP Users reconciliation scheduled task is stored in this parameter. See Section 5.7, "Initial LDAP Gateway Population and Full Reconciliation" for more information about this scheduled task.
The format of the value stored in this parameter is as follows:
MM/dd/yy hh:mm:ss a
In this format:
■ MM is the month of the year.
■ dd is the day of the month.
■ yy is the year.
■ hh is the hour in am/pm (01-12).
■ mm is the minute in the hour.
■ ss is the second in the minute.
■ a is the marker for AM or PM.
Sample value: 05/07/10 02:46:52 PM
Default value: 0
The reconciliation task will perform full LDAP user reconciliation when the value is 0. If the value is a non-zero, standard time-stamp value in the format given above, then incremental reconciliation is performed. Only records that have been created or modified after the specified time stamp are brought to Oracle Identity Manager for reconciliation.
Note: When required, you can manually enter a time-stamp value in the specified format.
Table 3–2 (Cont.) IT Resource Parameters
Parameter Description
Configuring Oracle Identity Manager
3-6 Oracle Identity Manager Connector Guide for IBM RACF Advanced
■ Section 3.4.1.1, "Creating and Activating a Sandbox"
■ Section 3.4.1.2, "Creating a New UI Form"
■ Section 3.4.1.3, "Creating an Application Instance"
■ Section 3.4.1.4, "Publishing a Sandbox"
■ Section 3.4.1.5, "Harvesting Entitlements and Sync Catalog"
■ Section 3.4.1.6, "Updating an Existing Application Instance with a New Form"
3.4.1.1 Creating and Activating a SandboxCreate and activate a sandbox as follows:
1. On the upper navigation bar, click Sandboxes. The Manage Sandboxes page is displayed.
2. On the toolbar, click Create Sandbox. The Create Sandbox dialog box is displayed.
3. In the Sandbox Name field, enter a name for the sandbox. This is a mandatory field.
4. In the Sandbox Description field, enter a description of the sandbox. This is an optional field.
5. Click Save and Close. A message is displayed with the sandbox name and creation label.
6. Click OK. The sandbox is displayed in the Available Sandboxes section of the Manage Sandboxes page.
7. From the table showing the available sandboxes in the Manage Sandboxes page, select the newly created sandbox that you want to activate.
8. On the toolbar, click Activate Sandbox.
The sandbox is activated.
3.4.1.2 Creating a New UI FormCreate a new UI form as follows. For detailed instructions, see Managing Forms in Oracle Fusion Middleware Administering Oracle Identity Manager.
1. In the left pane, under Configuration, click Form Designer.
2. Under Search Results, click Create.
3. Select the resource type for which you want to create the form, for example, OIMRacfResourceObject.
4. Enter a form name and click Create.
3.4.1.3 Creating an Application InstanceCreate an application instance as follows. For detailed instructions, see Managing Application Instances in Oracle Fusion Middleware Administering Oracle Identity Manager.
1. In the System Administration page, under Configuration in the left pane, click Application Instances.
2. Under Search Results, click Create.
3. Enter appropriate values for the fields displayed on the Attributes form and click Save.

Configuring Oracle Identity Manager
Connector Deployment on Oracle Identity Manager 3-7
4. In the Form drop-down list, select the newly created form and click Apply.
5. Publish the application instance to an organization to make the application instance available for requesting and subsequent provisioning to users. See Managing Organizations Associated With Application Instances in Oracle Fusion Middleware Administering Oracle Identity Manager for detailed instructions.
3.4.1.4 Publishing a SandboxTo publish the sandbox that you created in Section 3.4.1.1, "Creating and Activating a Sandbox":
1. Close all the open tabs and pages.
2. In the upper right corner of the page, click the Sandboxes link.
The Manage Sandboxes page is displayed.
3. From the table showing the available sandboxes in the Manage Sandboxes page, select the sandbox that you created in Section 3.4.1.1, "Creating and Activating a Sandbox."
4. On the toolbar, click Publish Sandbox. A message is displayed asking for confirmation.
5. Click Yes to confirm. The sandbox is published and the customizations it contained are merged with the main line.
3.4.1.5 Harvesting Entitlements and Sync CatalogTo harvest entitlements and sync catalog:
1. Run the scheduled jobs for lookup field synchronization. See Section 4.2, "Scheduled Tasks for Lookup Field Synchronization" for more information about these scheduled jobs.
2. Run the Entitlement List scheduled job to populate Entitlement Assignment schema from child process form table.
3. Run the Catalog Synchronization Job scheduled job.
See Predefined Scheduled Tasks in Oracle Fusion Middleware Administering Oracle Identity Manager for more information about these scheduled jobs.
3.4.1.6 Updating an Existing Application Instance with a New Form For any changes you do in the Form Designer, you must create a new UI form and update the changes in an application instance. To update an existing application instance with a new form:
1. Create a sandbox and activate it as described in Section 3.4.1.1, "Creating and Activating a Sandbox."
2. Create a new UI form for the resource as described in Section 3.4.1.2, "Creating a New UI Form."
3. Open the existing application instance.
4. In the Form field, select the new UI form that you created.
5. Save the application instance.
6. Publish the sandbox as described in Section 3.4.1.4, "Publishing a Sandbox."

Configuring Oracle Identity Manager
3-8 Oracle Identity Manager Connector Guide for IBM RACF Advanced
3.4.2 Localizing Field Labels in UI FormsTo localize field label that is added to the UI forms:
1. Log in to Oracle Enterprise Manager.
2. In the left pane, expand Application Deployments and then select oracle.iam.console.identity.sysadmin.ear.
3. In the right pane, from the Application Deployment list, select MDS Configuration.
4. On the MDS Configuration page, click Export and save the archive to the local computer.
5. Extract the contents of the archive, and open the following file in a text editor:
SAVED_LOCATION\xliffBundles\oracle\iam\ui\runtime\BizEditorBundle.xlf
6. Edit the BizEditorBundle.xlf file as follows:
a. Search for the following text:
<file source-language="en" original="/xliffBundles/oracle/iam/ui/runtime/BizEditorBundle.xlf"datatype="x-oracle-adf">
b. Replace with the following text:
<file source-language="en" target-language="LANG_CODE"original="/xliffBundles/oracle/iam/ui/runtime/BizEditorBundle.xlf"datatype="x-oracle-adf">
In this text, replace LANG_CODE with the code of the language that you want to localize the form field labels. The following is a sample value for localizing the form field labels in Japanese:
<file source-language="en" target-language="ja"original="/xliffBundles/oracle/iam/ui/runtime/BizEditorBundle.xlf"datatype="x-oracle-adf">
c. Search for the application instance code. The original code will be in the following format:
<trans-unit id="${adfBundle['oracle.adf.businesseditor.model.util.BaseRuntimeResourceBundle']['persdef.sessiondef.oracle.iam.ui.runtime.form.model.user.entity.userEO.UD_<Field_Name>__c_description']}"><source><Field_Label></source><target/></trans-unit><trans-unit id="sessiondef.oracle.iam.ui.runtime.form.model.<UI_Form_Name>.entity. <UI_Form_Name>EO.UD_<Field_Name>__c_LABEL"><source><Field_Label></source><target/></trans-unit>
For example, the following sample code shows the update that should be made for the FULL NAME field on a UI form named RacfUserForm1:
<trans-unit id="${adfBundle['oracle.adf.businesseditor.model.util.BaseRuntimeResourceBundle']['persdef.sessiondef.oracle.iam.ui.runtime.form.model.user.entity.use
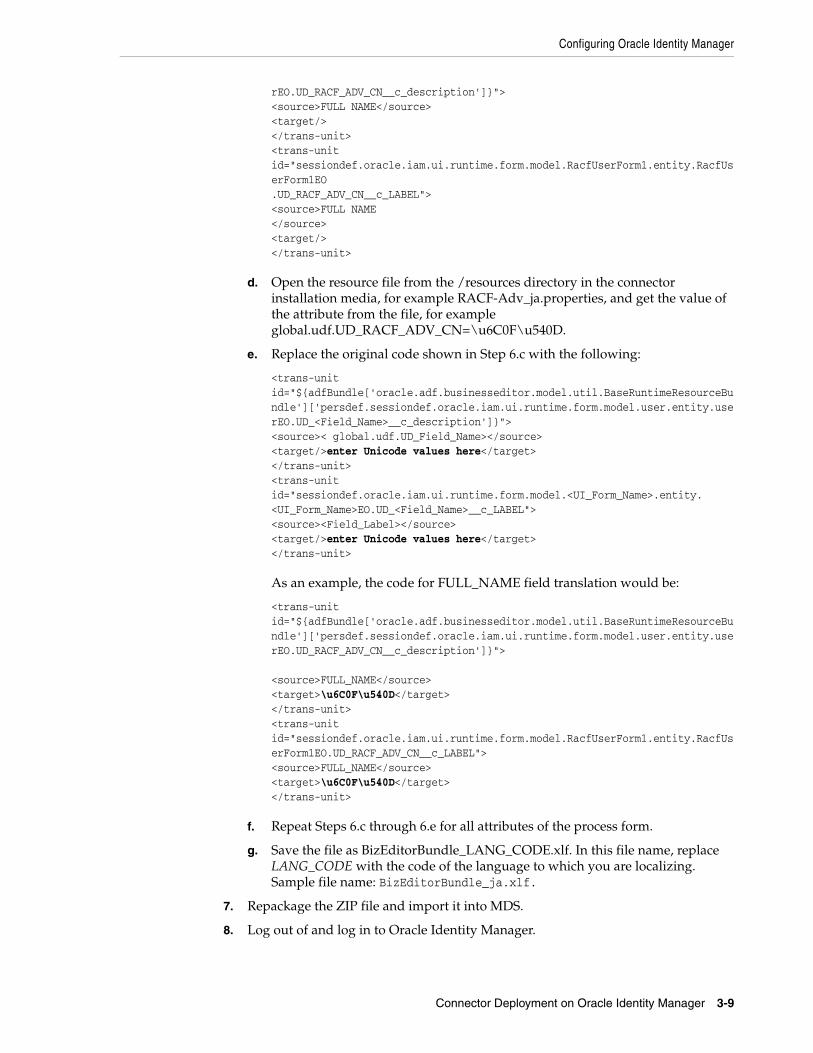
Configuring Oracle Identity Manager
Connector Deployment on Oracle Identity Manager 3-9
rEO.UD_RACF_ADV_CN__c_description']}"><source>FULL NAME</source><target/></trans-unit><trans-unit id="sessiondef.oracle.iam.ui.runtime.form.model.RacfUserForm1.entity.RacfUserForm1EO.UD_RACF_ADV_CN__c_LABEL"><source>FULL NAME</source><target/></trans-unit>
d. Open the resource file from the /resources directory in the connector installation media, for example RACF-Adv_ja.properties, and get the value of the attribute from the file, for example global.udf.UD_RACF_ADV_CN=\u6C0F\u540D.
e. Replace the original code shown in Step 6.c with the following:
<trans-unit id="${adfBundle['oracle.adf.businesseditor.model.util.BaseRuntimeResourceBundle']['persdef.sessiondef.oracle.iam.ui.runtime.form.model.user.entity.userEO.UD_<Field_Name>__c_description']}"><source>< global.udf.UD_Field_Name></source><target/>enter Unicode values here</target></trans-unit><trans-unit id="sessiondef.oracle.iam.ui.runtime.form.model.<UI_Form_Name>.entity. <UI_Form_Name>EO.UD_<Field_Name>__c_LABEL"><source><Field_Label></source><target/>enter Unicode values here</target></trans-unit>
As an example, the code for FULL_NAME field translation would be:
<trans-unit id="${adfBundle['oracle.adf.businesseditor.model.util.BaseRuntimeResourceBundle']['persdef.sessiondef.oracle.iam.ui.runtime.form.model.user.entity.userEO.UD_RACF_ADV_CN__c_description']}">
<source>FULL_NAME</source><target>\u6C0F\u540D</target></trans-unit><trans-unit id="sessiondef.oracle.iam.ui.runtime.form.model.RacfUserForm1.entity.RacfUserForm1EO.UD_RACF_ADV_CN__c_LABEL"><source>FULL_NAME</source><target>\u6C0F\u540D</target></trans-unit>
f. Repeat Steps 6.c through 6.e for all attributes of the process form.
g. Save the file as BizEditorBundle_LANG_CODE.xlf. In this file name, replace LANG_CODE with the code of the language to which you are localizing. Sample file name: BizEditorBundle_ja.xlf.
7. Repackage the ZIP file and import it into MDS.
8. Log out of and log in to Oracle Identity Manager.
Configuring Oracle Identity Manager
3-10 Oracle Identity Manager Connector Guide for IBM RACF Advanced
3.4.3 Clearing Content Related to Connector Resource Bundles from the Server CacheWhen you deploy the connector, the resource bundles are copied from the resources directory on the installation media into the Oracle Identity Manager database. Whenever you add a new resource bundle to the connectorResources directory or make a change in an existing resource bundle, you must clear content related to connector resource bundles from the server cache.
To clear content related to connector resource bundles from the server cache:
1. In a command window, switch to the OIM_HOME/server/bin directory.
2. Enter one of the following commands:
■ On Microsoft Windows: PurgeCache.bat All
■ On UNIX: PurgeCache.sh All
When prompted, enter the user name and password of an account belonging to the SYSTEM ADMINISTRATORS group. In addition, you are prompted to enter the service URL in the following format:
t3://OIM_HOST_NAME:OIM_PORT_NUMBER
In this format:
– Replace OIM_HOST_NAME with the host name or IP address of the Oracle Identity Manager host computer.
– Replace OIM_PORT_NUMBER with the port on which Oracle Identity Manager is listening.
3.4.4 Enabling LoggingThe IBM RACF connector supports two forms of logging, namely LDAP gateway-level logging and OIM-level logging. This section discusses the following topics:
■ Section 3.4.4.1, "Enabling Logging for the LDAP Gateway"
■ Section 3.4.4.2, "Enabling Logging on Oracle Identity Manager"
3.4.4.1 Enabling Logging for the LDAP GatewayLDAP Gateway logging operations are managed by the log4j.properties file, which can be extracted from within the ldapgateway/dist/idfserver.jar compilation file (see step 5 of Section 3.5, "Installing and Configuring the LDAP Gateway"). In the
Note: You can use the PurgeCache utility to purge the cache for any content category. Run PurgeCache.bat CATEGORY_NAME on Microsoft Windows or PurgeCache.sh CATEGORY_NAME on UNIX. The CATEGORY_NAME argument represents the name of the content category that must be purged.
For example, the following commands purge Metadata entries from the server cache:
PurgeCache.bat MetaData
PurgeCache.sh MetaData
Before running the PurgeCache utility, ensure the WL_HOME and JAVA_HOME environment variables are set.
Configuring Oracle Identity Manager
Connector Deployment on Oracle Identity Manager 3-11
log4j.properties file, edit the rootLogger log level:
log4j.rootLogger=ERROR
The following is a list of log levels that can be used:
■ ALL
This level enables logging for all events.
■ DEBUG
This level enables logging of information about fine-grained events that are useful for debugging.
■ INFO
This level enables logging of messages that highlight the progress of the application at a coarse-grained level.
■ WARN
This level enables logging of information about potentially harmful situations.
■ ERROR
This level enables logging of information about error events that may allow the application to continue running.
■ FATAL
This level enables logging of information about very severe error events that could cause the application to stop functioning.
■ OFF
This level disables logging for all events.
You can also edit the log4j.properties file to configure the maximum log file size and maximum number of log files by using the following entries:
■ log4j.appender.FILE.MaxFileSize
Use this entry to set the maximum size of the log file in MB. The default value is 10MB.
■ log4j.appender.FILE.MaxBackupIndex
Use this entry to set the number of log files to create before the oldest file is overwritten. The default value is 100.
Multiple log files are available for use with the connector. Table 3–3 lists the name, location, and contents of each LDAP gateway log file.
Table 3–3 Log Files and their Contents
Log File Description
nohup.out This log file contains the console window output from the LDAP Gateway. This file is primarily used in conjunction with the run.sh script (instead of the run.bat file).
Location: ~/ldapgateway/bin/
idfserver.log This log file contains provisioning and reconciliation logging messages from the LDAP Gateway. This file is the primary log file used by the gateway component.
Location: ~/idfserver/logs/

Configuring Oracle Identity Manager
3-12 Oracle Identity Manager Connector Guide for IBM RACF Advanced
3.4.4.2 Enabling Logging on Oracle Identity ManagerWhen you enable logging, Oracle Identity Manager automatically stores in a log file information about events that occur during the course of provisioning and reconciliation operations. Oracle Identity Manager uses Oracle Java Diagnostic Logging (OJDL) for logging. OJDL is based on java.util.logger.
To specify the type of event for which you want logging to take place, you can set the log level to one of the following:
■ ERROR:1
■ WARNING:1
■ NOTIFICATION:1
■ NOTIFICATION:16
■ TRACE:1
■ TRACE:16
■ TRACE:32
See Message Types and Levels in Oracle Fusion Middleware Administering Oracle Identity Manager for more information about the log levels.
Oracle Identity Manager level logging operations are managed by the logging.xml file which is located in the following directory:
DOMAIN_NAME/config/fmwconfig/servers/SERVER_NAME/
Loggers are used to configure logging operations for the Oracle Identity Manager functions of the connector.
To configure loggers:
1. In a text editor, open the DOMAIN_NAME/config/fmwconfig/servers/SERVER_NAME/logging.xml file.
2. Locate the logger you want to configure. If you are adding a logger for the first time, you must create the logger definition. Table 3–4, " Logger Parameters" lists the Oracle Identity Manager loggers for this connector.
Table 3–4 Logger Parameters
Logger Description
com.identityforge.IdfUserOperations Logs events related to provisioning operations from Oracle Identity Manager to the LDAP gateway, such as user creation and modification events.
com.identityforge.util.racf.LdapOperationsImpl Logs events related to basic LDAP functions, including connecting to and disconnecting from the LDAP gateway.
com.identityforge.racf.tasks.DeleteReconcileOIMUsersTask
Logs events related to the RACF Delete OIM Users scheduled task.
com.identityforge.racf.tasks.FindAllDatasetsTask Logs events related to the RACF Find All Datasets scheduled task.
com.identityforge.racf.tasks.FindAllGroupsTask Logs events related to the RACF Find All Groups scheduled task.
com.identityforge.racf.tasks.FindAllResourcesTask Logs events related to the RACF Find All Resources scheduled task.
Installing and Configuring the LDAP Gateway
Connector Deployment on Oracle Identity Manager 3-13
3. Define the <logger> element and its handlers. You can use the standard odl-handler as the log handler, or write your own. For more information on configuring logging in Oracle Identity Manager, see Enabling System Logging in Oracle Fusion Middleware Administering Oracle Identity Manager.
The following is an example of a logger definition for the Reconcile All Users scheduled task:
<logger name='com.identityforge.racf.tasks.ReconcileAllUsersTask' level="TRACE:32"><handler name="odl-handler"/></logger>
4. Save the changes and close the file.
5. Restart Oracle Identity Manager for the changes to take effect.
Log statements will be written to the path that is defined in the log handler that you assigned in the logger definition. For example, in the above logger definition for the Reconcile All Users scheduled task (in step 3), the handler is odl-handler, which has the following default output file path:
${domain.home}/servers/${weblogic.Name}/logs/${weblogic.Name}-diagnostic.log
3.5 Installing and Configuring the LDAP GatewayThe IT resource contains connection information for Oracle Identity Manager to connect to the LDAP Gateway. The racf.properties file is one of the components of the gateway. This file contains information used by the gateway to connect to the mainframe. Configuring the gateway involves setting values in the racf.properties file and the other files that are used by the gateway.
To install and configure the LDAP Gateway:
1. Extract the contents of the ldapgateway.zip file to a directory on the computer on which you want to install the LDAP Gateway. This ZIP file is in the etc/LDAP Gateway directory on the installation media.
com.identityforge.racf.tasks.FindAllSecurityAttributesTask
Logs events related to the RACF Find All Security Attributes scheduled task.
com.identityforge.racf.tasks.ReconcileAllLdapUsersTask
Logs events related to the RACF Reconcile All LDAP Users scheduled task.
com.identityforge.racf.tasks.ReconcileAllUsersTask Logs events related to the RACF Reconcile All Users scheduled task.
com.identityforge.racf.tasks.ReconcileDeletedLDAPUsersTask
Logs events related to the RACF Reconcile Deleted LDAP Users scheduled task.
com.identityforge.racf.tasks.ReconcileUsersToInternalLdapTask
Logs events related to the RACF Reconcile Users to Internal LDAP scheduled task.
Table 3–4 (Cont.) Logger Parameters
Logger Description

Installing and Configuring the LDAP Gateway
3-14 Oracle Identity Manager Connector Guide for IBM RACF Advanced
2. In a text editor, open the LDAP_INSTALL_DIR/conf/racf.properties file. Enter values for the properties listed in this file. Table 3–5 describes these properties.
Note: In this document, the location (and name) of the ldapgateway directory on the host computer is referred to as LDAP_INSTALL_DIR.
Table 3–5 Properties in the racf.properties File
Property Description
agentPort Enter the port number on the LDAP Gateway host computer that you are going to reserve for messages sent from the mainframe by the Reconciliation Agent Voyager. The LDAP Gateway will receive messages using this port. This value should match the value of the PORT parameter in the Voyager agent control file.
_configAttrs_ This property holds the field names of any custom target system fields that are defined in the CSDATA user segment and used during user provisioning operations. If entering more than one value, separate each value with a vertical bar (|) character. Each field name should have a corresponding configDNames entry.This step is mentioned in the following sections:
■ Section 5.1, "Adding Custom Fields for Target Resource Reconciliation"
■ Section 5.3, "Adding Custom Fields for Provisioning"
For example, if you define fields with a display name of $PST15 and VEND ID, then you would enter:
# CUSTOM CSDATA RACF ATTRIBUTE FIELD NAME
_configAttrs_=$PST15|VEND ID|
_configDNames_ This property holds the display name(s) of RACF field(s) that are defined in the CSDATA segment and used during user reconciliation operations. If entering more than one value, separate each value with a vertical bar (|) character. Each display name should have a corresponding configAttrs entry.
For example, if you define a field with a display name of $PST15 and VEND ID, then you would enter:
# CUSTOM CSDATA RACF ATTRIBUTE DISPLAY NAME
_configDNames_=$PST15 =|VEND ID =|
defaultDelete Enter one of the following as the value of this property:
■ Set revoke as the value if you want the user to be disabled on the target system as the outcome of a Delete User provisioning operation.
■ Set delete as the value if you want the user to be deleted from the target system as the outcome of a Delete User provisioning operation.
For example:
# DEFAULT ACTION WHEN DELETE FUNCTION USED
_defaultDelete_=delete
host Set the host name or IP address of the mainframe as the value of this property.

Installing and Configuring the LDAP Gateway
Connector Deployment on Oracle Identity Manager 3-15
port Enter the number of the port on the mainframe that you are going to reserve for the Provisioning Agent. The LDAP Gateway will send provisioning messages to this port. This value should match the PORT parameter specified in the Pioneer provisioning agent STC.
ver45 This property is used to determine whether the LDAP gateway must use the large (240K) socket buffer when passing messages to the target system.
Values: [true|false]
If you set the value of this property to true, the LDAP gateway will use a 240K socket buffer.
If you set the value of this property to false, the LDAP gateway will use a 32K socket buffer.
Default setting is true.
auditOn This property is used to store audit data from IBM RACF. Default setting is false.
domainOU This property is used to store user in a certain location under the ou=People tree of the internal LDAP. This needs to be unique and specific for each system if multiple systems are used within one LDAP Gateway. Default setting is = domainOu=racf
_stcID_ This property allows the real-time agent to ignore events that have been submitted to the target system by the Pioneer STC (such as by request from Oracle Identity manager).
Enter the name given to the Pioneer STARTED TASK.
_internalEnt_ This property is used to allow the real-time agent to store users in the LDAP internal store. Values: [true|false]
_internalGrpEnt_ This property is used to allow the real-time agent to store groups in the LDAP internal store.
Values: [true|false]
_internalCREnt_ This property is used to allow the real-time agent to store connect and remove commands in the LDAP internal store. Values: [true|false]
isStreamingUsers This property is used by the RACF Reconcile Users to Internal LDAP scheduled task.
If you set the value of this property to true, the LDAP gateway will process the USER EXTRACT data from the mainframe.
If you set the value of this property to false, the LDAP gateway will not process any USER EXTRACT data.
Default value: true
isStreamingGroups This property is used by the Top Secret Reconcile Users to Internal LDAP scheduled task.
If you set the value of this property to true, the LDAP gateway will process the GROUP EXTRACT data from the mainframe.
If you set the value of this property to false, the LDAP gateway will not process any GROUP EXTRACT data.
Default value: true
Table 3–5 (Cont.) Properties in the racf.properties File
Property Description

Installing and Configuring the LDAP Gateway
3-16 Oracle Identity Manager Connector Guide for IBM RACF Advanced
useExtractGrp Use this new property for faster reconciliation. Default setting is false which will run a LISTUSER.
If the default setting is set to true, an EXTRACT command will be issued instead.
useExtractUser Use this new property for faster reconciliation. Default setting is false which will run a LISTUSER.
If the property is set to true, an EXTRACT command will be issued instead and use configExtractAttrs for CSDATA fields.
_configExtractAttrs_ Use this property to list any custom CSDATA fields for RACF. Use this when using 'useExtractUser=true' property above.
Note: The value in this property must match the RACF CSDATA segment.
Sample value: EMPSER :|NETAN :|
_extractGrp_ Use this property to list any custom CSDATA GROUP fields for RACF. Use this when using 'useExtractGroup=true' property above.
Sample value: SYS1|SYS2|TESTGRU|STOCK1|STOCK2|
_allowDeleteDS_ This property is used for default action when a delete request occurs that will delete dataset profiles for user being deleted. If the property is set to true, deleting a user will delete both the user and the user's datasets.
revokePsuspendUsers Use this property to specify whether users with the PSUSPEND attribute should be flagged as revoked when parsing a LIST USER result message.
■ Set true as the value if you want the user to be disabled in Oracle Identity Manager as the outcome of a LIST USER reconciliation operation.
■ Set false as the value if you want the PSUSPEND attribute to not factor the user's OIM Status setting as the outcome of a LIST USER reconciliation operation.
For example:
# REVOKE OIM USERS WITH PSUSPEND
_revokePsuspendUsers_=true
resumeOnReset This property is used when resetting a user's password.
If you set the value of this property to true, the user will be enabled during a reset password operation.
If you set the value of this property to false, the user will not be enabled during a reset password operation.
Default value: true
secretKeyValue This property contains the custom encryption key. This key should match the secretKey value used by the mainframe agents.
See Appendix I, "Customizing AES Encryption Key" for more information on using this property.
_useUnivGrp_ Use this property to specify whether to use universal groups instead of normal groups on the target system. Universal groups can have an unlimited number of AUTH(USE) userIDs connected to it.
Values: [true|false]
Table 3–5 (Cont.) Properties in the racf.properties File
Property Description

Installing and Configuring the LDAP Gateway
Connector Deployment on Oracle Identity Manager 3-17
trimOmvsUid This property is used with the omvsUid attribute.
If you set the value of this property to true, the LDAP gateway will trim leading zeros, "0", from the omvsUid value.
If you set the value of this property to false, the LDAP gateway will not trim any leading zeroes from the omvsUid value.
Default value: true
trimNum This property is used with the trimOmvsUid property and specifies the number of leading zeroes to trim from a user's omvsUid attribute.
Default value: 2
newOmvsUidAttr This property specifies the new name to use for the omvsUid property.
Default value: OmvsUidEmplNumber
usePwdComplexLength This property is used to control the length of passwords. If you set the value of this property to true, the LDAP gateway will use the properties file password length settings.
If you set the value of this property to false, the LDAP gateway will use the standard password length.
Default value: true
idMinLength This property specifies the minimum UID length in characters.
Default value: 1
idMaxLength This property specifies the maximum UID length in characters.
Default value: 8
pwdMinLength This property specifies the minimum password length for a UID.
Default value: 1
pwdMaxLength This property specifies the maximum password length for a UID.
Default value: 8
type
isencrypted
timeout
authretries
requestorId
These properties are no longer used in Oracle installations.
Do not modify their values.
errormsg-sig-file This property defines an error message signature XML file that contains a new error message signatures (or overrides existing error message signatures by specifying the same id).
If it is an overriding entry, you must use the same id as specified in the LDAP Gateway\ldapgateway5.0-v5.3.18\dist\idfserver\com\identityforge\idfserver\back end\racf\repository\errorMsgSignatures.xml.
See Section 5.11, "Handling PIONEER Error Messaging Exceptions in the Gateway".
Table 3–5 (Cont.) Properties in the racf.properties File
Property Description
Installing and Configuring the LDAP Gateway
3-18 Oracle Identity Manager Connector Guide for IBM RACF Advanced
3. Save and close the racf.properties file.
4. From the LDAP_INSTALL_DIR/dist/idfserver.jar file, delete and extract the beans.xml file and then open the file in a text editor.
You use the beans.xml file to store the credentials of the account used by Oracle Identity Manager to connect to the LDAP Gateway. You also enter these credentials as parameters of the IT resource. During provisioning and reconciliation, the credentials passed through the IT resource are authenticated against the credentials stored in the beans.xml file. The LDAP Gateway exchanges data with the connector only after this authentication succeeds.
You enter the credentials of the LDAP Gateway user in the following lines of the beans.xml file:
<property name="adminUserDN" value="cn=idfRacfAdmin,dc=RACF,dc=com"/><property name="adminUserPassword" value="idfRacfPwd"/>
In the first line, replace cn=idfRacfAdmin,dc=RACF,dc=com with the value that you entered for the idfPrincipalDn parameter of the IT resource. In the second line, replace idfRacfPwd with the value that you entered for the idfPrincipalPwd parameter of the IT resource. Table 3–2, " IT Resource Parameters" describes both parameters. If you want to encrypt the password before you enter it in the beans.xml file, then:
a. In a text editor, copy one of the following script files from the installation media into a temporary directory and then open the script file in a text editor:
For Microsoft Windows:
check-return-codes Enable or Disable the SAF and RACF return codes that are examined from Pioneer to determine if the command is succeeded.
Note: Certain z/OS environments may produce warning codes that is interpreted as error codes if this feature is enabled and used with errormsg-sig-file.
You must set this parameter to "no" {check-return-codes=no} if you want to use custom message signature file.
See Section 5.11, "Handling PIONEER Error Messaging Exceptions in the Gateway".
Note: When installing, ensure you are using the latest Bundle Patch and consult Oracle Support with any questions.
Note: It is optional to encrypt the password that you set in the beans.xml file. However, it is recommended that you encrypt the password for security reasons.
You must enter the unencrypted password as the value of the idfPrincipalPwd IT resource parameter. This is regardless of whether you enter the encrypted password in the beans.xml file.
Table 3–5 (Cont.) Properties in the racf.properties File
Property Description
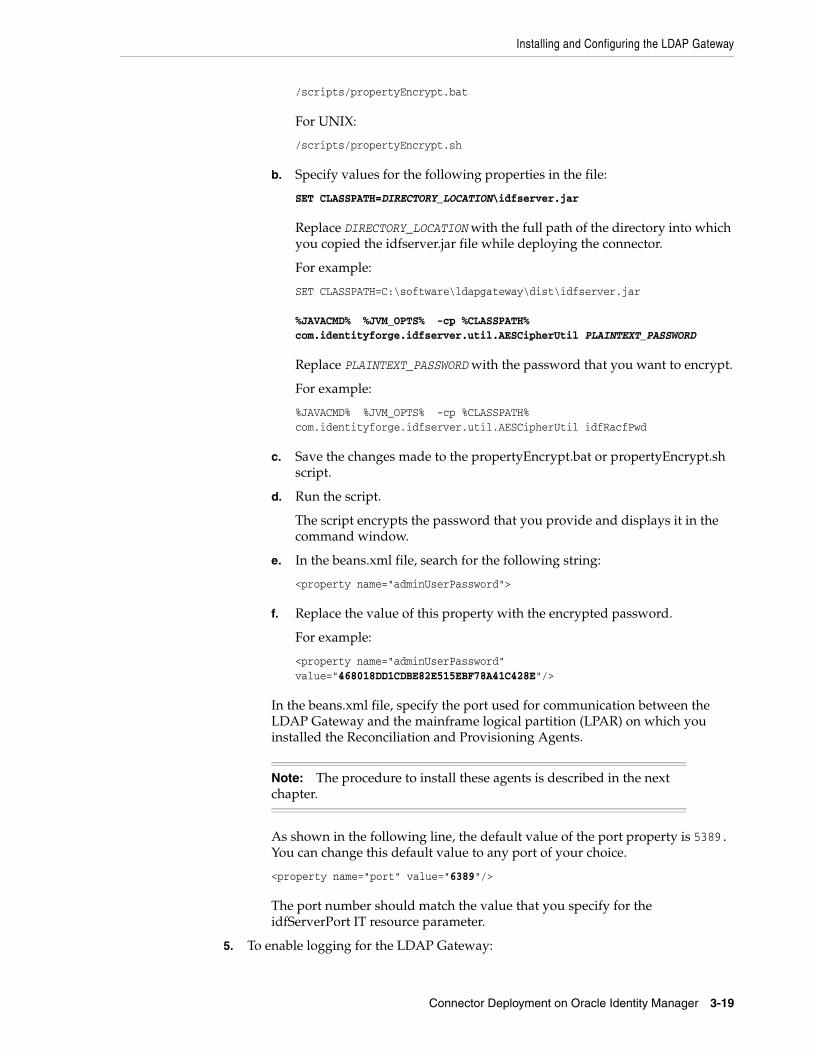
Installing and Configuring the LDAP Gateway
Connector Deployment on Oracle Identity Manager 3-19
/scripts/propertyEncrypt.bat
For UNIX:
/scripts/propertyEncrypt.sh
b. Specify values for the following properties in the file:
SET CLASSPATH=DIRECTORY_LOCATION\idfserver.jar
Replace DIRECTORY_LOCATION with the full path of the directory into which you copied the idfserver.jar file while deploying the connector.
For example:
SET CLASSPATH=C:\software\ldapgateway\dist\idfserver.jar
%JAVACMD% %JVM_OPTS% -cp %CLASSPATH% com.identityforge.idfserver.util.AESCipherUtil PLAINTEXT_PASSWORD
Replace PLAINTEXT_PASSWORD with the password that you want to encrypt.
For example:
%JAVACMD% %JVM_OPTS% -cp %CLASSPATH% com.identityforge.idfserver.util.AESCipherUtil idfRacfPwd
c. Save the changes made to the propertyEncrypt.bat or propertyEncrypt.sh script.
d. Run the script.
The script encrypts the password that you provide and displays it in the command window.
e. In the beans.xml file, search for the following string:
<property name="adminUserPassword">
f. Replace the value of this property with the encrypted password.
For example:
<property name="adminUserPassword" value="468018DD1CDBE82E515EBF78A41C428E"/>
In the beans.xml file, specify the port used for communication between the LDAP Gateway and the mainframe logical partition (LPAR) on which you installed the Reconciliation and Provisioning Agents.
As shown in the following line, the default value of the port property is 5389. You can change this default value to any port of your choice.
<property name="port" value="6389"/>
The port number should match the value that you specify for the idfServerPort IT resource parameter.
5. To enable logging for the LDAP Gateway:
Note: The procedure to install these agents is described in the next chapter.
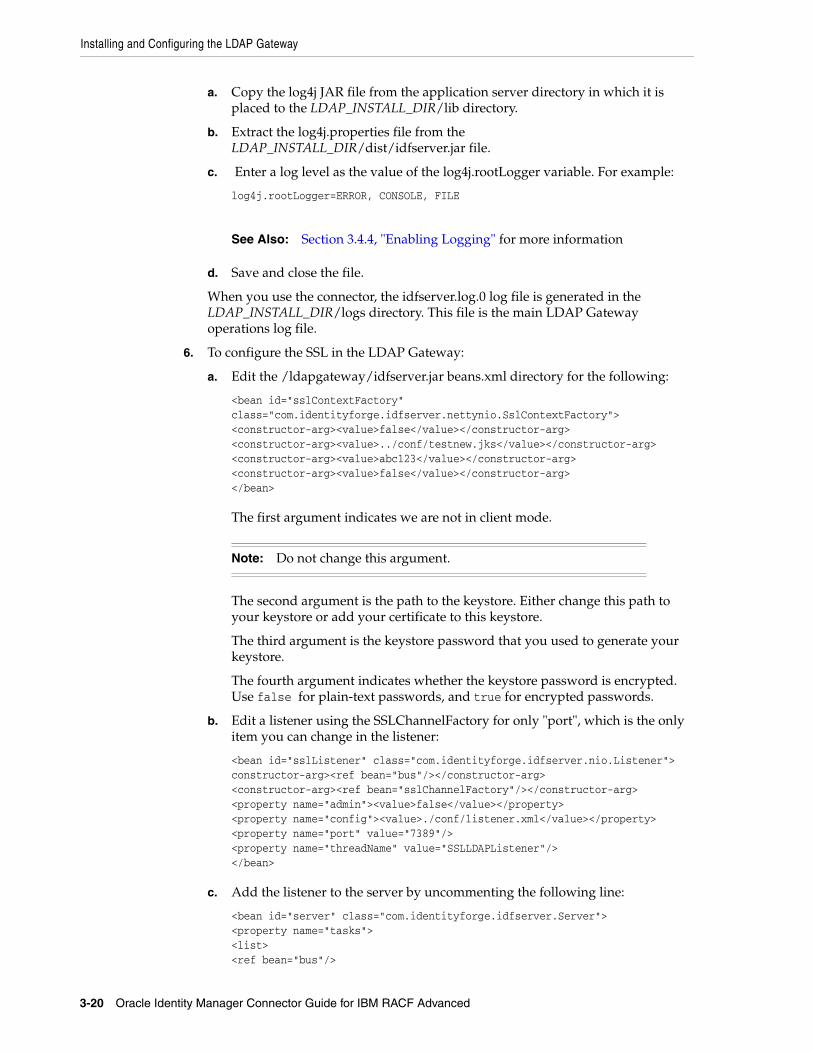
Installing and Configuring the LDAP Gateway
3-20 Oracle Identity Manager Connector Guide for IBM RACF Advanced
a. Copy the log4j JAR file from the application server directory in which it is placed to the LDAP_INSTALL_DIR/lib directory.
b. Extract the log4j.properties file from the LDAP_INSTALL_DIR/dist/idfserver.jar file.
c. Enter a log level as the value of the log4j.rootLogger variable. For example:
log4j.rootLogger=ERROR, CONSOLE, FILE
d. Save and close the file.
When you use the connector, the idfserver.log.0 log file is generated in the LDAP_INSTALL_DIR/logs directory. This file is the main LDAP Gateway operations log file.
6. To configure the SSL in the LDAP Gateway:
a. Edit the /ldapgateway/idfserver.jar beans.xml directory for the following:
<bean id="sslContextFactory" class="com.identityforge.idfserver.nettynio.SslContextFactory"><constructor-arg><value>false</value></constructor-arg><constructor-arg><value>../conf/testnew.jks</value></constructor-arg><constructor-arg><value>abc123</value></constructor-arg><constructor-arg><value>false</value></constructor-arg></bean>
The first argument indicates we are not in client mode.
The second argument is the path to the keystore. Either change this path to your keystore or add your certificate to this keystore.
The third argument is the keystore password that you used to generate your keystore.
The fourth argument indicates whether the keystore password is encrypted. Use false for plain-text passwords, and true for encrypted passwords.
b. Edit a listener using the SSLChannelFactory for only "port", which is the only item you can change in the listener:
<bean id="sslListener" class="com.identityforge.idfserver.nio.Listener">constructor-arg><ref bean="bus"/></constructor-arg><constructor-arg><ref bean="sslChannelFactory"/></constructor-arg><property name="admin"><value>false</value></property><property name="config"><value>./conf/listener.xml</value></property><property name="port" value="7389"/><property name="threadName" value="SSLLDAPListener"/></bean>
c. Add the listener to the server by uncommenting the following line:
<bean id="server" class="com.identityforge.idfserver.Server"><property name="tasks"><list><ref bean="bus"/>
See Also: Section 3.4.4, "Enabling Logging" for more information
Note: Do not change this argument.

Installing and Configuring the LDAP Gateway
Connector Deployment on Oracle Identity Manager 3-21
<ref bean="decoder"/><ref bean="listener"/><!-- <ref bean="sslListener"/> <!-- added here --><ref bean="client"/><ref bean="protocol"/><ref bean="encoder"/><ref bean="output"/></list></property><property name="nexus" ref="nexus"/><property name="logPath" value="../logs/idfserver.log"/></bean>
7. Save the changes made to the beans.xml file, and then re-create the idfserver.jar file.
8. Ensure that the JAVA version is 1.7 or 1.8.
[oracle@identity logs]$ java -versionjava version "1.8.0_45"Java(TM) SE Runtime Environment (build 1.8.0_45-b14)Java HotSpot(TM) 64-Bit Server VM (build 25.45-b02, mixed mode)
9. Ensure that run.sh and stop.sh can be executed on the non-Windows systems.
o - chmod 755 run.sho - chmod 755 stop.sh
Starting and Stopping the LDAP Gateway on UNIXTo start the LDAP Gateway on UNIX, run the following command:
bin>./run.sh
When the LDAP Gateway has started, the LDAP Gateway VERSION_NUMBER Started message is recorded in the in the LDAP_INSTALL_DIR/bin/nohup.out log file. For more information on logging, see Section 3.4.4, "Enabling Logging".
To stop the LDAP Gateway on UNIX, run the following command:
bin> ./stop_idf.sh
Starting and Stopping the LDAP Gateway on Microsoft WindowsTo start the LDAP Gateway on Microsoft Windows, run the run.bat file.
When the LDAP Gateway has started, the LDAP Gateway VERSION_NUMBER Started message is recorded in the idfserver.log.
To stop the LDAP Gateway on Microsoft Windows, close the command window in which the gateway is running.
Note: When recreating the idfserver.jar: jar uvf idfserver.jar *, do not use cvf as this overwrites the required META-INF Directory.
Note: Use Oracle JAVA JRE, but not JAVA JRockit.

Installing and Configuring the LDAP Gateway
3-22 Oracle Identity Manager Connector Guide for IBM RACF Advanced

4
Using the Connector 4-1
4Using the Connector
This chapter discusses the following topics:
■ Section 4.1, "Guidelines on Using the Connector"
■ Section 4.2, "Scheduled Tasks for Lookup Field Synchronization"
■ Section 4.3, "Configuring the Security Attributes Lookup Field"
■ Section 4.4, "Configuring Reconciliation"
■ Section 4.5, "Configuring Account Status Reconciliation"
■ Section 4.6, "Configuring Scheduled Tasks"
■ Section 4.7, "Performing Provisioning Operations"
4.1 Guidelines on Using the ConnectorApply the following guidelines while using the connector:
■ The LDAP Gateway does not send the full attribute value when provisioning attribute values that contain one or more space characters. If this problem occurs, surround the attribute value in single quotation marks when populating the form field.
■ The RACF connector LDAP gateway encrypts ASCII data transmitting the encrypted message to the mainframe. The mainframe decrypts this message, as the inbound message is in ASCII format, it is translated to EBCDIC for mainframe processing. As a result, any task that requires non-ASCII data transfer fails. In addition, there is no provision in the connector to indicate that the task has failed or that an error has occurred on the mainframe. To avoid errors of this type, you must exercise caution when providing inputs to the connector for the target system, especially when using a regional language interface.
■ Passwords used on the mainframe must conform to stringent rules related to passwords on mainframes. These passwords are also subject to restrictions imposed by corporate policies and rules about mainframe passwords. Keep in mind these requirements when you create or modify target system accounts through provisioning operations on Oracle Identity Manager.
■ The subpool must be started before starting the Reconciliation Agent. If the agent is started before the subpool, then an error message stating, "NO TOKEN FOUND", will be printed. Additionally, if the LDAP Gateway is not available when the Reconciliation Agent is started, then an error message is generated stating, "NO LDAP FOUND" will be printed.

Scheduled Tasks for Lookup Field Synchronization
4-2 Oracle Identity Manager Connector Guide for IBM RACF Advanced
■ When you update the TSO_SIZE and TSO_MAXSIZE attributes during a provisioning operation, you must not include leading zeros in the value that you specify. For example, if you want to change the value of the SIZE attribute from 000001 to 000002, then enter 2 in the SIZE field on the Identity Self Service.
4.2 Scheduled Tasks for Lookup Field SynchronizationThe following are the scheduled tasks for lookup field synchronization:
■ RACF Find All Resources
■ RACF Find All Datasets
■ RACF Find All Groups
These scheduled tasks populate lookup fields in Oracle Identity Manager with resource profiles, datasets, or group IDs. Values from these lookup fields can be assigned during user provisioning operations and reconciliation runs. When you configure these scheduled tasks, they run at specified intervals and fetch a listing of all resource, dataset, or group IDs on the target system for reconciliation.
Table 4–1 describes the attributes of the Find All Datasets and Find All Groups scheduled task.
See Also: Section 1.5.3, "User Attributes for Target Resource Reconciliation and Provisioning" for mapping information about the TSO_SIZE and TSO_MAXSIZE attributes
Table 4–1 Attributes of the Find All Datasets and Find All Groups Scheduled Tasks
Attribute Description
IT Resource Enter the name of the IT resource that was configured for the target system.
Sample value: RacfResource

Scheduled Tasks for Lookup Field Synchronization
Using the Connector 4-3
Table 4–2 describes the attributes of the Find All Resources scheduled task.
Resource Object Enter the name of the resource object against which provisioning runs must be performed.
Sample value: OIMRacfResourceObject
Lookup Code Name Enter the name of the lookup definition where Oracle Identity Manager will store the names of any datasets or groups to which the user belongs.
Sample value: Lookup.DatasetNames or Lookup.GroupNames
Recon Type This attribute determines how datasets or group memberships from the target system are populated in Oracle Identity Manager lookup definitions. You can use one of the following options:
■ Append adds datasets or group membership entries from the target system that do not exist in the Lookup.DatasetNames or Lookup.GroupNames lookup definitions. Any existing entries remain untouched.
■ Replace removes all the existing entries in Lookup.DatasetNames or Lookup.GroupNames lookup definition and replaces them with datasets or group membership entries from the target system.
■ Merge handles entries in the following manner:
– If you are using the connector for a single installation of the target system, then datasets and group membership entries that exist in both the target system and Oracle Identity Manager are updated in the Lookup.DatasetNames or Lookup.GroupNames lookup definitions. Datasets and group membership entries that exist only in the target system are added to the Lookup.DatasetNames or Lookup.GroupNames lookup definitions.
– If you are using the connector for multiple installations of the target system, then only datasets and group membership entries corresponding to the target system installation that you are using are updated or added.
Entries that exist in both the target system and Oracle Identity Manager are updated in the Lookup.DatasetNames or Lookup.GroupNames lookup definitions.
Entries that exist only in the target system are added to the Lookup.DatasetNames or Lookup.GroupNames lookup definitions.
Default value: Merge
Table 4–1 (Cont.) Attributes of the Find All Datasets and Find All Groups Scheduled Tasks
Attribute Description
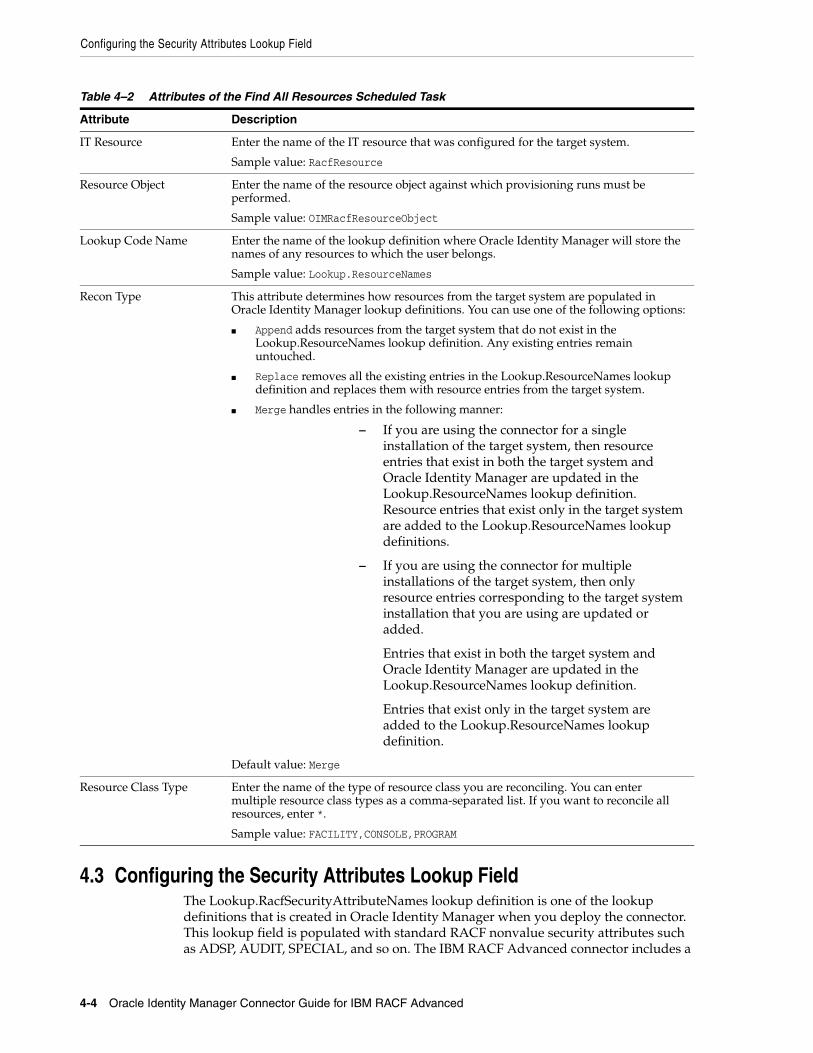
Configuring the Security Attributes Lookup Field
4-4 Oracle Identity Manager Connector Guide for IBM RACF Advanced
4.3 Configuring the Security Attributes Lookup FieldThe Lookup.RacfSecurityAttributeNames lookup definition is one of the lookup definitions that is created in Oracle Identity Manager when you deploy the connector. This lookup field is populated with standard RACF nonvalue security attributes such as ADSP, AUDIT, SPECIAL, and so on. The IBM RACF Advanced connector includes a
Table 4–2 Attributes of the Find All Resources Scheduled Task
Attribute Description
IT Resource Enter the name of the IT resource that was configured for the target system.
Sample value: RacfResource
Resource Object Enter the name of the resource object against which provisioning runs must be performed.
Sample value: OIMRacfResourceObject
Lookup Code Name Enter the name of the lookup definition where Oracle Identity Manager will store the names of any resources to which the user belongs.
Sample value: Lookup.ResourceNames
Recon Type This attribute determines how resources from the target system are populated in Oracle Identity Manager lookup definitions. You can use one of the following options:
■ Append adds resources from the target system that do not exist in the Lookup.ResourceNames lookup definition. Any existing entries remain untouched.
■ Replace removes all the existing entries in the Lookup.ResourceNames lookup definition and replaces them with resource entries from the target system.
■ Merge handles entries in the following manner:
– If you are using the connector for a single installation of the target system, then resource entries that exist in both the target system and Oracle Identity Manager are updated in the Lookup.ResourceNames lookup definition. Resource entries that exist only in the target system are added to the Lookup.ResourceNames lookup definitions.
– If you are using the connector for multiple installations of the target system, then only resource entries corresponding to the target system installation that you are using are updated or added.
Entries that exist in both the target system and Oracle Identity Manager are updated in the Lookup.ResourceNames lookup definition.
Entries that exist only in the target system are added to the Lookup.ResourceNames lookup definition.
Default value: Merge
Resource Class Type Enter the name of the type of resource class you are reconciling. You can enter multiple resource class types as a comma-separated list. If you want to reconcile all resources, enter *.
Sample value: FACILITY,CONSOLE,PROGRAM

Configuring the Security Attributes Lookup Field
Using the Connector 4-5
scheduled task to automatically populate the lookup field used for storing RACF security attributes. Table 4–3 describes the attributes of the Find All Security Attributes scheduled task.
However, you can also manually add additional values.
To add additional security attributes for provisioning and reconciliation:
Note: The Find All Security Attributes scheduled task does not query the target system for data. Instead, the scheduled task automatically populates the lookup field with "itResourceKey~securityAttributeName" pairs based on the IT Resource and Security Attribute scheduled task property values.
Table 4–3 Attributes of the Find All Security Attributes Scheduled Task
Attribute Description
IT Resource Enter the name of the IT resource that was configured for the target system.
Sample value: RacfResource
Security Attributes Enter a comma-separated list of RACF non-value security attributes.
Sample value: ADSP, AUDIT, RESTRICTED, SPECIAL, UAUDIT
Lookup Code Name Enter the name of the lookup definition where Oracle Identity Manager will store the security attribute entries fetched from the target system.
Sample value: Lookup.RacfSecurityAttributes
Recon Type This attribute determines how security attributes from the target system are populated in Oracle Identity Manager lookup definitions. You can use one of the following options:
■ Append adds security attributes from the target system that do not exist in the Lookup.RacfSecurityAttributes lookup definition. Any existing entries remain untouched.
■ Replace removes all the existing entries in the Lookup.RacfSecurityAttributes lookup definition and replaces them with security attributes from the target system.
■ Merge handles entries in the following manner:
– If you are using the connector for a single installation of the target system, then security attributes that exist in both the target system and Oracle Identity Manager are updated in the Lookup.RacfSecurityAttributes lookup definition. Security attributes that exist only in the target system are added to the Lookup.RacfSecurityAttributes lookup definitions.
– If you are using the connector for multiple installations of the target system, then only security attributes corresponding to the target system installation that you are using are updated or added.
Security attributes that exist in both the target system and Oracle Identity Manager are updated in the Lookup.RacfSecurityAttributes lookup definition.
Security attributes that exist only in the target system are added to the Lookup.RacfSecurityAttributes lookup definition.
Default value: Merge

Configuring Reconciliation
4-6 Oracle Identity Manager Connector Guide for IBM RACF Advanced
1. Log in to Oracle Identity Manager Design Console.
2. Expand Administration and then double-click Lookup Definition.
3. Search for the Lookup.RacfSecurityAttributesNames lookup definition.
4. Click Add.
5. In the Code Key column, enter the name of the security attribute. Enter the same value in the Decode column. The following is a sample entry:
Code Key: ITResource~ADSP Decode: ITResource~ADSP
6. Click the Save icon.
4.4 Configuring ReconciliationThe IBM RACF Advanced connector supports both incremental reconciliation and full reconciliation. This section discusses the following topics related to configuring reconciliation:
■ Section 4.4.1, "Configuring Incremental Reconciliation"
■ Section 4.4.2, "Performing Full Reconciliation"
■ Section 4.4.3, "Reconciliation Scheduled Tasks"
4.4.1 Configuring Incremental ReconciliationThe Voyager agent and the LDAP gateway perform incremental reconciliation using the RACF Reconcile All LDAP Users scheduled task. To configure incremental reconciliation:
1. Ensure the racf.properties has the following set:
■ USE INTERNAL META STORE
[true|false]_internalEnt_=true
■ USE GROUP INTERNAL META STORE
[true|false]_internalGrpEnt_=true
2. Use the Last Modified Timestamp parameter of the IT resource to set a date range that will reconcile all users that have changed since that date.
4.4.2 Performing Full ReconciliationFull reconciliation involves reconciling all existing user records from the target system into Oracle Identity Manager. After you deploy the connector, you must first perform full reconciliation. After first-time reconciliation, the connector will automatically switch to performing incremental reconciliation based on the time stamp value present in the IT resource.
Note: If the _internalEnt_ property, located in LDAP_INSTALL_DIR/conf/racf.properties, is set to true, then the LDAP internal store will also be populated on an ongoing basis by the "real-time" event capture using Voyager and the EXIT(s). So after initial population and reconciliation the process will still continue to use the RACF Reconcile All LDAP Users scheduled task using a Date range to reconcile these real-time event changes from data captured in the LDAP internal store.

Configuring Reconciliation
Using the Connector 4-7
To perform full reconciliation in a set up that involves LDAP gateway as an intermediary datastore between the RACF target system and Oracle Identity Manager, choose one of the options:
■ If you are performing reconciliation for the first time, then:
a. Generate an EXTRACT reconciliation file on the RACF target system.
b. Set the value of the Last Modified Time Stamp parameter of the IT resource parameter to 0.
c. Run the RACF Reconcile Users to Internal LDAP scheduled task.
d. Run the RACF Reconcile All LDAP Users scheduled task.
■ If this is not the first time that you are performing full reconciliation, then:
a. Set the value of the Last Modified Time Stamp parameter of the IT resource parameter to 0.
b. Run the RACF Reconcile All LDAP Users scheduled task.
This completes full reconciliation and from the next reconciliation run onward, the connector will automatically switch to incremental reconciliation by using the value in the Last Modified Time Stamp parameter of the IT resource.
To perform full reconciliation in a set up that does not involve LDAP gateway, run the RACF Reconcile All Users scheduled task. The scheduled job will always run in full reconciliation mode.
4.4.3 Reconciliation Scheduled Tasks When you run the Connector Installer, the following reconciliation scheduled tasks are automatically created in Oracle Identity Manager:
■ Section 4.4.3.1, "RACF Reconcile All Users"
■ Section 4.4.3.2, "RACF Deleted User Reconciliation Using OIM"
■ Section 4.4.3.3, "RACF Reconcile Users to Internal LDAP"
■ Section 4.4.3.4, "RACF Reconcile All LDAP Users"
4.4.3.1 RACF Reconcile All UsersThe RACF Reconcile All Users scheduled task is used to reconcile user data in the target resource (account management) mode of the connector. This scheduled task runs at specified intervals and fetches create or modify events on the target system for reconciliation.
Table 4–4 describes the attributes of RACF Reconcile All Users scheduled task.
Note: If you do not run the RACF Recon Users to Internal LDAP scheduled task with the EXTRACT recon file, then the RACF Reconcile LDAP Users scheduled task will always perform in incremental mode.

Configuring Reconciliation
4-8 Oracle Identity Manager Connector Guide for IBM RACF Advanced
4.4.3.2 RACF Deleted User Reconciliation Using OIMThe RACF Deleted User Reconciliation Using OIM scheduled task is used to reconcile data about deleted users in the target resource (account management) mode of the connector.
When you run this scheduled task, it fetches a list of users on the target system. These user names are then compared with provisioned users in Oracle Identity Manager. Any user profiles that exist within Oracle Identity Manager, but not in the target system, are deleted from Oracle Identity Manager.
Table 4–5 describes the attributes of RACF Deleted User Reconciliation Using OIM scheduled task.
Table 4–4 Attributes of the RACF Reconcile All Users Scheduled Task
Attribute Description
IT Resource Enter the name of the IT resource that was configured for the target system.
Sample value: RacfResource
Resource Object Enter the name of the resource object against which reconciliation runs must be performed.
Sample value: OIMRacfResourceObject
MultiValuedAttributes Enter a comma-separated list of multi-valued attributes that you want to reconcile. Do not include a space after each comma.
Sample value: attributes,memberOf
SingleValueAttributes Enter a comma-separated list of single-valued attributes that you want to reconcile. Do not include a space after each comma. Do not include attributes already listed in the MultiValueAttributes field.
Sample value: uid,owner,defaultGroup,waddr1,tsoMaxSize
Note: By default, Oracle Identity Manager's design form only allows entering up to 150 characters in a text field. To increase this limit, change the value of the TSA_VALUE column in the Oracle Identity Manager database.
UID Case Enter either upper or lower for the case of the UID attribute value.
Sample value: upper
UsersList Enter a comma-separated list of UIDs that you want to reconcile from the target system. If this property is left blank, then all users on the target system will be reconciled.
Sample value: userQA01,georgeb,marthaj,RST0354
Table 4–5 Attributes of the RACF Deleted User Reconciliation Using OIM Scheduled Task
Attribute Description
IT Resource Enter the name of the IT resource that was configured for the target system.
Sample value: RacfResource
Resource Object Enter the name of the resource object against which the delete reconciliation runs will be performed.
Sample value: OIMRacfResourceObject

Configuring Reconciliation
Using the Connector 4-9
4.4.3.3 RACF Reconcile Users to Internal LDAPThe RACF Reconcile Users to Internal LDAP scheduled task is used to reconcile users from the target system to the internal LDAP store. When you configure this scheduled task, it runs at specified intervals and fetches a list of users and their profiles on the target system. Each of these users is then reconciled to the internal LDAP store. No reconciliation to Oracle Identity Manager is performed. Table 4–6 describes the attributes of the scheduled task.
4.4.3.4 RACF Reconcile All LDAP UsersThe RACF Reconcile All LDAP Users scheduled task is used to reconcile users from the internal LDAP store to Oracle Identity Manager. When you configure this scheduled task, it runs at specified intervals and fetches a list of users within the internal LDAP store and reconciles these users to Oracle Identity Manager. Table 4–7 describes the attributes of the scheduled task.
Recon Matching Rule Attributes
Enter a comma-separated list of attributes used in the matching rule. If the IT resource is used, enter IT.
Sample value: UID,IT
Table 4–6 Attributes of the RACF Reconcile Users to Internal LDAP Scheduled Task
Attribute Description
IT Resource Enter the name of the IT resource that was configured for the target system.
Sample value: RacfResource
Domain OU Enter the name of the internally-configured directory in the LDAP internal store where the contents of event changes will be stored.
Sample value: racf
Table 4–7 Attributes of the RACF Reconcile All LDAP Users Scheduled Task
Attribute Description
IT Resource Enter the name of the IT resource that was configured for the target system.
Sample value: RacfResource
Resource Object Enter the name of the resource object against which the delete reconciliation runs must be performed.
Sample value: OIMRacfResourceObject
Domain OU Enter the name of the internally-configured directory in the LDAP internal store where the contents of event changes will be stored.
Sample value: racf
MultiValuedAttributes Enter a comma-separated list of multivalued attributes that you want to reconcile. Do not include a space after each comma.
Sample value: memberOf,attributes
Table 4–5 (Cont.) Attributes of the RACF Deleted User Reconciliation Using OIM Scheduled Task
Attribute Description

Configuring Reconciliation
4-10 Oracle Identity Manager Connector Guide for IBM RACF Advanced
4.4.4 Configuring Filtered Reconciliation to Multiple Resource ObjectsSome organizations use multiple resource objects to represent multiple user types in their system. The Resource Object property of the scheduled tasks is used to specify the resource object used during reconciliation, and you can enter more than one resource object in the value of the Resource Object property. Further, you can include IBM RACF attribute-value pairs to filter records for each resource object.
The following is a sample format of the value for the Resource Object attribute:
ATTRIBUTE1:VALUE1)RESOURCE_OBJECT1,RESOURCE_OBJECT2
As shown by RESOURCE_OBJECT2 in the sample format, specifying a filter attribute is optional, but if more than one resource object is specified, you must specify a filter for each additional resource object. If you do not specify a filter attribute, then all records are reconciled to the first resource object in the list. Further, the filters are checked in order, so the resource object without a filter attribute should be included last in the list.
Filter attributes should be surrounded by parentheses.
Apply the following guidelines while specifying a value for the Resource Object attribute:
■ The names of the resource objects must be the same as the names that you specified while creating the resource objects in the Design Console.
■ The IBM RACF attribute names must be the same as the names used in the LDAP Gateway configuration files.
■ The value must be a regular expression as defined in the java.util.regex Java package. Note that the find() API call of the regex matcher is used rather than the matches() API call. This means that a substring matching rule can be specified in the pattern, rather than requiring the entire string matching rule.
Further, substring matching is case-sensitive. A "(tso)" filter will not match a user with the user ID "TSOUSER1".
SingleValueAttributes Enter a comma-separated list of single-valued attributes that you want to reconcile. Do not include a space after each comma. Do not include attributes already listed in the MultiValueAttributes field.
Sample value: uid,owner,defaultGroup,waddr1,tsoMaxSize
Note: By default, Oracle Identity Manager's design form only allows entering up to 150 characters in a text field. To increase this limit, change the value of the TSA_VALUE column in the Oracle Identity Manager database.
LDAP Time Zone Enter the time zone ID for the server on which the LDAP gateway is hosted.
Sample value: EST
UID Case Enter whether the user ID should be displayed in uppercase or lowercase.
Sample value: upper
See Also: Section 4.4.3.1, "RACF Reconcile All Users" for information about the RACF Reconcile All Users scheduled task
See Also: Section 3.5, "Installing and Configuring the LDAP Gateway" for information about the LDAP Gateway configuration files
Table 4–7 (Cont.) Attributes of the RACF Reconcile All LDAP Users Scheduled Task
Attribute Description
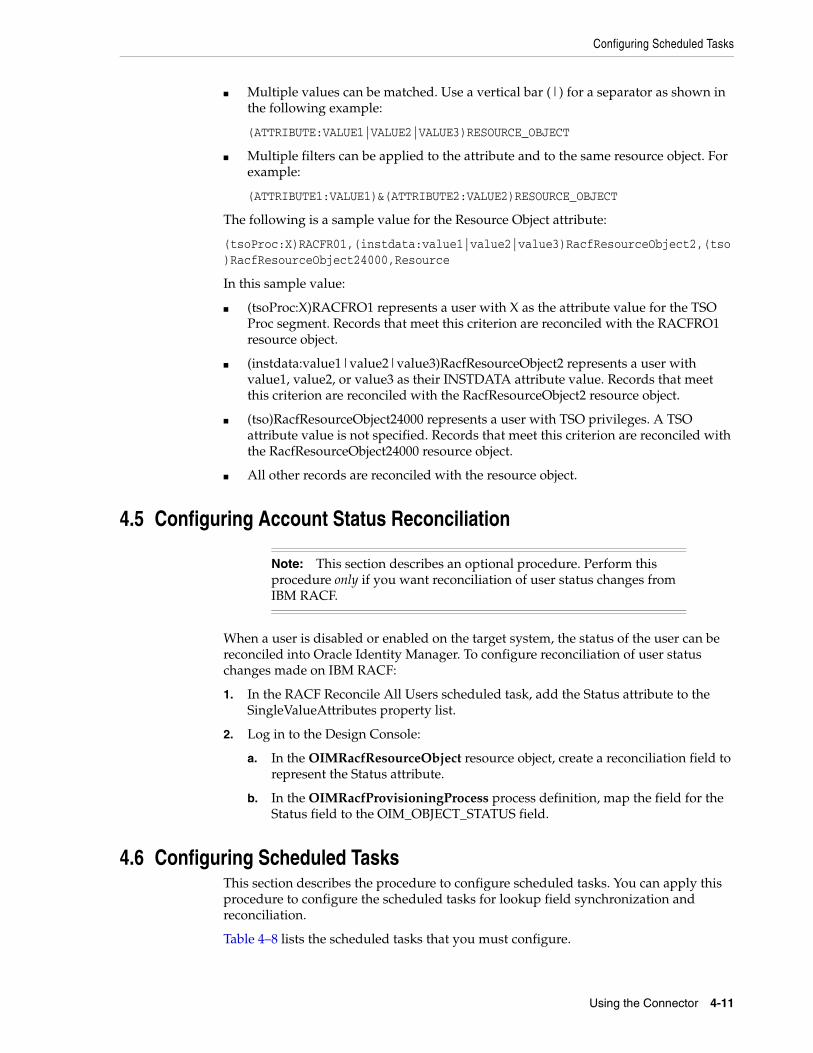
Configuring Scheduled Tasks
Using the Connector 4-11
■ Multiple values can be matched. Use a vertical bar (|) for a separator as shown in the following example:
(ATTRIBUTE:VALUE1|VALUE2|VALUE3)RESOURCE_OBJECT
■ Multiple filters can be applied to the attribute and to the same resource object. For example:
(ATTRIBUTE1:VALUE1)&(ATTRIBUTE2:VALUE2)RESOURCE_OBJECT
The following is a sample value for the Resource Object attribute:
(tsoProc:X)RACFR01,(instdata:value1|value2|value3)RacfResourceObject2,(tso)RacfResourceObject24000,Resource
In this sample value:
■ (tsoProc:X)RACFRO1 represents a user with X as the attribute value for the TSO Proc segment. Records that meet this criterion are reconciled with the RACFRO1 resource object.
■ (instdata:value1|value2|value3)RacfResourceObject2 represents a user with value1, value2, or value3 as their INSTDATA attribute value. Records that meet this criterion are reconciled with the RacfResourceObject2 resource object.
■ (tso)RacfResourceObject24000 represents a user with TSO privileges. A TSO attribute value is not specified. Records that meet this criterion are reconciled with the RacfResourceObject24000 resource object.
■ All other records are reconciled with the resource object.
4.5 Configuring Account Status Reconciliation
When a user is disabled or enabled on the target system, the status of the user can be reconciled into Oracle Identity Manager. To configure reconciliation of user status changes made on IBM RACF:
1. In the RACF Reconcile All Users scheduled task, add the Status attribute to the SingleValueAttributes property list.
2. Log in to the Design Console:
a. In the OIMRacfResourceObject resource object, create a reconciliation field to represent the Status attribute.
b. In the OIMRacfProvisioningProcess process definition, map the field for the Status field to the OIM_OBJECT_STATUS field.
4.6 Configuring Scheduled Tasks This section describes the procedure to configure scheduled tasks. You can apply this procedure to configure the scheduled tasks for lookup field synchronization and reconciliation.
Table 4–8 lists the scheduled tasks that you must configure.
Note: This section describes an optional procedure. Perform this procedure only if you want reconciliation of user status changes from IBM RACF.
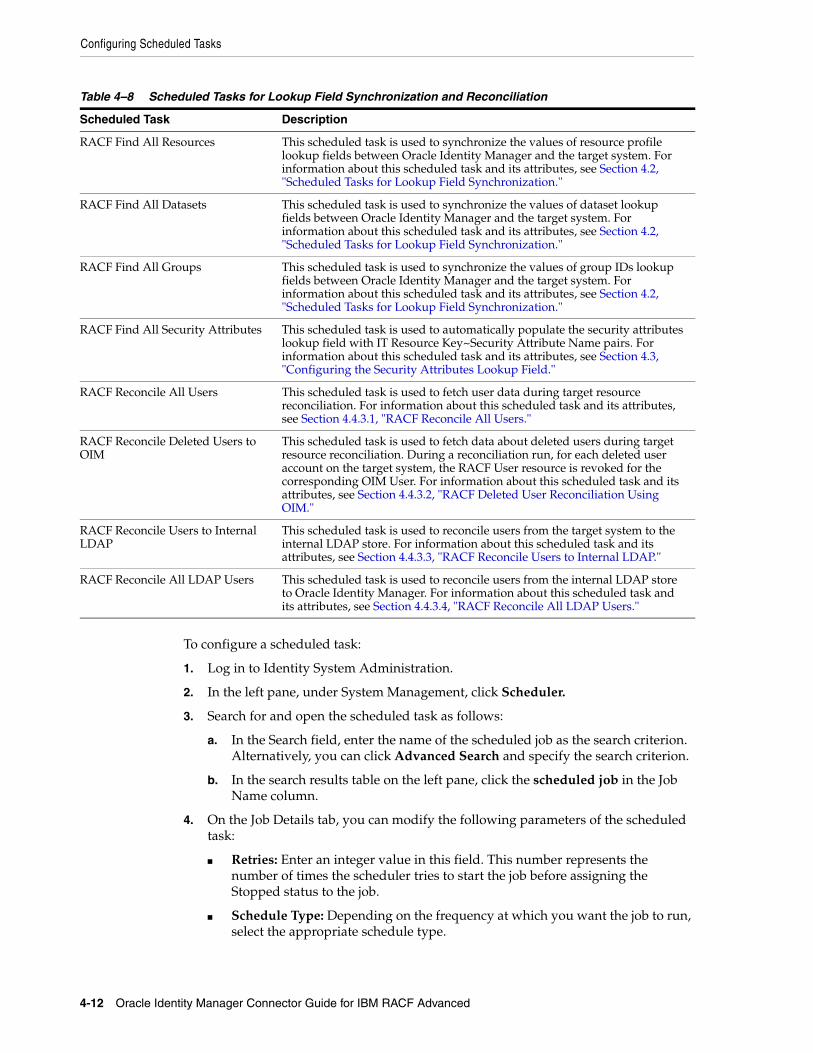
Configuring Scheduled Tasks
4-12 Oracle Identity Manager Connector Guide for IBM RACF Advanced
To configure a scheduled task:
1. Log in to Identity System Administration.
2. In the left pane, under System Management, click Scheduler.
3. Search for and open the scheduled task as follows:
a. In the Search field, enter the name of the scheduled job as the search criterion. Alternatively, you can click Advanced Search and specify the search criterion.
b. In the search results table on the left pane, click the scheduled job in the Job Name column.
4. On the Job Details tab, you can modify the following parameters of the scheduled task:
■ Retries: Enter an integer value in this field. This number represents the number of times the scheduler tries to start the job before assigning the Stopped status to the job.
■ Schedule Type: Depending on the frequency at which you want the job to run, select the appropriate schedule type.
Table 4–8 Scheduled Tasks for Lookup Field Synchronization and Reconciliation
Scheduled Task Description
RACF Find All Resources This scheduled task is used to synchronize the values of resource profile lookup fields between Oracle Identity Manager and the target system. For information about this scheduled task and its attributes, see Section 4.2, "Scheduled Tasks for Lookup Field Synchronization."
RACF Find All Datasets This scheduled task is used to synchronize the values of dataset lookup fields between Oracle Identity Manager and the target system. For information about this scheduled task and its attributes, see Section 4.2, "Scheduled Tasks for Lookup Field Synchronization."
RACF Find All Groups This scheduled task is used to synchronize the values of group IDs lookup fields between Oracle Identity Manager and the target system. For information about this scheduled task and its attributes, see Section 4.2, "Scheduled Tasks for Lookup Field Synchronization."
RACF Find All Security Attributes This scheduled task is used to automatically populate the security attributes lookup field with IT Resource Key~Security Attribute Name pairs. For information about this scheduled task and its attributes, see Section 4.3, "Configuring the Security Attributes Lookup Field."
RACF Reconcile All Users This scheduled task is used to fetch user data during target resource reconciliation. For information about this scheduled task and its attributes, see Section 4.4.3.1, "RACF Reconcile All Users."
RACF Reconcile Deleted Users to OIM
This scheduled task is used to fetch data about deleted users during target resource reconciliation. During a reconciliation run, for each deleted user account on the target system, the RACF User resource is revoked for the corresponding OIM User. For information about this scheduled task and its attributes, see Section 4.4.3.2, "RACF Deleted User Reconciliation Using OIM."
RACF Reconcile Users to Internal LDAP
This scheduled task is used to reconcile users from the target system to the internal LDAP store. For information about this scheduled task and its attributes, see Section 4.4.3.3, "RACF Reconcile Users to Internal LDAP."
RACF Reconcile All LDAP Users This scheduled task is used to reconcile users from the internal LDAP store to Oracle Identity Manager. For information about this scheduled task and its attributes, see Section 4.4.3.4, "RACF Reconcile All LDAP Users."

Performing Provisioning Operations
Using the Connector 4-13
5. In addition to modifying the job details, you can enable or disable a job.
6. On the Job Details tab, in the Parameters region specify values for the attributes of the scheduled task.
Click Apply to save the changes.
4.7 Performing Provisioning OperationsTo perform provisioning operations in Oracle Identity Manager:
1. Log in to Oracle Identity Self Service.
2. Create a user. See Creating a User in Oracle Fusion Middleware Performing Self Service Tasks with Oracle Identity Manager for more information about creating a user.
3. On the Account tab, click Request Accounts.
4. In the Catalog page, search for and add to cart the application instance created in Section 3.4.1.3, "Creating an Application Instance", and then click Checkout.
5. Specify value for fields in the application form and then click Ready to Submit.
6. Click Submit.
7. If you want to provision entitlements, then:
a. On the Entitlements tab, click Request Entitlements.
b. In the Catalog page, search for and add to cart the entitlement, and then click Checkout.
c. Click Submit.
Note: See Creating Jobs in Oracle Fusion Middleware Administering Oracle Identity Manager for detailed information about schedule types.
Note:
■ Values (either default or user-defined) must be assigned to all the attributes. If even a single attribute value is left empty, then reconciliation is not performed.
■ See "Reconciliation Scheduled Tasks" for the list of scheduled tasks and their attributes.
Note: You can use the Scheduler Status page in Identity System Administration to either start, stop, or reinitialize the scheduler.

Performing Provisioning Operations
4-14 Oracle Identity Manager Connector Guide for IBM RACF Advanced

5
Extending the Functionality of the Connector 5-1
5Extending the Functionality of the Connector
This chapter discusses the following optional procedures that you can perform to extend the functionality of the connector for addressing your business requirements:
■ Section 5.1, "Adding Custom Fields for Target Resource Reconciliation"
■ Section 5.2, "Adding Custom Multivalued Fields for Reconciliation"
■ Section 5.3, "Adding Custom Fields for Provisioning"
■ Section 5.4, "Removing Attributes Mapped for Target Resource Reconciliation"
■ Section 5.5, "Using the Provisioning Agent to Run IBM z/OS Batch Jobs"
■ Section 5.6, "Configuring the Connector for Provisioning to Multiple Installations of the Target System"
■ Section 5.7, "Initial LDAP Gateway Population and Full Reconciliation"
■ Section 5.8, "Configuring Windows Service"
■ Section 5.9, "Customizing Log File Locations"
■ Section 5.10, "LDAP Reconciliation Supported Queries"
■ Section 5.11, "Handling PIONEER Error Messaging Exceptions in the Gateway"
5.1 Adding Custom Fields for Target Resource Reconciliation
By default, the attributes listed in Table 1–3 are mapped for reconciliation between Oracle Identity Manager and the target system. If required, you can add new attributes for target resource reconciliation.
To add a custom field for reconciliation, you must first update the connector reconciliation component you are using, and then update Oracle Identity Manager.
This section discusses the following topics:
■ Section 5.1.1, "Adding Custom Fields for Reconciliation"
■ Section 5.1.2, "Adding Custom Fields to Oracle Identity Manager"
Note: You must ensure that new attributes you add for reconciliation contain only string-format data. Binary attributes must not be brought into Oracle Identity Manager natively.

Adding Custom Fields for Target Resource Reconciliation
5-2 Oracle Identity Manager Connector Guide for IBM RACF Advanced
5.1.1 Adding Custom Fields for ReconciliationYou can add custom fields for reconciliation by specifying a value for the SingleValueAttributes attribute of the RACF Reconcile All Users and RACF Reconcile All LDAP Users scheduled tasks. See Section 4.4.3.4, "RACF Reconcile All LDAP Users" and Section 4.4.3.1, "RACF Reconcile All Users" for more information about the attributes of these scheduled tasks.
To add a custom field for scheduled task reconciliation:
1. Log in to Identity System Administration.
2. In the left pane, under System Management, click Scheduler.
3. Search for and open the RACF Reconcile All Users and RACF Reconcile All LDAP Users scheduled tasks as follows:
a. On the left pane, in the Search field, enter RACF Reconcile All Users or RACF Reconcile All LDAP Users as the search criterion. Alternatively, you can click Advanced Search and specify the search criterion.
b. In the search results table on the left pane, click the scheduled job in the Job Name column.
4. Add the custom field to the list of attributes in the SingleValueAttributes scheduled task attribute.
5. Click Apply.
5.1.2 Adding Custom Fields to Oracle Identity ManagerAfter adding the custom field to the RACF Reconcile All Users scheduled task (if using scheduled task reconciliation), you must add the custom field to the Oracle Identity Manager components.
To update Oracle Identity Manager with the custom field:
1. Log in to the Design Console.
2. Add the custom field to the list of reconciliation fields in the resource object as follows:
a. Expand Resource Management and then double-click Resource Objects.
b. Search for and open the OIMRacfResourceObject resource object.
c. On the Object Reconciliation tab, click Add Field.
d. In the Add Reconciliation Field dialog box, enter the details of the field.
For example, enter Description in the Field Name field and select String from the Field Type list.
e. Click Save and close the dialog box.
f. Click Create Reconciliation Profile. This copies changes made to the resource object into MDS.
g. Click Save.
3. Add the custom field on the process form as follows:
a. Expand Development Tools and then double-click Form Designer.
b. Search for and open the UD_RACF_ADV process form.
c. Click Create New Version, and then click Add.
Adding Custom Multivalued Fields for Reconciliation
Extending the Functionality of the Connector 5-3
d. Enter the details of the field.
For example, if you are adding the Description field, then enter UD_RACF_ADV_DESCRIPTION in the Name field, and then enter the rest of the details of this field.
e. Click Save and then click Make Version Active.
4. Create a reconciliation field mapping for the custom field in the provisioning process as follows:
a. Expand Process Management and then double-click Process Definition.
b. Search for and open the OIMRacfProvisioningProcess process definition.
c. On the Reconciliation Field Mappings tab of the provisioning process, click Add Field Map.
d. In the Add Reconciliation Field Mapping dialog box, from the Field Name field, select the value for the field that you want to add.
e. For example, from the Field Name field, select Description.
f. Double-click the Process Data field, and then select UD_RACF_ADV_DESCRIPTION.
g. Click Save and close the dialog box.
h. Click Save.
5. Create a new UI form and attach it to the application instance to make this new attribute visible. See Section 3.4.1.2, "Creating a New UI Form" and Section 3.4.1.6, "Updating an Existing Application Instance with a New Form" for the procedures.
6. If you are adding a custom attribute or custom dataset, then set values for the _configAttrs_, _configDNames and _configDatasets_ properties in the tops.properties file. See Step 3 of Section 3.5, "Installing and Configuring the LDAP Gateway" for information about these properties.
5.2 Adding Custom Multivalued Fields for ReconciliationTo add a custom multivalued field for reconciliation, you must first update the IDF reconciliation component you are using, and then update Oracle Identity Manager.
■ Section 5.2.1, "Adding Custom Multivalued Fields to the Reconciliation Component"
■ Section 5.2.2, "Adding Custom Multivalued Fields to Oracle Identity Manager"
5.2.1 Adding Custom Multivalued Fields to the Reconciliation ComponentYou can add custom multivalued fields for reconciliation by specifying a value for the MultiValuedAttributes property of the RACF Reconcile All Users and RACF Reconcile All LDAP Users scheduled tasks. See Section 4.4.3.4, "RACF Reconcile All LDAP Users" and Section 4.4.3.1, "RACF Reconcile All Users" for more information about the attributes of these scheduled tasks.
To add a custom field for scheduled task reconciliation:
1. Log in to Identity System Administration.
2. In the left pane, under System Management, click Scheduler.

Adding Custom Multivalued Fields for Reconciliation
5-4 Oracle Identity Manager Connector Guide for IBM RACF Advanced
3. Search for and open the RACF Reconcile All Users and RACF Reconcile All LDAP Users scheduled tasks as follows:
a. On the left pane, in the Search field, enter RACF Reconcile All Users or RACF Reconcile All LDAP Users as the search criterion. Alternatively, you can click Advanced Search and specify the search criterion.
b. In the search results table on the left pane, click the scheduled job in the Job Name column.
4. Add the custom field to the list of attributes in the MultiValuedAttributes property.
5. Click Apply.
5.2.2 Adding Custom Multivalued Fields to Oracle Identity ManagerAfter adding the custom multivalued field to the RACF Reconcile All Users and RACF Reconcile All LDAP Users scheduled task (if using scheduled task reconciliation), you must add the custom multivalued field to the Oracle Identity Manager components.
To update Oracle Identity Manager with the multivalued field:
1. Log in to the Design Console.
2. Create a form for the multivalued field as follows:
a. Expand Development Tools and double-click Form Designer.
b. Create a form by specifying a table name and description, and then click Save.
c. Click Add and enter the details of the field.
d. Click Save and then click Make Version Active. Figure 5–1 shows the multivalued field added on a new form.

Adding Custom Multivalued Fields for Reconciliation
Extending the Functionality of the Connector 5-5
Figure 5–1 Multivalued Field Added on a New Form
3. Add the form created for the multi-valued field as a child form of the process form as follows:
a. Search for and open the UD_RACF_ADV process form.
b. Click Create New Version.
c. Click the Child Table(s) tab.
d. Click Assign.
e. In the Assign Child Tables dialog box, select the newly created child form, click the right arrow, and then click OK.
f. Click Save and then click Make Version Active. Figure 5–2 shows the child form added to the process form.

Adding Custom Multivalued Fields for Reconciliation
5-6 Oracle Identity Manager Connector Guide for IBM RACF Advanced
Figure 5–2 Child Form Added to the Process Form
4. Add the new multivalued field to the list of reconciliation fields in the resource object as follows:
a. Expand Resource Management and then double-click Resource Objects.
b. Search for and open the OIMRacfResourceObject resource object.
c. On the Object Reconciliation tab, click Add Field.
d. In the Add Reconciliation Field dialog box, enter the details of the field.
For example, enter phoneNumber in the Field Name field and select Multivalued Attribute from the Field Type list.
e. Click Save and close the dialog box.
f. Right click the newly created field and select Define Property Fields.
g. In the Add Reconciliation Field dialog box, enter the details of the newly created field. For example, enter phonenumber in the Field Name field and select String from the Field Type list.
h. Click Save, and then close the dialog box. Figure 5–3 shows the new reconciliation field added in the resource object.

Adding Custom Multivalued Fields for Reconciliation
Extending the Functionality of the Connector 5-7
Figure 5–3 New reconciliation Field Added in the resource Object
i. Click Create Reconciliation Profile. This copies changes made to the resource object into MDS.
5. Create an entry for the field in the AtMap.RACF lookup definition, as follows:
a. Expand Administration and then double-click Lookup Definition.
b. Search for the AtMap.RACF lookup definition.
c. Click Add and enter the Code Key and decode values for the field. The Code Key value is the name of the process form field that you created for the multivalued custom field in Step 3.d. The Decode value is the name of the target system field.
For example, enter UD_PHONENUM_PHONENUMBER in the Code Key field and then enter phonenumber in the Decode field. Figure 5–4 shows the lookup code added to the lookup definition.

Adding Custom Multivalued Fields for Reconciliation
5-8 Oracle Identity Manager Connector Guide for IBM RACF Advanced
Figure 5–4 Entry Added in the Lookup Definition
d. Click Save.
6. Create a reconciliation field mapping for the new multivalued field as follows:
a. Expand Process Management and then double-click Process Definition.
b. Search for and open the OIMRacfProvisioningProcess process definition.
c. On the Reconciliation Field Mappings tab of the provisioning process, click Add Table Map.
d. In the Add Reconciliation Table Mapping dialog box, select the field name and table name from the list, click Save, and then close the dialog box.
e. Right-click the newly created field and select Define Property Field Map.
f. In the Field Name field, select the value for the field that you want to add.
g. Double-click the Process Data field, and then select UD_PHONENUM_PHONENUMBER.
h. Select Key Field for Reconciliation Field Matching and click Save. Figure 5–5 shows the new reconciliation field mapped to a process data field in the process definition.

Adding Custom Fields for Provisioning
Extending the Functionality of the Connector 5-9
Figure 5–5 New Reconciliation Field Mapped to a Process Data Field
5.3 Adding Custom Fields for ProvisioningBy default, the attributes listed in Table 1–3 are mapped for provisioning between Oracle Identity Manager and the target system. If required, you can map additional attributes for provisioning.
To add a new attribute for provisioning:
1. Log in to the Design Console.
2. Add the new field on the process form as follows:
If you have added the field on the process form by performing Step 4 of Section 5.1.2, "Adding Custom Fields to Oracle Identity Manager," then you need not add the field again. If you have not added the field, then:
a. Expand Development Tools.
b. Double-click Form Designer.
c. Search for and open the UD_RACF_ADV process form.
d. Click Create New Version, and then click Add.
e. Enter the details of the attribute.

Adding Custom Fields for Provisioning
5-10 Oracle Identity Manager Connector Guide for IBM RACF Advanced
For example, if you are adding the Description field, enter UD_RACF_ADV_DESCRIPTION in the Name field, and then enter the rest of the details of this field.
f. Click Save and then click Make Version Active.
3. Enable update provisioning operation on the custom fields by creating a process task as follows:
a. Expand Process Management, and double-click Process Definition.
b. Search for and open the OIMRacfProvisioningProcess process definition.
c. Click Add.
d. On the General tab of the Creating New Task dialog box, enter a name and description for the task and then select the following:
Conditional
Required for Completion
Disable Manual Insert
Allow Cancellation while Pending
Allow Multiple Instances
e. Click Save.
f. Go to the Integration tab and click Add.
g. In the Handler Selection dialog box, select Adapter.
h. Click adpMODIFYUSER. and then click the save icon. The list of adapter variables is displayed on the Integration tab.
i. To create the mapping for the first adapter variable:
Double-click the number of the first row.
In the Edit Data Mapping for Variable dialog box, enter the following values: Variable Name: Adapter return value
Data Type: Object
Map To: Response code
j. Click the Save icon.
k. To create mappings for the remaining adapter variables, use the data given in the table Table 5–1:
Table 5–1 Values for the Variables, Map To, Qualifier, and Literal Value lists for each variable
Variable Number Variable Name Map To Qualifier
Second idfResource Process Data LDAP_SERVER
Third uid Process Data LoginId
Fourth attrName String Literal Enter the LDAP attribute name in the Literal Value field.
Example: description

Using the Provisioning Agent to Run IBM z/OS Batch Jobs
Extending the Functionality of the Connector 5-11
l. On the Responses tab, click Add to add at least the SUCCESS response code, with Status C. This ensures that if the custom task is successfully run, then the status of the task is displayed as Completed.
m. Click the Save icon and close the dialog box.
n. Save the process definition.
4. Create a new UI form and attach it to the application instance to make this new attribute visible. See Section 3.4.1.2, "Creating a New UI Form," and Section 3.4.1.6, "Updating an Existing Application Instance with a New Form" for the procedures.
5.4 Removing Attributes Mapped for Target Resource ReconciliationThe SingleValueAttributes and MultiValuedAttributes attributes contain the list of target system attributes that are mapped for scheduled task reconciliation. These attributes are found in the RACF Reconcile All Users and RACF Reconcile All LDAP Users scheduled tasks. If you want to remove an attribute mapped for scheduled task reconciliation, then remove it from the SingleValueAttributes or MultiValuedAttributes attributes.
5.5 Using the Provisioning Agent to Run IBM z/OS Batch JobsYou can use the Provisioning Agent to run IBM z/OS batch jobs after provisioning operations. This feature provides an interface to the batch environment of IBM z/OS. For example, a CLIST script written in IBM REXX can be called through the standard TSO JCL. When it is called, the CLIST can perform user functions such as calling IBM DB2 UDB for database table updates, calling user programs to handle file updates, and generating reports.
To configure the Provisioning Agent to run IBM z/OS batch jobs:
1. Open the Provisioning Agent control file in a text editor.
See Chapter 2, "Deploying the IDF Advanced Adapter for IBM RACF" for information about this file.
Fifth attrValue Process Data Select the process form field from the drop-down list.
Example: DESCRIPTION
Note: To enable Password Interval provisioning,
■ use literal attrName "pwdInterval" for the modifyUser task. Value=0 (Note a value of 0 will set the command to NOINTERVAL).
■ use literal attrName "pwdInterval" for the modifyUser task. Value=1 through nnn, where nnn is system accepted value range for INTERVAL (1) through INTERVAL (nnn).
Table 5–1 (Cont.) Values for the Variables, Map To, Qualifier, and Literal Value lists for each variable
Variable Number Variable Name Map To Qualifier
Using the Provisioning Agent to Run IBM z/OS Batch Jobs
5-12 Oracle Identity Manager Connector Guide for IBM RACF Advanced
2. In this file, create entries in the following format:
C=RACF_COMMAND,M=MEMBER_NAME,L=LIBRARY_NAME
P=USERID(Y),NAME(Y),CSDATA(003)
If the user wants to perform special post-processing, a new feature has been added to only one parameter of the control file. The following is the definition for the new feature:
C=DELUSER,M=member-name,L=library_name,DEL=Y or DEL=NDEL=Y -- execute Rexx clist or z/OS job stream in library L=, M= and Perform the actual deluser via RACFDEL=N -- execute Rexx clist or z/OS job stream in library L=,M= and DO NOT issue the deluser to RACF
In the first line:
■ RACF_COMMAND can be ADDUSER, ALTUSER, DELUSER, CONNECT, or REMOVE.
■ MEMBER_NAME is the name of the IBM z/OS PDS that is submitted for execution in the IBM z/OS batch environment.
■ LIBRARY_NAME is the name of the IBM z/OS PDS library name that contains the member specified by MEMBER_NAME.
The output of the submitted job is not sent back to the Provisioning Agent of the LDAP Gateway. You must take steps to ensure that the required action is taken based on the status of the operation.
For example:
C=ADDUSER,M=ABCD,L=PDS.LIBRARY.ONEP=USERID(Y),NAME(N)
The Provisioning Agent fetches the RACF user ID and passes it as a parameter to a REXX clist. The REXX clist must be set up to support parameters or arguments as shown in this example:
/* rexx */Arg p1 Here, p1 is the RACF user ID and it can be used in the REXX clist.
The same applies for NAME. If NAME(Y) and USERID(Y) are used, then the REXX clist can be similar to the following:
/* rexx */Arg p1 p2 Here, p1 is the RACF user ID and p2 is the name.
If USERID(Y),NAME(N) is used, then only the user ID is passed.
The csdata field can also be passed. The following example shows how to create and pass this field:
a. Define a csdata segment. See the IBM RACF System Administrator's Guide for information about the procedure.
b. To populate a CSDATA segment with one field:
See Also: Target system documentation for more information

Using the Provisioning Agent to Run IBM z/OS Batch Jobs
Extending the Functionality of the Connector 5-13
Altuser IDF004 CSDATA(EMPSER(100100))lu idf004 csdata noracfUSER=IDF004CSDATA INFORMATION ------------------EMPLOYEE SERIAL= 0000100100
c. To populate a CSDATA segment with multiple fields:
Altuser idf004 csdata(address('99 Main St, Anywhere, NJ, 08022') Phone(555-555-5555))lu idf004 csdata noracfUSER=IDF004CSDATA INFORMATION------------------EMPLOYEE SERIAL= 0000100100HOME ADDRESS = 99 Main St, Anywhere, NJ, 08022HOME PHONE = 555-555-5555For example:C=ADDUSER,M=ABCD,L=PDS.LIBRARY.ONEP=USERID(Y),NAME(N),CSDATA(001)
The Provisioning Agent fetches the RACF user ID and passes it and the EMPLOYEE SERIAL csdata field to a REXX clist. This format has been changed and on CSDATA, the number of CSDATA fields need to be passed. The passed fields including userID, name and CSDATA cannot exceed 80 bytes. A CSDATA(001) will pass the first CSDATA field defined.
The REXX clist must be set up to support parameters or arguments as shown in the following example:
/* rexx */Arg p1 p2
Here, p1 is the RACF user ID and p2 is Employee-Serial.
d. Save and close the file.
The following sequence of steps takes place after a provisioning operation:
1. The Provisioning Agent opens the control file and reads the association between provisioning functions and the members specified in the file.
2. If there is an entry for the provisioning operation that was performed, then the corresponding member is submitted to the IBM z/OS batch environment.
For example, suppose you had added the following entry in the control file:
C=ALTUSER,M=MY_MEMBER,L=MY_LIBRARY
Note: A hyphen must be added between the two names in this example and the length must be provided.
Note: In this release of the Provisioning Agent, there is an 80-byte limit on the size of the field value that is passed. For example, if the user ID, name, and Employee-Serial are together over 80 bytes, one or two of these values must be removed so that the 80-byte limit is not exceeded.

Configuring the Connector for Provisioning to Multiple Installations of the Target System
5-14 Oracle Identity Manager Connector Guide for IBM RACF Advanced
At the end of a Modify User provisioning operation on the target system, the Provisioning Agent runs the MY_MEMBER member. This member performs the required operation on IBM z/OS.
5.6 Configuring the Connector for Provisioning to Multiple Installations of the Target System
You can configure the connector for multiple installations of the target system. You can also configure the connector for a scenario in which multiple logical partitions (LPARs), which are not associated with the first LPAR, are configured in the target system.
For each installation of the target system, you create an IT resource and configure an additional instance of the LDAP Gateway.
To configure the connector for the second installation of the target system:
1. Create an IT resource based on the OIMLDAPGatewayResourceType IT resource type.
See Creating IT Resources in Oracle Fusion Middleware Developing and Customizing Applications for Oracle Identity Manager for information about creating IT resources.
See Section 3.3, "Configuring the IT Resource" for information about the parameters of the IT resource.
2. Copy the current LDAP_INSTALL_DIR directory, including all the subdirectories, to a new location on the Oracle Identity Manager computer.
3. Extract the contents of the LDAP_INSTALL_DIR/dist/idfserver.jar file.
4. In the beans.xml file, change the value of the port in the <property name="port" value="xxxx"/> line to specify a port that is different from the port used for the first instance of the LDAP Gateway. The default port number is shown in the following example:
<bean id="listener" class="com.identityforge.idfserver.nio.Listener"><constructor-arg><ref bean="bus"/></constructor-arg><property name="admin"><value>false</value></property><property name="config"><value>../conf/listener.xml</value></property><property name="port" value="5389"/></bean>
When you change the port number, you must make the same change in the value of the idfServerPort parameter of the IT resource that you create by performing Step 1.
5. Save and close the beans.xml file.
Note: Perform the same procedure for all installations of the target system.
Note: In the remaining steps of this procedure, LDAP_INSTALL_DIR refers to the newly copied directory.

Initial LDAP Gateway Population and Full Reconciliation
Extending the Functionality of the Connector 5-15
6. Open the LDAP_INSTALL_DIR/conf/racf.properties file and edit the following parameters:
■ _host_= Enter the IP address or host name of the mainframe.
■ _port_= Enter the port number for the second instance of the Provisioning agent.
■ _agentPort_= Enter the port number for the second instance of the Reconciliation agent.
7. Save and close the racf.properties file.
8. In a Linux or Solaris environment, if there are not enough socket file descriptors to open up all the ports needed for the server, then:
a. In a text editor, open the run script from the LDAP_INSTALL_DIR/bin directory.
b. Add the following line in the file:
-Djava.nio.channels.spi.SelectorProvider=sun.nio.ch.PollSelectorProvider
c. Save and close the file.
When you perform provisioning operations:
When you use Identity Self Service to perform provisioning, you can specify the IT resource corresponding to the IBM RACF installation to which you want to provision the user.
5.7 Initial LDAP Gateway Population and Full ReconciliationInstead of reconciling directly from the target system to OIM (which can be slow on large systems), the LDAP gateway offers an internal LDAP store that can be populated with target system users by using a single transaction to the mainframe. Oracle Identity Manager then reconciles user data from the LDAP store instead of the target system.
Reconciling user or group extract file requires the following procedure:
1. Download the RACSEQ Assembler program from the IBM website below:
http://www-03.ibm.com/systems/z/os/zos/features/racf/downloads/racseq.html
2. Assemble RACSEQ must be AC(1).
Note that RACSEQ is called by the supplied GENUFILE and GENGFILE CLISTs and the output is stored in SYSTSPRT DDs.
3. Load the PIONEER.IMPORTU.FILE and PIONEER.IMPORTG.FILE.
Note: The value of the _agentPort_ parameter must not be the same as that of the first instance if a second LPAR, which is not associated with the first LPAR, is configured in the target system. This value can be the same as the value of the idfServerPort parameter if you have two mainframe servers with IBM RACF running on each server.

Initial LDAP Gateway Population and Full Reconciliation
5-16 Oracle Identity Manager Connector Guide for IBM RACF Advanced
4. Build a JCL stream to create the PIONEER.IMPORTU.FILE: (USERS) file.
The SYSTSPRT (DD) points to the full import group IMPORTU file as shown below:
DISP=SHR,DSN=PIONEER.IMPORTU.FILESYSTIN DD INPUT % GENUFILE //SRCHLST JOB SYSTEMS,MSGLEVEL=(1,1),MSGCLASS=X,CLASS=A,PRTY=8,// NOTIFY=&SYSUID,REGION=0K//STEP1 EXEC PGM=IKJEFT01,DYNAMNBR=20//STEPLIB DD DISP=SHR,DSN=<YOURHLQ>.LINKLIB//SYSPRINT DD SYSOUT=*//SYSTSPRT DD DISP=SHR,DSN=<YOURHLQ>.IMPORTU.FILE//MSGOUT DD SYSOUT=*//SYSPROC DD DISP=SHR,DSN=<YOURHLQ>.REXX.CLISTS//SYSTERM DD DUMMY//SYSTSIN DD * %GENUFILE/*
5. Build a JCL stream to create the PIONEER.IMPORTG.FILE: (GROUPS).
The SYSTSPRT (DD) points to the full import group IMPORTG file as shown below:
DISP=SHR,DSN=PIONEER.IMPORTG.FILESYSTIN DD INPUT % GENGFILE
//SRCHLST JOB SYSTEMS,MSGLEVEL=(1,1),MSGCLASS=X,CLASS=A,PRTY=8,// NOTIFY=&SYSUID,REGION=0K//STEP1 EXEC PGM=IKJEFT01,DYNAMNBR=20//STEPLIB DD DISP=SHR,DSN=<YOURHLQ>.LINKLIB//SYSPRINT DD SYSOUT=*//SYSTSPRT DD DISP=SHR,DSN=<YOURHLQ>.IMPORTG.FILE//MSGOUT DD SYSOUT=*//SYSPROC DD DISP=SHR,DSN=<YOURHLQ>.REXX.CLISTS//SYSTERM DD DUMMY//SYSTSIN DD * %GENGFILE/*
6. Create a CLIST library or add the two attached CLISTs as listed below to the Pioneer clist library:
■ GENUFILE – for Users
Note: The output of the PIONEER.IMPORTU.FILE and PIONEER.IMPORTG.FILE files must be the same as the DSNs used by the PIONEER started task.
Note: During the IMPORTG process, there is no direct support for a filter such as "alldata=true" to be passed on to the LDAP gateway. This filter enables to populate IMPORTG into the backend of the LDAP Gateway. If you require this special customization, you must create a custom scheduled task as described in Appendix F.2, "Code for Searching All Groups and All Group Data".

Initial LDAP Gateway Population and Full Reconciliation
Extending the Functionality of the Connector 5-17
■ GENGFILE – for Groups
7. To perform the full import for users, perform the following steps:
a. Execute the Step 4 job stream building the IMPORTU file.
b. After completion, run the RACF Reconcile Users to Internal LDAP scheduled task (invokes SRCHLU).
8. To perform the full import for groups perform the following steps:
a. Execute the Step 5 job stream building the IMPORTG file.
b. After completion, execute the RACF Find All Groups scheduled task (invokes SEARCH CLASS (GROUP)).
Once the processing is complete, run the following steps:
1. Ensure the racf.properties file contains the following values.
a. USED FOR IMPORTING ALL USERS INTO INTERNAL META isStreamingUsers=true
b. USED FOR IMPORTING ALL GROUPS INTO INTERNAL META isStreamingGroups=true
2. Run the RACF Reconcile Users to Internal LDAP scheduled task. This invokes SRCHLU. See Section 5.7.1, "Reconcile User Extract File" for details.
3. Run the RACF Find All Groups scheduled task. This invokes SEARCH CLASS (GROUP).
5.7.1 Reconcile User Extract FileThis feature will perform full reconciliation 30% - 50% faster than the normal out-of-the-box scheduled task that reconciles all users. This requires coordination with configuration changes for the Pioneer Mainframe Agent.
1. Have the Mainframe Team configure the Pioneer agent to use a generated file. (See Chapter 2, "Deploying the IDF Advanced Adapter for IBM RACF"). Run the IRRXUTIL to use the EXTRACT USER or GROUP command that will generate the file of all users and data.
2. Open the LDAP_INSTALL_DIR/conf/racf.properties file for editing.
3. Set the value of the _internalEnt_ property to true.
4. Save and close the property file.
5. Log in to Identity System Administration, search for and run the RACF Reconcile Users to Internal LDAP scheduled task. This scheduled task will initially populate the internal LDAP store with all user profiles. See Table 4–6 for information about the attributes of the RACF Reconcile Users to Internal LDAP scheduled task.
6. Search for and open the RACF Reconcile All LDAP Users scheduled task.
Note: If they are not in the file, this is a good indication that the upgrade or installation was not completed in full.
Note: if you want to add or modify these values, the gateway must be stopped and re-started before performing the next step.

Initial LDAP Gateway Population and Full Reconciliation
5-18 Oracle Identity Manager Connector Guide for IBM RACF Advanced
7. Enter values for the attributes of the RACF Reconcile All LDAP Users scheduled task. See Table 4–7 for information about the attributes of the RACF Reconcile All LDAP Users scheduled task.
8. Run the RACF Reconcile All LDAP Users scheduled task. This task reconciles each user from the internal LDAP store to Oracle Identity Manager.
RACF Advanced Connector – Design/Deployment Review

Configuring Windows Service
Extending the Functionality of the Connector 5-19
5.8 Configuring Windows ServiceIn a Windows environment, the LDAP gateway server can also be installed as a Windows Service. This section describes the installation and configuration procedure of the Windows Service for the LDAP Gateway.
Overview of the Installation ProcessThe Windows Service for the LDAP Gateway is installed with a supplied IdentityForge batch file. The batch file for the Windows service installer should be updated with your system's JAVA_HOME, JVM, HOME, and APPLICATION_SERVICE_HOME variables. The Windows service installer uses the Apache Procrun utility prunsrv.exe to create a fully managed Windows Service for the LDAP Gateway.
To install and configure the Windows Service for the LDAP Gateway, you must perform the following steps:
1. In a text editor, open the IDF-Win-Service.bat file in the <LDAP_INSTALL_DIR>/win_service directory.
Modify the JAVA_HOME, JVM, HOME, and APPLICATION_SERVICE_HOME variables to match your environment settings. In the following example, the JAVA_HOME, JVM, HOME, and APPLICATION_SERVICE_HOME environment variables are set:
set JAVA_HOME=C:\software\Java\jdk1.7.0_55set JVM=C:\software\Java\jdk1.7.0_55\jre\bin\server\jvm.dllset HOME=D:\software\ldapgateway5.0set APPLICATION_SERVICE_HOME=D:\software\ldapgateway5.0\win_service
2. By default, the Windows service is called LDAPGatewayService. This name can be customized. To modify the service name, perform the following steps:
a. Update the SERVICE_NAME variable with the chosen custom service name.
b. In the /win_service directory, rename the LDAPGatewayService application to match the chosen custom service name.
3. To customize the log file locations, you must edit the CG_IDFLOG and CG_XMLERRLOG variables as follows:
a. Locate the following section of the IDF-Win-Service.bat file:
rem set CG_IDFLOG="-Didf.logpath="%CG_LOGPATH%\idfserver_custom.log"rem set CG_XMLERRLOG="-Didf.xmllogpath="%CG_LOGPATH%\idf.xml.error_custom.log"
b. Uncomment the CG_IDFLOG and CG_XMLERRLOG variables and modify the variable paths to match your custom locations.
c. Locate the following section of the IDF-Win-Service.bat file and uncomment the following lines:
rem set EXECUTE_STRING= "%EXECUTABLE%" //US//%SERVICE_NAME% ++JvmOptions %CG_IDFLOG%rem call:executeAndPrint %EXECUTE_STRING%rem echo .........rem set EXECUTE_STRING= "%EXECUTABLE%" //US//%SERVICE_NAME% ++JvmOptions %CG_XMLERRLOG%rem call:executeAndPrint %EXECUTE_STRING%rem echo .........
Customizing Log File Locations
5-20 Oracle Identity Manager Connector Guide for IBM RACF Advanced
d. Save and close the file.
4. After saving the file, execute the following command from a console from the <LDAP_INSTALL_DIR>/win_service directory to install the service:
> IDF_Win_Service install
5. If there are any problems with the installation of the service from the batch file, you may need to check the JAVA_HOME and JVM variables to make sure they are accurate.
6. Once the service is installed, you can start, stop, and restart it from the standard Windows Services manager.
Modifying or Removing the Windows Service If you need to modify the windows service settings, it is recommended to first uninstall the service, make the modifications, and then re-install the service.
To uninstall the service, execute the following command from the <LDAP_INSTALL_DIR>/win_service directory:
> IDF_Win_Service remove
5.9 Customizing Log File LocationsThe name and log location of the main LDAP gateway log file (idfserver.log) and the EXTRACT XML error log file (idf.xml.error.log) can be modified by adding additional arguments to the LDAP gateway server STARTUP command. These arguments are optional, and you can include one, both, or neither in the STARTUP command:
1. In a text editor, open the run script from the LDAP_INSTALL_DIR/bin directory. This run script is used to start and stop the LDAP gateway.
a. If using a Windows system, open the run.bat file.
b. If using a UNIX system, open the run.sh file.
2. Add the arguments to the start command, located at the end of the run script:
a. The arguments should be added after the -cp %CLASSPATH% argument.
b. To modify the idfserver.log path, use the -Didf.logpath= argument.
c. To modify the idf.xml.error.log path, use the -Didf.xmllogpath= argument.
In the following example, the start command will set the idfserver.log path to C:/logs/ldap/idfserver.log and the idf.xml.error.log path to C:/logs/errors/idf.xml.error.log:
%JAVACMD% %DEBUG% %JVM_OPTS% %SECURE% -cp %CLASSPATH% -Didf.logpath="c:/logs/ldap/idfserver.log" -Didf.xmllogpath="c:/logs/errors/idf.xml.error.log" -Djava.library.path=%HOME%/lib com.identityforge.idfserver.Main %1 %2 %3 %4 %5 %6 %7 %8 %9
5.10 LDAP Reconciliation Supported Queries
User Reconciliation Queries:1. All User DN's and "uid" attribute
a. baseDn= ou=People,dc=racfxxx,dc=com

Handling PIONEER Error Messaging Exceptions in the Gateway
Extending the Functionality of the Connector 5-21
b. filter= (objectclass=*)
2. Single User Search for all data
a. baseDn=ou=People,dc=racfxxx,dc=com
b. filter= (uid=idxxx)
Group Reconciliation Queries:1. All Group DN's and "cn" attribute
a. baseDn= ou=Groups,dc=racfxxx,dc=com
b. filter= (objectclass=*)
2. Single Group Search for all data
a. baseDn= ou=Groups,dc=racfxxx,dc=com
b. filter= (cn=idxxx)
Dataset Profiles for a given USER (uid) Reconciliation Queries:1. Dataset Profiles returned for a user
a. baseDn= ou=Datasets,dc=racfxxx,dc=com
b. filter= (uniqueMember=uid=idxxx,ou=People,dc=racfxxx,dc=com)i
OR
c. Filter= (uid=idxxx)
User-Defined Resources Reconciliation Queries:1. Retrieve All User-Defined Resources: SEARCH CLASS (type)
a. baseDn= ou=Resources,dc=racfxxx,dc=com
b. Filter= (resourceType="YOUR CLASS TYPE")
This returns all LDAP DN entries and each entry will contain the Resource ID via the 'cn' LDAP attribute.
2. Retrieve Single User-Defined Resource: RLIST (cn) ALL
a. baseDn=ou=Resources,dc=racfxxx,dc=com
b. Filter= (cn=classID)
5.11 Handling PIONEER Error Messaging Exceptions in the GatewayThis section provides instructions on using the error handling feature.
The existing error handling routines have been enhanced to allow for the ability to configure what error messages to look for when deciding that a request sent to Pioneer has succeeded or failed.
Turn on or turn off the ability to examine Pioneer SAF or RACF codeSome commands will return SAF or RACF codes whenever a command fails.
To turn on the ability to automatically throw an error whenever codes greater than 0 are returned, add the property check-return-codes=yes to the racf.properties file.
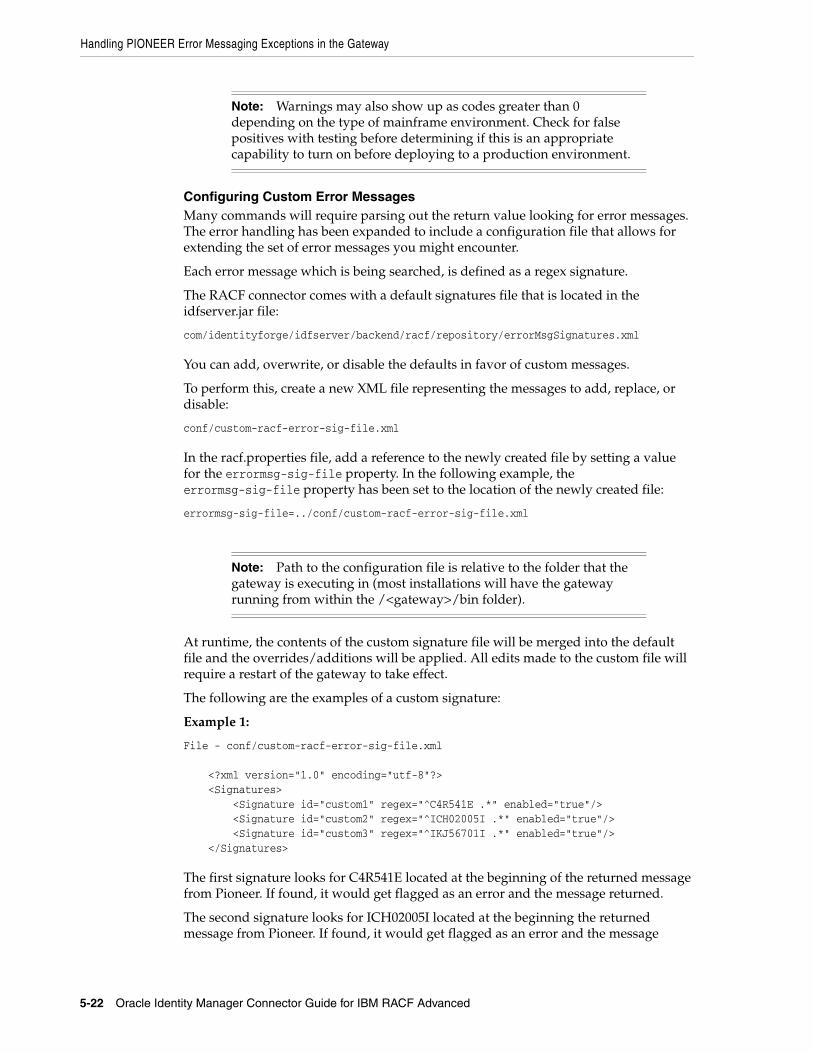
Handling PIONEER Error Messaging Exceptions in the Gateway
5-22 Oracle Identity Manager Connector Guide for IBM RACF Advanced
Configuring Custom Error MessagesMany commands will require parsing out the return value looking for error messages. The error handling has been expanded to include a configuration file that allows for extending the set of error messages you might encounter.
Each error message which is being searched, is defined as a regex signature.
The RACF connector comes with a default signatures file that is located in the idfserver.jar file:
com/identityforge/idfserver/backend/racf/repository/errorMsgSignatures.xml
You can add, overwrite, or disable the defaults in favor of custom messages.
To perform this, create a new XML file representing the messages to add, replace, or disable:
conf/custom-racf-error-sig-file.xml
In the racf.properties file, add a reference to the newly created file by setting a value for the errormsg-sig-file property. In the following example, the errormsg-sig-file property has been set to the location of the newly created file:
errormsg-sig-file=../conf/custom-racf-error-sig-file.xml
At runtime, the contents of the custom signature file will be merged into the default file and the overrides/additions will be applied. All edits made to the custom file will require a restart of the gateway to take effect.
The following are the examples of a custom signature:
Example 1:
File - conf/custom-racf-error-sig-file.xml
<?xml version="1.0" encoding="utf-8"?> <Signatures> <Signature id="custom1" regex="^C4R541E .*" enabled="true"/> <Signature id="custom2" regex="^ICH02005I .*" enabled="true"/> <Signature id="custom3" regex="^IKJ56701I .*" enabled="true"/> </Signatures>
The first signature looks for C4R541E located at the beginning of the returned message from Pioneer. If found, it would get flagged as an error and the message returned.
The second signature looks for ICH02005I located at the beginning the returned message from Pioneer. If found, it would get flagged as an error and the message
Note: Warnings may also show up as codes greater than 0 depending on the type of mainframe environment. Check for false positives with testing before determining if this is an appropriate capability to turn on before deploying to a production environment.
Note: Path to the configuration file is relative to the folder that the gateway is executing in (most installations will have the gateway running from within the /<gateway>/bin folder).

Handling PIONEER Error Messaging Exceptions in the Gateway
Extending the Functionality of the Connector 5-23
returned. Modify as needed for example, signature 3 regex="^IKJ56701I .* to indicate. If found, it would get flagged as an error and the message returned.
In the preceding example, the entry enabled="true" implies that the messages defined in the regex patterns are not to be considered as errors.
Example 2:
File - conf/custom-racf-error-sig-file.xml
<?xml version="1.0" encoding="utf-8"?><Signatures> <Signature id="custom1" regex="^ICH\d{5}I .*" enabled="true"> <Exception regex="^ICH01432I .*"/> <Exception regex="^ICH05555I .*"/> <Exception regex="^ICH01024I .*"/> </Signature<Signature id="custom2" regex=".*INVALID DEPARTMENT.*" enabled="true"/><Signature id="e2" enabled="false"/></Signatures>
The first signature looks for the ICHxxxxxxI pattern located at the beginning the returned message from Pioneer.
If found, it then examines the exceptions defined. If the message started with ICH01432I or ICH05555I, it would get marked as a warning and ignored, otherwise it would get flagged as an error and the message returned.
The second signature looks for INVALID DEPARTMENT to show up anywhere in the returned message. If found, it would get flagged as an error and the message returned.
The third signature is an example of disabling an existing default signature. All default signatures start with "e" in the id attribute followed by a number.
By referencing the id, the default signature's regex, enablement flag, and or exceptions can be replaced with a custom override.
To obtain the list of default signatures currently deployed, open up the JAR file and locate the file.
com/identityforge/idfserver/backend/racf/repository/errorMsgSignatures.xml
In the preceding example, the entry enabled="true" implies that the messages defined in the regex patterns are not to be considered as errors.
Note: Given that according to the IBM RACF manual "I" type messages are technically classified as informational and not error related, you will need to make sure that it truly is a failure on the Mainframe rather than something whereby the account gets created and Oracle Identity Manager thinks it failed. We explicitly called out this RACF code as a warning as that is what the original implementation was doing.

Handling PIONEER Error Messaging Exceptions in the Gateway
5-24 Oracle Identity Manager Connector Guide for IBM RACF Advanced
Note: Given that according to the IBM RACF manual "I" type messages are technically classified as informational and not error related, you will need to make sure that it truly is a failure on the Mainframe rather than something whereby the account gets created and Oracle Identity Manager thinks it failed. We explicitly called out this RACF code as a warning as that is what the original implementation was doing.

6
Troubleshooting 6-1
6Troubleshooting
Table 6–1 describes solutions to some problems that you might encounter while using the connector.
Table 6–1 Troubleshooting Tips
Problem Description Solution
Oracle Identity Manager cannot establish a connection with IBM RACF.
■ Ensure that the mainframe is running.
■ Verify that the required ports are working.
■ Due to the nature of the Provisioning Agent, the LDAP Gateway must be started first, and then the mainframe JCL started task must be started. This is a requirement based on how TCP/IP operates. Check that the IP address of the server that hosts the LDAP Gateway is configured in the Reconciliation Agent JCL.
■ Read the LDAP Gateway logs to determine if messages are being sent or received.
■ Verify that the IP address, administrator ID, and administrator password are correctly specified in the IT resource.
■ Verify that the mainframe user account and password have not been changed.
A particular use case does not work as expected.
Check for the use case event in the LDAP Gateway logs. Then check for the event in the specific log assigned to the IBM RACF Advanced connector that you are using.
■ If the event has not been recorded in either of these logs, then investigate the connection between Oracle Identity Manager and the LDAP Gateway.
■ If the event is in the log but the command has not had the intended change on a mainframe user profile, then check for configuration and connections between the LDAP Gateway and the mainframe.
Verify that the message transport layer is working.
The LDAP Gateway fails and stops working.
If this problem occurs, then the Reconciliation Agent stops sending messages to the LDAP Gateway. Instead, it stores them in the subpool cache.
When this happens, restart the LDAP Gateway instance so that the Reconciliation Agent reads the subpool cache and resends the messages.
The LDAP Gateway is running. However, the Reconciliation Agent fails and stops working
If this problem occurs, then all event data is sent to the subpool cache. If the mainframe fails, then all messages are written to the disk.
When this happens, restart the Reconciliation Agent so that it reads messages from the disk or subpool cache and resends the messages.
The LDAP Gateway does not respond to reconciliation requests when installed as a Windows service.
Check that the /lib directory in the LDAP Gateway does not contain multiple versions of the same JAR file. The Windows Service script installs all files in the /lib directory. Therefore, having multiple versions of the same JAR file can result in a collision.
See the run script located in the /bin directory for the correct name and version number of the JAR file.

6-2 Oracle Identity Manager Connector Guide for IBM RACF Advanced

7
Known Issues and Workarounds 7-1
7Known Issues and Workarounds
The following is a known issue associated with this release of the connector:
Bug 13497967
When more than one open batched reconciliation operation is created (that is, when multi-threaded batched reconciliation is invoked) for a particular job and resource object, the following error is encountered:
Internal Exception: java.sql.SQLException: ORA-01422: exact fetch returns more than requested number of rows
As a workaround, open the reconciliation profile of the resource object and set the value of the batchSize attribute to 0. By default, the attribute has a value of either -1 or higher. This approach would result in single event processing. If the error is already encountered, open the RECON_BATCHES table for the particular job and resource object. Of all the multiple reconciliation batches in the Initiated status, manually update all the batches except one to Completed status. Then, open the reconciliation profile of the resource object and set the value of the batchSize attribute to 0.
Note that the batchSize attribute to be updated is the reconciliation profile attribute and not a scheduled job parameter.

7-2 Oracle Identity Manager Connector Guide for IBM RACF Advanced

A
APF-Authorized Libraries A-1
AAPF-Authorized Libraries
APF stands for Authorized Program Facility. In a z/OS environment, APF is a facility that permits the identification of programs that are authorized to use restricted functions. APF-authorized programs must reside in one of the following authorized libraries:
■ SYS1.LINKLIB
■ SYS1.SVCLIB
■ SYS1.LPALIB
■ Authorized libraries specified by your installation.
Authorized libraries are defined in an APF list, or in the link pack area (LPA). Any module in the LPA
(pageable, modified, fixed, or dynamic) will be treated by the system as though it came from an APF-authorized library. The installation must ensure that it has properly protected SYS1.LPALIB and any other library that contributes modules to the link pack area to avoid system security and integrity exposures, just as it would protect any APF-authorized library.
APF also prevents authorized programs (supervisor state, APF-authorized, PSW key 0-7) from accessing a load module that is not in an APF-authorized library.
To find the datasets that have been APF authorized:
1. Type TSO ISRDDN in your ISPF session (some shops need just ISRDDN with no TSO prefix) and hit enter.
2. Type APF and hit enter. It'll bring up a list of all datasets that are APF authorized.
Remember that, if you like to use an APF authorized dataset in a job STEPLIB, make sure all the datasets in the STEPLIB are APF authorized.

A-2 Oracle Identity Manager Connector Guide for IBM RACF Advanced

B
Pioneer Datasets B-1
BPioneer Datasets
Table B–1 shows the relationship between the steps in the LOADDSN member and the file contents that are loaded into Pioneer's datasets. In these example datasets, PIONEER is used for the High-Level qualifier for Pioneer files and VOYAGER is used for the High-Level qualifier for Voyager files. The HLQ will have to be changed to meet installation standards.
Table B–1 shows the relationship between the steps in the LOADDSN member and the corresponding file contents.
Table B–1 Relationship between the Steps in the LOADDSN Member and the File Contents
Steps File Contents
Step#3 //STEP3 EXEC PGM=IEBGENER
//SYSUT1 DD DSN=IDF.PROD.JCLLIB(PSAMPLE),DISP=SHR
//SYSUT2 DD DSN=PIONEER.CONTROL.FILE,DISP=SHR
//SYSPRINT DD SYSOUT=*
//SYSIN DD DUMMY
PSAMPLE TCPN=TCPIP
IPAD=0.0.0.0
PORT=5697
DEBUG=N
ESIZE=16
LPAR=ZPDT-112
POST_PROC_ALIAS=T
IDLEMSG=N
DEBUGOUT=SYSOUT,CLASS(S)
SPIN_CLASS=K
AUDIT_LOG=YES
Step#4 //STEP4 EXEC PGM=IEBGENER
//SYSUT1 DD DSN=IDF.PROD.JCLLIB(VSAMPLE),DISP=SHR
//SYSUT2 DD DSN=VOYAGER.CONTROL.FILE,DISP=SHR
//SYSPRINT DD SYSOUT=*
//SYSIN DD DUMMY

B-2 Oracle Identity Manager Connector Guide for IBM RACF Advanced
VSAMPLE SUBPOOL_SIZE=7500K
TCPN=TCPIP
* IPAD=192.168.1.999
IPAD=192.168.1.100
* IPAD=RACF.LEGACYIDM.COM
PORT=5097
DEBUG=N
ESIZE=16
* DELAY=00
* STARTDELAY=10
* PRTNCODE=SHUTRC
CSDATA=N
VOYAGER_ID=TESTVGER
CACHE_DELAY=000
AUDIT_LOG=YES
PIONEER_ID=START2
EXTRACT=Y
Table B–1 (Cont.) Relationship between the Steps in the LOADDSN Member and the File Contents
Steps File Contents

C
Reconciliation Agent (Voyager) Messages C-1
CReconciliation Agent (Voyager) Messages
This appendix describes messages generated by the Reconciliation Agent.
Message: IDMV000I Voyager Reconciliation Agent Starting
Message-Type: Informational
Action Required: None
Message: IDMV001I Voyager Input Parameters are OK
Message-Type: Informational
Action Required: None
Description: All parameters passed via PARM= statement were ok no errors.
Message: IDMV002I Voyager Build Level is at yyyymmddHHMM
Message-Type: Informational
Action Required: None
Description: Voyager Build yyyy = 4 digit year, mm = 2 digit month dd = 2 digit day, HH = 2 digit hour, MM = 2 digit month This was the year,month,day,hour and minute of the Pioneer Reconciliation Agent Production Build prior to Distribution.
Message: IDMV004I Voyager Detects (TCPIP) Jobname XXXXXXXX
Message-Type: Informational
Action Required: None
Description: Voyager has detected the TCPIP STC(Started Task) Name where XXXXXXXX is the STC name passed via the TCPN parameter and used for the connection to the LDAP Gateway.
Note: All Reconciliation Agent messages are prefixed with IDMV.

C-2 Oracle Identity Manager Connector Guide for IBM RACF Advanced
Message: IDMP005I Pioneer Detects (TCPIP) IP Address of
xxx.xxx.xxx.xxx
Message-Type: Informational
Action Required: None
Description: Voyager will use this IP Address and PORT= to connect to the LDAP Gateway. This IP Address or Hostname is passed via PARM=, IPAD= parameter.
Message: IDMV006I Voyager Detects (TCPIP) IP PORT xxxx
Message-Type: Informational
Action Required: None
Description: Voyager will use the PORT= number in conjunction with the IPAD= parameter to connect to the LDAP gateway.
Message: IDMV007I Voyager Detects Encryption is ON
Message-Type: Informational
Action Required: None
Description: Voyager via ESIZE=16 will turn on 'enable' AES 128 encryption module for encryption of messages to/from LDAP.
Message: IDMV008I Voyager Detects Cache Delay Set to xx Secs
Message-Type: Informational
Action Required: None
Description: Voyager via DELAY= parameter will set a DELAY for polling Cache to xx Secs. This is only applicable to CA Top-Secret and RACF users only. All other users (ACF2) and initially should set this Parameter to DELAY=05 and increased if testing indicates.
Message: IDMV009I Voyager Detects Cache File Opened OK
Message-Type: Informational
Action Required: None
Description: Voyager's external Cache file on dasd has opened ok.

Reconciliation Agent (Voyager) Messages C-3
Message: IDMV010I Voyager Computing Cache Timer Delay successful
Message-Type: Informational
Action Required: None
Description: Voyager computed the DELAY= value correctly and will use it for polling cache. This is only applicable to CA Top-Secret and RACF users only.
Message: IDMV011I Voyager Detects Encryption
KVER xxxxxxxxxxxxxxxx
Message-Type: Informational
Action Required: None
Description: Voyager via ESIZE= parameter passed as a PARM= in the STC is using KVER xxxxxxxxxxxxxxxxx for Encryption.
Message: IDMV012I Voyager Detects Debugging is ON
Message-Type: Informational
Action Required: None
Description: Voyager will use the DEBUG= parameter passed to provide detailed diagnostics for Oracle/IDF technical personnel. The output routes to the DEBUGOUT 'DD' statement in Voyager. Be aware if DEBUG=Y then there will be a lot of output placed into the JES2 queue.
Message: IDMV013I Voyager Detects Debugging is OFF
Message-Type: Informational
Action Required: None
Description: Voyager will use the DEBUG= parameter passed and no detailed diagnostics will route to the DEBUGOUT 'DD' statement in Voyager.
Message: IDMV014I Voyager Detects MVS retcodes of xxx
Message-Type: Informational
Action Required: None
Description: Voyager via the PRTNCODE= parameter passed will use this value for its return code when it is shutdown. The value of 'SHUTRC' will produce a 0000 return code and the value of 'TERMRC' will produce the return code greater than zero and that was contained in register 15 at time of shutdown.

C-4 Oracle Identity Manager Connector Guide for IBM RACF Advanced
Message: IDMV015I Voyager Detects Country Code of XX
Message-Type: Informational
Action Required: None
Description: Voyager has queried z/OS and retrieved the Country code of this system. This will be used in all conversions from EBCDIC to ASCII and ASCII to EBCDIC.
Message: IDMV016I Voyager Detects Hostname of xxxxxxxxxx.xxx
Message-Type: Informational
Action Required: None
Description: Voyager was passed via IPAD= parameter a Hostname instead Of an IP address and this will be used to connect to the LDAP Gateway.
Message: IDMV016E Voyager Detects Bad Hostname of xxxxxxxxxx.xxx
Message-Type: Error
Action Required: Investigate error
Description: Voyager was passed via IPAD= parameter a Hostname instead Of an IP address and this will be used to connect to the LDAP Gateway this Hostname was queried via the local DNS server(s) and failed to be resolved.
Message: IDMV019I Voyager Initialization of TCP API was Successful
Message-Type: Informational
Action Required: None
Description: Voyager has initialized the TCPIP stack successfully.
Message: IDMP019E Voyager Initialization of TCP API Failed RC: xx
Message-Type: Error
Action Required: Investigate error
Description: Voyager's initialization of the TCPIP API interface failed. A primary cause is a missing security subsystem (RACF,ACF2, Or Top-Secret) permit for facility 'bpx.*'
Message: IDMV020I Voyager Initialization of GETCLIENTID was Successful

Reconciliation Agent (Voyager) Messages C-5
Message-Type: Informational
Action Required: None
Description: Voyager has issued a GETCLIENTID and it was successful. This is normal for the client/socket server like Voyager.
Message: IDMV021I Voyager Accepting Messages on xxx.xxx.xxx.xxx (OR) hostname.com
Message-Type: Informational
Action Required: None
Description: Voyager will send/receive message to/from the LDAP gateway
on IP Address xxx.xxx.xxx.xxx with PORT= or on Hostname - Hostname.com with PORT=
* Note: Hostname.com is an example, this would be the hostname
Of the LDAP gateway.
Message: IDMV021I Voyager Initialization of PTON was successful
Message-Type: Informational
Action Required: None
Description: Voyager successfully converted the IP address to the correct
addressing type to communicate to the LDAP gateway.
Message: IDMV021E Voyager Initialization of PTON failed RC: xx
Message-Type: Error
Action Required: Investigate
Description: Voyager failed during its conversion to numeric. The RC(return code) is documented in the following source. z/OS V1R9.0 Communication Server IP CICS Sockets Guide Manual – SC31-8807-04.
Message: IDMV025I Voyager Connected to Gateway Server
was successful
Message-Type: Informational
Action Required: None
Description: Voyager successfully connected to the LDAP Gateway using either IP address = xxx.xxx.xxx.xxx or Hostname.com with PORT = xxxx.

C-6 Oracle Identity Manager Connector Guide for IBM RACF Advanced
Message: IDMV032I Voyager Connection Start Timer Begins
Message-Type: Informational
Action Required: None
Description: Voyager using PARM=, 'STARTDELAY=' will delay it's connection by xx secs specified in 'STARTDELAY='. The 'STARTDELAY=' timer started.
Message: IDMV033I Voyager Connection Start Timer Ends
Message-Type: Informational
Action Required: None
Description: Voyager using PARM=, 'STARTDELAY=' will delay it's connection by xx secs specified in 'STARTDELAY='. The 'STARTDELAY=' timer ended.
Message: IDMV050I Voyager Cache Polling Begins
Message-Type: Informational
Action Required: None
Description: Voyager has started polling its subpool 231 cache for events created by the installed product exits. This is a normal process for the real-time reconciliation agent.
Message: IDMV051I Voyager Cache Polling Ends
Message-Type: Informational
Action Required: None
Description: Voyager has ended its polling its subpool 231 cache for events created by the installed product exits. This is a normal process for the real-time reconciliation agent.
Message: IDMV100I Voyager Shutdown Started
Message-Type: Informational
Action Required: None
Description: Voyager Shutdown has started via a z/OS Modify command.

Reconciliation Agent (Voyager) Messages C-7
Message: IDMV101I Voyager Reconciliation Agent Has Terminated
Message-Type: Informational
Action Required: None
Description: Voyager has been terminated.
Message: IDMV102I Voyager has Ended with Zero Return Codes
Message-Type: Informational
Action Required: None
Description: Voyager has ended with a zero MVS Condition code. This condition was set with the PRTNCODE=SHUTRC parameter.
Message: IDMV103I Voyager has Ended with Non-Zero Return Code
Message-Type: Informational
Action Required: None
Description: Voyager has ended with a non-zero MVS Condition code. This condition was set with the PRTNCODE=TERMRC parameter.
Message: IDMV104I Voyager sent messages xxxxxx received messages xxxxxx
Message-Type: Informational – Shutdown Statistic
Action Required: None
Description: Voyager shutdown statistic on amount of work done.
Message: IDMV102E Voyager Cache Dasd File Not be Found
Message-Type: Error
Action Required: Investigate
Description: Voyager Cache dasd file used for recovery was not found and Voyager will abend.
Message: IDMV130I Voyager Operator Interface now Open for 30 Seconds
Message-Type: Informational
Action Required: None
Description: Voyager Modify Operator interface is now open for commands.

C-8 Oracle Identity Manager Connector Guide for IBM RACF Advanced
Message: IDMV130I Voyager Operator Interface now Closed
Message-Type: Informational
Action Required: None
Description: Voyager Modify Operator interface is now closed and no more Modify commands are accepted.
Message: IDMV151I Voyager DNS Request hostname.com
Message-Type: Informational
Action Required: None
Description: Voyager via IPAD= has been asked to use a DNS hostname instead of an IP Address to connect to the LDAP gateway.
Message: IDMV152I Voyager IP Connect Request xxx.xxx.xxx.xxx
Message-Type: Informational
Action Required: None
Description: Voyager via IPAD= has been asked to use an IP address instead of a hostname to connect to the LDAP gateway.
-
Message: IDMV200E Voyager Startup Parameter Error xxxxxxxxxxxxxxx
Message-Type: Informational
Action Required: None
Description: Voyager had a startup PARM= error, indicated by xxxxxxxxxxxxxxx
-
Message: IDMV200I Voyager unable to connect to the Gateway
Message-Type: Informational
Action Required: None
Description: Voyager was unable to connect to the LDAP Gateway either Via hostname or IP Address, Voyager will retry the connection. This message and IDMV201I usually are together.
-
Message: IDMV201I Voyager connection to the Gateway failed
Reconciliation Agent (Voyager) Messages C-9
Message-Type: Informational
Action Required: None
Description: Voyager was unable to connect to the LDAP Gateway either Via hostname or IP Address, Voyager will retry the connection. This message and IDMV200I are usually together.
-
Message: IDMV202E Voyager no Storage Token Found
Message-Type: Informational
Action Required: None
Description: Voyager was unable to find the required subpool 231 storage token, Voyager will terminate.
-
Message: IDMV202I Voyager Unable to Connect to new IP/Port
Message-Type: Informational
Action Required: None
Description: Voyager's IP address and port were swapped via a Modify command and it could not connect to the LDAP using that combination.
Message: IDMV203E Voyager Quiescing Because of the subpool Not found.
Message-Type: Informational
Action Required: None
Description: Voyager is shutting down because of a missing Storage token for the subpool, required for normal operations.
Message: IDMV204E Voyager subpool 231 cannot be found
Message-Type: Informational
Action Required: None
Description: Voyager went to poll the subpool 231 (cache) for events And the subpool was not there. This will result in Voyager Quiescing and shutting down.
Message: IDMV300I *Debug* - xxxxxxxxxxxxxxxxxxxxxxxx
Message-Type: Error
Action Required: None

C-10 Oracle Identity Manager Connector Guide for IBM RACF Advanced
Description: Voyager will display this statement when DEBUG=Y is on and Output will route to // DEBUGOUT 'DD'.
Message: IDMV305I Voyager Debugging Was Turned XXX
Message-Type: Informational
Action Required: None
Dsecription: An Operator Command has either turned Debugging 'ON' or 'OFF'. If turned 'ON' and debugging is 'ON' Voyager takes no action. If debugging is 'OFF' the Voyager will turn 'ON' debugging and route all debug Output to z/OS Sysout/Sysprint.
Message: IDMV306I Voyager Received Status Query an is Alive
Message-Type: Informational
Action Required: None
Dsecription: An Operator Command has asked Voyager for a STATUS.

D
Provisioning Agent (Pioneer) Messages D-1
DProvisioning Agent (Pioneer) Messages
This appendix describes messages generated by the Provisioning Agent.
Message: IDFV101A (POLLOPER): <cmd-name> COMMAND
SENT TO: <process-name>
Message-Type: Informational
Action Required: None
Meaning: An Operator command <cmd-name> has been sent to process <process-name>
Examples:
IDFV101A (POLLOPER): SHUTDOWN
COMMAND SENT TO: PIONEER
IDFV101A (POLLOPER): DEBUG=Y
COMMAND SENT TO: PIONEER
IDFV101A (POLLOPER): HERT=Y (HEARTBEAT)
COMMAND SENT TO: PIONEER
Message: IDMP000I Pioneer Provision Agent is Starting
Message-Type: Informational
Action Required: None
Message: IDMP001I Pioneer Input Parameters are OK
Message-Type: Informational
Action Required: None
Note: All Reconciliation Agent messages are prefixed with IDMP.
D-2 Oracle Identity Manager Connector Guide for IBM RACF Advanced
Description: All parameters passed via PARM= statement were ok no errors
Message: IDMP002I Pioneer Detects Build yyyymmddHHMM
Message-Type: Informational
Action Required: None
Description: Pioneer Build yyyy = 4 digit year, mm = 2 digit month dd = 2 digit day, HH = 2 digit hour, MM = 2 digit month. This was the year,month,day,hour and minute of the Pioneer Provisioning Agent Production Build prior to Distribution.
Message: IDMP003I Pioneer Detects TCPIP Jobname XXXXXXXX
Message-Type: Informational
Action Required: None
Description: Pioneer has detected the TCPIP STC(Started Task) Name where XXXXXXXX is the STC name passed via the TCPN parameter and used for the connection to the LDAP Gateway.
Message: IDMP004I Pioneer Detects TCPIP IP Address of xxx.xxx.xxx.xxx
Message-Type: Informational
Action Required: None
Description: Pioneer will not use this IP Address it must be 0.0.0.0, Pioneer is a Socket Server and is only using PORT=, passed by the IPAD= parameter.
Message: IDMP005I Pioneer Detects TCPIP IP PORT of xxxx
Message-Type: Informational
Action Required: None
Description: Pioneer will use this port passed in the PORT= parameter to accept connections from the LDAP server. This port does not need reserving in the TCPIP file on z/OS.
Message: IDMP006I Pioneer Detects Debugging is ON
Message-Type: Informational
Action Required: None
Description: Pioneer will use the DEBUG= parameter passed to provide detailed diagnostics for Oracle/IDF technical personnel. The output routes to the

Provisioning Agent (Pioneer) Messages D-3
DEBUGOUT 'DD' statement in Pioneer. Be aware if DEBUG=Y then there will be a lot of output placed into the JES2 queue.
Message: IDMP007I Pioneer Detects Debugging is OFF
Message-Type: Informational
Action Required: None
Meaning: Pioneer will use the DEBUG= parameter passed and no detailed diagnostics will route to the DEBUGOUT 'DD' statement in Pioneer.
Message: IDMP008I Pioneer Detects KVER xxxxxxxxxxxxxxxx
Message-Type: Informational
Action Required: None
Description: Pioneer via ESIZE= parameter passed as a PARM= in the
STC is using KVER xxxxxxxxxxxxxxxxx for Encryption.
Message: IDMP009I Pioneer Detects Encryption Enabled
Message-Type: Informational
Action Required: None
Description: Pioneer via ESIZE=16 will turn on 'enable' AES 128 encryption module for encryption of messages to/from LDAP.
Message: IDMP010I Pioneer Detects Encryption Disabled
Message-Type: Informational
Action Required: None
Description: Pioneer via ESIZE=00 will turn off 'disable' AES 128 encryption module for encryption of messages to/from LDAP. Warning, Pioneer will not work in this mode of Operation.
Message: IDMP011I Pioneer Detects CPUID xxxxxxxxxxxx
Message-Type: Informational
Action Required: None
Description: Pioneer has queried z/OS and retrieved the actual CPUID of the system it is running.
D-4 Oracle Identity Manager Connector Guide for IBM RACF Advanced
Message: IDMP012I Pioneer Detects Sysplex Sysname xxxxxxxx
Message-Type: Informational
Action Required: None
Description: Pioneer has queried z/OS and retrieved the actual Sysplex Sysname it is executing on.
Message: IDMP013I Pioneer Detects LPARNAME xxxxxxxx
Message-Type: Informational
Action Required: None
Description: Pioneer via the LPAR= parameter will use the xxxxxxxx as A name for this system. This is informational only. Will be used in a later release of software.
Message: IDMP014I Pioneer Detects Country Code of XX
Message-Type: Informational
Action Required: None
Description: Pioneer has queried z/OS and retrieved the Country code of this system. This will be used in all conversions from EBCDIC to ASCII and ASCII to EBCDIC.
Message: IDMP015I Pioneer Detects Job Wait Time Of xx Secs
Message-Type: Informational
Action Required: None
Description: Pioneer has detected a Job Wait Time Of xx seconds. This is the JWAIT= PARM. Used for an optional feature not supported by all versions of Pioneer or LDAP.
Message: IDMP015I Pioneer Detects RECON wait time of xx Mins
Message-Type: Informational
Action Required: None
Description: Pioneer has detected via PARM= a RWAIT= which controls the amount of time Pioneer waits to query RECON file completion.
Message: IDMP020I Pioneer Accepting Messages on xxx.xxx.xxx.xxx
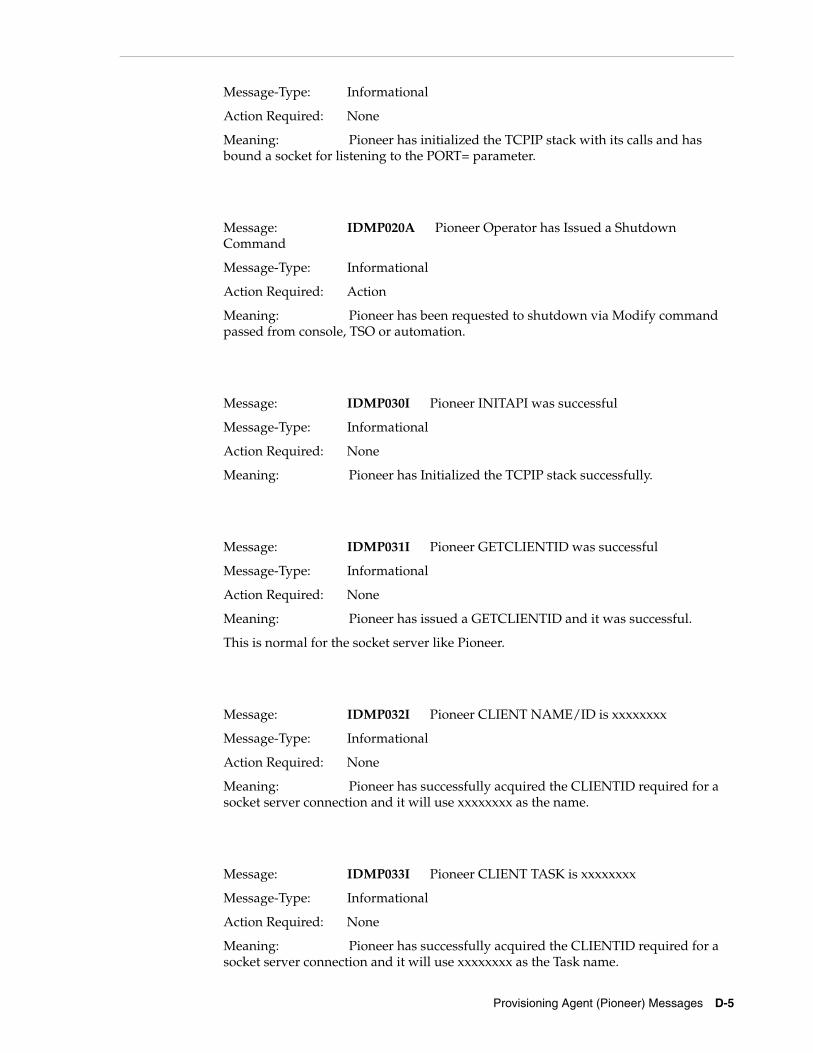
Provisioning Agent (Pioneer) Messages D-5
Message-Type: Informational
Action Required: None
Meaning: Pioneer has initialized the TCPIP stack with its calls and has bound a socket for listening to the PORT= parameter.
Message: IDMP020A Pioneer Operator has Issued a Shutdown Command
Message-Type: Informational
Action Required: Action
Meaning: Pioneer has been requested to shutdown via Modify command passed from console, TSO or automation.
Message: IDMP030I Pioneer INITAPI was successful
Message-Type: Informational
Action Required: None
Meaning: Pioneer has Initialized the TCPIP stack successfully.
Message: IDMP031I Pioneer GETCLIENTID was successful
Message-Type: Informational
Action Required: None
Meaning: Pioneer has issued a GETCLIENTID and it was successful.
This is normal for the socket server like Pioneer.
Message: IDMP032I Pioneer CLIENT NAME/ID is xxxxxxxx
Message-Type: Informational
Action Required: None
Meaning: Pioneer has successfully acquired the CLIENTID required for a socket server connection and it will use xxxxxxxx as the name.
Message: IDMP033I Pioneer CLIENT TASK is xxxxxxxx
Message-Type: Informational
Action Required: None
Meaning: Pioneer has successfully acquired the CLIENTID required for a socket server connection and it will use xxxxxxxx as the Task name.

D-6 Oracle Identity Manager Connector Guide for IBM RACF Advanced
Message: IDMP034I Pioneer CREATE SOCKET was successful
Message-Type: Informational
Action Required: None
Meaning: Pioneer has successfully created a socket for its SOCKET Server
function.
Message: IDMP035I Pioneer BIND SOCKET was successful
Message-Type: Informational
Action Required: None
Meaning: Pioneer has successfully BINDED the Socket to the port that was passed via PORT= parameter.
Message: IDMP036I Pioneer Listening port is xxxx
Message-Type: Informational
Action Required: None
Meaning: Pioneer will be listening on port xxxx for incoming LDAP
requests.
Message: IDMP037I Pioneer Listening Address is xxx.xxx.xxx.xxx
Message-Type: Informational
Action Required: None
Meaning: Pioneer will be listening on IP Address xxx.xxx.xxx.xxx
for incoming LDAP requests.
Message: IDMP038I Pioneer Listen Socket Call was successful
Message-Type: Informational
Action Required: None
Meaning: Pioneer has successfully issued a Socket Listen call.
Message: IDMP039I Pioneer Read Socket Call was successful

Provisioning Agent (Pioneer) Messages D-7
Message-Type: Informational
Action Required: None
Meaning: Pioneer has received a message from the LDAP gateway via
the Read Socket call and it was successful.
Message: IDMP039I Pioneer Write Socket Call was successful
Message-Type: Informational
Action Required: None
Meaning: Pioneer has sent a message to the LDAP gateway via the Write Socket call and it was successful.
Message: IDMP040I Pioneer Translation was successful from-to xxxxxxxxxxxxxxxxxx. (ASCII-TO-EBCDIC) or (EBCDIC-TO-ASCII)
Message-Type: Informational
Action Required: None
Meaning: Pioneer successfully translated LDAP's message from ASCII-TO-EBCDIC or translated the message going to the LDAP gateway from EBCDIC-TO-ASCII.
Message: IDMP040E Pioneer Translation was not successful from-to
xxxxxxxxxxxxxxxxxx.(ASCII-TO-EBCDIC) or (EBCDIC-TO-ASCII)
Message-Type: Informational
Action Required: None
Meaning: Pioneer did not successfully translated LDAP's message from ASCII-TO-EBCDIC or the message going to the LDAP gateway from EBCDIC-TO-ASCII
Message: IDMP040I Pioneer Socket Accept was successful
Message-Type: Informational
Action Required: None
Meaning: Pioneer's Socket Accept call was successful.
Message: IDMP040E Pioneer Socket Accept was not successful RC: xxxxxxxx

D-8 Oracle Identity Manager Connector Guide for IBM RACF Advanced
Message-Type: Error
Action Required: Review Socket Accept Return Code and take required action as outlined in z/OS V1R9.0 Communication Server IP CICS Sockets Guide – SC31-8807-04
Meaning: Pioneer's Socket Accept call failed with RC: xxxxxxxx
Message: IDMP048I Pioneer LDAP Connection Timed out
Message-Type: Informational
Action Required: None
Meaning: Pioneer to LDAP connection timed out.
Message: IDMP049I Pioneer Has Been Idle for 30 Mins
Message-Type: Informational
Action Required: None
Meaning: Pioneer has not received any messages from LDAP Gateway in 30 minutes.
Message: IDMP050A Pioneer Closing IP Connection
Message-Type: Informational
Action Required: None
Meaning: Pioneer has received or issued a Socket Close and the connection will be closed.
Message: IDMP051I Pioneer Close Socket Call was Successful
Message-Type: Informational
Action Required: None
Meaning: Pioneer has received or issued a Socket Close and it was successful.
Message: IDMP052I Pioneer Shutdown Socket Call was Successful
Message-Type: Informational
Action Required: None
Meaning: Pioneer has received or issued a Socket Close and it was successful.

Provisioning Agent (Pioneer) Messages D-9
Message: IDMP053I Pioneer MYRADMIN SAF call was Successful
Message-Type: Informational
Action Required: None
Meaning: Pioneer has passed the security system function call via the SAF interface (module IRRSEQ00) and it was a success.
Message: IDMP054I Pioneer Received Recon Request from LDAP
Message-Type: Informational
Action Required: None
Meaning: Pioneer has received a Batch Recon request from the LDAP Gateway.
Message: IDMP055I Pioneer Recon Processing Started
Message-Type: Informational
Action Required: None
Meaning: Pioneer has received a Batch Recon request from the LDAP Gateway and has been submitted to z/OS.
Message: IDMP056I Pioneer Recon Processing Ended
Message-Type: Informational
Action Required: None
Meaning: Pioneer Batch Recon request has ended.
Message: IDMP057I Pioneer Recon Processing Successful
Message-Type: Informational
Action Required: None
Meaning: Pioneer Batch Recon Request was successful and data was retrieved and send back to the LDAP gateway.
Message: IDMP058I Pioneer Recon Has Processed: xxxx Userids
Message-Type: Informational
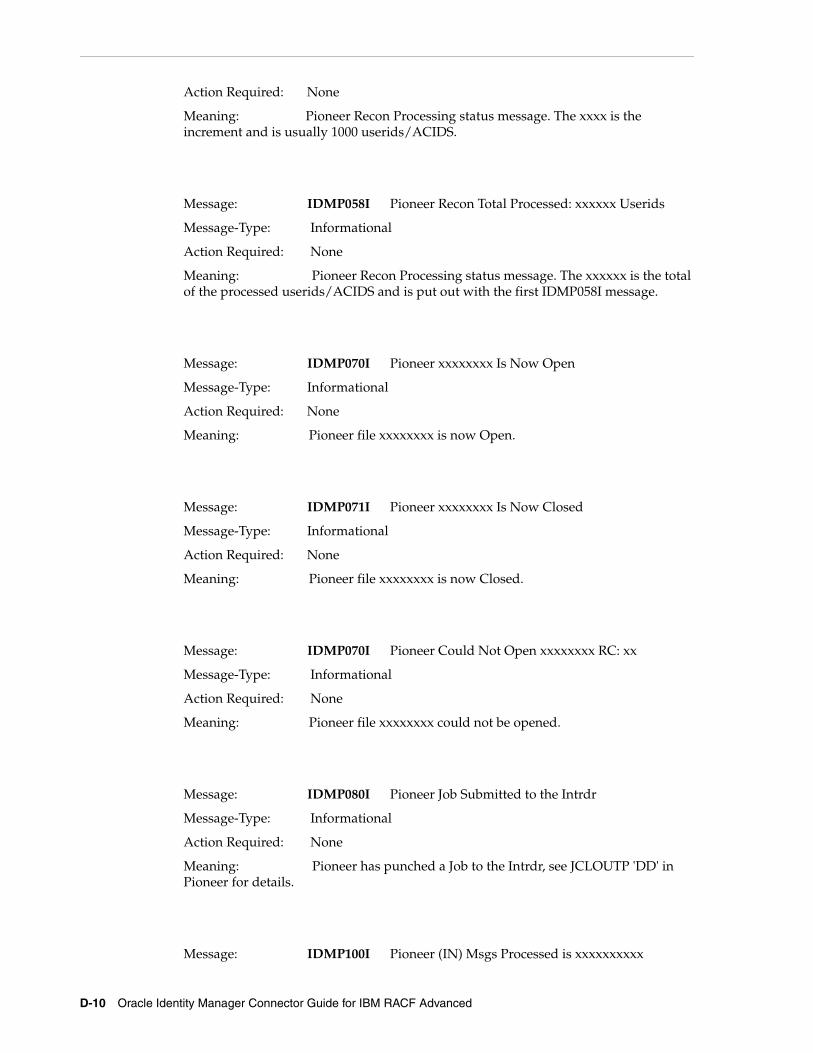
D-10 Oracle Identity Manager Connector Guide for IBM RACF Advanced
Action Required: None
Meaning: Pioneer Recon Processing status message. The xxxx is the increment and is usually 1000 userids/ACIDS.
Message: IDMP058I Pioneer Recon Total Processed: xxxxxx Userids
Message-Type: Informational
Action Required: None
Meaning: Pioneer Recon Processing status message. The xxxxxx is the total of the processed userids/ACIDS and is put out with the first IDMP058I message.
Message: IDMP070I Pioneer xxxxxxxx Is Now Open
Message-Type: Informational
Action Required: None
Meaning: Pioneer file xxxxxxxx is now Open.
Message: IDMP071I Pioneer xxxxxxxx Is Now Closed
Message-Type: Informational
Action Required: None
Meaning: Pioneer file xxxxxxxx is now Closed.
Message: IDMP070I Pioneer Could Not Open xxxxxxxx RC: xx
Message-Type: Informational
Action Required: None
Meaning: Pioneer file xxxxxxxx could not be opened.
Message: IDMP080I Pioneer Job Submitted to the Intrdr
Message-Type: Informational
Action Required: None
Meaning: Pioneer has punched a Job to the Intrdr, see JCLOUTP 'DD' in Pioneer for details.
Message: IDMP100I Pioneer (IN) Msgs Processed is xxxxxxxxxx
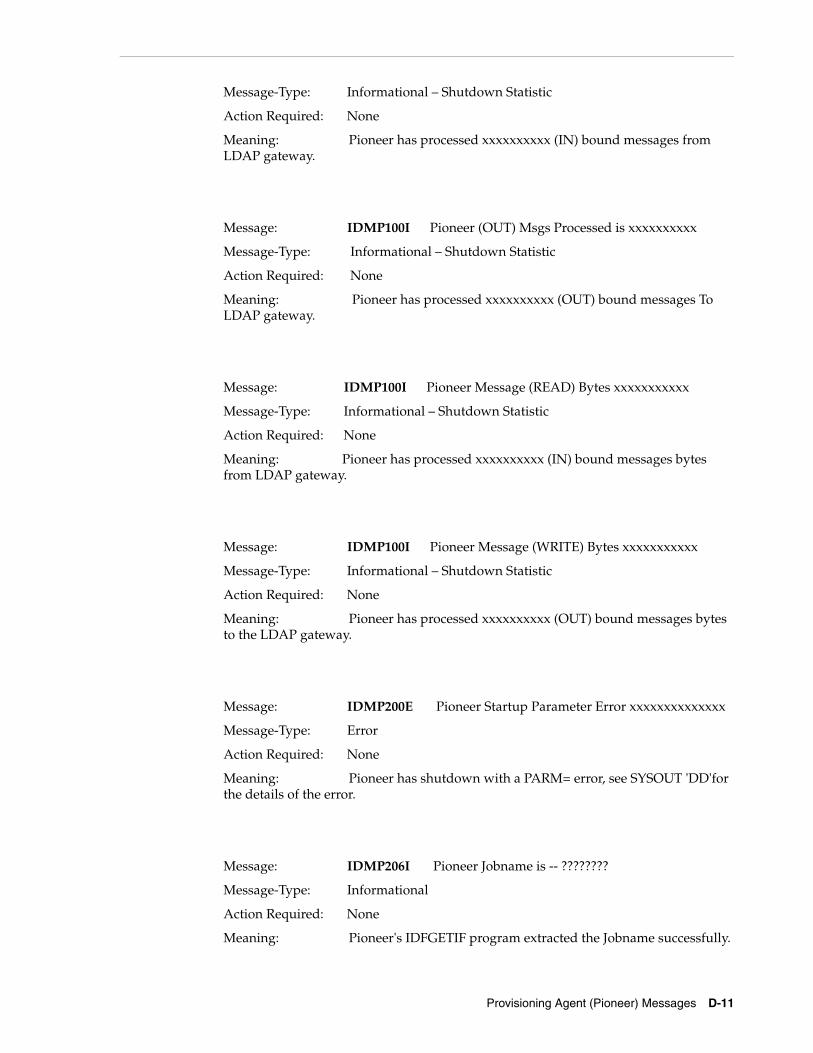
Provisioning Agent (Pioneer) Messages D-11
Message-Type: Informational – Shutdown Statistic
Action Required: None
Meaning: Pioneer has processed xxxxxxxxxx (IN) bound messages from LDAP gateway.
Message: IDMP100I Pioneer (OUT) Msgs Processed is xxxxxxxxxx
Message-Type: Informational – Shutdown Statistic
Action Required: None
Meaning: Pioneer has processed xxxxxxxxxx (OUT) bound messages To LDAP gateway.
Message: IDMP100I Pioneer Message (READ) Bytes xxxxxxxxxxx
Message-Type: Informational – Shutdown Statistic
Action Required: None
Meaning: Pioneer has processed xxxxxxxxxx (IN) bound messages bytes from LDAP gateway.
Message: IDMP100I Pioneer Message (WRITE) Bytes xxxxxxxxxxx
Message-Type: Informational – Shutdown Statistic
Action Required: None
Meaning: Pioneer has processed xxxxxxxxxx (OUT) bound messages bytes to the LDAP gateway.
Message: IDMP200E Pioneer Startup Parameter Error xxxxxxxxxxxxxx
Message-Type: Error
Action Required: None
Meaning: Pioneer has shutdown with a PARM= error, see SYSOUT 'DD'for the details of the error.
Message: IDMP206I Pioneer Jobname is -- ????????
Message-Type: Informational
Action Required: None
Meaning: Pioneer's IDFGETIF program extracted the Jobname successfully.

D-12 Oracle Identity Manager Connector Guide for IBM RACF Advanced
Message: IDMP207I Pioneer Jobid is -- ????????
Message-Type: Informational
Action Required: None
Meaning: Pioneer's IDFGETIF program extracted the Jobid successfully.
Message: IDMP208I Pioneer RACF Userid is -- ????????
Message-Type: Informational
Action Required: None
Meaning: Pioneer's IDFGETIF program extracted the RACF Userid Successfully.
Message: IDMP209I Pioneer RACF (????????) Authorized for
IDFRADMIN.CMD
Message-Type: Informational
Action Required: None
Meaning: Pioneer's IDFCHKAU verified RACF USERID (????????) is
Is authorized for access to the security facility.
Message: IDMP209E Pioneer RACF (????????) Not Authorized for
IDFRADMIN.CMD
Message-Type: Error
Action Required: None – Pioneer Terminates – RC=300
Meaning: Pioneer's IDFCHKAU found RACF USERID (????????)
was not authorized to access security facility –
IDFRADMIN.CMD.
Message: IDMP210I Pioneer RACF (????????) Authorized for
IRR.RADMIN.*
Message-Type: Informational
Action Required: None
Meaning: Pioneer's IDFCHKIR verified RACF USERID (????????) is
Is authorized for access to the r_admin API required for passing
RACF commands.
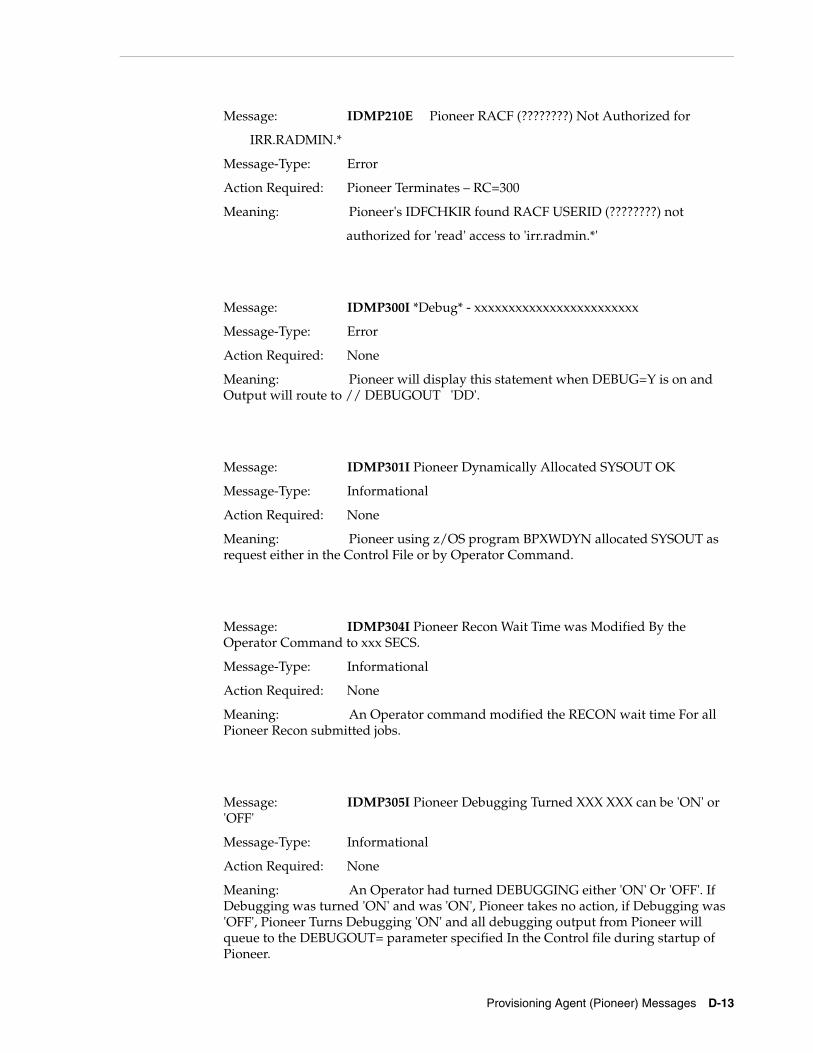
Provisioning Agent (Pioneer) Messages D-13
Message: IDMP210E Pioneer RACF (????????) Not Authorized for
IRR.RADMIN.*
Message-Type: Error
Action Required: Pioneer Terminates – RC=300
Meaning: Pioneer's IDFCHKIR found RACF USERID (????????) not
authorized for 'read' access to 'irr.radmin.*'
Message: IDMP300I *Debug* - xxxxxxxxxxxxxxxxxxxxxxxx
Message-Type: Error
Action Required: None
Meaning: Pioneer will display this statement when DEBUG=Y is on and Output will route to // DEBUGOUT 'DD'.
Message: IDMP301I Pioneer Dynamically Allocated SYSOUT OK
Message-Type: Informational
Action Required: None
Meaning: Pioneer using z/OS program BPXWDYN allocated SYSOUT as request either in the Control File or by Operator Command.
Message: IDMP304I Pioneer Recon Wait Time was Modified By the Operator Command to xxx SECS.
Message-Type: Informational
Action Required: None
Meaning: An Operator command modified the RECON wait time For all Pioneer Recon submitted jobs.
Message: IDMP305I Pioneer Debugging Turned XXX XXX can be 'ON' or 'OFF'
Message-Type: Informational
Action Required: None
Meaning: An Operator had turned DEBUGGING either 'ON' Or 'OFF'. If Debugging was turned 'ON' and was 'ON', Pioneer takes no action, if Debugging was 'OFF', Pioneer Turns Debugging 'ON' and all debugging output from Pioneer will queue to the DEBUGOUT= parameter specified In the Control file during startup of Pioneer.
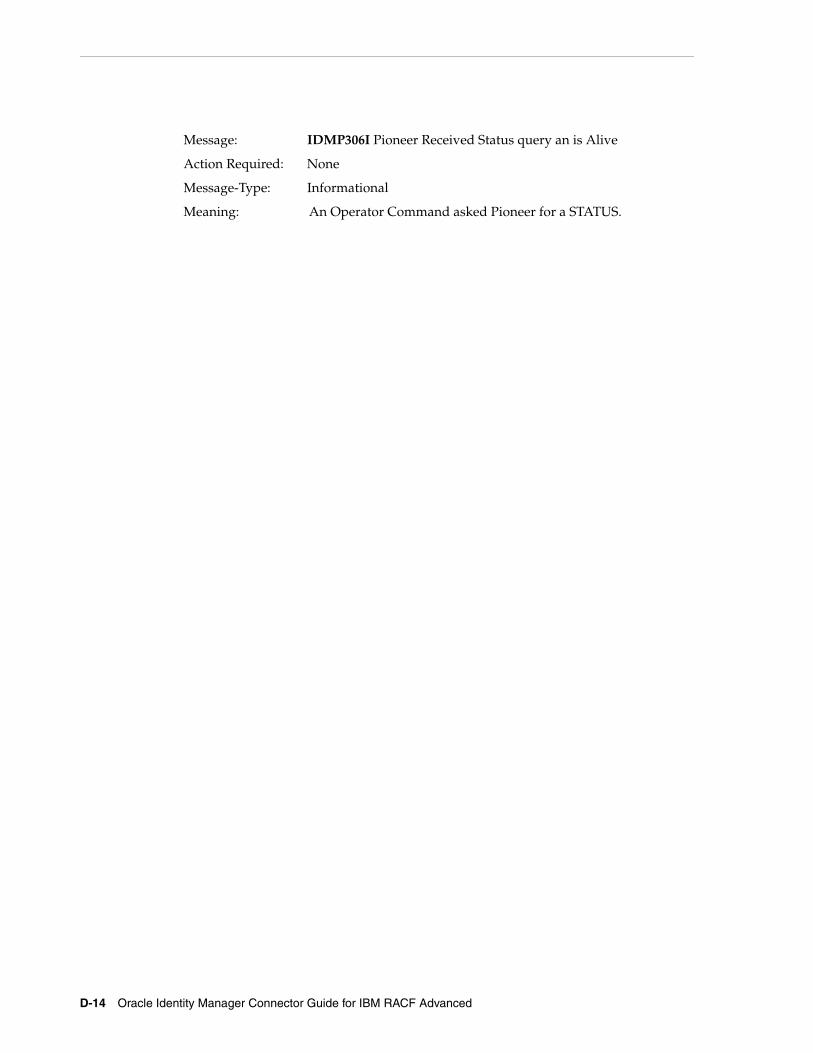
D-14 Oracle Identity Manager Connector Guide for IBM RACF Advanced
Message: IDMP306I Pioneer Received Status query an is Alive
Action Required: None
Message-Type: Informational
Meaning: An Operator Command asked Pioneer for a STATUS.

E
Mainframe Problem Source Identification and Problem Determination E-1
EMainframe Problem Source Identification andProblem Determination
Table E–1 describes Mainframe Problem Source Identification and Problem Determination.
Table E–1 Mainframe Problem Source Identification and Problem Determination
Problem Source Identification Problem Determination
Voyager unable to connect to the LDAP
1. Can the LDAP server be pinged?
2. Is the LDAP up?
3. Is the LDAP listening on the correct port? Must be what is defined on PORT= on Voyager.
4. Can the Server where the LDAP resides Ping Voyager?
Voyager abends: S306-30 or
Pioneer abends: S306-30
Review all RACF definitions. This abend is a incorrect definition.
Voyager or Pioneer abends other than S306-30 and SB37, SD37 or SE37
Open an Oracle SR and send the Voyager/Pioneer STC logs.
LDAP cant connect to Pioneer 1. Verify the listening port is correct on Pioneer, must be PORT=
2. Can the LDAP server ping Pioneer?
3. Can Pioneer ping the Server?
ADDUSER,ALTUSER,ADDGROUP,DELUSER submitted by LDAP and it fails.
Fails with SAF RC=8, RACF RC = 8
Incorrect RACF definitions for Pioneer. Must have access to all irr.radmin.* functions.
No Data in Voyager subpool. No events coming to the LDAP
Verify the three exits are up by:
"D PROG,EXIT" the command exit should be active, "IRREVX01"

E-2 Oracle Identity Manager Connector Guide for IBM RACF Advanced

F
Creating Custom Scheduled Tasks F-1
FCreating Custom Scheduled Tasks
The following sections provide information about Java classes that you can use to create scheduled tasks for user reconciliation and lookup field synchronization:
■ Appendix F.1, "Code for Searching All Users and All User Data"
■ Appendix F.2, "Code for Searching All Groups and All Group Data"
■ Appendix F.3, "Code for Searching All Datasets and All Dataset Data"
See Managing Scheduled Tasks in Oracle Fusion Middleware Administering Oracle Identity Manager and Developing Lookup Definitions, UDFs, and Remote Manager in Oracle Fusion Middleware Developing and Customizing Applications for Oracle Identity Manager for detailed information about creating scheduled tasks and adding lookup fields for provisioning operations.
F.1 Code for Searching All Users and All User DataUse the following class to create a scheduled task for fetching user data from the target system:
public void testSearchAllUsers() { try { SearchControls ctls = new SearchControls();// SET COUNT LIMIT to 0 for all users //ctls.setCountLimit(5); // Search for objects that have those matching attributes - (objectclass=*)//or (objectclass=idforgperson) is supportedNamingEnumeration answer =ctx.search("ou=People,dc=racf,dc=com", "(objectclass=idforgperson)", ctls ); while( answer.hasMoreElements() ) { SearchResult result = (SearchResult)answer.nextElement(); Attributes as = result.getAttributes(); } } catch( NamingException nException ) { System.out.println(nException.toString());}

Code for Searching All Groups and All Group Data
F-2 Oracle Identity Manager Connector Guide for IBM RACF Advanced
F.2 Code for Searching All Groups and All Group DataUse the following class to create a scheduled task for fetching group data from the target system. This data can be used to synchronize a group lookup field.
public void testSearchAllGroups() { try { SearchControls ctls = new SearchControls();// SET COUNT LIMIT to 0 for all users //ctls.setCountLimit(0); // Search for objects that have those matching attributes - (objectclass=*)//or (objectclass=idforggroup) is supportedNamingEnumeration answer =ctx.search("ou=Groups,dc=racf,dc=com", "(objectclass=idforggroup)", ctls ); while( answer.hasMoreElements() ) { SearchResult result = (SearchResult)answer.nextElement(); Attributes as = result.getAttributes(); } } catch( NamingException nException ) { System.out.println(nException.toString());}
F.3 Code for Searching All Datasets and All Dataset DataUse the following class to create a scheduled task for fetching dataset data from the target system. This data can be used to synchronize a dataset lookup field.
public void testSearchAllDatasets() { try { SearchControls ctls = new SearchControls();// SET COUNT LIMIT to 0 for all users //ctls.setCountLimit(5); // Search for objects that have those matching attributes - (objectclass=*)//or (objectclass=idforgdataset) is supportedNamingEnumeration answer =ctx.search("ou=Datasets,dc=racf,dc=com", "(objectclass=idforgdataset)", ctls); while( answer.hasMoreElements() ) { SearchResult result = (SearchResult)answer.nextElement(); Attributes as = result.getAttributes(); }

Code for Searching All Datasets and All Dataset Data
Creating Custom Scheduled Tasks F-3
} catch( NamingException nException ) { System.out.println(nException.toString());}

Code for Searching All Datasets and All Dataset Data
F-4 Oracle Identity Manager Connector Guide for IBM RACF Advanced
G
Voyager and Pioneer Control File Parameters G-1
GVoyager and Pioneer Control File Parameters
Table G–1 lists Voyager control file parameters and the corresponding descriptions.
Table G–1 Voyager Control File Parameters
Voyager Control File Parameters Description
SUBPOOL_SIZE= The size of the cache in Subpool 231(ECSA) Voyager will allocate for event messages created by installed exits. The values are from 0200K to 7500K. Before allocating verify that there is enough ECSA storage available.
Sample value: 1000K
TCPN= The TCPIP STC name where Voyager is executing. This is required for socket allocations.
Sample value: TCPIP
IPAD= The LDAP IP address or hostname. The hostname can only be 40 characters long.
Sample value: 10.10.10.10
PORT= The port the LDAP is listening on for Voyager messages.
Note: This is the value _agentPort_ as specified in racf.properties.
Sample value: 5790
DEBUG= Enter Y to turn on debugging and enter N to turn it off. If you enter Y, then the output is sent to DEBUGOUT.
Note: If you set DEBUG=Y produces enormous log. It is advised not to use DEBUG=Y in production.
Default value: N
ESIZE= The value of this parameter must be set to 16 always. This never changes.
CSDATA= Enter Y if the RACF database is supporting CSDATA fields. Otherwise, enter N.
If EXTRACT=Y, then set the value of this parameter to N.
Sample value: N

G-2 Oracle Identity Manager Connector Guide for IBM RACF Advanced
VOYAGER_ID= The ID defined to LDAP for Voyager, if several Voyagers are using the same RACF database, then they must all have the same VOYAGER_ID.
This parameter is used for the following purposes:
■ For user documentation.
■ Comes in handy when one VOYAGER PER LPAR.
■ Gateway uses VOYAGER_ID= and some consideration is given to configure to exclude gateway events by VOYAGER_ID if needed.
Sample value: VOYID
CACHE_DELAY= The delay (in seconds) Voyager will use when issuing a write socket to the LDAP. This parameter is used in conjunction with communications from the Mainframe Connector Portion to Oracle Identity Manager Appserver Parent Product.
Sample value: 005
AUDIT_LOG= Enter YES to turn on audit logging. Otherwise, enter NO.
Sample value: YES
PIONEER_ID= (Optional) Enter the RACF userID defined for Pioneer.
When Voyager reads a subpool message and the issuer is this RACF userID, then Voyager will not send this message to the LDAP.
If you do not specify a value for this parameter, no action takes place.
EXTRACT= Enter Y to utilize a RACF Extract versus a RACF LISTUSER. Otherwise, enter N. This Parameter should be "Y" unless told otherwise by Oracle Support Representative.
Sample value: Y
CONNECT_RETRY= The number of times Voyager will attempt to reconnect. You can specify a value from 001 through 999. A value of 999 indicates unlimited retries.
Note: 999 indicates unlimited retires.
Sample value: 009
CONNECT_INTV= The number of seconds between each reconnect attempt. The value can range from 01 through 99.
If CONNECT_RETRY=010 and CONNECT_INTV=10, then Voyager will retry the connection to the LDAP for 100 seconds. After the 100 seconds have elapsed, Voyager will shutdown.
Sample value: 05
EBCDIC_COUNTRY_CODE This parameter represents the EBCDIC Country Code page override.
Note: Do not specify values for special reserved usage parameters unless directed by Oracle Support. These parameters are available only for specific custom usage, and their sample values are not available.
These parameters must be used along with the gateway configuration property file (_mainframeCodePage_), which is available inside the racf.properties file.
Table G–1 (Cont.) Voyager Control File Parameters
Voyager Control File Parameters Description
Voyager and Pioneer Control File Parameters G-3
Table G–2 lists Pioneer control file parameter and the corresponding descriptions.
EBCDIC_TILDE_CHR This parameter represents the EBCDIC HEX value tilde character that indicates the end of data override.
Note: Do not specify values for special reserved usage parameters unless directed by Oracle Support. These parameters are available only for specific custom usage, and their sample values are not available.
These parameters must be used along with the gateway configuration property file (_mainframeCodePage_), which is available inside the racf.properties file.
Table G–2 Pioneer Control File Parameters
Pioneer Control File Parameter Description
TCPN= The TCPIP STC name where Voyager is executing. This is required for socket allocations.
Sample value: TCPIP
IPAD= This is the Reserved value. The value of this parameter must be set to 0.0.0.0 always.
PORT=
The port at which Pioneer is listening for LDAP messages.
Sample value: 5709
DEBUG= Enter Y to turn on debugging and enter N to turn it off. If you enter Y, then the output is sent to DEBUGOUT.
Note: Setting this flag to Y will create enormous log. Do not use it on production systems.
Sample value: N
ESIZE= The value of this parameter must be set to 16 always. This never changes.
LPAR= Enter a 20-byte unique name for the LPAR of the Voyager system.
Sample value: zOS-2.2-TEST
POST_PROC_ALIAS=
If you set the value of this parameter to T, then Pioneer will honor all DEFINE/DELETE alias requests from the LDAP.
If you set the value of this parameter to F, Pioneer will ignore all requests for DEFINE or DELETE aliases.
Sample value: T
IDLEMSG=
Can take a value of either Y or N.
If you set the value of this parameter to Y, then for every 60 minutes Pioneer is idle, it displays an IDLE message.
Sample value: N
Table G–1 (Cont.) Voyager Control File Parameters
Voyager Control File Parameters Description

G-4 Oracle Identity Manager Connector Guide for IBM RACF Advanced
DEBUGOUT= This parameter is valid only if you set DEBUG=Y.
If you have set DEBUG=N, then this parameter is ignored.
If the output must be sent to SYSOUT, then use the following format:
SYSOUT,CLASS(x)
In this format, x represents the JES2 output class desired, please use a lettered SYSOUT CLASS available at your installation versus "*".
Sample value: IBM z/oS JCL
Note: The usage of SYSOUT,CLASS(*) has been noted to cause IKJ56231I FILE DEBUGOUT NOT ALLOCATED, SYSTEM OR INSTALLATION ERROR+ when used with a Control card.
SPIN_CLASS= The output SPIN class for DEBUGOUT when Pioneer shutdown or debugging is turned off through Operator command.
Sample value: X
AUDIT_LOG= If you set the value of this parameter to YES, then the Audit log is turned on and the output goes to AUDTLOG ddname of Pioneer.
If you set the value of this parameter to NO, then auditing will not be in effect.
Sample value: YES
SECURE_ID= YES is required.
NO is not accepted and will fail.
SECURE id can run in one of the three following modes:
■ SECURE_ID = YES, DEFAULT = YES
This mode uses RACF userid IDFAGNT as the default userid. This must have 'SPECIAL' as a coded attribute.
■ SECURE_ID = YES, DEFAULT = NO, ENCRYPT = NO, ID = racfuserid
This mode uses the RACF userid for RACF API calls and must have 'SPECIAL' coded on that RACF userid.
■ SECURE_ID = YES, DEFAULT = NO, ENCRYPT = YES
This mode uses the RACF userid that was encrypted using the new IDFSECUT program. This encrypted RACF userid will be used for all RACF API calls.
Sample value: YES, DEFAULT=YES
SMF= A value of either N or Y is required.
If you set the value of this parameter to N, then SMF recording is not turned off, but custom SMF TYPE 245 subtype 1 and 2 records are not created when the SECURE_ID is invoked.
If you set the value of this parameter to Y, then every time the SECURE_ID is invoked, custom SMF TYPE 245 subtype 1 and 2 records are created. In addition, SMFPRMxx of z/OS SYS1.PARMLIB must be reviewed to verify that this SMF Type record will be written. Also, Pioneer must have the z/OS authority to write custom SMF type 245 entries.
Sample value: N
Table G–2 (Cont.) Pioneer Control File Parameters
Pioneer Control File Parameter Description

Voyager and Pioneer Control File Parameters G-5
EBCDIC_COUNTRY_CODE This parameter represents the EBCDIC Country Code Page override.
EBCDIC_TILDE_CHR This parameter represents the EBCDIC HEX value Tilde Character that indicates the end of data override.
Table G–2 (Cont.) Pioneer Control File Parameters
Pioneer Control File Parameter Description

G-6 Oracle Identity Manager Connector Guide for IBM RACF Advanced

H
Configuring RACF Starter User ID and Access for Voyager Agent and Pioneer Agent Started Tasks H-1
HConfiguring RACF Starter User ID and Accessfor Voyager Agent and Pioneer Agent Started
Tasks
From release 9.0.4.23-BPE onward, Pioneer Started Task no longer supports or requires a RACF userid attribute 'SPECIAL'. A normal RACF userid as shown below can be used.
There are various modes that you can use. The modes and the required RACF definitions are shown below. Note that the normal RACF userid is italicized.
One of the following 3 modes can be used:
1. Mode:
SECURE_ID=YES,DEFAULT=YES
This mode uses RACF userid IDFAGNT as the default userid. This must have SPECIAL as a coded attribute.
Default Pioneer control file parameter is SECURE_ID=YES,DEFAULT=YES
a. ADDGROUP SECGRP
b. ADDUSER PIONEER NAME(PIONEER) DFLTGRP(SECGRP) NOPASS NOPHRASE
c. ADDUSER IDFAGNT NAME(DEFAULT-ID) DFLTGRP(SECGRP) NOPASS NOPHRASE SPECIAL
d. PW USER(PIONEER) NOINTERVAL
e. ALU PIONEER AUDITOR
This is used for list type commands like LISTUSER, LISTGRP, and other similar commands.
f. RDEFINE FACILITY IDFADMIN.CMD UACC(NONE)
g. PERMIT IDFADMIN.CMD ID(PIONEER) ACCESS(READ)
h. CONNECT PIONEER GROUP(grpname).
Note: Depending on the requirement, select one of the modes between 1, 2, or 3.

H-2 Oracle Identity Manager Connector Guide for IBM RACF Advanced
The grpname must be the same grpname used for FTPD. It must have a OMVS segment and a Permit for using BPX.DAEMON without which the Pioneer RACF Userid will fail as shown below:
0090 IDMP006I - PIONEER DETECTS DEBUGGING IS ACTIVE0090 IDMP011I - PIONEER DETECTS CPUID 10061120640090 IDMP012I - PIONEER DETECTS SYSPLEX SYSNAME ADCD113S0090 IDMP013I - PIONEER DETECTS LPARNAME AS SYST0090 IDMP014I - PIONEER DETECTS COUNTRY CODE OF US0090 IDMP009I - PIONEER DETECTS ENCRYPTION ENABLED0090 IDMP016I - PIONEER APF LIBRARY IS GOOD0281 ICH408I JOB(PIONEER ) STEP(PIONEER ) CL(PROCESS ) 2510281 OMVS SEGMENT NOT DEFINED0090 IDMP402I PIONEER HAS NO OPEN SOCKETS0090 IDMP402I PIONEER DID NOT OPEN TCPIP API0090 IDMP402I PIONEER IS ENDING DUE TO ERRORS0090 IDMP402I PIONEER - REVIEW SYSLOG OR PARMOUT0090 IDMP402I PIONEER ENDS RC= 1000090 IEF404I PIONEER - ENDED - TIME=10.26.130281 $HASP395 PIONEER ENDED0281 IEA989I SLIP TRAP ID=X33E MATCHED. JOBNAME=*UNAVAIL, ASID=0037.
2. Mode:
SECURE ID=YES,DEFAULT=NO,ENCRYPT=NO,ID=IDMSECU
This mode uses the RACF userid for RACF API calls and must have 'SPECIAL' coded on that RACF userid.
Using a user defined RACF secure id:
Pioneer parameter is SECURE ID=YES,DEFAULT=NO,ENCRYPT=NO,ID=IDMSECU
a. ADDGROUP SECGRP
b. ADDUSER PIONEER NAME(PIONEER) DFLTGRP(SECGRP) NOPASS NOPHRASE
c. PW USER(PIONEER) NOINTERVAL
d. ALU PIONEER AUDITOR
This is used for list type commands like LISTUSER, LISTGRP, and other similar commands.
e. ADDUSER IDMSECU NAME('SECURE-ID') DFLTGRP(SECGRP) NOPASS NOPHRASE SPECIAL
f. RDEFINE FACILITY IDFADMIN.CMD UACC(NONE)
g. PERMIT IDFADMIN.CMD ID(PIONEER) ACCESS(READ)
h. See Pioneer CONNECT above
3. Mode:
SECURE_ID=YES,DEFAULT=NO,ENCRYPT=YES
This mode uses the RACF userid that was encrypted using the new IDFSECUT program. This encrypted RACF userid will be used for all RACF API calls.
Using a encrypted RACF userid:
Pioneer parameter is SECURE_ID=YES,DEFAULT=NO,ENCRYPT=YES
a. ADDGROUP SECGRP

Configuring RACF Starter User ID and Access for Voyager Agent and Pioneer Agent Started Tasks H-3
b. ADDUSER PIONEER NAME(PIONEER) DFLTGRP(SECGRP) NOPASS NOPHRASE
c. PW USER(PIONEER) NOINTERVAL
d. ALU PIONEER AUDITOR
This is used for list type commands like LISTUSER, LISTGRP, and other similar commands.
e. ADDUSER <your-secure-id-that was encrypted> NAME('SECURE-ID') DFLTGRP(SECGRP) NOPASS NOPHRASE SPECIAL
f. RDEFINE FACILITY IDFADMIN.CMD UACC(NONE)
g. PERMIT IDFADMIN.CMD ID(PIONEER) ACCESS(READ)
h. See Pioneer CONNECT above
You can encrypt and decrypt the RACF userid, and implement the SECUREID process. To do so, perform the following procedures:
■ Procedure to encrypt the RACF userid:
Execute IDFSECUT. In the sample below, JCL is supplied in the distribution JCLLIB. The 'DFLEOUT' ddname dataset must match the ddname//SECUREID of Pioneer. The member name of JCLLIB is 'SECUTLE' which is the encryption utility of JCL. Then, only the parameters are visible and the ID=XXXXX is the RACF userid that has to be encrypted.
//IDFSECUT JOB SYSTEMS,MSGLEVEL=(1,1),// MSGCLASS=X,CLASS=A,PRTY=8,// NOTIFY=&SYSUID,REGION=4096K//* ID=XXXXX IS THE RACF USER THAT HAS SPECIAL ATRIIBUTES//* FOR USE WITH PIONEER//STEP1 EXEC PGM=IDFSECUT,PARM='ID=XXXXX,FUNC=ENCRYPT'//STEPLIB DD DSN=<YOURHLQ.PROD.LOADLIB,DISP=SHR//DFLEOUT DD DSN=<YOURHLQ>.SECUREID.FILE,DISP=SHR//LINEOUT DD SYSOUT=*//SYSPRINT DD SYSOUT=*
■ Procedure to decrypt the RACF userid:
Execute IDFSECUT. In the sample below, JCL is supplied in the distribution JCLLIB. The 'DFLEOUT' ddname dataset must match he ddname//SECUREID of Pioneer. The member name of JCLLIB is 'SECUTLE' which is the encryption utility of JCL. The parameters are the only ones that are displayed.
//IDFSECUT JOB SYSTEMS,MSGLEVEL=(1,1),// MSGCLASS=X,CLASS=A,PRTY=8,// NOTIFY=&SYSUID,REGION=4096K//* ID=NONE IS TO VERIFY WHAT RACF USER ID IS CONTAINED IN//* THE SECUREID FILE//STEP1 EXEC PGM=IDFSECUT,PARM='ID=NONE,FUNC=DECRYPT'//STEPLIB DD DSN=<YOURHLQ.PROD.LOADLIB,DISP=SHR//DFLEOUT DD DSN=<YOURHLQ>.SECUREID.FILE,DISP=SHR//LINEOUT DD SYSOUT=*//SYSPRINT DD SYSOUT=*
■ Procedure to implement the SECUREID process:
– Select the RACF userid desired to perform the Pioneer RACF API calls to R_admin.
H-4 Oracle Identity Manager Connector Guide for IBM RACF Advanced
– Define it to RACF as shown in Step 3.
– Encrypt it using the IDFSECUT as shown in the above Step.
– Start Pioneer.
Pioneer reads the SECURE_ID file and stores the encrypted id.
Pioneer also first receives the RACF command and accesses the RACF facility 'MYADMN.CMD'. If access is granted, Pioneer uses the encrypted id with which it decrypts all RACF calls.
The following steps are required to use all the modes as these are common for each mode.
Perform the following steps after you select the mode:
1. RACF Facility must be changed as mentioned below in order to start Pioneer:
RDEF STARTED PIONEER.* UACC(NONE) OWNER(xxxxxxx)
RALT STARTED PIONEER.* AUDIT(FAILURES(READ))
RALT STARTED PIONEER.* STDATA(USER(PIONEER) GROUP(SYS1) PRIVILEGED(NO) TRACE(NO))
2. Pioneer (Other RACF definitions):
. RDEFINE FACILITY IRR.RADMIN.* UACC(NONE)
. PERMIT IRR.RADMIN CLASS(FACILITY) ID(<your-RACF-non-secure-id>) ACCESS(READ)
. ADDSD '<yourhlq>.CONTROL.FILE' UACC(NONE)
. PERMIT '<yourhlq>.CONTROL.FILE' ID(<your-RACF-non-secure-id>) ACCESS(READ)
. ADDSD '<yourhlq>.REXXOUT.FILE' UACC(NONE)
. PERMIT '<yourhlq>.REXXOUT.FILE' ID(<your-RACF-non-secure-id>)ACCESS(UPDATE)
. ADDSD '<yourhlq>.RECON.FILE' UACC(NONE)
. PERMIT '<yourhlq>.RECON.FILE' ID (<your-RACF-non-secure-id>)ACCESS(UPDATE)
. ADDSD '<yourhlq>.RECON.LIBRARY' UACC(NONE)
. PERMIT '<yourhlq>.RECON.LIBRARY' ID (<your-RACF-non-secure-id>)ACCESS(READ)
. ADDSD '<yourhlq>.IMPORTU.FILE' UACC(NONE)
. PERMIT '<yourhlq>.IMPORTU.FILE' ID (<your-RACF-non-secure-id>)ACCESS(UPDATE)
. ADDSD '<yourhlq>.IMPORTG.FILE' UACC(NONE)
. PERMIT '<yourhlq>.IMPORTG.FILE' ID (<your-RACF-non-secure-id>) ACCESS(UPDATE)
. ADDSD '<yourhlq>.ALIAS.LSTOUT' UACC(NONE)
. PERMIT '<yourhlq>.ALIAS.LSTOUT' ID(<your-RACF-non-secure-id>) ACCESS(UPDATE)
. ADDSD '<yourhlq>.IDCAMS.CTL' UACC(NONE)

Configuring RACF Starter User ID and Access for Voyager Agent and Pioneer Agent Started Tasks H-5
. PERMIT '<yourhlq>.IDCAMS.CTL' ID (<your-RACF-non-secure-id>) ACCESS(UPDATE)

H-6 Oracle Identity Manager Connector Guide for IBM RACF Advanced

I
Customizing AES Encryption Key I-1
ICustomizing AES Encryption Key
Perform the following procedure to configure and customize an AES encryption key:
1. Open the propertyEncrypt.bat or propertyEncrypt.sh file and add a 16 byte key that you will use to encrypt the data with. The propertyEncrypt.bat or propertyEncyprt.sh file is located in the scripts directory of the connector installation media.
For example, %JAVACMD% %JVM_OPTS% -cp %CLASSPATH% com.identityforge.idfserver.util.AESCipherUtil TEST12344321TEST
2. Save the file and run the propertyEncrypt.bat or propertyEncrypt.sh file.
Your input value: test12344321test
Your input value as HEX: 74657374313233343433323174657374
Final encrypted value as HEX: 52810283F6B4E0A5D82FDE935E23ED7C
Press any key to continue.
This output from the final encrypted value as HEX is the key used in the command window for both LDAP and Mainframe Agents.
3. In order to use your own key with the LDAP gateway, you will have to add it to the properties file for the particular mainframe connector that you are using. The property files used for the Top Secret mainframe connector is tops.properties. It will be a 32 character HEX key.
Define a property called _secretKeyValue_ to store the key you want to use.
The value defined is the same in all the property files.
For example, _secretKeyValue_=52810283F6B4E0A5D82FDE935E23ED7C
4. Once you have defined the key in the LDAP property file, you will need to set the key on the mainframe side.
A MVS Job called KEYMODR will set the key on the mainframe side. It will ship with the distribution JCL files in the JCLLIB.xmi library as follows:
//ADCDZZAP JOB ,SYSTEMS,CLASS=A,MSGCLASS=X, // MSGLEVEL=(1,1),REGION=4096K,TIME=1440,NOTIFY=&SYSUID //ZAPKEY EXEC PGM=AMASPZAP //SYSPRINT DD SYSOUT=* //SYSLIB DD DISP=SHR,DSN=MLIGHT.MY.LOAD
Note: The LDAP Gateway will have to be restarted for the new key to take effect.
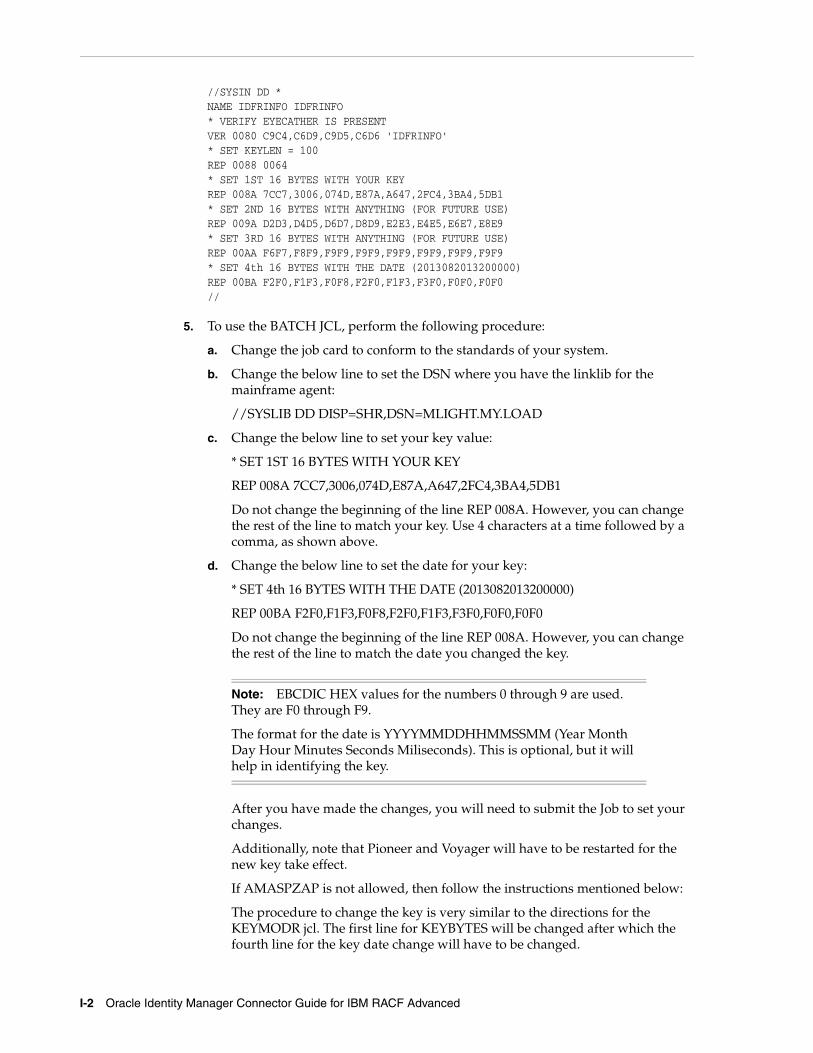
I-2 Oracle Identity Manager Connector Guide for IBM RACF Advanced
//SYSIN DD * NAME IDFRINFO IDFRINFO * VERIFY EYECATHER IS PRESENT VER 0080 C9C4,C6D9,C9D5,C6D6 'IDFRINFO' * SET KEYLEN = 100 REP 0088 0064* SET 1ST 16 BYTES WITH YOUR KEY REP 008A 7CC7,3006,074D,E87A,A647,2FC4,3BA4,5DB1 * SET 2ND 16 BYTES WITH ANYTHING (FOR FUTURE USE) REP 009A D2D3,D4D5,D6D7,D8D9,E2E3,E4E5,E6E7,E8E9 * SET 3RD 16 BYTES WITH ANYTHING (FOR FUTURE USE) REP 00AA F6F7,F8F9,F9F9,F9F9,F9F9,F9F9,F9F9,F9F9 * SET 4th 16 BYTES WITH THE DATE (2013082013200000) REP 00BA F2F0,F1F3,F0F8,F2F0,F1F3,F3F0,F0F0,F0F0 //
5. To use the BATCH JCL, perform the following procedure:
a. Change the job card to conform to the standards of your system.
b. Change the below line to set the DSN where you have the linklib for the mainframe agent:
//SYSLIB DD DISP=SHR,DSN=MLIGHT.MY.LOAD
c. Change the below line to set your key value:
* SET 1ST 16 BYTES WITH YOUR KEY
REP 008A 7CC7,3006,074D,E87A,A647,2FC4,3BA4,5DB1
Do not change the beginning of the line REP 008A. However, you can change the rest of the line to match your key. Use 4 characters at a time followed by a comma, as shown above.
d. Change the below line to set the date for your key:
* SET 4th 16 BYTES WITH THE DATE (2013082013200000)
REP 00BA F2F0,F1F3,F0F8,F2F0,F1F3,F3F0,F0F0,F0F0
Do not change the beginning of the line REP 008A. However, you can change the rest of the line to match the date you changed the key.
After you have made the changes, you will need to submit the Job to set your changes.
Additionally, note that Pioneer and Voyager will have to be restarted for the new key take effect.
If AMASPZAP is not allowed, then follow the instructions mentioned below:
The procedure to change the key is very similar to the directions for the KEYMODR jcl. The first line for KEYBYTES will be changed after which the fourth line for the key date change will have to be changed.
Note: EBCDIC HEX values for the numbers 0 through 9 are used. They are F0 through F9.
The format for the date is YYYYMMDDHHMMSSMM (Year Month Day Hour Minutes Seconds Miliseconds). This is optional, but it will help in identifying the key.
Customizing AES Encryption Key I-3
EBCDIC HEX values for the numbers 0 through 9 are used. They are F0 through F9. The format for the date is YYYYMMDDHHMMSSMM (Year Month Day Hour Minutes Seconds Miliseconds). This is optional, but it will help in identifying the key.
In addition to changing the Jobcard, you must change the following in IDFRINFO:
EYECATCH DC C'IDFRINFO'
INFOLEN DC H'100'
KEYBYTES DC X'D880D7614C07088BC2D51A1945FDB6B4': Ensure that you change this key.
DC X'D8D9E2E3E4E5E6E7E8E9F0F1F2F3F4F5': This is reserved for later use. Keep it as is.
DC X'F6F7F8F9F9F9F9F9F9F9F9F9F9F9F9F9': This is reserved for later use. Keep it as is.
DC X'F2F0F0F6F1F0F2F6F1F4F2F5F0F0F0F0': This is the date key was changed.
DC 86X'0'
END IDFRINFO
Once they have changed the Key and have assembled/linked IDFRINFO, then they will have to replace the IDFRINFO that we supply.
The LDAP gateway server settings must also be updated to use the new key. To configure the LDAP gateway, perform the following steps:
1. Stop the LDAP gateway server (if it is running).
2. Open the racf.properties file, located in the LDAP_INSTALL_DIR/conf directory.
3. Modify the value of the _secretKey_ property to match the new key.
4. Save and close the file.
5. Restart the LDAP gateway server.

I-4 Oracle Identity Manager Connector Guide for IBM RACF Advanced

J
Mainframe Language Environment Runtime Options J-1
JMainframe Language Environment RuntimeOptions
If the following settings are not properly set, they can cause random S806 or S0C4 conditions.
1. Add the following CEEOPTS DD to your PIONEER and or VOYAGER Task (or other modules through STC/JCL) as needed.
Example (this may vary by site requirements):
//CEEOPTS DD DISP=SHR, //DSN=&SYSPLEX.OIDM.VOYAGER.CONTROL.PARMLIB(CEEPRM00)
2. Where the CEEPRM00 PDS member contains:
a. RPTOPT(ON)
b. RPTSTG(ON)
3. When you run the offending STC/JCL again you will get a list of the options in affect.
4. Compare the output of the current JES LOG and look for one of the following literals, so one may review the current options in place.
a. "LAST WHERE SET"
b. "IBM-supplied default"
c. "ALL31"
5. Note that all LE options should all be reviewed (not only ALL31) as noted in step 8 of this section.
6. The options can be overridden within the CEEOPTS DD through the CEEPRM00 PDS member (or site specific implementation), as follows:
■ Where CEEPRM00
■ ALL31(ON)
■ RPTOPT(ON)
■ RPTSTG(ON)
■ STACK(128K,128K,ANYWHERE,KEEP,512K,512K)
7. When the anomaly is addressed, the RPT* lines can be removed, if desired:
■ Where CEEPRM00
■ ALL31(ON)

J-2 Oracle Identity Manager Connector Guide for IBM RACF Advanced
■ STACK(128K,128K,ANYWHERE,KEEP,512K,512K)
8. Customizing Language Environment run time options Z/OS Language Environment Customization: Info gathered from IBM Manual # SA22-7564-13.
Table J–1 lists Language Environment run time options, defaults and recommendations.
There are many more run time options that are not applicable to this situation.
Table J–1 Language Environment Run Time Options, Defaults and Recommendations
Option Default Recommended IDF's
ABPERC NONE NONE NONE
ABTERMENC ABEND ABEND ABEND
AIXBLD OFF OFF OFF
ALL31 ON ON ON
ANYHEAP 16K,8K,ANY,FREE 16K,8K,ANY,FREE 16K,8K,ANY,FREE
ARGPARSE ARGPARSE ARGPARSE ARGPARSE
AUTOTASK NOAUTOTASK NOAUTOTASK NOAUTOTASK
BELOWHEAP 8K,4K,FREE 8K,4K,FREE 8K,4K,FREE
CBLOPTS ON ON ON
CBLPSHPOP ON N/A ON
CBLQDA OFF OFF OFF
CEEDUMP 60,SYSOUT=*,FREE-END,SPIN-UNALLOC
60,SYSOUT=*,FREE-END,SPIN-UNALLOC
60,SYSOUT=*,FREE-END,SPIN-UNALLOC
CHECK ON ON ON
COUNTRY US User defined US
DEBUG OFF OFF OFF
DEPTHCONDLMT 10 0 10
DYNDMP *USERID,NODYNAMIC,TDUMP
*USERID,NODYNAMIC,TDUMP
*USERID,NODYNAMIC,TDUMP
ENV No default User default No default
ENVAR " " "
ERRCOUNT 0 0 0
ERRUNIT 6 6 6
EXECOPS EXECOPS EXECOPS EXECOPS
FILEHIST ON ON ON
FILETAG NOAUTOCVT,
NOAUTOTAG
NOAUTOCVT,
NOAUTOTAG
NOAUTOCVT,
NOAUTOTAG
HEAP 32K,32K,ANY,KEEP,8K,4K
32K,32K,ANY,KEEP,8K,4K
32K,32K,ANY,KEEP,8K,4K
HEAP64 1M,1M,KEEP,32K,32K,KEEP,4k,4K,FREE
N/A N/A
STACK 128K,128K,ANY,KEEP,512K,128K
128K,128K,ANY,KEEP,512K,128K
128K,128K,ANY,KEEP,512K,128K

Index-1
Index
AAdvanced Encryption Standard, 1-4AES, 1-4
Bbugs,issues, 7-1
Ccertified languages, 1-3clearing server cache, 3-10Configure
Initial Reconciliation, 4-6configuring
Oracle Identity Manager, 3-5connector
deployment, 3-1connector files and directories, 3-1CREATEDSN, 2-11
Ddefining
IT resources, 3-3deploying, connector, 3-1deployment
Oracle Identity Manager system, 3-1
Eenabling logging, 3-10
Ffiles and directories of the connector, 3-1
Gglobalization features, 1-3
IIBM RACF Advanced Connector
LDAP Gateway, 1-3message transport layer, 1-4
Pioneer Provisioning Agent, 1-3Voyager Reconciliation Agent, 1-3
IEBCOPYL, 2-11IEBCOPYP, 2-11IEBCPYRP, 2-11Initial Reconciliation, 4-6installation
LDAP Gateway, 3-13IT resources
defining, 3-3parameters, 3-3RacfResource, 3-3
Kknown issues, 7-1
LLDAP Gateway, 1-3
installing, 3-13LOADDSN, 2-11logging enabling, 3-10
Mmainframe repository, supported, 1-2Members of PDS IDF.JCLLIB, 2-13message transport layer, 1-2, 1-4
TCP/IP, 1-2TCP/IP with Advanced Encryption Standard, 1-4
multilanguage support, 1-3
OOracle Identity Manager, configuring, 3-5
Pparameters of IT resources, 3-3PDS, 2-11PIONEER Provisioning Agent, 1-3POLLOPER, 2-25provisioned target system attributes, 1-12Provisioning Agent, 1-8
functionality, 1-8
Index-2
provisioned target system attributes, 1-12
Rreconciled target system attributes, 1-12reconciliation action rules, 1-13Reconciliation Agent
reconciled target system attributes, 1-12reconciliation functions, supported, 1-8reconciliation rule, 1-13
Sserver cache, clearing, 3-10supported
mainframe repository, 1-2Oracle Identity Manager versions, 1-2target systems, 1-2
Ttarget resource reconciliation
adding new fields, 5-1target systems, supported, 1-2TCP/IP with Advanced Encryption Standard, 1-4TCP/IP with AES encryption, 1-2
VVoyager Reconciliation Agent, 1-3