Embed Size (px)
Citation preview
Integrating IBM Security IdentityManager with IBM Security IdentityGovernance and Intelligence
IBM

ii Integrating IBM Security Identity Manager with IBM Security Identity Governance and Intelligence
Contents
The Integration of IBM Security IdentityManager with IBM Security IdentityGovernance and Intelligence . . . . . . 1What's new . . . . . . . . . . . . . . . 1Overview . . . . . . . . . . . . . . . 3
Synchronization from IBM Security IdentityManager to IBM Security Identity Governance andIntelligence . . . . . . . . . . . . . . 4Synchronization from IBM Security IdentityGovernance and Intelligence to IBM SecurityIdentity Manager . . . . . . . . . . . . 4Deployment topologies . . . . . . . . . . 5Operations . . . . . . . . . . . . . . 5
Installation and configuration roadmap . . . . . 6Installation prerequisites . . . . . . . . . . 9Pre-installation setup . . . . . . . . . . . 10
Setting up IBM Tivoli Directory Integrator . . . 10Enabling the changelog for IBM Security IdentityManager . . . . . . . . . . . . . . 12Enabling SSL (optional) . . . . . . . . . 13Database preparation . . . . . . . . . . 13Defining a host name in the hosts file . . . . 14
Installing the solution for IBM Security IdentityGovernance and Administration Data Integrator . . 15Roadmap to upgrade IBM Security IdentityGovernance and Administration Data Integrator . . 17
Upgrading the solution for IBM Security IdentityGovernance and Administration Data Integrator . 18Updating the SDK for IBM Security IdentityGovernance and Intelligence. . . . . . . . 20Rerun the LOAD assembly line . . . . . . . 21
Configuring . . . . . . . . . . . . . . 21Setting the ITDI_HOME property . . . . . . 21Setting up the Data Integrator server startup fileand logging behavior . . . . . . . . . . 21Setting and encrypting properties . . . . . . 23Configure the SSL certificate for the IBM SecurityIdentity Manager 7.0 virtual appliance . . . . 24Importing the certificate from IBM SecurityIdentity Manager to IBM Tivoli DirectoryIntegrator . . . . . . . . . . . . . . 27Verifying the configuration . . . . . . . . 28
Assembly line operations . . . . . . . . . . 29Starting and stopping the IBM Tivoli DirectoryIntegrator server. . . . . . . . . . . . 30
Starting an initial data load . . . . . . . . 30Loading entities by type . . . . . . . . . 31Starting incremental data synchronization . . . 33Starting entitlement fulfillment synchronization 33Stopping incremental synchronization . . . . 34Stopping entitlement fulfillment synchronizationoperations . . . . . . . . . . . . . . 34Monitoring assembly lines . . . . . . . . 35
Data Integrator support for adapters . . . . . . 37Manually customizing IBM Security IdentityManager Adapters . . . . . . . . . . . 37Configuring adapters with complex groupattributes . . . . . . . . . . . . . . 38
Customization . . . . . . . . . . . . . 39Person attribute mapping. . . . . . . . . 39Account attribute mapping . . . . . . . . 41Non-group permission support . . . . . . . 42Complex RACF group right support . . . . . 45Support for IBM Security Identity Manager whenjustification is required . . . . . . . . . 47Customizing Organizational Unit Mapping . . . 47Supporting the PostgreSQL database . . . . . 48
Reference . . . . . . . . . . . . . . . 49Importing the server certificate to the TivoliDirectory Integrator client keystore . . . . . 49Configuration property files . . . . . . . . 50Files installed with IBM Security IdentityGovernance and Administration Data Integrator . 58
Troubleshooting . . . . . . . . . . . . . 59Repair list . . . . . . . . . . . . . . 60Synchronizing Oracle system times with IBMSecurity Identity Governance and Intelligence . . 61Odd status shown in OUT events table . . . . 61SOAP operation error . . . . . . . . . . 62IBM Security Identity Governance andAdministration Data Integrator .properties filesmodifications . . . . . . . . . . . . . 62Accept signer certificate from IBM Tivoli IdentityManager 5.1 and the IBM Security IdentityGovernance and Intelligence server . . . . . 62
Index . . . . . . . . . . . . . . . 65
iii

iv Integrating IBM Security Identity Manager with IBM Security Identity Governance and Intelligence
The Integration of IBM Security Identity Manager with IBMSecurity Identity Governance and Intelligence
Use the IBM® Security Identity Governance and Administration Data Integrator tointegrate IBM Security Identity Manager with IBM Security Identity Governanceand Intelligence
This document is intended for security deployment specialists.
You can obtain the IBM Security Identity Governance and Administration DataIntegrator package from the IBM Passport Advantage website,http://www.ibm.com/software/howtobuy/passportadvantage/pao_customers.htm.
What's newEach release of IBM Security Identity Governance and Administration DataIntegrator increases support for the integration of identity management andidentity governance.
The following table lists the features by release that are supported by IBM SecurityIdentity Governance and Administration Data Integrator.
1
Table 1. Features added in each version
Versions Features
7.0.7 v Support for setting the size of log files and the number of rolloverlog files that are kept. See “Setting up the Data Integrator serverstartup file and logging behavior” on page 21.
v The load-info.log file now lists objects that did not load. See“Starting an initial data load” on page 30.
v Support for non-group permission mapping. Attribute-to-Permission mapping treats the non-group attribute of an accountas group attribute or permission. See “Non-group permissionsupport” on page 42.
v Support for the PostgreSQL database in IBM Security IdentityGovernance and Intelligence. See “Supporting the PostgreSQLdatabase” on page 48.
v Support for complex RACF group rights permission mapping. See“Complex RACF group right support” on page 45.
v Support for IBM Security Identity Manager when justification isrequired by the enrole.jutificationRequired property. See“Support for IBM Security Identity Manager when justification isrequired” on page 47.
v Support for loading entities by type. If the initial load has errors,you can correct the errors and load specific entity types instead ofdoing another complete initial load. See “Loading entities by type”on page 31.
v Two new properties for loading subsets of services are nowavailable.
isim.service.include
isim.service.exclude
See “Configuration property files” on page 50.
v Support for the Oracle 12c database. See “Preparing the Oracledatabase for IBM Security Identity Governance andAdministration Data Integrator” on page 14.
7.0.6 v Support to extend person attribute synchronization from IBMSecurity Identity Manager to IBM Security Identity Governanceand Intelligence. See “Person attribute mapping” on page 39.
v Support to override account attribute synchronization from IBMSecurity Identity Manager to IBM Security Identity Governanceand Intelligence. See “Account attribute mapping” on page 41.
v Support to customize OU synchronization from IBM SecurityIdentity Manager to IBM Security Identity Governance andIntelligence. See “Customizing Organizational Unit Mapping” onpage 47.
v For Tivoli® Identity Manager, Version 5.1, the mapping betweenthe service profile name and the account profile name in theAttributes.properties file is automatically detected.
7.0.5 v Support for IBM Security Identity Governance and Intelligence,Version 5.2.1.
v Automatic support for adapters in IBM Security Identity Manager.You no longer need to provide mappings for group metadata inthe ATTRIBUTES.properties file.
2 Integrating IBM Security Identity Manager with IBM Security Identity Governance and Intelligence
Table 1. Features added in each version (continued)
Versions Features
7.0.4 Support for IBM Security Identity Manager adapters with complexgroup attributes. IBM Security Identity Manager, Version 6.0.0.10,added support for adapters with complex group attributes. Theadapter for Oracle EBS employs complex group attributes. You mustcustomize IBM Security Identity Governance and AdministrationData Integrator to support such adapters.
7.0.3.1 Internal fixes
7.0.3 Support for IBM Security Identity Governance and IntelligenceVersion 5.2. IBM Security Identity Governance and AdministrationData Integrator Version 7.03 does not support previous versions ofIBM Security Identity Governance.
v IBM Security Identity Manager roles become external roles in IBMSecurity Identity Governance and Intelligence rather than businessroles. The change fixes child role assignment issues in previousversions.
v Entitlement changes are synchronized only from external roles inIBM Security Identity Governance and Intelligence.
v Access information for IBM Security Identity Manager roles andgroups is synchronized.
v Upgrading from Data Integrator Version 7.0.2.x to 7.0.3 requiresthat you run the Load assembly line again.
7.0.2.1 Internal fixes
7.0.2 Support for IBM Tivoli Identity Manager 5.1
7.0.1.1 Support for IBM Security Identity Governance 5.1.1
7.0.1 An ISIGtoISIM assembly line fulfills the entitlement changes fromIBM Security Identity Governance to IBM Security Identity Manager.A set of command-line tools are added to start or stop the TivoliDirectory Integrator server and assembly lines.
7.0 Assembly lines to load data from IBM Security Identity Manager toIBM Security Identity Governance
v A Load assembly line loads all data.
v A Delta assembly line loads data incrementally. Only data that isadded or modified is loaded.
OverviewIBM Security Identity Governance and Administration Data Integrator, or DataIntegrator, synchronizes information between IBM Security Identity Manager andIBM Security Identity Governance and Intelligence by using IBM Tivoli DirectoryIntegrator assembly lines.
Data Integrator synchronizes the following data:v Information about people, roles, services, groups, and their organization from
IBM Security Identity Manager to IBM Security Identity Governance andIntelligence.
v Entitlement changes from IBM Security Identity Governance and Intelligence toIBM Security Identity Manager.
The Integration of IBM Security Identity Manager with IBM Security Identity Governance and Intelligence 3
Synchronization from IBM Security Identity Manager to IBMSecurity Identity Governance and Intelligence
The Load assembly line loads all data from IBM Security Identity Manager to IBMSecurity Identity Governance and Intelligence. It runs once. After the initial load,the Delta assembly line, which runs continuously, incrementally loads new andchanged data from IBM Security Identity Manager to IBM Security IdentityGovernance and Intelligence.
The following table shows the mapping of IBM Security Identity Manager entitiesto IBM Security Identity Governance and Intelligence entities.
Table 2. Mapping of entity types
IBM Security Identity Manager entityIBM Security Identity Governance andIntelligence entity
Organization Org Unit
Organizational Unit Org Unit
Location Org Unit
Admin Domain Org Unit
Business Partner Organization Unit Org Unit
Organization Role External Role
Service Account Configuration(1) + Application(1)
Group Permission
ISIM System Role Permission
Person ISIG User
Account Account
Roles from IBM Security Identity Manager are synchronized as external roles inIBM Security Identity Governance and Intelligence. In previous releases of the DataIntegrator, roles were synchronized as business roles.
An external role in IBM Security Identity Governance and Intelligence is aread-only role that acts as a permission. An external role cannot be added,changed, or deleted through the user interface in IBM Security Identity Governanceand Intelligence. The Data Integrator uses APIs to perform the requiredsynchronization operations.
IBM Security Identity Manager access information for roles and groups issynchronized. In IBM Security Identity Manager, if access is enabled for a role or agroup and the access name is defined, then the access name is used as the externalrole name or the permission name. The access description is also synchronized forthe role and group if the access is enabled and the access description is defined.
Synchronization from IBM Security Identity Governance andIntelligence to IBM Security Identity Manager
When entitlement or authorization changes are made for a user in IBM SecurityIdentity Governance and Intelligence, information about the changes is stored asevents in the IBM Security Identity Governance and Intelligence data store. Theevents can be shared with external applications.
4 Integrating IBM Security Identity Manager with IBM Security Identity Governance and Intelligence
The ISIGtoISIM assembly line, which runs continuously, periodically processes thefollowing events in the IBM Security Identity Governance and Intelligence datastore and synchronizes them to IBM Security Identity Manager:v Adding permission to a user. An external role is handled as a permission.v Removing permission from a user. An external role is handled as a permission.v Locking or suspending an account.v Unlocking or restoring an account.v Creating an account.v Removing an account.
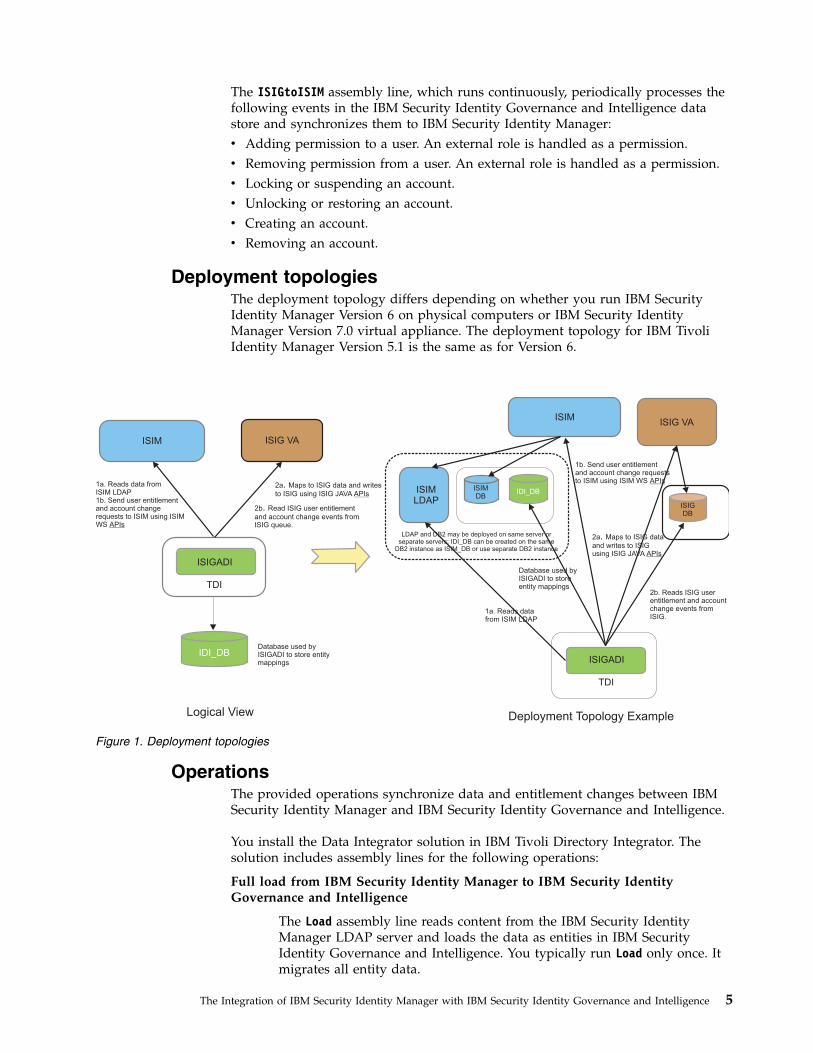
Deployment topologiesThe deployment topology differs depending on whether you run IBM SecurityIdentity Manager Version 6 on physical computers or IBM Security IdentityManager Version 7.0 virtual appliance. The deployment topology for IBM TivoliIdentity Manager Version 5.1 is the same as for Version 6.
OperationsThe provided operations synchronize data and entitlement changes between IBMSecurity Identity Manager and IBM Security Identity Governance and Intelligence.
You install the Data Integrator solution in IBM Tivoli Directory Integrator. Thesolution includes assembly lines for the following operations:
Full load from IBM Security Identity Manager to IBM Security IdentityGovernance and Intelligence
The Load assembly line reads content from the IBM Security IdentityManager LDAP server and loads the data as entities in IBM SecurityIdentity Governance and Intelligence. You typically run Load only once. Itmigrates all entity data.
1a. Reads data fromISIM LDAP1b. Send user entitlementand account changerequests to ISIM using ISIMWS APIs
2a Maps to ISIG data and writes
to ISIG using ISIG JAVA
.APIs
2b Read ISIG user entitlement
and account change events fromISIG queue.
.
ISIM
Database used byISIGADI to store entitymappings
ISIGADI
TDI
IDI_DB
ISIMLDAP
LDAP and DB2 may be deployed on same server orseparate servers; IDI_DB can be created on the same
DB2 instance as ISIM_DB or use DB2 instanceseparate
ISIGADI
TDI
1b. Send user entitlementand account change requeststo ISIM using ISIM WS APIs
1a. Reads datafrom ISIM LDAP
2b. Reads ISIG userentitlement and accountchange events fromISIG.
2a Maps to ISIG data
and writes to ISIGusing ISIG JAVA
.
APIs
Database used byISIGADI to storeentity mappings
Logical View Deployment Topology Example
ISIGDB
IDI_DBISIMDB
ISIG VA
ISIMISIG VA
Figure 1. Deployment topologies
The Integration of IBM Security Identity Manager with IBM Security Identity Governance and Intelligence 5
Incremental load (synchronization) from IBM Security Identity Manager to IBMSecurity Identity Governance and Intelligence
The Delta assembly line listens for changes in the LDAP server. It thenmigrates the detected changes to the corresponding entities in IBM SecurityIdentity Governance and Intelligence.
Entitlement fulfillment synchronization from IBM Security Identity Governanceand Intelligence to IBM Security Identity Manager
The ISIGtoISIM assembly line detects entitlement changes made in IBMSecurity Identity Governance and Intelligence. It fulfills those changes inIBM Security Identity Manager.
The following script files are also provided to start and stop the IBM TivoliDirectory Integrator server and assembly lines and to check the status of assemblylines.
startSrvStarts the IBM Tivoli Directory Integrator server, ibmdisrv, as a daemonprocess.
stopSrvStops the IBM Tivoli Directory Integrator server.
startALStarts the specified assembly line on the running IBM Tivoli DirectoryIntegrator server.
stopALStops the specified assembly line on the running IBM Tivoli DirectoryIntegrator server.
showStatShows the status of all assembly lines that are running on the IBM TivoliDirectory Integrator server.
For more information about these commands, see the following file on the installedsystem.
ISIGADI_SOL_DIR/isigadi_bin/README.txt
Installation and configuration roadmapThe roadmap provides general guidance for installing and configuring IBMSecurity Identity Governance and Administration Data Integrator.
You might find it useful to print the roadmap and refer to it as you set up IBMSecurity Identity Governance and Administration Data Integrator. Read theinformation topics that are referenced.
Table 3. Roadmap for the Data Integrator
Action Reference Comments
Prerequisites
Meet all the requirements forinstalling the IBM SecurityIdentity Governance andAdministration DataIntegrator.
“Installation prerequisites”on page 9
6 Integrating IBM Security Identity Manager with IBM Security Identity Governance and Intelligence
Table 3. Roadmap for the Data Integrator (continued)
Action Reference Comments
Install and configure Tivoli Directory Integrator
Install a supported version ofTivoli Directory Integrator
“Setting up IBM TivoliDirectory Integrator” onpage 10
If you have a supportedversion of Tivoli DirectoryIntegrator installed, youmight want to know whetherthe default solution directoryis used by other applicationto avoid a conflicting portnumber.
Note the followingabbreviations:
v TDI_INSTALL_DIR is theIBM Tivoli DirectoryIntegrator installationdirectory.
v TDI_SOL_DIR is the IBMTivoli Directory Integratordefault solution directory.
v ISIGADI_SOL_DIR is theIBM Security IdentityGovernance andAdministration DataIntegrator solutiondirectory.
Note: The ISIGADI_SOL_DIRcan be the same directory asTDI_SOL_DIR if no othersolution uses it.
Locate the default solutiondirectory for the IBM TivoliDirectory Integrator.
“Finding the default solutiondirectory for Tivoli DirectoryIntegrator” on page 11
If the Identity Governanceand Intelligence product usesan Oracle database, installthe Oracle JDBC driver.
“Installing the Oracle JDBCdriver” on page 12
Prepare the Security Identity Manager directory server for the Data Integrator
Enable changelog on theSecurity Identity Managerdirectory server.
“Enabling the changelog forIBM Security IdentityManager” on page 12
If SSL connections are usedfor the directory server,enable SSL.
“Enabling SSL (optional)” onpage 13
Create a database for the Data Integrator
Prepare the database. Preparing the database forIBM Security IdentityGovernance andAdministration DataIntegrator
Install IBM Security Identity Governance and Administration Data Integrator
The Integration of IBM Security Identity Manager with IBM Security Identity Governance and Intelligence 7
Table 3. Roadmap for the Data Integrator (continued)
Action Reference Comments
Install the IBM SecurityIdentity Governance andAdministration DataIntegrator solution.
“Installing the solution forIBM Security IdentityGovernance andAdministration DataIntegrator” on page 15
The Data Integratorinstallation places artifacts intwo locations.
v ISIGADI_SOL_DIR wherethe Data Integrator isinstalled.
v TDI_INSTALL_DIR/jarsdirectory where the .jarfiles are installed.
Configure IBM Security Identity Governance and Administration Data Integrator
In the ISIGADI_SOL_DIR/solution.properties file,add the ITDI_HOME property.
“Setting the ITDI_HOMEproperty” on page 21
Typically this value is equalto the TDI_INSTALL_DIR, forexampleITDI_HOME=c:\ProgramFiles\ibm\TDI\V7.1.1.
Create the Data Integratorserver startup file andconfigure the loggingbehavior.
See “Setting up the DataIntegrator server startup fileand logging behavior” onpage 21.
The file ensures that the DataIntegrator starts up correctly.You can also configure thelogging behavior so that thelogs roll over at a specifiedsize.
In the ISIGADI_SOL_DIR/ISIGADI directory, edit theproperty files according toyour environment.
v DBMAP.properties
v ISIG.properties
v ISIM.properties
“Setting and encryptingproperties” on page 23
Print the tables from“Configuration propertyfiles” on page 50 forreference.
Update ISIGADI_SOL_DIR/isigadi_bin/systype/setEnvto reflect your platforminformation.
“Configuring the setEnv file”on page 23
Configure the SSL certificatewith the Security IdentityManager virtual appliance.
“Configure the SSL certificatefor the IBM Security IdentityManager 7.0 virtualappliance” on page 24
1. “Checking the existingself-signed certificate” onpage 24
2. “Creating a self-signedcertificate and keystore”on page 25
3. “Updating the IBMSecurity Identity Managervirtual appliance servercertificate” on page 26
If you use an IBM SecurityIdentity Manager virtualappliance, these steps apply.
Import the IBM SecurityIdentity Manager certificate.
“Importing the certificatefrom IBM Security IdentityManager to IBM TivoliDirectory Integrator” onpage 27
If you use an IBM SecurityIdentity Manager virtualappliance with SSL, this taskapplies.
8 Integrating IBM Security Identity Manager with IBM Security Identity Governance and Intelligence
Table 3. Roadmap for the Data Integrator (continued)
Action Reference Comments
Define a host name. “Defining a host name in thehosts file” on page 14
Verify that the configurationis correct.
“Verifying the configuration”on page 28
Installation prerequisitesCheck your systems to be sure that the prerequisites are satisfied.
Operating System
v Red Hat Enterprise Linux 6.5v Windows 7
IBM Identity Manager
v IBM Tivoli Identity Manager– Version 5.1 fix pack 15 or later with IBM Tivoli Directory Server 6.3
and IBM WebSphere® Application Server 7.0v IBM Security Identity Manager
– Version 6.0 fix pack 4 or later with Tivoli Directory Server version 6.3– Version 7.0 virtual appliance with IBM Security Directory Server
Version 6.3.1– Version 7.0.0.2 virtual appliance with IBM Security Directory Server
Version 6.4– Version 7.0.1.3 virtual appliance with IBM Security Directory Server
Version 6.4
To run incremental loads, enable the changelog feature. See thedocumentation for IBM Security Directory Server. The simplest way to doit is to use the Configuration Tool, described in “Enabling the changelogfor IBM Security Identity Manager” on page 12.
IBM Security Identity Governance and Intelligence
v Version 5.2.2v Version 5.2.1v Version 5.2
If you are running version 5.1 or version 5.1.1 of IBM Security IdentityGovernance, you must use IBM Security Identity Governance andAdministration Data Integrator version 7.0.2.x.
IBM Tivoli Directory Integrator
Note the version, interim fix, and deployment requirements.v Version 7.1.1 with fix pack 4 or a later fix pack.
To determine the current version and fix pack level of your installation,perform the following steps:1. Go to the following directory in your installation of IBM Tivoli
Directory Integrator.TDI_INSTALL_DIR/bin/
2. Run the following command:applyUpdates -queryreg
The Integration of IBM Security Identity Manager with IBM Security Identity Governance and Intelligence 9
v Upgrade the IBM Tivoli Directory Integrator Java level to version 8.Install interim fix 7.1.1-TIV-TDI-LA0031. Go to http://www.ibm.com/support/docview.wss?uid=swg24042378 and follow the instructions.Select the version appropriate for your operating system. For example,for Windows 64-bit operating systems select refreshpack:8.0.3.0-JavaSE-JRE-Windowsx8664.
v Deployment requirementsUse a separate Tivoli Directory Integrator instance for the solution forIBM Security Identity Governance and Administration Data Integrator.The solution must have its own solution directory, and it must beconfigured to use its own ports. The instance can be installed on thesame host as other instances, but it must have its own configuration fileand use different ports.Before you install the solution for Data Integrator, set up the instance ofTivoli Directory Integrator as described in the following sections.– “Finding the default solution directory for Tivoli Directory Integrator”
on page 11.– “Installing the Oracle JDBC driver” on page 12.
Database
v DB2 Universal Database™ Enterprise Server– Version 10.1– Version 10.5 with fix pack 3 or laterData Integrator uses a database to store entity mapping information. Thedatabase can be created either on the same DB2® instance that SecurityIdentity Manager uses or on a separate DB2 instance.
v Oracle 12c database
Pre-installation setupSome setup is required before you install the solution for IBM Security IdentityGovernance and Administration Data Integrator.
The following setup tasks are required before you install IBM Security IdentityGovernance and Administration Data Integrator for the first time:v Understanding and setting up IBM Tivoli Directory Integratorv Enabling the changelog for IBM Security Identity Managerv Preparing the database for IBM Security Identity Governance and
Administration Data Integratorv Enabling SSLv Defining a host name
Setting up IBM Tivoli Directory IntegratorYou must understand the following information about IBM Tivoli DirectoryIntegrator.
During the installation of IBM Tivoli Directory Integrator, you are prompted toselect the Solution Directory for the Tivoli Directory Integrator Server. The solutiondirectory that is defined during installation is the default solution directory. It isthe working directory for the ITDI server instance, and it contains a server-specificproperties file, solution.properties. That file controls the configuration andbehavior of the server.
10 Integrating IBM Security Identity Manager with IBM Security Identity Governance and Intelligence
The Data Integrator solution consists of a group of assembly lines that are specifiedin a single XML solution configuration file, ISIGADI.xml. You can have one TivoliDirectory Integrator server instance that runs multiple solutions, or you can havemultiple server instances that run different solutions. Each Tivoli DirectoryIntegrator server instance must have its own Solution Directory andcorresponding configuration.
A Tivoli Directory Integrator server must bind to a port. The ports must beavailable, or the server does not start. The following settings in thesolution.properties file control the ports that are used.v api.remote.naming.port=1099 - Is the Java™ API port of the server.v web.server.port=1098 - Provides web service features, like the Tivoli Directory
Integrator browser dashboard.
When multiple Tivoli Directory Integrator servers run on the same computer, eachmust be given its own Solution Directory, and each solution.properties file mustdefine unique ports for the two port settings.
The Tivoli Directory Integrator server that runs on the default solution directory isoften called the default server.
If you are not using the default server for another solution, then you can use thedefault solution directory for IBM Security Identity Governance andAdministration Data Integrator. If you are already using the default solutiondirectory for another solution, then create a new solution directory for DataIntegrator and use a separate Tivoli Directory Integrator server instance.
The Delta and ISIGtoISIM assembly lines are designed to run all the time tosynchronize the data continuously between IBM Security Identity Manager andIBM Security Identity Governance and Intelligence.
This document assumes that you are using the default solution directory for DataIntegrator.
Do not use the Tivoli Directory Integrator server instance to run other solutions.
For more information, see IBM Knowledge Center documentation for IBM TivoliDirectory Integrator and the following resources.v Getting Started guide in the IBM Knowledge Center for IBM Tivoli Directory
Integrator Version 7.1.1v IBM Tivoli Directory Integrator blog articles
– What is the Solution Directory?– Changing the Solution Directory?– Portable Solutions
All relative paths in the solution are resolved from the Solution Directory. Forexample, the Tivoli Directory Integrator solution configuration file ISIGADI.xmlmust be in a Solution Directory subfolder named ISIGADI.
Finding the default solution directory for Tivoli DirectoryIntegratorYou must copy the extracted Data Integrator files into a Tivoli Directory Integratorsolution directory. Use this task to locate the default solution directory for TivoliDirectory Integrator.
The Integration of IBM Security Identity Manager with IBM Security Identity Governance and Intelligence 11
Procedure1. Go to the Tivoli Directory Integrator installation folder. For example, V7.1.1.
On Linux operating systems, the folder by default is/opt/IBM/TDI/V7.1.1
The location depends on how you installed Tivoli Directory Integrator.2. Go to the bin subfolder.3. Open the defaultSolDir script file.v For Windows operating systems, the file name is defaultSolDir.bat.v For Linux operating systems, the file name is defaultSolDir.sh.The script file contains a single line that sets the Solution Directory location.The specified directory is the default solution directory.
Installing the Oracle JDBC driverIf you use the Oracle database with IBM Security Identity Governance andIntelligence, install the Oracle JDBC driver to allow IBM Tivoli Directory Integratorto access the Oracle database.
About this task
If you use the Oracle database, then you need this driver so that the ISIGtoISIMassembly line can read the entitlement change events from the Oracle database.
If you use the DB2 database, then skip this step.
Procedure1. Download the ojdbc6.jar file for your Oracle database version from:
http://www.oracle.com/technetwork/database/features/jdbc/index-091264.html.
2. Copy the ojdbc6.jar file to the jars/3rdparty/others directory under theDirectory Integrator installation directory.
Enabling the changelog for IBM Security Identity ManagerThe changelog for IBM Security Identity Manager must be enabled. Use theConfiguration Tool to enable it.
About this task
For more information about changelog, see the Knowledge Center for IBM SecurityDirectory Server.
Procedure1. Stop the IBM Security Identity Manager server.2. Stop the IBM Tivoli Directory Integrator server.3. In the Configuration Tool, click Manage changelog in the task list on the left.4. In the Configure/unconfigure changelog window, select Enable change log
database.5. At Maximum number of log entries, click Unlimited for an unlimited number
of entries in the change log. To limit the number of entries, click Entries andtype the maximum number of entries you want recorded. The default is1,000,000 entries.
12 Integrating IBM Security Identity Manager with IBM Security Identity Governance and Intelligence
6. At Maximum age, accept the default of Unlimited if you want entries toremain in the change log indefinitely. You can also click Age and type thenumber of days and hours for which you want each entry to be kept.
7. Click Update.Messages are displayed while the change log is being enabled.
8. Click Close when the task is complete.
Enabling SSL (optional)If SSL connections to the IBM Security Identity Manager LDAP directory or thedatabase server are used, then you must import client certificates into the IBMTivoli Directory Integrator keystore.
About this task
See the IBM Tivoli Directory Integrator documentation at http://www.ibm.com/support/knowledgecenter/SSCQGF_7.1.1/com.ibm.IBMDI.doc_7.1.1/adminguide37.htm%23sslsupport for information about these procedures.
Database preparationThe Data Integrator requires a database in which to store referential links betweenIBM Security Identity Manager and IBM Security Identity Governance andIntelligence. It also uses the database to track the current change state in IBMSecurity Identity Manager.
The Data Integrator can use either a DB2 database or an Oracle 12 C database. Forthe supported levels of databases, see “Installation prerequisites” on page 9.
Preparing the DB2 database for IBM Security IdentityGovernance and Administration Data IntegratorYou can create a database in DB2 to work with the Data Integrator . You typicallyuse the DB2 instance that is part of the IBM Security Identity Manager installation.However, you can use a separate instance.
Before you begin
You must have administrative permissions.
About this task
To use the DB2 instance that is provided with IBM Security Identity Manager,create a database with 16k pagesize and create a database user. See IBMKnowledge Center for documentation specific to your version of DB2 andoperating system. http://www.ibm.com/support/knowledgecenter/SSEPGG/welcome?lang=en
Procedure1. Create a user with administrator privileges on the DB2 instance.2. Create the database and give the user the DBADM privileges by running these
commands:db2 CREATE DB ididb AUTOMATIC STORAGE YES PAGESIZE 16 Kdb2 CONNECT TO ididbdb2 GRANT DBADM ON DATABASE TO USER idiuser
Where
The Integration of IBM Security Identity Manager with IBM Security Identity Governance and Intelligence 13
ididb Is the name of the database.
idiuserIs the user name of the administrative user that you created.
Make a record of the database name, user ID, and password for this database.This information is needed for updating the DBMAP.properties file.
Note:
The Data Integrator uses the IBM Tivoli Directory Integrator System Store inthe database you created. The IBM Tivoli Directory Integrator documentationprovides information about database management systems other than DB2 forthe System Store. See http://www.ibm.com/support/knowledgecenter/SSCQGF_7.1.0/com.ibm.IBMDI.doc_7.1/adminguide67.htm%23wq456?lang=en.
Preparing the Oracle database for IBM Security IdentityGovernance and Administration Data IntegratorYou can create an Oracle 12c database to work with the Data Integrator.
About this task
With the version 7.0.7 release, you can use the Oracle 12c database to storereferential links between IBM Security Identity Manager and IBM Security IdentityGovernance and Intelligence and to track the current change state in IBM SecurityIdentity Manager.
Procedure1. If not already installed, install the Oracle 12c R1 database. See the Oracle
product documentation for instructions.2. Create a database ididb by using the Database Configuration Assistant (DBCA)
tool.v Use the database character set AL32UTF8.v For more information, see the Oracle 12c database documentation.
3. After you create the database, decide whether to create a user for the databaseor the table space for the user. If you create a user, then you must grant adminprivilege to this user. For more information, see the Oracle 12c documentation.If you don’t create a user, use the SYSTEM user and its password.
4. Copy the Oracle JDBC driver to the TDI_HOME/jars/3rdparty/others directory.Depending on the version of the JRE that the Tivoli Directory Integrator uses,copy the correct version of the JDBC driver to that directory. You cannot havemultiple Oracle JDBC drivers in that directory. If you have an old version ofthe Oracle JDBC driver in that directory, replace it with the new one. Forexample, the ojdbc6.jar file exists in that directory and you must use theojdbc7.jar file. You must delete the ojdbc6.jar file and replace it with theojdbc7.jar file.
5. Write down the SID, database admin user name and password, and thedatabase port number. You need this information to configure theDBMAP.properties file.
Defining a host name in the hosts fileTo access the IBM Security Identity Governance and Intelligence API, the systemwhere IBM Tivoli Directory Integrator is running must be able to resolve the hostname of the IBM Security Identity Governance and Intelligence server.
14 Integrating IBM Security Identity Manager with IBM Security Identity Governance and Intelligence
About this task
Normally DNS services for the network are configured so that hosts can find eachother.
If the systems cannot find each other through DNS, an issue with host namemapping might exist. To resolve the issue, modify the hosts file on the IBM TivoliDirectory Integrator server.
Procedure1. Locate the hosts file.
Windows systems/windows/system32/drivers/etc
Linux systems/etc
2. If you don't know the IP address and host name of the IBM Security IdentityGovernance and Intelligence server, follow these steps.a. Access the Virtual Appliance dashboard in IBM Security Identity
Governance and Intelligence.b. Select Manage System Settings > Application Interfaces > Interface 1. The
Adddress column shows the IPv4 address. The Interface FQDN columnshows the host name.
3. Add a line to the file for the host where IBM Security Identity Governance andIntelligence is running.Use the following format:ip_address host_name [short_name]
ip_addressThe IPv4 address of the host.
host_nameThe host name of the host.
short_nameYou can use this short name to access the server or in URL values inproperties files.
Example192.168.159.128 myisigserver.mydomain.com myisigserver
Note: The server does not need to be restarted when the hosts file is changed.
Installing the solution for IBM Security Identity Governance andAdministration Data Integrator
After you meet all prerequisites and perform the necessary pre-installation setup,install IBM Security Identity Governance and Administration Data Integrator.
Before you begin
Check the prerequisites for IBM Tivoli Directory Integrator. Seehttp://www.ibm.com/support/knowledgecenter/SSCQGF_7.1.1/com.ibm.IBMDI.doc_7.1.1/adminguide11.htm%23wq20?lang=en.
The Integration of IBM Security Identity Manager with IBM Security Identity Governance and Intelligence 15
These instructions are for a new installation of IBM Security Identity Governanceand Administration Data Integrator. If you are upgrading an existing installation,see “Roadmap to upgrade IBM Security Identity Governance and AdministrationData Integrator” on page 17.
About this task
The installed Directory Integrator solution for IBM Security Identity Governanceand Administration Data Integrator provides the assembly lines that are needed foroperations.
Procedure1. Copy the downloaded Data Integrator installation compressed file to a
temporary directory on the host where IBM Tivoli Directory Integrator isinstalled.
2. Extract the files from the compressed file. The following subdirectories arecreated:
jars Contains the JAR files that are needed for the Data Integrator.
licenseContains license files.
soldir Contains configuration files for the Data Integrator.The JAR files are in the following file hierarchy.jars
3rdpartyIBM
IGI52IGI521IGI522ISIGADIITIM51
connectorsisigadi-connectors-igi.jar
functionsisigadi-dn-child-of-fc.jarisigadi-dn-part-fc.jarisigadi-isim-adapter-handler-fc.jarisigadi-isim-api-fc.jarisigadi-normalize-dn-fc.jarisigadi-prop-value-oc.jar
3. Copy the jars files to the installation directory for IBM Tivoli DirectoryIntegrator.You might need to copy the files directory by directory, as shown in thefollowing steps.The following examples show the default installation directories.
Windows systemsc:\Program Files\IBM\TDI\V7.1.1\
Linux systemsopt/IBM/TDI/V7.1.1/
Make sure that write permissions are set on the directory.a. Copy the IGI52, IGI521, IGI522, ISIGADI, and ITIM51 directories to
TDI_INSTALL_DIR/jars/3rdparty/IBM.b. Rename and remove the directories for the version of IBM Security Identity
Governance and Intelligence.
16 Integrating IBM Security Identity Manager with IBM Security Identity Governance and Intelligence
v For Version 5.2.2, rename the IGI522 directory to IGI. Remove the IGI521and IGI52directories.
v For Version 5.2.1, rename the IGI521 directory to IGI. Remove the IGI522and IGI52 directories.
v For Version 5.2, rename the IGI52 directory to IGI. Remove the IGI522and IGI521 directories.
c. Copy the connectors/isigadi-connectors-igi.jar file toTDI_INSTALL_DIR/jars/connectors.
d. Copy all of the JAR files from the functions directory toTDI_INSTALL_DIR/jars/functions.
4. Take one of the following actions:v If you are not using IBM Security Identity Governance and Administration
Data Integrator with Version 5.1 of IBM Tivoli Identity Manager, skip thisstep.
v If you are using IBM Tivoli Identity Manager Version 5.1, then you mustmove the following Eclipse-specific files from TDI_INSTALL_DIR/jars/3rdparty/others to some temporary directory outside of theTDI_INSTALL_DIR/jars directory.org.eclipse.core.runtime.jarorg.eclipse.equinox.common.jarorg.eclipse.osgi.jar
5. Copy the ISIGADI and isigadi_bin directories from the extracted soldirdirectory to the solution directory of your installation of Tivoli DirectoryIntegrator.The abbreviation for the solution directory is ISIGADI_SOL_DIR.
Results
See “Files installed with IBM Security Identity Governance and AdministrationData Integrator” on page 58 for a list of installed files.
What to do next
After installation, you must configure Data Integrator before you can run it. See“Configuring” on page 21.
Roadmap to upgrade IBM Security Identity Governance andAdministration Data Integrator
These instructions provide the steps to upgrade an existing installation.
The upgrade process consists of upgrading the IBM Security Identity Governanceand Administration Data Integrator, rerunning the LOAD assembly line, andupdating the SDK.
Table 4. Upgrade roadmap
Action Reference
Upgrade to the current level of IBM SecurityIdentity Governance and AdministrationData Integrator.
“Upgrading the solution for IBM SecurityIdentity Governance and AdministrationData Integrator” on page 18
Update the SDK. “Updating the SDK for IBM SecurityIdentity Governance and Intelligence” onpage 20
The Integration of IBM Security Identity Manager with IBM Security Identity Governance and Intelligence 17
Table 4. Upgrade roadmap (continued)
Action Reference
Run the LOAD assembly line. “Rerun the LOAD assembly line” on page21
Upgrading the solution for IBM Security Identity Governanceand Administration Data Integrator
You can upgrade an existing version of IBM Security Identity Governance andAdministration Data Integrator.
About this task
You can upgrade the following versions of IBM Security Identity Governance andAdministration Data Integrator:
Table 5. Supported migration paths
Versions Comments
7.0.7 to 7.0.7.x When fix packs for version 7.0.7 are available, you canupdate an existing version 7.0.7 installation.
7.0.3.x, 7.0.4.x, 7.0.5.x, or7.0.6.x to 7.0.7
Migrate directly to the latest version of Data Integrator.
7.0.2.x to 7.0.7 You must first upgrade from your version of IBM SecurityIdentity Governance to IBM Security Identity Governanceand Intelligence version 5.2.1. Data Integrator version7.0.2.x was for use with IBM Security Identity Governance.
Procedure1. Copy the downloaded Data Integrator installation compressed file to a
temporary directory on the host where IBM Tivoli Directory Integrator isinstalled.
2. Extract the files. The following subdirectories are created:v The jars directory that contains the JAR files that are needed for the Data
Integrator.v The license directory that contains license files.v The soldir directory that contains configuration files for the Data
Integrator.
The JAR files are in the following file hierarchy.jars
3rdpartyIBM
IGI522IGI52IGI521ISIGADIITIM51
connectorsisigadi-connectors-igi.jar
functionsisigadi-dn-child-of-fc.jarisigadi-dn-part-fc.jar
18 Integrating IBM Security Identity Manager with IBM Security Identity Governance and Intelligence
isigadi-isim-adapter-handler-fc.jarisigadi-isim-api-fc.jarisigadi-normalize-dn-fc.jarisigadi-prop-value-oc.jar
3. Follow these steps to save directories from the existing solution directory to atemporary location. The variable, ver, is the version number of your currentinstallation of Data Integrator.a. Copy ISIGADI_SOL_DIR/ISIGADI to temp/ISIGADI_ver.b. Copy ISIGADI_SOL_DIR/isgadi_bin to temp/isigadi_bin_ver.
4. Remove the files and directories from your existing installation. You might nothave all of the files or directories that are listed, depending on what version ofData Integrator you have.a. Remove IGI, ISIG, ISIG511, ISIGADI, and ITIM51 from TDI_INSTALL_DIR/
jars/3rdparty/IBM/.b. Remove the following files from TDI_INSTALL_DIR/jars/.
Note: Do not remove the connectors or functions directories.connectors
isigadi-connectors.jarisigadi-connectors-forWAS.jarisigadi-connectors-igi.jar
functionsisigadi-dn-child-of-fc.jarisigadi-dn-part-fc.jarisigadi-isim-adapter-handler-fc.jarisigadi-isim-api-fc.jarisigadi-normalize-dn-fc.jarisigadi-prop-value-oc.jar
5. Copy the extracted .jar files to the installation directory for IBM TivoliDirectory Integrator. You might need to copy the files directory by directory,as shown in the following steps. The following examples show the defaultinstallation directories:
Example for Windows systems c:\Program Files\IBM\TDI\V7.1.1\
Example for Linux systems /opt/IBM/TDI/V7.1.1/
a. Make sure that write permissions are set on the directory.b. Copy the IGI52, IGI521, IGI522, ISIGADI, and ITIM51 directories to
TDI_INSTALL_DIR/jars/3rdparty/IBM.c. Rename and remove the directories for the version of IBM Security
Identity Governance and Intelligence.v For version 5.2.2, rename the IGI522 directory to IGI. Remove the IGI52
and IGI521 directories.v For version 5.2.1, rename the IGI521 directory to IGI. Remove the IGI522
and IGI52 directories.v For version 5.2, rename the IGI52 directory to IGI. Remove the IGI522
and IGI521 directoriesd. Copy the connectors/isigadi-connectors-igi.jar file to
TDI_INSTALL_DIR/jars/connectors.e. Copy all of the .jar files from the functions directory to
TDI_INSTALL_DIR/jars/functions.6. Take one of the following actions:
The Integration of IBM Security Identity Manager with IBM Security Identity Governance and Intelligence 19
v If you don't use IBM Security Identity Governance and Administration DataIntegrator with version 5.1 of IBM Tivoli Identity Manager, skip this step.
v If you use IBM Tivoli Identity Manager version 5.1, then you must movethe following Eclipse-specific files from TDI_INSTALL_DIR/jars/3rdparty/others to a temporary directory outside of the TDI_INSTALL_DIR/jarsdirectory (ISIGADI_SOL_DIR).org.eclipse.core.runtime.jarorg.eclipse.equinox.common.jarorg.eclipse.osgi.jar
7. Copy the ISIGADI and isigadi_bin directories from the extracted soldirdirectory to the solution directory of your installation of Tivoli DirectoryIntegrator.
8. Restore the script and properties files in ISIGADI and isigadi_bin from thebackup copies of ISIGADI_ver and isigadi_bin_ver.
9. Update the properties files in the ISIGADI_SOL_DIR/ISIGADI directory to meetyour needs. See “Configuration property files” on page 50.
10. If you did not do so, create the new server startup file and configure thelogging properties. See “Setting up the Data Integrator server startup file andlogging behavior” on page 21.
Results
See “Files installed with IBM Security Identity Governance and AdministrationData Integrator” on page 58.
Updating the SDK for IBM Security Identity Governance andIntelligence
To update the IBM Security Identity Governance and Intelligence SDK for the DataIntegrator, replace the IBM Security Identity Governance and Intelligence libraries.
About this task
The Data Integrator has dependencies on libraries in IBM Security IdentityGovernance and Intelligence. These libraries are a set of .jar files in theTDI_INSTALL_DIR/jars/3rdparty/IBM/IGI directory.
If the .jar files are updated when you apply fix packs to the IBM Security IdentityGovernance and Intelligence, you must reinstall them. You can save the old .jarfiles, by copying them to the temporary directory outside of theTDI_INSTALL_DIR/jars directory. For more information, see “Files installed withIBM Security Identity Governance and Administration Data Integrator” on page 58.
Procedure1. Stop the IBM Tivoli Directory Integrator server. See “Starting and stopping the
IBM Tivoli Directory Integrator server” on page 30.2. From the IBM Security Identity Governance and Intelligence virtual appliance
dashboard, click Configure Identity Governance > Custom File Management.3. From the Custom File Management page, select sdk from directories list.4. Select the sdk.zip file and click Download.5. Extract the file.6. Copy all the .jar files in the sdk/lib directory to TDI_INSTALL_DIR/jars/
3rdparty/IBM/IGI directory.
20 Integrating IBM Security Identity Manager with IBM Security Identity Governance and Intelligence

7. Restart the IBM Tivoli Directory Integrator server.
Rerun the LOAD assembly lineWhen you upgrade from version 7.0.2.x to version 7.0.7.x of the Data Integrator,you must run the Load assembly line again.
See “Starting an initial data load” on page 30.
Running the Load assembly line synchronizes organizational roles in IBM SecurityIdentity Manager as external roles in IBM Security Identity Governance andIntelligence.
In the 7.0.2.x versions of Data Integrator, organizational roles were synchronized asbusiness roles.
After you run the Load assembly line, the previous business roles remain in place.However, entitlement changes for these business roles are no longer synchronizedto IBM Security Identity Manager.
ConfiguringUse the following procedures to configure the IBM Security Identity Governanceand Administration Data Integrator solution.
Setting the ITDI_HOME propertyThe ISIGADI_SOL_DIR/solution.properties file must have the ITDI_HOME property.
About this task
The ISIGADI_SOL_DIR directory is the IBM Security Identity Governance andAdministration Data Integrator solution directory. This directory contains theISIGADI and the isigadi_bin directories.
Procedure
Set the ITDI_HOME property to the ITDI installation directory. Depending on youroperating system, use one of the following examples.
For Windows systemsITDI_HOME=C:\Program Files\ibm\TDI\V7.1.1
For Linux systemsITDI_HOME=/opt/IBM/TDI/V7.1.1
Setting up the Data Integrator server startup file and loggingbehavior
You must copy a file and modify several properties to ensure that the DirectoryIntegrator starts up and creates log files correctly.
Procedure1. Stop the server.
Windows systemsstopSrv
The Integration of IBM Security Identity Manager with IBM Security Identity Governance and Intelligence 21
Linux systems./stopSrv
2. Depending on your platform, perform one of these actions:v Copy the TDI_INSTALL_DIR/ibmdisrv.bat file and rename the copy to
TDI_INSTALL_DIR/ibmisigadisrv.bat.v Copy the TDI_INSTALL_DIR/ibmdisrv file and rename the copy to
TDI_INSTALL_DIR/ibmisigadisrv.3. Depending on your platform, perform one of these actions:v Edit the ibmisigadisrv.bat file and set the LOG_4J properties file location to
the ISIGADI_SOL_DIR. Change the path in the following informationLOG_4J=-Dlog4j.configuration="file:etc\log4j.properties"
to this path:LOG_4J=-Dlog4j.configuration="file:///%ISIGADI_SOL_DIR%\ISIGADI\log4j.properties"
v Edit the ibmisigadisrv file and set the LOG_4J properties file location to theISIGADI_SOL_DIR. Change the path in the following informationLOG_4J=-Dlog4j.configuration="file:etc\log4j.properties"
to this path:LOG_4J=-Dlog4j.configuration="file:$ISIGADI_SOL_DIR/ISIGADI/log4j.properties"
4. Depending on your platform, save the ibmisigadisrv.bat or theibmisigadisrv file.
5. Depending on your platform, perform one of these actions:v Copy the TDI_INSTALL_DIR/bin/tdisrvctl.bat file and rename the copy to
TDI_INSTALL_DIR/bin/isigaditdisrvctl.bat
v Copy the TDI_INSTALL_DIR/bin/tdisrvctl file and rename the copy toTDI_INSTALL_DIR/bin/isigaditdisrvctl
6. Edit the TDI_INSTALL_DIR/bin/isigaditdisrvctl.bat file or theTDI_INSTALL_DIR/bin/isigaditdisrvctl file and set the LOG_4J.properties filelocation to the ISIGADI_SOL_DIR directory. Depending on your platform,perform one of these actions:v Change LOG_4J=-Dlog4j.configuration="file:///%TDI_HOME_DIR%\etc\
tdisrvctl-log4j.properties" to LOG_4J=-Dlog4j.configuration="file:///%ISIGADI_SOL_DIR%\ISIGADI\log4j.properties"
v Change LOG_4J=-Dlog4j.configuration="file:etc/tdisrvctl-log4j.properties" to LOG_4J=-Dlog4j.configuration="file:$ISIGADI_SOL_DIR/ISIGADI/log4j.properties"
7. Save the isigaditdisrvctl.bat file or the isigaditdisrvctl file.8. Edit the ISIGADI_SOL_DIR\ISIGADI\log4j.properties file and set the following
properties:log4j.appender.Default.Append=truelog4j.appender.Default.MaxFileSize=1MBlog4j.appender.Default.MaxBackupIndex=10
Note: The log4j.appender.Default.MaxBackupIndex property is the numberof rolled over log files that you want to keep. If you need to keep more logfiles, you can set it higher.
9. Edit the ISIGADI_SOL_DIR\ISIGADI\log4j.properties file to modify the size ofthe assembly line log files and set the number of roll-over log files that youwant to keep. For example,log4j.appender.DeltaErr.MaxFileSize=1024KBlog4j.appender.DeltaErr.MaxBackupIndex=10
22 Integrating IBM Security Identity Manager with IBM Security Identity Governance and Intelligence
10. Save the ISIGADI_SOL_DIR\ISIGADI\log4j.properties file.11. Start the server.
Windows systemsstartSrv
Linux systems./startSrv
Setting and encrypting propertiesEdit properties files to set the properties that are needed to run Data Integrator.Add encryption for the properties to meet your needs.
About this task
You must configure properties for Data Integrator before you run it. You can addencryption for properties by adding the {protect}- prefix to the property key.
Procedure1. Set the properties in the Data Integrator properties files. See “Configuration
property files” on page 50.2. Add encryption for properties to meet your needs.
For example, to encrypt the isig.password property, make the followingmodification:{protect}-isig.password=Passw0rd
Enter the password value in clear text. It is encrypted the next time that thesolution is run.
Configuring the setEnv fileConfigure the setEnv file before you use the script files that are provided.
About this task
Script files start and stop the server, start and stop assembly lines, and show thestatus of assembly lines.
Before you run the script files, you must set the correct properties in the setEnvfile.
Procedure1. Locate the setEnv file.
It is in the following location:ISIGADI_SOL_DIR/isigadi_bin/systype/setEnv
Replace systype with your system type, either win or linux2. Update the setEnv file with the correct properties.
The setEnv file has comments in it that explain how to configure the file. Seealso the readme file in the ISIGADI_SOL_DIR/isigadi_bin/ directory.
3. On Linux systems, be sure that the script files are executable. Use the followingcommand to add execute permission.chmod +x filename
The Integration of IBM Security Identity Manager with IBM Security Identity Governance and Intelligence 23
Configure the SSL certificate for the IBM Security IdentityManager 7.0 virtual appliance
For Data Integrator to access the Web Services API on IBM Security IdentityManager version 7 virtual appliance, the IBM Security Identity Manager virtualappliance system must have a self-signed certificate that uses an explicit hostname.
Without a correct certificate, IBM Security Identity Governance and AdministrationData Integrator cannot access IBM Security Identity Manager Web Services APIs onan IBM Security Identity Manager virtual appliance system. This inability existseven if the server certificate is imported to the truststore file.
Check and update the self-signed certificate and keystore:1. Check the existing self-signed certificate. See “Checking the existing self-signed
certificate.”2. Create a self-signed certificate and keystore. See “Creating a self-signed
certificate and keystore” on page 25.3. Update the server certificate in IBM Security Identity Manager. See “Updating
the IBM Security Identity Manager virtual appliance server certificate” on page26.
Checking the existing self-signed certificateCheck the self-signed certificate for the IBM Security Identity Manager virtualappliance to see whether its subject is set to localhost.
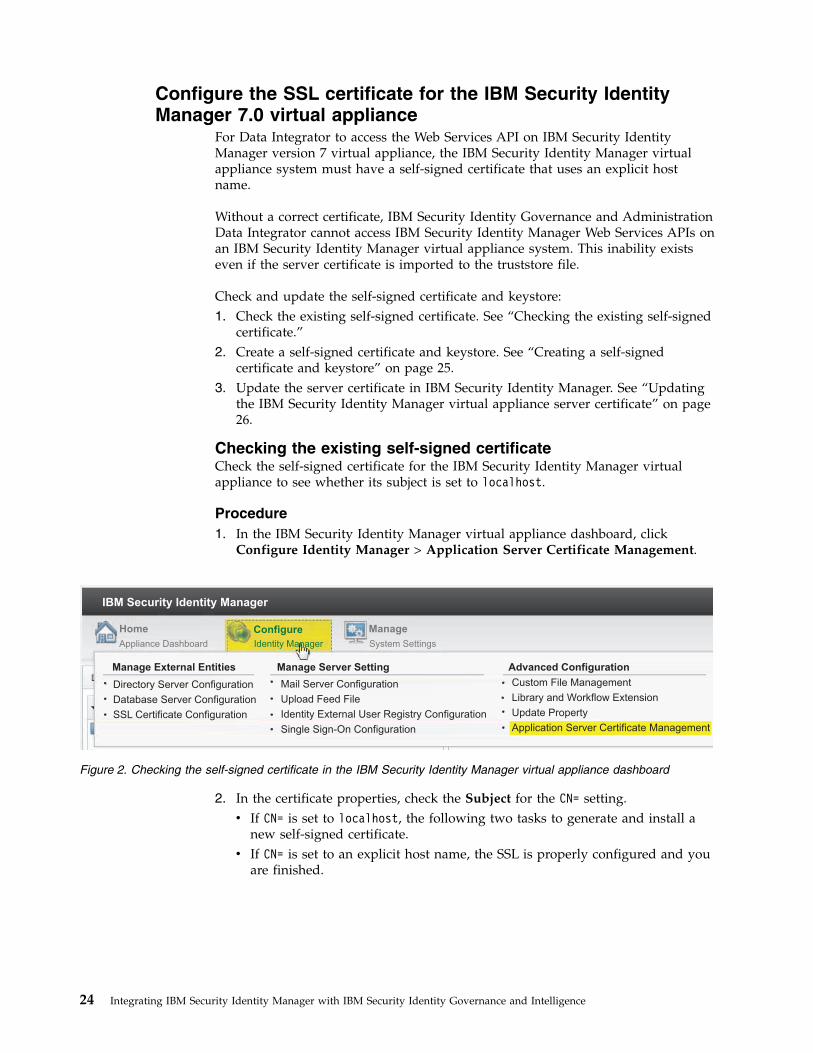
Procedure1. In the IBM Security Identity Manager virtual appliance dashboard, click
Configure Identity Manager > Application Server Certificate Management.
2. In the certificate properties, check the Subject for the CN= setting.v If CN= is set to localhost, the following two tasks to generate and install a
new self-signed certificate.v If CN= is set to an explicit host name, the SSL is properly configured and you
are finished.
IBM Security Identity Manager
Home
Appliance Dashboard System Settings
Manage
Identity Manager
Configure
Manage External Entities Manage Server Setting Advanced Configuration
Directory Server Configuration
Database Server Configuration
SSL Certificate Configuration
Mail Server Configuration
Upload Feed File
Identity External User Registry Configuration
Single Sign-On Configuration
Custom File Management
Library and Workflow Extension
Update Property
Application Server Certificate Management
Figure 2. Checking the self-signed certificate in the IBM Security Identity Manager virtual appliance dashboard
24 Integrating IBM Security Identity Manager with IBM Security Identity Governance and Intelligence
Creating a self-signed certificate and keystoreUse keytool to create a self-signed certificate and keystore.
Before you begin
Locate the keytool application, which manages keys and certificates. It comes withthe Java JDK. If the JDK is not installed, use the JDK provided with IBM TivoliDirectory Integrator 7.1.1. It is in TDI_INSTALL_DIR/jvm/jre/bin.
For example, on Windows systems, if the IBM Tivoli Directory Integrator isinstalled in C:\Program Files\IBM\TDI\V7.1.1, then keytool.exe is in C:\ProgramFiles\IBM\TDI\V7.1.1\jvm\jre\bin.
About this task
In the following procedure, note the following points.v The –storetype parameter is not specified. The default keystore type JKS is
used.v To answer the prompt What is your first and last name, enter the host name
for the IBM Security Identity Manager virtual appliance system.v Write down the password you enter for –storepass. You need it later.v For more information, see the keytool documentation.
Procedure1. Access the directory that contains keytool.exe. For example,
cd "C:\Program Files\IBM\TDI\V7.1.1\jvm\jre\bin"
2. Run keytool.keytool -genkey -keyalg RSA -alias isimva -keystore keystore.jks-storepass password -validity 360 -keysize 2048
3. Complete the certificate information that is requested as keytool runs.
Home Configure Manage
Appliance Dashboard Identity Manager System Settings
Application Server SSL Certificate
Update
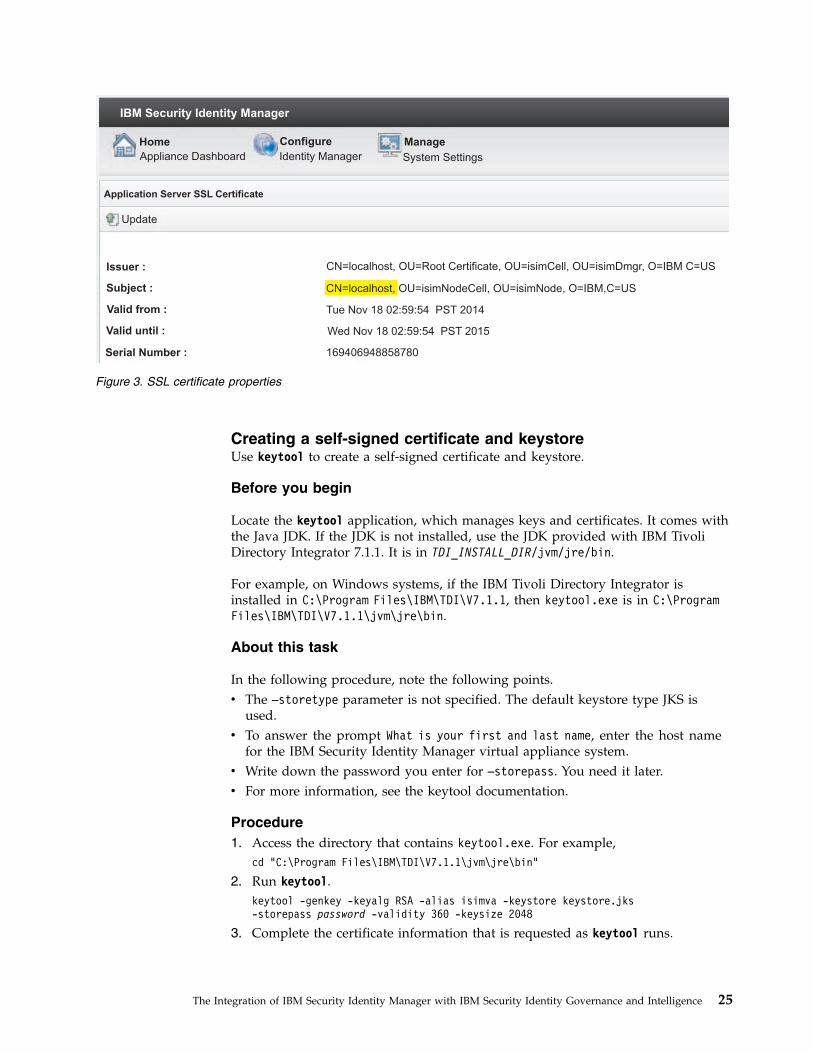
Subject :
Issuer :
Valid from :
Valid until :
Serial Number :
CN=localhost, OU=Root Certificate, OU=isimCell, OU=isimDmgr, O=IBM C=US
CN=localhost isimNode, OU=isimNodeCell, OU= , O=IBM,C=US
Tue Nov 18 02:59:54 PST 2014
Wed Nov 18 20102:59:54 PST 5
169406948858780
IBM Security Identity Manager
Figure 3. SSL certificate properties
The Integration of IBM Security Identity Manager with IBM Security Identity Governance and Intelligence 25
What is your first and last name?[Unknown]: myisimserver.mydomain.comWhat is the name of your organizational unit?[Unknown]: SecurityWhat is the name of your organization?[Unknown]: IBMWhat is the name of your City or Locality?[Unknown]: CMWhat is the name of your State or Province?[Unknown]: CAWhat is the two-letter country code for this unit?[Unknown]: USIs CN=myisimserver.mydomain.com, OU=Security, O=IBM, L=CM, ST=CA, C=US correct?(type "yes" or "no")[no]: yesEnter key password for:(RETURN if same as keystore password):
Updating the IBM Security Identity Manager virtual applianceserver certificateYou must upload the keystore file that you created to update the virtual applianceserver certificate.
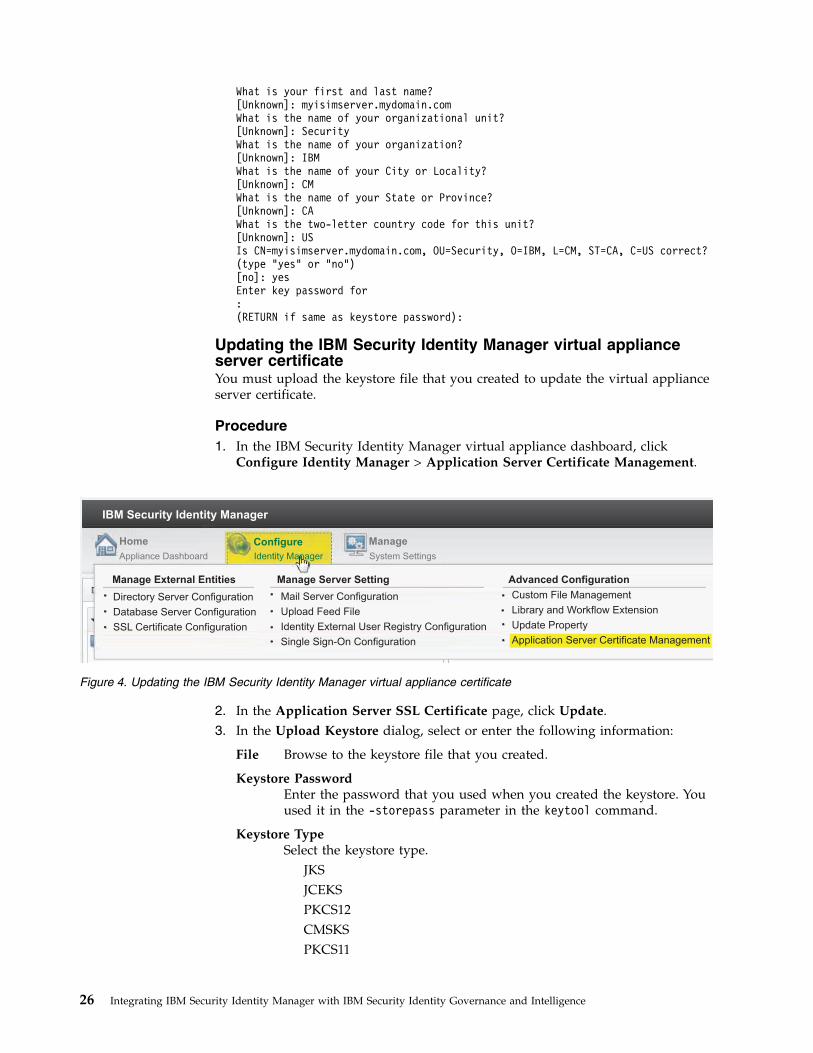
Procedure1. In the IBM Security Identity Manager virtual appliance dashboard, click
Configure Identity Manager > Application Server Certificate Management.
2. In the Application Server SSL Certificate page, click Update.3. In the Upload Keystore dialog, select or enter the following information:
File Browse to the keystore file that you created.
Keystore PasswordEnter the password that you used when you created the keystore. Youused it in the -storepass parameter in the keytool command.
Keystore TypeSelect the keystore type.
JKSJCEKSPKCS12CMSKSPKCS11
IBM Security Identity Manager
Home
Appliance Dashboard System Settings
Manage
Identity Manager
Configure
Manage External Entities Manage Server Setting Advanced Configuration
Directory Server Configuration
Database Server Configuration
SSL Certificate Configuration
Mail Server Configuration
Upload Feed File
Identity External User Registry Configuration
Single Sign-On Configuration
Custom File Management
Library and Workflow Extension
Update Property
Application Server Certificate Management
Figure 4. Updating the IBM Security Identity Manager virtual appliance certificate
26 Integrating IBM Security Identity Manager with IBM Security Identity Governance and Intelligence
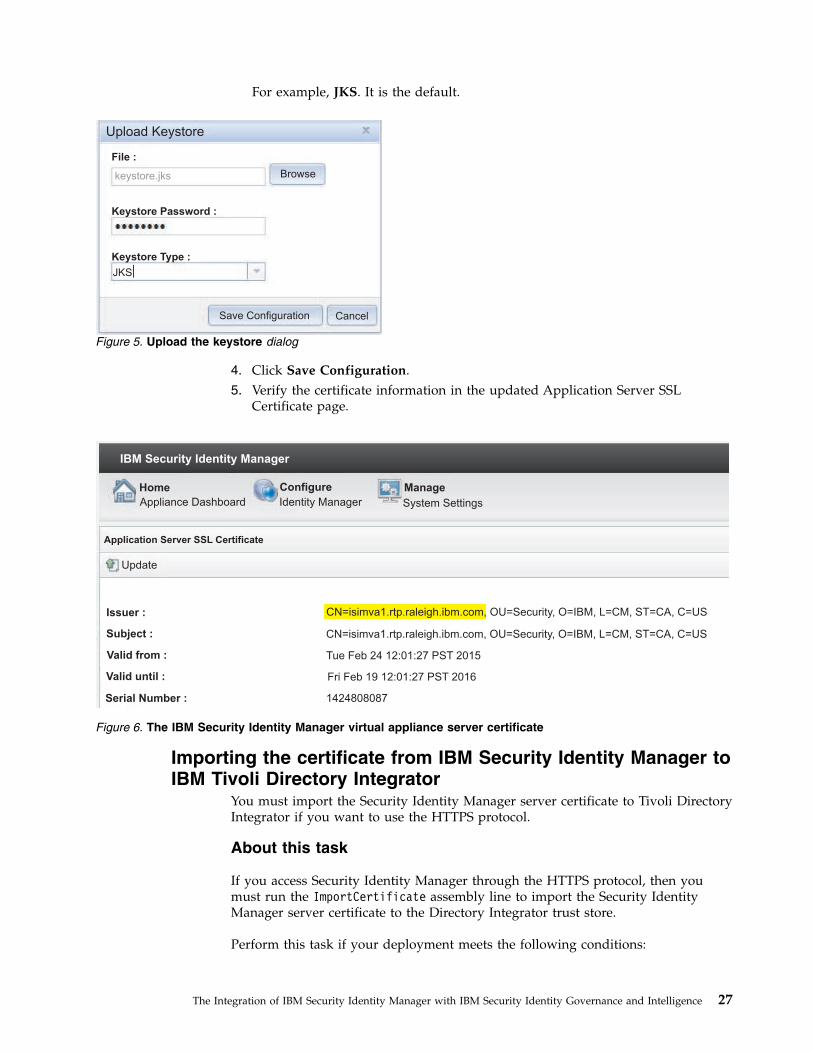
For example, JKS. It is the default.
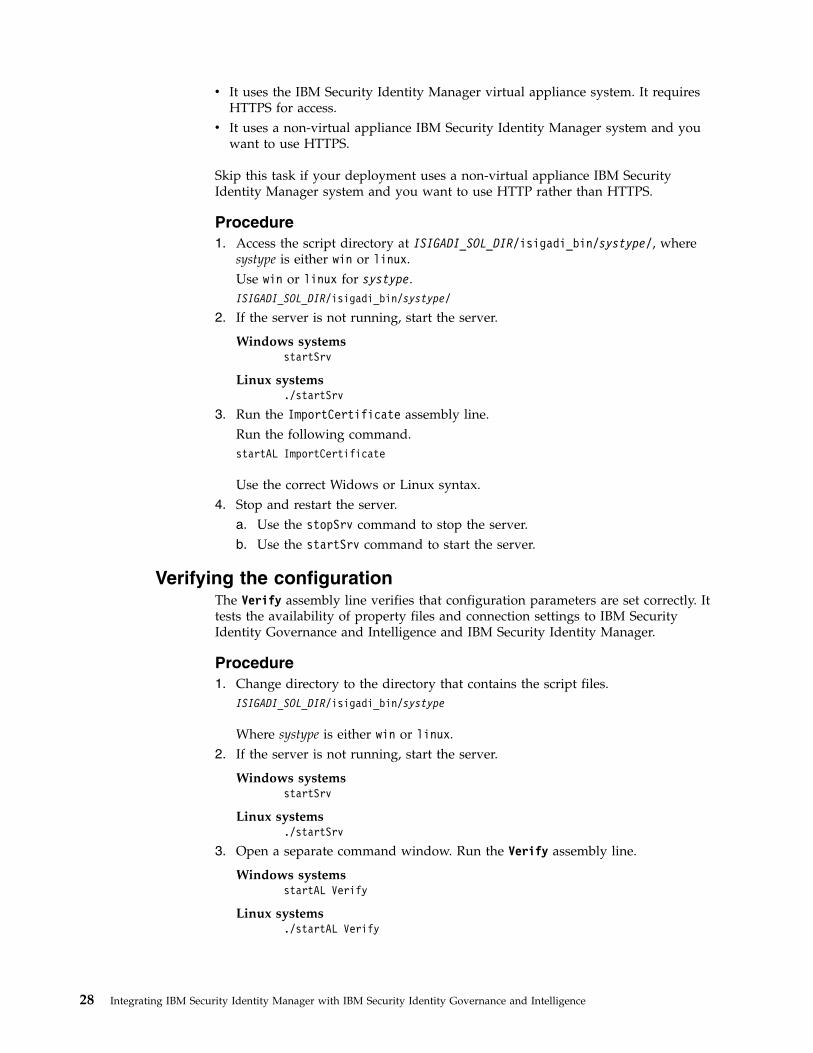
4. Click Save Configuration.5. Verify the certificate information in the updated Application Server SSL
Certificate page.
Importing the certificate from IBM Security Identity Manager toIBM Tivoli Directory Integrator
You must import the Security Identity Manager server certificate to Tivoli DirectoryIntegrator if you want to use the HTTPS protocol.
About this task
If you access Security Identity Manager through the HTTPS protocol, then youmust run the ImportCertificate assembly line to import the Security IdentityManager server certificate to the Directory Integrator trust store.
Perform this task if your deployment meets the following conditions:
Upload Keystore
File :
Keystore Password :
Keystore Type :
keystore.jks
JKS
Browse
Save Configuration Cancel
Figure 5. Upload the keystore dialog
Home Configure Manage
Appliance Dashboard Identity Manager System Settings
Application Server SSL Certificate
Update
Subject :
Issuer :
Valid from :
Valid until :
Serial Number :
CN=isimva1.rtp.raleigh.ibm.com, OU=Security, O=IBM, L=CM, ST=CA, C=US
CN=isimva1.rtp.raleigh.ibm.com, OU=Security, O=IBM, L=CM, ST=CA, C=US
Tue Feb 24 12:01:27 PST 2015
Fri Feb 19 12:01:27 PST 2016
1424808087
IBM Security Identity Manager
Figure 6. The IBM Security Identity Manager virtual appliance server certificate
The Integration of IBM Security Identity Manager with IBM Security Identity Governance and Intelligence 27
v It uses the IBM Security Identity Manager virtual appliance system. It requiresHTTPS for access.
v It uses a non-virtual appliance IBM Security Identity Manager system and youwant to use HTTPS.
Skip this task if your deployment uses a non-virtual appliance IBM SecurityIdentity Manager system and you want to use HTTP rather than HTTPS.
Procedure1. Access the script directory at ISIGADI_SOL_DIR/isigadi_bin/systype/, where
systype is either win or linux.Use win or linux for systype.ISIGADI_SOL_DIR/isigadi_bin/systype/
2. If the server is not running, start the server.
Windows systemsstartSrv
Linux systems./startSrv
3. Run the ImportCertificate assembly line.Run the following command.startAL ImportCertificate
Use the correct Widows or Linux syntax.4. Stop and restart the server.
a. Use the stopSrv command to stop the server.b. Use the startSrv command to start the server.
Verifying the configurationThe Verify assembly line verifies that configuration parameters are set correctly. Ittests the availability of property files and connection settings to IBM SecurityIdentity Governance and Intelligence and IBM Security Identity Manager.
Procedure1. Change directory to the directory that contains the script files.
ISIGADI_SOL_DIR/isigadi_bin/systype
Where systype is either win or linux.2. If the server is not running, start the server.
Windows systemsstartSrv
Linux systems./startSrv
3. Open a separate command window. Run the Verify assembly line.
Windows systemsstartAL Verify
Linux systems./startAL Verify
28 Integrating IBM Security Identity Manager with IBM Security Identity Governance and Intelligence
The output from this operation is displayed in the command line and theVerify.log file in the ISIGADI/logs subfolder of the IBM Tivoli DirectoryIntegrator Solution Directory. If all tests run successfully, it displays thefollowing message:Configuration successfully verified!
Otherwise, error messages indicate problems in the configuration.
Note:
v If the verification operation fails because of incorrect properties settings, stopthe IBM Tivoli Directory Integrator server. Update the properties and restartthe Tivoli Directory Integrator server. Run the Verify assembly line again.
v When you use the Data Integrator for IBM Tivoli Identity Manager 5.1 orIBM Security Identity Governance and Intelligence 5.2.1, or both, you mustaccept the signer certificate from the server. You are prompted for it, whenyou run the Verify assembly line for the first time. See “Accept signercertificate from IBM Tivoli Identity Manager 5.1 and the IBM SecurityIdentity Governance and Intelligence server” on page 62 in theTroubleshooting section.
Assembly line operationsAssembly lines in IBM Tivoli Directory Integrator provide load andsynchronization operations to transfer data between IBM Security Identity Managerand IBM Security Identity Governance and Intelligence.
Load Runs a full data load from IBM Security Identity Manager to IBM SecurityIdentity Governance and Intelligence. This assembly line provides theinitial data load. After the load finishes, you can run the Delta andISIGtoISIM assembly lines to keep the data updated.
LoadOU Runs a data load to add organizations and the sub organizational unitssuch as locations, admin domains, business partner units, andorganizational units.
LoadRoleRuns a data load to add roles as external roles.
LoadServiceRuns a data load to add the service as an application and accountconfiguration pair.
LoadGroupRuns a data load to add system groups and groups as permissions.
LoadPersonRuns a data load to add person entities.
LoadAccountRuns a data load to add account entities.
LoadAccountNGPRuns a data load to add accounts that have values on the attributes thatare mapped to permissions.
Delta Runs an incremental data synchronization from IBM Security IdentityManager to IBM Security Identity Governance and Intelligence.
The Integration of IBM Security Identity Manager with IBM Security Identity Governance and Intelligence 29
ISIGtoISIMSynchronizes entitlements from IBM Security Identity Governance andIntelligence to IBM Security Identity Manager.
Verify Verifies that configuration parameters are set correctly.
The Load assembly lines stop after the data load is complete. The Delta andISIGtoISIM assembly lines run continuously after you start them.
Starting and stopping the IBM Tivoli Directory Integratorserver
You must start the IBM Tivoli Directory Integrator before you run assembly lines.
About this task
The IBM Tivoli Directory Integrator server relies on Data Integrator propertiessettings. If you change the properties files after you start the IBM Tivoli DirectoryIntegrator server, you must restart it in order for the changes to take effect. See“Configuration property files” on page 50.
Procedure1. Change directory to the directory that contains the script files. The script files
are in the following directory.ISIGADI_SOL_DIR/isigadi_bin/systype
Replace systype with your system type, either win or linux.2. To start the IBM Tivoli Directory Integrator server, run the following command:v For Windows systems
startSrv
v For Linux systems./startSrv
3. To stop the IBM Tivoli Directory Integrator server, run the following command:v For Windows systems
stopSrv
v For Linux systems./stopSrv
Starting an initial data loadYou must migrate data from IBM Security Identity Manager to IBM SecurityIdentity Governance and Intelligence. Use this procedure to start the Load assemblyline to run the initial full data load.
Before you begin
Be sure that the IBM Tivoli Directory Integrator is running. See “Starting andstopping the IBM Tivoli Directory Integrator server.”
About this task
Use the Load assembly line to run a full data load from IBM Security IdentityManager to IBM Security Identity Governance and Intelligence.
30 Integrating IBM Security Identity Manager with IBM Security Identity Governance and Intelligence
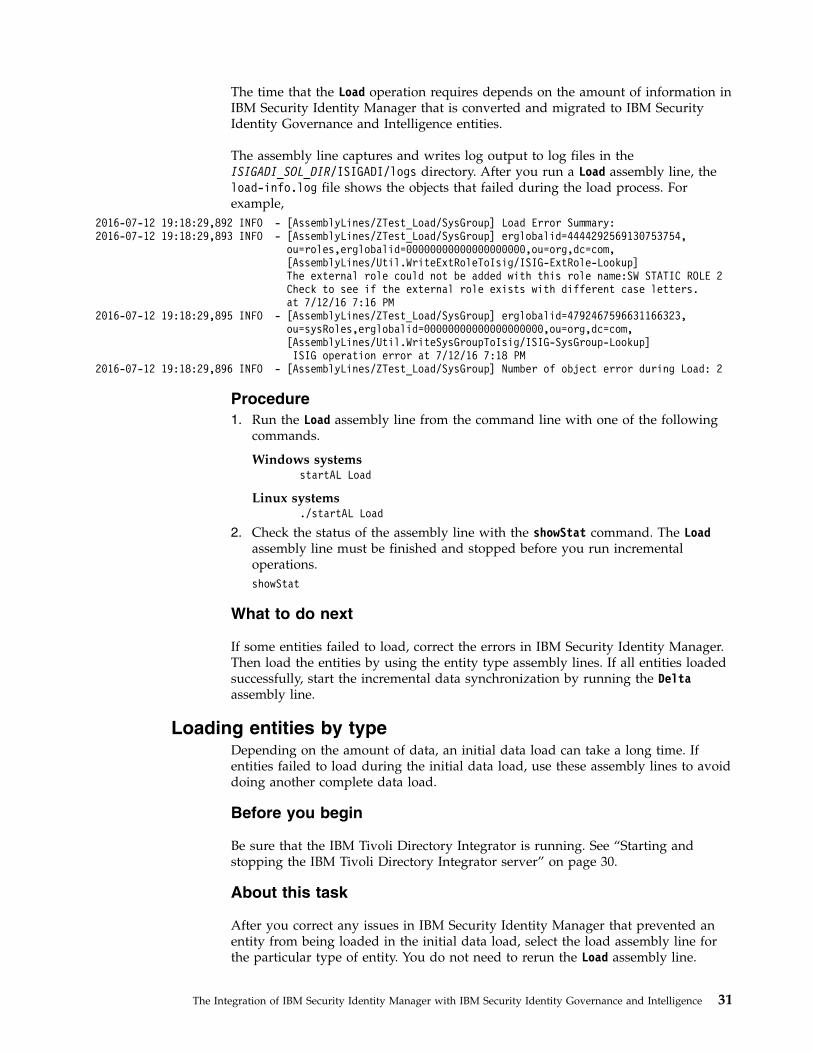
The time that the Load operation requires depends on the amount of information inIBM Security Identity Manager that is converted and migrated to IBM SecurityIdentity Governance and Intelligence entities.
The assembly line captures and writes log output to log files in theISIGADI_SOL_DIR/ISIGADI/logs directory. After you run a Load assembly line, theload-info.log file shows the objects that failed during the load process. Forexample,
2016-07-12 19:18:29,892 INFO - [AssemblyLines/ZTest_Load/SysGroup] Load Error Summary:2016-07-12 19:18:29,893 INFO - [AssemblyLines/ZTest_Load/SysGroup] erglobalid=4444292569130753754,
ou=roles,erglobalid=00000000000000000000,ou=org,dc=com,[AssemblyLines/Util.WriteExtRoleToIsig/ISIG-ExtRole-Lookup]The external role could not be added with this role name:SW STATIC ROLE 2Check to see if the external role exists with different case letters.at 7/12/16 7:16 PM
2016-07-12 19:18:29,895 INFO - [AssemblyLines/ZTest_Load/SysGroup] erglobalid=4792467596631166323,ou=sysRoles,erglobalid=00000000000000000000,ou=org,dc=com,[AssemblyLines/Util.WriteSysGroupToIsig/ISIG-SysGroup-Lookup]ISIG operation error at 7/12/16 7:18 PM
2016-07-12 19:18:29,896 INFO - [AssemblyLines/ZTest_Load/SysGroup] Number of object error during Load: 2
Procedure1. Run the Load assembly line from the command line with one of the following
commands.
Windows systemsstartAL Load
Linux systems./startAL Load
2. Check the status of the assembly line with the showStat command. The Loadassembly line must be finished and stopped before you run incrementaloperations.showStat
What to do next
If some entities failed to load, correct the errors in IBM Security Identity Manager.Then load the entities by using the entity type assembly lines. If all entities loadedsuccessfully, start the incremental data synchronization by running the Deltaassembly line.
Loading entities by typeDepending on the amount of data, an initial data load can take a long time. Ifentities failed to load during the initial data load, use these assembly lines to avoiddoing another complete data load.
Before you begin
Be sure that the IBM Tivoli Directory Integrator is running. See “Starting andstopping the IBM Tivoli Directory Integrator server” on page 30.
About this task
After you correct any issues in IBM Security Identity Manager that prevented anentity from being loaded in the initial data load, select the load assembly line forthe particular type of entity. You do not need to rerun the Load assembly line.
The Integration of IBM Security Identity Manager with IBM Security Identity Governance and Intelligence 31
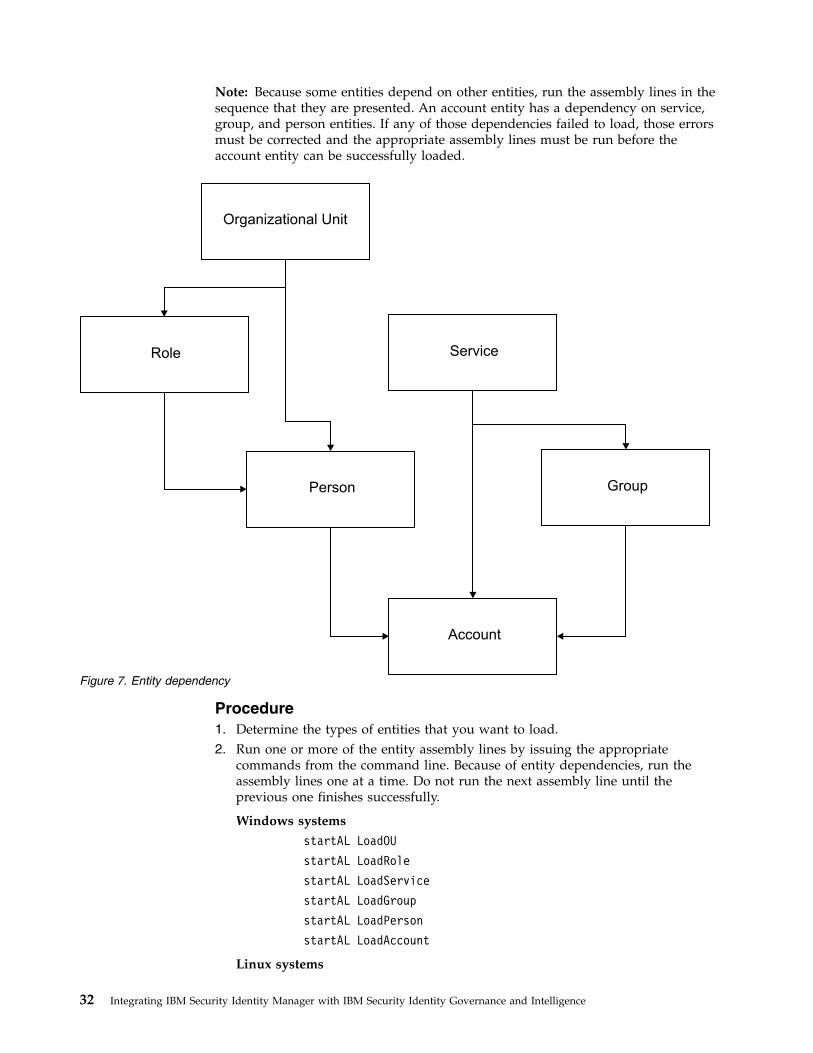
Note: Because some entities depend on other entities, run the assembly lines in thesequence that they are presented. An account entity has a dependency on service,group, and person entities. If any of those dependencies failed to load, those errorsmust be corrected and the appropriate assembly lines must be run before theaccount entity can be successfully loaded.
Procedure1. Determine the types of entities that you want to load.2. Run one or more of the entity assembly lines by issuing the appropriate
commands from the command line. Because of entity dependencies, run theassembly lines one at a time. Do not run the next assembly line until theprevious one finishes successfully.
Windows systems
startAL LoadOU
startAL LoadRole
startAL LoadService
startAL LoadGroup
startAL LoadPerson
startAL LoadAccount
Linux systems
Organizational Unit
Role
Person Group
Service
Account
Figure 7. Entity dependency
32 Integrating IBM Security Identity Manager with IBM Security Identity Governance and Intelligence
./startAL LoadOU
./startAL LoadRole
./startAL LoadService
./startAL LoadGroup
./startAL LoadPerson
./startAL LoadAccount
3. Check the status of the assembly line with the showStat command.showStat
What to do next
After the entities are successfully loaded, run the Delta assembly line to startincremental data synchronization.
Starting incremental data synchronizationAfter the initial full data load is completed, start the Delta assembly line tosynchronize new data.
Before you begin
Be sure that the IBM Tivoli Directory Integrator is running. See “Starting andstopping the IBM Tivoli Directory Integrator server” on page 30.
About this task
Use the Delta assembly line to run an incremental data synchronization from IBMSecurity Identity Manager to IBM Security Identity Governance and Intelligence.
Procedure1. Run the Delta assembly line from the command line with one of the following
commands:
Windows systemsstartAL Delta
Linux systems./startAL Delta
2. To check the status of the assembly lines, use the showStat command.showStat
If any write operations to IBM Security Identity Governance and Intelligencefail during a Load or Delta operation, a repair record is captured in the repairlist. The Delta operation periodically retries these items with a Repairoperation.If Repair is successful, the item is removed from the list. You can repeat therepair, while you work with issues that block the write operations. See “Repairlist” on page 60 in the Troubleshooting section.
Starting entitlement fulfillment synchronizationAfter the initial full load is complete, start the ISIGtoISIM assembly line tosynchronize entitlement fulfillments from IBM Security Identity Governance andIntelligence to IBM Security Identity Manager
The Integration of IBM Security Identity Manager with IBM Security Identity Governance and Intelligence 33
Before you begin
Be sure that the IBM Tivoli Directory Integrator is running. See “Starting andstopping the IBM Tivoli Directory Integrator server” on page 30.
Procedure1. Run the ISIGtoISIM assembly line from the command line with one of the
following commands: After the initial full load is completed, run theentitlement fulfillment synchronization process.
Windows systemsstartAL ISIGtoISIM
Linux systems./startAL ISIGtoISIM
2. To check the status of the assembly lines, use the showStat command.showStat
Stopping incremental synchronizationThe Delta assembly line runs continuously after it is started. If you need to stopincremental synchronization, you must stop the Delta and DeltaSynchassemblylines.
Before you begin
Be sure that the IBM Tivoli Directory Integrator is running. See “Starting andstopping the IBM Tivoli Directory Integrator server” on page 30.
About this task
To stop incremental synchronization, both the Delta and the DeltaSynch assemblylines must be stopped at the same time. If you stop the DeltaSynch assembly lineonly, the Delta assembly line restarts the DeltaSynch assembly line automatically. Ifyou stop the Delta assembly line only, then the DeltaSynch assembly line still runs.
Procedure
Use one of these methods to stop the incremental synchronization operationsv Run the following command:
stopAL Delta,DeltaSynch
v Use the browser-based Dashboard in IBM Tivoli Directory Integrator. Stop theDelta assembly line. Then, stop the DeltaSynchassembly line.
Stopping entitlement fulfillment synchronization operationsThe ISIGtoISIM assembly line runs continuously after it is started. If you need tostop the fulfillment synchronization, you can either stop just the ISIGtoISIM or allthe assembly lines.
Before you begin
Be sure that the IBM Tivoli Directory Integrator is running. See “Starting andstopping the IBM Tivoli Directory Integrator server” on page 30.
34 Integrating IBM Security Identity Manager with IBM Security Identity Governance and Intelligence
About this task
You must stop the assembly line to stop entitlement fulfillment synchronization.
Procedure
Issue one of the following commands.v Stop the ISIGtoISIM assembly line.
stopAL ISIGtoISIM
v Stop all assembly lines.stopAL all
Monitoring assembly linesThe Load, Delta, and ISIGtoISIM assembly lines display error messages in theconsole and write them to the log files. You can use the console to monitor theprogress of operations.
You can use the IBM Tivoli Directory Integrator Dashboard to see that an assemblyline is running. You can also use it to start or stop assembly lines. The Dashboardis a web application that starts when the Tivoli Directory Integrator server instancestarts. For each server instance, the Dashboard runs on a port that is specified bythe web.server.port property in your solution.properties file.
To access the Dashboard, enter the URL and port number of the Tivoli DirectoryIntegrator server, followed by the path /dashboard.
The example that is shown in the following figure uses my_tdi.mydomain.com as theURL and the default port 1098:http://my_tdi.mydomain.com:1098/dashboard
The Integration of IBM Security Identity Manager with IBM Security Identity Governance and Intelligence 35
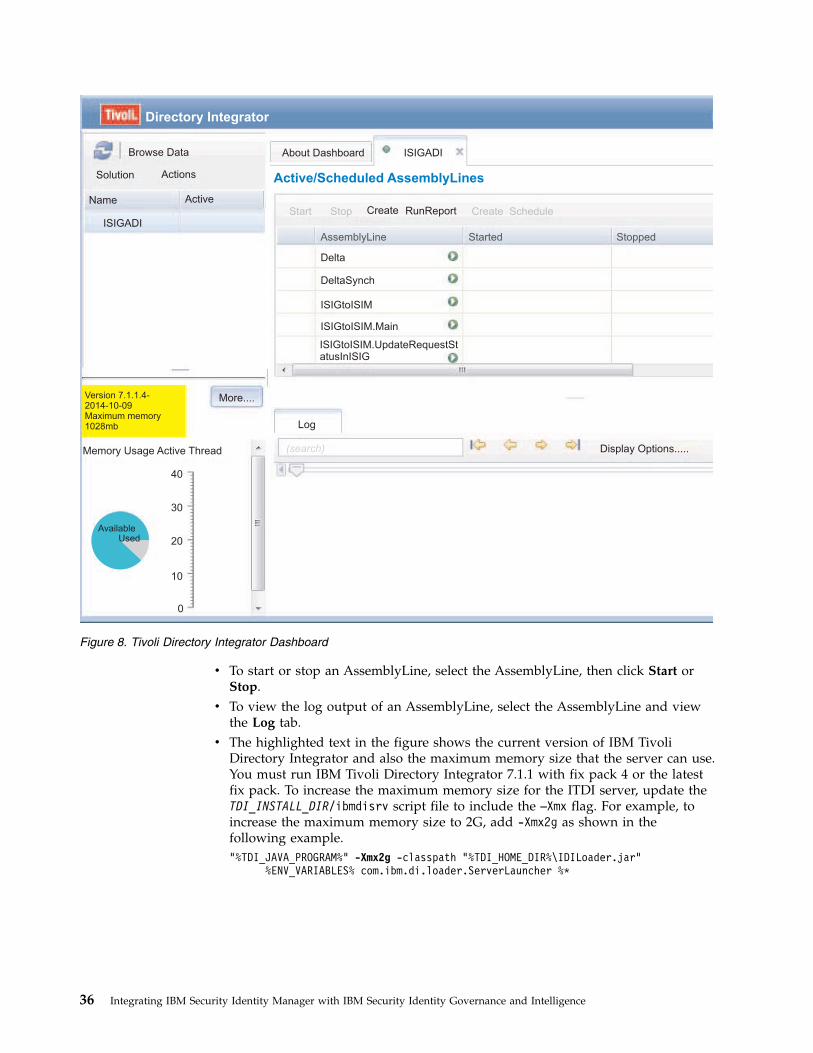
v To start or stop an AssemblyLine, select the AssemblyLine, then click Start orStop.
v To view the log output of an AssemblyLine, select the AssemblyLine and viewthe Log tab.
v The highlighted text in the figure shows the current version of IBM TivoliDirectory Integrator and also the maximum memory size that the server can use.You must run IBM Tivoli Directory Integrator 7.1.1 with fix pack 4 or the latestfix pack. To increase the maximum memory size for the ITDI server, update theTDI_INSTALL_DIR/ibmdisrv script file to include the –Xmx flag. For example, toincrease the maximum memory size to 2G, add -Xmx2g as shown in thefollowing example."%TDI_JAVA_PROGRAM%" -Xmx2g -classpath "%TDI_HOME_DIR%\IDILoader.jar"
%ENV_VARIABLES% com.ibm.di.loader.ServerLauncher %*
Directory Integrator
Browse Data
Solution Actions
Name Active
ISIGADI
About Dashboard ISIGADI
Active/Scheduled AssemblyLines
Start Stop Create RunReport Create Schedule
AssemblyLine StoppedStarted
Delta
DeltaSynch
ISIGtoISIM
ISIGtoISIM.Main
ISIGtoISIM.UpdateRequestStatusInISIG
More....Version 7.1.1.4-2014-10-09Maximum memory1028mb
Memory Usage Active Thread
Log
Display Options.....
AvailableUsed
(search)
40
30
20
10
0
Figure 8. Tivoli Directory Integrator Dashboard
36 Integrating IBM Security Identity Manager with IBM Security Identity Governance and Intelligence
Data Integrator support for adaptersYou can configure the Data Integrator to support extra IBM Security IdentityManager adapters.
POSIX adapters and LDAP adapters are supported by default.
Manually customizing IBM Security Identity Manager AdaptersFor Data Integrator version 7.0.4, you must manually customize support for moreIBM Security Identity Manager adapters. Starting with Data Integrator version7.0.5, adapters are supported automatically.
If you must customize your Data Integrator version to support adapters that usethe complex group attribute, see also “Configuring adapters with complex groupattributes” on page 38.
The Data Integrator supports IBM Security Identity Manager adapters byspecifying the mapping of the group metadata in the ATTRIBUTES.properties file.POSIX adapters and LDAP adapters are supported by default. If other adapters areused, add more mapping properties.
Note: After you change properties files, you must restart the IBM Tivoli DirectoryIntegrator server to put the changes into effect.
For each adapter, add the following properties:class.$account_custom_class$.group=$group_membership_attr$class.$group_custom_class$.description=$group_description_attr$class.$group_custom_class$.name=$group_name_attr$class.$account_custom_class$.groupitem.name=$group_id_attr$accountprofile.$service_profile_name$=$account_profile_name$
The parameters in the properties have the following definitions:
$account_custom_class$The account custom class for the adapter that is defined in the accountprofile.
$group_custom_class$The group custom class for the adapter that is defined in the group profile.
$group_membership_attr$The account attribute for the group membership.
$group_name_attr$The name attribute that is defined in the group profile.
$group_description_attr$The description attribute that is defined in the group profile.
$group_id_attr$The ID attribute that is defined in the group profile.
$service_profile_name$The name of the service profile. The erobjectprofilename of the serviceprofile.
$account_profile_name$The name of the account profile. The erobjectprofilename of the accountprofile.
The Integration of IBM Security Identity Manager with IBM Security Identity Governance and Intelligence 37
Example of Posix Linux adapter mappingsclass.erPosixLinuxAccount.group=erPosixSecondGroupclass.erPosixLinuxGroup.description=erGroupDescriptionclass.erPosixLinuxGroup.name=erPosixGroupNameclass.erPosixLinuxAccount.groupitem.name=erPosixGroupNameaccountprofile.PosixLinuxProfile=PosixLinuxAccount
Example of LDAP adapter mappingsclass.erLDAPUserAccount.group=erldapgroupnameclass.erLDAPGroupAccount.description=erLdapGroupDescriptionclass.erLdapGroupAccount.name=erLdapServiceGroupclass.erLDAPUserAccount.groupitem.name=erLdapGroupRDNaccountprofile.LdapProfile=LdapAccount
Example of Active Directory adapter mappingsclass.erADAccount.group=ergroupclass.erADGroup.description=erADGroupDescriptionclass.erADGroup.name=erADGroupDNclass.erADAccount.groupitem.name=erADGroupDNaccountprofile.ADprofile=ADAccount
Configuring adapters with complex group attributesThe Data Integrator requires more configuration to support IBM Security IdentityManager adapters with complex group attributes, such as the Oracle eBS adapter.
Before you begin
Starting with Data Integrator version 7.0.5, you must copy the handler .jar files,step 1, only. You no longer need to update the ATTRIBUTE.properties file, step 2.
You must have the following software:v Supported version of IBM Security Identity Manager.
– Version 6 fix pack 10 (6.0.0.10) or a later fix pack– Version 7.0.1 virtual appliance or a later fix pack.
v Adapter package that provides a complex attribute handler for complex groups.The following Oracle eBS adapter packages are listed as an example of anadapter with the complex attribute handler.Extract the contents.– IBM Security Identity Manager 6 Oracle eBusiness Suite adapter, version
6.0.10– IBM Security Identity Manager 7 Oracle eBusiness Suite adapter, version
7.0.10
About this task
Copy the handler .jar file from the extracted adapter package and place it whereIBM Tivoli Directory Integrator can parse the complex attributes.
Starting with Data Integrator version 7.0.5, you must copy the handler .jar files,step 1, only. You no longer need to update the ATTRIBUTE.properties file, step 2.
Procedure1. Copy the handler JAR file from the adapter package to TDI_HOME/jars/
3rdparty/IBM/ISIGADI.The handler JAR files use the following naming convention:
38 Integrating IBM Security Identity Manager with IBM Security Identity Governance and Intelligence
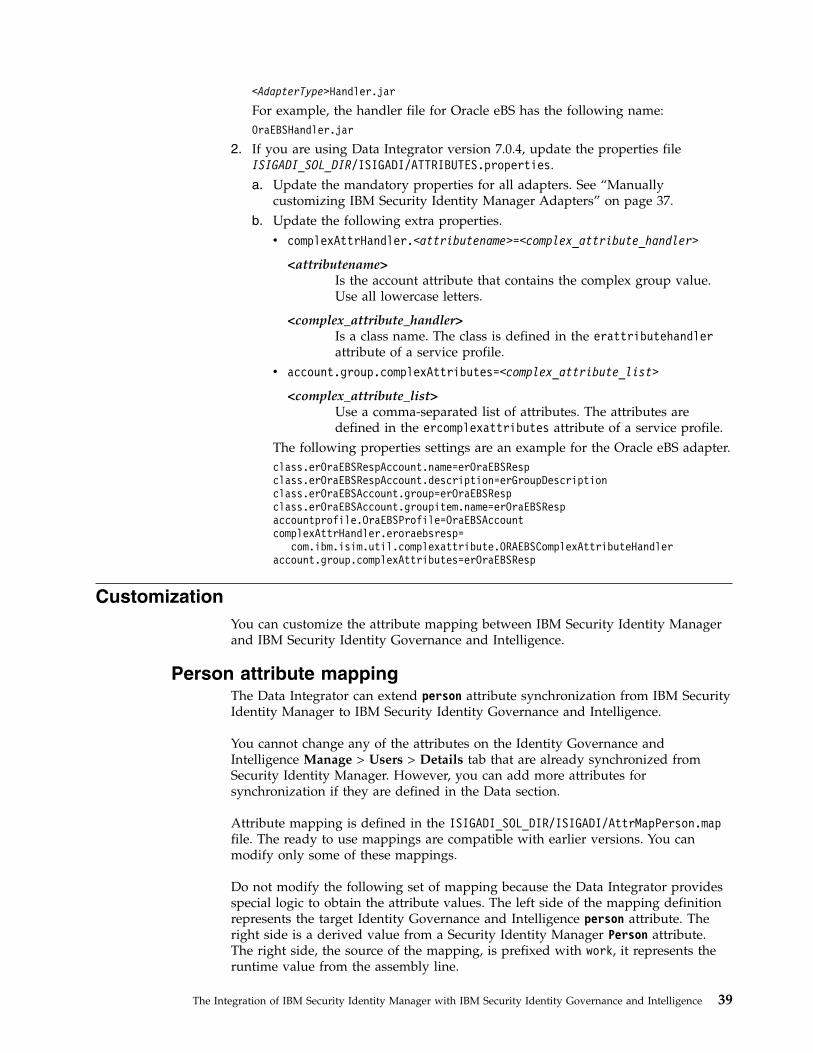
<AdapterType>Handler.jar
For example, the handler file for Oracle eBS has the following name:OraEBSHandler.jar
2. If you are using Data Integrator version 7.0.4, update the properties fileISIGADI_SOL_DIR/ISIGADI/ATTRIBUTES.properties.a. Update the mandatory properties for all adapters. See “Manually
customizing IBM Security Identity Manager Adapters” on page 37.b. Update the following extra properties.v complexAttrHandler.<attributename>=<complex_attribute_handler>
<attributename>Is the account attribute that contains the complex group value.Use all lowercase letters.
<complex_attribute_handler>Is a class name. The class is defined in the erattributehandlerattribute of a service profile.
v account.group.complexAttributes=<complex_attribute_list>
<complex_attribute_list>Use a comma-separated list of attributes. The attributes aredefined in the ercomplexattributes attribute of a service profile.
The following properties settings are an example for the Oracle eBS adapter.class.erOraEBSRespAccount.name=erOraEBSRespclass.erOraEBSRespAccount.description=erGroupDescriptionclass.erOraEBSAccount.group=erOraEBSRespclass.erOraEBSAccount.groupitem.name=erOraEBSRespaccountprofile.OraEBSProfile=OraEBSAccountcomplexAttrHandler.eroraebsresp=
com.ibm.isim.util.complexattribute.ORAEBSComplexAttributeHandleraccount.group.complexAttributes=erOraEBSResp
CustomizationYou can customize the attribute mapping between IBM Security Identity Managerand IBM Security Identity Governance and Intelligence.
Person attribute mappingThe Data Integrator can extend person attribute synchronization from IBM SecurityIdentity Manager to IBM Security Identity Governance and Intelligence.
You cannot change any of the attributes on the Identity Governance andIntelligence Manage > Users > Details tab that are already synchronized fromSecurity Identity Manager. However, you can add more attributes forsynchronization if they are defined in the Data section.
Attribute mapping is defined in the ISIGADI_SOL_DIR/ISIGADI/AttrMapPerson.mapfile. The ready to use mappings are compatible with earlier versions. You canmodify only some of these mappings.
Do not modify the following set of mapping because the Data Integrator providesspecial logic to obtain the attribute values. The left side of the mapping definitionrepresents the target Identity Governance and Intelligence person attribute. Theright side is a derived value from a Security Identity Manager Person attribute.The right side, the source of the mapping, is prefixed with work, it represents theruntime value from the assembly line.
The Integration of IBM Security Identity Manager with IBM Security Identity Governance and Intelligence 39
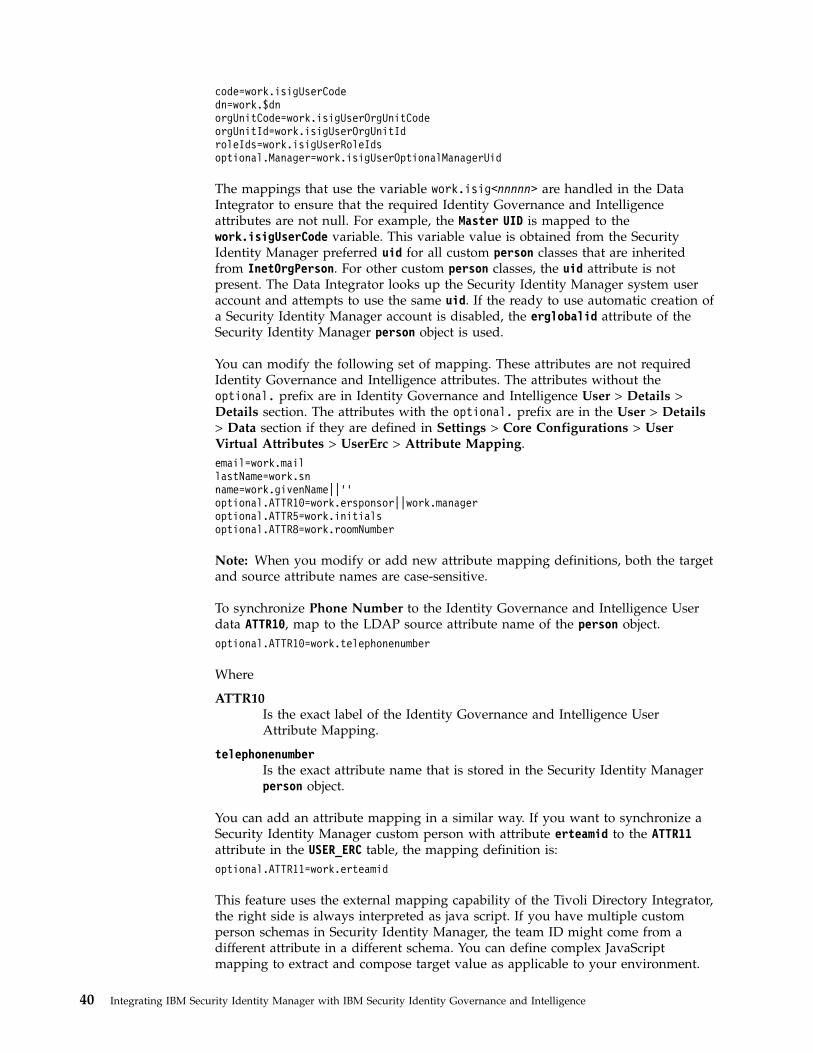
code=work.isigUserCodedn=work.$dnorgUnitCode=work.isigUserOrgUnitCodeorgUnitId=work.isigUserOrgUnitIdroleIds=work.isigUserRoleIdsoptional.Manager=work.isigUserOptionalManagerUid
The mappings that use the variable work.isig<nnnnn> are handled in the DataIntegrator to ensure that the required Identity Governance and Intelligenceattributes are not null. For example, the Master UID is mapped to thework.isigUserCode variable. This variable value is obtained from the SecurityIdentity Manager preferred uid for all custom person classes that are inheritedfrom InetOrgPerson. For other custom person classes, the uid attribute is notpresent. The Data Integrator looks up the Security Identity Manager system useraccount and attempts to use the same uid. If the ready to use automatic creation ofa Security Identity Manager account is disabled, the erglobalid attribute of theSecurity Identity Manager person object is used.
You can modify the following set of mapping. These attributes are not requiredIdentity Governance and Intelligence attributes. The attributes without theoptional. prefix are in Identity Governance and Intelligence User > Details >Details section. The attributes with the optional. prefix are in the User > Details> Data section if they are defined in Settings > Core Configurations > UserVirtual Attributes > UserErc > Attribute Mapping.email=work.maillastName=work.snname=work.givenName||’’optional.ATTR10=work.ersponsor||work.manageroptional.ATTR5=work.initialsoptional.ATTR8=work.roomNumber
Note: When you modify or add new attribute mapping definitions, both the targetand source attribute names are case-sensitive.
To synchronize Phone Number to the Identity Governance and Intelligence Userdata ATTR10, map to the LDAP source attribute name of the person object.optional.ATTR10=work.telephonenumber
Where
ATTR10Is the exact label of the Identity Governance and Intelligence UserAttribute Mapping.
telephonenumberIs the exact attribute name that is stored in the Security Identity Managerperson object.
You can add an attribute mapping in a similar way. If you want to synchronize aSecurity Identity Manager custom person with attribute erteamid to the ATTR11attribute in the USER_ERC table, the mapping definition is:optional.ATTR11=work.erteamid
This feature uses the external mapping capability of the Tivoli Directory Integrator,the right side is always interpreted as java script. If you have multiple customperson schemas in Security Identity Manager, the team ID might come from adifferent attribute in a different schema. You can define complex JavaScriptmapping to extract and compose target value as applicable to your environment.
40 Integrating IBM Security Identity Manager with IBM Security Identity Governance and Intelligence
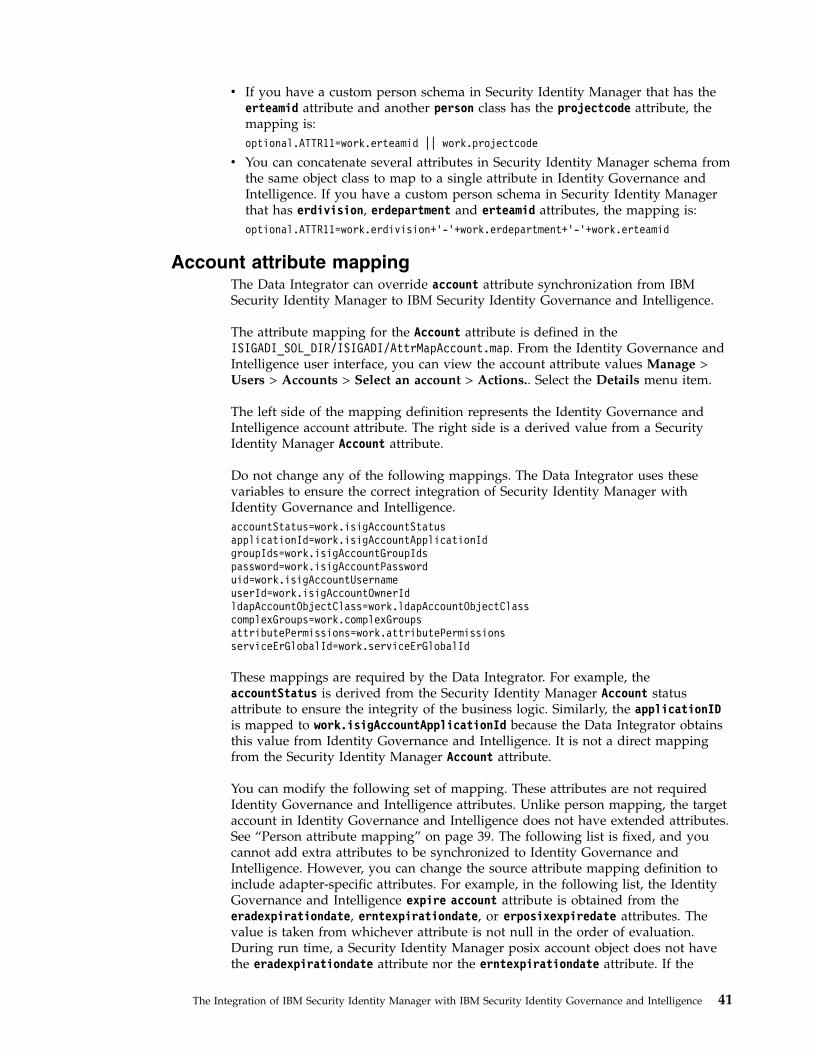
v If you have a custom person schema in Security Identity Manager that has theerteamid attribute and another person class has the projectcode attribute, themapping is:optional.ATTR11=work.erteamid || work.projectcode
v You can concatenate several attributes in Security Identity Manager schema fromthe same object class to map to a single attribute in Identity Governance andIntelligence. If you have a custom person schema in Security Identity Managerthat has erdivision, erdepartment and erteamid attributes, the mapping is:optional.ATTR11=work.erdivision+’-’+work.erdepartment+’-’+work.erteamid
Account attribute mappingThe Data Integrator can override account attribute synchronization from IBMSecurity Identity Manager to IBM Security Identity Governance and Intelligence.
The attribute mapping for the Account attribute is defined in theISIGADI_SOL_DIR/ISIGADI/AttrMapAccount.map. From the Identity Governance andIntelligence user interface, you can view the account attribute values Manage >Users > Accounts > Select an account > Actions.. Select the Details menu item.
The left side of the mapping definition represents the Identity Governance andIntelligence account attribute. The right side is a derived value from a SecurityIdentity Manager Account attribute.
Do not change any of the following mappings. The Data Integrator uses thesevariables to ensure the correct integration of Security Identity Manager withIdentity Governance and Intelligence.accountStatus=work.isigAccountStatusapplicationId=work.isigAccountApplicationIdgroupIds=work.isigAccountGroupIdspassword=work.isigAccountPassworduid=work.isigAccountUsernameuserId=work.isigAccountOwnerIdldapAccountObjectClass=work.ldapAccountObjectClasscomplexGroups=work.complexGroupsattributePermissions=work.attributePermissionsserviceErGlobalId=work.serviceErGlobalId
These mappings are required by the Data Integrator. For example, theaccountStatus is derived from the Security Identity Manager Account statusattribute to ensure the integrity of the business logic. Similarly, the applicationIDis mapped to work.isigAccountApplicationId because the Data Integrator obtainsthis value from Identity Governance and Intelligence. It is not a direct mappingfrom the Security Identity Manager Account attribute.
You can modify the following set of mapping. These attributes are not requiredIdentity Governance and Intelligence attributes. Unlike person mapping, the targetaccount in Identity Governance and Intelligence does not have extended attributes.See “Person attribute mapping” on page 39. The following list is fixed, and youcannot add extra attributes to be synchronized to Identity Governance andIntelligence. However, you can change the source attribute mapping definition toinclude adapter-specific attributes. For example, in the following list, the IdentityGovernance and Intelligence expire account attribute is obtained from theeradexpirationdate, erntexpirationdate, or erposixexpiredate attributes. Thevalue is taken from whichever attribute is not null in the order of evaluation.During run time, a Security Identity Manager posix account object does not havethe eradexpirationdate attribute nor the erntexpirationdate attribute. If the
The Integration of IBM Security Identity Manager with IBM Security Identity Governance and Intelligence 41

eradexpirationdate attribute is not null, that value is synchronized to IdentityGovernance and Intelligence account expiry date.
Identity Governance and Intelligence target account has four attributes for the Datetype:v expire
v lastChangePwd
v lastWrongLogin
v lastlogin
You can define the date attribute mapping and the date attribute format for theseattributes. These definitions identify the input date format to the Data Integrator.For each Security Identity Manager account type, you can define a variable<objectClassName>_<attributeName>_format to override the default format. Thedefault format is the Zulu format yyyyMMddHHmmZ. For example, you want theformat to use ddMMyy:HHmmss instead of the default for the lastlogin attribute. Tooverride the lastlogin date input format for posix account type, add the mappingerposixaccount_lastlogin_format=’ddMMyy:HHmmss’.
Note: The attribute name from LDAP is case-sensitive. Use the exact same case asthe attribute name in the LDAP server object entry.expire=work.eradexpirationdate||work.erntexpirationdate||work.erposixexpiredateerposixaixaccount_expire_format=’yyyyMMddHHmm\’Z\’’email=work.mailname=work.givennamesurname=work.sndisplayname=work.cnnumberLoginError{!}=lastChangePwd=work.erpswdlastchangedlastWrongLogin{!}=lastlogin{!}=identityUID{!}=
The {!} next to the variable name indicates to the Data Integrator to skip theattribute.
Non-group permission supportAttribute-to-Permission mapping treats the non-group attribute of an account asgroup attribute or permission.
With Attribute-to-Permission mapping, you can specify which account attribute canbe mapped to which permission. You can also specify the allowed attribute valuesand the right values in this mapping. For more detail about theAttribute-to-Permission Mapping, see the IBM Knowledge Center.
Attribute-to-Permission mapping is defined for an account configuration that iscreated by the Data Integrator. When the account is loaded or updated, themapped attribute is treated as group attribute on Identity Governance andIntelligence. If the account has the value that is specified on this mapped attribute,the permission and their right are assigned to the user as they are specified in theAttribute-to-Permission mapping.
Data Integrator uses the Identity Governance and Intelligence RESTful service APIto retrieve the Attribute-to-Permission mapping from Identity Governance and
42 Integrating IBM Security Identity Manager with IBM Security Identity Governance and Intelligence
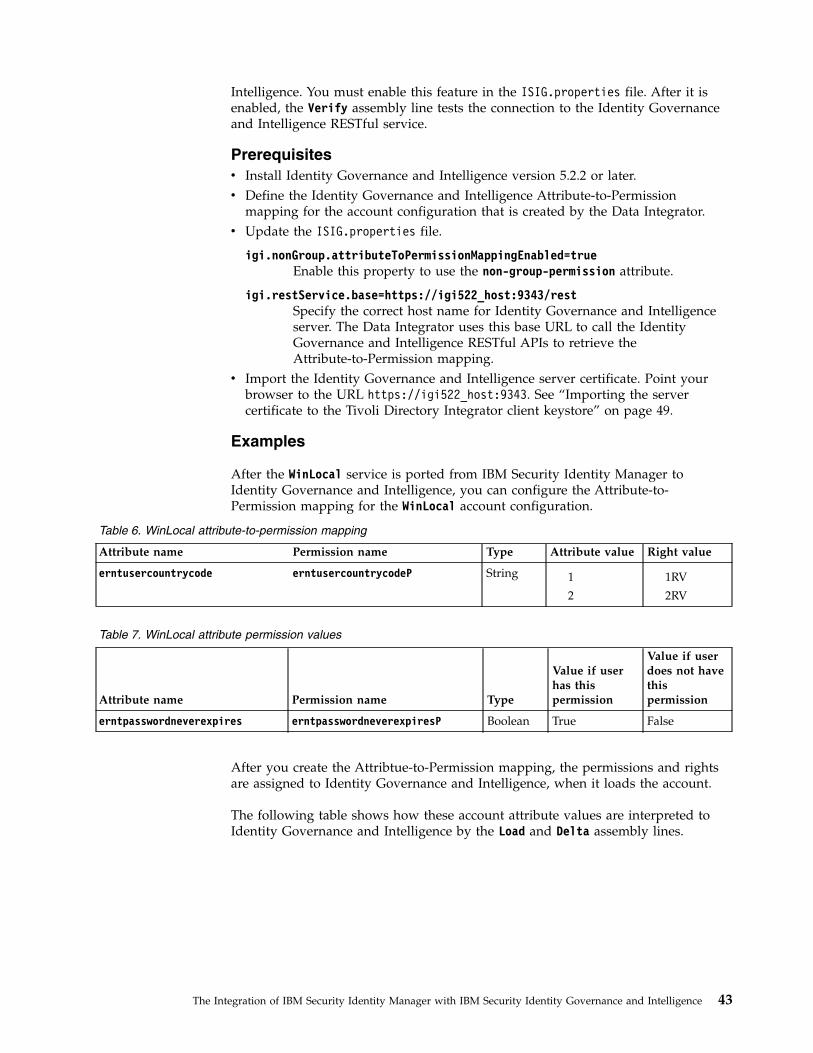
Intelligence. You must enable this feature in the ISIG.properties file. After it isenabled, the Verify assembly line tests the connection to the Identity Governanceand Intelligence RESTful service.
Prerequisitesv Install Identity Governance and Intelligence version 5.2.2 or later.v Define the Identity Governance and Intelligence Attribute-to-Permission
mapping for the account configuration that is created by the Data Integrator.v Update the ISIG.properties file.
igi.nonGroup.attributeToPermissionMappingEnabled=trueEnable this property to use the non-group-permission attribute.
igi.restService.base=https://igi522_host:9343/restSpecify the correct host name for Identity Governance and Intelligenceserver. The Data Integrator uses this base URL to call the IdentityGovernance and Intelligence RESTful APIs to retrieve theAttribute-to-Permission mapping.
v Import the Identity Governance and Intelligence server certificate. Point yourbrowser to the URL https://igi522_host:9343. See “Importing the servercertificate to the Tivoli Directory Integrator client keystore” on page 49.
Examples
After the WinLocal service is ported from IBM Security Identity Manager toIdentity Governance and Intelligence, you can configure the Attribute-to-Permission mapping for the WinLocal account configuration.
Table 6. WinLocal attribute-to-permission mapping
Attribute name Permission name Type Attribute value Right value
erntusercountrycode erntusercountrycodeP String 1
2
1RV
2RV
Table 7. WinLocal attribute permission values
Attribute name Permission name Type
Value if userhas thispermission
Value if userdoes not havethispermission
erntpasswordneverexpires erntpasswordneverexpiresP Boolean True False
After you create the Attribtue-to-Permission mapping, the permissions and rightsare assigned to Identity Governance and Intelligence, when it loads the account.
The following table shows how these account attribute values are interpreted toIdentity Governance and Intelligence by the Load and Delta assembly lines.
The Integration of IBM Security Identity Manager with IBM Security Identity Governance and Intelligence 43
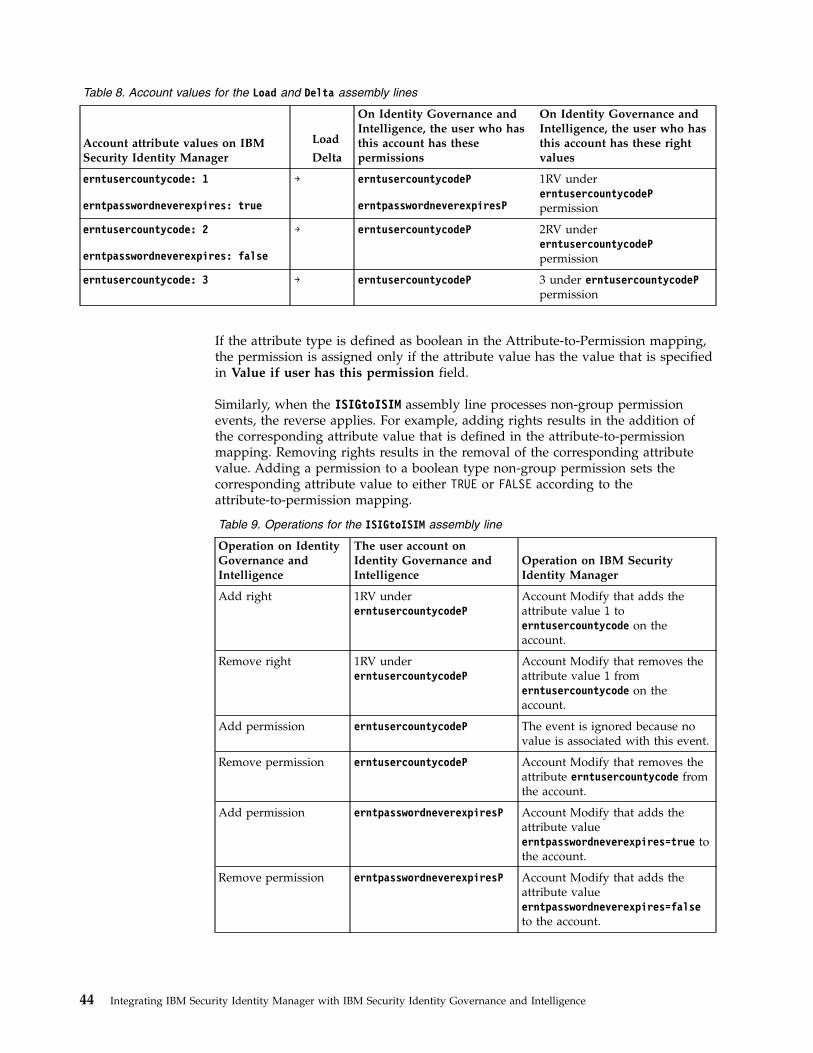
Table 8. Account values for the Load and Delta assembly lines
Account attribute values on IBMSecurity Identity Manager
Load
Delta
On Identity Governance andIntelligence, the user who hasthis account has thesepermissions
On Identity Governance andIntelligence, the user who hasthis account has these rightvalues
erntusercountycode: 1
erntpasswordneverexpires: true
→ erntusercountycodeP
erntpasswordneverexpiresP
1RV undererntusercountycodePpermission
erntusercountycode: 2
erntpasswordneverexpires: false
→ erntusercountycodeP 2RV undererntusercountycodePpermission
erntusercountycode: 3 → erntusercountycodeP 3 under erntusercountycodePpermission
If the attribute type is defined as boolean in the Attribute-to-Permission mapping,the permission is assigned only if the attribute value has the value that is specifiedin Value if user has this permission field.
Similarly, when the ISIGtoISIM assembly line processes non-group permissionevents, the reverse applies. For example, adding rights results in the addition ofthe corresponding attribute value that is defined in the attribute-to-permissionmapping. Removing rights results in the removal of the corresponding attributevalue. Adding a permission to a boolean type non-group permission sets thecorresponding attribute value to either TRUE or FALSE according to theattribute-to-permission mapping.
Table 9. Operations for the ISIGtoISIM assembly line
Operation on IdentityGovernance andIntelligence
The user account onIdentity Governance andIntelligence
Operation on IBM SecurityIdentity Manager
Add right 1RV undererntusercountycodeP
Account Modify that adds theattribute value 1 toerntusercountycode on theaccount.
Remove right 1RV undererntusercountycodeP
Account Modify that removes theattribute value 1 fromerntusercountycode on theaccount.
Add permission erntusercountycodeP The event is ignored because novalue is associated with this event.
Remove permission erntusercountycodeP Account Modify that removes theattribute erntusercountycode fromthe account.
Add permission erntpasswordneverexpiresP Account Modify that adds theattribute valueerntpasswordneverexpires=true tothe account.
Remove permission erntpasswordneverexpiresP Account Modify that adds theattribute valueerntpasswordneverexpires=falseto the account.
44 Integrating IBM Security Identity Manager with IBM Security Identity Governance and Intelligence
LoadAccountNGP assembly lineThe LoadAccountNGP assembly line loads the accounts with attribute values that aredefined for the attributes that are mapped to the permission. You can run thisassembly line after the Attribute-to-Permission mapping is either created orupdated.
If the attribute mapping is removed from IBM Security Identity Governance andIntelligence, accounts that were previously loaded because they had a definedvalue for that attribute are not loaded by the LoadAccountNGP assembly line.
Discovering account attributes from the targetAfter the service is ported to IBM Security Identity Governance and Intelligence,you can use the Discover Account Attributes from Target feature to browse theaccount attribute list. Then, select the attributes to create the Attribute-to-Permission mapping.
Before you beginv All the prerequisites from Non-Group Permission Support must be fulfilled.v From Identity Governance and Intelligence administration console, import the
target profile JAR file. Click Target Administration > Manage Target Type >Import Target Type.
About this task
For information about the Discover Account Attributes from Target feature, seehttps://www.ibm.com/support/knowledgecenter/SSGHJR_5.2.2/com.ibm.igi.doc/administering/tsk/tsk_ac_mapping_attribs_permissions_discovery.html
To use the Discover Account Attributes from Target feature for the service that isported from IBM Security Identity Manager, do the following steps.
Procedure1. Run either the Load or LoadService assembly line to load the service from IBM
Security Identity Manager to Identity Governance and Intelligence. Forexample, you have a WinLocal service that is called WinLocal-Service on IBMSecurity Identity Manager that you port to Identity Governance andIntelligence.
2. Import the target profile JAR file. On the Identity Governance and Intelligenceadministration console, click Target Administration > Manage Target Type >Import Target Type. For example, use the Browse function to select and importthe WinlocalProfile.jar file.
3. To use the Discover Account Attributes from Target feature, go to the IdentityGovernance and Intelligence Home page.a. Click Access Governance Core > Accounts.b. Select an account configuration.c. Click Attribute-to-Permission Mapping.d. Click Actions and select Discover Account attributes from Target.
The attributes on the target for the account are displayed.
Complex RACF group right supportYou can manage the erracconxml complex group's subattributes on the IBMSecurity Identity Manager RACF subform on IBM Security Identity Governanceand Intelligence as permission rights.
The Integration of IBM Security Identity Manager with IBM Security Identity Governance and Intelligence 45
Each subattribute in the RACF connect group (erracconxml) is treated aspermission rights in IGI. When RACF groups are loaded, the rights that areassociated with the permissions are created along with the rights' value lookup.Then, during account load, users are assigned the rights in Identity Governanceand Intelligence according to the subattributes values within the account's attributevalue.
Prerequisitesv Install the RACF Complex Group Handler on a version of IBM Security Identity
Manager. See the prerequisites section of “Configuring adapters with complexgroup attributes” on page 38 for the supported versions.
v Identity Governance and Intelligence 5.2.2 or later version is required. Theright's canonical values are obtained from Identity Broker that is only availablein Identity Governance and Intelligence 5.2.2.
v On Identity Governance and Intelligence 5.2.2, the racf2profile.jar file thatsupported schema discovery must be imported before the Load assembly line isrun.
v On Identity Governance and Intelligence 5.2.2, the IB_API feature must beenabled. See Enabling or disabling the Identity Brokerage REST API to enablethe Identity Brokerage IB_API.
v On Identity Governance and Intelligence 5.2.2, an API user must be created. SeeManaging Identity Brokerage users and passwords to create Identity BrokerageREST user and password.
v Update the ISIG.properties file.
igi.complexGroup.rightSupportEnabled=trueSet this property to true to enable RACF complex group permissionrights.
igi.ib.rest.user=usernameSet this property to the Identity Brokerage REST user that you created.
igi.ib.rest.password=passwordSet this property to the Identity Brokerage REST user password that youassigned to the user.
igi.ib.rest.URL=https://igi522_host:8443/BrokerageService/identity/Set the correct Identity Governance and Intelligence 5.2.2 server URLand Identity Broker's RESTful service port number. By default, it listenson port 8443.
v Import the Identity Governance and Intelligence server certificate by using thebrowser with the URL https://igi522_host:8443. See “Importing the servercertificate to the Tivoli Directory Integrator client keystore” on page 49.
Example
After the RACF groups are loaded, the rights that are associated with each groupare also defined. Click Access Governance Core > Manage > Applications >Application Access > Rights. The allowed values for each right are obtained fromthe rights lookup tables that are created during the load. Click Configure > RightsLookup.
The values in the Rights Lookup table are called canonical values for the rightsthat are obtained from Identity Brokerage service. Canonical values are not definedfor some subattributes in the RACF connect group, for example, owner. Rights arenot supported on these attributes.
46 Integrating IBM Security Identity Manager with IBM Security Identity Governance and Intelligence
During the account load, the Data Integrator assigns rights to the user based onthe subattributes values in the RACF Connect group. These user rights can bemanaged in Identity Governance and Intelligence by assigning or removing userrights. When a right is removed, the IBM Security Identity Manager accountattribute reflects the changes after the ISIGtoISIM assembly line picks up thechanges. The subattribute is added or removed from erracconxml attribute in theaccount object.
Support for IBM Security Identity Manager when justificationis required
On IBM Security Identity Manager version 6 or 7, justification is required when theIBM Security Identity Manager WebService APIs are called if theenrole.jutificationRequired property in enRole.properties file is set to true.
The Data Integrator supports justification with theisim.justificationRequired.enabled property that is added in theISIM.properties file. Enable this property if IBM Security Identity Managerversion 6 or 7 requires justification. It sends the justification Requested by ISIGADIas a parameter to WebService API.
Requirements
In the following fixes, the WebService API can take the justification as an optionalparameter.
For IBM Security Identity Manager version 66.0.0-ISS-SIM-FP0014 or later fix pack.
For IBM Security Identity Manager version 77.0.1.3-ISS-SIM-IF0002 or later fix pack.
Customizing Organizational Unit MappingYou can customize the Data Integrator so that the existing IBM Security IdentityGovernance and Intelligence organizational unit can be assigned to a person whena person is synchronized from IBM Security Identity Manager.
About this task
To enable the OU mapping, you must set three properties in theISIGADI_SOL_DIR/ISIGADI/ISIG.properties file.
Procedure1. Set the isim.skipOUSynch property to true to skip all the organization unit
synchronization from Security Identity Manager to Identity Governance andIntelligence. If this property is set to true, you must set theisim.person.ouAttribute and isim.defaultOU.IDCode properties. Use all lowercase letters such as true or false. The default value is set to false.
2. Set the isim.person.ouAttribute property to one or more than one of theperson attributes on Security Identity Manager.Use a comma as a separator to specify multiple attributes to support themultiple person types. For example, if you want to use the roomnumber attributefor Person and the ou attribute for BPPerson, set this property asisim.person.ouAttribute=roomnumber,ou. The Data Integrator uses the first
The Integration of IBM Security Identity Manager with IBM Security Identity Governance and Intelligence 47
attribute value that is not null. If the person has a value for both roomnumberand ou attributes, the value for roomnumber is used because it is specified first inthe list.v The value of this person attribute must have the ID Code of the
organizational unit on Identity Governance and Intelligence.v This ID Code maps the Security Identity Manager person to the Identity
Governance and Intelligence OU.v This property is only used if the isim.skipOUSynch property is set to true.v The value is case-sensitive.v The default value is not set.
3. Set the isim.defaultOU.IDCode property to the ID code of defaultorganizational unit on Identity Governance and Intelligence.v This OU value is used as a default OU if the ouAttribute of a person is invalid.v The value of this property must have the valid ID Code of the organizational
unit on Identity Governance and Intelligence. If it has an invalid value, thenLoad and Delta assembly lines fail with a FATAL error.
v This property is only used if the isim.skipOUSynch property is set to true.v The value is case-sensitive.v The default value is not set.
4. After you enable custom organizational unit mapping, run the Load assemblyline.
Resultsv When a person is synchronized from Security Identity Manager to Identity
Governance and Intelligence, the roles of this person are associated with the OUof this person.
v When an account is synchronized from Security Identity Manager to IdentityGovernance and Intelligence, the permissions of this account are associated withthe OU of the account owner.
v When a person is transferred from one organizational unit to anotherorganizational unit, all the roles and groups of this person are associated withthe new organizational unit.
Supporting the PostgreSQL databaseIBM Security Identity Governance and Intelligence version 5.2.2 supports thePostgreSQL database. If Identity Governance and Intelligence is configured to usethe PostgreSQL server, perform these steps to enable the Data Integrator to connectto the PostgreSQL server.
Procedure1. Download the JDBC driver for PostgreSQL server.
a. Go to https://jdbc.postgresql.org/download.html.b. Download the JDBC 42 version of latest driver.
2. Copy the JDBC driver JAR file to TDI_HOME/jars/3rdparty/others directory.3. Update the ISIG.properties file with the PostgreSQL server information.
isig.db.userThe default user is iga_core.
isig.db.passwordThe default password for iga_core is ideas.
48 Integrating IBM Security Identity Manager with IBM Security Identity Governance and Intelligence

isig.db.schemaThe default schema name is iga_core.
isig.db.urlThe url is jdbc:postgresql://igi522_host:5432/igidb.
isig.db.driverThe driver is org.postgresql.Driver.
4. Restart the Tivoli Directory Integrator.5. Run the Verify assembly line to verify that the connection to the Identity
Governance and Intelligence database is successful. See “Verifying theconfiguration” on page 28. If the connection to the Identity Governance andIntelligence is correct, you receive the following message.Connection is tested successfully to IGI Database: PostgreSQL
Similarly, if Identity Governance and Intelligence is configured with a DB2 oran Oracle database, you receive the following messages.Connection is tested successfully to IGI Database: DB2Connection is tested successfully to IGI Database: Oracle
ReferenceUse the reference information to identify the files that are installed with IBMSecurity Identity Governance and Administration Data Integrator and tounderstand the properties that they contain.
Importing the server certificate to the Tivoli DirectoryIntegrator client keystore
To access the RESTful API that run on the Identity Governance and Intelligencesystem, you must import the Identity Governance and Intelligence server certificateto the Tivoli Directory Integrator keystore file.
Procedure1. Export the Identity Governance and Intelligence server certificate to a file.
Open the Firefox browser and put in your Identity Governance and IntelligenceURL such as https://jsigi522ai.rtp.raleigh.ibm.com:9343. If you areaccessing this URL for the first time, then Firefox prompts a security warning.If this warning is not shown, you already imported the certificate to thebrowser. Skip to the next step.a. On the Your connection is not secure page, click Add Exception....b. On the Add Security Exception window, click Get Certificate and then click
View.c. On the Certificate Viewer window, click Details and then click Export.d. Rename the file and save as file type X.509 Certificate
(PEM)(*.crt,*.pem). For example, save the file as C:\temp\igiServer.crt.2. Export the Identity Governance and Intelligence server certificate from the
Firefox Certificate Manager.a. On the Firefox tool bar, click Tools > Options > Advanced > Certificate >
View Certificate.b. In the Certificate Manager window, click Servers. Locate and select the
Identity Governance and Intelligence server certificate. Then, click Export.c. Rename the file and save as file type X.509 Certificate
(PEM)(*.crt,*.pem). For example, save the file as C:\temp\igiServer.crt.
The Integration of IBM Security Identity Manager with IBM Security Identity Governance and Intelligence 49
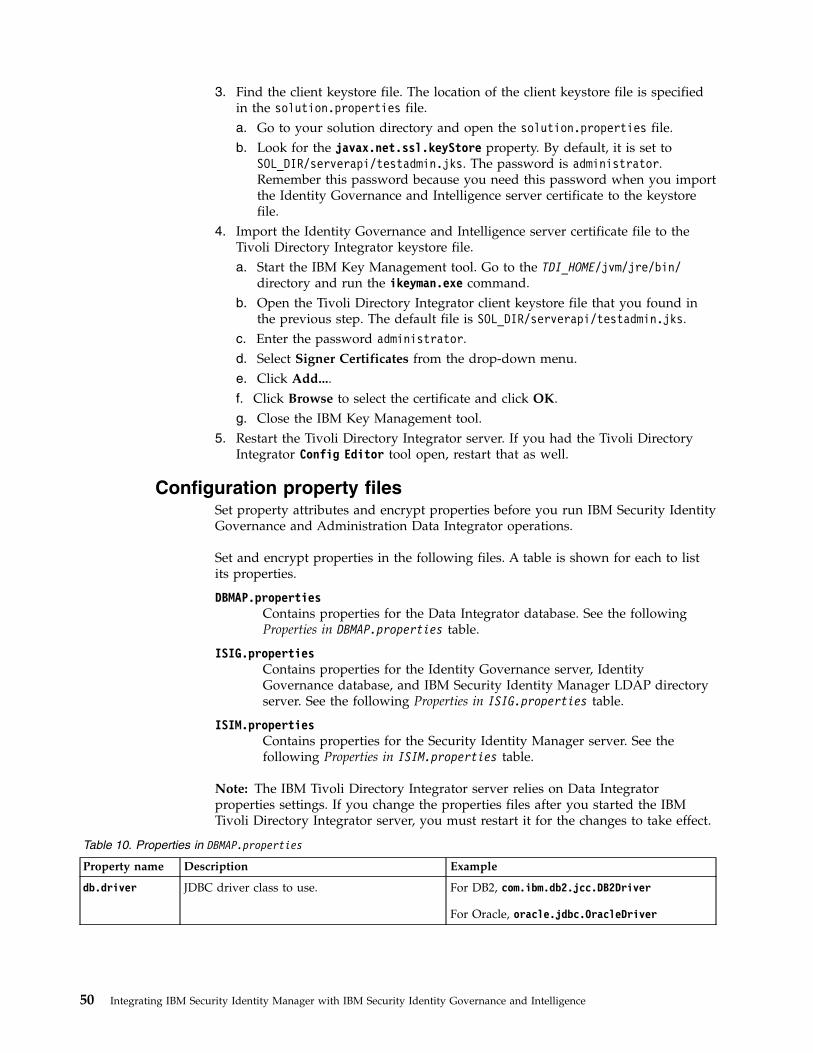
3. Find the client keystore file. The location of the client keystore file is specifiedin the solution.properties file.a. Go to your solution directory and open the solution.properties file.b. Look for the javax.net.ssl.keyStore property. By default, it is set to
SOL_DIR/serverapi/testadmin.jks. The password is administrator.Remember this password because you need this password when you importthe Identity Governance and Intelligence server certificate to the keystorefile.
4. Import the Identity Governance and Intelligence server certificate file to theTivoli Directory Integrator keystore file.a. Start the IBM Key Management tool. Go to the TDI_HOME/jvm/jre/bin/
directory and run the ikeyman.exe command.b. Open the Tivoli Directory Integrator client keystore file that you found in
the previous step. The default file is SOL_DIR/serverapi/testadmin.jks.c. Enter the password administrator.d. Select Signer Certificates from the drop-down menu.e. Click Add....f. Click Browse to select the certificate and click OK.g. Close the IBM Key Management tool.
5. Restart the Tivoli Directory Integrator server. If you had the Tivoli DirectoryIntegrator Config Editor tool open, restart that as well.
Configuration property filesSet property attributes and encrypt properties before you run IBM Security IdentityGovernance and Administration Data Integrator operations.
Set and encrypt properties in the following files. A table is shown for each to listits properties.
DBMAP.propertiesContains properties for the Data Integrator database. See the followingProperties in DBMAP.properties table.
ISIG.propertiesContains properties for the Identity Governance server, IdentityGovernance database, and IBM Security Identity Manager LDAP directoryserver. See the following Properties in ISIG.properties table.
ISIM.propertiesContains properties for the Security Identity Manager server. See thefollowing Properties in ISIM.properties table.
Note: The IBM Tivoli Directory Integrator server relies on Data Integratorproperties settings. If you change the properties files after you started the IBMTivoli Directory Integrator server, you must restart it for the changes to take effect.
Table 10. Properties in DBMAP.properties
Property name Description Example
db.driver JDBC driver class to use. For DB2, com.ibm.db2.jcc.DB2Driver
For Oracle, oracle.jdbc.OracleDriver
50 Integrating IBM Security Identity Manager with IBM Security Identity Governance and Intelligence
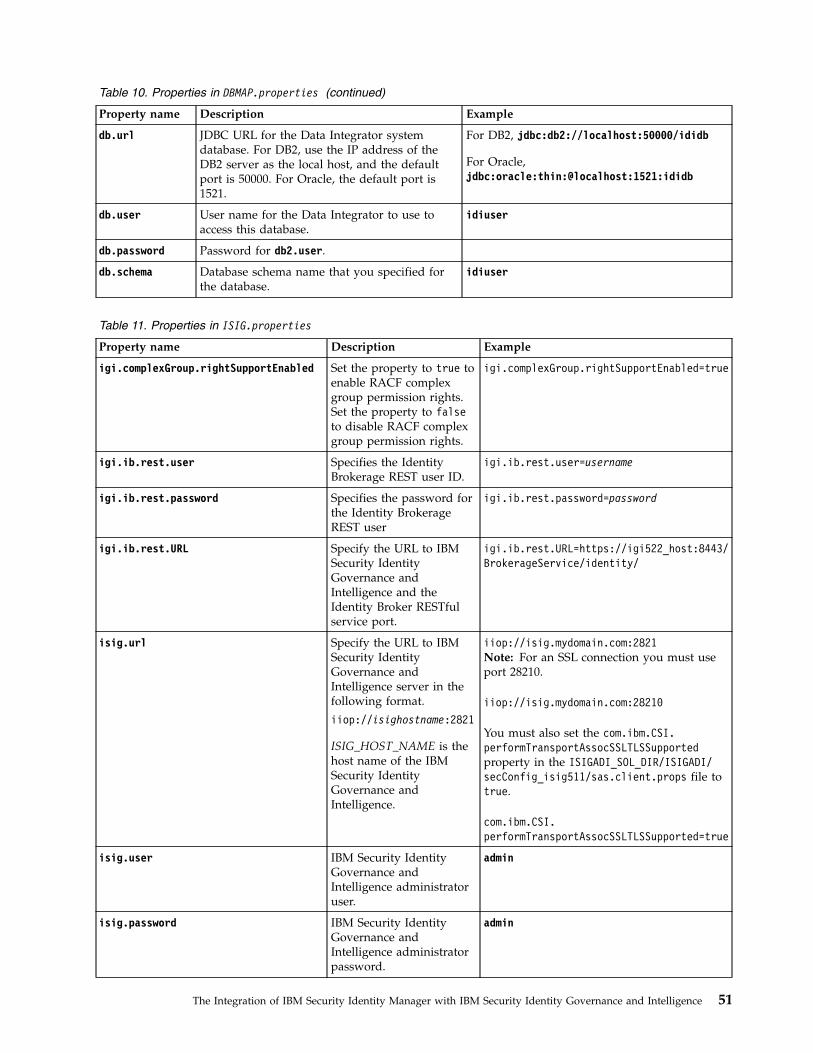
Table 10. Properties in DBMAP.properties (continued)
Property name Description Example
db.url JDBC URL for the Data Integrator systemdatabase. For DB2, use the IP address of theDB2 server as the local host, and the defaultport is 50000. For Oracle, the default port is1521.
For DB2, jdbc:db2://localhost:50000/ididb
For Oracle,jdbc:oracle:thin:@localhost:1521:ididb
db.user User name for the Data Integrator to use toaccess this database.
idiuser
db.password Password for db2.user.
db.schema Database schema name that you specified forthe database.
idiuser
Table 11. Properties in ISIG.properties
Property name Description Example
igi.complexGroup.rightSupportEnabled Set the property to true toenable RACF complexgroup permission rights.Set the property to falseto disable RACF complexgroup permission rights.
igi.complexGroup.rightSupportEnabled=true
igi.ib.rest.user Specifies the IdentityBrokerage REST user ID.
igi.ib.rest.user=username
igi.ib.rest.password Specifies the password forthe Identity BrokerageREST user
igi.ib.rest.password=password
igi.ib.rest.URL Specify the URL to IBMSecurity IdentityGovernance andIntelligence and theIdentity Broker RESTfulservice port.
igi.ib.rest.URL=https://igi522_host:8443/BrokerageService/identity/
isig.url Specify the URL to IBMSecurity IdentityGovernance andIntelligence server in thefollowing format.
iiop://isighostname:2821
ISIG_HOST_NAME is thehost name of the IBMSecurity IdentityGovernance andIntelligence.
iiop://isig.mydomain.com:2821Note: For an SSL connection you must useport 28210.
iiop://isig.mydomain.com:28210
You must also set the com.ibm.CSI.performTransportAssocSSLTLSSupportedproperty in the ISIGADI_SOL_DIR/ISIGADI/secConfig_isig511/sas.client.props file totrue.
com.ibm.CSI.performTransportAssocSSLTLSSupported=true
isig.user IBM Security IdentityGovernance andIntelligence administratoruser.
admin
isig.password IBM Security IdentityGovernance andIntelligence administratorpassword.
admin
The Integration of IBM Security Identity Manager with IBM Security Identity Governance and Intelligence 51
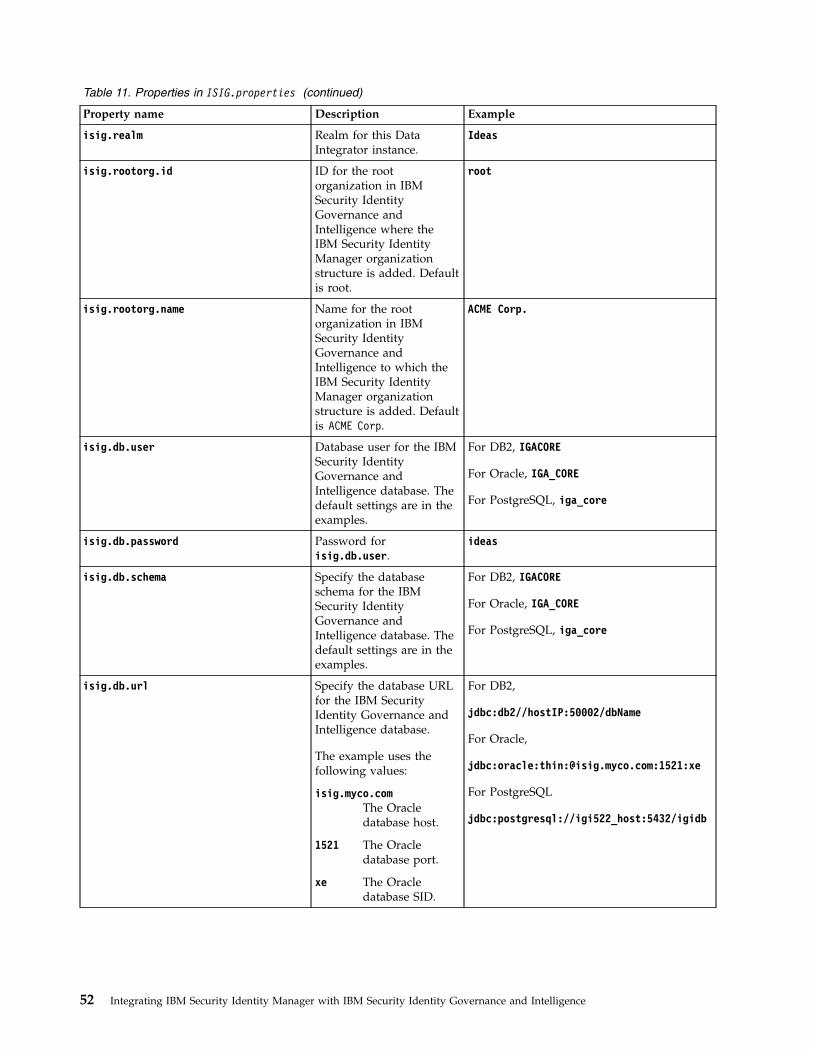
Table 11. Properties in ISIG.properties (continued)
Property name Description Example
isig.realm Realm for this DataIntegrator instance.
Ideas
isig.rootorg.id ID for the rootorganization in IBMSecurity IdentityGovernance andIntelligence where theIBM Security IdentityManager organizationstructure is added. Defaultis root.
root
isig.rootorg.name Name for the rootorganization in IBMSecurity IdentityGovernance andIntelligence to which theIBM Security IdentityManager organizationstructure is added. Defaultis ACME Corp.
ACME Corp.
isig.db.user Database user for the IBMSecurity IdentityGovernance andIntelligence database. Thedefault settings are in theexamples.
For DB2, IGACORE
For Oracle, IGA_CORE
For PostgreSQL, iga_core
isig.db.password Password forisig.db.user.
ideas
isig.db.schema Specify the databaseschema for the IBMSecurity IdentityGovernance andIntelligence database. Thedefault settings are in theexamples.
For DB2, IGACORE
For Oracle, IGA_CORE
For PostgreSQL, iga_core
isig.db.url Specify the database URLfor the IBM SecurityIdentity Governance andIntelligence database.
The example uses thefollowing values:
isig.myco.comThe Oracledatabase host.
1521 The Oracledatabase port.
xe The Oracledatabase SID.
For DB2,
jdbc:db2//hostIP:50002/dbName
For Oracle,
jdbc:oracle:thin:@isig.myco.com:1521:xe
For PostgreSQL
jdbc:postgresql://igi522_host:5432/igidb
52 Integrating IBM Security Identity Manager with IBM Security Identity Governance and Intelligence
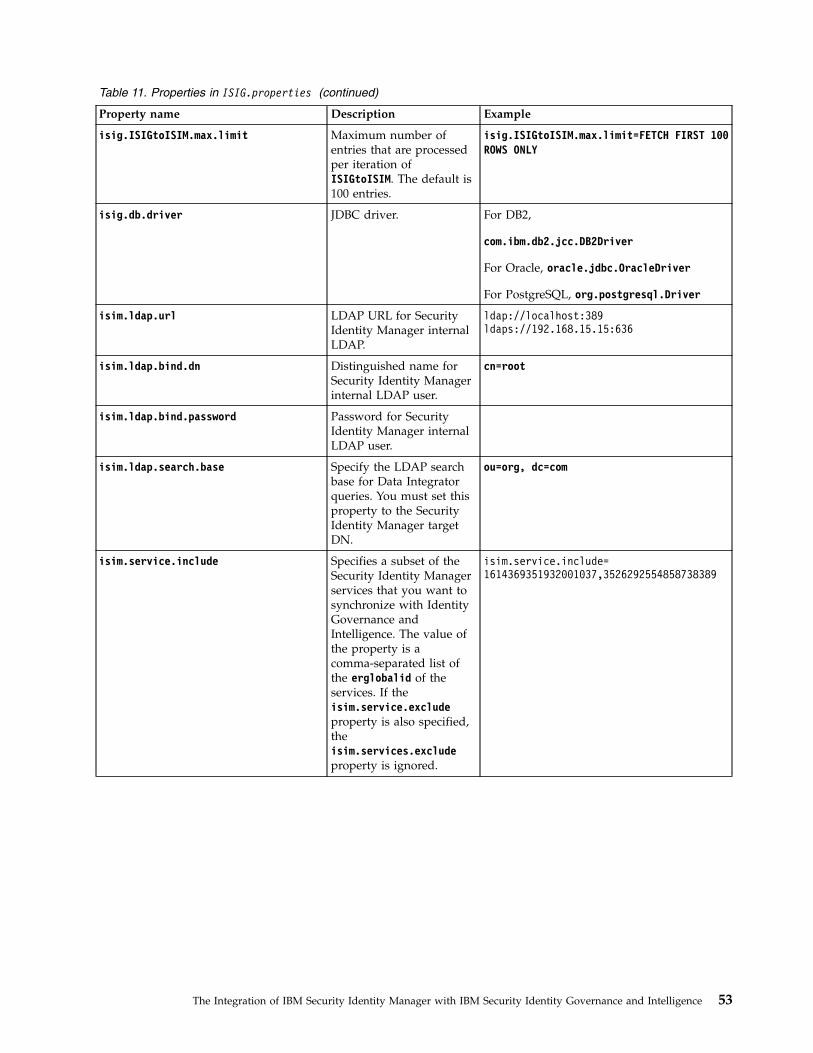
Table 11. Properties in ISIG.properties (continued)
Property name Description Example
isig.ISIGtoISIM.max.limit Maximum number ofentries that are processedper iteration ofISIGtoISIM. The default is100 entries.
isig.ISIGtoISIM.max.limit=FETCH FIRST 100ROWS ONLY
isig.db.driver JDBC driver. For DB2,
com.ibm.db2.jcc.DB2Driver
For Oracle, oracle.jdbc.OracleDriver
For PostgreSQL, org.postgresql.Driver
isim.ldap.url LDAP URL for SecurityIdentity Manager internalLDAP.
ldap://localhost:389ldaps://192.168.15.15:636
isim.ldap.bind.dn Distinguished name forSecurity Identity Managerinternal LDAP user.
cn=root
isim.ldap.bind.password Password for SecurityIdentity Manager internalLDAP user.
isim.ldap.search.base Specify the LDAP searchbase for Data Integratorqueries. You must set thisproperty to the SecurityIdentity Manager targetDN.
ou=org, dc=com
isim.service.include Specifies a subset of theSecurity Identity Managerservices that you want tosynchronize with IdentityGovernance andIntelligence. The value ofthe property is acomma-separated list ofthe erglobalid of theservices. If theisim.service.excludeproperty is also specified,theisim.services.excludeproperty is ignored.
isim.service.include=1614369351932001037,3526292554858738389
The Integration of IBM Security Identity Manager with IBM Security Identity Governance and Intelligence 53
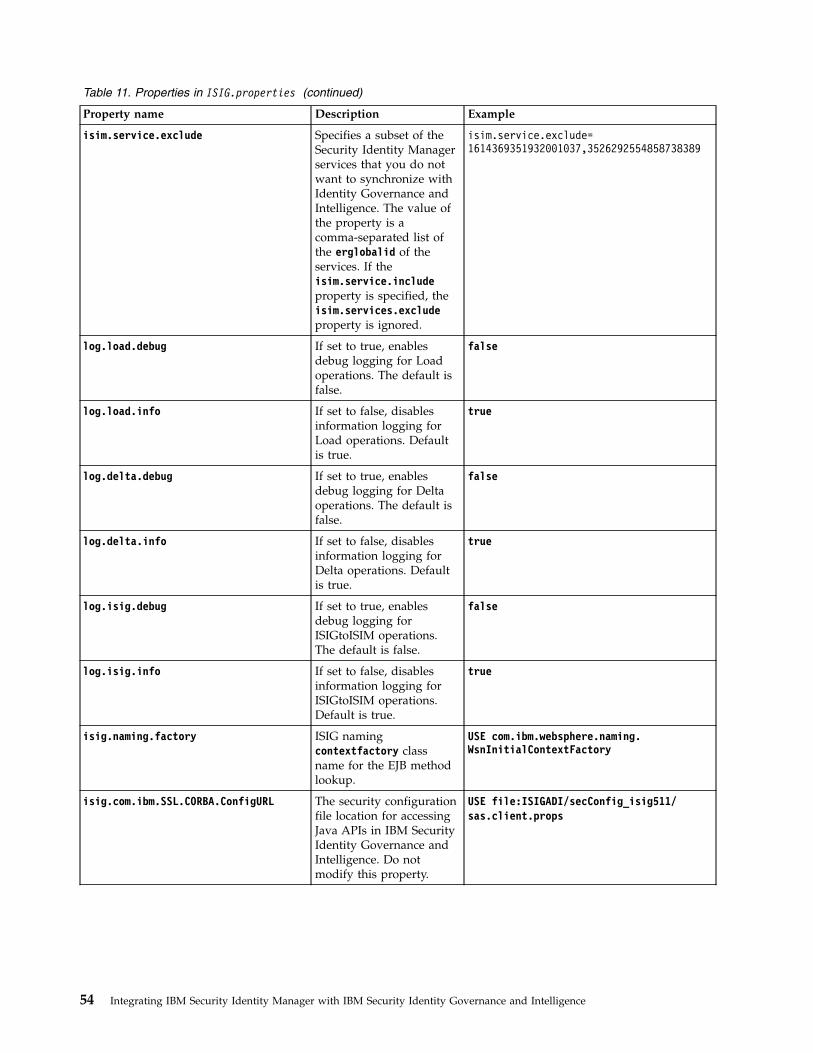
Table 11. Properties in ISIG.properties (continued)
Property name Description Example
isim.service.exclude Specifies a subset of theSecurity Identity Managerservices that you do notwant to synchronize withIdentity Governance andIntelligence. The value ofthe property is acomma-separated list ofthe erglobalid of theservices. If theisim.service.includeproperty is specified, theisim.services.excludeproperty is ignored.
isim.service.exclude=1614369351932001037,3526292554858738389
log.load.debug If set to true, enablesdebug logging for Loadoperations. The default isfalse.
false
log.load.info If set to false, disablesinformation logging forLoad operations. Defaultis true.
true
log.delta.debug If set to true, enablesdebug logging for Deltaoperations. The default isfalse.
false
log.delta.info If set to false, disablesinformation logging forDelta operations. Defaultis true.
true
log.isig.debug If set to true, enablesdebug logging forISIGtoISIM operations.The default is false.
false
log.isig.info If set to false, disablesinformation logging forISIGtoISIM operations.Default is true.
true
isig.naming.factory ISIG namingcontextfactory classname for the EJB methodlookup.
USE com.ibm.websphere.naming.WsnInitialContextFactory
isig.com.ibm.SSL.CORBA.ConfigURL The security configurationfile location for accessingJava APIs in IBM SecurityIdentity Governance andIntelligence. Do notmodify this property.
USE file:ISIGADI/secConfig_isig511/sas.client.props
54 Integrating IBM Security Identity Manager with IBM Security Identity Governance and Intelligence
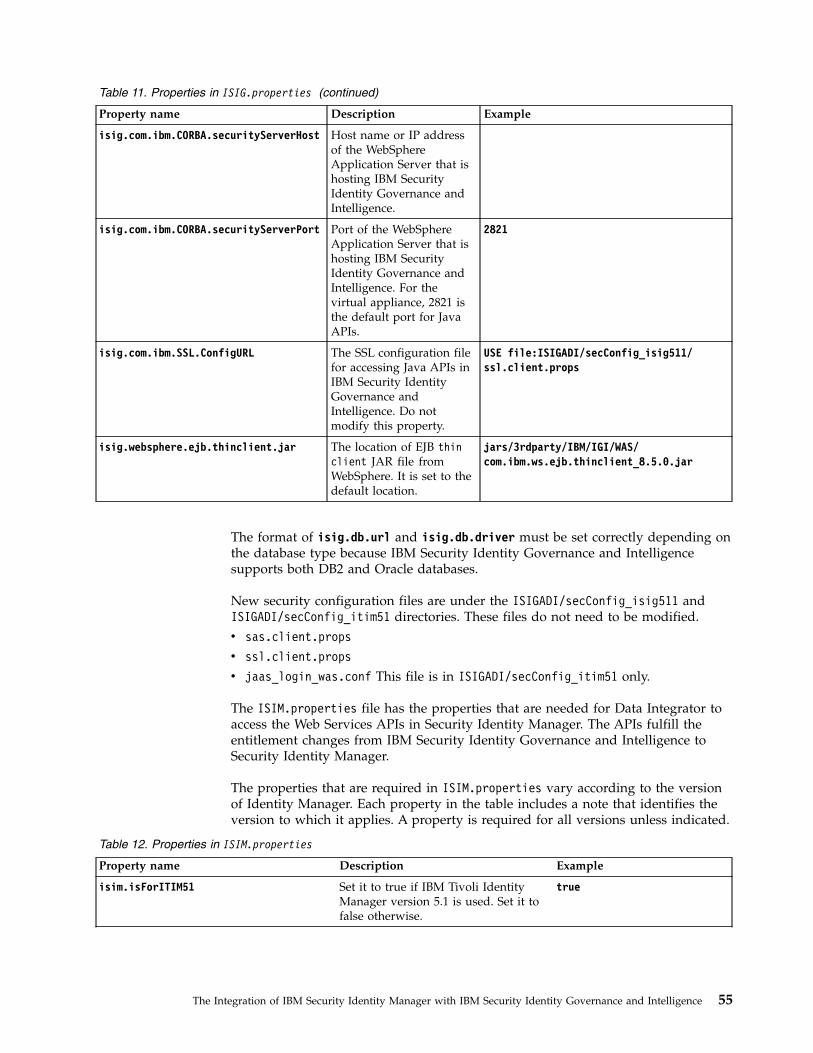
Table 11. Properties in ISIG.properties (continued)
Property name Description Example
isig.com.ibm.CORBA.securityServerHost Host name or IP addressof the WebSphereApplication Server that ishosting IBM SecurityIdentity Governance andIntelligence.
isig.com.ibm.CORBA.securityServerPort Port of the WebSphereApplication Server that ishosting IBM SecurityIdentity Governance andIntelligence. For thevirtual appliance, 2821 isthe default port for JavaAPIs.
2821
isig.com.ibm.SSL.ConfigURL The SSL configuration filefor accessing Java APIs inIBM Security IdentityGovernance andIntelligence. Do notmodify this property.
USE file:ISIGADI/secConfig_isig511/ssl.client.props
isig.websphere.ejb.thinclient.jar The location of EJB thinclient JAR file fromWebSphere. It is set to thedefault location.
jars/3rdparty/IBM/IGI/WAS/com.ibm.ws.ejb.thinclient_8.5.0.jar
The format of isig.db.url and isig.db.driver must be set correctly depending onthe database type because IBM Security Identity Governance and Intelligencesupports both DB2 and Oracle databases.
New security configuration files are under the ISIGADI/secConfig_isig511 andISIGADI/secConfig_itim51 directories. These files do not need to be modified.v sas.client.props
v ssl.client.props
v jaas_login_was.conf This file is in ISIGADI/secConfig_itim51 only.
The ISIM.properties file has the properties that are needed for Data Integrator toaccess the Web Services APIs in Security Identity Manager. The APIs fulfill theentitlement changes from IBM Security Identity Governance and Intelligence toSecurity Identity Manager.
The properties that are required in ISIM.properties vary according to the versionof Identity Manager. Each property in the table includes a note that identifies theversion to which it applies. A property is required for all versions unless indicated.
Table 12. Properties in ISIM.properties
Property name Description Example
isim.isForITIM51 Set it to true if IBM Tivoli IdentityManager version 5.1 is used. Set it tofalse otherwise.
true
The Integration of IBM Security Identity Manager with IBM Security Identity Governance and Intelligence 55
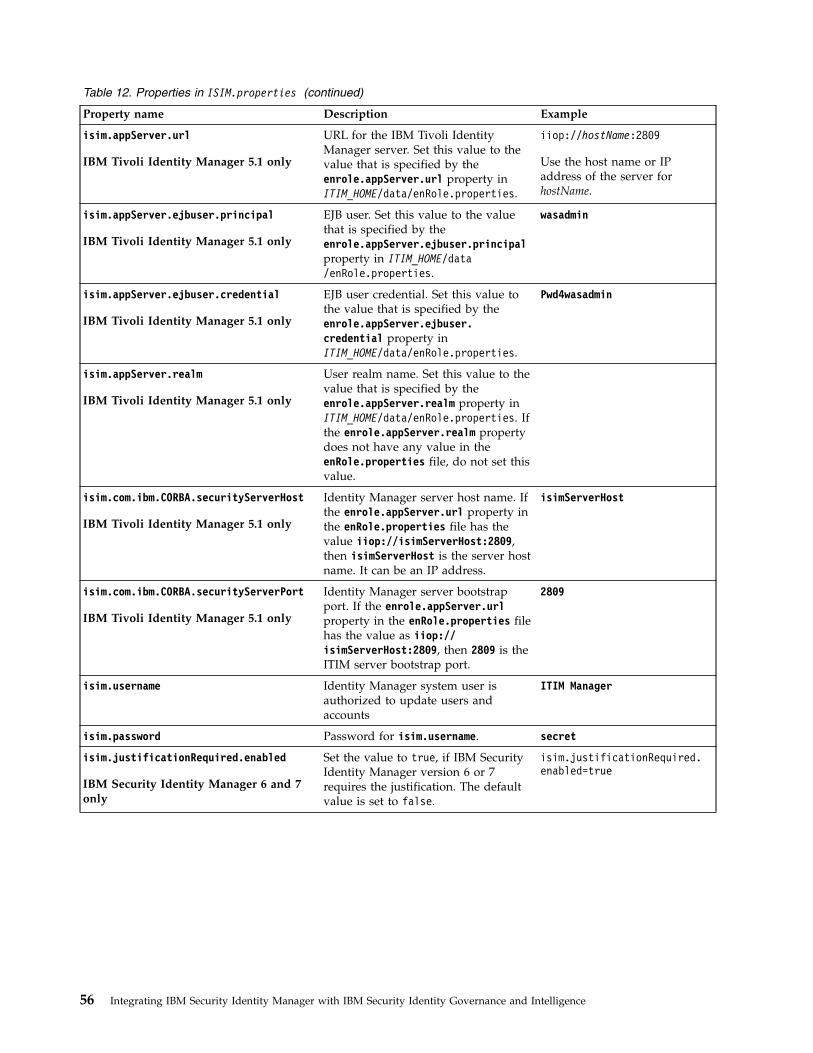
Table 12. Properties in ISIM.properties (continued)
Property name Description Example
isim.appServer.url
IBM Tivoli Identity Manager 5.1 only
URL for the IBM Tivoli IdentityManager server. Set this value to thevalue that is specified by theenrole.appServer.url property inITIM_HOME/data/enRole.properties.
iiop://hostName:2809
Use the host name or IPaddress of the server forhostName.
isim.appServer.ejbuser.principal
IBM Tivoli Identity Manager 5.1 only
EJB user. Set this value to the valuethat is specified by theenrole.appServer.ejbuser.principalproperty in ITIM_HOME/data/enRole.properties.
wasadmin
isim.appServer.ejbuser.credential
IBM Tivoli Identity Manager 5.1 only
EJB user credential. Set this value tothe value that is specified by theenrole.appServer.ejbuser.credential property inITIM_HOME/data/enRole.properties.
Pwd4wasadmin
isim.appServer.realm
IBM Tivoli Identity Manager 5.1 only
User realm name. Set this value to thevalue that is specified by theenrole.appServer.realm property inITIM_HOME/data/enRole.properties. Ifthe enrole.appServer.realm propertydoes not have any value in theenRole.properties file, do not set thisvalue.
isim.com.ibm.CORBA.securityServerHost
IBM Tivoli Identity Manager 5.1 only
Identity Manager server host name. Ifthe enrole.appServer.url property inthe enRole.properties file has thevalue iiop://isimServerHost:2809,then isimServerHost is the server hostname. It can be an IP address.
isimServerHost
isim.com.ibm.CORBA.securityServerPort
IBM Tivoli Identity Manager 5.1 only
Identity Manager server bootstrapport. If the enrole.appServer.urlproperty in the enRole.properties filehas the value as iiop://isimServerHost:2809, then 2809 is theITIM server bootstrap port.
2809
isim.username Identity Manager system user isauthorized to update users andaccounts
ITIM Manager
isim.password Password for isim.username. secret
isim.justificationRequired.enabled
IBM Security Identity Manager 6 and 7only
Set the value to true, if IBM SecurityIdentity Manager version 6 or 7requires the justification. The defaultvalue is set to false.
isim.justificationRequired.enabled=true
56 Integrating IBM Security Identity Manager with IBM Security Identity Governance and Intelligence
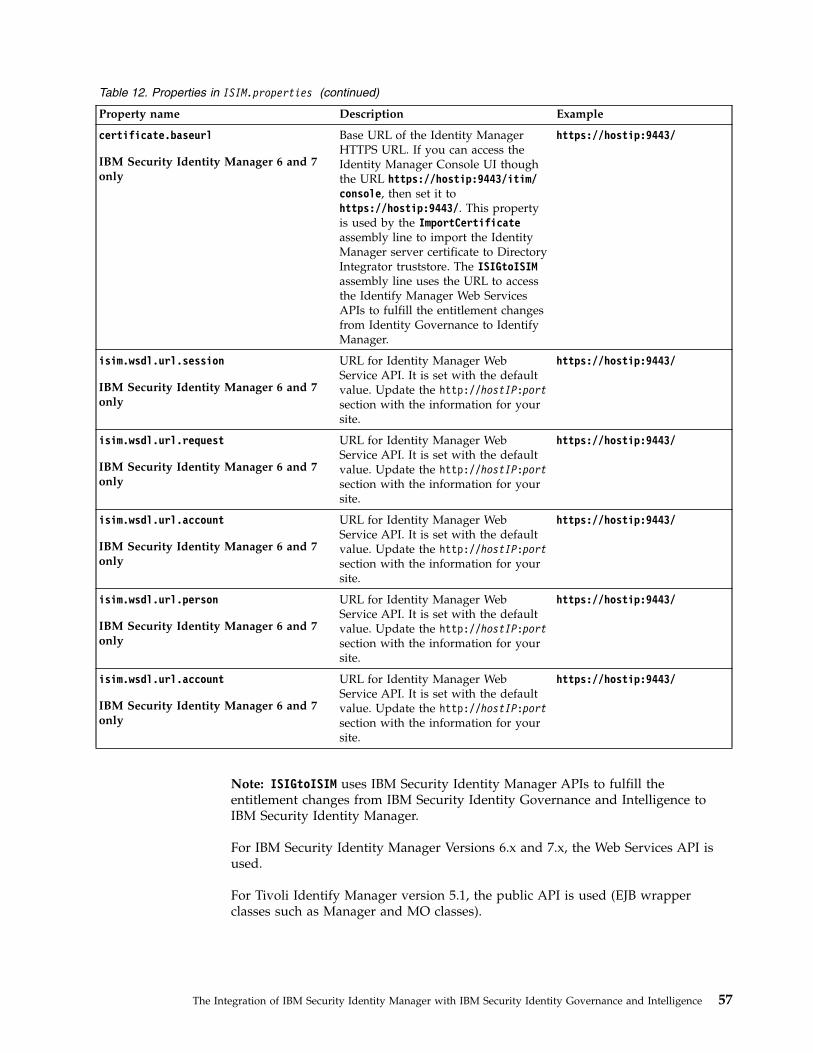
Table 12. Properties in ISIM.properties (continued)
Property name Description Example
certificate.baseurl
IBM Security Identity Manager 6 and 7only
Base URL of the Identity ManagerHTTPS URL. If you can access theIdentity Manager Console UI thoughthe URL https://hostip:9443/itim/console, then set it tohttps://hostip:9443/. This propertyis used by the ImportCertificateassembly line to import the IdentityManager server certificate to DirectoryIntegrator truststore. The ISIGtoISIMassembly line uses the URL to accessthe Identify Manager Web ServicesAPIs to fulfill the entitlement changesfrom Identity Governance to IdentifyManager.
https://hostip:9443/
isim.wsdl.url.session
IBM Security Identity Manager 6 and 7only
URL for Identity Manager WebService API. It is set with the defaultvalue. Update the http://hostIP:portsection with the information for yoursite.
https://hostip:9443/
isim.wsdl.url.request
IBM Security Identity Manager 6 and 7only
URL for Identity Manager WebService API. It is set with the defaultvalue. Update the http://hostIP:portsection with the information for yoursite.
https://hostip:9443/
isim.wsdl.url.account
IBM Security Identity Manager 6 and 7only
URL for Identity Manager WebService API. It is set with the defaultvalue. Update the http://hostIP:portsection with the information for yoursite.
https://hostip:9443/
isim.wsdl.url.person
IBM Security Identity Manager 6 and 7only
URL for Identity Manager WebService API. It is set with the defaultvalue. Update the http://hostIP:portsection with the information for yoursite.
https://hostip:9443/
isim.wsdl.url.account
IBM Security Identity Manager 6 and 7only
URL for Identity Manager WebService API. It is set with the defaultvalue. Update the http://hostIP:portsection with the information for yoursite.
https://hostip:9443/
Note: ISIGtoISIM uses IBM Security Identity Manager APIs to fulfill theentitlement changes from IBM Security Identity Governance and Intelligence toIBM Security Identity Manager.
For IBM Security Identity Manager Versions 6.x and 7.x, the Web Services API isused.
For Tivoli Identify Manager version 5.1, the public API is used (EJB wrapperclasses such as Manager and MO classes).
The Integration of IBM Security Identity Manager with IBM Security Identity Governance and Intelligence 57
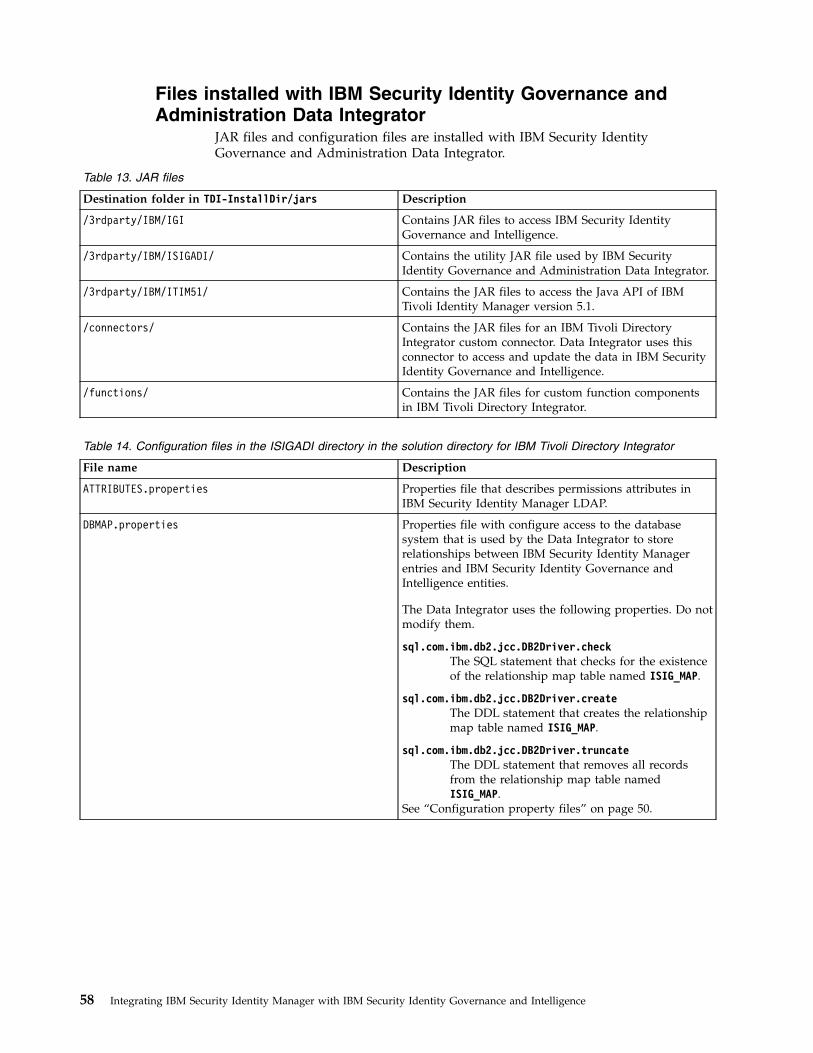
Files installed with IBM Security Identity Governance andAdministration Data Integrator
JAR files and configuration files are installed with IBM Security IdentityGovernance and Administration Data Integrator.
Table 13. JAR files
Destination folder in TDI-InstallDir/jars Description
/3rdparty/IBM/IGI Contains JAR files to access IBM Security IdentityGovernance and Intelligence.
/3rdparty/IBM/ISIGADI/ Contains the utility JAR file used by IBM SecurityIdentity Governance and Administration Data Integrator.
/3rdparty/IBM/ITIM51/ Contains the JAR files to access the Java API of IBMTivoli Identity Manager version 5.1.
/connectors/ Contains the JAR files for an IBM Tivoli DirectoryIntegrator custom connector. Data Integrator uses thisconnector to access and update the data in IBM SecurityIdentity Governance and Intelligence.
/functions/ Contains the JAR files for custom function componentsin IBM Tivoli Directory Integrator.
Table 14. Configuration files in the ISIGADI directory in the solution directory for IBM Tivoli Directory Integrator
File name Description
ATTRIBUTES.properties Properties file that describes permissions attributes inIBM Security Identity Manager LDAP.
DBMAP.properties Properties file with configure access to the databasesystem that is used by the Data Integrator to storerelationships between IBM Security Identity Managerentries and IBM Security Identity Governance andIntelligence entities.
The Data Integrator uses the following properties. Do notmodify them.
sql.com.ibm.db2.jcc.DB2Driver.checkThe SQL statement that checks for the existenceof the relationship map table named ISIG_MAP.
sql.com.ibm.db2.jcc.DB2Driver.createThe DDL statement that creates the relationshipmap table named ISIG_MAP.
sql.com.ibm.db2.jcc.DB2Driver.truncateThe DDL statement that removes all recordsfrom the relationship map table namedISIG_MAP.
See “Configuration property files” on page 50.
58 Integrating IBM Security Identity Manager with IBM Security Identity Governance and Intelligence
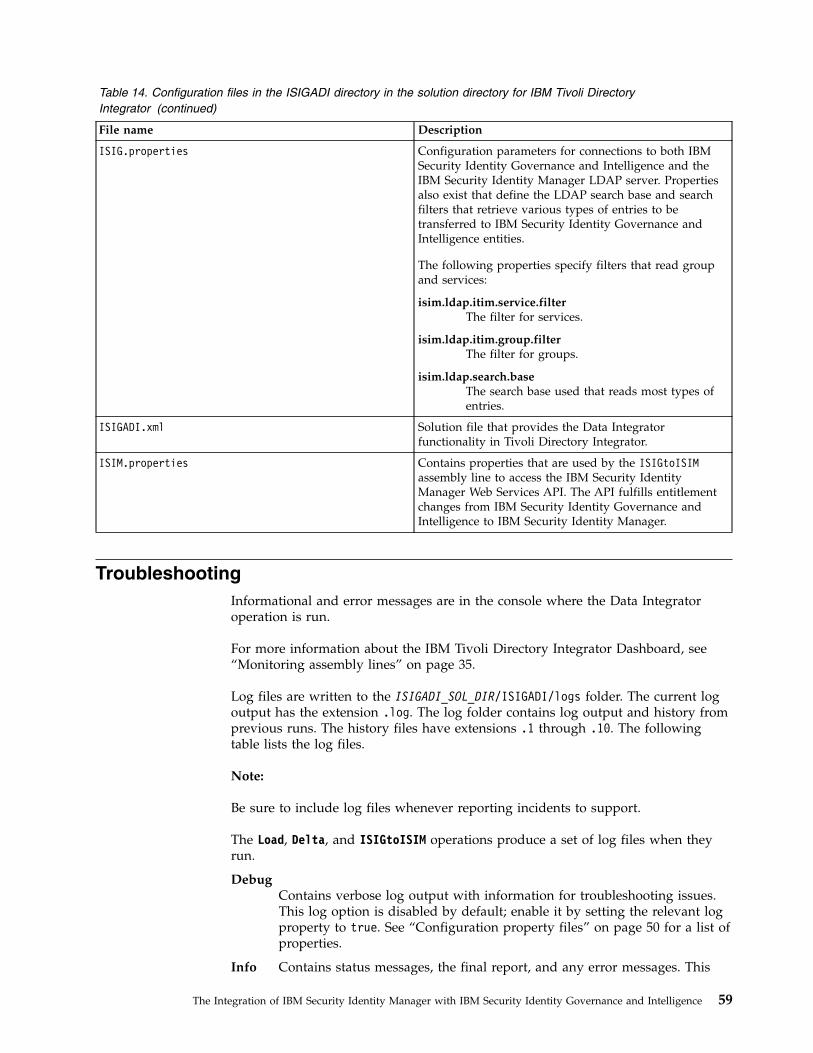
Table 14. Configuration files in the ISIGADI directory in the solution directory for IBM Tivoli DirectoryIntegrator (continued)
File name Description
ISIG.properties Configuration parameters for connections to both IBMSecurity Identity Governance and Intelligence and theIBM Security Identity Manager LDAP server. Propertiesalso exist that define the LDAP search base and searchfilters that retrieve various types of entries to betransferred to IBM Security Identity Governance andIntelligence entities.
The following properties specify filters that read groupand services:
isim.ldap.itim.service.filterThe filter for services.
isim.ldap.itim.group.filterThe filter for groups.
isim.ldap.search.baseThe search base used that reads most types ofentries.
ISIGADI.xml Solution file that provides the Data Integratorfunctionality in Tivoli Directory Integrator.
ISIM.properties Contains properties that are used by the ISIGtoISIMassembly line to access the IBM Security IdentityManager Web Services API. The API fulfills entitlementchanges from IBM Security Identity Governance andIntelligence to IBM Security Identity Manager.
TroubleshootingInformational and error messages are in the console where the Data Integratoroperation is run.
For more information about the IBM Tivoli Directory Integrator Dashboard, see“Monitoring assembly lines” on page 35.
Log files are written to the ISIGADI_SOL_DIR/ISIGADI/logs folder. The current logoutput has the extension .log. The log folder contains log output and history fromprevious runs. The history files have extensions .1 through .10. The followingtable lists the log files.
Note:
Be sure to include log files whenever reporting incidents to support.
The Load, Delta, and ISIGtoISIM operations produce a set of log files when theyrun.
DebugContains verbose log output with information for troubleshooting issues.This log option is disabled by default; enable it by setting the relevant logproperty to true. See “Configuration property files” on page 50 for a list ofproperties.
Info Contains status messages, the final report, and any error messages. This
The Integration of IBM Security Identity Manager with IBM Security Identity Governance and Intelligence 59
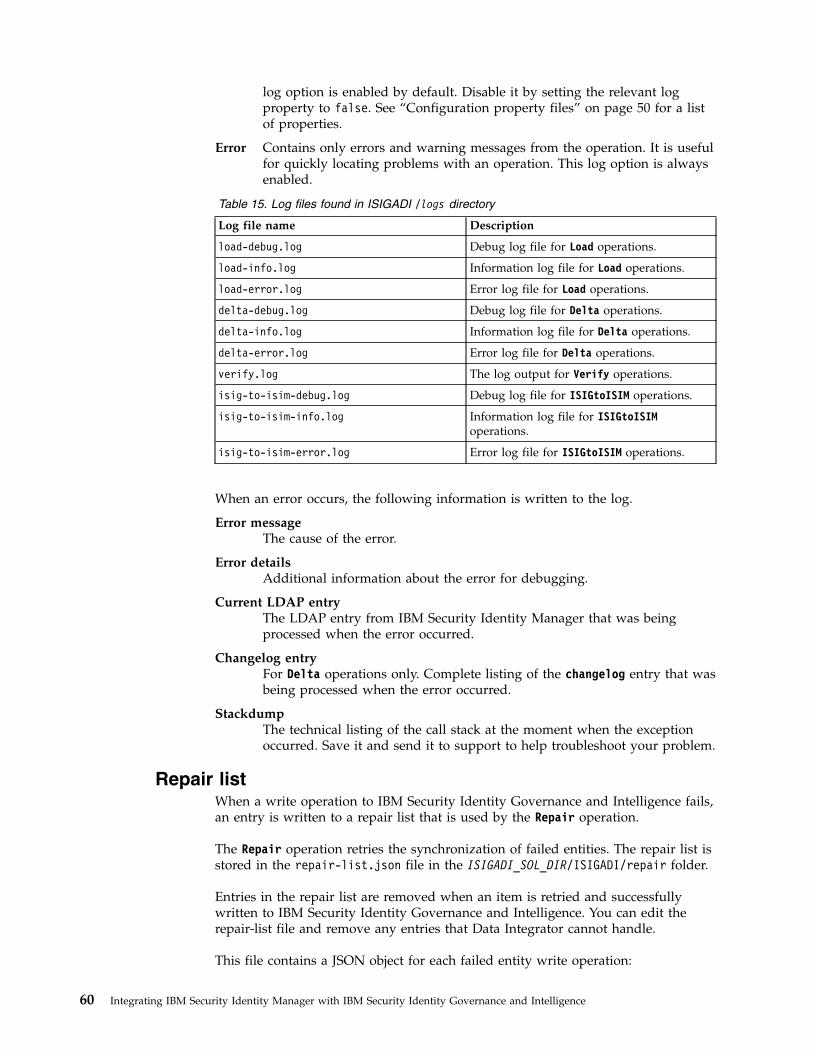
log option is enabled by default. Disable it by setting the relevant logproperty to false. See “Configuration property files” on page 50 for a listof properties.
Error Contains only errors and warning messages from the operation. It is usefulfor quickly locating problems with an operation. This log option is alwaysenabled.
Table 15. Log files found in ISIGADI /logs directory
Log file name Description
load-debug.log Debug log file for Load operations.
load-info.log Information log file for Load operations.
load-error.log Error log file for Load operations.
delta-debug.log Debug log file for Delta operations.
delta-info.log Information log file for Delta operations.
delta-error.log Error log file for Delta operations.
verify.log The log output for Verify operations.
isig-to-isim-debug.log Debug log file for ISIGtoISIM operations.
isig-to-isim-info.log Information log file for ISIGtoISIMoperations.
isig-to-isim-error.log Error log file for ISIGtoISIM operations.
When an error occurs, the following information is written to the log.
Error messageThe cause of the error.
Error detailsAdditional information about the error for debugging.
Current LDAP entryThe LDAP entry from IBM Security Identity Manager that was beingprocessed when the error occurred.
Changelog entryFor Delta operations only. Complete listing of the changelog entry that wasbeing processed when the error occurred.
StackdumpThe technical listing of the call stack at the moment when the exceptionoccurred. Save it and send it to support to help troubleshoot your problem.
Repair listWhen a write operation to IBM Security Identity Governance and Intelligence fails,an entry is written to a repair list that is used by the Repair operation.
The Repair operation retries the synchronization of failed entities. The repair list isstored in the repair-list.json file in the ISIGADI_SOL_DIR/ISIGADI/repair folder.
Entries in the repair list are removed when an item is retried and successfullywritten to IBM Security Identity Governance and Intelligence. You can edit therepair-list file and remove any entries that Data Integrator cannot handle.
This file contains a JSON object for each failed entity write operation:
60 Integrating IBM Security Identity Manager with IBM Security Identity Governance and Intelligence
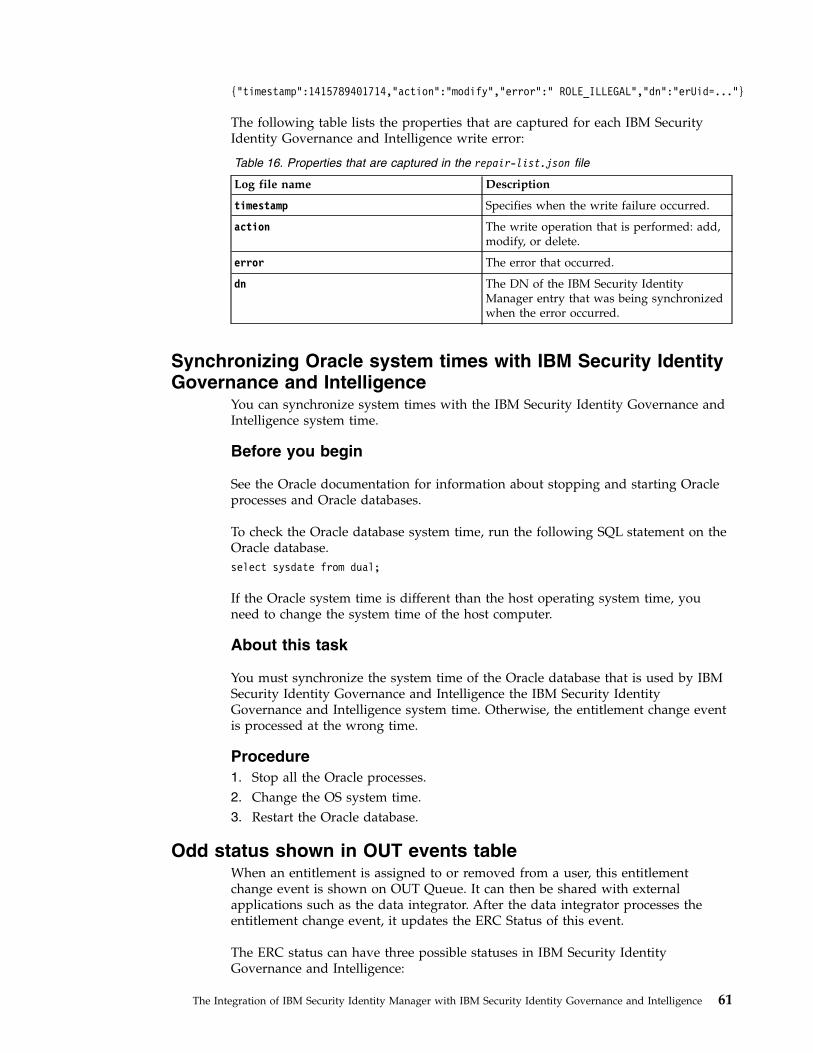
{"timestamp":1415789401714,"action":"modify","error":" ROLE_ILLEGAL","dn":”erUid=...”}
The following table lists the properties that are captured for each IBM SecurityIdentity Governance and Intelligence write error:
Table 16. Properties that are captured in the repair-list.json file
Log file name Description
timestamp Specifies when the write failure occurred.
action The write operation that is performed: add,modify, or delete.
error The error that occurred.
dn The DN of the IBM Security IdentityManager entry that was being synchronizedwhen the error occurred.
Synchronizing Oracle system times with IBM Security IdentityGovernance and Intelligence
You can synchronize system times with the IBM Security Identity Governance andIntelligence system time.
Before you begin
See the Oracle documentation for information about stopping and starting Oracleprocesses and Oracle databases.
To check the Oracle database system time, run the following SQL statement on theOracle database.select sysdate from dual;
If the Oracle system time is different than the host operating system time, youneed to change the system time of the host computer.
About this task
You must synchronize the system time of the Oracle database that is used by IBMSecurity Identity Governance and Intelligence the IBM Security IdentityGovernance and Intelligence system time. Otherwise, the entitlement change eventis processed at the wrong time.
Procedure1. Stop all the Oracle processes.2. Change the OS system time.3. Restart the Oracle database.
Odd status shown in OUT events tableWhen an entitlement is assigned to or removed from a user, this entitlementchange event is shown on OUT Queue. It can then be shared with externalapplications such as the data integrator. After the data integrator processes theentitlement change event, it updates the ERC Status of this event.
The ERC status can have three possible statuses in IBM Security IdentityGovernance and Intelligence:
The Integration of IBM Security Identity Manager with IBM Security Identity Governance and Intelligence 61

UnprocessedNot processed by an external application.
SuccessProcessed successfully by an external application.
Error Processed by external application but an error occurred.
You might see an extra status. This extra status means that the event wasprocessed by the external application, but it was ignored.
!emanager.stato.3! or Processed
For example, this status occurs when a permission that exists only on the IBMSecurity Identity Governance and Intelligence side is assigned to a user, who isported over from IBM Security Identity Manager. This status is shown after DataIntegrator processes this event. It means that this event is processed by the DataIntegrator, but it is ignored because no matching service group for this permissionexists in IBM Security Identity Manager.
SOAP operation errorIf you set the IBM Security Identity Manager WSDL URLs in the ISIM.propertiesfile with the IBM Security Identity Manager server IP address, you might receivetheCTGDIS483E Function has not been initialized SOAP operation error.
This error can occur even though the IP address is correct.
To resolve this issue, use your IBM Security Identity Manager server host namerather than the IP address.
Also, modify the hosts file on the server where IBM Tivoli Directory Integrator isrunning and add the IBM Security Identity Manager IP address, host name, andoptionally, the short name. For instructions about how to locate your hosts file andhow to modify it, see “Defining a host name in the hosts file” on page 14.
IBM Security Identity Governance and Administration DataIntegrator .properties files modifications
The Data Integrator properties files are loaded when the IBM Tivoli DirectoryIntegrator server is started.
If you change the Data Integrator properties files, you must stop and restart theIBM Tivoli Directory Integrator server to pick up the changes. For a list of the DataIntegrator properties files, see “Configuration property files” on page 50.
Accept signer certificate from IBM Tivoli Identity Manager 5.1and the IBM Security Identity Governance and Intelligenceserver
For IBM Security Identity Governance and Administration Data Integrator tocommunicate with WebSphere Application Server, Data Integrator must obtain asigner certificate from the server.
62 Integrating IBM Security Identity Manager with IBM Security Identity Governance and Intelligence
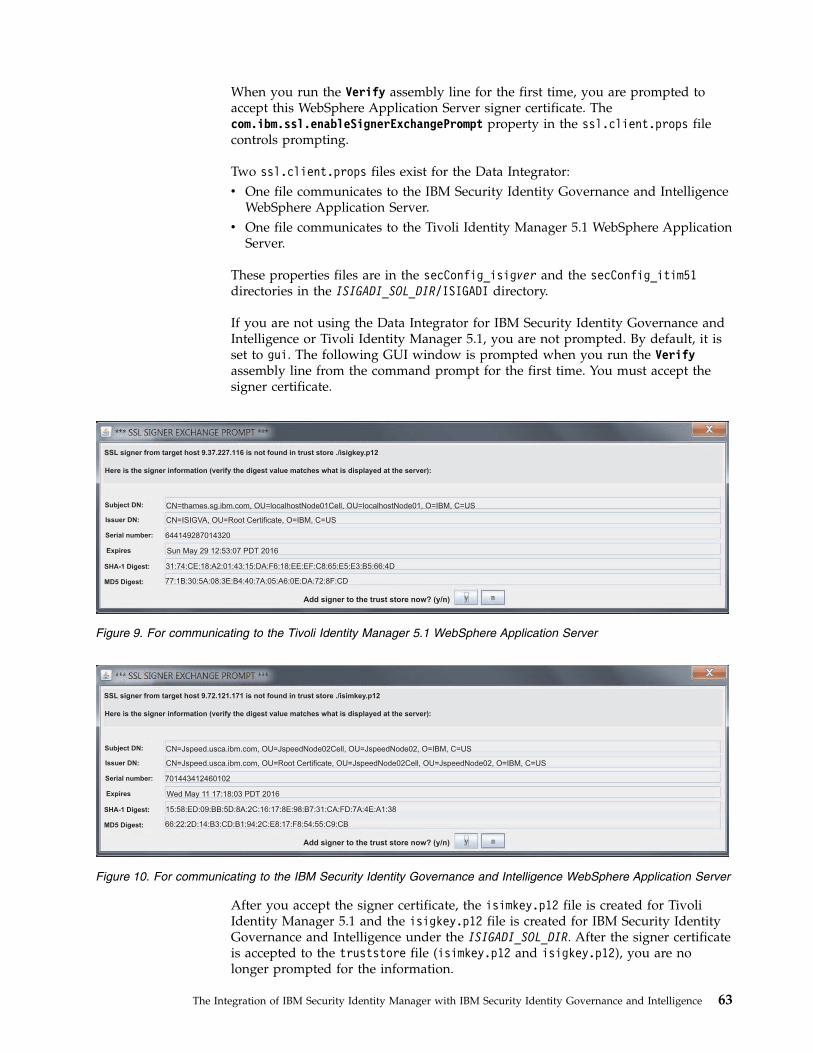
When you run the Verify assembly line for the first time, you are prompted toaccept this WebSphere Application Server signer certificate. Thecom.ibm.ssl.enableSignerExchangePrompt property in the ssl.client.props filecontrols prompting.
Two ssl.client.props files exist for the Data Integrator:v One file communicates to the IBM Security Identity Governance and Intelligence
WebSphere Application Server.v One file communicates to the Tivoli Identity Manager 5.1 WebSphere Application
Server.
These properties files are in the secConfig_isigver and the secConfig_itim51directories in the ISIGADI_SOL_DIR/ISIGADI directory.
If you are not using the Data Integrator for IBM Security Identity Governance andIntelligence or Tivoli Identity Manager 5.1, you are not prompted. By default, it isset to gui. The following GUI window is prompted when you run the Verifyassembly line from the command prompt for the first time. You must accept thesigner certificate.
After you accept the signer certificate, the isimkey.p12 file is created for TivoliIdentity Manager 5.1 and the isigkey.p12 file is created for IBM Security IdentityGovernance and Intelligence under the ISIGADI_SOL_DIR. After the signer certificateis accepted to the truststore file (isimkey.p12 and isigkey.p12), you are nolonger prompted for the information.
SSL signer from target host 9.37.227.116 is not found in trust store ./isigkey.p12
Here is the signer information (verify the digest value matches what is displayed at the server):
Subject DN:
Issuer DN:
Serial number:
Expires
MD5 Digest:
SHA-1 Digest:
CN=thames.sg.ibm.com, OU=localhostNode01Cell, OU= , O=IBM, C=USlocalhostNode01
CN=ISIGVA, OU=Root Certificate, O=IBM, C=US
644149287014320
Sun May 29 12:53:07 PDT 2016
31:74:CE:18:A2:01:43:15:DA:F6:18:EE:EF:C8:65:E5:E3:B5:66:4D
77:1B:30:5A:08:3E:B4:40:7A:05:A6:0E:DA:72:8F:CD
Add signer to the trust store now? (y/n)
Figure 9. For communicating to the Tivoli Identity Manager 5.1 WebSphere Application Server
SSL signer from target host 9.72.121.171 is not found in trust store ./isimkey.p12
Here is the signer information (verify the digest value matches what is displayed at the server):
Subject DN:
Issuer DN:
Serial number:
Expires
MD5 Digest:
SHA-1 Digest:
CN=Jspeed.usca.ibm.com, OU=JspeedNode02Cell, OU=JspeedNode02, O=IBM, C=US
CN=Jspeed.usca.ibm.com, OU=Root Certificate, OU=JspeedNode02Cell, OU=JspeedNode02, O=IBM, C=US
701443412460102
Wed May 11 17:18:03 PDT 2016
15:58:ED:09:BB:5D:8A:2C:16:17:8E:98:B7:31:CA:FD:7A:4E:A1:38
66:22:2D:14:B3:CD:B1:94:2C:E8:17:F8:54:55:C9:CB
Add signer to the trust store now? (y/n)
Figure 10. For communicating to the IBM Security Identity Governance and Intelligence WebSphere Application Server
The Integration of IBM Security Identity Manager with IBM Security Identity Governance and Intelligence 63
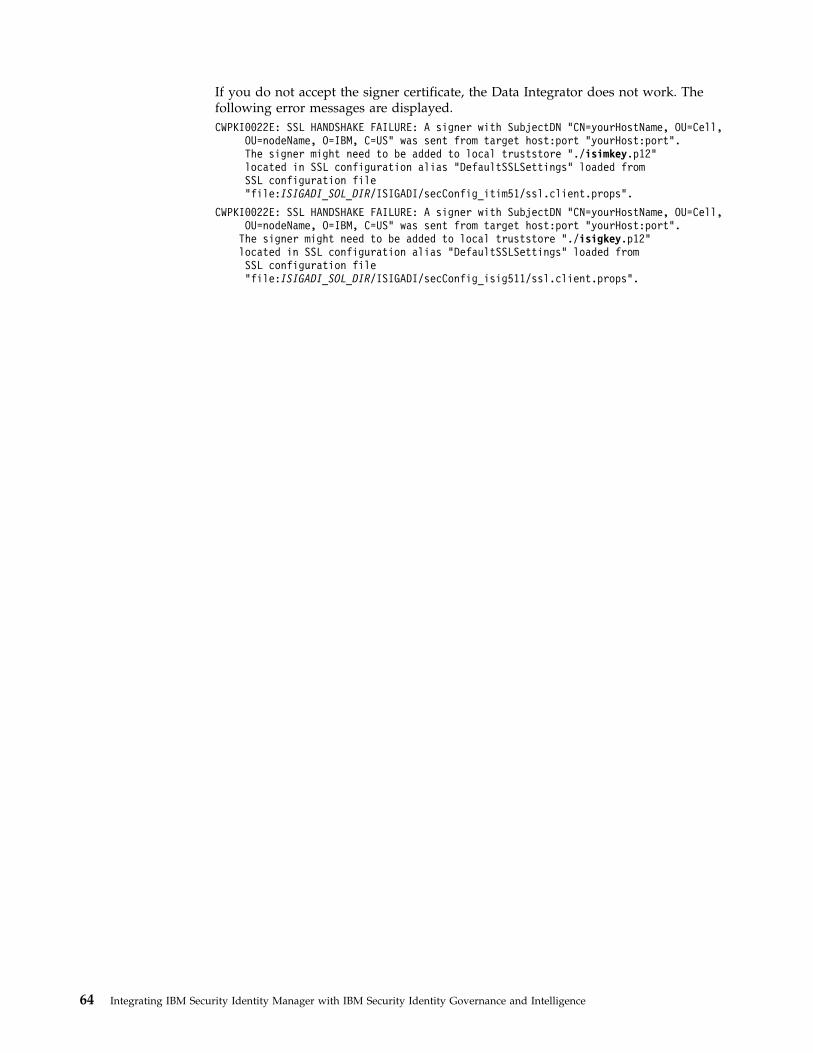
If you do not accept the signer certificate, the Data Integrator does not work. Thefollowing error messages are displayed.CWPKI0022E: SSL HANDSHAKE FAILURE: A signer with SubjectDN "CN=yourHostName, OU=Cell,
OU=nodeName, O=IBM, C=US" was sent from target host:port "yourHost:port".The signer might need to be added to local truststore "./isimkey.p12"located in SSL configuration alias "DefaultSSLSettings" loaded fromSSL configuration file"file:ISIGADI_SOL_DIR/ISIGADI/secConfig_itim51/ssl.client.props".
CWPKI0022E: SSL HANDSHAKE FAILURE: A signer with SubjectDN "CN=yourHostName, OU=Cell,OU=nodeName, O=IBM, C=US" was sent from target host:port "yourHost:port".
The signer might need to be added to local truststore "./isigkey.p12"located in SSL configuration alias "DefaultSSLSettings" loaded fromSSL configuration file"file:ISIGADI_SOL_DIR/ISIGADI/secConfig_isig511/ssl.client.props".
64 Integrating IBM Security Identity Manager with IBM Security Identity Governance and Intelligence
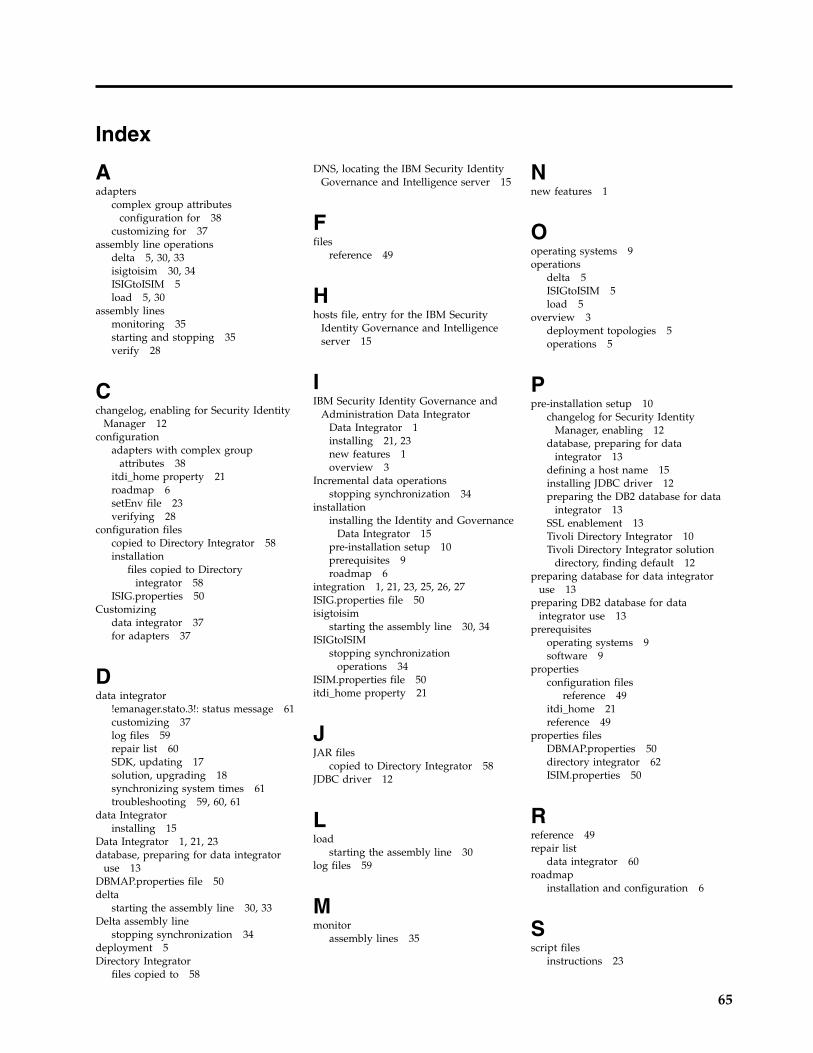
Index
Aadapters
complex group attributesconfiguration for 38
customizing for 37assembly line operations
delta 5, 30, 33isigtoisim 30, 34ISIGtoISIM 5load 5, 30
assembly linesmonitoring 35starting and stopping 35verify 28
Cchangelog, enabling for Security Identity
Manager 12configuration
adapters with complex groupattributes 38
itdi_home property 21roadmap 6setEnv file 23verifying 28
configuration filescopied to Directory Integrator 58installation
files copied to Directoryintegrator 58
ISIG.properties 50Customizing
data integrator 37for adapters 37
Ddata integrator
!emanager.stato.3!: status message 61customizing 37log files 59repair list 60SDK, updating 17solution, upgrading 18synchronizing system times 61troubleshooting 59, 60, 61
data Integratorinstalling 15
Data Integrator 1, 21, 23database, preparing for data integrator
use 13DBMAP.properties file 50delta
starting the assembly line 30, 33Delta assembly line
stopping synchronization 34deployment 5Directory Integrator
files copied to 58
DNS, locating the IBM Security IdentityGovernance and Intelligence server 15
Ffiles
reference 49
Hhosts file, entry for the IBM Security
Identity Governance and Intelligenceserver 15
IIBM Security Identity Governance and
Administration Data IntegratorData Integrator 1installing 21, 23new features 1overview 3
Incremental data operationsstopping synchronization 34
installationinstalling the Identity and Governance
Data Integrator 15pre-installation setup 10prerequisites 9roadmap 6
integration 1, 21, 23, 25, 26, 27ISIG.properties file 50isigtoisim
starting the assembly line 30, 34ISIGtoISIM
stopping synchronizationoperations 34
ISIM.properties file 50itdi_home property 21
JJAR files
copied to Directory Integrator 58JDBC driver 12
Lload
starting the assembly line 30log files 59
Mmonitor
assembly lines 35
Nnew features 1
Ooperating systems 9operations
delta 5ISIGtoISIM 5load 5
overview 3deployment topologies 5operations 5
Ppre-installation setup 10
changelog for Security IdentityManager, enabling 12
database, preparing for dataintegrator 13
defining a host name 15installing JDBC driver 12preparing the DB2 database for data
integrator 13SSL enablement 13Tivoli Directory Integrator 10Tivoli Directory Integrator solution
directory, finding default 12preparing database for data integrator
use 13preparing DB2 database for data
integrator use 13prerequisites
operating systems 9software 9
propertiesconfiguration files
reference 49itdi_home 21reference 49
properties filesDBMAP.properties 50directory integrator 62ISIM.properties 50
Rreference 49repair list
data integrator 60roadmap
installation and configuration 6
Sscript files
instructions 23
65
SDKupdating 17, 20
set updefining a host name 15enabling changelog for Security
Identity Manager 12installing JDBC driver 12preparing the database for data
integrator 13preparing the DB2 database for data
integrator 13SSL enablement 13Tivoli Directory Integrator 10Tivoli Directory Integrator solution
directory, finding default 12setEnv
configuring 23setting up 10signer certificates
troubleshooting 63soap operation error
troubleshooting 62software requirements 9SSL
certificate and keystore, creating 25certificate, uploading to Security
Identity Manager 26
SSL (continued)Security Identity Manager certificate,
importing to Tivoli DirectoryIntegrator 27
Tivoli Directory Integratorcertificates 13
SSL enablement 13checking the self-signed certificate 24
synchronization operationsstopping entitlement fulfillment 34stopping incremental data
operations 34system time synchronization 61
TTivoli Directory Integrator 10
default solutions directory 12JDBC driver 12SSL certificates 13
troubleshootingdata integrator
!emanager.stato.3!: statusmessage 61
log files 59repair list 60
troubleshooting (continued)data integrator (continued)
synchronizing system times 61modifying property files 62signer certificates 63soap operation error 62
Uupdate
SDK 20upgrade
data integrator 17data integrator solution 18SDK 17
Vverify assembly line
verifying the data integratorconfiguration 28
66 Integrating IBM Security Identity Manager with IBM Security Identity Governance and Intelligence