Embed Size (px)
Citation preview
300-TP-001-001
Operations Instructions for Synergy III Utilities and GUIs
Technical Paper
March 2003
Prepared Under Contract NAS5-60000
RESPONSIBLE AUTHOR
Carolyn Whitaker /s/ 2/25/03
Carolyn Whitaker, Systems Engineer Date EOSDIS Core System Project
RESPONSIBLE OFFICE
Royal J. White, Jr. /s/ 2/25/03
Royal White, Director of Systems Engineering Date EOSDIS Core System Project
Raytheon Systems Company Upper Marlboro, Maryland

This page intentionally left blank.

Abstract
This document describes the human-machine characteristics of the Synergy III related tools used by the ECS operations staff and external users of ECS.
Keywords: GUI, Interface, Operator, Synergy III, Tools
iii 300-TP-001-001

This page intentionally left blank.
iv 300-TP-001-001

Contents
Abstract
1. Introduction
1.1 Purpose........................................................................................................................... 1-1
1.2 Organization................................................................................................................... 1-1
2. Data Pool
2.1 Cleanup Utility............................................................................................................... 2-1
2.1.1 Executing the Data Pool Cleanup Utility........................................................... 2-1 2.1.2 Cleanup Configuration File .............................................................................. 2-5 2.1.3 Examples............................................................................................................ 2-6 2.1.4 Required Operating Environment ...................................................................... 2-9 2.1.5 Interfaces and Data Types.................................................................................. 2-9 2.1.6 Special Constraints ........................................................................................... 2-9 2.1.7 Log File............................................................................................................. 2-9 2.1.8 Reports and Output Files ................................................................................. 2-10
2.2 Batch Insert Utility...................................................................................................... 2-10
2.2.1 Using the Batch Insert Utility .......................................................................... 2-10 2.2.2 Batch Insert Utility Commands ....................................................................... 2-12 2.2.3 Required Operating Environment .................................................................... 2-13 2.2.4 Interfaces and Data Types................................................................................ 2-13 2.2.5 Configuration File Format – EcDlBatchInsert.CFG........................................ 2-13 2.2.6 Special Constraints .......................................................................................... 2-14 2.2.7 Outputs............................................................................................................. 2-14 2.2.8 Event and Error Messages ............................................................................... 2-14 2.2.9 Reports ............................................................................................................. 2-14 2.2.10 Logs.................................................................................................................. 2-14 2.2.11 Sybase Error Handling..................................................................................... 2-14
v 300-TP-001-001
2.3 Update Granule ............................................................................................................ 2-14
2.3.1 Using the Update Granule Utility .................................................................... 2-15 2.3.2 Update Granule Utility Commands ................................................................. 2-16 2.3.3 Required Operating Environment .................................................................... 2-17 2.3.4 Interfaces and Data Types................................................................................ 2-17 2.3.5 Input File Format ............................................................................................. 2-17 2.3.6 Configuration File............................................................................................ 2-17 2.3.7 Special Constraints .......................................................................................... 2-18 2.3.8 Outputs............................................................................................................. 2-18 2.3.9 Event and Error Messages ............................................................................... 2-18 2.3.10 Reports ............................................................................................................. 2-18 2.3.11 Logs.................................................................................................................. 2-18 2.3.12 Recovery .......................................................................................................... 2-19 2.3.13 Sybase Error Handling..................................................................................... 2-19
2.4 Data Pool Maintenance GUI........................................................................................ 2-19
2.4.1 Starting the DPM GUI ..................................................................................... 2-20 2.4.1.6 Manage Themes Tab...................................................................................... 2-38 2.4.2 Required Operating Environment .................................................................... 2-42 2.4.3 Interfaces and Data Types................................................................................ 2-42 2.4.4 Databases ......................................................................................................... 2-42 2.4.5 Special Constraints .......................................................................................... 2-42 2.4.6 Outputs............................................................................................................. 2-42 2.4.7 Event and Messages......................................................................................... 2-42 2.4.8 Reports ............................................................................................................. 2-42
2.5 HEG Data Pool Order Status GUI ............................................................................... 2-42
2.5.1 Accessing the HEG Data Pool Order Status GUI............................................ 2-42 2.5.2 Required Operating Environment .................................................................... 2-47 2.5.3 Interfaces and Data Types................................................................................ 2-47 2.5.4 Databases ......................................................................................................... 2-47 2.5.5 Special Constraints .......................................................................................... 2-47 2.5.6 Outputs............................................................................................................. 2-48 2.5.7 Events and Messages ....................................................................................... 2-48 2.5.8 Reports ............................................................................................................. 2-48
vi 300-TP-001-001

3. Order Manager
3.1 Order Manager GUI....................................................................................................... 3-1
3.1.1 Starting the OM GUI ......................................................................................... 3-1 3.1.2 Required Operating Environment .................................................................... 3-31 3.1.3 Interfaces and Data types ................................................................................. 3-31 3.1.4 Databases ......................................................................................................... 3-31 3.1.5 Special Constraints .......................................................................................... 3-31 3.1.6 Outputs............................................................................................................. 3-32 3.1.7 Events and Messages ....................................................................................... 3-32 3.1.8 Reports ............................................................................................................. 3-32
3.2 Order Manager CLI ..................................................................................................... 3-32
3.2.1 Quick Start Using the Order Manager Command Line Utility........................ 3-32 3.2.2 Order Manager Command Line Utility Main Screen ...................................... 3-41 3.2.3 Required Operating Environment .................................................................... 3-41 3.2.4 Databases ......................................................................................................... 3-42 3.2.5 Special Constraints .......................................................................................... 3-42 3.2.6 Outputs............................................................................................................. 3-42 3.2.7 Event and Error Messages ............................................................................... 3-42 3.2.8 Reports ............................................................................................................. 3-43
4. Spatial Subscription Server
4.1 Spatial Subscription Server GUI.................................................................................... 4-1
4.1.1 Using the Spatial Subscription Server (NBSRV) GUI ...................................... 4-1
4.2 SSS Command Line Interface...................................................................................... 4-51
5. Bulk Metadata Generation Tool (Enhancement)
5.1 ECHO Access to Data Pool ........................................................................................... 5-1
5.1.1 Using the EcOsBulkURL Utility ....................................................................... 5-1 5.1.2 Required Operating Environment ...................................................................... 5-2 5.1.3 Interfaces and Data Types.................................................................................. 5-2 5.1.4 Configuration File Format – EcBulkURLConfigParams.cfg ............................ 5-2 5.1.5 Special Constraints ............................................................................................ 5-2
vii 300-TP-001-001

5.1.6 Outputs............................................................................................................... 5-3 5.1.7 Event and Error Messages ................................................................................. 5-3 5.1.8 Reports ............................................................................................................... 5-3 5.1.9 Logs.................................................................................................................... 5-3 5.1.10 Sybase Error Handling....................................................................................... 5-3
5.2 ECHO Access to AIRS Browse..................................................................................... 5-3
List of Figures 2.4.1.1-1 Data Pool Maintenance Home Page ................................................................ 2-20
2.4.1.2-1 Batch Summary Screen.................................................................................... 2-21
2.4.1.3-1 List Insert Queue Screen.................................................................................. 2-22
2.4.1.3-2 List Insert Queue Screen - absolute xml file path............................................ 2-23
2.4.1.3-3 List Insert Queue Screen - xml file content ..................................................... 2-24
2.4.1.4-1 Data Pool Configuration Parameters (View or Update) .................................. 2-25
2.4.1.5-1 List of Collection Groups currently in the Data Pool ...................................... 2-28
2.4.1.5-2 Add Collection Group Screen.......................................................................... 2-29
2.4.1.5-3 Modify Collection Group Screen..................................................................... 2-30
2.4.1.5-4 Collections Associated with an ECS Collection Group................................... 2-31
2.4.1.5-5 Collections Associated with a non-ECS Collection Group ............................. 2-31
2.4.1.5-6 Description of a Collection .............................................................................. 2-32
2.4.1.5-7 Add new collections to a Collection Group..................................................... 2-33
2.4.1.5-8 Add New Non-ECS Collections to a Non-ECS Collection Group. ................. 2-34
2.4.1.5-9 Modify Collection Screen - Update Science Granules and/or Metadata and Data Pool Insertion Columns .................................................................... 2-36
2.4.1.5-10 Modify Collections Screen - Update non-ECS Collections............................. 2-37
2.4.1.6-1 Manage Themes Screen – List of Themes....................................................... 2-39
2.4.1.6-2 Add New Theme Screen .................................................................................. 2-40
2.4.1.6-3 Modify Theme Screen...................................................................................... 2-41
2.5.1-1 HEG Front-end Queue Control........................................................................ 2-44
2.5.1-2 Order Status Screen ......................................................................................... 2-45
2.5.1-3 Order Item Status Screen ................................................................................. 2-46
viii 300-TP-001-001

2.5.1-4 Order Item Details ........................................................................................... 2-47
3.1.1.1-1 Order Manager GUI Home Page. ...................................................................... 3-2
3.1.1.2-1 OM Server Queue Status Page........................................................................... 3-3
3.1.1.3-1 Server Configuration: Configuration Parameters Page of the Order Manager GUI........................................................................................... 3-5
3.1.1.3-2 Media Configuration: Configuration Parameters Page of the Order Manager GUI........................................................................................... 3-6
3.1.1.4-1 Order Manager Server Statistics Page ............................................................... 3-9
3.1.1.5-1 Request Management: View Open Interventions Page ................................... 3-11
3.1.1.6-1 Intervention for Request Page.......................................................................... 3-13
3.1.1.6-2 Intervention for Request Page with Option to Update FtpPush Parameters.... 3-14
3.1.1.7-1 Confirmation for Intervention Page................................................................. 3-17
3.1.1.8-1 Confirmation Page for Changing Media to FTP Push. .................................... 3-18
3.1.1.9-1 Requests with Completed Interventions Page ................................................. 3-20
3.1.1.10-1 Completed Intervention for Request Page ....................................................... 3-22
3.1.1.11-1 Distribution Requests List Page....................................................................... 3-24
3.1.1.12-1 Distribution Request details page .................................................................... 3-26
3.1.1.13-1 ECS Order Information Page ........................................................................... 3-27
3.1.1.14-1 User Profile Page ............................................................................................. 3-28
3.1.1.15-1 Sample Help Page. ........................................................................................... 3-29
3.1.1.15-2 Sample Help Pop-Up Window......................................................................... 3-30
3.1.1.16-1 OM GUI Log Viewer Example........................................................................ 3-31
4.1.1.2-1 NBSRV Home Page........................................................................................... 4-2
4.1.1.3-1 SSS – List Events............................................................................................... 4-4
4.1.1.4-1 Manage Subscriptions: List of All the Subscriptions in the NBSRV Database............................................................................................... 4-5
4.1.1.4-2a View Contents of a Subscription in the NBSRV Database ............................... 4-6
4.1.1.4-2b View Contents of a Subscription with Associated Email Notification Action (Continuation) .................................................................................................... 4-7
4.1.1.4-3 Delete Subscription Confirmation Request ....................................................... 4-8
ix 300-TP-001-001

4.1.1.4-4 Delete Subscription Confirmation Acknowledgement ...................................... 4-9
4.1.1.4-5a Update a Subscription in the NBSRV Database.............................................. 4-10
4.1.1.4-5b Update a Subscription in the NBSRV Database (Continuation to Add or Modify String or Spatial Qualifiers Associated with an Existing Subscription) .................................................................................................... 4-11
4.1.1.4-5c Update a Subscription in the NBSRV Database (Continuation to Add or Update Action Information for an Existing Subscription)............................... 4-12
4.1.1.4-5d Update a Subscription in the NBSRV Database (Continuation to Update E-Mail Action Information, Data Pool Information, or the Bundling Order Selection for an Existing Subscription............................................................. 4-13
4.1.1.4-6a Update Confirmation Screen ( Confirms Successful or Unsuccessful Updating of the Subscription).......................................................................... 4-14
4.1.1.4-6b Data Pool Action Associated with a Theme (Alternative to Update Confirmation Screen Figure 4.1.1.4-6a) .......................................................... 4-15
4.1.1.4-7 Add a New Subscription for a Valid ECS User............................................... 4-16
4.1.1.4-8 Event Selection (Continuation of Figure 4.1.1.4-7)......................................... 4-17
4.1.1.4-9 Add Subscription Continuation Information ................................................... 4-18
4.1.1.4-10 Add Subscription Screen Continuation (Adding String and Spatial Qualifiers) ............................................................................................ 4-19
4.1.1.4-11 Add Subscription Screen Continuation (Bundling Order)............................... 4-20
4.1.1.4-12 Add Subscription Screen Continuation (Information for the E-Mail Notification or Data Pool Actions) .................................................................. 4-22
4.1.1.4-13a Add Confirmation Screen (Confirms Successful or Unsuccessful Adding of the Subscription).......................................................................................... 4-24
4.1.1.4-13b Data Pool Action Associated with a Theme (Alternative to Add Confirmation Screen Figure 4.1.1.4-13a) ........................................................ 4-25
4.1.1.5-1 List Themes Screen Request............................................................................ 4-26
4.1.1.5-2 Theme List and Associated Action.................................................................. 4-27
4.1.1.6-1 Theme and Associated Subscriptions .............................................................. 4-28
4.1.1.7-1 Bundling Orders List ....................................................................................... 4-29
4.1.1.7-2 ConDefaults for Bundling Order ..................................................................... 4-30
4.1.1.7-3 Bundling Criteria Change Confirmation Screen.............................................. 4-31
4.1.1.8-1 Add New Bundling Order Screen (Part 1)....................................................... 4-32
x 300-TP-001-001

4.1.1.8-2 Add New Bundling Order Screen (Part 2)....................................................... 4-33
4.1.1.8-3 Add Bundling Order - Media Type Selected is FTPPULL. ............................ 4-34
4.1.1.8-4 Add Bundling Order - Media Type Selected is FTPPUSH. ............................ 4-35
4.1.1.8-5 Successful Results for Bundling Order............................................................ 4-38
4.1.1.8-6 Unsuccessful Results for Bundling Order Screen............................................ 4-39
4.1.1.9-1 Bundling Order Detailed Information.............................................................. 4-40
4.1.1.10-1 Update Existing Bundling Order (Part 1) ........................................................ 4-41
4.1.1.10-2 Update Existing Bundling Order (Part 2) ........................................................ 4-42
4.1.1.10-3 Update Existing Bundling Order (Media Type is FTP PULL)........................ 4-43
4.1.1.10-4 Update Existing Bundling Order (Media Type is FTP PUSH) ....................... 4-44
4.1.1.10-5 Update Existing Bundling Order (Successful Update) .................................... 4-45
4.1.1.10-6 Update Existing Bundling Order (Unsuccessful Update)................................ 4-45
4.1.1.11-1 Cancel Bundling Order Request ...................................................................... 4-46
4.1.1.11-2 Cancel Bundling Order (Successful Cancellation) .......................................... 4-47
4.1.1.11-3 Cancel Bundling Order (Unsuccessful Cancellation)...................................... 4-48
4.1.1.13-1 List Action Queue (Acquire and E-mail Notifications)................................... 4-49
4.1.1.14-1 List Statistics Screen........................................................................................ 4-50
List of Tables
2.1.1-1 Command Line Parameters................................................................................ 2-3
2.1.2-1 Configuration Parameters .................................................................................. 2-6
2.1.5-1 Interface Protocols ............................................................................................. 2-9
2.2.1-1 Command Line Parameters of the Batch Insert Utility.................................... 2-11
2.2.4-1 Interface Protocols ........................................................................................... 2-13
2.3.1-1 Command Line Parameters of the Update Granule Utility.............................. 2-16
2.3.4-1 Interface Protocols ........................................................................................... 2-17
2.3.6-1 Configuration Parameters ................................................................................ 2-18
2.4.1.1-1 DPM Home Page Field Descriptions............................................................... 2-21
xi 300-TP-001-001

2.4.1.4-1 Manage Configuration Parameters Field Description ..................................... 2-25
2.4.1.5-1 Add Collection Group Field Description......................................................... 2-29
2.4.1.5-2 Modify Collection Group Field Description.................................................... 2-30
2.4.1.5-3 Add Collection Group Field Description......................................................... 2-34
2.4.1.6-1 Filter Theme Field Description....................................................................... 2-39
2.4.1.6-2 Add Theme Field Description.......................................................................... 2-40
2.4.1.6-3 Modify Theme Field Description .................................................................... 2-41
3.1.1.2-1 OM GUI Queue Status Field Descriptions ........................................................ 3-4
3.1.1.3-1 OM GUI Configuration Parameters Descriptions ............................................. 3-6
3.1.1.4-1 Order Manager Server Statistics Page Field Descriptions................................. 3-9
3.1.1.5-1 Request Management Page Field Descriptions ............................................... 3-12
3.1.1.6-1 Intervention for Request Page Field Descriptions ........................................... 3-14
3.1.1.7-1 Confirmation for Intervention Page Field Description .................................... 3-17
3.1.1.8-1 Field descriptions for Confirmation Page with Change of Media to FTP Push.......................................................................................................... 3-19
3.1.1.9-1 Requests with Completed Interventions Page Field Descriptions ................... 3-21
3.1.1.10-1 Completed Intervention for Request Page Field Description .......................... 3-22
3.1.1.11-1 Distribution Requests List Page Field Descriptions ........................................ 3-25
3.2.1.1-1 Command Line Parameters.............................................................................. 3-33
3.2.1.2-1 Command Line Utility Configuration File Values .......................................... 3-33
3.2.4-1 Command Line Utility Database, Stored procedures and Tables .................... 3-42
3.2.5-1 CLI – COTS Product Dependencies ................................................................ 3-42
4.1.1.2-1 Spatial Subscription Server (NBSRV) GUI Operator Functions....................... 4-3
4.1.1.4-1 Add Subscriptions Screen Field Description ................................................... 4-17
4.1.1.4-2 Add Subscriptions Screen Field Description (continued) ............................... 4-19
4.1.1.4-3 Add Subscriptions Field Description (continued) ........................................... 4-20
4.1.1.4-4 Add Subscriptions Field Description (continued) ........................................... 4-21
4.1.1.4-5 Add Subscriptions Field Description (continued) .......................................... 4-23
4.1.1.5-1 Theme List Field Description .......................................................................... 4-27
xii 300-TP-001-001

4.1.1.8-1 Field descriptions for the Bundling Order Screens.......................................... 4-36
4.2-1 Text File Contents............................................................................................ 4-53
5.1.1-1 Command Line Parameters of the EcOsBulkURL Utility................................ 5-1
5.1.3-1 Interface Protocols ............................................................................................. 5-2
xiii 300-TP-001-001

This page intentionally left blank.
xiv 300-TP-001-001
1. Introduction
1.1 Purpose The purpose of this document is to provide an interim documentation source for the Tools that were added and/or modified for the Synergy III deployment. Contents of this document will subsequently be captured in the Operations Tools Manual for the ECS Project (DID 609). Until formal delivery of DID 609, this document can be used to support the ECS operations staff.
1.2 Organization This paper is organized as follows:
Section 1: Introduction
Section 2: Data Pool
Section 3: Order Manager
Section 4: Spatial Subscription Server
Section 5: Bulk Metadata Generation Tool
Questions regarding technical information contained within this Paper should be addressed to the following ECS contacts:
• ECS Contact
– Alton Davis, Systems Engineer, 301-883-4123, [email protected]
Questions concerning distribution or control of this document should be addressed to:
Data Management Office The ECS Project Office Raytheon Systems Company 1616 McCormick Drive Upper Marlboro, MD 20774-5301
1-1 300-TP-001-001

This page intentionally left blank.
1-2 300-TP-001-001
2. Data Pool
2.1 Cleanup Utility The Data Pool Cleanup utility provides a mechanism by which the ECS Operations Staff can remove expired granules and their associated metadata and browse files from the Data Pool disks and corresponding Data Pool database inventory. Qualification of a granule for cleanup is based on two criteria: expiration date/time and retention priority. Both are necessary in selecting which granules are to be removed from the Data Pool. Several enhancements have been made to the "cleanup" capability as part of the Synergy III release and they are listed below:
1. Capability to clean up non-ECS data the same way as ECS data
2. Capability to selectively clean up the Data Pool granules associated with a given "theme".
3. Capability to remove granule cross references associated with a given theme in the Data Pool inventory. This capability does not delete the granules themselves; it only removes the theme cross-references.
4. Capability to export a list of deleted granules for ECHO accessibility. This is accomplished by invoking an external utility, EcOsBulkURL, as part of cleanup processing.
5. Capability to clean up all HDF-EOS to Geotiff (HEG) conversion files associated with the HEG order IDs that have been processed and met certain cleanup criteria.
In addition to the above enhancements, a new Data Pool "validation" capability has been implemented as part of Synergy III release. This capability allows the ECS Operations Staff to check for the discrepancies between the Data Pool inventory and the disk content. The discrepancies are classified as "phantoms" or "orphans". A granule is a "phantom" if it exists in the inventory but one or more of its science or metadata files or associated browse files are missing on the disk. An "orphan" file is a science or metadata or browse file that exists on the Data Pool disk but there is no corresponding file entry in the inventory. Also, to be classified as an "orphan", the file must be older than or equal to a certain configurable maximum orphan file age. As part of "orphan" processing, the utility also checks for orphan files left in the /datapool/<mode>/user/temp directory structure whose file age have exceeded the maximum orphan age. The validation capability will repair all discrepancies found by removing the "phantoms" and "orphans" bringing the Data Pool inventory and the disk content into a consistent state. Optionally, the utility can log the discrepancies only without actually repairing them.
2-1 300-TP-001-001

2.1.1 Executing the Data Pool Cleanup Utility The Data Pool Cleanup utility is a Perl script in the /usr/ecs/<mode>/CUSTOM/utilities directory. The utility must be run as user ID "cmshared" or an equivalent that has the Unix access privileges to remove the science, metadata and browse files on the Data Pool disks. The utility must be executed on the same machine on which the Data Pool disks reside. Operationally, it can be run as needed from the command line or in the background as a regularly-scheduled cron job.
The Cleanup utility can be run as (1) cleanup only or (2) validation only or (3) cleanup followed by validation. The command line syntax for each case is provided below:
For a "cleanup only" run:
EcDlCleanupDataPool.pl <mode> [-noprompt] [-file <fileName>]
OR
EcDlCleanupDataPool.pl <mode> [-noprompt] [-offset <offset # of hours>] [-limit <priority limit>] [-theme <themeName>]
OR
EcDlCleanupDataPool.pl <mode> [-noprompt] [-themexref <themeName>]
For a "validation only" run:
EcDlCleanupDataPool.pl <mode> -orphan | -phantom [-collgroup <groupList>] [-maxorphanage <ageDays>] [-nofix]
For a "cleanup followed by validation" run:
EcDlCleanupDataPool.pl <mode> -orphan | -phantom -cleanvalidate [-collgroup <groupList>] [-maxorphanage <ageDays>] [-nofix]
The mode parameter is required to indicate the mode (OPS, TS1, TS2 etc) in which the utility is being run. The command line parameters supported are described in Table 2.1.1-1.
2-2 300-TP-001-001

Table 2.1.1-1. Command Line Parameters (1 of 2)
Parameter Name Required Description noprompt No Suppresses all confirmations and warnings normally displayed
on the screen. Requires no value. May be used with any other option.
Parameters specific to performing cleanup offset No Specifies hours before (negative) or after (positive) midnight of
the previous day from which to delete. Defaults to zero. (Some examples: -offset 5 would delete all granules which had expired as of 5 AM of the current day; -offset -5 would delete all granules which had expired as of 7 PM yesterday -offset 72 would delete all granules which will be expiring in 72 hours measured from the previous day's midnight).
limit No Specifies limiting value used for determining which granules will be deleted. Will delete all granules with priority less than or equal to the specified limit. Must be within the range 1–255, 1 being the lowest priority and 255 being the highest priority. Defaults to value specified in configuration file.
file No Specifies name of file containing granule ids to be deleted. May not be used with any other options other than the noprompt option.
theme No Specifies the name of a theme for which cleanup is to be performed. The Cleanup Utility will clean up granules that would otherwise qualify for cleanup only if the granules are associated with that theme, and remove the granules entirely if they are not associated with any other theme, otherwise only remove the cross references with that theme. The theme name must be enclosed in quotes (“).
themexref No Specifies the name of a theme all cross-references of which are to be removed from the Data Pool inventory. This option is specified to remove the theme cross references only. It does not remove any granules. This command line option cannot be used with any other options other than the noprompt option. The theme name must be enclosed in quotes (“).
Parameters specific to performing validation orphan No
Specifies that Data Pool validation be performed by performing orphan checking. The Data Pool inventory validation function will remove all orphan files and links from the Data pool disks unless the nofix option was specified. (In order to perform validation either orphan or phantom or both must be provided on the command line.)
2-3 300-TP-001-001

Table 2.1.1-1. Command Line Parameters (2 of 2)
Parameter Name Required Description phantom No Specifies that phantom checking be performed.
The Data Pool inventory validation function will remove granules affected by any phantom from the inventory and all its remaining files and links from the Data pool disks unless the nofix option was specified. (In order to perform validation either orphan or phantom or both must be provided on the command line.)
maxorphanage No Specifies the maximum orphan age in days. The value specified must be greater than or equal to 3 days. The Data Pool inventory validation function will consider only those files on disk as orphans whose age is equal to or larger than the maximum orphan age specified. If this parameter is omitted, a default value specified in the configuration file will be used.
nofix No Specifies that a Data Pool validation be performed, but does not attempt to reconcile the discrepancies found. The validation results will be logged.
collgroup No Limit the Data Pool validation to the collection group(s) specified. Single or multiple collection groups can be specified on the command line. Multiple collection groups if provided must be separated by commas, with the string enclosed in double quotes ("), e.g. "MOAT, ASTT". By default, all collection groups in the Data Pool inventory will be included in the validation if this option is not specified.
The Data Pool Cleanup utility performs the following as part of the "cleanup" processing:
1. Removes all data pool granules along with the associated browse files (if no other granules are cross-referenced to them) and the browse links that meet the specified cleanup criteria, from both the Data Pool inventory and the disks.
2. Exports a list of deleted granules for ECHO accessibility by invoking an external utility, EcOsBulkURL. If there are granules that are being deleted that qualify for ECHO export, this utility generates an XML file containing a list of those granules and stores it in the /datapool/<mode>/user/URLExport directory.
3. Removes all HEG conversion files associated with the HEG order IDs that have the status of "DONE" or "FAILED" and a timestamp older than a certain cleanup age. The HEG order IDs are provided in the DlCartOrder table and the cleanup age is specified by the "HEGCleanupAge" parameter in the DlConfig table. The HEG conversion files for each order ID are stored in the /datapool/<mode>/user/downloads/<orderID> directory. (HEG orders and conversion files are generated when end users request HEG-converted data via Data Pool Web Access.)
2-4 300-TP-001-001
(Note that the "URLExport" subdirectory as well as the "downloads" subdirectory are created at the time of Data Pool installation, owned by user "cmshared" with access permissions set to 775. The Cleanup utility does not create these subdirectories.)
The Data Pool Cleanup utility performs the following as part of the "validation" processing:
1. Validates the Data Pool inventory and disk content by checking for the existence of orphans and/or phantoms and removing or just logging them depending on the command line options specified.
After removing all the files, the Cleanup Utility determines how much free space it has cleared from the Data Pool disks. If the space cleared up is greater than or equal to the amount of disk space specified in the MIN_FREE_SPACE parameter (See Table 2.1.2-1), it will update the ‘NoFreeSpaceFlag’ in the Data Pool database indicating to the Data Pool Insert operations that they can continue inserting additional data.
The Cleanup Utility has the ability to continue from where it stopped in the event of interruption. Additionally, to alleviate database contention, it allows only one instance of itself to execute concurrently. The Cleanup Utility also provides the noprompt option to suppress operator prompts/messages.
In normal operations, the Cleanup Utility will be run once a day as a cron job as a "cleanup only" run and will clean up all Data Pool granules which expired on midnight of the previous day and have a retention priority less than or equal to the priority limit. (See DEFAULT_LIMIT in Table 2.1.2-1 below.) Validation can be rather time consuming and should not be run as often, since it potentially involves the checking of all files in the entire Data Pool inventory against those on the Data Pool disk in order to find and remove the discrepancies. It is advised that the validation function be run using the collgroup option whenever possible to limit the validation to the user specified collection groups.
Section 2.1.3 provides some examples, along with detailed explanations for executing this utility.
2.1.2 Cleanup Configuration File The Data Pool Cleanup utility uses a configuration file, EcDlCleanupDataPool.CFG, located in /usr/ecs/<mode>/CUSTOM/cfg directory. The configuration parameters are stored in a PARAMETER = VALUE format with each parameter/value pair as a separate line entry in the file. Table 2.1.2-1 describes the configuration parameters.
2-5 300-TP-001-001
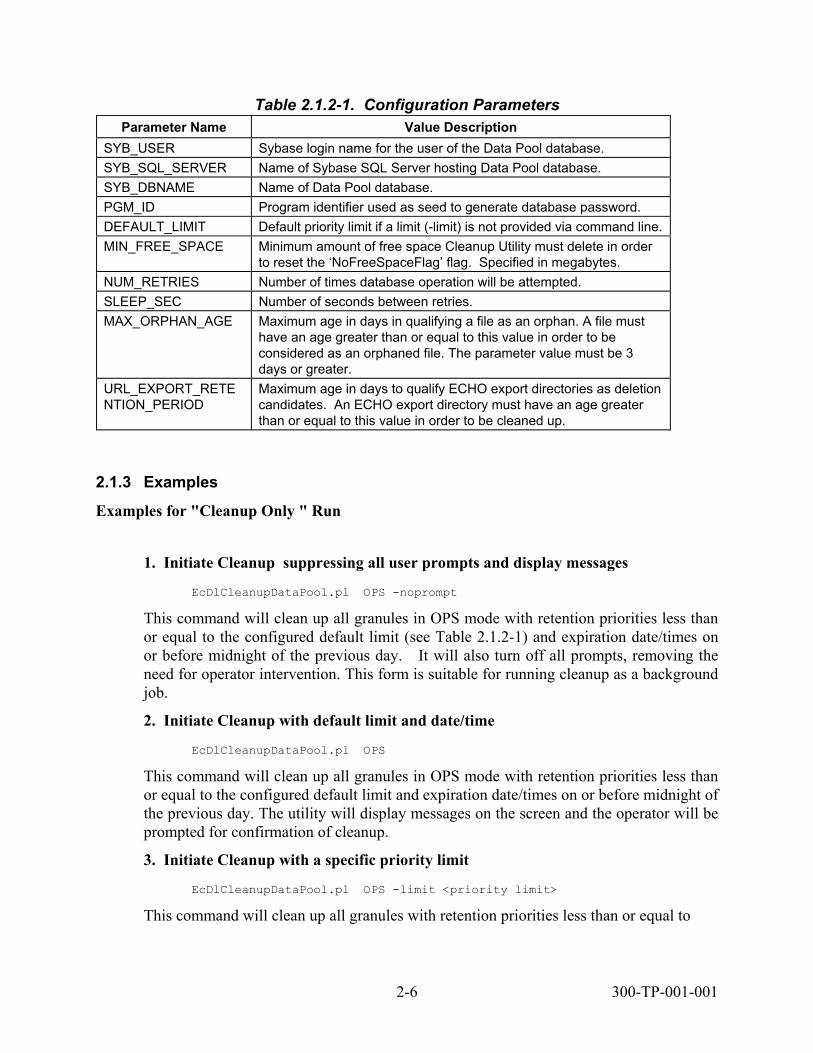
Table 2.1.2-1. Configuration Parameters
Parameter Name Value Description SYB_USER Sybase login name for the user of the Data Pool database. SYB_SQL_SERVER Name of Sybase SQL Server hosting Data Pool database. SYB_DBNAME Name of Data Pool database. PGM_ID Program identifier used as seed to generate database password. DEFAULT_LIMIT Default priority limit if a limit (-limit) is not provided via command line. MIN_FREE_SPACE Minimum amount of free space Cleanup Utility must delete in order
to reset the ‘NoFreeSpaceFlag’ flag. Specified in megabytes. NUM_RETRIES Number of times database operation will be attempted. SLEEP_SEC Number of seconds between retries. MAX_ORPHAN_AGE Maximum age in days in qualifying a file as an orphan. A file must
have an age greater than or equal to this value in order to be considered as an orphaned file. The parameter value must be 3 days or greater.
URL_EXPORT_RETENTION_PERIOD
Maximum age in days to qualify ECHO export directories as deletion candidates. An ECHO export directory must have an age greater than or equal to this value in order to be cleaned up.
2.1.3 Examples
Examples for "Cleanup Only " Run
1. Initiate Cleanup suppressing all user prompts and display messages
EcDlCleanupDataPool.pl OPS -noprompt
This command will clean up all granules in OPS mode with retention priorities less than or equal to the configured default limit (see Table 2.1.2-1) and expiration date/times on or before midnight of the previous day. It will also turn off all prompts, removing the need for operator intervention. This form is suitable for running cleanup as a background job.
2. Initiate Cleanup with default limit and date/time
EcDlCleanupDataPool.pl OPS
This command will clean up all granules in OPS mode with retention priorities less than or equal to the configured default limit and expiration date/times on or before midnight of the previous day. The utility will display messages on the screen and the operator will be prompted for confirmation of cleanup.
3. Initiate Cleanup with a specific priority limit
EcDlCleanupDataPool.pl OPS -limit <priority limit>
This command will clean up all granules with retention priorities less than or equal to
2-6 300-TP-001-001
< priority limit > and expiration date/times on or before midnight of the previous day.
For example, to clean up granules which had expired on or before midnight of the previous day and had a retention priority less than or equal to 100, the command would be the following:
EcDlCleanupDataPool.pl OPS -limit 100
4. Initiate Cleanup using a list of granules
EcDlCleanupDataPool.pl OPS -file <file name>
This command will clean up all granules whose granule ids are specified in <file name>. Note that the -limit and -offset parameters can not be specified with -file option.
For example, to clean up two specific granules with ids 1234 and 5678, a file "twograns.dat" could contain the following:
1234
5678
and the command would be the following:
EcDlCleanupDataPool.pl OPS -file twograns.dat
5. Initiate Cleanup with an offset from the previous midnight
EcDlCleanupDataPool.pl OPS -offset <hours>
This command will clean up all granules with retention priorities less than or equal to the configured default limit and expiration date/times on or before midnight of the previous day plus or minus the offset.
For example, let’s suppose we wanted to clean up all granules that expired on or before 7pm yesterday. The command for this would be:
EcDlCleanupDataPool.pl OPS -offset –5
Similarly, if we wanted to clean up all granules that will expire 48 hours in the future (actually 48 hours from the previous midnight), the command would be:
EcDlCleanupDataPool.pl OPS -offset 48
6. Limit the cleanup to a specific theme
EcDlCleanupDataPool.pl OPS -offset <hours> -theme <themeName>
This command is the same as the one described in the Example 5 except the cleanup will be limited to a specified theme <themeName>.
2-7 300-TP-001-001

7. Remove all cross-references to a specific theme
EcDlCleanupDataPool.pl OPS -noprompt -themexref <themeName>
This command removes all granule cross references to a specified theme <themeName> from the Data Pool inventory. It does not delete the granules or the physical granule files.
Examples for "Validation Only " Run
8. Initiate a Data Pool Validation suppressing all user prompts and display messages
EcDlCleanupDataPool.pl OPS -orphan -phantom
This command validates the Data Pool by checking for orphans and phantoms and removes any discrepancies found from the Data Pool inventory and the disks. In checking for orphans, a default maximum orphan age provided via the configuration parameter MAX_ORPHAN_AGE will be used.
9. Initiate a Data Pool Validation without fixing discrepancies found
EcDlCleanupDataPool.pl OPS -orphan -phantom -nofix
This command performs the same Data Pool validation run as in Example 8, except that the discrepancies found will not be fixed but will be logged.
10. Initiate a Data Pool Validation but limit the validation to specified collection group(s)
EcDlCleanupDataPool.pl OPS -orphan -phantom -collgroup "MOAT,ASTT"
This command performs the same Data Pool validation run as in Example 8, except that the validation checking will be limited to the collection groups MOAT and ASTT.
Examples for "Cleanup followed by Validation" Run 11. Initiate a Data Pool Cleanup and Validation suppressing all user prompts and display of messages
EcDlCleanupDataPool.pl OPS -cleanvalidate -orphan
-phantom
This command will first clean up all granules in OPS mode with retention priorities less than or equal to the configured default limit and expiration date/times on or before midnight of the previous day. It will then validate the Data Pool by checking for both orphans and phantoms and will remove all discrepancies found from the Data Pool inventory and the disks.
2-8 300-TP-001-001
12. Initiate a Data Pool Cleanup and Validation specifying maximum orphan age via command line
EcDlCleanupDataPool.pl OPS -cleanvalidate -orphan -maxorphanage 5
This command is the same as the one described in Example 11, except that the validation step will only check for orphans using the maximum orphan age of 5 days provided via command line, and no phantom checking will be performed.
13. Initiate a Data Pool Cleanup and Validation limiting the validation to specified collection group(s)
EcDlCleanupDataPool.pl OPS -cleanvalidate -orphan -phantom
-collgroup "MOAT,ASTT"
This command is the same as the one described in Example 11, except that the validation step will limit the Data Pool validation to the two collection groups MOAT and ASTT specified via command line.
2.1.4 Required Operating Environment The Cleanup Utility runs on Sun Solaris platform.
2.1.5 Interfaces and Data Types Table 2.1.5-1 lists the COTS product dependencies for the Data Pool Cleanup Utility.
Table 2.1.5-1. Interface Protocols Product Dependency Protocols Used Comments
Data Pool Database SQL via SQL server machine
Perl DBI DBD.pm::Sybase, DBI.pm requires proper baseline version of Perl
2.1.6 Special Constraints Only a single instance of the Cleanup Utility may be executed at any given time.
2.1.7 Log File The Cleanup Utility writes information useful to the operator to a log file. The file is stored in the /usr/ecs/<MODE>/CUSTOM/logs directory and is named EcDlCleanup.log. The utility creates the log if necessary and appends to it if it already exists.
There are three types of messages written to the utility’s log file: errors, warnings and informative messages. Error messages include information about program internal/external faults, unplanned disconnects with Sybase Server, general database errors, inability to delete granule/metadata files and directories due to file permissions, and configuration file problems.
2-9 300-TP-001-001

They are generally prefaced with "Error" followed by the specific message. Warnings include missing granule/metadata/browse files and cut-off date/times in the future. They are generally prefaced with "Warning". Informative messages include when the utility starts and stops, progress messages, whether the utility is running in recovery mode, the names of files deleted, and how much disk space has been freed. All messages are date and time stamped.
If there are syntax errors in command-line invocation, a usage message is printed to the screen.
2.1.8 Reports and Output Files The Cleanup Utility does not produce any output reports directly. However, in the process of a cleanup run, it invokes an external utility, EcOsBulkURL, to export a list of deleted granules for ECHO. If there are ECS granules deleted during the cleanup run that qualify for ECHO export, this utility will generate an XML file containing a list of those granules. The XML file generated is stored under /datapool/<mode>/user/URLExport directory. In the event that the execution of this external utility was not successful the Cleanup utility will create or append to an ASCII text file containing the same list of granules qualified for ECHO export under /usr/ecs/<mode>/data/DPL/bulkURLDel file. (See EcOsBulkURL utility in the Operations Tools Document, 609-CD-610-002, for details about these files.)
2.2 Batch Insert Utility The Batch Insert Utility allows operators to insert granules residing in or outside of (non-ECS granules) the ECS archive into the Data Pool. It is a command line utility, which queues the granules up for dispatch by the Data Pool Action Dispatcher (DPAD) for insertion by the Data Pool Insert Utility (DPIU). It accepts either a list of ECS granule identifiers or a list of non-ECS file names. The list can be provided via input file or standard input. A label identifying a batch of granules is specified as a command-line parameter so that operators can monitor a batch with the Data Pool Monitoring GUI. Thematic collections are also supported so that the granules to be inserted can be linked to a theme.
Fault recovery capability is also supported, preventing inserts of duplicate actions inserted from a previous run.
Batch Insert must be run as either cmshared or allmode.
2.2.1 Using the Batch Insert Utility The Batch Insert Utility is started by entering the following command from the /usr/ecs/<mode>/CUSTOM/utilities directory:
> EcDlBatchInsert.pl mode -ecs | -nonecs [ -file pathname ]
[ -theme "theme_name" ] [ -label label ]
[ -rpriority priority ] [ -rperiod period ]
[ -dpriority priority ] [ -mdonly ]
[ -verbose ]
2-10 300-TP-001-001
Table 2.2.1-1 provides a description of these parameters.
Table 2.2.1-1. Command Line Parameters of the Batch Insert Utility Parameter Name Description
mode An input parameter that specifies the mode of operation. This must be the first parameter on the command line, and it must be a valid, existing Data Pool mode (i.e. OPS, TS1, TS2).
-ecs Indicates that ECS granules will be inserted. The input file (see -file) (or standard input) must consist of a list of granule ids.
-nonecs Indicates that non-ECS granules will be inserted. The input file (see -file) (or standard input) must consist of a list of XML file pathnames.
-file pathname The pathname of the input file containing a list of either granule ids (if -ecs is specified) or XML pathnames (if -nonecs is specified). The XML pathnames must be accessible by the DPIU (i.e. must have rwx permission). NOTE: the XML files (and all science and browse files they reference) will be deleted by the DPIU after they are processed.
-theme "theme_name" Theme name to be associated with granules. theme_name is a character string and must match an existing theme name in the Data Pool inventory. Enclose it in quotes if embedded blanks or other special characters are part of the name.
-label label A 16-character label placed in the inventory to identify the batch of granules being inserted. If no label is supplied via the -label parameter, the label is set to the first sixteen characters of the input filename (excluding the directory name) or the entire filename if < 16 characters. If standard input is used in lieu of an input file, a label must be specified with the -label option.
-rpriority priority A retention priority to be applied to all granules being inserted. 255 ≥ priority ≥ 1. Defaults to value of DefaultRetentionPriority in the Data Pool database DlConfig table (Note: the value of DefaultRetentionPriority may be viewed and/or updated via the Manage Configuration Parameters tab on the Data Pool Maintenance GUI).
-rperiod period Number of days to retain all granules being inserted in inventory. Defaults to value of DefaultRetentionPeriod in the Data Pool database DlConfig table (Note: the value of DefaultRetentionPeriod may be viewed and/or updated via the Manage Configuration Parameters tab on the Data Pool Maintenance GUI).
-dpriority priority A dispatch priority to be applied to all granules being inserted. 255 ≥ priority ≥ 1. Defaults to 1.
-mdonly Flag indicating only metadata files will be inserted for all granules being inserted.
-verbose Directs the utility to run using verbose option. Default is non-verbose.
Mandatory parameters include mode and either -ecs or -nonecs. mode must be the first parameter supplied.
2-11 300-TP-001-001
2.2.2 Batch Insert Utility Commands Below are some examples for invoking this utility:
1. EcDlBatchInsert.pl OPS -ecs –file /home/fred/ECSMODISgranules1
Adds actions to action insert queue for all ECS granules specified by granule ids in file /home/fred/ECSMODISgranules1. No -label parameter was specified, so the label is formed from the first 16 characters of the input filename (ECSMODISgranules).
2. cat /home/fred/ECSfile1 | EcDlBatchInsert.pl OPS -ecs -label MODIS_batch1
Same as example 1 but using standard input instead of -file. Note that the -label parameter must be supplied since there is no filename to form a label.
3. EcDlBatchInsert.pl OPS -nonecs –file /home/fred/nonECSVolcanogranules
-label Chig_volcano -theme "Chiginagak Volcano 2002"
Adds actions to insert action queue for all non-ECS granules specified by XML pathnames in the input file, /home/fred/nonECSVolcanogranules. All granules will be linked with the theme name "Chiginagak Volcano 2002" in the Data Pool database. The theme must already exist in the Data Pool database in the DlThemes table. (Note: Use the Data Pool Maintenance GUI "Manage Themes" tab to define new themes.)
The Batch Insert Utility may also be used to link granules already present in the Data Pool database to a theme (or to additional themes). Note that if the granules were originally inserted into the Data Pool using the Batch Insert Utility, the batch label used when linking the granules to the theme should be different than the batch label used to insert the granules. (If DPAD is still processing the granules from the original insert and the same batch label is used to link those granules to a new theme, Batch Insert will reject them.)
Note that all the XML files listed in the input file, as well as all science and browse files they reference, will be automatically deleted from their source directories by DPIU. Therefore, their directories must have rwx permission for the DPIU user account.
4. EcDlBatchInsert.pl OPS -ecs –file /home/fred/ECSMODISgranules1 -mdonly
Same as example 1 but only metadata files will be inserted.
5. EcDlBatchInsert.pl OPS -ecs –file /home/fred/ECSMODISgranules1 -rpriority 255
Same as example 1 with retention priority of granules to be set to 255 in inventory.
6. EcDlBatchInsert.pl OPS -ecs –file /home/fred/ECSMODISgranules1 -rpriority 255 -rperiod 10 -dpriority 5
Same as example 1 with retention priority of granules to be set to 255 in inventory, retention period to last 10 days, and dispatch priority set to 5.
2-12 300-TP-001-001

2.2.3 Required Operating Environment The Batch Insert Utility will run on Sun platforms.
2.2.4 Interfaces and Data Types
Table 2.2.4-1 lists the supporting products that this tool depends upon in order to function properly.
Table 2.2.4-1. Interface Protocols Product Dependency Protocols Used Comments
Data Pool database SQL Via SQL server machinesPerl DBI DBD::Sybase Requires proper installation of baselined version of
Perl.
2.2.5 Configuration File Format – EcDlBatchInsert.CFG The “config” file contains vital details about how to connect to the Sybase database. Without this file, the utility can not run. The config file must be a single-entry plain text ASCII file, which has the following format: SYB_USER = EcDlBatchInsert SYB_SQL_SERVER = <string> SYB_DBNAME = <string> PGM_ID = <string> NUM_RETRIES = <integer> SLEEP_SEC = <integer>
Breakdown of the individual parameters:
Parameter Name Description
SYB_USER The user name for the Sybase connection.
SYB_SQL_SERVER The name of the SQL server for this Sybase connection.
SYB_DBNAME The name of the Data Pool database you intend to connect to.
PGM_ID Program ID used for connecting to the Data Pool database.
NUM_RETRIES The number of times the utility will attempt to connect to the database before exiting. The recommended default is 5.
SLEEP_SEC The number of seconds the utility will wait (‘sleep’) between connection attempts. The recommended default is 10.
2-13 300-TP-001-001

2.2.6 Special Constraints The Batch Insert Utility runs only if the Data Pool and Science Data Server databases and database servers are up and available. The stored procedures it uses must also be present in the Data Pool database.
2.2.7 Outputs
Output of events and errors will always be appended to a single log file. (See 2.2.10)
2.2.8 Event and Error Messages Events and error messages are written to the log file. A usage message will be displayed to the screen when command-line parameters are incorrectly specified.
2.2.9 Reports None.
2.2.10 Logs
The utility produces a log file called EcDlBatchInsert.log in the /usr/ecs/<mode>/CUSTOM/logs directory. If this log file already exists, the new information will automatically be appended. If there is no existing log file by this name, a new log file with this name will automatically be created.
Since the log file may grow to a considerable size after constant use, it is recommended that it be saved off into a separate file from time to time for maintainability.
2.2.11 Sybase Error Handling If a Sybase error occurs, you will most likely see the actual Sybase error string displayed on the screen and in the log. Some errors can be that the database server is unavailable, that the connection to the database was dropped, or that there was an error executing the stored procedure. In the event of a Sybase-sourced error, the utility will immediately stop running.
In the event that a connection to the Data Pool database or Science DataServer database can not be established, the utility may repeatedly attempt to connect to the database, depending on how the configuration file was set (see section 2.2.5). If, for example, NUM_RETRIES was set to 5 and SLEEP_SEC was set to 10, this means it will try to connect 5 times, and will wait 10 seconds before each attempt – a total of 50 seconds if all attempts are unsuccessful.
2.3 Update Granule The Update Granule Utility provides the ECS Operations Staff with a command-line interface to update the expiration date and optional retention priority of granules in the Data Pool inventory. The granules in the Data Pool inventory can be ECS or non-ECS granules. The utility can perform updates for
2-14 300-TP-001-001

1. a single Data Pool granule
2. multiple Data Pool granules
3. granules associated with a theme name.
A single granule update can be performed by providing the granule ID, expiration date, and an optional retention priority via command-line input. Multiple granules can be updated by providing via command line an input file, which contains a list of granule IDs, expiration dates and optional retention priorities for each granule to be updated. To update the granules associated with a specific "theme", the operator must specify a valid theme name, expiration date and the optional retention priority via command line. When updating the granules associated with a theme, the utility will update the expiration date of a granule associated with that theme if and only if the new expiration date specified is later than the current expiration date of the granule, and the retention priority of a granule associated with that theme if and only if the new retention priority specified is higher than the current retention priority of the granule.
The utility, by default, displays summary information to the operator and prompts for confirmation before executing the update. All warning/error messages and confirmation prompts can be suppressed using the noprompt option. This option is suitable for running the utility as a background process, as a cron job, or other automated tasking.
2.3.1 Using the Update Granule Utility
The Update Granule Utility is a Perl script that resides in /usr/ecs/<mode>/CUSTOM/utilities directory. The utility can be run using the following command line syntax.
EcDlUpdateGranule.pl <mode> [-noprompt] -file <fileName>
OR
EcDlUpdateGranule.pl <mode> [-noprompt]
-grnid <granuleID> | -theme <themeName>
-exp <expirationDate>
[-ret <retentionPriority>]
Note: The command line parameter changes from the previous release include the removal of "-verbose | -nonverbose" options, and the addition of "-theme" option.
Table 2.3.1-1 provides a description of the command line parameters.
2-15 300-TP-001-001

Table 2.3.1-1. Command Line Parameters of the Update Granule Utility Parameter Name Description
<mode> An input parameter that specifies the mode of operation. This must be the first parameter passed, and it must be a valid, existing Data Pool mode with a format like OPS or TS1.
-noprompt Directs the utility to run using noprompt display option. The utility will suppress the displaying of all messages to the screen and will update the granules without prompting the operator for confirmation. This option is suitable for running the utility as a background process.
-file <filename> An input parameter that specifies the file to be used to input granule data to the utility. <filename> is the name of a file containing a list of granule triplets. Each triplet is a separate line entry in the input file and consists of granule ID, expiration date, and optional retention priority. The granule ID in each triplet corresponds to the granule ID in the DlGranules table in the Data Pool database.
-grnid <granule ID> An input parameter that specifies granule information will be entered manually at the command line. The <granule ID> parameter must be a positive integer containing no more than 16 digits and corresponds to the granule ID in the DlGranules table in the Data Pool database.
-theme <theme name> An input parameter that specifies a valid theme name. The theme name is a character string and must match an existing theme name in the Data Pool inventory and is case sensitive. Note: If the theme name contains spaces like "Volcano Eruption", it must be enclosed in single or double quotes, or only the first word of the title will be used (an error could also occur when running the script).
-exp <expiration Date> An input parameter that specifies the new expiration date to be applied to the science granule indicated by the <granule ID>. The <expiration Date> has the format YYYY/MM/DD.
-ret <retention priority> An input parameter that specifies the new retention priority to be applied to the science granule indicated by the <granule ID>. The <retention priority> must be a positive integer within the range of 1 to 255; 1 being the lowest retention priority and 255 being the highest retention priority.
2.3.2 Update Granule Utility Commands
Below are some examples for invoking this utility:
1. EcDlUpdateGranule.pl <mode> -file <file name> Updates the granules provided via an input file. The utility will display all summary information and prompt the operator to confirm the update.
2. EcDlUpdateGranule.pl <mode> -grnid <granule id> -exp <expiration date> -ret
<retention priority> Updates the expiration date and retention priority for a single
2-16 300-TP-001-001

granule provided via command line. As in (1), the operator will be prompted for confirmation.
3. EcDlUpdateGranule.pl <mode> -noprompt -file <file name> Same as in (1) except that the utility will be run using noprompt option to suppress the confirmation and summary
4. EcDlUpdateGranule.pl <mode> -noprompt -grnid <granule id> -exp <expiration
date> -ret <retention priority> Same as (2) except that the utility will be run using noprompt option.
5. EcDlUpdateGranule.pl <mode> -noprompt -theme <theme name> -exp <expiration
date> -ret <retention priority> Updates the expiration date and retention priority of granules associated with a theme name. The utility will be run using noprompt option.
2.3.3 Required Operating Environment The Update Granule Utility runs on Sun Solaris platforms.
2.3.4 Interfaces and Data Types Table 2.3.4-1 lists the supporting products that this tool depends upon in order to function properly.
Table 2.3.4-1. Interface Protocols Product Dependency Protocols Used Comments
Data Pool database SQL Via SQL server machinesPerl DBI DBD::Sybase Requires proper install of Perl 5.005
2.3.5 Input File Format The input file contains a list of the granules to be processed, one per line. Each line will contain a single granule triplet, each triplet containing a granule ID (i.e. granuleId in the Data Pool database), expiration date, and (optionally) a new retention priority, the value of which may be null (i.e., left blank). The fields are separated by a single space. The details of the format are shown below:
GRANULE_ID=9999999999999999 EXP_DATE=YYYY/MM/DD RETENTION=999
To ensure that the file is read correctly, there should be no blank lines before the first or after the last granule in the list. It is also essential to eliminate leading or trailing spaces and tabs for each line. Extra characters (printable or non-printable) in the text may also corrupt the data while it is being read by the utility.
2.3.6 Configuration File
The Update Granule utility uses a configuration file, EcDlUpdateGranule.CFG, located in /usr/ecs/<mode>/CUSTOM/cfg directory. The configuration parameters are stored in a PARAMETER = VALUE format with each parameter/value pair as a separate line entry as follows.
2-17 300-TP-001-001
SYB_USER = <string> SYB_SQL_SERVER = <string> SYB_DBNAME = <string> PGM_ID = <string> NUM_RETRIES = <integer> SLEEP_SEC = <integer>
The individual configuration parameters are described in Table 2.3.6-1.
Table 2.3.6-1. Configuration Parameters Parameter Name Description
SYB_USER The user name for the Sybase connection. SYB_SQL_SERVER The name of the SQL server for this Sybase connection. SYB_DBNAME The name of the database you intend to connect to. PGM_ID Program ID used for connecting to the Data Pool database. NUM_RETRIES The number of times the utility will attempt to connect to the
database before exiting. The recommended default is 5. SLEEP_SEC The number of seconds the utility will wait (‘sleep’) between
connection attempts. The recommended default is 10.
2.3.7 Special Constraints The Update Granule Utility runs only if the Data Pool database server is running and if the database is available. It also assumes the stored procedures are present.
2.3.8 Outputs Output of update events and errors will be always appended to a single log file. Unless the noprompt option is specified on the command line, confirmation prompts and information will always be displayed to the screen.
2.3.9 Event and Error Messages By default, confirmation messages will be displayed to the operator, as well as any error conditions that may arise. Error messages are also written to the log files. With the noprompt option, all messages to the screen are suppressed and are only written to the log file. Command-line syntax errors are displayed regardless of the noprompt option.
2.3.10 Reports
None
2.3.11 Logs The utility produces a log file called EcDlUpdateGranule.log in the /usr/ecs/<mode>/CUSTOM/logs directory. If this log file already exists, the new information
2-18 300-TP-001-001

will automatically be appended. If there is no existing log file by this name, a new log file with this name will automatically be created.
The log file may grow to a considerable size after constant use. Although not necessary, it is recommended that it be saved off into a separate file from time to time for maintainability.
2.3.12 Recovery No specific automatic recovery mechanism is provided for this utility. If there is a database fault, system fault, or the utility was inadvertently interrupted, it is sufficient for the operator to simply re-run the utility providing the same command-line parameters.
2.3.13 Sybase Error Handling If a Sybase error occurs, you will most likely see the actual Sybase error string displayed on the screen and in the log. Some errors can be that the database server is unavailable, that the connection to the database was dropped, or that there was an error executing the stored procedure. In the event of a Sybase-sourced error, the utility will immediately stop running.
In the event that a connection to the Data Pool database can not be established, the utility may repeatedly attempt to connect to the database, depending on how the configuration file was set (see section 2.3.6). If, for example, NUM_RETRIES was set to 5 and SLEEP_SEC was set to 10, this means it will try to connect 5 times, and will wait 10 seconds before each attempt – a total of 50 seconds if all attempts are unsuccessful.
2.4 Data Pool Maintenance GUI The DPM GUI provides an operator interface to monitor the current status of Data Pool Inserts and to maintain specific Data Pool parameters. This GUI manages ECS and Non-ECS data collections. Specifically, the DPM GUI provides the following capabilities.
• Monitor the active insert processes
• Monitor the Data Pool Insert Queue
• Manage existing Data Pool Collection Groups
• Add new Data Pool Collection Groups ( includes ECS and Non-ECS )
• Manage existing Data Pool Collection Themes
• Add new Data Pool Collection Themes
• Suspend and Resume Data Pool Inserts
• Turn the NoFreeSpace Flag on or off
• Configure parameters used by the Data Pool Action Driver (DPAD) and the Data Pool Insert Utility (DPIU).
2-19 300-TP-001-001
2.4.1 Starting the DPM GUI Bring up Web Browser and then access the URL for the DPM GUI web page.
For example: http://f3ins01.hitc.com:22111/DataPool.html
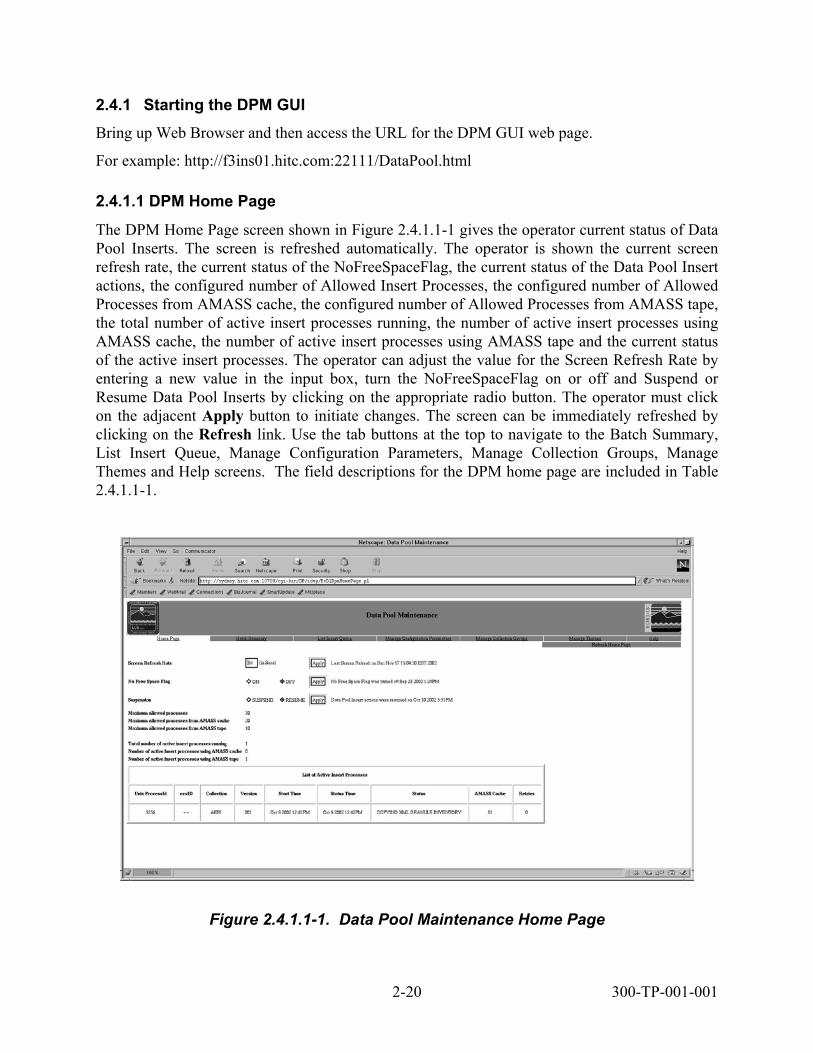
2.4.1.1 DPM Home Page The DPM Home Page screen shown in Figure 2.4.1.1-1 gives the operator current status of Data Pool Inserts. The screen is refreshed automatically. The operator is shown the current screen refresh rate, the current status of the NoFreeSpaceFlag, the current status of the Data Pool Insert actions, the configured number of Allowed Insert Processes, the configured number of Allowed Processes from AMASS cache, the configured number of Allowed Processes from AMASS tape, the total number of active insert processes running, the number of active insert processes using AMASS cache, the number of active insert processes using AMASS tape and the current status of the active insert processes. The operator can adjust the value for the Screen Refresh Rate by entering a new value in the input box, turn the NoFreeSpaceFlag on or off and Suspend or Resume Data Pool Inserts by clicking on the appropriate radio button. The operator must click on the adjacent Apply button to initiate changes. The screen can be immediately refreshed by clicking on the Refresh link. Use the tab buttons at the top to navigate to the Batch Summary, List Insert Queue, Manage Configuration Parameters, Manage Collection Groups, Manage Themes and Help screens. The field descriptions for the DPM home page are included in Table 2.4.1.1-1.
Figure 2.4.1.1-1. Data Pool Maintenance Home Page
2-20 300-TP-001-001

Table 2.4.1.1-1. DPM Home Page Field Descriptions
Field Name Data Type
Size Entry Descripton
Screen Refresh Rate int 4 optional Allows the operator to adjust the Screen Refresh Rate in seconds.
2.4.1.2 Batch Summary Tab The Batch Summary screen shown in Figure 2.4.1.2-1 displays a summary of status of Data Pool inserts for each batch label. Status includes pending, complete and failed.
Figure 2.4.1.2-1. Batch Summary Screen
2.4.1.3 List Insert Queue tab
The List Insert Queue screen shown in Figure 2.4.1.3-1 allows the operator to monitor the Data Pool Inserts that still need to be processed or retried. The operator can cancel Inserts that are in the Insert Queue by clicking on the checkbox adjacent to the InsertQueueID. After selecting all desired inserts, click on the Apply Change button to initiate changes. The Inserts will be marked as “CANCELED” in the Data Pool database. The List Insert Queue screen will be refreshed with only inserts left to be processed. The DPAD driver will cleanup all canceled inserts at a configured interval. The List Insert Queue Screen can be filtered using the Batch Labels drop down list and Status drop down list. Clicking on the Batch Labels drop down list will display all the batch labels in the database. The operator can choose one label and choose
2-21 300-TP-001-001

"ALL" from the Status drop down list to view all the insert statuses for that label. The operator can also narrow down the list by choosing a specific status from the Status drop down list. The Insert Queue list can also be filtered by Status. For example the operator can choose "Completed" from the Status drop down and "ALL" from the Batch Label drop down list which will show all the completed inserts for each batch label. After selecting the filter options, click on the Apply Filter button to display a filtered list. XML file and path name for a Non-ECS granule insert action can be viewed by clicking on "NONECS" from the Data Source column. xml file path is displayed in Figure 2.4.1.3-2. The content of the xml file can be viewed by clicking on the file path. This will display the text of the file as shown in Figure 2.4.1.3-3.
Figure 2.4.1.3-1. List Insert Queue Screen
Note: This screen depicts total number of Data Pool Inserts left to process and be retried. It also displays a detailed list of Data Pool Inserts using current filter and total number of rows in database. Default filter is set to ignore for Batch Label and NEW/RETRY for Status
2-22 300-TP-001-001

Figure 2.4.1.3-2. List Insert Queue Screen - absolute xml file path
2-23 300-TP-001-001

Figure 2.4.1.3-3. List Insert Queue Screen - xml file content
2.4.1.4 Manage Configuration Parameters Tab The Manage Configuration Parameters screen shown in Figure 2.4.1.4-1 allows the operator to display the current values for the Data Pool Configuration Parameters. The operator can adjust the values for the parameters by entering new values in the input box. After making all changes, click on the checkbox adjacent to the configuration parameters. Click on the Apply Change button (at the bottom, not visible in the figure) to initiate the changes. See Table 2.4.1.4-1 for a description of the configuration parameters.
2-24 300-TP-001-001

Figure 2.4.1.4-1. Data Pool Configuration Parameters (View or Update)
Table 2.4.1.4-1. Manage Configuration Parameters Field Description (1 of 3) Field Name Data
Type Size Entry Description
ActionQueueFrontRefreshFrequency int 4 optional The frequency in seconds when the action queue front is refreshed.
BatchSummaryAutoRefresh int 4 optional The frequency in minutes when the batch summary front is refreshed.
ChunkSizeInsertQueue int 4 optional The default chunk size to retrieve data from database is set to 100.
DefaultRetentionPeriod int 4 optional The default retention period in days for all Data Pool Insert Actions.
DefaultRetentionPriority int 4 optional The default retention priority for all Data Pool Inserts actions. The valid range is 1 – 255.
2-25 300-TP-001-001

Table 2.4.1.4-1. Manage Configuration Parameters Field Description (2 of 3)
Field Name Data Type
Size Entry Description
DeleteCompleteActionsAfter int 4 optional The time in minutes that operators let completed actions stay in the insert action queue before making them eligible for removal. This is intended to provide the operator with some ability to check on past actions. The time period should not be configured too long.
IdleSleep int 4 optional The number of seconds when there is nothing to do.
InCacheTimeLimit int 4 optional The max time in minutes that operators are willing to wait for a DPIU process to complete whose files are in cache. After the time, DPAD kills the process and retries the action.
InsertRetryWait int 4 optional The number of seconds to wait before an insert that failed retriably should be resubmitted.
MaxInsertRetries int 4 optional The maximum number of times an insert should be tried again (-1 means forever).
NewActionCheckFrequency int 4 optional The frequency in seconds for checking for new actions. DPAD will always check if we are out of actions that can be dispatched, so unless getting things queued up in memory is urgent, this could be a time interval of minutes.
NumOfAllowedCacheProcesses int 4 optional The max number of insert processes that do not require AMASS access to cache.
NumOfAllowedInsertProcesses int 4 optional The max number of insert processes running at any time.
NumOfAllowedNonCacheProcesses int 4 optional The max number of insert processes that require AMASS access in cache.
OnTapeTimeLimit int 4 optional The max time in hours operators are willing to wait for a DPIU process to complete whose files are not in cache. After that time, DPAD kills the process and retries the action.
2-26 300-TP-001-001
Table 2.4.1.4-1. Manage Configuration Parameters Field Description (3 of 3)
Field Name Data Type
Size Entry Description
RefreshRate int 4 optional The DPM Home Page refresh rate in seconds.
RunAwayCheckFrequency int 4 optional The frequency in seconds for checking for runaway processes. Recommend not making it much smaller than InCacheTimeLimit.
StartUpWait int 4 optional The number of seconds to delay start-up while trying to clean out left over DPIU processes.
SizeOfInsertQueueList int 4 optional The number of Data Pool Insert Queue entries that can be displayed at any one time by the DPM GUI.
2.4.1.5 Manage Collection Groups tab The Manage Collection Groups screen shown in Figure 2.4.1.5-1 allows the operator to view collection groups in the Data Pool database and navigate to the functions described in Sections 2.4.1.5.1 thru 2.4.1.5.6.
2-27 300-TP-001-001
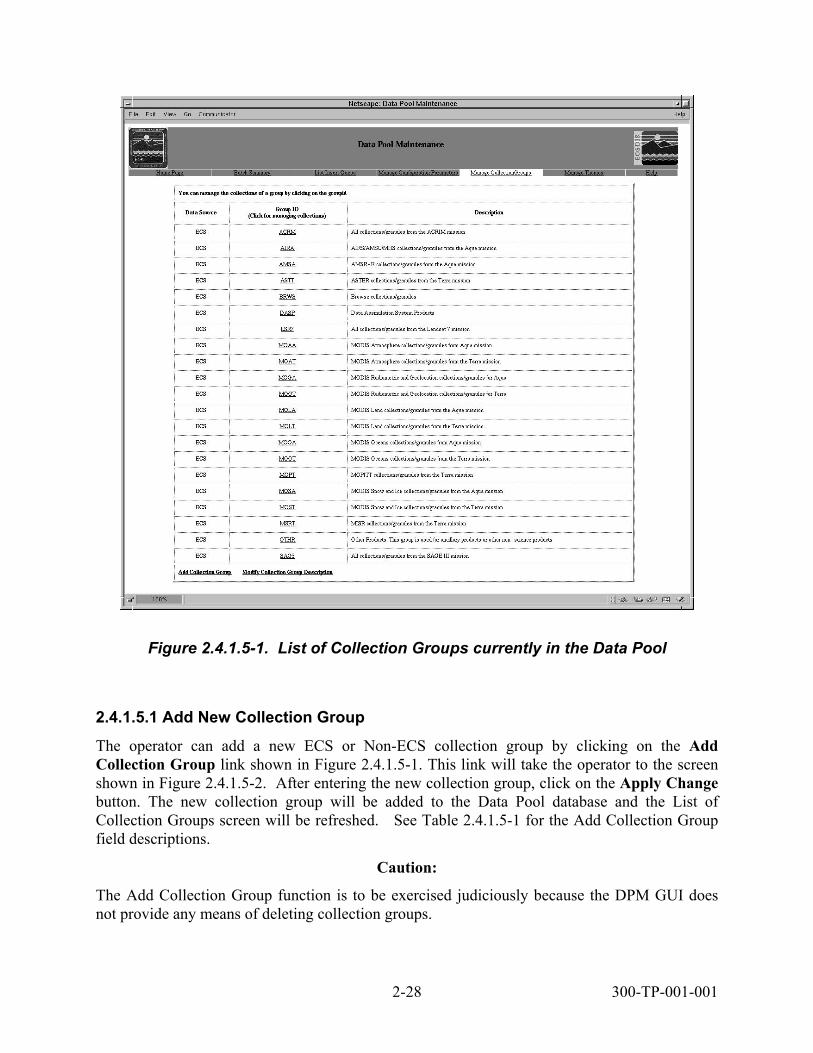
Figure 2.4.1.5-1. List of Collection Groups currently in the Data Pool
2.4.1.5.1 Add New Collection Group The operator can add a new ECS or Non-ECS collection group by clicking on the Add Collection Group link shown in Figure 2.4.1.5-1. This link will take the operator to the screen shown in Figure 2.4.1.5-2. After entering the new collection group, click on the Apply Change button. The new collection group will be added to the Data Pool database and the List of Collection Groups screen will be refreshed. See Table 2.4.1.5-1 for the Add Collection Group field descriptions.
Caution:
The Add Collection Group function is to be exercised judiciously because the DPM GUI does not provide any means of deleting collection groups.
2-28 300-TP-001-001
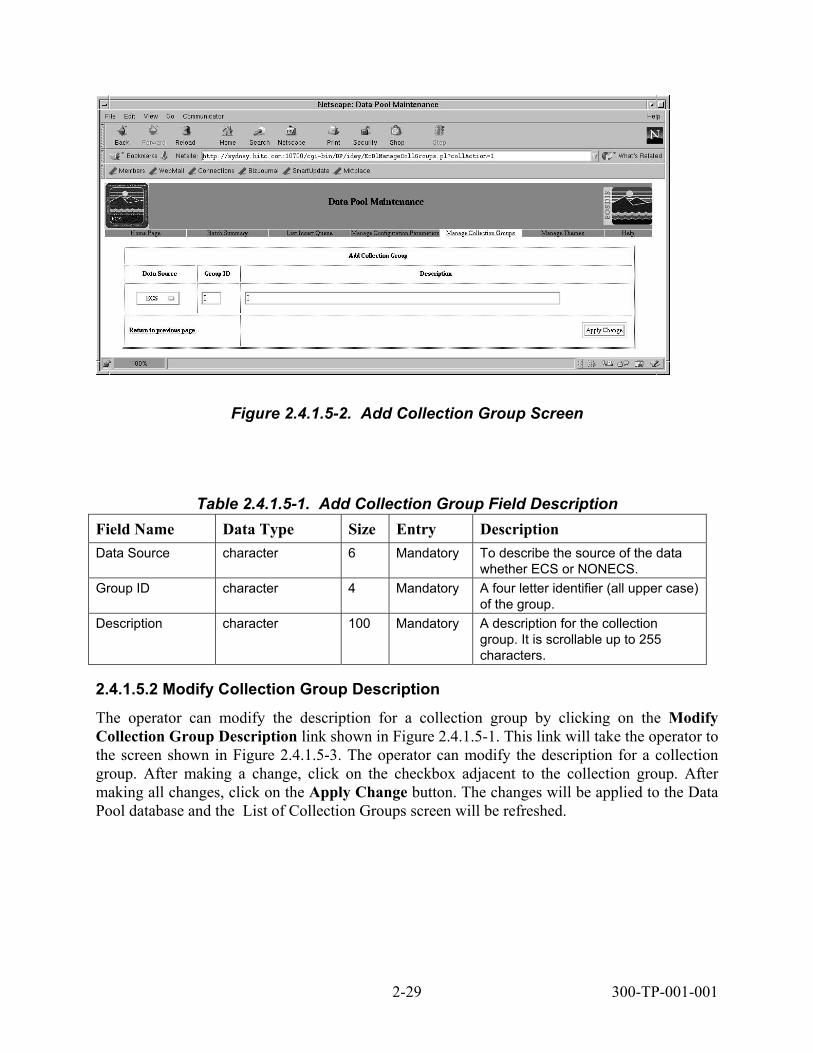
Figure 2.4.1.5-2. Add Collection Group Screen
Table 2.4.1.5-1. Add Collection Group Field Description Field Name Data Type Size Entry Description Data Source character 6 Mandatory To describe the source of the data
whether ECS or NONECS. Group ID character 4 Mandatory A four letter identifier (all upper case)
of the group. Description character 100 Mandatory A description for the collection
group. It is scrollable up to 255 characters.
2.4.1.5.2 Modify Collection Group Description The operator can modify the description for a collection group by clicking on the Modify Collection Group Description link shown in Figure 2.4.1.5-1. This link will take the operator to the screen shown in Figure 2.4.1.5-3. The operator can modify the description for a collection group. After making a change, click on the checkbox adjacent to the collection group. After making all changes, click on the Apply Change button. The changes will be applied to the Data Pool database and the List of Collection Groups screen will be refreshed.
2-29 300-TP-001-001
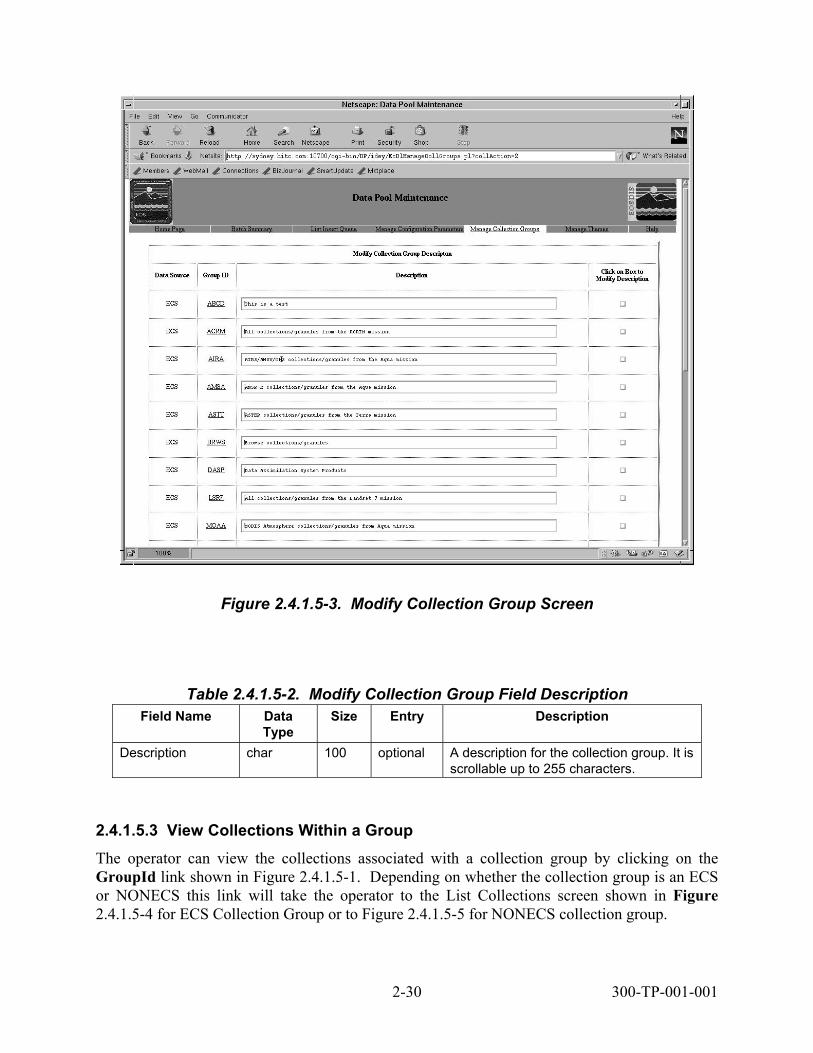
Figure 2.4.1.5-3. Modify Collection Group Screen
Table 2.4.1.5-2. Modify Collection Group Field Description Field Name Data
Type Size Entry Description
Description char 100 optional A description for the collection group. It is scrollable up to 255 characters.
2.4.1.5.3 View Collections Within a Group The operator can view the collections associated with a collection group by clicking on the GroupId link shown in Figure 2.4.1.5-1. Depending on whether the collection group is an ECS or NONECS this link will take the operator to the List Collections screen shown in Figure 2.4.1.5-4 for ECS Collection Group or to Figure 2.4.1.5-5 for NONECS collection group.
2-30 300-TP-001-001

Figure 2.4.1.5-4. Collections Associated with an ECS Collection Group.
Figure 2.4.1.5-5. Collections Associated with a non-ECS Collection Group
2-31 300-TP-001-001
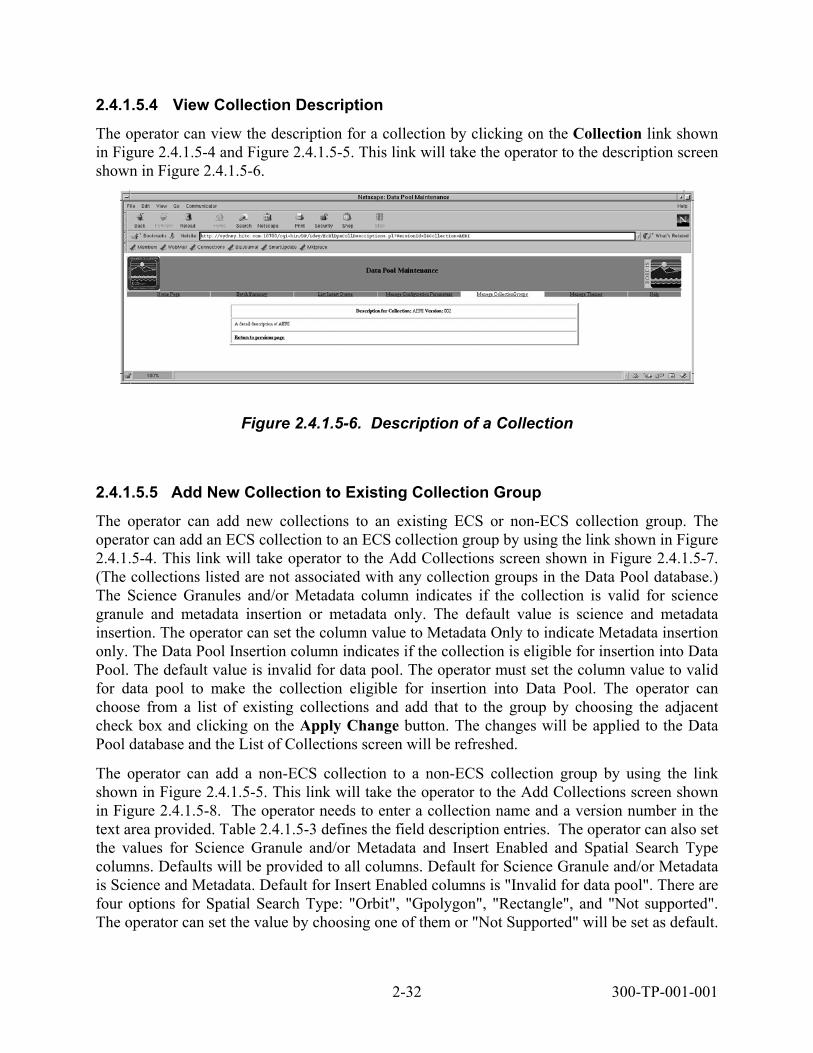
2.4.1.5.4 View Collection Description The operator can view the description for a collection by clicking on the Collection link shown in Figure 2.4.1.5-4 and Figure 2.4.1.5-5. This link will take the operator to the description screen shown in Figure 2.4.1.5-6.
Figure 2.4.1.5-6. Description of a Collection
2.4.1.5.5 Add New Collection to Existing Collection Group
The operator can add new collections to an existing ECS or non-ECS collection group. The operator can add an ECS collection to an ECS collection group by using the link shown in Figure 2.4.1.5-4. This link will take operator to the Add Collections screen shown in Figure 2.4.1.5-7. (The collections listed are not associated with any collection groups in the Data Pool database.) The Science Granules and/or Metadata column indicates if the collection is valid for science granule and metadata insertion or metadata only. The default value is science and metadata insertion. The operator can set the column value to Metadata Only to indicate Metadata insertion only. The Data Pool Insertion column indicates if the collection is eligible for insertion into Data Pool. The default value is invalid for data pool. The operator must set the column value to valid for data pool to make the collection eligible for insertion into Data Pool. The operator can choose from a list of existing collections and add that to the group by choosing the adjacent check box and clicking on the Apply Change button. The changes will be applied to the Data Pool database and the List of Collections screen will be refreshed.
The operator can add a non-ECS collection to a non-ECS collection group by using the link shown in Figure 2.4.1.5-5. This link will take the operator to the Add Collections screen shown in Figure 2.4.1.5-8. The operator needs to enter a collection name and a version number in the text area provided. Table 2.4.1.5-3 defines the field description entries. The operator can also set the values for Science Granule and/or Metadata and Insert Enabled and Spatial Search Type columns. Defaults will be provided to all columns. Default for Science Granule and/or Metadata is Science and Metadata. Default for Insert Enabled columns is "Invalid for data pool". There are four options for Spatial Search Type: "Orbit", "Gpolygon", "Rectangle", and "Not supported". The operator can set the value by choosing one of them or "Not Supported" will be set as default.
2-32 300-TP-001-001

After making all the selections, the operator needs to click on the Apply Change button. The changes will be applied to the Data Pool database and the List of Collections screen will be refreshed.
Figure 2.4.1.5-7. Add new collections to a Collection Group
Note: The lists of collections reflected in this screen are not currently associated with any Collection Groups in the Data Pool.
2-33 300-TP-001-001
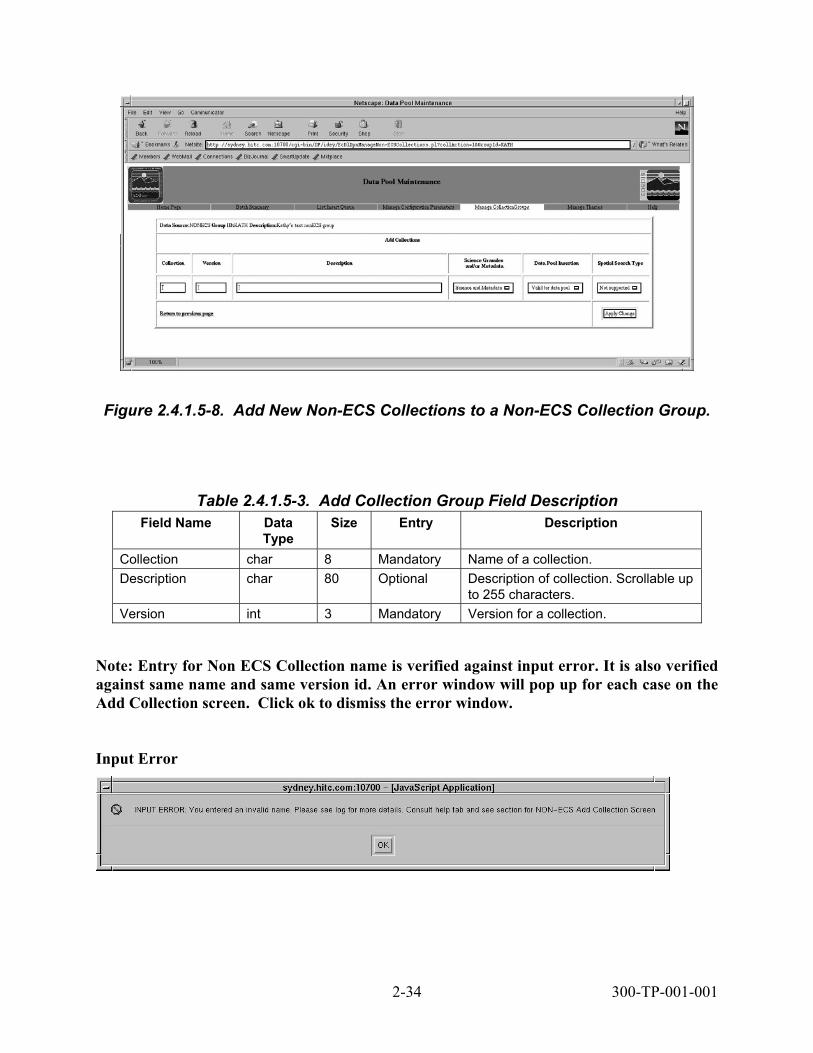
Figure 2.4.1.5-8. Add New Non-ECS Collections to a Non-ECS Collection Group.
Table 2.4.1.5-3. Add Collection Group Field Description Field Name Data
Type Size Entry Description
Collection char 8 Mandatory Name of a collection. Description char 80 Optional Description of collection. Scrollable up
to 255 characters. Version int 3 Mandatory Version for a collection.
Note: Entry for Non ECS Collection name is verified against input error. It is also verified against same name and same version id. An error window will pop up for each case on the Add Collection screen. Click ok to dismiss the error window.
Input Error
2-34 300-TP-001-001
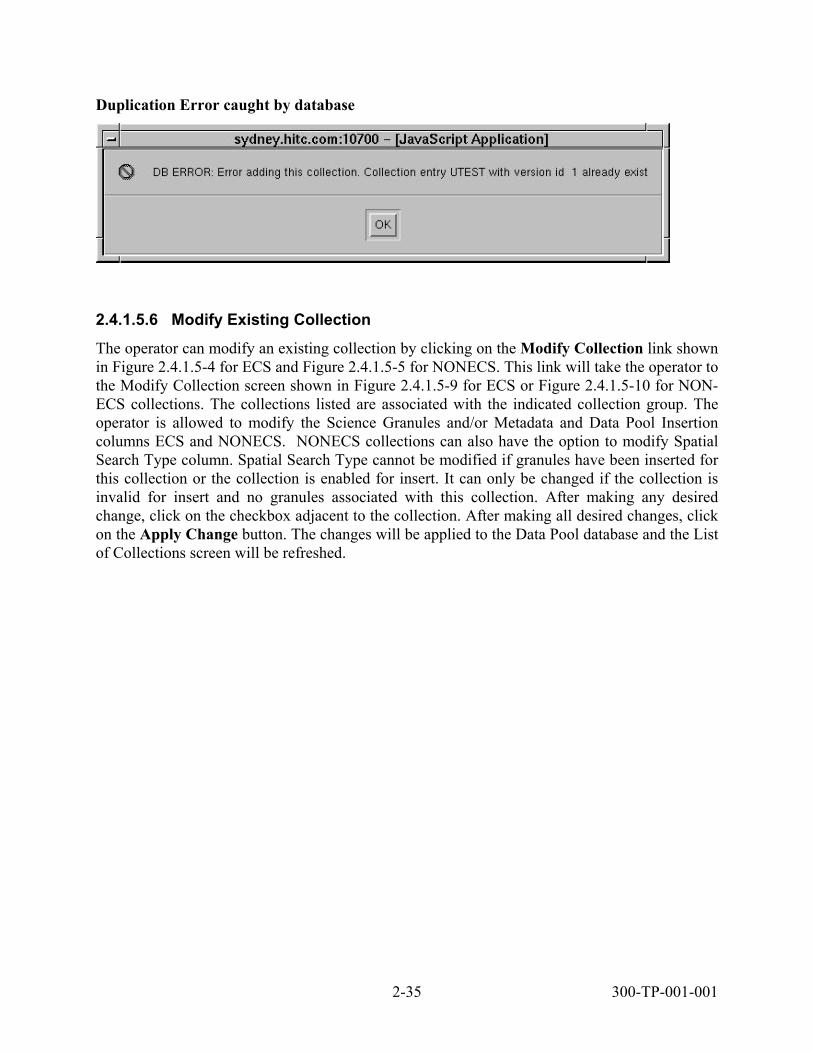
Duplication Error caught by database
2.4.1.5.6 Modify Existing Collection
The operator can modify an existing collection by clicking on the Modify Collection link shown in Figure 2.4.1.5-4 for ECS and Figure 2.4.1.5-5 for NONECS. This link will take the operator to the Modify Collection screen shown in Figure 2.4.1.5-9 for ECS or Figure 2.4.1.5-10 for NON-ECS collections. The collections listed are associated with the indicated collection group. The operator is allowed to modify the Science Granules and/or Metadata and Data Pool Insertion columns ECS and NONECS. NONECS collections can also have the option to modify Spatial Search Type column. Spatial Search Type cannot be modified if granules have been inserted for this collection or the collection is enabled for insert. It can only be changed if the collection is invalid for insert and no granules associated with this collection. After making any desired change, click on the checkbox adjacent to the collection. After making all desired changes, click on the Apply Change button. The changes will be applied to the Data Pool database and the List of Collections screen will be refreshed.
2-35 300-TP-001-001
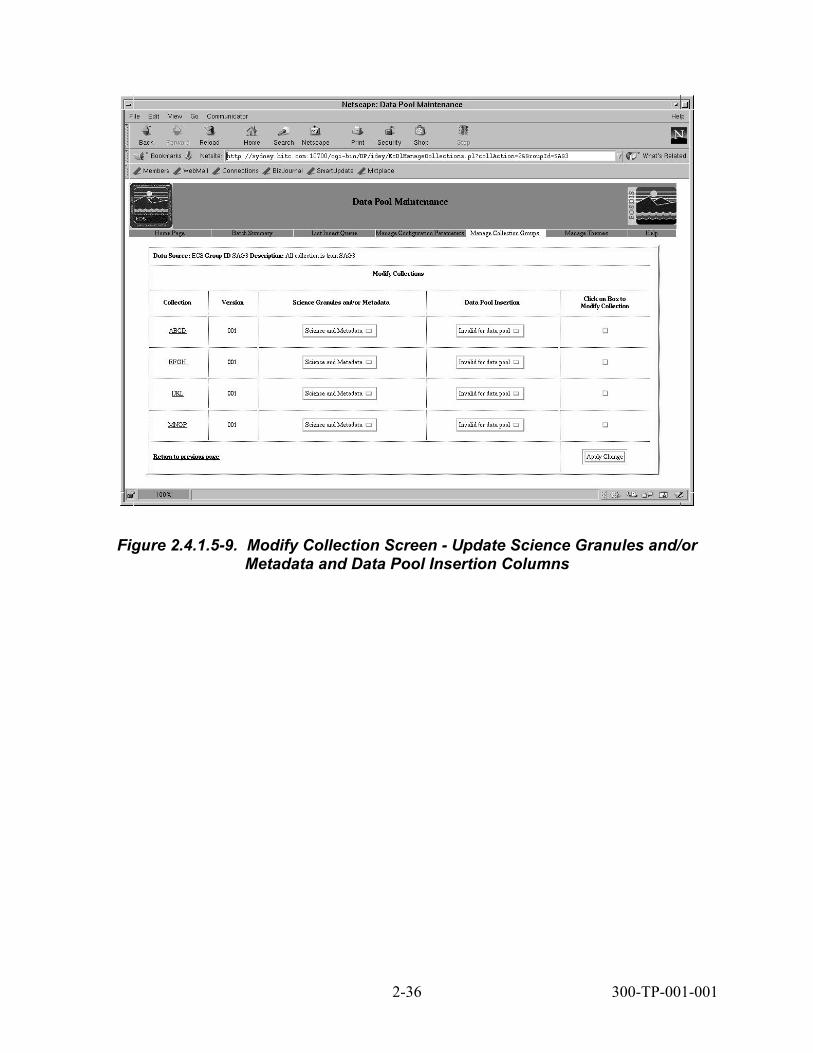
Figure 2.4.1.5-9. Modify Collection Screen - Update Science Granules and/or Metadata and Data Pool Insertion Columns
2-36 300-TP-001-001
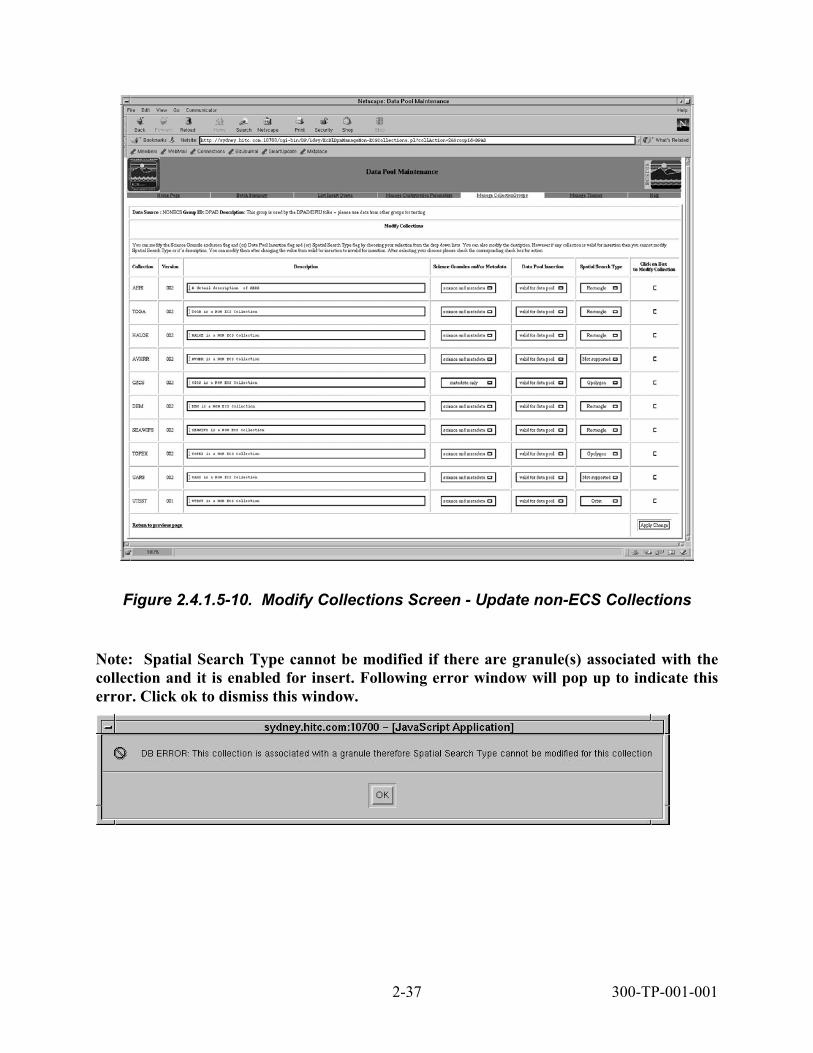
Figure 2.4.1.5-10. Modify Collections Screen - Update non-ECS Collections
Note: Spatial Search Type cannot be modified if there are granule(s) associated with the collection and it is enabled for insert. Following error window will pop up to indicate this error. Click ok to dismiss this window.
2-37 300-TP-001-001

2.4.1.6 Manage Themes Tab The Manage Themes screen shown in Figure 2.4.1.6-1 allows the operator to view a list of themes in alphabetical order. This list can be filtered using three filter criteria: Web Visible, Insert Enabled and Beginning Letters. The options for Web Visible: Yes, No and ALL. The options for Insert Enabled: Yes, No and ALL. All of these criteria can be used together or separately. Table 2.4.1.6-1 identifies the data entry field description when filtering themes. After selecting the option, click Apply Filter button to view the filtered list of themes. From this page the operator can also delete a theme by selecting the corresponding check box and clicking on the "Apply Change" button. The operator can add a new theme by clicking on the Add New Theme link. This link will take the operator to "Add New Theme" page shown in Figure 2.4.1.6-2. Table 2.4.1.6-2 identifies the data entry field description when adding a new theme. The operator needs to add four fields regarding a theme: name, description, valid for insert or not and valid for web drill down or not. The operator also can modify an existing theme by clicking on the "Modify Theme" link from Figure 2.4.1.6-1. This link will take the operator to the Modify Theme page shown in Figure 2.4.1.6-3. Table 2.4.1.6-3 identifies the data entry field description when modifying themes. Theme name is the only field which is not editable. The operator can modify the description of a theme by simply retyping in the text area. The operator also can change the option for Insert enabled and web enabled by selecting or deselecting the appropriate boxes. After making the selection the operator needs to select the check box corresponding to the theme and then press the Apply Change button. Upon pressing this button the changes will take effect in the DataPool database and also the Manage Themes page in Figure 2.4.1.6-1 will be refreshed.
2-38 300-TP-001-001

Figure 2.4.1.6-1. Manage Themes Screen – List of Themes
Note: This screen allows operator to delete a theme by selecting the checkbox at far right. A pop up window appears for confirmation for each delete request and an error message appears if a deletion request cannot be fulfilled.
Table 2.4.1.6-1. Filter Theme Field Description Field Name Data
Type Size Entry Description
Beginning Letters char 10 Mandatory Partial or full name of a theme. Scrollable up to 40 characters.
2-39 300-TP-001-001

Figure 2.4.1.6-2. Add New Theme Screen
Table 2.4.1.6-2. Add Theme Field Description Field Name Data
Type Size Entry Description
Theme Name char 20 Mandatory Name of a theme. Scrollable up to 40 characters.
Description char 100 Mandatory Description of a theme. Scrollable up to 255 characters.
Note: Theme names will be verified against input errors and name duplication. An error window will pop in each case over the Add Theme page to indicate the error. Click ok to dismiss the window.
Input Error:
2-40 300-TP-001-001

Duplicate name error caught by database
Figure 2.4.1.6-3. Modify Theme Screen
2-41 300-TP-001-001

Table 2.4.1.6-3. Modify Theme Field Description
Field Name Data Type
Size Entry Description
Description char 100 optional Description of a theme. Scrollable up to 255 characters.
2.4.2 Required Operating Environment
The following environment is required for the DPM GUI to work properly.
The O/S requirements are Solaris 2.5.1 or better.
2.4.3 Interfaces and Data Types The DPM GUI exchanges data between the Web Browser and Sybase using Perl CGI and DBI Modules for the Interface.
2.4.4 Databases The DPM GUI accesses the Data Pool and ScienceDataServer databases.
2.4.5 Special Constraints There are no special constraints to running the DPM GUI.
2.4.6 Outputs There are no outputs from the DPM GUI except for status and error messages.
2.4.7 Event and Messages The DPM GUI writes status and error messages to the EcDlDataPoolGUI.log file in the directory /usr/ecs/<MODE>/CUSTOM/logs.
2.4.8 Reports The DPM GUI does not generate reports.
2.5 HEG Data Pool Order Status GUI The web-based HDF-EOS to GeoTIF Converter (HEG) Data Pool Order Status GUI is provided to assist DAAC operators in tracking and controlling HEG orders. This GUI provides a very simple set of screens that allow for the following functionality:
• Start/stop the HEG Front End
• Change processing queue configuration and server process settings
• Change the state of an order or an order item
2-42 300-TP-001-001
2.5.1 Accessing the HEG Data Pool Order Status GUI Bring up the Web Browser and then access the URL for the Order Status user interface (URL is <webaccess_host>:<port>/<mode>/order). This will bring the operator directly into the Queue control screen
2.5.1.1 Queue Control
The Queue Control screen (shown in Figure 2.5.1-1) contains the following:
• HEG Front End Server:
o Status: UP or DOWN
o Control 1: ‘Exit Gracefully’: waits for all children (actual converter processes) to finish processing before exiting. This control is a form submit and as such does not need an ‘Apply’ to activate it.
o Control 2: ‘Exit Immediately (No Cleanup)’: kills all children without waiting for processing completion and then immediately exits. This control is also a form submit and as such does not need an ‘Apply’ to activate it.
• HEG Front End Processing State: Either process orders in the order queue or don’t. The order queue is the DlCartOrder table in the database.
• Maximum Number of HEG Converter Processes: Sets the limit for concurrently running converter processes. Reaching the limit just means that orders in the queue will wait longer to start processing (they’ll wait for the next available converter process slot).
• Maximum Order Queue Size: Sets the maximum number of orders the order queue will hold. Once the limit is reached, users will receive a message when attempting to place an order that tells them the order queue is full and to try again later.
• Maximum Packaging Processes: REMOVED FOR DELIVERY VERSION OF CODE.
Unless otherwise noted, the operator adjusts/changes the values by entering a new value in the input box. The operator must click on the Apply Changes button to initiate the changes. The operator can click on Reset to restore initial values if the changes have not been initiated.
2-43 300-TP-001-001
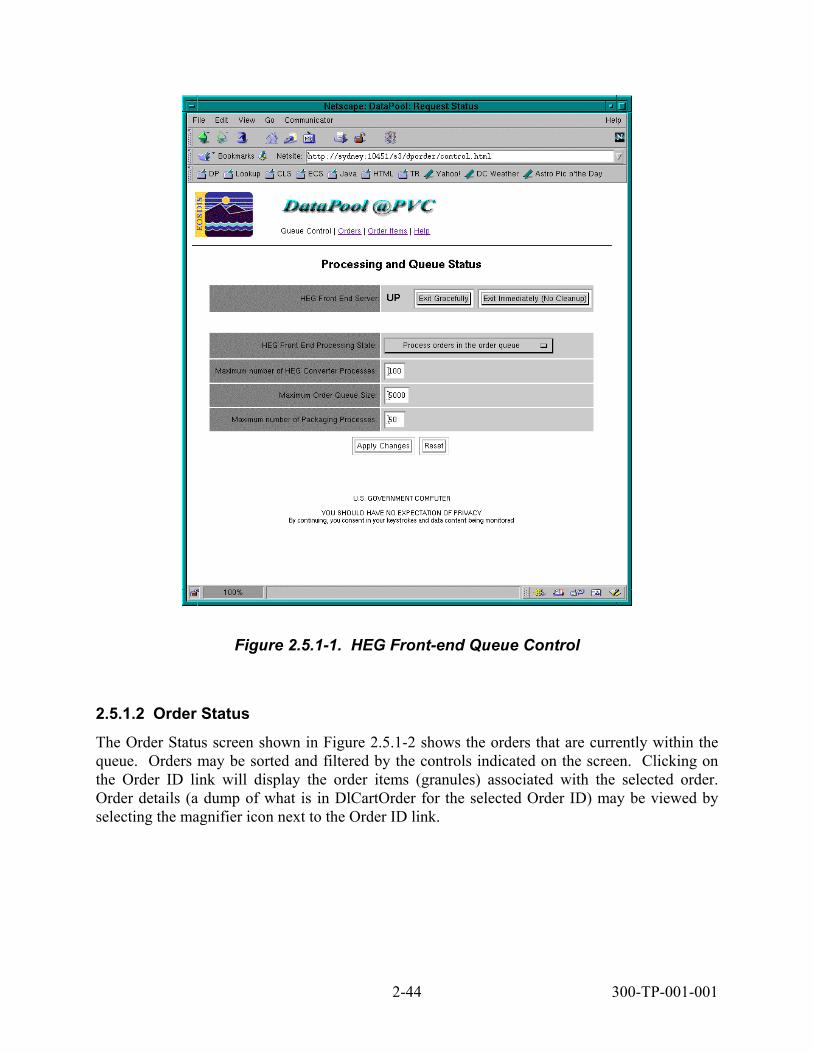
Figure 2.5.1-1. HEG Front-end Queue Control
2.5.1.2 Order Status The Order Status screen shown in Figure 2.5.1-2 shows the orders that are currently within the queue. Orders may be sorted and filtered by the controls indicated on the screen. Clicking on the Order ID link will display the order items (granules) associated with the selected order. Order details (a dump of what is in DlCartOrder for the selected Order ID) may be viewed by selecting the magnifier icon next to the Order ID link.
2-44 300-TP-001-001

Figure 2.5.1-2. Order Status Screen
2.5.1.3 Order Item Status The Order Item Status screen shown in Figure 2.5.1-3 shows the individual order items and their current status. Order items may be sorted and filtered by the controls displayed on the screen. Order item details (a dump of what is in DlCartOrderItem for the selected Item ID) may be viewed by clicking on the magnifier icon next to the Item ID link (see Figure 2.5.1-4).
2-45 300-TP-001-001

Figure 2.5.1-3. Order Item Status Screen
2-46 300-TP-001-001
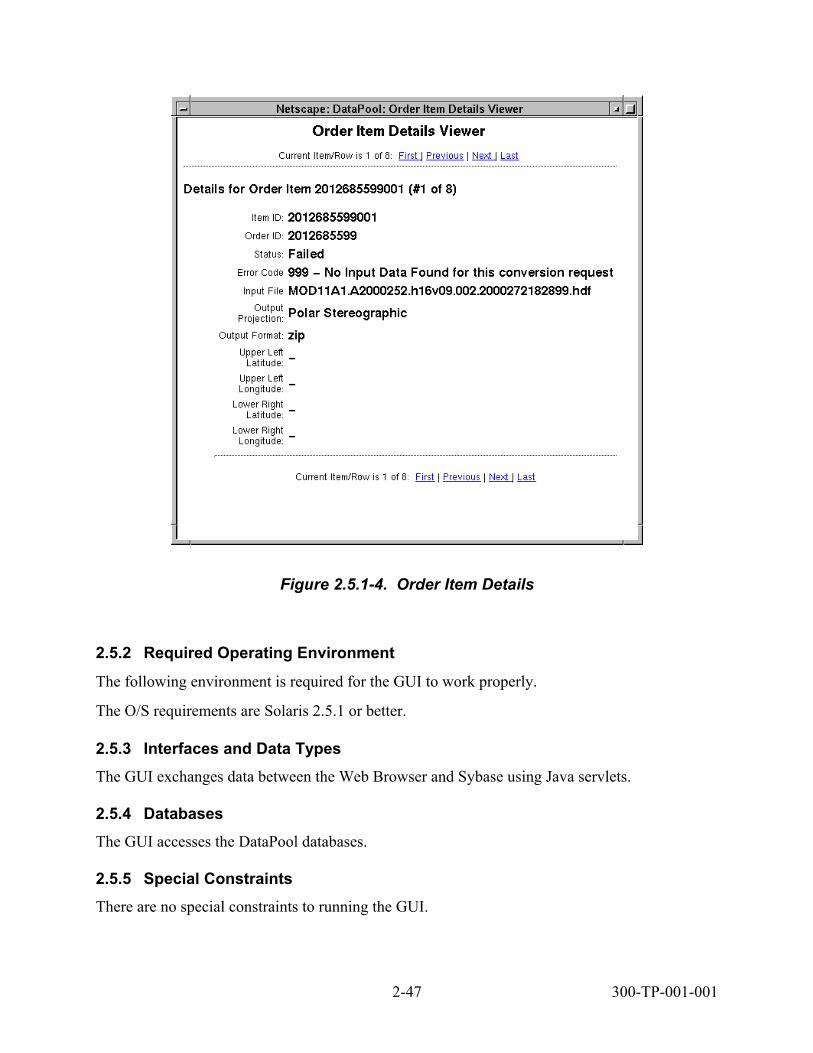
Figure 2.5.1-4. Order Item Details
2.5.2 Required Operating Environment The following environment is required for the GUI to work properly.
The O/S requirements are Solaris 2.5.1 or better.
2.5.3 Interfaces and Data Types The GUI exchanges data between the Web Browser and Sybase using Java servlets.
2.5.4 Databases The GUI accesses the DataPool databases.
2.5.5 Special Constraints There are no special constraints to running the GUI.
2-47 300-TP-001-001

2.5.6 Outputs There are no outputs from the GUI except for status and error messages.
2.5.7 Events and Messages The GUI writes status and error messages to the EcDlHEGFrontEnd.log file in the directory /usr/ecs/<MODE>/CUSTOM/logs.
2.5.8 Reports The GUI does not generate reports.
2-48 300-TP-001-001

3. Order Manager
3.1 Order Manager GUI The OM GUI provides the operators with access to the Order Manager database. The GUI is based on web standards. It performs most of its functions by accessing the database directly, in contrast to most current ECS operator GUIs that interface with a server. The GUI allows operators to view and modify requests that have been placed on hold by the Order Manager because they require operator intervention, and resubmit requests or portions of a request that failed. For Synergy III, the GUI is an addition to the existing MSS order tracking GUI and the DDIST GUI, rather than a replacement for them. Specifically, the OM GUI provides the following services:
• View queues status, suspend and resume the queues of the order manager.
• View and modify the configuration parameters.
• Monitor the Order Manager Server statistics.
• Monitor open interventions.
• Manage interventions on requests that have been placed on hold.
• View closed intervention list.
• View detailed closed intervention information.
• View distribution request list.
• View detailed distribution request information and resubmit requests with terminal status (failed, cancel, abort, aborted, shipped).
• View the ECS order information.
• View the user profile information.
• View, update and cancel the bundling order information (link to NSBRV GUI).
3.1.1 Starting the OM GUI Bring up the Web Browser and then access the URL for the OM GUI web page.
For example: http://yourserver:portnumber/cgi-bin/index.html
3.1.1.1 OM GUI Home Page The OM GUI Home Page screen shown in Figure 3.1.1.1-1 explains the basic services of the OM GUI. The operator can click on the links to go to the OM Queue Status page, OM
3-1 300-TP-001-001
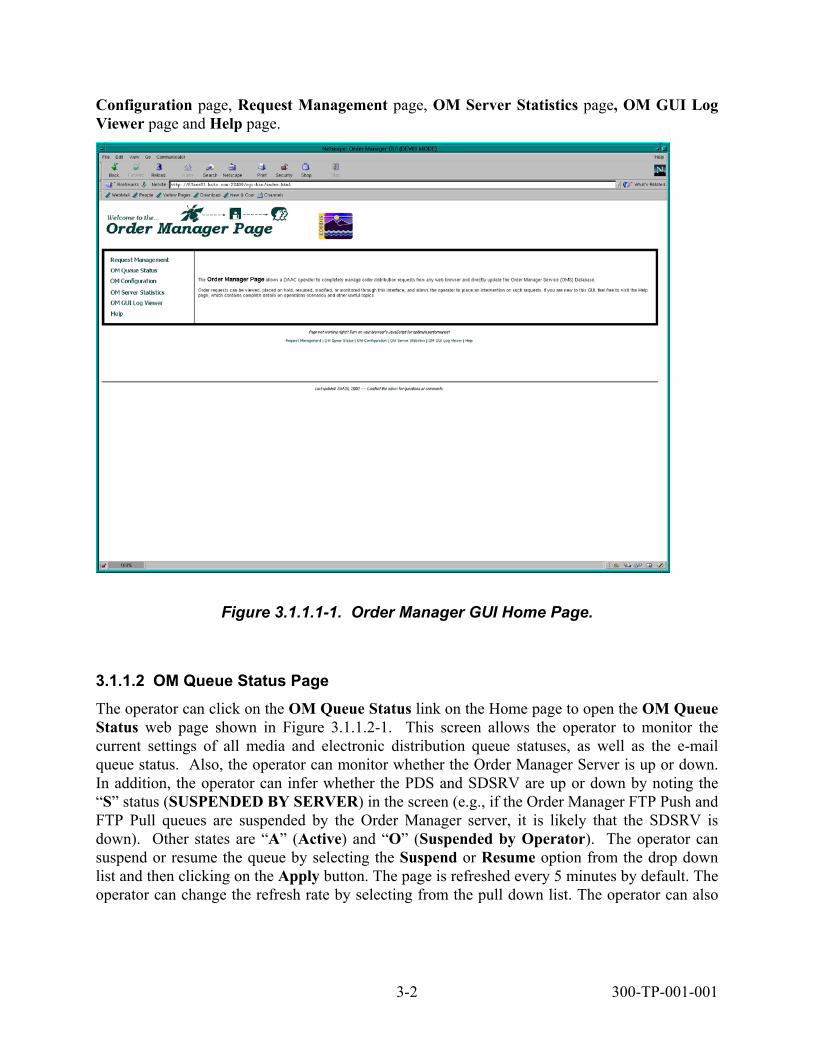
Configuration page, Request Management page, OM Server Statistics page, OM GUI Log Viewer page and Help page.
Figure 3.1.1.1-1. Order Manager GUI Home Page.
3.1.1.2 OM Queue Status Page The operator can click on the OM Queue Status link on the Home page to open the OM Queue Status web page shown in Figure 3.1.1.2-1. This screen allows the operator to monitor the current settings of all media and electronic distribution queue statuses, as well as the e-mail queue status. Also, the operator can monitor whether the Order Manager Server is up or down. In addition, the operator can infer whether the PDS and SDSRV are up or down by noting the “S” status (SUSPENDED BY SERVER) in the screen (e.g., if the Order Manager FTP Push and FTP Pull queues are suspended by the Order Manager server, it is likely that the SDSRV is down). Other states are “A” (Active) and “O” (Suspended by Operator). The operator can suspend or resume the queue by selecting the Suspend or Resume option from the drop down list and then clicking on the Apply button. The page is refreshed every 5 minutes by default. The operator can change the refresh rate by selecting from the pull down list. The operator can also
3-2 300-TP-001-001
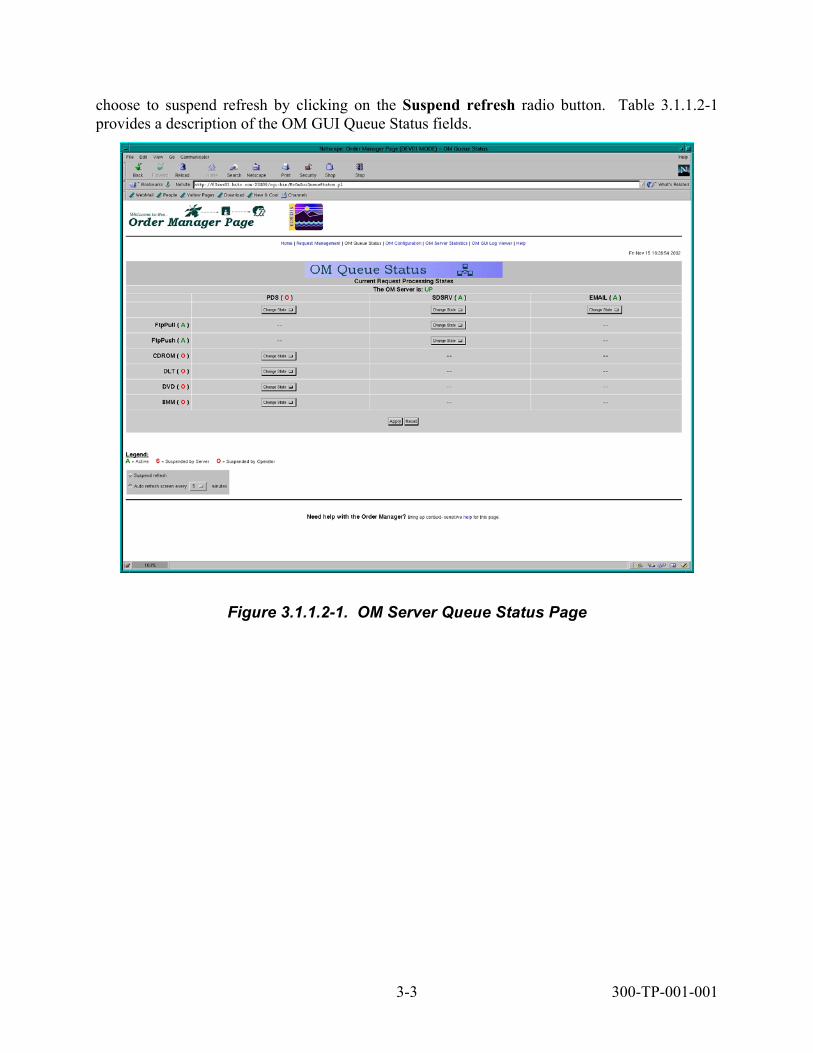
choose to suspend refresh by clicking on the Suspend refresh radio button. Table 3.1.1.2-1 provides a description of the OM GUI Queue Status fields.
Figure 3.1.1.2-1. OM Server Queue Status Page
3-3 300-TP-001-001

Table 3.1.1.2-1. OM GUI Queue Status Field Descriptions
Field Name Data Type Size Entry Description PDS Character n/a Optional, select
Activate All / Suspend All
Options for suspend and resume the PDS queue
SDSRV Character n/a Optional, select Activate All / Suspend All
Options for suspend and resume the SDSRV queue
E-mail Character n/a Optional, select Activate/Suspend
Options for suspend and resume the e-mail queue
8mm Character n/a Optional, select Activate/Suspend
Options for suspend and resume the 8mm queue
CD-ROM Character n/a Optional, select Activate/Suspend
Options for suspend and resume the CD-ROM queue
DVD Character n/a Optional, select Activate/Suspend
Options for suspend and resume the DVD queue
DLT Character n/a Optional, select Activate/Suspend
Options for suspend and resume the DLT queue
Ftp Push Character n/a Optional, select Activate/Suspend
Options for suspend and resume the Ftp Push queue
Ftp Pull Character n/a Optional, select Activate/Suspend
Options for suspend and resume the Ftp Pull queue
Auto-refresh screen every (Minutes)
Int 2 Optional Interval in minutes for screen auto-refresh
3.1.1.3 OM Configuration Page The operator can click on the OM Configuration link to open the OM Configuration page. Links at the top of the page permit selection of the Server Configuration shown in Figure 3.1.1.3-1 or the Media Configuration shown in Figure 3.1.1.3-2. The page displays the current setting of configuration parameters. The Operator can also change the configuration parameters of the OM Server by typing the new values in the text box and then clicking on the Apply button. Table 3.1.1.3-1 provides a description of the fields of the OM GUI Configuration Parameter page.
3-4 300-TP-001-001

Figure 3.1.1.3-1. Server Configuration: Configuration Parameters Page of the Order Manager GUI
3-5 300-TP-001-001

Figure 3.1.1.3-2. Media Configuration: Configuration Parameters Page of the Order Manager GUI
Table 3.1.1.3-1. OM GUI Configuration Parameters Descriptions (1 of 3) Field Name Data
Type Size Entry Description
8mm Media Capacity (MB) Int 10 Optional 8mm Media Capacity(MB) 8mm Maximum Request Size (MB)
Int 10 Optional 8mm maximum request size(MB)
8mm Minimum Bundle Size (MB)
Int 10 Optional 8mm minimum bundle size(MB)
8mm Granule Partition Limit (MB)
Int 10 Optional 8mm Granule Partition Limit(MB)
CD-ROM Media Capacity (MB)
Int 10 Optional CD-ROM Media Capacity(MB)
CD-ROM Maximum Request Size (MB)
Int 10 Optional CD-ROM maximum request size(MB)
3-6 300-TP-001-001

Table 3.1.1.3-1. OM GUI Configuration Parameters Descriptions (2 of 3)
Field Name Data Type
Size Entry Description
CD-ROM Minimum Bundle Size (MB)
Int 10 Optional CD-ROM minimum bundle size(MB)
CD-ROM Granule Partition Limit (MB)
Int 10 Optional CD-ROM Granule Partition Limit(MB)
DVD Media Capacity (MB) Int 10 Optional DVD Media Capacity(MB) DVD Maximum Request Size (MB)
Int 10 Optional DVD maximum request size(MB)
DVD Minimum Bundle Size (MB)
Int 10 Optional DVD minimum bundle size(MB)
DVD Granule Partition Limit (MB)
Int 10 Optional DVD Granule Partition Limit(MB)
DLT Media Capacity (MB) Int 10 Optional DLT Media Capacity(MB) DLT Maximum Request Size (MB)
Int 10 Optional DLT maximum request size(MB)
DLT Minimum Bundle Size (MB)
Int 10 Optional DLT minimum bundle size(MB)
DLT Granule Partition Limit (MB)
Int 10 Optional DLT Granule Partition Limit(MB)
Ftp Push Media Capacity (MB)
Int 10 Optional Ftp Push Media Capacity(MB)
Ftp Push Maximum Request Size (MB)
Int 10 Optional Ftp Push maximum request size(MB)
Ftp Push Minimum Bundle Size (MB)
Int 10 Optional Ftp Push minimum bundle size(MB)
Ftp Push Granule Partition Limit (MB)
Int 10 Optional Ftp Push Granule Partition Limit(MB)
Ftp Pull Media Capacity (MB) Int 10 Optional Ftp Pull Media Capacity(MB) Ftp Pull Maximum Request Size (MB)
Int 10 Optional Ftp Pull maximum request size(MB)
Ftp Pull Minimum Bundle Size (MB)
Int 10 Optional Ftp Pull minimum bundle size(MB)
Ftp Pull Granule Partition Limit (MB)
Int 10 Optional Ftp Pull Granule Partition Limit(MB)
Action Queue Cleanup Interval (Hours)
Int 10 Optional Time in hours in which the OmServer cleans up completed actions
Action Retry Wait (Seconds) Int 10 Optional Time in seconds the OmServer waits before attemping to re-dispatch an action
Bundling Order Expiration Period (Hours)
Int 10 Optional Default expiration period in hours for bundling orders.
Max Child Process Time (Seconds)
Int 10 Optional Time in seconds to wait to kill child process before retrying an action
3-7 300-TP-001-001

Table 3.1.1.3-1. OM GUI Configuration Parameters Descriptions (3 of 3)
Field Name Data Type
Size Entry Description
Partition Delay Time (Seconds)
Int 10 Optional Time delay in seconds for dispatching each successive partition
Intervention Display Time (Minutes)
Int 10 Optional Time in minutes completed interventions are maintained
Max OM Server Idle Time (Seconds)
Int 10 Optional Time in seconds OmServer is allowed to sleep when there are no active processes
Intervention Cleanup Interval (Days)
Int 10 Optional Interval in days OmServer will clean up completed interventions
Max Action Retries Int 10 Optional Maximum retries for a request before it is failed
Max Bundle Age (Days) Int 10 Optional Default maximum bundle age in days or fraction of days
Max Granules Per Request Int 10 Optional Maximum number of granules a request may contain
Max Granules Per Subsetted Request
Int 10 Optional Maximum number of granules a request may contain if subsetting is specified
Min Granules Per Bundle Int 10 Optional Default minimum bundle granule count
Max E-Mail Submissions Int 10 Optional Maximum e-mail submissions Max Concurrent PDS Submissions
Int 10 Optional Maximum concurrent submissions to PDS
Max Concurrent SDSRV Submissions
Int 10 Optional Maximum concurrent submissions to SDSRV
3.1.1.4 OM Server Statistics Page The operator can click on the OM Server Statistics link to open the OM Server Statistics page shown in Figure 3.1.1.4-1. This page displays the statistics of the OM server requests for the last 1 hour by default (including the number of requests and request volume to OM server from V0Gateway and Spatial Subscription Server by different distribution media and the output of the OM server to PDS and SDSRV). The operator can change the time period for statistics by entering a different number of hours in the text area and clicking the Apply button. This page will be refreshed by default every 5 minutes. The operator can change the refresh rate by selecting from the pull down list. The operator can also choose to suspend refresh by clicking on the Suspend refresh radio button.
Table 3.1.1.4-1 provides a description of the fields of the OM Server Statistics page.
3-8 300-TP-001-001

Figure 3.1.1.4-1. Order Manager Server Statistics Page
Table 3.1.1.4-1. Order Manager Server Statistics Page Field Descriptions Field Name Data Type Size Entry Description
Number of requests for the last (hours)
Int 5 Optional Duration of the immediately preceding period for which statistics are to be shown
Auto-refresh screen every (minutes)
Int 2 Optional Interval in minutes for screen auto-refresh
3.1.1.5 Request Management Page
The operator can click on the Request Management link to open the View Open Interventions page shown in Figure 3.1.1.5-1. This page displays a list of open interventions. The open intervention list can be sorted by clicking on the Media, Status, Worked By, Order Id, Request Id, and Created links. The default sort is creation time. The operator can scan through
3-9 300-TP-001-001
the list by clicking on navigation links. These links permit selecting specific listed blocks of requests or jumping to the first, next, previous or last block. The number of requests in a block is configurable. The operator can click on the View Completed Interventions link to view the list of completed interventions and click on the View Distribution Requests to view the list of distribution requests. The operator can click on any of the links in the Request Id column to go to one particular intervention’s detail page. This page will be refreshed by default every 5 minutes. The operator can change the refresh rate by selecting from the pull down list. The operator can also choose to suspend refresh by clicking on the Suspend refresh radio button. Table 3.1.1.5-1 provides a description of the fields for the Request Management page.
3-10 300-TP-001-001

Figure 3.1.1.5-1. Request Management: View Open Interventions Page
3-11 300-TP-001-001

Table 3.1.1.5-1. Request Management Page Field Descriptions
Field Name Data Type Size Entry Description Go directly to row
Link n/a Optional Selects first row of a block of requests to display. Click on OK to apply the row number.
first Link n/a Optional Selects first block of requests <previous Link n/a Optional Selects previous block of
requests next> Link n/a Optional Selects next block of requests last Link n/a Optional Selects last block of requests Auto-refresh screen every (minutes)
Int 2 Optional Interval in minutes for screen auto-refresh
3.1.1.6 Intervention for Request Pages The operator can click on one particular request ID link from the View Open Interventions page to display one particular open intervention for that request. The intervention information is displayed as shown in Figure 3.1.1.6-1. The operator can click on the Order ID link to view detailed order information. The list of granules in this request is displayed with the display order of “hold” status first, “failed” status second, “Ok” status last. The operator can scan through the list by clicking on navigation links. These links permit selecting specific listed blocks of granules or jumping to the first, next, previous or last block. The number of granules in a block is configurable. The attributes and options of disposition are also displayed. The operator notes are also shown in this page if there are existing operator notes.
3-12 300-TP-001-001

Figure 3.1.1.6-1. Intervention for Request Page
The Intervention for Request page is also displayed when an operator resubmits a distribution request clicking a resubmit button on the Distribution Requests List page (see paragraph 3.1.1.11) or the Resubmit This Request button on the Distribution Request Details page (see paragraph 3.1.1.12). This generates a new intervention request and permits the operator to set new parameters for the request (e.g., new FtpPush information). In this case, the Intervention for Request page displays Update FtpPush Parameters in the Request Attributes options under Request Level Disposition as illustrated in Figure 3.1.1.6-2.
Table 3.1.1.6-1 provides a description of the fields for the Intervention for Request page.
3-13 300-TP-001-001

Figure 3.1.1.6-2. Intervention for Request Page with Option to Update FtpPush Parameters
Table 3.1.1.6-1. Intervention for Request Page Field Descriptions (1 of 2) Field Name Data Type Size Entry Description
Worked by Character 14 Optional Name of operator working on the intervention
<n1> - <n2> Link n/a Optional Selects a block of granules first Link n/a Optional Selects first block of granules <previous Link n/a Optional Selects previous block of
granules next> Link n/a Optional Selects next block of granules last Link n/a Optional Selects last block of granules DBID (New) Character 15 Optional DbID of replacement for
inaccessible granule
3-14 300-TP-001-001

Table 3.1.1.6-1. Intervention for Request Page Field Descriptions (2 of 2)
Field Name Data Type Size Entry Description Request Attributes Checkbox 1 Optional Check the box to select
attributed for request disposition
Change Media to Character n/a Optional Selects media from pull-down list
Partition and spread request over (days)
Int 2 Optional Number of days in the interval over which a partitioned request is to be spread
Partition and spread request over (hours)
Int 2 Optional Number of hours in the interval over which a partitioned request is to be spread
Operator Notes Character 255 Optional Comments to be stored concerning the request
The following are the operator steps to work on an intervention.
1. If no one is currently working on the intervention, the button adjacent to the Worked by: field is labeled “Assign New Worker”. The operator can type in his or her name if he or she decides to work on this intervention. If there is already a worker assigned to the intervention, the button adjacent to the Worked by: field is labeled “Override Current Worker” and the operator can overwrite the displayed worker ID and click on the button. (The general rule is not to overwrite the name unless the previous worker is on vacation or is extremely busy. The change needs to be coordinated.)
2. First, the operator can choose to fail or edit granules (e.g., some granules which are inaccessible can be replaced by new granule DBID; the operator has the responsibility to choose the new granule and specify the new DBID in the entry field next to the old dbId). After the operator clicks on the Apply button for any granule to be failed or edited, a dialog will display to confirm the change to the granule. After the confirmation, the page will be reloaded. The order of the list of granules will be resorted. (Note: Any granule changes will be permanent after the confirmation.)
3. Next, the operator chooses the disposition on the intervention. If desired, the operator can first choose the attributes for disposition. There are always two attributes: 1. Disable Limit checking, 2. Change media to. A third attribute, Update FtpPush Parameters will appear if the media type is FTP Push. If the operator chooses the Disable Limit checking attribute, the request size limit checking will be disabled (when the Apply Disposition Request button is clicked to submit the request – see Step 5). If the operator chooses the Change Media to attribute, it is necessary to use the associated option button to select the new media selection from its drop-down list. The operator can choose to skip selecting the attributes. Finally, after choosing attributes (or skipping the selection of attributes), the operator can choose different dispositions. There are four kinds of dispositions:
• Keep on hold. (Normally, the operator can use this disposition to add or update the operator notes on intervention. The intervention is not done.)
3-15 300-TP-001-001

• Submit. (The operator can use this disposition to release the intervention (a) without
changing anything (just retry) (b) with limits disabled when selecting Disable limit checking attribute (c) changing the media when selecting Change Media to attribute (normally for the case that granule size exceeds media capacity) (d) retrying with any committed edits to the granules (see Step 2).)
• Fail request.
• Partition (Normally for the case that request size exceeds maximum request size).
4. The operator can also add or edit the operator notes.
5. Then click the Apply Disposition Request button. A confirmation page will display to show the disposition information (see paragraph 3.1.1.7). For a failed request and granules, the additional e-mail text will display to allow operator to optionally add additional e-mail text. The default is to send e-mail for failed request or granules. However, the operator can choose not to send e-mail. For changing the media to FTP Push, a list of FTP push parameters is shown in the confirmation page.
3.1.1.7 Confirmation for Intervention Page
After the operator clicks the Apply button in the open intervention page, a confirmation page will display to show the disposition information as shown in Figure 3.1.1.7-1. For a failed request and granules, the additional e-mail text field will display to allow the operator to optionally add additional e-mail text. The default is to send e-mail for a failed request or granules. However, the operator can choose not to send e-mail by clicking on Don’t send e-mail. The operator can click on the OK button to confirm the disposition. Table 3.1.1.7-1 provides a description of the entry field for the Confirmation for Intervention page.
3-16 300-TP-001-001

Figure 3.1.1.7-1. Confirmation for Intervention Page
Table 3.1.1.7-1. Confirmation for Intervention Page Field Description Field Name Data Type Size Entry Description
Additional e-mail text Character 255 Optional Comments to be appended to the standard e-mail text
3.1.1.8 Confirmation for Intervention Page when Changing Media to FTP Push If the operator changes the media type to FtpPush, the FtpPush parameters will be displayed in the confirmation page, as shown in Figure 3.1.1.8-1. The operator has to enter all values for Ftp Push parameters. Table 3.1.1.8-1 provides field descriptions for the entry of these values.
3-17 300-TP-001-001

Figure 3.1.1.8-1. Confirmation Page for Changing Media to FTP Push.
3-18 300-TP-001-001

Table 3.1.1.8-1. Field descriptions for Confirmation Page with
Change of Media to FTP Push Field Name Data Type Size Entry Description
FTP User Varchar 14 Required for FTP Push
The Unix login ID of the FTP recipient
FTP Password Varchar 15 Required for FTP Push
The Unix password for the FTP recipient
FTP Password Verification
Varchar 15 Required for FTP Push
The Unix password verification for the FTP recipient
FTP Host Varchar 20 Required for FTP Push
The Unix hostname of the FTP recipient
FTP Directory Varchar 255 Required for FTP Push
The pathname of the Unix directory where the acquired files are to be stored
Additional e-mail text Character 255 Optional Comments to be appended to the standard e-mail text
3.1.1.9 Completed Interventions Page The operator can click on the View Completed Interventions link in the Request Management page to display a list of completed interventions, as illustrated in Figure 3.1.1.9-1. The operator can filter the completed interventions by selecting a different user from the Worked by drop-down and selecting a different Completion time from the drop-down lists for date and time. The defaults are all users and completion times in the last 24 hours. The completed intervention list can be sorted by clicking on the column header links for Order ID, Request ID, UserID, Media, Worked by and Created. The default sort is Completed. The operator can scan through the list by clicking on navigation links. These links permit selecting specific listed blocks of interventions or jumping to the first, next, previous or last block. The number of interventions in a block is configurable. The operator can click the request ID to view the detailed information for a completed intervention. Table 3.1.1.9-1 provides descriptions of the fields for the Requests with Completed Interventions page.
3-19 300-TP-001-001

Figure 3.1.1.9-1. Requests with Completed Interventions Page
3-20 300-TP-001-001

Table 3.1.1.9-1. Requests with Completed Interventions Page Field Descriptions
Field Name Data Type Size Entry Description Worked by Character n/a Optional Select all or a specific name
from pull-down list for filtering when Apply Filter button is clicked
Completion time from/to
Character n/a Optional Select from pull-down lists to specify a starting date and time and an ending date and time for filtering when Apply Filter button is clicked
Go directly to row Link n/a Optional Selects the first row of a block of interventions to display. After entering the row, click OK to have the new block displayed.
first Link n/a Optional Selects first block of interventions
<previous Link n/a Optional Selects previous block of interventions
next> Link n/a Optional Selects next block of interventions
last Link n/a Optional Selects last block of interventions
3.1.1.10 Completed Intervention Page
The operator can click on one of the request ID links displayed on the View Completed Interventions page to open the detailed information on a completed intervention, as shown in Figure 3.1.1.10-1. The operator can scan through the list by clicking on navigation links. These links permit selecting specific listed blocks of granules or jumping to the first, next, previous or last block. The number of granules in a block is configurable. This page also displays the operator notes. Table 3.1.1.10-1 provides a description of the entry field for the Completed Intervention page.
3-21 300-TP-001-001
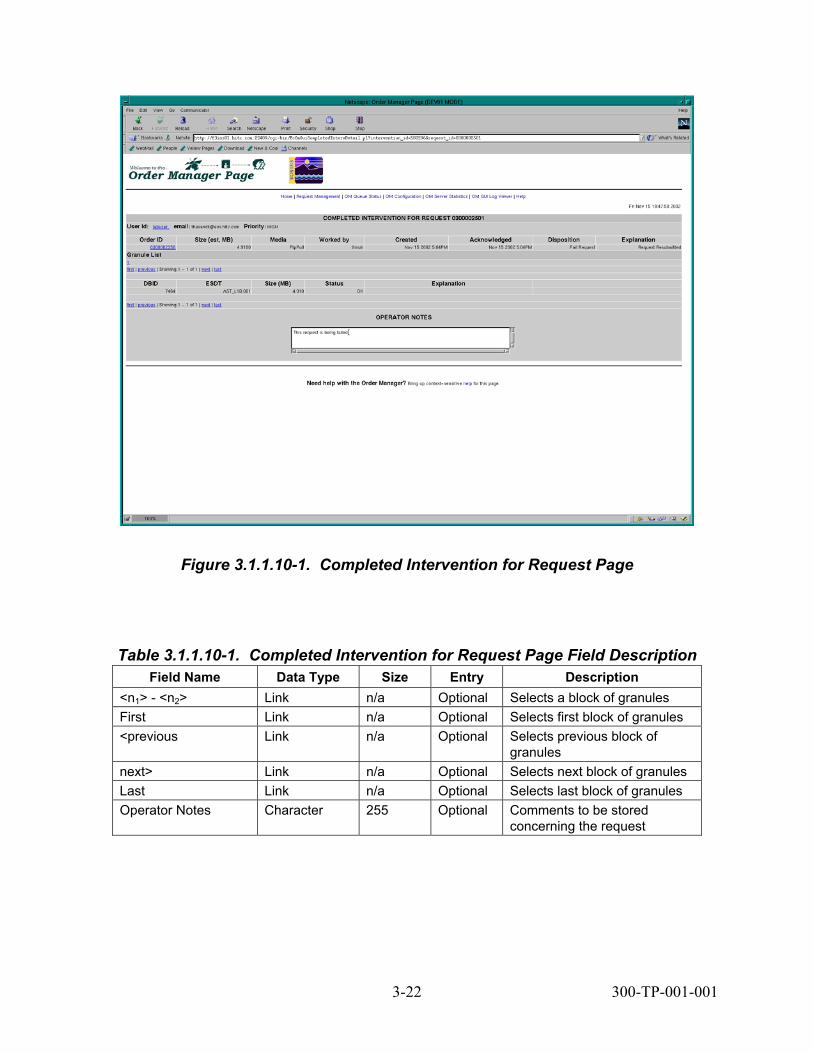
Figure 3.1.1.10-1. Completed Intervention for Request Page
Table 3.1.1.10-1. Completed Intervention for Request Page Field Description Field Name Data Type Size Entry Description
<n1> - <n2> Link n/a Optional Selects a block of granules First Link n/a Optional Selects first block of granules <previous Link n/a Optional Selects previous block of
granules next> Link n/a Optional Selects next block of granules Last Link n/a Optional Selects last block of granules Operator Notes Character 255 Optional Comments to be stored
concerning the request
3-22 300-TP-001-001

3.1.1.11 View Distribution Request List Page The operator can click on the View Distribution Requests in the request management page to display a list of distribution requests, as shown in Figure 3.1.1.11-1. The operator can filter the distribution requests by various attributes by clicking the Apply Filter button after selecting a filtering option and/or entering criteria for filtering. To select a filtering option, the operator can click on the Status option button and select or deselect one or more values from the displayed options (e.g., All, Shipped, Pending, Canceled, Abort, Aborted). If the "ALL" status is selected, requests with any status will displayed and all other status selections will be ignored. The operator can enter User ID, Request ID, or Order ID to filter on those criteria. To filter on Creation time, the operator can select from pull-down lists on the date and time fields to specify date and time criteria and clicking the Apply Filter button. To reset all filter options to their default values, click the "Set Defaults" button. The request list can be sorted by clicking on the column header links Request ID, Order ID, User ID, Status, Created and Last Update. The operator can scan through the list by entering "Go directly to row", then clicking OK. This will display a block of requests starting with the entered row number. These links permit jumping to the first, next, previous or last block. The number of requests in a block is configurable. This page will be refreshed by default every 5 minutes. The operator can change the refresh rate by selecting from the pull down list. The operator can also choose to suspend refresh by clicking on the Suspend refresh radio button. The operator can resubmit any request with a terminated status (including cancel, abort, aborted and shipped) by clicking on the resubmit button at the end of its row. Resubmitting a request that was for FtpPush in this way opens a new intervention for the request so that the operator can set new FtpPush parameters (see paragraph 3.1.1.6). The operator can view the detailed information for a distribution request by clicking on its Request ID. Table 3.1.1.11-1 provides descriptions of the fields for the Distribution Requests page.
3-23 300-TP-001-001

Figure 3.1.1.11-1. Distribution Requests List Page
3-24 300-TP-001-001

Table 3.1.1.11-1. Distribution Requests List Page Field Descriptions Field Name Data Type Size Entry Description
Status Character n/a Optional Select from the scrolling list to select or deselect all or any number of specific statuses for filtering when the Apply Filter button is clicked
User ID Character 14 Optional The Unix login ID of the FTP recipient, entered to specify a user ID for filtering when the Apply Filter button is clicked
Request ID Character 10 Optional A specific request ID, entered to specify a request ID for filtering when the Apply Filter button is clicked
Order ID Character 10 Optional A specific order ID, entered to specify an order ID for filtering when the Apply Filter button is clicked
Creation time from/to Character n/a Optional Select from pull-down lists to specify a starting date and time and an ending date and time for filtering when the Apply Filter button is clicked
Go directly to row Link n/a Optional Displays a block of requests starting with the entered row number when the OK button is clicked.
First Link n/a Optional Selects first block of requests <previous Link n/a Optional Selects previous block of
requests next> Link n/a Optional Selects next block of requests Last Link n/a Optional Selects last block of requests Auto-refresh screen every (minutes)
Int 2 Optional Interval in minutes for screen auto-refresh
3.1.1.12 Distribution Request Details Page The operator can click the request ID in the View Distribution Requests page to display the detailed information for a request, as shown in Figure 3.1.1.12-1. The operator can click the userID link to view the user profile for that user (see paragraph 3.1.1.14), or click on the OrderID link to view the ECS order information (see paragraph 3.1.1.13). The operator can resubmit the request if it is in a terminated state by clicking the Resubmit this Request button. After the operator clicks this button, the open intervention page for this request will display (see paragraph 3.1.1.6). The operator can scan through the granule list by clicking on navigation links. These links permit selecting specific listed blocks of granules or jumping to the first, next, previous or last block. If the Distribution Request information at the top of the page
3-25 300-TP-001-001
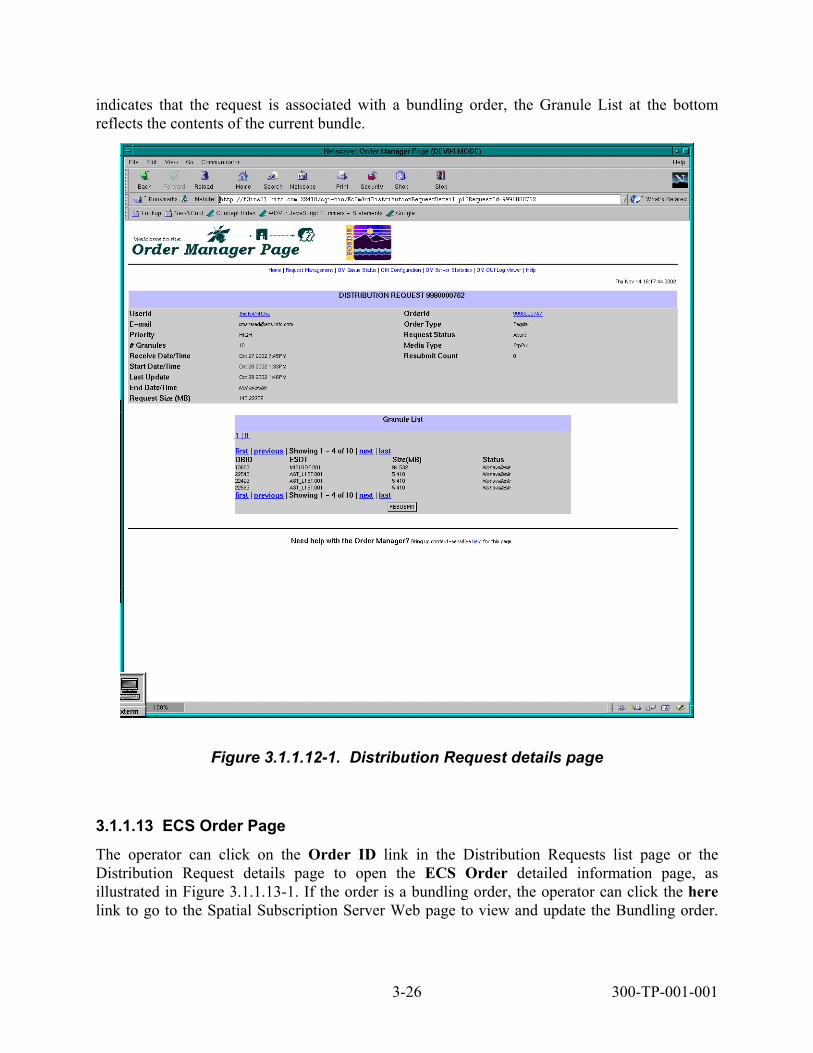
indicates that the request is associated with a bundling order, the Granule List at the bottom reflects the contents of the current bundle.
Figure 3.1.1.12-1. Distribution Request details page
3.1.1.13 ECS Order Page The operator can click on the Order ID link in the Distribution Requests list page or the Distribution Request details page to open the ECS Order detailed information page, as illustrated in Figure 3.1.1.13-1. If the order is a bundling order, the operator can click the here link to go to the Spatial Subscription Server Web page to view and update the Bundling order.
3-26 300-TP-001-001

The operator can click a Request ID to go to Distribution Request details page for that request (see paragraph 3.1.1.13) or click the User ID to go to the User Profile page (see paragraph 3.1.1.14).
Figure 3.1.1.13-1. ECS Order Information Page
3.1.1.14 User Profile Page The operator can click on the user ID link in the Distribution Request details page or the ECS Order details page to view the detailed information for a particular user in a User Profile page as shown in Figure 3.1.1.14-1. This page displays personal information, account information, various address information, and other data on the user.
3-27 300-TP-001-001
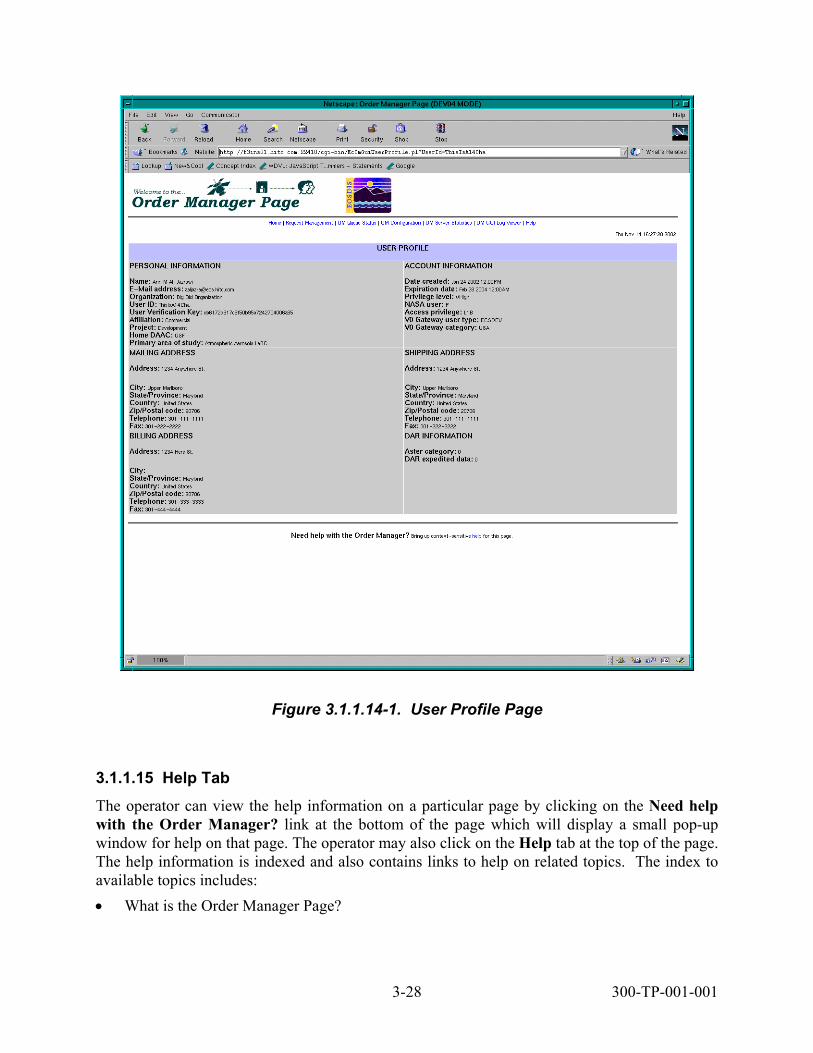
Figure 3.1.1.14-1. User Profile Page
3.1.1.15 Help Tab The operator can view the help information on a particular page by clicking on the Need help with the Order Manager? link at the bottom of the page which will display a small pop-up window for help on that page. The operator may also click on the Help tab at the top of the page. The help information is indexed and also contains links to help on related topics. The index to available topics includes: • What is the Order Manager Page?
3-28 300-TP-001-001

• Request Management
− Open Interventions Closing or Placing on Hold an Intervention
− Completed Interventions − Distribution Requests
• OM Queue Status • OM Configuration • OM Server Statistics • OM Log Viewer
Figure 3.1.1.15-1 and Figure 3.1.1.15-2 provide Help Page samples.
Figure 3.1.1.15-1. Sample Help Page.
3-29 300-TP-001-001
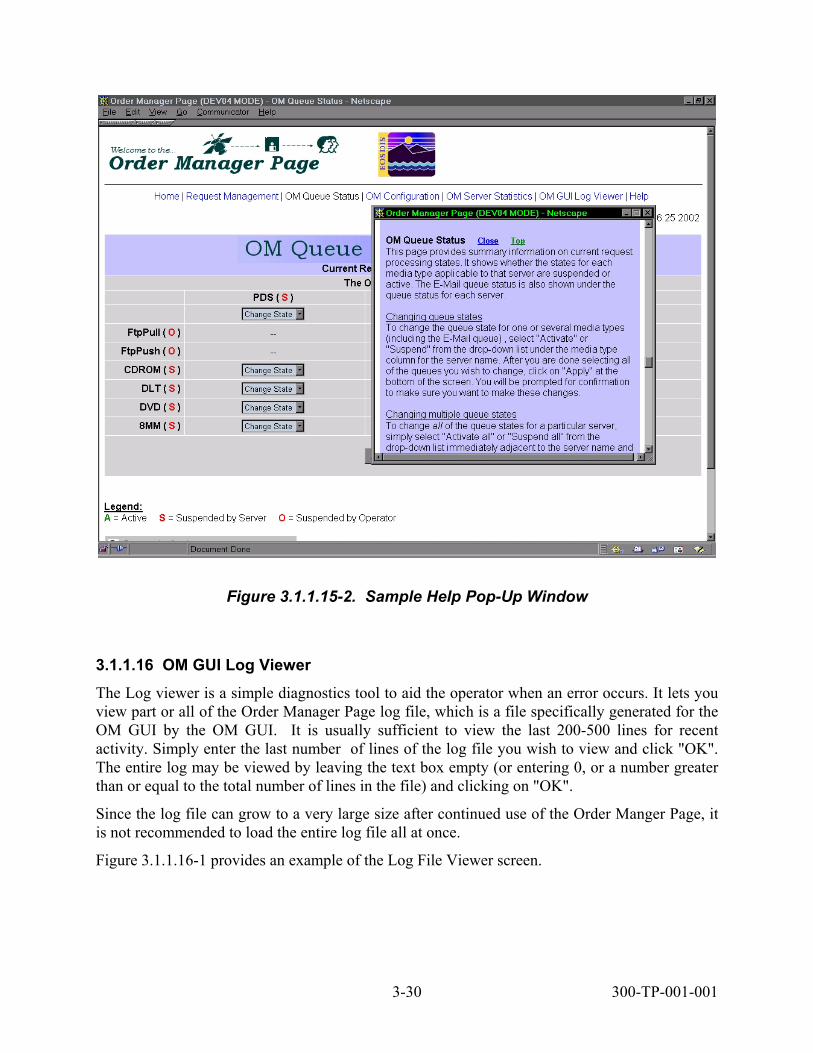
Figure 3.1.1.15-2. Sample Help Pop-Up Window
3.1.1.16 OM GUI Log Viewer The Log viewer is a simple diagnostics tool to aid the operator when an error occurs. It lets you view part or all of the Order Manager Page log file, which is a file specifically generated for the OM GUI by the OM GUI. It is usually sufficient to view the last 200-500 lines for recent activity. Simply enter the last number of lines of the log file you wish to view and click "OK". The entire log may be viewed by leaving the text box empty (or entering 0, or a number greater than or equal to the total number of lines in the file) and clicking on "OK".
Since the log file can grow to a very large size after continued use of the Order Manger Page, it is not recommended to load the entire log file all at once.
Figure 3.1.1.16-1 provides an example of the Log File Viewer screen.
3-30 300-TP-001-001

Figure 3.1.1.16-1. OM GUI Log Viewer Example
3.1.2 Required Operating Environment The following environment is required for the OM GUI to work properly:
• O/S requirements are Solaris 2.5.1 or better, or SGI IRIX6.5 or better.
3.1.3 Interfaces and Data types
The OM GUI exchanges data between the Web Browser and Sybase using Perl CGI and DBI Modules for the interface.
3.1.4 Databases
The OM GUI accesses the OMS and MSS Accountability databases.
3.1.5 Special Constraints
There are no special constraints for running the OM GUI.
3-31 300-TP-001-001
3.1.6 Outputs
There are no outputs from the OM GUI except for status and error messages.
3.1.7 Events and Messages
The OM GUI writes status and error messages to the EcOmGui.log file in the directory /usr/ecs/<MODE>/CUSTOM/WWW/OMS/cgi-bin/logs.
3.1.8 Reports
The OM GUI does not generate reports.
3.2 Order Manager CLI The Order Manager Command Line utility provides a mechanism by which the ECS Operations Staff can submit order requests into the Order Manager System (OMS) database directly without knowing whether the Order Manager Server is up or down. The order request submitted by the Command Line utility is in ODL format, which conforms to the Product Request ODL protocol in the ICD Between the EOSDIS Core System (ECS) and the Version 0 System for Interoperability, with a few extensions.
3.2.1 Quick Start Using the Order Manager Command Line Utility
3.2.1.1 Invoking Order Manager from the Command Line Interface
To execute the Order Manager from the command line interface, use the Command Line utility syntax provided below: EcSrOmCliDriverStart <MODE > <rootname of ODL files> <numRequest> [<submissionInterval> <dbRetries> <dbRetryInterval>]
The mode parameter is required to indicate the mode (i.e., OPS, TS1, or TS2) in which the utility is being run. The command line parameters supported are described in Table 3.2.1.1-1.
3-32 300-TP-001-001
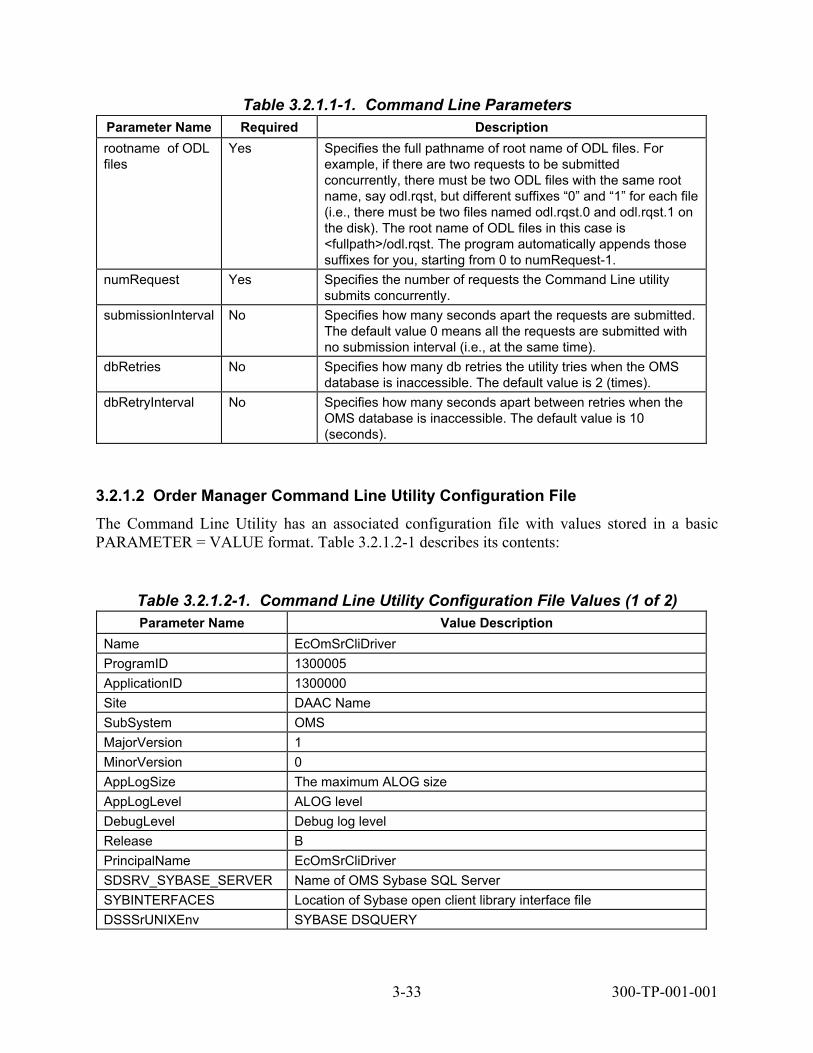
Table 3.2.1.1-1. Command Line Parameters
Parameter Name Required Description rootname of ODL files
Yes Specifies the full pathname of root name of ODL files. For example, if there are two requests to be submitted concurrently, there must be two ODL files with the same root name, say odl.rqst, but different suffixes “0” and “1” for each file (i.e., there must be two files named odl.rqst.0 and odl.rqst.1 on the disk). The root name of ODL files in this case is <fullpath>/odl.rqst. The program automatically appends those suffixes for you, starting from 0 to numRequest-1.
numRequest Yes Specifies the number of requests the Command Line utility submits concurrently.
submissionInterval No Specifies how many seconds apart the requests are submitted. The default value 0 means all the requests are submitted with no submission interval (i.e., at the same time).
dbRetries No Specifies how many db retries the utility tries when the OMS database is inaccessible. The default value is 2 (times).
dbRetryInterval No Specifies how many seconds apart between retries when the OMS database is inaccessible. The default value is 10 (seconds).
3.2.1.2 Order Manager Command Line Utility Configuration File
The Command Line Utility has an associated configuration file with values stored in a basic PARAMETER = VALUE format. Table 3.2.1.2-1 describes its contents:
Table 3.2.1.2-1. Command Line Utility Configuration File Values (1 of 2) Parameter Name Value Description
Name EcOmSrCliDriver ProgramID 1300005 ApplicationID 1300000 Site DAAC Name SubSystem OMS MajorVersion 1 MinorVersion 0 AppLogSize The maximum ALOG size AppLogLevel ALOG level DebugLevel Debug log level Release B PrincipalName EcOmSrCliDriver SDSRV_SYBASE_SERVER Name of OMS Sybase SQL Server SYBINTERFACES Location of Sybase open client library interface file DSSSrUNIXEnv SYBASE DSQUERY
3-33 300-TP-001-001

Table 3.2.1.2-1. Command Line Utility Configuration File Values (2 of 2) Parameter Name Value Description
DBMAXRESULTS Maximum database return rows DBNAME OMS database name DBPASSWDSEED 1300005 (the seed used to get Command Line utility database login
password) DBUSERNAME OmSrCliDriver (the database login name of Command Line utility) MAX_DB_CONNECTIONS The maximum database connections Command Line utility uses to
connect to the OMS Database DSQUERY Name of SQS Server SDSRV_DB_MAX_JOINS Maximum number of database join operations DSSSrEnv_DB DBUSERNAME DBPASSWDSEED DBNAME DBMAXRESULTS
SYBINTERFACES SDSRV_SYBASE_SERVER SDSRV_DB_MAX_JOINS
DSSSrEnv $DSSSrEnv_DB
3.2.1.3 ODL Template File There are brackets ([]), and braces ({}) around some of the lines and groups. The brackets mean it is optional and subject to change its contents. The braces mean it is not optional but subject to change its contents. The lines or groups with no brackets or braces around them mean “do not change them.” To use the template file:
Step 1. Copy the template file to a new file.
Step 2. Customize those lines and groups with the brackets or braces in the new file.
Step 3. Remove the brackets and braces around the lines and groups from the new file.
3.2.1.4 ODL Template File for “FtpPull” Media Type GROUP = PRODUCT_REQUEST MESSAGE_ID = "B1027711830" [REQUEST_ID = "37475:27364"] The above line is optional. If it is there, the value part must be in the format of “order id:requst id” which you retrieve from the MSS database, in this case <order id>=37475 and <request id>=27364. If it is not there, command line utility creates an order id and request id for this request. DATA_CENTER_ID = "ECS-TEST" [ECS_AUTHENTICATOR = "labuser"] The above line is optional. If it is there, the value ought to be a valid ECS user in the ECS User Registration Database. If it is not there, this request is regarded as an “ECSGuest” user. GROUP = USER_AFFILIATION CATEGORY = "USA" TYPE = "GOVERNMENT" END_GROUP = USER_AFFILIATION { GROUP = CONTACT_ADDRESS TITLE = ""
3-34 300-TP-001-001
FIRST_NAME = "Yu" MIDDLE_INITIAL = "" LAST_NAME = "Zhongfei" ORGANIZATION = "" ADDRESS = ("abcd") CITY = "Landover" STATE = "MD" ZIP = "" COUNTRY = "UNITED STATES" PHONE = "301-925-1042" FAX = "" EMAIL = "[email protected]" END_GROUP = CONTACT_ADDRESS } The above group is not optional, but the contents of each line could be customized. { GROUP = SHIPPING_ADDRESS TITLE = "" FIRST_NAME = "Yu" MIDDLE_INITIAL = "" LAST_NAME = "Zhongfei" ORGANIZATION = "" ADDRESS = ("abcd") CITY = "Landover" STATE = "MD" ZIP = "" COUNTRY = "UNITED STATES" PHONE = "301-925-1042" FAX = "" EMAIL = "[email protected]" END_GROUP = SHIPPING_ADDRESS } The above group is not optional, but the contents of each line could be customized. { GROUP = BILLING_ADDRESS TITLE = "" FIRST_NAME = "Yu" MIDDLE_INITIAL = "" LAST_NAME = "Zhongfei" ORGANIZATION = "" ADDRESS = ("abcd") CITY = "Landover" STATE = "MD" ZIP = "" COUNTRY = "UNITED STATES" PHONE = "301-925-1042" FAX = "" EMAIL = "[email protected]" END_GROUP = BILLING_ADDRESS } The above group is not optional, but the contents of each line could be customized. GROUP = LINE_ITEM {DATASET_ID = "LANDSAT-7 LEVEL-0R FLOATING SCENES V002"} This line could be changed to the ESDT long name matching with the granule given in the next line. {PACKAGE_ID = "SC:L70R.002:23420"} This line could be customized in the format of “granule type:ESDT shortname:ESDT version id:db id.” PROCESSING_OPTIONS = "Native Granule"
3-35 300-TP-001-001

{MEDIA_TYPE = "FtpPull"} This line could be customized to any media type such as CDROM, DVD, DLT, or 8MM. {MEDIA_FORMAT = "FILEFORMAT"} This line could be changed to match the media type given in the above line. EST_COST = 777.88 [ GROUP = SUBSET_SPEC GROUP = SPECIALIZED_CRITERIA CRITERIA_NAME = "Band Subsetting" CRITERIA_TYPE = "STRING" CRITERIA_VALUE = ("QA_BAND2_PRESENT", "QA_BAND3_PRESENT", "QA_BAND4_PRESENT", "QA_BAND5_PRESENT", "QA_BAND6_PRESENT_F1", "QA_BAND6_PRESENT_F2", "QA_BAND7_PRESENT", "QA_BAND8_PRESENT") END_GROUP = SPECIALIZED_CRITERIA GROUP = SPECIALIZED_CRITERIA CRITERIA_NAME = "Spatial Subsetting" CRITERIA_TYPE = "GEO" CRITERIA_VALUE = "BY_POLYGON_LOC" GROUP = POLYGON_LOC TANGENT_LATITUDE = 81.8895 TANGENT_LONGITUDE = 158.423 MAP_PROJECTION_TYPE = "ORTHOGRAPHIC" LATITUDE = (83.2017, 81.4847, 80.4686, 81.8274) LONGITUDE = (-175.078, -176.234, 155.986, 151.309) WG_ZOOM = 2 END_GROUP = POLYGON_LOC END_GROUP = SPECIALIZED_CRITERIA GROUP = SPECIALIZED_CRITERIA CRITERIA_NAME = "Scan Line Size" CRITERIA_TYPE = "INTEGER" CRITERIA_VALUE = 1104 END_GROUP = SPECIALIZED_CRITERIA END_GROUP = SUBSET_SPEC ] This group is optional, indicates the subset option goes along with this granule. GROUP = PATH_ROW_LOC PATH = (119) ROW = (233) END_GROUP = PATH_ROW_LOC GROUP = POLYGON_LOC LATITUDE = (70.31, 69.6, 64.78, 65.36) LONGITUDE = (-80.91, -85.44, 136.97, 133.18) CENTROID_LAT = 81.94 CENTROID_LON = -170.59 POLE_INCLUDED = "X" END_GROUP = POLYGON_LOC END_GROUP = LINE_ITEM The LINE_ITEM group could be repeated if there are more granules to be ordered in one request. GROUP = MONITOR SESSION_ID = "cheyenne.hitc.com:24496:20020726:153027" TX_CLIENT = ("1027711832", "939137") END_GROUP = MONITOR GROUP = VERSION SENDER_VERSION = "imswww-3_4b_6" PROTOCOL_VERSION = 3.2 IMS_STAFF = "1"
3-36 300-TP-001-001

END_GROUP = VERSION [PRIORITY = "HIGH"] This line is optional. The default is LOW with the possible values being LOW, NORMAL, HIGH, VHIGH and XPRESS. [USERSTRING = "TESTFOR"] This line is optional. But if it is there, the length of the value must be less than 80 characters. [NOTIFY = "[email protected]"] This line is optional. But if it is there, the length of the value must be less than 255 characters. [DDISTNOTIFYTYPE = “MAIL”] This line is optional. END_GROUP = PRODUCT_REQUEST END
3.2.1.5 ODL Template File for “FtpPush” Media Type
GROUP = PRODUCT_REQUEST MESSAGE_ID = "B1027711830" [REQUEST_ID = "37475:27364"] DATA_CENTER_ID = "ECS-TEST" [ECS_AUTHENTICATOR = "labuser"] GROUP = USER_AFFILIATION CATEGORY = "USA" TYPE = "GOVERNMENT" END_GROUP = USER_AFFILIATION { GROUP = CONTACT_ADDRESS TITLE = "" FIRST_NAME = "Yu" MIDDLE_INITIAL = "" LAST_NAME = "Zhongfei" ORGANIZATION = "" ADDRESS = ("abcd") CITY = "Landover" STATE = "MD" ZIP = "" COUNTRY = "UNITED STATES" PHONE = "301-925-1042" FAX = "" EMAIL = "[email protected]" END_GROUP = CONTACT_ADDRESS } { GROUP = SHIPPING_ADDRESS TITLE = "" FIRST_NAME = "Yu" MIDDLE_INITIAL = "" LAST_NAME = "Zhongfei" ORGANIZATION = "" ADDRESS = ("abcd") CITY = "Landover" STATE = "MD" ZIP = "" COUNTRY = "UNITED STATES" PHONE = "301-925-1042" FAX = "" EMAIL = "[email protected]"
3-37 300-TP-001-001

END_GROUP = SHIPPING_ADDRESS } { GROUP = BILLING_ADDRESS TITLE = "" FIRST_NAME = "Yu" MIDDLE_INITIAL = "" LAST_NAME = "Zhongfei" ORGANIZATION = "" ADDRESS = ("abcd") CITY = "Landover" STATE = "MD" ZIP = "" COUNTRY = "UNITED STATES" PHONE = "301-925-1042" FAX = "" EMAIL = "[email protected]" END_GROUP = BILLING_ADDRESS } GROUP = LINE_ITEM {DATASET_ID = "JPL-GENERATED ASTER LEVEL 1B DATA - THERMAL IR CHANNELS ONLY V001"} {PACKAGE_ID = "SC:AST_L1BT.001:7644"} PROCESSING_OPTIONS = "Native Granule" {MEDIA_TYPE = "FtpPush"} {MEDIA_FORMAT = "FILEFORMAT"} EST_COST = 777.88 GROUP = ORDER_SPEC GROUP = SPECIALIZED_CRITERIA CRITERIA_NAME = "FTPHOST" CRITERIA_TYPE = "STRING" {CRITERIA_VALUE = "origin"} END_GROUP = SPECIALIZED_CRITERIA GROUP = SPECIALIZED_CRITERIA CRITERIA_NAME = "FTPPASSWORD" CRITERIA_TYPE = "STRING" {CRITERIA_VALUE = "Sept6A02"} END_GROUP = SPECIALIZED_CRITERIA GROUP = SPECIALIZED_CRITERIA CRITERIA_NAME = "FTPPUSHDEST" CRITERIA_TYPE = "STRING" {CRITERIA_VALUE = "/devdata1/DEV01/PushArea"} END_GROUP = SPECIALIZED_CRITERIA GROUP = SPECIALIZED_CRITERIA CRITERIA_NAME = "FTPUSER" CRITERIA_TYPE = "STRING" {CRITERIA_VALUE = "labuser"} END_GROUP = SPECIALIZED_CRITERIA GROUP = SPECIALIZED_CRITERIA CRITERIA_NAME = "USERSTRING" CRITERIA_TYPE = "STRING" {CRITERIA_VALUE = "ABCD"} END_GROUP = SPECIALIZED_CRITERIA END_GROUP = ORDER_SPEC The ORDER_SPEC group is designed for specifying all the FtpPush parameters, it must be there for the FtpPush Media Type.
3-38 300-TP-001-001

GROUP = RANGE_LOC NORTH_LATITUDE = 10.12 WEST_LONGITUDE = -130.12 SOUTH_LATITUDE = -10.12 EAST_LONGITUDE = 63.1 END_GROUP = RANGE_LOC END_GROUP = LINE_ITEM GROUP = MONITOR SESSION_ID = "cheyenne.hitc.com:24496:20020726:153027" TX_CLIENT = ("1027711832", "939137") END_GROUP = MONITOR GROUP = VERSION SENDER_VERSION = "imswww-3_4b_6" PROTOCOL_VERSION = 3.2 IMS_STAFF = "1" END_GROUP = VERSION [PRIORITY = "HIGH"] [USERSTRING = "TESTFOR"] [NOTIFY = "[email protected]"] [DDISTNOTIFYTYPE = "MAIL"] END_GROUP = PRODUCT_REQUEST END
3.2.1.6 ODL Template File for “CDROM” Media Type
GROUP = PRODUCT_REQUEST MESSAGE_ID = "B1027711830" [REQUEST_ID = "37475:27364"] DATA_CENTER_ID = "ECS-TEST" [ECS_AUTHENTICATOR = "labuser"] GROUP = USER_AFFILIATION CATEGORY = "USA" TYPE = "GOVERNMENT" END_GROUP = USER_AFFILIATION { GROUP = CONTACT_ADDRESS TITLE = "" FIRST_NAME = "Yu" MIDDLE_INITIAL = "" LAST_NAME = "Zhongfei" ORGANIZATION = "" ADDRESS = ("abcd") CITY = "Landover" STATE = "MD" ZIP = "" COUNTRY = "UNITED STATES" PHONE = "301-925-1042" FAX = "" EMAIL = "[email protected]" END_GROUP = CONTACT_ADDRESS } {
3-39 300-TP-001-001

GROUP = SHIPPING_ADDRESS TITLE = "" FIRST_NAME = "Yu" MIDDLE_INITIAL = "" LAST_NAME = "Zhongfei" ORGANIZATION = "" ADDRESS = ("abcd") CITY = "Landover" STATE = "MD" ZIP = "" COUNTRY = "UNITED STATES" PHONE = "301-925-1042" FAX = "" EMAIL = "[email protected]" END_GROUP = SHIPPING_ADDRESS } { GROUP = BILLING_ADDRESS TITLE = "" FIRST_NAME = "Yu" MIDDLE_INITIAL = "" LAST_NAME = "Zhongfei" ORGANIZATION = "" ADDRESS = ("abcd") CITY = "Landover" STATE = "MD" ZIP = "" COUNTRY = "UNITED STATES" PHONE = "301-925-1042" FAX = "" EMAIL = "[email protected]" END_GROUP = BILLING_ADDRESS } GROUP = LINE_ITEM {DATASET_ID = "JPL-GENERATED ASTER LEVEL 1B DATA - THERMAL IR CHANNELS ONLY V001"} {PACKAGE_ID = "SC:AST_L1BT.001:7644"} PROCESSING_OPTIONS = "Native Granule" {MEDIA_TYPE = "CDROM"} The above line specifies the CDROM media type, and the next line specifies the matching media format. {MEDIA_FORMAT = "RockRidge"} EST_COST = 777.88 END_GROUP = LINE_ITEM GROUP = MONITOR SESSION_ID = "cheyenne.hitc.com:24496:20020726:153027" TX_CLIENT = ("1027711832", "939137") END_GROUP = MONITOR GROUP = VERSION SENDER_VERSION = "imswww-3_4b_6" PROTOCOL_VERSION = 3.2 IMS_STAFF = "1" END_GROUP = VERSION [PRIORITY = "HIGH"] [USERSTRING = "TESTFOR"] [NOTIFY = "[email protected]"] [DDISTNOTIFYTYPE = "MAIL"]
3-40 300-TP-001-001

END_GROUP = PRODUCT_REQUEST END
3.2.1.7 Examples
Example 1 EcSrOmCliDriverStart <MODE> /usr/ecs/<MODE>/CUSTOM/data/OMS/template/odl.rqst 1
This means one file called odl.rqst.0 in directory /usr/ecs/<MODE>/CUSTOM/data/OMS/template/
Example 2 EcSrOmCliDriverStart <MODE> /usr/ecs/<MODE>/CUSTOM/data/OMS/template/odl.rqst 10 This means ten files must be named, odl.rqst.0, odl.rqst.1, odl.rqst.2, odl, rqst.3, odl.rqst.4, odl.rqst.5, odl.rqst.6, odl.rqst.7, odl.rqst.8, odl.rqst.9 in directory /usr/ecs/<MODE>/CUSTOM/data/OMS/template/ Example 3
EcSrOmCliDriverStart <MODE> /usr/ecs/<MODE>/CUSTOM/data/OMS/template/odl.rqst 3 5
There are 3 requests to be submitted with 5 seconds submission interval.
Example 4
EcSrOmCliDriverStart <MODE> /usr/ecs/<MODE>/CUSTOM/data/OMS/template/odl.rqst 3 5 10 20
There are 3 requests to be submitted with 5 seconds submission interval and 5 db retries and 20 seconds db retry interval if database is inaccessible.
3.2.2 Order Manager Command Line Utility Main Screen
There is no main screen for this utility. This is a command line interface only.
3.2.3 Required Operating Environment The Command Line Utility runs on the Sun Solaris platform.
3.2.4 Databases Table 3.2.4-1 lists the databases, stored procedures and tables for the command line utility.
3-41 300-TP-001-001

Table 3.2.4-1. Command Line Utility Database, Stored procedures and Tables
Database Stored Procedure Table(s) OmRequest OmCreateRequest
OmRequestOptions OmInsertGranule OmGranule
OmInsertSubSetInfo OmSubSettingInfo
EcOmDB_<MODE>
OmInsertAction OmActionQueue EcAcRequest mss_acct_db_<MODE>
EcAcAddress
3.2.5 Special Constraints Table 3.2.5-1 lists the COTS product dependencies for the Command Line Utility.
Table 3.2.5-1. CLI – COTS Product Dependencies Product Dependency Protocols Used Comments
OMS Database SQL Via SQL server machine
Sybase Open Client library Sybase client/server communication
Requires proper baseline version of Open Client library
3.2.6 Outputs The Command Line Utility does not produce any outputs.
3.2.7 Event and Error Messages The Command Line Utility writes information useful to the operator to a log file. The file is stored in the /usr/ecs/<MODE>/CUSTOM/logs directory and is named EcOmSrCliDriverDebug.log and EcOmSrCliDriver.ALOG. The utility renames the debug log and ALOG files to the name with current time stamp suffixes if they already exist and creates new debug log and ALOG files.
There are two types of messages written to the utility’s log file: errors and informative messages. Error messages include information about program internal/external faults, unplanned disconnects with the Sybase Server, general database errors, unable to open ODL files due permission or nonexistence, and configuration file problems. Informative messages include when the utility starts and stops and progress messages. All messages are date and time stamped.
If there are syntax errors in command-line invocation, a usage message is printed to the screen
3-42 300-TP-001-001

3.2.8 Reports The Command Line Utility does not produce any reports.
3-43 300-TP-001-001

This page intentionally left blank.
3-44 300-TP-001-001

4. Spatial Subscription Server
4.1 Spatial Subscription Server GUI
4.1.1 Using the Spatial Subscription Server (NBSRV) GUI
The NBSRV GUI provides an operator interface to place a standing order (hereinafter called “subscription”) on an ECS event. Specifically, the NBSRV GUI provides the following capabilities:
• List the types of subscribable events.
• Add a subscription with an action for distribution of standard ECS products from the ECS archive holding or email notification. The subscription can be qualified with spatial, temporal, integer, string and floating point qualifiers.
• Associate a Data Pool insert action with a subscription.
• Associate a Data Pool theme with a Data Pool insert action.
• List the subscriptions which have been previously entered.
• View, Update and Delete an existing subscription.
• Suspend and Resume an existing subscription.
• Suspend, resume, or delete the subscriptions associated with a Data Pool theme.
• Add, update, or cancel a bundling order.
• Associate a bundling order with a subscription.
• List the bundling orders associated with a user.
• List the subscriptions associated with a bundling order.
• Determine the number of subscribed events left to dequeue.
• Determine the number of actions left to dequeue.
• List the status of email notification and distribution actions in the action queue.
• List statistics relating to Spatial Subscription Server performance.
4.1.1.1 Starting the NBSRV GUI Pre-conditions:
• Javascript must be enabled for the Web Browser.
4-1 300-TP-001-001
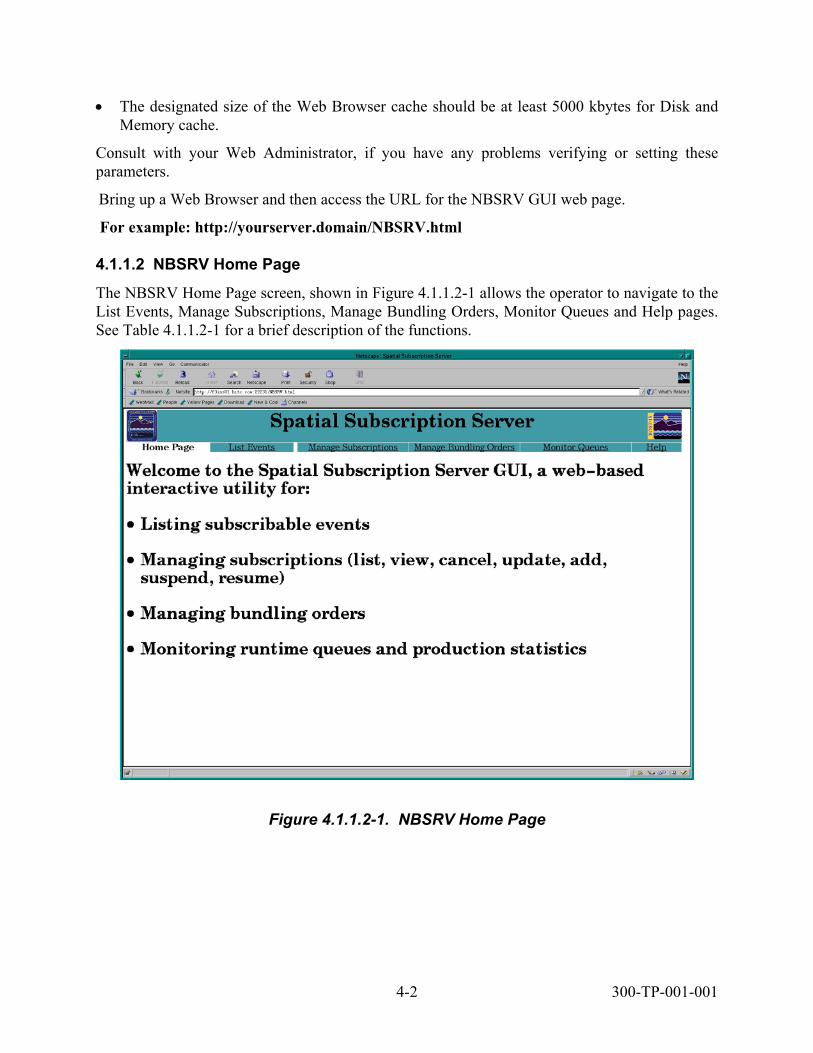
• The designated size of the Web Browser cache should be at least 5000 kbytes for Disk and
Memory cache.
Consult with your Web Administrator, if you have any problems verifying or setting these parameters.
Bring up a Web Browser and then access the URL for the NBSRV GUI web page.
For example: http://yourserver.domain/NBSRV.html
4.1.1.2 NBSRV Home Page The NBSRV Home Page screen, shown in Figure 4.1.1.2-1 allows the operator to navigate to the List Events, Manage Subscriptions, Manage Bundling Orders, Monitor Queues and Help pages. See Table 4.1.1.2-1 for a brief description of the functions.
Figure 4.1.1.2-1. NBSRV Home Page
4-2 300-TP-001-001
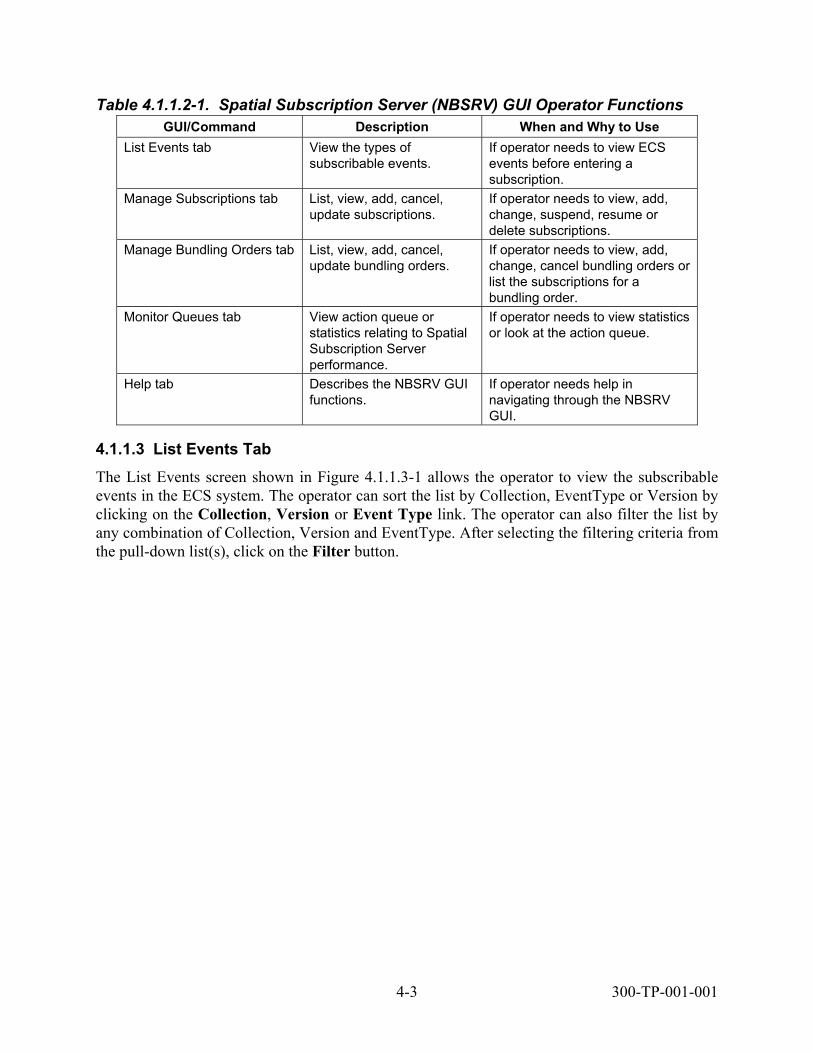
Table 4.1.1.2-1. Spatial Subscription Server (NBSRV) GUI Operator Functions
GUI/Command Description When and Why to Use List Events tab View the types of
subscribable events. If operator needs to view ECS events before entering a subscription.
Manage Subscriptions tab List, view, add, cancel, update subscriptions.
If operator needs to view, add, change, suspend, resume or delete subscriptions.
Manage Bundling Orders tab List, view, add, cancel, update bundling orders.
If operator needs to view, add, change, cancel bundling orders or list the subscriptions for a bundling order.
Monitor Queues tab View action queue or statistics relating to Spatial Subscription Server performance.
If operator needs to view statistics or look at the action queue.
Help tab Describes the NBSRV GUI functions.
If operator needs help in navigating through the NBSRV GUI.
4.1.1.3 List Events Tab The List Events screen shown in Figure 4.1.1.3-1 allows the operator to view the subscribable events in the ECS system. The operator can sort the list by Collection, EventType or Version by clicking on the Collection, Version or Event Type link. The operator can also filter the list by any combination of Collection, Version and EventType. After selecting the filtering criteria from the pull-down list(s), click on the Filter button.
4-3 300-TP-001-001

Figure 4.1.1.3-1. SSS – List Events
4.1.1.4 Manage Subscriptions Tab The Manage Subscriptions screen shown in Figure 4.1.1.4-1 allows the operator to list the subscriptions in the NBSRV database. The list can be sorted by clicking on the Subscription Id, User, Collection, Status, or Expiration Date link. The operator can also filter the list by any combination of User, Collection and Status. After selecting the filtering criteria from the pull-down list(s), click on the Filter button.
The operator can view the contents of a subscription by clicking on the View button associated with that subscription and pressing the Apply button. This will take the operator to the screens shown in Figures 4.1.1.4-2a and 4.1.1.4-2b.
The operator can delete a subscription by clicking on the Delete button associated with that subscription and pressing the Apply button. This will take the operator to the deletion confirmation screen shown in Figure 4.1.1.4-3. If the operator clicks on the Yes button, the screen shown in Figure 4.1.1.4-4 will be displayed. If the operator clicks on the No button, the screen shown in Figure 4.1.1.4-1 will be displayed.
4-4 300-TP-001-001

The operator can update a subscription by clicking on the Update button associated with the subscription and pressing the Apply button. This will take the operator to the screens in Figures 4.1.1.4-5a through 4.1.1.4-5d, followed by screen in Figure 4.1.1.4-6a or 4.1.1.4-6b.
The operator can add a new subscription by clicking on the Add Subscriptions tab. This will take the operator to the screens in Figures 4.1.1.4-7 through 4.1.1.4-13. Tables 4.1.1.4-1 through 4.1.1.4-5 lists the field descriptions for the identified screens used in this activity.
Figure 4.1.1.4-1. Manage Subscriptions: List of All the Subscriptions in the NBSRV Database.
4-5 300-TP-001-001
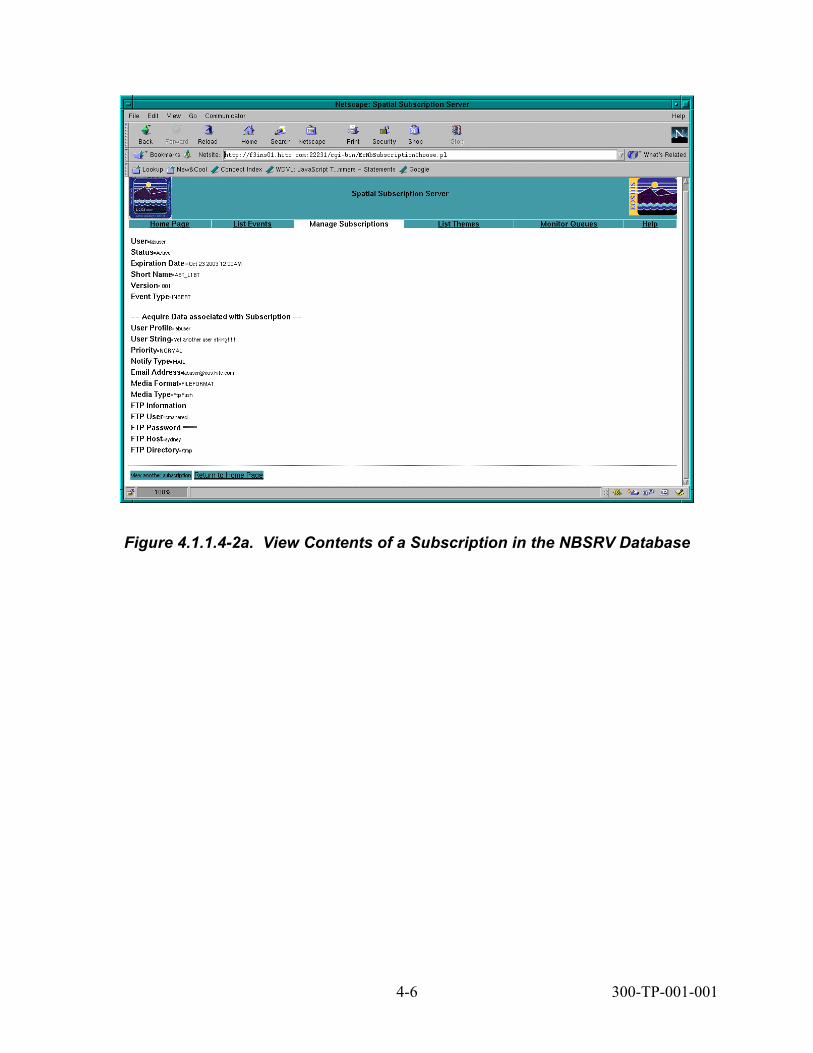
Figure 4.1.1.4-2a. View Contents of a Subscription in the NBSRV Database
4-6 300-TP-001-001
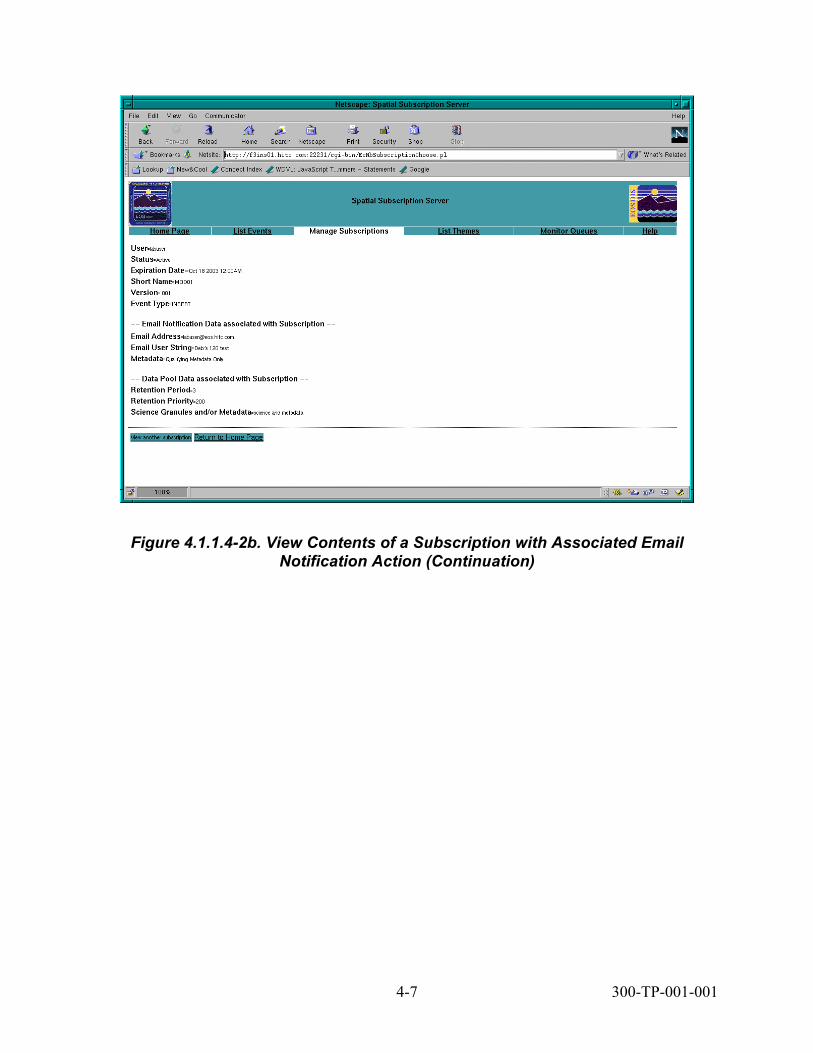
Figure 4.1.1.4-2b. View Contents of a Subscription with Associated Email Notification Action (Continuation)
4-7 300-TP-001-001

Figure 4.1.1.4-3. Delete Subscription Confirmation Request
4-8 300-TP-001-001

Figure 4.1.1.4-4. Delete Subscription Confirmation Acknowledgement
4-9 300-TP-001-001
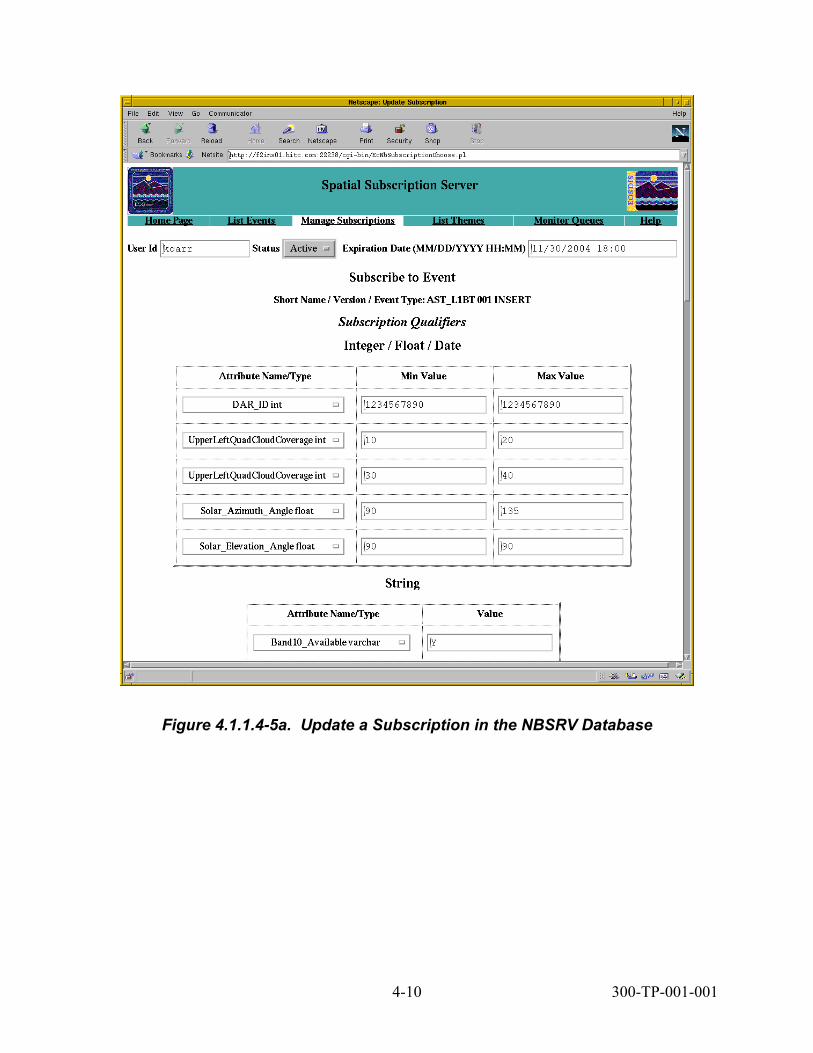
Figure 4.1.1.4-5a. Update a Subscription in the NBSRV Database
4-10 300-TP-001-001

Figure 4.1.1.4-5b. Update a Subscription in the NBSRV Database (Continuation to Add or Modify String or Spatial Qualifiers Associated with an Existing
Subscription)
4-11 300-TP-001-001

Figure 4.1.1.4-5c. Update a Subscription in the NBSRV Database (Continuation to Add or Update Action Information for an Existing Subscription)
4-12 300-TP-001-001

Figure 4.1.1.4-5d. Update a Subscription in the NBSRV Database (Continuation to Update E-Mail Action Information, Data Pool Information, or the Bundling Order
Selection for an Existing Subscription.
Note: The operator must click on the Update Subscription button to initiate the updating of a subscription.
4-13 300-TP-001-001

Figure 4.1.1.4-6a. Update Confirmation Screen ( Confirms Successful or Unsuccessful Updating of the Subscription)
Note: If invalid or missing data is detected for the subscription the errors will be displayed to the operator for correction. If a theme was to be associated with a data pool action, the screen will appear as in Figure 4.1.1.4-6b.
4-14 300-TP-001-001
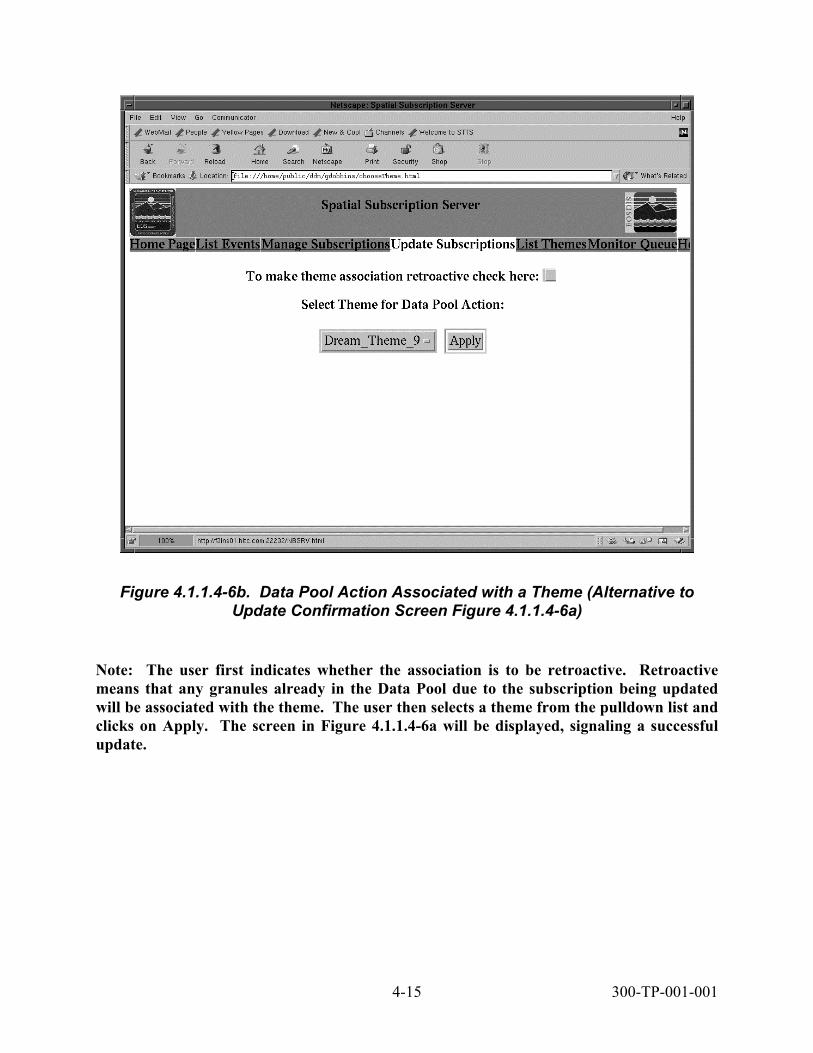
Figure 4.1.1.4-6b. Data Pool Action Associated with a Theme (Alternative to Update Confirmation Screen Figure 4.1.1.4-6a)
Note: The user first indicates whether the association is to be retroactive. Retroactive means that any granules already in the Data Pool due to the subscription being updated will be associated with the theme. The user then selects a theme from the pulldown list and clicks on Apply. The screen in Figure 4.1.1.4-6a will be displayed, signaling a successful update.
4-15 300-TP-001-001

Figure 4.1.1.4-7. Add a New Subscription for a Valid ECS User
4-16 300-TP-001-001
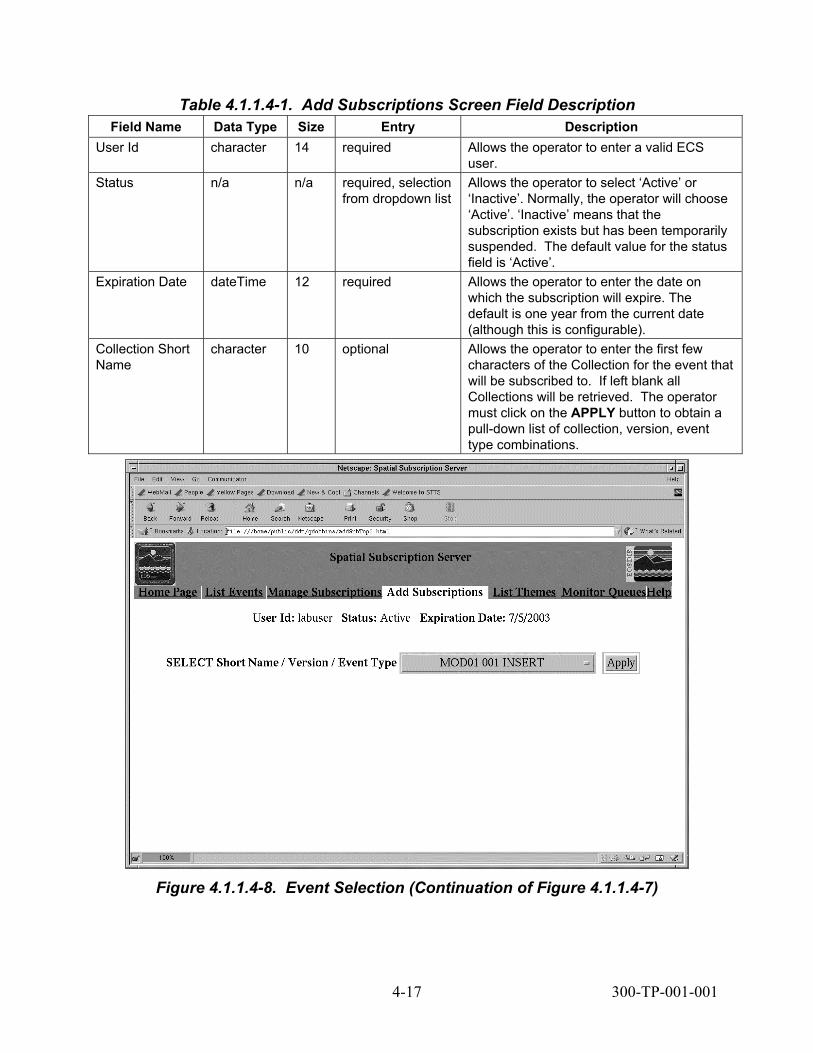
Table 4.1.1.4-1. Add Subscriptions Screen Field Description
Field Name Data Type Size Entry Description User Id character 14 required Allows the operator to enter a valid ECS
user. Status n/a n/a required, selection
from dropdown list Allows the operator to select ‘Active’ or ‘Inactive’. Normally, the operator will choose ‘Active’. ‘Inactive’ means that the subscription exists but has been temporarily suspended. The default value for the status field is ‘Active’.
Expiration Date dateTime 12 required Allows the operator to enter the date on which the subscription will expire. The default is one year from the current date (although this is configurable).
Collection Short Name
character 10 optional Allows the operator to enter the first few characters of the Collection for the event that will be subscribed to. If left blank all Collections will be retrieved. The operator must click on the APPLY button to obtain a pull-down list of collection, version, event type combinations.
Figure 4.1.1.4-8. Event Selection (Continuation of Figure 4.1.1.4-7)
4-17 300-TP-001-001

Note: This screen depicts the operator selecting the ‘MOD01 001 INSERT’ event from the pull-down list.
Figure 4.1.1.4-9. Add Subscription Continuation Information
Note: This screen is displayed after the operator clicks on the Apply button in Figure 4.1.1.4-8. It depicts the operator adding an integer qualifier to the new subscription.
4-18 300-TP-001-001

Table 4.1.1.4-2. Add Subscriptions Screen Field Description (continued)
Field Name Data Type
Size Entry Description
Attribute Name/ Type
n/a n/a optional, selection from dropdown list
Allows the operator to select Integer, Float or date qualifier. Note that only attributes associated with the current collection will be displayed. If the measured Parameter QAPercentCloudCover is valid for the Collection and the operator elects to qualify on it as part of the subscription, a pop-up window will be displayed requesting that the operator enter a valid parameter name for the attribute.
Min Value character 20 optional Allows the operator to enter valid minimum value for the qualifier selected.
Max Value character 20 optional Allows the operator to enter valid maximum value for the qualifier selected. For exact matching, enter the same value for the minimum and maximum.
Figure 4.1.1.4-10. Add Subscription Screen Continuation (Adding String and
Spatial Qualifiers)
4-19 300-TP-001-001
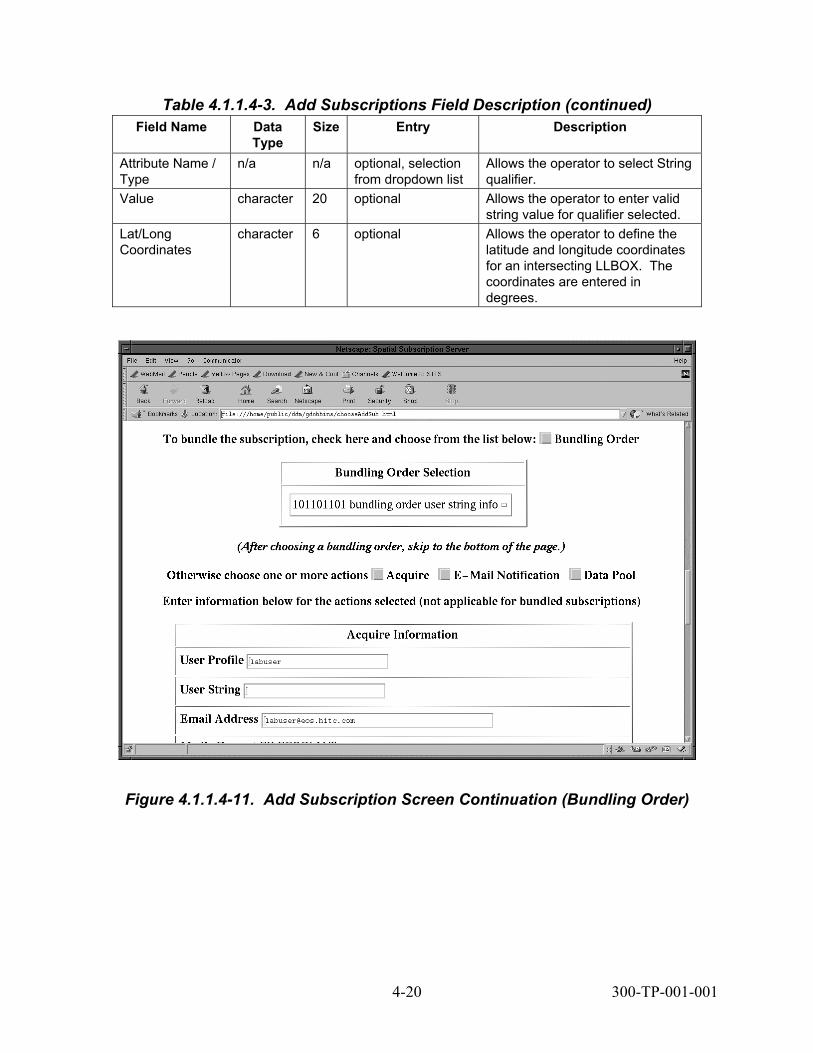
Table 4.1.1.4-3. Add Subscriptions Field Description (continued)
Field Name Data Type
Size Entry Description
Attribute Name / Type
n/a n/a optional, selection from dropdown list
Allows the operator to select String qualifier.
Value character 20 optional Allows the operator to enter valid string value for qualifier selected.
Lat/Long Coordinates
character 6 optional Allows the operator to define the latitude and longitude coordinates for an intersecting LLBOX. The coordinates are entered in degrees.
Figure 4.1.1.4-11. Add Subscription Screen Continuation (Bundling Order)
4-20 300-TP-001-001
Table 4.1.1.4-4. Add Subscriptions Field Description (continued)
Field Name Data Type
Size Entry Description
User Profile character 30 required, for Acquire
This will default to the User Id from the Add Subscriptions form and must correspond to a user profile already entered in the MSS accounting database.
User String character 30 optional, for Acquire
A secondary qualifier used to distinguish this request from others with the same user profile. The user string will appear in the distribution notice.
Email Address character 50 required, for Acquire
The e-mail address used by the Data Distribution to e-mail notification of the acquire. NOTE: a granule will be distributed at most once to a given email address, regardless of the number of matching subscriptions.
Media Format n/a n/a required, for Acquire
The format of the Media. The only default value is FILEFORMAT.
Media Type n/a n/a required, for Acquire
The type of the Media. The valid values are FtpPull and FtpPush. The default value is FtpPush.
Priority n/a n/a required, for Acquire
The distribution priority of the acquire. The valid values are VHIGH, HIGH, NORMAL, LOW, XPRESS. The default priority value is the distribution priority in the user profile of the userid associated with the subscription.
Notify Type n/a n/a required, for Acquire
The method of notification for the acquire. The only default value is MAIL.
FTP User character 30 optional, for Acquire
The Unix login ID of the FTP recipient. Required for FtpPush only.
FTP Password character 16 optional, for Acquire
The Unix password for the FTP recipient. Required for FtpPush only.
FTP Password Verification
character 16 optional, for Acquire
The Unix password verification for the FTP recipient. Required for FtpPush only.
FTP Host character 80 optional, for Acquire
The Unix hostname of the FTP recipient. Required for FtpPush only.
FTP Directory character 80 optional, for Acquire
The pathname of the Unix directory where the acquired files are to be stored. Required for FtpPush only.
4-21 300-TP-001-001

Figure 4.1.1.4-12. Add Subscription Screen Continuation (Information for the E-Mail Notification or Data Pool Actions)
Note: A data pool action may be associated with a theme by clicking the theme box. The theme will be chosen in the next screen. The operator can optionally enter the first few characters of the theme name in order to shorten the list of possibilities. The operator must click on the Add Subscription button to initiate the addition of the subscription to the NBSRV database.
4-22 300-TP-001-001
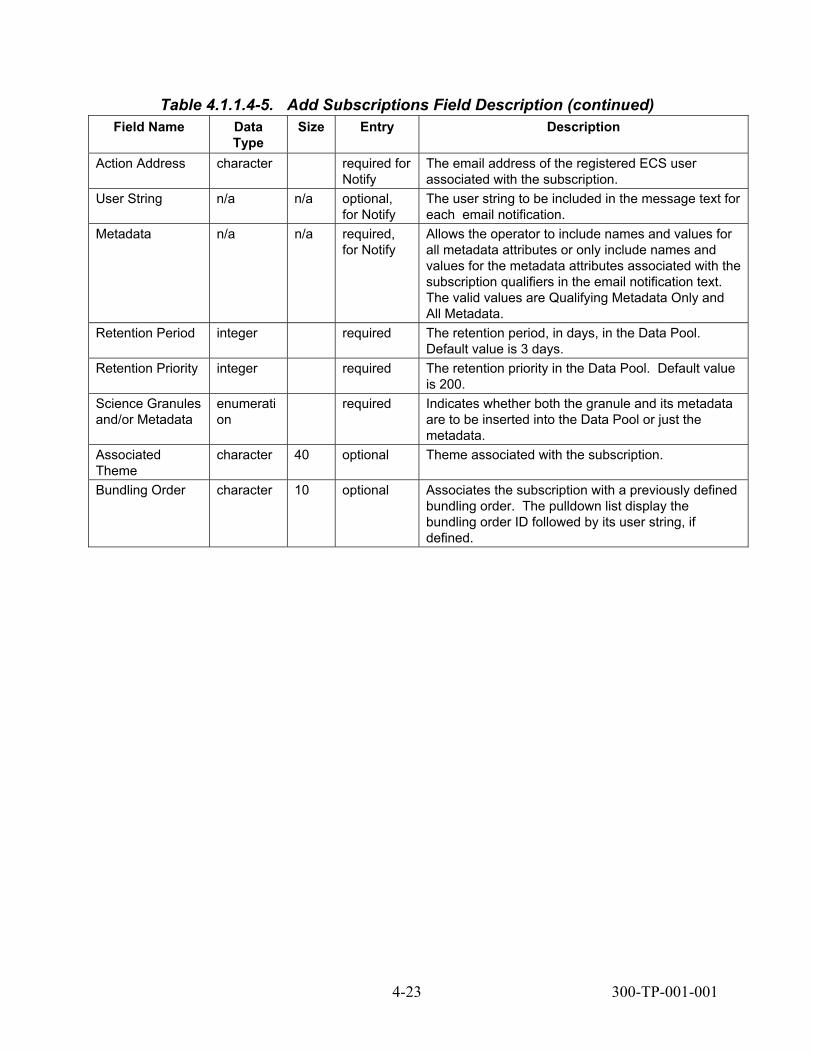
Table 4.1.1.4-5. Add Subscriptions Field Description (continued)
Field Name Data Type
Size Entry Description
Action Address character required for Notify
The email address of the registered ECS user associated with the subscription.
User String n/a n/a optional, for Notify
The user string to be included in the message text for each email notification.
Metadata n/a n/a required, for Notify
Allows the operator to include names and values for all metadata attributes or only include names and values for the metadata attributes associated with the subscription qualifiers in the email notification text. The valid values are Qualifying Metadata Only and All Metadata.
Retention Period integer required The retention period, in days, in the Data Pool. Default value is 3 days.
Retention Priority integer required The retention priority in the Data Pool. Default value is 200.
Science Granules and/or Metadata
enumeration
required Indicates whether both the granule and its metadata are to be inserted into the Data Pool or just the metadata.
Associated Theme
character 40 optional Theme associated with the subscription.
Bundling Order character 10 optional Associates the subscription with a previously defined bundling order. The pulldown list display the bundling order ID followed by its user string, if defined.
4-23 300-TP-001-001
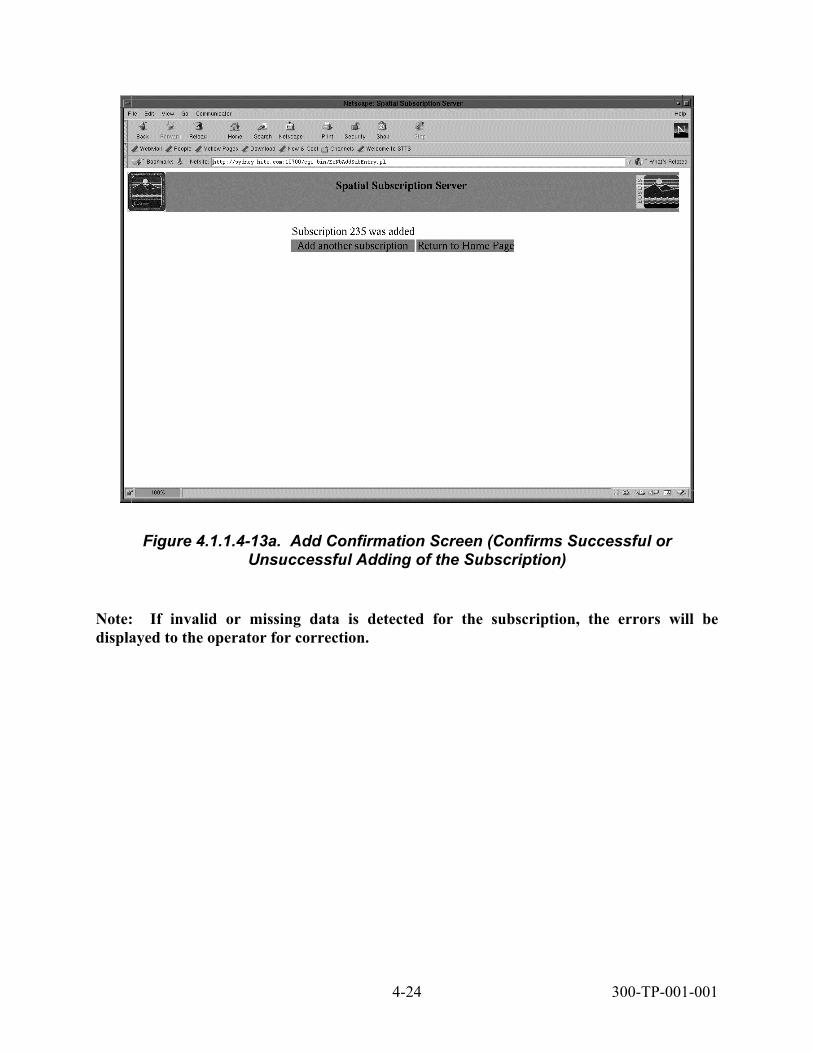
Figure 4.1.1.4-13a. Add Confirmation Screen (Confirms Successful or Unsuccessful Adding of the Subscription)
Note: If invalid or missing data is detected for the subscription, the errors will be displayed to the operator for correction.
4-24 300-TP-001-001

Figure 4.1.1.4-13b. Data Pool Action Associated with a Theme (Alternative to Add Confirmation Screen Figure 4.1.1.4-13a)
Note: The operator selects a theme name from the pulldown list and clicks on the Apply button. Confirmation that the subscription was successfully added appears as in Figure 4.1.1.4-13a. NOTE: The subscription is actually created prior to displaying this screen, and the association of the theme with the subscription is implemented as an update operation.
4.1.1.5 List Themes Tab
The List Themes screen, called from Monitor Subscriptions and shown in Figure 4.1.1.5-1 allows the operator to see a list of known themes which are enabled for insert. Table 4.1.1.5-1 lists the field descriptions for the List Themes Request screen.
4-25 300-TP-001-001

Figure 4.1.1.5-1. List Themes Screen Request
Note: The list may be filtered by entering the first few characters of the theme name.
4-26 300-TP-001-001

Figure 4.1.1.5-2. Theme List and Associated Action
Note: This screen allows the operator to see the list of themes enabled for insert and to view the list of subscriptions associated with a particular theme.
Table 4.1.1.5-1. Theme List Field Description Field Name Data
Type Size Entry Description
Choose Theme Action
checkbox 1 optional To view the subscriptions associated with a particular theme, check the box and click on Apply.
Continue link n/a optional To continue viewing the list of theme names, click on the continue link.
4-27 300-TP-001-001

4.1.1.6 List Subscriptions box The List Subscriptions for Theme screen, called from List Themes and shown in Figure 4.1.1.6-1 allows the operator to see a list of subscriptions associated with a particular theme.
Figure 4.1.1.6-1. Theme and Associated Subscriptions
Note: This screen allows the operator to see the list of subscriptions associated with a particular theme and to select one of them for view, update, or cancel. The operator also has the option to suspend, resume, or cancel all subscriptions by clicking on the appropriate link.
4.1.1.7 Manage Bundling Orders tab The Manage Bundling Orders screen shown in Figure 4.1.1.7-1 allows the operator to view, update, or cancel bundling orders or to create new bundling orders. The operator can also list the subscriptions associated with a particular bundling order.
4-28 300-TP-001-001

Figure 4.1.1.7-1. Bundling Orders List
Note: This screen allows the operator to view previously defined bundling orders; to view, update, or cancel a particular bundling order; or to list the subscriptions associated with a particular bundling order.
4-29 300-TP-001-001
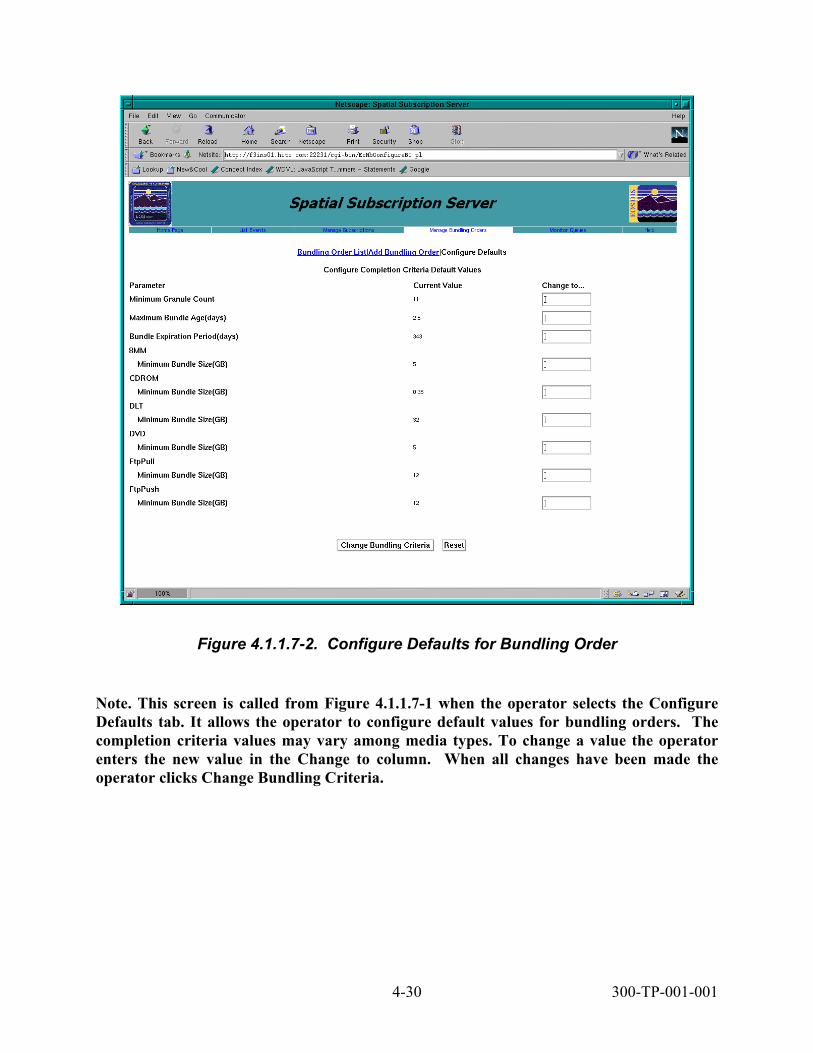
Figure 4.1.1.7-2. Configure Defaults for Bundling Order
Note. This screen is called from Figure 4.1.1.7-1 when the operator selects the Configure Defaults tab. It allows the operator to configure default values for bundling orders. The completion criteria values may vary among media types. To change a value the operator enters the new value in the Change to column. When all changes have been made the operator clicks Change Bundling Criteria.
4-30 300-TP-001-001
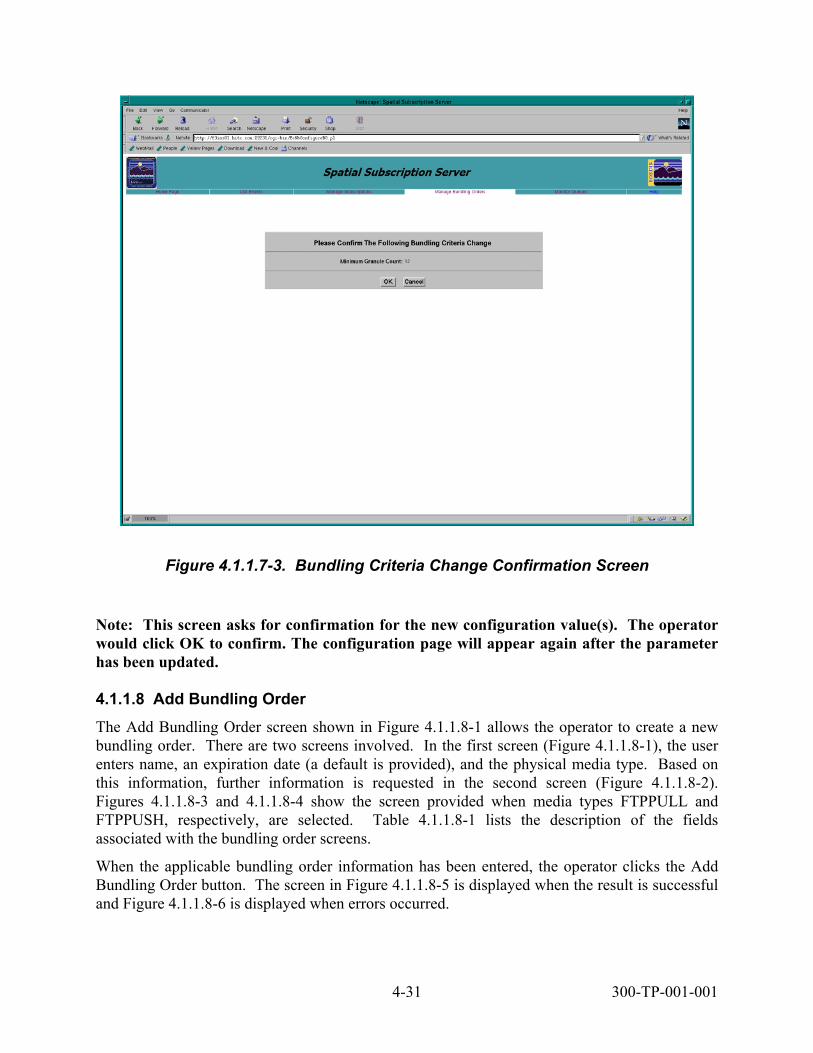
Figure 4.1.1.7-3. Bundling Criteria Change Confirmation Screen
Note: This screen asks for confirmation for the new configuration value(s). The operator would click OK to confirm. The configuration page will appear again after the parameter has been updated.
4.1.1.8 Add Bundling Order The Add Bundling Order screen shown in Figure 4.1.1.8-1 allows the operator to create a new bundling order. There are two screens involved. In the first screen (Figure 4.1.1.8-1), the user enters name, an expiration date (a default is provided), and the physical media type. Based on this information, further information is requested in the second screen (Figure 4.1.1.8-2). Figures 4.1.1.8-3 and 4.1.1.8-4 show the screen provided when media types FTPPULL and FTPPUSH, respectively, are selected. Table 4.1.1.8-1 lists the description of the fields associated with the bundling order screens.
When the applicable bundling order information has been entered, the operator clicks the Add Bundling Order button. The screen in Figure 4.1.1.8-5 is displayed when the result is successful and Figure 4.1.1.8-6 is displayed when errors occurred.
4-31 300-TP-001-001
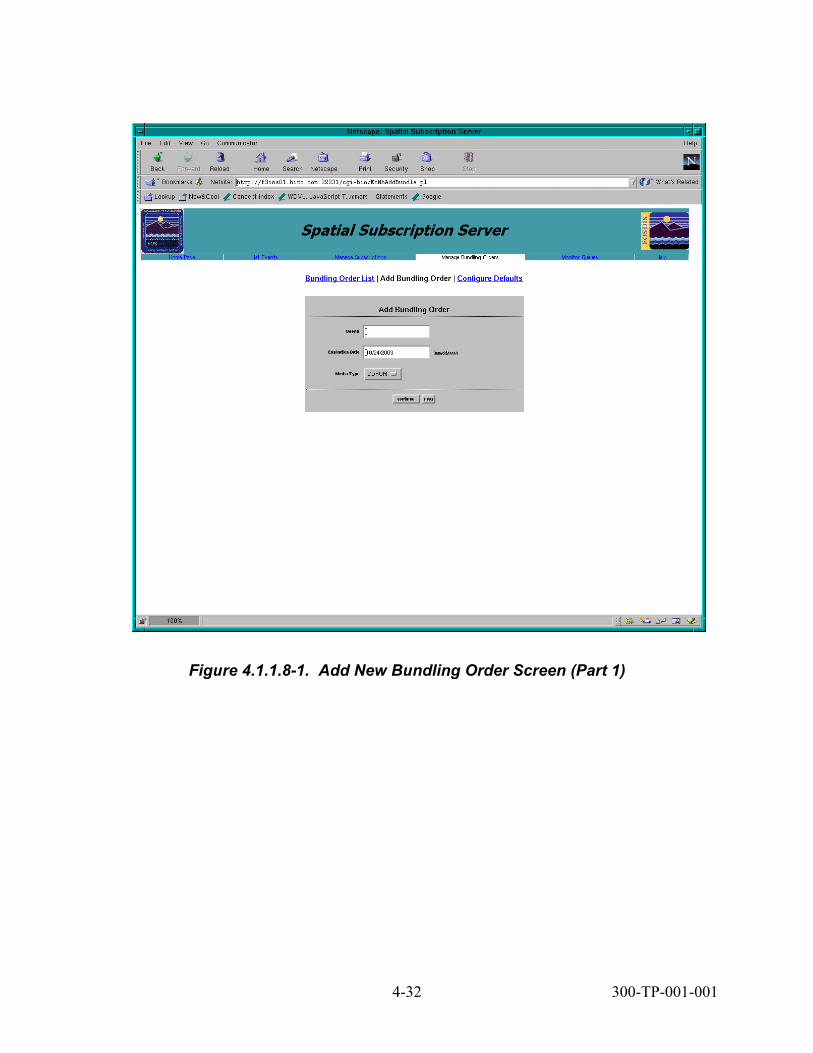
Figure 4.1.1.8-1. Add New Bundling Order Screen (Part 1)
4-32 300-TP-001-001

Figure 4.1.1.8-2. Add New Bundling Order Screen (Part 2)
Note: Information entered in the previous screen is used to provide options in the current screen. For example, for a physical media type, shipping information will be displayed.
4-33 300-TP-001-001
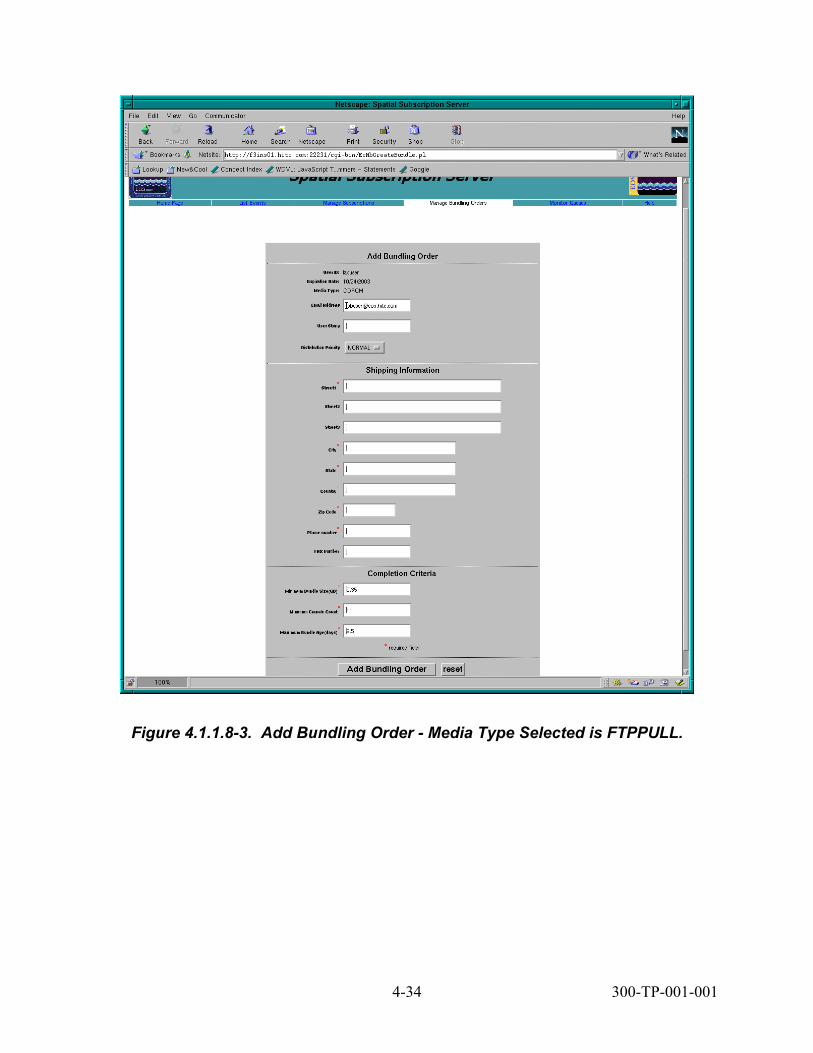
Figure 4.1.1.8-3. Add Bundling Order - Media Type Selected is FTPPULL.
4-34 300-TP-001-001

Figure 4.1.1.8-4. Add Bundling Order - Media Type Selected is FTPPUSH.
4-35 300-TP-001-001
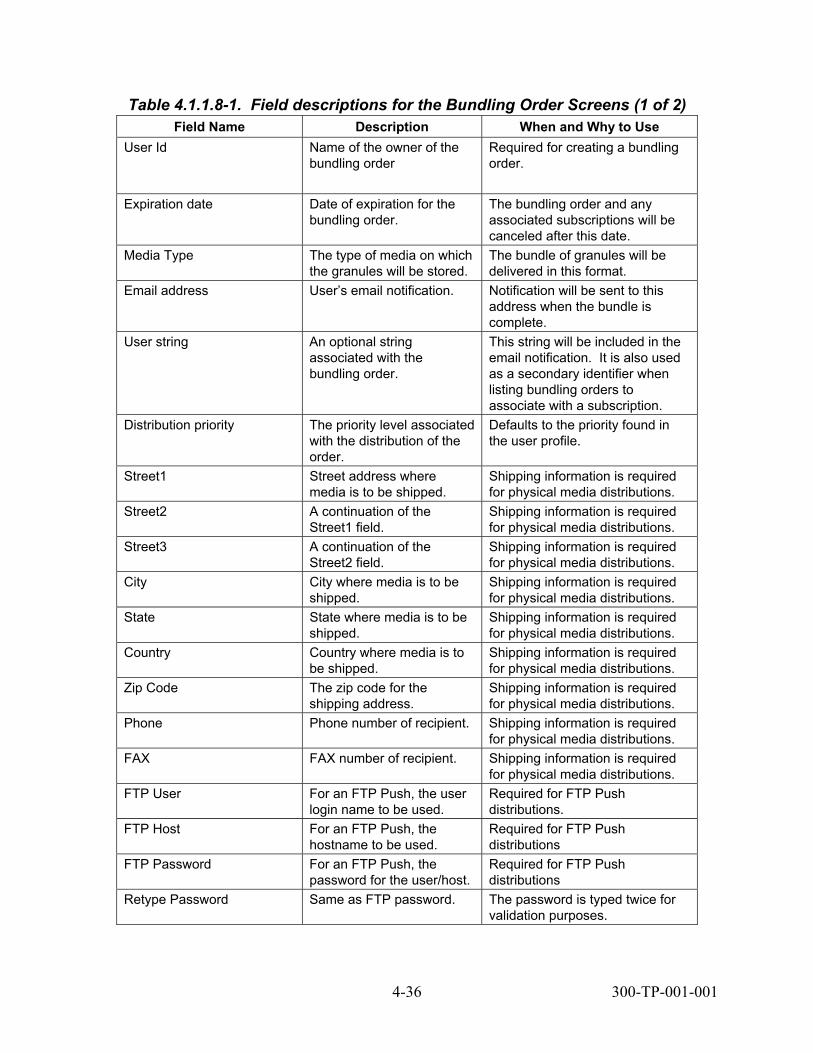
Table 4.1.1.8-1. Field descriptions for the Bundling Order Screens (1 of 2)
Field Name Description When and Why to Use User Id
Name of the owner of the bundling order
Required for creating a bundling order.
Expiration date Date of expiration for the bundling order.
The bundling order and any associated subscriptions will be canceled after this date.
Media Type The type of media on which the granules will be stored.
The bundle of granules will be delivered in this format.
Email address User’s email notification. Notification will be sent to this address when the bundle is complete.
User string An optional string associated with the bundling order.
This string will be included in the email notification. It is also used as a secondary identifier when listing bundling orders to associate with a subscription.
Distribution priority The priority level associated with the distribution of the order.
Defaults to the priority found in the user profile.
Street1 Street address where media is to be shipped.
Shipping information is required for physical media distributions.
Street2 A continuation of the Street1 field.
Shipping information is required for physical media distributions.
Street3 A continuation of the Street2 field.
Shipping information is required for physical media distributions.
City City where media is to be shipped.
Shipping information is required for physical media distributions.
State State where media is to be shipped.
Shipping information is required for physical media distributions.
Country Country where media is to be shipped.
Shipping information is required for physical media distributions.
Zip Code The zip code for the shipping address.
Shipping information is required for physical media distributions.
Phone Phone number of recipient. Shipping information is required for physical media distributions.
FAX FAX number of recipient. Shipping information is required for physical media distributions.
FTP User For an FTP Push, the user login name to be used.
Required for FTP Push distributions.
FTP Host For an FTP Push, the hostname to be used.
Required for FTP Push distributions
FTP Password For an FTP Push, the password for the user/host.
Required for FTP Push distributions
Retype Password Same as FTP password. The password is typed twice for validation purposes.
4-36 300-TP-001-001

Table 4.1.1.8-1. Field descriptions for the Bundling Order Screens (2 of 2)
Field Name Description When and Why to Use FTP Directory For an FTP Push, the
directory on the host where the data is to be pushed.
Required for FTP Push distributions
Minimum Bundle Size The minimum total size of all granules before the bundle can be considered complete.
See the Order Manager design documentation for further details.
Minimum Granule Count The minimum number of individual granules before the bundle can be considered complete.
See the Order Manager design documentation for further details
Maximum Bundle Age The maximum length of time that any granule can remain in the bundle before the bundle is considered complete.
See the Order Manager design documentation for further details
4-37 300-TP-001-001
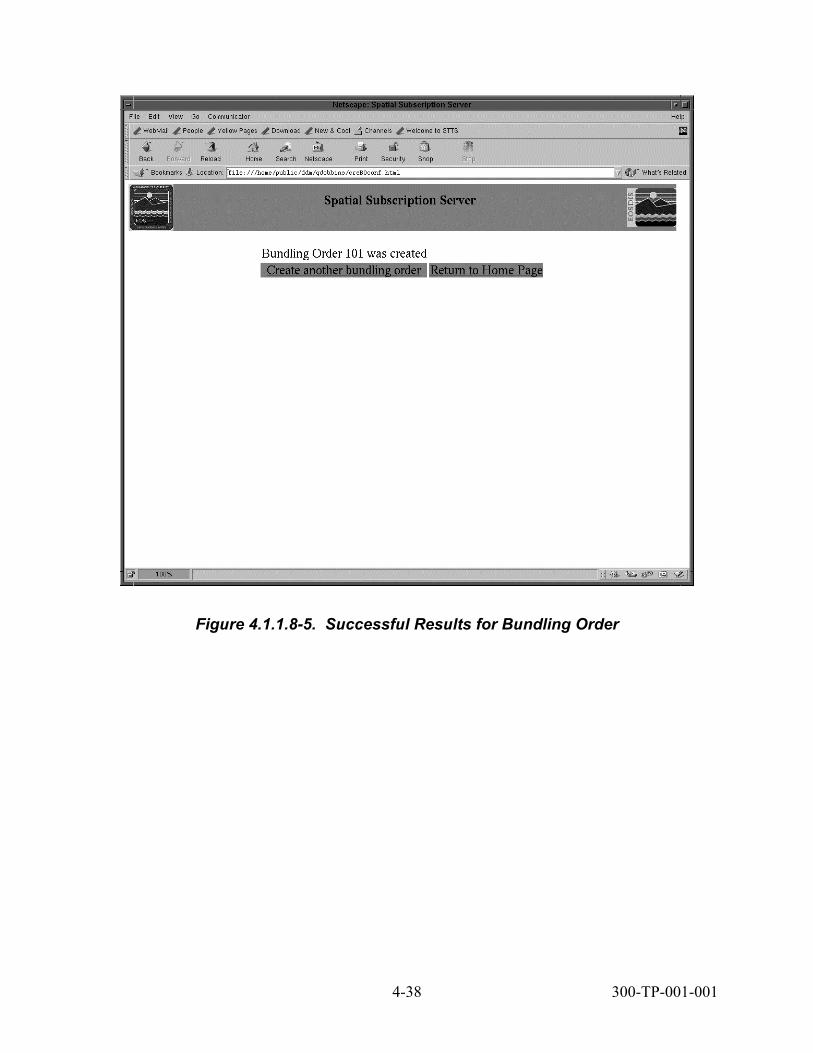
Figure 4.1.1.8-5. Successful Results for Bundling Order
4-38 300-TP-001-001

Figure 4.1.1.8-6. Unsuccessful Results for Bundling Order Screen
4.1.1.9 View Bundling Order The View Bundling Order screen shown in Figure 4.1.1.9-1 allows the operator to view the details of a particular bundling order.
4-39 300-TP-001-001

Figure 4.1.1.9-1. Bundling Order Detailed Information
Note: From this screen, the operator may choose to return to the list of bundling orders.
4.1.1.10 Update Bundling Order The Update Bundling Order screen shown in Figure 4.1.1.10-1 allows the operator to update an existing bundling order. There are two screens involved. In the first screen (Figure 4.1.1.10-1), the user selects the physical media type for the order selected. Based on the media type, a second screen is displayed (Figure 4.1.1.10-2). Figures 4.1.1.10-3 and 4.1.1.10-4 show the
4-40 300-TP-001-001

specific screen provided when media types FTPPULL and FTPPUSH, respectively, are identified
When the applicable update bundling order information has been entered, the operator clicks the Update Bundling Order button. The screen in Figure 4.1.1.10-5 is displayed when the result is successful and Figure 4.1.1.10-6 is displayed when errors occurred.
Figure 4.1.1.10-1. Update Existing Bundling Order (Part 1)
4-41 300-TP-001-001

Figure 4.1.1.10-2. Update Existing Bundling Order (Part 2)
4-42 300-TP-001-001

Figure 4.1.1.10-3. Update Existing Bundling Order (Media Type is FTP PULL)
4-43 300-TP-001-001
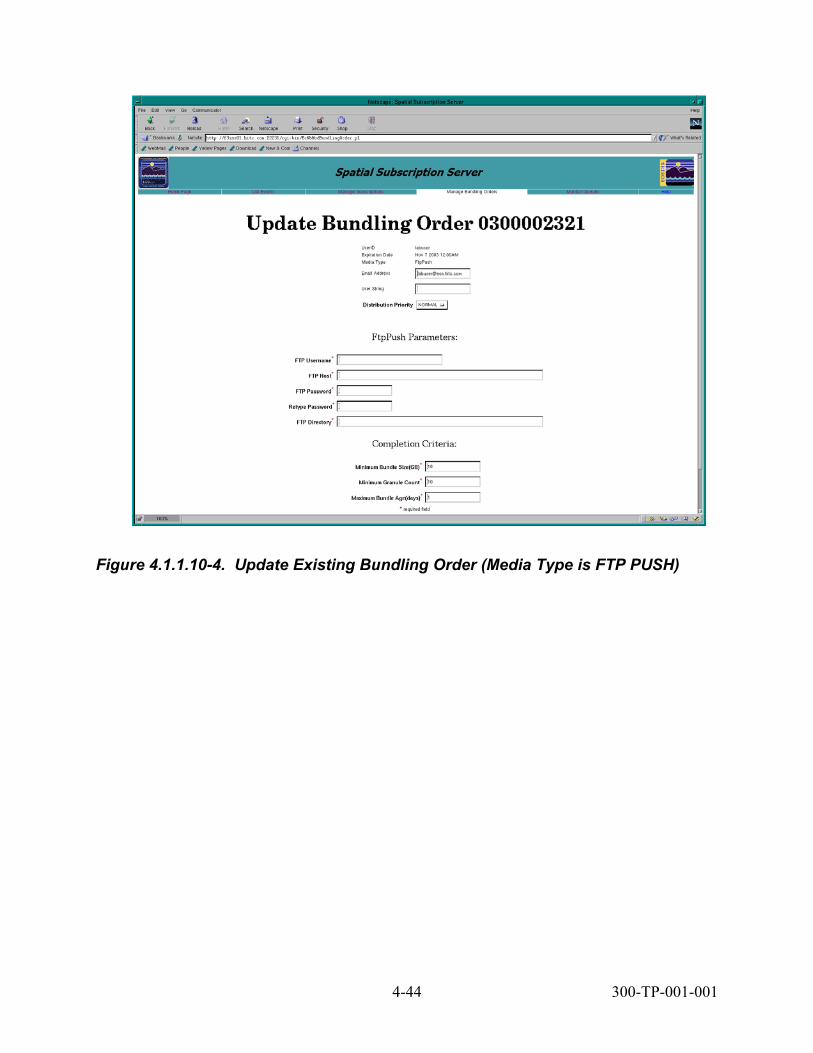
Figure 4.1.1.10-4. Update Existing Bundling Order (Media Type is FTP PUSH)
4-44 300-TP-001-001

Figure 4.1.1.10-5. Update Existing Bundling Order (Successful Update)
Figure 4.1.1.10-6. Update Existing Bundling Order (Unsuccessful Update)
4-45 300-TP-001-001

4.1.1.11 Cancel Bundling Order The Cancel Bundling Order screen shown in Figure 4.1.1.11-1 requests confirmation from the operator when the cancel option has been selected. If the operator selects Yes, the screen in Figure 4.1.1.11-2 is displayed if the cancellation was successful and Figure 4.1.1.11-3 is displayed if the cancellation is unsuccessful.
Figure 4.1.1.11-1. Cancel Bundling Order Request
4-46 300-TP-001-001
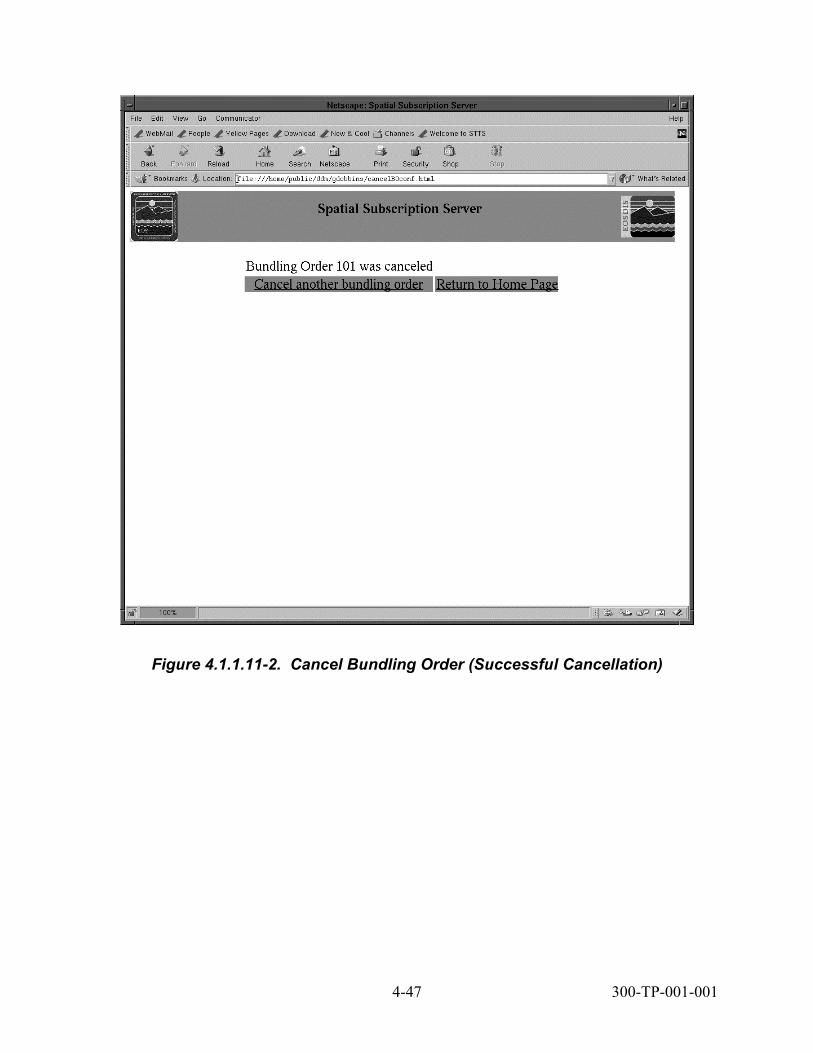
Figure 4.1.1.11-2. Cancel Bundling Order (Successful Cancellation)
4-47 300-TP-001-001

Figure 4.1.1.11-3. Cancel Bundling Order (Unsuccessful Cancellation)
4.1.1.12 Monitor Queues tab
When the operator selects the Monitor Queues tab, the List Action Queue page (see Section 4.1.1.13) will be displayed by default. From this page, the operator can view production statistics by selecting the List Statistics tab.
4.1.1.13 List Action Queue tab
The List Action Queue screen shown in Figure 4.1.1.13-1 allows the operator to view the Acquire and E-Mail Notification actions that are being processed. The operator can sort the list by Action Type and Subscription Id by clicking on the Action Type or Subscription Id link.
4-48 300-TP-001-001

The operator can also filter the list by any combination of Action Type, Subscription and Status. After selecting the filtering criteria from the pull-down list(s), click on the Filter button.
Figure 4.1.1.13-1. List Action Queue (Acquire and E-mail Notifications)
4.1.1.14 List Statistics tab The List Statistics screen shown in Figure 4.1.1.14-1 allows the operator to view the statistics relating to subscribed events and matched subscriptions. Note that the statistics are based only on data in the NBSRV database at the time the GUI page is displayed. The subscription statistics are retained in the NBSRV database only until they are cleaned up by the Deletion Driver. The Deletion Driver runs periodically at an interval specified in its configuration parameters.
4-49 300-TP-001-001
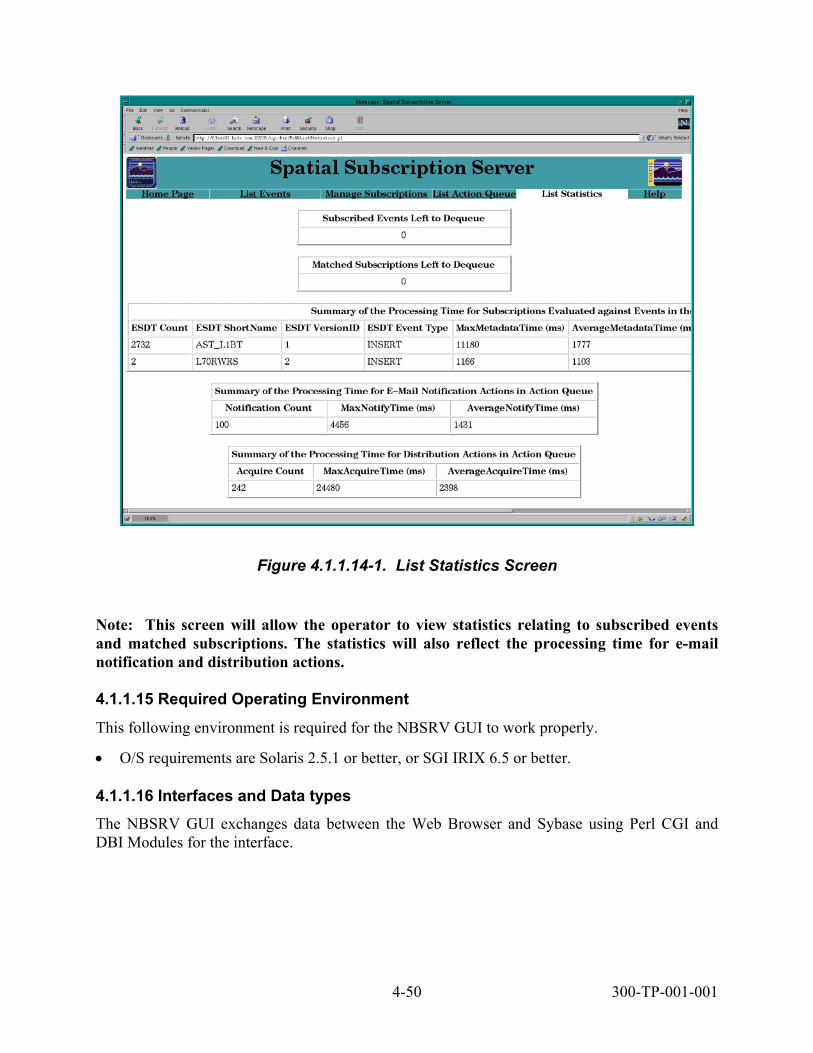
Figure 4.1.1.14-1. List Statistics Screen
Note: This screen will allow the operator to view statistics relating to subscribed events and matched subscriptions. The statistics will also reflect the processing time for e-mail notification and distribution actions.
4.1.1.15 Required Operating Environment This following environment is required for the NBSRV GUI to work properly.
• O/S requirements are Solaris 2.5.1 or better, or SGI IRIX 6.5 or better.
4.1.1.16 Interfaces and Data types The NBSRV GUI exchanges data between the Web Browser and Sybase using Perl CGI and DBI Modules for the interface.
4-50 300-TP-001-001

4.1.1.17 Databases The NBSRV GUI accesses the NBSRV, ScienceDataServer, DDict and MSS Accountability databases.
4.1.1.18 Special Constraints There are no special constraints to running the NBSRV GUI.
4.1.1.19 Outputs
There are no outputs from the NBSRV GUI except for status and error messages.
4.1.1.20 Events and Messages The NBSRV GUI issues client side validation errors when adding or modifying a subscription. If the operator does not correct the validation errors the subscription will be rejected when the operator attempts to add or update the subscription. The NBSRV GUI writes status and error messages to the EcNbGUI.log file in the directory /usr/ecs/<MODE>/CUSTOM/logs.
4.1.1.21 Reports The NBSRV GUI does not generate reports.
4.2 SSS Command Line Interface The SSS Command Line Interface (CLI) allows the user to add a new subscription, delete a subscription, update a subscription, or view a subscription without using a GUI. Details of the subscription are contained in a text file.
The CLI will be installed in the utilities directory for each mode. You must go to the appropriate mode directory in order to access the correct database for a particular mode. To execute the CLI, run the script EcNbSubscriptionCLIStart. This script takes three parameters: (1) the mode, (2) the function (Add, Delete, Update, View), (3) a third parameter which depends on the function in (2). If the function selected was Delete or View, then the third parameter must be the subscription number to be deleted or viewed. If the function selected was Add or Update, the third parameter must be the name of the text file containing the subscription information. This file will be assumed to reside in the current directory unless expressed as a qualified pathname.
Examples:
EcNbSubscriptionCLIStart OPS Add MyNewSubscription.txt
EcNbSubscriptionCLIStart TS1 Delete 5199
EcNbSubscriptionCLIStart TS2 Update /home/daacUser/MyOldSubscription.txt
4-51 300-TP-001-001

EcNbSubscriptionCLIStart OPS View 2355
Notes:
(1) When adding a subscription, a new subscription number will be assigned and returned as output to stdout.
(2) When deleting a subscription, the user will be prompted to confirm the delete.
(3) When updating a subscription, the number of the subscription to be updated must appear within the text file containing the subscription data.
(4) When viewing a subscription, the output will appear in a new file called sub.nnn.txt, where nnn refers to the subscription number. This file will be created in the current directory.
(5) To save on typing when adding a subscription, it will be helpful to start by viewing a subscription similar to the one to being added, edit the resulting text file, and then submit that file as input to the Add command.
(6) Prior to updating a subscription, always view the subscription first and then make your changes in the resulting text file, submitting it as input to the Update command.
(7) Physical media distributions for subscriptions are now supported through the use of bundling orders. The simplest way to do this is to create a bundling order via the GUI and then “bundle” the subscription by specifying the bundling order ID (see table below). Alternatively, if a bundling order ID is not specified for a physical media distribution, a bundling order will automatically be created for the subscription; however, in this case, all of the required information for the bundling order (such as shipping information) must be specified in the input file for the subscription.
(8) If the user updates a bundled subscription without altering the bundling order ID, the bundling order will be updated along with the subscription.
There is a log file called EcNbSubscriptionCLI.log in the logs directory for each mode. If your command did not appear to succeed, be sure to check the log file to see what went wrong.
The text file generated by the View command, or used as input to the Add or Update commands, consists of several lines of name and values pairs of the form “NAME=value”, one per line. If you wish to introduce comments into your text file, you may do so by starting the line for the comment with the # character.
Table 4.2-1 shows all possibilities for rows in the text file. This table is intended for reference only. If you have never entered a subscription before, it is recommended that you start by entering a few subscriptions using the GUI. Then use the View command of the CLI to generate text files for these subscriptions. Modify these text files to serve as input for adding or updating subscriptions.
4-52 300-TP-001-001

Table 4.2-1. Text File Contents (1 of 4)
Name Type Mandatory Description SUBSCRIPTION int Yes for
Update or View; ignored by Add
The subscription number.
USERNAME varchar Yes The name of the owner of the subscription. A user profile must already exist for the owner.
STATUS varchar Yes The subscription status: Active or Inactive. EXPIRATION datetime No (will
default to one year from the current date if not specified)
The expiration date for the subscription.
ESDT_SHORT_NAME varchar Yes The short name for the ESDT being subscribed to.
ESDT_VERSION int Yes The version for the ESDT being subscribed to (e.g. 1, if version ID is 001).
EVENT_TYPE varchar Yes The type of event being subscribed to: INSERT, DELETE, or UPDATEMETADATA.
NOTE: The next four lines should appear as a block in the text file. Up to five such blocks may be used.
ATTRIBUTE_NAME varchar No The name of a qualifying numeric attribute. Use this only for attributes of type int, float, or datetime.
ATTRIBUTE_TYPE varchar No The type of a qualifying attribute: int, float, or datetime.
ATTRIBUTE_MIN_VALUE int, float, or datetime
No The smallest acceptable value for this attribute.
ATTRIBUTE_MAX_VALUE
int, float, or datetime
No The largest acceptable value for this attribute.
NOTE: The next three lines should appear as a block in the text file. Up to five such blocks may be used.
STRING_ATTRIBUTE_NAME
varchar No The name of a qualifying string attribute.
STRING_ATTRIBUTE_TYPE
varchar No This will always be ‘varchar’.
STRING_ATTRIBUTE_VALUE
varchar No The value that this attribute must have in order to qualify.
4-53 300-TP-001-001

Table 4.2-1. Text File Contents (2 of 4)
Name Type Mandatory Description NOTE: The next six lines should appear as a block in the text file. Only one such block may be used.
SPATIAL_ATTRIBUTE_NAME
varchar No The name of a qualifying spatial attribute: GPolygonContainer, BoundingRectangle, or Nose.
SPATIAL_ATTRIBUTE_TYPE
varchar No The type of a qualifying spatial attribute: gpolygon, llbox, or PathBlock, respectively.
SPATIAL_VALUE_SOUTH
float No The lower latitude value for the qualifying rectangle.
SPATIAL_VALUE_WEST float No The lower longitude value for the qualifying rectangle.
SPATIAL_VALUE_NORTH
float No The upper latitude value for the qualifying rectangle.
SPATIAL_VALUE_EAST float No The upper longitude value for the qualifying rectangle.
NOTIFY_EMAIL_ADDRESS
varchar No The email address of the recipient if email notification is desired.
NOTIFY_USER_STRING varchar No An optional user string to be included in the email.
NOTIFY_METADATA char No Indicates whether the email should include all metadata (Y) or just metadata associated with the subscription qualifiers (N).
ACQUIRE_USERNAME varchar No The user profile name requesting an acquire.
ACQUIRE_USERSTRING varchar No An optional string to be included in the distribution notice.
ACQUIRE_EMAIL_ADDRESS
varchar No The email address for acquire notification. This will default to the email address in the user profile if not specified here.
ACQUIRE_MEDIA_FORMAT
varchar No At present, this value should always be FILEFORMAT,
ACQUIRE_MEDIA_TYPE varchar No The type of acquire: FtpPush or FtpPull. ACQUIRE_PRIORITY varchar No The distribution priority: VHIGH, HIGH,
NORMAL, LOW, or XPRESS. This will default to the distribution priority in the user profile if not specified here.
ACQUIRE_NOTIFY_TYPE
varchar No At present, this should always be MAIL.
ACQUIRE_FTP_USER varchar No The FTP login name for an FTP push operation.
ACQUIRE_FTP_PASSWORD
varchar No The FTP password for an FTP push operation.
ACQUIRE_FTP_HOST varchar No The destination hostname for an FTP push operation.
4-54 300-TP-001-001
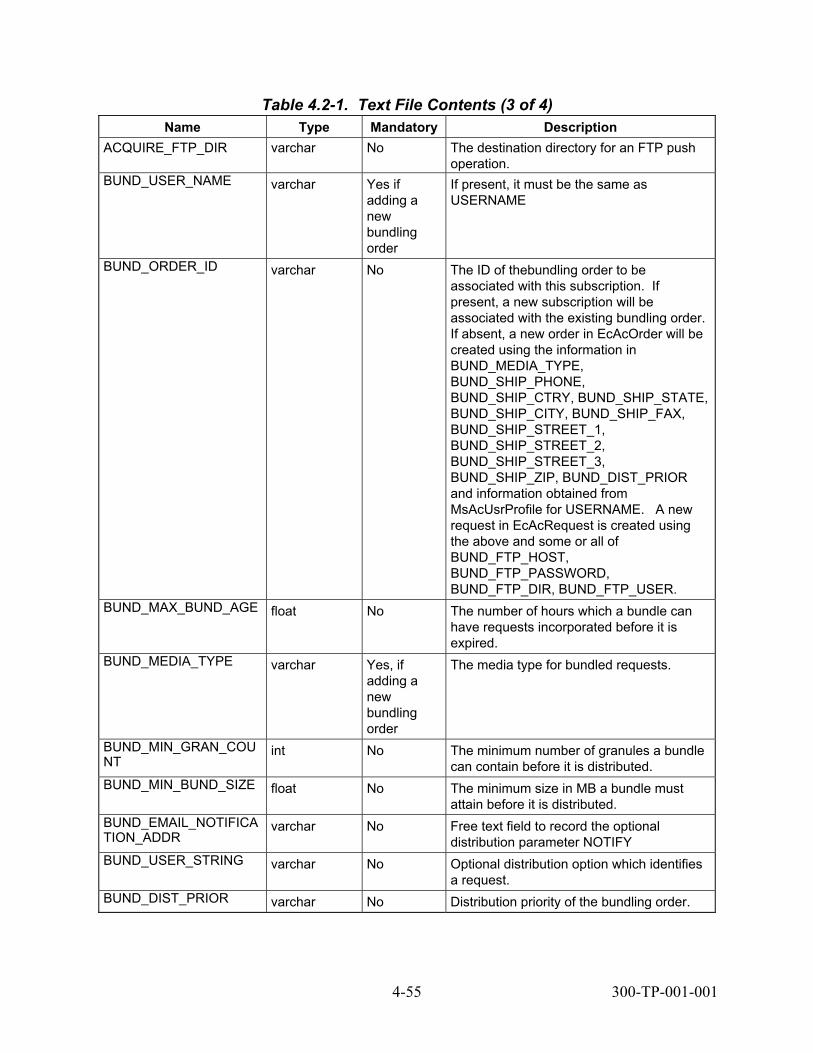
Table 4.2-1. Text File Contents (3 of 4)
Name Type Mandatory Description ACQUIRE_FTP_DIR varchar No The destination directory for an FTP push
operation. BUND_USER_NAME varchar Yes if
adding a new bundling order
If present, it must be the same as USERNAME
BUND_ORDER_ID varchar No The ID of thebundling order to be associated with this subscription. If present, a new subscription will be associated with the existing bundling order. If absent, a new order in EcAcOrder will be created using the information in BUND_MEDIA_TYPE, BUND_SHIP_PHONE, BUND_SHIP_CTRY, BUND_SHIP_STATE, BUND_SHIP_CITY, BUND_SHIP_FAX, BUND_SHIP_STREET_1, BUND_SHIP_STREET_2, BUND_SHIP_STREET_3, BUND_SHIP_ZIP, BUND_DIST_PRIOR and information obtained from MsAcUsrProfile for USERNAME. A new request in EcAcRequest is created using the above and some or all of BUND_FTP_HOST, BUND_FTP_PASSWORD, BUND_FTP_DIR, BUND_FTP_USER.
BUND_MAX_BUND_AGE float No The number of hours which a bundle can have requests incorporated before it is expired.
BUND_MEDIA_TYPE varchar Yes, if adding a new bundling order
The media type for bundled requests.
BUND_MIN_GRAN_COUNT
int No The minimum number of granules a bundle can contain before it is distributed.
BUND_MIN_BUND_SIZE float No The minimum size in MB a bundle must attain before it is distributed.
BUND_EMAIL_NOTIFICATION_ADDR
varchar No Free text field to record the optional distribution parameter NOTIFY
BUND_USER_STRING varchar No Optional distribution option which identifies a request.
BUND_DIST_PRIOR varchar No Distribution priority of the bundling order.
4-55 300-TP-001-001

Table 4.2-1. Text File Contents (4 of 4)
Name Type Mandatory Description BUND_FTP_HOST varchar No The destination hostname for an FTP push
operation. BUND_FTP_PASSWORD varchar No The FTP password for an FTP push
operation. BUND_FTP_DIR varchar No The destination directory for an FTP push
operation. BUND_FTP_USER varchar No The FTP login name for an FTP push
operation. BUND_SHIP_PHONE varchar No The phone number for the user requesting
the order. BUND_SHIP_CTRY varchar No The country that the order should be
shipped to. BUND_SHIP_STATE varchar No The state that the order should be shipped
to. BUND_SHIP_CITY varchar No The city that the order should be shipped to.BUND_SHIP_FAX varchar No The fax number for the user requesting the
order. BUND_SHIP_STREET_1 varchar No The street address to which the order
should shipped. BUND_SHIP_STREET_2 varchar No The street address to which the order
should shipped. BUND_SHIP_STREET_3 varchar No The street address to which the order
should shipped. BUND_SHIP_ZIP varchar No The zip code of address to which the order
should be shipped.
4-56 300-TP-001-001

5. Bulk Metadata Generation Tool (Enhancement)
5.1 ECHO Access to Data Pool The EcOsBulkURL Utility allows operators to make available the ftp URLs in the Data Pool to the ECS Clearing House (ECHO). These ftp URLs correspond to the products that have already been exported at some prior time by the BulkMetaGenerator tool (BMGT).
EcOsBulkURL must be run as cmshared.
5.1.1 Using the EcOsBulkURL Utility
The EcOsBulkURL Utility can be invoked two ways.
1. By entering the following command from the /usr/ecs/<mode>/CUSTOM/utilities directory:
> EcOsBulkURLStart mode Insert
This command is run, to generate the ECS related ftp URLs that are in the Datapool database for the time range specified in the EcOsBulkURLConfigParams.xml file. This will generate the URLs for the products that have been already exported by the BMGT. The generated products will be placed in the /datapool/<MODE>/user/URLExport directory which will be available for acces by ECHO.
2. By invoking the Datapool Cleanup Script:
> EcDlCleanupDataPool.pl <MODE>
EcDlCleanupDataPool.pl is a cleanup script which deletes granules that have expired, from the Datapool database. This script will automatically invoke EcOsBulkURLStart script in Delete mode. The EcOsBulkURLStart script will then generate the products which have been deleted from the Datapool database, whose ftp URLs have been previously exported at some point of time.
Table 5.1.1-1 provides a description of these parameters.
Table 5.1.1-1. Command Line Parameters of the EcOsBulkURL Utility Parameter Name Description
mode An input parameter that specifies the mode of operation. This must be the first parameter on the command line, and it must be a valid, existing Data Pool mode (i.e. OPS, TS1, TS2).
Insert Indicates that ftp URL inserted into the datapool database will be made available to ECHO.
5-1 300-TP-001-001

5.1.2 Required Operating Environment The EcOsBulkURL Utility will run on Sun platforms.
5.1.3 Interfaces and Data Types
Table 5.1.3-1 lists the supporting products that this tool depends upon in order to function properly.
Table 5.1.3-1. Interface Protocols Product Dependency Protocols Used Comments
Data Pool database SQL Via SQL server machinesJava jre Requires proper installation of baselined version of
jre JDBC jconnect Requires proper installation of baselined version of
JDBC jaxp Jaxp1.0.1 Requires proper installation of baselined version of
jaxp1.0.1
5.1.4 Configuration File Format – EcBulkURLConfigParams.cfg The “config” file contains vital details about how to connect to the Sybase database, what the time range for the run is, where the output files should be placed, etc. Without this file, the utility cannot run. The config file is an xml file.
Description of the individual elements in the configuration file that operators may want to set:
Element Name Description doPreviousFlag Set to “true”, if operators need to run previous the utility for previous day
or hour or “false” if the utility is to be run for a date range. duration This can be either “day” or “hour”. This is only effective when
doPreviousFlag is set to “true”. count Set it to number of the duration that the run is needed for. This is only
effective when doPreviousFlag is set to “true”. programId Program ID used for connecting to the Data Pool database. startDate The start date for the period for which the utility is to be run. This is only
effective if doPreviousFlag is set to “false”. endDate The end date for the period for which the utility is to be run. This is only
effective if doPreviousFlag is set to “false”.
5.1.5 Special Constraints The EcOsBulkURL Utility runs only if the Data Pool and database servers are up and available. The stored procedures it uses must also be present in the Data Pool database.
5-2 300-TP-001-001
5.1.6 Outputs Output files that are generated will be placed in the directory mentioned in the EcOsBulkURLParams.cfg file. Usually it will be as follows:
/datapool/<MODE>/user/ URLExport
5.1.7 Event and Error Messages
Events and error messages are written to the log file. A usage message will be displayed to the screen when command-line parameters are incorrectly specified.
5.1.8 Reports
None.
5.1.9 Logs
The utility produces log files called EcOsBulkURL.ALOG and EcOsBulkURLDebug.log in the /usr/ecs/<mode>/CUSTOM/logs directory. A new log file with this name will automatically be created, and the old log files will be renamed with a timestamp.
5.1.10 Sybase Error Handling If a Sybase error occurs, you will most likely see the actual Sybase error string displayed on the screen and in the log. Some errors can be that the database server is unavailable, that the connection to the database was dropped, or that there was an error executing the stored procedure. In the event of a Sybase-sourced error, the utility will immediately stop running.
5.2 ECHO Access to AIRS Browse The BMGT was enhanced to allow the export of AIRS Summary Browse products (ASBPs) to ECHO. During generation of ECSBBR products, the BMGT searches the SDSRV database to find all AIRS products inserted during the export time frame, and then finds all ASBPs associated with these AIRS products. The BMGT includes an association between each AIRS granule and its corresponding ASBP in the ECSBBR browse XML file.
ECHO will have FTP push subscriptions against ECSBBR inserts, as a result of which the ECSBBR granules will be pushed to ECHO for processing. As the ECSBBR granule is acquired for this purpose, ECS will include ASBP granules in the distribution along with all the other non-AIRS browse granules defined in the ECSBBR XML granule file. As a result, ECHO will receive the ECSBBR granule, along with the ASBP and standard browse granules.
This enhancement did not impact the usage of the BMGT. Reference Bulk Metadata and Browse Export Capability white paper, 170-WP-023-006 dated 11/2002, for BMGT usage information.
5-3 300-TP-001-001

5-4 300-TP-001-001
This page intentionally left blank.