Embed Size (px)
Citation preview

Operation/Reference Guide
Matrix Distr ibuted Audio
Mi-ControlMi-Series Configuration Software
v1.0.3
In i t ia l Release: 09/04/2007

Software License and Warranty Agreement• LICENSE GRANT. AMX grants to Licensee the non-exclusive right to use the AMX Software in the manner described in this
License. The AMX Software is licensed, not sold. This license does not grant Licensee the right to create derivative works of the AMX Software. The AMX Software consists of generally available programming and development software, product documenta-tion, sample applications, tools and utilities, and miscellaneous technical information. Please refer to the README.TXT file on the compact disc or download for further information regarding the components of the AMX Software. The AMX Software is sub-ject to restrictions on distribution described in this License Agreement. AMX Dealer, Distributor, VIP or other AMX authorized entity shall not, and shall not permit any other person to, disclose, display, loan, publish, transfer (whether by sale, assignment, exchange, gift, operation of law or otherwise), license, sublicense, copy, or otherwise disseminate the AMX Software. Licensee may not reverse engineer, decompile, or disassemble the AMX Software.
• ACKNOWLEDGEMENT. You hereby acknowledge that you are an authorized AMX dealer, distributor, VIP or other AMX autho-rized entity in good standing and have the right to enter into and be bound by the terms of this Agreement.
• INTELLECTUAL PROPERTY. The AMX Software is owned by AMX and is protected by United States copyright laws, patent laws, international treaty provisions, and/or state of Texas trade secret laws. Licensee may make copies of the AMX Software solely for backup or archival purposes. Licensee may not copy the written materials accompanying the AMX Software.
• TERMINATION. AMX RESERVES THE RIGHT, IN ITS SOLE DISCRETION, TO TERMINATE THIS LICENSE FOR ANY REA-SON UPON WRITTEN NOTICE TO LICENSEE. In the event that AMX terminates this License, the Licensee shall return or destroy all originals and copies of the AMX Software to AMX and certify in writing that all originals and copies have been returned or destroyed.
• PRE-RELEASE CODE. Portions of the AMX Software may, from time to time, as identified in the AMX Software, include PRE-RELEASE CODE and such code may not be at the level of performance, compatibility and functionality of the GA code. The PRE-RELEASE CODE may not operate correctly and may be substantially modified prior to final release or certain features may not be generally released. AMX is not obligated to make or support any PRE-RELEASE CODE. ALL PRE-RELEASE CODE IS PROVIDED "AS IS" WITH NO WARRANTIES.
• LIMITED WARRANTY. AMX warrants that the AMX Software (other than pre-release code) will perform substantially in accor-dance with the accompanying written materials for a period of ninety (90) days from the date of receipt. AMX DISCLAIMS ALL OTHER WARRANTIES, EITHER EXPRESS OR IMPLIED, INCLUDING, BUT NOT LIMITED TO IMPLIED WARRANTIES OF MERCHANTABILITY AND FITNESS FOR A PARTICULAR PURPOSE, WITH REGARD TO THE AMX SOFTWARE. THIS LIM-ITED WARRANTY GIVES LICENSEE SPECIFIC LEGAL RIGHTS. Any supplements or updates to the AMX SOFTWARE, including without limitation, any (if any) service packs or hot fixes provided to Licensee after the expiration of the ninety (90) day Limited Warranty period are not covered by any warranty or condition, express, implied or statutory.
• LICENSEE REMEDIES. AMX's entire liability and Licensee's exclusive remedy shall be repair or replacement of the AMX Soft-ware that does not meet AMX's Limited Warranty and which is returned to AMX in accordance with AMX's current return policy. This Limited Warranty is void if failure of the AMX Software has resulted from accident, abuse, or misapplication. Any replace-ment AMX Software will be warranted for the remainder of the original warranty period or thirty (30) days, whichever is longer. Outside the United States, these remedies may not available. NO LIABILITY FOR CONSEQUENTIAL DAMAGES. IN NO EVENT SHALL AMX BE LIABLE FOR ANY DAMAGES WHATSOEVER (INCLUDING, WITHOUT LIMITATION, DAMAGES FOR LOSS OF BUSINESS PROFITS, BUSINESS INTERRUPTION, LOSS OF BUSINESS INFORMATION, OR ANY OTHER PECUNIARY LOSS) ARISING OUT OF THE USE OF OR INABILITY TO USE THIS AMX SOFTWARE, EVEN IF AMX HAS BEEN ADVISED OF THE POSSIBILITY OF SUCH DAMAGES. BECAUSE SOME STATES/COUNTRIES DO NOT ALLOW THE EXCLUSION OR LIMITATION OF LIABILITY FOR CONSEQUENTIAL OR INCIDENTAL DAMAGES, THE ABOVE LIMITA-TION MAY NOT APPLY TO LICENSEE.
• U.S. GOVERNMENT RESTRICTED RIGHTS. The AMX Software is provided with RESTRICTED RIGHTS. Use, duplication, or disclosure by the Government is subject to restrictions as set forth in subparagraph ©(1)(ii) of The Rights in Technical Data and Computer Software clause at DFARS 252.227-7013 or subparagraphs ©(1) and (2) of the Commercial Computer Software Restricted Rights at 48 CFR 52.227-19, as applicable.
• SOFTWARE AND OTHER MATERIALS FROM AMX.COM MAY BE SUBJECT TO EXPORT CONTROL. The United States Export Control laws prohibit the export of certain technical data and software to certain territories. No software from this Site may be downloaded or exported (i) into (or to a national or resident of) Cuba, Iraq, Libya, North Korea, Iran, Syria, or any other coun-try to which the United States has embargoed goods; or (ii) anyone on the United States Treasury Department's list of Specially Designated Nationals or the U.S. Commerce Department's Table of Deny Orders. AMX does not authorize the downloading or exporting of any software or technical data from this site to any jurisdiction prohibited by the United States Export Laws.
This Agreement replaces and supersedes all previous AMX Software License Agreements and is governed by the laws of the State of Texas, and all disputes will be resolved in the courts in Collin County, Texas, USA. For any questions concerning this Agreement, or to contact AMX for any reason, please write: AMX License and Warranty Department, 3000 Research Drive, Richardson, TX 75082.
Table of Contents
Table of ContentsOverview ............................................................................................................1
System Requirements ............................................................................................... 1
About Mi-Control...................................................................................................... 1
Installing Mi-Control ................................................................................................. 2
Opening Mi-Control.................................................................................................. 2
Searching for Available Controllers .......................................................................... 3
Controller Network Status........................................................................................ 3
Mi-Control Main Window.......................................................................................... 4
Room Icons...................................................................................................................... 5
Working with Network Settings ............................................................................... 5
Reviewing Mi-Control Ethernet Settings................................................................... 5
Changing the Mi-Series Controller to Use DHCP ............................................................ 6
Changing the Mi-Series Controller to Use a Static IP Address ........................................ 6
Customizing Mi-Control Buttons ........................................................................7
Naming an Audio Source .......................................................................................... 7
Naming a Room ........................................................................................................ 8
Naming Source Control buttons ............................................................................... 9
Source Controls ................................................................................................11
Using On-Board Tuner Source Controls .................................................................. 11
Setting Direct Access to a Specific station .................................................................... 11
Using On-Board Sirius Satellite Source Controls..................................................... 12
Setting Direct Access to a Specific Channel or Category .............................................. 12
Using External Tuner Source Controls .................................................................... 13
Setting Direct Access to a Specific Station.................................................................... 13
Using CD Source Controls....................................................................................... 14
Setting Direct Access to a Specific DISC or TRACK....................................................... 14
Using DVD Source Controls .................................................................................... 15
Setting Direct Access on a DVD.................................................................................... 15
Using External Satellite Source Controls ................................................................ 16
Setting Direct Access to a Specific Channel .................................................................. 16
Using Audio Server Source Controls....................................................................... 17
Using OTHER Source Controls ................................................................................ 18
Using External XM Source Controls ........................................................................ 18
Summary of Direct Access for Audio Sources ............................................................... 19
Turning off an Audio Source ................................................................................... 19
Turning off all Audio Sources.................................................................................. 19
iMi-Control Mi-Series Configuration Software

Table of Contents
Working with Presets .......................................................................................21
System Presets........................................................................................................ 21
Custom Presets ....................................................................................................... 21
Playing a Preset ...................................................................................................... 21
System Presets........................................................................................................ 21
Adding a System Preset ................................................................................................ 21
Editing a System Preset ................................................................................................ 21
Removing a System Preset ............................................................................................ 22
Custom Presets ....................................................................................................... 22
Adding a Custom Preset List ......................................................................................... 22
Removing a Custom Preset List ..................................................................................... 22
Adding Presets to a Custom Preset List ........................................................................ 22
Editing Presets in a Custom Preset List ......................................................................... 22
Removing a Preset in a Custom Preset List ................................................................... 23
Working with Room Settings ............................................................................25
Favorite Source....................................................................................................... 25
Setting a Favorite Source .............................................................................................. 25
Clearing a Favorite Source ............................................................................................ 26
Room Favorites....................................................................................................... 26
Setting a Room Favorite................................................................................................ 26
Clearing a Room Favorite.............................................................................................. 26
Room Alarm ............................................................................................................ 26
Setting a Room Alarm ................................................................................................... 26
Clearing a Room Alarm ................................................................................................. 27
Working with Room Controls ...........................................................................29
Room Volume ......................................................................................................... 29
Setting the Volume for a Room..................................................................................... 29
Muting a Room.............................................................................................................. 29
SRS Controls ........................................................................................................... 30
Turning On an SRS Option ............................................................................................ 30
Turning Off SRS Controls .............................................................................................. 30
Room Locks............................................................................................................. 30
Locking a Room............................................................................................................. 30
Unlocking a Room ......................................................................................................... 30
Refreshing Mi-Control............................................................................................. 31
Refreshing All Rooms and All Sources ........................................................................... 31
Refreshing a Particular Room and Source...................................................................... 31
ii Mi-Control Mi-Series Configuration Software

Table of Contents
Working with Groupings ..................................................................................33
Adding a Grouping ................................................................................................. 33
Removing a Grouping............................................................................................. 33
Turning ON a Grouping ................................................................................................ 34
Turning OFF a Grouping ............................................................................................... 34
Setting the Volume of a Grouping.......................................................................... 34
Setting the Absolute Volume ........................................................................................ 34
Setting the Relative Volume.......................................................................................... 34
Setting the Volume of a Room within a Group ............................................................. 35
Changing a Grouping.............................................................................................. 35
iiiMi-Control Mi-Series Configuration Software

Table of Contents
iv Mi-Control Mi-Series Configuration Software

Overview
OverviewThis document describes the features and functionality of Mi-Control. Before you begin using Mi-Control, be sure to read this guide for installation instructions and other important information. This guide contains instructions for:
Installing Mi-Control
Selecting stations, channels and tracks
Working with presets
Working with room settings
Working with groups
Customizing Mi-Control
System RequirementsMi-Control is compatible with:
Microsoft Windows 2000 Professional, SP 4
Microsoft Windows 2000 Server, SP 4
Microsoft Windows 2003 Server, SP 1
Microsoft Windows XP Professional, SP 2
Base requirements of the computer are determined by the operating system selected.
Additional requirements are:
500 MHz or higher processor
256 MB of RAM
10 MB available disk space.
Network Interface Card
Microsoft .NET Framework Version 1.1
Minimum screen resolution of 800 x 600.
About Mi-ControlMi-Control lets you control the audio sources connected to the Mi-Series controller from any computer on your network.
From Mi-Control you can:
Adjust the volume of any room
Select satellite channels, radio stations, or CD and DVD tracks to play in one or more rooms
Group rooms together, to play the same source in multiple rooms - great for entertaining
Lock rooms to prevent others from changing the current settings
And many other features to customize the audio settings of your environment
For Mi-Control to operate correctly, the following conditions must be satisfied:
Mi-Control must be on the same local area network (LAN) as the Mi-Series controller.
The controller must be turned on.
1Mi-Control Mi-Series Configuration Software

Overview
Installing Mi-ControlThis section describes how to install Mi-Control. To install Mi-Control you must be logged into the computer as an Administrator.
1. Insert the Mi-Control installation disk into the computer's CD or DVD drive.
2. On the Welcome to Mi-Control Setup Wizard window, click Next.
3. On the Installation window, select a destination folder to install Mi-Control.
4. To install Mi-Control for all users of the computer, click Everyone, or to install the program for your use only, click Just me.
5. Click Next.
6. On the Confirm Installation window, click Next.
7. On the Installation Complete window, click Close.
Opening Mi-Control1. On the Start menu, select Programs | Matrix Audio Designs | Mi-Control. Once Mi-Control is
launched, it automatically searches the network for any available Mi-Series controllers. Any controllers Mi-Control finds display in the Available Controllers list.
You may need to restart your computer to complete the Mi-Control installation. If a message box is displayed indicating the computer needs to be restarted, click Yes.
Mi-Control depends on the Microsoft .NET Framework Version 1.1. We recommend that you use Windows Update to check for any critical updates to the .NET Framework. Refer to your Windows Help for more information.
You can run only one instance of Mi-Control computer at a time. If you attempt to launch another instance of Mi-Control, an error message displays informing you to check whether another Mi-Control instance is running. However, it is possible to run multiple Mi-Controls on different machines at the same time and control the same controllers.
2 Mi-Control Mi-Series Configuration Software

Overview
Searching for Available ControllersSearching locates Mi-Series controllers that connected to the network after you opened Mi-Control.
FIG. 1 Controller Selection Window
1. To locate connected controllers, on the Controller Selection window, click Search. Connected controllers display in the Available Controllers list.
Controller Network StatusThe Mi-Control Controller Selection window displays the IP Address and the current network status of controllers. The table below shows the possible status values.
Controller Network Status
Status Description
Failed The controller has stopped communicating. If this happens, check that your computer's network connection is working, and that the controller is powered on and properly connected to the network.
Handshaking Mi-Control is negotiating a connection with the controller.
Connected Mi-Control has established a connection with the controller.
A controller can only be used when its status is Connected. Otherwise, the Select button will be disabled.
3Mi-Control Mi-Series Configuration Software

Overview
Mi-Control Main WindowTo access the Mi-Control software, click Select beside the Controller you would like to access. The Main window opens.
Audio Source bar: Displays all sources connected to the controller. Clicking a tab will display the settings for that audio source.
Rooms bar: Displays a list of all rooms connected to the controller.
Groupings bar: Displays a list of all user defined room groupings.
Presets: Displays all presets for the selected audio source. Each audio source can have up to 10 System Presets, and an unlimited number of Custom Presets.
Room controls: Allows adjustments to room volume, tone control and SRS/WOW settings..
Audio Source controls: Displays a number pad and controls to select CD or DVD tracks, radio stations or satellite channels.
Alarm: When an alarm is set for a room, the alarm area displays the audio source and time the system will turn on.
Lock: A room can be locked to prevent others from turning the system on, or changing the audio source.
Advanced settings: Advanced settings let you customize room and source names, set room alarms, and change the network settings.
4 Mi-Control Mi-Series Configuration Software

Overview
Room Icons
The Rooms Bar displays a list of all rooms connected to the controller. Beside each room, an icon may be displayed which indicates the state of the room. The following table describes the possible states.
Working with Network SettingsMi-Series controllers connect to the network using a system generated network address from a router or other DHCP server, or using a static IP address. You can review the controller's current network settings and modify them in the Mi-Control Configuration window.
FIG. 2 Controller network settings
Reviewing Mi-Control Ethernet SettingsTo access the Mi-Series controller settings, on the Main window, click Advanced.
The Mi-Control Configuration window displays read-only information about the Mi-Series controller. The following controller details are displayed:
Controller version
Ethernet board version
Current network settings
Room Icons
Room Bar Icon Description
(Empty) No Audio Source is playing In the room.
Audio source is playing in the room.
The room is part of a playing group.
5Mi-Control Mi-Series Configuration Software

Overview
Changing the Mi-Series Controller to Use DHCP
1. On the Main window, click Advanced.
2. Select the Use DHCP check box.
3. Click OK.
Changing the Mi-Series Controller to Use a Static IP Address
1. On the Main window, click Advanced.
2. Select the Use Static IP check box.
3. In the IP Address box, type the IP address.
4. In the Subnet Mask box, type the subnet mask.
5. In the Gateway box, type the gateway.
6. Click OK.
If the controller is configured to use DHCP, and it cannot acquire an address (for example, if a DHCP server is not available), it will use its configured static IP address instead.
6 Mi-Control Mi-Series Configuration Software

Customizing Mi-Control Buttons
Customizing Mi-Control ButtonsTo easily identify your audio sources and rooms, you can customize the text that appears on the Room bar and Audio Source bar buttons. You can also customize the text on Source Control buttons.
Naming an Audio SourceTo make identifying audio sources easy, you can customize the name of the source. The default name listed on the audio tab is determined by the actual audio source connected to the Mi-Series controller. Sources are listed in order from 1-8. If a Source Name is left blank, the default Source Type will be displayed.
FIG. 3 Source Settings Window
1. Click Advanced.
2. To display the list of sources, double-click Sources.
3. Click the source you want to name.
4. In the Name box, type a name.
5. Click OK.
Custom Room and Source names are saved with every instance of Mi-Control and are not shared by other users/instances of Mi-Control.
If an audio source type is changed on the Mi-Series controller, click the Refresh All button on the Main Window, or reselect the Controller from the Controller Selection Window for Mi-Control to recognize the new source type. You may also need to rename the audio source to match the new source type.
7Mi-Control Mi-Series Configuration Software

Customizing Mi-Control Buttons
Naming a RoomTo make identifying rooms easy, you can customize the name of each room. By default the rooms are named sequentially.
FIG. 4 Room Settings
1. Click Advanced.
2. To display the list of rooms, double-click Rooms.
3. Click the room you want to name.
4. In the Name box, type a name.
5. Click OK.
8 Mi-Control Mi-Series Configuration Software

Customizing Mi-Control Buttons
Naming Source Control buttonsMi-Control allows you to change the roll-over text associated with Source Control Buttons.
FIG. 5 Source Settings Window. Labels Tab
1. Click Advanced.
2. To display the list of sources, double-click Sources.
3. Click the source you want.
4. Click the Labels tab.
5. Double-click the Roll-over Text field of the Source Command you want to rename.
6. Enter the new text.
7. Press the Enter key.
8. Click OK.
The On-board Tuner and On-board Sirius source type controls cannot be customized. Source Commands which can be customized are indicated by the icon
.
9Mi-Control Mi-Series Configuration Software

Customizing Mi-Control Buttons
10 Mi-Control Mi-Series Configuration Software

Source Controls
Source ControlsYou can select a specific radio station, satellite channel, CD or DVD track using the Audio Source Controls area of the Main window. The Audio Source bar displays a labelled tab for all audio sources connected to the Mi-Series controller. If a source is not defined at the Controller, the area is left empty.
Using On-Board Tuner Source ControlsThe Audio Source Controls enable you to control an internal AM/FM Tuner source to select a specific radio station. After selecting a radio station, the audio plays in the selected room.
FIG. 6 On-Board Tuner Source Control
1. Click the room.
2. Click the Tuner source tab.
3. Click the AM FM button to toggle between AM and FM stations.
4. Click the Stereo Mono button to toggle between stereo and mono mode.
5. Click the UP/DOWN button to SEEK UP/DOWN.
6. To advance through the System presets, click the RIGHT / LEFT button.
Setting Direct Access to a Specific station
To select a specific station, click the station's frequency number buttons (including the decimal place for FM stations), and click Enter.
11Mi-Control Mi-Series Configuration Software

Source Controls
Using On-Board Sirius Satellite Source ControlsThe Audio Source Controls enable you to control an internal Mi-Series Sirius source. You can select a specific channel or select a category and then select the channel. After selecting a Sirius channel, the audio plays in the selected room.
FIG. 7 On-Board Sirius Source Control
1. Click the room.
2. Click the Sirius source tab.
3. Click the UP/DOWN button to access the next/previous Channel.
4. To advance through the System presets, click the RIGHT / LEFT button.
5. The ROUND button is not used.
6. Click the Category buttons to switch between next and previous Category
Setting Direct Access to a Specific Channel or Category
1. To select a specific channel, key in the channel number and click Enter (Ex. 6Enter = Channel 6).
2. To select a specific category, key in the category number, plus dot, plus 0, and click Enter. This will select the category and the first channel within that category. (Ex. 1.0Enter = 1st channel in Category 1).
If you select a channel or category number but do not click the Enter button, the Sirius source will remain on the current channel.
12 Mi-Control Mi-Series Configuration Software

Source Controls
Using External Tuner Source ControlsThe Audio Source Controls enable you to control an external AM/FM Tuner source to select a specific radio station. After selecting a radio station, the audio plays in the selected room.
FIG. 8 External Tuner Source Control
1. Click the room.
2. Click the Tuner source tab.
3. Click the UP / DOWN button to SEEK UP/DOWN
4. The LEFT / RIGHT buttons are not used by an external Tuner source
5. Click the ROUND button to toggle between AM and FM
6. Click the SQUARE button to toggle between MONO and STEREO mode
Setting Direct Access to a Specific Station
1. 1.To select a specific station, click the station's frequency number buttons (including the decimal place for FM stations), and then click Enter.
If you select a frequency number but do not click the Enter button, the tuner will remain on the current station.
All source control buttons are defined at the Mi-Series Controller at the time of installation and may perform differently than described below. Please verify the functionality of the source control buttons with your Installer.
The ROUND and SQUARE source control buttons may or may not be defined. Please check with your installer.
13Mi-Control Mi-Series Configuration Software

Source Controls
Using CD Source ControlsThe Audio Source Controls enable you to control a CD Player source to select a specific CD and track. After selecting a CD and track, the audio plays in the selected room.
FIG. 9 CD Source Control
1. Click the room.
2. Click the CD Player source tab.
3. Click the UP / DOWN button to access the next/previous Track.
4. Click the LEFT / RIGHT button to access the next/previous CD.
5. The ROUND button may/may not be defined, check with your installer.
6. The SQUARE button may/may not be defined, check with your installer.
Setting Direct Access to a Specific DISC or TRACK
1. To select a specific CD and track, using the number buttons, key in the CD #, press the DOT button, key in the track # and press ENTER (Ex. 25.4Enter = CD 25, Track 4).
2. To select a specific Track on the current CD, key in the Track # and press ENTER (Ex.4Enter = Current CD, Track 4)
If a CD and track number are selected and the Enter button is not clicked, the CD player will remain on the current CD and track.
All source control buttons are defined at the Mi-Series Controller at the time of installation and may perform differently than described below. Please verify the functionality of the source control buttons with your Installer.
The ROUND and SQUARE source control buttons may or may not be defined. Please check with your installer.
14 Mi-Control Mi-Series Configuration Software

Source Controls
Using DVD Source ControlsThe Audio Source Controls enable you to control a DVD Player source to select a specific DVD and track. After selecting a DVD and track, the audio plays in the selected room.
FIG. 10 DVD Source Control
1. Click the room.
2. Click the DVD Player source tab.
3. Click the UP / DOWN button to navigate selections while in the DVD Menu.
4. Click the LEFT / RIGHT button to navigate selections while in the DVD Menu or to select next scene/track, etc.
5. Click the ROUND button to make a selection.
6. Click the SQUARE button to access the MENU.
Setting Direct Access on a DVD
1. To select a specific Track on a DVD, key in the Track # and press ENTER (Ex.4Enter = Track 4)
If you select a DVD and track number but do not click the Enter button, the DVD player will remain on the current DVD and track.
All source control buttons are defined at the Mi-Series Controller at the time of installation and may perform differently than described below. Please verify the functionality of the source control buttons with your Installer.
The ROUND and SQUARE source control buttons may or may not be defined. Please check with your installer.
15Mi-Control Mi-Series Configuration Software

Source Controls
Using External Satellite Source ControlsThe Audio Source Controls enable you to control a Satellite source to select a specific satellite channel or category. After selecting a channel, the audio plays in the selected room.
FIG. 11 External Satellite Source Control
1. Click the room.
2. Click the Satellite source tab.
3. Click the UP / DOWN button to access the next/previous Channel
4. Click the LEFT / RIGHT button to move up/down within the Guide.
5. Click the ROUND button to make a selection
6. Click the SQUARE button to access the MENU.
Setting Direct Access to a Specific Channel
1. To select a specific channel, key in the channel number and click Enter (Ex. 6Enter = Channel 6).
All source control buttons are defined at the Mi-Series Controller at the time of installation and may perform differently than described below. Please verify the functionality of the source control buttons with your Installer.
The ROUND and SQUARE source control buttons may or may not be defined. Please check with your installer.
16 Mi-Control Mi-Series Configuration Software

Source Controls
Using Audio Server Source ControlsThe Audio Source Controls enable you to control an Audio Server source to select a specific audio server track. After selecting the track, the audio plays in the selected room.
FIG. 12 Audio Server Source Control
1. Click the room.
2. Click the Audio Server source tab.
3. Click the UP / DOWN button to access the next/previous Channel
4. Click the LEFT / RIGHT button to move up/down within the Guide.
5. Click the ROUND button to make a selection
6. The SQUARE button may or may not be defined. Check with your installer.
All source control buttons are defined at the Mi-Series Controller at the time of installation and may perform differently than described below. Please verify the functionality of the source control buttons with your Installer.
The ROUND and SQUARE source control buttons may or may not be defined. Please check with your installer.
17Mi-Control Mi-Series Configuration Software

Source Controls
Using OTHER Source ControlsThe "Other" source type is used by installers to configure miscellaneous sources other than those previously mentioned (Tuner, Sirius, CD, DVD, Satellite, and Audio Server). It can be used, for example, for MP3 players, etc. The Source Controls are defined by the Installer and customized for every source defined as "Other".
FIG. 13 Other Source Control
1. Click the room.
2. Click the OTHER source tab.
3. The UP / DOWN / LEFT / RIGHT / ROUND / SQUARE buttons are defined at the Mi-Series Controller at the time of installation and may or may not be defined. Please verify the functionality of the source control buttons with your Installer.
Using External XM Source Controls The XM Source Type is used specifically for XM Satellite units that use RC5-X format IR codes. The XM Source Controls enable you to control a XM Satellite source to select a specific satellite channel or category. After selecting a channel, the audio plays in the selected room.
FIG. 14 External XM Source Control
1. Click the room.
2. Click the XM Satellite source tab.
3. Click the UP / DOWN button to access the next/previous Channel
18 Mi-Control Mi-Series Configuration Software

Source Controls
4. Click the LEFT / RIGHT button to move up/down within the Guide.
5. Click the ROUND button to make a selection
6. The SQUARE button may or may not be defined. Check with your installer.
Summary of Direct Access for Audio Sources
The table below recaps how to directly access a station, channel, disc & track, etc.
Turning off an Audio Source1. To turn off an individual room, click the room in the Rooms Bar.
2. On the Audio Source bar, click Off.
Turning off all Audio SourcesClick All Off to turn off all audio sources in all rooms and groupings.
All source control buttons are defined at the Mi-Series Controller at the time of installation and may perform differently than described below. Please verify the functionality of the source control buttons with your Installer.
The ROUND and SQUARE source control buttons may or may not be defined. Please check with your installer.
Direct Access for Audio Sources
Audio Source Value Description Example
Tuner Type the Station radio frequency number• "For an FM station, include the decimal• "For an AM station, type the numbers only
107.5 + Enter = 107.5 FM1310 + Enter = 1310 AM
CD Player Type the CD and track numbers as follows:CD # + dot + Track# + Enter
3.13Enter = CD 3; track 13
For a specific track on the current CD, type:Track # + Enter
14Enter = Track 14
DVD Player Type the DVD and track numbers as follows:DVD # + dot + Track # + Enter
3.13Enter = DVD 3; track 13
For a specific Track on the current DVD, type:Track # + Enter
14Enter = track 14
Satellite Type the channel number as follows:Channel # + Enter
510Enter = Channel 510
Sirius Type the channel number as follows:Channel # + EnterOr type the category number and 1 to select the first channel of the category:Category # + dot + 1 + Enter
130Enter = Channel 1306.1Enter = 1st channel of Category 6
Audio Server Not applicable Not applicable
19Mi-Control Mi-Series Configuration Software

Source Controls
20 Mi-Control Mi-Series Configuration Software

Working with Presets
Working with PresetsPresets are saved radio stations, satellite channels, and CD and DVDs tracks that are programmed into Mi-Control and can be recalled easily. They are saved in the same format described in the Summary of Direct Access for Audio Sources section on page 19.
Each audio source has two types of presets:
System PresetsThere is a maximum of ten (10) system presets per source. These presets are saved at the Mi-Series Controller and are available for all users of the Mi-Series Audio System. This includes access from any tactile keypad, LCD Keypad, every instance of Mi-Control, as well as by external Control Systems that are integrated with the Mi-Series Controller.
Custom PresetsThe number of custom presets and custom preset lists are unlimited. These presets are stored with every instance of Mi-Control and are not shared by any other user.
Playing a Preset1. On the Rooms bar, click the room.
2. On the Audio Source bar, click the audio source tab.
3. In the Presets area, click a preset list.
4. Click the preset. The audio source plays the preset.
System PresetsAdding a System Preset
The number of System presets is fixed at 10. Additional System presets cannot be added.
Editing a System Preset
1. To display the Audio Source bar, click any room.
2. On the Audio Source bar, click the appropriate audio source tab.
3. In the Presets area, click System.
4. Next to the preset to be edited, click Edit.
5. In the Edit Preset window, in the Name box, type a name to identify the preset.
6. In the Value box, type the value for the preset.
7. Click OK.
For information on what to type in the Edit Preset window, see the Summary of Direct Access for Audio Sources section on page 19.
21Mi-Control Mi-Series Configuration Software

Working with Presets
Removing a System Preset
System presets cannot be deleted from the system via Mi-Control as these presets are shared by all users of the Mi-Series Audio System.
Custom PresetsAdding a Custom Preset List
An unlimited number of custom preset lists can be added for each audio source.
1. To display the Audio Source bar, click any room.
2. On the Audio Source bar, click the appropriate audio source tab.
3. In the Presets area, click Create List.
4. In the Preset List Name box, type a name to identify the preset list.
5. Click OK.
Removing a Custom Preset List
Removing a custom preset list will delete the list and all of its custom presets.
1. To permanently remove a custom preset list, on the Main window, click Advanced.
2. In the Mi-Control Configuration window, double-click Sources.
3. Click the source that has the preset list you want to remove.
4. Click the Presets tab.
5. In Preset Lists, click the custom list to select it.
6. Click Remove.
7. Click OK.
Adding Presets to a Custom Preset List
1. To display the Audio Source bar, click any room.
2. On the Audio Source bar, click the appropriate audio source tab.
3. In the Presets area, click the appropriate list.
4. Click Create Preset.
5. In the Name box on the Create Preset for <List Name> window, type a name to identify the preset.
6. In the Value box, type the value for the preset.
7. Click OK.
Editing Presets in a Custom Preset List
1. To display the Audio Source bar, click any room.
2. On the Audio Source bar, click the appropriate audio source tab.
3. In the Presets area, click the preset list you want to change.
4. Next to the preset to be edited, click Edit.
5. In the Name box on the Edit Preset window, type a name to identify the preset.
6. In the Value box, type the value for the preset.
For information on what to type in the Edit Preset window, see Summary of Direct Access for Audio Sources section on page 19.
22 Mi-Control Mi-Series Configuration Software

Working with Presets
7. Click OK.
Removing a Preset in a Custom Preset List
1. To remove a preset from a custom preset list, in the Main window, click Advanced.
2. In the Mi-Control Configuration window, double-click Sources.
3. Click the source with the custom preset you want to remove.
4. Click the Presets tab.
5. Under Preset Lists, click the appropriate custom list to select it.
6. Click the preset you want to remove.
7. Click Remove.
8. Click OK.
For information on what to type in the Edit Preset window, see Summary of Direct Access for Audio Sources section on page 19.
23Mi-Control Mi-Series Configuration Software

Working with Presets
24 Mi-Control Mi-Series Configuration Software

Working with Room Settings
Working with Room SettingsThe Room Settings screen in the Configuration window allows you to customize a number of room options, including configuring a Favorite Source, configuring an Alarm, and setting the Room Favorites.
FIG. 15 Room Settings
To get to the Room Settings screen:
1. In the Mi-Control Main window, click the Advanced button.
2. In the Mi-Control Configuration window, double-click Rooms.
3. Click the room to configure.
Or:
1. In the Mi-Control Main window, click the Room button on the Room tabs.
2. In the Advanced area, click the Configure Room button.
Favorite SourceYou can set a Favorite Source for a room which plays automatically when the Room is selected in the Rooms bar. By default, the favorite source is disabled for a room.
Setting a Favorite Source
1. In the Favorite Source area on the Room Settings window, select the Source to play automatically from the Source drop down selection.
2. Ensure the Automatically play favorite when Room is selected check box is selected.
3. Click OK.
25Mi-Control Mi-Series Configuration Software

Working with Room Settings
Clearing a Favorite Source
1. In the Favorite Source area on the Room Settings window, deselect the Automatically play favorite when Room is selected check box.
2. Click OK.
Room FavoritesRoom Favorites are favorite stations, channels, CDs, etc. that can be set for each source, per room. When that source is turned on for that room (and there is a favorite set), the favorite begins playing in that zone automatically.
Example: If you like to listen to the Radio set to 104.5 FM while you're getting ready in the morning, you could set 104.5 FM as the favorite for your bedroom. In the morning, if you're the first person to turn on the radio from your bedroom, it will begin playing 104.5 FM.
Setting a Room Favorite
1. In the Room Favorites area on the Room Settings window, double-click an entry in the Favorite Station / Track / CD /Channel column.
2. Enter the room favorite for that source. See the Summary of Direct Access for Audio Sources section on page 19 for the format to which the favorite should conform.
3. Press the Enter key.
4. Click OK.
Clearing a Room Favorite
1. In the Room Favorites area on the Room Settings window, double-click an entry in the Favorite Station / Track / CD /Channel column.
2. Press the Delete key to delete the contents of the favorite.
3. Press the Enter key.
4. Click OK.
Room AlarmA separate alarm can be set for each room. If enabled, the alarm occurs every day at the specified time and turns on the selected source. The volume increases slowly to the set volume. The alarm configuration is saved on the Mi-Series controller itself, so it is not necessary for Mi-Control to be running for the alarm to operate.
Setting a Room Alarm
1. In the Room Alarm area on the Room Settings window, select the Enabled check box.
2. Select the source to play from the Source drop down list.
3. Select the volume to play by moving the Volume slider.
4. Enter the time to sound the alarm in the Time box.
5. Click OK.
The favorite only takes effect if the source was not already playing, and the source has been powered OFF.
26 Mi-Control Mi-Series Configuration Software

Working with Room Settings
Clearing a Room Alarm
1. In the Room Alarm area on the Room Settings window, deselect the Enabled check box.
2. Click OK.
The alarm information will still be available if you decide to enable the alarm in the future.
27Mi-Control Mi-Series Configuration Software

Working with Room Settings
28 Mi-Control Mi-Series Configuration Software
Working with Room Controls
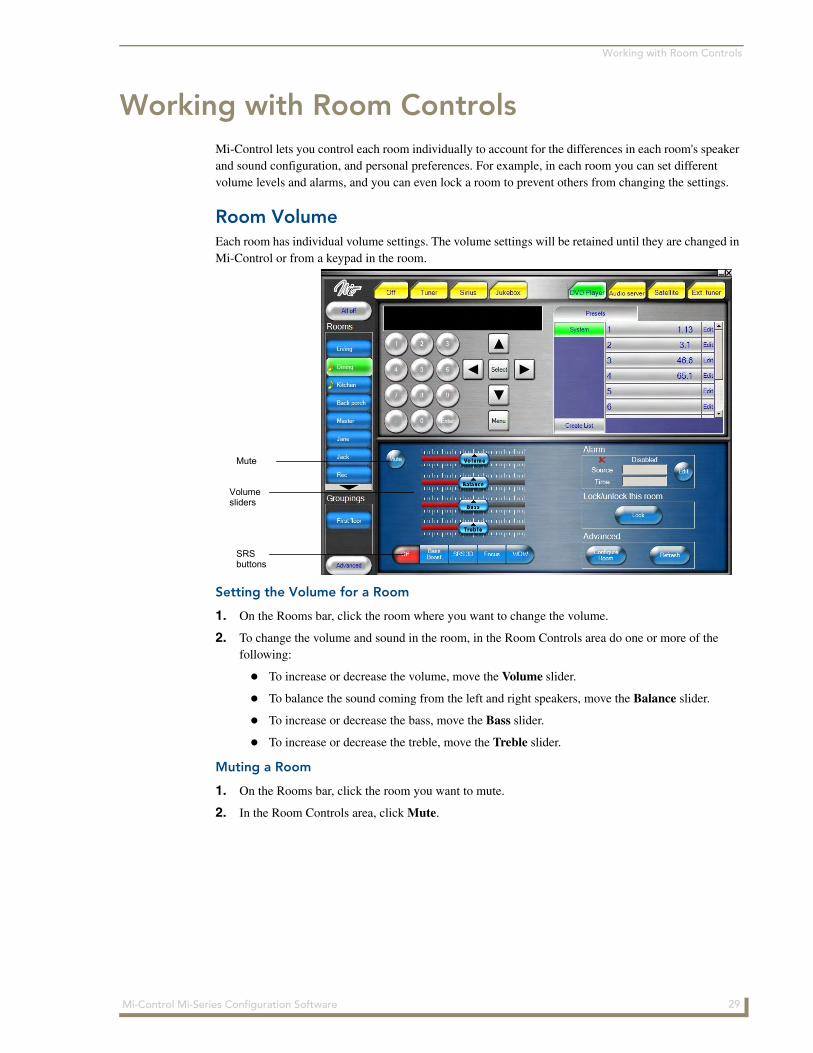
Working with Room ControlsMi-Control lets you control each room individually to account for the differences in each room's speaker and sound configuration, and personal preferences. For example, in each room you can set different volume levels and alarms, and you can even lock a room to prevent others from changing the settings.
Room VolumeEach room has individual volume settings. The volume settings will be retained until they are changed in Mi-Control or from a keypad in the room.
Setting the Volume for a Room
1. On the Rooms bar, click the room where you want to change the volume.
2. To change the volume and sound in the room, in the Room Controls area do one or more of the following:
To increase or decrease the volume, move the Volume slider.
To balance the sound coming from the left and right speakers, move the Balance slider.
To increase or decrease the bass, move the Bass slider.
To increase or decrease the treble, move the Treble slider.
Muting a Room
1. On the Rooms bar, click the room you want to mute.
2. In the Room Controls area, click Mute.
Mute
SRS buttons
Volume sliders
29Mi-Control Mi-Series Configuration Software

Working with Room Controls
SRS ControlsSRS/WOW technology provides audio processing that enhances the audio output from the source being played. The Mi-Series Controller provides the following four SRS modes available in every room:
BASS BOOST
A signal processing technology that enhances bass perception.
SRS 3D
Retrieves and restores the spatial information that is lost during ordinary audio compression of any stereo recording and restores the original three-dimensional sound field. The reproduced sound is much closer to what the artist originally intended, including accurate positioning of instruments and vocals.
FOCUS
Repositions the audio image to a more desirable position for the listener. It creates a "sweet spot", for a more optimal audio presentation.
WOW
Provides a panoramic three-dimensional audio image that extends the sound field in both the horizontal and vertical planes, and lowers the perceived bass response.
Turning On an SRS Option
1. On the Rooms bar, click the room to control.
2. In the Room Controls area, click one of the SRS buttons.
Turning Off SRS Controls
1. On the Rooms bar, click the room to control.
2. To turn the SRS controls off, click Off.
Room LocksTo prevent someone from changing a room's current setup, you can lock the room. When a room is locked, the room setup including audio source, volume, and the alarm cannot be changed from Mi-Control or from the keypad in the room.
Locking a Room
1. In the Rooms bar, click that room you want to lock.
2. In the Room Controls, Lock/unlock this room area, click the Lock button.
Unlocking a Room
1. In the Rooms bar, click the room you want to unlock.
2. Click the Unlock button.
Only one of the above modes can be set per room at a given time.
30 Mi-Control Mi-Series Configuration Software

Working with Room Controls
Refreshing Mi-Control Since changes to the Mi-Series Controller can be made not only from within the Mi-Control application, but also from the room keypads, you may wish to refresh Mi-Control from time-to-time to ensure you have the most up to date information.
Refreshing All Rooms and All Sources
1. From the Main window, click the Refresh All button.
Refreshing a Particular Room and Source
1. In the Rooms bar, click the room you want to refresh.
2. In the Room Controls, Advanced area, click the Refresh button.
Refreshing all states from the Mi-Series controller can take a few seconds depending on network speed and quality. For example, refreshing over a wireless network will take more time than over a wired network connection. During this time, commands you issue from Mi-Control may take longer than normal to process. Please be patient.
This command refreshes the information for the room, as well as the source that is currently playing in that room (if any). This command is much quicker than Refreshing all rooms and all sources, and is recommended when you only want to update one room.
31Mi-Control Mi-Series Configuration Software

Working with Room Controls
32 Mi-Control Mi-Series Configuration Software

Working with Groupings
Working with GroupingsA grouping is a collection of more than one room that, when grouped, behaves as a single zone. The grouping can be set to play the audio source at the same volume in all rooms, or at a different level in each room. With Mi-Control, you can add an unlimited number of groupings.
FIG. 16 Room Groupings Configuration Window
Adding a Grouping1. From the Main window, click Advanced.
2. In the Mi-Control Configuration window, click Room Groupings.
3. In the Room Grouping list, click Add.
4. A new Room Grouping will be added, and the Name should automatically be highlighted for editing. If it is not, then double-click the new group name.
5. Type a name for the group.
6. In the Included Rooms list, select the check box for each room you want to include in the grouping.
7. Click OK. The Groupings bar is updated with the new group.
Removing a GroupingRemoving a grouping removes the connection between the rooms only and does not affect the settings of the individual rooms. Before removing a grouping, the group must be turned off. For information on turning off a room or group see the Turning OFF a Grouping section on page 34.
1. From the Main window, click Advanced.
2. In the Mi-Control Configuration window, click Room Groupings.
3. In the Room Grouping list, click the group you want to remove.
4. Click Remove.
33Mi-Control Mi-Series Configuration Software

Working with Groupings
5. Click OK.
FIG. 17 Group Controls
Turning ON a Grouping
1. In the Groupings bar, select the group you want to turn on.
2. From the Sources bar, select the audio source to play. This will create the grouping on the controller and start playing the selected source.
3. In the Group Control area, adjust the absolute volume.
Turning OFF a Grouping
1. In the Groupings bar, select the group you want to turn off.
2. From the Sources bar, select the OFF button.
Setting the Volume of a GroupingThere are three methods to control the volume of a group: absolute volume, relative volume, and individual room volume. When a group is selected, the audio plays at the absolute volume level as displayed on the Grouping screen.
Setting the Absolute Volume
The absolute volume control sets all rooms to the same volume.
1. To adjust the absolute volume, in the Groupings bar, click the group you want to change.
2. Move the Absolute volume slider to increase or decrease the volume.
Setting the Relative Volume
The relative volume control increases or decreases the volume of each room relative to its current volume.
34 Mi-Control Mi-Series Configuration Software

Working with Groupings
1. To adjust the relative volume, in the Groupings bar, click the group you want to change.
2. In the Relative area, click the increase or decrease button.
Setting the Volume of a Room within a Group
Adjusting the volume of a room individually is the same as when a source is simply playing in a room. See the Room Volume section on page 29 to individually adjust a room's volume.
Changing a GroupingYou can easily change any grouping setting in the Grouping Controls area.
1. In the Groupings bar, click the grouping you want to change. The table below describes how to change the grouping.
Changing a grouping
To... Do this...
Remove a room from the grouping In the Included Rooms list, select the check box of the room you want to remove.
Add a room to a grouping In the Included Rooms list, select the check box of the room you want to add.
Change the relative volume of all rooms in the group
Click the Relative increase or decrease button.
Change the absolute volume of all rooms in the group
Move the Absolute volume slide to increase or decrease the volume.
To mute the volume of all rooms in a group Click Mute.
The Mute button toggles between mute and volume on.
35Mi-Control Mi-Series Configuration Software

Working with Groupings
36 Mi-Control Mi-Series Configuration Software

Changing a Grouping
37Mi-Control Mi-Series Configuration Software

9/07
©20
07 A
MX
. All
right
s re
serv
ed. A
MX
and
the
AM
X lo
go
are
reg
iste
red
tra
dem
arks
of A
MX
. AM
X r
eser
ves
the
right
to
alt
er s
pec
ifica
tio
ns w
itho
ut n
oti
ce a
t an
y ti
me.
It’s Your World - Take Control™
3000 RESEARCH DRIVE, RICHARDSON, TX 75082 USA • 800.222.0193 • 469.624.8000 • 469-624-7153 fax • 800.932.6993 technical support • www.amx.com