Embed Size (px)
Citation preview

OPERATING INSTRUCTION
Prior to use, please read this manual thoroughly. Keep this manual in a convenient place for quick and easy reference.

2
• BEFORE USE • SUPPROT AND SERVICE Customer support Internet sales site A/S regulation Warranty regulation• OPENHOBBY A/S CENTER• SAFETY PRECAUTIONS• BOX CONTENTS • SPECIFICATION • FEATURES• CHARGER CONTROL IDENTIFICATION• POWER SOURCE • BATTERY CONNECTION• BATTERY TYPE SELECTION • MEMORY SETUP• NiCd, NiMH BATTERIES CHARGE/DISCHARGE NiCd, NiMH charge NiCd, NiMH discharge NiCd, NiMH cycle• The temperature setup for NiCd, NiMH when charge/discharge• LiPo, LiIon, LiFe BATTERIES CHARGE/DISCHARGE LiPo charge LiPo discharge LiPo cycle LiPo store LiPo balancer The temperature setup for LiPo when charge/discharge• Pb BATTERY CHARGE/DISCHARGE Pb charge Pb discharge• DISPLAYS DURING CHARGE/DISCHARGE• ERROR MESSAGES• BATTERY CHARGE TIME CALCULATION• NEW BATTERY CHARGE• Pb BATTERY SAFETY• LiIon, LiPo, LiFe BATTREIES SAFETY• ENVIRONMENT PROTECTION NOTES • SAFETY APPROVAL
3P
3P
3P
3P
3P
3P
3P
4P
4P
5P
5P
6P
6P
7P
7P
8P
9P
9~10P
10P
10~11P
11P
12P
12P
13P
13~14P
14P
14~15P
15P
15P
15P
15~16P
16P
17P
17P
18P
18P
18~19P
19P
19P
Contents

3
◎ BEFORE USE
Thank you for purchasing ULTRA DC QUAD Charger. This system is extremely versatile and may be used by beginners and pros alike. In order for you to make the best use of your system and to fly safely, please read this manual carefully. If you have any difficulties while using your system, please consult the manual, our online Frequently Asked Questions (on the web pages referenced below), your hobby dealer, or the Graupner/SJ Service Center.Due to unforeseen changes in production procedures, the information contained in this manual is subject to change without notice.
◎ SUPPORT AND SERVICE
◎ OPENHOBBY A/S CENTER
8F, 202 Dong, Chunui Techno-Park II, 18, 198 street, Bucheon-ro, Wonmi-Gu, Bu-cheon-Shi, Gyungki-Do KOREA 420-857 Phone: 82-070-7863-3675 Fax: 82-070-7863-3670 Customer Service E-mail: [email protected]
Internet sales site
Warranty regulation
Please feel free to contact “www.openhobbby.com” to stay up to date the latest Graupner/SJ Firmware and the newest product line up.
Refer the WARRANTY CARD in a Package.
Customer support
Please feel free to ask any question by e-mail or phone. We’ve been trying to deal with your question. We are open from nine to six, Monday to Friday in Korea. We may respond to your question by e-mail as soon as possible when we are close.
A/S regulation
Only when the product is faulty after normal operation within the warranty period, we will repair the product for free based on our regulations. The repair will be paid for by the consumer when the damage is due to use in improper ways or beyond the warranty period.
4
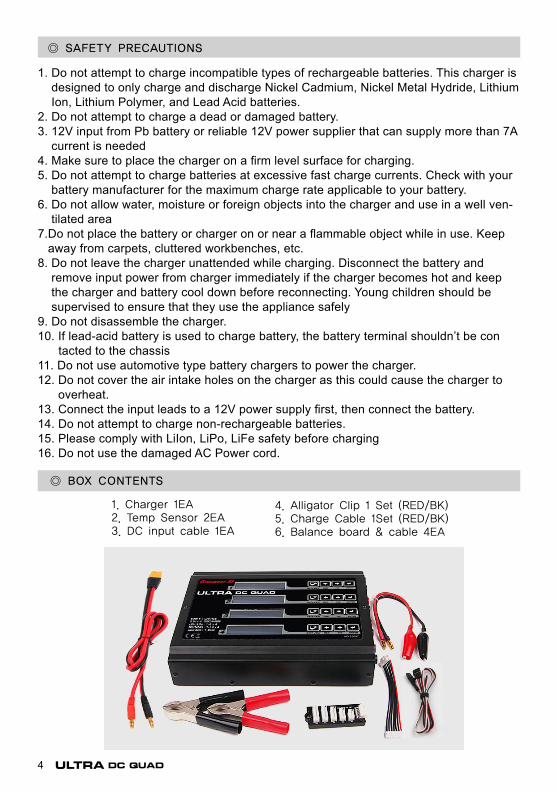
◎ BOX CONTENTS
◎ SAFETY PRECAUTIONS
1. Do not attempt to charge incompatible types of rechargeable batteries. This charger is designed to only charge and discharge Nickel Cadmium, Nickel Metal Hydride, Lithium Ion, Lithium Polymer, and Lead Acid batteries.
2. Do not attempt to charge a dead or damaged battery.3. 12V input from Pb battery or reliable 12V power supplier that can supply more than 7A
current is needed4. Make sure to place the charger on a firm level surface for charging.5. Do not attempt to charge batteries at excessive fast charge currents. Check with your
battery manufacturer for the maximum charge rate applicable to your battery.6. Do not allow water, moisture or foreign objects into the charger and use in a well ven-
tilated area7. Do not place the battery or charger on or near a flammable object while in use. Keep
away from carpets, cluttered workbenches, etc.8. Do not leave the charger unattended while charging. Disconnect the battery and
remove input power from charger immediately if the charger becomes hot and keep the charger and battery cool down before reconnecting. Young children should be supervised to ensure that they use the appliance safely
9. Do not disassemble the charger.10. If lead-acid battery is used to charge battery, the battery terminal shouldn’t be con tacted to the chassis11. Do not use automotive type battery chargers to power the charger.12. Do not cover the air intake holes on the charger as this could cause the charger to
overheat.13. Connect the input leads to a 12V power supply first, then connect the battery.14. Do not attempt to charge non-rechargeable batteries. 15. Please comply with LiIon, LiPo, LiFe safety before charging16. Do not use the damaged AC Power cord.
1. Charger 1EA2. Temp Sensor 2EA3. DC input cable 1EA
4. Alligator Clip 1 Set (RED/BK)5. Charge Cable 1Set (RED/BK)6. Balance board & cable 4EA

5
DC 11.0 - 15.0V
1-14Cells(NiCd/NiMH) 1-6Cells(LiPo/LiIon/LiFe) 1-6Cells(Pb batt)/4CH
100mAh ~ 9900mAh NiCd NiMH
100mAh ~ 50000mAh adjustable ONLY for Lilon, LiPo and LiFe
0.1A - 7A in 100mA steps(Max 80W) / 4CH
0.1A - 1.0A in 100mA steps (auto limited to 5W maximum) / 4CH
0 ~ 200mA / 4CH
Max 280mA / 4CH
3mV - 25mV(NiCd/NiMH) per cell
Charge to Discharge / Discharge to Charge
2-line, 16 Black & White backlit character LCD / 4CH
10 / 4CH
220.5 x 170.0 x 40.1 mm / 8.67 x 6.69 x 1.58 in
1012g / 35.70 oz
Input Voltage
Battery Type & Cell
Battery Capacity
Charge Current
Discharge Current
Trickle Charge
Balancing Current
Delta Peak
Cycling
Display Type
Memory
Dimensions
Weight
1. Built in micro processor controls charge/ discharge, storage, balance system2. NiCd, NiMH, LiIon, LiPo, LiFe, Pb batteries are available. Max 80W charge3. NiCd and NiMH: Delta peak detection system, Lithium and Pb: Voltage detection
system4. 2-line, 16 blue backlit character LCD, 4Channels, 10 memories per channel5. Selectable 3.6V or 3.7V or 3.3V, 1~6 cells LiIon battery 6. Support 0.1A~7.0A charge current, NiCd / NiMH 1-14cells, 1.2-16.8V7. Support 10~1000mA discharge current, NiCd / NiMH 1-14cells, 1.2-16.8V8. Support cycle mode (Charge to discharge / Discharge to charge).9. Prevent form reverse connecting of Input, output terminal. Built in cell balancer10. DC 12V input.
◎ SPECIFICATION
◎ FEATURES

6
2x16 character LCD
DC Input
- Output
DC lnput+ Output
Temp port
Balancing port
Buttons
+ Output- Output
Balancer port
Temperature sensor port
◎ CHARGER CONTROL IDENTIFICATION
1. Connect charger to 12V DC power supply
2. Connect the charge cable to OUT PUT terminal in the charger and battery, you need to double check the polarity( Red +, Black - ) and the input voltage. If the input voltage is below 11V or above 15V, the charger will show “BATTERY VOLTAGE ERROR” mes-sage.
◎ POWER SOURCE

7
Nixx
LiFe
LiPo
Lilon
Pb
Lithium batteries need to balance for more safety, if lithium batteries are charged without balance board, the balancing of lithium batteries is not performed.
CAUTION
◎ BATTERY CONNECTION
Connect charge cable to 4mm output banana sockets on charger with attention to polarity, red +, black –. If battery is not connected to charger correctly, the error message is appeared
- No battery : When a battery is not connected to the charger’s output- Open circuit : When a battery becomes disconnected during an operation- Reverse polarity : When a battery is connected to the output in reverse
When the power supplier is connected to the charger the below screen is displayed and the Setup screen is displayed after about 1 second
◎ BATTERY TYPE SELECTION
Press BATT TYPE button twice to select Battery type
※ The programming setup is applied differently when you press START/STOP button less than 1 Sec and longer than 1 Sec
Press ENTER button then battery type blinks and press ENTER button again then other value blinks. If you leave it for more than 3 sec without operating, the blinking is stopped. Press and hold ENTER button to start charge or discharge.
ULTRA DC QUADGraupner/SJ 1.00
PofileLiPo
PofileNixx
PofileLiPo
PofileLiFe
PofileLilo
PofilePb
2S
6S
3S
3S
3S
12V
[01]800
[01]3000
[01]3000
[01]3000
[01]3000
[01]pack

8
◎ MEMORY SETUP
ULTRA DC QUAD has 4 channels, 10 memories per channelIt is used to store specific battery, charge, discharge and safety parameters, as well as being used to initiate charging, discharging, cycling/store mode functions.
① Press ENTER BUTTON then the memory number blinks. Press INC/DEC buttons to select the memory number
② Press ENTER button then BATTERY TYPE blinks. Press INC/DEC buttons to select battery type.
④ Press ENTER button and INC/DEC buttons to set battery capacity.
③ Press ENTER button then battery cell blinks. Press INC/DEC buttons to set battery cell.
⑤ Press ENTER button to remove the curser blinking.
⑥ Press INC/DEC buttons to set charge current and charge voltage and then press EN-TER button to remove the curser blinking.
⑦ Press INC button to access to DISCHARGE mode and press INC/DEC buttons to set discharge current and discharge voltage and then press ENTER button to remove the curser blinking.
PofileLiPo
PofileLiPo
PofileLiPo
PofileLiPo
PofileLiPo
LiPoC=3.0A
6S
6S
6S
6S
6S
[01]3000
[01]3000
[01]3000
[01]3000
[01]3000
CHARGE4.2V/C
LiPoD=1.0A
DISCHARGE3.0V/C

9
⑧ Press INC button to access to CYCLE mode and press INC/DEC button to charge/dis-charge sequence and repeating number and then press ENTER button to remove the curser blinking.
⑨ Press INC button to access STORE mode and press INC/DEC buttons to set charge/discharge and then press ENTER button to remove the curser blinking.
⑩ Press INC button to access to BLANCER mode and check if the setup is correct.
⑪ Press INC button to access to TEMPERATURE mode and check if the setup is correct.
◎ NiCd, NiMH BATTERIES CHARGE/DISCHARGE
- NiCd, NiMH charge
① Go to Nixx mode
② Press INC button to access to CHARGE mode
③ Press ENTER button shortly then the value of charge current blinks, press DEC/INC buttons to set the desired value of charge current.
LiPoD=3.0A
LiPoC=3.0A
LiPo(03)CELL
LiPo
CYCLE D->C1D=1.0A
STORED=1.0A
BALANCERSTART
Temperature40℃
ProfileNixx 5S
NixxC=3.0A
NixxC=3.0A
[01]3000
CHARGEd=25mV/c
CHARGEd=25mV/c

10
④ Press ENTER button then the value of delta peak blinks, press DEC/INC buttons to set the desired value of delta peak.
⑤ Press and hold ENTER button to start charge battery.
- NiCd, NiMH cycle
① Go to Nixx mode
- NiCd, NiMH discharge
① Go to Nixx mode
② Press INC button twice to access to DISCHARGE mode
③ Press ENTER button shortly then the value of discharge current blinks, press DEC/INC buttons to set the desired value of discharge current
④ Press ENTER button then the value of discharge cutoff voltage blinks, press DEC/INC buttons to set the desired value of discharge cutoff voltage
※ We recommend battery cells x 0.9V as the discharge cutoff voltage⑤ Press and hold ENTER button to start discharge battery
NixxC=3.0A
CHARGEd=25mV/c
BATTERYPLEASE
CHECKWAIT....
ProfileNixx
NixxD=1.0A
NixxD=1.0A
NixxD=1.0A
BATTERYPLEASE
5S[01]
3000
DISCHARGE0.8V/C
DISCHARGE0.8V/C
DISCHARGE0.8V/C
CHECKWAIT....
ProfileNixx 5S
[01]3000
11
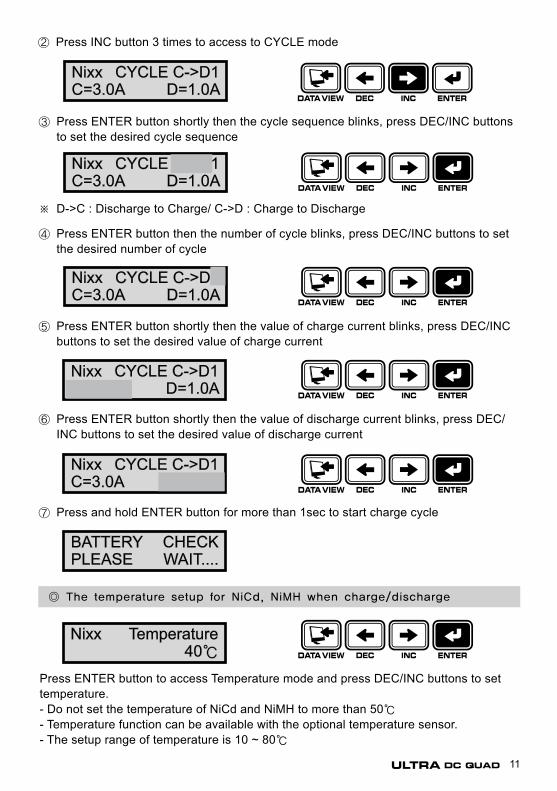
② Press INC button 3 times to access to CYCLE mode
⑤ Press ENTER button shortly then the value of charge current blinks, press DEC/INC buttons to set the desired value of charge current
⑥ Press ENTER button shortly then the value of discharge current blinks, press DEC/INC buttons to set the desired value of discharge current
⑦ Press and hold ENTER button for more than 1sec to start charge cycle
③ Press ENTER button shortly then the cycle sequence blinks, press DEC/INC buttons to set the desired cycle sequence
④ Press ENTER button then the number of cycle blinks, press DEC/INC buttons to set the desired number of cycle
※ D->C : Discharge to Charge/ C->D : Charge to Discharge
◎ The temperature setup for NiCd, NiMH when charge/discharge
Press ENTER button to access Temperature mode and press DEC/INC buttons to set temperature.- Do not set the temperature of NiCd and NiMH to more than 50℃- Temperature function can be available with the optional temperature sensor. - The setup range of temperature is 10 ~ 80℃
NixxC=3.0A
NixxC=3.0A
CYCLE C->D1D=1.0A
CYCLE C->D1D=1.0A
NixxC=3.0A
CYCLE C->D1D=1.0A
NixxC=3.0A
NixxC=3.0A
BATTERYPLEASE
CYCLE C->D1D=1.0A
CYCLE C->D1D=1.0A
CHECKWAIT....
Nixx Temperature40℃
12
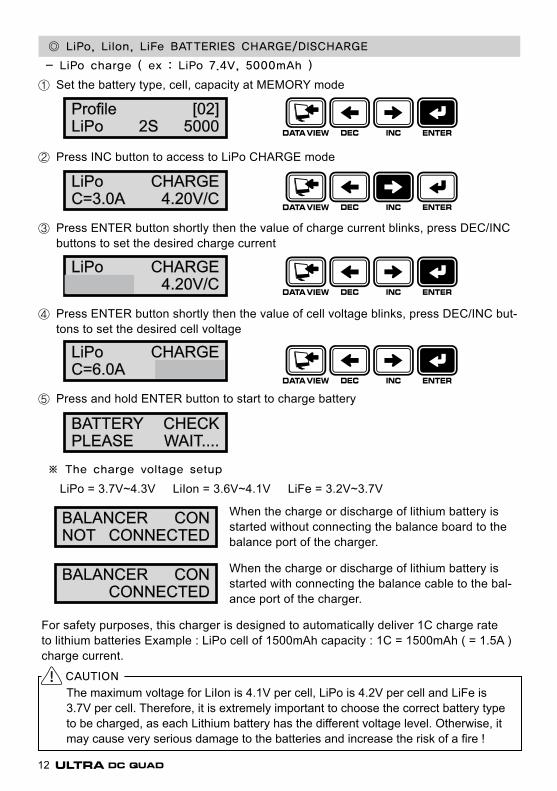
◎ LiPo, LiIon, LiFe BATTERIES CHARGE/DISCHARGE
① Set the battery type, cell, capacity at MEMORY mode
② Press INC button to access to LiPo CHARGE mode
③ Press ENTER button shortly then the value of charge current blinks, press DEC/INC buttons to set the desired charge current
④ Press ENTER button shortly then the value of cell voltage blinks, press DEC/INC but-tons to set the desired cell voltage
⑤ Press and hold ENTER button to start to charge battery
- LiPo charge ( ex : LiPo 7.4V, 5000mAh )
※ The charge voltage setup
When the charge or discharge of lithium battery is started without connecting the balance board to the balance port of the charger.
When the charge or discharge of lithium battery is started with connecting the balance cable to the bal-ance port of the charger.
LiPo = 3.7V~4.3V LiIon = 3.6V~4.1V LiFe = 3.2V~3.7V
For safety purposes, this charger is designed to automatically deliver 1C charge rate to lithium batteries Example : LiPo cell of 1500mAh capacity : 1C = 1500mAh ( = 1.5A ) charge current.
The maximum voltage for LiIon is 4.1V per cell, LiPo is 4.2V per cell and LiFe is 3.7V per cell. Therefore, it is extremely important to choose the correct battery type to be charged, as each Lithium battery has the different voltage level. Otherwise, it may cause very serious damage to the batteries and increase the risk of a fire !
CAUTION
BATTERYPLEASE
ProfileLiPo 2S
LiPoC=3.0A
LiPoC=6.0A
LiPoC=6.0A
CHECKWAIT....
[02]5000
CHARGE4.20V/C
CHARGE4.20V/C
CHARGE4.20V/C
BALANCERNOT
BALANCER
CONCONNECTED
CONCONNECTED
13
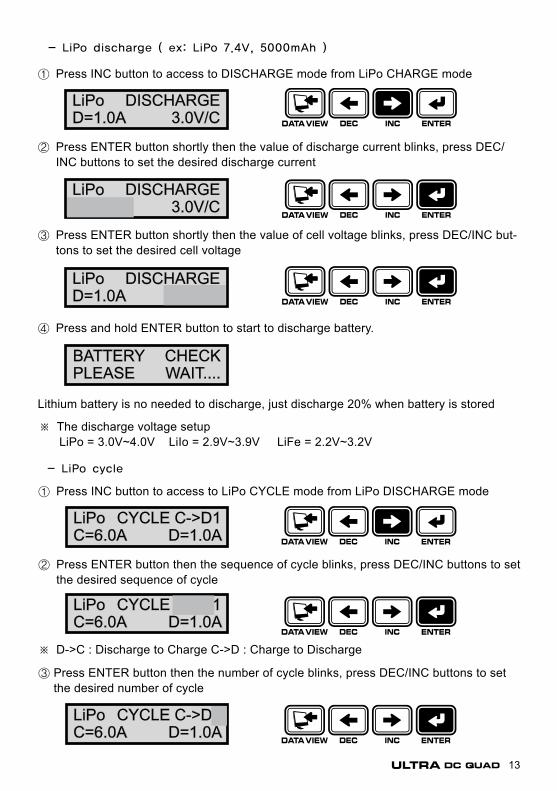
- LiPo discharge ( ex: LiPo 7.4V, 5000mAh )
① Press INC button to access to DISCHARGE mode from LiPo CHARGE mode
② Press ENTER button shortly then the value of discharge current blinks, press DEC/INC buttons to set the desired discharge current
③ Press ENTER button shortly then the value of cell voltage blinks, press DEC/INC but-tons to set the desired cell voltage
④ Press and hold ENTER button to start to discharge battery.
Lithium battery is no needed to discharge, just discharge 20% when battery is stored
※ The discharge voltage setup LiPo = 3.0V~4.0V LiIo = 2.9V~3.9V LiFe = 2.2V~3.2V
- LiPo cycle
① Press INC button to access to LiPo CYCLE mode from LiPo DISCHARGE mode
② Press ENTER button then the sequence of cycle blinks, press DEC/INC buttons to set the desired sequence of cycle
※ D->C : Discharge to Charge C->D : Charge to Discharge
③ Press ENTER button then the number of cycle blinks, press DEC/INC buttons to set the desired number of cycle
LiPoD=1.0A
LiPoD=1.0A
LiPoD=1.0A
DISCHARGE3.0V/C
DISCHARGE3.0V/C
DISCHARGE3.0V/C
BATTERYPLEASE
CHECKWAIT....
LiPoC=6.0A
LiPoC=6.0A
LiPoC=6.0A
CYCLE C->D1 D=1.0A
CYCLE C->D1 D=1.0A
CYCLE C->D1 D=1.0A

14
④ Press ENTER button shortly then the value of charge current blinks, press DEC/INC buttons to set the desired value of charge current
⑤ Press ENTER button shortly then the value of discharge current blinks, press DEC/INC buttons to set the desired value of discharge current
⑥ Press ENTER button to start charge cycle
- LiPo store
① Press INC button to access to LiPo STORE mode from LiPo DISCHARGE mode
④ Press ENTER button to start LiPo store
② Press ENTER button shortly then the value of charge current blinks, press DEC/INC buttons to set the desired value of charge current
③ Press ENTER button shortly then the value of discharge current blinks, press DEC/INC buttons to set the desired value of discharge current
- LiPo balancer
① Press INC button to access to LiPo BALANCER mode from LiPo STORE mode
LiPoC=6.0A
LiPoC=6.0A
BATTERYPLEASE
CYCLE C->D1 D=1.0A
CYCLE C->D1 D=1.0A
CHECKWAIT....
LiPoC=6.0A
STORED=1.0A
LiPoC=6.0A
LiPoC=6.0A
STORED=1.0A
STORED=1.0A
BATTERYPLEASE
CHECKWAIT....
LiPo(02)CELL
BALANCERSTART

15
- The temperature setup for LiPo when charge/discharge
The temperature setup method is the same with NiCd/NiMH temperature setup.
② Press ENTER button to start LiPo balancer
Lithium battery is very sensitive to temperature. Much careful to the sudden temperature change
CAUTION
◎ Pb BATTERY CHARGE/DISCHARGE
- Pb charge
① Set the battery type, cell, capacity at MEMORY mode
② Press INC button to access to Pb CHARGE mode
③ Press ENTER button shortly then the value of charge current blinks, press DEC/INC buttons to set the desired charge current
④ Press and hold ENTER button to start to charge battery
- Pb discharge ① Press INC button to access to Pb DISCHARGE mode from Pb CHARGE mode
LiPo①3.83②3.78③0.00V
BALANCER
BATTERYPLEASE
CHECKWAIT....
LiPo Temperature40℃
ProfilePb
[03]12Vpack
PbC=3.0A
PbC=3.0A
CHARGE
CHARGE
BATTERYPLEASE
CHECKWAIT....
PbD=1.0A
DISCHARGE

16
② Press ENTER button shortly then the value of discharge current blinks, press DEC/INC buttons to set the desired discharge current
③ Press and hold ENTER button to start to discharge battery
※ Pb battery don’t have cycle function.
◎ DISPLAYS DURING CHARGE/DISCHARGE
Charge/Discharge current
Charge/Discharge capacity
Battery type Battery voltage
Operating time Operating mode
CHG Charge mode DCH Discharge modeC->D Charge to Discharge D->C Discharge to ChargeBLC When a battery is connected to balancer connector
- Operating mode
ㆍ NC : NiCd, NiMH ㆍ LP : LiPo ㆍ LI : LiIonㆍ LF : LiFe/A123
- If you press ENTER button then the charge or discharge is terminated.- If you press and hold DATA VIEW button for more than 3 sec, you may check the pro-
gramming setup status. Press DEC/INC buttons to go to other mode and press DATA VIEW button again to get back to the previous display. You may get the all information such as input/output voltage, battery voltage/ capacity, the voltage of the highest/ low-est cell, the voltage of each cell, the average voltage, the peak voltage, the balancer voltage, the peak temperature.
- Battery type
When balancer connector is ported, this display is ap-peared. Press ENTER button then the value [01] blinks, press DEC/INC buttons to check the voltage of each cell.
It is the other display when balancer connector is ported you may check the max/min voltage
PbD=1.0A
DISCHARGE
BATTERYPLEASE
CHECKWAIT....
CHGNC
000007.200V
0:00+3.00
INPUT =OUTPUT =
LCB-[ 01 ] =LCB-AVG =
LCB-MAX =LCB-MIN =
0.00 0.00 0.00V0.00 0.00 0.00V
TEMP.PK 0.0℃TEMP. 0.0℃
ChgCAPA =DchCAPA =
CHG PEAK=DCHG AVR=
12.08V8.08V
0.000V0.000V
0.000V0.000V
0mAh0mAh
0.00V0.00V
ㆍ PB : Pb

17
◎ ERROR MESSAGES
When input voltage is below 11.0V or exceeds 15V.
When a battery is not connected to the charger’s output
When a battery is connected to the output in reverse
When the circuit of the charger has a problem
When a battery is disconnected during an operation
When wrong voltage is set while charging lithium or Pb battery
When wrong voltage is set, or battery is over dis-charged, while charging Lithium or Pb battery.
When voltage per cell is too high during balancing
When battery cell voltage is low or battery cells are short-circuited during balancing
When the charger starts charging, discharging, or cycle for NiCd/NiMH, or Pb battery with connecting the balanc-ing cable to the balancing port of the charger
When the detected temperature at the temperature sen-sor is out of 10[℃] ~ 80[℃]
◎ BATTERY CHARGE TIME CALCULATION
If you know the battery capacity, you may estimate charge time approximately
Ex) If 7.2V 2000mAh NiCd battery is charged with 3.0V, charge time is (2.0/3.0)x60, ap-prox 40 minutes It is just for your reference, not the correct time
Charge time (minute) = [ Capacity (Ah) / Charge current (A) ] x 60
INPUT VOLTAGE
NO
OUTPUTREVERSE
BATTERYERROR
BATTERY
BATTERYPOLARITY
OUTPUTPROBLEM
CHECK THE BATT..OPEN CIRCUIT
CHECK THE BATT..OVER VOLTAGE
CHECK THE BATT..LOW VOLTAGE
BALANCER VOLTAGE
BALANCER VOLTAGE
BALANCER
TEMPERTURE
IS TOO HIGH
IS TOO LOW
TOO LOW/HIGH
CIRCUIT
CONN.ERROR

18
◎ NEW BATTERY CHARGE
◎ Pb BATTERY SAFETY
When the new NiCd/ NiMH are charged at the first time, charge process might be termi-nated within minutes, it is not because charger or battery have a problem, but because battery is not stabilized yet. In this case, you need to charge battery after increasing the delta peak value or to charge battery after discharging and cooling down battery.Do not use the battery, if the charged capacity of battery exceeds battery capacity in specification. If such a phenomenon arises, repeat to charge and discharge more over 5 times and charge again. Such a phenomenon might arise till the third time charge.
Pb battery needs to be charged every day. If the charged capacity of battery is dropped below 50%, this battery might not be recharged. The average charge time of Pb battery is 4~5 hours. Do not charge Car battery, the charger might get the serious damage
◎ LiIon, LiPo, LiFe BATTREIES SAFETY
1. Always charge the batteries that have Lithium ion or Lithium polymer mark and do not charge the batteries that have Lithium mark. Failure to do so will damage the batteries and may cause fire or personal injury.
2. Always charge the batteries that the cell voltage ( 3.3V / 3.6V / 3.7V ) is written3. Ensure that the charger and battery are placed on a non-flammable surface whilst charging.4. Never charge Lithium ion/Polymer/Fe batteries inside a vehicle whatever the circumstances.5. Always ensure that the charger is correctly set for the battery being charged, checking both
voltage and capacity. Be particularly careful if using a series/parallel battery pack, or if using packs of different specifications with the same charger.
6. Never charge at a rate higher than that recommended by the cell manufacturer, this can be very dangerous.
7. Do not leave Lithium ion/Polymer/Fe batteries unattended whilst they are charging. Monitor-ing the batteries during charging is very important.
8. Always monitor the temperature of the battery being charged every few minutes. If the battery becomes hot to the touch, disconnect it from the charger immediately and allow to cool. Do not recommence charging until the battery and charger have been checked for compatibility and the charger settings have been confirmed as being correct.
9. In the unlikely event of the Lithium ion/Polymer/Fe battery catching fire DO NOT use water to attempt to put the fire out, instead use sand or a fire extinguisher designed for electrical fires.
10. When used correctly, Lithium ion/Polymer/Fe battery packs are as safe as any other type of rechargeable battery pack. However they do require different charge regimes to the longer established Nickel Cadmium and Nickel Metal Hydride technologies and have the potential of catching fire if severely mistreated.
11. If Lithium Polymer battery packs are short-circuited or severely over-charged elemental Lith-ium may be deposited internally, and if the battery pouch is damaged this can escape from inside the battery. If this occurs a fire may be caused, as elemental Lithium is highly reactive when exposed to water or moisture, producing flammable hydrogen gas and corrosive fumes. Elemental Lithium is not produced unless the battery pack is severely mistreated, so in normal usage there is no likelihood of explosion or fire.
12. Lithium Ion/Polymer battery packs must NEVER be discharged below 3 volts per cell (LiFe 2.0V) as this will result in damage to the cells. If the voltage is allowed to drop below 3 volts per cell the battery voltage may seem to recover following a charge, but the battery may not then give its full nominal capacity and a reduction in performance is likely - allowing the voltage to drop below 3 volts per cell will invalidate all warranty claims.

19
13. Never charge Lithium Polymer battery packs at greater than 4.2V per cell, Lithium Ion at 4.1V volts per cell or LiFe at greater than 3.7V per cell as this will cause irreversible damage to the cells and will invalidate all warranty claims.
14. Never charge Lithium battery packs above their maximum charge rate. This can dam-age the pack and can be dangerous. Generally, Lithium Polymer packs should not be charged above 2C (2 x Capacity). However, some newer packs do allow charging at up to 5C, but charging at these higher rates will reduce the life of the pack.
e.g Pack of 2500mAh capacity : 2C = 5000mAh = 5A max charge current.15. Do not use discharge rates in excess of those specified with the battery pack as this
will result in a significant drop in voltage under load and will dramatically reduce the number of charge/discharge cycles the battery pack will give. If disposing of Lithium battery packs ensure that the pack is fully discharged by using a light bulb, electric motor or similar to completely discharge the pack.
◎ ENVIRONMENT PROTECTION NOTES
16. Before charging any Lithium battery packs they should be closely inspected for any damage, such as punctures in the sleeving or if the battery has swollen or expanded in size. If any such damage is detected Do not charge, even if the battery otherwise appears to be brand new.
17. Before commencing charging always double check the settings on the charger to ensure it is set correctly for the battery pack to be charged. Using the wrong settings is likely to result in damage to the battery pack being charged and could result in the battery catching fire.
This product must not be disposed of with other waste. Instead, it is the user’s responsibility to their waste equipment by handing it over to a designated collection point for the recycling of waste electrical and electronic equipment. The separate collection and recycling of your waste equipment at the time of disposal will help to conserve natural resources and ensure that it is recycled in a manner that protects human health and the environment. For more information about where you can drop off your waste equipment for recycling, please contact your local city office, your household waste disposal service or where you purchased the produce
Do not allow any Lithium battery pack to short-circuit as this is likely to result in a minor explosion and consequent fire.
◎ SAFETY APPROVAL
DECLARATION OF CONFORMITYWe hereby declare that the flowing product
Product: Graupner/SJ ULTRA DC QUAD ChargerConfirms with the essential protective requirements as laid down in the directive for harmonizing the statutory directives of the member states concerning electro-magnetic interferenceThe applicant may issue a DECLARATION of CONFIRMITY and apply the CE marking in accordance with European Union Rules
KC InformationProduct: Graupner/SJ ULTRA DC QUAD Charger국립전파 연구원의 전자파 적합등록을 획득하였습니다.