Embed Size (px)
Citation preview
Operating and installation instructionsWine conditioning unit
To avoid the risk of accidents or damage to the appliance it is essentialto read these instructions before it is installed and used for the first time.
en-GB, ZA M.-Nr. 10 531 900
Contents
2
Warning and Safety instructions .......................................................................... 5
Caring for the environment ................................................................................ 12
How to save energy............................................................................................. 13
Guide to the appliance ........................................................................................ 14Symbols................................................................................................................. 15Door catch............................................................................................................. 17
Accessories ......................................................................................................... 18Accessories supplied ............................................................................................ 18Optional accessories............................................................................................. 18
Switching on and off ........................................................................................... 19Before using for the first time................................................................................ 19Operating the wine conditioning unit .................................................................... 19
Switching on..................................................................................................... 19Switching off..................................................................................................... 20
Switching off for longer periods of time ................................................................ 21
Selecting further settings ................................................................................... 22Safety lock ........................................................................................................ 22Audible tones ................................................................................................... 23Display brightness ............................................................................................ 24
The optimum temperature and air quality......................................................... 25The optimum temperature..................................................................................... 25
Setting the temperature.................................................................................... 26Temperature range ........................................................................................... 27Temperature display ......................................................................................... 27
Air quality and humidity......................................................................................... 28DynaCool (constant humidity) ..................................................................... 28Air filtration with the Active AirClean filter ........................................................ 29
Temperature and door alarm.............................................................................. 30
Feature lighting .................................................................................................... 32Switching the feature lighting on and off............................................................... 32
Setting the brightness of the feature lighting ................................................... 32Lighting duration of the feature lighting ........................................................... 33

Contents
3
Storing wine bottles ............................................................................................ 34Wooden shelves .................................................................................................... 34
Moving the wooden shelves............................................................................. 35Adjusting the wooden shelves ......................................................................... 36Annotating wooden shelves ............................................................................. 36Inserting the decor shelf................................................................................... 37
Maximum capacity ................................................................................................ 37
Automatic defrosting .......................................................................................... 38
Cleaning and care ............................................................................................... 39Cleaning agents..................................................................................................... 39Before cleaning ..................................................................................................... 40Interior, appliance door and accessories .............................................................. 40Cleaning the ventilation gaps ................................................................................ 40Cleaning the door seal .......................................................................................... 40Cleaning the air filter.............................................................................................. 41
Active AirClean filters ......................................................................................... 42Replacing the Active AirClean filter ....................................................................... 42
What to do if ... .................................................................................................... 44
Noises................................................................................................................... 49
Miele@home......................................................................................................... 50
After Sales / Guarantee....................................................................................... 52
Information for dealers ....................................................................................... 53Demo mode ........................................................................................................ 53
Electrical connection .......................................................................................... 55
Installation............................................................................................................ 56Location................................................................................................................. 56Side-by-side.......................................................................................................... 56Climate range ........................................................................................................ 57Ventilation.............................................................................................................. 57Before installing the wine conditioning unit........................................................... 58Door opening angle limiter .................................................................................... 58Appliance dimensions ........................................................................................... 59
View from above............................................................................................... 60
Adjusting the door hinges .................................................................................. 61

Contents
4
Changing the door hinging ................................................................................. 62
Installing the wine conditioning unit.................................................................. 67Setting up the wine conditioning unit.................................................................... 68
Aligning the wine conditioning unit to taller furniture doors ............................. 70Push the wine conditioning unit into the niche...................................................... 71Secure the wine conditioning unit in the niche ..................................................... 71
Adjusting the lateral alignment of the appliance door...................................... 72

Warning and Safety instructions
5
This wine conditioning unit complies with all statutory safety re-quirements. Please note that inappropriate use can lead to per-sonal injury and damage to property.
To avoid the risk of accidents and damage to the appliance,please read these instructions carefully before using it for the firsttime. They contain important notes on installation, safety, use andmaintenance.
Miele cannot be held liable for non-compliance with these instruc-tions.
Keep these instructions in a safe place and ensure that new usersare familiar with the contents. Pass them on to any future owner.
Glass breakage.Danger of injury from broken glass. If installed at altitudes above 1500 m there is a risk of the glass inthe door breaking because of changes in air pressure. Shards ofglass can cause severe injury if not handled with care.
Correct application
This wine conditioning unit is intended for use in domestic house-holds and similar working and residential environments. It is not intended for outdoor use.
The wine conditioning unit is intended for domestic use only forstoring wine.It must not be used for any other purpose.

Warning and Safety instructions
6
The wine conditioning unit is not suitable for storing and keepingcool medicines, blood plasma, laboratory preparations or other suchmaterials or products. Incorrect use of the wine conditioning unit forsuch purposes can cause deterioration of the items stored. The wineconditioning unit is not suitable for use in areas where there is a riskof explosion.Miele cannot be held liable for damage resulting from improper or in-correct use of the appliance.
The wine conditioning unit can only be used by people with re-duced physical, sensory or mental capabilities, or lack of experienceand knowledge, if they are supervised whilst using it, or have beenshown how to use it in a safe way and recognise and understand theconsequences of incorrect operation.
Safety with children
Children under 8 years of age must be kept away from the wineconditioning unit unless they are constantly supervised.
Children 8 years and older may only use the wine conditioning unitunsupervised if they have been shown how to use it safely and re-cognise and understand the consequences of incorrect operation.
Children must not be allowed to clean or maintain the wine condi-tioning unit unsupervised.
Please supervise children in the vicinity of the wine conditioningunit and do not let them play with it.

Warning and Safety instructions
7
Danger of suffocation. Packaging, e.g. plastic wrappings, must bekept out of the reach of babies and children. Whilst playing, childrencould become entangled in packaging or pull it over their head andsuffocate.
Technical safety
The coolant system is tested for leaks. The wine conditioning unitcomplies with statutory safety requirements and the appropriate EUguidelines.
This wine conditioning unit contains the coolant Isobutane(R600a), a natural gas which is environmentally friendly. Although it isflammable, it does not damage the ozone layer and does not in-crease the greenhouse effect.The use of this coolant has, however, led to a slight increase in thenoise level of the appliance. In addition to the noise of the com-pressor, you might be able to hear the coolant flowing around thesystem. This is unavoidable, and does not have any adverse effecton the performance of the appliance.Care must be taken during the transportation and setting up of thewine conditioning unit that no parts of the cooling system are dam-aged. Leaking coolant can damage the eyes.In the event of any damage:
– avoid naked flames or anything which creates a spark,
– disconnect the appliance from the mains electricity supply,
– ventilate the room where the wine conditioning unit is located forseveral minutes, and
– contact the Miele Service Department.

Warning and Safety instructions
8
The more coolant there is in a wine conditioning unit, the largerthe room it should be installed in. In the event of a leakage, if the ap-pliance is in a small room, there is the danger of combustible gasesbuilding up. For every 8 g of coolant at least 1 m3 of room space isrequired. The amount of coolant in the wine conditioning unit isstated on the data plate inside the appliance.
To avoid the risk of damage to the wine conditioning unit, makesure that the connection data (fuse rating, frequency and voltage) onthe data plate corresponds to the household supply.Check that this is the case before connecting the wine conditioningunit. Consult a qualified electrician if in any doubt.
The electrical safety of the wine conditioning unit can only beguaranteed when correctly earthed. It is essential that this standardsafety requirement is met. If in any doubt please have the electricalinstallation tested by a qualified electrician.
Reliable and safe operation of the wine conditioning unit can onlybe assured if it has been connected to the mains electricity supply.
If the electrical connection cable is faulty it must only be replacedby a Miele authorised service technician to protect the user fromdanger.
Do not connect the wine conditioning unit to the mains electricalsupply by a multi-socket adapter or extension lead. These are a firehazard and do not guarantee the required safety of the appliance.
Do not use in a damp or wet environment (e.g. garage or utilityroom). Moisture could reach live components or the electrical con-nection and cause a short circuit.

Warning and Safety instructions
9
This wine conditioning unit must not be used in a non-stationarylocation (e.g. on a ship).
Do not use a damaged wine conditioning unit. It could be danger-ous. Check the wine conditioning unit for visible signs of damage.
For safety reasons, this wine conditioning unit may only be usedafter it has been built in.
The wine conditioning unit must be isolated from the electricitysupply during installation, maintenance and repair work.
Unauthorised installation, maintenance and repairs can causeconsiderable danger for the user.Installation, maintenance and repairs must only be carried out by aMiele authorised technician.
While the wine conditioning unit is under guarantee, repairs shouldonly be undertaken by a Miele authorised service technician. Other-wise the guarantee is invalidated.
Miele can only guarantee the safety of the appliance when genu-ine original Miele replacement parts are used. Faulty componentsmust only be replaced by Miele spare parts.
Correct use
The wine conditioning unit is designed for use within a certain cli-mate range (ambient temperatures), and should not be used outsidethis range. The climate range for your wine conditioning unit is statedon the data plate inside the appliance. Installing it in a room with toolow an ambient temperature, e.g. a garage, will lead to the wine con-ditioning unit switching off for longer periods so that it cannot main-tain the required temperature.
Do not cover or block the air vents as this could impair the effi-ciency of the appliance, increase the electricity consumption andcould cause damage to the components.

Warning and Safety instructions
10
If the wine conditioning unit is used for storing food which con-tains fat or oil, make sure that it does not come into contact withplastic components as any spillages of oil or fat could cause stresscracks to the plastic and cause it to break or split.
Do not store explosive materials in the wine conditioning unit orany products containing propellants (e.g. spray cans). Electricalcomponents could cause flammable vapours to ignite. Danger of fireand explosion.
Do not operate any electrical equipment (e.g. an electric ice creammaker) inside the wine conditioning unit. Danger of sparking and ex-plosion.
Only use genuine original Miele accessories and spare parts withthis appliance. Using accessories or spare parts from other manu-facturers will invalidate the guarantee, and Miele cannot accept liab-ility.
Cleaning and care
Do not use any oils or grease on the door seals, as these willcause the seals to deteriorate and become porous with time.
Do not use a steam cleaning appliance to clean this wine condi-tioning unit. The steam could reach electrical components and cause a short cir-cuit.
Sharp edged or pointed objects will damage the evaporator, caus-ing irreversible damage to the wine conditioning unit. Do not usesharp edged or pointed objects to
– remove frost and ice,
– remove labels, stickers etc.

Warning and Safety instructions
11
Transporting the appliance
Always transport the wine conditioning unit in an upright positionand in its original transport packaging to avoid damage in transit.
Danger of injury and damage. The wine conditioning unit is veryheavy and must be transported by two people.
Disposing of your old appliance
Before disposing of an old appliance, first make the door latch orlock unusable.This way you will prevent children from accidentally locking them-selves in and endangering their lives.
Splashes of coolant can damage the eyes. Be careful not to dam-age any part of the pipework whilst awaiting disposal, e.g. by
– puncturing the coolant channels in the condenser,
– bending any pipework, or
– scratching the surface coating.

Caring for the environment
12
Disposal of the packing mater-ialThe packaging is designed to protectthe wine conditioning unit from damageduring transportation. The packagingmaterials used are selected from mater-ials which are environmentally friendlyfor disposal and should be recycled.
Recycling the packaging reduces theuse of raw materials in the manufactur-ing process and also reduces theamount of waste in landfill sites.
Disposal of your old applianceElectrical and electronic appliances of-ten contain valuable materials. Theyalso contain specific materials, com-pounds and components, which wereessential for their correct function andsafety. These could be hazardous to hu-man health and to the environment ifdisposed of with your domestic wasteor if handled incorrectly. Please do not,therefore, dispose of your old appliancewith your household waste.
Please dispose of it at your local com-munity waste collection / recyclingcentre for electrical and electronic ap-pliances, or contact your dealer orMiele for advice. You are also respons-ible (by law, depending on country) fordeleting any personal data that may bestored on the appliance being disposedof.
Take care not to damage the pipeworkat the back of your wine conditioningunit before or during transportation toan authorised collection depot.In this way, coolant in the pipework andoil in the compressor will be contained,and will not leak into the environment.
Please ensure that your old appliancepresents no danger to children whilebeing stored awaiting disposal. See"Warning and Safety instructions" formore information.

How to save energy
13
Normal energy consump-tion
Increased energy con-sumption
Installation site /Maintenance
In a ventilated room. In an enclosed, unventilatedroom.
Protected from direct sun-light.
In direct sunlight.
Not near to a heat source(radiator, oven).
Near to a heat source (radi-ator, oven).
Where the ideal ambientroom temperature is approx.20 °C.
Where there is a high ambi-ent room temperature.
Ventilation gaps uncoveredand dusted regularly.
Ventilation gaps covered ordusty.
Remove and clean the air fil-ter with a vacuum cleaner atleast once a year.
If dust has accumulated onthe air filter.
Temperaturesetting
10 to 12 °C The lower the temperature,the higher the energy con-sumption.
Use Wooden shelves arrangedas they were when the appli-ance was delivered.
Only open the door whennecessary and for as short atime as possible. Store winebottles in an organised way.
Frequent opening of thedoor for long periods willcause a loss of coldness.The wine conditioning unitworks harder to cool downand the compressor runs forlonger periods.
Do not over-fill the applianceto allow air to circulate.
Poor air circulation willcause a loss of coldness.

Guide to the appliance
14
Control panel
a For switching the wholewine conditioning unit on and off
b Optical interface(for Service technicians only)
c For selecting the upper or lower wineconditioning zone
d For switching the DynaCool function(constant humidity) on and off
e For switching the feature lighting onand off
f For setting the temperature( for colder)
g OK sensor for confirming a selection
h For setting the temperature( for warmer)
i For accessing or leaving settings mode
j For switching offthe temperature or door alarm
k Display with temperature and sym-bols (symbols only visible in settingsmode; see chart for an explanation ofthe symbols)

Guide to the appliance
15
Symbols
Symbol Meaning Function
Safety lock To prevent inadvertent switching off and al-tering of settings
Audible tones Choice of sensor tone and door alarm tone
Miele@home Only visible when a communication moduleor communication stick is fitted and signedon (see "Miele@home")
Demo mode (only visible whenDemo mode isswitched on)
For switching off Demo mode
Display brightness set-tings
For adjusting the brightness of the display
Active AirClean filters Lights up when the active charcoal filterneeds changing
Mains connection Confirms that the wine conditioning unit isconnected to the electricity supply when itis not switched on; flashes in the event of apower cut
Alarm Lights up when there is a door alarm;flashes when there is a temperature alarm,power cut or a fault

Guide to the appliance
16
a Push2open door catch
b Strip lighting (in both wine conditioning zones)
c Active AirClean filter
d Controls for the upper and lower wine conditioning zones/Isolator plate forthermal separation of the zones
e Isolator strips for thermal separation of the different conditioning zones
f Wooden shelves with labels (FlexiFrames with Noteboard)
g Decor shelf
h Safety glass door with UV filter
i Ventilation grille with air filter

Guide to the appliance
17
Door catchThe Push2Open door catch on yourwine conditioning unit makes it easy toopen the door. The appliance door issensitive to pressure.
The Push2open system is deactivatedex-works. It has to be activated afterinstalling the appliance in its niche.This is done by pressing the On/Offswitch.
To open the door
Press briefly against the appliancedoor and then release it. The appli-ance door opens automatically by agap.
Then pull the door fully open.
To protect against inadvertent open-ing: if you do not open the door wider,it will close again by itself after approx.3 seconds.
To close the door
Push the door shut.
Danger of damage!To avoid damage to the door catch: do not obstruct the door whilst it isopening.Do not push in or hold onto the doorcatch whilst the door is closing.
Please be aware that using magnets infront of the wine conditioning unit doorcan cause it to open by mistake. Thisis caused by the door closing mech-anism on the wine conditioning unit.

Accessories
18
Accessories supplied
Chalk
Use the chalk to annotate the magneticstrips on the wooden shelves to identifyyour wines quickly and easily.
Active AirClean filter
The Active AirClean filter ensures op-timum air quality in the wine condition-ing unit by filtering the incoming air.
Air filter
The air filter behind the ventilation grilleprotects the cooling system from dust.
Optional accessoriesA range of useful Miele accessories andcare products are available for yourwine conditioning unit.
Multi-purpose microfibre cloth
The microfibre cloth is suitable for re-moving fingerprints and light soilingfrom surfaces such as stainless steel,glass, plastic and chrome without theuse of chemicals.
Active AirClean filters
See "Accessories supplied".
Side-by-side fitting kit
For a high-quality side-by-side combin-ation of undercounter wine cabinets
Accessories are available to order viathe Miele Webshop, from Miele dir-ectly (see back cover for contact de-tails) or from your Miele dealer.

Switching on and off
19
Before using for the first time
Packaging material
Remove all packaging material fromthe inside of the appliance.
Protective foil
Stainless steel surfaces have a layer ofprotective foil to prevent scratching dur-ing transportation.
Do not remove the foil until the wineconditioning unit has been installed inits final location. Start at one of thetop corners.
Cleaning
Please refer to the relevant instruc-tions in "Cleaning and care".
Clean the inside of the appliance andthe accessories.
Operating the wine condition-ing unitA light touch of the finger on thesensors is all that is required to operatethis wine conditioning unit.
A tone will sound each time a sensor istouched. You can deactivate this, if youwish (see "Selecting further settings -Audible tones").
Switching on
When the wine conditioning unit is con-nected to the electrical supply, themains connection symbol will ap-pear in the display after a short while.
Touch the On/Off sensor.
The mains connection symbol willgo out and the wine conditioning unitwill start to cool.
The sensors for the upper and the lowerwine conditioning zones will then ap-pear in the control panel. The selectedzone will be highlighted yellow and thetemperature of the selected zone willshow in the display.The first time the appliance is switchedon the sensors for the wine conditioningzones and the Alarm symbol willflash until the selected temperature hasbeen reached in the zones.
As soon as the set temperature hasbeen reached, the sensor for the re-spective wine conditioning zone willlight up constantly. The alarm sym-

Switching on and off
20
bol will go out as soon as the settemperatures have been reached ineach zone.
The interior lighting will come on whenthe door is opened.
A different setting can be set for eachzone.
Touch the sensor for the wine condi-tioning zone you want to adjust thesettings for.
The sensor that has been selected ishighlighted in yellow.
– You can now set the temperature,and
– switch on the DynaCool function.
Please refer to the relevant section formore information.
If you then select a different wine con-ditioning zone, the settings for the pre-viously selected zone will remain un-changed.
Switching off
Touch the On/Off sensor.If this does not work, the safety lock is still activated.
The sensors for the two wine condition-ing zones will then go out. The temperature display will go out andthe mains connection symbol willappear.
The interior lighting will go out and thecooling process will be switched off.

Switching on and off
21
Switching off for longer peri-ods of timeIf the wine conditioning unit is not goingto be used for a longer period of time,e.g. whilst on holiday:
switch it off,
disconnect it from the mains,
clean it out, and
leave the door ajar to air the wineconditioning unit and avoid odoursbuilding up inside it.
If, during a long absence, the wineconditioning unit is switched off butnot cleaned and the door left shut,there is a danger of mould buildingup inside the appliance.
Selecting further settings
22
Certain settings on the wine condition-ing unit can only be selected in settingsmode.
The door alarm is automatically dis-abled when the appliance is in set-tings mode.
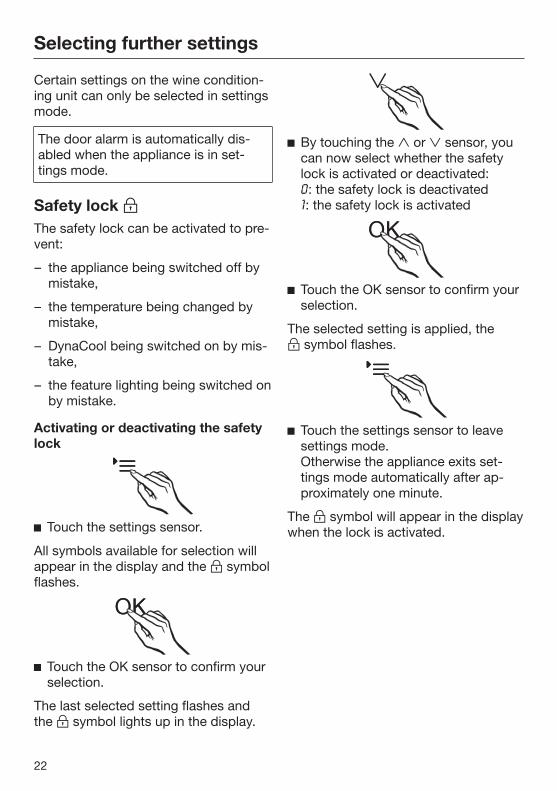
Safety lock The safety lock can be activated to pre-vent:
– the appliance being switched off bymistake,
– the temperature being changed bymistake,
– DynaCool being switched on by mis-take,
– the feature lighting being switched onby mistake.
Activating or deactivating the safetylock
Touch the settings sensor.
All symbols available for selection willappear in the display and the symbolflashes.
Touch the OK sensor to confirm yourselection.
The last selected setting flashes andthe symbol lights up in the display.
By touching the or sensor, youcan now select whether the safetylock is activated or deactivated: 0: the safety lock is deactivated 1: the safety lock is activated
Touch the OK sensor to confirm yourselection.
The selected setting is applied, the symbol flashes.
Touch the settings sensor to leavesettings mode.Otherwise the appliance exits set-tings mode automatically after ap-proximately one minute.
The symbol will appear in the displaywhen the lock is activated.
Selecting further settings
23
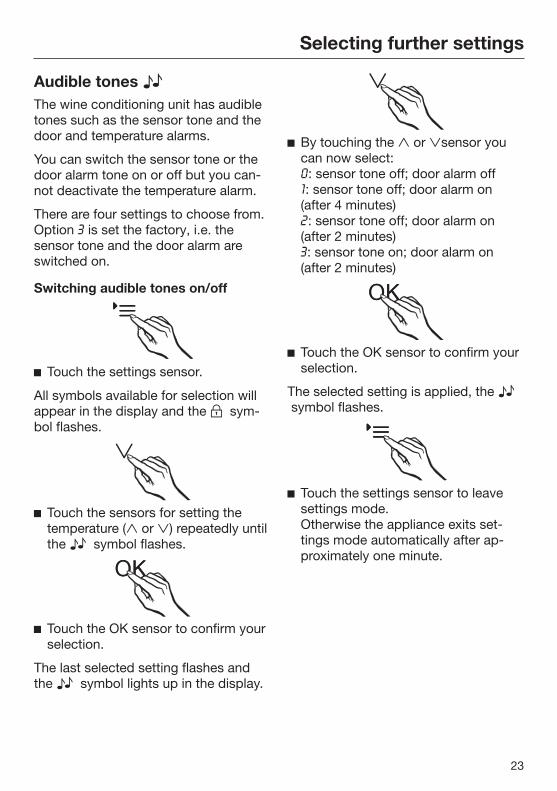
Audible tones The wine conditioning unit has audibletones such as the sensor tone and thedoor and temperature alarms.
You can switch the sensor tone or thedoor alarm tone on or off but you can-not deactivate the temperature alarm.
There are four settings to choose from.Option 3 is set the factory, i.e. thesensor tone and the door alarm areswitched on.
Switching audible tones on/off
Touch the settings sensor.
All symbols available for selection willappear in the display and the sym-bol flashes.
Touch the sensors for setting thetemperature ( or ) repeatedly untilthe symbol flashes.
Touch the OK sensor to confirm yourselection.
The last selected setting flashes andthe symbol lights up in the display.
By touching the or sensor youcan now select:0: sensor tone off; door alarm off1: sensor tone off; door alarm on(after 4 minutes)2: sensor tone off; door alarm on(after 2 minutes)3: sensor tone on; door alarm on(after 2 minutes)
Touch the OK sensor to confirm yourselection.
The selected setting is applied, the symbol flashes.
Touch the settings sensor to leavesettings mode.Otherwise the appliance exits set-tings mode automatically after ap-proximately one minute.

Selecting further settings
24
Display brightness The display brightness can be adjustedto suit lighting conditions in the room.
The display brightness can be adjustedin steps from 1 to 3. The factory defaultsetting is 3 (maximum brightness).
Altering the display brightness
Touch the settings sensor.
All symbols available for selection willappear in the display and the sym-bol flashes.
Touch the sensors for setting thetemperature ( or ) repeatedly untilthe symbol flashes.
Touch the OK sensor to confirm yourselection.
The last selected setting flashes andthe symbol lights up in the display.
By touching the or sensor youcan now alter the brightness of thedisplay:1: dimmest setting2: medium setting3: brightest setting.
Touch the OK sensor to confirm yourselection.
The selected setting is applied, the symbol flashes.
Touch the settings sensor to leavesettings mode.Otherwise the appliance exits set-tings mode automatically after ap-proximately one minute.

The optimum temperature and air quality
25
Wine keeps on maturing depending onthe surrounding conditions. The lengthof time for which wine can be kept ingood condition will therefore dependnot only on the temperature but also onthe air quality.
The wine conditioning unit with its con-stant ideal temperature, increased airhumidity and odour free atmosphere of-fers the perfect conditions for storingyour wine.
It also guarantees a vibration-free envir-onment (in contrast to a refrigerator) sothat the maturing process is not dis-turbed.
The optimum temperatureWine can be stored at a temperaturebetween 6 and 18 °C. If you are storingwhite and red wines together, select atemperature between 12 and 14 °C.This is suitable for both white and redwines. Red wine should be taken out ofthe wine conditioning unit and openedat least two hours before drinking to al-low it to breathe and develop its aroma.
At too high a temperature (over 22 °C)wine matures too quickly, which pre-vents the aromas from developing fur-ther. Wine cannot mature fully at toolow a temperature (below 5 °C).
Fluctuations in temperature put wineunder stress and interrupt the maturingprocess. It is therefore very important tomaintain a constant temperature.
Type of wine Recommendeddrinking temper-ature
Light, fruity reds: +14 °C to +16 °C
Full-bodied reds: +18 °C
Rosé wines: +8 °C to +10 °C
Delicate, aromaticwhites:
+8 °C to +12 °C
Full-bodied or sweet whites:
+12 °C to +14 °C
Champagne,sparkling whitewines:
+6 °C to +10 °C
Tip: Store the wine 1 or 2°C cooler thanthe recommended drinking temperatureas it warms up a little when poured intothe glass.
Tip: Full-bodied reds should be openedfor 2-3 hours before drinking to allowthe wine to breathe and develop itsaroma.

The optimum temperature and air quality
26
Safety device in case of low ambienttemperatures
The appliance is equipped with a safetythermostat to protect your wine againsta sharp drop in temperature. If the ex-ternal temperature should fall, a heaterelement switches on automatically tokeep the temperature inside as constantas possible. If the ambient temperaturecontinues to fall, the appliance switchesitself off automatically.
Isolator plate for thermal separation
The unit comes with a fixed isolationpanel that partitions the interior of thewine conditioning unit into two separatetemperature zones. This enables you tostore different types of wine at the sametime, e.g., red wine and Champagne.The isolation strips inside the glassdoor prevent the exchange of heatbetween the individual zones.
Setting the temperature
The temperature in the wine condition-ing zones can be set independently ofone another.
Touch the sensor for the zone forwhich you wish to change the tem-perature, so that it is highlighted inyellow.
The current temperature for the selec-ted zone appears in the display.
Use the two sensors underneath thedisplay to set the temperature.
By touching the sensor
– the temperature will get colder
– the temperature will get warmer.

The optimum temperature and air quality
27
Touch the OK sensor to confirm yourselectionor
wait approximately 5 seconds afterthe last touch of a sensor.
The temperature being set will flash inthe display.
The following information shows in thedisplay while the sensors are beingtouched:
– Touching a sensor once: the lasttemperature selected flashes.
– Each subsequent touch of thesensor: adjusts the temperatureshown in 1 °C steps.
– Leaving a finger on the sensorchanges the temperature continu-ously.
A tone will sound (if the sensor toneis switched on) when the lowest orhighest possible temperature isreached.
Approximately 5 seconds after the lasttime a sensor has been touched, theactual temperature inside the applianceis automatically shown.
When the temperature is altered, thereis a short delay until the temperatureselected is set.
The temperature display on the controlpanel always shows the actual tem-perature.
Temperature range
In both zones it is possible to set tem-peratures between 5 and 20 °C.
Temperature display
In normal operation the temperaturedisplay shows the actual temperature inthe zone.
If the temperature in one of the zones isnot within the range that the applianceis able to display, dashes will light up inthe temperature display.
Depending on the ambient temperatureand the temperature setting, it can takethe appliance a few hours to reach thetemperature required and for this tem-perature to then be shown as a con-stant temperature in the display.
The optimum temperature and air quality
28
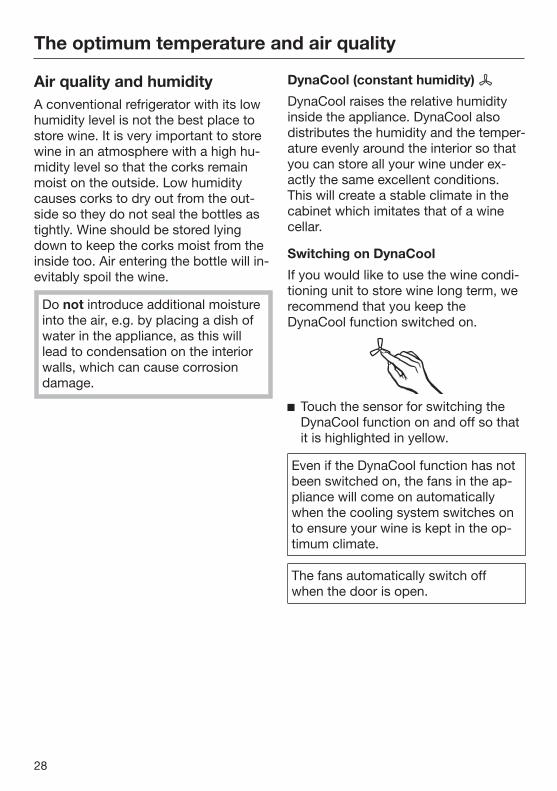
Air quality and humidityA conventional refrigerator with its lowhumidity level is not the best place tostore wine. It is very important to storewine in an atmosphere with a high hu-midity level so that the corks remainmoist on the outside. Low humiditycauses corks to dry out from the out-side so they do not seal the bottles astightly. Wine should be stored lyingdown to keep the corks moist from theinside too. Air entering the bottle will in-evitably spoil the wine.
Do not introduce additional moistureinto the air, e.g. by placing a dish ofwater in the appliance, as this willlead to condensation on the interiorwalls, which can cause corrosiondamage.
DynaCool (constant humidity)
DynaCool raises the relative humidityinside the appliance. DynaCool alsodistributes the humidity and the temper-ature evenly around the interior so thatyou can store all your wine under ex-actly the same excellent conditions.This will create a stable climate in thecabinet which imitates that of a winecellar.
Switching on DynaCool
If you would like to use the wine condi-tioning unit to store wine long term, werecommend that you keep theDynaCool function switched on.
Touch the sensor for switching theDynaCool function on and off so thatit is highlighted in yellow.
Even if the DynaCool function has notbeen switched on, the fans in the ap-pliance will come on automaticallywhen the cooling system switches onto ensure your wine is kept in the op-timum climate.
The fans automatically switch offwhen the door is open.

The optimum temperature and air quality
29
Switching off DynaCool
The appliance uses slightly more energyand is a little noisier when the DynaCoolfunction is switched on. You can switchit off now and then if you wish.
Touch the sensor for switching theDynaCool function on and off so thatit is no longer highlighted in yellow.
Air filtration with the Active AirCleanfilter
The Active AirClean filter achieves op-timum air quality by filtering the incom-ing air.
Fresh air from the room enters the ap-pliance via the Active AirClean filter.The fans (DynaCool function) then dis-tribute the air evenly throughout thecabinet.Filtering the incoming air through theActive AirClean filter ensures that all theair entering the appliance is fresh andfree from dust and odours.This also ensures your wine does notabsorb any unwanted odours throughthe corks.
Replace the Active AirClean filter regu-larly. The symbol will appear in thedisplay to remind you (see "ActiveAirClean filter").
Temperature and door alarm
30
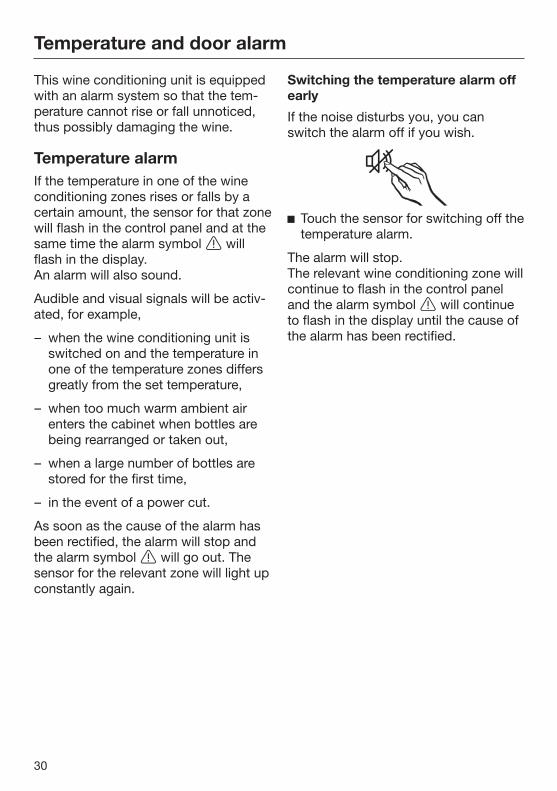
This wine conditioning unit is equippedwith an alarm system so that the tem-perature cannot rise or fall unnoticed,thus possibly damaging the wine.
Temperature alarmIf the temperature in one of the wineconditioning zones rises or falls by acertain amount, the sensor for that zonewill flash in the control panel and at thesame time the alarm symbol willflash in the display.An alarm will also sound.
Audible and visual signals will be activ-ated, for example,
– when the wine conditioning unit isswitched on and the temperature inone of the temperature zones differsgreatly from the set temperature,
– when too much warm ambient airenters the cabinet when bottles arebeing rearranged or taken out,
– when a large number of bottles arestored for the first time,
– in the event of a power cut.
As soon as the cause of the alarm hasbeen rectified, the alarm will stop andthe alarm symbol will go out. Thesensor for the relevant zone will light upconstantly again.
Switching the temperature alarm offearly
If the noise disturbs you, you canswitch the alarm off if you wish.
Touch the sensor for switching off thetemperature alarm.
The alarm will stop.The relevant wine conditioning zone willcontinue to flash in the control paneland the alarm symbol will continueto flash in the display until the cause ofthe alarm has been rectified.

Temperature and door alarm
31
Door alarmThe alarm will sound if the door is leftopen for more than approx. twominutes. The sensors for the wine con-ditioning zones will flash in the controlpanel. The alarm symbol will light upin the display.
The alarm will stop when the door isshut. The sensors for the wine condi-tioning zones and the alarm symbol will go out.
Switching the door alarm off early
If the noise disturbs you, you canswitch the alarm off if you wish.
Touch the sensor for switching off thedoor alarm.
The alarm will stop.The sensors for the wine conditioningzone will continue to flash and thealarm symbol will remain lit up untilyou close the door.
If the audible tone does not sound inthe event of a door alarm, then theaudible tone has been switched off insettings mode (see "Selecting furthersettings - Audible tones").

Feature lighting
32
The interior lighting can be set to re-main on when the door is closed soyour wines can be on display at alltimes.
Each wine conditioning zone has itsown lighting strip so that all zones areilluminated.
Thanks to the use of LED lighting, thewine will not be adversely affected byheat or UV light.
Switching the feature lightingon and off
Touch the On/Off sensor for the fea-ture lighting so that it is highlighted inyellow.
The interior lighting is now switched on,even when the door is closed.
To switch the feature lighting off again:
Touch the On/Off sensor for the fea-ture lighting so that it is no longerhighlighted in yellow.
The interior lighting is now switched offwhen the appliance door is closed.
Setting the brightness of the featurelighting
The brightness of the feature lightingcan be adjusted.
Touch the On/Off sensor for the fea-ture lighting so that it is highlighted inyellow.
Touch the sensor for the feature light-ing again for approx. four secondsuntil flashes in the display (after twoseconds will flash).
Use the and sensors for alteringthe temperature to set the featurelighting brightness. Touch and holdthe sensors. The brightness will im-mediately start to adjust gradually upor down.
By touching the sensor
– the lighting becomes dimmer
– the lighting becomes brighter.
Touch the OK sensor to confirm yourchoice.

Feature lighting
33
The selected brightness is saved andthe temperature reappears in the dis-play.
As soon as the appliance door isclosed, the set brightness for the fea-ture lighting takes effect. When the ap-pliance door is opened, the interiorlighting returns to its normal level.
Lighting duration of the feature light-ing
The lighting duration for the featurelighting is set to 30 minutes as stand-ard.The lighting duration can be set to 30,60, 90 minutes up to 00 (unlimited). Thefeature lighting will have the brightnesssetting you have selected previously.
Open the appliance door.
Touch the On/Off sensor for the fea-ture lighting so that it is highlighted inyellow.
Touch the sensor for the feature light-ing again for approx. two secondsuntil flashes in the display.
Use the and sensors for alteringthe temperature to set the featurelighting duration.The duration (in minutes) will flash inthe display.
By touching the sensor
– lighting duration is reduced by 30minutes
– lighting duration is increased by 30minutes.
Touch the OK sensor to confirm yourchoice.
The selected lighting duration is savedand the temperature reappears in thedisplay.
The lighting duration set starts anewwhenever the appliance door is openedand closed.
Caution. Laser beam class 1MDo not remove the lighting covers.Should the covers be damaged orneed to be removed due to damage,do not use optical instruments (mag-nifying glass or similar) to look at thelighting.

Storing wine bottles
34
Vibration and movement have a negat-ive effect on the maturing processwhich can affect the taste of the wine.
To avoid disturbing other bottles whenremoving a bottle of wine, store bottlesof the same type beside each other onthe same shelf. Avoid stacking bottleson top of one another on the woodenshelves.
Always place the bottles lying down sothat the corks can be kept moist on theinside and air is prevented from gettinginto the bottles.
Danger of injury.Take care that wine bottles do not fallout of the appliance when you pullout a wooden shelf. Wine bottlescould also become wedged in theshelf above.
Wooden shelves
The wooden shelves are on telescopicrunners which can be pulled out tomake it easier to store and removebottles.

Storing wine bottles
35
Moving the wooden shelves
The wooden shelves can be removedand replaced again if required.
Pull the wooden shelf out until itstops .
Release the wooden shelf at theback, lifting the shelf on the left andright at the same time .
Lift the wooden shelf forwards to re-move it.
To replace the wooden shelf, positionit on the extended runners. Thenotches in the wooden shelf fit overthe retaining pins. The magnetic stripshould be pointing forwards.
Slide the wooden shelf back into theappliance as far as it will go .
Push the wooden shelf right back sothat it clicks into place at the front.
Press down on the back of thewooden shelf until it clicks into placeat the back .
Storing wine bottles
36
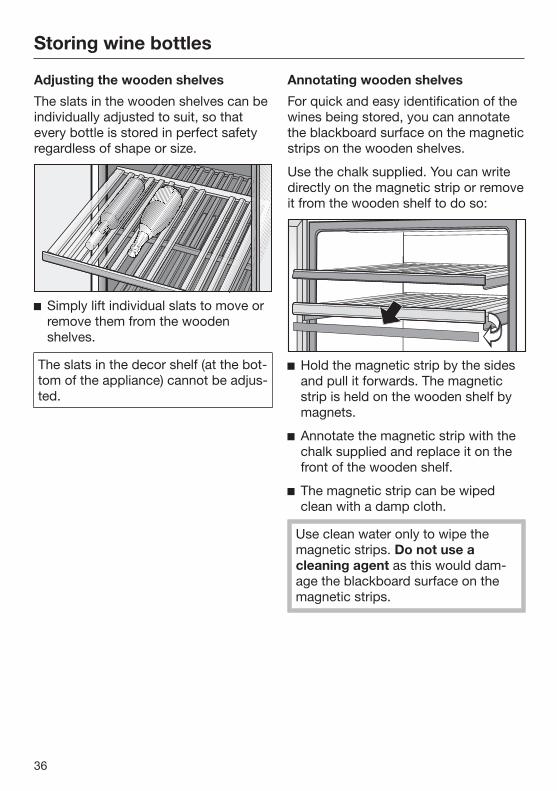
Adjusting the wooden shelves
The slats in the wooden shelves can beindividually adjusted to suit, so thatevery bottle is stored in perfect safetyregardless of shape or size.
Simply lift individual slats to move orremove them from the woodenshelves.
The slats in the decor shelf (at the bot-tom of the appliance) cannot be adjus-ted.
Annotating wooden shelves
For quick and easy identification of thewines being stored, you can annotatethe blackboard surface on the magneticstrips on the wooden shelves.
Use the chalk supplied. You can writedirectly on the magnetic strip or removeit from the wooden shelf to do so:
Hold the magnetic strip by the sidesand pull it forwards. The magneticstrip is held on the wooden shelf bymagnets.
Annotate the magnetic strip with thechalk supplied and replace it on thefront of the wooden shelf.
The magnetic strip can be wipedclean with a damp cloth.
Use clean water only to wipe themagnetic strips. Do not use acleaning agent as this would dam-age the blackboard surface on themagnetic strips.
Storing wine bottles
37
Inserting the decor shelf
Place the decor shelf at the very bot-tom of the appliance (see "Descrip-tion of the appliance").
Maximum capacity
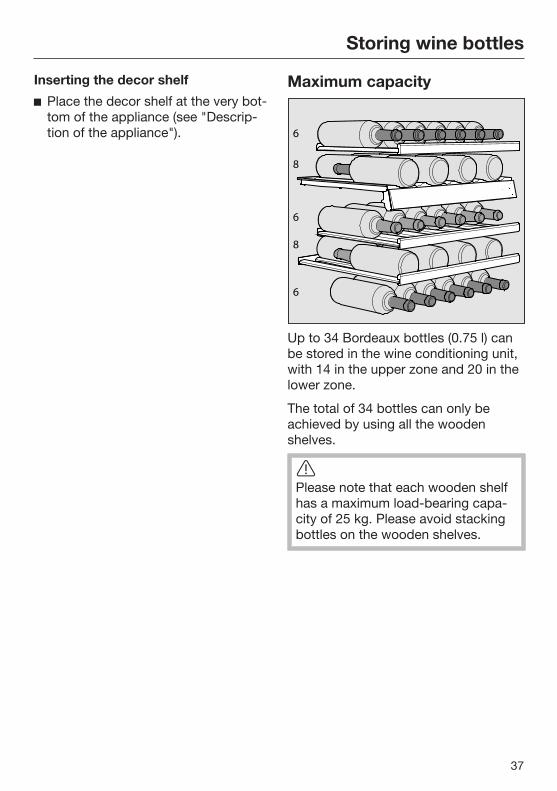
Up to 34 Bordeaux bottles (0.75 l) canbe stored in the wine conditioning unit,with 14 in the upper zone and 20 in thelower zone.
The total of 34 bottles can only beachieved by using all the woodenshelves.
Please note that each wooden shelfhas a maximum load-bearing capa-city of 25 kg. Please avoid stackingbottles on the wooden shelves.

Automatic defrosting
38
The wine conditioning unit defrostsautomatically.

Cleaning and care
39
Do not let water get into the elec-tronic unit, the ventilation gap or thelighting.
Do not use a steam cleaning appli-ance to clean this wine conditioningunit. The steam could reach electricalcomponents and cause a short cir-cuit.
The data plate inside the wine condi-tioning unit must not be removed. Itcontains information which is requiredin the event of a service call.
Cleaning agentsTo avoid damaging the surfaces of yourappliance, do not use:
– cleaning agents containing soda, am-monia, acids or chlorides
– cleaning agents containing descalingagents
– abrasive cleaning agents, e.g.powder cleaners and cream cleaners
– solvent-based cleaning agents
– stainless steel cleaning agents
– dishwasher cleaner
– oven sprays
– glass cleaner (except on the glass inthe appliance door)
– hard, abrasive sponges and brushes,e.g. pot scourers
– melamine eraser blocks
– sharp metal scrapers
Cleaning and conditioning agentsused inside the wine conditioningunit must be food safe.
We recommend using lukewarm waterwith a little washing-up liquid to cleansurfaces of the appliance.
The following pages contain import-ant information on cleaning.
Cleaning and care
40
Before cleaning Switch off the wine conditioning unit.
Disconnect it from the mains.
Take any wine bottles out of the wineconditioning unit and store them in acool place.
Take out all other removable parts forcleaning.
Remove the magnetic strips from thewooden shelves before cleaning them(see "Annotating wooden shelves").
Interior, appliance door andaccessories
Clean the wine conditioning unit atleast once a month.Remove soiling immediately to pre-vent it from drying on.
Clean the interior with a solution oflukewarm water and a little washing-up liquid.
The wooden shelves should only bewiped with a well wrung-out dampcloth. They must not be allowed toget wet.
Use clean water only to wipe themagnetic strips at the front of thewooden shelves. Do not use acleaning agent as this would dam-age the blackboard surface on themagnetic strips.
After cleaning, wipe the interior andaccessories with a damp cloth, anddry with a soft cloth. Leave the dooropen to air the appliance for a shortwhile.
Clean the appliance door with a pro-prietary glass cleaner.
Cleaning the ventilation gaps
A build-up of dust will increase the en-ergy consumption of the appliance.
The ventilation gaps should becleaned on a regular basis with abrush or vacuum cleaner (e.g. use thedusting brush for Miele vacuumcleaners)
Cleaning the door seal
Do not use any grease or oil on thedoor seal as these will cause the sealto deteriorate and become porousover time.
The door seal should be cleaned reg-ularly with clean water, and thenwiped dry with a soft cloth.

Cleaning and care
41
Cleaning the air filter Clean the air filter behind the ventila-
tion grille at least once a year.
Remove the air filter and vacuum itthoroughly on both sides. A dirty filtercan prevent the wine conditioningunit from cooling sufficiently.
After cleaning Replace all shelves and accessories
in the wine conditioning unit.
Reconnect to the mains and switchthe wine conditioning unit back on.
Place the wine bottles back in thewine conditioning unit and close thedoor.

Active AirClean filters
42
Fresh air from the room enters the wineconditioning unit through the ActiveAirClean filter. Filtering the incoming airthrough the Active AirClean filter en-sures that all the air entering the appli-ance is fresh and free from dust andodours.
The reminder to change the ActiveAirClean filter will appear every 12months at the latest.
When the Change Active AirClean filtersymbol lights up in the display, theActive AirClean filter needs to bechanged.
Replacing the Active AirCleanfilter
Push the filter in and then release it.
Pull the filter out.
Detach the back part of the filter fromthe cover.
Push the new filter onto the cover.
Insert the new filter.
Push the filter in and then release it.The filter will lock into place automat-ically with an audible click.
Active AirClean filters can be obtainedfrom your Miele dealer, Miele or fromthe Miele website.

Active AirClean filters
43
To confirm the filters have beenchanged
Touch the settings sensor.
All symbols available for selection willappear in the display and the symbolflashes.
Touch the sensors for setting thetemperature ( or ) repeatedly untilthe symbol flashes.
Touch the OK sensor to confirm yourselection.
The will flash in the display (means:Active AirClean filter is fitted in the ap-pliance), the symbol lights up.
Touch the symbols for setting thetemperature ( or ) repeatedly, untilthe symbol is displayed (means: thecounter has been reset).
Touch the OK sensor to confirm yourselection.
The selected setting is applied, the symbol flashes.
Touch the settings sensor to leavesettings mode.Otherwise the appliance exits set-tings mode automatically after ap-proximately one minute.
The in the display goes out.

What to do if ...
44
Some minor problems can be corrected without contacting Miele.If, having followed the suggestions below, you still cannot resolve the problem,please contact Miele.
To prevent unnecessary loss of temperature it is advisable not to open the doorwhile waiting for the wine conditioning unit to be serviced.
Unauthorised installation, maintenance and repairs can cause considerabledanger for the user.Installation, maintenance and repairs must only be carried out by a Miele au-thorised technician.
Problem Cause and remedy
The wine conditioningunit is not getting cold,the interior lightingdoes not come on whenthe door is opened, andthe display is not lit up.
The wine conditioning unit is not switched on and themains connection symbol is lit up in the display. Switch on the wine conditioning unit.
The plug is not inserted in the socket correctly. Insert the plug correctly into the socket. The mains
connection symbol appears in the displaywhen the wine conditioning unit is switched off.
Check whether the mains fuse has tripped. If it hasthere could be a fault with the appliance, the house-hold electrical wiring or another electrical appliance. Contact a qualified electrician or Miele.
The control panel andinterior lighting are stillworking.
Demo mode is activated and the symbol appears inthe display. Switch off Demo mode (see "Information for deal-
ers - Demo mode").

What to do if ...
45
Problem Cause and remedy
The compressor isswitching on more fre-quently and for longerperiods of time, thetemperature in the wineconditioning unit is fall-ing.
The temperature in the wine conditioning unit is settoo low. Adjust the temperature.
The appliance door is not properly closed. Check that the appliance door closes properly.
The appliance door has been opened too frequently. Only open the door when necessary and for as
short a time as possible.The ventilation gaps have been covered over or be-come dusty. Do not cover the ventilation gaps and dust them
regularly.The air filter is dusty. Clean the air filter (see "Cleaning and care").
The ambient room temperature is too warm. Decrease the ambient room temperature.
The compressor comeson less and less oftenand for shorter periodsof time. The temperat-ure in the wine condi-tioning unit rises.
This is not a fault. The temperature is too high. Adjust the temperature. Check the temperature again after 24 hours.
The air filter in the plinth is soiled. Clean the air filter in the appliance plinth (see
"Cleaning and care").

What to do if ...
46
Display warnings
Message Cause and remedy
The alarm symbol islit in the display andboth sensors for thewine conditioning zonesare flashing in the con-trol field. Furthermore,an audible alarm is alsosounding.
The door alarm has been activated. Close the appliance door. Both sensors for the
wine conditioning zones and the alarm symbol will go out and the audible alarm will stop.
The alarm symbol isflashing in the display,and the sensor for oneof the wine conditioningzones is also flashing.An audible alarm is alsosounding.
The temperature in the zone concerned has risenhigher or fallen lower than the temperature set.This could be due to:
– the appliance door being opened too often,
– blocked ventilation gaps,
– a lengthy interruption to the power supply.
Rectify the cause of the alarm. The alarm symbol will go out and the sensor for the zone con-cerned will light up constantly again. The audiblealarm stops.
The Change ActiveAirClean filter symbol is lit up.
This is the reminder to change the Active AirClean fil-ter. Replace the Active AirClean filter and then confirm
the filter change in settings mode (see "ActiveAirClean Filter").
A dash is lit up up/flash-ing in the display.
Only temperatures within the range the wine condi-tioning unit can display will be shown.
"F1" to "F3" or"S1" to "S3" appear inthe display.
There is a fault. Call the Service Department.
What to do if ...
47
The interior lighting is not working.
Problem Cause and remedy
The LED interior lightingis not working.
The wine conditioning unit is not switched on. Touch the On/Off sensor.
To avoid overheating, the LED lighting switches itselfoff automatically after approx. 15 minutes if the dooris left open. If this is not the case, then there is a fault.
Caution. Laser beam class 1MDo not remove the lighting covers.Should the covers be damaged or need to be re-moved due to damage, do not use optical instru-ments (magnifying glass or similar) to look at thelighting.
Call the Miele Service Department.
The LED interior lightingis on even when thedoor is closed.
The feature lighting is switched on. Switch the feature lighting off (see "Feature light-
ing").
What to do if ...
48
General problems with the wine conditioning unit
Problem Cause and remedy
There is no audiblealarm although the doorhas been open for along time.
This is not a fault. The alarm tone has been switchedoff in settings mode (see "Selecting further settings -Audible tones").
You cannot switch thewine conditioning unitoff.
The safety lock is activated. The symbol is lit up inthe display. Deactivate the lock (see "Selecting further settings
- Activating or deactivating the lock").
The slats on thewooden shelves arewarping.
Volume change due to moisture absorption or dryingout is a typical characteristic of wood. An increase inhumidity will cause wooden components to warp,which can lead to cracking. Knots and grain patinaare part of the natural character of wood.
Mildew has begun toform on the wine bottlelabels.
Mildew can begin to form on the labels, depending onthe type of label adhesive used. Clean the wine bottles and remove any adhesive
residue.
A white deposit hasformed on the winebottle corks.
The corks have oxidised due to contact with the air. Use a dry cloth to wipe off the deposit. The de-
posit will not affect the quality of the wine.

Noises
49
Normal noises What causes them
Brrrrr ... A humming noise is made by the motor (compressor). Thisnoise can get louder for brief periods when the motor switcheson.
Blubb, blubb ... A gurgling noise can be heard when coolant is circulatingthrough the pipes.
Click ... Clicking sounds are made when the thermostat switches themotor on and off.
Sssrrrrr ... On multi-zone wine conditioning units you can sometimes justhear the sound of the fan inside the appliance.
Crack ... A cracking sound can be heard when material inside the wineconditioning unit expands.
Remember that the noise of the compressor and the coolant circulating in thesystem is unavoidable.
Noises that youcan easily rectify
Possible cause Remedy
Rattling, vibrating The wine conditioning unit isuneven.
Realign the wine condition-ing unit using a spirit level,by raising or lowering thescrew feet underneath theappliance.
Shelves are unstable or stick-ing.
Check all removable itemsand refit them correctly.
Bottles or containers aretouching each other.
Separate them.
The transport cable clips arehanging loose at the back ofthe appliance.
Remove the cable clips.

Miele@home
50
a Miele@home communication enabled appliance
b Miele@home communication stick XKS3000Z or communication module XK-M3000Z
c Miele@home communication enabled Master appliance with SuperVision func-tionality
d Miele@home Gateway XGW3000
e WiFi router
f Connection to a Home automation system
g Smartphone, Tablet PC, Laptop
h Internet connection

Miele@home
51
Please note that the Miele@home andSuperVision system is currently onlyavailable in selected countries.
This appliance / is network enabledand can be connected to theMiele@home system via a communica-tion module or communication stick and a conversion kit where required.
The Miele@home system enables net-work enabled appliances to send in-formation via the household wiring net-work to a master appliance such asan oven with SuperVision functionality,about their operational status, as wellas information about the progress of theprogramme.
Displaying information and con-trolling appliances
– SuperVision master appliance The status of other signed on appli-ances can be shown in the display ofsome network enabled appliances.
– Mobile device A PC, Notebook, Tablet PC or aSmartphone can be used within thereception area of a household WLAN to display status information aboutsigned on appliances and carry outcertain functions.
– Household network The Miele@home system enablessmart living. The Miele@home Gate-way allows other network enabledappliances to integrate into thehousehold bus system.
– In Germany, network enabled appli-ances can be integrated into theQIVICON Smart Home Platform in-stead of the Miele@home Gateway(www.qivicon.de).
SmartStart (depending on householdappliance)
Smart grid enabled appliances can bestarted automatically at a time whenelectricity costs are favourable or whena favourable supply of electricity isavailable (e.g. from a solar power sys-tem).
Optional accessories (depending onhousehold appliance)
– Communication module XKM3000Zor communication stick XKS3000Z
– Conversion kit for communicationsystem XKV
– Miele@home Gateway XGW3000
These accessories are supplied withtheir own installation and operating in-structions.
Further information
Further information regardingMiele@home is available on the internetand in the instruction manuals of thevarious Miele@home components.

After Sales / Guarantee
52
After sales serviceIn the event of any faults which youcannot easily remedy, please contact
– your Miele Dealer, or
– the Miele Service Department.
See end of this booklet for contact de-tails.
When contacting your Dealer or Miele,please quote the model and serial num-ber of your appliance.
This information is given on the dataplate inside the wine conditioning unit.
Please note that telephone calls maybe monitored and recorded for train-ing purposes.
Guarantee: U.K.In the U.K. the appliance is guaranteedfor 2 years from the date of purchase.However, you must activate your coverby calling 0330 160 6640 or registeringonline at www.miele.co.uk.
Guarantee: Other countries
For information on the appliance guar-antee specific to your country pleasecontact Miele.
See end of this booklet for contact de-tails.

Information for dealers
53
Demo mode The wine conditioning unit can bedemonstrated in the showroom or atexhibitions in "Demo mode". In thismode the control panel and interiorlighting are active but the compressorremains switched off, so that the appli-ance does not cool down.
Switching on demo mode
Switch the wine conditioning unit offby touching the On/Off sensor.
The temperature display will go out andthe mains connection symbol willappear.
Place your finger on the sensor,and leave it there.
At the same time, briefly touch theOn/Off sensor (without letting go ofthe sensor).
Leave your finger on the sensoruntil the symbol appears in the dis-play.
Then release the sensor.
Demo mode is activated and the sym-bol appears in the display.
Switching off Demo mode
The symbol is lit up in the display.
Touch the settings sensor.
All symbols available for selection willappear in the display and the symbolflashes.
Touch the sensors for setting thetemperature ( or ) repeatedly untilthe symbol flashes.
Touch the OK sensor to confirm yourselection.
1 flashes in the display (means: Demomode is switched on) and the symbollights up.

Information for dealers
54
Touch the or sensor until 0 ap-pears (means: Demo mode isswitched off).
Touch the OK sensor to confirm yourselection.
The selected setting is applied, the symbol flashes.
Touch the settings sensor to leavesettings mode.Otherwise the appliance exits set-tings mode automatically after ap-proximately one minute.
Demo mode is switched off, the sym-bol goes out.

Electrical connection
55
The appliance is supplied with a mainscable with moulded plug for connectionto a 50 Hz 220–240 V supply.
The fuse rating must be at least 10 A(13 A in the UK).
All electrical work should be carried outby a suitably qualified and competentperson in strict accordance with currentlocal and national safety regulations (BS7671 in the UK). Please ensure that theconnection data quoted on the dataplate match the household mains sup-ply.
Connection should be made via a suit-able switched socket which is easily ac-cessible. It must not be located behindthe appliance.
If the mains socket is not accessibleafter the appliance has been installed, aseparator for each terminal must bepresent. There must be an all-pole con-tact gap of at least 3 mm in the switch(including switch, fuses and relays ac-cording to EN 60335).
The plug and mains connection cablemust not come into contact with theback of the appliance as vibrations cancause damage to these components.This, in turn, could result in a short cir-cuit.
Do not plug in other appliances behindthis wine conditioning unit.
Do not connect the appliance to themains electricity supply by an extensionlead. Extension leads do not guaranteethe required safety of the appliance(e.g. danger of overheating).
Do not connect the appliance to an in-verter such as those used with anautonomous energy source e.g. solarpower. When switched on, peak loadsin the system can cause the safetyswitch-off mechanism to be triggered.This can damage the electronic unit. The appliance must not be used withso-called energy-saving deviceseither. These reduce the amount of en-ergy supplied to the appliance, causingit to overheat.
If the mains cable needs to be replacedthis must be done by a suitably quali-fied person.

Installation
56
A wine conditioning unit that has notbeen installed in its niche can tip up.
Fire risk and danger of damage!This wine conditioning unit must notbe installed underneath a hob.
LocationThis appliance should be installed in adry, well-ventilated room.
It should not be installed underneath ahob, next to a cooker, an oven or aheater or near a window where it wouldbe affected by direct sunshine. Thehigher the ambient temperature of theroom, the longer the compressor willrun for and the higher the energy con-sumption.
When installing the wine conditioningunit, please note:
– The socket must be easily accessiblein an emergency, not concealed be-hind the appliance.
– The plug and cable must not touchthe back of the wine conditioning unitas they could be damaged by vibra-tions from the appliance.
– Do not plug in other appliances be-hind this wine conditioning unit.
Danger from broken glass!Danger of injury from broken glass. If installed at altitudes above 1500 mthere is a risk of the glass in the doorbreaking because of changes in airpressure. Shards of glass can causesevere injury if not handled with care.
Side-by-sideThis wine conditioning unit can be in-stalled side-by-side with another refri-geration appliance.
A side-by-side installation kit is re-quired for this. This is available fromMiele or your Miele dealer.
Your dealer will be able to advise youwhich combination of models is pos-sible.
Instructions for fitting appliances side-by-side are given in the side-by-sidefitting kit instruction manual.

Installation
57
Climate rangeThe wine conditioning unit is designedfor use within a certain climate range(ambient temperatures) and should notbe used outside this range. The climaterange of the wine conditioning unit isstated on the data plate inside it.
Climate range Ambient roomtemperature
SN +10 °C to +32 °C
N +16 °C to +32 °C
ST +16 °C to +38 °C
T +16 °C to +43 °C
Operating in a room which is too coldwill cause the compressor to switch offfor too long, causing the internal tem-perature in the wine conditioning unit torise which could lead to damage.
IMPORTANTIn environments with high humiditycondensation may appear on the ex-ternal surfaces of the wine condition-ing unit.Condensate can cause corrosion onexternal appliance walls.For prevention, it is advisable to in-stall the wine conditioning unit withsufficient ventilation in a dry and/orair conditioned room.After installation make sure that theappliance door closes properly, theventilation gaps are not covered andthat the wine conditioning unit hasbeen installed in accordance withthese installation instructions.
VentilationThe wine conditioning unit is ventilatedvia the grille in the plinth. This must notbe covered over or blocked. Clean theplinth regularly to remove any dust.
The cut-out in the plinth facing mustbe aligned centrally with the wine con-ditioning unit.

Installation
58
Before installing the wine con-ditioning unit Take any accessories out of the appli-
ance.
Remove the cable clip from the backof the appliance (depending on appli-ance).
Check that all parts at the back of theappliance are unhindered. Carefullyremove any hindrance.
Door opening angle limiterThe door opening angle limiter restrictsthe opening angle of the appliance doorto 90°. This may be necessary if the ap-pliance door hits an adjacent wall whenopened, for example (see "Adjusting thedoor hinges").
Installation
59
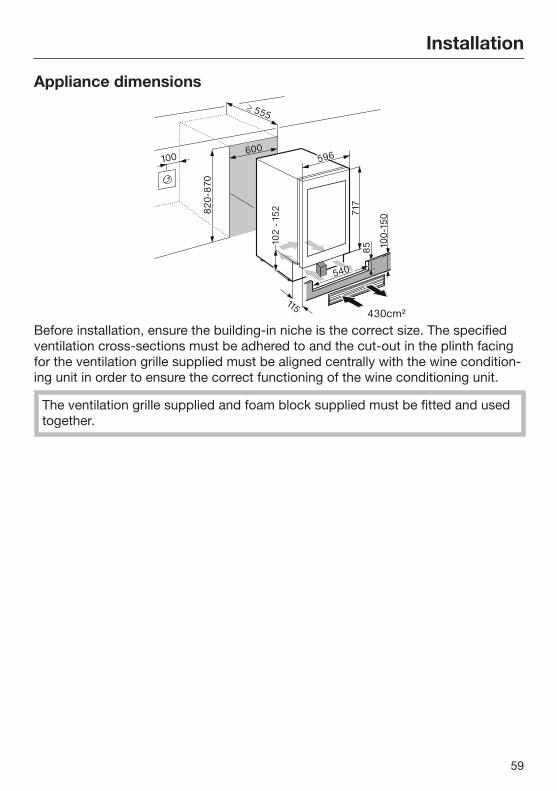
Appliance dimensions
Before installation, ensure the building-in niche is the correct size. The specifiedventilation cross-sections must be adhered to and the cut-out in the plinth facingfor the ventilation grille supplied must be aligned centrally with the wine condition-ing unit in order to ensure the correct functioning of the wine conditioning unit.
The ventilation grille supplied and foam block supplied must be fitted and usedtogether.

Installation
60
View from above

Adjusting the door hinges
61
The door hinges on the wine condition-ing unit are set ex works to enable theappliance door to be opened wide.
However if the opening angle of thedoor needs to be limited for any reason,the hinge can be adjusted to accom-modate this.
If the appliance door hits an adjacentwall when opened, for example, theopening angle can be limited to approx.90°.
Place the locking pins supplied forlimiting the door opening into thehinges from above.
The door opening angle is now limitedto approx. 90°.

Changing the door hinging
62
The wine conditioning unit is suppliedright-hand hinged. If left-hand hinging isrequired, the hinges must be changed.
To change the door hinging, you willneed the following tools:
Warning! The glass door is break-able!Two people are needed for changingthe door hinging.
Place a suitable cover on the floor infront of the appliance to protect theglass door and your floor from dam-age.
Be careful not to damage the doorseal. If the door seal is damaged, theappliance door may not close prop-erly and cooling will be insufficient.
Remove covers .
The second person must supportthe appliance door.Caution. When the hinge is sub-sequently released, the door is nolonger secure.
Changing the door hinging
63
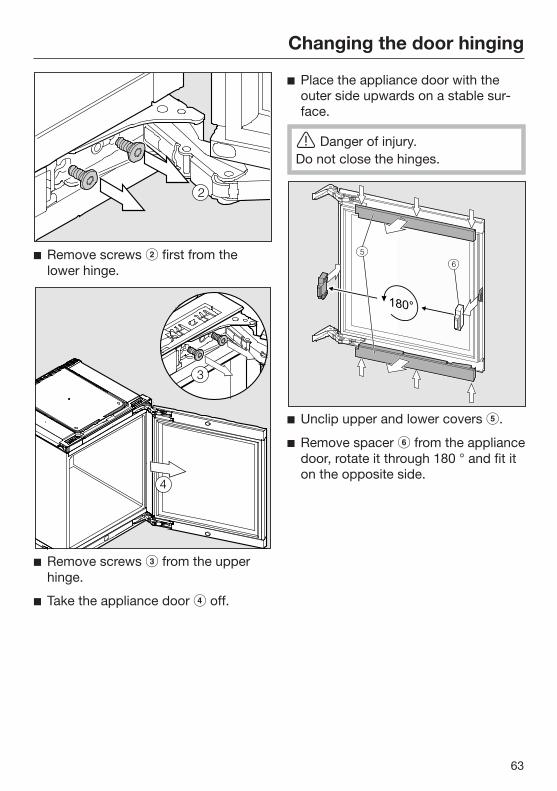
Remove screws first from thelower hinge.
Remove screws from the upperhinge.
Take the appliance door off.
Place the appliance door with theouter side upwards on a stable sur-face.
Danger of injury.Do not close the hinges.
Unclip upper and lower covers .
Remove spacer from the appliancedoor, rotate it through 180 ° and fit iton the opposite side.

Changing the door hinging
64
Remove screws completely.
Replace the hinges in their diagonallyopposite corners .
Replace screws .
Clip covers back on. Note the pos-ition of the notches on the hinges.

Changing the door hinging
65
Remove covers .
Take off upper retaining bracket andreplace it on the opposite side .
Take off lower retaining bracket and refit it on the opposite side.
Fit the appliance door .
Danger of injury.The second person must support theappliance door.
Tighten the screws in upper hinge .
Changing the door hinging
66
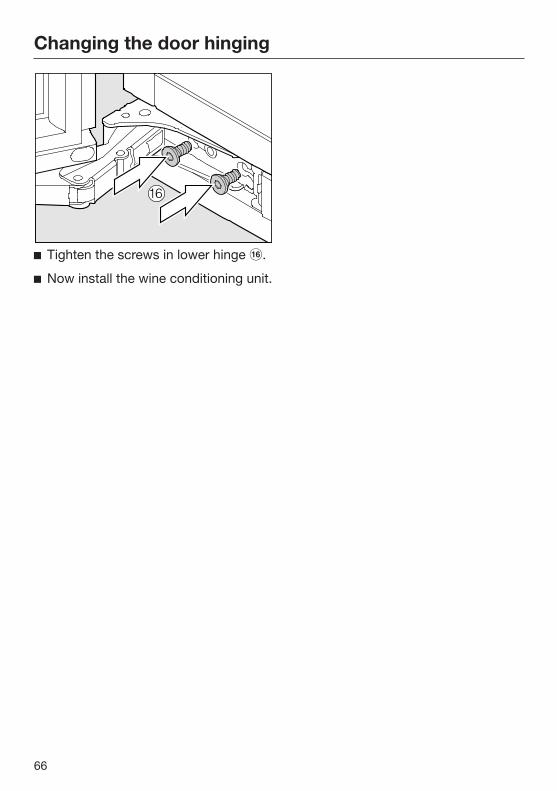
Tighten the screws in lower hinge .
Now install the wine conditioning unit.

Installing the wine conditioning unit
67
Warning! Do not drop the appli-ance. Risk of injury and damage.Two people are required for installingthis wine conditioning unit.
Install the wine conditioning unit in astable, solid housing unit, positionedon an even and level floor.
The niche must be horizontally andvertically aligned.
The required ventilation cross-sec-tions must be ensured (see "Installa-tion - Ventilation" and "Building-in di-mensions").
To install the wine conditioning unit,you will need the following tools:
– Screwdrivers of various sizes
– A spirit level
– A tape measure
The following installation parts arerequired:
– Ventilation grille
– Air filter
– Foam block for airflow separationin the appliance plinth
– Screws to secure the appliance inthe niche
– Spanner to adjust height in theniche

Installing the wine conditioning unit
68
Setting up the wine condition-ing unit
The air filter prevents soiling of thecompressor compartment to ensureefficient functioning of the appliance.
Remove the protective foil from air fil-ter .
Insert the air filter into the bottom leftof the appliance plinth.
Connect the wine conditioning unit tothe mains electrical supply (see"Electrical Connection").
Position the wine conditioning unit infront of the niche.
Unscrew feet clockwise until theappliance is 4 mm less than theheight of the niche.

Installing the wine conditioning unit
69
The feet can be adjusted with thespanner supplied or with an allenkey .
Align the wine conditioning unit hori-zontally and vertically. If the wineconditioning unit is not correctlyaligned it can distort.
Check the alignment of adjacent fur-niture housing doors. If adjacentdoors vary in height from the wineconditioning unit, see "Aligning thewine conditioning unit to taller fur-niture doors".
Installing the wine conditioning unit
70
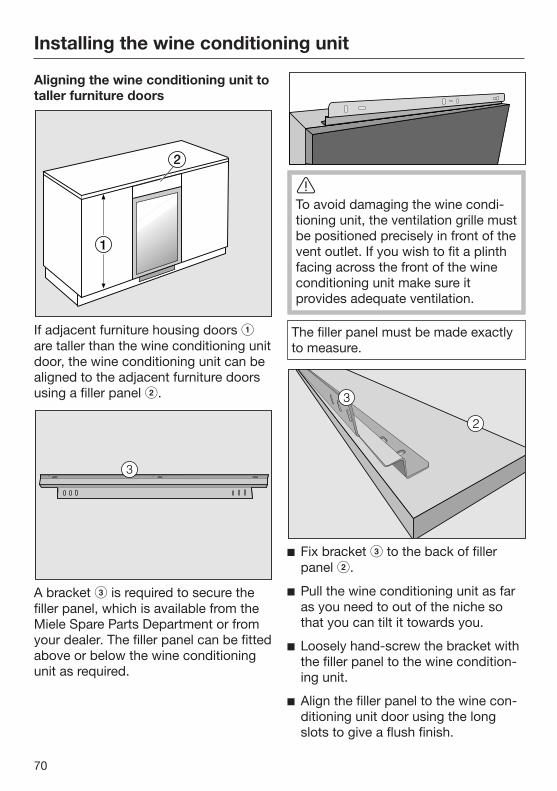
Aligning the wine conditioning unit totaller furniture doors
If adjacent furniture housing doors are taller than the wine conditioning unitdoor, the wine conditioning unit can bealigned to the adjacent furniture doorsusing a filler panel .
A bracket is required to secure thefiller panel, which is available from theMiele Spare Parts Department or fromyour dealer. The filler panel can be fittedabove or below the wine conditioningunit as required.
To avoid damaging the wine condi-tioning unit, the ventilation grille mustbe positioned precisely in front of thevent outlet. If you wish to fit a plinthfacing across the front of the wineconditioning unit make sure itprovides adequate ventilation.
The filler panel must be made exactlyto measure.
Fix bracket to the back of fillerpanel .
Pull the wine conditioning unit as faras you need to out of the niche sothat you can tilt it towards you.
Loosely hand-screw the bracket withthe filler panel to the wine condition-ing unit.
Align the filler panel to the wine con-ditioning unit door using the longslots to give a flush finish.

Installing the wine conditioning unit
71
Now tighten the screws.
You can now push the wine condi-tioning unit into the niche.
Push the wine conditioningunit into the niche
Make sure that the mains cable doesnot become trapped or damaged asyou push the wine conditioning unitinto its niche.To avoid damaging flooring which issusceptible to scratching, take greatcare when pushing the appliance intoits niche.
Push the wine conditioning unit intothe niche until the front of the appli-ance door is flush with adjacent fur-niture doors.
Pull the wine conditioning unit for-ward so that it stands proud of thefurniture doors evenly by 2 mm.
Secure the wine conditioningunit in the niche The wine conditioning unit must
stand proud of furniture doors evenlyby 2 mm.
Open the appliance door.
Remove cover , and first screw thewine conditioning unit to the adjacentfurniture unit at the top left .
The wine conditioning unit will align it-self to the left side of the niche. Thefront of the appliance door must beflush with the furniture front.
Refit the cover .
Screw the wine conditioning unit atthe bottom left and right to adjacentfurniture units.

Installing the wine conditioning unit
72
If necessary a fourth screw can beused in the top right hand hinge tosecure the wine conditioning unit.
To do so dismantle the door and thenfit this extra screw.
Close the appliance door and checkthat the side edges of the appliancedoor are aligned with the side walls ofthe wine conditioning unit.
Now connect the wine conditioningunit to the electrical supply.
When the wine conditioning unit is con-nected to the electrical supply, themains connection symbol will ap-pear in the display after a short while.
Touch the On/Off sensor.
The mains connection symbol willgo out and the wine conditioning unitwill start to cool.
The Push2open system on the wineconditioning unit is now activated (see"Door catch").
Adjusting the lateral alignment of theappliance door
If the appliance door is not aligned withthe housing side walls, the appliancedoor can be adjusted using the screwsunderneath the hinges.
Loosen screws and align the appli-ance door.
Tighten screws again.

Installing the wine conditioning unit
73
Fit the covers.
Insert foam block supplied into theappliance plinth.
If the foam block is not fitted, thewine conditioning unit will notachieve optimum cooling and cansuffer damage.
Fit plinth facing in position.
The cut-out in the plinth facing mustbe aligned centrally with the wineconditioning unit.
Fit plinth ventilation grille . As youdo so the foam block will be pushedback.
The foam block must be restingagainst the ventilation grille in orderto separate the airflow.


United KingdomMiele Co. Ltd.Fairacres, Marcham RoadAbingdon, Oxon, OX14 1TWCustomer Contact Centre Tel: 0330 160 6600E-mail: [email protected]: www.miele.co.uk
AustraliaMiele Australia Pty. Ltd.ACN 005 635 398ABN 96 005 635 3981 Gilbert Park Drive, Knoxfield, VIC 3180Tel: 1300 464 353Internet: www.miele.com.au
Miele (Shanghai) Trading Ltd.1-3 Floor, No. 82 Shi Men Yi RoadJing' an District200040 Shanghai, PRCTel: +86 21 6157 3500, Fax: +86 21 6157 3511E-mail: [email protected], Internet: www.miele.cn
China
41/F - 4101, Manhattan Place23 Wang Tai RoadKowloon Bay, Hong KongTel: (852) 2610 1025, Fax: (852) 3579 1404Email: [email protected]: www.miele.hk
Miele (Hong Kong) Limited
Miele India Pvt. Ltd.Ground Floor, Copia Corporate SuitesPlot No. 9, Jasola, New Delhi - 110025Tel: 011-46 900 000, Fax: 011-46 900 001E-mail: [email protected], Internet: www.miele.in
India
Miele Ireland Ltd.2024 Bianconi AvenueCitywest Business Campus, Dublin 24Tel: (01) 461 07 10, Fax: (01) 461 07 97E-Mail: [email protected], Internet: www.miele.ie
Ireland
MalaysiaMiele Sdn BhdSuite 12-2, Level 12Menara Sapura Kencana PetroleumSolaris Dutamas No. 1, Jalan Dutamas 150480 Kuala Lumpur, MalaysiaPhone: +603-6209-0288Fax: +603-6205-3768
Miele New Zealand LimitedIRD 98 463 631Level 2, 10 College HillFreemans Bay, Auckland 1011, NZTel: 0800 464 353Internet: www.miele.co.nz
New Zealand
Miele Pte. Ltd.163 Penang Road# 04 - 03 Winsland House IISingapore 238463Tel: +65 6735 1191, Fax: +65 6735 1161E-Mail: [email protected]: www.miele.sg
Singapore
Miele (Pty) Ltd63 Peter Place, Bryanston 2194P.O. Box 69434, Bryanston 2021Tel: (011) 875 9000, Fax: (011) 875 9035E-mail: [email protected]: www.miele.co.za
South Africa
Miele Appliances Ltd.Gold & Diamond ParkOffice No. 217-6, Sheikh Zayed RoadP.O. Box 11 47 82 - DubaiTel: +971 4 3044 999Fax: +971 4 3418 852800-MIELE (64353)E-Mail: [email protected]: www.miele.ae
United Arab Emirates
Carl-Miele-Straße 29, 33332 Gütersloh, GermanyManufacturer: Miele & Cie. KG
M.-Nr. 10 531 900 / 00en-GB, ZA
KWT 6322 UG